
Home » Incredible PBX (Page 10)
Category Archives: Incredible PBX
The Most Versatile VoIP Provider: FREE PORTING

 JUST RELEASED: Visit the Incredible PBX Wiki
Moving from Incredible PBX 2020 (CentOS) to 2021 (Debian)

If you’re still shackled to CentOS 7 with Incredible PBX 2020, the time has come to put the horse and buggy out to pasture. RedHat has become an unreliable partner upon whom your entire PBX depends. When RedHat abruptly reneged on LTS support for CentOS 8, the writing was on the wall. They could do much the same thing with CentOS 7. Rather than waiting for the other shoe to drop, we introduced Incredible PBX 2021 and migrated to Debian 10. Now it’s your turn, and today we’ll guide you to a much more stable platform moving forward.
Step 1. To get started, you’ll want to bring up a new Incredible PBX 2021 server on a platform of your choice. We recommend using one of the virtual machine platforms, all of which are documented on the Incredible PBX Wiki. The Vultr platform is especially well suited for Incredible PBX 2021 because a snapshot image is available which lets you bring up a functioning server in a couple of minutes.
Make note of your server’s public IP address (23.45.67.89 in example).
Step 2. The next step is to bring the FreePBX modules on your existing Incredible PBX 2020 up to the latest releases. After logging into your Incredible PBX 2020 server as root, issue the following commands:
fwconsole restart
rm -f /tmp/*
fwconsole ma upgradeall
fwconsole reload
/root/sig-fix
systemctl restart apache2
/root/sig-fix
Verify that everything is functioning properly by logging into the FreePBX GUI as admin using your favorite web browser.
Make note of your Incredible PBX 2020 server’s public IP address (12.34.56.78 in example).
Whitelist 2021 server on 2020 server: /root/add-ip 2021pbx 23.45.67.89 then option 0
Step 3. Next, we need a good FreePBX backup of your Incredible PBX 2020 setup. While still logged into your Incredible PBX 2020 server as root, issue the following commands:
fwconsole stop
mysqldump -u root -ppassw0rd asterisk > /root/asteriskDB.sql
mysqldump -u root -ppassw0rd asteriskcdrdb > /root/asteriskCDR.sql
tar -zcf /root/snapshot.tar.gz /var/www/html/admin/modules \
 /var/spool/asterisk /var/lib/asterisk/agi-bin \
 /etc/asterisk/*custom.conf /var/lib/asterisk/astdb.sqlite3 \
 /root/asteriskDB.sql /root/asteriskCDR.sql
Step 4. Log into your 2021 server as root and issue the following commands substituting your Incredible PBX 2020’s actual IP address for 12.34.56.78 below:
cd /
scp root@12.34.56.78:/root/snapshot.tar.gz .
fwconsole stop
tar zxvf snapshot.tar.gz
rm snapshot.tar.gz
cd /root
mysql -u root -ppassw0rd asterisk < asteriskDB.sql
mysql -u root -ppassw0rd asteriskcdrdb < asteriskCDR.sql
mysql -u root -ppassw0rd asterisk -e "UPDATE freepbx_settings \
 SET value = 'Incredible PBX 2021' WHERE \
 freepbx_settings.keyword = 'DASHBOARD_FREEPBX_BRAND';"
chown -R asterisk:asterisk /var/lib/asterisk
chmod -R 755 /var/lib/asterisk
fwconsole start
fwconsole reload
fwconsole ma delete clearlytrunking
fwconsole ma delete sms
fwconsole ma delete webrtc
fwconsole ma delete ucp
fwconsole ma downloadinstall ucp
fwconsole ma downloadinstall webrtc
fwconsole ma downloadinstall sms
fwconsole ma downloadinstall clearlytrunking
fwconsole reload
That completes the migration to Debian 10 and Incredible PBX 2021. Keep in mind that you may need to tweak the directories in the tarball step above if you've made custom changes in your Incredible PBX 2020 setup. If you're also migrating Incredible Fax from your 2020 platform, see the Incredible PBX Wiki for step-by-step instructions. Enjoy!
Originally published: Tuesday, June 2, 2021

Need help with Asterisk? Visit the VoIP-info Forum.

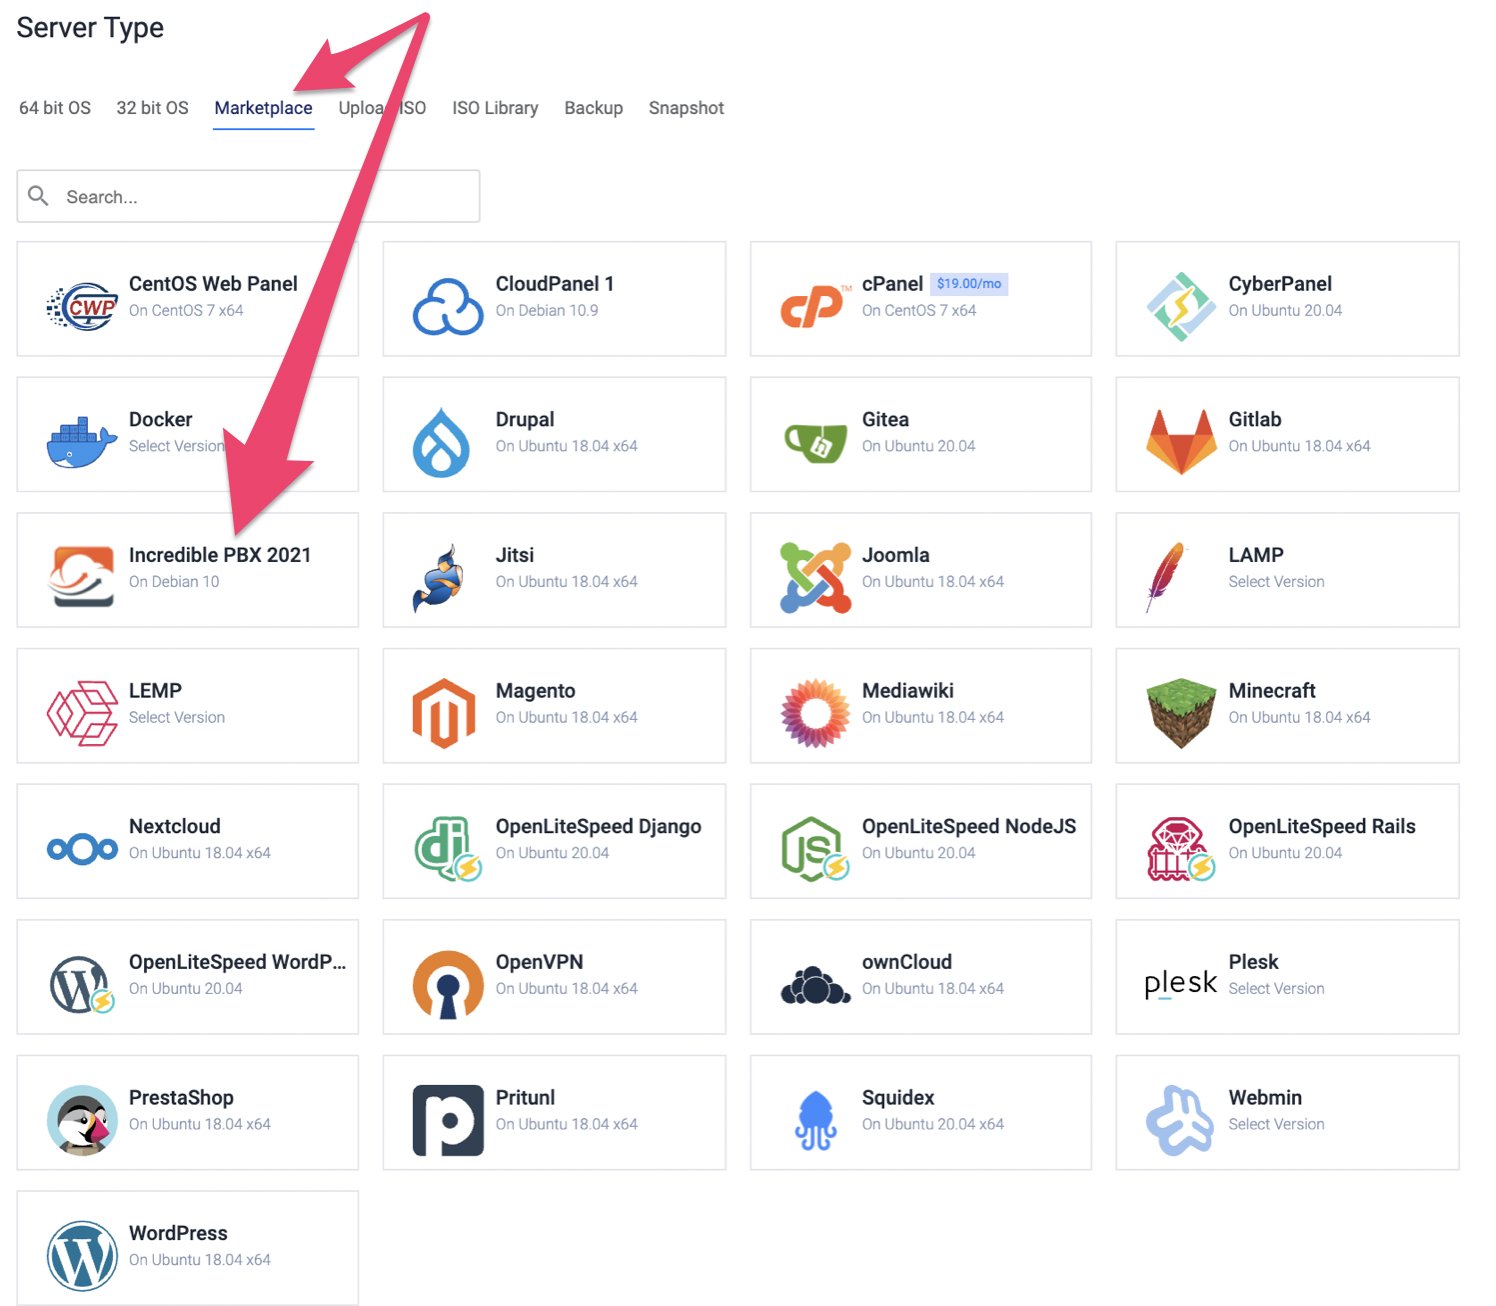
Introducing Vultr Marketplace Featuring Incredible PBX 2021
One of our oldest open source supporters, Vultr, introduced their new Vultr Marketplace today featuring one-click installs for dozens of turnkey apps including Incredible PBX 2021. Vultr boasts a whopping 1.3 million users running applications in 17 different locations around the globe. And, today, it’s easier than ever. With the new Incredible PBX 2021 image, a user can choose a location and server size and simply click on the Incredible PBX 2021 application in the Vultr Marketplace instead of wrestling with Linux and a cumbersome install procedure. Within a matter of minutes, your PBX is ready to start making calls. If you use our referral code to sign up, our open source projects get $25 from Vultr, and you receive a $100 credit to kick the tires for up to a month. So… you have nothing to lose!
Here’s a snapshot of the applications that await you in the new Vultr Marketplace:
If you’ve never used Vultr, you owe it to yourself to take their cloud platform for a spin. The performance is legendary, and a $5 a month Cloud Compute platform can easily manage the calls for dozens of users. Add automatic backups for an additional 20% a month, and your platform is virtually indestructible. And you’ll never have to babysit on-premise hardware as well as Internet and power issues again. Read the Incredible PBX 2021 tutorial to get started.
Originally published: Tuesday, May 25, 2021
Need help with Asterisk? Visit the VoIP-info Forum.
Virtual Paradise: It’s Incredible PBX 2021 for VMware

Today we’re rounding out our Virtual Machine Trifecta with the introduction of Incredible PBX 2021 for VMware. If you haven’t already figured it out, virtual Machines are the future of server administration. Whether you prefer your own dedicated hardware or cloud-based resources managed by you or someone else, virtual platforms are the way to go. You get more bang for the buck out of your hardware by pooling resources for multiple tasks. VMware®, Proxmox®, and VirtualBox® make it easy. This latest VMware image provides the latest Asterisk® 18 and FreePBX® 15 components and now includes Incredible Fax featuring HylaFax and AvantFax. All are built from source, and the install only takes a few minutes.
Just download the VMware tarball image from SourceForge to your desktop. Fire up your browser and login to your VMware Web Console. With a few mouse clicks, you’ll have a Debian 10.9 platform in place with Incredible PBX® and Incredible Fax just a single keystroke away. It doesn’t get much easier. And, you get the very latest release of Asterisk 18 compiled from source code that you can actually examine, enhance, and share… just like the GPL license says.
Choosing a Virtual Machine Platform
Making the right deployment choice for your virtual machine platform depends upon a number of factors. We’ve already sung the praises of VirtualBox so we won’t repeat it here. Similarly, Proxmox has a loyal following, and we’ve got you covered there as well. VMware also is rock-solid and has been for decades. VMware typically runs on dedicated hardware. If you don’t have the funds for a hardware purchase to support your virtualization requirements, then VirtualBox on your desktop machine is a no-brainer. For many, however, some separation of the virtualization environment from your desktop computing environment is desirable. That choice is equally easy. VMware wins, hands down. Better yet, you can make snapshot backups of your virtual machines in seconds with a single button click. If you’ve wrestled with backups on standalone hardware with Linux, you’ll quickly appreciate the difference.
Getting Started with VMware ESXi
Many of you have VMware platforms already in place at work. For you, installing Incredible PBX 2021 is as simple as downloading the image to your desktop and importing it into your existing platform. Better yet, your system administrator can do it for you. If you’re new to VMware, here’s an easy way to get started, and the software won’t cost you a dime. VMware offers a couple of free products that will give you everything you need to run a robust VMware platform on relatively inexpensive hardware. The choice is up to you. See our previous tutorial for step-by-step instructions to install VMware ESXi and the vSphere Web Client.
Deploying the Incredible PBX Template

Deploying the Incredible PBX 2021 template only takes a few minutes, but first you need to download the Incredible PBX 2021 tarball from SourceForge onto your Desktop PC. Then untar the tar.gz file which will create the IncrediblePBX folder with the VMware image components.
Once the Incredible PBX template components are on your desktop, here are the install steps:
1. Using a browser, login to the VMware Web Console using the root account you set up when you installed ESXi. Choose File, Deploy OVF/OVA Template.
2. Drag-and-drop the IncrediblePBX folder from your Desktop PC onto the web console.
3. Click Next.
4. Give the new Virtual Machine a name: Incredible PBX 2021.
5. IMPORTANT: Choose Thin Provision option and click Next.
6. Review your entries and click Next to create the new Virtual Machine.
7. It only takes a few minutes to create the new Virtual Machine.
8. The Main Client window will redisplay and your new VM should now be shown in the left panel. (1) Click on it. (2) Then click the Green start icon. (3) Then click the Console Window icon.
9. When the VM’s Console Window opens, click in the window in the black area. Log into your virtual machine as root using the default password: password.
10. To complete the Incredible PBX 2020 setup, you will automatically be walked through the short installation procedure when you start the virtual machine. Following the automatic reboot, just log in a second time as root and the install will complete. We recommend using SSH for your second login so that your desktop PC gets whitelisted in the Incredible PBX firewall.
11. Set up the proper time zone for your server: /root/timezone-setup.
12. Choose an email delivery address for your faxes: ./avantfax-email-change.
That should be enough tutorial for today. Enjoy your new VMware platform.
Continue Reading: Configuring Extensions, Trunks & Routes
Don’t Miss: Incredible PBX Application User’s Guide covering the 31 Whole Enchilada apps
Originally published: Monday, May 17, 2021
Need help with Asterisk? Visit the VoIP-info Forum.
Special Thanks to Our Generous Sponsors
FULL DISCLOSURE: ClearlyIP, Skyetel, Vitelity, DigitalOcean, Vultr, VoIP.ms, 3CX, Sangoma, TelecomsXchange and VitalPBX have provided financial support to Nerd Vittles and our open source projects through advertising, referral revenue, and/or merchandise. As an Amazon Associate and Best Buy Affiliate, we also earn from qualifying purchases. We’ve chosen these providers not the other way around. Our decisions are based upon their corporate reputation and the quality of their offerings and pricing. Our recommendations regarding technology are reached without regard to financial compensation except in situations in which comparable products at comparable pricing are available from multiple sources. In this limited case, we support our sponsors because our sponsors support us.
 BOGO Bonaza: Enjoy state-of-the-art VoIP service with a $10 credit and half-price SIP service on up to $500 of Skyetel trunking with free number porting when you fund your Skyetel account. No limits on number of simultaneous calls. Quadruple data center redundancy. $25 monthly minimum spend required. Tutorial and sign up details are here.
![]() The lynchpin of Incredible PBX 2020 and beyond is ClearlyIP components which bring management of FreePBX modules and SIP phone integration to a level never before available with any other Asterisk distribution. And now you can configure and reconfigure your new Incredible PBX phones from the convenience of the Incredible PBX GUI.
The lynchpin of Incredible PBX 2020 and beyond is ClearlyIP components which bring management of FreePBX modules and SIP phone integration to a level never before available with any other Asterisk distribution. And now you can configure and reconfigure your new Incredible PBX phones from the convenience of the Incredible PBX GUI.
 VitalPBX is perhaps the fastest-growing PBX offering based upon Asterisk with an installed presence in more than 100 countries worldwide. VitalPBX has generously provided a customized White Label version of Incredible PBX tailored for use with all Incredible PBX and VitalPBX custom applications. Follow this link for a free test drive!
 Special Thanks to Vitelity. Vitelity is now Voyant Communications and has halted new registrations for the time being. Our special thanks to Vitelity for their unwavering financial support over many years and to the many Nerd Vittles readers who continue to enjoy the benefits of their service offerings. We will keep everyone posted on further developments.

Meet Proxmox: A Virtual Machine Platform for Asterisk

UPDATE: Read our latest Proxmox tutorial: It’s Incredible PBX for Proxmox 7.
More than a decade ago, we introduced the Proxmox virtual machine platform for Asterisk®. Five years later we took another look. Along the way, there have been a few hiccups. But, by and large, Proxmox has had a loyal following for many years. Today we’re pleased to provide an updated tutorial to deploy Proxmox 6.3 with Incredible PBX®. Yes, we know Proxmox 6.4 was released yesterday, but we haven’t had a chance to test it. And, we had a terrific hardware special that’s only available for a short while. We will update this tutorial once we’ve had a chance to run Proxmox 6.4 through its paces.
Why go the virtual machine route? First, you can build Incredible PBX VMs in about one minute. Second, you can make backups and snapshots of your system with the click of a few buttons in the Proxmox GUI. Third, the performance is almost identical to running Incredible PBX on standalone hardware. What’s not to like?
One of our pet peeves with Proxmox has always been the nag screens trying to get you to pay for support. Fortunately, John McLaren solved that with this tutorial. Aside from that, there’s not much not to like about Proxmox. So let’s get started.
This tutorial assumes you have a working Proxmox server. If you don’t and you’re a home or SOHO user, here’s a steal from Amazon that’s only available at the $475.15 price while the remaining inventory is available. It includes a quad-core Intel Core i5 processor with 16GB of RAM, a 512GB NVME SSD drive plus wired and wireless networking. We’ve tried it. It’s great. Installing the Proxmox server from a USB flash drive takes about 5 minutes. This Proxmox tutorial will walk you through building the Proxmox installer with a USB flash drive. Once you have it, plug in a network cable, plug in the flash drive, and turn on the machine while holding down the F7 key. When the drive list appears, choose the USB drive and the Proxmox installer will load. Set up your credentials and fully-qualified domain name and email address, and the rest is just watching the installer work its magic. If you’re tempted to go the Intel NUC route, be advised that Intel and Microsoft have made some BIOS changes which may or may not lead you into harm’s way. Our earlier tutorial has some tips if you run into a snag.
Configuring Proxmox for Incredible PBX VMs
There are three ways you can "talk" to your Proxmox server once it’s up and running: SSH, SFTP, and the Proxmox web GUI. We’ll be using all three. Make note of the IP address assigned to your server during the install procedure.
1. Log into your Proxmox server as root using SSH. Issue the commands in John McLaren’s tutorial to disable the nag screens and restart Proxmox.
2. Download the Debian 10.9 ISO and our Incredible PBX installer (vzdump*.vma.gz) for Proxmox from SourceForge to your desktop.
3. Log into SCP as root using your Proxmox credentials. Using SCP, copy the vzdump*.vma.gz installer to /var/lib/vz/dump on your Proxmox server
4. Using a web browser navigate to https://192.168.0.208:8006/ where 192.168.0.208 is the IP address assigned to your Proxmox server. Login as root using the same root credentials you used with SSH.
5. In the Proxmox GUI, navigate to Datacenter -> Local -> ISO Images -> Upload and upload the Debian 10 ISO from your desktop.
Your Proxmox server now is configured to let you build as many Incredible PBX 2021 virtual machines as you like.
Creating Your First Incredible PBX Virtual Machine
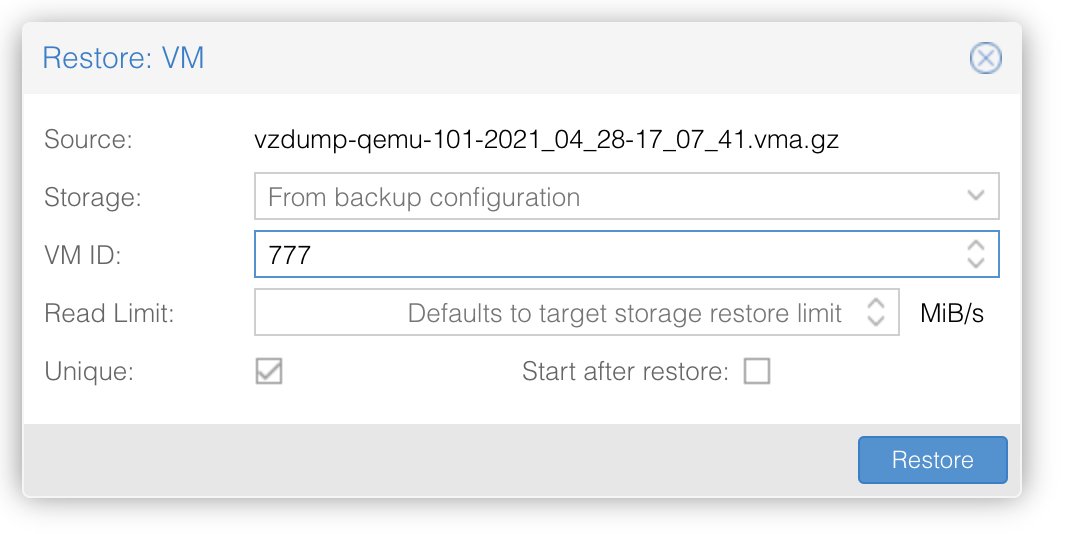
The easiest way to create Incredible PBX 2021 virtual machines is using the Proxmox web GUI. Navigate to Datacenter -> Local -> Backups -> Restore. When the dialog box appears, fill it in as shown below using a unique Proxmox Container Number for each VM (777 in the example). Be sure to tick the Unique box to assure that your VMs don’t step on each other. If you want to start up the VM after creating it, just tick the start up box. When you’re finished, click the Restore button.
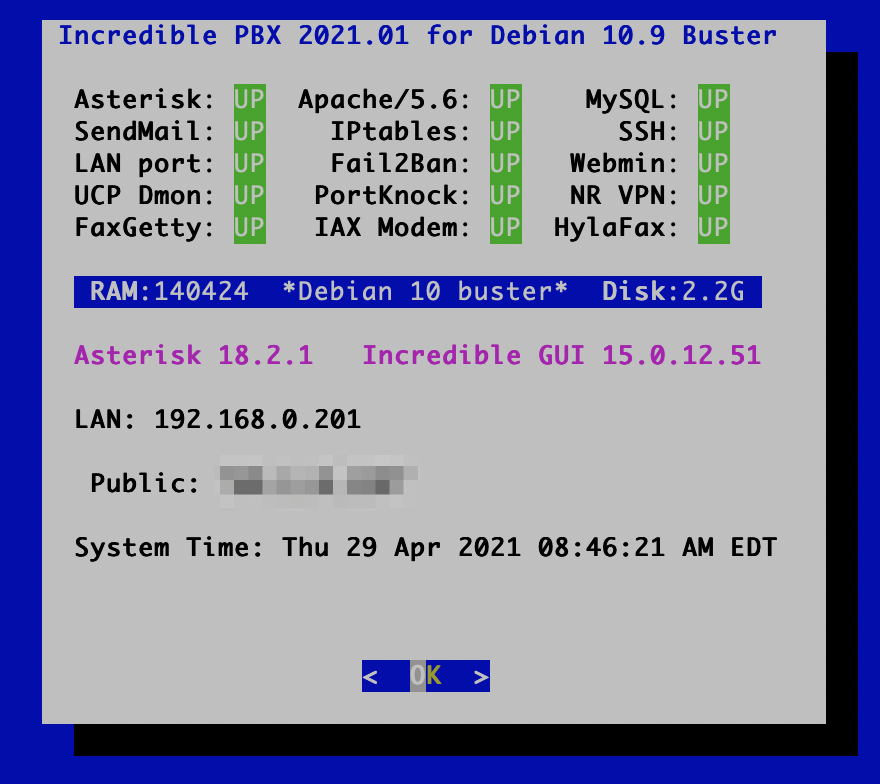
In about a minute, your VM will be ready to Start if you didn’t tick the start up box. Once started, click the Console button to open the Incredible PBX console box just as if you had logged in with SSH. For username and password, use root and password. You then will be prompted to change all of your VM’s passwords. New SSH credentials also will be generated. Following the reboot, log back in again with your new root password and let the installer complete its setup. You now have a fully-operational Incredible PBX and Incredible Fax platform. Hop over to the Incredible PBX 2021 tutorial to set up extensions, trunks, and routes.
Originally published: Saturday, May 1, 2021
Need help with Asterisk? Visit the VoIP-info Forum.
Special Thanks to Our Generous Sponsors
FULL DISCLOSURE: ClearlyIP, Skyetel, Vitelity, DigitalOcean, Vultr, VoIP.ms, 3CX, Sangoma, TelecomsXchange and VitalPBX have provided financial support to Nerd Vittles and our open source projects through advertising, referral revenue, and/or merchandise. As an Amazon Associate and Best Buy Affiliate, we also earn from qualifying purchases. We’ve chosen these providers not the other way around. Our decisions are based upon their corporate reputation and the quality of their offerings and pricing. Our recommendations regarding technology are reached without regard to financial compensation except in situations in which comparable products at comparable pricing are available from multiple sources. In this limited case, we support our sponsors because our sponsors support us.
BOGO Bonaza: Enjoy state-of-the-art VoIP service with a $10 credit and half-price SIP service on up to $500 of Skyetel trunking with free number porting when you fund your Skyetel account. No limits on number of simultaneous calls. Quadruple data center redundancy. $25 monthly minimum spend required. Tutorial and sign up details are here.
![]() The lynchpin of Incredible PBX 2020 and beyond is ClearlyIP components which bring management of FreePBX modules and SIP phone integration to a level never before available with any other Asterisk distribution. And now you can configure and reconfigure your new Incredible PBX phones from the convenience of the Incredible PBX GUI.
The lynchpin of Incredible PBX 2020 and beyond is ClearlyIP components which bring management of FreePBX modules and SIP phone integration to a level never before available with any other Asterisk distribution. And now you can configure and reconfigure your new Incredible PBX phones from the convenience of the Incredible PBX GUI.
VitalPBX is perhaps the fastest-growing PBX offering based upon Asterisk with an installed presence in more than 100 countries worldwide. VitalPBX has generously provided a customized White Label version of Incredible PBX tailored for use with all Incredible PBX and VitalPBX custom applications. Follow this link for a free test drive!
Special Thanks to Vitelity. Vitelity is now Voyant Communications and has halted new registrations for the time being. Our special thanks to Vitelity for their unwavering financial support over many years and to the many Nerd Vittles readers who continue to enjoy the benefits of their service offerings. We will keep everyone posted on further developments.
Housekeeping 101: Managing Your Asterisk Backups and Logs

If you’re one of those that likes planting shrubbery but ignores maintenance thereafter, then today’s column is for you. Linux servers and Asterisk® PBXs need some regular attention. If you don’t invest a little time in the backup and log purging tasks, sooner or later you’ll regret it when disaster strikes.
With Incredible PBX® 2020 and 2021 servers, you only have yourself to blame if you don’t make regular backups and move them off site. Simply run /root/incrediblebackup2020 and move the image from /backup to a safe place. For Incredible PBX 16 servers, use the /root/incrediblebackup16 script. If you’re considering a move of your on premise Incredible PBX 2020 or 2021 server to the cloud, then we recommend making a full FreePBX® backup. Simply use the FileStore module in FreePBX in conjunction with the FreePBX Backup module to backup to S3, FTP, SCP, or DropBox. For those using cloud platforms for your PBXs, we strongly recommend investing the few cents more to activate automatic backups or snapshots. See the Incredible PBX Wiki for provider suggestions.
Next, let’s turn to logs. On Linux-based systems running Asterisk, there are literally dozens of logs. If you don’t monitor them carefully, you run the risk of a system failure once your storage device fills up. For PUBLIC implementations of Incredible PBX, you also need to monitor /var/log/secure (CentOS) and /var/log/auth.log (Debian/Ubuntu) for SSH break-in attempts. Monitoring the logs for most other system problems is less necessary because these issues typically will rear their ugly heads in a way that you will instantly know there’s a problem.
That leaves us with taming log creep. Even though many of the logs rotate and manage their own total size, this isn’t true for all of them. The easiest way to identify where your problem areas are is to do full listings of the files in both the /var/log and /var/log/asterisk directories: ls -al /var/log && ls -al /var/log/asterisk. When you see the size of logs creeping into 7 digits or more, it’s time to take corrective action. The simplest way is to build yourself a bash script that runs as a cron job every week or so. Here’s what we typically put in the script. The first few lines clean out the rotated logs, and the other lines initialize all of the current log files except the SSH log. You would obviously want to examine any extremely large logs for issues and security breaches before running this script! We typically create a backup before running the script. This preserves a historical record in case of any problems.
#!/bin/bash
rm -rf /tmp/*
rm -f /var/log/*-2*
rm -f /var/log/asterisk/*-2*
rm -f /var/log/httpd/*-2*
rm -f /var/log/*.gz
rm -f /var/log/asterisk/*.gz
rm -f /var/log/apache2/*.gz
rm -f /var/log/apache2/*.1
rm -f /var/log/*.1
rm -f /var/log/asterisk/*.1
truncate -s 0 /root/.mysql_history
truncate -s 0 /root/.asterisk_history
truncate -s 0 /root/.bash_history
truncate -s 0 /var/log/wtmp
truncate -s 0 /var/log/lastlog
truncate -s 0 /var/log/mysql/error.log
truncate -s 0 /var/log/auth.log
truncate -s 0 /var/log/boot.log
truncate -s 0 /var/log/cron
truncate -s 0 /var/log/cron.log
truncate -s 0 /var/log/daemon.log
truncate -s 0 /var/log/debug
truncate -s 0 /var/log/dmesg
truncate -s 0 /var/log/dmesg.old
truncate -s 0 /var/log/dracut.log
truncate -s 0 /var/log/fail2ban.log
truncate -s 0 /var/log/ipchecker.log
truncate -s 0 /var/log/kern
truncate -s 0 /var/log/kern.log
truncate -s 0 /var/log/knockd.log
truncate -s 0 /var/log/mail.err
truncate -s 0 /var/log/mail.info
truncate -s 0 /var/log/maillog
truncate -s 0 /var/log/mail.warn
truncate -s 0 /var/log/messages
truncate -s 0 /var/log/mysqld.log
truncate -s 0 /var/log/slpd.log
truncate -s 0 /var/log/syslog
truncate -s 0 /var/log/alternatives.log
truncate -s 0 /var/log/bootstrap.log
truncate -s 0 /var/log/dpkg.log
truncate -s 0 /var/log/tallylog
truncate -s 0 /var/log/yum.log
truncate -s 0 /var/log/faillog
truncate -s 0 /var/log/fontconfig.log
truncate -s 0 /var/log/regen_ssh_keys.log
truncate -s 0 /var/log/apache2/access.log
truncate -s 0 /var/log/apache2/error.log
truncate -s 0 /var/log/apache2/other_vhosts_access.log
truncate -s 0 /var/log/asterisk/freepbx_dbug
truncate -s 0 /var/log/asterisk/freepbx_debug
truncate -s 0 /var/log/asterisk/freepbx.log
truncate -s 0 /var/log/asterisk/freepbx_security.log
truncate -s 0 /var/log/asterisk/full
truncate -s 0 /var/log/asterisk/h323_log
truncate -s 0 /var/log/asterisk/messages
truncate -s 0 /var/log/asterisk/queue_log
truncate -s 0 /var/log/asterisk/ucp_out.log
truncate -s 0 /var/log/asterisk/clearlydevices_out.log
truncate -s 0 /var/log/asterisk/clearlysp_out.log
truncate -s 0 /var/log/asterisk/core*.log
To automate this process, create a truncate-logs script in /root with the entries above. Make the script executable: chmod +x /root/truncate-logs. Then add this entry to the bottom of /etc/crontab: 35 4 * * 6 root /root/truncate-logs >/dev/null 2>&1. This would run the script every Saturday morning at 4:35 a.m.
Originally published: Monday, April 26, 2021
Need help with Asterisk? Visit the VoIP-info Forum.
Special Thanks to Our Generous Sponsors
FULL DISCLOSURE: ClearlyIP, Skyetel, Vitelity, DigitalOcean, Vultr, VoIP.ms, 3CX, Sangoma, TelecomsXchange and VitalPBX have provided financial support to Nerd Vittles and our open source projects through advertising, referral revenue, and/or merchandise. As an Amazon Associate and Best Buy Affiliate, we also earn from qualifying purchases. We’ve chosen these providers not the other way around. Our decisions are based upon their corporate reputation and the quality of their offerings and pricing. Our recommendations regarding technology are reached without regard to financial compensation except in situations in which comparable products at comparable pricing are available from multiple sources. In this limited case, we support our sponsors because our sponsors support us.
BOGO Bonaza: Enjoy state-of-the-art VoIP service with a $10 credit and half-price SIP service on up to $500 of Skyetel trunking with free number porting when you fund your Skyetel account. No limits on number of simultaneous calls. Quadruple data center redundancy. $25 monthly minimum spend required. Tutorial and sign up details are here.
![]() The lynchpin of Incredible PBX 2020 and beyond is ClearlyIP components which bring management of FreePBX modules and SIP phone integration to a level never before available with any other Asterisk distribution. And now you can configure and reconfigure your new Incredible PBX phones from the convenience of the Incredible PBX GUI.
The lynchpin of Incredible PBX 2020 and beyond is ClearlyIP components which bring management of FreePBX modules and SIP phone integration to a level never before available with any other Asterisk distribution. And now you can configure and reconfigure your new Incredible PBX phones from the convenience of the Incredible PBX GUI.
VitalPBX is perhaps the fastest-growing PBX offering based upon Asterisk with an installed presence in more than 100 countries worldwide. VitalPBX has generously provided a customized White Label version of Incredible PBX tailored for use with all Incredible PBX and VitalPBX custom applications. Follow this link for a free test drive!
Special Thanks to Vitelity. Vitelity is now Voyant Communications and has halted new registrations for the time being. Our special thanks to Vitelity for their unwavering financial support over many years and to the many Nerd Vittles readers who continue to enjoy the benefits of their service offerings. We will keep everyone posted on further developments.
Taming the Condo Call Box with a Raspberry Pi & Asterisk
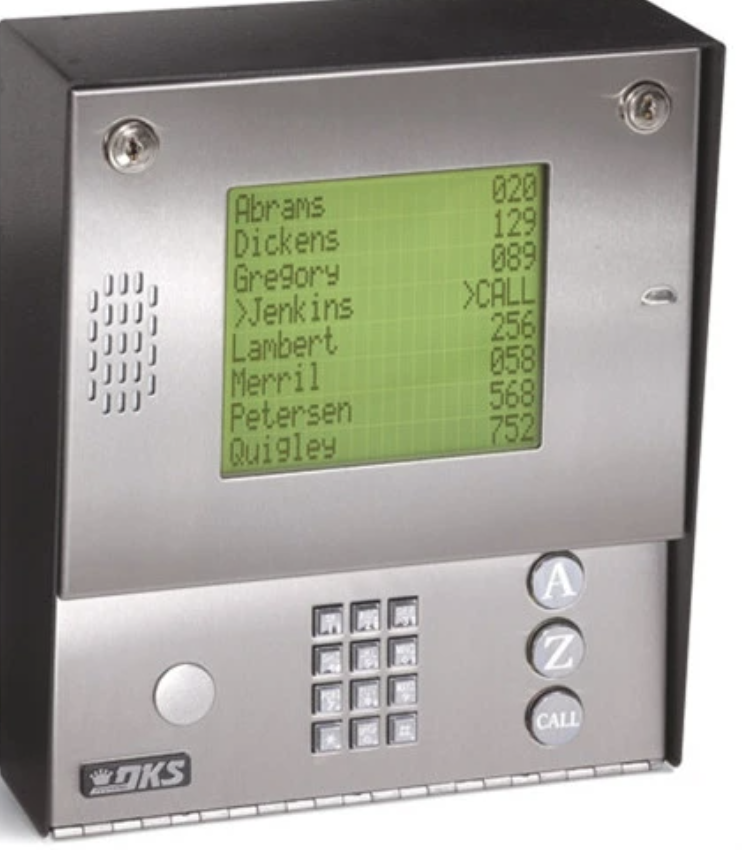
If you live in an apartment complex or condominium with a call box to let visitors gain door access by calling your apartment, then today’s column is for you. The way almost all of these call boxes work is the management company programs your name, phone number, and apartment number into the call box after which a visitor can look up your name or enter your apartment number and the call box will call you. When you answer the call and press 9 on your phone, the apartment door will unlock momentarily allowing the visitor to enter the building. But what if you don’t answer the call and a delivery driver needs to drop off your check from Publisher’s Clearinghouse? Or suppose you or a significant other has gone jogging without a cellphone and locked yourself out of the building? Well, worry no more. With Asterisk and a $35 Raspberry Pi running Incredible PBX, you can conquer the call box and let anybody into the building without ever touching your phone. All you need is an access code.
We will assume that you have a functioning Incredible PBX server with at least one incoming phone number. If not, start here. Then provide the management company with your 10-digit DID to assign to the call box. Once it’s set up, use the call box to call yourself and review the call detail records on your PBX to decipher the callbox’s actual phone number.
You do NOT need a dedicated DID to answer Call Box incoming calls. Deploying the script below will tell Asterisk to intercept calls from the Call Box for special processing and pass the rest of your incoming calls to your DID’s preconfigured Inbound Route. When a Call Box call is detected by its CallerID Number, the script will prompt the visitor to enter a security code. If the code entered is valid, a DTMF tone simulating the pressing of 9 on your phone will be sent to the Call Box to open the door, and the visitor will be advised that the door is being unlocked. If the visitor enters an invalid access code three times in a row, Asterisk will hang up the call from the Call Box. Easy peasy!
Now let’s reconfigure your Asterisk PBX to manage incoming calls from the Call Box. You’ll need (1) the 10-digit DID that you provided to the management company for calls from the CallBox. (2) the 10-digit phone number that the Call Box uses to call you, and (3) a security PIN which the visitor must enter to gain door access. In the sample code below, (1) substitute your 10-digit DID for 8881234567 on the 14 lines (twice on lines 3 and 5), (2) substitute the Call Box 10-digit phone number for 9990000000 on line 4, (3) in line 7 replace 90210 with the security PIN you want visitors to enter to gain door access, and (4) enter your email address on line 11 replacing yourname@gmail.com so you’re notified when visitors arrive.
[from-callbox]
exten => 8881234567,1,Answer
exten => 8881234567,n,Wait(1)
exten => 8881234567,n,NoOp(*** Incoming call on 8881234567 DID ***)
exten => 8881234567,n,GotoIf($["${CALLERID(number)}" = "9990000000"]?BUZZMEUP)
exten => 8881234567,n,Goto(from-trunk,8881234567,1)
exten => 8881234567,n,Hangup
exten => 8881234567,n(BUZZMEUP),Authenticate(90210)
exten => 8881234567,n,Playback(access-granted)
exten => 8881234567,n,agi(picotts.agi,"The door is opening. Please come in.")
exten => 8881234567,n,SendDTMF(9,50,2000)
exten => 8881234567,n,system(echo "Condo door opened" | /usr/bin/mail -s ALERT yourname@gmail.com)
exten => 8881234567,n,Wait(3)
exten => 8881234567,n,Playback(goodbye)
exten => 8881234567,n,Hangup
exten => s,1,Hangup
;-------------------------------------------------------------------------
Next, copy the edited code to the end of /etc/asterisk/extensions_custom.conf and reload your dialplan: asterisk -rx "dialplan reload".
Finally, using a browser, open the FreePBX GUI. Edit the trunk corresponding to your DID above and change the context to from-callbox. Also make certain you have an Inbound Route for your 10-digit DID to redirect non-CallBox calls to whatever destination is desired.
Now leave your building (with your key) and use the Call Box to test your new setup. Enjoy!
Originally published: Monday, April 5, 2021
Need help with Asterisk? Visit the VoIP-info Forum.
Special Thanks to Our Generous Sponsors
FULL DISCLOSURE: ClearlyIP, Skyetel, Vitelity, DigitalOcean, Vultr, VoIP.ms, 3CX, Sangoma, TelecomsXchange and VitalPBX have provided financial support to Nerd Vittles and our open source projects through advertising, referral revenue, and/or merchandise. As an Amazon Associate and Best Buy Affiliate, we also earn from qualifying purchases. We’ve chosen these providers not the other way around. Our decisions are based upon their corporate reputation and the quality of their offerings and pricing. Our recommendations regarding technology are reached without regard to financial compensation except in situations in which comparable products at comparable pricing are available from multiple sources. In this limited case, we support our sponsors because our sponsors support us.
BOGO Bonaza: Enjoy state-of-the-art VoIP service with a $10 credit and half-price SIP service on up to $500 of Skyetel trunking with free number porting when you fund your Skyetel account. No limits on number of simultaneous calls. Quadruple data center redundancy. $25 monthly minimum spend required. Tutorial and sign up details are here.
![]() The lynchpin of Incredible PBX 2020 and beyond is ClearlyIP components which bring management of FreePBX modules and SIP phone integration to a level never before available with any other Asterisk distribution. And now you can configure and reconfigure your new Incredible PBX phones from the convenience of the Incredible PBX GUI.
The lynchpin of Incredible PBX 2020 and beyond is ClearlyIP components which bring management of FreePBX modules and SIP phone integration to a level never before available with any other Asterisk distribution. And now you can configure and reconfigure your new Incredible PBX phones from the convenience of the Incredible PBX GUI.
VitalPBX is perhaps the fastest-growing PBX offering based upon Asterisk with an installed presence in more than 100 countries worldwide. VitalPBX has generously provided a customized White Label version of Incredible PBX tailored for use with all Incredible PBX and VitalPBX custom applications. Follow this link for a free test drive!
Special Thanks to Vitelity. Vitelity is now Voyant Communications and has halted new registrations for the time being. Our special thanks to Vitelity for their unwavering financial support over many years and to the many Nerd Vittles readers who continue to enjoy the benefits of their service offerings. We will keep everyone posted on further developments.
One-Minute Wonder: It’s Incredible PBX 2021 for VirtualBox
If you’re new to the VoIP world and want to kick the tires to see what you’re missing, then today’s one minute setup is for you. You’ll get a $10 credit to try out some penny-a-minute calls and to purchase a $1 a month phone number in your choice of area codes. If you decide VoIP is not for you, you don’t have to buy anything ever. And you can use almost any desktop computer you already own to bring up the VirtualBox® edition of Incredible PBX® 2021.
If you’ve followed Nerd Vittles over the years, you already know that VirtualBox from Oracle® is one of our favorite platforms. Once VirtualBox is installed on your desktop computer, adding Incredible PBX is a snap. Download the latest Incredible PBX 2021 image from SourceForge, double-click on the downloaded image, check the initialize MAC address box, and boom. In less than a minute, your PBX is ready to use with the very latest components of Asterisk® 18 and FreePBX® 15. There are no hidden fees or crippleware to hinder your use of Incredible PBX for as long as you like. Just set up an account with our Platinum provider, Skyetel, and you can start making calls in minutes. Of course, the Incredible PBX feature set is included as well which brings you nearly three dozen applications for Asterisk that will revolutionize your communications platform. Speech-to-text, voice recognition, and a Siri-like telephony interface are as close as your SIP phone.
Installing Oracle VM VirtualBox

Oracle’s virtual machine platform inherited from Sun is amazing. It’s not only free, but it’s pure GPL2 code. VirtualBox gives you a virtual machine platform that runs on top of any desktop operating system. In terms of limitations, we haven’t found any. We even tested this on an Atom-based Windows 7 machine with 2GB of RAM, and it worked without a hiccup. So step #1 today is to download one or more of the VirtualBox installers from VirtualBox.org or Oracle.com. Our recommendation is to put all of the 100MB installers on a 4GB thumb drive.1 Then you’ll have everything in one place whenever and wherever you happen to need it. Once you’ve downloaded the software, simply install it onto your favorite desktop machine. Accept all of the default settings, and you’ll be good to go. For more details, here’s a link to the Oracle VM VirtualBox User Manual.
NOTE: The Incredible PBX 2021 VM requires a VirtualBox 6.x platform. Adjust screen size in View -> Virtual Screen.
Installing the Incredible PBX 2021 Image
To begin, download the Incredible PBX 2021 image (3.1 GB) onto your desktop.
Next, double-click on the Incredible PBX .ova image on your desktop. Be sure to check the box to initialize the MAC address of the image if you’re using an older version of VirtualBox. Then click Import. Once the import is finished, you’ll see a new Incredible PBX 2021 virtual machine in the VM List of the VirtualBox Manager Window. Let’s make a couple of one-time adjustments to the Incredible PBX configuration to account for possible differences in sound and network cards on different host machines.
(1) Click once on the Incredible PBX virtual machine in the VM List. Then (2) click the Settings button. In System tab, check Hardware Clock in UTC Time. In the Audio tab, check the Enable Audio option and choose your sound card. In the Network tab for Adapter 1, check the Enable Network Adapter option. From the Attached to pull-down menu, choose Bridged Adapter. Then select your network card from the Name list. Then click OK. That’s all the configuration that is necessary for Incredible PBX.
Running Incredible PBX 2021 in VirtualBox
Once you’ve imported and configured the Incredible PBX Virtual Machine, you’re ready to go. Highlight the Incredible PBX virtual machine in the VM List on the VirtualBox Manager Window and click the Start button. The standard Linux boot procedure will begin and, within a few seconds, you’ll get the familiar Linux login prompt. During the bootstrap procedure, you’ll see a couple of dialogue boxes pop up that explain the keystrokes to move back and forth between your host operating system desktop and your virtual machine. Remember, you still have full access to your desktop computer. Incredible PBX is merely running as a task in a VM window. Always gracefully halt Incredible PBX just as you would on any computer.
Here’s what you need to know. To work in the Incredible PBX virtual machine, just left-click your mouse while it is positioned inside the VM window. To return to your host operating system desktop, press the right Option key on Windows machines or the left Command key on any Mac. On Linux desktops, press the right Ctrl key. For other operating systems, read the dialogue boxes for instructions on moving around. To access the Linux CLI, login as root with the default password: password. Change your root password when you are prompted to do so. Then update your admin password for web access: ./admin-pw-change. Also update your admin password for web applications: ./apache-pw-change. You’ll need these admin passwords to access the web GUI to manage your PBX as well as to use the AsteriDex and Reminders web apps. The above password updates are automatically requested when you first activate the virtual machine. You can update all of your other passwords using the scripts provided in /root. For example, you’ll want to set the email delivery address for incoming faxes by running: ./avantfax-email-change. And set the AvantFax admin password by running: ./avantfax-pw-change. When running the AvantFax web application, be advised that you first will be prompted for your Apache admin credentials. Then you will be prompted for your AvantFax admin credentials.
Setting the Date and Time with VirtualBox
On some platforms, VirtualBox has a nasty habit of mangling the date and time of your virtual machine. Verify that you have enabled the Hardware Clock in UTC Time option for your virtual machine as documented above. If pbxstatus still shows an incorrect time, manually set the date and time and then update the hardware clock. Here’s how assuming 08130709 is the month (August), day (13), and correct time (7:09 a.m.) of your server:
date 08130709
clock -w

Configuring Skyetel for Incredible PBX 2021
If you’d like to try out the Skyetel service at no charge, here’s the drill. Sign up for Skyetel service to take advantage of the Nerd Vittles specials. First, complete the Prequalification Form here. You then will be provided a link to the Skyetel site to complete your registration. Once you have registered on the Skyetel site and your account has been activated, open a support ticket and request the $10 credit for your account by referencing the Nerd Vittles special offer. Once you are satisfied with the service, fund your account as desired, and Skyetel will match your deposit of up to $250 simply by opening another ticket. That gets you up to $500 of half-price calling. Credit is limited to one per person, company, and address. Effective 10/1/2023, $25/month minimum spend required.
Skyetel does not use SIP registrations to make connections to your PBX. Instead, Skyetel utilizes Endpoint Groups to identify which servers can communicate with the Skyetel service. An Endpoint Group consists of a Name, an IP address, a UDP or TCP port for the connection, and a numerical Priority for the group. For incoming calls destined to your PBX, DIDs are associated with an Endpoint Group to route the calls to your PBX. For outgoing calls from your PBX, a matching Endpoint Group is required to authorize outbound calls through the Skyetel network. Thus, the first step in configuring the Skyetel side for use with your PBX is to set up an Endpoint Group. Here’s a typical setup for Incredible PBX 16-15:
- Name: MyPBX
- Priority: 1
- IP Address: PBX-Public-IP-Address
- Port: 5060
- Protocol: UDP
- Description: my.incrediblepbx.com
To receive incoming PSTN calls, you’ll need at least one DID. On the Skyetel site, you acquire DIDs under the Phone Numbers tab. You have the option of Porting in Existing Numbers (free for the first 60 days after you sign up for service) or purchasing new ones under the Buy Phone Numbers menu option.
Once you have acquired one or more DIDs, navigate to the Local Numbers or Toll Free Numbers tab and specify the desired SIP Format and Endpoint Group for each DID. Add SMS/MMS and E911 support, if desired. Call Forwarding and Failover are also supported. That completes the VoIP setup on the Skyetel side. System Status is always available here.
If VirtualBox is sitting behind a router or firewall on a private LAN, you’ll need to forward ports UDP 5060 and 10000-20000 in your router to the private LAN address of your Incredible PBX server. Also edit your extensions in the GUI and set NAT=YES in the Advanced tab of every extension. In Settings -> Asterisk SIP Settings, click the Detect Network Settings button and then Submit your changes and reload the Asterisk dialplan when prompted.
Configuring VoIP.ms for Incredible PBX 2021
To sign up for VoIP.ms service, may we suggest you use our signup link so that Nerd Vittles gets a referral credit for your signup. Once your account is set up, you’ll need to set up a SIP SubAccount and, for Authentication Type, choose Static IP Authentication and enter your Incredible PBX 2021 server’s public IP address. For Transport, choose UDP. For Device Type, choose Asterisk, IP PBX, Gateway or VoIP Switch. Order a DID in their web panel, and then point the DID to the SubAccount you just created. Be sure to specify atlanta1.voip.ms as the POP from which to receive incoming calls.
Configuring V1VoIP for Incredible PBX 2021
To sign up for V1VoIP service, sign up on their web site. Then login to your account and order a DID under the DIDs tab. Once the DID has been assigned, choose View DIDs and click on the Forwarding button beside your DID. For Option #1, choose Forward to IP Address/PBX. For the Forwarding Address, enter the public IP address of your server. For the T/O (timeout) value, set it to 2o seconds. Then click the Update button. Under the Termination tab, create a new Endpoint with the public IP address of your server so that you can place outbound calls through V1VoIP.
Configuring Anveo Direct for Incredible PBX 2021
To sign up for Anveo Direct service, sign up on their web site and then login. After adding funds to your account, purchase a DID under Inbound Service -> Order DID. Next, choose Configure Destination SIP Trunk. Give the Trunk a name. For the Primary SIP URI, enter $[E164]$@server-IP-address. For Call Options, select your new DID from the list. You also must whitelist your public IP address under Outbound Service -> Configure. Create a new Call Termination Trunk and name it to match your server. For Dialing Prefix, choose six alphanumeric characters beginning with a zero. In Authorized IP Addresses, enter the public IP address of your server. Set an appropriate rate cap. We like $0.01 per minute to be safe. Set a concurrent calls limit. We like 2. For the Call Routing Method, choose Least Cost unless you’re feeling extravagant. For Routes/Carriers, choose Standard Routes. Write down your Dialing Prefix and then click the Save button.
Before you can make outbound calls through Anveo Direct from your PBX, you first must configure the Dialing Prefix that you wrote down in the previous step. Log into the GUI as admin using a web browser and edit the Anveo-Out trunk in Connectivity -> Trunks. Click on the custom-Settings tab and replace anveo-pin with your actual Dialing Prefix. Click Submit and Apply Config to complete the setup.
By default, incoming Anveo Direct calls will be processed by the Default inbound route on your PBX. If you wish to redirect incoming Anveo Direct calls using DID-specific inbound routes, then you’ve got a bit more work to do. In addition to creating the inbound route using the 11-digit Anveo Direct DID, enter the following commands after logging into your server as root using SSH/Putty:
cd /etc/asterisk
echo "[from-anveo]" >> extensions_custom.conf
echo "exten => _.,1,Ringing" >> extensions_custom.conf
echo "exten => _.,n,Goto(from-trunk,\\${SIP_HEADER(X-anveo-e164)},1)" >> extensions_custom.conf
asterisk -rx "dialplan reload"
Configuring a Softphone for Incredible PBX 2021
We’re in the home stretch now. You can connect virtually any kind of telephone to your new PBX. Plain Old Phones require an analog telephone adapter (ATA) which can be a separate board in your computer from a company such as Digium. Or it can be a standalone SIP device such as ObiHai’s OBi100 or OBi110 (if you have a phone line from Ma Bell to hook up as well). SIP phones can be connected directly so long as they have an IP address. These could be hardware devices or software devices such as the YateClient softphone. We’ll start with a free one today so you can begin making calls. You can find dozens of recommendations for hardware-based SIP phones both on Nerd Vittles and the PIAF Forum when you’re ready to get serious about VoIP telephony.
We recommend YateClient for Windows which is free. Download it from here. Run YateClient once you’ve installed it and enter the credentials for the 701 extension on Incredible PBX. You can find them by running /root/show-passwords. You’ll need the IP address of your server plus your extension 701 password. In the YateClient, fill in the blanks using the IP address of your Server, 701 for your Username, and whatever Password was assigned to the extension when you installed Incredible PBX. Click OK to save your entries.

Configuring Incredible PBX 2021 for VirtualBox
In order to take advantage of all the Incredible PBX applications, you’ll need to obtain IBM text-to-speech (TTS) and speech-to-text (STT) credentials as well as a (free) Application ID for Wolfram Alpha.
This Nerd Vittles tutorial will walk you through getting your IBM account set up and obtaining both your TTS and STT credentials. Be sure to write down BOTH sets of credentials which you’ll need in a minute. For home and SOHO use, IBM access and services are mostly FREE even though you must provide a credit card when signing up. The IBM signup process explains their pricing plans.
To use Wolfram Alpha, sign up for a free Wolfram Alpha API account. Just provide your email address and set up a password. It takes less than a minute. Log into your account and click on Get An App ID. Make up a name for your application and write down (and keep secret) your APP-ID code. That’s all there is to getting set up with Wolfram Alpha. If you want to explore costs for commercial use, there are links to let you get more information.
In addition to your Wolfram Alpha APPID, there are two sets of IBM credentials to plug into the Asterisk AGI scripts. Keep in mind that there are different usernames and passwords for the IBM Watson TTS and STT services. The TTS credentials will look like the following: $IBM_username and $IBM_password. The STT credentials look like this: $API_USERNAME and $API_PASSWORD. Don’t mix them up. 🙂
All of the scripts requiring credentials are located in /var/lib/asterisk/agi-bin so switch to that directory after logging into your server as root. Edit each of the following files and insert your TTS credentials in the variables already provided: nv-today2.php, ibmtts.php, and ibmtts2.php. Edit each of the following files and insert your STT credentials in the variables already provided: getquery.sh, getnumber.sh, and getnumber2.sh. Finally, edit 4747 and insert your Wolfram Alpha APPID.
Using AsteriDex with Incredible PBX
AsteriDex is a web-based dialer and address book application for Asterisk and Incredible PBX. It lets you store and manage phone numbers of all your friends and business associates in an easy-to-use SQLite3 database. You simply call up the application with your favorite web browser: http://pbx-ip-address/asteridex4/. When you click on a contact that you wish to call, AsteriDex first calls you at extension 701, and then AsteriDex connects you to your contact through another outbound call made using your default outbound trunk that supports numbers in the 1NXXNXXXXXX format.
Keeping FreePBX 15 Modules Current
We strongly recommend that you periodically update all of your FreePBX modules to eliminate bugs and to reduce security vulnerabilities. From the Linux CLI, log into your server as root and issue the following commands:
rm -f /tmp/*
fwconsole ma upgradeall
fwconsole reload
/root/sig-fix
systemctl restart apache2
/root/sig-fix
Taking Incredible PBX for a Test Drive
You can take Incredible PBX on a test drive by dialing D-E-M-O (3366) from any phone connected to your PBX.
With Allison’s Demo IVR, you can choose from the following options:
- 0. Chat with Operator — connects to extension 701
- 1. AsteriDex Voice Dialer – say "Delta Airlines" or "American Airlines" to connect
- 2. Conferencing – log in using 1234 as the conference PIN
- 3. Wolfram Alpha Almanac – say "What planes are flying overhead"
- 4. Lenny – The Telemarketer’s Worst Nightmare
- 5. Today’s News Headlines — courtesy of Yahoo! News
- 6. Weather by ZIP Code – enter any 5-digit ZIP code for today’s weather
- 7. Today in History — courtesy of OnThisDay.com
- 8. Chat with Nerd Uno — courtesy of SIP URI connection to 3CX iPhone Client
- 9. DISA Voice Dialer — say any 10-digit number to be connected
- *. Current Date and Time — courtesy of Incredible PBX
Originally published: Sunday, March 28, 2021 Updated: Tuesday, November 30, 2021
Need help with Asterisk? Visit the VoIP-info Forum.
- Many of our purchase links refer users to Amazon when we find their prices are competitive for the recommended products. Nerd Vittles receives a small referral fee from Amazon to help cover the costs of our blog. We never recommend particular products solely to generate Amazon commissions. However, when pricing is comparable or availability is favorable, we support Amazon because Amazon supports us. [↩]
SPAM Blocker & CNAM Cornucopia for Incredible PBX 2021

If you enjoy calls from politicians and car warranty offers as much as we do, then today’s your lucky day. Blocking spam phone calls has been a challenge to put it charitably. Thanks to some earlier work by Stewart Nelson on the DSLR forum as well as Stewart’s considerable hand-holding in the development of our previous tutorials, we want to introduce an updated call screening approach for Incredible PBX 2021 that takes into account some recent changes in FreePBX® design. In a nutshell, the previous implementation no longer works because of some FreePBX plumbing changes that eliminated the "hook" we were using to intercept and screen incoming calls.
If you missed the earlier article, here’s the design. First time callers that are not on your WhiteList will be prompted to "press 5 to connect." Since most spam calls sit in a queue for several seconds before a live person chimes in, that person won’t hear the prompt. After 10 seconds or an invalid response, the call is sent to voicemail. In the alternative, you can play a SIT tone and disconnect the call or you can send the call to your favorite uncle, Lenny. When a successful caller calls again, the caller will be connected without a prompt. Once installed, you can change the voice prompt to a number other than 5 by modifying lines 11 and 13 of the context [sub-log-caller] which you will find in extensions_custom.conf in the /etc/asterisk directory at the completion of this install.
While today’s approach won’t block every robocaller, our testing suggests that it will catch more than 95% of these annoying calls. Using CallerID Superfecta coupled with the Asterisk® Phanebook will provide an extremely low-cost solution both for blocking spammers AND for displaying accurate CNAM data for incoming calls. The silver lining is you’ll only pay for CNAM lookups from legitimate callers once, and you have a choice of using OpenCNAM or BulkCNAM with the scripts we’ll provide today. Last, but not least, you’ll also get CNAM data for outgoing calls in your CDR logs.
Here’s the actual dialplan addition that will monitor your incoming calls:
[sub-log-caller]
exten => s,1,NoOp(*** begin sub-log-caller ***)
exten => s,n,Set(email='root')
exten => s,n,GotoIf($['${MESSAGE(from)}' != '']?SMSINCOMING)
exten => s,n,GotoIf(${DB_EXISTS(cidname/${CALLERID(num)})}?CNAMOK)
;exten => s,n,Goto(WHITELISTED)
exten => s,n,GotoIf($[${DB(SPAMCHECK/deactivate)} = 1]?CONNECTNOW)
exten => s,n,GotoIf($[${DB(cidname/0)} = SPAMCHECK]?CONNECTNOW)
exten => s,n,Playback(silence/1)
;exten => s,n,Goto(ANONTEST)
exten => s,n,Playback(custom/press5)
exten => s,n,Read(MYCODE,beep,1,n,1,10)
exten => s,n,GotoIf($["${MYCODE}" = "5"]?ANONTEST)
exten => s,n(FLUNKED),NoOp(*** Caller FLUNKED screening ***)
exten => s,n,Dial(local/*701@from-internal) ; uncomment to send to 701 VM
;exten => s,n,Dial(local/53669@from-internal) ; uncomment to send to Lenny
exten => s,n,Zapateller()
exten => s,n,Hangup
exten => s,n,Return()
exten => s,n(SMSINCOMING),NoOp(${MESSAGE(from)})
exten => s,n,NoOp(${MESSAGE(body)})
exten => s,n,GotoIf($["${email}" = "root"]?NOEMAIL)
exten => s,n,system(echo "FROM: ${MESSAGE(from)} \nVIA: ${CDR(did)} \n${MESSAGE(body)}" | `/usr/bin/which mail` -s "Incoming SMS Message" ${email})
;exten => s,n,SendText("Received but cannot reply now.")
exten => s,n(NOEMAIL),Hangup
exten => s,n,Return()
exten => s,n(CNAMOK),Set(CALLERID(name)=${DB(cidname/${CALLERID(number)})})
exten => s,n,Goto(WHITELISTED)
exten => s,n(ANONTEST),GotoIf($[${CALLERID(num)} > 0]?WHITELISTNOW:CONNECTNOW)
exten => s,n(WHITELISTNOW),Set(DB(cidname/${CALLERID(number)})=${CALLERID(name)})
exten => s,n,Set(CALLERID(all)="${CALLERID(name)} <${CALLERID(number)}>")
exten => s,n,Goto(SENDEMAIL)
exten => s,n(WHITELISTED),Set(CALLERID(all)="${CALLERID(name)} <${CALLERID(number)}>")
exten => s,n,Goto(CONNECTNOW)
exten => s,n(SENDEMAIL),NoOp(WhiteListed: ${CALLERID(all)})
exten => s,n,GotoIf($["${email}" = "root"]?CONNECTNOW)
exten => s,n,system(echo "In Asterisk Phone Book, verify new CNAM entry of ${CALLERID(name)} for ${CALLERID(number)}." | `/usr/bin/which mail` -s "Incredible PBX CNAM Reminder" ${email})
exten => s,n(CONNECTNOW),NoOp(*** end of sub-log-caller ***)
exten => s,n,Return()
;-------------------------------------------------------------------------------
The beauty of today’s design is that it won’t interfere with your existing call processing rules. In other words, FreePBX Inbound Routes sent to IVRs, Ring Groups, Conferences, and even incoming Faxes still will be processed exactly as they have been in the past once the CallerID number makes it onto your WhiteList. Unlike the previous design which tweaked the FreePBX Core module slightly, today’s implementation uses a slightly modified [app-blacklist-check] context to kick off our screening component above. This eliminates the need to modify the core module each time FreePBX updates the module. We’ve also enhanced the install to support those using the new Incredible PBX 2021 PUBLIC platform. This gives you the same SPAM protection for calls reaching your PBX directly via a SIP URI instead of a commercial DID.
Here are the basic steps to get this working:
- Configure and Enable CallerID Superfecta in FreePBX
- Enable CallerID Superfecta on All Inbound Routes
- Set the Proper Context for Your Trunks
- Download & Install Call Screener 2021
- Import Previous Callers into WhiteList
1. Configuring CallerID Superfecta in FreePBX
CallerID Superfecta is an integral component in today’s new call screening design. It will be used both to populate the Asterisk Phonebook’s WhiteList and to provide CallerID Name (CNAM) data about your callers while assuring that you only pay for one CNAM query even though grandma may call you a dozen times a day. We use the Asterisk Phonebook as the whitelist of authorized callers. The way CallerID Superfecta works is it checks multiple sources for a match on the incoming CallerID Number. As soon as a match is found, the checking ends and the CallerID Number and Name are passed to the Call Screening script.
The CallerID Superfecta lookup sequence needs to be set as follows in the United States: AsteriDex (if desired), Asterisk Phonebook (required), and then one of the following commercial CNAM lookup services: OpenCNAM or BulkCNAM. In other countries, there still may be free CNAM services, but they’ve all disappeared in the U.S. market. We’ve documented the other available sources in a previous Nerd Vittles article.
Low-volume OpenCNAM Value pricing provides global lookups for $0.0028 each. BulkCNAM provides CNAM queries with RoboCall identification for $0.002 per query. If you sign up with OpenCNAM, you will need your Account SID and Auth Token to configure CallerID Superfecta and to populate the Call Screening script. If you sign up with BulkVS, you will need your API Key from the API Credentials tab in your BulkVS Dashboard.
With your credentials in hand, login into FreePBX as admin and navigate to Admin -> CID Superfecta -> Default. Arrange and enable the lookup sources in the following order: AsteriDex, Asterisk Phonebook, and then either OpenCNAM or BulkCNAM (in the U.S. market) or your country’s best CNAM lookup source. Be sure to enter your credentials for the CNAM provider by clicking on the wrench icon beside the provider. If your incoming trunks already provide CNAM lookups (such as BulkVS and Incredible PBX Trunking), then you can substitute Trunk Provided as your CNAM lookup service. With Incredible PBX Trunking, in addition to free CNAM lookups, you also get SPAM detection at no additional cost. For details on the service, follow this link. Then we typically set Telco Data as the last lookup source which will at least give you the city and state of the caller.
2. Enabling CallerID Superfecta on Inbound Routes
By default, CallerID Superfecta is not enabled for incoming calls to your PBX. You must enable it on every Inbound Route by navigating to Connectivity -> Inbound Routes and then editing each of your routes. Then click on the Other tab and set Enable Superfecta Lookup to YES and set the Superfecta Scheme to DEFAULT. Click SUBMIT to save your route settings and then reload the dialplan when prompted.
3. Setting the Proper Context for Your Trunks
It’s equally important to make certain that the CallerID Numbers for all of your incoming calls arrive in the same format. Computers are stupid. 8005551212 and 18005551212 and +18005551212 are completely different callers as far as your PBX is concerned. If different trunks deliver calls with CallerID Numbers formatted differently, then you would need to whitelist ALL of the various permutations for every caller in the Asterisk Phonebook. For those in the U.S. and Canada that primarily receive calls from the U.S. and Canada, we recommend setting the context entry in every trunk to from-pstn-e164-us. This will handle the translation of all 3 number formats above into 10-digit numbers. Calls from other countries will not be affected.
4. Downloading & Installing Call Screener 2021
Now let’s put all the Call Screener components in place and configure the screening setup to meet your own requirements. To get started, log into Incredible PBX as root and issue the following commands:
mkdir /tmp/CALL-SCREENER
cd /tmp/CALL-SCREENER
wget http://incrediblepbx.com/CallScreener2021.tar.gz
tar zxvf CallScreener2021.tar.gz
rm -f CallScreener2021.tar.gz
./install
Once the install is begun, the editor will open to the dialplan code. In the [sub-log-caller] context, you have a few options. First, you need to choose how to handle incoming calls where the caller does not enter the "press5″ number prompt in a timely manner. The default setup (line 14) sends these callers to voicemail for extension 701. You can change the voicemail extension, or you can elect to treat the calls differently. We’ve provided two additional options. Line 15 will send the calls to Lenny at extension 53669. Line 16 will send the calls to Zapateller which is the universal tone for numbers that are not in service. You should enable only one of these three options and comment out the other two by placing a semicolon (;) at the start of the other two lines. If you have fax detection enabled on your PBX, you probably would not want to send failed calls to either Lenny or Zapateller since you may never know the incoming faxes failed. Similarly, if you get calls from people with rotary dial phones such as Grandma, you probably don’t want her talking to Lenny or listening to Zapateller tones.
The next option is which number to prompt callers to press. The default is 5. But you can change it by modifying the existing press5 entry on line 10 and entering the number to match on line 12. Available choices are 5 through 9.
The final option in the [sub-log-caller] context is to activate email notifications for new callers that pass the screening test. This is especially important if you receive lots of calls from cellphone users. Most of those calls will arrive with a CNAM entry of nothing more than the caller’s City and State. Activating an email reminder will notify you to update the Asterisk Phonebook entry for such callers to replace the City, State entry with the caller’s actual name so that your CDR listings and future calls provide accurate CNAM information for the caller. To activate email reminders, replace root in Set(email="root") in line 2 with your actual email address.
The [macro-dialout-trunk-predial-hook] context handles populating the Asterisk Phonebook WhiteList for outbound calls you make to people that are not yet in your Asterisk Phonebook. These numbers will automatically be added to your whitelist, but you also have the option of adding CNAM entries for these outbound calls using either OpenCNAM or BulkCNAM for outbound calls to numbers that are not yet in your Asterisk Phonebook. To activate CNAM lookups, simply uncomment either line 4 or 5 in the context. For the service you have activated, remember to also enter your Account SID and Auth Token in the case of OpenCNAM or your API Key in the case of BulkCNAM. If you leave both lines commented out which is the default, the callee’s phone number will be entered as both the CNAM and CNUM whitelist entry in the Asterisk Phonebook.
Once you have made all the changes desired, save the template by pressing Ctl-X, then Y, then ENTER. The installer then will complete installation of the Call Screener 2021 components.
5. Importing Previous Callers into WhiteList
We appreciate that you may not want to aggravate callers that have been calling you for years by making them jump through hoops the next time they call. So here’s a quick way to populate your Asterisk Phonebook with the names and numbers of previous callers. For entries where the CNAM is merely the CallerID Number, future calls from these numbers still will be looked up with OpenCNAM or BulkCNAM to obtain an actual CNAM match. We’ve made a couple of assumptions that you are more than welcome to adjust to meet your own needs. First, we’ve limited the list to callers from the past two calendar years. Second, we’ve only captured calls that lasted more than 15 seconds. We’ll drop down to the Linux CLI to build the list of callers to import. Then we’ll use the FreePBX GUI to import the list into the Asterisk Phonebook. While building the import list, you’ll have an opportunity to prune the list and remove any undesirable entries using nano. To generate the .csv file, issue the following commands:
cd /root
./export-CDR
Now you should have a 2YR-clean.csv file in its final form for import. Copy the file to your desktop PC and open FreePBX in your browser. Navigate to Admin -> Asterisk Phonebook. Click Import Phonebook and then Browse. Select the 2YR-clean.csv file from your desktop. Then click Upload. Take a final look at the new entries in your Asterisk Phonebook to make sure nothing came unglued, and you’re all set.
Originally published: Thursday, March 4, 2021
Need help with Asterisk? Visit the VoIP-info Forum.
Special Thanks to Our Generous Sponsors
FULL DISCLOSURE: ClearlyIP, Skyetel, Vitelity, DigitalOcean, Vultr, VoIP.ms, 3CX, Sangoma, TelecomsXchange and VitalPBX have provided financial support to Nerd Vittles and our open source projects through advertising, referral revenue, and/or merchandise. As an Amazon Associate and Best Buy Affiliate, we also earn from qualifying purchases. We’ve chosen these providers not the other way around. Our decisions are based upon their corporate reputation and the quality of their offerings and pricing. Our recommendations regarding technology are reached without regard to financial compensation except in situations in which comparable products at comparable pricing are available from multiple sources. In this limited case, we support our sponsors because our sponsors support us.
BOGO Bonaza: Enjoy state-of-the-art VoIP service with a $10 credit and half-price SIP service on up to $500 of Skyetel trunking with free number porting when you fund your Skyetel account. No limits on number of simultaneous calls. Quadruple data center redundancy. $25 monthly minimum spend required. Tutorial and sign up details are here.
![]() The lynchpin of Incredible PBX 2020 and beyond is ClearlyIP components which bring management of FreePBX modules and SIP phone integration to a level never before available with any other Asterisk distribution. And now you can configure and reconfigure your new Incredible PBX phones from the convenience of the Incredible PBX GUI.
The lynchpin of Incredible PBX 2020 and beyond is ClearlyIP components which bring management of FreePBX modules and SIP phone integration to a level never before available with any other Asterisk distribution. And now you can configure and reconfigure your new Incredible PBX phones from the convenience of the Incredible PBX GUI.
VitalPBX is perhaps the fastest-growing PBX offering based upon Asterisk with an installed presence in more than 100 countries worldwide. VitalPBX has generously provided a customized White Label version of Incredible PBX tailored for use with all Incredible PBX and VitalPBX custom applications. Follow this link for a free test drive!
Special Thanks to Vitelity. Vitelity is now Voyant Communications and has halted new registrations for the time being. Our special thanks to Vitelity for their unwavering financial support over many years and to the many Nerd Vittles readers who continue to enjoy the benefits of their service offerings. We will keep everyone posted on further developments.
Free Asterisk Solutions
