
Home » Incredible PBX (Page 12)
Category Archives: Incredible PBX
The Most Versatile VoIP Provider: FREE PORTING

 JUST RELEASED: Visit the Incredible PBX Wiki
Capitalism 101: IBM Castrates CentOS to "Improve" RHEL

If you loved the PC Jr. and New Coke, you’re going to love yesterday’s technology news. Claiming the best of intentions, IBM® cut the 8-year life span of CentOS® 8 to one year after which CentOS will become CentOS Stream, an experimental development platform sandwiched between Fedora® and Red Hat Enterprise Linus®. If you’ve spent the last year or two planning for or deploying CentOS 8, too bad. You can either pay up for RHEL licenses going forward or switch to a new platform. The government-sponsored Scientific Linux project folded into CentOS so that option no longer exists. Oracle Linux® remains an option but, considering Oracle’s track record with MySQL, that might give many organizations pause. For organizations with thousands of CentOS platforms, the remaining alternatives are PAINFUL. Both Debian and Ubuntu would require major software plumbing changes. There’s always a chance that the original CentOS developers will come to the rescue with a new product, but we’re not holding our breath.
So here we are. How does this affect Incredible PBX? As most of you know, we’ve had Incredible PBX 2020 versions for both CentOS 7 and Raspbian 10 for the Raspberry Pi®. There will be no CentOS 8 release of Incredible PBX, but you’ve got four more years of CentOS 7 support unless IBM welches on that commitment as well. Because Raspbian 10 is a derivative of Debian 10, moving forward it makes perfect sense to consolidate onto the Debian 10 platform. And Incredible PBX 2021 will do just that with versions for Debian 10 and Raspbian.
With a little help from Santa, we hope to have a beta release of Incredible PBX 2021 for Debian before the end of this month. Stay tuned. The world will not end.
Originally published: Wednesday, December 9, 2020

Need help with Asterisk? Visit the VoIP-info Forum.
Special Thanks to Our Generous Sponsors
FULL DISCLOSURE: ClearlyIP, Skyetel, Vitelity, DigitalOcean, Vultr, VoIP.ms, 3CX, Sangoma, TelecomsXchange and VitalPBX have provided financial support to Nerd Vittles and our open source projects through advertising, referral revenue, and/or merchandise. As an Amazon Associate and Best Buy Affiliate, we also earn from qualifying purchases. We’ve chosen these providers not the other way around. Our decisions are based upon their corporate reputation and the quality of their offerings and pricing. Our recommendations regarding technology are reached without regard to financial compensation except in situations in which comparable products at comparable pricing are available from multiple sources. In this limited case, we support our sponsors because our sponsors support us.
 BOGO Bonaza: Enjoy state-of-the-art VoIP service with a $10 credit and half-price SIP service on up to $500 of Skyetel trunking with free number porting when you fund your Skyetel account. No limits on number of simultaneous calls. Quadruple data center redundancy. $25 monthly minimum spend required. Tutorial and sign up details are here.
![]() The lynchpin of Incredible PBX 2020 and beyond is ClearlyIP components which bring management of FreePBX modules and SIP phone integration to a level never before available with any other Asterisk distribution. And now you can configure and reconfigure your new Incredible PBX phones from the convenience of the Incredible PBX GUI.
The lynchpin of Incredible PBX 2020 and beyond is ClearlyIP components which bring management of FreePBX modules and SIP phone integration to a level never before available with any other Asterisk distribution. And now you can configure and reconfigure your new Incredible PBX phones from the convenience of the Incredible PBX GUI.
 VitalPBX is perhaps the fastest-growing PBX offering based upon Asterisk with an installed presence in more than 100 countries worldwide. VitalPBX has generously provided a customized White Label version of Incredible PBX tailored for use with all Incredible PBX and VitalPBX custom applications. Follow this link for a free test drive!
 Special Thanks to Vitelity. Vitelity is now Voyant Communications and has halted new registrations for the time being. Our special thanks to Vitelity for their unwavering financial support over many years and to the many Nerd Vittles readers who continue to enjoy the benefits of their service offerings. We will keep everyone posted on further developments.

Meet Acer Spin 713: A Phenomenal Computer for All Seasons

It’s a portable office. It’s a movie theater. It’s a LAMP server. It’s a desktop PC. It’s a tablet computer. It’s a Chrome browser. It’s an Android platform. It’s a Linux server. And it gets almost 8 years of free software and firmware updates. Meet the $629 Acer Chromebook Spin 713. And, if you hurry, it’s $80 off at Best Buy today.
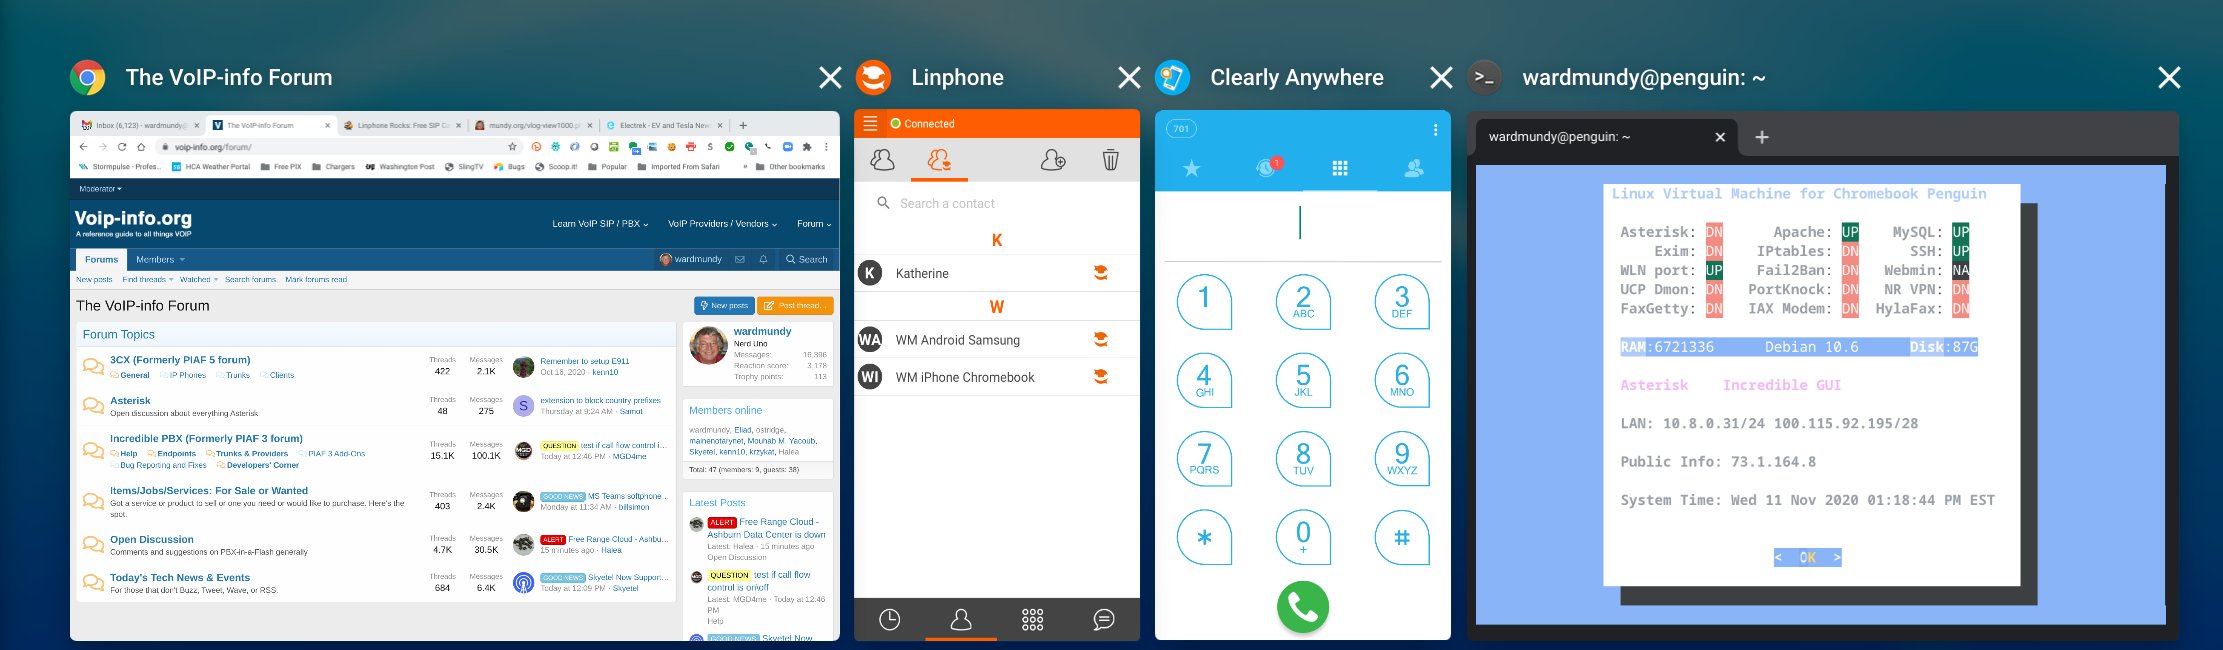
The checklist of superlatives is almost too lengthy to mention: a touchscreen of unrivaled quality, a 12-hour battery, dongle-free ports galore: HDMI, USB-C, USB 3.0, microSD slot, and headphone jack. While Chromium notebooks began as little more than a Chrome browser, that was then. The 2020 iteration includes complete Android integration as well as a feature-complete Debian 10 virtual machine platform supporting Apache, PHP 7, and the latest MariaDB/MySQL. If movies and television are your thing, Netflix and Sling TV transform the Chromebook into a near perfect viewing platform. As they say, seeing is believing. So here’s a snapshot from an iPhone that captures the quality of the 2256×1504-pixel (3:2 QHD) display. Suffice it to say, the display is as good or better than our $3,000 MacBook Pro’s screen.

Did we mention Best Buy’s $629 price. This 2-in-1 is a steal. It’s $200 below today’s Amazon pricing and is $400 below the closest comparable Chromebook models. Some may recall that we reviewed the System76 Lemur Pro Linux notebook in August and raved about its pricing at $1322, more than double the cost of Acer’s Spin 713. Having used both machines, I can honestly say you lose nothing by choosing the Acer device, and you gain access to the entire Android platform including Google Play as well as Linux. And the Spin 713 converts into a touchscreen tablet simply by flipping the screen. The only downside is, if these machines go on sale for Black Friday, you will be hard-pressed to find one to buy.
Deploying a LAMP Server with a Chromebook
If you pick up one of these bad boys, here’s a quick primer on setting up a LAMP server on the Linux virtual machine. Begin by enabling it in the Settings tab. Next, click on the Linux Terminal option in your Applications. At the Linux prompt, set up a new root user password: sudo passwd root. Switch to the root user account: su root. Now enter these commands:
cd ~
apt update
apt upgrade
apt install apache2 apache2-utils -y
systemctl start apache2
systemctl enable apache2
chown www-data:www-data /var/www/html/ -R
apt install mariadb-server mariadb-client -y
systemctl start mariadb
systemctl enable mariadb
mysql_secure_installation
apt install php7.3 libapache2-mod-php7.3 php7.3-mysql php-common \\
php7.3-cli php7.3-common php7.3-json php7.3-opcache php7.3-readline \\
php7.3-mbstring php7.3-dev -y
systemctl restart apache2
echo "<?php phpinfo(); ?>" > /var/www/html/info.php
echo "ip a" > /usr/local/bin/ifconfig
chmod +x /usr/local/bin/ifconfig
ifconfig | grep "inet "
Make note of your Linux machine’s IP address (last command above) and use a browser to access and verify the PHP info for your server: http://Spin-IP-Address/info.php
In the alternative, use this FQDN: http://penguin.linux.test/info.php
In keeping with their tradition of idiotic obsolescence, the PHP developers dropped support for mysqli in PHP 7 which means the mysql_connect function to interact with MySQL databases fails. Here’s how to restore it:
mkdir /usr
mkdir /usr/src
apt install build-essential git
cd /usr/src
git clone https://github.com/wardmundy/pecl-database-mysql mysql --recursive
cd mysql
phpize
./configure
make
make install
cd /etc/php/7.3/apache2
echo "extension=/usr/lib/php/20180731/mysql.so" >> php.ini
systemctl restart apache2
The mysql and mysqli sections will now magically reappear in your phpinfo() listing.
Adding Clearly Anywhere Softphone to the Spin 713
As noted, the Spin 713 also is a fully functional Android platform so adding the Clearly Anywhere softphone is easy. Simply download the software from Google Play. Then run the app and enter your extension credentials and FQDN of Incredible PBX 2020 PUBLIC server.
Adding Linphone Softphone to the Spin 713
Adding the Linphone softphone is equally easy. Simply download the software from Google Play. Then run the app and enter your Linphone SIP credentials with the configuration setup documented in our tutorial. Linphone calls to other Linphone users and to Incredible PBX 2020 PUBLIC users or anyone with a SIP URI worldwide are free.
Installing OpenVPN for Android on the Spin 713
There are several ways to install OpenVPN on the Spin 713 platform. You can use the traditional method we’ve documented for Linux installs; however, you will lose the ability to use OpenVPN IP addresses from your desktop and browser. The better method is to install the OpenVPN for Android client from the Play Store. Next, send yourself an email with the .ovpn file you created for the Chromebook. Open the message using Gmail on the Chromebook and save the received file in your Downloads folder. Open the OpenVPN for Android app on your desktop. Choose the + icon to create a new Profile and select the .ovpn file from Downloads. Once installed, edit the Settings. In the IP and DNS tab, disable No Local Binding. Enable Override DNS Settings and specify 8.8.8.8 and 8.8.4.4 for your DNS servers. Enable PULL Settings.In the ROUTING tab, enable Bypass VPN for Local Networks and Block IPv6. Then Start the VPN Client by clicking on your saved Profile.
Installing Zoom for Debian 10 on the Spin 713
No computer platform would be complete without Zoom. Begin by downloading Zoom for Debian here. In the File Manager (Alt-Shift-m), navigate to your Downloads folder and double-click on zoom_amd64.deb to install the application. Once installed, it will appear in your Linux apps container. Right-click (HINT: tap touchpad with two fingers) on Zoom icon to add Zoom to your Shelf.
Installing phpMyAdmin for PHP 7.3 on the Spin 713
No development platform would be complete without phpMyAdmin. We found an excellent tutorial to get everything set up properly with a few minor changes. Your LAMP platform already is in place so skip down to Step 2 in the tutorial. There’s one important correction in the instructions. Step 4, item 1 should be: sudo mkdir /var/www/html/phpmyadmin. And accessing phpMyAdmin once installed should be: http://Spin-IP-address/phpmyadmin.
Mastering Chromebook Shortcuts on the Spin 713
If you learn no other keyboard shortcut, remember this one: Ctrl + Alt + /. That gets you the entire list of keyboard shortcuts on the Chromebook. These keyboard shortcuts are a bit like memorizing multiplication tables. The sooner you learn them, the happier you will be using your Chromebook. If you’re an avid Linux user, be advised that the Linux virtual machine and the Chromebook desktop share the same clipboard so you can easily copy-and-paste between the two environments. On the desktop, Ctrl-c copies to the clipboard, and Ctrl-v pastes data from the clipboard. In the Linux virtual machine, Ctrl-Shift-C copies to the clipboard, and Ctrl-Shift-V pastes data from the clipboard. Learn a few new shortcuts each time you use your Chromebook. You’ll be amazed how quickly your productivity improves.
Where To Go From Here?
While you’re getting your feet wet, here are some must-have’s for your Spin 713. For openers, feast your eyes on the 4K Nature Videos on YouTube. Prepare to be blown away.
Next, you’ll want a free Office Suite for your Chromebook. Our favorite is WPS Office which provides Microsoft-compatible versions of Word, Excel, Powerpoint and a PDF Viewer/Editor.
For video editing, nothing comes close to PowerDirector. Also check out YouTube Studio.
For photo editing, Adobe Lightroom is the hands-down winner. Google Photos and Snapseed (our personal favorite) are also worth a careful look. Both are free compliments of Google.
For Nerds, check out the Crostini Wiki on Reddit. And master the Crosh terminal commands.
Originally published: Monday, November 16, 2020 Updated: Monday, December 7, 2020
Need help with Asterisk? Visit the VoIP-info Forum.
Special Thanks to Our Generous Sponsors
FULL DISCLOSURE: ClearlyIP, Skyetel, Vitelity, DigitalOcean, Vultr, VoIP.ms, 3CX, Sangoma, TelecomsXchange and VitalPBX have provided financial support to Nerd Vittles and our open source projects through advertising, referral revenue, and/or merchandise. As an Amazon Associate and Best Buy Affiliate, we also earn from qualifying purchases. We’ve chosen these providers not the other way around. Our decisions are based upon their corporate reputation and the quality of their offerings and pricing. Our recommendations regarding technology are reached without regard to financial compensation except in situations in which comparable products at comparable pricing are available from multiple sources. In this limited case, we support our sponsors because our sponsors support us.
BOGO Bonaza: Enjoy state-of-the-art VoIP service with a $10 credit and half-price SIP service on up to $500 of Skyetel trunking with free number porting when you fund your Skyetel account. No limits on number of simultaneous calls. Quadruple data center redundancy. $25 monthly minimum spend required. Tutorial and sign up details are here.
![]() The lynchpin of Incredible PBX 2020 and beyond is ClearlyIP components which bring management of FreePBX modules and SIP phone integration to a level never before available with any other Asterisk distribution. And now you can configure and reconfigure your new Incredible PBX phones from the convenience of the Incredible PBX GUI.
The lynchpin of Incredible PBX 2020 and beyond is ClearlyIP components which bring management of FreePBX modules and SIP phone integration to a level never before available with any other Asterisk distribution. And now you can configure and reconfigure your new Incredible PBX phones from the convenience of the Incredible PBX GUI.
VitalPBX is perhaps the fastest-growing PBX offering based upon Asterisk with an installed presence in more than 100 countries worldwide. VitalPBX has generously provided a customized White Label version of Incredible PBX tailored for use with all Incredible PBX and VitalPBX custom applications. Follow this link for a free test drive!
Special Thanks to Vitelity. Vitelity is now Voyant Communications and has halted new registrations for the time being. Our special thanks to Vitelity for their unwavering financial support over many years and to the many Nerd Vittles readers who continue to enjoy the benefits of their service offerings. We will keep everyone posted on further developments.

The Most Important Asterisk Component: It’s the Backups!

You might think Backups are critical in the event of a catastrophic hardware failure. And you’d be right. But there are other equally important reasons to maintain current backups. If you decide to migrate to a new server platform, a current backup makes it a painless exercise. If you need to recover from a FreePBX® module upgrade that hosed your server, a current backup is critical. If you want to migrate to a newer release of Asterisk® or FreePBX, a backup is all that stands in the way of a potential nightmare or days of drudgery.
Depending upon your server platform, there are a number of backup methodologies. The most obvious one is Incredible Backup 16 which was used to build your initial Incredible PBX® 2020 platform. Next is Incredible Backup 2020 which is available on the new Incredible PBX Wiki. A third backup option is the FreePBX Backup & Restore Module which is included in all Incredible PBX 2020 builds. On cloud-based server platforms from CrownCloud, Vultr, and Digital Ocean, there’s a backup or snapshot option built into the platform. On Vultr and Digital Ocean servers, backups are an optional feature for an additional 20% monthly charge. On CrownCloud servers, a free snapshot is included in your $25 annual fee. Other cloud platforms have different backup options. For on-premise virtual machine platforms such as VirtualBox and VMware, there are snapshot and backup options built into the platform. And, of course, there are disk imaging backup options such as Clonezilla, Mondo Rescue and dozens of other Linux backup solutions. Today we want to walk you through which backup alternatives work best depending on platform and the level of protection desired.
Incredible PBX 2020 Backup & Restore
As noted, Incredible PBX 2020 Backup & Restore is the newest release of backup and restore utilities for Incredible PBX 2020 platforms. It’s available for download from the Incredible PBX Wiki. To make a backup, run: /root/incrediblebackup2020. You would typically use it to recover from a catastrophic hardware failure or to migrate your PBX to a new, compatible platform such as moving from CentOS 7 on-premise hardware to a cloud-based CentOS 7 platform or migrating a VirtualBox installation to dedicated hardware. It backs up the entire web directory tree as well as all MySQL databases in addition to Asterisk files that you may have customized. It is well suited for restoration of an Incredible PBX 2020 server setup onto the same operating system platform from which the backup was made. In other words, you wouldn’t use it to restore an Incredible PBX 2020 server from a CentOS 7 platform to a Raspberry Pi platform or vice versa. Before restoring an Incredible PBX 2020 backup, you must first build the new server with the same operating system, Asterisk, and FreePBX versions as the backup image, i.e. a new Incredible PBX 2020 installation for CentOS 7 or Raspbian 10. Next, install the Incredible PBX 2020 Backup & Restore components. Finally, copy your Incredible Backup 2020 image to the /backup folder of the new server and then run: /root/incrediblerestore2020.
FreePBX Backup & Restore Module
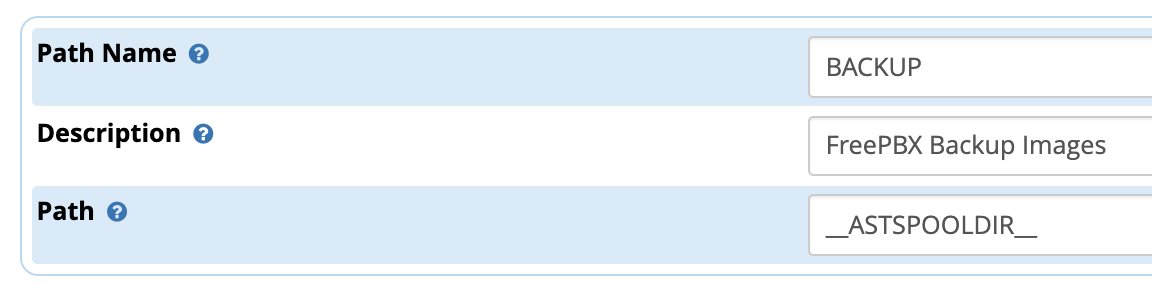
The FreePBX Backup & Restore Module is included in all Incredible PBX 2020 servers. It is accessed by logging into the FreePBX GUI as admin and navigating to Admin -> Backup & Restore after creating a Storage Location with Settings -> Filestore. For example, to create a backup directory in /var/spool/asterisk, the Local filestore entries would look like this:
The typical use case would be to recover from a module update scenario that went awry, to migrate from one FreePBX 15 platform to a new one with an incompatible operating system, e.g. to move from a Raspberry Pi to a CentOS 7-based server. It is also useful for upgrading from an Incredible PBX 13-13 platform to Incredible PBX 2020 but, for this to work, you must first remove the OSS Endpoint Manager module on the Incredible PBX 13-13 server.
To restore a FreePBX backup onto a new platform, repeat the steps above to set up the FileStore on the new server. Then copy the backup image from /var/spool/asterisk/backup to your desktop. Next, run the Restore option on the new platform and upload the backup image from your desktop.
Cloud Server Backups & Snapshots
Depending upon your cloud hosting provider, the procedure to create backups and snapshots may differ. The important point to stress is that these backups and snapshots are extremely easy to create but typically are housed in the same network operations center and often on the same server as your PBX. The risks in using these backup and snapshot options as your sole recovery mechanism from a catastrophic failure should be obvious. When combined with an off-site Incredible Backup 2020 image, you’re protected from a NOC catastrophic failure.
VirtualBox Backups & Snapshots
On the VirtualBox platform, you’ll find the Snapshot utility under Machine -> Tools. The other option is a full backup which is accomplished in one of two ways. For an external backup, choose File -> Export. For a backup in place, choose Machine -> Clone. The usual warnings about storing your backup images off-site apply.
VMware ESXi Backups & Snapshots
On the VMware ESXi platform, you’ll find the Snapshot utility under Actions -> Snapshots. To make an external backup, go to Actions -> Export. The usual warnings about storing your backup images off-site apply.
Installing Mondo Rescue for CentOS 7
The Mondo Rescue install for CentOS 7 is dependent upon a repository that is difficult to ascertain to put it charitably. Here is the correct installation procedure for CentOS 7:
cd /etc.yum.repos.d
wget ftp://ftp.mondorescue.org/centos/7/x86_64/mondorescue.repo
yum install mondo
For the backup and restore process using Mondo Rescue, follow this TecMint tutorial once you complete the install above.
Cloning a Raspberry Pi microSD Card
Our Incredible PBX 2020 for Raspberry Pi tutorial documents the easiest method for backing up your Raspberry Pi. We are repeating it here for completeness.

rpi-clone is a utility that makes it easy to make a bootable image of the microSD card used to start your Raspberry Pi. You’ll need a USB-to-microSD adapter to begin. Insert a backup microSD card large enough to hold all of the data on the primary microSD card (df -h). Insert the USB stick with the card. Identify the backup microSD card, usually sda (fdisk -l). Format the backup microSD card:
mkfs.vfat /dev/sda1 && mkfs.ext4 /dev/sda2. Then issue the following command to clone the primary microSD card: rpi-clone -f sda. Tutorial here.Originally published: Monday, November 23, 2020
Need help with Asterisk? Visit the VoIP-info Forum.
Special Thanks to Our Generous Sponsors
FULL DISCLOSURE: ClearlyIP, Skyetel, Vitelity, DigitalOcean, Vultr, VoIP.ms, 3CX, Sangoma, TelecomsXchange and VitalPBX have provided financial support to Nerd Vittles and our open source projects through advertising, referral revenue, and/or merchandise. As an Amazon Associate and Best Buy Affiliate, we also earn from qualifying purchases. We’ve chosen these providers not the other way around. Our decisions are based upon their corporate reputation and the quality of their offerings and pricing. Our recommendations regarding technology are reached without regard to financial compensation except in situations in which comparable products at comparable pricing are available from multiple sources. In this limited case, we support our sponsors because our sponsors support us.
BOGO Bonaza: Enjoy state-of-the-art VoIP service with a $10 credit and half-price SIP service on up to $500 of Skyetel trunking with free number porting when you fund your Skyetel account. No limits on number of simultaneous calls. Quadruple data center redundancy. $25 monthly minimum spend required. Tutorial and sign up details are here.
![]() The lynchpin of Incredible PBX 2020 and beyond is ClearlyIP components which bring management of FreePBX modules and SIP phone integration to a level never before available with any other Asterisk distribution. And now you can configure and reconfigure your new Incredible PBX phones from the convenience of the Incredible PBX GUI.
The lynchpin of Incredible PBX 2020 and beyond is ClearlyIP components which bring management of FreePBX modules and SIP phone integration to a level never before available with any other Asterisk distribution. And now you can configure and reconfigure your new Incredible PBX phones from the convenience of the Incredible PBX GUI.
VitalPBX is perhaps the fastest-growing PBX offering based upon Asterisk with an installed presence in more than 100 countries worldwide. VitalPBX has generously provided a customized White Label version of Incredible PBX tailored for use with all Incredible PBX and VitalPBX custom applications. Follow this link for a free test drive!
Special Thanks to Vitelity. Vitelity is now Voyant Communications and has halted new registrations for the time being. Our special thanks to Vitelity for their unwavering financial support over many years and to the many Nerd Vittles readers who continue to enjoy the benefits of their service offerings. We will keep everyone posted on further developments.
Revolutionary: Incredible PBX & Fax 2020 for Raspberry Pi

Enhancements to the Raspberry Pi 4 platform have been fast and furious this fall. Last week we introduced a $45 bootable SSD for the Raspberry Pi. And this week we’re showcasing the $70 Raspberry Pi 400 keyboard PC and a new release of the Incredible PBX 2020 image supporting both of these additions with all the latest Raspberry Pi firmware.
As we’re all hunkered down hiding from the Coronavirus, it seemed a perfect time to finally tackle the project we’ve been putting off for longer than we care to publish, integrating Incredible Fax with HylaFax and Avantfax into the base image of Incredible PBX® 2020 on the Raspberry Pi 4 platform. This build also features Asterisk® 16 with the latest FreePBX® 15 GPL modules plus the feature sets of Incredible PBX® and RasPBX and RonR’s latest build. It includes support for plug-and-play Incredible IP Phones and a new trunking platform that integrates SMS messaging into your Asterisk platform. And it’s all rolled into one terrific bundle that can be installed in about a minute after you burn the image to a microSD card.
Unlike other aggregations, there’s nothing to compile with Incredible PBX/FAX 2020 for Raspbian 10. And, unlike the FreePBX Distro, we don’t rely on static packages which make it difficult to add future modifications on your own. Instead, Incredible PBX/Fax 2020 offers a snapshot image with a complete toolkit to make future modifications as desired. Last, but not least, Incredible PBX/Fax 2020 features the new ClearlyIP module repository which protects you from proprietary modifications that limit or cripple your PBX moving forward.
What’s Included? Incredible PBX/Fax 2020 for Raspbian 10 serves up a never before available VoIP powerhouse featuring Asterisk 16 and all FreePBX 15 GPL modules, an Apache web server, the latest MariaDB SQL server (formerly MySQL), Exim4 mail server, Incredible Fax with turnkey Hylafax and AvantFax, and most of the Incredible PBX feature set including SIP, SMS, voice recognition, AsteriDex, PicoTTS Text-to-Speech VoIP applications plus email delivery of faxes in PDF format, Click-to-Dial, News, Weather, Telephone Reminders, and hundreds of features that typically are found in commercial PBXs: Conferencing, IVRs and AutoAttendants, Email Delivery of transcribed voicemails, Voicemail Blasting, and more. We’ve also incorporated the Zero Trunk Configuration feature from the LITE build which lets you sign up with one of four VoIP providers and start making and receiving calls instantly. Or you can use the new ClearlyIP trunking module included in the GUI for seamless integration of SMS messaging into FreePBX and its User Control Panel.
Choosing a SIP Provider. As we mentioned, Incredible PBX/Fax 2020 comes preconfigured to support five of the major SIP providers: ClearlyIP, Skyetel, VoIP.ms, V1VoIP, and Anveo Direct. We obviously hope you’ll choose ClearlyIP, Skyetel, or VoIP.ms trunking because they financially support Nerd Vittles and our open source projects. As the old saying goes, they may not be the cheapest, but you get what you pay for. With all five providers, you only pay for minutes you use so signing up with more than one provider is a smart idea.
") >
>Assembling the Required Raspberry Pi Components
Before you can deploy Incredible PBX 2020, you’ll first need the necessary Raspberry Pi hardware. To support the enhanced Incredible PBX/Fax platform, we strongly recommend either the Raspberry Pi 400 or the Raspberry Pi 4B with at least 2GB RAM for under $42. You can choose a reseller below for quicker delivery. Assuming you already own an HDMI-compatible monitor and a USB keyboard (only required if you don’t buy a RasPi 400)…
Raspberry Pi 4B or Raspberry Pi 400 $8 USB-C RasPi 4 (only) Power Supply $8 32GB microSDHC Class 10 card (strongly recommended!) $5 Official RasPi 4B Case or see above for our favorite
Getting Started with Incredible PBX 2020
Here’s our 10-Step Guide to installation and setup. "Automatic" means just watch. Steps #1 and #2: follow the links. For the remaining steps, we’ll further document the procedures.
- Download and unzip latest Incredible PBX/FAX 2020.3 image from SourceForge
- Transfer Incredible PBX/FAX 2020 image to microSD card and Boot server
- Login to RasPi console as root:password to initialize your server (Automatic)
- In Localization Options, set Locale, TimeZone, Keyboard, & WiFi Country
- Reboot after writing down your server IP address (Automatic)
- Login via SSH or Putty as root:password to set passwords & setup firewall (Automatic)
- Enter an email address for receipt of incoming faxes in PDF format
- Run admin-pw-change to set the admin password for access to the web GUI
- Register for and configure at least one trunk provider for Incredible PBX 2020
- Set up and test your Exim mail server as documented below
ALERT: Reportedly, the latest Raspberry Pi 4 board will not boot with the image above. We will post an updated image as soon as we can get our hands on a new Raspberry Pi. In the meantime, there’s a workaround if you have an older (working) Raspberry Pi. Begin by installing the Incredible PBX image above onto a new microSD card and boot the older RasPi 4 with that card. Login as root and immediately press Ctrl-C. Then issue the following commands and, following shutdown, insert the new microSD card into your new RasPi 4.
apt update
apt dist-upgrade
halt
First Boot of Incredible PBX 2020 with Wi-Fi
Incredible PBX 2020 requires Internet connectivity to complete its automated install. If you’re using a wired network connection, you can skip to the next section. With the Raspberry Pi 3B, 4B and 400, WiFi is built into the hardware. But you still have to insert your SSID name and SSID password to make a connection to your WiFi network. To do so, follow these next steps carefully. Insert the Incredible PBX 2020 microSD card into your Raspberry Pi and apply power to the hardware. When the bootup procedure finishes, login as root with the default password: password. At the first prompt, DO NOT PRESS THE ENTER KEY! Instead, press Ctrl-C to break out of the setup script. At the command prompt, issue the following commands to bring up the WiFi config file:
cd /etc/wpa_supplicant
nano -w wpa_supplicant.conf
If your WiFi network does not require a password, uncomment or insert the four lines below and save the file: Ctrl-X, Y, then Enter. Now restart your server: reboot. When the reboot finishes, you now should have network connectivity.
network={
 key_mgmt=NONE
 priority=1
 country=US
}
If your WiFi network requires a password, uncomment or insert the following into wpa_supplicant.conf:
ctrl_interface=DIR=/var/run/wpa_supplicant GROUP=netdev
update_config=1
country=US

network={
 ssid="YourSSID"
 psk="YourSSIDpassword"
 key_mgmt=WPA-PSK
 scan_ssid=1
 priority=7
}
Then scroll down to the SSID entry and replace YourSSID with the actual SSID of your WiFi network. Make sure you preserve the entry with the quotes as shown. Next, replace YourSSIDpassword with the SSID password of your WiFi network. Save the file: Ctrl-X, Y, then Enter. Now restart your server: reboot. When the reboot finishes, you now should have network connectivity.
Once the reboot process finishes, you should see an entry on about the middle line displayed on your monitor which reads: "My IP address is…". Write down the IP address shown. You’ll need it in a minute. Skip the next section since you are using a WiFi connection.
If you don’t see an IP address assigned to your server, then correct the network deficiency (invalid WiFi credentials, DHCP not working, Internet down), and reboot until you see an IP address assigned to your server. DO NOT PROCEED WITHOUT AN ASSIGNED IP ADDRESS. NOTE: The Raspberry Pi 400 requires the latest Incredible PBX image for Wi-Fi connectivity.
You’ll also need to change the default PortKnocker setting to your wireless LAN connection:
sed -i 's|eth0|wlan0|' /etc/default/knockd
service knockd restart
First Boot of Incredible PBX Using Wired Connection
Incredible PBX 2020 requires Internet connectivity to complete its automated install. After connecting your server to your local network with a network cable, insert the Incredible PBX 2020 microSD card into your Raspberry Pi and apply power to the hardware. When the bootup procedure finishes, you should see an entry on about the middle line displayed on your monitor which reads: "My IP address is…". Write down the IP address shown. You’ll need it in the next step.
If you don’t see an IP address assigned to your server, then correct the network deficiency (cable not connected, DHCP not working, Internet down), and reboot until you see an IP address assigned to your server. DO NOT PROCEED WITHOUT AN ASSIGNED IP ADDRESS.
Completing the Incredible PBX Initialization Procedure
Unless your desktop PC and RasPi are both on the same private LAN, the remainder of the install procedure should be completed from a desktop PC using SSH or Putty. This will assure that your desktop PC is also whitelisted in the Incredible PBX firewall. Using the console to complete the install is NOT recommended as your desktop PC will not be whitelisted in the firewall. This may result in your not being able to log in to your server. Once you have network connectivity, log in to your server as root from a desktop PC using the default password: password. Accept the license agreement by pressing ENTER. You then will be redirected to raspi-config. This is the utility used to expand your Incredible PBX 2020 image to use your entire microSD card; however, this new build does this for you so you can skip this step. Next, choose Localization Options and set Locale, TimeZone, Keyboard, & WiFi Country. Review the other items and then exit and reboot.
Once your server reboots and you log back in as root, you’ll first be prompted to enter an email address for delivery of incoming faxes in PDF format. All of your passwords then will be randomly assigned with the exception of the root user Linux password and your admin passwords for access to the web GUI and AvantFax. You can set the root password by issuing the command: passwd. Set the admin password for access to the web GUI with this command: /root/admin-pw-change. Set the admin password for access to AvantFax with this command: /root/avantfax-pw-change. With the exception of these passwords, the remaining passwords can be displayed using the command: /root/show-passwords.
Finally, if your PBX is sitting behind a NAT-based router, you’ll need to redirect incoming UDP 5060-5061 and UDP 10000-20000 traffic to the private IP address of your RasPi. This is required for all of the SIP providers included in the Incredible PBX 2020 build. Otherwise, all inbound calls will fail.

Configuring Skyetel for Incredible PBX 2020
If you’ve decided to go with Skyetel, here’s the drill. Sign up for Skyetel service and take advantage of the Nerd Vittles Free $10 credit and BOGO special. First, complete the Prequalification Form here. You then will be provided a link to the Skyetel site to complete your registration. Once you have registered on the Skyetel site and your account has been activated, open a support ticket and request the $10 credit for your account by referencing the Nerd Vittles special offer. Once you are happy with the service, open another ticket after funding your account and request that Skyetel match your deposit of up to $250. That gets you up to $500 of helf-price calling. Credit is limited to one per person/company/address/location. If you have numbers to port in, you can do it at no cost after funding your account. Effective 10/1/2023, $25/month minimum spend required.
Skyetel does not use SIP registrations to make connections to your PBX. Instead, Skyetel utilizes Endpoint Groups to identify which servers can communicate with the Skyetel service. An Endpoint Group consists of a Name, an IP address, a UDP or TCP port for the connection, and a numerical Priority for the group. For incoming calls destined to your PBX, DIDs are associated with an Endpoint Group to route the calls to your PBX. For outgoing calls from your PBX, a matching Endpoint Group is required to authorize outbound calls through the Skyetel network. Thus, the first step in configuring the Skyetel side for use with your PBX is to set up an Endpoint Group. Here’s a typical setup for Incredible PBX 2020:
- Name: MyPBX
- Priority: 1
- IP Address: PBX-Public-IP-Address
- Port: 5060
- Protocol: UDP
- Description: 2020.incrediblepbx.com
To receive incoming PSTN calls, you’ll need at least one DID. On the Skyetel site, you acquire DIDs under the Phone Numbers tab. You have the option of Porting in Existing Numbers (free for the first 60 days after you fund your account) or purchasing new ones under the Buy Phone Numbers menu option.
Once you have acquired one or more DIDs, navigate to the Local Numbers or Toll Free Numbers tab and specify the desired SIP Format and Endpoint Group for each DID. Add SMS/MMS and E911 support, if desired. Call Forwarding and Failover are also supported. That completes the VoIP setup on the Skyetel side. System Status is always available here.
Configuring VoIP.ms for Incredible PBX 2020
To sign up for VoIP.ms service, may we suggest you use our signup link so that Nerd Vittles gets a referral credit for your signup. Once your account is set up, you’ll need to set up a SIP SubAccount and, for Authentication Type, choose Static IP Authentication and enter your Incredible PBX 2020 server’s public IP address. For Transport, choose UDP. For Device Type, choose Asterisk, IP PBX, Gateway or VoIP Switch. Order a DID in their web panel, and then point the DID to the SubAccount you just created. Be sure to specify atlanta1.voip.ms as the POP from which to receive incoming calls. On the Incredible PBX side, simply Enable the VoIPms trunk and save your update.
Configuring V1VoIP for Incredible PBX 2020
To sign up for V1VoIP service, sign up on their web site. Then login to your account and order a DID under the DIDs tab. Once the DID has been assigned, choose View DIDs and click on the Forwarding button beside your DID. For Option #1, choose Forward to IP Address/PBX. For the Fowarding Address, enter the public IP address of your server. For the T/O (timeout) value, set it to 2o seconds. Then click the Update button. Under the Termination tab, create a new Endpoint with the public IP address of your server so that you can place outbound calls through V1VoIP. On the Incredible PBX side, simply Enable the V1VoIP trunks and save your updates.
Configuring Anveo Direct for Incredible PBX 2020
To sign up for Anveo Direct service, sign up on their web site and then login. After adding funds to your account, purchase a DID under Inbound Service -> Order DID. Next, choose Configure Destination SIP Trunk. Give the Trunk a name. For the Primary SIP URI, enter $[E164]$@server-IP-address. For Call Options, select your new DID from the list. You also must whitelist your public IP address under Outbound Service -> Configure. Create a new Call Termination Trunk and name it to match your server. For Dialing Prefix, choose six alphanumeric characters beginning with a zero. In Authorized IP Addresses, enter the public IP address of your server. Set an appropriate rate cap. We like $0.01 per minute to be safe. Set a concurrent calls limit. We like 2. For the Call Routing Method, choose Least Cost unless you’re feeling extravagant. For Routes/Carriers, choose Standard Routes. Write down your Dialing Prefix and then click the Save button. On the Incredible PBX side, simply Enable the AnveoDirect trunks and save your updates.
Before you can make outbound calls through Anveo Direct from your PBX, you first must configure the Dialing Prefix that you wrote down in the previous step. Using a browser, login to the GUI as admin. Navigate to Connectivity -> Trunks -> Anveo-Out. Click the Pencil icon to edit the trunk settings. Then click the Custom Settings tab. Replace anveo-pin with your actual Anveo PIN. Click Submit and Apply Settings to save your changes.
By default, incoming Anveo Direct calls will be processed by the Default inbound route on your PBX. If you wish to redirect incoming Anveo Direct calls using DID-specific inbound routes, then you’ve got a bit more work to do. In addition to creating the inbound route using the 11-digit Anveo Direct DID, enter the following commands after logging into your server as root using SSH/Putty:
cd /etc/asterisk
echo "[from-anveo]" >> extensions_custom.conf
echo "exten => _.,1,Ringing" >> extensions_custom.conf
echo "exten => _.,n,Goto(from-trunk,\\${SIP_HEADER(X-anveo-e164)},1)" >> extensions_custom.conf
asterisk -rx "dialplan reload"
Adding a Bootable SSD to Raspberry Pi
Shown below are the two components that make up the 256GB storage solution for the Raspberry Pi. These include the M.2 SSD SATA drive and the M.2 enclosure which provides a USB connector that’s compatible with your RasPi. Assembly of the components takes less than a minute as shown in the steps below:

You can order the M.2 SSD SATA drive and the UGREEN M.2 enclosure using our Amazon referral links which help support Nerd Vittles and the Incredible PBX open source project.
Once you have assembled your SSD in the sleeve, log back in as root using SSH or Putty. For best performance, insert the SSD drive into one of the blue USB 3.0 ports and verify that /dev/sda device is shown when you issue the command: fdisk -l
Now proceed with the following steps to copy the image from your microSD card to the new SSD SATA drive:
rpi-clone -l -e sda -f sda
# answer prompts with yes and incred2020
# once the image is copied, dismount the drive when prompted
mount /dev/sda2 /mnt/clone
cd /mnt/clone/boot
cp -p -r /boot/* .
sed -i 's|sda2|mmcblk0p2|' /boot/cmdline.txt
cd /
umount /mnt/clone
halt
Now you’re ready to restart your Raspberry Pi from the SSD SATA drive. Remove the microSD card and reboot your server.

Configuring a Softphone for Incredible PBX 2020
We’re in the home stretch now. You can connect virtually any kind of telephone to your new PBX. Plain Old Phones require an analog telephone adapter (ATA) which can be a separate board in your computer from a company such as Digium. Or it can be a standalone SIP device such as ObiHai’s OBi100 or OBi110 (if you have a phone line from Ma Bell to hook up as well). SIP phones can be connected directly so long as they have an IP address. These could be hardware devices or software devices such as the YateClient softphone. We’ll start with a free one today so you can begin making calls. You can find dozens of recommendations for hardware-based SIP phones both on Nerd Vittles and the PIAF Forum when you’re ready to get serious about VoIP telephony.
We recommend YateClient for Windows which is free. Download it from here. Run YateClient once you’ve installed it and enter the credentials for the 701 extension on Incredible PBX. You can find them by running /root/show-passwords. You’ll need the IP address of your server plus your extension 701 password. In the YateClient, fill in the blanks using the IP address of your Server, 701 for your Username, and whatever Password was assigned to the extension when you installed Incredible PBX. Click OK to save your entries.

Once you are registered to extension 701, close the Account window. Then click on YATE’s Telephony Tab and place some test calls to the numerous apps that are preconfigured on Incredible PBX. Dial a few of these to get started:
DEMO - Apps Demo
123 - Reminders
947 - Weather by ZIP Code
951 - Yahoo News
TODAY - Today in History
LENNY - The Telemarketer's Worst Nightmare
If you are a Mac user, another great no-frills softphone is Telephone. Just download and install it from the Mac App Store.
Audio Issues with Incredible PBX 2020
Only if you experience one-way or no audio on some calls, add your external IP address and LAN subnet in the GUI by navigating to Settings -> Asterisk SIP Settings. In the NAT Settings section, click Detect Network Settings. Click Submit and Apply Settings to save your changes.
Configuring Gmail as Exim Smart Relay Host
Most Raspberry Pi implementations will be on networks managed by companies like Comcast, Spectrum, and AT&T that block downstream mail servers (that’s you) from sending email. The solution is to use Gmail or your local ISP as a smart relay host to send mail from your server. You’ll need this to deliver voicemails via email. Here’s how to set it up using a Gmail account without two-step authentication. Log into your server as root and run dpkg-reconfigure exim4-config. Choose "mail sent by smarthost; received via SMTP or fetchmail." Accept all the defaults until you get to Outgoing Smarthost prompt. Enter: smtp.gmail.com::587. At the following prompts, choose NO, NO, mbox, and NO. When the setup completes, edit /etc/exim4/passwd.client and insert the following line using your Gmail AcctName and AcctPW. NOTE: If you are using a Gmail account with 2-step verification enabled, you MUST use a Gmail App Key instead of your Gmail account password. You also must enable Less Secure Apps access to your Gmail account.
smtp.gmail.com:AcctName@gmail.com:AcctPW
Save the file and then issue the following commands to complete the setup:
update-exim4.conf
systemctl restart exim4
exim4 -qff
Now send yourself a test email message to make sure things are working properly:
echo "test" | mail -s testmessage yourname@yourmailprovider.com
Once you have email messages flowing, incoming faxes automatically will be delivered to the email address you assigned when setting up your PBX. You can change this email address with the command: avantfax-email-change.
Some prefer an email notification whenever your server is booted. Once you have configured a relay host above, you can add the feature by editing /etc/rc.local and adding the following lines with your actual email address just above the service knockd start line:
_PRIVATE="Private IP: `cat /etc/hostip | cut -f1-2 -d " "`"
_PUBLIC=" Public IP: `curl -s -S --user-agent \\
"Mozilla/4.0" http://myip.incrediblepbx.com | awk 'NR==2'`"
echo "$_PRIVATE\\n$_PUBLIC" | mail -s "RasPi 2020 has booted" yourname@yourmailserver.com
Configuring Inbound Routes for Fax Detection
Not all VoIP trunks support fax transmission, e.g. Vitelity. Assuming yours do and you’ll only know by trial and error, here’s how to configure FreePBX to automatically detect incoming faxes and process them for PDF delivery by email. The default inbound route is preconfigured to support email delivery of your faxes. So, any trunks using that default route require no further configuration. If you add additional Inbound Routes, here’s how to enable fax detection on those routes.
Under the Fax tab of each new Inbound Route, enter the following settings:
Detect Faxes: YES
Fax Detection Type: SIP
Fax Ring: YES
Fax Detect Time: 4
Fax Destination: Custom Destinations -> Fax (Hylafax)
Managing Faxes with AvantFax
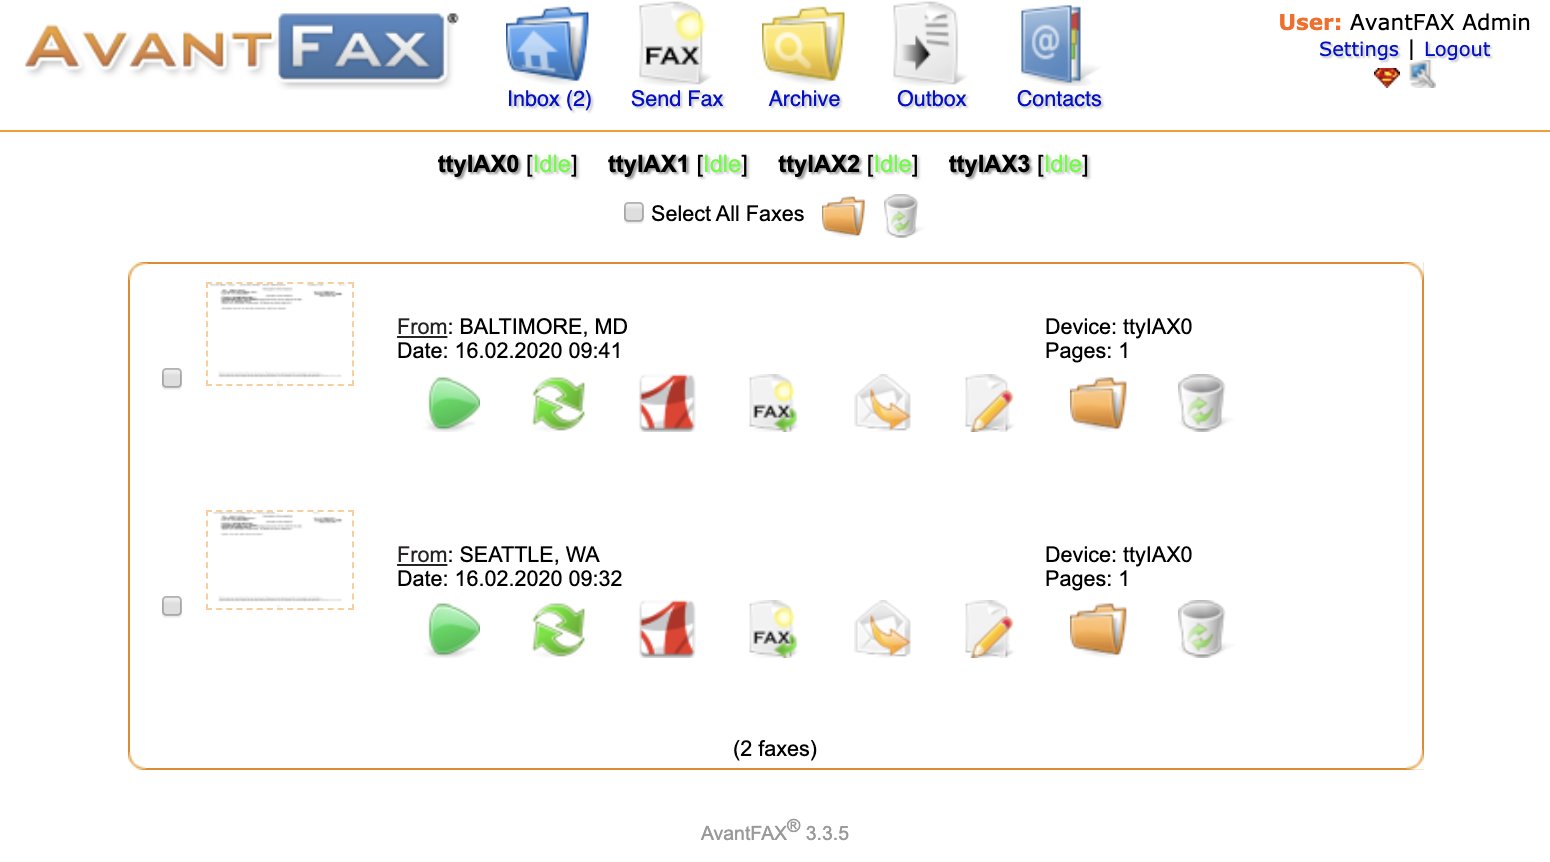
You can manage your incoming and outgoing faxes using AvantFax. Click on the AvantFax tab in FreePBX to access it. The default credentials are admin:password. When you first access AvantFax with a browser, you may get a missing page error. Just press the back arrow key in your browser and the AvantFax main page will appear.
If you want to change the admin password for AvantFax, log into your server as root with SSH/Putty and issue the command: /root/avantfax-pw-change.
Send yourself a fax at no cost in the United States from FaxZero.
Building the Incredible PBX Demo IVR
If you’d like to try your hand at building an IVR, here are the steps to build the Incredible PBX Demo IVR. From the FreePBX Dashboard, choose Applications -> IVR -> Add IVR. Then fill in the template using the entries shown below. Then click Submit and Reload Dialplan.


Building the Incredible PBX Stealth AutoAttendant
Many users prefer to play an announcement to incoming callers with a brief pause thereafter which indicates that the call is being connected. If configured properly, this lets you embed several dial codes which can be entered while the announcement is playing and the call is being transferred. For example, you might wish to route incoming calls to Lenny if a caller presses 0. Or you might wish to immediately route an incoming call to a Ring Group if the caller presses 1. Here’s a sample IVR setup to get you started.

Incredible PBX 2020 Administration
We’ve eased the pain of administering your new PBX with a collection of scripts which you will find in the /root folder after logging in with SSH or Putty. Here’s a quick summary of what each of the scripts does.
admin-pw-change lets you update the admin password for web browser access to the Incredible PBX GUI.
apache-pw-change lets you update the admin password for Apache applications such as AsteriDex and Reminders.
avantfax-pw-change lets you update the root password for AvantFax access (coming soon!).
add-fqdn is used to whitelist a fully-qualified domain name in the firewall. Because Incredible PBX 2020 blocks all traffic from IP addresses that are not whitelisted, this is what you use to authorize an external user for your PBX. The advantage of an FQDN is that you can use a dynamic DNS service to automatically update the IP address associated with an FQDN so that you never lose connectivity.
add-ip is used to whitelist a public IP address in the firewall. See the add-fqdn explanation as to why this matters.
del-acct is used to remove an IP address or FQDN from the firewall’s whitelist.
configure-exim-email lets you reconfigure the email server if you need to use an SMTP relay such as Google to get outbound email flowing. Tutorial here.
iptables-restart is the ONLY command you should ever use to restart the IPtables firewall and Fail2Ban.
knock.FAQ contains your PortKnocker credentials for emergency access to your server if the firewall locks you out. Tutorial here.
proximity (once configured) will automatically forward calls to your cellphone when you are out of BlueTooth range from your RasPi. Also must enable running of script in /etc/crontab.
reset-conference-pins is a script that automatically and randomly resets the user and admin pins for access to the preconfigured conferencing application. Dial C-O-N-F from any registered SIP phone to connect to the conference.
reset-extension-passwords is a script that automatically and randomly resets ALL of the SIP passwords for extensions 701-705. Be careful using this one, or you may disable existing registered phones and cause Fail2Ban to blacklist the IP addresses of those users. HINT: You can place a call to the Ring Group associated with all five extensions by dialing 777.
reset-reminders-pin is a script that automatically and randomly resets the pin required to access the Telephone Reminders application by dialing 123. It’s important to protect this application because a nefarious user could set up a reminder to call a number anywhere in the world assuming your SIP provider’s account was configured to allow such calls.
rpi-clone is a utility that makes it easy to make a bootable image of the microSD card used to start your Raspberry Pi. You’ll need a USB-to-microSD adapter to begin. Insert a backup microSD card large enough to hold all of the data on the primary microSD card (df -h). Insert the USB stick with the card. Identify the backup microSD card, usually sda (fdisk -l). Format the backup microSD card:
mkfs.vfat /dev/sda1 && mkfs.ext4 /dev/sda2. Then issue the following command to clone the primary microSD card: rpi-clone -f sda. Tutorial here.
show-feature-codes is a cheat sheet for all of the feature codes which can be dialed from any registered SIP phone. It documents how powerful a platform Incredible PBX 2020 actually is. A similar listing is available in the GUI at Admin -> Feature Codes.
show-passwords is a script that displays ALL of the passwords associated with Incredible PBX 2020. This includes SIP extension passwords, voicemail pins, conference pins, telephone reminders pin, and your Anveo Direct outbound calling pin (if configured). Note that voicemail pins are configured by the user of a SIP extension the first time the user accesses the voicemail system by dialing *97.
timezone-setup lets you reconfigure the correct time zone for your server.
purge-cdr-cel-records cleans out all existing entries in both the CDR and CEL tables of the Asterisk CDR database.
log-cleanup removes all entries from most of the logs in /var/log.
sig-fix disables module signature checking in FreePBX. It is automatically disabled upon installation.
readme-RonR.txt documents the scripts provided from RonR build. We do NOT recommend using the FCC Blacklist because of its current size.
update-asterisk16 is a utility that updates Asterisk 16 to the latest release. This should only be necessary when a security issue or bug is identified that affects the operation of your PBX.
update-IncrediblePBX is the Automatic Update Utility which checks for server updates from incrediblepbx.com every time you log into your server as root using SSH or Putty. Do NOT disable it as it is used to load important fixes and security updates when necessary. We recommend logging into your server at least once a week.
pbxstatus (shown above) displays status of all major components of Incredible PBX 2020.
Forwarding Calls to Your Cellphone. Keep in mind that inbound calls to your DIDs automatically ring all five SIP extensions, 701-705. The easiest way to also ring your cellphone is to set one of these five extensions to forward incoming calls to your cellphone. After logging into your PBX as root, issue the following command to forward calls from extension 705 to your cellphone: asterisk -rx "database put CF 705 6781234567"
To remove call forwarding: asterisk -rx "database del CF 705"
Keeping FreePBX 15 Modules Current
We strongly recommend that you periodically update all of your FreePBX modules to eliminate bugs and to reduce security vulnerabilities. Make a backup image with rpi-clone first! From the Linux CLI, log into your server as root and issue the following commands:
rm -f /tmp/*
fwconsole ma upgradeall
fwconsole reload
/root/sig-fix
systemctl restart apache2
/root/sig-fix
Upgrading Asterisk 16 to Asterisk 18
For those that enjoy living on the bleeding edge, we’ve create a script which makes it easy to upgrade Incredible PBX 2020 to Asterisk 18. The tutorial is available on the new Incredible PBX Wiki along with dozens of other tutorials.
Continue Reading: Icing on the Cake for Incredible PBX and Raspberry Pi
Now Available: Amazon’s Polly TTS for Incredible PBX. Works great on the RasPi platform!
Originally published: Tuesday, March 24, 2020 Updated: Monday, February 22, 2021
Need help with Asterisk? Visit the VoIP-info Forum.
Special Thanks to Our Generous Sponsors
FULL DISCLOSURE: ClearlyIP, Skyetel, Vitelity, DigitalOcean, Vultr, VoIP.ms, 3CX, Sangoma, TelecomsXchange and VitalPBX have provided financial support to Nerd Vittles and our open source projects through advertising, referral revenue, and/or merchandise. As an Amazon Associate and Best Buy Affiliate, we also earn from qualifying purchases. We’ve chosen these providers not the other way around. Our decisions are based upon their corporate reputation and the quality of their offerings and pricing. Our recommendations regarding technology are reached without regard to financial compensation except in situations in which comparable products at comparable pricing are available from multiple sources. In this limited case, we support our sponsors because our sponsors support us.
BOGO Bonaza: Enjoy state-of-the-art VoIP service with a $10 credit and half-price SIP service on up to $500 of Skyetel trunking with free number porting when you fund your Skyetel account. No limits on number of simultaneous calls. Quadruple data center redundancy. $25 monthly minimum spend required. Tutorial and sign up details are here.
![]() The lynchpin of Incredible PBX 2020 and beyond is ClearlyIP components which bring management of FreePBX modules and SIP phone integration to a level never before available with any other Asterisk distribution. And now you can configure and reconfigure your new Incredible PBX phones from the convenience of the Incredible PBX GUI.
The lynchpin of Incredible PBX 2020 and beyond is ClearlyIP components which bring management of FreePBX modules and SIP phone integration to a level never before available with any other Asterisk distribution. And now you can configure and reconfigure your new Incredible PBX phones from the convenience of the Incredible PBX GUI.
VitalPBX is perhaps the fastest-growing PBX offering based upon Asterisk with an installed presence in more than 100 countries worldwide. VitalPBX has generously provided a customized White Label version of Incredible PBX tailored for use with all Incredible PBX and VitalPBX custom applications. Follow this link for a free test drive!
Special Thanks to Vitelity. Vitelity is now Voyant Communications and has halted new registrations for the time being. Our special thanks to Vitelity for their unwavering financial support over many years and to the many Nerd Vittles readers who continue to enjoy the benefits of their service offerings. We will keep everyone posted on further developments.
Turbocharge Your Raspberry Pi 4 with a $45 Bootable SSD
>If a $45 addition to your Incredible PBX® 2020 setup on the Raspberry Pi 4 isn’t too rich for your blood, then today’s your lucky day. When we’re finished, you’ll have a perfect SOHO communications platform that boots from a 256GB drive to provide long-term reliability without having to worry about replacing worn-out microSD cards. You’ll also have ample room to implement a Network Attached Storage (NAS) solution to store music or documents. With Wi-Fi in your home or office, you then can tuck the RasPi away in an out of sight drawer.
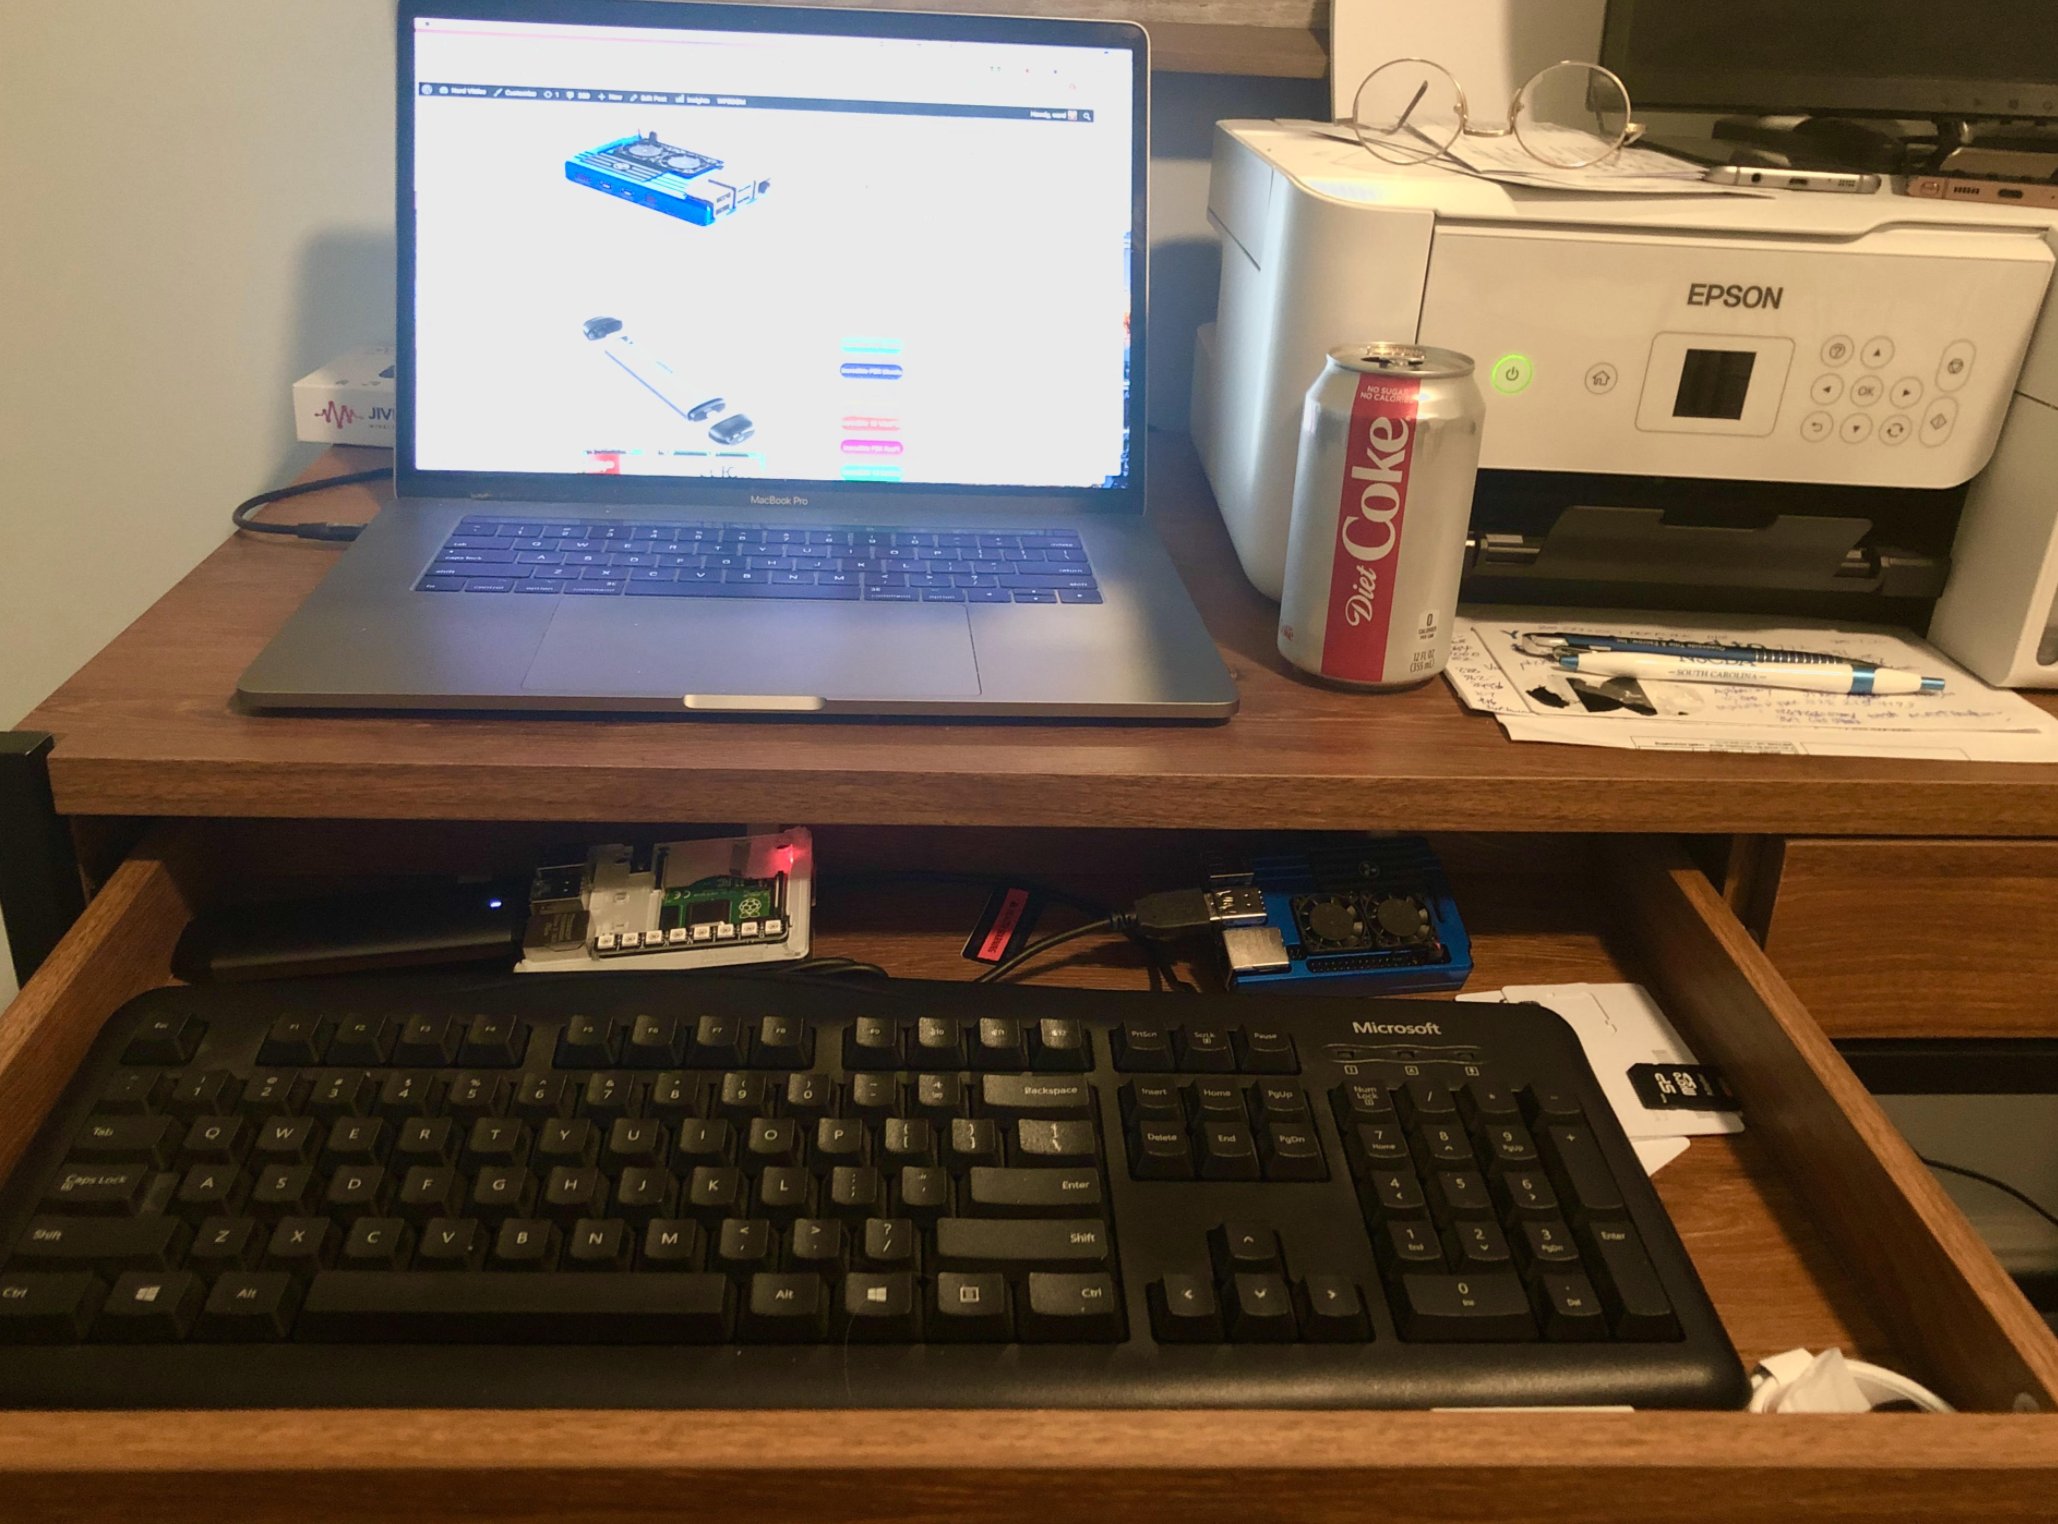
Shown below are the two components that make up the 256GB storage solution for the Raspberry Pi. These include the M.2 SSD SATA drive and the M.2 enclosure which provides a USB connector that’s compatible with your RasPi. Assembly of the components takes less than a minute as shown in the steps below:
You can order the M.2 SSD SATA drive and the UGREEN M.2 enclosure using our Amazon referral links which help support Nerd Vittles and the Incredible PBX open source project.
Once your order arrives and you have assembled the components as shown above, you’re ready to begin. The prerequisite for this project is an Incredible PBX® 2020 platform running on a Raspberry Pi 4. Begin by logging into Incredible PBX as root using SSH or Putty. Do NOT insert the SSD drive just yet. Issue the following commands:
apt update
apt full-upgrade -y
echo program_usb_boot_mode=1 | sudo tee -a /boot/config.txt
apt install rpi-eeprom -y
sed -i 's|critical|stable|' /etc/default/rpi-eeprom-update
rpi-eeprom-update -d -f \
/lib/firmware/raspberrypi/bootloader/stable/pieeprom-2020-09-03.bin
reboot
After Incredible PBX reboots, log back in as root using SSH or Putty. For best performance, insert the SSD drive into one of the blue USB 3.0 ports and verify that /dev/sda device is shown when you issue the command: fdisk -l
Now proceed with the following steps to copy the image from your microSD card to the new SSD SATA drive:
rpi-clone -l -e sda -f sda
# answer prompts with yes and incred2020
# once the image is copied, dismount the drive when prompted
mount /dev/sda2 /mnt/clone
cd /mnt/clone/boot
cp -p -r /boot/* .
sed -i 's|sda2|mmcblk0p2|' /boot/cmdline.txt
cd /
umount /mnt/clone
halt
Now you’re ready to restart your Raspberry Pi from the SSD SATA drive. Remove the microSD card and reboot your server. Our special thanks to @ext-104 for all of his work on this.
Adding Network Attached Storage to Raspberry Pi
While reliability and performance were the primary motivators in adding an SSD SATA drive to the Raspberry Pi platform, there’s also a silver lining. You now have loads of storage capacity that can be shared within your home or office for dozens of uses including a music collection to power your Sonos audio system or a data repository to share with other users on your private network. Here’s how to transform your Raspberry Pi into a network storage device which can be accessed from virtually any device including Windows machines, Macs, Linux servers, smartphones, and music players.
CAUTION: Heat is no friend of solid state electronics. If you choose to deploy NAS on your Raspberry Pi 4, do not proceed until you get a case for your device that includes one or more fans. Click on the one pictured at the top of this article for the hands-down winner.
We don’t typically add additional user accounts on your Raspberry Pi, but we don’t want users sharing your NAS drive to have access to your communications platform so an additional user account is an easy way to accomplish that. Begin by creating a new nas user account with no login access: useradd -r -s /usr/sbin/nologin nas
Next, we want to create a /nas directory to store your NAS data: mkdir /nas
Add the SAMBA components for net connectivity: apt install samba samba-common-bin
Choose YES when prompted for WINS connectivity. Set permissions: chmod -R 777 /nas
Add the following to the bottom of /etc/samba/smb.conf:
 [nas]
 path=/nas
 writeable=yes
 create mask=0777
 directory mask=0777
 public=yes
 read only=no
 guest ok=no
Restart SAMBA, activate SAMBA on boot, and create SAMBA credentials for nas user:
systemctl restart smbd
systemctl enable smbd
smbpasswd -a nas
Login to your NAS drive using your nas user credentials: smb://raspi-IP-address/nas
Your NAS drive now functions much like any other network drive on your LAN. Access to your NAS device from Windows or a Mac is simple using the native file managers. For smartphone access, you’ll need a file manager that supports SMB connections. We recommend Total Commander on the Android platform. On iPhones, follow this tutorial. For CentOS platforms, what you want is a process that mounts the NAS device as a directory on your server. You then can interact with the NAS device in the same way you interact with any other Linux directory.
apt install cifs-utils
mkdir /nas
chown nas:nas /nas
# you'll be prompted for your nas password after entering next command
mount -t cifs -o username=nas,sec=ntlmssp \
//RasPi-OpenVPN-IP-Address/nas /nas
ls /nas
# here's how to gracefully unmount your NAS drive
umount -t cifs /nas
UPDATE FOR SONOS COMPATIBILITY: If you plan to use your NAS drive to store music for playback with a Sonos device, add this in the [global] section of /etc/samba/smb.conf to support Sonos V1 SMB authentication: ntlm auth=yes. Your link to your NAS device should look like this assuming you have a music folder: \\ip-address\nas\music. Then enter your IP address and nas user credentials as above in Settings -> System -> Music Library. Don’t forget to update your Music Index once you have configured your NAS Music Library.
Originally published: Monday, November 2, 2020
Need help with Asterisk? Visit the VoIP-info Forum.
Special Thanks to Our Generous Sponsors
FULL DISCLOSURE: ClearlyIP, Skyetel, Vitelity, DigitalOcean, Vultr, VoIP.ms, 3CX, Sangoma, TelecomsXchange and VitalPBX have provided financial support to Nerd Vittles and our open source projects through advertising, referral revenue, and/or merchandise. As an Amazon Associate and Best Buy Affiliate, we also earn from qualifying purchases. We’ve chosen these providers not the other way around. Our decisions are based upon their corporate reputation and the quality of their offerings and pricing. Our recommendations regarding technology are reached without regard to financial compensation except in situations in which comparable products at comparable pricing are available from multiple sources. In this limited case, we support our sponsors because our sponsors support us.
BOGO Bonaza: Enjoy state-of-the-art VoIP service with a $10 credit and half-price SIP service on up to $500 of Skyetel trunking with free number porting when you fund your Skyetel account. No limits on number of simultaneous calls. Quadruple data center redundancy. $25 monthly minimum spend required. Tutorial and sign up details are here.
![]() The lynchpin of Incredible PBX 2020 and beyond is ClearlyIP components which bring management of FreePBX modules and SIP phone integration to a level never before available with any other Asterisk distribution. And now you can configure and reconfigure your new Incredible PBX phones from the convenience of the Incredible PBX GUI.
The lynchpin of Incredible PBX 2020 and beyond is ClearlyIP components which bring management of FreePBX modules and SIP phone integration to a level never before available with any other Asterisk distribution. And now you can configure and reconfigure your new Incredible PBX phones from the convenience of the Incredible PBX GUI.
VitalPBX is perhaps the fastest-growing PBX offering based upon Asterisk with an installed presence in more than 100 countries worldwide. VitalPBX has generously provided a customized White Label version of Incredible PBX tailored for use with all Incredible PBX and VitalPBX custom applications. Follow this link for a free test drive!
Special Thanks to Vitelity. Vitelity is now Voyant Communications and has halted new registrations for the time being. Our special thanks to Vitelity for their unwavering financial support over many years and to the many Nerd Vittles readers who continue to enjoy the benefits of their service offerings. We will keep everyone posted on further developments.
Groundwire for Android & iOS: The Best $10 You’ll Ever Spend
Now we’re getting down to the tough choices in VoIP softphones. You certainly need the Linphone app to make free SIP URI calls worldwide from your mobile phone. But you also need a softphone that connects to Incredible PBX® so that you never miss a traditional call to your home or office PBX. If you want tight integration with Asterisk® and FreePBX®, Clearly Anywhere is the hands-down winner, and you’ve still got until October 31 to take advantage of the $9.99 per year introductory offer. But some folks just bristle at the thought of annual fees for software licenses. If you fall into that category but still want the incoming call reliability offered by Clearly Anywhere, then the one-time $9.99 payment for Acrobits Groundwire on either the Android or iOS platform is your baby.1 Here’s the setup process.
Configuring Incredible PBX 2020 PUBLIC for Acrobits
Before you deploy Acrobits Groundwire on your smartphones, you first must set things up on the PBX side. Here’s how the process works. First, you will need to deploy the PUBLIC version of Incredible PBX 2020 on the Internet. It requires assignment of a fully-qualified domain name (FQDN) for server access. We’ll also need to reconfigure the IPtables firewall and Fail2Ban to support Acrobits Groundwire.
Begin by choosing a cloud provider to host your public server. Here are some of our favorites starting at only a couple bucks a month with an annual subscription. CrownCloud is highly recommended. You’ll need a KVM CentOS 7 platform with at least 1GB of RAM and 10GB of storage. Once your server is operational, log in as root and follow our Incredible PBX 2020 tutorial to begin. When the install finishes, reboot your server and log back in to get the latest updates with the Automatic Update Utility.
Now you’re ready to convert your PBX into a PUBLIC-facing server. You’ll need a fully-qualified domain name for the server. If you don’t have your own domain, you can always obtain a free FQDN from a service such as NoIP.com. With your FQDN in hand, switch over to the Incredible PBX 2020 PUBLIC tutorial to complete the setup. It only takes a few minutes.
Next, we need to whitelist the Acrobits server IP addresses in the IPtables firewall. Begin by editing iptables-custom in the /usr/local/sbin folder. Just above the "# End of Trusted Provider Section" marker, add the following block of code. Then save the file and restart IPtables with the following command: iptables-restart
/usr/sbin/iptables -A INPUT -s 159.65.167.207 -p udp -m udp --dport 5060:5069 -j ACCEPT
/usr/sbin/iptables -A INPUT -s 159.65.186.176 -p udp -m udp --dport 5060:5069 -j ACCEPT
/usr/sbin/iptables -A INPUT -s 159.65.251.173 -p udp -m udp --dport 5060:5069 -j ACCEPT
/usr/sbin/iptables -A INPUT -s 159.65.252.186 -p udp -m udp --dport 5060:5069 -j ACCEPT
/usr/sbin/iptables -A INPUT -s 159.65.253.49 -p udp -m udp --dport 5060:5069 -j ACCEPT
/usr/sbin/iptables -A INPUT -s 159.65.252.186 -p udp -m udp --dport 5060:5069 -j ACCEPT
/usr/sbin/iptables -A INPUT -s 159.65.253.49 -p udp -m udp --dport 5060:5069 -j ACCEPT
/usr/sbin/iptables -A INPUT -s 159.89.179.103 -p udp -m udp --dport 5060:5069 -j ACCEPT
/usr/sbin/iptables -A INPUT -s 162.243.226.164 -p udp -m udp --dport 5060:5069 -j ACCEPT
/usr/sbin/iptables -A INPUT -s 165.227.65.164 -p udp -m udp --dport 5060:5069 -j ACCEPT
/usr/sbin/iptables -A INPUT -s 165.227.115.186 -p udp -m udp --dport 5060:5069 -j ACCEPT
/usr/sbin/iptables -A INPUT -s 165.227.182.9 -p udp -m udp --dport 5060:5069 -j ACCEPT
/usr/sbin/iptables -A INPUT -s 165.227.184.188 -p udp -m udp --dport 5060:5069 -j ACCEPT
/usr/sbin/iptables -A INPUT -s 165.227.190.186 -p udp -m udp --dport 5060:5069 -j ACCEPT
/usr/sbin/iptables -A INPUT -s 165.227.210.221 -p udp -m udp --dport 5060:5069 -j ACCEPT
/usr/sbin/iptables -A INPUT -s 165.227.223.68 -p udp -m udp --dport 5060:5069 -j ACCEPT
/usr/sbin/iptables -A INPUT -s 167.99.48.91 -p udp -m udp --dport 5060:5069 -j ACCEPT
/usr/sbin/iptables -A INPUT -s 167.99.119.203 -p udp -m udp --dport 5060:5069 -j ACCEPT
/usr/sbin/iptables -A INPUT -s 167.99.119.244 -p udp -m udp --dport 5060:5069 -j ACCEPT
/usr/sbin/iptables -I INPUT -s 165.227.103.7 -p tcp -m tcp --dport 443 -j ACCEPT
/usr/sbin/iptables -I INPUT -p tcp -m tcp --dport 7343 -j ACCEPT
/usr/sbin/iptables -I INPUT -p tcp -m tcp --dport 4998 -j ACCEPT
/usr/sbin/iptables -I INPUT -p tcp -m tcp --dport 24998 -j ACCEPT
/usr/sbin/iptables -I INPUT -p udp -m udp --dport 4998 -j ACCEPT
Finally, we need to whitelist the Acrobits server IP addresses in Fail2Ban to be sure your server doesn’t block any of the Acrobits servers attempting to contact your PBX. Ask us how we know.2 Edit /etc/fail2ban/jail.conf and scroll down to line 34 which begins with ignoreip. Add a space at the end of the existing line and then add the following string of IP addresses without a line break. Save the file and restart Fail2Ban: service fail2ban restart
159.65.167.207 159.65.186.176 159.65.251.173 159.65.252.186 159.65.253.49 159.89.179.103 162.243.226.164 165.227.65.164 165.227.115.186 165.227.182.9 165.227.184.188 165.227.190.186 165.227.210.221 165.227.223.68 167.99.48.91 167.99.119.203 167.99.119.244
Configuring FreePBX for Acrobits Groundwire Access
For every Acrobits Groundwire user, you’ll need to have a PJsip extension to which to register their softphone(s). Keep in mind that multiple softphones of a single user or multiple users can register to the same extension. The first phone to answer an incoming call gets connected to the calling party. Using a web browser, access the FreePBX GUI using your admin credentials. Navigate to Applications -> Extensions -> Add PJsip Extension. Choose a Name and Number for the Extension. Click on the Advanced tab, increase the Max Contacts entry by two for each Acrobits Groundwire softphone that will be connecting to this PJsip extension. Save your PJsip extension setup by clicking Submit. Then Reload the Dialplan.
Acrobits Groundwire Setup on Smartphones
The setup process on the smartphone side is simple. Begin by purchasing the Acrobits Groundwire app from either the App Store or Google Play for your device. Once the client softphone is installed, run the app. You will be prompted for the Username (extension), Password, and Domain:Port of your PBX. If your server is sitting behind a router and you’ve elected to use OpenVPN for your connection, then you’ll need to add the actual Public IP address of your server as the Proxy in Advanced Settings. Don’t forget the :5061 suffix if you’re using a PJsip extension on your PBX.
Once connected, click on the Settings icon in Acrobits Groundwire. Verify that Push Notifications are enabled for Incoming Calls. In setting up your connection to a PJsip extension on your PUBLIC server, don’t forget to tack :5061 onto the server’s FQDN. In the Preferences tab, set a Ring Tone for incoming calls and decide whether to record calls. The Network preference by default will choose WiFi and then Cellular with automatic roll-over when needed. If you want 911 calls routed through your cell carrier instead of through your PBX, choose Number Rewriting. Then click +. For Conditions, choose Equals 911. For Actions, choose Override Dial Action and select gsmCall. Click Done.
We hope you enjoy using the Acrobits Groundwire softphone with Incredible PBX 2020.
Originally published: Monday, October 26, 2020 Updated: February 6, 2023
Need help with Asterisk? Visit the VoIP-info Forum.
Special Thanks to Our Generous Sponsors
FULL DISCLOSURE: ClearlyIP, Skyetel, Vitelity, DigitalOcean, Vultr, VoIP.ms, 3CX, Sangoma, TelecomsXchange and VitalPBX have provided financial support to Nerd Vittles and our open source projects through advertising, referral revenue, and/or merchandise. As an Amazon Associate and Best Buy Affiliate, we also earn from qualifying purchases. We’ve chosen these providers not the other way around. Our decisions are based upon their corporate reputation and the quality of their offerings and pricing. Our recommendations regarding technology are reached without regard to financial compensation except in situations in which comparable products at comparable pricing are available from multiple sources. In this limited case, we support our sponsors because our sponsors support us.
BOGO Bonaza: Enjoy state-of-the-art VoIP service with a $10 credit and half-price SIP service on up to $500 of Skyetel trunking with free number porting when you fund your Skyetel account. No limits on number of simultaneous calls. Quadruple data center redundancy. $25 monthly minimum spend required. Tutorial and sign up details are here.
![]() The lynchpin of Incredible PBX 2020 and beyond is ClearlyIP components which bring management of FreePBX modules and SIP phone integration to a level never before available with any other Asterisk distribution. And now you can configure and reconfigure your new Incredible PBX phones from the convenience of the Incredible PBX GUI.
The lynchpin of Incredible PBX 2020 and beyond is ClearlyIP components which bring management of FreePBX modules and SIP phone integration to a level never before available with any other Asterisk distribution. And now you can configure and reconfigure your new Incredible PBX phones from the convenience of the Incredible PBX GUI.
VitalPBX is perhaps the fastest-growing PBX offering based upon Asterisk with an installed presence in more than 100 countries worldwide. VitalPBX has generously provided a customized White Label version of Incredible PBX tailored for use with all Incredible PBX and VitalPBX custom applications. Follow this link for a free test drive!
Special Thanks to Vitelity. Vitelity is now Voyant Communications and has halted new registrations for the time being. Our special thanks to Vitelity for their unwavering financial support over many years and to the many Nerd Vittles readers who continue to enjoy the benefits of their service offerings. We will keep everyone posted on further developments.
- As with Vitelity, Acrobits is an Inteliquent company which provides financial support for Nerd Vittles and our Incredible PBX open source project. [↩]
- TRUE STORY: We couldn’t get Groundwire to answer incoming calls and finally opened a ticket withe Acrobits. Within 15 minutes, we got a response from Gabriel Baker, who requested a log which was easily generated from the app itself. About 15 minutes after we sent Gabriel the log, he responded noting that our server was blocking the Acrobits IP address which he provided. Issuing the
iptables -nLcommand on our end quickly revealed that Fail2Ban had blacklisted the address. Whitelisting the Acrobits IP addresses in Fail2Ban instantly solved the problem. One would have to conclude that Acrobits has some of the best tech support in the industry based upon our first-hand experience. [↩]
Linphone Rocks: Free SIP Calling to Anybody, Anywhere

We’re rounding out our softphone series today with the perfect complement to Clearly Anywhere for Asterisk® and FreePBX®. Let’s face it. SIP URI dialing from extensions is not Asterisk’s strong suit which is disappointing since SIP URI calling is free. If you’ve been following Incredible PBX® 2020 developments this year, you already know that we’ve pushed everyone to move their VoIP servers to the cloud. You not only get a more flexible PUBLIC platform that lets you go virtually anywhere while preserving home base connectivity for a few bucks a month. A public Asterisk server also lets anyone in the world call your PBX via a SIP URI, and the calls are free from any SIP phone. HINT: Linphone softphones are free!
Today we want to take a fresh look at one of our favorites, Linphone. We call it the perfect complement to Clearly Anywhere because it installs on almost every platform and provides SIP URI communications without any dependence upon a PBX at all. And, just like Clearly Anywhere, multiple devices can connect to the same Linphone account to make and receive calls. Linphone offers free SIP clients for Windows, Mac, Linux, iOS, Android, and many browsers. There’s even GPL source code if that’s your thing. Here are the download links:
- Windows
- Mac
- Linux
- iOS via App Store
- Android via Google Play
- Web Browser (Chrome, Edge, Firefox, Safari)
- GPL v3 Source Code
To get started, sign up for a free Linphone account. Now simply download the app of your choice from the links above and run it. Then choose the Assistant option and plug in your username and password. Be sure to Allow Push Notifications so that your phone will ring whenever you get an incoming call. Now all you need is a cellular data plan or a wired or wireless network connection. Anyone can reach you at yourname@sip.linphone.org. When friends sign up, their calls also will be free. You can talk as often and as long as you like.

Should you ever lose or forget your password. here’s a link that will let you reset it.
The Linphone feature set is downright impressive. Here’s what you and your friends will be using at zero cost:
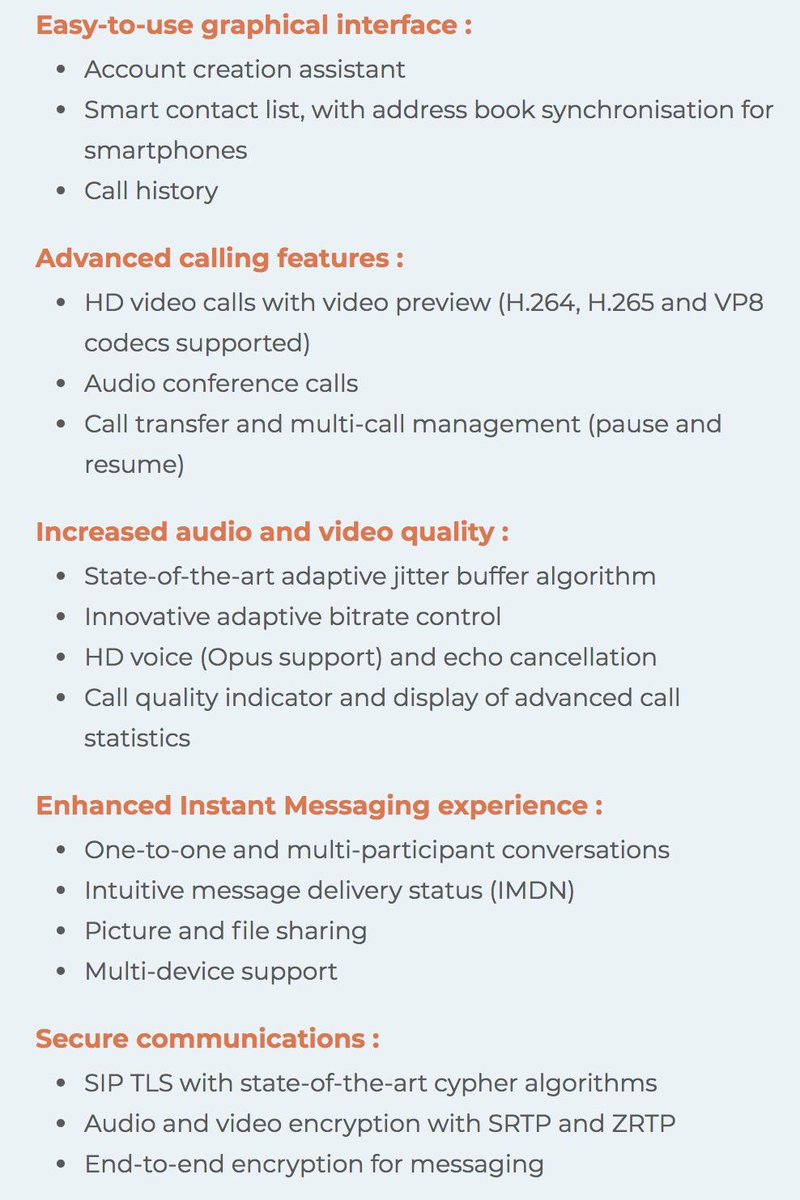
CONFIGURATION TIPS: Missing audio or one-way audio is a common problem on SIP calls especially if your phone is sitting behind a NAT-based router. For best results, configure your account in the Linphone app to use UDP for the Transport, Disable the Outbound Proxy, configure stun.linphone.org as the Stun Server, and enable ICE. In Network settings, turn off IPv6 and Media Encryption. In Audio Settings, enable Opus, G.722, PCMU, and PCMA only. In Video Settings, enable both VP8 and H.264. Then close the app and reopen it.

Once you have your Linphone credentials, another option in addition to using one of the SIP clients above is to acquire a stand-alone SIP telephone which can easily be connected to your Linphone SIP account. While there are literally hundreds of SIP telephones from which to choose, here’s a $40 offering from Grandstream that we like. It’s available from Amazon.1 Also consider Incredible PBX phones which take SIP communications to a whole new level.
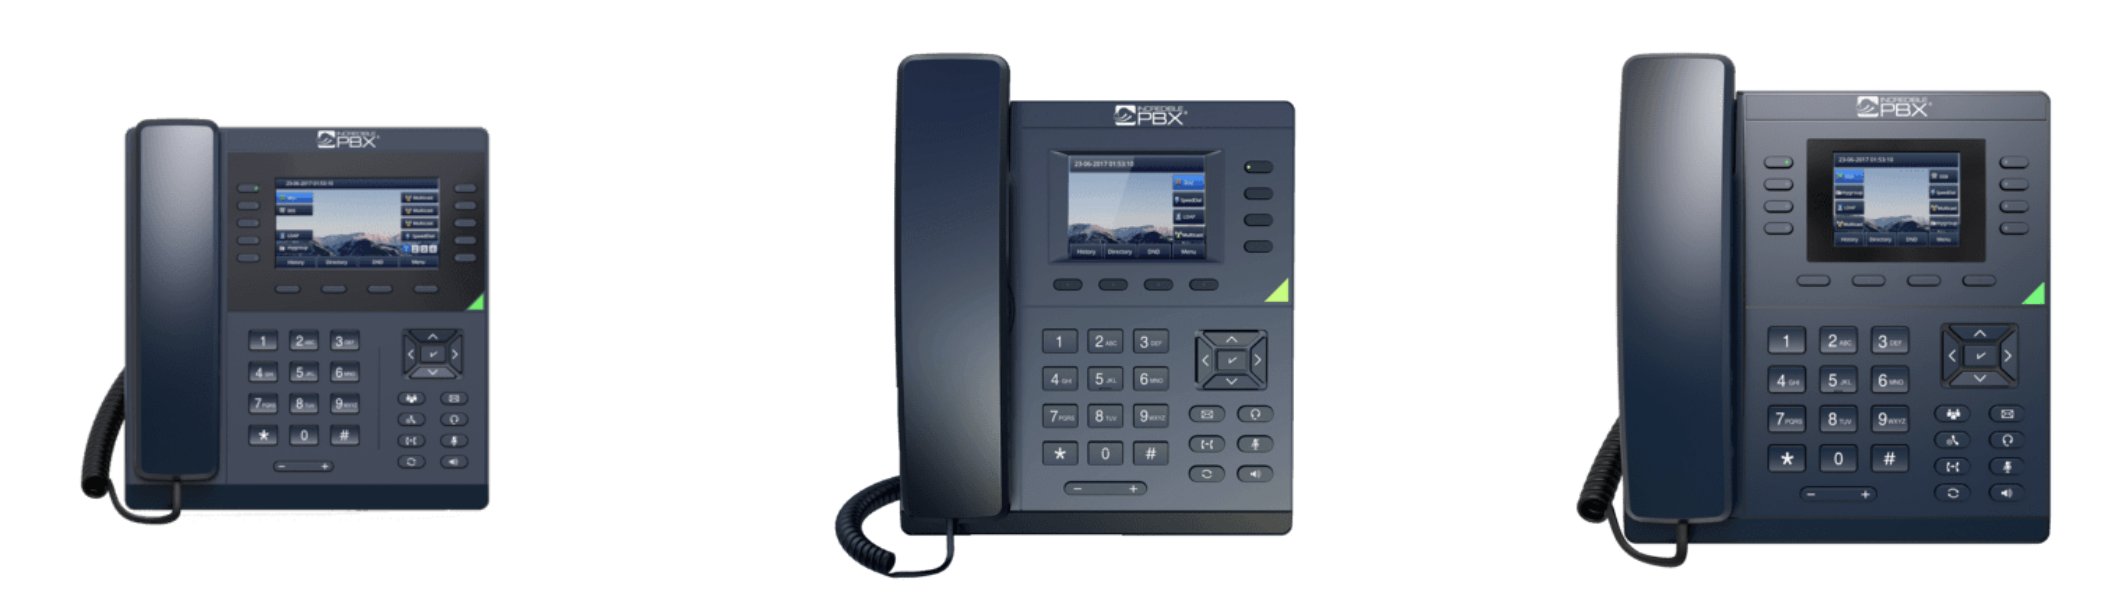
Unlike other proprietary communications apps, the beauty of using Linphone with its native SIP URI support is you can call any SIP phone in the world for free whether the recipient uses Linphone or not. For example, to annoy your friends and spammers, you can transfer their calls to Lenny: 2233435945@sip2sip.info. And here are some other SIP URI calls you might want to try. Store any or all of them in your Linphone Phonebook.
Your Linphone Friend - friend-name@sip.linphone.org
Yahoo News Headlines - news@demo.nerdvittles.com
Yahoo News Headlines - 951@demo.nerdvittles.com
Weather by Zip Code  - weather@demo.nerdvittles.com
Weather by Zip Code  - 947@demo.nerdvittles.com
Directory Assistance - information@demo.nerdvittles.com
Directory Assistance - 411@demo.nerdvittles.com
Call Any TollFree #  - **1800XXXXXXX@tollfree.future-nine.com
There are now more than 2,000 VoIP networks worldwide that support SIP URI access. Any person or organization with an account on any of these networks can be reached at no cost via SIP URI or via several hundred PSTN numbers. Using a SIP URI dialing prefix, you can call any referenced network@sipbroker.com. For example, *656news@sipbroker.com would reach the Nerd Vittles News Headlines from Yahoo. Or, from a PSTN phone, choose a local access number from the SipBroker worldwide directory, e.g. 702-789-0530 and then dial *656951 at the prompt for Yahoo News from Nerd Vittles. Call enabled PBX extensions the same way.
If you want to associate a phone number with your Linphone SIP URI, you can do it in a couple of ways. First, using a smartphone, you can link your cell number to Linphone within the Linphone app itself. If you have a free DID from IPComms, you can point it to your Linphone SIP URI. If you have a $1/month CallCentric DID, it can also be pointed to your Linphone SIP URI.
There’s one more nice surprise. Linphone accounts work much like the old key telephones and Google Voice setup that we all knew and loved. What that means is you can register the same Linphone account on multiple phones in different places.
Calling Linphone Users from Incredible PBX
Since Linphone doesn’t technically assign phone numbers to users’ accounts, you still need a way for PBX extensions to contact Linphone users. The easiest way is to create a Custom Extension for every Linphone user account you need to reach. In the FreePBX GUI, navigate to Applications -> Extensions -> Add Extension -> Custom Extension. Assign an Extension Number and Name to the custom extension. Then click on the Advanced tab. In the Dial field, enter the SIP URI for the Linphone user, e.g. SIP/username@sip.linphone.org. Click Submit and then Reload the Dialplan.
Originally published: Monday, October 19, 2020
Need help with Asterisk? Visit the VoIP-info Forum.
Special Thanks to Our Generous Sponsors
FULL DISCLOSURE: ClearlyIP, Skyetel, Vitelity, DigitalOcean, Vultr, VoIP.ms, 3CX, Sangoma, TelecomsXchange and VitalPBX have provided financial support to Nerd Vittles and our open source projects through advertising, referral revenue, and/or merchandise. As an Amazon Associate and Best Buy Affiliate, we also earn from qualifying purchases. We’ve chosen these providers not the other way around. Our decisions are based upon their corporate reputation and the quality of their offerings and pricing. Our recommendations regarding technology are reached without regard to financial compensation except in situations in which comparable products at comparable pricing are available from multiple sources. In this limited case, we support our sponsors because our sponsors support us.
BOGO Bonaza: Enjoy state-of-the-art VoIP service with a $10 credit and half-price SIP service on up to $500 of Skyetel trunking with free number porting when you fund your Skyetel account. No limits on number of simultaneous calls. Quadruple data center redundancy. $25 monthly minimum spend required. Tutorial and sign up details are here.
![]() The lynchpin of Incredible PBX 2020 and beyond is ClearlyIP components which bring management of FreePBX modules and SIP phone integration to a level never before available with any other Asterisk distribution. And now you can configure and reconfigure your new Incredible PBX phones from the convenience of the Incredible PBX GUI.
The lynchpin of Incredible PBX 2020 and beyond is ClearlyIP components which bring management of FreePBX modules and SIP phone integration to a level never before available with any other Asterisk distribution. And now you can configure and reconfigure your new Incredible PBX phones from the convenience of the Incredible PBX GUI.
VitalPBX is perhaps the fastest-growing PBX offering based upon Asterisk with an installed presence in more than 100 countries worldwide. VitalPBX has generously provided a customized White Label version of Incredible PBX tailored for use with all Incredible PBX and VitalPBX custom applications. Follow this link for a free test drive!
Special Thanks to Vitelity. Vitelity is now Voyant Communications and has halted new registrations for the time being. Our special thanks to Vitelity for their unwavering financial support over many years and to the many Nerd Vittles readers who continue to enjoy the benefits of their service offerings. We will keep everyone posted on further developments.
- This phone requires a wired network connection. Some of our purchase links refer users to Amazon when we find their prices are competitive for the recommended products. Nerd Vittles receives a small referral fee from Amazon to help cover the costs of our blog. We never recommend particular products solely to generate Amazon commissions. However, when pricing is comparable or availability is favorable, we support Amazon because Amazon supports us. [↩]
Oldie But Goodie: VoIP.ms, The Most Versatile VoIP Provider

We all are fortunate to have an extraordinary selection of options when it comes to VoIP Providers. For redundancy and reliability, nobody quite matches Skyetel. For FreePBX® and SIP phone integration, ClearlyIP is the hands-down winner. And, if you’re searching for the Most Versatile VoIP Provider, look no further than VoIP.ms, now with a $10 signup credit with your first deposit to kick the tires. We are thrilled that all three of these providers are Platinum Sponsors of Nerd Vittles and our open source projects. Here’s our VoIP.ms signup link.
As we have often stressed, the beauty of VoIP is not having to put all your eggs in one basket when it comes to communications. Most of the offerings we write about are free when not in use. So, unlike in the MaBell days, you lose nothing by signing up with multiple providers and enjoying the best of all worlds. Today we want to highlight what makes VoIP.ms extra special.
VoIP.ms Points of Presence
When it comes to Points of Presence (POPs), VoIP.ms covers all the bases. This matters because the closer your VoIP provider is to the physical location of your PBX, the better your calls will be. In the case of VoIP.ms, your choice of POPs is impressive. In the United States, there are multiple POPs in Atlanta, Chicago, Dallas, Denver, Houston, Los Angeles, New York, San Jose, Seattle, Tampa, and Washington, D.C. In Canada, you can choose between multiple POPs in Montreal, Toronto, and Vancouver. For our international friends, there are POPs in Amsterdam, London, Paris, and Sydney.
VoIP.ms DID Options
In addition to free number porting, VoIP.ms has an impressive array of DIDs from which to choose. They offer DIDs in virtually every state, province, and country in the world as well as toll-free and fax numbers in many locations with per minute and unlimited calling options.
Obtaining VoIP.ms SIP URIs
There are now more than 2,000 VoIP networks that support SIP URI access. Using a SIP URI dialing prefix, you can call any of the referenced networks @sipbbroker.com. The beauty of SIP URI calling is the calls typically are free worldwide regardless of duration. There are a number of ways to obtain a SIP URI for your PBX. Perhaps the easiest is to set up the PUBLIC Incredible PBX cloud platform that we previously introduced. Then you can create as many SIP URIs as you like, and they can be used to perform any task that’s available with Asterisk®. If you’re not quite ready to make that leap, virtual SIP URIs are available from VoIP.ms for 25¢ a month. SIP URIs are treated just like DIDs with incoming calls billed at ⅒¢ per minute.
VoIP.ms Incoming Call Routing
For call routing, the options are equally impressive. In fact, you may decide you don’t need a PBX at all. VoIP.ms supports SIP and IAX2 trunk registrations using credentials or IP address, a customizable IVR, a call queue, conferencing, call forwarding, SIP URI forwarding, call hunting, ring groups, callback, DISA, custom music on hold, voicemail transcription, and impressive call failover options for each of the following conditions: busy, unreachable, and unanswered calls. You can also perform CNAM lookups on incoming calls as well as setting the ring time, customizing each DID’s voicemail setup, and choosing whether to record calls.
VoIP.ms Outbound Call Pricing
No article would be complete without some mention of pricing. VoIP.ms is not the cheapest provider on the planet. But, as the old saying goes, you get what you pay for. Calls to toll-free numbers are free. While that may seem obvious, it is the exception rather than the rule in the VoIP world. Calls to US-48 destinations are a penny a minute and are billed in six second increments. Calls to most Canadian destinations are about a half-cent per minute. Calls to Mexico are just over a penny a minute billed in one minute increments. International calls vary based upon destination and latest published rates. International calls are blocked unless you enable them, and you can choose the countries you wish to enable as well as a dollar limit.
VoIP.ms Messaging Services
One of our favorite VoIP.ms features is the variety of SMS and MMS messaging options they provide. Virtually all of their DIDs now support messaging. With incoming messages, you have the choice of routing the message to an email address, another SMS destination, the VoIP.ms Message Portal, an SMS URL callback destination, and now an SMS SIP account. Our tutorial below sets up SMS SIP messaging with Incredible PBX® 2020 or 2021. You then can send quick messages in response to incoming calls on your Clearly Anywhere softphone.
Configuring VoIP.ms for SMS SIP Messaging
Prerequisites: DID supports messaging, SMS SIP messaging enabled on the DID
First, create an Asterisk SubAccount using the SIP protocol with User/Password Authentication. In the Security section, enter the public IP address of your PBX, and Save your Settings. Next, acquire a DID in the VoIP.ms portal. Then choose the Manage DIDs option and edit your DID configuration. For Call Routing, select the SIP/IAX option and pick your SubAccount. Choose a DID POP near your PBX location. In the Message Service section, enable SMS SIP Account and pick your SubAccount. Then Apply Changes.
Configuring Incredible PBX for SIP Messaging
Prerequisites: PJsip VoIP.ms Trunk, PJsip Extension for SMS, sms-in and sms-out Contexts
Both PJsip Trunks and PJsip Extensions in FreePBX now support a Messages Context option in the Advanced tab of the setup GUI. Using the sms-in and sms-out contexts documented below, FreePBX now can process incoming and outgoing SMS messages. A typical use case in the Incredible PBX 2020 would be to quickly respond to an incoming call to the Clearly Anywhere app on your smartphone to indicate that you were in the midst of another call and would return the caller’s call. It is anything but a robust SMS messaging application for your smartphone, but it is a welcome addition for many mobile users that have to juggle both cellphone calls and office calls forwarded from a PBX to your smartphone. VoIP.ms has developed an excellent SMS Management Portal that is included in the VoIP.ms Dashboard. It allows you to read, respond, and manage SMS messages sent to your VoIP.ms DIDs.
Once you have completed the necessary setup steps on the VoIP.ms side, there are three steps to activate SMS SIP messaging with Incredible PBX: (1) create and register your VoIP.ms PJsip Trunk, (2) create and configure a PJsip extension to receive incoming calls and SMS messages, (3) add the sms-in and sms-out contexts to extensions_custom.conf dialplan.
(1) Create a PJsip Trunk for VoIP.ms in FreePBX to process calls and SMS messages:

In the PJsip Settings tab, fill out the General tab. The Username will be your VoIP.ms account number followed by an underscore and then the name of the SubAccount you created above, e.g. 12345_mypbx. The Password will be the password you assigned to your VoIP.ms SubAccount. For SIP Server, enter VoIP.ms POP assigned to your DID, e.g. atlanta1.voip.ms. Accept the remaining defaults in the General tab. Click on the Advanced tab and scroll down to Message Context and enter sms-in. Click Submit and Reload your Dialplan.
(2) Next create a PJsip Extension in the FreePBX portal. This will be used to process calls and send SIP messages. NOTE: Incredible PBX ships with a number of chan_sip extensions preconfigured. Do NOT use these. You need to create a PJsip extension. The General tab should look something like this:
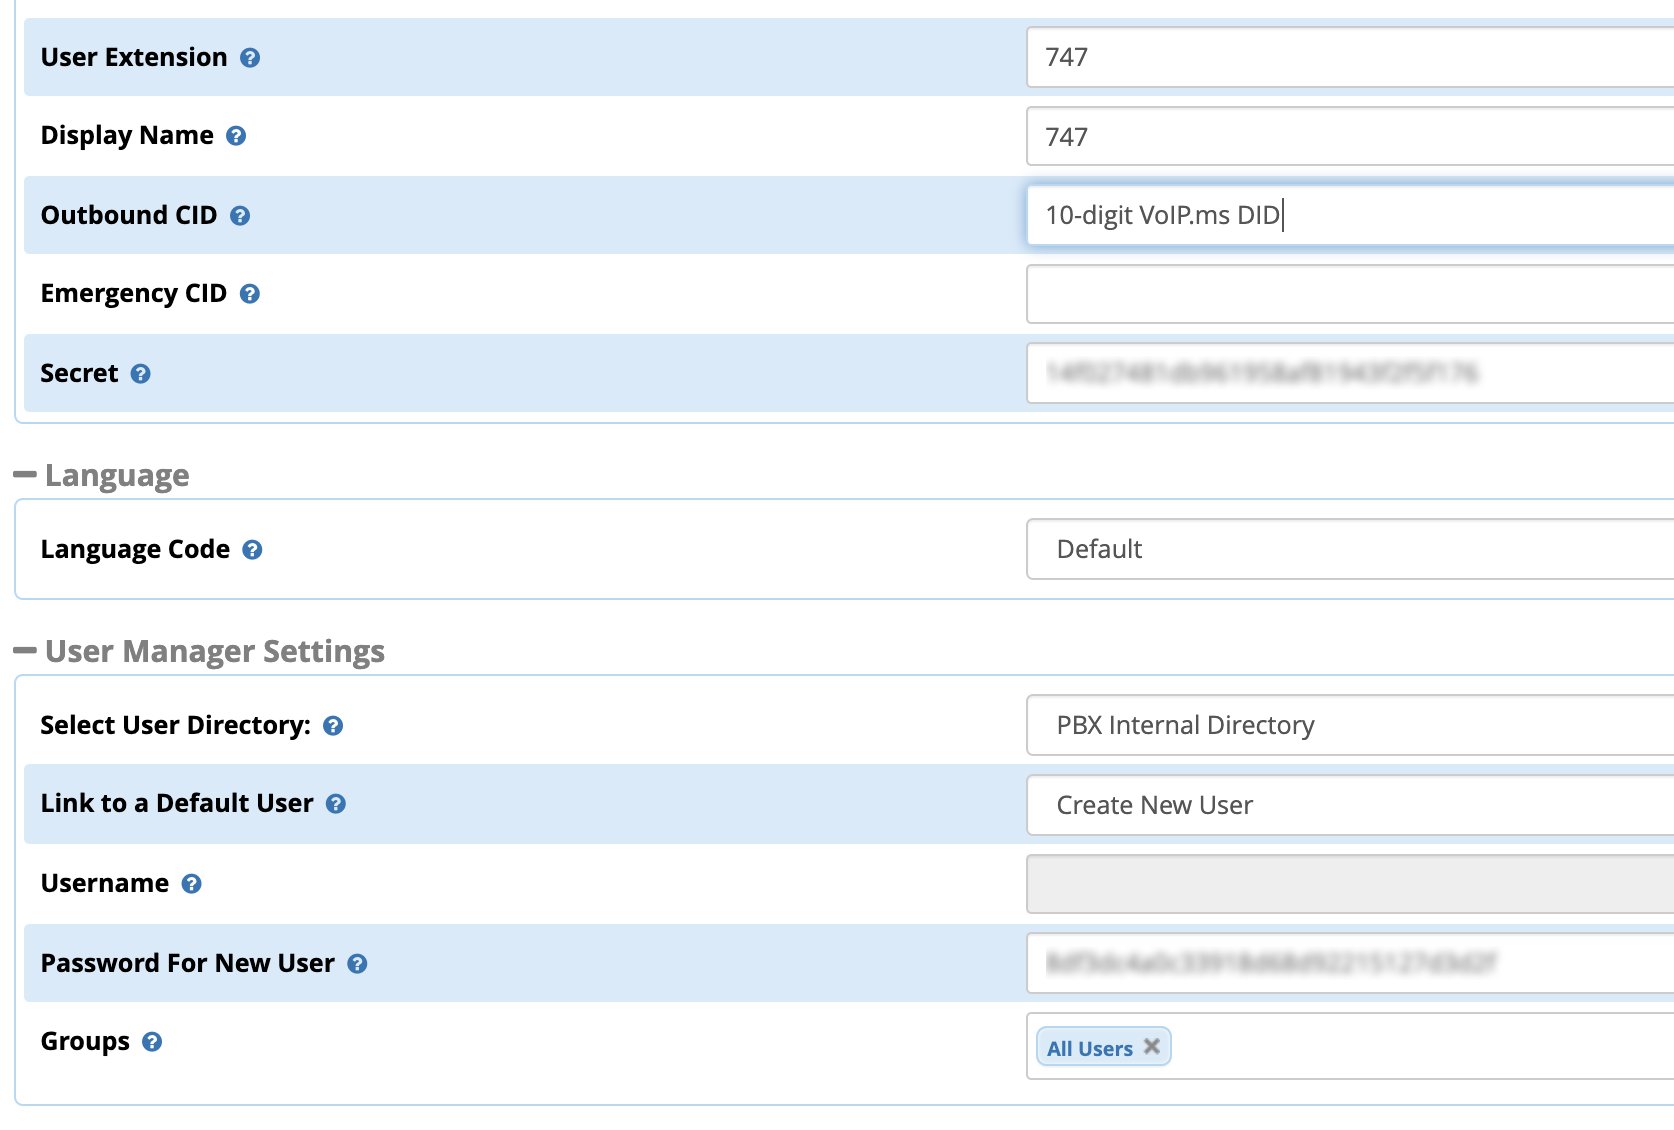
Click on the Advanced tab and scroll down to Max Contacts and enter a number that is one more than twice the number of phones that will be connected simultaneously to this extension. For example, if you have 3 smartphones connecting to this extension, enter 7. Scroll down to Message Context and enter sms-out. Click Submit and Reload your Dialplan.
(3) Finally, cut-and-paste the following code into the bottom of extensions_custom.conf in the /etc/asterisk directory:
[sms-out]
exten => _.,1,NoOp(Outbound Message dialplan invoked)
exten => _.,n,NoOp(To ${MESSAGE(to)})
exten => _.,n,NoOp(From ${MESSAGE(from)})
exten => _.,n,NoOp(Body ${MESSAGE(body)})
;
; add your VoIPms info in the next 3 lines
exten => _.,n,Set(VOIPMS_ACCOUNT="123456_subacct")
exten => _.,n,Set(VOIPMS_POP="atlanta.voip.ms")
exten => _.,n,Set(VOIPMS_TRUNK="VoIPms-PJsip") ; actual VoIP.ms trunk in FreePBX
;
exten => _.,n,Set(NUMBER_TO=${CUT(CUT(MESSAGE(to),@,1),:,2)})
exten => _.,n,Set(EXTENSION_FROM=${CUT(CUT(MESSAGE(from),@,1),:,2)})
;
; Now map your sending extensions EXTENSION_FROM to corresponding DIDs NUMBER_FROM
exten => _.,n,Set(CASE_701=6005550101) ; ext 701 msgs originate from 6005550101
exten => _.,n,Set(CASE_702=6005550102) ; ext 702 msgs originate from 6005550102
exten => _.,n,Set(CASE_703=6005550101) ; ext 703 msgs originate from 6005550101
;
exten => _.,n,Set(NUMBER_FROM=${CASE_${EXTENSION_FROM}})
exten => _.,n,Set(ACTUAL_FROM="${NUMBER_FROM}" )
exten => _.,n,Set(ACTUAL_TO=pjsip:${VOIPMS_TRUNK}/sip:${NUMBER_TO}@${VOIPMS_POP})
exten => _.,n,MessageSend(${ACTUAL_TO},${ACTUAL_FROM})
exten => _.,n,NoOp(Send status is ${MESSAGE_SEND_STATUS})
exten => _.,n,Hangup()
;-------------------------------------------------------------------------

[sms-in]
exten => _.,1,NoOp(Inbound SMS dialplan invoked)
exten => _.,n,NoOp(To ${MESSAGE(to)})
exten => _.,n,NoOp(From ${MESSAGE(from)})
exten => _.,n,NoOp(Body ${MESSAGE(body)})
;
; enter your default incoming SMS extension below
; if you want SMS messages delivered to multiple extensions,
; clone additional MessageSend lines below with extension numbers
exten => _.,n,Set(EXTENSION=701)
;
exten => _.,n,Set(ACTUAL_FROM=${MESSAGE(from)})
exten => _.,n,Set(HOST_TO=${CUT(MESSAGE(to),@,2)})
exten => _.,n,Set(NUMBER_TO=${MESSAGE_DATA(X-SMS-To)})
exten => _.,n,MessageSend(pjsip:${EXTENSION}@${HOST_TO},${ACTUAL_FROM})
exten => _.,n,NoOp(Send status is ${MESSAGE_SEND_STATUS})
exten => _.,n,Hangup()
;-------------------------------------------------------------------------
In the pasted [sms-out] context, insert your actual VOIPMS_ACCOUNT, VOIPMS_POP, and VOIPMS_TRUNK name in the lines provided. Then map each extension from which you wish to send SMS messages to a VoIP.ms DID on your PBX in the lines provided. In the pasted [sms-in] context, enter the EXTENSION number which should receive incoming messages from the PJsip trunk in which you designated [sms-in] as the Message Context. There is no magic to the [sms-in] context name. If you have more than one PJsip trunk, simply create additional incoming contexts (such as [sms-in-2]) for each additional trunk and clone the [sms-in] code designating the desired extension to receive incoming messages from each DID. For the [sms-out] context, it can be used as the Message Context for multiple extensions that should be enabled to send outbound SMS messages.
Save the file, and reload the Asterisk dialplan: asterisk -rx "dialplan reload"
Once all the pieces are in place, SMS messages sent to your VoIP.ms DID will be delivered to the FreePBX trunk registered to the SMS SIP destination specified in your VoIP.ms DID setup. And here’s one more tip. If you happen to have a Yealink T46G (not T48G) or a Grandstream GXV phone that is also registered to that extension, the messages will also pop up on your desktop phone with an alert tone. On Grandstream GXV Android phones, we recommend dragging the SMS app to the main screen so that the incoming message count appears beside the SMS icon when new messages are received.
Our special thanks and much of the credit for this SMS/SIP solution for Asterisk goes to Stepan Novotill and the participants in this thread on the VoIP-Info Forum.
Signing Up for VoIP.ms Service
Please consider using the Nerd Vittles referral link should you decide to sign up for VoIP.ms services. These referral commissions help to defray the costs of maintaining Nerd Vittles and the Incredible PBX open source project. Many thanks.
Originally published: Monday, October 12, 2020 Updated: Saturday, August 28, 2021
Need help with Asterisk? Visit the VoIP-info Forum.
Special Thanks to Our Generous Sponsors
FULL DISCLOSURE: ClearlyIP, Skyetel, Vitelity, DigitalOcean, Vultr, VoIP.ms, 3CX, Sangoma, TelecomsXchange and VitalPBX have provided financial support to Nerd Vittles and our open source projects through advertising, referral revenue, and/or merchandise. As an Amazon Associate and Best Buy Affiliate, we also earn from qualifying purchases. We’ve chosen these providers not the other way around. Our decisions are based upon their corporate reputation and the quality of their offerings and pricing. Our recommendations regarding technology are reached without regard to financial compensation except in situations in which comparable products at comparable pricing are available from multiple sources. In this limited case, we support our sponsors because our sponsors support us.
BOGO Bonaza: Enjoy state-of-the-art VoIP service with a $10 credit and half-price SIP service on up to $500 of Skyetel trunking with free number porting when you fund your Skyetel account. No limits on number of simultaneous calls. Quadruple data center redundancy. $25 monthly minimum spend required. Tutorial and sign up details are here.
![]() The lynchpin of Incredible PBX 2020 and beyond is ClearlyIP components which bring management of FreePBX modules and SIP phone integration to a level never before available with any other Asterisk distribution. And now you can configure and reconfigure your new Incredible PBX phones from the convenience of the Incredible PBX GUI.
The lynchpin of Incredible PBX 2020 and beyond is ClearlyIP components which bring management of FreePBX modules and SIP phone integration to a level never before available with any other Asterisk distribution. And now you can configure and reconfigure your new Incredible PBX phones from the convenience of the Incredible PBX GUI.
VitalPBX is perhaps the fastest-growing PBX offering based upon Asterisk with an installed presence in more than 100 countries worldwide. VitalPBX has generously provided a customized White Label version of Incredible PBX tailored for use with all Incredible PBX and VitalPBX custom applications. Follow this link for a free test drive!
Special Thanks to Vitelity. Vitelity is now Voyant Communications and has halted new registrations for the time being. Our special thanks to Vitelity for their unwavering financial support over many years and to the many Nerd Vittles readers who continue to enjoy the benefits of their service offerings. We will keep everyone posted on further developments.

Free Asterisk Solutions
