
Home » Incredible PBX (Page 14)
Category Archives: Incredible PBX
The Most Versatile VoIP Provider: FREE PORTING

 JUST RELEASED: Visit the Incredible PBX Wiki
Finding the Perfect Laptop: Meet the System76 Lemur Pro

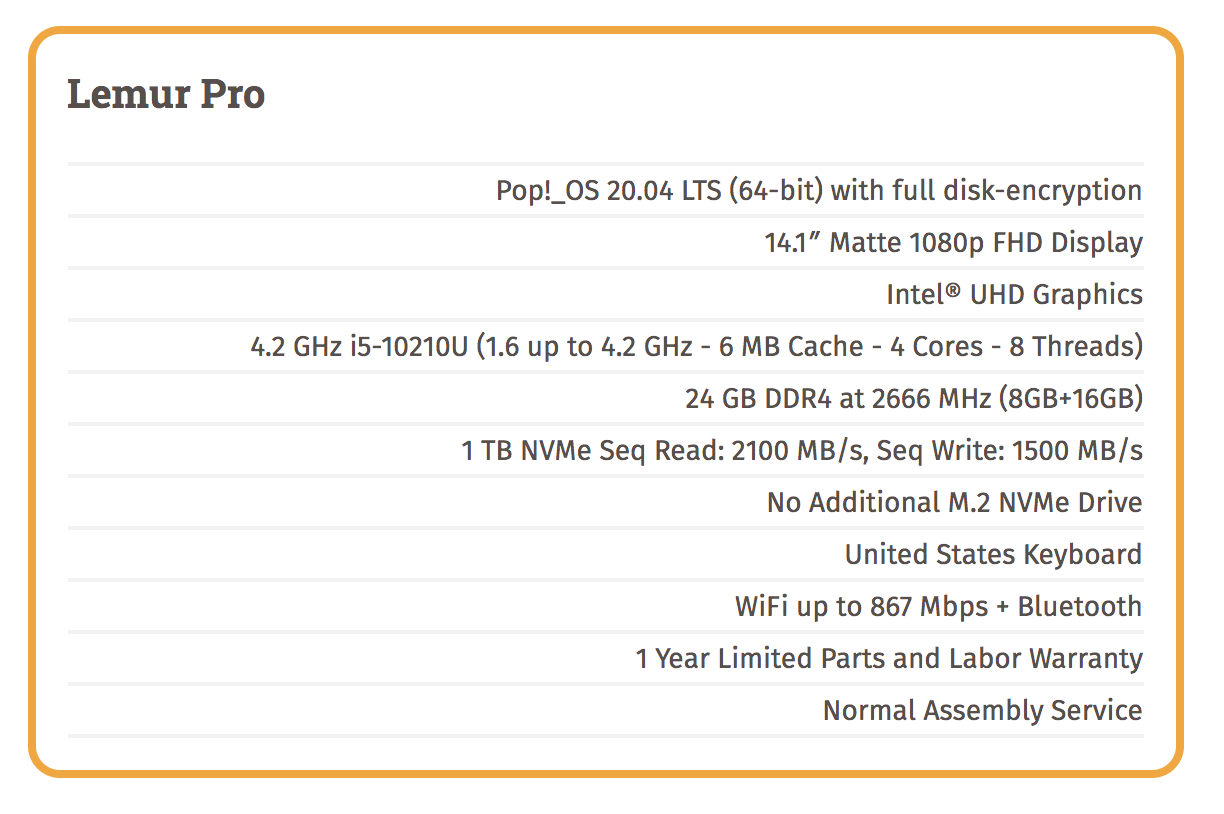
While we’ve been hunkered down in Vero Beach dodging the Covid-19 bullets, we spent a little time searching for a turnkey Linux notebook computer that could do everything a MacBook Pro could do… and more. The machine had to offer PORTS WITHOUT DONGLES plus the added benefits that only a pure Linux platform could provide. For $1099, our dream machine has arrived. The Lemur Pro is custom-built which means you order the 2.2 pound base computer with its 14-hour battery and then choose your operating system, CPU, RAM, storage devices, and warranty period. Shipping in the U.S. is free. We ended up at $1,322.21. In addition to 2 USB 3.0 Type-A slots, an HDMI port, a USB 3.1 Type-C w/ DisplayPort 1.2a, touchpad, stereo speakers, an audio jack, a webcam, and a backlit keyboard, the icing on the cake was a microSD slot which made the machine perfect for Raspberry Pi development.
Software, of course, has always been what separated the Mac from the Linux desktops. No more! The System76 developers of the Lemur Pro have released their own flavor of Ubuntu. It’s a refined and open source desktop environment with most of the modern feature set available in either Windows or Mac OS. You can read all about Pop!_OS here. You can even download an ISO suitable for installation in VirtualBox if you just want to try it out for free.

In addition to a robust desktop solution out of the box, Pop!_OS also includes an Automatic Update Utility to push out security fixes and software updates. And they have a terrific Pop!_Shop, an apt front-end, which is similar to Android’s Play Store or Apple’s App Store. All of the apps in Pop!_Shop have been engineered to work within Pop!_OS seamlessly, and they do. We also encountered no issues installing a traditional LAMP stack, PHPmyAdmin, VirtualBox, OpenVPN, or Twinkle, a SIP client to connect to Asterisk® and IncrediblePBX®. Of course you also can run the VirtualBox image of Incredible PBX 2020 on the Lemur Pro. And, if you’re ever curious how we build Incredible PBX images for the Raspberry Pi, here’s our soup-to-nuts tutorial using the Lemur Pro. We’ve also built the images for CrownCloud and VirtualBox on the Lemur Pro. So life is good.
Booted up a Windows machine, or a Mac, or even an iPad Pro lately? Then you already know it takes about as long as making your own breakfast. Imagine our surprise with the Lemur Pro when the login prompt appeared in less than 10 seconds. There are other clever touches that are too numerous to mention. One that jumps out is our pet peeve about the MacBook Pro. Whenever your wrist happens to slide over the touchpad while you’re typing, the cursor magically jumps to some random place in your document as you continue to type. With the Lemur Pro, the touchpad is disabled whenever you are actively typing. Brilliant!

Did we mention the tutorials? They are equally brilliant. Here’s one of many examples. In addition to a Quick Start Guide, there’s even a service manual. Remember those?
System76 purchases come with a 30-day, money back guarantee. What are you waiting for?
Originally published: Tuesday, August 4, 2020

Need help with Asterisk? Visit the VoIP-info Forum.
Special Thanks to Our Generous Sponsors
FULL DISCLOSURE: ClearlyIP, Skyetel, Vitelity, DigitalOcean, Vultr, VoIP.ms, 3CX, Sangoma, TelecomsXchange and VitalPBX have provided financial support to Nerd Vittles and our open source projects through advertising, referral revenue, and/or merchandise. As an Amazon Associate and Best Buy Affiliate, we also earn from qualifying purchases. We’ve chosen these providers not the other way around. Our decisions are based upon their corporate reputation and the quality of their offerings and pricing. Our recommendations regarding technology are reached without regard to financial compensation except in situations in which comparable products at comparable pricing are available from multiple sources. In this limited case, we support our sponsors because our sponsors support us.
 BOGO Bonaza: Enjoy state-of-the-art VoIP service with a $10 credit and half-price SIP service on up to $500 of Skyetel trunking with free number porting when you fund your Skyetel account. No limits on number of simultaneous calls. Quadruple data center redundancy. $25 monthly minimum spend required. Tutorial and sign up details are here.
![]() The lynchpin of Incredible PBX 2020 and beyond is ClearlyIP components which bring management of FreePBX modules and SIP phone integration to a level never before available with any other Asterisk distribution. And now you can configure and reconfigure your new Incredible PBX phones from the convenience of the Incredible PBX GUI.
The lynchpin of Incredible PBX 2020 and beyond is ClearlyIP components which bring management of FreePBX modules and SIP phone integration to a level never before available with any other Asterisk distribution. And now you can configure and reconfigure your new Incredible PBX phones from the convenience of the Incredible PBX GUI.
 VitalPBX is perhaps the fastest-growing PBX offering based upon Asterisk with an installed presence in more than 100 countries worldwide. VitalPBX has generously provided a customized White Label version of Incredible PBX tailored for use with all Incredible PBX and VitalPBX custom applications. Follow this link for a free test drive!
 Special Thanks to Vitelity. Vitelity is now Voyant Communications and has halted new registrations for the time being. Our special thanks to Vitelity for their unwavering financial support over many years and to the many Nerd Vittles readers who continue to enjoy the benefits of their service offerings. We will keep everyone posted on further developments.

One-Minute Wonder: It’s Incredible PBX 2020 for VirtualBox
If you’re new to the VoIP world and want to kick the tires to see what you’re missing, then today’s one minute setup is for you. You’ll get a $10 credit to try out some penny-a-minute calls and to purchase a $1 a month phone number in your choice of area codes. If you decide VoIP is not for you, you don’t have to buy anything ever. And you can use almost any desktop computer you already own to bring up the VirtualBox® edition of Incredible PBX® 2020.
If you’ve followed Nerd Vittles over the years, you already know that VirtualBox from Oracle® is one of our favorite platforms. Once VirtualBox is installed on your desktop computer, adding Incredible PBX is a snap. Download the latest Incredible PBX 2020 image from SourceForge, double-click on the downloaded image, check the initialize MAC address box, and boom. In less than a minute, your PBX is ready to use with the very latest components of Asterisk® 16 and FreePBX® 15. There are no hidden fees or crippleware to hinder your use of Incredible PBX for as long as you like. Just set up an account with our Platinum provider, Skyetel, and you can start making calls in minutes. Of course, the Incredible PBX feature set is included as well which brings you nearly three dozen applications for Asterisk® that will revolutionize your communications platform. Speech-to-text, voice recognition, and a Siri-like telephony interface are as close as your SIP phone.
Installing Oracle VM VirtualBox

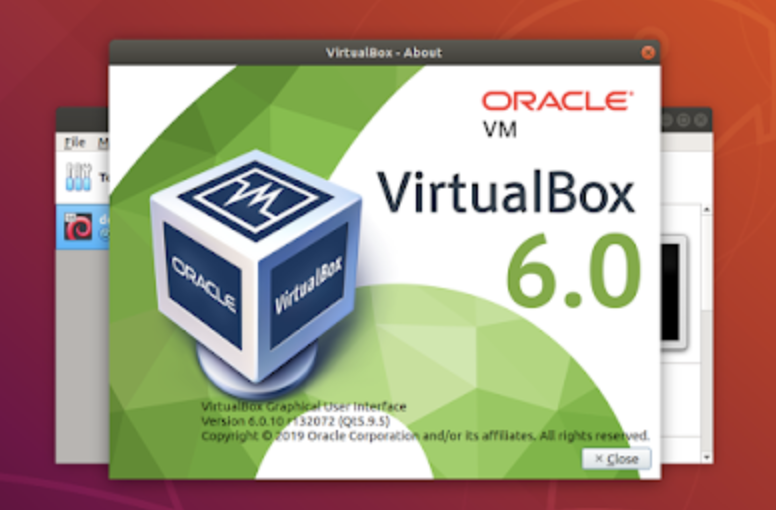
Oracle’s virtual machine platform inherited from Sun is amazing. It’s not only free, but it’s pure GPL2 code. VirtualBox gives you a virtual machine platform that runs on top of any desktop operating system. In terms of limitations, we haven’t found any. We even tested this on an Atom-based Windows 7 machine with 2GB of RAM, and it worked without a hiccup. So step #1 today is to download one or more of the VirtualBox installers from VirtualBox.org or Oracle.com. Our recommendation is to put all of the 100MB installers on a 4GB thumb drive.1 Then you’ll have everything in one place whenever and wherever you happen to need it. Once you’ve downloaded the software, simply install it onto your favorite desktop machine. Accept all of the default settings, and you’ll be good to go. For more details, here’s a link to the Oracle VM VirtualBox User Manual.
NOTE: The Incredible PBX 2020 VM requires a VirtualBox 6.x platform. Adjust screen size in View -> Virtual Screen.
Installing the Incredible PBX 2020 Image
To begin, download the Incredible PBX 2020 image (3.5 GB) onto your desktop.
Next, double-click on the Incredible PBX .ova image on your desktop. Be sure to check the box to initialize the MAC address of the image if you’re using an older version of VirtualBox. Then click Import. Once the import is finished, you’ll see a new Incredible PBX 2020 virtual machine in the VM List of the VirtualBox Manager Window. Let’s make a couple of one-time adjustments to the Incredible PBX configuration to account for possible differences in sound and network cards on different host machines.
(1) Click once on the Incredible PBX virtual machine in the VM List. Then (2) click the Settings button. In System tab, check Hardware Clock in UTC Time. In the Audio tab, check the Enable Audio option and choose your sound card. In the Network tab for Adapter 1, check the Enable Network Adapter option. From the Attached to pull-down menu, choose Bridged Adapter. Then select your network card from the Name list. Then click OK. That’s all the configuration that is necessary for Incredible PBX.
Running Incredible PBX 2020 in VirtualBox
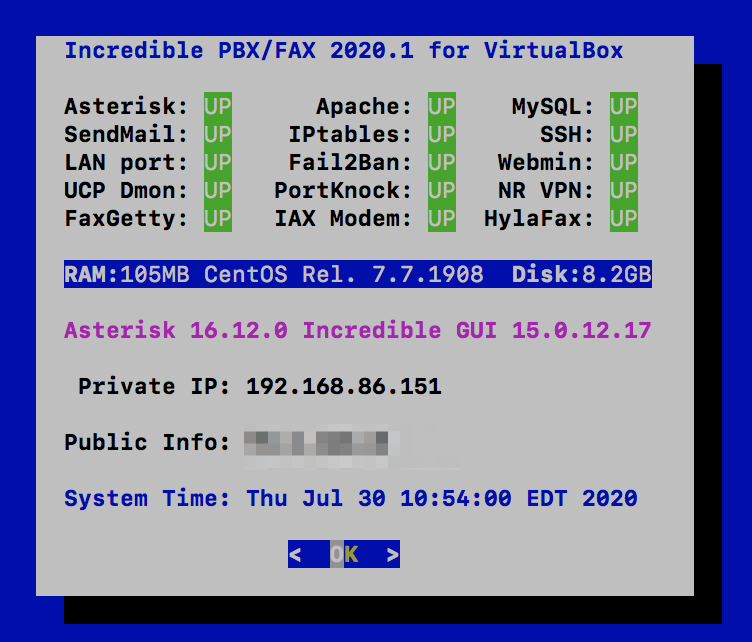
Once you’ve imported and configured the Incredible PBX Virtual Machine, you’re ready to go. Highlight the Incredible PBX virtual machine in the VM List on the VirtualBox Manager Window and click the Start button. The standard Linux boot procedure will begin and, within a few seconds, you’ll get the familiar Linux login prompt. During the bootstrap procedure, you’ll see a couple of dialogue boxes pop up that explain the keystrokes to move back and forth between your host operating system desktop and your virtual machine. Remember, you still have full access to your desktop computer. Incredible PBX is merely running as a task in a VM window. Always gracefully halt Incredible PBX just as you would on any computer.
Here’s what you need to know. To work in the Incredible PBX virtual machine, just left-click your mouse while it is positioned inside the VM window. To return to your host operating system desktop, press the right Option key on Windows machines or the left Command key on any Mac. On Linux desktops, press the right Ctrl key. For other operating systems, read the dialogue boxes for instructions on moving around. To access the Linux CLI, login as root with the default password: password. Change your root password when you are prompted to do so. Then update your admin password for web access: ./admin-pw-change. Also update your admin password for web applications: ./apache-pw-change. You’ll need these admin passwords to access the web GUI to manage your PBX as well as to use the AsteriDex and Reminders web apps. The above password updates are automatically requested when you first activate the virtual machine. You can update all of your other passwords using the scripts provided in /root. For example, you’ll want to set the email delivery address for incoming faxes by running: ./avantfax-email-change. And set the AvantFax admin password by running: ./avantfax-pw-change. When running the AvantFax web application, be advised that you first will be prompted for your Apache admin credentials. Then you will be prompted for your AvantFax admin credentials.
Setting the Date and Time with VirtualBox
On some platforms, VirtualBox has a nasty habit of mangling the date and time of your virtual machine. Verify that you have enabled the Hardware Clock in UTC Time option for your virtual machine as documented above. If pbxstatus still shows an incorrect time, manually set the date and time and then update the hardware clock. Here’s how assuming 08130709 is the month (August), day (13), and correct time (7:09 a.m.) of your server:
date 08130709
clock -w
Configuring Skyetel for Incredible PBX 2020
If you’d like to try out the Skyetel service at no charge, here’s the drill. Sign up for Skyetel service to take advantage of the Nerd Vittles specials. First, complete the Prequalification Form here. You then will be provided a link to the Skyetel site to complete your registration. Once you have registered on the Skyetel site and your account has been activated, open a support ticket and request the $10 credit for your account by referencing the Nerd Vittles special offer. Once you are satisfied with the service, fund your account as desired, and Skyetel will match your deposit of up to $250 simply by opening another ticket. That gets you up to $500 of half-price calling. Credit is limited to one per person, company, and address. Effective 10/1/2023, $25/month minimum spend required.
Skyetel does not use SIP registrations to make connections to your PBX. Instead, Skyetel utilizes Endpoint Groups to identify which servers can communicate with the Skyetel service. An Endpoint Group consists of a Name, an IP address, a UDP or TCP port for the connection, and a numerical Priority for the group. For incoming calls destined to your PBX, DIDs are associated with an Endpoint Group to route the calls to your PBX. For outgoing calls from your PBX, a matching Endpoint Group is required to authorize outbound calls through the Skyetel network. Thus, the first step in configuring the Skyetel side for use with your PBX is to set up an Endpoint Group. Here’s a typical setup for Incredible PBX 16-15:
- Name: MyPBX
- Priority: 1
- IP Address: PBX-Public-IP-Address
- Port: 5060
- Protocol: UDP
- Description: my.incrediblepbx.com
To receive incoming PSTN calls, you’ll need at least one DID. On the Skyetel site, you acquire DIDs under the Phone Numbers tab. You have the option of Porting in Existing Numbers (free for the first 60 days after you sign up for service) or purchasing new ones under the Buy Phone Numbers menu option.
Once you have acquired one or more DIDs, navigate to the Local Numbers or Toll Free Numbers tab and specify the desired SIP Format and Endpoint Group for each DID. Add SMS/MMS and E911 support, if desired. Call Forwarding and Failover are also supported. That completes the VoIP setup on the Skyetel side. System Status is always available here.
If VirtualBox is sitting behind a router or firewall on a private LAN, you’ll need to forward ports UDP 5060 and 10000-20000 in your router to the private LAN address of your Incredible PBX server. Also edit your extensions in the GUI and set NAT=YES in the Advanced tab of every extension. In Settings -> Asterisk SIP Settings, click the Detect Network Settings button and then Submit your changes and reload the Asterisk dialplan when prompted.
Configuring VoIP.ms for Incredible PBX 2020
To sign up for VoIP.ms service, may we suggest you use our signup link so that Nerd Vittles gets a referral credit for your signup. Once your account is set up, you’ll need to set up a SIP SubAccount and, for Authentication Type, choose Static IP Authentication and enter your Incredible PBX 2020 server’s public IP address. For Transport, choose UDP. For Device Type, choose Asterisk, IP PBX, Gateway or VoIP Switch. Order a DID in their web panel, and then point the DID to the SubAccount you just created. Be sure to specify atlanta1.voip.ms as the POP from which to receive incoming calls.
Configuring V1VoIP for Incredible PBX 2020
To sign up for V1VoIP service, sign up on their web site. Then login to your account and order a DID under the DIDs tab. Once the DID has been assigned, choose View DIDs and click on the Forwarding button beside your DID. For Option #1, choose Forward to IP Address/PBX. For the Forwarding Address, enter the public IP address of your server. For the T/O (timeout) value, set it to 2o seconds. Then click the Update button. Under the Termination tab, create a new Endpoint with the public IP address of your server so that you can place outbound calls through V1VoIP.
Configuring Anveo Direct for Incredible PBX 2020
To sign up for Anveo Direct service, sign up on their web site and then login. After adding funds to your account, purchase a DID under Inbound Service -> Order DID. Next, choose Configure Destination SIP Trunk. Give the Trunk a name. For the Primary SIP URI, enter $[E164]$@server-IP-address. For Call Options, select your new DID from the list. You also must whitelist your public IP address under Outbound Service -> Configure. Create a new Call Termination Trunk and name it to match your server. For Dialing Prefix, choose six alphanumeric characters beginning with a zero. In Authorized IP Addresses, enter the public IP address of your server. Set an appropriate rate cap. We like $0.01 per minute to be safe. Set a concurrent calls limit. We like 2. For the Call Routing Method, choose Least Cost unless you’re feeling extravagant. For Routes/Carriers, choose Standard Routes. Write down your Dialing Prefix and then click the Save button.
Before you can make outbound calls through Anveo Direct from your PBX, you first must configure the Dialing Prefix that you wrote down in the previous step. Log into the GUI as admin using a web browser and edit the Anveo-Out trunk in Connectivity -> Trunks. Click on the custom-Settings tab and replace anveo-pin with your actual Dialing Prefix. Click Submit and Apply Config to complete the setup.
By default, incoming Anveo Direct calls will be processed by the Default inbound route on your PBX. If you wish to redirect incoming Anveo Direct calls using DID-specific inbound routes, then you’ve got a bit more work to do. In addition to creating the inbound route using the 11-digit Anveo Direct DID, enter the following commands after logging into your server as root using SSH/Putty:
cd /etc/asterisk
echo "[from-anveo]" >> extensions_custom.conf
echo "exten => _.,1,Ringing" >> extensions_custom.conf
echo "exten => _.,n,Goto(from-trunk,\\${SIP_HEADER(X-anveo-e164)},1)" >> extensions_custom.conf
asterisk -rx "dialplan reload"
Configuring a Softphone for Incredible PBX 2020
We’re in the home stretch now. You can connect virtually any kind of telephone to your new PBX. Plain Old Phones require an analog telephone adapter (ATA) which can be a separate board in your computer from a company such as Digium. Or it can be a standalone SIP device such as ObiHai’s OBi100 or OBi110 (if you have a phone line from Ma Bell to hook up as well). SIP phones can be connected directly so long as they have an IP address. These could be hardware devices or software devices such as the YateClient softphone. We’ll start with a free one today so you can begin making calls. You can find dozens of recommendations for hardware-based SIP phones both on Nerd Vittles and the PIAF Forum when you’re ready to get serious about VoIP telephony.
We recommend YateClient for Windows which is free. Download it from here. Run YateClient once you’ve installed it and enter the credentials for the 701 extension on Incredible PBX. You can find them by running /root/show-passwords. You’ll need the IP address of your server plus your extension 701 password. In the YateClient, fill in the blanks using the IP address of your Server, 701 for your Username, and whatever Password was assigned to the extension when you installed Incredible PBX. Click OK to save your entries.

Configuring Incredible PBX 2020 for VirtualBox
In order to take advantage of all the Incredible PBX applications, you’ll need to obtain IBM text-to-speech (TTS) and speech-to-text (STT) credentials as well as a (free) Application ID for Wolfram Alpha.
This Nerd Vittles tutorial will walk you through getting your IBM account set up and obtaining both your TTS and STT credentials. Be sure to write down BOTH sets of credentials which you’ll need in a minute. For home and SOHO use, IBM access and services are mostly FREE even though you must provide a credit card when signing up. The IBM signup process explains their pricing plans.
To use Wolfram Alpha, sign up for a free Wolfram Alpha API account. Just provide your email address and set up a password. It takes less than a minute. Log into your account and click on Get An App ID. Make up a name for your application and write down (and keep secret) your APP-ID code. That’s all there is to getting set up with Wolfram Alpha. If you want to explore costs for commercial use, there are links to let you get more information.
In addition to your Wolfram Alpha APPID, there are two sets of IBM credentials to plug into the Asterisk AGI scripts. Keep in mind that there are different usernames and passwords for the IBM Watson TTS and STT services. The TTS credentials will look like the following: $IBM_username and $IBM_password. The STT credentials look like this: $API_USERNAME and $API_PASSWORD. Don’t mix them up. 🙂
All of the scripts requiring credentials are located in /var/lib/asterisk/agi-bin so switch to that directory after logging into your server as root. Edit each of the following files and insert your TTS credentials in the variables already provided: nv-today2.php, ibmtts.php, and ibmtts2.php. Edit each of the following files and insert your STT credentials in the variables already provided: getquery.sh, getnumber.sh, and getnumber2.sh. Finally, edit 4747 and insert your Wolfram Alpha APPID.
Using AsteriDex with Incredible PBX
AsteriDex is a web-based dialer and address book application for Asterisk and Incredible PBX. It lets you store and manage phone numbers of all your friends and business associates in an easy-to-use SQLite3 database. You simply call up the application with your favorite web browser: http://pbx-ip-address/asteridex4/. When you click on a contact that you wish to call, AsteriDex first calls you at extension 701, and then AsteriDex connects you to your contact through another outbound call made using your default outbound trunk that supports numbers in the 1NXXNXXXXXX format.
Keeping FreePBX 15 Modules Current
We strongly recommend that you periodically update all of your FreePBX modules to eliminate bugs and to reduce security vulnerabilities. From the Linux CLI, log into your server as root and issue the following commands:
rm -f /tmp/*
fwconsole ma upgradeall
fwconsole reload
/root/sig-fix
systemctl restart apache2
/root/sig-fix
Taking Incredible PBX for a Test Drive
You can take Incredible PBX on a test drive by dialing D-E-M-O (3366) from any phone connected to your PBX.
With Allison’s Demo IVR, you can choose from the following options:
- 0. Chat with Operator — connects to extension 701
- 1. AsteriDex Voice Dialer – say "Delta Airlines" or "American Airlines" to connect
- 2. Conferencing – log in using 1234 as the conference PIN
- 3. Wolfram Alpha Almanac – say "What planes are flying overhead"
- 4. Lenny – The Telemarketer’s Worst Nightmare
- 5. Today’s News Headlines — courtesy of Yahoo! News
- 6. Weather by ZIP Code – enter any 5-digit ZIP code for today’s weather
- 7. Today in History — courtesy of OnThisDay.com
- 8. Chat with Nerd Uno — courtesy of SIP URI connection to 3CX iPhone Client
- 9. DISA Voice Dialer — say any 10-digit number to be connected
- *. Current Date and Time — courtesy of Incredible PBX
Originally published: Monday, December 16, 2019 Updated: Thursday, July 30, 2020
Need help with Asterisk? Visit the VoIP-info Forum.
Special Thanks to Our Generous Sponsors
FULL DISCLOSURE: ClearlyIP, Skyetel, Vitelity, DigitalOcean, Vultr, VoIP.ms, 3CX, Sangoma, TelecomsXchange and VitalPBX have provided financial support to Nerd Vittles and our open source projects through advertising, referral revenue, and/or merchandise. As an Amazon Associate and Best Buy Affiliate, we also earn from qualifying purchases. We’ve chosen these providers not the other way around. Our decisions are based upon their corporate reputation and the quality of their offerings and pricing. Our recommendations regarding technology are reached without regard to financial compensation except in situations in which comparable products at comparable pricing are available from multiple sources. In this limited case, we support our sponsors because our sponsors support us.
BOGO Bonaza: Enjoy state-of-the-art VoIP service with a $10 credit and half-price SIP service on up to $500 of Skyetel trunking with free number porting when you fund your Skyetel account. No limits on number of simultaneous calls. Quadruple data center redundancy. $25 monthly minimum spend required. Tutorial and sign up details are here.
![]() The lynchpin of Incredible PBX 2020 and beyond is ClearlyIP components which bring management of FreePBX modules and SIP phone integration to a level never before available with any other Asterisk distribution. And now you can configure and reconfigure your new Incredible PBX phones from the convenience of the Incredible PBX GUI.
The lynchpin of Incredible PBX 2020 and beyond is ClearlyIP components which bring management of FreePBX modules and SIP phone integration to a level never before available with any other Asterisk distribution. And now you can configure and reconfigure your new Incredible PBX phones from the convenience of the Incredible PBX GUI.
VitalPBX is perhaps the fastest-growing PBX offering based upon Asterisk with an installed presence in more than 100 countries worldwide. VitalPBX has generously provided a customized White Label version of Incredible PBX tailored for use with all Incredible PBX and VitalPBX custom applications. Follow this link for a free test drive!
Special Thanks to Vitelity. Vitelity is now Voyant Communications and has halted new registrations for the time being. Our special thanks to Vitelity for their unwavering financial support over many years and to the many Nerd Vittles readers who continue to enjoy the benefits of their service offerings. We will keep everyone posted on further developments.
- Many of our purchase links refer users to Amazon when we find their prices are competitive for the recommended products. Nerd Vittles receives a small referral fee from Amazon to help cover the costs of our blog. We never recommend particular products solely to generate Amazon commissions. However, when pricing is comparable or availability is favorable, we support Amazon because Amazon supports us. [↩]
Harnessing the Cloud to Start An Incredible PBX Business

If you’ve ever wanted to start your own VoIP business and earn some big bucks through consulting and hosting cloud-based PBXs, now’s your chance. One of the requests we often receive from those that deploy Incredible PBX 2020® for a living is a quicker way to produce new Incredible PBX servers on cloud platforms such as Vultr and Digital Ocean while also preserving Incredible PBX’s unique ability to upgrade source components for Asterisk® and FreePBX®. For small businesses, these cloud providers offer a perfect $5 a month platform for Incredible PBX. You can mark it up to $10 or $15 a month and make a handsome 100% to 200% profit without lifting a finger as a VoIP consultant. And Vultr and Digital Ocean will spot you a $100 credit to get the ball rolling.
Today’s solution was especially designed for those that would like to host virtual machines for customers in your own cloud account. It would work equally well for anyone wanting a quick way to create multiple Incredible PBX platforms in 5 minutes for friends and neighbors.
To begin, you’ll need to create a master image of Incredible PBX 2020 on the cloud platform of your choice using the recommended $5/month platform with CentOS 7. The July 1, 2020 or later tarball of Incredible PBX 2020 is required. Here are the Five Easy Steps:
1. Create the base Incredible PBX 2020 platform in the traditional way:
# create a secure root password to hand out to future customers
passwd
yum -y update
yum -y install net-tools nano wget tar
cd /root
wget http://incrediblepbx.com/incrediblepbx2020.1.tar.gz
tar zxvf incrediblepbx2020.1.tar.gz
rm -f incrediblepbx2020.1.tar.gz
# to add swap file on non-OpenVZ cloud platforms with no swap file
./create-swapfile-DO
# kick off Phase I install
./IncrediblePBX2020.sh
# after reboot, kick off Phase II install
./IncrediblePBX2020.sh
# set desired timezone
./timezone-setup
# optionally install Incredible Fax 2020
./incrediblefax2020.sh
2. Once you complete the Phase I and Phase II installs and optionally install Incredible Fax, log out of your server and log back in so that the Automatic Update Utility can do its thing.
3. Next, we need to configure your master image so that it can be replicated using a simple image snapshot. A snapshot is free on the Vultr platform and will cost you about $5 a month with Digital Ocean. While still logged into your server as root, issue the following commands and then shut down your server gracefully:
cd /etc/sysconfig
cp -p rules.v4.tm3 iptables
sed -i 's|#-A|-A|' iptables
touch /etc/update_hostconfig
touch /etc/update_serverconfig
halt
4. Once your server has halted, create a snapshot image of the server from Vultr or Digital Ocean dashboard. You do NOT need to preserve your Master VM once the snapshot is created.
5. Create a new virtual machine but, instead of choosing CentOS 7 as the base platform, choose the snapshot image built in the previous step. Once the 5-minute install completes, it’s ready for handover to a new customer by providing the root password from the Master Image together with the IP address of the new virtual machine.
When the new customer logs in via SSH using the root password from the Master Image, the Incredible PBX reconfiguration script will complete the setup of the new platform in a couple minutes prompting the user to change all of the passwords, resetting the ports for PortKnocker, and reconfiguring the firewall by whitelisting the customer’s IP addresses. If the build includes Incredible Fax, the customer should be instructed to change the AvantFax password. Run: /root/avantfax-pw-change. If the customer is in a different time zone, the customer should run /root/timezone-setup. Whooda thunk making money could be this easy.
The real beauty of this design is that you keep control of all the virtual machines you create. If a customer fails to pay, it’s easy to either shut down their VM or even delete it. You also can schedule automatic backups for the customer while recovering the extra $1 per month charge from the provider. In addition, if the customer ever needs hands-on support, you can use the Console link in the Dashboard without the need to whitelist your IP address. The customer still retains full control over the root password which would have to be provided.
Originally published: Monday, July 27, 2020
Need help with Asterisk? Visit the VoIP-info Forum.
Special Thanks to Our Generous Sponsors
FULL DISCLOSURE: ClearlyIP, Skyetel, Vitelity, DigitalOcean, Vultr, VoIP.ms, 3CX, Sangoma, TelecomsXchange and VitalPBX have provided financial support to Nerd Vittles and our open source projects through advertising, referral revenue, and/or merchandise. As an Amazon Associate and Best Buy Affiliate, we also earn from qualifying purchases. We’ve chosen these providers not the other way around. Our decisions are based upon their corporate reputation and the quality of their offerings and pricing. Our recommendations regarding technology are reached without regard to financial compensation except in situations in which comparable products at comparable pricing are available from multiple sources. In this limited case, we support our sponsors because our sponsors support us.
BOGO Bonaza: Enjoy state-of-the-art VoIP service with a $10 credit and half-price SIP service on up to $500 of Skyetel trunking with free number porting when you fund your Skyetel account. No limits on number of simultaneous calls. Quadruple data center redundancy. $25 monthly minimum spend required. Tutorial and sign up details are here.
![]() The lynchpin of Incredible PBX 2020 and beyond is ClearlyIP components which bring management of FreePBX modules and SIP phone integration to a level never before available with any other Asterisk distribution. And now you can configure and reconfigure your new Incredible PBX phones from the convenience of the Incredible PBX GUI.
The lynchpin of Incredible PBX 2020 and beyond is ClearlyIP components which bring management of FreePBX modules and SIP phone integration to a level never before available with any other Asterisk distribution. And now you can configure and reconfigure your new Incredible PBX phones from the convenience of the Incredible PBX GUI.
VitalPBX is perhaps the fastest-growing PBX offering based upon Asterisk with an installed presence in more than 100 countries worldwide. VitalPBX has generously provided a customized White Label version of Incredible PBX tailored for use with all Incredible PBX and VitalPBX custom applications. Follow this link for a free test drive!
Special Thanks to Vitelity. Vitelity is now Voyant Communications and has halted new registrations for the time being. Our special thanks to Vitelity for their unwavering financial support over many years and to the many Nerd Vittles readers who continue to enjoy the benefits of their service offerings. We will keep everyone posted on further developments.
Introducing OpenVPN for Incredible PBX

We’ve been wrestling with virtual private networks for more than 22 years now. Here’s a quick walk down memory lane. Our adventure began with the Altiga 3000 series VPN concentrators which we introduced in the federal courts in 1999. It was a near perfect plug-and-play hardware solution for secure communications between remote sites using less than secure Windows PCs. Cisco quickly saw the potential, gobbled up the company, and promptly doubled the price of the rebranded concentrators. Over a decade ago, we introduced Hamachi® VPNs to interconnect Asterisk® and PBX in a Flash servers. At the time, Hamachi was free, but that was short-lived when they were subsequently acquired by LogMeIn®. What followed was a short stint with PPTP VPNs which worked great with Macs, Windows PCs, and many phones but suffered from an endless stream of security vulnerabilities. Finally, in April 2012, we introduced the free NeoRouter® VPN. Version 2 still is an integral component in every Incredible PBX® platform today, and PPTP still is available as well. While easy to set up and integrate into multi-site Asterisk deployments, the Achilles’ Heel of NeoRouter remains its inability to directly interconnect many smartphones and stand-alone SIP phones, many of which now support the OpenVPN platform.

The main reason we avoided OpenVPN® over the years was its complexity to configure and deploy.1 In addition, it was difficult to use with clients whose IP addresses were frequently changing. Thanks to the terrific work of Nyr, Stanislas Angristan, and more than a dozen contributors, OpenVPN now has been tamed. And the new server-based, star topology design makes it easy to deploy for those with changing or dynamic IP addresses. Today we’ll walk you through building an OpenVPN server as well as the one-minute client setup for almost any Asterisk deployment and most PCs, routers, smartphones, and VPN-compatible soft phones and SIP phones including Yealink, Grandstream, Snom, and many more. And the really great news is that OpenVPN clients can coexist with your current NeoRouter VPN.
Finally, a word about the OpenVPN Client installations below. We’ve tested all of these with current versions of Incredible PBX 13-13 and 16-15 as well as Incredible PBX 2020 and Incredible PBX 2021. They should work equally well with other server platforms which have been properly configured. However, missing dependencies on other platforms are, of course, your responsibility.
Building an OpenVPN Server Platform
There are many ways to create an OpenVPN server platform. The major prerequisites are a supported operating system, a static IP address for your server, and a platform that is extremely reliable and always available. If the server is off line, all client connections will also fail. While we obviously have not tested all the permutations and combinations, we have identified a platform that just works™. It’s the CentOS 7, 64-bit cloud offering from Vultr. If you use our referral link at Vultr, you not only will be supporting Nerd Vittles through referral revenue, but you also will be able to take advantage of their $100 free credit for new customers. For home and small business deployments, we have found the $5/month platform more than adequate, and you can add automatic backups for an additional $1 a month. Cheap insurance!
A more recent and less costly hosting alternative is the $25/year Crown Cloud offering that we introduced several weeks ago. It includes a free snapshot backup in the $25 annual price.
To get started, create your CentOS 7 instance and login as root using SSH or Putty. Immediately change your password and update and install the necessary CentOS 7 packages. Be sure to turn off SELinux if it is installed by default.
passwd
setenforce 0
# edit /etc/selinux/config
# insert: SELINUX=disabled
# save the SELinux config file
yum -y update
yum -y install net-tools nano wget tar iptables-services
systemctl stop firewalld
systemctl disable firewalld
systemctl enable iptables
We recommend keeping your OpenVPN server platform as barebones as possible to reduce the vulnerability risk. By default, this installer routes all client traffic through the VPN server which wastes considerable bandwidth. The sed commands below modify this design to only route client VPN traffic through the OpenVPN server.
#!/bin/bash
##filename # openvpn-install-mod
echo "      Fix script /root/openvpn-install.sh to ensure internet traffic doesn't use vpn-tunnel."
echo " "
read -p "     Press 'Enter' to continue at your own risk,  or Ctrl+c to abort."
##trap user non root
if [ "$(id -u)" -ne 0 ]; then
echo ""
echo "Must be run as root user: sudo $0" echo ""
exit 1
fi
# cd /root
echo "     Fetching latest copy of install script  /root/openvpn-install.sh from github.com/Angristan"
curl -O https://raw.githubusercontent.com/Angristan/openvpn-install/master/openvpn-install.sh
chmod +x openvpn-install.sh
echo "        running  3 sed commands to ensure only local traffic uses vpn-tunnel :-"
echo '        1st commenting-out line 857'
#### fails to complete with \\"redirect-gateway ## sed -i "s|\\techo 'push \\"redirect-gateway|#\\techo 'push \\"redirect-gateway|" openvpn-install.sh
sed -e '/redirect-gateway d/s/^/#/' -i openvpn-install.sh

echo '2nd commenting-out line 865'
###sed -i "s|push \\"redirect-gateway|#push \\"redirect-gateway|" openvpn-install.sh
sed -e '/redirect-gateway ipv6/s/^/#/' -i openvpn-install.sh

echo '3rd after line 1042 ;  newline 1043   pull-filter ignore redirect-gateway'
###sed -i 's|tls-client|tls-client\\npull-filter ignore "redirect-gateway"|' openvpn-install.sh
sed -i 's|tls-client|tls-client\npull-filter ignore "redirect-gateway"|' openvpn-install.sh
Here are the recommended entries in running the OpenVPN installer:
- Server IP Address: using FQDN strongly recommended to ease migration issues
- Enabled IPv6 (no): accept default
- Port (1194): accept default
- Protocol (UDP): accept default
- DNS (3): change to 9 (Google)
- Compression (no): accept default
- Custom encrypt(no): accept default
- Generate Server
- Client name: firstclient
- Passwordless (1): accept default
NOTE: On CentOS 7 platforms, edit /usr/lib/systemd/system/openvpn@.service. Scroll down to the ExecStart= line and change %i.conf to %I.conf. Then save the file. Special thanks to @mattburris for catching the error.
In the following steps, we will use IPtables to block all server access except via SSH or the VPN tunnel. Then we’ll start your OpenVPN server:
cd /etc/sysconfig
wget http://incrediblepbx.com/iptables-openvpn.tar.gz
tar zxvf iptables-openvpn.tar.gz
rm -f iptables-openvpn.tar.gz
echo "net.ipv4.ip_forward = 1" >> /etc/sysctl.conf
sysctl -p
systemctl -f enable openvpn@server.service
systemctl start openvpn@server.service
systemctl status openvpn@server.service
systemctl enable openvpn@server.service
systemctl restart iptables
Once OpenVPN is enabled, the server can be reached through the VPN at 10.8.0.1. OpenVPN clients will be assigned by DHCP in the range of 10.8.0.2 through 10.8.0.254. You can list your VPN clients like this: cat /etc/openvpn/ipp.txt. You can list active VPN clients like this: cat /var/log/openvpn/status.log | grep 10.8. And you can add new clients or delete old ones by rerunning /root/openvpn-install.sh.
For better security, change the SSH access port replacing 1234 with desired port number:
PORT=1234
sed -i "s|#Port 22|Port $PORT|" /etc/ssh/sshd_config
systemctl restart sshd
sed -i "s|dport 22|dport $PORT|" /etc/sysconfig/iptables
systemctl restart iptables
We’ve made changes in the Angristan script to adjust client routing. By default, all packets from every client flowed through the OpenVPN server which wasted considerable bandwidth. Our preference is to route client packets destined for the Internet directly to their destination rather than through the OpenVPN server. The sed commands added to the base install above do this; however, if you’ve already installed and run the original Angristan script, your existing clients will be configured differently. Our recommendation is to remove the existing clients, make the change below, and then recreate the clients again by rerunning the script. In the alternative, you can execute the command below to correct future client creations and then run it again on each existing client platform substituting the name of the /root/.ovpn client file for client-template.txt and then restart each OpenVPN client.
cd /etc/openvpn
sed -i 's|tls-client|tls-client\\npull-filter ignore "redirect-gateway"|' client-template.txt
Creating OpenVPN Client Templates
In order to assign different private IP addresses to each of your OpenVPN client machines, you’ll need to create a separate client template for each computer. You do this by running /root/openvpn-install.sh again on the OpenVPN server. Choose option 1 to create a new .ovpn template. Give each client machine template a unique name and do NOT require a password for the template. Unless the client machine is running Windows, edit the new .ovpn template and comment out the setenv line: #setenv. Save the file and copy it to the /root folder of the client machine. Follow the instructions below to set up OpenVPN on the client machine and before starting up OpenVPN replace firstclient.ovpn in the command line with the name of .ovpn you created for the individual machine.

Renewing OpenVPN Server’s Expired Certificate
The server certificate will expire after 1080 days, and clients will no longer be able to connect. Here’s what to do next:
systemctl stop openvpn@server.service
cd /etc/openvpn/easy-rsa
./easyrsa gen-crl
cp /etc/openvpn/easy-rsa/pki/crl.pem /etc/openvpn/crl.pem
systemctl start openvpn@server.service
Installing an OpenVPN Client on CentOS/RHEL
cd /root
yum -y install epel-release
yum --enablerepo=epel install openvpn -y
# copy /root/firstclient.ovpn from server to client /root
# and then start up the VPN client
openvpn --config /root/firstclient.ovpn --daemon
# adjust Incredible PBX firewall below
iptables -A INPUT -s 10.8.0.0/24 -j ACCEPT
cd /usr/local/sbin
echo "iptables -A INPUT -s 10.8.0.0/24 -j ACCEPT" >> iptables-custom
Running ifconfig should now show the VPN client in the list of network ports:
tun0 Link encap:UNSPEC  HWaddr 00-00-00-00-00-00-00-00-00-00-00-00-00-00-00-00
     inet addr:10.8.0.2  P-t-P:10.8.0.2  Mask:255.255.255.0
     UP POINTOPOINT RUNNING NOARP MULTICAST  MTU:1500  Metric:1
     RX packets:9 errors:0 dropped:0 overruns:0 frame:0
     TX packets:39 errors:0 dropped:0 overruns:0 carrier:0
     collisions:0 txqueuelen:100
     RX bytes:855 (855.0 b)  TX bytes:17254 (16.8 KiB)
And you should be able to login to the VPN server using its VPN IP address:
# enter actual SSH port replacing 1234
PORT=1234
ssh -p $PORT root@10.8.0.1
Installing an OpenVPN Client on Debian and Ubuntu
cd /root
apt-get update
apt-get install openvpn unzip
dpkg-reconfigure tzdata
# copy /root/firstclient.ovpn from server to client /root
# and then start up the VPN client
openvpn --config /root/firstclient.ovpn --daemon
# adjust Incredible PBX firewall below
iptables -A INPUT -s 10.8.0.0/24 -j ACCEPT
cd /usr/local/sbin
echo "iptables -A INPUT -s 10.8.0.0/24 -j ACCEPT" >> iptables-custom
Running ifconfig should now show the VPN client in the list of network ports:
tun0 Link encap:UNSPEC  HWaddr 00-00-00-00-00-00-00-00-00-00-00-00-00-00-00-00
     inet addr:10.8.0.2  P-t-P:10.8.0.2  Mask:255.255.255.0
     UP POINTOPOINT RUNNING NOARP MULTICAST  MTU:1500  Metric:1
     RX packets:9 errors:0 dropped:0 overruns:0 frame:0
     TX packets:39 errors:0 dropped:0 overruns:0 carrier:0
     collisions:0 txqueuelen:100
     RX bytes:855 (855.0 b)  TX bytes:17254 (16.8 KiB)
And you should be able to login to the VPN server using its VPN IP address:
# enter actual SSH port replacing 1234
PORT=1234
ssh -p $PORT root@10.8.0.1
Installing an OpenVPN Client on Raspbian
The OpenVPN client now is easy to install on the latest Incredible PBX builds for the Raspberry Pi. Log into your server as root and issue the following commands to set your time zone and install the OpenVPN client. pbxstatus should then show the 10.8.0.x VPN address in the Private IP listing.
dpkg-reconfigure tzdata
apt-get install openvpn unzip
# copy your .ovpn template into /root
# edit template and comment out setenv line
# start up the client using actual .ovpn filename
openvpn --config /root/raspi.ovpn --daemon
# adjust Incredible PBX firewall
iptables -A INPUT -s 10.8.0.0/24 -j ACCEPT
cd /usr/local/sbin
echo "iptables -A INPUT -s 10.8.0.0/24 -j ACCEPT" >> iptables-custom
iptables-restart
pbxstatus

Installing an OpenVPN Client on a Mac
While there are numerous OpenVPN clients for Mac OS X, none hold a candle to Tunnelblick in terms of ease of installation and use. First, create a new client config on your server and copy it (/root/*.ovpn) to a folder on your Mac where you can find it. Download Tunnelblick and install it. Run Tunnelblick and then open Finder. Click and drag your client config file to the Tunnelblick icon in the top toolbar. Choose Connect when prompted. Done.
Installing an OpenVPN Client for Windows 10
The installation procedure for Windows is similar to the Mac procedure above. Download the OpenVPN Client for Windows. Double-click on the downloaded file to install it. Create a new client config on your server and copy it (/root/*.ovpn) to a folder on your PC where you can find it. Start up the OpenVPN client and click on the OpenVPN client in the activity tray. Choose Import File and select the config file you downloaded from your OpenVPN Server. Right-click on the OpenVPN icon again and choose Connect. Done.
Installing an OpenVPN Client for Android
Our favorite OpenVPN client for Android is called OpenVPN for Android and is available in the Google Play Store. Download and install it as you would any other Android app. Upload a client config file from your OpenVPN server to your Google Drive. Run the app and click + to install a new profile. Navigate to your Google Drive and select the config file you uploaded.
Installing an OpenVPN Client for iOS Devices
The OpenVPN Connect client for iOS is available in the App Store. Download and install it as you would any other iOS app. Before uploading a client config file, open the OpenVPN Connect app and click the 4-bar Settings icon in the upper left corner of the screen. Click Settings and change the VPN Protocol to UDP and IPv6 to IPV4-ONLY Tunnel. Accept remaining defaults.
To upload a client config file, the easiest way is to use Gmail to send yourself an email with the config file as an attachment. Open the message with the Gmail app on your iPhone or iPad and click on the attachment. Then choose the Upload icon in the upper right corner of the dialog. Next, choose Copy to OpenVPN in the list of apps displayed. When the import listing displays in OpenVPN Connect, click Add to import the new profile. Click ADD again when the Profile has been successfully imported. You’ll be prompted for permission to Add VPN Configurations. Click Allow. Enter your iOS passcode when prompted. To connect, tap once on the OpenVPN Profile. To disconnect, tap on the Connected slider. When you reopen the OpenVPN Connect app, the OVPN Profiles menu will display by default. Simply tap once on your profile to connect thereafter.
Installing a Web Interface to Display Available Clients
One advantage of NeoRouter is a simple way for any VPN client to display a listing of all VPN clients that are online at any given time. While that’s not possible with OpenVPN, we can do the next best thing and create a simple web page that can be accessed using a browser but only from a connected OpenVPN client pointing to http://10.8.0.1.
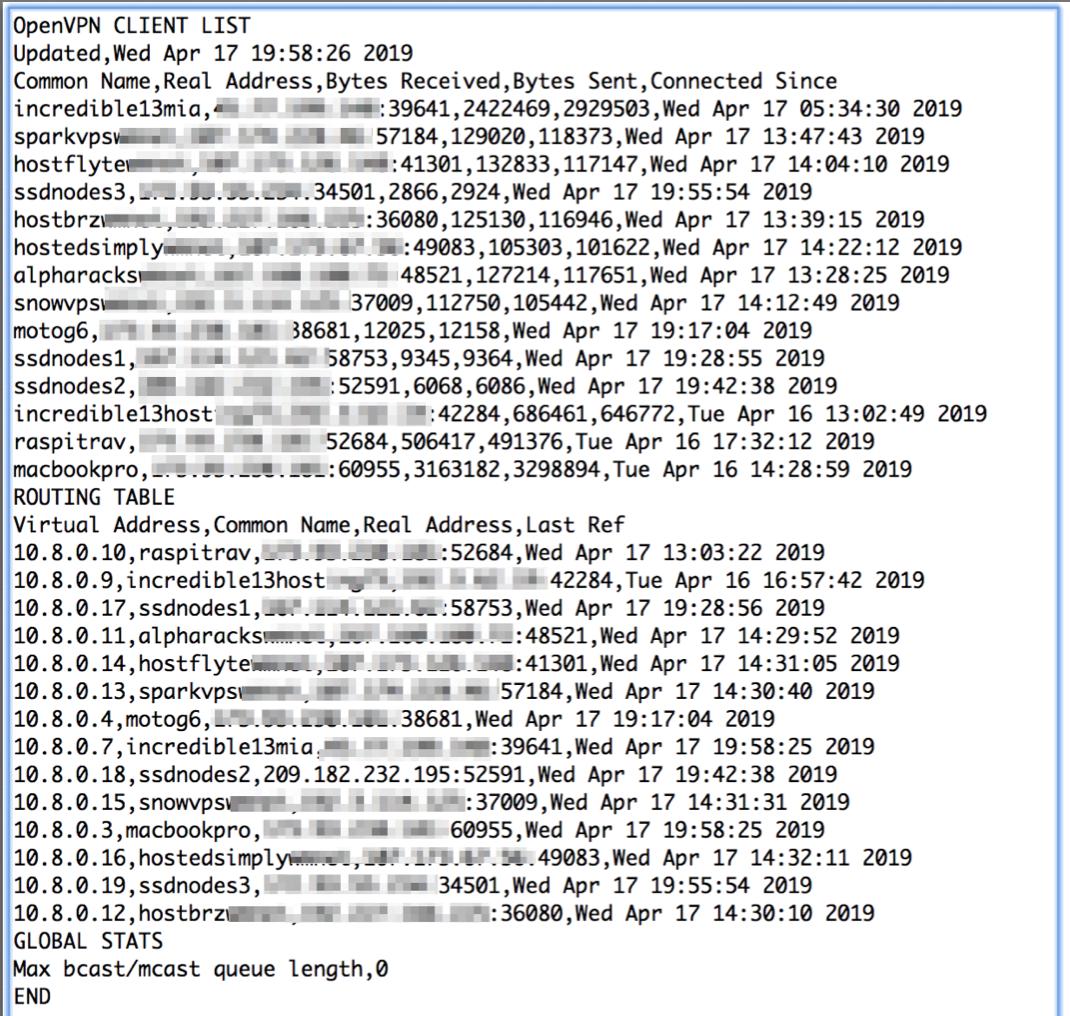
To set this up, log in to your OpenVPN server as root and issue the following commands:
yum --enablerepo=epel install lighttpd -y
systemctl start lighttpd.service
systemctl enable lighttpd.service
chown root:lighttpd /var/log/openvpn/status.log
chmod 640 /var/log/openvpn/status.log
cd /var/www
rm -rf lighttpd
wget http://incrediblepbx.com/lighttpd.tar.gz
tar zxvf lighttpd.tar.gz
ln -s /var/log/openvpn/status.log /var/www/lighttpd/status.log
sed -i 's|#server.bind = "localhost"|server.bind = "10.8.0.1"|' /etc/lighttpd/lighttpd.conf
systemctl restart lighttpd.service
UPDATE: On some cell phones and on Windows PCs, you may observe that you can no longer reach your favorite web sites after enabling the OpenVPN client. Luckily there’s a simple fix that allows 10.8.0.x traffic to be sent through the OpenVPN tunnel while all other traffic is routed out of your standard network connection. Here’s the fix. Make sure the .ovpn client config file includes the following lines:
pull-filter ignore redirect-gateway
route-nopull
route 10.8.0.0 255.255.255.0
Originally published: Monday, July 20, 2020 Updated: Saturday, June 25, 2022
Need help with Asterisk? Visit the VoIP-info Forum.
Special Thanks to Our Generous Sponsors
FULL DISCLOSURE: ClearlyIP, Skyetel, Vitelity, DigitalOcean, Vultr, VoIP.ms, 3CX, Sangoma, TelecomsXchange and VitalPBX have provided financial support to Nerd Vittles and our open source projects through advertising, referral revenue, and/or merchandise. As an Amazon Associate and Best Buy Affiliate, we also earn from qualifying purchases. We’ve chosen these providers not the other way around. Our decisions are based upon their corporate reputation and the quality of their offerings and pricing. Our recommendations regarding technology are reached without regard to financial compensation except in situations in which comparable products at comparable pricing are available from multiple sources. In this limited case, we support our sponsors because our sponsors support us.
BOGO Bonaza: Enjoy state-of-the-art VoIP service with a $10 credit and half-price SIP service on up to $500 of Skyetel trunking with free number porting when you fund your Skyetel account. No limits on number of simultaneous calls. Quadruple data center redundancy. $25 monthly minimum spend required. Tutorial and sign up details are here.
![]() The lynchpin of Incredible PBX 2020 and beyond is ClearlyIP components which bring management of FreePBX modules and SIP phone integration to a level never before available with any other Asterisk distribution. And now you can configure and reconfigure your new Incredible PBX phones from the convenience of the Incredible PBX GUI.
The lynchpin of Incredible PBX 2020 and beyond is ClearlyIP components which bring management of FreePBX modules and SIP phone integration to a level never before available with any other Asterisk distribution. And now you can configure and reconfigure your new Incredible PBX phones from the convenience of the Incredible PBX GUI.
VitalPBX is perhaps the fastest-growing PBX offering based upon Asterisk with an installed presence in more than 100 countries worldwide. VitalPBX has generously provided a customized White Label version of Incredible PBX tailored for use with all Incredible PBX and VitalPBX custom applications. Follow this link for a free test drive!
Special Thanks to Vitelity. Vitelity is now Voyant Communications and has halted new registrations for the time being. Our special thanks to Vitelity for their unwavering financial support over many years and to the many Nerd Vittles readers who continue to enjoy the benefits of their service offerings. We will keep everyone posted on further developments.

- Our discussion today is focused on the free, MIT-licensed version of OpenVPN. For details on their commercial offerings, follow this link. [↩]
A New World: Adding Cellular Extensions to Incredible PBX

Over the past few weeks, we’ve introduced a revolutionary new technology for the Asterisk® and FreePBX® community by marrying Incredible PBX® with GTI Global cellular extensions. For $20 to $35 a month, you get a new SIM card for your unlocked GSM cellphone that links all four U.S. carrier networks to a PJsip extension on your PBX. Incoming calls ring on both the cellphone and any other SIP phone connected to the same PJsip extension. Outbound calls from the cellphone get processed just like every other outbound call on your PBX. All the other bells and whistles that make Asterisk and FreePBX a one-of-a-kind platform work exactly the same way on the smartphone as they do with every other PBX extension. And your cell phone is no longer tied to a single carrier’s network. Based upon your current U.S. location, the GTI SIM finds the strongest signal by automatically selecting from the cell towers of the four major U.S. carriers: AT&T, Verizon, T-Mobile, and Sprint. And last week, we added additional icing to the cake by introducing the perfect cloud platform for Incredible PBX in either Atlanta or Los Angeles for a jaw-dropping $25 a year with a 5-minute install.
Today we want to document the setup procedure to put all the cellular pieces in place to add a GTI-enabled cellphone to your Incredible PBX platform. In a nutshell, there are preliminary configuration steps on your PBX so that GTI can verify that your PBX can be successfully integrated into their cellular network. Next, you’ll need to sign up for service with GTI Global and provide some basic information about your server configuration. Once you receive credentials from GTI Global, you’ll need to complete some additional setup steps on your PBX including creation of a GTI trunk as well as configuring inbound and outbound routes to support your cellphone calls. You’ll also need to add exceptions for each GTI DID to the [from-sip-external] context. Finally, await delivery of your SIM card and then decide how you will deploy the GTI SIM on a GSM cellphone of your choice.
GTI Global provides promotional consideration to help defray costs of our Asterisk projects.
Preliminary Configuration Steps with Incredible PBX
To connect a GTI-enabled cellphone to Incredible PBX, here are the preliminary steps:
- Incredible PBX must have a static IP address on the public Internet.
- Whitelist a number of GTI IP addresses in your firewall.
- Create a PJsip extension for each GTI-enabled cellphone.
- Create a Preliminary Chan_SIP Trunk for Registration to GTI.
These whitelist entries should be added to iptables-custom in the /usr/local/sbin directory:
/usr/sbin/iptables -I INPUT -p udp -m udp -s 99.198.122.166 --dport 5060:5069 -j ACCEPT
/usr/sbin/iptables -I INPUT -p udp -m udp -s 99.198.110.51  --dport 5060:5069 -j ACCEPT
/usr/sbin/iptables -I INPUT -p udp -m udp -s 96.127.174.38  --dport 5060:5069 -j ACCEPT
/usr/sbin/iptables -I INPUT -p udp -m udp -s 37.18.129.170  --dport 5060:5069 -j ACCEPT
/usr/sbin/iptables -I INPUT -p udp -m udp -s 37.18.129.171  --dport 5060:5069 -j ACCEPT
/usr/sbin/iptables -I INPUT -p udp -m udp -s 37.18.129.172  --dport 5060:5069 -j ACCEPT
/usr/sbin/iptables -I INPUT -p udp -m udp -s 37.18.129.173  --dport 5060:5069 -j ACCEPT
/usr/sbin/iptables -I INPUT -p udp -m udp -s someid.mvnoserver.com --dport 5060:5069 -j ACCEPT
For each GTI cellphone you plan to deploy, add a PJsip extension with a very secure password:
Extension: 484xx1
Display Name: 484xx1 GTI
Secret: yourSuperSecretpassword

Advanced -> Max Contacts: 3
Also make note of the SIP port that is configured for your PJsip extensions, typically 5061. It’s shown as Port to Listen On under Settings -> SIP Settings -> PJsip Settings in FreePBX GUI.
Create a preliminary Chan_SIP Trunk for registration to GTI leaving the CallerID field empty:
Trunk Name: trunk4321

PEER Details:

username=trunk4321
type=friend
secret=yourBIGpassword
host=xxxxxx.mvnoserver.com
disallow=all
allow=ulaw
canreinvite=no
dtmfmode=rfc2833
port=5062

Register string: trunk4321:yourBIGpassword@xxxxxx.mvnoserver.com:5062
Registration Information to be Provided to GTI
As part of your GTI setup procedure, in addition to your name and a reachable cellphone number, you will be prompted for the following information. If any of it is missing, open a support ticket and provide it. NOTE: you must register through our portal, or your request will be denied unless you pay the standard $250 setup fee which is waived for our users. All GTI accounts through Nerd Vittles include one free SIM card, a free trunk account to process calls to and from your GTI pjSIP extension(s), and a free DID for each SIM card. Unlimited calling and unlimited SMS/MMS messaging is included on all plans. Pricing difference is for monthly data allocations: $20 (no data), $25 (2GB), and $35 (4GB). You must pay for the first month’s service BEFORE your SIM card will be shipped.
- PBX Public IP Address and Trunk Listening Port (5062)
- Extension IP address (PBX public IP address)
- pjSIP Extension Number
- pjSIP Extension Secret
- pjSIP Extension Port (5061)
- Service Desired: $20, $25, or $35 monthly plan
- Area Code Desired for DID
- Business Name and Shipping Address for Your SIM
Configuring Your PBX with GTI Credentials
Once GTI has verified that they can communicate with your PBX, you will be provided the credentials for your GTI Trunk. Simply edit the trunk you configured above inserting the Trunkname/Username, Secret, Host, and Port for your new Trunk. Modify the Register String, save your settings, and reload your dialplan. Also edit your whitelist and change the FQDN from someid.mvnoserver.com to the host name that was provided. Then restart the firewall: iptables-restart.
Verifying Successful Extension & Trunk Registrations. Once your GTI extension and trunk are configured. You can verify successful connections in the Asterisk CLI.
For the extension: pjsip show aors
For the trunk: sip show registry
Configuring an Inbound Route for GTI Global Calls. Replacing 16785551212 with your actual 11-digit DID assigned to each cellphone, create Inbound Routes that look like this:
Description: GTIglobal 16785551212
DID Number: 16785551212
Destination: Extension -> 484001 (extension number of matching SIM)
Also add the following context at the end of /etc/asterisk/extensions_custom.conf using your DID. Then reload your dialplan: asterisk -rx "dialplan reload"
[from-sip-external]
; GTI Global
exten => 16785551212,3,Goto(from-trunk,${DID},1)
Configuring an Outbound Route for GTI Global Calls. No special outbound routes are required unless you wish to use the GTI Global trunk to process U.S. calls at no cost. In this case, configure an Outbound Route pointing to your GTI Global Trunk. NOTE: Calls using this trunk can only be made from the extensions associated with GTI Global SIMs.
CallerID and Trunking Strategy. In setting up the GTI components in FreePBX, you need to consider how you wish to process outbound calls. If you want all outbound calls including those from the GTI extensions to reflect the company’s main phone number, then you can use your default outbound route making certain that CallerID override is set with the company number in the appropriate trunks. No CallerID should be set in the outbound route.
If you want calls from the GTI extensions to use the GTI trunk with the CallerID number of the individual cellphones, then the GTI trunk needs to be moved to the top of the default route sequence with no CallerID number specified in the GTI trunk or the outbound route. Instead, set the correct 11-digit CallerID numbers in each of the GTI extensions. This will not impact outbound calls from other extensions because the GTI trunk will indicate congestion forcing the calls out through the next trunk specified in the outbound route.
I’ve Got My GTI SIM. Now What?
It’s decision time on what sort of smartphone you wish to use with your GTI SIM. If you’re a heavy data consumer then it may make sense to acquire a cellphone that supports dual SIMs and use a SIM with an unlimited data plan as your data provider and use the GTI SIM for business purposes with your PBX.
Choosing a Cellphone Platform. Our favorite deployment strategy is to take advantage of the new dual SIM offerings that allow a user to have one SIM for personal use and a second SIM (GTI) for business use. This lets you acquire the least expensive cell service with unlimited data for personal use and acquire the $20 GTI SIM with no data plan through our Incredible PBX offering. You don’t really need two data plans on the same smartphone. A couple of options worth exploring include GTI’s MVNO offering of T-Mobile unlimited data service for $35 a month and Visible (a Verizon-owned MVNO) that offers unlimited plans for as little as $25 a month with a four-user signup. The users need not be related, and the users can each pay their own monthly bill. Keep in mind that MVNOs almost always have fine print allowing "deprioritization" in busy areas and during busy times of the day. And the underlying carriers always screw their MVNO customers first.
Some smartphones support two SIMs while others have one physical SIM slot plus an eSIM registration that can be acquired from the major carriers. We personally liked an unlocked $200 Motorola G8+ which has two actual SIM slots as do most of the newer Samsung, OnePlus, Huawei, and many other smartphones. Several cellphones from BLU are available for under $25. The following devices currently support a single SIM card plus an eSIM:
- Apple® iPhone® SE
- Apple iPhone 11
- Apple iPhone 11 Pro
- Apple iPhone 11 Pro Max
- Apple iPhone XR
- Apple iPhone XS
- Apple iPhone XS Max
- Google Pixel 4 / Pixel 4 XL
Configuring the API Settings for GTI. Once you insert your SIM into your smartphone and power it on, you need to modify the API settings and choose GTI Global (Mobile-X) as your provider for the GTI SIM. Here is a FAQ covering the appropriate API settings depending on whether you’re using an iPhone or Android phone. Here’s another tip. Even though your phone may show a number of available carriers other than Mobile-X, that doesn’t mean you can connect to any of them directly. Why? Because you don’t have credentials to access those networks. Your connection to those other networks is only available through Mobile-X using your GTI credentials.
Testing Out Your GTI Smartphone
Once you complete all of the steps above, it’s time to try things out. From your cellphone, try dialing *98 to connect to Asterisk voicemail. Next, try calling another extension on your PBX. Then try calling an outside number. Finally, try calling the DID of your GTI SIM from another phone and be sure it rings and you have audio in both directions.
When you complete the testing, you can add another SIP phone to the same extension as your GTI cellphone. Be sure to set the port to the proper port for your PJsip extension. When you call your GTI SIM’s DID, both the smartphone and the SIP phone should ring simultaneously.
In some environments, you may wish to configure 611 calls to ring a support ring group in your organization. If so, add a new SIP extension 611 and forward calls to that extension to the number of the desired ring group. For example, if the Ring Group number is 777, you could enter the following command at the Asterisk CLI: database put CF 611 777.
Originally published: Monday, July 13, 2020
Need help with Asterisk? Visit the VoIP-info Forum.
Special Thanks to Our Generous Sponsors
FULL DISCLOSURE: ClearlyIP, Skyetel, Vitelity, DigitalOcean, Vultr, VoIP.ms, 3CX, Sangoma, TelecomsXchange and VitalPBX have provided financial support to Nerd Vittles and our open source projects through advertising, referral revenue, and/or merchandise. As an Amazon Associate and Best Buy Affiliate, we also earn from qualifying purchases. We’ve chosen these providers not the other way around. Our decisions are based upon their corporate reputation and the quality of their offerings and pricing. Our recommendations regarding technology are reached without regard to financial compensation except in situations in which comparable products at comparable pricing are available from multiple sources. In this limited case, we support our sponsors because our sponsors support us.
BOGO Bonaza: Enjoy state-of-the-art VoIP service with a $10 credit and half-price SIP service on up to $500 of Skyetel trunking with free number porting when you fund your Skyetel account. No limits on number of simultaneous calls. Quadruple data center redundancy. $25 monthly minimum spend required. Tutorial and sign up details are here.
![]() The lynchpin of Incredible PBX 2020 and beyond is ClearlyIP components which bring management of FreePBX modules and SIP phone integration to a level never before available with any other Asterisk distribution. And now you can configure and reconfigure your new Incredible PBX phones from the convenience of the Incredible PBX GUI.
The lynchpin of Incredible PBX 2020 and beyond is ClearlyIP components which bring management of FreePBX modules and SIP phone integration to a level never before available with any other Asterisk distribution. And now you can configure and reconfigure your new Incredible PBX phones from the convenience of the Incredible PBX GUI.
VitalPBX is perhaps the fastest-growing PBX offering based upon Asterisk with an installed presence in more than 100 countries worldwide. VitalPBX has generously provided a customized White Label version of Incredible PBX tailored for use with all Incredible PBX and VitalPBX custom applications. Follow this link for a free test drive!
Special Thanks to Vitelity. Vitelity is now Voyant Communications and has halted new registrations for the time being. Our special thanks to Vitelity for their unwavering financial support over many years and to the many Nerd Vittles readers who continue to enjoy the benefits of their service offerings. We will keep everyone posted on further developments.
Last Chance to Jump onto Incredible PBX Cellular Bandwagon

We introduced our new GTI Technologies cellular extensions for U.S.-based Incredible PBX® platforms last week, and the enthusiastic response has been truly amazing. This week we want to share the results of our testing, and encourage you to become one of the pioneers for this exciting new technology. It can be integrated into almost any Asterisk® platform.
To briefly summarize, GTI cellular extensions provide a traditional cellphone connection to all four of the major U.S. carriers. GTI-enabled cellphones also register as traditional PJsip extensions with Asterisk. The GTI SIM deciphers the best network based upon the cellphone’s current location and then processes inbound and outbound calls just as if your cellphone were a registered desktop SIP phone on your PBX. Incoming calls are routed according to the inbound routing rules on your PBX, and outgoing calls follow the outbound routing rules of your PBX. 911 calls are processed directly by the carrier to whom your cellphone is connected.
GTI Global provides promotional consideration to help defray costs of our Asterisk projects.

This is not our first rodeo, and we wander into new communications territory with our eyes wide open. So the real test of this new platform was our recent 1,000 mile voyage in the southeastern United States. Our benchmark cellphone is registered on the AT&T network and reported one or two bars of coverage throughout much of the journey. That’s more than adequate to handle calls, text messaging, Waze, and TuneIn Radio with less than a handful of momentary outages. But what a difference four carrier connectivity makes. On our Google Pixel 3 with the GTI SIM, we observed four-bar cellular coverage throughout most of the trip. So my first observation would be that those in remote locations with spotty cellphone service are likely to experience a dramatic improvement in connectivity thanks to access to almost every cellphone tower in the United States. This has nothing to do with Asterisk and everything to do with simply having a better cellphone experience in general.
Now for the Asterisk component using a GTI SIM-based cellphone. If you write down the top ten things you love about Asterisk, you now can do almost all of them from your cellphone: transfer calls, listen to your voicemail, call other extensions and ring groups, use various trunking options by dialing prefixes to save on international calls, chatting with colleagues, unlocking a front door, opening a gate, retrieving news and weather data, and on and on. You can even use the traditional 611 cellular option to route calls to your help desk or security services. And, thanks to the magic of PJsip, folks can call your office extension and both your cellphone and desktop phone ring. They’ll never know you’ve left the office.
Pricing for GTI cellular service is competitive until you get into the high data categories. Unlimited calling and texting is available on all of the plans. With no data service which is not required for calling and messaging, the monthly cost is just $20. A 2GB data plan is $25.
And here is an update on an Unlimited Data Plan that we received this morning:
We are working on building an "unlimited" data plan that is based on a data throttling mechanism. This mechanism would look like this:
User would be sold a 20GB data bundle. Once the user reaches 15GB, the data channel speed would be throttled to 128 kbps. This should stretch the remaining 5GB of data so it will last through the end of the month. While it is not truly unlimited data [nobody else has it either], it gives the perception of unlimited data to the end-user. This type of approach is under review by the business team.
UPDATE: GTI Global is a T-Mobile MVNO. So another option would be to purchase a separate T-Mobile SIM to cover data requirements. An unlimited data T-Mobile SIM costs $35/month while an unlimited plan with 2GB 4G LTE data and 3G throttling runs $20/month. There is a $2 charge for the additional T-Mobile SIM.
And here is another update. Canada DIDs are now available for an additional $0.55 per month. Cellphone calls still have to be initiated or received within the U.S.
Choosing a Cellphone Platform. Our favorite deployment strategy is to take advantage of the new dual SIM offerings that allow a user to have one SIM for personal use and a second SIM (GTI) for business use. This lets you acquire the least expensive cell service with unlimited data for personal use and acquire the $20 GTI SIM with no data plan through our Incredible PBX offering. You don’t really need two data plans on the same smartphone.
Some smartphones support two SIMs while others have one physical SIM slot plus an eSIM registration that can be acquired from the major carriers. We personally liked an unlocked $200 Motorola G8+ which has two actual SIM slots as do most of the newer Samsung, OnePlus, Huawei, and many other smartphones. Several cellphones from BLU are available for under $25. The following devices currently support a single SIM card plus an eSIM:
- Apple® iPhone® SE
- Apple iPhone 11
- Apple iPhone 11 Pro
- Apple iPhone 11 Pro Max
- Apple iPhone XR
- Apple iPhone XS
- Apple iPhone XS Max
- Google Pixel 4 / Pixel 4 XL
Become a Pioneer. At the end of this week, we’ll submit to GTI the email addresses of those wanting to venture into the future along with us. We think the companies you represent and the customers you support will thank you six months from now. GTI service is rock-solid, the technology has no competition, and the rewards for you and the organizations you support are noteworthy. You must have an Incredible PBX server or comparable Asterisk server with a static, public Internet address to use this service. Setup details are in last week’s article.
If you’d like to join the adventure, please shoot us an email request this week and keep us informed about your progress. We can’t wait to share in your discoveries!
UPDATE: After you hear back from us with the signup details, here’s what happens next. You will sign up on our GTI Portal. Within an hour or two, you will get an email from GTI requesting the IP address of your server and extension credentials for each GTI SIM. Once you have provided that information, GTI will provision your account. It typically takes about 2 to 4 hours for service setup on carriers network (and some time less that 30 minutes). Then you will receive further notice/request and or status of the progress via a support ticket with a copy to your email address. GTIGLOBAL IP address and FQDN information will be provided after GTI has completed the setup of your Asterisk/FreePBX domain and IP in GTI’s system. If GTI needs clarification or additional information, GTI will contact you via support ticket. Once provisioned, all of the information will be available in your GTI portal. We’re providing the sequence of events so that you can be on the lookout for each step. If it doesn’t happen, open a support ticket.
Continue Reading: Soup-to-Nuts Tutorial: Adding Cellular Extensions to Incredible PBX
Originally published: Monday, June 29, 2020
Need help with Asterisk? Visit the VoIP-info Forum.
Special Thanks to Our Generous Sponsors
FULL DISCLOSURE: ClearlyIP, Skyetel, Vitelity, DigitalOcean, Vultr, VoIP.ms, 3CX, Sangoma, TelecomsXchange and VitalPBX have provided financial support to Nerd Vittles and our open source projects through advertising, referral revenue, and/or merchandise. As an Amazon Associate and Best Buy Affiliate, we also earn from qualifying purchases. We’ve chosen these providers not the other way around. Our decisions are based upon their corporate reputation and the quality of their offerings and pricing. Our recommendations regarding technology are reached without regard to financial compensation except in situations in which comparable products at comparable pricing are available from multiple sources. In this limited case, we support our sponsors because our sponsors support us.
BOGO Bonaza: Enjoy state-of-the-art VoIP service with a $10 credit and half-price SIP service on up to $500 of Skyetel trunking with free number porting when you fund your Skyetel account. No limits on number of simultaneous calls. Quadruple data center redundancy. $25 monthly minimum spend required. Tutorial and sign up details are here.
![]() The lynchpin of Incredible PBX 2020 and beyond is ClearlyIP components which bring management of FreePBX modules and SIP phone integration to a level never before available with any other Asterisk distribution. And now you can configure and reconfigure your new Incredible PBX phones from the convenience of the Incredible PBX GUI.
The lynchpin of Incredible PBX 2020 and beyond is ClearlyIP components which bring management of FreePBX modules and SIP phone integration to a level never before available with any other Asterisk distribution. And now you can configure and reconfigure your new Incredible PBX phones from the convenience of the Incredible PBX GUI.
VitalPBX is perhaps the fastest-growing PBX offering based upon Asterisk with an installed presence in more than 100 countries worldwide. VitalPBX has generously provided a customized White Label version of Incredible PBX tailored for use with all Incredible PBX and VitalPBX custom applications. Follow this link for a free test drive!
Special Thanks to Vitelity. Vitelity is now Voyant Communications and has halted new registrations for the time being. Our special thanks to Vitelity for their unwavering financial support over many years and to the many Nerd Vittles readers who continue to enjoy the benefits of their service offerings. We will keep everyone posted on further developments.
Introducing Cellular Extensions for Incredible PBX & Asterisk

The Holy Grail for many of us in the VoIP community has been a cellphone that functions like a traditional Asterisk® extension on your PBX. The typical use case would be a real estate agent, service technician, salesperson, or other mobile worker who interacts with a home office as part of their daily routine. The beauty of this for the mobile workforce is it allows both the home office receptionist and the mobile worker to not only exchange calls but also to transfer the calls and retrieve voicemail just as if the worker were using a phone in the office.
Some of you may recall that we introduced a service like this called vMobile from Vitelity about six years ago. vMobile had some growing pains not the least of which was total reliance upon Sprint for cellular coverage. The service has been discontinued.

Today we’re testing a new offering from Global Technologies (GTI Global) on the Incredible PBX® platform that addresses some of the shortcomings of the vMobile offering. First, it provides a SIM card that can automatically utilize all four of the major carrier networks in the United States. Second, it offers a dedicated DID, a SIP trunk with free U.S. calling, and an Asterisk extension for every cellphone. And third, it takes advantage of PJsip which permits multiple phones to be connected to and ring on the same Asterisk extension.
GTI Global provided promotional consideration to help defray costs of our Asterisk projects.
Prerequisites. System integrators will acquire SIM cards through the Incredible PBX project. Pricing for the recommended unlimited calling, unlimited messaging, and 2GB monthly data plan is $25/month. A NoData plan is available for $20/month, and other higher data plans also are available. The SIM is compatible with any iPhone® or Android phone device. Users must provide their own cellphones which need not be jailbroken. Dual-SIM smartphones allow users to dedicate one line to the GTI Global SIM and another line for personal use. GTI Global currently is exploring support for eSIMs which would facilitate iPhone use.
To use the SIM-based phone, a public-facing Asterisk platform with a dedicated IP address is required, and it must support PJsip extensions. Incredible PBX 2020, Incredible PBX 16-15, and Incredible PBX 13-13 all have been tested. Other FreePBX® 13, 14, and 15 platforms should also suffice. Accompanying each SIM is a dedicated DID assigned to each cellphone. A matching PJsip extension must be created on the Asterisk platform, and the SIP credentials must be provided to GTI Global to make the cellphone connection to the PBX. Additional phones may be connected to the same PJsip extension to support a desktop phone or receptionist. Simply adjust the Max Connects entry when creating the PJsip extension to support the number of phones desired. Each phone on an extension requires a unique port.
How Calling Works. GTI Global has positioned servers in the facilities of every carrier. When a call arrives from a carrier’s tower, the carrier processes 911 calls directly through its network. For all other incoming calls, the carrier verifies the credentials of the SIM. Once verified, the call is passed to the GTI Global server which sends incoming calls to the associated extension on your PBX. The Inbound Route associated with that DID then sends the call to the assigned destination. If the GTI Global server is unavailable, the carrier processes the incoming calls just as it would any other call on its network by sending it directly to the cellphone.
When the cellphone user places a call, it is processed just as if the call had been made from an internal extension on the PBX with the exception of 911 calls which are handled directly by the carrier. After SIM verification, GTI Global passes the outgoing call to the PBX for processing using the Outbound Routing rules of the PBX. Internal extensions and voicemail can be dialed directly. Outbound calls can utilize any trunk associated with the PBX including the free U.S. trunk provided by GTI Global. CallerID is determined by the outbound trunk processing the call.
Configuring a GTI Global Extension. After logging into the FreePBX GUI, create a PJsip extension with the following settings:
Extension: 12345
Display Name: 12345 GTIglobal
Secret: yourSIPpassword

Advanced -> Max Contacts: 4
Configuring a GTI Global Trunk. Create a chan_SIP Trunk in the FreePBX GUI using your GTIglobal-provided credentials:
Trunk Name: trunk4321

PEER Details:

username=trunk4321
type=friend
secret=yourTRUNKpassword
host=xxxxxx.mvnoserver.com
disallow=all
allow=ulaw
canreinvite=no
dtmfmode=rfc2833
port=5062

Register string: trunk4321:yourTRUNKpassword@xxxxxx.mvnoserver.com:5062
IMPORTANT: When you sign up with GTI, you need to give them the IP address of your PBX, the credentials (extension and password) for your GTI PJsip extension, the outbound SIP port for your GTI trunk (UDP 5062), and the inbound PJsip port for your PJsip extension (UDP 5061).
Configuring an Inbound Route for GTI Global Calls. Replacing 16785551212 with your actual 11-digit DID assigned to each cellphone, create Inbound Routes that look like this:
Description: GTIglobal 16785551212
DID Number: 16785551212
Destination: Extension -> 12345 (your extension associated with each SIM)
You need to add the following context at the end of /etc/asterisk/extensions_custom.conf using your DID. Then reload your dialplan: asterisk -rx "dialplan reload"
[from-sip-external]
; GTI Global
exten => 16785551212,3,Goto(from-trunk,${DID},1)
Configuring an Outbound Route for GTI Global Calls. No special outbound routes are required unless you wish to use the GTI Global trunk to process U.S. calls at no cost. In this case, configure an Outbound Route pointing to your GTI Global Trunk. NOTE: Calls using this trunk can only be made from the extensions associated with GTI Global SIMs.
CallerID and Trunking Strategy. In setting up the GTI components in FreePBX, you need to consider how you wish to process outbound calls. If you want all outbound calls including those from the GTI extensions to reflect the company’s main phone number, then you can use your default outbound route making certain that CallerID override is set with the company number in the appropriate trunks. No CallerID should be set in the outbound route.
If you want calls from the GTI extensions to use the GTI trunk with the CallerID number of the individual cellphones, then the GTI trunk needs to be moved to the top of the default route sequence with no CallerID number specified in the GTI trunk or the outbound route. Instead, set the correct 11-digit CallerID numbers in each of the GTI extensions. This will not impact outbound calls from other extensions because the GTI trunk will indicate congestion forcing the calls out through the next trunk specified in the outbound route.
GTI Global Firewall WhiteList. On Incredible PBX servers and other IPtables platforms, add the following whitelist entries to your firewall:
/usr/sbin/iptables -I INPUT -p udp -m udp -s 99.198.122.166 --dport 5060:5069 -j ACCEPT
/usr/sbin/iptables -I INPUT -p udp -m udp -s 99.198.110.51  --dport 5060:5069 -j ACCEPT
/usr/sbin/iptables -I INPUT -p udp -m udp -s 96.127.174.38  --dport 5060:5069 -j ACCEPT
/usr/sbin/iptables -I INPUT -p udp -m udp -s 37.18.129.170  --dport 5060:5069 -j ACCEPT
/usr/sbin/iptables -I INPUT -p udp -m udp -s 37.18.129.171  --dport 5060:5069 -j ACCEPT
/usr/sbin/iptables -I INPUT -p udp -m udp -s 37.18.129.172  --dport 5060:5069 -j ACCEPT
/usr/sbin/iptables -I INPUT -p udp -m udp -s 37.18.129.173  --dport 5060:5069 -j ACCEPT
How to Proceed. If GTI Global cellular extensions are of interest for your customers, kindly contact us at support@incrediblepbx.com, and we’ll hook you up with the folks at GTI Global. There also is an extensive KnowledgeBase for those wanting more information.
Continue Reading: Last Chance to Jump onto Incredible PBX Cellular Bandwagon
Soup-to-Nuts Tutorial: Adding Cellular Extensions to Incredible PBX
Originally published: Monday, June 22, 2020
Need help with Asterisk? Visit the VoIP-info Forum.
Special Thanks to Our Generous Sponsors
FULL DISCLOSURE: ClearlyIP, Skyetel, Vitelity, DigitalOcean, Vultr, VoIP.ms, 3CX, Sangoma, TelecomsXchange and VitalPBX have provided financial support to Nerd Vittles and our open source projects through advertising, referral revenue, and/or merchandise. As an Amazon Associate and Best Buy Affiliate, we also earn from qualifying purchases. We’ve chosen these providers not the other way around. Our decisions are based upon their corporate reputation and the quality of their offerings and pricing. Our recommendations regarding technology are reached without regard to financial compensation except in situations in which comparable products at comparable pricing are available from multiple sources. In this limited case, we support our sponsors because our sponsors support us.
BOGO Bonaza: Enjoy state-of-the-art VoIP service with a $10 credit and half-price SIP service on up to $500 of Skyetel trunking with free number porting when you fund your Skyetel account. No limits on number of simultaneous calls. Quadruple data center redundancy. $25 monthly minimum spend required. Tutorial and sign up details are here.
![]() The lynchpin of Incredible PBX 2020 and beyond is ClearlyIP components which bring management of FreePBX modules and SIP phone integration to a level never before available with any other Asterisk distribution. And now you can configure and reconfigure your new Incredible PBX phones from the convenience of the Incredible PBX GUI.
The lynchpin of Incredible PBX 2020 and beyond is ClearlyIP components which bring management of FreePBX modules and SIP phone integration to a level never before available with any other Asterisk distribution. And now you can configure and reconfigure your new Incredible PBX phones from the convenience of the Incredible PBX GUI.
VitalPBX is perhaps the fastest-growing PBX offering based upon Asterisk with an installed presence in more than 100 countries worldwide. VitalPBX has generously provided a customized White Label version of Incredible PBX tailored for use with all Incredible PBX and VitalPBX custom applications. Follow this link for a free test drive!
Special Thanks to Vitelity. Vitelity is now Voyant Communications and has halted new registrations for the time being. Our special thanks to Vitelity for their unwavering financial support over many years and to the many Nerd Vittles readers who continue to enjoy the benefits of their service offerings. We will keep everyone posted on further developments.
Vonage Roars into the Asterisk World with Nexmo

We’re a bit late to the Nexmo® party. For those unfamiliar with the company, Nexmo was one of the leading communications platform-as-a-service (CPaaS) companies prior to their acquisition by Vonage® four years ago. Perhaps because of the Vonage name, Nexmo never appeared on our Asterisk® radar. This ZDnet article will get you up to speed. Suffice it to say, Nexmo has one of the best APIs in the VoIP business, and their pricing is reasonable. A DID offering multiple call paths will only set you back $1 a month with incoming calls costing $0.0049/minute with per second billing. Outbound U.S. calls are $0.0139/minute. Sending SMS messages using your DID costs $0.0068 per message while incoming messages are $0.0062. While barely scratching the surface of the Nexmo offerings, our goal today is to show you how to deploy a Nexmo trunk in IncrediblePBX® 2020 that provides voice and SMS.
As we have mentioned many times, one of the real beauties of VoIP is not having to put all your eggs in one basket like in the old MaBell days. Other than $1 a month for a DID, there are no other costs associated with a Nexmo account if you don’t use it AND your first $10 of usage is free. It also provides a terrific failover option from one of our two favorite providers: Skyetel and ClearlyIP.
Overview. There are eleven pieces to put in place to get inbound and outbound calls and SMS messages flowing. First, on the Nexmo site, (1) you’ll need to set up an account and (2) order a DID. HINT: When you search for numbers, be sure to use the 1 prefix to search for U.S. numbers by area code. Once the DID number has been activated, edit Your Number and (3) enter a web address to deliver incoming SMS messages to your PBX and (4) enter a SIP URI to send incoming calls to your PBX. (5) You’ll also need to make note of your API credentials and DID number which you will need in setting up the trunk and scripts on your PBX.
Second, on the PBX side, (1) you’ll need to whitelist several IP addresses for Nexmo in your firewall settings, (2) create a PJsip trunk with your Nexmo credentials and 11-digit CallerID number, (3) create an Outbound Route to send calls to Nexmo, (4) create an Inbound Route to accept calls from your Nexmo DID, (5) add a from-internal-custom dialplan rule to allow from-sip-external calls from Nexmo, and (6) install and configure our scripts to process SMS messages. This requires that outbound email is functional on your PBX.
SMS Messaging is a little different on every platform. The way we implemented it with Nexmo goes like this. Incoming SMS messages can be delivered either to an email address of your choice. Or, if your cellphone provider supports it, you can direct the emails to an address that your provider offers to process incoming messages and deliver by SMS to your cellphone:
- AT&T: phonenumber@txt.att.net
- Sprint: phonenumber@messaging.sprintpcs.com
- T-Mobile: phonenumber@tmomail.net
- Verizon: phonenumber@vtext.com or phonenumber@vzwpix.com
- Virgin Mobile: phonenumber@vmobl.com
Keep in mind that you can’t reply to a delivered email message and expect it to reach the sender. Outbound SMS messages with Nexmo must be generated either with a web browser pointed to the SMS directory on your PBX or from the Linux command line of your server. If the incoming SMS messages are redirected to SMS on your cellphone, you can click on the ORIGIN link and send an SMS reply, but it will have the number of your cellphone, not your Nexmo number. We’ll cover the syntax for these options once we get all the pieces in place.
Configuring SendMail with Incredible PBX 2020
Before we get too far along, let’s make sure you can send emails from your PBX. In order to receive SMS messages by email delivery, outbound mail functionality from your server obviously is required. If you’ve deployed your server in your home, your Internet Service Provider probably blocks downstream mail servers such as Incredible PBX from sending mail. This is done to reduce SPAM. In this case, you will need to configure SendMail using either your ISP or Gmail as an SMTP Relay Host. NOTE: If you are using a Gmail account with 2-step verification enabled, you MUST use a Gmail App Key instead of your Gmail account password. You also must enable Less Secure Apps access to the Gmail account. Here are the steps using a Gmail account:
cd /etc/mail
yum -y install sendmail-cf
hostname -f > genericsdomain
touch genericstable
cd /usr/bin
rm -f makemap
ln -s ../sbin/makemap.sendmail makemap
cd /etc/mail
makemap -r hash genericstable.db < genericstable
mv sendmail.mc sendmail.mc.original
wget http://incrediblepbx.com/sendmail.mc.gmail
cp sendmail.mc.gmail sendmail.mc
mkdir -p auth
chmod 700 auth
cd auth
echo AuthInfo:smtp.gmail.com \\"U:smmsp\\" \\"I:user_id\\" \\"P:password\\" \\"M:PLAIN\\" > client-info
echo AuthInfo:smtp.gmail.com:587 \\"U:smmsp\\" \\"I:user_id\\" \\"P:password\\" \\"M:PLAIN\\" >> client-info
echo AuthInfo:smtp.gmail.com:465 \\"U:smmsp\\" \\"I:user_id\\" \\"P:password\\" \\"M:PLAIN\\" >> client-info
# Stop here and edit client-info (nano -w client-info) in all three lines.
# Replace  user_id with your gMail account name without @gmail.com
# Replace password with your real gMail password OR
#  use your Gmail App Key if 2-step verification is enabled
# Be sure to replace the double-quotes shown above if they don't appear in the file!!!
# Save your changes (Ctrl-X, Y, then Enter)
chmod 600 client-info
makemap -r hash client-info.db < client-info
cd ..
make
systemctl restart sendmail
If your server is hosted in the cloud and your provider does not block TCP port 25, then you can send mail without using a SmartHost; however, your server's hostname must actually be real or downstream mail servers will reject your mail. You can set your server's hostname like this: hostname myserver.myhost.com. This is usually sufficient; however, it's a good idea to also add the hostname in /etc/hostname and in /etc/hosts as the first entry on 127.0.0.1 line:
127.0.0.1 myserver.myhost.com pbx.local localhost localhost.localdomain
Next, test outbound mail using this command with your actual email address:
echo "test" | mail -s testmessage yourname@youremaildomain.com
Configuring Nexmo for Use with Incredible PBX
NOTE: For ease of reference in the examples, we'll use 8005551212 to represent your 10-digit DID number, 18005551212 to represent your 11-digit DID number, and 22.33.44.55 to represent the public IP address of your PBX. You'll obviously need to replace these entries.
1. To get started, open Nexmo.com with a web browser and click on Try It Free. No credit card is required to use your $10 credit.
2. Next, purchase a DID to use with your PBX. Login to your Nexmo account, and click # Numbers then Buy Numbers. For Features, choose SMS & Voice. For Type, leave it set to Mobile. For Number, choose Starts With and enter 1800 replacing 800 with your desired area code. Don't forget the 1. When we opened our account, it already had a DID chosen. You can either use that one to experiment, or delete it and choose your own.
3. Click # Numbers then Your Numbers and click on the pencil icon to the right of your DID to edit the DID settings. Under SMS, enter a Webhook URL that looks like this using the public IP address of your PBX: http://22.33.44.55/sms.
4. Under Voice, choose Forward to SIP and enter a SIP URI in this format using your 10-digit DID (not eleven digits here!) and the public IP address of your PBX: 8005551212@22.33.44.55. Then click SAVE.
5. Navigate to Settings under your Account Name and write down your API Key and Secret as well as your purchased DID Number.
Configuring Incredible PBX for Use with Nexmo
1. Incredible PBX includes a whitelist as part of its Travelin' Man 3 firewall design. Begin by editing iptables-custom in /usr/local/sbin. Search for: # custom rules go below here. Below that line, insert the following, save the file, and restart IPtables: iptables-restsrt
# // New entry for Nexmo
/usr/sbin/iptables -I INPUT -s api.nexmo.com  -j ACCEPT
/usr/sbin/iptables -I INPUT -s 169.63.86.0/24 -j ACCEPT
/usr/sbin/iptables -I INPUT -p udp -m udp -s 5.10.112.121  --dport 5060:5069 -j ACCEPT
/usr/sbin/iptables -I INPUT -p udp -m udp -s 5.10.112.122  --dport 5060:5069 -j ACCEPT
/usr/sbin/iptables -I INPUT -p udp -m udp -s 69.59.247.1   --dport 5060:5069 -j ACCEPT
/usr/sbin/iptables -I INPUT -p udp -m udp -s 69.59.247.2   --dport 5060:5069 -j ACCEPT
/usr/sbin/iptables -I INPUT -p udp -m udp -s 69.59.247.3   --dport 5060:5069 -j ACCEPT
/usr/sbin/iptables -I INPUT -p udp -m udp -s 69.59.247.4   --dport 5060:5069 -j ACCEPT
/usr/sbin/iptables -I INPUT -p udp -m udp -s 69.59.248.2   --dport 5060:5069 -j ACCEPT
/usr/sbin/iptables -I INPUT -p udp -m udp -s 69.59.248.3   --dport 5060:5069 -j ACCEPT
/usr/sbin/iptables -I INPUT -p udp -m udp -s 69.59.248.4   --dport 5060:5069 -j ACCEPT
/usr/sbin/iptables -I INPUT -p udp -m udp -s 69.59.248.9   --dport 5060:5069 -j ACCEPT
/usr/sbin/iptables -I INPUT -p udp -m udp -s 69.59.249.1   --dport 5060:5069 -j ACCEPT
/usr/sbin/iptables -I INPUT -p udp -m udp -s 69.59.249.2   --dport 5060:5069 -j ACCEPT
/usr/sbin/iptables -I INPUT -p udp -m udp -s 69.59.249.3   --dport 5060:5069 -j ACCEPT
/usr/sbin/iptables -I INPUT -p udp -m udp -s 69.59.249.4   --dport 5060:5069 -j ACCEPT
/usr/sbin/iptables -I INPUT -p udp -m udp -s 69.59.250.1   --dport 5060:5069 -j ACCEPT
/usr/sbin/iptables -I INPUT -p udp -m udp -s 69.59.250.2   --dport 5060:5069 -j ACCEPT
/usr/sbin/iptables -I INPUT -p udp -m udp -s 69.59.250.3   --dport 5060:5069 -j ACCEPT
/usr/sbin/iptables -I INPUT -p udp -m udp -s 69.59.250.4   --dport 5060:5069 -j ACCEPT
/usr/sbin/iptables -I INPUT -p udp -m udp -s 69.59.251.1   --dport 5060:5069 -j ACCEPT
/usr/sbin/iptables -I INPUT -p udp -m udp -s 69.59.251.2   --dport 5060:5069 -j ACCEPT
/usr/sbin/iptables -I INPUT -p udp -m udp -s 69.59.251.3   --dport 5060:5069 -j ACCEPT
/usr/sbin/iptables -I INPUT -p udp -m udp -s 69.59.251.4   --dport 5060:5069 -j ACCEPT
/usr/sbin/iptables -I INPUT -p udp -m udp -s 119.81.44.6   --dport 5060:5069 -j ACCEPT
/usr/sbin/iptables -I INPUT -p udp -m udp -s 119.81.44.7   --dport 5060:5069 -j ACCEPT
/usr/sbin/iptables -I INPUT -p udp -m udp -s 168.100.88.1  --dport 5060:5069 -j ACCEPT
/usr/sbin/iptables -I INPUT -p udp -m udp -s 168.100.88.2  --dport 5060:5069 -j ACCEPT
/usr/sbin/iptables -I INPUT -p udp -m udp -s 168.100.88.3  --dport 5060:5069 -j ACCEPT
/usr/sbin/iptables -I INPUT -p udp -m udp -s 168.100.88.4  --dport 5060:5069 -j ACCEPT
/usr/sbin/iptables -I INPUT -p udp -m udp -s 169.48.36.56  --dport 5060:5069 -j ACCEPT
/usr/sbin/iptables -I INPUT -p udp -m udp -s 169.48.36.66  --dport 5060:5069 -j ACCEPT
/usr/sbin/iptables -I INPUT -p udp -m udp -s 169.55.62.70  --dport 5060:5069 -j ACCEPT
/usr/sbin/iptables -I INPUT -p udp -m udp -s 169.55.62.215 --dport 5060:5069 -j ACCEPT
/usr/sbin/iptables -I INPUT -p udp -m udp -s 169.60.141.29 --dport 5060:5069 -j ACCEPT
/usr/sbin/iptables -I INPUT -p udp -m udp -s 169.60.141.30 --dport 5060:5069 -j ACCEPT
/usr/sbin/iptables -I INPUT -p udp -m udp -s 216.147.0.1   --dport 5060:5069 -j ACCEPT
/usr/sbin/iptables -I INPUT -p udp -m udp -s 216.147.0.2   --dport 5060:5069 -j ACCEPT
/usr/sbin/iptables -I INPUT -p udp -m udp -s 216.147.1.1   --dport 5060:5069 -j ACCEPT
/usr/sbin/iptables -I INPUT -p udp -m udp -s 216.147.1.2   --dport 5060:5069 -j ACCEPT
/usr/sbin/iptables -I INPUT -p udp -m udp -s 216.147.2.1   --dport 5060:5069 -j ACCEPT
/usr/sbin/iptables -I INPUT -p udp -m udp -s 216.147.2.2   --dport 5060:5069 -j ACCEPT
/usr/sbin/iptables -I INPUT -p udp -m udp -s 216.147.3.1   --dport 5060:5069 -j ACCEPT
/usr/sbin/iptables -I INPUT -p udp -m udp -s 216.147.3.2   --dport 5060:5069 -j ACCEPT
/usr/sbin/iptables -I INPUT -p udp -m udp -s 216.147.4.1   --dport 5060:5069 -j ACCEPT
/usr/sbin/iptables -I INPUT -p udp -m udp -s 216.147.4.2   --dport 5060:5069 -j ACCEPT
/usr/sbin/iptables -I INPUT -p udp -m udp -s 216.147.5.1   --dport 5060:5069 -j ACCEPT
/usr/sbin/iptables -I INPUT -p udp -m udp -s 216.147.5.2   --dport 5060:5069 -j ACCEPT
/usr/sbin/iptables -I INPUT -p udp -m udp -s 216.147.62.4  --dport 5060:5069 -j ACCEPT
/usr/sbin/iptables -I INPUT -p udp -m udp -s 216.147.62.5  --dport 5060:5069 -j ACCEPT
/usr/sbin/iptables -I INPUT -p udp -m udp -s 216.147.63.4  --dport 5060:5069 -j ACCEPT
/usr/sbin/iptables -I INPUT -p udp -m udp -s 216.147.63.5  --dport 5060:5069 -j ACCEPT
/usr/sbin/iptables -I INPUT -p udp -m udp -s 216.147.63.38 --dport 5060:5069 -j ACCEPT
/usr/sbin/iptables -I INPUT -p udp -m udp -s 216.147.63.39 --dport 5060:5069 -j ACCEPT
/usr/sbin/iptables -I INPUT -p udp -m udp -s 216.147.63.100  --dport 5060:5069 -j ACCEPT
/usr/sbin/iptables -I INPUT -p udp -m udp -s 216.147.63.101  --dport 5060:5069 -j ACCEPT
/usr/sbin/iptables -I INPUT -p udp -m udp -s 216.147.63.116  --dport 5060:5069 -j ACCEPT
/usr/sbin/iptables -I INPUT -p udp -m udp -s 216.147.63.117  --dport 5060:5069 -j ACCEPT
# // End entry for Nexmo
2. Login to FreePBX as admin and navigate to Connectivity -> Trunks -> Add PJsip Trunk.
In General tab, enter Trunk Name: nexmo. Enter Outbound CallerID: your 11-digit Nexmo DID. If you forget the 1 or if your CallerID number doesn't match your Nexmo DID number, outbound calls will be delivered as Anonymous. No CallerID spoofing with Nexmo.
In PJSIP Settings under the General tab, enter your API Key as Username, your API Secret as Secret, Outbound as Authentication, sip.nexmo.com as SIP Server, 5060 as SIP Port, and from-pstn-e164-us as Context. Retain the other defaults.
In PJSIP Settings under the Advanced tab, enter YES for Send LineIn Registration, and 5.10.112.121, 5.10.112.122, 119.81.44.6,119.81.44.7,169.60.141.29,169.60.141.30 for Match.
In PJSIP Settings under the Codecs tab, select ULAW and ALAW. Then click Submit and Reload the Dialplan when prompted. Verify registration: pjsip show registrations
3. Create an Outbound Route under Connectivity. Name the route: Nexmo. For Trunk Sequence, choose nexmo. Create two Dial Patterns: one for NXXNXXXXXX with a prefix of 1 and one for 1NXXNXXXXXX. Click Submit and Reload Dialplan when prompted.
4. Create an Inbound Route under Connectivity with a Description of Nexmo Vonage, a DID Number consisting of your 10-digit DID, and a Destination of your choice for the incoming calls. Click Submit and Reload Dialplan when prompted.
5. Anonymous SIP access typically is blocked with Incredible PBX. Because of the way Nexmo delivers incoming calls, we need to make an adjustment to allow SIR URI access from Nexmo. Edit extensions_custom.conf in /etc/asterisk and scroll to the bottom of the file. Insert the following lines replacing 8005551212 with your actual 10-digit DID. Then SAVE the file and reload your dialplan: asterisk -rx "dialplan reload"
[from-sip-external](+)
exten => 8005551212,1,Goto(from-trunk,${DID},1)
6. In FreePBX Settings -> SIP Settings, change the RTP Port Range to 10000-50000.
7. The only remaining piece is to install the scripts to manage SMS Messaging with Nexmo. While logged into your server as root, issue these commands to install all of the components:
# CentOS 6 requires minimum PHP 5.6 with remi.repo enabled
# Prerequisites already are in place with Incredible PBX 2020
# On CentOS platforms, use the next command:
yum -y install composer
# On Raspbian platforms, use the next command:
apt-get -y install composer
# the remaining commands work on all platforms
composer require nexmo/client
composer require slim/slim:^3.8
cd /var/www/html
wget http://incrediblepbx.com/nexmo-sms.tar.gz
tar zxvf nexmo-sms.tar.gz
rm -f nexmo-sms.tar.gz
cd sms
nano -w config.inc.php
When the editor opens, insert your Nexmo API key, secret, and 11-digit DID number. For your email address, you have a choice of using a traditional email address which will cause incoming SMS messages to be delivered to your email account. Or you can use an email address that maps to SMS messaging on your cellphone as explained above. In the HEADER field, insert your 11-digit DID number once again leaving @noreply.nexmo.com unchanged. Save the file: Ctrl-X, Y, then ENTER. Done!
Taking SMS Messaging for a Spin with Nexmo
To try things out, first send an SMS message from some device to your Nexmo DID number. You should receive a copy of the message in your email or as an SMS message on your smartphone if you elected to set that up.
Next, using a browser with WhiteList privileges to your PBX, send an SMS message to some SMS number using the following syntax where 22.33.44.55 is the PBX public IP address:
http://22.33.44.55/sms/sendsms.php/?SENDTO=18431234567&MSG="Test message."
Finally, after logging into your server as root, send another SMS message to some destination using the following syntax:
php /var/www/html/sms/sendsms.php 18431234567 "Test message."
Originally published: Monday, June 15, 2020 Updated: Sunday, October 30, 2022
Need help with Asterisk? Visit the VoIP-info Forum.
Special Thanks to Our Generous Sponsors
FULL DISCLOSURE: ClearlyIP, Skyetel, Vitelity, DigitalOcean, Vultr, VoIP.ms, 3CX, Sangoma, TelecomsXchange and VitalPBX have provided financial support to Nerd Vittles and our open source projects through advertising, referral revenue, and/or merchandise. As an Amazon Associate and Best Buy Affiliate, we also earn from qualifying purchases. We’ve chosen these providers not the other way around. Our decisions are based upon their corporate reputation and the quality of their offerings and pricing. Our recommendations regarding technology are reached without regard to financial compensation except in situations in which comparable products at comparable pricing are available from multiple sources. In this limited case, we support our sponsors because our sponsors support us.
BOGO Bonaza: Enjoy state-of-the-art VoIP service with a $10 credit and half-price SIP service on up to $500 of Skyetel trunking with free number porting when you fund your Skyetel account. No limits on number of simultaneous calls. Quadruple data center redundancy. $25 monthly minimum spend required. Tutorial and sign up details are here.
![]() The lynchpin of Incredible PBX 2020 and beyond is ClearlyIP components which bring management of FreePBX modules and SIP phone integration to a level never before available with any other Asterisk distribution. And now you can configure and reconfigure your new Incredible PBX phones from the convenience of the Incredible PBX GUI.
The lynchpin of Incredible PBX 2020 and beyond is ClearlyIP components which bring management of FreePBX modules and SIP phone integration to a level never before available with any other Asterisk distribution. And now you can configure and reconfigure your new Incredible PBX phones from the convenience of the Incredible PBX GUI.
VitalPBX is perhaps the fastest-growing PBX offering based upon Asterisk with an installed presence in more than 100 countries worldwide. VitalPBX has generously provided a customized White Label version of Incredible PBX tailored for use with all Incredible PBX and VitalPBX custom applications. Follow this link for a free test drive!
Special Thanks to Vitelity. Vitelity is now Voyant Communications and has halted new registrations for the time being. Our special thanks to Vitelity for their unwavering financial support over many years and to the many Nerd Vittles readers who continue to enjoy the benefits of their service offerings. We will keep everyone posted on further developments.
Free Asterisk Solutions
