
Home » Incredible PBX (Page 16)
Category Archives: Incredible PBX
The Most Versatile VoIP Provider: FREE PORTING

 JUST RELEASED: Visit the Incredible PBX Wiki
The Big 30: Incredible PBX 2020 Application User’s Guide

For those just beginning the Incredible PBX® 2020 adventure, start here for CentOS 7 or here for the Raspberry Pi. Once your system is up and running, you’ll be ready to kick the tires. And today we’ll cover 30 applications for Asterisk® and FreePBX® that are included in the latest and greatest Incredible PBX server. Now that you have some time on your hands, continue learning about this powerful platform by reading this documentation. If you still have questions, post them on the PIAF Forum for some quick and friendly assistance.
Here’s a Table of Contents to the Incredible PBX 2020 Applications with hotlinks. Enjoy!
- Checking System Status
- Enabling Speech Recognition for Asterisk
- Wolfram Alpha for Siri-like queries by phone*
- Automatic Update Utility
- Resetting Incredible PBX Passwords
- Apache Authentication for Apps
- IPtables Firewall WhiteList
- PortKnocker Remote Access
- Travelin’ Man 4 Remote Access by Phone
- Conference Bridge
- CallerID Name (CNAM) Lookups
- Faxing with Incredible PBX
- Voicemail 101 with Incredible PBX
- Email Delivery of MP3 Voicemails
- Reconfiguring SendMail for SmartHosts
- SMS Messaging with VoIP.ms
- SIP URI Calling with Speed Dials
- IVR Demo of Incredible PBX Applications*
- Backup and Restore Options
- AsteriDex – The Poor Man’s Rolodex®
- Voice Dialing with AsteriDex*
- Speed Dialing with AsteriDex
- Scheduling Reminders by Phone or Web
- DISA Access with Incredible PBX
- Yahoo! News Headlines
- Weather Forecasts with Incredible PBX*
- ODBC Application Support
- Today in History
- Time of Day
- WebMin
* Requires Voice Recognition implementation. See #2 above.
1. Checking Current Status of Incredible PBX
There are several ways to check the status of your server. First, log into your server as root and type: pbxstatus. You can even add the default phone number for your server by inserting it in /etc/pbx/.phone.
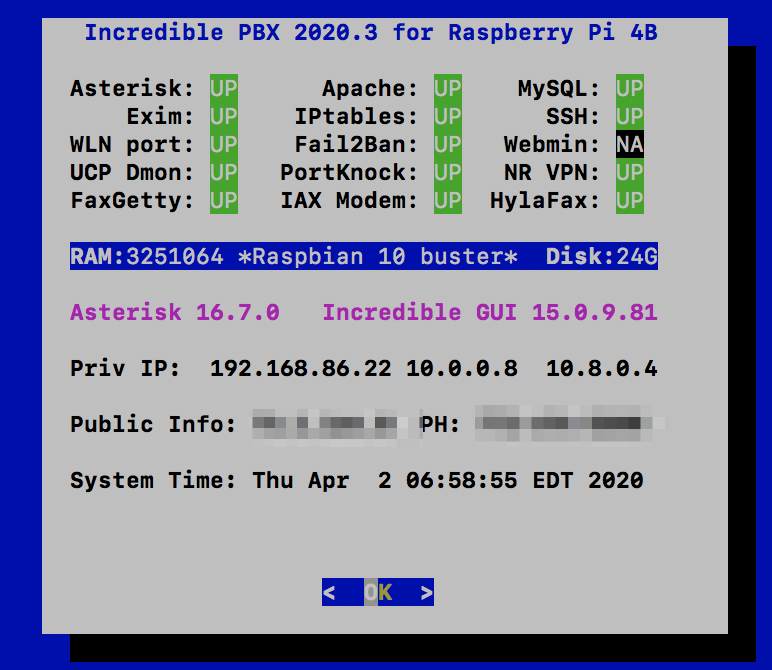
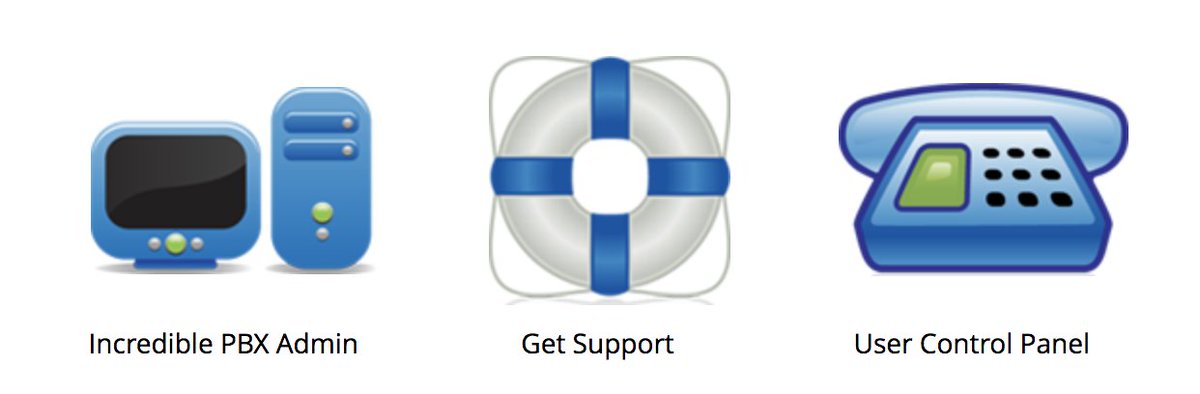
The second option is to use a browser to access your server. Choose the Incredible PBX Admin option after pointing a browser to the IP address of your server:
Once you log in with your admin password, the Dashboard of your server will display the status of trunks, users, and active calls on your server. In addition, you can review the latest news and security alerts from the RSS Feeds of Nerd Vittles, Incredible PBX, FreePBX, and Asterisk. For additional status information, choose Reports:Asterisk Info.

2. Adding Speech Recognition to Asterisk
We no longer recommend Google Speech Recognition because of the licensing issues and Google’s propensity to break things regularly. Instead, we recommend IBM’s Speech Recognition and TTS engines. For most users, there will be no cost. And the services are second to none. For a complete installation and setup tutorial, see our tutorial. Once speech recognition is enabled, the Incredible PBX 2020 feature set grows exponentially. You’ll have access to the Voice Dialer for AsteriDex as well as SMS Voice Messaging and Wolfram Alpha for a Siri-like encyclopedia.
3. Using Wolfram Alpha with Incredible PBX
Ever wished your Asterisk server could harness the power of a 10,000 CPU Supercomputer to answer virtually any question you can dream up about the world we live in? Well, so long as it’s for non-commercial use, today’s your lucky day. Apple demonstrated with Siri™ just how amazing this technology can be by coupling Wolfram Alpha® to a speech-to-text engine on the iPhone. Now you can do much the same thing using voice recognition with Incredible PBX 2020.

Before using Wolfram Alpha from any phone connected to your PBX, you first must configure it by obtaining and adding a Wolfram Alpha application ID to Incredible PBX. Here are the simple steps:
1. Obtain your free Wolfram Alpha APP-ID here.
2. Log into your server as root and issue the following command:
nano -w /var/lib/asterisk/agi-bin/wolfram.sh
3. When the nano editor opens, insert your IBM STT and Wolfram APP-ID credentials in the spaces provided. Then save the file.
To use Wolfram Alpha, dial 4747 (that’s S-I-R-I backwards) from any extension.
Here are some sample queries to get you started:
Weather in Charleston South Carolina
Weather forecast for Washington D.C.
Next solar eclipse
Otis Redding
Define politician
Who won the 1969 Superbowl? (Broadway Joe)
What planes are flying overhead now?
Ham and cheese sandwich (nutritional information)
Holidays 2015 (summary of all holidays for 2015 with dates and DOW)
Medical University of South Carolina (history of MUSC)
Star Trek (show history, air dates, number of episodes, and more)
Apollo 11 (everything you ever wanted to know)
Cheapest Toaster (brand and price)
Battle of Gettysburg (sad day 🙂 )
Daylight Savings Time 2015 (date ranges and how to set your clocks)
Tablets by Samsung (pricing, models, and specs)
Doughnut (you don’t wanna know)
Snickers bar (ditto)
Weather (local weather at your server’s location)
4. Automatic Update Utility for Incredible PBX
A key security component of Incredible PBX is its Automatic Update Utility. Each time you log into your server as root, the Automatic Update Utility is run. It installs the latest fixes and security patches for your server. Don’t disable it! In fact, don’t delete anything from the /root folder. You’ll need all of it sooner or later.
We recommend you log into your server as root at least once a week to keep your server current. Ditto for the web interface to Incredible PBX. Insofar as security is concerned, we make a best effort to keep the components of Incredible PBX up to date. The Linux operating system was installed by you before the Incredible PBX install began. That’s a nice way of saying Linux security is primarily your responsibility. When an egregious Linux vulnerability comes along that we know about, we will try to notify you of the issue on the PIAF Forum and on the RSS Feed that is part of the Incredible PBX GUI. Check the RSS Feeds at least once a week as well. As a condition of use of the free Incredible PBX product, you accepted ultimate responsibility for the security and reliability of your server. Be SAFE!
5. Resetting Incredible PBX Passwords
Yes. It happens to all of us. We forget our passwords. Incredible PBX includes a convenient utility that lets you reset many of the passwords associated with Incredible PBX. Just log into your server as root and issue the command: /root/update-passwords
To reset Incredible PBX GUI admin password, issue command: /root/admin-pw-change
To reset Apache admin password, issue command: /root/apache-pw-change. Apache credentials control access to the web interface of Telephone Reminders and AsteriDex from within the web GUI.
To reset the AvantFax admin password which is accessible within the Incredible PBX GUI, issue the following command: /root/avantfax-pw-change
6. Apache Authentication with Incredible PBX
With the exception of the Admin GUI and WebMin, all web-based applications included in Incredible PBX require successful Apache authentication to gain access. When you installed Incredible PBX, you should have created an admin account for Apache. If not, issue the following command using a secure password after logging in as root:
htpasswd -cb /etc/pbx/wwwpasswd admin newpassword
With the exception of AsteriDex and Reminders, you gain access to other Incredible PBX applications with the admin Apache account. For the remaining apps, you may wish to (but don’t have to) assign different account names and passwords to various departments in your organization. To set up these accounts, use the syntax above substituting the name of the department for "admin" and the department password for "newpassword."
7. Managing the IPtables Linux Firewall
As installed, Incredible PBX includes a preconfigured, locked-down Linux firewall that restricts incoming IPv6 traffic to localhost and, via a Travelin’ Man 3 WhiteList application, limits incoming IPv4 traffic to your server’s public and private IP addresses, your desktop computer’s IP address (that was used for the install), private LAN and NeoRouter VPN traffic, and a collection of our favorite VoIP providers. You can WhiteList additional IP addresses for additional providers or for SIP and IAX phones located outside your firewall. The following firewall management scripts are accessible from the /root directory:
- ./add-ip — WhiteList an additional IP address or IP address range (CIDR)
- ./add-fqdn — WhiteList a site using a fully-qualified domain name (FQDN)
- ./del-acct — Remove previously designated entry from the WhiteList
- ./ipchecker — Check whether specified FQDNs have changed & update IPtables
- iptables-restart — Used exclusively to restart IPtables and test for failed FQDNs
- iptables -nL — Check the current status of your IPtables firewall
On CentOS platforms, IPtables can be manually configured (if you know what you’re doing) by editing iptables and ip6tables in /etc/sysconfig. On the Raspberry Pi, the rules are stored in /etc/iptables/rules.v4. Additional IPtables rules are included and managed in /usr/local/sbin/iptables-custom. All FQDN entries must be entered in iptables-custom. The reason is because a failed FQDN entry in the main IPtables config file will cause the firewall to fail on startup. Also, NEVER use traditional iptables commands such as iptables save to update your IPtables configuration, or you will permanently delete all of your FQDN entries! Instead, use the provided utilities to whitelist additional sites and then restart IPtables using iptables-restart. This protects the FQDN entries in your setup while also checking for invalid FQDN entries and removing them temporarily so that IPtables will successfully restart. If you use service iptables restart to restart IPtables and there happens to be an FQDN entry for a host that is either down or has disappeared, IPtables will fail to restart and your server will be left with NO firewall protection! Using the traditional IPtables mechanisms also will disable Fail2Ban and the rules in iptables-custom will never be loaded. Incredible PBX periodically checks for changed FQDN entries using the ipchecker script as configured in /etc/crontab.
If you elect to integrate Facebook into your Incredible PBX setup, you will need to manually uncomment the last 3 lines in /usr/local/sbin/iptables-custom in order to whitelist the Facebook servers. Then restart the firewall: iptables-restart
WARNING: By default, Incredible PBX whitelists all of the non-routable LAN subnets including 10.0.0.0/8, 172.16.0.0/12, and 192.168.0.0/16. If you elect to install Incredible PBX in the Cloud, be advised that some cloud platforms including Amazon treat the 172.16.0.0/12 subnet as routable IP addresses. This means that anyone in the Amazon Cloud (including the bad guys) will have direct access to your server. While they still need a password or vulnerability to gain access, it nevertheless exposes your server to needless hacking attempts. We strongly recommend that you comment out the 172.16.0.0/12 entry in /usr/local/sbin/iptables-custom if you intend to deploy your server in the Amazon Cloud. Then restart the firewall: iptables-restart
8. PortKnocker Remote Access
IPtables is a powerful firewall that keeps the bad guys out. It also will keep legitimate users (including you) from gaining remote access to your server unless you had the forethought to WhiteList your remote IP address before you left on that family vacation. Unfortunately, you don’t always know your IP address in advance. And dynamic IP addresses assigned with hotel WiFi frequently change. To address this problem, Incredible PBX includes a preconfigured PortKnocker utility. This lets you send three secret "knocks" on random TCP ports to your server to tell it to let you in either temporarily (until IPtables is restarted) or permanently.
To reconfigure PortKnocker to permanently whitelist IP addresses from which you issue a successful knock, login as root and issue the command: iptables-knock activate
For PortKnocker to work, you obviously need to know the secret knocks. You’ll find them in /root/knock.FAQ. Record them in your wallet or inside your suitcase for that rainy day! There are PortKnocker apps for almost all smartphones as well as for Windows, Mac, and Linux computers. Install your favorite AND test access before you leave town. You can change the ports by editing /etc/knockd.conf. Then restart PortKnocker: service knockd restart
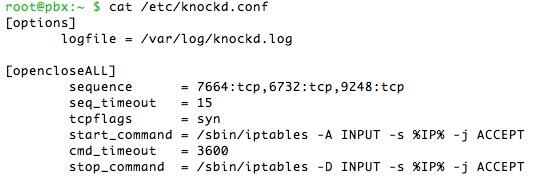
Finally, be aware that PortKnocker does not need any special access to your server to work; however, if your server is behind a hardware-based firewall, then you must map the three PortKnocker TCP ports to the private IP address of your server, or the knocks obviously will never get delivered to your server.
If you installed Incredible PBX 2020 on a cloud platform, then your server may use a network port other than eth0. Typically, it’s venet0:0 on OpenVZ servers. You can decipher the name of your network port for your public IP address by issuing the command: ifconfig. In this case, the CentOS config file needs to be modified and then PortKnocker needs to be restarted. Edit /etc/sysconfig/knockd and insert the following: OPTIONS="-i venet0:0". Restart PortKnocker with the command: service knockd restart
Review our PortKnocker tutorial for additional configuration tips.
9. Travelin’ Man 4 Remote Access (dial TM4)
In addition to PortKnocker, Incredible PBX also includes a telephone-based solution to temporarily gain remote access to your server. This does require a bit of preplanning since you must create account credentials for the person to whom you wish to give remote access via a phone call. The complete tutorial for Travelin’ Man 4 is available on the PIAF Forum. All of the pieces already are in place on your server so skip down to the Configuration & Operation sections for details on implementation.
10. Using the Conference Bridge (dial CONF)
A turnkey Conference Bridge is included in Incredible PBX 2020. A conference bridge allows a group of people to participate in a joint phone call. Typically, participants dial into a virtual meeting room from their own phone. This virtual meeting room supports dozens or even hundreds of participants depending upon server capacity.
You do not need a timing source for conferencing with Incredible PBX 2020! Old-style Asterisk Conference Rooms which required a timing source are disabled.
To access the Conference Bridge, dial C-O-N-F (2663) from any phone connected to your server. Remote users can be added to a conference by providing a DID that points to an IVR which includes Conference Bridge access. Once connected to the conference bridge, a caller is prompted for the Conference Bridge PIN and his or her name. The user and admin access PINs are randomly generated when you install Incredible PBX. You can decipher or modify the user and admin passwords to access the Conference Bridge in the Incredible PBX GUI: Applications:Conferences. Then edit 2663 and review or change the User and Admin PINs.
11. CallerID Name (CNAM) Lookups
By default, Incredible PBX is configured to automatically provide OpenCNAM CallerID name lookups for the first ten calls received each hour. These lookups are only from cached entries in the OpenCNAM database; however, you can enable the commercial lookup service if desired. The cost is four tenths of a cent per successful query.
To enable the OpenCNAM Professional Tier, set up an account at OpenCNAM.com. Once you’ve obtained your credentials, edit the OpenCNAM entry in Admin:CID Superfecta:Default. You may also wish to enable AsteriDex lookups and move the scheme to the top of your list of lookup schemes.
To activate CallerID Superfecta for incoming calls, edit each of your Inbound Routes and Enable Superfecta Lookup with the Default Scheme in the Other tab.
12. Faxing with Incredible PBX 2020
If you can press the ENTER key 25 times, you are fully capable of installing Incredible Fax on your new server. On the latest Raspberry Pi builds of Incredible PBX 2020, Incredible Fax is preinstalled. On other platforms, log into your server as root and run /root/incrediblefax2020.sh. Provide an email address for delivery of incoming faxes and press ENTER each time you are prompted to make a selection. Once you reboot your server, you’re all set. As part of the install, you provided an email address for delivery of incoming faxes. That’s all the setup that is required to have incoming faxes sent to most of your DIDs delivered via SendMail in PDF format. The best way to figure out whether a particular provider supports fax technology on their DIDs is to send a test fax to yourself. FaxZERO lets you send 5 free (in the U.S. only) faxes of up to 3 pages every day. Give it a whirl.
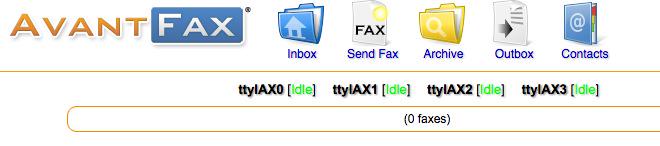
You also can send faxes using standard document types with the AvantFax web application. Log into AvantFax from the main Incredible PBX GUI by clicking on the AvantFax icon. The default credentials are admin:password. Choose the Send a Fax option from the main menu, fill in the blanks, and attach your document. AvantFax uses the default dialplan so use the prefix desired to send the fax using your preferred provider.
With the latest release of Incredible PBX 2020, fax recognition is supported on incoming calls. Edit each of your Inbound Routes and enable Detect Faxes with Detection Type=SIP, Fax Ring=Yes, Fax Detection Time=4, and Fax Destination=Custom Destination:Fax (HylaFax) in the Fax tab.
On the Raspberry Pi platform, you can change the destination email address for incoming faxes by issuing the command: /root/avantfax-email-change.
Copies of all incoming faxes also are available for retrieval within AvantFax.
13. Voicemail 101 for Incredible PBX 2020
Voicemail functionality is enabled on an extension-by-extension basis as part of the extension setup under the Voicemail tab. Once enabled, you can set up your mailbox and retrieve your messages by dialing *97 from the mailbox extension, or dial *98 to retrieve messages from any extension. Shortcut dialing is also supported, e.g. *98707 would retrieve messages for extension 707. You can leave a message for or forward calls to any extension’s mailbox without actually calling the extension. Just prepend * to any extension number before dialing, e.g. *701. A number of the system settings for voicemail can be tweaked under the Voicemail tab as well. For example, you can automatically delete voicemails once they have been delivered by email. Voicemail Blasting to multiple mailboxes is also supported. Just choose this option under the Applications tab and follow your nose.
14. Email Delivery of MP3 Voicemails
Speaking of email delivery, your voicemails also can be delivered to any email address of your choosing. For every extension under the Voicemail tab for the Extension, simply add an Email Address and enable the Email Attachment. With Incredible PBX 2020, the voicemail message will be attached to the email in MP3 format so it’s suitable for playback with most email clients on desktop PCs, Macs, and smartphones. Be advised that some Internet service providers (such as Comcast) block downstream SMTP servers. You can check whether your outbound email is flowing by issuing the command mailq from the Linux command line. Issuing the command mail will tell you whether outgoing emails are bouncing. You can test sending an email by issuing the following command using your destination email address:
echo "test" | mail -s testmessage your-name@your-email-provider.com
If you find outbound mail is accumulating, add your ISP’s SMTP server address as a SmartHost for SendMail as documented in the next section.
15. Reconfiguring SendMail for a SmartHost
Many residential Internet service providers block downstream SMTP servers such as the SendMail server running with Incredible PBX 2020. If you’re sending emails but they never arrive and you’ve checked your SPAM folder, then chances are your ISP is the culprit. The simple solution is to add your ISP’s SMTP server as a SmartHost for SendMail. This means outbound emails will be forwarded to your ISP for actual email transmission over the Internet. Here’s how. On CentOS platforms, edit /etc/mail/sendmail.cf and search for DS. Immediately after DS, add the FQDN of your ISP’s SMTP server, e.g. DSsmtp.comcrap.net (no spaces!). Save the file and then restart SendMail: service sendmail restart. Your email and voicemail messages with attachments should begin flowing without further delay.
On Raspberry Pi platforms, here’s how to set it up using a Gmail account without two-step authentication. Log into your server as root and run dpkg-reconfigure exim4-config. Choose "mail sent by smarthost; received via SMTP or fetchmail." Accept all the defaults until you get to Outgoing Smarthost prompt. Enter: smtp.gmail.com::587. At the following prompts, choose NO, NO, mbox, and NO. When the setup completes, edit /etc/exim4/passwd.client and insert the following line using your Gmail AcctName and AcctPW. NOTE: If you are using a Gmail account with 2-step verification enabled, you MUST use a Gmail App Key instead of your Gmail account password. You also must enable Less Secure Apps access to your Gmail account.
smtp.gmail.com:AcctName@gmail.com:AcctPW
Save the file and then issue the following commands to complete the setup:
update-exim4.conf
systemctl restart exim4
exim4 -qff
Now send yourself a test email message to make sure things are working properly:
echo "test" | mail -s testmessage yourname@yourmailprovider.com
16. SMS Messaging with VoIP.ms
Incredible PBX 2020 supports SMS messaging through VoIP.ms if you have an account and an SMS-enabled DID. See the VoIP.ms wiki for setup info on the VoIP.ms side.
To install the VoIP.ms SMS scripts, follow these steps:
cd /root
mkdir sms-voip.ms
cd sms-voip.ms
wget http://incrediblepbx.com/voipms-SMS.tar.gz
tar zxvf voipms-SMS.tar.gz
Edit voipms-sms.php and insert your VoIP.ms number that supports SMS messaging (no spoofing allowed!):
$SMSsender="8005551212";
Edit class.voipms.php and insert your VoIP.ms API credentials:
    /*******************************************\
     *  VoIPms - API Credentials
    \*******************************************/
    var $api_username   = 'yourname@youremail.com';
    var $api_password   = 'yourpassword';
Send an SMS message through VoIP.ms with the following command where smsnumber is the 10-digit number of the SMS recipient and "sms message" is the text message surrounded by quotes:
/root/sms-voip.ms/voipms-sms.php smsnumber "sms message"
NOTE: VoIP.ms has indicated that sooner or later there will be a penny per message charge for SMS messages; however, as of today, they’re still free.
17. SIP URI Calling with Incredible PBX
With one line of dialplan code, you can add Speed Dials for free SIP URI calling worldwide. The dialplan code is stored in the [CallingRule_SIP_URI] context in extensions_custom.conf. Just clone one of the existing entries, designate an extension to dial to connect to the SIP URI, and enter the SIP URI for the destination. Numerous SIP providers support assignment of SIP URI’s to DIDs for unlimited free calling from anywhere in the world. Here’s a sample using a speed dial code of 53669 that connects you to SIP URI 2233435945@sip2sip.info: exten = 53669,1,Dial(SIP/2233435945@sip2sip.info)
18. IVR Demo of Incredible PBX Apps
The easiest way to try out a number of the Incredible PBX applications is to take the IVR Demo for a spin. Just pick up any phone on a CentOS-based platform and dial 3366 (D-E-M-O). The sample code for the IVR is available for review and modification in the IVR section of the GUI. There’s also a sample Stealth AutoAttendant. This plays a brief greeting and then rings an extension or ring group. During the greeting, you could configure the application to allow button presses to branch to other applications on your PBX, hence the Stealth name since the codes are not disclosed to callers.
On the Raspberry Pi platform, our detailed tutorial will walk you through setting up the Demo IVR application.
19. Backup & Restore with Incredible PBX
Incredible Backup and Restore scripts are provided in the /root folder. In addition, the FreePBX GUI also provides Backup and Restore utilities under the Admin tab. If backups are important to you, we strongly recommend you consider a $3/month cloud server at Vultr using our referral code. For an additional 20% per month (60 cents), you get weekly image backups of your server that can be restored with a couple of button clicks. It’s the cheapest insurance you can buy for your PBX!
20. AsteriDex – The Poor Man’s Rolodex
AsteriDex is a web-based phonebook application for Incredible PBX. You can access it from the main web menu. Scripts are also available to import your contacts from Outlook and Google Contacts.
21. Voice Dialing with AsteriDex (dial 411)
If you have voice recognition enabled on your server, you can call anyone in your AsteriDex database by dialing 411.
22. Speed Dialing with AsteriDex (dial 000+)
For those without voice recognition, Incredible PBX 2020 includes two speed dialing utilities. The first is accessed by dialing 412. Then enter any 3-digit dialcode from your AsteriDex database to complete the call. If you’d prefer to skip the intermediate step, dial 000 + the 3-digit speed dial code desired. The call will be placed immediately using your default outbound routes.
For a complete listing of your AsteriDex dial codes, execute this query:
mysql -u root -ppassw0rd asteridex -e "select name,dialcode from user1 order by name"
To automatically generate the 3-digit speed dial codes for everyone in your AsteriDex database using the first three letters of each name, run the following script from your web browser: http://your-server-ip/asteridex4/dialcode.php.
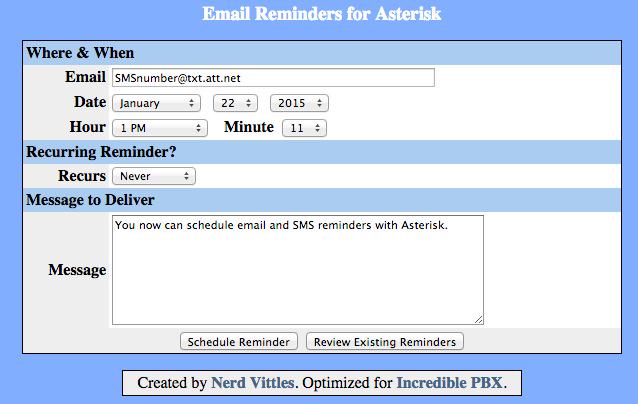
23. Telephone Reminders (dial 123)
Incredible PBX 2020 includes a sophisticated reminders system that lets you schedule individual or recurring reminders using your phone by dialing 123 or a web browser. A complete tutorial is available here. For phone reminders, a password is required to access the reminder system. Typically, these reminders set up a return call at a scheduled time that then plays back either a recorded message or a TTS message generated from the text you entered in the browser application. Incredible PBX also includes a new addition that lets you schedule web reminders that are delivered by email or SMS message.
24. DISA Access with Incredible PBX 2020
Direct Inward System Access (aka DISA) is one of the great PBX inventions of the last 50 years. It’s also one of the most dangerous. It lets someone connect to your PBX and obtain dial tone to place an outbound call using your trunks… on your nickel. Typically, it is offered as an option with an IVR or AutoAttendant. The DISA extension is not preconfigured with Incredible PBX; however, you can easily set it up in the GUI by choosing Applications:DISA. Make up a very secure PIN before exposing DISA access to the outside world. It’s your phone bill.
25. Yahoo! News (Dial 951)
Yahoo! news headlines are available by dialing 951. The news option also is included in the sample IVR application.
26. Weather Forecasts by Phone (dial 947)
You can obtain a current weather forecast for most zip codes by dialing 947 (Z-I-P) and entering the 5-digit zip code.
27. ODBC Application Support for Asterisk
If you’ve recently logged into your server as root, Automatic Update #4 added ODBC/MySQL application support for Asterisk. You can try out a few sample applications that are included to get you started. Dial 222 and enter 12345 for the employee number. This retrieves an employee name from the MySQL timeclock database using Asterisk. Dial 223 to retrieve an AsteriDex name and phone number by entering the 3-character dialcode. You then have the option of placing the call by pressing 1. Once you have created accounts for Travelin’ Man 4, you can dial 864 (T-M-4) to WhiteList an IP address for that account after entering the account number and matching PIN. Use the * key for periods in the IP address.
28. Today in History (Dial T-O-D-A-Y)
It’s always interesting to find out what happened Today in History. And Incredible PBX now delivers it by phone. Just dial 86329 (T-O-D-A-Y) for a walk down memory lane.
29. Time of Day
Speaking of yesteryear, if you grew up dialing TI-4-1212 for the time of day, Ma Bell may have discontinued the service, but we haven’t. Now you can do it on your very own PBX.
If you want your users to be able to dial in for the time directly by dialing extension, here’s how. In the GUI, choose Admin:Custom Destinations:Add Destination. Set up a Time of Day description with a target of new-time,s,1 and save your entry. Now Enable an Application:Misc Application:Add Application with a Feature Code of 8463, Time of Day description, and point it to Custom Destination:Time of Day. Save your entry and then dial 8463 (T-I-M-E) for the Time of Day.
30. WebMin: The Linux Swiss Army Knife
There is no finer Linux application than WebMin. There is no more dangerous Linux application than WebMin. You’ve been warned. We heartily recommend WebMin as a tool to LOOK at your server’s settings. We strongly discourage changing anything in WebMin unless you totally know what you are doing. This is especially true with management of Linux applications that make up the core of Incredible PBX: the Linux kernel, SendMail, IPtables, Apache, MySQL, PHP, and…
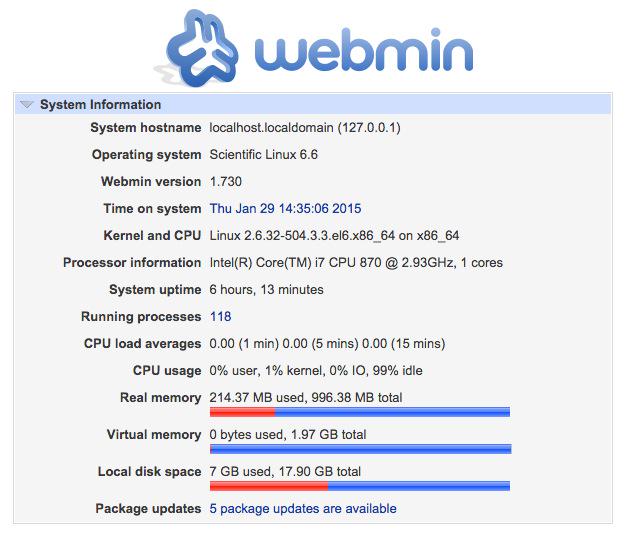
To access WebMin on the CentOS platform, visit the following link with a web browser using the actual IP address of your server: https://ip-address:9001/. The username is root. The password is your root password. WebMin has root privileges to your server. Reread paragraph 1 and act accordingly.
Due to space and performance constraints, WebMin is no longer installed by default on the Raspberry Pi platform. To install WebMin, follow these steps after logging into your Raspberry Pi as root:
cd /root
apt-get update
apt-get install python perl openssl libnet-ssleay-perl
apt-get install libauthen-pam-perl libio-pty-perl libpam-runtime
wget http://prdownloads.sourceforge.net/webadmin/webmin_1.941_all.deb
dpkg --install webmin_1.941_all.deb
For an exhaustive tutorial on WebMin, download The Book of WebMin by Joe Cooper. For a more recent commercial offering, take a look at Michal Karzyński’s WebMin Administrator’s Cookbook.
Originally published: Monday, April 13, 2020

Need help with Asterisk? Visit the VoIP-info Forum.
Special Thanks to Our Generous Sponsors
FULL DISCLOSURE: ClearlyIP, Skyetel, Vitelity, DigitalOcean, Vultr, VoIP.ms, 3CX, Sangoma, TelecomsXchange and VitalPBX have provided financial support to Nerd Vittles and our open source projects through advertising, referral revenue, and/or merchandise. As an Amazon Associate and Best Buy Affiliate, we also earn from qualifying purchases. We’ve chosen these providers not the other way around. Our decisions are based upon their corporate reputation and the quality of their offerings and pricing. Our recommendations regarding technology are reached without regard to financial compensation except in situations in which comparable products at comparable pricing are available from multiple sources. In this limited case, we support our sponsors because our sponsors support us.
 BOGO Bonaza: Enjoy state-of-the-art VoIP service with a $10 credit and half-price SIP service on up to $500 of Skyetel trunking with free number porting when you fund your Skyetel account. No limits on number of simultaneous calls. Quadruple data center redundancy. $25 monthly minimum spend required. Tutorial and sign up details are here.
![]() The lynchpin of Incredible PBX 2020 and beyond is ClearlyIP components which bring management of FreePBX modules and SIP phone integration to a level never before available with any other Asterisk distribution. And now you can configure and reconfigure your new Incredible PBX phones from the convenience of the Incredible PBX GUI.
The lynchpin of Incredible PBX 2020 and beyond is ClearlyIP components which bring management of FreePBX modules and SIP phone integration to a level never before available with any other Asterisk distribution. And now you can configure and reconfigure your new Incredible PBX phones from the convenience of the Incredible PBX GUI.
 VitalPBX is perhaps the fastest-growing PBX offering based upon Asterisk with an installed presence in more than 100 countries worldwide. VitalPBX has generously provided a customized White Label version of Incredible PBX tailored for use with all Incredible PBX and VitalPBX custom applications. Follow this link for a free test drive!
 Special Thanks to Vitelity. Vitelity is now Voyant Communications and has halted new registrations for the time being. Our special thanks to Vitelity for their unwavering financial support over many years and to the many Nerd Vittles readers who continue to enjoy the benefits of their service offerings. We will keep everyone posted on further developments.

Interconnect Incredible PBX 2020 to the Asterisk Mothership

The Holy Grail for a mobile VoIP solution is a simple way to connect back to your primary Asterisk® PBX via Wi-Fi from anywhere in the world to make and receive calls as if you never left. Let’s tick off the potential problems. First, many home-based PBXs are sitting behind NAT-based routers. Second, almost all remote Wi-Fi connections are made through a NAT-based router. Third, chances are the remote hosting platform blocks outgoing email from downstream servers such as a mobile PBX. Fourth, deciphering the IP address of your remote connection can be problematic. Fifth, the chances of experiencing one-way audio or no audio on your VoIP calls is high because of NAT-based routers at both ends of your connection.
For those that travel regularly or those that are living elsewhere during the Coronavirus pandemic and want to avoid the complexity of configuring OpenVPN, here is a quick thumbnail of the setup we recommend as your mobile companion. We use it regularly. You’ll never have a one-way audio problem again. In terms of hardware, you’ll need a Raspberry Pi 4B or 3B+ with its native WiFi support plus a Windows or Mac notebook computer for traveling. You’ll also need a NeoRouter VPN server to make this process seamless. If you’ve already set up an OpenVPN server platform, it will work equally well. One advantage of NeoRouter is that clients can be added from the client side without having to create a config file on the VPN server. All you need is a username and password. But the choice of VPN platform is totally a matter of preference. The objective using either OpenVPN or NeoRouter is secure communications to your home base. We don’t want to have to reconfigure either your home PBX or your traveling Raspberry Pi or your notebook PC based upon changes in your public and private IP addresses.
Today we’ll walk you through the easiest way to set up a (free) NeoRouter server on the Internet. It can be used to connect up to 254 devices on an encrypted private LAN. We’re delighted to have finally found a perfect use for the (free) Google Cloud instance.
Using a Raspberry Pi, build an Incredible PBX 2020 platform by following our latest tutorial. We’ll set this up on your home WiFi network so that you only have to throw the Raspberry Pi and its power supply in your suitcase when you travel. As part of the setup, we’ll download NeoRouter and activate private IP addresses for your notebook computer as well as both of your PBXs (using nrclientcmd). Next, we’ll interconnect the two PBXs using SIP trunks and the NeoRouter private LAN IP addresses. We’ll take advantage of a neat little Raspberry Pi trick by storing a wpa_supplicant.conf template on your PC for the remote WiFi setup even though we don’t yet know anything about the remote LAN. Once we know the SSID and password at the remote destination, we’ll use your notebook computer to edit the template and transfer the file to the /boot folder of your RasPi’s microSD card. When the card then is inserted and the RasPi is booted, it will automatically move the template to the proper /etc/wpa_supplicant folder to successfully activate your WiFi connection. We’ll also load links, a fast text-based browser, just in case you encounter a remote site that requires some sort of acknowledgement or password before establishing your WiFi connection to the Internet.

Setting Up a (free) NeoRouter Server in the Cloud
Because NeoRouter uses a star-based VPN architecture, that means the NeoRouter Server must always be available at the same IP address for all of the NeoRouter Clients (aka Nodes) to talk to. If you already have a cloud-based server that has a static IP address and can handle the traffic cop duties of NeoRouter Server, then that’s an ideal place to install NeoRouter Server. Simply download the Free flavor of NeoRouter Server that matches your existing platform and install it. Add an FQDN for your server’s IP address, and you’re all set. A detailed summary of available management options is included in our previous NeoRouter v2 article.
We devoted a couple weeks to Google Cloud instances, and it turned out to be a pretty awful platform for hosting Asterisk. But the free offering looks to be a perfect fit as a hosting platform for NeoRouter Server. You also won’t have to worry about Google going out of business anytime soon. So let us walk you through an abbreviated setup process on the Google Cloud platform. If you’re just getting started with Google Cloud, read our previous article to take advantage of Google’s generous $300 offer to get you started and to generally familiarize yourself with the mechanics of setting up an instance in the Google Cloud.
For NeoRouter Server, navigate to https://console.cloud.google.com. Click the 3-bar image ![]() in the upper left corner of your Dashboard. This exposes the Navigation Menu. In the COMPUTE section of the Dashboard, click Compute Engine -> VM Instances. Then click CREATE PROJECT and name it. Now click CREATE INSTANCE and Name it nrserver. The instance name becomes the hostname for your virtual machine. If you want to remain in the Free Tier, choose f1-micro instance as the Machine Type and choose a U.S. Region (us-central1, us-east1 or us-west1). For the Boot Disk, choose CentOS 6 and expand the disk storage to at least 20GB (30GB is available with the Free Tier). For the Firewall setting, leave HTTP and HTTPS disabled. Check your entries carefully and then click the Create button.
in the upper left corner of your Dashboard. This exposes the Navigation Menu. In the COMPUTE section of the Dashboard, click Compute Engine -> VM Instances. Then click CREATE PROJECT and name it. Now click CREATE INSTANCE and Name it nrserver. The instance name becomes the hostname for your virtual machine. If you want to remain in the Free Tier, choose f1-micro instance as the Machine Type and choose a U.S. Region (us-central1, us-east1 or us-west1). For the Boot Disk, choose CentOS 6 and expand the disk storage to at least 20GB (30GB is available with the Free Tier). For the Firewall setting, leave HTTP and HTTPS disabled. Check your entries carefully and then click the Create button.
When your virtual machine instance comes on line, jot down the assigned public IP address. We’ll need it in a minute. Now click on the SSH pull-down tab and choose Open in a Browser Window. Now we need to set a root password and adjust the SSH settings so that you can login from your desktop computer using SSH or Putty:
sudo passwd root
su root
nano -w /etc/ssh/sshd_config
When the editor opens the SSH config file, add the following entries. Then save the file and restart SSH: service sshd restart
PermitRootLogin yes
PasswordAuthentication yes
You now should be able to log in to your instance as root from your desktop computer using SSH or Putty. Test it to be sure: ssh root@server-IP-address
Before we leave the Google Cloud Dashboard, let’s make the assigned public IP address permanent so that it doesn’t get changed down the road. Keep in mind that, if you ever delete your instance, you also need to remove the assigned static IP address so you don’t continue to get billed for it. From Home on the Dashboard, scroll down to the NETWORKING section and choose VPS Network -> External IP Addresses. Change the Type of your existing address to Static and Name it staticip. Next, choose Firewall Rules in the VPS Network section and click CREATE FIREWALL RULE. Fill in the template like the following leaving the other fields with their default entries. Then click CREATE.
- Name: neorouter
- Target Tags: neorouter
- Source IP Range: 0.0.0.0/0
- Protocols/Ports: check tcp: 32976
CAUTION: Before this firewall rule will be activated for your instance, it also must be specified in the Network Tags section for your instance. Shut down your instance and add the neorouter tag by editing your instance. Then restart your instance.
Now we’re ready to install NeoRouter Free v2 Server on your instance. Be sure to choose the Free v2 variety. Log back into your server as root using SSH/Putty and issue these commands:
yum -y update
yum -y install nano
wget http://download.neorouter.com/Downloads/NRFree/Update_2.3.1.4360/Linux/CentOS/nrserver-2.3.1.4360-free-centos-x86_64.rpm
rpm -Uvh nrserver-2.3.1.4360-free-centos-x86_64.rpm
/etc/rc.d/init.d/nrserver.sh restart
nrserver -setdomain <DOMAINNAME> <DOMAINPASSWORD>
nrserver -adduser <USERNAME> <PASSWORD> admin
nrserver -enableuser <USERNAME>
nrserver -showsettings
Finally, add the following command to /etc/rc.local so that NeoRouter Server gets started whenever your instance is rebooted:
echo "/etc/rc.d/init.d/nrserver.sh start" >> /etc/rc.local
Installing Incredible PBX 2020 on a Raspberry Pi
Configuring NeoRouter Client on Your Computers
On Linux-based (non-GUI) platforms, setting up the NeoRouter Client is done by issuing the command: nrclientcmd. You’ll be prompted for your NeoRouter Server FQDN as well as your username and password credentials. Perform this procedure on both your home PBX and the Raspberry Pi.
To add your Windows or Mac notebook to the NeoRouter VPN, download the appropriate client and run the application which will prompt for your NeoRouter Server FQDN as well as your NeoRouter credentials. Once completed, you should see all three machines in your NeoRouter Free Client Dashboard: your PC as well as your home PBX and Raspberry Pi-based Incredible PBX. Make note of the private VPN addresses (10.0.0.X) of both your home PBX and your Raspberry Pi. These VPN addresses never change, and we’ll need them to interconnect your PBXs and to set up a softphone on your notebook computer.
Admininistrative Tools to Manage NeoRouter
Here are a few helpful commands for monitoring and managing your NeoRouter VPN.
To access your NeoRouter Linux client: nrclientcmd
To restart NeoRouter Linux client: /etc/rc.d/init.d/nrservice.sh restart
To restart NeoRouter Linux server: /etc/rc.d/init.d/nrserver.sh restart
To set domain: nrserver -setdomain YOUR-VPN-NAME domainpassword
For a list of client devices: nrserver -showcomputers
For a list of existing user accounts: nrserver -showusers
For the settings of your NeoRouter VPN: nrserver -showsettings
To add a user account: nrserver -adduser username password user
To add admin account: nrserver -adduser username password admin
For a complete list of commands: nrserver –help

Interconnecting Your Raspberry Pi and Home PBX
To keep things simple, our setup examples below assume the following NeoRouter VPN addresses: Home PBX (10.0.0.1) and Raspberry Pi (10.0.0.2). Using a browser, you’ll need to login to the GUI of your Home PBX and Raspberry Pi and add a Trunk to each PBX. Be sure to use the same secret on BOTH trunk setups. We don’t recommend forwarding incoming calls from your Home PBX to your Raspberry Pi because most folks won’t be sitting in their hotel room all day to answer incoming calls. Instead, add the number of your smartphone to a Ring Group on the Home PBX and don’t forget the # symbol at the end of the number. On the Raspberry Pi side, we are assuming that whenever a call is dialed from a registered softphone with the 9 prefix, the call will be sent to the Home PBX for call processing (without the 9). For example, 98005551212 would send 800-555-1212 to the Home PBX for outbound routing and 9701 would send 701 to the Home PBX for routing to the 701 extension. You can obviously adjust your dialplan to meet your own local requirements.
On the Home PBX, the chan_sip trunk entries should look like this:
Trunk Name: raspi-remote

PEER DETAILS

host=10.0.0.2
type=friend
context=from-internal
username=home-pbx
fromuser=home-pbx
secret=some-password
canreinvite=no
insecure=port,invite
qualify=yes
nat=yes
On the Raspberry Pi, the chan_sip trunk entries should look like this:
Trunk Name: home-pbx

PEER DETAILS

host=10.0.0.1
type=friend
context=from-internal
username=raspi-remote
fromuser=raspi-remote
secret=some-password
canreinvite=no
insecure=port,invite
qualify=yes
nat=yes
On the Raspberry Pi, add an Outbound Route named Out9-home-pbx pointed to home-pbx Trunk with the following Dial Patterns. For each Dial Pattern, prepend=blank and prefix=9:
dial string: 1NXXNXXXXXX
dial string: NXXNXXXXXX
dial string: *98X.
dial string: XXX
dial string: XXXX
dial string: XXXXX
Tweaking Your Raspberry Pi for WiFi Mobility
wpa_supplicant.conf config file to the /boot directory on the card once you arrive at your destination and know the SSID and password of the local WiFi network. When the Raspberry Pi is subsequently booted, the operating system will move the config file to the /etc/wpa_supplicant directory so that your WiFi network will come on line. Here’s what a typical wpa_supplicant.conf file should look like using your actual credentials. The last network section handles open WiFi network connections (think: McDonald’s) if you want to enable them:
country=US
update_config=1

network={
 ssid="your-SSID"
 psk="your-SSID-password"
 key_mgmt=WPA-PSK
 scan_ssid=1
 priority=5
}

network={
 key_mgmt=NONE
 priority=1
}
The other gotcha is that some public WiFi networks require some type of web login procedure before you can actually access the Internet even though an IP address may have been assigned to your Raspberry Pi. To handle this situation, you’ll need a text-based web browser on the Raspberry Pi that can be accessed through your notebook PC using SSH and your Raspberry Pi’s VPN address. Our favorite is links which can be installed on your Raspberry Pi before you pack up.
apt-get install links -y
Once you arrive at your destination, connect both your notebook PC and Raspberry Pi to the same WiFi network, login to the RasPi with SSH at the VPN address assigned to your RasPi, and run links to start the browser. Press <esc> to access the links menu options. If you can’t access your RasPi at the VPN IP address, try its WiFi-assigned local IP address.
Adding a Softphone to Your Notebook PC
For Windows PCs, we recommend VitalPBX Communicator. It’s a free download from here.

Another good choice is YateClient for Windows which also is free. Download it from here. Run YateClient once you’ve installed it and enter the credentials for an extension on your Raspberry Pi. Then enter the VPN IP address of your server plus your extension’s password. Click OK to save your entries.

If you are a Mac user, another great no-frills softphone is Telephone. Just download and install it from the Mac App Store.
Adding a Softphone to Your Smartphone
Enjoy your pain-free Home Away from Home!
Originally published: Tuesday, April 2, 2020
Need help with Asterisk? Visit the VoIP-info Forum.
Special Thanks to Our Generous Sponsors
FULL DISCLOSURE: ClearlyIP, Skyetel, Vitelity, DigitalOcean, Vultr, VoIP.ms, 3CX, Sangoma, TelecomsXchange and VitalPBX have provided financial support to Nerd Vittles and our open source projects through advertising, referral revenue, and/or merchandise. As an Amazon Associate and Best Buy Affiliate, we also earn from qualifying purchases. We’ve chosen these providers not the other way around. Our decisions are based upon their corporate reputation and the quality of their offerings and pricing. Our recommendations regarding technology are reached without regard to financial compensation except in situations in which comparable products at comparable pricing are available from multiple sources. In this limited case, we support our sponsors because our sponsors support us.
BOGO Bonaza: Enjoy state-of-the-art VoIP service with a $10 credit and half-price SIP service on up to $500 of Skyetel trunking with free number porting when you fund your Skyetel account. No limits on number of simultaneous calls. Quadruple data center redundancy. $25 monthly minimum spend required. Tutorial and sign up details are here.
![]() The lynchpin of Incredible PBX 2020 and beyond is ClearlyIP components which bring management of FreePBX modules and SIP phone integration to a level never before available with any other Asterisk distribution. And now you can configure and reconfigure your new Incredible PBX phones from the convenience of the Incredible PBX GUI.
The lynchpin of Incredible PBX 2020 and beyond is ClearlyIP components which bring management of FreePBX modules and SIP phone integration to a level never before available with any other Asterisk distribution. And now you can configure and reconfigure your new Incredible PBX phones from the convenience of the Incredible PBX GUI.
VitalPBX is perhaps the fastest-growing PBX offering based upon Asterisk with an installed presence in more than 100 countries worldwide. VitalPBX has generously provided a customized White Label version of Incredible PBX tailored for use with all Incredible PBX and VitalPBX custom applications. Follow this link for a free test drive!
Special Thanks to Vitelity. Vitelity is now Voyant Communications and has halted new registrations for the time being. Our special thanks to Vitelity for their unwavering financial support over many years and to the many Nerd Vittles readers who continue to enjoy the benefits of their service offerings. We will keep everyone posted on further developments.
Coping with Coronavirus: Working from Home with Asterisk

If one can only claim to be an expert in one subject matter, ours would be working from home building and deploying Asterisk®-based VoIP servers. We’ve been doing it for more than a decade. And, as the need for social distancing becomes imperative with the spread of COVID-19, working from home is by far the best antidote. For those with jobs in an actual office, you still need your computer and you still need transparent office phone call access. With an Internet connection, we will assume you can handle setting up a home computer on your own. So our focus today will be on showing you how to add your office phone to your home with VoIP to make and receive business calls with less pain than a WalMart checkout lane.
Here’s what you need:
- Home Internet Connection (15DN/5UP Mbps or faster)
- WiFi Router (Google Nest strongly recommended)
- Desktop or Notebook Computer (recent vintage)
- SIP Telephone (Incredible PBX SIP Phone recommended)
- Incredible PBX 2020 platform (VirtualBox or Raspberry Pi – both are free)
- VirtualBox software for your PC/Mac or a Raspberry Pi 4 for stand-alone PBX
- A quiet room at home with no screaming kids or barking dogs
- Smartphone with SIP software (optional for those that continue to travel)
We’ve written extensively about most of the components listed above so we will refer you to appropriate articles as we proceed. The plan is to build a free Incredible PBX® platform in your home and use it to receive calls from your office number and to make calls spoofing your office number so that those on the other end of the calls never know you’re not sitting at your desk in the office but are instead working from home.
Choosing an Incredible PBX Platform for Home Use
Once you have your network and desktop PC, Mac, or notebook computer set up at home, you have a decision to make. You can either run Incredible PBX as a task on this computer using VirtualBox, which means the computer needs to be operational all the time, or you can elect to build your Incredible PBX platform on a $35 Raspberry Pi 4 in which case your PBX is independent from your desktop or notebook computer. If you elect to run Incredible PBX on your home computer as a VirtualBox virtual machine, then follow this tutorial to install VirtualBox and the Incredible PBX 2020 virtual machine. If you decide to go the stand-alone route using a Raspberry Pi 4 as a dedicated platform for Incredible PBX 2020, then follow this tutorial to put all the pieces in place.
We typically run our remote systems using a Raspberry Pi 4 and a SIP phone, both with Wi-Fi connections. This means you can find a quiet place in your home to set up your office without worrying about network cables. Assuming you have good Internet service and a modern WiFi router such as the Google Nest device, you’ll never miss a beat. You can even drink on the job.

Choosing a VoIP Provider To Make & To Receive Calls
Even with your own PBX, you still need a connection to one or more VoIP service providers before you can communicate with those outside your network. Because we want to emulate your office phone environment, you probably will want a dedicated phone number and separate telephone to receive incoming calls from your office. This preserves the caller’s perception that he or she is dealing with you in your business capacity. We don’t want Junior answering incoming calls and shouting, "Daddy, somebody wants to talk to you."
We’re assuming that most business phone systems have the capacity to forward incoming calls to an external number. In this case, we recommend a new phone number known as a DID in the VoIP world. For outbound calls from your dedicated SIP phone, we will show you how to reset the outbound CallerID number to match your existing office phone number. Thus, both incoming and outgoing calls will appear to be emanating from your office.
As some of you know, in the VoIP world with Incredible PBX, the VoIP merchant providing your DID for incoming calls need not be the same as the company providing outbound call service. The cost of DIDs typically ranges from a few cents a month to a dollar or more. Most impose a per minute charge of about a penny a minute or less for both incoming and outgoing calls. The only mandatory requirement is that you choose an outbound call service that allows you to spoof your office’s CallerID number on the outbound calls. You probably will also want a CallerID Name (CNAM) service that associates names with incoming calls.
Both the Incredible PBX for VirtualBox and IncrediblePBX for the Raspberry Pi articles (links above) have extensive tutorials to deploy the various VoIP providers that we recommend. Just keep in mind that you usually get what you pay for. Cheaper isn’t always better when it comes to business communications.
Setting Up a SIP Phone for Incredible PBX 2020
You can connect virtually any kind of telephone to your new PBX. You don’t want callers and people you call to think you’re living in a tunnel so we recommend dedicated hardware for your SIP phone. The Incredible PBX SIP Phones are second to none and are very reasonably priced. In the FreePBX® GUI, simply navigate to Settings -> Clearly Devices. Here’s a tutorial to get you started and link your phone to the preconfigured SIP extension 701 on your PBX.
If price is your primary consideration, take a look at the Grandstream WiFi SIP phones. Refurbished Grandstream GXV3240 phones (a favorite of ours) are available for under $120.
Configuring an Inbound Route for Your Business Calls
For purposes of this tutorial, we will assume that you connected your new SIP phone to extension 701 on your PBX. Now we need to tell the PBX to route incoming calls from your office to your newly registered SIP phone on extension 701. Using a web browser, open the FreePBX GUI by pointing to the IP address of your PBX. Login as admin using the password you configured with /root/admin-pw-change. Once the FreePBX Dashboard displays, navigate to Connectivity -> Inbound Routes. Add a new route using the 10-digit number of the DID you acquired. As the Destination for the calls, choose Extension: 701. Click SAVE and reload your dialplan when prompted. Be sure you have also forwarded your office number to the new DID. Then place a test call to your office to verify everything is working properly.
Configuring an Outbound Route for Your Business Calls
A Default Outbound Route is automatically configured for Incredible PBX 2020. We need to modify it to route calls to your preferred trunk provider AND to specify the Outbound CallerID number for the calls as your 10-digit office number. In the FreePBX GUI, navigate to Connectivity -> Outbound Routes. Click on the pencil icon to the right of the Default route. In the Route CID field, enter the 10-digit number of your office. Change the Override Extension field from NO to YES. In the top entry of Trunk Sequences, use the pulldown menu to choose the Trunk Provider you want to use for outbound calls. Then click Submit and reload the dialplan when prompted. Place a test call from your SIP phone to a smartphone and make certain the incoming call displays your office phone number. If not, check with your SIP provider for the necessary steps to enable CallerID number spoofing.
Taking The Show On The Road
Once your home PBX is operational, there’s no reason you have to be tied to your desk at home all day. It’s easy to take the show on the road with an Android phone to make and receive your office calls. We use Android phone advisedly. Our experience with VoIP softphone connections using iPhones has always been hit and miss. And, with your business calls, we don’t think the platform is sufficiently reliable to recommend it. When you get incoming calls from your PBX, you want your smartphone to ring. When you make or receive calls on your smartphone, you want both ends of the conversation to be crystal clear. On the Android platform using the VitalPBX Communicator (free), it just works. We’ve had very different results using an iPhone.
If all you care about is receiving business calls (not making them) when away from your home, then an iPhone will work just as well as an Android phone. To set this up, just add your 10-digit cellphone number plus a # symbol after the number to the 777 Ring Group and make that ring group the destination for the Inbound Route for your office number in the FreePBX GUI. But if you prefer to make calls in both directions just as if you were sitting at your office desk, you’ll need a softphone on an Android device. Keep reading to learn how to set this up.
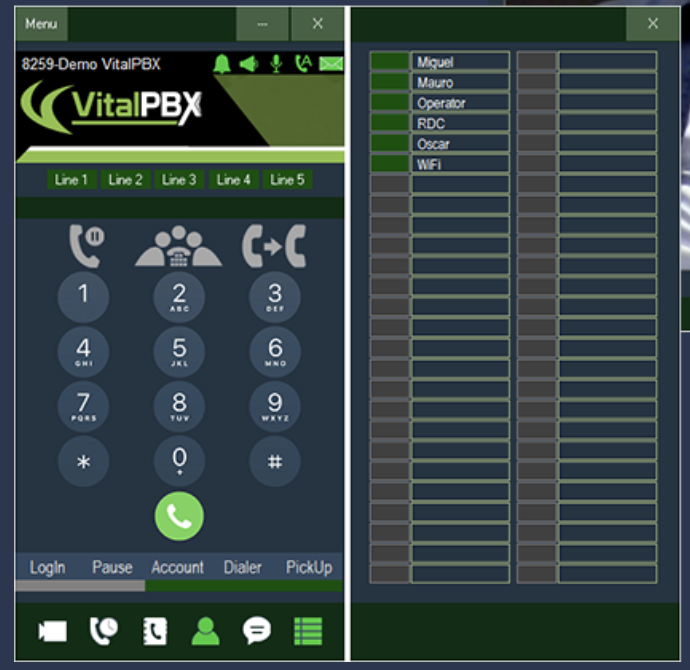
To get started, you’ll need to set up an OpenVPN server on some platform with a static IP address. Many businesses already have an OpenVPN server in which case you can ride on that one. Our OpenVPN tutorial will walk you through setting up your own and adding OpenVPN clients to both your Raspberry Pi and your Android smartphone. Once you have the clients installed, write down the private VPN addresses of both the Raspberry Pi and your Android phone. Next, on your Android phone, download and install the VitalPBX Communicator from the Google Play Store. In the FreePBX GUI, choose one of your preinstalled extensions to host the Android softphone and make note of the extension number and its password. Then use the Account Assistant in the Communicator to configure the connection on the smartphone end. Once it is registered, place a test call to make sure everything is working. Next we recommend changing the destination of the inbound calls to Ring Group 777 which will attempt to ring all five of the default extensions. Place a call to your office number and make sure that both your SIP phone and VitalPBX Communicator on your Android phone ring.
Continue Reading: Interconnecting a Mobile PBX to the Asterisk Mothership
Originally published: March 15, 2020
Need help with Asterisk? Visit the VoIP-info Forum.
Special Thanks to Our Generous Sponsors
FULL DISCLOSURE: ClearlyIP, Skyetel, Vitelity, DigitalOcean, Vultr, VoIP.ms, 3CX, Sangoma, TelecomsXchange and VitalPBX have provided financial support to Nerd Vittles and our open source projects through advertising, referral revenue, and/or merchandise. As an Amazon Associate and Best Buy Affiliate, we also earn from qualifying purchases. We’ve chosen these providers not the other way around. Our decisions are based upon their corporate reputation and the quality of their offerings and pricing. Our recommendations regarding technology are reached without regard to financial compensation except in situations in which comparable products at comparable pricing are available from multiple sources. In this limited case, we support our sponsors because our sponsors support us.
BOGO Bonaza: Enjoy state-of-the-art VoIP service with a $10 credit and half-price SIP service on up to $500 of Skyetel trunking with free number porting when you fund your Skyetel account. No limits on number of simultaneous calls. Quadruple data center redundancy. $25 monthly minimum spend required. Tutorial and sign up details are here.
![]() The lynchpin of Incredible PBX 2020 and beyond is ClearlyIP components which bring management of FreePBX modules and SIP phone integration to a level never before available with any other Asterisk distribution. And now you can configure and reconfigure your new Incredible PBX phones from the convenience of the Incredible PBX GUI.
The lynchpin of Incredible PBX 2020 and beyond is ClearlyIP components which bring management of FreePBX modules and SIP phone integration to a level never before available with any other Asterisk distribution. And now you can configure and reconfigure your new Incredible PBX phones from the convenience of the Incredible PBX GUI.
VitalPBX is perhaps the fastest-growing PBX offering based upon Asterisk with an installed presence in more than 100 countries worldwide. VitalPBX has generously provided a customized White Label version of Incredible PBX tailored for use with all Incredible PBX and VitalPBX custom applications. Follow this link for a free test drive!
Special Thanks to Vitelity. Vitelity is now Voyant Communications and has halted new registrations for the time being. Our special thanks to Vitelity for their unwavering financial support over many years and to the many Nerd Vittles readers who continue to enjoy the benefits of their service offerings. We will keep everyone posted on further developments.
Travelin’ Man 3: A Plug-and-Play Firewall for Incredible PBX

Seven years ago we introduced Travelin’ Man 3 to simplify the task of securing the Incredible PBX® VoIP platforms. Today we want to reexamine the Travelin’ Man 3 firewall design for the benefit of those that are new to Asterisk® and FreePBX®. In the old days, FreePBX-based VoIP servers were notoriously vulnerable because of numerous bugs in the original FreePBX code which was developed by dozens of developers around the world with very different skill sets. Not only did you risk having your server compromised, but there also was a very real risk of receiving a staggering phone bill for calls that neither you nor your users made.

Travelin’ Man 3 introduced a new security model by providing a whitelist-based, plug-and-play firewall for Incredible PBX servers using the Linux IPtables firewall platform. If the IP address of a device wasn’t listed in the firewall, then that device could not even see your PBX much less access it. SSH access, web access, SIP and IAX2 access all were blocked.
The whitelist design worked great so long as your PBX and all of your phones shared the same private network. But then came deployment of PBXs in the cloud on the wide open Internet. And, of course, there were traveling salesmen that moved from place to place with new IP addresses at every new hotel. And then there were the users with dynamic IP addresses whose IP address identity changed without much warning.
To address these limitations, Travelin’ Man 3 provided the add-ip script to whitelist new IP addresses. The setup included the ability to limit IP addresses to a certain group of features on the PBX such as SIP, IAX2, SSH, and web access. Or the administrator could enable full access to the PBX for a given IP address.
That solved the new IP address issue, but it wasn’t of much use to those with ever-changing dynamic IP addresses. Thus was born the add-fqdn addition which could be used in combination with a dynamic DNS provider to assign a fully-qualified domain name to a device and keep it regularly updated. An additional ipchecker script was also added as a cron job to pass IP address changes along to the IPtables firewall every 10 minutes.
To round out the Incredible PBX whitelist design, we added PortKnocker to protect administrators from locking themselves out of their own server. We added Travelin’ Man 4, OpenVPN and the NeoRouter VPN to facilitate easy access without resorting to the add-ip and add-fqdn utilities. Private LAN addresses are automatically whitelisted with Travelin’ Man 3 so deploying SIP phones with native VPN capability remains the simplest and safest connectivity option.
One key feature that sets Travelin’ Man 3 apart from other firewall alternatives is the fact that it’s plug-and-play. When you install any of the Incredible PBX 2020 platforms, your IPtables firewall and whitelist are automatically configured. The only requirement is that you perform the second phase of the Incredible PBX install using SSH or Putty from a desktop machine that will be used to manage your PBX. In that way, your desktop PC gets automatically whitelisted as part of the install process. And, as previously noted, all devices on the same private LAN or VPN as your Incredible PBX server have total access without jumping through any additional configuration hoops.
Let’s take a moment to examine how Travelin’ Man 3 works under the covers. First, it’s important to note that IPtables does not support FQDNs, only IP addresses. So, if you add an FQDN entry to the IPtables startup file, it gets translated into a static IP address when IPtables is started. More importantly, if that FQDN happens to be unresolvable when IPtables is started because the remote computer is off-line for some reason, then IPtables crashes and never deploys any of its other rules leaving your PBX totally exposed. For this reason, Travelin’ Man 3 handles firewall startup in a unique way. First, it loads some basic firewall rules, all of which have static IP addresses. These rules are found in the startup script: /etc/sysconfig/iptables on RedHat and CentOS platforms and /etc/iptables/rules.v4 on Debian, Ubuntu, and Raspbian platforms. Then, once IPtables is running, it executes the /usr/local/sbin/iptables-custom script with individual IPtables commands to deploy the remaining whitelist entries including FQDNs. When an individual IPtables command fails in this BASH script, the script simply moves on to the next rule without burning down the house. The only damage is an individual FQDN is not whitelisted. But the computer with this FQDN was off-line anyway so there’s no impact on the operation of your PBX. Once that computer comes back on line, it’s simple enough to whitelist the FQDN again. This is a long-winded explanation of why it’s important on Incredible PBX platforms to start and restart IPtables with the iptables-restart script rather than using systemctl restart iptables. The latter would only load the basic IPtables rules in the startup script and not iptables-custom.
Now that you know how Travelin’ Man 3 works, you may be wondering why FQDN support was never integrated into the IPtables design. We’ve wondered much the same thing and never got much of an answer from the developers other than a cryptic response that IPtables worked as designed. Oh well. What we also have found is there is substantial institutional resistance to whitelist firewall implementations even though they provide the most secure computing environment for most deployments. Blacklists, standing alone, simply don’t work because either the bad guys poison the blacklist with legitimate IP addresses (such as the DNS servers upon which you rely) or the bad guys move on to a new IP address which has not yet been added to the blacklist.
We’d be the first to admit that additional flexibility may be desirable in certain edge cases particularly where end-users must rely upon a smartphone on the road with little more than a softphone app available to connect back to the mothership. But, again, we would strongly recommend deploying OpenVPN on all your devices and sticking with a whitelist solution for most scenarios. For those that can’t or won’t, take a look at the Incredible PBX PUBLIC offering as an alternative. It strikes a good balance using a combination of blacklists, some security through obscurity tricks, and implementation of rules blocking most script kiddies.
Originally published: Monday, March 9, 2020
Need help with Asterisk? Visit the VoIP-info Forum.
Special Thanks to Our Generous Sponsors
FULL DISCLOSURE: ClearlyIP, Skyetel, Vitelity, DigitalOcean, Vultr, VoIP.ms, 3CX, Sangoma, TelecomsXchange and VitalPBX have provided financial support to Nerd Vittles and our open source projects through advertising, referral revenue, and/or merchandise. As an Amazon Associate and Best Buy Affiliate, we also earn from qualifying purchases. We’ve chosen these providers not the other way around. Our decisions are based upon their corporate reputation and the quality of their offerings and pricing. Our recommendations regarding technology are reached without regard to financial compensation except in situations in which comparable products at comparable pricing are available from multiple sources. In this limited case, we support our sponsors because our sponsors support us.
BOGO Bonaza: Enjoy state-of-the-art VoIP service with a $10 credit and half-price SIP service on up to $500 of Skyetel trunking with free number porting when you fund your Skyetel account. No limits on number of simultaneous calls. Quadruple data center redundancy. $25 monthly minimum spend required. Tutorial and sign up details are here.
![]() The lynchpin of Incredible PBX 2020 and beyond is ClearlyIP components which bring management of FreePBX modules and SIP phone integration to a level never before available with any other Asterisk distribution. And now you can configure and reconfigure your new Incredible PBX phones from the convenience of the Incredible PBX GUI.
The lynchpin of Incredible PBX 2020 and beyond is ClearlyIP components which bring management of FreePBX modules and SIP phone integration to a level never before available with any other Asterisk distribution. And now you can configure and reconfigure your new Incredible PBX phones from the convenience of the Incredible PBX GUI.
VitalPBX is perhaps the fastest-growing PBX offering based upon Asterisk with an installed presence in more than 100 countries worldwide. VitalPBX has generously provided a customized White Label version of Incredible PBX tailored for use with all Incredible PBX and VitalPBX custom applications. Follow this link for a free test drive!
Special Thanks to Vitelity. Vitelity is now Voyant Communications and has halted new registrations for the time being. Our special thanks to Vitelity for their unwavering financial support over many years and to the many Nerd Vittles readers who continue to enjoy the benefits of their service offerings. We will keep everyone posted on further developments.
An Incredible PBX Cloud Platform That’s Second to None
With mixed results, we’ve invested a lot of time scouring the Internet for reasonably priced cloud platform solutions for Incredible PBX®. The fatal flaw with many of the low-cost providers was bankruptcy. But today we have a winning solution that we’ve used for many years with excellent results. Vultr’s latest offer of a 30-day $100 credit means you can test out the performance levels of various Vultr instances to determine which best meets your needs. You can also try out their automatic backup service. In addition to providing a terrific platform for your VoIP server, this latest Vultr deal also provides financial assistance to Nerd Vittles to assist with future development of the Incredible PBX project. When the dust settles for most users, we think you’ll find their $5/month plan is more than adequate to host Incredible PBX and another $1/month buys you automatic backups. Setup takes 30 minutes.
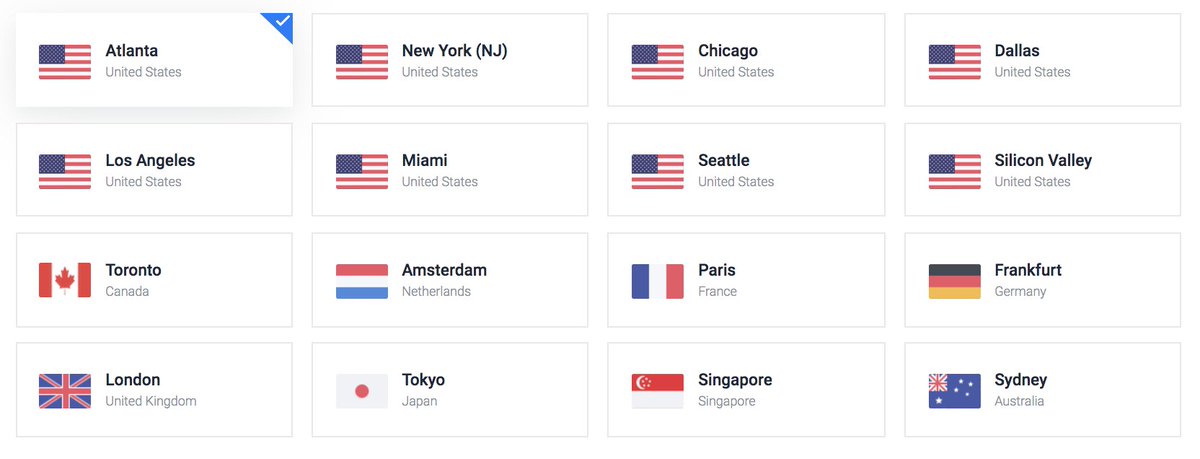
To get started, follow our Vultr referral link and sign up for a new account with your email address. Then deploy a new Cloud Compute instance in your choice of the locations shown above. Next choose 64-bit CentOS 7 as your Server Type. Then select the $5/month 25GB Server Size with 1GB RAM and 1TB monthly bandwidth. Choose a Server Hostname and click Deploy Now. CAUTION: Make sure you select CentOS 7 and not the default CentOS 8 platform!

Penny for Your Thoughts. One of the real beauties of Vultr is you pay by the hour for your instances. It only takes a minute or so to delete an instance and create a new one. If you’re new to Incredible PBX and VoIP servers, this makes it easy to experiment with the setup process until you are happy with the results. And the setup cost for a functioning Incredible PBX platform is about a penny. You’ll be hard-pressed to use up your $100 credit.
Installing Incredible PBX. Once your instance has been created, open an SSH or Putty session on your desktop PC and login to the IP address of your instance as root. You can copy-and-paste your default password from the Vultr dashboard. When you’ve successfully logged in, immediately change your default root password and follow the steps below to install Incredible PBX. It takes about 30 minutes to complete the process.
passwd
yum -y update
yum -y install net-tools nano wget tar
cd /root
wget http://incrediblepbx.com/incrediblepbx2020.1.tar.gz
tar zxvf incrediblepbx2020.1.tar.gz
rm -f incrediblepbx2020.1.tar.gz
# add a swap file for your instance
./create-swapfile-DO
# kick off Phase I install
./IncrediblePBX2020.sh
# after reboot, kick off Phase II install
./IncrediblePBX2020.sh
# set desired timezone
./timezone-setup
# set FreePBX admin password
./admin-pw-change
# set Apache admin password for AsteriDex and Reminders
./apache-pw-change
 # display your passwords
./show-passwords
# optionally install Incredible Fax 2020
./incrediblefax2020.sh
# set up NeoRouter VPN client, if desired
nrclientcmd
# check network speed and smile
wget -O speedtest-cli https://raw.githubusercontent.com/sivel/speedtest-cli/master/speedtest.py
chmod +x speedtest-cli
./speedtest-cli
Getting Started with Incredible PBX. Before you can actually make and receive calls using Incredible PBX, you’ll need to sign up with a SIP provider and configure a trunk, define how your PBX should route incoming and outgoing calls, and finally install and configure at least one softphone or SIP phone. All of this is accomplished using the FreePBX® GUI and your favorite web browser. Begin by pointing your browser to the IP address of your server. Login as admin using the password you configured with admin-pw-change above.
The way a PBX works is straight-forward. For incoming calls, the PBX identifies the Trunk delivering the incoming call, looks up the Inbound Route for that Trunk, and delivers the call to a destination specified in that route. This could be a phone registered to an Extension on your PBX, or it could be a group of phones known as a Ring Group, or it could be some other destination such as an IVR or AutoAttendant which answers the incoming call and provides the caller with a choice of options that define how the incoming call should be routed.
For outgoing calls, someone with a phone registered to the PBX picks up the phone and dials a number. The PBX looks through its defined Outbound Routes to identify how calls matching that Dial String should be handled. For example, 3-digit and 4-digit calls might be routed to an internal extension, 7-digit calls might have an area code automatically added as a prefix before sending the call to a specified Trunk provider, 10-digit calls might be routed to a different Trunk provider, and calls beginning with 01144 might be routed to yet another Trunk provider that offers inexpensive calling rates to the United Kingdom. Unlike traditional Ma Bell phone service, with VoIP calling, there is rarely a penalty for deploying multiple Trunk providers since most of the services offered are on a pay-as-you-go basis. If you don’t make any calls on a particular trunk in a given month, you don’t get a bill even though most providers require at least a minimal deposit to cover the costs of any calls you actually make.
Choosing a SIP Provider. Incredible PBX 2020 comes preconfigured with support for five SIP extensions and five of the major SIP providers: Skyetel, VoIP.ms, V1VoIP, Anveo Direct, and ClearlyIP. Both Skyetel and ClearlyIP financially support Nerd Vittles and our open source projects, and both offer clearly superior platforms with crystal-clear communications and redundancy so you never miss a call. Both also set themselves apart from the other providers in the support department. They actually respond to issues, and there’s never a charge. As the old saying goes, they may not be the cheapest, but you get what you pay for. Even without taking advantage of Nerd Vittles half-price offer on up to $500 of Skyetel services, both are still dirt cheap compared to the Bell Sisters and cable companies. Skyetel is so sure you’ll love their service that they give you a $10 credit to kick the tires before you ever spend a dime. Traditional DIDs are $1 per month. Outbound conversational calls are $0.012 per minute. Incoming conversational calls are a penny a minute, and CallerID lookups are $0.004. You only pay for minutes you use. Once you’re satisfied with the service and fund your account, you can port in your existing DIDs at no cost for 60 days after signup with Skyetel.
Configuring Skyetel for Incredible PBX 2020
If you’ve decided to go with Skyetel, here’s the drill. Sign up for Skyetel service and take advantage of the Nerd Vittles specials. First, complete the Prequalification Form here. You then will be provided a link to the Skyetel site to complete your registration. Once you have registered on the Skyetel site and your account has been activated, open a support ticket and request the $10 credit for your account by referencing the Nerd Vittles special offer. Once you are satisfied with the service, fund your account as desired, and Skyetel will match your deposit of up to $250 simply by opening another ticket. That gets you up to $500 of half-price calling. Credit is limited to one per person/company/address/location. Effective 10/1/2023, $25/month minimum spend required.
Skyetel does not use SIP registrations to make connections to your PBX. Instead, Skyetel utilizes Endpoint Groups to identify which servers can communicate with the Skyetel service. An Endpoint Group consists of a Name, an IP address, a UDP or TCP port for the connection, and a numerical Priority for the group. For incoming calls destined to your PBX, DIDs are associated with an Endpoint Group to route the calls to your PBX. For outgoing calls from your PBX, a matching Endpoint Group is required to authorize outbound calls through the Skyetel network. Thus, the first step in configuring the Skyetel side for use with your PBX is to set up an Endpoint Group. Here’s a typical setup for Incredible PBX 2020:
- Name: MyPBX
- Priority: 1
- IP Address: PBX-Public-IP-Address
- Port: 5060
- Protocol: UDP
- Description: my.incrediblepbx.com
To receive incoming PSTN calls, you’ll need at least one DID. On the Skyetel site, you acquire DIDs under the Phone Numbers tab. You have the option of Porting in Existing Numbers (free for the first 60 days after you sign up for service) or purchasing new ones under the Buy Phone Numbers menu option.
Once you have acquired one or more DIDs, navigate to the Local Numbers or Toll Free Numbers tab and specify the desired SIP Format and Endpoint Group for each DID. Add SMS/MMS and E911 support, if desired. Call Forwarding and Failover are also supported. That completes the VoIP setup on the Skyetel side. System Status is always available here.
Configuring ClearlyIP for Incredible PBX 2020
ClealyIP Trunking is perhaps the easiest to configure because the entire setup including registration is managed in the FreePBX GUI. Choose Connectivity -> Clearly Trunking -> Sign Up. Next click Login/Signup then Home then Start Your Free Trial to get started.
ClearlyIP Trunking provides E911 features that enable your organization to be Kari’s Law and Ray Baum Act compliant out of the box. You also have a choice of buckets of minutes providing expandable call paths or pay-by-the-minute service or a combination of the two. Unlike others, CNAM lookups and E911 support are included in the price of all their services.
Configuring VoIP.ms for Incredible PBX 2020
To sign up for VoIP.ms service, may we suggest you use our signup link so that Nerd Vittles gets a referral credit for your signup. Once your account is set up, you’ll need to set up a SIP SubAccount and, for Authentication Type, choose Static IP Authentication and enter your Incredible PBX 2020 server’s public IP address. For Transport, choose UDP. For Device Type, choose Asterisk, IP PBX, Gateway or VoIP Switch. Order a DID in their web panel, and then point the DID to the SubAccount you just created. Be sure to specify atlanta1.voip.ms as the POP from which to receive incoming calls. In the Incredible PBX GUI, be sure to enable the VoIP.ms trunk.
Configuring V1VoIP for Incredible PBX 2020
To sign up for V1VoIP service, sign up on their web site. Then login to your account and order a DID under the DIDs tab. Once the DID has been assigned, choose View DIDs and click on the Forwarding button beside your DID. For Option #1, choose Forward to IP Address/PBX. For the Forwarding Address, enter the public IP address of your server. For the T/O (timeout) value, set it to 2o seconds. Then click the Update button. Under the Termination tab, create a new Endpoint with the public IP address of your server so that you can place outbound calls through V1VoIP. In the Incredible PBX GUI, be sure to enable all of the V1VoIP trunks.
Configuring Anveo Direct for Incredible PBX 2020
To sign up for Anveo Direct service, sign up on their web site and then login. After adding funds to your account, purchase a DID under Inbound Service -> Order DID. Next, choose Configure Destination SIP Trunk. Give the Trunk a name. For the Primary SIP URI, enter $[E164]$@server-IP-address. For Call Options, select your new DID from the list. You also must whitelist your public IP address under Outbound Service -> Configure. Create a new Call Termination Trunk and name it to match your server. For Dialing Prefix, choose six alphanumeric characters beginning with a zero. In Authorized IP Addresses, enter the public IP address of your server. Set an appropriate rate cap. We like $0.01 per minute to be safe. Set a concurrent calls limit. We like 2. For the Call Routing Method, choose Least Cost unless you’re feeling extravagant. For Routes/Carriers, choose Standard Routes. Write down your Dialing Prefix and then click the Save button.
Before you can make outbound calls through Anveo Direct from your PBX, you first must configure the Dialing Prefix that you wrote down in the previous step. Log into the GUI as admin using a web browser and edit the Anveo-Out trunk in Connectivity -> Trunks. Enable the Trunk. Then click on the custom-Settings tab and replace anveo-pin with your actual Dialing Prefix. Click Submit and Apply Config to complete the setup. In the Incredible PBX GUI, be sure to enable all of the remaining Anveo trunks.
By default, incoming Anveo Direct calls will be processed by the Default inbound route on your PBX. If you wish to redirect incoming Anveo Direct calls using DID-specific inbound routes, then you’ve got a bit more work to do. In addition to creating the inbound route using the 11-digit Anveo Direct DID, enter the following commands after logging into your server as root using SSH/Putty:
cd /etc/asterisk
echo "[from-anveo]" >> extensions_custom.conf
echo "exten => _.,1,Ringing" >> extensions_custom.conf
echo "exten => _.,n,Goto(from-trunk,\\${SIP_HEADER(X-anveo-e164)},1)" >> extensions_custom.conf
asterisk -rx "dialplan reload"
Configuring a Softphone for Incredible PBX 2020
We’re in the home stretch now. You can connect virtually any kind of telephone to your new PBX. Plain Old Phones require an analog telephone adapter (ATA) which can be a separate board in your computer from a company such as Digium. Or it can be a standalone SIP device such as ObiHai’s OBi100 or OBi110 (if you have a phone line from Ma Bell to hook up as well). SIP phones can be connected directly so long as they have an IP address. These could be hardware devices or software devices such as the YateClient softphone. We’ll start with a free one today so you can begin making calls. You can find dozens of recommendations for hardware-based SIP phones both on Nerd Vittles and the PIAF Forum when you’re ready to get serious about VoIP telephony.
We recommend YateClient for Windows which is free. Download it from here. Run YateClient once you’ve installed it and enter the credentials for the 701 extension on Incredible PBX. You can find them by running /root/show-passwords. You’ll need the IP address of your server plus your extension 701 password. In the YateClient, fill in the blanks using the IP address of your Server, 701 for your Username, and whatever Password was assigned to the extension when you installed Incredible PBX. Click OK to save your entries.
Once you are registered to extension 701, close the Account window. Then click on YATE’s Telephony Tab and place some test calls to the numerous apps that are preconfigured on Incredible PBX. Dial a few of these to get started:
DEMO - Apps Demo
123 - Reminders
947 - Weather by ZIP Code
951 - Yahoo News
TODAY - Today in History
LENNY - The Telemarketer's Worst Nightmare
If you are a Mac user, another great no-frills softphone is Telephone. Just download and install it from the Mac App Store. For Android users, check out the terrific new VitalPBX Communicator. Works flawlessly with Incredible PBX.
Audio Issues with Incredible PBX 2020
If you experience one-way or no audio on some calls, add your external IP address and LAN subnet in the GUI by navigating to Settings -> Asterisk SIP Settings. In the NAT Settings section, click Detect Network Settings. Click Submit and Apply Settings to save your changes.
Configuring SendMail with Incredible PBX 2020
In order to receive voicemails by email delivery, outbound mail functionality from your server obviously is required. If you’ve deployed your server in your home, your Internet Service Provider probably blocks downstream mail servers such as Incredible PBX from sending mail. This is done to reduce SPAM. In this case, you will need to configure SendMail using either your ISP or Gmail as an SMTP Relay Host. NOTE: If you are using a Gmail account with 2-step verification enabled, you MUST use a Gmail App Key instead of your Gmail account password. You also must enable Less Secure Apps access to the Gmail account. Here are the steps using a Gmail account:
cd /etc/mail
yum -y install sendmail-cf
hostname -f > genericsdomain
touch genericstable
cd /usr/bin
rm -f makemap
ln -s ../sbin/makemap.sendmail makemap
cd /etc/mail
makemap -r hash genericstable.db < genericstable
mv sendmail.mc sendmail.mc.original
wget http://incrediblepbx.com/sendmail.mc.gmail
cp sendmail.mc.gmail sendmail.mc
mkdir -p auth
chmod 700 auth
cd auth
echo AuthInfo:smtp.gmail.com \\"U:smmsp\\" \\"I:user_id\\" \\"P:password\\" \\"M:PLAIN\\" > client-info
echo AuthInfo:smtp.gmail.com:587 \\"U:smmsp\\" \\"I:user_id\\" \\"P:password\\" \\"M:PLAIN\\" >> client-info
echo AuthInfo:smtp.gmail.com:465 \\"U:smmsp\\" \\"I:user_id\\" \\"P:password\\" \\"M:PLAIN\\" >> client-info
# Stop here and edit client-info (nano -w client-info) in all three lines.
# Replace  user_id with your gMail account name without @gmail.com
# Replace password with your real gMail password OR
#  use your Gmail App Key if 2-step verification is enabled
# Be sure to replace the double-quotes shown above if they don't appear in the file!!!
# Save your changes (Ctrl-X, Y, then Enter)
chmod 600 client-info
makemap -r hash client-info.db < client-info
cd ..
make
systemctl restart sendmail
At Vultr, you may need to open a ticket and request that TCP port 25 be unblocked. Then you can send mail without using a SmartHost; however, your server's hostname must actually be real or downstream mail servers will reject your mail. You can set your server's hostname like this: hostname noreply.incrediblepbx.com. This is usually sufficient; however, it's a good idea to also add the hostname in /etc/hostname and in /etc/hosts as the first entry on 127.0.0.1 line:
127.0.0.1 noreply.incrediblepbx.com pbx.local localhost
Next, test outbound mail using this command with your actual email address:
echo "test" | mail -s testmessage yourname@youremaildomain.com
Once you are sure your emails are being delivered reliably, here's a sample GUI voicemail configuration for an extension:
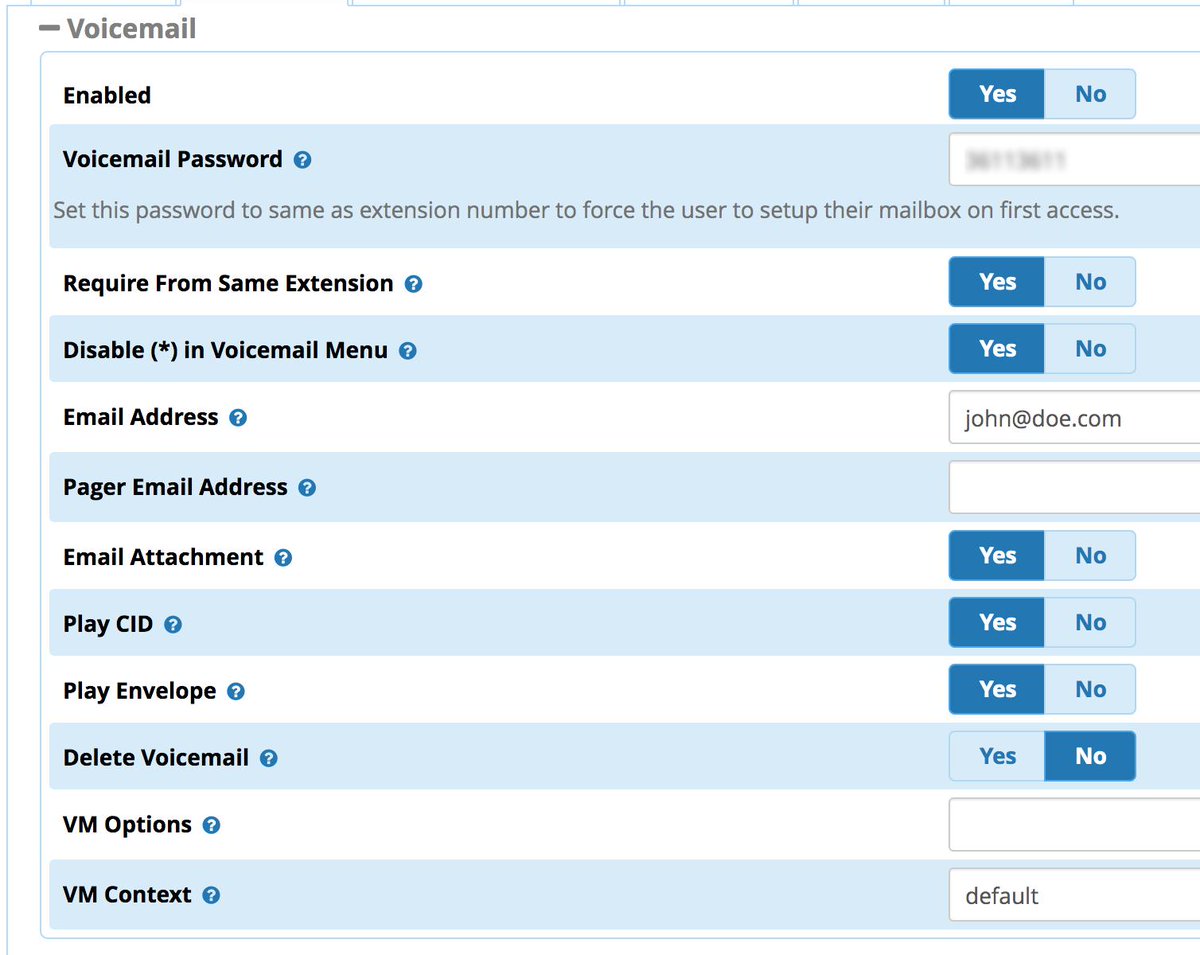
Getting Started with Incredible Fax 2020
Believe it or not, there still are lots of folks that use faxes in their everyday lives. If you're one of them, Incredible PBX has your back. Begin by logging into your server as root and running incrediblefax2020.sh to install HylaFax and AvantFax on your server. You'll be prompted a dozen or more times for information. Answer no to the secure fax question. For the rest of the prompts, just press ENTER to accept the default entries. Rebooting your server is required when the install finishes. Once your server is back on line, there will be a new AvantFax tab in the GUI. Before proceeding, be sure to set an Apache web apps password by running /root/apache-pw-change. Next, login to AvantFax with your browser. You first will be prompted for your Apache credentials. Enter admin for the username and whatever password you set up in the previous step. Then you will be prompted for your AvantFax credentials. The default is admin:password. After you enter the username and password, you will be prompted to change your admin password. The old password is still password. Then enter your desired password twice and save the setting. The AvantFax dashboard then will display. If nothing has come unglued, you should see four green Idle icons:
You can Send Faxes from within AvantFax by choosing the Send Fax tab, or you can use one of many HylaFax clients. Google is your friend.
Where To Go From Here
Complete documentation on the ClearlyIP Devices Module is available here.
Complete documentation on the FreePBX GPL Modules is available here.
Complete documentation on the Incredible PBX additions is available here.
An introduction to configuring extensions, trunks, and routes is available here.
HINT: An Incredible PBX server on Vultr makes an ideal platform for your OpenVPN server.
Originally published: Monday, March 2, 2020
Need help with Asterisk? Visit the VoIP-info Forum.
Special Thanks to Our Generous Sponsors
FULL DISCLOSURE: ClearlyIP, Skyetel, Vitelity, DigitalOcean, Vultr, VoIP.ms, 3CX, Sangoma, TelecomsXchange and VitalPBX have provided financial support to Nerd Vittles and our open source projects through advertising, referral revenue, and/or merchandise. As an Amazon Associate and Best Buy Affiliate, we also earn from qualifying purchases. We’ve chosen these providers not the other way around. Our decisions are based upon their corporate reputation and the quality of their offerings and pricing. Our recommendations regarding technology are reached without regard to financial compensation except in situations in which comparable products at comparable pricing are available from multiple sources. In this limited case, we support our sponsors because our sponsors support us.
BOGO Bonaza: Enjoy state-of-the-art VoIP service with a $10 credit and half-price SIP service on up to $500 of Skyetel trunking with free number porting when you fund your Skyetel account. No limits on number of simultaneous calls. Quadruple data center redundancy. $25 monthly minimum spend required. Tutorial and sign up details are here.
![]() The lynchpin of Incredible PBX 2020 and beyond is ClearlyIP components which bring management of FreePBX modules and SIP phone integration to a level never before available with any other Asterisk distribution. And now you can configure and reconfigure your new Incredible PBX phones from the convenience of the Incredible PBX GUI.
The lynchpin of Incredible PBX 2020 and beyond is ClearlyIP components which bring management of FreePBX modules and SIP phone integration to a level never before available with any other Asterisk distribution. And now you can configure and reconfigure your new Incredible PBX phones from the convenience of the Incredible PBX GUI.
VitalPBX is perhaps the fastest-growing PBX offering based upon Asterisk with an installed presence in more than 100 countries worldwide. VitalPBX has generously provided a customized White Label version of Incredible PBX tailored for use with all Incredible PBX and VitalPBX custom applications. Follow this link for a free test drive!
Special Thanks to Vitelity. Vitelity is now Voyant Communications and has halted new registrations for the time being. Our special thanks to Vitelity for their unwavering financial support over many years and to the many Nerd Vittles readers who continue to enjoy the benefits of their service offerings. We will keep everyone posted on further developments.
Introducing Incredible Fax 2020 for Raspberry Pi

Incredible Fax 2020 for the Raspberry Pi was the final missing piece in our 2020 rollout, and today we’re pleased to introduce it. Incredible Fax 2020 provides fax detection on incoming calls, email deliveries of incoming faxes in PDF format, and the ability to send faxes with attachments from the convenience of your favorite web browser. And, as with every Incredible PBX 2020 platform, all of the software is FREE.
Installation of Incredible Fax 2020 on the Raspbian platform is pretty simple. Just issue the following commands to put all the pieces in place and run the HylaFax and AvantFax installers. Before faxes can actually be delivered in PDF format, you obviously need outbound emails working on your Raspberry Pi. We’ll cover that in the next section. Before incoming faxes can be detected on Inbound Routes for your trunks, you’ll need to set that up in FreePBX®. We’ll cover that below as well.
Installing Incredible Fax 2020 for Raspbian 10
Let’s begin by installing the Incredible Fax 2020 software. Log into the Linux command line interface as root using SSH or Putty. Then execute the following commands:
cd /root
rm -f incrediblefax*
wget http://incrediblepbx.com/incrediblefax2020-raspi.tar.gz
tar zxvf incrediblefax2020-raspi.tar.gz
rm -f incrediblefax2020-raspi.tar.gz
./incrediblefax2020-raspi.sh
fwconsole ma downloadinstall fax
fwconsole reload
Once the HylaFax/AvantFax install begins, press the ENTER key about a dozen times to accept all of the defaults during the install procedure. Then reboot your server.
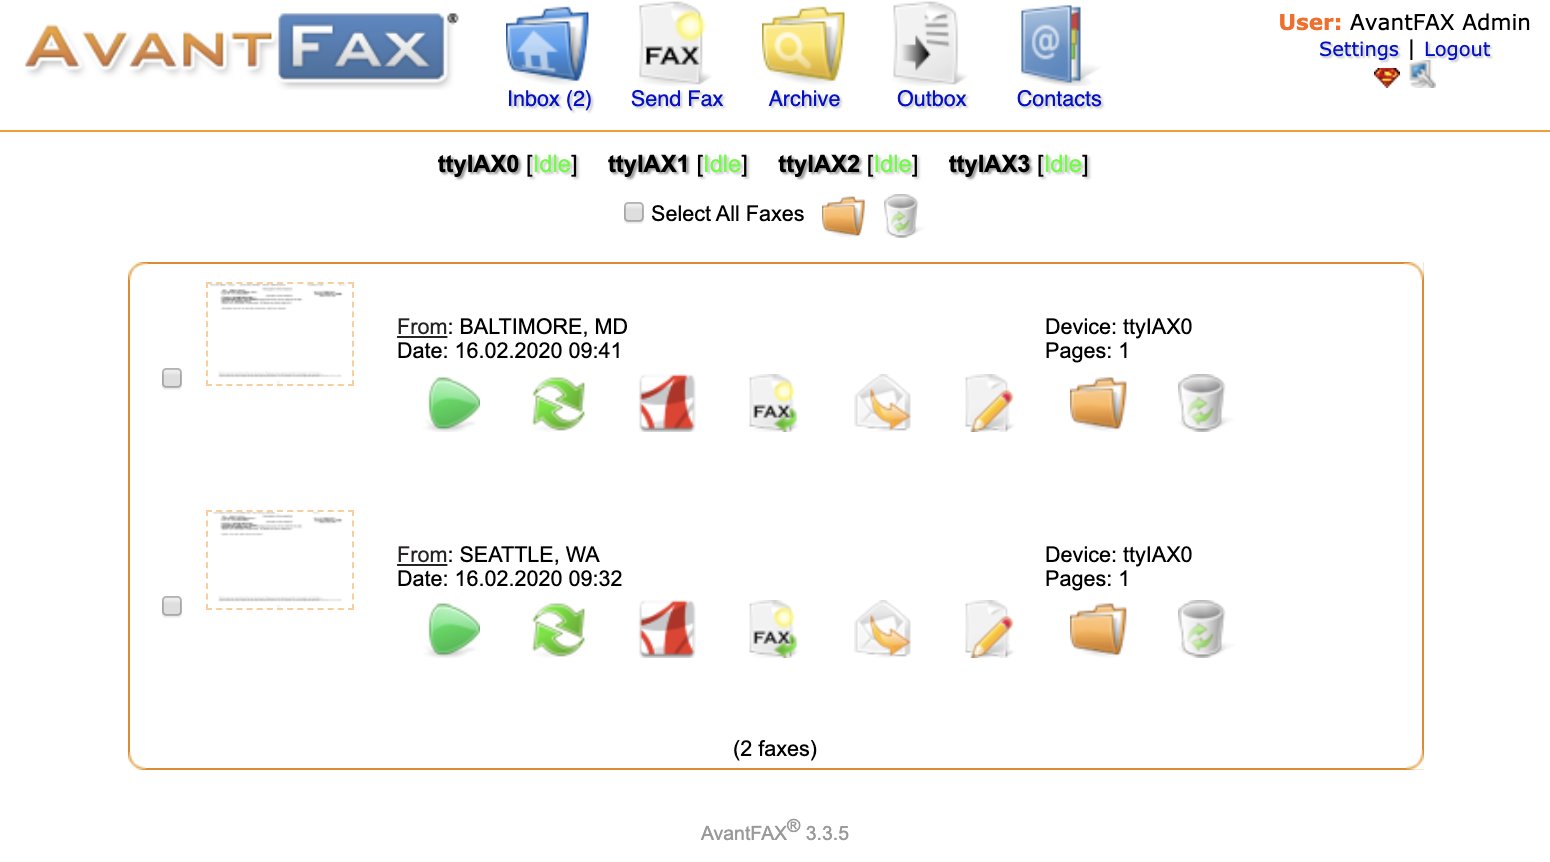
Configuring Gmail as Exim Smart Relay Host
Most Raspberry Pi implementations will be on networks managed by companies like Comcast, Spectrum, and AT&T that block downstream mail servers (that’s you) from sending email. The solution is to use Gmail or your local ISP as a smart relay host to send mail from your server. You’ll need this to deliver voicemails and faxes via email. Here’s how to set it up using a Gmail account without two-step authentication. Log into your server as root and run dpkg-reconfigure exim4-config. Choose "mail sent by smarthost; received via SMTP or fetchmail." Accept all the defaults until you get to Outgoing Smarthost prompt. Enter: smtp.gmail.com::587. At the following prompts, choose NO, NO, mbox, and NO. When the setup completes, edit /etc/exim4/passwd.client and insert the following line using your Gmail AcctName and AcctPW. NOTE: If you are using a Gmail account with 2-step verification enabled, you MUST use a Gmail App Key instead of your Gmail account password. You also must enable Less Secure Apps access to your Gmail account.
smtp.gmail.com:AcctName@gmail.com:AcctPW
Save the file and then issue the following commands to complete the setup:
update-exim4.conf
systemctl restart exim4
exim4 -qff
Now send yourself a test email message to make sure things are working properly:
echo "test" | mail -s testmessage yourname@yourmailprovider.com
Configuring Inbound Routes for Fax Detection
Not all VoIP trunks support fax transmission, e.g. Vitelity. Assuming yours do and you’ll only know by trial and error, here’s how to configure FreePBX to automatically detect incoming faxes and process them for PDF delivery by email.
Edit each of your Inbound Routes. Under the Fax tab, enter the following settings:
Detect Faxes: YES
Fax Detection Type: SIP
Fax Ring: YES
Fax Detect Time: 4
Fax Destination: Custom Destinations -> Fax (Hylafax)
Managing Faxes with AvantFax
You can manage your incoming and outgoing faxes using AvantFax. Click on the AvantFax tab in FreePBX to access it. The default credentials are admin:password. When you first access AvantFax with a browser, you may get a missing page error. Just press the back arrow key in your browser and the AvantFax main page will appear.
If you want to change the admin password for AvantFax, log into your server as root with SSH/Putty and issue the command: /root/avantfax-pw-change.
Send yourself a fax at no cost in the United States from FaxZero. Enjoy!
Originally published: Tuesday, February 25, 2020
Need help with Asterisk? Visit the VoIP-info Forum.
Special Thanks to Our Generous Sponsors
FULL DISCLOSURE: ClearlyIP, Skyetel, Vitelity, DigitalOcean, Vultr, VoIP.ms, 3CX, Sangoma, TelecomsXchange and VitalPBX have provided financial support to Nerd Vittles and our open source projects through advertising, referral revenue, and/or merchandise. As an Amazon Associate and Best Buy Affiliate, we also earn from qualifying purchases. We’ve chosen these providers not the other way around. Our decisions are based upon their corporate reputation and the quality of their offerings and pricing. Our recommendations regarding technology are reached without regard to financial compensation except in situations in which comparable products at comparable pricing are available from multiple sources. In this limited case, we support our sponsors because our sponsors support us.
BOGO Bonaza: Enjoy state-of-the-art VoIP service with a $10 credit and half-price SIP service on up to $500 of Skyetel trunking with free number porting when you fund your Skyetel account. No limits on number of simultaneous calls. Quadruple data center redundancy. $25 monthly minimum spend required. Tutorial and sign up details are here.
![]() The lynchpin of Incredible PBX 2020 and beyond is ClearlyIP components which bring management of FreePBX modules and SIP phone integration to a level never before available with any other Asterisk distribution. And now you can configure and reconfigure your new Incredible PBX phones from the convenience of the Incredible PBX GUI.
The lynchpin of Incredible PBX 2020 and beyond is ClearlyIP components which bring management of FreePBX modules and SIP phone integration to a level never before available with any other Asterisk distribution. And now you can configure and reconfigure your new Incredible PBX phones from the convenience of the Incredible PBX GUI.
VitalPBX is perhaps the fastest-growing PBX offering based upon Asterisk with an installed presence in more than 100 countries worldwide. VitalPBX has generously provided a customized White Label version of Incredible PBX tailored for use with all Incredible PBX and VitalPBX custom applications. Follow this link for a free test drive!
Special Thanks to Vitelity. Vitelity is now Voyant Communications and has halted new registrations for the time being. Our special thanks to Vitelity for their unwavering financial support over many years and to the many Nerd Vittles readers who continue to enjoy the benefits of their service offerings. We will keep everyone posted on further developments.
Future-Proofing FreePBX Distro with Incredible PBX Skin

If you’ve been following along on Sangoma’s FreePBX® power grab and are waiting for the next shoe to drop on the PBX that your users depend upon to conduct business and make emergency calls, we now have a non-intrusive solution for those on the FreePBX Distro platform. By installing the Incredible PBX branding module and updating to the patched Framework module on your PBX, you can insulate yourself from future Sangoma surprises including potential ramifications arising from revocation of the original FreePBX signing key.
NOTE: THIS IS NOT A FORK OF THE FREEPBX PROJECT. IT IS AN EMERGENCY PATCH TO NEUTRALIZE THE DAMAGE POSED BY SANGOMA’S PUBLIC THREAT TO DISRUPT THE COMMUNICATIONS SERVICES OF APPROPRIATELY LICENSED INCREDIBLE PBX 2020 TRUNKING PLATFORMS ON MONDAY, FEBRUARY 17, 2020. See 18 U.S.C. 1030(a)(7).
The Incredible PBX branding module is owned by Clearly IP and, with their permission, it is being offered at no cost for use on FreePBX Distro platforms pursuant to the terms of the AGPLv3 license. What does it do? In a nutshell, it gets you out from under the yoke of Sangoma for module administration and unauthorized tampering with your PBX.
Here are the specifics on what deployment of the Incredible PBX branding module will do:
- Rebrands FreePBX with Incredible PBX logos and artwork.
- Adds Incredible PBX and Nerd Vittles RSS Feeds to the FreePBX Dashboard.
- Disables the flow of proprietary info about your phones, trunks, and usage to Sangoma.
- Offers multiple module repository setups (soon) for sites with varying technical skillsets.
- Links Incredible PBX to ClearlyIP stores for Trunking and Incredible Phone purchases.
- Supports multiple GPG key signatures including the original FreePBX GPG key.
- Connects Module Admin to ClearlyIP Module Repos for future FreePBX updates.
As if the last few weeks haven’t provided enough reasons for any administrator to separate their PBX from the whims of Sangoma, here are some other factors which, we believe, make this migration compelling:
- Future-proofs your PBX from future Sangoma surprises that may damage your PBX.
- Provides a more redundant repository platform unlike Sangoma’s fragile repository.
- Provides instant access to all ClearlyIP-developed modules moving forward.
- Provides instant access to all existing and future FreePBX module releases.
- Addition of future Incredible PBX components is exclusively on an opt-in basis.
- Provides access to ClearlyIP Trunking module with integrated SMS and Kari’s Law 911.
- Provides access to Incredible IP Phone store for plug-and-play SIP telephones.
- Provides a revenue stream for Incredible PBX and ClearlyIP future development.
Deploying the Incredible PBX Branding Module
This deployment guide assumes you have a functioning FreePBX Distro platform with FreePBX 15, Linux 7.x, and Asterisk 16. If not, start here. Otherwise, login to the FreePBX web GUI as an administrator and perform the following steps:
- Make a Backup (Admin • Backup & Restore • Add Backup)
- Download the Incredible PBX Module to your Desktop PC
- Install the Module (Admin • Module Admin • Upload Module from Hard Disk)
- Update the patched Framework Module (Admin • Module Admin • Check Online)
- Install Clearly Devices and Trunking Module, if desired
- Verify all is well by viewing FreePBX Dashboard (see screenshot above)
Originally published: Tuesday, February 11, 2020
Need help with Asterisk? Visit the VoIP-info Forum.
Special Thanks to Our Generous Sponsors
FULL DISCLOSURE: ClearlyIP, Skyetel, Vitelity, DigitalOcean, Vultr, VoIP.ms, 3CX, Sangoma, TelecomsXchange and VitalPBX have provided financial support to Nerd Vittles and our open source projects through advertising, referral revenue, and/or merchandise. As an Amazon Associate and Best Buy Affiliate, we also earn from qualifying purchases. We’ve chosen these providers not the other way around. Our decisions are based upon their corporate reputation and the quality of their offerings and pricing. Our recommendations regarding technology are reached without regard to financial compensation except in situations in which comparable products at comparable pricing are available from multiple sources. In this limited case, we support our sponsors because our sponsors support us.
BOGO Bonaza: Enjoy state-of-the-art VoIP service with a $10 credit and half-price SIP service on up to $500 of Skyetel trunking with free number porting when you fund your Skyetel account. No limits on number of simultaneous calls. Quadruple data center redundancy. $25 monthly minimum spend required. Tutorial and sign up details are here.
![]() The lynchpin of Incredible PBX 2020 and beyond is ClearlyIP components which bring management of FreePBX modules and SIP phone integration to a level never before available with any other Asterisk distribution. And now you can configure and reconfigure your new Incredible PBX phones from the convenience of the Incredible PBX GUI.
The lynchpin of Incredible PBX 2020 and beyond is ClearlyIP components which bring management of FreePBX modules and SIP phone integration to a level never before available with any other Asterisk distribution. And now you can configure and reconfigure your new Incredible PBX phones from the convenience of the Incredible PBX GUI.
VitalPBX is perhaps the fastest-growing PBX offering based upon Asterisk with an installed presence in more than 100 countries worldwide. VitalPBX has generously provided a customized White Label version of Incredible PBX tailored for use with all Incredible PBX and VitalPBX custom applications. Follow this link for a free test drive!
Special Thanks to Vitelity. Vitelity is now Voyant Communications and has halted new registrations for the time being. Our special thanks to Vitelity for their unwavering financial support over many years and to the many Nerd Vittles readers who continue to enjoy the benefits of their service offerings. We will keep everyone posted on further developments.
Sangoma Developments Affecting All FreePBX Users

On Friday evening, Sangoma announced that they would be revoking the FreePBX® signing key of Clearly IP. The key was independently developed and copyrighted by Rob Thomas, who was the original developer of FreePBX. As we indicated in a previous article, we suspect that this is merely the first step in a process to replace Rob Thomas’s GPG key with a Sangoma-proprietary key. Indeed, tired_runner on the DSL Reports forum has reported that he "installed Framework 15.0.16.38 which apparently refreshes GPG keys before reading this thread. Dashboard kept complaining that version 15.0.16.30 I was running was vulnerable." Further surprises may be in store for FreePBX users tomorrow which is the day Sangoma indicated on Friday that they would be revoking the Clearly IP signing key. You can read all sides of the dispute in this thread on the FreePBX Forum. You should also review Rob Thomas’ comments on the PIAF Forum.
Unfortunately, this is an outcome we predicted about five years ago when Rob was first developing the signature checking module. While Rob intended it to be nothing more than an integrity check, it has been transformed into a commercial weapon just as we predicted. It’s the primary reason that Incredible PBX servers have always been shipped with module signature checking disabled. Pretty sad day for the open source community and a company that professed to care deeply for its users.
For those who already have deployed Incredible PBX 2020, you should immediately log into your server as root and allow the Automatic Update Utility to load the necessary patches to assure that your server still will be operational tomorrow on February 17. There are serious legal penalties, both state and federal, for anyone that tampers with the operation of a computer system which they do not own. Should this happen to you, please let us know, and we will assemble the necessary information to provide to any future legal counsel that may be retained to represent the class of affected users.
For those considering a new PBX and for your own peace of mind, we would encourage you to choose one of the Incredible PBX 2020 platforms, all of which have now been patched to provide a smooth transition to the ClearlyIP mirror servers for FreePBX module updates. Versions are available for CentOS 7, Raspbian 10, and VirtualBox.
We want to take a moment to express our sincere thanks to the Clearly IP development team which worked around the clock this weekend to assure that nobody would be needlessly harmed by Sangoma’s conduct. THANK YOU!
We will provide further details in coming days. So stay tuned for updates.
7 p.m. Sunday UPDATE: Sangoma reportedly has granted a one-week reprieve. Generous.
Valentine’s Day UPDATE: Without addressing whether revocation of the FreePBX Master Key was under consideration, Sangoma now denies any plan to revoke the FreePBX Master Key:
Continue reading: Future-Proofing FreePBX Distro with Incredible PBX Skin
Originally published: Sunday, February 9, 2020
Need help with Asterisk? Visit the VoIP-info Forum.
Special Thanks to Our Generous Sponsors
FULL DISCLOSURE: ClearlyIP, Skyetel, Vitelity, DigitalOcean, Vultr, VoIP.ms, 3CX, Sangoma, TelecomsXchange and VitalPBX have provided financial support to Nerd Vittles and our open source projects through advertising, referral revenue, and/or merchandise. As an Amazon Associate and Best Buy Affiliate, we also earn from qualifying purchases. We’ve chosen these providers not the other way around. Our decisions are based upon their corporate reputation and the quality of their offerings and pricing. Our recommendations regarding technology are reached without regard to financial compensation except in situations in which comparable products at comparable pricing are available from multiple sources. In this limited case, we support our sponsors because our sponsors support us.
BOGO Bonaza: Enjoy state-of-the-art VoIP service with a $10 credit and half-price SIP service on up to $500 of Skyetel trunking with free number porting when you fund your Skyetel account. No limits on number of simultaneous calls. Quadruple data center redundancy. $25 monthly minimum spend required. Tutorial and sign up details are here.
![]() The lynchpin of Incredible PBX 2020 and beyond is ClearlyIP components which bring management of FreePBX modules and SIP phone integration to a level never before available with any other Asterisk distribution. And now you can configure and reconfigure your new Incredible PBX phones from the convenience of the Incredible PBX GUI.
The lynchpin of Incredible PBX 2020 and beyond is ClearlyIP components which bring management of FreePBX modules and SIP phone integration to a level never before available with any other Asterisk distribution. And now you can configure and reconfigure your new Incredible PBX phones from the convenience of the Incredible PBX GUI.
VitalPBX is perhaps the fastest-growing PBX offering based upon Asterisk with an installed presence in more than 100 countries worldwide. VitalPBX has generously provided a customized White Label version of Incredible PBX tailored for use with all Incredible PBX and VitalPBX custom applications. Follow this link for a free test drive!
Special Thanks to Vitelity. Vitelity is now Voyant Communications and has halted new registrations for the time being. Our special thanks to Vitelity for their unwavering financial support over many years and to the many Nerd Vittles readers who continue to enjoy the benefits of their service offerings. We will keep everyone posted on further developments.
Free Asterisk Solutions
