
Home » Incredible PBX (Page 7)
Category Archives: Incredible PBX
The Most Versatile VoIP Provider: FREE PORTING

 JUST RELEASED: Visit the Incredible PBX Wiki
Oracle Cloud: Grab a Free Incredible PBX Cloud Server for Life

It’s not every day that you get an opportunity to deploy an Incredible PBX® server on a cloud platform as robust as the one offered by Oracle®. And the fact that it won’t cost you a dime EVER makes this all the more appealing. This isn’t some bargain basement, crippled cloud platform with barely enough horsepower to get your server booted. Quite the contrary. This is an ARM-based Ubuntu 20.04 platform with 6GB of RAM, 45+ GB of storage, and a 1GB network pipe. The CPU capacity is equivalent to multiple physical cores of an Intel Xeon processor with hyper threading enabled. The word you’re looking for is WOW! Our further testing suggests that, by deploying 1 OCPU instances, you can actually create 4 separate servers in your free allocation from Oracle. So let’s jump right in and get your new server up and running.
Getting Started with Oracle Cloud
For openers, you’ll need to set yourself up with a free Oracle Cloud account here. You can read all about Oracle’s Free Tier, and today we’ll be setting up an Always Free Ampere A1 Compute Resource which never expires. It provides 3,000 OCPU hours and 18,000 GB hours per month for free for VM instances using the VM.Standard.A1.Flex shape. For Always Free tenancies, this is equivalent to 4 OCPUs and 24 GB of memory. Translation: You can build an Asterisk® server to handle thousands of users with this platform. In fact, you can now build FOUR of them.
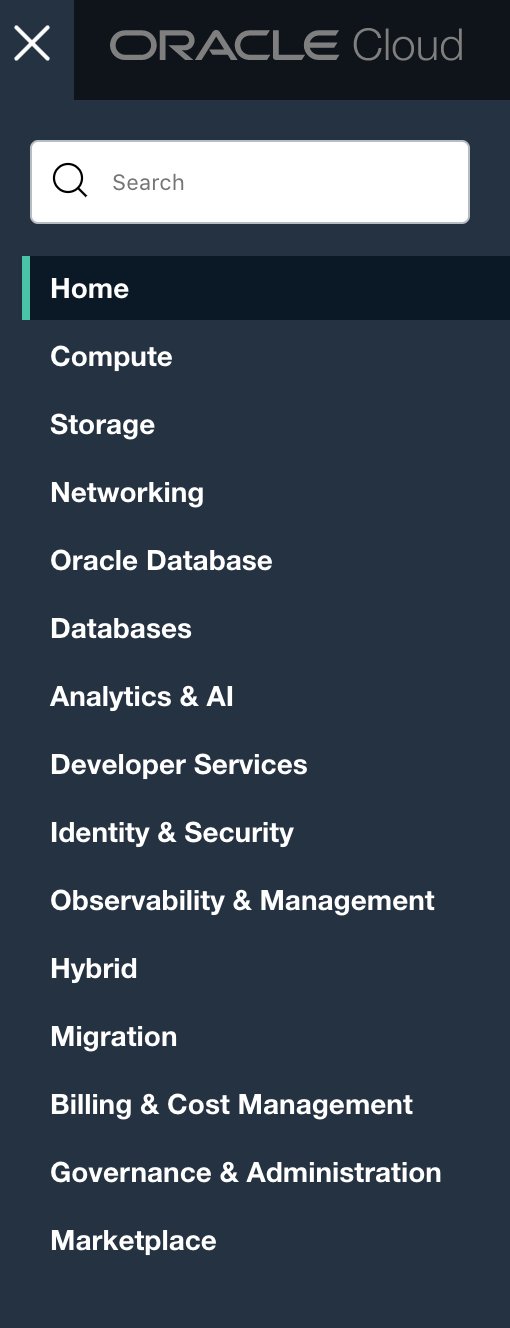
Once you’ve set up your account and accessed the Oracle Cloud Dashboard, click on the 3-bar Options Menu in the upper left column. You’ll be using two key options in the menus: Compute -> Instances and Networking -> Virtual Cloud Networks. We recommend you click the PIN icon on both of these so that they become available on your Home dashboard.
To begin, navigate to Identity -> Compartments and create a new incrediblepbx compartment. Then navigate to Compute -> Instances and click the Create Instance button. Accept the default Name and choose incrediblepbx as your Compartment. In the Image and shape section, click Edit. In the Image and Shape dialog, click the Change Image button and choose the Canonical Ubuntu 20.04 option. CAUTION: 22.04 is now the default so make sure you change it to 20.04 Image with the latest 20.04 Build Date! Next, click the Change Shape button and choose Virtual Machine, Ampere, check VM.Standard.A1.Flex) and select 1 OCPU with 6GB of RAM. In the Networking section, click Edit. Choose Public Subnet, Use network security groups to control traffic: No, Assign a public IPv4 address: Yes, and DNS record: Yes. Finally, in the Add SSH Keys section, leave the Generate a key pair for me option selected, and click Save Private Key then Save Public Key to download both keys to your desktop. Click Upload public key files (.pub) button and upload the Public Key you just downloaded into your instance. Finally, click the Create button to create your new instance. Once your instance is up and running, click on Public Subnet under Primary VNIC. In the Default Security List option, add Ingress and Egress Rules with an entry for Stateless=No, Source=0.0.0.0/0, IP Protocol=ALL, Source & Destination Port Range=ALL. In addition, add Ingress rules for UDP 5060:5069 and UDP 10000:20000. While appearing to be redundant, the UDP rules reportedly have been necessary to make and receive calls successfully.
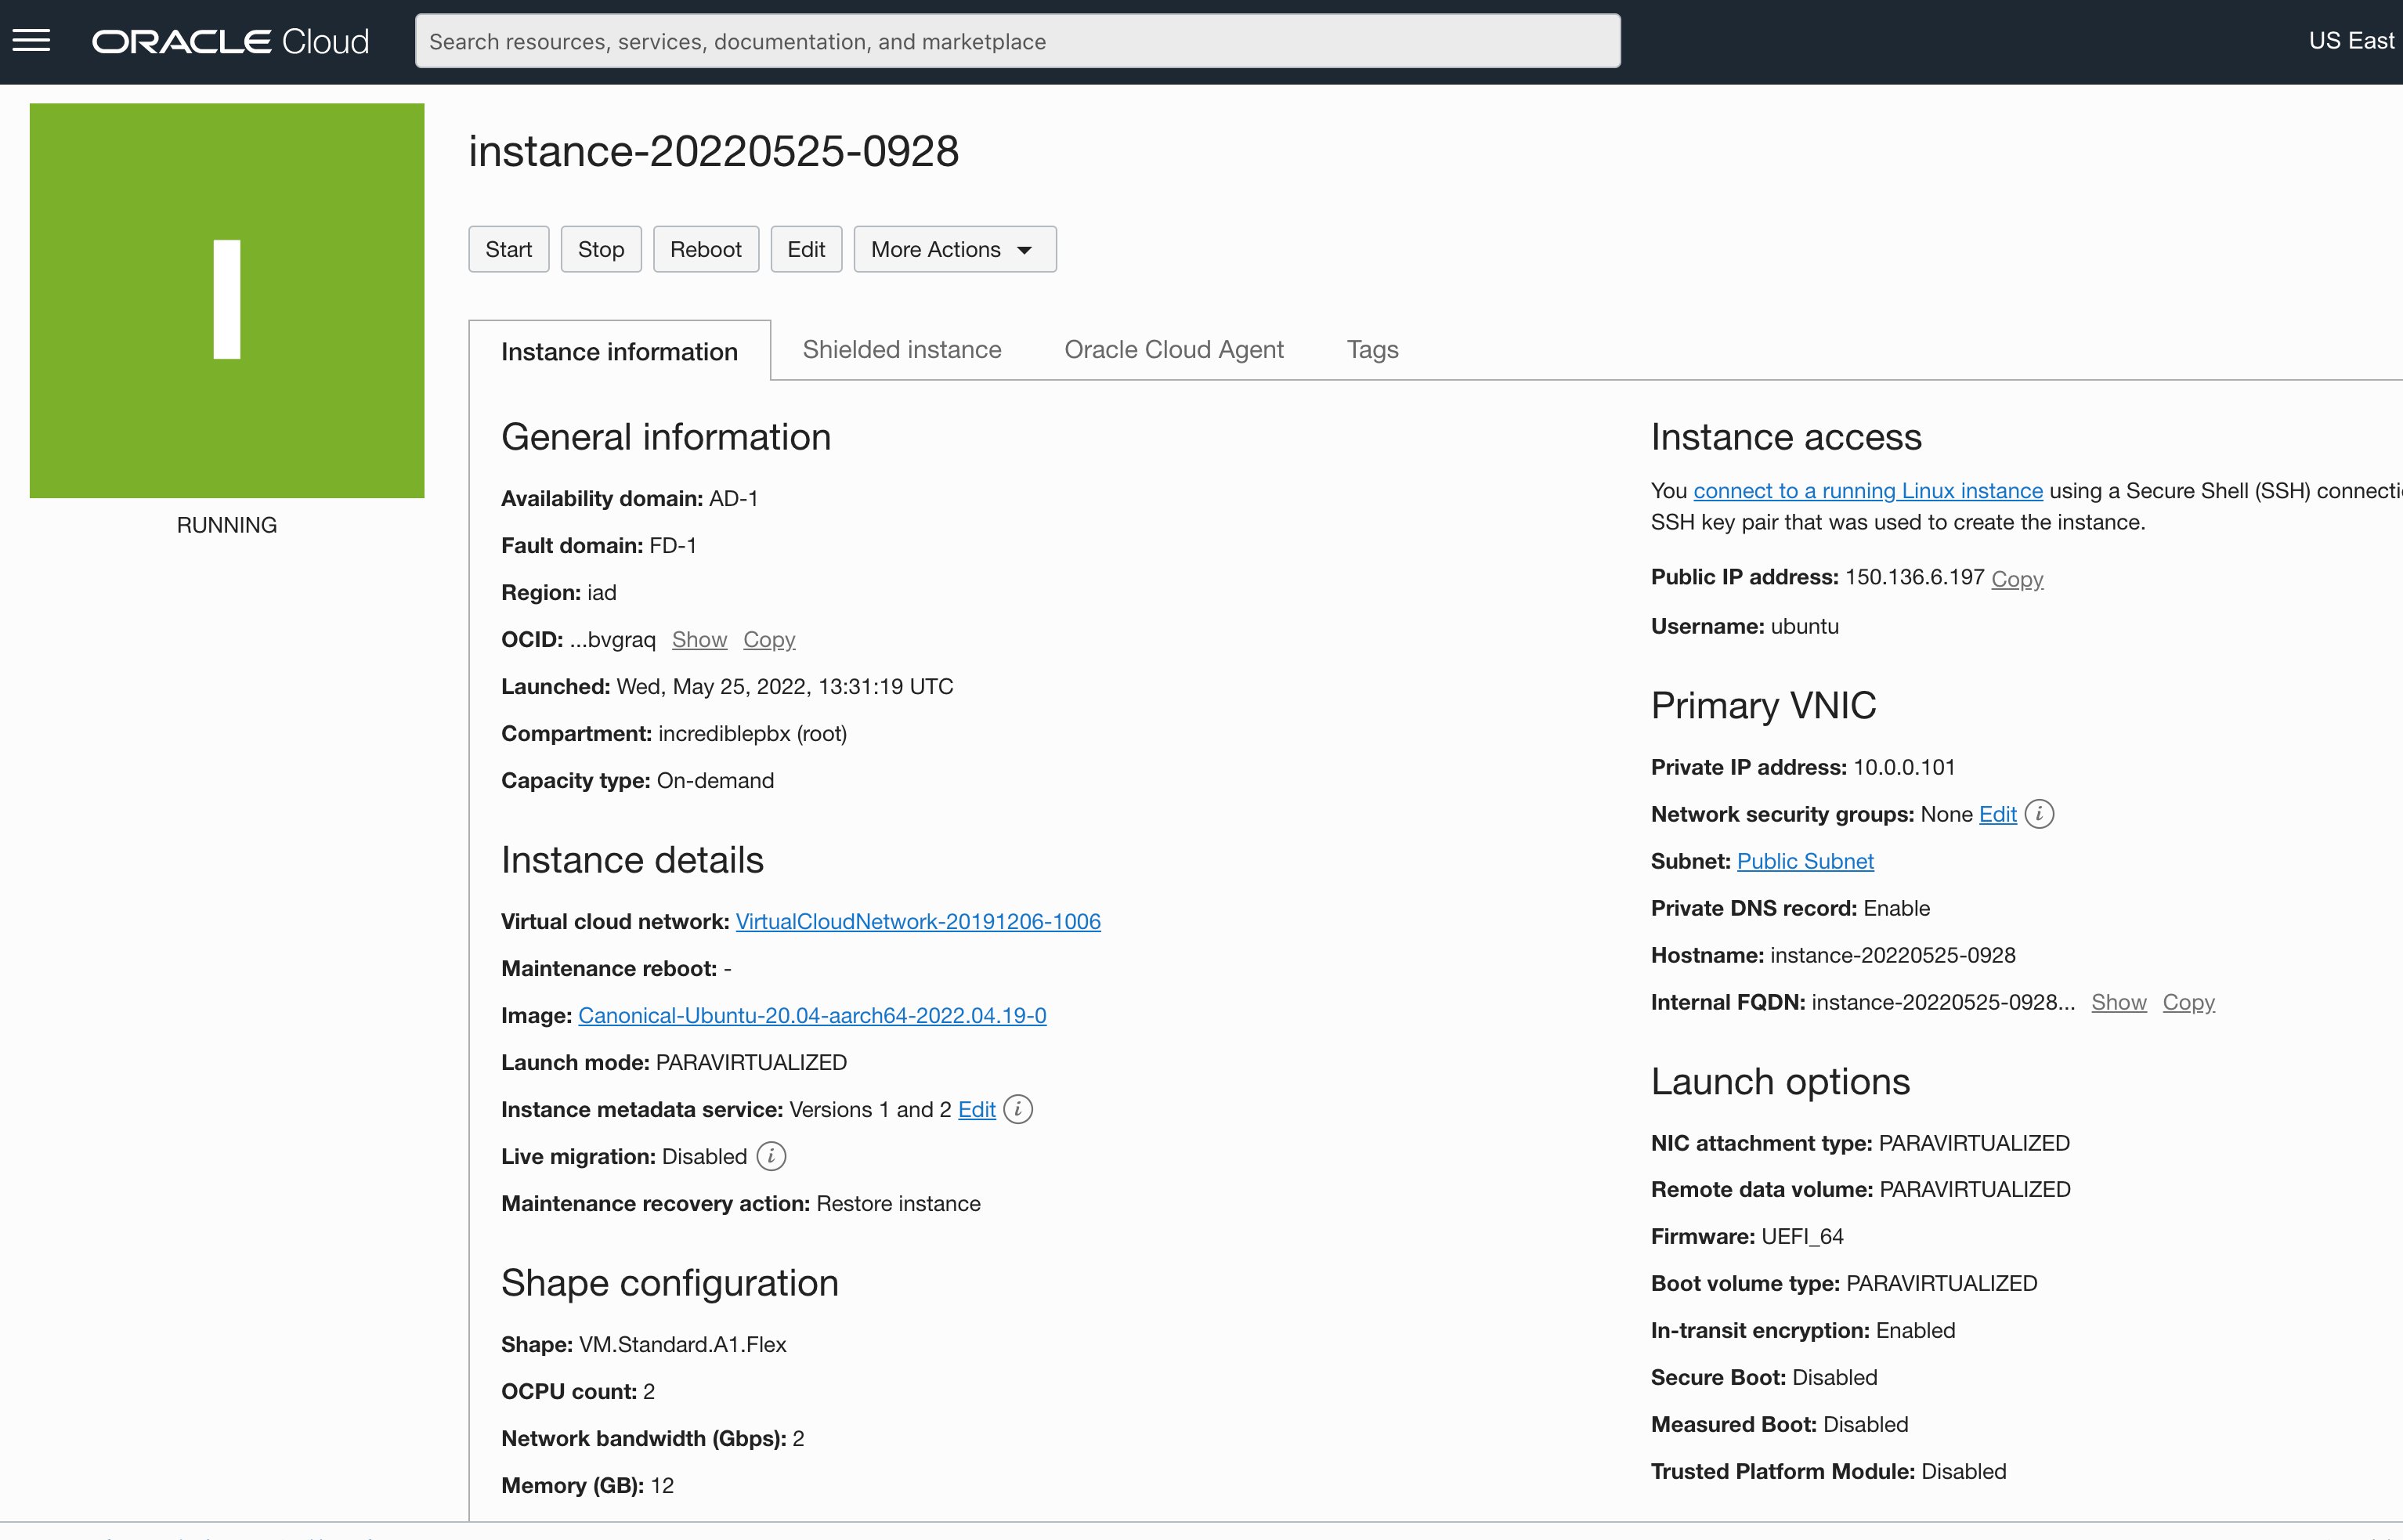
Now copy the public IP address of your server which, together with your private key, you’ll need to login. From a Terminal window on your desktop PC, login to your server using the following commands where ssh-key-2022-05-24.key is the filename of your private key and 159.201.201.173 is the public IP address of your instance:
chmod 0600 ssh-key-2022-05-24.key
ssh -i ssh-key-2022-05-24.key ubuntu@159.201.201.173
Once you’re logged in, let’s configure the root account which you will need to install Incredible PBX. Begin by setting up a very secure password for root.
sudo passwd root
su root
cd ~
wget http://incrediblepbx.com/IncrediblePBX2021-Oracle.sh
chmod +x IncrediblePBX2021-Oracle.sh
./IncrediblePBX2021-Oracle.sh
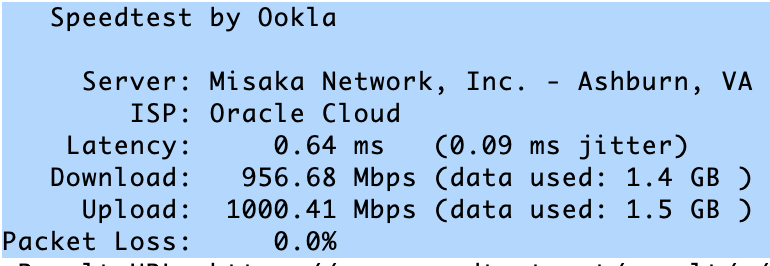
We think you will find the performance is second to none. Here are our 1-OCPU results which far exceed the performance specs you’ll find at Vultr, Digital Ocean, or OVH on their 1-2 GB RAM platforms.
This is not a trivial install procedure so go have a long cup of coffee and return in about 40 minutes to press the ENTER key to kick off the Automatic Update Utility. Once that begins, you’ll need to press ENTER again in about 5 minutes when the updates are completed. Then your install will continue for a couple minutes when you will be prompted to press ENTER to reboot. Do so and you’re all set.
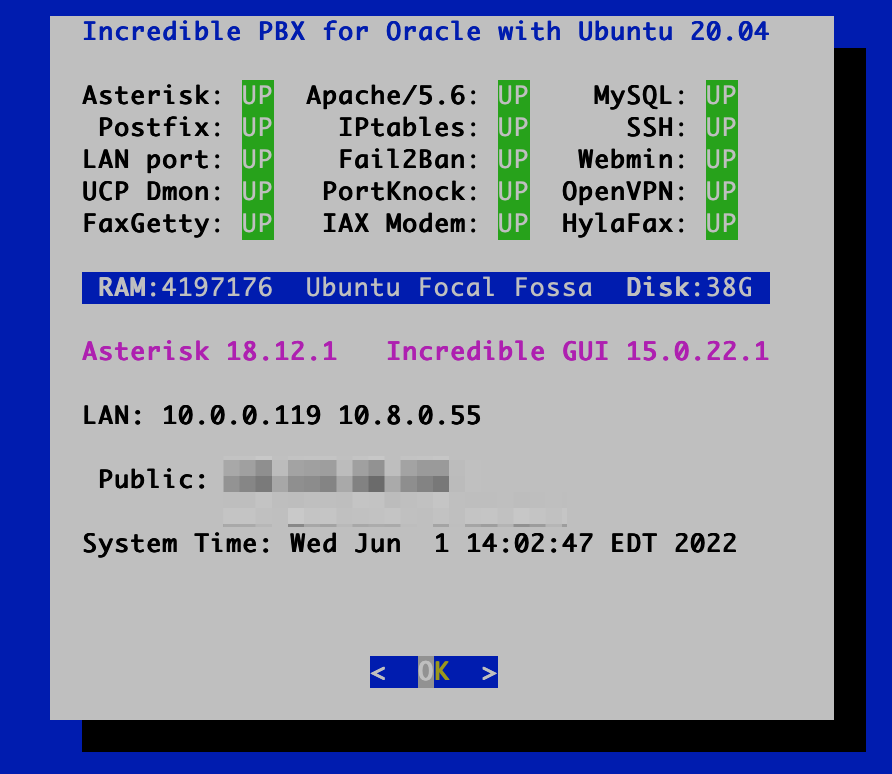
Managing Incredible PBX in the Oracle Cloud
All of the usual Incredible PBX features are available in the Oracle Cloud release. After rebooting, you now can login to your server as root using your root password. Be sure to login periodically so that the Automatic Update Utility is run to keep your server secure.
ssh -i ssh-key-2022-xx-xx.key ubuntu@public-IP-address
su root
cd ~
./update-IncrediblePBX
It’s also good practice to keep the FreePBX GPL modules up to date. Here’s how after logging in:
rm -f /tmp/*
fwconsole ma upgradeall
fwconsole reload
fwconsole restart
./sig-fix
./sig-fix
And don’t forget to…
Set your admin password for FreePBX GUI access: ./admin-pw-change
Set your admin password for Apache app access: ./apache-pw-change
Set your proper timezone: ./timezone-setup
Configure SendMail relay host: ./enable-gmail-smarthost-for-sendmail
Whitelist your IP addresses for access: ./add-ip and ./add-fqdn
Make a Backup and copy it off-site: ./incrediblebackup2021
Using Text-to-Speech Apps in the Oracle Cloud
Because the Oracle platform is ARM-based and most of the text-to-speech (TTS) apps are not, finding a TTS solution that actually worked was a challenge. But thanks to a tip from Dick Ollett, we’ve found a reliable alternative to PicoTTS. gTTS was easy to deploy with our existing applications and has restored the functionality of the Weather by ZIP Code (947) and News Headlines (951) applications using Incredible PBX on the Oracle Cloud platform.
Activating IBM Text-to-Speech for Oracle Cloud
IBM’s TTS offering still works reliably and, if you sign up for their LITE Pricing Plan, the first 10,000 characters per month are free. To get started, follow along in our previous IBM tutorial to sign up for service and the LITE TTS Pricing Plan which you will find by clicking on the Catalog tab in the toolbar, then choosing AI/Machine Learning, and then Text to Speech. Choose the Lite plan and make note of your API Key and access URL for the region you selected.
Next, log into your server as root and issue the following commands:
cd /var/lib/asterisk/agi-bin
wget http://incrediblepbx.com/ibmtts.tar.gz
tar zxvf ibmtts.tar.gz
rm -f ibmtts.tar.gz
./install-ibmtts-dialplan.sh
Finally, edit /var/lib/asterisk/agi-bin/ibmtts.php and insert your API Key and URL in the spaces provided. Then save the file.
Activating Amazon’s Polly TTS for Oracle Cloud
If you’d prefer to use Amazon’s Polly TTS, its pricing is incredibly reasonable, and the quality is second to none. For your first year of service, 5 million TTS characters a month are free. After that, the standard TTS cost is $4 per million characters per month prorated to actual usage. For example, with 300 TTS requests a month of 500 characters each, the monthly cost would be 60¢. We’ve previously documented the Polly TTS setup for Incredible PBX 2021 so you can follow that tutorial to deploy Polly TTS with Incredible PBX in the Oracle Cloud.
Using either service, you now should be able to obtain Weather Reports by ZIP Code by dialing 947 from any extension registered to your PBX. Get the latest News Headlines by dialing 951.
Deploying PicoTTS in the Oracle Cloud
Because Oracle Cloud runs on the ARM64 architecture, you’ll need the ARM64 version of PicoTTS:
cd /root
rm -f libttspico*
wget http://incrediblepbx.com/picotts-arm64.tar.gz
tar zxvf picotts-arm64.tar.gz
rm -f picotts-arm64.tar.gz
dpkg -i libttspico*
Activating OpenVPN Virtual Private Network
The OpenVPN Client software comes preinstalled with Incredible PBX. In order to activate OpenVPN, you simply need to copy your OpenVPN credentials to the server as /etc/incrediblepbx2021.ovpn. Then reboot. Your OpenVPN IP address will be shown in pbxstatus. For an overview of the OpenVPN setup procedure, read our original OpenVPN article. Then follow the simple steps on the Incredible PBX Wiki for OpenVPN Server and OpenVPN Client installs.
NOTE: Because of Oracle’s security zone policies, connecting extensions to your PBX using the public IP address may result in no audio on calls with some SIP clients. By connecting using the OpenVPN private IP address solves the problem in some cases.
Getting Started with Incredible Fax 2021
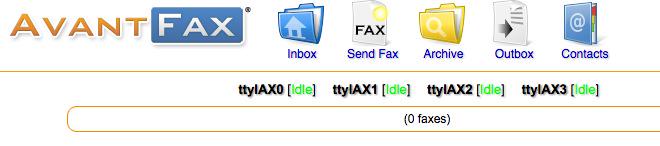
Believe it or not, there still are lots of folks that use faxes in their everyday lives. If you’re one of them, Incredible PBX has your back. Begin by logging into your server as root and running ./incrediblefax2021-ubuntu20.04.sh to install HylaFax and AvantFax on your server. You’ll be prompted a dozen or more times for information. Answer no to the secure fax question. For the rest of the prompts, just press ENTER to accept the default entries. Rebooting your server is required when the install finishes. Once your server is back on line, there will be a new AvantFax tab in the GUI. Before proceeding, be sure to set an Apache web apps password by running /root/apache-pw-change. Next, login to AvantFax with your browser. You first will be prompted for your Apache credentials. Enter admin for the username and whatever password you set up in the previous step. Then you will be prompted for your AvantFax credentials. The default is admin:password. After you enter the username and password, you will be prompted to change your admin password. The AvantFax dashboard then will display. If nothing has come unglued, you should see four green Idle icons:
You can Send Faxes from within AvantFax by choosing the Send Fax tab, or you can use one of many HylaFax clients. Google is your friend.
Configuring Inbound Routes for Fax Detection
Not all VoIP trunks support fax transmission, e.g. Vitelity. Assuming yours do and you’ll only know by trial and error, here’s how to configure FreePBX to automatically detect incoming faxes and process them for PDF delivery by email. First, make certain the Fax Configuration Module is enabled in Module Admin. Then, for each Inbound Route on which you wish to receive faxes, you’ll need to enable fax detection on each route.
Under the Fax tab of each Inbound Route, enter the following settings:
Detect Faxes: YES
Fax Detection Type: SIP
Fax Ring: YES
Fax Detect Time: 4
Fax Destination: Custom Destinations -> Fax (Hylafax)
To try things out, send yourself a fax at no cost in the U.S. from FaxZero.
Using the GraphQL API Tool with Incredible PBX
Begin by installing the required GraphQL components:
pip3 install --pre gql[all]
Next, open the FreePBX GUI and navigate to Connectivity -> API. Select the Scope Visualizer tab and check Read/Write for ALL GraphQL Modules. Then select the GraphQL Explorer tab and click Reload Explorer. In the GraphiQL dialog, enter the following and press the Start arrow to list all of your extensions:
query {
  fetchAllExtensions {
    status
    message
    totalCount
    extension {
      extensionId
    }
  }
}
For the complete tutorial on using GraphQL to list, edit, and populate virtually anything on your PBX, read this tutorial and review the Asterisk documentation for the GraphQL API.
Installing OPUS in the Oracle Cloud
Log into your server as root and issue the following commands:
rm /usr/lib64/asterisk/modules/codec_opus.so
rm /usr/lib64/asterisk/modules/codec_opus_open_source.so
rm /usr/lib64/asterisk/modules/res_format_attr_opus.so
rm /usr/lib/asterisk/modules/codec_opus.so
rm /usr/lib/asterisk/modules/format_ogg_opus*.so
rm /usr/lib/asterisk/modules/res_format_attr_opus.so
rm /usr/lib/asterisk/modules/codec_opus_open_source.so
cd /usr/lib64/asterisk/modules
wget http://incrediblepbx.com/opus-oracle.tar.gz
tar zxvf opus-oracle.tar.gz
rm opus-oracle.tar.gz
fwconsole restart
asterisk -rx "module show like opus"
asterisk -rx "core show translation paths opus"
How Sausage Is Made AND Special Thanks
While our name is associated with this build, I want to give a special tip of the hat to the important contributions from Dick Ollett on the text-to-speech deployment, Bill Simon on the CDR/CEL implementation with ODBC, and @knerd for his GraphQL tips. AArch64 is a different beast, and we couldn’t have pulled this off without their assistance. If you’re ever curious how sausage is actually made in the open source development world, you can read all about it in this VoIP-Info.org Forum thread. THANK YOU! Should you ever need paid Asterisk consulting, these are our two go-to guys. You can find them on the forum, or you can contact us for a referral.
Originally published: Monday, May 30, 2022 Updated: Sunday, September 25, 2022

Need help with Asterisk? Visit the VoIP-info Forum.
Special Thanks to Our Generous Sponsors
FULL DISCLOSURE: ClearlyIP, Skyetel, Vitelity, DigitalOcean, Vultr, VoIP.ms, 3CX, Sangoma, TelecomsXchange and VitalPBX have provided financial support to Nerd Vittles and our open source projects through advertising, referral revenue, and/or merchandise. As an Amazon Associate and Best Buy Affiliate, we also earn from qualifying purchases. We’ve chosen these providers not the other way around. Our decisions are based upon their corporate reputation and the quality of their offerings and pricing. Our recommendations regarding technology are reached without regard to financial compensation except in situations in which comparable products at comparable pricing are available from multiple sources. In this limited case, we support our sponsors because our sponsors support us.
 BOGO Bonaza: Enjoy state-of-the-art VoIP service with a $10 credit and half-price SIP service on up to $500 of Skyetel trunking with free number porting when you fund your Skyetel account. No limits on number of simultaneous calls. Quadruple data center redundancy. $25 monthly minimum spend required. Tutorial and sign up details are here.
![]() The lynchpin of Incredible PBX 2020 and beyond is ClearlyIP components which bring management of FreePBX modules and SIP phone integration to a level never before available with any other Asterisk distribution. And now you can configure and reconfigure your new Incredible PBX phones from the convenience of the Incredible PBX GUI.
The lynchpin of Incredible PBX 2020 and beyond is ClearlyIP components which bring management of FreePBX modules and SIP phone integration to a level never before available with any other Asterisk distribution. And now you can configure and reconfigure your new Incredible PBX phones from the convenience of the Incredible PBX GUI.
 VitalPBX is perhaps the fastest-growing PBX offering based upon Asterisk with an installed presence in more than 100 countries worldwide. VitalPBX has generously provided a customized White Label version of Incredible PBX tailored for use with all Incredible PBX and VitalPBX custom applications. Follow this link for a free test drive!
 Special Thanks to Vitelity. Vitelity is now Voyant Communications and has halted new registrations for the time being. Our special thanks to Vitelity for their unwavering financial support over many years and to the many Nerd Vittles readers who continue to enjoy the benefits of their service offerings. We will keep everyone posted on further developments.

Systems Integration and Public Participation with FreePBX

It’s been an interesting few days in the FreePBX® VoIP community with a thread on the VoIP-Info.org and another on the FreePBX Forum. It’s prompted us to revisit what open source development is all about and what all of this means to those of you that rely upon Asterisk® and FreePBX.
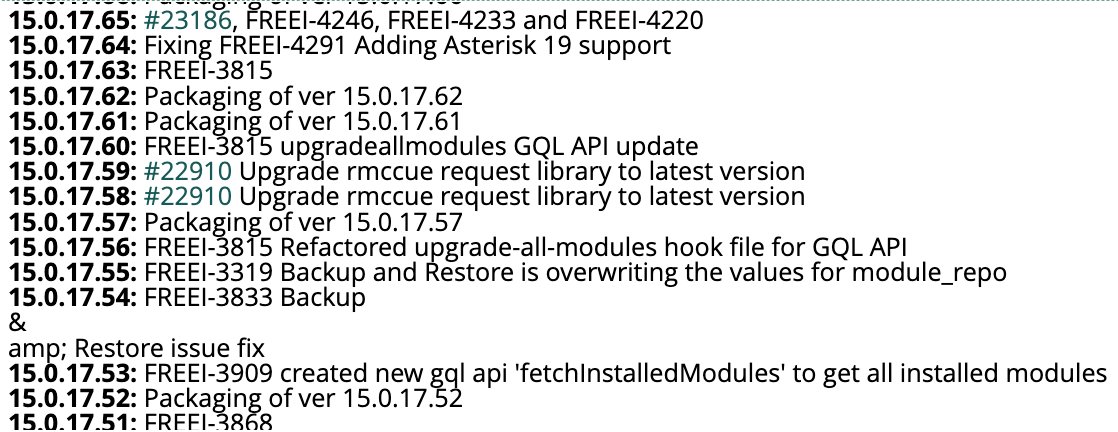
After the departure of the Schmooze folks from Sangoma, virtually all development has been moved behind closed doors with the first opportunity for public participation occurring after new features appear in modules pushed to the so-called Edge repository. This is where folks can shake the kinks out of modules that presumably are almost ready for prime time. For example, take a look at the Changelog for the Framework Module. Prior to the departure of the Schmooze team, changes were managed by openly-accessible tickets. But now you will notice tickets bear a FREEI designation indicating restricted Sangoma-internal access only.
Beta previously was an appropriate moniker for these modules. If you read the FreePBX forum post above, you’ll note that now modules are being pushed to the Edge repository not only before public comment but apparently before much of any internal testing is performed by the Sangoma folks. The net result is you’d be crazy to ever use Edge modules in any production environment where, in the past, Edge modules more typically were used to fix something that was already broken in the traditional repository. Because the Bootstrap module is the lynchpin of virtually all other FreePBX modules, a recent glitch that had not been tested broke almost everything in FreePBX 16 if you happened to be using Edge modules.
I’m reminded of the old adage about marine aquariums. You never want to put a new fish in your main tank unless you’re willing to risk killing all of your other fish. This latest fiasco prompts our cautionary note about further use of the FreePBX Edge repository. Don’t load new modules on your production servers without testing them first in a VirtualBox sandbox unless you have a snapshot or backup of your server that can be deployed in minutes when something cataclysmic occurs.
And that brings us to our response concerning what Incredible PBX® is and is not all about. Going back to the early 80’s, we began tweaking hardware and software deployments to eliminate much of the pain associated with deployment of automated systems. Our friend on the VoIP-Info forum refers to Incredible PBX as a fork of FreePBX. Quite the contrary, it is anything but a fork. We use the FreePBX GPL modules exactly as they are published by Sangoma with an additional master key not controlled by Sangoma for your protection and for ours. This allows us to block specific module updates that prove to be dangerous for our users. Equally important, Incredible PBX offers improved functionality and stability, the same features that are typically associated with the work of a systems integrator… that you pay for. On the stability side, we migrated to new FreePBX repositories maintained by Clearly IP simply because the FreePBX repos had become extremely unreliable and proprietary. Sangoma deploys modules using key signatures that only they control. That means if you make any improvements or changes the FreePBX Dashboard displays all sorts of security alerts, something your customers and end-users would prefer not to see. Some of you may recall this was our primary objection to module signatures years ago.
On the enhancement side, we’ve tried to add free components that our millions of readers have clamored for. You may recall that Nerd Vittles was the first to provide turnkey Google Voice support for Asterisk over a decade ago. We then tackled security after numerous compromises of FreePBX systems around the world. Since then the list has grown exponentially. Here’s the added feature set you’ve enjoyed by deploying an Incredible PBX platform instead of the FreePBX Distro. And, unlike FreePBX commercial modules, these components won’t cost you a dime and are freely distributable. So the choice is yours.
- User-customizable installers for Rocky 8, Debian 10 & 11, Ubuntu 20.04, Raspbian
- User-customizable images for VirtualBox, VMware, Proxmox, and Raspberry Pi
- Preconfigured, free faxing with HylaFax and AvantFax
- Preconfigured, secure IPtables firewall
- Preconfigured, secure Fail2Ban
- Preconfigured PortKnocker
- Preconfigured NeoRouter VPN
- Preconfigured OpenVPN
- Preconfigured, secure WebMin
- Preconfigured SendMail and Postfix
- Preconfigured ODBC Integration for FreePBX
- Sample ODBC Database Lookups for FreePBX
- Dozens of Preconfigured Trunk Provider Setups for FreePBX
- Preconfigured, secure PUBLIC Access Setups for FreePBX
- Preconfigured scripts to update CentOS, Debian, Ubuntu, Raspbian, and Rocky
- Preconfigured scripts to update or upgrade Asterisk
- Preconfigured scripts to update or upgrade FreePBX
- Preconfigured scripts to update or upgrade PHP
- Preconfigured script to implement PPTP
- Preconfigured script to implement TFTP
- Preconfigured script to implement SAMBA
- Preconfigured script to implement Gmail Smarthost for SendMail/Postfix
- Preconfigured script to implement non-Gmail Smarthost for SendMail/Postfix
- Automatic Update Utility to resolve bugs and security vulnerabilities
- Integrated TTS apps: FLITE, Festival, PicoTTS, GoogleTTS, Amazon Polly
- Integrated TTS apps for Voicemail Transcription
- Integrated STT apps and samples for Asterisk and FreePBX
- Integrated Voicemail Transcription for Asterisk with Email Delivery
- AsteriDex 4 web-based MySQL GUI with FreePBX Dialer & Lookups
- Telephone and Web-Based Reminders for FreePBX with Email and SMS Alerts
- TTS News Headlines for FreePBX
- TTS Weather Forecasts for FreePBX (by ZIP Code and Airport Code)
- CallerID Superfecta for Asterisk
- MailCall for Asterisk via TTS
- SMS Scripts for Skyetel and VoIP.ms Message Blasting
- Speech-to-Text Directory Assistance for Asterisk
- Wolfram Alpha TTS for FreePBX
- U-Rang Screenpop Utility for Asterisk
- xTide TTS for FreePBX
- Facebook Messaging Integration
- Twitter Messaging Integration
- Skype and Gizmo Telephony Integration
- Teleyapper Message Broadcasting System for Asterisk
- Scripts to disable Module Signature Checking with FreePBX
- Script to configure time zones worldwide
- Incredible Backup and Restore Utilities for all OS platforms
- LENNY, The Robocallers Worst Nightmare
People hear the word "fork" and get scared away from testing alternative VoIP solutions. If you’re one of those folks, we would encourage you to spend an hour with Incredible PBX using one of our supported virtual platforms: VirtualBox, VMware, or Proxmox. We think the decision will be a no-brainer after your testing. For a list of all of our free VoIP solutions, visit the Incredible PBX Wiki. Enjoy!
Originally published: Monday, May 23, 2022
Need help with Asterisk? Visit the VoIP-info Forum.
Special Thanks to Our Generous Sponsors
FULL DISCLOSURE: ClearlyIP, Skyetel, Vitelity, DigitalOcean, Vultr, VoIP.ms, 3CX, Sangoma, TelecomsXchange and VitalPBX have provided financial support to Nerd Vittles and our open source projects through advertising, referral revenue, and/or merchandise. As an Amazon Associate and Best Buy Affiliate, we also earn from qualifying purchases. We’ve chosen these providers not the other way around. Our decisions are based upon their corporate reputation and the quality of their offerings and pricing. Our recommendations regarding technology are reached without regard to financial compensation except in situations in which comparable products at comparable pricing are available from multiple sources. In this limited case, we support our sponsors because our sponsors support us.
BOGO Bonaza: Enjoy state-of-the-art VoIP service with a $10 credit and half-price SIP service on up to $500 of Skyetel trunking with free number porting when you fund your Skyetel account. No limits on number of simultaneous calls. Quadruple data center redundancy. $25 monthly minimum spend required. Tutorial and sign up details are here.
![]() The lynchpin of Incredible PBX 2020 and beyond is ClearlyIP components which bring management of FreePBX modules and SIP phone integration to a level never before available with any other Asterisk distribution. And now you can configure and reconfigure your new Incredible PBX phones from the convenience of the Incredible PBX GUI.
The lynchpin of Incredible PBX 2020 and beyond is ClearlyIP components which bring management of FreePBX modules and SIP phone integration to a level never before available with any other Asterisk distribution. And now you can configure and reconfigure your new Incredible PBX phones from the convenience of the Incredible PBX GUI.
VitalPBX is perhaps the fastest-growing PBX offering based upon Asterisk with an installed presence in more than 100 countries worldwide. VitalPBX has generously provided a customized White Label version of Incredible PBX tailored for use with all Incredible PBX and VitalPBX custom applications. Follow this link for a free test drive!
Special Thanks to Vitelity. Vitelity is now Voyant Communications and has halted new registrations for the time being. Our special thanks to Vitelity for their unwavering financial support over many years and to the many Nerd Vittles readers who continue to enjoy the benefits of their service offerings. We will keep everyone posted on further developments.
A Walk on the Wild Side: Meet Incredible PBX for MX Linux

This week’s adventure is just for fun. It’s a VirtualBox® Beauty featuring Incredible PBX®, Asterisk® 18, FreePBX® 15, and MX Linux 21.1. If you’re unfamiliar with MX Linux, it is one of the slickest Debian aggregations because it seamlessly integrates a desktop GUI featuring Xfce Desktop, KDE, and fluxbox into a Debian 11 platform with native support for LibreOffice, Firefox, Thunderbird, SAMBA, and some awesome games and music utilities including Clementine. If all of these apps sound like Greek, then you owe it to yourself to spend an evening or weekend exploring MX Linux while enjoying most of the integrated functionality of the Incredible PBX 2021 platform. Did we mention that printer integration is seamless with most of the major brands so you can enjoy the office suite without missing a beat by abandoning your Mac or Windows desktop.
What would we use this for? The short answer is not for production. The long answer is it’s a perfect complement for a traveling Chromebook where you want to connect back to your PBX mothership while retaining full functionality of a desktop computer back home at zero cost. VirtualBox is free. Incredible PBX is free. MX Linux including our bundled .ova image is free. And an 8GB Chromebook with 64GB of eMMC storage is dirt cheap. So what’s not to like?
Installing Oracle VM VirtualBox

Oracle’s virtual machine platform inherited from Sun is amazing. It’s not only free, but it’s pure GPL2 code. VirtualBox gives you a virtual machine platform that runs on top of any desktop operating system. In terms of limitations, we haven’t found any. We even tested this on an Atom-based Windows 7 machine with 2GB of RAM, and it worked without a hiccup. So step #1 today is to download one or more of the VirtualBox installers from VirtualBox.org or Oracle.com. Our recommendation is to put all of the 100MB installers on a 4GB thumb drive.1 Then you’ll have everything in one place whenever and wherever you happen to need it. Once you’ve downloaded the software, simply install it onto your favorite desktop machine. Here’s a link to get VirtualBox running on a Chromebook. Accept all of the default settings, and you’ll be good to go. For more details, here’s a link to the Oracle VM VirtualBox User Manual.
NOTE: The Incredible PBX for MX Linux VM requires a VirtualBox 6.x platform. Adjust screen size in View -> Virtual Screen.
Installing the Incredible PBX for MX Linux Image
To begin, visit our SourceForge page and follow the steps to assemble the 8GB+ .ova image of Incredible PBX with MX Linux.
Next, copy it to your VirtualBox desktop machine and double-click on the Incredible PBX .ova image. Then click Import. Once the import is finished, you’ll see a new Incredible PBX for MX Linux virtual machine in the VM List of the VirtualBox Manager Window. Let’s make a couple of one-time adjustments to the Incredible PBX configuration to account for possible differences in sound and network cards on different host machines.
(1) Click once on the Incredible PBX virtual machine in the VM List. Then (2) click the Settings button. In System tab, verify Hardware Clock in UTC Time is checked. In the Audio tab, check the Enable Audio option and choose your sound card. In the Network tab for Adapter 1, check the Enable Network Adapter option. From the Attached to pull-down menu, choose Bridged Adapter. Then select your network card from the Name list. Then click OK. That’s all the configuration that is necessary.
Running Incredible PBX for MX Linux in VirtualBox
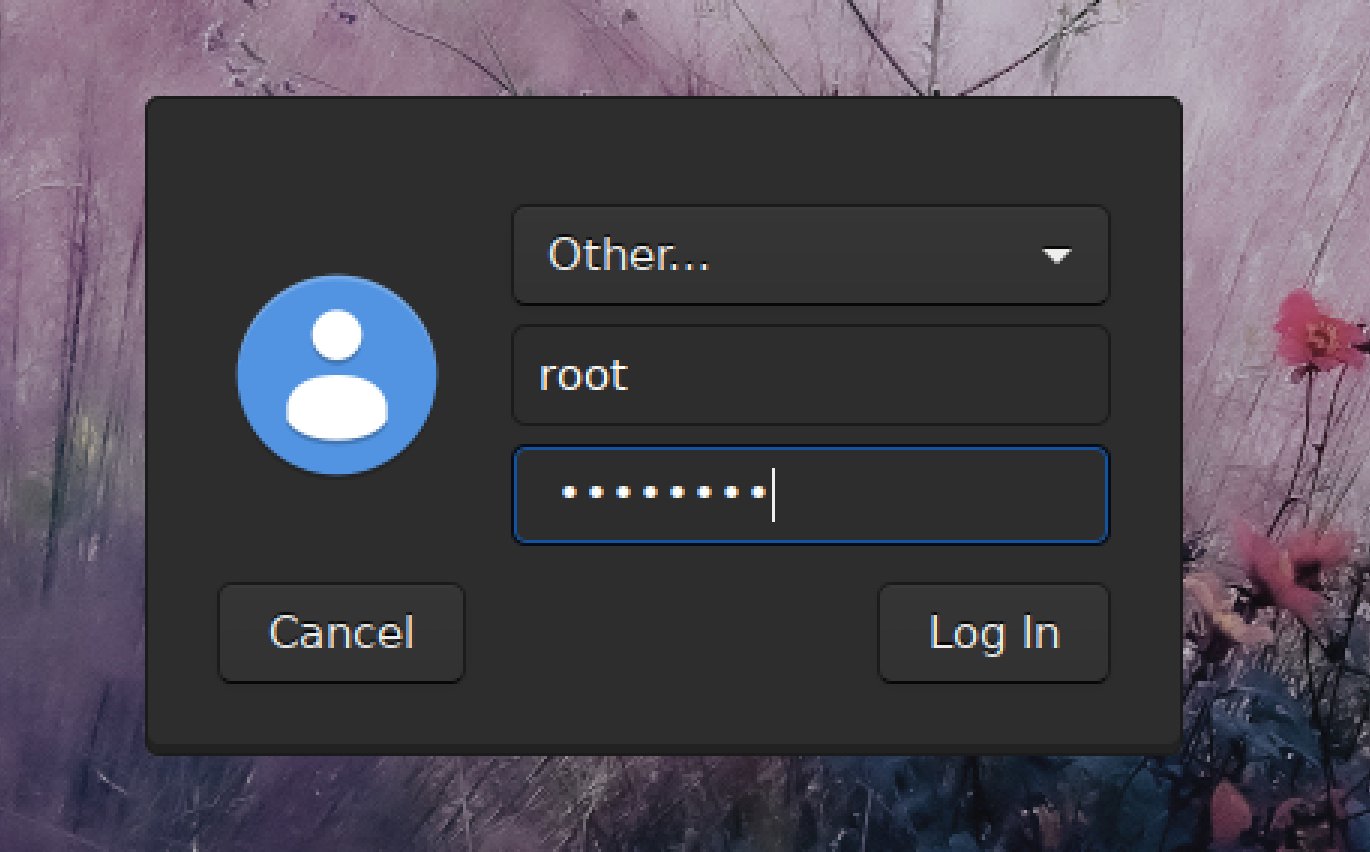
Once you’ve imported and configured the Incredible PBX for MX Linux Virtual Machine, you’re ready to go. Highlight the Incredible PBX virtual machine in the VM List on the VirtualBox Manager Window and click the Start button. The standard Linux boot procedure will begin and, within a few seconds, you’ll get the familiar Linux login prompt. Choose Other from the pull-down list and enter root for your username and password for your password.
During the bootstrap procedure, you may see a couple of dialogue boxes pop up that explain the keystrokes to move back and forth between your host operating system desktop and your virtual machine. Remember, you still have full access to your desktop computer. Incredible PBX is merely running as a task in a VM window. Always gracefully halt Incredible PBX just as you would on any computer.
Here’s what you need to know. To work in the Incredible PBX virtual machine, just left-click your mouse while it is positioned inside the VM window. To return to your host operating system desktop, press the right Option key on Windows machines or the left Command key on any Mac. On Linux desktops, press the right Ctrl key. For other operating systems, read the dialogue boxes for instructions on moving around. To access the Linux CLI, login as root with the default password: password.
Once the Xfce Desktop displays, click on the Xfce Terminal Emulator icon in the left menu bar which will drop you into the Linux CLI.
First, create a new end-user account which we will explain in a minute. Just enter the following command: adduser nerd.
Next, update your admin password for Incredible PBX web access: ./admin-pw-change.
Then update your admin password for web applications: ./apache-pw-change. You’ll need these admin passwords to access the web GUI to manage your PBX as well as to use the AsteriDex and Reminders web apps.
Finally, run ./timezone-setup to set the correct time zone for your virtual machine.
Make note of your virtual machine’s local IP and time by typing pbxstatus. You’ll need this IP address to log into the Incredible PBX GUI using Firefox on the Xfce Desktop.
Setting the Date and Time with VirtualBox
If pbxstatus still shows an incorrect time, manually set the date and time and then update the hardware clock. Here’s how assuming 05160709 is the month (May), day (16), and correct time (7:09 a.m.) of your server:
date 05160709
clock -w
Returning to the Xfce Desktop
Now let’s return to the Xfce Desktop and close the terminal window. Type exit and press ENTER.
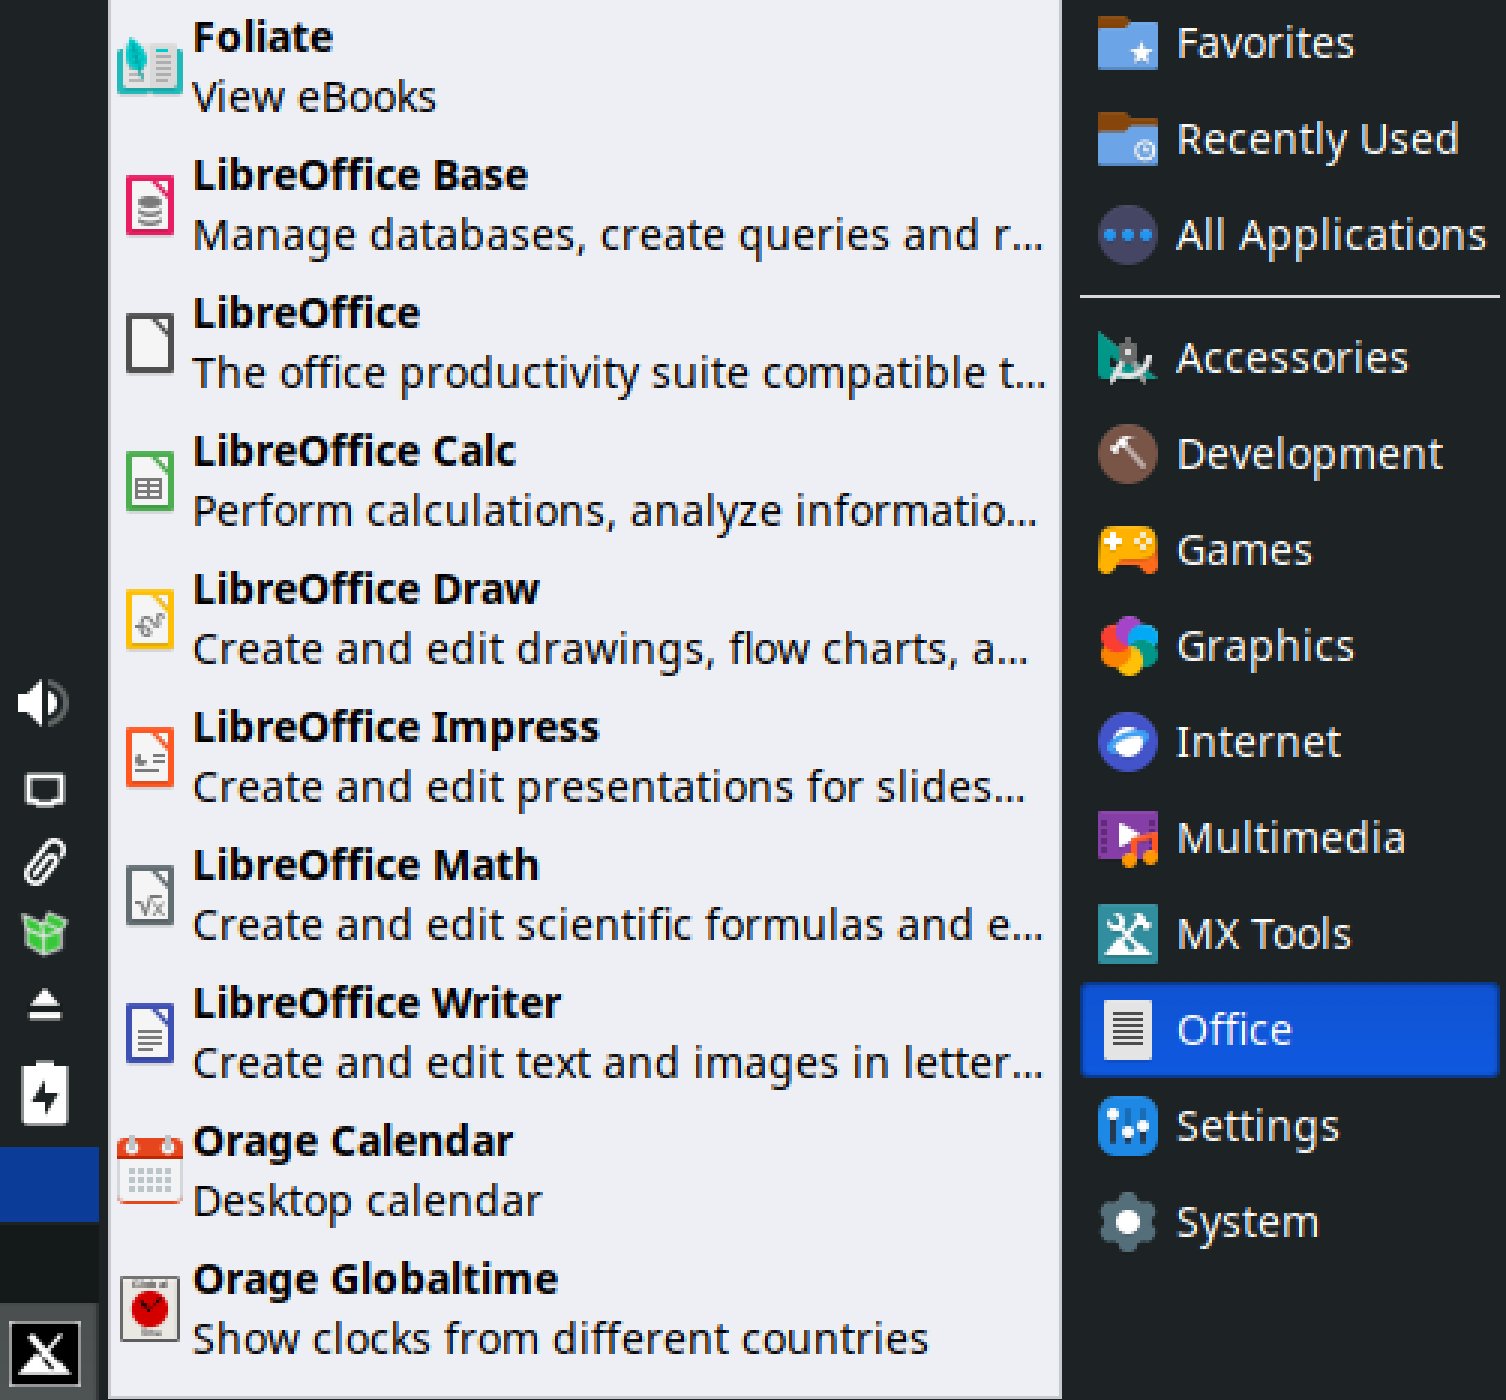
MX Linux won’t let you run many of its desktop applications while logged in as root. To switch to the nerd user we created above, do the following. Click on the Application Menu icon in the bottom left column. Then click the Lock Screen icon at the top of the applications menu. When the familiar login screen reappears, log back into your virtual machine as nerd using the password you set up when you created the account. Now explore all the fabulous features that MX Linux offers. And follow our Incredible PBX tutorial to get up and running in minutes.
Originally published: Monday, May 16, 2022
Need help with Asterisk? Visit the VoIP-info Forum.
Special Thanks to Our Generous Sponsors
FULL DISCLOSURE: ClearlyIP, Skyetel, Vitelity, DigitalOcean, Vultr, VoIP.ms, 3CX, Sangoma, TelecomsXchange and VitalPBX have provided financial support to Nerd Vittles and our open source projects through advertising, referral revenue, and/or merchandise. As an Amazon Associate and Best Buy Affiliate, we also earn from qualifying purchases. We’ve chosen these providers not the other way around. Our decisions are based upon their corporate reputation and the quality of their offerings and pricing. Our recommendations regarding technology are reached without regard to financial compensation except in situations in which comparable products at comparable pricing are available from multiple sources. In this limited case, we support our sponsors because our sponsors support us.
BOGO Bonaza: Enjoy state-of-the-art VoIP service with a $10 credit and half-price SIP service on up to $500 of Skyetel trunking with free number porting when you fund your Skyetel account. No limits on number of simultaneous calls. Quadruple data center redundancy. $25 monthly minimum spend required. Tutorial and sign up details are here.
![]() The lynchpin of Incredible PBX 2020 and beyond is ClearlyIP components which bring management of FreePBX modules and SIP phone integration to a level never before available with any other Asterisk distribution. And now you can configure and reconfigure your new Incredible PBX phones from the convenience of the Incredible PBX GUI.
The lynchpin of Incredible PBX 2020 and beyond is ClearlyIP components which bring management of FreePBX modules and SIP phone integration to a level never before available with any other Asterisk distribution. And now you can configure and reconfigure your new Incredible PBX phones from the convenience of the Incredible PBX GUI.
VitalPBX is perhaps the fastest-growing PBX offering based upon Asterisk with an installed presence in more than 100 countries worldwide. VitalPBX has generously provided a customized White Label version of Incredible PBX tailored for use with all Incredible PBX and VitalPBX custom applications. Follow this link for a free test drive!
Special Thanks to Vitelity. Vitelity is now Voyant Communications and has halted new registrations for the time being. Our special thanks to Vitelity for their unwavering financial support over many years and to the many Nerd Vittles readers who continue to enjoy the benefits of their service offerings. We will keep everyone posted on further developments.
- Many of our purchase links refer users to Amazon when we find their prices are competitive for the recommended products. Nerd Vittles receives a small referral fee from Amazon to help cover the costs of our blog. We never recommend particular products solely to generate Amazon commissions. However, when pricing is comparable or availability is favorable, we support Amazon because Amazon supports us. [↩]
Deal of the Year: OBi2182 Color WiFi Phones now $59.99

One year and counting… If you still have some Google Voice numbers lying around or if you’d like to join the party a little late, now is your second chance. Amazon now is selling the OBi2182 phones to U.S. residents with native Google Voice as well as WiFi, Bluetooth, HD Voice, speakerphone, and a power adapter currently selling for $69.99. Hold, transfer, and conferencing support are included in the phone. Here’s our Amazon referral link to keep the lights on.
We were big fans of OBiHai once upon a time. But then they sold out to Polycom. And they subsequently sold out to Plantronics. And support went from bad to worse along the way. But things appear to have stabilized so this offering may just be one of the best deals on the planet. Not only do you get unlimited free calling throughout the U.S., Canada, and Ukraine but you also get some of the best pricing ever on most international calls. While we no longer have any dealings with ObiHai, Polycom, or Plantronics, we know many of our followers were left high and dry when Google pulled the plug on Google Voice for Asterisk®. Here’s a tip.
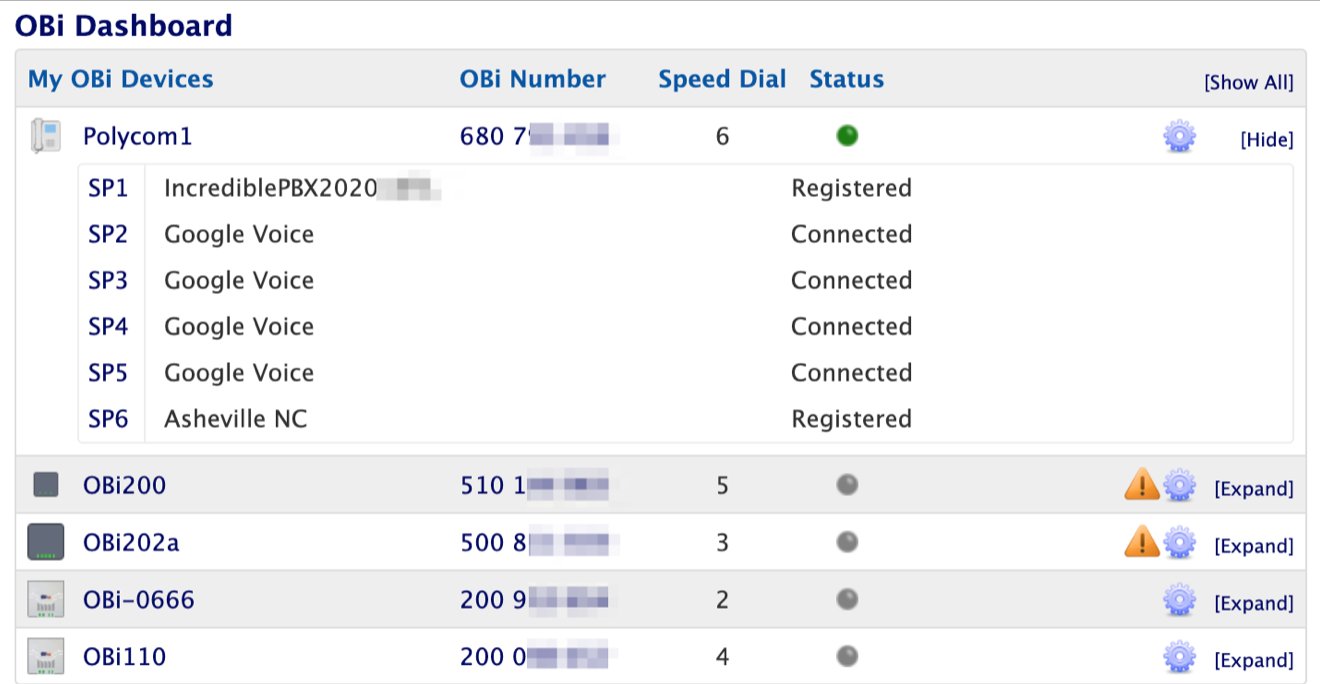
Adding one or more of these phones makes a perfect supplement to your Asterisk platform making it easy to add free calling to your home or home office PBX. And it’s not too late to order a Google Voice number if you’re new to the game. Configuring a SIP or PJsip connection as well as Bluetooth connectivity to your cellphone is just as simple as adding Google Voice trunks using the OBiTalk web interface shown below. Trunk setups take less than a minute apiece. The phone supports 12 lines. And WiFi calls are crystal-clear thanks to HD Voice.
Grab an OBi2182 while you still can! An Admin Guide to the OBi2182 is available here.
Originally published: Monday, May 9, 2022
Need help with Asterisk? Visit the VoIP-info Forum.
Special Thanks to Our Generous Sponsors
FULL DISCLOSURE: ClearlyIP, Skyetel, Vitelity, DigitalOcean, Vultr, VoIP.ms, 3CX, Sangoma, TelecomsXchange and VitalPBX have provided financial support to Nerd Vittles and our open source projects through advertising, referral revenue, and/or merchandise. As an Amazon Associate and Best Buy Affiliate, we also earn from qualifying purchases. We’ve chosen these providers not the other way around. Our decisions are based upon their corporate reputation and the quality of their offerings and pricing. Our recommendations regarding technology are reached without regard to financial compensation except in situations in which comparable products at comparable pricing are available from multiple sources. In this limited case, we support our sponsors because our sponsors support us.
BOGO Bonaza: Enjoy state-of-the-art VoIP service with a $10 credit and half-price SIP service on up to $500 of Skyetel trunking with free number porting when you fund your Skyetel account. No limits on number of simultaneous calls. Quadruple data center redundancy. $25 monthly minimum spend required. Tutorial and sign up details are here.
![]() The lynchpin of Incredible PBX 2020 and beyond is ClearlyIP components which bring management of FreePBX modules and SIP phone integration to a level never before available with any other Asterisk distribution. And now you can configure and reconfigure your new Incredible PBX phones from the convenience of the Incredible PBX GUI.
The lynchpin of Incredible PBX 2020 and beyond is ClearlyIP components which bring management of FreePBX modules and SIP phone integration to a level never before available with any other Asterisk distribution. And now you can configure and reconfigure your new Incredible PBX phones from the convenience of the Incredible PBX GUI.
VitalPBX is perhaps the fastest-growing PBX offering based upon Asterisk with an installed presence in more than 100 countries worldwide. VitalPBX has generously provided a customized White Label version of Incredible PBX tailored for use with all Incredible PBX and VitalPBX custom applications. Follow this link for a free test drive!
Special Thanks to Vitelity. Vitelity is now Voyant Communications and has halted new registrations for the time being. Our special thanks to Vitelity for their unwavering financial support over many years and to the many Nerd Vittles readers who continue to enjoy the benefits of their service offerings. We will keep everyone posted on further developments.
Interconnecting Asterisk Servers with PJsip and OpenVPN

It’s been several years since we discussed interconnecting Asterisk® servers so today we want to do a version refresh using PJsip Trunking. We also want to show you how easy it is to secure the communications path by setting up the trunks using OpenVPN connections. When we’re finished, you’ll have a FREE way to call between sites using FreePBX® Outbound Routes. Because Incredible PBX comes preconfigured with all the components you’ll need, we’ll use that platform to further simplify the deployment. We’ll be interconnecting two Asterisk servers today, but you can use the same methodology to connect numerous sites.
Deploying OpenVPN with Asterisk Servers
To begin, you’ll want to get all of the sites configured with a virtual private network using OpenVPN. Our tutorial will walk you through the process. Keep in mind that all current releases of Incredible PBX are preconfigured to let you drop in your OpenVPN client credentials by naming them incrediblepbx.ovpn and copying the file into the /etc directory. Rebooting your server will bring up the virtual private network with a 10.8.0.x IP address.
Configuring PJsip Trunks on Your Asterisk Servers
If you remember yesteryear’s knuckle drill configuring SIP or IAX trunks for Asterisk connectivity, you’re in for a pleasant surprise using PJsip trunking with FreePBX. Using the GUI, create a new PJsip trunk for every site to which you want to establish a connection. A similar PJsip trunk must be created on the other site as well. If you’re just interconnecting two servers, then using the City locations for the Trunk Names will suffice. But, if there are more than two servers, specify unique names for each end of every PJsip connection, e.g.
NewYork1 <-> London1
NewYork2 <-> Washington1
NewYork3 <-> Miami1
London2 <-> Washington2
London3 <-> Miami2
Washington3 <-> Miami3
For today, we’ll interconnect a server in New York and London, but we’ll plan for the future and use London1 for the Trunk Name on the New York server and NewYork1 for the Trunk Name on the London server.
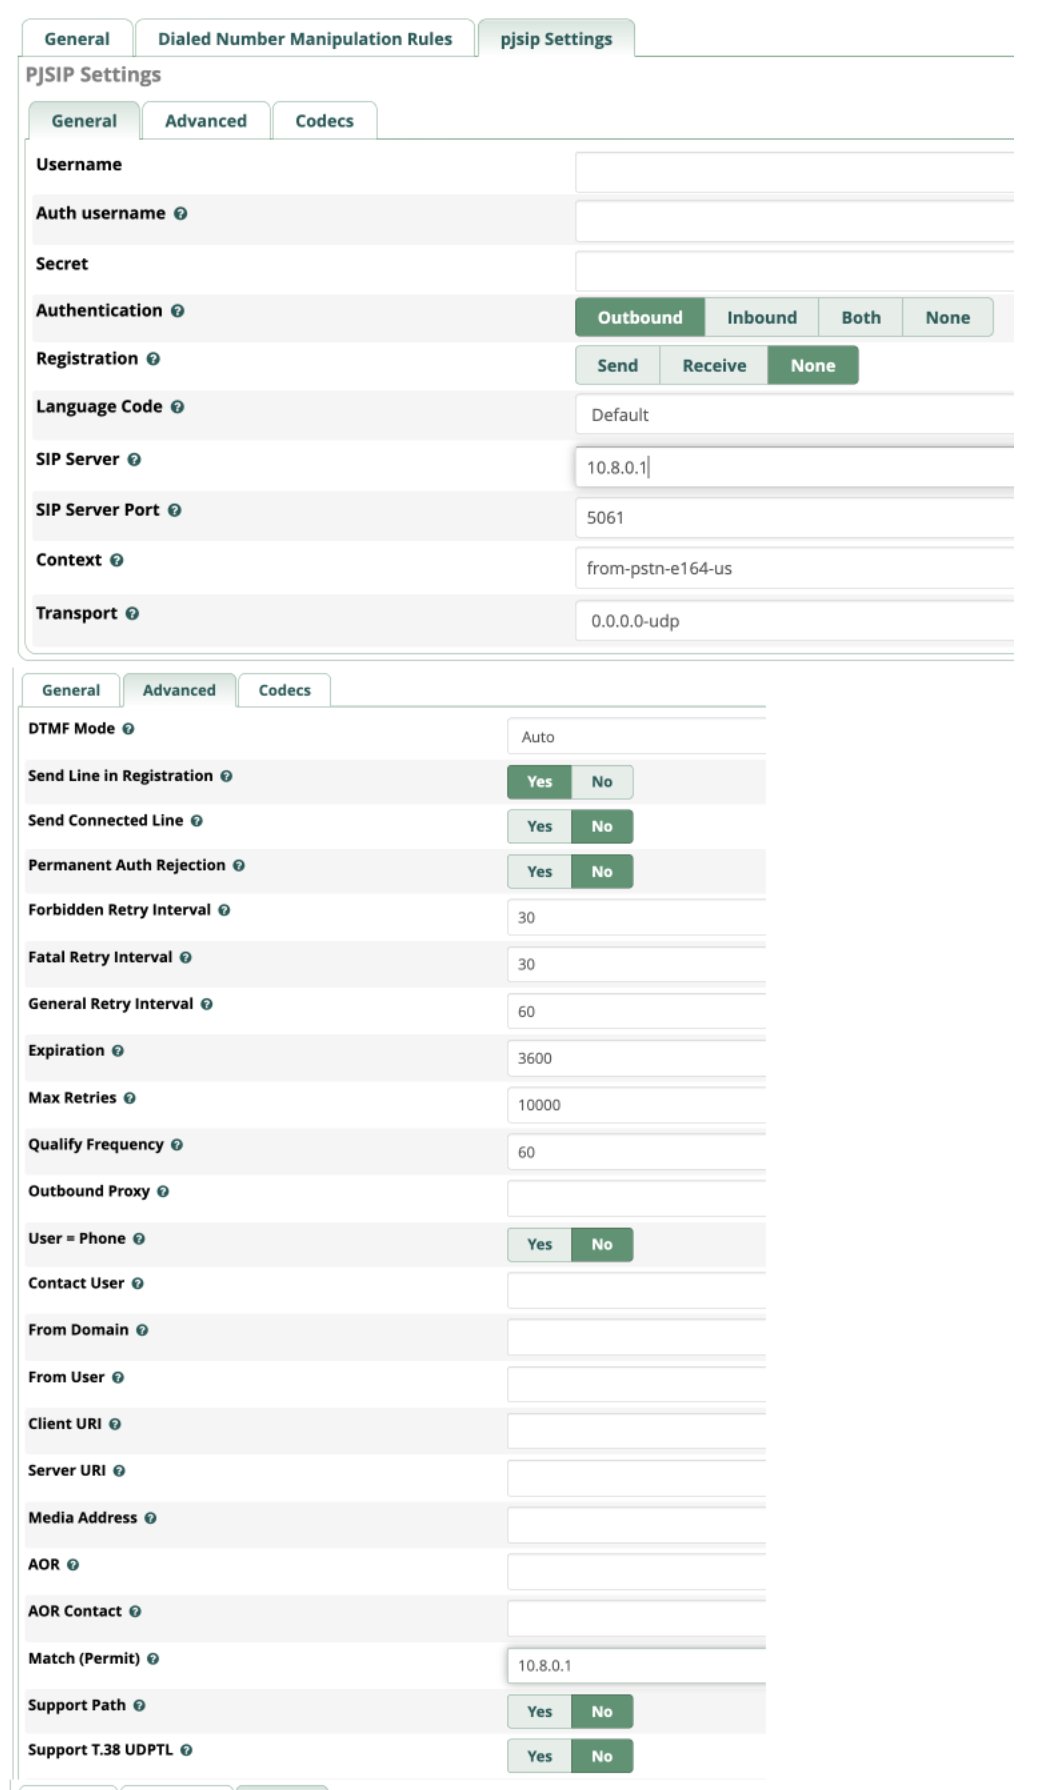
Let’s begin by configuring the London1 trunk on the New York server. After entering the London1 Trunk Name in the General tab, click on the pjsip Settings tab. In the General tab, leave the defaults in the first four fields. Then change the Registration field to None. For the SIP Server field, enter the OpenVPN IP address of the London server, e.g. 10.8.0.2. Because we’re using Incredible PBX, the PJsip port is 5061 so enter that in the SIP Server Port field. If you’re using a different flavor of FreePBX, enter the appropriate port number for PJsip on your platform. Next, click on the Advanced tab and enter the London server’s OpenVPN address in the Match (Permit) field, e.g. 10.8.0.2. In the Codecs tab, make note of the enabled codecs and make certain that the entries match on all of your servers. Click the Submit button to save your settings and then reload your dialplan.
Now let’s configure the NewYork1 trunk on the London server. After entering the NewYork1 Trunk Name in the General tab, click on the pjsip Settings tab. In the General tab, leave the defaults in the first four fields. Then change the Registration field to None. For the SIP Server field, enter the OpenVPN IP address of the New York server, e.g. 10.8.0.1. Because we’re using Incredible PBX, the PJsip port is 5061 so enter that in the SIP Server Port field. If you’re using a different flavor of FreePBX, enter the appropriate port number for PJsip on your platform. Next, click on the Advanced tab and enter the New York server’s OpenVPN address in the Match (Permit) field, e.g. 10.8.0.1. In the Codecs tab, make certain that the entries match those on your New York server. Click the Submit button to save your settings and then reload your dialplan. Here’s how it looks in the FreePBX GUI:
Use Outbound Routes to Interconnect Extensions
To keep things simple, let’s assume both your New York and London servers have extensions 701-705. To call an extension on the other server, we will simply dial 9 and then the 3-digit extension, e.g. dialing 9701 on the New York server will ring 701 on the London server and dialing 9701 on the London server will ring 701 on the New York server.
Create an Outbound Route on the New York server called London specifying London1 for the Trunk Sequence in the Route Settings tab. In the Dial Patterns tab, enter 9 in the Prefix field and XXX for the Match Pattern. Click Submit to save your settings and then reload dialplan.

Create an Outbound Route on the London server called New York specifying NewYork1 for the Trunk Sequence in the Route Settings tab. In the Dial Patterns tab, enter 9 in the Prefix field and XXX for the Match Pattern. Click Submit to save your settings and then reload dialplan.
If you’re interconnecting more than two sites, then you probably will want to designate a specific Prefix for every City so that users can travel between sites and use the same methodology to reach the same extensions from every location.
You can test things out using softphones by registering 701 to an extension in New York and another to the 701 extension in London. Now you can place secure and FREE calls between the sites by dialing 9701 from each softphone. Enjoy!
Originally published: Monday, May 2, 2022
Need help with Asterisk? Visit the VoIP-info Forum.
Special Thanks to Our Generous Sponsors
FULL DISCLOSURE: ClearlyIP, Skyetel, Vitelity, DigitalOcean, Vultr, VoIP.ms, 3CX, Sangoma, TelecomsXchange and VitalPBX have provided financial support to Nerd Vittles and our open source projects through advertising, referral revenue, and/or merchandise. As an Amazon Associate and Best Buy Affiliate, we also earn from qualifying purchases. We’ve chosen these providers not the other way around. Our decisions are based upon their corporate reputation and the quality of their offerings and pricing. Our recommendations regarding technology are reached without regard to financial compensation except in situations in which comparable products at comparable pricing are available from multiple sources. In this limited case, we support our sponsors because our sponsors support us.
BOGO Bonaza: Enjoy state-of-the-art VoIP service with a $10 credit and half-price SIP service on up to $500 of Skyetel trunking with free number porting when you fund your Skyetel account. No limits on number of simultaneous calls. Quadruple data center redundancy. $25 monthly minimum spend required. Tutorial and sign up details are here.
![]() The lynchpin of Incredible PBX 2020 and beyond is ClearlyIP components which bring management of FreePBX modules and SIP phone integration to a level never before available with any other Asterisk distribution. And now you can configure and reconfigure your new Incredible PBX phones from the convenience of the Incredible PBX GUI.
The lynchpin of Incredible PBX 2020 and beyond is ClearlyIP components which bring management of FreePBX modules and SIP phone integration to a level never before available with any other Asterisk distribution. And now you can configure and reconfigure your new Incredible PBX phones from the convenience of the Incredible PBX GUI.
VitalPBX is perhaps the fastest-growing PBX offering based upon Asterisk with an installed presence in more than 100 countries worldwide. VitalPBX has generously provided a customized White Label version of Incredible PBX tailored for use with all Incredible PBX and VitalPBX custom applications. Follow this link for a free test drive!
Special Thanks to Vitelity. Vitelity is now Voyant Communications and has halted new registrations for the time being. Our special thanks to Vitelity for their unwavering financial support over many years and to the many Nerd Vittles readers who continue to enjoy the benefits of their service offerings. We will keep everyone posted on further developments.
Migrating Incredible PBX 2022 to a PUBLIC-Facing Cloud PBX

Today we want to show you how to reconfigure Incredible PBX 2022 for Rocky 8 into a PUBLIC-facing Cloud PBX. What that means is authorized users can connect a SIP phone to the PBX regardless of where the user might be located without worries about an ever-changing dynamic IP address and the requirement to whitelist the new IP address. A PUBLIC-facing PBX also provides free SIP URI connectivity to users of your PBX by anyone from anywhere in the world. In other words, it’s similar to the way you could connect to any Ma Bell telephone in the world simply by knowing the number to dial. The difference, of course, is SIP URI connectivity is free while there were often staggering long distance charges for remote connectivity in the Ma Bell days. Fifty years ago it was not uncommon for a college boy to spend $200 a month calling his college sweetheart less than 200 miles away in the same state. Ask me how I know.
Why is this such a big deal? The short answer is security and your phone bill. You don’t want bad guys on the other side of the globe attempting to register a SIP phone to your PBX so that they can use your trunks to make free phone calls on your nickel. You also don’t want anybody and everybody calling your users by simply guessing the IP address of your PBX. As with Incredible PBX 2021 PUBLIC for Debian, today’s design combines several security mechanisms to make a PUBLIC-facing PBX safe and secure. First, we will block all SIP connectivity to your PBX by IP address. Second, we will identify 30,000+ known SIP bad guys and block their access to your PBX entirely. Third, we will only permit SSH access to your PBX using public key authentication instead of traditional username/password authentication. Fourth, we will only permit web access to the Incredible PBX portal from whitelisted IP addresses and OpenVPN private addresses. We haven’t mentioned the elephant in the room, Distributed Denial of Service (DDoS) attacks, but today’s methodology reduces the risk considerably since your PBX cannot be ping’d, and all IP address access is blocked at the Linux kernel level.
Prerequisites. To put all these safeguards in place, you’ll need a cloud-based Incredible PBX 2022 KVM platform running Rocky 8. Install the latest Incredible PBX 2022 platform using our tutorial. Next, you’ll need these items:
- Public IP Address of your server
- Obscure FQDN linked to this public IP address
- Random SSH port with registered public keys for SSH access
- List of SIP extensions to enable for SIP URI access
- IP Addresses to WhiteList for Access to the Web GUI
1. Deciphering Public IP Address of Your PBX
After logging into your PBX as root, you can execute pbxstatus to decipher the public IP address of the PBX. Or issue the command: wget -q -O - ipinfo.io/ip
2. Obtaining an FQDN for Your PBX
Security through obscurity provides a critical layer of protection for your server so choose an FQDN carefully. sip.yourname.com provides little protection while f246g.yourname.com pretty much assures that nobody is going to guess your domain name. This is particularly important with SIP registrations because registered extensions on your PBX can obviously make phone calls that cost you money. If you don’t have your own domain, you can always obtain a free hostname from a service such as NoIP.com.
3. Securing SSH Access to Your PBX
Whatever you do, don’t leave SSH access via port 22 exposed on your PBX. In the time it took to create a new PBX on CloudAtCost, there were over 400 attempted logins to the default SSH port of the new server. The simplest (but least secure) method to avoid these script kiddie attacks is to change the port number for SSH access to your server. We suggest using the year you were born as the port number because it’s easy to remember. Edit /etc/ssh/sshd_config and uncomment the Port line replacing 22 with the port number you chose. Then restart SSH: systemctl restart sshd.
The preferable solution to secure SSH is to create and use SSH keys for access and set PasswordAuthentication no on the last line of /etc/ssh/sshd_config. Digital Ocean has an excellent tutorial to walk you through the setup process.
4. Choosing Extensions for SIP URI Public Access
With today’s PUBLIC design, exposing an extension for PUBLIC access means anyone in the world that knows the FQDN of your server and the extension number can do two things using any SIP client: (1) they can call you and (2) they can attempt to register to that extension and make calls on your trunks AND your nickel. So only expose extensions for public access if there is a need to connect or call from remote locations. For extensions you decide to expose, make certain that the passwords for these extensions are extremely secure, lengthy, and use numbers with both UPPER and lower case letters. Never use default extension passwords!
5. Whitelisting IP Addresses for Public Web Access
Without enumerating IP addresses for public web access, you won’t be able to connect to the web GUI of your PBX from any IP address. Down the road, if you wish to authroize additional IP addresses, you can use /root/add-ip to add them via SSH.
Deploying Incredible PBX PUBLIC Firewall
To get started, log into your server as root and issue the following commands:
cd /tmp
wget http://incrediblepbx.com/newpublic.tar.gz
tar zxvf newpublic.tar.gz
rm -f newpublic.tar.gz
Next, edit /tmp/iptables.base and change the highlighted entries:
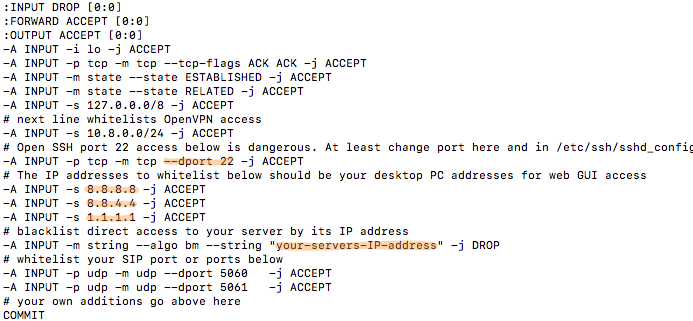
Change port 22 in the dport entry to the SSH port number you chose in Step 3, above.
Change 8.8.8.8, 8.8.4.4., and 1.1.1.1 to actual public IP addresses of desktop machines you wish to use to access the web GUI of your PBX. If you don’t need three entries, comment out the other entries with # at the beginning of each line.
Replace your-servers-IP-address with the actual IP address of your PBX from Step 1, above.
Save the file.
On the Rocky 8 platform, issue the following commands:
cd /etc/sysconfig
cp /tmp/iptables.base .
mv iptables iptables.orig
cp iptables.base iptables
Using Incredible PBX PUBLIC with Asterisk
The first line of defense with this PUBLIC implementation is your FQDN. Second is the IPtables firewall setup above. And third is the Asterisk® extensions configuration in extensions_override_freepbx.conf. Here’s how to configure it. Edit /tmp/extensions_override_freepbx.base and change the highlighted entries:
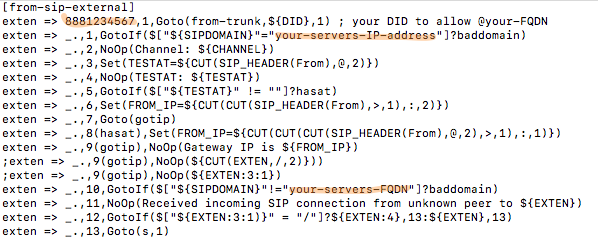
If there are phone numbers assigned to your PBX that you want processed according to your Inbound Routing rules, duplicate the first highlighted line above and, for each trunk, replace 8881234567 with your actual DID numbers.
In exten => _.,1 line, replace your-servers-IP-address with the actual IP address of your PBX from Step 1, above.
In exten => _.,10 line, replace your-servers-FQDN with the actual FQDN assigned to your PBX from Step 2, above.
Scroll down in the file to the following section:
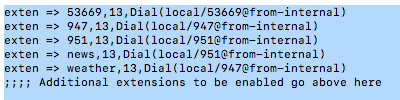
Comment out undesired default extensions. Place a semicolon at the beginning of the lines.
For any extensions you wish to add, insert a new line in the following format replacing both 7000 entries with the desired extension number:
exten => 7000,13,Dial(local/7000@from-internal)
Save the file and then execute the following commands to complete the PUBLIC setup:
cd /etc/asterisk
cp /tmp/extensions_override_freepbx.base .
mv extensions_override_freepbx.conf extensions_override_freepbx.orig
cp extensions_override_freepbx.base extensions_override_freepbx.conf
fwconsole restart
asterisk -rx "dialplan reload"
iptables-restart
sed -i 's|-A INPUT|-I INPUT|' /root/add-ip
sed -i 's|-A INPUT|-I INPUT|' /root/add-fqdn
Adding IPSET Incredible PBX 2022 Protection
We’re not the biggest fans of blacklists because the bad guys spend a lot of time trying to corrupt them by inserting valid IP addresses of sites such as DNS servers in the lists to wreak havoc. Having said that, there are two blacklists that are carefully monitored on a daily basis, and both provide additional protection for your PBX by weeding out access by 30,000+ potential bad guys. The oldest of these is VoIP Blacklist. And the new kid on the block is APIBAN from LOD.com and Fred Posner. We’ve simplified the setup process for use with Incredible PBX 2022. To get started, obtain an APIBAN API key here. Then issue the following commands to put all the pieces in place on your server:
cd /usr/local/sbin
wget http://incrediblepbx.com/incrediblepbx-ipsets8.tar.gz
tar zxvf incrediblepbx-ipsets8.tar.gz
rm -f incrediblepbx-ipsets8.tar.gz
Next, edit /usr/local/sbin/apiban-init and insert your APIkey.
Finally, issue the following command to reload the firewall: iptables-restart
Verifying Firewall Setup of Incredible PBX
Let’s make certain that everything got installed correctly. Begin by issuing this command: iptables -nL
Scroll toward the top of the list, and you should see two entries for the voipbl and apiban ipsets indicating that entries in those lists will be dropped by the firewall.
Next, verify that the voipbl and apiban ipsets are populated. The first two commands below will list all of the blocked IP addresses. And the next two commands will provide a count of the dropped IP addresses.
ipset list voipbl
ipset list apiban
ipset list voipbl | wc -l
ipset list apiban | wc -l
Finally, you can refresh the ipsets with the following two commands:
voipbl-init
apiban-init
Rebooting or restarting the firewall with iptables-restart also refreshes the ipset listings.
Calling an Incredible PBX PUBLIC Extension
Any extensions that you have whitelisted in the blue section above can be called from anywhere using any SIP client. Simply enter the SIP URI for the extension in the following format: SIP/extension@your-servers-FQDN
CAUTION: If a caller attempts to call any extension on your PUBLIC server from an extension on another Asterisk server to which the caller is registered, the call will fail if there is a matching extension number on the PUBLIC server and the two servers are not registered to each other. So remember to use unique extension numbers on your PUBLIC server if you expect callers from other Asterisk servers.
Registering Incredible PBX PUBLIC Extension
If you wish to login to a whitelisted extension using a SIP client, enter the extension and password of the extension. For the server address, enter the FQDN of your server. If it’s a PJsip extension, add :5061 to the end of the FQDN.
Originally published: Monday, April 25, 2022
Need help with Asterisk? Visit the VoIP-info Forum.
Special Thanks to Our Generous Sponsors
FULL DISCLOSURE: ClearlyIP, Skyetel, Vitelity, DigitalOcean, Vultr, VoIP.ms, 3CX, Sangoma, TelecomsXchange and VitalPBX have provided financial support to Nerd Vittles and our open source projects through advertising, referral revenue, and/or merchandise. As an Amazon Associate and Best Buy Affiliate, we also earn from qualifying purchases. We’ve chosen these providers not the other way around. Our decisions are based upon their corporate reputation and the quality of their offerings and pricing. Our recommendations regarding technology are reached without regard to financial compensation except in situations in which comparable products at comparable pricing are available from multiple sources. In this limited case, we support our sponsors because our sponsors support us.
BOGO Bonaza: Enjoy state-of-the-art VoIP service with a $10 credit and half-price SIP service on up to $500 of Skyetel trunking with free number porting when you fund your Skyetel account. No limits on number of simultaneous calls. Quadruple data center redundancy. $25 monthly minimum spend required. Tutorial and sign up details are here.
![]() The lynchpin of Incredible PBX 2020 and beyond is ClearlyIP components which bring management of FreePBX modules and SIP phone integration to a level never before available with any other Asterisk distribution. And now you can configure and reconfigure your new Incredible PBX phones from the convenience of the Incredible PBX GUI.
The lynchpin of Incredible PBX 2020 and beyond is ClearlyIP components which bring management of FreePBX modules and SIP phone integration to a level never before available with any other Asterisk distribution. And now you can configure and reconfigure your new Incredible PBX phones from the convenience of the Incredible PBX GUI.
VitalPBX is perhaps the fastest-growing PBX offering based upon Asterisk with an installed presence in more than 100 countries worldwide. VitalPBX has generously provided a customized White Label version of Incredible PBX tailored for use with all Incredible PBX and VitalPBX custom applications. Follow this link for a free test drive!
Special Thanks to Vitelity. Vitelity is now Voyant Communications and has halted new registrations for the time being. Our special thanks to Vitelity for their unwavering financial support over many years and to the many Nerd Vittles readers who continue to enjoy the benefits of their service offerings. We will keep everyone posted on further developments.
5 Minute Wonder: Incredible PBX 2022 in Cloud for $25/Yr.

We’ve been building turnkey Incredible PBX® servers for virtual machine platforms for many years. Because the servers are built from images, typical install times have been 5 minutes or less with Proxmox, VirtualBox, and VMware ESXi. But the missing piece has been a similar image install on a true cloud-based platform. This limitation was primarily due to the fact that we don’t own or control the available cloud platforms which typically limit image installs to operating systems such as CentOS, Debian, Ubuntu, and Windows. However, CrownCloud was good enough to add our Incredible PBX 2021 Debian image and the Incredible PBX 2020 CentOS 7 image to their portfolio. And, today, we have more good news. CrownCloud has now added the Incredible PBX 2022 image for Rocky 8 as well.
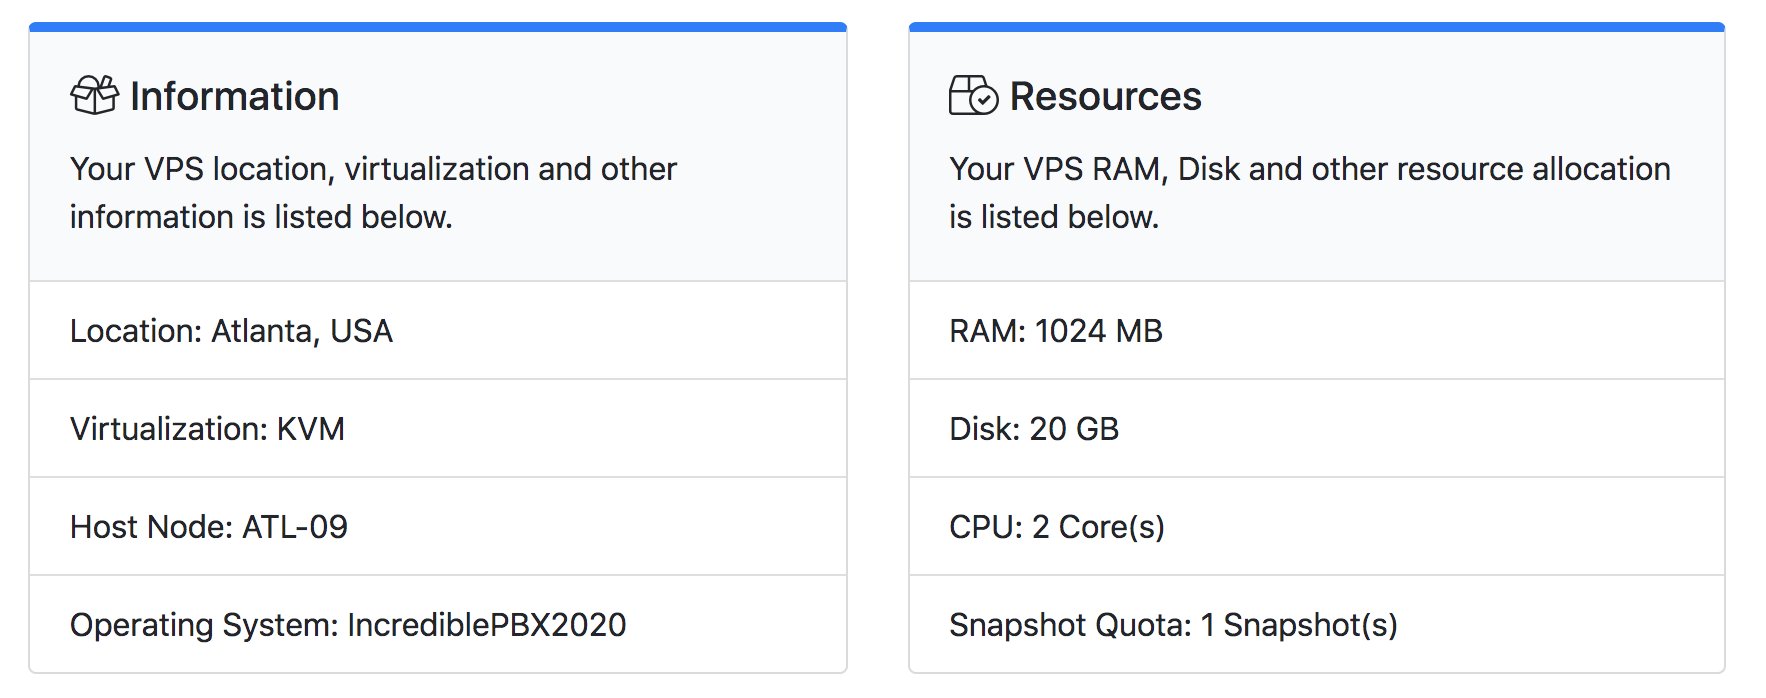
These 5-minute turnkey installs of Incredible PBX 2020 for CentOS 7, Incredible PBX 2021 for Debian 10, and now Incredible PBX 2022 for Rocky 8 are being offered at the jaw-dropping price of $25 a year. The monthly cost is cheaper than a cup of coffee at Starbucks, and you’ll have a fully-functioning, production-ready KVM platform including a free snapshot with 1GB RAM, 20GB SSD storage, and 1TB of monthly bandwidth in your choice of server locations including Los Angeles and Atlanta in the United States as well as Germany and the Netherlands in Europe. And, unlike all of the other Asterisk® aggregations, Incredible PBX still provides a source code-based platform that can be tailored to meet any special requirements your organization may need.
We don’t make a nickel on these offerings so consider this our special thanks to all of our loyal fans.
Here are the links to sign up for the service and take advantage of these Incredible PBX deals:
- Los Angeles: https://crowncloud.net/clients/cart.php?a=add&pid=382
- Atlanta: https://crowncloud.net/clients/cart.php?a=add&pid=487
- Germany: https://crowncloud.net/clients/cart.php?a=add&pid=399
- Netherlands: https://crowncloud.net/clients/cart.php?a=add&pid=400
When you sign up for the service, choose any traditional OS for the base install. Once it’s on line, go into CrownPanel and choose Reinstall. Then select Incredible PBX 2022 for Rocky from the Application Images pulldown as your new install. In less than 5 minutes, your server will be ready for you to login. Be sure to use SSH and NOT the VNC utility included in CrownPanel. This will assure that your desktop machine’s IP address gets whitelisted in the Incredible PBX firewall. Otherwise, you won’t be able to SSH into your server from your desktop. Once you login, the Incredible PBX configurator will prompt you to set passwords for root login, admin login to FreePBX, and admin login credentials for Apache to access AsteriDex and Reminders. Add a trunk provider (Skyetel is preconfigured and enabled by default) and a softphone or Incredible PBX SIP phone, and your PBX is fully operational. Check out the CrownCloud Wiki.
Planning Ahead for That Rainy Day
One of our favorite features of Crown Cloud is the free snapshot (a.k.a. backup) at no additional charge. We recommend you take snapshots regularly as you make major changes in your server’s configuration. In this way, if something comes unglued, you can easily restore the snapshot and never miss a beat. You’ll find the Remote Snapshot option in your CrownPanel menu.

Configuring Skyetel for Incredible PBX
If you’ve decided to go with Skyetel, here’s the drill. Sign up for Skyetel service and take advantage of the Nerd Vittles specials. First, complete the Prequalification Form here. You then will be provided a link to the Skyetel site to complete your registration. Once you have registered on the Skyetel site and your account has been activated, open a support ticket and request the $10 credit for your account by referencing the Nerd Vittles special offer. Once you are satisfied with the service, fund your account as desired, and Skyetel will match your deposit of up to $250 simply by opening another ticket. That gets you up to $500 of half-price calling. Credit is limited to one per person/company/address/location. Effective 10/1/2023, $25/month minimum spend required.
Skyetel does not require SIP registrations to make connections to your PBX. Instead, Skyetel can use Endpoint Groups to identify which servers can communicate with the Skyetel service. An Endpoint Group consists of a Name, an IP address, a UDP or TCP port for the connection, and a numerical Priority for the group. For incoming calls destined to your PBX, DIDs are associated with an Endpoint Group to route the calls to your PBX. For outgoing calls from your PBX, a matching Endpoint Group is required to authorize outbound calls through the Skyetel network. Thus, the first step in configuring the Skyetel side for use with your PBX is to set up an Endpoint Group. Here’s a typical setup for Incredible PBX:
- Name: MyPBX
- Priority: 1
- IP Address: PBX-Public-IP-Address
- Port: 5060
- Protocol: UDP
- Description: my.incrediblepbx.com
To receive incoming PSTN calls, you’ll need at least one DID. On the Skyetel site, you acquire DIDs under the Phone Numbers tab. You have the option of Porting in Existing Numbers (free for the first 60 days after you sign up for service) or purchasing new ones under the Buy Phone Numbers menu option.
Once you have acquired one or more DIDs, navigate to the Local Numbers or Toll Free Numbers tab and specify the desired SIP Format and Endpoint Group for each DID. Add SMS/MMS and E911 support, if desired. Call Forwarding and Failover are also supported. That completes the VoIP setup on the Skyetel side. System Status is always available here. Everything is already in place on the Incredible PBX 2022 side of the house so you can start making and receiving calls immediately.
Configuring ClearlyIP SIP Trunking
For the tightest integration with FreePBX, no SIP provider holds a candle to Incredible PBX SIP Trunking with ClearlyIP. The reason is fairly obvious. The ClearlyIP folks were the original developers of FreePBX. In addition to all of the traditional SIP trunking services, you also get CNAM support and state-of-the-art E911 service which can be deployed in full compliance with Kari’s Law and the Ray Baum Act. If you’re a system integrator and don’t know about your financial liability for failure to comply with the new rules, it’s time to do some reading.
Configuring VoIP.ms for Incredible PBX
To sign up for VoIP.ms service, may we suggest you use our signup link so that Nerd Vittles gets a referral credit for your signup. Once your account is set up, you’ll need to set up a SIP SubAccount and, for Authentication Type, choose Static IP Authentication and enter your Incredible PBX server’s public IP address. For Transport, choose UDP. For Device Type, choose Asterisk, IP PBX, Gateway or VoIP Switch. Order a DID in their web panel, and then point the DID to the SubAccount you just created. Be sure to specify atlanta1.voip.ms as the POP from which to receive incoming calls. In the Incredible PBX GUI, be sure to enable the VoIP.ms trunk.
Configuring Anveo Direct for Incredible PBX
To sign up for Anveo Direct service, sign up on their web site and then login. After adding funds to your account, purchase a DID under Inbound Service -> Order DID. Next, choose Configure Destination SIP Trunk. Give the Trunk a name. For the Primary SIP URI, enter $[E164]$@server-IP-address. For Call Options, select your new DID from the list. You also must whitelist your public IP address under Outbound Service -> Configure. Create a new Call Termination Trunk and name it to match your server. For Dialing Prefix, choose six alphanumeric characters beginning with a zero. In Authorized IP Addresses, enter the public IP address of your server. Set an appropriate rate cap. We like $0.01 per minute to be safe. Set a concurrent calls limit. We like 2. For the Call Routing Method, choose Least Cost unless you’re feeling extravagant. For Routes/Carriers, choose Standard Routes. Write down your Dialing Prefix and then click the Save button.
Before you can make outbound calls through Anveo Direct from your PBX, you first must configure the Dialing Prefix that you wrote down in the previous step. Log into the GUI as admin using a web browser and edit the Anveo-Out trunk in Connectivity -> Trunks. Enable the Trunk. Then click on the custom-Settings tab and replace anveo-pin with your actual Dialing Prefix. Click Submit and Apply Config to complete the setup. In the Incredible PBX GUI, be sure to enable all of the remaining Anveo trunks.
By default, incoming Anveo Direct calls will be processed by the Default inbound route on your PBX. If you wish to redirect incoming Anveo Direct calls using DID-specific inbound routes, then you’ve got a bit more work to do. In addition to creating the inbound route using the 11-digit Anveo Direct DID, enter the following commands after logging into your server as root using SSH/Putty:
cd /etc/asterisk
echo "[from-anveo]" >> extensions_custom.conf
echo "exten => _.,1,Ringing" >> extensions_custom.conf
echo "exten => _.,n,Goto(from-trunk,\\${SIP_HEADER(X-anveo-e164)},1)" >> extensions_custom.conf
asterisk -rx "dialplan reload"
Configuring a SIP Phone for Incredible PBX 2022
We’re in the home stretch now. You can connect virtually any kind of telephone to your new PBX. Plain Old Phones require an analog telephone adapter (ATA) which is a standalone SIP device such as ObiHai’s OBi100 or OBi110 (if you have a phone line from Ma Bell to hook up as well). SIP phones can be connected directly so long as they have an IP address. We obviously recommend the Incredible PBX IP phones from ClearlyIP which are the most versatile.
If you’ve been keeping up with recent Nerd Vittles developments, then you already know that we have just introduced a new Cellular Phone which connects directly to your PBX and serves as a perfect remote extension and traveling companion. You can read all about it here.
Software devices such as the YateClient softphone are another option for desktop machines. We’ll start with a free one today so you can begin making calls. You can find dozens of recommendations for hardware-based SIP phones both on Nerd Vittles and the VoIP-Info.org Forum when you’re ready to get serious about VoIP telephony.
We recommend YateClient for Windows which is free. Download it from here. Run YateClient once you’ve installed it and enter the credentials for the 701 extension on Incredible PBX. You can find them by running /root/show-passwords. You’ll need the IP address of your server plus your extension 701 password. In the YateClient, fill in the blanks using the IP address of your Server plus :5061 for the PJsip 701 extension, 701 for your Username, and whatever Password was assigned to the extension when you installed Incredible PBX. Click OK to save your entries.

Once you are registered to extension 701, close the Account window. Then click on YATE’s Telephony Tab and place some test calls to the numerous apps that are preconfigured on Incredible PBX. Dial a few of these to get started:
DEMO - Apps Demo
123 - Reminders
947 - Weather by ZIP Code
951 - Yahoo News
TODAY - Today in History
LENNY - The Telemarketer's Worst Nightmare
If you are a Mac user, another great no-frills softphone is Telephone. Just download and install it from the Mac App Store. For Android users, check out the terrific new VitalPBX Communicator. Works flawlessly with Incredible PBX.
For smartphone solutions, visit the Incredible PBX Wiki for our softphone recommendations.
Configuring SendMail with Incredible PBX
In order to receive voicemails by email delivery, outbound mail functionality from your server obviously is required. We strongly recommend configuring SendMail using either your ISP or Gmail as an SMTP Relay Host. NOTE: If you are using a Gmail account with 2-step verification enabled, you MUST use a Gmail App Key instead of your Gmail account password. You also must enable Less Secure Apps access to the Gmail account.
Configuring a Gmail account with Incredible PBX 2022 is as simple as entering your Gmail credentials. Just run this script: /root/enable-gmail-smarthost-for-sendmail.
Here are the steps using a Gmail account with Incredible PBX 2020:
cd /etc/mail
yum -y install sendmail-cf
hostname -f > genericsdomain
touch genericstable
cd /usr/bin
rm -f makemap
ln -s ../sbin/makemap.sendmail makemap
cd /etc/mail
makemap -r hash genericstable.db < genericstable
mv sendmail.mc sendmail.mc.original
wget http://incrediblepbx.com/sendmail.mc.gmail
cp sendmail.mc.gmail sendmail.mc
mkdir -p auth
chmod 700 auth
cd auth
echo AuthInfo:smtp.gmail.com \\"U:smmsp\\" \\"I:user_id\\" \\"P:password\\" \\"M:PLAIN\\" > client-info
echo AuthInfo:smtp.gmail.com:587 \\"U:smmsp\\" \\"I:user_id\\" \\"P:password\\" \\"M:PLAIN\\" >> client-info
echo AuthInfo:smtp.gmail.com:465 \\"U:smmsp\\" \\"I:user_id\\" \\"P:password\\" \\"M:PLAIN\\" >> client-info
# Stop here and edit client-info (nano -w client-info) in all three lines.
# Replace  user_id with your gMail account name without @gmail.com
# Replace password with your real gMail password OR
#  use your Gmail App Key if 2-step verification is enabled
# Be sure to replace the double-quotes shown above if they don't appear in the file!!!
# Save your changes (Ctrl-X, Y, then Enter)
chmod 600 client-info
makemap -r hash client-info.db < client-info
cd ..
make
systemctl restart sendmail
Even though these servers are hosted in the cloud, we still recommend using a SmartHost to minimize email delivery problems.
Test outbound mail using this command with your actual email address:
echo "test" | mail -s testmessage yourname@youremaildomain.com
On some implementations, you may notice in the FreePBX GUI that the mail queue has failed. Here's the fix:
chmod 777 /var/spool/mqueue
service sendmail restart
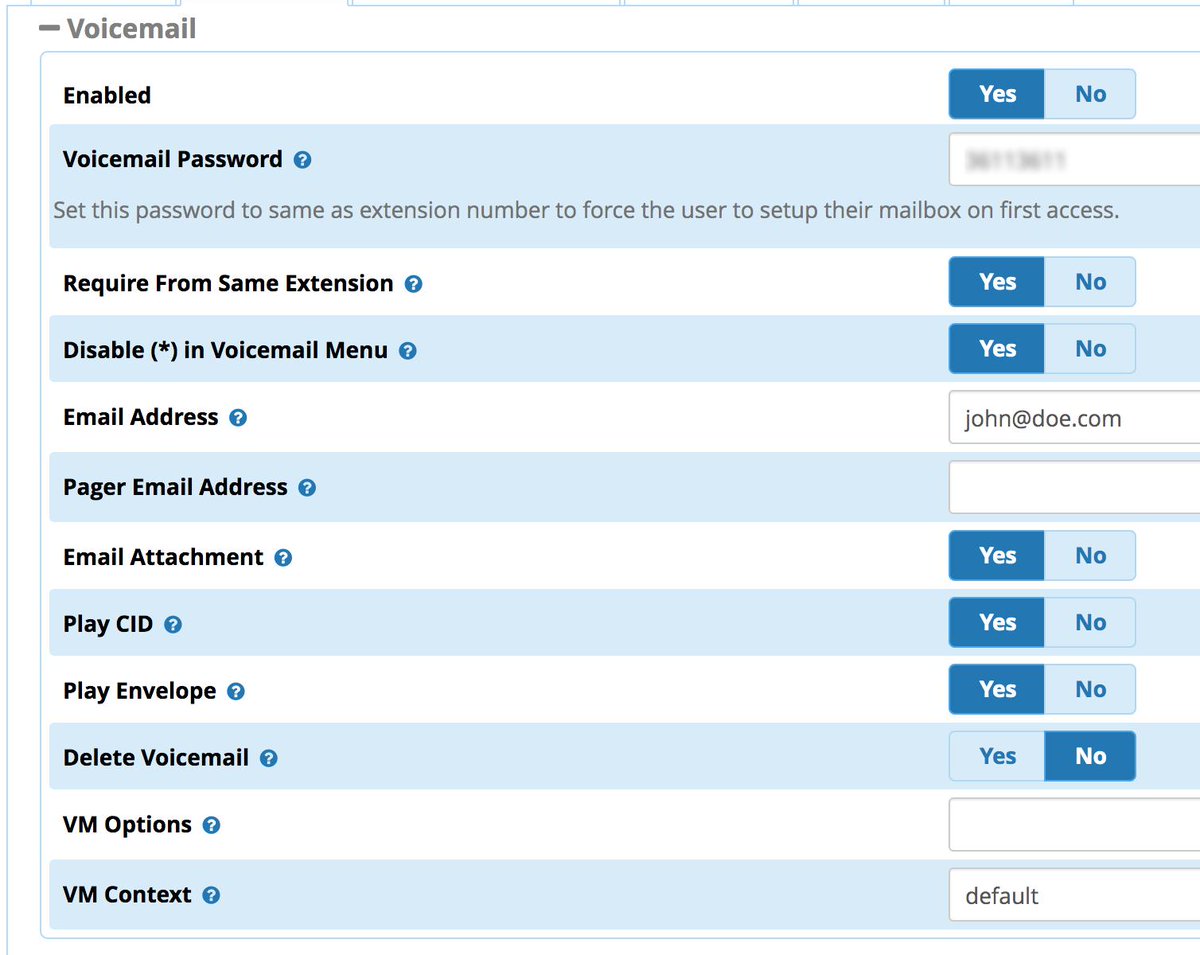
Once you are sure your emails are being delivered reliably, here's a sample GUI voicemail configuration for an extension:
Be advised that Google has hinted that the Gmail Smarthost landscape may be changing. See our recent article for a simple SmartHost alternative.
Incredible PBX Administration
We've eased the pain of administering your new PBX with a collection of scripts which you will find in the /root folder after logging in with SSH or Putty. Here's a quick summary of what each of the scripts does.
add-fqdn is used to whitelist a fully-qualified domain name in the firewall. Because Incredible PBX blocks all traffic from IP addresses that are not whitelisted, this is what you use to authorize an external user for your PBX. The advantage of an FQDN is that you can use a dynamic DNS service to automatically update the IP address associated with an FQDN so that you never lose connectivity.
add-ip is used to whitelist a public IP address in the firewall. See the add-fqdn explanation as to why this matters.
del-acct is used to remove an IP address or FQDN from the firewall's whitelist.
admin-pw-change is used to set the admin password for access to the FreePBX/Incredible PBX web GUI using a browser pointed to the local IP address of your server.
apache-pw-change is used to set the admin password for access to Apache/Incredible PBX apps including AsteriDex and Reminders. This provides a password layer of protection for access to these applications.
reset-conference-pins is a script that automatically and randomly resets the user and admin pins for access to the preconfigured conferencing application. Dial C-O-N-F from any registered SIP phone to connect to the conference.
reset-extension-passwords is a script that automatically and randomly resets ALL of the SIP passwords for extensions 702-705. Be careful using this one, or you may disable existing registered phones and cause Fail2Ban to blacklist the IP addresses of those users. HINT: You can place a call to the Ring Group associated with all five extensions by dialing 777.
reset-reminders-pin is a script that automatically and randomly resets the pin required to access the Telephone Reminders application by dialing 123. It's important to protect this application because a nefarious user could set up a reminder to call a number anywhere in the world assuming your SIP provider's account was configured to allow such calls.
show-feature-codes is a cheat sheet for all of the feature codes which can be dialed from any registered SIP phone. It documents how powerful a platform Incredible PBX actually is. A similar listing is available in the GUI at Admin -> Feature Codes.
show-passwords is a script that displays most of the passwords associated with Incredible PBX. This includes SIP extension passwords, voicemail pins, conference pins, telephone reminders pin, and your Anveo Direct outbound calling pin (if configured). Note that voicemail pins are configured by the user of a SIP extension the first time the user accesses the voicemail system by dialing *97.
ssh-regen.sh allows you to reset the SSH keys for your server for added security.
update-IncrediblePBX is the Automatic Update Utility which checks for server updates from incrediblepbx.com every time you log into your server as root using SSH or Putty. Do NOT disable it as it is used to load important fixes and security updates when necessary. We recommend logging into your server at least once a week.
pbxstatus (shown above) displays status of all major components of Incredible PBX.
Forwarding Calls to Your Cellphone. Keep in mind that inbound calls to your DIDs automatically ring all five SIP extensions, 701-705. The easiest way to also ring your cellphone is to set one of these five extensions to forward incoming calls to your cellphone. After logging into your PBX as root, issue the following command to forward calls from extension 705 to your cellphone: asterisk -rx "database put CF 705 6781234567"
To remove call forwarding: asterisk -rx "database del CF 705"
Keeping FreePBX 15 Modules Current
We strongly recommend that you periodically update all of your FreePBX modules to eliminate bugs and to reduce security vulnerabilities. From the Linux CLI, log into your server as root and issue the following commands:
rm -f /tmp/*
fwconsole ma upgradeall
fwconsole reload
/root/sig-fix
/root/sig-fix
Where To Go From Here
Complete documentation on the ClearlyIP Devices Module is available here.
Complete documentation on the FreePBX GPL Modules is available here.
Complete documentation on the Incredible PBX additions is available here.
An introduction to configuring extensions, trunks, and routes is available here.
Free voicemail transcription with email delivery. Tutorial available here.
Setting Up a VPN for Your PBX: OpenVPN or NeoRouter
Originally published: Monday, March 28, 2022
Need help with Asterisk? Visit the VoIP-info Forum.
Special Thanks to Our Generous Sponsors
FULL DISCLOSURE: ClearlyIP, Skyetel, Vitelity, DigitalOcean, Vultr, VoIP.ms, 3CX, Sangoma, TelecomsXchange and VitalPBX have provided financial support to Nerd Vittles and our open source projects through advertising, referral revenue, and/or merchandise. As an Amazon Associate and Best Buy Affiliate, we also earn from qualifying purchases. We’ve chosen these providers not the other way around. Our decisions are based upon their corporate reputation and the quality of their offerings and pricing. Our recommendations regarding technology are reached without regard to financial compensation except in situations in which comparable products at comparable pricing are available from multiple sources. In this limited case, we support our sponsors because our sponsors support us.
BOGO Bonaza: Enjoy state-of-the-art VoIP service with a $10 credit and half-price SIP service on up to $500 of Skyetel trunking with free number porting when you fund your Skyetel account. No limits on number of simultaneous calls. Quadruple data center redundancy. $25 monthly minimum spend required. Tutorial and sign up details are here.
![]() The lynchpin of Incredible PBX 2020 and beyond is ClearlyIP components which bring management of FreePBX modules and SIP phone integration to a level never before available with any other Asterisk distribution. And now you can configure and reconfigure your new Incredible PBX phones from the convenience of the Incredible PBX GUI.
The lynchpin of Incredible PBX 2020 and beyond is ClearlyIP components which bring management of FreePBX modules and SIP phone integration to a level never before available with any other Asterisk distribution. And now you can configure and reconfigure your new Incredible PBX phones from the convenience of the Incredible PBX GUI.
VitalPBX is perhaps the fastest-growing PBX offering based upon Asterisk with an installed presence in more than 100 countries worldwide. VitalPBX has generously provided a customized White Label version of Incredible PBX tailored for use with all Incredible PBX and VitalPBX custom applications. Follow this link for a free test drive!
Special Thanks to Vitelity. Vitelity is now Voyant Communications and has halted new registrations for the time being. Our special thanks to Vitelity for their unwavering financial support over many years and to the many Nerd Vittles readers who continue to enjoy the benefits of their service offerings. We will keep everyone posted on further developments.
Deploying a Non-Google SMTP RelayHost with Asterisk

This will not be the sexiest column you read this year, but it may be the most important. You need a reliable way for your VoIP-based PBX to deliver emails to you and your users when incoming voicemails arrive and when your server has problems. At least for Incredible PBX® platforms, we thought we had this solved with our Gmail Smarthost solution. But, alas, Google continues to move the goal posts and has announced that it will discontinue support for so-called "Less Secure Apps" on May 30, 2022. After watching Google blow up one of their apps after another over the years, you’d think we’d learn. But the ease of use and (free) pricing of Google offerings continues to entice until… another one bites the dust.
Why Do You Need a RelayHost? Many Internet Service Providers (ISPs) block downstream mail servers from sending email to reduce spam. If you have a PBX sitting behind a Comcast cable modem and you don’t have a business account, that would be you.
What Is a RelayHost? A RelayHost is an intermediate mail provider that provides last mile delivery of your server’s outbound email without your having to worry about the intricacies of setting up and properly configuring an SMTP gateway. Instead, your server pushes your outbound email messages to the smarthost using your credentials and leaves the rest of the delivery task to the RelayHost.
Choosing a RelayHost. Lucky for all of us, there are many RelayHost providers from which to choose. Most offer a free tier with 100 or more daily emails. For most PBXs, that is more than ample without spending a dime. If your server pushes out more than 100 emails a day, then there are commercial tiers of service available from these same providers. Here are some of the favorites recommended by our users: Twilio’s SendGrid, Mailjet, SendInBlue, and our own free MXroute offering. We would prefer you use our service as a last resort if you can’t get any of the other free offerings to work. We’ll show you how to set up Twilio’s SendGrid as a RelayHost to get you started.
Configuring a RelayHost with Incredible PBX. There’s good news and bad news. While all of these solutions offer a free tier, the setup process with some of these services can be a bear. We’ve attempted to take the pain out of this by walking you through the setup steps. For openers, configuring SendMail as an SMTP Smarthost is not for mere mortals so we’ll first migrate your PBX to Postfix to simplify the setup procedure. Here is a quick list of the tasks:
- Migrate Your PBX from SendMail to Postfix
- Obtain an Account with SmartHost Provider
- Configure Postfix Email Relay Using SmartHost Provider
- Test Outbound Mail
Migrating Incredible PBX 2022 to Postfix. Our new Incredible PBX 2022 build for Rocky 8 comes with both SendMail and Postfix preinstalled. So it’s simple to switch gears. Here are the commands:
systemctl stop sendmail
systemctl disable sendmail
systemctl start postfix
systemctl enable postfix
sed -i 's|-c sendmail|-c postfix|' /usr/local/sbin/pbxstatus
sed -i 's|SendMail| Postfix|' /usr/local/sbin/pbxstatus
systemctl status postfix
Migrating Incredible PBX 2021 to Postfix. By default, Incredible PBX 2021 servers do not include Postfix. So here are the steps to install Postfix and remove SendMail. These steps also apply to all releases of Incredible PBX on the Raspbian platform.
apt-get update
apt-get install postfix sasl2-bin -y
# choose No Configuration option when prompted in:
# dpkg-reconfigure postfix
systemctl stop sendmail
systemctl disable sendmail
systemctl start postfix
systemctl enable postfix
sed -i 's|-c sendmail|-c postfix|' /usr/local/sbin/pbxstatus
echo "incrediblepbx.com" > /etc/mailname
sed -i 's|SendMail| Postfix|' /usr/local/sbin/pbxstatus
systemctl status postfix
Creating a Free SendGrid Account. Begin by navigating to the SendGrid Start for Free link. Enter your Email Address and a 16-character password of your choice. Accept the Terms of Service and click Create Account. Fill in the Personal Information and click Get Started. Create a Single Sender Identity. Confirm receipt of the verification email. You can skip enabling Two-Factor Authentication if desired. Next, open the Email API tab and click Integration Guide. Choose SMTP Relay and create an APIKEY. Copy the generated APIKEY to a safe place. It cannot be deciphered again!
Now edit /etc/postfix/main.cf and add the following entries to the bottom of the file:
smtp_sasl_auth_enable = yes
smtp_sasl_password_maps = hash:/etc/postfix/sasl_passwd
smtp_sasl_security_options = noanonymous
smtp_sasl_tls_security_options = noanonymous
smtp_tls_security_level = encrypt
header_size_limit = 4096000
relayhost = [smtp.sendgrid.net]:587
Then create /etc/postfix/sasl_passwd and enter the following, replacing YOUR-APIKEY with your actual key from above:
[smtp.sendgrid.net]:587 apikey:YOUR-APIKEY
Complete the setup by issuing the following commands:
chmod 600 /etc/postfix/sasl_passwd
postmap /etc/postfix/sasl_passwd
systemctl restart postfix
systemctl status postfix
IMPORTANT NOTE: With SendGrid, the email address you entered for your Single Sender Identity must match the FROM: address on every outbound email message sent from your server. We’ll need to adjust the FROM: address in FreePBX before any voicemail emails can be successfully sent. Also, if you send emails from the command line, the syntax must be as shown here with your sender@yourdomain.com matching what was entered as your Sender Identity email address.
echo "test" | mail -r sender@yourdomain.com -s testmessage recipient@somedomain.com
At least with Gmail recipients, they may also see the following with messages from your PBX until they click Looks Safe:

Finally, be sure to adjust the FROM address for outbound voicemail messages in the FreePBX GUI. Login as admin and enter your Sender Identity Email Address in the Server Email field in Settings -> Voicemail Admin -> Settings -> Email Config.
You can check for errors by reviewing the Postfix mail log: tail /var/log/mail.log.
UPDATE: Setup scripts for Debian 10 and Rocky 8 can be downloaded here.
Originally published: Thursday, March 17, 2022
Need help with Asterisk? Visit the VoIP-info Forum.
Special Thanks to Our Generous Sponsors
FULL DISCLOSURE: ClearlyIP, Skyetel, Vitelity, DigitalOcean, Vultr, VoIP.ms, 3CX, Sangoma, TelecomsXchange and VitalPBX have provided financial support to Nerd Vittles and our open source projects through advertising, referral revenue, and/or merchandise. As an Amazon Associate and Best Buy Affiliate, we also earn from qualifying purchases. We’ve chosen these providers not the other way around. Our decisions are based upon their corporate reputation and the quality of their offerings and pricing. Our recommendations regarding technology are reached without regard to financial compensation except in situations in which comparable products at comparable pricing are available from multiple sources. In this limited case, we support our sponsors because our sponsors support us.
BOGO Bonaza: Enjoy state-of-the-art VoIP service with a $10 credit and half-price SIP service on up to $500 of Skyetel trunking with free number porting when you fund your Skyetel account. No limits on number of simultaneous calls. Quadruple data center redundancy. $25 monthly minimum spend required. Tutorial and sign up details are here.
![]() The lynchpin of Incredible PBX 2020 and beyond is ClearlyIP components which bring management of FreePBX modules and SIP phone integration to a level never before available with any other Asterisk distribution. And now you can configure and reconfigure your new Incredible PBX phones from the convenience of the Incredible PBX GUI.
The lynchpin of Incredible PBX 2020 and beyond is ClearlyIP components which bring management of FreePBX modules and SIP phone integration to a level never before available with any other Asterisk distribution. And now you can configure and reconfigure your new Incredible PBX phones from the convenience of the Incredible PBX GUI.
VitalPBX is perhaps the fastest-growing PBX offering based upon Asterisk with an installed presence in more than 100 countries worldwide. VitalPBX has generously provided a customized White Label version of Incredible PBX tailored for use with all Incredible PBX and VitalPBX custom applications. Follow this link for a free test drive!
Special Thanks to Vitelity. Vitelity is now Voyant Communications and has halted new registrations for the time being. Our special thanks to Vitelity for their unwavering financial support over many years and to the many Nerd Vittles readers who continue to enjoy the benefits of their service offerings. We will keep everyone posted on further developments.
Free Asterisk Solutions
