
Home » Incredible PBX » CentOS/SL Platform (Page 14)
Category Archives: CentOS/SL Platform
The Most Versatile VoIP Provider: FREE PORTING

 JUST RELEASED: Visit the Incredible PBX Wiki
Virtual Paradise: It’s Incredible PBX 13-13.10 for VMware

Let’s face it. Virtual Machines are the future of server administration. Whether you prefer your own dedicated hardware or cloud-based resources managed by you or someone else, virtual platforms are the way to go. You get more bang for the buck out of your hardware by pooling resources for multiple tasks. VMware® and VirtualBox® make it easy. Today we’re pleased to introduce our latest build for VMware. It provides the latest Asterisk® 13 and FreePBX® 13 GPL components from source in about 15 minutes.
Just download the VMware .zip image from SourceForge to your desktop and unzip it. Fire up your browser and login to your VMware Web Console. With a few mouse clicks, you’ll have a CentOS 6.10 platform in place with Incredible PBX® just a single keystroke away. It doesn’t get much easier. And, you get the very latest release of Asterisk 13 compiled from source code that you can actually examine, enhance, and share… just like the GPL license says.
Choosing a Virtual Machine Platform
Making the right deployment choice for your virtual machine platform depends upon a number of factors. We initially started out with Proxmox 4 which looked promising. After all, we had used and recommended earlier releases of Proxmox for many years until some security vulnerabilities caused us to look elsewhere. Those kernel issues are now a thing of the past, but Proxmox 4 introduced some new wrinkles. First, to stay current with software fixes and updates, you have to pay the piper by signing up for the annual support license. This turned out to be a deal breaker for a couple of reasons. It was expensive since it’s based upon the number of CPUs in your platform. In the case of the hardware shown below, that turned out to be 4 CPUs (by Proxmox’s calculation) which meant the annual support license would run nearly $400 per year. That buys an enormous number of cloud-based virtual machines without having to babysit hardware at all. So we’ve reluctantly concluded that Proxmox 4 isn’t a particularly good fit for development or production use.
We’ve already sung the praises of VirtualBox so we wont’ repeat it here. VMware also is rock-solid and has been for more than fifteen years. VMware typically runs on dedicated hardware. If you don’t have the funds for a hardware purchase to support your virtualization requirements, then VirtualBox on your desktop machine is a no-brainer. For many, however, some separation of the virtualization environment from your desktop computing environment is desirable. That choice is equally easy. VMware wins, hands down. Better yet, you can make snapshot backups of your virtual machines in seconds with a single button click. If you’ve wrestled with backups on standalone hardware with Linux, you’ll quickly appreciate the difference.
Getting Started with VMware ESXi
Many of you have VMware platforms already in place at work. For you, installing Incredible PBX 13-13.10 is as simple as downloading the image to your desktop and importing it into your existing platform. Better yet, your system administrator can do it for you. If you’re new to VMware, here’s an easy way to get started, and the software won’t cost you a dime. VMware offers a couple of free products that will give you everything you need to run a robust VMware platform on relatively inexpensive hardware. The choice is up to you.
A Free VMware Platform for SOHO Apps
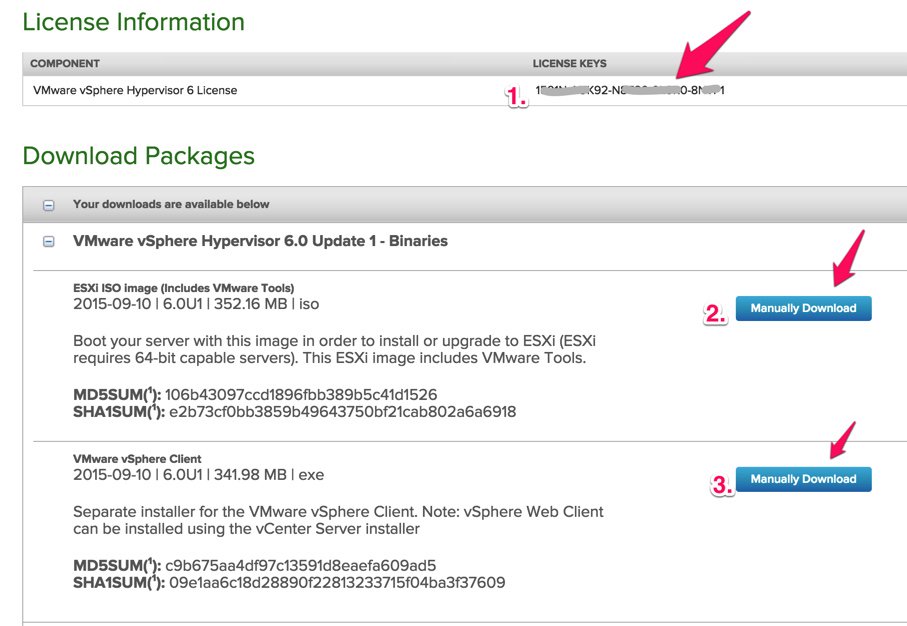
Before you can download the components for the free VMware ESXi platform, you’ll need to sign up for a free account at my.vmware.com. Once you’re signed up, log in and follow these simple steps to sign up for a free ESXi license key and download the ESXi version 6 software:
- Write down your assigned License Key
- Manually download the VMware vSphere Hypervisor 6.5 ISO
- Manually download the VMware vSphere Client 6.5
Next, burn the ISO to a CD/DVD and boot your dedicated VM hardware platform with it. Follow the instructions to complete the install. Next install the vSphere Client on a Windows computer. Don’t forget to add your ESXi License Key when you complete the installation. Once the ESXi server is up and running, you can stick the hardware on a shelf somewhere out of the way. You will rarely interact with it. That’s all handled using either the VMware vSphere Client on your Windows Desktop or the VMware Web Console. Don’t forget to apply your License Key once VMware ESXi is up: Virtual Machines -> Licensing -> Apply License.
Deploy VMware Template with vSphere Client

Deploying an Incredible PBX template takes about two minutes, but first you need to download the Incredible PBX 13-13.10 template from SourceForge onto your Windows Desktop and unzip it.
Once the Incredible PBX template components are on your desktop, here are the deployment steps:
1. Login to the vSphere Client on your Windows Desktop using the root account you set up when you installed ESXi. Choose File, Deploy OVF Template.
2. Select the two Incredible PBX components from your desktop PC.
3. Click Next.
4. Give the new Virtual Machine a name.
5. IMPORTANT: Choose Thin Provision option and click Next.
6. Review your entries and click Next to create the new Virtual Machine.
7. It only takes a couple minutes to create the new Virtual Machine.
8. The Main Client window will redisplay and your new VM should now be shown in the left panel. (1) Click on it. (2) Then click the Green start icon. (3) Then click the Console Window icon.
9. When the VM’s Console Window opens, click in the window in the black area. Log into your virtual machine as root using the default password: password.
10. To complete the Incredible PBX setup, you will automatically be walked through the short installation procedure when you start the virtual machine. Following the automatic reboot, just log in a second time as root and the install will complete.
11. To add Incredible Fax support with HylaFax and AvantFax, run: /root/incrediblefax13.sh.
12. Set up the proper time zone for your server: /root/timezone-setup.
13. Next, reset your root password and make it very secure: passwd.
14. Finally reset your admin password for web access to your server: /root/admin-pw-change.
15. Reset Enchilada passwords at any time by running: /root/update-passwords.
Press Ctrl-Alt to get your mouse and keyboard out of the console window.
Installing the vSphere Web Client
If you’re lucky, you may not have a Windows machine. The downside is that the vSphere Client described above only works on the Windows platform. After a good bit of searching, we finally uncovered a simple way to install the latest vSphere Web Client. It is pure HTML5 with no Flash code! While still under development, VMware has made progress, and it shows. Most of the feature set of vSphere Client now is available from the convenience of your browser. Just point it to the IP address of your VMware server like this: https://ip-address/ui/.
Here’s how to install the vSphere Web Client:
1. Log into the console of your ESXi server as root using your root password.
2. Press F2 to Customized System.
3. Choose Troubleshooting Options.
4. Choose Enable SSH.
5. Using a Terminal window on a Mac or Linux machine or using Putty with Windows, log into the IP address of your ESXi server as root.
6. Issue the following commands to install the latest vSphere Web Client vib and disable http firewall blockage:
esxcli software vib install -v http://download3.vmware.com/software/vmw-tools/esxui/esxui-signed-latest.vib
esxcli network firewall ruleset set -e true -r httpClient
7. Using a web browser, login to the web client as root at https://ESXi-server-IP-address/ui/
8. Should you ever wish to remove the web client from your server:
esxcli software vib remove -n esx-ui
9. You may wish to disable SSH access when you’re finished. Just repeat steps 1-4 above.
Here’s what a typical Incredible PBX Virtual Machine looks like in the web client once you’ve added the VMware Tools to your virtual machine as documented below. There’s even a Console window.
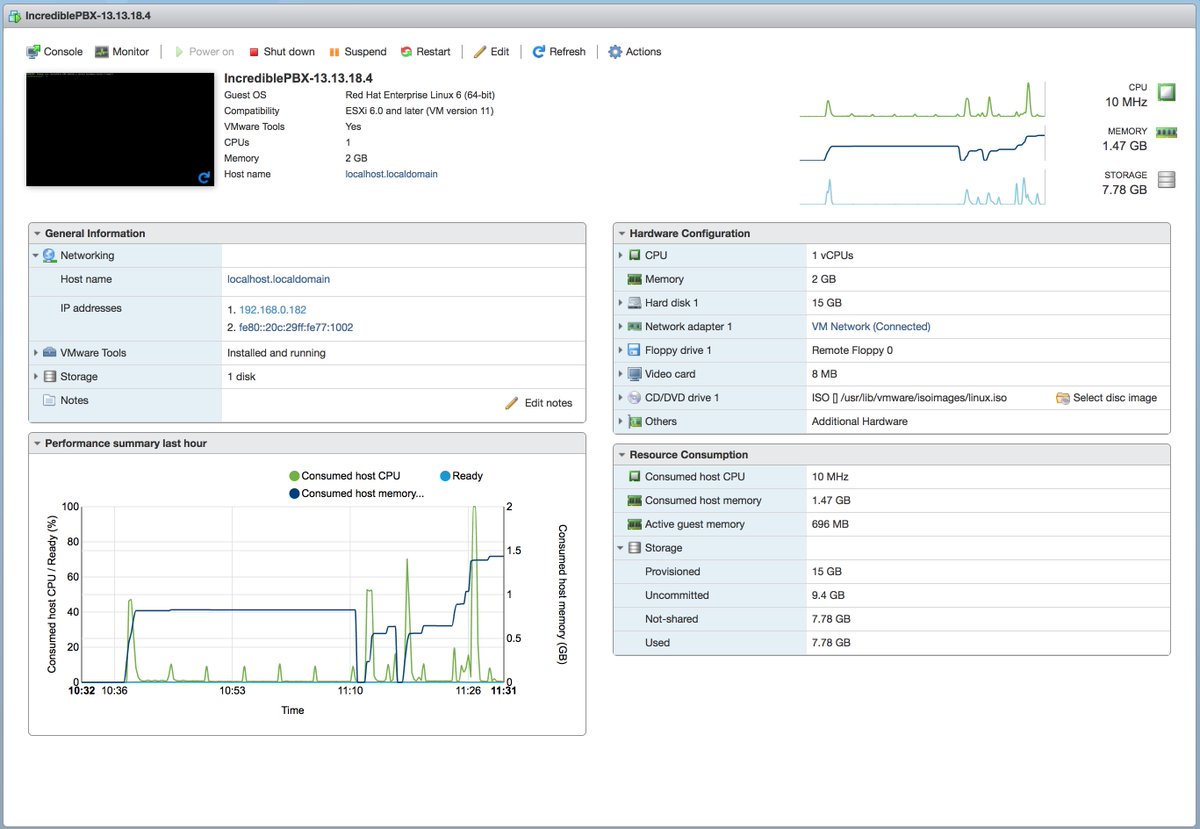
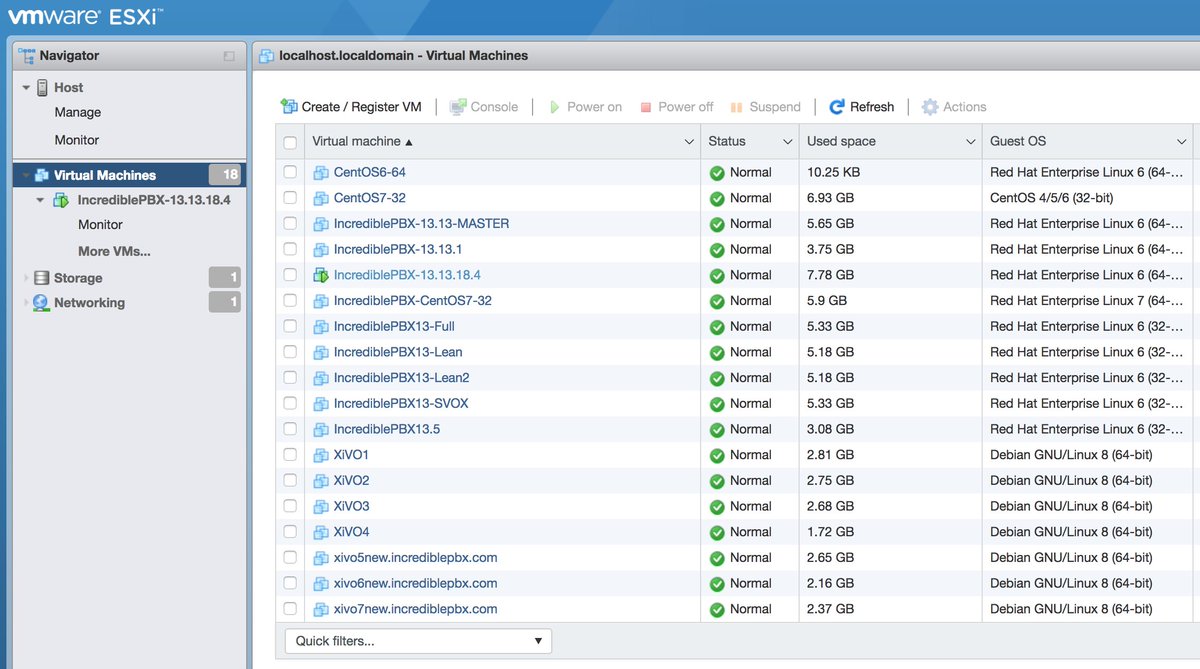
Under the Virtual Machines tab, you now can manage and add new VMs directly.
Installing VMware Tools in a Virtual Machine
If you plan to manage your virtual machines using the vSphere Web Client and a browser, then you definitely will want to install the VMware Tools in each of your virtual machines.
For ESXi 6.0, your only choice is VMwareTools. Here’s how to install:
1. Start up your VM and login as root.
2. From the Windows vSphere Client, right click on virtual machine you started.
3. Choose Guest:Install VMware Tools.
4. Return to the Linux CLI of your virtual machine and issue the following commands. Accept all of the defaults in the installation script when it is run in the final step below:
mkdir /mnt/cdrom
mount /dev/cdrom /mnt/cdrom
ls /mnt/cdrom
cd /tmp
tar -zxvf /mnt/cdrom/VMwareTools*
umount /mnt/cdrom
cd vmware-tools-distrib
./vmware-install.pl
For ESXi 6.5, we prefer the new GPL VMware open-vm-tools. Here’s how to install:
1. Start up your VM and login to the VM as root using SSH or Putty.
2. From the Linux CLI, issue the following commands:
yum -y install --enablerepo=epel open-vm-tools
reboot
Special thanks to John Borhek (@unsichtbarre on the PIAF Forum) for the VMware lessons. 🙂
That should be enough tutorial for today. Enjoy your new VMware platform.
Continue Reading: Configuring Extensions, Trunks & Routes
Don’t Miss: Incredible PBX Application User’s Guide covering the 31 Whole Enchilada apps
Originally published: Monday, December 18, 2017 Updated: Monday, June 17, 2019

Need help with Asterisk? Visit the VoIP-info Forum.
Special Thanks to Our Generous Sponsors
FULL DISCLOSURE: ClearlyIP, Skyetel, Vitelity, DigitalOcean, Vultr, VoIP.ms, 3CX, Sangoma, TelecomsXchange and VitalPBX have provided financial support to Nerd Vittles and our open source projects through advertising, referral revenue, and/or merchandise. As an Amazon Associate and Best Buy Affiliate, we also earn from qualifying purchases. We’ve chosen these providers not the other way around. Our decisions are based upon their corporate reputation and the quality of their offerings and pricing. Our recommendations regarding technology are reached without regard to financial compensation except in situations in which comparable products at comparable pricing are available from multiple sources. In this limited case, we support our sponsors because our sponsors support us.
 BOGO Bonaza: Enjoy state-of-the-art VoIP service with a $10 credit and half-price SIP service on up to $500 of Skyetel trunking with free number porting when you fund your Skyetel account. No limits on number of simultaneous calls. Quadruple data center redundancy. $25 monthly minimum spend required. Tutorial and sign up details are here.
![]() The lynchpin of Incredible PBX 2020 and beyond is ClearlyIP components which bring management of FreePBX modules and SIP phone integration to a level never before available with any other Asterisk distribution. And now you can configure and reconfigure your new Incredible PBX phones from the convenience of the Incredible PBX GUI.
The lynchpin of Incredible PBX 2020 and beyond is ClearlyIP components which bring management of FreePBX modules and SIP phone integration to a level never before available with any other Asterisk distribution. And now you can configure and reconfigure your new Incredible PBX phones from the convenience of the Incredible PBX GUI.
 VitalPBX is perhaps the fastest-growing PBX offering based upon Asterisk with an installed presence in more than 100 countries worldwide. VitalPBX has generously provided a customized White Label version of Incredible PBX tailored for use with all Incredible PBX and VitalPBX custom applications. Follow this link for a free test drive!
 Special Thanks to Vitelity. Vitelity is now Voyant Communications and has halted new registrations for the time being. Our special thanks to Vitelity for their unwavering financial support over many years and to the many Nerd Vittles readers who continue to enjoy the benefits of their service offerings. We will keep everyone posted on further developments.

Safely Deploying Incredible PBX on the Wide Open Internet

We’ve previously documented the benefits of SIP URI calling. Because the calls are free from and to anywhere in the world, the use case is compelling. The drawbacks, particularly with Asterisk® servers, have primarily centered around the security implications of exposing SIP on a publicly-accessible server. Today we want to take another look at an open Internet SIP implementation for Asterisk based upon the pioneering work of Dr. Lin Song back in the PBX in a Flash heyday. We’ve embellished Lin’s original IPtables creation and our original article with some additional security mechanisms for Fail2Ban, Asterisk, FreePBX®, and Travelin’ Man 3. Special thanks also for a terrific tutorial from JavaPipe. All of today’s implementation is open source code which you are more than welcome to use or improve pursuant to GPL3.
July 22 UPDATE: New Incredible PBX 16-15-PUBLIC deployment tutorial is now available here.
Consider this. If everyone in the world had an accessible SIP address instead of a phone number, every call to every person in the world via the Internet would be free. That pretty much sums up why SIP URIs are important. The syntax for SIP URIs depends upon your platform. With Asterisk they look like this: SIP/somebody@FQDN.yourdomain.com. On SIP phones, SIP URIs look like this: sip:somenameORnumber@FQDN.yourdomain.com. Others use somenameORnumber@FQDN.yourdomain.com. Assuming you have a reliable Internet connection, once you have “dialed” a SIP URI, the destination SIP device will ring just as if the called party had a POTS phone. Asterisk® processes SIP URIs in much the same way as calls originating from commercial trunk providers except anonymous SIP calls are blocked.
While we have tested today’s design extensively including implementation of a cloud-based server with no security issues since deployment over four months ago, we still don’t recommend this SIP design for mission-critical PBXs because there remain some security risks with denial of service attacks and zero-day vulnerabilities. For these deployments, Incredible PBX® coupled with the Travelin’ Man 3 firewall which blocks SIP access except from whitelisted IP addresses and FQDNs has no equal. When properly deployed, the bad guys cannot even see your server much less attack it. A typical use case for today’s new SIP design would be a public Asterisk server that provides anonymous SIP access to the general public without any exposure to the corporate jewels. For example, we’ve put up a demonstration server that provides news and weather reports. In the corporate world, an equivalent deployment might provide access to a product database with pricing and availability details. Our rule of thumb before deploying today’s platform would be to ask yourself what damage could be inflicted if your server were totally compromised. If the answer is zero, then proceed. Otherwise, stick with Incredible PBX and the Travelin’ Man 3 firewall. The ideal platform for deployment using the same rule of thumb as above is one of the $1 a month cloud platforms.
| Provider | RAM | Disk | Bandwidth | Performance as of 12/1/19 | Cost |
|---|---|---|---|---|---|
| CrownCloud KVM (LA) | 1GB | 20GB + Snapshot | 1TB/month | 598Mb/DN 281Mb/UP 2CPU Core | $25/year Best Buy! |
| Naranjatech KVM (The Netherlands) | 1GB | 20GB | 1TB/month | Hosting since 2005 VAT: EU res. | 20€/year w/code: SBF2019 |
| BudgetNode KVM (LA) | 1GB | 40GB RAID10 | 1TB/month | Also available in U.K PM @Ishaq on LET before payment | $24/year |
| FreeRangeCloud KVM (Ashburn VA, Winnipeg, Freemont CA) | 1GB | 20GB SSD | 3TB/month | Pick EGG loc'n Open ticket for last 5GB SSD | $30/year w/code: LEBEGG30 |
Overview. There are a number of moving parts in today’s implementation. So let’s briefly go through the steps. Begin with a cloud-based installation of Incredible PBX. Next, we’ll upgrade the Fail2Ban setup to better secure a publicly-accessible Asterisk server. We’ll also customize the port for SSH access to reduce the attack rate on the SSH port. You’ll need a fully-qualified domain name (FQDN) for your server because we’ll be blocking all access to your server by IP address. If you want to allow SIP URI calls to your server, you’ll need this FQDN. If you want to also allow SIP registrations from this same FQDN, then a single FQDN will suffice; however, with OpenVZ platforms, we recommend using a different (and preferably more obscure) FQDN for SIP registrations since registered users have an actual extension on your PBX that is capable of making outbound calls which usually cost money. In this case, the obscure FQDN performs double-duty as the equivalent of a password to your PBX. For example, an FQDN such as hk76dl34z.yourdomain.com would rarely be guessed by an anonymous person while sip.yourdomain.com would be fairly obvious to attempted intruders. But that’s your call.
Using whatever FQDN you’ve chosen for SIP registrations, we’ll add an entry to /etc/asterisk/sip_custom.conf that looks like this: domain=hk76dl34z.yourdomain.com. That will block all SIP registration attempts except from that domain. It will not block SIP invitations! The next step will be to add a new [from-sip-external] context to extensions_override_freepbx.conf. Inside that context, we’ll specify the FQDN used for public SIP URI connections to your server, e.g. sip.yourdomain.com. This will block SIP invitations except SIP URIs containing that domain name. We’ll also define all of the extensions on your Asterisk server which can be reached with SIP URI invitations. These could be actual extensions, or ring groups, or IVRs, or Asterisk applications. The choice is yours. These SIP URI authorizations can be either numeric (701@sip.yourdomain.com) or alpha (weather@sip.yourdomain.com) or alphanumeric (channel7@sip.abc.com). Finally, we’ll put the new IPtables firewall rules in place and adjust your existing iptables-custom setup to support the new publicly-accessible PBX. For example, we’ll still use whitelist entries for web access to your server since anonymous users would cause nothing but mischief if TCP ports 80 and 443 were exposed. It’s worth noting that KVM platforms provide a more robust implementation of IPtables that can block more types of nefarious traffic. We’ve supplemented the original article with a KVM update below. With OpenVZ platforms, we have to rely upon Asterisk to achieve IP address blocking and some types of packet filtering. So why not choose a KVM platform? It’s simple. These platforms typically cost twice as much as equivalent OpenVZ offerings. With this type of deployment, KVM is worth it.
Installing Incredible PBX Base Platform
Today’s design requires an Incredible PBX platform on a cloud-based server. Start by following this tutorial to put the pieces in place. We recommend you also install the Whole Enchilada addition once the base install is finished. Make sure everything is functioning reliably before continuing.
Upgrading the Fail2Ban Platform
Because this will be a publicly-accessible server, we’re going to tighten up the Asterisk configuration in Fail2Ban and lengthen the bantime and findtime associated with Fail2Ban’s Asterisk log monitoring. We also recommend that you whitelist the IP addresses associated with your server and PCs from which you plan to access your server so that you don’t inadvertently block yourself.
Log into your server as root and issue the following commands. When the jail.conf file opens in the nano editor, scroll down to line 34 and add the IP addresses you’d like to whitelist to the existing ignoreip settings separating each IP address with a space. Then press Ctrl-X, Y, then Enter to save your changes. Verify that Fail2Ban restarts successfully.
cd /etc/fail2ban
wget http://incrediblepbx.com/fail2ban-public.tar.gz
tar zxvf fail2ban-public.tar.gz
rm -f fail2ban-public.tar.gz
nano -w jail.conf
service fail2ban restart
If you ever get locked out of your own server, you can use the Serial Console in your VPS Control Panel to log into your server. Then verify that your IP address has been blocked by issuing the command: iptables -nL. If your IP is shown as blocked, issue this command with your address to unblock it: fail2ban-client set asterisk unbanip 12.34.56.78
Obtaining an FQDN for Your Server
Because we’ll be blocking IP address SIP access to your server, you’ll need to obtain one or perhaps two FQDNs for your server. If you manage DNS for a domain that you own, this is easy. If not, you can obtain a free FQDN from ChangeIP here. Thanks, @mbellot.
For the FQDN that you’ll be using for SIP registrations on your server, configure Asterisk to use it by logging into your server as root and issuing the following command using your new FQDN, e.g. xyz.yourdomain.com. Thanks, @ou812.
echo "domain=xyz.yourdomain.com" >> /etc/asterisk/sip_custom.conf
SECURITY ALERT: Never use the SIP URI MOD on a server such as this one with a publicly-exposed SIP port as it is possible for some nefarious individual to spoof your FQDN in the headers of a SIP packet and easily gain outbound calling access using your server’s trunk credentials.
Customizing the [sip-external-custom] Context
All FreePBX-based servers include a sip-external-custom context as part of the default installation; however, we need a customized version to use for a publicly-accessible PBX. You can’t simply update the context in /etc/asterisk/extensions.conf because FreePBX will overwrite the changes the next time you reload your dialplan. Instead we have to copy the context into extensions_override_freepbx.conf and make the changes there. So let’s start by copying the new template there with the following commands:
cd /tmp
wget http://incrediblepbx.com/from-sip-external.txt
cd /etc/asterisk
cat /tmp/from-sip-external.txt >> extensions_override_freepbx.conf
rm -f /tmp/from-sip-external.txt
nano -w extensions_override_freepbx.conf
When the nano editor opens the override file, navigate to line #10 of the [from-sip-external] context and replace xyz.domain.com with the FQDN you want to use for SIP invites to your server. These are the connections that are used to actually connect to an extension on your server (NOT to register). As noted previously, this can be a different FQDN than the one used to actually register to an extension on your server. Next, scroll down below line #27, and you will see a series of lines that actually authorize anonymous SIP connections with your server. There are two numeric entries and also two alpha entries to access the News and Weather apps on your server. The 13th position in the dialplan is required for all authorized calls.
exten => 947,13,Dial(local/947@from-internal)
exten => 951,13,Dial(local/951@from-internal)
exten => news,13,Dial(local/951@from-internal)
exten => weather,13,Dial(local/947@from-internal)
You can leave these in place, remove them, or add new entries depending upon which extensions you want to make publicly accessible on your server. Here are some syntax examples for other types of server access that may be of interest.
; Call VoIP Users Conference
exten => 882,13,Dial(SIP/vuc@vuc.me)
exten => vuc,13,Dial(SIP/vuc@vuc.me)
; Call Default CONF app
exten => 2663,13,Dial(local/${EXTEN}@from-internal)
exten => conf,13,Dial(local/2663@from-internal)
; Call Bob at Local Extension 701
exten => 701,13,Dial(local/${EXTEN}@from-internal)
exten => bob,13,Dial(local/701@from-internal)
; Call Default Inbound Route thru Time Condition
exten => home,13,Goto(timeconditions,1,1)
; Call Inbound Trunk 8005551212
exten => 8005551212,13,Goto(from-trunk,${DID},1)
; Call Lenny
exten => 53669,13,Dial(local/${EXTEN}@from-internal)
exten => lenny,13,Dial(SIP/2233435945@sip2sip.info)
; Call any toll-free number (AT&T Directory Assistance in example)
exten => information,13,Dial(SIP/18005551212@switch.starcompartners.com)
Once you’ve added your FQDN and authorized SIP URI extensions, save the file: Ctrl-X, Y, then Enter.
One final piece is required to enabled anonymous SIP URI connections to your server:
echo "allowguest=yes" >> /etc/asterisk/sip_general_custom.conf
Now restart Asterisk: amportal restart
UPDATE for DialPlan Junkies: We received a few inquiries following publication inquiring about the dialplan design. We’ve taken advantage of a terrific feature of Asterisk which lets calls fall through to the next line of a dialplan if there is no match on a Goto(${EXTEN},13) command. For example, if a caller dials ward@sip.domain.com and there is a line 12 in the dialplan directing the call to ward,13 which exists, call processing will continue there. However, if the extension does not exist, the call will not be terminated. Instead, if there exists a more generic line 13 in the dialplan, e.g. exten => _X.,13,Goto(s,1), call processing will continue there. We use this trick to then redirect the call to an ‘s’ extension sequence to announce that the called extension could not be reached. It’s the reason all of the whitelisted extensions have to have the same line 13 designation so that call processing can continue with the generic line 13 when a specific extension match fails.
Configuring IPtables for Public SIP Access
You may recall that, with Incredible PBX, we bring up the basic IPtables firewall using the /etc/sysconfig/iptables rules. Then we add a number of whitelist entries using /usr/local/sbin/iptables-custom. We’re going to do much the same thing with today’s setup except the rule sets are a bit different. Let’s start by putting the default iptables-custom file in place:
cd /usr/local/sbin
wget http://incrediblepbx.com/iptables-custom-public.tar.gz
tar zxvf iptables-custom-public.tar.gz
rm -f iptables-custom-public.tar.gz
nano -w iptables-custom
When the nano editor opens, scroll to the bottom of the file. You’ll note that we’ve started a little list of notorious bad guys to get you started. Fail2Ban will actually do a pretty good job of managing these, but for the serious recidivists, blocking them permanently is probably a good idea. In addition to the bad guys, you’ll want to whitelist your own IP addresses and domains so that you don’t get blocked from FreePBX web access to your server. The syntax looks like the following two examples:
/usr/sbin/iptables -I INPUT -s pbxinaflash.dynamo.org -j ACCEPT
/usr/sbin/iptables -I INPUT -s 8.8.8.8                -j ACCEPT
Whenever you make changes to your IPtables configuration, remember to restart IPtables using the following command ONLY: iptables-restart
Now let’s put the final IPtables piece in place with the default IPtables config file:
cd /etc/sysconfig
wget http://incrediblepbx.com/iptables-public.tar.gz
tar zxvf iptables-public.tar.gz
rm -f iptables-public.tar.gz
nano -w iptables
When the nano editor opens the file, scroll down to line 55 which controls the TCP port for SSH access to your server. We strongly recommend you change this from 22 to something in the 1000-2000 range. HINT: Your birth year is easy to remember. In the next step, we’ll make the change in your SSH configuration as well.
Next, scroll down to lines 148 and 149. Replace YOUR_HOSTNAME.no-ip.com on both lines with the FQDN of your server that will be used to accept SIP invitations (connections) on your server. These entries have no effect on SIP registrations which we covered above!
Once you’ve made these changes, save the file BUT DO NOT RESTART IPTABLES JUST YET.
Securing the SSH Access Port
TCP port 22 is probably one of the most abused ports on the Internet because it controls access to SSH and the crown jewels by default. Assuming you changed this port in the IPtables firewall setup above, we now need to change it in your SSH config file as well. Edit /etc/ssh/sshd_config and scroll down to line 12. Change the entry to: Port 1999 assuming 1999 is the port you’ve chosen. Be sure to remove the comment symbol (#) at the beginning of the line if it exists. Then save the file.
You’ll also want to update the SSH port in Fail2Ban. Edit /etc/fail2ban/jail.conf and search for port=ssh. In the [ssh-iptables] context, change the entry to port=1999 assuming 1999 is your chosen port. Save the file and reboot your server. Then you should be all set.
Dealing with the Bad Guys
You’ll be amazed how quickly and how many new friends you’ll make on the public Internet within the first few hours. You can watch the excitement from the Asterisk CLI by logging into your server as root and issuing the command: asterisk -rvvvvvvvvvv. Another helpful tool is to monitor your IPtables status which will show IP addresses that have been temporarily blocked by Fail2Ban: iptables -nL. This will catch most of the bad guys and block them. But some are smarter than others, and many know how to spoof IP addresses in SIP packets as you will quickly see. Unlike on KVM platforms, IPtables on most OpenVZ platforms cannot search packets for text strings which is a simple way to block many of these attackers. HINT: You get what you pay for. And, in some cases, attackers disguise their address or use yours. We’ve now found that ${SIPURI} holds the caller’s true identity so we’ve updated the code accordingly. Whether to permanently block these guys is completely up to you. A typical SIP INVITE before such a call is dropped only consumes about 100 bytes so it’s usually not a big deal. You also can manually block callers using the Fail2Ban client with the desired IP address: fail2ban-client set asterisk banip 12.34.56.78.
Additional Security on KVM Platforms
As we mentioned above, a KVM platform provides considerably more security for your public-facing server because you can block entire countries using the ipset extension to IPtables. You can read all about it here. After considerable discussion and suggestions on the PIAF Forum, we would offer the following code which blocks the countries we have identified as causing the majority of problems. First, modify your /etc/sysconfig/iptables configuration and insert the following code in the IPSPF section of the script around line 93. You can change the list of blocked countries to meet your own needs. Just be sure to make the same country-code changes in the blockem.sh script which we will cover in step 2. A list of available country codes can be found here. Save your changes, but do NOT restart IPtables just yet.
-A IPSPF -m set --match-set cn src -j DROP
-A IPSPF -m set --match-set ru src -j DROP
-A IPSPF -m set --match-set ps src -j DROP
-A IPSPF -m set --match-set kp src -j DROP
-A IPSPF -m set --match-set ua src -j DROP
-A IPSPF -m set --match-set md src -j DROP
-A IPSPF -m set --match-set nl src -j DROP
-A IPSPF -m set --match-set fr src -j DROP
-A IPSPF -m set --match-set SIPFLOOD src -j DROP
Second, we want to add a new /etc/blockem.sh script and make it executable (chmod +x /etc/blockem.sh). With the exception of the SIPFLOOD entry which is our custom Bad Guys List, make sure the country list in line #5 below matches the dropped countries list you added to IPtables in step #1 above.
#!/bin/bash
cd /etc
wget -qO - http://www.ipdeny.com/ipblocks/data/countries/all-zones.tar.gz| tar zxvf -
for i in \\
cn ru ps kp ua md nl fr
do
/usr/sbin/ipset create -exist $i hash:net
for j in $(cat $i.zone); do /usr/sbin/ipset add -exist $i $j; done
done
wait
sleep 5
wget http://incrediblepbx.com/badguys.tar.gz
tar zxvf badguys.tar.gz
rm -f badguys.tar.gz
/usr/sbin/ipset restore -! < /etc/SIPFLOOD.zone
wait
sleep 5
service iptables restart
wait
sleep 5
/usr/local/sbin/iptables-custom
wait
sleep 5
service fail2ban restart
wait
exit 0
Third, try things out by running the script: /etc/blockem.sh. Verify that IPtables is, in fact, blocking the listed countries: iptables -nL.
Finally, we recommend adding the script to /etc/rc.d/rc.local replacing the existing iptables-restart line. In that way, it gets run whenever you reboot your server.
In choosing a KVM platform, we've had good luck with the $5/month Digital Ocean platform where you still can get a $50 credit to kick the tires for 60 days, Vultr (similar pricing to D.O. also with a $50 credit). With either of these providers, you can add automatic backups for an extra dollar a month. In the bargain basement (may not be here tomorrow) category, we like the following providers. Many other low-cost options are documented on the LowEndBox site. Just don't invest more than you can afford to lose... and make a backup.1
Connecting a SIP Phone to OpenSIPS or LinPhone
If you followed along in our OpenSIPS adventure, then it's easy to test some SIP URI calls to your new server. You can connect virtually any kind of SIP telephone or endpoint to OpenSIPS. Another easy way to try out SIP calling is to first set up a free LinPhone Account.
You can find dozens of recommendations for hardware-based SIP phones both on Nerd Vittles and the PIAF Forum. For today we'll get you started with one of our favorite (free) softphones, YateClient. It's available for almost all desktop platforms. Download YateClient from here. Run YateClient once you’ve installed it and enter the credentials for your OpenSIPS or LinPhone account you've previously created. You’ll need the IP address of your OpenSIPS server or LinPhone's FQDN (sip.linphone.org) plus your account’s password. Fill in the Yate Client template using the IP address or FQDN as well as your Username and whatever Password you assigned to the account when you created it. Click OK to save your entries.
Once the Yate softphone shows that it is registered, try a test call to one of the SIP URIs you authorized on your new Asterisk server or try ours: ![]()
If you don't happen to have an OpenSIPS server or a LinPhone SIP account to play with but you have another Asterisk server, then the simple way to enable SIP URI extensions is by editing /etc/asterisk/extensions_custom.conf. In the [from-internal-custom] context, add an extension that can be used to contact any desired SIP URI. Then reload your dialplan: asterisk -rx "dialplan reload". Now dial that extension (2468 in the following example) from any phone connected to your Asterisk server. The entry would look something like this to call our SIP URI for the latest weather forecast:

NEWS FLASH: A new One-Minute Installer to use Incredible PBX on the open Internet is now available here.
Originally published: Monday, June 3, 2019
Need help with Asterisk? Visit the VoIP-info Forum.
Special Thanks to Our Generous Sponsors
FULL DISCLOSURE: ClearlyIP, Skyetel, Vitelity, DigitalOcean, Vultr, VoIP.ms, 3CX, Sangoma, TelecomsXchange and VitalPBX have provided financial support to Nerd Vittles and our open source projects through advertising, referral revenue, and/or merchandise. As an Amazon Associate and Best Buy Affiliate, we also earn from qualifying purchases. We’ve chosen these providers not the other way around. Our decisions are based upon their corporate reputation and the quality of their offerings and pricing. Our recommendations regarding technology are reached without regard to financial compensation except in situations in which comparable products at comparable pricing are available from multiple sources. In this limited case, we support our sponsors because our sponsors support us.
BOGO Bonaza: Enjoy state-of-the-art VoIP service with a $10 credit and half-price SIP service on up to $500 of Skyetel trunking with free number porting when you fund your Skyetel account. No limits on number of simultaneous calls. Quadruple data center redundancy. $25 monthly minimum spend required. Tutorial and sign up details are here.
![]() The lynchpin of Incredible PBX 2020 and beyond is ClearlyIP components which bring management of FreePBX modules and SIP phone integration to a level never before available with any other Asterisk distribution. And now you can configure and reconfigure your new Incredible PBX phones from the convenience of the Incredible PBX GUI.
The lynchpin of Incredible PBX 2020 and beyond is ClearlyIP components which bring management of FreePBX modules and SIP phone integration to a level never before available with any other Asterisk distribution. And now you can configure and reconfigure your new Incredible PBX phones from the convenience of the Incredible PBX GUI.
VitalPBX is perhaps the fastest-growing PBX offering based upon Asterisk with an installed presence in more than 100 countries worldwide. VitalPBX has generously provided a customized White Label version of Incredible PBX tailored for use with all Incredible PBX and VitalPBX custom applications. Follow this link for a free test drive!
Special Thanks to Vitelity. Vitelity is now Voyant Communications and has halted new registrations for the time being. Our special thanks to Vitelity for their unwavering financial support over many years and to the many Nerd Vittles readers who continue to enjoy the benefits of their service offerings. We will keep everyone posted on further developments.
- Digital Ocean and Vultr provide modest referral credits to Nerd Vittles for those that use our referral code. It in no way colors our recommendations regarding these two providers, both of whom we use extensively. [↩]
Skyetel Introduces a Spring Boatload of New VoIP Features

Spring is sprung and what better time for our Platinum Sponsor, Skyetel, to introduce a boatload of new features for their already outstanding, triple-redundant VoIP platform. Better yet, you still can take advantage of their half-price VoIP offer on up to $500 of communications services. Whether your wish list included SMS and MMS messaging , or faxing, or SPAM call filtering, or endpoint monitoring, or call recording and transcription, today’s your lucky day. You get all of them in the same familiar Dashboard you’ve been using. Let’s begin with a quick pricing overview and the sign up procedure, then on to the good stuff.
Skyetel Pricing Overview
This summary is not intended to be an exhaustive listing of all Skyetel services. Follow this link for a complete summary of fees and services. Incoming conversational calls are a penny a minute. Traditional DIDs are $1 per month. Toll free numbers are an additional 20¢ per month. Outbound conversational calls are $0.012 per minute. DIDs can be SMS/MMS enabled for 10¢ per month. Incoming SMS messages are a half penny apiece. Outbound SMS messages are a penny. MMS messages are 2¢ each. E911 service is $1.50 per month. CallerID lookups are $0.004 per call. Spam call filtering is $0.006 per inbound call. Voicemail transcription is available for 10¢ per message. Call recording is $.0025/minute. Call transcription is an additional $.005/minute. Storage of call recordings for up to 30 days is free. Effective 10/1/2023, $25/month minimum spend required.
Divide all these prices by 2 when you take advantage of the Nerd Vittles BOGO special below.
Signing Up for Skyetel Service
So here’s the drill to sign up for Skyetel service and take advantage of the Nerd Vittles special. First, complete the Prequalification Form here. You then will be provided a link to the Skyetel site to complete your registration. Once you have registered on the Skyetel site and your account has been activated, open a support ticket and request the BOGO credit for your account by referencing the Nerd Vittles special offer. Greed will get you nowhere. Credit is limited to one per person/company/address/location. If you want to take advantage of the 10% discount on your current service, open another ticket and attach a copy of your last month’s bill. See footnote 1 for the fine print.1 If you have high call volume requirements, document these in your Prequalification Form, and Skyetel will be in touch.
| Original Skyetel Deposit | Skyetel Deposit Match | Available SIP Service $'s |
|---|---|---|
| $20 | $20 | $40 |
| $50 | $50 | $100 |
| $100 | $100 | $200 |
| $200 | $200 | $400 |
| $250 | $250 | $500 |
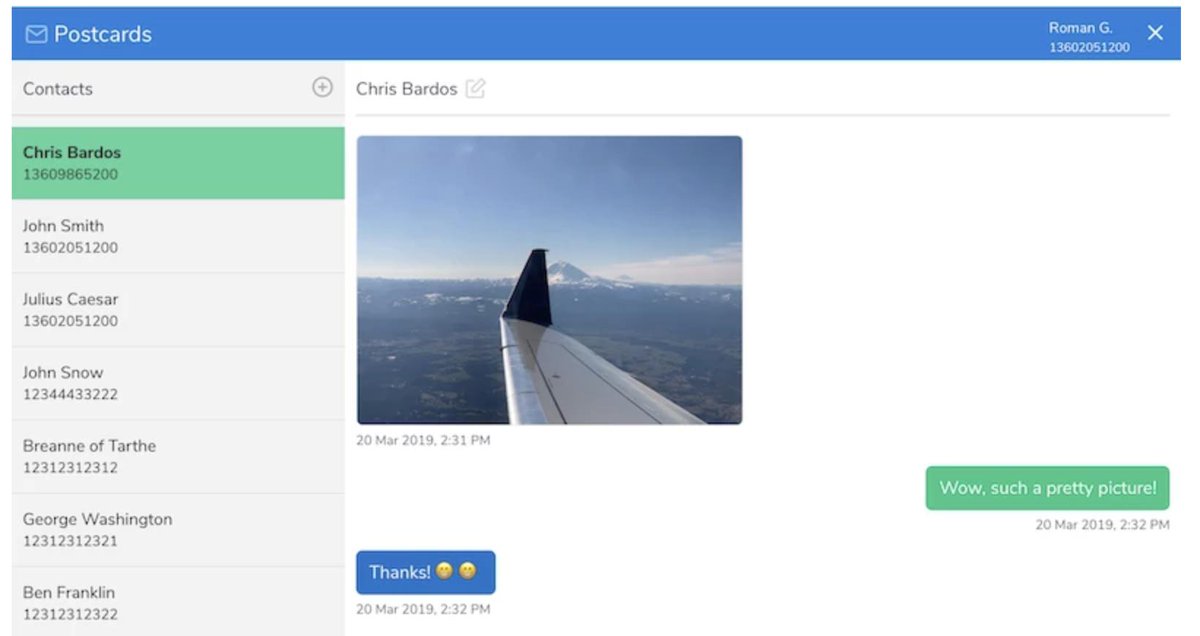
SMS and MMS Messaging with Postcards
In our original Skyetel article, we documented a simple way to send and receive SMS messages using your Skyetel DIDs. Now Skyetel has released a terrific, open source Docker app, Postcards, that lets you build an SMS and MMS messaging platform for your entire organization. Suffice it to say, anything you ever wanted to do with SMS and MMS messaging, you can do with Postcards. We won’t repeat Skyetel’s excellent tutorial, but you certainly need to visit their site and take Postcards for a spin.
Introducing Skyetel’s New Fax Platform
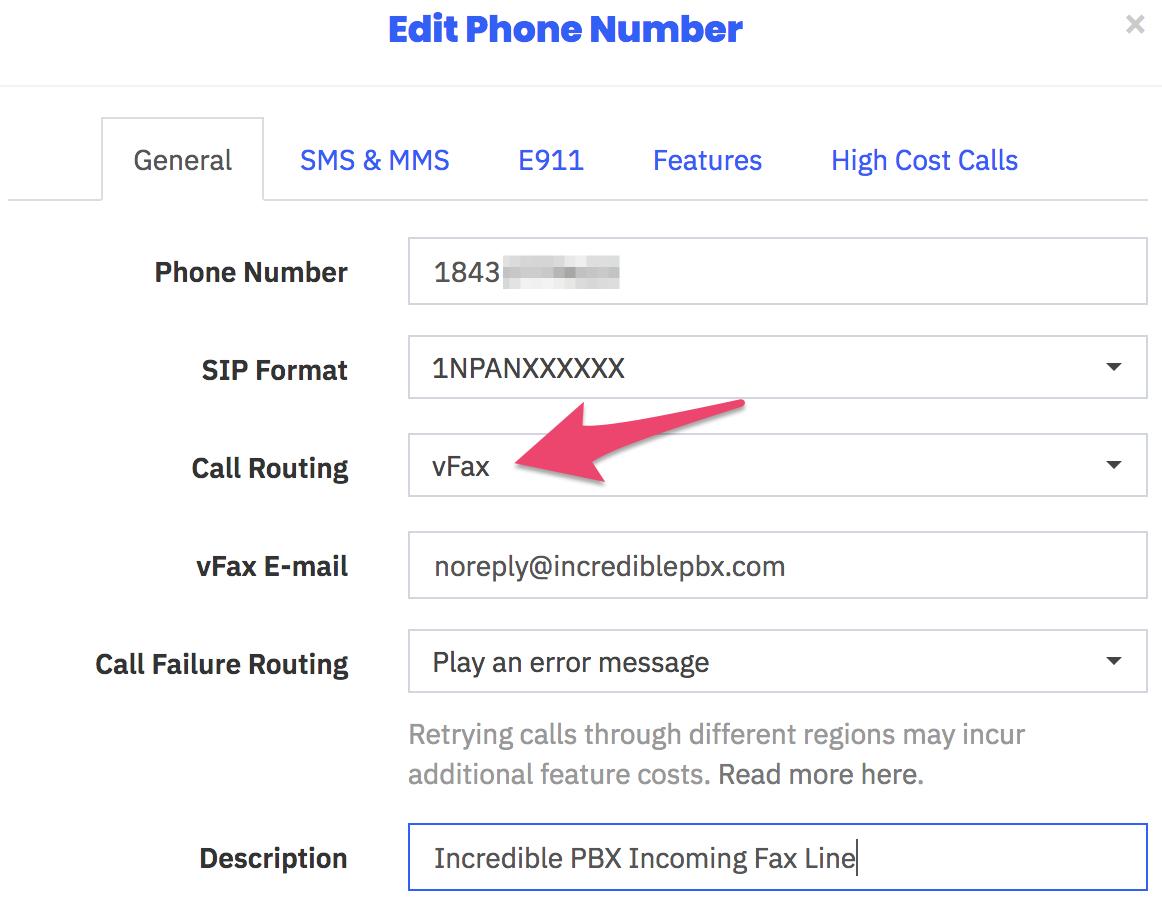
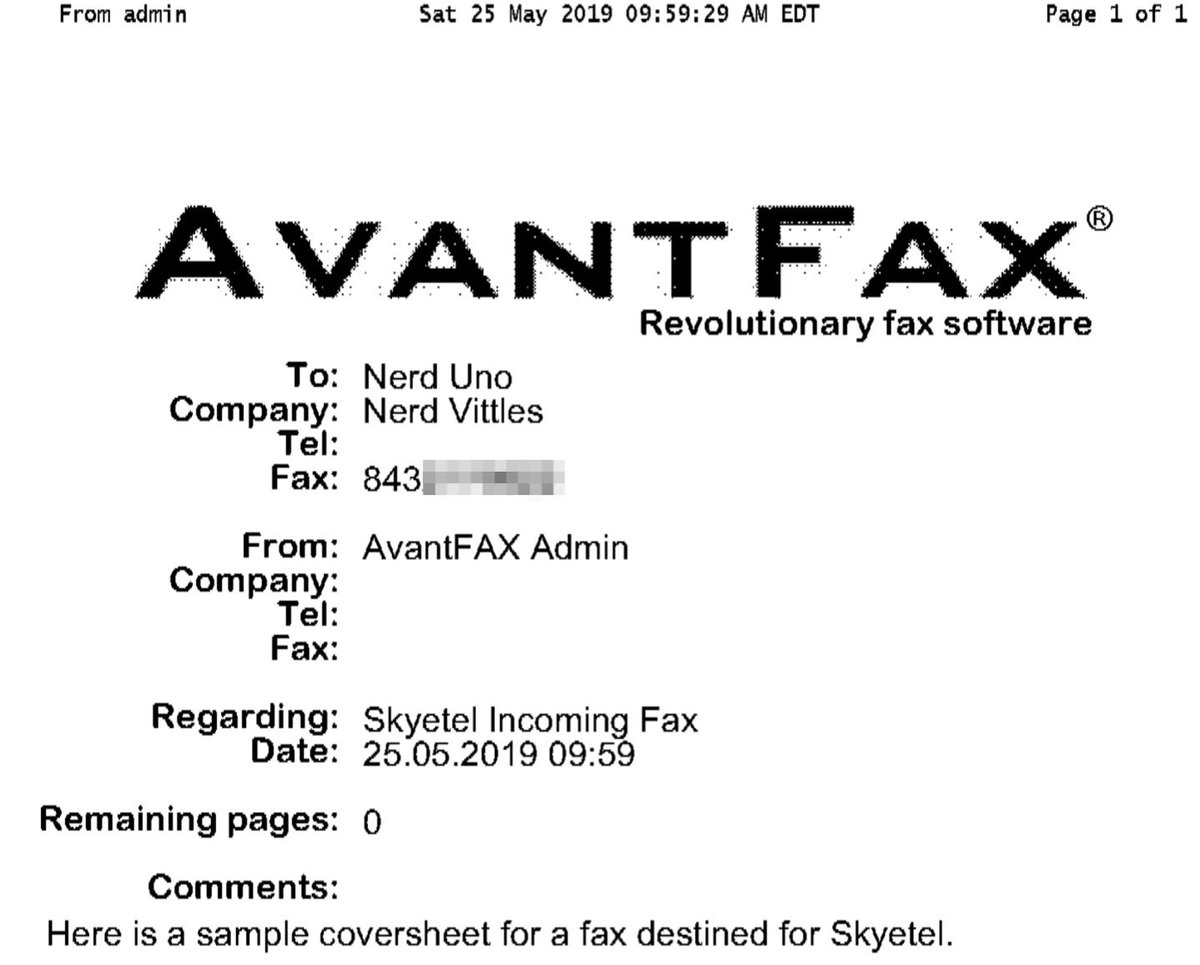
Every time we read an article predicting the demise of fax technology, we have to chuckle. We’ve been reading the articles for about 30 years now, and fax still is the goto solution for many organizations. Can you spell HIPPA? Finally, Skyetel has dipped its toes in the fax waters by offering an easy-to-use fax solution for receipt of traditional and T.38 faxes. Simply purchase a Skyetel DID and configure it for vFax routing. Enter an email address for delivery of the faxes, and you’re done.
Sending faxes from the Skyetel portal still is on the drawing boards, but it’s coming. In the meantime, Incredible Fax™ which is bundled with all Incredible PBX® platforms will let you send faxes ’til the cows come home with our easy-to-use Hylafax/AvantFax implementation.
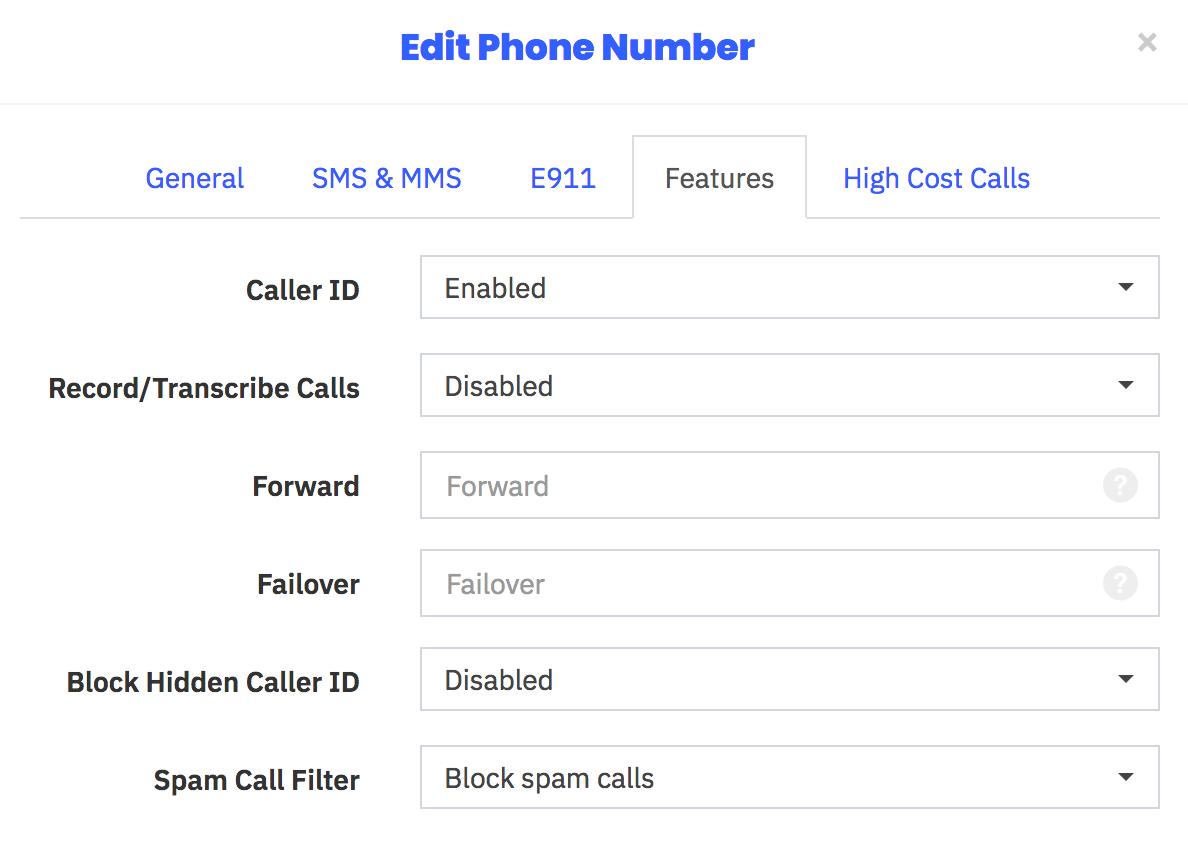
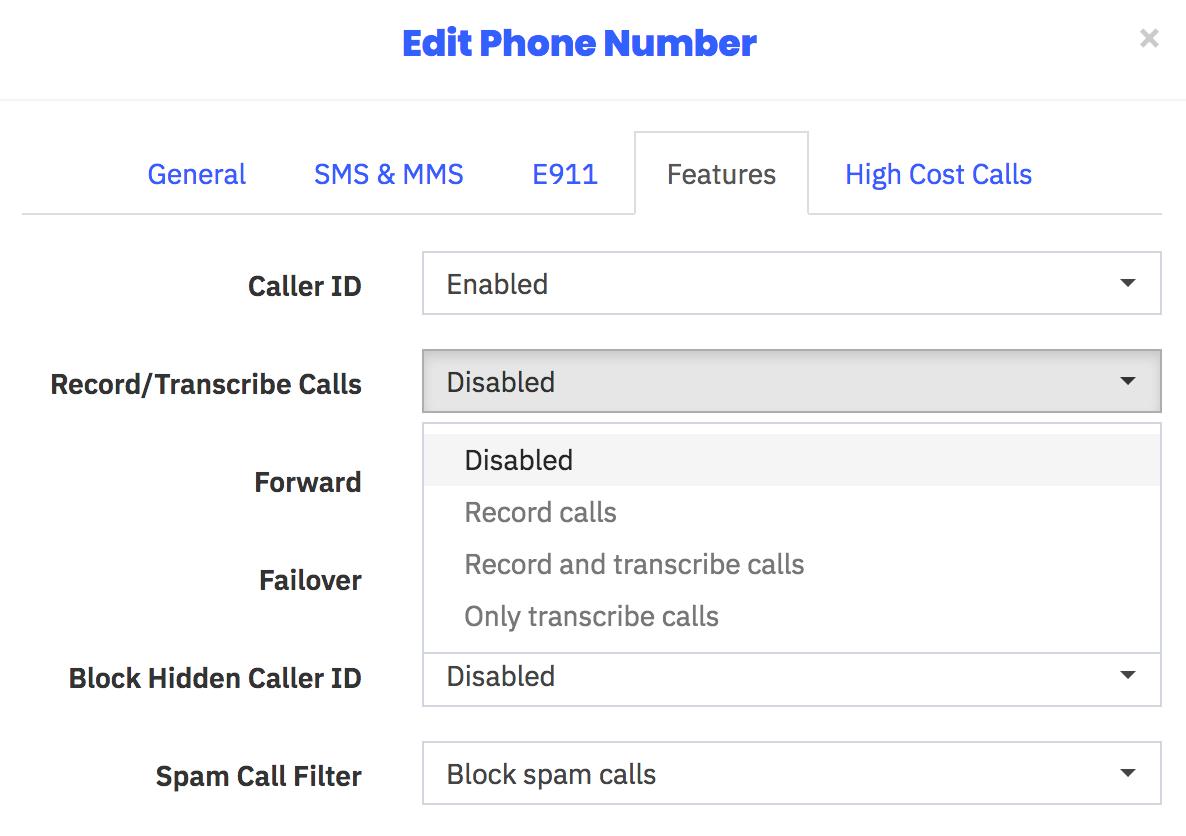
Implementing the New Spam Call Filter
One of the most often requested features for any PBX is spam call filtering. Skyetel takes it to the next level by dealing with the spammers before the calls ever reach your PBX. For each of your Skyetel phone numbers, click on the Features tab and set the Spam Call Filter as desired.
Recording and Transcribing Skyetel Calls
As with spam call filtering, recording and/or transcribing Skyetel calls is only a click away. For each of your Skyetel phone numbers, click on the Features tab and set the option desired for Recording and/or Transcribing calls. Recordings and Transcriptions can be managed from your Skyetel Dashboard. Storage is free for up to 30 days, after which they are deleted.
Skyetel Expansion for Canadian Users

Here’s some great news for our Canadian friends. Skyetel has been listening!
- Porting to Skyetel in Canada now is significantly easier and faster
- Awesome reductions in audio round trip times
- Epic reductions in time-to-deliver
- Faster response times to technical issues (and fewer of them!)
- Audio for Canadian calls will now originate from Canadian data centers
- SMS and MMS available on Canadian ported numbers
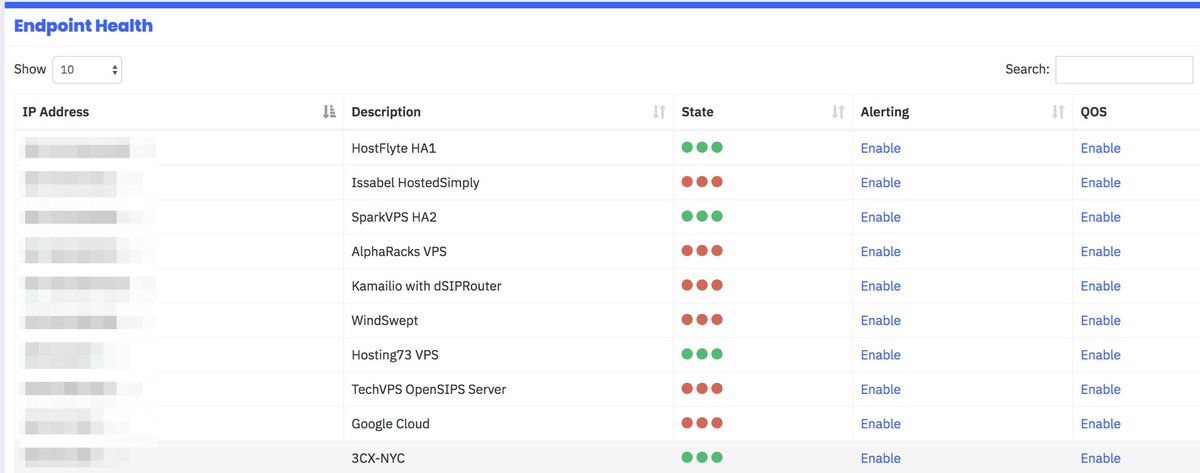
Skyetel Monitoring of Endpoint Health
In addition to monitoring and reporting the health of all Skyetel services in your web portal, today’s addition allows you to configure Skyetel to not only monitor the State of every registered endpoint but also its Health with realtime metrics of the Latency, Packet Loss, and Jitter of each of your endpoints. Simply check the Network QOS options desired.
Don’t forget to whitelist all of the Skyetel data centers in Incredible PBX:
- /root/add-ip Skyetel-NW 52.41.52.34
- /root/add-ip Skyetel-SW 52.8.201.128
- /root/add-ip Skyetel-NE 52.60.138.31
- /root/add-ip Skyetel-SE 50.17.48.216
- /root/add-ip Skyetel-EU 35.156.192.164
Continue reading the original Nerd Vittles Skyetel tutorial.
Originally published: Tuesday, May 28, 2019 Updated: Wednesday, June 12, 2019
Need help with Asterisk? Visit the VoIP-info Forum.
Special Thanks to Our Generous Sponsors
FULL DISCLOSURE: ClearlyIP, Skyetel, Vitelity, DigitalOcean, Vultr, VoIP.ms, 3CX, Sangoma, TelecomsXchange and VitalPBX have provided financial support to Nerd Vittles and our open source projects through advertising, referral revenue, and/or merchandise. As an Amazon Associate and Best Buy Affiliate, we also earn from qualifying purchases. We’ve chosen these providers not the other way around. Our decisions are based upon their corporate reputation and the quality of their offerings and pricing. Our recommendations regarding technology are reached without regard to financial compensation except in situations in which comparable products at comparable pricing are available from multiple sources. In this limited case, we support our sponsors because our sponsors support us.
BOGO Bonaza: Enjoy state-of-the-art VoIP service with a $10 credit and half-price SIP service on up to $500 of Skyetel trunking with free number porting when you fund your Skyetel account. No limits on number of simultaneous calls. Quadruple data center redundancy. $25 monthly minimum spend required. Tutorial and sign up details are here.
![]() The lynchpin of Incredible PBX 2020 and beyond is ClearlyIP components which bring management of FreePBX modules and SIP phone integration to a level never before available with any other Asterisk distribution. And now you can configure and reconfigure your new Incredible PBX phones from the convenience of the Incredible PBX GUI.
The lynchpin of Incredible PBX 2020 and beyond is ClearlyIP components which bring management of FreePBX modules and SIP phone integration to a level never before available with any other Asterisk distribution. And now you can configure and reconfigure your new Incredible PBX phones from the convenience of the Incredible PBX GUI.
VitalPBX is perhaps the fastest-growing PBX offering based upon Asterisk with an installed presence in more than 100 countries worldwide. VitalPBX has generously provided a customized White Label version of Incredible PBX tailored for use with all Incredible PBX and VitalPBX custom applications. Follow this link for a free test drive!
Special Thanks to Vitelity. Vitelity is now Voyant Communications and has halted new registrations for the time being. Our special thanks to Vitelity for their unwavering financial support over many years and to the many Nerd Vittles readers who continue to enjoy the benefits of their service offerings. We will keep everyone posted on further developments.
- In the unlikely event that Skyetel cannot provide a 10% reduction in your current origination rate and/or DID costs, Skyetel will give you an additional $50 credit to use with the Skyetel service. [↩]
Interconnecting a Mobile PBX to the Asterisk Mothership

The Holy Grail for a mobile VoIP solution is a simple way to connect back to your primary Asterisk® PBX via Wi-Fi from anywhere in the world to make and receive calls as if you never left. Let’s tick off the potential problems. First, many home-based PBXs are sitting behind NAT-based routers. Second, almost all remote Wi-Fi connections are made through a NAT-based router. Third, chances are the remote hosting platform blocks outgoing email from downstream servers such as a mobile PBX. Fourth, deciphering the IP address of your remote connection can be problematic. Fifth, the chances of experiencing one-way audio or no audio on your VoIP calls is high because of NAT-based routers at both ends of your connection.
Last week we introduced OpenVPN as a solution for those with multiple VoIP sites to interconnect. But there’s a much simpler solution for those that travel regularly and want to avoid the complexity of configuring OpenVPN. Here is a quick thumbnail of the setup we recommend as your mobile companion, and you’ll never have a one-way audio problem again. In terms of hardware, you’ll need a Raspberry Pi 3B+ with its native WiFi support and a Windows or Mac notebook computer for traveling. You’ll also need a NeoRouter VPN server to make this process seamless. If you’ve already set up an OpenVPN server platform, it will work equally well. One advantage of NeoRouter is that clients can be added from the client side without having to create a config file on the VPN server. All you need is a username and password. But the choice of VPN platform is totally a matter of preference. The objective using either OpenVPN or NeoRouter is secure communications to your home base. We don’t want to have to reconfigure either your home PBX or your traveling PBX or your notebook PC based upon changes in your public and private IP addresses.
Today we’ll walk you through the easiest way to set up a (free) NeoRouter server on the Internet. It can be used to connect up to 254 devices on an encrypted private LAN. We’re delighted to have finally found a perfect use for the (free) Google Cloud instance.
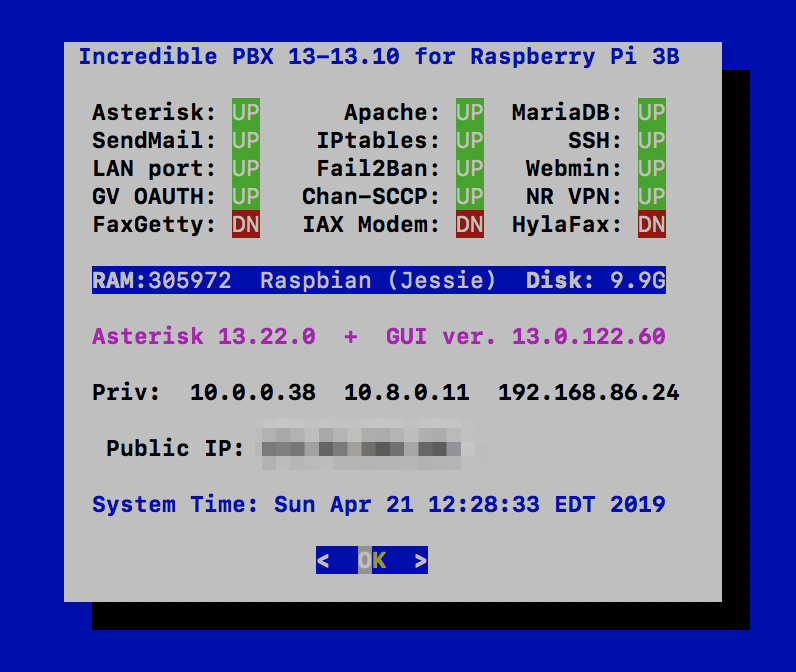
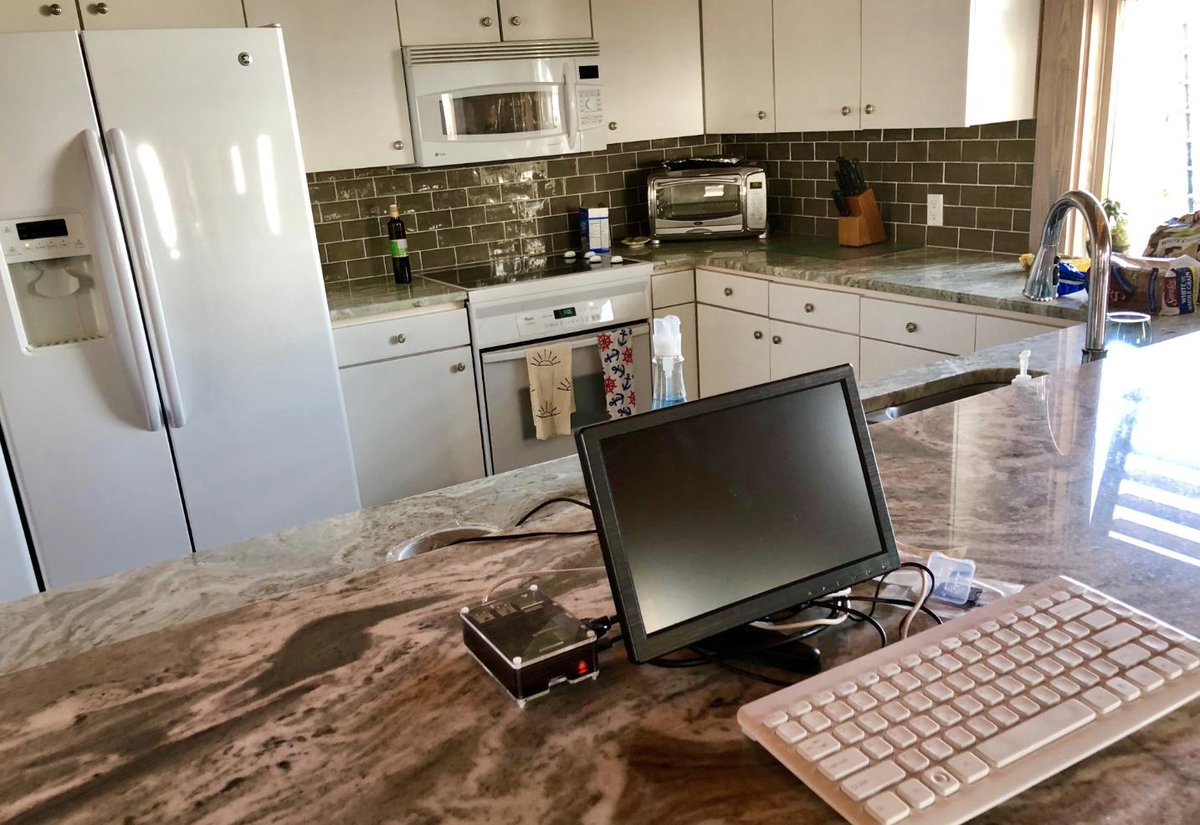
Using a RaspberryPi 3B+, build an Incredible PBX 13-13.10 platform by following our previous tutorial. We’ll set this up on your home WiFi network so that you only have to throw the Raspberry Pi and its power supply in your suitcase when you travel. As part of the setup, we’ll download NeoRouter and activate private IP addresses for your notebook computer as well as both of your PBXs (using nrclientcmd). Next, we’ll interconnect the two PBXs using SIP trunks and the NeoRouter private LAN IP addresses. We’ll take advantage of a neat little Raspberry Pi trick by storing a wpa_supplicant.conf template on your PC for the remote WiFi setup even though we don’t yet know anything about the remote LAN. Once we know the SSID and password at the remote destination, we’ll use your notebook computer to edit the template and transfer the file to the /boot folder of your RasPi’s microSD card. When the card then is inserted and the RasPi is booted, it will automatically move the template to the proper /etc/wpa_supplicant folder to successfully activate your WiFi connection. We’ll also load links, a fast text-based browser, just in case you encounter a hotel that requires some sort of acknowledgement or password before establishing your WiFi connection to the Internet.

Setting Up a (free) NeoRouter Server in the Cloud
Because NeoRouter uses a star-based VPN architecture, that means the NeoRouter Server must always be available at the same IP address for all of the NeoRouter Clients (aka Nodes) to talk to. If you already have a cloud-based server that has a static IP address and can handle the traffic cop duties of NeoRouter Server, then that’s an ideal place to install NeoRouter Server. Simply download the Free flavor of NeoRouter Server that matches your existing platform and install it. Add an FQDN for your server’s IP address, and you’re all set. A detailed summary of available management options is included in our previous NeoRouter v2 article.
We devoted a couple weeks to Google Cloud instances last month, and it turned out to be a pretty awful platform for hosting Asterisk. But the free offering looks to be a perfect fit as a hosting platform for NeoRouter Server. You also won’t have to worry about Google going out of business anytime soon. So let us walk you through an abbreviated setup process on the Google Cloud platform. If you’re just getting started with Google Cloud, read our previous article to take advantage of Google’s generous $300 offer to get you started and to generally familiarize yourself with the mechanics of setting up an instance in the Google Cloud.
For NeoRouter Server, navigate to https://console.cloud.google.com. Click the 3-bar image ![]() in the upper left corner of your Dashboard. This exposes the Navigation Menu. In the COMPUTE section of the Dashboard, click Compute Engine -> VM Instances. Then click CREATE PROJECT and name it. Now click CREATE INSTANCE and Name it nrserver. The instance name becomes the hostname for your virtual machine. If you want to remain in the Free Tier, choose f1-micro instance as the Machine Type and choose a U.S. Region (us-central1, us-east1 or us-west1). For the Boot Disk, choose CentOS 6 and expand the disk storage to at least 20GB (30GB is available with the Free Tier). For the Firewall setting, leave HTTP and HTTPS disabled. Check your entries carefully and then click the Create button.
in the upper left corner of your Dashboard. This exposes the Navigation Menu. In the COMPUTE section of the Dashboard, click Compute Engine -> VM Instances. Then click CREATE PROJECT and name it. Now click CREATE INSTANCE and Name it nrserver. The instance name becomes the hostname for your virtual machine. If you want to remain in the Free Tier, choose f1-micro instance as the Machine Type and choose a U.S. Region (us-central1, us-east1 or us-west1). For the Boot Disk, choose CentOS 6 and expand the disk storage to at least 20GB (30GB is available with the Free Tier). For the Firewall setting, leave HTTP and HTTPS disabled. Check your entries carefully and then click the Create button.
When your virtual machine instance comes on line, jot down the assigned public IP address. We’ll need it in a minute. Now click on the SSH pull-down tab and choose Open in a Browser Window. Now we need to set a root password and adjust the SSH settings so that you can login from your desktop computer using SSH or Putty:
sudo passwd root
su root
nano -w /etc/ssh/sshd_config
When the editor opens the SSH config file, add the following entries. Then save the file and restart SSH: service sshd restart
PermitRootLogin yes
PasswordAuthentication yes
You now should be able to log in to your instance as root from your desktop computer using SSH or Putty. Test it to be sure: ssh root@server-IP-address
Before we leave the Google Cloud Dashboard, let’s make the assigned public IP address permanent so that it doesn’t get changed down the road. Keep in mind that, if you ever delete your instance, you also need to remove the assigned static IP address so you don’t continue to get billed for it. From Home on the Dashboard, scroll down to the NETWORKING section and choose VPS Network -> External IP Addresses. Change the Type of your existing address to Static and Name it staticip. Next, choose Firewall Rules in the VPS Network section and click CREATE FIREWALL RULE. Fill in the template like the following leaving the other fields with their default entries. Then click CREATE.
- Name: neorouter
- Target Tags: neorouter
- Source IP Range: 0.0.0.0/0
- Protocols/Ports: check tcp: 32976
CAUTION: Before this firewall rule will be activated for your instance, it also must be specified in the Network Tags section for your instance. Shut down your instance and add the neorouter tag by editing your instance. Then restart your instance.
Now we’re ready to install NeoRouter Free v2 Server on your instance. Be sure to choose the Free v2 variety. Log back into your server as root using SSH/Putty and issue these commands:
yum -y update
yum -y install nano
wget http://download.neorouter.com/Downloads/NRFree/Update_2.3.1.4360/Linux/CentOS/nrserver-2.3.1.4360-free-centos-x86_64.rpm
rpm -Uvh nrserver-2.3.1.4360-free-centos-x86_64.rpm
/etc/rc.d/init.d/nrserver.sh restart
nrserver -setdomain <DOMAINNAME> <DOMAINPASSWORD>
nrserver -adduser <USERNAME> <PASSWORD> admin
nrserver -enableuser <USERNAME>
nrserver -showsettings
Finally, add the following command to /etc/rc.local so that NeoRouter Server gets started whenever your instance is rebooted:
echo "/etc/rc.d/init.d/nrserver.sh start" >> /etc/rc.local
Installing Incredible PBX 13-13.10 on a Raspberry Pi
Configuring NeoRouter Client on Your Computers
On Linux-based (non-GUI) platforms, setting up the NeoRouter Client is done by issuing the command: nrclientcmd. You’ll be prompted for your NeoRouter Server FQDN as well as your username and password credentials. Perform this procedure on both your home PBX and the Raspberry Pi.
To add your Windows or Mac notebook to the NeoRouter VPN, download the appropriate client and run the application which will prompt for your NeoRouter Server FQDN as well as your NeoRouter credentials. Once completed, you should see all three machines in your NeoRouter Free Client Dashboard: your PC as well as your home PBX and Raspberry Pi-based Incredible PBX. Make note of the private VPN addresses (10.0.0.X) of both your home PBX and your Raspberry Pi. These VPN addresses never change, and we’ll need them to interconnect your PBXs and to set up a softphone on your notebook computer.
Admininistrative Tools to Manage NeoRouter
Here are a few helpful commands for monitoring and managing your NeoRouter VPN.
To access your NeoRouter Linux client: nrclientcmd
To restart NeoRouter Linux client: /etc/rc.d/init.d/nrservice.sh restart
To restart NeoRouter Linux server: /etc/rc.d/init.d/nrserver.sh restart
To set domain: nrserver -setdomain YOUR-VPN-NAME domainpassword
For a list of client devices: nrserver -showcomputers
For a list of existing user accounts: nrserver -showusers
For the settings of your NeoRouter VPN: nrserver -showsettings
To add a user account: nrserver -adduser username password user
To add admin account: nrserver -adduser username password admin
For a complete list of commands: nrserver –help
Interconnecting Your Raspberry Pi and Home PBX
To keep things simple, our setup examples below assume the following NeoRouter VPN addresses: Home PBX (10.0.0.1) and Raspberry Pi (10.0.0.2). Using a browser, you’ll need to login to the GUI of your Home PBX and Raspberry Pi and add a Trunk to each PBX. Be sure to use the same secret on BOTH trunk setups. We don’t recommend forwarding incoming calls from your Home PBX to your Raspberry Pi because most folks won’t be sitting in their hotel room all day to answer incoming calls. Instead, add the number of your smartphone to a Ring Group on the Home PBX and don’t forget the # symbol at the end of the number. On the Raspberry Pi side, we are assuming that whenever a call is dialed from a registered softphone with the 9 prefix, the call will be sent to the Home PBX for call processing (without the 9). For example, 98005551212 would send 800-555-1212 to the Home PBX for outbound routing and 9701 would send 701 to the Home PBX for routing to the 701 extension. You can obviously adjust your dialplan to meet your own local requirements.
On the Home PBX, the chan_sip trunk entries should look like this:
Trunk Name: raspi-remote

PEER DETAILS

host=10.0.0.2
type=friend
context=from-internal
username=home-pbx
fromuser=home-pbx
secret=some-password
canreinvite=no
insecure=port,invite
qualify=yes
nat=yes
On the Raspberry Pi, the chan_sip trunk entries should look like this:
Trunk Name: home-pbx

PEER DETAILS

host=10.0.0.1
type=friend
context=from-internal
username=raspi-remote
fromuser=raspi-remote
secret=some-password
canreinvite=no
insecure=port,invite
qualify=yes
nat=yes
On the Raspberry Pi, add an Outbound Route named Out9-home-pbx pointed to home-pbx Trunk with the following Dial Patterns. For each Dial Pattern, prepend=blank and prefix=9:
dial string: 1NXXNXXXXXX
dial string: NXXNXXXXXX
dial string: *98X.
dial string: XXX
dial string: XXXX
dial string: XXXXX
Tweaking Your Raspberry Pi for WiFi Mobility
wpa_supplicant.conf config file to the /boot directory on the card once you arrive at your destination and know the SSID and password of the local WiFi network. When the Raspberry Pi is subsequently booted, the operating system will move the config file to the /etc/wpa_supplicant directory so that your WiFi network will come on line. Here’s what a typical wpa_supplicant.conf file should look like using your actual credentials. The last network section handles open WiFi network connections (think: McDonald’s) if you want to enable them:
country=US
update_config=1

network={
 ssid="your-SSID"
 psk="your-SSID-password"
 key_mgmt=WPA-PSK
 scan_ssid=1
 priority=5
}

network={
 key_mgmt=NONE
 priority=1
}
The other gotcha is that some public WiFi networks require some type of web login procedure before you can actually access the Internet even though an IP address may have been assigned to your Raspberry Pi. To handle this situation, you’ll need a text-based web browser on the Raspberry Pi that can be accessed through your notebook PC using SSH and your Raspberry Pi’s VPN address. Our favorite is links which can be installed on your Raspberry Pi before you pack up.
apt-get install links -y
Once you arrive at your destination, connect both your notebook PC and Raspberry Pi to the same WiFi network, login to the RasPi with SSH at the VPN address assigned to your RasPi, and run links to start the browser. Press <esc> to access the links menu options. If you can’t access your RasPi at the VPN IP address, try its WiFi-assigned local IP address.
Adding a Softphone to Your Notebook PC
We recommend YateClient which is free. Download it from here. Run YateClient once you’ve installed it and enter the credentials for an extension on your Raspberry Pi. Then enter the VPN IP address of your server plus your extension’s password. Click OK to save your entries.

If you are a Mac user, another great no-frills softphone is Telephone. Just download and install it from the Mac App Store.
Adding a Softphone to Your Smartphone
Enjoy your pain-free traveling!
Originally published: Monday, April 22, 2019
Need help with Asterisk? Visit the VoIP-info Forum.
Special Thanks to Our Generous Sponsors
FULL DISCLOSURE: ClearlyIP, Skyetel, Vitelity, DigitalOcean, Vultr, VoIP.ms, 3CX, Sangoma, TelecomsXchange and VitalPBX have provided financial support to Nerd Vittles and our open source projects through advertising, referral revenue, and/or merchandise. As an Amazon Associate and Best Buy Affiliate, we also earn from qualifying purchases. We’ve chosen these providers not the other way around. Our decisions are based upon their corporate reputation and the quality of their offerings and pricing. Our recommendations regarding technology are reached without regard to financial compensation except in situations in which comparable products at comparable pricing are available from multiple sources. In this limited case, we support our sponsors because our sponsors support us.
BOGO Bonaza: Enjoy state-of-the-art VoIP service with a $10 credit and half-price SIP service on up to $500 of Skyetel trunking with free number porting when you fund your Skyetel account. No limits on number of simultaneous calls. Quadruple data center redundancy. $25 monthly minimum spend required. Tutorial and sign up details are here.
![]() The lynchpin of Incredible PBX 2020 and beyond is ClearlyIP components which bring management of FreePBX modules and SIP phone integration to a level never before available with any other Asterisk distribution. And now you can configure and reconfigure your new Incredible PBX phones from the convenience of the Incredible PBX GUI.
The lynchpin of Incredible PBX 2020 and beyond is ClearlyIP components which bring management of FreePBX modules and SIP phone integration to a level never before available with any other Asterisk distribution. And now you can configure and reconfigure your new Incredible PBX phones from the convenience of the Incredible PBX GUI.
VitalPBX is perhaps the fastest-growing PBX offering based upon Asterisk with an installed presence in more than 100 countries worldwide. VitalPBX has generously provided a customized White Label version of Incredible PBX tailored for use with all Incredible PBX and VitalPBX custom applications. Follow this link for a free test drive!
Special Thanks to Vitelity. Vitelity is now Voyant Communications and has halted new registrations for the time being. Our special thanks to Vitelity for their unwavering financial support over many years and to the many Nerd Vittles readers who continue to enjoy the benefits of their service offerings. We will keep everyone posted on further developments.
A New VPN for All Seasons: Introducing OpenVPN for Asterisk
This month marks our twentieth anniversary wrestling with virtual private networks. Here’s a quick walk down memory lane. Our adventure began with the Altiga 3000 series VPN concentrators which we introduced in the federal courts in 1999. It was a near perfect plug-and-play hardware solution for secure communications between remote sites using less than secure Windows PCs. Cisco quickly saw the potential, gobbled up the company, and promptly doubled the price of the rebranded concentrators. About 10 years ago, we introduced Hamachi® VPNs to interconnect Asterisk® and PBX in a Flash servers. At the time, Hamachi was free, but that was short-lived when they were subsequently acquired by LogMeIn®. What followed was a short stint with PPTP VPNs which worked great with Macs, Windows PCs, and many phones but suffered from an endless stream of security vulnerabilities. Finally, in April 2012, we introduced the free NeoRouter® VPN. Version 2 still is an integral component in every Incredible PBX® platform today, and PPTP still is available as well. While easy to set up and integrate into multi-site Asterisk deployments, the Achilles’ Heel of NeoRouter remains its inability to directly interconnect many smartphones and stand-alone SIP phones, some of which support the OpenVPN platform and nothing else.

The main reason we avoided OpenVPN® over the years was its complexity to configure and deploy.1 In addition, it was difficult to use with clients whose IP addresses were frequently changing. Thanks to the terrific work of Nyr, Stanislas Angristan, and more than a dozen contributors, OpenVPN now has been tamed. And the new server-based, star topology design makes it easy to deploy for those with changing or dynamic IP addresses. Today we’ll walk you through building an OpenVPN server as well as the one-minute client setup for almost any Asterisk deployment and most PCs, routers, smartphones, and VPN-compatible soft phones and SIP phones including Yealink, Grandstream, Snom, and many more. And the really great news is that OpenVPN clients can coexist with your current NeoRouter VPN.
Finally, a word about the OpenVPN Client installations below. We’ve tested all of these with current versions of Incredible PBX 13-13, 16-15, and Incredible PBX 2020. They should work equally well with other server platforms which have been properly configured. However, missing dependencies on other platforms are, of course, your responsibility.
Building an OpenVPN Server Platform
There are many ways to create an OpenVPN server platform. The major prerequisites are a supported operating system, a static IP address for your server, and a platform that is extremely reliable and always available. If the server is off line, all client connections will also fail. While we obviously have not tested all the permutations and combinations, we have identified a platform that just works™. It’s the CentOS 7, 64-bit cloud offering from Vultr. If you use our referral link at Vultr, you not only will be supporting Nerd Vittles through referral revenue, but you also will be able to take advantage of their $50 free credit for new customers. For home and small business deployments, we have found the $5/month platform more than adequate, and you can add automatic backups for an additional $1 a month. Cheap insurance!
To get started, create your CentOS 7 Vultr instance and login as root using SSH or Putty. Immediately change your password and update and install the necessary CentOS 7 packages:
passwd
yum -y update
yum -y install net-tools nano wget tar iptables-services
systemctl stop firewalld
systemctl disable firewalld
systemctl enable iptables
We recommend keeping your OpenVPN server platform as barebones as possible to reduce the vulnerability risk. By default, this installer routes all client traffic through the VPN server which wastes considerable bandwidth. The sed commands below modify this design to only route client VPN traffic through the OpenVPN server.
cd /root
curl -O https://raw.githubusercontent.com/Angristan/openvpn-install/master/openvpn-install.sh
chmod +x openvpn-install.sh
sed -i "s|\\techo 'push \\"redirect-gateway|#\\techo 'push \\"redirect-gateway|" openvpn-install.sh
sed -i "s|push \\"redirect-gateway|#push \\"redirect-gateway|" openvpn-install.sh
sed -i 's|tls-client|tls-client\\npull-filter ignore "redirect-gateway"|' openvpn-install.sh
./openvpn-install.sh
Here are the recommended entries in running the OpenVPN installer:
- Server IP Address: using FQDN strongly recommended to ease migration issues
- Enabled IPv6 (no): accept default
- Port (1194): accept default
- Protocol (UDP): accept default
- DNS (3): change to 9 (Google)
- Compression (no): accept default
- Custom encrypt(no): accept default
- Generate Server
- Client name: firstclient
- Passwordless (1): accept default
In the following steps, we will use IPtables to block all server access except via SSH or the VPN tunnel. Then we’ll start your OpenVPN server:
cd /etc/sysconfig
wget http://incrediblepbx.com/iptables-openvpn.tar.gz
tar zxvf iptables-openvpn.tar.gz
rm -f iptables-openvpn.tar.gz
echo "net.ipv4.ip_forward = 1" >> /etc/sysctl.conf
sysctl -p
systemctl -f enable openvpn@server.service
systemctl start openvpn@server.service
systemctl status openvpn@server.service
systemctl enable openvpn@server.service
systemctl restart iptables
Once OpenVPN is enabled, the server can be reached through the VPN at 10.8.0.1. OpenVPN clients will be assigned by DHCP in the range of 10.8.0.2 through 10.8.0.254. You can list your VPN clients like this: cat /etc/openvpn/ipp.txt. You can list active VPN clients like this: cat /var/log/openvpn/status.log | grep 10.8. And you can add new clients or delete old ones by rerunning /root/openvpn-install.sh.
For better security, change the SSH access port replacing 1234 with desired port number:
PORT=1234
sed -i "s|#Port 22|Port $PORT|" /etc/ssh/sshd_config
systemctl restart sshd
sed -i "s|dport 22|dport $PORT|" /etc/sysconfig/iptables
systemctl restart iptables
04/16 UPDATE: We’ve made changes in the Angristan script to adjust client routing. By default, all packets from every client flowed through the OpenVPN server which wasted considerable bandwidth. Our preference is to route client packets destined for the Internet directly to their destination rather than through the OpenVPN server. The sed commands added to the base install above do this; however, if you’ve already installed and run the original Angristan script, your existing clients will be configured differently. Our recommendation is to remove the existing clients, make the change below, and then recreate the clients again by rerunning the script. In the alternative, you can execute the command below to correct future client creations and then run it again on each existing client platform substituting the name of the /root/.ovpn client file for client-template.txt and then restart each OpenVPN client.
cd /etc/openvpn
sed -i 's|tls-client|tls-client\\npull-filter ignore "redirect-gateway"|' client-template.txt
Creating OpenVPN Client Templates
In order to assign different private IP addresses to each of your OpenVPN client machines, you’ll need to create a separate client template for each computer. You do this by running /root/openvpn-install.sh again on the OpenVPN server. Choose option 1 to create a new .ovpn template. Give each client machine template a unique name and do NOT require a password for the template. Unless the client machine is running Windows, edit the new .ovpn template and comment out the setenv line: #setenv. Save the file and copy it to the /root folder of the client machine. Follow the instructions below to set up OpenVPN on the client machine and before starting up OpenVPN replace firstclient.ovpn in the command line with the name of .ovpn you created for the individual machine.

Renewing OpenVPN Server’s Expired Certificate
The server certificate will expire after 1080 days, and clients will no longer be able to connect. Here’s what to do next:
systemctl stop openvpn@server.service
cd /etc/openvpn/easy-rsa
./easyrsa gen-crl
cp /etc/openvpn/easy-rsa/pki/crl.pem /etc/openvpn/crl.pem
systemctl start openvpn@server.service
Installing an OpenVPN Client on CentOS/RHEL
cd /root
yum -y install epel-release
yum --enablerepo=epel install openvpn -y
# copy /root/firstclient.ovpn from server to client /root
# and then start up the VPN client
openvpn --config /root/firstclient.ovpn --daemon
# adjust Incredible PBX 13-13 firewall below
iptables -A INPUT -s 10.8.0.0/24 -j ACCEPT
cd /usr/local/sbin
echo "iptables -A INPUT -s 10.8.0.0/24 -j ACCEPT" >> iptables-custom
Running ifconfig should now show the VPN client in the list of network ports:
tun0 Link encap:UNSPEC  HWaddr 00-00-00-00-00-00-00-00-00-00-00-00-00-00-00-00
     inet addr:10.8.0.2  P-t-P:10.8.0.2  Mask:255.255.255.0
     UP POINTOPOINT RUNNING NOARP MULTICAST  MTU:1500  Metric:1
     RX packets:9 errors:0 dropped:0 overruns:0 frame:0
     TX packets:39 errors:0 dropped:0 overruns:0 carrier:0
     collisions:0 txqueuelen:100
     RX bytes:855 (855.0 b)  TX bytes:17254 (16.8 KiB)
And you should be able to login to the VPN server using its VPN IP address:
# enter actual SSH port replacing 1234
PORT=1234
ssh -p $PORT root@10.8.0.1
Installing an OpenVPN Client on Ubuntu 18.04.2
cd /root
apt-get update
apt-get install openvpn unzip
dpkg-reconfigure tzdata
# copy /root/firstclient.ovpn from server to client /root
# and then start up the VPN client
openvpn --config /root/firstclient.ovpn --daemon
# adjust Incredible PBX 13-13 firewall below
iptables -A INPUT -s 10.8.0.0/24 -j ACCEPT
cd /usr/local/sbin
echo "iptables -A INPUT -s 10.8.0.0/24 -j ACCEPT" >> iptables-custom
Running ifconfig should now show the VPN client in the list of network ports:
tun0 Link encap:UNSPEC  HWaddr 00-00-00-00-00-00-00-00-00-00-00-00-00-00-00-00
     inet addr:10.8.0.2  P-t-P:10.8.0.2  Mask:255.255.255.0
     UP POINTOPOINT RUNNING NOARP MULTICAST  MTU:1500  Metric:1
     RX packets:9 errors:0 dropped:0 overruns:0 frame:0
     TX packets:39 errors:0 dropped:0 overruns:0 carrier:0
     collisions:0 txqueuelen:100
     RX bytes:855 (855.0 b)  TX bytes:17254 (16.8 KiB)
And you should be able to login to the VPN server using its VPN IP address:
# enter actual SSH port replacing 1234
PORT=1234
ssh -p $PORT root@10.8.0.1
Installing an OpenVPN Client on Raspbian
Good news and bad news. First the bad news. Today’s OpenVPN server won’t work because of numerous unavailable encryption modules on the Raspberry Pi side. The good news is that NeoRouter is a perfect fit with Raspbian, and our upcoming article will show you how to securely interconnect a Raspberry Pi with any Asterisk server in the world… at no cost.
04/16 Update: We now have OpenVPN working with Incredible PBX for the Raspberry Pi. The trick is that you’ll need to build the latest version of OpenVPN from source before beginning the client install. Here’s how. Login to your Raspberry Pi as root and issue these commands:
apt-get remove openvpn
apt-get update
apt-get install libssl-dev liblzo2-dev libpam0g-dev build-essential -y
cd /usr/src
wget https://swupdate.openvpn.org/community/releases/openvpn-2.4.7.tar.gz
tar zxvf openvpn-2.4.7.tar.gz
cd openvpn-2.4.7
./configure --prefix=/usr
make
make install
openvpn --version
Now you should be ready to install a client config file, start up OpenVPN, and adjust firewall:
cd /root
dpkg-reconfigure tzdata
# copy /root/firstclient.ovpn from server to client /root
# and then start up the VPN client
openvpn --config /root/firstclient.ovpn --daemon
# adjust Incredible PBX 13-13 firewall below
iptables -A INPUT -s 10.8.0.0/24 -j ACCEPT
cd /usr/local/sbin
echo "iptables -A INPUT -s 10.8.0.0/24 -j ACCEPT" >> iptables-custom
Installing an OpenVPN Client on a Mac
While there are numerous OpenVPN clients for Mac OS X, none hold a candle to Tunnelblick in terms of ease of installation and use. First, create a new client config on your server and copy it (/root/*.ovpn) to a folder on your Mac where you can find it. Download Tunnelblick and install it. Run Tunnelblick and then open Finder. Click and drag your client config file to the Tunnelblick icon in the top toolbar. Choose Connect when prompted. Done.
Installing an OpenVPN Client for Windows 10
The installation procedure for Windows is similar to the Mac procedure above. Download the OpenVPN Client for Windows. Double-click on the downloaded file to install it. Create a new client config on your server and copy it (/root/*.ovpn) to a folder on your PC where you can find it. Start up the OpenVPN client and click on the OpenVPN client in the activity tray. Choose Import File and select the config file you downloaded from your OpenVPN Server. Right-click on the OpenVPN icon again and choose Connect. Done.
Installing an OpenVPN Client for Android
Our favorite OpenVPN client for Android is called OpenVPN for Android and is available in the Google Play Store. Download and install it as you would any other Android app. Upload a client config file from your OpenVPN server to your Google Drive. Run the app and click + to install a new profile. Navigate to your Google Drive and select the config file you uploaded.
Installing an OpenVPN Client for iOS Devices
The OpenVPN Connect client for iOS is available in the App Store. Download and install it as you would any other iOS app. Before uploading a client config file, open the OpenVPN Connect app and click the 4-bar Settings icon in the upper left corner of the screen. Click Settings and change the VPN Protocol to UDP and IPv6 to IPV4-ONLY Tunnel. Accept remaining defaults.
To upload a client config file, the easiest way is to use Gmail to send yourself an email with the config file as an attachment. Open the message with the Gmail app on your iPhone or iPad and click on the attachment. Then choose the Upload icon in the upper right corner of the dialog. Next, choose Copy to OpenVPN in the list of apps displayed. When the import listing displays in OpenVPN Connect, click Add to import the new profile. Click ADD again when the Profile has been successfully imported. You’ll be prompted for permission to Add VPN Configurations. Click Allow. Enter your iOS passcode when prompted. To connect, tap once on the OpenVPN Profile. To disconnect, tap on the Connected slider. When you reopen the OpenVPN Connect app, the OVPN Profiles menu will display by default. Simply tap once on your profile to connect thereafter.
Installing a Web Interface to Display Available Clients
One advantage of NeoRouter is a simple way for any VPN client to display a listing of all VPN clients that are online at any given time. While that’s not possible with OpenVPN, we can do the next best thing and create a simple web page that can be accessed using a browser but only from a connected OpenVPN client pointing to http://10.8.0.1.
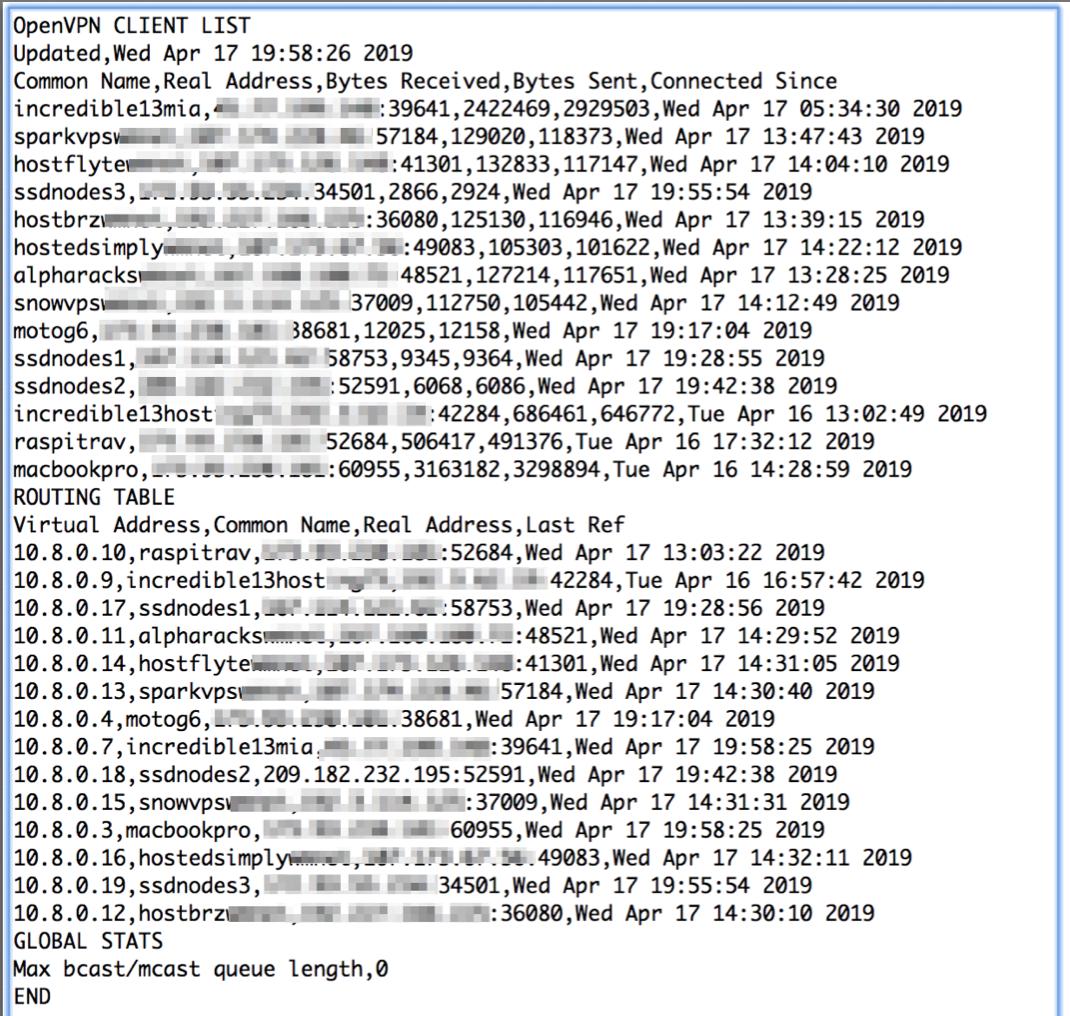
To set this up, log in to your OpenVPN server as root and issue the following commands:
yum --enablerepo=epel install lighttpd -y
systemctl start lighttpd.service
systemctl enable lighttpd.service
chown root:lighttpd /var/log/openvpn/status.log
chmod 640 /var/log/openvpn/status.log
cd /var/www
rm -rf lighttpd
wget http://incrediblepbx.com/lighttpd.tar.gz
tar zxvf lighttpd.tar.gz
ln -s /var/log/openvpn/status.log /var/www/lighttpd/status.log
sed -i 's|#server.bind = "localhost"|server.bind = "10.8.0.1"|' /etc/lighttpd/lighttpd.conf
systemctl restart lighttpd.service
Latest VPN Security Alerts
https://nakedsecurity.sophos.com/2019/04/16/security-weakness-in-popular-vpn-clients/
Originally published: Monday, April 15, 2019 Updated: Saturday, February 29, 2020
Need help with Asterisk? Visit the VoIP-info Forum.
Special Thanks to Our Generous Sponsors
FULL DISCLOSURE: ClearlyIP, Skyetel, Vitelity, DigitalOcean, Vultr, VoIP.ms, 3CX, Sangoma, TelecomsXchange and VitalPBX have provided financial support to Nerd Vittles and our open source projects through advertising, referral revenue, and/or merchandise. As an Amazon Associate and Best Buy Affiliate, we also earn from qualifying purchases. We’ve chosen these providers not the other way around. Our decisions are based upon their corporate reputation and the quality of their offerings and pricing. Our recommendations regarding technology are reached without regard to financial compensation except in situations in which comparable products at comparable pricing are available from multiple sources. In this limited case, we support our sponsors because our sponsors support us.
BOGO Bonaza: Enjoy state-of-the-art VoIP service with a $10 credit and half-price SIP service on up to $500 of Skyetel trunking with free number porting when you fund your Skyetel account. No limits on number of simultaneous calls. Quadruple data center redundancy. $25 monthly minimum spend required. Tutorial and sign up details are here.
![]() The lynchpin of Incredible PBX 2020 and beyond is ClearlyIP components which bring management of FreePBX modules and SIP phone integration to a level never before available with any other Asterisk distribution. And now you can configure and reconfigure your new Incredible PBX phones from the convenience of the Incredible PBX GUI.
The lynchpin of Incredible PBX 2020 and beyond is ClearlyIP components which bring management of FreePBX modules and SIP phone integration to a level never before available with any other Asterisk distribution. And now you can configure and reconfigure your new Incredible PBX phones from the convenience of the Incredible PBX GUI.
VitalPBX is perhaps the fastest-growing PBX offering based upon Asterisk with an installed presence in more than 100 countries worldwide. VitalPBX has generously provided a customized White Label version of Incredible PBX tailored for use with all Incredible PBX and VitalPBX custom applications. Follow this link for a free test drive!
Special Thanks to Vitelity. Vitelity is now Voyant Communications and has halted new registrations for the time being. Our special thanks to Vitelity for their unwavering financial support over many years and to the many Nerd Vittles readers who continue to enjoy the benefits of their service offerings. We will keep everyone posted on further developments.

- Our discussion today is focused on the free, MIT-licensed version of OpenVPN. For details on their commercial offerings, follow this link. [↩]
Finding Utopia: In Search of the Perfect VoIP Server Platform

Over the past decade, there is no subject that we have devoted more resources to than searching for the best platform on which to run a VoIP server. While our experience primarily has focused on finding the perfect fit for Incredible PBX®, much of what follows applies equally to any other Linux-based VoIP server including Wazo, Issabel, VitalPBX, and 3CX. Today we’d like to share what we’ve learned. Incredible PBX is a complex application. With close to a thousand moving parts, it requires major computing resources to support not only Asterisk® and FreePBX® but also an Apache web server, a MySQL database server, a SendMail server, a HylaFax server, and a Linux firewall with both IPtables and Fail2Ban.
Let’s begin by ticking off the platforms that Incredible PBX currently supports. These include stand-alone dedicated hardware from beefy Dell servers to the Intel NUC and Raspberry Pi. Then there are the virtual machine platforms including VirtualBox, VMware ESXi, and Proxmox. In the Cloud space we’ve covered the stratosphere from the high end with $25/month Google Cloud and Amazon EC2 instances to the dedicated $15/month VoIP platform with RentPBX to the $5/month KVM platforms including Digital Ocean and Vultr to the $2.25/month OVH KVM offering to the $1/month OpenVZ providers including HostedSimply, HostFlyte, Hosting73, HostBRZ, SnowVPS, and AlphaRacks. Have there been some train wrecks along the way? Absolutely. Just search the PIAF Forum for the threads on CloudAtCost, WootHosting, and HiFormance for the war stories and our battle scars. We would be remiss if we didn’t thank the dozens of PIAF Forum volunteers who have endured years of suffering at the hands of some of these providers to make today’s article possible.
So what have we learned? Unless you’re building a VoIP platform as a tinkerer to support just your family, there is zero reason to choose dedicated hardware. And, for home use, with the availability of the $35 Raspberry Pi 3B+, buying a beefier piece of hardware to host your VoIP platform makes no sense. Not only will it be considerably more expensive both to purchase and to operate, but the performance of your VoIP server will be indistinguishable from what you’d see using a Raspberry Pi 3B+. Exhibit A is our $125 RasPi WiFi setup for traveling.![]()
The downsides of dedicated hardware are numerous. In addition to the expense of the platform itself and the monthly cost of electricity, there also are other challenges. First, outages from most Internet service providers are frequent occurrences of unpredictable duration. Second, ISPs typically provide a dynamic IP address which is not a good fit for VoIP platforms that rely upon your IP address to reliably make and receive VoIP calls. Third, making backups using dedicated hardware is typically more expensive and less frequent than performing similar tasks with a cloud-based server. Recovery is easy with a spare SD card.![]()
The virtual machine platforms certainly have their place in the corporate world. And, if your company already has a server farm full of VMware servers, then taking advantage of that platform to host your PBX makes perfect sense. Performance will probably never be an issue, and you’ll avoid the task of babysitting the hardware leaving that to a staff of dedicated employees. And, hopefully, someone else is making frequent backups of your VoIP server. For home users that already have a beefy desktop machine, a VirtualBox-based PBX is certainly an option worth considering although it again puts you in the driver’s seat of dealing with backups, Internet outages, and performance hiccups when your desktop machine is being used for tasks that consume substantial computing resources.

If you haven’t already guessed, our recommended VoIP platform will almost always be cloud-based. Not only does it offload most server and network management headaches, but more often than not, it’s a more dependable platform with better performance at a comparable or less expensive cost than using your own hardware. So here’s the Golden Nugget of our findings. When it comes to cloud providers, you can forget the old adage that you get what you pay for. You don’t. Our experience suggests it’s just the opposite when it comes to running a VoIP server. With cloud providers, what you typically get by paying more is an improvement in the odds that your provider will still be around when next year rolls around. Getting over that hurdle is simple. Make frequent backups. If there are a multitude of available providers offering similar services, backups are the best insurance you can have, and they cost you almost nothing. In fact, Incredible Backup handles the task with ease AND reliability. Once you get past the vendor longevity issue, the only things that really matter with a cloud platform are stability and performance. While the high-end providers certainly deliver stability, our experience suggests their performance is nothing short of abysmal unless you’re willing to pay through the nose. By way of example, our experimental Google Cloud server running as a $25/month Standard VPS instance with zero daily calls still receives regular alerts from Google recommending that the instance be upgraded to the next pricing tier which starts at $48.95/month. Performance-wise, our subjective comparison of the $25/month Google Cloud instance is virtually identical to what we are seeing on a stand-alone $35 Raspberry Pi. As a VoIP server platform, the so-called free tier with Google Cloud that provides 600K of RAM and a shared virtual CPU is laughable, and that’s being charitable.

We haven’t spent a lot of time using Amazon EC2 in the past couple years primarily because their platform was even more expensive than Google’s. But, if money is no object, it’s certainly a hosting platform worth exploring. For most VoIP applications, it doesn’t make good financial sense.
That narrows our search for the perfect VoIP platform down to two categories: the KVM and OpenVZ platforms. As a general rule of thumb, with a given provider’s offerings you can expect performance to be comparable but you typically will pay at least double for a KVM platform as opposed to an OpenVZ platform with similar RAM, storage, and bandwidth. In a nutshell, KVM servers provide your virtual machine with its own Linux kernel while OpenVZ servers share a kernel over which you have no control. If you run a VoIP application that requires kernel access, this matters. If you plan to expose your server to the public Internet, the KVM option also is desirable because it allows you to run ipset in conjunction with the Linux firewall to block entire countries from accessing your server. In the case of Incredible PBX servers which rely upon a firewall limiting access to whitelisted IP addresses, there is little reason to choose the KVM platform based solely upon performance or security.
The elephant in the room with providers below the Google and Amazon tier is reliability. In the case of Digital Ocean and Vultr, they both have been around for many years now with excellent ratings in virtually every category. Both provide financial support for our open source projects through referral revenue, but we’d use them anyway. The virtual machine pricing from the two companies is almost identical. Except for extremely busy VoIP implementations, their 1GB RAM offering has proven to be a perfect choice at $5 a month. If you don’t mind paying by the year, you can’t beat OVH’s current $2.25/month KVM offering with 2GB RAM and 20GB SSD. They, too, have been around for years. At one time or another, OVH hosted much of 3CX’s cloud infrastructure. All offer scaling options to meet even the most demanding requirements. On the D.O. and Vultr platforms, you can add automatic backups for an additional $1 a month (20% surcharge) which is dirt cheap insurance. We have run both Incredible PBX and 3CX servers on all of these platforms with no outages or other issues… and weekly backups. Both Digital Ocean and Vultr also provide excellent web tools to manage your server, and the chance of any of these providers going out of business is extremely remote. We highly recommend all of them.
FULL DISCLOSURE: We have no business relationship with OVH or any of the following VPS providers and receive no referral commissions of any kind from any of them.
For some users and especially those that just want to learn about VoIP and tinker, there is yet another tier of providers. At roughly $1/month, their VPS services are a fraction of the cost of Digital Ocean and Vultr, but backups become your responsibility and at least one previous provider that many of us used went out of business. Those without a backup lost everything.

Choosing one of these providers comes down to balancing the risks versus the financial savings. We have nearly a dozen of these $1/month servers in operation all across the United States. While the VPS providers are different, almost all of the servers are hosted by ColoCrossing in Los Angeles, New York, Chicago, Dallas, or Atlanta. These VPS providers typically rent machines directly from ColoCrossing, and the performance of their VPS offerings varies depending upon the number of users each provider authorizes on each server. Some are obviously more greedy than others. And we’ve actually done the hard work of finding the reliable ones while rejecting at least as many that proved to be pretty awful.
Server locations and special signup details for these VPS providers are documented in our previous article. Average cost is about $1/month on an annual contract with a 1Gbit port or *free 1Gbit port upgrade on request based upon LowEndBox offer. All offer money-back guarantees for at least 24 hours so you can do your own testing if you hurry. Protect yourself by paying with PayPal which gives you 6 months to dispute a charge if the provider happens to go belly up. NOTE: The sort order below reflects our subjective performance evaluation.
| Provider | RAM | Disk | Bandwidth | Performance as of 12/1/19 | Cost |
|---|---|---|---|---|---|
| CrownCloud KVM (LA) | 1GB | 20GB + Snapshot | 1TB/month | 598Mb/DN 281Mb/UP 2CPU Core | $25/year Best Buy! |
| Naranjatech KVM (The Netherlands) | 1GB | 20GB | 1TB/month | Hosting since 2005 VAT: EU res. | 20€/year w/code: SBF2019 |
| BudgetNode KVM (LA) | 1GB | 40GB RAID10 | 1TB/month | Also available in U.K PM @Ishaq on LET before payment | $24/year |
| FreeRangeCloud KVM (Ashburn VA, Winnipeg, Freemont CA) | 1GB | 20GB SSD | 3TB/month | Pick EGG loc'n Open ticket for last 5GB SSD | $30/year w/code: LEBEGG30 |
Do we recommend these providers? Absolutely, with a couple of caveats. First, there is no guarantee that one or more of them may not go out of business at some point. The odds of several of them going under at the same time are fairly slim since none are related that we’re aware of. Second, make frequent backups when you make changes to your PBX and copy the Incredible Backups to a different location. Third, bring up a second VPS platform in a different location and keep it current with your latest backup. You could bring up all six of these platforms for roughly the same monthly cost as one Digital Ocean or Vultr virtual machine that’s running with automatic backups. If you can’t afford a second $1/month VPS platform, then at least create a matching VirtualBox platform, restore your backup, and make sure it is functional before deploying your VPS in the Cloud. It’s in your hands now. Enjoy!
Originally published: Monday, April 8, 2019
Need help with Asterisk? Visit the VoIP-info Forum.
Special Thanks to Our Generous Sponsors
FULL DISCLOSURE: ClearlyIP, Skyetel, Vitelity, DigitalOcean, Vultr, VoIP.ms, 3CX, Sangoma, TelecomsXchange and VitalPBX have provided financial support to Nerd Vittles and our open source projects through advertising, referral revenue, and/or merchandise. As an Amazon Associate and Best Buy Affiliate, we also earn from qualifying purchases. We’ve chosen these providers not the other way around. Our decisions are based upon their corporate reputation and the quality of their offerings and pricing. Our recommendations regarding technology are reached without regard to financial compensation except in situations in which comparable products at comparable pricing are available from multiple sources. In this limited case, we support our sponsors because our sponsors support us.
BOGO Bonaza: Enjoy state-of-the-art VoIP service with a $10 credit and half-price SIP service on up to $500 of Skyetel trunking with free number porting when you fund your Skyetel account. No limits on number of simultaneous calls. Quadruple data center redundancy. $25 monthly minimum spend required. Tutorial and sign up details are here.
![]() The lynchpin of Incredible PBX 2020 and beyond is ClearlyIP components which bring management of FreePBX modules and SIP phone integration to a level never before available with any other Asterisk distribution. And now you can configure and reconfigure your new Incredible PBX phones from the convenience of the Incredible PBX GUI.
The lynchpin of Incredible PBX 2020 and beyond is ClearlyIP components which bring management of FreePBX modules and SIP phone integration to a level never before available with any other Asterisk distribution. And now you can configure and reconfigure your new Incredible PBX phones from the convenience of the Incredible PBX GUI.
VitalPBX is perhaps the fastest-growing PBX offering based upon Asterisk with an installed presence in more than 100 countries worldwide. VitalPBX has generously provided a customized White Label version of Incredible PBX tailored for use with all Incredible PBX and VitalPBX custom applications. Follow this link for a free test drive!
Special Thanks to Vitelity. Vitelity is now Voyant Communications and has halted new registrations for the time being. Our special thanks to Vitelity for their unwavering financial support over many years and to the many Nerd Vittles readers who continue to enjoy the benefits of their service offerings. We will keep everyone posted on further developments.
A Better Way to Deploy Incredible PBX in the Google Cloud

Last week we introduced you to Incredible PBX 13-13.10 for the Google Cloud. This week we’ll take off the training wheels and show you how to deploy Incredible PBX in the Google Cloud in exactly 3 minutes using Google Cloud’s Image repository. And you can repeat the drill to deploy as many PBXs as you like at 3 minutes a pop. If you’re still cruising along on your $300 credit from Google, then your PBX should be cost-free for the entire first year. After that, you can decide which Google Cloud Machine Type best meets your requirements and those of your wallet. The free tier is an option, but don’t expect much more performance-wise than what you’d get with the original Raspberry Pi. As the saying goes, "It ain’t pretty, but it works." We would encourage you to move up to the Standard machine type for consistent performance.
Before we get started, let us just offer a little constructive criticism regarding Google’s methodology. If a developer builds an application as we have and wants to make it publicly available at no cost, wouldn’t it make sense to allow the developer to host the image in the Google Cloud (for a fee) so that other users could quickly deploy it on their own Google Cloud platforms? That apparently makes too much sense so Google requires you to jump through all sorts of hoops to use free software unless we’re willing to type in the Google email address of every user authorized to deploy the software. Sorry but we’ve got better ways to waste our time. This is the corporate mentality run amuck. Don’t Be Evil, Google. Remember?
So here’s the drill to get you to the place that Google already should have provided. Download the 3GB tarball image to your desktop from SourceForge. After you’ve created your Google Cloud account, create a Bucket (storage locker) on the platform to house your files and upload the tarball into your own Bucket. Next, transform the tarball into what Google calls an Image that can be used to quickly build VM Instances (5 minutes). Finally, start up the instance. The Incredible PBX installer will work its magic letting you set your passwords, and then your PBX platform is ready for use (3 minutes). The real install time is under 10 minutes, but Google has managed to turn it into a project of an hour or more depending upon the speed of your Internet connection. Our apologies, but it beats the tedium of last week’s methodology.
Downloading Incredible PBX for the Google Cloud
Unlike Google and to its eternal credit, SourceForge still hosts open source projects with tarballs of enormous size which can be downloaded at no cost other than what your Internet service provider may charge for bandwidth. Begin your Incredible PBX adventure by downloading the tarball image (3GB) which was designed specifically for the Google Cloud. Depending upon the speed of your Internet connection, this takes some time. Here’s the link.
Creating a Google Cloud Account
If you haven’t already done so, hop over to https://cloud.google.com/free and claim your $300 credit by signing up for a Google Cloud account.
Creating a Bucket in the Google Cloud
To begin, log in to your Google Cloud Console using your Google credentials. If you haven’t already done so, Create a Project from your Dashboard. This Project will house your Compute Engine VM Instances. In Plain English, a Google Cloud VM Instance is nothing more than an application that happens to run in the Google Cloud.
Next, click on the 3-bar image ![]() in the upper left corner of your Dashboard. This exposes the Navigation Menu. Scroll down to the STORAGE section and choose Storage -> Browser.
in the upper left corner of your Dashboard. This exposes the Navigation Menu. Scroll down to the STORAGE section and choose Storage -> Browser.
Click on the CREATE BUCKET button. When the dialog window opens, Name your bucket something unique and creative in lower case letters. Fill in the rest of the form as shown and choose the Region in which you want to store your stuff. Then click Create.
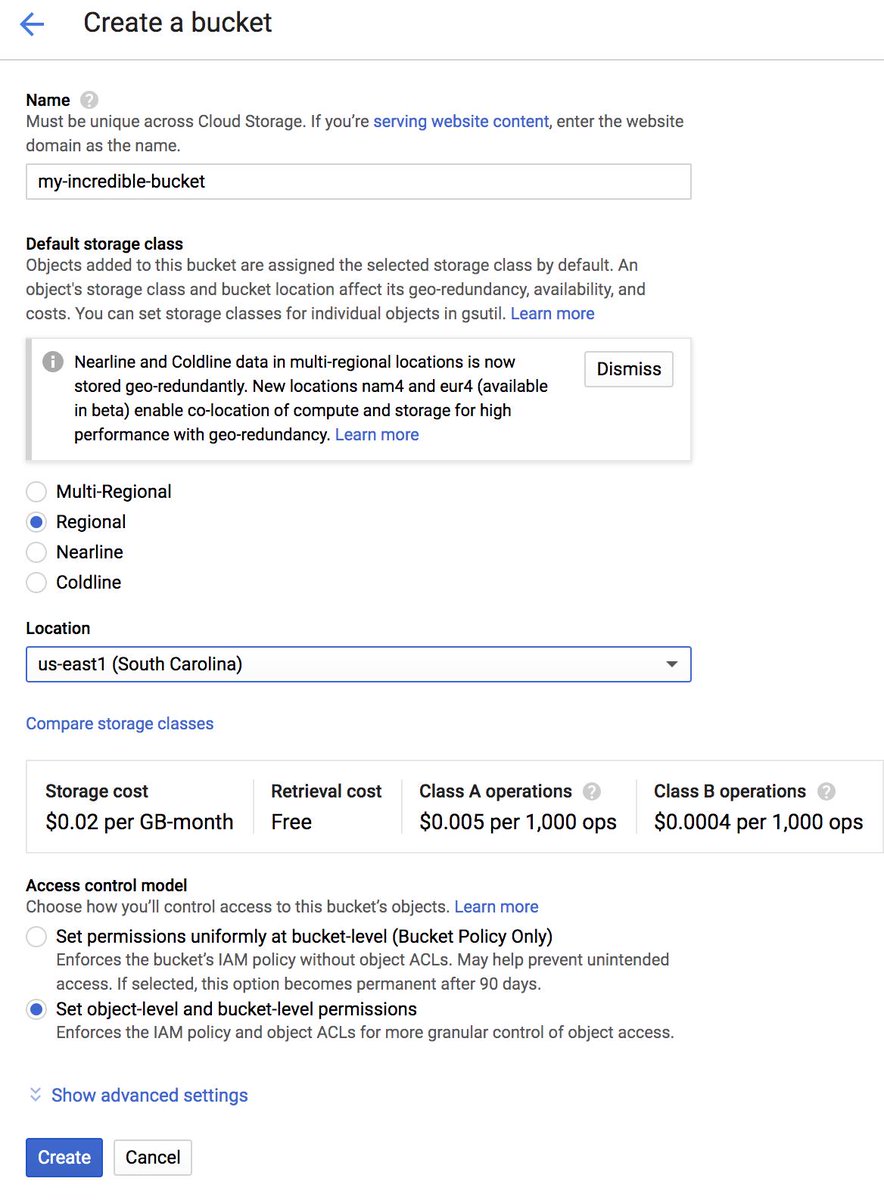
Uploading Incredible PBX into Google Cloud Bucket
Once you have created your Bucket, the Bucket Details dialog will open. Click on the Upload Files tab and choose the Incredible PBX tarball that you downloaded from SourceForge. Or you can simply drag the file to the area reserved for uploads in the dialog window.
Once the file upload completes, the Browser window will appear displaying your Bucket. You can click on the Bucket name to display the files in your Bucket which should now include the uploaded Incredible PBX tarball:
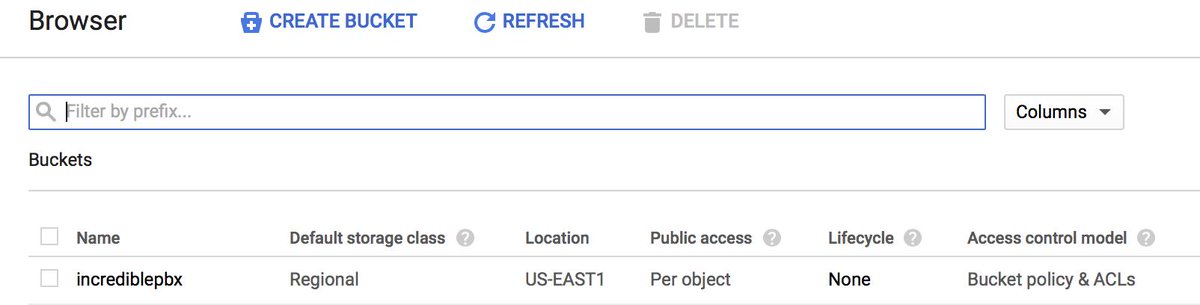
Transforming Incredible PBX Tarball into an Image
Google Cloud can create Instances from Images, but not from tarballs in your Bucket. So the next step is to create an Image from the Incredible PBX tarball. Once that is done, you can delete the tarball and bucket from your Google Cloud platform so you don’t have to pay monthly storage fees. Up to this step is where Google could have handled setup transparently by simply allowing us to share our bucket with anonymous users without this knuckle drill, but…
So now we need to create an Image which will transform the Incredible PBX tarball into a format that can be used to create Instances.
Click on the Navigation Menu ![]() (the 3-bar image in the upper left corner of your Dashboard). Navigate to COMPUTE -> Compute Engine -> Images. Click CREATE IMAGE.
(the 3-bar image in the upper left corner of your Dashboard). Navigate to COMPUTE -> Compute Engine -> Images. Click CREATE IMAGE.
When the Create Image dialog opens, fill in the form as shown below and click on the Browse button to choose the Incredible PBX tarball from your Bucket. Then click Create.
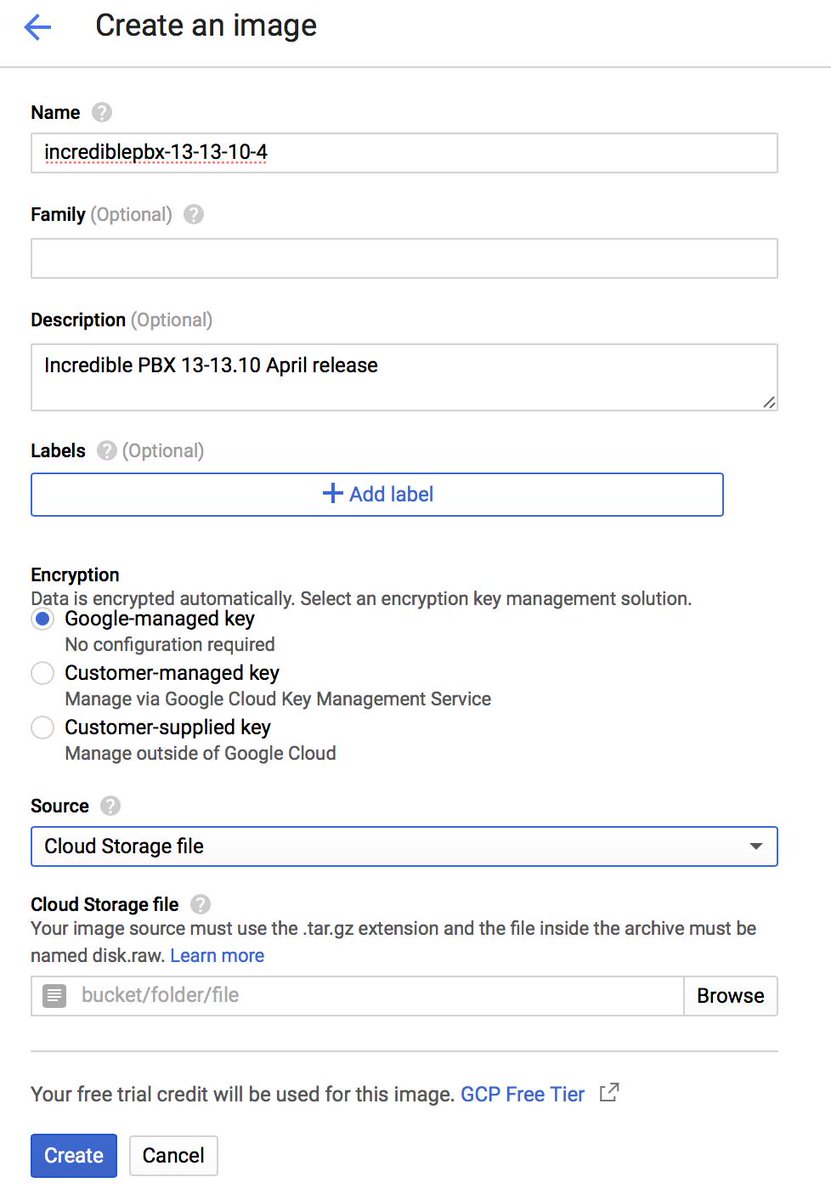
Creating an Instance from a Cloud Image
It takes about 5 minutes for Google Cloud to transmogrify the Incredible PBX tarball into an Image that can actually be used to create Instances. So be patient. Once your image has been created, it will appear at the top of the Images listing.
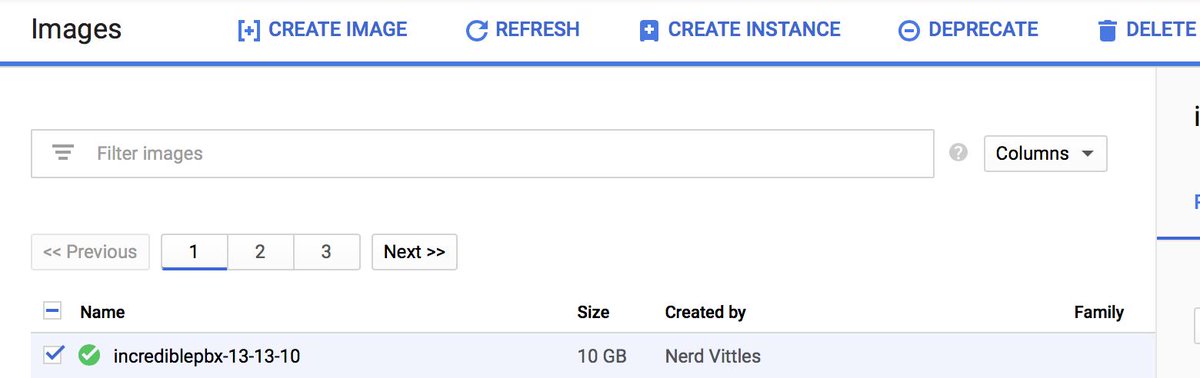
Click on the checkbox ![]() to the left of the Image to select it as shown above. Then click CREATE INSTANCE at the top of the form.
to the left of the Image to select it as shown above. Then click CREATE INSTANCE at the top of the form.
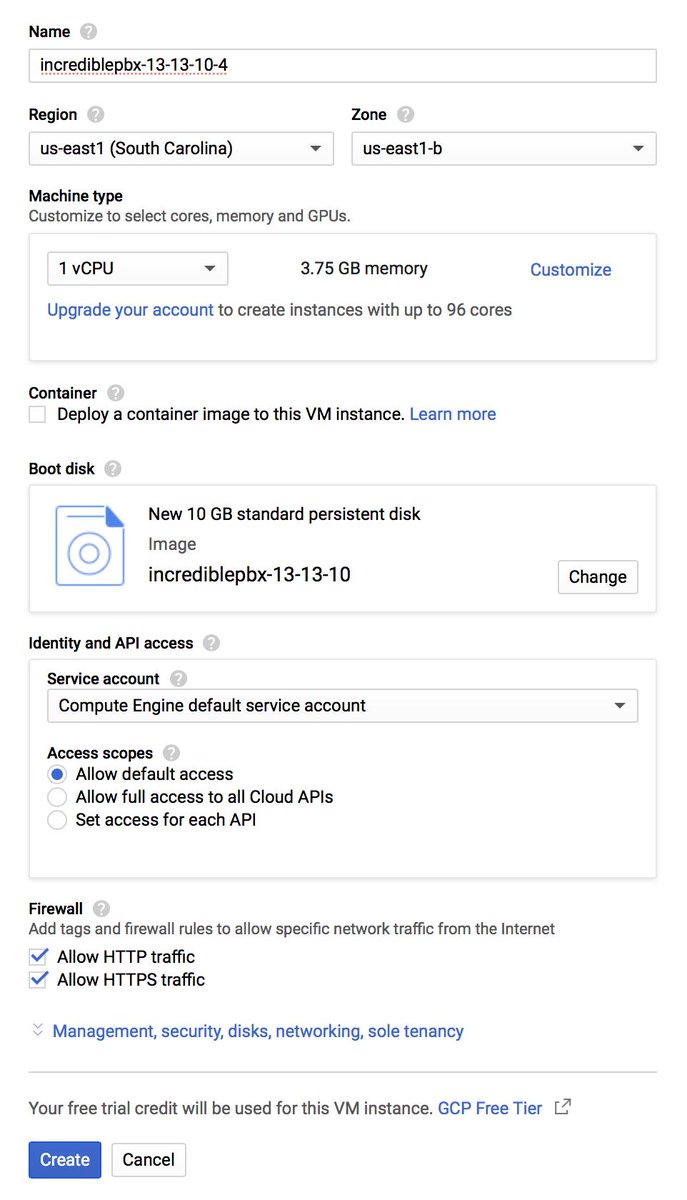
The Create Instance dialog window will appear. Fill in the form as shown above using a unique Name for your Instance. Adjust the Region to match your closest location. This choice may also affect the performance of your instance so picking the default is not a good idea if you want to stick with the freebie platform. Note that the Standard Machine Type (1vCPU) is selected by default. If you still have remaining credits, this won’t be a problem. Otherwise, you’ll have to pay about $25/month for this Machine Type level once your credits expire. We’ve had fair to good results using the Small Machine Type which costs under $15/month.
HINT #1: Never use the default zone for your PBX if you plan to use one of the shared vCPU machine types (micro or small). If you prefer the freebie which we strongly discourage because of performance issues, change the Machine Type to micro in the pull-down. Also note that the Boot Disk defaults to 10GB in size. This won’t work for long, and we’d recommend upping it to at least 20GB. Up to 30GB is provided at no cost using the micro Machine Type. Simply click the Change button to adjust the disk size. Once you’ve made your desired changes, click Create to build the Incredible PBX instance and bring it on line.
HINT #2: If you’re not going to move up to at least the small Machine Type, we would strongly urge you try one of our recommended $1/month VPS providers, all of whom offer considerably better performance at much less cost. In fact, you can bring up a redundant platform with a second VPS provider and still spend about the same money for a year that you would spend with a Google Cloud Standard VPS for one month.
While your Instance is being created and activated, navigate ![]() to COMPUTE -> Compute Engine -> VM Instances to display the status of your instances and to decipher the public IP address of your server. After you complete the next section, we’ll make a couple additional modifications using the Google Cloud Console by changing your public IP address from ephemeral (dynamic) to static and and adjusting the Google Cloud firewall. Delay making these changes at this time for the reason covered in the Word of Caution which follows.
to COMPUTE -> Compute Engine -> VM Instances to display the status of your instances and to decipher the public IP address of your server. After you complete the next section, we’ll make a couple additional modifications using the Google Cloud Console by changing your public IP address from ephemeral (dynamic) to static and and adjusting the Google Cloud firewall. Delay making these changes at this time for the reason covered in the Word of Caution which follows.
A Word of Caution: Incredible PBX for the Google Cloud installs with a default root password of ![]() That obviously makes your running instance susceptible to compromise if someone else reads this article. So IMMEDIATELY after creating and activating a new Incredible PBX instance, make sure you complete the setup process in the next step during which you will be prompted to reset all of your passwords including the root password.
That obviously makes your running instance susceptible to compromise if someone else reads this article. So IMMEDIATELY after creating and activating a new Incredible PBX instance, make sure you complete the setup process in the next step during which you will be prompted to reset all of your passwords including the root password.
Completing the Incredible PBX Setup Process
Login to Incredible PBX as root using the default password at the public IP address of your instance using SSH or Putty. The Incredible PBX license agreement should display. If not, your server may have already been compromised. Accept the license agreement and enter very secure passwords for your server when prompted. Once the setup process finishes, reboot your server and wait about a minute for the reboot process to finish. Then log back into your server and allow the Automatic Update Utility to bring your server up to current specs. Once the pbxstatus screen displays, make sure everything is up and running. If not, wait another minute and rerun pbxstatus. Now issue the command user and make certain that you are the only root user on your server. If not, or if you didn’t see the license agreement when you first logged in, or if you couldn’t log in with the default root password, immediately shut down and destroy your instance and create a new one from your Google Cloud Image as documented in the previous section. TIP: If you see connection refused when you first attempt to log in, don’t be alarmed. Just count to 60 and try to log in again. The instance has to have time to boot up after activation before you can log in.
Finalizing Your Google Cloud Setup
Now that you’ve completed the Incredible PBX setup process, here are a couple of changes that need to be made using the Google Cloud GUI. First, you’ll need to permanently assign your IP address to your instance so that you don’t risk having Google change it when your server is rebooted. We also need to make a couple adjustments in the Google Cloud Firewall. Login again to the Google Cloud Console using your Google credentials.
From the Navigation Menu ![]() scroll down to the NETWORKING section and choose VPS Network -> External IP Addresses. Change the Type of your existing address to Static and Name it staticip. Next, choose Firewall Rules in the VPS Network section and click CREATE FIREWALL RULE. Fill in the template like the following leaving the other fields with their default entries. Then click CREATE.
scroll down to the NETWORKING section and choose VPS Network -> External IP Addresses. Change the Type of your existing address to Static and Name it staticip. Next, choose Firewall Rules in the VPS Network section and click CREATE FIREWALL RULE. Fill in the template like the following leaving the other fields with their default entries. Then click CREATE.
Name: incrediblepbx-udp Target Tags: udp-in Source IP Range: 0.0.0.0/0 Protocols/Ports:udp: all
If you plan to use HTTPS with your server, you’ll also need to add another firewall rule similar to the existing default-allow-http rule. Simply change the Port to tcp:443 and Name it default-allow-https with a Target Tag of https-in.
CAUTION: Before these firewall rules will be activated for your instance, they also must be specified in the Network Tags section for your instance by adding the udp-in and https-in tags and restarting your instance.
It should be noted that Incredible PBX includes its own Travelin’ Man 3 firewall that manages a whitelist of IP addresses that are allowed ANY access to your server. So we will primarily use the firewall component of the Google Cloud instance to allow sufficient access to Incredible PBX to allow it to actually control server access.
Once you’ve verified that your instance is functioning properly, it’s safe to go back to your Bucket and delete it together with its contents. This will save you having to pay monthly storage fees even though they are quite reasonable.
Getting Started with Incredible PBX
Most of the configuration of your PBX will be performed using the web-based Incredible PBX GUI with its FreePBX® 13 GPL modules. Use a browser pointed to the IP address of your server and choose Incredible PBX Admin. Log in as admin with the password you configured above. HINT: You can always change it if you happen to forget it: /root/admin-pw-change
Configuring Trunks with Incredible PBX
Before you can actually make and receive calls, you’ll need to add one or more VoIP trunks with providers, create extensions for your phones, and add inbound and outbound routes that link your extensions to your trunks. Here’s how a PBX works. Phones connect to extensions. Extensions connect to outbound routes that direct calls to specific trunks, a.k.a. commercial providers that complete your outbound calls to any phone in the world. Coming the other way, incoming calls are directed to your phone number, otherwise known as a DID. DIDs are assigned by providers. Some require trunk registration using credentials handed out by these providers. Others including Skyetel use the IP address of your PBX to make connections. Incoming calls are routed to your DIDs which use inbound routes telling the PBX how to direct the calls internally. A call could go to an extension to ring a phone, or it could go to a group of extensions known as a ring group to ring a group of phones. It could also go to a conference that joins multiple people into a single call. Finally, it could be routed to an IVR or AutoAttendant providing a list of options from which callers could choose by pressing various keys on their phone.
We’ve done most of the prep work for you with Incredible PBX. We’ve set up an Extension to which you can connect a SIP phone or softphone. We’ve set up an Inbound Route that, by default, sends all incoming calls from registered trunks to a Demo IVR. And we’ve built dozens of trunks for some of the best providers in the business. Sign up with the ones you prefer, plug in your credentials, and you’re done.
Unlike traditional telephone service, you need not and probably should not put all your eggs in one basket when it comes to telephone providers. In order to connect to Plain Old Telephones, you still need at least one provider. But there is nothing wrong with having several. And a provider that handles an outbound call (termination) need not be the same one that handles an incoming call (origination) and provides your phone number (DID). Keep in mind that you only pay for the calls you make with each provider so you have little to lose by choosing several. The PIAF Forum also has dozens of recommendations on VoIP providers.
With the preconfigured trunks in Incredible PBX, all you need are your credentials for each provider and the domain name of their server. Log into Incredible PBX GUI Administration as admin using a browser. From the System Status menu, click Connectivity -> Trunks. Click on each provider you have chosen and fill in your credentials including the host entry. Be sure to uncheck the Disable Trunk checkbox! Fill in the appropriate information for the Register String. Save your settings by clicking Submit Changes. Then click the red Apply Config button.

Introducing Skyetel SIP Trunking for Incredible PBX
As frequent visitors already know, Skyetel is a Platinum Sponsor of Nerd Vittles and our open source projects including Incredible PBX. Their financial support keeps the lights on while all of our software remains free for the taking. Today we’re pleased to introduce a special new Skyetel offering for Nerd Vittles readers. If you loved BOGO deals at your favorite grocery store, then you’re going to love this new Skyetel offer which starts today. By signing up through this Nerd Vittles link, Skyetel will match any deposit originally made to your new account up to $250. For example, if you deposit $50, you’ll get $100 of SIP trunking service credit. Deposit $250, and you’ll get $500 of SIP trunking service credit. Basically, it’s half price service, and you get to choose how much you’d like. Skyetel also offers free porting of your DIDs for the first 60 days after you open your account plus a 10% reduction in your current origination rate and DID costs by presenting your last month’s bill.1 Complete details and configuration instructions on the Skyetel service are available in this tutorial. It only takes a minute or two to get up and running. Effective 10/1/2023, $25/month minimum spend at Skyetel is required.
Adding Skyetel Trunks to Incredible PBX
The Skyetel trunks were configured as part of the default install of Incredible PBX. All that’s required on your part is to sign up for Skyetel service to take advantage of the Nerd Vittles special offer. First, complete the Prequalification Form here. You then will be provided a link to the Skyetel site to complete your registration. Once you have registered on the Skyetel site and your account has been activated, open a support ticket and request the BOGO credit for your account by referencing the Nerd Vittles special offer. Greed will get you nowhere. Credit is limited to one per person/company/address/location. If you want to take advantage of the 10% discount on your current service, open another ticket and attach a copy of your last month’s bill. See footnote 1 for the fine print. If you have high call volume requirements, document these in your Prequalification Form, and we will be in touch. Easy Peasy!
Unlike many VoIP providers, Skyetel does not use SIP registrations to make connections to your PBX. Instead, Skyetel utilizes Endpoint Groups to identify which servers can communicate with the Skyetel service. An Endpoint Group consists of a Name, an IP address, a UDP or TCP port for the connection, and a numerical Priority for the group. For incoming calls destined to your PBX, DIDs are associated with an Endpoint Group to route the calls to your PBX. For outgoing calls from your PBX, a matching Endpoint Group is required to authorize outbound calls through the Skyetel network. Thus, the first step in configuring the Skyetel side for use with your PBX is to set up an Endpoint Group. A typical setup for use with Incredible PBX®, Asterisk®, or FreePBX® would look like the following:
- Name: MyPBX
- Priority: 1
- IP Address: PBX-Public-IP-Address
- Port: 5060
- Protocol: UDP
- Description: server1.incrediblepbx.com
To receive incoming PSTN calls, you’ll need at least one DID. On the Skyetel site, you acquire DIDs under the Phone Numbers tab. You have the option of Porting in Existing Numbers (free for the first 60 days after you sign up for service) or purchasing new ones under the Buy Phone Numbers menu option.
Once you have acquired one or more DIDs, navigate to the Local Numbers or Toll Free Numbers tab and specify the desired SIP Format and Endpoint Group for each DID. Add SMS/MMS and E911 support, if desired. Call Forwarding and Failover are also supported. That completes the VoIP setup on the Skyetel side. System Status is always available here.
Configuring a Skyetel Inbound Route
Because there is no SIP registration with Skyetel, incoming calls to Skyetel trunks will NOT be sent to the Default Inbound Route configured on your PBX because FreePBX treats the calls as blocked anonymous calls without an Inbound Route pointing to the 11-digit number of each Skyetel DID. From the GUI, choose Connectivity -> Inbound Routes -> Add Inbound Route. For both the Description and DID fields, enter the 11-digit phone number beginning with a 1. Set the Destination for the incoming DID as desired and click Submit. Reload the Dialplan when prompted. Place a test call to each of your DIDs after configuring the Inbound Routes.
With the included Incredible Fax add-on, you can enable Fax Detection under the Fax tab. And, if you’d like CallerID Name lookups using CallerID Superfecta, you can enable it under the Other tab before saving your setup and reloading your dialplan.
Configuring a Skyetel Outbound Route
If Skyetel will be your primary provider, you can use both 10-digit and 11-digit dialing to process outbound calls through your Skyetel account. It’s preconfigured to support Skyetel in Connectivity -> Outbound Routes -> Add Outbound Route. The recommended setup is shown below. Just add the CallerID Number you wish to associate with your outbound calls through Skyetel:
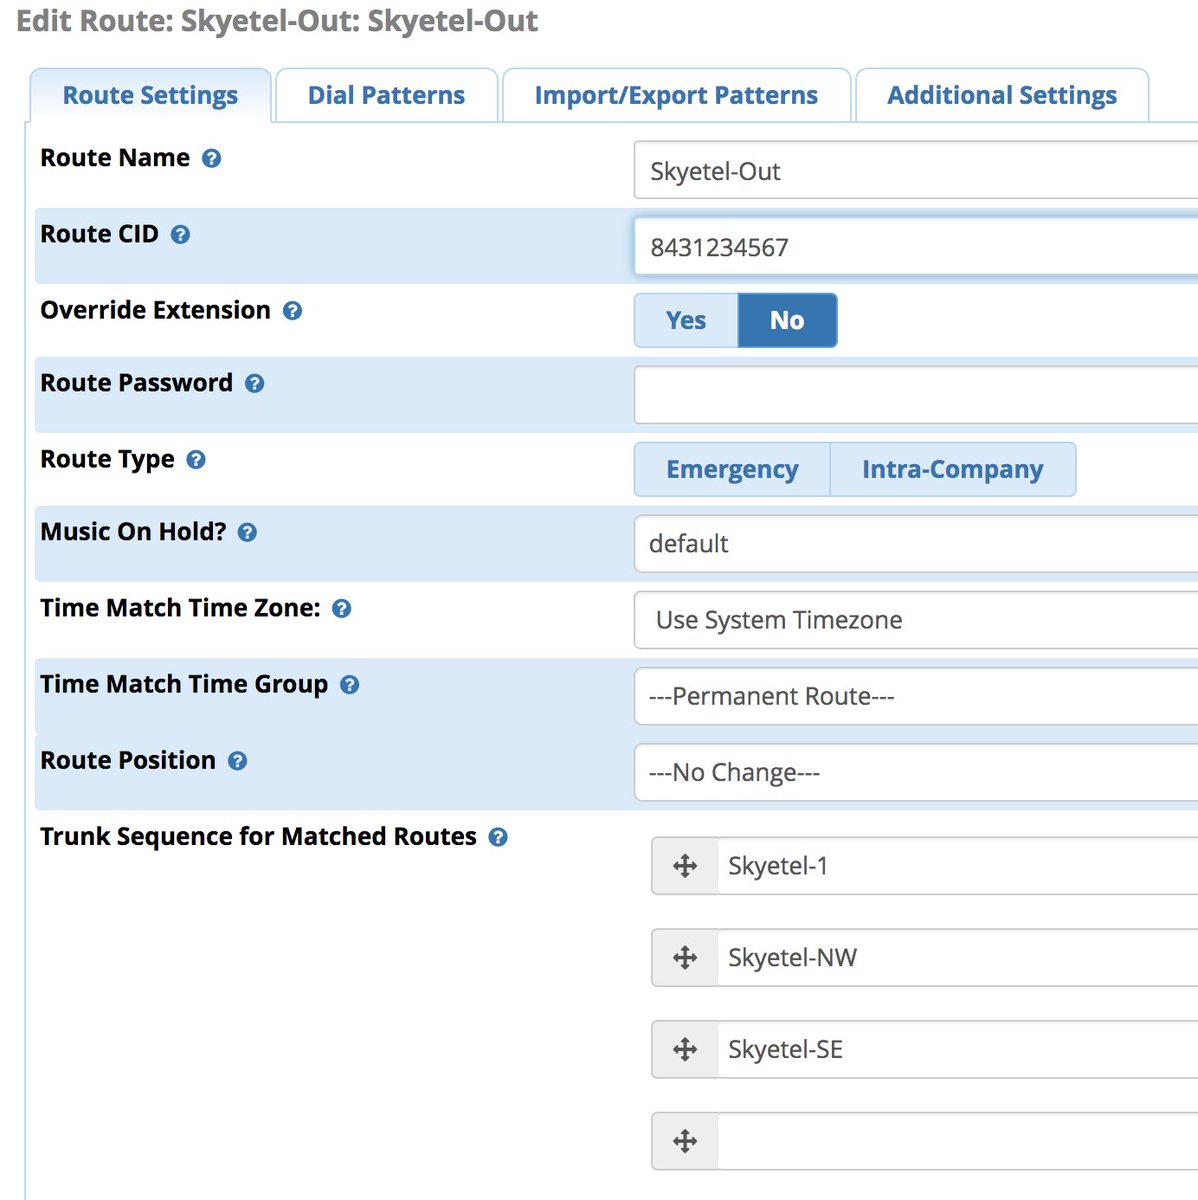
Under the Dial Patterns tab, you’ll find the default rules as shown below. Adjust them to meet your own requirements.

There are a million ways to design outbound calling schemes on PBXs with multiple trunks. One of the simplest ways is to use no dial prefix for the primary trunk and then use dialing prefixes for the remaining trunks.
Another outbound calling scheme would be to assign specific DIDs to individual extensions on your PBX. Here you could use NXXNXXXXXX with the 1 Prepend as the Dial Pattern with every Outbound Route and change the Extension Number in the CallerID field of the Dial Pattern. With this setup, you’d need a separate Outbound Route for each group of extensions using a specific trunk on your PBX. Additional dial patterns can be added for each extension designated for a particular trunk. A lower priority Outbound Route then could be added without a CallerID entry to cover extensions that weren’t restricted or specified.
HINT: Keep in mind that Outbound Routes are processed by FreePBX in top-down order. The first route with a matching dial pattern is the trunk that is selected to place the outbound call. No other outbound routes are ever used even if the call fails or the trunk is unavailable. To avoid failed calls, consider adding additional trunks to the Trunk Sequence in every outbound route. In summary, if you have multiple routes with the exact same dial pattern, then the match nearest to the top of the Outbound Route list wins. You can rearrange the order of the outbound routes by dragging them into any sequence desired.
Audio Issues with Skyetel
If you experience one-way or no audio on some calls, make sure you have filled in the NAT Settings section in the GUI under Settings -> Asterisk SIP Settings -> General. In addition to adding your external and internal IP addresses there, be sure to add your external IP address in /etc/asterisk/sip_general_custom.conf like the following example and restart Asterisk:
externip=xxx.xxx.xxx.xxx
If you’re using PJSIP trunks or extensions on your PBX, implement this fix as well.
Receiving SMS Messages Through Skyetel
Most Skyetel DIDs support SMS messaging. Once you have purchased one or more DIDs, you can edit each number and, under the SMS & MMS tab, you can redirect incoming SMS messages to an email or SMS destination of your choice using the following example:
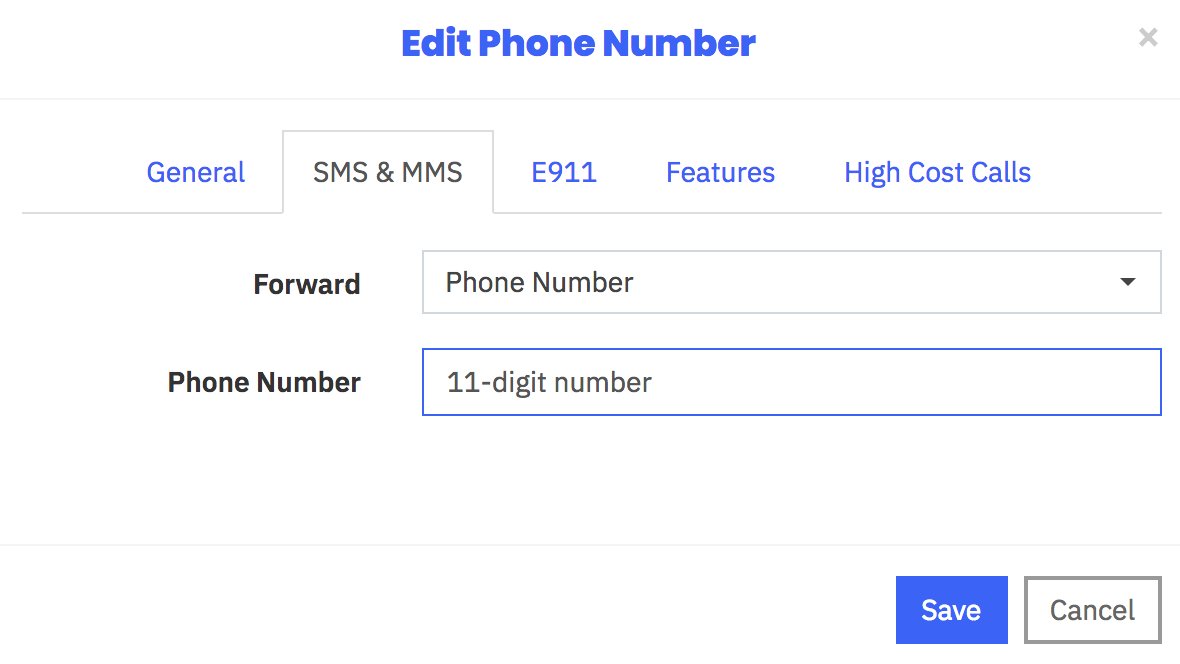
Sending SMS Messages Through Skyetel
We’ve created a simple script that will let you send SMS messages from the Linux CLI using your Skyetel DIDs. In order to send SMS messages, you first will need to create an SID key and password in the Skyetel portal. From the Settings icon, choose API Keys -> Create. Once the credentials appear, copy both your SID and Password. Then click SAVE.
Next, from the Linux CLI, issue the following commands to download the sms-skyetel script into your /root folder. Then edit the file and insert your SID, secret, and DID credentials in the fields at the top of the script. Save the file, and you’re all set.
cd /root
wget http://incrediblepbx.com/sms-skyetel
chmod +x sms-skyetel
nano -w sms-skyetel
To send an SMS message, use the following syntax where 18005551212 is the 11-digit SMS destination: sms-skyetel 18005551212 "Some message"
Configuring a Softphone for Incredible PBX
We’re in the home stretch now. You can connect virtually any kind of telephone to your new PBX. Plain Old Phones require an analog telephone adapter (ATA). With a cloud-based PBX, you need a standalone SIP device such as ObiHai’s OBi100 or OBi110 (if you have a phone line from Ma Bell to hook up as well). SIP phones can be connected directly so long as they have an IP address. These could be hardware devices or software devices such as the YateClient softphone. We’ll start with a free one today so you can begin making calls. You can find dozens of recommendations for hardware-based SIP phones both on Nerd Vittles and the PIAF Forum when you’re ready to get serious about VoIP telephony.
We recommend YateClient which is free. Download it from here. Run YateClient once you’ve installed it and enter the credentials for the 701 extension on Incredible PBX. You’ll need the IP address of your server plus your extension 701 password. Choose Applications _> Extensions -> 701 and write down your SIP/IAX Password. You can also find it in /root/passwords.FAQ. Fill in the blanks using the IP address of your Server, 701 for your Username, and whatever Password you assigned to the extension when you installed Incredible PBX. Click OK to save your entries.
Once you are registered to extension 701, close the Account window. Then click on YATE’s Telephony Tab and place some test calls to the numerous apps that are preconfigured on Incredible PBX. Dial a few of these to get started:
DEMO - Apps Demo

123 - Reminders

947 - Weather by ZIP Code

951 - Yahoo News

*61 - Time of Day

TODAY - Today in History
If you are a Mac user, another great no-frills softphone is Telephone. Just download and install it from the Mac App Store.
One cautionary note if you have multiple SIP softphones behind the same NAT-based router. Getting SIP packets routed back to the appropriate desktop machine can be problematic and typically results in missing audio on calls. The easy workaround is to set up the NeoRouter VPN on both your instance and each of your desktop computers. Then register the softphones to the NeoRouter private IP address of your instance. The NeoRouter client already is installed on your server, but you’ll need to set up a NeoRouter server somewhere and connect to it by running nrclientcmd.
Introducing the Incredible PBX Security Model
Incredible PBX includes one of the most secure turnkey PBX implementations on the planet. As configured, it is protected by both Fail2Ban and a hardened configuration of the IPtables Linux firewall. This release also includes Port Knocker for simple, secure access from any remote computer or smartphone. You can get up to speed on how the technology works by reading the Nerd Vittles tutorial. Your Port Knocker credentials are stored in /root/knock.FAQ together with activation instructions for your server and mobile devices. The NeoRouter VPN client also is included for rock-solid, secure connectivity to remote users. Read our previous tutorial for setup instructions. As configured, nobody can access your PBX without  your credentials AND
  an IP address that matches the IP address of your server or the PC from which you installed Incredible PBX. You can whitelist additional IP addresses by running the command-line utility /root/add-ip. You can remove whitelisted IP addresses by running /root/del-acct. Incredible PBX is preconfigured to let you connect to many of the leading SIP hosting providers without additional firewall tweaking. The Google Cloud firewall adds an extra layer of protection.
The IPtables firewall is a complex piece of software. If you need assistance with configuring it, visit the PIAF Forum for some friendly assistance.
Incredible Backup and Restore
We’re pleased to introduce our latest backup and restore utilities for Incredible PBX. Running /root/incrediblebackup13 will create a backup image of your server in /tmp. This backup image then can be copied to any other medium desired for storage. To restore it to another Incredible PBX server, simply copy the image to a server running Asterisk 13 and the same version of the Incredible PBX GUI. Then run /root/incrediblerestore13. Doesn’t get much simpler than that.
Incredible PBX Automatic Update Utility
Every time you log into your server as root, Incredible PBX will ping the IncrediblePBX.com web site to determine whether one or more updates are available to bring your server up to current specs. We recommend you log in at least once a week just in case some new security vulnerability should come along.
In the meantime, we encourage you to sign up for an account on the PIAF Forum and join the discussion. In addition to providing first-class, free support, we think you’ll enjoy the camaraderie.
Upgrading to IBM Speech Engines
If you’ve endured Google’s Death by a Thousand Cuts with text-to-speech (TTS) and voice recognition (STT) over the years, then we don’t have to tell you what a welcome addition IBM’s new speech utilities are. We can’t say enough good things about the new IBM Watson TTS and STT offerings. With IBM’s services, you have a choice of free or commercial tiers. Let’s put the pieces in place so you’ll be ready to play with the Whole Enchilada.
Getting Started with IBM Watson TTS Service
We’ve created a separate tutorial to walk you through obtaining and configuring your IBM Watson credentials. Start there.
Next, login to your Incredible PBX server and issue these commands to update your Asterisk dialplan and edit ibmtts.php:
cd /var/lib/asterisk/agi-bin
./install-ibmtts-dialplan.sh
nano -w ibmtts.php
Insert your credentials in $IBM_username and $IBM_password. For new users, your $IBM_username will be apikey. Your $IBM_password will be the TTS APIkey you obtained from IBM. Next, verify that $IBM_url matches the entry provided when you registered with IBM. Then save the file: Ctrl-X, Y, then ENTER. Now reload the Asterisk dialplan: asterisk -rx "dialplan reload". Try things out by dialing 951 (news) or 947 (Weather) from an extension registered on your PBX.
Getting Started with IBM Watson STT Service
Now let’s get IBM’s Speech to Text service activated. Log back in to the IBM Cloud. Click on the Speech to Text app. Choose a Region to deploy in, choose your Organization from the pull-down menu, and select STT as your Space. Choose the Standard Pricing Plan. Then click Create. When Speech to Text Portal opens, click the Service Credentials tab. In the Actions column, click View Credentials and copy down your STT username and password.
Finally, login to your Incredible PBX server and issue these commands to edit getnumber.sh:
cd /var/lib/asterisk/agi-bin
nano -w getnumber.sh
Insert apikey as your API_USERNAME and your actual STT APIkey API_PASSWORD in the fields provided. Then save the file: Ctrl-X, Y, then ENTER. Update your Voice Dialer (411) to use the new IBM STT service:
sed -i '\\:// BEGIN Call by Name:,\\:// END Call by Name:d' /etc/asterisk/extensions_custom.conf
sed -i '/\\[from-internal-custom\]/r ibm-411.txt' /etc/asterisk/extensions_custom.conf
asterisk -rx "dialplan reload"
Now try out the Incredible PBX Voice Dialer with AsteriDex by dialing 411 and saying "Delta Airlines."
Using Gmail as a SmartHost for SendMail
Many Internet service providers including Google block email transmissions from downstream servers (that’s you) to reduce spam. The simple solution is to use your Gmail account as a smarthost for SendMail. Here’s how. Log into your server as root and issue the following commands:
cd /etc/mail
hostname -f > genericsdomain
touch genericstable
makemap -r hash genericstable.db < genericstable
mv sendmail.mc sendmail.mc.original
wget http://incrediblepbx.com/sendmail.mc.gmail
cp sendmail.mc.gmail sendmail.mc
mkdir -p auth
chmod 700 auth
cd auth
echo AuthInfo:smtp.gmail.com \\"U:smmsp\\" \\"I:user_id\\" \\"P:password\\" \\"M:PLAIN\\" > client-info
echo AuthInfo:smtp.gmail.com:587 \\"U:smmsp\\" \\"I:user_id\\" \\"P:password\\" \\"M:PLAIN\\" >> client-info
echo AuthInfo:smtp.gmail.com:465 \\"U:smmsp\\" \\"I:user_id\\" \\"P:password\\" \\"M:PLAIN\\" >> client-info
nano -w client-info
When the nano editor opens the client-info file, change the 3 user_id entries to your Gmail account name without @gmail.com and change the 3 password entries to your actual Gmail password. Save the file: Ctrl-X, Y, then ENTER.
Now issue the following commands:
chmod 600 client-info
makemap -r hash client-info.db < client-info
cd ..
make
service sendmail restart
Finally, send yourself a test message. Be sure to check your spam folder!
echo "test" | mail -s testmessage yourname@yourdomain.com
Check mail success with: tail /var/log/mail.log. If you have trouble getting a successful Gmail registration (especially if you have previously used this Google account from a different IP address), try this Google Voice Reset Procedure. It usually fixes connectivity problems. If it still doesn’t work, enable Less Secure Apps using this Google tool.
Originally published: Monday, April 1, 2019
Continue Reading: Configuring Extensions, Trunks & Routes
Don't Miss: Incredible PBX Application User's Guide covering the 31 Whole Enchilada apps
 Support Issues. With any application as sophisticated as this one, you're bound to have questions. Blog comments are a difficult place to address support issues although we welcome general comments about our articles and software. If you have particular support issues, we encourage you to get actively involved in the PBX in a Flash Forum. It's the best Asterisk tech support site in the business, and it's all free! Please have a look and post your support questions there. Unlike some forums, the PIAF Forum is extremely friendly and is supported by literally hundreds of Asterisk gurus and thousands of users just like you. You won't have to wait long for an answer to your question.
Need help with Asterisk? Visit the VoIP-info Forum.
Special Thanks to Our Generous Sponsors
FULL DISCLOSURE: ClearlyIP, Skyetel, Vitelity, DigitalOcean, Vultr, VoIP.ms, 3CX, Sangoma, TelecomsXchange and VitalPBX have provided financial support to Nerd Vittles and our open source projects through advertising, referral revenue, and/or merchandise. As an Amazon Associate and Best Buy Affiliate, we also earn from qualifying purchases. We’ve chosen these providers not the other way around. Our decisions are based upon their corporate reputation and the quality of their offerings and pricing. Our recommendations regarding technology are reached without regard to financial compensation except in situations in which comparable products at comparable pricing are available from multiple sources. In this limited case, we support our sponsors because our sponsors support us.
BOGO Bonaza: Enjoy state-of-the-art VoIP service with a $10 credit and half-price SIP service on up to $500 of Skyetel trunking with free number porting when you fund your Skyetel account. No limits on number of simultaneous calls. Quadruple data center redundancy. $25 monthly minimum spend required. Tutorial and sign up details are here.
![]() The lynchpin of Incredible PBX 2020 and beyond is ClearlyIP components which bring management of FreePBX modules and SIP phone integration to a level never before available with any other Asterisk distribution. And now you can configure and reconfigure your new Incredible PBX phones from the convenience of the Incredible PBX GUI.
The lynchpin of Incredible PBX 2020 and beyond is ClearlyIP components which bring management of FreePBX modules and SIP phone integration to a level never before available with any other Asterisk distribution. And now you can configure and reconfigure your new Incredible PBX phones from the convenience of the Incredible PBX GUI.
VitalPBX is perhaps the fastest-growing PBX offering based upon Asterisk with an installed presence in more than 100 countries worldwide. VitalPBX has generously provided a customized White Label version of Incredible PBX tailored for use with all Incredible PBX and VitalPBX custom applications. Follow this link for a free test drive!
Special Thanks to Vitelity. Vitelity is now Voyant Communications and has halted new registrations for the time being. Our special thanks to Vitelity for their unwavering financial support over many years and to the many Nerd Vittles readers who continue to enjoy the benefits of their service offerings. We will keep everyone posted on further developments.
- In the unlikely event that Skyetel cannot provide a 10% reduction in your current origination rate and/or DID costs, Skyetel will give you an additional $50 credit to use with the Skyetel service. [↩]
Spring Is Sprung: Taking Incredible PBX to the Google Cloud

Let’s chat about Google. We’ve had a love-hate relationship with Google for the past decade. For every good deed they do, they always manage to follow it up with a swift kick in the teeth… or lower. Business Insider recently catalogued all of the Google carnage over the years. And that ignores the train wreck that many VoIP users experienced with Google Voice. So we have mixed emotions about writing this column at all. But, suffice it to say, you won’t have to worry about Google’s Cloud Platform disappearing. It’s as well entrenched in the Google profit center as their advertising juggernaut.
I’ll begin with a story about a former neighbor of ours that was the IT Director at a major university. Maintaining their server farm with staff, labor, and hardware had simply become too expensive and too painful for the university to absorb so he made what at the time appeared to be a very brave decision. He decided to move all of the computing resources of the university to the Google Cloud. I haven’t spoken to him recently, but I can tell you the day it was completed was one of the happiest days of his life. Taking hardware acquisition, hardware maintenance, and facilities management out of the IT equation is great for your blood pressure. And the university actually has saved boatloads of money.
Is the Google Cloud right for everyone? Of course not. But you’ve got nothing to lose by trying it because Google is going to spot you $300 for the first year to get started. So we’d recommend you make the decision whether to continue AFTER you’ve spent the $300 you found lying on the sidewalk. Today we’ll show you how to build the always-free platform which probably will suffice for home users and small businesses in perpetuity. After your first year, the only charge would be a little chump change for bandwidth each month. If you decide not to use it as your PBX platform, it still would come in handy as a VPN server platform for an application such as NeoRouter. Pricing details here.
We want to start today by thanking Stewart Nelson on the DSLR Forum for his pioneering work on this beginning over a year ago. To start, hop over to https://cloud.google.com/free and claim your $300 by signing up for a Google Cloud account.
CAUTION: Before you embark on this adventure, we would encourage you to read through this article AND read our followup article which documented a much easier and simpler implementation scheme.
Creating a Google Cloud Instance for Incredible PBX
Once you have your account set up, it’s time to create your first project. Navigate to https://console.cloud.google.com. In the COMPUTE section of the dashboard, click Compute Engine -> VM Instances. Then click CREATE PROJECT and name it. Now click CREATE INSTANCE and Name it incrediblepbx. The instance name becomes the hostname for your virtual machine. If you want to remain in the Free Tier, choose f1-micro instance as the Machine Type and choose a U.S. Region (us-central1, us-east1 or us-west1). We strongly recommend installing your VPS using the N1-standard-1 as the Machine Type. It costs about 3 cents an hour and will save you several hours of tedious waiting. Once you complete the install, you then can shut down the server, downgrade to the f1-micro Machine Type, and restart your instance. For the Boot Disk, choose CentOS 6 and expand the disk storage to at least 20GB (30GB is available with the Free Tier). For the Firewall setting, enable HTTP and optionally HTTPS, if desired. Check your entries carefully and then click the Create button.
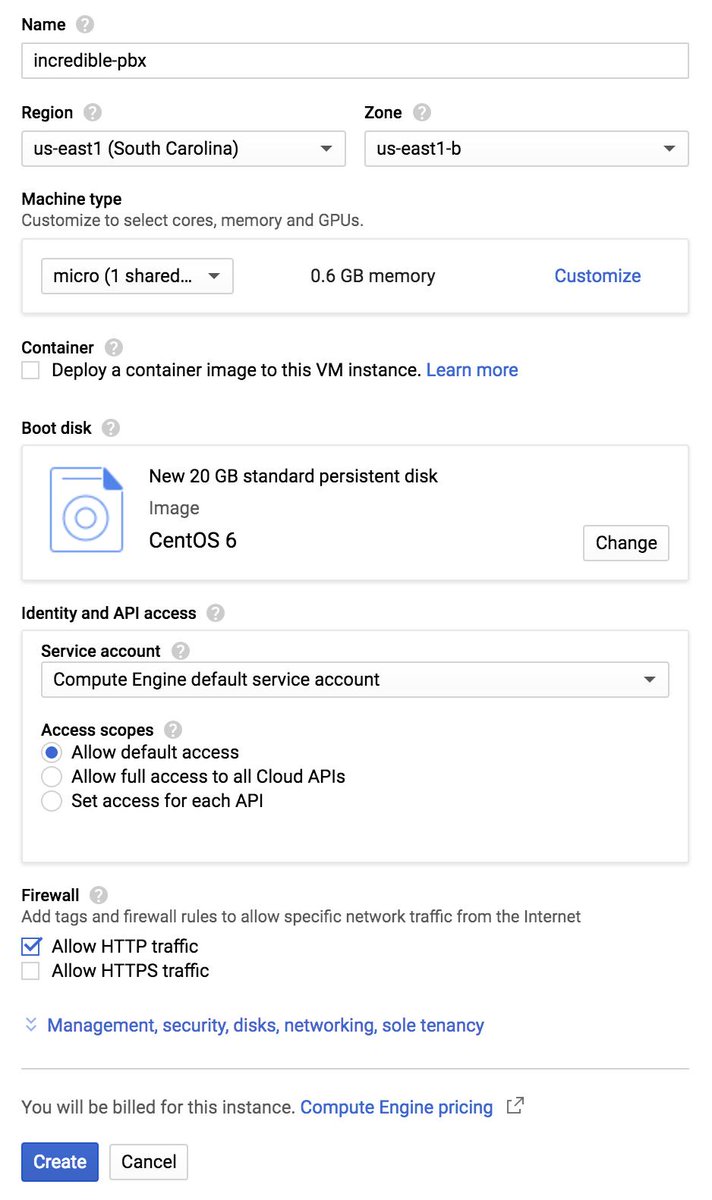
When your virtual machine instance comes on line, jot down the assigned public IP address. We’ll need it in a minute. Now click on the SSH pull-down tab and choose Open in a Browser Window. Now we need to set a root password and adjust the SSH settings so that you can login from your desktop computer using SSH or Putty. This is important since the Incredible PBX installer will whitelist the IP address of your desktop PC as part of the setup process. You don’t want to lock yourself out of your virtual machine.
sudo passwd root
su root
nano -w /etc/ssh/sshd_config
When the editor opens the SSH config file, add the following entries. Then save the file and restart SSH: service sshd restart
PermitRootLogin yes
PasswordAuthentication yes
You now should be able to log in to your instance as root from your desktop computer using SSH or Putty. Test it to be sure: ssh root@server-IP-address
Before we leave the Google Cloud Dashboard, let’s make the assigned public IP address permanent so that it doesn’t get changed down the road. Keep in mind that, if you ever delete your instance, you also need to remove the assigned static IP address so you don’t continue to get billed for it. From Home on the Dashboard, scroll down to the NETWORKING section and choose VPS Network -> External IP Addresses. Change the Type of your existing address to Static and Name it staticip. Next, choose Firewall Rules in the VPS Network section and click CREATE FIREWALL RULE. Fill in the template like the following leaving the other fields with their default entries. Then click CREATE.
- Name: incrediblepbx-udp
- Target Tags: udp-in
- Source IP Range: 0.0.0.0/0
- Protocols/Ports: check udp: all
If you plan to use HTTPS with your server, you’ll also need to add another firewall rule similar to the existing default-allow-http rule. Simply change the Port to tcp:443 and Name it default-allow-https with a Target Tag of https-in.
CAUTION: Before these firewall rules will be activated for your instance, they also must be specified in the Network Tags section for your instance by adding the udp-in and https-in tags and restarting your instance.
It should be noted that Incredible PBX includes its own Travelin’ Man 3 firewall that manages a whitelist of IP addresses that are allowed ANY access to your server. So we will primarily use the firewall component of the Google Cloud instance to allow sufficient access to Incredible PBX to allow it to actually control server access.
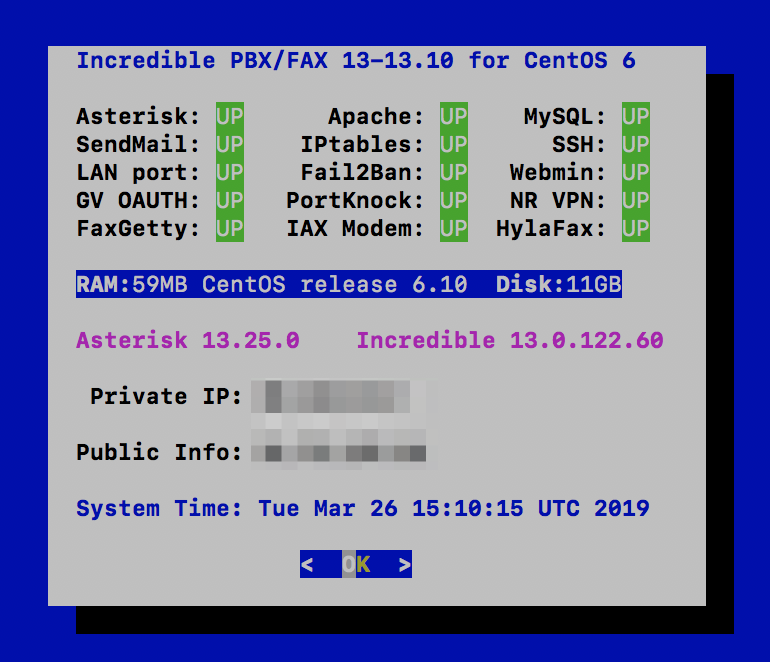
Installing Incredible PBX in the Google Cloud
If you’ve installed previous iterations of Incredible PBX, here is a thumbnail sketch of the install procedure. After logging into your server as root from a desktop PC using SSH or Putty, issue the following commands:
yum -y update
yum -y install net-tools nano wget tar
wget http://incrediblepbx.com/incrediblepbx-13-13-LEAN.tar.gz
tar zxvf incrediblepbx-13-13-LEAN.tar.gz
rm -f incrediblepbx-13-13-LEAN.tar.gz
# add swap file to your instance
./create-swapfile-DO
# kick off Phase I install
./IncrediblePBX-13-13.sh
# after reboot, kick off Phase II install
./IncrediblePBX-13-13.sh
# adjust TM3 firewall to block Google Cloud locals
sed -i 's|10.0.0.0/8|10.0.0.0/24|' /usr/local/sbin/iptables-custom
iptables-restart
# add Full Enchilada apps (see below)
./Enchilada-upgrade.sh
# add HylaFax/AvantFax (see below)
./incrediblefax13.sh
# after reboot, set passwords
./update-passwords
# set desired timezone
./timezone-setup
# fix permissions clobbered by Google Cloud install
chown -R asterisk:asterisk /var/lib/asterisk
amportal restart
# set up NeoRouter client, if desired
nrclientcmd
# check network speed
wget -O speedtest-cli https://raw.githubusercontent.com/sivel/speedtest-cli/master/speedtest.py
chmod +x speedtest-cli
./speedtest-cli
WebMin is also installed and configured as part of the base install. The root password for access is the same as your Linux root password. We strongly recommend that you not use WebMin to make configuration changes to your server. You may inadvertently damage the operation of your PBX beyond repair. WebMin is an excellent tool to LOOK at how your server is configured. When used for that purpose, we highly recommend WebMin as a way to become familiar with your Linux configuration.
Using the Incredible PBX 13-13 Web GUI
NOTE: If you plan to upgrade to the Whole Enchilada, you can skip this section. It’s for those that wish to roll their own PBX from the ground up.
Most of the configuration of your PBX will be performed using the web-based Incredible PBX GUI with its FreePBX 13 GPL modules. Use a browser pointed to the IP address of your server and choose Incredible PBX Admin. Log in as admin with the password you configured in the previous step. HINT: You can always change it if you happen to forget it.
To get a basic system set up so that you can make and receive calls, you’ll need to add a VoIP trunk, create one or more extensions, set up an inbound route to send incoming calls to an extension, and set up an outbound route to send calls placed from your extension to a VoIP trunk that connects to telephones in the real world. You’ll also need a SIP phone or softphone to use as an extension on your PBX. Our previous tutorial will walk you through this setup procedure. Over the years, we’ve built a number of command line utilities including a script to preconfigure SIP trunks for more than a dozen providers in seconds. You’ll find links to all of them here.
Continue Reading: Configuring Extensions, Trunks & Routes

Upgrading to Incredible PBX Whole Enchilada
There now are two more pieces to put in place. The sequence matters! Be sure to upgrade to the Whole Enchilada before you install Incredible Fax. If you perform the steps backwards, you may irreparably damage your fax setup by overwriting parts of it.
The Whole Enchilada upgrade script now is included in the Incredible PBX LEAN tarball. If you have an earlier release, you may need to download the Whole Enchilada tarball as documented below. Upgrading to the Whole Enchilada is simple. Log into your server as root and issue the following commands. Try issuing just the last command first to see if the enchilada upgrade script already is in place. Otherwise, execute all of the commands below. Be advised that the upgrade will overwrite all of your existing Incredible PBX setup including any extensions, trunks, and routes you may have created previously. You also will be prompted to reset all of your passwords as part of the upgrade.
cd /root
./Enchilada*
If you accidentally installed Incredible Fax before upgrading to the Whole Enchilada, you may be able to recover your Incredible Fax setup by executing the following commands. It’s worth a try anyway.
amportal a ma install avantfax
amportal a r
Installing Incredible Fax with HylaFax/AvantFax
You don’t need to upgrade to the Whole Enchilada in order to use Incredible Fax; however, you may forfeit the opportunity to later upgrade to the Whole Enchilada if you install Incredible Fax first. But the choice is completely up to you. To install Incredible Fax, log into your server as root and issue the following commands:
cd /root
./incrediblefax13.sh
After entering your email address to receive incoming faxes, you’ll be prompted about two dozen times to choose options as part of the install. Simple press the ENTER key at each prompt and accept all of the defaults. When the install finishes, make certain that you reboot your server to bring Incredible Fax on line. There will be a new AvantFax option in the Incredible PBX GUI. The default credentials for AvantFax GUI are admin:password; however, you first will be prompted for your Apache admin credentials which were set when you installed Incredible PBX 13-13 LEAN or the Whole Enchilada. Then you’ll be asked to change your AvantFax password.
Upgrading to IBM Speech Engines
If you’ve endured Google’s Death by a Thousand Cuts with text-to-speech (TTS) and voice recognition (STT) over the years, then we don’t have to tell you what a welcome addition IBM’s new speech utilities are. We can’t say enough good things about the new IBM Watson TTS and STT offerings. With IBM’s services, you have a choice of free or commercial tiers. Let’s put the pieces in place so you’ll be ready to play with the Whole Enchilada.
Getting Started with IBM Watson TTS Service
We’ve created a separate tutorial to walk you through obtaining and configuring your IBM Watson credentials. Start there.
Next, login to your Incredible PBX server and issue these commands to update your Asterisk dialplan and edit ibmtts.php:
cd /var/lib/asterisk/agi-bin
./install-ibmtts-dialplan.sh
nano -w ibmtts.php
Insert your credentials in $IBM_username and $IBM_password. For new users, your $IBM_username will be apikey. Your $IBM_password will be the TTS APIkey you obtained from IBM. Next, verify that $IBM_url matches the entry provided when you registered with IBM. Then save the file: Ctrl-X, Y, then ENTER. Now reload the Asterisk dialplan: asterisk -rx "dialplan reload". Try things out by dialing 951 (news) or 947 (Weather) from an extension registered on your PBX.
Getting Started with IBM Watson STT Service
Now let’s get IBM’s Speech to Text service activated. Log back in to the IBM Cloud. Click on the Speech to Text app. Choose a Region to deploy in, choose your Organization from the pull-down menu, and select STT as your Space. Choose the Standard Pricing Plan. Then click Create. When Speech to Text Portal opens, click the Service Credentials tab. In the Actions column, click View Credentials and copy down your STT username and password.
Finally, login to your Incredible PBX server and issue these commands to edit getnumber.sh:
cd /var/lib/asterisk/agi-bin
nano -w getnumber.sh
Insert apikey as your API_USERNAME and your actual STT APIkey API_PASSWORD in the fields provided. Then save the file: Ctrl-X, Y, then ENTER. Update your Voice Dialer (411) to use the new IBM STT service:
sed -i '\\:// BEGIN Call by Name:,\\:// END Call by Name:d' /etc/asterisk/extensions_custom.conf
sed -i '/\\[from-internal-custom\]/r ibm-411.txt' /etc/asterisk/extensions_custom.conf
asterisk -rx "dialplan reload"
Now try out the Incredible PBX Voice Dialer with AsteriDex by dialing 411 and saying "Delta Airlines." Check back next week for the Whole Enchilada apps tutorial.
Adding Skyetel Trunks to Incredible PBX
The Skyetel trunks were configured as part of the default install of Incredible PBX. All that’s required on your part is to sign up for Skyetel service and take advantage of the exclusive Nerd Vittles BOGO offer beginning April 1. Skyetel will match your original deposit of up to $250 which translates into as much as $500 of half-price SIP trunking service. Effective 10/1/2023, $25/month minimum spend required. First, complete the Prequalification Form here. You then will be provided a link to the Skyetel site to complete your registration. Once you have registered on the Skyetel site and your account has been activated, open a support ticket and request the BOGO credit for your account by referencing this Nerd Vittles special offer. Greed will get you nowhere. Credit is limited to one per person/company/address/location. If you want to take advantage of the 10% discount on your current service, open another ticket and attach a copy of your last month’s bill. See footnote 1 for the fine print.1 If you have high call volume requirements, document these in your Prequalification Form, and we will be in touch. Easy Peasy!
Unlike many VoIP providers, Skyetel does not use SIP registrations to make connections to your PBX. Instead, Skyetel utilizes Endpoint Groups to identify which servers can communicate with the Skyetel service. An Endpoint Group consists of a Name, an IP address, a UDP or TCP port for the connection, and a numerical Priority for the group. For incoming calls destined to your PBX, DIDs are associated with an Endpoint Group to route the calls to your PBX. For outgoing calls from your PBX, a matching Endpoint Group is required to authorize outbound calls through the Skyetel network. Thus, the first step in configuring the Skyetel side for use with your PBX is to set up an Endpoint Group. A typical setup for use with Incredible PBX®, Asterisk®, or FreePBX® would look like the following:
- Name: MyPBX
- Priority: 1
- IP Address: PBX-Public-IP-Address
- Port: 5060
- Protocol: UDP
- Description: server1.incrediblepbx.com
To receive incoming PSTN calls, you’ll need at least one DID. On the Skyetel site, you acquire DIDs under the Phone Numbers tab. You have the option of Porting in Existing Numbers (free for the first 60 days after you sign up for service) or purchasing new ones under the Buy Phone Numbers menu option.
Once you have acquired one or more DIDs, navigate to the Local Numbers or Toll Free Numbers tab and specify the desired SIP Format and Endpoint Group for each DID. Add SMS/MMS and E911 support, if desired. Call Forwarding and Failover are also supported. That completes the VoIP setup on the Skyetel side. System Status is always available here.
Configuring a Skyetel Inbound Route
Because there is no SIP registration with Skyetel, incoming calls to Skyetel trunks will NOT be sent to the Default Inbound Route configured on your PBX because FreePBX treats the calls as blocked anonymous calls without an Inbound Route pointing to the 11-digit number of each Skyetel DID. From the GUI, choose Connectivity -> Inbound Routes -> Add Inbound Route. For both the Description and DID fields, enter the 11-digit phone number beginning with a 1. Set the Destination for the incoming DID as desired and click Submit. Reload the Dialplan when prompted. Place a test call to each of your DIDs after configuring the Inbound Routes.
If you have installed the Incredible Fax add-on, you can enable Fax Detection under the Fax tab. And, if you’d like CallerID Name lookups using CallerID Superfecta, you can enable it under the Other tab before saving your setup and reloading your dialplan.
Configuring a Skyetel Outbound Route
If Skyetel will be your primary provider, you can use both 10-digit and 11-digit dialing to process outbound calls through your Skyetel account. From the GUI, choose Connectivity -> Outbound Routes -> Add Outbound Route. For the setup, we recommend the following using the CallerID Number you wish to associate with your outbound calls through Skyetel:
Enter the Dial Patterns under the Dial Patterns tab before saving your outbound route. Here’s what you would enter for 10-digit and 11-digit dialing. If you want to require a dialing prefix to use the Skyetel Outbound Route, enter it in the Prefix field for both dial strings.
There are a million ways to design outbound calling schemes on PBXs with multiple trunks. One of the simplest ways is to use no dial prefix for the primary trunk and then use dialing prefixes for the remaining trunks.
Another outbound calling scheme would be to assign specific DIDs to individual extensions on your PBX. Here you could use NXXNXXXXXX with the 1 Prepend as the Dial Pattern with every Outbound Route and change the Extension Number in the CallerID field of the Dial Pattern. With this setup, you’d need a separate Outbound Route for each group of extensions using a specific trunk on your PBX. Additional dial patterns can be added for each extension designated for a particular trunk. A lower priority Outbound Route then could be added without a CallerID entry to cover extensions that weren’t restricted or specified.
HINT: Keep in mind that Outbound Routes are processed by FreePBX in top-down order. The first route with a matching dial pattern is the trunk that is selected to place the outbound call. No other outbound routes are ever used even if the call fails or the trunk is unavailable. To avoid failed calls, consider adding additional trunks to the Trunk Sequence in every outbound route. In summary, if you have multiple routes with the exact same dial pattern, then the match nearest to the top of the Outbound Route list wins. You can rearrange the order of the outbound routes by dragging them into any sequence desired.
Audio Issues with Skyetel
If you experience one-way or no audio on some calls, make sure you have filled in the NAT Settings section in the GUI under Settings -> Asterisk SIP Settings -> General. In addition to adding your external and internal IP addresses there, be sure to add your external IP address in /etc/asterisk/sip_general_custom.conf like the following example and restart Asterisk:
externip=xxx.xxx.xxx.xxx
If you’re using PJSIP trunks or extensions on your PBX, implement this fix as well.
Receiving SMS Messages Through Skyetel
Most Skyetel DIDs support SMS messaging. Once you have purchased one or more DIDs, you can edit each number and, under the SMS & MMS tab, you can redirect incoming SMS messages to an email or SMS destination of your choice using the following example:
Sending SMS Messages Through Skyetel
We’ve created a simple script that will let you send SMS messages from the Linux CLI using your Skyetel DIDs. In order to send SMS messages, you first will need to create an SID key and password in the Skyetel portal. From the Settings icon, choose API Keys -> Create. Once the credentials appear, copy both your SID and Password. Then click SAVE.
Next, from the Linux CLI, issue the following commands to download the sms-skyetel script into your /root folder. Then edit the file and insert your SID, secret, and DID credentials in the fields at the top of the script. Save the file, and you’re all set.
cd /root
wget http://incrediblepbx.com/sms-skyetel
chmod +x sms-skyetel
nano -w sms-skyetel
To send an SMS message, use the following syntax where 18005551212 is the 11-digit SMS destination: sms-skyetel 18005551212 "Some message"
Using Gmail as a SmartHost for SendMail
Many Internet service providers including Google block email transmissions from downstream servers (that’s you) to reduce spam. The simple solution is to use your Gmail account as a smarthost for SendMail. Here’s how. Log into your server as root and issue the following commands:
cd /etc/mail
hostname -f > genericsdomain
touch genericstable
makemap -r hash genericstable.db < genericstable
mv sendmail.mc sendmail.mc.original
wget http://incrediblepbx.com/sendmail.mc.gmail
cp sendmail.mc.gmail sendmail.mc
mkdir -p auth
chmod 700 auth
cd auth
echo AuthInfo:smtp.gmail.com \\"U:smmsp\\" \\"I:user_id\\" \\"P:password\\" \\"M:PLAIN\\" > client-info
echo AuthInfo:smtp.gmail.com:587 \\"U:smmsp\\" \\"I:user_id\\" \\"P:password\\" \\"M:PLAIN\\" >> client-info
echo AuthInfo:smtp.gmail.com:465 \\"U:smmsp\\" \\"I:user_id\\" \\"P:password\\" \\"M:PLAIN\\" >> client-info
nano -w client-info
When the nano editor opens the client-info file, change the 3 user_id entries to your Gmail account name without @gmail.com and change the 3 password entries to your actual Gmail password. Save the file: Ctrl-X, Y, then ENTER.
Now issue the following commands:
chmod 600 client-info
makemap -r hash client-info.db < client-info
cd ..
make
service sendmail restart
Finally, send yourself a test message. Be sure to check your spam folder!
echo "test" | mail -s testmessage yourname@yourdomain.com
Check mail success with: tail /var/log/mail.log. If you have trouble getting a successful Gmail registration (especially if you have previously used this Google account from a different IP address), try this Google Voice Reset Procedure. It usually fixes connectivity problems. If it still doesn’t work, enable Less Secure Apps using this Google tool.
Finally, let's clean up Fail2Ban so you don't get bombarded by useless email messages. Issue the following commands and, when the editor opens, search for the nobody: line and change the destination from root to devnull. Save the file and then reload your aliases with the last command below:
sed -i 's|you@example.com|nobody@localhost|' /etc/fail2ban/jail.conf
nano -w /etc/aliases
newaliases
Continue Reading: A Better Way to Deploy Incredible PBX in the Google Cloud
Originally published: Tuesday, March 26, 2019
News Flash: Turn Incredible PBX into a Fault-Tolerant HA Platform for $1/Month
Continue Reading: Configuring Extensions, Trunks & Routes
Don't Miss: Incredible PBX Application User's Guide covering the 31 Whole Enchilada apps
Support Issues. With any application as sophisticated as this one, you're bound to have questions. Blog comments are a difficult place to address support issues although we welcome general comments about our articles and software. If you have particular support issues, we encourage you to get actively involved in the PBX in a Flash Forum. It's the best Asterisk tech support site in the business, and it's all free! Please have a look and post your support questions there. Unlike some forums, the PIAF Forum is extremely friendly and is supported by literally hundreds of Asterisk gurus and thousands of users just like you. You won't have to wait long for an answer to your question.
Need help with Asterisk? Visit the VoIP-info Forum.
Special Thanks to Our Generous Sponsors
FULL DISCLOSURE: ClearlyIP, Skyetel, Vitelity, DigitalOcean, Vultr, VoIP.ms, 3CX, Sangoma, TelecomsXchange and VitalPBX have provided financial support to Nerd Vittles and our open source projects through advertising, referral revenue, and/or merchandise. As an Amazon Associate and Best Buy Affiliate, we also earn from qualifying purchases. We’ve chosen these providers not the other way around. Our decisions are based upon their corporate reputation and the quality of their offerings and pricing. Our recommendations regarding technology are reached without regard to financial compensation except in situations in which comparable products at comparable pricing are available from multiple sources. In this limited case, we support our sponsors because our sponsors support us.
BOGO Bonaza: Enjoy state-of-the-art VoIP service with a $10 credit and half-price SIP service on up to $500 of Skyetel trunking with free number porting when you fund your Skyetel account. No limits on number of simultaneous calls. Quadruple data center redundancy. $25 monthly minimum spend required. Tutorial and sign up details are here.
![]() The lynchpin of Incredible PBX 2020 and beyond is ClearlyIP components which bring management of FreePBX modules and SIP phone integration to a level never before available with any other Asterisk distribution. And now you can configure and reconfigure your new Incredible PBX phones from the convenience of the Incredible PBX GUI.
The lynchpin of Incredible PBX 2020 and beyond is ClearlyIP components which bring management of FreePBX modules and SIP phone integration to a level never before available with any other Asterisk distribution. And now you can configure and reconfigure your new Incredible PBX phones from the convenience of the Incredible PBX GUI.
VitalPBX is perhaps the fastest-growing PBX offering based upon Asterisk with an installed presence in more than 100 countries worldwide. VitalPBX has generously provided a customized White Label version of Incredible PBX tailored for use with all Incredible PBX and VitalPBX custom applications. Follow this link for a free test drive!
Special Thanks to Vitelity. Vitelity is now Voyant Communications and has halted new registrations for the time being. Our special thanks to Vitelity for their unwavering financial support over many years and to the many Nerd Vittles readers who continue to enjoy the benefits of their service offerings. We will keep everyone posted on further developments.
- In the unlikely event that Skyetel cannot provide a 10% reduction in your current origination rate and/or DID costs, Skyetel will give you an additional $50 credit to use with the Skyetel service. [↩]
Free Asterisk Solutions
