
Home » Incredible PBX » Raspberry Pi (Page 4)
Category Archives: Raspberry Pi
The Most Versatile VoIP Provider: FREE PORTING

 JUST RELEASED: Visit the Incredible PBX Wiki
Introducing Incredible PBX 2022 for the Raspberry Pi
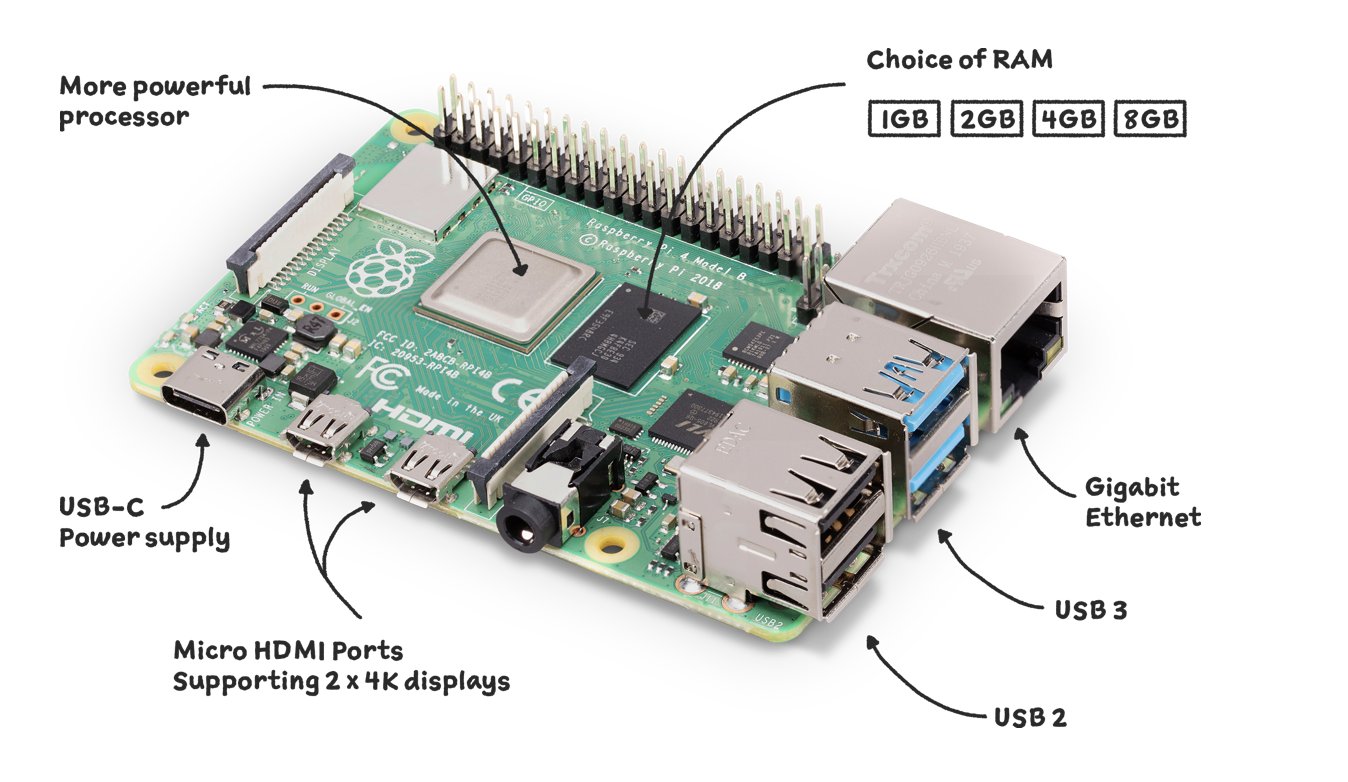
It’s been a year and a half since our last Incredible PBX® release for the Raspberry Pi platform, and the RasPi enhancements just keep coming. The latest RasPi 4 supports dual 4K monitors, two USB 2.0 ports, two USB 3.0 ports, gigabit Ethernet, a USB-C power supply, a Broadcom BCM2711, Quad core Cortex-A72 (ARM v8) 64-bit SoC running at 1.5GHz, and POE connectivity with the addition of the POE Hat. You can read all about it here. Incredible PBX 2022 supports the latest RasPi boards and keyboard and is backwards compatible.
UPDATE: Download the latest Incredible PBX 2027 image for RasPi here.
We’ve preserved the Raspbian 10 platform in this build because the Debian 11 release has broken free faxing, at least for the short term. This build features Asterisk® 16 or 18 with the latest FreePBX® 15 GPL modules plus the feature set you know and love. We’ve added PJSIP support for Skyetel and the new gTTS release for terrific text-to-speech applications including our News Headlines (951) and Weather Forecasts by ZIP Code (947). It’s all rolled into one terrific bundle that can be installed in about a minute after you download the image from SourceForge and burn the image to a microSD card.
Unlike other aggregations, there’s nothing to compile with Incredible PBX/FAX 2022 for Raspbian. And, unlike the FreePBX Distro, we don’t rely on static packages which make it difficult to add future modifications on your own. Instead, Incredible PBX/Fax 2022 offers a snapshot image with a complete toolkit to make future modifications as desired. And, of course, Incredible PBX/Fax 2022 features the ClearlyIP module repository which protects you from proprietary modifications that limit or cripple your PBX moving forward.
What’s Included? Incredible PBX/Fax 2022 serves up a never before available VoIP powerhouse featuring Asterisk 16 or 18 and all FreePBX 15 GPL modules, an Apache web server, the latest MariaDB SQL server (formerly MySQL), Exim4 mail server, Incredible Fax with turnkey Hylafax and AvantFax, and most of the Incredible PBX feature set including SIP, PJSIP, SMS, voice recognition, AsteriDex, gTTS Text-to-Speech VoIP applications plus email delivery of faxes in PDF format, Click-to-Dial, News, Weather, Telephone Reminders, and hundreds of features that typically are found in commercial PBXs: Conferencing, IVRs and Email Delivery of transcribed voicemails, AutoAttendants, Voicemail Blasting, and more. We’ve also incorporated the Zero Trunk Configuration feature from the LITE build which lets you sign up with one of our VoIP providers and start making and receiving calls instantly. Or you can use the new ClearlyIP trunking module included in the GUI for seamless integration of SMS messaging into FreePBX and its User Control Panel.
Choosing a SIP Provider. As we mentioned, Incredible PBX/Fax 2022 comes preconfigured to support many of the major SIP providers including those that financially support Nerd Vittles and our open source projects: ClearlyIP, Skyetel, and VoIP.ms. As the old saying goes, they may not be the cheapest, but you get what you pay for. With all our providers, you only pay for minutes you use so signing up with more than one provider is a smart idea. For the full list of supported VoIP providers, visit the Incredible PBX Wiki.
") >
>Assembling the Required Raspberry Pi Components
Before you can deploy Incredible PBX 2022, you’ll first need the necessary Raspberry Pi hardware. To support the enhanced Incredible PBX/Fax platform, we strongly recommend either the Raspberry Pi 400 or the Raspberry Pi 4B with at least 2GB RAM for under $42. You can choose a reseller below for quicker delivery. Assuming you already own an HDMI-compatible monitor and a USB keyboard (only required if you don’t buy a RasPi 400)…
Raspberry Pi 4B or Raspberry Pi 400 $8 USB-C RasPi 4 (only) Power Supply $11 32GB microSDHC Class 10 card (strongly recommended!) $5 Official RasPi 4B Case or see above for our favorite
Getting Started with Incredible PBX 2022
Here’s our 10-Step Guide to installation and setup. "Automatic" means just watch. Steps #1 and #2: follow the links. For the remaining steps, we’ll further document the procedures.
- Download and unzip latest Incredible PBX/FAX 2022.6 image from SourceForge
- Transfer Incredible PBX/FAX 2022 image to microSD card and Boot server
- Login to RasPi console as root:password to initialize your server (Automatic)
- In Localization Options, set Locale, TimeZone, Keyboard, & WiFi Country
- Reboot after writing down your server IP address (Automatic)
- Login via SSH or Putty as root:password to set passwords & setup firewall (Automatic)
- Enter an email address for receipt of incoming faxes in PDF format
- Run admin-pw-change to set the admin password for access to the web GUI
- Register for and configure at least one trunk provider for Incredible PBX 2022
- Set up and test your Exim mail server as documented below
ALERT: Reportedly, the latest Raspberry Pi 4 board will not boot with earlier Incredible PBX images. Today’s updated image solves that, but you may wish to simply move your existing build to the latest RasPi hardware and preserve your data. If you have an older (working) Raspberry Pi, simply issue the following commands on the old platform. Following shutdown, insert the new microSD card into your new RasPi 4.
apt update
apt dist-upgrade
halt
First Boot of Incredible PBX 2022 with Wi-Fi
Incredible PBX 2022 requires Internet connectivity to complete its automated install. If you’re using a wired network connection, you can skip to the next section. With the Raspberry Pi 3B, 4B and 400, WiFi is built into the hardware. But you still have to insert your SSID name and SSID password to make a connection to your WiFi network. To do so, follow these next steps carefully. Insert the Incredible PBX 2022 microSD card into your Raspberry Pi and apply power to the hardware. When the bootup procedure finishes, login as root with the default password: password. At the first prompt, DO NOT PRESS THE ENTER KEY! Instead, press Ctrl-C to break out of the setup script. At the command prompt, issue the following commands to bring up the WiFi config file:
cd /etc/wpa_supplicant
nano -w wpa_supplicant.conf
If your WiFi network does not require a password, uncomment or insert the four lines below and save the file: Ctrl-X, Y, then Enter. Now restart your server: reboot. When the reboot finishes, you now should have network connectivity.
network={
 key_mgmt=NONE
 priority=1
 country=US
}
If your WiFi network requires a password, uncomment or insert the following into wpa_supplicant.conf:
ctrl_interface=DIR=/var/run/wpa_supplicant GROUP=netdev
update_config=1
country=US

network={
 ssid="YourSSID"
 psk="YourSSIDpassword"
 key_mgmt=WPA-PSK
 scan_ssid=1
 priority=7
}
Then scroll down to the SSID entry and replace YourSSID with the actual SSID of your WiFi network. Make sure you preserve the entry with the quotes as shown. Next, replace YourSSIDpassword with the SSID password of your WiFi network. Save the file: Ctrl-X, Y, then Enter. Now restart your server: reboot. When the reboot finishes, you now should have network connectivity.
Once the reboot process finishes, you should see an entry on about the middle line displayed on your monitor which reads: "My IP address is…". Write down the IP address shown. You’ll need it in a minute. Skip the next section since you are using a WiFi connection.
If you don’t see an IP address assigned to your server, then correct the network deficiency (invalid WiFi credentials, DHCP not working, Internet down), and reboot until you see an IP address assigned to your server. DO NOT PROCEED WITHOUT AN ASSIGNED IP ADDRESS. NOTE: The Raspberry Pi 400 requires the latest Incredible PBX image for Wi-Fi connectivity.
You’ll also need to change the default PortKnocker setting to your wireless LAN connection:
sed -i 's|eth0|wlan0|' /etc/default/knockd
service knockd restart
First Boot of Incredible PBX Using Wired Connection
Incredible PBX 2022 requires Internet connectivity to complete its automated install. After connecting your server to your local network with a network cable, insert the Incredible PBX 2022 microSD card into your Raspberry Pi and apply power to the hardware. When the bootup procedure finishes, you should see an entry on about the middle line displayed on your monitor which reads: "My IP address is…". Write down the IP address shown. You’ll need it in the next step.
If you don’t see an IP address assigned to your server, then correct the network deficiency (cable not connected, DHCP not working, Internet down), and reboot until you see an IP address assigned to your server. DO NOT PROCEED WITHOUT AN ASSIGNED IP ADDRESS.
Completing the Incredible PBX Initialization Procedure
Unless your desktop PC and RasPi are both on the same private LAN, the remainder of the install procedure should be completed from a desktop PC using SSH or Putty. This will assure that your desktop PC is also whitelisted in the Incredible PBX firewall. Using the console to complete the install is NOT recommended as your desktop PC will not be whitelisted in the firewall. This may result in your not being able to log in to your server. Once you have network connectivity, log in to your server as root from a desktop PC using the default password: password. Accept the license agreement by pressing ENTER. You then will be redirected to raspi-config. This is the utility used to expand your Incredible PBX 2022 image to use your entire microSD card; however, this new build does this for you so you can skip this step. Next, choose Localization Options and set Locale, TimeZone, Keyboard, & WiFi Country. Review the other items and then exit and reboot.
Once your server reboots and you log back in as root, you’ll first be prompted to enter an email address for delivery of incoming faxes in PDF format. All of your passwords then will be randomly assigned with the exception of the root user Linux password and your admin passwords for access to the web GUI and AvantFax. You can set the root password by issuing the command: passwd. Set the admin password for access to the web GUI with this command: /root/admin-pw-change. Set the admin password for access to AvantFax with this command: /root/avantfax-pw-change. With the exception of these passwords, the remaining passwords can be displayed using the command: /root/show-passwords.
Finally, if your PBX is sitting behind a NAT-based router, you’ll need to redirect incoming UDP 5060-5061 and UDP 10000-20000 traffic to the private IP address of your RasPi. This is required for all of the SIP providers included in the Incredible PBX 2022 build. Otherwise, all inbound calls will fail.

Configuring Skyetel for Incredible PBX 2022
If you’ve decided to go with Skyetel, here’s the drill. Sign up for Skyetel service and take advantage of the Nerd Vittles Free $10 credit and BOGO special. First, complete the Prequalification Form here. You then will be provided a link to the Skyetel site to complete your registration. Once you have registered on the Skyetel site and your account has been activated, open a support ticket and request the $10 credit for your account by referencing the Nerd Vittles special offer. Once you are happy with the service, open another ticket after funding your account and request that Skyetel match your deposit of up to $250. That gets you up to $500 of helf-price calling. Credit is limited to one per person/company/address/location. If you have numbers to port in, you can do it at no cost after funding your account. Effective 10/1/2023, $25/month minimum spend required.
Skyetel typically does not require SIP registrations to make connections to your PBX. Instead, Skyetel utilizes Endpoint Groups to identify which servers can communicate with the Skyetel service. An Endpoint Group consists of a Name, an IP address, a UDP or TCP port for the connection, and a numerical Priority for the group. For incoming calls destined to your PBX, DIDs are associated with an Endpoint Group to route the calls to your PBX. For outgoing calls from your PBX, a matching Endpoint Group is required to authorize outbound calls through the Skyetel network. Thus, the first step in configuring the Skyetel side for use with your PBX is to set up an Endpoint Group. Here’s a typical setup for Incredible PBX 2022:
- Name: MyPBX
- Priority: 1
- IP Address: PBX-Public-IP-Address
- Port: 5061
- Protocol: UDP
- Description: 2022.incrediblepbx.com
To receive incoming PSTN calls, you’ll need at least one DID. On the Skyetel site, you acquire DIDs under the Phone Numbers tab. You have the option of Porting in Existing Numbers (free for the first 60 days after you fund your account) or purchasing new ones under the Buy Phone Numbers menu option.
Once you have acquired one or more DIDs, navigate to the Local Numbers or Toll Free Numbers tab and specify the desired SIP Format and Endpoint Group for each DID. Add SMS/MMS and E911 support, if desired. Call Forwarding and Failover are also supported. That completes the VoIP setup on the Skyetel side. System Status is always available here.
Configuring VoIP.ms for Incredible PBX 2022
To sign up for VoIP.ms service, may we suggest you use our signup link so that Nerd Vittles gets a referral credit for your signup. Once your account is set up, you’ll need to set up a SIP SubAccount and, for Authentication Type, choose Static IP Authentication and enter your Incredible PBX 2022 server’s public IP address. For Transport, choose UDP. For Device Type, choose Asterisk, IP PBX, Gateway or VoIP Switch. Order a DID in their web panel, and then point the DID to the SubAccount you just created. Be sure to specify atlanta1.voip.ms as the POP from which to receive incoming calls. On the Incredible PBX side, simply Enable the VoIPms trunk and save your update.
Adding a Bootable SSD to Raspberry Pi
Shown below are the two components that make up the 256GB storage solution for the Raspberry Pi. These include the M.2 SSD SATA drive and the M.2 enclosure which provides a USB connector that’s compatible with your RasPi. Assembly of the components takes less than a minute as shown in the steps below:

You can order the M.2 SSD SATA drive and the UGREEN M.2 enclosure using our Amazon referral links which help support Nerd Vittles and the Incredible PBX open source project.
Once you have assembled your SSD in the sleeve, log back in as root using SSH or Putty. For best performance, insert the SSD drive into one of the blue USB 3.0 ports and verify that /dev/sda device is shown when you issue the command: fdisk -l
Now proceed with the following steps to copy the image from your microSD card to the new SSD SATA drive:
rpi-clone -l -e sda -f sda
# answer prompts with yes and incred2022
# once the image is copied, dismount the drive when prompted
mount /dev/sda2 /mnt/clone
cd /mnt/clone/boot
cp -p -r /boot/* .
sed -i 's|sda2|mmcblk0p2|' /boot/cmdline.txt
cd /
umount /mnt/clone
halt
Now you’re ready to restart your Raspberry Pi from the SSD SATA drive. Remove the microSD card and reboot your server.

Configuring a Softphone for Incredible PBX 2022
We’re in the home stretch now. You can connect virtually any kind of telephone to your new PBX. Plain Old Phones require an analog telephone adapter (ATA) which can be a separate board in your computer from a company such as Digium. Or it can be a standalone SIP device such as ObiHai’s OBi100 or OBi110 (if you have a phone line from Ma Bell to hook up as well). SIP phones can be connected directly so long as they have an IP address. These could be hardware devices or software devices such as the YateClient softphone. We’ll start with a free one today so you can begin making calls. You can find dozens of recommendations for hardware-based SIP phones both on Nerd Vittles and the PIAF Forum when you’re ready to get serious about VoIP telephony.
We recommend YateClient for Windows which is free. Download it from here. Run YateClient once you’ve installed it and enter the credentials for the 701 extension on Incredible PBX. You can find them by running /root/show-passwords. You’ll need the IP address of your server plus your extension 701 password. In the YateClient, fill in the blanks using the IP address of your Server, 701 for your Username, and whatever Password was assigned to the extension when you installed Incredible PBX. Click OK to save your entries.

Once you are registered to extension 701, close the Account window. Then click on YATE’s Telephony Tab and place some test calls to the numerous apps that are preconfigured on Incredible PBX. Dial a few of these to get started:
DEMO - Apps Demo
123 - Reminders
947 - Weather by ZIP Code
951 - Yahoo News
TODAY - Today in History
LENNY - The Telemarketer's Worst Nightmare
If you are a Mac user, another great no-frills softphone is Telephone. Just download and install it from the Mac App Store.
Audio Issues with Incredible PBX 2022
Only if you experience one-way or no audio on some calls, add your external IP address and LAN subnet in the GUI by navigating to Settings -> Asterisk SIP Settings. In the NAT Settings section, click Detect Network Settings. Click Submit and Apply Settings to save your changes.
Configuring Gmail as Exim Smart Relay Host
Most Raspberry Pi implementations will be on networks managed by companies like Comcast, Spectrum, and AT&T that block downstream mail servers (that’s you) from sending email. The solution is to use Gmail or your local ISP as a smart relay host to send mail from your server. You’ll need this to deliver voicemails via email. Here’s how to set it up using a Gmail account without two-step authentication. Log into your server as root and run dpkg-reconfigure exim4-config. Choose "mail sent by smarthost; received via SMTP or fetchmail." Accept all the defaults until you get to Outgoing Smarthost prompt. Enter: smtp.gmail.com::587. At the following prompts, choose NO, NO, mbox, and NO. When the setup completes, edit /etc/exim4/passwd.client and insert the following line using your Gmail AcctName and AcctPW. NOTE: Because insecure Gmail access is going away, you MUST use a Gmail App Password instead of your Gmail account password.
smtp.gmail.com:AcctName@gmail.com:AcctPW
Save the file and then issue the following commands to complete the setup:
update-exim4.conf
systemctl restart exim4
exim4 -qff
Now send yourself a test email message to make sure things are working properly:
echo "test" | mail -s testmessage yourname@yourmailprovider.com
Once you have email messages flowing, incoming faxes automatically will be delivered to the email address you assigned when setting up your PBX. You can change this email address with the command: avantfax-email-change.
Fixing Corrupted rc.local File & More
Some prefer an email notification whenever your server is booted. Also fixes the corrupted rc.local file. Once you have configured a relay host above, you can add the feature by editing /etc/rc.local and making the file look like this replacing name@domain.com with your actual email address:
#!/bin/sh -e

# Print the IP address
_IP=$(hostname -I) || true
if [ "$_IP" ]; then
  printf "My IP address is %s\n" "$_IP"
fi

_PRIVATE="Private IP: `cat /etc/hostip | cut -f1-2 -d " "`"
_PUBLIC="Public: $(dig TXT +short o-o.myaddr.l.google.com @ns1.google.com | sed 's|"||g')"
echo "$_PRIVATE   $_PUBLIC" | mail -s "Incredible PBX 2022.6 has booted" name@domain.com

sleep 5

service knockd start
sleep 30
chmod -R 777 /var/www/html/avantfax
exit 0
Configuring Inbound Routes for Fax Detection
Not all VoIP trunks support fax transmission, e.g. Vitelity. Assuming yours do and you’ll only know by trial and error, here’s how to configure FreePBX to automatically detect incoming faxes and process them for PDF delivery by email. The default inbound route is preconfigured to support email delivery of your faxes. So, any trunks using that default route require no further configuration. If you add additional Inbound Routes, here’s how to enable fax detection on those routes.
Under the Fax tab of each new Inbound Route, enter the following settings:
Detect Faxes: YES
Fax Detection Type: SIP
Fax Ring: YES
Fax Detect Time: 4
Fax Destination: Custom Destinations -> Fax (Hylafax)
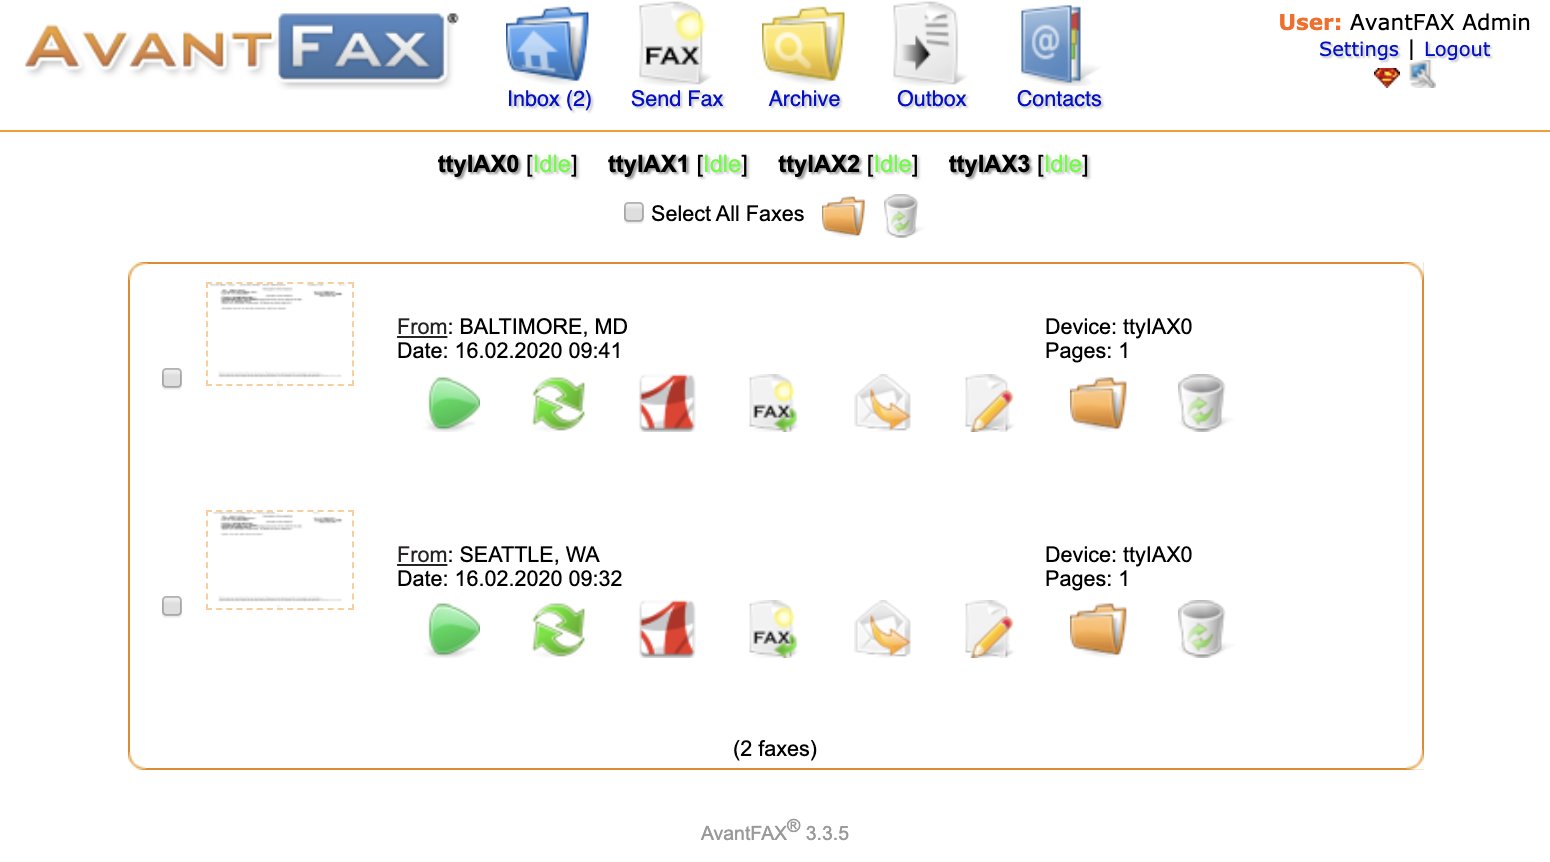
Managing Faxes with AvantFax
You can manage your incoming and outgoing faxes using AvantFax. Click on the AvantFax tab in FreePBX to access it. The default credentials are admin:password. When you first access AvantFax with a browser, you may get a missing page error. Just press the back arrow key in your browser and the AvantFax main page will appear.
If you want to change the admin password for AvantFax, log into your server as root with SSH/Putty and issue the command: /root/avantfax-pw-change.
Send yourself a fax at no cost in the United States from FaxZero.
Building the Incredible PBX Demo IVR
If you’d like to try your hand at building an IVR, here are the steps to build the Incredible PBX Demo IVR. From the FreePBX Dashboard, choose Applications -> IVR -> Add IVR. Then fill in the template using the entries shown below. Then click Submit and Reload Dialplan.


Building the Incredible PBX Stealth AutoAttendant
Many users prefer to play an announcement to incoming callers with a brief pause thereafter which indicates that the call is being connected. If configured properly, this lets you embed several dial codes which can be entered while the announcement is playing and the call is being transferred. For example, you might wish to route incoming calls to Lenny if a caller presses 0. Or you might wish to immediately route an incoming call to a Ring Group if the caller presses 1. Here’s a sample IVR setup to get you started.

Incredible PBX 2022 Administration
We’ve eased the pain of administering your new PBX with a collection of scripts which you will find in the /root folder after logging in with SSH or Putty. Here’s a quick summary of what each of the scripts does.
admin-pw-change lets you update the admin password for web browser access to the Incredible PBX GUI.
apache-pw-change lets you update the admin password for Apache applications such as AsteriDex and Reminders.
avantfax-pw-change lets you update the root password for AvantFax access (coming soon!).
add-fqdn is used to whitelist a fully-qualified domain name in the firewall. Because Incredible PBX 2022 blocks all traffic from IP addresses that are not whitelisted, this is what you use to authorize an external user for your PBX. The advantage of an FQDN is that you can use a dynamic DNS service to automatically update the IP address associated with an FQDN so that you never lose connectivity.
add-ip is used to whitelist a public IP address in the firewall. See the add-fqdn explanation as to why this matters.
del-acct is used to remove an IP address or FQDN from the firewall’s whitelist.
configure-exim-email lets you reconfigure the email server if you need to use an SMTP relay such as Google to get outbound email flowing. Tutorial here.
iptables-restart is the ONLY command you should ever use to restart the IPtables firewall and Fail2Ban.
knock.FAQ contains your PortKnocker credentials for emergency access to your server if the firewall locks you out. Tutorial here.
proximity (once configured) will automatically forward calls to your cellphone when you are out of BlueTooth range from your RasPi. Also must enable running of script in /etc/crontab.
reset-conference-pins is a script that automatically and randomly resets the user and admin pins for access to the preconfigured conferencing application. Dial C-O-N-F from any registered SIP phone to connect to the conference.
reset-extension-passwords is a script that automatically and randomly resets ALL of the SIP passwords for extensions 701-705. Be careful using this one, or you may disable existing registered phones and cause Fail2Ban to blacklist the IP addresses of those users. HINT: You can place a call to the Ring Group associated with all five extensions by dialing 777.
reset-reminders-pin is a script that automatically and randomly resets the pin required to access the Telephone Reminders application by dialing 123. It’s important to protect this application because a nefarious user could set up a reminder to call a number anywhere in the world assuming your SIP provider’s account was configured to allow such calls.

rpi-clone is a utility that makes it easy to make a bootable image of the microSD card used to start your Raspberry Pi. You’ll need a USB-to-microSD adapter to begin. Insert a backup microSD card large enough to hold all of the data on the primary microSD card (df -h). Insert the USB stick with the card. Identify the backup microSD card, usually sda (fdisk -l). Format the backup microSD card:
mkfs.vfat /dev/sda1 && mkfs.ext4 /dev/sda2. Then issue the following command to clone the primary microSD card: rpi-clone -f sda. Tutorial here.
show-feature-codes is a cheat sheet for all of the feature codes which can be dialed from any registered SIP phone. It documents how powerful a platform Incredible PBX 2022 actually is. A similar listing is available in the GUI at Admin -> Feature Codes.
show-passwords is a script that displays ALL of the passwords associated with Incredible PBX 2022. This includes SIP extension passwords, voicemail pins, conference pins, telephone reminders pin, and your Anveo Direct outbound calling pin (if configured). Note that voicemail pins are configured by the user of a SIP extension the first time the user accesses the voicemail system by dialing *97.
timezone-setup lets you reconfigure the correct time zone for your server.
purge-cdr-cel-records cleans out all existing entries in both the CDR and CEL tables of the Asterisk CDR database.
log-cleanup removes all entries from most of the logs in /var/log.
sig-fix disables module signature checking in FreePBX. It is automatically disabled upon installation.
readme-RonR.txt documents the scripts provided from RonR build. We do NOT recommend using the FCC Blacklist because of its current size.
update-asterisk16 is a utility that updates Asterisk 16 to the latest release. This should only be necessary when a security issue or bug is identified that affects the operation of your PBX.
update-IncrediblePBX is the Automatic Update Utility which checks for server updates from incrediblepbx.com every time you log into your server as root using SSH or Putty. Do NOT disable it as it is used to load important fixes and security updates when necessary. We recommend logging into your server at least once a week.
pbxstatus (shown above) displays status of all major components of Incredible PBX 2022.
Forwarding Calls to Your Cellphone. Keep in mind that inbound calls to your DIDs automatically ring all five SIP extensions, 701-705. The easiest way to also ring your cellphone is to set one of these five extensions to forward incoming calls to your cellphone. After logging into your PBX as root, issue the following command to forward calls from extension 705 to your cellphone: asterisk -rx "database put CF 705 6781234567"
To remove call forwarding: asterisk -rx "database del CF 705"
Keeping FreePBX 15 Modules Current
We strongly recommend that you periodically update all of your FreePBX modules to eliminate bugs and to reduce security vulnerabilities. Make a backup image with rpi-clone first! From the Linux CLI, log into your server as root and issue the following commands:
rm -f /tmp/*
fwconsole ma upgradeall
fwconsole reload
/root/sig-fix
systemctl restart apache2
/root/sig-fix
Upgrading Asterisk 16 to Asterisk 18
For those that enjoy living on the bleeding edge, we’ve create a script which makes it easy to upgrade Incredible PBX 2022 to Asterisk 18. The tutorial is available on the new Incredible PBX Wiki along with dozens of other tutorials.
Resolving an Expired Certificate Alert
1. Navigate to Admin -> Certificate Management in the FreePBX GUI
2. Click the Trashcan to delete the Self-Signed Certificate
3. Click New Certificate -> Generate Self-Signed Certificate
4. In the Description field, type: Default
5. Click Generate Certificate button
Continue Reading: Icing on the Cake for Incredible PBX and Raspberry Pi
Now Available: Amazon’s Polly TTS for Incredible PBX. Works great on the RasPi platform!
Originally published: Tuesday, March 24, 2022 Updated: Monday, February 22, 2021

Need help with Asterisk? Visit the VoIP-info Forum.
Special Thanks to Our Generous Sponsors
FULL DISCLOSURE: ClearlyIP, Skyetel, Vitelity, DigitalOcean, Vultr, VoIP.ms, 3CX, Sangoma, TelecomsXchange and VitalPBX have provided financial support to Nerd Vittles and our open source projects through advertising, referral revenue, and/or merchandise. As an Amazon Associate and Best Buy Affiliate, we also earn from qualifying purchases. We’ve chosen these providers not the other way around. Our decisions are based upon their corporate reputation and the quality of their offerings and pricing. Our recommendations regarding technology are reached without regard to financial compensation except in situations in which comparable products at comparable pricing are available from multiple sources. In this limited case, we support our sponsors because our sponsors support us.
 BOGO Bonaza: Enjoy state-of-the-art VoIP service with a $10 credit and half-price SIP service on up to $500 of Skyetel trunking with free number porting when you fund your Skyetel account. No limits on number of simultaneous calls. Quadruple data center redundancy. $25 monthly minimum spend required. Tutorial and sign up details are here.
![]() The lynchpin of Incredible PBX 2020 and beyond is ClearlyIP components which bring management of FreePBX modules and SIP phone integration to a level never before available with any other Asterisk distribution. And now you can configure and reconfigure your new Incredible PBX phones from the convenience of the Incredible PBX GUI.
The lynchpin of Incredible PBX 2020 and beyond is ClearlyIP components which bring management of FreePBX modules and SIP phone integration to a level never before available with any other Asterisk distribution. And now you can configure and reconfigure your new Incredible PBX phones from the convenience of the Incredible PBX GUI.
 VitalPBX is perhaps the fastest-growing PBX offering based upon Asterisk with an installed presence in more than 100 countries worldwide. VitalPBX has generously provided a customized White Label version of Incredible PBX tailored for use with all Incredible PBX and VitalPBX custom applications. Follow this link for a free test drive!
 Special Thanks to Vitelity. Vitelity is now Voyant Communications and has halted new registrations for the time being. Our special thanks to Vitelity for their unwavering financial support over many years and to the many Nerd Vittles readers who continue to enjoy the benefits of their service offerings. We will keep everyone posted on further developments.

Systems Integration and Public Participation with FreePBX

It’s been an interesting few days in the FreePBX® VoIP community with a thread on the VoIP-Info.org and another on the FreePBX Forum. It’s prompted us to revisit what open source development is all about and what all of this means to those of you that rely upon Asterisk® and FreePBX.
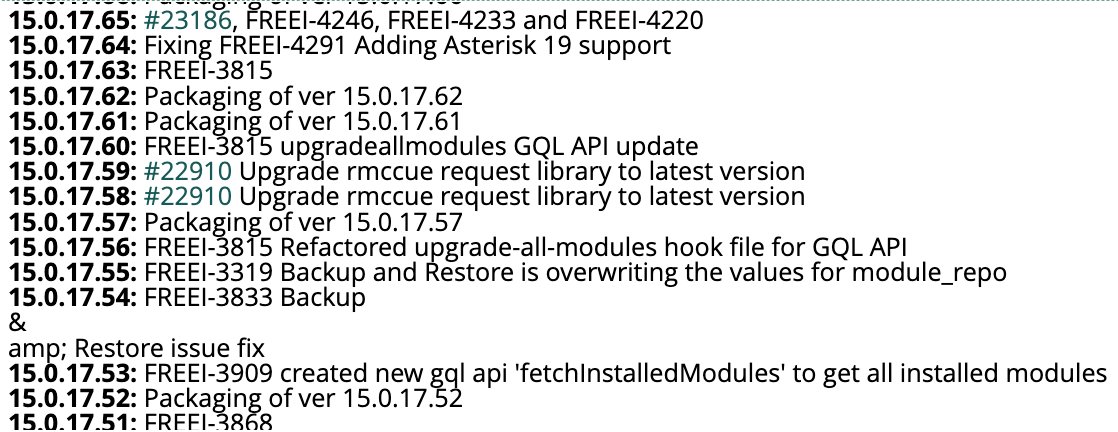
After the departure of the Schmooze folks from Sangoma, virtually all development has been moved behind closed doors with the first opportunity for public participation occurring after new features appear in modules pushed to the so-called Edge repository. This is where folks can shake the kinks out of modules that presumably are almost ready for prime time. For example, take a look at the Changelog for the Framework Module. Prior to the departure of the Schmooze team, changes were managed by openly-accessible tickets. But now you will notice tickets bear a FREEI designation indicating restricted Sangoma-internal access only.
Beta previously was an appropriate moniker for these modules. If you read the FreePBX forum post above, you’ll note that now modules are being pushed to the Edge repository not only before public comment but apparently before much of any internal testing is performed by the Sangoma folks. The net result is you’d be crazy to ever use Edge modules in any production environment where, in the past, Edge modules more typically were used to fix something that was already broken in the traditional repository. Because the Bootstrap module is the lynchpin of virtually all other FreePBX modules, a recent glitch that had not been tested broke almost everything in FreePBX 16 if you happened to be using Edge modules.
I’m reminded of the old adage about marine aquariums. You never want to put a new fish in your main tank unless you’re willing to risk killing all of your other fish. This latest fiasco prompts our cautionary note about further use of the FreePBX Edge repository. Don’t load new modules on your production servers without testing them first in a VirtualBox sandbox unless you have a snapshot or backup of your server that can be deployed in minutes when something cataclysmic occurs.
And that brings us to our response concerning what Incredible PBX® is and is not all about. Going back to the early 80’s, we began tweaking hardware and software deployments to eliminate much of the pain associated with deployment of automated systems. Our friend on the VoIP-Info forum refers to Incredible PBX as a fork of FreePBX. Quite the contrary, it is anything but a fork. We use the FreePBX GPL modules exactly as they are published by Sangoma with an additional master key not controlled by Sangoma for your protection and for ours. This allows us to block specific module updates that prove to be dangerous for our users. Equally important, Incredible PBX offers improved functionality and stability, the same features that are typically associated with the work of a systems integrator… that you pay for. On the stability side, we migrated to new FreePBX repositories maintained by Clearly IP simply because the FreePBX repos had become extremely unreliable and proprietary. Sangoma deploys modules using key signatures that only they control. That means if you make any improvements or changes the FreePBX Dashboard displays all sorts of security alerts, something your customers and end-users would prefer not to see. Some of you may recall this was our primary objection to module signatures years ago.
On the enhancement side, we’ve tried to add free components that our millions of readers have clamored for. You may recall that Nerd Vittles was the first to provide turnkey Google Voice support for Asterisk over a decade ago. We then tackled security after numerous compromises of FreePBX systems around the world. Since then the list has grown exponentially. Here’s the added feature set you’ve enjoyed by deploying an Incredible PBX platform instead of the FreePBX Distro. And, unlike FreePBX commercial modules, these components won’t cost you a dime and are freely distributable. So the choice is yours.
- User-customizable installers for Rocky 8, Debian 10 & 11, Ubuntu 20.04, Raspbian
- User-customizable images for VirtualBox, VMware, Proxmox, and Raspberry Pi
- Preconfigured, free faxing with HylaFax and AvantFax
- Preconfigured, secure IPtables firewall
- Preconfigured, secure Fail2Ban
- Preconfigured PortKnocker
- Preconfigured NeoRouter VPN
- Preconfigured OpenVPN
- Preconfigured, secure WebMin
- Preconfigured SendMail and Postfix
- Preconfigured ODBC Integration for FreePBX
- Sample ODBC Database Lookups for FreePBX
- Dozens of Preconfigured Trunk Provider Setups for FreePBX
- Preconfigured, secure PUBLIC Access Setups for FreePBX
- Preconfigured scripts to update CentOS, Debian, Ubuntu, Raspbian, and Rocky
- Preconfigured scripts to update or upgrade Asterisk
- Preconfigured scripts to update or upgrade FreePBX
- Preconfigured scripts to update or upgrade PHP
- Preconfigured script to implement PPTP
- Preconfigured script to implement TFTP
- Preconfigured script to implement SAMBA
- Preconfigured script to implement Gmail Smarthost for SendMail/Postfix
- Preconfigured script to implement non-Gmail Smarthost for SendMail/Postfix
- Automatic Update Utility to resolve bugs and security vulnerabilities
- Integrated TTS apps: FLITE, Festival, PicoTTS, GoogleTTS, Amazon Polly
- Integrated TTS apps for Voicemail Transcription
- Integrated STT apps and samples for Asterisk and FreePBX
- Integrated Voicemail Transcription for Asterisk with Email Delivery
- AsteriDex 4 web-based MySQL GUI with FreePBX Dialer & Lookups
- Telephone and Web-Based Reminders for FreePBX with Email and SMS Alerts
- TTS News Headlines for FreePBX
- TTS Weather Forecasts for FreePBX (by ZIP Code and Airport Code)
- CallerID Superfecta for Asterisk
- MailCall for Asterisk via TTS
- SMS Scripts for Skyetel and VoIP.ms Message Blasting
- Speech-to-Text Directory Assistance for Asterisk
- Wolfram Alpha TTS for FreePBX
- U-Rang Screenpop Utility for Asterisk
- xTide TTS for FreePBX
- Facebook Messaging Integration
- Twitter Messaging Integration
- Skype and Gizmo Telephony Integration
- Teleyapper Message Broadcasting System for Asterisk
- Scripts to disable Module Signature Checking with FreePBX
- Script to configure time zones worldwide
- Incredible Backup and Restore Utilities for all OS platforms
- LENNY, The Robocallers Worst Nightmare
People hear the word "fork" and get scared away from testing alternative VoIP solutions. If you’re one of those folks, we would encourage you to spend an hour with Incredible PBX using one of our supported virtual platforms: VirtualBox, VMware, or Proxmox. We think the decision will be a no-brainer after your testing. For a list of all of our free VoIP solutions, visit the Incredible PBX Wiki. Enjoy!
Originally published: Monday, May 23, 2022
Need help with Asterisk? Visit the VoIP-info Forum.
Special Thanks to Our Generous Sponsors
FULL DISCLOSURE: ClearlyIP, Skyetel, Vitelity, DigitalOcean, Vultr, VoIP.ms, 3CX, Sangoma, TelecomsXchange and VitalPBX have provided financial support to Nerd Vittles and our open source projects through advertising, referral revenue, and/or merchandise. As an Amazon Associate and Best Buy Affiliate, we also earn from qualifying purchases. We’ve chosen these providers not the other way around. Our decisions are based upon their corporate reputation and the quality of their offerings and pricing. Our recommendations regarding technology are reached without regard to financial compensation except in situations in which comparable products at comparable pricing are available from multiple sources. In this limited case, we support our sponsors because our sponsors support us.
BOGO Bonaza: Enjoy state-of-the-art VoIP service with a $10 credit and half-price SIP service on up to $500 of Skyetel trunking with free number porting when you fund your Skyetel account. No limits on number of simultaneous calls. Quadruple data center redundancy. $25 monthly minimum spend required. Tutorial and sign up details are here.
![]() The lynchpin of Incredible PBX 2020 and beyond is ClearlyIP components which bring management of FreePBX modules and SIP phone integration to a level never before available with any other Asterisk distribution. And now you can configure and reconfigure your new Incredible PBX phones from the convenience of the Incredible PBX GUI.
The lynchpin of Incredible PBX 2020 and beyond is ClearlyIP components which bring management of FreePBX modules and SIP phone integration to a level never before available with any other Asterisk distribution. And now you can configure and reconfigure your new Incredible PBX phones from the convenience of the Incredible PBX GUI.
VitalPBX is perhaps the fastest-growing PBX offering based upon Asterisk with an installed presence in more than 100 countries worldwide. VitalPBX has generously provided a customized White Label version of Incredible PBX tailored for use with all Incredible PBX and VitalPBX custom applications. Follow this link for a free test drive!
Special Thanks to Vitelity. Vitelity is now Voyant Communications and has halted new registrations for the time being. Our special thanks to Vitelity for their unwavering financial support over many years and to the many Nerd Vittles readers who continue to enjoy the benefits of their service offerings. We will keep everyone posted on further developments.
Deal of the Year: OBi2182 Color WiFi Phones now $59.99

One year and counting… If you still have some Google Voice numbers lying around or if you’d like to join the party a little late, now is your second chance. Amazon now is selling the OBi2182 phones to U.S. residents with native Google Voice as well as WiFi, Bluetooth, HD Voice, speakerphone, and a power adapter currently selling for $69.99. Hold, transfer, and conferencing support are included in the phone. Here’s our Amazon referral link to keep the lights on.
We were big fans of OBiHai once upon a time. But then they sold out to Polycom. And they subsequently sold out to Plantronics. And support went from bad to worse along the way. But things appear to have stabilized so this offering may just be one of the best deals on the planet. Not only do you get unlimited free calling throughout the U.S., Canada, and Ukraine but you also get some of the best pricing ever on most international calls. While we no longer have any dealings with ObiHai, Polycom, or Plantronics, we know many of our followers were left high and dry when Google pulled the plug on Google Voice for Asterisk®. Here’s a tip.
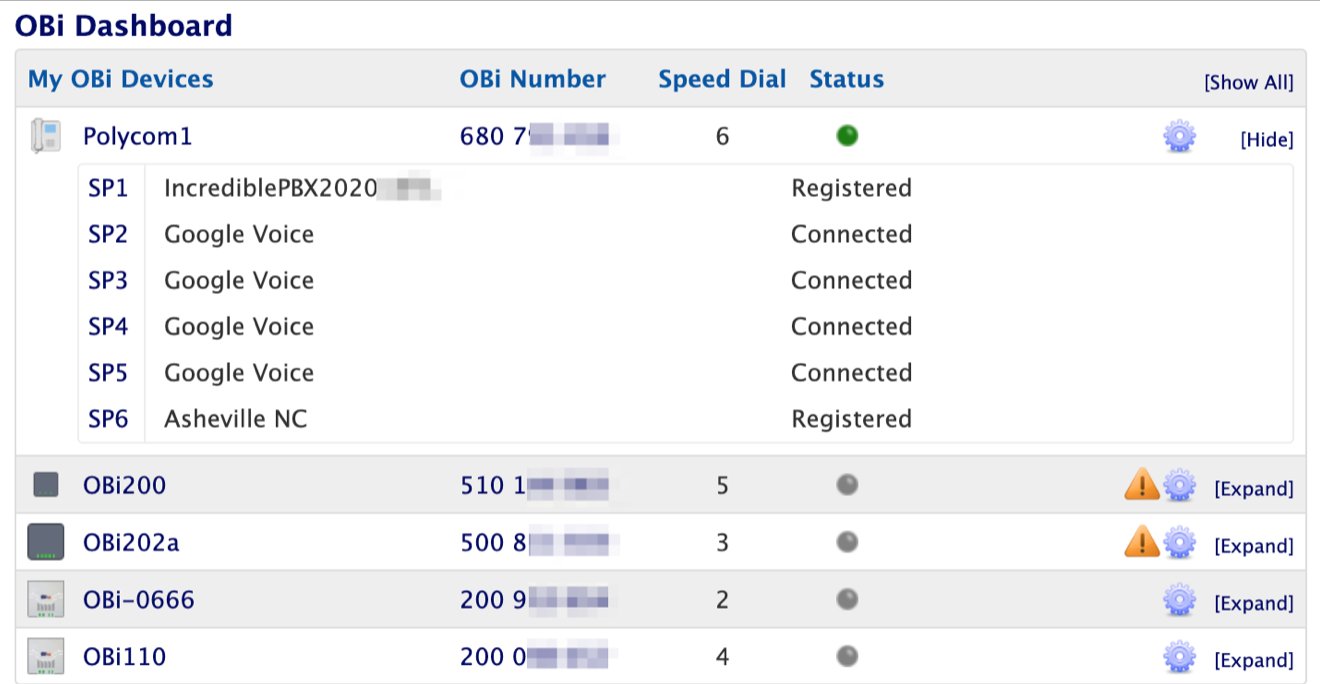
Adding one or more of these phones makes a perfect supplement to your Asterisk platform making it easy to add free calling to your home or home office PBX. And it’s not too late to order a Google Voice number if you’re new to the game. Configuring a SIP or PJsip connection as well as Bluetooth connectivity to your cellphone is just as simple as adding Google Voice trunks using the OBiTalk web interface shown below. Trunk setups take less than a minute apiece. The phone supports 12 lines. And WiFi calls are crystal-clear thanks to HD Voice.
Grab an OBi2182 while you still can! An Admin Guide to the OBi2182 is available here.
Originally published: Monday, May 9, 2022
Need help with Asterisk? Visit the VoIP-info Forum.
Special Thanks to Our Generous Sponsors
FULL DISCLOSURE: ClearlyIP, Skyetel, Vitelity, DigitalOcean, Vultr, VoIP.ms, 3CX, Sangoma, TelecomsXchange and VitalPBX have provided financial support to Nerd Vittles and our open source projects through advertising, referral revenue, and/or merchandise. As an Amazon Associate and Best Buy Affiliate, we also earn from qualifying purchases. We’ve chosen these providers not the other way around. Our decisions are based upon their corporate reputation and the quality of their offerings and pricing. Our recommendations regarding technology are reached without regard to financial compensation except in situations in which comparable products at comparable pricing are available from multiple sources. In this limited case, we support our sponsors because our sponsors support us.
BOGO Bonaza: Enjoy state-of-the-art VoIP service with a $10 credit and half-price SIP service on up to $500 of Skyetel trunking with free number porting when you fund your Skyetel account. No limits on number of simultaneous calls. Quadruple data center redundancy. $25 monthly minimum spend required. Tutorial and sign up details are here.
![]() The lynchpin of Incredible PBX 2020 and beyond is ClearlyIP components which bring management of FreePBX modules and SIP phone integration to a level never before available with any other Asterisk distribution. And now you can configure and reconfigure your new Incredible PBX phones from the convenience of the Incredible PBX GUI.
The lynchpin of Incredible PBX 2020 and beyond is ClearlyIP components which bring management of FreePBX modules and SIP phone integration to a level never before available with any other Asterisk distribution. And now you can configure and reconfigure your new Incredible PBX phones from the convenience of the Incredible PBX GUI.
VitalPBX is perhaps the fastest-growing PBX offering based upon Asterisk with an installed presence in more than 100 countries worldwide. VitalPBX has generously provided a customized White Label version of Incredible PBX tailored for use with all Incredible PBX and VitalPBX custom applications. Follow this link for a free test drive!
Special Thanks to Vitelity. Vitelity is now Voyant Communications and has halted new registrations for the time being. Our special thanks to Vitelity for their unwavering financial support over many years and to the many Nerd Vittles readers who continue to enjoy the benefits of their service offerings. We will keep everyone posted on further developments.
Interconnecting Asterisk Servers with PJsip and OpenVPN

It’s been several years since we discussed interconnecting Asterisk® servers so today we want to do a version refresh using PJsip Trunking. We also want to show you how easy it is to secure the communications path by setting up the trunks using OpenVPN connections. When we’re finished, you’ll have a FREE way to call between sites using FreePBX® Outbound Routes. Because Incredible PBX comes preconfigured with all the components you’ll need, we’ll use that platform to further simplify the deployment. We’ll be interconnecting two Asterisk servers today, but you can use the same methodology to connect numerous sites.
Deploying OpenVPN with Asterisk Servers
To begin, you’ll want to get all of the sites configured with a virtual private network using OpenVPN. Our tutorial will walk you through the process. Keep in mind that all current releases of Incredible PBX are preconfigured to let you drop in your OpenVPN client credentials by naming them incrediblepbx.ovpn and copying the file into the /etc directory. Rebooting your server will bring up the virtual private network with a 10.8.0.x IP address.
Configuring PJsip Trunks on Your Asterisk Servers
If you remember yesteryear’s knuckle drill configuring SIP or IAX trunks for Asterisk connectivity, you’re in for a pleasant surprise using PJsip trunking with FreePBX. Using the GUI, create a new PJsip trunk for every site to which you want to establish a connection. A similar PJsip trunk must be created on the other site as well. If you’re just interconnecting two servers, then using the City locations for the Trunk Names will suffice. But, if there are more than two servers, specify unique names for each end of every PJsip connection, e.g.
NewYork1 <-> London1
NewYork2 <-> Washington1
NewYork3 <-> Miami1
London2 <-> Washington2
London3 <-> Miami2
Washington3 <-> Miami3
For today, we’ll interconnect a server in New York and London, but we’ll plan for the future and use London1 for the Trunk Name on the New York server and NewYork1 for the Trunk Name on the London server.
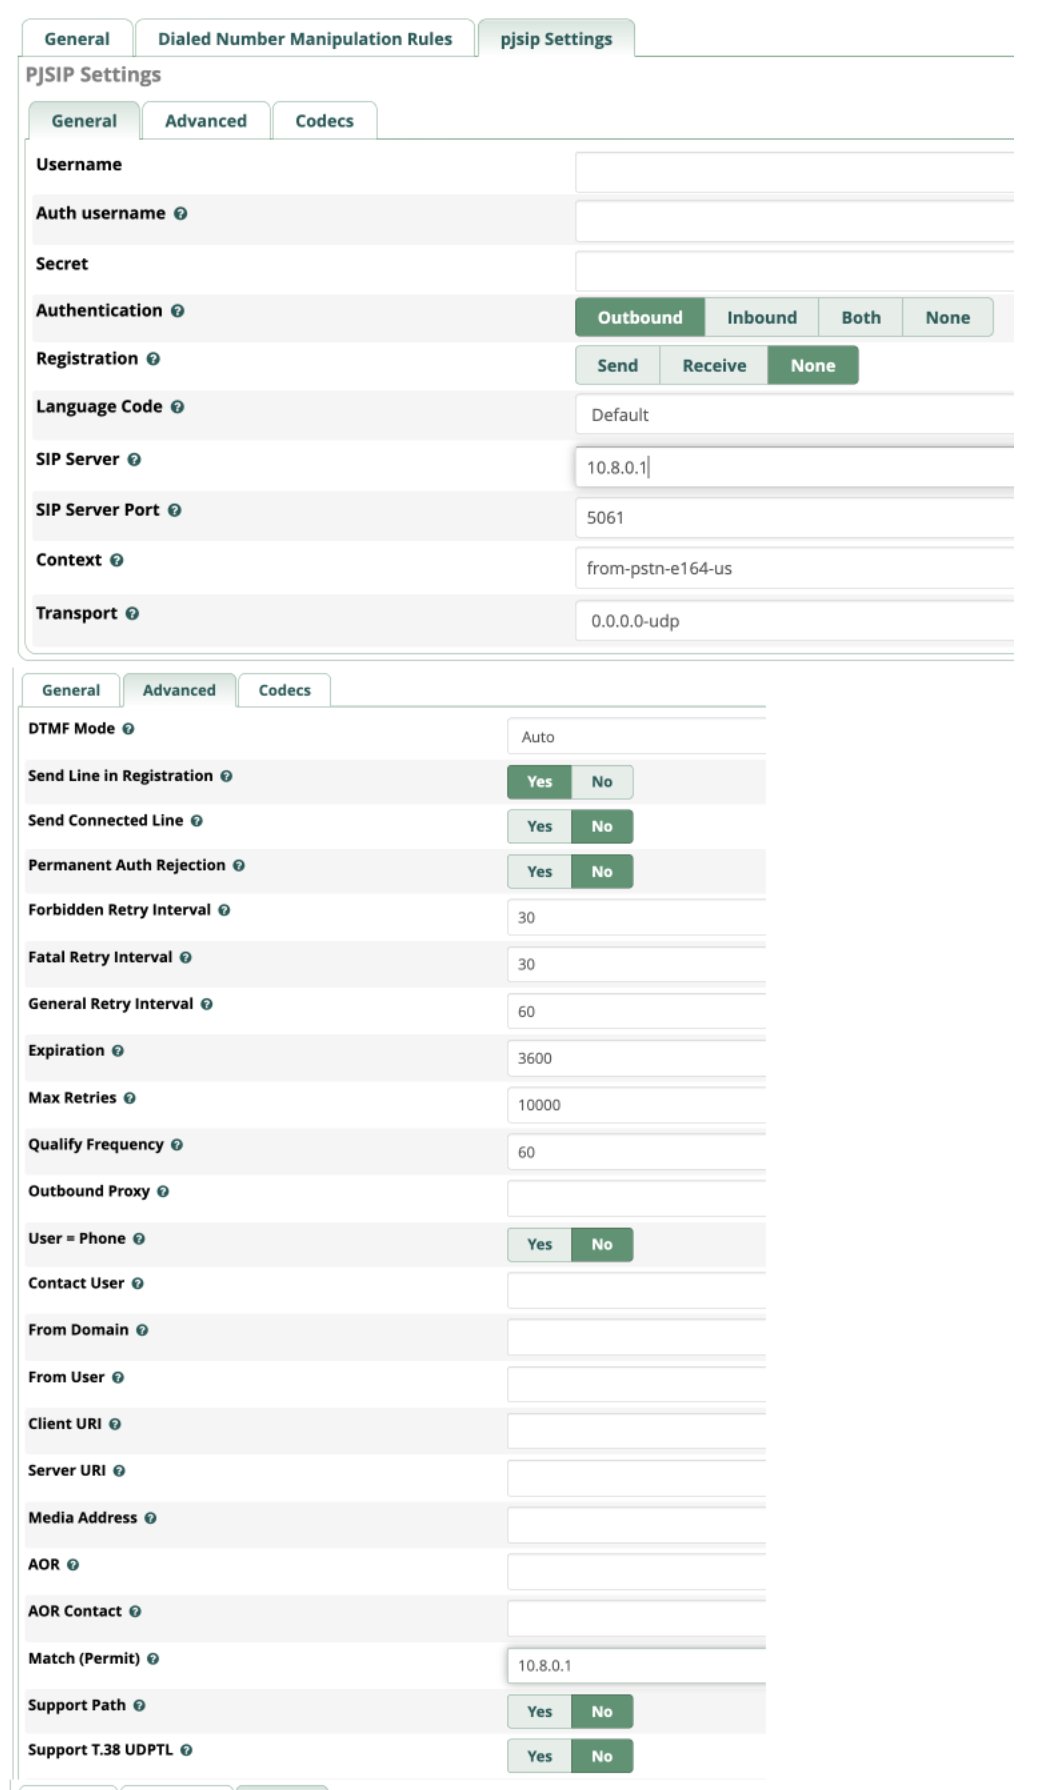
Let’s begin by configuring the London1 trunk on the New York server. After entering the London1 Trunk Name in the General tab, click on the pjsip Settings tab. In the General tab, leave the defaults in the first four fields. Then change the Registration field to None. For the SIP Server field, enter the OpenVPN IP address of the London server, e.g. 10.8.0.2. Because we’re using Incredible PBX, the PJsip port is 5061 so enter that in the SIP Server Port field. If you’re using a different flavor of FreePBX, enter the appropriate port number for PJsip on your platform. Next, click on the Advanced tab and enter the London server’s OpenVPN address in the Match (Permit) field, e.g. 10.8.0.2. In the Codecs tab, make note of the enabled codecs and make certain that the entries match on all of your servers. Click the Submit button to save your settings and then reload your dialplan.
Now let’s configure the NewYork1 trunk on the London server. After entering the NewYork1 Trunk Name in the General tab, click on the pjsip Settings tab. In the General tab, leave the defaults in the first four fields. Then change the Registration field to None. For the SIP Server field, enter the OpenVPN IP address of the New York server, e.g. 10.8.0.1. Because we’re using Incredible PBX, the PJsip port is 5061 so enter that in the SIP Server Port field. If you’re using a different flavor of FreePBX, enter the appropriate port number for PJsip on your platform. Next, click on the Advanced tab and enter the New York server’s OpenVPN address in the Match (Permit) field, e.g. 10.8.0.1. In the Codecs tab, make certain that the entries match those on your New York server. Click the Submit button to save your settings and then reload your dialplan. Here’s how it looks in the FreePBX GUI:
Use Outbound Routes to Interconnect Extensions
To keep things simple, let’s assume both your New York and London servers have extensions 701-705. To call an extension on the other server, we will simply dial 9 and then the 3-digit extension, e.g. dialing 9701 on the New York server will ring 701 on the London server and dialing 9701 on the London server will ring 701 on the New York server.
Create an Outbound Route on the New York server called London specifying London1 for the Trunk Sequence in the Route Settings tab. In the Dial Patterns tab, enter 9 in the Prefix field and XXX for the Match Pattern. Click Submit to save your settings and then reload dialplan.

Create an Outbound Route on the London server called New York specifying NewYork1 for the Trunk Sequence in the Route Settings tab. In the Dial Patterns tab, enter 9 in the Prefix field and XXX for the Match Pattern. Click Submit to save your settings and then reload dialplan.
If you’re interconnecting more than two sites, then you probably will want to designate a specific Prefix for every City so that users can travel between sites and use the same methodology to reach the same extensions from every location.
You can test things out using softphones by registering 701 to an extension in New York and another to the 701 extension in London. Now you can place secure and FREE calls between the sites by dialing 9701 from each softphone. Enjoy!
Originally published: Monday, May 2, 2022
Need help with Asterisk? Visit the VoIP-info Forum.
Special Thanks to Our Generous Sponsors
FULL DISCLOSURE: ClearlyIP, Skyetel, Vitelity, DigitalOcean, Vultr, VoIP.ms, 3CX, Sangoma, TelecomsXchange and VitalPBX have provided financial support to Nerd Vittles and our open source projects through advertising, referral revenue, and/or merchandise. As an Amazon Associate and Best Buy Affiliate, we also earn from qualifying purchases. We’ve chosen these providers not the other way around. Our decisions are based upon their corporate reputation and the quality of their offerings and pricing. Our recommendations regarding technology are reached without regard to financial compensation except in situations in which comparable products at comparable pricing are available from multiple sources. In this limited case, we support our sponsors because our sponsors support us.
BOGO Bonaza: Enjoy state-of-the-art VoIP service with a $10 credit and half-price SIP service on up to $500 of Skyetel trunking with free number porting when you fund your Skyetel account. No limits on number of simultaneous calls. Quadruple data center redundancy. $25 monthly minimum spend required. Tutorial and sign up details are here.
![]() The lynchpin of Incredible PBX 2020 and beyond is ClearlyIP components which bring management of FreePBX modules and SIP phone integration to a level never before available with any other Asterisk distribution. And now you can configure and reconfigure your new Incredible PBX phones from the convenience of the Incredible PBX GUI.
The lynchpin of Incredible PBX 2020 and beyond is ClearlyIP components which bring management of FreePBX modules and SIP phone integration to a level never before available with any other Asterisk distribution. And now you can configure and reconfigure your new Incredible PBX phones from the convenience of the Incredible PBX GUI.
VitalPBX is perhaps the fastest-growing PBX offering based upon Asterisk with an installed presence in more than 100 countries worldwide. VitalPBX has generously provided a customized White Label version of Incredible PBX tailored for use with all Incredible PBX and VitalPBX custom applications. Follow this link for a free test drive!
Special Thanks to Vitelity. Vitelity is now Voyant Communications and has halted new registrations for the time being. Our special thanks to Vitelity for their unwavering financial support over many years and to the many Nerd Vittles readers who continue to enjoy the benefits of their service offerings. We will keep everyone posted on further developments.
Deploying a Non-Google SMTP RelayHost with Asterisk

This will not be the sexiest column you read this year, but it may be the most important. You need a reliable way for your VoIP-based PBX to deliver emails to you and your users when incoming voicemails arrive and when your server has problems. At least for Incredible PBX® platforms, we thought we had this solved with our Gmail Smarthost solution. But, alas, Google continues to move the goal posts and has announced that it will discontinue support for so-called "Less Secure Apps" on May 30, 2022. After watching Google blow up one of their apps after another over the years, you’d think we’d learn. But the ease of use and (free) pricing of Google offerings continues to entice until… another one bites the dust.
Why Do You Need a RelayHost? Many Internet Service Providers (ISPs) block downstream mail servers from sending email to reduce spam. If you have a PBX sitting behind a Comcast cable modem and you don’t have a business account, that would be you.
What Is a RelayHost? A RelayHost is an intermediate mail provider that provides last mile delivery of your server’s outbound email without your having to worry about the intricacies of setting up and properly configuring an SMTP gateway. Instead, your server pushes your outbound email messages to the smarthost using your credentials and leaves the rest of the delivery task to the RelayHost.
Choosing a RelayHost. Lucky for all of us, there are many RelayHost providers from which to choose. Most offer a free tier with 100 or more daily emails. For most PBXs, that is more than ample without spending a dime. If your server pushes out more than 100 emails a day, then there are commercial tiers of service available from these same providers. Here are some of the favorites recommended by our users: Twilio’s SendGrid, Mailjet, SendInBlue, and our own free MXroute offering. We would prefer you use our service as a last resort if you can’t get any of the other free offerings to work. We’ll show you how to set up Twilio’s SendGrid as a RelayHost to get you started.
Configuring a RelayHost with Incredible PBX. There’s good news and bad news. While all of these solutions offer a free tier, the setup process with some of these services can be a bear. We’ve attempted to take the pain out of this by walking you through the setup steps. For openers, configuring SendMail as an SMTP Smarthost is not for mere mortals so we’ll first migrate your PBX to Postfix to simplify the setup procedure. Here is a quick list of the tasks:
- Migrate Your PBX from SendMail to Postfix
- Obtain an Account with SmartHost Provider
- Configure Postfix Email Relay Using SmartHost Provider
- Test Outbound Mail
Migrating Incredible PBX 2022 to Postfix. Our new Incredible PBX 2022 build for Rocky 8 comes with both SendMail and Postfix preinstalled. So it’s simple to switch gears. Here are the commands:
systemctl stop sendmail
systemctl disable sendmail
systemctl start postfix
systemctl enable postfix
sed -i 's|-c sendmail|-c postfix|' /usr/local/sbin/pbxstatus
sed -i 's|SendMail| Postfix|' /usr/local/sbin/pbxstatus
systemctl status postfix
Migrating Incredible PBX 2021 to Postfix. By default, Incredible PBX 2021 servers do not include Postfix. So here are the steps to install Postfix and remove SendMail. These steps also apply to all releases of Incredible PBX on the Raspbian platform.
apt-get update
apt-get install postfix sasl2-bin -y
# choose No Configuration option when prompted in:
# dpkg-reconfigure postfix
systemctl stop sendmail
systemctl disable sendmail
systemctl start postfix
systemctl enable postfix
sed -i 's|-c sendmail|-c postfix|' /usr/local/sbin/pbxstatus
echo "incrediblepbx.com" > /etc/mailname
sed -i 's|SendMail| Postfix|' /usr/local/sbin/pbxstatus
systemctl status postfix
Creating a Free SendGrid Account. Begin by navigating to the SendGrid Start for Free link. Enter your Email Address and a 16-character password of your choice. Accept the Terms of Service and click Create Account. Fill in the Personal Information and click Get Started. Create a Single Sender Identity. Confirm receipt of the verification email. You can skip enabling Two-Factor Authentication if desired. Next, open the Email API tab and click Integration Guide. Choose SMTP Relay and create an APIKEY. Copy the generated APIKEY to a safe place. It cannot be deciphered again!
Now edit /etc/postfix/main.cf and add the following entries to the bottom of the file:
smtp_sasl_auth_enable = yes
smtp_sasl_password_maps = hash:/etc/postfix/sasl_passwd
smtp_sasl_security_options = noanonymous
smtp_sasl_tls_security_options = noanonymous
smtp_tls_security_level = encrypt
header_size_limit = 4096000
relayhost = [smtp.sendgrid.net]:587
Then create /etc/postfix/sasl_passwd and enter the following, replacing YOUR-APIKEY with your actual key from above:
[smtp.sendgrid.net]:587 apikey:YOUR-APIKEY
Complete the setup by issuing the following commands:
chmod 600 /etc/postfix/sasl_passwd
postmap /etc/postfix/sasl_passwd
systemctl restart postfix
systemctl status postfix
IMPORTANT NOTE: With SendGrid, the email address you entered for your Single Sender Identity must match the FROM: address on every outbound email message sent from your server. We’ll need to adjust the FROM: address in FreePBX before any voicemail emails can be successfully sent. Also, if you send emails from the command line, the syntax must be as shown here with your sender@yourdomain.com matching what was entered as your Sender Identity email address.
echo "test" | mail -r sender@yourdomain.com -s testmessage recipient@somedomain.com
At least with Gmail recipients, they may also see the following with messages from your PBX until they click Looks Safe:

Finally, be sure to adjust the FROM address for outbound voicemail messages in the FreePBX GUI. Login as admin and enter your Sender Identity Email Address in the Server Email field in Settings -> Voicemail Admin -> Settings -> Email Config.
You can check for errors by reviewing the Postfix mail log: tail /var/log/mail.log.
UPDATE: Setup scripts for Debian 10 and Rocky 8 can be downloaded here.
Originally published: Thursday, March 17, 2022
Need help with Asterisk? Visit the VoIP-info Forum.
Special Thanks to Our Generous Sponsors
FULL DISCLOSURE: ClearlyIP, Skyetel, Vitelity, DigitalOcean, Vultr, VoIP.ms, 3CX, Sangoma, TelecomsXchange and VitalPBX have provided financial support to Nerd Vittles and our open source projects through advertising, referral revenue, and/or merchandise. As an Amazon Associate and Best Buy Affiliate, we also earn from qualifying purchases. We’ve chosen these providers not the other way around. Our decisions are based upon their corporate reputation and the quality of their offerings and pricing. Our recommendations regarding technology are reached without regard to financial compensation except in situations in which comparable products at comparable pricing are available from multiple sources. In this limited case, we support our sponsors because our sponsors support us.
BOGO Bonaza: Enjoy state-of-the-art VoIP service with a $10 credit and half-price SIP service on up to $500 of Skyetel trunking with free number porting when you fund your Skyetel account. No limits on number of simultaneous calls. Quadruple data center redundancy. $25 monthly minimum spend required. Tutorial and sign up details are here.
![]() The lynchpin of Incredible PBX 2020 and beyond is ClearlyIP components which bring management of FreePBX modules and SIP phone integration to a level never before available with any other Asterisk distribution. And now you can configure and reconfigure your new Incredible PBX phones from the convenience of the Incredible PBX GUI.
The lynchpin of Incredible PBX 2020 and beyond is ClearlyIP components which bring management of FreePBX modules and SIP phone integration to a level never before available with any other Asterisk distribution. And now you can configure and reconfigure your new Incredible PBX phones from the convenience of the Incredible PBX GUI.
VitalPBX is perhaps the fastest-growing PBX offering based upon Asterisk with an installed presence in more than 100 countries worldwide. VitalPBX has generously provided a customized White Label version of Incredible PBX tailored for use with all Incredible PBX and VitalPBX custom applications. Follow this link for a free test drive!
Special Thanks to Vitelity. Vitelity is now Voyant Communications and has halted new registrations for the time being. Our special thanks to Vitelity for their unwavering financial support over many years and to the many Nerd Vittles readers who continue to enjoy the benefits of their service offerings. We will keep everyone posted on further developments.
An Electronics Home Makeover for the 21st Century

It was a sad day when we finally sold our Bozak Concert Grand speakers this year after enjoying them for over half a century. They were a graduation present from "Papa Gene" Newsom of Newsom’s Music Center when I graduated from law school in 1971. The sale got me thinking that I really needed to write about what has changed in home entertainment now that we’ve turned the page to another century. Back then, there was no Internet or Spotify, just bootleg 8-track tapes, an Apple record label, and great home audio made by McIntosh.
For those living in the present, let me tick off what we hope will save you a boatload of money in the coming years. We’ll cover Internet service providers as well as telephony, home audio and TV options, and home automation. Our plan here is to show you how to replace your $200-$500 a month Comcast, Spectrum, and cellular bills with setups that are more robust and considerably less expensive for the whole family.
Choosing a Cell Provider in 2021
With the advent of 46/LTE and 5G cellular service, the cell phone landscape in the U.S. has changed dramatically in the past two years. Unless you live in a remote location, 5G service now is available from all of the major U.S. carriers: T-Mobile, Verizon, and AT&T. This is where looking at the overall family picture can pay off royally. For example, T-Mobile bundles Netflix, Apple TV, and In-Flight WiFi plus discounted YouTube TV service with many of their plans, and there are substantial discounts compared with other carriers particularly if you’re on a family plan or are a military veteran or age 55+. If you wrote off T-Mobile years ago, it’s time to have another look. Their 5G coverage area now is second to none and pricing is typically 30-50% less than Verizon or AT&T. If you’re looking for the least costly all-you-can-eat cellular plan, then take a careful look at the Nerd Vittles special with Visible, which is the Verizon discount carrier. Unless you need great cell service during major sporting events inside the stadium, our $25 plan has no equal. Here’s a link to our article with the details.
Choosing an Internet Service Provider in 2021
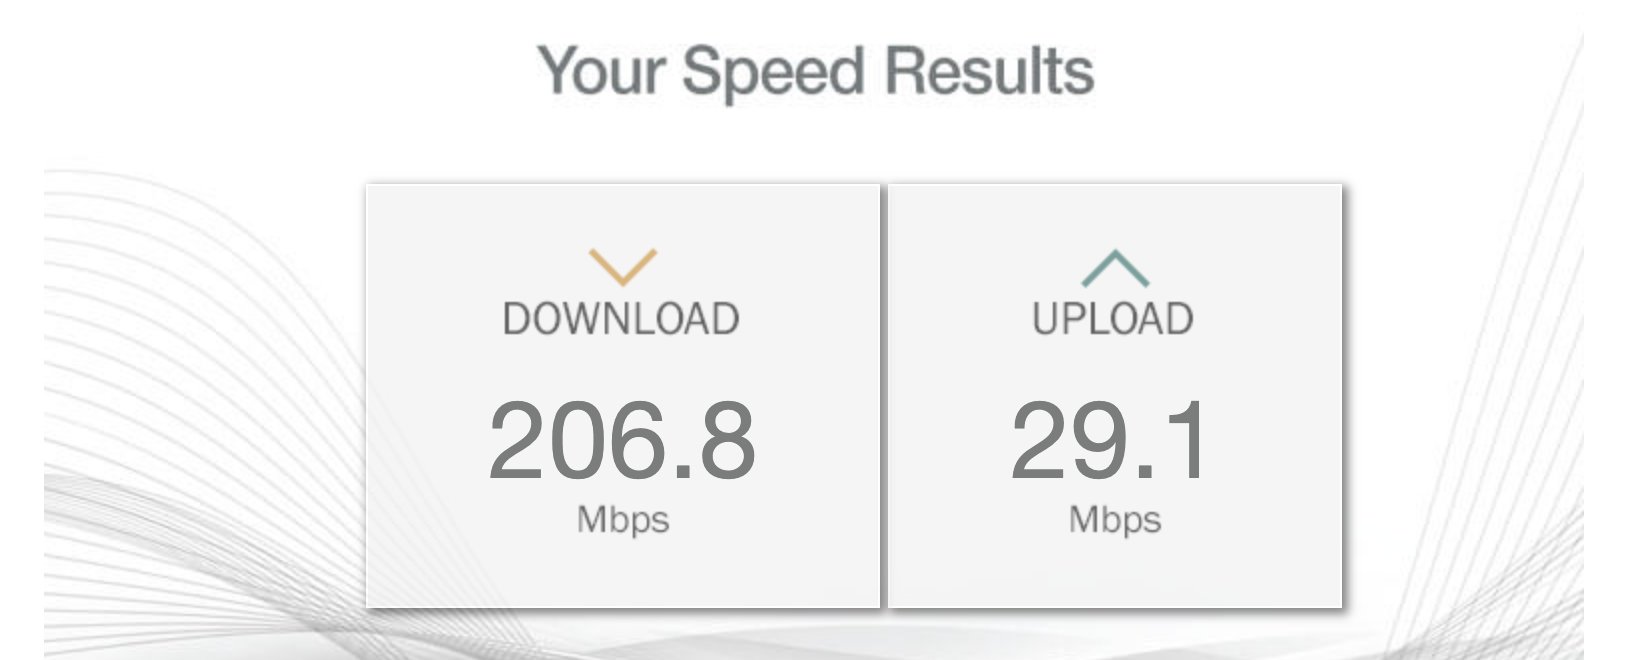
If your cable TV and Internet bill is in the $150+ range and most are, we’ve got some exciting news for you. T-Mobile now has unlimited 5G Home Internet service for $50 a month. While it’s still a little difficult to obtain in all areas, check often. We’ve been searching for eight months in four cities and had signed up for email notice when it was available. We never got an email but, lo and behold, it popped up as available in Asheville NC when we checked last week. Once you have the T-Mobile router, it will work anywhere there’s a T-Mobile 4G/LTE or 5G tower. The results below were in Charleston, SC where the T-Mobile site shows it’s unavailable. Our one-week report card gives T-Mobile an A+ for ease of setup, web access performance, streaming media reliability, and VoIP telephony. There literally have been zero hiccups. You can review our play-by-play adventure on the VoIP-Info.org Forum.
To achieve similar performance from the service providers offering wired service, you’re looking at $100+ a month from Comcast or WOW and at least $50 a month from Spectrum. And, unfortunately, in most U.S. markets, there is zero competition between the major providers. You get Comcast or nothing in many cities and Spectrum or nothing in others.
Choosing a TV Provider in 2021
Even if you’re stuck with Comcast or Spectrum for the time being, there’s still a silver lining. Drop their TV service immediately. Our last (and final) Comcast bill included $55 for hardware rentals, $23.55 in TV broadcast fees, and $13.92 in taxes. That’s nearly $100/month just to get television delivered to your house! That’s before you sign up for a single channel. Here’s a better idea. Once you’ve invested $50 to $100 in your Internet service, sign up for YouTube TV and enjoy unlimited streaming with numerous simultaneous streams, unlimited DVR recordings, 85+ channels including your local TV channels, and almost every sporting event you can name for $65 a month with no additional fees or contracts. The picture quality with a smart TV looks exactly the same as watching cable television. CNET rated it the "best premium live TV streaming service." If you’ve taken our advice thus far, your total home entertainment bill is $50 for T-Mobile Home WiFi and $65 for YouTube TV and includes free Netflix at no additional charge.
Choosing a Music Provider in 2021
Now let’s suppose you still have a teenager in college. Rather than worry about your kids pirating music and movies, here’s a better idea. Sign them up for Spotify with unlimited music plus Showtime plus Hulu for $5 a month for four years! The good news is they’re rarely up when you are so you, too, can enjoy their Spotify, Showtime, and Hulu accounts while they’re sleeping. We’ve never been particularly big fans of Sirius/XM after they pulled their stunt of cancelling lifetime subscriptions. But that lawsuit got settled and they righted their wrong in a most generous way. You not only got your lifetime subscriptions back, but you also got free streaming. While you can’t take advantage of the lifetime subscription any longer, you still can snag the service for about $5 a month if you wait for a deal. That gets you hundreds of music channels for your car plus streaming to your favorite phone, PC, or Sonos device so it’s worth a careful look if you like music.
Home Automation Basics for 2021
If you haven’t dipped your toes into home automation, it’s finally time. An inexpensive Amazon Echo device will get you started. They range in price from under $50 to a couple hundred dollars. Our favorite is the Echo Show 8 for $99. This will bring Alexa into your home and in many of the newer automobiles as well. The next step is to purchase a few smart light bulbs so you can light up your house when the sun goes down and turn off the lights when you crawl into bed at 8:30. There are lots of lights to choose from. Our favorites are Sylvania’s WiFi Smart Lights which can bring every color of the rainbow to your lamps for under $10. For everyday use, you can pick your favorite shade of white, and for holidays, you can set them to orange for Halloween and red and green for Christmas. Now buy yourself a Nest WiFi thermostat and never worry about the proper setting again. It’s that smart. Then get yourself an August Door Lock, and you’ll never have to fumble for your house keys again. Finally, link Spotify with Alexa, and every song on the planet awaits your command. Get hip, dude!
TIP: Using our Amazon referral links helps keep the lights burning brightly at Nerd Vittles.
What About Telephony?
We saved the best for last. Hopefully, you don’t still have a Ma Bell telephone hanging on the wall in your kitchen. But, if you do, today’s your lucky day. You can dump Ma Bell and add a little gizmo called a Raspberry Pi to your home electronics collection. Then follow our tutorial and for about $100 and a monthly cost of a few dollars, you can enjoy home telephone service using your WiFi Internet connection forever. Welcome to the 21st century. Enjoy!
Originally published: Saturday, October 23, 2021
Need help with Asterisk? Visit the VoIP-info Forum.
Special Thanks to Our Generous Sponsors
FULL DISCLOSURE: ClearlyIP, Skyetel, Vitelity, DigitalOcean, Vultr, VoIP.ms, 3CX, Sangoma, TelecomsXchange and VitalPBX have provided financial support to Nerd Vittles and our open source projects through advertising, referral revenue, and/or merchandise. As an Amazon Associate and Best Buy Affiliate, we also earn from qualifying purchases. We’ve chosen these providers not the other way around. Our decisions are based upon their corporate reputation and the quality of their offerings and pricing. Our recommendations regarding technology are reached without regard to financial compensation except in situations in which comparable products at comparable pricing are available from multiple sources. In this limited case, we support our sponsors because our sponsors support us.
BOGO Bonaza: Enjoy state-of-the-art VoIP service with a $10 credit and half-price SIP service on up to $500 of Skyetel trunking with free number porting when you fund your Skyetel account. No limits on number of simultaneous calls. Quadruple data center redundancy. $25 monthly minimum spend required. Tutorial and sign up details are here.
![]() The lynchpin of Incredible PBX 2020 and beyond is ClearlyIP components which bring management of FreePBX modules and SIP phone integration to a level never before available with any other Asterisk distribution. And now you can configure and reconfigure your new Incredible PBX phones from the convenience of the Incredible PBX GUI.
The lynchpin of Incredible PBX 2020 and beyond is ClearlyIP components which bring management of FreePBX modules and SIP phone integration to a level never before available with any other Asterisk distribution. And now you can configure and reconfigure your new Incredible PBX phones from the convenience of the Incredible PBX GUI.
VitalPBX is perhaps the fastest-growing PBX offering based upon Asterisk with an installed presence in more than 100 countries worldwide. VitalPBX has generously provided a customized White Label version of Incredible PBX tailored for use with all Incredible PBX and VitalPBX custom applications. Follow this link for a free test drive!
Special Thanks to Vitelity. Vitelity is now Voyant Communications and has halted new registrations for the time being. Our special thanks to Vitelity for their unwavering financial support over many years and to the many Nerd Vittles readers who continue to enjoy the benefits of their service offerings. We will keep everyone posted on further developments.
Introducing OpenSIPS 3 for Incredible PBX and Debian 10

Today we’re pleased to introduce an updated OpenSIPS installer for Debian 10 featuring the latest release of OpenSIPS. Our previous tutorial with Debian 8 is now obsolete, an all-too-frequent occurrence in the open source world. Today’s open source SIP server lets you connect users to make and receive free as well as commercial calls worldwide. There’s excellent documentation making it easy to integrate into our existing Incredible PBX platform without hiring a consultant. It’s also straight-forward to secure without providing free phone service to every bad guy on the planet.
OpenSIPS is a multi-functional, multi-purpose signaling SIP server used by carriers, telecoms or ITSPs for solutions like Class4/5 Residential Platforms, Trunking / Wholesale, Enterprise / Virtual PBX Solutions, Session Border Controllers, Application Servers, Front-End Load Balancers, IMS Platforms, Call Centers, and many others. Source: opensips.org
We’ve often complained that the problem with many open source projects is that the developers get so focused on making money that they skimp on the documentation to encourage consulting work or participation in expensive conferences. We have found just the opposite with OpenSIPS. In fact, much of today’s implementation is based upon an excellent tutorial by the folks at PowerPBX. Down the road, if you find yourself in need of a consultant, their services would be a good place to start. What we’ve added to the PowerPBX design is security, support for clients behind NAT-based routers, and an integration scheme for Asterisk®, FreePBX®, and Incredible PBX® platforms so that you get the best of all worlds, a public facing SIP server with the UC feature set that most organizations expect. Last but not least, our turnkey GPLv2 installer will get you up and running in about 5 minutes.
Choosing an Appropriate Platform for OpenSIPS
Let’s begin by addressing the appropriate platform for an OpenSIPS server. The server needs to have a public IP address that is static, and the server should not be situated behind a NAT-based router. It only complicates things and is beyond the scope of what we plan to address. For those that are frequent visitors, you already know that we’ve been pushing everyone to kiss their local hardware goodbye and join the cloud revolution. When it comes to public-facing VoIP platforms like OpenSIPS, most of us don’t have a choice. You need a static IP address on the open Internet. And, for the sake of security, a KVM cloud platform is a must since older OpenVZ platforms don’t support the ipset component of IPtables which makes it easy to block hundreds of thousands of IP addresses without a performance hit on your server. Pure whitelist access simply isn’t an option if you wish to retain the functionality of a VoIP application such as OpenSIPS.
Ten to twenty gigabytes of disk space should be more than ample for OpenSIPS. The amount of RAM in your server depends upon the volume of calls your server will be handling. If it’s a dozen simultaneous calls then 1GB of RAM will suffice. If it’s 100,000 calls, then take a look at this article for tips on sizing your server. For today’s implementation, you’ll need a Debian 10 platform so a low-cost KVM provider including Digital Ocean, Vultr, and OVH should be fine.1
Choosing OpenSIPS Components to Deploy
We’ve divided up today’s tutorial into bite-sized pieces so that you can pick and choose where to stop implementing and start using. You do not need to have an Asterisk server to make and receive calls with OpenSIPS. However, OpenSIPS lacks voicemail and AutoAttendant/IVR components so, if those are a requirement, then you either need a VoIP service provider that offers them, or deploy a $50 Incredible PBX for the Raspberry Pi to add the missing pieces.
What OpenSIPS offers is a free server platform for worldwide SIP communications so that you, your friends, and business associates can call or connect from anywhere using freely available SIP softphones or any of dozens of SIP telephone instruments. We’ll stick with softphones for today, but hardware-based SIP telephones are equally simple to deploy.
This is not a criticism because it is one of the best tutorials we’ve ever used but, if you want to see how complex a typical OpenSIPS server deployment is, take a look at the PowerPBX tutorial we used as a starting point with OpenSIPS. We’ve compressed most of those procedures into a turnkey installer that only requires you to enter a MySQL root password of passw0rd (with a zero) once you have your Debian 10/64 platform up and running.
Deploying a Debian 10 Server Platform
Start by choosing a cloud provider that offers the 64-bit Debian 10 minimal platform as a deployment option. Most do. As noted, we recommend a KVM platform with support for ipset making it easy to block entire countries overrun with bad guys. Choose offerings with at least 1GB RAM and a 10GB drive to get started. Configure your Debian 10 server with a fully-qualified domain name (FQDN). This is critically important with our security design because we will assign all OpenSIPS users/extensions to this FQDN and reserve your server’s IP address purely for connections from service providers and Asterisk servers. This makes it all but impossible for anyone to hack into your server since most script kiddies launch attacks on IP addresses, not FQDNs. Using an unusual FQDN adds an extra layer of security, but that’s your call. If you lack the ability to assign FQDN aliases to a domain which you own, you can obtain a free FQDN from numerous sources including ChangeIP and point it to the IP address of your OpenSIPS server.
Installing OpenSIPS on a Debian 10 Server
Now the fun begins. Log into your Debian 8 server as root and issue the following commands to prepare for the OpenSIPS install:
cd /root
wget http://incrediblepbx.com/opensips3.tar.gz
tar zxvf opensips3.tar.gz
rm -f opensips3.tar.gz
Make sure you have logged into your Debian 10 server as root using SSH or Putty from a desktop PC that you will use to manage OpenSIPS with a browser. The reason is because this IP address automatically will be whitelisted in the OpenSIPS firewall as part of the install process. Otherwise, you will need to manually log into SSH and whitelist the IP address of your desktop PC using /root/add-ip each time you wish to access the OpenSIPS Control Panel since TCP port 80 (HTTP) is not exposed to the public Internet as a security precaution.
To begin the install, issue this command: /root/install
As the install progresses, you’ll first be prompted to choose the GRUB install device. Press the spacebar on the first entry. Then press TAB and ENTER. When prompted for the SSH configuration, choose "keep local version" and then press TAB and ENTER. For the MariaDB setup, press ENTER when prompted for the current password. Type N when prompted whether to switch to unix_socket authorization. Then type Y to change the root password. Be sure to use passw0rd (with a zero) as your MySQL password, or the install will fail. This is NOT a security risk unless your Debian 10 root user account is compromised. And, in that case, it won’t matter anyway since the MySQL password could easily be changed. Type Y to remove anonymous users. Type Y to disallow remote root logins. Type Y to reload the MySQL privilege tables.
Next you’ll be prompted to set your timezone and TZ entries. For East Coast U.S., it’s 2,49,1,1 then America/New_York. Later you’ll be prompted twice for the MySQL root password. You must enter passw0rd (with a zero). When the OpenSIPS status screen displays, type Q to exit the display. There are a couple of steps where you will be prompted for input. Correct responses are indicated before the various prompts. Pay particular attention when you are prompted to change the SSH port from TCP 22 to a port number in the 1000-2020 range as a security precaution. We recommend using the year you were born because it will be easy for you to remember. When the install finishes and you log out of your server, the next SSH login will look like this where XXXX is the SSH port you chose and yyy.yyy.yyy.yyy is the OpenSIPS server address: ssh -p XXXX root@yyy.yyy.yyy.yyy
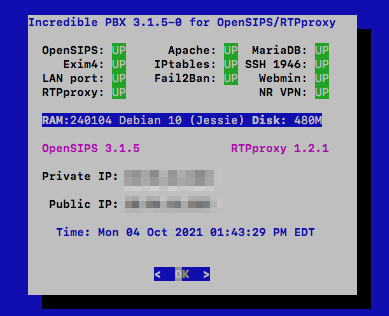
Although most of the configuration of your OpenSIPS server will be handled using a web browser and the OpenSIPS Control Panel GUI, we’ve included a few scripts in /root to assist with maintenance of your server platform. Here’s a brief summary of the script functions:
- pbxstatus – Status of your OpenSIPS server (image sample above)
- add-ip – Temporarily WhiteList IP address until next iptables-restart
- ban-ip – Permanently Ban an IP address
- unban-ip – Unban a previously banned IP address
- log-purge – Zero out all of the major Linux log files
- opensips-check – Assures OpenSIPS and RTPproxy are running (runs automatically)
- Fail2Ban BlackLists –
iptables -nL | grep -A100000 "opensips (" - IPset BlackList (KVM/OVZ7 platforms only) –
ipset list | sort
We secure your server in several ways: (1) by disguising the SSH port, (2) by locking down almost every port on your server with the IPtables firewall with the exception of the SIP ports, (3) by deploying Fail2Ban to scan your OpenSIPS log for errors and lock out attackers for an extended period of time, and (4) by deploying the IPset blacklist for KVM platforms. With this design, there is a symbiotic relationship between IPtables, Fail2Ban, and IPset. Therefore, it is critically important that you only restart these services using the iptables-restart command. NEVER issue other IPtables commands to restart or save your firewall settings.
Activating a SIP Server with OpenSIPS Control Panel
We don’t want to overload you on the first day with your new OpenSIPS 3 platform so we’ll walk you through the preliminary setup steps to create your SIP Domain. Then we’ll show you how to set up user accounts (also known as extensions). Finally we’ll walk you through setting up a trunk to make and receive calls from a commercial SIP provider. When we’re finished today, you’ll be able to make and receive calls using SIP URIs or DIDs which you have purchased from a provider. Then next week we’ll focus on integration of OpenSIPS with an Asterisk platform of your choice using Incredible PBX as an example. Once we’re finished, you’ll be able to handle user account registrations exclusively on your OpenSIPS server while leaving your Asterisk platform completely hidden from public exposure.
Logging into the OpenSIPS Control Panel
As deployed, the OpenSIPS Control Panel is accessible via web browser. As noted previously, HTTP Port 80 access is blocked by default unless the IP address of your desktop PC has been whitelisted either as part of the initial install or using the add-ip script in /root. Once your desktop PC’s IP address is whitelisted, point your browser to http://xxx.xxx.xxx.xxx/cp
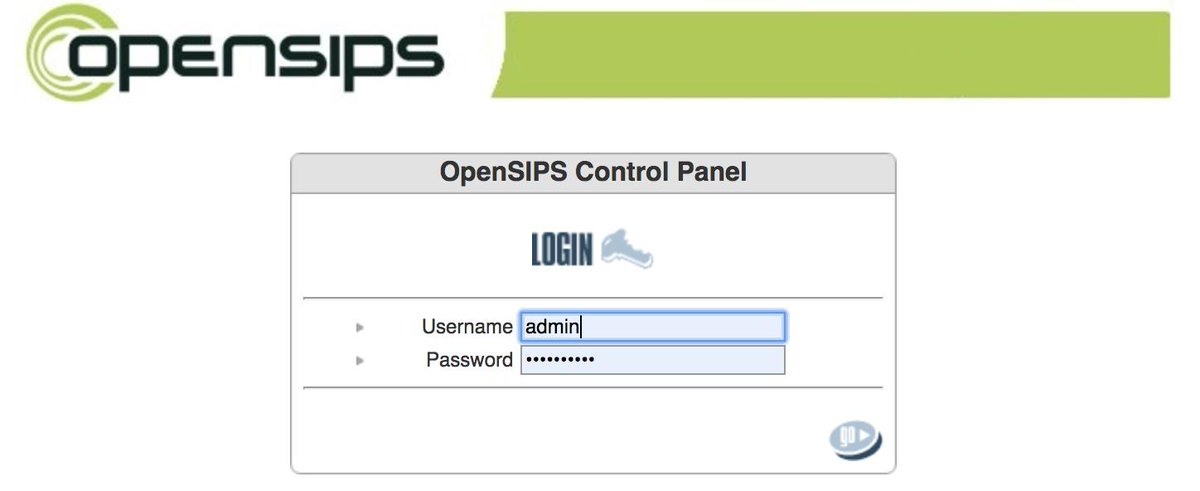
The default Username is admin, and the default password is opensips. Once you’re logged in, immediately click on the Users icon in the upper-right corner of the dashboard. Then click the Edit Info pencil icon for user Admin and change your password. Click Save when done.
Creating Domains with OpenSIPS Control Panel
In the Left column of the Dashboard, you’ll see two tabs: Users and System. Click on the System tab to expose the available choices. Then choose the Domains option.
Domains are the essential building blocks in OpenSIPS. You can manage one or a hundred domains on a single OpenSIPS server, and each domain can have its own set of Users, Trunks/Gateways, and Dialplan rules. We’re actually going to create two domains, one for the IP Address of your OpenSIPS server and a second one for the FQDN of your OpenSIPS server. For added security, we will create all User accounts under the FQDN Domain. And we’ll reserve the IP Address Domain for DID Trunks/Gateways from registered, commercial SIP providers. This design allows attackers to attempt to register to accounts on your IP Address Domain until the cows come home, and they will never be successful because there are no existing SIP user accounts there. Keep it that way! With our OpenSIPS design, Fail2Ban will block attackers after a single failed registration attempt. And OpenSIPS itself will identify and block all SIP flood attacks using either Fail2Ban or IPset.
Now that you understand the design, let’s set up your domains. After choosing System -> Domains, enter the IP Address of your OpenSIPS server at the SIP Domain prompt. Then click Add New Domain followed by Reload on Server. Repeat the same steps to enter the fully-qualified domain name (FQDN) of your OpenSIPS server. When finished, you should see:

Creating Users with OpenSIPS Control Panel
We’ve already explained the security implications and reason for creating User accounts with your FQDN Domain only. Click on Users -> User Management -> Add New to get started. You can use Numbers (what we call Extensions in Asterisk) or Names. Our preference is to use Numbers for the User accounts and then to create Alias Names (as desired) for each User account. You can’t dial names from most SIP telephones. This also keeps the design similar to what many are used to in the Asterisk environment. A completed dialog would look something like the following. Use the Domain pull-down to choose your FQDN. Obviously, the passwords must be secure and must match. Then the Register button will be enabled to save. The actual Numbers used for Usernames are completely up to you.
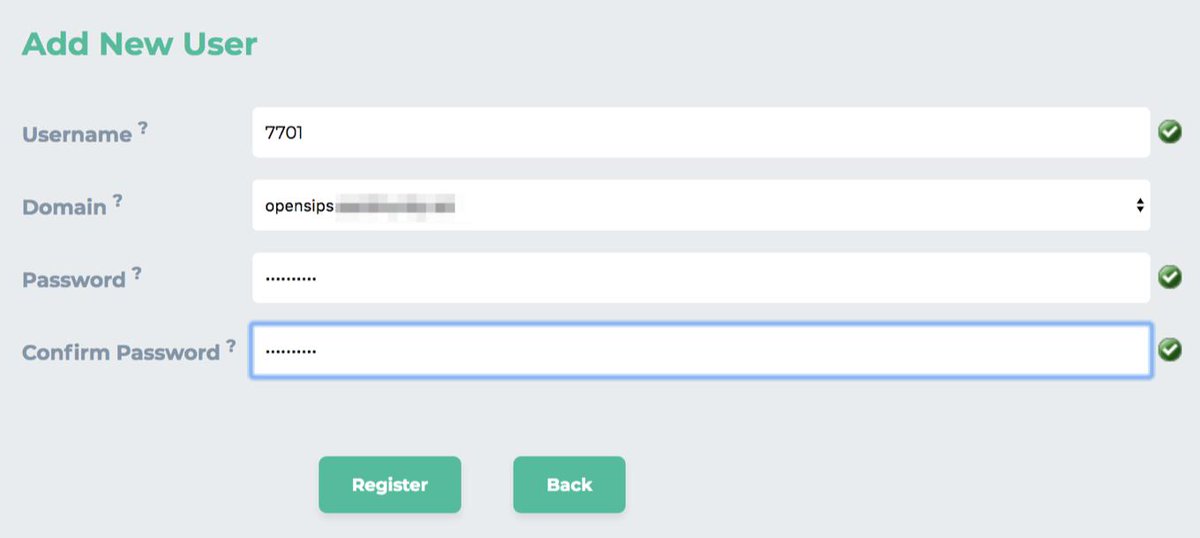
Create at least a couple User accounts so that you can set up two SIP phones to call yourself and verify that everything is working. These User accounts become an integral part of the SIP URI to receive calls from any SIP phone in the world:
7701@opensips.yourdomain.com
Before you can actually answer an incoming call to your SIP URI, you’ll need to register the User account using either a softphone or SIP phone. We’ll do that next. But, first, let’s create an Alias to 7701 User so that folks can reach you by calling joe@opensips.yourdomain.com
Click on Users -> Alias Management -> Add New Alias to get started. Fill in the form using the example below. Make sure that you select your FQDN Domain using the pull-downs for BOTH the Domain and Alias Domain fields. Then click Add to save.
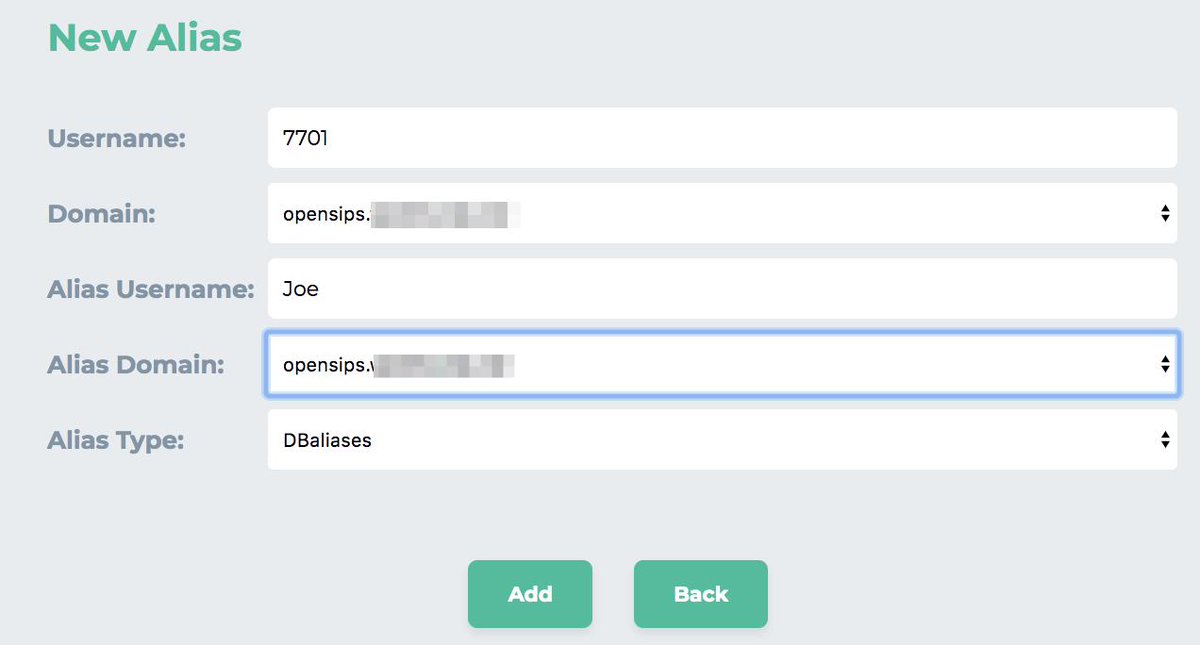
Registering a Softphone to an OpenSIPS User Account
There are literally dozens of free SIP soft phones from which to choose. We covered some of our favorites for every platform in previous articles. For our purposes today, we recommend you choose one of the Linphone softphones which are available for the PC, Mac, Linux, Android, and iOS platforms. We also recommend signing up for a free Linphone.org SIP account which doesn’t cost you anything. For today, we will be configuring the softphone to register to your new OpenSIPS server.
Once you have downloaded and installed the Linphone client, go into the Preferences menu and make the following changes. Some depend upon your calling platform.
- Audio Codecs: PCMU, G722, PCMA
- Video Codecs: VP8, H264
- Call Encryption: None
- DTMF: RFC2833 only
- Send InBand DTMF: OFF
- Send SIP INFO DTMF: OFF
- SIP UDP 5060: Enabled
- SIP TCP 5060: Enabled
- Allow IPv6: Disabled
Then set up a new SIP Proxy account: Username (7701), Password (as defined), Domain: your FQDN not IP address, Transport: UDP, Outbound Proxy: OFF, Stun Server: stun.linphone.org, ICE: ON, AVPF: OFF, Push Notification: ON, Country Code Prefix: 1 (if required by your commercial SIP provider), Register: YES, Account Enabled: YES. HINT: You can call Alias Names via SIP URI, but you can only register to a SIP account using its actual Username.
Avoiding Lockouts with NeoRouter VPN
By design, Fail2Ban is unforgiving when it comes to failed registrations. A single failed registration will get an IP address banned for a full week. The reason is because the new bad guy strategy is to hit your server once to determine whether anybody is home. Then the creep bombards you later with an endless stream of registration attempts. With our design, nobody will be home when they return. The bad news is a single failed registration attempt by you or your users will also trigger a ban. There are several workarounds. The easiest is to set up the NeoRouter client on each of your machines including your OpenSIPS server and use the 10.0.0.x private network for access. These IP addresses never get banned. Our previous tutorial will walk you through setting up a free NeoRouter server and installing the free NeoRouter clients on your machines. The client software already is installed and running on your OpenSIPS server. It only requires that you log in using nrclientcmd and register to your NeoRouter server to obtain a private IP address. The other option is to install OpenVPN. Our previous tutorial will walk you through that process. The advantage of OpenVPN is that it’s supported directly on many SIP telephone instruments. The 10.8.0.x addresses are already whitelisted by our OpenSIPS installer.
There are other options to unban an IP address which has accidentally been snagged. First, almost all of the cloud providers include a Console option in their web portals. Second, you can log into your server via SSH from any non-blacklisted IP address to remove the banned IP address. Once you’re logged in, simply run this command using the IP address you wish to unban: /root/unban-ip xxx.xxx.xxx.xxx
Choosing Commercial SIP Providers
Recall that you cannot register to a SIP alias on your OpenSIPS server. We’ll take advantage of this restriction in setting up incoming calls from commercial providers’ DIDs. To set up Trunks from commercial providers so that you can not only receive incoming calls but also make outbound calls over their PSTN network connections, you must use providers that support IP address authentication rather than a SIP registration. Many providers support this including our platinum sponsor, Skyetel, as well as providers such as VoIP.ms, Anveo Direct, V1VoIP, and many others. In our OpenSIPS design, you also can use DIDs from providers that support SIP URI forwarding such as CallCentric and LocalPhone; however, you are limited to receiving inbound calls only. VoIP communications really shines here because you don’t have to choose a single provider to meet all of your communications requirements.
Skyetel is by far the easiest provider to set up with OpenSIPS. See our earlier tutorial for a special offer that will get you half-price calling for up to $500. Effective 10/1/2023, $25/month minimum spend required. Once you’re registered on the Skyetel site, add a new EndPoint Group using the IP address of your OpenSIP server and designate UDP 5060 as the access port. Sign up for a DID and map it to the OpenSIPS Endpoint Group. Done. In the OpenSIPS Control Panel, navigate to System -> Dynamic Routing and click Add Gateway. Using the template below, create 5 Proxy gateways for the following Skyetel data centers:
- skyetel-NW 52.41.52.34
- skyetel-SW 52.8.201.128
- skyetel-NE 52.60.138.31
- skyetel-SE 50.17.48.216
- skyetel-EU 35.156.192.164
Begin by whitelisting the IP addresses of your SIP providers in /etc/iptables/rules.v4 just below the existing 10.8.0.0/24 rule. The entries should look like this:
-I INPUT -s 52.41.52.34 -j ACCEPT
Once you’ve entered IP addresses for your providers, issue the command: iptables-restart
Next, we need to create what Asterisk users know as an Outbound Route. This tells OpenSIPS to send dialed numbers in 11-digit format to Skyetel for termination. We’ve already created the Dial Plan rule for calling out by dialing 1 plus a 10-digit number. So, while you’re still in the Dynamic Routing section of the OpenSIPS Control Panel, click on the Rules tab at the top of the template. Then click Add Rule. Begin by clicking Add ID button and choosing Group ID 0. In the Prefix field, type 1. Now click the Add GW button 3 times after choosing the Skyetel gateways in the following order from the GW pull-down list: skyetel-nw, skyetel-sw, and skyetel-se. Those are the three currently operational Skyetel gateways. When you’re finished, your template should look like the following. Then click the Add button to save the new rule. Click Reload Server to load the new rule into OpenSIPS. Then repeat this procedure leaving the Prefix field blank so that you can make 10-digit calls as well.
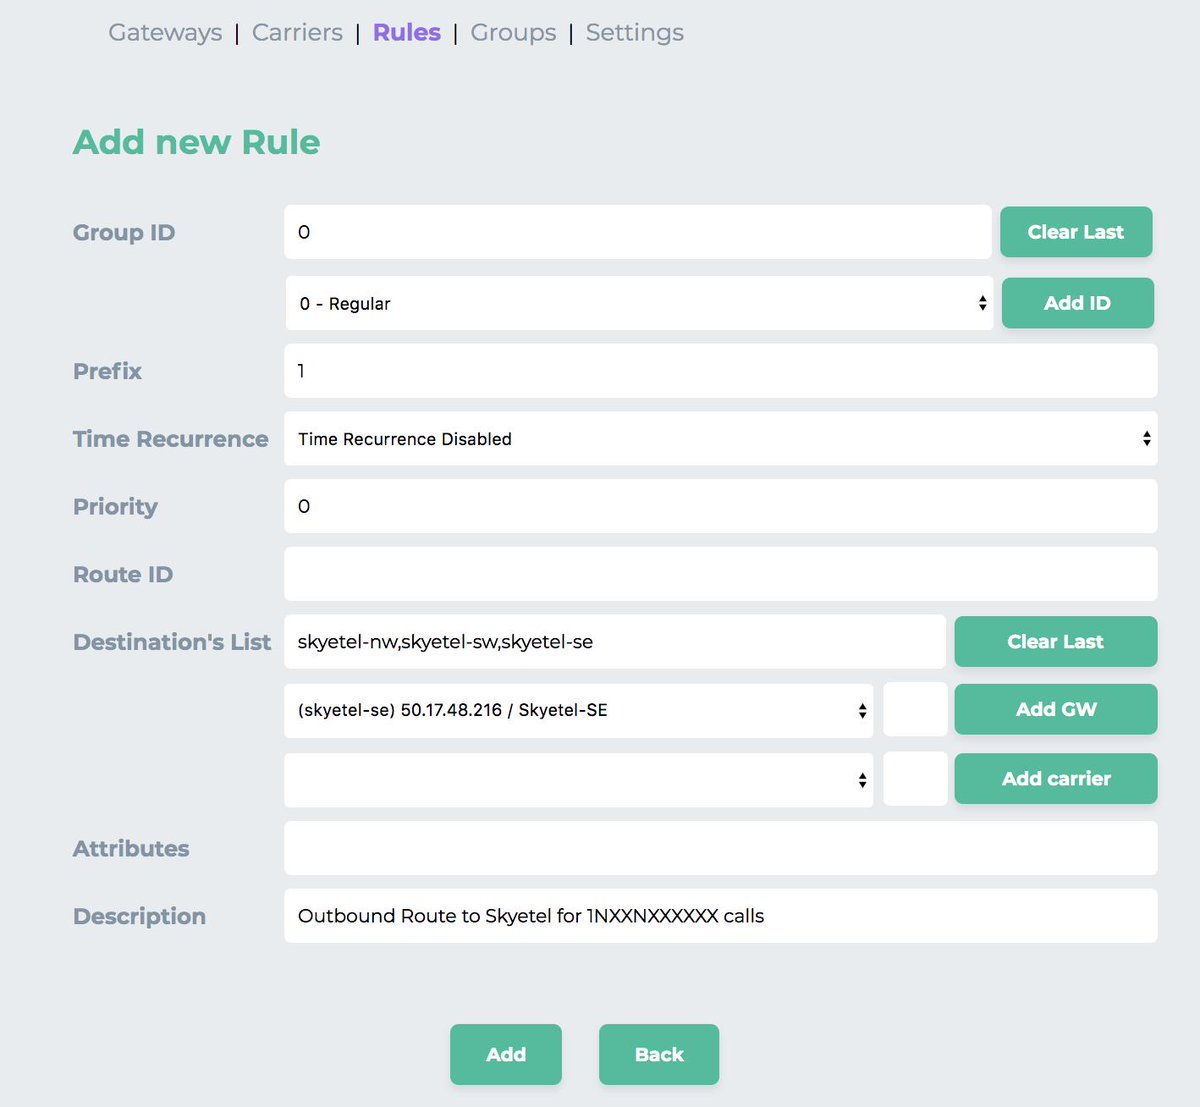
Finally, we need to create what Asterisk users know as an Inbound Route. This tells OpenSIPS where to send incoming calls from our Skyetel DID. OpenSIPS handles inbound routes by defining a User Alias for the Username to which you want to route the incoming DID calls. Click on Users -> Alias Management -> Add New Alias to get started. Fill in the form using the following template and then click Add.
- Username: 7701 (the extension to which to route the incoming calls)
- Domain: opensips.xyz.com (the FQDN of your OpenSIPS server)
- Alias Username: 18435551212 (the 11-digit Skyetel DID)
- Alias Domain: 11.12.13.14 (the IP address of your OpenSIPS server)
- Alias Type: dbaliases
Introducing the VoIP Blacklist
We’ve always dreamed of an effective VoIP Blacklist, and many have tried. But the crowd-sourced VoIP Blacklist at voipbl.org is the real deal. Everybody can post entries (including the bad guys) and, magically, most of the illegitimate entries get sifted out before the next day’s list is released. The list gets populated every night while you sleep. Here are the steps to install the VoIP Blacklist with IPset:
apt update && apt install ipset iptables netfilter-persistent ipset-persistent iptables-persistent
cd /usr/local/sbin
wget http://incrediblepbx.com/voipbl-update
chmod +x voipbl-update
sed -i 's|fail2ban restart|fail2ban restart\n/usr/local/sbin/voipbl-update|' iptables-restart
iptables-restart
ipset list voipbl
ipset list voipbl | wc -l
Then create a cron job in /etc/crontab to run /usr/local/sbin/voipbl-update every day to update the VoIP blacklist.
1 4 * * * root /usr/local/sbin/voipbl-update > /dev/null 2>&1
Congratulations! You now have a functioning OpenSIPS 3 server that can process incoming calls from SIP URIs as well as DIDs. And you can make SIP URI and 11-digit PSTN calls using your SIP softphone that’s registered to your OpenSIPS server. See you next week. Enjoy!
Continue Reading: Best of Both Worlds: Safely Marrying Asterisk to OpenSIPS
Originally published: Monday, October 4, 2021
Need help with Asterisk? Visit the VoIP-info Forum.
Special Thanks to Our Generous Sponsors
FULL DISCLOSURE: ClearlyIP, Skyetel, Vitelity, DigitalOcean, Vultr, VoIP.ms, 3CX, Sangoma, TelecomsXchange and VitalPBX have provided financial support to Nerd Vittles and our open source projects through advertising, referral revenue, and/or merchandise. As an Amazon Associate and Best Buy Affiliate, we also earn from qualifying purchases. We’ve chosen these providers not the other way around. Our decisions are based upon their corporate reputation and the quality of their offerings and pricing. Our recommendations regarding technology are reached without regard to financial compensation except in situations in which comparable products at comparable pricing are available from multiple sources. In this limited case, we support our sponsors because our sponsors support us.
BOGO Bonaza: Enjoy state-of-the-art VoIP service with a $10 credit and half-price SIP service on up to $500 of Skyetel trunking with free number porting when you fund your Skyetel account. No limits on number of simultaneous calls. Quadruple data center redundancy. $25 monthly minimum spend required. Tutorial and sign up details are here.
![]() The lynchpin of Incredible PBX 2020 and beyond is ClearlyIP components which bring management of FreePBX modules and SIP phone integration to a level never before available with any other Asterisk distribution. And now you can configure and reconfigure your new Incredible PBX phones from the convenience of the Incredible PBX GUI.
The lynchpin of Incredible PBX 2020 and beyond is ClearlyIP components which bring management of FreePBX modules and SIP phone integration to a level never before available with any other Asterisk distribution. And now you can configure and reconfigure your new Incredible PBX phones from the convenience of the Incredible PBX GUI.
VitalPBX is perhaps the fastest-growing PBX offering based upon Asterisk with an installed presence in more than 100 countries worldwide. VitalPBX has generously provided a customized White Label version of Incredible PBX tailored for use with all Incredible PBX and VitalPBX custom applications. Follow this link for a free test drive!
Special Thanks to Vitelity. Vitelity is now Voyant Communications and has halted new registrations for the time being. Our special thanks to Vitelity for their unwavering financial support over many years and to the many Nerd Vittles readers who continue to enjoy the benefits of their service offerings. We will keep everyone posted on further developments.
- Nerd Vittles receives referral fees from some VoIP service providers to help cover the costs of our blog. We never recommend particular companies solely to generate commissions. We also test all services that we recommend. [↩]
Some Further Thoughts & Solutions Regarding DDoS Attacks

This month’s DDoS attacks on SIP infrastructure in the VoIP community should give us all pause to reflect upon what each of us can do to lessen the impact of these attacks in our Internet-centric community. Suffice it to say, DDoS attacks can be directed toward carriers (last week it was Bandwidth.com), VoIP providers (last week it was VoIP.ms), and VoIP servers (that would be your PBX). While they may not like it, carriers and many VoIP providers have the financial resources to withstand or mitigate a DDoS attack. You, on the other hand, with your budget-basement cloud server probably do not. So what can you do?
Almost 10 years ago, we introduced the Travelin’ Man 3 firewall for VoIP servers. The idea was novel at the time. You can’t attack what you can’t see. By placing an Incredible PBX server behind the IPtables firewall with no public exposure except for trusted sites and users, your server is essentially hidden from the Internet and all of the world’s bad guys. At the time, the design was poo-poo’d by the SIP purists who were adamant that SIP ports needed to be publicly exposed to function reliably. Wrong. Then there was the FreePBX® firewall which blocked repeated attacks from the IP address of a would-be attacker. But what if a botnet unleashed hundreds of thousands of attacks on your IP address. The FreePBX blocking mechanism obviously would fail. One of the shortcomings of Asterisk®: it isn’t a SIP proxy.
The moral of the story is pretty simple. Unless you have an unlimited bank account to thwart DDoS attacks and unless your PBX is sitting behind a SIP proxy, you’re much safer with a fully-protected Incredible PBX platform. And, for those believing your IP address is too obscure to attract much attention, try installing a server on CloudAtCost, or Digital Ocean, or Vultr without a firewall to protect your SSH port. You’ll quickly discover how popular you are. Stay safe!
Originally published: Monday, September 27, 2021
Need help with Asterisk? Visit the VoIP-info Forum.
Special Thanks to Our Generous Sponsors
FULL DISCLOSURE: ClearlyIP, Skyetel, Vitelity, DigitalOcean, Vultr, VoIP.ms, 3CX, Sangoma, TelecomsXchange and VitalPBX have provided financial support to Nerd Vittles and our open source projects through advertising, referral revenue, and/or merchandise. As an Amazon Associate and Best Buy Affiliate, we also earn from qualifying purchases. We’ve chosen these providers not the other way around. Our decisions are based upon their corporate reputation and the quality of their offerings and pricing. Our recommendations regarding technology are reached without regard to financial compensation except in situations in which comparable products at comparable pricing are available from multiple sources. In this limited case, we support our sponsors because our sponsors support us.
BOGO Bonaza: Enjoy state-of-the-art VoIP service with a $10 credit and half-price SIP service on up to $500 of Skyetel trunking with free number porting when you fund your Skyetel account. No limits on number of simultaneous calls. Quadruple data center redundancy. $25 monthly minimum spend required. Tutorial and sign up details are here.
![]() The lynchpin of Incredible PBX 2020 and beyond is ClearlyIP components which bring management of FreePBX modules and SIP phone integration to a level never before available with any other Asterisk distribution. And now you can configure and reconfigure your new Incredible PBX phones from the convenience of the Incredible PBX GUI.
The lynchpin of Incredible PBX 2020 and beyond is ClearlyIP components which bring management of FreePBX modules and SIP phone integration to a level never before available with any other Asterisk distribution. And now you can configure and reconfigure your new Incredible PBX phones from the convenience of the Incredible PBX GUI.
VitalPBX is perhaps the fastest-growing PBX offering based upon Asterisk with an installed presence in more than 100 countries worldwide. VitalPBX has generously provided a customized White Label version of Incredible PBX tailored for use with all Incredible PBX and VitalPBX custom applications. Follow this link for a free test drive!
Special Thanks to Vitelity. Vitelity is now Voyant Communications and has halted new registrations for the time being. Our special thanks to Vitelity for their unwavering financial support over many years and to the many Nerd Vittles readers who continue to enjoy the benefits of their service offerings. We will keep everyone posted on further developments.
Free Asterisk Solutions
