Home » Incredible PBX » Wazo & XiVO (Page 2)
Category Archives: Wazo & XiVO
Dare to Compare: The Best (free) VoIP Offerings for 2018

Last week we showed you how to get 10 months of free hosting for your Incredible PBX® in the Cloud. And today we present our semi-annual survey of the latest and greatest VoIP offerings for 2018. The beauty of the cloud platform is you can try all of them for less than a penny an hour and decide for yourself which free offering best meets your needs. This year we’ve ushered in new Asterisk® 13 LTS releases of Incredible PBX® on the CentOS, Ubuntu, and Raspberry Pi platforms as well as new versions for Issabel 4 and VitalPBX. To sweeten the pot even further, we nailed down a new Cloud-based offering for $10 a year that makes a perfect VOIP sandbox for our CentOS platform. For 2018, we also secured new (free) DID offerings in the U.S. and announced a Nerd Vittles exclusive providing access to 300+ VoIP providers worldwide, all at wholesale prices. And, last but not least, we introduced Digium’s newest IP phones for Asterisk including a $59 model that makes a perfect VoIP companion.
Choosing the Best VoIP Platform for Your Needs
Choosing a VoIP platform is partially a subjective decision, but there also are some glaring red flags to consider. We suggest you begin by deciding whether your preferences include any must-have’s. Do your requirements mandate an open source solution? Do you need text-to-speech and voice recognition? Does the operating system have to be Linux-based and, if so, must it be CentOS, Debian, or Ubuntu? If you’ll be using SIP phones, must the platform include phone provisioning software for your phones, or is the ability to purchase it as an add-on sufficient? Is paid support important in making your platform decision and how much are you prepared to pay? Are automatic or pain-free software updates critical in making your selection? Is migration from an existing platform a factor? Does a preconfigured, secure firewall matter, or are you prepared to do it yourself or take your chances? Before choosing to ignore security, read this RIPS analysis of FreePBX®. Here’s a snippet from the article. Read it carefully. It’s your phone bill.
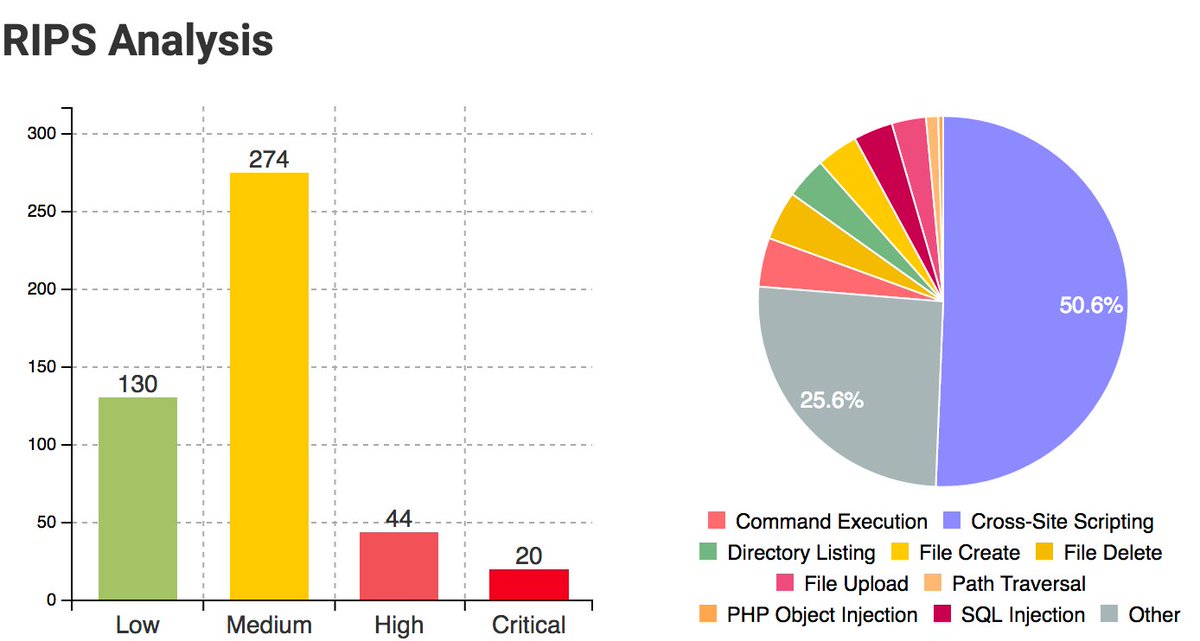
Since FreePBX is written completely in PHP, we decided to throw it into our code analysis tool RIPS. The results were more than surprising and should tell you why a rock-solid firewall is absolutely essential.
The total amount of detected vulnerabilities is very high. Luckily, the majority of the detected vulnerabilities are inside the administration control panel, such that attackers either need to steal a valid account or they have to trick an administrator into visiting a malicious website that triggers one of the critical vulnerabilities. For example, a remote command execution vulnerability could be triggered by a less critical cross-site scripting vulnerability. By chaining both vulnerabilities, the severity is increased drastically and can lead to full server compromise.
In choosing which platforms to include today, we eliminated platforms which we considered too complicated for the average new user to configure. We also eliminated any platform that did not offer at least a free tier of service with a reasonably complete feature set as part of their offering. So here’s our Pick of the Litter.
We must confess that we are partial to the Incredible PBX offerings because they provide a turnkey GPL platform with minimal configuration required on your part. Regardless of platform, all come standard with a preconfigured firewall and about three dozen applications for Asterisk that will help you learn everything there is to know about VoIP telephony.
VoIP Platform Feature Summary
Aggregation: Incredible PBX 13-13 for CentOS/SL
License: Open Source GPL
VoIP Platform: Asterisk 13
GUI: FreePBX 13 GPL modules
O/S: CentOS/SL 6.9 or 7
Phone Provisioning: Open Source
Text-to-Speech/Voice Recognition: Yes/Yes
Software Updates: Automatic Update Utility included
Migration Tools: No
Security: Fail2Ban + Preconfigured Firewall Whitelist
Security Rating (as delivered): Secure
Comments: Lean & Mean or Whole Enchilada installers as well as ISO available
Aggregation: Incredible PBX 13-13 for Raspbian
License: Open Source GPL
VoIP Platform: Asterisk 13
GUI: FreePBX 13 GPL modules
O/S: Raspbian 7
Phone Provisioning: Open Source
Text-to-Speech/Voice Recognition: Yes/Yes
Software Updates: Automatic Update Utility included
Migration Tools: No
Security: Fail2Ban + Preconfigured Firewall Whitelist
Security Rating (as delivered): Secure
Aggregation: Incredible PBX 13-13 for Ubuntu
License: Open Source GPL
VoIP Platform: Asterisk 13
GUI: FreePBX 13 GPL modules
O/S: Ubuntu 18.04
Phone Provisioning: Open Source
Text-to-Speech/Voice Recognition: Yes/Yes
Software Updates: Automatic Update Utility included
Migration Tools: No
Security: Fail2Ban + Preconfigured Firewall Whitelist
Security Rating (as delivered): Secure
Comments: Lean & Mean or Whole Enchilada installers
Aggregation: VitalPBX
License: Closed Source
VoIP Platform: Asterisk 13
GUI: Free and Commercial modules
O/S: CentOS 7
Phone Provisioning: Free
Text-to-Speech/Voice Recognition: Optional/Optional
Software Updates: Automatic
Migration Tools: Yes
Security: Fail2Ban + User-Configurable Firewall
Security Rating (as delivered): Insecure
Comments: Incredible PBX add-on now available including TM3 firewall.
Aggregation: Incredible PBX for Issabel 4
License: Open Source GPL
VoIP Platform: Asterisk 13
GUI: FreePBX 11 GPL modules
O/S: CentOS 7
Phone Provisioning: Open Source
Text-to-Speech/Voice Recognition: No/No
Software Updates: Semi-Automatic
Migration Tools: No
Security: Fail2Ban + Unconfigured Firewall
Security Rating (as delivered): Secure with Incredible PBX add-on
Comments: Incredible PBX add-on provides secure platform
Aggregation: FusionPBX for FreeSWITCH
License: Open Source MPL 1.1
VoIP Platform: FreeSWITCH 1.6
GUI: FusionPBX
O/S: Debian 8
Phone Provisioning: Free
Text-to-Speech/Voice Recognition: Optional/Optional
Software Updates: Automatic
Security: Fail2Ban + User-Configurable Firewall
Security Rating (as delivered): Secure with mods below
Comments: Incredible PBX firewall add-on now available .
Aggregation: Incredible PBX for Wazo
License: GPL3 Open Source
VoIP Platform: Asterisk 15 RealTime
GUI: Wazo GPL3 modules
O/S: Debian 9
Phone Provisioning: Extensive Open Source
Text-to-Speech/Voice Recognition: Yes/Yes
Software Updates: Automatic or 2-minute Manual
Migration Tools: No
Security: Fail2Ban + Preconfigured Firewall
Security Rating (as delivered): Secure WhiteList with Incredible PBX add-on
Comments: High Availability & Call Center GPL3 Modules
Aggregation: FreePBX Distro a.k.a. AsteriskNOW
License: Closed Source
VoIP Platform: Asterisk 13/14/15
GUI: FreePBX GPL and Commercial modules
O/S: Closed-source CentOS fork
Phone Provisioning: Open Source (minimal) or Commercial
Text-to-Speech/Voice Recognition: Optional/No
Software Updates: Manual from Hidden Repo
Migration Tools: Yes
Security: Fail2Ban + User-Configurable Firewall
Security Rating (as delivered): Insecure
Comments: Extensive commercial NagWare preinstalled
Deploying a Local Server vs. Cloud Platform
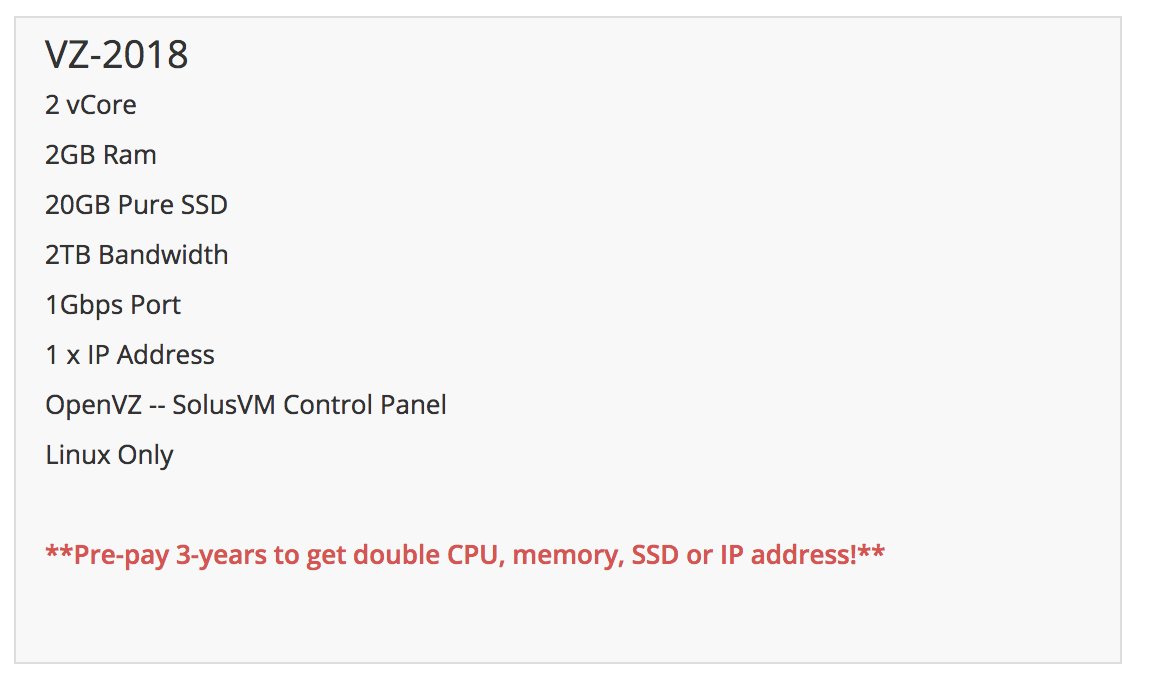
We’ve always been big fans of local servers because you have almost total control of your own destiny. This was especially true when the Raspberry Pi came along to take the financial pain out of the server equation. But the price of Cloud-based servers has continued to plummet. For 2018, you can run any of our favorites on the least expensive platform at Vultr or Digital Ocean for $2.50 a month. And, if you hurry, your first 10 months are free at Vultr. Spending another 50 cents buys you automatic backups.1 And, for the Incredible PBX 13-13 build with CentOS 6.9 (64-bit), we’ve found a deal at HiFormance that offers a high-performance OpenVZ platform at an annual cost of just $10. The technical specs are impressive (even better if you sign up for 3 years), and we don’t think you’ll find a comparable deal with anything near comparable performance and specs anywhere, period. You get your choice of hosting sites including New York, Chicago, Los Angeles, Buffalo, Atlanta, and Dallas. Complete tutorial available here.
NOTE: OpenVZ/SolusVM platforms not suitable for CentOS 7, Debian 9, or Ubuntu 18 implementations, and some providers do not yet support Ubuntu 18.04 platform although Vultr and Digital Ocean both do.
Available Free Trunks for VoIP Servers
For many years, we’ve offered free Google Voice connectivity with our VoIP platforms. And that remains true at least for a few more weeks. On all of the Incredible PBX platforms, Google Voice trunks can be set up to make free calls in the U.S. and Canada provided you have a U.S. residence and a U.S. cellphone number to verify that you are who you say you are. There’s even a ray of hope that the Simonics gateway may allow you to continue using Google Voice after Google Voice’s mid-June drop-dead date for XMPP. Details here. But what about the rest of the world. For 2018, we solved the problem by offering free DID trunks for inbound calls and a collection of 300 wholesale VoIP carriers worldwide to make outbound calls at the same wholesale rates offered to the very largest resellers. Simply pay a 13% surcharge in lieu of the $650 annual fee, and TelecomsXchange (TCXC) will provide you access to their entire suite of wholesale carriers together with state-of-the-art tools to manage all of the services.2 The Nerd Vittles setup tutorial is available here. Enjoy!
Published: Monday, March 5, 2018 Updated: Sunday, May 27, 2018

Need help with Asterisk? Visit the PBX in a Flash Forum.
Special Thanks to Our Generous Sponsors
FULL DISCLOSURE: ClearlyIP, Skyetel, Vitelity, DigitalOcean, Vultr, VoIP.ms, 3CX, Sangoma, TelecomsXchange and VitalPBX have provided financial support to Nerd Vittles and our open source projects through advertising, referral revenue, and/or merchandise. As an Amazon Associate and Best Buy Affiliate, we also earn from qualifying purchases. We’ve chosen these providers not the other way around. Our decisions are based upon their corporate reputation and the quality of their offerings and pricing. Our recommendations regarding technology are reached without regard to financial compensation except in situations in which comparable products at comparable pricing are available from multiple sources. In this limited case, we support our sponsors because our sponsors support us.
 BOGO Bonaza: Enjoy state-of-the-art VoIP service with a $10 credit and half-price SIP service on up to $500 of Skyetel trunking with free number porting when you fund your Skyetel account. No limits on number of simultaneous calls. Quadruple data center redundancy. $25 monthly minimum spend required. Tutorial and sign up details are here.
 The lynchpin of Incredible PBX 2020 and beyond is ClearlyIP components which bring management of FreePBX modules and SIP phone integration to a level never before available with any other Asterisk distribution. And now you can configure and reconfigure your new Incredible PBX phones from the convenience of the Incredible PBX GUI.
 VitalPBX is perhaps the fastest-growing PBX offering based upon Asterisk with an installed presence in more than 100 countries worldwide. VitalPBX has generously provided a customized White Label version of Incredible PBX tailored for use with all Incredible PBX and VitalPBX custom applications. Follow this link for a free test drive!
 Special Thanks to Vitelity. Vitelity is now Voyant Communications and has halted new registrations for the time being. Our special thanks to Vitelity for their unwavering financial support over many years and to the many Nerd Vittles readers who continue to enjoy the benefits of their service offerings. We will keep everyone posted on further developments.
Some Recent Nerd Vittles Articles of Interest…
- On the Vultr and Digital Ocean $2.50 platforms, be sure to (1) create a 1GB swapfile once you’ve chosen your operating system. (2) Then, for Vultr, issue the following command before beginning the Incredible PBX install: apt-get install cloud-init.
(3) Now complete the steps outlined in your preferred Nerd Vittles tutorial, and you’ll be all set in about 15 minutes. [↩] - Our special thanks to TelecomsXchange. They have generously offered to contribute a portion of the wholesale surcharge to support the Incredible PBX open source project. [↩]
Cloud 9: Free Incredible PBX in the Cloud Hosting until 2019

These deals don’t come along every day so we’re interrupting our regular programming to alert you to a terrific, limited time cloud hosting offer for first-time users of Vultr. If you hurry, you can take advantage of a $25 credit on Vultr which translates into 10 free months of cloud hosting service. We can’t say enough about Vultr. They’ve been one of our key resources for development and testing of new releases of Incredible PBX for many years. Historically, they’ve supported our open source projects through generous referral revenue although that does not apply with this special offer. If you’ve always wondered whether cloud hosting was a viable alternative to on-premise solutions, now’s your chance to kick the tires at zero cost. And the other good news is you have your choice of the following Incredible PBX offerings. Simply load the required OS or upload the ISO for the platform of your choice and follow the linked tutorials below. Enjoy!
- Incredible PBX for CentOS 6 or 7
- Incredible PBX with Incredible PBX 13-13 ISO
- Incredible PBX for Ubuntu 18.04
- Incredible PBX with VitalPBX 2.0 ISO
- Incredible PBX with Jan. 2018 Issabel ISO
- Incredible PBX with Wazo 17.17 (Debian 8)
Originally published: Friday, May 25, 2018
 Support Issues. With any application as sophisticated as this one, you’re bound to have questions. Blog comments are a terrible place to handle support issues although we welcome general comments about our articles and software. If you have particular support issues, we encourage you to get actively involved in the PBX in a Flash Forums. It’s the best Asterisk tech support site in the business, and it’s all free! Please have a look and post your support questions there. Unlike some forums, ours is extremely friendly and is supported by literally hundreds of Asterisk gurus and thousands of users just like you. You won’t have to wait long for an answer to your question.

Need help with Asterisk? Visit the PBX in a Flash Forum.
Special Thanks to Our Generous Sponsors
FULL DISCLOSURE: ClearlyIP, Skyetel, Vitelity, DigitalOcean, Vultr, VoIP.ms, 3CX, Sangoma, TelecomsXchange and VitalPBX have provided financial support to Nerd Vittles and our open source projects through advertising, referral revenue, and/or merchandise. As an Amazon Associate and Best Buy Affiliate, we also earn from qualifying purchases. We’ve chosen these providers not the other way around. Our decisions are based upon their corporate reputation and the quality of their offerings and pricing. Our recommendations regarding technology are reached without regard to financial compensation except in situations in which comparable products at comparable pricing are available from multiple sources. In this limited case, we support our sponsors because our sponsors support us.
 BOGO Bonaza: Enjoy state-of-the-art VoIP service with a $10 credit and half-price SIP service on up to $500 of Skyetel trunking with free number porting when you fund your Skyetel account. No limits on number of simultaneous calls. Quadruple data center redundancy. $25 monthly minimum spend required. Tutorial and sign up details are here.
 The lynchpin of Incredible PBX 2020 and beyond is ClearlyIP components which bring management of FreePBX modules and SIP phone integration to a level never before available with any other Asterisk distribution. And now you can configure and reconfigure your new Incredible PBX phones from the convenience of the Incredible PBX GUI.
 VitalPBX is perhaps the fastest-growing PBX offering based upon Asterisk with an installed presence in more than 100 countries worldwide. VitalPBX has generously provided a customized White Label version of Incredible PBX tailored for use with all Incredible PBX and VitalPBX custom applications. Follow this link for a free test drive!
 Special Thanks to Vitelity. Vitelity is now Voyant Communications and has halted new registrations for the time being. Our special thanks to Vitelity for their unwavering financial support over many years and to the many Nerd Vittles readers who continue to enjoy the benefits of their service offerings. We will keep everyone posted on further developments.
Some Recent Nerd Vittles Articles of Interest…
Introducing Digium’s Awesome SIP Phones for Asterisk

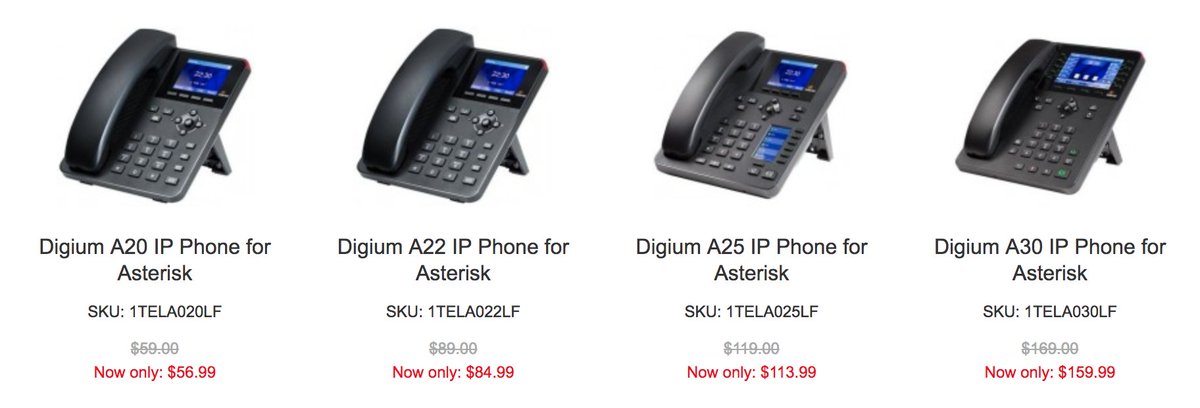
If you’ve been waiting for a low-cost, feature-rich SIP phone that meshes perfectly with your Asterisk® PBX, your prayers have been answered. Digium has just released not one, but four, new SIP phones with prices starting at $59. No, that’s not a typo. Digium gave us a couple of early models to play with, and today we’ll walk you through the incredibly simple setup. We would begin by noting that, despite the pricing, these phones are configured with nothing resembling a bargain basement feature set. All four models have color displays, HD Voice, POE for use without the $15 power adapter, and at least two lines. The phones can be configured using the phones themselves, or through a slick web interface, or with auto-provisioning by MAC address. Beginning with the $89 A22, the top three models support gigabit Ethernet. With the $119 A25, you get four line registrations as well as a second LCD supporting six Rapid Dial keys or up to 30 BLF entries. The top-of-the-line $169 A30 supports six line registrations and an LED setup that closely matches our previous VoIP Phone of the Year, Yealink’s T46G. While the phones were not designed for use with Switchvox®, we found them to be plug-and-play with 3CX® which is probably also true with Switchvox even though we have not tested them on that platform. We have been using our A22 phone with one line connected to Incredible PBX® for the Raspberry Pi and the second connected to VitalBox. We’ve had zero issues with the phone, and sound quality is excellent.
Connecting Digium’s A-Series IP Phone
To get started, you’ll need a power source for the phone which can be either a POE network connection or a power adapter. You’ll also need to connect to a network that can provide DHCP or VLAN configuration data. Once the phone boots up, press the checkmark button (✓) twice to display the IP address assigned to the phone. Using a desktop browser, navigate to that IP address and enter admin:789 as the default login credentials.
Configuring a SIP Extension on Your IP Phone
Once you’re logged in, click on the Line tab and fill in the blanks for the SIP1 account using the desired extension number, extension password, and IP address of your Asterisk server. Be sure Activate is checked. It should look something like the following. Then click Apply.
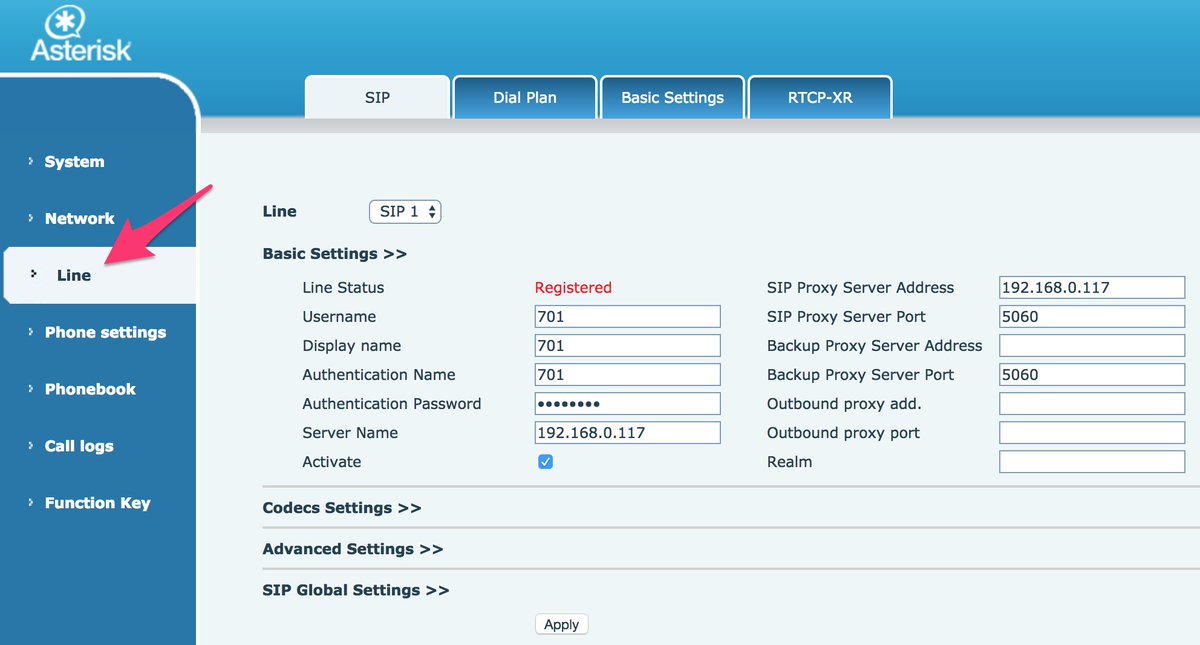
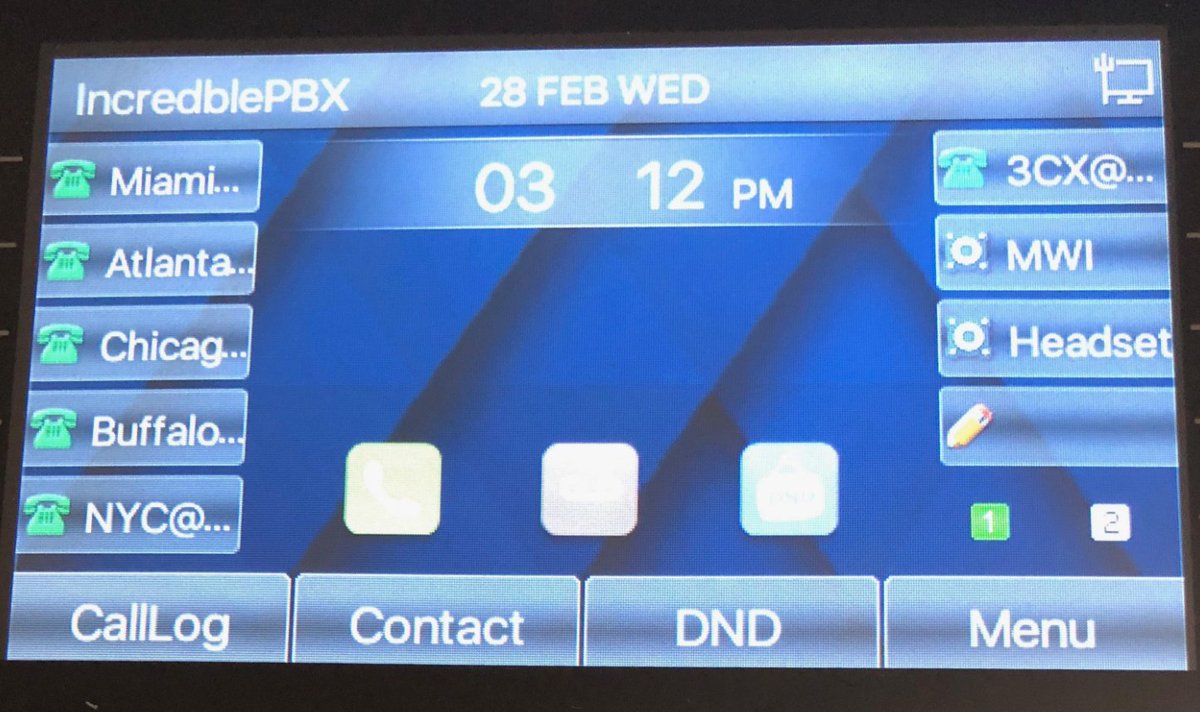
This one-minute setup is all that’s required to put your new phone into production with Asterisk. You’re ready to make and receive calls. The L1 button on the A20 or A22 phone (pictured above) should now be lit. To light up the L2 button, add a second SIP connection by repeating the drill after choosing the SIP2 Line from the pull-down menu. If you have redundant PBXs, fill in the IP address of the Backup server, and the phone will automatically failover when the primary PBX goes down. It doesn’t get any easier than that.
With 3CX extensions, the setup is virtually identical except the phone’s Authentication Name field should reflect the Authentication Name chosen when setting up the 3CX extension.
Customizing Your SIP Phone Settings
VoiceMail Setup. The voicemail button can be activated for one or both SIP lines in the Advanced Settings tab under each of the SIP connections. Check the Subscribe to Voice Message box and enter the Voice Message Number to retrieve your voicemails, e.g. *98701 for extension 701 on an Asterisk PBX or 999 for a 3CX extension’s voicemail.
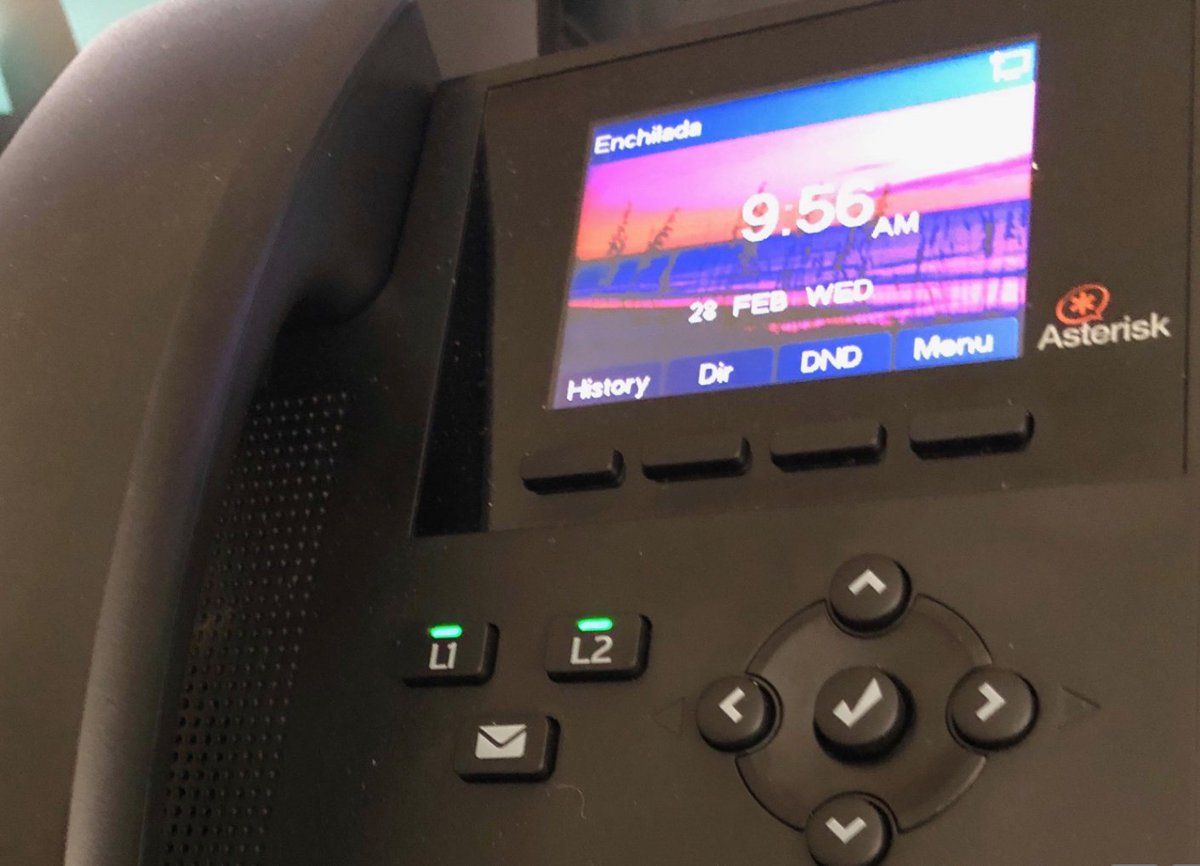
Customizing Phone Display. If you’d like to customize the branding and background image on your phone, navigate to Phone Settings and click the Advanced tab. Here’s a link to download one of our favorite beach scenes (pictured above), or you can use your own 320×240 BMP image on the A20 and A22. The high end phones use a 480×272 BMP image. The Asterisk label at the top of the phone’s display can also be adjusted in the Greeting Words field. We’re Enchilada fans personally. 🙂
Changing Passwords and PINs. You also can adjust the passwords and PINs for the phone device itself under the Phone Settings:Advanced tab. The default is 789. To modify the admin credentials for the browser interface or to add new accounts, go to System and click on the Account tab. Because the phone can be configured using either the phone itself or the browser interface, you’ll need to change both sets of passwords to secure your phone.
Adjusting Codecs. Depending upon your PBX setup, you may need to adjust or reorder the codecs for one or both of your SIP lines. Simply navigate to Line:SIP1:Codec Settings and make any necessary changes. HINT: You’ll rarely have a problem if you make G.711U (U.S.) or G.711A (elsewhere) your primary codec although G.722 is what you’ll want for HD Voice. This is especially important if you’re using Google Voice trunks or 3CX client software.
Auto-Provisioning Your A20, A22, and A25 Phones
Let’s get to the fun stuff now. Everything we’ve covered (and much more) can be scripted with these new phones. You can read all about it here. For today, let’s get your Phonebook Contacts populated using your AsteriDex database entries. And then you can press the Down button on the phone to retrieve your Contacts.
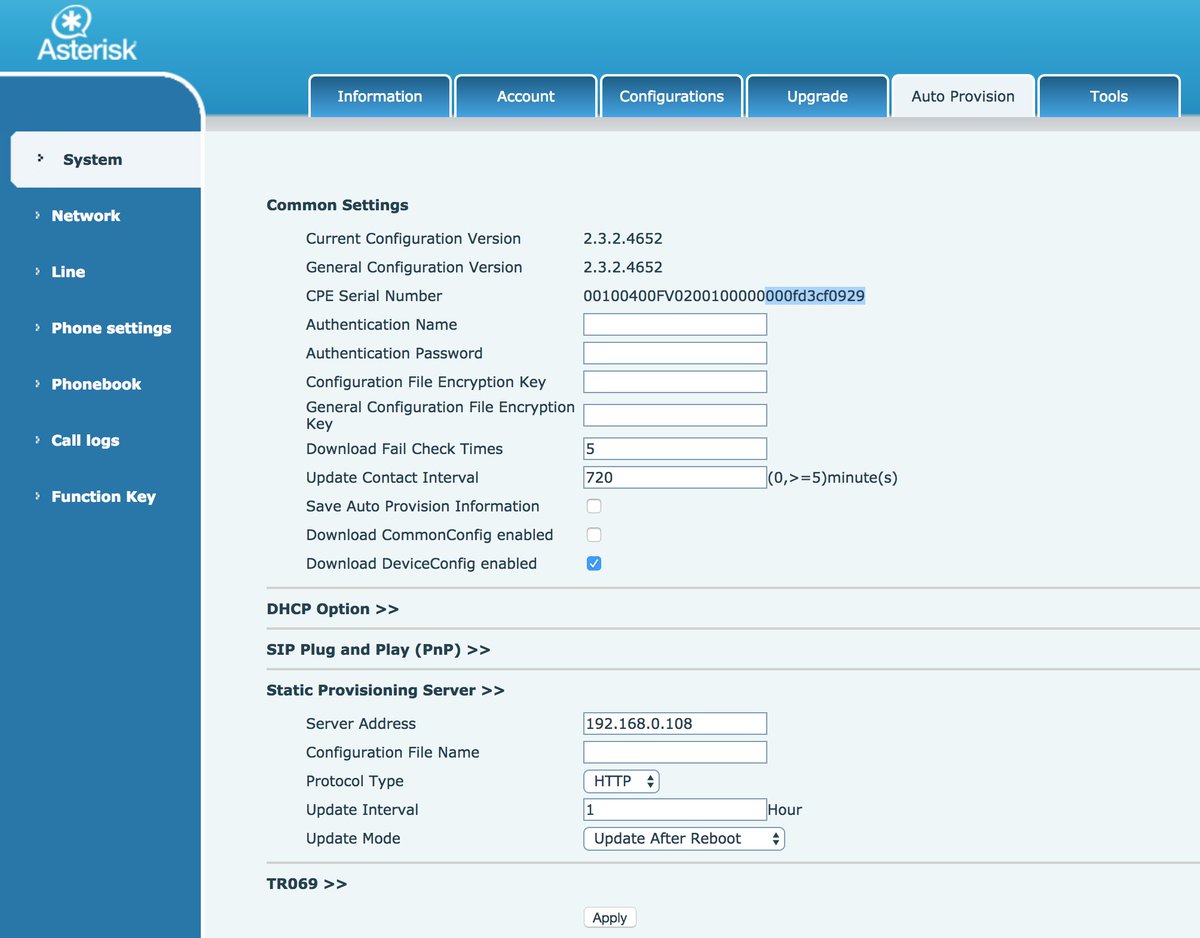
Setting Up Phone Provisioning. Before you can auto-provision your phone, both your phone and your Asterisk server need a little navigation information. Let’s start with the phone so login as admin:789 to get started. Click on the System option and then the Auto Provision tab. Write down the last 12 digits of your phone’s MAC address (CPE Serial Number highlighted above). Check the DownloadDeviceConfig option (as shown). Disable the DHCP Option and the SIP Plug and Play options by clicking on the respective tabs. Then open the Static Provisioning Server option (as shown). Enter the local IP address of your server assuming your phone and server are both behind a firewall. For the Protocol Type, choose HTTP. For the Update Mode, choose Update After Reboot. Then click the Apply button.

Next, let’s configure the phone so that you can press the Down arrow button to access your Phonebook Contacts. Click on the Function Key option in the left margin. Then look in the Programmable Keys section and locate the row with the settings for the Down button. Change the entry in the Desktop column to Phonebook. Then click the Apply button.
Configuring Asterisk for Phone Provisioning. Now we need to get your server set up to support phone provisioning. The way provisioning works is we will set up a provisioning profile for each phone which will be processed by your web server whenever a phone is rebooted. This profile will also tell the phone where to find your Phonebook Contacts XML file. To get started, navigate to /var/www/html and create a new .cfg file for each of your phones using the 12-character MAC address of the phone, e.g. 000123456789.cfg. The file should look like the following with the exception of the Auto Pbook Url entry which should reflect the local IP address of your server:
<<VOIP CONFIG FILE>>Version:2.0.0.0

<PHONE CONFIG MODULE>
LCD Title          :IncredblePBX

<AUTOUPDATE CONFIG MODULE>
Download CommonConf:0
Download DeviceConf:1
Check FailTimes    :5
update PB Interval :720
Clr PB B4 Import   :1
Trust Certification:0
Enable Auto Upgrade:0
Upgrade Server 1   :
Upgrade Server 2   :
Auto Upgrade intval:24
Auto Pbook Url     :http://192.168.0.108/phonebook.xml

<<END OF FILE>>
Populating Phonebook Contacts with AsteriDex. Now we’re ready to build the Phonebook Contacts file (phonebook.xml) using the AsteriDex 4 database. Just issue the following commands and then reboot each of your phones (Menu+8+Yes):
cd /var/www/html/asteridex4
wget http://incrediblepbx.com/asterisk-phonebook.tar.gz
tar zxvf asterisk-phonebook.tar.gz
rm -f asterisk-phonebook.tar.gz
php asterisk-phonebook.php
Digium A-Series IP Phone User Guide
Last but not least, take a look at Digium’s A-Series IP Phone User Guide (PDF) for more tips.
Final Thoughts on A-Series IP Phones
If you couldn’t already tell, we’re quite impressed with the new A-Series phones from Digium. If you’re on a budget, the $59 model is one terrific bargain for home or SOHO use. The only thing you’re really forfeiting with this phone is the gigabit Ethernet port which will have zero impact on small and medium-sized network implementations of a VoIP server. Rather than buying power adapters for your phones, drop by your favorite WalMart and purchase a network switch that includes POE support. They start at about $30. Then pick one of these phones up from your favorite provider and let us know what you think. You’ll also be helping to fund Digium’s open source Asterisk project. Enjoy!
Originally published: Friday, April 13, 2018
Got Friends? 7 Countries Have Never Visited Nerd Vittles. 2018 Is Calling! https://t.co/wMfmlhAr16 #asterisk #freepbx #wazo #issabel #IncrediblePBX #3CX pic.twitter.com/kAmAEnwVIw
— Ward Mundy (@NerdUno) January 9, 2018

Need help with VitalPBX? Visit the VitalPBX Forum.
Special Thanks to Our Generous Sponsors
FULL DISCLOSURE: ClearlyIP, Skyetel, Vitelity, DigitalOcean, Vultr, VoIP.ms, 3CX, Sangoma, TelecomsXchange and VitalPBX have provided financial support to Nerd Vittles and our open source projects through advertising, referral revenue, and/or merchandise. As an Amazon Associate and Best Buy Affiliate, we also earn from qualifying purchases. We’ve chosen these providers not the other way around. Our decisions are based upon their corporate reputation and the quality of their offerings and pricing. Our recommendations regarding technology are reached without regard to financial compensation except in situations in which comparable products at comparable pricing are available from multiple sources. In this limited case, we support our sponsors because our sponsors support us.
 BOGO Bonaza: Enjoy state-of-the-art VoIP service with a $10 credit and half-price SIP service on up to $500 of Skyetel trunking with free number porting when you fund your Skyetel account. No limits on number of simultaneous calls. Quadruple data center redundancy. $25 monthly minimum spend required. Tutorial and sign up details are here.
 The lynchpin of Incredible PBX 2020 and beyond is ClearlyIP components which bring management of FreePBX modules and SIP phone integration to a level never before available with any other Asterisk distribution. And now you can configure and reconfigure your new Incredible PBX phones from the convenience of the Incredible PBX GUI.
 VitalPBX is perhaps the fastest-growing PBX offering based upon Asterisk with an installed presence in more than 100 countries worldwide. VitalPBX has generously provided a customized White Label version of Incredible PBX tailored for use with all Incredible PBX and VitalPBX custom applications. Follow this link for a free test drive!
 Special Thanks to Vitelity. Vitelity is now Voyant Communications and has halted new registrations for the time being. Our special thanks to Vitelity for their unwavering financial support over many years and to the many Nerd Vittles readers who continue to enjoy the benefits of their service offerings. We will keep everyone posted on further developments.

Beginner’s Navigation Guide to VoIP PBXs and Nerd Vittles

Here at Nerd Vittles, we cover a lot of VoIP territory over the course of a year. To kick off the new year, we thought it might be helpful for those just beginning their VoIP adventure to sketch out the VoIP lay of the land for you. We’re assuming that you came to our site because you wanted a VoIP solution that gives you something to play with and to learn from. That’s not for everybody, and there are less flexible, turnkey VoIP solutions that function pretty much like a toaster. At the top of that short list would be the Ooma Telo and OBi200. Both offer (almost) free calling in the U.S. and Canada.
Keep in mind that all of us started as beginners so there’s no reason to be intimidated if you choose to deploy your own PBX. We’ve gotten a dozen years of enjoyment out of our adventures with VoIP telephony, and there’s no reason you can’t do the same. Let’s begin.
Choosing a Hardware Platform for Your VoIP PBX
First, you’ll need to choose a platform for your VoIP-based PBX: dedicated hardware, virtual machine, or cloud-based PBX. In no small part, this choice depends upon the target audience for your PBX. If it’s for home use or a SOHO business, a $35 Raspberry Pi may suffice. On the other hand, if your PBX will be supporting more than a dozen users or more than a handful of simultaneous calls, we’d look elsewhere. Many of Intel’s Atom-based PCs work very well. And a VirtualBox virtual PBX running atop an iMac or beefy Dell PC can support dozens of users if you have the necessary Internet bandwidth to handle your call volume. Cloud-based servers come in all shapes and sizes as well. As prices have plummeted, cloud solutions have become our favorite. For $3 to $6 a month, you now can host your PBX in the cloud with automatic image backups of your entire server every week. If you’re willing to forfeit backups, here is a cloud solution that will only set you back about a dollar a month. If your server is primarily for business use, we strongly recommend our Platinum Sponsor, RentPBX, that offers dozens of VoIP choices for $14.99 a month with coupon code: NOGOTCHAS.
Choosing the Best PBX to Meet Your Requirements
Once you’ve nailed down your hardware platform, the next step is choosing an operating system and PBX to support your individual requirements. As you might have guessed, there are dozens from which to choose. In both the open source and commercial PBX world, most systems require a specific version of Linux so your operating system choice typically is dependent upon the PBX you choose. In the open source world, the PBX learning curve is often related to the feature set being offered. More sophisticated feature sets typically have a steeper learning curve. If you’re just getting started with VoIP and you want a platform for learning, experimenting, or home use, you can’t beat Incredible PBX 13-13 Whole Enchilada. It was designed by us to be a turnkey PBX for first-time users with rock-solid security and all of the features you will ever need. It includes 31 applications for Asterisk® that cover every imaginable function that can be performed with a telephone including faxing, voice dialing, SMS messaging, wakeup calls and telephone reminders, free calling, conferencing, text-to-speech applications such as News Headlines and Weather Forecasts, Wolfram Alpha for Siri-like queries, plus all the usual PBX features: blacklists, call forwarding, call waiting, call transfer, call parking, call recording, intercom, voicemail including voicemail transcription with email delivery, IVRs, paging, AutoAttendants, DISA, and many more.
If you’re an experienced Asterisk developer that just wants a lean PBX where you can customize it to meet individual customer’s requirements, then Incredible PBX 13-13 Lean should be just the ticket. All of its components are configurable including Asterisk which can be recompiled from the included source code.
At the sophisticated end of the spectrum is Incredible PBX for Wazo which is based upon the Wazo PBX, an Asterisk 15 realtime implementation with full support for High Availability redundancy, multi-party videoconferencing, WebRTC, and automatic nightly backups. It includes API libraries from which you literally can build your own customized PBX from the ground up. The Incredible PBX feature set provides a platform with virtually identical applications to those found in Incredible PBX 13-13.
Sandwiched in between Incredible PBX 13-13 and Incredible PBX for Wazo is Incredible PBX 13 for Issabel. Issabel is an enhanced fork of the previous Elastix 4.0 PBX. The 2018 release includes Asterisk 13, the LTS version of the Asterisk platform. With the new Incredible PBX 13 add-on, you get the best of all worlds with Google Voice support and dozens of applications for Asterisk. Issabel provides a Unified Communications platform that is second to none in the open source world.
Thus far, all of our recommendations have been to open source, GPL-licensed PBX platforms. But you’d be making a mistake to limit your search for business telephony platforms to open source offerings. Our corporate sponsor, 3CX, offers a full year of their commercial PBX running in the Google Cloud at no cost. It’s incredibly simple to install and configure. And the beauty of the 3CX commercial platform is it can scale to any size as your business grows. And the 3CX feature set can be expanded geometrically as your business requirements mature. We added free text-to-speech applications for News and Weather reports just last week. Our favorite open source deployment strategy is to install a 3CX PBX alongside Incredible PBX which yields literally the best of both worlds. The 3CX clients for Windows and Macs, Android, and iOS make VoIP telephony available from anywhere with a couple of button clicks, and 3CX users experience none of the traditional communications problems that invariably crop up on platforms deployed by novice VoIP users running Asterisk.
Getting Started with Extensions, Trunks, and Routes
The Big 3 when it comes to PBX configuration are extensions, trunks, and routes. Extensions carry calls between phones on the PBX and other phones either inside or outside your home or office. Trunks actually provide the links between your PBX and the outside telephony world. Inbound routes tell your PBX where to send incoming calls while Outbound routes tell your PBX which trunk to use when calls are made to numbers outside your PBX. We’ve covered this in more detail including dozens of trunk setups in this Nerd Vittles tutorial.
Making Free U.S./Canada Calls within the United States
There are three ways to make free calls using your PBX. If you’re in the United States, you can use Google Voice to make free calls to the U.S. and Canada if your PBX supports Google Voice trunks, e.g. Incredible PBX 13-13 Whole Enchilada and Incredible PBX for Issabel. An alternative, if your PBX does not directly support Google Voice trunks, e.g. Incredible PBX for Wazo and 3CX, is to use the Simonics SIP to Google Voice Gateway service. For Nerd Vittles users, there is a one-time $4.99 signup fee with no additional charges ever. Whether you live in the U.S or not, all the PBXs we’ve covered today can make free SIP calls to anyone in the world that has a SIP URI address and a SIP phone. Most SIP softphones are free.
Mastering the Incredible PBX Feature Set
Configuring the Travelin’ Man 3 Firewall
All Incredible PBX servers include a firewall that is configured automatically as part of the installation process. On the 3CX platform, you’ll need to add the Travelin’ Man 3 firewall after installing your 3CX PBX. Here’s how:
Configuring a Firewall WhiteList:
WhiteListing Users with Travelin’ Man 3 and IPtables Firewall
Learning to Build Effective IVRs
Interactive Voice Response (IVR) systems and AutoAttendants are the bread-and-butter applications for businesses. If you’ve ever called a business and actually spoken to a live person without encountering an IVR, lucky you! But, believe it or not, IVRs can actually be a useful tool including our Stealth AutoAttendant which lets you intercept incoming calls with a greeting which provides a slight delay to allow the caller (or you) to reroute the call to a specific destination before the default destination kicks in. Nerd Vittles and the Incredible PBX offerings provide all of the tools you’ll need to build any type of IVR imaginable. Mastering Allison Smith’s Top 15 is an excellent starting point.
Harnessing Nerd Vittles Resources
Google is your friend when it comes to finding tutorials of interest in the VoIP world. To narrow searches to just Nerd Vittles, use the following syntax:
stealth autoattendant site:nerdvittles.com
And the Nerd Vittles site itself provides several powerful ways to drill down into topics of interest. In the upper right column of any article, you’ll find a search function which will return a list of matching articles to peruse. At the bottom of every article, check out the all-new Articles of Interest section of Nerd Vittles arranged by topic. Also in the right column of Nerd Vittles, you’ll find a listing of Categories with Nerd Vittles articles conveniently grouped by topic. And, finally, you can quickly jump to the lead article on every major Incredible PBX implementation in the color-coded tabs labeled: GPL VOIP SOLUTIONS FOR ALL.
Happy New Year!

Originally published: Monday, January 1, 2018
 Support Issues. With any application as sophisticated as a VoIP PBX, you’re bound to have questions. Blog comments are a terrible place to handle support issues although we welcome general comments about our articles and software. If you have particular support issues, we encourage you to get actively involved in the PBX in a Flash Forums. It’s the best Asterisk tech support site in the business, and it’s all free! Please have a look and post your support questions there. Unlike some forums, ours is extremely friendly and is supported by literally hundreds of Asterisk and 3CX gurus and thousands of users just like you. You won’t have to wait long for an answer to your question.

NEW YEAR’S TREAT: If you could use one or more free DIDs in the U.S. with unlimited inbound calls and unlimited simultaneous channels, then today’s your lucky day. TelecomsXChange and Bluebird Communications have a few hundred thousand DIDs to give away so you better hurry. You have your choice of DID locations including New York, New Jersey, California, Texas, and Iowa. The DIDs support Voice, Fax, Video, and even Text Messaging (by request). The only requirement at your end is a dedicated IP address for your VoIP server. Once you receive your welcome email with your number, be sure to whitelist the provider’s IP address in your firewall. For Incredible PBX servers, use add-ip to whitelist the UDP SIP port, 5060, using the IP address provided in your welcoming email.
Here’s the link to order your DIDs.
Your DID Trunk Setup in your favorite GUI should look like this:
Trunk Name: IPC
Peer Details:
type=friend
qualify=yes
host={IP address provided in welcome email}
context=from-trunk
Your Inbound Route should specify the 11-digit DID beginning with a 1. Enjoy!

Need help with Asterisk or 3CX? Visit the PBX in a Flash Forum.
Special Thanks to Our Generous Sponsors
FULL DISCLOSURE: ClearlyIP, Skyetel, Vitelity, DigitalOcean, Vultr, VoIP.ms, 3CX, Sangoma, TelecomsXchange and VitalPBX have provided financial support to Nerd Vittles and our open source projects through advertising, referral revenue, and/or merchandise. As an Amazon Associate and Best Buy Affiliate, we also earn from qualifying purchases. We’ve chosen these providers not the other way around. Our decisions are based upon their corporate reputation and the quality of their offerings and pricing. Our recommendations regarding technology are reached without regard to financial compensation except in situations in which comparable products at comparable pricing are available from multiple sources. In this limited case, we support our sponsors because our sponsors support us.
 BOGO Bonaza: Enjoy state-of-the-art VoIP service with a $10 credit and half-price SIP service on up to $500 of Skyetel trunking with free number porting when you fund your Skyetel account. No limits on number of simultaneous calls. Quadruple data center redundancy. $25 monthly minimum spend required. Tutorial and sign up details are here.
 The lynchpin of Incredible PBX 2020 and beyond is ClearlyIP components which bring management of FreePBX modules and SIP phone integration to a level never before available with any other Asterisk distribution. And now you can configure and reconfigure your new Incredible PBX phones from the convenience of the Incredible PBX GUI.
 VitalPBX is perhaps the fastest-growing PBX offering based upon Asterisk with an installed presence in more than 100 countries worldwide. VitalPBX has generously provided a customized White Label version of Incredible PBX tailored for use with all Incredible PBX and VitalPBX custom applications. Follow this link for a free test drive!
 Special Thanks to Vitelity. Vitelity is now Voyant Communications and has halted new registrations for the time being. Our special thanks to Vitelity for their unwavering financial support over many years and to the many Nerd Vittles readers who continue to enjoy the benefits of their service offerings. We will keep everyone posted on further developments.
Some Recent Nerd Vittles Articles of Interest…
Free Calling Returns with Incredible PBX 15 for Wazo

Since we began our XiVO/Wazo adventure 18 months ago, the most requested feature has been direct support for Google Voice with OAuth 2 authentication. For those in the United States, it remains the cheapest VoIP solution on the planet with unlimited free calls in the U.S. and Canada. When Wazo migrated to Asterisk® 15, the Asterisk platform natively supported Google Voice, but there was no direct support in either Wazo or Incredible PBX. Instead, over the past couple months, we’ve had Google Voice functionality through Simonics SIP to Google Voice Gateway. Well, today’s a new day. We’re pleased to announce Google Voice is back!
Overview. If you’re new to Google Voice, here’s how the installation scenario goes. First, you set up a Gmail account at gmail.com. Next, you create a Google Voice account. Then, you configure Google Voice for use with Asterisk®. Next, you obtain your Google Voice OAuth 2 Refresh Token which becomes your password to use in configuring Google Voice on the Wazo platform. Next, using SSH or Putty, you log into your Wazo server as root and run the add-gvtrunk script to get your Google Voice credentials set up in Wazo. Finally, you log into the Wazo GUI with a browser and set up a custom trunk as well as an outgoing and incoming route for Google Voice calls. To add more Google Voice trunks, you simply repeat the drill. You now should have a perfectly functioning, free VoIP platform compliments of Google and Sylvain Boily and his development team. Start by deploying Incredible PBX 15 for Wazo.
Configuring Google Voice for Wazo
If you’re one of the five people on Earth that does not yet have a Gmail account, start there. Once you’ve set up your Gmail account and logged in, open a new browser tab to access the Google Voice site. Accept the Google Terms and Privacy Policy. Then choose a new Phone Number in your favorite area code. NOTE: Before Google will assign you a number, you must enter an existing U.S. phone number to verify your identity and location as well as to use for initially forwarding calls. Once your account is set up, you will get an email asking that you verify your email address.
Google continues to tighten up on obtaining more than one Google Voice number from the same computer or the same IP address. If this is a problem for you, here’s a workaround. From your smartphone, install the Google Voice app from iPhone App Store or Google’s Play Store. Then open the app and login to your new Google account. Choose your new Google Voice number when prompted and provide a cell number with SMS as your callback number for verification. Once the number is verified, log out of Google Voice. Do NOT make any calls. Now head back to your PC’s browser and login to http://google.com/voice. You will be presented with the new Google Voice interface which does not include the Google Chat option. But fear not. At least for now there’s still a way to get there. After you have set up your new phone number and opened the Google Voice interface, click on the 3 vertical dots in the left sidebar (it’s labeled More). When it opens, click Legacy Google Voice in the sidebar. That will return you to the old UI. Now click on the Gear icon (upper right) and choose Settings. Make sure the Google Chat option is selected and disable forwarding calls to whatever default phone number you set up.
Next, click on the Calls tab. Make sure your settings match these:
- Call Screening – OFF
- Call Presentation – OFF
- Caller ID (In) – Display Caller’s Number
- Caller ID (Out) – Don’t Change Anything
- Do Not Disturb – OFF
- Call Options (Enable Recording) – OFF
- Global Spam Filtering – ON
Under the Voicemail tab, plug in your email address so you get notified of new voicemails. Then click Save Settings. Down the road, receipt of a Google Voice voicemail will be a big hint that something has come unglued on your PBX.
One final word of caution is in order regardless of your choice of providers: Do NOT use special characters in your Google Voice password, and don’t enable two-step authentication.
Now it’s time to obtain your OAuth 2 credentials. Even though it’s a bit more work on the front end, the good news is you won’t have to worry about your Google Voice trunks failing when Google phases out plain-text passwords. The other good news is you won’t be passing your plain-text Google Voice credentials across the Internet for everyone in the world to see.
Obtaining Your Google Voice OAuth 2 Credentials
While you’re still logged into your Google Voice account, you need to obtain a refresh_token which is what you’ll use instead of a password when setting up your Google Voice account with XiVO. Here’s how.
1. Be sure you are still logged into your Google Voice account. If not, log back in at https://voice.google.com.
2. In a separate browser tab, go to the Google OAUTH Playground using your browser while still logged into your Google Voice account.
3. Once logged in to Google OAUTH Playground, click on the Gear icon in upper right corner (as shown below).
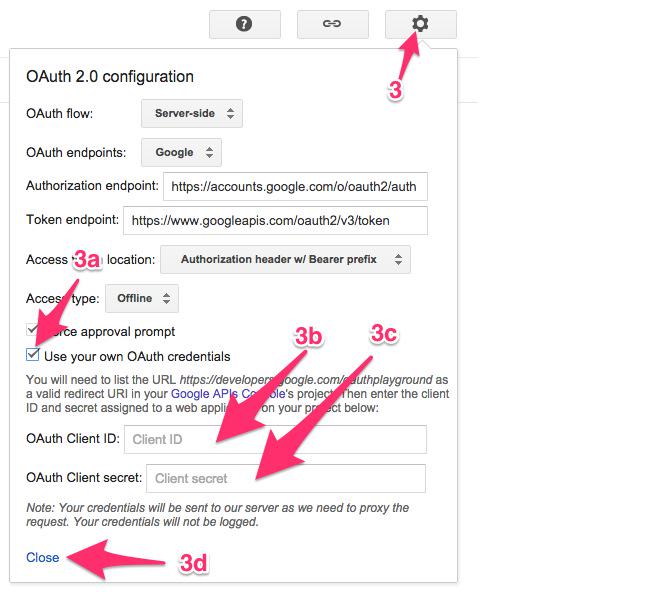
3a. Check the box: Use your own OAuth credentials
3b. Enter Incredible PBX OAuth Client ID:
466295438629-prpknsovs0b8gjfcrs0sn04s9hgn8j3d.apps.googleusercontent.com
3c. Enter Incredible PBX OAuth Client secret: 4ewzJaCx275clcT4i4Hfxqo2
3d. Click Close
4. Click Step 1: Select and Authorize APIs (as shown below)
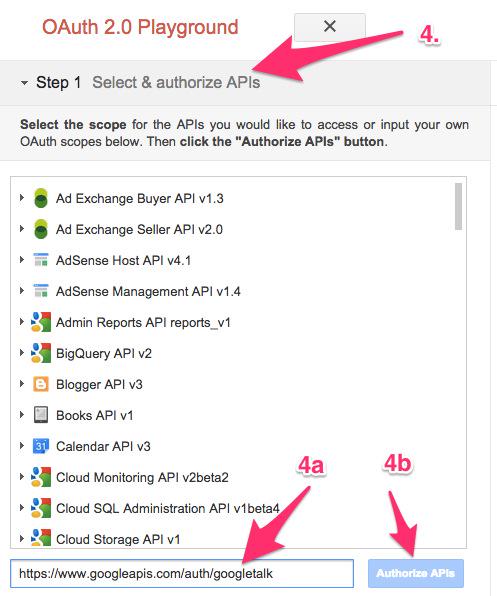
4a. In OAUTH Scope field, enter: https://www.googleapis.com/auth/googletalk
4b. Click Authorize APIs (blue) button.
With a recent Google change, you then will be prompted to choose your Google account again. Click on the same account name that you logged into in Step #1. You then will be prompted whether to allow Google to view and send Chat messages. Click Allow.
5. Click Step 2: Exchange authorization code for tokens
5a. Click Exchange authorization code for tokens (blue) button
5b. When the tokens have been generated, Step 2 will close.
6. Reopen Step 2 and copy your Refresh_Token. This is the "password" you will need to enter (together with your Gmail account name and 10-digit GV phone number) when you add your GV trunk with the add-gvtrunk script. Store this refresh_token in a safe place. Google doesn’t permanently store it!
7. Authorization tokens NEVER expire! If you ever need to remove your authorization tokens, go here and delete Incredible PBX Google Voice OAUTH entry by clicking on it and choosing DELETE option.
Switch back to your Gmail account and click on the Phone icon at the bottom of the window to place one test call. Once you successfully place a call, you can log out of Google Voice and Gmail.
Yes, this is a convoluted process. Setting up a secure computing environment often is. Just follow the steps and don’t skip any. It’s easy once you get the hang of it. And you’ll sleep better.
Downloading and Installing Google Voice with OAuth 2
Installs of Incredible PBX 15 for Wazo beginning December 7 already have the necessary components in place to support Google Voice. If you have an earlier installation of Incredible PBX 15 for Wazo, you can easily upgrade your server to support Google Voice. Simply log into your server’s Linux CLI as root using SSH or Putty and issue the following commands:
cd /root
wget http://incrediblepbx.com/gvtrunk15.tar.gz
tar zxvf gvtrunk15.tar.gz
rm -f gvtrunk15.tar.gz
If you’re upgrading Wazo from a release before 17.15, you can follow the usual upgrade steps after first removing your existing Google Voice trunks from the configuration. Start by copying your Google Voice credentials from /etc/asterisk/oauth_xmpp.conf. Next, delete the following file: /etc/asterisk/extensions_extra.d/gv.conf. Then perform the upgrade:
cd /root
cp -pr /etc/postfix /root
cp -p /etc/nginx/sites-enabled/xivo /root
echo "noload => res_xmpp_oauth.so" >> /etc/asterisk/modules.conf
xivo-dist wazo-17.17
apt-get update
/etc/init.d/netfilter-persistent stop
wazo-upgrade
iptables-restart
# put the Incredible PBX web add-ons back in place
cd /
wget http://incrediblepbx.com/incredible-nginx.tar.gz
tar zxvf incredible-nginx.tar.gz
rm -f incredible-nginx.tar.gz
ln -s /etc/nginx/locations/https-available/01_incrediblepbx /etc/nginx/locations/https-enabled/.
cd /etc/nginx
wget http://incrediblepbx.com/nginx-config.tar.gz
tar zxvf nginx-config.tar.gz
rm -f /etc/nginx/sites-enabled/default
cp -p /root/xivo /etc/nginx/sites-enabled
/etc/init.d/nginx restart
cp -pr /root/postfix /etc
/etc/init.d/postfix restart
sed -i 's|fr|us|' /etc/asterisk/indications.d/99-general.conf
/etc/init.d/asterisk restart
Initial Google Voice OAuth Trunk Setup with Wazo
Now it’s time to create your Google Voice OAuth 2 trunk to use with Wazo. Log back into the Linux CLI as root. Be sure you have your 10-digit Google Voice phone number, your Google account name without @gmail.com, and your Refresh Token from the previous step. Then run the script to add your Google Voice trunk:
cd /root
./add-gvtrunk
Plug in your Google Voice phone number, your account name (without @gmail.com), and refresh token when prompted. Check your work carefully. When the install finishes, fire up your favorite browser to finish the setup using the settings displayed in the Linux CLI.
Configuring Wazo for Google Voice OAuth
From a browser pointed to your server’s IP address, log in to Wazo as root with your GUI password.
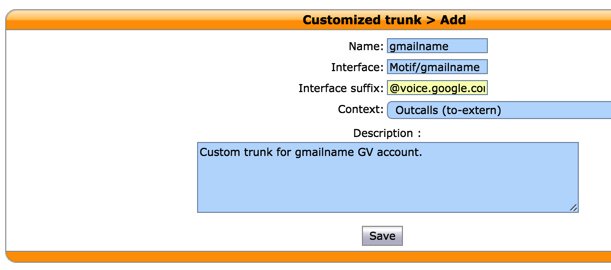
Choose Services.IPBX.Trunk Management.Customized. Click on + Add to create a new custom trunk. Configure the trunk using the settings provided in the previous step. Click the Save button when finished. The Trunk Name will be your actual gmailname (without @gmail.com). Interface will be Motif/gmailname (using your actual Gmail name). Interface suffix will be @voice.google.com. And the Context will be Outcalls (to-extern).
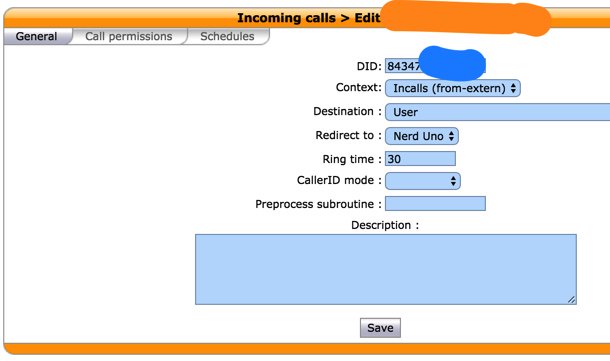
Next, choose Services.IPBX.Call Management.Incoming Calls. Click on + Add to create a new inbound route for your Google Voice DID. This is where you tell Wazo how to route calls placed to your Google Voice number. For your DID, enter your 10-digit Google Voice number. For the Context, choose Incalls (from-extern). Then choose from the pick lists to select a Destination and Redirect option for the incoming calls. It could be an extension, a ring group, a conference room, or an IVR. Click Save when you’re finished.
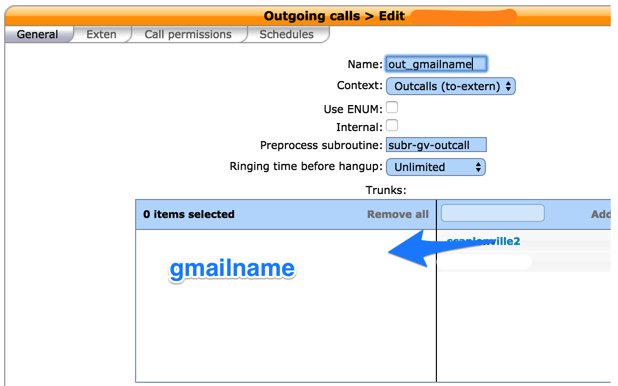
Finally, choose Services.IPBX.Call Management.Outgoing Calls. Click on + Add to create a new outbound route. Under the General tab, configure the route as shown below using a Name of out_gmailname (using your actual Gmail name). The Context should be Outcalls (to-extern). The Preprocess subroutine should be subr-gv-outcall. And the desired Custom Trunk should be dragged left to the selected column:
Under the Exten tab, add the desired 10-digit Exten string that users will dial to place a call through the Google Voice trunk. Trim off any prefix (such as 9) that you assigned to the dial string using the Stripnum setting. Then click the Save button.
For example, for a first trunk, you might choose NXXNXXXXXX as the Exten with a Stripnum of 0. This would tell Wazo to route all 10-digit calls to this Custom GV Trunk. For a second Google Voice trunk, you might choose 9NXXNXXXXXX with a Stripnum of 1. This would tell Wazo to route 11-digit calls with a 9 prefix to this Custom Trunk AND to strip off the first digit (9) before sending the 10-digit call to Google Voice.

SMS Messaging with Google Voice
Incredible PBX implementations include a separate Python-based component called pygooglevoice that allows SMS messaging using a Google Voice account. You’ll find the SMS Dictator and SMS message blasting scripts in the /root folder of your server. Be advised that the gvoice script used to send these SMS messages does NOT use OAuth 2 authentication and requires your traditional Google Voice account name and password. Because it uses plain text, you probably will experience failures using gvoice unless your PBX is housed on the same server from which you traditionally access this account. The workaround is to do the following immediately before attempting to use SMS messaging with Google Voice. Using a browser, log into the Gmail account that corresponds to the account you plan to use for SMS messaging. In a separate tab of your browser while still logged into Gmail, go to the following link and enable Less Secure Apps for this account. In a third tab, go to the following link and activate the Google Reset Procedure. Now, from the Linux CLI on your PBX, attempt to login to gvoice using your Gmail account name including @gmail.com AND your plain-text Gmail password. If it succeeds, you’re good to go and can now use the SMS messaging tools. Type quit to exit from gvoice. Google normally follows up insecure access attempts with an email requesting that you confirm this is a "safe IP address" for your account. If you fail to respond to that email, you probably will need to repeat this exercise every time you attempt to use SMS messaging.
Taking Google Voice for a Test Drive
That completes the Google Voice setup. You now should be able to place a call using your Google Voice trunk by dialing any 10-digit number. And calls placed to your Google Voice number should ring at the inbound destination you chose above.
If you have additional Google Voice trunks, simply run /root/add-gvtrunk again and insert the new credentials.
If you ever need to delete a Google Voice account, just run /root/del-gvtrunk with the name of the Google Voice trunk to delete. Enjoy your free phone service!
Originally published: Monday, December 11, 2016
 Support Issues. With any application as sophisticated as this one, you’re bound to have questions. Blog comments are a terrible place to handle support issues although we welcome general comments about our articles and software. If you have particular support issues, we encourage you to get actively involved in the PBX in a Flash Forums. It’s the best Asterisk tech support site in the business, and it’s all free! Please have a look and post your support questions there. Unlike some forums, ours is extremely friendly and is supported by literally hundreds of Asterisk and Wazo gurus and thousands of users just like you. You won’t have to wait long for an answer to your question.

Need help with Asterisk or Wazo? Visit the PBX in a Flash Forum.
Special Thanks to Our Generous Sponsors
FULL DISCLOSURE: ClearlyIP, Skyetel, Vitelity, DigitalOcean, Vultr, VoIP.ms, 3CX, Sangoma, TelecomsXchange and VitalPBX have provided financial support to Nerd Vittles and our open source projects through advertising, referral revenue, and/or merchandise. As an Amazon Associate and Best Buy Affiliate, we also earn from qualifying purchases. We’ve chosen these providers not the other way around. Our decisions are based upon their corporate reputation and the quality of their offerings and pricing. Our recommendations regarding technology are reached without regard to financial compensation except in situations in which comparable products at comparable pricing are available from multiple sources. In this limited case, we support our sponsors because our sponsors support us.
 BOGO Bonaza: Enjoy state-of-the-art VoIP service with a $10 credit and half-price SIP service on up to $500 of Skyetel trunking with free number porting when you fund your Skyetel account. No limits on number of simultaneous calls. Quadruple data center redundancy. $25 monthly minimum spend required. Tutorial and sign up details are here.
 The lynchpin of Incredible PBX 2020 and beyond is ClearlyIP components which bring management of FreePBX modules and SIP phone integration to a level never before available with any other Asterisk distribution. And now you can configure and reconfigure your new Incredible PBX phones from the convenience of the Incredible PBX GUI.
 VitalPBX is perhaps the fastest-growing PBX offering based upon Asterisk with an installed presence in more than 100 countries worldwide. VitalPBX has generously provided a customized White Label version of Incredible PBX tailored for use with all Incredible PBX and VitalPBX custom applications. Follow this link for a free test drive!
 Special Thanks to Vitelity. Vitelity is now Voyant Communications and has halted new registrations for the time being. Our special thanks to Vitelity for their unwavering financial support over many years and to the many Nerd Vittles readers who continue to enjoy the benefits of their service offerings. We will keep everyone posted on further developments.
Some Recent Nerd Vittles Articles of Interest…
It’s Soup: The Definitive Quick Start Guide to Wazo 17.17

Today we’re pleased to introduce Wazo 17.17, the latest iteration in the Wazo fork of XiVO. Twelve years in the making with the same development team, Wazo 17.17 is really something special. It’s the latest release featuring Asterisk® 15 with multi-party videoconferencing and also includes a new easy-to-use WebRTC feature and support for Asterisk FollowMe Roaming. We are pleased to announce that this release of Wazo 17.17 using the latest Incredible PBX 15 installer for Asterisk 15 now supports native Google Voice trunks with OAuth 2. Of course, all of your favorite Incredible PBX add-ons are ready as well. What follows is a new soup-to-nuts tutorial covering everything you need to know to get started with Incredible PBX for Wazo 17.17.
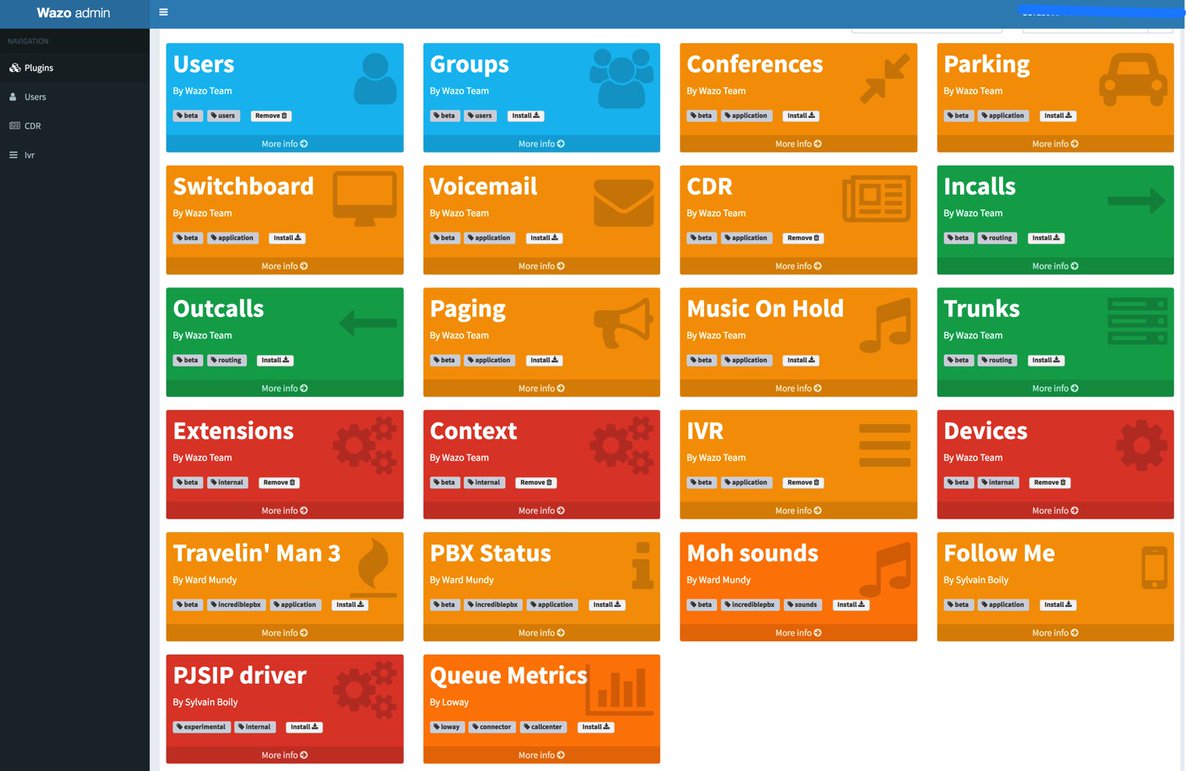
Wazo 17.17 enhances the brand new user interface to complement Wazo’s existing GUI. Revolutionary is probably the best way to describe its design. The reason is that it is generated using pure API calls to the Wazo engine. What that means to the administrator is you can tweak it, enhance it, replace it, or build additional functionality into your UI using the same API calls that the Wazo developers employed to build these components. This is obviously the first of many iterations that will be released in coming months, but it gives you an opportunity to kick the tires. Once you complete the installation process which follows, simply use a browser to log into the IP address of your server at the following link: https://serverIP/admin/. To begin, login with your root GUI credentials and click Plugins to display available options (pictured above). Then install each of the following plugins to begin: Users, Extensions, Contexts, and Devices. The remaining plugins are optional; however, the following plugins are not yet operational: Outcalls and Trunks. The Parking Lots and Switchboard plugins are functional but do not yet show existing setups configured through the legacy GUI. Additional tips and getting started tips are available here and here.
If you’ve been following along in our XiVO adventure with Incredible PBX last year, then you already know that there were a significant number of configuration hoops to jump through once the base install was finished. While these steps are well documented in the original Incredible PBX for XiVO tutorial, there still were plenty of opportunities for typos and skipping steps. Any misstep could spell the difference in a perfectly functioning PBX and one that couldn’t make or receive calls. So we introduced XiVO Snapshots, and today we bring the same technology to the Wazo platform as well.

A Wazo Snapshot is just what the name implies. It’s a snapshot of a working Wazo PBX that has virtually everything already configured: SIP settings that work with Asterisk®, a SIP extension that works with a SIP phone plus your cellphone, a SIP extension preconfigured for WebRTC that uses the new Opus codec, SIP and Google Voice trunk setups for many of the major commercial providers, and default inbound and outbound routes to ease the task of routing calls into and out of your PBX. Basically, you plug in your credentials from your favorite provider after running the Incredible PBX for Wazo installer, tell Wazo how to route the calls, and you’re done. You can have a stable and functional PBX making calls to anywhere in the world in a matter of minutes. Then you can review our numerous tutorials to add additional bells and whistles while actually using your Wazo PBX while you learn.
Incredible PBX for Wazo Installation Overview
Before we roll up our sleeves and walk you through the installation process, we wanted to provide a quick summary of the 10 Basic Steps in setting up Incredible PBX for Wazo. By the way, the whole process takes less than an hour!
- Set Up Desired PBX Platform: Stand-alone PC, Virtual Machine, or Cloud-Based Server
- Run the Incredible PBX for Wazo installer
- Set Up One or More SIP or Google Voice Trunks for Your PBX
- Tell Wazo Where to Direct Incoming Calls from Each Trunk
- Tell Wazo Which Trunk to Use for Every Outbound Calling Digit Sequence
- Set Up a SoftPhone or WebRTC Phone (or both)
- Decide Whether to Activate Simultaneous Ringing on your Cellphone
- Add Google Speech Recognition Key (if desired)
- Activate DISA with Incredible PBX for Wazo (if desired)
- Test Drive Incredible PBX for Wazo
1. Incredible PBX for Wazo Hardware Platform Setup
NOTE: Ignore references to Debian 9 in the platform setup tutorials. Debian 9 is not quite ready yet so stick with Debian 8.
The first step is to choose your hardware platform and decide whether you want to babysit a server and network or leave those tasks to others. We’ve taken the guesswork out of the setups documented below. Five of the options are cloud providers, each of whom provides a generous discount to let you kick the tires. So click on the links below to review the terms and our walkthrough of the setup process on each platform.
- Wazo Platform Tutorial: Installing Wazo on a Dedicated PC
- Wazo Platform Tutorial: Installing Wazo VM on VirtualBox
- Wazo Platform Tutorial: Installing Wazo VM on VMware ESXi
- Wazo Platform Tutorial: Installing Wazo VM at ImpactVPS
- Wazo Platform Tutorial: Installing Wazo VM at Vultr
- Wazo Platform Tutorial: Installing Wazo VM at OVH.com
- Wazo Platform Tutorial: Installing Wazo VM at Digital Ocean
- Wazo Platform Tutorial: Installing Wazo VM at WootHosting
- Wazo Platform Tutorial: Installing Wazo VM at CloudAtCost
- Wazo Platform Tutorial: Manually Installing Wazo and Debian 8
2. Running the Incredible PBX for Wazo Installer
Once you have your hardware platform up and running, the rest of the initial setup process is easy. Simply download and run the Incredible PBX for Wazo installer. On some platforms, it first updates Debian 8 to current specs and reboots. Then log back in and rerun the installer a second time if you are prompted to do so.
cd /root
wget http://incrediblepbx.com/IncrediblePBX15-Wazo.sh
chmod +x IncrediblePBX15-Wazo.sh
./IncrediblePBX15-Wazo.sh
3. Setting Up SIP and Google Voice Trunks with Wazo
When the installation is finished, you can make toll-free calls in the U.S. and Canada without doing anything except dialing "1″ and the 10-digit number from any phone connected to your server. For other calls, there are two steps in setting up trunks to use with Incredible PBX. First, you have to sign up with the provider of your choice and obtain trunk credentials. These typically include the FQDN of the provider’s server as well as your username and password to use for access to that server. Second, you have to configure a trunk on the Incredible PBX for Wazo server so that you can make or receive calls outside of your PBX. As with the platform tutorials, we have taken the guesswork out of the trunk setup procedure for roughly a dozen respected providers around the globe. In addition, Wazo Snapshots goes a step further and actually creates the trunks for you, minus your credentials, as part of the initial Incredible PBX install.
For Google Voice trunks with Incredible PBX 15, log into your server as root and run ./add-gvtrunk. When prompted, insert your 10-digit Google Voice number, your Google Voice email address and your OAuth 2 token. The native Google Voice OAuth tutorial explains how to obtain it.
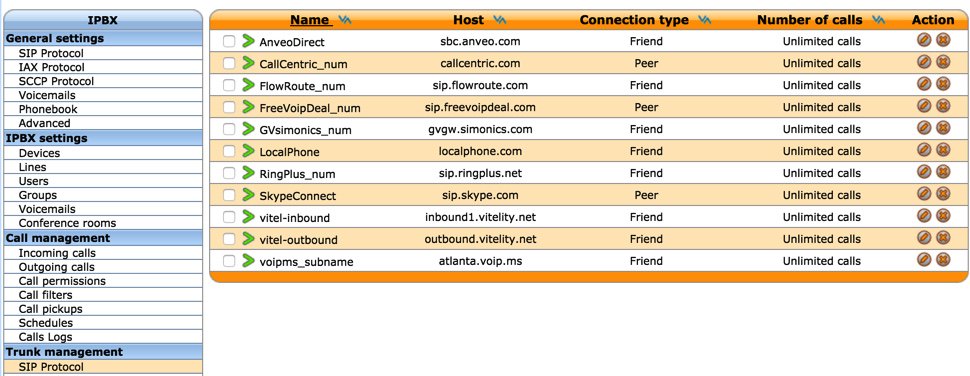
For the other providers, review the setup procedure below and then edit the preconfigured trunk for that provider by logging into the Wazo web GUI and choosing IPX → Trunk Management → SIP Protocol. Edit the setup for your provider (as shown above) and fill in your credentials and CallerID number in the General tab. Activate the trunk in the Register tab after again filling in your credentials. Save your settings when finished. No additional configuration for these providers is required using the Incredible PBX for Wazo Snapshot.
- Wazo Trunks Tutorial: Installing a Vitelity SIP Trunk
- Wazo Trunks Tutorial: Installing a VoIP.ms SIP Trunk
- Wazo Trunks Tutorial: Installing a RingPlus SIP Trunk
- Wazo Trunks Tutorial: Installing a FreeVoipDeal (Betamax) SIP Trunk
- Wazo Trunks Tutorial: Installing a Google Voice-Simonics SIP Trunk
- Wazo Trunks Tutorial: Deploying Native Google Voice with OAuth Trunks
- Wazo Trunks Tutorial: Installing an Anveo Direct Outbound SIP Trunk
- Wazo Trunks Tutorial: Installing a Skype Connect SIP Trunk
- Wazo Trunks Tutorial: Installing a LocalPhone SIP Trunk
- Wazo Trunks Tutorial: Installing a CallCentric SIP Trunk
- Wazo Trunks Tutorial: Installing a FlowRoute SIP Trunk
4. Directing Incoming Calls from Wazo Trunks
Registered Wazo trunks typically include a DID number. With the exception of CallCentric, this is the number that callers would dial to reach your PBX. With CallCentric, it’s the 11-digit account number of your account, e.g. 17771234567. In the Wazo web GUI, we use IPX → Call Management → Incoming Calls to create inbound routes for every DID and trunk associated with your PBX. Two sample DIDs have been preconfigured to show you how to route calls to an extension or to an IVR. To use these, simply edit their settings and change the DID to match your trunk. Or you can create new incoming routes to send calls to dozens of other destinations on your PBX.
5. Routing Outgoing Calls from Wazo to Providers
Outgoing calls from extensions on your Wazo PBX must be routed to a trunk provider to reach call destinations outside your PBX. Outgoing call routing is managed in IPX → Call Management → Outgoing Calls. You tell Wazo which trunk provider to use in the General tab. Then you assign a Calling Digit Sequence to this provider in the Exten tab. For example, if NXXNXXXXXX were assigned to Vitelity, this would tell Wazo to send calls to Vitelity if the caller dialed a 10-digit number. Wazo has the flexibility to add and remove digits from a dialed number as part of the outbound call routing process. For example, you might want callers to dial 48NXXNXXXXXX to send calls to a Google Voice trunk where 48 spells "GV" on the phone keypad. We obviously don’t want to send the entire dial string to Google Voice so we tell Wazo to strip the first 2 digits (48) from the number before routing the call out your Google Voice trunk. We’ve included two examples in the Wazo Snapshot to get you started. Skype Connect (shown below) is an example showing how to strip digits and also add digits before sending a call on its way:

6. Setting Up a Softphone & WebRTC with Wazo
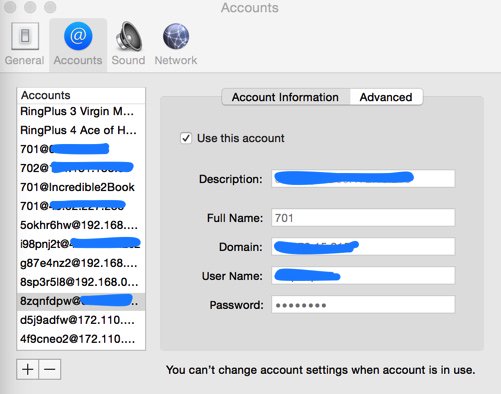
If you’re a Mac user, you’re lucky (and smart). Download and install Telephone from the Mac App Store. Start up the application and choose Telephone:Preference:Accounts. Click on the + icon to add a new account. To set up your softphone, you need 3 pieces of information: the IP address of your server (Domain), and your Username and Password. In the World of Wazo, you’ll find these under IPBX → Services → Lines. Just click on the Pencil icon beside the extension to which you want to connect. Now copy or cut-and-paste your Username and Password into the Accounts dialog of the Telephone app. Click Done when you’re finished, and your new softphone will come to life and should show Available. Dial the IVR (4871) to try things out. With Telephone, you can use over two dozen soft phones simultaneously on your desktop.
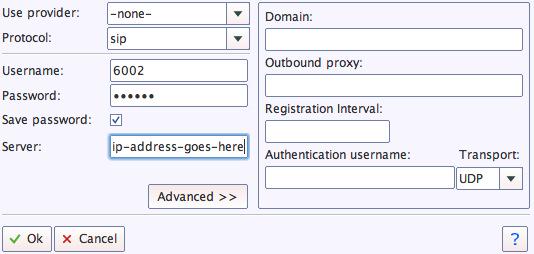
For everyone else, we recommend the YateClient softphone which is free. Download it from here. Run YateClient once you’ve installed it and enter the credentials for the Wazo Line. You’ll need the IP address of your server plus your Line username and password associated with the 701 extension. On the Wazo platform, do NOT use an actual extension number for your username with Wazo. Go to IPBX Settings → Lines to decipher the appropriate username and password for the desired extension. Click OK to save your entries.
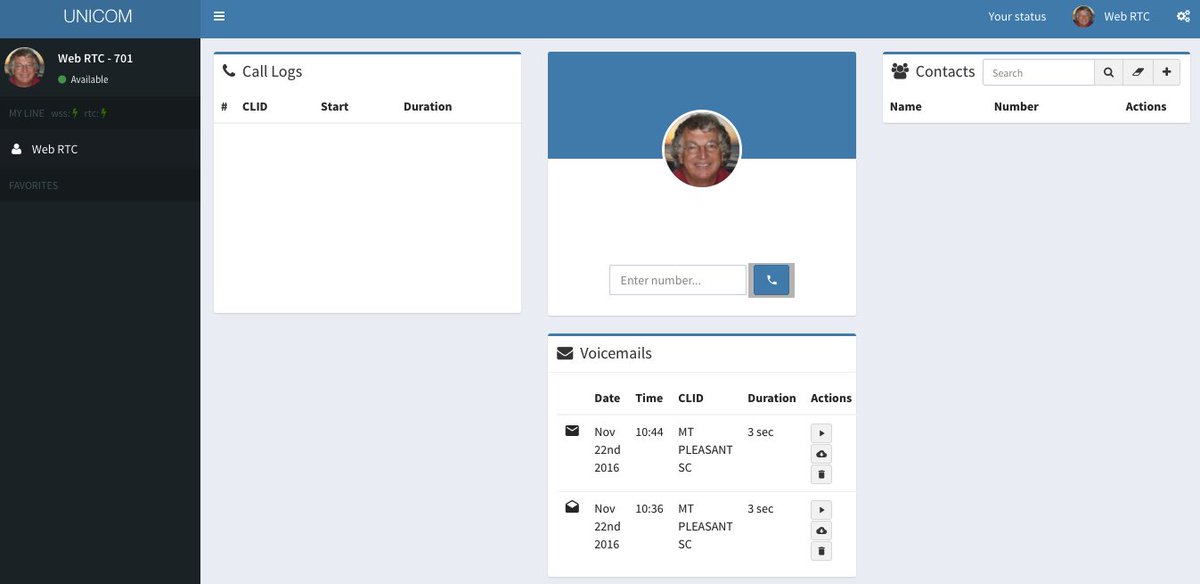
WebRTC allows you to use your Chrome or Firefox browser as a softphone. Extension 701 comes preconfigured for WebRTC access with Incredible PBX for Wazo. It shares the same password as the Line associated with extension 701, but the username is 701 rather than the username associated with the Line. You can decipher the password by accessing the Wazo Web GUI and then IPBX → Services → Users → Incredible PBX → XiVO Client Password. Or log into your server as root using SSH or Putty and run: /root/show-701-pw. Wazo introduces several new features to WebRTC including support for the awesome new Opus codec plus voicemail management and even Gravatar support. It’s all preconfigured!
Special Note: Beginning with version 17.02 of Wazo, WebRTC is fully integrated with NGINX on your server, and a simplified method for configuring WebRTC users has been added. When you create a new User account, simply choose the SIP (WebRTC) Protocol when creating a new user account, and all of the Advanced Line options required to support WebRTC will be preconfigured for you.

To use WebRTC, you no longer need to accept the different SSL certificates associated with the WebRTC app. From your browser, go to the following site and click on each link to accept the certificates. Once you’ve completed this process, simply visit the Wazo WebRTC site.
Before logging in, click on the Gear icon in the lower right corner and then click on the Pencil icon to edit your Settings. Fill in the public IP address of your Wazo server and specify 443 for the Port. Leave the Backend field blank and click Save. Now login to your WebRTC account with Username 701. The Password is the one you obtained running show-701-pw. The IP Address (if required) is the address of your Wazo PBX.
Implementing FollowMe Roaming with a CellPhone
In addition to ringing your SIP extension when incoming calls arrive, Wazo 17.17 can also ring your cellphone simultaneously. This obviously requires at least one outbound trunk. If that trunk provider also supports CallerID spoofing, then Wazo will pass the CallerID number of the caller rather than the DID associated with the trunk. Incredible PBX for Wazo comes with cellphone support for extension 702 ready to go. To enable it, access the Wazo Web GUI and go to IPBX → Services → Users → Incredible PBX and insert your Mobile Phone Number using the same dial string format associated with the trunk you wish to use to place the calls to your cellphone. You then can answer the incoming calls on either your cellphone or the registered SIP phone. If you answer on your cellphone, you will be prompted whether you wish to accept the call. If you press 1 after observing the CallerID, the caller will be connected. If you decline, the caller will be routed to the Wazo voicemail account of the extension.
8. Activating Voice Recognition for Wazo
Google has changed the licensing of their speech recognition engine about as many times as you change diapers on a newborn baby. Today’s rule restricts use to “personal and development use.” Assuming you qualify, the very first order of business is to enable speech recognition for your Wazo PBX. Once enabled, the Incredible PBX feature set grows exponentially. You’ll ultimately have access to the Voice Dialer for AsteriDex, Worldwide Weather Reports where you can say the name of a city and state or province to get a weather forecast for almost anywhere, Wolfram Alpha for a Siri-like encyclopedia for your PBX, and Lefteris Zafiris’ speech recognition software to build additional Asterisk apps limited only by your imagination. And, rumor has it, Google is about to announce new licensing terms, but we’re not there yet. To try out the Voice Dialer in today’s demo IVR, you’ll need to obtain a license key from Google. This Nerd Vittles tutorial will walk you through that process. Add your key to /var/lib/asterisk/agi-bin/speech-recog.agi on line 72.
9. Adding DISA Support to Your Wazo PBX
If you’re new to PBX lingo, DISA stands for Direct Inward System Access. As the name implies, it lets you make calls from outside your PBX using the call resources inside your PBX. This gives anybody with your DISA credentials the ability to make calls through your PBX on your nickel. It probably ranks up there as the most abused and one of the most loved features of the modern PBX.
There are three ways to implement DISA with Incredible PBX for Wazo. You can continue reading this section for our custom implementation with two-step authentication. There also are two native Wazo methods for implementing DISA using a PIN for security. First, you can dedicate a DID to incoming DISA calls. Or you can add a DISA option to an existing IVR. Both methods are documented in our tutorial on the PIAF Forum.
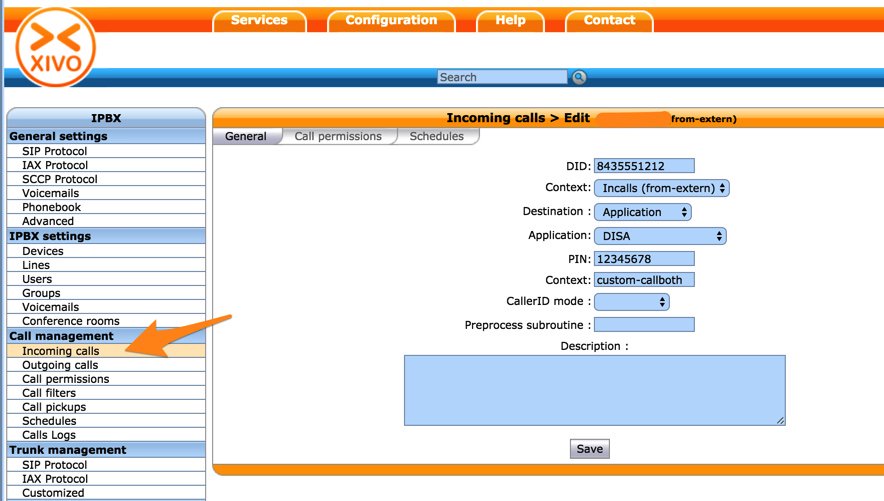
We prefer two-step authentication with DISA to make it harder for the bad guys. First, the outside phone number has to match the whitelist of numbers authorized to use your DISA service. And, second, you have to supply the DISA password for your server before you get dialtone to place an outbound call. Ultimately, of course, the monkey is on your back to create a very secure DISA password and to change it regularly. If all this sounds too scary, don’t install DISA on your PBX.
1. To get started, edit /root/disa-xivo.txt. When the editor opens the dialplan code, move the cursor down to the following line:
exten => 3472,n,GotoIf($["${CALLERID(number)}"="701"]?disago1) ; Good guy
2. Clone the line by pressing Ctrl-K and then Ctrl-U. Add copies of the line by pressing Ctrl-U again for each phone number you’d like to whitelist so that the caller can access DISA on your server. Now edit each line and replace 701 with the 10-digit number to be whitelisted.
3. Move the cursor down to the following line and replace 12341234 with the 8-digit numeric password that callers will have to enter to access DISA on your server:
exten => 3472,n,GotoIf($["${MYCODE}" = "12341234"]?disago2:bad,1)
4. Save the dialplan changes by pressing Ctrl-X, then Y, then ENTER.
5. Now copy the dialplan code into your Wazo setup, remove any previous copies of the code, and restart Asterisk:
cd /root
sed -i '\:// BEGIN DISA:,\:// END DISA\:d' /etc/asterisk/extensions_extra.d/xivo-extrafeatures.conf
cat disa-xivo.txt >> /etc/asterisk/extensions_extra.d/xivo-extrafeatures.conf
/etc/init.d/asterisk reload
6. The traditional way to access DISA is to add it as an undisclosed option in an IVR that is assigned to one of your inbound trunks (DIDs). For the demo IVR that is installed, edit the ivr-1.conf configuration file and change the "option 0″ line so that it looks like this. Then SAVE your changes.
exten => 0,1(ivrsel-0),Dial(Local/3472@default)
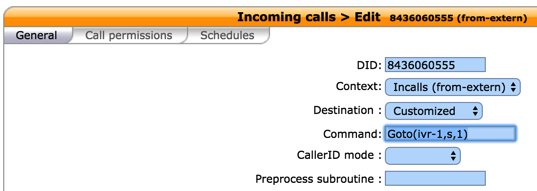
7. Adjust the inbound calls route of one of your DIDs to point to the demo IVR by changing the destination to Customized with the following Command:
Goto(ivr-1,s,1)
A sample is included in the Wazo Snapshot. Here’s how ours looks for the Demo IVR:
8. Now you should be able to call your DID and choose option 0 to access DISA assuming you have whitelisted the number from which you are calling. When prompted, enter the DISA password you assigned and press #. You then should be able to dial a 10-digit number to make an outside call from within your PBX.
SECURITY HINT: Whenever you implement a new IVR on your PBX, it’s always a good idea to call in from an outside number 13 TIMES and try every key from your phone to make sure there is no unanticipated hole in your setup. Be sure to also let the IVR timeout to see what result you get.
10. NEW: Travelin’ Man 3 WhiteList Firewall
All new installs of Incredible PBX for Wazo include the newly enhanced and preconfigured IPtables Firewall featuring Travelin’ Man 3. Please read the new tutorial when you have a few minutes. It documents how to enable access to your server for remote phones and traveling users.
PortKnocker previously let a remote user ping the server with a 3-digit code to temporarily add the remote user’s IP address to the IPtables Firewall WhiteList so that the user could gain remote access. We now are adding the ability to let end-users make successful PortKnocks permanent just as if an administrator had used add-ip on the server to add an IP address. Administrators still can remove these entries using del-acct although you will have to know the date and time that the entry was added. The file names consist of timestamp.iptables in /root and the additions are made to the custom WhiteList in /usr/local/sbin/iptables-custom. To enable permanent PortKnocker additions, simply run this command while logged into your server as root: iptables-knock activate.
11. Test Drive Incredible PBX for Wazo
To give you a good idea of what to expect with Incredible PBX for Wazo, just pick up a phone and dial any toll-free number in the U.S. and Canada using a 1 prefix. We’ve also set up a sample IVR using voice prompts from Allison. Try it out from any phone on your PBX by dialing 4871 (IVR1):
Nerd Vittles Demo IVR Options
1 – Call by Name (say "Delta Airlines" or "American Airlines" to try it out)
2 – MeetMe Conference
3 – Wolfram Alpha (Coming Soon!)
4 – Lenny (The Telemarketer’s Worst Nightmare)
5 – Today’s News Headlines
6 – Weather Forecast (enter a 5-digit ZIP code)
7 – Today in History (Coming Soon!)
8 – Speak to a Real Person (or maybe just Lenny if we’re out)
What To Do and Where to Go Next?
Here are a boatload of projects to get you started exploring Wazo on your own. Just plug the keywords into the search bar at the top of Nerd Vittles to find numerous tutorials covering the topics or simply follow our links. Unless there is an asterisk (*) the components already are in place so do NOT reinstall them. Just read the previous tutorials to learn how to configure each component. Be sure to also join the PIAF Forum to keep track of the latest tips and tricks with Wazo. There’s a treasure trove of information that awaits.
- Deploy Gmail as SMTP Relay for Wazo
- Build IVRs in Minutes
- Activate SMS Messaging
- Configure CallerID Superfecta
- Explore Munin Graphics in Wazo
- Integrate Google Calendar Alerts
- Configure NeoRouter and PPTP VPN
- Set Up EndPoint Management in Wazo
- Customize and Create New Wazo IVRs
- Try Out SQLite3 Call Detail Reports
- Learn About Wazo Backups and Upgrades
- Deploy SIP URIs for Free Worldwide Calling
- Develop a PortKnocker Emergency Access Plan
- Deploy Redundancy with Wazo High Availability
- * Install FCC RoboCall BlackList with WhiteList
- * Install Siri-Like Wolfram Alpha Module
- * Install Lenny, The Robocallers’ Worst Nightmare
Wazo and Incredible PBX Dial Code Cheat Sheets
Complete Wazo documentation is available here. But here are two cheat sheets in PDF format for Wazo Star Codes and Incredible PBX Dial Codes.
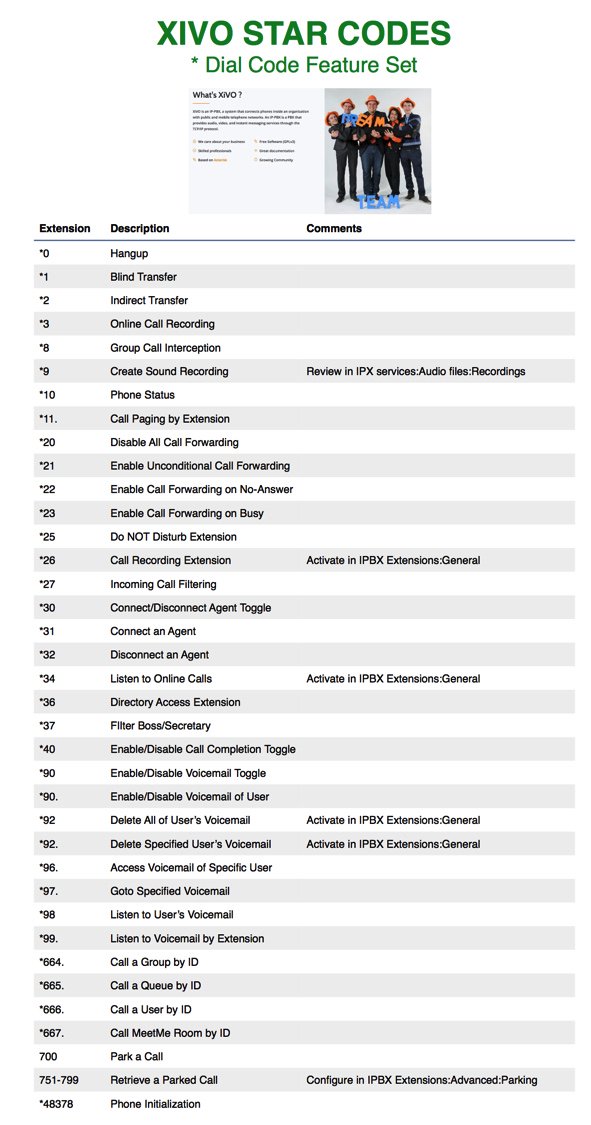

Published: Wednesday, December 14, 2016 Last Updated: Monday, December 12, 2017
 Don’t forget to List Yourself in Directory Assistance so everyone can find you by dialing 411. And add your new number to the Do Not Call Registry to block telemarketing calls. Or just call 888-382-1222 from your new number.

Need help with Asterisk? Visit the PBX in a Flash Forum.
Special Thanks to Our Generous Sponsors
FULL DISCLOSURE: ClearlyIP, Skyetel, Vitelity, DigitalOcean, Vultr, VoIP.ms, 3CX, Sangoma, TelecomsXchange and VitalPBX have provided financial support to Nerd Vittles and our open source projects through advertising, referral revenue, and/or merchandise. As an Amazon Associate and Best Buy Affiliate, we also earn from qualifying purchases. We’ve chosen these providers not the other way around. Our decisions are based upon their corporate reputation and the quality of their offerings and pricing. Our recommendations regarding technology are reached without regard to financial compensation except in situations in which comparable products at comparable pricing are available from multiple sources. In this limited case, we support our sponsors because our sponsors support us.
 BOGO Bonaza: Enjoy state-of-the-art VoIP service with a $10 credit and half-price SIP service on up to $500 of Skyetel trunking with free number porting when you fund your Skyetel account. No limits on number of simultaneous calls. Quadruple data center redundancy. $25 monthly minimum spend required. Tutorial and sign up details are here.
 The lynchpin of Incredible PBX 2020 and beyond is ClearlyIP components which bring management of FreePBX modules and SIP phone integration to a level never before available with any other Asterisk distribution. And now you can configure and reconfigure your new Incredible PBX phones from the convenience of the Incredible PBX GUI.
 VitalPBX is perhaps the fastest-growing PBX offering based upon Asterisk with an installed presence in more than 100 countries worldwide. VitalPBX has generously provided a customized White Label version of Incredible PBX tailored for use with all Incredible PBX and VitalPBX custom applications. Follow this link for a free test drive!
 Special Thanks to Vitelity. Vitelity is now Voyant Communications and has halted new registrations for the time being. Our special thanks to Vitelity for their unwavering financial support over many years and to the many Nerd Vittles readers who continue to enjoy the benefits of their service offerings. We will keep everyone posted on further developments.

The New Hybrid PBX: Why Settle for a One Trick Pony?

Let’s face it. It’s hard not to like the application development flexibility that Asterisk® offers, especially if you’re part of an organization that has very specific telephony needs. But the price you pay for "free" and putting all of your eggs in the Asterisk basket is painful. Here are a few of the hurdles that come to mind: security, NAT, one-way audio, remote users, CRM support, conferencing, painful upgrades to address frequent bug fixes, and, more generally, telephone management and support. We love Asterisk, but…
Most folks don’t buy all of their cars or groceries or computer software from a single company. So why do it with your phone system when you can take advantage of the best of all worlds, open source and commercial? To us, that’s the compelling case for integrating a 3CX commercial PBX into your Asterisk infrastructure. It’s a new iteration of what we used to call a hybrid PBX. And you can do it without cost for a full year to kick the 3CX tires and provide your mobile users with transparent phone service regardless of where they are roaming. Using the special Nerd Vittles signup link, you get a custom version of 3CX that supports 4 simultaneous calls, 10-user web meetings, unlimited trunks, and 10 or more extensions. After the first year, you can either spring for less than $100 a year to maintain the 3CX free PBX platform and mobile clients with pain-free updates, or you can upgrade to a more robust 3CX Pro commercial offering with a much expanded feature set including call center technology and seamless CRM integration with MS Exchange, Salesforce, Microsoft Dynamics, Microsoft Outlook, Office 365, Google Contacts, Exact Online, Freshdesk, Datev, Zendesk, Nutshell, vtiger, EBP, Insightly, amoCRM, Bitrix24 and Act. What’s not to like?
If you’re a frequent Nerd Vittles visitor, you already know that the 3CX clients for iOS, Android, Windows, and Macs are one of our favorite telephony apps of all time. The ease with which the 3CX client can be configured with a single click on an email attachment is revolutionary. And, once configured, the fact that you never again experience a NAT problem with a SIP call is nothing short of miraculous. As we’ve previously mentioned, the 3CX Client provides a nearly perfect mobile client for those that rely upon Asterisk. Now 3CX is poised to release an even easier configuration procedure for their mobile clients in update 2 for version 15.5. Simply log into your 3CX web client on a PC or Mac and choose the Settings:QR Code option from the menu bar. 3CX will present a QR code to activate the 3CX Client for your smartphone. Scan it using the 3CX Client app on your smartphone and, presto, your phone is instantly provisioned. It doesn’t get any easier than this…
Let’s spend a little time reviewing our favorite Hybrid PBX setup. In this scenario which is perfect for small businesses with a mobile workforce, the setup looks like this. An Asterisk server is deployed to manage company trunks including Google Voice, voicemail, IVRs, custom apps, and extensions for every employee. Then we add a 3CX free PBX, interconnect it with the Asterisk PBX, and assign a 3CX extension for every employee. The 3CX extensions will all tie back to the employee extensions on the Asterisk PBX. It obviously simplifies things if you keep your number schemes consistent. For example, extension 7000 on the Asterisk PBX could be matched to extension 000 on the 3CX PBX. Then we set up outbound trunks on both the Asterisk PBX and 3CX to dial a 9 prefix to reach extensions on the other PBX. So dialing 9000 on the Asterisk PBX would connect the caller to extension 000 on the 3CX PBX. On the 3CX side, dialing 9000 would connect the caller to extension 7000 on the Asterisk PBX in our example. And, of course, 3CX Clients can reach any number worldwide using Asterisk outbound trunks by dialing a 9 prefix and then the long distance number. Our previous tutorials will walk you through setting this up with Incredible PBX® 13, Issabel™, any FreePBX®-based PBX, or even Wazo. Once you complete the 5-minute setup, mobile users can take advantage of all the powerful features on any 3CX Client platform while still receiving their incoming calls from the Asterisk-based office PBX by simply forwarding their extension to their matching 9XXX destination on the 3CX platform. This will ring their 3CX Client anywhere in the world with nothing but a Wi-Fi connection! And it’s a free call.
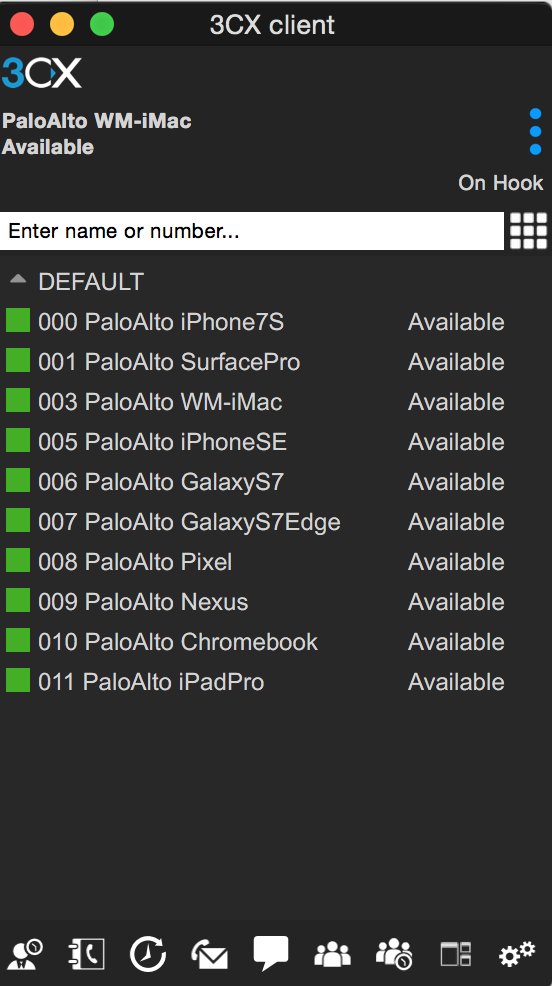
Published: Monday, October 16, 2017

Need help with Asterisk? Visit the PBX in a Flash Forum.
Special Thanks to Our Generous Sponsors
FULL DISCLOSURE: ClearlyIP, Skyetel, Vitelity, DigitalOcean, Vultr, VoIP.ms, 3CX, Sangoma, TelecomsXchange and VitalPBX have provided financial support to Nerd Vittles and our open source projects through advertising, referral revenue, and/or merchandise. As an Amazon Associate and Best Buy Affiliate, we also earn from qualifying purchases. We’ve chosen these providers not the other way around. Our decisions are based upon their corporate reputation and the quality of their offerings and pricing. Our recommendations regarding technology are reached without regard to financial compensation except in situations in which comparable products at comparable pricing are available from multiple sources. In this limited case, we support our sponsors because our sponsors support us.
 BOGO Bonaza: Enjoy state-of-the-art VoIP service with a $10 credit and half-price SIP service on up to $500 of Skyetel trunking with free number porting when you fund your Skyetel account. No limits on number of simultaneous calls. Quadruple data center redundancy. $25 monthly minimum spend required. Tutorial and sign up details are here.
 The lynchpin of Incredible PBX 2020 and beyond is ClearlyIP components which bring management of FreePBX modules and SIP phone integration to a level never before available with any other Asterisk distribution. And now you can configure and reconfigure your new Incredible PBX phones from the convenience of the Incredible PBX GUI.
 VitalPBX is perhaps the fastest-growing PBX offering based upon Asterisk with an installed presence in more than 100 countries worldwide. VitalPBX has generously provided a customized White Label version of Incredible PBX tailored for use with all Incredible PBX and VitalPBX custom applications. Follow this link for a free test drive!
 Special Thanks to Vitelity. Vitelity is now Voyant Communications and has halted new registrations for the time being. Our special thanks to Vitelity for their unwavering financial support over many years and to the many Nerd Vittles readers who continue to enjoy the benefits of their service offerings. We will keep everyone posted on further developments.
Some Recent Nerd Vittles Articles of Interest…
The Ultimate Voice Dialer for Asterisk and Incredible PBX

Let’s face it. Voice recognition with Google has been hit and miss, and that’s on a good day. So we’re delighted to shift gears and introduce a new platform powered by IBM Watson’s Speech-to-Text (STT) engine. While it’s not free, that’s really theoretical for most of our readers. Your first month on the platform is entirely free. And, after that, you get 1,000 minutes a month of free voice recognition services. If you still want more, it’s 2¢ a minute.
We first introduced IBM’s STT platform back in March when we documented how to use the service to transcribe voicemails and deliver them via email. Today, we’re introducing the Incredible Voice Dialer for Asterisk. It runs on all of the major Incredible PBX platforms: CentOS, Wazo, and Issabel. It’s married to our AsteriDex phonebook application that is deployed with Incredible PBX using MySQL, MariaDB, or SQLite3 depending upon platform.
The way it works is a user picks up an extension on your PBX and dials 411. The caller will be prompted for the name of the person or company to call. Once the caller says the name, the Incredible Voice Dialer will send the recording to IBM’s Watson STT engine for transcription. The result is then passed to AsteriDex where the text will be matched against the phone number saved for that person or company. The number is then passed to your default outbound trunk to place the call. All of the magic happens in less than two seconds, and the call begins ringing at your destination. You can try it out for yourself on our demo server this week. Just dial:  , choose option 1 when the IVR answers, and then say "Delta Airlines" or "American Airlines" when prompted for a name. The queries support wildcard matching. If you say "Delta", you’ll still be connected to Delta Airlines.
What About the Quality? Here’s the bottom line. Speech recognition isn’t all that useful if it fails miserably in recognizing everyday speech. The good news is that IBM Watson’s speech recognition engine is now the best in the business. If you want more details, read the article below which will walk you through IBM’s latest speech recognition breakthrough:
Why IBM's speech recognition breakthrough matters for AI and IoT. Via @techrepublic https://t.co/AJi8MA3E20
— IBM Developer (@IBMDeveloper) March 15, 2017
Creating an IBM Bluemix Speech to Text Account
NOV. 1 UPDATE: IBM has moved the goal posts effective December 1, 2018:

1. Create Bluemix account here.
2. Confirm your registration by replying to email from IBM.
3. Login to Bluemix using your new credentials.
4. Agree to terms and conditions, name your organization, and name your space (STT).
5. Choose Watson Speech to Text service and click Create.
6. When Speech to Text-kb opens, click Service Credentials tab (on the left).
7. In Actions column, click View Credentials. Write down your username and password.
8. Logout by clicking on image icon in upper right corner of dialog window.
Install Voice Dialer with Incredible PBX for Wazo
1. Login to your server as root using SSH/Putty and issue the following commands:
cd /
wget http://incrediblepbx.com/ibmstt-411-wazo.tar.gz
tar zxvf ibmstt-411-wazo.tar.gz
rm -f ibmstt-411-wazo.tar.gz
sed -i '\\:// BEGIN Call by Name:,\\:// END Call by Name:d' /etc/asterisk/extensions_extra.d/xivo-extrafeatures.conf
sed -i '/\\[xivo-extrafeatures\\]/r /tmp/411.txt' /etc/asterisk/extensions_extra.d/xivo-extrafeatures.conf
asterisk -rx "dialplan reload"
2. Edit /var/lib/asterisk/agi-bin/getnumber.sh and insert your IBM credentials from step #7 above into these variables:
API_USERNAME="XXXXXXXX-XXXX-XXXX-XXXX-XXXXXXXXXXXX"
API_PASSWORD="XXXXXXXXXXXX"
3. Save the file.
Install Voice Dialer on Other Incredible PBX Platforms
1. Login to your server as root using SSH/Putty and issue the following commands:
cd /
wget http://incrediblepbx.com/ibmstt-411.tar.gz
tar zxvf ibmstt-411.tar.gz
rm -f ibmstt-411.tar.gz
sed -i '\\:// BEGIN Call by Name:,\\:// END Call by Name:d' /etc/asterisk/extensions_custom.conf
sed -i '/\\[from-internal-custom\\]/r /tmp/411.txt' /etc/asterisk/extensions_custom.conf
asterisk -rx "dialplan reload"
2. Edit /var/lib/asterisk/agi-bin/getnumber.sh and insert your IBM credentials from step #7 above into these variables:
API_USERNAME="XXXXXXXX-XXXX-XXXX-XXXX-XXXXXXXXXXXX"
API_PASSWORD="XXXXXXXXXXXX"
3. Save the file.
Take Incredible Voice Dialer for a Test Drive
1. From an extension connected to your PBX, dial 411. When prompted for the name to call, say "Delta Airlines" or "American Airlines."
2. Quicker than you could actually dial the number, you’ll be connected.
Building Voice-Enabled Applications with Asterisk
All of our code is open source, GPL2 code so you’re more than welcome to use it, learn from it, and then build your own voice-enabled applications. Just abide by the terms of the license and share. When you review /var/lib/asterisk/agi-bin/getnumber.sh, you’ll see that it’s incredibly easy to change the backend database. Here’s the Wazo flavor of the script:
API_USERNAME="XXXXXXXX-XXXX-XXXX-XXXX-XXXXXXXXXXXX"
API_PASSWORD="XXXXXXXXXXXX"

thisfile="$1"

# sending the recording to IBM Watson for transcription
curl -k -u $API_USERNAME:$API_PASSWORD -X POST --limit-rate 40000 --header "Content-Type: audio/wav" --data-binary @/tmp/$thisfile.wav "https://stream.watsonplatform.net/speech-to-text/api/v1/recognize?continuous=true&model=en-US_NarrowbandModel" 1>/tmp/$thisfile.txt

# grabbing the text out of the IBM Watson response
msg=`cat /tmp/$thisfile.txt | grep transcript | cut -f 2 -d ":" | cut -f 2 -d '"' | sed 's| *$||' | sed -e "s/\b\(.\)/\u\1/g"`%

# passing text to MySQL (1st line) or SQLite3 (2nd line) for name lookup. answer is num2call.
#num2call=$(mysql -uroot -ppassw0rd asteridex -ss -N -e "SELECT user1.out FROM user1 where name LIKE '$msg'");
num2call=`/usr/bin/sqlite3 /var/lib/asterisk/agi-bin/asteridex.sqlite "select out from user1 where name LIKE '$msg'"`

# clearing out our temporary files
rm -f /tmp/$thisfile.*

# passing the results to the Asterisk dialplan
echo "SET VARIABLE PTY2CALL "\""$msg"\"""
echo "SET VARIABLE NUM2CALL "\""$num2call"\"""

# we're done with the AGI bash script so let's exit gracefully
exit 0
The Asterisk dialplan code could be modified for any number of applications. Here’s what it looks like on the Incredible PBX 13 platform. It’s slightly different with Wazo to accomodate their dialplan syntax.
;# // BEGIN Call by Name
exten => 411,1,Answer
exten => 411,n,Playback(custom/411)
exten => 411,n,Set(RANDFILE=${RAND(8000,8599)})
exten => 411,n,Record(/tmp/${RANDFILE}.wav,3,10)
exten => 411,n,Playback(/tmp/${RANDFILE})
exten => 411,n,AGI(getnumber.sh,${RANDFILE})
exten => 411,n,NoOp(Party to call : ${PTY2CALL})
exten => 411,n,NoOp(Number to call: ${NUM2CALL})
exten => 411,n,Goto(outbound-allroutes,${NUM2CALL},1)
exten => 411,n,Hangup()
;# // END Call by Name
There’s nothing magical about it. (1) It answers the call to 411. (2) It plays back a recording that prompts the user to say the name of the person or company to call. (3) It generates a random number to use for the filenames associated with the STT process. (4) It records the caller’s speech and saves it to the random filename as a .wav file which IBM STT can understand. (5) It passes the call to the AGI bash script to send the recording to IBM Watson and obtain the transcription and to pass the text to MySQL or SQLite3 to lookup the text in the AsteriDex database. (6) We display the called party’s name on the Asterisk CLI. (7) We display the called party’s phone number on the Asterisk CLI. (8) We place the call using the PBX’s default outbound route. (9) We hangup the call when it’s completed.
Published: Monday, October 9, 2017

Need help with Asterisk? Visit the PBX in a Flash Forum.
Special Thanks to Our Generous Sponsors
FULL DISCLOSURE: ClearlyIP, Skyetel, Vitelity, DigitalOcean, Vultr, VoIP.ms, 3CX, Sangoma, TelecomsXchange and VitalPBX have provided financial support to Nerd Vittles and our open source projects through advertising, referral revenue, and/or merchandise. As an Amazon Associate and Best Buy Affiliate, we also earn from qualifying purchases. We’ve chosen these providers not the other way around. Our decisions are based upon their corporate reputation and the quality of their offerings and pricing. Our recommendations regarding technology are reached without regard to financial compensation except in situations in which comparable products at comparable pricing are available from multiple sources. In this limited case, we support our sponsors because our sponsors support us.
 BOGO Bonaza: Enjoy state-of-the-art VoIP service with a $10 credit and half-price SIP service on up to $500 of Skyetel trunking with free number porting when you fund your Skyetel account. No limits on number of simultaneous calls. Quadruple data center redundancy. $25 monthly minimum spend required. Tutorial and sign up details are here.
 The lynchpin of Incredible PBX 2020 and beyond is ClearlyIP components which bring management of FreePBX modules and SIP phone integration to a level never before available with any other Asterisk distribution. And now you can configure and reconfigure your new Incredible PBX phones from the convenience of the Incredible PBX GUI.
 VitalPBX is perhaps the fastest-growing PBX offering based upon Asterisk with an installed presence in more than 100 countries worldwide. VitalPBX has generously provided a customized White Label version of Incredible PBX tailored for use with all Incredible PBX and VitalPBX custom applications. Follow this link for a free test drive!
 Special Thanks to Vitelity. Vitelity is now Voyant Communications and has halted new registrations for the time being. Our special thanks to Vitelity for their unwavering financial support over many years and to the many Nerd Vittles readers who continue to enjoy the benefits of their service offerings. We will keep everyone posted on further developments.
Some Recent Nerd Vittles Articles of Interest…


 JUST RELEASED: Visit the Incredible PBX Wiki