
Home » Google Voice & Svcs (Page 10)
Category Archives: Google Voice & Svcs
The Most Versatile VoIP Provider: FREE PORTING

 JUST RELEASED: Visit the Incredible PBX Wiki
2016, Celebrating The Preakness: CallerID Superfecta Rides Again with XiVO
If you missed The Preakness Saturday, another Triple Crown bit the dust… or the mud in this case. But, if you had the winning Superfecta ticket, you made a $316 profit on your $1 bet. For the rest of us, there’s still a Superfecta win to celebrate, and this one’s free. We’ve begun porting CallerID Superfecta to the XiVO platform and today we’ll share that code with you together with lots of other goodies in our third roundup of Incredible PBX add-ons for the XiVO PBX. If you’re just joining the party, start with the first and second articles on XiVO, and then you’ll be ready to roll up your sleeves for Chapter 3.
UPDATE: The first release of Incredible PBX for XiVO is now available here. Please consider this article superseded by the new release.
Installing CallerID Superfecta for XiVO
As we mentioned in April, it’s always nice to see your baby grow up. Nearly a decade ago, we introduced an AGI script for Asterisk@Home known as CallerID Trifecta for FreePBX® 2.2.0. As sources of CNAM lookups expanded, a number of other individuals contributed code to support those lookups. When we added a fourth CNAM lookup source, the original application morphed into CallerID Superfecta. Then we gave up. The source lookups became too numerous to mention.
For today, we’ve changed the design a bit to better accommodate the XiVO platform. There’s a single AGI script that houses the various CNAM lookup sources and the code to extract CallerID names from those sources. And there’s a dialplan script that let’s you specify which CNAM sources to use and in which order. As with the original release, CallerID lookups take the phone number of the caller and walk through your CNAM lookup sources in the order you specify until a CallerID name match is found. Then the result is returned to the PBX for use with the incoming call. The reason for all of this is historical. The Bell Sisters decided it was more profitable to dump CallerID name information in the bit bucket rather than passing it along with incoming calls. In that way, they could charge folks for looking up the matching name in their proprietary databases. A few CallerID lookup sources remain free, but many now are pay-as-you-go platforms with a typical lookup costing about half a cent. Unfortunately, all providers consider "WIRELESS CALLER" a successful lookup. Ka-Ching! We’ve documented the procedure to add additional CNAM lookup sources on the PIAF Forum. Please share your work!
This release of CallerID Superfecta provides four lookup sources. That’s what a Superfecta is all about, picking four winners:
0 - AsteriDex SQLite3 database

1 - OpenCNAM (free from cache or commercial)

2 - BulkCNAM (commercial only with free trial)

3 - TelcoData (provider, city, and state of caller)
There are three simple steps to putting everything in place. First, run the scripted commands below. Second, specify which CNAM sources you wish to use and in what order. Third, register with the commercial providers you’d like to use and plug your credentials into the CallerID Superfecta script.
To install CallerID Superfecta, log into your server as root and issue the following commands:
cd /
apt-get -y install php5-xmlrpc
wget http://incrediblepbx.com/cid-superfecta.tar.gz
tar zxvf cid-superfecta.tar.gz
rm -f cid-superfecta.tar.gz
/etc/init.d/asterisk restart
By default, CallerID Superfecta will attempt to use all four of the providers in the order shown to retrieve a CNAM match. If you have migrated your AsteriDex database to XiVO as we covered in last week’s article, then CallerID names will be provided for your most frequent incoming calls without ever accessing external sources. You won’t break anything by leaving all four CNAM sources activated. But, without signing up for service with OpenCNAM or BulkCNAM, your CNAM results will be diminished considerably. And a result of "WIRELESS CHARLESTON SC" from TelcoData doesn’t provide much of a clue as to who is calling. But at least you don’t get charged for that one.
In the next release, we will add an optional feature that will populate entries in AsteriDex from CNAM data returned from OpenCNAM and BulkCNAM. The good news is, if you leave AsteriDex at the top of the CallerID Superfecta search list, you’ll never pay for the CNAM lookup of the same number twice. The bad news is, to keep the bad guys from self-populating your database with expensive phone numbers, you’ll need to password-protect the Voice Dialing application if it is part of your inbound IVR.
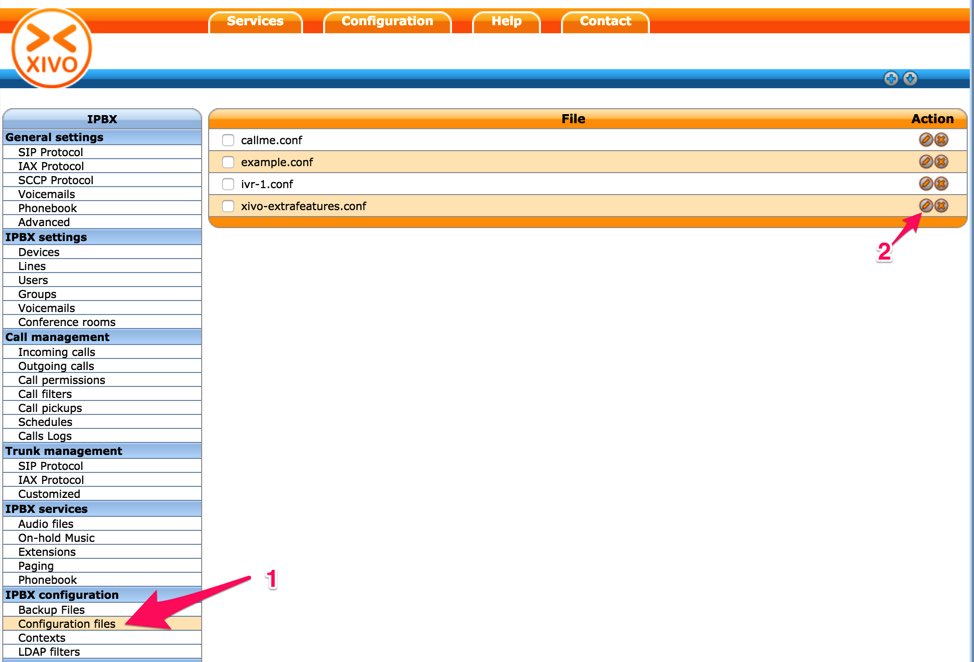
To change the source list or sequence of CNAM lookups, open the XiVO GUI and navigate to IPX configuration -> Configuration files. Then edit cid-superfecta.conf. Find the line that looks like the following and specify the sources you wish to use and the sequence in which they should be searched using the source numbers listed above to replace 0-1-2-3. Separate your entries with hyphens. Then SAVE the file.
same = n,AGI(nv-cid-superfecta.php,${XIVO_SRCNUM},0-1-2-3)
To use the commercial CNAM services of either OpenCNAM or BulkCNAM, you first must register with them and provide a credit card. You then will be provided credentials to use for your CNAM lookups. These need to be inserted at the top of /var/lib/asterisk/agi-bin/nv-cid-superfecta.php. Then SAVE the file.

Activating Traditional Asterisk Call Detail Recordings
If you want to preserve the numbers AND names of those that call your PBX, you’ll need to activate the traditional CDR reporting mechanisms in Asterisk®.
To activate SQLite3 logging of calls:
cd /etc/asterisk
sed -i 's|no|yes|' cdr.conf
echo "[master]" >  cdr_sqlite3_custom.conf
echo "table = cdr" >>  cdr_sqlite3_custom.conf
echo "columns => calldate, clid, dcontext, channel, dstchannel, lastapp, lastdata, duration, billsec, disposition, amaflags, accountcode, uniqueid, userfield"  >>  cdr_sqlite3_custom.conf
echo "values => '${CDR(start)}','${CDR(clid)}','${CDR(dcontext)}','${CDR(channel)}', '${CDR(dstchannel)}','${CDR(lastapp)}','${CDR(lastdata)}','${CDR(duration)}', '${CDR(billsec)}','${CDR(disposition)}','${CDR(amaflags)}', '${CDR(accountcode)}','${CDR(uniqueid)}','${CDR(userfield)}'" >>  cdr_sqlite3_custom.conf
chown asterisk:www-data cdr_sqlite3_custom.conf
chmod 660 cdr_sqlite3_custom.conf
sed -i 's|noload => app_cdr.so|;noload => app_cdr.so|' modules.conf
sed -i 's|noload => cdr_sqlite3_custom.so|;noload => cdr_sqlite3_custom.so|' modules.conf
sed -i 's|noload => func_cdr.so|;noload => func_cdr.so.so|' modules.conf
touch /var/log/asterisk/master.db
chown asterisk:asterisk /var/log/asterisk/master.db
chmod 640 /var/log/asterisk/master.db
/etc/init.d/asterisk restart
To also activate CSV logging of calls:
cd /etc/asterisk
echo "[csv]" >> cdr.conf
echo "loguniqueid=yes" >> cdr.conf
echo "loguserfield=yes" >> cdr.conf
echo "accountlogs=yes" >> cdr.conf
sed -i 's|noload => cdr_csv.so|;noload => cdr_csv.so|' modules.conf
/etc/init.d/asterisk restart
To retrieve SQLite3 call log data, here are a few examples to get you started:
 ALL: sqlite3 /var/log/asterisk/master.db "select * from cdr"

DATE: sqlite3 /var/log/asterisk/master.db "select * from cdr where calldate >= '2016-05-22'"

 NPA: sqlite3 /var/log/asterisk/master.db "SELECT * from cdr WHERE clid LIKE '%<843%'"

DEST: sqlite3 /var/log/asterisk/master.db "SELECT * from cdr WHERE dstchannel LIKE '%411%'"

FLDS: sqlite3 /var/log/asterisk/master.db "PRAGMA table_info(cdr)"
To retrieve the CDR log in CSV format suitable for spreadsheets, download:
/var/log/asterisk/cdr-csv/Master.csv
Adding Asterisk ULAW Sound Files to Your XiVO PBX
At least for us, the default sound files distributed with XiVO didn’t work. Here’s how to add the ulaw versions of all the files to your server:
cd /usr/share/asterisk/sounds/en
wget http://downloads.asterisk.org/pub/telephony/sounds/asterisk-extra-sounds-en-ulaw-current.tar.gz
wget http://downloads.asterisk.org/pub/telephony/sounds/asterisk-core-sounds-en-ulaw-current.tar.gz
tar zxvf asterisk-extra-sounds-en-ulaw-current.tar.gz
tar zxvf asterisk-core-sounds-en-ulaw-current.tar.gz
rm -f *.tar.gz
chown asterisk:asterisk *.ulaw
Adding DISA Support to Your XiVO PBX
If you’re new to PBX lingo, DISA stands for Direct Inward System Access. As the name implies, it lets you make calls from outside your PBX using the call resources inside your PBX. This gives anybody with your DISA credentials the ability to make calls through your PBX on your nickel. It probably ranks up there as the most abused and one of the most loved features of the modern PBX.
We use two-step authentication with DISA to make it harder for the bad guys. First, the outside phone number has to match the whitelist of numbers authorized to use your DISA service. And, second, you have to supply the DISA password for your server before you get dialtone to place an outbound call. Ultimately, of course, the monkey is on your back to create a very secure DISA password and to change it regularly. If all this sounds too scary, don’t install DISA on your PBX.
1. Download the DISA dialplan script into your /root folder where it can be edited:
cd /root
wget http://incrediblepbx.com/disa-xivo.tar.gz
tar zxvf disa-xivo.tar.gz
rm -f disa-xivo.tar.gz
nano -w disa-xivo.txt
2. When the editor opens the dialplan code, move the cursor down to the following line:
exten => 3472,n,GotoIf($["${CALLERID(number)}"="701"]?disago1) ; Good guy
3. Clone the line by pressing Ctrl-K and then Ctrl-U. Add copies of the line by pressing Ctrl-U again for each phone number you’d like to whitelist so that the caller can access DISA on your server. Now edit each line and replace 701 with the 10-digit number to be whitelisted.
4. Move the cursor down to the following line and replace 12341234 with the 8-digit numeric password that callers will have to enter to access DISA on your server:
exten => 3472,n,GotoIf($["${MYCODE}" = "12341234"]?disago2:bad,1)
5. Save the dialplan changes by pressing Ctrl-X, then Y, then ENTER.
6. Now copy the dialplan code into your XiVO setup, remove any previous copies of the code, and restart Asterisk:
cd /root
sed -i '\:// BEGIN DISA:,\:// END DISA:d' /etc/asterisk/extensions_extra.d/xivo-extrafeatures.conf
cat disa-xivo.txt >> /etc/asterisk/extensions_extra.d/xivo-extrafeatures.conf
/etc/init.d/asterisk restart
7. The traditional way to access DISA is to add it as an undisclosed option in an IVR that is assigned to one of your inbound trunks (DIDs). For the demo IVR that we installed last week, edit the ivr-1.conf configuration file and change the "option 0″ line so that it looks like this. Then SAVE your changes.
exten => 0,1(ivrsel-0),Dial(Local/3472@default)
8. Adjust the inbound calls route of one of your DIDs to point to the demo IVR by changing the destination to Customized with the following Command:
Goto(ivr-1,s,1)
Here’s how ours looks for the Nerd Vittles XiVO Demo IVR:

9. Now you should be able to call your DID and choose option 0 to access DISA assuming you have whitelisted the number from which you are calling. When prompted, enter the DISA password you assigned and press #. You then should be able to dial a 10-digit number to make an outside call from within your PBX.
SECURITY HINT: Whenever you implement a new IVR on your PBX, it’s always a good idea to call in from an outside number 13 TIMES and try every key from your phone to make sure there is no unanticipated hole in your setup. Be sure to also let the IVR timeout to see what result you get.
Adding Vitelity to XiVO for Flawless VoIP Calling
We already have shown you several ways to take advantage of free VoIP calling in the U.S. and Canada as well as internationally. But, the old adage still holds true. You get what you pay for. And, if you’re using XiVO for your business or if you like a good night’s sleep without worrying about whether your spouse is going to stab you because of lousy phone connections, then splurge and spend a penny and a half a minute for outbound calls while getting unlimited incoming calls (4 at a time!) for only $3.99 a month. You’re worth it. The signup link for Vitelity is at the end of today’s article. Once you have your credentials, create a subaccount on the Vitelity site and then you’re ready to set up your Vitelity trunks with XiVO. We’ll use one trunk for incoming calls and a second trunk for outbound calls. The setup procedure for both trunks is already documented on the PIAF Forum. Make that your next stop!
PIONEERS: For Flawless VoIP, Choose Vitelity SIP Trunks for your XiVO PBX https://t.co/Kvovaj2f8F #asterisk #XiVO pic.twitter.com/XbUOP21GzV
— Ward Mundy (@NerdUno) May 16, 2016
Simultaneous Cellphone Ringing for Inbound Calls with XiVO
Speaking of incoming calls, wouldn’t it be nice if your cellphone also rang when XiVO calls arrived on your main extension. Then you don’t have to worry about missing a call just because you stepped out of the office.
If you took our earlier advice and purchased a RingPlus phone with free monthly service, then you’re already covered. Setting up the RingPlus SIP trunk last week covered all the bases. And, there’s more good news from RingPlus. Now you can buy a phone in their Classifieds section without previously owning a phone. So you can hit the ground running with a phone AND a free calling plan. For example, $149 currently buys a brand new Moto E with 3,000 4G/LTE and SIP minutes, 3,000 SMS messages, and 3,000 MB of LTE data every month. And the monthly cost: ZERO!
But, let’s assume you’re not the sharpest tool in the shed, and you still want your cellphone to ring when extension 701 rings on your PBX. Here’s how.
In the User setup for your extension:
1. Enter your cellphone number in the Mobile Phone Number field. Be sure it includes any necessary dial prefix so that it’s routed out through the correct trunk.
2. On the same screen, you’ll find a Preprocess subroutine field. Enter the following there: pre-mobility
3. SAVE your changes.
Keep in mind that outbound calls in XiVO are routed out using dialing prefixes. If you have set up a trunk with a provider that allows CallerID spoofing such as Vitelity, Anveo Direct, or VoIP.ms, then you can preserve the caller’s original CallerID number on the forwarded call to your mobile phone provided the dial string for your cellphone number matches the format you set up for the trunk you wish to use. For example, if Exten for Vitelity is 8NXXNXXXXXX, then you would enter the number for your cellphone with an 8 prefix: 89991234567.
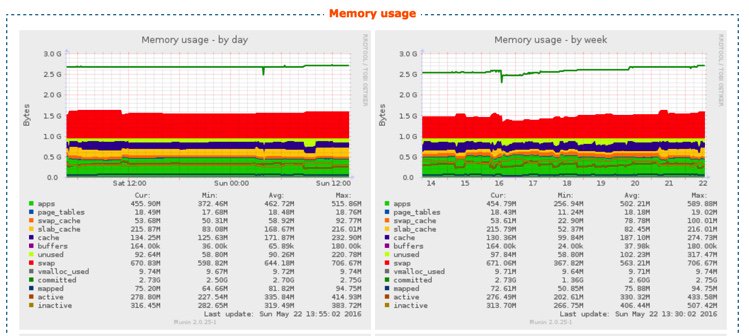
Munin Makes XiVO Shine
If you look under the Services tab and choose Graphics, the World of Munin will suddenly appear. There are literally dozens of gorgeous charts to tell you anything and everything you’d ever want to know about your server’s performance. Enjoy!
Endpoint Management on Steroids… and It’s FREE
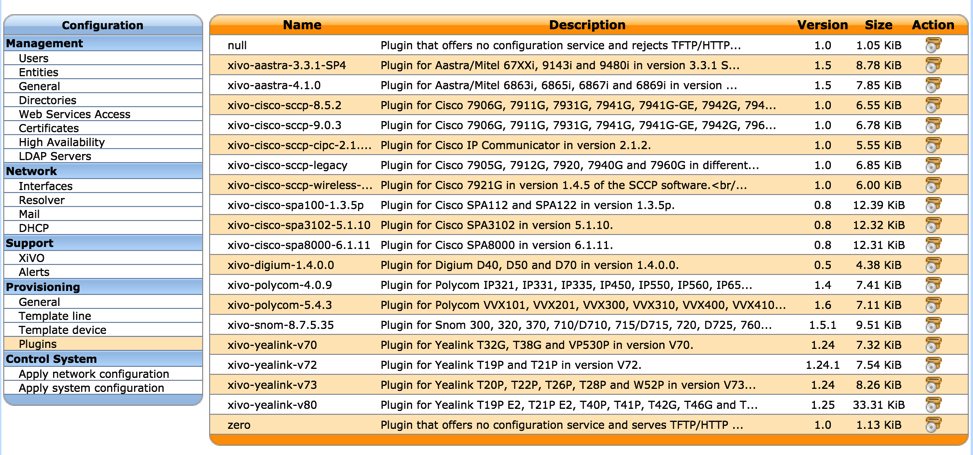
If you’ve longed for an endpoint manager that would automatically configure your phones, the wait is over. XiVO supports literally dozens of phones out of the box. And the setup is integrated into the setup procedure for the users and devices. To get started, choose the Configuration tab and click Plugins. Next click on the + icon to load the default endpoint config files. We couldn’t do justice to this topic in a blog. That’s what tutorials are for. And XiVO has a 700+ page reference guide that will tell you everything you ever wanted to know about endpoint management.
Adding NeoRouter VPN to XiVO
We’ll finish up for this week by showing you how easy it is to add the NeoRouter Client to XiVO. In less than five minutes, you’ll be able to use XiVO’s NeoRouter private IP address to access your server securely from anywhere in the world. Start by reading our last introduction to NeoRouter. If you do not already have a NeoRouter Server, follow this tutorial to set one up before you begin.
If you’re running XiVO on a 64-bit platform, issue the following commands to install the free NeoRouter client:
cd /root
wget http://download.neorouter.com/Downloads/NRFree/Update_2.3.1.4360/Linux/Ubuntu/nrclient-2.3.1.4360-free-ubuntu-amd64.deb
dpkg -i nrclient-2.3.1.4360-free-ubuntu-amd64.deb
If you’re running XiVO on a 32-bit platform, do this instead:
cd /root
wget http://download.neorouter.com/Downloads/NRFree/Update_2.3.1.4360/Linux/Ubuntu/nrclient-2.3.1.4360-free-ubuntu-i386.deb
dpkg -i nrclient-2.3.1.4360-free-ubuntu-i386.deb
Unless you want your server identified in NeoRouter as localhost, we recommend changing your hostname and rebooting your server at this juncture. Just edit /etc/hostname and give it a name, e.g. xivo. Then reboot.
Now log back into your server as root and then log into your NeoRouter client. This will assign a private IP address to your XiVO server. The nrtap entry running ifconfig will tell you what that address actually is.
nrclientcmd
ifconfig
Taking Nerd Vittles’ XiVO IVR for a Test Drive
There’s a Demo IVR running at www.pacificnx.com on their XenServer virtualization platform. Scott McCarthy, a leading outside XiVO developer and a principal at PacificNX, tells us they soon will have a $20 a month platform specifically tailored to XiVO. And that’s what you’ll be hearing when you call the Nerd Vittles Demo IVR: 
Nerd Vittles Demo IVR Options
1 – Call by Name (say "Delta Airlines" or "American Airlines" to try it out)
2 – MeetMe Conference
3 – Wolfram Alpha (Coming Soon!)
4 – Lenny (The Telemarketer’s Worst Nightmare)
5 – Today’s News Headlines
6 – Weather Forecast (enter a 5-digit ZIP code)
7 – Today in History (Coming Soon!)
8 – Speak to a Real Person (or maybe just Lenny if we’re out)
Published: Monday, May 23, 2016
9 Countries Have Never Visited Nerd Vittles. Got a Friend in Any of Them https://t.co/wMfmlhiQ9y #asterisk #freepbx pic.twitter.com/TPFGZbqWB6
— Ward Mundy (@NerdUno) April 22, 2016

Need help with Asterisk? Visit the PBX in a Flash Forum.
Special Thanks to Our Generous Sponsors
FULL DISCLOSURE: ClearlyIP, Skyetel, Vitelity, DigitalOcean, Vultr, VoIP.ms, 3CX, Sangoma, TelecomsXchange and VitalPBX have provided financial support to Nerd Vittles and our open source projects through advertising, referral revenue, and/or merchandise. As an Amazon Associate and Best Buy Affiliate, we also earn from qualifying purchases. We’ve chosen these providers not the other way around. Our decisions are based upon their corporate reputation and the quality of their offerings and pricing. Our recommendations regarding technology are reached without regard to financial compensation except in situations in which comparable products at comparable pricing are available from multiple sources. In this limited case, we support our sponsors because our sponsors support us.
 BOGO Bonaza: Enjoy state-of-the-art VoIP service with a $10 credit and half-price SIP service on up to $500 of Skyetel trunking with free number porting when you fund your Skyetel account. No limits on number of simultaneous calls. Quadruple data center redundancy. $25 monthly minimum spend required. Tutorial and sign up details are here.
![]() The lynchpin of Incredible PBX 2020 and beyond is ClearlyIP components which bring management of FreePBX modules and SIP phone integration to a level never before available with any other Asterisk distribution. And now you can configure and reconfigure your new Incredible PBX phones from the convenience of the Incredible PBX GUI.
The lynchpin of Incredible PBX 2020 and beyond is ClearlyIP components which bring management of FreePBX modules and SIP phone integration to a level never before available with any other Asterisk distribution. And now you can configure and reconfigure your new Incredible PBX phones from the convenience of the Incredible PBX GUI.
 VitalPBX is perhaps the fastest-growing PBX offering based upon Asterisk with an installed presence in more than 100 countries worldwide. VitalPBX has generously provided a customized White Label version of Incredible PBX tailored for use with all Incredible PBX and VitalPBX custom applications. Follow this link for a free test drive!
 Special Thanks to Vitelity. Vitelity is now Voyant Communications and has halted new registrations for the time being. Our special thanks to Vitelity for their unwavering financial support over many years and to the many Nerd Vittles readers who continue to enjoy the benefits of their service offerings. We will keep everyone posted on further developments.
Some Recent Nerd Vittles Articles of Interest…
The XiVO Adventure Continues: Adding Incredible PBX Goodies to Your Sandbox

We began our XiVO adventure last week by introducing a terrific new communications platform for both businesses and hobbyists. This week we begin the task of incorporating the Incredible PBX Goody Bag into an already amazing PBX, and we’ll cover about a dozen new topics. We’ll also address a few XiVO basics such as where to find and how to use the backups that XiVO makes every morning while many of us are still sleeping. Since a new XiVO release is imminent, we also want to show you how easy it is to upgrade your server. Before we get to the good stuff, we want to take a moment and document a fourth platform for XiVO that will appeal to many large organizations and perhaps some of our pioneers. It’s our platform of choice for development of new applications.
UPDATE: The first release of Incredible PBX for XiVO is now available here. Please consider this article superseded by the new release.
Installing XiVO as a VMware Virtual Machine
If your organization runs VMware, you may not need to worry about finding your own platform for XiVO. You can get your IT guys to build you a XiVO VM using XiVO’s Debian-based ISO. Then again, you might have followed our tutorial and chosen to run your own VMware ESXi server. In either case, a quick refresher on getting XiVO installed may be helpful. Begin by downloading XiVO to your Windows desktop. Then log into VMware vSphere Client on your Windows machine to access ESXi.
First, you’ll want to upload the XiVO ISO as a VMware guest operating system so that it can be used to create virtual machines at any time. From your inventory, click on the Configuration tab. Then click Storage under the Hardware listing. When your Datastore appears, right-click on datastore1 and choose Browse Datastore. Finally, click the Upload Files to this Datastore icon in your Datastore Browser and choose Upload File option. Choose the XiVO ISO from the Upload Items menu to upload it into your Datastore.
Now we’re ready to create a Virtual Machine. Right-click on the IP address of your VMware server and choose New Virtual Machine. Leave the Typical Configuration option selected and click Next. Give the virtual machine a name and click Next. Select the Destination Storage device and click Next. For the Operating System, choose Linux and pick Debian 8 (64-bit) then Next. Choose the NIC to use for the VM and click Next. Choose your Virtual Disk Size and Thin Provision option then Next. Check the box to Edit Virtual Machine Settings Before Completion and click Continue. Click the Options tab in Virtual Machine Properties and click Boot Options. Check the Force BIOS Setup option on next boot. Click Finish.
Starting your virtual machine the first time is not exactly intuitive so follow these steps carefully and in order. Keep in mind that, on the initial bootup of your virtual machine, what we want to do is run the XiVO ISO installer just as if we had booted a standalone machine using a CD on which we had burned the XiVO ISO. To begin the boot process correctly, first highlight your new VM by clicking on it and then choose Power on Virtual Machine. Next, click on the CD/DVD icon in the toolbar, choose CD/DVD Drive 1, choose connect to ISO image on Datastore. Double-click on datastore1 and then double-click on the XiVO ISO we uploaded previously. Now click on Launch Virtual Machine Console icon in the toolbar. When the BIOS setup utility appears, click in the window and use the Right Arrow key to move to the Boot tab. Move the CD-ROM option to the top of the list by highlighting it and pressing the + key to move it up. Press F10 to Save and Exit from the BIOS Setup and boot into your XiVO ISO. Click Install option to begin the regular XiVO installation procedure. When you finish the install, log into your server as root and obtain your IP address: ifconfig. You then can exit from the Console window by pressing Ctrl-Alt and use a browser to complete the install by pointing to the IP address of your virtual machine. Don’t forget that root SSH access is disabled by default. Our original tutorial will show you how to fix it AND install the Travelin’ Man 3 firewall whitelist to protect your server.
Adding a RingPlus SIP Trunk for Unified Communications with Sprint
Last week we began the XiVO adventure by turning on free Google Voice calling in the U.S. and Canada. Today we want to integrate smartphones into the mix by providing an incredibly simple and dirt cheap way to expand your XiVO communications platform while transparently meshing it with a RingPlus smartphone and the Sprint cellular network. When we’re finished, calls to your smartphone will also ring on one or more XiVO extensions. And designated users of your XiVO PBX will be able to place free calls to U.S. destinations using a SIP trunk tied directly to your RingPlus cellular account. These calls won’t be cellular. They’ll be pure VoIP calls using Sprint’s Internet backbone so listen for that pin to drop. If you have a (free) unlimited calling plan with RingPlus, then you’ll inherit a (free) unlimited calling plan for your XiVO PBX. Stated another way, whatever calling minutes you have with RingPlus can be shared on your XiVO PBX as inbound and outbound VoIP calls. The silver lining is that voicemails left on RingPlus get transcribed and delivered to your email address in seconds. So you get the best of both worlds. That’s what Unified Communications is all about!

Don’t worry if you’re late to the party and not yet a RingPlus user. They announce new deals every week so just check every few days until you find a plan that meets your needs. You won’t have to wait long. Here’s a list of all the previously announced PROMOS to give you a good handle on the scope of the RingPlus offerings. Deals don’t last but a couple hours or days so check often or sign up for RingPlus Alerts on SlickDeals and you’ll be the first to know! There’s a terrific deal tonight only from 8 p.m. until midnight.
Tonite @ 8 EDT: 3,750 Cellular/SIP monthly minutes free with $27 deposit https://t.co/fC4k9mhf5u #asterisk #RingPlus pic.twitter.com/huREsZVXC9
— Ward Mundy (@NerdUno) May 12, 2016
We’ve already documented the XiVO setup procedure on the PIAF Forum so hop over there to see how easy this is. Keep in mind that XiVO differs a bit from FreePBX® in the way Outbound Calls are managed. In FreePBX, you prioritized the routes by arranging them in a hierarchical list. In XiVO, you use unique dial strings, e.g. NXXNXXXXXX, for every Outbound Route. So, if you’re adding RingPlus to an existing XiVO server that already is using the NXXNXXXXXX dial string, then you’d need to use a different dial string to route calls out through the RingPlus trunk, e.g. 77NXXNXXXXXX with Stripnum=2. That tells XiVO that your users will dial calls to be handled by RingPlus with a prefix of 77 (RP), and then we want XiVO to strip off the first two digits before passing the call to the RingPlus SIP trunk for processing.
If you’re new to RingPlus, start with the original Nerd Vittles article for some background and then follow the RingPlus threads on the PIAF Forum and DSL Reports for the latest tips and tricks.
Adding a FreeVoipDeal (Betamax) SIP Trunk for Free International Calling
Before deploying a SIP trunk from one of the Betamax companies, read our latest article about Betamax for tips and tricks and land mines to watch out for. Then click the link below when you’re ready to deploy FreeVoipDeal as a trunk on your XiVO PBX:
PIONEERS: FreeVoIPDeal and Betamax Trunk Setups for XiVO PBX https://t.co/j4Q3vqSfmQ #asterisk #FreeCalling #voip pic.twitter.com/0axAv7Nmqn
— Ward Mundy (@NerdUno) May 13, 2016
Everything You Need to Know About XiVO Backups
Another feature of XiVO that separates the men from the boys is its documentation. In the case of backups, you’ll find everything you need to know here. All backups are stored on your XiVO server’s local drive in /var/backups/xivo. Be sure you have ample storage space available and, if you’re smart, you’ll copy both data.tgz and db.tgz from the local drive to a safe remote location periodically just in case disaster strikes. The documentation shows you how to quickly restore a backup should that ever become necessary.
Upgrading XiVO to the Latest Release
The XiVO development cycle is nothing short of miraculous. A new version is released every three weeks! The average time to close a bug has dropped from 315 days in 2009 to 28 days in 2012! You’ll probably want to keep your system current. 🙂
Upgrading XiVO is even easier than restoring a backup. Upgrade documentation is available here. Because we’ve added the Travelin’ Man 3 firewall, we recommend stopping IPtables during an upgrade and then restarting it when you’re finished. Your phone system is disabled during the upgrade. When upgrading XiVO, remember to also upgrade all associated XiVO Clients. Be sure to verify that things are back to normal once the upgrade procedure is completed: xivo-service status.
The commands to upgrade your XiVO PBX are as follows:
/etc/init.d/netfilter-persistent stop
xivo-upgrade
iptables-restart
Update: There’s a great tip from one of the XiVO developers on a better way to do this. See the first comment below.
Prerequisites for Today’s XiVO Adventure
If you’re just getting started with XiVO, DON’T START HERE. Read our first article. Be sure you have completed the following 8 steps before proceeding:
- Set Up Root SSH Access to Your XiVO PBX
- Set Up the Travelin’ Man 3 IPtables Firewall Using an SSH/Putty Connection
- Complete the XiVO Setup Using a Web Browser
- Create At Least One User with a 701 Extension
- Create At Least One SIP Trunk to Use for Outbound Calls
- Configure Outbound Call Settings for Your Trunk Using NXXNXXXXXX
- Configure an Inbound Route for Trunk Pointing to Your User Account
- If Behind NAT Firewall, Set externip and local network in General Settings -> SIP Protocol -> Network
Creating a MeetMe Conference Room for XiVO
There are just two steps to setting up a conference room. First, you need to add the extensions you will use for your conferences in the Default context. Then you add the Conference Room under IPBX Settings. Let’s set up a conference room extension 2663 (C-O-N-F). In your Default context, click on the Conference Rooms tab and enter an extension range of 2663-2664 and click Save. Then, in the Conference Rooms tab, click the + icon to add a new CONF conference room at extension 2663 in the Default context. You can experiment with the other settings when you have some spare time. The entries are pretty much self-explanatory. Click Save to activate your conference room. You won’t have music on hold for the first participant just yet. We’ll do that next.

Adding Music on Hold to XiVO
By default, XiVO doesn’t come with any music on hold. Fortunately, Digium has negotiated a music on hold license that you can use to add it to your PBX at no cost. While logged into your XiVO PBX as root, issue the following commands:
cd /
wget http://incrediblepbx.com/moh-xivo.tar.gz
tar zxvf moh-xivo.tar.gz
/etc/init.d/asterisk restart
Asterisk Application Development with XiVO
For those coming from the FreePBX world, here’s a quick introduction to Asterisk application development on the XiVO platform. First and foremost, there are more similarities than differences. In the FreePBX environment, custom dialplan code was stored in /etc/asterisk/extensions_custom.conf. For custom extensions that you wanted to add, that code had to appear in the [from-internal-custom] context. For custom dialplan contexts, those appeared immediately below the last entry in the [from-internal-custom] context. If your custom code appeared anywhere else, there was always the risk that it might be overwritten with your next FreePBX reload.
The XiVO design is quite different. As we noted last week, it is not an Asterisk code generator at all, unlike FreePBX. Instead, it has a realtime interface to Asterisk using its PostGreSQL database engine. Updates are nearly instantaneous without reloading Asterisk modules from disk.

The other advantage is you won’t have to worry about XiVO stepping on your custom code as long as you leave PostGreSQL alone. HINT! The good news is there still are hooks to add your own custom dialplan extensions and code as well as PHP/AGI scripts. And it’s easy. In XiVO, custom extensions are stored in xivo-extrafeatures.conf which you’ll find in the /etc/asterisk/extensions_extra.d directory. Don’t edit files in /etc/asterisk/extensions_extra.d from the Linux command prompt! Instead, use the editor built into the XiVO GUI by selecting Configuration Files under IPBX configuration. This will automatically assure that realtime updates are posted correctly. To add additional contexts to your dialplan, create separate files for each context and store them in this same directory. Again, the easy way to make certain that Asterisk is updated automatically when you add new code snippets is to create and edit them within the XiVO GUI. These files all will appear under IPBX Configuration -> Configuration Files as well.
In order to better mimic the FreePBX way of doing things so that your PHP/AGI scripts work in either environment, we recommend issuing the following symlink while logged into XiVO. We’ll do it as part of the SQLite3 install below.
ln -s /var/lib/asterisk/agi-bin /usr/share/asterisk/agi-bin
Once you’ve established the symlink, PHP/AGI scripts can be migrated from FreePBX to XiVO directly using the same directory structure for storage: /var/lib/asterisk/agi-bin. As with FreePBX, all files in this directory should be owned by asterisk with 775 permissions:
chown asterisk:asterisk /var/lib/asterisk/agi-bin/*
chmod 775 /var/lib/asterisk/agi-bin/*
There are many other powerful features in XiVO that weren’t available at all in FreePBX. We’ll cover some of them in coming months. In the meantime, this brief overview of the dialplan environment should be sufficient to let you start building.
Installing SQLite3 to Support Incredible PBX Applications
There’s one other difference between XiVO and FreePBX that we’ve already touched upon. But it bears repeating here. XiVO doesn’t use MySQL or MariaDB for its database management tasks. Instead, the XiVO development team chose PostGreSQL which is equally powerful, but different. For the Incredible PBX application suite, we’ve chosen to rewrite the ones that depend upon MySQL so that they can run under SQLite3 which is considerably less processor intensive than running both PostGreSQL and MySQL 24/7. We also didn’t want to interfere with the PostGreSQL setup of XiVO since it is an integral component of the product and will get upgraded automatically as part of the regular XiVO upgrade cycle.
Here’s how to put the SQLite3 and corresponding ODBC components in place on your new server. While logged into your server as root, simply issue the following commands:
cd /
wget http://incrediblepbx.com/sqlite3-xivo.tar.gz
tar zxvf sqlite3-xivo*
rm -f sqlite3-xivo.tar.gz
cd /root
./sqlite3-xivo.sh
Running a couple SQLite3 queries using the ZIPCODES and ASTERIDEX databases will give you a feel for the performance you can expect from SQLite3. The queries might look like this:
sqlite3 /var/lib/asterisk/agi-bin/zipcodes.sqlite "select zip,city,state from zipcodes where zip=29401;"
sqlite3 /var/lib/asterisk/agi-bin/asteridex.sqlite 'select name,out from user1 where name LIKE "%Airlines%";'
And here are the results of the two queries:
29401|CHARLESTON|SC
--------------------------------
American Airlines|8004337300
Continental Airlines|8005250280
Delta AirLines|8002211212
Frontier Airlines|8004321359
Iberia AirLines|8007724642
Midway Airlines|8004464392
Northwest Airlines|8002252525
Southwest Airlines|8004359792
Ted Airlines|8002255833
United Airlines|8002416522
WestJet Airlines|8005385696
Yemen Airlines|8009368300
We’ve included a bonus script in /root that will let you convert existing MySQL databases to SQLite3. For example, if you’re currently using AsteriDex on another Incredible PBX platform, it only takes a couple seconds to convert your MySQL database to SQLite3. The syntax to run the script should look like this:
./mysql2sqlite3.sh -u root -ppassw0rd yourdatabase | sqlite3 yourdatabase.sqlite
You obviously cannot run the script on your XiVO server because your MySQL databases and MySQL itself are missing. So move the script to the server on which your MySQL databases are stored and run it there using the above syntax. Then copy the asteridex.sqlite file to your XiVO server and save it in /var/lib/asterisk/agi-bin.
Installing and Activating the Festival TTS Engine with Asterisk
We’ve got a couple more building blocks to put in place to support Incredible PBX applications. Then we’ll be ready to kick the tires with a few applications to get you started. In coming weeks, we’ll finish up the conversion of the remaining apps, and then we’ll publish an Incredible PBX installer for XiVO with all the pieces. But why wait? Finish up installing the remaining pieces today, and you’ll have something to play with. And, as we said, it will also provide you with simple scripts so you can actually see how Incredible PBX is put together.
Many of the Incredible PBX applications rely upon text-to-speech and/or voice recognition (speech-to-text) to work their magic. Neither comes installed with XiVO by default, but Asterisk was properly configured to support Festival so let’s work with that. Festival is the Big Brother of FLITE and includes some additional voices of fairly good quality. The XiVO Demo IVR will give you an idea of the TTS voice quality you can expect:
To get Festival installed and activated for use with Asterisk, issue these commands:
cd /
wget http://incrediblepbx.com/festival-xivo.tar.gz
tar zxvf festival-xivo.tar.gz
cd /root
./festival-xivo.sh
Installing Dial Plan Code for Sample Incredible PBX Applications
Now we’re ready to put today’s Dial Plan Code and IVR in place and load the PHP/AGI components necessary to make the sample applications work. Here’s how:
cd /
wget http://incrediblepbx.com/ivr-xivo.tar.gz
tar zxvf ivr-xivo.tar.gz
chown asterisk:www-data /etc/asterisk/extensions_extra.d
chmod 775 /etc/asterisk/extensions_extra.d
chmod g+s /etc/asterisk/extensions_extra.d
/etc/init.d/asterisk restart
Installing and Activating Voice Recognition for XiVO
Google has changed the licensing of their speech recognition engine about as many times as you change diapers on a newborn baby. Today’s rule restricts use to “personal and development use.” Assuming you qualify, the very first order of business is to enable speech recognition for your XiVO PBX. Once enabled, the Incredible PBX feature set grows exponentially. You’ll ultimately have access to the Voice Dialer for AsteriDex, Worldwide Weather Reports where you can say the name of a city and state or province to get a weather forecast for almost anywhere, Wolfram Alpha for a Siri-like encyclopedia for your PBX, and Lefteris Zafiris’ speech recognition software to build additional Asterisk apps limited only by your imagination. And, rumor has it, Google is about to announce new licensing terms, but we’re not there yet. To try out the Voice Dialer in today’s demo IVR, you’ll need to obtain a license key from Google. This Nerd Vittles tutorial will walk you through that process. Don’t forget to add your key to /var/lib/asterisk/agi-bin/speech-recog.agi on line 72.
Taking XiVO on a Test Drive with the Incredible PBX Apps
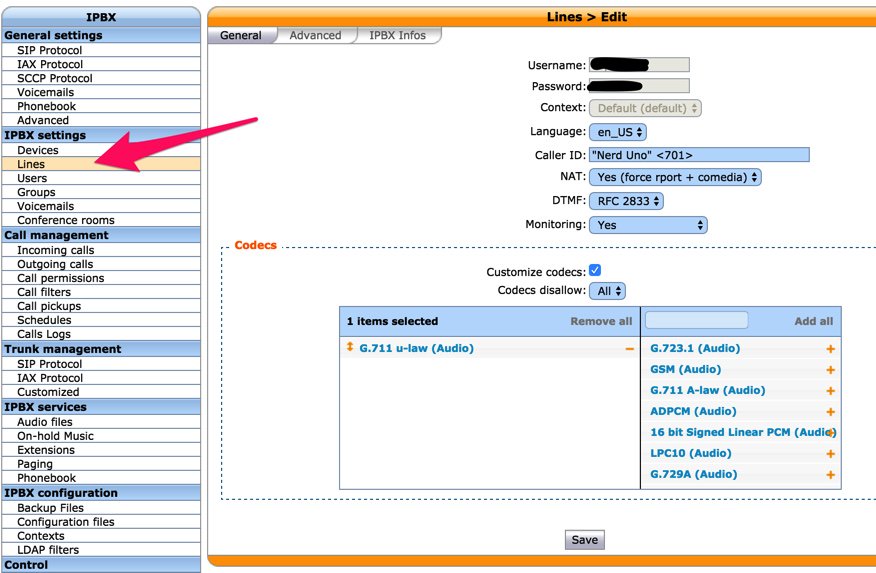
Now set up a softphone using the IP address of your XiVO server and the Line credentials for Extension 701. When you obtain your credentials, double-check to make sure all of the fields for the Line are filled in correctly as shown below:
Once your softphone is registered, you can try out some of the sample applications:
- 4871 (IVR1) – Allison’s Demo IVR
- 411 (Voice Dialing) – Call by Name (try "Delta Airlines")
- 2663 (CONF) – MeetMe Conference with Music on Hold
- 951 – Yahoo! News Headlines (TTS)
- 947 (ZIP) – NWS Weather by ZIP Code
- 53669 (LENNY) – The Telemarketer’s Worst Nightmare
You can review the Dialplan code in the GUI by choosing Configuration Files and clicking xivo-extrafeatures.conf. The sample IVR code is in ivr-1.conf.
Taking Nerd Vittles’ XiVO IVR for a Test Drive
There’s also a new Demo IVR running at www.pacificnx.com on their XenServer virtualization platform. Scott McCarthy, a leading outside XiVO developer and a principal at PacificNX, tells us they soon will have a $20 a month platform specifically tailored to XiVO. And that’s what you’ll be hearing when you call the Nerd Vittles IVR: 1-843-606-0555. Setup at PacificNX took less than a minute. Enjoy!
Published: Thursday, May 12, 2016
9 Countries Have Never Visited Nerd Vittles. Got a Friend in Any of Them https://t.co/wMfmlhiQ9y #asterisk #freepbx pic.twitter.com/TPFGZbqWB6
— Ward Mundy (@NerdUno) April 22, 2016
Need help with Asterisk? Visit the PBX in a Flash Forum.
Special Thanks to Our Generous Sponsors
FULL DISCLOSURE: ClearlyIP, Skyetel, Vitelity, DigitalOcean, Vultr, VoIP.ms, 3CX, Sangoma, TelecomsXchange and VitalPBX have provided financial support to Nerd Vittles and our open source projects through advertising, referral revenue, and/or merchandise. As an Amazon Associate and Best Buy Affiliate, we also earn from qualifying purchases. We’ve chosen these providers not the other way around. Our decisions are based upon their corporate reputation and the quality of their offerings and pricing. Our recommendations regarding technology are reached without regard to financial compensation except in situations in which comparable products at comparable pricing are available from multiple sources. In this limited case, we support our sponsors because our sponsors support us.
BOGO Bonaza: Enjoy state-of-the-art VoIP service with a $10 credit and half-price SIP service on up to $500 of Skyetel trunking with free number porting when you fund your Skyetel account. No limits on number of simultaneous calls. Quadruple data center redundancy. $25 monthly minimum spend required. Tutorial and sign up details are here.
![]() The lynchpin of Incredible PBX 2020 and beyond is ClearlyIP components which bring management of FreePBX modules and SIP phone integration to a level never before available with any other Asterisk distribution. And now you can configure and reconfigure your new Incredible PBX phones from the convenience of the Incredible PBX GUI.
The lynchpin of Incredible PBX 2020 and beyond is ClearlyIP components which bring management of FreePBX modules and SIP phone integration to a level never before available with any other Asterisk distribution. And now you can configure and reconfigure your new Incredible PBX phones from the convenience of the Incredible PBX GUI.
VitalPBX is perhaps the fastest-growing PBX offering based upon Asterisk with an installed presence in more than 100 countries worldwide. VitalPBX has generously provided a customized White Label version of Incredible PBX tailored for use with all Incredible PBX and VitalPBX custom applications. Follow this link for a free test drive!
Special Thanks to Vitelity. Vitelity is now Voyant Communications and has halted new registrations for the time being. Our special thanks to Vitelity for their unwavering financial support over many years and to the many Nerd Vittles readers who continue to enjoy the benefits of their service offerings. We will keep everyone posted on further developments.
Some Recent Nerd Vittles Articles of Interest…
2016, The Year of (real) VoIP Choice: Meet XiVO, a UC Solution for Any Business
We promised you that 2016 was going to be a year filled with surprises, and today we’re pleased to introduce another open source, pure GPL3 solution for any business. Whether your requirements are a call center or a versatile phone system for hundreds of employees, XiVO™ offers a compelling unified communications solution that checks all the boxes. Unlike some products that function merely as a code generator for Asterisk®, XiVO is in a league of its own. XiVO is actually an integral component of the Asterisk application itself. It manages your telephony server in realtime using its versatile PostGreSQL database platform. Did we mention it’s also a great playground for hobbyists and SOHO VoIP enthusiasts? Let’s get started.
UPDATE: The first release of Incredible PBX for XiVO is now available here. Please consider this article superseded by the new release.
There’s no way to do justice to a product like XiVO in a single article. So our plan is to introduce XiVO today and get your platform up and running where you can make and receive free calls throughout the United States and Canada. Then you can add Incredible PBX components and additional SIP providers as we continue to build them out. Just follow along with our Incredible PBX development for XiVO on the PIAF Forum, and you’ll get a first-hand look at how sausage is made. We already have text-to-speech applications for news and weather up and running. You can take them for a test drive by calling the XiVO demo:
And, of course, we’ve integrated the Travelin’ Man 3 IPtables firewall to provide rock-solid security for XiVO, and we’ll cover that today as well. As part of this development process, you’ll discover how easy it is to build Asterisk applications for XiVO on your own. And hopefully you’ll share some of your creations with the rest of us. That’s what open source development is all about.
Choosing an Experimental Platform for XiVO
We’re just getting started with XiVO development so, like us, we’re assuming you’ll want to kick the tires a bit before jumping into a new VoIP solution for the long haul. That means you first must choose a platform on which to install XiVO. We have several recommendations for you. If you have a robust desktop machine with lots of RAM and processing power, then installing XiVO under VirtualBox may be the way to go. We actually use an iMac with 16GB of RAM, and it provides plenty of horsepower to run VirtualBox and XiVO. With VirtualBox, we’ll start by downloading the XiVO ISO.
We didn’t mention that XiVO has been under development for over 10 years and is supported by the original developers with financial support from Avencall. Because of its Canadian roots, it seems only fitting that many may wish to consider CloudAtCost in Canada as an appropriate site to host your experimental XiVO server. A one-time payment of $10.50 still buys you a sandbox in the cloud for life with coupon code TAKE70, and XiVO installs on the CloudAtCost platform without a hiccup. For a CloudAtCost implementation, we’ll start by creating a Debian 8 server.1 And then we’ll download and run the XiVO installation script to build our XiVO server. Finally, we’ll walk you through setting up XiVO on a $5/month Digital Ocean Droplet which provides state-of-the-art performance at rock-bottom Cloud pricing. So begin by choosing your hardware platform from the three options below:
1. Installing XiVO as a VirtualBox Virtual Machine
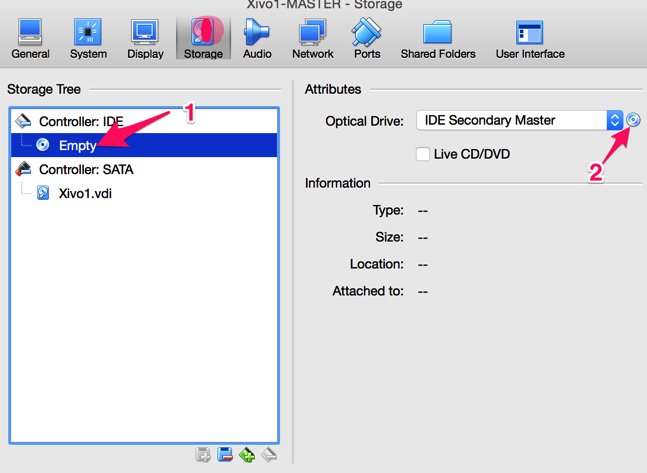
For standalone implementations including VirtualBox, we’ll begin by downloading the 64-bit XiVO Server ISO to your desktop. Next, create a VirtualBox 64-bit Debian VM platform with 1024 MB RAM and at least a 10GB virtual drive. In System Settings, enable I/O APIC and disable the other options. Select a Sound Card to match your machine and configure Network Adapter 1 as a Bridged Network Device. In the Storage Settings (shown below) for your (1) Empty IDE Controller, (2) select the downloaded XiVO ISO as your installation media. Start the VM and proceed through the initial install.
Click Install, choose your language, pick your time zone, choose your keyboard map, create a very secure root password, and choose a Debian mirror that’s close to your server. Choose /dev/sda as your bootloader assuming that’s the disk drive configured by VirtualBox. In less than 10 minutes, the install will complete and your VM will reboot. Log into your server as root and obtain your IP address: ifconfig. You’ll need it for the web configuration step that comes next.
2. Installing XiVO as a CloudAtCost Cloud-Based Server
You can’t use an ISO as the installation media at CloudAtCost so we have to start by building a 64-bit Debian 8 virtual machine with at least 512 MB RAM and a 10GB virtual drive. No need to choose a larger drive at the moment since there’s a bug in CloudAtCost’s installer for Debian 8. See the footnote for details. Once your virtual machine is built, log in as root and issue the following commands to kick off the XiVO install:
apt-get -y remove apache2*
apt-get update
apt-get -y upgrade
reboot
# log back in as root and...
wget http://mirror.xivo.io/fai/xivo-migration/xivo_install_current.sh
bash xivo_install_current.sh
3. Installing XiVO as a Digital Ocean Droplet
As with CloudAtCost, you’ll need to begin your XiVO adventure at Digital Ocean by first signing up for an account. With our referral code, you’ll get a $10 credit (and so will Nerd Vittles). That’s good for two full months of service to kick the tires of XiVO without ever spending a dime. Once your account is set up, create a $5/month Debian 8 (64-bit) Droplet. When you receive the email with your droplet credentials, log into your new server as root using SSH/Putty and issue the following commands to get Debian 8 squared away:
apt-get update
apt-get upgrade -y
dd if=/dev/zero of=/swapfile bs=1024 count=1024k
chown root:root /swapfile
chmod 0600 /swapfile
mkswap /swapfile
swapon /swapfile
echo "/swapfile          swap            swap    defaults        0 0" >> /etc/fstab
sysctl vm.swappiness=10
echo vm.swappiness=10 >> /etc/sysctl.conf
free
reboot
After the reboot, log into your server again with your new root password and kick off the XiVO install:
wget http://mirror.xivo.io/fai/xivo-migration/xivo_install_current.sh
bash xivo_install_current.sh
Enabling SSH Root Access with XiVO
If you installed XiVO using the XiVO ISO, then root logins via SSH are disabled by default. Only enable it if you plan to also implement the firewall in the next step! To enable root logins via SSH, log into the server console as root and edit the SSH config file: nano -w /etc/ssh/sshd_config. Find the line in the Authentication section that begins with PermitRootLogin and change it to: PermitRootLogin yes. Save your change (Ctrl-X, y, ENTER) and then restart SSH: /etc/init.d/ssh restart.
Setting Up a Firewall to Protect XiVO
We don’t build PBXs without a rock-solid firewall, but it’s your phone bill so the choice is all yours. The Travelin’ Man 3 implementation of the Linux IPtables firewall provides a safe computing platform using a WhiteList to only allow access by trusted users and providers. You can add additional users to the whitelist as desired using add-ip and add-fqdn in the /root folder. Restart your firewall using only this command: iptables-restart. If you’ll be using FQDNs in your WhiteList, then add the ipchecker script to your cron jobs. Then review Step #5 in the TM3 tutorial.
echo "*/10 5-22 * * * root /root/ipchecker > /dev/null 2>&1" >> /etc/crontab
It’s imperative that you set this up from a client workstation that’s running SSH or Putty. Otherwise, you may inadvertently lock yourself out from your own server. While logged into your server via SSH as root, issue the following commands:
cd /root
wget http://incrediblepbx.com/firewall-xivo.tar.gz
tar zxvf firewall-xivo.tar.gz
rm -f firewall-xivo.tar.gz
./tm3-xivo.sh
Configuring XiVO with a Web Browser
Once the basic install is completed, you use a web browser to actually configure and manage your XiVO server. To get things started, point your browser to the IP address of your XiVO server. Choose your Language. Accept the GPL3 license agreement. Then fill in the blanks to create a Hostname for your server (XiVO), a domain name (some domain that you own or one chosen from your favorite dynamic DNS provider), a very secure Web interface password (choose as if your phone bill depends upon it). The network interface and DNS server entries should already be correct. Click Next.
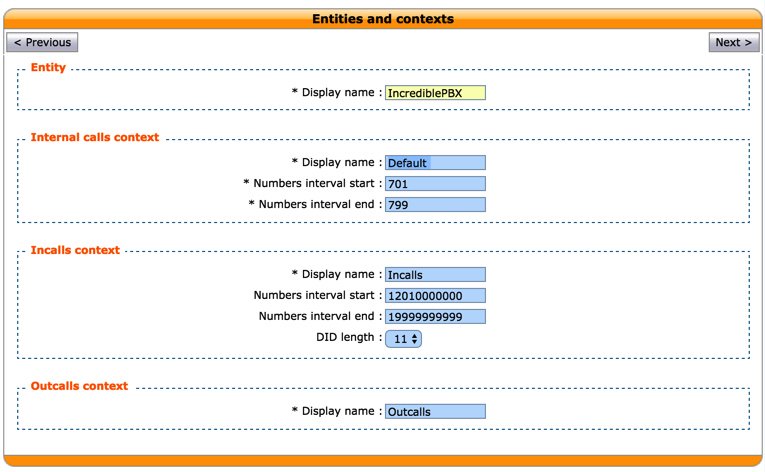
On the second configuration screen, choose an Entity (department/organization name or IncrediblePBX will suffice). Then set up the Contexts to manage calls on your PBX:
- Internal Calls Context: manages extension numbers that can be reached internally
- Incalls Context: manages calls coming from outside of your system
- Outcalls Context: manages calls going from your system to the outside
Here’s what we’ll be using by way of example:
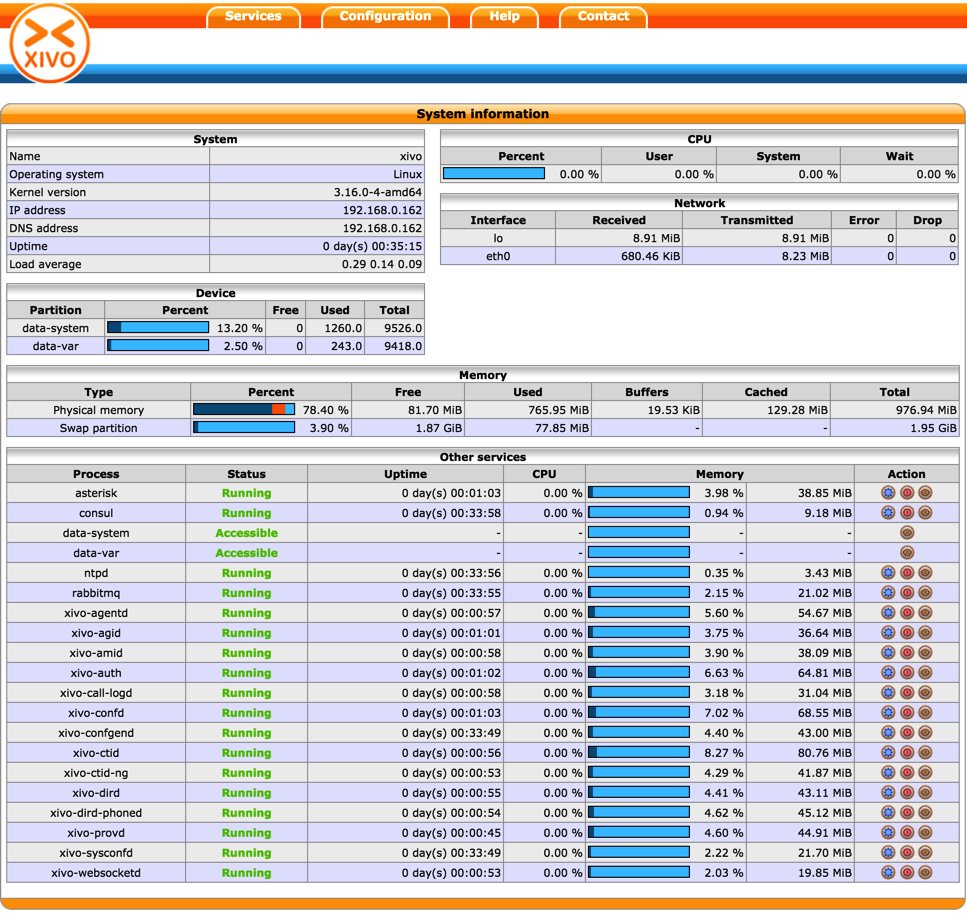
Finally, validate your entries to complete the configuration. Now log into your XiVO server as root using your newly created web password. You should get a status screen that looks something like this. If you had any doubts about the quality of the XiVO product, this should put your mind at ease. 🙂
Logging Into the XiVO Web Interface
To make changes in your XiVO setup, you’ll need to log into the web interface at the IP address of your XiVO PBX. Login with root as the username together with the Web Interface Password you set up above. You can change this password at any time under the Configuration tab by clicking on Users and editing your existing settings.
Creating Users and Lines with XiVO
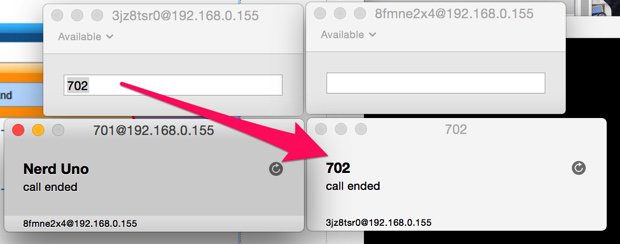
For those migrating from the FreePBX® world, you’re probably most familiar with the procedure for creating extensions. More advanced administrators may have switched to device and user mode where users and devices are created separately. Phone numbers or extensions were associated with users while phone instruments were associated with devices. In the World of XiVO, we’ll start with the simplest configuration, and you can move on from there when you’re ready. In our scenario today, we’ll create a couple of users. Each user has a Name, Language, Time Zone, and other optional characteristics such as a Mobile Phone Number which can ring simultaneously whenever a user receives a call to his or her local XiVO phone number. By adding a Line (aka Phone Number) for the user as the user account is created, XiVO will automatically generate a separate Line with username and password credentials. This Line will be associated with the User during the initial user setup procedure, and this Line then can be registered to a SIP phone, softphone, or XiVO client (which we will cover separately down the road). In the example below, we’re using Nerd Uno’s extension 701 (associated with line 3jz8tsr0) to call Nerd Dos’ extension 702 (associated with line 8fmne2x4).
XiVO has an excellent tutorial that covers creating Users with a SIP Line. So jump there and add a couple of Users following the steps in the tutorial. When you’re finished, you’ll have two Users and two associated Lines with credentials to set up SIP phones. Since you’re just getting your feet wet and will probably make some mistakes, it’s probably a good idea to turn off Fail2Ban while you’re experimenting. Otherwise, you may accidentally lock yourself out of your server (ask us how we know) and think it’s a problem with XiVO. Here’s how:
/etc/init.d/fail2ban stop
To set up your SIP phones, you’ll need the credentials for each of the two lines. Under the Lines tab, click on the Pencil icon to reveal the Username and Password. Fill in the missing pieces as shown below and make certain that your NAT entry is set to Yes.

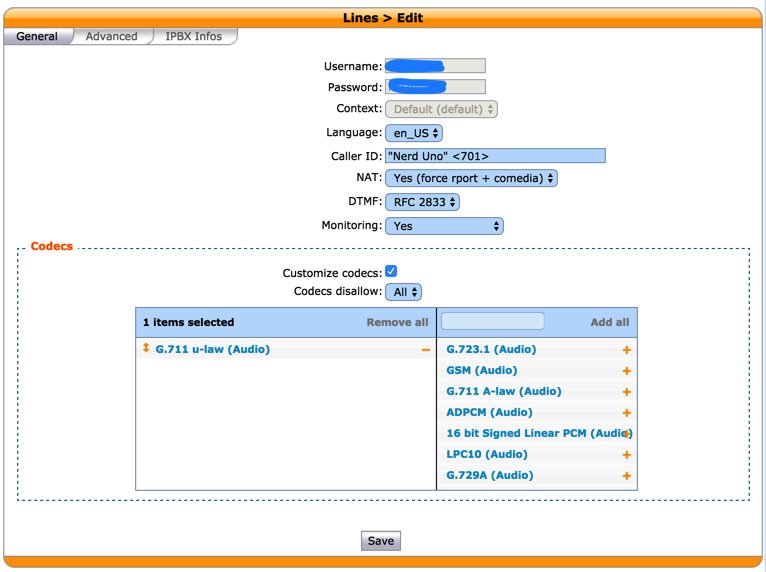
With those credentials in hand, go ahead and configure a couple of SIP phones and make certain you can call between them with audio in both directions before proceeding. For those with a Mac, Telephone is perfect for experimentation because you can set up multiple softphones and place calls between them.
IMPORTANT: If your server is sitting behind a NAT-based firewall, you must set the external and local network IP addresses for XiVO in General Settings -> SIP Protocol. You’ll find the fields in the Network tab.
Configuring a SIP Trunk for Google Voice with XiVO
Now that you have internal calls working, let’s turn our attention to connecting your PBX to the rest of the world. We obviously can’t cover the setup for every SIP provider, but we can provide a good example that will get our U.S. friends free calling in the U.S. and Canada. We’ve chosen the Simonics SIP Gateway to Google Voice because a one-time payment of $5.99 gets you a traditional SIP trunk to interface with any existing Google Voice number. If you don’t have a Google Voice number, sign up here. In your Google Voice Settings, make sure Forward Calls to Google Chat is enabled and disable Call Screening in the Calls tab. Then, with your Google credentials and Google Voice number in hand, visit the Simonics web site to sign up for service. Sign in with your Google credentials and complete the registration process. Once you have your Simonics account name and password, log into your XiVO web portal.
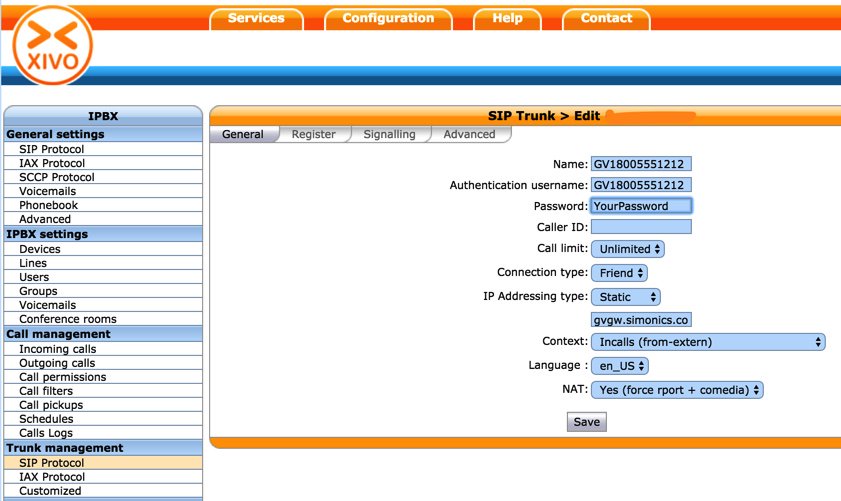
With credentials in hand, on the XiVO side, start by choosing the SIP Protocol tab under Trunk Management. There are actually three tabs to configure for the SIP trunk. Begin in the General tab and make it look like this using your credentials. NOTE: The complete FQDN for the Simonics gateway should be gvgw.simonics.com:
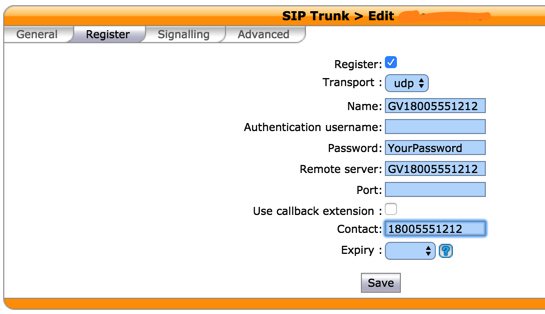
Next, click on the Register tab and reenter your credentials. Leave the empty fields exactly as shown. Be sure the Register box is checked.
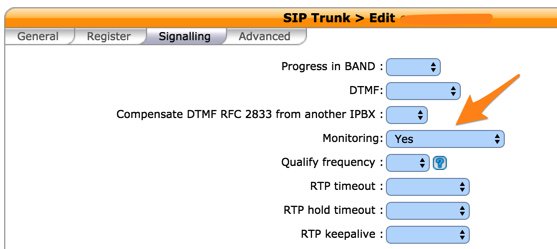
Next, in the Signaling tab, change the Monitoring option to Yes and then click Save. Monitoring is the XiVO equivalent of the SIP Qualify option.
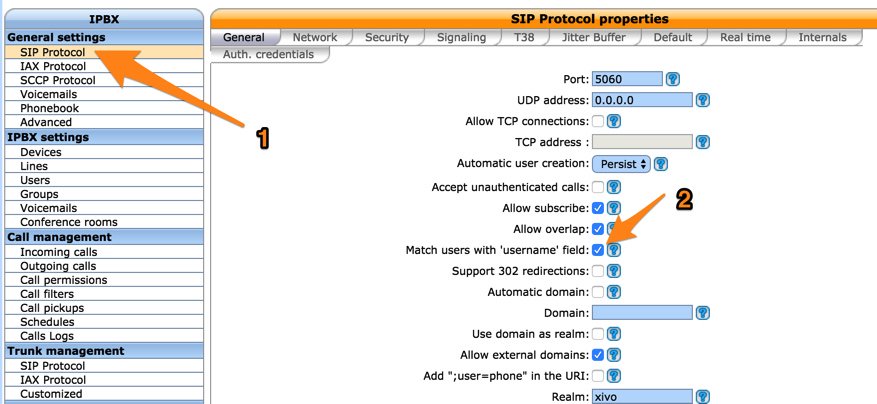
We also need to make one minor adjustment in the SIP Protocol Defaults in the General Settings. Just Save your settings after checking Match users with ‘username’ field.
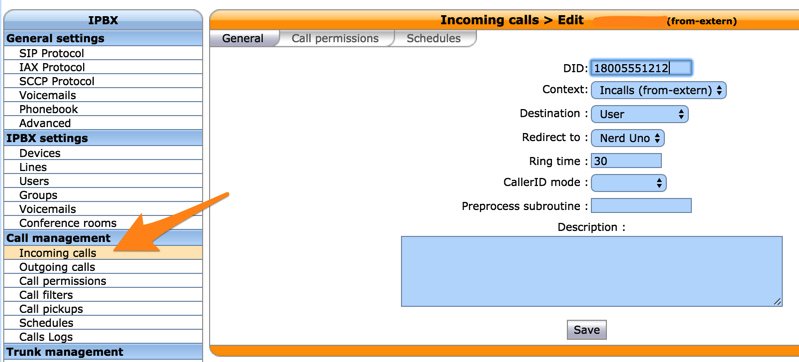
Next, we need to tell XiVO how to process Incoming and Outgoing Calls using the Google Voice SIP trunk. Under the Call Management section, let’s begin with the Incoming Calls setup by creating a new Incoming Calls DID for your 11-digit Google Voice number. To keep things simple, we’ll route the incoming calls to the User mapped to extension 701:
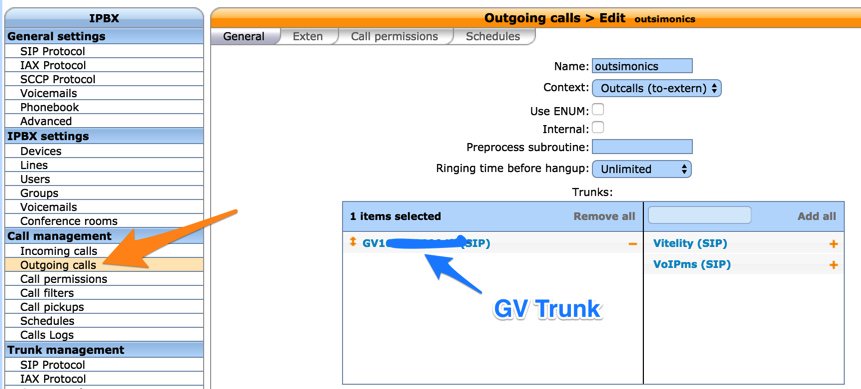
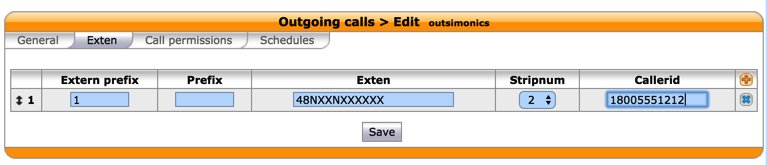
For Outgoing Calls, we need to route calls with a specific dial string out the Simonics SIP trunk using the to-extern context. By way of example, we’ve set this up using a dialing prefix of 48 (GV) and a 10-digit number. We’re letting XiVO supply the missing 1 country code required by Google Voice, and we’ll let XiVO strip off the 48 prefix in processing the outbound calls. If this is your only outgoing trunk, you may prefer not to use a dial prefix at all. In that case, change the dial string to a 10-digit number (NXXNXXXXXX) and set Stripnum to 0.
Well, that’s enough for today. There’s complete XiVO PDF Documentation available here. We’ll have lots more to say about XiVO in coming weeks. Come join the party!
Published: Thursday, May 5, 2016
9 Countries Have Never Visited Nerd Vittles. Got a Friend in Any of Them https://t.co/wMfmlhiQ9y #asterisk #freepbx pic.twitter.com/TPFGZbqWB6
— Ward Mundy (@NerdUno) April 22, 2016
Need help with Asterisk? Visit the PBX in a Flash Forum.
Special Thanks to Our Generous Sponsors
FULL DISCLOSURE: ClearlyIP, Skyetel, Vitelity, DigitalOcean, Vultr, VoIP.ms, 3CX, Sangoma, TelecomsXchange and VitalPBX have provided financial support to Nerd Vittles and our open source projects through advertising, referral revenue, and/or merchandise. As an Amazon Associate and Best Buy Affiliate, we also earn from qualifying purchases. We’ve chosen these providers not the other way around. Our decisions are based upon their corporate reputation and the quality of their offerings and pricing. Our recommendations regarding technology are reached without regard to financial compensation except in situations in which comparable products at comparable pricing are available from multiple sources. In this limited case, we support our sponsors because our sponsors support us.
BOGO Bonaza: Enjoy state-of-the-art VoIP service with a $10 credit and half-price SIP service on up to $500 of Skyetel trunking with free number porting when you fund your Skyetel account. No limits on number of simultaneous calls. Quadruple data center redundancy. $25 monthly minimum spend required. Tutorial and sign up details are here.
![]() The lynchpin of Incredible PBX 2020 and beyond is ClearlyIP components which bring management of FreePBX modules and SIP phone integration to a level never before available with any other Asterisk distribution. And now you can configure and reconfigure your new Incredible PBX phones from the convenience of the Incredible PBX GUI.
The lynchpin of Incredible PBX 2020 and beyond is ClearlyIP components which bring management of FreePBX modules and SIP phone integration to a level never before available with any other Asterisk distribution. And now you can configure and reconfigure your new Incredible PBX phones from the convenience of the Incredible PBX GUI.
VitalPBX is perhaps the fastest-growing PBX offering based upon Asterisk with an installed presence in more than 100 countries worldwide. VitalPBX has generously provided a customized White Label version of Incredible PBX tailored for use with all Incredible PBX and VitalPBX custom applications. Follow this link for a free test drive!
Special Thanks to Vitelity. Vitelity is now Voyant Communications and has halted new registrations for the time being. Our special thanks to Vitelity for their unwavering financial support over many years and to the many Nerd Vittles readers who continue to enjoy the benefits of their service offerings. We will keep everyone posted on further developments.
Some Recent Nerd Vittles Articles of Interest…
- There’s a glitch in the CloudAtCost builds for Debian8. Regardless of how much disk storage you allocate, CloudAtCost will only use 10GB. Moral: Don’t waste your resources by allocating more than 10GB of disk space. This is an experimental platform, and 10GB will suffice. If you really need more space, this thread on the PIAF Forum will walk you through expanding the storage allocation beyond the 10GB threshold. [↩]
Chasing the Asterisk Rainbow: An Incredible PBX for Everyman… and Woman
The one thing we’ve learned over the past decade is that everyone’s telecommunications needs are different. We began the Incredible PBX™ project by offering a script for PBX in a Flash™ that enhanced its functionality by adding three dozen applications for Asterisk® plus a rock-solid, preconfigured firewall. We expanded on that initial design by offering installers to support both Elastix® 4.0 and even the FreePBX® Distro and AsteriskNOW. But many asked for something more. Some wanted a turnkey install on inexpensive hardware so we now have a Raspberry Pi® 3 image that configures itself in under a minute. Others wanted and we provided an ISO image that could be loaded onto a USB thumb drive and used to install Incredible PBX on virtually any standalone hardware platform including the $200 Intel NUC. Then there were the enthusiasts that insisted upon virtual machines for virtually everything. So we built Incredible PBX images for Proxmox, and VirtualBox, and VMware. All of these builds could be set up about as quick as you can snap your fingers. Still others believed that all computing should be handled with Cloud-based servers. So we created a $10.50 solution for lifetime Cloud computing with CloudAtCost, a $5/month solution with Digital Ocean, and a $15/month rock-solid reliable PBX with RentPBX. Finally, there were operating system purists. Some preferred RedHat/CentOS/Scientific Linux while others swore by Debian or Ubuntu or Raspbian 8. So we added Incredible PBX builds for every conceivable operating system.
What remained consistent through all of these Incredible PBX iterations was our absolute commitment to providing a secure computing environment out of the box with a feature set unmatched in both the open source and commercial PBX communities. But, of course, there is always someone that doesn’t want features and prefers a secure platform on which to build their own servers. We’ve even accommodated that request with the Lean, Mean Edition of Incredible PBX.
So, today while we work on taxes, you can take a leisurely stroll through all of the available Incredible PBX links above and choose a platform that best meets your needs. Our other uncompromising feature is price. Incredible PBX is and always will be free with NoGotchas. If you’re still confused about choosing a favorite build, try our Decision Tree below. It’ll give you suggestions in less than a minute. Come join the party!
Originally published: Monday, April 11, 2016
9 Countries Have Never Visited Nerd Vittles. Got a Friend in Any of Them https://t.co/wMfmlhiQ9y #asterisk #freepbx pic.twitter.com/TPFGZbqWB6
— Ward Mundy (@NerdUno) April 22, 2016
Need help with Asterisk? Visit the PBX in a Flash Forum.
Special Thanks to Our Generous Sponsors
FULL DISCLOSURE: ClearlyIP, Skyetel, Vitelity, DigitalOcean, Vultr, VoIP.ms, 3CX, Sangoma, TelecomsXchange and VitalPBX have provided financial support to Nerd Vittles and our open source projects through advertising, referral revenue, and/or merchandise. As an Amazon Associate and Best Buy Affiliate, we also earn from qualifying purchases. We’ve chosen these providers not the other way around. Our decisions are based upon their corporate reputation and the quality of their offerings and pricing. Our recommendations regarding technology are reached without regard to financial compensation except in situations in which comparable products at comparable pricing are available from multiple sources. In this limited case, we support our sponsors because our sponsors support us.
BOGO Bonaza: Enjoy state-of-the-art VoIP service with a $10 credit and half-price SIP service on up to $500 of Skyetel trunking with free number porting when you fund your Skyetel account. No limits on number of simultaneous calls. Quadruple data center redundancy. $25 monthly minimum spend required. Tutorial and sign up details are here.
![]() The lynchpin of Incredible PBX 2020 and beyond is ClearlyIP components which bring management of FreePBX modules and SIP phone integration to a level never before available with any other Asterisk distribution. And now you can configure and reconfigure your new Incredible PBX phones from the convenience of the Incredible PBX GUI.
The lynchpin of Incredible PBX 2020 and beyond is ClearlyIP components which bring management of FreePBX modules and SIP phone integration to a level never before available with any other Asterisk distribution. And now you can configure and reconfigure your new Incredible PBX phones from the convenience of the Incredible PBX GUI.
VitalPBX is perhaps the fastest-growing PBX offering based upon Asterisk with an installed presence in more than 100 countries worldwide. VitalPBX has generously provided a customized White Label version of Incredible PBX tailored for use with all Incredible PBX and VitalPBX custom applications. Follow this link for a free test drive!
Special Thanks to Vitelity. Vitelity is now Voyant Communications and has halted new registrations for the time being. Our special thanks to Vitelity for their unwavering financial support over many years and to the many Nerd Vittles readers who continue to enjoy the benefits of their service offerings. We will keep everyone posted on further developments.
Some Recent Nerd Vittles Articles of Interest…
The Sensational Raspberry Pi 3 Featuring Incredible PBX GUI with Raspbian 8 Jessie
")
[iframe-popup id="3″]
Hard to believe it’s been four years since the introduction of the original Raspberry Pi®. Over eight million RasPi’s have been shipped. To celebrate its fourth birthday, Eben Upton has done it again. Meet the sensational Raspberry Pi 3 sporting a 1.2GHz 64-bit quad-core ARM Cortex-A53 CPU with ten times the performance of the original Raspberry Pi. Of particular interest to the VoIP community will be the RasPi 3’s integrated 802.11n wireless LAN and Bluetooth 4.1 hardware. And, of course, the RasPi 3 retains its compatibility with the Raspberry Pi 1 and 2. Did we mention it’s still just $35? Because we like to celebrate birthdays, too, we’re pleased to introduce a brand new Incredible PBX™ image for the Raspberry Pi 2 and 3 featuring Raspbian 8 and the latest release of Asterisk® 13. Unlike previous builds, this one installs in under a minute. Yes, it’s still FREE and features pure open source GPL code. No Gotchas!
07/01/2019 NEWS FLASH: Just released Incredible PBX LITE for the Raspberry Pi 2, 3, and 4 featuring Raspbian 10 Buster. Tutorial here.
Raspberry Pi 3 Performance. Gone are the days of worrying about Raspberry Pi performance. Both the user interface and call quality now match what you’d expect to find on a $300-$500 VoIP server. Even with a Raspberry Pi 2, we have detected no performance degradation thanks to the latest Raspbian 8 OS and a virtually flawless Asterisk 13 platform. For best results, we recommend 32GB Class 10 microSD cards which now are plentiful at the $10 price point.1
Raspberry Pi 3 Shopping List. Before you can install Incredible PBX, you’ll need a compatible Raspberry Pi 3 platform. Here’s the short list:
$35* Raspberry Pi 3 from MCM or Newark or Amazon $10 Power Adapter (2.5 amps minimum!) $9 32GB microSDHC Class 10 card £12.95 Rainbow Pibow case or $9.50 Official RasPi case
About That Asterisk. We write about Asterisk® regularly, but the asterisk we’re talking about is the one accompanying the $35* price tag for the Raspberry Pi 3. Yes, that’s the advertised price. And, no, if you want one this year, you’re not going to pay that. There are the marked up shipping prices, the bundled add-on’s that you don’t need or want, and the must-have accessories like a power adapter. We’re assuming you already own a USB keyboard and an HDMI-compatible monitor. If so, just plan on $100 and consider yourself lucky if you get all the pieces for less. Our order from Pimoroni in the U.K. with a case and 3-day shipping was £59.36 or $82.95 U.S. Our order from MCM for just the RasPi 3 with shipping was $46.99.
Incredible PBX Feature Set. Where to begin? Let’s start with the Alphabet Stew: IAX, SIP, GVSIP, SMS, and SRTP functionality. Voice Recognition and Text-to-Speech VoIP application support using FLITE, GoogleTTS, and PicoTTS. Free calling with Google Voice, Simonics SIP gateway, or RingPlus cellular service. And all of your Nerd Vittles favorites: Fax, AsteriDex, Click-to-Dial, News, Weather, Reminders, and Wakeup Calls. Plus hundreds of features that typically are found in commercial PBXs: Conferencing, IVRs and AutoAttendants, Email Delivery of Voicemail, Voicemail Blasting, and more…
10-Layer Network Security Model. Most phone calls cost money. Unlike many of the other "free" VoIP solutions, our most important criteria for VoIP is rock-solid security. If your free server ends up costing you thousands of dollars in phone bills due to fraud, it isn’t free at all. Once you plug in that network cable, you’ve painted a bullseye on your checkbook.
No single network security system can protect you against zero-day vulnerabilities that no one has ever seen. Deploying multiple layers of security is not only smart, it’s essential with today’s Internet topology. It works much like the Bundle of Sticks from Aesop’s Fables. The more sticks there are in your bundle, the more difficult it is to break them apart. If a vulnerability suddenly appears in the Linux kernel, or in Asterisk, or in Apache, or in your favorite web GUI, you can continue to sleep well knowing that other layers of security have your back. No one else in the telecommunications industry has anything close. Ours is all open source GPL code so we would encourage everyone to get on board and do their part to make the Internet a safer place!
Do your part and do your homework. Comparison shop as if your phone bill matters! 😉 Incredible PBX provides:
- Preconfigured IPtables Linux Firewall
- Preconfigured Travelin’ Man 3 WhiteLists
- Randomized Port Knocker for Remote Access
- TM4 WhiteListing by Telephone (optional)
- Fail2Ban Log Monitoring for SSH, Apache, Asterisk
- Randomized Ultra-Secure Passwords
- Automatic Update Utility for Security & Bug Fixes
- Asterisk Manager Lockdown to localhost
- Apache htaccess Security for Vulnerable Web Apps
- Security Alerts via RSS Feeds in Kennonsoft and Incredible PBX GUIs
Installation Tutorial. Here’s everything need to know about installation and setup. "Automatic" means you just watch.
- Download and unzip Incredible PBX image from SourceForge (with or without GV OAuth support)
- Transfer Incredible PBX image to microSD card
- Boot Raspberry Pi from new microSD card
- Login to RasPi console as pi:raspberry to initialize your server (Automatic)
- Reboot after writing down your server IP address (Automatic)
- Login via SSH as root:password to randomize passwords & configure firewall (Automatic)
- Optionally, install Incredible Fax: /root/incrediblefax13_raspi3.sh (Credentials: admin:password)
- Enjoy!
Configuring Trunks with Incredible PBX
Before you can actually make and receive calls, you’ll need to add one or more VoIP trunks with providers, create extensions for your phones, and add inbound and outbound routes that link your extensions to your trunks. Here’s how a PBX works. Phones connect to extensions. Extensions connect to outbound routes that direct calls to specific trunks, a.k.a. commercial providers that complete your outbound calls to any phone in the world. Coming the other way, incoming calls are directed to your phone number, otherwise known as a DID. DIDs are assigned by providers and you register your trunks using credentials handed out by these providers. Incoming calls are routed to your DIDs which use inbound routes telling the PBX how to direct the calls internally. A call could go to an extension to ring a phone, or it could go to a group of extensions known as a ring group to ring a group of phones. It could also go to a conference that joins multiple people into a single call. Finally, it could be routed to an IVR or AutoAttendant providing a list of options from which callers could choose by pressing various keys on their phone.
We’ve done most of the prep work for you with Incredible PBX. We’ve set up an Extension to which you can connect a SIP phone or softphone. We’ve set up an Inbound Route that, by default, sends all incoming calls to a Demo IVR. And we’ve built a dozen trunks for some of the best providers in the business. Sign up with the ones you prefer, plug in your credentials, and you’re good to go.
Unlike traditional telephone service, you need not and probably should not put all your eggs in one basket when it comes to telephone providers. In order to connect to Plain Old Telephones, you still need at least one provider. But there is nothing wrong with having several. And a provider that handles an outbound call (termination) need not be the same one that handles an incoming call (origination) and provides your phone number (DID). We cannot recommend Vitelity highly enough, and it’s not just because they have financially supported our projects for almost a decade. They’re as good as VoIP providers get, and we use lots of them. If you’re lucky enough to live in the U.S., you’d be crazy not to set up a Google Voice account. It’s free as are all phone calls to anywhere in the U.S. and Canada. The remaining preconfigured providers included in Incredible PBX are equally good, and we’ve used and continue to use almost all of them. So pick a few and sign up. You only pay for the calls you make with each provider so you have little to lose by choosing several. The PIAF Forum includes dozens of recommendations on VoIP providers if you want additional information.
With the preconfigured trunks in Incredible PBX, all you need are your credentials for each provider and the domain name of their server. Log into Incredible PBX GUI Administration as admin using a browser. From the System Status menu, click Connectivity -> Trunks. Click on each provider you have chosen and fill in your credentials including the host entry. Be sure to uncheck the Disable Trunk checkbox! Fill in the appropriate information for the Register String. Save your settings by clicking Submit Changes. Then click the red Apply Config button.
Configuring a Softphone for Incredible PBX
We’re in the home stretch now. You can connect virtually any kind of telephone to your new PBX. Plain Old Phones require an analog telephone adapter (ATA) which can be a separate board in your computer from a company such as Digium. Or it can be a standalone SIP device such as ObiHai’s OBi100 or OBi110 (if you have a phone line from Ma Bell to hook up as well). SIP phones can be connected directly so long as they have an IP address. These could be hardware devices or software devices such as the YateClient softphone. We’ll start with a free one today so you can begin making calls. You can find dozens of recommendations for hardware-based SIP phones both on Nerd Vittles and the PIAF Forum when you’re ready to get serious about VoIP telephony.
We recommend YateClient which is free. Download it from here. Run YateClient once you’ve installed it and enter the credentials for the 701 extension on Incredible PBX. You’ll need the IP address of your server plus your extension 701 password. Choose Applications _> Extensions -> 701 and write down your SIP/IAX Password. You can also find it in /root/passwords.FAQ. Fill in the blanks using the IP address of your Server, 701 for your Username, and whatever Password you assigned to the extension when you installed Incredible PBX. Click OK to save your entries.

Once you are registered to extension 701, close the Account window. Then click on YATE’s Telephony Tab and place some test calls to the numerous apps that are preconfigured on Incredible PBX. Dial a few of these to get started:
DEMO - Apps Demo

123 - Reminders

947 - Weather by ZIP Code

951 - Yahoo News

*61 - Time of Day

TODAY - Today in History
If you are a Mac user, another great no-frills softphone is Telephone. Just download and install it from the Mac App Store.
Configuring Google Voice
If you want to use Google Voice, you’ll need a dedicated Google Voice account to support Incredible PBX. The more obscure the username (with some embedded numbers), the better off you will be. This will keep folks from bombarding you with unsolicited Gtalk chat messages, and who knows what nefarious scheme will be discovered using Google messaging six months from now. So keep this account a secret!
IMPORTANT: Do NOT under any circumstances take Google’s bait to switch from Google Chat to Hangouts, or you will forever lose the ability to use Google Chat with Incredible PBX. Also be sure to enable the Google Chat option as one of your phone destinations in Settings, Voice Setting, Phones. That’s the destination we need for The Incredible PBX to work its magic! Otherwise, all inbound and outbound calls will fail. Good News! You’re in luck. Google has apparently had a change of heart on discontinuing Google Chat support so it’s enabled by default in all new Google Voice accounts. Once you’ve created a Gmail and Google Voice account, go to Google Voice Settings and click on the Calls tab. Make sure your settings match these:
- Call Screening – OFF
- Call Presentation – OFF
- Caller ID (In) – Display Caller’s Number
- Caller ID (Out) – Don’t Change Anything
- Do Not Disturb – OFF
- Call Options (Enable Recording) – OFF
- Global Spam Filtering – ON
Click Save Changes once you’ve adjusted your settings. Under the Voicemail tab, plug in your email address so you get notified of new voicemails. Down the road, receipt of a Google Voice voicemail will be a big hint that something has come unglued on your PBX.
One final word of caution is in order regardless of your choice of providers: Do NOT use special characters in any provider passwords, or nothing will work!
Now you’re ready to configure your Google Voice account in Incredible PBX. You can do it from within the Incredible PBX GUI by choosing Connectivity -> Google Voice. How you enter your credentials depends upon whether you have chosen the Incredible PBX image with OAuth 2 support. For a complete Google Voice OAuth tutorial, follow steps 8-10 in this Nerd Vittles tutorial. Once you’ve entered your credentials, you MUST restart Asterisk from the command line, or Google Voice calls will fail.
If you have trouble getting Google Voice to work (especially if you have previously used your Google Voice account from a different IP address), try this Google Voice Reset Procedure. It usually fixes connectivity problems. If it still doesn’t work, enable Less Secure Apps using this Google tool.
If you have difficulty finding the Google Chat option after setting up a new Google Voice account, follow this tutorial.
Another option is to use an inexpensive SIP Gateway to Google Voice. The Simonics trunk in the Incredible PBX GUI is preconfigured for this purpose. All you’ll need is your Google Voice credentials. Get started with this tutorial.
Adding Speech Recognition Support to Incredible PBX
To support many of our applications, Incredible PBX has included Google’s speech recognition service for years. These applications include Weather Reports by City (949), AsteriDex Voice Dialing by Name (411), and Wolfram Alpha for Asterisk (4747), all of which use Lefteris Zafiris’ terrific speech-recog AGI script. Unfortunately (for some), Google now has tightened up the terms of use for their free speech recognition service. Now you can only use it for "personal and development use." If you meet those criteria, keep reading. Here’s how to activate speech recognition on Incredible PBX. Don’t skip any steps!
To use Wolfram Alpha by phone, you first must obtain a free Wolfram Alpha APP-ID. Then issue the following command replacing APP-ID with your actual ID. Do NOT change the yourID portion of the command:
sed -i "s|yourID|APP-ID|" /var/lib/asterisk/agi-bin/4747
Now you’re ready to try out the speech recognition apps. Dial 949 and say the name of a city and state/province/country to get a current weather forecast from Yahoo. Dial 411 and say "American Airlines" to be connected to American.
To access Wolfram Alpha by phone, dial 4747 and enter your query, e.g. "What planes are overhead." Read the Nerd Vittles tutorial for additional examples and tips.
Enabling WiFi on the Raspberry Pi
With the Raspberry Pi 3, wi-fi hardware is included. With the Raspberry Pi 2, you’ll need to add an inexpensive wifi dongle. The next step is connecting to your WiFi router. Simply open /etc/wpa_supplicant/wpa_supplicant.conf with your favorite editor and insert the following code using the actual SSID name and password to access your local, password-protected WiFi router or any open WiFi network:
network={
 ssid="YourSSID"
 psk="YourSSIDpassword"
 key_mgmt=WPA-PSK
 scan_ssid=1
 priority=5
}

network={
 key_mgmt=NONE
 priority=1
}
Finally, stop and restart the wlan0 interface, count to 15, and check the status of your server to decipher the new IP address for your WiFi connection:
ifdown wlan0
ifup wlan0
pbxstatus
If you want to run your Raspberry Pi exclusively off the WiFi connection, simply unplug the network cable from your RasPi and reboot your server.
UPDATE: There still is a quirk with the wireless LAN driver on the Raspberry Pi 3. The problem has to do with the default power management of the wlan0 interface which results in it being powered off after very brief periods of inactivity. Special thanks to Matt Gemmell for this fix. Just cut-and-paste the lines below into a terminal window, and you’ll be good to go.
WARNING: Run pbxstatus first. If the top line shows Raspberry Pi 3, the following WiFi patch is already installed.
echo "options 8192cu rtw_power_mgnt=0 rtw_enusbss=0 rtw_ips_mode=1" > /etc/modprobe.d/8192cu.conf
sed -i '/exit 0/d' /etc/rc.local
echo "sleep 10" >> /etc/rc.local
echo "iwconfig wlan0 power off" >> /etc/rc.local
echo "exit 0" >> /etc/rc.local
echo "[Unit]" > /etc/systemd/system/root-resume.service
echo "Description=Turn off wlan power management" >> /etc/systemd/system/root-resume.service
echo "After=suspend.target" >> /etc/systemd/system/root-resume.service
echo "" >> /etc/systemd/system/root-resume.service
echo "[Service]" >> /etc/systemd/system/root-resume.service
echo "Type=simple" >> /etc/systemd/system/root-resume.service
echo "ExecStartPre= /bin/sleep 10" >> /etc/systemd/system/root-resume.service
echo "ExecStart= /sbin/iwconfig wlan0 power off" >> /etc/systemd/system/root-resume.service
echo "" >> /etc/systemd/system/root-resume.service
echo "[Install]" >> /etc/systemd/system/root-resume.service
echo "WantedBy=suspend.target" >> /etc/systemd/system/root-resume.service
systemctl enable root-resume
reboot
After rebooting, if you issue the iwconfig wlan0 command, it should show: Power Management:off.
Update: Lessons Learned for Raspberry Pi 3 Road Warriors
As with all new devices, you learn some things as you go along. So we’re providing an update to our original article to offer a couple of additional tips and tricks for those that want to travel with a RasPi…
Alternative Power Sources. If you’re like us, you have a number of devices around the house or office that all require 5V power adapters of various amperages. The Raspberry Pi has traditionally been one of the most temperamental when it came to power adapters and, with the Raspberry Pi 3, the developers specifically mention a 2.5 amp minimum. If you travel and want to take devices such as the Raspberry Pi with you, the last thing you want to do is approach airport security with a bunch of wires hanging out of your carry-on bag. Well, there’s good news. The Anker device shown in the Amazon ad in the right column of Nerd Vittles can supply power to 6 devices including a Raspberry Pi 3. And we’ve given the RasPi a healthy workout with no adverse effects.
Deciphering the RasPi IP Address. As we mentioned, we travel a lot so obtaining a DHCP address for your RasPi in WiFi mode is not always the easiest thing to accomplish. If your smartphone supports tethering, that’s the easiest way to get connectivity on the road. A better way is to stick a WiFi HotSpot in your luggage and it, too, can be powered using the Anker device. See our recent article for WiFi HotSpot choices. Regardless of which option you choose, it will require some planning to use your RasPi sans monitor and keyboard. First, you need to preconfigure /etc/wpa_supplicant/wpa_supplicant.conf with the SSID of the device you’ll be using to hand out DHCP addresses. You’ll note from the discussion above that each entry in this file has a priority with higher numbers having higher priority. The way we typically do this is to assign our home network as the highest priority. Below that, we set up credentials for our MiFi Hotspot, then our smartphones, and finally open networks. So it looks like this:
- Home Network – 6
- MiFi HotSpot – 5
- Android phone – 4
- iPhone (AT&T) – 3
- Open Network – 1
Keep in mind that the Incredible PBX firewall probably will block you from accessing the RasPi from a computer on the public network. So you also must connect your computer to the same private WiFi network because private LAN addresses are whitelisted in the firewall by default.
Once you have connectivity for your RasPi and your laptop, the other wrinkle is figuring out the IP address of the Raspberry Pi. Our recommended approach goes like this. First, configure SendMail on the RasPi to use a Gmail account that you own as an SMTP smarthost to send emails. That should work almost anywhere you go. Second, modify /etc/rc.local to automatically send you an email with the IP address and SSID of your wireless network whenever the RasPi boots. Again, this takes some advance planning because you need to set all of this up and test it before you go on the road.
Here are the steps to modify SendMail to use an existing Gmail account as a SmartHost. Log into your RasPi as root and issue the following commands:
cd /etc/mail
hostname -f > genericsdomain
touch genericstable
makemap -r hash genericstable.db < genericstable
mv sendmail.mc sendmail.mc.original
wget http://nerdvittles.dreamhosters.com/pbxinaflash/source/sendmail/sendmail.mc.gmail
cp sendmail.mc.gmail sendmail.mc
mkdir -p auth
chmod 700 auth
cd auth
echo AuthInfo:smtp.gmail.com \"U:smmsp\" \"I:user_id\" \"P:password\" \"M:PLAIN\" > client-info
echo AuthInfo:smtp.gmail.com:587 \"U:smmsp\" \"I:user_id\" \"P:password\" \"M:PLAIN\" >> client-info
echo AuthInfo:smtp.gmail.com:465 \"U:smmsp\" \"I:user_id\" \"P:password\" \"M:PLAIN\" >> client-info
nano -w client-info
When the nano editor opens the client-info file, change the 3 user_id entries to your Gmail account name without @gmail.com and change the 3 password entries to your actual Gmail password. Save the file: Ctrl-X, Y, then ENTER.
Now issue the following commands. In the last step, press ENTER to accept all of the default prompts:
chmod 600 client-info
makemap -r hash client-info.db < client-info
cd ..
make
sed -i 's|sendmail-cf|sendmail\/cf' /etc/mail/sendmail.mc
sed -i 's|sendmail-cf|sendmail\/cf|' /etc/mail/sendmail.mc
sed -i 's|sendmail-cf|sendmail\/cf|' /etc/mail/Makefile
sed -i 's|sendmail-cf|sendmail\/cf|' /etc/mail/sendmail.cf
sed -i 's|sendmail-cf|sendmail\/cf|' /etc/mail/databases
sed -i 's|sendmail-cf|sendmail\/cf|' /etc/mail/sendmail.mc.gmail
sed -i 's|sendmail-cf|sendmail\/cf|' /etc/mail/sendmail.cf.errors
sendmailconfig
Next, edit /etc/hosts and /etc/hostname. Change the raspberypi3 entries to: raspberrypi3.incrediblepbx.com.
Finally, stop and restart SendMail and then send yourself a test message. Be sure to check your spam folder!
/etc/init.d/sendmail stop
/etc/init.d/sendmail start
apt-get install mailutils -y
echo "test" | mail -s testmessage yourname@yourdomain.com
The last step is to add these commands to /etc/rc.local to send you an email with your IP address and SSID whenever the RasPi is rebooted. Insert the following commands just above the exit 0 line at the end of the file. Use an email address to which you have access on the road!
ESSID=`iwconfig | grep ESSID | tail -1 | cut -f 9 -d " "`
echo "IP address: $(hostname -I) on $ESSID" | mail -s "RaspberryPi3 IP Address" yourname@yourdomain.com
Enabling Bluetooth on the Raspberry Pi
Implementing Bluetooth Proximity Detection with Smartphone and your #RaspberryPi3 https://t.co/TYFrcqcLux #asterisk pic.twitter.com/QqGNjqG3Ag
— Ward Mundy (@NerdUno) March 4, 2016
Incredible Fax Returns for the Raspberry Pi
PIONEERS: Free Faxing Returns for #RaspberryPi3 and Raspbian Jessie https://t.co/As1dMYPNLF #asterisk #IncrediblePBX pic.twitter.com/qDrJcy9cgn
— Ward Mundy (@NerdUno) March 7, 2016
Mastering the Incredible PBX Feature Set
Now would be a good time to explore the Incredible PBX applications. Continue reading there. If you have questions, join the PBX in a Flash Forums and take advantage of our awesome collection of gurus. There's an expert available on virtually any topic, and the price is right. As with Incredible PBX, it's absolutely free. Enjoy!
Originally published: Monday, March 7, 2016 Updated: Saturday, March 26, 2016
 Support Issues. With any application as sophisticated as this one, you're bound to have questions. Blog comments are a difficult place to address support issues although we welcome general comments about our articles and software. If you have particular support issues, we encourage you to get actively involved in the PBX in a Flash Forum. It's the best Asterisk tech support site in the business, and it's all free! Please have a look and post your support questions there. Unlike some forums, the PIAF Forum is extremely friendly and is supported by literally hundreds of Asterisk gurus and thousands of users just like you. You won't have to wait long for an answer to your question.
Need help with Asterisk? Visit the PBX in a Flash Forum.
Special Thanks to Our Generous Sponsors
FULL DISCLOSURE: ClearlyIP, Skyetel, Vitelity, DigitalOcean, Vultr, VoIP.ms, 3CX, Sangoma, TelecomsXchange and VitalPBX have provided financial support to Nerd Vittles and our open source projects through advertising, referral revenue, and/or merchandise. As an Amazon Associate and Best Buy Affiliate, we also earn from qualifying purchases. We’ve chosen these providers not the other way around. Our decisions are based upon their corporate reputation and the quality of their offerings and pricing. Our recommendations regarding technology are reached without regard to financial compensation except in situations in which comparable products at comparable pricing are available from multiple sources. In this limited case, we support our sponsors because our sponsors support us.
BOGO Bonaza: Enjoy state-of-the-art VoIP service with a $10 credit and half-price SIP service on up to $500 of Skyetel trunking with free number porting when you fund your Skyetel account. No limits on number of simultaneous calls. Quadruple data center redundancy. $25 monthly minimum spend required. Tutorial and sign up details are here.
![]() The lynchpin of Incredible PBX 2020 and beyond is ClearlyIP components which bring management of FreePBX modules and SIP phone integration to a level never before available with any other Asterisk distribution. And now you can configure and reconfigure your new Incredible PBX phones from the convenience of the Incredible PBX GUI.
The lynchpin of Incredible PBX 2020 and beyond is ClearlyIP components which bring management of FreePBX modules and SIP phone integration to a level never before available with any other Asterisk distribution. And now you can configure and reconfigure your new Incredible PBX phones from the convenience of the Incredible PBX GUI.
VitalPBX is perhaps the fastest-growing PBX offering based upon Asterisk with an installed presence in more than 100 countries worldwide. VitalPBX has generously provided a customized White Label version of Incredible PBX tailored for use with all Incredible PBX and VitalPBX custom applications. Follow this link for a free test drive!
Special Thanks to Vitelity. Vitelity is now Voyant Communications and has halted new registrations for the time being. Our special thanks to Vitelity for their unwavering financial support over many years and to the many Nerd Vittles readers who continue to enjoy the benefits of their service offerings. We will keep everyone posted on further developments.
Some Recent Nerd Vittles Articles of Interest...
- Many of our purchase links refer users to Amazon when we find their prices are competitive for the recommended products. Nerd Vittles receives a small referral fee from Amazon to help cover the costs of our blog. We never recommend particular products solely to generate Amazon commissions. However, when pricing is comparable or availability is favorable, we support Amazon because Amazon supports us. [↩]
Four Months in Paradise: Free International VoIP Calling From Your Cellphone

Following our article documenting how to set up free cellphone service in the United States using the Sprint reseller, RingPlus, we received a number of questions seeking ways to add free or low cost international calling to the RingPlus offerings. Today we’ll provide a quick tutorial on how to turn any cellphone into a terrific platform to make free international calls, lots of them. As of this writing, for every 10 euros ($11.27) you deposit into your account, you’ll get 300 minutes a week of free calls to 44 countries for 120 days. You can also call anywhere else in the world at very reasonable per minute rates that compare favorably with other SIP providers around the world. In addition to the freebies, for the mathematically challenged, today we’ll also show you how to minimize international calling charges on any U.S. cellphone using Incredible PBX with DISA and your choice of SIP providers. Some provide all-you-can-eat international calling to certain countries for a monthly fee while others charge by the minute depending upon the destination. Do some Googling. The beauty of a PBX and SIP trunks is you can mix and match as many providers as you like to take advantage of favorable calling rates to multiple countries. We’re going to start with the almost-free option because we like to share great deals.
There are a few things you need to know about the so-called Betamax VoIP services up front. Most importantly, they change rates and free countries more frequently than college kids change partners. Betamax also has dozens of companies offering similar services with differing rates and freebies. You can keep track of the daily changes on this Facebook page. Here’s a 5-year old spreadsheet that will give you a good idea of what you’re up against. Don’t depend upon it for the current rates. You’ll need to visit the actual site(s) of your choice for their current rate tables or visit the site maintained by Betamax for a country-by-country comparison by provider. That’s another way of saying DON’T BLAME US IF YOUR 3-HOUR CALL TO ANTARCTICA CHANGED FROM 20¢ PER MINUTE TO $1 PER MINUTE OVERNIGHT. IT PROBABLY WON’T, BUT THEN AGAIN IT MIGHT. Before making a lengthy call to a remote destination, spend the two minutes it takes to look up the current rate and make a snapshot of the web page for your records. Here’s another tip. If you make frequent calls to Antarctica, spend a little time doing your homework. Review the latest Betamax spreadsheet to track down the cheapest rates. Then double-check the actual sites for the current rates. There’s a $150 difference in the cost of a 3-hour call at €.20/minute from one Betamax site versus the €.906/minute rate at another Betamax site. THIS CAN AND OFTEN DOES CHANGE! As it happens, two of the lowest cost providers still offer the calls at the same two-year-old €.20/minute rate.
Today we’ll be focusing on the company we’ve tracked for many years, FreeVoipDeal.com. Except for the domain name, the setup with other Betamax providers is similar but not identical. And, of course, you’ll have to kick in another deposit to make free calls from each site. The length of the Freebie period also may vary so read the terms carefully. FreeVoipDeal actually hasn’t changed much since our last visit about two years ago. In fact, we still had most of our ten euro credit so we could play all we wanted even though the calls were no longer free since our four month window had long since expired.
Here’s the April 19, 2017 Freebie list by country compared to several years ago. Don’t depend upon it! Check their actual web site or the Betamax country summary for current freebies and current rates. Here’s another neat little trick to remember. When you visit the FreeVoipDeal Rate Table, just click on the Out of Minutes tab for a quick listing of all the Free Calling Countries as well as the rates once you use up your four months of free calls. With few exceptions, most of the "free countries" still had a rate of 1.1¢ per minute even after you ran out of minutes. Not bad!

Here’s How the Free International Calling Procedure Works
There are really two ways to make international calls from your smartphone. You can either load an app to make the calls if your cellphone supports it. Or you can dial a secondary number using the traditional dialer on your cellphone, enter an access code, and then dial the international number. We’re going to begin with the latter option because it works with any cellphone and it’s safer in numerous ways. At the end of the article, we’ll also show you how to load an app and make the calls that way if you like living dangerously.
So let’s start with the basics. The way this will work when we’re finished today is you’ll pick up your cellphone and dial a phone number assigned to your own Incredible PBX. The call will be answered and a sweet lady named Allison will ask you for a password. Once you enter it correctly, you’ll get a secondary dial tone. You then can dial any international number that you have preauthorized on your PBX, and the call will be routed out through your FreeVoipDeal trunk to its destination. When the person answers, you will have made your first free international call using your cellphone.
The key components include the Incredible PBX platform with the DISA application to provide secondary dialtone for processing international calls. A phone number and trunk will receive incoming calls bound for DISA from your cellphone. An inbound route will only forward incoming calls to DISA that match your cellphone number. A secondary trunk from FreeVoipDeal or other providers will be used to process outgoing international calls that are dialed using DISA. We’ll create an outbound route or rule for every country to which you want to authorize international calling. Each of these outbound routes will point to the least expensive (or free) trunk to complete the call. In the VoIP world, you actually could have dozens of outbound trunks that handle international calls based upon the country codes of each international call. This lets you take advantage of the best calling rates for each country. We will block international calls to country codes you have not specifically authorized.
Just to restate the obvious, a misconfigured DISA application that allows the world to make international calls on your nickel can get expensive quickly. We’ll protect today’s setup with two layers of protection. First, we’ll require that the CallerID of the incoming call match your cellphone number. While this isn’t failsafe since CallerID numbers can be spoofed, it does reduce the risk considerably because the bad guys will have to know BOTH your cellphone number and the incoming phone number managing DISA on your PBX. Without those two phone numbers, nobody gets to the DISA application at all. Second, for incoming Incredible PBX calls from a number matching your cellphone number, the caller will be prompted for a six-digit password, and you can make it longer if you will sleep better. Just remember, compromising DISA on your PBX is just as risky as handing out your credit card to a stranger so follow the setup steps carefully. And then TEST, TEST, TEST to make sure strangers can’t access your DISA setup. We’ll show you how.
Eight Is Enough: Choosing an Incredible PBX Platform for International Calling
Before any of this will work, you’ll obviously need an Incredible PBX. The software is free. The cost of the hardware depends upon the Incredible PBX platform you choose. This could be a PBX hosted in the Cloud, or it could be a PBX running as a virtual machine on your desktop computer or VMware corporate server, or it could be a PBX running on dedicated hardware in your home or office. Here are some choices with approximate prices and links to the tutorials to set them up. After downloading the Incredible PBX software from SourceForge, the setup process only takes 30 minutes or less.
- Incredible PBX in the Cloud at CloudAtCost ($10.50 one-time fee)
- Incredible PBX in the Digital Ocean Cloud ($5 a month after 2 free months)
- Incredible PBX in the RentPBX Cloud ($15 a month with Coupon Code: NOGOTCHAS)
- Incredible PBX running under VirtualBox on your Desktop PC (free)
- Incredible PBX running on your company’s VMware server (free)
- Incredible PBX running on standalone Raspberry Pi 3 ($35++)
- Incredible PBX running on standalone Intel NUC ($200)
- Incredible PBX running on your favorite old clunker (free)
Configuring Incredible PBX for International Calling with DISA
Here’s an overview of the setup drill for today once you have Incredible PBX running. We’ll walk through each of the six steps below. Don’t get frustrated. There are a lot of steps, but none of them are difficult. Just don’t skip any.
- Set Up Your Trunk to Process Incoming DISA Calls
- Set Up Your Trunk(s) to Process Outgoing International Calls
- Configure DISA with a Very Secure Password
- Configure an Inbound Route to Limit Incoming DISA Calls to Your Cellphone #
- Configure an Outbound Route for Each International Country Code
- Test, Test, Test
1. Setting Up a Trunk to Process Incoming DISA Calls
Before you can make calls to your PBX, it’ll need a phone number (known affectionately as a DID). As installed, Incredible PBX includes preconfigured SIP trunks from about a dozen SIP providers. All you’ll need is credentials from the company you wish to use. Most providers of DID trunks offer a monthly flat rate for unlimited incoming calls. There’s a great deal from our Platinum Sponsor, Vitelity, at the end of this article. And their international calling rates are extremely competitive.
In addition to SIP trunks, Incredible PBX is preconfigured to support Google Voice trunks for those living in the United States. These trunks are free and provide unlimited incoming and outgoing calls throughout the U.S. and Canada. Because this option is free, you’d be crazy not to use it for today’s application if it’s available where you live. The setup procedure is covered in detail in all of the Incredible PBX installation tutorials referenced above. So start there.
2. Setting Up a Trunk to Process Outgoing International Calls
We’re going to walk you through setting up a trunk with FreeVoipDeal to handle free international calls to certain countries documented above. This may not be the best fit for you depending upon the international destinations you wish to call. Figure that out first! Then adjust the trunk settings below to match each SIP provider trunk you wish to create. There’s no limit to the number you can have. And, with most of these providers, you pay by the minute for international calls anyway so there is no harm in configuring multiple trunks to take advantage of the best rates calling the countries of your choice. The same applies to all-you-can-eat and "free" trunks except there are varying fees for using the services so you’re probably not going to want a dozen of them even if some of the calls are free after making a periodic deposit. One other word of warning. Some Betamax sites such as powervoip.com have good calling rates, but they tack on a 3.9¢ connection fee to every call. If you make lengthy calls, it’s not a big deal. If you make numerous short calls, it drives your discount calling rates through the roof. So start with the pink and green entries on the old spreadsheet we referenced for the cheapest historical rates and then visit the actual sites and read the fine print. One of our favorite Betamax sites for many tourist destinations is HotVoIP.com.

To add new trunks to Incredible PBX, use a browser to access the IP address of your server. Choose Incredible GUI Administration from the Admin menu of the Kennonsoft GUI (shown above) by clicking on User to switch. The default username is admin and the password is what you set when the install completed. Once the Incredible PBX GUI appears, click the Connectivity tab and choose Trunks -> Add SIP (chan_sip) Trunk.
For Trunk Name, enter FreeVoipDeal. In the Dialed Number Manipulation Rules section, add a rule for each country code you wish to activate. You can decipher the Country Code for any country at this link. For example, for the United Kingdom, you’d enter a rule like this where 44 is the Country Code and each X represents a required digit in the local area code and phone number. The trailing period means the number includes one or more additional digits. NOTE: DISA calls will not have to be prefixed with 011 to place international calls. Just enter the country code and number to be called. And, I am told that only 441, 442, and perhaps 443 calls to the U.K. are free since those are the designated landline prefixes.
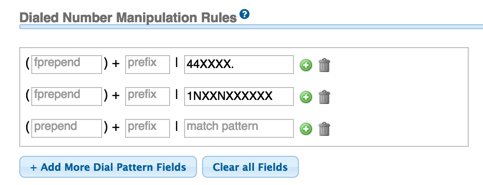
If there are other countries, you wish to support with this trunk provider, you’d click Add More Dial Pattern Fields and insert an additional rule for each country following the example above. If you’ll be using this trunk to make calls in the U.S. and Canada as well, the correct Match Pattern is 1NXXNXXXXXX, and calls will need to be dialed with the 1 to avoid conflicts with international dialing. And, by the way, calls to Alaska and Hawaii are also free!
Next, we need to enter the Outgoing Settings. For the Trunk Name, enter freevoipdeal. Clear out the entries in Peer Details section and enter the following using your actual FreeVoipDeal credentials for yourusername and yourpassword:
authuser=yourusername
username=yourusername
secret=yourpassword
type=peer
qualify=yes
nat=yes
insecure=port,invite
host=sip.freevoipdeal.com
fromdomain=sip.freevoipdeal.com
dtmfmode=auto
disallow=all
canreinvite=no
allow=alaw&ulaw
Finally, clear out the default entries in User Details and click the Submit Changes button and then red Apply Config button to save your new trunk.
Spoofing Your CallerID. When setting up your FreeVoipDeal account, you can set up one or more numbers to use as your CallerID number on FreeVoipDeal calls. You simply verify the number with a code sent by SMS or phone call from their service. Once you’ve gone through the verification procedure, you can spoof the outbound CallerID on FreeVoipDeal calls using your actual cellphone number. Just add the following entries to your Trunk settings replacing 9991234567 with your cellphone number. Special thanks to @hillclimber on the PIAF Forum for the tip.
fromuser=0019991234567
sendrpid=yes
3. Configuring DISA to Support International Calling
In the Incredible PBX GUI, we’ll set up DISA by clicking the Applications tab and choosing DISA. Add your new DISA configuration by following this sample. Use a VERY secure password. It’s your phone bill. Once you’ve finished, click the Submit Changes button and then red Apply Config button to save your new DISA setup.
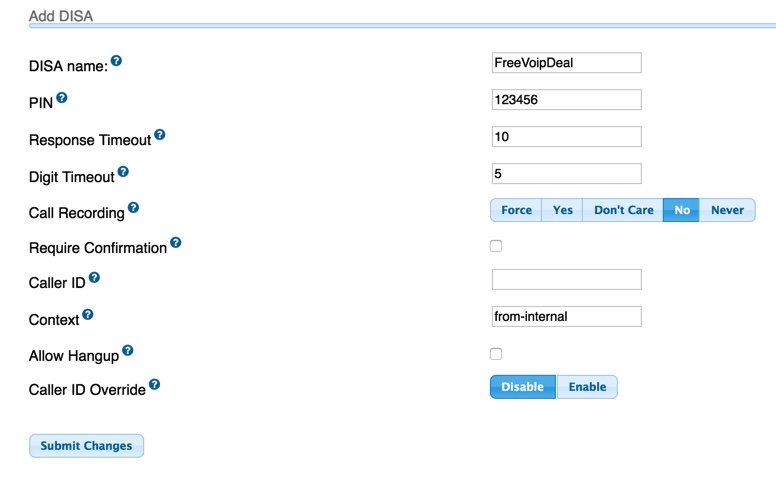
4. Configuring an Inbound Route for Your Incoming DISA Calls
Here’s where we lock down your setup so that Incredible PBX only accepts DISA calls from your cellphone number. If you want to allow additional people to use your DISA setup or if you have multiple cellphones, then simply create multiple inbound routes with the 10-digit numbers of each phone to be supported.
In the Incredible PBX GUI, we’ll set up a new Inbound Route by clicking the Connectivity tab and choosing Inbound Routes. If you plan to support multiple phones, then create multiple inbound routes and give each of them a unique Description and CallerID Number that matches the phone number of the cellphone to be supported. Be sure to check the CID Priority Route checkbox and set the correct Destination for your incoming calls. Just fill in the blanks appropriately using this template as a guide. Once you’ve finished, click the Submit button and then red Apply Config button to save your new Inbound Route.
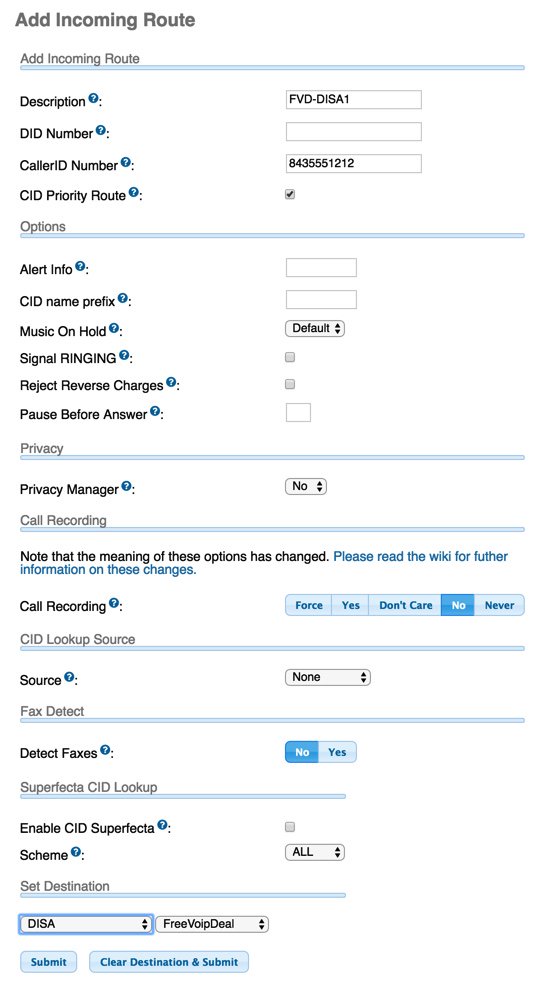
5. Configuring an Outbound Route for Each International Country Code
The DISA application is going to obtain the phone number to be dialed and will pass that to the Outbound Routes module. The job of the Outbound Routes module is to examine the phone number passed to it from DISA to figure out which trunk to use to make the outbound call. It then will pass the call to the appropriate trunk which sends the outgoing call on its way to the destination.
For each Dialed Number Manipulation Rule in every Trunk that you set up in Step #2 above, you’ll need a matching Outbound Route if your PBX is used to place calls using multiple trunks. If you’re only using one provider for all of your outbound calls, then we can use a more generic Outbound Route. It’s always a good idea to create the one-to-one match between Outbound Routes and Trunks to make certain that outbound calls are sent to the correct Trunk for processing. So let’s do that using the U.K. trunk we created above.
In the Incredible PBX GUI, we’ll set up a new Outbound Route by clicking the Connectivity tab and choosing Outbound Routes. When the template appears, notice in the far right column that there’s a listing of all your existing Outbound Routes. Calls are actually processed sequentially using the order that these Outbound Routes appear in the list. If there’s no number match in the top route or if the call via the top route fails, processing drops to the next route in the list until there is a match AND a successful connection. You can adjust the sequence by dragging the Outbound Routes to a different position in the priority list.
It’s important to use specificity in your Outbound Routes (especially with International calling) to make certain that a call isn’t inadvertently processed by a secondary trunk. For example, if you have a Google Voice trunk in addition to a FreeVoipDeal trunk, we want to make certain that calls to England are processed by the FreeVoipDeal trunk and that 10-digit numbers starting with area code 440 (Cleveland) are routed out through Google Voice. The easiest way to do this is to require the Outbound Route Match Pattern for U.K. calls to be at least 11 digits, e.g. 44XXXXXXXX. (the trailing period is important in that it requires at least one more digit for a match). And we can force a Hangup if the FreeVoipDeal trunk is not available for some reason by adjusting the Destination on Congestion setting. This keeps the call routing from dropping down to the next available Outbound Route in the list if FreeVoipDeal happens to be off-line at some point. So our Outbound Route for U.K. calls should look something like this:
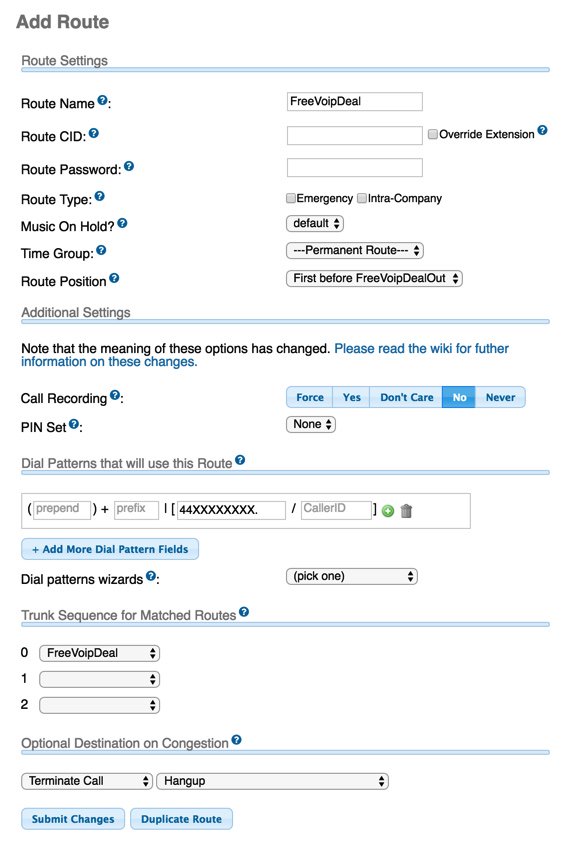
The final step is to move the new Outbound Route for U.K. calls to the top of the Outbound Routes listing in the right column to assure that it is processed first. Once you’ve done that, click the Submit Changes button and then red Apply Config button to save your new Outbound Route AND the adjusted Outbound Route Priority List.
Another alternative in creating Outbound Routes is to use a Dial Prefix that never matches a real phone number to direct calls to a particular trunk. For example, you might use 08 as a dial prefix for FreeVoipDeal calls. By placing 08 in the Prefix column of the Dial Pattern, it will get stripped off before the number is actually passed to the FreeVoipDeal trunk for processing. We actually prefer this setup because it adds an additional layer of security for international calls. If someone were to break into your DISA application by knowing your cellphone number AND your DID AND your DISA password, it’s unlikely they’d also know to prefix outgoing international calls with some arbitrary dial prefix. Just don’t use 08 in case they’re a Nerd Vittles reader. 😉
6. Test, Test, Test!
The easiest way to test the new setup is to place a couple of calls and to watch the Asterisk CLI (asterisk -rvvvvvvvvvv) and see how the calls are processed and who answers at the other end. Then you can apologize for reaching the wrong number.
You can make up your own test methodology, but here’s one that works for us. There are several tests you need to make. First, call your Incredible PBX DID from your authorized cellphone and enter a correct DISA password to see if you get dial tone to make an international call. Then repeat the drill with an invalid password and make sure you don’t get a dial tone. Next, call your Incredible PBX DID from a phone other than your authorized cellphone. You should not get a prompt for a DISA password. Finally, we use the first three digits of a U.K. number to identify a matching NANPA area code. Then, we find hotels in the two matching cities. For example, one might attempt to call a hotel in Bath, England (44 1… ……) and a hotel in Bermuda (441-…-….). The U.K. call should go through, and the Bermuda call should fail. If you pass all three tests with flying colors, you’re good to go.
Using FreeVoipDeal’s MobileVoIP App Instead of Incredible PBX with DISA
FreeVoIPDeal also offers a MobileVoIP app that can be used directly on your smartphone (Android, iOS, and Windows phone versions available) using any Wi-Fi, UMTS, 4G/LTE, 3G, GPRS or EDGE connection. The drawback is the lack of the three extra layers of security protection that Incredible PBX using DISA offers. MobileVOIP lets you log in with your registered Betamax credentials and offers the option to use your existing VoIP credit from your smartphone. The downside is that anyone with the app and your credentials can call anywhere and talk for as long as they like on your nickel using any of your registered CallerIDs. You’ve been warned. For more information or to download the app for your mobile device, go here. Remember to dial the "+1″ country code prefix for U.S./Canada calls. Enjoy!
Originally published: Monday, March 21, 2016
Support Issues. With any application as sophisticated as this one, you’re bound to have questions. Blog comments are a terrible place to handle support issues although we welcome general comments about our articles and software. If you have particular support issues, we encourage you to get actively involved in the PBX in a Flash Forums. It’s the best Asterisk tech support site in the business, and it’s all free! Please have a look and post your support questions there. Unlike some forums, ours is extremely friendly and is supported by literally hundreds of Asterisk gurus and thousands of users just like you. You won’t have to wait long for an answer to your question.
Need help with Asterisk? Visit the PBX in a Flash Forum.
Special Thanks to Our Generous Sponsors
FULL DISCLOSURE: ClearlyIP, Skyetel, Vitelity, DigitalOcean, Vultr, VoIP.ms, 3CX, Sangoma, TelecomsXchange and VitalPBX have provided financial support to Nerd Vittles and our open source projects through advertising, referral revenue, and/or merchandise. As an Amazon Associate and Best Buy Affiliate, we also earn from qualifying purchases. We’ve chosen these providers not the other way around. Our decisions are based upon their corporate reputation and the quality of their offerings and pricing. Our recommendations regarding technology are reached without regard to financial compensation except in situations in which comparable products at comparable pricing are available from multiple sources. In this limited case, we support our sponsors because our sponsors support us.
BOGO Bonaza: Enjoy state-of-the-art VoIP service with a $10 credit and half-price SIP service on up to $500 of Skyetel trunking with free number porting when you fund your Skyetel account. No limits on number of simultaneous calls. Quadruple data center redundancy. $25 monthly minimum spend required. Tutorial and sign up details are here.
![]() The lynchpin of Incredible PBX 2020 and beyond is ClearlyIP components which bring management of FreePBX modules and SIP phone integration to a level never before available with any other Asterisk distribution. And now you can configure and reconfigure your new Incredible PBX phones from the convenience of the Incredible PBX GUI.
The lynchpin of Incredible PBX 2020 and beyond is ClearlyIP components which bring management of FreePBX modules and SIP phone integration to a level never before available with any other Asterisk distribution. And now you can configure and reconfigure your new Incredible PBX phones from the convenience of the Incredible PBX GUI.
VitalPBX is perhaps the fastest-growing PBX offering based upon Asterisk with an installed presence in more than 100 countries worldwide. VitalPBX has generously provided a customized White Label version of Incredible PBX tailored for use with all Incredible PBX and VitalPBX custom applications. Follow this link for a free test drive!
Special Thanks to Vitelity. Vitelity is now Voyant Communications and has halted new registrations for the time being. Our special thanks to Vitelity for their unwavering financial support over many years and to the many Nerd Vittles readers who continue to enjoy the benefits of their service offerings. We will keep everyone posted on further developments.
Some Recent Nerd Vittles Articles of Interest…
The Best of Both Worlds: Taking Incredible PBX from the Cloud to the Ocean
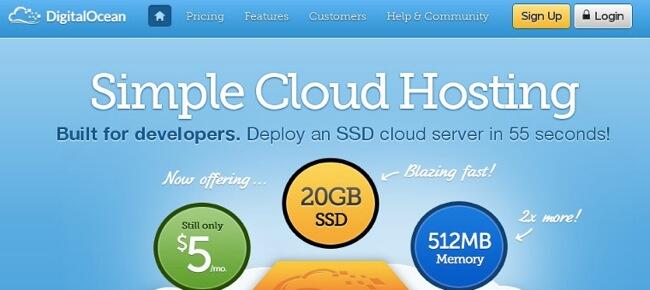
We’ve spent a good bit of time documenting a dirt cheap way to learn about VoIP in the Cloud with our Incredible PBX offering using a $10.50 virtual machine at CloudAtCost. Is it production ready? Probably not. But we’re reminded of the old saying that pizza is a lot like sex: "When it’s good, it’s really good. And, when it’s bad, it’s still pretty good." That pretty much sums up CloudAtCost. And it’s not like a one-time investment for the cost of a pizza lunch is going to break the bank.
Today we turn our attention to a more reliable, long term Cloud solution with a fresh look at Incredible PBX with Digital Ocean. This setup runs about $5 a month after a free $10 trial using our referral link. If you continue to use the service, it also generates a little revenue for Nerd Vittles to keep the lights on.
It’s been about two years since we first introduced the Digital Ocean platform. Back then, it was the experimental platform. But a lot has changed, and it’s all for the better. First, you get a Cloud Server on which you can create virtually any Linux platform you like including CentOS, Fedora, Debian, Ubuntu, and more. Second, you get your choice of seven datacenters all around the world: New York, San Francisco, Toronto, London, Frankfurt, Amsterdam, and Singapore. Third, you get enormous scalability. You can start with the $5/month flavor with 512MB of RAM and a single CPU, 20GB of SSD storage, and 1TB of bandwidth. As your requirements grow and with a couple clicks, you can scale up through 8 multiples of capacity to a whopping 64GB of RAM with 20 CPUs, 640GB of storage, and 9TB of bandwidth for less than a dollar an hour. Just make a Snapshot of any off-line Droplet, and then use that Snapshot as the image for your new server in lieu of a Linux Distribution.

For our purposes today and for home and SOHO business users, the $5/month Digital Ocean platform is a perfect fit for both the CentOS 6.7 and Ubuntu 14.04 flavors of Incredible PBX. Once you’ve created your Digital Ocean Droplet with your choice of operating system, the Incredible PBX install procedure takes about 25 minutes. This includes the time necessary to compile and install the latest release of Asterisk® 13 from source code. When you’re finished, you’ll have a rock-solid PBX that is fully secured using the Linux firewall. For out-of-the-gate security, no other PBX comes close… at any price. Incredible PBX is and always will be pure open source GPL code and, of course, it’s FREE!
Creating Your First Digital Ocean Droplet
CentOS 6.7 remains our Gold Standard of Linux operating systems. We’ll start there and walk you through the Incredible PBX install procedure. Begin by signing up for a Digital Ocean account and creating a 512MB $5 droplet in your choice of data centers. Choose the CentOS 6.7 x32 platform just to keep things simple, and pick a hostname such as centos.incrediblepbx.com. It doesn’t matter if it is not resolvable, but it does need to be in FQDN format.
By the way, you only pay for the time your droplet actually exists so build several and play for a couple hours. Your total cost will be about 5¢. And, as we noted, your first $10 of server charges are actually free. So you have nothing to lose by experimenting. If you make a mistake, delete your droplet and start over. No big deal. Once your droplet has been created, Digital Ocean will send you an email with your root user credentials and the IP address of your new server. Login with SSH or Putty, and you’ll be prompted to immediately change your root password. Make it secure… as if your bank account depended upon it. 😉
Installing Incredible PBX 13 for CentOS 6.7
Now we’re ready to begin the Incredible PBX install. It’s a two-step procedure. First, we’ll get CentOS up to date and reboot. Then we’ll kick off the actual install. Just cut-and-paste the following commands while logged into your droplet as root:
setenforce 0
yum -y upgrade --skip-broken
yum -y install net-tools nano wget tar
reboot
Once your server reboots, login again as root and cut-and-paste the following commands. Take a 30-minute break while the installer does its thing. If you’re one that likes to watch, don’t worry if you see some error messages. They all get sorted out before the installation finishes.
cd /root
wget http://incrediblepbx.com/incrediblepbx13-12.2-centos.tar.gz
tar zxvf incrediblepbx*
./create-swapfile-DO
./IncrediblePBX*
reboot
Let’s login to your server one more time to get the latest Incredible PBX updates and set up your passwords and time zone. Then you’ll be ready to handle future server admin using your browser:
Make your root password very secure: passwd
Create admin password for GUI access: /root/admin-pw-change
Create admin password for web apps: htpasswd /etc/pbx/wwwpasswd admin
Set your correct time zone: /root/timezone-setup
Make a copy of your Knock codes: cat /root/knock.FAQ
Review current info about your server: status OR pbxstatus (depends on release)
If you want to add fax support to your PBX, we’ve got one more installer to run, and you’ll be all set. Just run the following command and press the ENTER key each time you are prompted for input (about 21 times):
cd /root
./incrediblefax11.sh
Success!
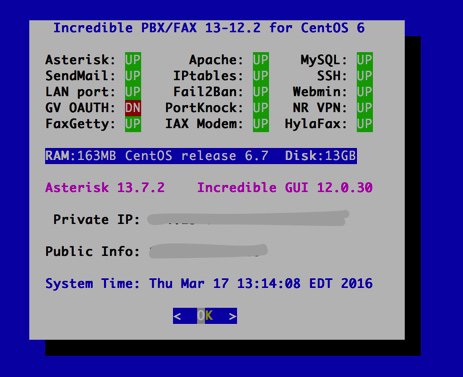
It’s a GUI, GUI World Out There
Most management of Incredible PBX will be handled using your favorite browser and one of two GUIs: the Kennonsoft menu which appears when you access the IP address of your server using a browser AND the Incredible GUI which is available on the Admin page of the Kennonsoft menu.
Choose Incredible GUI Administration from the Admin menu of the Kennonsoft GUI (shown above) by clicking on User to switch. The default username is admin and the password is what you set in the preceding step. Now edit extension 701 so you can decipher or change the randomized passwords that was assigned to the 701 extension and its voicemail account: Applications -> Extensions -> 701.
Setting Up a Soft Phone to Use with Incredible PBX
Now you’re ready to set up a telephone so that you can play with Incredible PBX. We recommend YateClient which is free. Download it from here. Run YateClient once you’ve installed it and enter the credentials for the 701 extension on Incredible PBX. You’ll need the IP address of your server plus your extension
701 password. Choose Settings -> Accounts and click the New button. Fill in the blanks using the IP address of your server, 701 for your account name, and whatever password you created for the extension. Click OK.
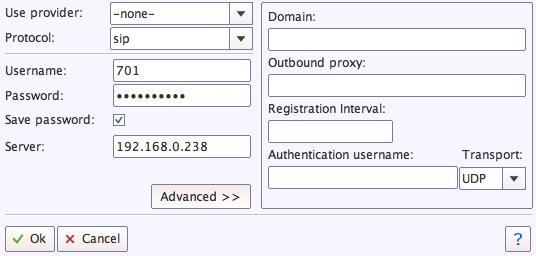
Once you are registered to extension 701, close the Account window. Then click on YATE’s Telephony Tab and place some test calls to the numerous apps that are preconfigured on Incredible PBX. Dial a few of these to get started:
DEMO - Allison's IVR Demo

947 - Weather by ZIP Code

951 - Yahoo News

*61 - Time of Day

*68 - Wakeup Call

TODAY - Today in History
Now you’re ready to connect to the telephones in the rest of the world. If you live in the U.S., the easiest way (at least for now) is to set up a free Google Voice account. Google has threatened to shut this down but as this is written, it still works. An update supporting Google Voice OAUTH 2 authentication is available here with a complete tutorial. Just start at step #1b. A better long-term solution is to choose several SIP providers and set up redundant trunks for your incoming and outbound calls. The PIAF Forum includes dozens of recommendations to get you started. You’ll also find an incredible deal from our platinum sponsor, Vitelity, at the end of this article.
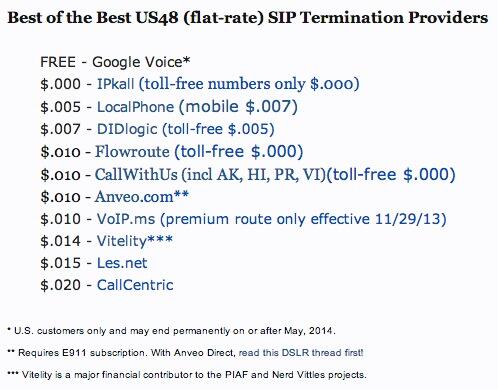
Configuring Google Voice
If you want to use Google Voice, you’ll need a dedicated Google Voice account to support Incredible PBX. If you want to use the inbound fax capabilities of Incredible Fax, then you’ll need an additional Google Voice line that can be routed to the FAX custom destination using the GUI. The more obscure the username (with some embedded numbers), the better off you will be. This will keep folks from bombarding you with unsolicited Gtalk chat messages, and who knows what nefarious scheme will be discovered using Google messaging six months from now. So keep this account a secret!
We’ve tested this extensively using an existing Gmail account, and inbound calling is just not reliable. The reason seems to be that Google always chooses Gmail chat as the inbound call destination if there are multiple registrations from the same IP address. So, be reasonable. Do it our way! Set up a dedicated Gmail and Google Voice account, and use it exclusively with Incredible PBX. It’s free at least through 2013. Google Voice no longer is by invitation only so, if you’re in the U.S. or have a friend that is, head over to the Google Voice site and register.
You must choose a telephone number (aka DID) for your new account, or Google Voice calling will not work… in either direction. Google used to permit outbound Gtalk calls using a fake CallerID, but that obviously led to abuse so it’s over! You also have to tie your Google Voice account to at least one working phone number as part of the initial setup process. Your cellphone number will work just fine. Don’t skip this step either. Just enter the provided 2-digit confirmation code when you tell Google to place the test call to the phone number you entered. Once the number is registered, you can disable it if you’d like in Settings, Voice Setting, Phones. But…
IMPORTANT: Be sure to enable the Google Chat option as one of your phone destinations in Settings, Voice Setting, Phones. That’s the destination we need for The Incredible PBX to work its magic! Otherwise, all inbound and outbound calls will fail. If you don’t see this option, you may need to call up Gmail and enable Google Chat there first. Then go back to the Google Voice Settings.
While you’re still in Google Voice Settings, click on the Calls tab. Make sure your settings match these:
- Call Screening – OFF
- Call Presentation – OFF
- Caller ID (In) – Display Caller’s Number
- Caller ID (Out) – Don’t Change Anything
- Do Not Disturb – OFF
- Call Options (Enable Recording) – OFF
- Global Spam Filtering – ON
Click Save Changes once you adjust your settings. Under the Voicemail tab, plug in your email address so you get notified of new voicemails. Down the road, receipt of a Google Voice voicemail will be a big hint that something has come unglued on your PBX.
One final word of caution is in order regardless of your choice of providers: Do NOT use special characters in any provider passwords, or nothing will work!
Now you’re ready to set up your Google Voice trunk in the GUI. After logging in with your browser, click the Connectivity tab and choose Google Voice/Motif. To Add a new Google Voice account, just fill out the form. Do NOT check the third box or incoming calls will never ring!
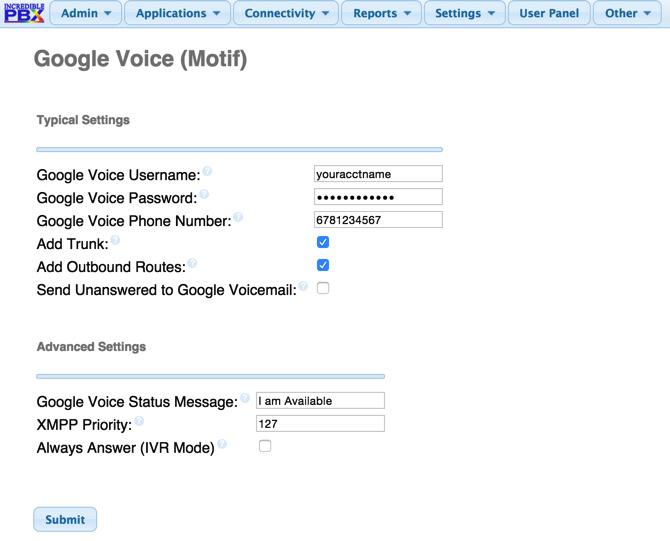
IMPORTANT LAST STEP: Google Voice will not work unless you restart Asterisk from the Linux command line at this juncture. Using SSH, log into your server as root and issue the following command: amportal restart.
If you have trouble getting Google Voice to work (especially if you have previously used your Google Voice account from a different IP address), try this Google Voice Reset Procedure. It usually fixes connectivity problems. If it still doesn’t work, enable Less Secure Apps using this Google tool.
Troubleshooting Audio and DTMF Problems
You can avoid one-way audio on calls and touchtones that don’t work with these simple settings in the GUI: Settings -> Asterisk SIP Settings. Just plug in your public IP address and your private IP subnet. Then set ULAW as the only Audio Codec.
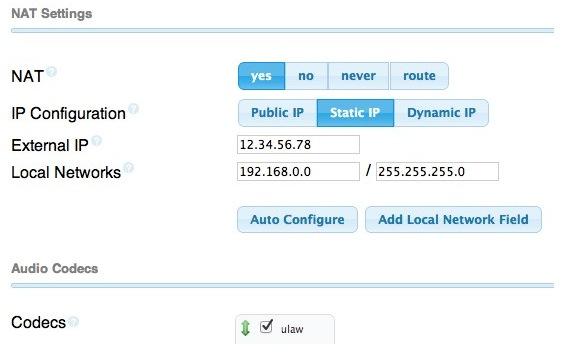
A Few Words about the Incredible PBX Security Model for CentOS
Incredible PBX for CentOS joins our previous Ubuntu build as our most secure turnkey PBX implementation. As configured, it is protected by both Fail2Ban and a hardened configuration of the IPtables Linux firewall. The latest release also includes Port Knocker for simple, secure access from any remote computer or smartphone. You can get up to speed on how the technology works by reading the Nerd Vittles tutorial. Your Port Knocker credentials are stored in /root/knock.FAQ together with activation instructions for your server and mobile devices. The NeoRouter VPN client also is included for rock-solid, secure connectivity to remote users. Read our previous tutorial for setup instructions. As configured, nobody can access your PBX without  your credentials AND
  an IP address that is either on your private network or that matches the IP address of your server or the PC from which you installed Incredible PBX. You can whitelist additional IP addresses by running the command-line utility /root/add-ip. You can remove whitelisted IP addresses by running /root/del-acct. Incredible PBX is preconfigured to let you connect to many of the leading SIP hosting providers without additional firewall tweaking. We always recommend you also add an extra layer of protection by running your server behind a hardware-based firewall with no Internet port exposure, but that’s your call. And it’s your phone bill. 😉
The IPtables firewall is a complex piece of software. If you need assistance with configuring it, visit the PIAF Forum for some friendly assistance.
Incredible Backup and Restore
We’re also pleased to offer our latest backup and restore utilities for Incredible PBX. Running /root/incrediblebackup will create a backup image of your server in /tmp. This backup image then can be copied to any other medium desired for storage. To restore it to another Incredible PBX server, simply copy the image to a server running Asterisk 13 and the same version of the Incredible PBX GUI. Then run /root/incrediblerestore. Doesn’t get much simpler than that.
Incredible PBX Automatic Update Utility
Every time you log into your server as root, Incredible PBX will ping the IncrediblePBX.com web site to determine whether one or more updates are available to bring your server up to current specs. We recommend you log in at least once a week just in case some new security vulnerability should come along.
In the meantime, we encourage you to sign up for an account on the PIAF Forum and join the discussion. In addition to providing first-class, free support, we think you’ll enjoy the camaraderie.
Originally published: Thursday, March 17, 2016
Support Issues. With any application as sophisticated as this one, you’re bound to have questions. Blog comments are a terrible place to handle support issues although we welcome general comments about our articles and software. If you have particular support issues, we encourage you to get actively involved in the PBX in a Flash Forums. It’s the best Asterisk tech support site in the business, and it’s all free! Please have a look and post your support questions there. Unlike some forums, ours is extremely friendly and is supported by literally hundreds of Asterisk gurus and thousands of users just like you. You won’t have to wait long for an answer to your question.

Need help with Asterisk? Visit the PBX in a Flash Forum.
Special Thanks to Our Generous Sponsors
FULL DISCLOSURE: ClearlyIP, Skyetel, Vitelity, DigitalOcean, Vultr, VoIP.ms, 3CX, Sangoma, TelecomsXchange and VitalPBX have provided financial support to Nerd Vittles and our open source projects through advertising, referral revenue, and/or merchandise. As an Amazon Associate and Best Buy Affiliate, we also earn from qualifying purchases. We’ve chosen these providers not the other way around. Our decisions are based upon their corporate reputation and the quality of their offerings and pricing. Our recommendations regarding technology are reached without regard to financial compensation except in situations in which comparable products at comparable pricing are available from multiple sources. In this limited case, we support our sponsors because our sponsors support us.
BOGO Bonaza: Enjoy state-of-the-art VoIP service with a $10 credit and half-price SIP service on up to $500 of Skyetel trunking with free number porting when you fund your Skyetel account. No limits on number of simultaneous calls. Quadruple data center redundancy. $25 monthly minimum spend required. Tutorial and sign up details are here.
![]() The lynchpin of Incredible PBX 2020 and beyond is ClearlyIP components which bring management of FreePBX modules and SIP phone integration to a level never before available with any other Asterisk distribution. And now you can configure and reconfigure your new Incredible PBX phones from the convenience of the Incredible PBX GUI.
The lynchpin of Incredible PBX 2020 and beyond is ClearlyIP components which bring management of FreePBX modules and SIP phone integration to a level never before available with any other Asterisk distribution. And now you can configure and reconfigure your new Incredible PBX phones from the convenience of the Incredible PBX GUI.
VitalPBX is perhaps the fastest-growing PBX offering based upon Asterisk with an installed presence in more than 100 countries worldwide. VitalPBX has generously provided a customized White Label version of Incredible PBX tailored for use with all Incredible PBX and VitalPBX custom applications. Follow this link for a free test drive!
Special Thanks to Vitelity. Vitelity is now Voyant Communications and has halted new registrations for the time being. Our special thanks to Vitelity for their unwavering financial support over many years and to the many Nerd Vittles readers who continue to enjoy the benefits of their service offerings. We will keep everyone posted on further developments.
Some Recent Nerd Vittles Articles of Interest…
2016, The Year of (real) VoIP Choice: Introducing Elastix 4.0 with Incredible PBX

DEC. 7 NEWS FLASH: The Elastix project has been sold to 3CX. Elastix 4.0 and Elastix MT have been removed from production "due to a legal disagreement with another open source distribution."
Our crystal ball suggests that 2016 is shaping up to be a fantastic year full of VoIP surprises and excitement. We’ll be there to cover every new development. When it comes to graphical user interfaces for Asterisk®, the days of the one trick pony are officially over. Free At Last! And leave it to Edgar Landivar and Team Elastix® to be first out of the gate with Elastix 4.0. What a terrific new product it is! The Elastix project began nearly a decade ago, and every release continues to demonstrate why Elastix remains at the top of the leader board when it comes to true open source unified communications solutions. Whether you’re building a commercial call center or seeking an open source telephony platform for your organization, Elastix competes favorably with the best commercial brands in the business. We’ll put a little icing on the cake today by offering an all-new Incredible PBX release for Elastix 4.0. It adds a preconfigured and locked down firewall plus dozens of applications for Asterisk including text-to-speech and voice recognition applications as well as new SIP gateways to RingPlus cellular service and Google Voice communications. So let’s begin and take Elastix 4.0 for a spin! Download the ISO here.
Celebrate with us!
Elastix, 10 years delivering Open Source Communications #opensource #voip #asterisk pic.twitter.com/r29QPL4eFu— Elastix (@elastix) March 23, 2016
A Word of Caution. If you’re new to Incredible PBX, install a clean version of Elastix 4.0 with NO MODIFICATIONS before you begin the Incredible PBX install. All of the existing Elastix 4.0 setup will be modified as part of the Incredible PBX install, and these changes will wipe out any additions you’ve previously made to Elastix. So don’t make any! Once the Incredible PBX install is completed, you can make all the changes you wish in your Elastix configuration. The only major design change we’ve made is to rework the Elastix MySQL database tables into MyISAM format from InnoDB. This facilitates making future backups and restores of your server as well as providing the necessary platform to install current and future Incredible PBX components.
Did We Mention Security? You also get a locked down, preconfigured IPtables Firewall WhiteList with all of the Travelin’ Man 3 tools plus the automatic update service to keep your server up to date and safe. There is a $20 voluntary annual license fee for the update service but, if you’d prefer to buy donuts, be our guest. But understand that voluntary is a two-way street. Running the update service costs us time and money and, when it ceases to be worthy of our time and financial investment, we reserve the right to discontinue the service down the road. The next time you log into your server after installing Incredible PBX, you’ll quickly appreciate why an automatic update service is important. We watch for and fix problems so you don’t have to.
Getting Started with Incredible PBX and Elastix 4.0
Here’s a quick overview of the installation and setup process for Incredible PBX for Elastix 4.0:
- Choose a Hardware Platform – Dedicated PC, Cloud Provider, or Virtual Machine
- Install Elastix 4.0 – 64-bit CentOS 7 platform
- Download and Install Incredible PBX for Elastix 4.0
- Set Up Passwords for Incredible PBX for Elastix 4.0
- Activate Trunks with Incredible PBX for Elastix 4.0
- Connect a Softphone to Incredible PBX for Elastix 4.0
- Configuring SMTP Mail with Incredible PBX for Elastix 4.0
1. Choose a Platform for Incredible PBX and Elastix 4.0
Incredible PBX for Elastix 4.0 works equally well on dedicated hardware, a cloud-based server, or a virtual machine. Just be sure you have a sufficiently robust Internet connection to support 100Kb of download and upload bandwidth for each simultaneous call you wish to handle with your new PBX.
For Dedicated Hardware, we recommend at least an Atom-based PC of recent vintage with at least a 30GB drive and 4GB of RAM. That will take care of an office with 10-20 extensions and a half dozen or more simultaneous calls if you have the Internet bandwidth to support it. Our favorite hardware platform remains the $200 Intel NUC, and you can read all about it here.
For Cloud-Based Servers, we recommend RentPBX, one of our financial supporters who also happens to size servers properly and restrict usage solely to VoIP. This avoids performance bottlenecks that cause problems with VoIP calls. Yes, we have a coupon code for you to get the $15/month rate: NOGOTCHAS. The new image to support Incredible PBX for Elastix 4.0 should be available shortly.
Or you can install Elastix 4.0 on top of an existing CentOS 7 platform by following this tutorial.
For Virtual Machine Installs, we recommend Oracle’s VirtualBox platform which runs atop almost any operating system including Windows, Macs, Linux, and Solaris. Here’s a link to our original VirtualBox tutorial to get you started. We suggest allocating 1GB of RAM and at least a 20GB disk image to your virtual machine for best performance. We actually used VirtualBox to build Incredible PBX for Elastix 4.0.
2. Install 64-bit Elastix 4.0 on Your Platform
Begin by downloading the 64-bit Elastix 4.0 ISO. For dedicated hardware, burn the ISO image to a DVD and boot your server with the Elastix 4.0 ISO to begin the install. You’ll be presented with the CentOS 7 Installation GUI:
Choose: Time Zone (click)
Choose: Keyboard (click)
Choose: Install Drive (double-click)
Choose: Root Password (Make it Secure!)
Wait for Install and Reboot to Complete
Set MySQL Password to: passw0rd (MANDATORY: with a zero!)
Set Elastix admin Password: minimum 10 alphanumeric characters with upper & lowercase
For VirtualBox, create an Elastix 4.0 virtual machine of Linux (RedHat 64-bit) type by clicking New. Click Settings button. In System, enable I/O APIC and disable Hardware Clock in UTC Time. In Audio, enable Audio for your sound card. In Network, enable Bridged Adapter for Adapter 1. In Storage, click on Empty in the Storage Tree. Then click on the Disk icon to the right of CD/DVD Drive attributes. Choose the Elastix 4.0 ISO file that you downloaded. Click OK. Then start the virtual machine to begin the installation process. Follow the setup steps above to install Elastix 4.0 in your virtual machine.
3. Download and Install Incredible PBX for Elastix 4.0
After completing the Elastix 4.0 install, log into your server as root using SSH or Putty from a desktop machine that you will use to manage your server. This is important with the Incredible PBX IPtables Firewall WhiteList so you don’t get locked out of your own server! Then issue the following commands to begin the Incredible PBX install. You’ll actually run the installer twice, once to upgrade CentOS 7 and Elastix 4.0 and a second time to install Incredible PBX.
cd /root
yum -y install wget
wget http://incrediblepbx.com/incrediblepbx11elastix40.tar.gz
tar zxvf incrediblepbx11elastix40.tar.gz
rm -f incrediblepbx11elastix40.tar.gz
./IncrediblePBX*
# after reboot, login again as root and...
./IncrediblePBX*
4. Initial Configuration of Incredible PBX for Elastix 4.0
Incredible PBX is installed with the preconfigured IPtables Linux firewall already in place. It implements WhiteList Security to limit server access to connected LANs, your server’s IP address, your desktop computer’s IP address, and a few of our favorite SIP providers. You can add additional entries to this WhiteList whenever you like using the add-ip and add-fqdn tools in /root. There’s also an Apache security layer for our web applications. And, of course, Elastix 4.0 has its own security methodology. Finally, we randomize various passwords as part of the initial install process. You’ll also be prompted to set your MySQL and Elastix admin password again. Be sure your MySQL password is passw0rd with a zero, or nothing will work! Out of the starting gate, you won’t find a more secure VoIP server implementation anywhere. After all, it’s your phone bill.
Even with all of these layers of security, here are 6 Quick Steps to better safeguard your server. You only do this once, but failing to do it may lead to security issues you don’t want to have to deal with down the road. So DO IT NOW!
First, log out and back into your server as root with your root password to get the latest updates. Then do the following:
Make your root password very secure: passwd
Set your correct time zone: ./timezone-setup
Create admin password for web apps: htpasswd -b /etc/pbx/wwwpasswd admin newpassword
Set MySQL and Elastix admin PW: ./admin-pw-change (MySQL PW MUST be passw0rd with zero)
Make a copy of your other passwords: cat passwords.FAQ
Decipher IP address and other info about your server: pbxstatus
Last but not least, Incredible PBX includes an automatic update utility which downloads important updates whenever you log into your server as root. We recommend you log in once a week to keep your server current. If you haven’t already done so, NOW would be a good time to log out and back into your server at the Linux command line to bring your server current.
Incredible PBX Stand-Alone Apps. Currently, there are several standalone applications included with Incredible PBX that cannot be accessed from within the Elastix Dashboard because the Elastix Developer component for Elastix 4.0 still is under development. For all of these web applications except WebMin, you will need to set up Apache web credentials using the web apps password syntax documented above. Once you’ve done that, you can access the applications using a browser with the username admin. Just substitute your server’s IP address for 192.168.0.1 in the examples below. For WebMin only, use root as your username and your root password for access.
- Config Edit: https://192.168.0.1/maint/configedit
- phpMyAdmin: https://192.168.0.1/maint/phpMyAdmin
- Sys Info: https://192.168.0.1/maint/sysinfo
- Telephone Reminders: https://192.168.0.1/reminders
- WebMin: https://192.168.0.1:9001
5. Activate Trunks with Incredible PBX for Elastix 4.0
For those migrating from another aggregation including PBX in a Flash, this should be familiar territory for you. Using a browser, log into Elastix 4.0 at the IP address of your server using your admin password. Before you can actually make or receive calls outside your PBX, you’ll need at least one trunk. In the Elastix 4.0 GUI, click PBX -> PBX Configuration -> Trunks. Once you have your credentials from a provider, choose a provider from the list of preconfigured trunks on the right or create a new one. If you’re using one of the preconfigured options, remember to enable the trunk after adding your desired CallerID and credentials. Then save your settings and reload your Asterisk dialplan. That’s it. You’re ready to go.
To display your trunk registrations: asterisk -rx "sip show registry"
Google Voice Setup. If you wish to use Google Voice for free calling in the U.S. and Canada, you’ll need to sign up for an account with Simonics SIP to Google Voice Gateway service. Complete documentation is here.
RingPlus SIP Gateway. If you’ve signed up for (free) RingPlus cellular service, you also can use your cellular account as a SIP gateway to Elastix. Complete documentation is here.
Connection Issues. If you experience problems getting trunks to register with providers, add or remove the following entry in /etc/asterisk/sip_custom.conf: nat=yes. Then restart Asterisk: amportal restart.
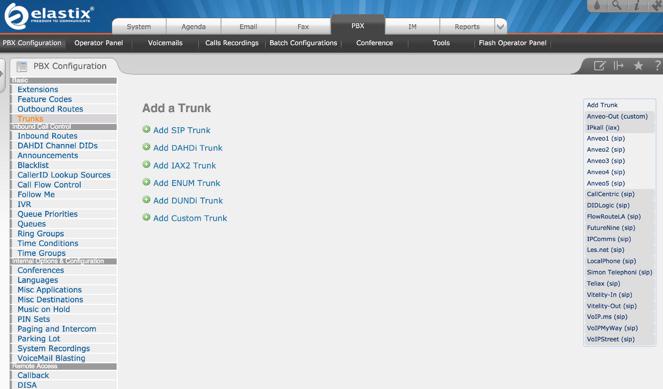
6. Configure a Softphone with Incredible PBX for Elastix 4.0
Incredible PBX comes preconfigured with two extensions (701 and 702) that let you connect phones to your PBX. You can connect virtually any kind of telephone to your Elastix 4.0 PBX. Plain Old Phones require an analog telephone adapter (ATA) which can be a separate board in your computer from a company such as Digium. Or it can be a standalone SIP device such as ObiHai’s OBi100 or OBi110 (if you have a phone line from Ma Bell to hook up as well). SIP phones can be connected directly so long as they have an IP address. These could be hardware devices or software devices such as the YateClient softphone. We’ll start with a free one today so you can begin making calls. You can find dozens of recommendations for hardware-based SIP phones both on Nerd Vittles and the PIAF Forum when you’re ready to get serious about VoIP.
We recommend YateClient which is free. Download it from here. Run YateClient once you’ve installed it and enter the credentials for the 701 extension on Incredible PBX. You’ll need the IP address of your server plus your extension 701 password. You can find them in /root/passwords.FAQ. Fill in the blanks using the IP address of your server, 701 for your account name, and whatever password is assigned to the extension. Here’s what your entries should look like. Click OK to save your entries.
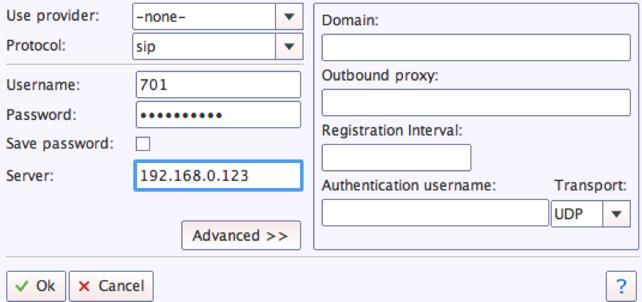
Once you are registered to extension 701, close the Account window. Then click on YATE’s Telephony Tab and place some test calls to the numerous apps that are preconfigured on Incredible PBX. Here are a few numbers to get you started:
123 - Reminders

222 - ODBC Demo (use: 12345)

947 - Weather by ZIP Code

951 - Yahoo News

DEMO - Allison's IVR Demo

TODAY - Today in History
7. Configuring SMTP Mail with Incredible PBX for Elastix 4.0
Outbound email support using Postfix is preconfigured with Elastix 4.0. You can test whether it’s actually working by issuing the following command using your destination email address after logging in as root:
echo "test" | mail -s testmessage yourname@gmail.com
If you don’t receive the email message within a minute or two and you’ve checked your spam folder, chances are your ISP is blocking downstream SMTP servers in an effort to combat spam. Comcast is one of the usual suspects. To enable outbound email service for delivery of voicemail and other email messages with a provider blocking downstream SMTP servers, you first need to obtain the SMTP domain of your ISP, e.g. smtp.comcrap.net. Next, edit /etc/postfix/main.cf and add your SmartHost entry [in brackets] to the line that begins like this: relayhost =. The line should look like this: relayhost = [smtp.comcrap.net]. Save your addition and restart Postfix: service postfix restart. Be sure to try another email test message after completing the SmartHost update. To use Gmail as your mail relay, see this tutorial.
8. Homework Assignment: Mastering Incredible PBX for Elastix 4.0
We’ve put together a complete tutorial for the applications included in Incredible PBX for Asterisk-GUI. Most of it is fully applicable to Elastix 4.0 as well. That should be your next stop. Then you’ll be ready to tackle Elastix 4.0. Google is your friend. Do some exploring, and we’ll post links to great articles on this terrific platform as we discover them. Your suggestions are also welcomed!
9 Countries Have Never Visited Nerd Vittles. Got a Friend in Any of Them https://t.co/wMfmlhiQ9y #asterisk #freepbx pic.twitter.com/TPFGZbqWB6
— Ward Mundy (@NerdUno) April 22, 2016
In the meantime, if you have questions, join the PBX in a Flash Forums and take advantage of our awesome collection of gurus. There’s an expert available on virtually any topic, and the price is right. As with Incredible PBX, it’s absolutely free. The same applies to the Elastix forum.
And if all of that wasn’t enough, feast your eyes on the Elastix Add-Ons that are only a button click away:
[gview file="http://nerdvittles.com/wp-content/ElastixAddOns.pdf"]
Originally published: Monday, February 22, 2016
Need help with Asterisk? Visit the PBX in a Flash Forum.
Special Thanks to Our Generous Sponsors
FULL DISCLOSURE: ClearlyIP, Skyetel, Vitelity, DigitalOcean, Vultr, VoIP.ms, 3CX, Sangoma, TelecomsXchange and VitalPBX have provided financial support to Nerd Vittles and our open source projects through advertising, referral revenue, and/or merchandise. As an Amazon Associate and Best Buy Affiliate, we also earn from qualifying purchases. We’ve chosen these providers not the other way around. Our decisions are based upon their corporate reputation and the quality of their offerings and pricing. Our recommendations regarding technology are reached without regard to financial compensation except in situations in which comparable products at comparable pricing are available from multiple sources. In this limited case, we support our sponsors because our sponsors support us.
BOGO Bonaza: Enjoy state-of-the-art VoIP service with a $10 credit and half-price SIP service on up to $500 of Skyetel trunking with free number porting when you fund your Skyetel account. No limits on number of simultaneous calls. Quadruple data center redundancy. $25 monthly minimum spend required. Tutorial and sign up details are here.
![]() The lynchpin of Incredible PBX 2020 and beyond is ClearlyIP components which bring management of FreePBX modules and SIP phone integration to a level never before available with any other Asterisk distribution. And now you can configure and reconfigure your new Incredible PBX phones from the convenience of the Incredible PBX GUI.
The lynchpin of Incredible PBX 2020 and beyond is ClearlyIP components which bring management of FreePBX modules and SIP phone integration to a level never before available with any other Asterisk distribution. And now you can configure and reconfigure your new Incredible PBX phones from the convenience of the Incredible PBX GUI.
VitalPBX is perhaps the fastest-growing PBX offering based upon Asterisk with an installed presence in more than 100 countries worldwide. VitalPBX has generously provided a customized White Label version of Incredible PBX tailored for use with all Incredible PBX and VitalPBX custom applications. Follow this link for a free test drive!
Special Thanks to Vitelity. Vitelity is now Voyant Communications and has halted new registrations for the time being. Our special thanks to Vitelity for their unwavering financial support over many years and to the many Nerd Vittles readers who continue to enjoy the benefits of their service offerings. We will keep everyone posted on further developments.
Some Recent Nerd Vittles Articles of Interest…
Free Asterisk Solutions
