
Home » Technology » Networking (Page 7)
Category Archives: Networking
The Most Versatile VoIP Provider: FREE PORTING

 JUST RELEASED: Visit the Incredible PBX Wiki
FMC: The Future of Telephony with Vitelity’s vMobile and Asterisk in the Cloud

If making phone calls from a web browser is what you’ve always longed for, then you’re in good company with Google and its future direction in the telephony space. Call us old fashioned but this strikes us as a solution in desperate need of a problem. What’s wrong with a Plain Old Telephone or a smartphone for making connections with friends and business associates? The real head scratcher is the fact that the WebRTC and Hangouts push demonstrates that the wizards at Google are seriously out of touch with the next generation. Will our 14-year-old daughter use Skype or Hangouts or FaceTime? Sure. About once a month to chat with Grandma or to interact with cousins scattered around the country, it’s a terrific option. And the same is true in the business community. When you need to collaborate with a half dozen colleagues, conferencing applications are invaluable. But to meet 95% of day in and day out business requirements, a telephone or smartphone is the clear device of choice. So join us today in celebrating the end of Google Voice XMPP service and the beginning of a new and even more exciting VoIP era… sans Google.
Of course, if it were up to the next generation, telephone calls might completely disappear in favor of text messaging, Snapchat, Instagram, and any other platform that includes recorded photos or videos. Note the subtle difference. Kids really are not interested in live video interaction. They find posed images that tell a story much more appealing. Why? Because recorded photos and videos let users present their best face, their movie star pose, and their expression of what they want others to perceive they’re really like. In short, live video is too much like real life. Our conclusion for those targeting the next generation is you’d better come up with something better and quite different than Skype, Hangouts, and FaceTime.
It’s Fixed-Mobile Convergence, Stupid!
Now let’s return to our primary focus for today, the current business community. Suffice it to say, there are a dwindling number of what we used to call "desk jobs" where an employee arrives at his or her desk at 9 a.m. and leaves at 5 p.m. As more and more jobs are headed off shore, the telephone and smartphone have replaced the corporate desk as the most indispensable corporate fixture. Particularly in the American marketplace, what we see with most businesses is a management layer and an (upwardly) mobile force of salespeople, consultants, and implementers that interact primarily through PBXs in an office headquarters or home office together with smartphones for those that generally are on the road. Many of these Road Warriors don’t even have a home phone any longer.
The telephony Holy Grail for this new business model is Fixed-Mobile Convergence (FMC). It’s the ability to transparently move from place to place while retaining your corporate identity. Every employee from the night watchman in Miami to the salesperson making calls from a Starbucks in California to the CEO in New York has an extension on a PBX in the cloud together with the ability to accept and place calls using the company’s CallerID name and number, transfer calls, and participate in conference calls regardless of whether the phone instrument happens to be a desktop phone or a smartphone. Is this even possible? Well, as of last week, the answer is ABSOLUTELY.

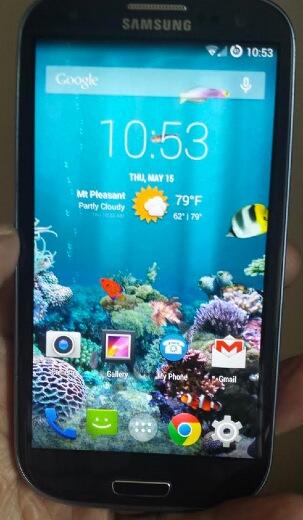
Vitelity has been a long-time corporate sponsor of both the Nerd Vittles and PBX in a Flash open source projects so we were thrilled when we were offered a free, Samsung Galaxy S III to try out the new (live) vMobile service that took Best in Show honors at ITEXPO Miami in January. As Vitelity’s Chris Brown would probably tell you, it’s one thing to demonstrate a new technology at a trade show and quite another to bring it into production. But Vitelity did it:
What we want to stress up front is that we’ve received no special treatment in getting this to work. We received the phone, opened a support ticket to register the phone on Vitelity’s vMobile network, and plugged our new credentials into the phone so that it could be integrated into our PBX in a Flash server. Once the smartphone became an extension on our PBX, we could place calls through our PBX with the S3 using both WiFi and Sprint 3G/4G service. Switching between WiFi and cellular is totally transparent. The CallerID for all outbound calls was our standard PBX CallerID. We also could place calls to other extensions on the PBX by dialing a 4-digit extension while connected to WiFi or the Sprint network virtually anywhere. If you have 3-digit extensions, those are a problem over the Sprint network but we’ll show you a little trick to get them working as well.
Keep in mind that every call from the S3 goes out through the PBX just as if you were using a standard desktop phone as a hardwired extension. And it really doesn’t matter whether the S3 has a WiFi connection or a pure cellular connection on Sprint’s network. You receive calls on the S3 in much the same way. It’s just another extension on your PBX. If you want to add it to a ring group to process incoming calls, that works. If other users on your PBX wish to call the S3 directly using the extension number, that works as well. If you want to transfer a call, pressing ## on the S3 initiates the transfer just as if you were using a phone on your desk. When we say transparent convergence, we really do mean transparent. No recipient of a call from the vMobile S3 would have any idea whether you were sitting at a desk in the corporate headquarters in New York or in a seat on a Delta jet after landing in San Francisco. Both the call quality and the corporate CallerID would be identical. And your secretary on maternity leave at Grandma’s house still could reach you using her vMobile S3 by simply dialing your corporate extension.
So that’s the Fortune 500 view of the new VoIP universe. How about the little guy with a $15 a month PBX in a Flash server in the RentPBX cloud1, a couple mobile sales people, and a handful of construction workers that build swimming pools for a living? It works identically. Each has an S3 connected as an extension on the PIAF cloud server. And calls can be managed in exactly the same way they would be handled if everyone were sitting side-by-side at desks in an office headquarters somewhere. The silver lining of cloud computing is that it serves as the Great Equalizer between SOHO businesses and Fortune 500 companies. Asterisk® paired with inexpensive cloud hosting services such as RentPBX lets you mimic the Big Boys for pennies on the dollar. We think Vitelity has hit a bases loaded, home run with vMobile.
vMobile Pricing
We know what you’re thinking. "Since you got yours for free, what does it really cost??" The Galaxy S3 (or S4) is proprietary running Trebuchet 1.0, a (rooted) CyanogenMod version of Android’s KitKat. You can purchase these devices directly from the Vitelity Store. Currently, you can’t bring your own device. The refurbished S3 is $189 including warranty. Works perfectly! That’s what we’re using. Next, you’ll need a vMobile account for each phone. Unless you’re a Nerd Vittles reader, it’s $9.95 per month. That gets you free WiFi calling and data usage anywhere you can find an available WiFi hotspot. And text messaging is free. For calls and data using Sprint’s nationwide network, the calls are 2¢ a minute and the data is 2¢ per megabyte ($20 per gigabyte). For us, a typical day of data usage with an email account and light web use costs about a quarter. YMMV! So long as you configure Android to download application updates when connected to WiFi, data usage should not be a problem unless you’re into photos and streaming video. Android includes excellent tools for monitoring and even curbing your data usage if this is a concern.
vMobile Gotchas
Before we walk you through the setup process, let’s cover the gotchas. The list is short. First, we don’t recommend connecting vMobile devices to a PBX sitting behind a NAT-based firewall, or you may end up with some calls missing audio. The reason is NAT and quirky residential routers. If you think about it, when your S3 is inside the firewall and connected to WiFi, it will have an IP address on your private LAN just like your Asterisk server. When your S3 is outside your firewall on either a cellular connection or someone else’s WiFi network, it will have an IP address that is not on your private LAN. Others may be smarter than we are, but we couldn’t figure a way to have connections work reliably in both scenarios using most residential routers. You can configure your S3’s PBX extension for NAT=No or NAT=yes, but you can’t tell Asterisk how to change it depending upon where you are. One simple solution is to deploy these phones with a VPN connection to your Asterisk server sitting behind a NAT-based firewall. The more reliable solution is to build your PBX in a Flash server in the cloud with no NAT-based firewall. Then use an IPtables WhiteList (aka Travelin’ Man 3) to protect your server. From there, you can either interconnect the cloud-based server with a second PBX behind your firewall, or you can dispense with the local PBX entirely. Either way will eliminate the NAT issues with missing audio. In both cases, use NAT=yes for the vMobile extension.
Another wrinkle involves text messaging. Traditional text messages work fine; however, MMS still is problematic unless you initiate the outbound MMS session with the other recipient. It’s probably worth noting that Google Voice never got MMS working at all despite years of promises. This wasn’t a deal breaker for us, but it’s a bug that still is being worked on.
Finally, there’s Sprint. You either love ’em or hate ’em. We really haven’t used Sprint service in about eight years. In the Charleston area, the barely 3G service still is just as lousy as it was eight years ago. But, if you live in an area with good Sprint coverage and performance, this shouldn’t be an issue for you. And vMobile works fine in Charleston. You just won’t be surfing the web very often unless you have hours to kill… waiting. Additionally, dialing numbers with less than 4 numbers is a non-starter with Sprint, but we’ll show you a simple workaround to reach 3-digit local extensions from your vMobile device below.
With a service as revolutionary as vMobile with Sprint’s new FMC architecture, we can’t help thinking there may be other cellular carriers with an interest in deploying this technology sooner rather than later. But, given the vMobile feature set, Sprint is good enough for now especially when WiFi connectivity is available almost everywhere.
vMobile Configuration at Vitelity
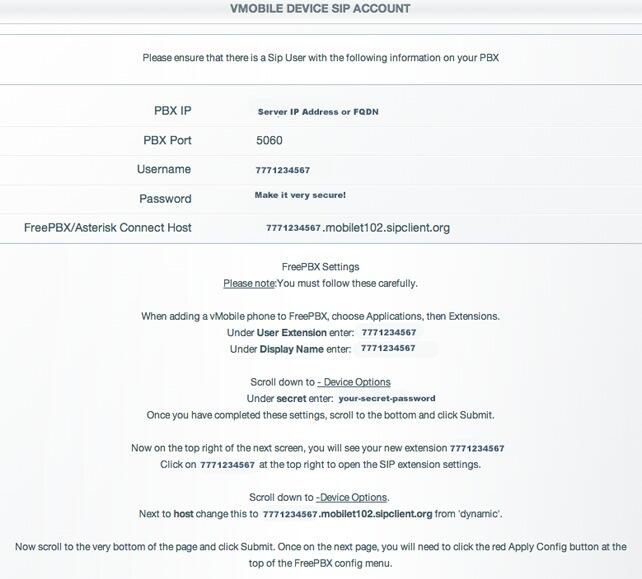
For the Vitelity side of the setup, you first configure your smartphone using the (included) My Phone app. When the application is run, your cellphone number will be shown. Tapping the display about a dozen times will cause the phone’s setup to be reconfigured. Vitelity will provide you the secret key to activate your account. Next, you’ll log into the Vitelity portal and choose vMobile -> My Devices under My Products and Services. The account for your vMobile device will already exist. Clicking on the pull-down menu beside your vMobile device will let you create your SIP account on Vitelity’s server. Enter the IP address or FQDN of your Asterisk server and set up a very secure password. Your username will be the 10-digit phone number assigned to your vMobile phone. Save your settings and then choose the Edit option to view your setup. The portal will display your Username, Password, and FreePBX/Asterisk Connect Host name. Write them down for use when you configure your new extension using FreePBX®.
vMobile Configuration for Asterisk and PBX in a Flash
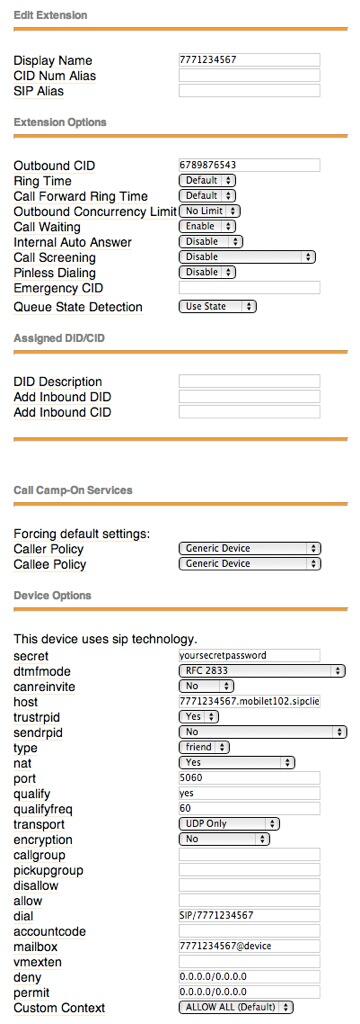
On the PBX in a Flash server, use a browser to open FreePBX. Choose Applications -> Extensions and add a new generic SIP device. For Display Name and User Extension, enter the 10-digit phone number assigned to your vMobile device. Under Secret, enter the password you assigned in Vitelity’s vMobile portal. Click Submit and reload FreePBX when prompted. Then edit the extension you just created. Set NAT=yes and change the Host entry from dynamic to the FQDN entry that was shown in Vitelity’s vMobile portal, e.g. 7209876542.mobilet103.sipclient.org. Update your configuration and restart FreePBX once again. Finally, from the Linux command prompt, restart Asterisk: amportal restart. If you’re using a WhiteList with IPtables such as Travelin’ Man 3, be sure to add a new WhiteList entry for your vMobile Host entry. Finally, add your vMobile extension to any desired Inbound Routes to make certain your vMobile device rings when desired.
You now should be able to place and receive calls on your vMobile device. If you want to be able to call 3-digit Asterisk extensions on both WiFi and while roaming on the Sprint cellular network, then you’ll need to add a little dialplan code since Sprint reserves 3-digit numbers for emergency services and will reject other calls with numbers of less than 4 digits. Here’s the simple fix. Always dial 3-digit extensions with a leading 0, e.g. 0701 to reach extension 701. We’ll strip off the leading zero before routing the call. The dialplan code below works whether you’re calling a local 3-digit extension or a 3-digit extension on an interconnected remote Asterisk server. Simply edit extensions_custom.conf in /etc/asterisk and insert the following code at the top of the [from-internal-custom] context. Then restart Asterisk: amportal restart. Note that we’ve set this up so that, if you have an extension 701 on both the local server and a remote server, the call will be connected to the local 701 extension. If you have different extension prefixes for different branch offices (e.g. 7XX in Atlanta and 8XX in Dallas), then this dialplan code will route the calls properly assuming you’ve configured an outbound route with the appropriate dial pattern for each branch office.
exten => _0XXX,1,Answer

exten => _0XXX,n,Wait(1)

exten => _0XXX,n,Set(NUM2CALL=${CALLERID(dnid):1})

exten => _0XXX,n,Dial(sip/${NUM2CALL})

exten => _0XXX,n,Dial(local/${NUM2CALL}@from-internal)

exten => _0XXX,n,Hangup
Vitelity vMobile Special for Nerd Vittles Readers
Now for the icing on the cake… We asked Vitelity if they would consider offering special pricing to Nerd Vittles readers and PBX in a Flash users. We’re pleased to report that Vitelity agreed. By using this special link when you sign up, the vMobile monthly fee will be $8.99 instead of $9.95. In addition, your first month is free with no activation fee. We told you last week that there was a very good reason for choosing Vitelity as your SIP provider. Now you know why.

And, if you’re new to Cloud Computing, take advantage of the RentPBX special for Nerd Vittles readers. $15 a month gets you your very own PBX in a Flash server in the Cloud. Just use this coupon code: PIAF2012. Enjoy!
Originally published: Thursday, May 15, 2014


Need help with Asterisk? Visit the PBX in a Flash Forum.
Special Thanks to Our Generous Sponsors
FULL DISCLOSURE: ClearlyIP, Skyetel, Vitelity, DigitalOcean, Vultr, VoIP.ms, 3CX, Sangoma, TelecomsXchange and VitalPBX have provided financial support to Nerd Vittles and our open source projects through advertising, referral revenue, and/or merchandise. As an Amazon Associate and Best Buy Affiliate, we also earn from qualifying purchases. We’ve chosen these providers not the other way around. Our decisions are based upon their corporate reputation and the quality of their offerings and pricing. Our recommendations regarding technology are reached without regard to financial compensation except in situations in which comparable products at comparable pricing are available from multiple sources. In this limited case, we support our sponsors because our sponsors support us.
 BOGO Bonaza: Enjoy state-of-the-art VoIP service with a $10 credit and half-price SIP service on up to $500 of Skyetel trunking with free number porting when you fund your Skyetel account. No limits on number of simultaneous calls. Quadruple data center redundancy. $25 monthly minimum spend required. Tutorial and sign up details are here.
![]() The lynchpin of Incredible PBX 2020 and beyond is ClearlyIP components which bring management of FreePBX modules and SIP phone integration to a level never before available with any other Asterisk distribution. And now you can configure and reconfigure your new Incredible PBX phones from the convenience of the Incredible PBX GUI.
The lynchpin of Incredible PBX 2020 and beyond is ClearlyIP components which bring management of FreePBX modules and SIP phone integration to a level never before available with any other Asterisk distribution. And now you can configure and reconfigure your new Incredible PBX phones from the convenience of the Incredible PBX GUI.
 VitalPBX is perhaps the fastest-growing PBX offering based upon Asterisk with an installed presence in more than 100 countries worldwide. VitalPBX has generously provided a customized White Label version of Incredible PBX tailored for use with all Incredible PBX and VitalPBX custom applications. Follow this link for a free test drive!
 Special Thanks to Vitelity. Vitelity is now Voyant Communications and has halted new registrations for the time being. Our special thanks to Vitelity for their unwavering financial support over many years and to the many Nerd Vittles readers who continue to enjoy the benefits of their service offerings. We will keep everyone posted on further developments.
Some Recent Nerd Vittles Articles of Interest…
- RentPBX also is a corporate sponsor of the Nerd Vittles and PBX in a Flash projects. [↩]
The End of an Era: Farewell to Dell and Microsoft and Windows
As some of you know, we use computers to do Real Work™ so we’re pretty much agnostic when it comes to operating systems and hardware. We have Windows machines and Macs and Linux servers from quad-core systems that will heat your house to Raspberry Pi’s and BeagleBone Blacks that can run full-featured phone systems. We also take full advantage of cloud-based solutions from Amazon to RentPBX to Copy.com when it is cost-effective to do so. And we give equal time to iPads and Android tablets as well as iPhones and Android phones of many flavors.
When Microsoft moved into copy protection for Windows, we began transitioning to Mac OS X and Linux to handle stuff that mattered to us, but we always kept a foot in the door with Microsoft hoping things might turn around. They haven’t, and Microsoft frankly has no one to blame but itself for the demise of the PC. It’s become almost impossible for mere mortals to maintain, and we’ll get to that story in a minute.

For those that would write us off as yet another Apple fanboy, you obviously haven’t been reading Nerd Vittles for long. We started in the PC business with the third IBM PC sold in Atlanta in the early 1980’s. DOS 1.0 came with a beautiful hard-bound binder that included all of the source code for the operating system. With dual 160K floppies, the price tag was about $4,500, and that’s 1980 dollars when Cokes were still a nickel in Atlanta.
When the IBM AT was introduced, we championed the deployment of what would become 30,000+ systems in the federal courts with accompanying HP LaserJet printers. When DOS 3.1 was introduced, we deployed networks in hundreds of courthouses by clipping network cables to the ceiling tiles in the offices to avoid the risks associated with asbestos in many of the old federal courthouses in the United States. When Dell introduced servers, #6 and #7 arrived in Atlanta the next week to run our new Novell NetWare systems. We thought we had died and gone to heaven.
But something happened along the way. Windows was introduced with much fanfare but suffered growing pains for nearly a decade. Despite the fact that Windows bore striking similarities to the work of Apple and Xerox, Microsoft wasted little time engineering the demise of WordPerfect and Lotus 1-2-3 through "software anomalies." And then came copy protection to make sure others couldn’t do what Microsoft had turned into an art form. And that brings us to yesterday at the new Nerd Vittles headquarters. We’ve been moving this month, and my office transition was low on the totem pole in the family priorities as only those of you with families can appreciate.

We had set up a few desks and a state-of-the-art Dell XPS One for temporary use during the transition. As we previously have written in our touchscreen roundup, the XPS One is truly an engineering marvel in a league of its own. If you haven’t seen an XPS One, it is close to the perfect, touch-screen All-in-One hardware platform that we’ve all dreamed about… except it runs Windows 8. Our "real work" still gets done at a stand-up desk in another room using an iMac with redundant drives.
After writing a couple letters on the XPS One, it suddenly started locking up in the grandest Windows tradition. No notice, but no mouse or keyboard functionality either. Reboot and all is well for a couple minutes, and then more of the same. Within an hour, nothing worked and the dreaded "No boot device" error appeared on reboot. Reaching for the Windows 8 DVD provided by Dell didn’t help either. It complained that there were no drivers for the hardware. Nice touch, Dell dudes! Since the machine was less than a year old, it was time to call Dell. To their credit, the call was answered promptly. And our 90-minute support call begins.
After a 15-minute registration process, we finally were handed off to India. With excruciating clarity, Noah walked us through F2 and F12 Hell attempting to identify what had failed. All of Dell’s diagnostics reported that we had a perfectly functioning computer except for the minor detail that it wouldn’t boot. In the end, the resolution was to ship a new motherboard and hard disk for installation by a local service tech. Noah then asked, "Do you have a backup." My response was easy. "I don’t need one. We don’t do anything on this machine that isn’t saved elsewhere." The reason is simple. It’s almost impossible to make a useful backup of a Windows machine. You still have to restore the operating system first and navigate the copy protection minefield before you ever get to your backup. Yes, we know there are alternatives, but cumbersome doesn’t begin to describe that process. And, if you are one of the poor souls that relies upon Comcast and their "free" Norton backup, then you have another Chinese fire drill to endure getting all of that installed before you ever can restore your actual backup files. In short, it’s a multi-day ordeal even assuming nothing goes wrong in the laborious process.
As Noah was wading through the weeds trying to make Windows 8 come back to life, I couldn’t help contrasting the Microsoft/Dell situation to what I have experienced in the Mac world with a similar catastrophic failure. You simply turn off the Mac and then restart it while holding down the Option key. When the list of hard drives appears, choose your USB-connected backup drive and wait for the system to boot and all of your data to reappear. When you finish what you’re doing, shut down the computer, carry it to the Apple store, and pick it up in a couple hours with its new hard disk. Restore the external drive with the click of a button, and you’re back in business.
With all due respect to Noah, what I keep asking myself is why anyone or any organization would endure this kind of misery just to use Microsoft’s copy-protected crapola. Tedious doesn’t begin to describe the 90-minute ordeal which is merely Phase I of a week-long process. Multiply that by thousands of PCs in an organization, and you’d be visiting the closest gun dealer begging anyone to put you out of your misery.
When I see every kid with zero interest in a desktop computer of any kind, I think we all have Microsoft to thank for the rise of the tablet and cellphone. If an iPhone or Android phone dies, you move your SIM card to a new one and reboot. All of your stuff reappears without touching anything. Who would want anything else?
Michael Dell is a smart guy with lots of money and a (once again) private company. If he wants to stay in business, he needs to figure out a way to kiss India goodbye and develop a functional backup and restore methodology that’s as easy as what you find on a tablet or cellphone. Short of that, our love affair with Dell will end when our 3-year extended warranty comes to a close. I can’t say it’s always been fun, but it has been a Wild Ride!
Epilogue: After completion of our call to Dell, it took 21 hours for the local service tech to receive the parts from Dell, arrive at our doorstep, and complete the motherboard and hard drive replacement. Very impressive! Unfortunately, the kudos end there. And that’s exactly the point of this article. The replacement drive was shipped blank with two DVDs and a Windows 8 product key. The process to get back to the functioning system we previously had involved reloading Windows 8 plus all of the software updates plus the free Windows 8.1 upgrade. Total time: a whopping 21 hours! And this was before we ever restored the first backup! It’s a procedure with good imaging technology that could have been completed in about 15 minutes. So our conclusion remains the same. Absent some focus by Dell in addressing the restore shortcomings with hardware failures, the best hardware in the world isn’t going to keep Dell or the Microsoft desktop empire afloat. Painful doesn’t begin to describe this ordeal for the average consumer.
Originally published: Thursday, March 27, 2014
Need help with Asterisk? Visit the PBX in a Flash Forum.
Special Thanks to Our Generous Sponsors
FULL DISCLOSURE: ClearlyIP, Skyetel, Vitelity, DigitalOcean, Vultr, VoIP.ms, 3CX, Sangoma, TelecomsXchange and VitalPBX have provided financial support to Nerd Vittles and our open source projects through advertising, referral revenue, and/or merchandise. As an Amazon Associate and Best Buy Affiliate, we also earn from qualifying purchases. We’ve chosen these providers not the other way around. Our decisions are based upon their corporate reputation and the quality of their offerings and pricing. Our recommendations regarding technology are reached without regard to financial compensation except in situations in which comparable products at comparable pricing are available from multiple sources. In this limited case, we support our sponsors because our sponsors support us.
BOGO Bonaza: Enjoy state-of-the-art VoIP service with a $10 credit and half-price SIP service on up to $500 of Skyetel trunking with free number porting when you fund your Skyetel account. No limits on number of simultaneous calls. Quadruple data center redundancy. $25 monthly minimum spend required. Tutorial and sign up details are here.
![]() The lynchpin of Incredible PBX 2020 and beyond is ClearlyIP components which bring management of FreePBX modules and SIP phone integration to a level never before available with any other Asterisk distribution. And now you can configure and reconfigure your new Incredible PBX phones from the convenience of the Incredible PBX GUI.
The lynchpin of Incredible PBX 2020 and beyond is ClearlyIP components which bring management of FreePBX modules and SIP phone integration to a level never before available with any other Asterisk distribution. And now you can configure and reconfigure your new Incredible PBX phones from the convenience of the Incredible PBX GUI.
VitalPBX is perhaps the fastest-growing PBX offering based upon Asterisk with an installed presence in more than 100 countries worldwide. VitalPBX has generously provided a customized White Label version of Incredible PBX tailored for use with all Incredible PBX and VitalPBX custom applications. Follow this link for a free test drive!
Special Thanks to Vitelity. Vitelity is now Voyant Communications and has halted new registrations for the time being. Our special thanks to Vitelity for their unwavering financial support over many years and to the many Nerd Vittles readers who continue to enjoy the benefits of their service offerings. We will keep everyone posted on further developments.
Some Recent Nerd Vittles Articles of Interest…
Crippleware: Is Red Hat Rewriting the GPL and the Future of Open Source?

We’ve always been a believer that things happen for a reason. And so it is with the recent CentOS "acquisition" by Red Hat. It’s no secret that CentOS was cutting into Red Hat’s revenue stream. While Red Hat had announced plans to create its own CentOS-like spinoff, the actual absorption of CentOS and its development team into Red Hat, Inc. was a surprise. So was the claim by Karanbir Singh that he individually owned the CentOS trademark. As we previously described, the whole CentOS story is more than a little murky. What began as a rebellion by some open source developers to the heavy-handed Red Hat reinvention of what open source and the GPL were all about abruptly morphed into something quite different. We hope Red Hat has the best of intentions, but some may see things differently given Red Hat’s history in the open source space. Did one or more developers just throw in the towel in exchange for some undisclosed money and a cushy job? Only the developer(s) know the answer to that. From Red Hat’s perspective, it gives them complete control of the best known, free, competitive and compatible product that was making inroads into their cash cow, Enterprise Linux. Only time will tell whether the goal of this acquisition was to make CentOS a better product. Nothing now prevents Red Hat from diminishing the compatibility between Enterprise Linux and CentOS.
In the VoIP world, CentOS has played a leading role in the evolution of Asterisk-compatible turnkey systems. That history includes Asterisk@Home, trixbox, Elastix, PBX in a Flash, Asterisk Now, and the FreePBX platform. Just as Excel relies upon Windows to run, all of these distributions have relied upon CentOS as the underlying Linux operating system for their VoIP platform. And this has been the case for almost a decade with no objection from the CentOS folks. In fact, some of us that contributed to the CentOS project received tacit approval to do exactly what we’ve been doing by bundling CentOS with the PBX in a Flash VoIP platform. After all, CentOS is GPL2 software, and we can read.
Having said that, the PBX in a Flash Dev Team is shifting gears. Down the road we plan to release 32-bit and 64-bit Scientific Linux-based ISOs. By popular demand, over the next few weeks, we will release the PIAF3-Installer, a freeware installation program that installs PBX in a Flash 3.0.6.5 on an existing Linux platform. You first install the operating system of your choice, and then the PIAF3-Installer takes it from there. The first release will support 32-bit or 64-bit CentOS 6.5 or the Scientific Linux 6.5 minimal install. Future releases will support additional Linux operating systems, and we’ll keep you posted on what those platforms will be. All of the installs have been designed to look and feel and perform exactly as the PIAF 2.0.6.5 ISO works today. The installer also has been designed to work with our cloud partner, RentPBX. And it should work well on other cloud platforms as well as virtual machines including VirtualBox. The PIAF-Green Virtual Machine featuring Scientific Linux 6.5 is already available and was built using the new PIAF3-Installer. For the time being, the PIAF3-Installer gets us out of the operating system business until some of the legal issues are resolved. There’s lots of exciting new PIAF3 software coming your way very shortly. So stay tuned.
So what’s the big deal with the Red Hat acquisition?
Red Hat has a different view of the open source universe and the GNU General Public license (GPL2) under which CentOS is distributed. And, make no mistake, Red Hat has no choice about using the GPL2 license because their aggregations include thousands of components, most of which are licensed under GPL2. One of the fundamental precepts of GPL licensing is you are free to use or add to others’ GPL-licensed products so long as you also license your software under the same terms, i.e. the GPL2 license. Historically, Red Hat has applied its own GPL interpretation.
Here’s where it gets interesting. Red Hat aggregated thousands of these GPL2 products and configured them so that they worked harmoniously. And thus was born Enterprise Linux, a wildly profitable Linux "operating system" which consisted primarily of other developers’ free open source software components. And what did Red Hat bring to the table? A trademarked name and logo consisting of some artwork, a method of installing and configuring the various components so that they played nice with each other, and a marketing, support, and legal department. In pulling off this hat trick, Red Hat sprinkled its trademarked name and copyrighted artwork in various files throughout the operating system in such a way that the system wouldn’t function if you removed or renamed some of the files under which the Enterprise Linux operating system was running. Then Red Hat barred others from using its trademarks and copyrighted artwork in competitive products that sought to fork, use, and enhance the Enterprise Linux GPL2-licensed code claiming brand confusion. Merriam-Webster calls it a gotcha. We do, too.
With CentOS, the developers (perhaps with some Red Hat coaching) were sufficiently savvy to remove the Red Hat branding and artwork and then recompiled the source code substituting their own branding and artwork while never disclosing exactly how they did what they did. Scientific Linux did much the same thing a bit later. Was there a non-disclosure agreement between CentOS and Red Hat that was part of their legal settlement? Who knows? The bottom line was that the CentOS project operating under the cAOS Foundation made bold claims that they’d never act like RedHat in dealing with others that wanted to use their free product. And, more importantly, they kept their word and never did… at least until the 2014 Red Hat acquisition when CentOS license terms abruptly changed.
Here’s the key language that all of us relied upon as far as CentOS licensing and integration into other products:
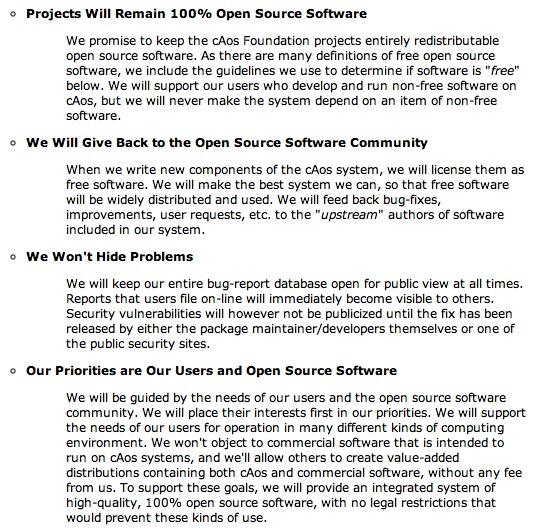
[W]e will never make the system depend on an item of non-free software.
We won’t object to commercial software that is intended to run on cAos systems, and we’ll allow others to create value-added distributions containing both cAos and commercial software, without any fee from us. To support these goals, we will provide an integrated system of high quality, 100% open source software, with no legal restrictions that would prevent these kinds of use. (Emphasis added)
Indeed, this licensing approach is exactly what GPL2 requires! The Red Hat theory of open source licensing goes something like this. You are free to use our source code (only) to develop your own GPL2 product provided you recompile the executables after removing all of our trademarks and copyrighted artwork from the source before you proceed. And here’s the rub with that approach: the GPL2 license. Three important components of the GPL2 license are listed below. Red Hat’s new CentOS license only partially complies with sections 1 and 2 while ignoring sections 3 and 7.
Sections 1 and 2 of GPL2 give users the right to copy, modify, and redistribute source code provided appropriate notices are attached and the new source code is licensed under GPL2. There’s no authorization to restrict or limit reuse or modification of individual components in the GPL2 program.
Section 3 of GPL2 gives users the right to copy and use or modify the object code provided in the original work. There’s no authorization to restrict or limit reuse or modification of individual executable components in the program.
Section 7 of GPL2 is the enforcement mechanism of the license. If the licensor uses a patent "or any other reason (not limited to patent issues)" to restrict the use of a GPL2-licensed product then the licensor has two options: (1) remove the restriction on use or (2) stop distributing the product pursuant to GPL2. If the licensor insists upon enforcement of a patent, a trademark, or copyright claim whether real or contrived, then "the only way you could satisfy both it and this License would be to refrain entirely from distribution of the Program." The quoted passages couldn’t be more clear.
Red Hat wants to have its cake and eat it, too: sell a product using everyone else’s free GPL2 products without restriction and then tie up its own GPL2 product with trademark and copyright land mines that deter others from using the product except in an inoperative form. This is nothing new. Back in the shareware days, we called it Crippleware. Stated another way, Red Hat wants to permit GPL2 use of modified CentOS in source code format only minus the CentOS marks and images and without any object code or executables and without telling you how to restore functionality after removing the required pieces to which RedHat claims ownership. Simply stated, the boat won’t float without major plumbing changes from any user that wants to keep the boat from sinking. And Red Hat won’t tell you where the boat is leaking or how to fix the leaks. Never mind that Red Hat didn’t mind using thousands of other developers’ trademarks and copyrighted artwork in the Enterprise Linux and CentOS aggregations. There’s a reason. Such restrictions are impermissible under the GPL2 license. Indeed, it’s one of the primary reasons that the GPL license came about in the first place. Assuming Red Hat ever obtains the CentOS registered trademark (which we plan to challenge if no one else does), Red Hat has two options under section 7 of GPL2: drop the trademark and artwork removal requirements or stop marketing CentOS and Enterprise Linux as GPL products (which they obviously cannot do since they are using thousands of other folks’ open source trademarked GPL2 products in "their work" at no cost).
Here’s a modest proposal that we believe would make everybody happy. First, many folks don’t give a rip about using either the RHEL or CentOS marks or artwork. It’s the source AND executable code that was released under the GPL that users are after just as they were promised under GPL2 and under CentOS previously published licensing terms. What we’re not going to do is invest hundreds of programming hours rebranding and maintaining what is touted and distributed as a GPL2 product. Personally, I’d prefer to spend the hours on a legal brief blowing Red Hat’s GPL2 reincarnation of open source out of the water. It’s dead wrong based upon the clear language of the GPL2 license. Paying lawyers or experts to twist the meaning of the GPL2 language that’s perfectly clear on its face simply isn’t going to fly. We’ve been down this road before. And David and Goliath is still one of our favorite Bible stories.
If Red Hat wants a generic, mark-free, image-free distribution of CentOS in lieu of waiving its trademark and copyright claims, then Red Hat can produce a clone with binaries AND keep it current as new versions of RHEL and CentOS are released! Make it a 100% RHEL-compatible and call it MugWump™. Use the Nerd Vittles logo for the artwork. Or come up with any other name and logo so long as there are no restrictions on use by others. If Red Hat uses our proposed name and logo, we will license everyone to use the product, the copyrighted artwork and the MugWump trademark pursuant to GPL2 at no cost. If Red Hat chooses its own new name and logo, then Red Hat agrees to license the product under the same terms we have proffered. The end result: everybody will be happy while saving Red Hat hundreds of thousands of dollars in legal fees. What’s not acceptable is distribution of a product which purports to be GPL2 code but places unreasonable and unachievable restrictions on use without hundreds of hours of development work by potential end users. That’s not what GPL2 was ever about. Hopefully the federal courts won’t have to say so.
Originally published: Tuesday, February 11, 2014
Need help with Asterisk? Visit the PBX in a Flash Forum.
Special Thanks to Our Generous Sponsors
FULL DISCLOSURE: ClearlyIP, Skyetel, Vitelity, DigitalOcean, Vultr, VoIP.ms, 3CX, Sangoma, TelecomsXchange and VitalPBX have provided financial support to Nerd Vittles and our open source projects through advertising, referral revenue, and/or merchandise. As an Amazon Associate and Best Buy Affiliate, we also earn from qualifying purchases. We’ve chosen these providers not the other way around. Our decisions are based upon their corporate reputation and the quality of their offerings and pricing. Our recommendations regarding technology are reached without regard to financial compensation except in situations in which comparable products at comparable pricing are available from multiple sources. In this limited case, we support our sponsors because our sponsors support us.
BOGO Bonaza: Enjoy state-of-the-art VoIP service with a $10 credit and half-price SIP service on up to $500 of Skyetel trunking with free number porting when you fund your Skyetel account. No limits on number of simultaneous calls. Quadruple data center redundancy. $25 monthly minimum spend required. Tutorial and sign up details are here.
![]() The lynchpin of Incredible PBX 2020 and beyond is ClearlyIP components which bring management of FreePBX modules and SIP phone integration to a level never before available with any other Asterisk distribution. And now you can configure and reconfigure your new Incredible PBX phones from the convenience of the Incredible PBX GUI.
The lynchpin of Incredible PBX 2020 and beyond is ClearlyIP components which bring management of FreePBX modules and SIP phone integration to a level never before available with any other Asterisk distribution. And now you can configure and reconfigure your new Incredible PBX phones from the convenience of the Incredible PBX GUI.
VitalPBX is perhaps the fastest-growing PBX offering based upon Asterisk with an installed presence in more than 100 countries worldwide. VitalPBX has generously provided a customized White Label version of Incredible PBX tailored for use with all Incredible PBX and VitalPBX custom applications. Follow this link for a free test drive!
Special Thanks to Vitelity. Vitelity is now Voyant Communications and has halted new registrations for the time being. Our special thanks to Vitelity for their unwavering financial support over many years and to the many Nerd Vittles readers who continue to enjoy the benefits of their service offerings. We will keep everyone posted on further developments.
Some Recent Nerd Vittles Articles of Interest…
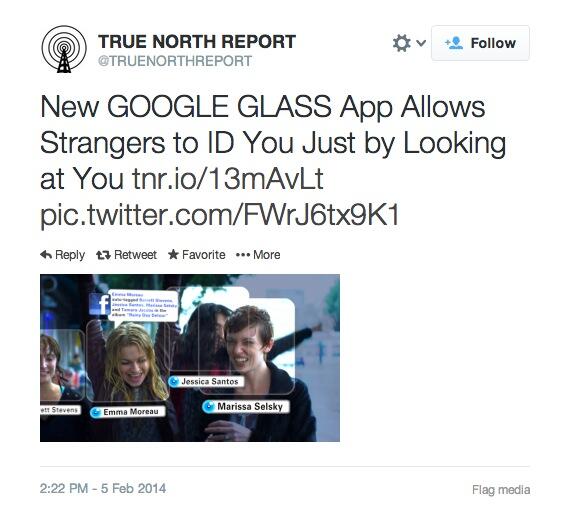
Don’t Hurry: A First Look at Google Glass with Google Glass Frame

It’s one thing to read about new technology, and quite another to actually try it out. We’ve been holding off on Google Glass awaiting support for prescription lenses. Well, it’s finally here. And Nerd Uno was one of the first to receive the new Google Glass Frames. Having spent the better part of a week with the new technology, here’s our review.
Let’s start with the price tag. Ours came to $1,868.75. That’s before you add the cost of prescription lenses, some of which are now subsidized by vision insurance plans. So the $2,000 question is whether you’re ready for that type of investment in order to assume the mantle of PIONEER. And, make no mistake, Google Glass is a beta project in every sense of the word. We’ll get to that in a minute.

Pardon our morphing into a male chauvinist pig for a moment. Can you picture your significant other ever wearing a pair of these glasses? Seriously? If the answer is no, then put yourself in her shoes and ask the same question. Looks aside (and some of us need all the help we can get), much of the resistance to Google Glass boils down to the privacy issue. It’s one thing to carry a hidden pen camera when nobody knows they’re being recorded. It’s quite another to advertise what you’re up to. As Engadget put it:
It’s a headset with a projected display, a camera and a data connection that could revolutionize the mobile device industry. It could also cause a public uproar over privacy concerns.
People can and should be a bit concerned about someone walking in a public restroom with Glass on and, since you can’t fold them up and stick them in your pocket, finding something to do with them while you do your business is a challenge.
Take it from us. Your friends are going to disown you if you wear these things around them. Nobody (except people that work for Google or would like to) wants to be on camera all the time. And nobody except the Glass wearer knows whether the camera is on or off. Therein lies the problem. All it takes to send a photo to the Google Cloud is the wink of an eye. Ask yourself this question. Do you really want to live in a world like this? We haven’t even gotten to the way you can expect to be treated by strangers. Consider, for example, the poor guy that got dragged out of the movie theater because of a claim that he was illegally recording the movie. He wasn’t! But there was a parking lot full of police and FBI interrogators anyway. Then there are the restaurants and bars that will throw you out just for wearing a pair of wonder glasses. And finally we’ve got the Eager Beaver traffic cop that couldn’t wait to make his first Google Glass bust. So let me repeat the question. Do you really want to live in a world like this? Perhaps the better question is this. Do you think other folks want to live in a world with people like you wearing Google Glass? You can probably guess our answer, but the world does not stand still. So… we will see what we see.
Google Glass Setup and Operation
If you’ve set up an iPhone or Android phone with Gmail using your Google credentials, then you already know the drill for setting up Google Glass. It’s a breeze with the MyGlass app for your smartphone. In 5 minutes, you’ll be ready to tilt your head up and take Google Glass for a spin. The magic word to activate Glass is "OK, Glass." So far, so good. In the default setup, you can make phone calls, check the weather, participate in Hangouts (you can see them but they can’t see you), read emails, send dictated email messages, take photos and videos as well as perform Google searches and navigate to a destination with Google Maps. The ability to schedule reminders has been removed in the latest software release. Unfortunately, messages sent to Gmail accounts (with or without a photo) go to Hangouts, not to Gmail.
You can take photos by blinking your right eye after enabling the feature. The photos are immediately uploaded to your Google account in the sky. There also is an option to forward a photo to an email address. But choosing a recipient was problematic. If you have an extensive list of Contacts as we do, it’s almost impossible to navigate through the list or to use it reliably with the Glass speech-to-text function. Oftentimes you will find yourself inadvertently sending something to the wrong person with no notification as to who that person was. And there’s no quick way to cancel delivery. That is a major shortcoming of virtually all the Glass features presently. There is no "go back" or "never mind" or "hangup" voice command to cancel an activity. We often found ourselves tapping, swiping, and yelling at Glass in order to cancel some action. Painful is the kindest adjective we can muster. Do you have any idea how stupid you look tapping on the side of your head all the time? People really will think you’ve lost your marbles. Let’s put it this way. If the Google self-driving car worked as well as Glass, you’d be in a ditch or dead in a matter of minutes.
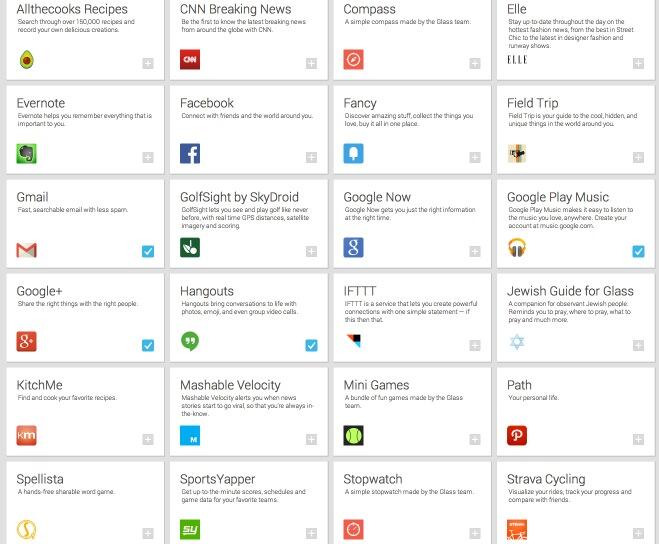
There are a whole host of additional features you can add to Glass. Google calls them Glassware. The process is straight-forward, much like adding an app to a smartphone. Here’s a partial list to give you some idea of what’s already out there:
With all these potential applications, you’re undoubtedly asking yourself about battery life. In a word, it’s HORRIBLE. If you get a half day out of Glass even with minimal use, count yourself among the lucky ones. If the idea is that folks should wear Glass instead of glasses, you’re not going to be a happy camper. While Google has taken steps to shut off Glass when you’re not actively using it, this is an uphill battle. Glass depends upon Wi-Fi and Bluetooth and regularly communicates with your cellphone and the closest WiFi access point. That’s a battery-consuming activity that is not going to be easily remedied without a bigger battery or better battery technology. As someone described it in the Google forum, "It’s like watching the gas gauge on a Ford Expedition with a 454 engine going up a mountain." There’s a reason that over half the inside of a smartphone is reserved as a battery compartment. Unfortunately, Glass doesn’t have that luxury of space.

In conclusion, we were tempted to keep Glass only because of its novelty. Everybody likes to play with the latest toy. And we have a reputation to uphold. But the battery life and privacy issues are truly dealbreakers for us. Before it’s over, we suspect there will be overwhelming public demand for a little red blinking light on Glass to tell others when you’re doing something that might affect them. If you’ve seen the way people react when you point a movie camera at them with a blinking red light, you’ll at least know what you have to look forward to. There has been no bigger Google Glass evangelist than Robert Scoble. Check out his comments on why Google Glass is doomed. Then read today’s comments from Jeff Jarvis before you take the plunge. We’re saving our money for the self-driving car. Here’s hoping the people that make ours don’t read this review.
Originally published: Wednesday, February 5, 2014
Need help with Asterisk? Visit the PBX in a Flash Forum.
Special Thanks to Our Generous Sponsors
FULL DISCLOSURE: ClearlyIP, Skyetel, Vitelity, DigitalOcean, Vultr, VoIP.ms, 3CX, Sangoma, TelecomsXchange and VitalPBX have provided financial support to Nerd Vittles and our open source projects through advertising, referral revenue, and/or merchandise. As an Amazon Associate and Best Buy Affiliate, we also earn from qualifying purchases. We’ve chosen these providers not the other way around. Our decisions are based upon their corporate reputation and the quality of their offerings and pricing. Our recommendations regarding technology are reached without regard to financial compensation except in situations in which comparable products at comparable pricing are available from multiple sources. In this limited case, we support our sponsors because our sponsors support us.
BOGO Bonaza: Enjoy state-of-the-art VoIP service with a $10 credit and half-price SIP service on up to $500 of Skyetel trunking with free number porting when you fund your Skyetel account. No limits on number of simultaneous calls. Quadruple data center redundancy. $25 monthly minimum spend required. Tutorial and sign up details are here.
![]() The lynchpin of Incredible PBX 2020 and beyond is ClearlyIP components which bring management of FreePBX modules and SIP phone integration to a level never before available with any other Asterisk distribution. And now you can configure and reconfigure your new Incredible PBX phones from the convenience of the Incredible PBX GUI.
The lynchpin of Incredible PBX 2020 and beyond is ClearlyIP components which bring management of FreePBX modules and SIP phone integration to a level never before available with any other Asterisk distribution. And now you can configure and reconfigure your new Incredible PBX phones from the convenience of the Incredible PBX GUI.
VitalPBX is perhaps the fastest-growing PBX offering based upon Asterisk with an installed presence in more than 100 countries worldwide. VitalPBX has generously provided a customized White Label version of Incredible PBX tailored for use with all Incredible PBX and VitalPBX custom applications. Follow this link for a free test drive!
Special Thanks to Vitelity. Vitelity is now Voyant Communications and has halted new registrations for the time being. Our special thanks to Vitelity for their unwavering financial support over many years and to the many Nerd Vittles readers who continue to enjoy the benefits of their service offerings. We will keep everyone posted on further developments.
Some Recent Nerd Vittles Articles of Interest…
netTALK to the Rescue: Dumping Google Voice for Less Than 10¢ a Day
The Google Voice Adventure with Asterisk® has been disappointing to put it charitably. Google never really saw the benefit of providing free phone service to millions of Americans because they never could quite figure out how to monetize the project. In the meantime, shady call centers were eating them alive with dozens if not hundreds of Google Voice trunks that were placing endless calls around the clock. The final straw was Microsoft deciding to keep Skype proprietary while adding free Google Voice connectivity to its communications products. This meant Microsoft customers had the best of all worlds while Google’s platform had no way to access Skype except through Microsoft’s proprietary client. Google decided to pull the plug on XMPP beginning May 15 of this year and more or less blamed it on abuse by the open source community for using Google’s own open source development toolkit for Google Voice.
We’ve never been one to sit around crying about spilt milk when there are plenty of other excellent choices available to the VoIP community. Today we begin our exploration of alternatives with a look at all-you-can-eat VoIP. There still are a few pure VoIP service plans available, but every one that we’ve tried leaves a bait-and-switch aftertaste. The first year may be reasonable, but once they’ve got you hooked, look out. Quite literally, they have your number. For this reason, we’ve chosen a hardware hybrid approach that still relies upon VoIP for the actual calls. Below the stratospheric pricing of the Bell Sisters, Comcast, and Vonage, there still are several wallet-friendly, all-you-can-eat VoIP products to choose from including netTALK, Ooma, and magicJack.
We know. Nothing beats free even with a little pain. But we think you’ll love today’s alternative especially given its expanded feature set and modest long-term cost. Up front hardware cost including service for the first year is about $100. Amortizing the hardware and service costs over three years reduces your investment for unlimited U.S./Canada/E911 phone service to roughly $1 a week. After recovery of your $100 hardware investment, the cost is $29.95 a year which works out to less than 10¢ a day… forever. This compares quite favorably to today’s best all-you-can-eat VoIP deal. AxVoice charges $99 for equivalent first year service and then the price escalates to over $150 for subsequent years. It doesn’t take a math major to figure out that’s 5 times the netTALK pricing beginning in Year 2.

That brings us back to Google. If you had several million happy customers already using your VoIP service and you saw a small company that was still in business charging $30 a year for a VoIP feature set that was better than yours, wouldn’t you think you might try to cash in on $100 million a year in new revenue rather than flushing the project down the toilet while shafting the open source developers that got you the customers in the first place??
Earth to Google: Few on the planet are ever going to use a web browser with Hangouts to make traditional phone calls regardless of how many places you plaster the Hangouts logo. Before you hire another Marketing Genius, read a good book or two. The well-deserved 2013 Lame Foot of the Year Award goes to Google. </rant>
Overview. Today we’ll be pairing an old friend, the OBi110, with the unlimited calling options provided by netTALK. When we’re finished, you’ll have a drop-in replacement for Google Voice on your Asterisk server that provides unlimited calling within the U.S. and Canada, plus free calling to other netTALK and OBi users around the world, plus free 911 emergency service for you and your family, plus voicemail delivery by email, and fax support. And you can keep your existing phone number! All of the existing PBX in a Flash and Incredible PBX features still work exactly as they do today without worrying about Google pulling the rug out from under you… again. With the OBiON app for iOS or Android, you can make free calls from your cellphone using today’s netTALK-OBi110 setup. And, if calls from a cellphone aren’t your thing, when you go on vacation to anywhere with an Internet connection, you can slip the netTALK device into your suitcase and plug it in to the Internet at your destination without ever losing the ability to make and receive free calls. We’ll cover all these magic tricks and more today so hang on to your hat. Let’s get started.
Legal Disclaimer. This is not legal advice. Consult your own attorney for that. We have reviewed netTALK’s Terms of Service and find nothing that would preclude your using the services as described in this article so long as the device is used in the United States, usage is under 3,000 minutes per month, and usage is limited to "normal residential or home office usage patterns" without "auto-dialing, continuous or extensive call forwarding, telemarketing, fax broadcasting or fax blasting." Terms of service can and do change from time to time. Review them regularly.
BY IMPLEMENTING THE TIPS IN THIS TUTORIAL, YOU AGREE TO ASSUME ALL RISKS ASSOCIATED WITH THE METHODOLOGY INCLUDING, BUT NOT LIMITED TO, THE LEGAL AND FINANCIAL CONSEQUENCES OF YOUR ACTIONS. IF YOU ARE UNWILLING TO DO SO, STOP READING HERE!
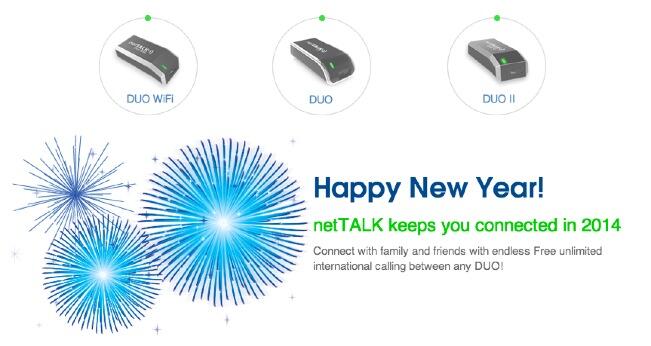
Hardware Requirements. Here’s what you’ll need. First, purchase a netTALK device. You have several choices. The netTALK DUO is still available for under $50 and includes a full year of unlimited calling in the U.S. and Canada. The netTALK DUO II is the newer model (with the same feature set). It sells for about $30 but only includes three months of free calling. The netTALK DUO WiFi is about $60 and adds WiFi support. Additional years of free calling in the U.S. and Canada are $29.95 with a guarantee of no price escalation as long as you continue the service without interruption. You can add free calling to 60+ countries for an additional $10 a month. Unlimited SMS messaging in the U.S. and Canada is an additional $2.50 a month. AT&T charges $20 a month for unlimited SMS messaging, and it only works on a single cell phone.
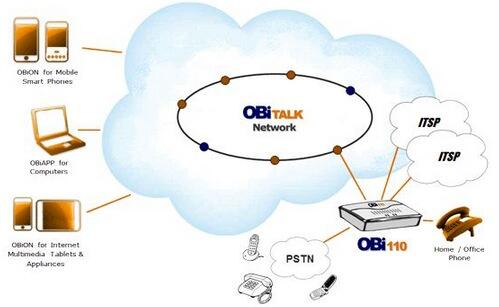
In addition to your Asterisk server, the other piece for today’s puzzle is OBiHai’s OBi110, a terrific analog telephone adapter that we’ll use to connect the netTALK adapter to your Asterisk server. If you want to connect a Google Voice account for a few more months, it can do that as well. It also supports a connection to another SIP provider of your choice for redundancy. For today, our focus is getting a Google Voice replacement service in place for your Asterisk server. You can scour the Internet to add the other pieces. The OBi110 is available through Amazon for under $50.1
Installing and Configuring the netTALK Duo
Before your netTALK Duo will work, it has to be registered on the netTALK web site. Locate your temporary username and password for the NetTalk DUO inside the box. Log into the web site and click Start Activation. Plug in your credentials and click LOGIN. Fill out the registration information and create a username and password for your new account. Then press CONTINUE. Complete the E911 information and click SAVE. Select a phone number and ASSIGN it to your account. Now plug a plain-old phone into your netTalk Duo, connect the device to your LAN, and then connect the power adapter. Some routers are problematic. Be sure SIP ALG is disabled on your router. It took about 5 minutes for ours to change from alternating green and red lights to a solid green light and the one-ring call indicating that the device is operating properly. Once you get the solid green light, make a call to the device and from the device. Nothing else works if the netTALK can’t make calls! Once it’s working, you can unplug the phone and use it to configure the OBi110 in the next section.
Installing and Configuring the OBi110
There are a number of steps to the OBi110 setup, but it isn’t difficult. If you can handle slice-and-bake cookies, you can do this. Just follow the recipe and don’t skip any steps. We’ll be configuring the OBi110 in two phases using the OBiTalk web site first and then using the OBi110’s built-in web server. Plug the OBi110 into your LAN and then attach the power adapter. Plug a POTS phone into the PHONE port of your OBi110. Once the OBi110 has booted, pick up the phone and make sure you have a dial tone. Then hang up.
IMPORTANT: Make sure that you restore the OBi to its factory default settings if you have previously used the device! ALWAYS keep your OBi110 behind a hardware-based firewall with NO Internet port exposure!
Now head over to the OBi web portal and set up an account if you don’t already have one. From the OBi Dashboard, click ADD DEVICE. Uncheck the box to set up a Google Voice account. You can do that later if desired. Now pick up the phone connected to the OBi110 and dial **5 plus the 4-digit number shown in your browser. This will identify your device to OBiTalk. Your OBi110 will appear in a dialog box for confirmation. Click CONFIRM promptly, or start over.
In the Device Configuration window that appears, add a Device Display Name, Webpage Admin PW, OBi Attendant PIN, and your TimeZone. SAVE your settings. The OBi110 should now appear in the OBi Dashboard with its assigned OBi number and speed dial number together with a Green status icon signifying it’s working.
Now is a good time to download the OBiON app to your iOS device or Android phone. Launch the app and login with your OBiTalk account information. In the OBi Dashboard, you will note that your softphone now has appeared and was assigned a 9-digit OBiTALK number. Write it down. You’ll need it in a minute to complete the OBi110 setup. Click on the Edit icon for the softphone and assign your OBi110 as the OBi Voice Gateway. SAVE your settings.
For the remainder of the OBi110 setup, we’ll be using the web interface built into the OBi110. If you don’t know the IP address of your OBi110, pick up the phone connected to your OBi and dial ***1.
1. Use your browser to log into the OBi110’s web interface. Log in with admin:admin as the username:password.
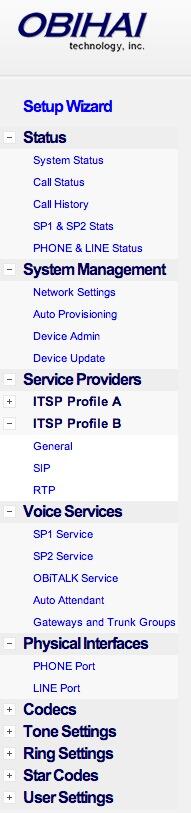
2. Once you’re logged into your OBi110’s web interface, the Setup Wizard will display. Expand the first five headings in the left column by clicking on the + icons for Status, System Management, Service Providers, Voice Services, and Physical Interfaces. Then expand ITSP Profile B under Service Providers.
3. Download the latest firmware from here to your desktop. Currently it’s 1.3.0 (Build: 2824). Install it on your device: Device Update -> Firmware Update. Your OBi110 will restart after loading the new firmware.
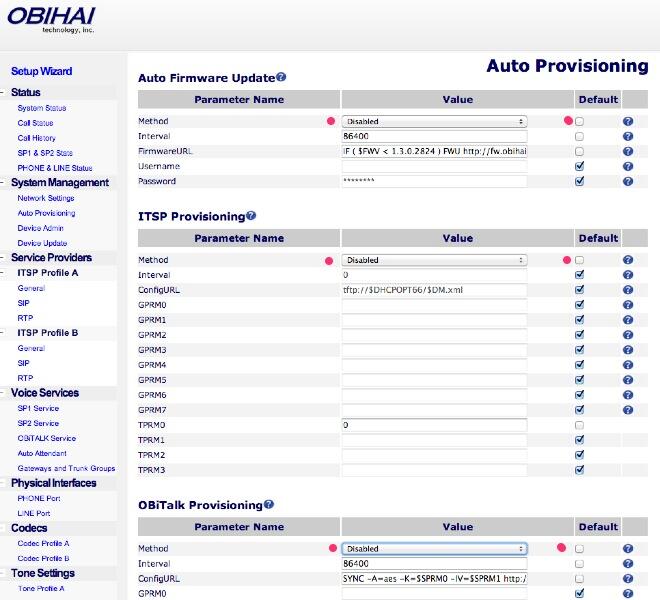
4. Disable ALL AutoProvisioning: Auto Provisioning -> Firmware Updates, ITSP Provisioning, OBiTalk Provisioning. Then Submit and Reboot.
This keeps external forces from stepping on your setup once it’s working. If something breaks down the road, you can manually provision your device once you know what’s broken.
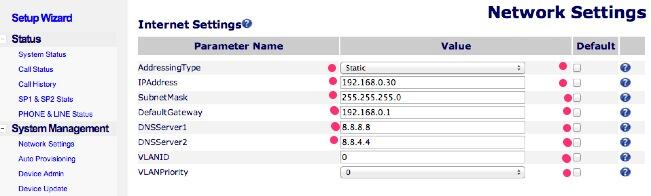
5. While not absolutely necessary, we recommend you set a static IP address for your OBi110: Network Settings -> Internet Settings. Submit and Reboot. Using your browser, log back into the new IP address.
Another alternative is to permanently lock the DHCP-assigned IP address to the OBi110 using the web interface of your router.
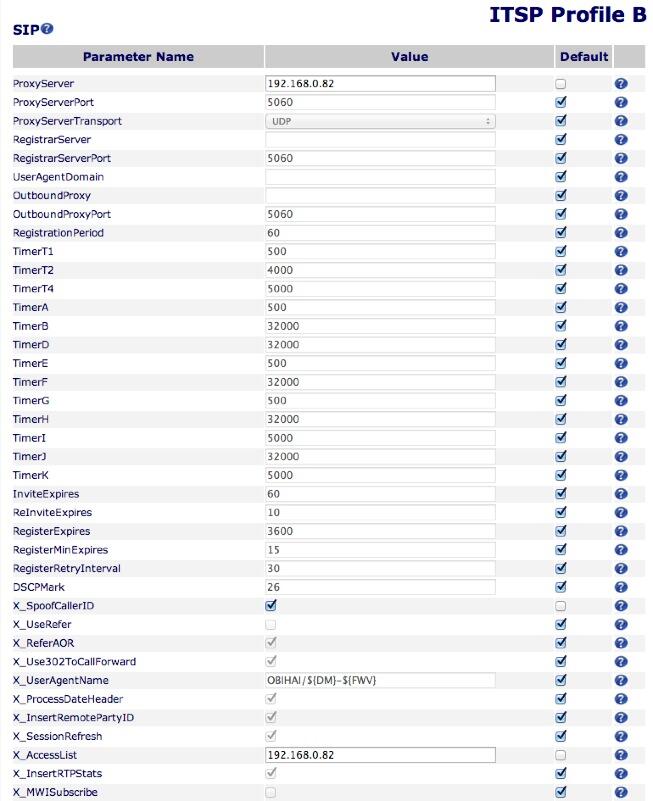
6. Open the SIP profile under ITSP Profile B. Here you’ll need to insert the IP address of your Asterisk server in BOTH the ProxyServer and X_AccessList fields. Also add a check mark for X_SpoofCallerID. Before you can add these entries, you’ll need to uncheck the Default checkbox beside each entry. This applies to all further steps as well. After making the three entries, click Submit and Reboot.
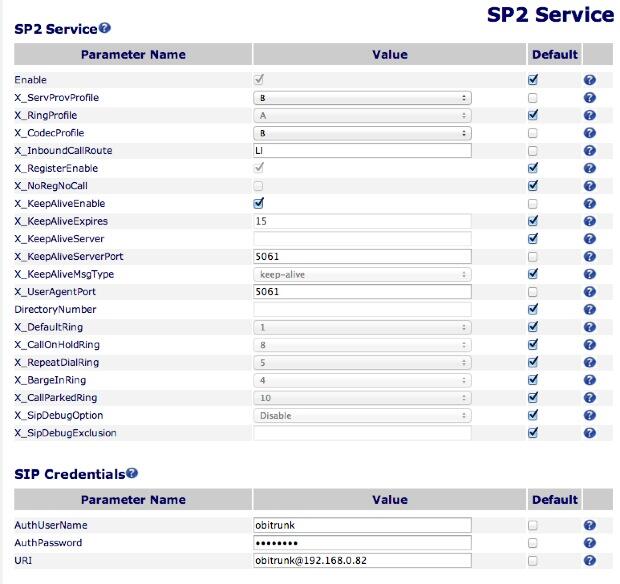
7. Open the SP2 Service window. For X_ServProvProfile and X_CodecProfile, change the settings to B. Change X_InboundCallRoute to LI. Add a check mark for X_KeepAliveEnable. Change X_KeepAliveServerPort and X_UserAgentPort to 5061.
In the SIP Credentials section, change AuthUserName to obitrunk. Make up a secure password and insert it in the AuthPassword field. Remember the password! We’ll need it to configure your Asterisk trunk in a minute. For the URI entry, use the following with the actual IP address of your Asterisk server: obitrunk@192.168.0.82. Double-check all nine entries carefully and then click Submit and Reboot.
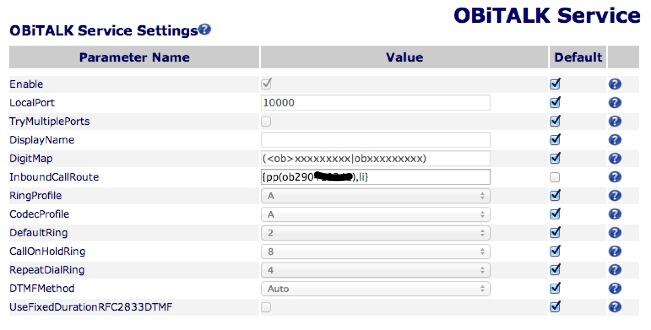
8. In the OBiTalk Service Settings window, change the InboundCallRoute to an entry that looks like this: {pp(ob290999999),li}. We recommend you cut-and-paste our example and then replace 290999999 with the 9-digit OBiTalk number that was assigned to your softphone above. A punctuation error here will block your softphone from ever working. Click Submit and Reboot.
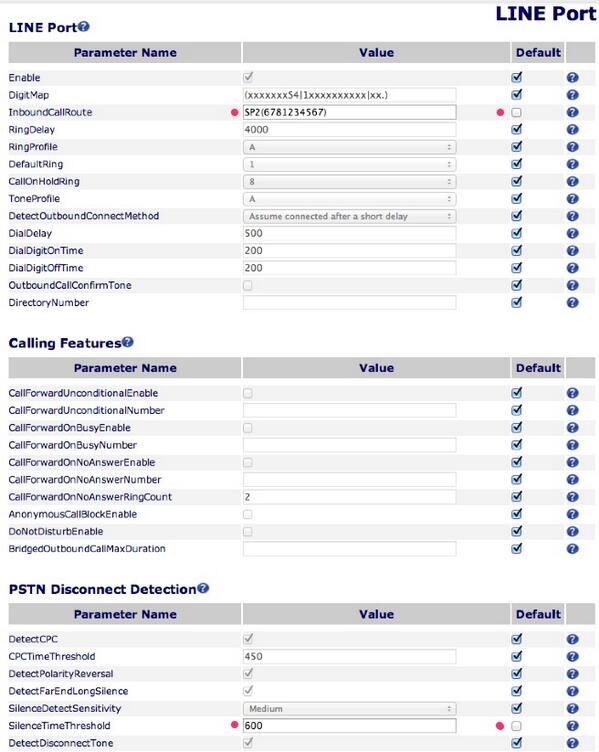
9. Finally, we need to configure the LINE Port. For the InboundCallRoute, insert the following using the 10-digit phone number assigned to your netTALK Duo: SP2(6781234567). For the SilenceTimeThreshold, set the number of seconds you want the OBi110 to wait before disconnecting a call where nobody at the other end of the call says anything. We recommend 600 which is 10 minutes. Click Submit and Reboot.
10. Now it’s time to connect your netTALK Duo to your OBi110. Unplug any phone connected to the netTALK Duo. Using a telephone cable, connect the PHONE port of the netTALK Duo to the LINE port of the OBi110. Never plug the netTALK Duo into the PHONE port of the OBi110, or your OBi is (burnt) toast!!!
11. Test your configuration. Pick up the phone that’s still connected to the OBi110 and dial either a 10-digit or 11-digit number of someone you love: 8005551212 or 18005551212. Do the same thing using the OBiON app on your cellphone or tablet. Be patient! OBiON connections are not instantaneous. Your connections have to be authenticated through OBiHai’s servers before they go through.
Interconnecting Asterisk with the OBi110
There basically are three pieces you need to add to Asterisk so that it can communicate with your netTALK Duo and OBi110. You need a Trunk to which the OBi110 will register. You need an Inbound Route to tell Asterisk how to handle incoming calls from the netTALK Duo phone number. And you need an Outbound Route to tell Asterisk which outgoing calls should be routed out through the netTALK Duo. We’re assuming you will be using the netTALK Duo as your primary trunk for outbound AND emergency calls. We’re also assuming you will not be making international calls. Finally, we’re assuming you are using FreePBX 2.11 with either PBX in a Flash or with one of the Incredible PBX builds on the CentOS 6.5, Raspbian, or Ubuntu platforms. Other FreePBX 2.11 setups should work in much the same way. If any of these assumptions don’t apply, you’ll obviously need to make the necessary adjustments for your environment.
Trunk Configuration. To set up the obitrunk under FreePBX 2.11, log into FreePBX and choose Connectivity -> Trunks -> Add SIP Trunk. For the Trunk Name, use obitrunk. For Outbound Caller ID, enter the 10-digit phone number assigned to your netTALK Duo. For Maximum Channels, use 1. For Dialed Number Manipulation Rules, add the following Match Patterns: 1NXXNXXXXXX, NXXNXXXXXX, and 911.
In Outgoing Settings, use obitrunk for Trunk Name and enter the following PEER Details:
type=peer

host=dynamic

port=5061

disallow=all

allow=ulaw

dtmfmode=rfc2833
In Incoming Settings, enter your actual 10-digit netTalk phone number in the User Context field: 6781234567. Enter the following USER Details replacing mypassword with the password you set up in OBi110 step #7 SIP credentials above and adjusting the permit entry to match your LAN subnet:
type=friend

secret=mypassword

host=dynamic

context=from-trunk

canreinvite=no

nat=yes

port=5061

qualify=yes

dtmfmode=rfc2833

disallow=all

allow=ulaw

deny=0.0.0.0/0.0.0.0

permit=192.168.0.0/255.255.255.0
Click Submit Changes and Apply Config to save your entries.
Inbound Route Configuration. If you already have a default inbound route on your Asterisk server, then you can skip this step unless you want incoming calls from the netTALK DID routed in a special way. To create an inbound route for the netTALK phone number, choose Connectivity -> Inbound Routes -> Add Incoming Route. For the Description, enter netTALK-OBi110. For the DID Number, enter your 10-digit netTALK phone number. For CID Lookup Source, choose CallerID Superfecta if you’re using this module. For Set Destination, choose how you want FreePBX to route the incoming calls, i.e. an extension, ring group, IVR, etc.
Click Submit and Apply Config to save your entries.
Outbound Route Configuration. If you want all 10-digit, 11-digit, and 911 calls placed from your Asterisk server to be routed out through the netTALK Duo, then you’d Add a Route under Connectivity -> Outbound Routes that looks something like the following. Don’t forget to move this Outbound Route (in the right column) to the TOP of your list of Outbound Routes to make certain it is processed first by FreePBX.
For Route Name, use obiout. For Dial Patterns, use the same ones you used in your Trunk setup above: 1NXXNXXXXXX, NXXNXXXXXX, and 911. For Trunk Sequence, select obitrunk.
Click Submit Changes and Apply Config to save your entries.
While still in Outbound Routes, drag obiout to the top of the outbound routes list in the right column. Then click Apply Config again to save your trunk processing sequence.
Verifying Connectivity. Let’s be sure everything works. First, log back into the IP address of your OBi110 and verify that System Status -> SP2 Service Status shows the OBi110 is registered to your Asterisk server. Next place a 10-digit call using an extension on your Asterisk server and monitor the Asterisk CLI to make certain that the call went out using the netTALK Duo trunk and was completely successfully. Finally, use your cellphone to call the number assigned to your netTALK Duo. The call should ring on the devices you configured in the Inbound Route above. Enjoy your new freedom from Google Voice!
Special Thanks. We want to express our appreciation to ObiHai for an excellent Administrator’s Guide and to the numerous individuals who have wrestled with the OBi110 setup over the years. This includes Adrian Li, Ad_Hominem and MichiganTelephone on the OBiTalk Forum as well as the reference articles which now are available here.
Originally published: Tuesday, January 7, 2014
Need help with Asterisk? Visit the PBX in a Flash Forum.
whos.amung.us If you’re wondering what your fellow man is reading on Nerd Vittles these days, wonder no more. Visit our whos.amung.us statistical web site and check out what’s happening. It’s a terrific resource both for all of us.
Special Thanks to Our Generous Sponsors
FULL DISCLOSURE: ClearlyIP, Skyetel, Vitelity, DigitalOcean, Vultr, VoIP.ms, 3CX, Sangoma, TelecomsXchange and VitalPBX have provided financial support to Nerd Vittles and our open source projects through advertising, referral revenue, and/or merchandise. As an Amazon Associate and Best Buy Affiliate, we also earn from qualifying purchases. We’ve chosen these providers not the other way around. Our decisions are based upon their corporate reputation and the quality of their offerings and pricing. Our recommendations regarding technology are reached without regard to financial compensation except in situations in which comparable products at comparable pricing are available from multiple sources. In this limited case, we support our sponsors because our sponsors support us.
BOGO Bonaza: Enjoy state-of-the-art VoIP service with a $10 credit and half-price SIP service on up to $500 of Skyetel trunking with free number porting when you fund your Skyetel account. No limits on number of simultaneous calls. Quadruple data center redundancy. $25 monthly minimum spend required. Tutorial and sign up details are here.
![]() The lynchpin of Incredible PBX 2020 and beyond is ClearlyIP components which bring management of FreePBX modules and SIP phone integration to a level never before available with any other Asterisk distribution. And now you can configure and reconfigure your new Incredible PBX phones from the convenience of the Incredible PBX GUI.
The lynchpin of Incredible PBX 2020 and beyond is ClearlyIP components which bring management of FreePBX modules and SIP phone integration to a level never before available with any other Asterisk distribution. And now you can configure and reconfigure your new Incredible PBX phones from the convenience of the Incredible PBX GUI.
VitalPBX is perhaps the fastest-growing PBX offering based upon Asterisk with an installed presence in more than 100 countries worldwide. VitalPBX has generously provided a customized White Label version of Incredible PBX tailored for use with all Incredible PBX and VitalPBX custom applications. Follow this link for a free test drive!
Special Thanks to Vitelity. Vitelity is now Voyant Communications and has halted new registrations for the time being. Our special thanks to Vitelity for their unwavering financial support over many years and to the many Nerd Vittles readers who continue to enjoy the benefits of their service offerings. We will keep everyone posted on further developments.
Some Recent Nerd Vittles Articles of Interest…
- Many of our purchase links refer users to Amazon when we find their prices are competitive for the recommended products. Nerd Vittles receives a small referral fee from Amazon to help cover the costs of our blog. We never recommend particular products solely to generate Amazon commissions. However, when pricing is comparable or availability is favorable, we support Amazon because Amazon supports us. [↩]
Finally a 100% Portable PBX: Introducing GoIP, a SIP-GSM Gateway for Asterisk

How far we have come! The original Asterisk® claim to fame was its ability to interface with proprietary phone systems and legacy telephony hardware, the glue that literally kept companies stuck to their overpriced PBXs. And, just as wired phone systems began to lose their edge, along came the Bell Sisters to introduce cellular communications with billing that began when the phone started ringing and an end to toll-free calling and extra fees for text messaging on top of exorbitantly priced data service. The piece that traditionally has been missing from Asterisk deployments has been interconnectivity with cellular data services. Well, that was then, and this is now. Meet the GoIP GSM Gateway in one, four, eight, and 16-channel flavors to meet your every need. Our focus today will be the one-channel GoIP device, but the larger units work almost identically so, once you’ve mastered the device, it’s not rocket science to move to the 4-channel or 8-channel device (or even larger) if the extra GSM ports better meet your office’s requirements.1
Let’s begin with the basics. What does it do? What does it cost? Why do I need it? How steep is the learning curve?
What Does It Do? In a nutshell, GoIP is a SIP-talkin’ GSM gateway that sits on the same network as your Asterisk server. Once you configure a trunk and a few special Asterisk settings to support SMS messaging, you’ll have another full-featured provider for your PBX, only this one happens to be GSM cellular-based. The good news is GoIP brings to your PBX most of the same feature set that is available using your favorite GSM cellphone except now every extension on your PBX in a Flash™ server can share the cellular connection both for calls and messaging. That means inbound and outbound cell calls as well as inbound and outbound SMS messaging for every extension on your PBX.
With today’s Nerd Vittles additions, here’s the new feature set using a GoIP device from any extension on your PBX:
- Make outbound calls through the GoIP cellular trunk from any PBX extension
- Receive incoming cellular calls and redirect them to any number on your PBX
- Dictate text by phone and deliver SMS messages to any SMS-capable device
- Use a browser to create and deliver outbound SMS messages to any SMS device
- Receive incoming SMS messages and forward the messages to any email address
- Receive incoming SMS messages and forward the messages to any SMS number
- Send an SMS message with a password and receive a callback with DISA dialtone
What Does It Cost? As much as we love Amazon for its referral revenue support of our blog and open source projects, we couldn’t find a single-channel GoIP offering at a reasonable price. The Amazon links provided above for the larger units are competitive (about $100 per port). For the single-channel model, eBay® is your friend. You’ll find multiple providers in the $150 price range. All of the units we’ve found ship from China. We used this provider who got the GoIP device to us exactly 14 days after we ordered it. Ours shipped with the latest firmware, but firmware updates are available here. AliExpress also sells the devices for about the same price. We’ve had good luck with them in the past.
The other expense with the GoIP devices is cellular service. For each channel, you’ll need a GSM SIM card just like what your GSM, AT&T, or T-Mobile cell phone uses. The good news is there are lots of other choices now. See WalMart for some options. Another option for low frequency use would be T-Mobile’s pay-by-the day plans. The $1 (unlimited SMS messaging) or $2/day (unlimited calls and unlimited SMS messaging) plans are almost perfect since you don’t need data. Just be sure to choose a GSM carrier, AT&T or T-Mobile in the U.S. market. Both are supported by StraightTalk. Our favorite remains the (almost) unlimited calling, text, and data $45 plan from StraightTalk. With their AT&T-compatible SIM (don’t buy it in a StraightTalk-locked phone!), it’s a simple matter of moving the SIM card from your cellphone to the GoIP’s GSM slot (connectors facing down). The GoIP unit can spoof an IMEI for picky providers.

Why Do I Need It? The two major advantages of adding a cellular trunk to your PBX are redundancy and portability. Except in the Hurricane Katrina situation, chances are that your Internet service provider and your cellular provider won’t both be dead in the water2 at the same time. The good news is that even with a hurricane, you can pack up your PBX in a Flash server or Raspberry Pi together with your GoIP device and move to higher ground. As fast as you can say "George Bush is a compassionate conservative," you’ll be back in business.
And then there are the mobile users such as construction site workers, mobile firefighters deployed to a site far from home and other first responders, or even the nomads that manage conventions in a different town every week. Think AstriCon! Rather than relying on crappy hotel WiFi service or paying an arm and a leg for installation of cable or DSL Internet service which often isn’t available anyway, now you have the flexibility to deploy a full-featured PBX at almost any temporary site with nothing more than a $30 Wi-Fi firewall/router, a PBX in a Flash Server or Raspberry Pi, and a GSM SIP trunk courtesy of GoIP. The only other ingredient you need is a little electricity. That could be a wall outlet, or a generator, or an inexpensive AC inverter for your vehicle. Did we mention it’ll work identically on the next site without spending an extra nickel. Hardware cost for the Mobile Communications Center (as shown below): about $250.

Last but not least are all of the organizations that could benefit from an SMS-based emergency messaging service. A dollar a day is a small price to pay to deploy a service that can alert the public, employees, or parents and students of emergency situations. Before you read about the next mass shooting or midnight tornado, give it some thought. We’ve already introduced SMS Blaster to make the job easy. Or you can roll your own by building a simple text file in /tmp/callees.txt with a 10-digit3 callee’s phone number on each line. Then add the following snippet to your Asterisk dialplan code and put your emergency message in line 2. You’ve just replaced a $100 a month message blasting service with a totally portable, self-managed solution. And you’ll recover your hardware costs in less than three months.
[goip-sms-blaster]

exten => s,1,Answer

exten => s,n,Set(SMSMSG="Here is where your emergency message goes.")

exten => s,n,ReadFile(callees=/tmp/callees.txt)

exten => s,n,Set(callees=${URIENCODE(${callees})})

exten => s,n,Set(callees=${REPLACE(callees,%0A,-)})

exten => s,n,Set(SMSNUM=${callees:0:10})

exten => s,n,While($[${LEN(${SMSNUM})}>9])

exten => s,n,NoOp(Here's where we send SMS message to: ${SMSNUM})

exten => s,n,Set(SMSOUT=${SMSNUM}%0A${SMSMSG})

exten => s,n,Set(SMSOUTRAW=${URIDECODE(${SMSOUT})})

exten => s,n,Set(MESSAGE(body)=${SMSOUTRAW})

exten => s,n,MessageSend(sip:goip_1)

exten => s,n,Set(callees=${callees:13})

exten => s,n,Set(SMSNUM=${callees:0:10})

exten => s,n,Set(SMSNUM=${REPLACE(SMSNUM,-,0)})

exten => s,n,EndWhile()

exten => s,n,Hangup()
How Steep Is the Learning Curve? Lucky for you, you’re not going to have to worry about the learning curve. After all, that’s why you come to Nerd Vittles, isn’t it? We’ve spent the better part of a week getting the GoIP to sit up and bark. If you’re a slow typist, it might take you 10 minutes to get everything set up and functional once you have your GoIP device and SIM card in hand. When we’re finished, you’ll have an easy way to make and receive calls through your GoIP device using any extension on your PBX. And you’ll have a simple utility to send and receive SMS messages. In fact, you’ll be able to dictate your SMS messages from any phone connected to your PBX and send them out to any number supported by SMS including the millions of Google Voice numbers. Last but not least, we’ll provide a utility to send password-protected SMS messages to GoIP and receive a return call with DISA dial tone to make outbound calls using any available trunks on your PBX.
A Word About Security. We’re a little paranoid when it comes to security so bear with us. Without impugning anyone’s integrity, suffice it to say this device is manufactured in China. Although the device reportedly runs Linux, none of its other firmware is open source, at least not that we could find. There also are three back doors into the system which can be triggered by SMS commands to the device itself. These are well documented in the GoIP User’s Manual. Whether there are other backdoors or whether the device "phones home" are questions we have neither the time nor the money to explore. Unless you do, you are well advised to treat the device in the same way you would treat a new employee on their first day at work. Don’t put the device on a private LAN in which other computers or devices on the LAN are not protected. Don’t use a SIM card with an automatic renewal feature or with authority to post charges against your credit or debit card. Change your Admin password to the device immediately. Don’t use a password you use elsewhere! Anyone can reset the device to factory defaults by knowing the default credentials and sending RESET admin in an SMS message to the device. We love the device, but be careful.
Initial Setup of the GoIP Device
To begin, you’ll need cellphone coverage in the place where you intend to connect your GoIP device. Verify this while the SIM card you plan to use is still installed in a working cellphone. Make a call and send an SMS message to verify that the site is appropriate. Next, verify that you have a place to connect your GoIP device to your LAN in the same location. Both of these are important first steps, or you’ll be wasting your time continuing on. Once the connectivity issues are out of the way, turn off your cell phone, remove the GSM SIM card, and insert it into the GoIP device with the connectors pointing downward. You should hear a click when the SIM card is properly seated. Now connect the device behind a hardware-based firewall/router that provides DHCP service. Plug an Ethernet cable into the LAN port of the GoIP device and connect it to your network. Finally, using the power adapter provided, apply power to the device. Watch the blinking lights. While booting the RUN light will flash on and off every 100 milliseconds. Once the RUN and CHANNEL lights flash GREEN once per second, you’re in business. Now use another cellphone to send a text message with the word INFO to the phone number associated with the SIM card you plugged into the GoIP Device. You should receive a return message telling you the DHCP LAN address associated with the GoIP CHANNEL port where you plugged in the SIM card. Write it down! We’re not going to use the PC port so you can ignore its IP address for now.
Asterisk Prerequisites for Today’s GoIP Project
We’ll be using PIAF-Green with Asterisk 11 and FreePBX 2.11 today so you’ll have to read between the lines if you’re using a prehistoric release or a non-FreePBX system. We’re also assuming you’ve installed Incredible PBX™ 11 which provides the necessary components to get Google’s text-to-speech and speech-to-text features working. If you’d prefer to roll your own, then start by installing Lefteris Zafiris’ GoogleTTS and Speech Recognition components for Asterisk. For PBX in a Flash users that aren’t using Incredible PBX, you can follow this tutorial to install all of the necessary components in one click.
Initial Setup of FreePBX for the GoIP Device
We’ve found that it’s easier to configure the FreePBX® side to support the GoIP, and then configure the GoIP unit. There are seven simple steps. If you don’t want SMS DISA callback support in your setup, skip the last two steps.
- Add GoIP SIP Trunk
- Add Custom SIP Settings
- Add GoIP Outbound Route
- Add GoIP Custom Destination
- Add GoIP Misc Application
- Add GoIP DISA Context
- Add GoIP DISA Misc Application
1. Start by adding a new SIP Trunk to support the GoIP device. Be sure to match the device names we’ve shown exactly, or nothing will work. Our special thanks to samyantoun for his initial work on this. Replace 192.168.0.107 with the IP address of your GoIP. Replace 77 with whatever dialing prefix you want to use to make calls through the GoIP trunk. And add the phone number associated with your GoIP in the Outbound CallerID field. If you’re using the GoIP device behind a hardware-based firewall with no Internet port exposure, then you can leave password as the secret. Otherwise, you would want something very secure!4
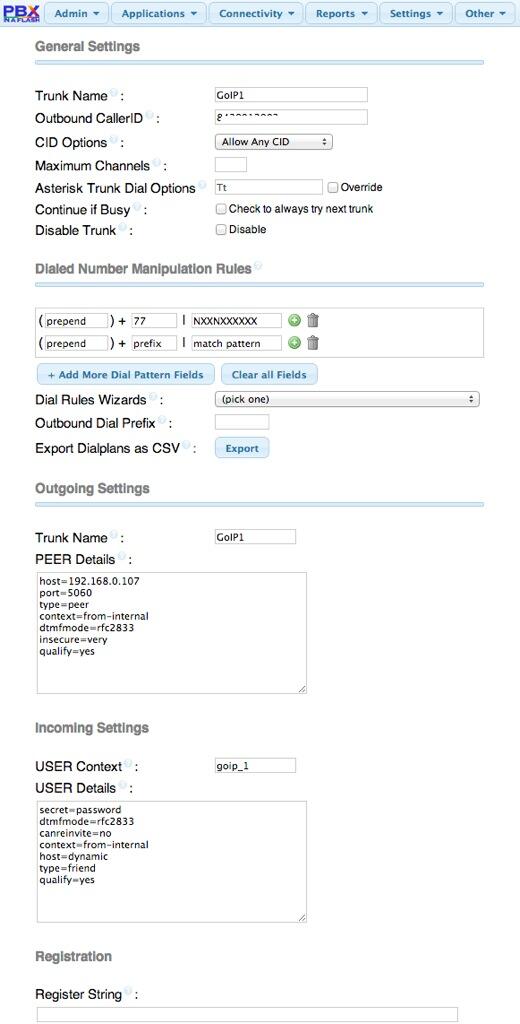
2. Add a couple of custom SIP entries at the bottom of Asterisk SIP Settings to support SMS messaging with Asterisk. Set accept_outofcall_messages=yes and outofcall_message_context=sms_message. Then Submit Changes.
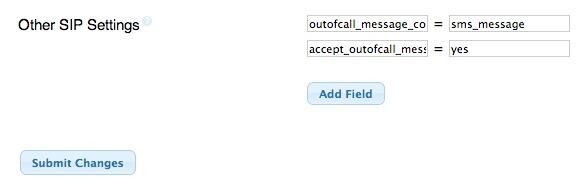
3. Add an Outbound Route to make calls using your GoIP device using the dial prefix you chose for the trunk:
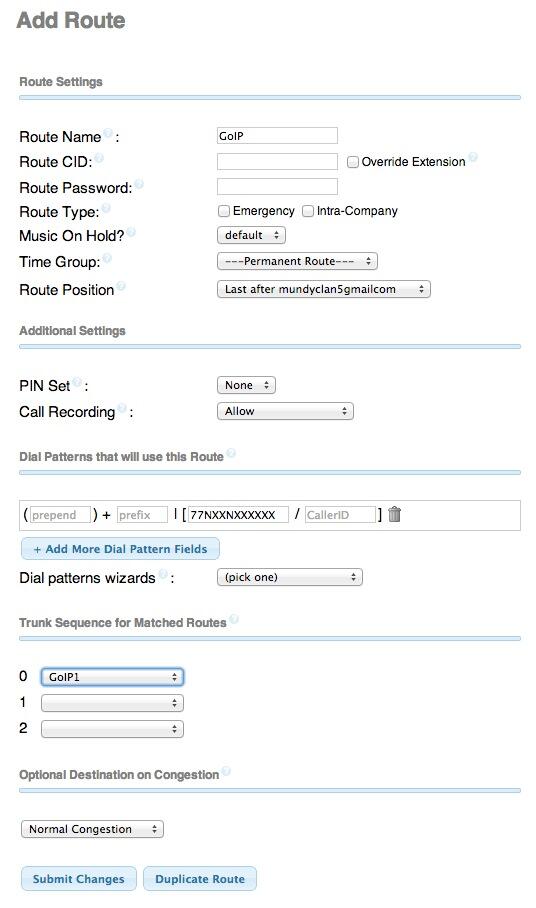
4. Next we need to add a FreePBX Custom Destination to support the Nerd Vittles speech-to-text module which we’ll be using to dictate and send SMS messages using any telephone on your PBX. Under Admin -> Custom Destination, add an entry that looks like this:
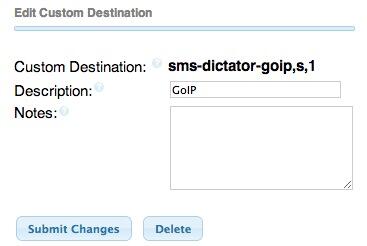
5. Then we need to associate an extension number with the custom destination we just added. We’ve chosen 4647 which spells GoIP. Choose Applications -> Misc Application and enter the following:

6. DISA is an Asterisk function that lets someone call into your PBX and obtain dial tone to place an outbound call using the available trunks on your PBX. In the case of the GoIP device, this gets a little fancier. We’ll actually be sending an SMS message with a custom password to the GoIP device, and it will in turn call the SMS sender’s number and provide DISA dialtone after the user enters a special DISA PIN. Make the PIN and password very secure. We’ll get to the password in a minute. On the FreePBX side, add a DISA context in FreePBX under Applications -> DISA that looks something like the following with a secure PIN (not the one in the example):
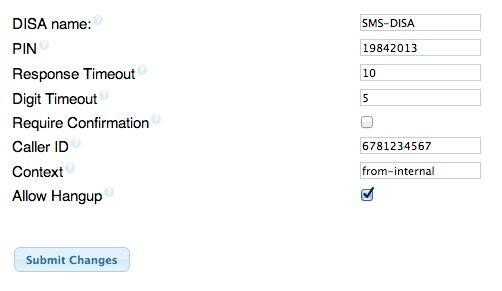
7. In order to use DISA with GoIP, we’ll need an extension associated with the DISA function. We add this number using FreePBX Misc Application. You can use any available extension number you like. Just remember what you chose when we configure the GoIP side to support SMS DISA access. Here’s what we use:
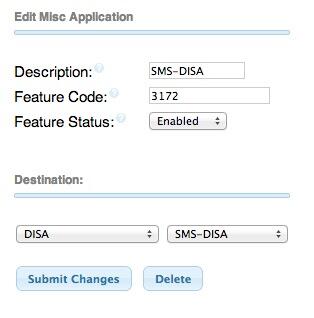
Configuration of the GoIP Device
All of the GoIP device configuration is handled using a browser pointed to the internal IP address of the GoIP. If you haven’t already done so, send an SMS message with the word INFO to the phone number associated with your GoIP device. You will get a return message with the private IP address of the unit. Using a browser, point it to the IP address and login with username admin and password admin. It’s probably a good idea to reset your unit to factory defaults before beginning the setup just to make sure you’re starting with a clean slate. Send an SMS message to the device with the words RESET admin to initialize the hardware.
As we’ve mentioned, sending the admin password to the device with the RESET keyword forces a total reset of the device so you obviously want to change this admin password immediately unless you want to risk a total stranger sending a reset command to your device. Do it now under Tools -> Change Password -> Administration Level. It’s probably a good idea to change the other passwords as well.
Next, click Configurations. This is the screen on which you set everything. The Preference pane has the country-specific settings for both the network and your cellphone carrier so set them carefully. The IMEI will default to the actual IMEI of your unit. If your cellphone carrier requires registration of a specific IMEI before your SIM card will work, then you can spoof the IMEI using the IMEI of the cell phone that was previously used with this SIM card. For the East Coast of the United States, our setup looks like this:
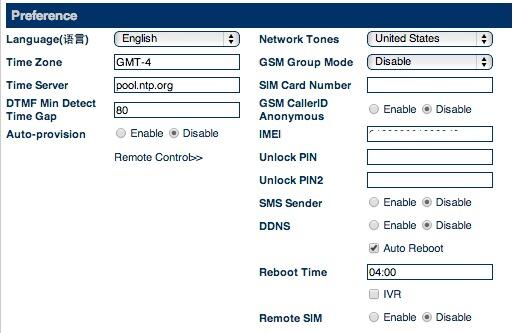
If you’re using DHCP for the GoIP, the Network Configuration pane shouldn’t require any changes. We do recommend that you lock the DHCP address to the GoIP in your router so that it doesn’t inadvertently change down the road. You will note that a PPTP VPN tunnel for the device is supported although we haven’t yet played with it.
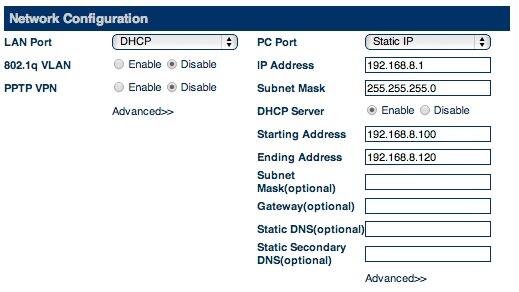
The Call Settings pane has all of your SIP settings for the GoIP. These have got to be right or nothing will work. Our setup (that works) is shown below. Start by clicking on each of the Settings and Preferences links to open up the sub-menus. Both 192.168.0.180 entries should be replaced with the IP address of your Asterisk server. The Phone Number and Authentication ID both need to be goip_1 as shown. The password is password unless you changed your secret in the FreePBX trunk setup. DTMF Signaling should be changed to Outband and DTMF Type should be RFC2833. Ours still doesn’t work reliably, but that may be the lousy cellphone signal in our office. We recommend ULAW and ALAW exclusively for the Audio Codecs. You don’t want the overhead of codec translation particularly if you’re using a Raspberry Pi. On a normal server, G.729 would obviously reduce the bandwidth of GoIP voice calls. Get it working first and then experiment! The RTP port range should be 10000-20000 to match your Asterisk default setup.
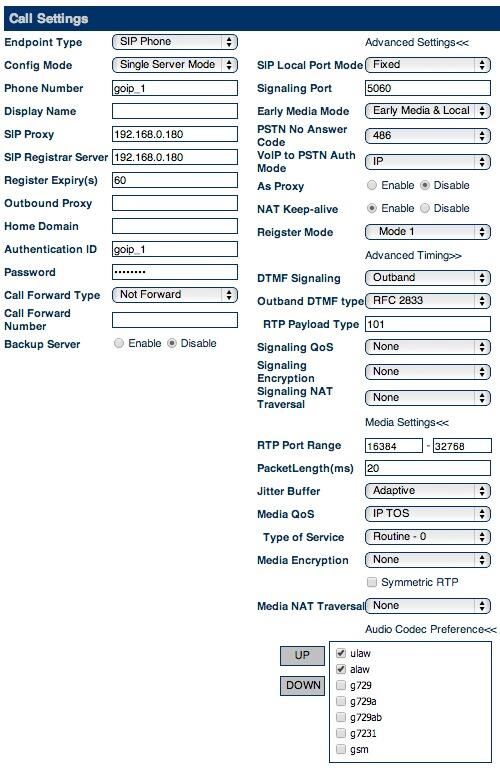
The Call Divert pane is where we configure all of the Nerd Vittles magic. Forward Number(PSTN To VoIP) should be the number on your PBX to which you want inbound GoIP calls forwarded when someone calls the cellphone number associated with your GoIP device. This could be an extension, ring group, IVR, or even the DISA number we set up above. Just be sure you have a verrrrrry secure DISA PIN if you go this route! It’s your phone bill. The SMS Mode must be changed to Relay, and SMS Forward SIP Number must be s to work with the Nerd Vittles apps.
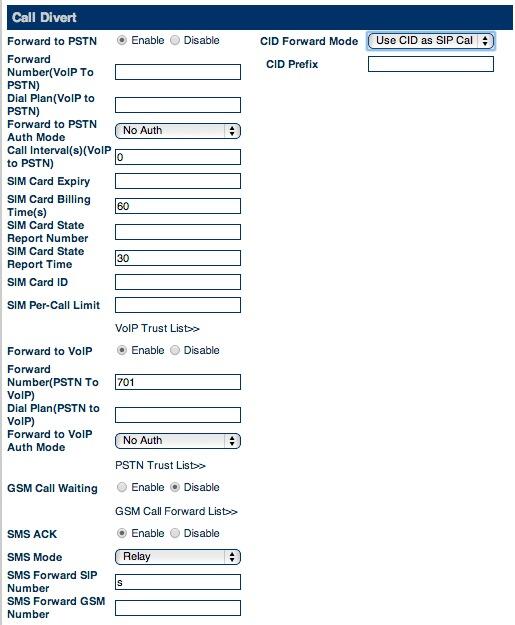
Once you have all of your settings entered, click the Save Settings link under Configurations. The unit will reload its SIP setup. It usually takes about 30 seconds. We recommend you now test the setup to make sure you can make a call to the GoIP number and have it forwarded to an extension on your Asterisk server. Then use an extension on your PBX to place an outbound call using the GoIP dial prefix you assigned above. If either call fails, check your settings for typos in both the FreePBX and GoIP configurations.
Adding the Nerd Vittles Apps to Support the GoIP Device
Now for the fun stuff. We’ve built a little shell script that sets up all of the Nerd Vittles applications we outlined above. It’s licensed as GPL2 code so you are more than welcome to make any changes or additions which you believe would be useful. We hope you’ll share them with the rest of us. The script puts everything in the proper place on Incredible PBX systems to support SMS messaging with Asterisk. You’ll be prompted for the following information:
- Email address to which to forward incoming SMS messages
- SMS number to which to forward incoming SMS messages
- Very secure password to trigger PBX callbacks
- Extension number to ring on callbacks
1. When incoming SMS messages are received by the GoIP unit, Asterisk will forward them to this email address.
2. When incoming SMS messages are received by the GoIP unit, Asterisk will forward them to this SMS number. You can disable either the forwarding email address or the forwarding SMS number (not both!) by editing the [sms_message] context in extensions_custom.conf and commenting out either of these lines with a semicolon:
exten => s,n,system(echo "SMS Message From ${SMSDID}: ${SMSMSG}"...exten => s,n,MessageSend(sip:goip_1)
3. This password is what must be sent as an SMS message to the GoIP device to trigger a return call from Asterisk. Do NOT include any spaces in the password and make it very secure!
4. This is the extension number that will be used to place the return call from Asterisk. For DISA service, it would be 3172 in today’s setup. It could also be a regular extension on your PBX if you simply want to trigger a return call from your home or office extension when you send this password via SMS to the GoIP device. Note that the home or office extension must answer the call before the return call will be placed to your SMS device or phone.
Installation. To install the components (a one-minute job!), log into your server as root and issue the following commands:
cd /root

rm GoIP-install.sh

wget http://incrediblepbx.com/GoIP-install.sh

chmod +x GoIP-install.sh

./GoIP-install.sh
If you ever need to make changes to your setup, just run the script again and answer the prompts.
Kicking the Tires. To make sure everything is working, try sending an SMS message to the GoIP with your secret password from #3 above. You should get a return call within 30 seconds. Next, from an extension on your PBX, dial 4647. Dictate a brief message and then enter a phone number for delivery of the message via GoIP to some SMS device (not your GoIP unit!). Finally, send a "Hello World" SMS message to your GoIP device. It should be forwarded to both your email address (#1) and SMS number (#2) within a few seconds. Enjoy!
Deals of the Week. There’s still an amazing deal on the street if you hurry. A new company called Copy.com is offering 20GB of free cloud storage with no restrictions on file size uploads (which are all too common with other free offers). Copy.com has free sync apps for Windows, Macs, and Linux systems. To take advantage of the offer, just click on our referral link here. We get 5GB of extra storage, too, which will help avoid another PIAF Forum disaster.
Originally published: Monday, September 30, 2013
Need help with Asterisk? Visit the PBX in a Flash Forum.

We are pleased to once again be able to offer Nerd Vittles’ readers a 20% discount on registration to attend this year’s 10th Anniversary AstriCon in Atlanta. And, if you hurry, you also can take advantage of the early bird registration discount. Here’s the Nerd Vittles Discount Code: AC13NERD.
Special Thanks to Our Generous Sponsors
FULL DISCLOSURE: ClearlyIP, Skyetel, Vitelity, DigitalOcean, Vultr, VoIP.ms, 3CX, Sangoma, TelecomsXchange and VitalPBX have provided financial support to Nerd Vittles and our open source projects through advertising, referral revenue, and/or merchandise. As an Amazon Associate and Best Buy Affiliate, we also earn from qualifying purchases. We’ve chosen these providers not the other way around. Our decisions are based upon their corporate reputation and the quality of their offerings and pricing. Our recommendations regarding technology are reached without regard to financial compensation except in situations in which comparable products at comparable pricing are available from multiple sources. In this limited case, we support our sponsors because our sponsors support us.
BOGO Bonaza: Enjoy state-of-the-art VoIP service with a $10 credit and half-price SIP service on up to $500 of Skyetel trunking with free number porting when you fund your Skyetel account. No limits on number of simultaneous calls. Quadruple data center redundancy. $25 monthly minimum spend required. Tutorial and sign up details are here.
![]() The lynchpin of Incredible PBX 2020 and beyond is ClearlyIP components which bring management of FreePBX modules and SIP phone integration to a level never before available with any other Asterisk distribution. And now you can configure and reconfigure your new Incredible PBX phones from the convenience of the Incredible PBX GUI.
The lynchpin of Incredible PBX 2020 and beyond is ClearlyIP components which bring management of FreePBX modules and SIP phone integration to a level never before available with any other Asterisk distribution. And now you can configure and reconfigure your new Incredible PBX phones from the convenience of the Incredible PBX GUI.
VitalPBX is perhaps the fastest-growing PBX offering based upon Asterisk with an installed presence in more than 100 countries worldwide. VitalPBX has generously provided a customized White Label version of Incredible PBX tailored for use with all Incredible PBX and VitalPBX custom applications. Follow this link for a free test drive!
Special Thanks to Vitelity. Vitelity is now Voyant Communications and has halted new registrations for the time being. Our special thanks to Vitelity for their unwavering financial support over many years and to the many Nerd Vittles readers who continue to enjoy the benefits of their service offerings. We will keep everyone posted on further developments.
Some Recent Nerd Vittles Articles of Interest…
- Some of our purchase links refer users to Amazon when we find their prices are competitive for the recommended products. Nerd Vittles receives a small referral fee from Amazon to help cover the costs of our blog. We never recommend particular products solely to generate Amazon commissions. However, when pricing is comparable or availability is favorable, we support Amazon because Amazon supports us. [↩]
- With apologies for the tasteless photo and pun. [↩]
- The length of the phone numbers obviously can be adjusted to meet your local requirements. Just replace the 10’s with the length of the phone numbers you wish to use. Then replace 13 with 3 more than the phone number length you chose. [↩]
- We have engineered today’s GoIP solution for users in the U.S. and Canada. It obviously will support international deployment as well by making adjustments to the dial strings and cellphone settings in both the FreePBX and GoIP configurations. [↩]
Practicing Safe SIP: Adding SIP URI and Free DID Connectivity to Asterisk
 Last year, we began our exploration of safe SIP options for Asterisk® by introducing a hybrid solution using VoIP.ms for a registered SIP trunk and IPkall for a free DID. Today, in addition to a free IPkall DID to accept incoming PSTN calls, we have a slightly different approach that provides a direct SIP URI address from Sip2Sip.info for your server. As with the original tutorial, today’s implementation preserves our Zero Internet Footprint™ design for total SIP insulation of your server from the Internet. And all of the components to deploy today’s solution are completely free.
PBX in a Flash™ has a long (safe) history in the VoIP community, and the major reason is that we constantly preach never directly exposing any ports on your Asterisk server to the Internet without implementing a WhiteList of safe IP addresses. This Zero Internet Footprint™ design keeps everybody out except a trusted, defined group on your WhiteList. For everyone else, they never see your server. So how do you receive calls?
You do it with phone numbers (DIDs) or SIP URIs tied to registered Google Voice, SIP, and IAX trunks from reputable providers. Because these trunks have constant registrations with safe service providers on the Internet, calls to these DIDs and SIP URIs can flow in and out of your server without exposing your server directly to the Internet. Callers still can contact you, but they do it through an intermediary with whom you have a registered SIP trunk. Thus, the SIP vulnerability (if there is any) remains with the SIP provider and never with your server directly.
For today’s tutorial, we’ll be using the latest and greatest PIAF-Green™ Virtual Machine featuring Asterisk 11 and FreePBX® 2.11. We also recommend installation of Incredible PBX™ 11 which includes Travelin’ Man™ 3 to provide secure WhiteList management for your Asterisk firewall. Here are links to the PIAF-Green VM with Incredible PBX 11 as well as the Travelin’ Man 3 tutorial to get you started. We recommend you configure this using a VirtualBox® virtual machine on your favorite desktop computer just to get comfortable with the setup. Then you can repeat the drill using a dedicated or cloud-based server once you’ve mastered the basics. All of today’s setup will work without making any adjustments to your hardware-based firewall which should be sitting between your desktop computer and the Internet.
Registering for a Sip2Sip Account. Once you have the VoIP platform in place with Asterisk 11, FreePBX 2.11, Incredible PBX 11, and Travelin’ Man 3, you’re ready to add a SIP trunk from Sip2Sip.info. Just sign up for a free account on their site leaving the Account Name field blank. They will email you your credentials. Click on the provided link in the email to access your new account at http://x.sip2sip.info. Your account name will consist of a 10-digit-number@sip2sip.info. To log in, use the default SIP address as shown and leave the password field blank. Then click Login Now. Immediately click on the settings tab, choose an 8-digit numeric password, disable your Voice Mailbox, and click the SAVE button. Your Sip2Sip account is now secure unless someone is lucky enough to guess your password from the 100 million possibilities. You’ll need your 10-digit SIP account number and password to set up your SIP trunk on your Asterisk 11 server in the next step so write them down and then log out of your Sip2Sip account!
FreePBX and Asterisk Configuration Overview. Using a web browser, log into FreePBX® on your server. We’ll need to create several items to get everything working. First, we’ll add a new SIP trunk with your Sip2Sip credentials to handle incoming calls. Second, we’ll add a Custom Trunk to handle outbound calls to Sip2Sip. Third, we’ll add an Inbound Route to process incoming calls. Fourth, we’ll add an Outbound Route so that you can make calls using your outbound Sip2Sip trunk. Calls to other Sip2Sip numbers are free. For the rest, you’ll pay a per minute fee. Whether to use the pay service is completely up to you! Finally, we’ll log into your server as root and add Sip2Sip to your IPtables WhiteList and make two manual adjustments to the Asterisk dialplan to accommodate Sip2Sip’s way of handling SIP calls. Then we’ll restart Asterisk, and you’re done.
- Connectivity -> Trunks -> Add SIP Trunk
- Connectivity -> Trunks -> Add Custom Trunk
- Connectivity -> Inbound Routes -> Add Incoming Route
- Connectivity -> Outbound Routes -> Add Route
- Enable Sip2Sip in your IPtables WhiteList
- Add srvlookup=yes in sip_general_custom.conf
- Set enable=yes in dnsmgr.conf
- Restart Asterisk: amportal restart
Adding Sip2Sip SIP Trunk. While logged into FreePBX 2.11, choose Connectivity -> Trunks -> Add SIP Trunk. Fill out the form like this using your Sip2Sip 10-digit number and password. Unlike some trunk setups, entering your actual 10-digit Sip2Sip number as the Outbound Caller ID is mandatory, or inbound calls will be rejected by your server. Replace 223XXXXXXX with your actual 10-digit Sip2Sip number in the five places shown below. Replace 12345678 with your actual Sip2Sip password in the two places shown below.
- Trunk Name: Sip2Sip
- Outbound Caller ID: 223XXXXXXX
- Dial Pattern: leave blank
- Trunk Name: sip2sip
- Trunk Details:
- type=peer
- canreinvite=no
- nat=yes
- qualify=yes
- domain=sip2sip.info
- fromdomain=sip2sip.info
- outboundproxy=proxy.sipthor.net
- fromuser=223XXXXXXX
- defaultuser=223XXXXXXX
- secret=12345678
- insecure=invite
- context=from-trunk
- host=sip2sip.info&81.23.228.129&81.23.228.150&85.17.186.7
- Register String: 223XXXXXXX:12345678@sip2sip.info/223XXXXXXX
Adding Sip2Sip Custom Trunk for Outbound Calling. While logged into FreePBX 2.11, choose Connectivity -> Trunks -> Add Custom Trunk. Fill out the form like this using the entries below:
- Trunk Name: sip2sip-out
- Dialed Number Matched Pattern: 223NXXXXXX
- Custom Dial String: SIP/$OUTNUM$@sip2sip.info
Adding Inbound Route. Next you need to tell FreePBX how to process incoming calls from your Sip2Sip number. Choose Connectivity -> Inbound Routes -> Add Incoming Route and fill out the form to look like this. Change the destination to match whatever you prefer: an extension, ring group, IVR, etc. If you followed last week’s tutorial to install Lenny Encore, then you can choose Lenny as your destination as well.
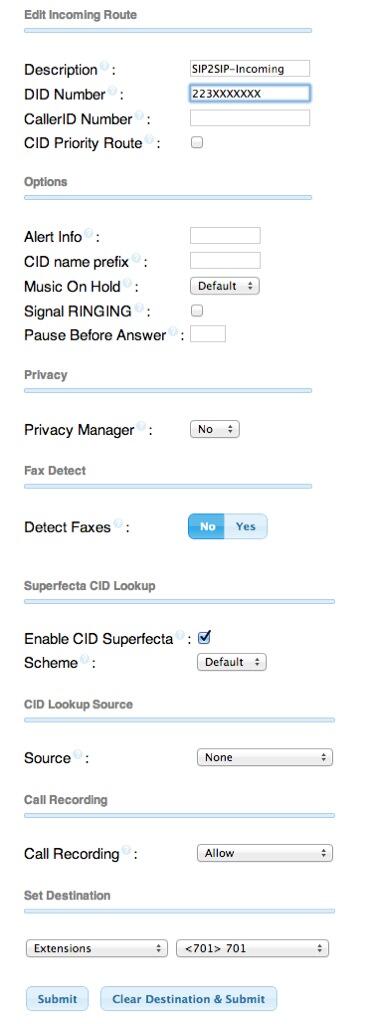
Adding Outbound Route. Next you need to tell FreePBX how to process outbound calls to your Sip2Sip account. Choose Connectivity -> Outbound Routes -> Add Route and fill out the form to look like this. After you have saved your entries, make certain that you drag the sip2sip-out route to the top of your Outbound Route List (on the right side). Otherwise, 10-digit Sip2Sip calls may inadvertently be processed by one of your other trunks that handles 10-digit numbers. The 3333 and 4444 numbers are test accounts at Sip2Sip to enable you to try out connectivity.
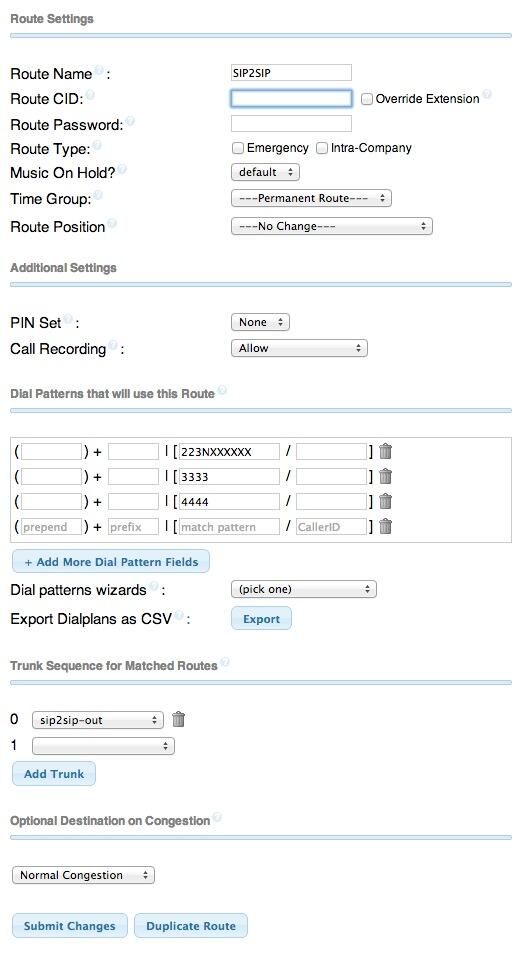
Adding Sip2Sip to Your IPtables WhiteList. We’re assuming you already have installed Travelin’ Man 3 and secured your server by running /root/secure-iptables. If not, start there. Now we need to enable UDP SIP connectivity for Sip2Sip in your WhiteList by running the following commands while logged in as root:
/root/add-fqdn sip2sip sip2sip.info

/root/add-ip sip2sip1 81.23.228.129

/root/add-ip sip2sip2 81.23.228.150

/root/add-ip sip2sip3 85.17.186.7
Making Asterisk Dialplan Adjustments. While still logged into your server as root, issue the following commands to finish up enabling Sip2Sip URI support in Asterisk. The last command verifies that your Sip2Sip trunk is actually registered.
echo "enable=yes" >> /etc/asterisk/dnsmgr.conf

echo "srvlookup=yes" >> /etc/asterisk/sip_general_custom.conf

amportal restart

asterisk -rx "sip show registry"

Adding an IPkall DID for Your SIP URI. We’ve now completed all the steps necessary to receive incoming SIP URI calls using your new Sip2Sip URI: 323XXXXXXX@sip2sip.info. Anyone in the world can dial that SIP URI from a SIP phone, and the calls will be answered by your server. But suppose we’d also like folks to be able to pick up a Plain Old Telephone and call using Sip2Sip.info to route the incoming call through the SIP URI. Here’s the easy way to do it. Just sign up for a free DID at www.ipkall.com. After choosing an area code for your free number, you’ll be prompted for the following information. Here’s what you’d enter using today’s example:
- Sip2Sip Phone Number: 323XXXXXXX
- SIP Proxy: sip2sip.info
- Email Address: your-email-address
- Password: some-password-to-get-back-into-your-account
Once you’ve completed the form, submit it and wait for your new phone number to be delivered in your email. You should get it within a couple minutes so check your spam folder if you don’t see it. Congratulations! You’ve done everything you need to do for anyone to call you using either your Sip2Sip URI or your new DID number from IPkall.
It’s worth noting that IPkall recycles DIDs that aren’t used for 30 days. If you use Incredible PBX, the easiest way to assure you don’t lose your number is to set up a weekly recurring Telephone Reminder that calls your IPkall number.
Adding SIP URI Dialing with Your Own Domain. Thanks to a great tip from @w1ve on the PIAF Forum, you now can create free SIP URIs using your own domain. Here’s how.
Troubleshooting. If you experience intermittent congestion issues with attempted connections to your SIP URI, try the [from-sip-external] trick outlined in our PIAF Forum posting.
Add Free Calls to 40 Million Asterisk Servers with e164.org. While we’re on a roll of free calling, here’s a simple way to add free calling to 40 million Asterisk servers around the world. Just add your name and phone numbers to the e164.org registry at no cost and configure FreePBX with ENUM support. Then outbound calls to numbers in the e164 registry will always be free as well. The whole setup takes less than 10 minutes. Here’s how.
You already have a SIP URI for your Asterisk server from the Sip2Sip setup above. Now let’s get you signed up with an account on e164.org. Go to the web site and click the Sign Up tab. Go through the sign up drill and then log into your new account. Then click the Phone Numbers tab and add your IPkall phone number to e164. If you have additional DIDs, enter the area code and number for each of them. Then click the Next button. You’ll be warned about not having the number you’ve specified redirected to an IVR. If you already have this DID redirected to an IVR, change the routing temporarily to an extension that you can answer to obtain your PIN before you press Next to proceed. You’ll then be prompted for the SIP address to contact your server. Leave the default SIP protocol and plug in the address you were assigned by Sip2Sip. As soon as you click the Next button, your phone should start to ring, but there may not be a message when you answer. Hang up and wait for the second call within 15 minutes. It will include your PIN. Now click on the Phone Numbers tab and update your phone entry by choosing Enter PIN and typing your assigned PIN. Your phone number now has been activated with the e164 service. To complete the setup, you’ll want to click on the Do Not Call option and make your selections. You also can decide whether to list yourself in the ENUM White Pages directory.
Remember that the real purpose of this drill is to avoid charges when you place outbound calls to numbers in the ENUM directory. We merely added your numbers to e164.org so that others could benefit as well. So the final step before you can start saving money is to configure FreePBX to handle ENUM lookups for outbound calls from your server. One more observation may be helpful. You’ll recall that one of the limitations of FreePBX has always been that once an outbound route was chosen for a call, if the call was completed using the first destination trunk in that route, then the call processing ended there. ENUM adds a new wrinkle because we basically want to connect to ENUM to check for a free route and, if no matching entry is found, then we want the next trunk to process the call. As luck would have it, FreePBX has been tweaked to allow this scenario. All you have to do is create an ENUM trunk and then place it first in your sequence of trunks for each of your outbound routes. If an ENUM entry is found for the number you’re calling, the call will be routed as a free call with a direct SIP connection. Otherwise, the call processing will continue and the call will be routed using the next trunk specified in your outbound route.
There are two steps in FreePBX to implement ENUM. First, create a special ENUM trunk. Second, adjust your Outbound Routes to process outbound calls using the ENUM trunk first. Then the series of trunks you already have specified in each outbound route will be triggered if there is no ENUM path for your call. NOTE: You obviously wouldn’t do this for an emergency 911 outbound route.

In FreePBX, click Connectivity -> Trunks, Add ENUM Trunk. Enter your desired CallerID for these calls. Set a maximum number of channels, if desired, and then leave the other entries blank in most cases. Save your settings and reload your dialplan. Now click Connectivity -> Outbound Routes and adjust the sequence of trunks for each of your existing routes. Be sure to put ENUM in the top position of each desired route. Also make certain that all calls are dialed with a dial string of 1NXXNXXXXXX or NXXNXXXXXX with a Prepend entry of 1 as shown below. Enjoy!
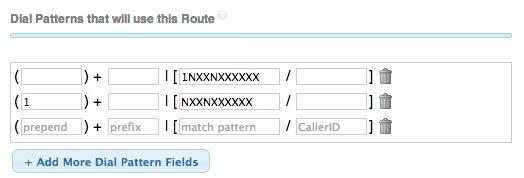
 Don’t forget to List Yourself in Directory Assistance so everyone can find you by dialing 411. And add your new number to the Do Not Call Registry to block telemarketing calls. Or just call 888-382-1222 from your new number.
Deals of the Week. There’s still one amazing deal on the street, but you’d better hurry. A new company called Copy.com is offering 20GB of free cloud storage with no restrictions on file size uploads (which are all too common with other free offers). Copy.com has free sync apps for Windows, Macs, and Linux systems. To take advantage of the offer, just click on our referral link here. We get 5GB of extra storage which will help avoid another PIAF Forum disaster.
Originally published: Monday, August 19, 2013
Need help with Asterisk? Visit the PBX in a Flash Forum.

Don’t miss the first-ever FreePBX World on August 27-28 at the Mandalay Bay in Las Vegas. For complete details, see this post on the FreePBX blog.
We are pleased to once again be able to offer Nerd Vittles’ readers a 20% discount on registration to attend this year’s 10th Anniversary AstriCon in Atlanta. Here’s the Nerd Vittles Discount Code: AC13NERD.
Special Thanks to Our Generous Sponsors
FULL DISCLOSURE: ClearlyIP, Skyetel, Vitelity, DigitalOcean, Vultr, VoIP.ms, 3CX, Sangoma, TelecomsXchange and VitalPBX have provided financial support to Nerd Vittles and our open source projects through advertising, referral revenue, and/or merchandise. As an Amazon Associate and Best Buy Affiliate, we also earn from qualifying purchases. We’ve chosen these providers not the other way around. Our decisions are based upon their corporate reputation and the quality of their offerings and pricing. Our recommendations regarding technology are reached without regard to financial compensation except in situations in which comparable products at comparable pricing are available from multiple sources. In this limited case, we support our sponsors because our sponsors support us.
BOGO Bonaza: Enjoy state-of-the-art VoIP service with a $10 credit and half-price SIP service on up to $500 of Skyetel trunking with free number porting when you fund your Skyetel account. No limits on number of simultaneous calls. Quadruple data center redundancy. $25 monthly minimum spend required. Tutorial and sign up details are here.
![]() The lynchpin of Incredible PBX 2020 and beyond is ClearlyIP components which bring management of FreePBX modules and SIP phone integration to a level never before available with any other Asterisk distribution. And now you can configure and reconfigure your new Incredible PBX phones from the convenience of the Incredible PBX GUI.
The lynchpin of Incredible PBX 2020 and beyond is ClearlyIP components which bring management of FreePBX modules and SIP phone integration to a level never before available with any other Asterisk distribution. And now you can configure and reconfigure your new Incredible PBX phones from the convenience of the Incredible PBX GUI.
VitalPBX is perhaps the fastest-growing PBX offering based upon Asterisk with an installed presence in more than 100 countries worldwide. VitalPBX has generously provided a customized White Label version of Incredible PBX tailored for use with all Incredible PBX and VitalPBX custom applications. Follow this link for a free test drive!
Special Thanks to Vitelity. Vitelity is now Voyant Communications and has halted new registrations for the time being. Our special thanks to Vitelity for their unwavering financial support over many years and to the many Nerd Vittles readers who continue to enjoy the benefits of their service offerings. We will keep everyone posted on further developments.
Some Recent Nerd Vittles Articles of Interest…
Introducing NeoRouter 1.9 VPN: Still a Shining Star
In a previous article, we introduced PPTP VPNs for interconnecting remote users and branch offices to a central network hub. Known as a hub-and-spoke VPN, the advantage of this design is it lets remote users participate as peers in an existing home office LAN. It’s simple to set up and easy to maintain. The drawback is vulnerability to man-in-the-middle attacks.

Today, we want to revisit the more traditional client-server VPN which relies upon a central server but uses a star topology to connect remote nodes. The major difference is that only registered devices participate in the virtual private network so there is no direct access to other machines on the LANs of the registered devices. If you have servers scattered all over the countryside, however, this is an excellent way to manage and interconnect them. All data and communications between the nodes can then be routed through the encrypted VPN tunnel for rock-solid security and NSA avoidance. Well, maybe and maybe not…
https://twitter.com/chrisVEGGIE16/status/364463018647629824
With NeoRouter’s latest 1.9 (free) software, you can set up your VPN server using a PC, a Mac, a Linux or FreeBSD machine, OpenWrt Backfire, Tomato, or even a Raspberry Pi. VPN clients are available for PCs, Macs, Linux and FreeBSD machines, Raspberry Pi, OpenWrt, Tomato as well as Android and iOS phones and tablets. There’s even an HTML5 web application in addition to a Chrome browser plug-in. With the OpenWrt and Tomato devices or if you’re an extreme techie, you can broaden your NeoRouter star configuration to include bridging of remote LANs. See pp. 47-50 of the NeoRouter User’s Manual.
You can interconnect up to 256 devices at no cost. For $999, you can enlarge your VPN to support 1,000 devices. Screen sharing, remote desktop connections, HTTP, and SSH access all work transparently using private IP addresses of the VPN nodes which are automatically assigned in the 10.0.0.0 private network.


Several years ago, we kissed Hamachi goodbye. Suffice it to say, LogMeIn put the squeeze on the free version to the point that it became next to worthless. In fact, you’d be hard-pressed to find any mention of a free version of Hamachi (other than a trial edition) on LogMeIn’s current web site. Here’s a feature comparison which says it better than we could:
Today we are introducing the second generation of the NeoRouter VPN solution. We have a simple installation script that works with any current PBX in a Flash™ server. It’s suitable for use on a dedicated server or running as a virtual machine. Whether to run NeoRouter 1.9 server on a dedicated machine is your call. Keep in mind that a dedicated platform isolates your VPN server from your PBX which generally is a better network strategy. Regardless of the installation scenario you choose, remember that neither option requires exposure of your entire server to the Internet. Only a single TCP port needs to be opened in your hardware-based firewall and IPtables Linux firewall.
NeoRouter Setup with PIAF™. We’re assuming you already have a PBX in a Flash server set up behind a hardware-based firewall. If not, start there. Next, we’ll need to download and run the installer for your new NeoRouter Server. It also installs the client. Just log into your server as root and issue the following commands:
wget http://incrediblepbx.com/install-neorouter
chmod +x install-neorouter
./install-neorouter
The installer will walk you through these five installation steps, but we’ll repeat them here so you have a ready reference down the road.
First, on your hardware-based firewall, map TCP port 32976 to the private IP address of your PIAF server. This tells the router to send all NeoRouter VPN traffic to your PIAF server when it hits your firewall. If you forget this step, your NeoRouter VPN will never work!
Second, we’re going to use your server’s public IP address as the destination for incoming traffic to your NeoRouter VPN. If this is a dynamic IP address, you’ll need an FQDN that’s kept current by a service such as DynDNS.com.
Third, each administrator and user is going to need a username to access your NeoRouter VPN. You can use the same credentials to log in from multiple client machines, something you may or may not want to do. We’re going to set up credentials for one administrator as part of the install. You can add extra ones by adding entries with one of the following commands using the keyword admin or user. Don’t use any special characters in the username and password!
nrserver -adduser username password admin
nrserver -adduser username password user
Fourth, make up a very secure password to access your NeoRouter VPN. No special characters.
You’re done. Review your entries very carefully. If all is well, press Enter. If you blink, you may miss the completion of the install process. It’s that quick.
Fifth, after your NeoRouter 1.9 VPN is installed, you can optionally go to the NeoRouter web site and register your new VPN by clicking Create Standalone Domain. Make up a name you can easily remember with no periods or spaces. You’ll be prompted for the IP address of your server in the second screen. FQDNs are NOT permitted.
When a VPN client attempts to login to your server, the server address is always checked against this NeoRouter database first before any attempt is made to resolve an IP address or FQDN using DNS. If no matching entry is found, it will register directly to your server using a DNS lookup of the FQDN. Whether to register your VPN is totally up to you. Logins obviously occur quicker using this registered VPN name, but logins won’t happen at all if your server’s dynamic IP address changes and you’ve hard-coded a different IP address into your registration at neorouter.com.
Setting Up a NeoRouter Client. As mentioned previously, there are NeoRouter clients available for almost every platform imaginable, including iPhones, iPads, and our beloved Raspberry Pi. So Step #1 is to download whatever clients are appropriate to meet your requirements. Here’s the NeoRouter Download Link. Make sure you choose a client for the Free version of NeoRouter. And make sure it is a version 1.9 client! Obviously, the computing platform needs to match your client device. The clients can be installed in the traditional way with Windows machines, Macs, etc. Older NeoRouter 1.7 clients still work with the new 1.9 server; however, the Android client is much improved and now provides the same functionality as the Mac and Windows clients. In short, you can use your NeoRouter VPN tunnel to connect to another resource using SSH, VoIP clients, and web browsers.
CentOS NeoRouter Client. As part of the installation above, we have automatically installed the NeoRouter client for your particular flavor of CentOS 6, 32-bit or 64-bit. In order to access resources on your NeoRouter server from other clients, you will need to activate the client on your server as well. This gets the server a private IP address in the 10.0.0.0 network.
To activate the client, type: nrclientcmd. You’ll be prompted for your Domain, Username, and Password. You can use the registered domain name from neorouter.com if you completed step #5. Or you can use the private IP address of your server. If your router supports hairpin NAT, you can use the public IP address or server’s FQDN, if you have one. After you complete the entries, you’ll get a display that looks something like this:

To exit from NeoRouter Explorer, type: quit. The NeoRouter client will continue to run so you can use the displayed private IP addresses to connect to any other online devices in your NeoRouter VPN. All traffic from connections to devices in the 10.0.0.0 network will flow through NeoRouter’s encrypted VPN tunnel. This includes inter-office SIP and IAX communications between Asterisk® endpoints.
Admin Tools for NeoRouter. Here are a few helpful commands for monitoring and managing your NeoRouter VPN.
Browser access to NeoRouter Configuration Explorer (requires user with Admin privileges)
Browser access to NeoRouter Network Explorer (user with Admin or User privileges)
Manage your account on line at this link
To access your NeoRouter Linux client: nrclientcmd
To restart NeoRouter Linux client: /etc/rc.d/init.d/nrservice.sh restart
To restart NeoRouter Linux server: /etc/rc.d/init.d/nrserver.sh restart
To set domain: nrserver -setdomain YOUR-VPN-NAME domainpassword
For a list of client devices: nrserver -showcomputers
For a list of existing user accounts: nrserver -showusers
For the settings of your NeoRouter VPN: nrserver -showsettings
To add a user account: nrserver -adduser username password user
To add admin account: nrserver -adduser username password admin
Test VPN access: http://www.neorouter.com/checkport.php
For a complete list of commands: nrserver –help
To change client name from default pbx.local: rename-server OR…
- Edit /etc/hosts
- Edit /etc/sysconfig/network
- Edit /etc/sysconfig/network-scripts/ifcfg-eth0
- Edit /etc/asterisk/vm_general.inc
- reboot
For the latest NeoRouter happenings, follow the NeoRouter blog on WordPress.com.
Upgrading NeoRouter 1.7 Server to 1.9. If you followed our previous tutorial to install NeoRouter 1.7 Server, then upgrading to version 1.9 is easy. Log into your NeoRouter 1.7 server as root and download either the 32-bit or 64-bit 1.9 server software for your operating system. Then issue the following commands:
/etc/rc.d/init.d/nrserver.sh stop

rpm -Uvh nrserver-1.9*

/etc/rc.d/init.d/nrserver.sh start

chkconfig nrserver.sh on
GPL2 License. The install-neorouter application is open source software licensed under GPL2. The NeoRouter Server and Client software is freeware but not open source. This installer has been specifically tailored for use on PBX in a Flash servers, but it can be adjusted to work with virtually any Linux-based Asterisk system. If you make additions or changes, we hope you’ll share them on the PIAF Forum for the benefit of the entire VoIP community. Enjoy!
Deals of the Week. There are a few amazing deals still on the street, but you’d better hurry. First, for new customers, Sangoma is offering a board of your choice from a very impressive list at 75% off. For details, see this thread on the PIAF Forum. Second, a new company called Copy.com is offering 20GB of free cloud storage with no restrictions on file size uploads (which are all too common with other free offers). Copy.com has free sync apps for Windows, Macs, and Linux systems. To take advantage of the offer, just click on our referral link here. We get 5GB of extra storage, too, which will help avoid another PIAF Forum disaster. Finally, O’Reilly has over 1,000 Packt Ebooks on sale for 50% off until August 15. Better hurry!
Originally published: Tuesday, August 6, 2013
Need help with Asterisk? Visit the PBX in a Flash Forum.
Don’t miss the first-ever FreePBX World on August 27-28 at the Mandalay Bay in Las Vegas. For complete details, see this post on the FreePBX blog.
We are pleased to once again be able to offer Nerd Vittles’ readers a 20% discount on registration to attend this year’s 10th Anniversary AstriCon in Atlanta. Here’s the Nerd Vittles Discount Code: AC13NERD.
Special Thanks to Our Generous Sponsors
FULL DISCLOSURE: ClearlyIP, Skyetel, Vitelity, DigitalOcean, Vultr, VoIP.ms, 3CX, Sangoma, TelecomsXchange and VitalPBX have provided financial support to Nerd Vittles and our open source projects through advertising, referral revenue, and/or merchandise. As an Amazon Associate and Best Buy Affiliate, we also earn from qualifying purchases. We’ve chosen these providers not the other way around. Our decisions are based upon their corporate reputation and the quality of their offerings and pricing. Our recommendations regarding technology are reached without regard to financial compensation except in situations in which comparable products at comparable pricing are available from multiple sources. In this limited case, we support our sponsors because our sponsors support us.
BOGO Bonaza: Enjoy state-of-the-art VoIP service with a $10 credit and half-price SIP service on up to $500 of Skyetel trunking with free number porting when you fund your Skyetel account. No limits on number of simultaneous calls. Quadruple data center redundancy. $25 monthly minimum spend required. Tutorial and sign up details are here.
![]() The lynchpin of Incredible PBX 2020 and beyond is ClearlyIP components which bring management of FreePBX modules and SIP phone integration to a level never before available with any other Asterisk distribution. And now you can configure and reconfigure your new Incredible PBX phones from the convenience of the Incredible PBX GUI.
The lynchpin of Incredible PBX 2020 and beyond is ClearlyIP components which bring management of FreePBX modules and SIP phone integration to a level never before available with any other Asterisk distribution. And now you can configure and reconfigure your new Incredible PBX phones from the convenience of the Incredible PBX GUI.
VitalPBX is perhaps the fastest-growing PBX offering based upon Asterisk with an installed presence in more than 100 countries worldwide. VitalPBX has generously provided a customized White Label version of Incredible PBX tailored for use with all Incredible PBX and VitalPBX custom applications. Follow this link for a free test drive!
Special Thanks to Vitelity. Vitelity is now Voyant Communications and has halted new registrations for the time being. Our special thanks to Vitelity for their unwavering financial support over many years and to the many Nerd Vittles readers who continue to enjoy the benefits of their service offerings. We will keep everyone posted on further developments.
Some Recent Nerd Vittles Articles of Interest…
Free Asterisk Solutions
