
Home » Technology » Networking (Page 8)
Category Archives: Networking
The Most Versatile VoIP Provider: FREE PORTING

 JUST RELEASED: Visit the Incredible PBX Wiki
WebRTC: Asterisk Joins the Brave New World of Real Time Communications
This week we’ll be wading into the world of real time communications and the Asterisk® 11 implementation of WebRTC, a JavaScript API that makes it easy to build click-to-call systems and softphone interfaces using nothing more than a web page. To simplify the task of creating an Asterisk 11/WebRTC platform, we’ve created a free virtual appliance for you that can be deployed in a matter of minutes on any Windows®, Mac®, Linux® or Solaris® desktop using Oracle’s VirtualBox®. In producing this WebRTC implementation, the Asterisk Dev Team has introduced an impressive new set of (stable) features formerly lacking in Asterisk: SRTP for secure communications, ICE, STUN, and TURN to allow NAT clients to better communicate with Asterisk. As the old saying goes, a picture is worth a thousand words. So let’s begin with a one-minute video that actually demonstrates Asterisk WebRTC in action. Using nothing more than a Chrome browser, we’re connecting to a web site hosted on the PBX in a Flash™ appliance to dial a news application that’s part of the included Incredible PBX™ 11 build.
Before we walk you through deploying your own WebRTC platform with Asterisk 11, let’s quickly cover some of the WebRTC basics as they apply in the Asterisk environment.

Rolling Your Own. If you’re one of the purists that prefers to roll your own server, then the starting point for your build should be the Asterisk Wiki. The other important component is sipml5, Doubango Telecom‘s terrific HTML5 SIP client. It’s the actual interface demonstrated in the YouTube video above. And this link provides a failsafe recipe for bringing up WebRTC on any Asterisk 11 server. Our appliance just saves you the one-hour hassle. We’ve chosen not to deploy WebRTC2SIP, the middleware that’s currently necessary if you want to add video support to Asterisk WebRTC. And our current build only works with the latest Chrome browser; however, WebRTC4all is available if you prefer Safari, Opera, Firefox, or Internet Explorer. All of the documentation for these components is provided in the links above for our pioneers.
Why WebRTC? Some of you may be asking, "What’s the big deal? Why would I want to deploy WebRTC?" The short answer is that it eliminates the need to install and configure a proprietary softphone on every customers’ desktop computer before they can communicate. Instead, all they need is a web browser that supports Real-Time Communications. By pointing their browser to a server address that you provide, the customer instantly gains a communications platform that’s as feature-rich as you choose to make it. And it’s comparable to the dedicated clients of old… without the cost or hassle of marrying a softphone to every customer’s particular desktop operating system! And your web page could easily provide a directory of supported contact names and numbers as part of the user interface.
http://www.youtube.com/watch?v=MsAWR_rJ5n8
The other beauty of WebRTC is it allows you to create your own (secure) Skype-like communications system without a Man in the Middle. And all you need is a browser at both ends. The WebRTC video above demonstrates a video conversation between a Chrome user at Google and a Firefox user at Mozilla.
Deploying PIAF-Green-WebRTC. So much for the theory. Let’s get your own server set up so you can experiment with this yourself. Here are the steps. It’s about a 10-minute procedure once you’ve downloaded our virtual machine appliance from SourceForge.
- Install Oracle’s VirtualBox on your Desktop computer
- Download PIAF-Green-WebRTC
- Import PIAF-Green-WebRTC into VirtualBox
- Start the PIAF-Green-WebRTC Appliance
- Using Chrome, Access the WebRTC Page Hosted on PIAF-Green-WebRTC
- Configure sipml5 to Make a Connection Using an Asterisk Extension
- Place Your First Call
1. Install Oracle’s VirtualBox. Download the VirtualBox installer for your desktop platform from VirtualBox.org. Run the installer and accept the default settings. For details, here’s a link to Oracle’s VM VirtualBox User Manual.
2. Download PIAF-Green-WebRTC. To get PIAF-Green-WebRTC installed on your desktop is quick and easy. Because the image tips the scales at over 2GB and due to the 2GB file size limit on many systems, we’ve chosen to split the download into two pieces. You need both of them! Just download them onto any flavor desktop from SourceForge. Once you’ve downloaded the two files, reassemble them into a single file known as an Open Virtualization Appliance (.ova). Then verify the checksums for the reassembled file to be sure everything is in its proper place. Finally, double-click on the .ova file which will initiate the import process into VirtualBox.
So let’s begin by downloading the two halves from SourceForge: PIAF20631aa and PIAF20631ab.
The reassembly procedure depends upon your desktop operating system. For Windows PCs, you’ll need to drop down to the Command Prompt, change to the directory in which you downloaded the two files, and type the following command:
copy /b PIAF20631aa + PIAF20631ab PIAF-Green-WebRTC.ova
To check the MD5/SHA1 checksums in Windows, download and run Microsoft’s File Checksum Integrity Verifier.
For Mac or Linux desktops, open a Terminal window, change to the directory in which you downloaded the two files, and type the following commands:
cat PIAF20631a{a..b} > PIAF-Green-WebRTC.ova

md5 PIAF-Green-WebRTC.ova (use md5sum for Linux)

openssl sha1 PIAF-Green-WebRTC.ova
The MD5 checksum for PIAF-Green-WebRTC.ova is 946c149c6adb53602ccfcd3ace10e13b. The SHA1 checksum is 285a5b999c761fcbef13d1a97b4c335a81e1cb0d. If you have a match, proceed. Otherwise, rinse and repeat.
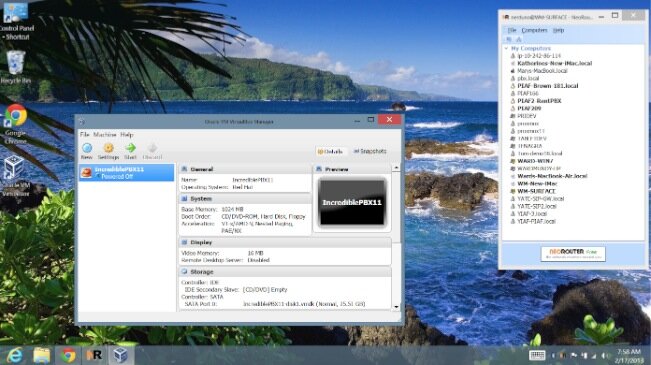
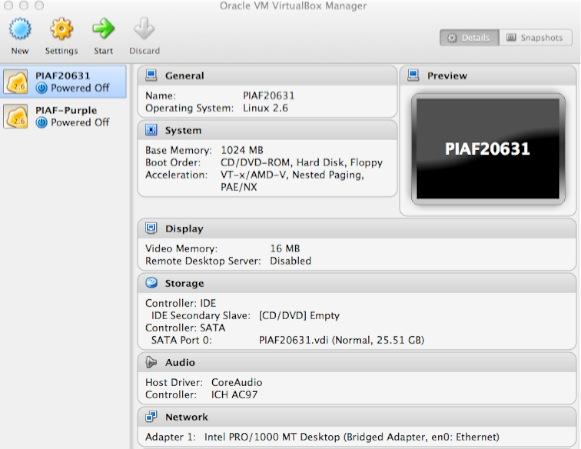
3. Import PIAF-Green-WebRTC into VirtualBox. You only perform the import step one time. Once imported into VirtualBox, PIAF-Green-WebRTC is ready to use. There’s no further installation required, just like an OpenVZ template… only better. Double-click on the .ova file you downloaded to begin the procedure and load VirtualBox. When prompted, be sure to check the Reinitialize the Mac address of all network cards box. Read and accept the license agreement. Then click the Import button. Once the import is finished, you’ll see a new PIAF-Green-WebRTC virtual machine in your VM List on the VirtualBox Manager Window. You need to make a couple of one-time adjustments to the PIAF-Green-WebRTC Virtual Machine configuration to account for differences in sound and network cards on different host machines.
Click on PIAF-Green-WebRTC Virtual Machine in the VM List. Then click Settings -> Audio and check the Enable Audio option and choose your sound card. Save your setup by clicking the OK button. Next click Settings -> Network. For Adapter 1, check the Enable Network Adapter option. From the Attached to pull-down menu, choose Bridged Adapter. Then select your network card from the Name list. Then click OK to save your setup. Finally, click Settings -> System, uncheck Hardware clock in UTC time, and click OK. That’s all the configuration that is necessary for the PIAF-Green-WebRTC Virtual Machine. If you blinked, you probably missed it.
4. Start the PIAF-Green-WebRTC Appliance. Once you’ve imported and configured your new Virtual Machine, you’re ready to go. Highlight the appliance in the VM List on the VirtualBox Manager Window and click the Start button. The boot procedure with CentOS 6.3 will begin just as if you had installed PBX in a Flash and Incredible PBX on a standalone machine. You’ll see a couple of dialogue boxes pop up that explain the keystrokes to move back and forth between your host operating system desktop and Incredible PBX.
Here’s what you need to know. To work in the Virtual Machine, just left-click your mouse while it is positioned inside the VM window. To return to your host operating system desktop, press the right Option key on Windows machines or the left Command key on any Mac. For other operating systems, read the dialogue boxes for instructions on moving around. Always shut down your virtual machine gracefully! Click in the VM window with your mouse, log in as root, and type: shutdown -h now. Or, from the VirtualBox Manager Window, Ctl-Click on the PIAF-Green-WebRTC VM and choose Close -> ACPI Shutdown.
Always run Virtual Machines behind a hardware-based firewall with no Internet port exposure!
To begin, position your mouse over the VM window and left-click. Once the virtual machine has booted, log in as root with password as the password. Change your root password immediately by typing passwd at the command prompt. Now set up a secure maint password for FreePBX as well. Type passwd-master. If you’re not in the Eastern U.S. time zone, then you’ll want to adjust your timezone setting so that reminders and other time-sensitive events happen at the correct time. Issue the following command to pick your time zone: /root/timezone-setup. Now type status and write down the IP address of your appliance. Finally, edit /etc/asterisk/sip_custom.conf and replace the secret=8000 entry with a very secure password. This is your WebRTC extension password. Restart Asterisk: amportal restart.
5. Access WebRTC Page Hosted on PIAF-Green-WebRTC Using the latest Chrome browser from a machine on the same subnet as your appliance, point to the WebRTC web page of your appliance using the actual IP address of your virtual machine: http://192.168.0.141/myphone/call.htm.
6. Configure sipml5 to Make a Connection to Asterisk. There are two configuration steps before you can log in and start making calls through your Asterisk server. First, click on the Expert Mode button. Fill out the form as shown below using the actual IP address of your server. Click Save when you’re finished, close this browser window, and return to the main WebRTC page.
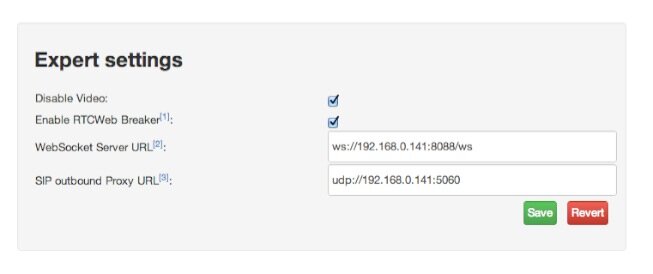
Next, fill out the Registration section using the actual IP address of your server and the extension 8000 password that you created above. Private Identity is 8000, Public Identity is sip:8000@ipaddress, Realm is Asterisk ipaddress.

Once you’ve completed your entries, click Login to make a connection to your Asterisk server.
7. Placing a Call with WebRTC. Once you’re logged in, it’s just as if you had registered a softphone to your Asterisk server. Calls from other extensions can reach you by dialing extension 8000. And you can place outbound calls using the Call Control panel. To demonstrate how this works, try the following. To retrieve Today’s News Headlines, enter 951. Then click the Call button. To retrieve the latest Weather Forecast for your city, dial 949 and say the city and state when prompted. You can’t enter touchtone keys so just ignore the "press pound" instruction and wait for the timeout.
We have intentionally not walked you through configuring an outbound trunk even though one can easily be used to make outbound calls. Before doing so, make very certain that your appliance is behind a hardware-based firewall with no Internet port exposure. It’s your phone bill. Enjoy!

WebRTC Conference and Expo. The 2013 WebRTC Conference and Expo is returning to Atlanta on June 25. For everything you ever wanted to know about WebRTC, that’s the place to be. You can sign up now at WebRTCWorld.com. The Half-Price Early Bird discount ends on March 1. And you can save an additional 15% by using Coupon Code: AA.
Originally published: Tuesday, February 26, 2013

Need help with Asterisk? Visit the PBX in a Flash Forum.
Some Recent Nerd Vittles Articles of Interest…
The Ultimate Android Tablet: Meet the Microsoft Surface Pro

We were fully prepared to hate the Microsoft Surface Pro. After all, it was designed and produced by Microsoft, and we haven’t seen many flashes of brilliance from Redmond since the XBox. That was more than eleven years ago! Yes, Microsoft has new smartphones, but they’re too little, too late in our opinion. So why is the Surface Pro different? For openers, it runs pure Windows 8, not the Windows RT crippleware. While we’re not much of a Windows cheerleader any more (we were for the first 25 years), it is worth noting that Apple has one operating system for desktops and notebooks and a different (crippled) one for smartphones and tablets. And Google has one operating system for its notebooks and a very different one for its smartphones and tablets. Microsoft, on the other hand, had a better idea. The same operating system runs on both its desktop computers, its notebooks, and its latest tablet, the Surface Pro. What that means is the same application that runs on your desktop computer can now perform equally well on a tablet. And it can do it with or without the Surface’s revolutionary, portable keyboard. Application portability is huge especially if your company happens to still be a pure Microsoft shop. And it’s especially important if you or your employees happen to travel for a living.

It Just Works. So much for the theory. The bottom line for us was whether our existing PBX in a Flash, Incredible PBX, and Android platforms could live and breathe on the Surface Pro. The short answer is a resounding YES. This is not the crippled, proprietary Windows RT platform found in the original (klunky) Surface. This is a fully functional Windows 8 machine with an Intel processor, blazing performance, and both microSD and USB 3.0 slots, nice additions that you won’t find on a lot of tablets. If an app will run with Windows 7 or Windows XP, it works just as well or better on the Surface Pro. And with BlueStacks, you can run 750,000 Android apps on your Surface Pro as well. We quickly downloaded our favorite Android VoIP app, Groove IP, from Google’s Play Store using BlueStacks. Then we performed a couple of quick calls using a Google Voice account. The calls were flawless even with our shaky DSL connection on a very snowy day in the mountains. Adding BlueStack’s Cloud Connect will let you push existing apps from your Android phone or tablet to your Surface Pro. Pretty cool.
For a complete technical review of the Surface Pro, visit ZDnet or TechRadar. Just pray you never need repairs.
The only thing we’ve found missing hardware-wise on the Surface Pro is a PrintScreen key on the awesome keyboard which is a must-have, by the way. To print screens, you’ll need to use the tablet trick: VolDown + Home. But, as you can see from the screenshot above, it works fine. Because of the high resolution screen however, you lose something shrinking the images down to 650 pixels. On the software front, there were few surprises. WiFi is rock solid, and links to MiFi devices make the Surface Pro truly portable. If ass-backwards scrolling with the touchpad drives you crazy, use RegEdit and search for the mouse entry for FlipFlopHScroll. Change the decimal value from 0 to 1. The Chrome browser works fine with the keyboard and mousepad, but you’ll be using Internet Explorer to work with the touchscreen in tablet mode. Hopefully, that will get fixed shortly.
SAMBA connections work fine after the usual tweaks to the Windows Registry and a reboot. NeoRouter as a VPN client or server functions just as you would expect after telling Windows 8 to run the main programs as Administrator. Windows 8 is a bit more picky about this even when you’re logged in as an Administrator. Oracle’s VirtualBox as a virtual machine platform for Linux appliances works swimmingly, and performance is AMAZING. We built an Incredible PBX server using the latest .ova template in under 5 minutes, and we were making free calls and sending out faxes through Google Voice in under 10 minutes. Amazing!
Family Feud. There’s only one major shortcoming worth noting. Microsoft has taken their feud with Google to a whole new level with Windows 8. It’s not so much the Bingification of every Windows utility that bothers us. It’s what appears to be a conscious effort to banish Google from the Windows platform entirely. Think Apple! Those using two-step authentication for Google services are S.O.L. when it comes to Gmail. You’re left having to deploy Gmail as an IMAP mail service to get your mail at all. Giving Microsoft the benefit of the doubt, you could give them a pass on this if it had just been the initial Windows 8 release. But there have been plenty of patches and updates since Day One, and two-step authentication for Google services remains MIA. If the United States is going to retain its lead in the software development arena, Microsoft and Google and Apple had best bury the hatchet and learn how to work together to make their offerings complimentary. Consumers aren’t going to tolerate this kind of seventh grader nonsense in this day and age. So, wake up, Microsoft. Ruining an otherwise promising platform while trying to shaft Google is a lousy business decision, and it’s going to backfire. Consumers will simply move exclusively to their platform of choice, and guess what? That platform isn’t going to be Microsoft. More importantly, this article is a testament to what actually can be accomplished in Googlifying a Surface Pro with a little Yankee ingenuity. For all practical purposes, our Surface Pro is the best Android tablet we’ve ever owned, and we’ve owned a few. So here’s a little tip for Microsoft: Remember what made Windows a hit! Ubiquity, not exclusivity!
Originally published: Monday, February 18, 2013
Need help with Asterisk? Visit the PBX in a Flash Forum.
whos.amung.us If you’re wondering what your fellow man is reading on Nerd Vittles these days, wonder no more. Visit our new whos.amung.us statistical web site and check out what’s happening. It’s a terrific resource both for us and for you.
Special Thanks to Our Generous Sponsors
FULL DISCLOSURE: ClearlyIP, Skyetel, Vitelity, DigitalOcean, Vultr, VoIP.ms, 3CX, Sangoma, TelecomsXchange and VitalPBX have provided financial support to Nerd Vittles and our open source projects through advertising, referral revenue, and/or merchandise. As an Amazon Associate and Best Buy Affiliate, we also earn from qualifying purchases. We’ve chosen these providers not the other way around. Our decisions are based upon their corporate reputation and the quality of their offerings and pricing. Our recommendations regarding technology are reached without regard to financial compensation except in situations in which comparable products at comparable pricing are available from multiple sources. In this limited case, we support our sponsors because our sponsors support us.
 BOGO Bonaza: Enjoy state-of-the-art VoIP service with a $10 credit and half-price SIP service on up to $500 of Skyetel trunking with free number porting when you fund your Skyetel account. No limits on number of simultaneous calls. Quadruple data center redundancy. $25 monthly minimum spend required. Tutorial and sign up details are here.
![]() The lynchpin of Incredible PBX 2020 and beyond is ClearlyIP components which bring management of FreePBX modules and SIP phone integration to a level never before available with any other Asterisk distribution. And now you can configure and reconfigure your new Incredible PBX phones from the convenience of the Incredible PBX GUI.
The lynchpin of Incredible PBX 2020 and beyond is ClearlyIP components which bring management of FreePBX modules and SIP phone integration to a level never before available with any other Asterisk distribution. And now you can configure and reconfigure your new Incredible PBX phones from the convenience of the Incredible PBX GUI.
 VitalPBX is perhaps the fastest-growing PBX offering based upon Asterisk with an installed presence in more than 100 countries worldwide. VitalPBX has generously provided a customized White Label version of Incredible PBX tailored for use with all Incredible PBX and VitalPBX custom applications. Follow this link for a free test drive!
 Special Thanks to Vitelity. Vitelity is now Voyant Communications and has halted new registrations for the time being. Our special thanks to Vitelity for their unwavering financial support over many years and to the many Nerd Vittles readers who continue to enjoy the benefits of their service offerings. We will keep everyone posted on further developments.
Some Recent Nerd Vittles Articles of Interest…
Paradise Found: The Holy Grail of Mobile Communications » Meet the OBi202
 Much has been written about the quest for Unified Communications where all real-time communications services are transparently accessible by phone, by email, or via the web using multiple devices and various media types. But the Holy Grail of Business Communications is a bit different from our perspective. For the modern business person, business telecommunications comes down to a 3-way time slice between a home or home office, a real office with a real phone, and a cellphone whenever the person morphs into a road warrior or telecommuter. What the business person really wants is transparent integration of his or her smartphone into existing home and office phone setups. In other words, when we’re at home with a cell phone, we want to answer incoming cell phone calls on a house phone rather than scrambling to find a ringing cellphone on the other side of the house. And when we’re at the office, we want incoming cellphone calls to either ring on our desktop phone or be redirected to the office PBX when we’re unavailable. For many businesses, the only phone number that a customer ever has is the business person’s smartphone number. So, when we place outbound calls from home, or the office, or the cellphone, we want the customer to always see the cellphone number in the CallerID display. For accounting purposes, we’d also like all of the calls to be recorded in the cellphone log so that we can actually track call activity without reviewing logs in three different places. Well, we’ve finally got it!
Google Voice™ solved some of this cellphone integration with its new service. You can actually have calls ring on multiple devices simultaneously including your cellphone, your office phone, and your home phone. But there are several limitations. First, it’s only available in the United States. Second, some folks just don’t want Google knowing everything about your call history. Third, there’s a flexibility issue when using Google Voice to forward calls to your home or office. Without a lot of hands-on daily management, the incoming calls get forwarded to your alternate numbers whether you’re there or not. So, for example, if you’re on the road, you probably don’t want incoming business calls to your cellphone picked up by either your spouse or the office switchboard because there’s no way to easily route the calls back to you.
And that brings us to a pair of terrific new products from ObiHai. Last year we were provided a prerelease version of the OBi202™ at no cost, but frankly we hadn’t had time to play with it until a business opportunity presented the perfect case for the OBi202. In addition to being a terrific standalone VoIP phone system, the OBi202 also supports an analog fax machine using Google Voice as well as T.38 digital faxing with a CallCentric trunk. And then we discovered the OBiBT™ Bluetooth® Adapter which we actually purchased. Lo and behold, for under $100, the Holy Grail of Mobile Phone Communications was staring us in the face. So let’s begin with a quick summary of how all of this works, and then we’ll show you how to do it yourself. As with all of our Amazon links, you are obviously free to buy products wherever you like. Where prices are competitive or availability is a factor, we often recommend Amazon because Amazon provides financial support to Nerd Vittles through its referral links. That really does help keep the lights on so thanks in advance for your understanding.

The way The Holy Grail works in our SOHO setup goes something like this. I carry a Bluetooth-enabled, Galaxy Note II smartphone. While away from the house, the smartphone works like any other cellphone. I can make and receive calls as well as email and SMS messages. The only difference is that I have the phone connected through a Google Voice number so that incoming SMS messages are also delivered as Gmail messages. When I return home, the OBi202 with the OBiBT adapter senses that a smartphone is within range. You can pair and prioritize up to 10 of them. Incoming calls still ring on the cellphone, but they also ring on some POTS cordless phones scattered around the office. The POTS phones are connected to the first of two phone connections on the OBi202. CallerID actually shows the same thing as the cellphone CallerID. And incoming SMS messages also appear in the CallerID display of the cordless phones. If an incoming call is not answered in two rings, the OBi202 transfers the call to our Incredible PBX™ running on a Raspberry Pi®. It then processes the call through an AutoAttendant and delivers the call either to all of the house phones or to the desired person in the house. If there’s no answer, the call is handled by the voicemail system in Incredible PBX, and the message is also emailed to the desired recipient.
While at home base, outbound calls from the POTS phones in the office are always placed through my cellphone using the Bluetooth connection in the OBi202. Depending upon how you set up your Google Voice interaction with your cellphone, outbound calls will show either your cell phone number or Google Voice number as the CallerID. When we leave the office, the office phones no longer ring, just the Galaxy Note II. And outbound calls from the SOHO cordless phones are handled using a preconfigured SIP provider or Google Voice trunk in the OBi202 instead of via Bluetooth and the smartphone.
This may sound trivial to some of you. Suffice it to say, it’s not. You won’t find any commercial PBX that can do it. And the Asterisk Dev Team has been working on a Bluetooth connector called chan_mobile for as long as we can remember. It still doesn’t work reliably. You can follow the progress of our half dozen chan_mobile pioneers here.
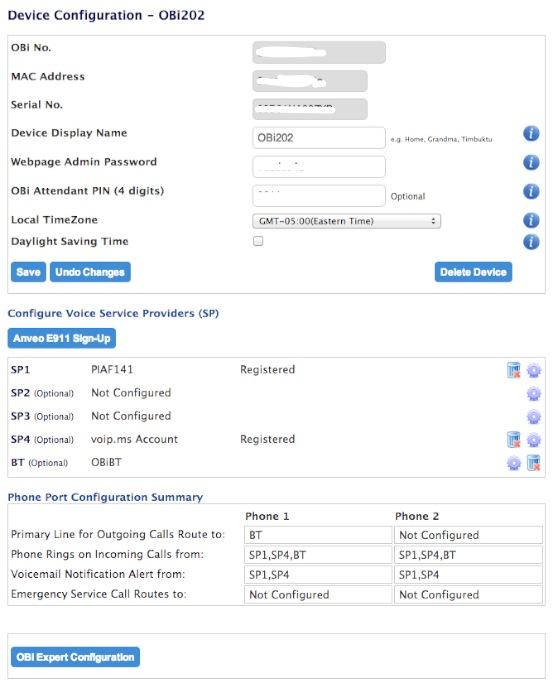
Getting Started with the OBi202. Before you can tackle Bluetooth, you need to get a perfectly functioning OBi202. Plug it in with a network cable behind your router which must provide a DHCP address to the device. Plug a POTS phone into PHONE 1. Now make a test call to OBiTALK by dialing **9 222 222 222. Next, decipher the IP address of your device by dialing ***1. Make sure your device is running the latest software by dialing ***6. Using a browser, go to http://www.obitalk.com. Create an account and then log in. Choose Add Device and follow the prompts to get your new device registered. If you want to use Google Voice, now is the time to set up your account. Choose Configure Voice Service Providers, choose your provider, and specify what phone port to use for the service. By default, both phone ports will work with whatever service provider you first configure. If you want to register your OBi202 as an extension on your Asterisk® server, now’s the time to do that as well. We also recommend you create an account with VoIP.ms and obtain a free INUM trunk. You can read how to set this up and why in this Nerd Vittles article. The advantage of having this trunk is that you can use it to route calls between your OBi202 and your Asterisk server at no cost. Just create and then register separate subaccounts on VoIP.ms for both your Asterisk server and your OBi202. Build a trunk and an inbound route on your Asterisk server to route calls from your INUM DID to wherever you’d like incoming INUM calls to go, e.g. an extension, a ring group, or an IVR. INUM DIDs look like this: 88351000XXXXXXX where the last seven digits are your personal number. Use SP4 on your OBi202 to set up your VoIP.ms subaccount. Be sure all of the accounts you create get properly registered.
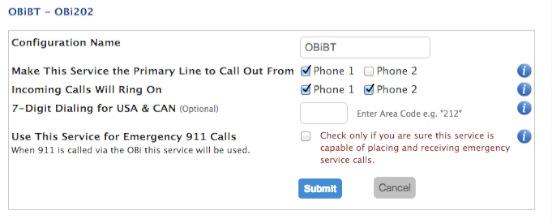
Configuring Bluetooth on the OBi202. Setting up the Bluetooth functionality is straightforward. Plug in the OBiBT. Dial *28 from a phone connected to the OBi202. Within two minutes, open the Bluetooth network settings menu on your smartphone and pair it with the OBi202. If prompted for a passcode, it’s 0000. Refresh your OBi Dashboard, and click on Edit BT icon in the Voice Service Providers frame. Set the device up as shown above. Click the Submit button.
At this point, incoming calls on your cellphone will also ring on the POTS phones connected to your OBi202. And calls that you place using a phone connected to the OBi202 will be routed out through your cellphone. This may be sufficient for many of you. We wanted the added functionality of routing inbound calls to our PBX when there was no answer on the OBi202-connected phones. At least with AT&T and StraightTalk, two rings is about the most you can allow without risking a voicemail pickup through your cellphone provider. Here’s how to set it up.
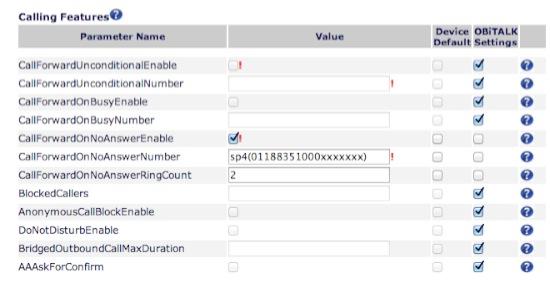
From the OBi202 Device Configuration Menu, click on the blue OBi Expert Configuration button. Acknowledge that you know what you’re doing and then click on the blue Enter OBi Expert button. In the left column under Voice Service, click OBiBlueTooth. Edit the Calling Features section and make it look like what’s shown above, replacing xxxxxxx with your personal INUM DID assigned from VoIP.ms. Click the Submit button when you’re finished. Now incoming calls will ring twice on your OBi202-connected phones and then be transferred to the INUM DID configured in Asterisk.
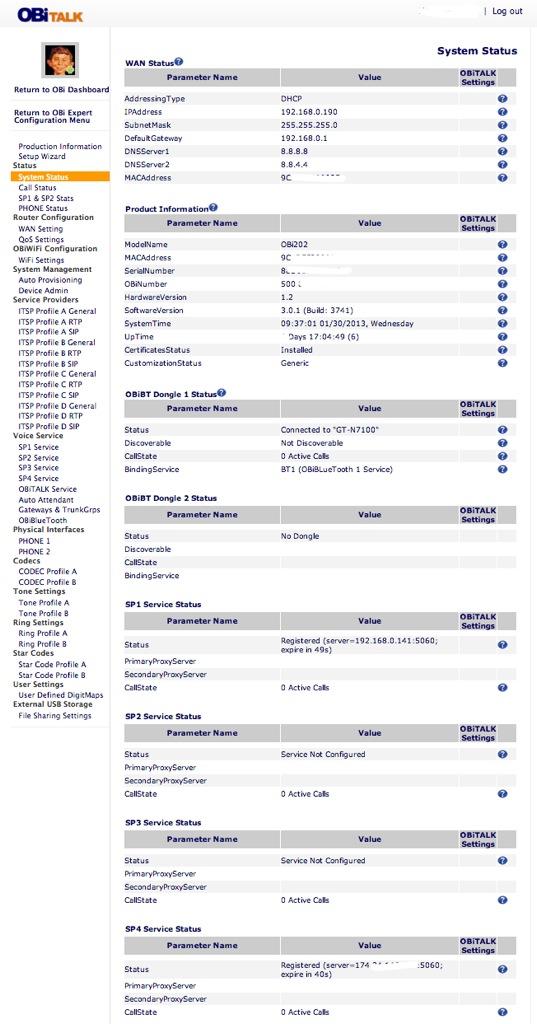
You can check the status of your OBi202 at any time by launching OBi Expert and clicking System Status. Enjoy!
Originally published: Monday, February 4, 2013
 Support Issues. With any application as sophisticated as this one, you’re bound to have questions. Blog comments are a terrible place to handle support issues although we welcome general comments about our articles and software. If you have particular support issues, we encourage you to get actively involved in the PBX in a Flash Forum. It’s the best Asterisk tech support site in the business, and it’s all free! Unlike some forums, ours is extremely friendly and is supported by literally hundreds of Asterisk gurus and thousands of users just like you.
Need help with Asterisk? Visit the PBX in a Flash Forum.
whos.amung.us If you’re wondering what your fellow man is reading on Nerd Vittles these days, wonder no more. Visit our new whos.amung.us statistical web site and check out what’s happening. It’s a terrific resource both for us and for you.
Special Thanks to Our Generous Sponsors
FULL DISCLOSURE: ClearlyIP, Skyetel, Vitelity, DigitalOcean, Vultr, VoIP.ms, 3CX, Sangoma, TelecomsXchange and VitalPBX have provided financial support to Nerd Vittles and our open source projects through advertising, referral revenue, and/or merchandise. As an Amazon Associate and Best Buy Affiliate, we also earn from qualifying purchases. We’ve chosen these providers not the other way around. Our decisions are based upon their corporate reputation and the quality of their offerings and pricing. Our recommendations regarding technology are reached without regard to financial compensation except in situations in which comparable products at comparable pricing are available from multiple sources. In this limited case, we support our sponsors because our sponsors support us.
BOGO Bonaza: Enjoy state-of-the-art VoIP service with a $10 credit and half-price SIP service on up to $500 of Skyetel trunking with free number porting when you fund your Skyetel account. No limits on number of simultaneous calls. Quadruple data center redundancy. $25 monthly minimum spend required. Tutorial and sign up details are here.
![]() The lynchpin of Incredible PBX 2020 and beyond is ClearlyIP components which bring management of FreePBX modules and SIP phone integration to a level never before available with any other Asterisk distribution. And now you can configure and reconfigure your new Incredible PBX phones from the convenience of the Incredible PBX GUI.
The lynchpin of Incredible PBX 2020 and beyond is ClearlyIP components which bring management of FreePBX modules and SIP phone integration to a level never before available with any other Asterisk distribution. And now you can configure and reconfigure your new Incredible PBX phones from the convenience of the Incredible PBX GUI.
VitalPBX is perhaps the fastest-growing PBX offering based upon Asterisk with an installed presence in more than 100 countries worldwide. VitalPBX has generously provided a customized White Label version of Incredible PBX tailored for use with all Incredible PBX and VitalPBX custom applications. Follow this link for a free test drive!
Special Thanks to Vitelity. Vitelity is now Voyant Communications and has halted new registrations for the time being. Our special thanks to Vitelity for their unwavering financial support over many years and to the many Nerd Vittles readers who continue to enjoy the benefits of their service offerings. We will keep everyone posted on further developments.
Some Recent Nerd Vittles Articles of Interest…
The 5-Minute PBX: PIAF Virtual Machine for VirtualBox (Windows, Mac, or Linux)
For most of us, today marks the last time we’ll ever see the day, month, and year line up on the calendar in perfect harmony so Happy 12-12-12 to everyone. It’ll be 88+ years before it happens again. And the Mayans believe the world will be ending in 9 more days so there may be no need to worry about the 88 years anyway. Whatever happens, it seemed like an appropriate time to take stock of how we’re doing in the development of the Perfect PBX™. Such an assessment, of course, is in the eyes of the beholder. From our perspective, in addition to being feature-rich, it has to have three components: ease of installation, ease of use, and flexibility. The first two are self-explanatory but flexibility needs some explanation. Flexibility to us means a feature set that’s appealing not only to those just beginning the journey but also to those of us that need to make frequent changes and additions to the platform to keep it current or make it better. After all, that’s what open source is all about.
The real beauty of PBX in a Flash has not been that someone with sufficient expertise couldn’t assemble something just as good or even better. Watch the AstriCon presentations from this year if you have any doubts. The beauty of PIAF is it puts this technology down where the goats can get it. It provides a toolset that encourages further development by simplifying the learning curve for a broad cross-section of the VoIP community while not compromising functionality or flexibility. The source code for the major components is included in the build so you can customize and recompile Asterisk or load a new version of Asterisk or any additional Linux app in minutes without losing your existing setup.
As many of you know, we have literally hundreds of gurus on the PIAF Forum. That doesn’t mean any particular person or group knows everything. It’s merely a designation that a particular individual is an expert at something. The collective wisdom of the group is what makes PBX in a Flash as a project better because we’ve put in place a platform that experts from many different disciplines can build upon without needing to learn everything about everything. Simply stated, you can be a terrific chef without knowing how to build a stove!
Turning to Asterisk® 11 and FreePBX® 2.11, from everything we’re seeing, these new releases are shaping up to be a remarkable step forward both in terms of toolset and in the new mindset of the development community. That’s a good thing. For our part, we’ve wanted to get our latest preview release of PBX in a Flash with CentOS 6.3, Asterisk 11 and the new FreePBX 2.11 beta into as many hands as possible keeping in mind the objectives we outlined above.
The Ultimate VoIP Appliance: PIAF Virtual Machine for VirtualBox
Today brings us to a new plateau in the virtual machine development era. Thanks to the masterful work of Tom King on PBX in a Flash 2.0.6.3.1, we’re pleased to introduce a new product that can be installed in under 5 minutes and will run on any Windows PC, Mac, or Linux machine as well as Solaris. And, unlike the dedicated machine platforms and OpenVZ compromises of years past, today’s PIAF Virtual Machine gives you everything a bare metal install from source code would have provided. Most importantly, the components are truly portable. They can be copied to a 4GB flash drive1 for the price of a good hamburger and installed from there onto any type of machine that happens to be in front of you. Five minutes later, you have a fully functional Asterisk server with FreePBX and exactly the same feature set and source code that you would have had doing a bare metal PIAF install to a dedicated server. And we’ve built both a production-ready PIAF-Purple VM with Asterisk 1.8 and FreePBX 2.10 as well as a Pioneer edition PIAF-Green VM with Asterisk 11 and FreePBX 2.11 beta. The choice is yours. No Internet access required to perform the install. Sound too good to be true? Keep reading or, better yet, try the PIAF appliance for yourself. The install process is simple:
- Download and install VirtualBox onto a Desktop Machine of your choice
- Download and double-click on the PIAF Virtual Machine to import it into VirtualBox
- Select the PIAF Virtual Machine in VirtualBox Manager Window and click the Start button
Introducing Oracle VM VirtualBox

We’re late to the party, but Virtual Box®, Oracle’s virtual machine platform inherited from Sun, is really something. It’s not only free, but it’s pure GPL2 code. VirtualBox gives you a virtual machine platform that runs on top of any desktop operating system. In terms of limitations, we haven’t found any. We even tested this on an Atom-based Windows 7 machine with 2GB of RAM, and it worked without a hiccup. So step #1 is to download one or more of the VirtualBox installers from VirtualBox.org or Oracle.com. As mentioned, our recommendation is to put all of the 100MB installers on a 4GB thumb drive. Then you’ll have everything in one place whenever and wherever you happen to need it. Once you’ve downloaded the software, simply install it onto your favorite desktop machine. Accept all of the default settings, and you’ll be good to go. For more details, here’s a link to the Oracle VM VirtualBox User Manual.
Introducing the PIAF Virtual Machine
We’ll walk you through installing the PIAF-Green Virtual Machine. It’s basically the same procedure with PIAF-Purple except you get to skip the reassembly step since the PIAF-Purple.ova image is only 1.3GB.
The PIAF-Green Virtual Machine tips the scales at over 2GB. Because of the 2GB file size limit on many systems, we’ve chosen to split this download into two pieces. You need both of them. Just download them onto any flavor desktop from SourceForge. Once you’ve downloaded the two files, we need to reassemble them into a single file known as an Open Virtualization Appliance (.ova). Then verify the checksums for the reassembled file to be sure everything is in its proper place. Finally, we’ll double-click on the .ova file which will initiate the import process into VirtualBox.
So let’s begin by downloading the two halves of PIAF-Green from SourceForge: PIAFGREENaa and PIAFGREENab. If you’d prefer production-ready code, just download PIAF-Purple.ova and skip the reassembly step. There’s also a new surprise offering that’s covered in the comments to this article. 🙂
The reassembly procedure depends upon your desktop operating system. For Windows PCs, you’ll need to drop down to the Command Prompt, change to the directory in which you downloaded the two files, and type the following command:
copy /b PIAFGREENaa + PIAFGREENab PIAF-Green.ova
To check the MD5/SHA1 checksums in Windows, download and run Microsoft’s File Checksum Integrity Verifier.
For Mac or Linux desktops, open a Terminal window, change to the directory in which you downloaded the two files, and type the following commands:
cat PIAFGREENa{a..b} > PIAF-Green.ova

md5 PIAF-Green.ova (use md5sum for Linux)

openssl sha1 PIAF-Green.ova
The correct MD5 checksum for PIAF-Green ( PIAF-Green.ova) is a86a018466c7045372e51100cddd42ea. For PIAF-Purple.ova, it’s 664b1afe75c3b1877029531b0fe28063. The correct SHA1 checksum for PIAF-Green is d883c5e137ac19ecb45c1e6f127180b78a9cd0af. For PIAF-Purple, it’s 15f94352745ca989fd9939d9a8ee8b765fc8388c. If you have a match, proceed. Otherwise, rinse and repeat.
Importing the PIAF Virtual Machine into VirtualBox
You only perform the import step one time. Once imported into VirtualBox, PBX in a Flash is ready to use. There’s no further installation required, just like an OpenVZ template… only better. Double-click on the .ova file you downloaded to begin the procedure and load VirtualBox. When prompted, be sure to check the Reinitialize the Mac address of all network cards box and then click the Import button. Once the import is finished, you’ll see a new PIAF virtual machine in your VM List on the VirtualBox Manager Window. Regardless of flavor, you’ll need to make a couple of one-time adjustments to the PIAF Virtual Machine configuration to account for differences in sound and network cards on different host machines.
Click on the PIAF Virtual Machine in the VM List. Then click Settings -> Audio and check the Enable Audio option and choose your sound card. Save your setup by clicking the OK button. Next click Settings -> Network. For Adapter 1, check the Enable Network Adapter option. From the Attached to pull-down menu, choose Bridged Adapter. Then select your network card from the Name list. Then click OK. Finally, click Settings -> System, uncheck Hardware clock in UTC time, and click OK. That’s all the configuration that is necessary for your PIAF Virtual Machine. The rest is automagic.
Running the PIAF Virtual Machine in VirtualBox
Once you’ve imported and configured the PIAF Virtual Machine, you’re ready to go. Highlight PIAF Virtual Machine in the VM List on the VirtualBox Manager Window and click the Start button. The PIAF boot procedure with CentOS 6.3 will begin just as if you had installed PBX in a Flash on a standalone machine. You’ll see a couple of dialogue boxes pop up that explain the keystrokes to move back and forth between your host operating system desktop and your PIAF VM.

Here’s what you need to know. To work in the PIAF Virtual Machine, just left-click your mouse while it is positioned inside the VM window. To return to your host operating system desktop, press the right Option key on Windows machines or the left Command key on any Mac. For other operating systems, read the dialogue boxes for instructions on moving around. Always shut down PIAF gracefully! Click in the VM window with your mouse, log in as root, and type: shutdown -h now.
Run the PIAF Virtual Machine behind a hardware-based firewall with no Internet port exposure!
To begin, position your mouse over the VM window and left-click. Once the PIAF VM has booted, log in as root with password as the password. Change your root password immediately by typing passwd at the command prompt. Now set up a secure maint password for FreePBX as well. Type passwd-master. If you’re not in the Eastern U.S. time zone, then you’ll want to adjust your timezone setting so that reminders and other time-sensitive events happen at the correct time. While logged into your server as root, issue these commands to download and run the timezone-setup script:
cd /root

wget http://pbxinaflash.com/timezone-setup.tar.gz

tar zxvf timezone-setup.tar.gz

./timezone-setup
Next, use a browser to log into your PIAF server by pointing to the IP address of the PIAF VM that’s displayed in the status window of the CLI. Click on the User button to display the Admin choices in the main PIAF Menu. Click on the FreePBX option to load the FreePBX GUI. You will be prompted for an Apache username and password. For the username, use maint. For the password, use whatever password you set up with passwd-master.
Now read the latest PIAF Quick Start Guide and begin your VoIP adventure. Then you’ll want to do some reading on VirtualBox. We’ve barely scratched the surface. Setting up Headless VMs that run in the background on any server is a breeze. From the command line, here’s an article to get you started. But you also can start Headless VMs from within the GUI by highlighting the VM and clicking Shift->Start. Always shut down VMs gracefully: Close->ACPI Shutdown. You’ll find more great tips at virtualbox.org and GitHub.
One of the real beauties of VirtualBox is you don’t have to use a GUI at all. The entire process can be driven from the command line. Other than on a Mac, here is the procedure to import, configure, and run PIAF-Purple Virtual Machine:
VBoxManage import PIAF-Purple.ova

VBoxManage modifyvm "PIAF-Purple" --nic1 nat

VBoxManage modifyvm "PIAF-Purple" --acpi on --nic1 bridged

VBoxHeadless --startvm "PIAF-Purple" &

# Wait 1 minute for PIAF-Purple to load. Then decipher IP address like this:

VBoxManage guestproperty get "PIAF-Purple" /VirtualBox/GuestInfo/Net/0/V4/IP

# Now you can use SSH to login to PIAF-Purple at the displayed IP address

# Shutdown the PIAF-Purple Virtual Machine with the following command:

VBoxManage controlvm "PIAF-Purple" acpipowerbutton
On a Mac, everything works the same way except for deciphering the IP address. Download our findip script for that.
Enjoy!
Originally published: Wednesday, December 12, 2012
Need help with Asterisk? Visit the PBX in a Flash Forum.
Special Thanks to Our Generous Sponsors
FULL DISCLOSURE: ClearlyIP, Skyetel, Vitelity, DigitalOcean, Vultr, VoIP.ms, 3CX, Sangoma, TelecomsXchange and VitalPBX have provided financial support to Nerd Vittles and our open source projects through advertising, referral revenue, and/or merchandise. As an Amazon Associate and Best Buy Affiliate, we also earn from qualifying purchases. We’ve chosen these providers not the other way around. Our decisions are based upon their corporate reputation and the quality of their offerings and pricing. Our recommendations regarding technology are reached without regard to financial compensation except in situations in which comparable products at comparable pricing are available from multiple sources. In this limited case, we support our sponsors because our sponsors support us.
BOGO Bonaza: Enjoy state-of-the-art VoIP service with a $10 credit and half-price SIP service on up to $500 of Skyetel trunking with free number porting when you fund your Skyetel account. No limits on number of simultaneous calls. Quadruple data center redundancy. $25 monthly minimum spend required. Tutorial and sign up details are here.
![]() The lynchpin of Incredible PBX 2020 and beyond is ClearlyIP components which bring management of FreePBX modules and SIP phone integration to a level never before available with any other Asterisk distribution. And now you can configure and reconfigure your new Incredible PBX phones from the convenience of the Incredible PBX GUI.
The lynchpin of Incredible PBX 2020 and beyond is ClearlyIP components which bring management of FreePBX modules and SIP phone integration to a level never before available with any other Asterisk distribution. And now you can configure and reconfigure your new Incredible PBX phones from the convenience of the Incredible PBX GUI.
VitalPBX is perhaps the fastest-growing PBX offering based upon Asterisk with an installed presence in more than 100 countries worldwide. VitalPBX has generously provided a customized White Label version of Incredible PBX tailored for use with all Incredible PBX and VitalPBX custom applications. Follow this link for a free test drive!
Special Thanks to Vitelity. Vitelity is now Voyant Communications and has halted new registrations for the time being. Our special thanks to Vitelity for their unwavering financial support over many years and to the many Nerd Vittles readers who continue to enjoy the benefits of their service offerings. We will keep everyone posted on further developments.
Some Recent Nerd Vittles Articles of Interest…
- Many of our purchase links refer users to Amazon when we find their prices are competitive for the recommended products. Nerd Vittles receives a small referral fee from Amazon to help cover the costs of our blog. We never recommend particular products solely to generate Amazon commissions. However, when pricing is comparable or availability is favorable, we support Amazon because Amazon supports us. [↩]
Introducing PBX in a Phone: Grandstream GXP2200 featuring Incredible PBX

One of the long-term goals of the PBX in a Flash™ Project has always been the desire to integrate a full-featured PBX directly into a desktop phone. For those that travel or support small branch offices, this would be the best of all possible worlds. We never quite achieved it with PBX in a Flash, but thanks to the Raspberry Pi™, Grandstream’s new GXP2200, a couple of screws, and a power drill, we’ve found the perfect couple. Imagine managing a virtual private network with your branch office PBX whirring away beneath your desktop phone and nothing more than a touchscreen browser built into your phone. And now you can appreciate what a milestone this is for the VoIP telephony community.
We introduced the GXP2200 in our Black Friday roundup last week, but here are the highlights for those of you that may have missed it. While there have been other VoIP phones built around Android, this is the first affordable unit (under $200)1 that also includes access to Google’s Play Store thanks to Grandstream’s firmware update released last week. This is significant because proprietary app stores mean the phone manufacturer keeps total control of what you can install on your phone while access to Google’s Play Store makes available virtually all of the Android software in the commercial (and free) marketplace.
Why Android Matters with a VoIP Phone
Using Android as the underlying operating system for a VoIP phone provides the best of all worlds with SIP access to your favorite Asterisk® server or Incredible PBX™ for the Raspberry Pi plus Skype, Google Voice, Microsoft Lync, YouTube, Pandora, Facebook, Twitter, and Angry Birds without leaving your chair. The GXP2200 supports six SIP lines, five-way conference calls, HD audio, Bluetooth, integrated PoE, and VPNs of many flavors. You also can add four 20-button sidecar expansion modules. GrooVe IP can be installed from the Google Play Store for plug-and-play Google Voice calling. That gives you the "VoIP Big Three" on a single desktop phone: SIP, Skype, and Google Voice. Plug in an SD card with your favorite tunes and videos, and they’ll play back flawlessly on the GXP2200. The PBX in a Flash RSS Security Feed can also be installed on the desktop of this phone. With the $5 IP Cam Viewer app, you can use your phone to monitor dozens of IP cameras in your organization or anyone else anywhere in the world. AsteriDex also can be used from the phone’s browser to provide click-to-dial calling with any SIP trunk you’ve set up on the phone. And, as we noted, the touchscreen browser lets you access FreePBX® to configure and manage Incredible PBX and your Asterisk server directly from your phone. Did we mention the 1,000-client phone directory and Google Calendar plus dedicated voicemail, call transfer, and conferencing buttons right on the phone? All of them work flawlessly with Asterisk as well as PBX in a Flash and Incredible PBX. While the version of Android is a bit long in the tooth, we haven’t found that to be a distraction when paired with a desktop phone. One of the consultants on the PIAF Forum mentioned that he had taken this phone to a customer site last week. The employees were so impressed with the GXP2200 that they told the boss they would subsidize the cost of the phones if he would purchase them for the office. When is the last time you had that conversation with your boss?
Hooking Up the Raspberry Pi with a GXP2200
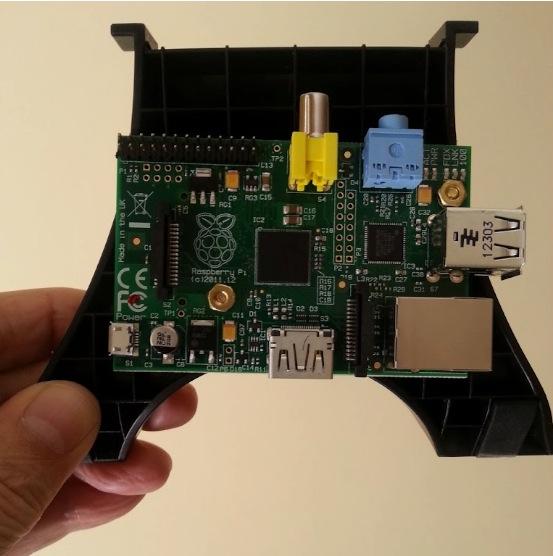
The Raspberry Pi integration is accomplished easily because of the new design of the 512MB Raspberry Pi boards with two mounting holes (covered by the two brass-colored nuts above) plus the unique phone stand that is provided with Grandstream’s GXP2200. A quick trip to the hardware store for two one-inch screws and a couple minutes with a power drill, and it was easy enough for any fifth grader to mount the Raspberry Pi on the inner side of the plastic phone stand. Once you slide the stand into place on the phone, the Raspberry Pi is completely hidden inside the phone stand with plenty of ventilation to operate unobtrusively for years. A 6-inch CAT5 cable will let you take advantage of the spare network jack on the back of the phone to add network connectivity for the Raspberry Pi. Insert your SD card with Incredible PBX, power up the Raspberry Pi with a 5-volt adapter, and your branch office PBX comes to life. Fire up your phone’s browser, log in to http://incrediblepbx.local, and your entire PBX is quite literally at your fingertips:
By the time your GXP2200 is delivered, Incredible PBX 3.6 for the Raspberry Pi will be on the street featuring Incredible Fax.2 Then you’ll have everything any remote office could ever ask for, and it’ll all be neatly tucked away beneath your telephone with management convenience like you’ve never experienced. Enjoy!
Originally published: Monday, November 26, 2012
Need help with Asterisk? Visit the PBX in a Flash Forum.
Special Thanks to Our Generous Sponsors
FULL DISCLOSURE: ClearlyIP, Skyetel, Vitelity, DigitalOcean, Vultr, VoIP.ms, 3CX, Sangoma, TelecomsXchange and VitalPBX have provided financial support to Nerd Vittles and our open source projects through advertising, referral revenue, and/or merchandise. As an Amazon Associate and Best Buy Affiliate, we also earn from qualifying purchases. We’ve chosen these providers not the other way around. Our decisions are based upon their corporate reputation and the quality of their offerings and pricing. Our recommendations regarding technology are reached without regard to financial compensation except in situations in which comparable products at comparable pricing are available from multiple sources. In this limited case, we support our sponsors because our sponsors support us.
BOGO Bonaza: Enjoy state-of-the-art VoIP service with a $10 credit and half-price SIP service on up to $500 of Skyetel trunking with free number porting when you fund your Skyetel account. No limits on number of simultaneous calls. Quadruple data center redundancy. $25 monthly minimum spend required. Tutorial and sign up details are here.
![]() The lynchpin of Incredible PBX 2020 and beyond is ClearlyIP components which bring management of FreePBX modules and SIP phone integration to a level never before available with any other Asterisk distribution. And now you can configure and reconfigure your new Incredible PBX phones from the convenience of the Incredible PBX GUI.
The lynchpin of Incredible PBX 2020 and beyond is ClearlyIP components which bring management of FreePBX modules and SIP phone integration to a level never before available with any other Asterisk distribution. And now you can configure and reconfigure your new Incredible PBX phones from the convenience of the Incredible PBX GUI.
VitalPBX is perhaps the fastest-growing PBX offering based upon Asterisk with an installed presence in more than 100 countries worldwide. VitalPBX has generously provided a customized White Label version of Incredible PBX tailored for use with all Incredible PBX and VitalPBX custom applications. Follow this link for a free test drive!
Special Thanks to Vitelity. Vitelity is now Voyant Communications and has halted new registrations for the time being. Our special thanks to Vitelity for their unwavering financial support over many years and to the many Nerd Vittles readers who continue to enjoy the benefits of their service offerings. We will keep everyone posted on further developments.
Some Recent Nerd Vittles Articles of Interest…
- Some of our purchase links refer users to Amazon when we find their prices are competitive for the recommended products. Nerd Vittles receives a small referral fee from Amazon to help cover the costs of our blog. We never recommend particular products solely to generate Amazon commissions. However, when pricing is comparable or availability is favorable, we support Amazon because Amazon supports us. [↩]
- If you have that pioneering spirit, you can take the Preview Edition of Incredible PBX 3.6 for a spin today. [↩]
VPN in a Flash Reborn: Meet the Dedicated Server Edition in PIAF 2.0.6.2.4
 We’re dusting off our favorite old trademark to introduce the all-new VPN in a Flash™ featuring NeoRouter™ 1.7 Free Server Edition. Last month we showed how to install NeoRouter as an add-on for existing PBX in a Flash™ servers. In sites with 10 or fewer machines to interconnect, this works extremely well. However, for those with major collections of servers and PCs scattered across the universe (up to 256!), you’re going to want dedicated hardware to manage your virtual private network. Thanks to the terrific work of Tom King, you’ve got that choice. Meet VPN in a Flash.
As with PBX in a Flash, the Dedicated Server Edition of VPN in a Flash is offered in 32-bit or 64-bit flavors. How do you get it? It’s now an option in the PBX in a Flash 2.0.6.2.4 ISO featuring the CentOS 6.2 platform for the ultimate in reliability. Just download the new 2.0.6.2.4 ISO from SourceForge, burn it to a CD or DVD or, better yet, make yourself a bootable flash drive, and find some hardware to dedicate to the task of managing your virtual private network. Set up the server behind a dedicated firewall on any private LAN other than the 10.0.0.x network. Answer a few prompts to choose your timezone and set up your NeoRouter credentials. Then configure your hardware firewall to lock down the assigned DHCP address of your VPN in a Flash server and map TCP 32976 to the IP address of your VPN server, and you’re done. In 30 minutes, you get a rock-solid, preconfigured VPN. Not only is it SECURE, it’s also FREE!
After your VPN in a Flash server is installed, you can optionally go to the NeoRouter web site and register your new VPN by clicking Create Standalone Domain. Make up a name you can easily remember with no periods or spaces. You’ll be prompted for the IP address of your server in the second screen. FQDNs are NOT permitted.
When a VPN client attempts to login to your server, the server address is always checked against this NeoRouter database first before any attempt is made to resolve an IP address or FQDN using DNS. If no matching entry is found, it will register directly to your server using a DNS lookup of the FQDN. Whether to register your VPN is totally up to you. Logins obviously occur quicker using this registered VPN name, but logins won’t happen at all if your server’s dynamic IP address changes and you’ve hard-coded a different IP address into your registration at neorouter.com.
Setting Up a NeoRouter Client. There are NeoRouter clients available for almost every platform imaginable, except iPhones and iPads. Hopefully, they’re in the works. So Step #1 is to download whatever clients are appropriate to meet your requirements. The VPN in a Flash install automatically loads the Linux clients into the /usr/src/neorouter directory and installs the NeoRouter client for you. Here’s the NeoRouter Download Link for the other clients. Make sure you choose a client for the Free version of NeoRouter. And make sure it is a version 1.7 client! Obviously, the computing platform needs to match your client device. The clients can be installed in the traditional way with Windows machines, Macs, etc.

CentOS NeoRouter Client. As part of the installation above, we have automatically installed the NeoRouter client for your particular flavor of CentOS 6, 32-bit or 64-bit. In order to access resources on your NeoRouter server from other clients, you will need to activate the client on your server as well. This gets the server a private IP address in the 10.0.0.0 network.
To activate the client, type: nrclientcmd. You’ll be prompted for your Domain, Username, and Password. You can use the registered domain name from neorouter.com if you completed the optional registration step above. Or you can use the private IP address of your server. If your router supports hairpin NAT, you can use the public IP address or server’s FQDN, if you have one. After you complete the entries, you’ll get a display that looks something like this:

To exit from NeoRouter Explorer, type: quit. The NeoRouter client will continue to run so you can use the displayed private IP addresses to connect to any other online devices in your NeoRouter VPN. All traffic from connections to devices in the 10.0.0.0 network will flow through NeoRouter’s encrypted VPN tunnel. This includes inter-office SIP and IAX communications between Asterisk® endpoints.

Admin Tools for NeoRouter. Here are a few helpful commands for monitoring and managing your NeoRouter VPN.
Browser access to NeoRouter Configuration Explorer (requires user with Admin privileges)
Browser access to NeoRouter Network Explorer (user with Admin or User privileges)
To access your NeoRouter Linux client: nrclientcmd
To restart NeoRouter Linux client: /etc/rc.d/init.d/nrservice.sh restart
To restart NeoRouter Linux server: /etc/rc.d/init.d/nrserver.sh restart
To set domain: nrserver -setdomain YOUR-VPN-NAME domainpassword
For a list of client devices: nrserver -showcomputers
For a list of existing user accounts: nrserver -showusers
For the settings of your NeoRouter VPN: nrserver -showsettings
To add a user account: nrserver -adduser username password user
To add admin account: nrserver -adduser username password admin
Test VPN access: http://www.neorouter.com/checkport.php
For a complete list of commands: nrserver –help
To change client name from default pbx.local1:
- Edit /etc/hosts
- Edit /etc/sysconfig/network
- Edit /etc/sysconfig/network-scripts/ifcfg-eth0
- reboot
For the latest NeoRouter happenings, follow the NeoRouter blog on WordPress.com.

Eating Our Own Bear Food. We’ve actually been at our SOHO cabin this month "testing" VPN in a Flash. It’s provided instant access both to our desktop machines and servers in Charleston as well as Tom King’s Proxmox server in Florida where we’ve been developing Yate in a Flash™, a new, dedicated SIP to Google Voice Gateway for Asterisk. We’ll have more to say about it next week, or you can follow the link and get a head start. The bottom line on VPN in a Flash: It Just Works! VPN in a Flash frees you from ever having to stay in your home or office to get work done. And it’s been rock-solid reliable. Enjoy!
Originally published: Wednesday, June 20, 2012
Need help with Asterisk? Visit the NEW PBX in a Flash Forum.
whos.amung.us If you’re wondering what your fellow man is reading on Nerd Vittles these days, wonder no more. Visit our new whos.amung.us statistical web site and check out what’s happening. It’s a terrific resource both for us and for you.
Special Thanks to Our Generous Sponsors
FULL DISCLOSURE: ClearlyIP, Skyetel, Vitelity, DigitalOcean, Vultr, VoIP.ms, 3CX, Sangoma, TelecomsXchange and VitalPBX have provided financial support to Nerd Vittles and our open source projects through advertising, referral revenue, and/or merchandise. As an Amazon Associate and Best Buy Affiliate, we also earn from qualifying purchases. We’ve chosen these providers not the other way around. Our decisions are based upon their corporate reputation and the quality of their offerings and pricing. Our recommendations regarding technology are reached without regard to financial compensation except in situations in which comparable products at comparable pricing are available from multiple sources. In this limited case, we support our sponsors because our sponsors support us.
BOGO Bonaza: Enjoy state-of-the-art VoIP service with a $10 credit and half-price SIP service on up to $500 of Skyetel trunking with free number porting when you fund your Skyetel account. No limits on number of simultaneous calls. Quadruple data center redundancy. $25 monthly minimum spend required. Tutorial and sign up details are here.
![]() The lynchpin of Incredible PBX 2020 and beyond is ClearlyIP components which bring management of FreePBX modules and SIP phone integration to a level never before available with any other Asterisk distribution. And now you can configure and reconfigure your new Incredible PBX phones from the convenience of the Incredible PBX GUI.
The lynchpin of Incredible PBX 2020 and beyond is ClearlyIP components which bring management of FreePBX modules and SIP phone integration to a level never before available with any other Asterisk distribution. And now you can configure and reconfigure your new Incredible PBX phones from the convenience of the Incredible PBX GUI.
VitalPBX is perhaps the fastest-growing PBX offering based upon Asterisk with an installed presence in more than 100 countries worldwide. VitalPBX has generously provided a customized White Label version of Incredible PBX tailored for use with all Incredible PBX and VitalPBX custom applications. Follow this link for a free test drive!
Special Thanks to Vitelity. Vitelity is now Voyant Communications and has halted new registrations for the time being. Our special thanks to Vitelity for their unwavering financial support over many years and to the many Nerd Vittles readers who continue to enjoy the benefits of their service offerings. We will keep everyone posted on further developments.
Some Recent Nerd Vittles Articles of Interest…
The Bluetooth Revolution: Watch What We Can Do
If ever there’s been a sleeping technology giant still worth watching, it’s got to be Bluetooth. Originally developed by Ericsson, the Swedish telecommunications company, Bluetooth is a proprietary wireless technology for exchanging data over short distances using fixed and mobile devices. If you use it at all, it’s probably to answer phone calls and play music in your car using your smartphone or to walk around looking like a lunatic talking to yourself because you have a Bluetooth headset for your cellphone hanging out of your ear. Or you may be using our Bluetooth Proximity Detection utility to automatically forward calls from your PBX in a Flash server to your cellphone when you leave the office. Well, that’s so last week!
What’s coming in tomorrow’s vehicles (unless the federal government gets too crazy) is literally a revolution in the way vehicles interact with your smartphone. Rather than buying all of your existing cellphone technology again in every car you own, Bluetooth will give you a dashboard with the rich feature set of your existing smartphone without another monthly cellphone bill. That’s right. All of the data will be delivered to your dashboard via Bluetooth using middleware that translates existing information on your cellphone to a display on your dash. And you’ll be able to control the flow and type of information using a touchscreen in your car or truck that bears an uncanny resemblance to the display on your iPad or Android Tablet. See why you might really need a quad-core processor on your next smartphone?

I’m sorry. Did we say in tomorrow’s vehicles? You actually can get it right now in the Prius V with Entune. Of course, Toyota would like to replace your cellphone carrier and charge you monthly fees for services you’re already paying for on your cellphone, but that will sort itself out shortly. Why? Because there are some new open source experiments underway using Android instead of our old friend Micro$oft.
Meet The Watch. Suppose you were a nerd and just graduated from college with nothing to do except beg for a job flipping burgers. But then you had this idea to create a Bluetooth-enabled watch that could display content from your cellphone while you were driving, or running, or swimming. Well, you’d probably turn to KickStarter and try to raise $100,000 so you could build your dream watch. That was six weeks ago. They raised nearly $1 million the first day. And, by the time the fund-raising campaign ends in mid-May, it looks like this project will have raised nearly 10 million dollars!

Nice Surprise. So now you have the background on coming attractions. But there’s more. There’s the company that inspired Steve Jobs doing what they once did better than anyone on the planet, quietly churning out incredible products while nobody was looking. Meet Sony and the SmartWatch.

If you want a glimpse at what tomorrow’s vehicles will look like, the Sony SmartWatch is the one to follow. It’s in living color. It’s feature-rich. And it just works! Released in the United States three short weeks ago, there already are nearly 50 available Android applications (mostly free) that you can display on your watch. Here’s a sampling to give you some idea of the scope. We loaded a dozen on our SmartWatch in minutes!
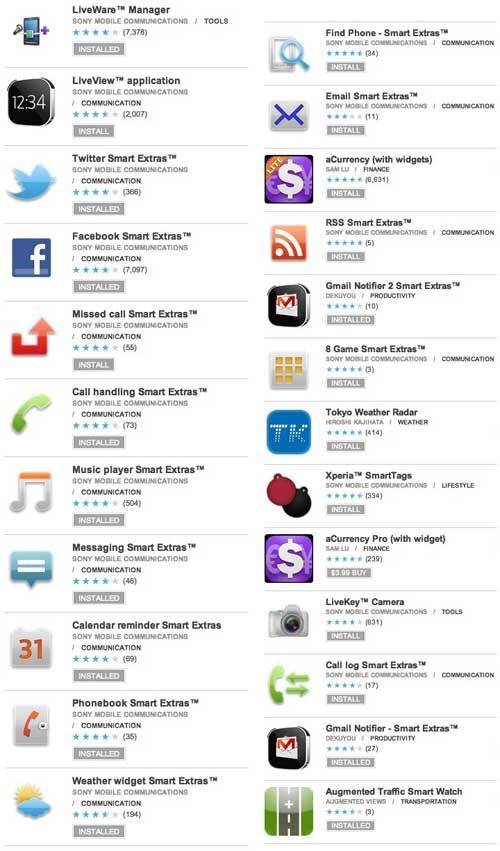
You actually manage and download apps for your SmartWatch using Sony’s LiveWare Manager which lives on your Android phone. And, yes, almost any Android phone will work although a higher end device with more memory is a definite plus. You won’t want just a couple of apps once you get started.

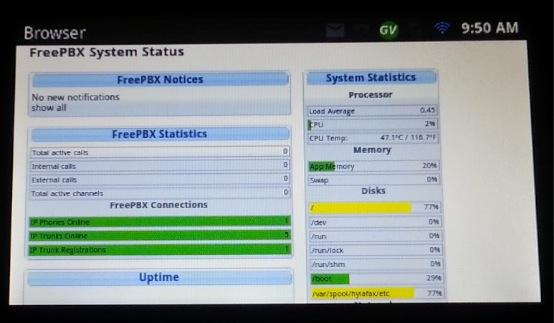
We, of course, took one look at this watch and decided it was a perfect platform on which to display network management information about your PBX in a Flash communications servers or any other server. Keep reading!

One of the terrific apps for the SmartPhone is called Traffic Cams which does just what you’d think. It displays live web cam images from traffic cameras using GPS technology to figure out which ones are closest to you. Very slick! As you can see, we have some stunning ones within a mile of our home. And if you depend upon bridges to get to where you need to go, you’ll soon learn how indispensable these traffic cams really are. The camera shown above actually faces due east. For a real treat, come visit Nerd Vittles at 6:30 a.m. EDT (this time of the year) and enjoy the sunrise. Stunning!
HINT: The image shows the local time if you are timezone-challenged. It is refreshed every 3-4 minutes during the day.
Update: Wondering why this bridge is so empty? Check our SmartWatch! Pays to use more than one traffic camera when you set this up.

A bonus from the app is the ability to display your own 200×200 images on the watch from any public web site. So we whipped together a quick-and-dirty script that extracts status information about your PBX in a Flash server and converts it with ImageMagick (Don’t Forget: yum install ImageMagick) into a couple of jpeg images. Using FTP, these images then can be uploaded to a public web server and displayed on the phone. If you like the code and want to see what else is possible using the SmartWatch, come follow our progress on the PBX in a Flash Forum. Enjoy your new watch! Here’s a short list showing where to get a great deal on one.

Originally published: Monday, April 30, 2012
Need help with Asterisk®? Visit the NEW PBX in a Flash Forum.
whos.amung.us If you’re wondering what your fellow man is reading on Nerd Vittles these days, wonder no more. Visit our new whos.amung.us statistical web site and check out what’s happening. It’s a terrific resource both for us and for you.
Special Thanks to Our Generous Sponsors
FULL DISCLOSURE: ClearlyIP, Skyetel, Vitelity, DigitalOcean, Vultr, VoIP.ms, 3CX, Sangoma, TelecomsXchange and VitalPBX have provided financial support to Nerd Vittles and our open source projects through advertising, referral revenue, and/or merchandise. As an Amazon Associate and Best Buy Affiliate, we also earn from qualifying purchases. We’ve chosen these providers not the other way around. Our decisions are based upon their corporate reputation and the quality of their offerings and pricing. Our recommendations regarding technology are reached without regard to financial compensation except in situations in which comparable products at comparable pricing are available from multiple sources. In this limited case, we support our sponsors because our sponsors support us.
BOGO Bonaza: Enjoy state-of-the-art VoIP service with a $10 credit and half-price SIP service on up to $500 of Skyetel trunking with free number porting when you fund your Skyetel account. No limits on number of simultaneous calls. Quadruple data center redundancy. $25 monthly minimum spend required. Tutorial and sign up details are here.
![]() The lynchpin of Incredible PBX 2020 and beyond is ClearlyIP components which bring management of FreePBX modules and SIP phone integration to a level never before available with any other Asterisk distribution. And now you can configure and reconfigure your new Incredible PBX phones from the convenience of the Incredible PBX GUI.
The lynchpin of Incredible PBX 2020 and beyond is ClearlyIP components which bring management of FreePBX modules and SIP phone integration to a level never before available with any other Asterisk distribution. And now you can configure and reconfigure your new Incredible PBX phones from the convenience of the Incredible PBX GUI.
VitalPBX is perhaps the fastest-growing PBX offering based upon Asterisk with an installed presence in more than 100 countries worldwide. VitalPBX has generously provided a customized White Label version of Incredible PBX tailored for use with all Incredible PBX and VitalPBX custom applications. Follow this link for a free test drive!
Special Thanks to Vitelity. Vitelity is now Voyant Communications and has halted new registrations for the time being. Our special thanks to Vitelity for their unwavering financial support over many years and to the many Nerd Vittles readers who continue to enjoy the benefits of their service offerings. We will keep everyone posted on further developments.
Some Recent Nerd Vittles Articles of Interest…
Introducing NeoRouter VPN: A Star Is Born
In our last article, we introduced PPTP VPNs for interconnecting remote users and branch offices to a central network hub. Known as a hub-and-spoke VPN, the advantage of this design is it lets remote users participate as peers in an existing home office LAN. It’s simple to set up and easy to maintain. The drawback is vulnerability to man-in-the-middle attacks.
Today, we want to turn our attention to the more traditional client-server VPN which still relies upon a central server but uses a star topology to connect remote nodes. The major difference is that only registered devices participate in the virtual private network so there is no direct access to other machines on the LANs of the registered devices. If you have servers scattered all over the countryside, this is an excellent way to manage and interconnect them. All data and communications between the nodes can then be routed through the encrypted VPN tunnel for rock-solid security.
With NeoRouter’s free software, you can set up your VPN server using a PC, a Mac, a Linux or FreeBSD machine, OpenWrt Backfire, and Tomato. VPN clients are available for PCs, Macs, Linux and FreeBSD PCs, OpenWrt, Tomato as well as Android phones and tablets. There’s even an HTML5 web application in addition to a Chrome browser plug-in. With the OpenWrt and Tomato devices or if you’re an extreme techie, you can broaden your NeoRouter star configuration to include bridging of remote LANs. See pp. 47-50 of the NeoRouter User’s Manual. And you can interconnect up to 256 devices at no cost. For $999, you can enlarge your VPN to support 1,000 devices. Screen sharing, remote desktop connections, HTTP, and SSH access all work transparently using private IP addresses of the VPN nodes which are automatically assigned to the 10.0.0.0 private network.
You may be wondering why we’ve moved on from Hamachi. Suffice it to say, LogMeIn has put the squeeze on the free version to the point that it’s now next to worthless. In fact, you’d be hard-pressed to find any mention of a free version of Hamachi (other than a trial edition) on LogMeIn’s current web site. Here’s a feature comparison which says it better than we could.
Today we are introducing the first of two NeoRouter VPN solutions. First, we have a simple installation script that works with any PBX in a Flash 2™ server. See also our more recent column for the dedicated server edition of NeoRouter VPN known as VPN in a Flash. It’s suitable for use on a dedicated server or running as a virtual machine. For smaller VPNs, we prefer the add-on module for PBX in a Flash. For larger deployments, you probably should opt for the dedicated machine. It also isolates your VPN server from your PBX which generally is the better network strategy. Regardless of the installation scenario you choose, keep in mind that neither option requires exposure of your entire server to the Internet. Only a single TCP port needs to be opened in your hardware-based firewall and IPtables Linux firewall.
NeoRouter Setup with PIAF2™. We’re assuming you already have a PBX in a Flash 2 server set up behind a hardware-based firewall. If not, start there. Next, we’ll need to download and run the installer for your new NeoRouter Server. It also installs the client. Just log into your server as root and issue the following commands:
wget http://incrediblepbx.com/install-neorouter
chmod +x install-neorouter
./install-neorouter
The installer will walk you through these five installation steps, but we’ll repeat them here so you have a ready reference down the road.
First, on your hardware-based firewall, map TCP port 32976 to the private IP address of your PIAF2 server. This tells the router to send all NeoRouter VPN traffic to your PIAF2 server when it hits your firewall. If you forget this step, your NeoRouter VPN will never work!
Second, we’re going to use your server’s public IP address as the destination for incoming traffic to your NeoRouter VPN. If this is a dynamic IP address, you’ll need an FQDN that’s kept current by a service such as DynDNS.com.
Third, each administrator and user is going to need a username to access your NeoRouter VPN. You can use the same credentials to log in from multiple client machines, something you may or may not want to do. We’re going to set up credentials for one administrator as part of the install. You can add extra ones by adding entries with one of the following commands using the keyword admin or user. Don’t use any special characters in the username and password!
nrserver -adduser username password admin
nrserver -adduser username password user
Fourth, make up a very secure password to access your NeoRouter VPN. No special characters.
You’re done. Review your entries very carefully. If all is well, press Enter. If you blink, you may miss the completion of the install process. It’s that quick.
Fifth, after your NeoRouter VPN is installed, you can optionally go to the NeoRouter web site and register your new VPN by clicking Create Standalone Domain. Make up a name you can easily remember with no periods or spaces. You’ll be prompted for the IP address of your server in the second screen. FQDNs are NOT permitted.
When a VPN client attempts to login to your server, the server address is always checked against this NeoRouter database first before any attempt is made to resolve an IP address or FQDN using DNS. If no matching entry is found, it will register directly to your server using a DNS lookup of the FQDN. Whether to register your VPN is totally up to you. Logins obviously occur quicker using this registered VPN name, but logins won’t happen at all if your server’s dynamic IP address changes and you’ve hard-coded a different IP address into your registration at neorouter.com.
Setting Up a NeoRouter Client. As mentioned previously, there are NeoRouter clients available for almost every platform imaginable, except iPhones and iPads. Hopefully, they’re in the works. So Step #1 is to download whatever clients are appropriate to meet your requirements. Here’s the NeoRouter Download Link. Make sure you choose a client for the Free version of NeoRouter. And make sure it is a version 1.7 client! Obviously, the computing platform needs to match your client device. The clients can be installed in the traditional way with Windows machines, Macs, etc.
CentOS NeoRouter Client. As part of the installation above, we have automatically installed the NeoRouter client for your particular flavor of CentOS 6, 32-bit or 64-bit. In order to access resources on your NeoRouter server from other clients, you will need to activate the client on your server as well. This gets the server a private IP address in the 10.0.0.0 network.
To activate the client, type: nrclientcmd. You’ll be prompted for your Domain, Username, and Password. You can use the registered domain name from neorouter.com if you completed step #5. Or you can use the private IP address of your server. If your router supports hairpin NAT, you can use the public IP address or server’s FQDN, if you have one.
To exit from NeoRouter Explorer, type: quit. The NeoRouter client will continue to run so you can use the displayed private IP addresses to connect to any other online devices in your NeoRouter VPN. All traffic from connections to devices in the 10.0.0.0 network will flow through NeoRouter’s encrypted VPN tunnel. This includes inter-office SIP and IAX communications between Asterisk® endpoints.
Admin Tools for NeoRouter. Here are a few helpful commands for monitoring and managing your NeoRouter VPN.
Browser access to NeoRouter Configuration Explorer (requires user with Admin privileges)
Browser access to NeoRouter Network Explorer (user with Admin or User privileges)
To access your NeoRouter Linux client: nrclientcmd
To restart NeoRouter Linux client: /etc/rc.d/init.d/nrservice.sh restart
To restart NeoRouter Linux server: /etc/rc.d/init.d/nrserver.sh restart
To set domain: nrserver -setdomain YOUR-VPN-NAME domainpassword
For a list of client devices: nrserver -showcomputers
For a list of existing user accounts: nrserver -showusers
For the settings of your NeoRouter VPN: nrserver -showsettings
To add a user account: nrserver -adduser username password user
To add admin account: nrserver -adduser username password admin
Test VPN access: http://www.neorouter.com/checkport.php
For a complete list of commands: nrserver –help
To change client name from default pbx.local1:
- Edit /etc/hosts
- Edit /etc/sysconfig/network
- Edit /etc/sysconfig/network-scripts/ifcfg-eth0
- Edit /etc/asterisk/vm_general.inc
- reboot
For the latest NeoRouter happenings, follow the NeoRouter blog on WordPress.com.
GPL2 License. The install-neorouter application is open source software licensed under GPL2. The NeoRouter Server and Client software is freeware but not open source. This installer has been specifically tailored for use on PBX in a Flash 2 servers, but it can easily be adjusted to work with virtually any Linux-based Asterisk system. If you make additions or changes, we hope you’ll share them on our forums for the benefit of the entire VoIP community. Enjoy!
Originally published: Wednesday, April 18, 2012
Need help with Asterisk? Visit the NEW PBX in a Flash Forum.
whos.amung.us If you’re wondering what your fellow man is reading on Nerd Vittles these days, wonder no more. Visit our new whos.amung.us statistical web site and check out what’s happening. It’s a terrific resource both for us and for you.
Special Thanks to Our Generous Sponsors
FULL DISCLOSURE: ClearlyIP, Skyetel, Vitelity, DigitalOcean, Vultr, VoIP.ms, 3CX, Sangoma, TelecomsXchange and VitalPBX have provided financial support to Nerd Vittles and our open source projects through advertising, referral revenue, and/or merchandise. As an Amazon Associate and Best Buy Affiliate, we also earn from qualifying purchases. We’ve chosen these providers not the other way around. Our decisions are based upon their corporate reputation and the quality of their offerings and pricing. Our recommendations regarding technology are reached without regard to financial compensation except in situations in which comparable products at comparable pricing are available from multiple sources. In this limited case, we support our sponsors because our sponsors support us.
BOGO Bonaza: Enjoy state-of-the-art VoIP service with a $10 credit and half-price SIP service on up to $500 of Skyetel trunking with free number porting when you fund your Skyetel account. No limits on number of simultaneous calls. Quadruple data center redundancy. $25 monthly minimum spend required. Tutorial and sign up details are here.
![]() The lynchpin of Incredible PBX 2020 and beyond is ClearlyIP components which bring management of FreePBX modules and SIP phone integration to a level never before available with any other Asterisk distribution. And now you can configure and reconfigure your new Incredible PBX phones from the convenience of the Incredible PBX GUI.
The lynchpin of Incredible PBX 2020 and beyond is ClearlyIP components which bring management of FreePBX modules and SIP phone integration to a level never before available with any other Asterisk distribution. And now you can configure and reconfigure your new Incredible PBX phones from the convenience of the Incredible PBX GUI.
VitalPBX is perhaps the fastest-growing PBX offering based upon Asterisk with an installed presence in more than 100 countries worldwide. VitalPBX has generously provided a customized White Label version of Incredible PBX tailored for use with all Incredible PBX and VitalPBX custom applications. Follow this link for a free test drive!
Special Thanks to Vitelity. Vitelity is now Voyant Communications and has halted new registrations for the time being. Our special thanks to Vitelity for their unwavering financial support over many years and to the many Nerd Vittles readers who continue to enjoy the benefits of their service offerings. We will keep everyone posted on further developments.
Some Recent Nerd Vittles Articles of Interest…
Free Asterisk Solutions
