
Home » Technology » Smartphones (Page 11)
Category Archives: Smartphones
The Most Versatile VoIP Provider: FREE PORTING

 JUST RELEASED: Visit the Incredible PBX Wiki
Mobile Internet: A 2015 Update on Caribbean Cruising and WiFi-Enabled Travel

We decided to spend Christmas a little differently this year and joined 10,000 of our closest friends on cruises to the Western Caribbean taking in Cozumel and Grand Cayman with a few extra days at sea. If you haven’t tried it, put it on your bucket list. Christmas week is a bargain and about 50% cheaper than the same cruise to ring in the new year. Rates start at about $300 per person for the 5-day cruise. You’d be hard-pressed to dine out for a week in your home town at those prices. Today we want to provide an update on the dramatic changes in Internet connectivity not only aboard ship but also in navigating 1,000 miles of highway to get there. Let’s start with the glamorous part.
Surfing the Internet Aboard Ship
What a difference a couple years has made. On previous cruises to Alaska and the Eastern Caribbean, Internet service was spotty at best and cost prohibitive on sea days. Typical connection rates were $25 or more per hour. You found yourself scrambling to find a bar with cheap Internet service every time you hit a port. But that was then. Here’s our 2015 update.
Carnival which owns the majority of the cruise ship companies (9 different brands) prides itself on making cruising affordable for almost any traveler. So we qualified. They’ve also revolutionized Internet service with rates on some ships (including ours) as low as $5 a day for unlimited (but basic) Internet connectivity. Here’s a typical pricing plan, but ours was even less expensive. $70 got us unlimited premium Internet service including Skype (one user at a time) for the entire 5-day cruise, and performance was surprisingly good, roughly triple the speed of the $5 a day plan and equivalent to or better than cellular 3G service regardless of the time of day. During early mornings, dinner hours, and when docked at a port, the speed difference from DSL was barely noticeable. Part of this is due to Carnival’s new hybrid Internet technology which blends satellite service with strategically placed Internet towers along your itinerary. The way it works is simple. You login with your account number and birthday, and you can stay logged in as long as you like. If another member of your family wishes to use the service, they simply login on a different device with the same account number and birthday. They’ll be prompted whether to bump you off. Clicking YES transfers the Internet connection to their device and terminates your connection. With three people, it worked amazingly well and was a wonderful testament to what it means to share. Complete details of the WiFi@Sea Internet program are available here. The rollout will be complete by the end of the first quarter in 2016.

We made roughly a dozen Skype calls to test the quality of the calls. With a couple of exceptions, the calls were roughly equivalent to what you would expect using a cable modem connection. With the two bad calls, it was obvious within a couple seconds, and the simple solution was to hang up and try again.

If you’re an Asterisk user, connectivity to an office or home server was easy by making a free call with Skype Connect which we documented just last week. Once connected to an AutoAttendant on the home server, using DISA to make secondary calls to other destinations at minimal cost was a no-brainer. The setup is simple, and we showed how to do it over 10 years ago. Today, it’s built into the GUI. We routed the incoming Skype calls to a Stealth AutoAttendant on the Asterisk server. By pressing an unannounced key during the welcome message, we were prompted for our DISA password. After entering it successfully, we were prompted for a number to dial. In our setup, this includes any number supported by our dialplan: local extensions, 10-digit NANPA numbers throughout the U.S., Canada, and 18 other north American countries as well as special dial codes to retrieve voicemails and other Asterisk functions.
Bottom Line: Do your homework before you book a cruise. Decide what your must-have’s for the cruise are and then compare prices.
Surfing the Internet from Your Car or Motorhome

The other eye-opener was the advances in cellular service along America’s interstates. 4G service now is available almost everywhere. Average download speeds were in the 20-40 Mb range. We used 7.18GB of data during 16 hours of travel. That works out to roughly a half gig per hour of travel with three users. YMMV! Funny how quickly 4G service rolled out once the (not so) Baby Bells got their monopoly back and could charge by the megabyte. We were one of the lucky ones to snag one of the few remaining Verizon unlimited data plans on eBay. Verizon now has tightened the screws and doesn’t allow transfer of the plans to others. But, if you’re one of the lucky ones that still pays over $100 a month for an unlimited data plan (Verizon just quietly raised the monthly charge by $20), then here’s some information for you. First, as part of the FCC’s 4G spectrum auction, bidders (Verizon in this case) were required to agree to the following condition as laid out in 47 C.F.R. 27.16:
(b) Use of devices and applications. Licensees offering service on spectrum subject to this section shall not deny, limit, or restrict the ability of their customers to use the devices and applications of their choice on the licensee’s C Block network, except:
(1) Insofar as such use would not be compliant with published technical standards reasonably necessary for the management or protection of the licensee’s network, or
(2) As required to comply with statute or applicable government regulation.
When Verizon won the auction, they reluctantly acknowledged a customer’s ability to move a SIM card from one device to another so long as the new device was on Verizon’s approved devices list. It doesn’t mean Verizon hasn’t dragged its feet on adding new approved devices, however. The important takeaway from this is that moving between approved devices appears to be safe even though there have been some reported problems. You’ll know whether you’re using a Verizon-approved device by examining your Verizon account to see if a picture of the new device shows up once you insert your SIM card.

So what does all of this have to do with surfing the Internet from your vehicle? Well, you have two choices. You can use your existing smartphone, enable tethering, and have multiple passengers surfing the Internet at 4G speeds with unlimited bandwidth. Or you can purchase a Verizon-approved Novatel T1114 4G Router on eBay and move your SIM card there for trips. Just be sure you buy one with the required 3.5W power adapter. Then add a $20 150W Power Inverter, and you’ve got a Mobile WiFi powerhouse plus a POTS phone connection… in your car.

If you’re one of the unlucky ones that doesn’t have an unlimited data plan with Verizon Wireless, there’s now another option if you live in an area with Sprint service. HINT: Sprint works great along most interstate highways in the United States. For $50 or less per month, you can set up a WiFi HotSpot in your vehicle with unlimited data using Karma Go. If you use our signup link, you get $10 off, and we get a $10 referral credit. There’s a 45-day money-back guarantee. For a great review of Karma Go, go here. And 2016 promises more choices with most new GM vehicles sporting an integrated WiFi HotSpot.
Karma Go Bait-and-Switch: Before buying this "unlimited Internet" device, read the latest news. https://t.co/0tnPvKlDPU #asterisk #freepbx
— Ward Mundy (@NerdUno) January 8, 2016
UPDATE: Karma Go this week began backing off from its unlimited Internet pledge. Seems these companies never learn the bait-and-switch lessons from those that preceded them… or they don’t want to. You can read all about it here.
1/18 UPDATE: Karma Go today announced that they were restoring the original 5 Gbit performance of the product but would cap usage at 15GB/month after which performance would be throttled to "speeds good enough for emailing and messaging."
NEWS FLASH: Beginning January 12, 2016, unlimited Internet plans return to AT&T Wireless for those that also subscribe to DirecTV or U-Verse. Details available here.

There’s more good news from our 1,000 mile travel adventure. We were late to this party, but what an awesome addition for those that travel for a living or just for vacations. If you’ve never tried Waze, add it to your smartphone right now! Not only do you get turn-by-turn directions to any destinations, but you also get road hazard alerts, automatic traffic rerouting to avoid bottlenecks, cheap gas price alerts, and… did we mention that in 1,000 miles it didn’t miss alerting us to every single speed trap. Police departments are government bureaucracies that have grown just like the rest of federal, state, and local government agencies. We counted nearly 100 police vehicles doing nothing but traffic enforcement. On 70 mile per hour Interstate highways, our unscientific survey showed that speeds increased to 75 miles per hour with no police presence compared to 69 miles per hour when a speed trap had been identified. It was readily apparent that truckers and frequent travelers have been using Waze long before us. What we kept asking ourselves was whether the cost of 100 police officers + 100 police cars + an enormous fuel bill was really worth it to slow folks down (momentarily) by 6 miles per hour. We hear a lot about government waste, but the police seem to get a pass on frugality by claiming they’re saving lives. We just didn’t see much of a correlation. It looked more like a game of cat and mouse. Happy New Year everybody. Don’t Drink and Drive!
Originally published: Monday, December 28, 2015
9 Countries Have Never Visited Nerd Vittles. Got a Friend in Any of Them https://t.co/wMfmlhiQ9y #asterisk #freepbx pic.twitter.com/TPFGZbqWB6
— Ward Mundy (@NerdUno) April 22, 2016

Need help with Asterisk? Visit the PBX in a Flash Forum.
Special Thanks to Our Generous Sponsors
FULL DISCLOSURE: ClearlyIP, Skyetel, Vitelity, DigitalOcean, Vultr, VoIP.ms, 3CX, Sangoma, TelecomsXchange and VitalPBX have provided financial support to Nerd Vittles and our open source projects through advertising, referral revenue, and/or merchandise. As an Amazon Associate and Best Buy Affiliate, we also earn from qualifying purchases. We’ve chosen these providers not the other way around. Our decisions are based upon their corporate reputation and the quality of their offerings and pricing. Our recommendations regarding technology are reached without regard to financial compensation except in situations in which comparable products at comparable pricing are available from multiple sources. In this limited case, we support our sponsors because our sponsors support us.
 BOGO Bonaza: Enjoy state-of-the-art VoIP service with a $10 credit and half-price SIP service on up to $500 of Skyetel trunking with free number porting when you fund your Skyetel account. No limits on number of simultaneous calls. Quadruple data center redundancy. $25 monthly minimum spend required. Tutorial and sign up details are here.
![]() The lynchpin of Incredible PBX 2020 and beyond is ClearlyIP components which bring management of FreePBX modules and SIP phone integration to a level never before available with any other Asterisk distribution. And now you can configure and reconfigure your new Incredible PBX phones from the convenience of the Incredible PBX GUI.
The lynchpin of Incredible PBX 2020 and beyond is ClearlyIP components which bring management of FreePBX modules and SIP phone integration to a level never before available with any other Asterisk distribution. And now you can configure and reconfigure your new Incredible PBX phones from the convenience of the Incredible PBX GUI.
 VitalPBX is perhaps the fastest-growing PBX offering based upon Asterisk with an installed presence in more than 100 countries worldwide. VitalPBX has generously provided a customized White Label version of Incredible PBX tailored for use with all Incredible PBX and VitalPBX custom applications. Follow this link for a free test drive!
 Special Thanks to Vitelity. Vitelity is now Voyant Communications and has halted new registrations for the time being. Our special thanks to Vitelity for their unwavering financial support over many years and to the many Nerd Vittles readers who continue to enjoy the benefits of their service offerings. We will keep everyone posted on further developments.
Some Recent Nerd Vittles Articles of Interest…
The Voice Recognition Revolution: Move Over Siri and Meet the New Kids
The automobile manufacturers had the right idea years ago. Make it easy to change the temperature in your vehicle. Just say "cooler" or "warmer." That project went about as well as their GPS interfaces are progressing today. So let’s give credit where credit is due. Apple’s Siri revolutionized voice recognition by making it something really useful on the smartphone. If you’ve wondered who Siri actually is, wonder no more. You’re in for a pleasant surprise. Meet Siri from Australia. And Siri U.S.A.:
Google, of course, is not one to be left behind. There was a reason they were offering to transcribe your voicemails for free all those years. They were putting in place the building blocks for a similar system on Android-based phones. Hey, Siri. Meet "OK, Google." And the competition has transformed both products into incredibly useful additions to every smartphone.
Then the latest Silicon Valley Wannabe got into the picture. Let me introduce Alexa for your kitchen or living room masquerading as Amazon’s Echo, a fascinating new half-baked product. If the Echo weren’t so transfixed with selling you music and other stuff from Amazon, it could be a terrific product. Not to be outdone, Google wasted little time introducing their look-alike, OnHub, which makes half-baked look really useful. OnHub does absolutely nothing but serve as a home router with more antennas than the Mars Rover. And now both Apple and Google are circling back to the automobile promising to revolutionize the way in which you talk to or even drive your car. Stay tuned. It’s going to get interesting. And, on the living room front, you’re probably going to need to buy another round of hardware. Even though many building blocks were in place with OnHub, Google left out a microphone… unless they use the one on your smartphone or watch. 😉
So what does all of this have to do with Asterisk® and VoIP telephony? Well, nothing actually… until today. Most of the cool things you can do with your smartphone or sitting in your living room simply weren’t available using a Plain Old telephone. We decided to fix that.
For the tinkerers and experimenters of the world, Google has generously offered free access to their voice recognition software. And today we’ll show you how to put it to good use. In the time it takes to drink your morning coffee, you’ll have a platform on your PBX that’s every bit as capable as Siri. And it’s all free!
Meet Star! When we’re finished today, you’ll be able to pick up any telephone and dial * to obtain the latest weather, news, stock prices, sports scores, time of day, and anything else that an almanac at your fingertips provides. In addition, you’ll be able to call anyone by saying their name or phone number. Not bad for free, huh? Down the road, we’ll work on adding text messaging, email, and scheduling reminders. But today’s release should whet your appetite for what’s possible.
Putting in Place the Star Platform
We don’t own or control most of the components that actually make Star work! That means you’ll need to sign up (for free) for a couple key pieces before the puzzle actually takes shape. Here’s the three-step process.
First, install one of the Certified Incredible PBX builds on either a dedicated server, a virtual machine, or in the Cloud. This tutorial will walk you through the easiest 20-minute installation procedure.
Second, you’ll need to obtain and set up the credentials for two of the third-party components that will bring Star to life. You’ll need  a Google Speech Recognition key and
  a Wolfram Alpha App-ID. Then add an AsteriDex entry to tell Star the zip code of your hometown, and you’re ready to go.
Third, you’ll spend less than a minute installing the Star software on your server.
1. Adding Speech Recognition Support to Incredible PBX
To support many of the Star features, we rely upon Google’s speech recognition service and Lefteris Zafiris’ terrific speech-recog AGI script. Unfortunately (for some), Google now has tightened up the terms of use for their free speech recognition service. Now you can only use it for "personal and development use." If you meet those criteria, keep reading. Here’s how to activate speech recognition on Incredible PBX. Don’t skip any steps!
Finally, let’s be sure you have all the necessary packages in place to support text-to-speech and speech recognition:
yum -y install perl-XML-Simple libesd.so.0 sox perl-libwww-perl
If you’re not on the Incredible PBX platform: yum -y install mpg123
2. Adding Wolfram Alpha Support to Incredible PBX
To use Wolfram Alpha by phone, you first must obtain a free Wolfram Alpha APP-ID. Then issue the following command replacing APP-ID with your actual ID. Do NOT change the yourID portion of the command:
sed -i "s|yourID|APP-ID|" /var/lib/asterisk/agi-bin/4747
3. Adding Your Hometown ZIP Code to AsteriDex
1. Using a browser, visit the IP address of your server.
2. Click on the Nerd Vittles AsteriDex button in the Kennonsoft GUI.
3. Click on the Admin tab in AsteriDex.
4. In the Add Entry column, enter the following data using your hometown ZIP code:
Contact Name: Weather

Contact Phone: 947

Dial Code: your local 5-digit ZIP code
5. Click the Add New Record button to save your entry.
Installing or Upgrading Star
We’ve designed the Star install so that you also can easily update the application by simply running the install-star command again. After logging into your server as root, here are the commands to install or upgrade your Star application:
cd /root
wget http://incrediblepbx.com/install-star.tar.gz
tar zxvf install-star.tar.gz
rm -f install-star.tar.gz
./install-star
10/10 UPDATE: Star apparently was too popular for Google to absorb, and they’ve imposed new limits on TTS playback. So, for the time being, we’ve switched Star back to FLITE for text-to-speech. To update your server, just run the installer again: /root/install-star
Taking Star for a Spin
Here’s a quick summary of the available commands that Star currently supports:
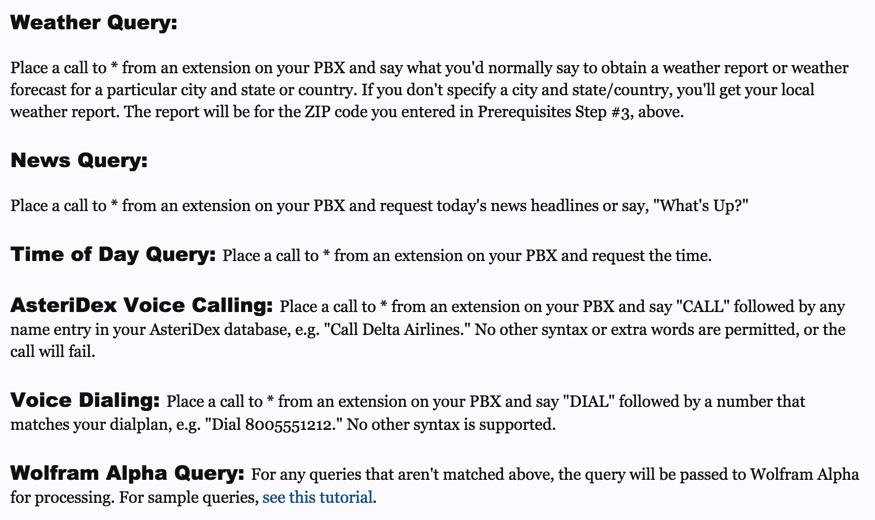
And here are some sample Wolfram Alpha queries to get you started:
Weather in Charleston South Carolina
Weather forecast for Washington D.C.
Next solar eclipse
Otis Redding
Define politician
Who won the 1969 Superbowl? (Broadway Joe)
What planes are overhead? (flying over your server’s location)
Ham and cheese sandwich (nutritional information)
Holidays 2015 (summary of all holidays for 2015 with dates and DOW)
Medical University of South Carolina (history of MUSC)
Star Trek (show history, air dates, number of episodes, and more)
Apollo 11 (everything you ever wanted to know)
Cheapest Toaster (brand and price)
Battle of Gettysburg (sad day 🙂 )
Daylight Savings Time 2015 (date ranges and how to set your clocks)
Tablets by Samsung (pricing, models, and specs)
Doughnut (you don’t wanna know)
Snickers bar (ditto)
Weather (local weather at your server’s location)
For late-breaking updates and news about the Star platform, visit this thread on the PIAF Forum. Enjoy!
Originally published: Tuesday, October 6, 2015
Need help with Asterisk? Visit the PBX in a Flash Forum.
Special Thanks to Our Generous Sponsors
FULL DISCLOSURE: ClearlyIP, Skyetel, Vitelity, DigitalOcean, Vultr, VoIP.ms, 3CX, Sangoma, TelecomsXchange and VitalPBX have provided financial support to Nerd Vittles and our open source projects through advertising, referral revenue, and/or merchandise. As an Amazon Associate and Best Buy Affiliate, we also earn from qualifying purchases. We’ve chosen these providers not the other way around. Our decisions are based upon their corporate reputation and the quality of their offerings and pricing. Our recommendations regarding technology are reached without regard to financial compensation except in situations in which comparable products at comparable pricing are available from multiple sources. In this limited case, we support our sponsors because our sponsors support us.
BOGO Bonaza: Enjoy state-of-the-art VoIP service with a $10 credit and half-price SIP service on up to $500 of Skyetel trunking with free number porting when you fund your Skyetel account. No limits on number of simultaneous calls. Quadruple data center redundancy. $25 monthly minimum spend required. Tutorial and sign up details are here.
![]() The lynchpin of Incredible PBX 2020 and beyond is ClearlyIP components which bring management of FreePBX modules and SIP phone integration to a level never before available with any other Asterisk distribution. And now you can configure and reconfigure your new Incredible PBX phones from the convenience of the Incredible PBX GUI.
The lynchpin of Incredible PBX 2020 and beyond is ClearlyIP components which bring management of FreePBX modules and SIP phone integration to a level never before available with any other Asterisk distribution. And now you can configure and reconfigure your new Incredible PBX phones from the convenience of the Incredible PBX GUI.
VitalPBX is perhaps the fastest-growing PBX offering based upon Asterisk with an installed presence in more than 100 countries worldwide. VitalPBX has generously provided a customized White Label version of Incredible PBX tailored for use with all Incredible PBX and VitalPBX custom applications. Follow this link for a free test drive!
Special Thanks to Vitelity. Vitelity is now Voyant Communications and has halted new registrations for the time being. Our special thanks to Vitelity for their unwavering financial support over many years and to the many Nerd Vittles readers who continue to enjoy the benefits of their service offerings. We will keep everyone posted on further developments.
Some Recent Nerd Vittles Articles of Interest…
A Firsthand Look at Disaster Recovery: Tethering and IAX with Asterisk

One of the exciting challenges of building a swimming pool is knowing that it’s just a matter of time until your Internet connection dies. As you might imagine, swimming pools are major construction and involve a lot of digging. And digging usually means some oops moments when cables get cut. In our case, we had watched the folks digging the trenches for all of the pool plumbing to be sure they didn’t accidentally whack one of three coax cables coming into our house. And, when it came time to cover up the trenches, we pointed out the orange cables to the Bobcat driver knowing we were finally home free. Not so fast! Two minutes later, Mario had driven the Bobcat right over the primary Internet cable leaving the shredded remains sticking up through the dirt. Oops. Sorry. Shit happens!
Looking on the positive side, we chuckled, "What a perfect opportunity to test our backup Asterisk® system!" Our backup system is pretty clever if we do say so. It relies upon a Verizon WiFi HotSpot running on our Galaxy smartphone and a duplicate of our Asterisk-based PBX in a Flash™ server running as a virtual machine under VirtualBox on an iMac desktop. The entire setup takes less than a minute to activate. Well, that was the plan anyway.
It turns out that Verizon does SIP a little differently with a SIP ALG in the path so Asterisk couldn’t register with all but one of our dozen SIP providers. Congratulations, CallCentric! The workaround is to enable STUN. That is now possible with Asterisk 11. Short of that, you’re left with CallCentric. Unfortunately for us, we don’t do much SIP trunking with CallCentric, and none of our primary DIDs are connected through them. The other option is to add port=5080 to your trunk setup with any SIP trunks you register with VoIP.ms using a username and password. Our attention span was too short to tackle STUN in the middle of this crisis. But there’s good news. Verizon doesn’t mess with IAX network traffic at all. Since a couple of our primary DIDs are registered with VoIP.ms using IAX trunks, restoring these IAX trunks to full functionality took less than a minute. That is step one of a three-step process. You need inbound trunks, phones, and outbound trunks to get your redundant VoIP server back in business.
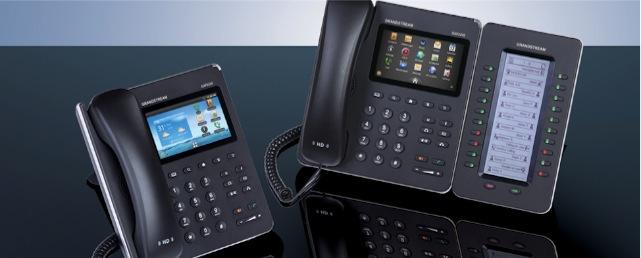
Getting phones to function on what is now a purely WiFi network (through the Verizon HotSpot) can be problematic unless you’ve done your homework and sprinkled a few WiFi-capable SIP phones around your home or office. In our case, we still have Grandstream’s GXP2200 Android phones scattered everywhere so it was just a matter of plugging in the WiFI adapters and rebooting. The newer GXV3240 would work just as well.1
All that remained was enabling several trunks for outbound calls. Since VoIP.ms IAX trunks support both incoming and outgoing calls, we were home free. And, with Google Voice trunks, it was simply a matter of jumping through Google’s security hoops to reenable the connections on a new IP address.
Lessons Learned. Here’s a quick checklist for those of you that think about disaster recovery for your home or for clients and businesses. Nothing beats some advance planning. If money is no object, then WiFi tethering from a smartphone with one of the major providers whose service works well in your home or office environment is the way to go. 4G is a must!
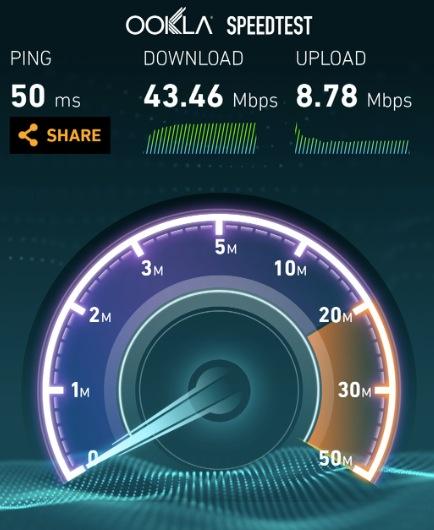
In our case, money was an object so we had the foresight to acquire a Verizon SIM card from eBay that included an unlimited data plan. With this setup, it costs only $1 a day extra to add WiFi tethering, and you can turn it off and on as often as you like without any additional fees or surcharges. There also are no additional charges for using boatloads of data! We’re actually writing this column with a tethered connection from a hotel in Washington (results above). To give you some idea of why an unlimited data plan is important, our home operation burned through 4 gigs of data in less than 24 hours once we activated WiFi tethering. Of course, there were people doing things other than making phones calls, but tethering enables 5 connections to function just about like the cable modem service you originally had in place. So expect the data usage to be substantial. Everybody likes 24/7 Internet service.
Loss of phone calls through a PBX is more of an annoyance than a crisis these days because almost everyone also has a smartphone. Even so, the SIP gotcha with Verizon Wireless was a surprise because we hadn’t really tested our super-duper emergency system in advance. That wasn’t too smart obviously. The old adage applies. Do as we say, not as we do. Unplug your cable modem or DSL connection and actually test your backup system before D-Day arrives.
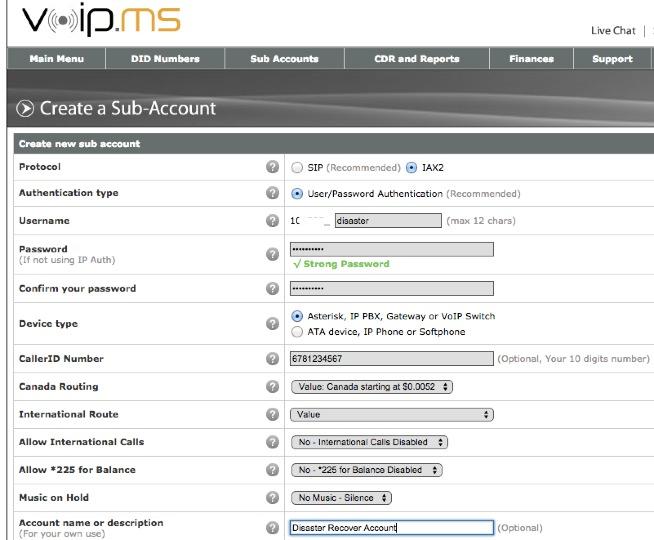
On the VoIP provider end, now is the time to set up an account with a provider that offers both SIP and IAX connectivity. Step 2 is to actually configure an IAX trunk (as a subaccount to use VoIP.ms parlance) and test it. IAX trunks actually have fewer headaches with NAT, but there are only a handful of providers that still provide the service. Find one now and make certain that your primary DIDs will roll over to the IAX trunk in case of an outage. I’m always reminded that we have Mark Spencer to thank for IAX. It was his brainchild. Thank you, Mark! With VoIP.ms, you also can spoof your CallerID so that calls will still appear to originate from your primary Asterisk PBX.
Keep in mind that a VirtualBox-based Asterisk virtual machine and a Desktop computer both need an IP address and will have to be started on WLAN0 rather than ETH0. Remember, your wired connection is now dead.
You’re also going to want to acquire at least a couple of WiFi-capable SIP phones that can be connected with your Asterisk server using your WiFi HotSpot. Also make certain that you have a preconfigured IPtables firewall on your backup system. Remember, your hardware-based firewall connected to your cable modem won’t provide any protection once you switch to HotSpot operation. Lucky for you, Incredible PBX™ servers come preconfigured with a locked-down IPtables firewall and a WhiteList. Just add the new IP addresses of your server and phones, and you’re secure on the public Internet.
Finally, let’s do the HotSpot connection math. You’ll need an IP address for your desktop computer running VirtualBox. You’ll need a second IP address for the Asterisk virtual machine. Then you’ll need an IP address for every WiFi-enabled SIP phone. If the maximum number of connections is five on your HotSpot, that means you’ve got the necessary capacity for at most 3 WiFi SIP phones assuming you don’t enable a WiFi printer and if nobody else wants to use a computer during the outage. The other option is to add an inexpensive travel router with bridge mode to your mix of 5 devices. We always keep one handy for extended trips. A properly configured travel router provides an additional WiFi network with some extra WiFi connections. Good luck!
Security Alerts. Serious SSL and FreePBX security vulnerabilities have been discovered AND patched during the past week. If you have not patched your server and Asterisk, FreePBX, Apache, and/or WebMin are exposed to the public Internet, you have a serious problem on your hands. See this thread for details on the FreePBX vulnerability. And see this thread for the steps necessary to patch SSL in Asterisk, Apache, and Webmin. While Incredible PBX servers were automatically patched for the FreePBX vulnerability, the SSL issues require manual patching and an Asterisk upgrade. A script for upgrading Asterisk 11 servers is included in the message thread linked above. ALWAYS run your VoIP server behind a firewall with no Internet port exposure to Asterisk, FreePBX, SSH, or the Apache and Webmin web servers! And, if you think all of this security stuff is just a silly waste of your time, then read about the latest lucky recipient of a $166,000 phone bill.
Originally published: Monday, October 20, 2014
Need help with Asterisk? Visit the PBX in a Flash Forum.
Special Thanks to Our Generous Sponsors
FULL DISCLOSURE: ClearlyIP, Skyetel, Vitelity, DigitalOcean, Vultr, VoIP.ms, 3CX, Sangoma, TelecomsXchange and VitalPBX have provided financial support to Nerd Vittles and our open source projects through advertising, referral revenue, and/or merchandise. As an Amazon Associate and Best Buy Affiliate, we also earn from qualifying purchases. We’ve chosen these providers not the other way around. Our decisions are based upon their corporate reputation and the quality of their offerings and pricing. Our recommendations regarding technology are reached without regard to financial compensation except in situations in which comparable products at comparable pricing are available from multiple sources. In this limited case, we support our sponsors because our sponsors support us.
BOGO Bonaza: Enjoy state-of-the-art VoIP service with a $10 credit and half-price SIP service on up to $500 of Skyetel trunking with free number porting when you fund your Skyetel account. No limits on number of simultaneous calls. Quadruple data center redundancy. $25 monthly minimum spend required. Tutorial and sign up details are here.
![]() The lynchpin of Incredible PBX 2020 and beyond is ClearlyIP components which bring management of FreePBX modules and SIP phone integration to a level never before available with any other Asterisk distribution. And now you can configure and reconfigure your new Incredible PBX phones from the convenience of the Incredible PBX GUI.
The lynchpin of Incredible PBX 2020 and beyond is ClearlyIP components which bring management of FreePBX modules and SIP phone integration to a level never before available with any other Asterisk distribution. And now you can configure and reconfigure your new Incredible PBX phones from the convenience of the Incredible PBX GUI.
VitalPBX is perhaps the fastest-growing PBX offering based upon Asterisk with an installed presence in more than 100 countries worldwide. VitalPBX has generously provided a customized White Label version of Incredible PBX tailored for use with all Incredible PBX and VitalPBX custom applications. Follow this link for a free test drive!
Special Thanks to Vitelity. Vitelity is now Voyant Communications and has halted new registrations for the time being. Our special thanks to Vitelity for their unwavering financial support over many years and to the many Nerd Vittles readers who continue to enjoy the benefits of their service offerings. We will keep everyone posted on further developments.
Some Recent Nerd Vittles Articles of Interest…
- Some of our links refer users to Amazon or other service providers when we find their prices are competitive for the recommended products. Nerd Vittles receives a small referral fee from these providers to help cover the costs of our blog. We never recommend particular products solely to generate commissions. However, when pricing is comparable or availability is favorable, we support these providers because they support us. [↩]
The Disappointing iPhone 6: Eight Generations of iOS and Bluetooth Still Sucks
Our technology reviews are a little different than the dozens of reviews you’ve probably already seen that read more like Apple press releases. First of all, we typically buy products to actually use. And second, we base our smartphone evaluations on real-world requirements rather than best case scenarios that you’re unlikely to ever experience in the real world.
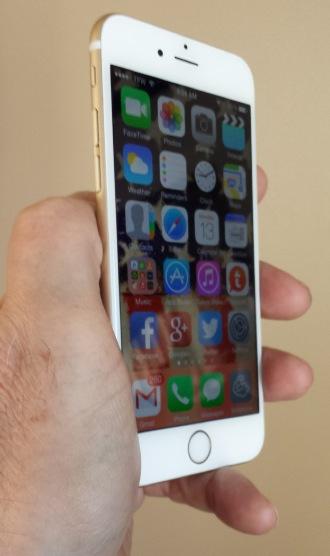
So we begin our review of the iPhone 6 with the simple question: "Can it make calls?" Funny as this sounds, it’s been a huge problem with previous iPhone models if you planned to use a reasonably priced provider such as StraightTalk instead of one of America’s "Big Four." To Apple’s credit, they finally got it right in the AT&T model of the iPhone 6. StraightTalk works out of the box, something Android mastered years ago. You still cannot manually configure the cellphone provider specs, but at least it now works.
We’re not going to spend a lot of time on Apple’s continuing push to lock users into the Apple universe. Suffice it to say, the lock in marches on with each new release. To some it’s a good thing. To others, it’s not. If you’re going to fork over $1,0001 for an iPhone 6 in order to use StraightTalk for $45 a month, then you’re probably committed to and comfortable with Apple’s ways of doing things. We’re pretty much an observer of the iPhone cosmos except to assure that our VoIP products still work reliably on the platform. On the other hand, our teenager and all of her teenage friends have iPhones, period. Just the mention of Android conjures up visions of nerds hanging from trees to hear them tell it. In other words, lock in is a good thing in their view. All of their apps work exactly the same on every person’s smartphone. All of their emojis are compatible for texting. And messaging is pure Apple with no worries whether SMS and MMS work or not. By the way, messaging is still a mess if you switch between Apple and Android with your SIM card without first disabling iMessage on the iPhone. It’s almost as if Apple likes it this way. 😉
Did we mention that the iPhone 6 is gorgeous? Hands down, it is the best looking smartphone ever. We won’t get into whether it bends or not. Ours didn’t, and we carry it in our pocket like every other guy on the planet. Not sure I’d do it if I rode on a tractor all day but in typical everyday use, it holds it’s own.
We were especially curious about the camera given the numerous reviews documenting that the iPhone 6 is not the megapixel wonder you’ve come to expect with Android phones. We’ve typically been able to take much better real-world photos using Samsung’s Galaxy S4. So we’re including two marsh photos taken with a Galaxy S4 as well as iPhone 5c and iPhone 6 portrait shots to let you judge the quality for yourself. Keep in mind that all four of the images below are screen captures rather than the actual photographs. We came away from the experiment very impressed that the newer iPhones can hold their own against the Android devices with far better technical specs. While it’s still a bit of a knuckle drill to export a photo from your photo stream to iPhoto to email to a download to your desktop, it’s at least intuitive. Bottom Line: We no longer worry about photo quality when we don’t have an Android phone along for a trip.


With the camera testing behind us, that left us with two burning questions: how’s the WiFI and how’s the Bluetooth connectivity with cars?
Not to beat a dead horse, but WiFi typically hasn’t been Apple’s strong suit unless you happen to be using their access points. That seems to be resolved with iOS 8. 5G WiFi connectivity worked great with download and upload speeds matching the limits of our broadband service. That’s the good news.
The bad news is that Bluetooth is still a mess after years and years of problem reports. If anything, iOS 8 is a step backwards judging from the reports on Apple’s own support forum. Our results with one of the latest General Motors vehicles were terrible. While the iPhone 6 could be paired with the vehicle, nothing worked afterwards. No calls, no Pandora, nothing! When every $100 Android smartphone can pair with almost any vehicle and work, we get back to our initial question: "Can it make calls?" Unfortunately, unless you want to step back in time and hold your shiny, new iPhone 6 next to your ear, the answer is a resounding NO. And, yes, we jumped through all of the Apple hoops attempting to resolve the Bluetooth problems even though nobody should ever have to endure that! For $1,000, one would expect all of the basics on a smartphone to function correctly just as you expect your brakes and windshield wipers to work when you buy a new car. The fact that Apple has dropped the ball on Bluetooth for years is yet another reason we won’t be switching from Android anytime soon. In fact, the Bluetooth problem is a deal breaker for us so we’re returning the phone.
Finally, a word to the Apple fanboys. Don’t post comments. We won’t publish them. We are not Apple haters. Quite the contrary, we have more Apple hardware under our roof than any other brand. What Apple has done in the educational arena and to foster the image of technical support as a good thing is legendary. But you can’t drop the ball on the basics and expect people that depend upon technology to be impressed. Drop everything that deals with the shiny new watch for a few days and fix Bluetooth. It’s that important!
Originally published: Monday, October 13, 2014
Need help with Asterisk? Visit the PBX in a Flash Forum.
Special Thanks to Our Generous Sponsors
FULL DISCLOSURE: ClearlyIP, Skyetel, Vitelity, DigitalOcean, Vultr, VoIP.ms, 3CX, Sangoma, TelecomsXchange and VitalPBX have provided financial support to Nerd Vittles and our open source projects through advertising, referral revenue, and/or merchandise. As an Amazon Associate and Best Buy Affiliate, we also earn from qualifying purchases. We’ve chosen these providers not the other way around. Our decisions are based upon their corporate reputation and the quality of their offerings and pricing. Our recommendations regarding technology are reached without regard to financial compensation except in situations in which comparable products at comparable pricing are available from multiple sources. In this limited case, we support our sponsors because our sponsors support us.
BOGO Bonaza: Enjoy state-of-the-art VoIP service with a $10 credit and half-price SIP service on up to $500 of Skyetel trunking with free number porting when you fund your Skyetel account. No limits on number of simultaneous calls. Quadruple data center redundancy. $25 monthly minimum spend required. Tutorial and sign up details are here.
![]() The lynchpin of Incredible PBX 2020 and beyond is ClearlyIP components which bring management of FreePBX modules and SIP phone integration to a level never before available with any other Asterisk distribution. And now you can configure and reconfigure your new Incredible PBX phones from the convenience of the Incredible PBX GUI.
The lynchpin of Incredible PBX 2020 and beyond is ClearlyIP components which bring management of FreePBX modules and SIP phone integration to a level never before available with any other Asterisk distribution. And now you can configure and reconfigure your new Incredible PBX phones from the convenience of the Incredible PBX GUI.
VitalPBX is perhaps the fastest-growing PBX offering based upon Asterisk with an installed presence in more than 100 countries worldwide. VitalPBX has generously provided a customized White Label version of Incredible PBX tailored for use with all Incredible PBX and VitalPBX custom applications. Follow this link for a free test drive!
Special Thanks to Vitelity. Vitelity is now Voyant Communications and has halted new registrations for the time being. Our special thanks to Vitelity for their unwavering financial support over many years and to the many Nerd Vittles readers who continue to enjoy the benefits of their service offerings. We will keep everyone posted on further developments.
Some Recent Nerd Vittles Articles of Interest…
- Actually, the sales price for the 128GB iPhone 6 with AppleCare+ and sales tax came to a whopping $1,028.59 [↩]
Hardware Device of the Year: Meet the CuBox-i with Incredible PBX for Ubuntu

It’s been many years since we’ve written back-to-back articles about the same device. That should tell you how really special the CuBox-i is. After two weeks of 14-hour days developing the new Incredible PBX platform for CuBox, we are thrilled to crown this jewel as Nerd Vittles Hardware Device of the Year. Flawless design, incredible performance, tiny size, feature-rich components, minimal power consumption, and completely silent operation are merely the tip of the iceberg with this 2x2x2 cubic zircon. On the $130 CuBox-i4PRO, there’s a Quad Core processor, 2 gigs of RAM, a 10/100/1000 Ethernet port, a 1080p HDMI port, two powered USB 2 ports, an eSATA II port for an external drive, a realtime clock with backup battery, an Optical S/PDIF Audio Out port, a microSD port, an infrared receiver and transmitter, WiFi 11n, and Bluetooth plus a power adapter to match either American or European power sources. Whew! And here’s the best part. Everything works while squeezed in a tiny case that’s a third the size of Rubic’s Cube.

A SOHO Swiss Army Knife That Fits in Your Cupholder: Voice, Fax, SMS, TTS, Email, PBX, Incredible!
Did we mention it’s a near perfect VoIP platform for any home office or small business? Well, it is. And everything we’ve learned about Asterisk® and FreePBX® and Internet security over the past decade is rolled into today’s release of our crown jewel edition of Incredible PBX™ for the CuBox. First, you’ll need to purchase one and we strongly recommend the CuBox-i4PRO with its Quad Core ARM processor and built-in WiFi and Bluetooth. In the U.S, there’s NewEgg or NewEgg (10% off on i4PRO with promo code SW829NE10 = $117 until 9/4). In the U.K, there’s NewIT. For everyone else, you can buy directly from SolidRun, the creator.
Before we dive into Incredible PBX, we want to express our deepest appreciation to Zhando and Josh North of PIAF Forum fame. Zhando’s pioneering efforts with Ubuntu and Incredible PBX on the CuBox platform and Josh North’s morphing of Incredible Fax for deployment with Ubuntu paved the way for everything you’re about to read. It reinforces the spectacular results which can be achieved in the open source community when a talented group of even a few folks put their heads together. The Ubuntu developers and the tens of thousands of open source contributors from around the world also deserve a well-earned tip of the hat for producing a Linux platform that is rock-solid reliable and incredibly versatile. Nearly 1,000 open source packages are included in the latest Incredible PBX build. Click on the link to view the package list in PDF format and prepare to be amazed. We couldn’t have done it without all of you!
Introducing Incredible PBX 11.12.0 for the CuBox-i4PRO
If you’re new to Asterisk and the world of VoIP telephony, let us take a moment and explain how Incredible PBX fits into the puzzle. For lack of a better term, Incredible PBX on the CuBox platform is a turnkey aggregation in a bootable image that is based upon a superset of Ubuntu 14 packages plus Asterisk, the FreePBX GUI, and a sizable collection of applications for the Asterisk platform. You download a tarball, decompress it, write the image file to a microSD card, insert the card into your CuBox-i, and presto! You’ve got a turnkey PBX. Add credentials for a trunk or two to make and receive calls, connect some phones, and your whole office will come alive with a versatile PBX platform that used to cost organizations hundreds of thousands of dollars. What’s included in Incredible PBX? Glad you asked. Here’s a 3-minute video showcasing a few of our favorite Incredible PBX text-to-speech applications:
The Incredible PBX 11 Inventory. Here’s the current feature set on the CuBox platform. It’s the most robust ever! In addition to its superset of nearly 1,000 Ubuntu 14 packages, Asterisk 11, and FreePBX 2.11 with Apache, SendMail, MySQL, PHP, phpMyAdmin, Fail2Ban, WebMin, and the IPtables Linux firewall, check out these additions:
- AsteriDex: The Poor Man’s Rolodex®
- Asterisk Upgrade Utility (/root/upgrade-asterisk-cubox-bt)
- AvantFax Management Utilities (see /root folder)
- Bluetooth Integration turns your cellphone into an Asterisk Trunk
- CallerID Superfecta (FreePBX Module adds Names to CID Numbers)
- CallWho for Asterisk (Dial by Voice from AsteriDex: 411)
- Preconfigured Email That Works with SendMail and Incredible Fax
- OSS Endpoint Manager (Phone Configuration FreePBX module)
- eSATA External Hard Drive Integration
- Extensions (1 preconfigured with voicemail and randomized passwords)
- Fax to PDF Conversion with EMail Delivery (/root/avantfax-email-dest)
- Google Speech Recognition for Incredible PBX apps (follow setup tutorial)
- Flite TTS for Asterisk (text-to-speech with Igor)
- GoogleTTS for Asterisk (Lefteris Zafiris’ state-of-the-art TTS)
- Google Voice (FreePBX GV/Motif Module for free U.S./Canada calls)
- Hotel-Style Wakeup Calls (FreePBX Module to simulate your favorite Holiday Inn)
- Incredible Backups… and Restores (see /root)
- Incredible Fax 11 with HylaFax/AvantFax
- ODBC Database Support (Dial 222 with Employee Number 12345 to see what’s possible)
- Automated Incredible PBX Update Utility
- Lenny: The Telemarketer’s Worst Nightmare (dial L-E-N-N-Y)
- Network Management Utilities for Wired and Wireless Networking (see /root)
- Parking Lot Attendant (dial ## then 70 to simulate key telephones)
- Partition Resizing Tutorial for eSATA external drives
- Partition Resizing Utility for SD card expansion (/root/resize-partition)
- Phone Conference Bridge (Dial C-O-N-F for Private Conferences)
- PortKnocker for Quick Remote Access (cat /root/knock.FAQ)
- PPTP Virtual Private Network (interconnect with other computers in minutes)
- Reminders by Phone and Web (supports recurring reminders and TTS delivery)
- SAMBA Windows Networking (Windows Networking Made Easy)
- SMS Dictator with Google Voice (Dial S-M-S to dictate and send an SMS message)
- Speech-to-Text Directory Assistance (Dial 411)
- Stealth AutoAttendant
- TimeZone Setup Utility (see /root)
- Today in History (Dial T-O-D-A-Y for today’s major events)
- Travelin’ Man 3 (IPtables WhiteList for rock-solid network security)
- Travelin’ Man 4 (Dialup to WhiteList any IP address: 864)
- Voice Dictation by Phone (Dial 5678)
- Weather by ZIP Code (Dial Z-I-P and enter any 5-digit zip code)
- Worldwide Weather by Phone (Dial 949 and say the name of your favorite city)
- Wolfram Alpha by Phone (/root/wolfram to install the world’s best almanac)
- Yahoo News by Phone (Dial 951 for the latest news headlines)
A Few Words About Security. Thanks to its Zero Internet Footprint™ design, Incredible PBX is different. It remains the most secure Asterisk-based PBX around. What this means is Incredible PBX has been engineered to sit anywhere, either behind a NAT-based, hardware firewall or directly on the Internet. No device other than those on your private LAN, a few of the major (trusted) SIP providers around the world, and those that you authorize on your WhiteList can even see your server. Additional IP addresses can be added to the WhiteList in three ways:
- An administrator registers new IP addresses using add-ip or add-fqdn from the Linux CLI
- A remote user sends the (correct) randomized PortKnock code assigned to your CuBox
- A remote user dials in from a standard telephone to register a new remote IP address
Read about this $100,000 VoIP phone bill, and you’ll better appreciate why WhiteList-based server security has become absolutely essential. WhiteList Security means only those devices with a registered IP address in your WhiteList can get to your server’s resources. To the NSA and everyone else, your server doesn’t even show up on the radar. Their only way to contact you is a POTS telephone using your published phone number. Our complete tutorial on Travelin’ Man 3 is available here. With Incredible PBX for CuBox, it’s installed and preconfigured.
Installing Incredible PBX 11.12.0 on the CuBox-i
There are five simple steps to get Incredible PBX up and running on your CuBox:
- Purchase a storage device
- Download Incredible PBX image
- Untar the image on your desktop
- Burn the image to a microSD card
- Insert microSD card in CuBox and boot
Choosing a Storage Platform. Unless you plan to run your server with an external eSATA hard drive (CuBox-i4PRO tutorial here), the first step is to purchase a suitable microSD card. We recommend at least a 32GB Class 10 card from Transcend, SanDisk, or Kingston. All of them are under $20 on Amazon and most include free 2-day shipping for Prime customers. If using an eSATA drive, you still need a microSD card to boot up, but any 4GB or 8GB card will suffice.1
Downloading Incredible PBX for CuBox. From your favorite desktop computer, download the latest build of Incredible PBX from SourceForge. Depending upon your network connection and the SourceForge mirror, it can take awhile. It’s a whopping 1.3GB!
Untarring Incredible PBX for CuBox. Depending upon your desktop platform, untarring incrediblepbx.4.cubox.U14.latest.tar.gz is as simple as double-clicking on it in the Downloads folder (on a Mac). On the Windows platform, here are 3 utilities that will do the job. On a Linux desktop, open a Terminal window and…
tar zxvf incrediblepbx.4.cubox.U14.latest.tar.gz
Burning the Incredible PBX image to microSD. Once you’ve untarred the file, you’ll find two scripts that make burning the image to a microSD card simple if you’re on a Mac or Linux desktop. On a Windows machine, it’s a little more complicated. Most SD cards come preformatted with a DOS partition so your Windows machine should recognize the microSD card when it’s inserted. If not, format the card using a utility such as SD Card Formatter. Next, you’ll need Win32 Disk Imager to burn cubox.img to your card. Once the image has been transferred, gracefully unmount the card from your desktop, and then remove the card from the SD card adapter.
Booting Incredible PBX on the CuBox. Insert the microSD card (electronics side up) into your CuBox-i. Then apply power to the CuBox after connecting a USB keyboard, HDMI monitor, and Ethernet cable to a network with Internet connectivity that can also hand out DHCP addresses. Log into Incredible PBX as root with cubox as your password. Your SSH credentials, Asterisk DUNDI secrets, logs, and network connection options will be initialized and then your server will reboot. You may need to hit the Enter key once or twice during the SSH credentials initialization to move things along. And, with some SD cards, you may find yourself waiting an eternity for the promised reboot. After seeing the "rebooting" message, count to ten. If your server still hasn’t rebooted, remove and reapply power. This quirk goes away after the first reboot.
After the reboot, log in again as root with password: cubox. Your firewall setup will be initialized to lock down your whitelist to your server’s public and private IP addresses AND the IP address of the machine from which you’re logging in. All of your FreePBX passwords will be randomized and your secret PortKnocker codes will be generated. The whole process only takes a few seconds.
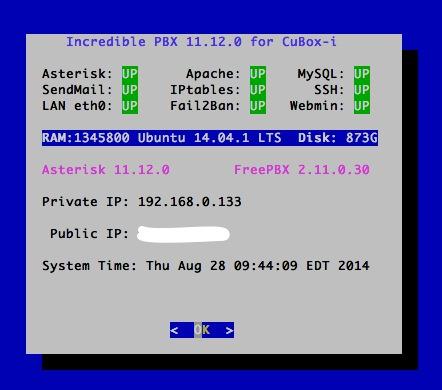
When the second pass configuration is complete, you will be greeted by a welcoming message. STOP and read it. It has loads of important information about your server’s configuration and your next steps. Press ENTER to review status:
The Next 10 Steps. Before you do anything else, complete the following steps. It only takes a minute to secure and properly configure your server:
- Change your root password: passwd
- Change your FreePBX admin password: /root/admin-pw-change
- Set your correct time zone: /root/timezone-setup
- Expand partition to match microSD card size: /root/resize-partition
- Add any desired IP addresses to WhiteList: /root/add-ip
- Put PortKnocker credentials in a safe place: cat /root/knock.FAQ
- Change AvantFax admin password: /root/avantfax-pw-change
- Set Email Address for Incoming Faxes: /root/avantfax-email-dest
- Check status to be sure everything is working: status
- If using an eSATA external drive, do the migration drill (note the free disk space in status above)
A Few Important Tips. Every operating system and service provider has their quirks. Ask Bill Gates! Ubuntu and especially Comcast are no different. Fortunately, with Ubuntu, it’s a very short list.
1. Use the following commands (only!) to shutdown and restart your server: halt and reboot. These commands are reworked in Incredible PBX to gracefully shutdown important services so that files don’t get damaged. Please use them!
2. If you ever want to move your server to a different network, complete these three simple steps before you leave your existing network. This will trigger a new Phase I update (outlined above) and set the default network back to wired eth0 using DHCP the next time you boot your server.
touch /etc/update_hostconfig
/root/enable-eth0-only
# press Ctrl-C when prompted to reboot. then type:
halt
3. You really do need email connectivity to get the most out of Incredible PBX. It’s the way you receive important notifications from FreePBX, and it’s also how faxes and voicemail messages are delivered. From the Linux CLI, test your server to be sure you can send emails reliably:
echo "test" | mail -s testmessage yourname@gmail.com
After checking your spam folder, if you really didn’t get the email, it may be that your service provider is blocking downstream SMTP traffic. You can use your provider’s SMTP server as a smarthost to send out mail with SendMail. Just edit /etc/mail/sendmail.cf, search for DS, and add the provider’s SMTP server address immediately after it (no spaces!), e.g. DSsmtp.comcast.net or DSsmtp.knology.net. Then restart SendMail: service sendmail restart.
Once you’ve logged into FreePBX below, be sure to set your default email address in the right margin of Admin -> Module Admin and save your entry. This will assure receipt of timely notifications of FreePBX updates for your server.
4. If you’re sure you’ll never need remote access in an emergency, you can disable PortKnocker at startup and save about 5% of your processing cycles. Our complete PortKnocker tutorial is available here. To disable startup on boot, issue the following command from the Linux CLI:
update-rc.d -f knockd disable
5. The same applies to WebMin. We actually introduced one of the first tutorials for WebMin… over 9 years ago. A word to the wise: WebMin is a terrific tool for looking at stuff about your system. But be very careful making system changes with WebMin. You usually will break some of the customized settings in Incredible PBX. This is particularly true in the case of the IPtables firewall. To access WebMin, use a browser and the actual IP address of your server to go to: https://12.34.56.78:9001. Log in as root with your root password. To disable automatic startup of WebMin on boot:
update-rc.d -f webmin disable
Setting Up WiFi with the CuBox-i4PRO
This may sound simple now, but two weeks ago it was quite a different story. For those with a CuBox-i4Pro, WiFi is built into the hardware. The trick was getting it to work. Well, with Incredible PBX, it does. In the /root folder, you’ll find several self-explanatory scripts to do the heavy lifting for you. For options 2 and 3, you’ll need the SSID of the WiFi network you’ll be using as well as the SSID password.
- enable-eth0-only (the default setting)
- enable-wifi-eth0 (enables both but eth0 works with Asterisk)
- enable-wifi-only (runs your server purely on WiFi)
Getting Started with VoIP and FreePBX
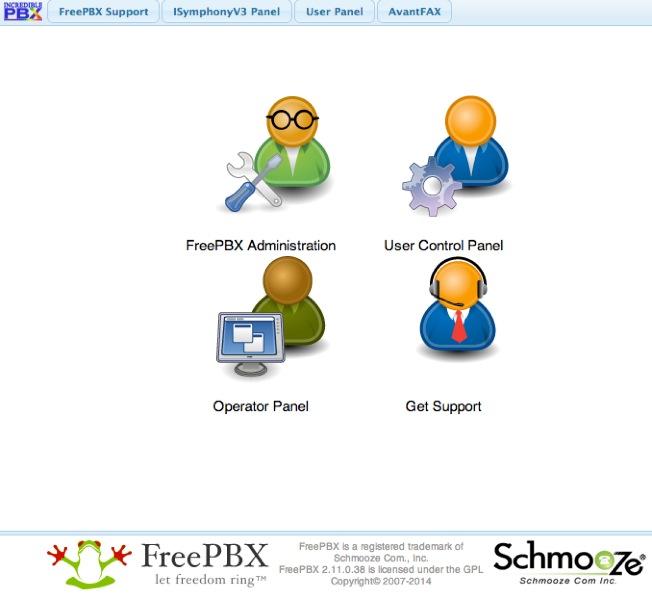
Up to now, all of your time has been spent using the Linux CLI. That will be a rarity once you get this far. Henceforth, 90% of your time setting up Incredible PBX will be done using the FreePBX GUI and your favorite web browser. To access it, just point to the IP address of your server. status will tell you the address if you’ve forgotten it. The main control panel looks like this:
As configured, the default user account for both FreePBX and AvantFax administration is admin. The passwords are whatever you set in steps #2 and #7 above. As configured, email delivery of faxes with AvantFax is automatic so no further setup is required other than setting a delivery mechanism for faxes within FreePBX.
For those new to Asterisk and FreePBX, here’s a brief primer on what needs to happen before you can make and receive calls. If you have an existing Google Voice account or a smartphone that’s less than 2 years old, lucky you. This gets you a phone number for your PBX so people can call you. And it provides a vehicle to place calls to plain old telephones at little or no cost.
If you don’t have a Google Voice account or a shiny new smartphone, then you will need to purchase a SIP trunk from one of the numerous vendors around the world. Our favorite (because they provide terrific service at a modest price AND provide financial support to the Nerd Vittles, PBX in a Flash, and Incredible PBX projects) is Vitelity. Their special rates and a link for a discount are included at the end of today’s article.
Unlike POTS phone service from Ma Bell, the SIP World is a little different. First, you don’t need to put all your eggs in one basket. A trunk that gets you a phone number for incoming calls need not be with the same vendor that provides a trunk to place outbound calls. In fact, you may want multiple trunks for outbound calls just to have some redundancy. A list of our favorites in the U.S. and Canada is available on the PIAF Forum. Of course, there also are providers that offer all-you-can-eat calling plans. Two of our favorites are Vestalink and Future-Nine.
You’ll also need a softphone or SIP phone to actually place and receive calls. YATE makes a free softphone for PCs, Macs, and Linux machines so download your favorite and install it on your desktop.
Phones connect to extensions in FreePBX to work with Incredible PBX. Extensions talk to trunks (like Google Voice) to make and receive calls. FreePBX uses outbound routes to direct outgoing calls from extensions to trunks, and FreePBX uses inbound routes to route incoming calls from trunks to extensions to make your phones ring. In a nutshell, that’s how a PBX works.
There are lots of bells and whistles that you can explore down the road including voicemail, conferencing, IVRs, autoattendants, paging, intercoms, CallerID lookups, announcements, DISA, call parking and pickup, queues, ring groups, and on and on. And then there’s all of the Incredible PBX applications which are covered separately in this Nerd Vittles article. Once you’re comfortable with one server, you or your company will want some more. This Nerd Vittles article will walk you through interconnecting them into a seamless mesh network so that you can call from one office to another transparently. Yes, those articles were written for the Raspberry Pi. But the beauty of Incredible PBX is that it runs identically on virtually every server platform.
Here’s our 10-Step Checklist to Getting Started with FreePBX:
1. Setting Up Google Voice. If you want free calling in the U.S. and Canada, then you’ll need an existing Google Voice account that includes the Google Chat feature. You’ll need one dedicated to Incredible PBX, or it won’t work. Log out after setting up the new Google Voice account! Also note that Google Voice may cease to function at any time after May 15, 2014. You can read all about it here.
- Log into existing Google Voice account
- Enable Google Chat as Phone Destination
- Configure Google Voice Calls Settings:
- Call Screening – OFF
- Call Presentation – OFF
- Caller ID (In) – Display Caller’s Number
- Caller ID (Out) – Don’t Change Anything
- Do Not Disturb – OFF
- Call Options (Enable Recording) – OFF
- Global Spam Filtering – ON
- Place test call in and out using GMail Call Phone
- Log out of your Google Voice account
2. Activating a Google Voice Trunk. To create a Trunk in FreePBX to handle calls to and from Google Voice, you’ll need three pieces of information from the Google Voice account you set up above: the 10-digit Google Voice phone number, your Google Voice account name, and your Google Voice password. Choose Connectivity -> Google Voice (Motif) from the FreePBX GUI. The following form will appear:
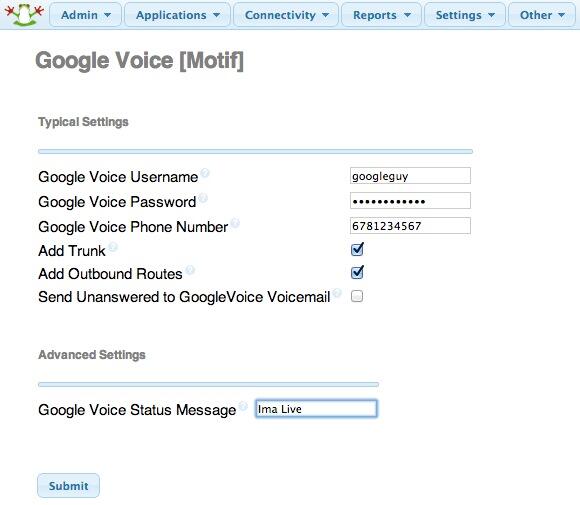
Fill in the blanks with your information and check only the top 2 boxes. If your Google Voice account name ends in @gmail.com, leave that out. Otherwise, include the full email address. Then click Submit Changes and Apply Config.
There’s one more step or your Google Voice account won’t work reliably with Incredible PBX! From the Linux command prompt while logged into your server as root, restart Asterisk: amportal restart
3. Setting a Destination for Incoming Calls and Managing Faxes. Now that you’ve created your Google Voice Trunk, we need to tell FreePBX how to process inbound calls when someone dials your Google Voice number. There are any number of choices. You could simply ring an extension. Or you could ring multiple extensions by first creating a Ring Group which is just a list of extension numbers. Or you could direct incoming calls to an Interactive Voice Response (IVR) system. By default, Incredible PBX is configured to route all incoming calls to extension 701. You can change the setting whenever you like by choosing Connectivity -> Inbound Routes -> Default. In the Set Destination section of the form, change the target destination from the pull-down lists.
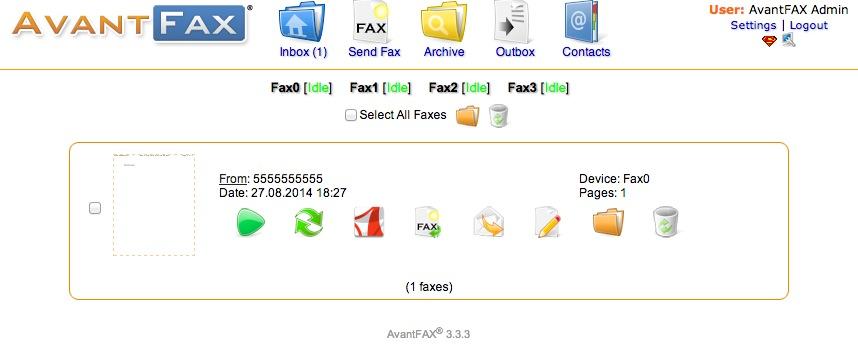
If you want your default inbound route to also handle incoming faxes, then go to the Fax Detect section of the Default inbound route. Change Detect Faxes to Yes. Change Fax Detection Type to SIP. Leave the Detection Time setting at 4. And change the Fax Destination to Custom Destinations: Fax (Hylafax). To Send Faxes, open AvantFax in FreePBX’s Other pulldown menu.
Always click Submit and then click Apply Config to save new settings in FreePBX.
4. Activating a Smartphone Trunk Using Bluetooth. One of the more exotic features of Incredible PBX on the CuBox platform is the ability to add your smartphone as an Asterisk trunk using Bluetooth. We’ve written a short recipe to get things working. So have a look at our Bluetooth tutorial and see if you’re up for the challenge. Moral of the story: the newer the cellphone, the better.
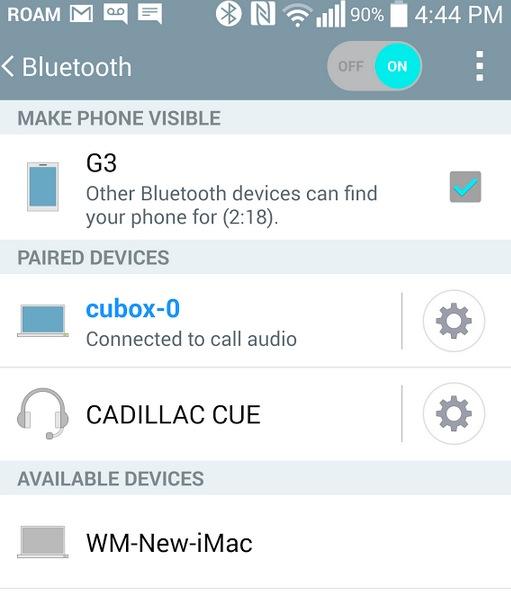
The LG G3 is the best of the lot, at least of the numerous cellphones we tested. Even better is an LG G3 paired with StraightTalk’s (AT&T-hosted) unlimited talk, text, and data plan for $45 a month. With Samsung smartphones older than a Galaxy S4, don’t waste your time. Ditto with Apple iPhones other than perhaps the very latest. Our iPhone 4S failed miserably. We gave up on Apple phones after that. Someday I’ll test my daughter’s 5c and report back.
5. Activating Additional Trunks with FreePBX. As we mentioned, there are lots of SIP providers to choose from. Once you have signed up for service, configuring the trunk is easy. Here is a quick Cheat Sheet courtesy of Kristian Hare, who translated our original setups into a spreadsheet. Just click on the image below to open it in a new window. Then click on the redisplayed image to enlarge it. The left and right cursor keys will move you around in the image. Click on the image again to shrink it.

6. Changing Extension Passwords. From the main FreePBX GUI, choose Applications -> Extensions. Then click on 701 in the Extension List on the right side of your display. You’ll see a form that looks like this:
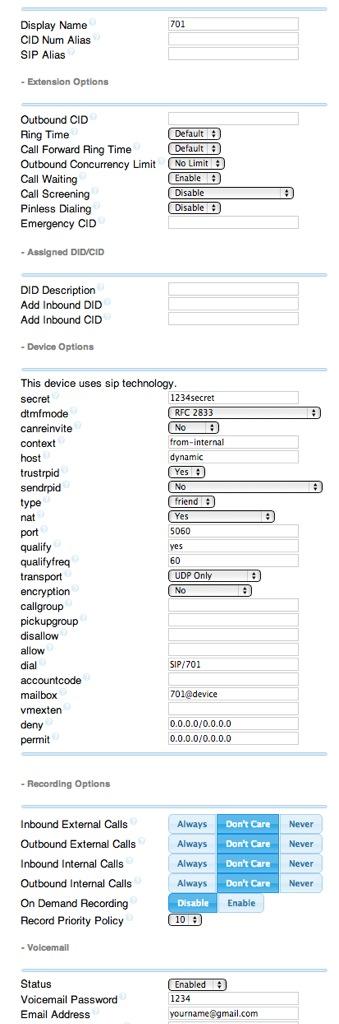
For now, we only need to make a few changes. First, you need a very secure password for both the extension itself and your voicemail account for this extension. The extension secret needs to be a combination of letters and numbers. The Voicemail Password needs to be all numbers, preferably six or more. Replace the existing password entries with your own (very secure) entries. You also need to lock down this extension so that it is only accessible from devices on your private LAN. You do that with the deny and permit entries which currently are filled with zeroes. Leave the deny entry the way it is which tells Incredible PBX to block everybody except those allowed in the permit entry below. For the permit, we need the first three octets of your private LAN address, e.g. if your LAN is 192.168.0.something then the permit entry will be 192.168.0.0/255.255.255.0.
Finally, you need to plug in your actual email address in the Voicemail section so that voicemails can be delivered to you when someone leaves a message. You can also include a pager email address if you want a text message alert with incoming voicemails. If you want the voicemails to automatically be deleted from the server after they are emailed to you (a good idea considering the disk storage limitations of your microSD card), change the Delete Voicemail option from No to Yes. That’s it. Now save your settings by clicking the Submit button. Then reload the dialplan by clicking on the red prompt when it appears.
In case you’re curious, unless you’ve chosen to automatically delete voicemails after emailing them, you can retrieve your voicemails by dialing *98701 from any extension on your phone system. You’ll be prompted to enter the voicemail password you set up. In addition to managing your voicemails, you’ll also be given the opportunity to either return the call to the number of the person that called or to transfer the voicemail to another extension’s voicemail box. And you can always leave a voicemail for someone by dialing their extension number preceded by an asterisk, e.g. *701 would let someone leave you a voicemail without actually calling you.
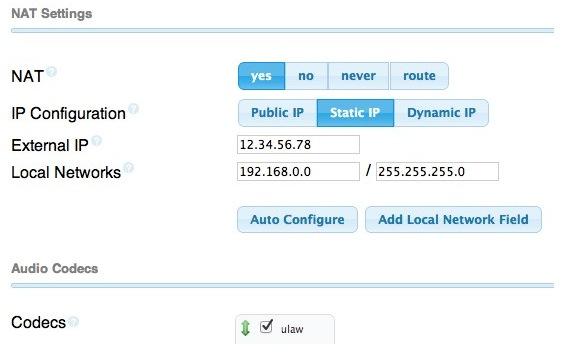
7. Eliminating Audio and DTMF Problems. You can avoid one-way audio on calls and touchtones that don’t work with these simple settings in FreePBX: Settings -> Asterisk SIP Settings. Just plug in your public IP address and your private IP subnet. Then set ULAW as the only Audio Codec.
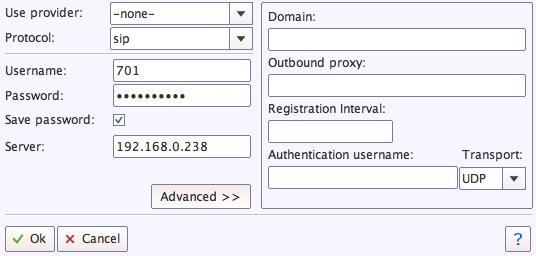
8. Configuring Your YATE Softphone. As we mentioned, the easiest way to get started with Incredible PBX is to set up a free YATE softphone on your Desktop computer. Versions are available at no cost for Macs, PCs, and Linux machines. Just download the appropriate one and install it from this link. Once installed, it’s a simple matter to plug in your extension 701 credentials and start making calls. Run the application and choose Settings -> Accounts and click the New button. Fill in the blanks using the IP address of Incredible PBX, 701 for your account name, and whatever password you created for the extension. Click OK.
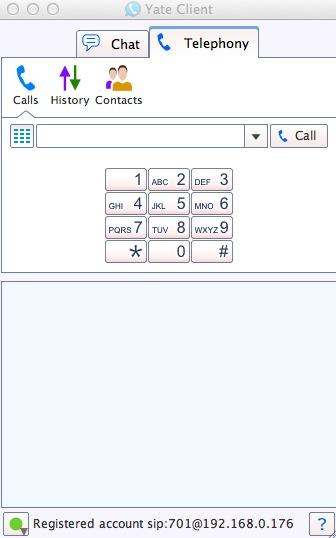
Once you are registered to extension 701, close the Account window. Then click on YATE’s Telephony Tab and place your first call. It’s that easy!
9. Configuring CallerID Superfecta. In order to match names with phone numbers, Incredible PBX includes a FreePBX application named CallerID Superfecta. Out of the box, Incredible PBX will work fine if you remember to activate CallerID Superfecta whenever you create a new Inbound Route. The CNAM entries also will be displayed in your CDR reports. For those not in the United States, you may prefer to use a lookup source for your numbers other than the ones preconfigured in CallerID Superfecta. You will find all of the available modules on the POSSA GitHub site. Just download the ones desired into /var/www/html/admin/superfecta/sources and then activate the desired sources in Admin -> CID Superfecta -> Default. You can test your results and the performance using the Debug facility that’s built into the module.
10. Adding Speech Recognition for Incredible Applications. We used to include Google’s Speech-to-Text service in Incredible PBX builds. Unfortunately, Google has changed the rules a bit. Assuming your server still meets the "personal and development" standard, you can obtain an API key from Google and reactivate speech-to-text functionality for many of the Incredible PBX applications including Weather Reports by City (949), AsteriDex Voice Dialing by Name (411), SMS Dictator (767), and Wolfram Alpha for Asterisk (4747). To activate the STT service, just complete the steps in our tutorial. Then sign up for a Wolfram Alpha App ID (tutorial here), and run the following install scripts:
/root/wolfram/wolframalpha-oneclick.sh
/root/smsdictator/sms-dictator.sh
Enabling SAMBA Windows Networking with Ubuntu
It only takes a minute to enable SAMBA Windows Networking on your CuBox. We’ve reproduced our quick tutorial to show you how. Just follow the steps below to interconnect Incredible PBX with all the other computers on your LAN.
apt-get -y install samba samba-common python-glade2 system-config-samba
cd /etc/samba
mv smb.conf smb.orig.conf
wget http://incrediblepbx.com/samba-ubuntu.tar.gz
tar zxvf samba-ubuntu.tar.gz
rm *.tar.gz
sed -i '/# End of Trusted Provider Section/r '/etc/samba/smb.iptables'' /etc/iptables/rules.v4
iptables-restart
service smbd restart
service nmbd restart
sed -i 's|/usr/local/sbin/amportal restart|service smbd restart\\nservice nmbd restart\\n/usr/local/sbin/amportal restart|' /etc/rc.local
# set up root password for SAMBA access with full RW privileges
smbpasswd -a root
Incredible Backup and Restore
Once you have everything configured, it’s time to take a snapshot of your system and store it in a safe place. The new Incredible Backup lets you do that. From the Linux CLI, login as root and run: /root/incrediblebackup. The backup image will be saved to the /tmp folder and can be copied to a different server easily. To restore the backup to another system, you simply bring the other system up to the same version of Asterisk (11) and FreePBX (2.11), and then run /root/incrediblerestore with your backed up image. It’s the cheapest insurance you can buy! For detailed instructions on restoring backups, see this thread on the PIAF Forum.
 Don’t forget to List Yourself in Directory Assistance so everyone can find you by dialing 411. And add your new number to the Do Not Call Registry to block telemarketing calls. Or just call 888-382-1222 from your new number.
Originally published: Monday, September 1, 2014
 Support Issues. With any application as sophisticated as this one, you’re bound to have questions. Blog comments are a terrible place to handle support issues although we welcome general comments about our articles and software. If you have particular support issues, we encourage you to get actively involved in the PBX in a Flash Forums. It’s the best Asterisk tech support site in the business, and it’s all free! Please have a look and post your support questions there. Our forum is extremely friendly and is supported by literally hundreds of Asterisk gurus.
Need help with Asterisk? Visit the PBX in a Flash Forum.
Special Thanks to Our Generous Sponsors
FULL DISCLOSURE: ClearlyIP, Skyetel, Vitelity, DigitalOcean, Vultr, VoIP.ms, 3CX, Sangoma, TelecomsXchange and VitalPBX have provided financial support to Nerd Vittles and our open source projects through advertising, referral revenue, and/or merchandise. As an Amazon Associate and Best Buy Affiliate, we also earn from qualifying purchases. We’ve chosen these providers not the other way around. Our decisions are based upon their corporate reputation and the quality of their offerings and pricing. Our recommendations regarding technology are reached without regard to financial compensation except in situations in which comparable products at comparable pricing are available from multiple sources. In this limited case, we support our sponsors because our sponsors support us.
BOGO Bonaza: Enjoy state-of-the-art VoIP service with a $10 credit and half-price SIP service on up to $500 of Skyetel trunking with free number porting when you fund your Skyetel account. No limits on number of simultaneous calls. Quadruple data center redundancy. $25 monthly minimum spend required. Tutorial and sign up details are here.
![]() The lynchpin of Incredible PBX 2020 and beyond is ClearlyIP components which bring management of FreePBX modules and SIP phone integration to a level never before available with any other Asterisk distribution. And now you can configure and reconfigure your new Incredible PBX phones from the convenience of the Incredible PBX GUI.
The lynchpin of Incredible PBX 2020 and beyond is ClearlyIP components which bring management of FreePBX modules and SIP phone integration to a level never before available with any other Asterisk distribution. And now you can configure and reconfigure your new Incredible PBX phones from the convenience of the Incredible PBX GUI.
VitalPBX is perhaps the fastest-growing PBX offering based upon Asterisk with an installed presence in more than 100 countries worldwide. VitalPBX has generously provided a customized White Label version of Incredible PBX tailored for use with all Incredible PBX and VitalPBX custom applications. Follow this link for a free test drive!
Special Thanks to Vitelity. Vitelity is now Voyant Communications and has halted new registrations for the time being. Our special thanks to Vitelity for their unwavering financial support over many years and to the many Nerd Vittles readers who continue to enjoy the benefits of their service offerings. We will keep everyone posted on further developments.
Some Recent Nerd Vittles Articles of Interest…
- Some of our links refer users to Amazon or other service providers when we find their prices are competitive for the recommended products. Nerd Vittles receives a small referral fee from these providers to help cover the costs of our blog. We never recommend particular products solely to generate commissions. However, when pricing is comparable or availability is favorable, we support these providers because they support us. [↩]
The Poor Wise Man’s Burglar Alarm System with Asterisk: Under $10/month

If you’re like us, spending $50 a month or more on a home security system is a bit like pouring money down the toilet. Add to that the complications of getting one to work reliably with VoIP without spending another $50 a month on a Ma Bell vintage telephone line just adds insult to injury.
So perhaps you can share our elation when an email arrived last week announcing Straight Talk’s new Remote Alert System, a $10/month cellular-based system that uses Verizon Wireless to provide SMS and phone call alerts for up to eight numbers. And actually it’s cheaper than that. $100 buys you a year of service. That’s less than $8.50 a month. Today we’ll show you how to transform your Prius-like Remote Alert System into a Tesla that will rival virtually any intrusion detection system on the market… at any price! The extra hardware required: any Asterisk-based server including the Raspberry Pi and BeagleBone Black.
Read and weep, ADT!
If we didn’t already have three Straight Talk lines of service, we would have filed this in the Too Good To Be True pile and moved on. But we’ve had terrific Almost-Unlimited™ AT&T Wireless service with Straight Talk for less than $500 a year. It’s not only indistinguishable from AT&T’s own offerings costing at least 50% more, but it’s also contract-free so we can bring any AT&T smartphone including iPhones to the party and never miss a beat.

We decided to take the bait and ordered the home security bundle. This gets you the Remote Alert wireless controller plus a wireless motion sensor plus a year of service for $229.99. If you prefer a one-month gamble, the bundle is only $139.99. Down the road, you can add additional motion sensors and window/door sensors for about $30 each. The add-ons now are available at Wal-Mart.
Shameless Plug. We obviously don’t charge for access to our articles. But you can assist the Nerd Vittles project financially by using our referral link with eBates® to make your purchase if you decide to try this. It doesn’t cost you a dime but returns 13.5% of your purchase price to the Nerd Vittles project. It’s just a couple of clicks.  Start here to access eBates.
  Then Search for Straight Talk and click on the link. After the Straight Talk web site displays, click on the following link to access the Straight Talk Security Bundle. And, THANK YOU!
So… back to our story. The controller supports four zones for monitoring. Zone 4 is reserved for sensors you want to monitor while someone may still be moving around in the house, for example while only some of your family may be sleeping or if pets are roaming. The other three zones typically would be used for motion sensors that trigger alerts when anything moves… after giving you 30 seconds to leave and return, of course. You can activate Home or Away monitoring using either the controller, an optional $25 key fob, or a free app for your iPhone or Android smartphone.
You get to decide what happens when the system is armed and an alert is triggered either by motion or a monitored door or window being opened. For us, silence was the name of the game. Using the Android Remote Alert System, click the Silent ARM icon once you leave the house, and you’re done. When you return, click the Disarm icon within 30 seconds of opening the door, and monitoring is disabled. You can also enter your 4-digit alarm code on the controller to disable monitoring.

Remote Alert System Setup. Once you get the equipment, it’s a 5-minute phone call to get set up. Install the backup batteries in the controller and motion detector, and plug the controller into an A/C power source. Press the required sequence on the controller to activate it, and you’re in business. The motion detector is already paired with the controller when it arrives, but adding new sensors is a 15-second task. All of the commands are documented in the manual which accompanies the system. But the tutorials also are available on line if you want to have a look.
Step #1 is changing your security alarm password. The next step is entering your phone numbers. Straight Talk goes to great lengths warning you that this is not a home security system because it has no external siren and can’t make 911 calls. They obviously haven’t heard of Asterisk®. 🙂 But let’s get through the standard setup before we talk about Asterisk integration. You get to set up three numbers to receive SMS text messages when an alarm is triggered. And you get to set up five phone numbers to receive calls when an alarm is triggered. What the called party will actually hear is an obnoxious alarm tone which continues to play for 15 seconds. If you had multiple properties with alarm systems and no Caller ID, you’d never know the source of the alarm! But people with multiple properties probably aren’t smart enough to use this system to begin with so let’s move on. You configure the SMS and phone numbers by entering a special code on the controller to program each of the eight destinations. Then you enter the 10-digit number twice, and you’re done. Easy Peasy!
If you’re new to home security systems, the key to motion sensors is placement. Straight Talk recommends placement about seven to ten feet off the floor with a wide field of view. The range of the motion sensor is about 26 feet. It obviously depends upon the layout of your house or apartment, but we had much better success placing the motion sensor on a window sill at about 5 feet high and aiming it at the center hall of our home. It improved the motion detection dramatically. Trial and error is your friend!
The next step is positioning your controller. A mounting bracket is included so that you can place it almost anywhere you like. Our preference is to hide it so long as it still has Verizon cellular coverage and a source of electricity. You can test it by arming the controller with your smartphone and then triggering the motion sensor. If you get an SMS message or a call, it’s working. We also prefer silent mode. An intruder is obviously going to attempt to destroy your controller if they hear it. Yes, the intruder may leave, but they’ll probably carry some of the family jewels with them. With an Asterisk server in place, we’d prefer to send the police without alerting the intruder that something has gone wrong.
Asterisk Integration. Speaking of Asterisk, here’s what we’ve developed to add 911 alerts and telephone alarms to this system. It’s a 5-10 minute project! The way this works is to first add a phone number to your controller that calls a dedicated DID on your Asterisk server. Calls to that DID trigger the special context [st-remote-alert] which verifies the CallerID number of your alarm system. As configured, if the CallerID doesn’t match, the call is immediately disconnected although you could easily modify our code to use an existing (non-dedicated) DID if you prefer. Just route the non-matching CallerIDs to whatever context you traditionally use to process inbound calls. If the CallerID of the alarm system is matched, then the call is disconnected AND an outbound call is placed to 911. When the 911 operator answers, a prerecorded message is played at least twice that says something like this using REAL information:
This is an automated security request for assistance from the residence at 36 Elm Street in Podunck, Arkansas. The owner of this residence is Joe Schmo at phone number: 678-123-8888. An intruder has been detected inside the home. A suspected burglary is in progress. All of the residents of the home are unavailable to place this call. Please send the police.
The phone number from which this automated call is being placed is 678-123-4567. If the owners have a working cell phone, you can reach them at the following number: 678-123-9999. Please dispatch the police to 36 Elm Street immediately, whether you can reach the owners or not.
A suspected burglary is in progress. Thank you for your assistance. This message will repeat until you hang up…
You can either use Flite and Igor to play the message, or you can record your own message to be played to 911. Use the FreePBX® Admin -> System Recordings option. We recommend the latter especially since you’ll be sending these emergency calls to 911. You obviously want the 911 operator to be able to quickly decipher what’s being said.
Legal Disclaimer. We cannot stress strongly enough that you need to test this carefully on your own server by placing test calls to some number other than 911 until you are positive that it is working reliably as determined solely by you. Be advised that this system will not work at all in the event of an electrical, Internet, or server outage. As delivered, this code will NOT place calls to 911. The choice of whether to modify the code to place 911 emergency calls is solely yours to make. Be advised that false and inadvertent calls to 911 may result in civil and criminal penalties. DON’T BLAME US!
NO WARRANTIES, EXPRESS OR IMPLIED, INCLUDING THE IMPLIED WARRANTY OF FITNESS
FOR A PARTICULAR PURPOSE AND MERCHANTABILITY, ARE BEING PROVIDED.
BY PROCEEDING WITH IMPLEMENTATION AND INSTALLATION OF THIS SOFTWARE, YOU AGREE
TO ASSUME ALL RISK AND COMPLETE RESPONSIBILITY FOR ANY AND ALL CONSEQUENCES
OF IMPLEMENTATION WHETHER INTENDED OR NOT AND WHETHER IMPLEMENTED CORRECTLY
OR NOT. YOU ALSO AGREE TO HOLD WARD MUNDY, WARD MUNDY & ASSOCIATES LLC, AND
NERD VITTLES HARMLESS FROM ALL CLAIMS FOR ACTUAL OR CONSEQUENTIAL DAMAGES.
BEFORE IMPLEMENTING AUTOMATED 911 CALLS, CHECK WITH A LOCAL ATTORNEY TO MAKE
CERTAIN THAT SUCH CALLS ARE LEGAL IN YOUR JURISDICTION.
IN THE EVENT THAT ANY OF THESE TERMS AND CONDITIONS ARE RULED UNENFORCEABLE,
YOU AGREE TO ACCEPT $1.00 IN COMPENSATION FOR ANY AND ALL CLAIMS YOU MAY HAVE.
THIS SOFTWARE IS FREE AND YOU AGREE TO ASSUME ALL RISKS WHETHER INTENDED OR NOT.
YOU ALSO ACKNOWLEDGE AND UNDERSTAND THAT THINGS CAN GO WRONG IN TECHNOLOGY.
WE CANNOT AND DO NOT WARRANT THAT THIS CODE IS ERROR-FREE OR THAT IT WILL
PROTECT YOUR PROPERTY, YOUR LOVED ONES, OR ANYONE, OR ANY THING IN ANY WAY.
IF YOU DO NOT AGREE WITH THESE TERMS AND CONDITIONS OF USE, DO NOT PROCEED!
Asterisk Implementation. First, you’ll need a dedicated DID that can be used to receive incoming calls from your Remote Alert System. Hopefully, you won’t be receiving many calls on this number so any of the inexpensive pay-by-the-minute DIDs will suffice. Or you can use a free DID from ipkall.com. The only gotcha with ipkall.com is having to make a call to keep the number active at least once every 30 days. But this could be accomplished with a weekly telephone reminder that only connected for a few seconds. Just don’t make the weekly call using the CallerID of your alarm system. You obviously do not want to trigger a 911 emergency call.
Next, you’ll need an outbound trunk on your Asterisk server that’s previously been registered with E911 support and that already is configured to place outbound 911 calls from your server. Google Voice trunks will not work! Your name, address, and phone number as they were registered with E911 will be important pieces of information to relay in your automated emergency call to 911. You’ll also need a cellphone number that can be provided with your 911 calls so that emergency responders have a way to contact you to follow up on automated emergency calls from your server.
Temporarily, you’ll also need a 10-digit number to which to deliver the automated emergency calls for testing. Your cellphone number would suffice. Once you’re sure everything is working, we’ll show you how to modify the dial plan code to replace this number with 911 when your system goes "live."
Installation. Once you have all of the required pieces in place, you’re ready to begin the installation. Log into your server as root and issue the following commands to begin:
cd /root
wget http://nerdvittles.com/wp-content/st-remote-alert.tar.gz
tar zxvf st-remote-alert.tar.gz
rm -f st-remote-alert.tar.gz
./st-remote-alert.sh
Once the install is finished, use FreePBX to modify the DID Trunk that will receive the incoming alerts from your Remote Alert System. Change the context entry to: context=st-remote-alert
Test. Test. Test. Testing is critically important before you actually turn on automated calls to 911. Once you’ve installed the software, activate your Remote Alarm System and then trip the motion detector to trigger a call to the dedicated DID on your Asterisk server. There’s typically a 30-second delay between tripping a motion detector and the commencement of the alert calls. Within a minute, you should receive a call on the emergency number you set up for testing. You can follow the progress of the procedure using the Asterisk CLI: asterisk -rvvvvvvvvvv. We recommend testing this repeatedly for at least a month before even considering 911 deployment. Make certain that everyone in your household knows how to disable the alarm system when they return home after arming it. Make certain that everyone in your household knows to never arm the system with motion detectors activated when anyone or any animal inside the house could potentially trip the alarm. At least until everyone is accustomed to these new security procedures and has a proven (successful) track record, NEVER DEPLOY SILENT ARMING OF YOUR REMOTE ALERT SYSTEM! If you change to silent arming of the Remote Alert System, test for at least another full month with no inadvertent failures before considering 911 deployment.
Making Changes. The st-remote-alert.sh installer has been designed to let you run it over and over again to replace or update your settings. So don’t be shy about making changes.
Substituting a Personally Recorded Message. If you’d prefer to record your own message to be delivered to 911, then review the script above and make yourself a cheat sheet before you begin. Then use a browser to open FreePBX. Choose Admin -> System Recordings and enter an extension number on your system to use for recording. Click the Go button to begin. Then dial *77 from that extension and record your message. Press # when you’re finished. Be sure to listen to the recording to make sure it’s what you intended. If not, rerecord the message until you get it right. You can dial *99 to listen to your recording a final time. When you’re sure it’s correct, name the recording nv-alert. Click Save.
Now you need to tell the automated alert dialer to use your recorded message instead of Flite and Igor.
Edit /etc/asterisk/extensions_custom.conf. Search for the line containing "pickrecording". Change Extension: 4 to Extension: 5. Save the file and reload your dial plan: asterisk -rx "dialplan reload"
Do some additional testing if you have substituted your own recording!
Adding Audible Alarms During Emergencies. If you prefer a little noise sprinkled around your home during burglaries, then we’ve put in place the necessary components to sound alarms on SIP phones that support AutoAnswer after feeding an extension to the speakerphone. For example, assuming you have deployed a Yealink T46G with an IP address of 192.168.0.10 and default admin credentials, you could add this additional line just before the final s,n,Hangup line in the [st-remote-alert] context of /etc/asterisk/extensions_custom.conf:
exten => s,n,System(curl -s -S --user-agent "Alert" http://admin:admin@192.168.0.10/servlet?number=25276)
To add additional Yealink phones, just add additional lines to the dialplan with the IP address of each phone. For other phone models, you’ll need to do a little research. 😉
Going Live with Automated Emergency Calls to 911. When you and everyone in your household are absolutely comfortable with the arming, disarming, and motion detection procedures, then you can decide whether to reroute the automated notifications to 911. Be advised that, in some states or municipalities, it may be illegal to auto-dial 911 from a non-human caller/system. Before doing this, check with an attorney or local authorities in your jurisdiction to make sure you are in compliance with federal/state/local laws.1 If you elect to proceed, edit extensions_custom.conf in /etc/asterisk. Search for the line containing "SEND-HELP-REQUEST-TO". Replace the temporary number that you set up with the number: 911. Save the file and reload your dial plan: asterisk -rx "dialplan reload". Sleep well!
Originally published: Monday, July 14, 2014
Support Issues. With any application as sophisticated as this one, you’re bound to have questions. Blog comments are a terrible place to handle support issues although we welcome general comments about our articles and software. If you have particular support issues, we encourage you to get actively involved in the PBX in a Flash Forums. It’s the best Asterisk tech support site in the business, and it’s all free! Please have a look and post your support questions there. Unlike some forums, ours is extremely friendly and is supported by literally hundreds of Asterisk gurus and thousands of users just like you. You won’t have to wait long for an answer to your question.
Need help with Asterisk? Visit the PBX in a Flash Forum.
Special Thanks to Our Generous Sponsors
FULL DISCLOSURE: ClearlyIP, Skyetel, Vitelity, DigitalOcean, Vultr, VoIP.ms, 3CX, Sangoma, TelecomsXchange and VitalPBX have provided financial support to Nerd Vittles and our open source projects through advertising, referral revenue, and/or merchandise. As an Amazon Associate and Best Buy Affiliate, we also earn from qualifying purchases. We’ve chosen these providers not the other way around. Our decisions are based upon their corporate reputation and the quality of their offerings and pricing. Our recommendations regarding technology are reached without regard to financial compensation except in situations in which comparable products at comparable pricing are available from multiple sources. In this limited case, we support our sponsors because our sponsors support us.
BOGO Bonaza: Enjoy state-of-the-art VoIP service with a $10 credit and half-price SIP service on up to $500 of Skyetel trunking with free number porting when you fund your Skyetel account. No limits on number of simultaneous calls. Quadruple data center redundancy. $25 monthly minimum spend required. Tutorial and sign up details are here.
![]() The lynchpin of Incredible PBX 2020 and beyond is ClearlyIP components which bring management of FreePBX modules and SIP phone integration to a level never before available with any other Asterisk distribution. And now you can configure and reconfigure your new Incredible PBX phones from the convenience of the Incredible PBX GUI.
The lynchpin of Incredible PBX 2020 and beyond is ClearlyIP components which bring management of FreePBX modules and SIP phone integration to a level never before available with any other Asterisk distribution. And now you can configure and reconfigure your new Incredible PBX phones from the convenience of the Incredible PBX GUI.
VitalPBX is perhaps the fastest-growing PBX offering based upon Asterisk with an installed presence in more than 100 countries worldwide. VitalPBX has generously provided a customized White Label version of Incredible PBX tailored for use with all Incredible PBX and VitalPBX custom applications. Follow this link for a free test drive!
Special Thanks to Vitelity. Vitelity is now Voyant Communications and has halted new registrations for the time being. Our special thanks to Vitelity for their unwavering financial support over many years and to the many Nerd Vittles readers who continue to enjoy the benefits of their service offerings. We will keep everyone posted on further developments.
Some Recent Nerd Vittles Articles of Interest…
- Autodialers that make emergency calls to E911 as part of a burglar alarm system are specifically exempted in some states such as Illinois. This comports with federal law under The Telephone Consumer Protection Act (47 U.S.C. § 227). Emergency robocalls are specifically exempted from the new PSAP Do-Not-Call Registry rules. See also this article about E911 laws in the Northeast. In most cases, but not all, these laws target abuse of the E911 system. Surprisingly, one town that reportedly prohibits ALL autodialing to 911 is Palo Alto, CA. And Paris, Tennessee also has joined the illegal club. Special thanks to @TheMole on the PIAF Forum for his excellent research. [↩]
Knock Three Times: Pain-Free Remote Access to Your Asterisk or Linux Server

No. We’re not going to make you relive the 1970’s with us today although now you can listen to this Number 1 Hit and a million others for free with Amazon’s new Prime Music. No, we don’t get a commission if you sign up for Amazon Prime. Yes, we make millions when you buy something from Amazon using our links. Thank you! What we have for you today is a Number 1 Utility, and it works on virtually any Linux platform. If your fraternity or sorority had a secret knock to gain access, then you already know the basic concept. Port Knocker (aka knockd) from Judd Vinet is a terrific utility that runs as a daemon on your server and does just what you’d expect. It listens for knocks. When it detects three knocks on the correct three ports in the proper sequence and from the same IP address, it opens the IPtables Linux Firewall for remote access from that IP address to your server for a predefined period of time. This would allow you to log into your server with SSH or make SIP phone calls using a softphone registered to your remote Asterisk® server. What makes Port Knocker especially useful is the existence of knocking clients for virtually any smartphone, tablet, or desktop computer. For the Travelin’ Man, it’s another must have utility.
We introduced a turnkey implementation of Port Knocker in Incredible PBX for Ubuntu 14 late last week. If you were a pioneer earlier in the week, go back and install it again to take advantage of Port Knocker. Or better yet, follow along and we’ll show you how to install it on your own RedHat/CentOS or Ubuntu/Debian server in just a couple of minutes.
Prerequisites. We’ve built open source installation scripts for both the RedHat/CentOS platform as well as the Ubuntu/Debian operating systems. These knockd installers assume that you have a fully functional and locked down IPtables firewall with an existing WhiteList of authorized users. We’d recommend Travelin’ Man 3 if you need to deploy this technology and haven’t done so already. Last week’s Incredible PBX for Ubuntu 14 already includes Travelin’ Man 3 whitelisting technology. Read the article for full details.
Today’s knockd installers are fairly generic but, if you’re running a version of CentOS earlier than 6.x or Ubuntu earlier than 14 or Debian.anything, be advised that we haven’t tested these installers on those platforms so you’re on your own. Finally, if your server is sitting behind a hardware-based firewall (as we ALWAYS recommend), then you’ll also need to map the service you wish to access (e.g. UDP 5060 for SIP or TCP 22 for SSH) plus the three TCP ports from your hardware-based firewall to your server so that legitimate "knocks" can find their way to your server. The "knock" ports themselves do not need to be opened in your IPtables firewall configuration! We’re just knocking, not entering. 🙂
Overview. As configured, today’s installation scripts will install and preconfigure knockd to load automatically when you boot up your server. Three random TCP ports will be assigned for your server, and this port sequence is what remote users will need to have in order to gain access. Yes, you can change almost everything. How secure is it? Well, we’re randomizing the 3-port knock sequence using over 3,900 ports so you can do the math to figure out the odds of a bad guy guessing the correct sequence. HINT: 3900 x 3900 x 3900. Keep in mind that these "knocks" must all be received from the same IP address within a 15-second window. So sleep well but treat the port sequence just as if it were a password. It is! Once a successful knock sequence has been received, the default Port Knocker configuration will open all ports on your server for remote access from the knocking IP address for a period of one hour. During this time, "The Knocker" can log in using SSH or make SIP calls using trunks or extensions on the server. Port Knocker does not alleviate the need to have legitimate credentials to log into your server. It merely opens the door so that you can use them. At the bewitching (end of the) hour, all ports will be closed for this IP address unless "The Knocker" adds a whitelist entry for the IP address to IPtables during the open period. Yes, all of this can be modified to meet your individual requirements. For example, the setup could limit the range of ports available to "The Knocker." Or the setup could leave the ports open indefinitely until another series of knocks were received telling knockd to close the IPtables connection. Or perhaps you would want to leave the ports open for a full day or a week instead of an hour. We’ll show you how to modify all of the settings.
Server Installation. To get started, log into your server as root and download and run the appropriate installer for your operating system platform.
For RedHat/Fedora/CentOS/ScientificLinux servers, issue the following commands:
cd /root
wget http://nerdvittles.com/wp-content/knock-R.tar.gz
tar zxvf knock*
rm knock-R.tar.gz
./knock*
For Ubuntu/Debian servers, issue the following commands:
cd /root
wget http://nerdvittles.com/wp-content/knock-U.tar.gz
tar zxvf knock*
rm knock-U.tar.gz
./knock*
For ARM-based servers, issue the following commands:
cd /root
wget http://nerdvittles.com/wp-content/knock-ARM.tar.gz
tar zxvf knock*
rm knock-ARM.tar.gz
./knock*
Server Navigation Guide. On both the RedHat/CentOS/Fedora and Ubuntu/Debian platforms, the knockd configuration is managed in /etc/knockd.conf. Before making changes, always shutdown knockd. Then make your changes. Then restart knockd. On RedHat systems, use service knockd stop and start. On Ubuntu, use /etc/init.d/knockd stop and start. By default, knockd monitors activity on eth0. If your setup is different, on Ubuntu, you’ll need to change the port in /etc/default/knockd: KNOCKD_OPTS="-i wlan0". On RedHat, the config file to modify is /etc/sysconfig/knockd and the syntax: OPTIONS="-i venet0:0".
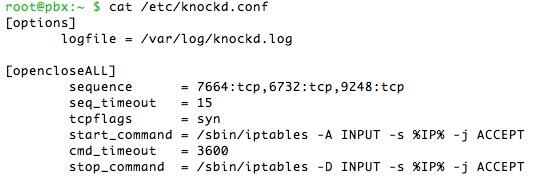
In /etc/knockd.conf, create an additional context to either start or stop an activity. It can also be used do both as shown in the example code above. More examples here. There’s no reason these activities have to be limited to opening and closing the IPtables firewall ports. You could also use a knock sequence to turn on home lighting or a sprinkler system with the proper software on your server.
To change the knock ports, edit sequence. Both tcp and udp ports are supported. seq_timeout is the number of seconds knockd waits for the complete knock sequence before discarding what it’s already received. We’ve had better luck on more servers setting tcpflags=syn. start_command is the command to be executed when the sequence matches. cmd_timeout and stop_command tell knockd what to do after a certain number of seconds have elapsed since the start_command was initiated. If you’re only starting or stopping some activity (rather than both), use command instead of start_command and stop_command to specify the activity.
IPtables 101. The default setup gives complete server access to anyone that gets the knock right. That doesn’t mean they get in. In the PIAF World, it means they get rights equivalent to what someone else on your LAN would have, i.e. they can attempt to log in or they can use a browser to access FreePBX® provided they know the server’s root or FreePBX credentials.
If you would prefer to limit access to a single port or just a few ports, you can modify command or start_command and stop_command. Here are a few examples to get you started.
To open SSH access (TCP port 22):
/sbin/iptables -A INPUT -s %IP% -p tcp --dport 22 -j ACCEPT
To close SSH access (TCP port 22):
/sbin/iptables -D INPUT -s %IP% -p tcp --dport 22 -j ACCEPT
To open a range of SIP ports (UDP 5060 to 5069):
/sbin/iptables -A INPUT -s %IP% -p udp --dport 5060:5069 -j ACCEPT
To close a range of SIP ports (UDP 5060 to 5069):
/sbin/iptables -D INPUT -s %IP% -p udp --dport 5060:5069 -j ACCEPT
Here’s a gotcha to be aware of. If you’re using the Travelin’ Man 3 WhiteList setup on your server, be especially careful in crafting your IPtables rules so that you don’t accidentally remove an existing Travelin’ Man 3 rule in closing some port with knockd. You will note that the syntax of the knockd commands is intentionally a bit different than what you will find in your Travelin’ Man 3 setup. This avoids clobbering something accidentally.
Monitoring Activity. Here are the two best tools to monitor knockd activity to make certain your setup is performing as expected. The knockd log (/var/log/knockd.log) will tell you when a knocking attempt has occurred and whether it was successful:
[2014-07-06 14:44] starting up, listening on eth0

[2014-07-06 15:29] 79.299.148.11: opencloseSSH: Stage 1

[2014-07-06 15:29] 79.299.148.11: opencloseSSH: Stage 2

[2014-07-06 15:29] 79.299.148.11: opencloseSSH: Stage 3

[2014-07-06 15:29] 79.299.148.11: opencloseSSH: OPEN SESAME

[2014-07-06 15:29] opencloseSSH: running command: /sbin/iptables -A INPUT -s 79.299.148.11 -p tcp --dport 22 -j ACCEPT
Next, verify that the IPtables command did what it was supposed to do. iptables -nL will tell you whether port 22 access was, in fact, enabled for 79.299.148.11. The entry will appear just above the closing Chain entries in the listing:
ACCEPT tcp -- 79.299.148.11 0.0.0.0/0 tcp dpt:22
Two things typically can go wrong. Either the knock from a client computer or cellphone wasn’t successful (knockd.log will tell you that) or IPtables didn’t open the port(s) requested in your knockd command (the iptables -nL query will show you that). In the latter case, it’s usually a syntax error in your knockd command. Or it could be the timing of the knocks. See /var/log/knockd.log.
Port Knocker Clients. The idea behind Port Knocker is to make remote access easy both for system administrators and end-users. From the end-user perspective, the simplest way to do that is to load an app on the end-user’s smartphone so that even a monkey could push a button to gain remote access to a server. If the end-user’s cellphone has WiFi connectivity sitting behind a firewall in a hotel somewhere, then executing a port knock from the smartphone should open up connectivity for any other devices in the hotel room including any notebook computers and tablets. All the devices typically will have the same public IP address, and this is the IP address that will be enabled with a successful knock from the smartphone.
Gotta love Apple’s search engine. Google, they’re not…
There actually are numerous port knocking clients for both Android and iOS devices. Here are two that we’ve tested that work: PortKnock for the iPhone and iPad is 99¢ and PortKnocker for Android is free. Some clients work better than others, and some don’t work at all or work only once. DroidKnocker always worked great the first time. Then it wouldn’t work again until the smartphone was restarted. KnockOnD for the iPhone, which is free, worked fine with our office-based server but wouldn’t work at all with a cloud-based server at RentPBX. With all the clients, we had better results particularly with cloud-based servers by changing the timing between knocks to 200 or 500 milliseconds. How and when the three knocks are sent seems to matter! Of all the clients on all the platforms, PortKnocker was the least temperamental and offered the most consistent results. And you can’t beat the price. A typical setup is to specify the address of the server and the 3 ports to be knocked. Make sure you have set the correct UDP/TCP option for each of the three knocks (the default setup uses 3 TCP ports), and make sure the IP address or FQDN for your server is correct.
Another alternative is to use nmap to send the knocks from a remote computer. The knock.FAQ file in your server’s /root directory will tell you the proper commands to send to successfully execute a connection with your server’s default Port Knocker setup. Enjoy!
Originally published: Monday, July 7, 2014
Support Issues. With any application as sophisticated as this one, you’re bound to have questions. Blog comments are a terrible place to handle support issues although we welcome general comments about our articles and software. If you have particular support issues, we encourage you to get actively involved in the PBX in a Flash Forums. It’s the best Asterisk tech support site in the business, and it’s all free! Please have a look and post your support questions there. Unlike some forums, ours is extremely friendly and is supported by literally hundreds of Asterisk gurus and thousands of users just like you. You won’t have to wait long for an answer to your question.
Need help with Asterisk? Visit the PBX in a Flash Forum.
Special Thanks to Our Generous Sponsors
FULL DISCLOSURE: ClearlyIP, Skyetel, Vitelity, DigitalOcean, Vultr, VoIP.ms, 3CX, Sangoma, TelecomsXchange and VitalPBX have provided financial support to Nerd Vittles and our open source projects through advertising, referral revenue, and/or merchandise. As an Amazon Associate and Best Buy Affiliate, we also earn from qualifying purchases. We’ve chosen these providers not the other way around. Our decisions are based upon their corporate reputation and the quality of their offerings and pricing. Our recommendations regarding technology are reached without regard to financial compensation except in situations in which comparable products at comparable pricing are available from multiple sources. In this limited case, we support our sponsors because our sponsors support us.
BOGO Bonaza: Enjoy state-of-the-art VoIP service with a $10 credit and half-price SIP service on up to $500 of Skyetel trunking with free number porting when you fund your Skyetel account. No limits on number of simultaneous calls. Quadruple data center redundancy. $25 monthly minimum spend required. Tutorial and sign up details are here.
![]() The lynchpin of Incredible PBX 2020 and beyond is ClearlyIP components which bring management of FreePBX modules and SIP phone integration to a level never before available with any other Asterisk distribution. And now you can configure and reconfigure your new Incredible PBX phones from the convenience of the Incredible PBX GUI.
The lynchpin of Incredible PBX 2020 and beyond is ClearlyIP components which bring management of FreePBX modules and SIP phone integration to a level never before available with any other Asterisk distribution. And now you can configure and reconfigure your new Incredible PBX phones from the convenience of the Incredible PBX GUI.
VitalPBX is perhaps the fastest-growing PBX offering based upon Asterisk with an installed presence in more than 100 countries worldwide. VitalPBX has generously provided a customized White Label version of Incredible PBX tailored for use with all Incredible PBX and VitalPBX custom applications. Follow this link for a free test drive!
Special Thanks to Vitelity. Vitelity is now Voyant Communications and has halted new registrations for the time being. Our special thanks to Vitelity for their unwavering financial support over many years and to the many Nerd Vittles readers who continue to enjoy the benefits of their service offerings. We will keep everyone posted on further developments.
Some Recent Nerd Vittles Articles of Interest…
FMC: The Future of Telephony with Vitelity’s vMobile and Asterisk in the Cloud

If making phone calls from a web browser is what you’ve always longed for, then you’re in good company with Google and its future direction in the telephony space. Call us old fashioned but this strikes us as a solution in desperate need of a problem. What’s wrong with a Plain Old Telephone or a smartphone for making connections with friends and business associates? The real head scratcher is the fact that the WebRTC and Hangouts push demonstrates that the wizards at Google are seriously out of touch with the next generation. Will our 14-year-old daughter use Skype or Hangouts or FaceTime? Sure. About once a month to chat with Grandma or to interact with cousins scattered around the country, it’s a terrific option. And the same is true in the business community. When you need to collaborate with a half dozen colleagues, conferencing applications are invaluable. But to meet 95% of day in and day out business requirements, a telephone or smartphone is the clear device of choice. So join us today in celebrating the end of Google Voice XMPP service and the beginning of a new and even more exciting VoIP era… sans Google.
Of course, if it were up to the next generation, telephone calls might completely disappear in favor of text messaging, Snapchat, Instagram, and any other platform that includes recorded photos or videos. Note the subtle difference. Kids really are not interested in live video interaction. They find posed images that tell a story much more appealing. Why? Because recorded photos and videos let users present their best face, their movie star pose, and their expression of what they want others to perceive they’re really like. In short, live video is too much like real life. Our conclusion for those targeting the next generation is you’d better come up with something better and quite different than Skype, Hangouts, and FaceTime.
It’s Fixed-Mobile Convergence, Stupid!
Now let’s return to our primary focus for today, the current business community. Suffice it to say, there are a dwindling number of what we used to call "desk jobs" where an employee arrives at his or her desk at 9 a.m. and leaves at 5 p.m. As more and more jobs are headed off shore, the telephone and smartphone have replaced the corporate desk as the most indispensable corporate fixture. Particularly in the American marketplace, what we see with most businesses is a management layer and an (upwardly) mobile force of salespeople, consultants, and implementers that interact primarily through PBXs in an office headquarters or home office together with smartphones for those that generally are on the road. Many of these Road Warriors don’t even have a home phone any longer.
The telephony Holy Grail for this new business model is Fixed-Mobile Convergence (FMC). It’s the ability to transparently move from place to place while retaining your corporate identity. Every employee from the night watchman in Miami to the salesperson making calls from a Starbucks in California to the CEO in New York has an extension on a PBX in the cloud together with the ability to accept and place calls using the company’s CallerID name and number, transfer calls, and participate in conference calls regardless of whether the phone instrument happens to be a desktop phone or a smartphone. Is this even possible? Well, as of last week, the answer is ABSOLUTELY.

Vitelity has been a long-time corporate sponsor of both the Nerd Vittles and PBX in a Flash open source projects so we were thrilled when we were offered a free, Samsung Galaxy S III to try out the new (live) vMobile service that took Best in Show honors at ITEXPO Miami in January. As Vitelity’s Chris Brown would probably tell you, it’s one thing to demonstrate a new technology at a trade show and quite another to bring it into production. But Vitelity did it:
What we want to stress up front is that we’ve received no special treatment in getting this to work. We received the phone, opened a support ticket to register the phone on Vitelity’s vMobile network, and plugged our new credentials into the phone so that it could be integrated into our PBX in a Flash server. Once the smartphone became an extension on our PBX, we could place calls through our PBX with the S3 using both WiFi and Sprint 3G/4G service. Switching between WiFi and cellular is totally transparent. The CallerID for all outbound calls was our standard PBX CallerID. We also could place calls to other extensions on the PBX by dialing a 4-digit extension while connected to WiFi or the Sprint network virtually anywhere. If you have 3-digit extensions, those are a problem over the Sprint network but we’ll show you a little trick to get them working as well.
Keep in mind that every call from the S3 goes out through the PBX just as if you were using a standard desktop phone as a hardwired extension. And it really doesn’t matter whether the S3 has a WiFi connection or a pure cellular connection on Sprint’s network. You receive calls on the S3 in much the same way. It’s just another extension on your PBX. If you want to add it to a ring group to process incoming calls, that works. If other users on your PBX wish to call the S3 directly using the extension number, that works as well. If you want to transfer a call, pressing ## on the S3 initiates the transfer just as if you were using a phone on your desk. When we say transparent convergence, we really do mean transparent. No recipient of a call from the vMobile S3 would have any idea whether you were sitting at a desk in the corporate headquarters in New York or in a seat on a Delta jet after landing in San Francisco. Both the call quality and the corporate CallerID would be identical. And your secretary on maternity leave at Grandma’s house still could reach you using her vMobile S3 by simply dialing your corporate extension.
So that’s the Fortune 500 view of the new VoIP universe. How about the little guy with a $15 a month PBX in a Flash server in the RentPBX cloud1, a couple mobile sales people, and a handful of construction workers that build swimming pools for a living? It works identically. Each has an S3 connected as an extension on the PIAF cloud server. And calls can be managed in exactly the same way they would be handled if everyone were sitting side-by-side at desks in an office headquarters somewhere. The silver lining of cloud computing is that it serves as the Great Equalizer between SOHO businesses and Fortune 500 companies. Asterisk® paired with inexpensive cloud hosting services such as RentPBX lets you mimic the Big Boys for pennies on the dollar. We think Vitelity has hit a bases loaded, home run with vMobile.
vMobile Pricing
We know what you’re thinking. "Since you got yours for free, what does it really cost??" The Galaxy S3 (or S4) is proprietary running Trebuchet 1.0, a (rooted) CyanogenMod version of Android’s KitKat. You can purchase these devices directly from the Vitelity Store. Currently, you can’t bring your own device. The refurbished S3 is $189 including warranty. Works perfectly! That’s what we’re using. Next, you’ll need a vMobile account for each phone. Unless you’re a Nerd Vittles reader, it’s $9.95 per month. That gets you free WiFi calling and data usage anywhere you can find an available WiFi hotspot. And text messaging is free. For calls and data using Sprint’s nationwide network, the calls are 2¢ a minute and the data is 2¢ per megabyte ($20 per gigabyte). For us, a typical day of data usage with an email account and light web use costs about a quarter. YMMV! So long as you configure Android to download application updates when connected to WiFi, data usage should not be a problem unless you’re into photos and streaming video. Android includes excellent tools for monitoring and even curbing your data usage if this is a concern.
vMobile Gotchas
Before we walk you through the setup process, let’s cover the gotchas. The list is short. First, we don’t recommend connecting vMobile devices to a PBX sitting behind a NAT-based firewall, or you may end up with some calls missing audio. The reason is NAT and quirky residential routers. If you think about it, when your S3 is inside the firewall and connected to WiFi, it will have an IP address on your private LAN just like your Asterisk server. When your S3 is outside your firewall on either a cellular connection or someone else’s WiFi network, it will have an IP address that is not on your private LAN. Others may be smarter than we are, but we couldn’t figure a way to have connections work reliably in both scenarios using most residential routers. You can configure your S3’s PBX extension for NAT=No or NAT=yes, but you can’t tell Asterisk how to change it depending upon where you are. One simple solution is to deploy these phones with a VPN connection to your Asterisk server sitting behind a NAT-based firewall. The more reliable solution is to build your PBX in a Flash server in the cloud with no NAT-based firewall. Then use an IPtables WhiteList (aka Travelin’ Man 3) to protect your server. From there, you can either interconnect the cloud-based server with a second PBX behind your firewall, or you can dispense with the local PBX entirely. Either way will eliminate the NAT issues with missing audio. In both cases, use NAT=yes for the vMobile extension.
Another wrinkle involves text messaging. Traditional text messages work fine; however, MMS still is problematic unless you initiate the outbound MMS session with the other recipient. It’s probably worth noting that Google Voice never got MMS working at all despite years of promises. This wasn’t a deal breaker for us, but it’s a bug that still is being worked on.
Finally, there’s Sprint. You either love ’em or hate ’em. We really haven’t used Sprint service in about eight years. In the Charleston area, the barely 3G service still is just as lousy as it was eight years ago. But, if you live in an area with good Sprint coverage and performance, this shouldn’t be an issue for you. And vMobile works fine in Charleston. You just won’t be surfing the web very often unless you have hours to kill… waiting. Additionally, dialing numbers with less than 4 numbers is a non-starter with Sprint, but we’ll show you a simple workaround to reach 3-digit local extensions from your vMobile device below.
With a service as revolutionary as vMobile with Sprint’s new FMC architecture, we can’t help thinking there may be other cellular carriers with an interest in deploying this technology sooner rather than later. But, given the vMobile feature set, Sprint is good enough for now especially when WiFi connectivity is available almost everywhere.
vMobile Configuration at Vitelity
For the Vitelity side of the setup, you first configure your smartphone using the (included) My Phone app. When the application is run, your cellphone number will be shown. Tapping the display about a dozen times will cause the phone’s setup to be reconfigured. Vitelity will provide you the secret key to activate your account. Next, you’ll log into the Vitelity portal and choose vMobile -> My Devices under My Products and Services. The account for your vMobile device will already exist. Clicking on the pull-down menu beside your vMobile device will let you create your SIP account on Vitelity’s server. Enter the IP address or FQDN of your Asterisk server and set up a very secure password. Your username will be the 10-digit phone number assigned to your vMobile phone. Save your settings and then choose the Edit option to view your setup. The portal will display your Username, Password, and FreePBX/Asterisk Connect Host name. Write them down for use when you configure your new extension using FreePBX®.
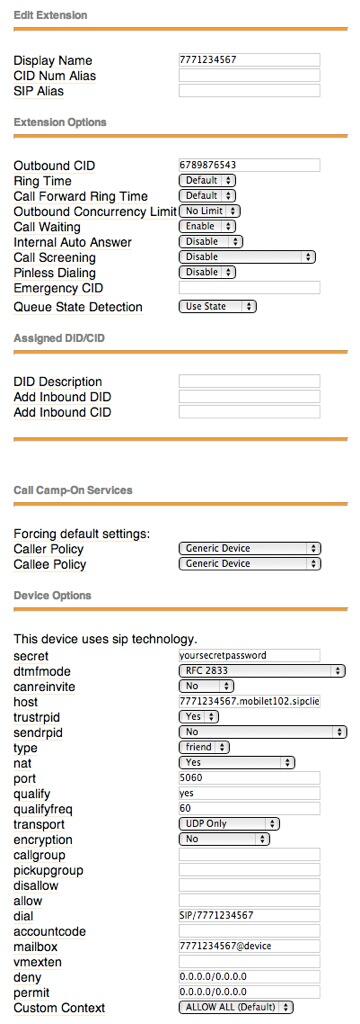
vMobile Configuration for Asterisk and PBX in a Flash
On the PBX in a Flash server, use a browser to open FreePBX. Choose Applications -> Extensions and add a new generic SIP device. For Display Name and User Extension, enter the 10-digit phone number assigned to your vMobile device. Under Secret, enter the password you assigned in Vitelity’s vMobile portal. Click Submit and reload FreePBX when prompted. Then edit the extension you just created. Set NAT=yes and change the Host entry from dynamic to the FQDN entry that was shown in Vitelity’s vMobile portal, e.g. 7209876542.mobilet103.sipclient.org. Update your configuration and restart FreePBX once again. Finally, from the Linux command prompt, restart Asterisk: amportal restart. If you’re using a WhiteList with IPtables such as Travelin’ Man 3, be sure to add a new WhiteList entry for your vMobile Host entry. Finally, add your vMobile extension to any desired Inbound Routes to make certain your vMobile device rings when desired.
You now should be able to place and receive calls on your vMobile device. If you want to be able to call 3-digit Asterisk extensions on both WiFi and while roaming on the Sprint cellular network, then you’ll need to add a little dialplan code since Sprint reserves 3-digit numbers for emergency services and will reject other calls with numbers of less than 4 digits. Here’s the simple fix. Always dial 3-digit extensions with a leading 0, e.g. 0701 to reach extension 701. We’ll strip off the leading zero before routing the call. The dialplan code below works whether you’re calling a local 3-digit extension or a 3-digit extension on an interconnected remote Asterisk server. Simply edit extensions_custom.conf in /etc/asterisk and insert the following code at the top of the [from-internal-custom] context. Then restart Asterisk: amportal restart. Note that we’ve set this up so that, if you have an extension 701 on both the local server and a remote server, the call will be connected to the local 701 extension. If you have different extension prefixes for different branch offices (e.g. 7XX in Atlanta and 8XX in Dallas), then this dialplan code will route the calls properly assuming you’ve configured an outbound route with the appropriate dial pattern for each branch office.
exten => _0XXX,1,Answer

exten => _0XXX,n,Wait(1)

exten => _0XXX,n,Set(NUM2CALL=${CALLERID(dnid):1})

exten => _0XXX,n,Dial(sip/${NUM2CALL})

exten => _0XXX,n,Dial(local/${NUM2CALL}@from-internal)

exten => _0XXX,n,Hangup
Vitelity vMobile Special for Nerd Vittles Readers
Now for the icing on the cake… We asked Vitelity if they would consider offering special pricing to Nerd Vittles readers and PBX in a Flash users. We’re pleased to report that Vitelity agreed. By using this special link when you sign up, the vMobile monthly fee will be $8.99 instead of $9.95. In addition, your first month is free with no activation fee. We told you last week that there was a very good reason for choosing Vitelity as your SIP provider. Now you know why.

And, if you’re new to Cloud Computing, take advantage of the RentPBX special for Nerd Vittles readers. $15 a month gets you your very own PBX in a Flash server in the Cloud. Just use this coupon code: PIAF2012. Enjoy!
Originally published: Thursday, May 15, 2014

Need help with Asterisk? Visit the PBX in a Flash Forum.
Special Thanks to Our Generous Sponsors
FULL DISCLOSURE: ClearlyIP, Skyetel, Vitelity, DigitalOcean, Vultr, VoIP.ms, 3CX, Sangoma, TelecomsXchange and VitalPBX have provided financial support to Nerd Vittles and our open source projects through advertising, referral revenue, and/or merchandise. As an Amazon Associate and Best Buy Affiliate, we also earn from qualifying purchases. We’ve chosen these providers not the other way around. Our decisions are based upon their corporate reputation and the quality of their offerings and pricing. Our recommendations regarding technology are reached without regard to financial compensation except in situations in which comparable products at comparable pricing are available from multiple sources. In this limited case, we support our sponsors because our sponsors support us.
BOGO Bonaza: Enjoy state-of-the-art VoIP service with a $10 credit and half-price SIP service on up to $500 of Skyetel trunking with free number porting when you fund your Skyetel account. No limits on number of simultaneous calls. Quadruple data center redundancy. $25 monthly minimum spend required. Tutorial and sign up details are here.
![]() The lynchpin of Incredible PBX 2020 and beyond is ClearlyIP components which bring management of FreePBX modules and SIP phone integration to a level never before available with any other Asterisk distribution. And now you can configure and reconfigure your new Incredible PBX phones from the convenience of the Incredible PBX GUI.
The lynchpin of Incredible PBX 2020 and beyond is ClearlyIP components which bring management of FreePBX modules and SIP phone integration to a level never before available with any other Asterisk distribution. And now you can configure and reconfigure your new Incredible PBX phones from the convenience of the Incredible PBX GUI.
VitalPBX is perhaps the fastest-growing PBX offering based upon Asterisk with an installed presence in more than 100 countries worldwide. VitalPBX has generously provided a customized White Label version of Incredible PBX tailored for use with all Incredible PBX and VitalPBX custom applications. Follow this link for a free test drive!
Special Thanks to Vitelity. Vitelity is now Voyant Communications and has halted new registrations for the time being. Our special thanks to Vitelity for their unwavering financial support over many years and to the many Nerd Vittles readers who continue to enjoy the benefits of their service offerings. We will keep everyone posted on further developments.
Some Recent Nerd Vittles Articles of Interest…
- RentPBX also is a corporate sponsor of the Nerd Vittles and PBX in a Flash projects. [↩]
Free Asterisk Solutions
