
Home » Technology » Smartphones (Page 8)
Category Archives: Smartphones
The Most Versatile VoIP Provider: FREE PORTING

 JUST RELEASED: Visit the Incredible PBX Wiki
The New Hybrid PBX: Why Settle for a One Trick Pony?

Let’s face it. It’s hard not to like the application development flexibility that Asterisk® offers, especially if you’re part of an organization that has very specific telephony needs. But the price you pay for "free" and putting all of your eggs in the Asterisk basket is painful. Here are a few of the hurdles that come to mind: security, NAT, one-way audio, remote users, CRM support, conferencing, painful upgrades to address frequent bug fixes, and, more generally, telephone management and support. We love Asterisk, but…
Most folks don’t buy all of their cars or groceries or computer software from a single company. So why do it with your phone system when you can take advantage of the best of all worlds, open source and commercial? To us, that’s the compelling case for integrating a 3CX commercial PBX into your Asterisk infrastructure. It’s a new iteration of what we used to call a hybrid PBX. And you can do it without cost for a full year to kick the 3CX tires and provide your mobile users with transparent phone service regardless of where they are roaming. Using the special Nerd Vittles signup link, you get a custom version of 3CX that supports 4 simultaneous calls, 10-user web meetings, unlimited trunks, and 10 or more extensions. After the first year, you can either spring for less than $100 a year to maintain the 3CX free PBX platform and mobile clients with pain-free updates, or you can upgrade to a more robust 3CX Pro commercial offering with a much expanded feature set including call center technology and seamless CRM integration with MS Exchange, Salesforce, Microsoft Dynamics, Microsoft Outlook, Office 365, Google Contacts, Exact Online, Freshdesk, Datev, Zendesk, Nutshell, vtiger, EBP, Insightly, amoCRM, Bitrix24 and Act. What’s not to like?
If you’re a frequent Nerd Vittles visitor, you already know that the 3CX clients for iOS, Android, Windows, and Macs are one of our favorite telephony apps of all time. The ease with which the 3CX client can be configured with a single click on an email attachment is revolutionary. And, once configured, the fact that you never again experience a NAT problem with a SIP call is nothing short of miraculous. As we’ve previously mentioned, the 3CX Client provides a nearly perfect mobile client for those that rely upon Asterisk. Now 3CX is poised to release an even easier configuration procedure for their mobile clients in update 2 for version 15.5. Simply log into your 3CX web client on a PC or Mac and choose the Settings:QR Code option from the menu bar. 3CX will present a QR code to activate the 3CX Client for your smartphone. Scan it using the 3CX Client app on your smartphone and, presto, your phone is instantly provisioned. It doesn’t get any easier than this…
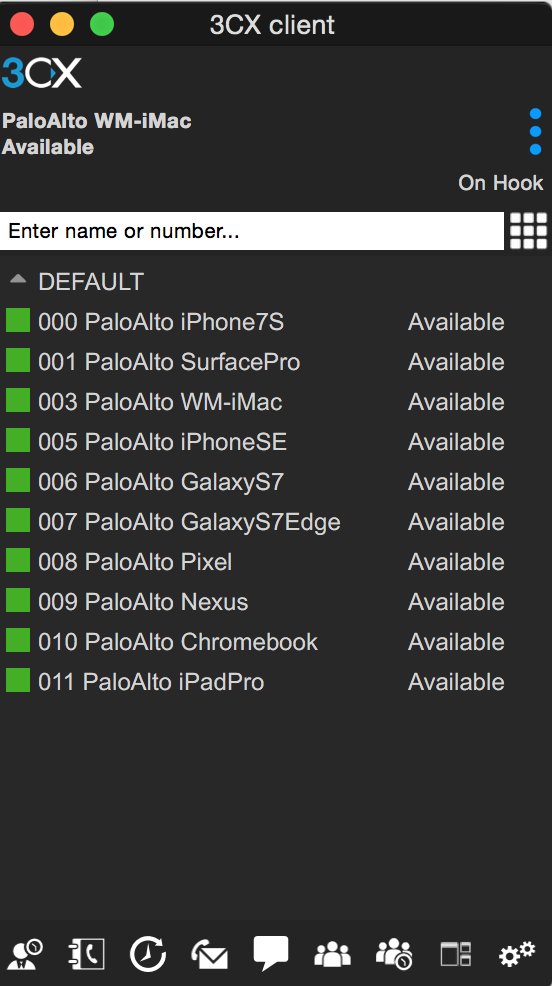
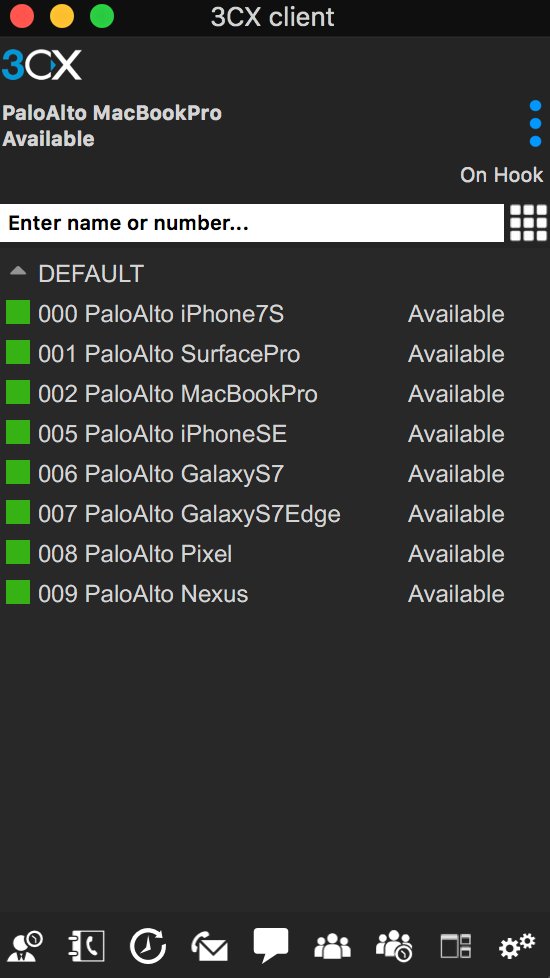
Let’s spend a little time reviewing our favorite Hybrid PBX setup. In this scenario which is perfect for small businesses with a mobile workforce, the setup looks like this. An Asterisk server is deployed to manage company trunks including Google Voice, voicemail, IVRs, custom apps, and extensions for every employee. Then we add a 3CX free PBX, interconnect it with the Asterisk PBX, and assign a 3CX extension for every employee. The 3CX extensions will all tie back to the employee extensions on the Asterisk PBX. It obviously simplifies things if you keep your number schemes consistent. For example, extension 7000 on the Asterisk PBX could be matched to extension 000 on the 3CX PBX. Then we set up outbound trunks on both the Asterisk PBX and 3CX to dial a 9 prefix to reach extensions on the other PBX. So dialing 9000 on the Asterisk PBX would connect the caller to extension 000 on the 3CX PBX. On the 3CX side, dialing 9000 would connect the caller to extension 7000 on the Asterisk PBX in our example. And, of course, 3CX Clients can reach any number worldwide using Asterisk outbound trunks by dialing a 9 prefix and then the long distance number. Our previous tutorials will walk you through setting this up with Incredible PBX® 13, Issabel™, any FreePBX®-based PBX, or even Wazo. Once you complete the 5-minute setup, mobile users can take advantage of all the powerful features on any 3CX Client platform while still receiving their incoming calls from the Asterisk-based office PBX by simply forwarding their extension to their matching 9XXX destination on the 3CX platform. This will ring their 3CX Client anywhere in the world with nothing but a Wi-Fi connection! And it’s a free call.
Published: Monday, October 16, 2017

Need help with Asterisk? Visit the PBX in a Flash Forum.
Special Thanks to Our Generous Sponsors
FULL DISCLOSURE: ClearlyIP, Skyetel, Vitelity, DigitalOcean, Vultr, VoIP.ms, 3CX, Sangoma, TelecomsXchange and VitalPBX have provided financial support to Nerd Vittles and our open source projects through advertising, referral revenue, and/or merchandise. As an Amazon Associate and Best Buy Affiliate, we also earn from qualifying purchases. We’ve chosen these providers not the other way around. Our decisions are based upon their corporate reputation and the quality of their offerings and pricing. Our recommendations regarding technology are reached without regard to financial compensation except in situations in which comparable products at comparable pricing are available from multiple sources. In this limited case, we support our sponsors because our sponsors support us.
 BOGO Bonaza: Enjoy state-of-the-art VoIP service with a $10 credit and half-price SIP service on up to $500 of Skyetel trunking with free number porting when you fund your Skyetel account. No limits on number of simultaneous calls. Quadruple data center redundancy. $25 monthly minimum spend required. Tutorial and sign up details are here.
![]() The lynchpin of Incredible PBX 2020 and beyond is ClearlyIP components which bring management of FreePBX modules and SIP phone integration to a level never before available with any other Asterisk distribution. And now you can configure and reconfigure your new Incredible PBX phones from the convenience of the Incredible PBX GUI.
The lynchpin of Incredible PBX 2020 and beyond is ClearlyIP components which bring management of FreePBX modules and SIP phone integration to a level never before available with any other Asterisk distribution. And now you can configure and reconfigure your new Incredible PBX phones from the convenience of the Incredible PBX GUI.
 VitalPBX is perhaps the fastest-growing PBX offering based upon Asterisk with an installed presence in more than 100 countries worldwide. VitalPBX has generously provided a customized White Label version of Incredible PBX tailored for use with all Incredible PBX and VitalPBX custom applications. Follow this link for a free test drive!
 Special Thanks to Vitelity. Vitelity is now Voyant Communications and has halted new registrations for the time being. Our special thanks to Vitelity for their unwavering financial support over many years and to the many Nerd Vittles readers who continue to enjoy the benefits of their service offerings. We will keep everyone posted on further developments.
Some Recent Nerd Vittles Articles of Interest…
Twofer Tuesday: Incredible PBX 13 to the Rescue

With the Digium announcement last week that four and a half year’s worth of Asterisk® servers were vulnerable to the RTP eavesdropping bug, it prompted us to dust off our Incredible PBX® 13 for CentOS build and bring it up to current specs including the Digium patch for RTPbleed. And then along came Hurricane Issabel to remind us that sh*t happens, and it pays to have a backup plan for your telecommunications infrastructure. So today we’re pleased to introduce two new Asterisk solutions: a cloud-based server for $1 a month and a VirtualBox image that will run on any Windows or Mac computer. We would stress that these should be part of a comprehensive backup plan and may not be suitable to implement as your primary communications platform. But, for those impacted by Harvey’s or Issabel’s devastation, either of today’s solutions will get you a very stable PBX platform as soon as you have Internet or cellular connectivity.
Cloud Hosting for $1/month in NYC, Miami or LA
For today’s emergency cloud platform, we’ve chosen WootHosting which provides a rock-solid VPS in your choice of locations starting at $12 a year. That buys you the following:
2 CPU Core Allocations
1024MB Dedicated RAM
1024MB vSwap
50GB Secured Disk Space
3000GB Premium Bandwidth
1 IPv4 Address
100Mbps Port Speed
Choose New York Grand Opening Specials under the left tab. You still get your choice of cities for the $12/year VPS! Just configure the VPS as a CentOS 6, 64-bit platform. Login to the server as root using SSH or Putty and issue these commands:
setenforce 0
yum -y install net-tools nano wget tar
yum -y upgrade --skip-broken
wget http://incrediblepbx.com/incrediblepbx13-12.2-centos.tar.gz
tar zxvf incrediblepbx*
./create-swapfile-DO
./IncrediblePBX*
On some platforms (not WootHosting’s VPS), your server may automatically reboot midway through the install. On these platforms, log back in as root and run the installer a second time to complete the install:
./IncrediblePBX*
After restarting the server at the conclusion of the install, log back in as root and perform the following steps to complete your setup:
Make your root password very secure: passwd
Create admin password for GUI access: /root/admin-pw-change
Set your correct time zone: /root/timezone-setup
Create admin password for web apps: htpasswd /etc/pbx/wwwpasswd admin
Make a copy of your Knock codes: cat /root/knock.FAQ
Decipher your Reminders password: cat /root/reminders.FAQ
InsertOPTIONS="-i venet0:0"in /etc/sysconfig/knockd
Decipher IP address and other info about your server: status
Your server will be up and running in about an hour. Remember, we are compiling all of the components including Asterisk from source which means customization and updates are easy. Continue your adventure by following our previous tutorial.
Incredible PBX 13 with VirtualBox in Under 5 Minutes
If you’re in a time crunch or prefer to set up a PBX locally, there is no better solution than VirtualBox. It runs on any desktop PC, Mac, Linux or Solaris machine, and the new Incredible PBX 13 image for VirtualBox can be installed and configured in under 5 minutes. With a single button click, you can backup your entire PBX in a couple of minutes and save it for a rainy day.
Today’s release is built atop the CentOS 6.9 platform and features the latest release of Asterisk 13 and a terrific collection of GPL modules from FreePBX® 12. Think of Incredible PBX as the glue stick that assembles all the necessary VoIP components and holds them together seamlessly. As with all Incredible PBX builds, you also get the full complement of goodies including dozens of text-to-speech apps, voice recognition and dialing, SMS messaging, Google Voice and free fax support, reminders and wakeup calls, and SECURITY!
Is VirtualBox merely a sandbox for experimentation? Absolutely not. With any of the beefier desktop computers available today, running Incredible PBX as a 24/7 VirtualBox image is every bit as feature rich with stellar performance that’s equivalent to using dedicated hardware. And there are some added advantages. Obviously, deploying a turnkey VoIP platform in under 5 minutes is a major plus. But, unlike using a dedicated Linux platform, you also get the ability to take snapshots of your system and do full backups in minutes instead of the hours required to bring down dedicated hardware, load a different backup application using a different operating system, perform a backup, and then reboot your VoIP server. And your backups won’t just run on the one server on which the backup was performed. You can restore the backup to any other computer that can run VirtualBox. For any of you that came from a network management background, you know what a big deal that really is. And there’s one more bonus. With Incredible Backup and Restore, you can move your image to dedicated hardware running the same operating system with Asterisk 13 and the same GUI platform in minutes.
Are there security compromises using the VirtualBox platform? Not at all. Incredible PBX still comes preconfigured with the Linux IPtables firewall that is locked down to a whitelist of local area networks, preferred providers, and your own IP addresses. You can expand the whitelist using the add-ip and add-fqdn scripts or use PortKnocker and Travelin’ Man 4 tools to let remote users gain instant access.
Getting Started with VirtualBox. Step #1 today is to download one or more of the 64-bit VirtualBox installers from VirtualBox.org or Oracle.com. Our recommendation is to put all of the 100MB installers on a 4GB thumb drive.1 Then you’ll have everything in one place whenever and wherever you happen to need it. Once you’ve downloaded the software, simply install it onto your favorite desktop machine. Accept all of the default settings, and you’ll be good to go. And here’s a link to the latest Oracle VM VirtualBox User Manual.
Downloading the Incredible PBX 13 Virtual Machine. A word of warning on the front end. The new Incredible PBX image featuring Asterisk 13 for VirtualBox is huge, about 2.3GB! Download the image from SourceForge onto your desktop by clicking here.
Importing Incredible PBX 13 into VirtualBox. Double-click on the .ova file you downloaded to begin the import procedure and load it into VirtualBox. When prompted, be sure to check the Reinitialize the Mac address of all network cards box and then click the Import button. Once the import is finished, you’ll see a new Incredible PBX 13 for CentOS 6.9 virtual machine in your VM List on the VirtualBox Manager Window. We need to make a couple of one-time adjustments to the Incredible PBX VM configuration to account for differences in sound and network cards on different host machines.
Click on the Incredible PBX Virtual Machine in the VM List. Then click Settings -> Audio. Verify that Enable Audio option is checked and choose your sound card. Then click OK. Next click Settings -> Network. For Adapter 1, be sure the Enable Network Adapter option is checked. From the Attached to pull-down menu, choose Bridged Adapter. Then select your network card from the Name list. Then click OK. That’s all the configuration that is necessary for your Incredible PBX Virtual Machine.
Running Incredible PBX 13 on VirtualBox. Once you’ve imported and configured the Incredible PBX Virtual Machine, you’re ready to go. Highlight Incredible PBX 13 for CentOS 6.9 Virtual Machine in the VM List on the VirtualBox Manager Window and click the Start button. The CentOS 6.9 boot procedure will begin just as if you had installed Incredible PBX on a standalone machine. You’ll see a couple of dialogue boxes pop up that explain the keystrokes to move back and forth between your host operating system desktop and your virtual machine. Remember, you still have full access to your desktop computer. Incredible PBX is merely running as a task in a VirtualBox window. Always gracefully halt Incredible PBX just as you would on a dedicated computer.
Here’s what you need to know. To work in the Incredible PBX Virtual Machine, just left-click your mouse while it is positioned inside the VM window. To return to your host operating system desktop, press the right Option key on Windows machines or the left Command key on any Mac. For other operating systems, read the dialogue boxes for instructions on moving around. To access the Linux CLI, login as root with the default password: password.
When logging in for the first time, Incredible PBX will go through some setup steps and then reboot. Login again to complete the setup. status will always provide a snapshot of your system. To shut down Incredible PBX gracefully, click in the VM window with your mouse, log in as root, and type: halt. Be sure to complete the following setup steps from the Linux CLI:
- Change your root password: passwd
- Set your FreePBX admin password: /root/admin-pw-change
- Set your web apps admin password: htpasswd /etc/pbx/wwwpasswd admin
- Set your correct time zone: /root/timezone-setup
- Add WhiteList entries to firewall if needed: /root/add-ip or /root/add-fqdn
- Store PortKnocker credentials in a safe place: cat /root/knock.FAQ
- Decipher your Reminders password: cat /root/reminders.FAQ
- Login to your NeoRouter VPN server if desired: /root/nrclientcmd
To access the Incredible PBX GUI with a browser, point to the IP address of your virtual machine and login as admin with admin password set above. We recommend that you log in to the Linux CLI as root at least once a week so that Incredible PBX updates get applied to your server regularly. This is critically important if you care about your phone bill. Enjoy!
Published: Tuesday, September 12, 2017
Need help with Asterisk? Visit the PBX in a Flash Forum.
Special Thanks to Our Generous Sponsors
FULL DISCLOSURE: ClearlyIP, Skyetel, Vitelity, DigitalOcean, Vultr, VoIP.ms, 3CX, Sangoma, TelecomsXchange and VitalPBX have provided financial support to Nerd Vittles and our open source projects through advertising, referral revenue, and/or merchandise. As an Amazon Associate and Best Buy Affiliate, we also earn from qualifying purchases. We’ve chosen these providers not the other way around. Our decisions are based upon their corporate reputation and the quality of their offerings and pricing. Our recommendations regarding technology are reached without regard to financial compensation except in situations in which comparable products at comparable pricing are available from multiple sources. In this limited case, we support our sponsors because our sponsors support us.
BOGO Bonaza: Enjoy state-of-the-art VoIP service with a $10 credit and half-price SIP service on up to $500 of Skyetel trunking with free number porting when you fund your Skyetel account. No limits on number of simultaneous calls. Quadruple data center redundancy. $25 monthly minimum spend required. Tutorial and sign up details are here.
![]() The lynchpin of Incredible PBX 2020 and beyond is ClearlyIP components which bring management of FreePBX modules and SIP phone integration to a level never before available with any other Asterisk distribution. And now you can configure and reconfigure your new Incredible PBX phones from the convenience of the Incredible PBX GUI.
The lynchpin of Incredible PBX 2020 and beyond is ClearlyIP components which bring management of FreePBX modules and SIP phone integration to a level never before available with any other Asterisk distribution. And now you can configure and reconfigure your new Incredible PBX phones from the convenience of the Incredible PBX GUI.
VitalPBX is perhaps the fastest-growing PBX offering based upon Asterisk with an installed presence in more than 100 countries worldwide. VitalPBX has generously provided a customized White Label version of Incredible PBX tailored for use with all Incredible PBX and VitalPBX custom applications. Follow this link for a free test drive!
Special Thanks to Vitelity. Vitelity is now Voyant Communications and has halted new registrations for the time being. Our special thanks to Vitelity for their unwavering financial support over many years and to the many Nerd Vittles readers who continue to enjoy the benefits of their service offerings. We will keep everyone posted on further developments.
Some Recent Nerd Vittles Articles of Interest…
Another Perfect Pair: Flawless VoIP with Wazo and 3CX

We previously documented how to interconnect an Issabel PBX with 3CX to take advantage of the best of both worlds. Today, we’ll again use the Nerd Vittles free 3CX server offering and interconnect it with a Wazo PBX. An added benefit of using Wazo is the fact that you can set up redundant (and free) HA servers with Wazo in minutes. Once we get the pieces in place, from Wazo extensions, you’ll be able to call your 3CX Clients by dialing 4 digits. And, from 3CX Clients, you can call Wazo extensions as well as all of your Asterisk® applications in the same way with the added bonus of being able to make outbound calls through your Wazo trunks by dialing any number with an 8 prefix from 3CX extensions. Once you have both of your PBXs running, the setup time to interconnect them is under 5 minutes.
Why would you want to maintain two PBXs? As we previously noted, the simple answer is the added flexibility you achieve coupled with a 99% reduction in VoIP headaches. If you haven’t yet used 3CX Clients on a PC or Mac desktop or on an iOS or Android device, you have missed perhaps the greatest VoIP advancement of the last decade. As the name suggests 3CX Clients connect to a 3CX server with less than a one-minute setup. They work flawlessly from anywhere using WiFi or cellular. Every function you’re accustomed to on a top-of-the-line desktop SIP phone works exactly the same on the 3CX clients: phonebook, hold, transfer, voicemail, chat, conferencing, and WebMeeting. It’s what every Unified Communications system should deliver. The silver lining is you can kiss all of your Asterisk NAT woes goodbye! If you ever travel or if you need remote phone access to your PBX infrastructure, you owe it to yourself to try a 3CX Client. We promise. You’ll never go back!
Building Your Wazo and 3CX Server Platforms
The prerequisite for interconnecting Wazo and 3CX servers is, of course, to install the two PBXs on platforms of your choice. Our preference is cloud-based servers because it avoids many of the stumbling blocks with NAT-based routers. If you know what you’re doing, you obviously can deploy the PBXs in any way you like. For the Wazo PBX, start with our latest Wazo tutorial. For 3CX, start with our introductory tutorial which includes a link to obtain a free perpetual license supporting 4 simultaneous calls and unlimited trunks. Then secure your server by adding the Travelin’ Man 3 firewall for 3CX. Once both servers are up and running, whitelist the IP address or FQDN of the Wazo PBX on the 3CX server and vice versa. You’ll find the add-ip and add-fqdn utilities in /root of each server.
Overview of Interconnection Methodology
If you’re new to all of this, suffice it to say that 3CX is a powerful, commercial PBX while Wazo provides a robust Asterisk RealTime implementation for basic telephony operation. The two systems are quite different in terms of their approaches to interconnectivity. While you can transparently interconnect one 3CX server to another one, you cannot accomplish the same thing when the second PBX is Asterisk-based. Instead, Wazo is configured as a SIP trunk on the 3CX platform. The limitation this causes is that extensions on the Wazo PBX can only direct dial extensions on the 3CX platform. Wazo-based extensions cannot utilize 3CX trunks to place outbound calls. There’s more flexibility on the 3CX side of things. 3CX extensions can place direct calls to Wazo extensions. They also can take advantage of Wazo’s trunks to place outbound calls. Additionally, as we noted above, 3CX extensions can take advantage of every Asterisk application hosted on the Wazo platform including all of the Incredible PBX® enhancements. This actually works out perfectly because you can deploy 3CX Clients for your end-users, and they can take advantage of all the extension and trunk resources on both the 3CX and Wazo platforms. It also greatly simplifies remote deployment by removing NAT one-way audio hassles while allowing almost instantaneous setup of remote 3CX Clients, even by end-users.
For our setup today, we’re assuming you have elected to use 3-digit extensions on both the Wazo and 3CX platforms. To call extensions connected directly to the alternate server, we will simply dial 8 + the extension number on the remote PBX. To make external calls from 3CX extensions using Wazo trunks, we will dial 8 + a 10-digit number. For international users, you can adjust the dialplan on both PBXs accordingly.
By default, SIP trunks are associated with a DID on the 3CX platform. We will register the 3CX DID trunk with Wazo to maintain connectivity; however, we will not register the corresponding trunk on the Wazo side with the 3CX server. Keep in mind that you can only route a 3CX DID to a single destination, i.e. an extension, a ring group, or an IVR. But we can use 3CX’s CallerID routing feature to send calls to specific 3CX extensions from Wazo extensions even using a single 3CX trunk. For each 3CX extension, we’ll create an Outbound Route on the Wazo side with a CallerID number that matches the 3CX extension number we wish to reach. On the 3CX side, we’ll create an Inbound CID Rule that specifies the extension number to which each matching CallerID number should be routed. This sounds harder than it actually is. So keep reading, and it’ll all make sense momentarily. Once you’ve set all of this up, we think you’ll agree that it makes sense to create the bulk of your extensions exclusively on the 3CX side.
Configuring Wazo for Interconnection to 3CX
Let’s begin by creating a Trunk on the Wazo side to connect to your 3CX server. In the Wazo GUI, choose IPBX:Trunk Management:SIP Protocol and + Add SIP Trunk.
In the General tab, fill in the blanks as shown below. Make up a very secure Password:

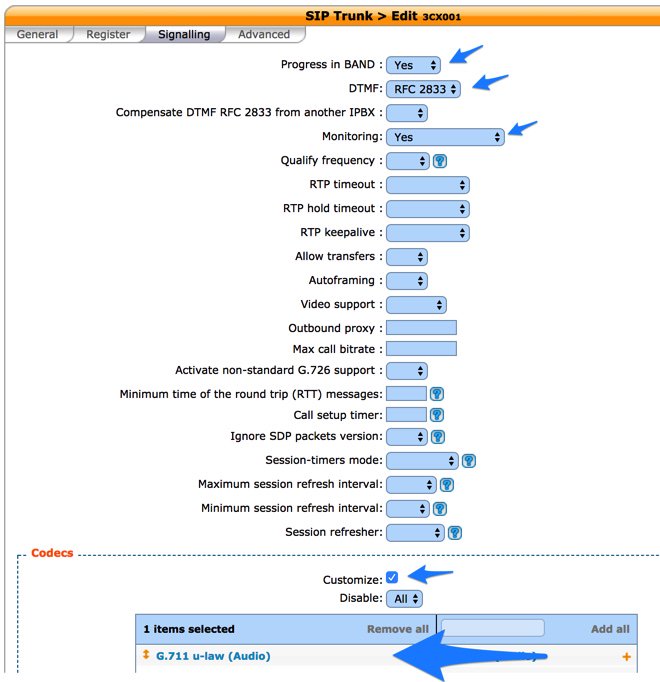
In the Signalling tab, fill in the blanks identified by arrows as shown below:
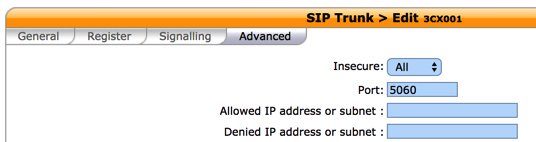
In the Advanced tab, fill in the blanks as shown below. Then SAVE the trunk settings.
Because we set up the Wazo trunk with a Default destination context, we don’t need an Incoming Route for the 3CX calls since they will be processed exactly as if they were dialed from a local extension on the Wazo PBX, i.e. local calls will be routed to extensions and outgoing calls through trunks will be routed using your existing Outbound Routes.
Finally, we need to create the Outbound Routes for calls originating from Wazo extensions that should be directed to specific extensions on the 3CX platform. You’ll need a list of the 3CX extension numbers you wish to enable on the Wazo platform, and we’ll need to create a separate Outbound Route for each 3CX extension to be enabled. Create the Outbound Routes using the template below after accessing Call Management:Outgoing Calls:+ Add Route.
In the General tab, we recommend including the 3CX extension in the Name field. The Context should be Outcalls, and the Trunk should be the 3CX001 trunk we created above.
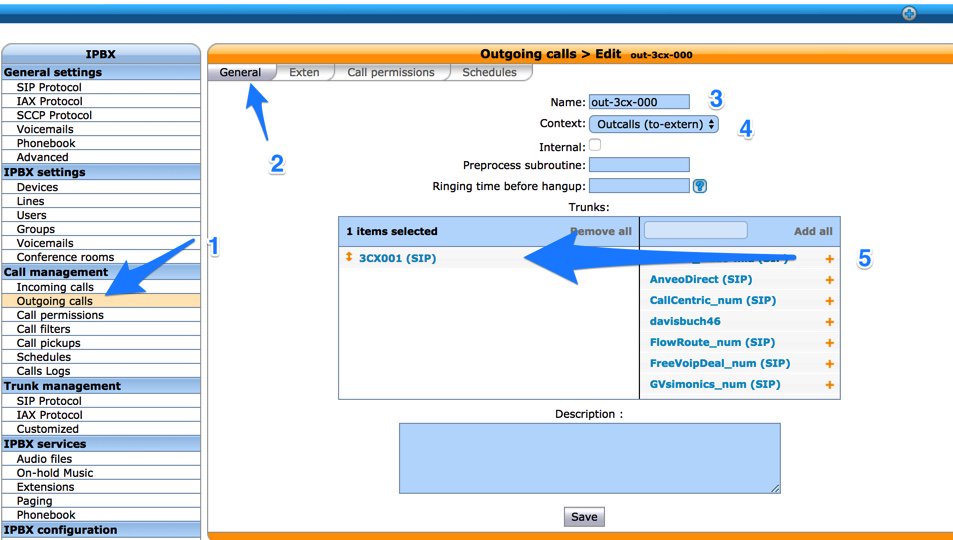
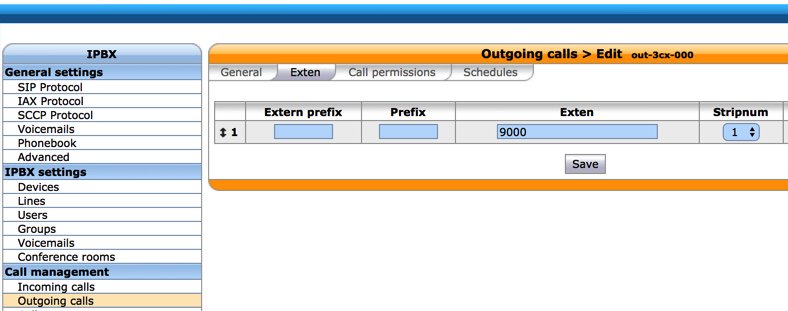
In the Exten tab, specify the dialing prefix (9) followed by the 3CX extension number in the Exten field. Then choose 1 in the Stripnum field to tell Wazo to strip off the dialing prefix before sending the call to the 3CX PBX. Click SAVE to save your new outbound route settings. Repeat for each 3CX extension that should be accessible from the Wazo PBX.
Configuring 3CX for Interconnection to Issabel PBX
Now we’re ready to set up the 3CX side to interconnect with your Wazo PBX. Start by creating a SIP Trunk and fill out the template as shown below using one of the phone numbers associated with your Wazo PBX as the Main Trunk No.
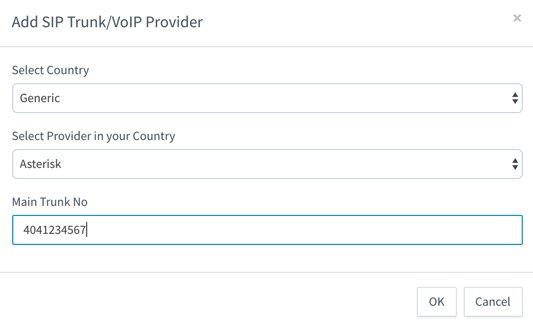
Fill in the Trunk Details using the example below. Be sure to specify the actual IP address or FQDN of your Wazo server as well as the SIP credentials of 3CX for username and the actual password you set up on the Wazo side of things. The Main Trunk No will be the same as you entered in the previous step. Choose a Default Destination for the Trunk.
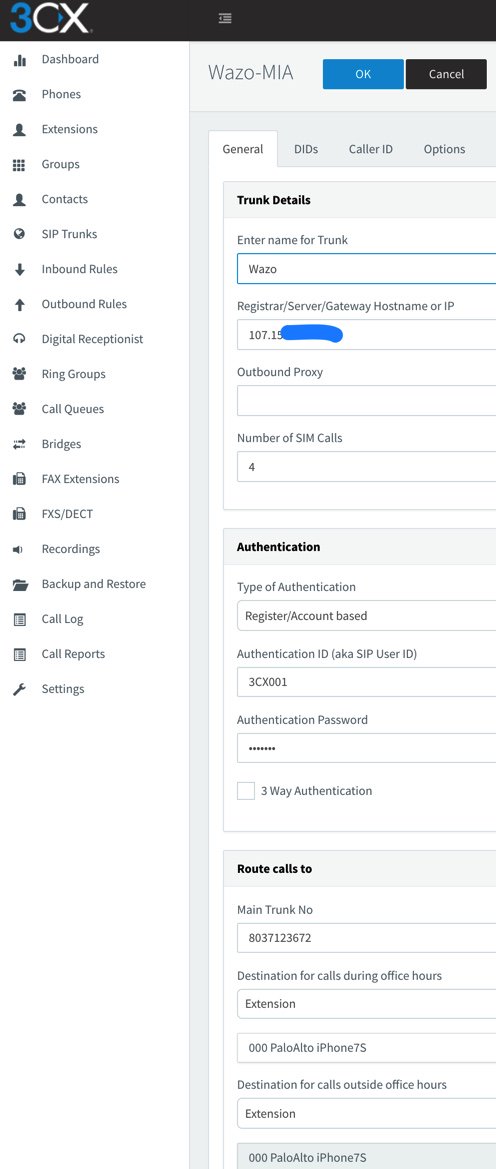
When the SIP Trunks listing redisplays, highlight your new Asterisk trunk and click Refresh Registration. The icon beside the Trunk should turn green. If not, be sure your IP address and password match the settings on the Wazo side. Remember to also whitelist the IP address of your 3CX server on the Wazo PBX using /root/add-ip and do the same for the Wazo PBX on the 3CX side. Don’t proceed until you get a green light!
Now we need two Outbound Routes for calls placed from 3CX extensions. One will handle calls destined for Local Extensions on the Wazo side. Our design is to place calls to Wazo extensions by dialing 8 + the 3-digit extension number. Adjust this to meet your own requirements. Be sure to set the Route as Wazo with a value of 1 for Strip Digits.
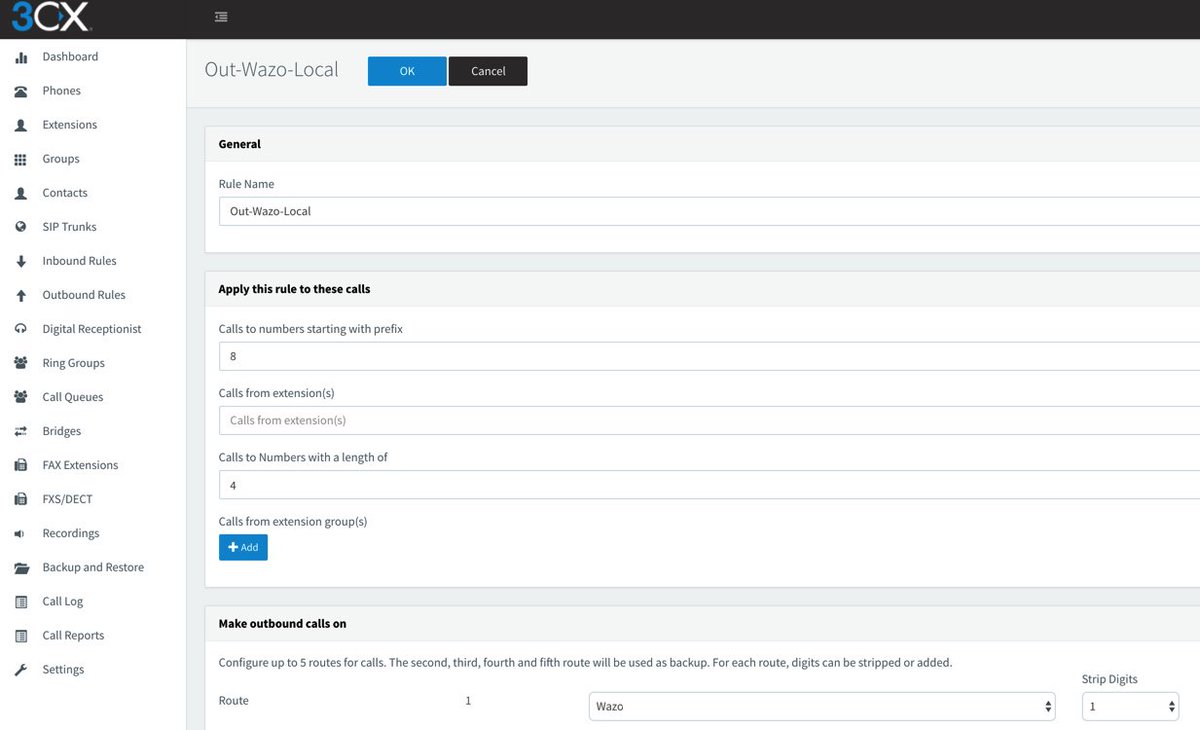
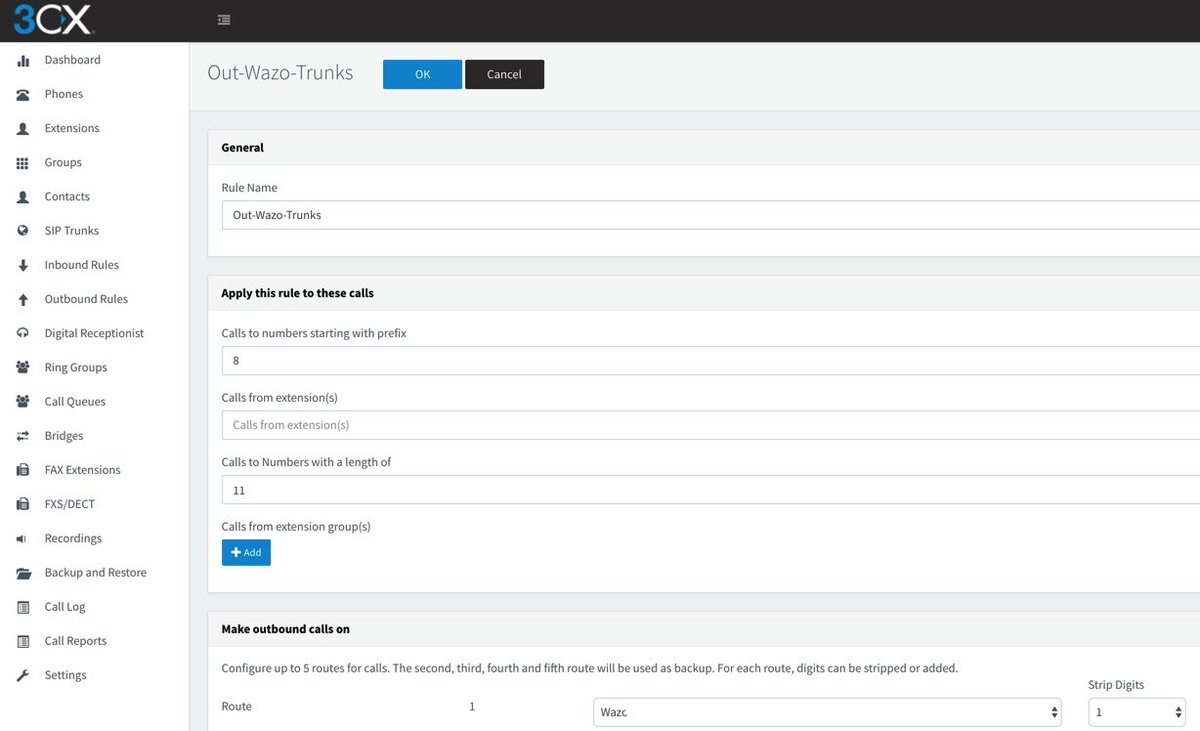
The other Outbound Route will handle calls destined for external calling with a Wazo trunk using a similar methodology. 3CX users will dial 8 + 10-digit number for calls to be processed by Trunks on the Wazo server.
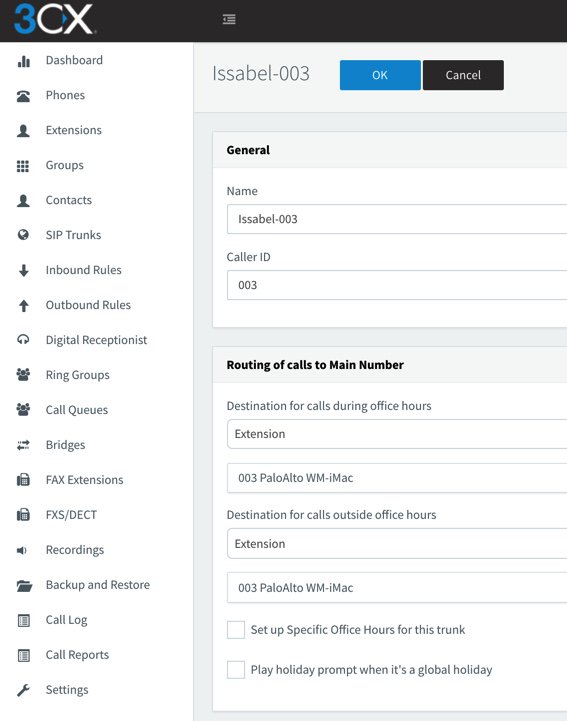
Finally, we need an Inbound Rule for every 3CX extension that you wish to enable for remote calling from Wazo extensions. Use the Add CID Rule option to create each Inbound Rule using the sample below. In our example, we’re authorizing incoming calls to 3CX extension 003 where the CallerID number of the incoming call is 003. This template is exactly the same as what we used with the 3CX-Issabel setup previously.
Test Drive Your Interconnected Servers
Now we’re ready to try things out. From an extension on the 3CX server, dial 8 plus any 3-digit extension that exists on the Wazo server. Next, dial 8 plus a 10-digit number such as your smartphone. The call should be routed out of your Wazo server using the Trunk associated with the NXXNXXXXXX rule in your Wazo Outbound Routes. Finally, from an extension on your Wazo PBX, dial 9 plus 000 which should route the call to extension 000 on your 3CX server. Enjoy!
Published: Tuesday, September 5, 2017
 Support Issues. With any application as sophisticated as this one, you’re bound to have questions. Blog comments are a difficult place to address support issues although we welcome general comments about our articles and software. If you have particular support issues, we encourage you to get actively involved in the PBX in a Flash Forum. It’s the best Asterisk tech support site in the business, and it’s all free! Please have a look and post your support questions there. Unlike some forums, the PIAF Forum is extremely friendly and is supported by literally hundreds of Asterisk gurus and thousands of users just like you. You won’t have to wait long for an answer to your question.
Need help with Asterisk? Visit the PBX in a Flash Forum.
Special Thanks to Our Generous Sponsors
FULL DISCLOSURE: ClearlyIP, Skyetel, Vitelity, DigitalOcean, Vultr, VoIP.ms, 3CX, Sangoma, TelecomsXchange and VitalPBX have provided financial support to Nerd Vittles and our open source projects through advertising, referral revenue, and/or merchandise. As an Amazon Associate and Best Buy Affiliate, we also earn from qualifying purchases. We’ve chosen these providers not the other way around. Our decisions are based upon their corporate reputation and the quality of their offerings and pricing. Our recommendations regarding technology are reached without regard to financial compensation except in situations in which comparable products at comparable pricing are available from multiple sources. In this limited case, we support our sponsors because our sponsors support us.
BOGO Bonaza: Enjoy state-of-the-art VoIP service with a $10 credit and half-price SIP service on up to $500 of Skyetel trunking with free number porting when you fund your Skyetel account. No limits on number of simultaneous calls. Quadruple data center redundancy. $25 monthly minimum spend required. Tutorial and sign up details are here.
![]() The lynchpin of Incredible PBX 2020 and beyond is ClearlyIP components which bring management of FreePBX modules and SIP phone integration to a level never before available with any other Asterisk distribution. And now you can configure and reconfigure your new Incredible PBX phones from the convenience of the Incredible PBX GUI.
The lynchpin of Incredible PBX 2020 and beyond is ClearlyIP components which bring management of FreePBX modules and SIP phone integration to a level never before available with any other Asterisk distribution. And now you can configure and reconfigure your new Incredible PBX phones from the convenience of the Incredible PBX GUI.
VitalPBX is perhaps the fastest-growing PBX offering based upon Asterisk with an installed presence in more than 100 countries worldwide. VitalPBX has generously provided a customized White Label version of Incredible PBX tailored for use with all Incredible PBX and VitalPBX custom applications. Follow this link for a free test drive!
Special Thanks to Vitelity. Vitelity is now Voyant Communications and has halted new registrations for the time being. Our special thanks to Vitelity for their unwavering financial support over many years and to the many Nerd Vittles readers who continue to enjoy the benefits of their service offerings. We will keep everyone posted on further developments.
Some Recent Nerd Vittles Articles of Interest…
Finding the Perfect Phone Solution for Small Organizations

Many of us wear several hats during our business careers. One of those invariably is managing a community organization of some flavor. We frequently are asked for advice on what the ideal telephony solution would be for such an organization. The reason for the inquiries typically is because the Bell Sisters have now jacked up the cost of a single, business phone line to well over $100 a month. And that gets you local calls only unless you sign up for exorbitant additional charges for long distance calling. It’s worth noting that most of the individuals making these inquiries stress that they do not want to get in the business of managing a phone system. They’re looking for a plug-and-play, set-it-and-forget-it setup that will require minimal tweaking. My first question is always: "What’s your budget?" Then we explore (1) how many phones, (2) the frequency of calls, (3) the number of simultaneous calls, (4) the mix of local and long distance calling, and, last but not least, (5) the must-have feature set. No shocker: the budget is always near zero.

Today, we’re going to start on the bottom rung and work our way up the technology ladder. If you never thought smartphones and cellular would be part of this equation, guess again. $60 will now buy you a 4G LTE smartphone at WalMart, and monthly plans with unlimited calling in the U.S. start at $25 for Walmart’s Family Mobile plan, a far cry from the Ma Bell business phone rates. And you can keep your number! If you need multiple phones but only a single line, that’s not a problem either. Add a Link2Cell digital cordless phone system from Panasonic and now you have as many as 5 phones that can make and receive calls using your cellular connection via Bluetooth®. Some even support a second cellphone connection. With many you can build a phonebook on your cellphone and import it into all of your cordless phones. And, of course, voicemail is included as part of your cell plan. For those with poor cellular service, the Family Calling Plan supports free WiFi calling on many cellphones. And $10 extra buys you rollover international calling funds with 5¢/min. rates to Canada and Mexico. Calling rates to other countries are less than impressive and do not compare favorably with typical VoIP rates.
Cellular phone service isn’t for everyone, and there are considerably more choices in the Land of VoIP. The wrinkle with all of the VoIP solutions is that now you need internet service at the site of your organization. To say there is minimal competition in the internet service provider market is an understatement. If you’re lucky, you’ll have a choice between AT&T and one of the cable companies: Comcast, Charter, or Time Warner/Spectrum. The downside is it adds an additional $25 to $75+ to your monthly costs unless the organization already has Internet service that is used for purposes other than telephony. What won’t work for VoIP is satellite internet service because of latency issues.

Once you’re over the internet service hurdle, there are numerous VoIP choices for phone service depending upon your skillset. Again, let’s start on the bottom rung. If you can make it with one phone and one call at a time, it’s hard to beat Ooma Telo. $100 buys you a device that delivers landline-like phone service at a monthly cost of $4 (you only pay communications taxes and fees) to $10 depending upon the feature set you choose. The basic, fees-only plan gets you toll-free nationwide calling in the U.S., call waiting, caller ID, 911 service, a call log history and voicemail through Ooma’s online dashboard. The premium $10 a month plan adds a second line, free calling to Canada and Mexico, voicemail via email, call screening, do not disturb and call forwarding to an Android phone or iPhone. As with cellular service, you can keep your existing phone number. If you need WiFi connectivity or cellphone Bluetooth connectivity for your Ooma device, add $50. Otherwise, just plug a standard telephone into the Ooma hardware, and you’re good to go. You also could use a wireless phone system such as the ones described in the previous section to add up to five extensions.

If you need additional lines or phones, the $200 Ooma Office offering is worth considering. You can add as many users as desired for $19.95/month/each with every user getting unlimited U.S./Canada calling, CallerID service, and an impressive collection of business phone features (shown above). The cost of the VoIP phones for each user are not included. While the monthly service charges are pricey, you’re paying for the simplicity of never having to deal with the intricacies of configuring and managing a business phone system. However, you do have to purchase and configure a SIP phone for each user.

When you get beyond the single user, single line requirement, the sky opens up in the VoIP market. The savings go from getting part of your hundred dollars back each month to saving several hundred or thousands of dollars every month. What becomes important is how much of the deployment work you’re willing to undertake yourself. If the answer is not much, then the phone systems from one of our corporate sponsors, 3CX or RentPBX, are probably your best bets. Both offer turnkey VoIP solutions, and 3CX also has a worldwide dealer network to handle all of the deployment chores for you as well. While the front end costs with the 3CX commercial solution must be considered, the long-term savings more than cover these costs in your first year.
If you’re capable of making your own dinner by reading the directions off the side of a box, then you can probably handle many VoIP deployments yourself. The list of tasks goes something like this. You’ll either need a computer or cloud provider for a computing platform. Then you need a Linux operating system for that platform. Next, you need VoIP software to serve as your PBX. Services such as RentPBX handle setup of all three of these tasks for a monthly cost of $15. Or you can do it yourself and reduce the cost to $5 or less per month. We have dozens of tutorials to show you how.
At this juncture, you’re pretty much on your own except for our tutorials. The remaining tasks include purchasing and configuring phones for your users and configuring trunks from one or more VoIP providers, the folks that interconnect your phone calls to the people you are calling. Then you configure your PBX to route calls in and out of your PBX, and you’re in business. All of these tasks are managed using web-based GUI software, and there are plenty of tutorials to hold your hand every step of the way.
We’ll finish up today by walking you through one of our favorite open source VOIP setups. It provides free calling and faxing in the United States. Typical setup takes less than an hour, and the monthly cost is $3 which includes nightly backups of your entire PBX. These backups can be restored with a single button click.
FULL DISCLOSURE: 3CX, RentPBX, Amazon, Vitelity, and Vultr all provide financial support to Nerd Vittles and our open source projects. We’ve chosen these providers not the other way around. Our decisions were based upon their corporate reputation and the quality of their offerings and their pricing,
The Vultr/VoIP Open Source Solution
Begin by setting up an account at Vultr using our referral link. Then create a new instance choosing the smallest Server Size and CentOS 7/64-bit as the Server Type. Pick a Server Location that supports the $2.50 server size. Currently, Miami and New York are available. Once your virtual machine is running, you can activate automatic backups under the Server Information:Backups tab in the Vultr Control Panel.
(1) Once you’ve built and started your new virtual machine, log into your server as root using SSH/Putty and immediately change your root password: passwd.
(2) With the $2.50 size VULTR virtual machine, you must create a swapfile before proceeding. Here are the commands:
dd if=/dev/zero of=/swapfile bs=1024 count=1024k
chown root:root /swapfile
chmod 0600 /swapfile
mkswap /swapfile
swapon /swapfile
echo "/swapfile swap swap defaults 0 0">>/etc/fstab
sysctl vm.swappiness=10
echo vm.swappiness=10>>/etc/sysctl.conf
free -h
cat /proc/sys/vm/swappiness
(3) Now you’re ready to kick off the Issabel 4 install. Here are the commands:
cd /root
yum -y install wget nano dialog
wget -O - http://repo.issabel.org/issabel4-netinstall.sh | bash
When prompted for a MySQL password, use: passw0rd (with a zero). Choose a secure Issabel admin password for the GUI.
(4) After the reboot, log back in as root and install Incredible PBX for Issabel:
cd /root
wget http://incrediblepbx.com/IncrediblePBX11-Issabel4.sh
chmod +x IncrediblePBX11-Issabel4.sh
./IncrediblePBX11-Issabel4.sh
When prompted for a MySQL password, use: passw0rd (with a zero). Choose a secure Issabel admin password for the GUI.
(5) After the reboot, configure your correct timezone: /root/timezone-setup
Be advised that, when you log into the Issabel web interface, you will be prompted (three times) for your admin credentials. You can save these entries to avoid having to repeat it in the future. Now you can jump over to the Incredible PBX for Issabel tutorial to complete your installation. Within a couple minutes, your PBX will be ready to accept calls. Enjoy!
Published: Monday, August 7, 2017
Support Issues. With any application as sophisticated as this one, you’re bound to have questions. Blog comments are a difficult place to address support issues although we welcome general comments about our articles and software. If you have particular support issues, we encourage you to get actively involved in the PBX in a Flash Forum. It’s the best Asterisk tech support site in the business, and it’s all free! Please have a look and post your support questions there. Unlike some forums, the PIAF Forum is extremely friendly and is supported by literally hundreds of Asterisk gurus and thousands of users just like you. You won’t have to wait long for an answer to your question.
Need help with Asterisk? Visit the PBX in a Flash Forum.
Special Thanks to Our Generous Sponsors
FULL DISCLOSURE: ClearlyIP, Skyetel, Vitelity, DigitalOcean, Vultr, VoIP.ms, 3CX, Sangoma, TelecomsXchange and VitalPBX have provided financial support to Nerd Vittles and our open source projects through advertising, referral revenue, and/or merchandise. As an Amazon Associate and Best Buy Affiliate, we also earn from qualifying purchases. We’ve chosen these providers not the other way around. Our decisions are based upon their corporate reputation and the quality of their offerings and pricing. Our recommendations regarding technology are reached without regard to financial compensation except in situations in which comparable products at comparable pricing are available from multiple sources. In this limited case, we support our sponsors because our sponsors support us.
BOGO Bonaza: Enjoy state-of-the-art VoIP service with a $10 credit and half-price SIP service on up to $500 of Skyetel trunking with free number porting when you fund your Skyetel account. No limits on number of simultaneous calls. Quadruple data center redundancy. $25 monthly minimum spend required. Tutorial and sign up details are here.
![]() The lynchpin of Incredible PBX 2020 and beyond is ClearlyIP components which bring management of FreePBX modules and SIP phone integration to a level never before available with any other Asterisk distribution. And now you can configure and reconfigure your new Incredible PBX phones from the convenience of the Incredible PBX GUI.
The lynchpin of Incredible PBX 2020 and beyond is ClearlyIP components which bring management of FreePBX modules and SIP phone integration to a level never before available with any other Asterisk distribution. And now you can configure and reconfigure your new Incredible PBX phones from the convenience of the Incredible PBX GUI.
VitalPBX is perhaps the fastest-growing PBX offering based upon Asterisk with an installed presence in more than 100 countries worldwide. VitalPBX has generously provided a customized White Label version of Incredible PBX tailored for use with all Incredible PBX and VitalPBX custom applications. Follow this link for a free test drive!
Special Thanks to Vitelity. Vitelity is now Voyant Communications and has halted new registrations for the time being. Our special thanks to Vitelity for their unwavering financial support over many years and to the many Nerd Vittles readers who continue to enjoy the benefits of their service offerings. We will keep everyone posted on further developments.
Some Recent Nerd Vittles Articles of Interest…
Leap Into Summer: Introducing Incredible PBX for Issabel

NEWS FLASH: A new release of Incredible PBX for Issabel is now available. Tutorial is here.
If you didn’t already know, we’ve always liked free. No strings, no gotchas, no demoware, and no legal shenanigans. That’s why our introduction of Issabel 4 last week was such a breath of fresh air. While there’s now an awesome free version of 3CX, the open source community has had a very long dry spell. So today we celebrate a decade of adding fun to phone systems with the introduction of Incredible PBX® for Issabel 4. It includes our next generation, preconfigured Travelin’ Man 3 firewall, additional text-to-speech engines (FLITE, GoogleTTS, and PicoTTS), voice recognition, turnkey trunk and extension setups with preconfigured tollfree calling, Google Voice support with OAuth 2 or plain text passwords for free calling in the U.S. and Canada, SMS messaging, telephone reminders, turnkey fax support, AsteriDex phone book with both voice and speed dialing, Wolfram Alpha, sample ODBC apps, and a boatload of dialplan code and AGI scripts to help anyone wanting to learn how to develop custom applications with Asterisk®.
Installing Incredible PBX for Issabel 4
Let’s start with the basics and get all of the Incredible PBX components loaded. As with all Incredible PBX builds, running the Incredible PBX installer will erase ALL of your existing Issabel configuration. So begin with a clean, unaltered Issabel 4 platform with no added components or configuration changes. Be sure to use either the June or July ISO for base Issabel install. We will update it from there as part of the Incredible PBX install. Just follow last week’s tutorial to bring up Issabel 4 on a dedicated server or a virtual machine.
JUST RELEASED: A new tutorial to walk you through Getting Started: Issabel in the Cloud.

The Travelin’ Man 3 firewall is installed and configured as part of the install. It whitelists certain IP addresses and blocks everyone else from even seeing your server on the Internet. For this reason, it is critically important that you perform the Incredible PBX install using SSH or Putty from a PC that you will use to manage your Issabel server. Otherwise, you risk locking yourself out of your own server. Whitelisted IP addresses include the Issabel server itself, the public and private IP addresses of your desktop PC, all non-routable, private LAN addresses, and the Nerd Vittles collection of recommended SIP hosting providers. You can add as many additional providers or users to the whitelist using the simple tools provided as part of the install and further documented below. Do NOT activate Issabel’s firewall.
As part of the install process, you’ll be prompted during both passes to create a password for MySQL/MariaDB and an admin password for the Issabel web GUI. The MySQL password MUST be passw0rd (with a zero), or you will get a permanent mess. The admin password can be anything you like. Passwords can be updated by running /root/admin-pw-change. Many of the Incredible PBX apps depend upon this MySQL password so don’t change it. Your MySQL databases remain secure and can only be accessed on localhost or after a successful root login to your server from a whitelisted IP address.
Begin the Incredible PBX install by logging into your Issabel server as root from a desktop PC using SSH or Putty and execute the following commands:
cd /root
wget http://incrediblepbx.com/IncrediblePBX11-Issabel4.sh
chmod +x IncrediblePBX11-Issabel4.sh
./IncrediblePBX11-Issabel4.sh
Introducing the (new) Travelin’ Man 3 Firewall
Issabel 4 includes an IPtables firewall component. Do NOT activate it because Incredible PBX includes its own preconfigured IPtables firewall, better known as Travelin’ Man 3. With the Issabel 4 firewall, the administrator is responsible for setting all of the firewall rules. With Travelin’ Man 3, all the heavy lifting is done for you. The design is also markedly different. Issabel 4 opens ports which you define, but it gives worldwide access to those ports by any user. Travelin’ Man 3 employs a WhiteList rather than opening ports for everyone. If you’re on the WhiteList, you get access to the limited collection of ports assigned to that IP address. If you’re not on the WhiteList, you cannot even see the Issabel PBX from the Internet. For those without remote telephones or traveling employees, this provides total protection of your server with virtually no further firewall management.
If you have remote users of your PBX or if you wish to deploy softphones on mobile devices and rely upon WiFi facilities at random locations, Travelin’ Man 3 provides several utilities to assist. If the remote users have static IP addresses, then those IP addresses can be added to the WhiteList by running /root/add-ip. Better yet, a NeoRouter VPN is provided that lets remote users access Issabel using NeoRouter private LAN addresses that already are WhiteListed as part of the installation process. These require little to no configuration with static or dynamic IP addresses even when switching between WiFi networks. For those with dynamic IP addresses and no VPN, FQDNs can be assigned using a service such as dyn.com and a dynamic DNS client can be loaded on the smartphone to keep the current IP address synchronized with the FQDN. On the Incredible PBX side, these FQDNs can be added using /root/add-fqdn, and the IP addresses will be updated automatically every 10 minutes. The final option to provide remote users the 3-digit PortKnocker codes from knock.FAQ and let them automatically whitelist their own IP addresses by running the PortKnocker client from any smartphone or Linux server. When the Issabel server detects a successful knock sequence, the source IP of the knock sequence is whitelisted until the next reload of the firewall. If an administrator prefers to allow permanent additions to the WhiteList that survive a reboot or restart of the firewall, the administrator need only run the following command one time: iptables-knock activate. WhiteListed entries can be removed using the /root/del-acct utility. Further details on the new Travelin’ Man 3 design are available here.
Update: The July Issabel ISO introduced a quirk into our Travelin’ Man 3 setup. For a reason that we have not yet tracked down, it is no longer possible to whitelist an IP address and use that address to access the Issabel GUI with a browser. Until we can track down the problem, we have modified the security methodology to access the Issabel web GUI. While we have opened port 443 for public access, we have added another layer of security by requiring Apache htaccess credentials before you can access any web site on your Issabel server. As the last step of the Incredible PBX installation procedure, you will be prompted to enter your admin password again. The username admin and the admin password are used BOTH for Apache authentication AND Issabel GUI authentication. Should you ever need to change your Issabel GUI admin password using /root/admin-pw-change, you also will need to execute the following command to change the admin password for Apache authentication: htpasswd -c /etc/pbx/wwwpasswd admin.
Setting Up a Softphone with Issabel 4
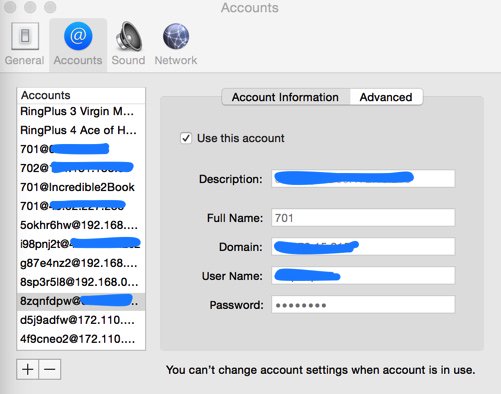
If you’re a Mac user, you’re lucky (and smart). Download and install Telephone from the Mac App Store. Start up the application and choose Telephone:Preference:Accounts. Click on the + icon to add a new account. To set up your softphone, you need 3 pieces of information: the IP address of your server (Domain), and your Username and Password. You can decipher your server’s IP address by running pbxstatus. If you wish to use one of the preconfigured extensions (701 and 702), you’ll find the randomized passwords in /root/passwords.FAQ. Now copy or cut-and-paste your Username and Password into the Accounts dialog of the Telephone app. Click Done when you’re finished, and your new softphone will come to life and should show Available. Dial the IVR (D-E-M-O) to try things out. With Telephone, you can use over two dozen soft phones simultaneously.
For everyone else, we recommend the YateClient softphone which is free. Download it from here. Run YateClient once you’ve installed it and enter the credentials for the Issabel extension. You’ll need the IP address of your server plus your extension number and password associated with either the 701 or 702 extension.

Configuring Google Voice Natively or Using Simonics
Everybody likes free calling, and nobody does it better than Google. Will it last? Well, the naysayers (including me) have been predicting its demise for over 5 years. Yet it keeps on ticking. If you live in the U.S. and want to take advantage of free calls in the U.S. and Canada, you’d be crazy not to deploy a Google Voice trunk on your PBX. Voice quality is near perfect. And the price is right.
The original release of Incredible PBX for Issabel did not support Google Voice trunks so we suggested an intermediary to provide the functionality through a SIP gateway. It works flawlessly using OAuth 2 password authentication, but it’ll set you back $5. If you prefer free, we’ve added the original Google Voice plain-text password solution from the FreePBX® 2.11 days in the latest Incredible PBX release using the July Issabel ISO. It is far from perfect. While you can make and receive calls and faxes to and from Issabel extensions, you cannot direct incoming calls to an IVR because of an old NAT quirk in Asterisk 11. If this isn’t a problem for you, keep reading. Otherwise, skip down to the Simonics tutorial below after completing the initial Google Voice setup which follows.
Here are the initial setup steps on the Google side:
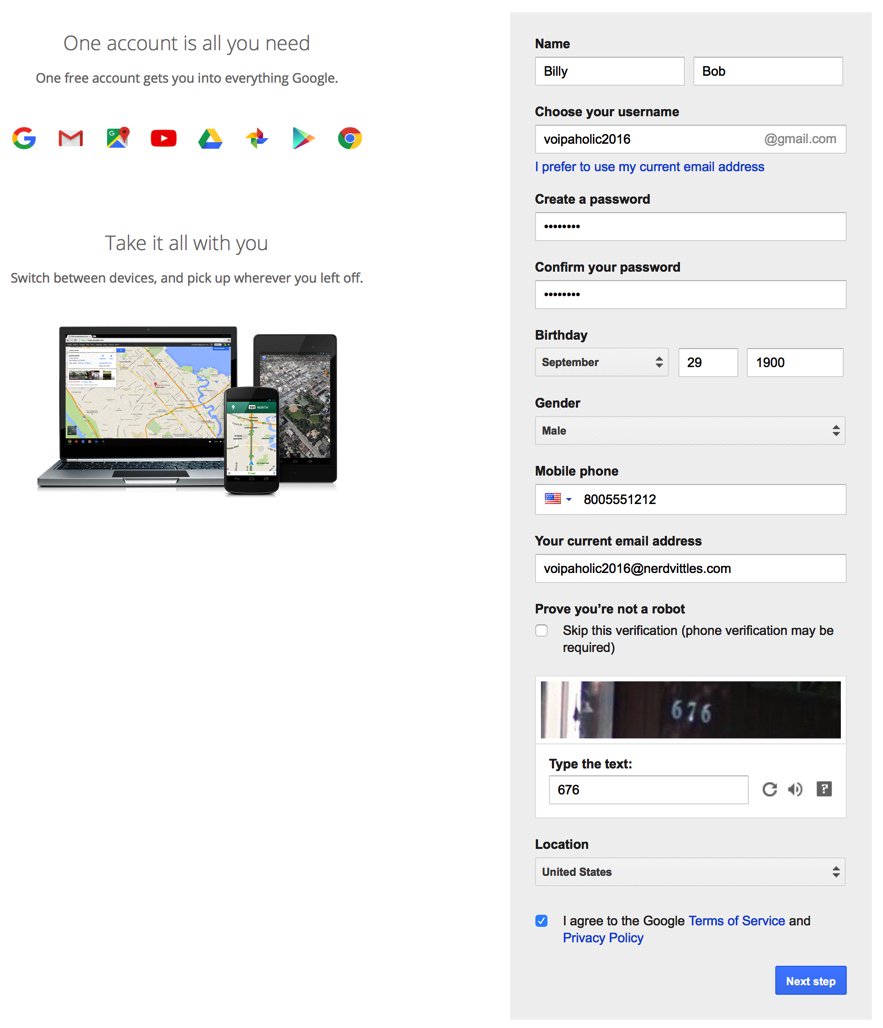
1. Set up a dedicated Gmail and Google Voice account to use exclusively for this new SIP gateway. Head over to the Google Voice site and register. You’ll need to provide a U.S. phone number to verify your account by either text message or phone call.
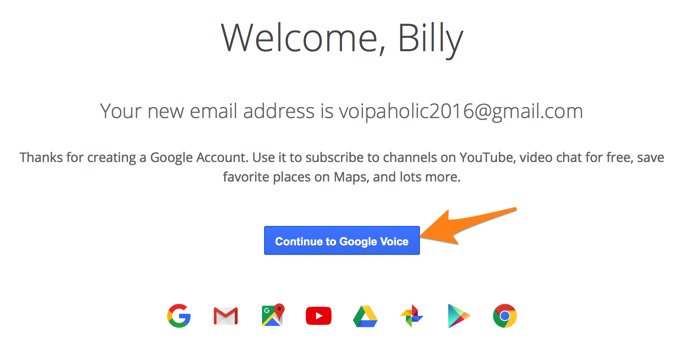
2. Once you have verified your account by entering your verification code, you’ll get a welcome message from Mr. Google. Click Continue to Google Voice.
3. Provide an existing U.S. phone number for verification. It can be the same one you used to set up your Google account in step #1.
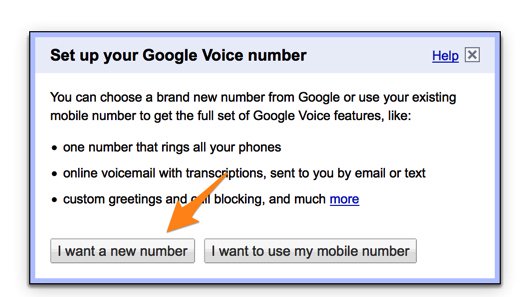
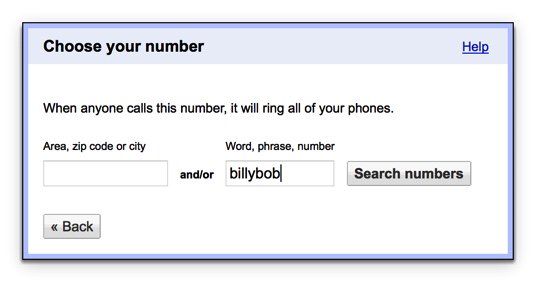
4. Once your phone number has been verified, choose a DID in the area code of your choice.
5. When your DID has been assigned, click the More icon at the bottom of the left column of the Google Voice desktop. Click Legacy Google Voice. Now click the Settings icon on your legacy Google Voice desktop. Make certain that Forward Calls to Google chat is checked and disable calls to your forwarding number. Click on the Calls tab and select Call Screening:OFF, CallerID (Incoming):Display Caller’s Number, and Global Spam Filtering:checked. The remaining entries should be blank.
6. Google Voice configuration is now complete. Sign out of your Google Voice account.
The Native Google Voice Solution using FreePBX Motif Module. Here’s a quick thumbnail of the steps to put all the pieces in place using the FreePBX Google Voice/Motif module. First, we set up a Google Voice account at Google as documented above. Next, we’ll set up the Google Voice account in the Issabel GUI to activate the Google Voice trunk. Next, we’ll add an Incoming Route to tell Issabel how to process Google Voice calls. Then we need to tell Google to relax the rules on use of plain text passwords. And, finally, we’ll restart Asterisk from the Linux CLI.
1. Login to the Issabel web interface with your admin password and choose PBX:PBX Config:Google Voice. Enter your Google Voice account name, password, and 10-digit phone number. Be sure to check all three boxes to Add a Trunk, Add an Outbound Route, and Send Unanswered Calls to Google Voicemail. Click Submit and then reload your dialplan when prompted.
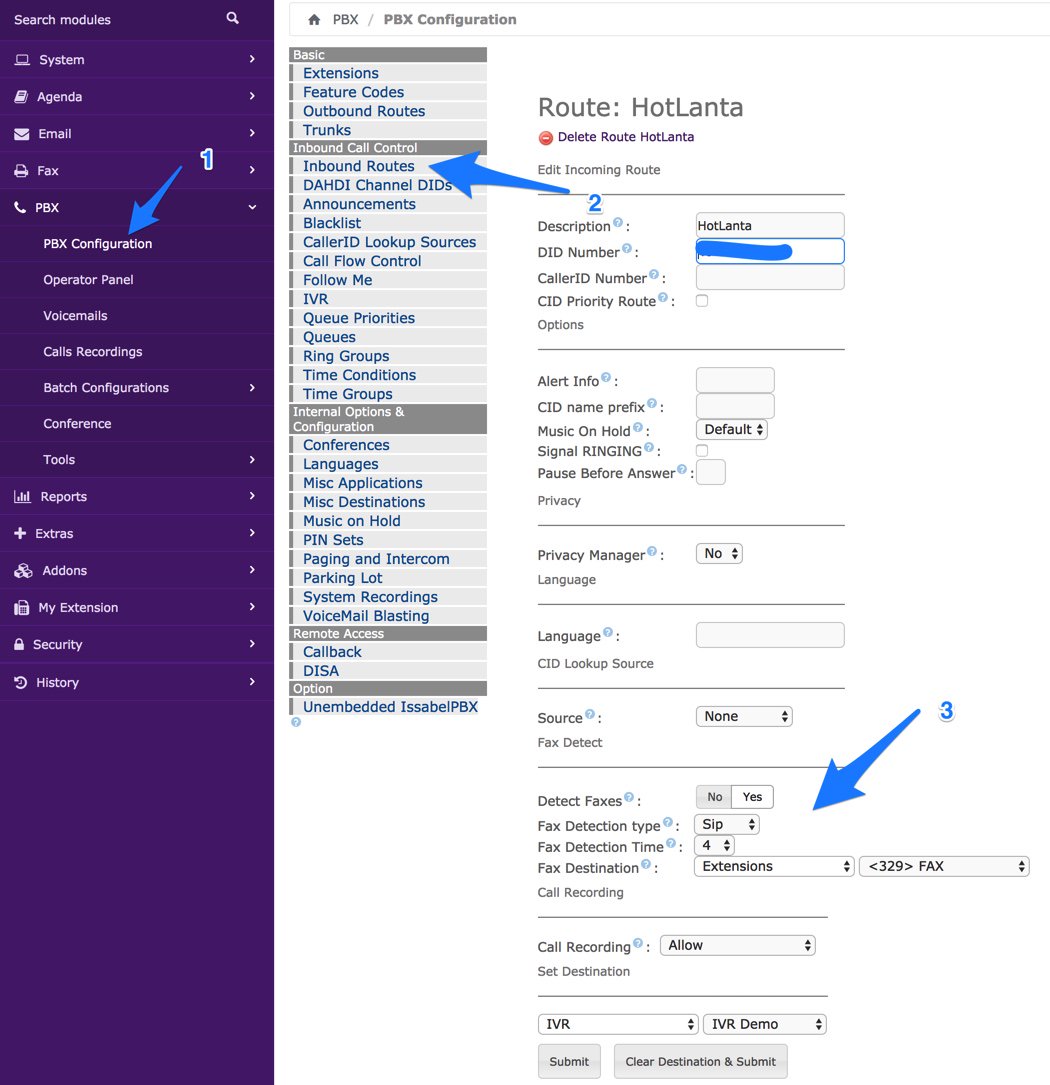
2. Configure an Inbound Route for your incoming Google Voice calls. Click Inbound Routes in the PBX Configuration Menu. Then click Add Incoming Route and enter a Description for the route and enter the DID Number using your 10-digit Google Voice number. If you want to activate CNAM (CallerID Name) lookups, choose OpenCNAM from the Source list. Choose an appropriate Destination for the calls from the pull-down menu of choices. Use only an extension or a ring group. Then SAVE your settings and reload dialplan. To activate fax detection, change Detect Faxes to YES, Detection type to SIP, Detection time to 4, and Destination to Extension 329 (F-A-X). Click Submit and then reload your dialplan again.
3. On the Google site, login into your Google Voice account again. Then follow this link to Enable Less Secure Apps. Then follow this link to activate the Google Voice Reset Procedure. Now log out of your Google Voice account.
4. Login to your Issabel server with SSH/Putty as root and restart Asterisk: amportal restart
5. Now connect a SIP phone to extension 701 and place a call to any number in the U.S. or Canada.
6. Once you have placed an outbound call, incoming calls should work by dialing your Google Voice number from any phone. If you have trouble getting Google to answer the call, this is fairly typical. Try adjusting the NAT settings for your extension from YES to NEVER and place another call. Then change then back to NAT = yes, and you should be good to go.
7. For additional Google Voice trunks, rinse and repeat.
The Simonics GV-SIP Gateway Solution. Here’s the quick thumbnail of the steps to put all the pieces in place. First, we set up a Google Voice account at Google as documented above. Next, we’ll set up an account at the Simonics site to link our Google Voice account to the Simonics SIP Gateway. Then we’ll plug our Simonics SIP credentials into the preconfigured Simonics trunk on Incredible PBX. Finally, we’ll add Incoming and Outgoing Routes to tell Issabel how to process Google Voice calls.
Now you’re ready to set up an account on the Simonics site. With this Nerd Vittles link, there’s a one-time fee of $4.99.
1. Start by registering your new Google account.
2. After paying the $4.99 registration fee via PayPal, proceed through the setup process to link your Google Voice account and 11-digit Google Voice phone number to the Simonics SIP Gateway.
3. You then will be provided your SIP username and password as well as the gateway address, gvgw.simonics.com, to use in building your SIP trunk on your Issabel PBX.

4. If your SIP credentials ever get compromised, regenerate your password by logging back into the Simonics GW site.
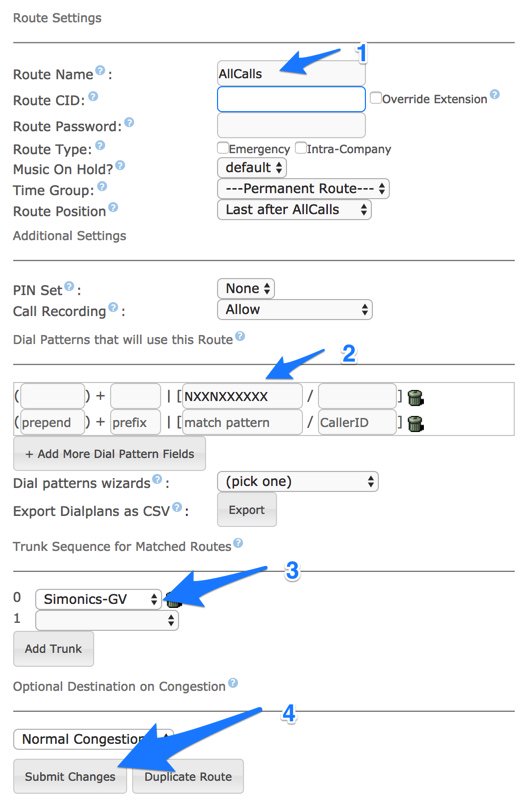
Now it’s time to configure your Simonics trunk in Incredible PBX for Issabel. Start by logging into the Issabel web interface as admin with your admin password from above. Next, click PBX:PBX Configuration in the left Issabel menu. Click Trunks:Simonics-GV in the PBX Configuration menu. The Simonics-GV trunk template will display:

1. Untick the Disable Trunk check box.
2. In Outbound CallerID, insert your 10-digit Google Voice number.
3. In username, insert GV1 followed by your 10-digit Google Voice number.
4. In secret, insert your Simonics SIP password.
5. In the Registration String, insert GV1 followed by your 10-digit Google Voice number followed by a colon (:)
6. In the Registration String after the colon, insert your Simonics SIP password.
7. In the tail of the Registration String after the slash (/), insert your 10-digit Google Voice number.
8. Click Submit Changes and then Reload the Dialplan when prompted.
Now you’re ready to configure an Outbound Route for your Google Voice calls. Click Outbound Routes in the PBX Configuration Menu. Then click Add Route and fill out the form as shown below, save your settings, and reload the dialplan.
Finally, let’s configure an Inbound Route for your incoming Google Voice calls. Click Inbound Routes in the PBX Configuration Menu. Then click Add Incoming Route and enter a Description for the route and enter the DID Number using your 10-digit Google Voice number. If you want to activate CNAM (CallerID Name) lookups, choose OpenCNAM from the Source list. Choose an appropriate Destination for the calls from the pull-down menu of choices, e.g. extension, ring group, IVR, etc. Then SAVE your settings and reload dialplan.
Your Google Voice trunk through the Simonics SIP Gateway should now be working. You can verify this by entering sip show registry in the Asterisk CLI. Place a test call from a softphone connected to your Issabel PBX by dialing a 10-digit number. Then place a call to your Google Voice number from a mobile phone or home/office phone. The Asterisk CLI displays progress of calls by activating it from Linux CLI: asterisk -rvvvvvvvvvv
If you have trouble getting Google Voice to work (especially if you have previously used your Google Voice account from a different IP address), try this Google Voice Reset Procedure. It usually fixes connectivity problems. If it still doesn’t work, enable Less Secure Apps using this Google tool.
If you want to display your primary phone number on the pbxstatus dialog, simply enter the number in /etc/pbx/.phone.
Adding Speech Recognition Support to Incredible PBX
To support many of our applications, Incredible PBX has included Google’s speech recognition service. These applications include AsteriDex Voice Dialing by Name (411) and Wolfram Alpha for Asterisk (4747), all of which use Lefteris Zafiris’ terrific speech-recog AGI script. Unfortunately (for some), Google now has tightened up the terms of use for their free speech recognition service. Now you can only use it for "personal and development use." If you meet those criteria, keep reading. Here’s how to activate speech recognition on Incredible PBX. Don’t skip any steps!
If you like Siri, you’ll love Wolfram Alpha. To use Wolfram Alpha by phone, you first must obtain a free Wolfram Alpha APP-ID. Then issue the following command replacing APP-ID with your actual ID. Don’t change the yourID portion of the command:
sed -i "s|yourID|APP-ID|" /var/lib/asterisk/agi-bin/4747
Now you’re ready to try out the speech recognition apps. Dial 411 and say "American Airlines" to be connected to American.
To access Wolfram Alpha by phone, dial 4747 and enter your query, e.g. "What planes are overhead now?" Read the Nerd Vittles tutorial for additional examples and tips.
Configuring the Issabel Fax Server
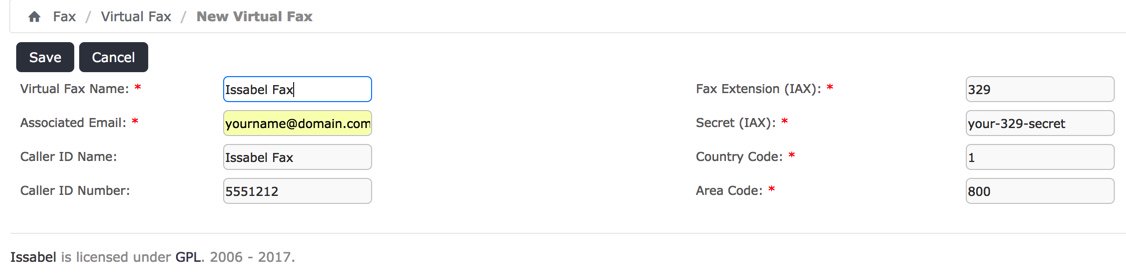
Incredible PBX for Issabel includes turnkey fax support with Issabel. Once you have added a trunk that supports VoIP faxing (HINT: Google Voice trunks work great!), fax configuration with Issabel only takes a minute. Start by logging into the Issabel web interface as admin. First, navigate to PBX:PBX Configuration:Extensions:Fax and obtain your password for extension 329. Next, navigate to Fax:Virtual Fax:New Virtual Fax. Fill in the form as shown below using your actual email address and phone number for receiving faxes as well as your actual extension 329 secret. Then click SAVE. Assuming you typed your secret correctly, you will see a status notification showing virtual fax machine "Running and idle on ttyIAX1."
Assuming you already have set up a Google Voice trunk as outlined above, the next step is to modify the Inbound Route for this trunk to support fax detection. In that way, incoming fax calls will automatically be redirected to extension 329 and the received faxes will be emailed to you in PDF format. Set the email address in Fax:Fax Master. In addition, the faxes can be downloaded and managed from Fax:Virtual Fax:Fax Viewer. Modify your Inbound Route to match the #3 settings shown below. Then save/reload your changes.
To receive the incoming faxes by email, navigate to Fax:Fax Master and enter your email address. Then click SAVE.
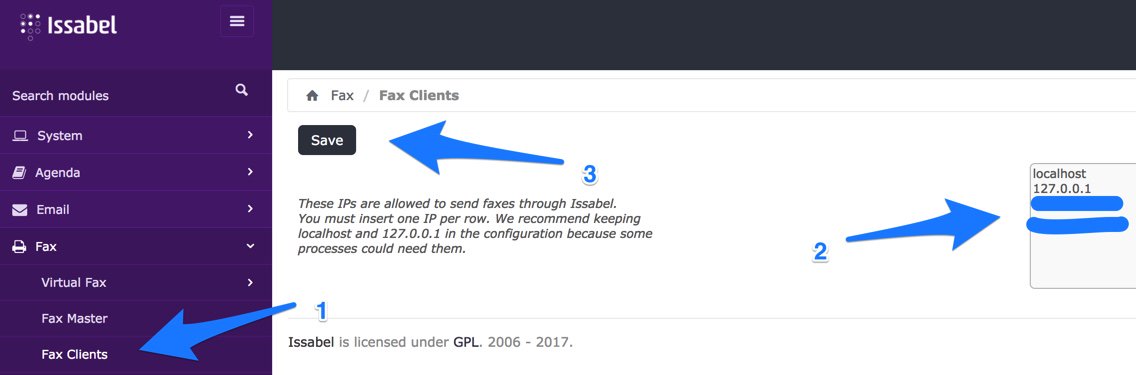
The final step is to designate the IP addresses of those authorized to send faxes using Issabel. Navigate to Fax:Fax Clients and specify the public and private IP addresses (one per line) authorized to send faxes. Then click SAVE. Hylafax clients can be used remotely, or you can use the web utility included with Issabel: Fax:Virtual Fax:Send Fax.
The best way to test things out is to send yourself a test fax. FaxZERO lets you send 5 free faxes of up to 3 pages every day. Give it a whirl.
To send a fax out from your server from the Linux CLI using either a text document or PDF file, the syntax looks like the following:
sendfax -n -d 8005551212 smsmsg.txt
Sampling Other Incredible PBX Applications
As installed, Incredible PBX includes dozens of additional applications for Asterisk. Here’s how to sample some of them using a softphone connected to your Issabel PBX. A good place to start is Allison’s Demo IVR (dial D-E-M-O) using any phone connected to your PBX:
Nerd Vittles Demo IVR Options
1 – 411 -Call by Name (say "American Airlines")
2 – 2663 – MeetMe Conference
3 – 4747 – Wolfram Alpha
4 – 53669 – Lenny (The Telemarketer’s Worst Nightmare)
5 – 951 – Today’s News Headlines
6 – 947 – Weather Forecast (enter a 5-digit ZIP code)
7 – 86329 – Today in History
8 – 701 – Speak to a Real Person
For ODBC demos, dial 222 and enter 12345 for the employee number for a sample database application. Or dial 223 for a sample ODBC dialer using AsteriDex. Enter 263 (first three letters of American Airlines) to place the call. Sample dialplan code is stored in /etc/asterisk/odbc.conf. Dial L-E-N-N-Y (53669) to call or forward telemarketer calls to Lenny. Dial T-I-M-E (8463) for Time of Day. Dial *88HHMM to set an Alarm for HH:MM where HH is the hour of the day in military time. Dial C-O-N-F (2663) for MeetMe conference. Conference credentials are in /root/passwords.FAQ. Voice Dialer (411) works with any database entry in AsteriDex. Access AsteriDex with a browser at https://Issabel-IP-Address/asteridex4. Telephone Reminders can be scheduled by phone (123) or via the web: https://Issabel-IP-Address/reminders. Sample code for the FLITE, GoogleTTS, and PicoTTS engines is in 951 (Yahoo News) context of /etc/asterisk/extensions_custom.conf. All of your FreePBX "old favorites" including blacklists, call transfers and forwarding, dictation, recordings and more are still available as well: PBX:PBX Config:Feature Codes.
Update: We’ve added Allison’s Demo IVR to our own Issabel server at Vultr ($2.50/mo.)1 so you can judge the call quality and feature set for yourself. You can even send us a fax or SMS message if you’d like to try out those features: 
For VoIP callers, use this free SIP URI: 1015954772235642@tampa.voip.ms
Published: Monday, July 10, 2017 Updated: Tuesday, July 25, 2017
Support Issues. With any application as sophisticated as this one, you’re bound to have questions. Blog comments are a difficult place to address support issues although we welcome general comments about our articles and software. If you have particular support issues, we encourage you to get actively involved in the PBX in a Flash Forum. It’s the best Asterisk tech support site in the business, and it’s all free! Please have a look and post your support questions there. Unlike some forums, the PIAF Forum is extremely friendly and is supported by literally hundreds of Asterisk gurus and thousands of users just like you. You won’t have to wait long for an answer to your question.
Need help with Asterisk? Visit the PBX in a Flash Forum.
Special Thanks to Our Generous Sponsors
FULL DISCLOSURE: ClearlyIP, Skyetel, Vitelity, DigitalOcean, Vultr, VoIP.ms, 3CX, Sangoma, TelecomsXchange and VitalPBX have provided financial support to Nerd Vittles and our open source projects through advertising, referral revenue, and/or merchandise. As an Amazon Associate and Best Buy Affiliate, we also earn from qualifying purchases. We’ve chosen these providers not the other way around. Our decisions are based upon their corporate reputation and the quality of their offerings and pricing. Our recommendations regarding technology are reached without regard to financial compensation except in situations in which comparable products at comparable pricing are available from multiple sources. In this limited case, we support our sponsors because our sponsors support us.
BOGO Bonaza: Enjoy state-of-the-art VoIP service with a $10 credit and half-price SIP service on up to $500 of Skyetel trunking with free number porting when you fund your Skyetel account. No limits on number of simultaneous calls. Quadruple data center redundancy. $25 monthly minimum spend required. Tutorial and sign up details are here.
![]() The lynchpin of Incredible PBX 2020 and beyond is ClearlyIP components which bring management of FreePBX modules and SIP phone integration to a level never before available with any other Asterisk distribution. And now you can configure and reconfigure your new Incredible PBX phones from the convenience of the Incredible PBX GUI.
The lynchpin of Incredible PBX 2020 and beyond is ClearlyIP components which bring management of FreePBX modules and SIP phone integration to a level never before available with any other Asterisk distribution. And now you can configure and reconfigure your new Incredible PBX phones from the convenience of the Incredible PBX GUI.
VitalPBX is perhaps the fastest-growing PBX offering based upon Asterisk with an installed presence in more than 100 countries worldwide. VitalPBX has generously provided a customized White Label version of Incredible PBX tailored for use with all Incredible PBX and VitalPBX custom applications. Follow this link for a free test drive!
Special Thanks to Vitelity. Vitelity is now Voyant Communications and has halted new registrations for the time being. Our special thanks to Vitelity for their unwavering financial support over many years and to the many Nerd Vittles readers who continue to enjoy the benefits of their service offerings. We will keep everyone posted on further developments.
Some Recent Nerd Vittles Articles of Interest…
- Some of our links refer users to providers that support Nerd Vittles through referral fees or advertising. These funds help cover the costs of our blog. We never recommend particular products solely to generate revenue. However, when pricing is comparable or particular features warrant our recommendation, we support these vendors and deeply appreciate their financial support of our software development efforts. [↩]
Independence Day for Elastix 4: Introducing Issabel 4

There was more than a little disappointment when PaloSanto Solutions closed up their Elastix® shop last year. The good news was that 3CX stepped in with a terrific free offer on their commercial PBX for Elastix users. And, of course, Sangoma® quickly learned Spanish to tout their closed source crippleware, the FreePBX® Distro. But today’s a new day, and there’s another great surprise as the discontinued Elastix 4 open source product is reincarnated as Issabel 4. Featuring a respin of CentOS 7 plus Asterisk® 11 and FreePBX GPL components (only), Issabel is the first new open source project in the Asterisk community in many, many years. And what a terrific GPL platform it is.
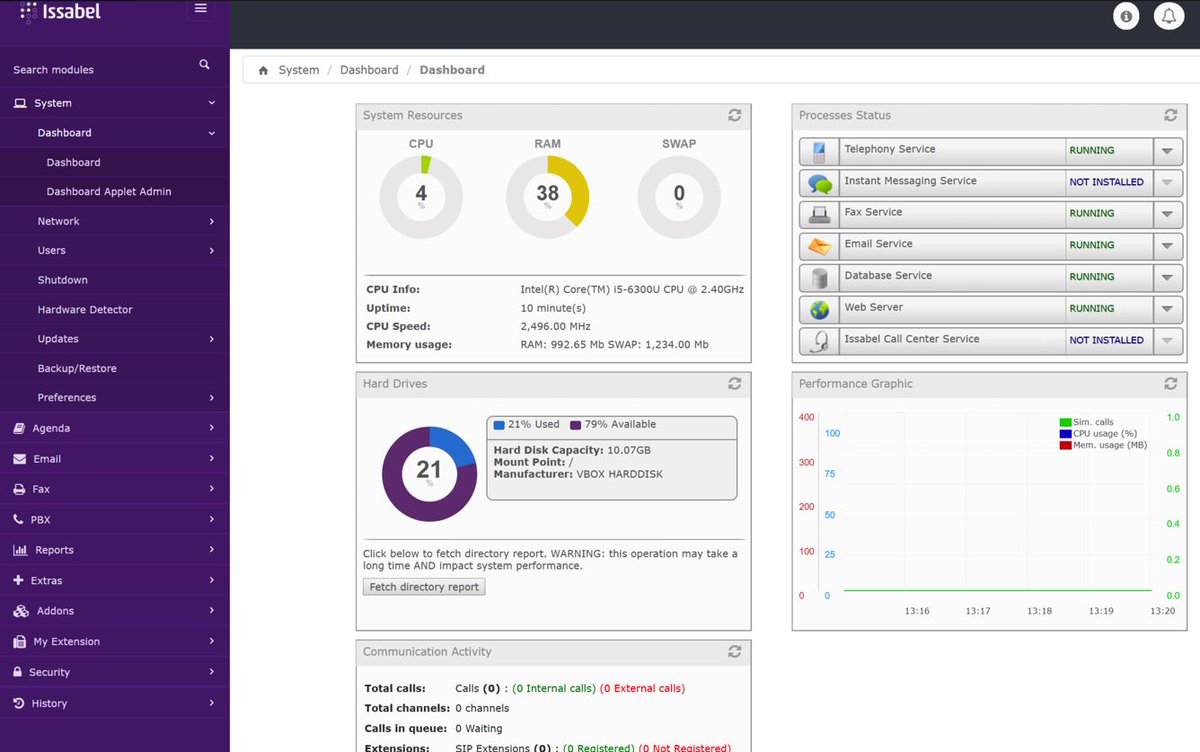
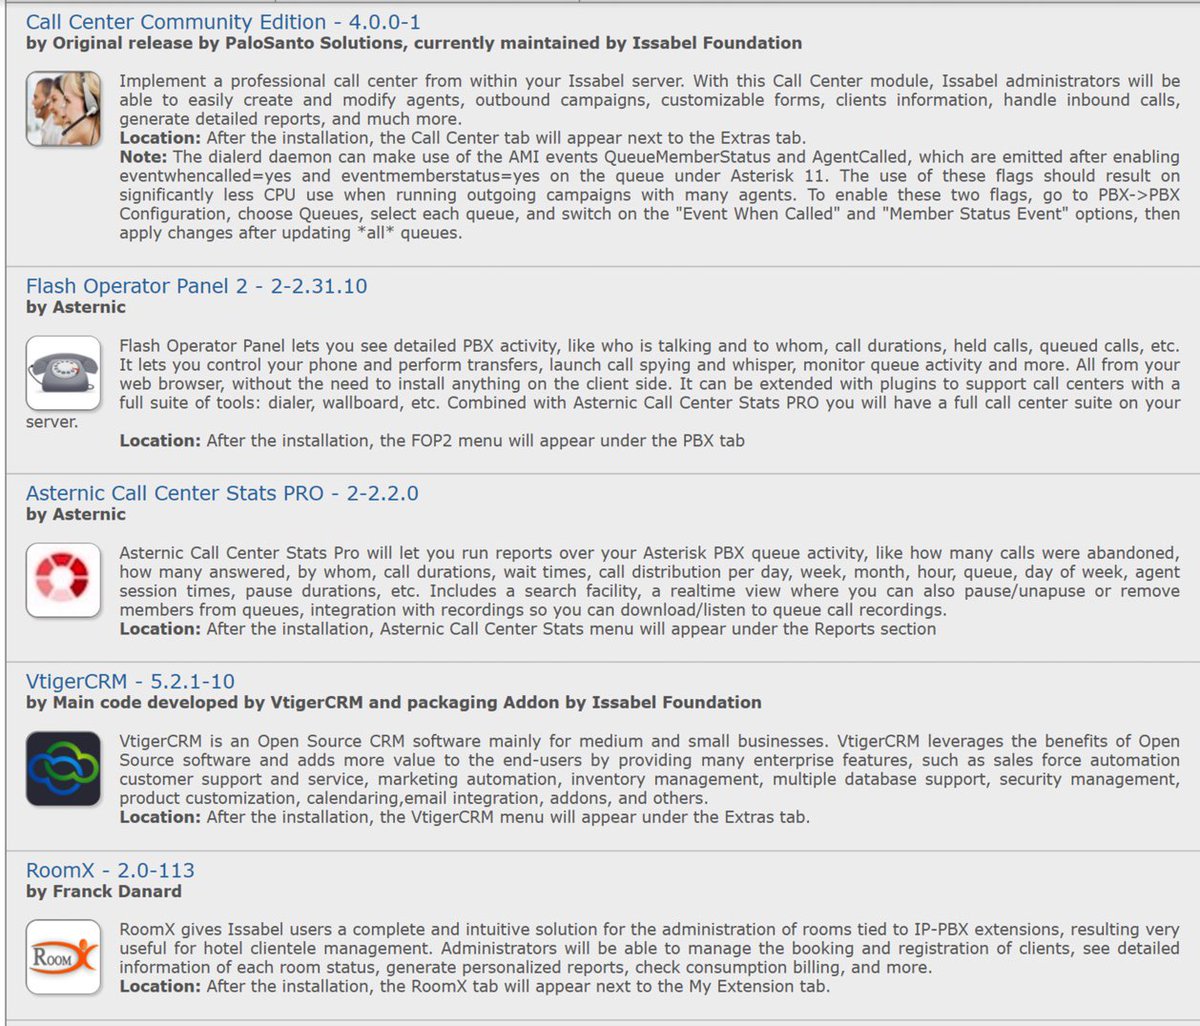
If you liked Elastix 4, you’re going to love Issabel. Its feature set not only matches Elastix 4, but it further enhances it with a collection of bells and whistles you won’t find anywhere else for free. In addition to a modern GUI and Dashboard, you’ll find a rich collection of add-ons to further enhance the FreePBX GPL components without any NagWare. There’s a native email server, a firewall, a fax server, chat service, Festival TTS, and optional add-ons for a Call Center, FOP 2, Vtiger CRM, and RoomX for hotel management.
2018 NEWS FLASH: Incredible PBX® 13 for the 2018 edition of Issabel supporting Asterisk 13 is now available for download. Complete tutorial available at this link.
For today, let’s get Issabel up and running. Installation is a breeze. Just download the 64-bit ISO from SourceForge. Be sure to use the January 2018 release. We will upgrade it from there when we install Incredible PBX 13 for Issabel in this new tutorial. Then burn the image to a CD or, better yet, load it up on your desktop PC with VirtualBox and take it for a quick spin. We think you’ll be thrilled.
Once you’ve installed the image and created your passwords, simply log into the Issabel GUI as admin with your GUI password. Click on PBX in the left column of the Dashboard. Set up a SIP trunk with an inbound and outbound route. Add an extension and a softphone, and you’ll be making your first call in minutes. If you’re unfamiliar with Elastix and FreePBX GPL components, here’s a quick tutorial to get you started.
Getting Started with Issabel 4
Here’s a quick overview of the installation and setup process for Issabel 4:
- Choose HW Platform – Dedicated PC, Cloud, Virtual Machine
- Install Issabel 4 – 64-bit CentOS 7 platform
- Activate Trunks for Issabel 4
- Connect a Softphone to Issabel 4
- Configuring SMTP Mail with Issabel 4
1. Choose a Platform for Issabel 4
Issabel 4 works equally well on dedicated hardware, a cloud-based server, or a virtual machine. Just be sure you have a sufficiently robust Internet connection to support 100Kb of download and upload bandwidth for each simultaneous call you wish to handle with your new PBX.
For Dedicated Hardware, we recommend at least an Atom-based PC of recent vintage with at least a 30GB drive and 4GB of RAM. That will take care of an office with 10-20 extensions and a half dozen or more simultaneous calls if you have the Internet bandwidth to support it. Our favorite hardware platform remains the $200 Intel NUC, and you can read all about it here.
For Cloud-Based Servers, we recommend RentPBX, one of our financial supporters who also happens to size servers properly and restrict usage solely to VoIP. This avoids performance bottlenecks that cause problems with VoIP calls. Yes, we have a coupon code for you to get the $15/month rate: NOGOTCHAS.1 The new image to support Issabel 4 should be available shortly. In the meantime, you can roll your own VPS using the Issabel ISO at Vultr for just $5 $2.50 a month using our referral code. First, upload the ISO by choosing Servers -> ISO -> Add ISO after login. ISO image link: http://nerd.bz/2ukpAXC
Next, create a new Instance by clicking the + icon in Servers. Choose a Server Location close to you. For Server Type, choose Upload ISO and pick your new ISO image. Use $2.50/month Server Size. Enter issabel for your Hostname. Leave everything else at default settings. Click Deploy Now. Click the Manage tab once your Cloud Instance is up and running. Make note of your server’s IP address. You’ll need it shortly.
Wait about a minute and then click View the Console to connect to VNC with your booted Issabel installer. Expand the console window so you can see the entire screen. Highlight Install and press ENTER. Choose the default Installation Destination, and then click Begin Installation. Click Root Password and set a very secure root password. Click Done to proceed with install. Have a cup of coffee while you wait. At about the 60% mark in the post-installation setup, the install may appear to be hung. Relax. It’s not. While you’re waiting, on the Vultr console, go to Settings -> Custom ISO under Server Details for your instance and locate the button to remove the ISO from the instance. Don’t do it yet. Switch back to the console window and wait for the instance to reboot and redisplay the Issabel installer menu. Now switch back to the Vultr window in your browser and click the Remove ISO button, and your server will reboot again. Close the Console window and then reopen it. Enter passw0rd (with a zero) for your MySQL password when prompted and create a very secure admin password for the web interface. Once the installer finishes, you can login to the IP address of your instance using user account admin and the web password you just created. If you ever need to reset them, login with SSH as root using your root password and issue the following command: issabel-admin-passwords --change
Update: On other cloud platforms that do not directly support ISO image installs, you can begin by installing a minimal, 64-bit version of CentOS 7. Then issue the following commands via SSH or Putty after logging into your server as root. NOTE: The 2018 release of Issabel featuring Asterisk 13 is NOT yet supported:
yum -y install wget nano openssh-server
wget -O - http://repo.issabel.org/issabel4-netinstall.sh | bash
For Virtual Machine Installs, we recommend Oracle’s VirtualBox platform which runs atop almost any operating system including Windows, Macs, Linux, and Solaris. Here’s a link to our original VirtualBox tutorial to get you started. We suggest allocating 1GB of RAM and at least a 20GB disk image to your virtual machine for best performance. We actually used VirtualBox to build our first Issabel 4 platform.
2. Install 64-bit Issabel 4 on Your Platform
Begin by downloading the 64-bit Issabel 4 ISO. For dedicated hardware, burn the ISO image to a DVD and boot your server with the Issabel 4 ISO to begin the install. You’ll be presented with the CentOS 7 Installation GUI:
Choose: Time Zone (click)
Choose: Keyboard (click)
Choose: Install Drive (double-click)
Choose: Root Password (Make it Secure!)
Wait for Install and Reboot to Complete
Set MySQL Password to: passw0rd (MANDATORY: with a zero!)
Set Issabel admin Password: minimum 10 alphanumeric characters with upper & lowercase
For VirtualBox, create an Issabel 4 virtual machine of Linux (RedHat 64-bit) type by clicking New. Click Settings button. In System, enable I/O APIC and disable Hardware Clock in UTC Time. In Audio, enable Audio for your sound card. In Network, enable Bridged Adapter for Adapter 1. In Storage, click on Empty in the Storage Tree. Then click on the Disk icon to the right of CD/DVD Drive attributes. Choose the Issabel 4 ISO file that you downloaded. Click OK. Then start the virtual machine to begin the installation process. Follow the setup steps above to install Issabel 4 in your virtual machine.
3. Activate Trunks with Issabel 4
For those migrating from another aggregation including PIAF 3, this should be familiar territory for you. Using a browser, log into Issabel 4 at the IP address of your server using your admin password. Before you can actually make or receive calls outside your PBX, you’ll need at least one trunk. In the Issabel 4 GUI, click PBX -> PBX Configuration -> Trunks. Once you have your credentials from a provider, choose a provider from the list of preconfigured trunks on the right or create a new one. If you’re using one of the preconfigured options, remember to enable the trunk after adding your desired CallerID and credentials. Then save your settings and reload your Asterisk dialplan. That’s it. You’re ready to go.
To display your trunk registrations: asterisk -rx "sip show registry"
Google Voice Setup. If you wish to use Google Voice for free calling in the U.S. and Canada, you’ll need to sign up for an account with Simonics SIP to Google Voice Gateway service. Complete documentation is here. With the latest version of Incredible PBX 13 for Issabel, Google Voice support is included in the GUI.
Connection Issues. If you experience problems getting trunks to register with providers, add or remove the following entry in /etc/asterisk/sip_custom.conf: nat=yes. Then restart Asterisk: amportal restart.
4. Configure a Softphone for Issabel 4
You can connect virtually any kind of telephone to your Issabel 4 PBX after you first create a SIP extension. Plain Old Phones require an analog telephone adapter (ATA) which can be a separate board in your computer from a company such as Digium. Or it can be a standalone SIP device such as ObiHai’s OBi100 or OBi110 (if you have a phone line from Ma Bell to hook up as well). SIP phones can be connected directly so long as they have an IP address. These could be hardware devices or software devices such as the YateClient softphone. We’ll start with a free one today so you can begin making calls. You can find dozens of recommendations for hardware-based SIP phones both on Nerd Vittles and the PIAF Forum when you’re ready to get serious about VoIP.
We recommend YateClient which is free. Download it from here. Run YateClient once you’ve installed it and enter your credentials once you create a 701 extension in Issabel 4. You’ll need the IP address of your server plus your extension 701 password. Fill in the blanks using the IP address of your server, 701 for your account name, and whatever password is assigned to the extension. Here’s what your entries should look like. Click OK to save your entries.
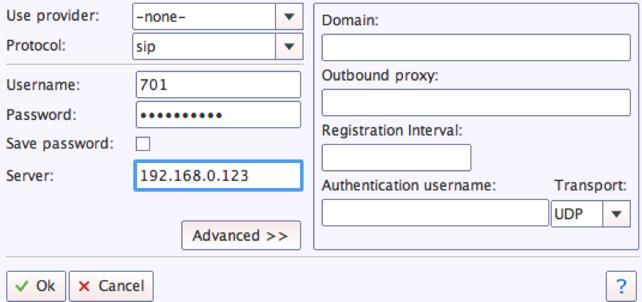
Once you are registered to extension 701, close the Account window. Then click on YATE’s Telephony Tab and place some test calls.
5. Configuring SMTP Mail with Issabel 4
Outbound email support using Postfix is preconfigured with Issabel 4. You can test whether it’s actually working by issuing the following command using your destination email address after logging in as root:
echo "test" | mail -s testmessage yourname@gmail.com
If you don’t receive the email message within a minute or two and you’ve checked your spam folder, chances are your ISP is blocking downstream SMTP servers in an effort to combat spam. Comcast is one of the usual suspects. To enable outbound email service for delivery of voicemail and other email messages with a provider blocking downstream SMTP servers, just follow our recent tutorial to reconfigure Postfix on your server.
Published: Monday, July 3, 2017
Support Issues. With any application as sophisticated as this one, you’re bound to have questions. Blog comments are a difficult place to address support issues although we welcome general comments about our articles and software. If you have particular support issues, we encourage you to get actively involved in the PBX in a Flash Forum. It’s the best Asterisk tech support site in the business, and it’s all free! Please have a look and post your support questions there. Unlike some forums, the PIAF Forum is extremely friendly and is supported by literally hundreds of Asterisk gurus and thousands of users just like you. You won’t have to wait long for an answer to your question.
Need help with Asterisk? Visit the PBX in a Flash Forum.
Special Thanks to Our Generous Sponsors
FULL DISCLOSURE: ClearlyIP, Skyetel, Vitelity, DigitalOcean, Vultr, VoIP.ms, 3CX, Sangoma, TelecomsXchange and VitalPBX have provided financial support to Nerd Vittles and our open source projects through advertising, referral revenue, and/or merchandise. As an Amazon Associate and Best Buy Affiliate, we also earn from qualifying purchases. We’ve chosen these providers not the other way around. Our decisions are based upon their corporate reputation and the quality of their offerings and pricing. Our recommendations regarding technology are reached without regard to financial compensation except in situations in which comparable products at comparable pricing are available from multiple sources. In this limited case, we support our sponsors because our sponsors support us.
BOGO Bonaza: Enjoy state-of-the-art VoIP service with a $10 credit and half-price SIP service on up to $500 of Skyetel trunking with free number porting when you fund your Skyetel account. No limits on number of simultaneous calls. Quadruple data center redundancy. $25 monthly minimum spend required. Tutorial and sign up details are here.
![]() The lynchpin of Incredible PBX 2020 and beyond is ClearlyIP components which bring management of FreePBX modules and SIP phone integration to a level never before available with any other Asterisk distribution. And now you can configure and reconfigure your new Incredible PBX phones from the convenience of the Incredible PBX GUI.
The lynchpin of Incredible PBX 2020 and beyond is ClearlyIP components which bring management of FreePBX modules and SIP phone integration to a level never before available with any other Asterisk distribution. And now you can configure and reconfigure your new Incredible PBX phones from the convenience of the Incredible PBX GUI.
VitalPBX is perhaps the fastest-growing PBX offering based upon Asterisk with an installed presence in more than 100 countries worldwide. VitalPBX has generously provided a customized White Label version of Incredible PBX tailored for use with all Incredible PBX and VitalPBX custom applications. Follow this link for a free test drive!
Special Thanks to Vitelity. Vitelity is now Voyant Communications and has halted new registrations for the time being. Our special thanks to Vitelity for their unwavering financial support over many years and to the many Nerd Vittles readers who continue to enjoy the benefits of their service offerings. We will keep everyone posted on further developments.
Some Recent Nerd Vittles Articles of Interest…
- Some of our links refer users to providers that support Nerd Vittles through referral fees or advertising. These funds help cover the costs of our blog. We never recommend particular products solely to generate revenue. However, when pricing is comparable or particular features warrant our recommendation, we support these vendors and deeply appreciate their financial support of our software development efforts. [↩]
The World Traveler and 3CX: A Match Made in Heaven

Last week we introduced the new (free) version of PIAF5 powered by 3CX v15.5 supporting four simultaneous calls, unlimited trunks, 10 extensions, and 10-user conference calls. And today we’re torture-testing our new 3CX server in the Bahamas aboard one of Carnival’s 3,000-passenger floating cities. Somebody’s gotta do it, right? What makes this such a challenging test for any PBX are several things. First, we’re using a free Google Voice trunk on a free 3CX PBX that we configured in under 10 minutes at CloudAtCost for a one-time cloud server charge of $17.50. Second, we’re sharing a satellite Internet connection with 3,000 other people in the middle of the Caribbean. The weekly charge is about $100 so every Internet junkie subscribes. Third, we’re using a 3CX Client on an iPhone in Airplane Mode. And, finally, we’re sitting behind the most Draconian firewall you can imagine because Carnival assumes everyone is a bad guy trying to bring their Internet service to its knees.
For those coming from the Asterisk® world, I don’t have to remind you how challenging this NAT-based setup would be even assuming you had a flawless Internet connection. Believe me. We don’t. And the secret sauce that makes all of this seem like child’s play is the latest collection of 3CX Clients for PCs, Macs, Android devices, and iPhones/iPads. Simply download the client for your platform, log into your 3CX portal and send the welcome email from a configured extension to your phone, open the email on your phone and double-click on the attachment, and boom. Your 3CX Client is automatically configured in seconds and ready to make your first call. A monkey could do it. It’s that easy!

So our torture-test for today looks more like a final exam in VoIP telephony. We’ll be using Carnival’s WiFi connection from our iPhone with its iOS 3CX Client. We’ll dial into the Incredible PBX™ at our office in Charleston. The office number is configured with a Stealth AutoAttendant which we’ll use to make an outbound call to our Demo IVR in Marbella, Spain using DISA and a FreeVoipDeal trunk. For the techies, it’s the NAT Trifecta with DTMF hurdles that are virtually impossible to traverse using Asterisk and any SIP client.
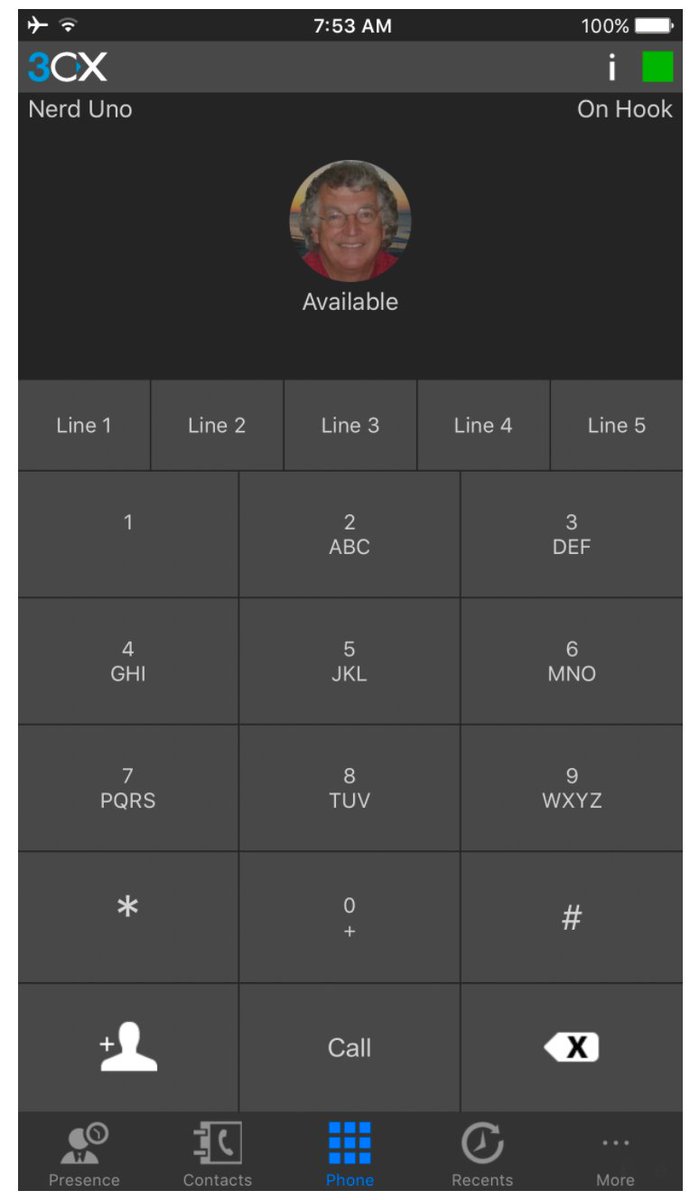
Guess what? It not only works, but it sounds like you’re sitting in the adjoining office. No echo, no DTMF problems, no missing audio, and no detectable problems in voice quality with either the Charleston IVR or the Marbella IVR. If cost matters and traveling is a key component in your telephony requirements, you owe it to yourself to set up a free 3CX PBX and take it for a spin. Whether you use it to supplement an existing Asterisk setup or as a standalone PBX, we think you’ll be thrilled with the results.
Continue reading about the new, free PIAF5 server powered by 3CX v.15.5…
Originally published: Monday, June 12, 2017
Need help with 3CX or VoIP? Visit the PBX in a Flash Forum.
Special Thanks to Our Generous Sponsors
FULL DISCLOSURE: ClearlyIP, Skyetel, Vitelity, DigitalOcean, Vultr, VoIP.ms, 3CX, Sangoma, TelecomsXchange and VitalPBX have provided financial support to Nerd Vittles and our open source projects through advertising, referral revenue, and/or merchandise. As an Amazon Associate and Best Buy Affiliate, we also earn from qualifying purchases. We’ve chosen these providers not the other way around. Our decisions are based upon their corporate reputation and the quality of their offerings and pricing. Our recommendations regarding technology are reached without regard to financial compensation except in situations in which comparable products at comparable pricing are available from multiple sources. In this limited case, we support our sponsors because our sponsors support us.
BOGO Bonaza: Enjoy state-of-the-art VoIP service with a $10 credit and half-price SIP service on up to $500 of Skyetel trunking with free number porting when you fund your Skyetel account. No limits on number of simultaneous calls. Quadruple data center redundancy. $25 monthly minimum spend required. Tutorial and sign up details are here.
![]() The lynchpin of Incredible PBX 2020 and beyond is ClearlyIP components which bring management of FreePBX modules and SIP phone integration to a level never before available with any other Asterisk distribution. And now you can configure and reconfigure your new Incredible PBX phones from the convenience of the Incredible PBX GUI.
The lynchpin of Incredible PBX 2020 and beyond is ClearlyIP components which bring management of FreePBX modules and SIP phone integration to a level never before available with any other Asterisk distribution. And now you can configure and reconfigure your new Incredible PBX phones from the convenience of the Incredible PBX GUI.
VitalPBX is perhaps the fastest-growing PBX offering based upon Asterisk with an installed presence in more than 100 countries worldwide. VitalPBX has generously provided a customized White Label version of Incredible PBX tailored for use with all Incredible PBX and VitalPBX custom applications. Follow this link for a free test drive!
Special Thanks to Vitelity. Vitelity is now Voyant Communications and has halted new registrations for the time being. Our special thanks to Vitelity for their unwavering financial support over many years and to the many Nerd Vittles readers who continue to enjoy the benefits of their service offerings. We will keep everyone posted on further developments.
Some Recent Nerd Vittles Articles of Interest…
Choosing the Best (free) PBX for SOHO Deployments

[iframe-popup id="6″]
When it comes to choices in free PBXs, times have indeed changed. A decade ago your options went something like this. There was Asterisk@Home or Asterisk@Home. Then along came trixbox® and Elastix® and PBX in a Flash™ and AsteriskNOW®. What remained constant throughout this evolution was the underlying Asterisk® platform. With the exception of Digium’s offering, the remaining products all included the FreePBX® GUI. Then came a whole new way of looking at things with FreeSWITCH®. Another morphing occurred when the FreePBX developers introduced their own distribution which bundled free software with a collection of commercial demoware, better known as NagWare. Along the way we introduced Incredible PBX™ which let you choose an underlying platform and then an installer preconfigured the entire PBX together with dozens of applications. We also discovered an open source sleeper called XiVO that morphed into Wazo. It wasn’t long until commercial companies discovered that there might be gold in them hills. Sangoma® purchased FreePBX and 3CX acquired PBX in a Flash and Elastix. Digium’s AsteriskNOW product morphed into a rebranded FreePBX Distro®. Another popular commercial company that had been around the Asterisk community for more than a decade was Xorcom, and in 2016, they introduced their own freeware PBX called Ombutel. Another well-respected commercial provider, 3CX, quickly followed suit and introduced a collection of freeware PBXs1 including PBX in a Flash 5, Elastix 5, and a free edition of its popular 3CX UC platform running under Debian. Whew! What a ride it has been. But now what?

We’ve gone from rags to riches, but how do you sort out which solution is best for you? I’m reminded of some advice my dad gave me when I was trying to choose a college to attend. He said, "Make yourself a list of what’s important to you, and then rank each school from 1 to 10 on each of those criteria. Add up the columns, and there’s your answer." I would offer you the same advice in choosing a PBX. So let’s start with our list of 10 criteria in no particular order that should be considered in choosing a PBX. Then we’ll drill down on each of these and provide some tips on what to consider when you develop your own scorecard.
- Reputation of the Provider
- Reliability of the Product
- Feature Set
- Security
- Performance
- Redundancy
- Ease of Deployment
- Ease of Use
- Support Availability
- Long-Term Cost
A couple other factors will weigh into your ratings. First, your own level of expertise matters. And, second, the intended use for your PBX is critically important. If you’re deploying a PBX in your home where the only Happy Campers have to be you and the Little Mrs., that’s obviously a different use case than a business that relies upon telephones for its livelihood. If you have 30 years of telephony and networking experience, that makes some of these criteria less important than others. You can adjust your ratings scale accordingly or simply remove the criteria that don’t matter in your particular situation.
1. Reputation of the Provider
Depending upon whether you’ve chosen an open source PBX and your own level of expertise, the reputation of the provider matters. And, for those that aren’t do-it-yourselfers, the reputation of the installer or reseller is also important. There’s a reason that people pay big bucks for Cisco phone systems. Provider reputation becomes even more significant if you’re installing a closed source system and there’s a risk that the vendor won’t be around in a couple of years. If, on the other hand, you’re choosing a free PBX as a sandbox to learn about telephony, then provider reputation is obviously less important than some of the other factors. One of the real beauties of the Internet is that it’s easy to obtain information on and customer ratings of providers. So do your homework!
2. Reliability of the Product
Forums such as the PIAF Forum and DSL Reports provide a limitless supply of information about PBX offerings. Take the time to read user comments about their experience with the various offerings. Most of the free PBX products we’ve listed above have been around for many years, but that doesn’t always tell you everything you need to know. Visit the provider’s own forum so you can see for yourself what problems are being reported by their own users. If there are dozens of postings about bugs and non-working components with no proffered solutions, that’s usually a pretty good hint to start looking elsewhere.
3. Feature Set
Whenever we provide consulting services to companies, the first thing we do is ask everyone in the organization to provide a list of the top 10 features they need in an ideal phone system. You then can take that survey and match it against available offerings for free and commercial PBXs. If 90% of your users travel and need their smartphones integrated into the company’s PBX, that’s important. If your organization depends upon incoming phone calls for 90% of your new business, then deployment of a PBX that never hands out busy signals is critical. If IVRs need to be integrated into your existing corporate databases to check availability of product without employee intervention, then write it down as a "must have." You get the idea. Figure out what really matters to everyone that will actually be using phones connected to your PBX. Then find the offerings that are the best fit insofar as features are concerned.
4. Security
The last thing anyone wants to see is a whopping phone bill because some creep on the other side of the globe managed to make expensive calls on your nickel. Do all the research that time permits to discover which phone systems have a history of security breaches. Does the phone system you are considering have its own firewall? Is it self-configured or are you on your own? Will you need to hire a consultant just to keep your phone system secure? What’s your budget for security mistakes? A PBX isn’t free if you get an unexpected $100,000 phone bill. Visit the forums including the forums of the providers you are considering and look for any mentions of security breaches, hacking, and bugs related to software vulnerabilities. Google is your friend as well. Search for the name of the PBX you’re considering together with the word "vulnerability" and see how long a list you receive. Last, but not least, visit CVE Details and look up the scorecard of your vendor and product. One final consideration worth mentioning is the procedure required to update the PBX when security vulnerabilities are discovered. Is it a manual upgrade process or is it automatic when you log into your server? Do you have to keep abreast of security developments by regularly visiting some web site or are the alerts prominently displayed on the admin interface whenever you log into your PBX? Are you responsible for keeping the underlying operating system vulnerabilities patched or does your vendor handle that as well? Suffice it to say, you get what you pay for when it comes to a secure PBX. Do your homework and decide whether a free PBX really is the best choice for your situation.
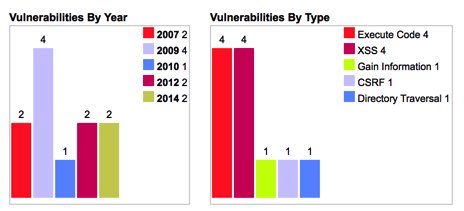
5. Performance
There’s a big difference in a phone system for a home or SOHO deployment with a handful of phones versus a small business PBX with dozens of phones and hundreds or thousands of calls every day. Lots of external factors weigh into the actual performance you will see with any given phone system. For VoIP-based PBXs, your calls are only as good as your Internet connection and the ability of your server to handle the workload. Whether you plan to deploy your PBX on local hardware or in the Cloud also impacts performance. There are cloud providers and cloud providers. Some put you on an overloaded shared server to maximize profits while others (such as our own advertiser, RentPBX) carefully monitor the time slice that every PBX receives to assure reliable PBX performance all the time. As we’ve previously noted, you get what you pay for. Don’t expect a Cloud at Cost server for which you paid a one-time fee to provide the same level of performance and phone quality as a dedicated server or a provider such as RentPBX. Our best advice is to try your desired platform with your desired PBX. You’ll know quickly whether the combination will meet your performance requirements.
6. Redundancy
If your business depends upon reliable telephone calls, redundancy would be a requirement at the top of our list. How long can your business go without incoming or outgoing phone service? Do you have a dedicated administrator on staff? Does your support provider offer 24/7 assistance? Answers to those questions will narrow down your options. With a dedicated administrator on site and a hot standby server, you probably have all the redundancy you need unless criticality is judged in minutes. In the latter case, a High Availability failover system may be what you need. You can spend thousands of dollars on software and hardware to achieve an acceptable level of High Availability. What is your budget? Luckily, Wazo is a free alternative that also includes free HA support. All you need is a second server which could be a second hardware device on site or a Cloud-based server at minimal cost. We’ve documented the Wazo HA setup procedure here if you want to evaluate whether it will meet your requirements.
7. Ease of Deployment
Determining the ease with which you can deploy a new server is obviously subjective and depends upon your skill set, the expertise of others in your organization, and the complexity of the system you will be deploying. Bringing up and configuring the various systems is the only way you’re going to get an accurate picture of what’s involved. If you will be relying upon a vendor to perform the heavy lifting, then get some references and start making calls to judge the satisfaction level of similarly situated customers. Then ask yourself what the likelihood is that your vendor will still be around five years down the road. Is there a competitor that could step in and perform the same tasks? Are your available choices limited to telephone support or are on site services available to assist with or perform setup and configuration tasks? Be sure to get an accurate estimate of the overall cost of deployment including server and telephone configuration as well as staff training.
8. Ease of Use
Nothing holds a candle to letting employees at all levels in your organization actually use the system you’ve chosen before you purchase it. Particularly with a phone system, a free evaluation period is worth its weight in gold. The beauty of a free PBX is you can install it and kick the tires to your heart’s content. To end users, the ease of use determination is pretty simple. There’s a phone sitting on the desk. Does it do what I need it to do to get my job done?
9. Support Availability
There are three kinds of support: in-house, free, and paid. If you have in-house staff to manage and support your PBX, this criteria may be less important to you. If not, then the free and paid options are important. We have tens of thousands of administrators who have relied upon the PIAF Forum for support over the years. With the latest PBXs that have been around for a very long time, that’s probably all you need if you have made backups and have a recovery plan or a redundant system. As for paid support, the sky’s the limit quite literally. Telephone support does not equal on site support. If your business demands 24×7 phone service, then choose a support option that can make that happen.
10. Long-Term Cost
Last, but not least, is factoring in the overall cost of your phone system. Just because your PBX may be free, it doesn’t mean that add-ons and software maintenance and support are. Do the math and figure out what the long-term cost actually is to get the feature set and support level that your business requires. It may very well turn out that $395 a year for a fully-supported commercial PBX such as our corporate sponsor’s 3CX PBX may be a downright bargain compared to a free PBX for which you’d easily spend that much with a single call for commercial support. Do the math before you jump feet first into the free fire.
Originally published: Monday, May 8, 2017
|
SECURITY ALERT: The Sangoma® Portal reportedly has been compromised. According to Sangoma’s Chief Operating Officer, customers’ root passwords were stored on Sangoma servers as a favor to customers to facilitate future support access by Sangoma staff. That procedure now has been discontinued. Although not acknowledged, the root passwords were apparently stored in unencrypted format unbeknownst to customers. More than a dozen customers have since reported their servers were compromised using their own root credentials. Sangoma maintains there is a "theoretical possibility" that their portal was the culprit although the COO indicates that they have been unable to find any evidence of an intrusion. Rootkit appears to be a word missing from the Sangoma lexicon. If you do business with Sangoma through their web portal, you are well advised to check your server immediately to determine if your PBX also has been compromised. Full details regarding breach detection and a link to Sangoma’s response are available on the PIAF Forum. If your server has been hacked, prudence would dictate rebuilding your server from the ground up. There was no mention whether Sangoma did the same after a previous unauthorized intrusion. As this incident reinforces, attempting to patch a compromised server is extremely risky. |
Need help with Asterisk? Visit the PBX in a Flash Forum.
Special Thanks to Our Generous Sponsors
FULL DISCLOSURE: ClearlyIP, Skyetel, Vitelity, DigitalOcean, Vultr, VoIP.ms, 3CX, Sangoma, TelecomsXchange and VitalPBX have provided financial support to Nerd Vittles and our open source projects through advertising, referral revenue, and/or merchandise. As an Amazon Associate and Best Buy Affiliate, we also earn from qualifying purchases. We’ve chosen these providers not the other way around. Our decisions are based upon their corporate reputation and the quality of their offerings and pricing. Our recommendations regarding technology are reached without regard to financial compensation except in situations in which comparable products at comparable pricing are available from multiple sources. In this limited case, we support our sponsors because our sponsors support us.
BOGO Bonaza: Enjoy state-of-the-art VoIP service with a $10 credit and half-price SIP service on up to $500 of Skyetel trunking with free number porting when you fund your Skyetel account. No limits on number of simultaneous calls. Quadruple data center redundancy. $25 monthly minimum spend required. Tutorial and sign up details are here.
![]() The lynchpin of Incredible PBX 2020 and beyond is ClearlyIP components which bring management of FreePBX modules and SIP phone integration to a level never before available with any other Asterisk distribution. And now you can configure and reconfigure your new Incredible PBX phones from the convenience of the Incredible PBX GUI.
The lynchpin of Incredible PBX 2020 and beyond is ClearlyIP components which bring management of FreePBX modules and SIP phone integration to a level never before available with any other Asterisk distribution. And now you can configure and reconfigure your new Incredible PBX phones from the convenience of the Incredible PBX GUI.
VitalPBX is perhaps the fastest-growing PBX offering based upon Asterisk with an installed presence in more than 100 countries worldwide. VitalPBX has generously provided a customized White Label version of Incredible PBX tailored for use with all Incredible PBX and VitalPBX custom applications. Follow this link for a free test drive!
Special Thanks to Vitelity. Vitelity is now Voyant Communications and has halted new registrations for the time being. Our special thanks to Vitelity for their unwavering financial support over many years and to the many Nerd Vittles readers who continue to enjoy the benefits of their service offerings. We will keep everyone posted on further developments.
Some Recent Nerd Vittles Articles of Interest…
- Don’t confuse a free PBX with Sangoma’s FreePBX® GUI. The former means a truly free PBX. The latter is a code generator for Asterisk that commingles free components with commercial nagware for which you have to pay registration fees before use and maintenance fees annually after purchase. [↩]
Free Asterisk Solutions
