
The Most Versatile VoIP Provider: FREE PORTING

 JUST RELEASED: Visit the Incredible PBX Wiki
SOHO Delight: Introducing the Ultimate Asterisk Appliance for Under $30
We continue our journey to identify cost-effective, Gotcha-Free Asterisk® solutions. And, yes, we eat our own dog food! So this week we turn our attention to a real sleeper. It’s an Asterisk appliance with an almost unbelievable price and an even more incredible feature set. With the PBX in a Flash™ and Incredible PBX™ projects, we meet hundreds of thousands of new VoIP enthusiasts each year. But let’s face it. Even software products as simple to use as ours present a formidable challenge to some folks that are new to networking and dealing with complex hardware setups. There’s also the corner grocery store and the mom-and-pop restaurants and the shoe repair store and the tire store and the neighborhood bike shop that shouldn’t have to spend hundreds of dollars each month for basic phone service. And then there are those with a cabin in the mountains or a weekend beach house that just want a plug-and-play communications device that’s available when you need it. So this week’s VoIP solution is dedicated to those on a budget that have no interest in spending months learning the intricacies of VoIP technology. These folks just want basic phone service that works at an affordable price. Bells and whistles are nice but not if they add complexity or cost. And, boy, do we have an incredible find to share with you today. What you’ll need in addition to this Asterisk appliance is electricity and a working Internet connection with a router/firewall. That’s it.
WARNING: We do not recommend EVER connecting the JS-200FX directly to the Internet because of potential security issues with this older version of Asterisk.

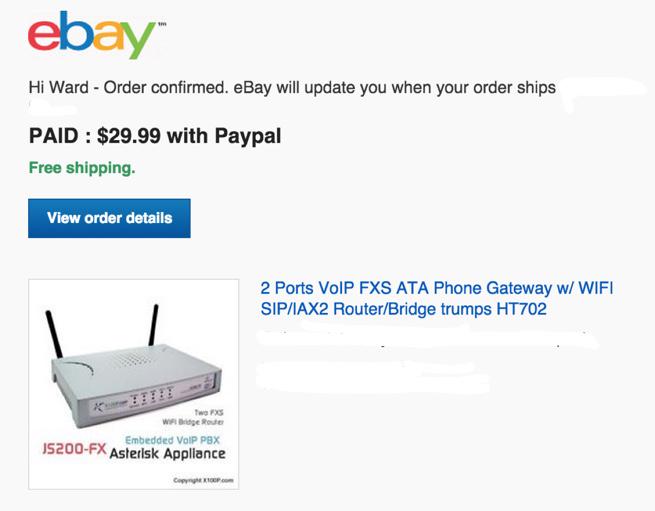
We purchased our first JS-200FX Asterisk Appliance from X100P.com for $89.95 with $15 for shipping from the Far East. But others tipped us off that refurbished units (that means they’ve actually been tested and they work) are regularly available for considerably less cost. We’ve added a direct link to the manufacturer for your convenience. Either way, the JS-200FX is a steal. In addition to a router and firewall, the appliance includes two FXS ports to connect plain old telephones, integrated WiFi to connect softphones and SIP devices wirelessly, and best of all turnkey Google Voice support for two lines to make free calls in the United States and Canada. Because the Asterisk-GUI is an integral part of the appliance, setup time is under 5 minutes. And we’ll show you how. As we love to say, if you can handle slice-and-bake cookies, you can do this. So here’s the drill:
- Sign up for Google Voice service (do it twice for double the fun!)
- Boot and login to JS200-FX after connecting network cable from ETH2 to a computer
- Configure Networking and Connect CAT5 from ETH1 to Internet router
- Configure Google Voice and Make a Call
- Configure Asterisk (optional)
- Interconnect Remote Asterisk Server (optional)
1. Getting Started with Google Voice
With the JS200-FX, you can use any SIP provider including our platinum sponsor, Vitelity. See below for a deal you can’t refuse. But, if you live in the United States, you’d be crazy not to also use Google Voice. It’s free! To use Google Voice with the JS200-FX, you’ll need at least one dedicated Google Voice account. Create a Gmail account first. The more obscure the username (with some embedded numbers), the better off you will be. This will keep folks from bombarding you with unsolicited Gtalk chat messages. Then visit http://google.com/voice to set up your Google Voice account and phone number. Yes, you can port an existing number into Google Voice!
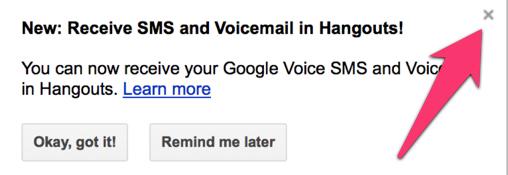
IMPORTANT: Do NOT under any circumstances take Google’s bait to switch from Google Chat to Hangouts. Click the X (shown above), or you will forever lose the ability to use Google Chat with your Asterisk appliance. Also be sure to enable the Google Chat option as one of your phone destinations in Settings, Voice Setting, Phones. That’s the destination we need for the Asterisk appliance to work its magic! Otherwise, all inbound and outbound calls will fail. Good News! You’re in luck. Google has apparently had a change of heart on discontinuing Google Chat support so it’s enabled by default in all new Google Voice accounts. Once you’ve created a Gmail and Google Voice account, go to Google Voice Settings and click on the Calls tab. Make sure your settings match these:
- Call Screening – OFF
- Call Presentation – OFF
- Caller ID (In) – Display Caller’s Number
- Caller ID (Out) – Don’t Change Anything
- Do Not Disturb – OFF
- Call Options (Enable Recording) – OFF
- Global Spam Filtering – ON
Click Save Changes once you’ve adjusted your settings. Under the Voicemail tab, plug in your email address so you get new voicemails delivered… and transcribed.
One final word of caution is in order regardless of your choice of providers: Do NOT use special characters in any provider passwords, or nothing will work! If you have trouble placing or receiving calls, try BOTH of these tips.
If you have difficulty finding the Google Chat option after setting up a new Google Voice account, follow this tutorial.
2. Connecting to JS200-FX Asterisk Appliance
Now you’re ready to begin the adventure. Turn the switch on the back of the JS200-FX to ON. Plug in the included CAT5 cable between ETH2 port on the JS200-FX and a desktop computer or notebook. Power on the device and wait about 2 minutes. From your computer, browse to 192.168.10.1 and login to Asterisk-GUI as user admin with password for your password. You’ll be prompted to change your password. Make it secure!
3. Configuring Networking on JS200-FX Asterisk Appliance
In a nutshell, you’ll be using the ETH1 port on the JS200-FX to connect to your Internet router. We’ll use ETH2 to directly connect to the JS200-FX from a computer when things go haywire. Assuming your router hands out private IP addresses with DHCP, you don’t really need to do much in the way of network configuration on the JS200-FX unless you want to set up a static IP address for the appliance. You’ll find that option under Networking -> WAN -> Connection Type. We typically recommend permanently assigning the IP address that was handed out by your router within the router’s configuration menu. The real trick at this point is deciphering what that IP address will be. You can figure that out by plugging a CAT5 cable between ETH1 and your router now. The address will appear in the WAN entry under Networking -> Status.
Next, we’ll want to configure the Wireless Networking. We recommend setting the device up as an Access Point under Wireless -> Basic Settings. Under the Wireless Security tab, switch to WPA2-PSK security and create an 8-character password to access the device on its WiFi gateway. This gives you a way to connect wirelessly and be assigned an IP address in the range 192.168.10.100-200. If that range duplicates the private LAN subnet of your router, change it to 192.168.0.
Finally, click on Firewall -> Remote Admin and activate remote access to Asterisk-GUI using port 80. Whatever you do, DO NOT MAP ANY PORTS FROM YOUR FIREWALL TO THIS ASTERISK APPLIANCE! It is an older version of Asterisk that probably is not without some security holes. So long as it’s safely ensconced behind a hardware-based firewall, you should have little to worry about especially if you only use Google Voice trunks for outside calling.
4. Configuring Google Voice on JS200-FX Asterisk Appliance
This is a 5-second task. In the Asterisk-GUI, click Google Voice. Plug in your Google Voice email address and password. If you wish to enable a second Google Voice account, click Enable Line #2 and enter your credentials for the second account. Save your settings and reload the dialplan when prompted. Now plug in a Plain Old Telephone to the TEL1 port on the JS200-FX. To dial out using the first Google Voice account, dial 941 + 1 + the 10-digit number. To retrieve your voicemail, dial 41. For the second Google Voice account, use the 942 prefix and 42 for voicemail.
VoIP 101: Learning the Basics of Asterisk-GUI Management
Everything from here on out is optional reading. But, if you plan to get the most out of your new PBX, you’ve got to master the basics of the lingo so you’ll know how to navigate through and manage the Asterisk-GUI. For the sake of simplicity, we’ll divide calls into three categories: local calls, incoming calls, and outgoing calls. The latter two categories are External calls from or to destinations outside your PBX.
Local Calls. These are Internal Calls between users of your PBX. Users typically are assigned a local phone number, an Extension, on which to receive calls. You connect a telephone to an extension in order to answer and make calls. Traditional analog phones are called POTS phones (a.k.a. Plain Old Telephones). They connect to an FXS port (only!) which is identified by the TEL1 or TEL2 jacks on the JS200-FX. SIP and IAX phones or softphones are digital devices that connect to extensions configured as SIP or IAX extensions/users.
Incoming Calls. As the name implies, these are calls coming into your PBX. You typically rent a phone number (DID) from a Provider. The provider assigns you credentials and registers the DID to a Trunk. On your PBX, you Create and Register a Trunk with credentials matching those assigned by the provider. When a call is placed to your DID, the provider passes the call to your PBX through the registered Trunk. The PBX then identifies both the DID and the CallerID of the incoming call and routes it to a Destination based upon the rules you establish in your Incoming Calling Rules (a.k.a. Inbound Routes). A typical destination would be an Extension or User, a Ring Group or collection of extensions, a Conference Room where multiple callers can converse at the same time, or a Voice Menu (a.k.a. IVR or AutoAttendant).
Outgoing Calls. These are calls destined for Termination on a telephone outside your PBX. It could be across the street or on the other side of the world. Some of these calls are free and some are not. Outgoing calls begin from a Phone connected to an Extension or User. Once a number is dialed, a Dial Plan determines whether the caller is authorized to make the call. If so, the call is passed to the Outgoing Calling Rules (a.k.a. Outbound Routes). These rules determine which Trunk will actually process the call. As with incoming trunks, you sign up for Termination service with a provider that may be the same or different from your DID provider. Outgoing call rules may send calls with a certain Dialing Prefix to a specified Trunk to take advantage of free calling or reduced cost. These calling rules may strip off dialing prefixes and/or add additional digits to the dialed number before it is passed to the Provider for termination on a remote phone.
5. Configuring Asterisk on JS200-FX Asterisk Appliance
Now that you’ve mastered the basics, there’s so much more you can do. In fact, we could write a book about it. Lucky for us (and for you), others have already done that. To get the most out of this terrific appliance, you’ll need to learn more about Asterisk and the Asterisk-GUI. Fortunately, there’s no shortage of tutorials. Start with the JS200-FX Quick Start Guide (PDF). Then take a careful look at Chapter 3 of Digium’s Asterisk Appliance™ Administrator Manual. Next, review Chapter 11 of The Asterisk Book (Second Edition). Finally, review these tutorials that have been written by other companies that incorporated Asterisk-GUI into their hardware products, e.g. Yeastar’s MyPBX SOHO User Manual and Grandstream’s UCM6100 User Manual.
6. Interconnecting JS200-FX Asterisk Appliance to Remote Asterisk Server
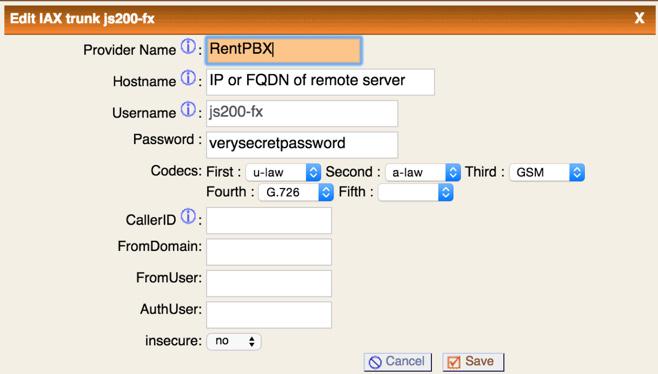
Interconnecting the new Asterisk appliance to a remote Asterisk server to share outbound trunks or to allow free calls to local extensions on the remote server is easy. First, create an IAX trunk on the remote Asterisk server using a very secure password. This setup will give callers on the Asterisk appliance access to the entire dialplan on the remote Asterisk server so be careful. Also make sure the Trunk Name and username are the same.
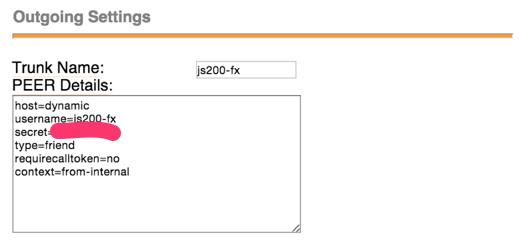
On the Asterisk appliance, there are 3 steps: create an IAX trunk to make the connection to the remote server, add an outbound route with a dialing prefix to route calls out the new trunk, and enable the new Trunk in your DefaultLocalContext dialplan.
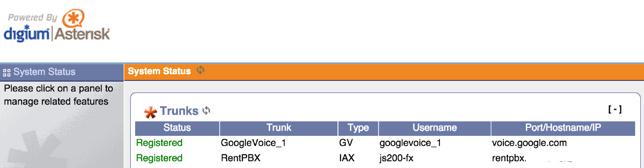
Trunk setup: Trunks -> New IAX Trunk
You’ll need the IP address or FQDN of your remote server. In addition, the username and password must match what you set up (above) on the remote server.
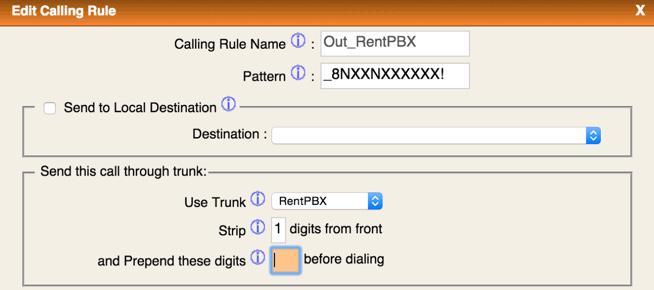
Outbound Route setup: Outgoing Call Rules -> New Calling Rule
In our example, we’re requiring an 8 prefix followed by a 10-digit number to send a call to the remote server for outbound call processing. If you wanted to force a different dialing prefix at the remote server end in order to send calls out through a specific trunk, that prefix should be Prepended in the highlighted field of the outbound route. This setup would not permit calls to local extensions on the remote PBX. To do that, you’d probably want to create an additional outbound route with a Dial Pattern such as _8XXXX! if the extensions on the remote server were all four digits. Don’t forget to also enable that second outbound route in the dialplan setup below!
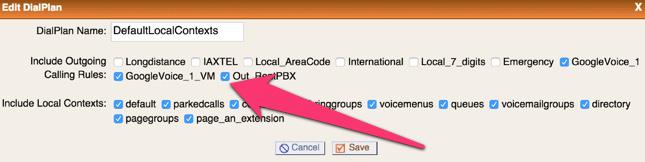
Dialplan setup: Dial Plans -> Edit DefaultLocalContexts
Just click on the Out_RentPBX checkbox and Save your update. Then reload the Asterisk dialplan, and you’re all set.
Making Free SIP URI Calls Worldwide
One of the hidden beauties of Asterisk is the ability to place SIP URI calls to anyone in the world and talk for free… for as long as you wish. SIP URIs look much like an email address with a name or number, followed by @, followed by an FQDN or IP address, e.g. 2233435945@sip2sip.info. While the SIP URI setup on the JS200-FX Asterisk Appliance is not exactly straightforward, it’s pretty easy once you know some of Asterisk-GUI’s magic tricks. The simplest method is to Create a New Voice Menu which will work like a Speed Dial for the new SIP URI. For example, here’s the setup to add Lenny to your appliance. Name the new voice menu Lenny and assign a number to the new voice menu (53669 spells L-E-N-N-Y). Now add two Actions by clicking Add New Step twice with the entries shown below. Save your Voice Menu. Then Reload the dialplan. Now dial 53669 to speak to Lenny. Or route telemarketers to this extension as part of your dial plan.
Answer
Macro trunkdial-failover-0.3,sip/2233435945@sip2sip.info,,,
If you’re comfortable using an editor, there’s an easier way using the same methodology included in Incredible PBX for Asterisk-GUI. We’ll actually add a new [CallingRule_SIP_URI] context in which to save SIP URI speed dials. Then we’ll add that new context to the default dialplan: [DLPN_DefaultLocalContexts]. In the future, you can easily add additional SIP URI speed dials to this context. Just give each one a unique extension number and plug in the SIP URI using the syntax shown below.
In the Asterisk-GUI, click Options -> Advanced Options -> Show Advanced Options. Then click on the new File Editor tab. In the Config Files pulldown, choose extensions.conf. Click Add Context button and name it: CallingRule_SIP_URI. The new context will be added to the bottom of the file so go there and click on + to edit its contents. Add the following line and click Save:
exten = 53669,1,Dial(SIP/2233435945@sip2sip.info)
Now we need to add the new context to the default dialplan so search through the contexts until you find [DLPN_DefaultLocalContexts]. Click on the + to edit the context. Then add the following line to the end of the existing list and click Save:
include=CallingRule_SIP_URI
Now click Apply Settings button to save your settings to NVRAM and reload the dialplan. That wasn’t so hard, was it?
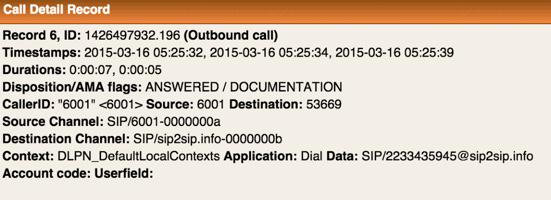
There’s another advantage to the second approach. Your Call Detail Records now will actually show the speed dial numbers that are called:
Setting Up Incoming SIP URIs for Your PBX
This is only recommended for those that are highly skilled in Asterisk and those that can afford an expensive phone bill. It requires that UDP port 5060 be exposed to the Internet through your firewall. You need to be extremely careful in setting up SIP URIs to avoid unintended consequences such as allowing strangers to place outbound calls through your PBX on your nickel. The steps are straight-forward. First, configure an FQDN for your server and, if your provider uses dynamic IP addresses, set up dynamic DNS refreshes using the facility included in Networking -> Dynamic DNS. Second, use the File Editor to edit the [general] context in sip.conf. Insert your FQDN into the fromdomain and domain variables. Next, insert the following line: allowexternaldomains=no. Then Save the file. Third, edit the [default-public] context in extensions.conf. Insert your desired SIP URIs in this context using the proper syntax. For example, to route a SIP URI for mothership@FQDN.yourdomain.com to extension 6001, the dialplan code would look like this: exten=mothership,1,Goto(default,6001,1). To route the same SIP URI to your first Voice Menu, the code would look like this: exten=mothership,1,Goto(voicemenu-custom-1,s,1). To route the same SIP URI to your first Ring Group, use: exten=mothership,1,Goto(ringroups-custom-1,s,1). To route the incoming SIP URI to an outgoing SIP URI, use: exten=mothership,1,Dial(SIP/somewhere@someFQDN.somedomain.com).

There’s a silver lining to activating an inbound SIP URI. Once it’s properly configured, you can sign up for a free phone number in the Seattle area and map that DID to the SIP URI of your server. All of the incoming calls are free! This gives you some redundancy in the event of a Google Voice outage. Just visit www.ipkall.com to sign up for your free number.
Hardening the JS200-FX Firewall
Particularly if you elect to support incoming SIP URIs, you’ll want to tighten up the SPI Firewall included in the JS200-FX. While we have no simple way to decipher the existing rules, you can add rules of your own to lessen the opportunity for mischief. This is especially important in the SIP arena. Just to be sure you don’t lock yourself out of your own server, we recommend a 4-step process: (1) allowing full access from private LAN subnets, (2) whitelisting the FQDNs and IP addresses from which you will access the JS200-FX, (3) whitelisting the providers that you intend to use as well as the IP addresses of external phone devices, and (4) locking down incoming SIP URI access to a single FQDN for your server. The fourth step keeps random strangers from attempting to gain SIP access by scanning blocks of IP addresses in search of vulnerable servers. It’s a good idea to use an obscure FQDN for your appliance which minimizes the ability of strangers to guess the acceptable SIP URIs, e.g. somefunkyFQDN.somedomain.net would block all incoming SIP URI attempts by either IP address or by guessing any other FQDN. In other words, the FQDN works just like a password. Thus, if you set up a mothership SIP URI (make up your own!), the only incoming SIP URI calls that would be allowed would be those calling mothership@somefunkyFQDN.somedomain.net. Don’t publish the actual SIP URI anywhere!
Also be advised that, if you use FQDNs in the step #2 white list and the dynamic IP address of these FQDNs changes, you will need to manually restart the JS200-FX to enable the new IP address. Currently, there is no ability to check for FQDN changes and automatically restart the appliance.
To create the new firewall rules, choose Firewall -> Custom Rules -> Enable ON. Then enter and SAVE & APPLY the following rules using your actual settings rather than the sample entries below. CAUTION: This data should be entered by accessing the JS200-FX via WiFi at the 192.168.10.1 address, or you may lock yourself out during the update process.
#1 private subnets and loopback - no changes needed in this section
-A INPUT -s 192.168.0.0/16 -j ACCEPT
-A INPUT -s 10.0.0.0/8 -j ACCEPT
-A INPUT -s 172.16.0.0/12 -j ACCEPT
-A INPUT -s 127.0.0.0/8 -j ACCEPT

#2 enter your own IP addresses for WhiteList access below
-A INPUT -s homeFQDN.dyndns.org -j ACCEPT
-A INPUT -s alternateFQDN.dyndns.org -j ACCEPT
-A INPUT -s 129.43.13.220 -j ACCEPT

#3 providers and interconnected servers and phone devices
## atlanta.voip.ms sample entry
-A INPUT -s 174.34.146.162/32 -p udp -m multiport --dports 5060,5061,5062,5063,5064,5065,5066,5067,5068,5069,5080,4569 -j ACCEPT

#4 SIP URI access - enter JS200-FX FQDN in next line and leave the rest
-A INPUT -p udp --dport 5060 -m string --string "REGISTER sip:somefunkyFQDN.somedomain.net" --algo bm -j ACCEPT
-A INPUT -p udp --dport 5060 -m string --string "REGISTER sip:" --algo bm -j DROP
-A INPUT -p udp --dport 5060 -m string --string "OPTIONS sip:" --algo bm -j DROP
-A INPUT -p udp --dport 5060 -j ACCEPT
Implementing 7-Digit Dialing with Your Favorite Area Code
Once you have at least one Google Voice account set up, here’s another trick to implement 7-digit dialing with your favorite area code. Just add an additional line to the [CallingRule_SIP_URI] context substituting your area code for 843:
exten=_NXXXXXX!,1,Macro(trunkdial-failover-0.3,${GoogleVoice_1}/1843${EXTEN},,GoogleVoice_1,)
OK, Smarty Pants: Show Me the Beef!
We know what some of you are thinking. "Do you really know as much about VoIP as Lenny does?? Before wasting 30 bucks on this, show me the beef!" Fair enough. Sit by your phone and click the Call Me icon below. Type in a fake name and your real phone number. Click the Connect button. Answer your phone when it rings. Then press 1. You’ll be connected to the Conferencing System running on the JS200-FX Asterisk Appliance. You can chat with other Nerd Vittles users that have joined before you. So… what are you waiting for? Click away and try the JS200-FX Appliance for yourself.
You can implement this Click-to-Dial technology using your own JS200-FX Asterisk Appliance in about 10 seconds. Once you have configured Google Voice as outlined in Step #1 above, click on the Call Widgets tab under Settings. Click Add a New Call Widget, give it a name, turn off ringing your home or office phone, turn off Call Presentation, and Save Changes. Now simply cut-and-paste the Embed code that’s provided and insert it into a public web page of your choice. Doesn’t get much easier than that, and all your family and friends can call you for free from the convenience of any available telephone in the U.S. or Canada by simply clicking on the Call Me widget on your web site’s home page.
Originally published: Monday, March 16, 2015
 Support Issues. With any application as sophisticated as this one, you’re bound to have questions. Blog comments are a terrible place to handle support issues although we welcome general comments about our articles and software. If you have particular support issues, we encourage you to get actively involved in the PBX in a Flash Forums. It’s the best Asterisk tech support site in the business, and it’s all free! Please have a look and post your support questions there. Unlike some forums, ours is extremely friendly and is supported by literally hundreds of Asterisk gurus and thousands of users just like you. You won’t have to wait long for an answer to your question.

Need help with Asterisk? Visit the PBX in a Flash Forum.
Special Thanks to Our Generous Sponsors
FULL DISCLOSURE: ClearlyIP, Skyetel, Vitelity, DigitalOcean, Vultr, VoIP.ms, 3CX, Sangoma, TelecomsXchange and VitalPBX have provided financial support to Nerd Vittles and our open source projects through advertising, referral revenue, and/or merchandise. As an Amazon Associate and Best Buy Affiliate, we also earn from qualifying purchases. We’ve chosen these providers not the other way around. Our decisions are based upon their corporate reputation and the quality of their offerings and pricing. Our recommendations regarding technology are reached without regard to financial compensation except in situations in which comparable products at comparable pricing are available from multiple sources. In this limited case, we support our sponsors because our sponsors support us.
 BOGO Bonaza: Enjoy state-of-the-art VoIP service with a $10 credit and half-price SIP service on up to $500 of Skyetel trunking with free number porting when you fund your Skyetel account. No limits on number of simultaneous calls. Quadruple data center redundancy. $25 monthly minimum spend required. Tutorial and sign up details are here.
![]() The lynchpin of Incredible PBX 2020 and beyond is ClearlyIP components which bring management of FreePBX modules and SIP phone integration to a level never before available with any other Asterisk distribution. And now you can configure and reconfigure your new Incredible PBX phones from the convenience of the Incredible PBX GUI.
The lynchpin of Incredible PBX 2020 and beyond is ClearlyIP components which bring management of FreePBX modules and SIP phone integration to a level never before available with any other Asterisk distribution. And now you can configure and reconfigure your new Incredible PBX phones from the convenience of the Incredible PBX GUI.
 VitalPBX is perhaps the fastest-growing PBX offering based upon Asterisk with an installed presence in more than 100 countries worldwide. VitalPBX has generously provided a customized White Label version of Incredible PBX tailored for use with all Incredible PBX and VitalPBX custom applications. Follow this link for a free test drive!
 Special Thanks to Vitelity. Vitelity is now Voyant Communications and has halted new registrations for the time being. Our special thanks to Vitelity for their unwavering financial support over many years and to the many Nerd Vittles readers who continue to enjoy the benefits of their service offerings. We will keep everyone posted on further developments.
Some Recent Nerd Vittles Articles of Interest…
Free Asterisk Solutions
