
The Most Versatile VoIP Provider: FREE PORTING

 JUST RELEASED: Visit the Incredible PBX Wiki
60 Seconds to Real Independence: Incredible PBX GUI Comes to VirtualBox
As we continue the march toward a truly free, RealGPL, open source VoIP platform for Asterisk®, we couldn’t think of a better time of the year for this announcement. Today we’re pleased to introduce our first virtual machine platform with an Incredible PBX™ GUI image that you can install in less than 60 seconds on virtually any desktop computer in the world. When the install is finished you’ll have the latest Asterisk 11 running atop Scientific Linux™ 6.6 with version 12 of the new Incredible PBX GUI. You’ll also have the very first Asterisk aggregation with native support for OAUTH authentication and secure communications using Google Voice. And it’s all FREE. No Gotchas!
Think of Incredible PBX as the glue stick that assembles all the necessary VoIP components into a state of the art Linux platform and holds them together seamlessly. As with all Incredible PBX builds, you also get the full complement of goodies including dozens of text-to-speech apps, voice dialing, SMS messaging, free fax support, reminders and wakeup calls, and SECURITY! The difference with the VirtualBox® platform is you get a turnkey install of everything on any desktop computer in less than one minute! That includes Windows PCs, Macs, Linux desktops, and even Solaris machines.

Is VirtualBox merely a sandbox for experimentation? Absolutely not. With any of the beefier desktop computers today, running Incredible PBX as a 24/7 VirtualBox image is every bit as feature rich with stellar performance, and it’s equivalent to using dedicated hardware. And there are some added advantages. Obviously, deploying a turnkey VoIP platform in under a minute is a major plus. But, unlike using a dedicated Linux platform, you also get the ability to take snapshots of your system and do full backups in minutes instead of the hours required to bring down dedicated hardware, load a different backup application using a different operating system, perform a backup, and then reboot your VoIP server. And your backups won’t just run on the one server on which the backup was performed. You can restore the backup to any other computer that can run VirtualBox. For any of you that came from a network management background, you know what a big deal that really is. And there’s one more bonus. With Incredible Backup and Restore, you can move to dedicated hardware running the same operating system with Asterisk 11 and the same version of the Incredible PBX GUI in minutes.
Need to deploy VoIP servers at dozens of sites around the globe? Not a problem with VirtualBox. Just send a preconfigured VirtualBox image to each site and install VirtualBox on a local desktop computer. In 60 seconds, you’ll have a functional VoIP server including interconnectivity to all of your other VoIP servers with a virtual private network already in place to provide secure VoIP connectivity between all of your sites.
Are there security compromises using the VirtualBox platform? Not at all. Incredible PBX comes preconfigured with the Linux IPtables firewall that is locked down to a whitelist of local area networks, preferred providers, and your own IP addresses. You can expand the whitelist using the add-ip and add-fqdn scripts or use PortKnocker and Travelin’ Man 4 tools to let remote users gain instant access.
So What’s All the GPL Fuss About? It’s about FREEDOM, the freedom to use or not use the GPL modules you wish to use without enduring false alerts that your system has been compromised and without being blocked from removing components that produce revenue for Sangoma®… as the GPL requires. It’s about FREEDOM to redistribute or resell the product AS IS… as the GPL requires. It’s about FREEDOM to examine and modify ALL of the source code using ALL of the tools and components necessary, not just ones Sangoma has chosen to provide… as the GPL requires. It’s about FREEDOM to add GUI components to your server with No Gotchas whether or not the individual modules were produced by Sangoma… as the GPL requires.
🇺🇸 An Independence Day Wish: #GPL Freedom for #FreePBX 🇺🇸 #asterisk http://t.co/pYuPndu87M #NoGotchas #NoCrippleware #NoMissingSource
— Ward Mundy (@NerdUno) June 30, 2015
If you support the GPL and use open source projects, then you owe it to yourself and to the GPL community to get up to speed and get involved! Can’t we all just get along? You bet… when everyone does what they’ve agreed to do. Spend an hour or two of your Independence Day reading some of the Nerd Vittles commentary on FreePBX® and the GPL.
- An Open Letter to Sangoma: Here’s to a New Beginning in 2015
- We Have a Dream, Too: The Return of (Gotcha-free) Open Source GPL Software
- Turning the Page on Asterisk GUIs: Here’s to a New Beginning with a GUI Facelift
- Wear Something Green for May Day: The Schmoozification of Sangoma
- Freedom and the FreePBX Cloud: Is an Apple-like Ecosystem GPL-Compliant?
- Holey Socks! It’s the Missing FreePBX GPL Source Code, Or Is It?
- Choosing the Asterisk Platform That’s Right for You
BUY 3 STAMPS and let Sangoma and Digium hear from you. Don’t be shy. It’s about your FREEDOM.
William J. Wignall, President and CEO
Sangoma Technologies
100 Renfrew Drive, Suite 100
Markham ON L3R 9R6 CANADADanny Windham, CEO
Digium, Inc.
445 Jan Davis Drive Northwest
Huntsville, AL 35806 USAMark Spencer, Founder and CTO
Digium, Inc.
445 Jan Davis Drive Northwest
Huntsville, AL 35806 USA
Getting Started. For today, we’ll provide a refresher course on loading VirtualBox and the Incredible PBX virtual image. Then we want to spend a little time explaining the secret sauce that goes into building these images so that you can do it yourself either to migrate to a different network or to deploy at multiple sites. It’s called open source for a reason! When we’re finished, you’ll know everything we’ve learned about deploying VirtualBox machines and, unlike Grandma and some GUI platforms, we won’t leave an important ingredient out of the recipe just to be sure you never forget how good Grandma’s cookies really were. So let’s get started.
Installing Oracle VM VirtualBox

Oracle’s virtual machine platform inherited from Sun is amazing. It’s not only free, but it’s pure GPL2 code. VirtualBox gives you a virtual machine platform that runs on top of any desktop operating system. In terms of limitations, we haven’t found any. We even tested this on an Atom-based Windows 7 machine with 2GB of RAM, and it worked without a hiccup. So step #1 today is to download one or more of the VirtualBox installers from VirtualBox.org or Oracle.com. Our recommendation is to put all of the 100MB installers on a 4GB thumb drive.1 Then you’ll have everything in one place whenever and wherever you happen to need it. Once you’ve downloaded the software, simply install it onto your favorite desktop machine. Accept all of the default settings, and you’ll be good to go. For more details, here’s a link to the Oracle VM VirtualBox User Manual.
Downloading the Incredible PBX GUI Virtual Machine
A word of warning on the front end. Today’s Incredible PBX image featuring Asterisk 11 for VirtualBox is huge! The Scientific Linux 6.6 image with version 12 of Incredible PBX GUI is nearly 3GB. Be patient. You only have to download it once. Just click on the 11-12.3 .OVA image in this SourceForge link and start the download to your desktop. Then go have a nice lunch.
Importing & Configuring Incredible PBX Virtual Machines in VirtualBox
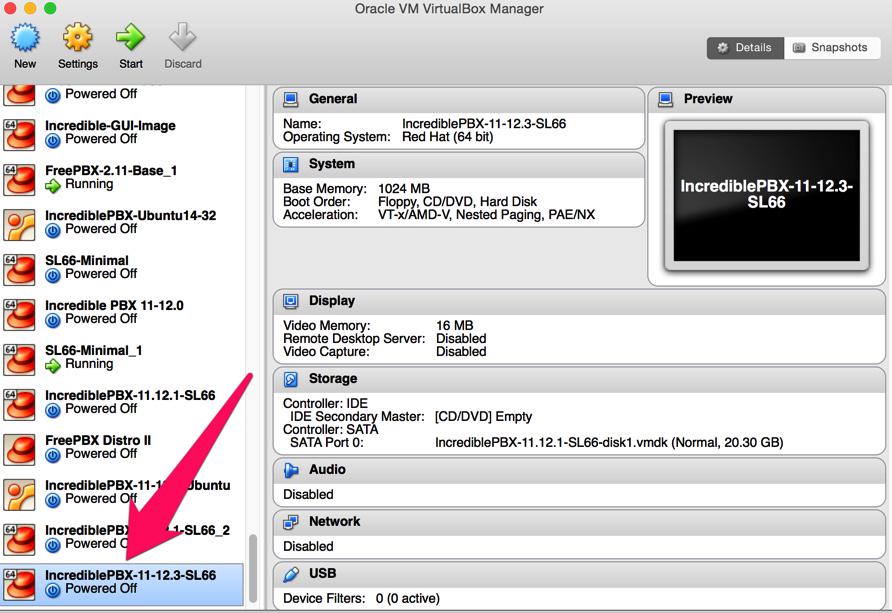
You only perform the import step one time. Once imported into VirtualBox, Incredible PBX is ready to use. There’s no further installation required, just like an OpenVZ template… only better. Double-click on the .ova file you downloaded to begin the procedure and load it into VirtualBox. When prompted, be sure to check the Reinitialize the Mac address of all network cards box and then click the Import button. Once the import is finished, you’ll see a new Incredible PBX virtual machine in your VM List on the VirtualBox Manager Window. We need to make a couple of one-time adjustments to the Incredible PBX VM configuration to account for differences in sound and network cards on different host machines.
Click on the Incredible PBX Virtual Machine in the VM List. Then click Settings -> Audio and check the Enable Audio option and choose your sound card. Save your setup by clicking the OK button. Next click Settings -> Network. For Adapter 1, check the Enable Network Adapter option. From the Attached to pull-down menu, choose Bridged Adapter. Then select your network card from the Name list. Then click OK. Finally, click Settings -> System, uncheck Hardware clock in UTC time, and click OK. That’s all the configuration that is necessary for your Incredible PBX Virtual Machine. The rest is automagic.
Running Incredible PBX Virtual Machines in VirtualBox
Once you’ve imported and configured the Incredible PBX Virtual Machine, you’re ready to go. Highlight IncrediblePBX Virtual Machine in the VM List on the VirtualBox Manager Window and click the Start button. The boot procedure with your chosen operating system will begin just as if you had installed Incredible PBX on a standalone machine. You’ll see a couple of dialogue boxes pop up that explain the keystrokes to move back and forth between your host operating system desktop and your virtual machine. Remember, you still have full access to your desktop computer. Incredible PBX is merely running as a task in a VirtualBox window. Always gracefully halt Incredible PBX just as you would on a dedicated computer.
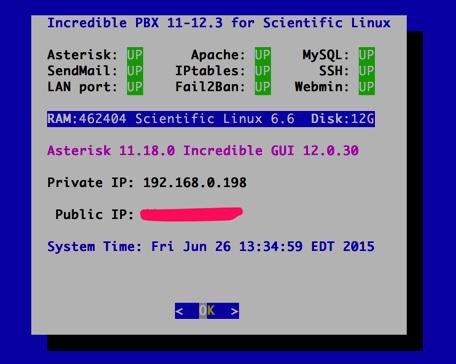
Here’s what you need to know. To work in the Incredible PBX Virtual Machine, just left-click your mouse while it is positioned inside the VM window. To return to your host operating system desktop, press the right Option key on Windows machines or the left Command key on any Mac. For other operating systems, read the dialogue boxes for instructions on moving around. To access the Linux CLI, login as root with the default password: password. To access Incredible PBX GUI with a browser, point to the IP address of your virtual machine. Then, in the Administrator window, click on Incredible GUI Administration. Login as admin with the admin password you set below. For the security of your server, we recommend that you log in to the Linux CLI at least once a week so that Incredible PBX updates get applied to your server regularly. This is critically important if you care about your phone bill.
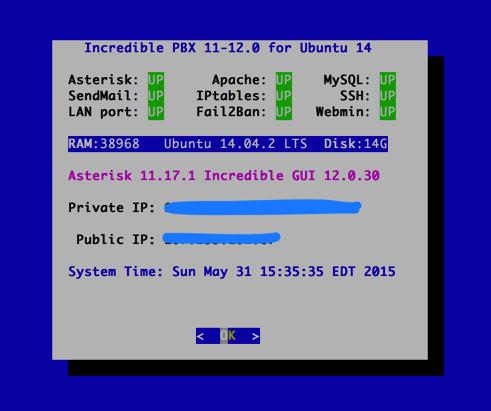
When logging in for the first time, Incredible PBX will go through some setup steps and then reboot. Login again to complete the setup. status will always provide a snapshot of your system. To shut down Incredible PBX gracefully, click in the VM window with your mouse, log in as root, and type: halt. Be sure to complete the following setup steps from the Linux CLI:
- Change your root password: passwd
- Set your Incredible GUI admin password: /root/admin-pw-change
- Set the admin password for web apps: htpasswd /etc/pbx/wwwpasswd admin
- Set your correct time zone: /root/timezone-setup
- Add WhiteList entries to firewall if needed: /root/add-ip or /root/add-fqdn
- Store PortKnocker credentials in a safe place: cat /root/knock.FAQ
- Enable Incredible Fax support if desired: /root/incrediblefax11.sh
- Login to your NeoRouter VPN server if desired: /root/neorouter-login
Upgrading Modules with Module Admin in the GUI. The GUI includes a Module Administration component in the Admin tab which will let you check online for new modules and upgrade to newer releases. Once you have added or updated any modules, you will get some nasty error messages in the System Status display because we allow installation of all GPL-compatible modules, not just those of Sangoma. It’s one of the proprietary gotchas that we have been writing about. Simply click on the X option in the upper right corner of each window to remove the warnings. Log out of the GUI. Then login to your Linux CLI as root and issue the following command to permanently clear the error messages: gui-fix. Now you can log back in and the warning messages will be gone… until you add or update modules again. Sangoma calls it a feature. 🙄
Command Line Management of Incredible PBX with VirtualBox
One of the real beauties of VirtualBox is you don’t have to use the VirtualBox GUI at all. The entire process can be driven from the command line. Other than on a Mac, here is the procedure to import, configure, and run Incredible PBX:
VBoxManage import IncrediblePBX-11-12.3-SL66.ova

VBoxManage modifyvm "IncrediblePBX-11-12.3-SL66" --nic1 nat

VBoxManage modifyvm "IncrediblePBX-11-12.3-SL66" --acpi on --nic1 bridged

VBoxHeadless --startvm "IncrediblePBX-11-12.3-SL66" &

# Wait 1 minute for Incredible PBX to load. Then decipher IP address like this:

VBoxManage guestproperty get "IncrediblePBX-11-12.3-SL66" /VirtualBox/GuestInfo/Net/0/V4/IP

# Now you can use SSH to login to Incredible PBX at the displayed IP address

# Shutdown the Incredible PBX Virtual Machine with the following command:

VBoxManage controlvm "IncrediblePBX-11-12.3-SL66" acpipowerbutton
On a Mac, everything works the same way except for deciphering the IP address. Download our findip script for that. Be sure to plug in the correct name of your virtual machine: ./findip IncrediblePBX-11-12.3-SL66
Deploying Google Voice Secure Communications with Incredible PBX
As with all prior releases of Incredible PBX, free calling in the U.S. and Canada with Google Voice is an integral component of this GPL platform. You still add Google Voice trunks using the GUI in exactly the same way: Connectivity -> Google Voice (Motif). What has changed under the covers with this release is what happens behind the scenes. Google has warned (for years) that they plan to phase out plain text passwords using your actual Google Voice credentials. This is for your protection! Unfortunately, until today, the only way to take advantage of the new OAUTH authentication method with Asterisk was to use one of the external SIP gateways to Google Voice. Now you no longer have to. The new 11-12.3 release of Incredible PBX adds native OAUTH authentication support to Asterisk and the Incredible PBX GUI. When prompted for the password in setting up your Google Voice accounts in the GUI, now you’ll enter your OAUTH token instead of your plain text password. It’s that easy. Obviously, you first need to obtain a free OAUTH token for each of your Google Voice accounts that you wish to activate. This tutorial on the PIAF Forum will walk you through the simple, one-time procedure.
IMPORTANT: Once you have added one or more Google Voice trunks in the GUI, you must restart Asterisk to activate the trunks: amportal restart

We want to take a moment and express our heartfelt thanks to Ryan Tilton of GVsip.com for setting up and maintaining the free platform to support OAUTH tokens for Google Voice. And a special shoutout to Martin Dindos (a.k.a. @dziny on the PIAF Forum) for his truly Herculean efforts in getting this to work properly with Asterisk 11, no small feat. This is yet another amazing testament to how the open source community should really function. Thank you!
Preparing Incredible PBX Virtual Machine for Backups & Migration
To us, the most compelling feature of the virtual machine platform is the ease with which you can make a perfect backup of your server in minutes! From that backup, you can restore a working platform in the same 60 seconds it took to build today’s platform on your desktop. One of the drawbacks as the Linux operating systems have become more turnkey is the shortcut that was implemented on both the RedHat and Debian/Ubuntu platforms to store your network setup so that the server reboots more quickly. While that’s fine for rebooting on the same server, it’s a real problem if you attempt to move your setup to different hardware or a new network because your network configuration will not load properly on the new platform. That means no IP address! Here’s the easy way to assure that things will actually work after the move. It assumes you will have a DHCP server at the new location just as you did at your existing site.
The Easy Way. If you have console access after the VM image is restored on the new platform (which means you don’t need a network IP address for the server in order to log in as root), then the easy way to prepare any of the Incredible PBX machines for relocation is to issue the following commands before you halt the system and make a VirtualBox backup:
touch /etc/update_hostconfig
touch /etc/update_serverconfig
rm -f /etc/ssh/ssh_host*
rpm -e openssh-server openssh-xinetd
yum -y install openssh-server openssh-xinetd
rm /etc/ssh/*.rpmsave
Once you have halted the server, edit both the sound card and network card settings and disable both of them in VirtualBox Manager. Then choose File -> Export Appliance from the VirtualBox title bar and create an .ova backup image on your desktop. You now have an image that is similar to the Incredible PBX image that you originally downloaded, except it has all of your data and settings. All you have to do is repeat the install drill above at the new location using the .ova image you created and log in with whatever your current root password happens to be. You’ll get a two-pass automatic setup just as you did when you began today’s adventure.
The only drawback to this procedure is the fact that the extension 701 and default DISA passwords as well as your firewall configuration will be initialized when you first boot from your .ova image at the other location. Aside from that, you’ll have a clean platform with new SSH and DUNDI credentials as well as mostly sanitized log files.
What’s Next. Now that you have a functioning server, it’s time to learn all about the Incredible PBX applications that are ready for use. Jump over to the latest Nerd Vittles application tutorial for a quick look at what’s available. Even though it was written for the Asterisk-GUI, everything will work exactly the same way. That’s the beauty of the Incredible PBX platform. Enjoy!
Originally published: Monday, June 29, 2015
 Support Issues. With any application as sophisticated as this one, you’re bound to have questions. Blog comments are a terrible place to handle support issues although we welcome general comments about our articles and software. If you have particular support issues, we encourage you to get actively involved in the PBX in a Flash Forums. It’s the best Asterisk tech support site in the business, and it’s all free! Please have a look and post your support questions there. Our forum is extremely friendly and is supported by literally hundreds of Asterisk gurus.

Need help with Asterisk? Visit the PBX in a Flash Forum.
Special Thanks to Our Generous Sponsors
FULL DISCLOSURE: ClearlyIP, Skyetel, Vitelity, DigitalOcean, Vultr, VoIP.ms, 3CX, Sangoma, TelecomsXchange and VitalPBX have provided financial support to Nerd Vittles and our open source projects through advertising, referral revenue, and/or merchandise. As an Amazon Associate and Best Buy Affiliate, we also earn from qualifying purchases. We’ve chosen these providers not the other way around. Our decisions are based upon their corporate reputation and the quality of their offerings and pricing. Our recommendations regarding technology are reached without regard to financial compensation except in situations in which comparable products at comparable pricing are available from multiple sources. In this limited case, we support our sponsors because our sponsors support us.
 BOGO Bonaza: Enjoy state-of-the-art VoIP service with a $10 credit and half-price SIP service on up to $500 of Skyetel trunking with free number porting when you fund your Skyetel account. No limits on number of simultaneous calls. Quadruple data center redundancy. $25 monthly minimum spend required. Tutorial and sign up details are here.
![]() The lynchpin of Incredible PBX 2020 and beyond is ClearlyIP components which bring management of FreePBX modules and SIP phone integration to a level never before available with any other Asterisk distribution. And now you can configure and reconfigure your new Incredible PBX phones from the convenience of the Incredible PBX GUI.
The lynchpin of Incredible PBX 2020 and beyond is ClearlyIP components which bring management of FreePBX modules and SIP phone integration to a level never before available with any other Asterisk distribution. And now you can configure and reconfigure your new Incredible PBX phones from the convenience of the Incredible PBX GUI.
 VitalPBX is perhaps the fastest-growing PBX offering based upon Asterisk with an installed presence in more than 100 countries worldwide. VitalPBX has generously provided a customized White Label version of Incredible PBX tailored for use with all Incredible PBX and VitalPBX custom applications. Follow this link for a free test drive!
 Special Thanks to Vitelity. Vitelity is now Voyant Communications and has halted new registrations for the time being. Our special thanks to Vitelity for their unwavering financial support over many years and to the many Nerd Vittles readers who continue to enjoy the benefits of their service offerings. We will keep everyone posted on further developments.
Some Recent Nerd Vittles Articles of Interest…
- Many of our purchase links refer users to Amazon when we find their prices are competitive for the recommended products. Nerd Vittles receives a small referral fee from Amazon to help cover the costs of our blog. We never recommend particular products solely to generate Amazon commissions. However, when pricing is comparable or availability is favorable, we support Amazon because Amazon supports us. [↩]
Keeping It Real: Holey Socks! It’s the Missing FreePBX GPL Source Code, Or Is It?
If you’ve ever shopped at the outlet malls, you quickly learn that things are often not quite as they appear on first blush. Labels inside shirts have either been removed or mangled in some way to keep you from returning the merchandise to a ‘real store’ for a refund at full retail price. Socks in particular always have a habit of sprouting a hole after you’ve worn them about twice. For those that were ever in the military, you may recall that the Post Exchange always had name-brand shirts for about half the price of the regular men’s stores. They were quite a deal… as long as your favorite colors were pink and purple. Let’s face it. These manufacturers think they’re smarter than we are, and all these sleights of hand are no accident. They’re purposeful actions engineered to assure that we don’t get something for nothing.
All FreePBX gpl source is available at http://t.co/7z6lXPVwVo and mirrored at https://t.co/n9Cu46hFRV #asterisk #showyourcode
— James Finstrom (@geek3point0) June 8, 2015
Source: twitter.com/geek3point0/status/607910432385441793
All FreePBX gpl source is available at http://t.co/7z6lXPVwVo and mirrored at https://t.co/n9Cu46hFRV #asterisk #showyourcode
— James Finstrom (@geek3point0) June 15, 2015
Source: twitter.com/geek3point0/status/610447235852201986
All FreePBX GPL source code is available at http://t.co/K1k9CGnGB8 and mirrored at http://t.co/Wcd2rvm5LI #asterisk #showyourcode #FreePBX
— FreePBX (@FreePBX) June 17, 2015
So what do retail merchandising tricks have to do with Sangoma® and FreePBX® source code? You’ve probably seen the weekly ads on Twitter touting the availability of GPL source code for FreePBX.1 So life is good, right? What’s the problem?
If you tell a lie big enough and keep repeating it, people will eventually come to believe it.
— Dr. Joseph Goebbels… among others*
‘CliffsNotes-like Version’ of the GPL… with apologies to CliffsNotes™
Ever Dealt with a DOP? That’s not a typo for DOPE. Quite the contrary, these aren’t dumb people. In fact, they are folks that think they’re smarter than the rest of us. Our new word "DOP" means somebody you suspect is being Dense on Purpose. We’ve gone around and around on Twitter this week with the FreePBX developers who repeatedly have claimed they’ve released "ALL FreePBX GPL source code" while we have suggested just the opposite. So let’s dumb it down to a single paragraph with short sentences that even a Fifth Grader can understand…
FreePBX is a GPL product. FreePBX consists of TWO components. A GUI generates Asterisk code. A Cloud-based CDN provides updated modules to make FreePBX continue to work. FreePBX won’t continue to function properly without its CDN. Thus, the GPL says BOTH components must be licensed as GPL code. The GPL requires ALL corresponding source for ALL integral components. A GPL toolkit that generates crippled source doesn’t cut it. A toolkit with strings attached doesn’t suffice. A toolkit that only functions properly if you agree to pay Sangoma’s legal expenses does not comply with the GPL source requirement. Toolkits are fine and may be required components under the GPL but… Source means SOURCE CODE. The source requirement means ALL the actual code necessary to replicate ALL of the uncrippled functionality of the original GPL product. GPL Source "means all the source code needed to generate, install, and (for an executable work) run the object code and to modify the work, including scripts to control those activities." Source means ALL the same source that the FreePBX product itself uses to make the product fully functional in an uncrippled, unrestricted manner.
So Sangoma… SHOW ME (ALL) THE SOURCE!
CliffsNotes is a trademark of HOUGHTON MIFFLIN HARCOURT. Reference is a simile only. CliffsNotes makes no product associated with the GPL.
The Rest of the Story for Those That Enjoy Reading
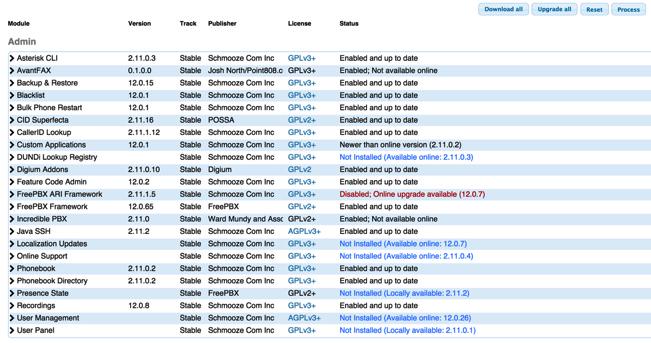
For those that have used the FreePBX GUI, you quickly learn that the best feature of this GPL-touted product is its ability to automatically update all of its included modules with three button clicks. Clicking Check Online gives you an instantaneous snapshot of every component in the GUI and every update that’s available. Clicking Upgrade All tags all of your modules that have an update available. Clicking Process brings all of your modules current. It works exactly the same way whether you have one module to update or twenty. It’s simple, easy, and quick. You couldn’t ask for a better upgrade design.
The deal, of course, with GPL software is that you’re entitled to get the source code with the application itself so that you can make changes and improvements if you choose to do so. We’ve been outspoken critics of the fact that Sangoma doesn’t meet that requirement. And these weekly Twitter ads presumably are their response suggesting that they do. So let’s take a careful look at the ‘GPL Source’ that Sangoma says they’re providing and do a little experiment to find the hole in the socks.
To make this Module Admin component of FreePBX work, you need two pieces: the FreePBX GUI software itself AND the FreePBX Cloud component that houses the (hidden) GPL modules for FreePBX. Sangoma provides only one of the two necessary components. In a previous article, we showed how to build the cloud component to independently maintain the FreePBX GPL modules. The implication from the Twitter ads is that you can build the equally important cloud component using the ‘GPL source’ provided in either Sangoma’s GIT repository or on GitHub. Otherwise, the source code provided yields a crippled version of FreePBX in which the critical Module Admin component wouldn’t function properly. In other words, the GitHub ‘GPL Source’ wouldn’t be the real source code necessary to make the GPL product work as designed. It speaks volumes about the type of "open source" folks we’re dealing with when you come to appreciate that a single Apache command switch (Options +Indexes) is all that would be necessary for Sangoma to provide the Real Source Code™.
So let’s do a simple experiment. First, download the touted ‘GPL Source’ for the Core module that’s buried in GitHub. Next, download the Core module that’s hidden in Sangoma’s Cloud repository. This is the one that’s actually used to update FreePBX using the Module Admin tool explained above. Now let’s expand the tarballs and compare the contents. The GitHub-touted source is pictured on the left. The "real source" from the Sangoma repository is on the right. Can you guess which one will actually work in the cloud repository to make Module Admin and FreePBX function properly?
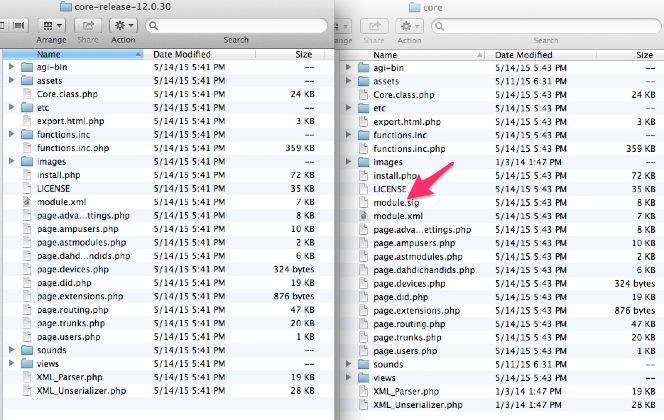
By comparing the contents of the two tarballs, you’ll notice several things. First, the file names are different. This naming convention is critically important to the FreePBX Module Admin component. One works. One doesn’t. Second, the time stamps on the individual components are different. This is a tell-tale sign that the two tarballs were generated using different programs, none of which have been provided. Third, the "real source" file is over 6,000 bytes larger than the GitHub version. Expanding the two files as we have done above tells you why. The "real source" (on the right) has an extra signature file that is missing from the GitHub version. Not only is the signature file missing, but so is the program to actually generate it.2 This is critically important because FreePBX 12 uses these signature files to determine whether a module is legitimate. Guess which one passes that test?
There’s actually another missing piece that the Sangoma ads and GitHub repositories fail to acknowledge: the XML file for each FreePBX version and the scripts to actually generate the contents of these files. These XML files tell the Module Admin component what modules have been updated and what the checksums for the modules are. The XML files in the cloud and for the individual modules are essential in assuring that you don’t destroy your server by installing a partially downloaded component that cripples the functionality of the FreePBX GUI or brings down your telephone system.
In conclusion, FreePBX is the antithesis of open source and violates the basic tenets of the GPL. Not only is the platform anything but open, but its real source is shrouded in secrecy together with the tools to make the product functional. This is not the way GPL open source projects are supposed to work, and Sangoma should know better. They’ve been a long-time supporter of the open source community.

Pinocchio would be proud. Standing alone without its hidden components, FreePBX has become the poster child for CrippleWare with its missing pieces and half-baked source code. Giving Sangoma the benefit of the doubt, let’s assume that Sangoma had no knowledge of any of this and chalk it up to the Schmoozers pulling a fast one on the new boss to protect their still-to-be-paid profits from Year One sales of FreePBX commercial offerings. After all, that was the silver lining in the Sangoma purchase contract.
Dear Sangoma: NOW YOU KNOW!
What happens going forward is on your watch, not the previous owners. Sangoma now owns the FreePBX product and is obliged to provide the "real source code" for the program and all of its critical components in accordance with the GPL. We trust that after reading this (and we’ve mailed them a copy), Sangoma will choose to do the right thing for the Asterisk community upon which its livelihood depends. Abide by the terms of your GPL license and release the "real source code" for all of the critical components of FreePBX including all of its GPL modules and all of the pieces necessary to make the cloud repository, XML local and cloud components, and signature generation and checking mechanisms function as designed and integrated into your FreePBX product.
For the rest of the story…
- An Open Letter to Sangoma: Here’s to a New Beginning in 2015
- We Have a Dream, Too: The Return of (Gotcha-free) Open Source GPL Software
- Turning the Page on Asterisk GUIs: Here’s to a New Beginning with a GUI Facelift
- Wear Something Green for May Day: The Schmoozification of Sangoma
- Freedom and the FreePBX Cloud: Is an Apple-like Ecosystem GPL-Compliant?
Epilogue. After release of our article, the lead FreePBX developer, Philippe Lindheimer, finally documented Online Module Management… after 9 years of secrecy. Better late than never! This was followed by a posting from Rob Thomas that sought to document the process of writing a new FreePBX module. Anyone with an interest in the GPL and open source software should read both of them. Here are two guys whose entire livelihood is thanks to the open source community. Yet they both tout the FreePBX Distro which is neither open source nor GPL code. Here’s what’s missing with the current FreePBX GUI. Their focus appears to be on the process for introducing new modules into FreePBX, a process that remains proprietary. Our focus has been on obtaining the source for the existing components of the FreePBX GUI. There still is no way to independently replicate the Cloud-based CDN component of FreePBX 12 with the same modules that FreePBX uses because that "open source software" has not been provided. The new FreePBX 12 design requires a PROPRIETARY KEY in order to produce any modules for the FreePBX "GPL" platform. That includes any attempt to replicate the original FreePBX components. Bottom Line: You cannot replicate the same source code that FreePBX 12 uses in the Cloud using the tools provided by the FreePBX developers. And that is a no-no under the GPL unless the apparatus to produce and manage the original keys is also provided. The GPL requires release of the original source upon which the FreePBX platform operates, not a toolkit and not a reworked version using different source resulting in different modules. Providing proprietary tools to generate different source with different module components is NOT the same as original source code… as the GPL requires.
As one of our PIAF Forum users suggested, this design would make perfect sense for a proprietary platform such as the FreePBX Distro, and the developers would do everyone in the open source community a favor by migrating the technology there while restoring the original GPL design of the FreePBX GUI.3
Originally published: Monday, June 15, 2015 Updated: Friday, June 19, 2015 Epilogue: Monday, June 22, 2015
Need help with Asterisk? Visit the PBX in a Flash Forum.
Special Thanks to Our Generous Sponsors
FULL DISCLOSURE: ClearlyIP, Skyetel, Vitelity, DigitalOcean, Vultr, VoIP.ms, 3CX, Sangoma, TelecomsXchange and VitalPBX have provided financial support to Nerd Vittles and our open source projects through advertising, referral revenue, and/or merchandise. As an Amazon Associate and Best Buy Affiliate, we also earn from qualifying purchases. We’ve chosen these providers not the other way around. Our decisions are based upon their corporate reputation and the quality of their offerings and pricing. Our recommendations regarding technology are reached without regard to financial compensation except in situations in which comparable products at comparable pricing are available from multiple sources. In this limited case, we support our sponsors because our sponsors support us.
BOGO Bonaza: Enjoy state-of-the-art VoIP service with a $10 credit and half-price SIP service on up to $500 of Skyetel trunking with free number porting when you fund your Skyetel account. No limits on number of simultaneous calls. Quadruple data center redundancy. $25 monthly minimum spend required. Tutorial and sign up details are here.
![]() The lynchpin of Incredible PBX 2020 and beyond is ClearlyIP components which bring management of FreePBX modules and SIP phone integration to a level never before available with any other Asterisk distribution. And now you can configure and reconfigure your new Incredible PBX phones from the convenience of the Incredible PBX GUI.
The lynchpin of Incredible PBX 2020 and beyond is ClearlyIP components which bring management of FreePBX modules and SIP phone integration to a level never before available with any other Asterisk distribution. And now you can configure and reconfigure your new Incredible PBX phones from the convenience of the Incredible PBX GUI.
VitalPBX is perhaps the fastest-growing PBX offering based upon Asterisk with an installed presence in more than 100 countries worldwide. VitalPBX has generously provided a customized White Label version of Incredible PBX tailored for use with all Incredible PBX and VitalPBX custom applications. Follow this link for a free test drive!
Special Thanks to Vitelity. Vitelity is now Voyant Communications and has halted new registrations for the time being. Our special thanks to Vitelity for their unwavering financial support over many years and to the many Nerd Vittles readers who continue to enjoy the benefits of their service offerings. We will keep everyone posted on further developments.
Some Recent Nerd Vittles Articles of Interest…
- Following publication of our article, the ads on Twitter from the FreePBX Community Manager were removed from public view, not exactly the Sangoma response we had hoped for. Now the GPL Source Code AND the ads are hidden. NEWS FLASH: The ads have now reappeared. Coming on the heels of this article, that would appear to be an official FU from Sangoma that they do not intend to release the module source components hidden in their CDN cloud. [↩]
- After release of this article, one of the FreePBX developers suggested that the GPL FreePBX Development Tools could be used to build your own Cloud component for FreePBX. There are several problems with that. First, these tools and their output are for development use only and were never intended for use with FreePBX in a production environment. Second, the tools require a (revocable) "key" issued by FreePBX. In and of itself, that makes FreePBX proprietary. Third, this key requires a user to sign a blank check legal indemnification agreement to cover all of Sangoma’s legal expenses (reasonable or otherwise) should they be sued for anything associated with that key. Without a key, unsigned modules (including those from FreePBX’s own GitHub source tree) would generate nasty compromised server messages in the GUI. So, no, providing a toolkit to build crippled source is not the same as providing the actual source code upon which FreePBX relies for proper operation, i.e. the XML and TGZ files hidden in the Sangoma Cloud which in Sangoma-speak is euphemistically described as their content delivery network (CDN). [↩]
- We will not get into the developer’s claim in footnote 1 that these FreePBX security breaches were not caused by "a FreePBX exploit" but instead were the result of an "unauthorized module installed on them that was named ‘Admin Dashboard.'" In point of fact, the unauthorized module was detected by some early users of FreePBX 12; however, the exploit that resulted in the introduction of the Trojan module was most definitely caused by a FreePBX exploit, an acknowledged security vulnerability "within the legacy FreePBX ARI Framework module/Asterisk Recording Interface (ARI)." It was that exploit that allowed the introduction of the Trojan module in the first place. As we have often suggested, this vulnerability never would have occurred if all of the aggregations including the FreePBX Distro had provided a locked down firewall as part of their distribution. [↩]
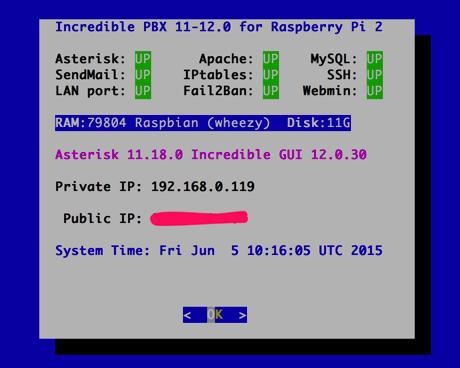
Introducing Incredible PBX and the New Incredible GUI for the Raspberry Pi 2

[iframe-popup id="3″]
We’ve been huge fans of the Raspberry Pi since its introduction. And the Raspberry Pi 2 with its quad-core processor and gig of RAM transformed the platform from a tinkerer’s dream machine into a production workhorse. Four months ago, we introduced our Gotcha-Free PBX with Asterisk® 11 for the new platform. But Asterisk-GUI had a steep learning curve, and Digium now has officially discontinued support of what we believe was a terrific product with enormous potential. So today we’re pleased to introduce the all-new Incredible PBX with the Incredible PBX GUI running the very latest Asterisk 11.18 release together with all of the GPL-compatible PBX GUI modules you’ve known and loved for the past decade. No strings, no trademark gotchas, just pure GPL code that you can share and embellish as you see fit without legal retribution from us.
|
Target Audience: Home or SOHO/SBO seeking a GPL PBX with a web-based Graphical User Interface Default Configuration: Asterisk 11 with Incredible PBX GUI, Kennonsoft GUI, and NANPA dialplan Platform: Raspbian 7 running on a Raspberry Pi 2 Standard Memory: 1024MB Recommended Disk: 16GB+ Default Trunks: Google Voice, CallCentric, DIDlogic, Future-Nine, IPcomms, Les.net, Vitelity, VoIP.ms1 Feature Set: SMS messaging, VPN, Reminders, ConfBridge Conferencing, AsteriDex, Voicemail, Email, IVR, News, Weather, Voice Dialer, Wolfram Alpha, Today in History, TM3 Firewall WhiteList, Speed Dialer, iNUM and SIP URI (free) worldwide calling, OpenCNAM CallerID lookups, DISA, Call Forwarding, CSV CDRs Administrator Utilities: Incredible Backup/Restore, Automatic Updater, Asterisk Upgrader, phpMyAdmin, Timezone Config, Plug-and-Play Trunk Configurator, WebMin, External IP Setup, Firewall WhiteList Tools |
As if that weren’t enough good news, we also are pleased to introduce our new 10-Layer Network Security Model for future Incredible PBX builds including today’s Raspberry Pi edition.
- Preconfigured IPtables Linux Firewall
- Preconfigured Travelin’ Man 3 WhiteLists
- Randomized Port Knocker for Remote Access
- TM4 WhiteListing by Telephone (optional)
- Fail2Ban Log Monitoring for SSH, Apache, Asterisk
- Randomized Ultra-Secure Passwords
- Automatic Security Updates & Bug Fixes
- Asterisk Manager Lockdown to localhost
- Apache htaccess Security for Vulnerable Web Apps
- Security Alerts via RSS Feeds in Kennonsoft and Incredible PBX GUIs
No single network security system can protect you against zero-day vulnerabilities that no one has ever seen. Just ask the FreePBX® folks. Deploying multiple layers of security is not only smart, it’s essential with today’s Internet topology. It works much like the Bundle of Sticks from Aesop’s Fables. The more sticks there are in your bundle, the more difficult it is to break them apart. If a vulnerability suddenly appears in the Linux kernel, or in Asterisk, or in Apache, or in your favorite web GUI, you can continue to sleep well knowing that other layers of security have your back. No one else in the telecommunications industry has anything even close. It’s all open source GPL code so we would encourage everyone to get on board and do their part to make the Internet a safer place!
Getting Started with Incredible PBX and Incredible PBX GUI (RasPi 2 Edition)
Here’s a quick overview of the installation and setup process for Incredible PBX featuring the Incredible PBX GUI:
- Install Linux for Raspberry Pi 2 – Install Raspbian 7 Platform
- Configure Raspbian 7 – Optimize Raspbian 7 for Incredible PBX
- Download and Install Incredible PBX + Incredible PBX GUI
- Install Incredible Fax with HylaFax/AvantFax (optional)
- Set Up Passwords for Incredible PBX
- Configure Trunks using Incredible PBX GUI
- Connect a Softphone using Incredible PBX GUI
1. Install Raspbian 7 Platform for Raspberry Pi 2
For those with Raspberry Pi experience, this is the same drill you’ve performed a dozen times before. For newbies, here’s the procedure. You’ll need a microSD card of at least 8GB, and we strongly recommend a 16GB or 32GB Type 10 card for Incredible PBX. We’ve tested both the SanDisk and Transcend cards, and they work great.
Begin by downloading the RASPBIAN Wheezy image from RaspberryPi.org to your desktop. After you’ve unzipped the image, you need to get it moved to your microSD card. RaspberryPi.org has excellent tutorials that will walk you through the process using a Linux, Mac, or Windows desktop platform. Don’t forget to unmount the card before removing it!
Once you have your microSD card ready to go, plug it into the slot on the back of the Raspberry Pi 2 and then plug in the power cord. On your attached monitor, you can follow the boot up process. When the login prompt appears, log in as user pi with the password raspberry. Choose text mode for bootups!
2. Optimizing Raspbian 7 for Incredible PBX
The first time you boot up your Raspberry Pi 2 with Raspbian 7, it will run the raspi-config script. This allows you to make a number of changes to your Raspberry Pi environment to maximize performance. Let’s take advantage of it.
Option 1. Expand the File System to fill your SD card. Otherwise, there’s insufficient disk space to complete the install.
Advanced Options. Enable Remote SSH access to your Raspberry Pi 2.
Tab to the Finish option and press ENTER. Then choose Reboot and YES.
After the reboot, log back in as pi:raspberry and set a very secure root password: sudo passwd root. Decipher your IP address so that you can log in as root via SSH: ifconfig.
We strongly recommend completing the install by logging in as root using a desktop computer via SSH or Putty (for Windows). This gives you the ability to scroll back up and find errors if something happens to come unglued during the install process. It also assures that your desktop computer will be whitelisted in the automated setup of the IPtables firewall.
3. Install Incredible PBX on Your Raspberry Pi 2
Adding Incredible PBX to the Raspberry Pi 2 is easy. To restate the obvious, your server needs a reliable Internet connection to proceed. Using SSH (or Putty on a Windows machine), log into your Raspberry Pi 2 as root at the IP address you deciphered in the ifconfig step at the end of the Raspbian install procedure above.
Now let’s begin the Incredible PBX install. After logging in as root, issue the following commands. The install takes less than an hour and runs unattended so there’s no need to watch unless you’re curious about how sausage is made. Remember, as part of the build process, we compile all of the major components for Incredible PBX from source. And you can review the open source GPL script to see how it’s done if you have an interest or wish to embellish. It’s Gotcha-Free code so go for it and share your discoveries. After all, that’s what open source is all about!
cd /root
wget http://incrediblepbx.com/incrediblepbx11-12.2.raspbian.tar.gz
tar zxvf incrediblepbx11-12.2.raspbian.tar.gz
rm -f incrediblepbx11-12.2.raspbian.tar.gz
./IncrediblePBX11-12.2-raspbian.sh
4. Install Incredible Fax for Incredible PBX (optional)
Administrators have been trying to stomp out faxing for at least two decades. Here’s a hint. It ain’t gonna happen. So go with the flow and add Gotcha-Free Faxing to your server. It’ll be there when you need it. And sooner or later, you’ll need it. This install script is simple enough for any monkey to complete. Run the script and enter the email address for delivery of your faxes. Then, if you’re in the U.S. or Canada, press the Enter key to accept every default entry during the HylaFax and AvantFax installation steps. For other countries, read the prompts and answer accordingly.
cd /root
./incrediblefax11_raspi2.sh
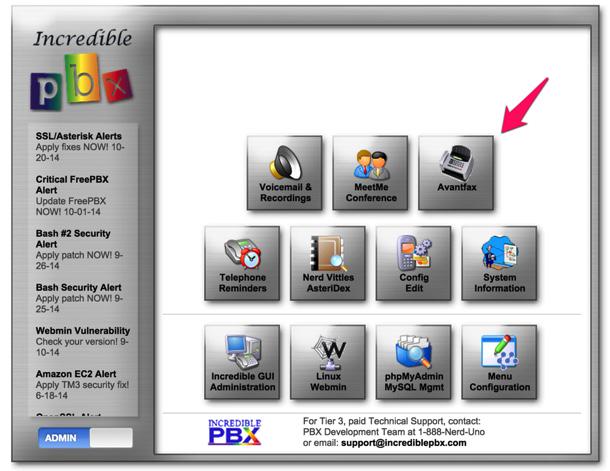
When the installation finishes, reboot your server to bring faxing on line. After rebooting, change your AvantFax admin password: /root/avantfax-pw-change. You can access the AvantFax GUI with your browser by logging in as admin with your admin password from the previous step suing either the Kennonsoft admin menu (pictured below) or from within the Incredible PBX GUI itself by clicking on the AvantFax tab.
Outgoing faxes using standard document attachments can be created using the AvantFax GUI. The faxes will be sent out using your default outbound dial rules. You can add a dial prefix in sending a fax with AvantFax to force the call out a particular trunk that has been preconfigured in the Incredible PBX GUI.
Incoming faxes will be delivered to the email address you specified when installing Incredible Fax; however, incoming faxes will be ignored until you configure a destination DID to accept the faxes. For the incoming route of the destination DID, specify: 
5. Initial Configuration of Incredible PBX
Incredible PBX is installed with the preconfigured IPtables Linux firewall already in place. It implements WhiteList Security to limit server access to private LANs, your server’s IP address, your desktop computer’s IP address, and a few of our favorite SIP providers. You can add additional entries to this WhiteList whenever you like using the add-ip and add-fqdn tools in /root. There’s also an Apache security layer for our web applications. And the Incredible PBX GUI has its own security methodology. Finally, we randomize extension and DISA passwords as part of the initial install process. Out of the starting gate, you won’t find a more secure VoIP server implementation anywhere. After all, it’s your phone bill.
Even with all of these layers of security, here are 10 Quick Steps to better safeguard your server. You only do this once, but failing to do it may lead to security issues you don’t want to have to deal with down the road. So DO IT NOW!
First, log into your server as root with your root password and do the following:
Make your root password very secure: passwd
Set your correct time zone: ./timezone-setup
Restart Asterisk: amportal restart
Create admin password for main GUI: /root/admin-pw-change
Create admin password for web apps: htpasswd -b /etc/pbx/wwwpasswd admin newpassword
Make a copy of your other passwords: cat passwords.FAQ
Make a copy of your Knock codes: cat knock.FAQ
Decipher IP address and other info about your server: status
Second, log into your server as admin using a web browser pointed to your server’s IP address and change your extension 701 extension and voicemail passwords:
Click USERS tab in Incredible PBX GUI
Click Incredible PBX GUI Administration
Log in as user: admin with admin-pw-change password
Last but not least, Incredible PBX includes an automatic update utility which downloads important updates whenever you log into your server as root. We recommend you log in once a week to keep your server current. Now would be a good time to log out and back into your server at the Linux command line to bring your Raspberry Pi 2 up to current specs.
6. Configure Trunks with Incredible PBX
Now for the fun part. If this is your first VoIP adventure, be advised that this ain’t your grandma’s phone system. You need not and should not put all your eggs in one basket when it comes to telephone providers. In order to connect to Plain Old Telephones, you still need at least one provider. But there is nothing wrong with having several. And a provider that handles an outbound call (termination) need not be the same one that handles an incoming call (origination) and provides your phone number (DID). We cannot recommend Vitelity highly enough, and it’s not just because they have financially supported our projects for almost a decade. They’re as good as VoIP providers get, and we use lots of them. If you’re lucky enough to live in the U.S., you’d be crazy not to set up a Google Voice account. It’s free as are all phone calls to anywhere in the U.S. and Canada. The remaining preconfigured providers included in Incredible PBX are equally good, and we’ve used and continue to use almost all of them. So pick a few and sign up. You only pay for the calls you make with each provider so you have little to lose by choosing several. The PIAF Forum includes dozens of recommendations on VoIP providers if you want additional information.
With the preconfigured trunks in Incredible PBX, all you need are your credentials for each provider and the FQDN of their server. Log into Incredible PBX GUI Administration as admin using a browser. From the System Status menu, click Connectivity -> Trunks. Click on each provider you have chosen and fill in your credentials including the host entry. Be sure to uncheck the Disable Trunk checkbox! Fill in the appropriate information for the Register String. Save your settings by clicking Submit Changes. Then click the red Apply Config button.
7. Configure a Softphone for Incredible PBX
We’re in the home stretch now. You can connect virtually any kind of telephone to your new PBX. Plain Old Phones require an analog telephone adapter (ATA) which can be a separate board in your computer from a company such as Digium. Or it can be a standalone SIP device such as ObiHai’s OBi100 or OBi110 (if you have a phone line from Ma Bell to hook up as well). SIP phones can be connected directly so long as they have an IP address. These could be hardware devices or software devices such as the YateClient softphone. We’ll start with a free one today so you can begin making calls. You can find dozens of recommendations for hardware-based SIP phones both on Nerd Vittles and the PIAF Forum when you’re ready to get serious about VoIP telephony.
We recommend YateClient which is free. Download it from here. Run YateClient once you’ve installed it and enter the credentials for the 701 extension on Incredible PBX. You’ll need the IP address of your server plus your extension 701 password. Choose Applications _> Extensions -> 701 and write down your SIP/IAX Password. You can also find it in /root/passwords.FAQ. Fill in the blanks using the IP address of your server, 701 for your account name, and whatever password is assigned to the extension. Click OK to save your entries.

Once you are registered to extension 701, close the Account window. Then click on YATE’s Telephony Tab and place some test calls to the numerous apps that are preconfigured on Incredible PBX. Dial a few of these to get started:
DEMO - Apps Demo

123 - Reminders

947 - Weather by ZIP Code

951 - Yahoo News

*61 - Time of Day

TODAY - Today in History
If you are a Mac user, another great no-frills softphone is Telephone. Just download and install it from the Mac App Store.
Configuring Google Voice
If you want to use Google Voice, you’ll need a dedicated Google Voice account to support Incredible PBX. The more obscure the username (with some embedded numbers), the better off you will be. This will keep folks from bombarding you with unsolicited Gtalk chat messages, and who knows what nefarious scheme will be discovered using Google messaging six months from now. So keep this account a secret!
IMPORTANT: Do NOT under any circumstances take Google’s bait to switch from Google Chat to Hangouts, or you will forever lose the ability to use Google Chat with Incredible PBX. Also be sure to enable the Google Chat option as one of your phone destinations in Settings, Voice Setting, Phones. That’s the destination we need for The Incredible PBX to work its magic! Otherwise, all inbound and outbound calls will fail. Good News! You’re in luck. Google has apparently had a change of heart on discontinuing Google Chat support so it’s enabled by default in all new Google Voice accounts. Once you’ve created a Gmail and Google Voice account, go to Google Voice Settings and click on the Calls tab. Make sure your settings match these:
- Call Screening – OFF
- Call Presentation – OFF
- Caller ID (In) – Display Caller’s Number
- Caller ID (Out) – Don’t Change Anything
- Do Not Disturb – OFF
- Call Options (Enable Recording) – OFF
- Global Spam Filtering – ON
Click Save Changes once you’ve adjusted your settings. Under the Voicemail tab, plug in your email address so you get notified of new voicemails. Down the road, receipt of a Google Voice voicemail will be a big hint that something has come unglued on your PBX.
One final word of caution is in order regardless of your choice of providers: Do NOT use special characters in any provider passwords, or nothing will work!
Now you’re ready to configure your Google Voice account in Incredible PBX. You can do it from within the Incredible PBX GUI by choosing Connectivity -> Google Voice. Once you’ve entered your credentials, you MUST restart Asterisk from the command line, or Google Voice calls will fail.
If you have trouble getting Google Voice to work (especially if you have previously used your Google Voice account from a different IP address), try this Google Voice Reset Procedure. It usually fixes connectivity problems. If it still doesn’t work, enable Less Secure Apps using this Google tool.
If you have difficulty finding the Google Chat option after setting up a new Google Voice account, follow this tutorial.
NOTE: There are all sorts of rumors circulating again that the Google Voice free ride may be coming to a close. We’ve heard this song before, but who knows?? Whether true or not, you are well advised to not rely solely on Google Voice for your phone calls. That’s the real beauty of a PBX. So take advantage of it!
Another option is to use one of the inexpensive SIP Gateways to Google Voice. HINT: The Simonics trunk in the Incredible PBX GUI is preconfigured. All you’ll need is your credentials.
Adding Speech Recognition Support to Incredible PBX
To support many of our applications, Incredible PBX has included Google’s speech recognition service for years. These applications include Weather Reports by City (949), AsteriDex Voice Dialing by Name (411), and Wolfram Alpha for Asterisk (4747), all of which use Lefteris Zafiris’ terrific speech-recog AGI script. Unfortunately (for some), Google now has tightened up the terms of use for their free speech recognition service. Now you can only use it for "personal and development use." If you meet those criteria, keep reading. Here’s how to activate speech recognition on Incredible PBX. Don’t skip any steps!
To use Wolfram Alpha by phone, you first must obtain a free Wolfram Alpha APP-ID. Then issue the following command replacing APP-ID with your actual ID. Do NOT change the yourID portion of the command:
sed -i "s|yourID|APP-ID|" /var/lib/asterisk/agi-bin/4747
Now you’re ready to try out the speech recognition apps. Dial 949 and say the name of a city and state/province/country to get a current weather forecast from Yahoo. Dial 411 and say "American Airlines" to be connected to American.
To access Wolfram Alpha by phone, dial 4747 and enter your query, e.g. "What planes are overhead." Read the Nerd Vittles tutorial for additional examples and tips.
OK, Smarty Pants: Show Me the Beef!
We know what some of you are thinking. "What does a fast food worker really know about VoIP and Gotcha-Free PBXs?? Before wasting a bunch of time on this, show me the beef!" Fair enough. Sit by your phone and click the Call Me icon below. Type in a fake name and your real phone number. Click the Connect button, answer your phone when it rings, and press 1. You’ll be connected to the Incredible PBX IVR. Pick an option from the menu of choices and take the Incredible PBX apps for a spin on our dime… actually it’s Google’s dime. Everything you see and hear is part of what you get with Incredible PBX for the Raspberry Pi 2 including the ability to set up your own click-to-dial web interface exactly like this one. The demo just happens to be running on our hardware instead of yours. So… what are you waiting for? Click away and try Incredible PBX for yourself. And, by the way, nobody besides the NSA and Google will be monitoring your call. 😉
Nerd Vittles Demo IVR Options
1 – Call by Name (say “Delta Airlines” or “American Airlines” to try it out)
2 – MeetMe Conference (password is 1234)
3 – Wolfram Alpha (say “What planes are overhead?”)
4 – Lenny (The Telemarketer’s Worst Nightmare)
5 – Today’s News Headlines
6 – Weather Forecast (say the city and state, province, or country)
7 – Today in History
8 – Speak to a Real Person (or maybe just voicemail if we’re out)
Homework Assignment: Mastering the Incredible PBX Feature Set
Now would be a good time to explore the Incredible PBX applications. Continue reading there. If you have questions, join the PBX in a Flash Forums and take advantage of our awesome collection of gurus. There’s an expert available on virtually any topic, and the price is right. As with Incredible PBX, it’s absolutely free.
Originally published: Monday, June 8, 2015
Support Issues. With any application as sophisticated as this one, you’re bound to have questions. Blog comments are a terrible place to handle support issues although we welcome general comments about our articles and software. If you have particular support issues, we encourage you to get actively involved in the PBX in a Flash Forums. It’s the best Asterisk tech support site in the business, and it’s all free! Please have a look and post your support questions there. Unlike some forums, ours is extremely friendly and is supported by literally hundreds of Asterisk gurus and thousands of users just like you. You won’t have to wait long for an answer to your question.
Need help with Asterisk? Visit the PBX in a Flash Forum.
Special Thanks to Our Generous Sponsors
FULL DISCLOSURE: ClearlyIP, Skyetel, Vitelity, DigitalOcean, Vultr, VoIP.ms, 3CX, Sangoma, TelecomsXchange and VitalPBX have provided financial support to Nerd Vittles and our open source projects through advertising, referral revenue, and/or merchandise. As an Amazon Associate and Best Buy Affiliate, we also earn from qualifying purchases. We’ve chosen these providers not the other way around. Our decisions are based upon their corporate reputation and the quality of their offerings and pricing. Our recommendations regarding technology are reached without regard to financial compensation except in situations in which comparable products at comparable pricing are available from multiple sources. In this limited case, we support our sponsors because our sponsors support us.
BOGO Bonaza: Enjoy state-of-the-art VoIP service with a $10 credit and half-price SIP service on up to $500 of Skyetel trunking with free number porting when you fund your Skyetel account. No limits on number of simultaneous calls. Quadruple data center redundancy. $25 monthly minimum spend required. Tutorial and sign up details are here.
![]() The lynchpin of Incredible PBX 2020 and beyond is ClearlyIP components which bring management of FreePBX modules and SIP phone integration to a level never before available with any other Asterisk distribution. And now you can configure and reconfigure your new Incredible PBX phones from the convenience of the Incredible PBX GUI.
The lynchpin of Incredible PBX 2020 and beyond is ClearlyIP components which bring management of FreePBX modules and SIP phone integration to a level never before available with any other Asterisk distribution. And now you can configure and reconfigure your new Incredible PBX phones from the convenience of the Incredible PBX GUI.
VitalPBX is perhaps the fastest-growing PBX offering based upon Asterisk with an installed presence in more than 100 countries worldwide. VitalPBX has generously provided a customized White Label version of Incredible PBX tailored for use with all Incredible PBX and VitalPBX custom applications. Follow this link for a free test drive!
Special Thanks to Vitelity. Vitelity is now Voyant Communications and has halted new registrations for the time being. Our special thanks to Vitelity for their unwavering financial support over many years and to the many Nerd Vittles readers who continue to enjoy the benefits of their service offerings. We will keep everyone posted on further developments.
Some Recent Nerd Vittles Articles of Interest…
- Vitelity and Google provide financial support to Nerd Vittles and the Incredible PBX project. [↩]
Introducing Incredible PBX 11-12 with Incredible GUI for the Ubuntu 14 Platform

On May 15, we turned the page on Asterisk® GUIs by introducing a new GUI that hopefully provides the best of both worlds. It preserves the GPL components of the FreePBX® product that many of us have nurtured for almost a decade while removing the commercial pieces that have introduced some friction into the equation for users and companies that simply wished to deploy or redistribute a graphical user interface for Asterisk in accordance with the free GPL licenses under which the product and its components were licensed. Last week we did much the same thing with the essential cloud component which serves as the lynchpin for GPL module administration within the GUI itself. Hopefully, these two tweaks will encourage Sangoma, the new owner of the FreePBX project, to do the right thing and get the non-commercial pieces of the project back on the right track moving forward. What we did not want to do was tarnish the incredibly hard work that dozens of developers in the open source community have poured into this project over the past decade. We continue to be amazed at what they’ve been able to achieve, and we salute their accomplishments. The Asterisk 12 and 13 revolution never would have been achieved without the contributions of the FreePBX development team. We think the new Incredible PBX GUI stands as a testament to what can be accomplished while preserving the true spirit of open source development and the terms of the GPL licenses under which this product and its numerous modules were licensed.
Two weeks ago, we introduced the all-new Incredible PBX with Incredible GUI for CentOS, Scientific Linux, and Oracle Linux. Last week we added a Cloud-based GPL repository and all the tools necessary to maintain it. Today we’re pleased to release the production-ready version for the Ubuntu 14 platform with all the bells and whistles including Incredible Fax featuring HylaFax and AvantFax. Today’s release mimics the functionality of the previous build for the CentOS platform with literally dozens of turnkey applications that show off the very best features of Asterisk®. In addition to Incredible PBX, you also get our new GPL repository to maintain release 12 of the GUI. No strings, no gotchas, and no murky licenses. Pure GPL!
Building an Ubuntu 14.04 Platform for Incredible PBX
As a result of the trademark and copyright morass, we’ve steered away from the bundled operating system in favor of a methodology that relies upon you to put in place the operating system platform on which to run PBX in a Flash or Incredible PBX. The good news is it’s easy! With many cloud-based providers1, you can simply click a button to choose your favorite OS flavor and within minutes, you’re ready to go. With many virtual machine platforms such as VirtualBox, it’s equally simple to find a pre-built Ubuntu 14.04 image or roll your own.
If you’re new to VoIP or to Nerd Vittles, here’s our best piece of advice. Don’t take our word for anything! Try it for yourself in the Cloud! You can build an Ubuntu 14.04 image on Digital Ocean in under one minute and install today’s Incredible PBX for Ubuntu 14.04 in about 15 minutes. Then try it out for two full months. It won’t cost you a dime. Use our referral link to sign up for an account. Enter a valid credit card to verify you’re who you say you are. Create an Ubuntu 14.04 (not 14.10!) 512MB droplet of the cheapest flavor ($5/mo.). Go to the Billing section of the site, and enter the following promo code: UBUNTUDROPLET. That’s all there is to it. A $10 credit will be added to your account, and you can play to your heart’s content. Delete droplets, add droplets, and enjoy the free ride!
For today, we’ll walk you through building your own stand-alone server using the Ubuntu 14.04 mini.iso. If you’re using Digital Ocean in the Cloud, skip down to Installing Incredible PBX 11-12 (HINT: 11 tells you the Asterisk release and 12 tells you the GUI release). If you’re using your own hardware, to get started, download the 64-bit Ubuntu 14.04 "Trusty Tahr" Minimal ISO from here. Then burn it to a CD/DVD or thumb drive and boot your dedicated server from the image. Remember, you’ll be reformatting the drive in your server so pick a machine you don’t need for other purposes.
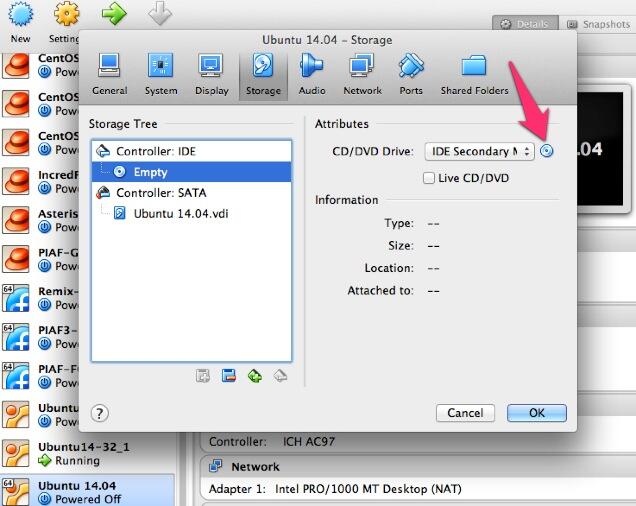
For those that would prefer to build your Ubuntu 14.04 Wonder Machine using VirtualBox on any Windows, Mac, or existing Linux Desktop, here are the simple steps. Create a new virtual machine specifying the 64-bit version of Ubuntu. Allocate 1024MB of RAM (512MB also works fine with a swap file) and at least 20GB of disk space using the default hard drive setup in all three steps. In Settings, click System and check Enable I/O APIC and uncheck Hardware Clock in UTC Time. Click Audio and Specify then Enable your sound card. Click Network and Enable Network Adapter for Adapter 1 and choose Bridged Adapter. Finally, in Storage, add the Ubuntu 14.04 mini.iso to your VirtualBox Storage Tree as shown below. Then click OK and start up your new virtual machine. Simple!
Here are the steps to get Ubuntu 14.04 humming on your new server or virtual machine once you’ve booted up. If you can bake cookies from a recipe, you can do this:
UBUNTU mini.iso install:
Choose language
Choose timezone
Detect keyboard
Hostname: incrediblepbx < continue >
Choose mirror for downloads
Confirm archive mirror
Leave proxy blank unless you need it < continue >
** couple minutes of whirring as initial components are loaded **
New user name: incredible < continue >
Account username: incredible < continue >
Account password: makeitsecure
Encrypt home directory < no >
Confirm time zone < yes >
Partition disks: Guided - use entire disk and set up LVM
Confirm disk to partition
Write changes to disks and configure LVM
Whole volume? < continue>
Write changes to disks < yes> < -- last chance to preserve your disk drive!
** about 15 minutes of whirring during base system install ** < no touchy anything>
** another 5 minutes of whirring during base software install ** < no touchy anything>
Upgrades? Install security updates automatically
** another 5 minutes of whirring during more software installs ** < no touchy anything>
Software selection: *Basic Ubuntu server (only!)
** another couple minutes of whirring during software installs ** < no touchy anything>
Grub boot loader: < yes>
UTC for system clock: < no>
Installation complete: < continue> after removing installation media
** on VirtualBox, PowerOff after reboot and remove [-] mini.iso from Storage Tree & restart VM
login as user: incredible
** enter user incredible's password **
sudo passwd
** enter incredible password again and then create secure root user password **
su root
** enter root password **
apt-get update
apt-get install ssh -y
sed -i 's|without-password|yes|' /etc/ssh/sshd_config
sed -i 's|yes"|without-password"|' /etc/ssh/sshd_config
sed -i 's|"quiet"|"quiet text"|' /etc/default/grub
update-grub
ifconfig
** write down the IP address of your server from ifconfig results
reboot
** login via SSH to continue **
Installing Incredible PBX 11-12 on Your Ubuntu 14.04 Server
Adding Incredible PBX 11-12 to a running Ubuntu 14.04 server is a walk in the park. To restate the obvious, your server needs a reliable Internet connection to proceed. Using SSH (or Putty on a Windows machine), log into your new server as root at the IP address you deciphered in the ifconfig step at the end of the Ubuntu install procedure above. First, make sure to run the update step for Ubuntu below before you begin the install. This is especially important if you’re using a cloud-based Ubuntu 14 server.
WARNING: As of early June, 2016, Ubuntu has introduced a bug in their latest MySQL upgrade. Do NOT run apt-get upgrade for the time being, or your Incredible PBX install will fail.
apt-get update && touch /root/COPYING
WARNING: If you’re using a 512MB droplet at Digital Ocean, be advised that the DO Ubuntu setup does NOT include a swap file. This may cause serious problems when you run out of RAM. Uncomment ./create-swapfile-DO line below to create a 1GB swap file which will be activated whenever you exceed 90% RAM usage on Digital Ocean.
Now let’s begin the Incredible PBX 11-12 install. Log back in as root and issue the following commands:
cd /root
wget http://incrediblepbx.com/incrediblepbx11-12.2-ubuntu14.tar.gz
tar zxvf incrediblepbx*
#./create-swapfile-DO
./Incredible*
Once you have agreed to the license agreement and terms of use, press Enter and go have a 30-minute cup of coffee. The Incredible PBX installer runs unattended so find something to do for a bit unless you just like watching code compile. When you see "Have a nice day", your installation is complete. Write down your admin password for the GUI as well as your three "knock" ports for PortKnocker. If you forget your admin password or wish to change it, just run: /root/admin-pw-change. Retrieve your PortKnocker setup like this: cat /root/knock.FAQ.
Log out and back in as root and you should be greeted with a status display that looks something like this after the Automatic Update Utility runs:
Perform the following steps:
Make your root password very secure: passwd
Set your correct time zone: ./timezone-setup
Restart Asterisk: amportal restart
Create admin password for web apps: htpasswd -b /etc/pbx/wwwpasswd admin newpassword
Make a copy of your other passwords: cat passwords.FAQ
Make a copy of your Knock codes: cat knock.FAQ
Decipher IP address and other info about your server: status
Incredible PBX includes an automatic update utility which downloads important updates whenever you log into your server as root. We recommend you log in once a week to keep your server current. Now would be a good time to log out and back into your server at the Linux command line to bring your server up to current specs.
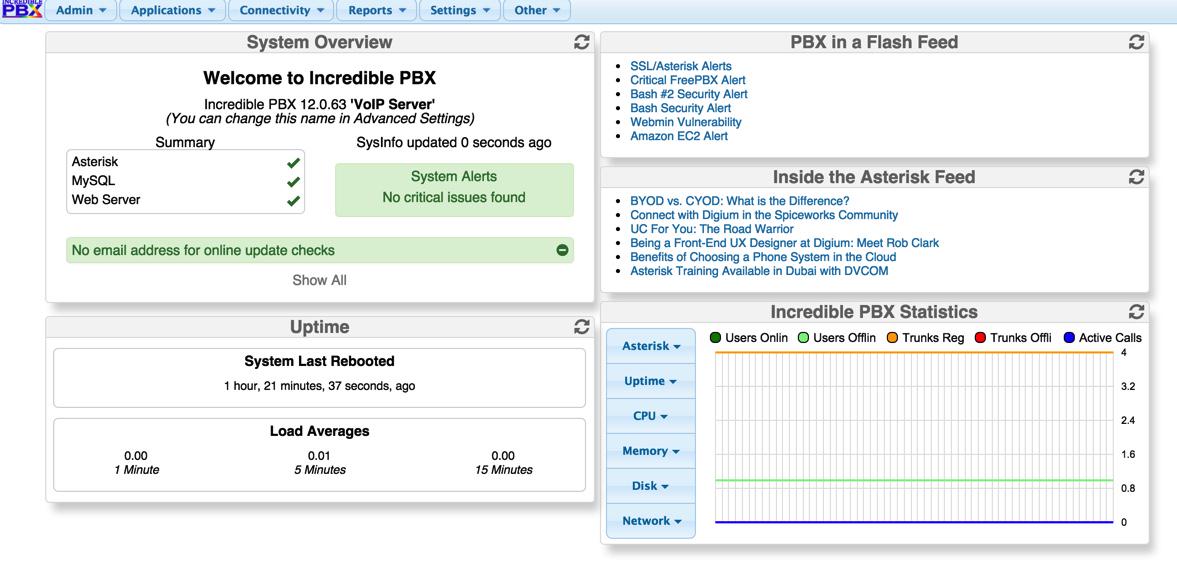
You can access the Incredible PBX GUI using your favorite web browser to configure your server. Just enter the IP address shown in the status display.

When the Kennonsoft menu (shown above) appears, click on the User tab to open the Admin menu. Then click on Incredible GUI Administration to access the Incredible PBX GUI. The default username is admin with the randomized password you wrote down above. If desired, you can change them after logging into the GUI by clicking Admin -> Administrators -> admin. Enter a new password and click Submit Changes then Apply Config. Now edit extension 701 so you can figure out (or change) the randomized passwords that were set up for default 701 extension and voicemail: Applications -> Extensions -> 701.
Setting Up a Soft Phone to Use with Incredible PBX
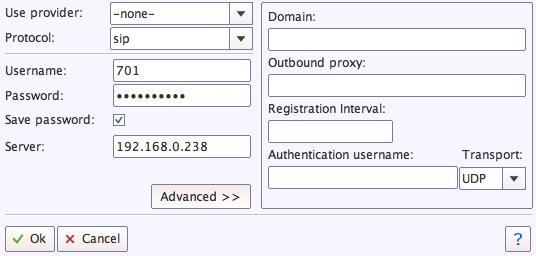
Now you’re ready to set up a telephone so that you can play with Incredible PBX. We recommend YateClient which is free. Download it from here. Run YateClient once you’ve installed it and enter the credentials for the 701 extension on Incredible PBX. You’ll need the IP address of your server plus your extension 701 password. Choose Settings -> Accounts and click the New button. Fill in the blanks using the IP address of your server, 701 for your account name, and whatever password you created for the extension. Click OK.
Once you are registered to extension 701, close the Account window. Then click on YATE’s Telephony Tab and place some test calls to the numerous apps that are preconfigured on Incredible PBX. Dial a few of these to get started:
123 - Reminders

222 - ODBC Demo (use acct: 12345)

947 - Weather by ZIP Code

951 - Yahoo News

*61 - Time of Day

*68 - Wakeup Call

TODAY - Today in History
The next step is establishing an interface on your PBX to connect to the telephones in the rest of the world. If you live in the U.S., the easiest way (at least for now) is to use an existing (free) Google Voice account. Google has threatened to shut this down but as this is written, it still works with previously set up Google Voice accounts. The more desirable long-term solution is to choose several SIP providers and set up redundant trunks for your incoming and outbound calls. The PIAF Forum includes dozens of recommendations to get you started.
Configuring Google Voice
If you want to use Google Voice, you’ll need a dedicated Google Voice account to support Incredible PBX. If you want to use the inbound fax capabilities of Incredible Fax 11, then you’ll need an additional Google Voice line that can be routed to the FAX custom destination using the GUI. The more obscure the username (with some embedded numbers), the better off you will be. This will keep folks from bombarding you with unsolicited Gtalk chat messages, and who knows what nefarious scheme will be discovered using Google messaging six months from now. So keep this account a secret!
We’ve tested this extensively using an existing Google Voice account, and inbound calling is just not reliable. The reason seems to be that Google always chooses Gmail chat as the inbound call destination if there are multiple registrations from the same IP address. So, be reasonable. Do it our way! Use a previously configured and dedicated Gmail and Google Voice account, and use it exclusively with Incredible PBX 11.
IMPORTANT: Be sure to enable the Google Chat option as one of your phone destinations in Settings, Voice Setting, Phones. That’s the destination we need for The Incredible PBX to work its magic! Otherwise, all inbound and outbound calls will fail. If you don’t see this option, you’re probably out of luck. Google has disabled the option in newly created accounts as well as some old ones that had Google Chat disabled. Now go back to the Google Voice Settings.
While you’re still in Google Voice Settings, click on the Calls tab. Make sure your settings match these:
- Call Screening – OFF
- Call Presentation – OFF
- Caller ID (In) – Display Caller’s Number
- Caller ID (Out) – Don’t Change Anything
- Do Not Disturb – OFF
- Call Options (Enable Recording) – OFF
- Global Spam Filtering – ON
Click Save Changes once you adjust your settings. Under the Voicemail tab, plug in your email address so you get notified of new voicemails. Down the road, receipt of a Google Voice voicemail will be a big hint that something has come unglued on your PBX.
One final word of caution is in order regardless of your choice of providers: Do NOT use special characters in any provider passwords, or nothing will work!
Now you’re ready to set up your Google Voice trunk in the GUI. After logging in with your browser, click the Connectivity tab and choose Google Voice/Motif. To Add a new Google Voice account, just fill out the form. Do NOT check the third box or incoming calls will never ring!
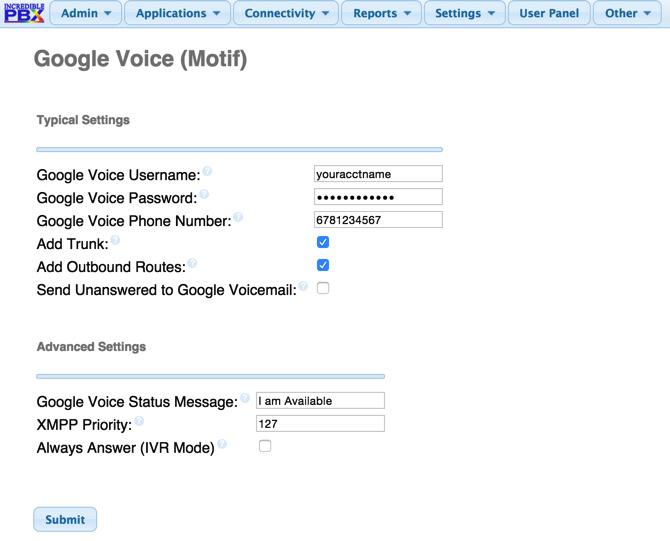
IMPORTANT LAST STEP: Google Voice will not work unless you restart Asterisk from the Linux command line at this juncture. Using SSH, log into your server as root and issue the following command: amportal restart.
If you have trouble getting Google Voice to work (especially if you have previously used your Google Voice account from a different IP address), try this Google Voice Reset Procedure. It usually fixes connectivity problems. If it still doesn’t work, enable Less Secure Apps using this Google tool.
And here’s another way to access Google Voice securely using an inexpensive commercial SIP gateway:
Troubleshooting Audio and DTMF Problems
You can avoid one-way audio on calls and touchtones that don’t work by entering these simple settings in the GUI: Settings -> Asterisk SIP Settings. Just plug in your public IP address and your private IP subnet. Then set ULAW as the only Audio Codec.
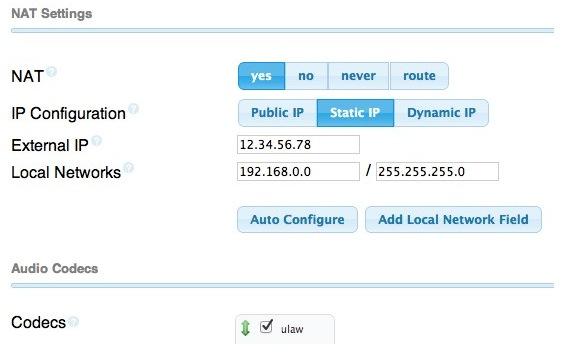
Adding Speech Recognition to Incredible PBX
To support many of our applications, Incredible PBX has included Google’s speech recognition service for years. These applications include Weather Reports by City (949), AsteriDex Voice Dialing by Name (411), and Wolfram Alpha for Asterisk (4747), all of which use Lefteris Zafiris’ terrific speech-recog AGI script. Unfortunately (for some), Google now has tightened up the terms of use for their free speech recognition service. Now you can only use it for "personal and development use." If you meet those criteria, keep reading.
First, log into your server as root and issue the following commands:
# for Ubuntu and Debian platforms
apt-get clean
apt-get install libjson-perl flac -y
# for RedHat and CentOS platforms
yum -y install perl-JSON
# for all Linux platforms
cd /var/lib/asterisk/agi-bin
mv speech-recog.agi speech-recog.last.agi
wget --no-check-certificate https://raw.githubusercontent.com/zaf/asterisk-speech-recog/master/speech-recog.agi
chown asterisk:asterisk speech*
chmod 775 speech*
nano -w speech-recog.agi
Here’s how to activate speech recognition on Incredible PBX. Don’t skip any steps!
Now you’re ready to try out the speech recognition apps. Dial 949 and say the name of a city and state/province/country to get a current weather forecast from Yahoo. Dial 411 and say "American Airlines" to be connected to American.
To use Wolfram Alpha by phone, you first must install it. Obtain your free Wolfram Alpha APP-ID here. Then run the one-click installer: /root/wolfram/wolframalpha-oneclick.sh. Insert your APP-ID when prompted. Now dial 4747 to access Wolfram Alpha by phone and enter your query, e.g. "What planes are overhead." Read the Nerd Vittles tutorial for additional examples and tips.
A Few Words about the Incredible PBX Security Model for Ubuntu
Incredible PBX for Ubuntu 14 is a very secure, turnkey PBX implementation. As configured, your server is protected by both Fail2Ban and a hardened configuration of the IPtables Linux firewall. Nobody can access your PBX without  your credentials AND
  an IP address that is either on your private network or that matches the IP address of your server or the PC from which you installed Incredible PBX. Incredible PBX is preconfigured to let you connect to many of the leading SIP hosting providers without additional firewall tweaking.
You can whitelist additional IP addresses for remote access in several ways. First, you can use the command-line utilities: /root/add-ip and /root/add-fqdn. You can also remove whitelisted IP addresses by running /root/del-acct. Second, you can dial into extension 864 (or use a DID pointed to extension 864 aka TM4) and enter an IP address to whitelist. Before Travelin’ Man 4 will work, you’ll need to add credentials for each caller using the tools in /root/tm4. You must add at least one account before dial-in whitelisting will be enabled. Third, you can temporarily whitelist an IP address by successfully executing the PortKnocker 3-knock code established for your server. You’ll find the details and the codes in /root/knock.FAQ. Be advised that IP addresses whitelisted with PortKnocker (only!) go away whenever your server is rebooted or the IPtables firewall is restarted. For further information on the PortKnocker technology and available clients for iOS and Android devices, review the Nerd Vittles tutorial.
HINT: The reason that storing your PortKnocker codes in a safe place is essential is because it may be your only available way to gain access to your server if your IP address changes. You obviously can’t use the command-line tools to whitelist a new IP address if you cannot gain access to your server at the new IP address.
We always recommend you also add an extra layer of protection by running your server behind a hardware-based firewall with no Internet port exposure, but that’s your call. If you use a hardware-based firewall, be sure to map the three PortKnocker ports to the internal IP address of your server!
The NeoRouter VPN client also is included for rock-solid, secure connectivity for remote users. Read our previous tutorial for setup instructions.
As one would expect, the IPtables firewall is a complex piece of software. If you need assistance configuring it, visit the PIAF Forum for some friendly assistance.
Adding Incredible Fax 11 to Your Server
Once you’ve completed the Incredible PBX install, log out and log back in to load the latest automatic updates. Then reboot. Now you’re ready to continue your adventure by installing Incredible Fax 11 for Ubuntu. Special thanks to Josh North for all his hard work on this! The latest download includes the Incredible Fax 11 installer. So just run the script:
cd /root
./incrediblefax11_ubuntu14.sh
Accept all of the defaults during the installation process. IMPORTANT: Once you complete the install, reboot your server. After rebooting, log into the GUI and choose Module Admin and enable the AvantFax module. When you log out of the GUI, there now will be an option for AvantFax on the GUI’s main login screen. Choose it and enter admin:password to login and change your default password. You also can set your AvantFax admin password by logging into the Linux CLI and… /root/avantfax-pw-change.
Incredible Backup and Restore
We’re pleased to introduce our latest backup and restore utilities for Incredible PBX. Running /root/incrediblebackup will create a backup image of your server in /tmp. This backup image then can be copied to any other medium desired for storage. To restore it to another Incredible PBX 11 server, simply copy the image to a server running Asterisk 11 and the Incredible PBX 11-12 GUI. Then run /root/incrediblerestore. Doesn’t get much simpler than that.
Incredible PBX Automatic Update Utility
Every time you log into your server as root, Incredible PBX will ping the IncrediblePBX.com web site to determine whether one or more updates are available to bring your server up to current specs. We recommend you log in at least once a week just in case some new security vulnerability should come along. Also be sure to check the PBX in a Flash RSS Feed inside the GUI for the latest security alerts.
Mastering the Incredible PBX Applications
Your next stop should be a quick read of the Application User’s Guide for Incredible PBX. Even though the target audience was Raspberry Pi users, the feature set is identical, and this guide will tell you everything you need to know about the dozens of applications for Asterisk that have been installed on your new server.
We also want to encourage you to sign up for an account on the PIAF Forum and join the discussion. In addition to providing first-class, free support, we think you’ll enjoy the camaraderie. Come join us!
Originally published: Monday, June 1, 2015
Support Issues. With any application as sophisticated as this one, you’re bound to have questions. Blog comments are a terrible place to handle support issues although we welcome general comments about our articles and software. If you have particular support issues, we encourage you to get actively involved in the PBX in a Flash Forums. It’s the best Asterisk tech support site in the business, and it’s all free! Please have a look and post your support questions there. Unlike some forums, ours is extremely friendly and is supported by literally hundreds of Asterisk gurus and thousands of users just like you. You won’t have to wait long for an answer to your question.
Need help with Asterisk? Visit the PBX in a Flash Forum.
Special Thanks to Our Generous Sponsors
FULL DISCLOSURE: ClearlyIP, Skyetel, Vitelity, DigitalOcean, Vultr, VoIP.ms, 3CX, Sangoma, TelecomsXchange and VitalPBX have provided financial support to Nerd Vittles and our open source projects through advertising, referral revenue, and/or merchandise. As an Amazon Associate and Best Buy Affiliate, we also earn from qualifying purchases. We’ve chosen these providers not the other way around. Our decisions are based upon their corporate reputation and the quality of their offerings and pricing. Our recommendations regarding technology are reached without regard to financial compensation except in situations in which comparable products at comparable pricing are available from multiple sources. In this limited case, we support our sponsors because our sponsors support us.
BOGO Bonaza: Enjoy state-of-the-art VoIP service with a $10 credit and half-price SIP service on up to $500 of Skyetel trunking with free number porting when you fund your Skyetel account. No limits on number of simultaneous calls. Quadruple data center redundancy. $25 monthly minimum spend required. Tutorial and sign up details are here.
![]() The lynchpin of Incredible PBX 2020 and beyond is ClearlyIP components which bring management of FreePBX modules and SIP phone integration to a level never before available with any other Asterisk distribution. And now you can configure and reconfigure your new Incredible PBX phones from the convenience of the Incredible PBX GUI.
The lynchpin of Incredible PBX 2020 and beyond is ClearlyIP components which bring management of FreePBX modules and SIP phone integration to a level never before available with any other Asterisk distribution. And now you can configure and reconfigure your new Incredible PBX phones from the convenience of the Incredible PBX GUI.
VitalPBX is perhaps the fastest-growing PBX offering based upon Asterisk with an installed presence in more than 100 countries worldwide. VitalPBX has generously provided a customized White Label version of Incredible PBX tailored for use with all Incredible PBX and VitalPBX custom applications. Follow this link for a free test drive!
Special Thanks to Vitelity. Vitelity is now Voyant Communications and has halted new registrations for the time being. Our special thanks to Vitelity for their unwavering financial support over many years and to the many Nerd Vittles readers who continue to enjoy the benefits of their service offerings. We will keep everyone posted on further developments.
Some Recent Nerd Vittles Articles of Interest…
- With some providers including ones linked in this article, Nerd Vittles receives referral fees which assist in keeping the Nerd Vittles lights burning brightly. [↩]
Free Asterisk Solutions
