
The Most Versatile VoIP Provider: FREE PORTING

 JUST RELEASED: Visit the Incredible PBX Wiki
Why Reinvent the Wheel: Incredible PBX GUI Application User’s Guide
We’ve spent the last two months introducing a half dozen new flavors of Incredible PBX™ featuring the new GPL-compliant Incredible PBX GUI. We hope you’re enjoying the new builds. But it’s Back-to-School Time in the United States so today we’re shifting gears and providing a refresher course on the three dozen or so applications for Asterisk® that accompany every Incredible PBX install.
For those just beginning your Incredible PBX adventure, start here and choose your favorite platform. There are plenty of choices featuring Asterisk 11 or 13, FreePBX® GPL-compatible modules for versions 2.11 and 12, plus your favorite operating system: CentOS 6.7 and 7.0, Ubuntu 14, and Raspbian for the Raspberry Pi 2. There’s even an installer for the AsteriskNOW and FreePBX Distro proprietary platforms.
- Introducing Incredible PBX GUI for AsteriskNOW and FreePBX Distro
- Introducing Incredible PBX GUI for Asterisk 13 and CentOS/Scientific Linux
- Introducing Incredible PBX GUI for Asterisk 13 and the Ubuntu 14 Platform
- Introducing Incredible PBX GUI for Asterisk 11 and the Raspberry Pi 2
- Introducing Incredible PBX GUI for Asterisk 11 and the Ubuntu 14 Platform
- Introducing Incredible PBX GUI for Asterisk 11 and CentOS/Scientific Linux
Once your system is up and running, you’ll be ready to kick the tires and discover all of the hidden goodies that await. Today we’ll cover all of the applications for Asterisk® that are included in the new Incredible PBX GUI platforms. After reading this tutorial, if you have specific questions, by all means post them on the PIAF Forum for some quick and friendly help.
Table of Contents to the Incredible PBX Applications
- Checking System Status
- Enabling Speech Recognition
- Wolfram Alpha for Siri-like queries by phone*
- Automatic Update Utility
- Asterisk Upgrade Utility
- Apache Authentication for Apps
- IPtables Firewall WhiteList
- PortKnocker Remote Access
- Travelin’ Man 4 Remote Access by Phone
- Conference Bridge
- CallerID Name (CNAM) Lookups
- Faxing with Incredible PBX
- Voicemail 101 with Incredible PBX
- Email Delivery of MP3 Voicemails
- Reconfiguring SendMail for SmartHosts
- SMS Blasting with Google Voice
- SMS Voice Messaging with Google Voice*
- SMS Messaging with VoIP.ms
- SIP URI Calling with Speed Dials
- IVR Demo of Incredible PBX Applications*
- Backup and Restore Options
- AsteriDex – The Poor Man’s Rolodex®
- Voice Dialing with AsteriDex*
- Speed Dialing with AsteriDex
- Scheduling Reminders by Phone or Web
- DISA Access with Incredible PBX
- Yahoo! News Headlines
- Weather Forecasts with Incredible PBX*
- ODBC Application Support
- Today in History
- Time of Day
- WebMin: The Linux Swiss Army Knife
- phpMyAdmin: The MySQL Swiss Army Knife
- SIP Gateways for Secure (and Free) Google Voice Calling
- User Control Panel for Extension Management
* Requires Voice Recognition implementation. See #2 above.
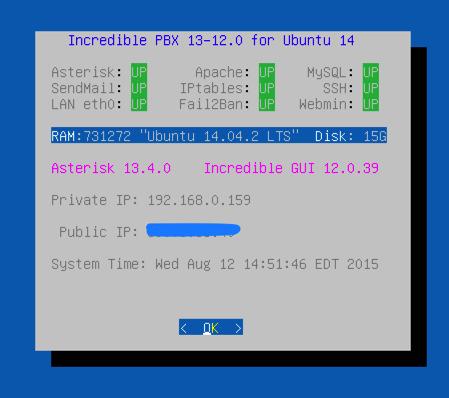
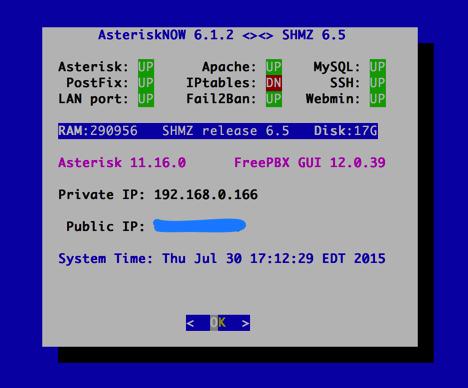
1. Checking Current Status of Incredible PBX
There are several ways to check the status of your server. First, log in as root and type: status or pbxstatus
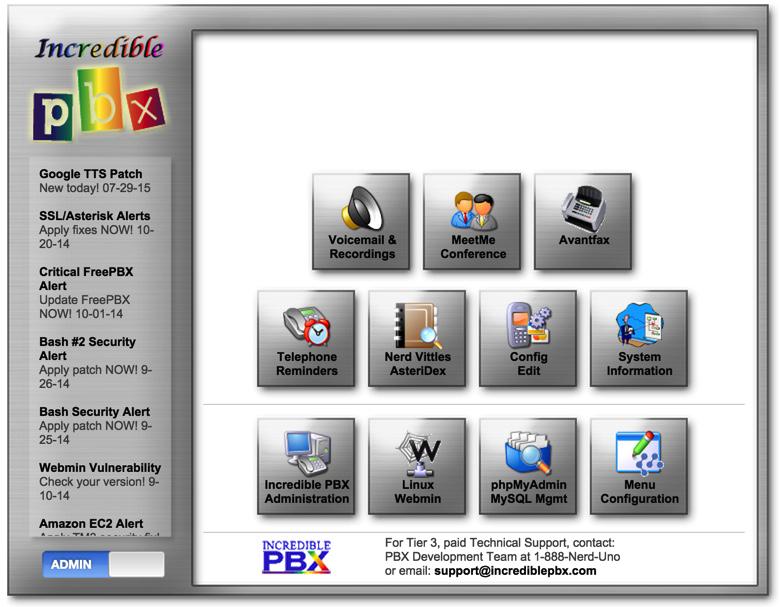
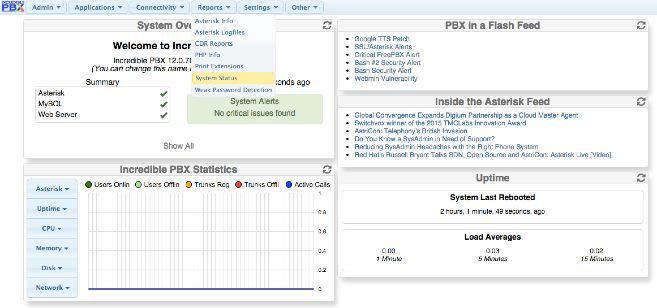
The second option is to use a browser to access your server. Choose the Admin menu. Then click Incredible PBX Administration. Log in as admin with the password you set in the Linux CLI: /root/admin-pw-change. Once you log in with your Incredible GUI admin password, the System Status menu will be displayed.
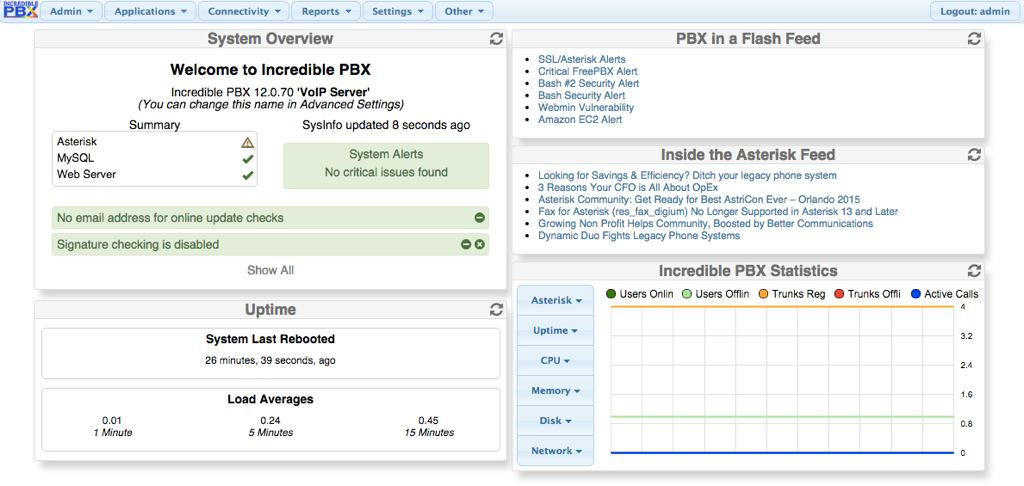
Once you roam through the GUI options, you can redisplay the System Status screen by clicking Reports -> System Status.
2. Adding Speech Recognition to Incredible PBX
Google changed the licensing of their speech recognition engine last year and now restricts use to "personal and development use." Assuming you qualify, the very first order of business is to enable speech recognition for your new PBX. Once enabled, the Incredible PBX feature set grows exponentially. You’ll have access to the Voice Dialer for AsteriDex, Worldwide Weather Reports where you can say the name of a city and state or province to get a weather forecast for almost anywhere, Wolfram Alpha for a Siri-like encyclopedia for your PBX, and Lefteris Zafiris’ speech recognition software to build additional Asterisk apps limited only by your imagination.
Here’s how to activate speech recognition on Incredible PBX. Don’t skip any steps!
3. Using Wolfram Alpha with Incredible PBX
Ever wished your Asterisk server could harness the power of a 10,000 CPU Supercomputer to answer virtually any question you can dream up about the world we live in? Well, so long as it’s for non-commercial use, today’s your lucky day. Apple demonstrated with Siri™ just how amazing this technology can be by coupling Wolfram Alpha® to a speech-to-text engine on the iPhone. Now you can do much the same thing using voice recognition with Incredible PBX.

Before using Wolfram Alpha from any phone connected to your PBX, you first must configure it by obtaining and adding a Wolfram Alpha application ID to Incredible PBX. Here are the simple steps:
1. Obtain your free Wolfram Alpha APP-ID here.
2. Log into your server as root and issue the following command:
nano -w /var/lib/asterisk/agi-bin/4747
3. When the nano editor opens, the top line of the file will look like this:
APPID="Your-Wolfram-Alpha-App-ID-Goes-Here"
4. Replace the text between the quotes with your APP_ID key from Step #1 above. Then save the file: Ctrl-X, Y, then Enter.
To use Wolfram Alpha, dial 4747 (that’s S-I-R-I backwards) from any extension.
Here are some sample queries to get you started:
Weather in Charleston South Carolina
Weather forecast for Washington D.C.
Next solar eclipse
Otis Redding
Define politician
Who won the 1969 Superbowl? (Broadway Joe)
What planes are overhead? (flying over your server’s location)
Ham and cheese sandwich (nutritional information)
Holidays 2015 (summary of all holidays for 2015 with dates and DOW)
Medical University of South Carolina (history of MUSC)
Star Trek (show history, air dates, number of episodes, and more)
Apollo 11 (everything you ever wanted to know)
Cheapest Toaster (brand and price)
Battle of Gettysburg (sad day 🙂 )
Daylight Savings Time 2015 (date ranges and how to set your clocks)
Tablets by Samsung (pricing, models, and specs)
Doughnut (you don’t wanna know)
Snickers bar (ditto)
Weather (local weather at your server’s location)
4. Automatic Update Utility for Incredible PBX
A key security component of Incredible PBX is its Automatic Update Utility. Each time you log into your server as root, the Automatic Update Utility is run. It installs the latest fixes and security patches for your server. Don’t disable it! In fact, don’t delete anything from the /root folder. You’ll need all of it sooner or later.
We recommend you log into your server as root at least once a week to keep your server current. Ditto for the web interface to Incredible PBX. Insofar as security is concerned, we make a best effort to keep the components of Incredible PBX up to date. The Linux operating system was installed by you before the Incredible PBX install began. That’s a nice way of saying Linux security is primarily your responsibility. When an egregious Linux vulnerability comes along that we know about, we will try to notify you of the issue on the PIAF Forum and on the RSS Feed that is part of the Incredible PBX Main Menu shown at the top of this article. Check the RSS Feed with a browser at least once a week. As a condition of use of the free Incredible PBX, you accepted ultimate responsibility for the security and reliability of your server. None of this discussion changes any of that.
5. Asterisk Upgrade Utility for Incredible PBX
We’ve developed a script to upgrade Asterisk to the latest version whenever you feel the urge. This brings you current in your existing release, e.g. Asterisk 11 or 13. It does NOT upgrade Asterisk 11 to 13! Before beginning the upgrade, log into your server as root using SSH and maximize the window. Otherwise, Asterisk may not compile properly. Then execute these commands:
cd /root

wget http://incrediblepbx.com/upgrade-asterisk-to-current.tar.gz

tar zxvf upgrade-asterisk-to-current.tar.gz

rm -f upgrade-asterisk-to-current.tar.gz

./upgrade-asterisk-to-current
6. Implementing Apache Authentication with Incredible PBX
With the exception of the Incredible GUI and WebMin, all web-based applications included in Incredible PBX require successful authentication with the Apache admin password to gain access. When you installed Incredible PBX, you should have created an Apache admin account. If not, issue the following command using a secure password after logging in as root:
htpasswd -b /etc/pbx/wwwpasswd admin newpassword
With the exception of AsteriDex and Reminders, you gain access to other Incredible PBX applications with the Apache admin account. For the remaining apps, you may wish to (but don’t have to) assign different account names and passwords to various departments in your organization. To set up these accounts, use the syntax above substituting the name of the department for "admin" and the department password for "newpassword."
7. Managing the IPtables Linux Firewall and WhiteList
As installed, Incredible PBX includes a preconfigured, locked-down Linux firewall that restricts incoming IPv6 traffic to localhost and, via a WhiteList, limits incoming IPv4 traffic to your server’s public and private IP addresses, your desktop computer’s IP address (that was used for the install), private LAN and NeoRouter VPN traffic, and a collection of our favorite SIP providers. You can WhiteList additional IP addresses for additional providers or for SIP and IAX phones located outside your firewall. The following firewall management scripts are mostly installed in the /root directory:
- ./add-ip — WhiteList an additional IP address or IP address range (CIDR)
- ./add-fqdn — WhiteList a site using a fully-qualified domain name (FQDN)
- ./del-acct — Remove previously designated entry from the WhiteList
- ./ipchecker — Check whether specified FQDNs have changed & update IPtables
- iptables-restart — Used exclusively to restart IPtables and test for failed FQDNs
- iptables -nL — Check the current status of your IPtables firewall
IPtables can be manually configured (if you know what you’re doing) by editing iptables and ip6tables in /etc/sysconfig (CentOS) or rules.v4 and rules.v6 in /etc/iptables (Ubuntu/Debian/Raspbian). NEVER use traditional iptables commands such as service iptables save to update your IPtables configuration, or you will permanently delete all of your FQDN entries! Instead, edit the files directly and then restart IPtables using iptables-restart. This protects the FQDN entries in your setup while also checking for invalid FQDN entries and removing them temporarily so that IPtables will successfully restart. If you use service iptables restart to restart IPtables and there happens to be an FQDN entry for a host that is either down or has disappeared, IPtables will fail to restart and your server will be left with NO firewall protection! The reason for this is the IPtables design which converts all FQDN entries to fixed IP addresses when it starts up. It’s also the reason we have to periodically check for changed FQDN entries using the ipchecker script with cron. For this to work properly, you will need to manually add your FQDN setups to the top of /root/ipchecker by inserting the filenames of any add-fqdn entries you have created. For additional details, read our Travelin’ Man 3 tutorial.
8. PortKnocker Remote Access to Incredible PBX
IPtables is a powerful firewall that keeps the bad guys out. It also will keep legitimate users (including you) from gaining remote access to your server unless you had the forethought to WhiteList your remote IP address before you left on that family vacation. Unfortunately, you don’t always know your IP address in advance. And dynamic IP addresses assigned with hotel WiFi frequently change. To address this problem, Incredible PBX includes a preconfigured PortKnocker utility. This lets you send three secret "knocks" on random TCP ports to your server to tell it to let you in temporarily (until IPtables is again restarted or the access window time expires).
For PortKnocker to work, you obviously need to know the secret knocks. You’ll find them in /root/knock.FAQ. Record them in your wallet or inside your suitcase for that rainy day! There are PortKnocker apps for almost all smartphones as well as for Windows, Mac, and Linux computers. Install your favorite AND test access before you leave town.
Finally, be aware that PortKnocker does not need any special access to your server to work; however, if your server is behind a hardware-based firewall, then you must map the three PortKnocker TCP ports to the private IP address of your server, or the knocks obviously will never get delivered to your server.
Review our PortKnocker tutorial for additional configuration tips.
9. Travelin’ Man 4 Remote Access to Incredible PBX (Dial TM4)
In addition to PortKnocker, Incredible PBX also includes a telephone-based solution to temporarily gain remote access to your server. This does require a bit of preplanning since you must create account credentials for the person to whom you wish to give remote access via a phone call. The complete tutorial for Travelin’ Man 4 is available on the PIAF Forum. All of the pieces already are in place on your server so skip down to the Configuration & Operation sections for details on implementation. The tutorial also covers the Administrator Utilities in /root/tm4 which let you set up remote user accounts.
10. Using the Conference Bridge in Incredible PBX (Dial C-O-N-F)
A new turnkey Asterisk Conference Bridge has been added to Incredible PBX. A conference bridge allows a group of people to participate in a joint phone call. Typically, participants dial into a virtual meeting room from their own phone. This virtual meeting room supports dozens or even hundreds of participants depending upon server capacity.
You do not need a timing source for conferencing with Incredible PBX! Old-style Asterisk MeetMe Conference Rooms which required a timing source are disabled.
To access the Conference Bridge, dial C-O-N-F (2663) from any phone connected to your server. Remote users can be added to a conference by providing a DID that points to an IVR which includes Conference Bridge access. Once connected to the conference bridge, a caller is prompted for the Conference Bridge PIN and his or her name.
To display Conference Bridge PINs, open Incredible GUI with a browser. Choose Applications -> Conferences -> 2663 and your Conference Bridge PINs will be shown. Reset them as desired.
11. CallerID Name (CNAM) Lookups with Incredible PBX
By default, Incredible PBX is configured to automatically provide CallerID Name lookups using CallerID Superfecta, an application initially developed on Nerd Vittles almost a decade ago. You also have the option of using free OpenCNAM CallerID name lookups for the first ten calls received each hour. These lookups are only from cached entries in the OpenCNAM database; however, you can enable the commercial lookup service if desired. The cost is four tenths of a cent per successful query.
12. Free Faxing with Incredible PBX
If you added Incredible Fax to your server by running incrediblefax script in the /root folder, then you’re in for a treat. As part of the install, you provided an email address for delivery of incoming faxes. That’s all the setup that is required to have incoming faxes delivered via email in PDF format. The best way to figure out whether a particular provider supports fax technology on their DIDs is to send a test fax to yourself. FaxZERO lets you send 5 free faxes of up to 3 pages every day. Give it a whirl.
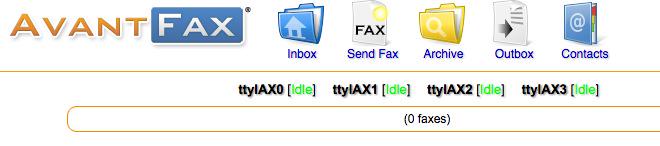
You also can send faxes using standard document types with the AvantFax web application. Log into AvantFax from the main Incredible PBX page by clicking on the AvantFax icon. Choose the Send a Fax option from the main menu, fill in the blanks, and attach your document. AvantFax uses the default dialplan so use the prefix desired to send the fax using your preferred provider. HINT: Google Voice does an excellent job with both incoming and outgoing faxes, and the calls are free in the U.S. and Canada.
Copies of all incoming faxes also are available for retrieval within AvantFax.
13. Voicemail 101 for Incredible PBX
Voicemail functionality is enabled on an extension-by-extension basis as part of the Extension setup under the Applications tab in the GUI. Once enabled, you can set up your mailbox and retrieve your messages by dialing *98. You can leave a message for any extension without actually calling the extension. Just prepend * to any extension number before dialing, e.g. *701. A number of the system settings for voicemail can be tweaked under the Voicemail Admin option under the Settings tab.
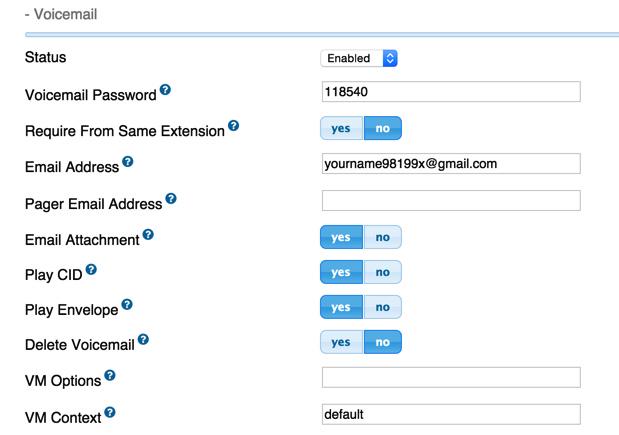
14. Email Delivery of MP3 Voicemails with Incredible PBX
Speaking of email delivery, your voicemails also can be delivered to any email address of your choosing. For every Extension, simply add an Email Address in the Voicemail section of the form. With Incredible PBX, the voicemail message will be attached to the email in MP3 format so it’s suitable for playback with most email clients on desktop PCs, Macs, and smartphones. Be advised that some Internet service providers (such as Comcast) block downstream SMTP servers. You can check whether your outbound email is flowing by accessing WebMin (below) and choosing Servers -> SendMail Mail Server -> Mail Queue. If you find outbound mail is accumulating, then you’ll need to add your ISP’s SMTP server address as a SmartHost for SendMail as documented in the next section.
15. Reconfiguring SendMail for SmartHost SMTP Delivery Of Outgoing Emails
Many residential Internet service providers block downstream SMTP servers such as the SendMail server running with Incredible PBX. If you’re sending emails but they never arrive and you’ve checked your SPAM folder, then chances are your ISP is the culprit. The simple solution is to add your ISP’s SMTP server as a SmartHost for SendMail. This means outbound emails will be forwarded to your ISP for actual email transmission over the Internet. Here’s how. Edit /etc/mail/sendmail.cf and search for DS. Immediately after DS, add the FQDN of your ISP’s SMTP server, e.g. DSsmtp.comcrap.net (no spaces!). Save the file and then restart SendMail: service sendmail restart. Your email and voicemail messages with attachments should begin flowing without further delay.
Email from: Asterisk PBX asterisk@pbx.local...
"Nerd Vittles" at 8001234567 left a new voicemail message 1 for extension 6002 on Thursday, January 29, 2015 at 01:42:33 PM.
You can test email delivery by sending yourself a message from the Linux CLI:
echo "test" | mail -s testmessage yourname@somedomain.com
16. SMS Blasting with Google Voice and Incredible PBX
Out of the box, Incredible PBX supports SMS Message Blasting if you have a functioning Google Voice account set up. Before first use, you must add your credentials, address list, and text message to the SMS Blaster scripts in the /root folder.
In smsblast, insert your credentials:
GVACCT="yourname@gmail.com"
GVPASS="yourpassword"
MSGSUBJECT="Little League Alert"
In smslist.txt, insert one or more recipients for your message. These can be a combination of SMS addresses and email addresses and will be delivered accordingly.
NOTE: For most cellphone providers, you also can send an email message for SMS delivery by the provider. The complete list of providers is available here. Email messaging for SMS requires that you know the cellphone provider for your recipient while standard SMS messaging does not.
# In lieu of SMS number, email is also OK
8431234567 Doe John
mary@doe.com Doe Mary
8435551212@txt.att.net Mr T
In smsmsg.txt, enter the text message to be sent.
Once you have all three files configured, run the script: /root/smsblast.
17. Voice-Activated SMS Messaging with Incredible PBX (Dial S-M-S)
In addition to message blasting, you also can dial 767 from any extension and dictate an SMS message to send through your Google Voice account. When prompted for the destination, simply enter the 10-digit SMS number of the recipient.
18. SMS Messaging with VoIP.ms and Incredible PBX
Incredible PBX also supports SMS messaging through VoIP.ms if you have an account and an SMS-enabled DID. See the VoIP.ms wiki for setup info on the VoIP.ms side.
To install the VoIP.ms SMS scripts, follow these steps:
cd /root
mkdir sms-voip.ms
cd sms-voip.ms
wget http://incrediblepbx.com/voipms-SMS.tar.gz
tar zxvf voipms-SMS.tar.gz
Edit voipms-sms.php and insert your VoIP.ms number that supports SMS messaging (no spoofing allowed!):
$SMSsender="8005551212";
Edit class.voipms.php and insert your VoIP.ms API credentials:
    /*******************************************\
     *  VoIPms - API Credentials
    \*******************************************/
    var $api_username   = 'yourname@youremail.com';
    var $api_password   = 'yourpassword';
Send an SMS message through VoIP.ms with the following command where smsnumber is the 10-digit number of the SMS recipient and "sms message" is the text message surrounded by quotes:
/root/sms-voip.ms/voipms-sms.php smsnumber "sms message"
NOTE: VoIP.ms has indicated that sooner or later there will be a penny per message charge for SMS messages; however, they’re still free as of now.
19. SIP URI Calling with Incredible PBX (Demo: Dial L-E-N-N-Y)
With one line of dialplan code, you can add Speed Dials for free SIP URI calling worldwide. Just create an Other (Custom) Device Extension. Provide an extension number for the SIP URI and enter the SIP URI in the following format in the dial field: SIP/2233435945@sip2sip.info
20. IVR Demo of Incredible PBX Applications (Dial 7001)
The easiest way to try out a number of the Incredible PBX applications is to take the IVR Demo for a spin. Just pick up any phone and dial D-E-M-O (3366). The sample code for the IVR is available for review and modification in extensions_custom.conf. Just search for 3366. You can create your own IVRs and AutoAttendants using the IVR option under the Applications tab in the GUI.
21. Incredible Backup & Restore with Incredible PBX
Incredible Backup and Restore scripts are included in the /root folder. These scripts make and restore snapshots of the settings on your server and should be used in conjunction with a full system backup solution. The GUI includes its own backup snapshots by choosing Backup & Restore under the Admin tab.
22. AsteriDex – The Poor Man’s Rolodex
AsteriDex is a web-based phonebook application for Incredible PBX. You can access it from the main web menu. Scripts are also available to import your contacts from Outlook and Google Contacts.
23. Voice Dialing with AsteriDex (Dial 411)
If you have voice recognition enabled on your server, you can call anyone in your AsteriDex database by dialing 411.
24. Speed Dialing with AsteriDex (Dial 412 or 000+)
For those without voice recognition, Incredible PBX includes two speed dialing utilities. The first is accessed by dialing 412. Then enter any 3-digit dialcode from your AsteriDex database to complete the call.
For a complete listing of your AsteriDex dial codes, execute this query:
mysql -u root -ppassw0rd asteridex -e "select name,dialcode from user1 order by name"
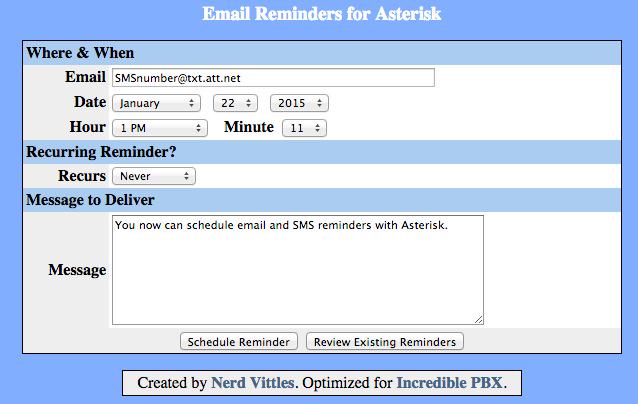
25. Telephone Reminders (Dial 123)
Incredible PBX includes a sophisticated reminders system that lets you schedule individual or recurring reminders using your phone by dialing 123 or a web browser. A complete tutorial is available here. For phone reminders, a password is required to access the reminder system. You’ll find or can set your Reminders password by searching for 123 in extensions_custom.conf. Typically, these reminders set up a return call at a scheduled time that then plays back either a recorded message or a TTS message generated from the text you entered in the browser application. Incredible PBX also includes a new addition that lets you schedule web reminders that are delivered by email or SMS message. Links to the web-based reminders applications are in the main Incredible PBX web menu.
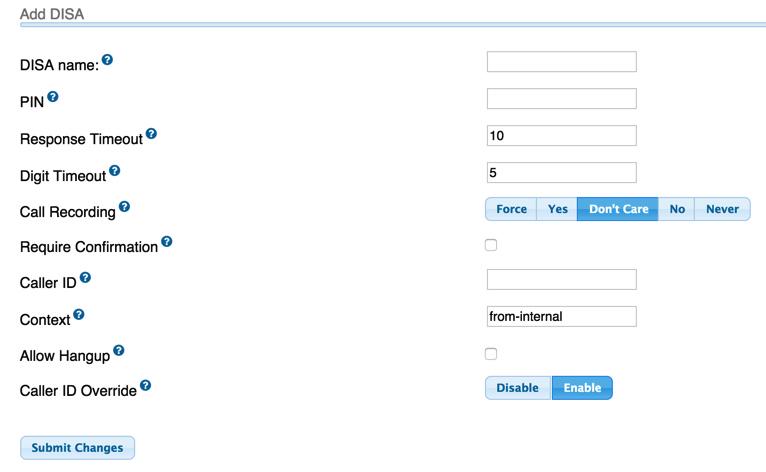
26. DISA Access with Incredible PBX
Direct Inward System Access (aka DISA) is one of the great PBX inventions of the last 50 years. It’s also one of the most dangerous. It lets someone connect to your PBX and obtain dial tone to place an outbound call using your trunks… on your nickel. Typically, it is offered as an option with an IVR or AutoAttendant. DISA extensions can be added using the DISA option under the Applications tab. Make sure you assign a very secure password. It’s your phone bill.
27. Yahoo! News (Dial 951)
Yahoo! news headlines are available by dialing 951. The news option also is included in the sample IVR application.
28. Weather Forecasts by Phone (Dial 949 or Z-I-P)
If you have voice recognition enabled on your server, you can retrieve a weather report for most cities in the world by dialing 949 and saying the name of the city plus the state, province, or country. For PBXs without voice recognition, you can obtain a weather forecast for most zip codes by dialing 947 (Z-I-P) and entering the 5-digit zip code.
29. ODBC Application Support for Asterisk
ODBC/MySQL application support for Asterisk is included in Incredible PBX. You can try out a few sample applications that are included to get you started. Dial 222 and enter 12345 for the employee number. This retrieves an employee name from the MySQL timeclock database using Asterisk. Dial 223 to retrieve an AsteriDex name and phone number by entering the 3-character dialcode. You then have the option of placing the call by pressing 1. Once you have created accounts for Travelin’ Man 4, you can dial 864 (T-M-4) to WhiteList an IP address for that account after entering the account number and matching PIN. Use the * key for periods in the IP address. The code for all of the samples is in the following files in /etc/asterisk: odbc.conf and func_odbc.conf. If you create new MySQL databases, remember to add corresponding entries in res_odbc.conf and /etc/odbc.ini. Then restart Asterisk: amportal restart.
30. Today in History (Dial T-O-D-A-Y)
It’s always interesting to find out what happened Today in History. And Incredible PBX now delivers it by phone. Just dial 86329 (T-O-D-A-Y) for a walk down memory lane.
31. Time of Day
Speaking of yesteryear, if you grew up dialing TI-4-1212 for the time of day, Ma Bell may have discontinued the service, but we haven’t. Now you can do it on your very own PBX. Just dial into the DEMO IVR and choose option 4.
But suppose you want your users to be able to dial in for the time. Just dial *61 for a time update.
32. WebMin: The Linux Swiss Army Knife
There is no finer Linux application than WebMin. There is no more dangerous Linux application than WebMin. You’ve been warned. We heartily recommend WebMin as a tool to LOOK at your server’s settings. We strongly discourage changing anything in WebMin unless you totally know what you are doing. This is especially true with management of Linux applications that make up the core of Incredible PBX: the Linux kernel, SendMail, IPtables, Apache, MySQL, PHP, and…
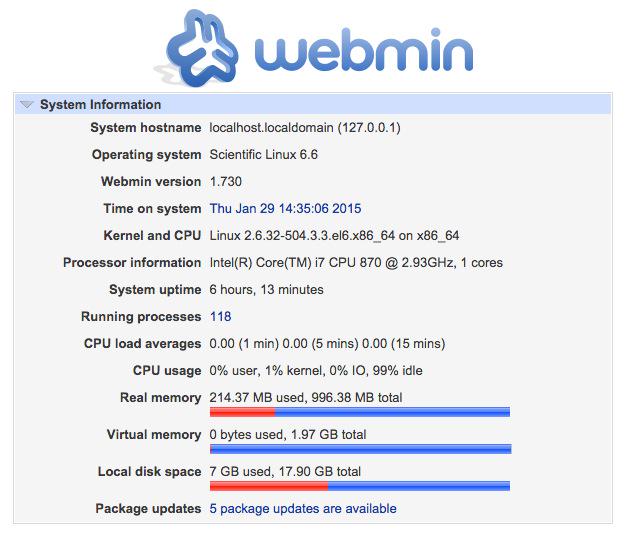
To access WebMin, click on the WebMin link in the main Incredible PBX web menu. The username is root. The password is your root password. WebMin has root privileges to your server. Reread paragraph 1 and act accordingly.
For an exhaustive tutorial on WebMin, download The Book of WebMin by Joe Cooper. For a more recent commercial offering, take a look at Michal Karzyński’s WebMin Administrator’s Cookbook.
33. phpMyAdmin: The MySQL Swiss Army Knife
The same caveats we expressed regarding WebMin apply to phpMyAdmin. It is a powerful tool for managing MySQL databases in the right hands. It is a dangerous tool in the wrong hands. There should be little need to use phpMyAdmin unless you are developing a customized database solution for your business. We’ve included phpMyAdmin just in case.
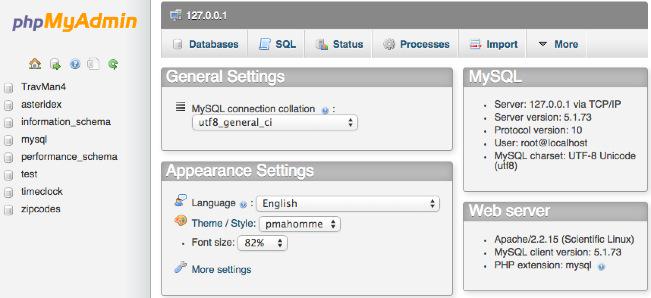
To access phpMyAdmin, click on the phpMyAdmin link in the main Incredible PBX web menu. For tutorials on phpMyAdmin, see the phpMyAdmin wiki. For an excellent commercial offering focused on the version of phpMyAdmin installed on your server, consider Mastering phpMyAdmin 3.4 for Effective MySQL Management by Marc Delisle.
34. SIP Gateways for Secure (and Free) Google Voice Calling
If you have difficulty finding the Google Chat option after setting up a new Google Voice account, follow this tutorial. If you’d prefer a secure, pain-free method of accessing Google Voice via SIP for a modest one-time fee, there are some other options:
35. User Control Panel for Extension Management
For those that have clamored for a safe way to permit end-users to manage their extensions and voicemails, your ship has arrived. Meet the User Control Panel (UCP) which now is part of the Incredible PBX GUI. First, set up accounts for your users with the User Management option under the Admin tab. Specify account names, passwords, and extensions to be managed. Other entries for email addresses are optional. Then choose the UCP option in the GUI, login with one of the accounts you’ve created, and follow your nose.
Originally published: Wednesday, August 26, 2015
 Support Issues. With any application as sophisticated as this one, you’re bound to have questions. Blog comments are a terrible place to handle support issues although we welcome general comments about our articles and software. If you have particular support issues, we encourage you to get actively involved in the PBX in a Flash Forums. It’s the best Asterisk tech support site in the business, and it’s all free! Please have a look and post your support questions there. Unlike some forums, ours is extremely friendly and is supported by literally hundreds of Asterisk gurus and thousands of users just like you. You won’t have to wait long for an answer to your question.

Need help with Asterisk? Visit the PBX in a Flash Forum.
Special Thanks to Our Generous Sponsors
FULL DISCLOSURE: ClearlyIP, Skyetel, Vitelity, DigitalOcean, Vultr, VoIP.ms, 3CX, Sangoma, TelecomsXchange and VitalPBX have provided financial support to Nerd Vittles and our open source projects through advertising, referral revenue, and/or merchandise. As an Amazon Associate and Best Buy Affiliate, we also earn from qualifying purchases. We’ve chosen these providers not the other way around. Our decisions are based upon their corporate reputation and the quality of their offerings and pricing. Our recommendations regarding technology are reached without regard to financial compensation except in situations in which comparable products at comparable pricing are available from multiple sources. In this limited case, we support our sponsors because our sponsors support us.
 BOGO Bonaza: Enjoy state-of-the-art VoIP service with a $10 credit and half-price SIP service on up to $500 of Skyetel trunking with free number porting when you fund your Skyetel account. No limits on number of simultaneous calls. Quadruple data center redundancy. $25 monthly minimum spend required. Tutorial and sign up details are here.
![]() The lynchpin of Incredible PBX 2020 and beyond is ClearlyIP components which bring management of FreePBX modules and SIP phone integration to a level never before available with any other Asterisk distribution. And now you can configure and reconfigure your new Incredible PBX phones from the convenience of the Incredible PBX GUI.
The lynchpin of Incredible PBX 2020 and beyond is ClearlyIP components which bring management of FreePBX modules and SIP phone integration to a level never before available with any other Asterisk distribution. And now you can configure and reconfigure your new Incredible PBX phones from the convenience of the Incredible PBX GUI.
 VitalPBX is perhaps the fastest-growing PBX offering based upon Asterisk with an installed presence in more than 100 countries worldwide. VitalPBX has generously provided a customized White Label version of Incredible PBX tailored for use with all Incredible PBX and VitalPBX custom applications. Follow this link for a free test drive!
 Special Thanks to Vitelity. Vitelity is now Voyant Communications and has halted new registrations for the time being. Our special thanks to Vitelity for their unwavering financial support over many years and to the many Nerd Vittles readers who continue to enjoy the benefits of their service offerings. We will keep everyone posted on further developments.
Some Recent Nerd Vittles Articles of Interest…
Introducing Incredible PBX GUI for AsteriskNOW and the FreePBX Distro

Before we get started today, let’s clear the air on a few things that have been brought to our attention. We’re not opposed to any organization making money. That includes Digium® and Sangoma®. And we fully appreciate that both of these companies need to make money to continue to deliver first rate products like Asterisk® and FreePBX®. Our fundamental disagreement with SchmoozeCom and now Sangoma stems from their sales methodology. In a nutshell, they’ve taken what purports to be an open source GPL product and turned it into a marketing tool for a whole host of commercial, closed source, time-restricted add-ons. If this were done in keeping with the GPL requirement for clear separation between the GPL components and the commercial ones, we would have no objection at all. As it stands, the Sangoma commercial bundling approach is functionally identical to distributing commercial components tied to the Linux GPL kernel, a practice that is specifically prohibited by the GPL. The prohibition stems from hooking commercial components to any GPL component, not merely the Linux kernel. Hence, hooking commercial FreePBX components to the open source GPL FreePBX and Linux ISO platforms is just as problematic as hooking a commercial driver to the Linux kernel. You’re profiting off the free work of others while confusing consumers on what’s free software and what’s not.
Sangoma’s decision to commingle and intertwine the GPL and commercial components in such a way that end-users have no choice but to install the entire bundle including the NagWare and CrippleWare hooks is problematic in another way as well. It also means users cannot legally redistribute the SHMZ ISO (even though it includes the functionally identical components found in the RedHat Enterprise Linux GPL ISO) because consumers also would be redistributing non-GPL software without a license to do so.
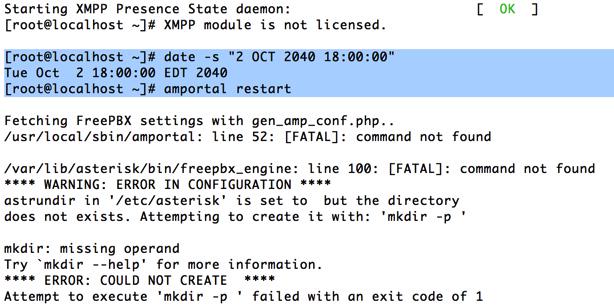
If you really want to have some fun (on a non-production machine, of course), try setting the clock up about 26 years and experience time bomb software in all its glory. And we thought this disappeared in the shareware days. Heh.
Last, but not least, Sangoma has shrouded the essential Cloud components of the FreePBX distribution in secrecy with encrypted signatures to prevent others from adding to the GPL-advertised project without encountering nasty error messages suggesting that your server has been compromised. Issuing keys while keeping exclusive control over issuance and rescission of those keys doesn’t help. That is a textbook example of PROPRIETARY software.
Until these issues are addressed, we believe everyone is better served by converting your GUI platform to the Incredible PBX GUI which offers GPL-compatible modules and an open source, GPL-based Cloud platform for all to see. That’s what FREEDOM really means, Sangoma. And that’s our objective for today, no more and no less.
Installing the SHMZ Base Operating System
If you’ve installed Incredible PBX on another operating system platform, today’s exercise isn’t that different. You’ll start by downloading and installing a fresh copy of AsteriskNOW or FreePBX Distro 6.12. You need a fresh install because all of your setup will be modified as part of the Incredible PBX install anyway. Both the 32-bit and 64-bit platforms are supported. Once the install begins, we recommend choosing the NO RAID setup because upgrading to FreePBX 13 down the road reportedly leaves you with a kernel that does not support RAID.
Begin by installing the 32-bit or 64-bit version of your choice on your favorite hardware or Desktop. Or you may prefer to use a Cloud provider1 that already offers a preconfigured image. In the latter case, you can skip this section.
For those using a dedicated hardware platform or wishing to install as a virtual machine, the drill is the same. Start by downloading the ISO. Then burn the ISO to a DVD unless you’ll be booting from the ISO on a virtual machine platform such as VirtualBox. On virtual platforms, we recommend at least 1GB RAM and a 20GB dedicated drive. For VirtualBox, here are the settings:
Type: Linux
Version: RedHat 64-bit or 32-bit
RAM: 1024MB
Default Drive Options with 20GB+ space
Create
Settings->System: Enable IO APIC and Disable HW Clock (leave rest alone)
Settings->Audio: Enable
Settings->Network: Enable, Bridged
Settings->Storage: Far right CD icon (choose your ISO)
Start
Boot your server with the ISO, and start the install. Here are the simplest installation steps:
Choose NO-RAID install and Click Continue
Choose Whether to Enable IPv6 Support
Choose Time Zone and Uncheck System Clock Uses UTC
Create Root Password: somepassword, somepassword, Click Done
Wait for Install and Setup to finish (about 30 minutes)
Installing Incredible PBX for SHMZ 6.5
Unlike other Linux operating systems, today’s ISOs will leave you with a functioning Asterisk platform with the FreePBX GUI. Both are built from RPMs rather than being compiled on the fly from source. We’ve chosen to leave the Asterisk platform in place for those that prefer the ease of use of an RPM solution. Be advised that this means adjustments to Asterisk modules are extremely difficult should you ever decide you need some functionality that is not provided in the default build. The FreePBX GUI platform will be replaced with the Incredible PBX GUI using GPL-compatible modules from version 12.
To begin, log in to your server as root and issue the following commands:
cd /root
wget http://incrediblepbx.com/incrediblepbx11-12.1.shmz.tar.gz
tar zxvf incrediblepbx*
./IncrediblePBX*
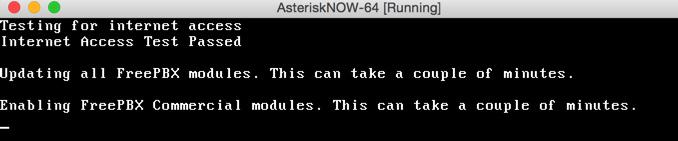
Once you have agreed to the license agreement and terms of use, press Enter and go have a long cup of coffee. The Incredible PBX installer runs unattended so find something to do for the next 30-60 minutes unless you just like watching code compile. When the installation is complete, run /root/admin-pw-change to set the admin password for GUI access using a browser. Log out and back into your server. After the Automatic Update Utility runs, you’ll be greeted by the status display:
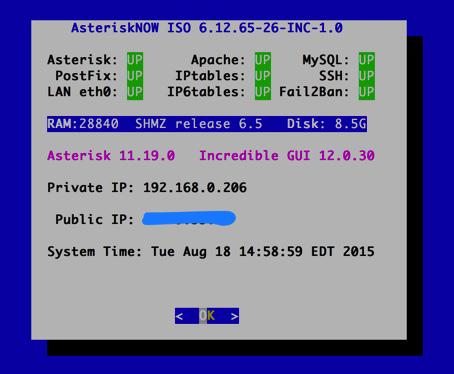
Press ENTER and perform at least the first 5 steps below:
Make your root password very secure: passwd
Set an admin GUI password: ./admin-pw-change
Create admin password for web apps: htpasswd /etc/pbx/wwwpasswd admin
Set your correct time zone: ./timezone-setup
Restart Asterisk: amportal restart
Reload the GUI: amportal a r
Clean Up GUI Module Signature Mess: gui-fix
Make a copy of your Knock codes: cat knock.FAQ
Decipher IP address and other info about your server: status
Incredible PBX includes an Automatic Update Utility which downloads important updates whenever you log into your server as root. We recommend you log in once a week to keep your server current. If you haven’t done so already, now would be a good time to log out and back into your server at the Linux command line to bring your server up to current specs.
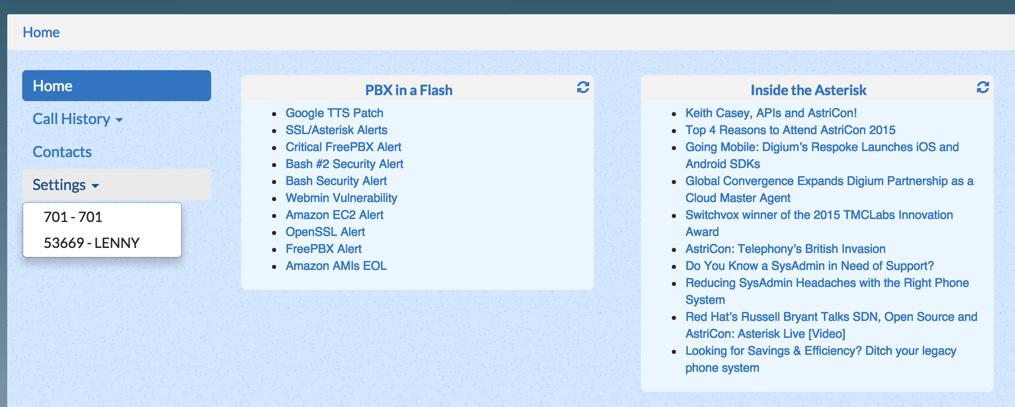
You can access the Incredible PBX GUI using your favorite web browser to configure your server. Just enter the IP address shown in the status display.
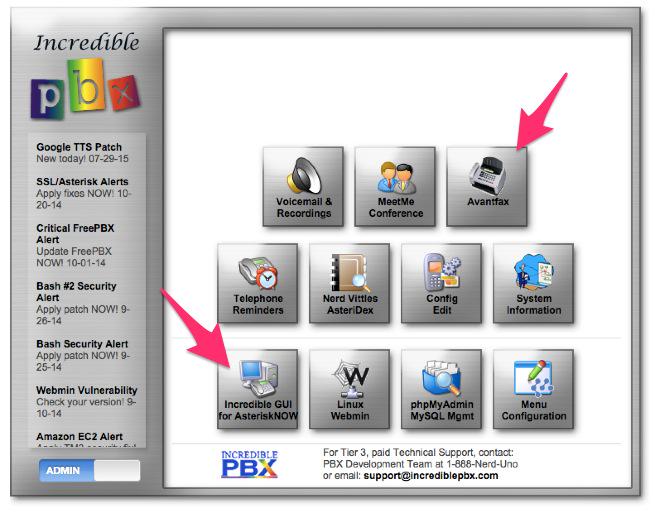
Choose Incredible GUI Administration from the Admin menu of the Kennonsoft GUI (shown above). The default username is admin and the password is what you set above. Now edit extension 701 so you can figure out (or change) the randomized passwords that were set up for your 701 extension and voicemail account: Applications -> Extensions -> 701. If you’re behind a hardware-based firewall, change the NAT setting to: YES. NOTE: The fax option will not appear until you’ve run the Incredible FAX installation script in /root.
Setting Up a Soft Phone to Use with Incredible PBX
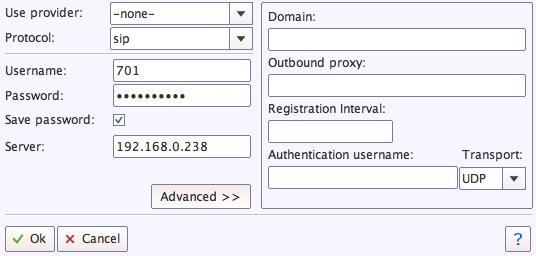
Now you’re ready to set up a telephone so that you can play with Incredible PBX. We recommend YateClient which is free. Download it from here. Run YateClient once you’ve installed it and enter the credentials for the 701 extension on Incredible PBX. You’ll need the IP address of your server plus your extension 701 password. Choose Settings -> Accounts and click the New button. Fill in the blanks using the IP address of your server, 701 for your account name, and whatever password you created for the extension. Click OK.
Once you are registered to extension 701, close the Account window. Then click on YATE’s Telephony Tab and place some test calls to the numerous apps that are preconfigured on Incredible PBX. Dial a few of these to get started:
947 - Weather by ZIP Code

951 - Yahoo News

*61 - Time of Day

*68 - Wakeup Call

TODAY - Today in History
Now you’re ready to connect to the telephones in the rest of the world. If you live in the U.S., the easiest way (at least for now) is to set up a free Google Voice account. Google has threatened to shut this down but as this is written, it still works. The more desirable long-term solution is to choose several SIP providers and set up redundant trunks for your incoming and outbound calls. The PIAF Forum includes dozens of recommendations to get you started.
Configuring Google Voice
If you want to use Google Voice, you’ll need a dedicated Google Voice account to support Incredible PBX. If you want to use the inbound fax capabilities of Incredible Fax 11, then you’ll need an additional Google Voice line that can be routed to the FAX custom destination using the GUI. The more obscure the username (with some embedded numbers), the better off you will be. This will keep folks from bombarding you with unsolicited Gtalk chat messages, and who knows what nefarious scheme will be discovered using Google messaging six months from now. So keep this account a secret!
We’ve tested this extensively using an existing Gmail account, and inbound calling is just not reliable. The reason seems to be that Google always chooses Gmail chat as the inbound call destination if there are multiple registrations from the same IP address. So, be reasonable. Do it our way! Set up a dedicated Gmail and Google Voice account, and use it exclusively with Incredible PBX. It’s free at least through 2013. Google Voice no longer is by invitation only so, if you’re in the U.S. or have a friend that is, head over to the Google Voice site and register.
You must choose a telephone number (aka DID) for your new account, or Google Voice calling will not work… in either direction. Google used to permit outbound Gtalk calls using a fake CallerID, but that obviously led to abuse so it’s over! You also have to tie your Google Voice account to at least one working phone number as part of the initial setup process. Your cellphone number will work just fine. Don’t skip this step either. Just enter the provided 2-digit confirmation code when you tell Google to place the test call to the phone number you entered. Once the number is registered, you can disable it if you’d like in Settings, Voice Setting, Phones. But…
IMPORTANT: Be sure to enable the Google Chat option as one of your phone destinations in Settings, Voice Setting, Phones. That’s the destination we need for The Incredible PBX to work its magic! Otherwise, all inbound and outbound calls will fail. If you don’t see this option, you may need to call up Gmail and enable Google Chat there first. Then go back to the Google Voice Settings.
While you’re still in Google Voice Settings, click on the Calls tab. Make sure your settings match these:
- Call Screening – OFF
- Call Presentation – OFF
- Caller ID (In) – Display Caller’s Number
- Caller ID (Out) – Don’t Change Anything
- Do Not Disturb – OFF
- Call Options (Enable Recording) – OFF
- Global Spam Filtering – ON
Click Save Changes once you adjust your settings. Under the Voicemail tab, plug in your email address so you get notified of new voicemails. Down the road, receipt of a Google Voice voicemail will be a big hint that something has come unglued on your PBX.
One final word of caution is in order regardless of your choice of providers: Do NOT use special characters in any provider passwords, or nothing will work!
Now you’re ready to set up your Google Voice trunk in the GUI. After logging in with your browser, click the Connectivity tab and choose Google Voice/Motif. To Add a new Google Voice account, just fill out the form. Do NOT check the third box or incoming calls will never ring!
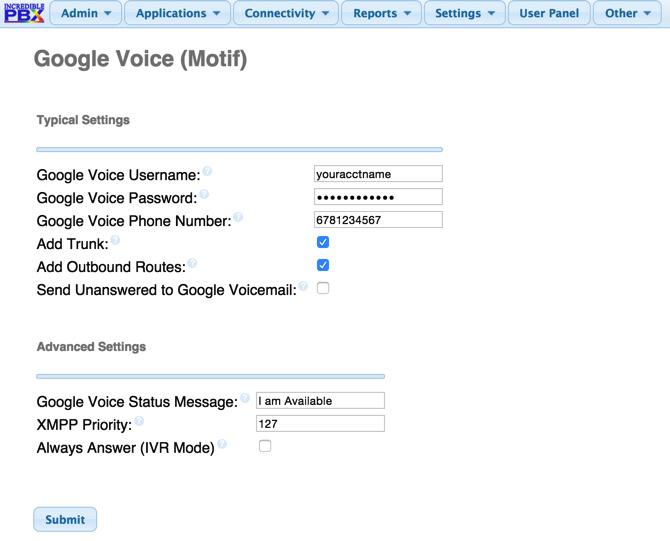
IMPORTANT LAST STEP: Google Voice will not work unless you restart Asterisk from the Linux command line at this juncture. Using SSH, log into your server as root and issue the following command: amportal restart.
If you have trouble getting Google Voice to work (especially if you have previously used your Google Voice account from a different IP address), try this Google Voice Reset Procedure. It usually fixes connectivity problems. If it still doesn’t work, enable Less Secure Apps using this Google tool.
Troubleshooting Audio and DTMF Problems
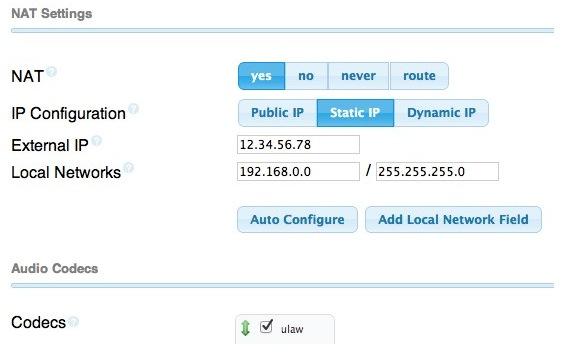
You can avoid one-way audio on calls and touchtones that don’t work with these simple settings in the GUI: Settings -> Asterisk SIP Settings. Just plug in your public IP address and your private IP subnet. Then set ULAW as the only Audio Codec.
A Few Words about the Incredible PBX Security Model
Today’s Incredible PBX install joins our previous builds as our most secure turnkey PBX implementation, ever. As configured, it is protected by both Fail2Ban and a hardened configuration of the IPtables Linux firewall. The latest release also includes Port Knocker for simple, secure access from any remote computer or smartphone. You can get up to speed on how the technology works by reading the Nerd Vittles tutorial. Your Port Knocker credentials are stored in /root/knock.FAQ together with activation instructions for your server and mobile devices. The NeoRouter VPN client also is included for rock-solid, secure connectivity to remote users. Read our previous tutorial for setup instructions. As configured, nobody can access your PBX without  your credentials AND
  an IP address that is either on your private network or that matches the IP address of your server or the PC from which you installed Incredible PBX. You can whitelist additional IP addresses by running the command-line utility /root/add-ip. You can remove whitelisted IP addresses by running /root/del-acct. Incredible PBX is preconfigured to let you connect to many of the leading SIP hosting providers without additional firewall tweaking. We always recommend you also add an extra layer of protection by running your server behind a hardware-based firewall with no Internet port exposure, but that’s your call. And it’s your phone bill. 😉
The IPtables firewall is a complex piece of software. If you need assistance with configuring it, visit the PIAF Forum for some friendly assistance.
Incredible Backup and Restore
We’re pleased to introduce our latest backup and restore utilities for Incredible PBX. Running /root/incrediblebackup will create a backup image of your server in /tmp. This backup image then can be copied to any other medium desired for storage. To restore it to another Incredible PBX server on the same platform, simply copy the image to a server running Asterisk 11 and the same version of the Incredible PBX GUI. Then run /root/incrediblerestore. Doesn’t get much simpler than that.
Switching Major Versions of Asterisk
One of the unique features of this aggregation is the ability to quickly switch from one major version of Asterisk to another, e.g. from Asterisk 11 to 13 or from Asterisk 13 back to 11. It will also bring your particular Asterisk version up to the current release. This functionality has been retained in the Incredible PBX implementation.
WARNING: You will lose your free faxing capability with HylaFax/AvantFax if you deployed it before switching Asterisk versions! You may be able to restore the fax functionality by running the incrediblefax installer again. No guarantees.
To switch versions, issue the following commands after logging into your server as root:
sed -i 's|enabled=0|enabled=1|' /etc/yum.repos.d/FreePBX.repo
asterisk-version-switch
sed -i 's|enabled=1|enabled=0|' /etc/yum.repos.d/FreePBX.repo
Incredible PBX Automatic Update Utility
Every time you log into your server as root, Incredible PBX will ping the IncrediblePBX.com web site to determine whether one or more updates are available to bring your server up to current specs. We recommend you log in at least once a week just in case some new security vulnerability should come along.
A Word to the Wise: yum update can be a very dangerous tool. We have disabled the FreePBX repositories as part of the Incredible PBX install. We recommend you keep it that way. Security updates, if necessary, are distributed through the Automatic Update Utility. This puts an additional layer of protection between your server and yum repos. Keep it that way!
In the meantime, we encourage you to sign up for an account on the PIAF Forum and join the discussion. In addition to providing first-class, free support, we think you’ll enjoy the camaraderie.
Originally published: Wednesday, August 19, 2015
Support Issues. With any application as sophisticated as this one, you’re bound to have questions. Blog comments are a terrible place to handle support issues although we welcome general comments about our articles and software. If you have particular support issues, we encourage you to get actively involved in the PBX in a Flash Forums. It’s the best Asterisk tech support site in the business, and it’s all free! Please have a look and post your support questions there. Unlike some forums, ours is extremely friendly and is supported by literally hundreds of Asterisk gurus and thousands of users just like you. You won’t have to wait long for an answer to your question.
NEWS FLASH: There’s a message thread to handle Bugs & Fixes for this new release. If you have issues with your install, start there.
Need help with Asterisk? Visit the PBX in a Flash Forum.
Special Thanks to Our Generous Sponsors
FULL DISCLOSURE: ClearlyIP, Skyetel, Vitelity, DigitalOcean, Vultr, VoIP.ms, 3CX, Sangoma, TelecomsXchange and VitalPBX have provided financial support to Nerd Vittles and our open source projects through advertising, referral revenue, and/or merchandise. As an Amazon Associate and Best Buy Affiliate, we also earn from qualifying purchases. We’ve chosen these providers not the other way around. Our decisions are based upon their corporate reputation and the quality of their offerings and pricing. Our recommendations regarding technology are reached without regard to financial compensation except in situations in which comparable products at comparable pricing are available from multiple sources. In this limited case, we support our sponsors because our sponsors support us.
BOGO Bonaza: Enjoy state-of-the-art VoIP service with a $10 credit and half-price SIP service on up to $500 of Skyetel trunking with free number porting when you fund your Skyetel account. No limits on number of simultaneous calls. Quadruple data center redundancy. $25 monthly minimum spend required. Tutorial and sign up details are here.
![]() The lynchpin of Incredible PBX 2020 and beyond is ClearlyIP components which bring management of FreePBX modules and SIP phone integration to a level never before available with any other Asterisk distribution. And now you can configure and reconfigure your new Incredible PBX phones from the convenience of the Incredible PBX GUI.
The lynchpin of Incredible PBX 2020 and beyond is ClearlyIP components which bring management of FreePBX modules and SIP phone integration to a level never before available with any other Asterisk distribution. And now you can configure and reconfigure your new Incredible PBX phones from the convenience of the Incredible PBX GUI.
VitalPBX is perhaps the fastest-growing PBX offering based upon Asterisk with an installed presence in more than 100 countries worldwide. VitalPBX has generously provided a customized White Label version of Incredible PBX tailored for use with all Incredible PBX and VitalPBX custom applications. Follow this link for a free test drive!
Special Thanks to Vitelity. Vitelity is now Voyant Communications and has halted new registrations for the time being. Our special thanks to Vitelity for their unwavering financial support over many years and to the many Nerd Vittles readers who continue to enjoy the benefits of their service offerings. We will keep everyone posted on further developments.
Some Recent Nerd Vittles Articles of Interest…
- Some of our links refer users to Amazon or other service providers when we find their prices are competitive for the recommended products. Nerd Vittles receives a small referral fee from these providers to help cover the costs of our blog. We never recommend particular products solely to generate commissions. However, when pricing is comparable or availability is favorable, we support these providers because they support us. [↩]
Introducing the FUD-Free Firewall for FreePBX Distro and AsteriskNOW
After frequent complaints from our FreePBX® users, we introduced a firewall application for the PBX in a Flash™ and Incredible PBX™ platforms that protected FreePBX resources. That was over 5 years ago. The product became Travelin’ Man™ 3, an IPtables-based WhiteList that totally eliminated access to your Asterisk® server unless a WhiteList entry had been authorized by the administrator. The application was further embellished over the years to facilitate access by remote users. First, we introduced PortKnocker™ for Asterisk® and later we introduced Travelin’ Man 4 to let users call in with a passcode to authorize server access. For the past several years, a preconfigured firewall has been an integral component in what has become the 7-Layer Security Model included in all Incredible PBX builds. TIP: Security is not a new idea for us.
During this evolution, the FreePBX developers introduced their own distribution, the FreePBX Distro™. Conspicuously absent was a functioning firewall. We believed that the shortcoming would be remedied quickly. Hasn’t happened! In the meantime, a number of serious security vulnerabilities arose in the FreePBX product that compromised numerous servers running their distribution because of the absence of a functioning firewall. Digium® recently reintroduced AsteriskNOW™ as a clone of the FreePBX Distro. But still no firewall.
About a month ago, we decided to close the loophole for everyone’s security and develop a firewall for the only FreePBX-based distributions without a firewall, the FreePBX Distro and AsteriskNOW. Last week we began the rollout with a Nerd Vittles article explaining why this was essential, as if an explanation were necessary. Today, you get the GPL code.
Suffice it to say, our article was not well received. The usual Sangoma® players went into Damage Control Mode with what has become a predictable scenario whenever security issues are raised concerning the FreePBX design or vulnerabilities.
Meet The Sangoma 7.
- The Good Cop: If only you’d purchase Genuine Sangoma Hardware, all of your security problems would disappear
- The Bad Cop: Enjoy this nice Cup of FUD about your own distro which proves we’re all just alike
- The Techie Cop: We thought of developing an open source firewall just the other day, and now you’re complaining
- The Rest of "The Team": Let the Astroturfing Begin… Retweet, favorite, and cheer for the brilliance of My 3 Cops
The Good Cop offered to solve all your security woes if you’d just buy (some more Sangoma) hardware.
The Bad Cop suggested that, with "cookie cutter security, you might as well hand out your password." Just in case you have any doubts about whose approach has stood the test of time, let’s Google the FreePBX Security Vulnerability Track Record.
The Techie Cop claimed we had stolen his 2-day old idea to create an Open Source Firewall. Really?
Earth to Techie Cop: Where have you been for the past five years??
Funny stuff… if it weren’t so damaging to the Asterisk community and those trying to decide whether to put their faith in open source communications software.
Firewall Basics.
We’ve written dozens of articles on Asterisk security and firewall approaches so we won’t repeat all of the information. Here’s what you need to know. Software-based firewalls on Linux servers need to be integrated into the Linux kernel to be secure. IPtables is kernel-based and extremely reliable. Blacklist-based firewall designs, i.e. those that seek to identify the IP addresses of every bad guy on the planet don’t work very well. Bad guys aren’t stupid. They can do their damage by commandeering a little old lady’s Windows machine so you’re never going to collect all of the necessary "bad" IP addresses. They’re also smart enough to poison the blacklists with Internet resources you need such as DNS servers. So don’t waste your time with blacklists. WhiteLists work very well. You identify the IP addresses and FQDNs of all the Internet sites you need to support and all the SIP providers you wish to use. Nobody else even sees your server on the Internet. If the bad guys can’t see your server, they can’t attack it. Simple as that.
Travelin’ Man 3 WhiteList Tutorial.
Here are the fundamentals of the Travelin’ Man 3 design. We allow access from anybody and everybody on your private LAN. They still need a password to access FreePBX or to gain root access, but they can "see" your server. Private LAN addresses are non-routable over the Internet which means the bad guys can’t access your 192.168.0.4 IP address if you’re sitting behind a NAT-based hardware firewall. All of your internal phones will work with no firewall modifications. You may need to adjust these settings if you’re using a Cloud resource such as Amazon because they actually route non-routable IP addresses which would leave your server vulnerable without removing these entries (especially the 172 subnet for Amazon):
#-A INPUT -s 10.0.0.0/8 -j ACCEPT
#-A INPUT -s 172.16.0.0/12 -j ACCEPT
#-A INPUT -s 192.168.0.0/16 -j ACCEPT
Travelin’ Man 3 also authorizes access for certain mandatory services that are needed to keep your server operating properly. In addition, during installation, Travelin’ Man 3 whitelists localhost and the public and private IP addresses of your server as well as your PC or workstation. You obviously don’t want to lock yourself out of your own server.
As of today, Travelin’ Man 3 is primarily an IPv4 whitelist toolkit. IPv6 addresses are only supported to allow localhost access to your server. Any other IPv6 addresses must be added manually in /etc/sysconfig/ip6tables. We recommend not using FQDNs with IPv6 for the time being. And always restart IP6tables after adding new entries: service ip6tables restart.
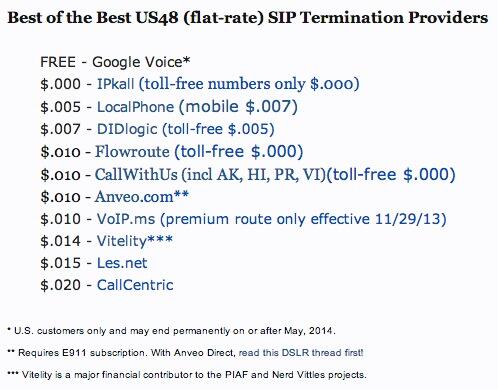
You have the option of enabling the Incredible PBX collection of IP addresses used by many of the leading SIP providers around the world. Just run the enable-trusted-providers script in /root. The list of included providers is available here. You also have the option of adding (whitelisting) or deleting users’ and providers’ IP addresses and FQDNs yourself. Use the included scripts in the /root folder: add-ip, add-fqdn, and del-acct. For each account you set up, you get to define which access permission or combination of permissions will be available:
0 – ALL Services
1 – SIP (UDP)
2 – SIP (TCP)
3 – IAX
4 – Web
5 – WebMin
6 – FTP
7 – TFTP
8 – SSH
9 – FOP
Once you have made your selection, a user account will be created in /root with the name of the account and an extension of .iptables. Do NOT delete these files. They keep track of current IP addresses and accounts authorized for server access.
If you have remote users on the Internet, e.g. traveling salespeople, you can individually authorize access for them using a dynamic FQDN (add-fqdn) coupled with a dynamic DNS server that keeps IP addresses current as folks move around. Just load a dynamic DNS updater on their smartphone. Then plug the user entries into the included ipchecker script and execute a cron job on your server every few minutes to keep the FQDN entries refreshed. Simple.
echo "*/10 * * * * root /root/ipchecker > /dev/null 2>&1" >> /etc/crontab
IPtables does not directly support FQDN rules through the kernel. However, IPtables lets you configure your firewall rules using FQDNs which get translated into IP addresses whenever IPtables is restarted. The gotcha here is that, if an FQDN is not resolvable, IPtables fails to load, and you’re left with a vulnerable server. Travelin’ Man 3 takes care of this by employing a special restart script that temporarily disables unresolvable IP addresses.
The moral of the story:
ALWAYS USE iptables-restart TO RELOAD IPTABLES OR YOUR SERVER MAY END UP WITH NO FIREWALL!
We’ve also included support for a neat little trick that lets you whitelist remote SIP access to your server using a special FQDN. No further firewall adjustments are necessary. This is supported on most platforms except OpenVZ containers. The way this works is you first assign an obscure FQDN to your server’s IP address. It needs to be obscure because anyone with the FQDN gains SIP access to your server. But chances are pretty good that the bad guys will have a hard time figuring out that xq356jq.dyndns.org points to your server. You then can embed this FQDN in the SIP phone credentials for all of your remote users. The final step is to uncomment the last few lines in /etc/sysconfig/iptables after plugging in your obscure FQDN. Then restart IPtables: iptables-restart.
-A INPUT -p udp --dport 5060:5061 -m string --string "REGISTER sip:xq356jq.dyndns.org" --algo bm -j ACCEPT
-A INPUT -p udp --dport 5060:5061 -m string --string "REGISTER sip:" --algo bm -j DROP
-A INPUT -p udp --dport 5060:5061 -m string --string "OPTIONS sip:" --algo bm -j DROP
Finally, a word of caution about deploying Travelin’ Man 3 on the FreePBX Distro and AsteriskNOW platforms. We currently don’t have a vehicle in place to push security updates out to you as we do with Incredible PBX. This means you will have to remain vigilant to what’s happening in the telecommunications world and load updates yourself. You can stay current in a number of ways. We will post updates to this article in comments below so you can simply check back here periodically. An easier way to keep up with the latest security alerts and updates is to subscribe to the PBX in a Flash RSS Feed. This can be added to the FreePBX Status page by editing RSS Feeds in Settings -> Advanced Settings and adding:
http://pbxinaflash.com/rssfeed.xml
As you can see, there’s nothing "cookie cutter" about Travelin’ Man 3. It’s totally customizable to meet your own unique requirements. All we have done is tame IPtables and eliminate much of its complexity so that you can get a functional firewall up and running quickly. Now it’s deployment time!
Installing Travelin’ Man 3 for the FreePBX Distro & AsteriskNOW.
Log into your server as root from a desktop PC using SSH or Putty. This assures that you will have access from a device other than the console when you are finished. Then issue the following commands:
cd /root
wget http://incrediblepbx.com/tm3-firewall.tar.gz
tar zxvf tm3-firewall.tar.gz
./enable-iptables-whitelist
If you wish to enable the Incredible PBX trusted providers whitelist, issue the following command:
./enable-trusted-providers
ALWAYS use the following command to start or restart IPtables:
iptables-restart
NEVER use the following syntax with Travelin’ Man 3:
service iptables...
CHECK the status of your server at any time:
/root/status

The GPL Is NOT Dead: Coming Soon to FreePBX Distro and AsteriskNOW…
Stay tuned for Incredible PBX GUI, all of the GPL modules you know and love with NO NAGWARE and NO GOTCHAS. This also will assist users that got duped by the Sangoma offer to convert PBX in a Flash into a proprietary FreePBX Distro. ![]() After reading the Sangoma disclaimer about the script being donated by an anonymous user, ask yourself this question. When was the last time Sangoma republished code that they did not own or create themselves? Try NEVER.
After reading the Sangoma disclaimer about the script being donated by an anonymous user, ask yourself this question. When was the last time Sangoma republished code that they did not own or create themselves? Try NEVER.
BEFORE:
AFTER:
Originally published: Monday, August 10, 2015
Need help with Asterisk? Visit the PBX in a Flash Forum.
Special Thanks to Our Generous Sponsors
FULL DISCLOSURE: ClearlyIP, Skyetel, Vitelity, DigitalOcean, Vultr, VoIP.ms, 3CX, Sangoma, TelecomsXchange and VitalPBX have provided financial support to Nerd Vittles and our open source projects through advertising, referral revenue, and/or merchandise. As an Amazon Associate and Best Buy Affiliate, we also earn from qualifying purchases. We’ve chosen these providers not the other way around. Our decisions are based upon their corporate reputation and the quality of their offerings and pricing. Our recommendations regarding technology are reached without regard to financial compensation except in situations in which comparable products at comparable pricing are available from multiple sources. In this limited case, we support our sponsors because our sponsors support us.
BOGO Bonaza: Enjoy state-of-the-art VoIP service with a $10 credit and half-price SIP service on up to $500 of Skyetel trunking with free number porting when you fund your Skyetel account. No limits on number of simultaneous calls. Quadruple data center redundancy. $25 monthly minimum spend required. Tutorial and sign up details are here.
![]() The lynchpin of Incredible PBX 2020 and beyond is ClearlyIP components which bring management of FreePBX modules and SIP phone integration to a level never before available with any other Asterisk distribution. And now you can configure and reconfigure your new Incredible PBX phones from the convenience of the Incredible PBX GUI.
The lynchpin of Incredible PBX 2020 and beyond is ClearlyIP components which bring management of FreePBX modules and SIP phone integration to a level never before available with any other Asterisk distribution. And now you can configure and reconfigure your new Incredible PBX phones from the convenience of the Incredible PBX GUI.
VitalPBX is perhaps the fastest-growing PBX offering based upon Asterisk with an installed presence in more than 100 countries worldwide. VitalPBX has generously provided a customized White Label version of Incredible PBX tailored for use with all Incredible PBX and VitalPBX custom applications. Follow this link for a free test drive!
Special Thanks to Vitelity. Vitelity is now Voyant Communications and has halted new registrations for the time being. Our special thanks to Vitelity for their unwavering financial support over many years and to the many Nerd Vittles readers who continue to enjoy the benefits of their service offerings. We will keep everyone posted on further developments.
Some Recent Nerd Vittles Articles of Interest…
Firewalls 101: Why Every Asterisk Server Should Have a Functioning Firewall
Part of our fundamental disagreement with the FreePBX® design can be summed up in one word: FIREWALL or the lack of a functioning firewall in the FreePBX Distro and in the functionally identical Digium product, AsteriskNOW®.1 Most of the other design choices including the controversial, non-GPL compliant Module Signature Checking mechanism are touted as failsafe ways to detect altered systems even though changes in FreePBX MySQL tables and Asterisk config files can be modified easily without triggering alerts. In short, the Band-Aid® approach to module tampering does nothing to address the fundamental problem, prevention of unauthorized intrusions in the first place.
Some would contend that the included Fail2Ban product is specifically designed to prevent unauthorized intrusions by locking out the bad guys after a certain number of failed login attempts. Assuming Fail2Ban were functioning properly, which does not appear to be the case, putting all your eggs in the Fail2Ban basket also ignores several critical shortcomings in Fail2Ban. First, it has been documented that powerful servers such as Amazon EC2 and Twitter botnets give hackers almost unlimited intrusion attempts before Fail2Ban ever gets a time slice sufficient to scan logs for intrusion attempts. Second, Fail2Ban provides no protection against stealthy distributed bruteforcing activity. For example, if a botnet with 770,000 PCs attacked your server and each PC executed only two login attempts, Fail2Ban never gets triggered even assuming your server could handle the load and Fail2Ban got sufficient server resources to actually scan your logs. Finally, Fail2Ban provides no protection against Zero Day vulnerabilities where an intruder basically walks right into your server because of an unidentified vulnerability lurking in the existing code. Unfortunately, these are not hypothetical situations but regular occurrences over the past 10 years of Asterisk and FreePBX development. In a nutshell, that’s why you need a real firewall. It completely blocks all access to your server by unauthorized users all of the time.
Numerous companies have intentionally exposed Asterisk® servers to the public Internet in a continuing effort to identify problems before they affect "real servers." We know of no similar efforts with a platform that includes FreePBX as an integral component of the server. Why? Because the potential for Zero Day Vulnerabilities in a platform of modular design is enormous. One vulnerable component in FreePBX and the entire house of cards collapses because of the blank check server access that a compromised FreePBX asterisk user account gives to an intruder. It’s the fundamental reason that services such as Apache were engineered to run with different user credentials than a root user in the real world. In essence, the current FreePBX design with Asterisk has elevated asterisk user credentials to allow root-like access to almost every server file and function with the exception of SSH access. And SSH access becomes all but unnecessary given the scope of the GUI functionality provided within FreePBX and the escalated privileges it enjoys.
On FreePBX-based Asterisk servers, the absence of any user account separation means Asterisk, Apache, and FreePBX services all operate under the single asterisk user account. If any piece collapses due to a vulnerability, the intruder gets the keys to the castle including read/write access to Asterisk and FreePBX manager credentials and config files as well as broad MySQL access. This, in turn, exposes your VoIP account credentials in addition to facilitating SQL injection into any and all FreePBX database tables. Because FreePBX "hides" numerous settings in over a hundred MySQL tables, the Asterisk DB, and dozens of Asterisk config files, once the asterisk user account access is compromised, many of the major components on your server could be cleverly reconfigured without leaving much of a hint that your server had been compromised. In fact, VoIP account credentials could be extracted and used elsewhere with no traceable footprint back to your server. For all you would know, your provider compromised your credentials rather than the other way around. Just another reminder that keeping a credit card on file for automatic replenishment with VoIP providers is a very bad idea!
Providing the asterisk user with these broad permissions was a (poor) design choice. Why was it done? To make it easy for the developers to alter virtually everything on your Asterisk server using FreePBX’s integrated Module Admin component. Root user permissions are never required to do much of anything other than server platform upgrades once the FreePBX Distro or AsteriskNOW product is installed. That’s exactly the design one would expect to find in a commercial, closed source software platform. But it’s unusual in the open source community to put it charitably. We trust we’ve made the case why a rock-solid firewall with any product that uses FreePBX modules is absolutely essential. FreePBX is a wonderful GUI, but use of the platform without a properly configured, fully functional firewall could be financially catastrophic not to mention the serious damage it could cause to others including the good reputation of Asterisk in the Internet community.
Our objective next week will be to help you implement a functioning Linux-based software firewall on the FreePBX Distro and AsteriskNOW platforms. It’s FREE! Not only will this improve the security of your server, but it will deny the bad guys a platform from which to launch mischievous acts against the rest of us. Unless you’re running Asterisk on a Cloud-based platform, do all of us a favor NOW! Run, don’t walk, to your nearest electronics store (including WalMart and BestBuy) and purchase one of the dozens of inexpensive NAT-based routers. Install it between the Internet and your server TODAY! This is the one we use, but there are plenty from which to choose including our refurbished one.2
NEWS FLASH: Download the new FUD-Free Firewall for FreePBX Distro and AsteriskNOW.
Originally published: Monday, August 3, 2015
Need help with Asterisk? Visit the PBX in a Flash Forum.
Special Thanks to Our Generous Sponsors
FULL DISCLOSURE: ClearlyIP, Skyetel, Vitelity, DigitalOcean, Vultr, VoIP.ms, 3CX, Sangoma, TelecomsXchange and VitalPBX have provided financial support to Nerd Vittles and our open source projects through advertising, referral revenue, and/or merchandise. As an Amazon Associate and Best Buy Affiliate, we also earn from qualifying purchases. We’ve chosen these providers not the other way around. Our decisions are based upon their corporate reputation and the quality of their offerings and pricing. Our recommendations regarding technology are reached without regard to financial compensation except in situations in which comparable products at comparable pricing are available from multiple sources. In this limited case, we support our sponsors because our sponsors support us.
BOGO Bonaza: Enjoy state-of-the-art VoIP service with a $10 credit and half-price SIP service on up to $500 of Skyetel trunking with free number porting when you fund your Skyetel account. No limits on number of simultaneous calls. Quadruple data center redundancy. $25 monthly minimum spend required. Tutorial and sign up details are here.
![]() The lynchpin of Incredible PBX 2020 and beyond is ClearlyIP components which bring management of FreePBX modules and SIP phone integration to a level never before available with any other Asterisk distribution. And now you can configure and reconfigure your new Incredible PBX phones from the convenience of the Incredible PBX GUI.
The lynchpin of Incredible PBX 2020 and beyond is ClearlyIP components which bring management of FreePBX modules and SIP phone integration to a level never before available with any other Asterisk distribution. And now you can configure and reconfigure your new Incredible PBX phones from the convenience of the Incredible PBX GUI.
VitalPBX is perhaps the fastest-growing PBX offering based upon Asterisk with an installed presence in more than 100 countries worldwide. VitalPBX has generously provided a customized White Label version of Incredible PBX tailored for use with all Incredible PBX and VitalPBX custom applications. Follow this link for a free test drive!
Special Thanks to Vitelity. Vitelity is now Voyant Communications and has halted new registrations for the time being. Our special thanks to Vitelity for their unwavering financial support over many years and to the many Nerd Vittles readers who continue to enjoy the benefits of their service offerings. We will keep everyone posted on further developments.
Some Recent Nerd Vittles Articles of Interest…
- Technically, IPtables is running on the FreePBX Distro and AsteriskNOW platforms; however, it’s sole function is to act as the shutdown mechanism for Fail2Ban-detected breaches. It does not independently examine packets. There is no functioning iptables config file. From our vantage point, serving as the Fail2Ban traffic cop doesn’t qualify as a functioning firewall since it lacks any of the traditional IPtables rules that manage PREROUTING, INPUT, FORWARD, OUTPUT, and POSTROUTING of packets. [↩]
- Where prices are competitive or availability is a factor, we often recommend Amazon because Amazon provides financial support to Nerd Vittles through our referral links. We encourage everyone to shop independently and purchase products from suppliers that best meet your own requirements. [↩]
Free Asterisk Solutions
