
The Most Versatile VoIP Provider: FREE PORTING

 JUST RELEASED: Visit the Incredible PBX Wiki
2016, Celebrating The Preakness: CallerID Superfecta Rides Again with XiVO
If you missed The Preakness Saturday, another Triple Crown bit the dust… or the mud in this case. But, if you had the winning Superfecta ticket, you made a $316 profit on your $1 bet. For the rest of us, there’s still a Superfecta win to celebrate, and this one’s free. We’ve begun porting CallerID Superfecta to the XiVO platform and today we’ll share that code with you together with lots of other goodies in our third roundup of Incredible PBX add-ons for the XiVO PBX. If you’re just joining the party, start with the first and second articles on XiVO, and then you’ll be ready to roll up your sleeves for Chapter 3.
UPDATE: The first release of Incredible PBX for XiVO is now available here. Please consider this article superseded by the new release.
Installing CallerID Superfecta for XiVO
As we mentioned in April, it’s always nice to see your baby grow up. Nearly a decade ago, we introduced an AGI script for Asterisk@Home known as CallerID Trifecta for FreePBX® 2.2.0. As sources of CNAM lookups expanded, a number of other individuals contributed code to support those lookups. When we added a fourth CNAM lookup source, the original application morphed into CallerID Superfecta. Then we gave up. The source lookups became too numerous to mention.
For today, we’ve changed the design a bit to better accommodate the XiVO platform. There’s a single AGI script that houses the various CNAM lookup sources and the code to extract CallerID names from those sources. And there’s a dialplan script that let’s you specify which CNAM sources to use and in which order. As with the original release, CallerID lookups take the phone number of the caller and walk through your CNAM lookup sources in the order you specify until a CallerID name match is found. Then the result is returned to the PBX for use with the incoming call. The reason for all of this is historical. The Bell Sisters decided it was more profitable to dump CallerID name information in the bit bucket rather than passing it along with incoming calls. In that way, they could charge folks for looking up the matching name in their proprietary databases. A few CallerID lookup sources remain free, but many now are pay-as-you-go platforms with a typical lookup costing about half a cent. Unfortunately, all providers consider "WIRELESS CALLER" a successful lookup. Ka-Ching! We’ve documented the procedure to add additional CNAM lookup sources on the PIAF Forum. Please share your work!
This release of CallerID Superfecta provides four lookup sources. That’s what a Superfecta is all about, picking four winners:
0 - AsteriDex SQLite3 database

1 - OpenCNAM (free from cache or commercial)

2 - BulkCNAM (commercial only with free trial)

3 - TelcoData (provider, city, and state of caller)
There are three simple steps to putting everything in place. First, run the scripted commands below. Second, specify which CNAM sources you wish to use and in what order. Third, register with the commercial providers you’d like to use and plug your credentials into the CallerID Superfecta script.
To install CallerID Superfecta, log into your server as root and issue the following commands:
cd /
apt-get -y install php5-xmlrpc
wget http://incrediblepbx.com/cid-superfecta.tar.gz
tar zxvf cid-superfecta.tar.gz
rm -f cid-superfecta.tar.gz
/etc/init.d/asterisk restart
By default, CallerID Superfecta will attempt to use all four of the providers in the order shown to retrieve a CNAM match. If you have migrated your AsteriDex database to XiVO as we covered in last week’s article, then CallerID names will be provided for your most frequent incoming calls without ever accessing external sources. You won’t break anything by leaving all four CNAM sources activated. But, without signing up for service with OpenCNAM or BulkCNAM, your CNAM results will be diminished considerably. And a result of "WIRELESS CHARLESTON SC" from TelcoData doesn’t provide much of a clue as to who is calling. But at least you don’t get charged for that one.
In the next release, we will add an optional feature that will populate entries in AsteriDex from CNAM data returned from OpenCNAM and BulkCNAM. The good news is, if you leave AsteriDex at the top of the CallerID Superfecta search list, you’ll never pay for the CNAM lookup of the same number twice. The bad news is, to keep the bad guys from self-populating your database with expensive phone numbers, you’ll need to password-protect the Voice Dialing application if it is part of your inbound IVR.
To change the source list or sequence of CNAM lookups, open the XiVO GUI and navigate to IPX configuration -> Configuration files. Then edit cid-superfecta.conf. Find the line that looks like the following and specify the sources you wish to use and the sequence in which they should be searched using the source numbers listed above to replace 0-1-2-3. Separate your entries with hyphens. Then SAVE the file.
same = n,AGI(nv-cid-superfecta.php,${XIVO_SRCNUM},0-1-2-3)
To use the commercial CNAM services of either OpenCNAM or BulkCNAM, you first must register with them and provide a credit card. You then will be provided credentials to use for your CNAM lookups. These need to be inserted at the top of /var/lib/asterisk/agi-bin/nv-cid-superfecta.php. Then SAVE the file.

Activating Traditional Asterisk Call Detail Recordings
If you want to preserve the numbers AND names of those that call your PBX, you’ll need to activate the traditional CDR reporting mechanisms in Asterisk®.
To activate SQLite3 logging of calls:
cd /etc/asterisk
sed -i 's|no|yes|' cdr.conf
echo "[master]" >  cdr_sqlite3_custom.conf
echo "table = cdr" >>  cdr_sqlite3_custom.conf
echo "columns => calldate, clid, dcontext, channel, dstchannel, lastapp, lastdata, duration, billsec, disposition, amaflags, accountcode, uniqueid, userfield"  >>  cdr_sqlite3_custom.conf
echo "values => '${CDR(start)}','${CDR(clid)}','${CDR(dcontext)}','${CDR(channel)}', '${CDR(dstchannel)}','${CDR(lastapp)}','${CDR(lastdata)}','${CDR(duration)}', '${CDR(billsec)}','${CDR(disposition)}','${CDR(amaflags)}', '${CDR(accountcode)}','${CDR(uniqueid)}','${CDR(userfield)}'" >>  cdr_sqlite3_custom.conf
chown asterisk:www-data cdr_sqlite3_custom.conf
chmod 660 cdr_sqlite3_custom.conf
sed -i 's|noload => app_cdr.so|;noload => app_cdr.so|' modules.conf
sed -i 's|noload => cdr_sqlite3_custom.so|;noload => cdr_sqlite3_custom.so|' modules.conf
sed -i 's|noload => func_cdr.so|;noload => func_cdr.so.so|' modules.conf
touch /var/log/asterisk/master.db
chown asterisk:asterisk /var/log/asterisk/master.db
chmod 640 /var/log/asterisk/master.db
/etc/init.d/asterisk restart
To also activate CSV logging of calls:
cd /etc/asterisk
echo "[csv]" >> cdr.conf
echo "loguniqueid=yes" >> cdr.conf
echo "loguserfield=yes" >> cdr.conf
echo "accountlogs=yes" >> cdr.conf
sed -i 's|noload => cdr_csv.so|;noload => cdr_csv.so|' modules.conf
/etc/init.d/asterisk restart
To retrieve SQLite3 call log data, here are a few examples to get you started:
 ALL: sqlite3 /var/log/asterisk/master.db "select * from cdr"

DATE: sqlite3 /var/log/asterisk/master.db "select * from cdr where calldate >= '2016-05-22'"

 NPA: sqlite3 /var/log/asterisk/master.db "SELECT * from cdr WHERE clid LIKE '%<843%'"

DEST: sqlite3 /var/log/asterisk/master.db "SELECT * from cdr WHERE dstchannel LIKE '%411%'"

FLDS: sqlite3 /var/log/asterisk/master.db "PRAGMA table_info(cdr)"
To retrieve the CDR log in CSV format suitable for spreadsheets, download:
/var/log/asterisk/cdr-csv/Master.csv
Adding Asterisk ULAW Sound Files to Your XiVO PBX
At least for us, the default sound files distributed with XiVO didn’t work. Here’s how to add the ulaw versions of all the files to your server:
cd /usr/share/asterisk/sounds/en
wget http://downloads.asterisk.org/pub/telephony/sounds/asterisk-extra-sounds-en-ulaw-current.tar.gz
wget http://downloads.asterisk.org/pub/telephony/sounds/asterisk-core-sounds-en-ulaw-current.tar.gz
tar zxvf asterisk-extra-sounds-en-ulaw-current.tar.gz
tar zxvf asterisk-core-sounds-en-ulaw-current.tar.gz
rm -f *.tar.gz
chown asterisk:asterisk *.ulaw
Adding DISA Support to Your XiVO PBX
If you’re new to PBX lingo, DISA stands for Direct Inward System Access. As the name implies, it lets you make calls from outside your PBX using the call resources inside your PBX. This gives anybody with your DISA credentials the ability to make calls through your PBX on your nickel. It probably ranks up there as the most abused and one of the most loved features of the modern PBX.
We use two-step authentication with DISA to make it harder for the bad guys. First, the outside phone number has to match the whitelist of numbers authorized to use your DISA service. And, second, you have to supply the DISA password for your server before you get dialtone to place an outbound call. Ultimately, of course, the monkey is on your back to create a very secure DISA password and to change it regularly. If all this sounds too scary, don’t install DISA on your PBX.
1. Download the DISA dialplan script into your /root folder where it can be edited:
cd /root
wget http://incrediblepbx.com/disa-xivo.tar.gz
tar zxvf disa-xivo.tar.gz
rm -f disa-xivo.tar.gz
nano -w disa-xivo.txt
2. When the editor opens the dialplan code, move the cursor down to the following line:
exten => 3472,n,GotoIf($["${CALLERID(number)}"="701"]?disago1) ; Good guy
3. Clone the line by pressing Ctrl-K and then Ctrl-U. Add copies of the line by pressing Ctrl-U again for each phone number you’d like to whitelist so that the caller can access DISA on your server. Now edit each line and replace 701 with the 10-digit number to be whitelisted.
4. Move the cursor down to the following line and replace 12341234 with the 8-digit numeric password that callers will have to enter to access DISA on your server:
exten => 3472,n,GotoIf($["${MYCODE}" = "12341234"]?disago2:bad,1)
5. Save the dialplan changes by pressing Ctrl-X, then Y, then ENTER.
6. Now copy the dialplan code into your XiVO setup, remove any previous copies of the code, and restart Asterisk:
cd /root
sed -i '\:// BEGIN DISA:,\:// END DISA:d' /etc/asterisk/extensions_extra.d/xivo-extrafeatures.conf
cat disa-xivo.txt >> /etc/asterisk/extensions_extra.d/xivo-extrafeatures.conf
/etc/init.d/asterisk restart
7. The traditional way to access DISA is to add it as an undisclosed option in an IVR that is assigned to one of your inbound trunks (DIDs). For the demo IVR that we installed last week, edit the ivr-1.conf configuration file and change the "option 0″ line so that it looks like this. Then SAVE your changes.
exten => 0,1(ivrsel-0),Dial(Local/3472@default)
8. Adjust the inbound calls route of one of your DIDs to point to the demo IVR by changing the destination to Customized with the following Command:
Goto(ivr-1,s,1)
Here’s how ours looks for the Nerd Vittles XiVO Demo IVR:

9. Now you should be able to call your DID and choose option 0 to access DISA assuming you have whitelisted the number from which you are calling. When prompted, enter the DISA password you assigned and press #. You then should be able to dial a 10-digit number to make an outside call from within your PBX.
SECURITY HINT: Whenever you implement a new IVR on your PBX, it’s always a good idea to call in from an outside number 13 TIMES and try every key from your phone to make sure there is no unanticipated hole in your setup. Be sure to also let the IVR timeout to see what result you get.
Adding Vitelity to XiVO for Flawless VoIP Calling
We already have shown you several ways to take advantage of free VoIP calling in the U.S. and Canada as well as internationally. But, the old adage still holds true. You get what you pay for. And, if you’re using XiVO for your business or if you like a good night’s sleep without worrying about whether your spouse is going to stab you because of lousy phone connections, then splurge and spend a penny and a half a minute for outbound calls while getting unlimited incoming calls (4 at a time!) for only $3.99 a month. You’re worth it. The signup link for Vitelity is at the end of today’s article. Once you have your credentials, create a subaccount on the Vitelity site and then you’re ready to set up your Vitelity trunks with XiVO. We’ll use one trunk for incoming calls and a second trunk for outbound calls. The setup procedure for both trunks is already documented on the PIAF Forum. Make that your next stop!
PIONEERS: For Flawless VoIP, Choose Vitelity SIP Trunks for your XiVO PBX https://t.co/Kvovaj2f8F #asterisk #XiVO pic.twitter.com/XbUOP21GzV
— Ward Mundy (@NerdUno) May 16, 2016
Simultaneous Cellphone Ringing for Inbound Calls with XiVO
Speaking of incoming calls, wouldn’t it be nice if your cellphone also rang when XiVO calls arrived on your main extension. Then you don’t have to worry about missing a call just because you stepped out of the office.
If you took our earlier advice and purchased a RingPlus phone with free monthly service, then you’re already covered. Setting up the RingPlus SIP trunk last week covered all the bases. And, there’s more good news from RingPlus. Now you can buy a phone in their Classifieds section without previously owning a phone. So you can hit the ground running with a phone AND a free calling plan. For example, $149 currently buys a brand new Moto E with 3,000 4G/LTE and SIP minutes, 3,000 SMS messages, and 3,000 MB of LTE data every month. And the monthly cost: ZERO!
But, let’s assume you’re not the sharpest tool in the shed, and you still want your cellphone to ring when extension 701 rings on your PBX. Here’s how.
In the User setup for your extension:
1. Enter your cellphone number in the Mobile Phone Number field. Be sure it includes any necessary dial prefix so that it’s routed out through the correct trunk.
2. On the same screen, you’ll find a Preprocess subroutine field. Enter the following there: pre-mobility
3. SAVE your changes.
Keep in mind that outbound calls in XiVO are routed out using dialing prefixes. If you have set up a trunk with a provider that allows CallerID spoofing such as Vitelity, Anveo Direct, or VoIP.ms, then you can preserve the caller’s original CallerID number on the forwarded call to your mobile phone provided the dial string for your cellphone number matches the format you set up for the trunk you wish to use. For example, if Exten for Vitelity is 8NXXNXXXXXX, then you would enter the number for your cellphone with an 8 prefix: 89991234567.
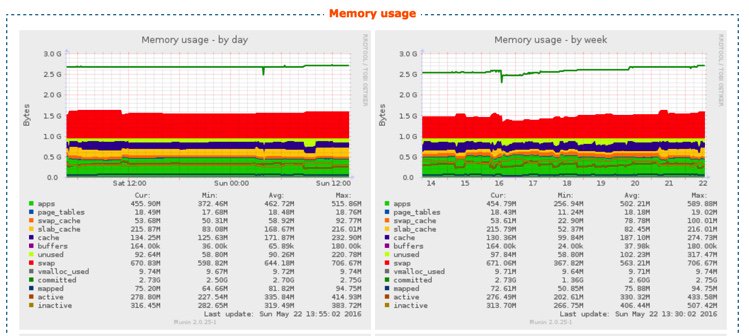
Munin Makes XiVO Shine
If you look under the Services tab and choose Graphics, the World of Munin will suddenly appear. There are literally dozens of gorgeous charts to tell you anything and everything you’d ever want to know about your server’s performance. Enjoy!
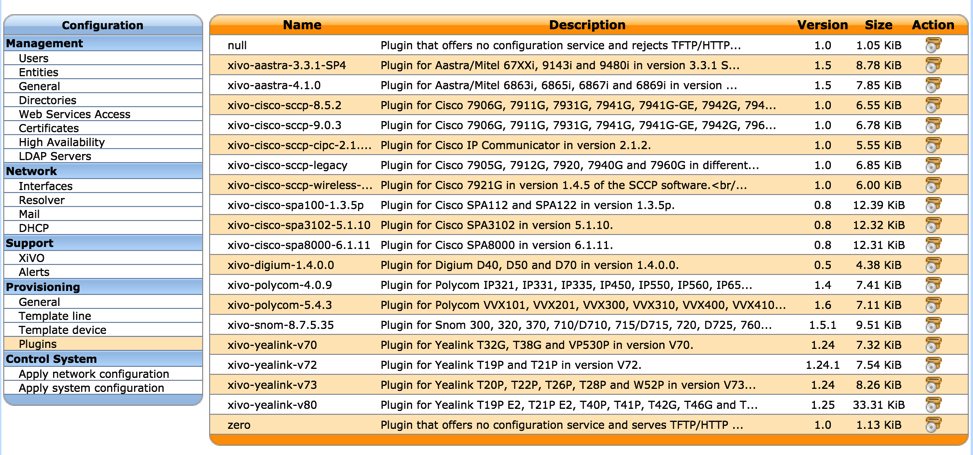
Endpoint Management on Steroids… and It’s FREE
If you’ve longed for an endpoint manager that would automatically configure your phones, the wait is over. XiVO supports literally dozens of phones out of the box. And the setup is integrated into the setup procedure for the users and devices. To get started, choose the Configuration tab and click Plugins. Next click on the + icon to load the default endpoint config files. We couldn’t do justice to this topic in a blog. That’s what tutorials are for. And XiVO has a 700+ page reference guide that will tell you everything you ever wanted to know about endpoint management.
Adding NeoRouter VPN to XiVO
We’ll finish up for this week by showing you how easy it is to add the NeoRouter Client to XiVO. In less than five minutes, you’ll be able to use XiVO’s NeoRouter private IP address to access your server securely from anywhere in the world. Start by reading our last introduction to NeoRouter. If you do not already have a NeoRouter Server, follow this tutorial to set one up before you begin.
If you’re running XiVO on a 64-bit platform, issue the following commands to install the free NeoRouter client:
cd /root
wget http://download.neorouter.com/Downloads/NRFree/Update_2.3.1.4360/Linux/Ubuntu/nrclient-2.3.1.4360-free-ubuntu-amd64.deb
dpkg -i nrclient-2.3.1.4360-free-ubuntu-amd64.deb
If you’re running XiVO on a 32-bit platform, do this instead:
cd /root
wget http://download.neorouter.com/Downloads/NRFree/Update_2.3.1.4360/Linux/Ubuntu/nrclient-2.3.1.4360-free-ubuntu-i386.deb
dpkg -i nrclient-2.3.1.4360-free-ubuntu-i386.deb
Unless you want your server identified in NeoRouter as localhost, we recommend changing your hostname and rebooting your server at this juncture. Just edit /etc/hostname and give it a name, e.g. xivo. Then reboot.
Now log back into your server as root and then log into your NeoRouter client. This will assign a private IP address to your XiVO server. The nrtap entry running ifconfig will tell you what that address actually is.
nrclientcmd
ifconfig
Taking Nerd Vittles’ XiVO IVR for a Test Drive
There’s a Demo IVR running at www.pacificnx.com on their XenServer virtualization platform. Scott McCarthy, a leading outside XiVO developer and a principal at PacificNX, tells us they soon will have a $20 a month platform specifically tailored to XiVO. And that’s what you’ll be hearing when you call the Nerd Vittles Demo IVR: 
Nerd Vittles Demo IVR Options
1 – Call by Name (say "Delta Airlines" or "American Airlines" to try it out)
2 – MeetMe Conference
3 – Wolfram Alpha (Coming Soon!)
4 – Lenny (The Telemarketer’s Worst Nightmare)
5 – Today’s News Headlines
6 – Weather Forecast (enter a 5-digit ZIP code)
7 – Today in History (Coming Soon!)
8 – Speak to a Real Person (or maybe just Lenny if we’re out)
Published: Monday, May 23, 2016
9 Countries Have Never Visited Nerd Vittles. Got a Friend in Any of Them https://t.co/wMfmlhiQ9y #asterisk #freepbx pic.twitter.com/TPFGZbqWB6
— Ward Mundy (@NerdUno) April 22, 2016

Need help with Asterisk? Visit the PBX in a Flash Forum.
Special Thanks to Our Generous Sponsors
FULL DISCLOSURE: ClearlyIP, Skyetel, Vitelity, DigitalOcean, Vultr, VoIP.ms, 3CX, Sangoma, TelecomsXchange and VitalPBX have provided financial support to Nerd Vittles and our open source projects through advertising, referral revenue, and/or merchandise. As an Amazon Associate and Best Buy Affiliate, we also earn from qualifying purchases. We’ve chosen these providers not the other way around. Our decisions are based upon their corporate reputation and the quality of their offerings and pricing. Our recommendations regarding technology are reached without regard to financial compensation except in situations in which comparable products at comparable pricing are available from multiple sources. In this limited case, we support our sponsors because our sponsors support us.
 BOGO Bonaza: Enjoy state-of-the-art VoIP service with a $10 credit and half-price SIP service on up to $500 of Skyetel trunking with free number porting when you fund your Skyetel account. No limits on number of simultaneous calls. Quadruple data center redundancy. $25 monthly minimum spend required. Tutorial and sign up details are here.
![]() The lynchpin of Incredible PBX 2020 and beyond is ClearlyIP components which bring management of FreePBX modules and SIP phone integration to a level never before available with any other Asterisk distribution. And now you can configure and reconfigure your new Incredible PBX phones from the convenience of the Incredible PBX GUI.
The lynchpin of Incredible PBX 2020 and beyond is ClearlyIP components which bring management of FreePBX modules and SIP phone integration to a level never before available with any other Asterisk distribution. And now you can configure and reconfigure your new Incredible PBX phones from the convenience of the Incredible PBX GUI.
 VitalPBX is perhaps the fastest-growing PBX offering based upon Asterisk with an installed presence in more than 100 countries worldwide. VitalPBX has generously provided a customized White Label version of Incredible PBX tailored for use with all Incredible PBX and VitalPBX custom applications. Follow this link for a free test drive!
 Special Thanks to Vitelity. Vitelity is now Voyant Communications and has halted new registrations for the time being. Our special thanks to Vitelity for their unwavering financial support over many years and to the many Nerd Vittles readers who continue to enjoy the benefits of their service offerings. We will keep everyone posted on further developments.
Some Recent Nerd Vittles Articles of Interest…
Free Asterisk Solutions
