It’s All About Choices: Incredible PBX ISO Now Available in the Vultr VPS Cloud
[iframe-popup id="5″]
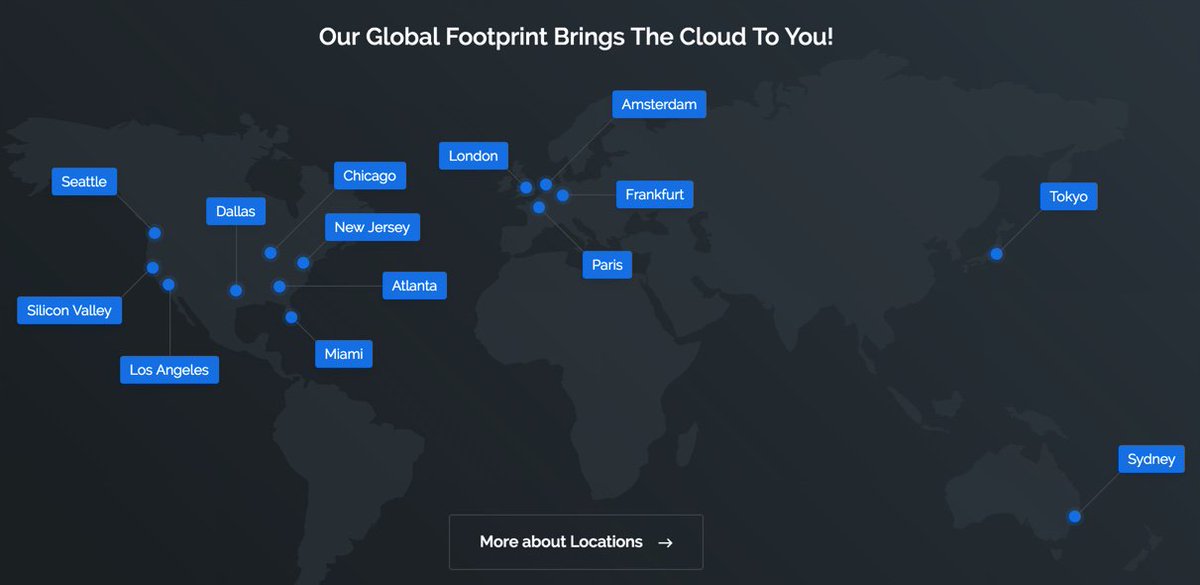
We’ve heard you. Many prefer the ease of installation offered by the Incredible PBX ISO. Unfortunately, until now, it wasn’t available if you wanted a do-it-yourself Cloud Solution other than, of course, using a turnkey Incredible PBX server at RentPBX. Well, now you have a choice. A great new VPS provider, Vultr, now gives you the option of using your own ISO when you deploy Cloud servers on their worldwide platforms. It’s not 100% intuitive just yet, but Vultr will get there. In the meantime, we’ll walk you through the procedure if you’d like to try it yourself. The good news is Incredible PBX can run on a $5/month Vultr server with 768MB of RAM plus a 768MB cache and a 15GB SSD plus 1TB of monthly bandwidth. And you can build your server in less than 30 minutes.
Getting Started with VULTR
Before you can set up virtual machines at VULTR, you’ll obviously need an account. Help Nerd Vittles keep the lights on by using our referral link. It doesn’t cost you a nickel extra. In fact,for a limited time, you get a $20 credit to try out the service when you sign up using our link above.
Once you’ve set up your account and logged in, the first step is to upload the Incredible PBX ISO so that you can use it to build cloud-based servers:
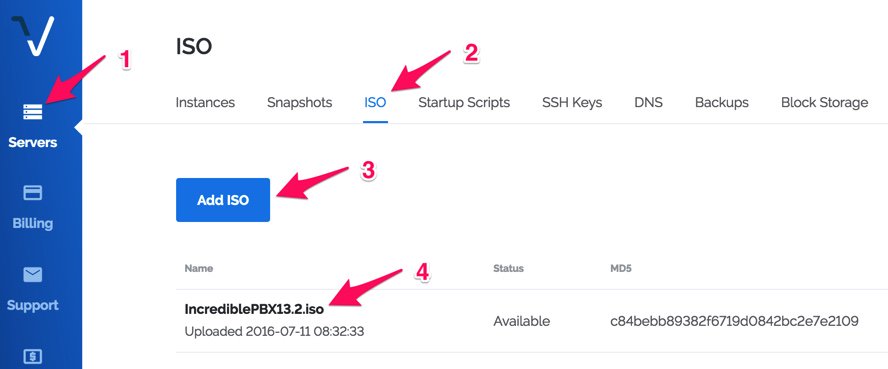
(1) Click on the Servers link in the left column.
(2) Click the ISO tab.
(3) Click the Add ISO button and use the following Incredible PBX ISO link to upload the ISO to VULTR:
http://sourceforge.net/projects/pbxinaflash/files/IncrediblePBX13.2.iso
(4) Once the ISO has been uploaded, it will display in your ISO uploads listing as shown above.
Building an Incredible PBX Server at VULTR
Now you have two ways to build Incredible PBX servers at VULTR. You can do it the traditional way by starting with a 64-bit CentOS 6.7 image and running the installer. Or you can use your new Incredible PBX ISO which we’ve preloaded into your VULTR account. Let’s do it the new way just to document the procedure.
Start by clicking on the Servers link in the left column. Then click + Deploy New Server button.
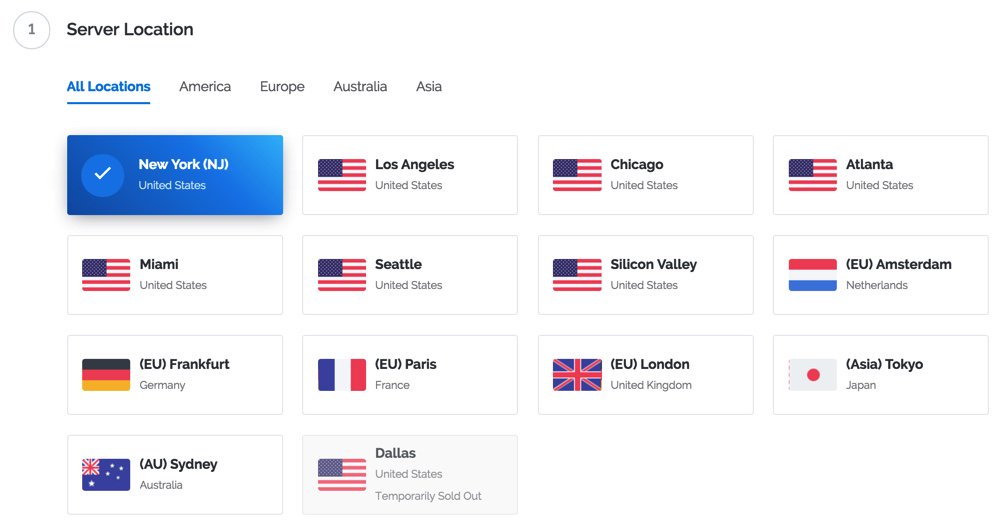
(1) Choose a Server Location from the list of choices shown above. For PBXs it’s always good to choose a location that’s near to both your VoIP hosting provider(s) and your actual phones where possible.
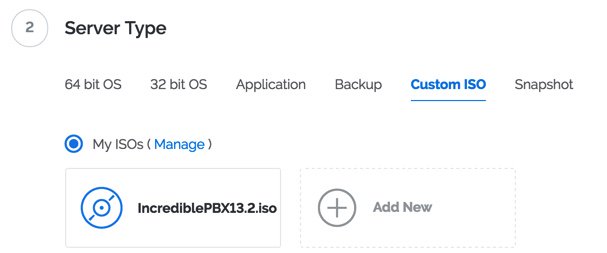
(2) For Server Type, click on the Custom ISO tab as shown above and select IncrediblePBX13.2.iso.
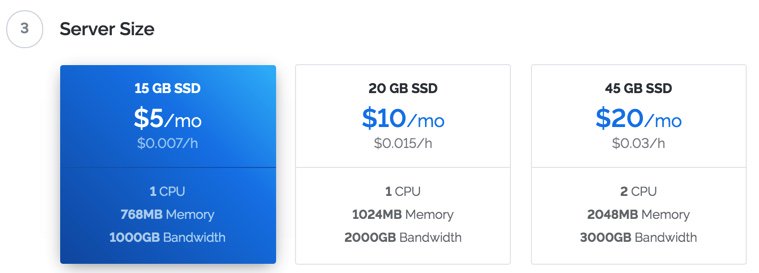
(3) For Server Size, choose the platform that meets your needs. You can always start small, take a snapshot of your server, and rebuild with a larger platform down the road if your requirements change.
(4) Choose any Additional Features and HostName desired. Then click the Deploy Now button.
(5) Click the Servers link to monitor the progress in building your virtual machine.
Installing Incredible PBX at VULTR from the ISO

Once your virtual machine Status changes from Installing to Running, (1) write down the IP address of your new server and click Restart button. (2) Click Manage. (3) Click View Console. Choose the type of Incredible PBX install you prefer and follow the prompts to enter your root password and time zone. When the operating system phase of the install finishes, your virtual machine will reboot. While this phase is underway, you’ll need to get prepared to disable the ISO during the reboot. You don’t want to inadvertently start the install all over again!
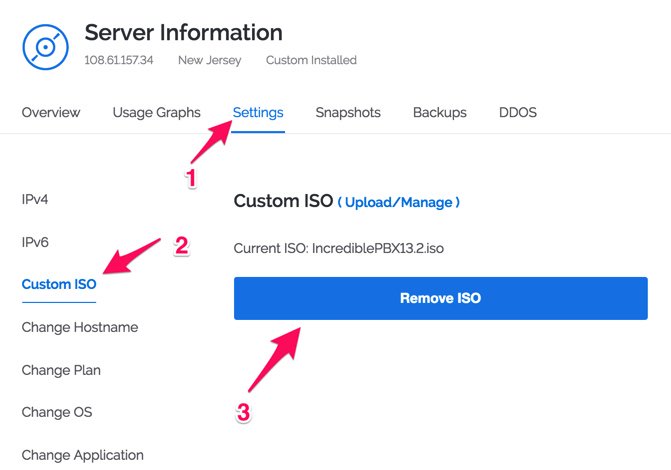
While the Phase I install is underway, click Server Details in your browser. Then choose (1) Settings, (2) Custom ISO, and (3) click Remove ISO. WAIT at the Are You Sure prompt until the reboot begins in the Console Window. Then click YES in your browser and also close the Console window.
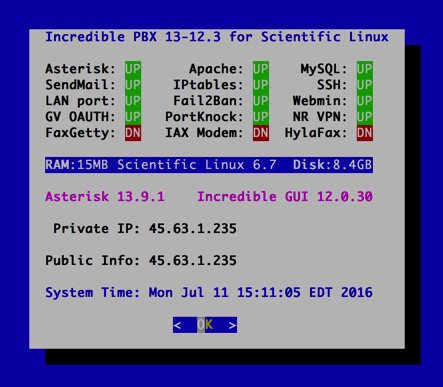
Now use SSH or Putty to login to your new server as root at the IP address you wrote down above. Once logged in, run the Incredible PBX installer to begin Phase 2 of the install: ./IncrediblePBX13-12R.sh. Choose the type passwords you wish to use for Google Voice, and the install will begin. In order to bring your server up to current specs, it will reboot once more after a few minutes. Then you’ll need to kick off the install once again: ./IncrediblePBX13-12R.sh. Choose the type passwords you wish to use for Google Voice, and the install will finish without further interruption. When the install finishes, the server will reboot to bring Asterisk and your firewall on line.
Login to your server as root one more time to get the latest Incredible PBX updates and set up your passwords and verify your time zone. Then you’ll be ready to handle future server admin using your browser:
Make your root password very secure: passwd
Create admin password for GUI access: /root/admin-pw-change
Create admin password for web apps: htpasswd /etc/pbx/wwwpasswd admin
Set your correct time zone: /root/timezone-setup
Make a copy of your Knock codes: cat /root/knock.FAQ
Review current info about your server: status
If you want to add fax support to your PBX, we’ve got one more installer to run, and you’ll be all set. Just run the following command and press the ENTER key each time you are prompted for input (about 21 times):
cd /root
./incrediblefax11.sh
Success!
It’s a GUI, GUI World Out There
Most management of Incredible PBX will be handled using your favorite browser and one of two GUIs: the Kennonsoft menu which appears when you access the IP address of your server using a browser AND the Incredible GUI which is available on the Admin page of the Kennonsoft menu.
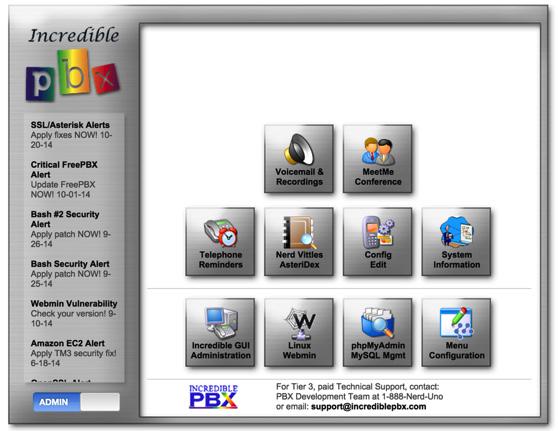
Choose Incredible GUI Administration from the Admin menu of the Kennonsoft GUI (shown above) by clicking on User to switch. The default username is admin and the password is what you set in the preceding step. Now edit extension 701 so you can decipher or change the randomized passwords that was assigned to the 701 extension and its voicemail account: Applications -> Extensions -> 701.
Setting Up a Soft Phone to Use with Incredible PBX
Now you’re ready to set up a telephone so that you can play with Incredible PBX. We recommend YateClient which is free. Download it from here. Run YateClient once you’ve installed it and enter the credentials for the 701 extension on Incredible PBX. You’ll need the IP address of your server plus your extension
701 password. Choose Settings -> Accounts and click the New button. Fill in the blanks using the IP address of your server, 701 for your account name, and whatever password you created for the extension. Click OK.
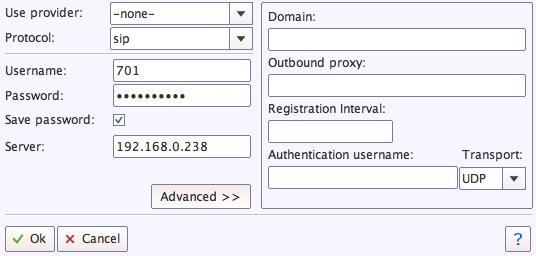
Once you are registered to extension 701, close the Account window. Then click on YATE’s Telephony Tab and place some test calls to the numerous apps that are preconfigured on Incredible PBX. Dial a few of these to get started:
DEMO - Allison's IVR Demo

947 - Weather by ZIP Code

951 - Yahoo News

*61 - Time of Day

*68 - Wakeup Call

TODAY - Today in History
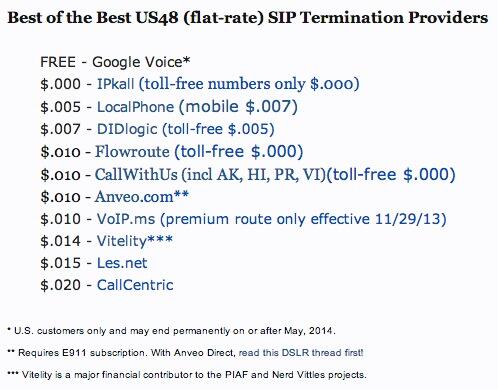
Now you’re ready to connect to the telephones in the rest of the world. If you live in the U.S., the easiest way (at least for now) is to set up a free Google Voice account. Google has threatened to shut this down but as this is written, it still works. An update supporting Google Voice OAUTH 2 authentication is available here with a complete tutorial. Just start at step #1b. A better long-term solution is to choose several SIP providers and set up redundant trunks for your incoming and outbound calls. The PIAF Forum includes dozens of recommendations to get you started. You’ll also find an incredible deal from our platinum sponsor, Vitelity, at the end of this article.
Configuring Google Voice
If you want to use Google Voice, you’ll need a dedicated Google Voice account to support Incredible PBX. If you want to use the inbound fax capabilities of Incredible Fax, then you’ll need an additional Google Voice line that can be routed to the FAX custom destination using the GUI. The more obscure the username (with some embedded numbers), the better off you will be. This will keep folks from bombarding you with unsolicited Gtalk chat messages, and who knows what nefarious scheme will be discovered using Google messaging six months from now. So keep this account a secret!
We’ve tested this extensively using an existing Gmail account, and inbound calling is just not reliable. The reason seems to be that Google always chooses Gmail chat as the inbound call destination if there are multiple registrations from the same IP address. So, be reasonable. Do it our way! Set up a dedicated Gmail and Google Voice account, and use it exclusively with Incredible PBX. It’s free at least through 2013. Google Voice no longer is by invitation only so, if you’re in the U.S. or have a friend that is, head over to the Google Voice site and register.
You must choose a telephone number (aka DID) for your new account, or Google Voice calling will not work… in either direction. Google used to permit outbound Gtalk calls using a fake CallerID, but that obviously led to abuse so it’s over! You also have to tie your Google Voice account to at least one working phone number as part of the initial setup process. Your cellphone number will work just fine. Don’t skip this step either. Just enter the provided 2-digit confirmation code when you tell Google to place the test call to the phone number you entered. Once the number is registered, you can disable it if you’d like in Settings, Voice Setting, Phones. But…
IMPORTANT: Be sure to enable the Google Chat option as one of your phone destinations in Settings, Voice Setting, Phones. That’s the destination we need for The Incredible PBX to work its magic! Otherwise, all inbound and outbound calls will fail. If you don’t see this option, you may need to call up Gmail and enable Google Chat there first. Then go back to the Google Voice Settings.
While you’re still in Google Voice Settings, click on the Calls tab. Make sure your settings match these:
- Call Screening – OFF
- Call Presentation – OFF
- Caller ID (In) – Display Caller’s Number
- Caller ID (Out) – Don’t Change Anything
- Do Not Disturb – OFF
- Call Options (Enable Recording) – OFF
- Global Spam Filtering – ON
Click Save Changes once you adjust your settings. Under the Voicemail tab, plug in your email address so you get notified of new voicemails. Down the road, receipt of a Google Voice voicemail will be a big hint that something has come unglued on your PBX.
One final word of caution is in order regardless of your choice of providers: Do NOT use special characters in any provider passwords, or nothing will work!
Now you’re ready to set up your Google Voice trunk in the GUI. After logging in with your browser, click the Connectivity tab and choose Google Voice/Motif. To Add a new Google Voice account, just fill out the form. Do NOT check the third box or incoming calls will never ring!
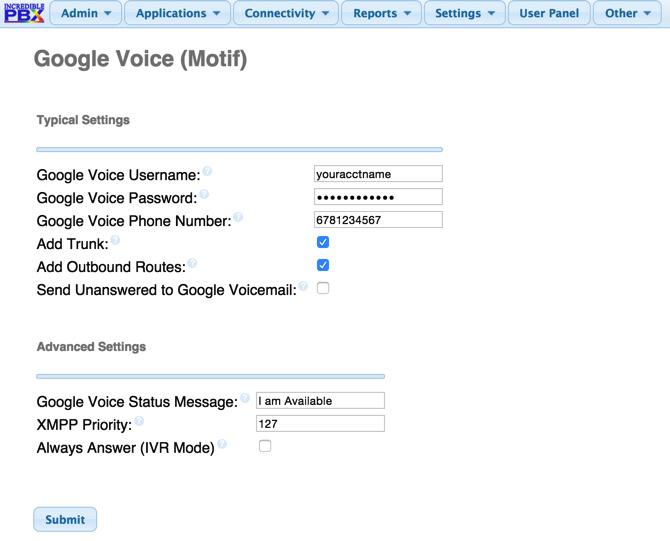
IMPORTANT LAST STEP: Google Voice will not work unless you restart Asterisk from the Linux command line at this juncture. Using SSH, log into your server as root and issue the following command: amportal restart.
If you have trouble getting Google Voice to work (especially if you have previously used your Google Voice account from a different IP address), try this Google Voice Reset Procedure. It usually fixes connectivity problems. If it still doesn’t work, enable Less Secure Apps using this Google tool.
Troubleshooting Audio and DTMF Problems
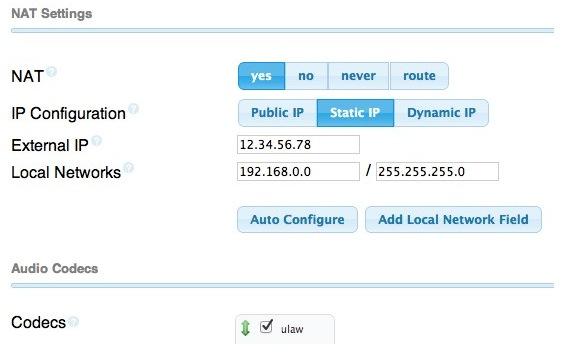
You can avoid one-way audio on calls and touchtones that don’t work with these simple settings in the GUI: Settings -> Asterisk SIP Settings. Just plug in your public IP address and your private IP subnet. Then set ULAW as the only Audio Codec.
A Few Words about the Incredible PBX Security Model for CentOS
Incredible PBX for CentOS joins our previous Ubuntu build as our most secure turnkey PBX implementation. As configured, it is protected by both Fail2Ban and a hardened configuration of the IPtables Linux firewall. The latest release also includes Port Knocker for simple, secure access from any remote computer or smartphone. You can get up to speed on how the technology works by reading the Nerd Vittles tutorial. Your Port Knocker credentials are stored in /root/knock.FAQ together with activation instructions for your server and mobile devices. The NeoRouter VPN client also is included for rock-solid, secure connectivity to remote users. Read our previous tutorial for setup instructions. As configured, nobody can access your PBX without  your credentials AND
  an IP address that is either on your private network or that matches the IP address of your server or the PC from which you installed Incredible PBX. You can whitelist additional IP addresses by running the command-line utility /root/add-ip. You can remove whitelisted IP addresses by running /root/del-acct. Incredible PBX is preconfigured to let you connect to many of the leading SIP hosting providers without additional firewall tweaking. We always recommend you also add an extra layer of protection by running your server behind a hardware-based firewall with no Internet port exposure, but that’s your call. And it’s your phone bill. 😉
The IPtables firewall is a complex piece of software. If you need assistance with configuring it, visit the PIAF Forum for some friendly assistance.
Incredible Backup and Restore
We’re also pleased to offer our latest backup and restore utilities for Incredible PBX. Running /root/incrediblebackup will create a backup image of your server in /tmp. This backup image then can be copied to any other medium desired for storage. To restore it to another Incredible PBX server, simply copy the image to a server running Asterisk 13 and the same version of the Incredible PBX GUI. Then run /root/incrediblerestore. Doesn’t get much simpler than that.
Incredible PBX Automatic Update Utility
Every time you log into your server as root, Incredible PBX will ping the IncrediblePBX.com web site to determine whether one or more updates are available to bring your server up to current specs. We recommend you log in at least once a week just in case some new security vulnerability should come along.
In the meantime, we encourage you to sign up for an account on the PIAF Forum and join the discussion. In addition to providing first-class, free support, we think you’ll enjoy the camaraderie.
Incredible PBX Application User’s Guide
And now would be a great time to learn about the dozens of Incredible PBX applications. Enjoy!
Originally published: Tuesday, July 12, 2016
9 Countries Have Never Visited Nerd Vittles. Got a Friend in Any of Them https://t.co/wMfmlhiQ9y #asterisk #freepbx pic.twitter.com/TPFGZbqWB6
— Ward Mundy (@NerdUno) April 22, 2016

Need help with Asterisk? Visit the PBX in a Flash Forum.
Special Thanks to Our Generous Sponsors
FULL DISCLOSURE: ClearlyIP, Skyetel, Vitelity, DigitalOcean, Vultr, VoIP.ms, 3CX, Sangoma, TelecomsXchange and VitalPBX have provided financial support to Nerd Vittles and our open source projects through advertising, referral revenue, and/or merchandise. As an Amazon Associate and Best Buy Affiliate, we also earn from qualifying purchases. We’ve chosen these providers not the other way around. Our decisions are based upon their corporate reputation and the quality of their offerings and pricing. Our recommendations regarding technology are reached without regard to financial compensation except in situations in which comparable products at comparable pricing are available from multiple sources. In this limited case, we support our sponsors because our sponsors support us.
 BOGO Bonaza: Enjoy state-of-the-art VoIP service with a $10 credit and half-price SIP service on up to $500 of Skyetel trunking with free number porting when you fund your Skyetel account. No limits on number of simultaneous calls. Quadruple data center redundancy. $25 monthly minimum spend required. Tutorial and sign up details are here.
 The lynchpin of Incredible PBX 2020 and beyond is ClearlyIP components which bring management of FreePBX modules and SIP phone integration to a level never before available with any other Asterisk distribution. And now you can configure and reconfigure your new Incredible PBX phones from the convenience of the Incredible PBX GUI.
 VitalPBX is perhaps the fastest-growing PBX offering based upon Asterisk with an installed presence in more than 100 countries worldwide. VitalPBX has generously provided a customized White Label version of Incredible PBX tailored for use with all Incredible PBX and VitalPBX custom applications. Follow this link for a free test drive!
 Special Thanks to Vitelity. Vitelity is now Voyant Communications and has halted new registrations for the time being. Our special thanks to Vitelity for their unwavering financial support over many years and to the many Nerd Vittles readers who continue to enjoy the benefits of their service offerings. We will keep everyone posted on further developments.
Some Recent Nerd Vittles Articles of Interest…


 JUST RELEASED: Visit the Incredible PBX Wiki