
The Most Versatile VoIP Provider: FREE PORTING

 JUST RELEASED: Visit the Incredible PBX Wiki
Picking the Best (and worst) Cellphone and Provider for 2012
We’ve delayed chiming in on favorite cellphones for the past six months because, quite frankly, we were on the fence about which way to jump. We still are. But we do have some things for you to consider now that we’ve tested and used three of the world’s best available cellphones. Along the way, we’ve also encountered more than a few roadblocks that we also want to warn you about.
Like many of you, we were eagerly anticipating the arrival of the iPhone 5. We hadn’t used an iPhone since the original was released, and this seemed like a good time to make the switch. Unfortunately, that was not to be, and we shared the disappointment of many others when the iPhone 4S was released. But read on. Our situation may not be unlike many of you. We travel about once month. It’s typically by car on the interstates. And our destinations are big cities in the U.S. such as Atlanta and Washington, D.C. But just as often our final destination is our beach house at Pawleys Island, South Carolina or our cabin in Balsam Mountain Preserve in the Smoky Mountains of North Carolina.
We have been generally thrilled with the Virgin Mobile Android and Blackberry offerings which provide excellent value (originally $25 $35 for 300 minutes and an unlimited text and data plan with no contract) and rock-solid Sprint service when you’re in a populated area or traveling down the interstate. Unlike normal Sprint phones which roam on Verizon when you enter an area without Sprint coverage, neither Boost Mobile nor Virgin Mobile has this option. So, once you enter a little beach town or the Smoky Mountains, all bets are off. In fact, you might as well turn your cellphone off. It’s not going to work.
Our solution was to acquire an ObiHai device (a link to Amazon appears in the right column) which provides Google Voice service in your choice of area codes and free calling in the U.S. and Canada for an investment of $50. The monthly cost: $0. You can configure your Google Voice account to also ring your cellphone, your home phone and a vacation home or two simultaneously so that you never miss a call. The only thing it won’t do is ring an extension in a hotel. But that’s what cellphones are for. This worked extremely well for us, but we still missed having a functioning cellphone when we were driving. We decided to leave the family phones on these inexpensive, contract-free plans and acquire one or more of the newer cellphones for business use and testing. By the way, if you root the LG Optimus V phone, you also can add free WiFi tethering for those road trips. So long as you don’t abuse it, Sprint doesn’t seem to mind. So… what to buy?
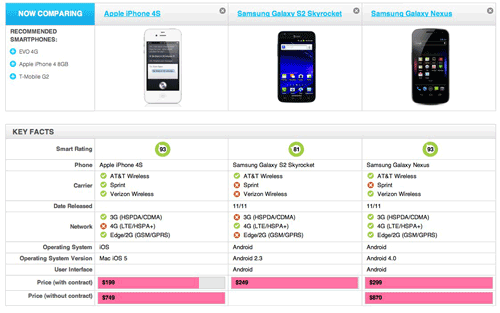
There have been dozens of good reviews of the best new phones, and we pretty much narrowed down the field to the iPhone 4S, the Samsung Galaxy Nexus, and the Samsung Galaxy S II Skyrocket from AT&T. If you haven’t used Siri, suffice it to say that it catapults the iPhone into a league of its own. The same holds true for the camera comparison. And, with a simple patch of an unrooted iPhone 4S, the camera even supports Panoramic mode.
<rant> We’ve never actually used Verizon, and their service is especially good at our remote sites so we began our quest by ordering an iPhone 4S on release day with a phone call to Verizon. Stacy was extremely helpful in outlining the various plans and indicated that they had a special underway for new iPhone 4S activations. She indicated that the $35 activation fee would be waived. She also provided her personal number (813-410-4413) so that we could contact her for assistance once the phone arrived. We were in a bit of a crunch because we were headed out of town on the same day the phone was supposed to arrive. She assured us the phone would ship overnight and arrive via FedEx before 2 p.m. You can guess the rest of the story. Rather than FedEx, UPS actually attempted to deliver the phone at 6:30 p.m. that evening, well after we had left town. No special handling had been requested by Verizon which meant end-of-day delivery was good enough in the eyes of UPS. Four days later we picked the phone up at UPS which had refused to reschedule delivery for a specific date without payment of an additional special handling charge. By letting them attempt delivery while we were out of town for four days would have meant the phone would have been returned to Verizon.
Setup of the iPhone 4S was uneventful although a call to Verizon was necessary to activate the data service. Two days use around our home office where 3G service was nowhere to be found, and we decided to return the phone. We still were within our 14-day return window without any cancellation penalty. Let the nightmare begin. The phone was returned using a shipping label included in the box, and it arrived back at Verizon within a couple days. We had prepaid for the phone by credit card to the tune of $433.99 so the only charges due were for two days of usage on a $100 a month plan. The first bill arrived before the phone had actually been received. It showed a balance of $134.65 due within 25 days. It included an activation fee. Upon calling Verizon, we were told to disregard the bill and wait on the next one which would clear everything up and remove the activation fee. Four days later, we received the new bill for $464.81 and a notice that payment was now "Past Due" despite the previous bill which indicated that payment was due within 25 days. The entire previous balance was on the bill including the activation fee. In addition, there was a $350 early termination fee and over $39 in fees and taxes. So, yes, they got the phone back. Another call to Verizon, and this time, of course, they could find no record of previous discussions or agreed terms with their sales agent. An hour later a supervisor agreed to take my word for it and, you guessed it, another bill would fix everything. A month later, the third bill arrived with most of the charges removed including a credit for the $74 payment I had made to protect my credit. Another $38 of fees had been added. Call #5 to Verizon, and they agreed to waive the balance due. We’ll see. That was 25 days ago. Bottom line: 11 minutes of rounded up test phone calls and 5 minutes of data usage rounded up to one gigabyte. Cost: $74 so far. Verizon did refund the cost of the phone. Nice!
To suggest that the design of Verizon’s ordering and billing system borders on fraudulent is about the kindest adjective we can muster. Not only is there no paper record of your order to review, but Verizon internally knew the phone had been returned within the 14-day, no termination fee window. And yet their billing system generated a $350 early termination fee in addition to other bogus charges. It’s hard to believe that any of this was accidental given the volume of customers that Verizon handles. And what do folks without a law degree do? Our guess is that more than a few may just pay the charges fearing that their credit will be ruined if they balk. By the third bill, no mortal could decipher the charges and fees including Verizon’s own agents. And, at least to us, that appears to be by design. Our advice is simple. Steer clear of Verizon until they either clean up their act or the Federal Trade Commission does it for them. </rant>
Our next adventure was an iPhone 4S for AT&T which we ordered from our local Apple store. While AT&T has a well earned reputation that’s not far off the Verizon mark, this time around it’s been a pleasant surprise. Apple handled all of the phone setup in minutes. To obtain a credit authorization from AT&T, an agent requested much of the same information you used to provide in buying your first home. Where do you live? How long have you lived there? What was the cost of your home? Where did you live before that? For how long, etc.? We passed.
We already had an AT&T Microcell device which provides AT&T cell access through your local area network. A quick call to AT&T support, and the device was reactivated. AT&T has gotten a bit greedy since we last had service with them. Not only is the unlimited data plan a thing of the past, but, unlike Verizon, your only text messaging option is all-you-can-eat for $20 a month or pay-as-you-go for 20¢ text and 30¢ photo per message. You’re well advised to choose the $20 plan at least for the first month until you’re sure the former owner of your phone number didn’t spend all day and night texting with 100 friends. There’s now a fee to change your phone number, too.

We really can’t say enough good things about the iPhone 4S. I tell folks that it’s like comparing your favorite pair of old shoes to a shiny new pair of boots. It may not be the latest and greatest, but it’s comfortable to use and reliable. If you don’t mind holding your nose because of Apple’s Soup Nazi mentality, then the iPhone 4S is hard to beat. Antennagate appears to be a thing of the past, the screen is spectacular, the camera is awesome (click on the image above and judge for yourself), and Siri is in a league of its own. Just after acquiring the phone, my mother-in-law came to visit. And, of course, I wanted to impress her with Siri by showing how quickly I could figure out my wife’s birthday. So I held the phone up to my ear and said, "When is Mary’s birthday?" Siri promptly responded, "I found six entries for Mary. Which one did you want?" Not cool, Siri. Mental note: Be careful what you ask.
Our adventure continued with the recent release of the new Google phone, Samsung’s Galaxy Nexus. Using a Micro SIM Adapter, we were able to quickly get the Galaxy Nexus up and running on AT&T’s network. We let the phone charge overnight with a WiFi connection to get all of our Google data migrated. The following day, we unplugged the phone and began using it in much the same way as our iPhone 4S: checking emails periodically, reviewing our Twitter stream, and snapping an occasional photo which gets uploaded to Picasa automatically. To make a long story short, the phone blazed through half of its battery life in about 2-1/2 hours. You can read our complete review of the phone on Google+. Suffice it to say, we weren’t impressed. The 5 megapixel camera is 2-year-old technology, the battery cover is not what you’d expect in a $500+ phone, and the face unlocking feature qualifies as gee-whiz stuff, but we unlocked the phone by displaying our own photo from an iPhone 4S. The real dealbreaker for us was the 16GB internal storage limitation on AT&T-compatible phones coupled with the absence of a microSD expansion slot. In short, this new Google phone is anything but state-of-the-art despite the addition of the Ice Cream Sandwich OS which was not that different than existing Android builds.
We’re a big believer in the open source Android platform. So we didn’t give up. AT&T had also announced a new version of Samsung’s Galaxy S II known as Skyrocket. In the past, we’ve been hesitant to try AT&T branded phones because of our experience with the original Samsung Galaxy Tab which was crippled in about every way a provider could cripple an Android device. The most serious limitation was that AT&T locked the device so that apps could only be downloaded from the Android Market. This meant downloads from Amazon’s App Store were barred which in some cases meant higher prices for identical software.
Unlike the Galaxy Nexus, Samsung’s Galaxy S II Skyrocket includes an 8 megapixel camera which rivals the iPhone 4S. See the link above for a photo comparison. We’ve had excellent results with both the iPhone 4S and the Skyrocket. And unlike AT&T’s Galaxy Tab, the Skyrocket was not crippled except insofar as tethering without a 4GB data plan is concerned. For those that can’t live without a rooted phone, this was a 5-minute operation on the Skyrocket device. And, unlike the Galaxy Nexus, we haven’t seen the extreme battery depletion. We easily get a full day’s use out of the Skyrocket.
The only wrinkle with the Galaxy Skyrocket was that the iPhone 4S data plan didn’t work at all with the device. Unlike some other features, this isn’t one you can change yourself using AT&T’s web portal. But a quick call to AT&T will get you switched to the DataPro for Smartphone 4G LTE Plan which is similarly priced. Be sure to follow up by checking their changes on the web portal. In our case, we were switched to the Enterprise version which added an additional $20 a month to already exorbitant data plan charges. Once a Bell Sister, always a Bell Sister. But at least we expect it.

The correct plan is identical to the iPhone 4S offerings except you also get access to AT&T’s new 4G network. Even in the hybrid 4G network areas (aka HSPA+) which roughly doubles 3G performance, the speeds are quite remarkable. The other good news is that, once you’re on the 4G LTE data plan, you can swap back and forth between the Skyrocket phone and 3G service with the iPhone 4S without another phone call since the 4G LTE plan is downward compatible with the 3G network supported by the iPhone 4S. So we’re happy campers at the moment. Both phones work for calling, data, and texting. Switching from one to the other is as easy as swapping the SIM card between the devices. When we’re in a real 4G metropolitan area (which AT&T expanded to 11 new markets today), the Skyrocket device will be our phone of choice. Its speed, performance, huge screen, and gorgeous display are second to none. Coupled with the $5 Groove IP app, you’ll have a perfect Google Voice experience using WiFi with or without a SIM card. In the meantime, we’re still enjoying our old pair of shoes.
Originally published: Thursday, January 5, 2012
Need help with Asterisk? Visit the PBX in a Flash Forum.
Or Try the New, Free PBX in a Flash Conference Bridge.
whos.amung.us If you’re wondering what your fellow man is reading on Nerd Vittles these days, wonder no more. Visit our new whos.amung.us statistical web site and check out what’s happening. It’s a terrific resource both for us and for you.
Special Thanks to Our Generous Sponsors
FULL DISCLOSURE: ClearlyIP, Skyetel, Vitelity, DigitalOcean, Vultr, VoIP.ms, 3CX, Sangoma, TelecomsXchange and VitalPBX have provided financial support to Nerd Vittles and our open source projects through advertising, referral revenue, and/or merchandise. As an Amazon Associate and Best Buy Affiliate, we also earn from qualifying purchases. We’ve chosen these providers not the other way around. Our decisions are based upon their corporate reputation and the quality of their offerings and pricing. Our recommendations regarding technology are reached without regard to financial compensation except in situations in which comparable products at comparable pricing are available from multiple sources. In this limited case, we support our sponsors because our sponsors support us.
 BOGO Bonaza: Enjoy state-of-the-art VoIP service with a $10 credit and half-price SIP service on up to $500 of Skyetel trunking with free number porting when you fund your Skyetel account. No limits on number of simultaneous calls. Quadruple data center redundancy. $25 monthly minimum spend required. Tutorial and sign up details are here.
![]() The lynchpin of Incredible PBX 2020 and beyond is ClearlyIP components which bring management of FreePBX modules and SIP phone integration to a level never before available with any other Asterisk distribution. And now you can configure and reconfigure your new Incredible PBX phones from the convenience of the Incredible PBX GUI.
The lynchpin of Incredible PBX 2020 and beyond is ClearlyIP components which bring management of FreePBX modules and SIP phone integration to a level never before available with any other Asterisk distribution. And now you can configure and reconfigure your new Incredible PBX phones from the convenience of the Incredible PBX GUI.
 VitalPBX is perhaps the fastest-growing PBX offering based upon Asterisk with an installed presence in more than 100 countries worldwide. VitalPBX has generously provided a customized White Label version of Incredible PBX tailored for use with all Incredible PBX and VitalPBX custom applications. Follow this link for a free test drive!
 Special Thanks to Vitelity. Vitelity is now Voyant Communications and has halted new registrations for the time being. Our special thanks to Vitelity for their unwavering financial support over many years and to the many Nerd Vittles readers who continue to enjoy the benefits of their service offerings. We will keep everyone posted on further developments.
Some Recent Nerd Vittles Articles of Interest…
Introducing PIAF2 and Incredible PBX 2.9 with CentOS 6.1

We're pleased to introduce the latest and greatest PBX in a Flash™ 2.0.6.1 featuring CentOS® 6.11 and the brand-new Incredible PBX™ 2.9 with an incomparable VoIP feature set. PIAF2™ provides turnkey installs of Asterisk® 1.8 or 2.0 with your choice of FreePBX® 2.8, 2.9, or 2.10. And, for those choosing to install Incredible PBX 2.9, it's been engineered to work flawlessly with the 32-bit version of PIAF2 using Asterisk 1.8 and FreePBX 2.9. For the ultimate in performance, a 64-bit version of PIAF2 is also available; however, because of its size, a DVD is required to burn the ISO. And, as noted, it is not compatible with Incredible PBX 2.9.
12/17 Update: Shortly after PIAF2 hit the street, Digium released Asterisk 1.8.8.0 and the first non-beta version of Asterisk 10. New 32-bit and 64-bit PIAF 2.0.6.1.2 ISOs will be available on SourceForge today that incorporate these new builds. In addition, a CentOS 6 video quirk has been identified on some Atom hardware. So the new ISOs include an install option to disable the problematic video testing by kicking off the install with one of the following commands instead of merely pressing the Enter key: ks-nomode, ksraid-nomode, or kslvm-nomode. You'll know if you have the problem if your server locks up. 😉 Finally, because there now are multiple stable versions of Asterisk, we have added the option to selectively choose a version of Asterisk to install. Instead of picking PIAF-Purple or PIAF-Red, you can drop down to the Linux command prompt, log in as root, and issue a command using the following syntax: piafdl -p beta_1872_purple.

Free Google Voice calling in the U.S. and Canada has been extended for calendar year 2012 and now can be configured using the simple FreePBX 2.9 GUI. And you can use it with or without Incredible PBX. Set up one or many Google Voice connections in less than 10 seconds per line. With Incredible PBX, we've also included Andrew Nagy's terrific EndPoint Manager that lets you configure dozens of SIP phones with the click of a button. You'll also find Kennonsoft's terrific new PBX in a Flash UI with HTML5 and CSS3 support for the latest Firefox, Chrome, and IE browsers. And, of course, you still get almost every Asterisk application on the planet preconfigured and ready to use.
With PIAF2, the installation process has been streamlined considerably. At the outset, you will be prompted for some basic information and a root password. Once the CentOS 6.1 install completes and you remove the CD/DVD during the server reboot, you will be prompted for whether you wish to tailor Asterisk using menuconfig, your time zone, the version of FreePBX you wish to install, and your master password for FreePBX access. Once you've answered these few questions, you can kick off the PIAF2 install and walk away. Depending upon the performance of your server, come back in 15-30 minutes. While it's not the quickest install on the planet, it will always be the most current because PIAF2 always loads the latest patches to CentOS as well as Asterisk and FreePBX. In other words, it's worth the wait to know you're installing a secure and up-to-date system. And, as your high school girlfriend probably taught you, faster is not always better.
 The Incredible PBX 2.9 Inventory. For those that have never heard of The Incredible PBX, here's the current 2.9 feature set in addition to the base install of PBX in a Flash with the CentOS 6.1, Asterisk 1.8, FreePBX 2.9, and Apache, SendMail, MySQL, PHP, phpMyAdmin, IPtables Linux firewall, Fail2Ban, and WebMin. Cepstral TTS, Faxing, Hamachi VPN, and Mondo Backups are still just one command away and may be installed using the scripts included with base Incredible PBX 2.9 installation.
- Amazon S3 Cloud Computing
- AsteriDex
- Asternic CDR Reports
- Baseball Scores & Schedules
- CallerID Superfecta (FreePBX Module adds Names to CID Numbers)
- SIP Color Videophone Support
- CallWho for Asterisk
- Cepstral TTS for 32-bit, Asterisk 1.8 (/root/nv/install-cepstral)
- Preconfigured Email That Works with SendMail
- PIAF Endpoint Manager
- ENUMPLUS (Use FreePBX to configure)
- Extensions (16 preconfigured with random passwords)
- Festival Server and Festival TTS for Asterisk (festival --server &)
- Flite TTS for Asterisk
- FONmail
- FreePBX Backups
- Google Voice (preconfigured)
- Free Hamachi VPN (install-hamachi)
- Hotel-Style Wakeup Calls (FreePBX Module)
- Incredible Backups... and Restores
- ISN: FreeNum SIP Calling from Any Phone
- MeetMe Conference Bridge (just dial C-O-N-F)
- Mondo Full System Backups (install-diskbackup)
- Incremental Daily Backups (install-dailybackup)
- Munin Reports (install-munin)
- NewsClips from Yahoo
- ODBC Database Support
- New PBX in a Flash Registry (show-registry)
- PogoPlug Cloud Computing
- Reminders by Phone and Web
- SAMBA Windows Networking (configure-samba)
- SIP URI Outbound Calling (call any SIP URI worldwide for free)
- Free Skype Inbound & Outbound Calling (for personal use)
- SMS Messaging with Google Voice
- Stealth AutoAttendant
- TeleYapper
- TFTP Server (setup-tftp)
- Tide Reports with xTide
- Trunk Lister Script (/root/nv/trunks.sh)
- Trunks (Vitelity, Gtalk, SIPgate, IPkall, VoIP.ms, and ENUM)
- Twitter Interface (Make Free Calls and Send SMS Messages)
- Weather by Airport Code
- Weather by ZIP Code
- Worldwide Weather
Update: Incredible Fax is not yet compatible with PIAF2, but we're working on it.
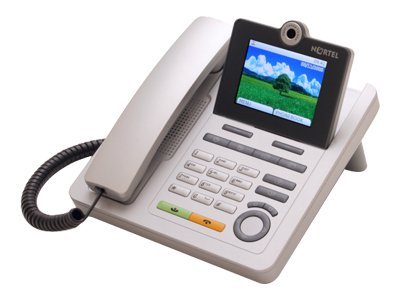
What began as a kludgey, dual-call, dual-provider Google Voice implementation to take advantage of Google's free PSTN calling in the U.S. and Canada with Asterisk 1.4 and 1.6 is now a zippy-quick, Gtalk-based calling platform that rivals the best SIP-to-SIP calls on the planet and provides virtually instantaneous PSTN connections to almost anybody, anywhere. Trust us! Except for the price which is still free, you'll never know you weren't connected via Ma Bell's overpriced long-distance lines and neither will the Little Mrs. And, yes, our recommended $50 Nortel SIP videophone is plug-and-play.
Just download the latest 32-bit PBX in a Flash 2.0.6.1 ISO from SourceForge, burn to then boot from the PIAF2 CD, choose the PIAF-Purple option to load Asterisk 1.8, and pick FreePBX 2.9 when prompted. Once the PIAF2 install is completed, just run the new Incredible PBX 2.9 installer. In less than an hour, you'll have a turnkey PBX with a local phone number and free calling in the U.S. and Canada via your own Google Voice account plus dozens and dozens of terrific Asterisk applications to keep you busy exploring for months.
Thanks to its Zero Internet Footprint™ design, Incredible PBX 2.9 remains the most secure Asterisk-based PBX around. What this means is The Incredible PBX™ has been engineered to sit safely behind a NAT-based, hardware firewall with no port exposure to your actual server. And you won't find a more full-featured Personal Branch Exchange™ at any price.
Did we mention that all of this telephone goodness is still absolutely FREE!
Prerequisites. Here's what we recommend to get started properly:
- Broadband Internet connection
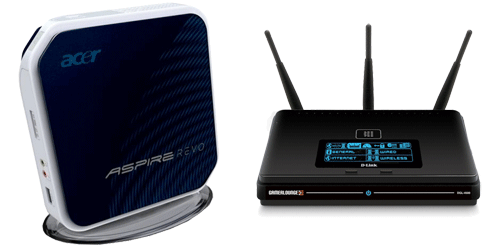
- $200-$300 Atom PC2
- dLink Router/Firewall. Low Cost: $35 WBR-2310 Best: DGL-4500
- Dedicated Google Voice account (not your main Gmail account!)
Installing Incredible PBX 2.9. The installation process is simple and straight-forward. We're down to 3 Easy Steps to Free Calling, and The Incredible PBX will be ready to receive and make free U.S./Canada calls immediately:
1. Install PIAF-Purple & FreePBX 2.9 using 32-bit PIAF2 ISO
2. Download & run Incredible PBX 2.9 installer
3. Configure Google Voice and a softphone or SIP telephone
 Installing PBX in a Flash. Here's a quick tutorial to get PBX in a Flash 2.0 installed. To use Incredible PBX 2.9, just install the latest 32-bit version of PBX in a Flash 2.0. Unlike other Asterisk aggregations, PBX in a Flash utilizes a two-step install process. The ISO only installs the CentOS 6.1 operating system. Once CentOS is installed, the server reboots and downloads a payload file that includes Asterisk, FreePBX, and many other VoIP and Linux utilities including all of the new Google Voice components. Just choose the PIAF-Purple payload to get the latest Asterisk 1.8. You'll then be prompted to choose your flavor of FreePBX. Choose FreePBX 2.9. Then set your time zone and set up a password for FreePBX access, and you're all set. As part of the install, yum now will automatically update your operating system to CentOS 6.2 minus the 6.2 kernel.
You can download the 32-bit PIAF2 from SourceForge. Burn the ISO to a CD. Then boot from the installation CD and press the Enter key to begin.
WARNING: This install will completely erase, repartition, and reformat EVERY DISK (including USB flash drives) connected to your system so disable any disk you wish to preserve AND remove any USB flash drives! Press Ctrl-C to cancel.
At the keyboard prompt, tab to OK and press Enter. At the time zone prompt, tab once, highlight your time zone, tab to OK and press Enter. At the password prompt, make up a VERY secure root password. Type it twice. Tab to OK, press Enter. Get a cup of coffee. Come back in about 5 minutes. When the system has installed CentOS 6.1, it will reboot. Remove the CD promptly. After the reboot, choose PIAF-Purple. In less than a minute, you'll be prompted for the FreePBX version you wish to install. Choose 2.9 and fill in your choices for the remaining prompts. Then have a 15-minute cup of coffee. After installation is complete, the machine will reboot a second time. You now have a PBX in a Flash base install. On a stand-alone machine, it takes 30-60 minutes. On a virtual machine, it takes about half that time. Log into your server with your root password and write down the server's IP address. You'll need it to access FreePBX with your browser.
NOTE: For previous users of PBX in a Flash, be aware that this new version automatically runs update-programs, update-fixes, and passwd-master for you. So your system is relatively secure out of the box! See the Proxmox cautionary alert in the footnotes to this article!
 Configuring Google Voice. You'll need a dedicated Google Voice account to support Incredible PBX 2.9. If you plan to use the inbound fax capabilities of Incredible PBX 2.9, then you'll want an additional Google Voice line that can be routed to the FAX miscellaneous destination using FreePBX. The more obscure the username (with some embedded numbers), the better off you will be. This will keep folks from bombarding you with unsolicited Gtalk chat messages, and who knows what nefarious scheme will be discovered using Google messaging six months from now. So keep this account a secret!
We've tested this extensively using an existing Gmail account, and inbound calling is just not reliable. The reason seems to be that Google always chooses Gmail chat as the inbound call destination if there are multiple registrations from the same IP address. So, be reasonable. Do it our way! Set up a dedicated Gmail and Google Voice account, and use it exclusively with The Incredible PBX. Google Voice no longer is by invitation only so, if you're in the U.S. or have a friend that is, head over to the Google Voice site and register. If you're living on another continent, see MisterQ's posting for some tips on getting set up.
You must choose a telephone number (aka DID) for your new account, or Google Voice calling will not work... in either direction. Google used to permit outbound Gtalk calls using a fake CallerID, but that obviously led to abuse so it's over! You also have to tie your Google Voice account to at least one working phone number as part of the initial setup process. Your cellphone number will work just fine. Don't skip this step either. Just enter the provided 2-digit confirmation code when you tell Google to place the test call to the phone number you entered. Once the number is registered, you can disable it if you'd like in Settings, Voice Setting, Phones. But...
IMPORTANT: Be sure to enable the Google Chat option as one of your phone destinations in Settings, Voice Setting, Phones. That's the destination we need for The Incredible PBX to work its magic! Otherwise, all inbound and outbound calls will fail. If you don't see this option, you may need to call up Gmail and enable Google Chat there first. Then go back to the Google Voice Settings.
While you're still in Google Voice Settings, click on the Calls tab. Make sure your settings match these:
- Call Screening - OFF
- Call Presentation - OFF
- Caller ID (In) - Display Caller's Number
- Caller ID (Out) - Don't Change Anything
- Do Not Disturb - OFF
- Call Options (Enable Recording) - OFF
- Global Spam Filtering - ON
Click Save Changes once you adjust your settings. Under the Voicemail tab, plug in your email address so you get notified of new voicemails. Down the road, receipt of a Google Voice voicemail will be a big hint that something has come unglued on your PBX.
Incredible PBX 2.9 Installation. Log into your server as root and issue the following commands to download and run The Incredible PBX installer:
cd /root
wget http://incrediblepbx.com/incrediblepbx29.x
chmod +x incrediblepbx29.x
./incrediblepbx29.x
When The Incredible PBX install begins, you'll be prompted for your FreePBX maint password. This is required to properly configure CallerID Superfecta for you. Your credentials never leave your server!
Now have another 15-minute cup of coffee, and consider a modest donation to Nerd Vittles... for all of our hard work. 😉 You'll find a link at the top of the page. While you're waiting just make sure that you've heeded our advice and installed your server behind a hardware-based firewall. No ports need to be opened on your firewall to support Incredible PBX. Leave it that way!
One final word of caution is in order regardless of your choice of providers: Do NOT use special characters in any provider passwords, or nothing will work!
Logging in to FreePBX 2.9. Using a web browser, you access the FreePBX GUI by pointing your browser to the IP address of your Incredible PBX. Click on the Users tab. It will change to Admin. Now click the FreePBX button. When prompted for a username, it's maint. When prompted for the password, it's whatever you set up as your maint password when you installed Incredible PBX 2.9. If you forget it, you can always reset it by logging into your server as root and running passwd-master.
Configuring Google Voice Trunks in FreePBX. All trunk configurations now are managed within FreePBX, including Google Voice. This makes it easy to customize your Incredible PBX to meet your specific needs. If you plan to use Google Voice, here's how to quickly configure one or more Google Voice trunks within FreePBX. After logging into FreePBX with your browser, click the Setup tab and choose Google Voice in the Third Party Addons. To Add a new Google Voice account, just fill out the form:

Phone number is your 10-digit Google Voice number. Username is your Google Voice account name without @gmail.com. NOTE: You must use a Gmail.com address in the current version of this module! Password is your Google Voice password. NOTE: Don't use 2-stage password protection in this Google Voice account! Be sure to check all three boxes: Add trunk, Add routes, and Agree to TOS. Then click Submit Changes and reload FreePBX. You can add additional Google Voice numbers by clicking Add GoogleVoice Account option in the right margin and repeating the drill.
While you're still in FreePBX, choose Setup, Extensions, and click on the 701 extension. Write down your extension password which you'll need to configure a phone in a minute.
IMPORTANT LAST STEP: Google Voice will not work unless you restart Asterisk from the Linux command line at this juncture. Using SSH, log into your server as root and issue the following command: amportal restart.
Incredible Fax Installation. If you want the added convenience of having your Incredible PBX double as a free fax machine, run /root/incrediblefax.sh shell script when the Incredible PBX install completes. Plug in your email address for delivery of incoming faxes and enter your home area code when prompted. For every other prompt, just press the Enter key. For complete documentation, see this Nerd Vittles article. Don't forget to REBOOT YOUR SERVER when the install is finished, or faxing won't work!
Also be sure to set up a second, dedicated Google Voice number if you want support for inbound faxing. Once the Google Voice credentials are configured in FreePBX for the additional Google Voice line, simply add an Inbound Route for this DID to point to the FAX misc. destination that comes preconfigured with Incredible PBX 2.9. Just substitute your 10-digit Google Voice number for the DID number shown below. Save your entries and reload FreePBX.

Extension Password Discovery. If you're too lazy to look up your extension 701 password using the FreePBX GUI, you can log into your server as root and issue the following command to obtain the password for extension 701 which we'll need to configure your softphone or color videophone in the next step:
mysql -uroot -ppassw0rd -e"select id,data from asterisk.sip where id='701' and keyword='secret'"
The result will look something like the following where 701 is the extension and 18016 is the randomly-generated extension password exclusively for your Incredible PBX:
+-----+-------+
id data
+-----+-------+
701 18016
+-----+-------+
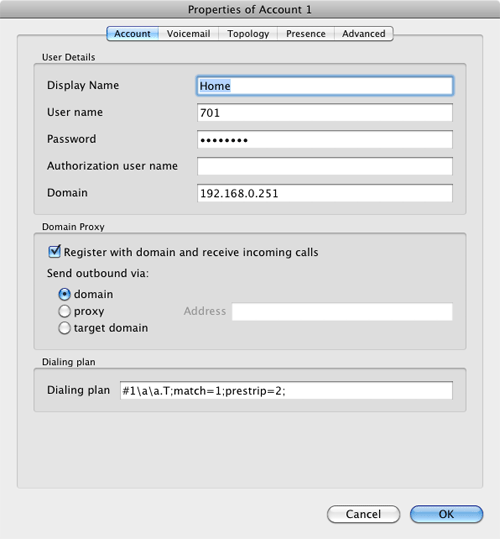
 Configuring a SIP Phone. There are hundreds of terrific SIP telephones and softphones for Asterisk-based systems. Once you get things humming along, you'll want a real SIP telephone such as the $50 Nortel color videophone we've recommended above. You'll also find lots of additional recommendations on Nerd Vittles and in the PBX in a Flash Forum. If you're like us, we want to make damn sure this stuff works before you shell out any money. So, for today, let's download a terrific (free) softphone to get you started. We recommend X-Lite because there are versions for Windows, Mac, and Linux. So download your favorite from this link. Install and run X-Lite on your Desktop. At the top of the phone, click on the Down Arrow and choose SIP Account Settings, Add. Enter the following information using your actual password for extension 701 and the actual IP address of your Incredible PBX server instead of 192.168.0.251. Click OK when finished. Your softphone should now show: Available.
 Incredible PBX Test Flight. The proof is in the pudding as they say. So let's try two simple tests. First, let's place an outbound call. Using the softphone, dial your 10-digit cellphone number. Google Voice should transparently connect you. Answer the call and make sure you can send and receive voice on both phones. Second, from another phone, call the Google Voice number that you've dedicated to The Incredible PBX. Your softphone should begin ringing shortly. Answer the call, press 1 to accept the call, and then make sure you can send and receive voice on both phones. Hang up. If everything is working, congratulations!
Here's a brief video demonstration showing how to set up a softphone to use with your Incredible PBX, and it also walks you through several of the dozens of Asterisk applications included in your system.
 Solving One-Way Audio Problems. If you experience one-way audio on some of your phone calls, you may need to adjust the settings in /etc/asterisk/sip_custom.conf. Just uncomment the first two lines by removing the semicolons. Then replace 173.15.238.123 with your public IP address, and replace 192.168.0.0 with the subnet address of your private network. There are similar settings in gtalk.conf that can be activated although we've never had to use them. In fact, we've never had to use any of these settings. After making these changes, save the file(s) and restart Asterisk with the command: amportal restart.
Learn First. Explore Second. Even though the installation process has been completed, we strongly recommend you do some reading before you begin your VoIP adventure. VoIP PBX systems have become a favorite target of the hackers and crackers around the world and, unless you have an unlimited bank account, you need to take some time learning where the minefields are in today's VoIP world. Start by reading our Primer on Asterisk Security. We've secured all of your passwords except your root password and your passwd-master password. We're assuming you've put very secure passwords on those accounts as if your phone bill depended upon it. It does! Also read our PBX in a Flash and VPN in a Flash knols. If you're still not asleep, there's loads of additional documentation on the PBX in a Flash documentation web site.
![]() Choosing a VoIP Provider for Redundancy. Nothing beats free when it comes to long distance calls. But nothing lasts forever. And, in the VoIP World, redundancy is dirt cheap. So we strongly recommend you set up another account with Vitelity using our special link below. This gives your PBX a secondary way to communicate with every telephone in the world, and it also gets you a second real phone number for your new system... so that people can call you. Here's how it works. You pay Vitelity a deposit for phone service. They then will bill you $3.99 a month for your new phone number. This $3.99 also covers the cost of unlimited inbound calls (two at a time) delivered to your PBX for the month. For outbound calls, you pay by the minute and the cost is determined by where you're calling. If you're in the U.S., outbound calls to anywhere in the U.S. are a little over a penny a minute. If you change your mind about Vitelity and want a refund of the balance in your account, all you have to do is ask. The trunks for Vitelity already are preconfigured with The Incredible PBX. Just insert your credentials using FreePBX and uncheck the Disable Trunk checkbox. Then add the Vitelity trunk as the third destination for your default outbound route. That's it. Congratulations! You now have a totally redundant phone system.
Choosing a VoIP Provider for Redundancy. Nothing beats free when it comes to long distance calls. But nothing lasts forever. And, in the VoIP World, redundancy is dirt cheap. So we strongly recommend you set up another account with Vitelity using our special link below. This gives your PBX a secondary way to communicate with every telephone in the world, and it also gets you a second real phone number for your new system... so that people can call you. Here's how it works. You pay Vitelity a deposit for phone service. They then will bill you $3.99 a month for your new phone number. This $3.99 also covers the cost of unlimited inbound calls (two at a time) delivered to your PBX for the month. For outbound calls, you pay by the minute and the cost is determined by where you're calling. If you're in the U.S., outbound calls to anywhere in the U.S. are a little over a penny a minute. If you change your mind about Vitelity and want a refund of the balance in your account, all you have to do is ask. The trunks for Vitelity already are preconfigured with The Incredible PBX. Just insert your credentials using FreePBX and uncheck the Disable Trunk checkbox. Then add the Vitelity trunk as the third destination for your default outbound route. That's it. Congratulations! You now have a totally redundant phone system.
We've also included Trunk configurations for a dozen of our favorite hosting providers to get you started. You can sign up for service with any of them, insert your credentials in the existing trunk, uncheck the Disable Trunk checkbox, and then adjust your outbound route and add an inbound route for your new DID (if you get one).

Stealth AutoAttendant. When incoming calls arrive, the caller is greeted with a welcoming message from Allison which says something like "Thanks for calling. Please hold a moment while I locate someone to take your call." To the caller, it's merely a greeting. To those "in the know," it's actually an AutoAttendant (aka IVR system) that gives you the opportunity to press a button during the message to trigger the running of some application on your Incredible PBX. As configured, the only option that works is 0 which fires up the Nerd Vittles Apps IVR. It's quite easy to add additional features such as voicemail retrieval or DISA for outbound calling. Just edit the MainIVR option in FreePBX under Setup, IVR. Keep in mind that anyone (anywhere in the world) can choose these options. So be extremely careful not to expose your system to security vulnerabilities by making certain that any options you add have very secure passwords! It's your phone bill. 😉
Configuring Email. You're going to want to be notified when updates are available for FreePBX, and you may also want notifications when new voicemails arrive. Everything already is set up for you except actually entering your email notification address. Using a web browser, open the FreePBX GUI by pointing your browser to the IP address of your Incredible PBX. Then click Administration and choose FreePBX. To set your email address for FreePBX updates, go to Setup, General Settings and scroll to the bottom of the screen. To configure emails to notify you of incoming voicemails, go to Setup, Extensions, 701 and scroll to the bottom of the screen. Then follow your nose. Be sure to reload FreePBX when prompted after saving your changes.
A Word About Security. Security matters to us, and it should matter to you. Not only is the safety of your system at stake but also your wallet and the safety of other folks' systems. Our only means of contacting you with security updates is through the RSS Feed that we maintain for the PBX in a Flash project. This feed is prominently displayed in the web GUI which you can access with any browser pointed to the IP address of your server. Check It Daily! Or add our RSS Feed to your favorite RSS Reader. We also recommend you follow @NerdUno on Twitter. We'll keep you entertained and provide immediate notification of security problems that we hear about. Be safe!
Enabling Google Voicemail. Some have requested a way to retain Google's voicemail system for unanswered calls in lieu of using Asterisk voicemail. The advantage is that Google offers a free transcription service for voicemail messages. To activate this, you'll need to edit the [googlein] context in extensions_custom.conf in /etc/asterisk. Just modify the last four lines in the context so that they look like this and then restart Asterisk: amportal restart
;exten => s,n(regcall),Answer
;exten => s,n,SendDTMF(1)
exten => s,n(regcall),Set(DIAL_OPTIONS=${DIAL_OPTIONS}aD(:1))
exten => s,n,Goto(from-trunk,gv-incoming,1)
Kicking the Tires. OK. That's enough tutorial for today. Let's play. Using your new softphone, begin your adventure by dialing these extensions:
- D-E-M-O - Incredible PBX Demo (running on your PBX)
- 1234*1061 - Nerd Vittles Demo via ISN FreeNum connection to NV
- 17476009082*1089 - Nerd Vittles Demo via ISN to Google/Gizmo5
- Z-I-P - Enter a five digit zip code for any U.S. weather report
- 6-1-1 - Enter a 3-character airport code for any U.S. weather report
- 5-1-1 - Get the latest news and sports headlines from Yahoo News
- T-I-D-E - Get today's tides and lunar schedule for any U.S. port
- F-A-X - Send a fax to an email address of your choice
- 4-1-2 - 3-character phonebook lookup/dialer with AsteriDex
- M-A-I-L - Record a message and deliver it to any email address
- C-O-N-F - Set up a MeetMe Conference on the fly
- 1-2-3 - Schedule regular/recurring reminder (PW: 12345678)
- 2-2-2 - ODBC/Timeclock Lookup Demo (Empl No: 12345)
- 2-2-3 - ODBC/AsteriDex Lookup Demo (Code: AME)
- Dial *68 - Schedule a hotel-style wakeup call from any extension
- 1061*1061 - PIAF Support Conference Bridge (Conf#: 1061)
- 882*1061 - VoIP Users Conference every Friday at Noon (EST)

PBX in a Flash SQLite Registry. Last, but not least, we want to introduce you to the new PBX in a Flash Registry which uses SQLite, a zero-configuration SQL-compatible database engine. After logging into your server as root, just type show-registry for a listing of all of the applications, versions, and install dates of everything on your new server. Choosing the A option will generate registry.txt in the /root folder while the other options will let you review the applications by category on the screen. For example, the G option displays all of The Incredible PBX add-ons that have been installed. Here's the complete list of options:
- A - Write the contents of the registry to registry.txt
- B - PBX in a Flash install details
- C - Extra programs install details
- D - Update-fixes status and details
- E - RPM install details
- F - FreePBX modules install details
- G - Incredible PBX install details
- Q - Quit this program
And here's a sample from an install we recently completed.
 Special Thanks. It's hard to know where to start in expressing our gratitude for all of the participants that made today's incredibly simple-to-use product possible. To Philippe Sultan and the rest of the Asterisk development team, thank you for finally making Jabber jabber with Asterisk. To Leif Madsen, our special thanks for your early pioneering work with Gtalk and Jabber which got this ball rolling. To Philippe Lindheimer, Tony Lewis, and the rest of the FreePBX development team, thanks for FreePBX 2.9 which really makes Asterisk shine. To Lefteris Zafiris, thank you for making Flite work with Asterisk 1.8 thereby preserving all of the Nerd Vittles text-to-speech applications. To Darren Sessions, thanks for whipping app_swift into shape and restoring Cepstral and commercial TTS applications to the land of the living with Asterisk 1.8. And to our pal, Tom King, we couldn't have done it without you. You rolled up your sleeves and really made CentOS 6 and Asterisk 1.8 and 10 sit up and bark. No one will quite understand what an endeavor that is until they try it themselves. You won't find another CentOS 6 implementation of Asterisk, and Tom has made it look incredibly easy. It wasn't! In fact, when CentOS released 6.1 this week, Tom actually shifted gears (again) and rebuilt PIAF2 (in a couple of days) to take advantage of CentOS 6.1. And, last but not least, to our dozens of beta testers, THANK YOU! We've implemented almost all of your suggestions.
 Additional Goodies. Be sure to log into your server as root and look through the scripts added in the /root and /root/nv folders. You'll find all sorts of goodies to keep you busy. There's an all-new incrediblefax.sh script that painlessly installs and configures HylaFax and AvantFax for state-of-the-art faxing. The 32-bit install-cepstral script does just what it says. With Allison's Cepstral voice, you'll have the best TTS implementation for Asterisk available. ipscan is a little shell script that will tell you every working IP device on your LAN. trunks.sh tells you all of the Asterisk trunks configured on your system. purgeCIDcache.sh will clean out the CallerID cache in the Asterisk database. convert2gsm.sh shows you how to convert a .wav file to .gsm. munin.pbx will install Munin on your system while awstats.pbx installs AWstats. s3cmd.faq tells you how to quickly activate the Amazon S3 Cloud Computing service. All the other scripts and apps in /root/nv already have been installed for you so don't install them again.
If you've heeded our advice and purchased a PogoPlug, you can link to your home-grown cloud as well. Just add your credentials to /root/pogo-start.sh. Then run the script to enable the PogoPlug Cloud on your server. All of your cloud resources are instantly accessible in /mnt/pogoplug. It's perfect for off-site backups and is included as one of the backup options in the PBX in a Flash backup utilities.
 Don't forget to List Yourself in Directory Assistance so everyone can find you by dialing 411. And add your new number to the Do Not Call Registry to block telemarketing calls. Or just call 888-382-1222 from your new number. Enjoy!
Originally published: Thursday, December 15, 2011
VoIP Virtualization with Incredible PBX: OpenVZ and Cloud Solutions
Safely Interconnecting Asterisk Servers for Free Calling
Adding Skype to The Incredible PBX
Adding Incredible Fax to The Incredible PBX
Adding Incredible Backup... and Restore to The Incredible PBX
Adding Remotes, Preserving Security with The Incredible PBX
Remote Phone Meets Travelin' Man with The Incredible PBX
 Support Issues. With any application as sophisticated as this one, you're bound to have questions. Blog comments are a terrible place to handle support issues although we welcome general comments about our articles and software. If you have particular support issues, we encourage you to get actively involved in the PBX in a Flash Forums. It's the best Asterisk tech support site in the business, and it's all free! We maintain a thread with Information, Patches and Bug Fixes for Incredible PBX 2.9. Please have a look. Unlike some forums, ours is extremely friendly and is supported by literally hundreds of Asterisk gurus and thousands of ordinary users just like you. You won't have to wait long for an answer to your question.

Need help with Asterisk? Visit the PBX in a Flash Forum.
Or Try the New, Free PBX in a Flash Conference Bridge.
whos.amung.us If you're wondering what your fellow man is reading on Nerd Vittles these days, wonder no more. Visit our new whos.amung.us statistical web site and check out what's happening. It's a terrific resource both for us and for you.
Special Thanks to Our Generous Sponsors
FULL DISCLOSURE: ClearlyIP, Skyetel, Vitelity, DigitalOcean, Vultr, VoIP.ms, 3CX, Sangoma, TelecomsXchange and VitalPBX have provided financial support to Nerd Vittles and our open source projects through advertising, referral revenue, and/or merchandise. As an Amazon Associate and Best Buy Affiliate, we also earn from qualifying purchases. We’ve chosen these providers not the other way around. Our decisions are based upon their corporate reputation and the quality of their offerings and pricing. Our recommendations regarding technology are reached without regard to financial compensation except in situations in which comparable products at comparable pricing are available from multiple sources. In this limited case, we support our sponsors because our sponsors support us.
BOGO Bonaza: Enjoy state-of-the-art VoIP service with a $10 credit and half-price SIP service on up to $500 of Skyetel trunking with free number porting when you fund your Skyetel account. No limits on number of simultaneous calls. Quadruple data center redundancy. $25 monthly minimum spend required. Tutorial and sign up details are here.
![]() The lynchpin of Incredible PBX 2020 and beyond is ClearlyIP components which bring management of FreePBX modules and SIP phone integration to a level never before available with any other Asterisk distribution. And now you can configure and reconfigure your new Incredible PBX phones from the convenience of the Incredible PBX GUI.
The lynchpin of Incredible PBX 2020 and beyond is ClearlyIP components which bring management of FreePBX modules and SIP phone integration to a level never before available with any other Asterisk distribution. And now you can configure and reconfigure your new Incredible PBX phones from the convenience of the Incredible PBX GUI.
VitalPBX is perhaps the fastest-growing PBX offering based upon Asterisk with an installed presence in more than 100 countries worldwide. VitalPBX has generously provided a customized White Label version of Incredible PBX tailored for use with all Incredible PBX and VitalPBX custom applications. Follow this link for a free test drive!
Special Thanks to Vitelity. Vitelity is now Voyant Communications and has halted new registrations for the time being. Our special thanks to Vitelity for their unwavering financial support over many years and to the many Nerd Vittles readers who continue to enjoy the benefits of their service offerings. We will keep everyone posted on further developments.
Some Recent Nerd Vittles Articles of Interest...
- As part of the yum update process, you'll actually end up with CentOS 6.2 minus the 6.2 kernel. [↩]
- If you use the recommended Acer Aspire Revo, be advised that it does NOT include a CD/DVD drive. You will need an external USB CD/DVD drive to load the software. Some of these work with CentOS, and some don't. Most HP and Sony drives work; however, we strongly recommend you purchase an external DVD drive from a merchant that will accept returns, e.g. Best Buy, WalMart, Office Depot, Office Max, Staples. You also can run Incredible PBX 2.9 on a virtual machine such as the free Proxmox server. A security vulnerability has been reported in the Proxmox browser so be sure to run your server behind a secure, hardware-based firewall with no port exposure to the actual Proxmox server from the Internet. [↩]
The Ultimate VoIP Sandbox: PBX in a Flash 2 with CentOS 6
Today we're delighted to introduce the new PBX in a Flash 2™ beta built atop the latest release of CentOS® 6. Featuring superior scalability, improved performance, better resource management, and unmatched device support, PBX in a Flash 2.0.6.0 brings you the most versatile Asterisk® platform on the planet with the latest and greatest releases of virtually every major open source product in the marketplace. In addition to providing your choice of Asterisk 1.8 versions or Asterisk 10, PIAF2™ also gives you a choice of FreePBX® 2.8, 2.9, or 2.10. For those wanting to experiment, PIAF2 also provides direct access to Asterisk's menuconfig system to customize the selection of Asterisk modules you wish to deploy. And, of course, PIAF2 continues to provide the only turnkey Google Voice solution providing immediate free calling throughout the U.S. and Canada. We'll walk you through the 2-minute drill to deploy Google Voice for inbound and outbound calling with FreePBX. Incredible PBX is not yet compatible!
NEWS FLASH: Looks like free Google Voice calling in the U.S. and Canada will be continued for 2012. See our Google+ post for details.
[iframe-popup id="6"]
Our special tip of the hat again goes to Tom King, who has spent the better part of four months integrating PIAF2 into the new CentOS 6 release. To suggest that this was not a job for mere mortals doesn't begin to paint the picture of this long and winding road. The good news is we think you'll be delighted with the results. The PBX in a Flash install process now has been streamlined into three distinct components. After downloading the ISO and burning a DVD to install your new server, here's how it works. First, you get to choose the file system for your new CentOS server. The PIAF2 installer will whir away for about 15 minutes installing CentOS6. When your system reboots, remove the DVD and Phase 2 begins. Here you get to choose your flavor of Asterisk to deploy. We continue to recommend PIAF2-Purple as the stable product for all but pioneers. Within a minute or so, your chosen Asterisk installer will load. In Phase 3 (the Config Module), you pick your flavor of FreePBX and choose a password for access, set your time zone, and decide whether you want to further customize Asterisk using menuconfig. Once you've made your selections, everything else installs on autopilot unless you opted to use menuconfig. If so, come back in 15 minutes and tailor away. Then press x to save your settings and finish the install. Depending on the speed of your server or virtual machine, the complete install usually takes 30-60 minutes.
After the final reboot, you'll have a working PIAF2 server. Open up FreePBX with a browser, enter your Google Voice credentials, create an extension, link an inbound route to that extension to accept calls, restart Asterisk from the command prompt, and you'll have a fully operational PBX in less than 2 minutes.
PIAF2 in the Cloud. We've been experimenting with several new (free) Cloud storage offerings. Because of the enormous size of the new ISO (1.79 GB), we've decided to host the PIAF2 beta ISO with two of these cloud providers in addition to some of our regular mirrors. This will let you judge the spectacular download performance of these new cloud offerings for yourself. Incidentally, you can sign up for your own free cloud storage at both sites. Our favorite is minus.com which offers 10GB of free cloud storage for life plus an extra gigabyte for you and for the PIAF Dev Team when you use our special signup link. You've got nothing to lose, and it helps the PBX in a Flash project as well. The other free offering is from one of our old favorites, PogoPlug. Just visit their site and grab your 5GB of free storage. Just a footnote that C|NET was offering 10GB of free PogoPlug storage last week, but you missed the window unless you're a PIAF Forum regular. HINT!
Creating a PIAF2 DVD. To get started, download the 1.79GB PIAF2 ISO. The MD5 checksum for the 32-bit ISO is 13d9302ef408feae726c2ca2b2c42a7c. The 64-bit MD5 is 3e7264e27099e35b631e7c7acca65c95. Here are the current download links.
Special Note: Upcoming Incredible PBX 2.9 only works with 32-bit ISO using PIAF-Purple (Asterisk 1.8) and FreePBX 2.9.
Minus Cloud (32-bit): Folder or ISO or Wget Link
Minus Cloud (64-bit): Folder or ISO or Wget Link
PogoPlug Cloud: Folder or 32-bit ISO
Google Cloud: Folder or 32-bit ISO
Vitelity: 32-bit ISO Download Link
SourceForge: Folder or 32-bit ISO or 64-bit ISO
Once you have the ISO image in hand, the next step is to burn the ISO image to a DVD. If you've never done it before, here's a tutorial that will show you how on either a Windows machine or a Mac.
Using PIAF2 with Proxmox. For those using Proxmox to host PIAF2 virtual machines, the easiest approach is to log into your server as root, change to the /var/lib/vz/template/iso directory, and issue a wget command using the Wget Link above. Once the download completes, don't forget to rename the ISO to pbxinaflash20601-i386.iso. The naming convention really matters with Proxmox! In building KVM virtual machines with Proxmox, you'll need to allocate at least 768MB of RAM (1024MB recommended) for each image. CentOS 6 has a much larger memory footprint than CentOS 5. Reminder: Be sure Proxmox is sitting behind a secure hardware-based firewall. It is NOT secure on the open Internet!
Atom-based PC Platform. Unless you're using PIAF2 on a virtual hosting platform, you'll need a dedicated PC. For the least expensive hardware alternative, pick up an Atom-based PC. We previously have recommended against an EEE PC because of the network driver incompatibility with CentOS 5. We'll have to leave it to the pioneers to tell us whether this still applies with CentOS 6. We do know that the refurbished Acer desktops work fine. Someone has actually tested them! And they can easily support a small business with dozens of phones.

FreePBX Setup. After the PIAF2 install finishes, your server will reboot once again. Log into the Linux CLI as root using your root password. Write down the IP address of your server from the status display and verify that everything installed properly. Note that Samba is disabled by default. If you want to use it for Windows Networking, run configure-samba once your server is up and running.
Most of your life with PBX in a Flash will be spent using the FreePBX web GUI and your favorite browser. The PIAF Web GUI (shown above) is undergoing some upgrades to assure compatibility with the new PHP release. If you point a browser to the IP address of your server and see no icons or RSS Feed (as shown above), then apply the update patch below.
Update: Here's the two-line patch to address the PHP 5.3 change in behavior. The PHP opening tag syntax of <? is no longer allowed by default. To force PHP 5.3 to conform to the prior (permissible) syntax, log into your server as root and issue the following two commands:
sed -i 's|short_open_tag = Off|short_open_tag = On|' /etc/php.ini
service httpd restart
This restores the PIAF GUI to its former operation. Be sure to check the RSS Feed daily by pointing your browser to the IP address of your server. The RSS Feed is displayed in the left column of the GUI and will alert you to any newly discovered security vulnerabilities.

You also can access the FreePBX GUI directly by pointing your browser to the IP address of your PIAF2 server: http://ipaddress/admin. When prompted for your username and password, the username is maint. The password will be the FreePBX master password you chose in Phase 3 of the PIAF install. Because of the PHP 5.3 issues mentioned above, we recommend FreePBX 2.9 which already is compatible with this new release.

To get a minimal system functioning to make and receive calls, here's the 2-minute drill. You'll need to set up at least one extension with voicemail and configure a free Google Voice account for free calls in the U.S. and Canada. Next, configure inbound and outbound routes to manage incoming and outgoing calls. Finally, add a phone with your extension credentials, and you're done.
A Word About Security. PBX in a Flash has been engineered to run on a server sitting safely behind a hardware-based firewall with NO port exposure from the Internet. Leave it that way! It's your wallet and phone bill that are at stake.
Extension Setup. Now let's set up an extension to get you started. A good rule of thumb for systems with less than 50 extensions is to reserve the IP addresses from 192.x.x.201 to 192.x.x.250 for your phones. Then you can create extension numbers in FreePBX to match those IP addresses. This makes it easy to identify which phone on your system goes with which IP address and makes it easy for end-users to access the phone's GUI to add bells and whistles. To create extension 201 (don't start with 200), click Setup, Extensions, Generic SIP Device, Submit. Then fill in the following blanks USING VERY SECURE PASSWORDS and leaving the defaults in the other fields for the time being.
User Extension ... 201
Display Name ... Home
Outbound CID ... [your 10-digit phone number if you have one; otherwise, leave blank]
Emergency CID ... [your 10-digit phone number for 911 ID if you have one; otherwise, leave blank]Device Options
secret ... 1299864Xyz [make this unique AND secure!]
dtmfmode ... rfc2833
Voicemail & Directory ... Enabled
voicemail password ... 14332 [make this unique AND secure!]
email address ... yourname@yourdomain.com [if you want voicemail messages emailed to you]
pager email address ... yourname@yourdomain.com [if you want to be paged when voicemail messages arrive]
email attachment ... yes [if you want the voicemail message included in the email message]
play CID ... yes [if you want the CallerID played when you retrieve a message]
play envelope ... yes [if you want the date/time of the message played before the message is read to you]
delete Vmail ... yes [if you want the voicemail message deleted after it's emailed to you]
vm options ... callback=from-internal [to enable automatic callbacks by pressing 3,2 after playing a voicemail message]
vm context ... default
Write down the passwords. You'll need them to configure your SIP phone.
Extension Security. We cannot overstress the need to make your extension passwords secure. All the firewalls in the world won't protect you from malicious phone calls on your nickel if you use your extension number or something like 1234 for your extension password if your SIP or IAX ports happen to be exposed to the Internet.
In addition to making up secure passwords, the latest versions of FreePBX also let you define the IP address or subnet that can access each of your extensions. Use it!!! Once the extensions are created, edit each one and modify the permit field to specify the actual IP address or subnet of each phone on your system. A specific IP address entry should look like this: 192.168.1.142/255.255.255.255. If most of your phones are on a private LAN, you may prefer to use a subnet entry in the permit field like this: 192.168.1.0/255.255.255.0 using your actual subnet.

Adding a Google Voice Trunk. There are lots of trunk providers, and one of the real beauties of having your own PBX is that you don't have to put all of your eggs in the same basket... unlike the AT&T days. We would encourage you to take advantage of this flexibility. With most providers, you don't pay anything except when you actually use their service so you have nothing to lose.
For today, we're going to take advantage of Google's current offer of free calling in the U.S. and Canada through the end of this year. You also get a free phone number in your choice of area codes. PBX in a Flash now installs a Google Voice module for FreePBX that lets you set up your Google Voice account with PBX in a Flash in just a few seconds once you have your credentials.
Signing Up for Google Voice. You'll need a dedicated Google Voice account to support PBX in a Flash. The more obscure the username (with some embedded numbers), the better off you will be. This will keep folks from bombarding you with unsolicited Gtalk chat messages, and who knows what nefarious scheme will be discovered using Google messaging six months from now. So keep this account a secret!
We've tested this extensively using an existing Gmail account rather than creating a separate account. Take our word for it. Inbound calling is just not reliable. The reason seems to be that Google always chooses Gmail chat as the inbound call destination if there are multiple registrations from the same IP address. So... set up a dedicated Gmail and Google Voice account, and use it exclusively with PBX in a Flash. Google Voice no longer is by invitation only. If you're in the U.S. or have a friend that is, head over to the Google Voice site and register. If you're living on another continent, see MisterQ's posting for some tips on getting set up.
You must choose a telephone number (aka DID) for your new account, or Google Voice calling will not work... in either direction. You also have to tie your Google Voice account to at least one working phone number as part of the initial setup process. Your cellphone number will work just fine. Don't skip this step either. Just enter the provided confirmation code when you tell Google to place the test call to the phone number you entered. Once the number is registered, you can disable it if you'd like in Settings, Voice Setting, Phones. But...
IMPORTANT: Be sure to enable the Google Chat option as one of your phone destinations in Settings, Voice Setting, Phones. That's the destination we need for PBX in a Flash to function with Google Voice! Otherwise, inbound and/or outbound calls will fail. If you don't see this option, you may need to call up Gmail and enable Google Chat there first. Then go back to the Google Voice Settings and enable it. Be sure to try one call each way from Google Chat in Gmail. Then disable Google Chat in GMail for this account. Otherwise, it won't work with PIAF.
While you're still in Google Voice Settings, click on the Calls tab. Make sure your settings match these:
- Call Screening - OFF
- Call Presentation - OFF
- Caller ID (In) - Display Caller's Number
- Caller ID (Out) - Don't Change Anything
- Do Not Disturb - OFF
- Call Options (Enable Recording) - OFF
- Global Spam Filtering - ON
Click Save Changes once you adjust your settings. Under the Voicemail tab, plug in your email address so you get notified of new voicemails. Down the road, receipt of a Google Voice voicemail will be a big hint that something has come unglued on your PBX.
Configuring Google Voice Trunk in FreePBX. All trunk configurations now are managed within FreePBX, including Google Voice. This makes it easy to customize PBX in a Flash to meet your specific needs. Click the Setup tab and choose Google Voice in the Third Party Addons. To Add a new Google Voice account, just fill out the form:
Phone number is your 10-digit Google Voice number. Username is your Google Voice account name without @gmail.com. NOTE: You must use a Gmail.com address in the current version of this module! Password is your Google Voice password. NOTE: Don't use 2-stage password protection in this Google Voice account! Be sure to check all three boxes: Add trunk, Add routes, and Agree to TOS. Then click Submit Changes and reload FreePBX. Down the road, you can add additional Google Voice numbers by clicking Add GoogleVoice Account option in the right margin and repeating the drill. For Google Apps support, see this post on the PIAF Forum.
Outbound Routes. The idea behind multiple outbound routes is to save money. Some providers are cheaper to some places than others. It also provides redundancy which costs you nothing if you don't use the backup providers. The Google Voice module actually configures an Outbound Route for 10-digit Google Voice calling as part of the automatic setup. If this meets your requirements, then you can skip this step for today.
Inbound Routes. An Inbound Route tells PBX in a Flash how to route incoming calls. The idea here is that you can have multiple DIDs (phone numbers) that get routed to different extensions or ring groups or departments. For today, we'll build a simple route that directs your Google Voice calls to extension 201. Choose Inbound Routes, leave all of the settings at their default values except enter your 10-digit Google Voice number in the DID Number field. Enable CallerID lookups by choosing CallerID Superfecta in the CID Lookup Source pulldown. Then move to the Set Destination section and choose Extensions in the left pull-down and 201 in the extension pull-down. Now click Submit and save your changes. That will assure that incoming Google Voice calls are routed to extension 201.
IMPORTANT: Before Google Voice calling will actually work, you must restart Asterisk from the Linux command line interface. Log into your server as root and issue this command: amportal restart.
General Settings. Last, but not least, we need to enter an email address for you so that you are notified when new FreePBX updates are released. Scroll to the bottom of the General Settings screen after selecting it from the left panel. Plug in your email address, click Submit, and save your changes. Done!
Adding Plain Old Phones. Before your new PBX will be of much use, you're going to need something to make and receive calls, i.e. a telephone. For today, you've got several choices: a POTS phone, a softphone, or a SIP phone. Option #1 and the best home solution is to use a Plain Old Telephone or your favorite cordless phone set (with 8-10 extensions) if you purchase a little device known as a Sipura SPA-3102. It's under $70. Be sure you specify that you want an unlocked device, meaning it doesn't force you to use a particular service provider. This device also supports connection of your PBX to a standard office or home phone line as well as a telephone.
Configuring a SIP Phone. There are hundreds of terrific SIP telephones and softphones for Asterisk-based systems. Once you get things humming along, you'll want a real SIP telephone such as the $50 Nortel color videophone we've recommended previously. You'll also find lots of additional recommendations on Nerd Vittles and in the PBX in a Flash Forum. If you're like us, we want to make damn sure this stuff works before you shell out any money. So, for today, let's download a terrific (free) softphone to get you started. We recommend X-Lite because there are versions for Windows, Mac, and Linux. So download your favorite from this link. Install and run X-Lite on your Desktop. At the top of the phone, click on the Down Arrow and choose SIP Account Settings, Add. Enter the following information using 201 for your extension and your actual password for extension 201. Then plug in the actual IP address of your PBX in a Flash server instead of 192.168.0.251. Click OK when finished. Your softphone should now show: Available.
Enabling Google Voicemail. Some have requested a way to retain Google's voicemail system for unanswered calls in lieu of using Asterisk voicemail. The advantage is that Google offers a free transcription service for voicemail messages. To activate this, you'll need to edit the [googlein] context in extensions_custom.conf in /etc/asterisk. Just modify the last four lines in the context so that they look like this and then restart Asterisk: amportal restart
;exten => s,n(regcall),Answer
;exten => s,n,SendDTMF(1)
exten => s,n(regcall),Set(DIAL_OPTIONS=${DIAL_OPTIONS}aD(:1))
exten => s,n,Goto(from-trunk,gv-incoming,1)
But I Don't Want to Use Google Voice. If you'd prefer not to use Google Voice at all with PBX in a Flash, that's okay, too. Here's how to disable it and avoid the chatter in the Asterisk CLI. Log into your server as root and edit /etc/asterisk/modules.conf. Change the first three lines in the [modules] context so that they look like this. Then restart Asterisk: amportal restart.
autoload=yes
noload => res_jabber.so
noload => chan_gtalk.so
Incredible PBX. Just a cautionary note that Incredible PBX 2 was not designed for use with CentOS 6. Don't try it! Give us a few weeks to make some needed adjustments, and we'll let you know when it is safe to have a go at it.

A Final Word About Beta Software. We take great pride in our software. Before it reaches beta stage, you can rest assured that it's not only been tested, but it actually works. That doesn't mean it's bug free. You can help enormously by reporting bugs. Just leave a comment here, or log into the PIAF Forum and let us know about any issues you encounter. We hope you're as thrilled with this new release as we are. Happy Thanksgiving!
Originally published: Monday, November 21, 2011
Need help with Asterisk? Visit the PBX in a Flash Forum.
Or Try the New, Free PBX in a Flash Conference Bridge.
whos.amung.us If you're wondering what your fellow man is reading on Nerd Vittles these days, wonder no more. Visit our new whos.amung.us statistical web site and check out what's happening. It's a terrific resource both for us and for you.
Special Thanks to Our Generous Sponsors
FULL DISCLOSURE: ClearlyIP, Skyetel, Vitelity, DigitalOcean, Vultr, VoIP.ms, 3CX, Sangoma, TelecomsXchange and VitalPBX have provided financial support to Nerd Vittles and our open source projects through advertising, referral revenue, and/or merchandise. As an Amazon Associate and Best Buy Affiliate, we also earn from qualifying purchases. We’ve chosen these providers not the other way around. Our decisions are based upon their corporate reputation and the quality of their offerings and pricing. Our recommendations regarding technology are reached without regard to financial compensation except in situations in which comparable products at comparable pricing are available from multiple sources. In this limited case, we support our sponsors because our sponsors support us.
BOGO Bonaza: Enjoy state-of-the-art VoIP service with a $10 credit and half-price SIP service on up to $500 of Skyetel trunking with free number porting when you fund your Skyetel account. No limits on number of simultaneous calls. Quadruple data center redundancy. $25 monthly minimum spend required. Tutorial and sign up details are here.
![]() The lynchpin of Incredible PBX 2020 and beyond is ClearlyIP components which bring management of FreePBX modules and SIP phone integration to a level never before available with any other Asterisk distribution. And now you can configure and reconfigure your new Incredible PBX phones from the convenience of the Incredible PBX GUI.
The lynchpin of Incredible PBX 2020 and beyond is ClearlyIP components which bring management of FreePBX modules and SIP phone integration to a level never before available with any other Asterisk distribution. And now you can configure and reconfigure your new Incredible PBX phones from the convenience of the Incredible PBX GUI.
VitalPBX is perhaps the fastest-growing PBX offering based upon Asterisk with an installed presence in more than 100 countries worldwide. VitalPBX has generously provided a customized White Label version of Incredible PBX tailored for use with all Incredible PBX and VitalPBX custom applications. Follow this link for a free test drive!
Special Thanks to Vitelity. Vitelity is now Voyant Communications and has halted new registrations for the time being. Our special thanks to Vitelity for their unwavering financial support over many years and to the many Nerd Vittles readers who continue to enjoy the benefits of their service offerings. We will keep everyone posted on further developments.
Some Recent Nerd Vittles Articles of Interest...
11/11/11: To Celebrate Nerd New Year’s, Please Welcome…

Just click on the image above to visit the site. Content is updated at least twice daily. As always, we welcome your content suggestions. Enjoy!
Originally published: Friday, November 11, 2011
Great News! Google Plus is available to everyone. Sign up here and circle us. Click these links to view the Asterisk feed or PBX in a Flash feed on Google+.
Need help with Asterisk? Visit the PBX in a Flash Forum.
Or Try the New, Free PBX in a Flash Conference Bridge.
whos.amung.us If you’re wondering what your fellow man is reading on Nerd Vittles these days, wonder no more. Visit our new whos.amung.us statistical web site and check out what’s happening. It’s a terrific resource both for us and for you.
Special Thanks to Our Generous Sponsors
FULL DISCLOSURE: ClearlyIP, Skyetel, Vitelity, DigitalOcean, Vultr, VoIP.ms, 3CX, Sangoma, TelecomsXchange and VitalPBX have provided financial support to Nerd Vittles and our open source projects through advertising, referral revenue, and/or merchandise. As an Amazon Associate and Best Buy Affiliate, we also earn from qualifying purchases. We’ve chosen these providers not the other way around. Our decisions are based upon their corporate reputation and the quality of their offerings and pricing. Our recommendations regarding technology are reached without regard to financial compensation except in situations in which comparable products at comparable pricing are available from multiple sources. In this limited case, we support our sponsors because our sponsors support us.
BOGO Bonaza: Enjoy state-of-the-art VoIP service with a $10 credit and half-price SIP service on up to $500 of Skyetel trunking with free number porting when you fund your Skyetel account. No limits on number of simultaneous calls. Quadruple data center redundancy. $25 monthly minimum spend required. Tutorial and sign up details are here.
![]() The lynchpin of Incredible PBX 2020 and beyond is ClearlyIP components which bring management of FreePBX modules and SIP phone integration to a level never before available with any other Asterisk distribution. And now you can configure and reconfigure your new Incredible PBX phones from the convenience of the Incredible PBX GUI.
The lynchpin of Incredible PBX 2020 and beyond is ClearlyIP components which bring management of FreePBX modules and SIP phone integration to a level never before available with any other Asterisk distribution. And now you can configure and reconfigure your new Incredible PBX phones from the convenience of the Incredible PBX GUI.
VitalPBX is perhaps the fastest-growing PBX offering based upon Asterisk with an installed presence in more than 100 countries worldwide. VitalPBX has generously provided a customized White Label version of Incredible PBX tailored for use with all Incredible PBX and VitalPBX custom applications. Follow this link for a free test drive!
Special Thanks to Vitelity. Vitelity is now Voyant Communications and has halted new registrations for the time being. Our special thanks to Vitelity for their unwavering financial support over many years and to the many Nerd Vittles readers who continue to enjoy the benefits of their service offerings. We will keep everyone posted on further developments.
Some Recent Nerd Vittles Articles of Interest…
7 Steps to Skytopia: Pain-Free Calls with Skype and Asterisk

As you probably know, Digium® announced that Skype for Asterisk® would not be available for sale or activation after July 26, 2011. Here we are in November. So what to do? If you're looking for a commercial solution, you're S.O.L. But, if you have a non-commercial PBX for personal use1, then keep reading. We'll walk you through, step-by-step, getting Skype integrated into your PBX in a Flash or Incredible PBX environment. It's easy, but it's a manual process. If you follow the steps below in order, you'll be up and running in about 15 minutes.
Prerequisites. For today's project, we're assuming you have an existing Incredible PBX server running CentOS 5.7. If not, here's our tutorial to get you up and running quickly. You'll also need a keyboard, mouse, and monitor. We strongly recommend a dedicated server such as an Atom-based PC. If you're using a virtual machine, then you'll need a sound card alternative. Try this: /sbin/modprobe snd-dummy.
UPDATE: We've revised this article a bit to accommodate PIAF2 with CentOS 6.2 and Incredible PBX 3. Keep in mind that Skype is a 32-bit application so we strongly recommend a 32-bit platform if reliability matters to you.
Step 1. For inbound Skype calling to work with other implementations including generic PBX in a Flash systems, you'll need to create a SIP URI for your Asterisk server: mothership@127.0.0.1. You do NOT need to expose the SIP port(s) of your Asterisk server to the Internet, and we strongly recommend that you don't! We've previously explained how to set up a SIP URI in this article. The Incredible PBX includes this SIP URI functionality out of the box.
Step 2. You'll also need Java 1.5. To see if it's included in your distribution, issue the following command: rpm -q jdk. If your particular Asterisk distribution doesn't have JAVA 1.5 or higher installed (rpm -q jdk), here's how to do it. Go to the Oracle Technology Network, sign up for a free Oracle web account and log in. While still logged in, accept the binary code license agreement, and click on this link to download jdk-6u12-linux-i586-rpm.bin. Then copy the file to /root on your Asterisk server. Make the file executable (chmod +x jdk-6u12-linux-i586-rpm.bin) and then run it. Scroll down the wordy license agreement AGAIN and type yes. Java 1.6 then will be installed on your system. Whew!
Step 3. You'll also obviously need a dedicated Skype account for your Asterisk server. If you don't have one to spare, download the Skype software for your Mac or Windows PC, and sign up for a free account. You can try out your account by calling our demo hotline: nerdvittles. Get this working on your Mac or PC before proceeding! Then be sure you log out and disable automatic logins on reboot, or you'll have a problem down the road with two machines trying to log in to a single Skype account.
Step 4. Now we're ready to install the remaining software components that your server will need to access Skype. Log into your Asterisk server as root and issue the following commands.
cd /root
mkdir skype
cd skype
wget http://download.skype.com/linux/skype_static-2.1.0.47.tar.bz2
tar jxvf skype_static*
yum -y install xorg-x11-server-Xvfb
yum -y install qt4
yum -y install xterm
yum -y install libXScrnSaver.i386 < == use this for CentOS 5.x #yum -y install libXScrnSaver <== use this for CentOS 6.x wget http://incrediblepbx.com/siptosis.tgz cd .. wget http://incrediblepbx.com/skype-start chmod +x skype-start cp skype-start skype/. cd / tar zxvf /root/skype/siptosis.tgz cd /root/skype
If you'd prefer to avoid all the typing, you can issue the following commands to download a script that will do all the heavy lifting for you. This is for CentOS 5.x systems only:
cd /root
wget http://incrediblepbx.com/skype-setup
chmod +x skype-setup
./skype-setup
For PIAF2 systems running CentOS 6.x, use this instead:
cd /root
wget http://incrediblepbx.com/skype-setup2
chmod +x skype-setup2
./skype-setup2
Step 5. Now there are a few steps to manually configure the software components so that the entire Skype startup process can be automated when your server boots in the future. To begin, you'll need to fire up X-Windows which puts your server in graphics mode. This is the only mode that Skype understands. While logged into your server as root, issue the following command: xinit
NOTE: If xinit won't start on your particular machine, you may need to create /etc/X11/xorg.conf. Here's a generic config file that should work fine for CentOS 5.x systems:
Section "ServerLayout"
Identifier "X.org Configured"
Screen 0 "Screen0" 0 0
EndSectionSection "Device"
Identifier "Card0"
Driver "vesa"
EndSectionSection "Screen"
Identifier "Screen0"
Device "Card0"
SubSection "Display"
Viewport 0 0
Depth 16
Modes "800x600"
EndSubSection
SubSection "Display"
Viewport 0 0
Depth 16
Modes "800x600"
EndSubSection
EndSection
For PIAF2 users, some have reported issues on Atom machines with seeing a display at all after xinit loads. If this happens to you, don't panic. Simply log into your server from a PC or MAC using SSH. Then run: vncserver :1. Set a password for VNC, and then use a VNC client on your PC or Mac to access VNC at the IP address of your server on display port 1. Now you can continue with Step 6, below.
Step 6. Now we're ready to start up Skype, and get it properly configured. There are two important requirements. First, we want to make sure your credentials are saved for automatic login in the future. And second, we want to configure Skype to run in a minimized state each time it restarts. To begin, click in the white graphics window on your screen using your mouse and issue these commands:
cd /root/skype/skype_static-2.1.0.47
./skype
Click on the Accept button to accept the Skype license agreement. Once Skype loads, enter your Skype Name and Password. Before clicking on Sign In, be sure to check the Automatic Sign In box so that you'll be logged in automatically in the future. Once you're logged in, click on the blue S in the lower left corner of the window to access the Skype Main Menu. Then click Options. When the General tab displays, check the box which says Start Skype minimised in the system tray. Then click the Apply button. To test things out, click on the Sound Device tab and then Make a Test Call. Once you're sure everything is working, click the Close button. Now click on the blue S again and click Quit to shut down Skype.
Step 7. Now we're ready to integrate Skype into the SipToSis middleware so that Asterisk can communicate with Skype. Issue the following commands to start Skype in background mode and then start SipToSis. Be sure to write down the PID for Skype in case we need to kill the app if something goes wrong.
./skype &
cd /siptosis
./SipToSis_linux
A message from Skype will pop up asking if you want to authorize external use of Skype. Before clicking Yes, be sure to click the Checkbox to Remember This Selection for future connections! When you click Yes, you'll see the SipToSis CLI indicating that it's waiting for a Skype call.
If you've installed this on an Incredible PBX, Skype should now be functional. From another Skype account, just call the Skype Name that you used to set this up, and your Asterisk extensions should start ringing. To test outbound Skype calling, use an X-Lite softphone connected to an extension on your Asterisk server and dial *echo123 to access Skype's call testing service or *nerdvittles to access our demo.
All that remains is to configure your server to automatically start Skype and SipToSis whenever your system is restarted. Here's how. Press Ctrl-Alt-F2 to get a new login prompt on your server. Log in as root and issue the following command:
echo "/root/skype-start" >> /etc/rc.d/rc.local
Now reboot your server and make sure everything is working.
Navigation Tips. Here are a few navigation tips for managing your Asterisk console on CentOS systems once Skype has been installed:
1. Ctrl-Alt-F2 gets you a new login prompt for your server
2. Ctrl-Alt-F7 gets you back to the SipToSis/Skype session. You can kill SipToSis by holding down Ctrl-C for several seconds. To find the Skype PID: pidof skype. To kill Skype: kill pid#. To restart Skype: skype & and to restart SipToSis, just issue the command again: ./SipToSis_Linux
3. Ctrl-Alt-F9 gets you to the Asterisk CLI.
Setting Up Speed Dials for Skype Friends. One of the wrinkles with Skype is that Skype uses names for its users rather than numbers. If you don't have a SIP URI-capable softphone, there's still an easy way to place calls to your Skype friends using FreePBX®. Just add a Speed Dial number to your FreePBX dialplan. Choose Extension, then select the Custom type, provide an Extension Number which is the Speed Dial number (this could actually spell your friend's name using a TouchTone phone), enter a Display Name for your friend, and add an optional SIP Alias. Then insert the following in the dial field replacing joeschmo with your friend's actual Skype name. Save your entries and reload the dialplan when prompted.
SIP/joeschmo@127.0.0.1:5070
Security Warning. One final note of caution. Do NOT expose UDP port 5070 to the Internet unless you first secure this port with a username and password to avoid Internet intruders using your gateway as a free Skype dialing platform! You do not need 5070 exposed to the Internet to implement today's gateway solution for inbound or outbound Skype calling from your Asterisk server so we recommend you keep it securely behind at least a hardware-based firewall.
FreePBX Design. For those not using Incredible PBX, here is the FreePBX setup that Incredible PBX uses and that we recommend. For outbound Skype calls, you have two choices.
1. To place a call to a regular phone number using SkypeOut (which costs you money), you'll simply dial 8 plus the area code and number. Our foreign friends will have to adjust their dialplans and /siptosis/SkypeOutDialingRules.props accordingly. Today's setup assumes 10-digit phone numbers!
2. To place a call to a Skype username using a softphone that supports SIP URI dialing such as X-Lite, you simply precede the Skype username with an asterisk, e.g. *echo123 will connect you to the Skype Call Testing Service or *nerdvittles will connect you to the Nerd Vittles Skype demo.
For incoming Skype calls, the default setup routes those calls to a SIP URI: mothership@127.0.0.1. Whether you point this URI to an extension, ring group, or IVR is up to you. In the default Incredible PBX build, the mothership URI is pointed to the Stealth AutoAttendant, an IVR that plays a welcoming message and then transfers the call to a ring group if no digit is pressed by the caller.
Configuring FreePBX. To put this setup in place, use a web browser to access FreePBX on your Asterisk server. You'll need to create a Custom Trunk and then an Outbound Route.
1. Choose Setup, Add Trunk, Add Custom Trunk. Fill in the form so that it looks like the following using your own CallerID number obviously:
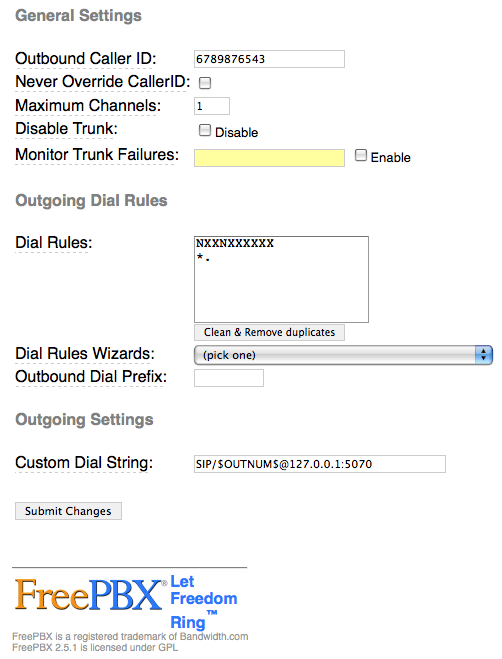
When you're finished, click the Submit Changes button and then reload the dialplan when prompted.
2. Next choose Setup, Outbound Routes, Add Route. Fill in the form so that it looks like this:
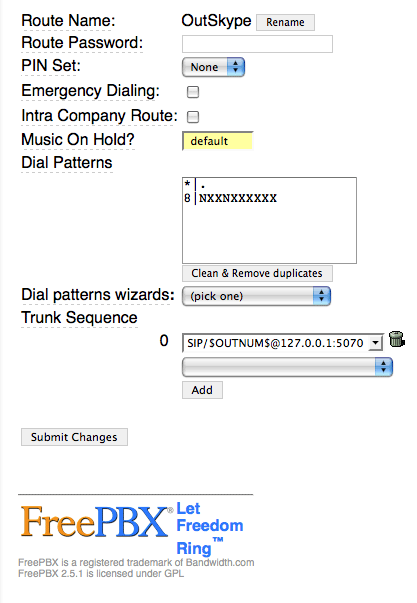
When you're finished, click the Submit Changes button. Be sure to move this new OutSkype route to the top position in your Outbound Routes listing in the right margin! Then reload the dialplan when prompted.
3. If you're not using Incredible PBX, add a new DayNight Control 1 option while you're still in FreePBX. Just specify where you want calls routed for Day mode and Night mode. Then, here's the easy way to activate SIP URI support on your Asterisk/FreePBX server. Copy the [from-sip-external] context from the extensions.conf file in /etc/asterisk. Now copy the content into extensions_override_freepbx.conf. Be sure to preserve the context name in brackets! On a FreePBX 2.8 system, make it look like the following. The additions we're making are shown in bold below:
[from-sip-external]
;give external sip users congestion and hangup
; Yes. This is _really_ meant to be _. - I know asterisk whinges about it, but
; I do know what I'm doing. This is correct.
exten => _.,1,NoOp(Received incoming SIP connection from unknown peer to ${EXTEN})
exten => _.,n,Set(DID=${IF($["${EXTEN:1:2}"=""]?s:${EXTEN})})
exten => _.,n,Goto(s,1)
exten => s,1,GotoIf($["${ALLOW_SIP_ANON}"="yes"]?from-trunk,${DID},1)
exten => mothership,1,Goto(app-daynight,1,1)
exten => s,n,Set(TIMEOUT(absolute)=15)
exten => s,n,Answer
exten => s,n,Wait(2)
exten => s,n,Playback(ss-noservice)
exten => s,n,Playtones(congestion)
exten => s,n,Congestion(5)
exten => h,1,NoOp(Hangup)
exten => i,1,NoOp(Invalid)
exten => t,1,NoOp(Timeout)
Finally, reload your Asterisk dialplan, and we're finished with Asterisk and FreePBX setup:
asterisk -rx "dialplan reload"
Fedora Builds. For those using recent Fedora builds, these systems have a full implementation of X-Windows and KDE. Just start the system in mode5 (graphics mode), log in, run Skype in one window and start up SipToSis in a terminal window using the commands in Step 7 above. Authorize external use of Skype when prompted.
Where To Go From Here. Well, those are the basics. You now can make one outbound Skype call at a time from your Asterisk server, and you can receive an inbound Skype call on any Asterisk extension when Skype users call your regular Skype name. If you want multiple Skype account support, then you'll need to do some tweaking. What you'll need is the STS Trunk Builder toolkit which is free, but proprietary. Enjoy!
Originally published: Tuesday, November 1, 2011
Great News! Google Plus is available to everyone. Sign up here and circle us. Click these links to view the Asterisk feed or PBX in a Flash feed on Google+.
Need help with Asterisk? Visit the PBX in a Flash Forum.
Or Try the New, Free PBX in a Flash Conference Bridge.
whos.amung.us If you're wondering what your fellow man is reading on Nerd Vittles these days, wonder no more. Visit our new whos.amung.us statistical web site and check out what's happening. It's a terrific resource both for us and for you.
Special Thanks to Our Generous Sponsors
FULL DISCLOSURE: ClearlyIP, Skyetel, Vitelity, DigitalOcean, Vultr, VoIP.ms, 3CX, Sangoma, TelecomsXchange and VitalPBX have provided financial support to Nerd Vittles and our open source projects through advertising, referral revenue, and/or merchandise. As an Amazon Associate and Best Buy Affiliate, we also earn from qualifying purchases. We’ve chosen these providers not the other way around. Our decisions are based upon their corporate reputation and the quality of their offerings and pricing. Our recommendations regarding technology are reached without regard to financial compensation except in situations in which comparable products at comparable pricing are available from multiple sources. In this limited case, we support our sponsors because our sponsors support us.
BOGO Bonaza: Enjoy state-of-the-art VoIP service with a $10 credit and half-price SIP service on up to $500 of Skyetel trunking with free number porting when you fund your Skyetel account. No limits on number of simultaneous calls. Quadruple data center redundancy. $25 monthly minimum spend required. Tutorial and sign up details are here.
![]() The lynchpin of Incredible PBX 2020 and beyond is ClearlyIP components which bring management of FreePBX modules and SIP phone integration to a level never before available with any other Asterisk distribution. And now you can configure and reconfigure your new Incredible PBX phones from the convenience of the Incredible PBX GUI.
The lynchpin of Incredible PBX 2020 and beyond is ClearlyIP components which bring management of FreePBX modules and SIP phone integration to a level never before available with any other Asterisk distribution. And now you can configure and reconfigure your new Incredible PBX phones from the convenience of the Incredible PBX GUI.
VitalPBX is perhaps the fastest-growing PBX offering based upon Asterisk with an installed presence in more than 100 countries worldwide. VitalPBX has generously provided a customized White Label version of Incredible PBX tailored for use with all Incredible PBX and VitalPBX custom applications. Follow this link for a free test drive!
Special Thanks to Vitelity. Vitelity is now Voyant Communications and has halted new registrations for the time being. Our special thanks to Vitelity for their unwavering financial support over many years and to the many Nerd Vittles readers who continue to enjoy the benefits of their service offerings. We will keep everyone posted on further developments.
Some Recent Nerd Vittles Articles of Interest...
- Excerpt from the Skype Terms of Service: "Subscriptions are for individual use only. Each subscription is to be used by one person only and is not to be shared with any other user (whether via a PBX, call centre, computer or any other means). Each subscription is to be used for your own personal communication purposes only, to make calls to another individual. The use of the subscription for commercial gain, such as calling numbers specifically to generate income for yourself or others by placing such calls, is not permitted. Unusual call patterns may be considered indicative of such use and may result in us terminating your subscription and blocking your User Account in accordance with paragraph 11.2." [↩]
The Googlifier: WordPress Widget Alternative for Google+
Nerd Vittles has been not only a fan but also a user of WordPress for the better part of this century. So it only made sense to contribute a little something back once the opportunity presented itself. Now that Google Plus has released the first iteration of an API, it became fairly easy to extract all of your Google+ content and import it into any current WordPress blog. Rather than offering a plugin or widget that requires constant maintenance, today we’re providing an open source toolkit that lets you automatically and regularly grab your public Google+ content and add it to your new or existing WordPress 3.2.1 blog. Here’s a screenshot of our sample blog using the WordPress twentyten template. We set this up in less than an hour on a hosted platform using cPanel with Fantastico, an application installer which is available on thousands of hosted platforms around the world. Our favorite for new bloggers is Lunarpages for as little as $4.95 a month.

The hidden beauty of this project is that others can take our open source code and transform the same Google+ content into other templates as well. For example, it would be pretty simple to turn your Google Plus feed into something that looked more like the new Facebook Timeline Layout:

Or you might prefer something more like Flipboard or Google’s new secret project that transforms Twitter content into a customized social news magazine:

But, for today, we want to concentrate on WordPress and show you how easy it is to assimilate your Google+ content into a new or existing blog. Down the road, it would be pretty easy to use The Googlifier to grab the public feeds of your Favorite Google+ Circle and assimilate all of that content into a Best of Google+ Blog. But let’s save that project for another day.
Prerequisites. There are some basic components of both Google+ and WordPress that you’ll need to have in place before using The Googlifier. On the Google front, for openers you’ll obviously need a Google+ account. You no longer need an invitation. Just sign up here. You’ll also need your Google+ account ID which is the long string of numbers displayed in the web link when you access your Google+ Profile:

Last, but not least, you’ll need a free Google+ API key. This lets you grab a JSON feed of your Google+ public posts up to 1,000 times per day. You do NOT need an OAuth Token to download your public Google+ content!
On the WordPress side, The Googlifier is expecting to find a working WordPress 3.2.1 blog. You also need command-line access to run The Googlifier scripts. This can also be done using cPanel. Be advised that we have not tested this application with prior releases of WordPress! We would caution you to be very careful doing so if you have a working live blog. As frequent readers of Nerd Vittles already know, we provide the same advice on introducing new software as we do for those contemplating a new marine aquarium. Always have two platforms: one for display and one to test whether your new fish have cooties. If you choose the all-in-one approach, sooner or later you’ll probably end up with a bunch of dead fish. You’ve been warned. 😉
The good news is that, once you have obtained your Google+ credentials and have the proper WordPress platform in place, using The Googlifier requires zero technical skills. Set a few defaults once, run a couple scripts at regular intervals, and you’re done. If you’d like to add Categories to each of your blog posts, that is easily accomplished after you import your Google+ content by simply editing your posts while logged into WordPress with your admin credentials.
Getting Started. Now we’re ready to download the software. If you have SSH access to your WordPress blog, log in and change directories to the default directory for your blog. Then issue the following commands:
wget http://mundy.org/googleplus/googlifier.zip
unzip googlifier.zip
rm googlifier.zip
Next, you need to insert your Google+ credentials in wm-getfeed.sh. Edit the file using the command: nano -w wm-getfeed.sh. Near the top of the script, you’ll see the following two lines:
acctid="12345″
apikey="67890″
Replace 12345 with your Google+ Account ID. Replace 67890 with your Google+ API Key. Be careful to preserve the quotes on each side of the two entries. Once you’re finished, save the file: Ctrl-X, Y, and Enter.
Now make sure your credentials work by running the app and agreeing to the license: ./wm-getfeed.sh. If you see ERROR 400: Bad Request, then there’s an error in your credentials.
Next, you need to edit wm-readfeed.php using the same extended nano syntax shown above. On line #15, insert your blog URL in place of ours. Be sure to preserve the trailing /. Save the file and then run the script to populate your blog with your latest Google+ public postings: ./wm-readfeed.php.
Finally, access your blog using a web browser and make certain the content looks right. If the images are too large, you can adjust them in the settings section at the top of wm-readfeed.php. Make certain to preserve the correct proportions between the width and height entries. As installed, your Google+ posts will only be imported once into WordPress. If you’d prefer to overwrite your entries each time you run the PHP script, then set the variable $overwriteposts to true. Be aware that this may cause issues with search engines because the links to your posts will change each time you rerun the PHP script and delete the previously imported posts.
We also recommend you install the free (for non-business use) FancyZoom app for WordPress. This lets users click on images in your blog to enlarge them automatically. You can try it out here or in our Demo Google+ Blog. If you decide not to use FancyZoom, then you may wish to set $click2photoalbum to true. This will allow users to access the Google+ photo album associated with certain posts by clicking on the displayed image.
Automating The Googlifier Imports. Once you’re satisfied that the imports are working correctly, it’s simple to automate the process so that it runs regularly to gobble up your Google+ content. For those using cPanel, you’ll find a Cron Jobs option on the main screen. What we want to do is schedule the wm-getfeed.sh script to run every hour at one minute after the hour. And then schedule the wm-readfeed.php script to run every hour at three minutes after the hour. That way you’ll always have the latest content on your blog. Here’s the way a sample cron entry should look. Just substitute your account name on your cPanel host for ward, and you’re all set. Unless you want to be bombarded hourly with email confirmations, add > /dev/null to the end of the commands (not shown in the sample below).

And One More Thing… We saved the best for last. One of the drawbacks of Google+ has been the lack of support for in-line images such as you see in this blog posting. With The Googlifier, it’s now a thing of the past. You can embed as many images as you like in any posting at any place you like except in the first line of the posting. Just enclose image links in {curly braces} within your Google+ posting, and The Googlifier will handle the rest. Here’s a quick sample:

A Word About Open Source Development. The real beauty of open source code is that you have an opportunity to improve what’s been provided. We hope you not only will do so but also will share your improvements with the rest of us. Just post a comment below using your real email address which won’t be published. We will contact you to obtain your code which we’ll be happy to host on Nerd Vittles for everyone to enjoy.
A Word About Versions. This is version 1.0 software so don’t assume it’s finished or error-free. Check this post regularly to download new updates as they are finished. The comments below or update notices appearing just below here will attempt to explain what has been added, changed, or improved. Enjoy!
Originally published: Monday, October 24, 2011
Need help with Asterisk? Visit the PBX in a Flash Forum.
Or Try the New, Free PBX in a Flash Conference Bridge.
whos.amung.us If you’re wondering what your fellow man is reading on Nerd Vittles these days, wonder no more. Visit our new whos.amung.us statistical web site and check out what’s happening. It’s a terrific resource both for us and for you.
Special Thanks to Our Generous Sponsors
FULL DISCLOSURE: ClearlyIP, Skyetel, Vitelity, DigitalOcean, Vultr, VoIP.ms, 3CX, Sangoma, TelecomsXchange and VitalPBX have provided financial support to Nerd Vittles and our open source projects through advertising, referral revenue, and/or merchandise. As an Amazon Associate and Best Buy Affiliate, we also earn from qualifying purchases. We’ve chosen these providers not the other way around. Our decisions are based upon their corporate reputation and the quality of their offerings and pricing. Our recommendations regarding technology are reached without regard to financial compensation except in situations in which comparable products at comparable pricing are available from multiple sources. In this limited case, we support our sponsors because our sponsors support us.
BOGO Bonaza: Enjoy state-of-the-art VoIP service with a $10 credit and half-price SIP service on up to $500 of Skyetel trunking with free number porting when you fund your Skyetel account. No limits on number of simultaneous calls. Quadruple data center redundancy. $25 monthly minimum spend required. Tutorial and sign up details are here.
![]() The lynchpin of Incredible PBX 2020 and beyond is ClearlyIP components which bring management of FreePBX modules and SIP phone integration to a level never before available with any other Asterisk distribution. And now you can configure and reconfigure your new Incredible PBX phones from the convenience of the Incredible PBX GUI.
The lynchpin of Incredible PBX 2020 and beyond is ClearlyIP components which bring management of FreePBX modules and SIP phone integration to a level never before available with any other Asterisk distribution. And now you can configure and reconfigure your new Incredible PBX phones from the convenience of the Incredible PBX GUI.
VitalPBX is perhaps the fastest-growing PBX offering based upon Asterisk with an installed presence in more than 100 countries worldwide. VitalPBX has generously provided a customized White Label version of Incredible PBX tailored for use with all Incredible PBX and VitalPBX custom applications. Follow this link for a free test drive!
Special Thanks to Vitelity. Vitelity is now Voyant Communications and has halted new registrations for the time being. Our special thanks to Vitelity for their unwavering financial support over many years and to the many Nerd Vittles readers who continue to enjoy the benefits of their service offerings. We will keep everyone posted on further developments.
Some Recent Nerd Vittles Articles of Interest…
PBX in a Flash Rolls Out New CentOS 5.7 Releases
 We are pleased to announce the release of new 32-bit and 64-bit versions of PBX in a Flash. The new PIAF-17571 ISOs are available now for free download from SourceForge. In addition to an updated release of our new 64-bit CentOS 5.7 OpenVZ virtual machine template available on SourceForge, we now have a 32-bit Thumb Drive installer up on SourceForge as well.
So PBX in a Flash continues to bring you the best of all worlds: a hardware-based bare metal install using either our 32-bit or 64-bit ISOs to build a bootable CD-ROM installer, a 32-bit thumb drive installer for use with any 1GB USB flash drive to create PIAF systems on machines that lack an optical drive, or a 1-minute install of a virtual machine using our new 64-bit OpenVZ template. Nobody else provides this flexibility much less support for CentOS 5.7 as well as every current and experimental flavor of Asterisk. So why wait? The price is definitely right!
Today's step-by-step guide will walk you through installing PIAF-Purple with Asterisk 1.8.6.0 on a dedicated machine with a CD/DVD drive using the new CentOS 5.7 ISOs. Instructions for installation of the OpenVZ template on a virtual machine are provided in this updated Nerd Vittles article. Instructions for use of the flash drive installer are available in this updated Nerd Vittles article. As always, we recommend installation of any new PIAF server or virtual host behind a secure, hardware-based firewall (such as dLink's Gaming Router) with NO INTERNET PORT EXPOSURE to your PIAF box!
Atom-based PC Platform. For the least expensive hardware alternative, pick up an Atom-based PC, preferably not an EEE PC because of the network driver incompatibility with CentOS. The refurbished Revos work fine. Someone has actually tested them! They can easily support a business with dozens of phones.
PIAF ISO Setup. Once you have your hardware connected to a reliable Internet source, you'll need to choose the appropriate ISO for your hardware. If you have a CD-ROM or DVD drive on your server, we'd recommend the 32-bit PIAF 1.7.5.7.1 ISO. Just download it from SourceForge or one of the PIAF mirror sites, burn it to a CD, and then boot your server from the CD. If your server lacks a CD-ROM and DVD drive, then download the brand new 32-bit PIAF 1.7.5.7.1 Flash-Only ISO from SourceForge and copy it to a 1GB or larger thumb drive following the instructions in this Nerd Vittles tutorial. Then boot your server from the thumb drive.
PIAF Installation. Once you've booted the PIAF installer, you'll be prompted to choose an installation method. For most users, simply pressing the Enter key will get things started. Choose a keyboard and time zone when prompted and then enter a very secure root password for your new server. The installer then will load CentOS 5.7 onto your server. When complete, your server will reboot. Remove the CD or Flash Drive at this point, and you'll be prompted to choose the version of Asterisk to install. If you don't get the CD out in time, the install process will start from scratch. At the first prompt, just reboot after removing the CD and everything will be fine. We recommend PIAF-Purple. It loads Asterisk 1.8.6.0, the only current version of Asterisk with long-term support.

During the final phase of the install, you will be prompted to choose a master password for FreePBX® and the other VoIP web utilities. Once your server reboots, log into the Linux CLI using your root password and write down the IP address of your server from the status display.
FreePBX Setup. Most of your life with PBX in a Flash will be spent using the FreePBX web GUI (click on image below to enlarge) and your favorite browser. To access the FreePBX GUI, point your browser at the IP address you wrote down. Read the RSS Feed in the PIAF GUI for late-breaking security alerts. Any alerts older than September, 2011 already are included in current PIAF builds. Now click on the Users button which will toggle to the Admin menu. Click the FreePBX icon. When prompted for your username and password, the username is maint. The password will be the FreePBX master password you chose during the PIAF install.
Got That Pioneer Spirit? If you like living on the wild side, it's a simple process to upgrade the default FreePBX 2.8 install to FreePBX 2.9. Here's a 5-minute video that will walk you through the process. If you should get stumped, don't worry! Just visit this thread on the PIAF Forum.
With either FreePBX 2.8 or 2.9, getting a minimal system operational is a 5-minute drill. You'll need to set up at least one extension with voicemail, configure a free Google Voice account for free calls in the U.S. and Canada, configure inbound and outbound routes to manage incoming and outgoing calls, and plug your maint password into CallerID Superfecta so that names arrive with your incoming calls. Now add a phone with your extension credentials and you're done.
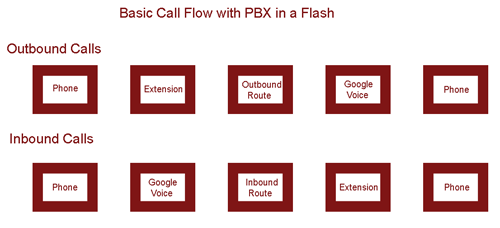
Extension Setup. Let's start by setting up an extension. A good rule of thumb for systems with less than 50 extensions is to reserve the IP addresses from 192.x.x.201 to 192.x.x.250 for your phones. Then you can create extension numbers in FreePBX to match those IP addresses. This makes it easy to identify which phone on your system goes with which IP address and makes it easy for end-users to access the phone's GUI to add bells and whistles. To create extension 201 (don't start with 200), click Setup, Extensions, Generic SIP Device, Submit. Then fill in the following blanks USING VERY SECURE PASSWORDS and leaving the defaults in the other fields for the time being.
User Extension ... 201
Display Name ... Home
Outbound CID ... [your 10-digit phone number if you have one; otherwise, leave blank]
Emergency CID ... [your 10-digit phone number for 911 ID if you have one; otherwise, leave blank]Device Options
secret ... 1299864Xyz [make this unique AND secure!]
dtmfmode ... rfc2833
Voicemail & Directory ... Enabled
voicemail password ... 14332 [make this unique AND secure!]
email address ... yourname@yourdomain.com [if you want voicemail messages emailed to you]
pager email address ... yourname@yourdomain.com [if you want to be paged when voicemail messages arrive]
email attachment ... yes [if you want the voicemail message included in the email message]
play CID ... yes [if you want the CallerID played when you retrieve a message]
play envelope ... yes [if you want the date/time of the message played before the message is read to you]
delete Vmail ... yes [if you want the voicemail message deleted after it's emailed to you]
vm options ... callback=from-internal [to enable automatic callbacks by pressing 3,2 after playing a voicemail message]
vm context ... default
Write down the passwords. You'll need them to configure your SIP phone.
Extension Security. We cannot overstress the need to make your extension passwords secure. All the firewalls in the world won't protect you from malicious phone calls on your nickel if you use your extension number or something like 1234 for your extension password if your SIP or IAX ports happen to be exposed to the Internet. Incredible PBX automatically randomizes all of the extension passwords for you. PBX in a Flash does not!
In addition to making up secure passwords, the latest versions of FreePBX also let you define the IP address or subnet that can access each of your extensions. Use it!!! Once the extensions are created, edit each one and modify the permit field to specify the actual IP address or subnet of each phone on your system. A specific IP address entry should look like this: 192.168.1.142/255.255.255.255. If most of your phones are on a private LAN, you may prefer to use a subnet entry in the permit field like this: 192.168.1.0/255.255.255.0 using your actual subnet.
Adding a Google Voice Trunk. There are lots of trunk providers, and one of the real beauties of having your own PBX is that you don't have to put all of your eggs in the same basket... unlike the AT&T days. We would encourage you to take advantage of this flexibility. With most providers, you don't pay anything except when you actually use their service so you have nothing to lose.
For today, we're going to take advantage of Google's current offer of free calling in the U.S. and Canada through the end of this year. You also get a free phone number in your choice of area codes. PBX in a Flash now installs a Google Voice module for FreePBX that lets you set up your Google Voice account with PBX in a Flash in just a few seconds once you have your credentials.
Signing Up for Google Voice. You'll need a dedicated Google Voice account to support PBX in a Flash. The more obscure the username (with some embedded numbers), the better off you will be. This will keep folks from bombarding you with unsolicited Gtalk chat messages, and who knows what nefarious scheme will be discovered using Google messaging six months from now. So keep this account a secret!
We've tested this extensively using an existing Gmail account rather than creating a separate account. Take our word for it. Inbound calling is just not reliable. The reason seems to be that Google always chooses Gmail chat as the inbound call destination if there are multiple registrations from the same IP address. So... set up a dedicated Gmail and Google Voice account, and use it exclusively with PBX in a Flash. Google Voice no longer is by invitation only. If you're in the U.S. or have a friend that is, head over to the Google Voice site and register. If you're living on another continent, see MisterQ's posting for some tips on getting set up.
You must choose a telephone number (aka DID) for your new account, or Google Voice calling will not work... in either direction. You also have to tie your Google Voice account to at least one working phone number as part of the initial setup process. Your cellphone number will work just fine. Don't skip this step either. Just enter the provided confirmation code when you tell Google to place the test call to the phone number you entered. Once the number is registered, you can disable it if you'd like in Settings, Voice Setting, Phones. But...
IMPORTANT: Be sure to enable the Google Chat option as one of your phone destinations in Settings, Voice Setting, Phones. That's the destination we need for PBX in a Flash to function with Google Voice! Otherwise, inbound and/or outbound calls will fail. If you don't see this option, you may need to call up Gmail and enable Google Chat there first. Then go back to the Google Voice Settings and enable it. Be sure to try one call each way from Google Chat in Gmail. Then disable Google Chat in GMail for this account. Otherwise, it won't work with PIAF.
While you're still in Google Voice Settings, click on the Calls tab. Make sure your settings match these:
- Call Screening - OFF
- Call Presentation - OFF
- Caller ID (In) - Display Caller's Number
- Caller ID (Out) - Don't Change Anything
- Do Not Disturb - OFF
- Call Options (Enable Recording) - OFF
- Global Spam Filtering - ON
Click Save Changes once you adjust your settings. Under the Voicemail tab, plug in your email address so you get notified of new voicemails. Down the road, receipt of a Google Voice voicemail will be a big hint that something has come unglued on your PBX.
Configuring Google Voice Trunk in FreePBX. All trunk configurations now are managed within FreePBX, including Google Voice. This makes it easy to customize PBX in a Flash to meet your specific needs. Click the Setup tab and choose Google Voice in the Third Party Addons. To Add a new Google Voice account, just fill out the form:
Phone number is your 10-digit Google Voice number. Username is your Google Voice account name without @gmail.com. NOTE: You must use a Gmail.com address in the current version of this module! Password is your Google Voice password. NOTE: Don't use 2-stage password protection in this Google Voice account! Be sure to check all three boxes: Add trunk, Add routes, and Agree to TOS. Then click Submit Changes and reload FreePBX. Down the road, you can add additional Google Voice numbers by clicking Add GoogleVoice Account option in the right margin and repeating the drill. For Google Apps support, see this post on the PIAF Forum.
Outbound Routes. The idea behind multiple outbound routes is to save money. Some providers are cheaper to some places than others. It also provides redundancy which costs you nothing if you don't use the backup providers. The Google Voice module actually configures an Outbound Route for 10-digit Google Voice calling as part of the automatic setup. If this meets your requirements, then you can skip this step for today.
Inbound Routes. An Inbound Route tells PBX in a Flash how to route incoming calls. The idea here is that you can have multiple DIDs (phone numbers) that get routed to different extensions or ring groups or departments. For today, we'll build a simple route that directs your Google Voice calls to extension 201. Choose Inbound Routes, leave all of the settings at their default values except enter your 10-digit Google Voice number in the DID Number field. Enable CallerID lookups by choosing CallerID Superfecta in the CID Lookup Source pulldown. Then move to the Set Destination section and choose Extensions in the left pull-down and 201 in the extension pull-down. Now click Submit and save your changes. That will assure that incoming Google Voice calls are routed to extension 201.
IMPORTANT: Before Google Voice calling will actually work, you must restart Asterisk from the Linux command line interface. Log into your server as root and issue this command: amportal restart.
CallerID Superfecta Setup. CallerID Superfecta needs to know your maint password in order to access the necessary modules to retrieve CallerID information for inbound calls. Just click Setup, CID Superfecta, and click on Default in the Scheme listings in the right column. Scroll down to the General Options section and insert your maint password in the Password field. You may also want to enable some of the other providers and adjust the order of the lookups to meet your local needs. Click Agree and Save once you have the settings adjusted. One terrific feature of CID Superfecta is the ability to test a phone number and see what results are returned by different services. It also tells you how long the various lookups are taking. Use this tool to narrow down the number of services you need and minimize the delay in answering inbound calls.
General Settings. Last, but not least, we need to enter an email address for you so that you are notified when new FreePBX updates are released. Scroll to the bottom of the General Settings screen after selecting it from the left panel. Plug in your email address, click Submit, and save your changes. Done!
Adding Plain Old Phones. Before your new PBX will be of much use, you're going to need something to make and receive calls, i.e. a telephone. For today, you've got several choices: a POTS phone, a softphone, or a SIP phone. Option #1 and the best home solution is to use a Plain Old Telephone or your favorite cordless phone set (with 8-10 extensions) if you purchase a little device known as a Sipura SPA-3102. It's under $70. Be sure you specify that you want an unlocked device, meaning it doesn't force you to use a particular service provider. This device also supports connection of your PBX to a standard office or home phone line as well as a telephone.
Configuring a SIP Phone. There are hundreds of terrific SIP telephones and softphones for Asterisk-based systems. Once you get things humming along, you'll want a real SIP telephone such as the $50 Nortel color videophone we've recommended previously. You'll also find lots of additional recommendations on Nerd Vittles and in the PBX in a Flash Forum. If you're like us, we want to make damn sure this stuff works before you shell out any money. So, for today, let's download a terrific (free) softphone to get you started. We recommend X-Lite because there are versions for Windows, Mac, and Linux. So download your favorite from this link. Install and run X-Lite on your Desktop. At the top of the phone, click on the Down Arrow and choose SIP Account Settings, Add. Enter the following information using 201 for your extension and your actual password for extension 201. Then plug in the actual IP address of your PBX in a Flash server instead of 192.168.0.251. Click OK when finished. Your softphone should now show: Available.
Enabling Google Voicemail. Some have requested a way to retain Google's voicemail system for unanswered calls in lieu of using Asterisk voicemail. The advantage is that Google offers a free transcription service for voicemail messages. To activate this, you'll need to edit the [googlein] context in extensions_custom.conf in /etc/asterisk. Just modify the last four lines in the context so that they look like this and then restart Asterisk: amportal restart
;exten => s,n(regcall),Answer
;exten => s,n,SendDTMF(1)
exten => s,n(regcall),Set(DIAL_OPTIONS=${DIAL_OPTIONS}aD(:1))
exten => s,n,Goto(from-trunk,gv-incoming,1)
But I Don't Want to Use Google Voice. If you'd prefer not to use Google Voice at all with PBX in a Flash, that's okay, too. Here's how to disable it and avoid the chatter in the Asterisk CLI. Log into your server as root and edit /etc/asterisk/modules.conf. Change the first three lines in the [modules] context so that they look like this. Then restart Asterisk: amportal restart.
autoload=yes
noload => res_jabber.so
noload => chan_gtalk.so
Where To Go From Here. We've barely scratched the surface of what you can do with your new PBX in a Flash system. If you're new to all of this, then your next step probably should be the latest Incredible PBX 2.0 tutorial. It's a 5-minute addition that installs nearly 50 Asterisk applications that will keep you entertained for the rest of the year. If you'd prefer to do it yourself, that's okay, too. We'd also recommend you set up an alternate VoIP provider. You can't beat Vitelity, and they also happen to provide financial support to both Nerd Vittles and the PBX in a Flash projects. See the special pricing in the section below. Enjoy!
Originally published: Tuesday, September 27, 2011
Great News! Google Plus is available to everyone. Sign up here and circle us. Click these links to view the Asterisk feed or PBX in a Flash feed on Google+.
Need help with Asterisk? Visit the PBX in a Flash Forum.
Or Try the New, Free PBX in a Flash Conference Bridge.
whos.amung.us If you're wondering what your fellow man is reading on Nerd Vittles these days, wonder no more. Visit our new whos.amung.us statistical web site and check out what's happening. It's a terrific resource both for us and for you.
Special Thanks to Our Generous Sponsors
FULL DISCLOSURE: ClearlyIP, Skyetel, Vitelity, DigitalOcean, Vultr, VoIP.ms, 3CX, Sangoma, TelecomsXchange and VitalPBX have provided financial support to Nerd Vittles and our open source projects through advertising, referral revenue, and/or merchandise. As an Amazon Associate and Best Buy Affiliate, we also earn from qualifying purchases. We’ve chosen these providers not the other way around. Our decisions are based upon their corporate reputation and the quality of their offerings and pricing. Our recommendations regarding technology are reached without regard to financial compensation except in situations in which comparable products at comparable pricing are available from multiple sources. In this limited case, we support our sponsors because our sponsors support us.
BOGO Bonaza: Enjoy state-of-the-art VoIP service with a $10 credit and half-price SIP service on up to $500 of Skyetel trunking with free number porting when you fund your Skyetel account. No limits on number of simultaneous calls. Quadruple data center redundancy. $25 monthly minimum spend required. Tutorial and sign up details are here.
![]() The lynchpin of Incredible PBX 2020 and beyond is ClearlyIP components which bring management of FreePBX modules and SIP phone integration to a level never before available with any other Asterisk distribution. And now you can configure and reconfigure your new Incredible PBX phones from the convenience of the Incredible PBX GUI.
The lynchpin of Incredible PBX 2020 and beyond is ClearlyIP components which bring management of FreePBX modules and SIP phone integration to a level never before available with any other Asterisk distribution. And now you can configure and reconfigure your new Incredible PBX phones from the convenience of the Incredible PBX GUI.
VitalPBX is perhaps the fastest-growing PBX offering based upon Asterisk with an installed presence in more than 100 countries worldwide. VitalPBX has generously provided a customized White Label version of Incredible PBX tailored for use with all Incredible PBX and VitalPBX custom applications. Follow this link for a free test drive!
Special Thanks to Vitelity. Vitelity is now Voyant Communications and has halted new registrations for the time being. Our special thanks to Vitelity for their unwavering financial support over many years and to the many Nerd Vittles readers who continue to enjoy the benefits of their service offerings. We will keep everyone posted on further developments.
Some Recent Nerd Vittles Articles of Interest...
Virtual Paradise: 1-Minute Asterisk Installs with PIAF-OpenVZ

One of the real beauties of hosting your own Proxmox server is the flexibility it gives you to create and load a wide variety of virtual machines that each appear to users to be dedicated servers. This could include a dozen Asterisk servers, or it might be a mix of a dedicated Apache server, a Windows Server, an Asterisk server or two, as well as Joomla, Drupal, Zimbra, and many others from this list. The other obvious advantage is cost. Individual Asterisk servers can be had for $300 or less to host a small branch office. But a Proxmox server such as Dell's current offerings can host a dozen dedicated systems for about $50 per server.

Today we have two really terrific OpenVZ templates for PBX in a Flash to introduce. One features CentOS 5.5, and the other includes the just released CentOS 5.7. The choice is yours! Both allow you to create unlimited PIAF virtual machines in exactly 1 minute per server! And you can boot your new virtual machines in less than 90 seconds apiece. These new PIAF-OpenVZ templates include the usual PBX in a Flash Feature Set with some extra bells and whistles: Asterisk 1.8.6.0, FreePBX 2.8, Google Voice for free calling in the U.S. and Canada, Tom King's latest Apache, PHP, PHPMyAdmin security updates, Andrew Nagy's EndPoint Manager and CallerID Superfecta, as well as AsteriDex, Telephone Reminders, and Hotel WakeUp Call modules for FreePBX.
If you haven't heard of OpenVZ templates before, you've missed one of the real technological breakthroughs of the last decade. Rather than wading through the usual 30-60 minute ISO installation drill, with an OpenVZ template, all of the work is done for you. And it's quick. You can build a dozen PIAF-Purple systems using an OpenVZ template in the time it takes to bake a pan of slice-and-bake cookies. And it's incredibly easy to then tie all of these systems together using either SIP or IAX trunks. Just follow our previous tutorial. For resellers and developers that want to try various Asterisk configurations before implementation and for trainers and others that want to host dedicated Asterisk systems for customers, the OpenVZ platform is a perfect fit.

We'll start with the bad news before we get to the really exciting new Asterisk platform we're introducing today. All of the current Proxmox server software that supports OpenVZ virtual machines has a serious security flaw. For that reason, you would only want to run Proxmox behind a hardware-based firewall with no Internet port exposure. If you fail to heed this warning, you run the very real risk of having not only your Promox server compromised but also all of the virtual machines running on it. The good news is that this security flaw does not appear to affect the PBX in a Flash virtual machines which we are introducing today. Since no direct Internet access is required to have a perfectly functioning PIAF server, we still strongly recommend never exposing any server to direct Internet access. MORAL: No Internet port exposure for any of your servers means you can sleep like a baby. We recommend Proxmox 1.8 which is a free download from the Proxmox VE web site. To get optimum use from a Proxmox, you'll also want a processor in your server that supports Kernel-based Virtual Machines (KVMs). This full virtualization solution requires an x86 processor containing virtualization extensions (Intel VT1 or AMD-V CPU2 is needed). HINT: Most of Dell's servers are not a problem. Regardless of the server you choose, make certain that you check the CPU specs before you buy. Also be aware that, in addition to Proxmox, there are many other OpenVZ platforms from which to choose.
 Installing Proxmox. If you go the Dell route, you'll need an external USB CD or DVD drive to install Proxmox. Dell's optical drives aren't supported in the Proxmox boot image. So begin by downloading the Proxmox VE 1.8 ISO image and create your CD. Then boot your new server from the CD (by pressing F11 for the boot selection screen and choosing your USB external drive on Dell servers). Press Return to begin the install, agree to the license agreement, and click Next on the installer screen to begin. Choose your country, time zone, and keyboard layout. Next choose a secure password and provide a valid email address which is used to send you critical alerts from your Proxmox server. Finally, choose a hostname, specify a fixed IP address, netmask, gateway, and DNS servers and then press Next. Three minutes later, you'll have a new Proxmox server. Log in to your server as root and create a directory for your backups: mkdir /backup.
 Enabling IPtables Firewall. IPtables works a little differently in the OpenVZ environment. It actually runs on the Proxmox host. There are just two steps to get it working. First, shut down every running VM on your Proxmox server using the web interface. When you're sure they're all stopped and while logged into your Proxmox server as root carefully enter the following two commands. Note that, because of the length, the sed command stretches to several lines which should be unraveled into a single line for the command to execute properly! Using a block-copy from a desktop machine to your SSH session is the safest method.
sed -i 's|ipt_REJECT ipt_tos ipt_limit ipt_multiport iptable_filter iptable_mangle ipt_TCPMSS ipt_tcpmss ipt_ttl ipt_length|ipt_REJECT ipt_tos ipt_TOS ipt_LOG ip_conntrack ipt_limit ipt_multiport iptable_filter iptable_mangle ipt_TCPMSS ipt_tcpmss ipt_ttl ipt_length ipt_state iptable_nat ip_nat_ftp|' /etc/vz/vz.conf
/etc/init.d/vz restart
Don't forget to set the system time on your server: dpkg-reconfigure tzdata
You're finished on the CLI at this point. Now you'll be able to configure IPtables within each of your OpenVZ virtual machines as explained below.
 OpenVZ vs. ISO Images. One of the beauties of Proxmox is that it supports two different types of images to create virtual machines. An OpenVZ template is akin to a snapshot of an existing system while an ISO image is identical to the installer you normally would burn onto a CD in order to install a software application on your server. In short, you still have to go through the installation scenario when you create a virtual machine (KVM) from an ISO image. A virtual machine created from an OpenVZ image is ready for use the moment it is created. If you remember when instant-on televisions first were introduced, you'll also appreciate the difference in boot times between OpenVZ and KVM machines which boot an application installed from an ISO in much the same manner as you would experience on a standalone machine.
As with life, there's a dark cloud lurking behind every silver lining, and this is especially true in the Asterisk environment. OpenVZ containers rely upon a shared kernel, the one that actually boots the Proxmox server. KVM containers created from ISO images are self-contained with their own complete operating system and kernel. Thus, zaptel or dahdi cannot be loaded directly from an OpenVZ container. Instead one must rely upon a shared version of zaptel or dahdi loaded on the Proxmox server itself. As it turns out, this is no small feat and certainly not a task for mere mortals. Bottom Line: If you need conferencing or otherwise need a timing source for your Asterisk deployment, you will not want to use the OpenVZ approach at least for now. If you want to try it later, here is the message thread on the PBX in a Flash Forum. On the other hand, if you have more traditional VoIP requirements for your PBX, then the ease of installation and use of the OpenVZ image makes perfect sense. So let's start there assuming you understand the limitations.

Installing PIAF-OpenVZ Template. Using a web browser, download one of the new PIAF-OpenVZ images to your Desktop. Once you have the OpenVZ image in hand, point your web browser to your Proxmox server: https://ipaddress. Accept the default certificate and login as root. You'll get a Welcome screen that looks something like what's shown above. Click on the Appliance Template option. In the Upload File section, choose the PIAF-OpenVZ image on your Desktop and click Upload. Be patient. It's a big file. So go have a cup of coffee. You'll get a prompt when it's completed. You can also do this directly within the Proxmox server by logging in as root and issuing the following commands to install the latest CentOS 5.7 PIAF-OpenVZ template:
cd /var/lib/vz/template/cache/
wget http://nerd.bz/p8UjwY
To install the CentOS 5.5 PIAF-OpenVZ template, here are the commands:
cd /var/lib/vz/template/cache/
wget http://nerd.bz/p45qzi
Creating OpenVZ Virtual Machines. Once installed, you can build Asterisk 1.8.6.0 virtual machines to your heart's content... in about a minute apiece. Just choose Virtual Machine, Create to create a new virtual machine using the OpenVZ template you just uploaded. In the Configuration section, choose OpenVZ for the Type and pick your new OpenVZ template from the pulldown list. Fill in a Host Name, Disk Space maximum (in GB), and a very secure (root) Password. The other defaults should be fine. In the Network section of the form, change to the Bridged Ethernet (veth) option which means the VM will obtain its IP address from your DHCP server. Make sure your DNS settings are correct for your LAN. Here's how a typical OpenVZ creation form will look. Just click on the image to enlarge.

Once the image is created, start up the virtual machine, wait about 90 seconds for the system to load, and then click on Open VNC Console. Asterisk will be loaded and running. You can verify this on the status display. You can safely ignore the status messages pertaining to IPtables assuming iptables -nL shows that IPtables is functioning properly. You now have a PIAF-Purple base platform running Asterisk 1.8.6.0 and FreePBX 2.8.1. REMINDER: Be sure you always run both Proxmox AND your virtual machines behind a hardware-based firewall with no port exposure to the Internet!
The FreePBX login credentials are username: maint and password: password11. This is anything but secure. Before you do anything else, log into your virtual machine using SSH and run passwd-master to secure the passwords for FreePBX GUI access to your system. Also be sure to set the correct time zone on your virtual machine: system-config-date.3 Don't forget!
Once you have secured your passwords, you're ready to set up Asterisk to make and receive calls. For the complete 5-minute tutorial, see this Nerd Vittles article. The steps are identical with Asterisk 1.8.6.0 and Asterisk 10. REMINDER: Once you have set up a Google Voice account, created an extension with a secure password, and created an inbound route for your incoming calls, don't forget to reload Asterisk from the CLI or Google Voice calling will fail: amportal restart.
Asterisk CLI Change. Finally, just a heads up that (once again) the Asterisk Dev Team appears to have changed the default behavior of the Asterisk CLI. With Asterisk 1.8, if you make outbound calls after loading the CLI, you will notice that call progress no longer appears in the CLI. To restore the standard behavior (since Moses), issue the following command: core set verbose 3. 🙄
Securing IPtables with a WhiteList. If you're running your virtual machines behind a hardware-based firewall with no Internet port exposure AND all of those on your private LAN are trusted, you can quit here. Otherwise, you need to lock down the IPtables firewall on your virtual machines to only permit access from trusted IP addresses. As delivered, all private IP addresses are authorized and a number of dangerous Internet services also are accessible. Here's how to fix it. Log into each VM and edit /etc/sysconfig/iptables: nano -w iptables. Change the section of entries that look like the following by inserting a # at the beginning of each entry. Once you've added the # characters, your entries should look like this:
#-A INPUT -p tcp -m tcp --dport 22 -j ACCEPT
#-A INPUT -p tcp -m tcp --dport 113 -j ACCEPT
#-A INPUT -p tcp -m tcp --dport 80 -j ACCEPT
#-A INPUT -p tcp -m tcp --dport 443 -j ACCEPT
#-A INPUT -p tcp -m tcp --dport 21 -j ACCEPT
#-A INPUT -p tcp -m tcp --dport 9001 -j ACCEPT
#-A INPUT -p tcp -m tcp --dport 9080 -j ACCEPT
#-A INPUT -p udp -m udp --dport 4569 -j ACCEPT
#-A INPUT -p udp -m udp --dport 5000:5082 -j ACCEPT
#-A INPUT -p udp -m udp --dport 10000:20000 -j ACCEPT
#-A INPUT -p tcp -m tcp --dport 4445 -j ACCEPT
#-A INPUT -p tcp -m tcp --dport 5038 -j ACCEPT
Now scroll down a bit in the file and find the entries that look like the following:
-A INPUT -s 192.168.0.0/255.255.0.0 -j ACCEPT
-A INPUT -s 172.16.0.0/255.240.0.0 -j ACCEPT
-A INPUT -s 10.0.0.0/255.0.0.0 -j ACCEPT
-A INPUT -s 127.0.0.0/255.0.0.0 -j ACCEPT
Immediately below these private network entries, enter the actual IP addresses that are needed to administer your virtual machine. Also include the IP addresses of any remote telephones that are not covered by the private LAN entries above. Each entry should look like the following using the actual IP addresses needed:
-A INPUT -s 111.222.111.222 -j ACCEPT
IMPORTANT: Make sure you've included an entry for the IP address from which you currently are accessing your server, or you will lock yourself out of your server. Then restart IPtables: service iptables restart. Verify that the entries are the way you expect: iptables -nL. Now, with a browser, attempt to access the IP address of your virtual machine from an untrusted IP address, e.g. your cellphone. Then repeat from a trusted IP address. If all is well, you're done.

Solving One-Way Audio Problems. If you experience one-way audio on some of your phone calls, you may need to adjust the settings in /etc/asterisk/sip_custom.conf. Just uncomment the first two lines by removing the semicolons. Then replace 173.15.238.123 with your public IP address, and replace 192.168.0.0 with the subnet address of your private network. There are similar settings in gtalk.conf that can be activated although we've never had to use them. In fact, we've never had to use any of these settings. After making these changes, save the file(s) and restart Asterisk: amportal restart.
Quirks, Gotchas, and Updates. The only quirk you will notice in the current virtual machines is that the status display incorrectly shows IPtables is not running. This is because it actually is hosted on the Proxmox host. For the latest breaking news and updates about PIAF-OpenVZ, visit this thread on the PIAF Forum. Enjoy!
Originally published: Tuesday, September 20, 2011
Breaking News. Google Plus is now available to everyone. Sign up here and join us. And wait 'til you read the Google Hangouts News. Now it's easy to view the Asterisk feed or PBX in a Flash feed on Google+.

Need help with Asterisk? Visit the PBX in a Flash Forum.
Or Try the New, Free PBX in a Flash Conference Bridge.
whos.amung.us If you're wondering what your fellow man is reading on Nerd Vittles these days, wonder no more. Visit our new whos.amung.us statistical web site and check out what's happening. It's a terrific resource both for us and for you.
Special Thanks to Our Generous Sponsors
FULL DISCLOSURE: ClearlyIP, Skyetel, Vitelity, DigitalOcean, Vultr, VoIP.ms, 3CX, Sangoma, TelecomsXchange and VitalPBX have provided financial support to Nerd Vittles and our open source projects through advertising, referral revenue, and/or merchandise. As an Amazon Associate and Best Buy Affiliate, we also earn from qualifying purchases. We’ve chosen these providers not the other way around. Our decisions are based upon their corporate reputation and the quality of their offerings and pricing. Our recommendations regarding technology are reached without regard to financial compensation except in situations in which comparable products at comparable pricing are available from multiple sources. In this limited case, we support our sponsors because our sponsors support us.
BOGO Bonaza: Enjoy state-of-the-art VoIP service with a $10 credit and half-price SIP service on up to $500 of Skyetel trunking with free number porting when you fund your Skyetel account. No limits on number of simultaneous calls. Quadruple data center redundancy. $25 monthly minimum spend required. Tutorial and sign up details are here.
![]() The lynchpin of Incredible PBX 2020 and beyond is ClearlyIP components which bring management of FreePBX modules and SIP phone integration to a level never before available with any other Asterisk distribution. And now you can configure and reconfigure your new Incredible PBX phones from the convenience of the Incredible PBX GUI.
The lynchpin of Incredible PBX 2020 and beyond is ClearlyIP components which bring management of FreePBX modules and SIP phone integration to a level never before available with any other Asterisk distribution. And now you can configure and reconfigure your new Incredible PBX phones from the convenience of the Incredible PBX GUI.
VitalPBX is perhaps the fastest-growing PBX offering based upon Asterisk with an installed presence in more than 100 countries worldwide. VitalPBX has generously provided a customized White Label version of Incredible PBX tailored for use with all Incredible PBX and VitalPBX custom applications. Follow this link for a free test drive!
Special Thanks to Vitelity. Vitelity is now Voyant Communications and has halted new registrations for the time being. Our special thanks to Vitelity for their unwavering financial support over many years and to the many Nerd Vittles readers who continue to enjoy the benefits of their service offerings. We will keep everyone posted on further developments.
Some Recent Nerd Vittles Articles of Interest...
- Be very careful choosing Intel processors. Even some high-end processors do not support Intel Virtualization Technology. Here's the official list. [↩]
- And here is a useful reference for AMD-compatible processors. The AMD WIKI provides the following list of AMD-V compatible processors: "AMD's x86 virtualization extension to the 64-bit x86 architecture is named AMD Virtualization, also known by the abbreviation AMD-V, and is sometimes referred to by the code name 'Pacifica'. AMD processors using Socket AM2, Socket S1, and Socket F include AMD Virtualization support. AMD Virtualization is also supported by release two (8200, 2200 and 1200 series) of the Opteron processors. The third generation (8300 and 2300 series of Opteron processors) will see an update in virtualization technology..." [↩]
- Getting the correct time in your VMs can be problematic with Proxmox. If you continually see the wrong time when you issue the date command after starting up your VMs, try this. Log into the Proxmox host and issue the following commands using the correct container number and your local time zone city for your virtual machine:
vzctl stop 108
vzctl set 108 --capability sys_time:on --save
vzctl start 108
vzctl enter 108
mv /etc/localtime /etc/localtime.old
ln -s /usr/share/zoneinfo/America/New_York /etc/localtime
exit[↩]
Free Asterisk Solutions
