
The Most Versatile VoIP Provider: FREE PORTING

 JUST RELEASED: Visit the Incredible PBX Wiki
5 Steps to Paradise: It’s Incredible PBX for Asterisk 1.8
 Hard to believe it's been almost six months since we introduced The Incredible PBX, but that makes today even more special. With the release of Asterisk® 1.8, the PBX in a Flash Development Team headed up by Tom King burned the midnight oil to introduce the latest PBX in a Flash Purple Edition with Asterisk 1.8 in less than 24 hours.
News Flash: Incredible PBX 4.0 is now available with FreePBX 2.10 support!
Coming January 19: Incredible PBX 11 & Incredible Fax for Asterisk 11 and FreePBX 2.11
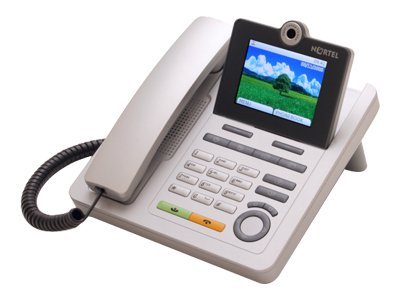
So we had all the tools necessary to reengineer, design and build the all-new Incredible PBX for Asterisk 1.8. What used to be a somewhat kludgey, dual-call, dual-provider Google Voice implementation to take advantage of Google's free PSTN calling in the U.S. and Canada with Asterisk 1.4 and 1.6 is now a zippy-quick, Gtalk-based calling platform that rivals the best SIP-to-SIP calls on the planet and provides virtually instantaneous PSTN connections to almost anybody, anywhere. Trust us! Except for the price which is now free, you'll never know you weren't connected via Ma Bell's overpriced long-distance lines and neither will the Little Mrs. And, yes, our recommended $50 Nortel SIP videophone is plug-and-play on extensions 701 and 702.
Just download the latest PBX in a Flash ISO, burn to then boot from the PIAF CD, choose the Purple Edition to load Asterisk 1.8 and FreePBX 2.8, and then install the new Incredible PBX for Asterisk 1.8. In about an hour, you'll have a turnkey PBX with a local phone number and free calling in the U.S. and Canada via your own Google Voice account plus dozens and dozens of terrific Asterisk applications to keep your head spinning for months.
Thanks to its Zero Internet Footprint™ design, The Incredible PBX remains the most secure Asterisk-based PBX around. What this means is The Incredible PBX™ has been engineered to sit safely behind a NAT-based, hardware firewall with minimal port exposure to your actual server. And you won't find a more full-featured Personal Branch Exchange™ at any price.
Did we mention that all of this telephone goodness is still absolutely FREE!
 The Incredible PBX Inventory. For those that have never heard of The Incredible PBX, here's a feature list of components you get in addition to the base install of PBX in a Flash the latest CentOS 5.x, Asterisk 1.8, FreePBX 2.8, and Apache, SendMail, MySQL, PHP, phpMyAdmin, IPtables Linux firewall, Fail2Ban, and WebMin. Cepstral TTS, Hamachi VPN, and Mondo Backups are just one command away and may be installed using some of the PBX in a Flash-provided scripts.
- Amazon S3 Cloud Computing
- AsteriDex
- Baseball Scores & Schedules
- CallerID Superfecta (FreePBX Module adds Names to CID Numbers)
- SIP Color Videophone Support
- CallWho for Asterisk
- Cepstral TTS for 32-bit, Asterisk 1.81 (/root/nv/install-cepstral)
- Preconfigured Email That Works with SendMail
- ENUMPLUS (Use FreePBX to configure)
- Extensions (16 preconfigured with random passwords)
- FAX with HylaFax & AvantFax (/root/incrediblefax.sh)
- Festival Server and Festival TTS for Asterisk (festival --server &)
- Flite TTS for Asterisk
- FONmail
- FreePBX Backups
- Gizmo5 (Free Calls to Gizmo5 users worldwide: 1747xxxxxxx*1089)
- Google Voice (preconfigured)
- Free Hamachi VPN (install-hamachi)
- Hotel-Style Wakeup Calls (FreePBX Module)
- ISN: FreeNum SIP Calling from Any Phone
- MeetMe Conference Bridge (just dial C-O-N-F)
- Mondo Full System Backups (install-diskbackup)
- Incremental Daily Backups (install-dailybackup)
- Munin Reports (install-munin)
- NewsClips from Yahoo
- ODBC Database Support
- New PBX in a Flash Registry (show-registry)
- PogoPlug Cloud Computing
- Reminders by Phone and Web
- SAMBA Windows Networking (setup-samba)
- SIP URI Outbound Calling (call any SIP URI worldwide for free)
- Free Skype Inbound & Outbound Calling (for personal use)
- Stealth AutoAttendant
- TeleYapper
- TFTP Server (setup-tftp)
- Tide Reports with xTide
- Trunk Lister Script (/root/nv/trunks.sh)
- Trunks (Vitelity, Gtalk, SIPgate, IPkall, and ENUM)
- Twitter Interface (Make Free Calls and Send SMS Messages)
- Weather by Airport Code
- Weather by ZIP Code
- Worldwide Weather
Prerequisites. Here's what we recommend to get started properly:
- Broadband Internet connection
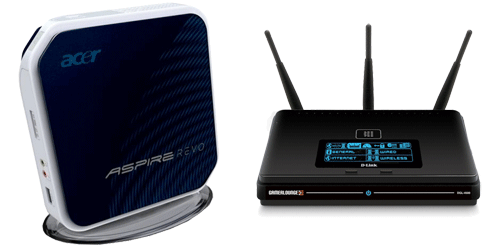
- $250 Dual-Core Atom PC2 on which to run The Incredible PBX
- dLink Router/Firewall. Low Cost: $35 WBR-2310 Best: DGL-4500
- Dedicated Google Voice account (not your main Gmail account!)
Installing The Incredible PBX. The installation process is simple and straight-forward. Here are the 5 Easy Steps to Free Calling, and The Incredible PBX will be ready to receive and make free U.S./Canada calls immediately:
1. Install PBX in a Flash Purple Edition
2. Download & run The Incredible PBX 1.8 installer
3. Run passwd-master on your PIAF server
4. Map UDP 5222 on firewall to PIAF server
5. Configure a softphone or SIP telephone
 Installing PBX in a Flash. Here's a quick tutorial to get PBX in a Flash installed. To use Incredible PBX for Asterisk 1.8, you must install the latest 32-bit version of PBX in a Flash.3 Unlike other Asterisk aggregations, PBX in a Flash utilizes a two-step install process. The ISO only installs the CentOS operating system. That hasn't changed. But, once CentOS is installed, the server reboots and downloads a payload file that includes Asterisk, FreePBX, and many other VoIP and Linux utilities including all of the new Google Voice components. Just choose the new Purple Payload to get the latest Asterisk 1.8 release and all of the Google Voice goodies!
You can download the 32-bit PIAF from SourceForge or one of our download mirrors. Burn the ISO to a CD. Then boot from the installation CD and press the Enter key to begin.
WARNING: This install will completely erase, repartition, and reformat EVERY DISK (including USB flash drives) connected to your system so disable any disk you wish to preserve! Press Ctrl-C to cancel the install.
On some systems you may get a notice that CentOS can't find the kickstart file. Just tab to OK and press Enter. Don't change the name or location of the kickstart file! This will get you going. Think of it as a CentOS 'feature'. 🙂 If your system still won't boot, then you have an incompatible drive controller.
At the keyboard prompt, tab to OK and press Enter. At the time zone prompt, tab once, highlight your time zone, tab to OK and press Enter. At the password prompt, make up a VERY secure root password. Type it twice. Tab to OK, press Enter. Get a cup of coffee. Come back in about 5 minutes. When the system has installed CentOS, it will reboot. Remove the CD promptly. After the reboot, choose PIAF-Purple option. Have a 15-minute cup of coffee. After installation is complete, the machine will reboot a second time. You now have a PBX in a Flash base install. On a stand-alone machine, it takes about 30 minutes. On a virtual machine, it takes about half that time. Write down the IP address of your new PIAF server. You'll need it to configure your hardware-based firewall in a minute.
NOTE: For previous users of PBX in a Flash, be aware that this new version automatically runs update-programs and update-fixes for you. You still should set your FreePBX passwords by running passwd-master after The Incredible PBX installer finishes!
 Configuring Google Voice. You'll need a dedicated Google Voice account to support The Incredible PBX. The more obscure the username (with some embedded numbers), the better off you will be. This will keep folks from bombarding you with unsolicited Gtalk chat messages, and who knows what nefarious scheme will be discovered using Google messaging six months from now. So why take the chance. Keep this account a secret!
We've tested this extensively using an existing Gmail account, and inbound calling is just not reliable. The reason seems to be that Google always chooses Gmail chat as the inbound call destination if there are multiple registrations from the same IP address. So, be reasonable. Do it our way! Set up a dedicated Gmail and Google Voice account, and use it exclusively with The Incredible PBX. Google Voice no longer is by invitation only so, if you're in the U.S. or have a friend that is, head over to the Google Voice site and register. If you're living on another continent, see MisterQ's posting for some tips on getting set up.
You must choose a telephone number (aka DID) for your new account, or Google Voice calling will not work... in either direction. Google used to permit outbound Gtalk calls using a fake CallerID, but that obviously led to abuse so it's over! You also have to tie your Google Voice account to at least one working phone number as part of the initial setup process. Your cellphone number will work just fine. Don't skip this step either. Just enter the provided 2-digit confirmation code when you tell Google to place the test call to the phone number you entered. Once the number is registered, you can disable it if you'd like in Settings, Voice Setting, Phones. But...
IMPORTANT: Be sure to enable the Google Chat option as one of your phone destinations in Settings, Voice Setting, Phones. That's the destination we need for The Incredible PBX to work its magic! Otherwise, all inbound and outbound calls will fail. If you don't see this option, you may need to call up Gmail and enable Google Chat there first. Then go back to the Google Voice Settings.
While you're still in Google Voice Settings, click on the Calls tab. Make sure your settings match these:
- Call Screening - OFF
- Call Presentation - OFF
- Caller ID (In) - Display Caller's Number
- Caller ID (Out) - Don't Change Anything
- Do Not Disturb - OFF
Click Save Changes once you adjust your settings. Under the Voicemail tab, plug in your email address so you get notified of new voicemails. Down the road, receipt of a Google Voice voicemail will be a big hint that something has come unglued on your PBX.
Running The Incredible PBX Installer. Log into your server as root and issue the following commands to download and run The Incredible PBX installer:
cd /root
wget http://incrediblepbx.com/incrediblepbx18.x
chmod +x incrediblepbx18.x
./incrediblepbx18.x
passwd-master
If you've installed the previous version of The Incredible PBX, you'll recall that there was a two-step install process after configuring another trunk with either SIPgate or IPkall. That's now a thing of the past. All you need to do after The Incredible PBX script completes is run passwd-master to set up your master password for FreePBX.
When The Incredible PBX install begins, you'll be prompted for the following:
Google Voice Account Name
Google Voice Password
Gmail Notification Address
FreePBX maint Password
The Google Voice Account Name is the Gmail address for your new dedicated account, e.g. joeschmo@gmail.com. Don't forget @gmail.com! The Google Voice Password is the password for this dedicated account. The Gmail Notification Address is the email address where you wish to receive alerts when incoming and outgoing Google Voice calls are placed using The Incredible PBX. And your FreePBX maint Password is the password you'll use to access FreePBX. You'll actually set it by running passwd-master after The Incredible PBX completes. We need this password to properly configure the CallerID Superfecta for you. By the way, none of this confidential information ever leaves your machine... just in case you were wondering. 🙄
Now have another 15-minute cup of coffee, and consider a modest donation to Nerd Vittles... for all of our hard work. 😉 You'll find a link at the top of the page. While you're waiting (and so you don't forget), go ahead and configure your hardware-based firewall to support Google Voice. See the next section for what's required. Without completing this firewall configuration step, no calls will work! When the installer finishes, READ THE SCREEN just for grins.
Here's a short video demonstration of the original Incredible PBX installer process. It still works just about the same way except there's no longer a second step to get things working.
One final word of caution is in order regardless of your choice of providers: Do NOT use special characters in any provider passwords, or nothing will work!
Firewall Configuration. We hope you've taken our advice and installed a hardware-based firewall in front of The Incredible PBX. It's your phone bill. You'll need to make one adjustment on the firewall. Map UDP 5222 traffic to the internal IP address of The Incredible PBX. This is the port that Google Voice uses for phone calls and Google chat. You can decipher the IP address of your server by logging into the server as root and typing status.
Logging in to FreePBX. Using a web browser, you access the FreePBX GUI by pointing your browser to the IP address of your Incredible PBX. Click on the Admin tab and choose FreePBX. When prompted for a username, it's maint. When prompted for the password, it's whatever you set up as your maint password when you installed Incredible PBX. If you forget it, you can always reset it by logging into your server as root and running passwd-master.
Extension Password Discovery. If you're too lazy to look up your extension 701 password using the FreePBX GUI, you can log into your server as root and issue the following command to obtain the password for extension 701 which we'll need to configure your softphone or color videophone in the next step:
mysql -uroot -ppassw0rd -e"select id,data from asterisk.sip where id='701' and keyword='secret'"
The result will look something like the following where 701 is the extension and 18016 is the randomly-generated extension password exclusively for your Incredible PBX:
+-----+-------+
id data
+-----+-------+
701 18016
+-----+-------+
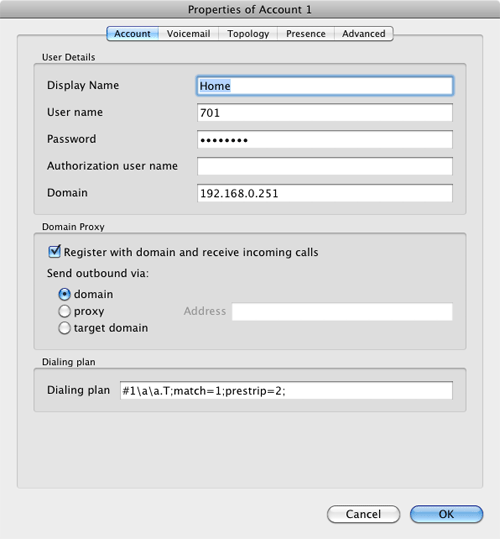
 Configuring a SIP Phone. There are hundreds of terrific SIP telephones and softphones for Asterisk-based systems. Once you get things humming along, you'll want a real SIP telephone such as the $50 Nortel color videophone we've recommended above. You'll also find lots of additional recommendations on Nerd Vittles and in the PBX in a Flash Forum. If you're like us, we want to make damn sure this stuff works before you shell out any money. So, for today, let's download a terrific (free) softphone to get you started. We recommend X-Lite because there are versions for Windows, Mac, and Linux. So download your favorite from this link. Install and run X-Lite on your Desktop. At the top of the phone, click on the Down Arrow and choose SIP Account Settings, Add. Enter the following information using your actual password for extension 701 and the actual IP address of your Incredible PBX server instead of 192.168.0.251. Click OK when finished. Your softphone should now show: Available.
 Incredible PBX Test Flight. The proof is in the pudding as they say. So let's try two simple tests. First, let's place an outbound call. Using the softphone, dial your 10-digit cellphone number. Google Voice should transparently connect you. Answer the call and make sure you can send and receive voice on both phones. Second, from another phone, call the Google Voice number that you've dedicated to The Incredible PBX. Your softphone should begin ringing shortly. Answer the call, press 1 to accept the call, and then make sure you can send and receive voice on both phones. Hang up. If everything is working, congratulations!
Here's a brief video demonstration showing how to set up a softphone to use with your Incredible PBX, and it also walks you through several of the dozens of Asterisk applications included in your system.
 Solving One-Way Audio Problems. If you experience one-way audio on some of your phone calls, you may need to adjust the settings in /etc/asterisk/sip_custom.conf. Just uncomment the first two lines by removing the semicolons. Then replace 173.15.238.123 with your public IP address, and replace 192.168.0.0 with the subnet address of your private network. There are similar settings in gtalk.conf that can be activated although we've never had to use them. In fact, we've never had to use any of these settings. After making these changes, save the file(s) and restart Asterisk with the command: amportal restart.
Learn First. Explore Second. Even though the installation process has been completed, we strongly recommend you do some reading before you begin your VoIP adventure. VoIP PBX systems have become a favorite target of the hackers and crackers around the world and, unless you have an unlimited bank account, you need to take some time learning where the minefields are in today's VoIP world. Start by reading our Primer on Asterisk Security. We've secured all of your passwords except your root password and your passwd-master password, and we're assuming you've put very secure passwords on those accounts as if your phone bill depended upon it. It does! Also read our PBX in a Flash and VPN in a Flash knols. If you're still not asleep, there's loads of additional documentation on the PBX in a Flash documentation web site.
Adding Multiple Google Voice Trunks. Thanks to rentpbx on our forums, adding support for multiple Google Voice trunks is now a five-minute operation. Once you have your initial setup running smoothly, hop on over to the forums and check out this Incredible solution.
![]() Choosing a VoIP Provider for Redundancy. Nothing beats free when it comes to long distance calls. But nothing lasts forever. And, in the VoIP World, redundancy is dirt cheap. So we strongly recommend you set up another account with Vitelity using our special link below. This gives your PBX a secondary way to communicate with every telephone in the world, and it also gets you a second real phone number for your new system... so that people can call you. Here's how it works. You pay Vitelity a deposit for phone service. They then will bill you $3.99 a month for your new phone number. This $3.99 also covers the cost of unlimited inbound calls (two at a time) delivered to your PBX for the month. For outbound calls, you pay by the minute and the cost is determined by where you're calling. If you're in the U.S., outbound calls to anywhere in the U.S. are a little over a penny a minute. If you change your mind about Vitelity and want a refund of the balance in your account, all you have to do is ask. The trunks for Vitelity already are preconfigured with The Incredible PBX. Just insert your credentials using FreePBX. Then add the Vitelity trunk as the third destination for your default outbound route. That's it. Congratulations! You now have a totally redundant phone system.
Choosing a VoIP Provider for Redundancy. Nothing beats free when it comes to long distance calls. But nothing lasts forever. And, in the VoIP World, redundancy is dirt cheap. So we strongly recommend you set up another account with Vitelity using our special link below. This gives your PBX a secondary way to communicate with every telephone in the world, and it also gets you a second real phone number for your new system... so that people can call you. Here's how it works. You pay Vitelity a deposit for phone service. They then will bill you $3.99 a month for your new phone number. This $3.99 also covers the cost of unlimited inbound calls (two at a time) delivered to your PBX for the month. For outbound calls, you pay by the minute and the cost is determined by where you're calling. If you're in the U.S., outbound calls to anywhere in the U.S. are a little over a penny a minute. If you change your mind about Vitelity and want a refund of the balance in your account, all you have to do is ask. The trunks for Vitelity already are preconfigured with The Incredible PBX. Just insert your credentials using FreePBX. Then add the Vitelity trunk as the third destination for your default outbound route. That's it. Congratulations! You now have a totally redundant phone system.
Using ENUMPlus. Another terrific money-saving tool is ENUM. Your system comes with ENUMPlus installed. The advantage of ENUM is that numbers registered with any of the ENUM services such as e164.org can be called via SIP for free. You can read all about it in this Nerd Vittles' article. To activate ENUMPlus, you'll need to register and obtain an API Key at enumplus.org. It's free! Sign up, log in, and click on the Account tab to get your API key. Once you have your key, copy it to your clipboard and open FreePBX with your browser. Then choose SetUp, ENUMPlus and paste in your API Key. Save your entry, and you're all set. After entering your key, all outbound calls will be checked for a free ENUM calling path first before using other outbound trunks.
Stealth AutoAttendant. When incoming calls arrive, the caller is greeted with a welcoming message from Allison which says something like "Thanks for calling. Please hold a moment while I locate someone to take your call." To the caller, it's merely a greeting. To those "in the know," it's actually an autoattendant (aka IVR system) that gives you the opportunity to press a button during the message to trigger the running of some application on your Incredible PBX. As configured, the only option that works is 0 which fires up the Nerd Vittles Apps IVR. It's quite easy to add additional features such as voicemail retrieval or DISA for outbound calling. Just edit the MainIVR option in FreePBX under Setup, IVR. Keep in mind that anyone (anywhere in the world) can choose these options. So be extremely careful not to expose your system to security vulnerabilities by making certain that any options you add have very secure passwords! It's your phone bill. 😉
Configuring Email. You're going to want to be notified when updates are available for FreePBX, and you may also want notifications when new voicemails arrive. Everything already is set up for you except actually entering your email notification address. Using a web browser, open the FreePBX GUI by pointing your browser to the IP address of your Incredible PBX. Then click Administration and choose FreePBX. To set your email address for FreePBX updates, go to Setup, General Settings and scroll to the bottom of the screen. To configure emails to notify you of incoming voicemails, go to Setup, Extensions, 701 and scroll to the bottom of the screen. Then follow your nose. Be sure to reload FreePBX when prompted after saving your changes.
A Word About Security. Security matters to us, and it should matter to you. Not only is the safety of your system at stake but also your wallet and the safety of other folks' systems. Our only means of contacting you with security updates is through the RSS Feed that we maintain for the PBX in a Flash project. This feed is prominently displayed in the web GUI which you can access with any browser pointed to the IP address of your server. Check It Daily! Or add our RSS Feed to your favorite RSS Reader. We also recommend you follow @NerdUno on Twitter. We'll keep you entertained and provide immediate notification of security problems that we hear about. Be safe!
Enabling Google Voicemail. Some have requested a way to retain Google's voicemail system for unanswered calls in lieu of using Asterisk voicemail. The advantage is that Google offers a free transcription service for voicemail messages. To activate this, you'll need to edit the [googlein] context in extensions_custom.conf in /etc/asterisk. Just modify the last four lines in the context so that they look like this and then restart Asterisk: amportal restart
;exten => s,n(regcall),Answer
;exten => s,n,SendDTMF(1)
exten => s,n(regcall),Set(DIAL_OPTIONS=${DIAL_OPTIONS}aD(:1))
exten => s,n,Goto(from-trunk,gv-incoming,1)
Kicking the Tires. OK. That's enough tutorial for today. Let's play. Using your new softphone, begin your adventure by dialing these extensions:
- D-E-M-O - Incredible PBX Demo (running on your PBX)
- 1234*1061 - Nerd Vittles Demo via ISN FreeNum connection to NV
- 17476009082*1089 - Nerd Vittles Demo via ISN to Google/Gizmo5
- Z-I-P - Enter a five digit zip code for any U.S. weather report
- 6-1-1 - Enter a 3-character airport code for any U.S. weather report
- 5-1-1 - Get the latest news and sports headlines from Yahoo News
- T-I-D-E - Get today's tides and lunar schedule for any U.S. port
- F-A-X - Send a fax to an email address of your choice
- 4-1-2 - 3-character phonebook lookup/dialer with AsteriDex
- M-A-I-L - Record a message and deliver it to any email address
- C-O-N-F - Set up a MeetMe Conference on the fly
- 1-2-3 - Schedule regular/recurring reminder (PW: 12345678)
- 2-2-2 - ODBC/Timeclock Lookup Demo (Empl No: 12345)
- 2-2-3 - ODBC/AsteriDex Lookup Demo (Code: AME)
- Dial *68 - Schedule a hotel-style wakeup call from any extension
- 1061*1061 - PIAF Support Conference Bridge (Conf#: 1061)
- 882*1061 - VoIP Users Conference every Friday at Noon (EST)
PBX in a Flash SQLite Registry. Last, but not least, we want to introduce you to the new PBX in a Flash Registry which uses SQLite, a zero-configuration SQL-compatible database engine. After logging into your server as root, just type show-registry for a listing of all of the applications, versions, and install dates of everything on your new server. Choosing the A option will generate registry.txt in the /root folder while the other options will let you review the applications by category on the screen. For example, the G option displays all of The Incredible PBX add-ons that have been installed. Here's the complete list of options:
- A - Write the contents of the registry to registry.txt
- B - PBX in a Flash install details
- C - Extra programs install details
- D - Update-fixes status and details
- E - RPM install details
- F - FreePBX modules install details
- G - Incredible PBX install details
- Q - Quit this program
And here's a sample from an install we just completed. We'll have more details and additional utilities for your use in coming weeks. Stay tuned!
 Special Thanks. It's hard to know where to start in expressing our gratitude for all of the participants that made today's incredibly simple-to-use product possible. Please bear with us. To Mark Spencer, Malcolm Davenport, and the rest of the Asterisk development team, thanks for a much improved Asterisk. To Philippe Sultan and his co-developers, thank you for finally making Jabber jabber with Asterisk. To Leif Madsen, our special thanks for your early pioneering work with Gtalk and Jabber which got this ball rolling. To Philippe Lindheimer & Co., thanks for FreePBX 2.8 which really makes Asterisk shine. To Lefteris Zafiris, thank you for making Flite work with Asterisk 1.8 thereby preserving all of the Nerd Vittles text-to-speech applications. To Darren Sessions, thanks for whipping app_swift into shape and restoring Cepstral and commercial TTS applications to the land of the living with Asterisk 1.8. And to our pal, Tom King, we couldn't have done it without you. You rolled up your sleeves and really made Asterisk 1.8.0 sit up and bark. No one will quite understand what an endeavor that was until they try it themselves. You've made it look so easy. And, finally, to our dozens of beta testers, THANK YOU! We've implemented almost all of your suggestions.
 Additional Goodies. Be sure to log into your server as root and look through the scripts added in the /root/nv folder. You'll find all sorts of goodies to keep you busy. The 32-bit install-cepstral script does just what it says. With Allison's Cepstral voice, you'll have the best TTS implementation for Asterisk available. ipscan is a little shell script that will tell you every working IP device on your LAN. trunks.sh tells you all of the Asterisk trunks configured on your system. purgeCIDcache.sh will clean out the CallerID cache in the Asterisk database. convert2gsm.sh shows you how to convert a .wav file to .gsm. munin.pbx will install Munin on your system while awstats.pbx installs AWstats. s3cmd.faq tells you how to quickly activate the Amazon S3 Cloud Computing service. All the other scripts and apps in /root/nv already have been installed for you so don't install them again.
If you've heeded our advice and purchased a PogoPlug, you can link to your home-grown cloud as well. Just add your credentials to /root/pogo-start.sh. Then run the script to enable the PogoPlug Cloud on your server. All of your cloud resources are instantly accessible in /mnt/pogoplug. It's perfect for off-site backups and is included as one of the backup options in the PBX in a Flash backup utilities.
 Don't forget to List Yourself in Directory Assistance so everyone can find you by dialing 411. And add your new number to the Do Not Call Registry to block telemarketing calls. Or just call 888-382-1222 from your new number. Enjoy!
Originally published: Monday, November 1, 2010
VoIP Virtualization with Incredible PBX: OpenVZ and Cloud Solutions
Safely Interconnecting Asterisk Servers for Free Calling
Adding Skype to The Incredible PBX
Adding Incredible Backup... and Restore to The Incredible PBX
Adding Remotes, Preserving Security with The Incredible PBX
Remote Phone Meets Travelin' Man with The Incredible PBX
 Support Issues. With any application as sophisticated as this one, you're bound to have questions. Blog comments are a terrible place to handle support issues although we welcome general comments about our articles and software. If you have particular support issues, we encourage you to get actively involved in the PBX in a Flash Forums. It's the best Asterisk tech support site in the business, and it's all free! We maintain a thread with the latest Patches and Bug Fixes for Incredible PBX. Please have a look. Unlike some forums, ours is extremely friendly and is supported by literally hundreds of Asterisk gurus and thousands of ordinary users just like you. So you won't have to wait long for an answer to your questions.

Need help with Asterisk? Visit the PBX in a Flash Forum.
Or Try the New, Free PBX in a Flash Conference Bridge.
whos.amung.us If you're wondering what your fellow man is reading on Nerd Vittles these days, wonder no more. Visit our new whos.amung.us statistical web site and check out what's happening. It's a terrific resource both for us and for you.
Special Thanks to Our Generous Sponsors
FULL DISCLOSURE: ClearlyIP, Skyetel, Vitelity, DigitalOcean, Vultr, VoIP.ms, 3CX, Sangoma, TelecomsXchange and VitalPBX have provided financial support to Nerd Vittles and our open source projects through advertising, referral revenue, and/or merchandise. As an Amazon Associate and Best Buy Affiliate, we also earn from qualifying purchases. We’ve chosen these providers not the other way around. Our decisions are based upon their corporate reputation and the quality of their offerings and pricing. Our recommendations regarding technology are reached without regard to financial compensation except in situations in which comparable products at comparable pricing are available from multiple sources. In this limited case, we support our sponsors because our sponsors support us.
 BOGO Bonaza: Enjoy state-of-the-art VoIP service with a $10 credit and half-price SIP service on up to $500 of Skyetel trunking with free number porting when you fund your Skyetel account. No limits on number of simultaneous calls. Quadruple data center redundancy. $25 monthly minimum spend required. Tutorial and sign up details are here.
![]() The lynchpin of Incredible PBX 2020 and beyond is ClearlyIP components which bring management of FreePBX modules and SIP phone integration to a level never before available with any other Asterisk distribution. And now you can configure and reconfigure your new Incredible PBX phones from the convenience of the Incredible PBX GUI.
The lynchpin of Incredible PBX 2020 and beyond is ClearlyIP components which bring management of FreePBX modules and SIP phone integration to a level never before available with any other Asterisk distribution. And now you can configure and reconfigure your new Incredible PBX phones from the convenience of the Incredible PBX GUI.
 VitalPBX is perhaps the fastest-growing PBX offering based upon Asterisk with an installed presence in more than 100 countries worldwide. VitalPBX has generously provided a customized White Label version of Incredible PBX tailored for use with all Incredible PBX and VitalPBX custom applications. Follow this link for a free test drive!
 Special Thanks to Vitelity. Vitelity is now Voyant Communications and has halted new registrations for the time being. Our special thanks to Vitelity for their unwavering financial support over many years and to the many Nerd Vittles readers who continue to enjoy the benefits of their service offerings. We will keep everyone posted on further developments.
Some Recent Nerd Vittles Articles of Interest...
- For 64-bit systems with Asterisk 1.8, use the Cepstral install procedures outlined in this Nerd Vittles article. [↩]
- If you use the recommended Acer Aspire Revo, be advised that it does NOT include a CD/DVD drive. You will need an external USB drive to load the software. Some of these work with CentOS, and some don't. Most HP and Sony drives work; however, we strongly recommend you purchase an external DVD drive from a merchant that will accept returns, e.g. Best Buy, WalMart, Office Depot, Office Max, Staples. You also can run The Incredible PBX on a virtual machine such as the free Proxmox server. Another less costly (but untested) option might be this Shuttle from NewEgg: $185 with free shipping. Use Promo Code: EMCYTZT220 [↩]
- HINT: Version 1.7.5.6 recommended, but 1.7.5.5.3+ ISOs also work just fine. [↩]
Paradise Lost… and Found Again: Incredible PBX Returns

For the tenth time in as many months, Google is up to its old tricks again with Google Voice access. Beginning December 1, Gtalk outbound calling requires a web connection with all the cookie mess that’s made Python a household word. And we’re back to the 2-call mumbo jumbo that we started with in the original Incredible PBX. There’s some good news though. First, the return call can use Gtalk as the transport mechanism rather than having to acquire yet another phone number from yet another provider. So the return call connection is virtually instantaneous. Our special thanks to Lost Trunk on the PIAF Forums for his discovery and the pioneering work he did to get everything working again. And second, Asterisk® 1.8 now provides transparent call bridging so the days of jumping in and out of the Asterisk Parking Lot to complete an outbound call are over. For the non-techies, it just works! So just follow the installation procedure in the original article and you’ll be good to go. No need to keep reading unless you enjoy getting down in the weeds.
We’re getting smarter with every Google Voice iteration. In fact, we kinda saw this one coming before Incredible PBX 1.8 was released. All of the Python plumbing already was built into Incredible PBX 1.8 just in case we needed to return to the old fashioned way of doing things. So it was a relatively easy fix to adjust the Asterisk dialplan and FreePBX® contexts to support the new requirements.
There are a few more Christmas bonuses today as well. First, you now can add as many Google Voice accounts to your server as you’d like. So Tom, Dick, and Mary can all have their own Google Voice number if desired. Second, for those that like to experiment and aren’t comfortable with Python scripts, there now are bash and AGI scripts to make Google Voice calls as well. We haven’t played with these, but here are links to the gvout bash script docs and AGI script documentation (such as they are) if you’d like to experiment. Just don’t ask us any questions. But, by all means, share your discoveries!
Can An Existing System Be Upgraded? Let’s begin with the question you’re all wondering about. If you have an existing Incredible PBX 1.8 system, can it be retrofitted so that outbound calling once again works? And the answer is YES! Here’s how. You’ll need to make some changes both in your dialplan and using the FreePBX GUI. Just follow along below. It’s not hard.
Dialplan Adjustments. For the dialplan modifications, we’ve written a script which makes it easy. Log into your server and enter the following commands. When prompted, enter the Google Voice email address and password that you already are using with Incredible PBX 1.8. Then enter the Google Voice email address for call notifications, and you’re all set. If you’ve forgotten which Google Voice email address and password you’re using, then issue the following command: cat /etc/asterisk/jabber.conf.
NOTE: This script assumes you have made no additions to the end of extensions_custom.conf. If you have made changes, then you’ll need to put your changes back into extensions_custom.conf once it has been updated. The original version of the file has been renamed to extensions_custom.conf.last.
cd /root
wget http://incrediblepbx.com/fixit.sh
chmod +x fixit.sh
./fixit.sh
If you happen to screw up and enter your credentials wrong, it won’t hurt to run the script again. Just save a copy of extensions_custom.conf.last with a different file name so you don’t lose the contents of your original file in the event you made changes to it.
FreePBX Changes. Now for the manual stuff. Using your browser, log into FreePBX at http://ipaddress/admin using maint as the username and the password you set up with passwd-master. It’s easier to explain the process using an example so let’s assume the Google Voice account you’re using with Incredible PBX is johndoe@gmail.com. We’ll refer to this as your Google Voice Email. We’ll also be using your Google Voice Name which would be johndoe without the @gmail.com. Finally, you’ll need your 10-digit Google Voice DID (aka phone number) with a +1 prefix: +18431234567. You’re not going to need your Google Voice notification email address. We’ve already taken care of that in the extensions_custom.conf dialplan code.
Step #1: Make yourself a Cheat Sheet with these 3 pieces of information for your actual account:
Google Voice Email: johndoe@gmail.com
Google Voice Name: johndoe
Google Voice DID: +18431234567
Step #2: Create a new Custom Trunk in FreePBX: Setup, Trunks, Add Custom Trunk:
Trunk Name: gvoice-johndoe
Custom Dial String: local/$OUTNUM$@gvoice-johndoe
NOTE: If we don’t show an entry on the FreePBX form, leave the default. After each step, save your entries and reload your dialplan when prompted.
Be very careful with these entries. A single typo means nothing will work. Don’t post a comment saying nothing works, or you’ll get a cryptic response that says, "Check for typos!" 🙄
Step #3: Create a new Custom Destination in FreePBX: Tools, Custom Destinations, Add Custom Destination:
Custom Destination: googlein,johndoe@gmail.com,1
Description: GV In – johndoe
Step #4: Create a new Inbound Route in FreePBX: Setup, Inbound Routes, Add Incoming Route:
DID Number: gvoice-johndoe
CallerID Number: +18431234567
CID Lookup Source: Caller ID Superfecta
Custom Destination: GV In – johndoe
Step #5: Modify the Default Outbound Route in FreePBX: Setup, Outbound Routes, Default. Delete the ENUM Trunk Sequence by clicking on the Trashcan icon beside it. Then change the remaining Trunk Sequence entry to the following: gvoice-johndoe.
Step #6: Modify the GoogleVoice Outbound Route in FreePBX: Setup, Outbound Routes, GoogleVoice. Change the existing Trunk Sequence entry to: gvoice-johndoe.
Step #7: Modify the TollFree Outbound Route in FreePBX: Setup, Outbound Routes, TollFree. Change the existing gvoice Trunk Sequence entry to: gvoice-johndoe.
Step #8: Reboot your server for good measure.
UPDATE: If you still have trouble completing outbound calls, here’s a temporary fix to address what appears to be a bug in Asterisk 1.8.0. Log into your server as root and issue the following commands once or twice. Then all will be well… at least until you reboot. 😉
amportal restart
/root/jab
UPDATE #2: Kudos to Doktur on the PIAF Forums for actually finding a permanent outbound calling solution. It turns out that, unlike Asterisk 1.6, Asterisk 1.8 now requires that the Python gvoice script be run with root privileges. This now has been fixed in the base install so you won’t have to worry about it. However, to update an existing system, here’s a link to the commands to fix it once and for all.
Adding Multiple Google Voice Accounts. Once you’re sure everything is back to normal, and you can successfully make outbound calls and receive inbound calls from your Google Voice number, then you’re ready to add support for additional Google Voice accounts. Set up your Google Voice second account using the steps outlined in the Incredible PBX 1.8 article. Then do the following:
Step #1: Repeat the first seven FreePBX steps shown above using the Google Voice credentials for your second account instead of your first. In steps 4, 5, and 6, simply add your second account as an additional Trunk Sequence. This will provide a second outbound call path when the first one is busy.
Step #2: Log into your server as root and edit /etc/asterisk/jabber.conf. Copy the entire [asterisk] context and name it [asterisk2]. Then replace the username and secret in [asterisk2] with your new Google Voice name and password for your second account.
Step #3: Edit /etc/asterisk/extensions_custom.conf. Find the [googlein] context and make a duplicate copy of the top section of code which includes all lines beginning with exten => johndoe@gmail.com. In the duplicate section, replace johndoe@gmail.com with your second account Google Voice Email, replace both gv_dialout_johndoe entries using your second account Google Voice Name, and change the ALERTNAME email address in the second line, if desired.
Step #4: While still in extensions_custom.conf, make a duplicate of the [gvoice-johndoe] context which should be at the end of the file. Copy the duplicate just below it and name it using your second account Google Voice Name, e.g. [gvoice-marydoe]. Enter your Google Voice credentials for the second account in the first and eighth lines of the new context. Remember to modify the email address twice in the first line! In the third, fifth, and seventh lines, change gv_dialout_johndoe to reflect your second account Google Voice Name. Save your changes.
Step #5: Reboot your server. Enjoy!
Need help with Asterisk? Visit the PBX in a Flash Forum.
Or Try the New, Free PBX in a Flash Conference Bridge.
whos.amung.us If you’re wondering what your fellow man is reading on Nerd Vittles these days, wonder no more. Visit our new whos.amung.us statistical web site and check out what’s happening. It’s a terrific resource both for us and for you.
Special Thanks to Our Generous Sponsors
FULL DISCLOSURE: ClearlyIP, Skyetel, Vitelity, DigitalOcean, Vultr, VoIP.ms, 3CX, Sangoma, TelecomsXchange and VitalPBX have provided financial support to Nerd Vittles and our open source projects through advertising, referral revenue, and/or merchandise. As an Amazon Associate and Best Buy Affiliate, we also earn from qualifying purchases. We’ve chosen these providers not the other way around. Our decisions are based upon their corporate reputation and the quality of their offerings and pricing. Our recommendations regarding technology are reached without regard to financial compensation except in situations in which comparable products at comparable pricing are available from multiple sources. In this limited case, we support our sponsors because our sponsors support us.
BOGO Bonaza: Enjoy state-of-the-art VoIP service with a $10 credit and half-price SIP service on up to $500 of Skyetel trunking with free number porting when you fund your Skyetel account. No limits on number of simultaneous calls. Quadruple data center redundancy. $25 monthly minimum spend required. Tutorial and sign up details are here.
![]() The lynchpin of Incredible PBX 2020 and beyond is ClearlyIP components which bring management of FreePBX modules and SIP phone integration to a level never before available with any other Asterisk distribution. And now you can configure and reconfigure your new Incredible PBX phones from the convenience of the Incredible PBX GUI.
The lynchpin of Incredible PBX 2020 and beyond is ClearlyIP components which bring management of FreePBX modules and SIP phone integration to a level never before available with any other Asterisk distribution. And now you can configure and reconfigure your new Incredible PBX phones from the convenience of the Incredible PBX GUI.
VitalPBX is perhaps the fastest-growing PBX offering based upon Asterisk with an installed presence in more than 100 countries worldwide. VitalPBX has generously provided a customized White Label version of Incredible PBX tailored for use with all Incredible PBX and VitalPBX custom applications. Follow this link for a free test drive!
Special Thanks to Vitelity. Vitelity is now Voyant Communications and has halted new registrations for the time being. Our special thanks to Vitelity for their unwavering financial support over many years and to the many Nerd Vittles readers who continue to enjoy the benefits of their service offerings. We will keep everyone posted on further developments.
Some Recent Nerd Vittles Articles of Interest…
Avoiding a $100,000 Phone Bill: VoIP WhiteList for IPtables
 It’s been almost a year since we last wrestled with VoIP security for Asterisk®. With Christmas just around the corner, it seemed like a fitting time for a report card. Suffice it to say, the bad guys have not stood still. Attacks have become much more frequent and more sophisticated as VoIP systems have proliferated. A year ago we saw brute force attacks with thousands of password attempts on VoIP servers. These attacks could easily be detected by Fail2Ban. What we are seeing today are one and two hit drive-bys that usually are initiated from Windows zombies or hosted accounts established with stolen credit cards. These VoIP attacks fly under the radar unless you review your logs every day. Have the creeps gotten more patient? No, just smarter. They now understand the VoIP security model that has been deployed on systems like PBX in a Flash, and they simply work around it. Two hits per server, and they’re off to the next IP address only to return in a few hours to try two more. Are these attempts successful? Well, here’s the latest recipient of a $100,000 phone bill so the answer would appear to be affirmative.
We continue to wrestle with new security approaches to better protect Asterisk VoIP systems, and we’ve stumbled upon another golden arrow for your security quiver. Our Incredible PBX platform continues to offer the very best security solution because it is designed to sit safely behind a hardware-based firewall with virtually no exposure to the Internet. But such deployments assume that both your server and your phones are all safely ensconced behind a hardware-based firewall. If it turns out that you want to deploy a SIP phone for use by grandma or you’ve decided you’d like to try hosted PBX service from a provider such as rentpbx.com,1 then there either need to be holes opened in the firewall or there is no hardware firewall protection in the case of hosted service.
Over the past few weeks, we’ve explored a number of new security approaches to better protect your Asterisk server. These include The SunshineNetworks Knock as well as VoIP Black Lists and VoIP White Lists. If you’re technically savvy, you’ll want to carefully consider "The Knock" for all of your SIP phones exposed to the Internet.
We spent a good bit of time considering various VoIP BlackList solutions. As the name implies, a list of the bad guys’ IP addresses is fed into IPtables which then blocks access to your server from these addresses. Sounds good, right? One approach with a BlackList is to block all IP addresses from "problem countries." The methodology to implement this solution can be found in this thread on the PIAF Forums. The problem, of course, is identifying the "problem countries." Another option was to implement an IPtables Blacklist based upon the work of the VoIP Blacklist Project. Perhaps ironically, the VoIP Blacklist Project actually blocks the IP addresses of both Nerd Vittles and PBX in a Flash, and emails requesting removal of our IP address were ignored. To save time, the VoIP Blacklist Project employs CIDR Masks which can blacklist hundreds of thousands of IP addresses in one fell swoop. Problem is that a lot of innocent people get caught in the net, and there’s no easy way out without maintaining the blacklist yourself. The final dagger in the black list approach is zombies. Insecure Windows machines have been compromised by the droves worldwide and particularly in the United States. So identifying all of these now-malicious systems is not unlike playing Whack-a-Mole. When you block one of them, six more pop up. So, after giving it the good old college try, our view of VoIP Blacklists should be obvious. No, thanks. There are very real risks that the bad guys can and have poisoned existing blacklists with safe IP addresses, and the number of Windows zombies grows geometrically making it all but impossible to have or maintain a blacklist that affords any real protection.
These results with black lists led us to the conclusion that the only real security mechanism that could protect many VoIP servers today was a VoIP WhiteList for IPtables. As the name implies, we want to identify the IP addresses of every SIP and IAX trunk and extension on your server and then feed those addresses into IPtables so that the only access to VoIP resources on your server is from these addresses. Today’s VoIP WhiteList for IPtables consists of two bash scripts: one queries the MySQL database in which FreePBX stores all of the trunk and extension information for your server and the other populates IPtables with the results of the queries. We would hasten to add that a similar white list is equally important for SSH access to your server although we think it is better to implement an SSH WhiteList on your hardware-based firewall. In this way, you can adjust the SSH white list via web browser while traveling without locking yourself out of your Asterisk server.
Prerequisites. To use today’s VoIP WhiteList for IPtables, you’ll need either a current version of PBX in a Flash or Incredible PBX. Other aggregations will also work provided your system is FreePBX-based (version 2.6 or later), has IPtables already installed and functioning properly, and has an /etc/sysconfig/iptables configuration file that closely matches the stock PBX in a Flash design. We’ll leave it to you to make that call after reviewing the scripts.
VoIP WhiteList Design. We’ve designed the VoIP WhiteList for IPtables to be modular. There’s a firewall-whitelist-gen.sh script which extracts from MySQL the list of IP addresses used by your trunks and extensions. This text-based list is stored in /etc/firewall.whitelist. You can manually add and delete entries from the list once it is populated.You also can rerun the script at any time to generate a fresh catalog of WhiteList IP addresses based upon your current trunk and extension settings. This script also enables access to your server from the public IP address of your server as well as all non-routable IP addresses. Finally, it modifies /etc/sudoers slightly so that Travelin’ Man can be used to add dynamic IP addresses on the fly. We’ll cover that below.
The second script is firewall-whitelist.sh, and it is used to actually implement your new VoIP WhiteList in IPtables. The changes take effect immediately. It also can be run again to update these entries if you manually add or delete IP addresses in /etc/firewall.whitelist. This script always creates a backup copy of your previous /etc/sysconfig/iptables file and names it iptables.timestamp where the timestamp is the date and time of your last update, e.g. iptables.12012010-083841 was created on Dec. 1, 2010 at 08:38:41. If you should ever shoot yourself in the foot, simply copy one of the iptables backup files to /etc/sysconfig/iptables and then restart IPtables: service iptables restart.
WARNINGS: In order to implement the WhiteList, the script removes the existing IPtables entries which permit SIP and IAX access from anywhere using UDP ports 4569 and 5000 to 5082. If you have edited these entries in any way, you’ll need to remove them and restart IPtables before running firewall-whitelist.sh. Otherwise, your more general firewall entries will leave your system vulnerable to access from IP addresses not in your VoIP WhiteList.
If your system is running on a hosted server, you’ll need to make a couple of additions to /etc/sysconfig/iptables and restart IPtables (service iptables restart) before running firewall-whitelist.sh, or you may lock yourself out of your own server. Be sure to add the public IP address of your server, and also add the IP address from which you are making changes to your server. Each entry should look like the following example using your actual IP addresses. And the entries should be added above the COMMIT line in the same section of the iptables file as the existing UDP 10000:20000 ACCEPT entry:
-A INPUT -s 222.222.222.222 -j ACCEPT
Installing the VoIP WhiteList for IPtables. Installation is easy. Just log into your server as root and issue the following commands:
cd /root
wget http://incrediblepbx.com/firewall-whitelist.tar.gz
tar zxvf firewall-whitelist.tar.gz
./firewall-whitelist-gen.sh
./firewall-whitelist.sh
If you installed one of the beta versions of the VoIP WhiteList from the PIAF Forums, then you’ll need to do a little housecleaning before actually running either of the scripts. Just edit /etc/sysconfig/iptables and clean out all of the entries that contain 5000:5082 as well as any entries nearby that include the non-routable IP addresses, e.g. 192.168.0.0. Finally, if there are entries beginning with -A WHITELIST, delete those as well. Then restart IPtables: service iptables restart. Thank you for your testing and feedback!
Deploying Remote SIP Phones. What remains is some method for connecting remote SIP phones with dynamic IP addresses. Our Travelin’ Man application was specifically designed to provide this support although the initial version only opened the necessary IP address for Asterisk access. The latest release also provides the necessary IPtables support. You have two options: either remove the old version and supporting directories under /var/www/travelman or edit the index.php file in each subdirectory you’ve created and make the change shown in this post on the PIAF Forums. Enjoy!
Need help with Asterisk? Visit the PBX in a Flash Forum.
Or Try the New, Free PBX in a Flash Conference Bridge.
whos.amung.us If you’re wondering what your fellow man is reading on Nerd Vittles these days, wonder no more. Visit our new whos.amung.us statistical web site and check out what’s happening. It’s a terrific resource both for us and for you.
Special Thanks to Our Generous Sponsors
FULL DISCLOSURE: ClearlyIP, Skyetel, Vitelity, DigitalOcean, Vultr, VoIP.ms, 3CX, Sangoma, TelecomsXchange and VitalPBX have provided financial support to Nerd Vittles and our open source projects through advertising, referral revenue, and/or merchandise. As an Amazon Associate and Best Buy Affiliate, we also earn from qualifying purchases. We’ve chosen these providers not the other way around. Our decisions are based upon their corporate reputation and the quality of their offerings and pricing. Our recommendations regarding technology are reached without regard to financial compensation except in situations in which comparable products at comparable pricing are available from multiple sources. In this limited case, we support our sponsors because our sponsors support us.
BOGO Bonaza: Enjoy state-of-the-art VoIP service with a $10 credit and half-price SIP service on up to $500 of Skyetel trunking with free number porting when you fund your Skyetel account. No limits on number of simultaneous calls. Quadruple data center redundancy. $25 monthly minimum spend required. Tutorial and sign up details are here.
![]() The lynchpin of Incredible PBX 2020 and beyond is ClearlyIP components which bring management of FreePBX modules and SIP phone integration to a level never before available with any other Asterisk distribution. And now you can configure and reconfigure your new Incredible PBX phones from the convenience of the Incredible PBX GUI.
The lynchpin of Incredible PBX 2020 and beyond is ClearlyIP components which bring management of FreePBX modules and SIP phone integration to a level never before available with any other Asterisk distribution. And now you can configure and reconfigure your new Incredible PBX phones from the convenience of the Incredible PBX GUI.
VitalPBX is perhaps the fastest-growing PBX offering based upon Asterisk with an installed presence in more than 100 countries worldwide. VitalPBX has generously provided a customized White Label version of Incredible PBX tailored for use with all Incredible PBX and VitalPBX custom applications. Follow this link for a free test drive!
Special Thanks to Vitelity. Vitelity is now Voyant Communications and has halted new registrations for the time being. Our special thanks to Vitelity for their unwavering financial support over many years and to the many Nerd Vittles readers who continue to enjoy the benefits of their service offerings. We will keep everyone posted on further developments.
Some Recent Nerd Vittles Articles of Interest…
- We gratefully acknowledge the contributions of rentpbx.com to the PBX in a Flash Development Team. In addition to hosted accounts to test PBX in a Flash in the hosted environment, rentpbx.com also has contributed technical assistance particularly as it relates to our Google Voice-Asterisk integration efforts. [↩]
The Incredible PBX: Safely Interconnecting Asterisk Servers
WOW! What a couple of weeks it has been. The response to Incredible PBX for Asterisk® 1.8 has been, well, incredible. Just last week, SlickDeals and FatWallet introduced over 50,000 bargain hunters to the beauties of Asterisk and Google Voice using Incredible PBX. They joined our regular 50,000 weekly visitors in discovering what may be the best VoIP calling platform on the planet, free or otherwise.
But we’ve also heard from long-time users of PBX in a Flash: "How can we take advantage of this new Google Voice technology without breaking our existing server?" Well, starting today, it’s easy! We’re going to show you how to interconnect as many Asterisk servers as you like using a simple FreePBX tweak to make free calls using your Incredible PBX. To begin, just set up a second server or virtual machine running Incredible PBX 1.8. Then we’ll walk you through interconnecting it with any other Asterisk server that’s running FreePBX. It really is a 5 minute project… once you’ve finished reading this article.
Don’t be intimidated by all of the screen shots shown below. We’re just showing multiple ways of doing the same thing. So you don’t need to use all of them. Once you’ve added one trunk entry on each of your servers and an outbound route on your existing Asterisk server, all of the users on your primary server can instantly begin making free outbound calls through the Google Voice setup on your Incredible PBX. Keep in mind that, at least for now, there is no limit to the number of simultaneous (free) outbound calls you can make within the U.S. and Canada using the Incredible PBX 1.8 platform. And you can interconnect as many Asterisk servers as you like assuming you have the 100kbps VoIP bandwidth to support each simultaneous call.
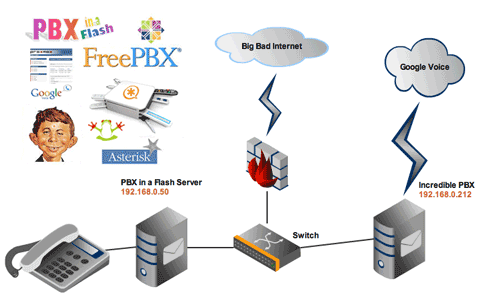
To get started, follow our last article to get an Incredible PBX 1.8 server set up. As shown in the diagram above, we’re going to assume you’ve got both your new and old Asterisk servers running on the same subnet behind a very secure hardware-based firewall. But this isn’t really required from a technical standpoint. One or more additional servers could be strung all around the globe if that’s your requirement. Or you may wish to take advantage of the incredible deal at RentPBX.com and let them host Incredible PBX 1.8 for you at $15 a month. Just use this special coupon code: BACK10. Then all of your other Asterisk servers can take advantage of today’s free-calling solution. We would hasten to add that, once you’re using the Internet as the transport mechanism for interconnecting servers, we recommend you read and use the secure VPN setup outlined in our VPN in a Flash knol, but the IAX setup outlined below is secure except your voice data is not encrypted. So that’s your call to make.
Today’s Drill. We’re going to show you how to make calls from your existing Asterisk server through The Incredible PBX today. We’ll leave it to you to get things working in the other direction if that is a requirement for your project. First, we’ll create a new trunk on The Incredible PBX, and then we’ll create both a new trunk and a new outbound route on your existing server. We’ll also cover two different interconnection setups. First, we’ll do it using SIP. And then we’ll show you a similar setup using Asterisk’s IAX.
If both servers are sitting on the same private LAN, then the SIP setup is a little easier because the Linux firewall running on Incredible PBX allows SIP traffic to flow freely without any adjustment. It assumes you have added the recommended hardware firewall layer of protection with SIP access to your servers closed off. If one or more of your servers are outside the hardware firewall that is protecting Incredible PBX 1.8, then we recommend the VPN solution referenced above first and the IAX solution outlined here as a second option because the data is unencrypted. Both of these options avoid having to open up any SIP ports on your hardware firewall, and require only a minor adjustment to IPtables, the Linux-based firewall running on The Incredible PBX.
Naming Conventions. To keep things simple, we’re going to refer to the two servers in our example as incredible-pbx and piaf-main where incredible-pbx is your new Incredible PBX 1.8 server that will host the outbound Google Voice calls for users on your piaf-main server. You can obviously adjust these names in any way you like. The only gotcha is that Asterisk attempts to match an incoming call’s username against one of its corresponding trunk names before allowing the call. If there’s no match, the call will fail. So make sure that, if you change the names in the example, do it for both the username and trunk name entries on both servers. Better yet, follow the naming convention in our example, and it just works. 😉
Security Implications. If any of your Asterisk servers allow direct SIP traffic from the Internet, then you need to be extra careful in setting up this interconnectivity since it may allow anyone to attempt to make calls through your Incredible PBX depending upon how your primary server’s dialplan is configured. For example, once a server is interconnected with Incredible PBX, anyone could dial 6789876543@youripaddress and the call might be processed by Google Voice. To avoid this, the simple solution is to password-protect every Outbound Route on your Incredible PBX by adding a Route Password. Or, better yet, don’t expose any of your Asterisk servers to Internet SIP access. Whatever you do, be sure to test making a SIP URI call such as the one shown here once you have all of the pieces in place. Then you’ll know whether you have a security issue or not.
Setting Up Incredible PBX for Interconnecting Servers. Let’s set up a SIP and IAX trunk on your Incredible PBX first. You really don’t need both of these. To repeat, if The Incredible PBX is located on the same private subnet as your other Asterisk server, just use the SIP trunk. If you need access from an Asterisk server outside your private LAN, use the IAX setup. To begin, login to FreePBX using maint and the password you set up with passwd-master. To create a trunk, first choose Setup, Trunks.
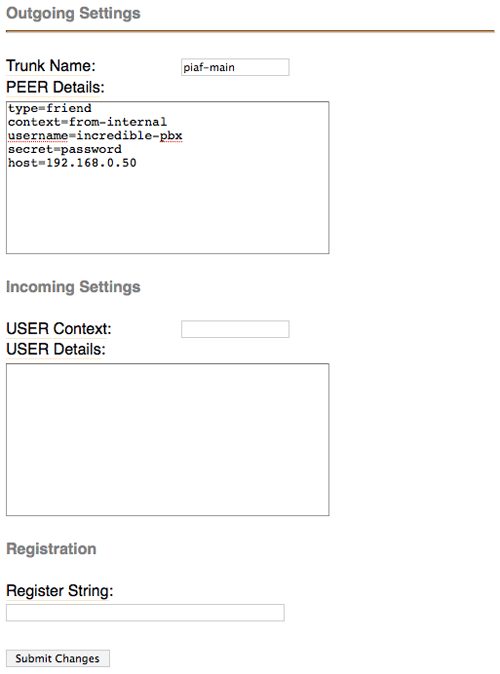
To create a SIP trunk, click Add SIP Trunk. For the Trunk Name, enter piaf-main. Then skip down to the Outgoing Settings and use the following as a guide. Then clear out the Incoming Settings, leave the Registration String blank, and click Submit Changes. Replace 192.168.0.50 with the actual IP address of your piaf-main server. Replace password with a very secure alphanumeric password. Leave the other entries as they are.
To create an IAX trunk, click Add IAX2 Trunk. For the Trunk Name, enter piaf-main. Then skip down to the Outgoing Settings and use the following as a guide. Then clear out the Incoming Settings, leave the Registration String blank, and click Submit Changes. Replace 192.168.0.50 with the actual IP address of your piaf-main server. Replace password with a very secure alphanumeric password. Leave the other entries as they are.
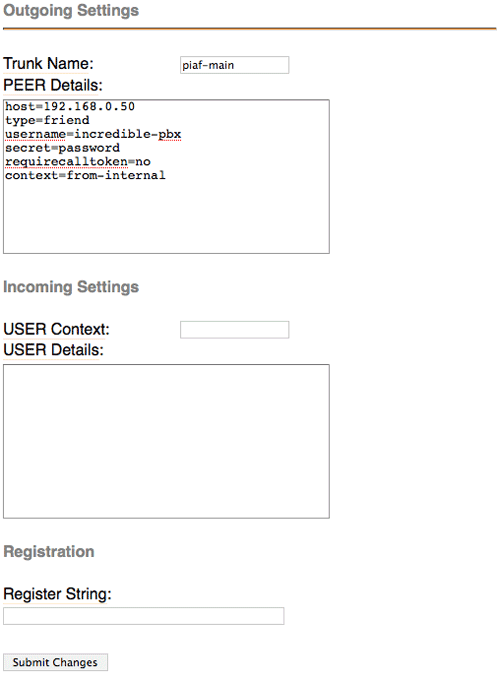
With either or both trunks, you have the option of tightening up how calls placed from the other server are routed. To force all calls to go out through the Google Voice trunk, just change context=from-internal to context=gvoice. If you want extensions on the other server to be able to call extensions on The Incredible PBX directly, leave the context entry the way it is shown.
While we don’t recommend it, if you’re going to have multiple Asterisk servers connecting to The Incredible PBX to place Google Voice calls and you’re too lazy to create separate trunks to support each server, you can eliminate the IP address checking mechanism in Asterisk by replacing host=192.168.0.50 with insecure=port,invite. The security implications should be obvious.
Setting Up The Other Asterisk Server. There are two steps in setting up any other server that you wish to interconnect with The Incredible PBX. First, you have to create a compatible trunk to handle the calls. Then we’ll add an Outbound Route to send certain calls to Incredible PBX for processing. If you’re using SIP on the Incredible PBX, then you have to use SIP on the other Asterisk server. Same goes for IAX. We’ll set up both a SIP and IAX trunk on the PIAF main server just to show you what the entries should look like. And, to repeat, you really don’t need both of these. If your other Asterisk server is located on the same private subnet as Incredible PBX, use the SIP trunk. If you need access to Incredible PBX from elsewhere, use the IAX setup. To begin, login to FreePBX on your other PIAF server using maint and the password you set up with passwd-master. To create a trunk, first choose Setup, Trunks.
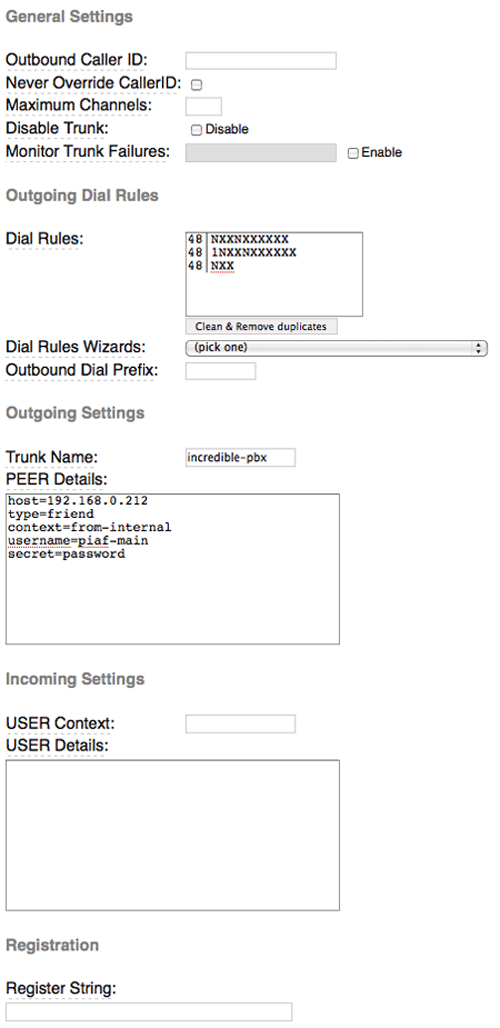
To create a SIP trunk, click Add SIP Trunk. For the Trunk Name, enter incredible-pbx. Then skip down to the Outgoing Settings and use the following as a guide. Then clear out the Incoming Settings, leave the Registration String blank, and click Submit Changes. Replace 192.168.0.212 with the actual IP address of your incredible-pbx server. Replace password with the same secure alphanumeric password you used on the Incredible PBX SIP trunk to which you will be connecting. Leave the other entries as they are.
To create an IAX trunk, click Add IAX2 Trunk. For the Trunk Name, enter incredible-pbx. Then skip down to the Outgoing Settings and use the following as a guide. Then clear out the Incoming Settings, leave the Registration String blank, and click Submit Changes. Replace 192.168.0.212 with the actual IP address of your incredible-pbx server. Replace password with the same secure alphanumeric password you used on the Incredible PBX IAX trunk to which you will be connecting. Leave the other entries as they are.
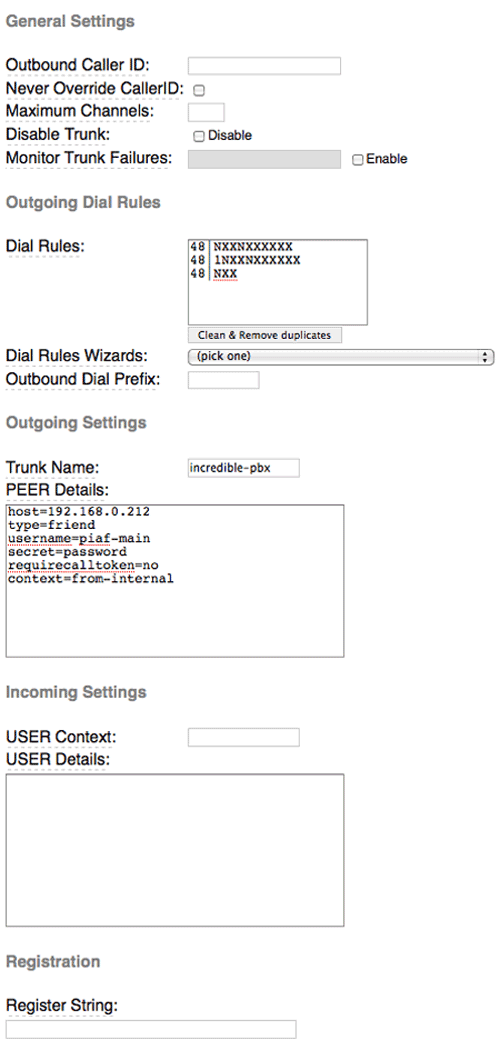
You’ll notice in the Dial Rules, we’ve used 48 (which is GV on a phone) as the prefix to be dialed on your other Asterisk server to route calls out through Google Voice on The Incredible PBX. So, to place a call from your other Asterisk server via Google Voice, a user would dial something like this: 48-678-987-6543. Before the call leaves the Asterisk server, the 48 prefix will be stripped off. You can make this prefix anything you’d like. Just be sure to use the same prefix when you set up the Outbound Route in the next step.
Adding an Outbound Route. The final configuration step is to add a new outbound route on your other Asterisk server to actually send calls to The Incredible PBX. As noted, we use a dialing prefix so that we can identify the calls to be sent. Create a new route called GoogleVoice and make your entries look like the following if you’re using IAX. If you’re using SIP, just change Trunk Sequence 0 to SIP/incredible-pbx. Click Submit Change and reload FreePBX when prompted.
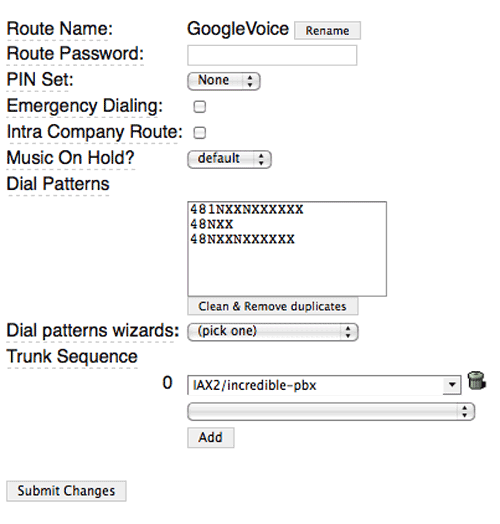
Keep in mind that FreePBX processes Outbound Routes in top down order, and the first matching route is the only route that is used to place the call even if the call fails. So the trick here is to move your new GoogleVoice route up the list so that it’s at least above the default calling route (which is a route with no specified dial patterns to match) and any other routes consisting of 12 or 13-digit dial strings which might match our GoogleVoice dial patterns.
IAX Firewall Adjustments. If you’re using the IAX method above, you’ll need to adjust the IPtables firewall rules on Incredible PBX to allow communications with your other Asterisk server. If your other Asterisk server is PBX in a Flash, you may need to add a similar entry in the IPtables rules on that machine as well. In addition, you’ll need to map UDP 4569 on your hardware-based firewall to the private IP address of your Asterisk server. Otherwise, calls will never make it past your firewall.
On each server, edit /etc/sysconfig/iptables and add an entry with the IP address of the other server with which you’ll be communicating. If your Incredible PBX is on a different public network than your other server, we’d need to add an entry near the end of the file and above COMMIT allowing IAX communications with the public (not private!) IP address of the piaf-main server assuming that server is outside the LAN, e.g. something like this:
-A INPUT -p udp -m udp -s 222.68.100.150 –dport 4569 -j ACCEPT
If you’re using IAX and both servers are on the same private subnet or interconnected private subnets, then the entry might look like this:
-A INPUT -p udp -m udp -s 192.168.0.50 –dport 4569 -j ACCEPT
Once you’ve saved your change, restart the firewall: service iptables restart
Testing Things Out. Now you’re ready to place a test call. Pick up an extension on your piaf-main system and dial 48-800-322-7300. You’ll be greeted by American Airlines courtesy of Google Voice. The CallerID of your outbound calls will be your Google Voice number regardless of the extension or server from which the call originates. Enjoy!
Originally published: Monday, November 15, 2010
Introducing The Incredible PBX for Asterisk 1.8
Adding Skype to The Incredible PBX
Adding Incredible Backup… and Restore to The Incredible PBX
Adding Remotes, Preserving Security with The Incredible PBX
Remote Phone Meets Travelin’ Man with The Incredible PBX
Support Issues. With any application as sophisticated as this one, you’re bound to have questions. Blog comments are a terrible place to handle support issues although we welcome general comments about our articles and software. If you have particular support issues, we encourage you to get actively involved in the PBX in a Flash Forums. It’s the best Asterisk tech support site in the business, and it’s all free! We maintain a thread with the latest Patches and Bug Fixes for Incredible PBX. Please have a look. Unlike some forums, ours is extremely friendly and is supported by literally hundreds of Asterisk gurus and thousands of ordinary users just like you. So you won’t have to wait long for an answer to your questions.
Need help with Asterisk? Visit the PBX in a Flash Forum.
Or Try the New, Free PBX in a Flash Conference Bridge.
whos.amung.us If you’re wondering what your fellow man is reading on Nerd Vittles these days, wonder no more. Visit our new whos.amung.us statistical web site and check out what’s happening. It’s a terrific resource both for us and for you.
Special Thanks to Our Generous Sponsors
FULL DISCLOSURE: ClearlyIP, Skyetel, Vitelity, DigitalOcean, Vultr, VoIP.ms, 3CX, Sangoma, TelecomsXchange and VitalPBX have provided financial support to Nerd Vittles and our open source projects through advertising, referral revenue, and/or merchandise. As an Amazon Associate and Best Buy Affiliate, we also earn from qualifying purchases. We’ve chosen these providers not the other way around. Our decisions are based upon their corporate reputation and the quality of their offerings and pricing. Our recommendations regarding technology are reached without regard to financial compensation except in situations in which comparable products at comparable pricing are available from multiple sources. In this limited case, we support our sponsors because our sponsors support us.
BOGO Bonaza: Enjoy state-of-the-art VoIP service with a $10 credit and half-price SIP service on up to $500 of Skyetel trunking with free number porting when you fund your Skyetel account. No limits on number of simultaneous calls. Quadruple data center redundancy. $25 monthly minimum spend required. Tutorial and sign up details are here.
![]() The lynchpin of Incredible PBX 2020 and beyond is ClearlyIP components which bring management of FreePBX modules and SIP phone integration to a level never before available with any other Asterisk distribution. And now you can configure and reconfigure your new Incredible PBX phones from the convenience of the Incredible PBX GUI.
The lynchpin of Incredible PBX 2020 and beyond is ClearlyIP components which bring management of FreePBX modules and SIP phone integration to a level never before available with any other Asterisk distribution. And now you can configure and reconfigure your new Incredible PBX phones from the convenience of the Incredible PBX GUI.
VitalPBX is perhaps the fastest-growing PBX offering based upon Asterisk with an installed presence in more than 100 countries worldwide. VitalPBX has generously provided a customized White Label version of Incredible PBX tailored for use with all Incredible PBX and VitalPBX custom applications. Follow this link for a free test drive!
Special Thanks to Vitelity. Vitelity is now Voyant Communications and has halted new registrations for the time being. Our special thanks to Vitelity for their unwavering financial support over many years and to the many Nerd Vittles readers who continue to enjoy the benefits of their service offerings. We will keep everyone posted on further developments.
Some Recent Nerd Vittles Articles of Interest…
2010 Bargain of the Year: Nortel 1535 Color SIP Videophone
We try not to get overly excited by new discoveries, but once in a while there comes along a VoIP deal that probably never will be repeated. Now’s the time. Here are a Baker’s Dozen reasons why you should buy a boatload of these Nortel IP 1535 phones before they’re all gone. Just make a bid of ~$60. We’ve given you a hint below on the going rate. 😉
WARNING: There are reports that some of the phones from various merchants do NOT include WiFi even though the ad may say otherwise. If you need WiFi, be sure to carefully read the merchant’s ad AND verify that the phone you are ordering has WiFi before purchasing.
- Nortel’s top-of-the-line $700 phone can be had for about $60
- SIP-compatible and works with Asterisk® and sip2sip.info among others
- H.263-compatible color videophone works flawlessly
- Wired and 802.11 b/g WiFi is easily configured
- Supports both U.S. and European power cords out of the box
- Speakerphone rivals the best speakerphones on the market
- Integrated apps include browser, email, calendar
- Music and video storage supported using SD/MMC cards
- Configurable voicemail button for easy access to any mailbox
- Language support for English, French, Spanish, German and more
- Tons of integrated multimedia capabilities
- Robust STUN and proxy support so they work from anywhere
- One year warranty on the phones from the eBay merchant
Connectivity Options. Once you have your phones, there are almost limitless SIP connectivity options including direct connections to many of our favorite providers: Vitelity, voip.ms, Future Nine, and Axvoice. But today we want to address two other connectivity options: sip2sip.info or as an Asterisk extension on your PBX in a Flash system, both of which give you color videoconferencing out of the box.
Using sip2sip.info with the Nortel 1535. If you haven’t discovered sip2sip.info, it’s one of the few VoIP freebies left in the universe. By simply providing your name and email address, sip2sip.info will give you a free SIP a URI that lets anyone on the planet call you via SIP at no cost. In addition, all calls to numbers registered with ENUM are free as well. For example, to call numbers in the U.S. listed with e164.org, just dial 001NXXNXXXXXX. You can talk as long and as often as you like. The call can be pure audio, or it can be an H.263 video call. It’s simple to set up and use. And, once you have your phone configured with sip2sip.info, it’s incredibly easy to add a free DID from IPkall and then a free local DID from Google Voice. Then, presto, you have a local phone number for inbound calls that will never cost you a dime. If you make most of your outbound calls from a cellphone, then this is a perfect solution for a free home telephone number where anyone can reach you. And it includes a free voicemail account that will deliver the voicemails to your registered email address whenever you miss a call. We actually travel with one of these phones preconfigured with a local number in our favorite towns. When we go to a different place, it’s easy to change the local phone number. Update: You also can obtain a free SIP URI from GetOnSIP.
There’s only one trick to the sip2sip.info setup. Once your credentials are emailed to you, log into your account and change your password to a very secure but all-numeric password.
Using Asterisk with the Nortel 1535. We have a personal preference for Asterisk, and it’s a perfect fit with these phones. Just add these entries to sip_general_custom.conf in /etc/asterisk, and video support comes to life in all versions of PBX in a Flash once you restart Asterisk:
rtptimeout=120
videosupport=yes
allow=h263
Then you’re ready to set up your extensions to support the Nortel 1535. Here are the settings we use, and they work equally well with the X-Lite 4 client if you’d like to try some test video calls on your server:
dtmfmode=rfc2833
canreinvite=yes
context=from-internal
host=dynamic
type=friend
nat=yes
port=5060
qualify=yes
disallow=all
allow=h263,ulaw,gsm
Configuring the Nortel 1535. All of the manuals for these phones still can be downloaded from Nortel’s web site. With the exception of the early phones which were configured for Turkey, here is the setup that works for us with sip2sip.info and Asterisk. Our special thanks to the dozens of gurus on the PBX in a Flash Forum who assisted with sorting all of this out. If you get stumped on any of this, the thread link provided has loads of additional information.
The two buttons at the top of the phone do most of the heavy lifting. The left one is the equivalent of the Enter key on a keyboard. The right one is the Back key. The other two keys of importance are * and #. * is used to enter special characters such as the period, slash, etc. # is used to change the keyboard type: ABC, Abc, 123, etc. Be sure you always have the correct keyboard type for the type of data you are entering. Pressing the Green button twice redials the last number called. The function key to the right of the number 3 connects you to voicemail. The function key to the right of the number 6 accesses the web browser.
Before you can configure the phone, you have to log in as Admin (Menu, Settings, System Settings, Admin, Login). The password is 1234. Then back out one level and set your Date/Time preferences. The most important one is to enable Network Time. For the Server Setting, enter time.nist.gov for a reliable NTP server. Then back out a level and choose Enable.
You’ve got to set up network connectivity before the phones will work obviously. They come preconfigured for a wired connection with DHCP support. That’s a good way to begin. Once everything is working reliably, you can switch to WiFi if desired. The only trick to WiFi is that you need to set your WiFi Type (Menu, Settings, Profile, WiFi, Settings, Wireless Settings, Authentication, Type) and then the WiFi Password for the chosen type before choosing your WiFi network (Menu, Settings, Profile, WiFi, Settings, Wireless Settings, WiFi Scanning). Once you have those set up, back out one level and choose Apply. Then back out one more level and choose Enable. You’ll be prompted to confirm you wish to restart the WiFi network. Then you’re all set.
Now you’re ready to configure your VoIP settings (Menu, Settings, VoIP Settings). Start with the domain of your server: sip2sip.info or the FQDN of your Asterisk server (Menu, Settings, VoIP Settings, Misc., Domain Name). While still in Misc., adjust the Codec Priority for video (Menu, Settings, VoIP Settings, Misc., Codec priority, Video). Choose First and change it to None. Choose Second and change it to H.264. Then choose First again and change it to H.263. Asterisk only supports H.263 so it has to be the first priority, or video won’t work. Then back out until the top left of the screen shows VoIP Settings. Choose User Information and enter your username for Username, Display Name, and Authentication name. For Asterisk, it’s your extension number. For sip2sip.info, it’s your 10-digit number beginning with 223. Enter your account password for Authentication pwd. Back out to VoIP Settings and enter the IP address of your server for Proxy, Proxy Address. For sip2sip.info, it’s 81.23.228.129. For Asterisk, it’s the public IP address of your server. While still in Proxy, choose STUN. For STUN Server IP Address, enter 75.101.138.128. Then Enable the STUN Server. Finally, back out to VoIP Settings again and choose Registration. Set the Expiry Timer to 3600. Then choose Register to connect your phone to your desired server. Done!
Using sip2sip.info with Asterisk. We were so impressed with the simplicity and functionality of sip2sip.info that we decided to also set up a sip2sip.info trunk on our Asterisk server. This is a very secure way to enable a SIP URI on your Asterisk server without exposing your server to SIP vulnerability. The only additional step with PBX in a Flash is to lock down external SIP access to the IP address of sip2sip.info. For setup instructions, see this thread on the PBX in a Flash Forums.
Configuring Voicemail Access. It’s easy to configure these phones to access any existing voicemail system. The only trick is that the number to call for voicemail access must be all numeric. On Asterisk systems, this means *98 won’t work! So, in FreePBX, first set up a Misc. Destination called Voicemail-Read and use *98 as the Dial String. Then set up a Misc. Application called VoiceMailRead and enter 86245 as the Feature Code. Then choose Misc Destination: Voicemail-Read as the Destination.
On the phone, choose Menu, Settings, VoIP Settings, Misc., Voice Mail, Voicemail Number and enter 86245. You can leave the Mailbox ID and password blank on Asterisk-based systems, and you’ll be prompted for them. Or you can fill in either the mailbox number or both the mailbox number and password, and your entries will be passed to Asterisk to access the desired voicemail box.
To access Voicemail from the phone, press the function key just to the right of the number 3 on the phone.
Using the Nortel 1535 Browser. While it’s not the best browser on the planet, these Nortel phones do have a decent web browser that can be used to retrieve current content such as news, weather, and sports scores. To set up a web link, choose Menu, Services, Web Browser, and choose one of the four links. Here are a couple entries to get you started. Others can be found in this thread on the PBX in a Flash Forums. Remember to use the Top Left function key as the Enter key in browser links! HINT: While in one of your four preconfigured web sites, if you press the Right Button just above the directional arrow keys, you can navigate to additional web sites.
- mundy.org/news.php – Latest Yahoo! News
- google.com/m – Google Mobile
To access the Browser, press the function key just to the right of the number 6 on the phone.
Accessing Email on the Nortel 1535. Both POP3 and IMAP email access are supported on the phone. And a number of boilerplate email messages already are preconfigured for sending using your chosen email provider. You can set up additional ones using the Template option. To set up email, go to Setup, Messages, Account Settings.
Nortel 1535 Organizer. These phones also include a very capable Address Book and Calendar. Entries can be imported using a standard SD/MMC card. We’ll leave the rest for you to sort out. Or take the guess work out of the experiment and read Nortel’s excellent documentation. Enjoy!
Need help with Asterisk? Visit the PBX in a Flash Forum.
Or Try the New, Free PBX in a Flash Conference Bridge.
whos.amung.us If you’re wondering what your fellow man is reading on Nerd Vittles these days, wonder no more. Visit our new whos.amung.us statistical web site and check out what’s happening. It’s a terrific resource both for us and for you.
Special Thanks to Our Generous Sponsors
FULL DISCLOSURE: ClearlyIP, Skyetel, Vitelity, DigitalOcean, Vultr, VoIP.ms, 3CX, Sangoma, TelecomsXchange and VitalPBX have provided financial support to Nerd Vittles and our open source projects through advertising, referral revenue, and/or merchandise. As an Amazon Associate and Best Buy Affiliate, we also earn from qualifying purchases. We’ve chosen these providers not the other way around. Our decisions are based upon their corporate reputation and the quality of their offerings and pricing. Our recommendations regarding technology are reached without regard to financial compensation except in situations in which comparable products at comparable pricing are available from multiple sources. In this limited case, we support our sponsors because our sponsors support us.
BOGO Bonaza: Enjoy state-of-the-art VoIP service with a $10 credit and half-price SIP service on up to $500 of Skyetel trunking with free number porting when you fund your Skyetel account. No limits on number of simultaneous calls. Quadruple data center redundancy. $25 monthly minimum spend required. Tutorial and sign up details are here.
![]() The lynchpin of Incredible PBX 2020 and beyond is ClearlyIP components which bring management of FreePBX modules and SIP phone integration to a level never before available with any other Asterisk distribution. And now you can configure and reconfigure your new Incredible PBX phones from the convenience of the Incredible PBX GUI.
The lynchpin of Incredible PBX 2020 and beyond is ClearlyIP components which bring management of FreePBX modules and SIP phone integration to a level never before available with any other Asterisk distribution. And now you can configure and reconfigure your new Incredible PBX phones from the convenience of the Incredible PBX GUI.
VitalPBX is perhaps the fastest-growing PBX offering based upon Asterisk with an installed presence in more than 100 countries worldwide. VitalPBX has generously provided a customized White Label version of Incredible PBX tailored for use with all Incredible PBX and VitalPBX custom applications. Follow this link for a free test drive!
Special Thanks to Vitelity. Vitelity is now Voyant Communications and has halted new registrations for the time being. Our special thanks to Vitelity for their unwavering financial support over many years and to the many Nerd Vittles readers who continue to enjoy the benefits of their service offerings. We will keep everyone posted on further developments.
Some Recent Nerd Vittles Articles of Interest…
It’s TeleYapper 5.0: The Ultimate RoboDialer for Asterisk
 We don't normally take a month off at Nerd Vittles which should tell you something about today's 10/10/10 column. We're pleased to introduce TeleYapper 5.0, a completely rewritten, Asterisk® 1.4 and 1.6.2-compatible version of our telephone broadcasting service.1 Using Cepstral text-to-speech, TeleYapper 5.0 brings individualized, text-based messaging and customized reminders coupled with the ability to capture recorded responses from every call.
WARNING: Because of changes in Cepstral, this application now requires an additional $200 license from Cepstral. We no longer recommend Cepstral for obvious reasons and will have a comparable system using Google's new Speech-to-Text application soon. Our apologies.
As part of the message delivery process, you now can customize and capture any one of four different responses from those that are called. And TeleYapper 5.0 will email you a CSV and/or XML file with the RoboResponse™ results when the calling process is completed including a list of failed calls and calls that were answered by an answering machine. In addition, you can have TeleYapper email certain call results to various individuals as the calls are processed if your requirements demand it.
For those with multiple outbound trunks, TeleYapper 5.0 supports simultaneous calls using multiple trunks. And now there are significant enhancements that detect answering machines and real people. This lets you deliver customized messages depending upon whether an actual human answers the phone.
Version 5 has been tested extensively with the Gold, Silver, and Bronze editions of PBX in a Flash 1.7.5.5, which provides support for the latest and greatest versions of Asterisk 1.4 and 1.6.2. And it should work well with other Asterisk aggregations with MySQL, Cepstral TTS support, and FreePBX 2.5 or later.
Overview. For those that have never used TeleYapper, here's a quick summary of how the new version works. It's an automated message broadcasting service commonly known as a call blasting or phone blasting system. In addition to loads of creepy uses, phone blasting has legitimate purposes as well. TeleYapper is licensed in several different ways for the following purposes: prerecorded phone messages for neighborhood association announcements, medical appointment reminders, school closings, tornado alerts, little league practices, municipal government reminders. It's free to use for non-profit, civic, and non-political purposes provided you don't solicit money or seek to sway someone's opinion or encourage a particular vote on an issue or candidate. All other uses require a commercial license. For commercial, political, and medical applications, please review our licensing terms below.
How it Works. Step #1 is to create a CSV or XML export from your favorite database application with the information that will be used to send the messages or reminders. This could be as simple as a list of phone numbers or as complex as a listing of doctors and patients with the dates, times, and places of their next medical appointments together with special patient instructions for activity preceding their visit, e.g. "Please remember to start flossing a month before your next dental appointment."
Step #2 is to create a config file with the robodial settings as well as the text which will actually be spoken during each customized call. If you remember form letters from your word processing days, TeleYapper's config file offers the same flexibility. A message can be as simple as "Take cover immediately. A tornado has been spotted at the end of your street." Or it could be a medical appointment reminder such as the following:
Hi. This is Allison from Charleston Family Clinic calling to confirm Jan's appointment with Doctor Quack on Tuesday, October 5th, 2010, at 10:30 a.m. in our Charleston office. Please remember not to eat or drink anything after midnight on the night before your scheduled appointment.
To confirm your appointment, press 1. To reschedule your appointment, press 2. To cancel your appointment, press 3. If we have reached you in error or if you do not wish to receive further automated medical appointment reminders, press 4. To hear this message again, please press 5 now.
And you can create a separate message which would be delivered in the event an answering machine takes the call:
Hi. This is Allison from Charleston Family Clinic calling to confirm Jan's appointment with Doctor Quack on Tuesday, October 5th, 2010, at 10:30 a.m. in our Charleston office. Please remember not to eat or drink anything after midnight on the night before your scheduled appointment.
If you need to change or cancel your appointment or if we have reached you in error, please call our office at your earliest convenience. The number is 800-123-4567. Goodbye.
Step #3 is to use your web browser to access a password-protected web page that will let you upload your CSV or XML data and your config file to kick off the dialing spree. Once the files have been uploaded, everything else is automatic.
Step #4 is to sit back and relax while TeleYapper executes your instructions and calling list. When the calling has been completed, the email address in your config file will be sent both CSV and XML reports of the results of all the calls. Either of these reports is suitable for import and manipulation using most spreadsheet applications.
Status Codes. Every call that is processed gets a status code entry whether the call is successful or fails. A status code of 0 means a call failed to both phone numbers provided for a particular callee. The second phone number is entirely optional. A status code of 5 means the call was answered but no response was provided by the called party. This typically would mean the call was picked up by an answering machine although it could mean Granny answered the call using a rotary dial phone. 🙄 Status codes of 1 through 4 have whatever meaning you choose to assign to each option when setting up a configuration for a particular calling campaign.
Legalese. TeleYapper 5.0 is free for use by non-profit, civic, and non-political organizations provided you absolve us from all financial and other responsibility in conjunction with your use of the software. Non-profit use further requires that no financial benefit be derived from the substance of the calls. Simply stated, your Little League team can use the software at no cost to remind kids to attend practice, but it cannot be used to solicit charitable contributions or to sell doughnuts without obtaining a commercial license.
By using this software, you also agree to strictly comply with federal and state regulations including 16 C.F.R. Part 310. In addition, you agree to assume all risks associated with use of the software. NO WARRANTIES EXPRESS OR IMPLIED INCLUDING ITS FITNESS FOR USE OR MERCHANTABILITY ARE PROVIDED WITH THIS SOFTWARE.
WARNING: With certain limited exceptions, most robocalling now requires prior written approval from those being called. See this link for a summary of the federal requirements. Be advised that improper use of this software may subject the user to penalties of up to $16,000 per call plus monetary damages to injured consumers.
 Licensing. You are licensed to use this software under certain conditions. You do not own it. We do, and we also own the copyright. It is licensed for use under the terms of the Creative Commons Attribution Non-Commercial license. A Plain English summary is available here. We've done this primarily to do our part to stamp out the telemarketing creeps of the world. Those wishing to use TeleYapper for commercial or political purposes must first request and then purchase a commercial license after outlining your proposed terms of use. Telemarketers need not apply! For doctors, lawyers, and others falling outside the scope of our free license who wish to obtain a commercial use license, please contact us for pricing and details. Be sure to summarize your intended use in your request together with a sufficient factual summary to demonstrate that your use is in compliance with 16 C.F.R. Part 310. Please also indicate whether you will require assistance with installation and setup.
Prerequisites. As mentioned, you'll need a Linux-based Asterisk aggregation such as PBX in a Flash to use TeleYapper 5.0. This means you need a system with Asterisk 1.4 or 1.6 as well as FreePBX 2.5 or higher. For quality reasons, we strongly recommend you purchase a commercial Cepstral text-to-speech license for your server. While Flite would technically work, most folks don't respond well to calls from Egor so we have customized the code for use solely with Cepstral. You'll find Cepstral installation instructions in this Nerd Vittles article. The TeleYapper 5.0 code also relies heavily on Apache and PHP, both of which are included in every PBX in a Flash system.
Installing Cepstral. Cepstral installation is not the simplest application to get working with Asterisk so here are the commands for those running 32-bit systems with Asterisk 1.4 or 1.6.2. For details on purchasing and registering Cepstral (and a discount) and for 64-bit installs, read our previous article including the comments.
For Asterisk 1.4 systems running under 32-bit CentOS, log into your server as root and issue the following commands accepting the Cepstral defaults. Be sure to create the Cepstral directory when prompted!
cd /root
wget http://nerd.bz/bnTVjX
tar -zxvf Cepstral*
cd Cepstral_Allison-8kHz_i386-linux_5.1.0
./install.sh
echo /opt/swift/lib > /etc/ld.so.conf.d/cepstral.conf
ldconfig
cd /usr/src
wget http://pbxinaflash.net/source/app_swift/app_swift-1.4.2.tar.gz
tar -zxvf app_swift*
cd app_swift-1.4.2
make
make install
ln -s /opt/swift/bin/swift /usr/bin/swift
sed -i 's|David-8kHz|Allison-8kHz|' /etc/asterisk/swift.conf
amportal restart
asterisk -rx "core show application swift"
ls /opt/swift/voices
swift --reg-voice
For Asterisk 1.6.2 systems running under 32-bit CentOS, log into your server as root and issue the following commands accepting the Cepstral defaults. Be sure to create the Cepstral directory when prompted!
cd /root
wget http://nerd.bz/bnTVjX
tar -zxvf Cepstral*
cd Cepstral_Allison-8kHz_i386-linux_5.1.0
./install.sh
echo /opt/swift/lib > /etc/ld.so.conf.d/cepstral.conf
ldconfig
cd /usr/src
wget http://pbxinaflash.net/source/app_swift/app_swift-1.6.2.tar.gz
tar -zxvf app_swift*
cd app_swift-1.6.2
make
make install
ln -s /opt/swift/bin/swift /usr/bin/swift
sed -i 's|David-8kHz|Allison-8kHz|' /etc/asterisk/swift.conf
amportal restart
asterisk -rx "core show application swift"
ls /opt/swift/voices
swift --reg-voice
Installing TeleYapper 5.0 The real beauty of PBX in a Flash as an Asterisk platform is demonstrated by the ease with which you can install new applications such as this one. The drill is very simple. You download an install script, make it executable, and run it. Less than a minute later, the TeleYapper install is done. Here are the commands to execute to install TeleYapper 5.0 after logging into your PBX in a Flash system as root. On other systems, you are well advised to carefully review the install script and tailor it to meet the individual requirements of the platform on which you are installing it.
cd /root
wget http://bestof.nerdvittles.com/applications/teleyapper5/teleyapper5.pbx
chmod +x teleyapper5.pbx
./teleyapper5.pbx
The TeleYapper Database. We use the MySQL database management system to manage the list of callees for TeleYapper to dial. It can handle a database of almost any size and generally stands up well in performance comparisons with Oracle. So you're covered on the database front. For most users, you never should need to access the MySQL database directly. TeleYapper 5.0 handles the importing of CSV or XML files for processing, manages the call queue, and processes and emails CSV and/or XML-formatted reports to you when the calls are completed.
The install script creates the MySQL database to support TeleYapper 5.0. Should you need or want to manage the database directly, the easiest tool to use is phpMyAdmin which is accessible through the Tools tab in FreePBX on PBX in a Flash systems. You'll need to login as maint with your maint password to access phpMyAdmin. After phpMyAdmin loads, click on the reminders database in the left column. Then click the reminders table entry in the left column to open the file. Unless you really, really know what you are doing and appreciate how much coding will be required to support new or different fields in the reminders file, don't improve it.
Here's the layout of the MySQL database table for TeleYapper 5.0:
- id - System generated record ID
- acctno - Account Number (12 alphanumeric characters)
- provider - Provider Name (30 alphanumeric characters)
- recipient - Recipient Name (30 alphanumeric characters)
- apptdt - Appointment Date (MM/DD/YY format)
- appttime - Appointment Time (HHMM format using 24-hr clock)
- apptplace - Appointment Location (30 alphanumeric characters)
- instructions - Free-form text (65535 alphanumeric characters)
- phone1 - Primary Phone (NNN-NNN-NNNN or NNNNNNNNNN)
- phone2 - Alternate Phone (NNN-NNN-NNNN or NNNNNNNNNN)
- status - Status: 0=failedcall 5=ansmachine 1,2,3,4=user-defined
- failedcalls - System Generated Number of Failed Calls
Tweaking PHP for TeleYapper. Depending upon your PHP setup and the number of calls you plan to process, you may need to adjust the default PHP resource settings on your server. The main reason is because TeleYapper generates a custom sound file for every call to be processed before the calling ever starts. If you plan to make thousands of calls, this can take some time. The PHP settings are stored in /etc/php.ini. You must log in as root and restart Apache after making changes to these settings: service httpd restart. The settings that matter are the following:
max_execution_time = 30 (we recommend 900 which is 15 minutes to process)
max_input_time = 60 (we recommend 300 which is 5 minutes to upload a file)
memory_limit = 100M (OK as is)post_max_size = 8M (we recommend 100 megabytes which should be ample)
file_uploads = On (OK as is on most systems)
upload_max_filesize = 100M (we recommend 100 megabytes which should be ample)
Tweaking Crontab. TeleYapper relies upon a cron job to kick off its calling sprees so you'll need the following entry in your /etc/crontab file unless you used the install script which inserts it automatically:
* * * * * root /var/www/html/appt-reminders/gen-reminders.php > /dev/null 2>&1
Formatting CSV Data For Import. You don't necessarily need an external database in order to use TeleYapper 5.0 although it is designed to support almost any database or spreadsheet application in the marketplace so long as it can export data in CSV or XML format. A CSV (comma-separated values) or XML file is the middleware that makes everything work. Each line in a CSV file represents an entry to be processed by TeleYapper 5.0 when the CSV file is uploaded. Each item in a line is called a field. Every field begins and ends with double-quotes, and fields are separated from each other with commas. Do NOT include any quotation marks in your actual text, or you'll get a disaster. All fields are required, by the way, but only the Phone1 field must have an actual entry. The remaining fields may each consist of nothing more than a pair of double-quotes. Note also that the id, status, and failedcalls fields (shown in red below) must consist of a pair of double-quotes and nothing more. Here's the actual CSV format which must be used, and all of the data must appear on the same line so disregard the WordPress formatting below:
"id","acctno","provider","recipient","apptdt","appttime","apptplace","instructions","phone1","phone2",
"status","failedcalls"
Here's what the CSV entry used for our sample medical reminder shown near the top of this article would look like. We've excluded the special instructions and Phone2 entries below only to simplify the display because of constraints inherent in our blog formatting:
"","12345","Quack","Jan","10/05/10","1030","Charleston","","4049876543","","",""
The XML Alternative. If you'd prefer to upload XML file templates for your calls instead of CSV data, a sample XML file is included in the distribution to show you the proper formatting. Here's a sample entry that matches the CSV data above:
<!-- Database: reminders -->
<reminders>
<!-- Table: reminders -->
<reminders>
<id></id>
<acctno>12345</acctno>
<provider>Quack</provider>
<recipient>Jan</recipient>
<apptdt>10/05/10</apptdt>
<appttime>1030</appttime>
<apptplace>Charleston</apptplace>
<instructions></instructions>
<phone1>4049876543</phone1>
<phone2></phone2>
<status></status>
<failedcalls></failedcalls>
</reminders>
</reminders>
Direct Uploading with SAMBA. If you've activated SAMBA on your Asterisk server, you can upload TeleYapper files for processing directly. Be sure to name your CSV or XML file as reminders.csv or reminders.xml. And name your config file: config.php. Copy the files to the /var/www/html/appt-reminders/upload directory on your Asterisk server. That's all there is to it. If you need hints on SAMBA installation, see our Best of Nerd Vittles tutorial. Pay particular attention to the sections on Security Considerations and Firewall Settings. Before using the SAMBA, be sure to upload some test CSV/XML files using the web interface. There is no error checking when you use the SAMBA option!
Configuring TeleYapper 5.0 Calling Scripts. Now let's address how we transform a CSV or XML entry such as the ones shown above into a personalized phone call to Jan, the actual patient in our example. Every TeleYapper session can have an individual configuration file associated with it. If none is specified, then a default configuration is used. In this way, you can customize call procedures and calling scripts for different tasks. The easiest approach is to always upload a config file with your CSV or XML data file. Then you won't get unexpected results when the calling begins.
HINT: It's a very good idea to create a sample upload with your own phone number and some sample configuration data to test things out before you start calling thousands of clients.
A default configuration file (config.default.php) as well as sample CSV and XML templates (reminders.csv and reminders.xml) come with TeleYapper 5.0 and can be found on your Asterisk server in the /var/www/html/appt-reminders directory. Make a copy of them, and move the copies to your Mac or PC. Then, using TextEdit or Notepad, open the files and have a look. Before addressing other configuration options in config.php, let's tackle the setup procedure for calling scripts.
The actual boilerplate message to be delivered to the called party is stored in $msg. Notice that you can substitute data out of your database in the boilerplate template by enclosing any desired fields in braces. Just make sure the fieldname exactly matches one of the fields in the reminders database. So our entry for the sample call above would look like this:
$msg="Hi: This is Allison from Charleston Family Clinic calling to confirm an appointment for {recipient}, with Doctor {provider}, on {apptdt}, at {appttime}, in our {apptplace} office. {instructions}";
Just a comment that, for those with large data processing systems, you may find it more convenient to generate the actual text for each reminder on your mega-machine. In this case, all of the data (up to 65,535 characters) could be loaded into the instructions field for each callee. So each upload record might consist of nothing more than phone numbers and instructions. In this scenario, the $msg entry in config.php would look like this: $msg="{instructions}";
The key press choices that are provided to the called party are configured using the $options field which would look like this for our example:
$options = "To confirm your appointment, please press 1. To reschedule your appointment, press 2. To cancel your appointment, press 3. If we have reached you in error or if you do not wish to receive appointment reminders, press 4. To hear this message again, please press 5 now.";
Don't confuse the 5 option which is automatically included in the TeleYapper dialplan code with status code 5 which means an answering machine picked up a call. Status code 5 is system-generated and is not stored based upon a callee choosing to listen to a recorded message more than once. The two 5's are not the same even though options 1-4 are actually used to define what the first four status codes mean on your system.
As we mentioned, the system has the smarts to usually figure out if an answering machine took the call. When it detects this, the $ansmach message is played instead of $options. A sample entry might look like this:
$ansmach = "If you need to cancel or reschedule this appointment, if we reached you in error, or if you do not wish to receive appointment reminders in the future, please call 777-123-4567 at your earliest convenience. Thank you for your assistance. Goodbye.";
Finally, for each of the four choices (1 through 4), there is a response message which is played if the callee chooses that option. Here's a sample template to get you started:
$chose1 = "Thank you for making Charleston Family Clinic your medical home. Your appointment has been confirmed. Goodbye.";
$chose2 = "Thank you. A representative will be calling you to reschedule your appointment. Goodbye.";
$chose3 = "Thank you for making Charleston Family Clinic your medical home. Your appointment has been cancelled. Goodbye.";
$chose4 = "Thank you. We will update our systems and apologize for the call. Goodbye.";
Thus, when a callee responds to the boilerplate call by pressing 1, $chose1 is played in response. If an email address has been entered for $chose1email, then a copy of the log entry for that call is sent to the specified email address using the customized email subjects (shown below) in addition to being placed in the master call log. The same process occurs when the other options are chosen. Particularly with medical appointment cancellations, it may be important to receive immediate notification when an appointment is canceled or a patient requests a change in scheduling. So the software includes the flexibility to generate instant emails to various email addresses depending upon which option is pressed. As noted, the optional instant emails will be generated using the email subjects entered for the following fields in your customized configuration file:
$chose1subj = "APPOINTMENT NOTIFICATION CONFIRMED BY PHONE";
$chose2subj = "APPOINTMENT RESCHEDULING REQUEST BY PHONE";
$chose3subj = "APPOINTMENT CANCELLATION REQUEST BY PHONE";
$chose4subj = "APPOINTMENT SCHEDULING ERROR REPORTED BY PHONE";
$chose5subj = "APPOINTMENT NOTIFICATION LEFT ON ANSWERING MACHINE";
Uploading Data & Config Files to TeleYapper. Simple web pages are used to upload CSV and XML data with config files to TeleYapper 5.0. WARNING: These web pages have NOT been sanitized for use on the Internet. They are designed for use on your local area network behind a secure firewall. On PBX in a Flash systems, the web pages are password-protected and require a valid user account login for access. This will NOT be the case on other Asterisk aggregations without tweaking your Apache configuration. Sample entries can be found in teleyapper.conf in the /var/www/html/appt-reminders directory. On PBX in a Flash systems, you can log in using maint, wwwadmin, or meetme accounts. Or you can create an additional account to use with TeleYapper 5.0:
There are separate web pages depending upon whether you wish to upload CSV or XML data. For CSV data, the web address is http://ipaddress/appt-reminders/uploadcsv/. For XML data, the web address is http://ipaddress/appt-reminders/uploadxml/. Substitute the private IP address of your Asterisk server for ipaddress. Here's a sample of the CSV web form. You can, of course, substitute your own logo on the right if desired.
Other TeleYapper 5.0 Config Options. In addition to the boilerplate text for TeleYapper calls, there are a number of other settings which can be adjusted to meet your individual requirements.
The database settings should never need adjusting so just leave them alone. They look like this:
$db="reminders";
$fi="reminders";
$dbuser="root";
$dbpass="passw0rd";
You can manually set a starting and ending time to begin and end the calling sequence for a particular upload. Never set these in the default configuration! Only set them in a config file to be uploaded. If the entries are blank, calls will commence shortly after the upload completes and will end when all of the entries have been processed. Note that there is no current flexibility to schedule individual calls based upon the time of the appointment. This typically would be handled by selecting particular records for processing in your primary database. For example, for medical appointments, you would select records in which an appointment is scheduled for tomorrow and then upload the list to TeleYapper which would place the calls today. We probably will expand this functionality down the road, but it's not there yet. So it's up to you to upload call lists which basically are ripe for calling now.
If you wish to use the $startcalls and $endcalls features in your custom config files, the syntax should look like this: YYYYMMDD,HHMM where YYYY is a 4-digit year, MM is a 2-digit month, DD is a 2-digit day of the month, HH is the 2-digit hour based upon a 24-hour clock (aka Military Time), and MM is the 2-digit minute. Note that calls will not end precisely at the $endcalls time. Any existing calls already in process will be completed including redials and calls to an alternate $phone2 number. This process can take up to 10 minutes to complete.
CAUTION: Be very careful using the $startcalls option! Nothing precludes your scheduling a thousand reminder calls to kick off at 0200 which is 2 a.m. Not really a good thing if job security matters to you.
To restart the calling process on the following day, log into your server as root and switch to the /var/www/html/appt-reminders directory. Then edit config.php and adjust the $startcalls and $endcalls for the remaining calls. Then run: ./gen-calls.php. Any existing database entry with a status=0 will be called when the calling process resumes. You can monitor the calling process by running: ./showcalls.sh. Press Ctrl-C to terminate the call display. It usually takes a minute or two for the first call to be placed.
$callerid is used to set the CallerID of outbound calls if your telephony provider supports it.
$trunk is used to set the outbound dialing trunk for calls. The default works for most purposes.
$channel is used to set the outbound dialing channel for calls. The default works for most purposes.
$maxcalls and $spacing are used to set the number of simultaneous calls and spacing between calls respectively. Be very careful with these settings. You must have sufficient outbound trunks to handle the number of simultaneous calls you schedule with $maxcalls, or you will get circuit busy conditions which are recorded as calls to busy numbers. Keep in mind that TeleYapper tries every call twice with 2 minutes of separation. So, if you only have two outbound trunks, don't set $maxcalls above 1, or you will get trunk busy conditions whenever original calls to an individual fail, i.e. line busy or no answer situations. In addition, remember that TeleYapper 5.0 supports a second phone number for each called party. These are triggered whenever the original two calls to the primary number fail and must also be considered in setting $maxcalls properly. If your logs show a disproportionate number of failed calls (status=0), this may be a tell-tale sign of trunk busy conditions.
$waittime is the number of seconds a call to any given number will ring. 45 seconds is about 7 rings.
$email is the email address that will be used to send the logs at the completion of the calling process. $chose1email through $chose5email are the optional email addresses if you want instantaneous feedback on certain types of status results. This means you get an immediate email if a certain call results in a certain status code. Leave the ones blank for $status conditions on which you want no immediate feedback and simply wait for the logs to arrive.
$csvreport and $xmlreport are used to set which type of completion report you wish to receive. If you want both of them, set them both to 1. Otherwise, set the one you don't want to 0.
The Old Fashioned Way. For those of you that preferred the older method of entering data directly into MySQL, you still can use phpMyAdmin or some other front-end tool to enter the data directly into the reminders.reminders table. Just leave the id field blank since it automatically gets generated by MySQL. And either leave the status and failedcalls fields blank or set them to 0. They also are system-generated. Once you have your data in place, log into your server as root, and...
cd /var/www/html/appt-reminders
Configure config.php for your calling campaign
Run ./gen-mysql.php to kick off TeleYapper 5.0
In Closing... Finally, let us issue our usual tinkerer's warning. Don't delete anything from the /var/www/html/appt-reminders directory tree. Just because you don't know its function doesn't mean it doesn't have one. Aside from that, the documentation above should get you started today. Be advised that TeleYapper 5.0 still is a work in progress. So check back every week or so for new comments on this article to see what's been changed, added, or fixed since you originally downloaded the application. Enjoy!
Need help with Asterisk? Visit the PBX in a Flash Forum.
Or Try the New, Free PBX in a Flash Conference Bridge.
whos.amung.us If you're wondering what your fellow man is reading on Nerd Vittles these days, wonder no more. Visit our new whos.amung.us statistical web site and check out what's happening. It's a terrific resource both for us and for you.
Special Thanks to Our Generous Sponsors
FULL DISCLOSURE: ClearlyIP, Skyetel, Vitelity, DigitalOcean, Vultr, VoIP.ms, 3CX, Sangoma, TelecomsXchange and VitalPBX have provided financial support to Nerd Vittles and our open source projects through advertising, referral revenue, and/or merchandise. As an Amazon Associate and Best Buy Affiliate, we also earn from qualifying purchases. We’ve chosen these providers not the other way around. Our decisions are based upon their corporate reputation and the quality of their offerings and pricing. Our recommendations regarding technology are reached without regard to financial compensation except in situations in which comparable products at comparable pricing are available from multiple sources. In this limited case, we support our sponsors because our sponsors support us.
BOGO Bonaza: Enjoy state-of-the-art VoIP service with a $10 credit and half-price SIP service on up to $500 of Skyetel trunking with free number porting when you fund your Skyetel account. No limits on number of simultaneous calls. Quadruple data center redundancy. $25 monthly minimum spend required. Tutorial and sign up details are here.
![]() The lynchpin of Incredible PBX 2020 and beyond is ClearlyIP components which bring management of FreePBX modules and SIP phone integration to a level never before available with any other Asterisk distribution. And now you can configure and reconfigure your new Incredible PBX phones from the convenience of the Incredible PBX GUI.
The lynchpin of Incredible PBX 2020 and beyond is ClearlyIP components which bring management of FreePBX modules and SIP phone integration to a level never before available with any other Asterisk distribution. And now you can configure and reconfigure your new Incredible PBX phones from the convenience of the Incredible PBX GUI.
VitalPBX is perhaps the fastest-growing PBX offering based upon Asterisk with an installed presence in more than 100 countries worldwide. VitalPBX has generously provided a customized White Label version of Incredible PBX tailored for use with all Incredible PBX and VitalPBX custom applications. Follow this link for a free test drive!
Special Thanks to Vitelity. Vitelity is now Voyant Communications and has halted new registrations for the time being. Our special thanks to Vitelity for their unwavering financial support over many years and to the many Nerd Vittles readers who continue to enjoy the benefits of their service offerings. We will keep everyone posted on further developments.
Some Recent Nerd Vittles Articles of Interest...
- Special thanks to my dear wife, Mary, who did much of the system design work for this project, and to Community Health Centers of Florida for underwriting some of the design and development costs. [↩]
Donate Now To Claim Your $299 Web Appointment System

It's back-to-school time in the United States, and we want to lessen the pain of the transition with a deal you simply cannot refuse. Here's how it works. Every fall we solicit contributions to Nerd Vittles so that we can keep the lights on for another year. We try to reward our readers with great deals whenever we find them but especially during donation season. So this one is especially for you, our loyal readers! You'll find a PayPal Donate button just to the right. It works with every major credit card whether you have a PayPal account or not. For everyone that makes a contribution to Nerd Vittles this month, we'll forward a portion of your contribution to Ward Mundy & Associates, an organization we know and love, to purchase on your behalf a fully licensed copy of hitAppoint to run on a server of your choice. Ward Mundy & Associates already has purchased an unlimited distribution license to hitAppoint. We hope you'll consider running hitAppoint with PBX in a Flash or the Incredible PBX because, over the next few months, we'll be writing a new module for hitAppoint that lets you add Telephone Reminders and Client/Patient Confirmations when the software is run on PBX in a Flash systems. Who knows? We may even get energetic and write a module to let folks schedule appointments using their Plain Old Telephone.

What's the Catch? Sorry. There isn't one other than our assumption that you're a loyal Nerd Vittles reader. We obviously have no way to check. Just make a donation to Nerd Vittles this month and patiently await an email from us telling you how to download your software. If you're a long time reader of Nerd Vittles, you already know about our previous contributions to the open source and shareware communities. And today is no different even though this is commercial software. Yes, the Little Mrs. is not going to be happy. So there goes the new house... again.

Can I Pass the Software On? No. Your copy of hitAppoint will be licensed just to you or the entity making a donation to Nerd Vittles. And it's for use on a single server. This is the identical commercial software product that can be purchased from the hitAppoint web site for $299.

What Are Typical Uses for hitAppoint? The hitAppoint web site lists a number of real-world examples of how hitAppoint is being used. These include scheduling of medical appointments, fitness and wellness appointment scheduling, piano or guitar lessons, tutoring appointments, photographic services scheduling, workout class appointments, hair salon scheduling, carpet cleaning services, and almost any other trade or profession that involves scheduling of people's time or facilities.
Is it Full-Featured? You bet. It's one of the best in the business. That's why we chose it! Here's an overview of hitAppoint functionality in the latest release:
Appointments
- Appointment packs
- Multiple seats at a time if needed
- Customer can request/cancel appointment
- Provider can create/accept/reject appointment
- Manage past appointments
- View appointments during any time period
- Color for appointment status
- Customizable automatic confirmation emails
- Export to Outlook, iCal apps, Google Calendar
- Export to Excel or any CSV-capable software
- View apptmt by customer, provider, location
- Day appointments visual view
- One screen print view
- Review appointments before scheduling
- Configure service, location, provider, time
- Move appointment to another location
- Reassign appointment to another provider
- Reschedule appointment to different time
- Custom additional fields for appointments
- Recurring Appointments
Payments
- Paypal integration
- Authorize.Net integration
- SagePage integration
- Accept offline payments at your office
Customers
- Configure to allow registered users only
- Require customer email validation
- Require admin approval for new customer
- Additional information fields for customer data
- Search for customers by any field
- View customer appointment history
- Use of customer database from other apps
- Temporarily suspend users
Providers
- Assign provider to any service and location
- Flexible availability schedule for providers
- Specify individual time off
Services
- Variable duration and pricing for sessions
- Lead-in and lead-out times
- Flexible availability for every service
- Configure providers and locations for service
- Define when advance booking is possible
- Define when appointment cancellation is possible
Locations
- Flexible availability scheduling by location
- Configure services and providers by location
System
- Tailor look and feel with themes
- Integrate with WordPress
- Integrate with Joomla
- Multi-language support

Prerequisites. Here's what you'll need on your host machine which could be either Windows, Linux, or Mac OS X:
* Apache web server
* PHP (version 4.1 or greater or PHP 5)
* MySQL 3.23 or greater
* phpMyAdmin (strongly recommended)
In the Windows world, the easiest way to get everything you need is to install WampServer 2. With Mac OS X, we'd recommend XAMPP. For Linux, all you need is PBX in a Flash. If you plan to run hitAppoint in a hosted environment (e.g. WestNIC, LunarPages, BlueHost), we'd recommend you choose a provider that includes cPanel. This makes it easy to set up your MySQL database and credentials. The three providers we've listed all provide the necessary software to run hitAppoint, and we've used all three of them with good results. The three are ranked in our order of preference.

Downloading & Installing hitAppoint. If you're installing this on a PBX in a Flash server, it's incredibly simple and takes less than a minute. Log into your server as root and issue the following commands. Then skip down to the Running Setup section below:
cd /root
wget http://pbxinaflash.com/hitappoint.tgz
tar zxvf hitappoint.tgz
./hitappoint.sh
For those not installing hitAppoint on a PBX in a Flash server, download the hitAppoint software from the link that was provided in the email from us. The link changes regularly so download it as soon as you receive your email confirmation. Unzip the file in the root directory of your web server so that hitAppoint can be accessed using a web browser pointed to:
Step #2 is to create a MySQL database and user with permissions to manage hitAppoint.
On cPanel hosted systems, there will be a MySQL Databases option. Choose it and create a new database called hitappoint. This will actually create a database called nerd_hitappoint where nerd is your cPanel account name. Now add a new username and call it hitappoint as well. Then choose a very secure password for this username. Then click the Create User button. Finally, move to the Add User to Database option and specify nerd_hitappoint as the database and nerd_hitappoint as the user (using your own cPanel account name obviously). Then click the Add button.
On systems with phpMyAdmin, use a browser to open the application. Click on the Privileges option in the center column. Then click Add a New User. For Username, choose Use Text Field and enter hitappoint. For Host, choose Local and it will default to Localhost. For Password, choose Use Text Field and enter a very secure password twice. In the Database for User section of the form, choose the radio button marked "Create database with same name and grant all privileges." Now move to the bottom of the form and click the Go button.
Now you're ready to configure hitAppoint to use your newly created MySQL database. Use your favorite editor to open db.rename_it.php in the new hitappoint directory on your web server. Change the default entries so that they look like the following but use your actual password instead of yourpassword for the MySQL user account you created:
define( 'NTS_DB_HOST', 'localhost');
define( 'NTS_DB_USER', 'hitappoint');
define( 'NTS_DB_PASS', 'yourpassword');
define( 'NTS_DB_NAME', 'hitappoint');
If you're on a hosted platform, don't forget to add your prefix (e.g. nerd_) to both the DB_USER and DB_NAME entries. Then save your changes and rename db.rename_it.php to db.php.
Running Setup. You're almost finished with the installation. Using your favorite browser, call up the following page and follow the prompts:
When you finish running the setup procedure, delete setup.php in the /hitappoint directory.

Language Support. hitAppoint has been designed to support multiple languages. Unfortunately, it has not yet been translated into German, French, and Spanish. The entire translation process takes only an hour or so. If you are fluent in both Spanish and English, please drop us a note, and we'll walk you through the translation procedure. In addition, we'll share your handiwork with the rest of the hitAppoint community.

Getting Started. After you've downloaded and installed the software, review the hitAppoint Getting Started Guide for instructions on configuring the software to meet your needs. Here's an example of what you can create in less than 10 minutes. And, as you can see, integrating the live application into existing web sites, forums, or blogs takes only a couple minutes. Feel free to make some sample entries. We won't bill you. 😉 Enjoy!
Need help with Asterisk?® Visit the PBX in a Flash Forum.
Or Try the New, Free PBX in a Flash Conference Bridge.
whos.amung.us If you're wondering what your fellow man is reading on Nerd Vittles these days, wonder no more. Visit our new whos.amung.us statistical web site and check out what's happening. It's a terrific resource both for us and for you.
Special Thanks to Our Generous Sponsors
FULL DISCLOSURE: ClearlyIP, Skyetel, Vitelity, DigitalOcean, Vultr, VoIP.ms, 3CX, Sangoma, TelecomsXchange and VitalPBX have provided financial support to Nerd Vittles and our open source projects through advertising, referral revenue, and/or merchandise. As an Amazon Associate and Best Buy Affiliate, we also earn from qualifying purchases. We’ve chosen these providers not the other way around. Our decisions are based upon their corporate reputation and the quality of their offerings and pricing. Our recommendations regarding technology are reached without regard to financial compensation except in situations in which comparable products at comparable pricing are available from multiple sources. In this limited case, we support our sponsors because our sponsors support us.
BOGO Bonaza: Enjoy state-of-the-art VoIP service with a $10 credit and half-price SIP service on up to $500 of Skyetel trunking with free number porting when you fund your Skyetel account. No limits on number of simultaneous calls. Quadruple data center redundancy. $25 monthly minimum spend required. Tutorial and sign up details are here.
![]() The lynchpin of Incredible PBX 2020 and beyond is ClearlyIP components which bring management of FreePBX modules and SIP phone integration to a level never before available with any other Asterisk distribution. And now you can configure and reconfigure your new Incredible PBX phones from the convenience of the Incredible PBX GUI.
The lynchpin of Incredible PBX 2020 and beyond is ClearlyIP components which bring management of FreePBX modules and SIP phone integration to a level never before available with any other Asterisk distribution. And now you can configure and reconfigure your new Incredible PBX phones from the convenience of the Incredible PBX GUI.
VitalPBX is perhaps the fastest-growing PBX offering based upon Asterisk with an installed presence in more than 100 countries worldwide. VitalPBX has generously provided a customized White Label version of Incredible PBX tailored for use with all Incredible PBX and VitalPBX custom applications. Follow this link for a free test drive!
Special Thanks to Vitelity. Vitelity is now Voyant Communications and has halted new registrations for the time being. Our special thanks to Vitelity for their unwavering financial support over many years and to the many Nerd Vittles readers who continue to enjoy the benefits of their service offerings. We will keep everyone posted on further developments.
Some Recent Nerd Vittles Articles of Interest...
TweedleD Back From the Dead Using Twitter OAuth
 Twitter Direct Messages and SMS Instant Messages are great ways to send yourself important notes that you want to keep track of… privately. Today, we’ll restore TweedleD to the living and let you harness the power of Twitter and SMS to announce every call on your Asterisk® server with the name and number of the caller as well as the DID of the incoming call.
If you’re one of the gazillion handful of folks using one of our Twitter applications, then you awakened to an unpleasant surprise earlier this morning. Neither Tweet2Dial nor TweedleD would connect to Twitter! That meant you could no longer use Twitter to place Google Voice calls, to send Google Voice SMS messages, or to manage your Asterisk server. Nor could you send yourself direct messages when new incoming calls hit your Asterisk server. Unfortunately (for us), the Twitter folks have discontinued use of basic authentication to log into and use Twitter’s API. Instead, you now must use the more secure (and more complicated) OAuth authentication mechanism. Actually, this is a good thing in the grand scheme of things because it means you no longer have to give out your actual Twitter account name and password to anyone. So let’s move on to how to put Humpty back together again.
We’ve actually been wrestling with this a good long while. The basic problem is generating the necessary new credentials for use on servers that are tucked safely behind hardware-based firewalls. Without getting too deep in the weeds, here’s the drill. To use OAuth, you basically need two sets of credentials. First, you need your own (not ours!) application-specific credentials known in the Twitterverse as your consumer key and consumer secret. These are generated by Twitter and normally hide inside your application. They are never made public. You also need an access_token and access_secret. But these can only be obtained once Twitter generates a request_token that is passed back to your application. There’s also a request_token_secret that is used by Twitter to verify that you are who you say you are before the access_token and access_secret are provided. If this sounds complicated, you’d be right. Now add the fact that our particular Twitter apps are sitting behind a firewall on your server, and you can begin to appreciate why OAuth complicates things with apps running on private networks.
So here’s the deal. To use the new OAuth-compatible versions of Tweet2Dial and TweedleD, you’ll need four pieces of information for each of these applications: a consumer_key, consumer_secret, access_token, and access_token_secret. Because the two applications typically use two different Twitter accounts, you cannot interchange these four pieces.
The traditional procedure for getting these four pieces of data works like this. First, you go to the Twitter apps web site and register each application while logged into your Twitter account that will host the application. For each app, you must specify the following. In return, Twitter will provide a consumer_key and consumer_secret for the application.
- Application Name
- Description
- Application Web Site
- Organization
- Web Site
- Application Type
- Callback URL
- Default Access Type
- Use Twitter for Login?
Second, you must create an application on the public web to log into Twitter using your new credentials. This log in process will produce the remaining pieces necessary to generate an access_token and access_token_secret specifically for you. Can you do all of this? Obviously, only you can answer that question, and here’s the best guide we’ve found to walk you through the process. Suffice it to say, unless you are a seasoned programmer, it’s a hairy procedure with lots of opportunities for disaster. But be our guest and try your hand at it.
What’s Plan B? The alternative to Step #2 above is to log into a special web site we’ve created to generate the necessary credentials for you. But this means you have to provide (and trust us not to store or use) your consumer key and consumer secret. You also don’t want someone looking over your shoulder while you’re obtaining the remaining credentials. Unfortunately, without your consumer key and consumer secret, we can’t obtain an access_token and access_token_secret for you. And without those, nothing works.
To get started, you’ll need to register your new application with Twitter. For this to work, the Application Web Site address and Application Callback URL in Step #1 need to point to our web site, not yours. Once you get the secret codes, you can change the web links for your application to any fake address you care to make up. Just don’t delete the Twitter app you’ve created.
If it makes you sleep any better, this isn’t your bank account we’re talking about, it’s a specific Twitter application, one that we happened to write for you. So, if you like Plan B and you’re comfortable with our assurance that none of your confidential keys or passwords are being harvested, continue reading. Otherwise, use your own devices for getting the four necessary credentials. Then you can download the new OAuth-compatible version of TweedleD, and you’re off to the races.
Today we’re going to tackle TweedleD and get it back in operation. In coming weeks, we’ll tackle Tweet2Dial as well.
TweedleD Setup. Let’s begin with TweedleD which lets you send Twitter DMs and SMS alerts to announce every incoming call on your Asterisk server. This tutorial assumes you previously have installed the original version of TweedleD. If not, start there. Now let’s proceed. First, you’ll need to register the application with Twitter.
Step #1 is to use a browser to log into the Twitter account that you plan to use to generate the Direct Messages. If you can’t remember which Twitter account you used to originally set this application up, log into your Asterisk server as root and find the $username entry near the top of nv-twitter.php in the /var/lib/asterisk/agi-bin directory. Your password for this Twitter account will be there as well.
Step #2 is to open a new tab with your browser and visit Twitter apps. Choose the Register a New Application option and fill out the form like this:
- Application Icon: Your choice
- Application Name: TweedleD
- Description: Asterisk Incoming Call Announcer
- Application Web Site: http://pbxinaflash.com/oauth/index.php
- Organization: Your Name or Company Name
- Web Site: http://anything-you-like.com
- Application Type: Browser
- Callback URL: http://pbxinaflash.com/oauth/callback.php
- Default Access Type: Read & Write
- Use Twitter for Login: Leave unchecked
Click the Save button once you’ve entered all the data and completed the Captcha code. Once your app is registered, call it up and write down your Consumer key and Consumer secret. By the way, if these ever get compromised, you can generate new ones. But it means you’ll have to repeat the rest of this exercise since the other credentials will change as well.
Step #3 is to visit our OAuth Credentials Generator web site using your browser. Now plug in your Consumer key and Consumer secret. Then fill out the Captcha code and click the Submit button. If you got the Captcha code right, you’ll see your entries redisplayed with an option to Login with Twitter. Just click on the link, sign in to Twitter if you’re not already signed in, and click the Allow button when prompted whether to Allow TweedleD access to your new web site. If you get some funky error message from Twitter, then you didn’t enter your Consumer key and secret correctly. Try again. Otherwise, you’ll then get a screen that displays some information about your Twitter account as well as your new Access Token and Secret. Write these down, too.
Access Token: 32438037iO5cYUq4h0BJD4Z6Un5phaZHZ2zJ4P4LQ2t6TX8fpU
Access Secret: PQrhUlM9nnJwIrYCNTF07ai3vlXgMD3uf3qmmWJp6o
Step #4 is to download and install the new TweedleD application. Log into your Asterisk server as root and issue the following commands:
cd /
wget http://bestof.nerdvittles.com/applications/TweedleD2.tgz
tar zxvf TweedleD2.tgz
rm TweedleD2.tgz
cd /var/lib/asterisk/agi-bin
nano -w nv-twitter.php
Step #5 is to configure TweedleD for use using your new Twitter credentials and your SMS email address. You’ll also need to choose whether to activate tweets, SMS messages, or both by setting $tweet and $sms to 1 if you want either or both of them activated.
If you’re activating Twitter, set $tweet=1 and fill in the 4 credentials that you wrote down previously: $consumer_key, $consumer_secret, $access_token, and $access_token_secret. In the $user4msg option, enter the Twitter account name to which the direct messages should be sent.
To activate SMS messaging as well, set $sms=1 and enter your SMS email address in the $smsaddress field using one of the examples provided.
Save the file, and you’re ready to try things out. Just make a call to your Asterisk server and the Twitter message announcing the call should arrive shortly thereafter. For syntax on other Twitter API calls, see the Twitter API Documentation. Enjoy!
Need help with Asterisk? Visit the PBX in a Flash Forum.
Or Try the New, Free PBX in a Flash Conference Bridge.
whos.amung.us If you’re wondering what your fellow man is reading on Nerd Vittles these days, wonder no more. Visit our new whos.amung.us statistical web site and check out what’s happening. It’s a terrific resource both for us and for you.
Special Thanks to Our Generous Sponsors
FULL DISCLOSURE: ClearlyIP, Skyetel, Vitelity, DigitalOcean, Vultr, VoIP.ms, 3CX, Sangoma, TelecomsXchange and VitalPBX have provided financial support to Nerd Vittles and our open source projects through advertising, referral revenue, and/or merchandise. As an Amazon Associate and Best Buy Affiliate, we also earn from qualifying purchases. We’ve chosen these providers not the other way around. Our decisions are based upon their corporate reputation and the quality of their offerings and pricing. Our recommendations regarding technology are reached without regard to financial compensation except in situations in which comparable products at comparable pricing are available from multiple sources. In this limited case, we support our sponsors because our sponsors support us.
BOGO Bonaza: Enjoy state-of-the-art VoIP service with a $10 credit and half-price SIP service on up to $500 of Skyetel trunking with free number porting when you fund your Skyetel account. No limits on number of simultaneous calls. Quadruple data center redundancy. $25 monthly minimum spend required. Tutorial and sign up details are here.
![]() The lynchpin of Incredible PBX 2020 and beyond is ClearlyIP components which bring management of FreePBX modules and SIP phone integration to a level never before available with any other Asterisk distribution. And now you can configure and reconfigure your new Incredible PBX phones from the convenience of the Incredible PBX GUI.
The lynchpin of Incredible PBX 2020 and beyond is ClearlyIP components which bring management of FreePBX modules and SIP phone integration to a level never before available with any other Asterisk distribution. And now you can configure and reconfigure your new Incredible PBX phones from the convenience of the Incredible PBX GUI.
VitalPBX is perhaps the fastest-growing PBX offering based upon Asterisk with an installed presence in more than 100 countries worldwide. VitalPBX has generously provided a customized White Label version of Incredible PBX tailored for use with all Incredible PBX and VitalPBX custom applications. Follow this link for a free test drive!
Special Thanks to Vitelity. Vitelity is now Voyant Communications and has halted new registrations for the time being. Our special thanks to Vitelity for their unwavering financial support over many years and to the many Nerd Vittles readers who continue to enjoy the benefits of their service offerings. We will keep everyone posted on further developments.
Some Recent Nerd Vittles Articles of Interest…
Free Asterisk Solutions
