
The Most Versatile VoIP Provider: FREE PORTING

 JUST RELEASED: Visit the Incredible PBX Wiki
Introducing Noojee Click for Asterisk: The Free Click-to-Dial Solution for Firefox Using AJAM
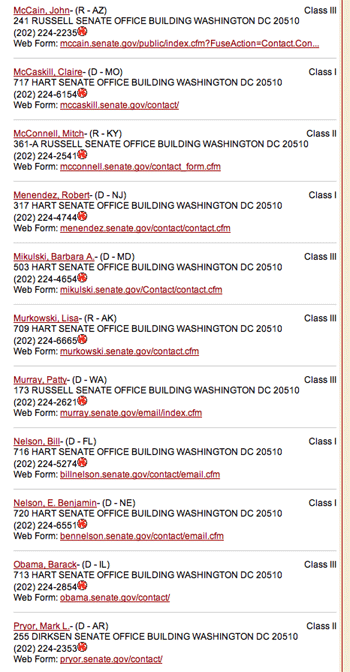
 AJAM is a new technology available in Asterisk® 1.4 which allows web browsers or other HTTP-enabled applications and web pages to directly access the Asterisk Manager Interface (AMI) via HTTP. You can read muppetmaster's complete writeup at voip-info.org. Because of Apache, it was Asterisk's mini-web server that rarely was needed or enabled with PBX in a Flash, Elastix, trixbox, or any other Asterisk aggregation... until recently. Then along came a terrific app called Noojee Click for Firefox from Noojee Telephony Solutions in Australia. What this little gem provides is Asterisk click-to-dial functionality with AJAM for any phone number found on any web page you happen to be browsing with Firefox. See, for example, the U.S. Senate web site (shown below). You'll note that little Noojee icons are displayed beside each senator's telephone number. So give Barack and John a call, and tell them what's on your mind. To call your favorite senator, just click on the desired icon. And, because it's a Firefox Addon, it's operating system agnostic so it works well on almost any desktop computer. We're going to walk you through getting everything set up today with Asterisk, but we have one cautionary note.
WARNING: We strongly urge you NOT to expose AJAM or the Asterisk Manager Interface to public access over the Internet or to untrusted users! Doing so almost certainly will compromise the integrity of your Asterisk system without a significant amount of additional work (not covered in this article) to harden and broaden the number of passwords and to better secure these services. Having said that, Noojee Click is a terrific tool for use on a private intranet where you trust ALL of the users or via VPN access where you trust ALL of the users with VPN access. And that's what we'll cover today in this tutorial.
Prerequisites. In order to follow along in this tutorial, you'll need a properly configured Asterisk 1.4 system as well as the Noojee Click Addon for Firefox which must be installed and properly configured on your client machines. We also are assuming that your Asterisk 1.4 implementation includes a relatively current version of FreePBX that is functioning reliably. We've given up installing every release of every Asterisk aggregation on the planet. So... what follows assumes you're using PBX in a Flash. If the other aggregations are properly configured, the same instructions should work without any changes. But we haven't tested them so proceed at your own risk.
Activating AJAM. Asterisk 1.4 as compiled on PBX in a Flash systems comes with AJAM support built in but not activated. Here are the three steps to activate and test that it's working properly.
1. Copy the sample AJAM config file into the /etc/asterisk directory:
cp /usr/src/asterisk/configs/http.conf.sample /etc/asterisk/http.conf
2. Using your favorite editor, edit http.conf so that it looks like the following. Be sure to change the private IP address 192.168.0.236 to reflect the private IP address of your Asterisk server or, in the alternative, you can use the VPN IP address of your Asterisk server .
;

; Asterisk Builtin mini-HTTP server

;

;

[general]

;

; Whether HTTP interface is enabled or not.  Default is no.

;

enabled=yes

;

; Whether Asterisk should serve static content from http-static

; Default is no.

;

;enablestatic=yes

;

; Address to bind to.  Default is 0.0.0.0

;

bindaddr=192.168.0.236

;

; Port to bind to (default is 8088)

;

bindport=8088

;

; Prefix allows you to specify a prefix for all requests

; to the server.  The default is "asterisk" so that all

; requests must begin with /asterisk

;

prefix=asterisk

;

; The post_mappings section maps URLs to real paths on the filesystem.  If a

; POST is done from within an authenticated manager session to one of the

; configured POST mappings, then any files in the POST will be placed in the

; configured directory.

;

;[post_mappings]

;

; In this example, if the prefix option is set to "asterisk", then using the

; POST URL: /asterisk/uploads will put files in /var/lib/asterisk/uploads/.

uploads = /var/lib/asterisk/uploads/

;
3. Now issue the following commands to configure and restart Asterisk and make sure AJAM is functioning properly:
mkdir /var/lib/asterisk/uploads

chown asterisk:asterisk  /var/lib/asterisk/uploads

amportal restart

asterisk -rx "http show status"
You should receive a response that looks something like the following:
HTTP Server Status:

Prefix: /asterisk

Server Enabled and Bound to 192.168.0.236:8088

Enabled URI's:

/asterisk/httpstatus => Asterisk HTTP General Status

/asterisk/manager => HTML Manager Event Interface

/asterisk/rawman => Raw HTTP Manager Event Interface

/asterisk/static/... => Asterisk HTTP Static Delivery

/asterisk/mxml => XML Manager Event Interface
Adjusting Security Settings to Permit Noojee Click Access. Two of the default security settings on PBX in a Flash systems would prevent Noojee Click running on any PC inside or outside your private network from accessing your Asterisk server to place a call. We want you to be fully aware that we are loosening up security to permit this access so that you'll know how to reverse it if you change your mind. First, the IPtables firewall blocks TCP port 8088 access to your Asterisk server from any external machine. Second, the default Asterisk Manager configuration blocks access to the Asterisk Manager Interface except from the Asterisk server itself. So the next two sections will walk you through adjusting both the IPtables firewall setup and the Asterisk Manager configuration to permit Noojee Click access.
Adjusting IPtables for TCP Port 8088 Access. We always recommend that your Asterisk server be installed behind a hardware-based firewall/router with all web access blocked. IPtables is configured to permit access to port 80 and several other web ports; however, this is intended to allow private intranet access to your server, not public Internet access. We're going to unblock TCP port 8088 with the same cautionary note. Do NOT expose TCP port 8088 to the public Internet! If you cannot live without Internet access to your server, use a VPN tunnel to make the connection so that all of the data is secured and the connection does not expose unencrypted data and passwords to the public Internet.
To open TCP port 8088 on your IPtables firewall, add the following line to the bottom of /etc/sysconfig/iptables just above the COMMIT line:
-A INPUT -p tcp -m tcp --dport 8088 -j ACCEPT
Then restart the IPtables service:
service iptables stop

service iptables start
Adjusting Asterisk Manager for Local Subnet Access. Giving any user Asterisk Manager access is equivalent to handing over the keys to your Asterisk castle. If you have any doubt about the integrity of any user on the subnet on which your Asterisk server is running, don't follow these instructions. Instead, consult an expert and limit access by individual IP addresses with separate account names and passwords for each trusted machine on your network, e.g. permit=192.168.0.31/255.255.255.255. This also could be the VPN address of any remote machine. To enable Noojee Click access to the Asterisk Manager for your entire local subnet, edit /etc/asterisk/manager.conf and add a new context at the bottom of the file that looks like the following using the actual subnet address of your intranet instead of 192.168.0.0. AND be sure to use a very secure password:
[noojee]

secret = YourVerySecurePasswordGoesHere

deny=0.0.0.0/0.0.0.0

permit=192.168.0.0/255.255.255.0

read = system,call,log,verbose,command,agent,user

write = system,call,log,verbose,command,agent,user
In the [general] context of the same file, add the following entry:
webenabled = yes
Save your changes and restart Asterisk: amportal restart.
Testing AJAM on Your Server. The easiest way to be sure you have a correct setup on your system is to try to access AJAM with a browser. First, install the text-based lynx browser. Issue the command: yum install lynx. Once installed, type lynx to start it up. Then choose G and enter the following URL using your actual IP address and password from above, of course:
http://192.168.0.236:8088/asterisk/manager?action=login&username=noojee&secret=YourVerySecurePasswordGoesHere
Installing and Configuring Noojee Click. Now that AJAM is humming along, you're ready to install Noojee Click on each of your desktop machines. On every machine, you'll need to fire up Firefox and go to this link. Click on the provided link to install Noojee Click for Asterisk. Firefox will display the following message just under the tab bar: 'Firefox prevented this site (www.noojee.com.au) from asking you to install software on this computer.' Click the 'Allow' button on the right hand side of your browser to allow Noojee Click to be installed. Then repeat the process again. You'll need to restart Firefox to finish the install. When Firefox reloads, you'll see the Noojee logo in the bottom right hand corner of the Firefox status bar. Click on it and choose Configuration. Enter the following settings using the IP address of your Asterisk server, noojee for the username, and whatever password you chose above for Asterisk Manager access:
ServerType: AJAM (Asterisk 1.4+)

Host: Internal IP Address of Your Asterisk Server

Port: 8088

Username: noojee

Password: YourVerySecurePasswordGoesHere

Phone Extension: the extension number where you will pick up this outbound call (works like AsteriDex!)

Context: from-internal

Enable Autoanswer: your choice

Phone Type: your choice (use Aastra for softphones)

Dial Prefix: only if required by your existing trunk setup

International Prefix: only if required by your setup

Pattern: leave the ones that are there and add the following for calls in the U.S.

XXX-XXX-XXXX

(XXX) XXX-XXXX

Enable Logging: your choice
Press the Escape key to save your settings. Now access a web page with some phone numbers and click on the Noojee icon beside a phone number to place an outbound call. The extension you specified in the Configuration should begin to ring. Answer the call, and the outbound call will be placed. Enjoy!
Hosting Provider Mega Deal. Just an FYI that the Nerd Vittles hosting provider, BlueHost, has raised the bar again on hosting services. For $6.95 a month, you can host unlimited domains with unlimited web hosting disk storage and unlimited monthly bandwidth. Free domain registration is included for as long as you have an account. It really doesn't get any better than that. And their hosting services are flawless! Just use our link. You get a terrific hosting service, and we get a little lunch money.
 New Fonica Special. If you want to communicate with the rest of the telephones in the world, then you'll need a way to route outbound calls (terminations) to their destination. For outbound calling, we recommend you establish accounts with several providers. We've included two of the very best! These include Joe Roper's new service for PBX in a Flash as well as our old favorite, Vitelity. To get started with the Fonica service, just visit the web site and register. You can choose penny a minute service in the U.S. Or premium service is available for a bit more. Try both. You've got nothing to lose! In addition, Fonica offers some of the best international calling rates in the world. And Joe Roper has almost a decade of experience configuring and managing these services. So we have little doubt that you'll love the service AND the support. To sign up in the USA and be charged in U.S. Dollars, sign up here. To sign up for the European Service and be charged in Euros, sign up here. See the Fonica image which tells you everything you need to know about this terrific new offering. In addition to being first rate service, Fonica is one of the least expensive and most reliable providers on the planet.
Special Thanks to Our Generous Sponsors
FULL DISCLOSURE: ClearlyIP, Skyetel, Vitelity, DigitalOcean, Vultr, VoIP.ms, 3CX, Sangoma, TelecomsXchange and VitalPBX have provided financial support to Nerd Vittles and our open source projects through advertising, referral revenue, and/or merchandise. As an Amazon Associate and Best Buy Affiliate, we also earn from qualifying purchases. We’ve chosen these providers not the other way around. Our decisions are based upon their corporate reputation and the quality of their offerings and pricing. Our recommendations regarding technology are reached without regard to financial compensation except in situations in which comparable products at comparable pricing are available from multiple sources. In this limited case, we support our sponsors because our sponsors support us.
 BOGO Bonaza: Enjoy state-of-the-art VoIP service with a $10 credit and half-price SIP service on up to $500 of Skyetel trunking with free number porting when you fund your Skyetel account. No limits on number of simultaneous calls. Quadruple data center redundancy. $25 monthly minimum spend required. Tutorial and sign up details are here.
![]() The lynchpin of Incredible PBX 2020 and beyond is ClearlyIP components which bring management of FreePBX modules and SIP phone integration to a level never before available with any other Asterisk distribution. And now you can configure and reconfigure your new Incredible PBX phones from the convenience of the Incredible PBX GUI.
The lynchpin of Incredible PBX 2020 and beyond is ClearlyIP components which bring management of FreePBX modules and SIP phone integration to a level never before available with any other Asterisk distribution. And now you can configure and reconfigure your new Incredible PBX phones from the convenience of the Incredible PBX GUI.
 VitalPBX is perhaps the fastest-growing PBX offering based upon Asterisk with an installed presence in more than 100 countries worldwide. VitalPBX has generously provided a customized White Label version of Incredible PBX tailored for use with all Incredible PBX and VitalPBX custom applications. Follow this link for a free test drive!
 Special Thanks to Vitelity. Vitelity is now Voyant Communications and has halted new registrations for the time being. Our special thanks to Vitelity for their unwavering financial support over many years and to the many Nerd Vittles readers who continue to enjoy the benefits of their service offerings. We will keep everyone posted on further developments.
Some Recent Nerd Vittles Articles of Interest...
It’s a Dell With Asterisk, Dude: Introducing the Orgasmatron II for the Dirt-Cheap Dell SC440
 About 20 years ago, we began our migration from proprietary DEC VAX minicomputers by acquiring two of the first Dell servers ever manufactured. They were serial numbers 6 and 7. And we were just about as excited about the transition as the folks on Sesame Street. The machines were quickly named Bert and Ernie, and there was even a scrolling LCD display on the units showing the machine names. Considering that this all occurred inside a federal courthouse, it was revolutionary at the time. Michael Dell has gotten a little richer since that initial $10,000 investment (a bargain at the time!), and I'd have to say Dell servers have improved a good bit as well. So we finally bit the bullet last week and bought two of Dell's SC440 servers when they went on sale for a whopping $199 each. For this price, you got Dual Core Intel® Pentium®E2180, 2.0GHz processors with 1MB Cache, an 800MHz FSB, an 80GB 7.2K RPM Serial ATA 3Gbps 3.5-in Cabled Hard Drive connected to the onboard SATA controller, 512MB of 667MHz DDR2 RAM, a 48X CD-ROM Drive, and an On-Board Single Gigabit Network Adapter. For $19 more, you got 2GB of RAM. We hope some of you also took advantage of the offer because today we're releasing our plug-and-play Osgasmatron II for the SC440. Nov. 13 NEWS FLASH: Dell once again is offering the SC440 with Dual-Core processor but it now includes a second hard disk for $299 until November 19. It's still a great deal on a top-notch server. To get email alerts when the SC440 again goes on sale, go to techbargains.com and search for SC440. Then click on Send Email Deal Alert. Be sure to confirm the alert by replying to the email. These units have gone on sale roughly every two weeks since early September.
If you've missed the last two week's articles, the Orgasmatron II is the Ultimate Kitchen Sink for Asterisk®. It includes PBX in a Flash 1.3 in all its glory plus the newly released FreePBX 2.5 and so much more. From the time you insert the CD 'til you have a functioning Asterisk PBX with all the bells and whistles imaginable... 15 minutes!
If you've been following along with our articles, you already know that we've identified what we believe to be the perfect Asterisk SIP phone, the Aastra 57i. But our previously anointed perfect small business/home computer on which to run a production Asterisk server for about 50 employees, the Everex gPC2 (aka "The WalMart Special"), is no more. So this build moves to a different platform and a very different performance level. You'll see about twice the performance on the SC440 compared to the WalMart Special. Today's build provides a preconfigured SC440 installation on a 2-disk ISO image backup of the whole system using Mondo. And, NO, it won't work with any other hardware! Once you download the ISO images and burn your CDs, it's a 15-minute No-Brainer to install the entire image onto your own SC440. Wait to install any add-on cards until after you complete the Orgasmatron install. You must have an SC440 configured as above, or this Mondo restore will not work. So accept no substitutes, or you may end up with an Electronic Brick instead of an Orgasmatron II.
We've preconfigured some extensions on your new system as well as outbound and incoming trunks from some terrific providers including our second homegrown entry for VoIP terminations. Joe Roper and his business partner in Spain now offer a terrific IAX VoIP termination service. You can choose penny a minute service in the U.S. and most of Canada, or you can opt for premium VoIP service at about 2¢ a minute in the U.S. International rates also are VERY reasonable! You literally can sign up for service, plug in your phones, and have a system in full operation in under an hour.
So... what do you get with this preconfigured build? In addition to all of the goodness of a stock PBX in a Flash 1.3 build including Asterisk 1.4.21.2 running under CentOS 5.2 with a version of Zaptel that actually works with legacy cards. You also get the brand new FreePBX 2.5 as well as the latest versions of Apache, MySQL, PHP, and SendMail. And you get a Baker's Dozen preconfigured Nerd Vittles applications. Complete documentation is available here.
- Inbound and Outbound VoIP Faxing Using nvFax... finally!
- FONmail for Asterisk to send voice messages to any email address on the planet
- AsteriDex RoboDialer and Telephone Directory
- Telephone Reminders with Support for Recurring Reminders and Web-based TTS Reminder Messages
- NewsClips for Asterisk featuring Dozens of Yahoo News Feeds (TTS)
- Weather Reports by Airport Code (TTS)
- Weather Reports by ZIP Code (TTS)
- Worldwide Weather Forecasts (TTS)
- xTide for Asterisk (TTS)
- MailCall for Asterisk: Get Your Email By Telephone (TTS)
- TeleYapper 4.0 Message Broadcasting System
- CallWho for Phone Lookup and Dialing of Entries in the AsteriDex Database (TTS)
- TFTP Server with preconfigured setups for 10 Aastra 57i SIP telephones
In addition, you get dozens of preconfigured telephony applications and functions that would take even an expert the better part of a year or two to build independently. And, unlike all of the other distributions, we build Asterisk from source so it's simple to modify and upgrade whenever you feel the need. Here's a short list of what you have to look forward to:
- Stealth AutoAttendant with Welcome and Application IVRs
- Key Telephone Support Using Park and Parking Lot
- Intercom/Paging Support
- Bluetooth Proximity Detection with Automatic Call Forwarding to Cell Phone
- DISA
- Blacklisting with Web and Telephony Interfaces
- CallerID Name Lookups from Numerous Providers
- Weekly Automated System Backups to a Flash Drive
- One Touch Day/Night Service
- Music on Hold
- Voicemail with Email Delivery of Messages and Pager Notification
- Voicemail Blasting
- Cell Phone Direct Dial
- Call Forward: All, Busy, No Answer
- Call Waiting
- Call Pickup
- Zap Barge
- Call Transfer: Attended and Blind
- Dictation Service with Email Delivery
- Do Not Disturb
- Gabcast
- Phonebook Dial by Name
- Speed Dial
- Flite Text to Speech (TTS)
- Windows Networking with SAMBA
- Linux Firewall and Fail2Ban with SSH, HTTP, and SIP/IAX login protection
- PBX in a Flash Software Update Service To Keep Your System Current
- One-Click Cepstral TTS Install with Allison... Just Type install-cepstral
Prerequisites. As mentioned, you'll need an SC440 configured with the specs outlined above including the 2GB RAM upgrade. We also recommend a 4GB USB flash drive on which to store automatic weekly backups of your new system. Just plug it into your new machine, log in as root, and type: /root/usbformat.sh. That's it! Every Sunday night, you'll get a new backup in ISO format on your flash drive. If something goes wrong on your system, copy the ISOs to CDs and reboot with Disk 1. It doesn't get any easier than that. And you can always check on the latest backup by issuing the command: /root/usbcheck.sh
Finally, you'll need to cough up a whopping $5 to download the two-disk ISO image for this build. And, yes, we eat our own dog food. The ISO images you'll be downloading were captured as a backup on the flash drive of one of our SC440 lab machines. We got 'em yesterday! If you use this special build, it seemed only fair that you cover the cost of the bandwidth to download it. As most of you know, we don't have the luxury of freeloading off SourceForge for our downloads. And we didn't want to impose upon our existing bandwidth providers to bring you this custom image. The good news is that, once you download the image from DreamHost, you are more than welcome to pass it along to one or more of your friends or business acquaintances at no charge. You can even do it electronically through the DreamHost Files Forever program. And, if you'd like to host this image for your fellow man at no cost, be our guest... and thank you! Bottom line: For under $250, you'll have the slickest, fastest, most reliable PBX and fax machines on the planet with rock-solid weekly backups and, of course, access to the one-of-a-kind PBX in a Flash Software Update Service!
Getting Started. Once you have your SC440 in hand, take it out of the box, plug it into your LAN with DHCP and DNS support and Internet connectivity. You'll need a USB keyboard for typing temporarily. We also strongly recommend that you always keep your system running behind a NAT-based firewall/router. We strongly recommend the dirt-cheap dLink WBR-2310 WiFi router which handles NAT issues with VoIP masterfully. Don't redirect any ports to the machine and don't turn the PC on just yet.
Download the two ISO images for the SC440 from here. If you don't know how to create a CD from an ISO image, read that section from our previous article. In fact, read the whole article. It'll help you immensely down the road. Once you have the two CDs in hand, turn on the SC440 and quickly insert Disk 1 into the CD drive and close the drive. If you don't see a Mondo Rescue screen within a minute or less, turn the machine off and then back on again. At the Mondo Rescue main screen, type nuke and press the Enter key. This will erase, repartition, and reformat your hard disk in case you didn't know. This is normal. If you get any kind of errors about incorrect drive or partition names, halt the install by pressing CTL-ALT-DEL and remove the CD. Otherwise, ignore the errors. You'll need to install PBX in a Flash using our standard ISO which is available here. Otherwise, go have a cup of coffee and come back in about 10 minutes. After fileset #87 is restored, you'll be prompted to insert Disk 2 and press Enter to finish the install. When the second CD finishes, eject it and wait for the prompt. Then type "exit" and press Enter. Your SC440 will reboot, and you're ready to go.
After the reboot finishes, type root at the login prompt for your username and password for your password. The IP address assigned by your DHCP server should appear near the top of the screen. Write it down. If there is no IP address, your machine does not have network connectivity or access to a DHCP server with an available IP address. Correct the problem and reboot. You can safely ignore the warning that Fail2Ban is OFFLINE. We've updated the Fail2Ban software to protect Asterisk SIP and IAX connections, and our status program isn't up to date as this article goes to press. update-fixes will get you a new version from our Software Update Service shortly.
Securing Passwords. We're going to change five passwords now. For the time being (until you've done some reading), think up one really difficult password (that you won't forget) and use it for all five passwords. At the root@pbx:~ $ command prompt, type the following commands and type in your new password when prompted. Don't forget your password or you'll get to put in your two CDs and start over.
passwd

passwd-maint

passwd-wwwadmin

passwd-meetme

/usr/libexec/webmin/changepass.pl /etc/webmin root yournewpasswordhere
Now, using a web browser, go to the IP address of your new PBX in a Flash server. Click the Admin tab and then choose the FreePBX Administration botton. Log in as maint with your new maint password. Before you do anything else, change ALL of the 10 extension passwords to something secure... as if your phone bill depended upon it! Click Setup, Extensions and then choose each extension, modify BOTH the device secret and Voicemail Password, and click Submit. When you finish all the extensions, then reload the dialplan to save your changes. Finally, change your DISA password to something very, very secure: Setup, DISA, DISAmain, PIN. Reload your dialplan once again to save your changes.
Regardless of what you may read elsewhere, the Orgasmatron II has all the very latest security patches as of today. If you want more security, take our advice and add a hardware-based firewall/router between your Internet connection and your new Orgasmatron II and don't expose port 80 (the web interface) to the Internet!
Permanently Setting the IP Address. There are different schools of thought on whether to use a fixed or dynamic IP address. Most hardware-based routers support DHCP IP address reservations. The simplest way to permanently secure the existing IP address for your server is to reserve it on your router. If you'd prefer to assign your own IP address, we have included the deprecated netconfig utility which can be run after logging into your server as root. Sometimes you will need to run it once, enter your settings, reboot, and then repeat the drill. Then you should be all set. Either way, you need a permanent IP address for your machine when all is said and done. Once you have a permanent IP address, hop on over to dyndns.org and sign up for your own fully-qualified domain name (FQDN), e.g. mypbx.dyndns.org. You're going to need it for a whole host of things with your new PBX, and dyndns.org is about the easiest way to do it. Once you have your FQDN and DynDNS username and password, log in as root and edit: /etc/ddclient/ddclient.conf. Search (Ctl-W) for ***. Fill in your username and password and uncomment those two lines. Then search for *** again, uncomment the next three lines and fill in your fully-qualified domain name. Save the file and service ddclient restart. To make sure everything worked, issue the following command: ddclient -force. Assuming there are no errors, issue the following command to start ddclient each time your server reboots: /sbin/chkconfig --add ddclient. Now the IP address of your Asterisk server will always resolve to your FQDN from DynDNS. And anyone can call you via SIP for free using the following SIP URI: mothership@yourFQDN.dyndns.org. You can take this a step further and sign up for a free incoming phone number at ipkall.com. For your account type, choose SIP. For your SIP phone number, enter: mothership. For your SIP proxy, enter the fully-qualified domain name (FQDN) for your server, e.g. mypbx.dyndns.org. Choose a password and enter your real email address, and they will beam you a Washington state phone number within a day or so. You can't beat the price!
Adding Plain Old Phones. Before your new PBX will be of much use, you're going to need something to make and receive calls, i.e. a telephone. For today, you've got several choices: a POTS phone, a softphone, or a SIP phone (highly recommended). Option #1 and the best home solution is to use a Plain Old Telephone or your favorite cordless phone set (with 8-10 extensions) if you purchase a little device (the size of a pack of cigs) known as an SPA-2102. It's under $70. Be sure you specify that you want an unlocked device, meaning it doesn't force you to use a particular service provider. Once you get it, plug the device into your LAN, and then plug your phone instrument into the SPA-2102. Note that this adapter supports two-line cordless phones! Your router will hand out a private IP address for the SPA-2102 to talk on your network. You'll need the IP address of the SPA-2102 in order to configure it to work with Asterisk. After you connect the device to your network and a phone to the device, pick up the phone and dial ****. At the voice prompt, dial 110#. The device will tell you its DHCP-assigned IP address. Write it down and then access the configuration utility by pointing your web browser to that IP address.
Once the configuration utility displays in your web browser, click Admin Login and then Advanced in the upper right corner of the web page. When the page reloads, click the Line1 tab and then repeat this drill for the Line2 tab if you want to connect the device to two extensions on your Asterisk system. Scroll down the screen to the Proxy field in the Proxy and Registration section of the form. Type in the private IP address of your Asterisk system which you wrote down previously. Be sure the Register field is set to Yes and then move to the Subscriber Information section of the form. Assuming you're using the preconfigured extensions starting with 701, do the following. Enter House Phone as the Display Name. Enter 701 as the User ID. Enter your actual password for this extension in the Password field, and set Use Auth ID to No. Click the Submit All Changes button and wait for your Sipura to reset. In the Line 1 Status section of the Info tab, your device should show that it's Registered. You're done. Now repeat the drill for Line2 using extension 702. Pick up a phone and dial 1234# to test out BOTH extensions.
Downloading a Free Softphone. Unless you already have an IP phone, the easiest way to get started and make sure everything is working is to install an IP softphone. You can download a softphone for Windows, Mac, or Linux from CounterPath. Or download the pulver.Communicator. Here's another great SIP/IAX softphone for all platforms that's great, too, and it requires no installation: Zoiper 2.0 (formerly IDEfisk). All are free! Just install and then configure with the IP address of your PBX in a Flash server. For username and password, use one of the extension numbers and passwords which you set up with FreePBX. Once you make a few test calls, don't waste any more time. Buy a decent SIP telephone. We think the best phone out there is the Aastra 57i for under $200. Another $100 buys you the Aastra 57i CT with a cordless DECT phone.
Configuring Aastra 57i SIP Phones. Your new system comes preconfigured to automatically configure up to 15 Aastra 57i phones. Plug each phone into your network and wait for it to boot. Once it boots, press the Option button, then Phone Status (3), then IP & MAC Address (1). Write down each phone's IP address and MAC address. Then press Done to exit from the menus.
Next, we need to tell your phone to use your new Asterisk server as the TFTP server to obtain its setup. Press the Option button again, then Admin Menu (5). Type 22222 for the admin password and press Enter. Then choose Config Server (1), then TFTP Settings (2), then Primary TFTP (1), enter the IP address of your new server, and press Done a half dozen times.
Log back into your server as root. Switch to the TFTP directory: cd /tftpboot. You'll notice that there are config files for up to 15 phones. Simply choose the extension number you wish to use for each phone AND rename each file (filenames are 701.cfg to 715.cfg) to the MAC address of each phone.cfg. Do NOT use hyphens in the MAC address. One final step and you'll be ready to load up your phones. We need to set the correct IP address to tell each phone where your server is located. So... issue the following command using the IP address of your new server instead of 192.168.0.123. Leave the rest of the command as it is!
sed -i 's|192.168.0.0|192.168.0.123|g' /tftpboot/aastra.cfg
Now restart each phone by pressing the Option button and then Restart Phone (6) and then the Restart button. Once the phone reboots, you can make a test call by dialing 1-2-3-4. You can get the latest news by dialing 5-1-1. Or get a weather forecast by airport code (6-1-1) or zip code (Z-I-P).
A Word About Ports. For the techies out there that want to configure remote telephones or link to a server in another town, you'll need to know the ports to remap to your new server from your firewall. Here's a list of the ports available and used by PBX in a Flash. We don't recommend exposing UDP 5038 which is used to communicate with Asterisk via the Asterisk Manager.
TCP 80 - HTTP (needed to access the web sites on your server from the Internet... not recommended!!!)

TCP 22 - SSH (needed if you want remote SSH access)

TCP 9001 - WebMin (needed if you want remote WebMin access... not recommended!!!)

UDP 10000-62000 - RTP (needed for SIP communications)

UDP 5004-5037 - SIP (ditto)

UDP 5039-5082 - SIP (ditto)

UDP 4569 - IAX2 (needed for IAX communications typically between Asterisk servers)
Setting Up Trunks for Outgoing and Incoming Calls. If you want to communicate with the rest of the telephones in the world, then you'll need a way to route outbound calls (terminations) to their destination. And you'll need a phone number (DIDs) so that folks can call you. Unlike the Ma Bell world, you need not rely upon the same provider for both. And nothing prevents you from having multiple outbound and incoming trunks to your new PBX. At a minimum, however, you do need one outbound trunk and one inbound phone number unless you're merely planning to talk to other extensions set up on your system. We've actually put all the hooks in place to make it easy for you to interconnect to other Asterisk servers, but we'll save that for another day. For today, we want to get you a functioning system so that you can place outbound calls to anywhere in the world and can receive incoming calls from anywhere in the world.
For outbound calling, we recommend you establish accounts with several providers. We've included the necessary setups for Joe Roper's new service for PBX in a Flash as well as Vitelity and AOL. To register for the service, just visit the web site and register. To sign up to the service in the USA and be charged in US Dollars, please sign up here. To sign up for the European Service and be charged in Euros, sign up here.
In addition to being one of the least expensive providers, there's also the premium service option. You can prefix any number with 000 to try it out. Give it a try. We think you'll be pleased with the service AND the pricing. DIDs for inbound service are not yet available, but Vitelity has lots of them, and there's a link below to get you started.
 Vitelity: One of the Best Providers on the Planet. If you're seeking the best flexibility in choosing an area code and phone number plus reasonable entry level pricing plus high quality calls, then Vitelity is a winner. Vitelity provides Tier A DID inbound service in over 3,000 rate centers throughout the US and Canada. And, when you use our special link to sign up, the Nerd Vittles and PBX in a Flash projects get a few shekels down the road while you get an incredible signup deal as well. The going rate for Vitelity's DID service is $7.95 a month which includes up to 4,000 incoming minutes on two simultaneous channels with terminations priced at 1.45¢ per minute. For PBX in a Flash users, sign up now, and you can purchase a Tier A DID with unlimited incoming calls for just $3.99 a month and you get a free hour of outbound calling to test out their call quality. To check availability of local numbers and tiers of service from Vitelity, click here. Do not use this link to order your DIDs, or you won't get the special pricing! After the free hour of outbound calling, Vitelity's rate is just 1.44¢ per minute for outbound calls in the U.S. You can't beat the price (except with us) and the call quality is excellent as well. We've tried just about everybody.
To sweeten the pot a bit more, we've preconfigured both inbound and outbound Vitelity trunks for you. For the vitel-inbound trunk, all you'll need to do is plug in your username, password, and host assigned by Vitelity and adjust the registration string to match your assigned username and password. In FreePBX, click Setup, Trunks, SIP/vitel-inbound and make the changes. Then adjust the vitel-outbound trunk to reflect your actual username in the fromuser and username entries, your real password in the secret entry, and the correct host provided by Vitelity for your outbound calls, and you're all set. In FreePBX, click Setup, Trunks, SIP/vitel-outbound and make the changes. The same setup drill will get you going the the PIAF VoIP service as well.
To test things out, pick up a phone configured on your system and dial an area code and number of someone in the United States or Canada. Now get someone to call you using your new number. Presto! You have inbound and outbound phone service. And, if you'd like to see just how good SIP service can be, pick up a phone on your system and dial D-E-M-O. This will connect you to the PBX in a Flash hosted demo applications server at Aretta Communications.
An Alternate Outbound Calling Solution. As we said, it costs you almost nothing to add an alternate outbound calling solution to your new system. As luck would have it, adding a third outbound calling provider is now a breeze because AOL just entered the SIP terminations market with a product called AIM Call Out. We wrote about it recently, and you can read the article here. All you need is an AOL or AIM account name and $5 to get you started. The system you've just installed is preconfigured to use AIM Call Out. All you have to do is plug in your username and password, and you can immediately make calls to anywhere in the United States for under 2¢ per minute. Adding international calling is as easy as inserting the correct dial string. If you never use it, it doesn't cost you a dime. So $5 is mighty cheap insurance in our book.
First things first. Sign up for the service at this link. Your username will look something like this: johndoe@aim.com. You also will be assigned a password. Using your web browser, open FreePBX by pointing to the IP address of your new server and choosing Administration, then FreePBX. Type in admin as your username and the password you assigned to your system. From the main FreePBX menu, choose Setup, Trunks, and click on SIP/AIM in the far right column. Scroll down to the Peer Details section of the form and replace yourAIMpassword with your new password. Then replace yourAIMaccountname with your actual AIM account name. Now click the Submit Changes button and then Apply Configuration Changes and Continue with Reload.
Setting Up an Alternate DID for Incoming Calls. You also may want to consider a second phone number where people can call you. For example, if Grandma and Grandpa happen to be in another state and still have an old fashioned telephone, you might consider adding an additional DID to your system in their area code. They then can make a local call to reach you by dialing the local DID. On the les.net pay-as-you-go plan, it costs less than a dollar a month plus a penny a minute for the calls. Money well spent if we do say so... and you'll sleep better.
If this setup looks a bit complicated, don't be intimidated. Remember, we're connecting your PBX to the rest of the world so people can call you! With les.net, you have a choice of rate plans for most DIDs. You either can pay $3.99 a month for unlimited inbound calls with two concurrent channels or 99¢ per month and 1.1¢ per minute with four concurrent channels. Just visit their site and click Signup to register. Once you are registered, click Login and then Order DIDs. Pick a phone number. Then click Peers/Trunks and Create New Peer. Write down the Peer Name as you will need it in a minute to set up your connection. Choose SIP for Peer Technology, RFC2833 for DTMF Mode, G.711 for Codecs, Registration for Peer Type, enter the public IP address of your server for Peer Address, make up a secure password and write it down also, specify an Outbound CallerID for your calls, and check the 10-digit dialing box. Leave voicemail unchecked since you'll handle this on your end. Save your changes.
Now choose Your DIDs and click on the one you just ordered. We now need to tie the phone number to the Peer setup you just created above. Click on the DID and select the Route to Peer which you just created. Check the Send DID Prefix box and leave everything else blank. Click Save Changes and you're finished at the les.net end. Now let's set up your inbound DID trunk in Asterisk using FreePBX.
Log into FreePBX using a web browser. Click Setup, Trunks and then Add SIP Trunk. Fill in the CallerID and then drop down to the Outgoing Settings section of the form. For Trunk Name, use the Peer Name that you created above and wrote down. It ought to look something like this: 1092832198. For Peer Details, enter the following using the Peer Name and Password you assigned at les.net:
canreinvite=no

context=from-trunk

fromuser=1092832198

host=did.voip.les.net

insecure=port,invite

nat=yes

secret=yourpassword

type=peer

username=1092832198
For Incoming Settings, use from-pstn for the User Context and enter the following User Details:
canreinvite=no

context=from-pstn

dtmfmode=rfc2833

insecure=port,invite

nat=yes

type=user
For the registration string, enter a string like the following using your Peer Name and Password:
1092832198:yourpassword@did.voip.les.net/1092832198
Now click the Submit Changes button and then Apply Configuration Changes and Continue with Reload.
Choosing a VoIP Provider That Supports Faxing. We've included a reliable fax solution in this build, and we'll cover all the details soon. We do want to give you a head start if you plan to use your new machine to handle inbound faxes. To test your machine, you can connect a real fax machine to one of the lines on an SPA-2102. Then send a fax to extension 329 (F-A-X). But first you must configure your email address in two places using FreePBX: Setup, General Settings, Email address to have faxes emailed to AND Setup, Inbound Routes, any DID / any CID, fax Email. Once you've saved your settings, send the fax and see if it's delivered to your email address. If it works reliably, then the fax and email applications on your machine are configured correctly. Unfortunately, that's only half the battle. To receive faxes from outside your system, you'll also need a DID from a provider that supports faxing. And then it's still only about a 90% proposition... on a good day. We've tested this with many, many VoIP providers. Some work. Many don't. Some, such as Vitelity, offer a faxing service for a fee. Guess what? Their regular VoIP setup doesn't support faxing. Our old friends at Telasip.com still support faxing. We've also had good luck with Future-Nine and Teliax. You can read the beginnings of our fax dissertation here for more details. With the exception of the trunk setup covered in the article, all of the remaining setup steps already have been completed on your new server!
Interconnecting Two Asterisk Servers. We've preconfigured this build to support an IAX interconnect to a second PBX in a Flash system. The trunk setup for the second machine to match the setup on this build can be printed out. The filename is /root/MainPeerTrunkSetup.gif.
Choosing a Preferred Provider. Finally, you'll need to decide whether to use PIAF-USA or AOL or Vitelity as your primary terminations provider. HINT: We're the cheapest! So we've set things up this way. This is handled in FreePBX in the Outbound Routes tab under the Default entry. You can adjust easily these in any way you like by adding trunks or moving entries up and down the list to change their priority. Just be sure to leave ENUM at the top of the list since ENUM calls are always free. If a free call isn't possible, your server will automatically drop down to the next trunk in the priority list. Don't add Vitelity to the list unless you have actually created a Vitelity account since they handle unsuccessful connections in a non-standard way which will cause FreePBX not to drop down to the next trunk to attempt a connection.
Activating the Stealth AutoAttendant for Inbound Calls. By default, all incoming calls are routed to the Day/Night Code 1 context which allows you to toggle calls between a Day setting and a Night setting by pressing *281. For builds before Rev. D, the Day setting for Code 1 is set to Ring Group 700 which rings all of the extensions on your system. If you'd prefer our Stealth Autoattendant which plays a brief greeting during which you can choose other options or direct dial extensions on your system before the call is passed to Ring Group 700, then edit Day/Night Code 1 and set the Day option to IVR: MainIVR.
A Word About Mondo Rescue. We would be remiss if we didn't mention what a fantastic open source product Mondo Rescue is. It's the sole reason that today's build was possible. Our special thanks go to the development team: Bruno Cornec, Andree Leidenfrost, and Hugo Rabson. It is the first (and only) backup software for Linux builds that actually works reliably. The best way to prove that for yourself is to download this build and try it for yourself on your Dell, dude. It has much more flexibility than what you will experience, but that would take another dozen pages to explain. We'll save that for another day. In the meantime, if you'd like more information, visit the Mondo Rescue web site.
What you need to know today is that the device name for your USB flash drive may differ from the setting of /dev/sdb1 that is preconfigured depending upon the Dude that built your Dell. If you have the Rev. D build (shown at the bottom of the DreamHost download site), simply log into your server as root and type: /root/usbdevice.sh. You're all set. With prior builds, to find out the identity of your USB stick, plug it into one of the front USB ports, log in as root, and type dmesg. Included in the output will be a section that looks something like this:
USB Mass Storage support registered.

  Vendor: VBTM      Model: Store 'n' Go      Rev: 5.00

  Type:   Direct-Access                      ANSI SCSI revision: 00

SCSI device sdb: 2013184 512-byte hdwr sectors (1031 MB)

sdb: Write Protect is off

sdb: Mode Sense: 23 00 00 00

sdb: assuming drive cache: write through

SCSI device sdb: 2013184 512-byte hdwr sectors (1031 MB)

sdb: Write Protect is off

sdb: Mode Sense: 23 00 00 00

sdb: assuming drive cache: write through

 sdb: sdb4
If the entry in bold above does not say "sdb1" then you have a little work to do. First, edit /root/usbcheck.sh and change sdb1 on the mount line to the sdb# entry shown above in bold. Save your change: Ctrl-X, Y, then Enter. Now edit /root/usbformat.sh and make the same change in the fdisk AND mkdosfs lines of the script. Save your changes. Finally edit /etc/asterisk/disk-backup.conf. Press Ctl-W and search for sdb1. Change the entry to the device name in bold above. Save your change. Now restart Asterisk with the command: amportal restart. Finally, format your new flash drive and you're ready to go: /root/usbformat.sh. Be sure to check your flash drive periodically to make certain you're getting backups: /root/usbcheck.sh.
Installing Cepstral on Your New Server. If you want real text-to-speech with Allison's familiar voice, then you'll need to buy Cepstral. It's dirt cheap for single, non-commercial use. To install it, there's still a problem with the script on your new machine unfortunately. Something has happened to Darren Sessions' archives, but luckily we still have backups. This has been fixed in Rev. D. Otherwise, to point to the uncorrupted version of the software, log in to your server as root and issue the following two commands:
sed -i 's|www.darrensessions.com/pub|pbxinaflash.net/source|' /root/install-cepstral

sed -i 's|www.darrensessions.com/pub|pbxinaflash.net/source|' /usr/local/sbin/install-cepstral
Then run install-cepstral from the command prompt. At one point you'll be asked whether to create a missing directory for the Cepstral installation. Be sure to type y at the prompt rather than just pressing the Enter key. Instructions for registering your copy of Cepstral are displayed when the install completes. For complete documentation, read our previous tutorial.
Addendum: Enabling Parking Lot. As configured, FreePBX gets confused by the 700 ring group thinking it is your default parking lot. To fix the problem, simply enable the Parking Lot feature from the FreePBX Setup tab. Click on the Enable checkbox, leave the default 70 extension to place calls in the parking lot, and choose a default location to which to send orphaned parking lot calls. Then everything works normally.
Where To Go From Here. Well, we've covered a good bit of territory today. When you're ready, move on to the second part of this article at the link below. In the meantime, you have a new phone system that works. And there are a number of PDF documents in the /root folder on your new system which are worth a read. Better yet, you can browse through all of the documentation which is available for PBX in a Flash by going here. You also can dial D-E-M-O on your new system and see just how powerful direct SIP connections can be to other Asterisk hosts (in this case, ours!)... at no cost. Finally, you can log into your server and type help-pbx for access to a treasure trove of additional features. Enjoy!
Special Thanks to Our Generous Sponsors
FULL DISCLOSURE: ClearlyIP, Skyetel, Vitelity, DigitalOcean, Vultr, VoIP.ms, 3CX, Sangoma, TelecomsXchange and VitalPBX have provided financial support to Nerd Vittles and our open source projects through advertising, referral revenue, and/or merchandise. As an Amazon Associate and Best Buy Affiliate, we also earn from qualifying purchases. We’ve chosen these providers not the other way around. Our decisions are based upon their corporate reputation and the quality of their offerings and pricing. Our recommendations regarding technology are reached without regard to financial compensation except in situations in which comparable products at comparable pricing are available from multiple sources. In this limited case, we support our sponsors because our sponsors support us.
BOGO Bonaza: Enjoy state-of-the-art VoIP service with a $10 credit and half-price SIP service on up to $500 of Skyetel trunking with free number porting when you fund your Skyetel account. No limits on number of simultaneous calls. Quadruple data center redundancy. $25 monthly minimum spend required. Tutorial and sign up details are here.
![]() The lynchpin of Incredible PBX 2020 and beyond is ClearlyIP components which bring management of FreePBX modules and SIP phone integration to a level never before available with any other Asterisk distribution. And now you can configure and reconfigure your new Incredible PBX phones from the convenience of the Incredible PBX GUI.
The lynchpin of Incredible PBX 2020 and beyond is ClearlyIP components which bring management of FreePBX modules and SIP phone integration to a level never before available with any other Asterisk distribution. And now you can configure and reconfigure your new Incredible PBX phones from the convenience of the Incredible PBX GUI.
VitalPBX is perhaps the fastest-growing PBX offering based upon Asterisk with an installed presence in more than 100 countries worldwide. VitalPBX has generously provided a customized White Label version of Incredible PBX tailored for use with all Incredible PBX and VitalPBX custom applications. Follow this link for a free test drive!
Special Thanks to Vitelity. Vitelity is now Voyant Communications and has halted new registrations for the time being. Our special thanks to Vitelity for their unwavering financial support over many years and to the many Nerd Vittles readers who continue to enjoy the benefits of their service offerings. We will keep everyone posted on further developments.
Some Recent Nerd Vittles Articles of Interest...
Orgasmatron II for Asterisk: A Turnkey PBX Install in Under 15 Minutes, Part II
We began our 15-minute adventure with a turnkey install of Asterisk onto either a $199 Everex gPC2 or a Dell SC440 or T100 using a fully-customized version of PBX in a Flash. If you haven't yet read the first article, start there. In Part II, we want to cover what components are included and walk you through using most of them. When we're finished, you'll have a good idea why PBX in a Flash is not only different but also a quantum leap forward in the turnkey IP telephony marketplace. We'll also cover the new fax addition to this build as well as adding RAID 1 redundant drive support to your new gPC2 server (not the Dell) for about $40.
Putting Your Backup System Into Operation. Hopefully, you heeded our recommendation and purchased a $20 4GB USB flash drive to store backups of your new PBX in a Flash system. Cheap insurance! Now let's put it into production. In the /root folder of your new system, you'll find a PDF with complete documentation for the new Mondo Rescue backup system. If you flip to Appendix A, it will walk you through formatting your new flash drive for use with the backup software. If you'd prefer the easy way, log into your new server as root and type: /root/usbformat.sh. That's it. Your flash drive is now ready to make automatic backups of your entire system every Sunday night. Let's kick off one backup just to be sure everything is working. Log into your server as root and type /etc/cron.weekly/disk-backup.cron. Now go have a cup of coffee. When the command prompt returns in about 30 minutes, type /root/usbcheck.sh to get a listing of the files on your USB flash drive. Now you can sit back and relax knowing that every Sunday night a new full system backup will be loaded onto your flash drive. Should something go horribly wrong with your main drive down the road, it's a simple matter to burn CDs of the ISO backup images and reload everything, the same process you used to build your new system in the first place. Remember, we provided you a Mondo Rescue backup to build your system from ours so you know it works. For us at least, having automatic backups of your data is a critical component in any computer system, particularly your entire telephone system. While Asterisk® aggregations are a dime a dozen these days, no one else has implemented any system backup solution except PBX in a Flash.
Text-to-Speech on Steroids. The next thing you need to do is install Cepstral with Allison on your system. This gives something close to perfect text-to-speech capability for your entire phone system for under $25. And, yes, you can try it out first without spending a dime. Log into your server as root and edit /root/install-cepstral. Delete the current contents and substitute the following code:1
#!/bin/bash

cd /root

wget http://downloads.cepstral.com/cepstral/i386-linux/  ↵

 Cepstral_Allison-8kHz_i386-linux_5.1.0.tar.gz

tar -zxvf Cepstral*

cd Cepstral_Allison-8kHz_i386-linux_5.1.0

./install.sh

echo /opt/swift/lib > /etc/ld.so.conf.d/cepstral.conf

ldconfig

cd /usr/src

wget http://pbxinaflash.net/source/app_swift/app_swift-1.4.2.tar.gz

tar -zxvf app_swift-1.4*

rm *.gz

cd app_swift-1.4.2

make

make install

cp swift.conf.sample /etc/asterisk/swift.conf

chown asterisk:asterisk /etc/asterisk/swift.conf

ln -s /opt/swift/bin/swift /usr/bin/swift

sed -i 's|David-8kHz|Allison-8kHz|' /etc/asterisk/swift.conf

amportal restart

asterisk -rx "core show application swift"

echo "Installation completed. "

echo "To purchase a license, go here:"

echo "https://www.cepstral.com/cgi-bin/store/home"

echo "Choose US English, Allison-8kHz, Linux."

echo "To register your installed copy of Cepstral, type: swift --reg-voice"
Now save the script and then run it: /root/install-cepstral. Accept the defaults except create the missing directory when prompted. You're done. That was hard wasn't it. We'll test it out in a few minutes.
PiaF Software Update Service. The PBX in a Flash Software Update Service continues to be a free option on all PBX in a Flash systems until November so, by all means, use it to keep your system current, bug-free, and secure. Log into your server as root and type update-scripts. Once the new scripts are loaded onto your system, type update-fixes. Yes, you can build an Asterisk system from many other ISO distributions. But you won't find another one that can keep your system current and secure without starting all over with a new ISO install. And when you want the latest and greatest version of Asterisk without missing a beat, that's easy, too. Just type update-source and have another cup of coffee while your system is upgraded. And don't forget to run update-fixes one more time to clean up any mess created by the upgrade. NOTE: There's no need to run update-source after installing the Orgasmatron II build. All of the updates already are included in the ISO image you downloaded.
Help at Your Fingertips. And, what if you forget all of these commands down the road and you're too lazy to pull out the documentation? Not to worry! Log into your server as root and type help-pbx.
What's Next? Now that you have a stable, secure, and up-to-date server, let's have some fun. We've loaded and preconfigured most of the Nerd Vittles applications in this build so all you have to do is learn the numbers to dial to use most of the applications. Here's a quick thumbnail sketch for each of the applications:
- The Ultimate VoIP Fax Machine
Orgasmatron II now incorporates the original nv-Fax application for sending and receiving faxes using your new Asterisk system. Every incoming call is screened for a fax tone. If it's detected, the fax is received, converted to a PDF document, and emailed to the email address you set up in Part I of this article. You also can convert any document to a fax by simply faxing it to the F-A-X extension on your system. And, when you need to send a fax, just save the document in /tmp with a PDF file extension and the number to which the fax should be routed. Then pick up any phone on your system and dial F-A-X-I-T. Specify the matching destination phone number, and your fax will be on its way. For complete documentation, click on the link above. - AsteriDex RoboDialer and Telephone Directory
This app gets you a phonebook, a web-based dialer using a browser or your cellphone, and a CallerID lookup source when used in conjunction with Ultimate CNAM. To add and update entries or lookup numbers, point your web browser to the IP address of your server: http://ipaddress/asteridex4/. For cell phone access, point the web browser on your cellphone to the public IP address or fully-qualified domain name of your server: http://publicIPaddress/cellphone/. You now can import all of your Microsoft Outlook contacts as well. Just click on the link above for complete documentation and security suggestions. - Telephone Reminders 4.0 with Support for Recurring Reminders and Web-based TTS Reminder Messages
This app lets you schedule reminders for future events by telephone (dial 1-2-3) or with a web browser (http://ipaddress/reminders/). When the appointed date and time arrives, Asterisk swings into action and places a call to the number you designate to deliver a customized reminder message. Recurring reminders (daily, weekday, weekly, monthly, and annual) also are supported. And the text-to-speech web interface lets you schedule and deliver reminders using either Flite or Cepstral-generated messages with any web browser. For more info, click on the link above. - NewsClips for Asterisk featuring Dozens of Yahoo News Feeds (TTS) - Dial 5-1-1
- Weather Reports by Airport Code (TTS) - Dial 6-1-1
- Weather Reports by ZIP Code (TTS) - Dial Z-I-P
- Worldwide Weather Forecasts (TTS) - Dial 6-1-2
- MailCall for Asterisk: Get Your Email By Telephone (TTS)
This app reads your emails to you over the telephone. Some setup is required to plug in information about your email account. Once configured, dial 5-5-5 to retrieve your messages. Click on the link above for setup instructions. - TeleYapper 4.0 Message Broadcasting System - Dial M-S-G (licensed for non-commercial use only!)
- CallWho for TTS Retrieval and Dialing of Entries in the AsteriDex Database (TTS)
After entering contacts in AsteriDex, run http://serverIPaddress/asteridex4/dialcode.php to populate the dialcodes. Then dial 4-1-2 and enter the first three letters of anyone in your AsteriDex database to place a call. - TFTP Server with preconfigured setups for 15 Aastra 57i SIP telephones - See setup instructions in last week's article
Of course, there are literally hundreds of things you can do with your PBX in addition to running the Nerd Vittles applications. Here's a short list of some of our favorites with some tips to get you started. The best source of information for more detail is our original article on PBX in a Flash 1.3 and the PBX in a Flash Forum.
- Stealth AutoAttendant with Welcome and Application IVRs
Whenever an incoming call comes into your PBX, a generic greeting will play. If no button is pressed on the caller's phone, the call then will be routed to a ring group (700) for all of the extensions set up in that ring group. If no one answers, the call will be sent to the voicemail box for extension 701. While the greeting message is playing, the caller can press a digit on their phone to activate a hidden option in the Main IVR. As delivered, the only one that works is 0. This presents the caller with a list of Nerd Vittles apps from which to choose. You can add other options by modifying the Main IVR settings in FreePBX. To try out the Main IVR from any extension on your system, dial 7-7-7. - Key Telephone Support Using Park and Parking Lot
Most PBXs do not support shared line appearances like the old key telephones from Ma Bell. With these phones you could answer a call, place it on hold, and then someone else could pick up the call by pressing the blinking light on their phone. Our Aastra phone setup does much the same thing except, instead of placing a call on hold, you press the Park button. The parked extension number then will be read to you by Allison (starting with 71). Anyone else on your system can retrieve the parked call by pressing the ParkLot button on their Aastra phone and selecting the call to be retrieved by CallerID. Or, if the recipient knows the parking lot extension (e.g. 71), the recipient can pick up any phone and dial that extension number to retrieve the call. - Intercom/Paging Support
The Aastra phone setup for PBX in a Flash fully supports intercom calls and paging by pressing the ICom button on the phone. For more information, click Setup, Paging and Intercom from within the FreePBX web interface. - Bluetooth Proximity Detection with Automatic Call Forwarding to Cell Phone
Your system is preconfigured to support a USB Bluetooth dongle. No additional software installation is required. When properly configured, this lets you automatically forward your calls to your cellphone just by leaving your home or office with your Bluetooth-enabled cellphone. When you return, your calls will magically begin ringing on your local extension again. Click the link above for setup instructions. - DISA
Direct Inward System Access lets you call into your PBX and get dialtone to make an outbound call. To use it, you typically would add it as a hidden option on your IVR with a very secure password. We have preconfigured DISA support on your server. Just be sure you change the password to something very secure before activating it. To change the password, click Setup, DISA, DISAmain in FreePBX. Then save your changes and reload the Asterisk dialplan. - Blacklisting with Web and Telephony Interfaces
To block future calls from the last person who called you, dial *32. To block calls from a specific phone number, dial *30. To remove a number from the blacklist, dial *31. You also can use FreePBX to blacklist certain numbers. Just click Setup, Blacklist to access the web interface. - CallerID Name Lookups from 8 Providers
Most telephony providers reliably pass CallerID numbers but discard CallerID name info. With Ultimate CNAM which is preinstalled on your system, you can look up CallerID names from up to 8 different directory providers. To activate it, use FreePBX and click Setup, Inbound Routes, DefaultIncoming. Scroll down to CID Lookup Source and choose Ultimate CNAM from the dropdown box. Save your changes and reload the dialplan. For complete documentation, consult cnam_user_guide.pdf in the /root folder on your server. To choose the providers to use for the lookups, log into your server as root and type: cnam-config.pl - Weekly Automated System Backups to a Flash Drive
See the first section of today's article for the one-minute setup instructions. - One Touch Day/Night Service
With our Aastra phone setup, there is a DayNite button that toggles your system between Day and Night operation. As configured, the Night option transfers all calls to voicemail for extension 701. The Day option routes all incoming calls through the Main IVR which routes calls to the 700 Ring Group on timeout. To activate Night service from an Aastra phone, just press the DayNite button. To deactivate Night service, just press the button again. You also can dial *28 from any phone on your system to toggle Day/Night mode. - Music on Hold
Royalty-free music on hold is provided as part of the basic Asterisk install. Additional music can be added through the Music on Hold option in FreePBX. WAV files must be PCM Encoded, 16 Bits, at 8000Hz. See this thread for assistance. For other royalty-free and free music on hold, start here, choose Creative Commons for the License Type, and then click Go. - Voicemail with Email Delivery of Messages and Pager Notification
All of these settings are performed within FreePBX for each extension. Choose Setup, Extensions, and pick one of the extensions you already have created. Make certain that Voicemail Status is enabled. Then enter a valid email address and pager address. To include the voicemail as an attachment in the delivered email message, set Email Attachment to Yes. To include the CallerID in the voicemail message, set Play CID to Yes. To include the date and time of the call, set Play Envelope to Yes. To delete the voicemail message from the system after emailing it, set Delete Vmail to Yes. Don't ever do this until you're sure it's working reliably! If you want the option of calling back the caller when you retrieve your voicemail message by phone, set VMoptions to callback=from-internal. Submit your changes and reload the Asterisk dialplan to put the modifications into effect. If the emails are not delivered, then it may be because your ISP is blocking downstream SMTP traffic. To reconfigure your server to use gMail or Comcast as your SMTP host, click on one of the links. - Voicemail Blasting
This feature allows you to record a message and distribute it via voicemail to one or more extensions without actually calling the users. We've already configured extension 500 to send voicemail blasts to extensions 701 and 702. You can adjust the destinations in FreePBX by choosing Setup, Voicemail Blasts, Vmail (500). You also can add additional extensions to handle voicemail blasts to a different group of phones. - Cell Phone Direct Dial
There are two ways to make a cellphone an integral part of your PBX. The first involves setting up a specific extension for each cellphone and forwarding incoming calls to that extension to your cellphone. First, create an extension 501 on your system if it doesn't already exist. Once the extension is created, simply log into your server as root and issue a command like this where 6781234567 is your actual cellphone number:
asterisk -rx "database put CF 501 6781234567"
When callers dial 501 on your system, your cellphone will automatically ring. Another option is to use FreePBX's Follow Me function under Setup. With this option, you can specify multiple destinations for incoming calls to a specific extension. Point to the Ring Strategy option and review the available choices. Choose the one that best meets your needs. Then enter the numbers to be called. Numbers outside your PBX should be in the format 6781234567# and must match your outbound dialing rules. You also can choose the time to attempt the call and what to do if no one answers. Very slick!
- Call Forward: All, Busy, No Answer
While you can certainly use FreePBX's Follow Me functionality to accomplish any flavor of call forwarding, you also can dial codes from any extensions to activate call forwarding. To activate Call Forwarding All, dial *72; for Call Forwarding Busy, dial *90; for Call Forwarding No Answer, dial *52. To deactivate Call Forwarding All, dial *73; for Call Forwarding Busy, dial *91; for Call Forwarding No Answer, dial *53. To deactivate Call Forwarding All from a different extension, dial *74; for Call Forwarding Busy, dial *92. You also can activate and deactivate Call Forwarding from any Aastra phone using our default setup. - Call Waiting
To activate Call Waiting from any extension (which is the default), dial *70. To deactivate Call Waiting, dial *71. - Call Pickup
To pickup a call ringing on another extension, dial **. - Zap Barge
To barge into an existing call, dial 888. - Call Transfer: Attended and Blind
For attended call transfers where you can remain on the line until the other party answers, dial *2. For unattended call transfers, dial ## and then the number to which the call should be transferred. - Dictation Service with Email Delivery
Before using FreePBX's dictation service, you must activate Dictation Services for the specific extension to be used. Using FreePBX, go to Setup, Extensions, and click on the desired extension. Scroll down to the Dictation Services section of the form and enter your email address, the format of the sound files to be used, and change Dictation Service to Enabled. Save your settings and reload the dialplan. Then you can dictate your message by dialing *34. Once you finish your dictation, you can email it to your email address for this extension by dialing *35. - Do Not Disturb
To activate Do Not Disturb on any extension, dial *78. To deactivate Do Not Disturb, dial *79. There's also a button to accomplish the same thing with our Aastra phone setup. - Phonebook Dial by Name - Dial 4-1-1
- VoiceMail Options
To retrieve your voicemail from any phone, dial *97. To retrieve voicemail for a different extension, dial *98 or *98701 where 701 is the extension desired. To leave a voicemail message for any extension with voicemail enabled, dial *701 where 701 is the extension desired. - Speed Dial
To set up a user speed dial entry, dial *75. To call any previously established speed dial entry, dial *0 plus the speed dial number. To create or modify speed dial entries in FreePBX, click Tools, Asterisk Phonebook. You also can import entries from a CSV-formatted file. - Flite and Cepstral Text to Speech (TTS)
Flite TTS is installed by default with all PBX in a Flash systems using Asterisk 1.4 or 1.6. Cepstral can be installed using the directions below with Asterisk 1.4. To use Flite with Egor in your dialplan, here's the syntax:
exten => 444,5,Flite("Hello World.")
To use Cepstral with Allison in your dialplan, use this syntax:
exten => 444,5,Swift("Hello World.")
- One-Click (almost) Cepstral TTS Install with Allison
After logging in as root, type install-cepstral to install Cepstral. Accept all the defaults except create the missing directory when prompted by the install script to do so. For detailed instructions on reconfiguring Nerd Vittles apps to use Cepstral instead of Flite, see this article. No software needs to be reinstalled. Simply change the dialplan and PHP app settings to use Cepstral as explained in the article. For more background on Cepstral, read this article. To register your newly installed Allison voice, go to this link. Be sure you select U.S. English language, Allison-8kHz voice, and Linux platform before you check out, or it's money down the drain. Write down the name, company (optional), and key that is issued once you fill in the blanks. Then log into your server as root, and typeswift --reg-voice. Fill in the blanks with the information you wrote down above, and you're all set. - Windows Networking with SAMBA
Windows Networking with SAMBA is disabled by default in this special build. The default workgroup is "workgroup." To change the workgroup, log into your server as root and edit /etc/samba/smb.conf. To start SAMBA, type service smb start. You then can connect to your server from any computer that supports Windows networking using root as your username and whatever root password you created. For more setup tips and to configure SAMBA for automatic startup on boot, click on the link above. - Linux Firewall
The IPtables firewall is enabled by default in all PBX in a Flash systems. For this build, we have disabled SAMBA access to your server. To enable it, log into your server as root, and edit /etc/sysconfig/iptables by adding the following three lines just above the COMMIT line at the end of the file:
-A INPUT -p udp -m udp --dport 137:138 -j ACCEPT

-A INPUT -p tcp -m tcp --dport 139 -j ACCEPT

-A INPUT -p tcp -m tcp --dport 445 -j ACCEPT
Then issue the following command to restart SAMBA:
service iptables restart
- WebMin
WebMin is often described as the Swiss Army Knife of Linux. It provides a terrific web interface to Linux.everything. It is enabled by default in this install. To access it using a web browser, go to http://serverIPaddress:9001/ and login as root with the password you set up above for WebMin access. For complete documentation, go here. - PBX in a Flash Software Update Service To Keep Your System Current
To load current fixes for this build of PBX in a Flash, log into your server as root and type the following commands:
update-scripts

update-fixes
More Good News with the Everex gPC2. From the "Learn Something New Every Day Department," this newsflash. The Everex gPC2 has built in hardware SATA RAID 1 support that actually works. What you'll need to get this going is a second 80GB hard disk to match the one delivered in your original box. Total cost: about $40. If one disk fails, the other kicks in automatically. Here's a link to purchase your drive. And here's the link that'll tell you how to get everything set up. Before you begin, make certain that you have a current ISO backup on your flash drive so that you can restore your system once the RAID setup is up and running. See the top of this article for the backup and testing procedure.
Special Thanks to Our Generous Sponsors
FULL DISCLOSURE: ClearlyIP, Skyetel, Vitelity, DigitalOcean, Vultr, VoIP.ms, 3CX, Sangoma, TelecomsXchange and VitalPBX have provided financial support to Nerd Vittles and our open source projects through advertising, referral revenue, and/or merchandise. As an Amazon Associate and Best Buy Affiliate, we also earn from qualifying purchases. We’ve chosen these providers not the other way around. Our decisions are based upon their corporate reputation and the quality of their offerings and pricing. Our recommendations regarding technology are reached without regard to financial compensation except in situations in which comparable products at comparable pricing are available from multiple sources. In this limited case, we support our sponsors because our sponsors support us.
BOGO Bonaza: Enjoy state-of-the-art VoIP service with a $10 credit and half-price SIP service on up to $500 of Skyetel trunking with free number porting when you fund your Skyetel account. No limits on number of simultaneous calls. Quadruple data center redundancy. $25 monthly minimum spend required. Tutorial and sign up details are here.
![]() The lynchpin of Incredible PBX 2020 and beyond is ClearlyIP components which bring management of FreePBX modules and SIP phone integration to a level never before available with any other Asterisk distribution. And now you can configure and reconfigure your new Incredible PBX phones from the convenience of the Incredible PBX GUI.
The lynchpin of Incredible PBX 2020 and beyond is ClearlyIP components which bring management of FreePBX modules and SIP phone integration to a level never before available with any other Asterisk distribution. And now you can configure and reconfigure your new Incredible PBX phones from the convenience of the Incredible PBX GUI.
VitalPBX is perhaps the fastest-growing PBX offering based upon Asterisk with an installed presence in more than 100 countries worldwide. VitalPBX has generously provided a customized White Label version of Incredible PBX tailored for use with all Incredible PBX and VitalPBX custom applications. Follow this link for a free test drive!
Special Thanks to Vitelity. Vitelity is now Voyant Communications and has halted new registrations for the time being. Our special thanks to Vitelity for their unwavering financial support over many years and to the many Nerd Vittles readers who continue to enjoy the benefits of their service offerings. We will keep everyone posted on further developments.
Some Recent Nerd Vittles Articles of Interest...
- Join the following line whenever you encounter this character: ↵ [↩]
The Asterisk Mother Lode: Introducing the Orgasmatron II for the $199 Everex gPC2
Well, okay. Today's creation still doesn't quite measure up to the legendary Orgasmatron... but, we're getting closer. It's been several months since we released our first Orgasmatron for Asterisk®. Much has changed both in Asterisk and in the hardware and software environment since then. So today, to celebrate the release of PBX in a Flash 1.3 and FreePBX 2.5, we're taking another stab at building the Ultimate Kitchen Sink. From the time you insert the CD 'til you have a functioning Asterisk PBX with all the bells and whistles imaginable... 15 minutes! There's now a custom build for the Dell SC440 as well. Here's the link.
Our approach today is refined a bit since the last time around. The processing overhead of CentOS 5.2 continues to make VMware problematic. Luckily, the price of hardware continues its downward spiral. So today we're comfortable recommending the best phone, the best value PC, and our own new entry in the VoIP provider sweepstakes. But, you'd better hurry, there's only one retailer still carrying the Everex Green PC: good old WalMart. And now you can even get free shipping of the unit to the WalMart store of your choice.
If you've been following along with our articles, you already know that we've identified what we believe to be the perfect Asterisk SIP phone, the Aastra 57i, and we've also identified a perfect small business/home computer on which to run a production Asterisk server for about 50 employees, the Everex gPC2 (aka "The WalMart Special"). So this build provides a preconfigured gPC2 installation on a 2-disk ISO image backup of the whole system using Mondo. And, NO, it won't work with any other hardware! Once you download the ISO images and burn your CDs, it's a 15-minute No-Brainer to install the entire image onto your own Everex gPC2. But you must have a gPC2 so accept no substitutes, or you may end up with an Electronic Brick instead of an Orgasmatron II. Once again for the reading impaired, the $199 gPC2 systems are only available from WalMart.
We've preconfigured some extensions on your new system as well as outbound and incoming trunks from some terrific providers including our own new entry for VoIP terminations. Ours is dirt cheap, of course, at just over a penny a minute in the U.S. and about half that in many parts of Canada. You literally can sign up for service, plug in your phones, and have a system in full operation in under an hour.
So... what do you get with this preconfigured build? In addition to all of the goodness of a stock PBX in a Flash 1.3 build including Asterisk 1.4.21.2 running under CentOS 5.2, you also get the brand new FreePBX 2.5 as well as the latest versions of Apache, MySQL, PHP, and SendMail. And you get a Baker's Dozen preconfigured Nerd Vittles applications. Complete documentation is available here.
- Inbound and Outbound VoIP Faxing Using nvFax... finally!
- FONmail for Asterisk to send voice messages to any email address on the planet
- AsteriDex RoboDialer and Telephone Directory
- Telephone Reminders with Support for Recurring Reminders and Web-based TTS Reminder Messages
- NewsClips for Asterisk featuring Dozens of Yahoo News Feeds (TTS)
- Weather Reports by Airport Code (TTS)
- Weather Reports by ZIP Code (TTS)
- Worldwide Weather Forecasts (TTS)
- xTide for Asterisk (TTS)
- MailCall for Asterisk: Get Your Email By Telephone (TTS)
- TeleYapper 4.0 Message Broadcasting System
- CallWho for Phone Lookup and Dialing of Entries in the AsteriDex Database (TTS)
- TFTP Server with preconfigured setups for 15 Aastra 57i SIP telephones
In addition, you get dozens of preconfigured telephony applications and functions that would take even an expert the better part of a year or two to build independently. And, unlike all of the other distributions, we build Asterisk from source so it's simple to modify and upgrade whenever you feel the need. Here's a short list of what you have to look forward to:
- Stealth AutoAttendant with Welcome and Application IVRs
- Key Telephone Support Using Park and Parking Lot
- Intercom/Paging Support
- Bluetooth Proximity Detection with Automatic Call Forwarding to Cell Phone
- DISA
- Blacklisting with Web and Telephony Interfaces
- CallerID Name Lookups from 8 Providers
- Weekly Automated System Backups to a Flash Drive
- One Touch Day/Night Service
- Music on Hold
- Voicemail with Email Delivery of Messages and Pager Notification
- Voicemail Blasting
- Cell Phone Direct Dial
- Call Forward: All, Busy, No Answer
- Call Waiting
- Call Pickup
- Zap Barge
- Call Transfer: Attended and Blind
- Dictation Service with Email Delivery
- Do Not Disturb
- Gabcast
- Phonebook Dial by Name
- Speed Dial
- Flite Text to Speech (TTS)
- Windows Networking with SAMBA
- Linux Firewall
- PBX in a Flash Software Update Service To Keep Your System Current
- One-Click Cepstral TTS Install with Allison... Just Type install-cepstral
Prerequisites. As mentioned, you'll need a $199 Everex gPC2 (aka The WalMart Special) to use this build. We also recommend an additional $25 gig of RAM for anything other than home use. We also recommend a 4GB USB flash drive on which to store automatic weekly backups of your new system. Just plug it into your new machine, log in as root, and type: /root/usbformat.sh. That's it! Every Sunday night, you'll get a new backup in ISO format on your flash drive. If something goes wrong on your system, copy the ISOs to CDs and reboot with Disk 1. It doesn't get any easier than that. And you can always check on the latest backup by issuing the command: /root/usbcheck.sh
Finally, you'll need to cough up a whopping $5 to download the two-disk ISO image for this build. And, yes, we eat our own dog food. The ISO images you'll be downloading were captured as a backup on the flash drive of our gPC2 lab machine. If you use this special build, it seemed only fair that you cover the cost of the bandwidth to download it. As most of you know, we don't have the luxury of freeloading off SourceForge for our downloads. And we didn't want to impose upon our existing bandwidth providers to bring you this custom image. The good news is that, once you download the image from DreamHost, you are more than welcome to pass it along to one or more of your friends or business acquaintances at no charge. You can even do it electronically through the DreamHost Files Forever program. And, if you'd like to host this image for your fellow man at no cost, be our guest... and thank you! Bottom line: For about $250, you'll have the slickest, most reliable PBX and fax machine on the planet with rock-solid weekly backups and, of course, access to the one-of-a-kind PBX in a Flash Software Update Service!
Getting Started. Once you have purchased your Everex gPC2, take it out of the box, plug it into your LAN with DHCP and DNS support and Internet connectivity. Having said that, we strongly recommend that you always keep your system running behind a NAT-based firewall/router. We strongly recommend the dirt-cheap dLink WBR-2310 WiFi router which handles NAT issues with VoIP masterfully. Don't redirect any ports to the machine and don't turn the PC on just yet.
Download the two ISO images for the gPC2 from here. If you don't know how to create a CD from an ISO image, read that section from our previous article. In fact, read the whole article. It'll help you immensely down the road. Once you have the two CDs in hand, turn on the gPC2 and quickly insert Disk 1 into the CD/DVD drive and close the drive. If you don't see a Mondo Rescue screen within a minute or less, turn the machine off and then back on again. At the Mondo Rescue main screen, type nuke and press the Enter key. This will erase, repartition, and reformat your hard disk in case you didn't know. This is normal. If you get any kind of errors about incorrect drive or partition names, halt the install by pressing CTL-ALT-DEL and remove the CD. You'll need to install PBX in a Flash using our standard ISO which is available here. Otherwise, go have a cup of coffee and come back in about 12 minutes. When prompted, insert Disk 2 and press the Enter key to finish the install. When the CD ejects, remove it and your gPC2 will reboot after you perform the three-finger salute (Ctl-Alt-Del).
After the reboot finishes, type root at the login prompt for your username and password for your password. The IP address assigned by your DHCP server should appear near the top of the screen. Write it down. If there is no IP address, your machine does not have network connectivity or access to a DHCP server with an available IP address. Correct the problem and reboot.
Securing Passwords. We're going to change five passwords now. For the time being (until you've done some reading), think up one really difficult password (that you won't forget) and use it for all five passwords. At the root@pbx:~ $ command prompt, type the following commands and type in your new password when prompted. Don't forget your password or you'll get to put in your two CDs and start over.
passwd

passwd-maint

passwd-wwwadmin

passwd-meetme

/usr/libexec/webmin/changepass.pl /etc/webmin root yournewpasswordhere
Now, using a web browser, go to the IP address of your new PBX in a Flash server. Click the Admin tab and then choose the FreePBX Administration botton. Log in as maint with your new maint password. Before you do anything else, change ALL of the 16 extension passwords to something secure... as if your phone bill depended upon it! Click Setup, Extensions and then choose each extension, modify BOTH the device secret and Voicemail Password, and click Submit. When you finish all the extensions, then reload the dialplan to save your changes. Finally, change your DISA password to something very, very secure: Setup, DISA, DISAmain, PIN. Reload your dialplan once again to save your changes.
Regardless of what you may read elsewhere, the Orgasmatron II has all the very latest security patches as of October 1. If you want more security, take our advice and add a hardware-based firewall/router between your Internet connection and your new Orgasmatron II and don't expose port 80 (the web interface) to the Internet!
Permanently Setting the IP Address. There are different schools of thought on whether to use a fixed or dynamic IP address. Most hardware-based routers support DHCP IP address reservations. The simplest way to permanently secure the existing IP address for your server is to reserve it on your router. If you'd prefer to assign your own IP address, we have included the deprecated netconfig utility which can be run after logging into your server as root. Sometimes you will need to run it once, enter your settings, reboot, and then repeat the drill. Then you should be all set. Either way, you need a permanent IP address for your machine when all is said and done. Once you have a permanent IP address, hop on over to dyndns.org and sign up for your own fully-qualified domain name (FQDN), e.g. mypbx.dyndns.org. You're going to need it for a whole host of things with your new PBX, and dyndns.org is about the easiest way to do it. Once you have your FQDN and DynDNS username and password, log in as root and edit: /etc/ddclient/ddclient.conf. Search (Ctl-W) for ***. Fill in your username and password and uncomment those two lines. Then search for *** again, uncomment the next three lines and fill in your fully-qualified domain name. Save the file and service ddclient restart. To make sure everything worked, issue the following command: ddclient -force. Assuming there are no errors, issue the following command to start ddclient each time your server reboots: /sbin/chkconfig --add ddclient. Now the IP address of your Asterisk server will always resolve to your FQDN from DynDNS. And anyone can call you via SIP for free using the following SIP URI: mothership@yourFQDN.dyndns.org. You can take this a step further and sign up for a free incoming phone number at ipkall.com. For your account type, choose SIP. For your SIP phone number, enter: mothership. For your SIP proxy, enter the fully-qualified domain name (FQDN) for your server, e.g. mypbx.dyndns.org. Choose a password and enter your real email address, and they will beam you a Washington state phone number within a day or so. You can't beat the price!
Adding Plain Old Phones. Before your new PBX will be of much use, you're going to need something to make and receive calls, i.e. a telephone. For today, you've got several choices: a POTS phone, a softphone, or a SIP phone (highly recommended). Option #1 and the best home solution is to use a Plain Old Telephone or your favorite cordless phone set (with 8-10 extensions) if you purchase a little device (the size of a pack of cigs) known as an SPA-2102. It's under $70. Be sure you specify that you want an unlocked device, meaning it doesn't force you to use a particular service provider. Once you get it, plug the device into your LAN, and then plug your phone instrument into the SPA-2102. Note that this adapter supports two-line cordless phones! Your router will hand out a private IP address for the SPA-2102 to talk on your network. You'll need the IP address of the SPA-2102 in order to configure it to work with Asterisk. After you connect the device to your network and a phone to the device, pick up the phone and dial ****. At the voice prompt, dial 110#. The device will tell you its DHCP-assigned IP address. Write it down and then access the configuration utility by pointing your web browser to that IP address.
Once the configuration utility displays in your web browser, click Admin Login and then Advanced in the upper right corner of the web page. When the page reloads, click the Line1 tab and then repeat this drill for the Line2 tab if you want to connect the device to two extensions on your Asterisk system. Scroll down the screen to the Proxy field in the Proxy and Registration section of the form. Type in the private IP address of your Asterisk system which you wrote down previously. Be sure the Register field is set to Yes and then move to the Subscriber Information section of the form. Assuming you're using the preconfigured extensions starting with 701, do the following. Enter House Phone as the Display Name. Enter 701 as the User ID. Enter your actual password for this extension in the Password field, and set Use Auth ID to No. Click the Submit All Changes button and wait for your Sipura to reset. In the Line 1 Status section of the Info tab, your device should show that it's Registered. You're done. Now repeat the drill for Line2 using extension 702. Pick up a phone and dial 1234# to test out BOTH extensions.
Downloading a Free Softphone. Unless you already have an IP phone, the easiest way to get started and make sure everything is working is to install an IP softphone. You can download a softphone for Windows, Mac, or Linux from CounterPath. Or download the pulver.Communicator. Here's another great SIP/IAX softphone for all platforms that's great, too, and it requires no installation: Zoiper 2.0 (formerly IDEfisk). All are free! Just install and then configure with the IP address of your PBX in a Flash server. For username and password, use one of the extension numbers and passwords which you set up with FreePBX. Once you make a few test calls, don't waste any more time. Buy a decent SIP telephone. We think the best phone out there is the Aastra 57i for under $200. Another $100 buys you the Aastra 57i CT with a cordless DECT phone.
Configuring Aastra 57i SIP Phones. Your new system comes preconfigured to automatically configure up to 15 Aastra 57i phones. Plug each phone into your network and wait for it to boot. Once it boots, press the Option button, then Phone Status (3), then IP & MAC Address (1). Write down each phone's IP address and MAC address. Then press Done to exit from the menus.
Next, we need to tell your phone to use your new Asterisk server as the TFTP server to obtain its setup. Press the Option button again, then Admin Menu (5). Type 22222 for the admin password and press Enter. Then choose Config Server (1), then TFTP Settings (2), then Primary TFTP (1), enter the IP address of your new server, and press Done a half dozen times.
Log back into your server as root. Switch to the TFTP directory: cd /tftpboot. You'll notice that there are config files for up to 15 phones. Simply choose the extension number you wish to use for each phone AND rename each file (filenames are 701.cfg to 715.cfg) to the MAC address of each phone.cfg. Do NOT use hyphens in the MAC address. One final step and you'll be ready to load up your phones. We need to set the correct IP address to tell each phone where your server is located. So... issue the following command using the IP address of your new server instead of 192.168.0.123. Leave the rest of the command as it is!
sed -i 's|192.168.0.0|192.168.0.123|g' /tftpboot/aastra.cfg
Now restart each phone by pressing the Option button and then Restart Phone (6) and then the Restart button. Once the phone reboots, you can make a test call by dialing 1-2-3-4. You can get the latest news by dialing 5-1-1. Or get a weather forecast by airport code (6-1-1) or zip code (Z-I-P).
A Word About Ports. For the techies out there that want to configure remote telephones or link to a server in another town, you'll need to know the ports to remap to your new server from your firewall. Here's a list of the ports available and used by PBX in a Flash. We don't recommend exposing UDP 5038 which is used to communicate with Asterisk via the Asterisk Manager.
TCP 80 - HTTP (needed to access the web sites on your server from the Internet... not recommended!!!)

TCP 22 - SSH (needed if you want remote SSH access)

TCP 9001 - WebMin (needed if you want remote WebMin access... not recommended!!!)

UDP 10000-62000 - RTP (needed for SIP communications)

UDP 5004-5037 - SIP (ditto)

UDP 5039-5082 - SIP (ditto)

UDP 4569 - IAX2 (needed for IAX communications typically between Asterisk servers)
Setting Up Trunks for Outgoing and Incoming Calls. If you want to communicate with the rest of the telephones in the world, then you'll need a way to route outbound calls (terminations) to their destination. And you'll need a phone number (DIDs) so that folks can call you. Unlike the Ma Bell world, you need not rely upon the same provider for both. And nothing prevents you from having multiple outbound and incoming trunks to your new PBX. At a minimum, however, you do need one outbound trunk and one inbound phone number unless you're merely planning to talk to other extensions set up on your system. We've actually put all the hooks in place to make it easy for you to interconnect to other Asterisk servers, but we'll save that for another day. For today, we want to get you a functioning system so that you can place outbound calls to anywhere in the world and can receive incoming calls from anywhere in the world.
For outbound calling, we recommend you establish accounts with several providers. We've included the necessary setups for our own service as well as Vitelity and AOL. To register for our service, just dial any 10-digit phone number from a phone on your system before you set up any other trunks. We're one of the least expensive providers, but you know the old saying about that. Give us a try and, if you don't like the call quality, do some more shopping. We think it's pretty good quality actually, but we don't sell DIDs for inbound service... yet.
Vitelity: One of the Best Providers on the Planet. If you're seeking the best flexibility in choosing an area code and phone number plus reasonable entry level pricing plus high quality calls, then Vitelity is a winner. Vitelity provides Tier A DID inbound service in over 3,000 rate centers throughout the US and Canada. And, when you use our special link to sign up, the Nerd Vittles and PBX in a Flash projects get a few shekels down the road while you get an incredible signup deal as well. The going rate for Vitelity's DID service is $7.95 a month which includes up to 4,000 incoming minutes on two simultaneous channels with terminations priced at 1.45¢ per minute. For PBX in a Flash users, sign up before October 15, and you can purchase a Tier A DID with unlimited incoming calls for just $3.99 a month and you get a free hour of outbound calling to test out their call quality. To check availability of local numbers and tiers of service from Vitelity, click here. Do not use this link to order your DIDs, or you won't get the special pricing! After the free hour of outbound calling, Vitelity's rate is just 1.44¢ per minute for outbound calls in the U.S. You can't beat the price (except with us) and the call quality is excellent as well. We've tried just about everybody.
To sweeten the pot a bit more, we've preconfigured both inbound and outbound Vitelity trunks for you. For the vitel-inbound trunk, all you'll need to do is plug in your username, password, and host assigned by Vitelity and adjust the registration string to match your assigned username and password. In FreePBX, click Setup, Trunks, SIP/vitel-inbound and make the changes. Then adjust the vitel-outbound trunk to reflect your actual username in the fromuser and username entries, your real password in the secret entry, and the correct host provided by Vitelity for your outbound calls, and you're all set. In FreePBX, click Setup, Trunks, SIP/vitel-outbound and make the changes. The same setup drill will get you going the the PIAF VoIP service as well, and you have your choice of the following POPs: Houston, Dallas, LAX, NYC, London, Montreal, and Toronto. The POP addresses are entered in the following format: sip.lax.pbxinaflash.net or sip.london.pbxinaflash.net.
To test things out, pick up a phone configured on your system and dial an area code and number of someone in the United States or Canada. Now get someone to call you using your new number. Presto! You have inbound and outbound phone service. And, if you'd like to see just how good SIP service can be, pick up a phone on your system and dial D-E-M-O. This will connect you to the PBX in a Flash hosted demo applications server at Aretta Communications.
An Alternate Outbound Calling Solution. As we said, it costs you almost nothing to add an alternate outbound calling solution to your new system. As luck would have it, adding a third outbound calling provider is now a breeze because AOL just entered the SIP terminations market with a product called AIM Call Out. We wrote about it recently, and you can read the article here. All you need is an AOL or AIM account name and $5 to get you started. The system you've just installed is preconfigured to use AIM Call Out. All you have to do is plug in your username and password, and you can immediately make calls to anywhere in the United States for under 2¢ per minute. Adding international calling is as easy as inserting the correct dial string. If you never use it, it doesn't cost you a dime. So $5 is mighty cheap insurance in our book.
First things first. Sign up for the service at this link. Your username will look something like this: johndoe@aim.com. You also will be assigned a password. Using your web browser, open FreePBX by pointing to the IP address of your new server and choosing Administration, then FreePBX. Type in admin as your username and the password you assigned to your system. From the main FreePBX menu, choose Setup, Trunks, and click on SIP/AIM in the far right column. Scroll down to the Peer Details section of the form and replace yourAIMpassword with your new password. Then replace yourAIMaccountname with your actual AIM account name. Now click the Submit Changes button and then Apply Configuration Changes and Continue with Reload.
Setting Up an Alternate DID for Incoming Calls. You also may want to consider a second phone number where people can call you. For example, if Grandma and Grandpa happen to be in another state and still have an old fashioned telephone, you might consider adding an additional DID to your system in their area code. They then can make a local call to reach you by dialing the local DID. On the les.net pay-as-you-go plan, it costs less than a dollar a month plus a penny a minute for the calls. Money well spent if we do say so... and you'll sleep better.
If this setup looks a bit complicated, don't be intimidated. Remember, we're connecting your PBX to the rest of the world so people can call you! With les.net, you have a choice of rate plans for most DIDs. You either can pay $3.99 a month for unlimited inbound calls with two concurrent channels or 99¢ per month and 1.1¢ per minute with four concurrent channels. Just visit their site and click Signup to register. Once you are registered, click Login and then Order DIDs. Pick a phone number. Then click Peers/Trunks and Create New Peer. Write down the Peer Name as you will need it in a minute to set up your connection. Choose SIP for Peer Technology, RFC2833 for DTMF Mode, G.711 for Codecs, Registration for Peer Type, enter the public IP address of your server for Peer Address, make up a secure password and write it down also, specify an Outbound CallerID for your calls, and check the 10-digit dialing box. Leave voicemail unchecked since you'll handle this on your end. Save your changes.
Now choose Your DIDs and click on the one you just ordered. We now need to tie the phone number to the Peer setup you just created above. Click on the DID and select the Route to Peer which you just created. Check the Send DID Prefix box and leave everything else blank. Click Save Changes and you're finished at the les.net end. Now let's set up your inbound DID trunk in Asterisk using FreePBX.
Log into FreePBX using a web browser. Click Setup, Trunks and then Add SIP Trunk. Fill in the CallerID and then drop down to the Outgoing Settings section of the form. For Trunk Name, use the Peer Name that you created above and wrote down. It ought to look something like this: 1092832198. For Peer Details, enter the following using the Peer Name and Password you assigned at les.net:
canreinvite=no

context=from-trunk

fromuser=1092832198

host=did.voip.les.net

insecure=port,invite

nat=yes

secret=yourpassword

type=peer

username=1092832198
For Incoming Settings, use from-pstn for the User Context and enter the following User Details:
canreinvite=no

context=from-pstn

dtmfmode=rfc2833

insecure=port,invite

nat=yes

type=user
For the registration string, enter a string like the following using your Peer Name and Password:
1092832198:yourpassword@did.voip.les.net/1092832198
Now click the Submit Changes button and then Apply Configuration Changes and Continue with Reload.
Choosing a VoIP Provider That Supports Faxing. We've included a reliable fax solution in this build, and we'll cover all the details next week. We do want to give you a head start if you plan to use your new machine to handle inbound faxes. To test your machine, you can connect a real fax machine to one of the lines on an SPA-2102. Then send a fax to extension 329 (F-A-X). But first you must configure your email address in two places using FreePBX: Setup, General Settings, Email address to have faxes emailed to AND Setup, Inbound Routes, any DID / any CID, fax Email. Once you've saved your settings, send the fax and see if it's delivered to your email address. If it works reliably, then the fax and email applications on your machine are configured correctly. Unfortunately, that's only half the battle. To receive faxes from outside your system, you'll also need a DID from a provider that supports faxing. And then it's still only about a 90% proposition... on a good day. We've tested this with many, many VoIP providers. Some work. Many don't. Some, such as Vitelity, offer a faxing service for a fee. Guess what? Their regular VoIP setup doesn't support faxing. Our old friends at Telasip.com still support faxing. We've also had good luck with Future-Nine and Teliax. You can read the beginnings of our fax dissertation here for more details. With the exception of the trunk setup covered in the article, all of the remaining setup steps already have been completed on your new server!
Choosing a Preferred Provider. Finally, you'll need to decide whether to use us or AOL or Vitelity as your primary terminations provider. HINT: We're the cheapest! So we've set things up with us and then AOL. This is handled in FreePBX in the Outbound Routes tab under the Default entry. You can adjust easily these in any way you like by adding trunks or moving entries up and down the list to change their priority. Just be sure to leave ENUM at the top of the list since ENUM calls are always free. If a free call isn't possible, your server will automatically drop down to the next trunk in the priority list. Don't add Vitelity to the list unless you have actually created a Vitelity account since they handle unsuccessful connections in a non-standard way which will cause FreePBX not to drop down to the next trunk to attempt a connection.
A Word About Mondo Rescue. We would be remiss if we didn't mention what a fantastic open source product Mondo Rescue is. It's the sole reason that today's build was possible. Our special thanks go to the development team: Bruno Cornec, Andree Leidenfrost, and Hugo Rabson. It is the first (and only) backup software for Linux builds that actually works reliably. The best way to prove that for yourself is to download this build and try it for yourself on your Everex gPC2. It has much more flexibility than what you will experience, but that would take another dozen pages to explain. We'll save that for another day. In the meantime, if you'd like more information, visit the Mondo Rescue web site.
Where To Go From Here. Well, we've covered a good bit of territory today so we're going to save the really fun stuff for our next installment. In the meantime, you have a new phone system that works. And there are a number of PDF documents in the /root folder on your new system which are worth a read. Better yet, you can browse through all of the documentation which is available for PBX in a Flash by going here. You also can dial D-E-M-O on your new system and see just how powerful direct SIP connections can be to other Asterisk hosts (in this case, ours!)... at no cost. Finally, you can log into your server and type help-pbx for access to a treasure trove of additional features. Enjoy!
Special Thanks to Our Generous Sponsors
FULL DISCLOSURE: ClearlyIP, Skyetel, Vitelity, DigitalOcean, Vultr, VoIP.ms, 3CX, Sangoma, TelecomsXchange and VitalPBX have provided financial support to Nerd Vittles and our open source projects through advertising, referral revenue, and/or merchandise. As an Amazon Associate and Best Buy Affiliate, we also earn from qualifying purchases. We’ve chosen these providers not the other way around. Our decisions are based upon their corporate reputation and the quality of their offerings and pricing. Our recommendations regarding technology are reached without regard to financial compensation except in situations in which comparable products at comparable pricing are available from multiple sources. In this limited case, we support our sponsors because our sponsors support us.
BOGO Bonaza: Enjoy state-of-the-art VoIP service with a $10 credit and half-price SIP service on up to $500 of Skyetel trunking with free number porting when you fund your Skyetel account. No limits on number of simultaneous calls. Quadruple data center redundancy. $25 monthly minimum spend required. Tutorial and sign up details are here.
![]() The lynchpin of Incredible PBX 2020 and beyond is ClearlyIP components which bring management of FreePBX modules and SIP phone integration to a level never before available with any other Asterisk distribution. And now you can configure and reconfigure your new Incredible PBX phones from the convenience of the Incredible PBX GUI.
The lynchpin of Incredible PBX 2020 and beyond is ClearlyIP components which bring management of FreePBX modules and SIP phone integration to a level never before available with any other Asterisk distribution. And now you can configure and reconfigure your new Incredible PBX phones from the convenience of the Incredible PBX GUI.
VitalPBX is perhaps the fastest-growing PBX offering based upon Asterisk with an installed presence in more than 100 countries worldwide. VitalPBX has generously provided a customized White Label version of Incredible PBX tailored for use with all Incredible PBX and VitalPBX custom applications. Follow this link for a free test drive!
Special Thanks to Vitelity. Vitelity is now Voyant Communications and has halted new registrations for the time being. Our special thanks to Vitelity for their unwavering financial support over many years and to the many Nerd Vittles readers who continue to enjoy the benefits of their service offerings. We will keep everyone posted on further developments.
Some Recent Nerd Vittles Articles of Interest...
The Dawn of Unified Messaging: Introducing FONmail for Asterisk
 First, there were telegraphs and telephones for delivering messages. Then came answering machines, and voicemail, and email. And today Nerd Vittles takes the plunge into Unified Messaging by introducing FONmail for Asterisk®. Just pick up a phone, dictate a message, enter either a phone number or the first three letters of any contact in your AsteriDex database, and poof. Your FONmail is delivered in your own voice to the email account of your recipient. No special software is needed at the receiving end to play the incoming message. It’s a standard WAV file. And all you need at your end is AsteriDex and today’s FONmail application. Both are open source and are available at no cost. Is this the ultimate Unified Messaging solution for Asterisk? Well, no. But it sure is convenient when you’re driving down the highway and can’t type. One of the real problems with Unified Messaging is that it requires software or software compatibility at both ends, and that’s a tough nut to crack outside of the corporate walls. So, at least for now, FONmail for Asterisk provides another option in your messaging bag of tricks. It’s especially well-suited for Road Warriors. And you can’t beat the price!
Prerequisites. As with many of our applications, FONmail for Asterisk is a text-to-speech (TTS) application. So, in addition to a LAMP-based Asterisk installation (such as PBX in a Flash), you’ll also need either Flite or Cepstral to handle the TTS chores. All current versions of PBX in a Flash now include Flite, but you’ll have to purchase Cepstral if you want to listen to Allison. A link to our Cepstral tutorial is in the list at the end of this article. Today’s dialplan code is the first to automatically select Cepstral as the TTS engine if it is installed on your system. Special thanks to Thomas Bullinger of B-LUC Consulting for the TTS integration suggestion and some tips.
Before proceeding with today’s install, you’ll also need to first set up AsteriDex 4 if it isn’t already installed on your existing system. Finally, you need to have outbound email (aka SendMail) working reliably on your Asterisk server. For tips and tricks, see the Activating Email Delivery of Voicemail Messages section of our PBX in a Flash tutorial. FONmail for Asterisk works with almost all of the LAMP-based Asterisk products. If you prefer PostFix, that’s fine, too.
Installation. Once you have AsteriDex and outbound email working reliably on your server, you’re ready to install FONmail for Asterisk. Here’s a link to the complete installation instructions. The entire setup process takes less than a minute or two. Enjoy!
VPN in a Flash Update! We’ve had over 100 reservations for our new VPN in a Flash system. We’re very close to having a manufacturer in place so hopefully we’ll have more good news in a week or two. We have begun the documentation for the new product, and we encourage you to take a look and offer any questions or comments you may have on our forums. The documentation is in the new Google Knol format and can be reviewed here. It’s not too late to get in the queue and place a reservation for a system. Just send us a note, and we’ll keep you posted as the release date approaches. It’ll hold your place in line with absolutely no obligation to purchase.
Hosting Provider Mega Deal. Just an FYI that the Nerd Vittles hosting provider, BlueHost, has raised the bar again on hosting services. For $6.95 a month, you can host unlimited domains with unlimited web hosting disk storage and unlimited monthly bandwidth. Free domain registration is included for as long as you have an account. It really doesn’t get any better than that. And their hosting services are flawless! Just use our link. You get a terrific hosting service, and we get a little lunch money.
Special Thanks to Our Generous Sponsors
FULL DISCLOSURE: ClearlyIP, Skyetel, Vitelity, DigitalOcean, Vultr, VoIP.ms, 3CX, Sangoma, TelecomsXchange and VitalPBX have provided financial support to Nerd Vittles and our open source projects through advertising, referral revenue, and/or merchandise. As an Amazon Associate and Best Buy Affiliate, we also earn from qualifying purchases. We’ve chosen these providers not the other way around. Our decisions are based upon their corporate reputation and the quality of their offerings and pricing. Our recommendations regarding technology are reached without regard to financial compensation except in situations in which comparable products at comparable pricing are available from multiple sources. In this limited case, we support our sponsors because our sponsors support us.
BOGO Bonaza: Enjoy state-of-the-art VoIP service with a $10 credit and half-price SIP service on up to $500 of Skyetel trunking with free number porting when you fund your Skyetel account. No limits on number of simultaneous calls. Quadruple data center redundancy. $25 monthly minimum spend required. Tutorial and sign up details are here.
![]() The lynchpin of Incredible PBX 2020 and beyond is ClearlyIP components which bring management of FreePBX modules and SIP phone integration to a level never before available with any other Asterisk distribution. And now you can configure and reconfigure your new Incredible PBX phones from the convenience of the Incredible PBX GUI.
The lynchpin of Incredible PBX 2020 and beyond is ClearlyIP components which bring management of FreePBX modules and SIP phone integration to a level never before available with any other Asterisk distribution. And now you can configure and reconfigure your new Incredible PBX phones from the convenience of the Incredible PBX GUI.
VitalPBX is perhaps the fastest-growing PBX offering based upon Asterisk with an installed presence in more than 100 countries worldwide. VitalPBX has generously provided a customized White Label version of Incredible PBX tailored for use with all Incredible PBX and VitalPBX custom applications. Follow this link for a free test drive!
Special Thanks to Vitelity. Vitelity is now Voyant Communications and has halted new registrations for the time being. Our special thanks to Vitelity for their unwavering financial support over many years and to the many Nerd Vittles readers who continue to enjoy the benefits of their service offerings. We will keep everyone posted on further developments.
Some Recent Nerd Vittles Articles of Interest…
Using Asterisk and Gizmo5 to Transform Your Nokia N95 Cellphone into the Ultimate Free SIP Phone
 We're wrapping up our Gizmo5 series with what we believe is the real silver lining in the Gizmo Project. Here's our YouTube demo to prove it. We kicked things off by showing you how to set up a Gizmo5 account to make free calls with Asterisk® using Backdoor Dialing and ENUM. Then last week we added an Asterisk dialplan script to actually test whether an outbound call would be free through Gizmo5 before choosing a final route to terminate outgoing calls from your Asterisk server. Today we're going to use your Gizmo5 account to transform a standard Nokia N95 cellphone into a SIM-free, carrier-free WiFi SIP telephone which can perform a whole bag of tricks at absolutely no cost... once you own the unlocked phone. It's the perfect back-to-college gift if your wallet matters. Without too much hype, suffice it to say the N95 earned PC Magazine's Editor's Choice. In a word, the call quality is phenomenal. If you like Snickers candy bars, then you'll love the size of this phone. And WiFi works all day with Nokia's Symbian OS even though you're lucky to make it an hour with Windows Mobile devices. Maybe it's not the WiFi that's the problem after all, Bill. Ooops. He retired. Sorry. Anyway, any unlocked Nokia N95 will do. Just not the N96! And you'd better get one while they last. Nokia apparently has had a change of heart on SIP telephony support, and it's quickly disappearing from their newer models. Dumb move!
SPECIAL NOTE: We have one, gently used N95 for sale. It actually was used to prepare this article. Make us an offer, or we'll make you a deal you can't refuse. If you're interested, contact us.
When we're finished, you'll have a better appreciation for why AT&T and the other cellphone carriers hate Nokia phones and why Comcast would prefer to limit your bandwidth and charge you $40 (extra) per month for their VoIP service and boatloads more for their pay-per-view movies. This isn't about greedy bandwidth abusers. It's about a greedy service provider. Comcast could easily rein in bandwidth abusers with a letter threatening to terminate service. What they can't control with nastygrams are the Blockbuster's and Walmart's of the world that want to deliver pay-per-view movies to your doorstep via the Internet. So this looks more like restraint of trade to us than protection of scarce resources from the Napster generation as Comcast would have you believe. You don't make the whole class stay after school because one kid chewed gum... if your motives are as pure as the Comcast TV barons would have you believe. Now where were we? </rant>
For openers today, you can place SIP calls at no cost to any SIP phone or Asterisk server in the world. See our previous tutorial to learn how to set this up on your Asterisk server. Second, you can place "regular" phone calls to any phone in the world using a Gizmo5 account at Gizmo5's discounted calling rates (2¢ a minute or less for calls to U.S., U.K., most of Europe, China, and Australia for example) rather than cellphone subscription plus stratospheric long distance charges. Third, you can place free calls to almost every non-AT&T cellphone in the U.S. by dialing 0101 and the number. Fourth, you can place free calls back to and through your Asterisk server to just about anywhere on the globe (except resort areas surrounded by water) for almost nothing. And, finally, you can receive free calls on your N95 cellphone whenever anyone dials your free IPkall-assigned DID in the Seattle area or your SIP number through Gizmo5. And, did we mention that all of this magic occurs with no connection to AT&T or any other cellphone carrier. In fact, we don't even have a SIM chip in our N95. Well... not all the time anyway. All you really need is a WiFi connection to make all of this work. And even the Asterisk server is optional. So let's get started.
Enabling WiFi on Your Nokia N95. Before we can use the N95 as a free SIP telephone, we've first got to get a WiFi connection enabled on the phone. Pressing Menu, Tools, WLAN Wizard will get you started. You can test your connection by opening the web browser for a trial run after you have your WiFi connection set up. Once it's working, be sure to disable the WiFi Access Point scanning feature by choosing Menu, Tools, Settings, Connection, Wireless LAN and set Show WLAN availability to Never.
Installing the Gizmo5 Application. Now the tricky part, and it's really not that difficult. It just happens that there's lots of conflicting information posted around the web, and this makes the drill more confusing than it needs to be. First, if you already have automatic registration of your Gizmo5 account on another device or an Asterisk server, disable the automatic registration. You can't have the same account registered in two places simultaneously. Just open a second account if you need it. There are two components that need to be installed on your Nokia N95, and they're in different places. First, install Nokia Internet Services Support Package to the device memory (not to the memory card). Here's Nokia's download link. Next, install the Gizmo5-Nokia PlugIn from gizmovoip.com. Here's the download link for that one. Finally, we had one little gotcha with getting everything to work once it was installed. On your phone go to Menu, Tools, Settings, Connection, SIP Settings, Options, Edit SIP Profile and set the Service Profile to Nokia 3GPP. Next, go to Menu, Tools, Internet Tel and activate Gizmo after choosing your default WiFi network. You'll be prompted for your Gizmo account name and password. Once it's registered, you should be able to dial 0101 plus an area code and phone number to test out the free calling feature. Or you can dial an area code and number, and route your outbound call as a pay-by-the-minute Gizmo5 Internet Call under the Options button. To call a sip phone directly, simply create a new Contact and insert an Internet telephone entry in the SIP URI format: sipname@FQDN.com. Once you have saved the entry, simply choose it from your Contacts to place the free SIP call. In Nokia-speak, it's referred to as an Internet Call.
If the above procedure doesn't work for you, repeat the drill and set the Service Profile to IETF instead of Nokia 3GPP. Not sure why but one setting works some of the time, and the other one works the rest of the time. If you can't connect, this is usually the problem... assuming you've gotten your Gizmo5 username and password entered correctly.
You also can use your Asterisk server to forward outbound SIP calls from your N95 to other phones. For example, if there are 10 close friends that you call frequently, assign each of them a SIP URI on your Asterisk server. We covered the setup process in this article. In a nutshell, create an Incoming Route in FreePBX named tom and point it to the phone number you wish to call. For destination phones outside your PBX, first create a Miscellaneous Destination called Tom-home that includes the home phone number. Then use this destination in your Incoming Route for tom. Save your entry and reload your FreePBX dialplan. Finally get your own fully-qualified domain name from a service such as dyndns.org. Assuming your FQDN was pbx.dyndns.org, then your Internet telephone entry for Tom in your N95 contacts would be this SIP URI: tom@pbx.dyndns.org. Otherwise, you'll need a SIP URI with the IP address of your Asterisk server, e.g. tom@36.24.36.1.
Adding a Free DID for Inbound Calling to Your Nokia N95. One of the world's best kept secrets continues to be the availability of free DIDs from ipkall.com in Seattle. This saves you $35 a year over the current Gizmo5 DID rate, and IPkall will give you a free phone number in one of several available area codes to use with the SIP device of your choice. Your Nokia N95 qualifies! Just be sure to place at least one call a month to the number, or it's automatically recycled to someone else. To register for a free IPkall account, go to this link and sign up. Your SIP Phone Number is your 11-digit Gizmo5 phone number starting with a 1. Your SIP Proxy for Gizmo5 is proxy01.sipphone.com. Now plug in a valid email address and create a password for your account. Your new phone number will be delivered to this email address. Once it arrives, you should be able to dial the number from any phone, and your Nokia N95 should start ringing. Answer the call just as you would any other cellphone call. The only difference is that you can talk as long as you like... for free. For other free DIDs and some great tips including ATA setup, go here.
Using Asterisk to Add the Missing Pieces. There are a number of ways you can use Asterisk to enhance your SIM-free Nokia experience. By enabling DISA, you can place a SIP call to your Asterisk server, obtain dial tone, and call anywhere using your existing Asterisk trunks. Here's the way we set this up. Edit /etc/asterisk/extensions_custom.conf and add a [custom-disa] context at the end of the file that looks like the following code. Be sure to set a VERY secure password in line s,7 by replacing 1234. It's your phone bill! Then set your IPkall DID number as the CallerID in s,13. By changing 701 in s,12 you can call any extension on your Asterisk server just by dialing 0 when you're using DISA. For our foreign friends, be sure to adjust the dial string length (10) in s,9 to meet your local needs.
[custom-disa]

exten => s,1,Answer

exten => s,2,Wait(1)

exten => s,3,Set(TIMEOUT(digit)=7)

exten => s,4,Set(TIMEOUT(response)=10)

exten => s,5,Background(enter-password)

exten => s,6,Read(MYCODE,beep,7)

exten => s,7,GotoIf($["${MYCODE}" = "1234"]?8:15)

exten => s,8,Set(TIMEOUT(absolute)=9000)

exten => s,9,Read(NUM2CALL,pls-entr-num-uwish2-call,10)

exten => s,10,Playback(pls-wait-connect-call)

exten => s,11,GotoIf($["${NUM2CALL}" = "0"]?12:13)

exten => s,12,Dial(Local/701@from-internal)

exten => s,13,Set(CALLERID(number)=4251234567)

exten => s,14,Goto(outbound-allroutes,${NUM2CALL},1)

exten => s,15,Hangup
Next, add an Incoming Route using FreePBX. For the DID Number, use a SIP name that is not easily guessed, e.g. DISA2375. This gives you an extra layer of password protection since anyone can try to guess your SIP URI's once they know the IP address of your Asterisk server. Leave all of the other entries at their defaults and, for the Destination, choose Custom Route: custom-disa,s,1. Save your settings and reload your dialplan. Ignore the warning that you're doing something odd. We know what we're doing.
Finally, on your Nokia N95, add a new Contact called DISA with an Internet telephone number to match the name of your incoming route above with the fully-qualified domain name of your Asterisk server, e.g. DISA2375@pbx.dyndns.org. Now you're ready to dial away by simply selecting this contact on your N95. Enter your DISA password when prompted and then enter a 10-digit phone number to call.
The WiFi HotSpot Two-Step (and a few more steps). Now that everything is working swimmingly, we're ready to take your Nokia N95 on the road. Here's the failsafe step-by-step to get connected in a WiFi HotSpot of your choice.
- Turn off the phone
- Arrive at HotSpot
- Turn on the phone
- Menu, Tools, WLAN Wiz., Pick Your HotSpot, and Start Web Browsing, Create WLAN While OffLine=Yes
- Using Browser, log into the HotSpot with your account name and password
- Leave the browser open so it'll be easy to log out when you're finished
- Menu, Tools, Internet Tel., Pick Your HotSpot AP
- Once Connected, Dial Away As Usual
- When finished, Hold Down Menu Button and Choose Browser App, Log Out of the HotSpot
- Turn off the phone
Cellphone Options. But what if you really do want to use the Nokia N95 in all its glory with the 5 megapixel camera and the multimedia goodies and even a cellphone provider? Well, it works great for just about anything you need. In fact, you can even take the SIM chip from your iPhone (even a First Generation iPhone) and plug it in. Phone calls work, voicemail works (even though you get two text messages when a new voicemail arrives... which is a lot better than Cingular in the old days when you typically got zero), and email and web browsing work great, too. Just select MediaNet as the access point when you open your Internet connection, and you'll be off to the races. Of course, all the cheapo, pay-as-you-go SIM cards work as well. Both Oxygen and Airvoice packages including free minutes and a SIM card are available at this eBay store for under $10. And there are lots of other options as well. Enjoy!
VPN in a Flash Update! We've had over 100 reservations for our new VPN in a Flash system. We're very close to having a manufacturer in place so hopefully we'll have more good news in a week or two. We have begun the documentation for the new product, and we encourage you to take a look and offer any questions or comments you may have on our forums. The documentation is in the new Google Knol format and can be reviewed here. It's not too late to get in the queue and place a reservation for a system. Just send us a note, and we'll keep you posted as the release date approaches. It'll hold your place in line with absolutely no obligation to purchase.
Coming Attractions. We're very close to signing on a new VoIP provider for PBX in a Flash users that will provide penny-a-minute calls in the U.S. and Canada. And a new version of AsteriDex with Outlook synchronization and a TTS dialer for AsteriDex queries from any connected Asterisk phone is just around the corner. Stay tuned!
Hosting Provider Mega Deal. Just an FYI that the Nerd Vittles hosting provider, BlueHost, has raised the bar again on hosting services. For $6.95 a month, you can host unlimited domains with unlimited web hosting disk storage and unlimited monthly bandwidth. Free domain registration is included for as long as you have an account. It really doesn't get any better than that. And their hosting services are flawless! Just use our link. You get a terrific hosting service, and we get a little lunch money.
Special Thanks to Our Generous Sponsors
FULL DISCLOSURE: ClearlyIP, Skyetel, Vitelity, DigitalOcean, Vultr, VoIP.ms, 3CX, Sangoma, TelecomsXchange and VitalPBX have provided financial support to Nerd Vittles and our open source projects through advertising, referral revenue, and/or merchandise. As an Amazon Associate and Best Buy Affiliate, we also earn from qualifying purchases. We’ve chosen these providers not the other way around. Our decisions are based upon their corporate reputation and the quality of their offerings and pricing. Our recommendations regarding technology are reached without regard to financial compensation except in situations in which comparable products at comparable pricing are available from multiple sources. In this limited case, we support our sponsors because our sponsors support us.
BOGO Bonaza: Enjoy state-of-the-art VoIP service with a $10 credit and half-price SIP service on up to $500 of Skyetel trunking with free number porting when you fund your Skyetel account. No limits on number of simultaneous calls. Quadruple data center redundancy. $25 monthly minimum spend required. Tutorial and sign up details are here.
![]() The lynchpin of Incredible PBX 2020 and beyond is ClearlyIP components which bring management of FreePBX modules and SIP phone integration to a level never before available with any other Asterisk distribution. And now you can configure and reconfigure your new Incredible PBX phones from the convenience of the Incredible PBX GUI.
The lynchpin of Incredible PBX 2020 and beyond is ClearlyIP components which bring management of FreePBX modules and SIP phone integration to a level never before available with any other Asterisk distribution. And now you can configure and reconfigure your new Incredible PBX phones from the convenience of the Incredible PBX GUI.
VitalPBX is perhaps the fastest-growing PBX offering based upon Asterisk with an installed presence in more than 100 countries worldwide. VitalPBX has generously provided a customized White Label version of Incredible PBX tailored for use with all Incredible PBX and VitalPBX custom applications. Follow this link for a free test drive!
Special Thanks to Vitelity. Vitelity is now Voyant Communications and has halted new registrations for the time being. Our special thanks to Vitelity for their unwavering financial support over many years and to the many Nerd Vittles readers who continue to enjoy the benefits of their service offerings. We will keep everyone posted on further developments.
Some Recent Nerd Vittles Articles of Interest...
Adding Post-Dial Processing to Asterisk and FreePBX Dialplans
 Last week we introduced a couple of new free calling options for Asterisk®: ENUM and Gizmo5's Backdoor Dialing. But one of the limitations of the Gizmo5 service in particular was the need for a 0101 prefix in order to trigger a free call as opposed to a pay per minute call to the same number. This highlighted a pretty serious limitation in the way FreePBX processes most outbound calls. As we indicated, the process goes something like this. After a caller dials a number, FreePBX searches through its Outbound Routes (from top to bottom) looking for a match on the dial string. Once it finds one, FreePBX then initiates calls beginning with the first trunk in the trunk priorities list for that outbound route. If the call is completed, no further call processing takes place. And a completed call includes a call that is either answered or rings busy. If a call is not completed, FreePBX continues to drop down the available trunks list and repeats the process until a call is either completed or the trunk list is exhausted. The one exception to this scenario was support for ENUM. In that situation, a lookup occurs after a call is dialed to see if it can be placed as a free SIP call. We'd like to do the same thing with Gizmo5's Backdoor Dialing. What we want to do is query the Gizmo5 database to determine whether a number to be called is a free call. If it is, then we want to modify the route for processing the outbound call to take advantage of Gizmo5's free calling option. And we'll also need to change the phone number by adding a 0101 prefix.
Since our last column, another serious limitation in FreePBX post-call processing was mentioned on the PBX in a Flash Forums. With a number of commercial PBXs, it's possible to specify post-dial processing for emergency calls. For example, in an office environment, if an employee dialed 911, it would be helpful to alert a receptionist in some way so that immediate first aid could be attempted and also to give the receptionist a heads up so that he or she could direct emergency responders to the appropriate location in a building. As written, FreePBX doesn't provide an easy way to handle this.
So our objective today is to provide a couple applications which address these limitations. And the apps also will document a methodology for overcoming other post-dial processing issues which may arise using the existing FreePBX framework.
The trick to adding today's hooks into the Asterisk dialplan is to understand that Asterisk loads identically named dialplan contexts only once. Taking advantage of this, FreePBX provides a mechanism for users to insert custom code to replace default FreePBX contexts. All of these configuration files are stored in /etc/asterisk. For today, the context we want to modify is [macro-dialout-trunk]. This is the FreePBX macro that does the heavy lifting once a call has been placed and a trunk route has been selected to handle the call. With FreePBX 2.3, the macro is in extensions.conf. In FreePBX 2.4 and 2.5, the context is in extensions_additional.conf. In both cases, what we want to do is copy the entire contents of the existing context into the bottom of extensions_override_freepbx.conf. If you're using an editor to cut-and-paste the code, be sure you get the code that is located outside the left and right margins of your editor. And the context ends on the line before the next context begins. In the case of FreePBX 2.3, the next context is [macro-agent-add]. In the case of FreePBX 2.4, the next context is [macro-dialout-dundi]. And, in 2.4, there is now a comment which indicates where each context ends: ; end of [macro-dialout-trunk].
What we want to do is insert a line or two of custom code in this context which you've copied into extensions_override_freepbx.conf. The purpose is to run our custom code after the number to dial and trunk ID have been passed to this macro. Then, in the case of the Gizmo5 application, we'll run out to the Internet to determine if this call should be handled as a free call. If so, we'll change the trunk ID number to match your Gizmo5 trunk, and we'll change the number to dial by prefixing the existing number with 0101. The only gotcha with the Gizmo5 Backdoor Dialing is that every number must be tested at least once by someone (not necessarily you) in order to populate the Gizmo5 free calling database. You can check as many numbers as you like at this link. In the case of our 911 emergency application, we'll check to see if the number being dialed is 911. If so, we'll send an email or text message to an address that you define with an alert that extension 1234 just placed a call for emergency assistance to 911.
If you're using FreePBX 2.3, the custom code below should be inserted after the third "exten" line in the context, i.e. after the following line of code:
exten => s,n,Set(ROUTE_PASSWD=${ARG3})
If you're using FreePBX 2.4, the custom code below should be inserted after the first "exten" line, i.e. after the following code:
exten => s,1,Set(DIAL_TRUNK=${ARG1})
And the code to be inserted looks like this for Asterisk 1.4:
exten => s,n,AGI(nv-outbound.php|${ARG2}|${ARG1})

exten => s,n,AGI(nv-gizmo.php|${ARG2}|${ARG1})
For Asterisk 1.6, it should look like this:
exten => s,n,AGI(nv-outbound.php,${ARG2},${ARG1})

exten => s,n,AGI(nv-gizmo.php,${ARG2},${ARG1})
Now we need to add a couple of PHP scripts to your system and set a few configuration options, and you'll be ready to go. While logged into your server as root, issue the following commands:
cd /var/lib/asterisk/agi-bin

wget http://pbxinaflash.net/source/gizmo/nv-gizmo.zip

unzip nv-gizmo.zip

rm nv-gizmo.zip

wget http://pbxinaflash.net/source/gizmo/nv-outbound.zip

unzip nv-outbound.zip

rm nv-outbound.zip

chown asterisk:asterisk *.php

chmod +x *.php

asterisk -rx "dialplan reload"

grep OUT_ /etc/asterisk/extensions_add* | awk '/ = / { print $0 }'
The last line of code above is used to decipher the trunk numbers associated with each of your trunks. What we need to know is the trunk number for the Gizmo5 trunk that you set up in last week's tutorial. Write it down and then edit nv-gizmo.php: nano -w nv-gizmo.php. Look down the screen about 5 or 6 lines for the line that reads $GIZMO_TRUNK = "21" ; and replace 21 with the number you wrote down for your actual Gizmo5 trunk. In the next two lines, insert your actual Gizmo5 username and password between the quotation marks. Don't change anything else. Save your changes: Ctrl-X, Y, and then press the Enter key.
With the other application, nv-outbound.php, we need to be sure it's working with your phone system before you actually need it. And we don't place test calls to 911. So here's the drill. Edit the file: nano -w nv-outbound.php and insert your email address or text message address in the $email variable between the quotes. Then move to the next line and insert a telephone number with the area code that you can dial from a phone on your system to test that the notification is working. For example, put in your cell phone number. Once you save your changes, pick up a phone on your system and call your cellphone. You should receive an email notification within a few seconds. Once it's working, edit the application again and change the $number2monitor to "911" and you're all set. Enjoy!
VPN in a Flash Update! We've had over 100 reservations for our new VPN in a Flash system. We're very close to having a manufacturer in place so hopefully we'll have more good news in a week or two. We have begun the documentation for the new product, and we encourage you to take a look and offer any questions or comments you may have on our forums. The documentation is in the new Google Knol format and can be reviewed here. It's not too late to get in the queue and place a reservation for a system. Just send us a note, and we'll keep you posted as the release date approaches. It'll hold your place in line with absolutely no obligation to purchase.
Coming Attractions. We're very close to signing on a new VoIP provider for PBX in a Flash users that will provide penny-a-minute calls in the U.S. and Canada as well as all-you-can-eat plans for just over $10 a month with an annual contract. We're also only a week or two away from a new version of AsteriDex with Outlook synchronization and a TTS dialer for AsteriDex queries from any connected Asterisk phone. Stay tuned!
Hosting Provider Deal of the Century. Just an FYI that the Nerd Vittles hosting provider, BlueHost, has raised the bar again on hosting services. For $6.95 a month, you can host unlimited domains with unlimited web hosting disk storage and unlimited monthly bandwidth. Free domain registration is included for as long as you have an account. It really doesn't get any better than that. And their hosting services are flawless! Just use our link. You get a terrific hosting service, and we get a little lunch money.
Special Thanks to Our Generous Sponsors
FULL DISCLOSURE: ClearlyIP, Skyetel, Vitelity, DigitalOcean, Vultr, VoIP.ms, 3CX, Sangoma, TelecomsXchange and VitalPBX have provided financial support to Nerd Vittles and our open source projects through advertising, referral revenue, and/or merchandise. As an Amazon Associate and Best Buy Affiliate, we also earn from qualifying purchases. We’ve chosen these providers not the other way around. Our decisions are based upon their corporate reputation and the quality of their offerings and pricing. Our recommendations regarding technology are reached without regard to financial compensation except in situations in which comparable products at comparable pricing are available from multiple sources. In this limited case, we support our sponsors because our sponsors support us.
BOGO Bonaza: Enjoy state-of-the-art VoIP service with a $10 credit and half-price SIP service on up to $500 of Skyetel trunking with free number porting when you fund your Skyetel account. No limits on number of simultaneous calls. Quadruple data center redundancy. $25 monthly minimum spend required. Tutorial and sign up details are here.
![]() The lynchpin of Incredible PBX 2020 and beyond is ClearlyIP components which bring management of FreePBX modules and SIP phone integration to a level never before available with any other Asterisk distribution. And now you can configure and reconfigure your new Incredible PBX phones from the convenience of the Incredible PBX GUI.
The lynchpin of Incredible PBX 2020 and beyond is ClearlyIP components which bring management of FreePBX modules and SIP phone integration to a level never before available with any other Asterisk distribution. And now you can configure and reconfigure your new Incredible PBX phones from the convenience of the Incredible PBX GUI.
VitalPBX is perhaps the fastest-growing PBX offering based upon Asterisk with an installed presence in more than 100 countries worldwide. VitalPBX has generously provided a customized White Label version of Incredible PBX tailored for use with all Incredible PBX and VitalPBX custom applications. Follow this link for a free test drive!
Special Thanks to Vitelity. Vitelity is now Voyant Communications and has halted new registrations for the time being. Our special thanks to Vitelity for their unwavering financial support over many years and to the many Nerd Vittles readers who continue to enjoy the benefits of their service offerings. We will keep everyone posted on further developments.
Some Recent Nerd Vittles Articles of Interest...
Free Asterisk Calls to Zillions of Phones with ENUM and Gizmo5’s Backdoor Dialing
 It’s been a while since there’s been much to cheer about in the free calls department with Asterisk®. But today, to kick off the new school year, we have lots of good news and some simple tricks to add zillions of free phone numbers to your Asterisk repertoire. In fact, you’ll be able to call almost any non-AT&T cellphone or landline in the United States at no cost. Remember that when you buy your next cellphone! Special thanks to Cliff on the PBX in a Flash Forums for heads up.
Some early readers of Nerd Vittles may remember sipphone.com which morphed into Gizmo5.com. In January of this year, Gizmo5 struck peering deals with a number of telephone providers that already routed their calls over the Internet. And it’s a pretty impressive list that includes more than 10% of the phones and cellphones in the United States according to Gizmo5’s bean counters. There’s Access One, Airadigm, Allegiance, Alltel, Cablevision Lightpath, Cat Communications, Cbeyond, Cellcom, Cellular Properties, Centennial Wireless, Choice One, Cincinnati Bell Wireless, Cinergy Communications, Cingular, CityNet, Cleveland Unlimited, Comcast Digital Voice, Commpartners, Conversent Communications, Cox Communications, CP Telecom, CTC Communications, Dobson Cell, Eureka, Globalcom, Heartland Communications, Illinois Valley, ITC Deltacom, LDMI, McLeod, Metro PCS, Mpower, Nationsline, Nextel, Nextera Communications, Paetec, RCN, Sprint PCS, Talk America, Telnet Worldwide, T-Mobile, US Cellular, Verizon Wireless, and XO. Whew! And the program is constantly being expanded. Toll-free numbers and Gizmo5-to-Gizmo5 calls also are free using Gizmo5. You can check whether your frequently called numbers are free calls by simply entering the phone numbers at this link.
Thus was born what Gizmo5 calls Backdoor Dialing. Just dial 0101 and the 10-digit number of your choice. If it’s free, the call goes through. If not, you get a message that the number is not yet supported and click. The beauty of the program is that your total investment to use the free service with Asterisk is a one-time fee of $10 for a bucket of CallOut minutes to activate your account. Sometimes this takes a day for the credit to appear, particularly if you use PayPal to cover the cost. The good news is you can spend most of the $10 making calls to any phone in the world, many for under 2¢ per minute, using just about any computer on the planet. Just leave a few cents in the pot to keep your free Backdoor Dialing service enabled. From our testing, we’d rate the Gizmo5 call quality as excellent on both the free and the pay-per-minute calls! Complete rate tables are available here.
Gizmo5 provides free softphones for Windows, Macs, and Linux as well as numerous cell phones and mobile devices including Treo, Nokia, and many more (not the iPhone… yet!). All of the softphones make it extremely easy to place SIP calls, e.g. joeschmo@mypbx.dyndns.org. And you can place these calls all day long at no cost. See our tutorial for step-by-step instructions on setting up your own SIP addresses on your Asterisk server. The softphones also include Conferencing, SMS, and Instant Messaging with AIM, Yahoo, MSN, Google, and MySpace.
As with many of these services, they weren’t designed for Asterisk, but nothing in their fine print precludes Asterisk use so today we’ll show you how. Will the program last forever? Who knows, but it’s free for now. And the cost of admission is too good to resist. You’re obviously not going to dial every number you frequently call twice just to see if the call is free. That’s why you’ll want to use a robodialer such as AsteriDex for your outbound calling. Then it’s easy to adjust the phone numbers of your friends with Sprint, T-Mobile, or Verizon cellphones so that you never have to pay for those calls again. Just add a prefix of 0101 to the numbers, and you’re done. And they can call you on your Gizmo5 CallIn number through Asterisk if you’ve enabled the CallIn Service and chosen a number. It’s under $3 a month with an annual subscription. Or the calls can be returned using the CallerID number displayed by Gizmo5 when you call your friends. Toll charges may apply in this case due to the Gizmo5 area code.
So let’s get started. Step 1 is to download and install a free softphone of your choice and follow the prompts to sign up for your account. There’s really no reason not to install a Gizmo5 softphone on every computer you own. If you don’t use it, there’s no cost. If you ever need it, it’ll be there for you. Step 2 is to make a $10 purchase of CallOut minutes. While you’re waiting on the credit to appear (and it usually takes less than a day), let’s set up Asterisk. You’ll need your new account name, password, and phone number from Gizmo5 to get started.
Setting Up a FreePBX Trunk for Gizmo5. If you’re using a product such as PBX in a Flash that includes FreePBX, then open FreePBX in your browser and choose Setup->Trunks->Add SIP Trunk. Leave the General Settings blank. For the Dialing Rules, if you just want free calling through your Gizmo5 trunk, plug in values below. For regular calls as well, add 1NXXNXXXXXX or an entry that is suitable for each country you wish to call.
1800NXXXXXX

1822NXXXXXX

1833NXXXXXX

1844NXXXXXX

1855NXXXXXX

1866NXXXXXX

1877NXXXXXX

1888NXXXXXX

800NXXXXXX

822NXXXXXX

833NXXXXXX

844NXXXXXX

855NXXXXXX

866NXXXXXX

877NXXXXXX

888NXXXXXX

0101+NXXNXXXXXX

0101NXXNXXXXXX
Name the Trunk: Gizmo5. Make the following entries in Outgoing Settings Peer Details:
disallow=all

allow=ulaw

auth=md5

authuser=youracctnameNOTyourphonenumber

canreinvite=no

context=from-trunk

dtmfmode=auto

fromdomain=proxy01.sipphone.com

fromuser=youracctnameNOTyourphonenumber

host=proxy01.sipphone.com

insecure=very

nat=yes

qualify=yes

secret=yourpassword

type=peer

username=youracctnameNOTyourphonenumber
Clear out the Incoming Settings and use the following syntax for the Registration String. Then Save your setup and Reload Your Dialplan. NOTE: Don’t use any registration string unless you want incoming call support. By not registering, you can use your softphones whenever you need it to also make outbound calls. If you register with Gizmo5 using a registration string, then it knocks out use of a softphone since you can’t have two simultaneous registrations to the same account. But registering allows those you call with this service to call you back conveniently… although not necessarily for free from the caller’s phone.
youracctname:yourpassword@proxy01.sipphone.com/yourphonenumber
Setting Up a FreePBX Outbound Route for Gizmo5. While still in FreePBX, choose Setup->Outbound Routes->Add Route. Name the route: OutGizmo5. Then enter the following Dial Pattern: 0101NXXNXXXXXX. Choose SIP/Gizmo5 as your Trunk Sequence. Then click Submit Changes and Reload Your Dialplan.
Setting Up a FreePBX Inbound Route for Gizmo5. While still in FreePBX, choose Setup->Inbound Routes->Add Incoming Route. Name the route: Gizmo5 and plug in your 10-digit DID number in the appropriate field. Then Set a Destination for the incoming calls. That’s it. Save your entries by clicking the Submit button and then Reload Your Dialplan.
Making a Free Call with Gizmo5. Once your DialOut credit appears on your softphone or in your Gizmo5 web account, you’re ready to start making calls. From any phone connected to your Asterisk server, just dial 0101 plus the 10-digit phone number. On the Asterisk CLI, you should see the call routed out through your SIP/Gizmo5 trunk. If you get a congestion tone and you’re sure your DialOut credit has been posted to your account, then check your username and password entries in your Trunk setup. Be sure to use your account name and NOT your Gizmo5 phone number for your username, authuser, and fromuser entries. But, if that doesn’t work, try using your Gizmo5 phone number instead of your assigned user name. Some have reported quirks in which actually works. For us, the assigned user name did the trick. Also make certain that the disallow all entry is above the allow=ulaw in versions of FreePBX after 2.3, or no calls will ever be successful.
 Turning Non-Free Numbers into Freebies. There’s always some enterprising individual that figures out a quick way to beat the system even when many calls already are free. Suppose the number you wish to call isn’t yet available through Backdoor Dialing. The only trick is to have a pool of numbers from a provider with a peering arrangement with Gizmo5… and, of course, an Asterisk or FreeSwitch server to forward the calls and handle the number translation. You can read about RingBranch’s implementation, and then you can sign up for the service here.
There’s another way to turn non-free calls into freebies. This is Gizmo5’s "All Calls Free" Plan which is available in 60 countries. Landlines and mobile phones are supported in 17 countries while landlines only are supported in 43 more. U.S., Canadian, and Chinese landlines and cellphones are included in the program in addition to those of the Pope and the other residents of Vatican City. God works in mysterious ways! Here’s the complete list of countries that are supported.
To qualify a landline or mobile number for free calling (by dialing with the usual country code prefixes), you both have to be "active" Gizmo5 subscribers, your landline and mobile numbers must be listed on your account, and you must enter each other in your respective Buddy Lists. Then free calls using your Asterisk Gizmo trunk can be made to the "regular" phone numbers of all your pals whether the called person is online with Gizmo or not. Be aware that you can’t call your own numbers for free, and there is lots of additional "fine print" in this program. Nothing precludes your spouse having his or her own Gizmo5 account, however. You’ll need to wade through the rules carefully to take advantage of the free calling. It is possible, but it’s not easy. If you have relatives in Europe, Australia, or the Far East, you might want to have a look here. Just do a search for "All Calls Free." Your Gizmo5 softphone also will report your current All Calls Free Status.
 Add Free Calls to 40 Million Asterisk Servers with e164.org. While we’re on a roll of free calling, here’s a simple way to add free calling to 40 million Asterisk servers around the world. Just add your name and phone numbers to the e164.org registry at no cost and configure FreePBX with ENUM support. Then outbound calls to numbers in the e164 registry will always be free as well. The whole setup takes less than 10 minutes. Here’s how.
The first step in setting up ENUM is to create a SIP address for your Asterisk server. The format looks like this: myname@somedomain.com. You’ll need either a fully-qualified domain name (FQDN) if your server has a static IP address or an FQDN issued through a dynamic DNS service such as dyndns.org if you have a dynamic IP address, e.g. pbx.dyndns.org. In the latter case, your router keeps dyndns.org apprised of changes in your external IP address so that pbx.dyndns.org always resolves to the correct IP address of your Asterisk server. Incidentally, with any hosted domain using a registrar such as omnis.com, it’s easy to add a subdomain DNS entry and point it to your Asterisk server, e.g. sip.joeschmo.com. That won’t cost you a dime other than the annual $6.95 domain registration fee which you’re already paying anyway.
Step two is to add your new FQDN address with a name of your choice to your Asterisk server. Then Asterisk will know how to process incoming SIP calls to that address. Read the Rolling Your Own section of our article on SIP Proxies for the procedure using FreePBX. It only takes a minute or two to set up. Let’s assume for purposes of this tutorial that you’re going to use the following destination address on e164.org for your server: e164@pbx.dyndns.org. An advantage to this type naming scheme is you can always keep straight the source of your incoming SIP calls. Thus your /etc/asterisk/extensions_override_freepbx.conf file should include a line in the [from-sip-external] context that looks like this: exten => e164,1,Goto(from-trunk,e164,1)
This tells Asterisk to route incoming SIP calls to e164@pbx.dyndns.org to the FreePBX Incoming Route for e164. And to complete the routing of the inbound calls to this address, add an Inbound Route in FreePBX called e164 that includes a destination of your choice for these SIP calls, e.g. an extension, a ring group, or an IVR already configured on your system. Just a footnote that e164.org requires you to enter a confirmation PIN when you set up the SIP routing to your server. So, at least initially, make the destination for your e164 SIP calls an extension that you can answer to obtain your PIN. You can safely ignore the FreePBX warning that you’re entering an odd type of inbound route by clicking OK. But you knew that.
Now let’s get you signed up with an account on e164.org. Go to the web site and click the Sign Up tab. Go through the sign up drill and then log into your new account. Then click the Phone Numbers tab and Add your phone numbers to e164. For each number, enter the area code and number. Then click the Next button. You’ll be warned about not having the number you’ve specified redirected to an IVR. If you already have this DID redirected to an IVR, change the routing temporarily to an extension that you can answer to obtain your PIN before you press Next to proceed. You’ll then be prompted for the SIP address to contact your server. Leave the default SIP protocol and plug in the address you created, e.g. e164@pbx.dyndns.org (using your own FQDN, of course). As soon as you click the Next button, your phone should start to ring, but there may not be a message when you answer. Hang up and wait for the second call within 15 minutes. It will include your PIN. Now click on the Phone Numbers tab and update your phone entry by choosing Enter PIN and typing your assigned PIN. Your phone number now has been activated with the e164 service. To complete the setup, you’ll want to click on the Do Not Call option and make your selections. You also can decide whether to list yourself in the ENUM White Pages directory.
Remember that the real purpose of this drill was to avoid charges when you place outbound calls to numbers in the ENUM directory. We merely added your numbers to e164.org so that others could benefit as well. So the final step before you can start saving money is to configure FreePBX to handle ENUM lookups for outbound calls from your server. One more observation may be helpful. You’ll recall that one of the limitations of FreePBX has always been that once an outbound route was chosen for a call, if the call was completed using the first destination trunk in that route, then the call processing ended there. ENUM adds a new wrinkle because we basically want to connect to ENUM to check for a free route and, if no matching entry is found, then we want the next trunk to process the call. As luck would have it, FreePBX has been tweaked to allow this scenario. All you have to do is create an ENUM trunk and then place it first in your sequence of trunks for each of your outbound routes. If an ENUM entry is found for the number you’re calling, the call will be routed as a free call with a direct SIP connection. Otherwise, the call processing will continue and the call will be routed using the next trunk specified in your outbound route.
There are two steps in FreePBX to implement ENUM. First, we need to create a special ENUM trunk. And second, we need to adjust our outbound routes to use the ENUM trunk first, and then the series of trunks you already have specified in each outbound route. NOTE: You obviously wouldn’t do this for an emergency 911 outbound route.
In FreePBX, click Setup, Trunk, Add ENUM Trunk. Enter your desired CallerID for these calls. Set a maximum number of channels, if desired, and then leave the other entries blank in most cases. Save your settings and reload your dialplan. Now click Setup, Outbound Routes and adjust the sequence of trunks for each of your existing routes. Be sure to put ENUM in the top position of each desired route. We also recommend adding a new Free Calls route so that users on your system can dial 0 and then a number to place a call through ENUM and then Gizmo5. If neither has a route for calling the party for free, the call will fail. The dial patterns might look like this for U.S. calls:
0|1NXXNXXXXXX

0|NXXNXXXXXX
The trunk list would look like this:
0 ENUM

1 SIP/gizmo5
Continue reading Part II.
Today’s Must Read: 101 Things You Can Do With Asterisk
VPN in a Flash Update! We’ve had over 100 reservations for our new VPN in a Flash system since last week. We’re very close to having a manufacturer in place so hopefully we’ll have more good news in a week or two. We have begun the documentation for the new product, and we encourage you to take a look and offer any questions or comments you may have on our forums. The documentation is in the new Google Knol format and can be reviewed here. It’s not too late to get in the queue and place a reservation for a system. Just send us a note, and we’ll keep you posted as the release date approaches. It’ll hold your place in line with absolutely no obligation to purchase.
Coming Attractions. We’re very close to signing on a new VoIP provider for PBX in a Flash users that will provide penny-a-minute calls in the U.S. and Canada as well as all-you-can-eat plans for just over $10 a month with an annual contract. We’re also only a week or two away from a new version of AsteriDex with Outlook synchronization and a TTS dialer for AsteriDex queries from any connected Asterisk phone. Stay tuned!
Hosting Provider Deal of the Century. Just an FYI that the Nerd Vittles hosting provider, BlueHost, has raised the bar again on hosting services. For $6.95 a month, you can host unlimited domains with unlimited web hosting disk storage and unlimited monthly bandwidth. Free domain registration is included for as long as you have an account. It really doesn’t get any better than that. And their hosting services are flawless! Just use our link. You get a terrific hosting service, and we get a little lunch money.
Special Thanks to Our Generous Sponsors
FULL DISCLOSURE: ClearlyIP, Skyetel, Vitelity, DigitalOcean, Vultr, VoIP.ms, 3CX, Sangoma, TelecomsXchange and VitalPBX have provided financial support to Nerd Vittles and our open source projects through advertising, referral revenue, and/or merchandise. As an Amazon Associate and Best Buy Affiliate, we also earn from qualifying purchases. We’ve chosen these providers not the other way around. Our decisions are based upon their corporate reputation and the quality of their offerings and pricing. Our recommendations regarding technology are reached without regard to financial compensation except in situations in which comparable products at comparable pricing are available from multiple sources. In this limited case, we support our sponsors because our sponsors support us.
BOGO Bonaza: Enjoy state-of-the-art VoIP service with a $10 credit and half-price SIP service on up to $500 of Skyetel trunking with free number porting when you fund your Skyetel account. No limits on number of simultaneous calls. Quadruple data center redundancy. $25 monthly minimum spend required. Tutorial and sign up details are here.
![]() The lynchpin of Incredible PBX 2020 and beyond is ClearlyIP components which bring management of FreePBX modules and SIP phone integration to a level never before available with any other Asterisk distribution. And now you can configure and reconfigure your new Incredible PBX phones from the convenience of the Incredible PBX GUI.
The lynchpin of Incredible PBX 2020 and beyond is ClearlyIP components which bring management of FreePBX modules and SIP phone integration to a level never before available with any other Asterisk distribution. And now you can configure and reconfigure your new Incredible PBX phones from the convenience of the Incredible PBX GUI.
VitalPBX is perhaps the fastest-growing PBX offering based upon Asterisk with an installed presence in more than 100 countries worldwide. VitalPBX has generously provided a customized White Label version of Incredible PBX tailored for use with all Incredible PBX and VitalPBX custom applications. Follow this link for a free test drive!
Special Thanks to Vitelity. Vitelity is now Voyant Communications and has halted new registrations for the time being. Our special thanks to Vitelity for their unwavering financial support over many years and to the many Nerd Vittles readers who continue to enjoy the benefits of their service offerings. We will keep everyone posted on further developments.
Some Recent Nerd Vittles Articles of Interest…
Free Asterisk Solutions
