
Home » Search results for 'ivr' (Page 2)
Search Results for: ivr
The Most Versatile VoIP Provider: FREE PORTING

 JUST RELEASED: Visit the Incredible PBX Wiki
The 5-Minute PBX in the Cloud Platform for $2 a Month

If $2.10 a month for a state-of-the-art VoIP PBX isn’t too rich for your blood, then today’s your lucky day. What that buys you is a turnkey, cloud-based PBX platform that is fully installed and configured IN LESS THAN 5 MINUTES! Did we mention the feature set? The Incredible PBX 2027-U image at CrownCloud has an unequaled feature set: Ubuntu 22.04 LTS, Asterisk® 20, and FreePBX® 16 with preconfigured extensions and trunks for dozens of VoIP providers plus voicemail with transcription and email delivery, IVRs, DISA, SMS messaging, conferencing, call queues, paging, intercom, and lots of text-to-speech features to whet your developer appetite: news headlines, weather reports by zip code, today in history, and sample ODBC apps for customer and accounting lookups using MySQL/MariaDB databases. The web server offerings include the latest FreePBX GUI with all of its GPL modules plus WebMin, AsteriDex, and Telephone Reminders. It’s taken us more than a decade to develop this free platform. You get to take advantage of it in less than 5 minutes.
So what’s the difference in today’s $2 a month offering from CrownCloud and the previous offering from RackNerd for $1 a month. The major difference is Incredible PBX 2027-U is an actual image offering at CrownCloud while, at RackNerd, you had to first install the operating system and then go through the entire setup procedure for the Incredible PBX platform of your choice. The CrownCloud scenario takes five minutes while the RackNerd procedure consumes more than an hour assuming all of the repositories upon which Incredible PBX relies are on line and functioning as advertised. What you’ll quickly learn with open source software is this. We rely upon the work product of over 1,000 different individuals and companies, any one of whom can seriously break things either because their software is off-line or because they’ve "improved" something in a way that quickly cascades into a disaster for those of us that relied upon their old way of doing things. If patience and time are your strong suits, then the $1 a month alternative may be a perfect fit. Otherwise, our new CrownCloud image of Incredible PBX 2027-U is a godsend. So let’s get started.
Getting Started at CrownCloud
These 5-minute turnkey installs of Incredible PBX 2027-U for Ubuntu 22.04 are offered at the jaw-dropping price of $25 a year. The monthly cost is cheaper than a cup of coffee at Starbucks, and you’ll have a fully-functioning, production-ready KVM platform including a free snapshot with 1GB RAM, 20GB SSD storage, and 1TB of monthly bandwidth in your choice of server locations including Los Angeles, Miami, and Atlanta in the United States as well as Germany and the Netherlands in Europe. And, unlike all of the other Asterisk® aggregations, Incredible PBX still provides a source code-based platform that can be tailored to meet any special requirements your organization may need.
It’s worth mentioning that we don’t make a nickel on these cloud offerings so consider this our special thanks to all of our loyal fans.
Here are the links to sign up for the service and take advantage of the Incredible PBX 2027 deal:
- Los Angeles: https://crowncloud.net/clients/cart.php?a=add&pid=382
- Atlanta: https://crowncloud.net/clients/cart.php?a=add&pid=487
- Miami: https://crowncloud.net/clients/index.php?rp=/store/specials/mia-1g-20g-ssd
- Germany: https://crowncloud.net/clients/cart.php?a=add&pid=399
- Netherlands: https://crowncloud.net/clients/cart.php?a=add&pid=400
After you sign up for the service, open the CrownPanel application and choose Incredible PBX 2027-U under Application Images for your base install. Take a 5-minute coffee break while your server image is installed. Once your server comes on line, login as root from a desktop machine using the password that was provided. Be sure to use SSH and NOT the VNC utility included in CrownPanel. This will assure that your desktop machine’s IP address gets whitelisted in the Incredible PBX firewall. Otherwise, you won’t be able to SSH into your server from your desktop. Once you login, the Incredible PBX configurator will prompt you to set passwords for root login, admin login to FreePBX, and admin login credentials for Apache to access AsteriDex and Reminders. Add a trunk provider (Skyetel is preconfigured and enabled by default) and a softphone or Incredible PBX SIP phone, and your PBX is ready to go.
Planning Ahead for That Rainy Day
One of our favorite features of Crown Cloud is the free snapshot (a.k.a. backup) that’s provided at no additional charge. We recommend you take snapshots regularly as you make major changes in your server’s configuration. In this way, if something comes unglued, you can easily restore the snapshot and never miss a beat. You’ll find the Remote Snapshot option in your CrownPanel menu.
Next Steps with Incredible PBX 2027
Before you can manage your PBX through a web browser, you first will need to set the root password for Ubuntu as well as the admin passwords for FreePBX and Apache web apps such as Reminders and AsteriDex. These all can be set by logging into your server as root and issuing the following commands: passwd, admin-pw-change, and apache-pw-change.
Outbound mail functionality needs to be working so that you can receive voicemail messages and faxes by email. To prevent SPAM, most ISPs and ITSPs block messages from downstream mail servers. That would be you. The easiest way to resolve this is to configure SendMail using Gmail as an SMTP Smarthost. You obviously need a Gmail account to implement this and you also will need to obtain an App password for your Gmail account, and use that in lieu of your regular Gmail password when configuring SendMail. With your Gmail username and App password in hand, log into your server as root and run: /root/enable-gmail-smarthost-for-sendmail.
If your Incredible PBX 2027 is hosted with a cloud provider, be advised that many providers do not include a swap file as part of their offering. FreePBX requires a swap file. To see if you have one, issue the command: free -h. To add one, issue this command after logging into your server as root: /root/create-swapfile-DO.
To correctly set the time on your PBX, run: /root/timezone-setup.
By default, the voicemail password for each of the configured extensions (701-705) is set to the extension number. This means the user will be prompted to set a voicemail password on the first login to voicemail for each extension. A phone must be registered to the actual extension to access its voicemail account. For example, once a phone is registered to extension 701, the voicemail setup can be accessed by dialing *98701.
Overview of the Initial Asterisk Setup Process
For those new to PBXs, here’s a two paragraph summary of how Voice over IP (VoIP) works. Phones connected to your PBX are registered with Extensions so that they can make and receive calls. When a PBX user picks up a phone and dials a number, an Outbound Route tells the PBX which Trunk to use to place the call based upon established dialing rules. Unless the dialed number is a local extension, a Trunk registered with some service provider accepts the call, and the PBX sends the call to that provider. The provider then routes the call to its destination where the recipient’s phone rings to announce the incoming call. When the recipient picks up the phone, the conversation begins.
Looking at things from the other end, when a caller somewhere in the world wishes to reach you, the caller picks up a telephone and dials a number known as a DID that is assigned to you by a provider with whom you have established service. When the provider receives the call to your DID, it routes the call to your PBX based upon destination information you established with the provider. Your PBX receives the call with information identifying the DID of the call as well as the CallerID name and number of the caller. An Inbound Route on your PBX then determines where to send the call based upon that DID and CallerID information. Typically, a call is routed to an Extension, a group of Extensions known as a Ring Group, or an IVR or AutoAttendant giving the caller choices on routing the call to the desired destination. Once the call is routed to an Extension, the PBX rings the phone registered to that Extension. When you pick up the phone, the conversation begins.
Configuring Trunks with Incredible PBX GUI
Perhaps the most difficult component to configure in the PBX is the Trunk. Almost every provider has a different way of doing things. We’ve taken some of the torture out of the exercise by providing a script which will configure settings for dozens of providers in seconds. Once installed, all you need to do is edit the desired Trunk (Connectivity:Trunks), change the Disable Trunk entry to No, and insert your credentials in both the PEER Details and Registration string of the SIP Settings Outgoing and Incoming tabs. Skyetel is enabled by default and needs no setup on the PBX side.
Configuring Skyetel for Incredible PBX 2027
If you’ve decided to go with Skyetel, here’s the drill. Sign up for Skyetel service and take advantage of the Nerd Vittles specials. First, complete the Prequalification Form here. You then will be provided a link to the Skyetel site to complete your registration. Once you have registered on the Skyetel site and your account has been activated, open a support ticket and request the $10 credit for your account by referencing the Nerd Vittles special offer. Once you are satisfied with the service, fund your account as desired, and Skyetel will match your deposit of up to $250 simply by opening another ticket. That gets you up to $500 of half-price calling. Credit is limited to one per person/company/address/location. Effective 10/1/2023, $25/month minimum spend required.
Skyetel does not use SIP registrations to make connections to your PBX. Instead, Skyetel utilizes Endpoint Groups to identify which servers can communicate with the Skyetel service. An Endpoint Group consists of a Name, an IP address, a UDP or TCP port for the connection, and a numerical Priority for the group. For incoming calls destined to your PBX, DIDs are associated with an Endpoint Group to route the calls to your PBX. For outgoing calls from your PBX, a matching Endpoint Group is required to authorize outbound calls through the Skyetel network. Thus, the first step in configuring the Skyetel side for use with your PBX is to set up an Endpoint Group. Here’s a typical setup for Incredible PBX 2027:
- Name: MyPBX
- Priority: 1
- IP Address: PBX-Public-IP-Address
- Port: 5060
- Protocol: UDP
- Description: my.incrediblepbx.com
To receive incoming PSTN calls, you’ll need at least one DID. On the Skyetel site, you acquire DIDs under the Phone Numbers tab. You have the option of Porting in Existing Numbers (free for the first 60 days after you sign up for service) or purchasing new ones under the Buy Phone Numbers menu option.
Once you have acquired one or more DIDs, navigate to the Local Numbers or Toll Free Numbers tab and specify the desired SIP Format and Endpoint Group for each DID. Add SMS/MMS and E911 support, if desired. Call Forwarding and Failover are also supported. That completes the VoIP setup on the Skyetel side. System Status is always available here.
Configuring VoIP.ms for Incredible PBX 2027
To sign up for VoIP.ms service, may we suggest you use our signup link so that Nerd Vittles gets a referral credit for your signup. Once your account is set up, you’ll need to set up a SIP SubAccount and, for Authentication Type, choose Static IP Authentication and enter your Incredible PBX 2027 server’s public IP address. For Transport, choose UDP. For Device Type, choose Asterisk, IP PBX, Gateway or VoIP Switch. Order a DID in their web panel, and then point the DID to the SubAccount you just created. Be sure to specify atlanta1.voip.ms as the POP from which to receive incoming calls. In the Incredible PBX GUI, be sure to enable the VoIP.ms trunk.
Configuring V1VoIP for Incredible PBX 2027
To sign up for V1VoIP service, sign up on their web site. Then login to your account and order a DID under the DIDs tab. Once the DID has been assigned, choose View DIDs and click on the Forwarding button beside your DID. For Option #1, choose Forward to IP Address/PBX. For the Forwarding Address, enter the public IP address of your server. For the T/O (timeout) value, set it to 2o seconds. Then click the Update button. Under the Termination tab, create a new Endpoint with the public IP address of your server so that you can place outbound calls through V1VoIP. In the Incredible PBX GUI, be sure to enable all of the V1VoIP trunks.
Configuring Anveo Direct for Incredible PBX 2027
To sign up for Anveo Direct service, sign up on their web site and then login. After adding funds to your account, purchase a DID under Inbound Service -> Order DID. Next, choose Configure Destination SIP Trunk. Give the Trunk a name. For the Primary SIP URI, enter $[E164]$@server-IP-address. For Call Options, select your new DID from the list. You also must whitelist your public IP address under Outbound Service -> Configure. Create a new Call Termination Trunk and name it to match your server. For Dialing Prefix, choose six alphanumeric characters beginning with a zero. In Authorized IP Addresses, enter the public IP address of your server. Set an appropriate rate cap. We like $0.01 per minute to be safe. Set a concurrent calls limit. We like 2. For the Call Routing Method, choose Least Cost unless you’re feeling extravagant. For Routes/Carriers, choose Standard Routes. Write down your Dialing Prefix and then click the Save button.
Before you can make outbound calls through Anveo Direct from your PBX, you first must configure the Dialing Prefix that you wrote down in the previous step. Log into the GUI as admin using a web browser and edit the Anveo-Out trunk in Connectivity -> Trunks. Enable the Trunk. Then click on the custom-Settings tab and replace anveo-pin with your actual Dialing Prefix. Click Submit and Apply Config to complete the setup. In the Incredible PBX GUI, be sure to enable all of the remaining Anveo trunks.
By default, incoming Anveo Direct calls will be processed by the Default inbound route on your PBX. If you wish to redirect incoming Anveo Direct calls using DID-specific inbound routes, then you’ve got a bit more work to do. In addition to creating the inbound route using the 11-digit Anveo Direct DID, enter the following commands after logging into your server as root using SSH/Putty:
cd /etc/asterisk
echo "[from-anveo]" >> extensions_custom.conf
echo "exten => _.,1,Ringing" >> extensions_custom.conf
echo "exten => _.,n,Goto(from-trunk,\\${SIP_HEADER(X-anveo-e164)},1)" >> extensions_custom.conf
asterisk -rx "dialplan reload"
Configuring Extensions with Incredible PBX GUI
Extensions are created using the Incredible PBX GUI: Applications:Extensions. Many SIP phones expect extensions to communicate on UDP port 5060. If this is the case with your SIP phone or softphone, then always create Chan_SIP extensions which communicate on UDP 5060. If your SIP phone or softphone provide port flexibility, then you have a choice in the type of SIP extension to create: Chan_SIP or the more versatile PJSIP (UDP 5061). Just remember to always configure SIP extensions with NAT Mode=YES in the Advanced tab. If your VoIP phones or softphones support IAX connectivity, you may wish to consider IAX extensions which avoid NAT problems.
When you create a new Extension, a new entry is automatically created in the PBX Internal Directory. If you wish to allow individual users to manage their extensions or use the WebRTC softphone, then you will also have to create a (very) secure password for User Control Panel (UCP) access. Choose Admin:User Management and click on the key icon of the desired extension to assign a password for UCP and WebRTC access.
Configuring a Desktop Softphone for Incredible PBX
We’re in the home stretch now. You can connect virtually any kind of telephone to your new PBX. Plain Old Phones require an analog telephone adapter (ATA) which can be a separate board in your computer from a company such as Digium. Or it can be a standalone SIP device such as ObiHai’s OBi100 or OBi110 (if you have a phone line from Ma Bell to hook up as well). SIP phones can be connected directly so long as they have an IP address. These could be hardware devices or software devices such as a softphone. We’ll start with a free one today so you can begin making calls. You can find dozens of recommendations for hardware-based SIP phones both on Nerd Vittles and the PIAF Forum when you’re ready to get serious about VoIP telephony.
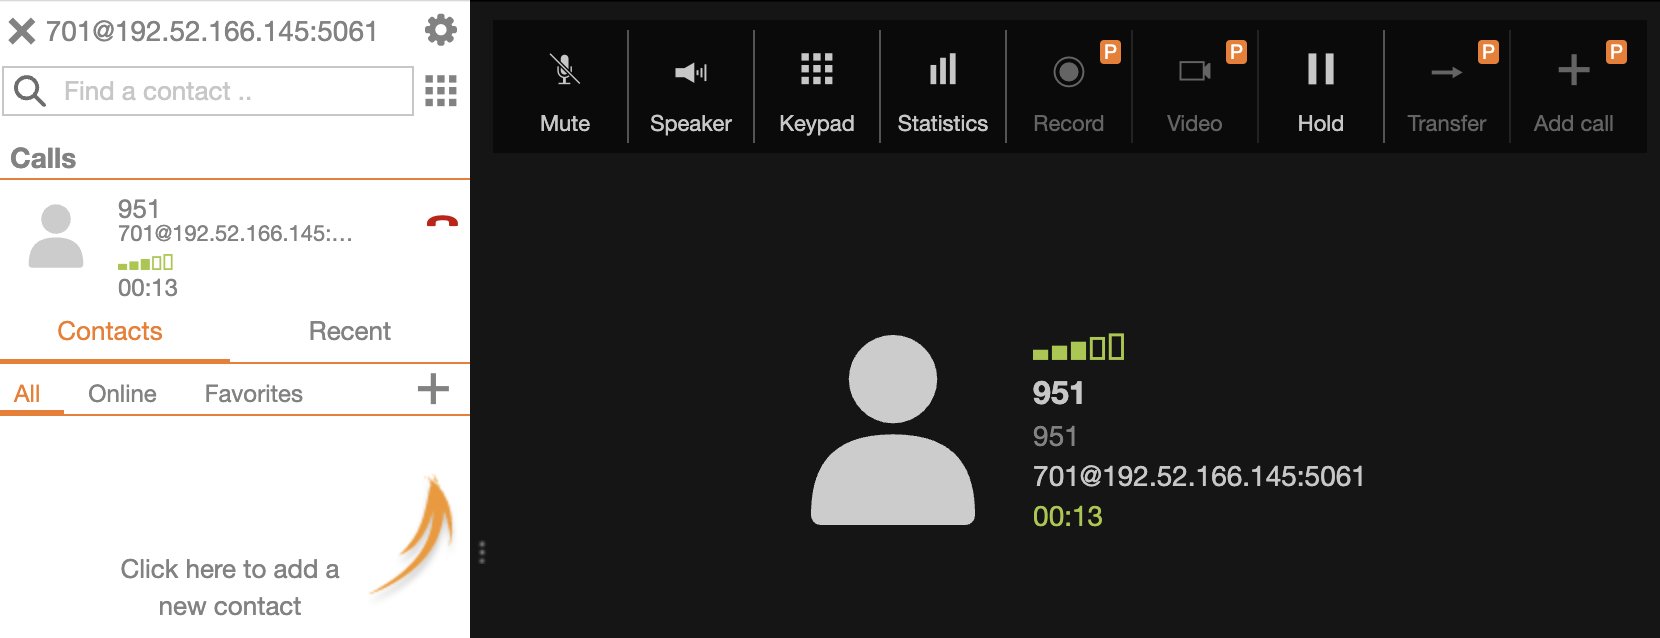
The easiest way to get started is to download a free softphone onto your desktop. We recommend Zoiper 5 for personal use. You can download and install it from here. Once installed, you’ll first need to decipher your extension password for an extension you wish to use to connect to Zoiper. Log into your Linux CLI and switch to the root user as documented above. Then run: /root/show-passwords. Specify 701 and 705 as the starting and ending extensions. Make note of the 701 extension password. Run pbxstatus and make note of your LAN IP address, e.g. 179.xx.yy.zz. Next, start up Zoiper from your desktop and choose the free version. For the desired account enter: 701@179.xx.yy.zz:5061 where 179.xx.yy.zz is the local IP address of your virtual machine. For the password, enter the 701 extension password you deciphered above. Press ENTER twice to complete the connection. When the dialer appears, try out some of the free Incredible PBX applications below.
NOTE: You must use the Keypad option shown in the right window of Zoiper after your call is connected for any app that prompts for keyboard input.
Here are some numbers to try:
123 - Reminders
222 - Timeclock for Employees (try 12345)
223 - AsteriDex Lookup & Dialer (try 335 for Delta Airlines)
947 - Weather by ZIP Code (requires keyboard entry of ZIP code)
951 - Yahoo News
TODAY - Today in History
LENNY - The Telemarketer's Worst Nightmare
If you are a Mac user, another great no-frills softphone is Telephone. Just download and install it from the Mac App Store. For Android users, check out the terrific new VitalPBX Communicator. Works flawlessly with Incredible PBX.
Configuring a Softphone Extension on a Smartphone
Adding an Incredible PBX extension to your smartphone gets a little trickier. Whether you’re an iPhone or Android lover, all smartphones use batteries, and you don’t want to drain your battery by running a softphone as a foreground app all the time. Fortunately, you now have some choices in softphones engineered to work without draining your battery. While they all cost money, it’s not much money. We’ve written about all the choices, and you’ll find the links in our Softphone Provider Recommendations on the new Incredible PBX Wiki.
With PJsip extensions, you’re not limited to a single phone connection at a time, and we’ve preconfigured extension 701 to support ten simultaneous connections. The setup on the softphone side is simple. For the server, enter the actual IP address of your PBX in the following format: 22.33.44.55:5061. Then enter 701 for the username and enter the password assigned to the 701 extension on your PBX. When an incoming call arrives, all the phones registered to extension 701 will ring simultaneously. Simply answer the call on the phone that is most convenient. For extension 702, you can change the number of simultaneous connections by clicking the Advanced tab and setting the number in Max Contacts.
Configuring Outbound Routes in Incredible PBX GUI
Outbound Routes serve a couple of purposes. First, they assure that calls placed by users of your PBX are routed out through an appropriate trunk to reach their destination in the least costly manner. Second, they serve as a security mechanism by either blocking or restricting certain calls by requiring a PIN to complete the calls. Never authorize recurring charges on credit cards registered with your VoIP providers and, if possible, place pricing limits on calls with your providers. If a bad guy were to break into your PBX, you don’t want to give the intruder a blank check to make unauthorized calls. And you certainly don’t want to join the $100,000 Phone Bill Club.
To create outbound routes in the Incredible PBX GUI, navigate to Connectivity:Outbound Routes and click Add Outbound Route. In the Route Settings tab, give the Outbound Route a name and choose one or more trunks to use for the outbound calls. In the Dial Patterns tab, specify the dial strings that must be matched to use this Outbound Route. NXXNXXXXXX would require only 10-digit numbers with the first and fourth digits being a number between 2 and 9. Note that Outbound Routes are searched from the top entry to the bottom until there is a match. Make certain that you order your routes correctly and then place test calls watching the Asterisk CLI to make sure the calls are routed as you intended.
Configuring Inbound Routes in Incredible PBX GUI
Inbound Routes, as the name implies, are used to direct incoming calls to a specific destination. That destination could be an extension, a ring group, an IVR or AutoAttendant, or even a conference or DISA extension to place outbound calls (hopefully with a very secure password). Inbound Routes can be identified by DID, CallerID number, or both. To create Inbound Routes, choose Connectivity:Inbound Routes and then click Add Inbound Route. Provide at least a Description for the route, a DID to be matched, and the Destination for the incoming calls that match. If you only want certain callers to be able to reach certain extensions, add a CallerID number to your matching criteria. You can add Call Recording and CallerID CNAM Lookups under the Other tab.
Audio Issues with Incredible PBX 2027
While it is always a good idea anyway, if you experience one-way or no audio on some calls, be sure to add your external IP address and LAN subnet in the GUI by navigating to Settings -> Asterisk SIP Settings. In the NAT Settings section, click Detect Network Settings. Click Submit and Apply Settings to save your changes.
Adding Fax Support to Incredible PBX 2027
We’ve had to live without faxing on the new Incredible PBX 2027 platforms since the beginning of the year. But those days are over. If you’d like to add fax support to your virtual machine, head over to our new Fax Tutorial to install the components. It only takes a couple minutes.
Adding Incredible PBX 2027 to an OpenVPN Network
We previously have documented the procedure for creating an OpenVPN server as well as OpenVPN client templates (.ovpn). If you need a refresher, the tutorial is here. To add your Incredible PBX 2027 server to an existing OpenVPN network, begin by creating an incrediblepbx2027.ovpn template on your OpenVPN server. Be sure to comment out or delete the setenv line in the template. Then copy this template to /etc on your Incredible PBX 2027 server. The following commands are already in place:
echo "[Unit]
Description=openvpn2027
ConditionPathExists=/etc/openvpn-start
After=rclocal.service
[Service]
Type=forking
ExecStart=/etc/openvpn-start /etc/incrediblepbx2027.ovpn
TimeoutSec=0
StandardOutput=tty
RemainAfterExit=yes
PermissionsStartOnly=true
SysVStartPriority=99
[Install]
WantedBy=multi-user.target" > /etc/systemd/system/openvpn2027.service
We’ve also enabled this openvpn2027.service which will start when you reboot your server. The OpenVPN IP address should now appear on the LAN line in pbxstatus:
systemctl enable openvpn2027.service
reboot
Deploying ODBC Apps with Incredible PBX 2027
Appreciating that many use a PBX to perform actual tasks for your business, we have included two sample ODBC apps to give you a head start. The code for these ODBC apps is stored in odbc.conf in the /etc/asterisk folder. Dialing 222 from any Asterisk extension calls up the TimeClock application which provides access to an employee database. You can enter 12345 as an employee number to see how it works. Dialing 223 from any Asterisk extension connects to the AsteriDex MySQL database and performs a lookup based upon the 3-digit code corresponding to the first three letters of the company name. For example, entering 335 (D-E-L) will call up the entry for Delta Airlines and connect you to their reservations desk once you have an outbound trunk enabled. You could build something similar to look up real-time inventory information from a MySQL database. These are just examples of the thousands of applications that could be quickly developed using ODBC and the Incredible PBX 2027 platform.
Incredible PBX 2027 Administration
We’ve eased the pain of administering your new PBX with a collection of scripts which you will find in the /root folder after logging in with SSH or Putty. Here’s a quick summary of what each of the scripts does.
add-fqdn is used to whitelist a fully-qualified domain name in the firewall. Because Incredible PBX 2027 blocks all traffic from IP addresses that are not whitelisted, this is what you use to authorize an external user for your PBX. The advantage of an FQDN is that you can use a dynamic DNS service to automatically update the IP address associated with an FQDN so that you never lose connectivity.
add-ip is used to whitelist a public IP address in the firewall. See the add-fqdn explanation as to why this matters.
del-acct is used to remove an IP address or FQDN from the firewall’s whitelist.
admin-pw-change is used to set the admin password for access to the FreePBX/Incredible PBX web GUI using a browser pointed to the local IP address of your server.
apache-pw-change is used to set the admin password for access to Apache/Incredible PBX apps including AsteriDex and Reminders. This provides a password layer of protection for access to these applications.
incrediblebackup2021 makes a backup of critical components on your PBX to a tarball saved in /backup. This should be copied to safe location off-site for a rainy day.
incrediblerestore2021 restores a backup file which has been copied to the /backup folder.
ipchecker is a script which deciphers the public IP addresses associated with whitelisted FQDNs created with add-fqdn on your server. If any of the addresses have changed, the firewall is restarted after updating the IP addresses. By default, it is executed every 10 minutes by /etc/crontab.
licenses.sh displays the license associated with each of the FreePBX modules on your server.
logos-b-gone removes proprietary artwork from your PBX and is no longer necessary with the included IncrediblePBX FreePBX module.
mime-construct is a command-line utility to send emails with attachments.
neorouter-login is a script to add your PBX to a NeoRouter VPN. Tutorial here.
odbc-gen.sh is a script that was run to generate the ODBC settings for Asterisk. Do NOT use it.
openvpn-start is a script to add your PBX to an existing OpenVPN network using an .ovpn config file. Tutorial here.
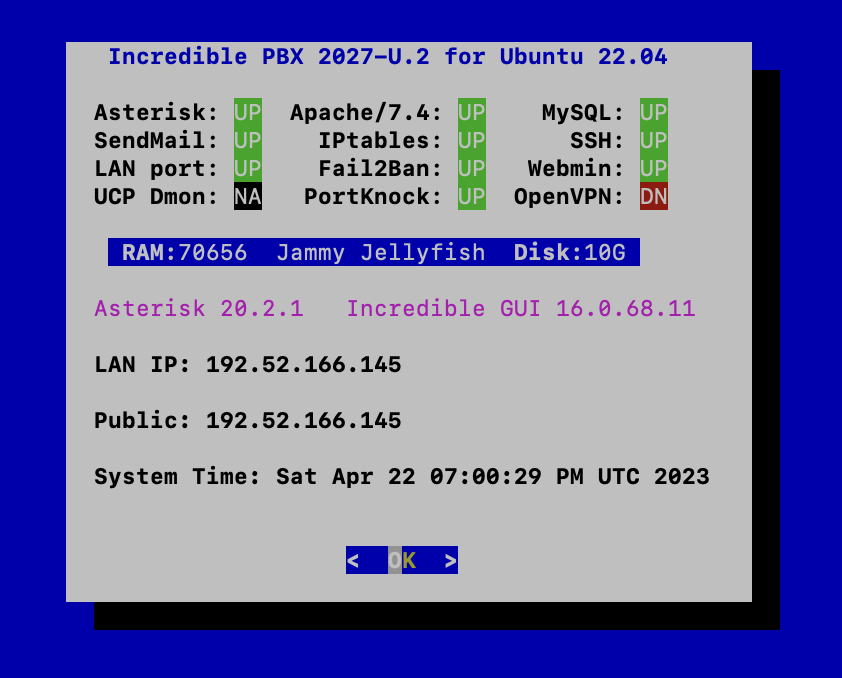
pbxstatus displays status of all major components of Incredible PBX 2027.
pptp-install is a script to create a PPTP network connection for your PBX. Tutorial here.
purge-cdr-cel-records removes all CDR and CEL records from the MySQL database.
reset-conference-pins is a script that automatically and randomly resets the user and admin pins for access to the preconfigured conferencing application. Dial C-O-N-F from any registered SIP phone to connect to the conference.
reset-extension-passwords is a script that automatically and randomly resets ALL of the SIP passwords for extensions 701-705. Be careful using this one, or you may disable existing registered phones and cause Fail2Ban to blacklist the IP addresses of those users. HINT: You can place a call to the Ring Group associated with all five extensions by dialing 777.
reset-reminders-pin is a script that automatically and randomly resets the pin required to access the Telephone Reminders application by dialing 123. It’s important to protect this application because a nefarious user could set up a reminder to call a number anywhere in the world assuming your SIP provider’s account was configured to allow such calls.
show-feature-codes is a cheat sheet for all of the feature codes which can be dialed from any registered SIP phone. It documents how powerful a platform Incredible PBX 2027 actually is. A similar listing is available in the GUI at Admin -> Feature Codes.
show-passwords is a script that displays most of the passwords associated with Incredible PBX 2027. This includes SIP extension passwords, voicemail pins, conference pins, telephone reminders pin, and your Anveo Direct outbound calling pin (if configured). Note that voicemail pins are configured by the user of a SIP extension the first time the user accesses the voicemail system by dialing *97.
sig-fix disables Module Signature Checking in the FreePBX GUI. This should not be necessary unless you have added or edited FreePBX Modules with missing module signatures.
sms-skyetel is a script to send SMS messages using a Skyetel trunk.
sms-voip.ms is a script to send SMS messages using a VoIP.ms trunk.
sms-blast, sms-blaster, and sms-dictator are scripts for message blasting. Tutorial here.
timezone-setup is a script to set the timezone for your PBX.
update-IncrediblePBX is a script that runs the Automatic Update Utility whenever you login to your server as root. These updates typically resolve bugs and security issues with your PBX. Do NOT remove it.
wolfram is a script to deploy Wolfram Alpha on your PBX. Tutorial here.
Forwarding Calls to Your Cellphone. Keep in mind that inbound calls to your DIDs automatically ring all five SIP extensions, 701-705. The easiest way to also ring your cellphone is to set one of these five extensions to forward incoming calls to your cellphone. After logging into your PBX as root, issue the following command to forward calls from extension 705 to your cellphone: asterisk -rx "database put CF 705 6781234567"
To remove call forwarding: asterisk -rx "database del CF 705"
Implementing Call By Name with 411
Once you have an Outbound Trunk and Route configured, deploying Call by Name by dialing 411 is simple. The way it works is to pick up any phone connected to your PBX and dial 411. When prompted for the name of the person or company to call, say the name as you entered it in the AsteriDex directory, e.g. Delta Air Lines. The name will then be looked up to decipher the number of the person or company to call. Then the call will be placed using your default outbound route. To deploy Call By Name, simply follow the setup instructions in this Nerd Vittles tutorial.
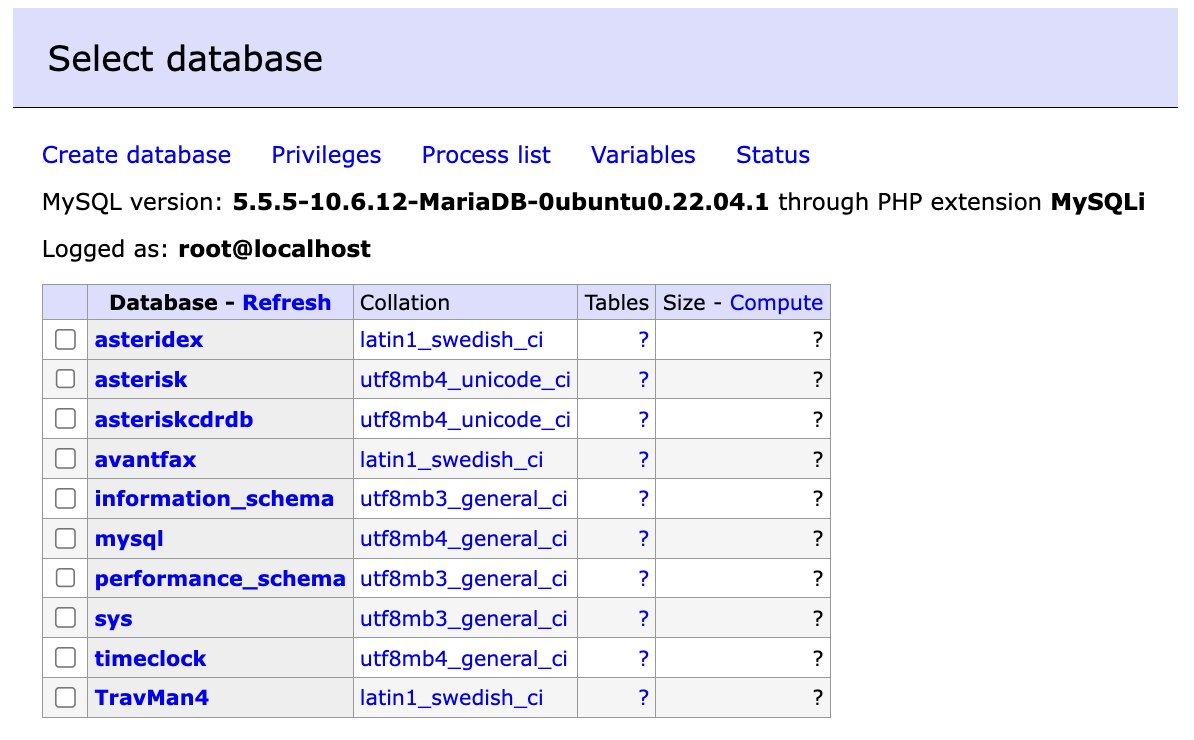
Introducing Adminer: The Ultimate MySQL Editor
If you’re as sick of phpMyAdmin as we are, you’ll be happy to know there’s a new kid on the block, Adminer. Better yet, the install procedure is a painless, one-minute exercise. The setup procedure for Incredible PBX 2027 is documented here. Once installed, you can connect to Adminer at http://server-ip-address/adminer. You should be prompted for your Apache admin credentials which were configured when you first installed Incredible PBX. Next, enter your MySQL root credentials and Adminer will display in all its glory. DO NOT OPEN PORT 80 FOR PUBLIC ACCESS, OR YOUR ENTIRE PBX WILL BE AT A HACKER’S MERCY!
Keeping FreePBX 16 Modules Current
We strongly recommend that you periodically update all of your FreePBX modules to eliminate bugs and to reduce security vulnerabilities. From the Linux CLI, log into your server as root and issue the following commands:
rm -f /tmp/*
fwconsole ma upgradeall
fwconsole reload
/root/sig-fix
systemctl restart apache2
/root/sig-fix
Help If You Can
Many of you know Tony Lewis and especially his tireless efforts over the years in support of the open source community. Our heartfelt condolences go out to Tony and his extended family upon the death of his brother, Dan, last week. In the midst of renovating their home, Dan leaves behind his wife and four young children to pick up the pieces. If you’re able, they could use your financial help. A Go Fund Me campaign was launched in Dan’s honor here.
Originally published: Tuesday, April 25, 2023

Need help with Asterisk? Visit the VoIP-info Forum.
Special Thanks to Our Generous Sponsors
FULL DISCLOSURE: ClearlyIP, Skyetel, Vitelity, DigitalOcean, Vultr, VoIP.ms, 3CX, Sangoma, TelecomsXchange and VitalPBX have provided financial support to Nerd Vittles and our open source projects through advertising, referral revenue, and/or merchandise. As an Amazon Associate and Best Buy Affiliate, we also earn from qualifying purchases. We’ve chosen these providers not the other way around. Our decisions are based upon their corporate reputation and the quality of their offerings and pricing. Our recommendations regarding technology are reached without regard to financial compensation except in situations in which comparable products at comparable pricing are available from multiple sources. In this limited case, we support our sponsors because our sponsors support us.
 BOGO Bonaza: Enjoy state-of-the-art VoIP service with a $10 credit and half-price SIP service on up to $500 of Skyetel trunking with free number porting when you fund your Skyetel account. No limits on number of simultaneous calls. Quadruple data center redundancy. $25 monthly minimum spend required. Tutorial and sign up details are here.
![]() The lynchpin of Incredible PBX 2020 and beyond is ClearlyIP components which bring management of FreePBX modules and SIP phone integration to a level never before available with any other Asterisk distribution. And now you can configure and reconfigure your new Incredible PBX phones from the convenience of the Incredible PBX GUI.
The lynchpin of Incredible PBX 2020 and beyond is ClearlyIP components which bring management of FreePBX modules and SIP phone integration to a level never before available with any other Asterisk distribution. And now you can configure and reconfigure your new Incredible PBX phones from the convenience of the Incredible PBX GUI.
 VitalPBX is perhaps the fastest-growing PBX offering based upon Asterisk with an installed presence in more than 100 countries worldwide. VitalPBX has generously provided a customized White Label version of Incredible PBX tailored for use with all Incredible PBX and VitalPBX custom applications. Follow this link for a free test drive!
 Special Thanks to Vitelity. Vitelity is now Voyant Communications and has halted new registrations for the time being. Our special thanks to Vitelity for their unwavering financial support over many years and to the many Nerd Vittles readers who continue to enjoy the benefits of their service offerings. We will keep everyone posted on further developments.

Deploying Incredible PBX 2027 with Microsoft Windows 11

Miracles happen every so often, but we never expected our Linux-based Incredible PBX platform to be running natively on the Microsoft Windows 11 desktop. Some have asked why you’d even want to do this when VirtualBox is available for Windows, and Incredible PBX VirtualBox images are available for Debian 10 and Rocky 8. The short answer is we got kernel crashes on our cheapo Windows 11 hardware. The longer answer is the VirtualBox days are numbered as it won’t run on any of the new ARM-based platforms including Apple’s new Macs. That sent us searching for an alternative. We finally solved kernel crashes in VirtualBox by adding a second CPU core and maxing out the display graphics to 128MB in each VM.
Lo and behold, Microsoft was offering their Windows Subsystem for Linux GUI (WSLg) on GitHub. You may recall that we introduced a Debian 10 offering for this platform in July, 2022. Unfortunately, "improvements" in the WSLg platform appear to have permanently broken that offering. But, hope springs eternal, and today we’re pleased to introduce Incredible PBX 2027 for WSLg running on their Ubuntu 22.04 platform. You can read all about the lengths to which Microsoft has gone to integrate WSLg into Windows 11 here.

In our original article we provided a referral link to this (now updated) tiny, $220 Windows 11 powerhouse. These referral commissions help keep the lights on at Nerd Vittles. But any Windows 11 hardware will work just fine. In fact, our current favorite that we personally use is this Windows 11 Acer notebook that currently sells for $519 with a whopping 20 gigs of RAM, a one terabyte NVMe SSD, and every bell, whistle, and port you could ever want. But we digress. Today we’re installing Incredible PBX 2027-U on the Windows 11 WSL platform.

To get started, you’ll need Windows 11 (build 22000.*) or Windows 11 Insider Preview (builds 21362+) using any hardware platform that supports Windows 11. To begin, from the Windows 11 Start Menu, Search for powershell. Right click on the app and choose Run As Administrator.
Here are some wsl commands you’ll want to keep handy:
List Available Linux Offerings  : wsl --list --online
Show Installed Linux Platforms  : wsl -l -v
Install a Linux Virtual Machine : wsl --install -d {distro}
Startup a Linux Virtual Machine : wsl -d {distro}
Shutdown Running Virtual Machine: wsl --terminate {distro}
Remove any Linux Virtual Machine: wsl --unregister {distro}
Backup any Linux Virtual Machine: wsl --export {distro} {filename.tar}
Restore a Linux Virtual Machine : wsl --import {distro} {filename.tar}
Let’s begin by installing an Ubuntu Virtual Machine: wsl --install -d Ubuntu-22.04. You’ll be prompted to create a user account and password, e.g. nerd and password. If you’re not prompted to create a user account, reboot your Windows machine and reopen the Ubuntu-22.04 app from the Start menu. That will straighten things out. Once the Ubuntu CLI window appears, enter the following commands to set up the root user account and begin your Incredible PBX install. Then go have a very long cup of coffee.
sudo passwd root
su root
# enter password you created for root
cd ~
apt install wget -y
wget http://incrediblepbx.com/IncrediblePBX2027-U-Win11.sh
chmod +x IncrediblePBX2027-U-Win11.sh
./IncrediblePBX2027-U-Win11.sh
While you’re waiting, notice that the Windows Start Menu now includes a new Ubuntu app which you will use to launch the Incredible PBX 2027-U virtual machine down the road.
When the install finishes, reboot.
Keep in mind that Incredible PBX will be running as an Ubuntu-22.04 virtual machine under Windows 11. So it’s important to know how to start things up and shut things down. As with any operating system, you don’t want to simply pull the plug and risk damaging both the file system and your MySQL databases.
To start the Ubuntu-22.04 virtual machine, you can do it in either of two ways. From the Windows Start Menu, double-click on the Ubuntu-22.04 app. Or from the PowerShell running as Administrator, type: wsl -d Ubuntu-22.04. Verify it’s running like this: wsl -l -v
Once the Ubuntu CLI appears, issue the following commands to activate all of the Linux components upon which Incredible PBX depends:
su root
# enter root password
cd ~
./update-IncrediblePBX
pbxstatus
# if pbxstatus shows non-fax apps down
# then run startup below
./startup
pbxstatus
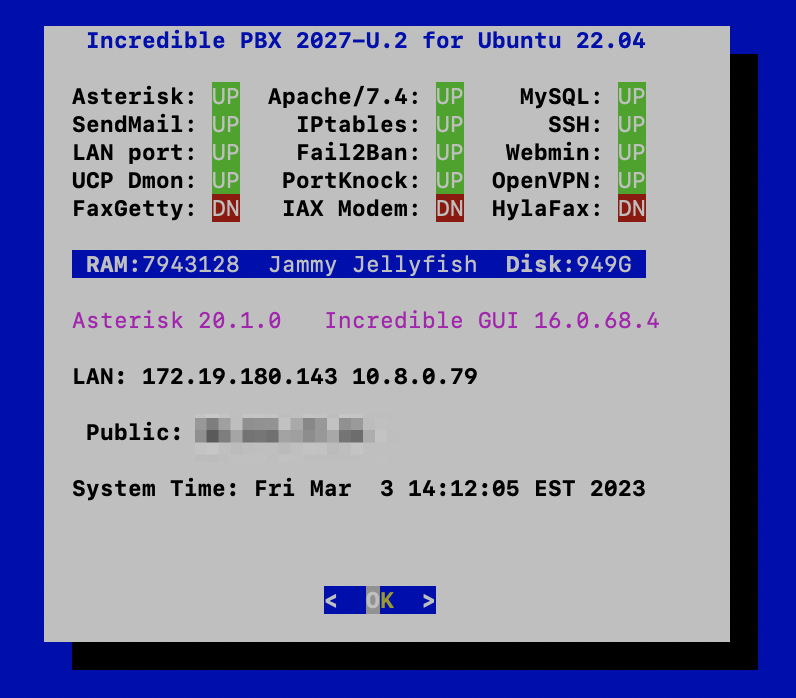
The LAN IP address is only accessible from your Windows machine. To run the Automatic Update Utility, you’ll need to SSH into this LAN address from the PowerShell running as Administrator where 172.19.180.143 is the LAN address shown in pbxstatus:
ssh root@172.19.180.143
To shutdown the Ubuntu-22.04 virtual machine, first open the Ubuntu-22.04 app and switch to the root user. Issue the halt command. This gracefully shuts down Asterisk, MySQL, and Apache. When the script completes, return to the PowerShell and issue this command to halt the virtual machine: wsl --terminate Ubuntu-22.04
Deploying OpenVPN with Incredible PBX. We strongly recommend deploying an OpenVPN client as part of your WSLg install and also on the Windows 11 desktop. It will simplify access to the server both from within Windows and also from any external source without having to wrestle with your firewall settings. This Incredible PBX Wiki article will walk you through creation of an OpenVPN Server platform, and this Incredible PBX Wiki article will walk you through the OpenVPN Client setup process. Simply name your Ubuntu .ovpn config file incrediblepbx.ovpn and save it in the /etc directory for automatic startup.
CAUTION: Be sure to create and use a separate .ovpn configuration file for your Windows desktop including these additional settings documented in the Wiki:
pull-filter ignore redirect-gateway
route-nopull
route 10.8.0.0 255.255.255.0
Next Steps with Incredible PBX 2027
Before you can manage your PBX through a web browser, you first will need to set the admin passwords for FreePBX and Apache web apps such as Reminders and AsteriDex. These all can be set by logging into your server as root and issuing the following commands: /root/admin-pw-change and /root/apache-pw-change.
Outbound mail functionality needs to be working so that you can receive voicemail messages and faxes by email. To prevent SPAM, most ISPs and ITSPs block messages from downstream mail servers. That would be you. The easiest way to resolve this is to configure SendMail using Gmail as an SMTP Smarthost. You obviously need a Gmail account to implement this and you also will need to obtain an App password for your Gmail account, and use that in lieu of your regular Gmail password when configuring SendMail. With your Gmail username and App password in hand, log into your server as root and run: /root/enable-gmail-smarthost-for-sendmail.
To correctly set the time on your PBX, run: /root/timezone-setup.
By default, the voicemail password for each of the configured extensions (701-705) is set to the extension number. This means the user will be prompted to set a voicemail password on the first login to voicemail for each extension. A phone must be registered to the actual extension to access its voicemail account. For example, once a phone is registered to extension 701, the voicemail setup can be accessed by dialing *98701.
Adding a Destination for Blacklisted Calls. The first time you log into the FreePBX GUI with your admin credentials using a web browser, you will be prompted to enter a destination for blacklisted callers. Navigate to Admin -> Blacklist -> Settings in the GUI and enter a Destination for Blacklisted Callers. We recommend Extension 53669. That’s our buddy, Lenny, who is great with spammers. Then clear the message from the Dashboard Overview.
Adding Faxing to the Incredible PBX 2027 Platform. We had to live without faxing on the new Incredible PBX 2027 platforms since the beginning of the year. But those days are over. If you’d like to add fax support to your virtual machine, head over to our new Fax Tutorial to install the components. It only takes a couple minutes.
Connecting a Softphone to Make Your First Call. The easiest way to get started is to download a free softphone onto your Windows desktop. We recommend Zoiper 5 which you can download and install from here. Once installed, you’ll first need to decipher your extension password for an extension you wish to use to connect to Zoiper. Log into your Linux CLI and switch to the root user as documented above. Then run: /root/show-passwords. Specify 701 and 705 as the starting and ending extensions. Make note of the 701 extension password. Run pbxstataus and make note of your LAN IP address, e.g. 179.xx.yy.zz. Next, start up Zoiper from your Windows desktop and choose the free version. For the desired account enter: 701@179.xx.yy.zz:5061 where 179.xx.yy.zz is the local IP address of your virtual machine. For the password, enter the 701 extension password you deciphered above. Press ENTER twice to complete the connection. When the dialer appears, try out some of the free Incredible PBX applications below.
NOTE: You must use the keyboard option shown in the right window of Zoiper after your call is connected for any app that prompts for keyboard input.
Here are some numbers to try:
123 - Reminders
947 - Weather by ZIP Code (requires keyboard entry of ZIP code)
951 - Yahoo News
TODAY - Today in History
LENNY - The Telemarketer's Worst Nightmare
Configuring Trunks with Incredible PBX GUI
Perhaps the most difficult component to configure in the PBX is the Trunk. Almost every provider has a different way of doing things. We’ve taken some of the torture out of the exercise by providing a script which will configure settings for dozens of providers in seconds. Once installed, all you need to do is edit the desired Trunk (Connectivity:Trunks), change the Disable Trunk entry to No, and insert your credentials in both the PEER Details and Registration string of the SIP Settings Outgoing and Incoming tabs. Skyetel is enabled by default and needs no setup on the PBX side.
Configuring Skyetel for Incredible PBX 2027
If you’ve decided to go with Skyetel, here’s the drill. Sign up for Skyetel service and take advantage of the Nerd Vittles specials. First, complete the Prequalification Form here. You then will be provided a link to the Skyetel site to complete your registration. Once you have registered on the Skyetel site and your account has been activated, open a support ticket and request the $10 credit for your account by referencing the Nerd Vittles special offer. Once you are satisfied with the service, fund your account as desired, and Skyetel will match your deposit of up to $250 simply by opening another ticket. That gets you up to $500 of half-price calling. Credit is limited to one per person/company/address/location. Effective 10/1/2023, $25/month minimum spend required.
Skyetel does not use SIP registrations to make connections to your PBX. Instead, Skyetel utilizes Endpoint Groups to identify which servers can communicate with the Skyetel service. An Endpoint Group consists of a Name, an IP address, a UDP or TCP port for the connection, and a numerical Priority for the group. For incoming calls destined to your PBX, DIDs are associated with an Endpoint Group to route the calls to your PBX. For outgoing calls from your PBX, a matching Endpoint Group is required to authorize outbound calls through the Skyetel network. Thus, the first step in configuring the Skyetel side for use with your PBX is to set up an Endpoint Group. Here’s a typical setup for Incredible PBX 2027:
- Name: MyPBX
- Priority: 1
- IP Address: PBX-Public-IP-Address
- Port: 5060
- Protocol: UDP
- Description: my.incrediblepbx.com
To receive incoming PSTN calls, you’ll need at least one DID. On the Skyetel site, you acquire DIDs under the Phone Numbers tab. You have the option of Porting in Existing Numbers (free for the first 60 days after you sign up for service) or purchasing new ones under the Buy Phone Numbers menu option.
Once you have acquired one or more DIDs, navigate to the Local Numbers or Toll Free Numbers tab and specify the desired SIP Format and Endpoint Group for each DID. Add SMS/MMS and E911 support, if desired. Call Forwarding and Failover are also supported. That completes the VoIP setup on the Skyetel side. System Status is always available here.
Configuring VoIP.ms for Incredible PBX 2027
To sign up for VoIP.ms service, may we suggest you use our signup link so that Nerd Vittles gets a referral credit for your signup. Once your account is set up, you’ll need to set up a SIP SubAccount and, for Authentication Type, choose Static IP Authentication and enter your Incredible PBX 2027 server’s public IP address. For Transport, choose UDP. For Device Type, choose Asterisk, IP PBX, Gateway or VoIP Switch. Order a DID in their web panel, and then point the DID to the SubAccount you just created. Be sure to specify atlanta1.voip.ms as the POP from which to receive incoming calls. In the Incredible PBX GUI, be sure to enable the VoIP.ms trunk.
Configuring V1VoIP for Incredible PBX 2027
To sign up for V1VoIP service, sign up on their web site. Then login to your account and order a DID under the DIDs tab. Once the DID has been assigned, choose View DIDs and click on the Forwarding button beside your DID. For Option #1, choose Forward to IP Address/PBX. For the Forwarding Address, enter the public IP address of your server. For the T/O (timeout) value, set it to 2o seconds. Then click the Update button. Under the Termination tab, create a new Endpoint with the public IP address of your server so that you can place outbound calls through V1VoIP. In the Incredible PBX GUI, be sure to enable all of the V1VoIP trunks.
Configuring Anveo Direct for Incredible PBX 2027
To sign up for Anveo Direct service, sign up on their web site and then login. After adding funds to your account, purchase a DID under Inbound Service -> Order DID. Next, choose Configure Destination SIP Trunk. Give the Trunk a name. For the Primary SIP URI, enter $[E164]$@server-IP-address. For Call Options, select your new DID from the list. You also must whitelist your public IP address under Outbound Service -> Configure. Create a new Call Termination Trunk and name it to match your server. For Dialing Prefix, choose six alphanumeric characters beginning with a zero. In Authorized IP Addresses, enter the public IP address of your server. Set an appropriate rate cap. We like $0.01 per minute to be safe. Set a concurrent calls limit. We like 2. For the Call Routing Method, choose Least Cost unless you’re feeling extravagant. For Routes/Carriers, choose Standard Routes. Write down your Dialing Prefix and then click the Save button.
Before you can make outbound calls through Anveo Direct from your PBX, you first must configure the Dialing Prefix that you wrote down in the previous step. Log into the GUI as admin using a web browser and edit the Anveo-Out trunk in Connectivity -> Trunks. Enable the Trunk. Then click on the custom-Settings tab and replace anveo-pin with your actual Dialing Prefix. Click Submit and Apply Config to complete the setup. In the Incredible PBX GUI, be sure to enable all of the remaining Anveo trunks.
By default, incoming Anveo Direct calls will be processed by the Default inbound route on your PBX. If you wish to redirect incoming Anveo Direct calls using DID-specific inbound routes, then you’ve got a bit more work to do. In addition to creating the inbound route using the 11-digit Anveo Direct DID, enter the following commands after logging into your server as root using SSH/Putty:
cd /etc/asterisk
echo "[from-anveo]" >> extensions_custom.conf
echo "exten => _.,1,Ringing" >> extensions_custom.conf
echo "exten => _.,n,Goto(from-trunk,\\${SIP_HEADER(X-anveo-e164)},1)" >> extensions_custom.conf
asterisk -rx "dialplan reload"
Configuring Outbound Routes in Incredible PBX GUI
Outbound Routes serve a couple of purposes. First, they assure that calls placed by users of your PBX are routed out through an appropriate trunk to reach their destination in the least costly manner. Second, they serve as a security mechanism by either blocking or restricting certain calls by requiring a PIN to complete the calls. Never authorize recurring charges on credit cards registered with your VoIP providers and, if possible, place pricing limits on calls with your providers. If a bad guy were to break into your PBX, you don’t want to give the intruder a blank check to make unauthorized calls. And you certainly don’t want to join the $100,000 Phone Bill Club.
To create outbound routes in the Incredible PBX GUI, navigate to Connectivity:Outbound Routes and click Add Outbound Route. In the Route Settings tab, give the Outbound Route a name and choose one or more trunks to use for the outbound calls. In the Dial Patterns tab, specify the dial strings that must be matched to use this Outbound Route. NXXNXXXXXX would require only 10-digit numbers with the first and fourth digits being a number between 2 and 9. Note that Outbound Routes are searched from the top entry to the bottom until there is a match. Make certain that you order your routes correctly and then place test calls watching the Asterisk CLI to make sure the calls are routed as you intended.
Configuring Inbound Routes in Incredible PBX GUI
Inbound Routes, as the name implies, are used to direct incoming calls to a specific destination. That destination could be an extension, a ring group, an IVR or AutoAttendant, or even a conference or DISA extension to place outbound calls (hopefully with a very secure password). Inbound Routes can be identified by DID, CallerID number, or both. To create Inbound Routes, choose Connectivity:Inbound Routes and then click Add Inbound Route. Provide at least a Description for the route, a DID to be matched, and the Destination for the incoming calls that match. If you only want certain callers to be able to reach certain extensions, add a CallerID number to your matching criteria. You can add Call Recording and CallerID CNAM Lookups under the Other tab.
Audio Issues with Incredible PBX 2027
While it is always a good idea anyway, if you experience one-way or no audio on some calls, be sure to add your external IP address and LAN subnet in the GUI by navigating to Settings -> Asterisk SIP Settings. In the NAT Settings section, click Detect Network Settings. Click Submit and Apply Settings to save your changes.
Bug Fixes with Incredible PBX 2027
It’s a good idea to check back here regularly for any late-breaking bug fixes. Here’s the first one, and it involves remote SSH connections using Ubuntu 22.04. It appears to be more prevalent where one or both ends of the connection are wireless. If you experience delays in the SSH connection, try this syntax where 10.8.xx..yy is your server’s private OpenVPN IP address:
ssh -o IPQoS=none root@10.8.xx.yy
Originally published: Friday, March 3, 2023
Need help with Asterisk? Visit the VoIP-info Forum.
Special Thanks to Our Generous Sponsors
FULL DISCLOSURE: ClearlyIP, Skyetel, Vitelity, DigitalOcean, Vultr, VoIP.ms, 3CX, Sangoma, TelecomsXchange and VitalPBX have provided financial support to Nerd Vittles and our open source projects through advertising, referral revenue, and/or merchandise. As an Amazon Associate and Best Buy Affiliate, we also earn from qualifying purchases. We’ve chosen these providers not the other way around. Our decisions are based upon their corporate reputation and the quality of their offerings and pricing. Our recommendations regarding technology are reached without regard to financial compensation except in situations in which comparable products at comparable pricing are available from multiple sources. In this limited case, we support our sponsors because our sponsors support us.
BOGO Bonaza: Enjoy state-of-the-art VoIP service with a $10 credit and half-price SIP service on up to $500 of Skyetel trunking with free number porting when you fund your Skyetel account. No limits on number of simultaneous calls. Quadruple data center redundancy. $25 monthly minimum spend required. Tutorial and sign up details are here.
![]() The lynchpin of Incredible PBX 2020 and beyond is ClearlyIP components which bring management of FreePBX modules and SIP phone integration to a level never before available with any other Asterisk distribution. And now you can configure and reconfigure your new Incredible PBX phones from the convenience of the Incredible PBX GUI.
The lynchpin of Incredible PBX 2020 and beyond is ClearlyIP components which bring management of FreePBX modules and SIP phone integration to a level never before available with any other Asterisk distribution. And now you can configure and reconfigure your new Incredible PBX phones from the convenience of the Incredible PBX GUI.
VitalPBX is perhaps the fastest-growing PBX offering based upon Asterisk with an installed presence in more than 100 countries worldwide. VitalPBX has generously provided a customized White Label version of Incredible PBX tailored for use with all Incredible PBX and VitalPBX custom applications. Follow this link for a free test drive!
Special Thanks to Vitelity. Vitelity is now Voyant Communications and has halted new registrations for the time being. Our special thanks to Vitelity for their unwavering financial support over many years and to the many Nerd Vittles readers who continue to enjoy the benefits of their service offerings. We will keep everyone posted on further developments.
Happy New Year: It’s Incredible PBX 2027 for the Raspberry Pi
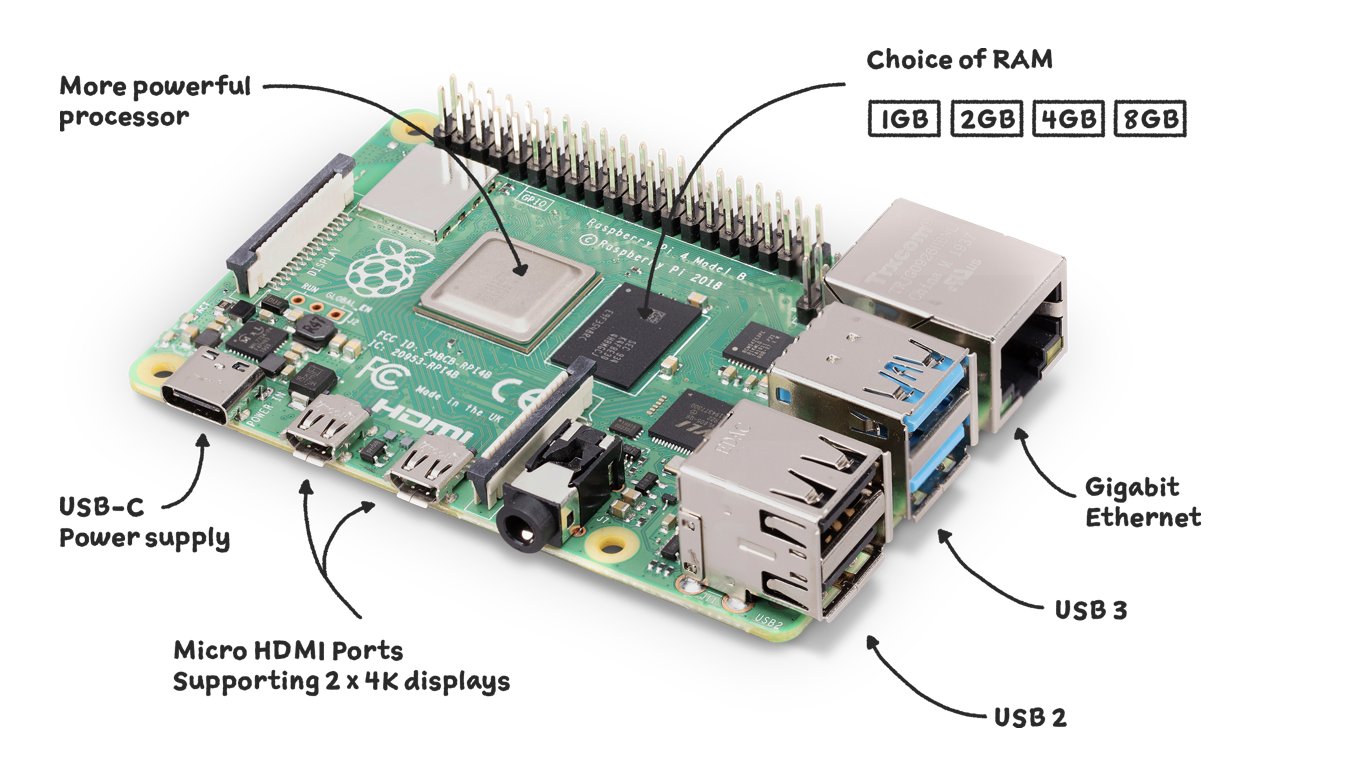
Ever since Eben and Liz Upton first introduced the Raspberry Pi to our Charleston community over a decade ago, the primary focus of their development team has been to encourage people of the world to learn about computers on an affordable platform. To this day, the Raspberry Pi 4B can still be purchased (if you can find one) for $35. Unfortunately, supply chain issues have taken their toll. If you prefer not to pay a premium for the Raspberry Pi 4B or 400 keyboard, then visit the RPiLocator. If time is of the essence, then eBay is your friend for both the RasPi4 and the RasPi 400 keyboard.
Many of you may know that Mark Spencer, who founded Digium and initially developed Asterisk®, now has a new avionics company in Huntsville, Avilution. You may be surprised to learn that their unPanel Avionics platform was developed using redundant Raspberry Pi’s.
UPDATE: Download the latest Incredible PBX 2027 image for RasPi here.
To celebrate the New Year, we’ve taken an entirely new approach in developing this latest Incredible PBX iteration for the Raspberry Pi. In previous builds, we’ve offered a turnkey image for the Raspberry Pi. This time around we’ve incorporated the same Debian 11 installer that we use on AMD64 and ARM64 platforms. The primary advantage is that this installer will continue to work with future Raspberry Pi hardware that supports the Debian 11 platform. It also allows us to make slipstream enhancements across all hardware platforms in minutes instead of weeks. One final benefit of the new design is that you now can take advantage of the Raspberry Pi Imager which lets you create the base Debian 11 microSD platform for the Raspberry Pi in minutes.
What’s Included? Incredible PBX 2027 serves up a never before available VoIP powerhouse featuring Asterisk 20 and all FreePBX 16 GPL modules, an Apache web server, the latest MariaDB SQL server (formerly MySQL), SendMail mail server, Webmin, and most of the Incredible PBX feature set including SIP, PJSIP, SMS, voice recognition, AsteriDex, gTTS Text-to-Speech VoIP applications, Call-By-Name Dialing, News, Weather, Telephone Reminders, and hundreds of features that typically are found in commercial PBXs: Conferencing, IVRs and Email Delivery of transcribed voicemails, AutoAttendants, Voicemail Blasting, and more. We’ve also incorporated the Zero Trunk Configuration feature from the LITE build which lets you sign up with one of our VoIP providers and start making and receiving calls instantly. Or you can use the new ClearlyIP trunking module included in the GUI for seamless integration of SMS messaging into FreePBX® and its User Control Panel.
Choosing a SIP Provider. As we mentioned, Incredible PBX 2027 comes preconfigured to support many of the major SIP providers including those that financially support Nerd Vittles and our open source projects: ClearlyIP, Skyetel, and VoIP.ms. As the old saying goes, they may not be the cheapest, but you get what you pay for. With all our providers, you only pay for minutes you use so signing up with more than one provider is a smart idea. For the full list of supported VoIP providers, visit the Incredible PBX Wiki.
Assembling the Required Raspberry Pi Components
Before you can deploy Incredible PBX 2027, you’ll first need the necessary Raspberry Pi hardware. To support the enhanced Incredible PBX 2027 platform, we strongly recommend either the Raspberry Pi 400 or the Raspberry Pi 4B with at least 2GB RAM. You can choose a reseller below for quicker delivery. Assuming you already own an HDMI-compatible monitor and a USB keyboard (only required if you don’t buy a RasPi 400)…
Raspberry Pi 4B or Raspberry Pi 400 $10 USB-C RasPi 4 (only) Power Supply $9 32GB microSDHC Class 10 card (strongly recommended!) $5 Official RasPi 4B Case or see above for our favorite
Getting Started with Incredible PBX 2027
Begin by downloading Raspberry Pi Imager for PC, MAC, or Ubuntu desktop. Run the Imager from your desktop computer with the following settings after inserting microSD card in your desktop machine:
OS: Raspberry Pi OS (other) -> Raspberry Pi OS Lite (64-bit)
Storage: Select your microSD card (32GB Type 10 recommended)
Click WRITE
Remove the microSD card from your desktop computer. Insert it into your Raspberry Pi and power on the device. The initial Raspberry Pi OS setup for the United States follows. For users elsewhere, follow your nose.
Choose keyboard layout: (Other, English (US) for USA users)
Keyboard Layout: English (US)
username: nerd
password: make it secure, type it twice
login: nerd with new password
sudo passwd root
create new secure root password
logout: exit
login: root with new root password
userdel nerd
nano -w /etc/ssh/sshd_config
  edit and uncomment: PermitRootLogin yes
  uncomment PasswordAuthentication yes
  save: Ctrl-X, Y, then ENTER key
run: raspi-config
  Settings Apply to: pi
  Localization: WLAN Country: US
  System Options: Wireless LAN: Enter your SSID and SSID passphrase
  System Options: Hostname: debian
  System Options: Power LED: YES
  Interface Options: SSH: YES
  Localization: Locale: Disable en_GB.UTF-8 and Enable en_US.UTF-8
  Localization: TimeZone: America, NewYork
  FINISH and Reboot
Once your Raspberry Pi has restarted, login as root with your root password and issue the following commands:
wget http://incrediblepbx.com/IncrediblePBX2027-D-RasPi.sh
chmod +x IncrediblePBX2027-D-RasPi.sh
ip a
To assure that your desktop computer is whitelisted in the Incredible PBX firewall, we recommend completing the rest of the install using SSH or Putty on your desktop machine. The ip a command above will tell you the local IP address of your RasPi. So login using this command: ssh root@ip-address. Then issue the following command:
./IncrediblePBX2027-D-RasPi.sh
When the install finishes, reboot your Raspberry Pi and log back in as root. Let the Automatic Update Utility bring your system up to current specs after which the pbxstatus display should show something like the following.
NOTE: To activate an OpenVPN client connection, create and copy a client configuration named incrediblepbx2027.ovpn from your OpenVPN server into the /etc folder & reboot.

First Boot of Incredible PBX 2027
If you entered WiFi credentials when running raspi-config above and your Raspberry Pi does not have a wired network connection, it should automatically enable the Wi-Fi connection on reboot. Issuing the command ip a will tell you the local IP addresses of wlan0 and eth0. With the Raspberry Pi 3B, 4B and 400, WiFi is built into the hardware. But you still have to provide your SSID name and SSID password to make a connection to your WiFi network. If pbxstatus does not show a network connection, here’s how to enable Wi-Fi:
If your WiFi network requires a password, insert the following into /etc/wpa_supplicant/wpa_supplicant.conf:
ctrl_interface=DIR=/var/run/wpa_supplicant GROUP=netdev
update_config=1
country=US

network={
 ssid="YourSSID"
 psk="YourSSIDpassword"
 key_mgmt=WPA-PSK
 scan_ssid=1
 priority=7
}
Now restart your server: reboot. When the reboot finishes, you now should have network connectivity.
You may also need to change the default PortKnocker setting to your wireless LAN connection:
sed -i 's|eth0|wlan0|' /etc/default/knockd
service knockd restart
Finally, if your PBX is sitting behind a NAT-based router, you’ll need to redirect incoming UDP 5060-5061 and UDP 10000-20000 traffic to the private IP address of your RasPi. This is required for all of the SIP providers included in the Incredible PBX 2027 build. Otherwise, all inbound calls will fail.
Configuring Skyetel for Incredible PBX 2027
If you’ve decided to go with Skyetel, here’s the drill. Sign up for Skyetel service and take advantage of the Nerd Vittles Free $10 credit and BOGO special. First, complete the Prequalification Form here. You then will be provided a link to the Skyetel site to complete your registration. Once you have registered on the Skyetel site and your account has been activated, open a support ticket and request the $10 credit for your account by referencing the Nerd Vittles special offer. Once you are happy with the service, open another ticket after funding your account and request that Skyetel match your deposit of up to $250. That gets you up to $500 of helf-price calling. Credit is limited to one per person/company/address/location. If you have numbers to port in, you can do it at no cost after funding your account. Effective 10/1/2023, $25/month minimum spend required.
Skyetel typically does not require SIP registrations to make connections to your PBX. Instead, Skyetel utilizes Endpoint Groups to identify which servers can communicate with the Skyetel service. An Endpoint Group consists of a Name, an IP address, a UDP or TCP port for the connection, and a numerical Priority for the group. For incoming calls destined to your PBX, DIDs are associated with an Endpoint Group to route the calls to your PBX. For outgoing calls from your PBX, a matching Endpoint Group is required to authorize outbound calls through the Skyetel network. Thus, the first step in configuring the Skyetel side for use with your PBX is to set up an Endpoint Group. Here’s a typical setup for Incredible PBX 2027:
- Name: MyPBX
- Priority: 1
- IP Address: PBX-Public-IP-Address
- Port: 5061
- Protocol: UDP
- Description: 2027.incrediblepbx.com
To receive incoming PSTN calls, you’ll need at least one DID. On the Skyetel site, you acquire DIDs under the Phone Numbers tab. You have the option of Porting in Existing Numbers (free for the first 60 days after you fund your account) or purchasing new ones under the Buy Phone Numbers menu option.
Once you have acquired one or more DIDs, navigate to the Local Numbers or Toll Free Numbers tab and specify the desired SIP Format and Endpoint Group for each DID. Add SMS/MMS and E911 support, if desired. Call Forwarding and Failover are also supported. That completes the VoIP setup on the Skyetel side. System Status is always available here.
Configuring VoIP.ms for Incredible PBX 2027
To sign up for VoIP.ms service, may we suggest you use our signup link so that Nerd Vittles gets a referral credit for your signup. Once your account is set up, you’ll need to set up a SIP SubAccount and, for Authentication Type, choose Static IP Authentication and enter your Incredible PBX 2027 server’s public IP address. For Transport, choose UDP. For Device Type, choose Asterisk, IP PBX, Gateway or VoIP Switch. Order a DID in their web panel, and then point the DID to the SubAccount you just created. Be sure to specify atlanta1.voip.ms as the POP from which to receive incoming calls. On the Incredible PBX side, simply Enable the VoIPms trunk and save your update.
Adding a Bootable SSD to Raspberry Pi
Shown below are the two components that make up the 256GB storage solution for the Raspberry Pi. These include the M.2 SSD SATA drive and the M.2 enclosure which provides a USB connector that’s compatible with your RasPi. Assembly of the components takes less than a minute as shown in the steps below:

You can order the M.2 SSD SATA drive and the M.2 enclosure using our Amazon referral links which help support Nerd Vittles and the Incredible PBX open source project.
Once you have assembled your SSD in the sleeve, log back in as root using SSH or Putty. For best performance, insert the SSD drive into one of the blue USB 3.0 ports and verify that /dev/sda device is shown when you issue the command: fdisk -l
Now proceed with the following steps to copy the image from your microSD card to the new SSD SATA drive:
rpi-clone -l -e sda -f sda
# answer prompts with yes and incred2027
# once the image is copied, dismount the drive when prompted
mount /dev/sda2 /mnt/clone
cd /mnt/clone/boot
cp -p -r /boot/* .
sed -i 's|sda2|mmcblk0p2|' /boot/cmdline.txt
cd /
umount /mnt/clone
halt
Now you’re ready to restart your Raspberry Pi from the SSD SATA drive. Remove the microSD card and reboot your server.

Configuring a Softphone for Incredible PBX 2027
We’re in the home stretch now. You can connect virtually any kind of telephone to your new PBX. Plain Old Phones require an analog telephone adapter (ATA) which can be a separate board in your computer from a company such as Digium. SIP phones can be connected directly so long as they have an IP address. These could be hardware devices or software devices such as the YateClient softphone. We’ll start with a free one today so you can begin making calls. You can find dozens of recommendations for hardware-based SIP phones both on Nerd Vittles and the PIAF Forum when you’re ready to get serious about VoIP telephony.
We recommend YateClient which is free. Download it from here or the Mac App Store. Run YateClient once you’ve installed it and enter the credentials for the 701 extension on Incredible PBX. You can find them by running /root/show-passwords. You’ll need the IP address of your server plus your extension 701 password. In the YateClient, fill in the blanks using the IP address of your Server, 701 for your Username, and whatever Password was assigned to the extension when you installed Incredible PBX. Click OK to save your entries.

Once you are registered to extension 701, close the Account window. Then click on YATE’s Telephony Tab and place some test calls to the numerous apps that are preconfigured on Incredible PBX. Dial a few of these to get started:
DEMO - Apps Demo
123 - Reminders
947 - Weather by ZIP Code
951 - Yahoo News
TODAY - Today in History
LENNY - The Telemarketer's Worst Nightmare
If you are a Mac user, another great no-frills softphone is Telephone. Just download and install it from the Mac App Store.
Last but not least, we also like the Zoiper5 free softphone. You can download it for your Windows, Mac, and Linux desktops here.
Audio Issues with Incredible PBX 2027
If you experience one-way or no audio on some calls, add your external IP address and LAN subnet in the GUI by navigating to Settings -> Asterisk SIP Settings. In the NAT Settings section, click Detect Network Settings. Click Submit and Apply Settings to save your changes.
Configuring Gmail as Smart Relay Host
Most Raspberry Pi implementations will be on networks managed by companies like Comcast, Spectrum, and AT&T that block downstream mail servers (that’s you) from sending email. The solution is to use Gmail or your local ISP as a smart relay host to send mail from your server. You’ll need this to deliver voicemails via email. Here’s how to set it up using a Gmail account. IMPORTANT: You MUST use a Gmail App Password instead of your Gmail account password.
/root/enable-gmail-smarthost-for-sendmail
Now send yourself a test email message to make sure things are working properly:
echo "test" | mail -s testmessage yourname@yourmailprovider.com
Incredible PBX 2027 Administration
We’ve eased the pain of administering your new PBX with a collection of scripts which you will find in the /root folder after logging in with SSH or Putty. Here’s a quick summary of what each of the scripts does.
admin-pw-change lets you update the admin password for web browser access to the Incredible PBX GUI.
apache-pw-change lets you update the admin password for Apache applications such as AsteriDex and Reminders.
add-fqdn is used to whitelist a fully-qualified domain name in the firewall. Because Incredible PBX 2027 blocks all traffic from IP addresses that are not whitelisted, this is what you use to authorize an external user for your PBX. The advantage of an FQDN is that you can use a dynamic DNS service to automatically update the IP address associated with an FQDN so that you never lose connectivity.
add-ip is used to whitelist a public IP address in the firewall. See the add-fqdn explanation as to why this matters.
del-acct is used to remove an IP address or FQDN from the firewall’s whitelist.
iptables-restart is the ONLY command you should ever use to restart the IPtables firewall and Fail2Ban.
knock.FAQ contains your PortKnocker credentials for emergency access to your server if the firewall locks you out. Tutorial here.
reset-conference-pins is a script that automatically and randomly resets the user and admin pins for access to the preconfigured conferencing application. Dial C-O-N-F from any registered SIP phone to connect to the conference.
reset-extension-passwords is a script that automatically and randomly resets ALL of the SIP passwords for extensions 701-705. Be careful using this one, or you may disable existing registered phones and cause Fail2Ban to blacklist the IP addresses of those users. HINT: You can place a call to the Ring Group associated with all five extensions by dialing 777.
reset-reminders-pin is a script that automatically and randomly resets the pin required to access the Telephone Reminders application by dialing 123. It’s important to protect this application because a nefarious user could set up a reminder to call a number anywhere in the world assuming your SIP provider’s account was configured to allow such calls.

rpi-clone is a utility that makes it easy to make a bootable image of the microSD card used to start your Raspberry Pi. You’ll need a USB-to-microSD adapter to begin. Insert a backup microSD card large enough to hold all of the data on the primary microSD card (df -h). Insert the USB stick with the card. Identify the backup microSD card, usually sda (fdisk -l). Format the backup microSD card: mkfs.vfat /dev/sda1 && mkfs.ext4 /dev/sda2. Then issue the following command to clone the primary microSD card: rpi-clone -f sda. Tutorial here.
show-feature-codes is a cheat sheet for all of the feature codes which can be dialed from any registered SIP phone. It documents how powerful a platform Incredible PBX 2027 actually is. A similar listing is available in the GUI at Admin -> Feature Codes.
show-passwords is a script that displays ALL of the passwords associated with Incredible PBX 2027. This includes SIP extension passwords, voicemail pins, conference pins, telephone reminders pin, and your Anveo Direct outbound calling pin (if configured). Note that voicemail pins are configured by the user of a SIP extension the first time the user accesses the voicemail system by dialing *97.
timezone-setup lets you reconfigure the correct time zone for your server.
purge-cdr-cel-records cleans out all existing entries in both the CDR and CEL tables of the Asterisk CDR database.
sig-fix disables module signature checking in FreePBX. It is automatically disabled upon installation.
update-IncrediblePBX is the Automatic Update Utility which checks for server updates from incrediblepbx.com every time you log into your server as root using SSH or Putty. Do NOT disable it as it is used to load important fixes and security updates when necessary. We recommend logging into your server at least once a week.
pbxstatus (shown above) displays status of all major components of Incredible PBX 2027.
Forwarding Calls to Your Cellphone. Keep in mind that inbound calls to your DIDs automatically ring all five SIP extensions, 701-705. The easiest way to also ring your cellphone is to set one of these five extensions to forward incoming calls to your cellphone. After logging into your PBX as root, issue the following command to forward calls from extension 705 to your cellphone: asterisk -rx "database put CF 705 6781234567"
To remove call forwarding: asterisk -rx "database del CF 705"
Keeping FreePBX 16 Modules Current
We strongly recommend that you periodically update all of your FreePBX modules to eliminate bugs and to reduce security vulnerabilities. Make a backup image with rpi-clone first! From the Linux CLI, log into your server as root and issue the following commands:
rm -f /tmp/*
fwconsole ma upgradeall
fwconsole reload
/root/sig-fix
systemctl restart apache2
/root/sig-fix
Resolving an Expired Certificate Alert
1. Navigate to Admin -> Certificate Management in the FreePBX GUI
2. Click the Trashcan to delete the Self-Signed Certificate
3. Click New Certificate -> Generate Self-Signed Certificate
4. In the Description field, type: Default
5. Click Generate Certificate button
What About Fax Support?
Come back next week for a pleasant surprise.
Continue Reading: Icing on the Cake for Incredible PBX but do NOT deploy Exim.
Originally published: Monday, January 23, 2023
Need help with Asterisk? Visit the VoIP-info Forum.
Special Thanks to Our Generous Sponsors
FULL DISCLOSURE: ClearlyIP, Skyetel, Vitelity, DigitalOcean, Vultr, VoIP.ms, 3CX, Sangoma, TelecomsXchange and VitalPBX have provided financial support to Nerd Vittles and our open source projects through advertising, referral revenue, and/or merchandise. As an Amazon Associate and Best Buy Affiliate, we also earn from qualifying purchases. We’ve chosen these providers not the other way around. Our decisions are based upon their corporate reputation and the quality of their offerings and pricing. Our recommendations regarding technology are reached without regard to financial compensation except in situations in which comparable products at comparable pricing are available from multiple sources. In this limited case, we support our sponsors because our sponsors support us.
BOGO Bonaza: Enjoy state-of-the-art VoIP service with a $10 credit and half-price SIP service on up to $500 of Skyetel trunking with free number porting when you fund your Skyetel account. No limits on number of simultaneous calls. Quadruple data center redundancy. $25 monthly minimum spend required. Tutorial and sign up details are here.
![]() The lynchpin of Incredible PBX 2020 and beyond is ClearlyIP components which bring management of FreePBX modules and SIP phone integration to a level never before available with any other Asterisk distribution. And now you can configure and reconfigure your new Incredible PBX phones from the convenience of the Incredible PBX GUI.
The lynchpin of Incredible PBX 2020 and beyond is ClearlyIP components which bring management of FreePBX modules and SIP phone integration to a level never before available with any other Asterisk distribution. And now you can configure and reconfigure your new Incredible PBX phones from the convenience of the Incredible PBX GUI.
VitalPBX is perhaps the fastest-growing PBX offering based upon Asterisk with an installed presence in more than 100 countries worldwide. VitalPBX has generously provided a customized White Label version of Incredible PBX tailored for use with all Incredible PBX and VitalPBX custom applications. Follow this link for a free test drive!
Special Thanks to Vitelity. Vitelity is now Voyant Communications and has halted new registrations for the time being. Our special thanks to Vitelity for their unwavering financial support over many years and to the many Nerd Vittles readers who continue to enjoy the benefits of their service offerings. We will keep everyone posted on further developments.
Happy New Year: It’s Incredible PBX 2027 for Debian 11

These past two weeks to celebrate the New Year, we’ve introduced Incredible PBX 2027 for Rocky 8 with AMD64-compatible hardware and Incredible PBX 2027 for Ubuntu 22.04 with AMD64 and ARM64 hardware support. Today we’re pleased to introduce Incredible PBX 2027 for Debian 11 featuring Asterisk® 20 LTS support until the fall of 2027. This release comes with full support for FreePBX® 16 as well as all the Incredible PBX goodies to which you’ve become accustomed.
UPDATE: Proxmox image of Incredible PBX 2027-D now available in the Incredible PBX Repository.
Again we want to offer our thanks to the many talented individuals on the VoIP-Info.org Forum who have assisted us in working through the growing pains of bringing you these new open source products at zero cost. And our special thanks to @kenn10 for his Herculean efforts refining the Incredible PBX 2027 install scripts. Come celebrate the New Year with us and join the party!
If you’re using on-premise hardware, download Debian 11, codenamed bullseye, netinst, for 64-bit PC (amd64). If you’d prefer to experiment in the cloud for about a penny an hour, open an account at Vultr or Digital Ocean using our referral links that support the Nerd Vittles project. You’ll also get some free credit to try out the service. Then create a new $5/month Debian 11, 64-bit instance in your favorite city. Want some cheaper KVM cloud alternatives? Visit the Incredible PBX Wiki for tips.
If your PBX is sitting behind a NAT-based router, you’ll need to redirect incoming UDP 5060-5061 and UDP 10000-20000 traffic to the private IP address of your server. This is required for all of the SIP providers included in the Incredible PBX 2027 builds. Otherwise, all inbound calls will fail.
Installing Incredible PBX 2027 on Debian 11 Server
If you’re building the Debian platform from the ISO, boot your server from the ISO, choose your Language, choose your Location, and choose your Keyboard. Wait for the network to be configured. Then leave the Hostname set as debian. Leave the Domain blank. Set your root password. Create a New User and Password. Set the TimeZone for your clock. Accept the defaults to partition disks. Write the changes to disk. Wait for the base system to be installed. Answer NO at the Scan More Media prompt. Select a Mirror for Package Manager that is close to you. Leave the proxy information blank. At the Software Selection prompt, choose only the bottom two options to get the basics and SSH. Load the GRUB boot manager and select your drive. Then reboot. After reboot, login as the new user and issue these commands:
# set root password
su root
passwd
exit
exit
# log back in as root
# delete temporary user
userdel -r temp-user-name
# decipher server IP address
ip a
# try logging in via SSH: ssh root@ip-address
If you cannot login via SSH or Putty as root then, from the console while logged in as root, issue these commands:
apt install nano -y
cd /etc/ssh
nano -w sshd_config
# change the following entries as shown here:
  PermitRootLogin yes
  PasswordAuthentication yes
# save the file and restart SSH
# Ctrl-X, Y, and press ENTER key
systemctl restart ssh
Once your Debian 11 platform is properly configured, login as root using SSH or Putty. Issue the commands below to kick off the install:
apt install wget tar nano -y
wget http://incrediblepbx.com/IncrediblePBX2027-D.sh
chmod +x IncrediblePBX2027-D.sh
./IncrediblePBX2027-D.sh
Setting a Hostname for Incredible PBX 2027
Once your server is up and running, you’ll need to set a hostname for the machine that is resolvable on the Internet. Failure to do so will make access to the FreePBX GUI a painfully delayed process. If you don’t have an FQDN that can be used, you can use the default: noreply.incrediblepbx.com. To change it, edit /etc/hosts and /etc/hostname. Also enter your new FQDN with the command: hostname myfqdn.com.
Next Steps with Incredible PBX 2027
Before you can manage your PBX through a web browser, you first will need to set the root password for Debian as well as the admin passwords for FreePBX and Apache web apps such as Reminders and AsteriDex. These all can be set by logging into your server as root and issuing the following commands: passwd, admin-pw-change, and apache-pw-change.
Outbound mail functionality needs to be working so that you can receive voicemail messages and faxes by email. To prevent SPAM, most ISPs and ITSPs block messages from downstream mail servers. That would be you. The easiest way to resolve this is to configure SendMail using Gmail as an SMTP Smarthost. You obviously need a Gmail account to implement this and you also will need to obtain an App password for your Gmail account, and use that in lieu of your regular Gmail password when configuring SendMail. With your Gmail username and App password in hand, log into your server as root and run: /root/enable-gmail-smarthost-for-sendmail.
If your Incredible PBX 2027 is hosted with a cloud provider, be advised that some providers do not include a swap file as part of their offering. To see if a swapfile is enabled, issue the command: free -h. FreePBX requires a swap file. To add one, issue this command after logging into your server as root: /root/create-swapfile-DO.
To correctly set the time on your PBX, run: /root/timezone-setup.
By default, the voicemail password for each of the configured extensions (701-705) is set to the extension number. This means the user will be prompted to set a voicemail password on the first login to voicemail for each extension. A phone must be registered to the actual extension to access its voicemail account. For example, once a phone is registered to extension 701, the voicemail setup can be accessed by dialing *98701.
Overview of the Initial Asterisk Setup Process
For those new to PBXs, here’s a two paragraph summary of how Voice over IP (VoIP) works. Phones connected to your PBX are registered with Extensions so that they can make and receive calls. When a PBX user picks up a phone and dials a number, an Outbound Route tells the PBX which Trunk to use to place the call based upon established dialing rules. Unless the dialed number is a local extension, a Trunk registered with some service provider accepts the call, and the PBX sends the call to that provider. The provider then routes the call to its destination where the recipient’s phone rings to announce the incoming call. When the recipient picks up the phone, the conversation begins.
Looking at things from the other end, when a caller somewhere in the world wishes to reach you, the caller picks up a telephone and dials a number known as a DID that is assigned to you by a provider with whom you have established service. When the provider receives the call to your DID, it routes the call to your PBX based upon destination information you established with the provider. Your PBX receives the call with information identifying the DID of the call as well as the CallerID name and number of the caller. An Inbound Route on your PBX then determines where to send the call based upon that DID and CallerID information. Typically, a call is routed to an Extension, a group of Extensions known as a Ring Group, or an IVR or AutoAttendant giving the caller choices on routing the call to the desired destination. Once the call is routed to an Extension, the PBX rings the phone registered to that Extension. When you pick up the phone, the conversation begins.
Configuring Trunks with Incredible PBX GUI
Perhaps the most difficult component to configure in the PBX is the Trunk. Almost every provider has a different way of doing things. We’ve taken some of the torture out of the exercise by providing a script which will configure settings for dozens of providers in seconds. Once installed, all you need to do is edit the desired Trunk (Connectivity:Trunks), change the Disable Trunk entry to No, and insert your credentials in both the PEER Details and Registration string of the SIP Settings Outgoing and Incoming tabs. Skyetel is enabled by default and needs no setup on the PBX side.
Configuring Skyetel for Incredible PBX 2027
If you’ve decided to go with Skyetel, here’s the drill. Sign up for Skyetel service and take advantage of the Nerd Vittles specials. First, complete the Prequalification Form here. You then will be provided a link to the Skyetel site to complete your registration. Once you have registered on the Skyetel site and your account has been activated, open a support ticket and request the $10 credit for your account by referencing the Nerd Vittles special offer. Once you are satisfied with the service, fund your account as desired, and Skyetel will match your deposit of up to $250 simply by opening another ticket. That gets you up to $500 of half-price calling. Credit is limited to one per person/company/address/location. Effective 10/1/2023, $25/month minimum spend required.
Skyetel does not use SIP registrations to make connections to your PBX. Instead, Skyetel utilizes Endpoint Groups to identify which servers can communicate with the Skyetel service. An Endpoint Group consists of a Name, an IP address, a UDP or TCP port for the connection, and a numerical Priority for the group. For incoming calls destined to your PBX, DIDs are associated with an Endpoint Group to route the calls to your PBX. For outgoing calls from your PBX, a matching Endpoint Group is required to authorize outbound calls through the Skyetel network. Thus, the first step in configuring the Skyetel side for use with your PBX is to set up an Endpoint Group. Here’s a typical setup for Incredible PBX 2027:
- Name: MyPBX
- Priority: 1
- IP Address: PBX-Public-IP-Address
- Port: 5060
- Protocol: UDP
- Description: my.incrediblepbx.com
To receive incoming PSTN calls, you’ll need at least one DID. On the Skyetel site, you acquire DIDs under the Phone Numbers tab. You have the option of Porting in Existing Numbers (free for the first 60 days after you sign up for service) or purchasing new ones under the Buy Phone Numbers menu option.
Once you have acquired one or more DIDs, navigate to the Local Numbers or Toll Free Numbers tab and specify the desired SIP Format and Endpoint Group for each DID. Add SMS/MMS and E911 support, if desired. Call Forwarding and Failover are also supported. That completes the VoIP setup on the Skyetel side. System Status is always available here.
Configuring VoIP.ms for Incredible PBX 2027
To sign up for VoIP.ms service, may we suggest you use our signup link so that Nerd Vittles gets a referral credit for your signup. Once your account is set up, you’ll need to set up a SIP SubAccount and, for Authentication Type, choose Static IP Authentication and enter your Incredible PBX 2027 server’s public IP address. For Transport, choose UDP. For Device Type, choose Asterisk, IP PBX, Gateway or VoIP Switch. Order a DID in their web panel, and then point the DID to the SubAccount you just created. Be sure to specify atlanta1.voip.ms as the POP from which to receive incoming calls. In the Incredible PBX GUI, be sure to enable the VoIP.ms trunk.
Configuring V1VoIP for Incredible PBX 2027
To sign up for V1VoIP service, sign up on their web site. Then login to your account and order a DID under the DIDs tab. Once the DID has been assigned, choose View DIDs and click on the Forwarding button beside your DID. For Option #1, choose Forward to IP Address/PBX. For the Forwarding Address, enter the public IP address of your server. For the T/O (timeout) value, set it to 2o seconds. Then click the Update button. Under the Termination tab, create a new Endpoint with the public IP address of your server so that you can place outbound calls through V1VoIP. In the Incredible PBX GUI, be sure to enable all of the V1VoIP trunks.
Configuring Anveo Direct for Incredible PBX 2027
To sign up for Anveo Direct service, sign up on their web site and then login. After adding funds to your account, purchase a DID under Inbound Service -> Order DID. Next, choose Configure Destination SIP Trunk. Give the Trunk a name. For the Primary SIP URI, enter $[E164]$@server-IP-address. For Call Options, select your new DID from the list. You also must whitelist your public IP address under Outbound Service -> Configure. Create a new Call Termination Trunk and name it to match your server. For Dialing Prefix, choose six alphanumeric characters beginning with a zero. In Authorized IP Addresses, enter the public IP address of your server. Set an appropriate rate cap. We like $0.01 per minute to be safe. Set a concurrent calls limit. We like 2. For the Call Routing Method, choose Least Cost unless you’re feeling extravagant. For Routes/Carriers, choose Standard Routes. Write down your Dialing Prefix and then click the Save button.
Before you can make outbound calls through Anveo Direct from your PBX, you first must configure the Dialing Prefix that you wrote down in the previous step. Log into the GUI as admin using a web browser and edit the Anveo-Out trunk in Connectivity -> Trunks. Enable the Trunk. Then click on the custom-Settings tab and replace anveo-pin with your actual Dialing Prefix. Click Submit and Apply Config to complete the setup. In the Incredible PBX GUI, be sure to enable all of the remaining Anveo trunks.
By default, incoming Anveo Direct calls will be processed by the Default inbound route on your PBX. If you wish to redirect incoming Anveo Direct calls using DID-specific inbound routes, then you’ve got a bit more work to do. In addition to creating the inbound route using the 11-digit Anveo Direct DID, enter the following commands after logging into your server as root using SSH/Putty:
cd /etc/asterisk
echo "[from-anveo]" >> extensions_custom.conf
echo "exten => _.,1,Ringing" >> extensions_custom.conf
echo "exten => _.,n,Goto(from-trunk,\\${SIP_HEADER(X-anveo-e164)},1)" >> extensions_custom.conf
asterisk -rx "dialplan reload"
Configuring Extensions with Incredible PBX GUI
Extensions are created using the Incredible PBX GUI: Applications:Extensions. Many SIP phones expect extensions to communicate on UDP port 5060. If this is the case with your SIP phone or softphone, then always create Chan_SIP extensions which communicate on UDP 5060. If your SIP phone or softphone provide port flexibility, then you have a choice in the type of SIP extension to create: Chan_SIP or the more versatile PJSIP (UDP 5061). Just remember to always configure SIP extensions with NAT Mode=YES in the Advanced tab. If your VoIP phones or softphones support IAX connectivity, you may wish to consider IAX extensions which avoid NAT problems.
When you create a new Extension, a new entry is automatically created in the PBX Internal Directory. If you wish to allow individual users to manage their extensions or use the WebRTC softphone, then you will also have to create a (very) secure password for User Control Panel (UCP) access. Choose Admin:User Management and click on the key icon of the desired extension to assign a password for UCP and WebRTC access.
Configuring a Desktop Softphone for Incredible PBX
We’re in the home stretch now. You can connect virtually any kind of telephone to your new PBX. Plain Old Phones require an analog telephone adapter (ATA) which can be a separate board in your computer from a company such as Digium. Or it can be a standalone SIP device such as ObiHai’s OBi100 or OBi110 (if you have a phone line from Ma Bell to hook up as well). SIP phones can be connected directly so long as they have an IP address. These could be hardware devices or software devices such as the YateClient softphone. We’ll start with a free one today so you can begin making calls. You can find dozens of recommendations for hardware-based SIP phones both on Nerd Vittles and the PIAF Forum when you’re ready to get serious about VoIP telephony.
We recommend YateClient for Windows which is free. Download it from here. Run YateClient once you’ve installed it and enter the credentials for the 701 extension on Incredible PBX. You can find them by running /root/show-passwords. You’ll need the IP address of your server plus your extension 701 password. In the YateClient, fill in the blanks using the IP address of your Server, 701 for your Username, and whatever Password was assigned to the extension when you installed Incredible PBX. Click OK to save your entries.
Once you are registered to extension 701, close the Account window. Then click on YATE’s Telephony Tab and place some test calls to the numerous apps that are preconfigured on Incredible PBX. Dial a few of these to get started:
DEMO - Apps Demo
123 - Reminders
947 - Weather by ZIP Code
951 - Yahoo News
TODAY - Today in History
LENNY - The Telemarketer's Worst Nightmare
If you are a Mac user, another great no-frills softphone is Telephone. Just download and install it from the Mac App Store. For Android users, check out the terrific new VitalPBX Communicator. Works flawlessly with Incredible PBX.
Configuring a Softphone Extension on a Smartphone
Adding an Incredible PBX extension to your smartphone gets a little trickier. Whether you’re an iPhone or Android lover, all smartphones use batteries, and you don’t want to drain your battery by running a softphone as a foreground app all the time. Fortunately, you now have some choices in softphones engineered to work without draining your battery. While they all cost money, it’s not much money. We’ve written about all the choices, and you’ll find the links in our Softphone Provider Recommendations on the new Incredible PBX Wiki.
With PJsip extensions, you’re not limited to a single phone connection at a time, and we’ve preconfigured extension 701 to support ten simultaneous connections. The setup on the softphone side is simple. For the server, enter the actual IP address of your PBX in the following format: 22.33.44.55:5061. Then enter 701 for the username and enter the password assigned to the 701 extension on your PBX. When an incoming call arrives, all the phones registered to extension 701 will ring simultaneously. Simply answer the call on the phone that is most convenient. For extension 702, you can change the number of simultaneous connections by clicking the Advanced tab and setting the number in Max Contacts.
Configuring Outbound Routes in Incredible PBX GUI
Outbound Routes serve a couple of purposes. First, they assure that calls placed by users of your PBX are routed out through an appropriate trunk to reach their destination in the least costly manner. Second, they serve as a security mechanism by either blocking or restricting certain calls by requiring a PIN to complete the calls. Never authorize recurring charges on credit cards registered with your VoIP providers and, if possible, place pricing limits on calls with your providers. If a bad guy were to break into your PBX, you don’t want to give the intruder a blank check to make unauthorized calls. And you certainly don’t want to join the $100,000 Phone Bill Club.
To create outbound routes in the Incredible PBX GUI, navigate to Connectivity:Outbound Routes and click Add Outbound Route. In the Route Settings tab, give the Outbound Route a name and choose one or more trunks to use for the outbound calls. In the Dial Patterns tab, specify the dial strings that must be matched to use this Outbound Route. NXXNXXXXXX would require only 10-digit numbers with the first and fourth digits being a number between 2 and 9. Note that Outbound Routes are searched from the top entry to the bottom until there is a match. Make certain that you order your routes correctly and then place test calls watching the Asterisk CLI to make sure the calls are routed as you intended.
Configuring Inbound Routes in Incredible PBX GUI
Inbound Routes, as the name implies, are used to direct incoming calls to a specific destination. That destination could be an extension, a ring group, an IVR or AutoAttendant, or even a conference or DISA extension to place outbound calls (hopefully with a very secure password). Inbound Routes can be identified by DID, CallerID number, or both. To create Inbound Routes, choose Connectivity:Inbound Routes and then click Add Inbound Route. Provide at least a Description for the route, a DID to be matched, and the Destination for the incoming calls that match. If you only want certain callers to be able to reach certain extensions, add a CallerID number to your matching criteria. You can add Call Recording and CallerID CNAM Lookups under the Other tab.
Audio Issues with Incredible PBX 2027
While it is always a good idea anyway, if you experience one-way or no audio on some calls, be sure to add your external IP address and LAN subnet in the GUI by navigating to Settings -> Asterisk SIP Settings. In the NAT Settings section, click Detect Network Settings. Click Submit and Apply Settings to save your changes.
Adding Incredible PBX 2027 to an OpenVPN Network
We previously have documented the procedure for creating an OpenVPN server as well as OpenVPN client templates (.ovpn). If you need a refresher, the tutorial is here. To add your Incredible PBX 2027 server to an existing OpenVPN network, begin by creating an incrediblepbx2027.ovpn template on your OpenVPN server. Be sure to comment out or delete the setenv line in the template. Then copy this template to /etc on your Incredible PBX 2027 server. The following commands are already in place:
echo "[Unit]
Description=openvpn2027
ConditionPathExists=/etc/openvpn-start
After=rclocal.service
[Service]
Type=forking
ExecStart=/etc/openvpn-start /etc/incrediblepbx2027.ovpn
TimeoutSec=0
StandardOutput=tty
RemainAfterExit=yes
PermissionsStartOnly=true
SysVStartPriority=99
[Install]
WantedBy=multi-user.target" > /etc/systemd/system/openvpn2027.service
We’ve also enabled this openvpn2027.service which will start when you reboot your server. The OpenVPN IP address should now appear on the LAN line in pbxstatus:
systemctl enable openvpn2027.service
reboot
Incredible PBX 2027 Administration
We’ve eased the pain of administering your new PBX with a collection of scripts which you will find in the /root folder after logging in with SSH or Putty. Here’s a quick summary of what each of the scripts does.
add-fqdn is used to whitelist a fully-qualified domain name in the firewall. Because Incredible PBX 2027 blocks all traffic from IP addresses that are not whitelisted, this is what you use to authorize an external user for your PBX. The advantage of an FQDN is that you can use a dynamic DNS service to automatically update the IP address associated with an FQDN so that you never lose connectivity.
add-ip is used to whitelist a public IP address in the firewall. See the add-fqdn explanation as to why this matters.
del-acct is used to remove an IP address or FQDN from the firewall’s whitelist.
admin-pw-change is used to set the admin password for access to the FreePBX/Incredible PBX web GUI using a browser pointed to the local IP address of your server.
apache-pw-change is used to set the admin password for access to Apache/Incredible PBX apps including AsteriDex and Reminders. This provides a password layer of protection for access to these applications.
incrediblebackup2021 makes a backup of critical components on your PBX to a tarball saved in /backup. This should be copied to safe location off-site for a rainy day.
incrediblerestore2021 restores a backup file which has been copied to the /backup folder.
ipchecker is a script which deciphers the public IP addresses associated with whitelisted FQDNs created with add-fqdn on your server. If any of the addresses have changed, the firewall is restarted after updating the IP addresses. By default, it is executed every 10 minutes by /etc/crontab.
licenses.sh displays the license associated with each of the FreePBX modules on your server.
logos-b-gone removes proprietary artwork from your PBX and is no longer necessary with the included IncrediblePBX FreePBX module.
mime-construct is a command-line utility to send emails with attachments.
neorouter-login is a script to add your PBX to a NeoRouter VPN. Tutorial here.
odbc-gen.sh is a script that was run to generate the ODBC settings for Asterisk. Do NOT use it.
openvpn-start is a script to add your PBX to an existing OpenVPN network using an .ovpn config file. Tutorial here.
pbxstatus displays status of all major components of Incredible PBX 2027.
pptp-install is a script to create a PPTP network connection for your PBX. Tutorial here.
purge-cdr-cel-records removes all CDR and CEL records from the MySQL database.
reset-conference-pins is a script that automatically and randomly resets the user and admin pins for access to the preconfigured conferencing application. Dial C-O-N-F from any registered SIP phone to connect to the conference.
reset-extension-passwords is a script that automatically and randomly resets ALL of the SIP passwords for extensions 701-705. Be careful using this one, or you may disable existing registered phones and cause Fail2Ban to blacklist the IP addresses of those users. HINT: You can place a call to the Ring Group associated with all five extensions by dialing 777.
reset-reminders-pin is a script that automatically and randomly resets the pin required to access the Telephone Reminders application by dialing 123. It’s important to protect this application because a nefarious user could set up a reminder to call a number anywhere in the world assuming your SIP provider’s account was configured to allow such calls.
show-feature-codes is a cheat sheet for all of the feature codes which can be dialed from any registered SIP phone. It documents how powerful a platform Incredible PBX 2027 actually is. A similar listing is available in the GUI at Admin -> Feature Codes.
show-passwords is a script that displays most of the passwords associated with Incredible PBX 2027. This includes SIP extension passwords, voicemail pins, conference pins, telephone reminders pin, and your Anveo Direct outbound calling pin (if configured). Note that voicemail pins are configured by the user of a SIP extension the first time the user accesses the voicemail system by dialing *97.
sig-fix disables Module Signature Checking in the FreePBX GUI. This should not be necessary unless you have added or edited FreePBX Modules with missing module signatures.
sms-skyetel is a script to send SMS messages using a Skyetel trunk.
sms-voip.ms is a script to send SMS messages using a VoIP.ms trunk.
sms-blast, sms-blaster, and sms-dictator are scripts for message blasting. Tutorial here.
timezone-setup is a script to set the timezone for your PBX.
update-IncrediblePBX is a script that runs the Automatic Update Utility whenever you login to your server as root. These updates typically resolve bugs and security issues with your PBX. Do NOT remove it.
wolfram is a script to deploy Wolfram Alpha on your PBX. Tutorial here.
Forwarding Calls to Your Cellphone. Keep in mind that inbound calls to your DIDs automatically ring all five SIP extensions, 701-705. The easiest way to also ring your cellphone is to set one of these five extensions to forward incoming calls to your cellphone. After logging into your PBX as root, issue the following command to forward calls from extension 705 to your cellphone: asterisk -rx "database put CF 705 6781234567"
To remove call forwarding: asterisk -rx "database del CF 705"
Implementing Call By Name with 411
Once you have an Outbound Trunk and Route configured, deploying Call by Name by dialing 411 is simple. The way it works is to pick up any phone connected to your PBX and dial 411. When prompted for the name of the person or company to call, say the name as you entered it in the AsteriDex directory, e.g. Delta Air Lines. The name will then be looked up to decipher the number of the person or company to call. Then the call will be placed using your default outbound route. To deploy Call By Name, simply follow the setup instructions in this Nerd Vittles tutorial.
Keeping FreePBX 16 Modules Current
We strongly recommend that you periodically update all of your FreePBX modules to eliminate bugs and to reduce security vulnerabilities. From the Linux CLI, log into your server as root and issue the following commands:
rm -f /tmp/*
fwconsole ma upgradeall
fwconsole reload
/root/sig-fix
systemctl restart apache2
/root/sig-fix
Originally published: Monday, January 16, 2023
Need help with Asterisk? Visit the VoIP-info Forum.
Special Thanks to Our Generous Sponsors
FULL DISCLOSURE: ClearlyIP, Skyetel, Vitelity, DigitalOcean, Vultr, VoIP.ms, 3CX, Sangoma, TelecomsXchange and VitalPBX have provided financial support to Nerd Vittles and our open source projects through advertising, referral revenue, and/or merchandise. As an Amazon Associate and Best Buy Affiliate, we also earn from qualifying purchases. We’ve chosen these providers not the other way around. Our decisions are based upon their corporate reputation and the quality of their offerings and pricing. Our recommendations regarding technology are reached without regard to financial compensation except in situations in which comparable products at comparable pricing are available from multiple sources. In this limited case, we support our sponsors because our sponsors support us.
BOGO Bonaza: Enjoy state-of-the-art VoIP service with a $10 credit and half-price SIP service on up to $500 of Skyetel trunking with free number porting when you fund your Skyetel account. No limits on number of simultaneous calls. Quadruple data center redundancy. $25 monthly minimum spend required. Tutorial and sign up details are here.
![]() The lynchpin of Incredible PBX 2020 and beyond is ClearlyIP components which bring management of FreePBX modules and SIP phone integration to a level never before available with any other Asterisk distribution. And now you can configure and reconfigure your new Incredible PBX phones from the convenience of the Incredible PBX GUI.
The lynchpin of Incredible PBX 2020 and beyond is ClearlyIP components which bring management of FreePBX modules and SIP phone integration to a level never before available with any other Asterisk distribution. And now you can configure and reconfigure your new Incredible PBX phones from the convenience of the Incredible PBX GUI.
VitalPBX is perhaps the fastest-growing PBX offering based upon Asterisk with an installed presence in more than 100 countries worldwide. VitalPBX has generously provided a customized White Label version of Incredible PBX tailored for use with all Incredible PBX and VitalPBX custom applications. Follow this link for a free test drive!
Special Thanks to Vitelity. Vitelity is now Voyant Communications and has halted new registrations for the time being. Our special thanks to Vitelity for their unwavering financial support over many years and to the many Nerd Vittles readers who continue to enjoy the benefits of their service offerings. We will keep everyone posted on further developments.
Happy New Year: It’s Incredible PBX 2027 for Ubuntu 22.04

Last week to celebrate New Year’s Day, we introduced Incredible PBX 2027 for Rocky 8 with AMD64-compatible hardware. Today we’re pleased to introduce Incredible PBX 2027 for Ubuntu 22.04 LTS with its ten-year life cycle to complement Asterisk® 20 featuring LTS support until the fall of 2027. Both new AMD64 releases come with full support for FreePBX® 16 as well as all the Incredible PBX goodies to which you’ve become accustomed.
We also want to offer our thanks to the many talented individuals on the VoIP-Info.org Forum who have assisted us in working through the growing pains of bringing you these new open source products at zero cost. And our special thanks to @kenn10 for his Herculean efforts refining the Incredible PBX 2027 install scripts. Come join the party!
If you’re using on-premise hardware, begin by downloading the Live Server ISO image of Ubuntu 22.04 for amd64. Follow our previous tutorials for tips on installation with VirtualBox or VMware ESXi. If you’d prefer to experiment in the cloud for about a penny an hour, open an account at Vultr or Digital Ocean using our referral links that support the Nerd Vittles project. You’ll also get some free credit to try out the service. Then create a new $5/month Ubuntu 22.04, 64-bit instance in your favorite city. Want some cheaper KVM cloud alternatives? Visit the Incredible PBX Wiki for tips.
If your PBX is sitting behind a NAT-based router, you’ll need to redirect incoming UDP 5060-5061 and UDP 10000-20000 traffic to the private IP address of your server. This is required for all of the SIP providers included in the Incredible PBX 2027 build. Otherwise, all inbound calls will fail.
Installing Incredible PBX 2027 on Ubuntu 22.04 Server
If you’re building the Ubuntu platform from the ISO, select the option to install a Minimal Server Platform. Then you’ll need to create a temporary user as part of the install. Enable installation of SSH and no additional components. After reboot, login as the new user and issue these commands:
# set root password
sudo passwd root
exit
# log back in as root
# delete temporary user
userdel -r temp-user-name
# decipher server IP address
ip a
# try logging in via SSH: ssh root@ip-address
On desktop machines, if you experience a 2-minute delay on boot up waiting for network to be configured, issue these two commands after logging in as root:
systemctl disable systemd-networkd-wait-online.service
systemctl mask systemd-networkd-wait-online.service
If you cannot login via SSH or Putty as root then, from the console while logged in as root, issue these commands:
apt install nano -y
cd /etc/ssh
nano -w sshd_config
# change the following entries as shown here:
  PermitRootLogin yes
  PasswordAuthentication yes
# save the file and restart SSH
# Ctrl-X, Y, and press ENTER key
systemctl restart ssh
ALERT: On some cloud platforms, e.g. RackNerds, they reportedly provide a non-interactive version of Ubuntu 22.04. So, after completing the steps above, you will need to run the following script: /usr/local/sbin/unminimize. Next, run: apt update && apt upgrade. Finally, reboot the server and log back in as root to continue.
Once your Ubuntu 22.04 platform is properly configured, login as root using SSH or Putty. Issue the commands below to kick off the install:
apt install wget tar nano -y
wget http://incrediblepbx.com/IncrediblePBX2027-U.sh
chmod +x IncrediblePBX2027-U.sh
./IncrediblePBX2027-U.sh
On homespun, ISO-built platforms, you will be prompted within a minute or so on whether to preserve your existing SSH configuration. Press ENTER to accept the default.
Setting a Hostname for Incredible PBX 2027
Once your server is up and running, you’ll need to set a hostname for the machine that is resolvable on the Internet. Failure to do so will make access to the FreePBX GUI a painfully delayed process. If you don’t have an FQDN that can be used, you can use the default: noreply.incrediblepbx.com. To change it, edit /etc/hosts and /etc/hostname. Also enter your new FQDN with the command: hostname myfqdn.com.
If you’re running your PBX in the Oracle Cloud, this message thread will show you how to set the hostname there.
Next Steps with Incredible PBX 2027
Before you can manage your PBX through a web browser, you first will need to set the root password for Ubuntu as well as the admin passwords for FreePBX and Apache web apps such as Reminders and AsteriDex. These all can be set by logging into your server as root and issuing the following commands: passwd, admin-pw-change, and apache-pw-change.
Outbound mail functionality needs to be working so that you can receive voicemail messages and faxes by email. To prevent SPAM, most ISPs and ITSPs block messages from downstream mail servers. That would be you. The easiest way to resolve this is to configure SendMail using Gmail as an SMTP Smarthost. You obviously need a Gmail account to implement this and you also will need to obtain an App password for your Gmail account, and use that in lieu of your regular Gmail password when configuring SendMail. With your Gmail username and App password in hand, log into your server as root and run: /root/enable-gmail-smarthost-for-sendmail.
If your Incredible PBX 2027 is hosted with a cloud provider, be advised that many providers do not include a swap file as part of their offering. FreePBX requires a swap file. To add one, issue this command after logging into your server as root: /root/create-swapfile-DO.
To correctly set the time on your PBX, run: /root/timezone-setup.
By default, the voicemail password for each of the configured extensions (701-705) is set to the extension number. This means the user will be prompted to set a voicemail password on the first login to voicemail for each extension. A phone must be registered to the actual extension to access its voicemail account. For example, once a phone is registered to extension 701, the voicemail setup can be accessed by dialing *98701.
Overview of the Initial Asterisk Setup Process
For those new to PBXs, here’s a two paragraph summary of how Voice over IP (VoIP) works. Phones connected to your PBX are registered with Extensions so that they can make and receive calls. When a PBX user picks up a phone and dials a number, an Outbound Route tells the PBX which Trunk to use to place the call based upon established dialing rules. Unless the dialed number is a local extension, a Trunk registered with some service provider accepts the call, and the PBX sends the call to that provider. The provider then routes the call to its destination where the recipient’s phone rings to announce the incoming call. When the recipient picks up the phone, the conversation begins.
Looking at things from the other end, when a caller somewhere in the world wishes to reach you, the caller picks up a telephone and dials a number known as a DID that is assigned to you by a provider with whom you have established service. When the provider receives the call to your DID, it routes the call to your PBX based upon destination information you established with the provider. Your PBX receives the call with information identifying the DID of the call as well as the CallerID name and number of the caller. An Inbound Route on your PBX then determines where to send the call based upon that DID and CallerID information. Typically, a call is routed to an Extension, a group of Extensions known as a Ring Group, or an IVR or AutoAttendant giving the caller choices on routing the call to the desired destination. Once the call is routed to an Extension, the PBX rings the phone registered to that Extension. When you pick up the phone, the conversation begins.
Configuring Trunks with Incredible PBX GUI
Perhaps the most difficult component to configure in the PBX is the Trunk. Almost every provider has a different way of doing things. We’ve taken some of the torture out of the exercise by providing a script which will configure settings for dozens of providers in seconds. Once installed, all you need to do is edit the desired Trunk (Connectivity:Trunks), change the Disable Trunk entry to No, and insert your credentials in both the PEER Details and Registration string of the SIP Settings Outgoing and Incoming tabs. Skyetel is enabled by default and needs no setup on the PBX side.
Configuring Skyetel for Incredible PBX 2027
If you’ve decided to go with Skyetel, here’s the drill. Sign up for Skyetel service and take advantage of the Nerd Vittles specials. First, complete the Prequalification Form here. You then will be provided a link to the Skyetel site to complete your registration. Once you have registered on the Skyetel site and your account has been activated, open a support ticket and request the $10 credit for your account by referencing the Nerd Vittles special offer. Once you are satisfied with the service, fund your account as desired, and Skyetel will match your deposit of up to $250 simply by opening another ticket. That gets you up to $500 of half-price calling. Credit is limited to one per person/company/address/location. Effective 10/1/2023, $25/month minimum spend required.
Skyetel does not use SIP registrations to make connections to your PBX. Instead, Skyetel utilizes Endpoint Groups to identify which servers can communicate with the Skyetel service. An Endpoint Group consists of a Name, an IP address, a UDP or TCP port for the connection, and a numerical Priority for the group. For incoming calls destined to your PBX, DIDs are associated with an Endpoint Group to route the calls to your PBX. For outgoing calls from your PBX, a matching Endpoint Group is required to authorize outbound calls through the Skyetel network. Thus, the first step in configuring the Skyetel side for use with your PBX is to set up an Endpoint Group. Here’s a typical setup for Incredible PBX 2027:
- Name: MyPBX
- Priority: 1
- IP Address: PBX-Public-IP-Address
- Port: 5060
- Protocol: UDP
- Description: my.incrediblepbx.com
To receive incoming PSTN calls, you’ll need at least one DID. On the Skyetel site, you acquire DIDs under the Phone Numbers tab. You have the option of Porting in Existing Numbers (free for the first 60 days after you sign up for service) or purchasing new ones under the Buy Phone Numbers menu option.
Once you have acquired one or more DIDs, navigate to the Local Numbers or Toll Free Numbers tab and specify the desired SIP Format and Endpoint Group for each DID. Add SMS/MMS and E911 support, if desired. Call Forwarding and Failover are also supported. That completes the VoIP setup on the Skyetel side. System Status is always available here.
Configuring VoIP.ms for Incredible PBX 2027
To sign up for VoIP.ms service, may we suggest you use our signup link so that Nerd Vittles gets a referral credit for your signup. Once your account is set up, you’ll need to set up a SIP SubAccount and, for Authentication Type, choose Static IP Authentication and enter your Incredible PBX 2027 server’s public IP address. For Transport, choose UDP. For Device Type, choose Asterisk, IP PBX, Gateway or VoIP Switch. Order a DID in their web panel, and then point the DID to the SubAccount you just created. Be sure to specify atlanta1.voip.ms as the POP from which to receive incoming calls. In the Incredible PBX GUI, be sure to enable the VoIP.ms trunk.
Configuring V1VoIP for Incredible PBX 2027
To sign up for V1VoIP service, sign up on their web site. Then login to your account and order a DID under the DIDs tab. Once the DID has been assigned, choose View DIDs and click on the Forwarding button beside your DID. For Option #1, choose Forward to IP Address/PBX. For the Forwarding Address, enter the public IP address of your server. For the T/O (timeout) value, set it to 2o seconds. Then click the Update button. Under the Termination tab, create a new Endpoint with the public IP address of your server so that you can place outbound calls through V1VoIP. In the Incredible PBX GUI, be sure to enable all of the V1VoIP trunks.
Configuring Anveo Direct for Incredible PBX 2027
To sign up for Anveo Direct service, sign up on their web site and then login. After adding funds to your account, purchase a DID under Inbound Service -> Order DID. Next, choose Configure Destination SIP Trunk. Give the Trunk a name. For the Primary SIP URI, enter $[E164]$@server-IP-address. For Call Options, select your new DID from the list. You also must whitelist your public IP address under Outbound Service -> Configure. Create a new Call Termination Trunk and name it to match your server. For Dialing Prefix, choose six alphanumeric characters beginning with a zero. In Authorized IP Addresses, enter the public IP address of your server. Set an appropriate rate cap. We like $0.01 per minute to be safe. Set a concurrent calls limit. We like 2. For the Call Routing Method, choose Least Cost unless you’re feeling extravagant. For Routes/Carriers, choose Standard Routes. Write down your Dialing Prefix and then click the Save button.
Before you can make outbound calls through Anveo Direct from your PBX, you first must configure the Dialing Prefix that you wrote down in the previous step. Log into the GUI as admin using a web browser and edit the Anveo-Out trunk in Connectivity -> Trunks. Enable the Trunk. Then click on the custom-Settings tab and replace anveo-pin with your actual Dialing Prefix. Click Submit and Apply Config to complete the setup. In the Incredible PBX GUI, be sure to enable all of the remaining Anveo trunks.
By default, incoming Anveo Direct calls will be processed by the Default inbound route on your PBX. If you wish to redirect incoming Anveo Direct calls using DID-specific inbound routes, then you’ve got a bit more work to do. In addition to creating the inbound route using the 11-digit Anveo Direct DID, enter the following commands after logging into your server as root using SSH/Putty:
cd /etc/asterisk
echo "[from-anveo]" >> extensions_custom.conf
echo "exten => _.,1,Ringing" >> extensions_custom.conf
echo "exten => _.,n,Goto(from-trunk,\\${SIP_HEADER(X-anveo-e164)},1)" >> extensions_custom.conf
asterisk -rx "dialplan reload"
Configuring Extensions with Incredible PBX GUI
Extensions are created using the Incredible PBX GUI: Applications:Extensions. Many SIP phones expect extensions to communicate on UDP port 5060. If this is the case with your SIP phone or softphone, then always create Chan_SIP extensions which communicate on UDP 5060. If your SIP phone or softphone provide port flexibility, then you have a choice in the type of SIP extension to create: Chan_SIP or the more versatile PJSIP (UDP 5061). Just remember to always configure SIP extensions with NAT Mode=YES in the Advanced tab. If your VoIP phones or softphones support IAX connectivity, you may wish to consider IAX extensions which avoid NAT problems.
When you create a new Extension, a new entry is automatically created in the PBX Internal Directory. If you wish to allow individual users to manage their extensions or use the WebRTC softphone, then you will also have to create a (very) secure password for User Control Panel (UCP) access. Choose Admin:User Management and click on the key icon of the desired extension to assign a password for UCP and WebRTC access.
Configuring a Desktop Softphone for Incredible PBX
We’re in the home stretch now. You can connect virtually any kind of telephone to your new PBX. Plain Old Phones require an analog telephone adapter (ATA) which can be a separate board in your computer from a company such as Digium. Or it can be a standalone SIP device such as ObiHai’s OBi100 or OBi110 (if you have a phone line from Ma Bell to hook up as well). SIP phones can be connected directly so long as they have an IP address. These could be hardware devices or software devices such as the YateClient softphone. We’ll start with a free one today so you can begin making calls. You can find dozens of recommendations for hardware-based SIP phones both on Nerd Vittles and the PIAF Forum when you’re ready to get serious about VoIP telephony.
We recommend YateClient for Windows which is free. Download it from here. Run YateClient once you’ve installed it and enter the credentials for the 701 extension on Incredible PBX. You can find them by running /root/show-passwords. You’ll need the IP address of your server plus your extension 701 password. In the YateClient, fill in the blanks using the IP address of your Server, 701 for your Username, and whatever Password was assigned to the extension when you installed Incredible PBX. Click OK to save your entries.
Once you are registered to extension 701, close the Account window. Then click on YATE’s Telephony Tab and place some test calls to the numerous apps that are preconfigured on Incredible PBX. Dial a few of these to get started:
DEMO - Apps Demo
123 - Reminders
947 - Weather by ZIP Code
951 - Yahoo News
TODAY - Today in History
LENNY - The Telemarketer's Worst Nightmare
If you are a Mac user, another great no-frills softphone is Telephone. Just download and install it from the Mac App Store. For Android users, check out the terrific new VitalPBX Communicator. Works flawlessly with Incredible PBX.
Configuring a Softphone Extension on a Smartphone
Adding an Incredible PBX extension to your smartphone gets a little trickier. Whether you’re an iPhone or Android lover, all smartphones use batteries, and you don’t want to drain your battery by running a softphone as a foreground app all the time. Fortunately, you now have some choices in softphones engineered to work without draining your battery. While they all cost money, it’s not much money. We’ve written about all the choices, and you’ll find the links in our Softphone Provider Recommendations on the new Incredible PBX Wiki.
With PJsip extensions, you’re not limited to a single phone connection at a time, and we’ve preconfigured extension 701 to support ten simultaneous connections. The setup on the softphone side is simple. For the server, enter the actual IP address of your PBX in the following format: 22.33.44.55:5061. Then enter 701 for the username and enter the password assigned to the 701 extension on your PBX. When an incoming call arrives, all the phones registered to extension 701 will ring simultaneously. Simply answer the call on the phone that is most convenient. For extension 702, you can change the number of simultaneous connections by clicking the Advanced tab and setting the number in Max Contacts.
Configuring Outbound Routes in Incredible PBX GUI
Outbound Routes serve a couple of purposes. First, they assure that calls placed by users of your PBX are routed out through an appropriate trunk to reach their destination in the least costly manner. Second, they serve as a security mechanism by either blocking or restricting certain calls by requiring a PIN to complete the calls. Never authorize recurring charges on credit cards registered with your VoIP providers and, if possible, place pricing limits on calls with your providers. If a bad guy were to break into your PBX, you don’t want to give the intruder a blank check to make unauthorized calls. And you certainly don’t want to join the $100,000 Phone Bill Club.
To create outbound routes in the Incredible PBX GUI, navigate to Connectivity:Outbound Routes and click Add Outbound Route. In the Route Settings tab, give the Outbound Route a name and choose one or more trunks to use for the outbound calls. In the Dial Patterns tab, specify the dial strings that must be matched to use this Outbound Route. NXXNXXXXXX would require only 10-digit numbers with the first and fourth digits being a number between 2 and 9. Note that Outbound Routes are searched from the top entry to the bottom until there is a match. Make certain that you order your routes correctly and then place test calls watching the Asterisk CLI to make sure the calls are routed as you intended.
Configuring Inbound Routes in Incredible PBX GUI
Inbound Routes, as the name implies, are used to direct incoming calls to a specific destination. That destination could be an extension, a ring group, an IVR or AutoAttendant, or even a conference or DISA extension to place outbound calls (hopefully with a very secure password). Inbound Routes can be identified by DID, CallerID number, or both. To create Inbound Routes, choose Connectivity:Inbound Routes and then click Add Inbound Route. Provide at least a Description for the route, a DID to be matched, and the Destination for the incoming calls that match. If you only want certain callers to be able to reach certain extensions, add a CallerID number to your matching criteria. You can add Call Recording and CallerID CNAM Lookups under the Other tab.
Audio Issues with Incredible PBX 2027
While it is always a good idea anyway, if you experience one-way or no audio on some calls, be sure to add your external IP address and LAN subnet in the GUI by navigating to Settings -> Asterisk SIP Settings. In the NAT Settings section, click Detect Network Settings. Click Submit and Apply Settings to save your changes.
Adding Incredible PBX 2027 to an OpenVPN Network
We previously have documented the procedure for creating an OpenVPN server as well as OpenVPN client templates (.ovpn). If you need a refresher, the tutorial is here. To add your Incredible PBX 2027 server to an existing OpenVPN network, begin by creating an incrediblepbx2027.ovpn template on your OpenVPN server. Be sure to comment out or delete the setenv line in the template. Then copy this template to /etc on your Incredible PBX 2027 server. The following commands are already in place:
echo "[Unit]
Description=openvpn2027
ConditionPathExists=/etc/openvpn-start
After=rclocal.service
[Service]
Type=forking
ExecStart=/etc/openvpn-start /etc/incrediblepbx2027.ovpn
TimeoutSec=0
StandardOutput=tty
RemainAfterExit=yes
PermissionsStartOnly=true
SysVStartPriority=99
[Install]
WantedBy=multi-user.target" > /etc/systemd/system/openvpn2027.service
We’ve also enabled this openvpn2027.service which will start when you reboot your server. The OpenVPN IP address should now appear on the LAN line in pbxstatus:
systemctl enable openvpn2027.service
reboot
Incredible PBX 2027 Administration
We’ve eased the pain of administering your new PBX with a collection of scripts which you will find in the /root folder after logging in with SSH or Putty. Here’s a quick summary of what each of the scripts does.
add-fqdn is used to whitelist a fully-qualified domain name in the firewall. Because Incredible PBX 2027 blocks all traffic from IP addresses that are not whitelisted, this is what you use to authorize an external user for your PBX. The advantage of an FQDN is that you can use a dynamic DNS service to automatically update the IP address associated with an FQDN so that you never lose connectivity.
add-ip is used to whitelist a public IP address in the firewall. See the add-fqdn explanation as to why this matters.
del-acct is used to remove an IP address or FQDN from the firewall’s whitelist.
admin-pw-change is used to set the admin password for access to the FreePBX/Incredible PBX web GUI using a browser pointed to the local IP address of your server.
apache-pw-change is used to set the admin password for access to Apache/Incredible PBX apps including AsteriDex and Reminders. This provides a password layer of protection for access to these applications.
incrediblebackup2021 makes a backup of critical components on your PBX to a tarball saved in /backup. This should be copied to safe location off-site for a rainy day.
incrediblerestore2021 restores a backup file which has been copied to the /backup folder.
ipchecker is a script which deciphers the public IP addresses associated with whitelisted FQDNs created with add-fqdn on your server. If any of the addresses have changed, the firewall is restarted after updating the IP addresses. By default, it is executed every 10 minutes by /etc/crontab.
licenses.sh displays the license associated with each of the FreePBX modules on your server.
logos-b-gone removes proprietary artwork from your PBX and is no longer necessary with the included IncrediblePBX FreePBX module.
mime-construct is a command-line utility to send emails with attachments.
neorouter-login is a script to add your PBX to a NeoRouter VPN. Tutorial here.
odbc-gen.sh is a script that was run to generate the ODBC settings for Asterisk. Do NOT use it.
openvpn-start is a script to add your PBX to an existing OpenVPN network using an .ovpn config file. Tutorial here.
pbxstatus displays status of all major components of Incredible PBX 2027.
pptp-install is a script to create a PPTP network connection for your PBX. Tutorial here.
purge-cdr-cel-records removes all CDR and CEL records from the MySQL database.
reset-conference-pins is a script that automatically and randomly resets the user and admin pins for access to the preconfigured conferencing application. Dial C-O-N-F from any registered SIP phone to connect to the conference.
reset-extension-passwords is a script that automatically and randomly resets ALL of the SIP passwords for extensions 701-705. Be careful using this one, or you may disable existing registered phones and cause Fail2Ban to blacklist the IP addresses of those users. HINT: You can place a call to the Ring Group associated with all five extensions by dialing 777.
reset-reminders-pin is a script that automatically and randomly resets the pin required to access the Telephone Reminders application by dialing 123. It’s important to protect this application because a nefarious user could set up a reminder to call a number anywhere in the world assuming your SIP provider’s account was configured to allow such calls.
show-feature-codes is a cheat sheet for all of the feature codes which can be dialed from any registered SIP phone. It documents how powerful a platform Incredible PBX 2027 actually is. A similar listing is available in the GUI at Admin -> Feature Codes.
show-passwords is a script that displays most of the passwords associated with Incredible PBX 2027. This includes SIP extension passwords, voicemail pins, conference pins, telephone reminders pin, and your Anveo Direct outbound calling pin (if configured). Note that voicemail pins are configured by the user of a SIP extension the first time the user accesses the voicemail system by dialing *97.
sig-fix disables Module Signature Checking in the FreePBX GUI. This should not be necessary unless you have added or edited FreePBX Modules with missing module signatures.
sms-skyetel is a script to send SMS messages using a Skyetel trunk.
sms-voip.ms is a script to send SMS messages using a VoIP.ms trunk.
sms-blast, sms-blaster, and sms-dictator are scripts for message blasting. Tutorial here.
timezone-setup is a script to set the timezone for your PBX.
update-IncrediblePBX is a script that runs the Automatic Update Utility whenever you login to your server as root. These updates typically resolve bugs and security issues with your PBX. Do NOT remove it.
wolfram is a script to deploy Wolfram Alpha on your PBX. Tutorial here.
Forwarding Calls to Your Cellphone. Keep in mind that inbound calls to your DIDs automatically ring all five SIP extensions, 701-705. The easiest way to also ring your cellphone is to set one of these five extensions to forward incoming calls to your cellphone. After logging into your PBX as root, issue the following command to forward calls from extension 705 to your cellphone: asterisk -rx "database put CF 705 6781234567"
To remove call forwarding: asterisk -rx "database del CF 705"
Implementing Call By Name with 411
Once you have an Outbound Trunk and Route configured, deploying Call by Name by dialing 411 is simple. The way it works is to pick up any phone connected to your PBX and dial 411. When prompted for the name of the person or company to call, say the name as you entered it in the AsteriDex directory, e.g. Delta Air Lines. The name will then be looked up to decipher the number of the person or company to call. Then the call will be placed using your default outbound route. To deploy Call By Name, simply follow the setup instructions in this Nerd Vittles tutorial.
Keeping FreePBX 16 Modules Current
We strongly recommend that you periodically update all of your FreePBX modules to eliminate bugs and to reduce security vulnerabilities. From the Linux CLI, log into your server as root and issue the following commands:
rm -f /tmp/*
fwconsole ma upgradeall
fwconsole reload
/root/sig-fix
systemctl restart apache2
/root/sig-fix
Originally published: Monday, January 9, 2023
Need help with Asterisk? Visit the VoIP-info Forum.
Special Thanks to Our Generous Sponsors
FULL DISCLOSURE: ClearlyIP, Skyetel, Vitelity, DigitalOcean, Vultr, VoIP.ms, 3CX, Sangoma, TelecomsXchange and VitalPBX have provided financial support to Nerd Vittles and our open source projects through advertising, referral revenue, and/or merchandise. As an Amazon Associate and Best Buy Affiliate, we also earn from qualifying purchases. We’ve chosen these providers not the other way around. Our decisions are based upon their corporate reputation and the quality of their offerings and pricing. Our recommendations regarding technology are reached without regard to financial compensation except in situations in which comparable products at comparable pricing are available from multiple sources. In this limited case, we support our sponsors because our sponsors support us.
BOGO Bonaza: Enjoy state-of-the-art VoIP service with a $10 credit and half-price SIP service on up to $500 of Skyetel trunking with free number porting when you fund your Skyetel account. No limits on number of simultaneous calls. Quadruple data center redundancy. $25 monthly minimum spend required. Tutorial and sign up details are here.
![]() The lynchpin of Incredible PBX 2020 and beyond is ClearlyIP components which bring management of FreePBX modules and SIP phone integration to a level never before available with any other Asterisk distribution. And now you can configure and reconfigure your new Incredible PBX phones from the convenience of the Incredible PBX GUI.
The lynchpin of Incredible PBX 2020 and beyond is ClearlyIP components which bring management of FreePBX modules and SIP phone integration to a level never before available with any other Asterisk distribution. And now you can configure and reconfigure your new Incredible PBX phones from the convenience of the Incredible PBX GUI.
VitalPBX is perhaps the fastest-growing PBX offering based upon Asterisk with an installed presence in more than 100 countries worldwide. VitalPBX has generously provided a customized White Label version of Incredible PBX tailored for use with all Incredible PBX and VitalPBX custom applications. Follow this link for a free test drive!
Special Thanks to Vitelity. Vitelity is now Voyant Communications and has halted new registrations for the time being. Our special thanks to Vitelity for their unwavering financial support over many years and to the many Nerd Vittles readers who continue to enjoy the benefits of their service offerings. We will keep everyone posted on further developments.
VirtualBox Wonder: It’s Incredible PBX for Debian 11
If you’re new to the VoIP world and want to kick the tires to see what you’re missing, then today’s one minute setup is for you. You’ll get a $10 credit to try out some penny-a-minute calls and to purchase a $1 a month phone number in your choice of area codes. If you decide VoIP is not for you, you don’t have to buy anything ever. And you can use almost any desktop computer you already own to bring up the VirtualBox® edition of Incredible PBX® with Debian 11. Apple’s new ARM-based Macs unfortunately do not support VirtualBox.
If you’ve followed Nerd Vittles over the years, you already know that VirtualBox from Oracle® is one of our favorite platforms. Once VirtualBox is installed on your desktop computer, adding Incredible PBX is a snap. Download the latest Incredible PBX image for Debian 11 from SourceForge, double-click on the downloaded image and boom. In less than a minute, your PBX is ready to use with the very latest components of Asterisk® 18 and FreePBX® 15. There are no hidden fees or crippleware to hinder your use of Incredible PBX for as long as you like. Just set up an account with our Platinum provider, Skyetel, and you can start making calls in minutes. Of course, the Incredible PBX feature set is included as well which brings you nearly three dozen applications for Asterisk that will revolutionize your communications platform. Speech-to-text, voice recognition, and a Siri-like telephony interface are as close as your SIP phone.
Installing Oracle VM VirtualBox

Oracle’s virtual machine platform inherited from Sun is amazing. It’s not only free, but it’s pure GPL2 code. VirtualBox gives you a virtual machine platform that runs on top of many desktop operating systems including Linux, Windows, and Intel-based Macs. In terms of limitations, we haven’t found any. We even tested this on an Atom-based Windows 7 machine with 2GB of RAM, and it worked without a hiccup. So step #1 today is to download one or more of the VirtualBox installers from VirtualBox.org or Oracle.com. Our recommendation is to put all of these 100MB installers on a USB thumb drive.1 Then you’ll have everything in one place whenever and wherever you happen to need it. Once you’ve downloaded the software, simply install it onto your favorite desktop machine. Accept all of the default settings, and you’ll be good to go. For more details, here’s a link to the Oracle VM VirtualBox User Manual.
NOTE: A VirtualBox 6.x platform is required. Adjust screen size in View -> Virtual Screen.
Installing the Incredible PBX for Debian 11 Image
To begin, download the Incredible PBX for Debian 11 image (3.7 GB) onto your desktop.
Next, double-click on the Incredible PBX .ova image on your desktop. Be sure to check the box to initialize the MAC address of the image if you’re using an older version of VirtualBox. Then click Import. Once the import is finished, you’ll see a new Incredible PBX for Debian 11 virtual machine in the VM List of the VirtualBox Manager Window. Let’s make a couple of one-time adjustments to the Incredible PBX configuration to account for possible differences in sound and network cards on different host machines.
(1) Click once on the Incredible PBX virtual machine in the VM List. Then (2) click the Settings button. In System tab, check Hardware Clock in UTC Time. In the Audio tab, check the Enable Audio option and choose your sound card. In the Network tab for Adapter 1, check the Enable Network Adapter option. From the Attached to pull-down menu, choose Bridged Adapter. Then select your network card from the Name list. Then click OK. That’s all the configuration that is necessary for Incredible PBX.
Running Incredible PBX for Debian 11 in VirtualBox
Once you’ve imported and configured the Incredible PBX Virtual Machine, you’re ready to go. Highlight the Incredible PBX virtual machine in the VM List on the VirtualBox Manager Window and click the Start button. The standard Linux boot procedure will begin and, within a few seconds, you’ll get the familiar Linux login prompt. During the bootstrap procedure, you’ll see a couple of dialogue boxes pop up that explain the keystrokes to move back and forth between your host operating system desktop and your virtual machine. Remember, you still have full access to your desktop computer. Incredible PBX is merely running as a task in a VM window. Always gracefully halt Incredible PBX just as you would on any computer.
Here’s what you need to know. To work in the Incredible PBX virtual machine, just left-click your mouse while it is positioned inside the VM window. To return to your host operating system desktop, press the right Option key on Windows machines or the left Command key on any Mac. On Linux desktops, press the right Ctrl key. For other operating systems, read the dialogue boxes for instructions on moving around. To access the Linux CLI, login as root with the default password: password. Change your root password when you are prompted to do so. Then update your admin password for web access: ./admin-pw-change. Also update your admin password for web applications: ./apache-pw-change. You’ll need these admin passwords to access the web GUI to manage your PBX as well as to use the AsteriDex and Reminders web apps. The above password updates are automatically requested when you first activate the virtual machine. You can update all of your other passwords using the scripts provided in /root.
Setting the Date and Time with VirtualBox
On some platforms, VirtualBox has a nasty habit of mangling the date and time of your virtual machine. Verify that you have enabled the Hardware Clock in UTC Time option for your virtual machine as documented above. If pbxstatus still shows an incorrect time, manually set the date and time and then update the hardware clock. Here’s how assuming 08130709 is the month (August), day (13), and correct time (7:09 a.m.) of your server:
date 08130709
clock -w

Configuring Skyetel for Incredible PBX
If you’d like to try out the Skyetel service at no charge, here’s the drill. Sign up for Skyetel service to take advantage of the Nerd Vittles specials. First, complete the Prequalification Form here. You then will be provided a link to the Skyetel site to complete your registration. Once you have registered on the Skyetel site and your account has been activated, open a support ticket and request the $10 credit for your account by referencing the Nerd Vittles special offer. Once you are satisfied with the service, fund your account as desired, and Skyetel will match your deposit of up to $250 simply by opening another ticket. That gets you up to $500 of half-price calling. Credit is limited to one per person, company, and address. Effective 10/1/2023, $25/month minimum spend required.
Skyetel by default does not use SIP registrations to make connections to your PBX. Instead, Skyetel utilizes Endpoint Groups to identify which servers can communicate with the Skyetel service. An Endpoint Group consists of a Name, an IP address, a UDP or TCP port for the connection, and a numerical Priority for the group. For incoming calls destined to your PBX, DIDs are associated with an Endpoint Group to route the calls to your PBX. For outgoing calls from your PBX, a matching Endpoint Group is required to authorize outbound calls through the Skyetel network. Thus, the first step in configuring the Skyetel side for use with your PBX is to set up an Endpoint Group. Here’s a typical setup for Incredible PBX:
- Name: MyPBX
- Priority: 1
- IP Address: PBX-Public-IP-Address
- Port: 5060
- Protocol: UDP
- Description: my.incrediblepbx.com
To receive incoming PSTN calls, you’ll need at least one DID. On the Skyetel site, you acquire DIDs under the Phone Numbers tab. You have the option of Porting in Existing Numbers (free for the first 60 days after you sign up for service) or purchasing new ones under the Buy Phone Numbers menu option.
Once you have acquired one or more DIDs, navigate to the Local Numbers or Toll Free Numbers tab and specify the desired SIP Format and Endpoint Group for each DID. Add SMS/MMS and E911 support, if desired. Call Forwarding and Failover are also supported. That completes the VoIP setup on the Skyetel side. System Status is always available here.
If VirtualBox is sitting behind a router or firewall on a private LAN, you’ll need to forward ports UDP 5060 and 10000-20000 in your router to the private LAN address of your Incredible PBX server. Also edit your extensions in the GUI and set NAT=YES in the Advanced tab of every extension. In Settings -> Asterisk SIP Settings, click the Detect Network Settings button and then Submit your changes and reload the Asterisk dialplan when prompted.
Configuring VoIP.ms for Incredible PBX
To sign up for VoIP.ms service, may we suggest you use our signup link so that Nerd Vittles gets a referral credit for your signup. Once your account is set up, you’ll need to set up a SIP SubAccount and, for Authentication Type, choose Static IP Authentication and enter your Incredible PBX server’s public IP address. For Transport, choose UDP. For Device Type, choose Asterisk, IP PBX, Gateway or VoIP Switch. Order a DID in their web panel, and then point the DID to the SubAccount you just created. Be sure to specify atlanta1.voip.ms as the POP from which to receive incoming calls.
Configuring Anveo Direct for Incredible PBX
To sign up for Anveo Direct service, sign up on their web site and then login. After adding funds to your account, purchase a DID under Inbound Service -> Order DID. Next, choose Configure Destination SIP Trunk. Give the Trunk a name. For the Primary SIP URI, enter $[E164]$@server-IP-address. For Call Options, select your new DID from the list. You also must whitelist your public IP address under Outbound Service -> Configure. Create a new Call Termination Trunk and name it to match your server. For Dialing Prefix, choose six alphanumeric characters beginning with a zero. In Authorized IP Addresses, enter the public IP address of your server. Set an appropriate rate cap. We like $0.01 per minute to be safe. Set a concurrent calls limit. We like 2. For the Call Routing Method, choose Least Cost unless you’re feeling extravagant. For Routes/Carriers, choose Standard Routes. Write down your Dialing Prefix and then click the Save button.
Before you can make outbound calls through Anveo Direct from your PBX, you first must configure the Dialing Prefix that you wrote down in the previous step. Log into the GUI as admin using a web browser and edit the Anveo-Out trunk in Connectivity -> Trunks. Click on the custom-Settings tab and replace anveo-pin with your actual Dialing Prefix. Click Submit and Apply Config to complete the setup.
By default, incoming Anveo Direct calls will be processed by the Default inbound route on your PBX. If you wish to redirect incoming Anveo Direct calls using DID-specific inbound routes, then you’ve got a bit more work to do. In addition to creating the inbound route using the 11-digit Anveo Direct DID, enter the following commands after logging into your server as root using SSH/Putty:
cd /etc/asterisk
echo "[from-anveo]" >> extensions_custom.conf
echo "exten => _.,1,Ringing" >> extensions_custom.conf
echo "exten => _.,n,Goto(from-trunk,\\${SIP_HEADER(X-anveo-e164)},1)" >> extensions_custom.conf
asterisk -rx "dialplan reload"
Configuring a Softphone for Incredible PBX
We’re in the home stretch now. You can connect virtually any kind of telephone to your new PBX. Plain Old Phones require an analog telephone adapter (ATA) which can be a separate board in your computer from a company such as Digium. Or it can be a standalone SIP device. SIP phones can be connected directly so long as they have an IP address. These could be hardware devices or software devices such as the YateClient softphone. We’ll start with a free one today so you can begin making calls. You can find dozens of recommendations for hardware-based SIP phones both on Nerd Vittles and the PIAF Forum when you’re ready to get serious about VoIP telephony.
We recommend YateClient for Windows which is free. Download it from here. Run YateClient once you’ve installed it and enter the credentials for the 701 extension on Incredible PBX. You can find them by running /root/show-passwords. You’ll need the IP address of your server plus your extension 701 password. In the YateClient, fill in the blanks using the IP address of your Server, 701 for your Username, and whatever Password was assigned to the extension when you installed Incredible PBX. Click OK to save your entries.

Configuring Incredible PBX for VirtualBox
In order to take advantage of all the Incredible PBX applications, you’ll need to obtain IBM text-to-speech (TTS) and speech-to-text (STT) credentials as well as a (free) Application ID for Wolfram Alpha.
This Nerd Vittles tutorial will walk you through getting your IBM account set up and obtaining both your TTS and STT credentials. Be sure to write down BOTH sets of credentials which you’ll need in a minute. For home and SOHO use, IBM access and services are mostly FREE even though you must provide a credit card when signing up. The IBM signup process explains their pricing plans.
To use Wolfram Alpha, sign up for a free Wolfram Alpha API account. Just provide your email address and set up a password. It takes less than a minute. Log into your account and click on Get An App ID. Make up a name for your application and write down (and keep secret) your APP-ID code. That’s all there is to getting set up with Wolfram Alpha. If you want to explore costs for commercial use, there are links to let you get more information.
In addition to your Wolfram Alpha APPID, there are two sets of IBM credentials to plug into the Asterisk AGI scripts. Keep in mind that there are different usernames and passwords for the IBM Watson TTS and STT services. The TTS credentials will look like the following: $IBM_username and $IBM_password. The STT credentials look like this: $API_USERNAME and $API_PASSWORD. Don’t mix them up. 🙂
All of the scripts requiring credentials are located in /var/lib/asterisk/agi-bin so switch to that directory after logging into your server as root. Edit each of the following files and insert your TTS credentials in the variables already provided: nv-today2.php, ibmtts.php, and ibmtts2.php. Edit each of the following files and insert your STT credentials in the variables already provided: getquery.sh, getnumber.sh, and getnumber2.sh. Finally, edit 4747 and insert your Wolfram Alpha APPID.
Using AsteriDex with Incredible PBX
AsteriDex is a web-based dialer and address book application for Asterisk and Incredible PBX. It lets you store and manage phone numbers of all your friends and business associates in an easy-to-use SQLite3 database. You simply call up the application with your favorite web browser: http://pbx-ip-address/asteridex4/. When you click on a contact that you wish to call, AsteriDex first calls you at extension 701, and then AsteriDex connects you to your contact through another outbound call made using your default outbound trunk that supports numbers in the 1NXXNXXXXXX format.
Keeping FreePBX 15 Modules Current
We strongly recommend that you periodically update all of your FreePBX modules to eliminate bugs and to reduce security vulnerabilities. From the Linux CLI, log into your server as root and issue the following commands:
rm -f /tmp/*
fwconsole ma upgradeall
fwconsole reload
/root/sig-fix
systemctl restart apache2
/root/sig-fix
Taking Incredible PBX for a Test Drive
You can take Incredible PBX on a test drive by dialing D-E-M-O (3366) from any phone connected to your PBX.
With Allison’s Demo IVR, you can choose from the following options:
- 0. Chat with Operator — connects to extension 701
- 1. AsteriDex Voice Dialer – say "Delta Airlines" or "American Airlines" to connect
- 2. Conferencing – log in using 1234 as the conference PIN
- 3. Wolfram Alpha Almanac – say "What planes are flying overhead"
- 4. Lenny – The Telemarketer’s Worst Nightmare
- 5. Today’s News Headlines — courtesy of Yahoo! News
- 6. Weather by ZIP Code – enter any 5-digit ZIP code for today’s weather
- 7. Today in History — courtesy of OnThisDay.com
- 8. Chat with Nerd Uno — courtesy of SIP URI connection to 3CX iPhone Client
- 9. DISA Voice Dialer — say any 10-digit number to be connected
- *. Current Date and Time — courtesy of Incredible PBX
Originally published: Monday, September 19, 2022
Need help with Asterisk? Visit the VoIP-info Forum.
Special Thanks to Our Generous Sponsors
FULL DISCLOSURE: ClearlyIP, Skyetel, Vitelity, DigitalOcean, Vultr, VoIP.ms, 3CX, Sangoma, TelecomsXchange and VitalPBX have provided financial support to Nerd Vittles and our open source projects through advertising, referral revenue, and/or merchandise. As an Amazon Associate and Best Buy Affiliate, we also earn from qualifying purchases. We’ve chosen these providers not the other way around. Our decisions are based upon their corporate reputation and the quality of their offerings and pricing. Our recommendations regarding technology are reached without regard to financial compensation except in situations in which comparable products at comparable pricing are available from multiple sources. In this limited case, we support our sponsors because our sponsors support us.
BOGO Bonaza: Enjoy state-of-the-art VoIP service with a $10 credit and half-price SIP service on up to $500 of Skyetel trunking with free number porting when you fund your Skyetel account. No limits on number of simultaneous calls. Quadruple data center redundancy. $25 monthly minimum spend required. Tutorial and sign up details are here.
![]() The lynchpin of Incredible PBX 2020 and beyond is ClearlyIP components which bring management of FreePBX modules and SIP phone integration to a level never before available with any other Asterisk distribution. And now you can configure and reconfigure your new Incredible PBX phones from the convenience of the Incredible PBX GUI.
The lynchpin of Incredible PBX 2020 and beyond is ClearlyIP components which bring management of FreePBX modules and SIP phone integration to a level never before available with any other Asterisk distribution. And now you can configure and reconfigure your new Incredible PBX phones from the convenience of the Incredible PBX GUI.
VitalPBX is perhaps the fastest-growing PBX offering based upon Asterisk with an installed presence in more than 100 countries worldwide. VitalPBX has generously provided a customized White Label version of Incredible PBX tailored for use with all Incredible PBX and VitalPBX custom applications. Follow this link for a free test drive!
Special Thanks to Vitelity. Vitelity is now Voyant Communications and has halted new registrations for the time being. Our special thanks to Vitelity for their unwavering financial support over many years and to the many Nerd Vittles readers who continue to enjoy the benefits of their service offerings. We will keep everyone posted on further developments.
- Many of our purchase links refer users to Amazon when we find their prices are competitive for the recommended products. Nerd Vittles receives a small referral fee from Amazon to help cover the costs of our blog. We never recommend particular products solely to generate Amazon commissions. However, when pricing is comparable or availability is favorable, we support Amazon because Amazon supports us. [↩]
Happy Fourth: Our Gift to You — 17+ Years of Nerd Vittles

- $300 Chromebook Faceoff: ARM vs. x86? Which Is Better?
- Introducing Incredible PBX 2022 for the Raspberry Pi
- Oracle Cloud: Grab a Free Incredible PBX Cloud Server for Life
- Systems Integration and Public Participation with FreePBX
- A Walk on the Wild Side: Meet Incredible PBX for MX Linux
- Deal of the Year: OBi2182 Color WiFi Phones now $59.99
- Interconnecting Asterisk Servers with PJsip and OpenVPN
- Migrating Incredible PBX 2022 to a PUBLIC-Facing Cloud PBX
- It’s Debian 11, Asterisk 19, & FreePBX 16: Come And Get It
- 5 Minute Wonder: Incredible PBX 2022 in Cloud for $25/Yr.
- Deploying a Non-Google SMTP RelayHost with Asterisk
- One-Minute Wonder: It’s Incredible PBX 2022 for VirtualBox
- Oh My God, It’s Omicron!
- Santa’s Surprise: Free Faxing Returns for FreePBX 16
- The $10,000 Hoax: Meet Tesla’s Full Self-Driving Vehicle
- Call By Name for Asterisk with IBM Voice Recognition Returns
- An Electronics Home Makeover for the 21st Century
- Some Further Thoughts & Solutions Regarding DDoS Attacks
- Is SIP Trunking Safe & Reliable in the DDoS World?
- DEAL OF THE DAY: OBi2182 Color WiFi Phones now $69.98
- Unified Communications: Adding SMS to the Asterisk Toolkit
- Meet RackNerd: The Best VoIP Cloud Bargain on the Planet
- Morphing Incredible PBX into a PUBLIC-Facing Cloud PBX
- Amazon’s Alexa Now Available for Incredible PBX
- Blink Cameras: The Travelin’ Man’s Dream Come True
- Moving from Incredible PBX 2020 to 2021 on the Raspberry Pi
- Adding the Linux XFCE GUI to Incredible PBX 2021
- Virtual Paradise: It’s Incredible PBX 2021 for VMware
- Housekeeping 101: Managing Your Asterisk Backups and Logs
- Taming the Condo Call Box with a Raspberry Pi & Asterisk
- SPAM Blocker & CNAM Cornucopia for Incredible PBX 2021
- Verizon 5G Service for $25/month with Unlimited Everything
- Review: The 2021 Cadillac Escalade – Everything a Tesla Isn’t
- Our Best VoIP Cloud Platform Recommendations for 2021
- Happy New Year: Introducing Incredible PBX 2021 for Debian
- Capitalism 101: IBM Castrates CentOS to "Improve" RHEL
- Cyber Monday 2020: TV Deals You Can’t & Shouldn’t Refuse
- Revolutionary: Incredible PBX & Fax 2020 for Raspberry Pi
- Turbocharge Your Raspberry Pi 4 with a $45 Bootable SSD
- Groundwire for Android & iOS: The Best $10 You’ll Ever Spend
- Linphone Rocks: Free SIP Calling to Anybody, Anywhere
- Oldie But Goodie: VoIP.ms, The Most Versatile VoIP Provider
- Clearly Anywhere: The Ultimate Mobile User VoIP Companion
- Frozen in Time: Sangoma at a Crossroads or the Cliff
- Android Alert: Unmasking Your Hidden SIP Phone
- Finding the Perfect Laptop: Meet the System76 Lemur Pro
- Harnessing the Cloud to Start An Incredible PBX Business
- Last Chance to Jump onto Incredible PBX Cellular Bandwagon
- Vonage Roars into the Asterisk World with Nexmo
- OSS End Point Manager Returns for Incredible PBX 2020
- Turning Incredible PBX into a Lean, Mean Asterisk Machine
- Free IBM Voicemail Transcription with Incredible PBX 2020
- ClearlyIP Introduces New Features for Incredible PBX Phones
- BulkVS: A Bargain SIP Provider for Incredible PBX Platforms
- Election Protection: Deploying Lenny to Block Robocalls
- Interconnect Incredible PBX 2020 to the Asterisk Mothership
- Coping with Coronavirus: Working from Home with Asterisk
- Travelin’ Man 3: A Plug-and-Play Firewall for Incredible PBX
- Future-Proofing FreePBX Distro with Incredible PBX Skin
- Sangoma Developments Affecting All FreePBX Users
- Sangoma’s New FreePBX Gotchas With Module Signatures
- Return of Free Voicemail Transcription & Voice Dialing
- 2019 Technology RoundUp: What’s Hot and What’s Not
- Black Friday/Cyber Monday & Beyond: Incredible PBX 2020
- Skyetel SMS Smorgasbord for Incredible PBX with VitalPBX
- Going Public with Incredible PBX 16 and VitalPBX 2.3.8
- Desktop Dream Machine: Incredible PBX 16-15 for VirtualBox
- Honeymoon Time: Meet Incredible PBX 16-15.2 for CentOS 7
- Mastering the Incredible PBX 16-15 Feature Set with Raspbian
- Icing on the Cake for Incredible PBX 16-15 and Raspberry Pi
- Back to School: It’s Incredible PBX 16-15 for the Raspberry Pi
- Enchilada Amore: It’s Incredible PBX 16-15 for CentOS 7
- Lessons Learned: Circling Back for a Second Look at OpenSIPS
- Safely Deploying Incredible PBX on the Wide Open Internet
- Best of Both Worlds: Safely Marrying Asterisk to OpenSIPS
- F-O-R-K? A Few Thoughts on the Sangoma Employee Exodus
- Spring Is Sprung: Taking Incredible PBX to the Google Cloud
- Cell Phone Tips for Spring Break and International Travel
- Yowza! A Fault-Tolerant Incredible PBX Platform for $1/Mo.
- In Search of a Better Mousetrap: Meet Incredible PBX 13-13.10
- Now Serving: The Incredible PBX 13-13 Whole Enchilada
- Keep On Trunkin’: Free International VoIP Calling Returns
- Big Kahuna: 70 New FreePBX GPL Modules for Incredible PBX
- UC on Steroids: Incredible PBX for Issabel Joins the Cloud
- SIP Happens! Deploying a Publicly-Accessible Asterisk PBX – replaced
- Celebrating 2019: Return of the One-Minute Desktop PBX
- Spam Phone Call Blocker and CNAM Caching for FreePBX
- R.I.P. GVSIP: A Final Farewell to Google Voice
- Road Warrior’s Advice: Before You Buy a Tesla…
- FusionPBX on Steroids: Text-to-Speech Apps Have Arrived
- Creating Free IBM Voice Prompts for FusionPBX/FreeSWITCH
- Double-NAT Blues: Tackling Asterisk’s Thorniest Problems
- One Minute Cloud VPS: Meet Incredible PBX for HiFormance
- VoIP 101: Developing a Cost-Effective SIP Strategy
- Dare to Compare: The Best (free) VoIP Offerings for 2018
- Cloud 9: Free Incredible PBX in the Cloud Hosting until 2019
- Autonomous Cars: Move Over Tesla, Here Comes Everybody
- VoiceMail Transcription for VitalPBX Using IBM Watson STT
- Incredible PBX in the Cloud: A $10/Year VoIP Cloud Platform
- VitalPBX in the Cloud: Providers, Backups, & Airtight Security
- 300 New Wholesale Providers Make Asterisk Shine
- Revolutionary VoIP: The Best (free) PBX Ever from 3CX
- Rolling Your Own: Building a Custom ISO with Incredible PBX
- Beginner’s Navigation Guide to VoIP PBXs and Nerd Vittles
- November 24, 2017: A Black Friday to Remember
- Sneak Peek: Incredible PBX with FreePBX 13 GPL Modules
- Game Changer: Hooking Up Facebook with Incredible PBX
- Twofer Tuesday: Incredible PBX 13 to the Rescue
- RTPbleed Security Alert: Asterisk Calls Can Be Intercepted
- Another Perfect Pair: Flawless VoIP with Wazo and 3CX
- Almost Free: Professional Grade TTS Comes to Issabel 4
- Leap Into Summer: Introducing Incredible PBX for Issabel
- Independence Day for Elastix 4: Introducing Issabel 4
- 3CX in the Cloud: 8 Great Ways to Secure Your Server
- Postfix + Gmail: A Pain-Free SMTP Relay for Wazo PBX
- Choosing the Best (free) PBX for SOHO Deployments
- Paradise Found: Amazon’s Polly TTS Meets Incredible PBX
- IBM’s Speech Recognition Engine Comes to Asterisk
- Cellphone Hell: 2017 Minefield Navigation Guide
- Chasing Rainbows: The VoIP in the Cloud Trifecta
- VoIPtopia 2017: Choosing the Best, Free VoIP Platform
- If It Walks Like a Duck and Quacks Like a Duck, Guess What?
- Siriously: It’s Wolfram Alpha for XiVO and Wazo
- 2016, The Year of VoIP Choice: Meet Wazo and XiVO 16.15
- VoIPtopia: Google Services with Incredible PBX and PIAF5
- XiVO Nirvana: Cloud Hosting with SIP Service for 15¢ a Day
- Type It or Say It: Asterisk SMS Messaging Returns with Incredible PBX for XiVO
- Integrating SIP URIs into XiVO for Free Worldwide Calling
- Never Miss a Meeting: Google Calendar Alerts for XiVO
- Raspberry Pi One-Minute Wonder: A Turnkey and Truly Incredible PBX for XiVO
- VirtualBox Magic: A Turnkey PBX in 5 Minutes Flat with XiVO
- Google Voice with OAuth 2 Comes to Incredible PBX for XiVO
- Take the XiVO Plunge: 4 Months of Free Cloud Hosting
- Security 101: A Fresh Look at Incredible PBX Security Audit Methodology
- Tempus Fugit: Introducing Incredible PBX Alarm Clock for Asterisk and XiVO
- As Easy As 1-2-3: Introducing Incredible PBX Telephone Reminders for XiVO
- 2016: The Year of the May Bromance with XiVO, Asterisk 13, and the GPL
- Sleep Well: Create a $10.50 Incredible Backup Server in the Cloud with WebDAV
- No Brainer: Free Cell Service, Free Texting, Free Data Plan + Free SIP Trunk
- Taking a Fresh Look at the Asterisk, FreePBX, and Incredible PBX Security Models
- TrueCNAM: A Breath of Fresh Air for CNAM Lookups and CallerID Superfecta
- Smartphone Trifecta: 2016’s Very Best Cellphones with Two Awesome Surprises
- Four Months in Paradise: Free International VoIP Calling From Your Cellphone
- Mobile WiFi Shootout: Torture Testing the Best WiFi HotSpots for Your Vehicle
- I Have A Dream: Free Cellular Service with Integrated Remote SIP Connectivity
- Just in Time for Santa: Return of The Glory Days with Skype Connect for Asterisk?
- FCC and Asterisk Now Provide The Tools Needed to Put an End to Robocalls
- Asterisk Server Troubleshooting: Finding and Fixing Bugs & Gremlins in Your PBX
- Why Reinvent the Wheel: Incredible PBX GUI Application User’s Guide
- Firewalls 101: Why Every Asterisk Server Should Have a Functioning Firewall
- Decisions, Decisions: Choosing the SOHO Asterisk Platform That’s Best For You
- 60 Seconds to Real Independence: Incredible PBX GUI Comes to VirtualBox
- Keeping It Real: Holey Socks! It’s the Missing FreePBX GPL Source Code, Or Is It?
- Freedom and the FreePBX Cloud: Is an Apple-like Ecosystem GPL-Compliant?
- View from the Trenches: A Fresh Look at VoIP Project Development in the Cloud
- Wear Something Green for May Day: The Schmoozification of Sangoma
- Gotcha-Free PBX: GIT-R-Done with Incredible PBX for Asterisk-GUI (CentOS)
- SOHO Delight: Introducing the Ultimate Asterisk Appliance for Under $30
- Where to Begin: A Comparison of Open Source Features in Asterisk Aggregations
- We Have a Dream, Too: The Return of (Gotcha-free) Open Source GPL Software
- 30 Minutes to Paradise: Incredible PBX for Ubuntu 14.04 is Ready for Primetime
- Midnight Madness: Introducing Incredible PBX 12 with Asterisk 12 and FreePBX
- Zero Day Vulnerability Protection and More: Introducing Cover Your Asterisk
- Hold On to Your Wallet: Another Huge VoIP Phone Bill May Be Lurking
- Hardware Device of the Year: Meet the CuBox-i with Incredible PBX for Ubuntu
- Commented on Where are people getting the Lenny sound prompts for his voice?
- Pioneers, Start Your Engines: Introducing Incredible PBX for CuBox-i with Ubuntu
- State of the Art: The New Incredible PBX Security Model for Asterisk
- Knock Three Times: Pain-Free Remote Access to Your Asterisk or Linux Server
- Top 3 Asterisk Security Tips for 2014: WhiteLists, WhiteLists, and WhiteLists
- FMC: The Future of Telephony with Vitelity’s vMobile and Asterisk in the Cloud
- Beware the Ides of May: It’s Hammertime for Google Voice
- 4 Months in Paradise: The Return of Free International VoIP Calling
- BYOB: Easy Peasy PIAF-Green with Asterisk 11.8.1 and ‘Genuine’ CentOS 6.5
- Closing the Book on CentOS: Introducing PBX in a Flash 3 with PIAF 3.0.6.5 OS
- Crippleware: Is Red Hat Rewriting the GPL and the Future of Open Source?
- Don’t Hurry: A First Look at Google Glass with Google Glass Frame
- Putting the Genie Back in the Bottle: More RedHat Legal Shenanigans with CentOS
- Obivoice = OBi Heaven: Dumping Google Voice for Less Than 10¢ a Day
- netTALK to the Rescue: Dumping Google Voice for Less Than 10¢ a Day
- IVR 101: Six Quick Steps to Building Incredible IVRs for Asterisk with FreePBX
- Two Thumbs Up: A New Flash Drive Installer for PBX in a Flash 2.0.6.4.5
- Adventures in Twitterland: You Can’t Make This Stuff Up
- AstriCon 10: WOW! What a Coming Out Party for Asterisk 12!
- Finally a 100% Portable PBX: Introducing GoIP, a SIP-GSM Gateway for Asterisk
- Fall Festivus: Asterisk Text-to-Speech Roundup with a Baker’s Dozen New Voices
- Newbie’s SIP Navigation Guide for Asterisk: Is It Safe?
- Practicing Safe SIP: Adding SIP URI and Free DID Connectivity to Asterisk
- 2013 Greatest Hits: Lenny Returns for an Encore Performance
- Programmer’s Paradise: Introducing the VoIP Phone of the Year, Yealink’s T46G
- Triple Treat: Some Asterisk Utilities to Brighten Your Summer
- Amerika the Beautiful: An Insider’s View of What Went Wrong and How To Fix It
- Here We Go Again: Getting Ready for the Next Google Voice Train Wreck
- WebRTC: Asterisk Joins the Brave New World of Real Time Communications
- Allison Smith: State of the IVR Address
- What’s As Good As a $35 Raspberry Pi? How About 35 Free Incredible PBX Apps
- Time to Celebrate: Incredible PBX for Raspberry Pi Turns 21
- SMS Dictator 2.0: Send SMS Messages Using Your Phonebook with Google Voice
- GV Call Notifier: Send Jabber and SMS Alerts for Incoming Asterisk Calls
- Straight Talk: Keep AT&T Humming While Chopping Your Cellphone Bill in Half
- YATE in a Flash: Rolling Your Own SIP to Google Voice Gateway for Asterisk
- VPN in a Flash Reborn: Meet the Dedicated Server Edition in PIAF 2.0.6.2.4
- 5-Minute VoIP: Deploying a SIP to Google Voice Gateway
- Eating Our Own Dog Food: And It Tastes Pretty Good
- Googlicious: News, Weather, Stocks & Dictionary for Asterisk
- Good Morning: Hotel-Style Wake Up Calls Return to Asterisk
- PIAF 2.0.6.2.3: It’s PIAF-Brown with Certified Asterisk
- PBX in a Flash 2: One Incredible VoIP Platform
- Thumbs Up: A New Flash Drive Installer for PIAF2 + CentOS6
- Bluetooth Proximity Detection for Automatic Call Forwarding
- Speech-to-Text Directory Assistance Comes to Asterisk
- Open Source Development and the Patent Trolls
- Picking the Best (and worst) Cellphone and Provider for 2012
- 11/11/11: To Celebrate Nerd New Year’s, Please Welcome…
- 7 Steps to Skytopia: Pain-Free Calls with Skype and Asterisk
- 3 Steps to VoIP Nirvana: It’s Incredible PBX 2.0
- How Good Can a $298 Android Tablet Be?
- Welcome to Frontier Days
- Installing OS X Lion: The Short List of Gotcha’s
- Sorry Apple: The Google Lion No Longer Sleeps
- Coming to a Cloud Near You: Incredible PBX in the Cloud
- Introducing: New PBX in a Flash Installer for USB Flash Drives
- Skype + Asterisk (still) = Beautiful Music + Free Phone Calls
- Dear Digium: It’s Time to Start Eating Your Own Dog Food
- FreePBX Backdoor Passwords Pose Asterisk Security Threat
- Home Run: Asterisk Baseball Scores & Schedules with Gtalk
- Worldwide Weather Forecasts with Asterisk and Google Talk
- Tips, Tricks & Apps to Get the Most Out of Your iPad 2
- Motorola Xoom: A Disappointing Introduction to Android 3.0
- 2011 VoIP Device of the Year: Obihai OBi110 for Google Voice
- Samsung Galaxy Tab: The Good, The Bad, and The Ugly
- Avoiding a $100,000 Phone Bill: VoIP WhiteList for IPtables
- 2010 Bargain of the Year: Nortel 1535 Color SIP Videophone
- Donate Now To Claim Your $299 Web Appointment System
- TweedleD Back From the Dead Using Twitter OAuth
- Orgasmatron 5.2: The Secure Swiss Army Knife for Asterisk
- Apple’s iPad: A Home Run for Education
- Tweet2Dial: SMS Messaging with Google Voice and Twitter
- CallerID Superfecta 2.2.2: International CNAM Directories
- Surfing the Google Wave
- Tweaking Asterisk for Free Google Voice Calling
- New, Free Hospitality Management System for Asterisk
- Strike 3 for the Amazon Kindle Project
- Whole House iPod + $5/mo. Gets You Every Song on the Planet
- Asterize Your Data: Taming ODBC with Asterisk
- Googlified Messaging Returns: The Gizmo-Asterisk Marriage
- Remotely Managing Your Asterisk Server with WebDAV
- What PBX in a Flash Brings to the Asterisk Table
- Using Asterisk and Gizmo5 to Transform Nokia N95 Cellphone into Free SIP Phone
- Add SUSHI to Your Asterisk Server for Rock-Solid, Secure VoIP Telephony
- Statistically Speaking: AWstats Meets Asterisk and PBX in a Flash
- Roll Tide: Let Allison and Asterisk Plan Your Next Surfin’ Safari
- Text-to-Speech Bonanza with Cepstral and Asterisk 1.4
- Allison’s Text-to-Speech Trifecta: Cepstral, Asterisk 1.4 or 1.6, and FreePBX 2.4
- Build a $199 Turnkey (Green!) Asterisk 1.4 System in Less Than An Hour
- 100 Great Halftime Projects For You & Your Asterisk IP PBX
- Ho, Ho, Ho: Some Asterisk Stocking Stuffers from Santa
- Week #2: PBX in a Flash … The Lean, Mean Asterisk Machine
- Announcing PBX-in-a-Flash: A New Asterisk Platform for Everyman… and Woman!
- Managing Your Cellphone Calls with Asterisk or MagicJack
- magicJack: Could It Be the Asterisk Killer?
- Proximity Detection Perfection: Bluetooth + Asterisk + iPhone
- iPhone: The Perfect Asterisk Companion
- Your Choice: iPhone + AT&T or A New Car
- Broadband for Asterisk: Now Just $10 a Month… NOT!
- March Madness: Another Asterisk Security Hole in TrixBox Systems
- Fixing the Asterisk Security Hole in TrixBox Systems
- Click2Dial for Every(Asterisk)man… and Woman
- Weather, Weather Everywhere: Finally, Worldwide Weather Forecasts
- Hacker’s Dream Machine: Introducing the Best Gadget of the Year
- New Year’s Roundup: Pick-of-the-Litter VoIP Providers for Asterisk
- PBX-in-a-Flash: HOW-TO NerdVittlize Your TrixBox 1.2.3 Asterisk PBX
- FON.com WiFi Router Giveaway for $5 Ends Wednesday
- Tricking Out Your TrixBox
- Get Your News By Telephone: Introducing NewsClips for Asterisk
- VoipDiscount.com: Free Asterisk Calling Returns to the VoIP Wild West
- Upgrading Asterisk@Home 2.7 to Asterisk 1.2.6: Here’s How
- Follow-Me Roaming: Integrating Mobile Phones Into Your Dialplan
- Manly Man Alert: A Valentine’s "Gift With A Plug" That Won’t Get You Killed
- 50 Great Halftime Projects Using Your Free Asterisk@Home PBX
- ISP-In-A-Box: The $500 Mac mini (Create Your Own Planet … Really!)
- Backups and Redundancy with Asterisk
- Internet Telephony Shootout II: Finding the Best International VoIP Providers
- Quick & Easy: Configuring Remote Phone Access to an Asterisk PBX
- Phone Home Revisited: Getting Remote Dialtone With Asterisk — Three Great Solutions
- Securing Your Asterisk@Home PBX: Here’s How
- Save Millions on VoIP Costs: Here’s How
- HOW-TO Bonanza: 50 Great Summertime Projects for You & Your Mac mini
- Turbocharging Your Asterisk@Home PBX
- Tips & Tricks to Turbocharge Your Asterisk@Home PBX
- WHERE-TO Bonanza: 50 Great Summertime Web Sites for You & Your Mac mini
- Mac OS X Tiger Backups: The Good, The Bad, and The Ugly
- iTunes Bait and Switch: Say It Ain’t So, Steve
- RSS Made Really, Really Simple
- Ultimate Computer Telephony Server: The $500 Mac mini
- Turn Your Mac Mini Into A Media Center
- Blogging with Style
- ATTN: Bankers — Here’s An Idea
- PC Killer: The $500 Mac mini
- Web Hosting (Is Not) For Dummies
- palmOne’s Treo 650 Smartphone
Originally published: Monday, July 4, 2022
Need help with Asterisk? Visit the VoIP-info Forum.
Special Thanks to Our Generous Sponsors
FULL DISCLOSURE: ClearlyIP, Skyetel, Vitelity, DigitalOcean, Vultr, VoIP.ms, 3CX, Sangoma, TelecomsXchange and VitalPBX have provided financial support to Nerd Vittles and our open source projects through advertising, referral revenue, and/or merchandise. As an Amazon Associate and Best Buy Affiliate, we also earn from qualifying purchases. We’ve chosen these providers not the other way around. Our decisions are based upon their corporate reputation and the quality of their offerings and pricing. Our recommendations regarding technology are reached without regard to financial compensation except in situations in which comparable products at comparable pricing are available from multiple sources. In this limited case, we support our sponsors because our sponsors support us.
BOGO Bonaza: Enjoy state-of-the-art VoIP service with a $10 credit and half-price SIP service on up to $500 of Skyetel trunking with free number porting when you fund your Skyetel account. No limits on number of simultaneous calls. Quadruple data center redundancy. $25 monthly minimum spend required. Tutorial and sign up details are here.
![]() The lynchpin of Incredible PBX 2020 and beyond is ClearlyIP components which bring management of FreePBX modules and SIP phone integration to a level never before available with any other Asterisk distribution. And now you can configure and reconfigure your new Incredible PBX phones from the convenience of the Incredible PBX GUI.
The lynchpin of Incredible PBX 2020 and beyond is ClearlyIP components which bring management of FreePBX modules and SIP phone integration to a level never before available with any other Asterisk distribution. And now you can configure and reconfigure your new Incredible PBX phones from the convenience of the Incredible PBX GUI.
VitalPBX is perhaps the fastest-growing PBX offering based upon Asterisk with an installed presence in more than 100 countries worldwide. VitalPBX has generously provided a customized White Label version of Incredible PBX tailored for use with all Incredible PBX and VitalPBX custom applications. Follow this link for a free test drive!
Special Thanks to Vitelity. Vitelity is now Voyant Communications and has halted new registrations for the time being. Our special thanks to Vitelity for their unwavering financial support over many years and to the many Nerd Vittles readers who continue to enjoy the benefits of their service offerings. We will keep everyone posted on further developments.
Introducing Incredible PBX 2022 for the Raspberry Pi

It’s been a year and a half since our last Incredible PBX® release for the Raspberry Pi platform, and the RasPi enhancements just keep coming. The latest RasPi 4 supports dual 4K monitors, two USB 2.0 ports, two USB 3.0 ports, gigabit Ethernet, a USB-C power supply, a Broadcom BCM2711, Quad core Cortex-A72 (ARM v8) 64-bit SoC running at 1.5GHz, and POE connectivity with the addition of the POE Hat. You can read all about it here. Incredible PBX 2022 supports the latest RasPi boards and keyboard and is backwards compatible.
UPDATE: Download the latest Incredible PBX 2027 image for RasPi here.
We’ve preserved the Raspbian 10 platform in this build because the Debian 11 release has broken free faxing, at least for the short term. This build features Asterisk® 16 or 18 with the latest FreePBX® 15 GPL modules plus the feature set you know and love. We’ve added PJSIP support for Skyetel and the new gTTS release for terrific text-to-speech applications including our News Headlines (951) and Weather Forecasts by ZIP Code (947). It’s all rolled into one terrific bundle that can be installed in about a minute after you download the image from SourceForge and burn the image to a microSD card.
Unlike other aggregations, there’s nothing to compile with Incredible PBX/FAX 2022 for Raspbian. And, unlike the FreePBX Distro, we don’t rely on static packages which make it difficult to add future modifications on your own. Instead, Incredible PBX/Fax 2022 offers a snapshot image with a complete toolkit to make future modifications as desired. And, of course, Incredible PBX/Fax 2022 features the ClearlyIP module repository which protects you from proprietary modifications that limit or cripple your PBX moving forward.
What’s Included? Incredible PBX/Fax 2022 serves up a never before available VoIP powerhouse featuring Asterisk 16 or 18 and all FreePBX 15 GPL modules, an Apache web server, the latest MariaDB SQL server (formerly MySQL), Exim4 mail server, Incredible Fax with turnkey Hylafax and AvantFax, and most of the Incredible PBX feature set including SIP, PJSIP, SMS, voice recognition, AsteriDex, gTTS Text-to-Speech VoIP applications plus email delivery of faxes in PDF format, Click-to-Dial, News, Weather, Telephone Reminders, and hundreds of features that typically are found in commercial PBXs: Conferencing, IVRs and Email Delivery of transcribed voicemails, AutoAttendants, Voicemail Blasting, and more. We’ve also incorporated the Zero Trunk Configuration feature from the LITE build which lets you sign up with one of our VoIP providers and start making and receiving calls instantly. Or you can use the new ClearlyIP trunking module included in the GUI for seamless integration of SMS messaging into FreePBX and its User Control Panel.
Choosing a SIP Provider. As we mentioned, Incredible PBX/Fax 2022 comes preconfigured to support many of the major SIP providers including those that financially support Nerd Vittles and our open source projects: ClearlyIP, Skyetel, and VoIP.ms. As the old saying goes, they may not be the cheapest, but you get what you pay for. With all our providers, you only pay for minutes you use so signing up with more than one provider is a smart idea. For the full list of supported VoIP providers, visit the Incredible PBX Wiki.
") >
>Assembling the Required Raspberry Pi Components
Before you can deploy Incredible PBX 2022, you’ll first need the necessary Raspberry Pi hardware. To support the enhanced Incredible PBX/Fax platform, we strongly recommend either the Raspberry Pi 400 or the Raspberry Pi 4B with at least 2GB RAM for under $42. You can choose a reseller below for quicker delivery. Assuming you already own an HDMI-compatible monitor and a USB keyboard (only required if you don’t buy a RasPi 400)…
Raspberry Pi 4B or Raspberry Pi 400 $8 USB-C RasPi 4 (only) Power Supply $11 32GB microSDHC Class 10 card (strongly recommended!) $5 Official RasPi 4B Case or see above for our favorite
Getting Started with Incredible PBX 2022
Here’s our 10-Step Guide to installation and setup. "Automatic" means just watch. Steps #1 and #2: follow the links. For the remaining steps, we’ll further document the procedures.
- Download and unzip latest Incredible PBX/FAX 2022.6 image from SourceForge
- Transfer Incredible PBX/FAX 2022 image to microSD card and Boot server
- Login to RasPi console as root:password to initialize your server (Automatic)
- In Localization Options, set Locale, TimeZone, Keyboard, & WiFi Country
- Reboot after writing down your server IP address (Automatic)
- Login via SSH or Putty as root:password to set passwords & setup firewall (Automatic)
- Enter an email address for receipt of incoming faxes in PDF format
- Run admin-pw-change to set the admin password for access to the web GUI
- Register for and configure at least one trunk provider for Incredible PBX 2022
- Set up and test your Exim mail server as documented below
ALERT: Reportedly, the latest Raspberry Pi 4 board will not boot with earlier Incredible PBX images. Today’s updated image solves that, but you may wish to simply move your existing build to the latest RasPi hardware and preserve your data. If you have an older (working) Raspberry Pi, simply issue the following commands on the old platform. Following shutdown, insert the new microSD card into your new RasPi 4.
apt update
apt dist-upgrade
halt
First Boot of Incredible PBX 2022 with Wi-Fi
Incredible PBX 2022 requires Internet connectivity to complete its automated install. If you’re using a wired network connection, you can skip to the next section. With the Raspberry Pi 3B, 4B and 400, WiFi is built into the hardware. But you still have to insert your SSID name and SSID password to make a connection to your WiFi network. To do so, follow these next steps carefully. Insert the Incredible PBX 2022 microSD card into your Raspberry Pi and apply power to the hardware. When the bootup procedure finishes, login as root with the default password: password. At the first prompt, DO NOT PRESS THE ENTER KEY! Instead, press Ctrl-C to break out of the setup script. At the command prompt, issue the following commands to bring up the WiFi config file:
cd /etc/wpa_supplicant
nano -w wpa_supplicant.conf
If your WiFi network does not require a password, uncomment or insert the four lines below and save the file: Ctrl-X, Y, then Enter. Now restart your server: reboot. When the reboot finishes, you now should have network connectivity.
network={
 key_mgmt=NONE
 priority=1
 country=US
}
If your WiFi network requires a password, uncomment or insert the following into wpa_supplicant.conf:
ctrl_interface=DIR=/var/run/wpa_supplicant GROUP=netdev
update_config=1
country=US

network={
 ssid="YourSSID"
 psk="YourSSIDpassword"
 key_mgmt=WPA-PSK
 scan_ssid=1
 priority=7
}
Then scroll down to the SSID entry and replace YourSSID with the actual SSID of your WiFi network. Make sure you preserve the entry with the quotes as shown. Next, replace YourSSIDpassword with the SSID password of your WiFi network. Save the file: Ctrl-X, Y, then Enter. Now restart your server: reboot. When the reboot finishes, you now should have network connectivity.
Once the reboot process finishes, you should see an entry on about the middle line displayed on your monitor which reads: "My IP address is…". Write down the IP address shown. You’ll need it in a minute. Skip the next section since you are using a WiFi connection.
If you don’t see an IP address assigned to your server, then correct the network deficiency (invalid WiFi credentials, DHCP not working, Internet down), and reboot until you see an IP address assigned to your server. DO NOT PROCEED WITHOUT AN ASSIGNED IP ADDRESS. NOTE: The Raspberry Pi 400 requires the latest Incredible PBX image for Wi-Fi connectivity.
You’ll also need to change the default PortKnocker setting to your wireless LAN connection:
sed -i 's|eth0|wlan0|' /etc/default/knockd
service knockd restart
First Boot of Incredible PBX Using Wired Connection
Incredible PBX 2022 requires Internet connectivity to complete its automated install. After connecting your server to your local network with a network cable, insert the Incredible PBX 2022 microSD card into your Raspberry Pi and apply power to the hardware. When the bootup procedure finishes, you should see an entry on about the middle line displayed on your monitor which reads: "My IP address is…". Write down the IP address shown. You’ll need it in the next step.
If you don’t see an IP address assigned to your server, then correct the network deficiency (cable not connected, DHCP not working, Internet down), and reboot until you see an IP address assigned to your server. DO NOT PROCEED WITHOUT AN ASSIGNED IP ADDRESS.
Completing the Incredible PBX Initialization Procedure
Unless your desktop PC and RasPi are both on the same private LAN, the remainder of the install procedure should be completed from a desktop PC using SSH or Putty. This will assure that your desktop PC is also whitelisted in the Incredible PBX firewall. Using the console to complete the install is NOT recommended as your desktop PC will not be whitelisted in the firewall. This may result in your not being able to log in to your server. Once you have network connectivity, log in to your server as root from a desktop PC using the default password: password. Accept the license agreement by pressing ENTER. You then will be redirected to raspi-config. This is the utility used to expand your Incredible PBX 2022 image to use your entire microSD card; however, this new build does this for you so you can skip this step. Next, choose Localization Options and set Locale, TimeZone, Keyboard, & WiFi Country. Review the other items and then exit and reboot.
Once your server reboots and you log back in as root, you’ll first be prompted to enter an email address for delivery of incoming faxes in PDF format. All of your passwords then will be randomly assigned with the exception of the root user Linux password and your admin passwords for access to the web GUI and AvantFax. You can set the root password by issuing the command: passwd. Set the admin password for access to the web GUI with this command: /root/admin-pw-change. Set the admin password for access to AvantFax with this command: /root/avantfax-pw-change. With the exception of these passwords, the remaining passwords can be displayed using the command: /root/show-passwords.
Finally, if your PBX is sitting behind a NAT-based router, you’ll need to redirect incoming UDP 5060-5061 and UDP 10000-20000 traffic to the private IP address of your RasPi. This is required for all of the SIP providers included in the Incredible PBX 2022 build. Otherwise, all inbound calls will fail.

Configuring Skyetel for Incredible PBX 2022
If you’ve decided to go with Skyetel, here’s the drill. Sign up for Skyetel service and take advantage of the Nerd Vittles Free $10 credit and BOGO special. First, complete the Prequalification Form here. You then will be provided a link to the Skyetel site to complete your registration. Once you have registered on the Skyetel site and your account has been activated, open a support ticket and request the $10 credit for your account by referencing the Nerd Vittles special offer. Once you are happy with the service, open another ticket after funding your account and request that Skyetel match your deposit of up to $250. That gets you up to $500 of helf-price calling. Credit is limited to one per person/company/address/location. If you have numbers to port in, you can do it at no cost after funding your account. Effective 10/1/2023, $25/month minimum spend required.
Skyetel typically does not require SIP registrations to make connections to your PBX. Instead, Skyetel utilizes Endpoint Groups to identify which servers can communicate with the Skyetel service. An Endpoint Group consists of a Name, an IP address, a UDP or TCP port for the connection, and a numerical Priority for the group. For incoming calls destined to your PBX, DIDs are associated with an Endpoint Group to route the calls to your PBX. For outgoing calls from your PBX, a matching Endpoint Group is required to authorize outbound calls through the Skyetel network. Thus, the first step in configuring the Skyetel side for use with your PBX is to set up an Endpoint Group. Here’s a typical setup for Incredible PBX 2022:
- Name: MyPBX
- Priority: 1
- IP Address: PBX-Public-IP-Address
- Port: 5061
- Protocol: UDP
- Description: 2022.incrediblepbx.com
To receive incoming PSTN calls, you’ll need at least one DID. On the Skyetel site, you acquire DIDs under the Phone Numbers tab. You have the option of Porting in Existing Numbers (free for the first 60 days after you fund your account) or purchasing new ones under the Buy Phone Numbers menu option.
Once you have acquired one or more DIDs, navigate to the Local Numbers or Toll Free Numbers tab and specify the desired SIP Format and Endpoint Group for each DID. Add SMS/MMS and E911 support, if desired. Call Forwarding and Failover are also supported. That completes the VoIP setup on the Skyetel side. System Status is always available here.
Configuring VoIP.ms for Incredible PBX 2022
To sign up for VoIP.ms service, may we suggest you use our signup link so that Nerd Vittles gets a referral credit for your signup. Once your account is set up, you’ll need to set up a SIP SubAccount and, for Authentication Type, choose Static IP Authentication and enter your Incredible PBX 2022 server’s public IP address. For Transport, choose UDP. For Device Type, choose Asterisk, IP PBX, Gateway or VoIP Switch. Order a DID in their web panel, and then point the DID to the SubAccount you just created. Be sure to specify atlanta1.voip.ms as the POP from which to receive incoming calls. On the Incredible PBX side, simply Enable the VoIPms trunk and save your update.
Adding a Bootable SSD to Raspberry Pi
Shown below are the two components that make up the 256GB storage solution for the Raspberry Pi. These include the M.2 SSD SATA drive and the M.2 enclosure which provides a USB connector that’s compatible with your RasPi. Assembly of the components takes less than a minute as shown in the steps below:

You can order the M.2 SSD SATA drive and the UGREEN M.2 enclosure using our Amazon referral links which help support Nerd Vittles and the Incredible PBX open source project.
Once you have assembled your SSD in the sleeve, log back in as root using SSH or Putty. For best performance, insert the SSD drive into one of the blue USB 3.0 ports and verify that /dev/sda device is shown when you issue the command: fdisk -l
Now proceed with the following steps to copy the image from your microSD card to the new SSD SATA drive:
rpi-clone -l -e sda -f sda
# answer prompts with yes and incred2022
# once the image is copied, dismount the drive when prompted
mount /dev/sda2 /mnt/clone
cd /mnt/clone/boot
cp -p -r /boot/* .
sed -i 's|sda2|mmcblk0p2|' /boot/cmdline.txt
cd /
umount /mnt/clone
halt
Now you’re ready to restart your Raspberry Pi from the SSD SATA drive. Remove the microSD card and reboot your server.

Configuring a Softphone for Incredible PBX 2022
We’re in the home stretch now. You can connect virtually any kind of telephone to your new PBX. Plain Old Phones require an analog telephone adapter (ATA) which can be a separate board in your computer from a company such as Digium. Or it can be a standalone SIP device such as ObiHai’s OBi100 or OBi110 (if you have a phone line from Ma Bell to hook up as well). SIP phones can be connected directly so long as they have an IP address. These could be hardware devices or software devices such as the YateClient softphone. We’ll start with a free one today so you can begin making calls. You can find dozens of recommendations for hardware-based SIP phones both on Nerd Vittles and the PIAF Forum when you’re ready to get serious about VoIP telephony.
We recommend YateClient for Windows which is free. Download it from here. Run YateClient once you’ve installed it and enter the credentials for the 701 extension on Incredible PBX. You can find them by running /root/show-passwords. You’ll need the IP address of your server plus your extension 701 password. In the YateClient, fill in the blanks using the IP address of your Server, 701 for your Username, and whatever Password was assigned to the extension when you installed Incredible PBX. Click OK to save your entries.
Once you are registered to extension 701, close the Account window. Then click on YATE’s Telephony Tab and place some test calls to the numerous apps that are preconfigured on Incredible PBX. Dial a few of these to get started:
DEMO - Apps Demo
123 - Reminders
947 - Weather by ZIP Code
951 - Yahoo News
TODAY - Today in History
LENNY - The Telemarketer's Worst Nightmare
If you are a Mac user, another great no-frills softphone is Telephone. Just download and install it from the Mac App Store.
Audio Issues with Incredible PBX 2022
Only if you experience one-way or no audio on some calls, add your external IP address and LAN subnet in the GUI by navigating to Settings -> Asterisk SIP Settings. In the NAT Settings section, click Detect Network Settings. Click Submit and Apply Settings to save your changes.
Configuring Gmail as Exim Smart Relay Host
Most Raspberry Pi implementations will be on networks managed by companies like Comcast, Spectrum, and AT&T that block downstream mail servers (that’s you) from sending email. The solution is to use Gmail or your local ISP as a smart relay host to send mail from your server. You’ll need this to deliver voicemails via email. Here’s how to set it up using a Gmail account without two-step authentication. Log into your server as root and run dpkg-reconfigure exim4-config. Choose "mail sent by smarthost; received via SMTP or fetchmail." Accept all the defaults until you get to Outgoing Smarthost prompt. Enter: smtp.gmail.com::587. At the following prompts, choose NO, NO, mbox, and NO. When the setup completes, edit /etc/exim4/passwd.client and insert the following line using your Gmail AcctName and AcctPW. NOTE: Because insecure Gmail access is going away, you MUST use a Gmail App Password instead of your Gmail account password.
smtp.gmail.com:AcctName@gmail.com:AcctPW
Save the file and then issue the following commands to complete the setup:
update-exim4.conf
systemctl restart exim4
exim4 -qff
Now send yourself a test email message to make sure things are working properly:
echo "test" | mail -s testmessage yourname@yourmailprovider.com
Once you have email messages flowing, incoming faxes automatically will be delivered to the email address you assigned when setting up your PBX. You can change this email address with the command: avantfax-email-change.
Fixing Corrupted rc.local File & More
Some prefer an email notification whenever your server is booted. Also fixes the corrupted rc.local file. Once you have configured a relay host above, you can add the feature by editing /etc/rc.local and making the file look like this replacing name@domain.com with your actual email address:
#!/bin/sh -e

# Print the IP address
_IP=$(hostname -I) || true
if [ "$_IP" ]; then
  printf "My IP address is %s\n" "$_IP"
fi

_PRIVATE="Private IP: `cat /etc/hostip | cut -f1-2 -d " "`"
_PUBLIC="Public: $(dig TXT +short o-o.myaddr.l.google.com @ns1.google.com | sed 's|"||g')"
echo "$_PRIVATE   $_PUBLIC" | mail -s "Incredible PBX 2022.6 has booted" name@domain.com

sleep 5

service knockd start
sleep 30
chmod -R 777 /var/www/html/avantfax
exit 0
Configuring Inbound Routes for Fax Detection
Not all VoIP trunks support fax transmission, e.g. Vitelity. Assuming yours do and you’ll only know by trial and error, here’s how to configure FreePBX to automatically detect incoming faxes and process them for PDF delivery by email. The default inbound route is preconfigured to support email delivery of your faxes. So, any trunks using that default route require no further configuration. If you add additional Inbound Routes, here’s how to enable fax detection on those routes.
Under the Fax tab of each new Inbound Route, enter the following settings:
Detect Faxes: YES
Fax Detection Type: SIP
Fax Ring: YES
Fax Detect Time: 4
Fax Destination: Custom Destinations -> Fax (Hylafax)
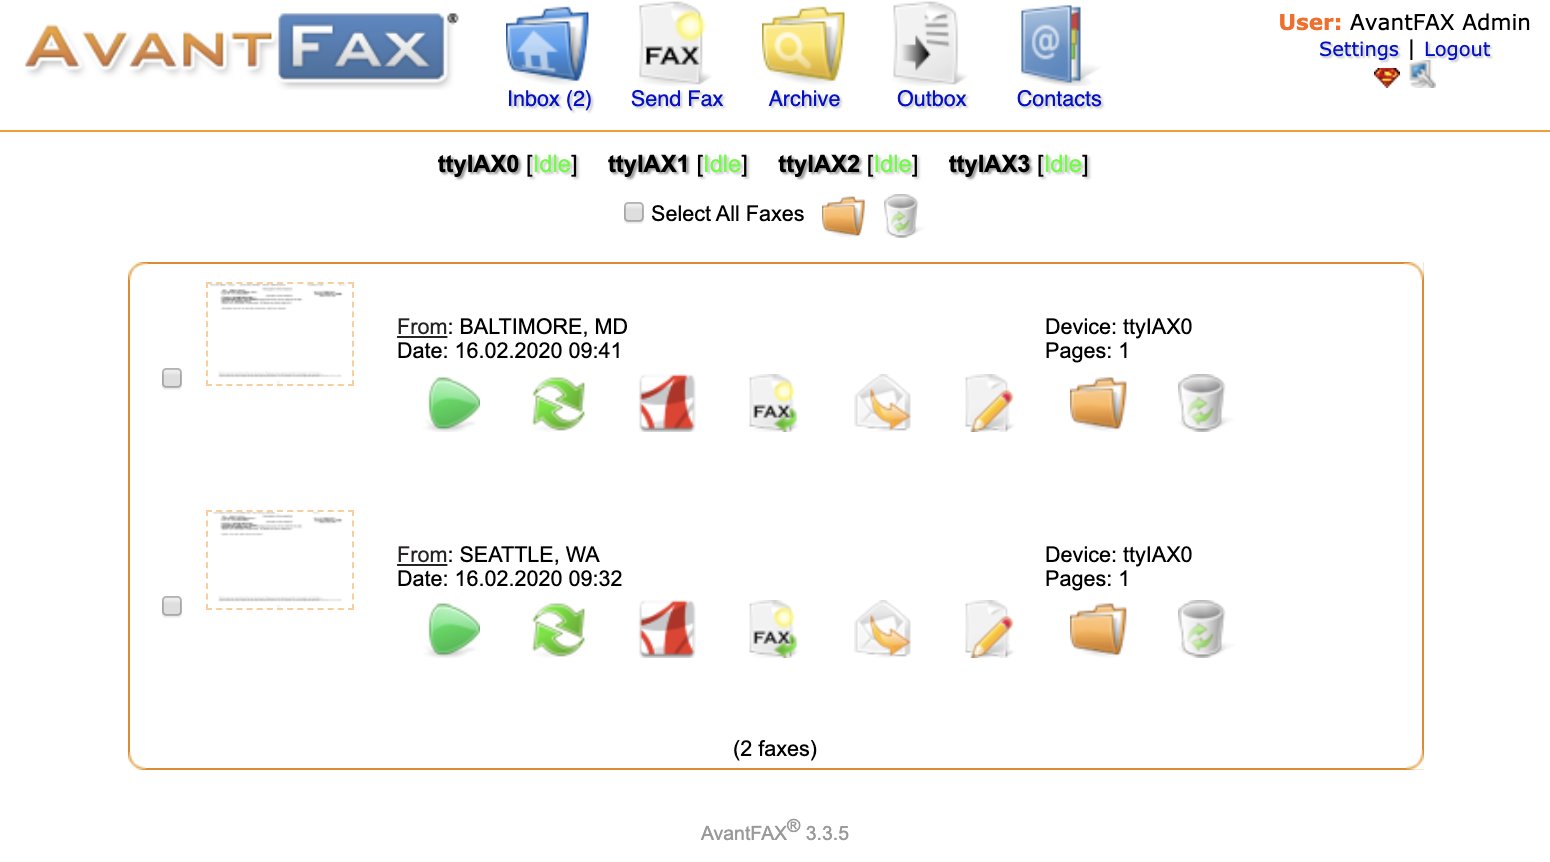
Managing Faxes with AvantFax
You can manage your incoming and outgoing faxes using AvantFax. Click on the AvantFax tab in FreePBX to access it. The default credentials are admin:password. When you first access AvantFax with a browser, you may get a missing page error. Just press the back arrow key in your browser and the AvantFax main page will appear.
If you want to change the admin password for AvantFax, log into your server as root with SSH/Putty and issue the command: /root/avantfax-pw-change.
Send yourself a fax at no cost in the United States from FaxZero.
Building the Incredible PBX Demo IVR
If you’d like to try your hand at building an IVR, here are the steps to build the Incredible PBX Demo IVR. From the FreePBX Dashboard, choose Applications -> IVR -> Add IVR. Then fill in the template using the entries shown below. Then click Submit and Reload Dialplan.


Building the Incredible PBX Stealth AutoAttendant
Many users prefer to play an announcement to incoming callers with a brief pause thereafter which indicates that the call is being connected. If configured properly, this lets you embed several dial codes which can be entered while the announcement is playing and the call is being transferred. For example, you might wish to route incoming calls to Lenny if a caller presses 0. Or you might wish to immediately route an incoming call to a Ring Group if the caller presses 1. Here’s a sample IVR setup to get you started.

Incredible PBX 2022 Administration
We’ve eased the pain of administering your new PBX with a collection of scripts which you will find in the /root folder after logging in with SSH or Putty. Here’s a quick summary of what each of the scripts does.
admin-pw-change lets you update the admin password for web browser access to the Incredible PBX GUI.
apache-pw-change lets you update the admin password for Apache applications such as AsteriDex and Reminders.
avantfax-pw-change lets you update the root password for AvantFax access (coming soon!).
add-fqdn is used to whitelist a fully-qualified domain name in the firewall. Because Incredible PBX 2022 blocks all traffic from IP addresses that are not whitelisted, this is what you use to authorize an external user for your PBX. The advantage of an FQDN is that you can use a dynamic DNS service to automatically update the IP address associated with an FQDN so that you never lose connectivity.
add-ip is used to whitelist a public IP address in the firewall. See the add-fqdn explanation as to why this matters.
del-acct is used to remove an IP address or FQDN from the firewall’s whitelist.
configure-exim-email lets you reconfigure the email server if you need to use an SMTP relay such as Google to get outbound email flowing. Tutorial here.
iptables-restart is the ONLY command you should ever use to restart the IPtables firewall and Fail2Ban.
knock.FAQ contains your PortKnocker credentials for emergency access to your server if the firewall locks you out. Tutorial here.
proximity (once configured) will automatically forward calls to your cellphone when you are out of BlueTooth range from your RasPi. Also must enable running of script in /etc/crontab.
reset-conference-pins is a script that automatically and randomly resets the user and admin pins for access to the preconfigured conferencing application. Dial C-O-N-F from any registered SIP phone to connect to the conference.
reset-extension-passwords is a script that automatically and randomly resets ALL of the SIP passwords for extensions 701-705. Be careful using this one, or you may disable existing registered phones and cause Fail2Ban to blacklist the IP addresses of those users. HINT: You can place a call to the Ring Group associated with all five extensions by dialing 777.
reset-reminders-pin is a script that automatically and randomly resets the pin required to access the Telephone Reminders application by dialing 123. It’s important to protect this application because a nefarious user could set up a reminder to call a number anywhere in the world assuming your SIP provider’s account was configured to allow such calls.

rpi-clone is a utility that makes it easy to make a bootable image of the microSD card used to start your Raspberry Pi. You’ll need a USB-to-microSD adapter to begin. Insert a backup microSD card large enough to hold all of the data on the primary microSD card (df -h). Insert the USB stick with the card. Identify the backup microSD card, usually sda (fdisk -l). Format the backup microSD card:
mkfs.vfat /dev/sda1 && mkfs.ext4 /dev/sda2. Then issue the following command to clone the primary microSD card: rpi-clone -f sda. Tutorial here.
show-feature-codes is a cheat sheet for all of the feature codes which can be dialed from any registered SIP phone. It documents how powerful a platform Incredible PBX 2022 actually is. A similar listing is available in the GUI at Admin -> Feature Codes.
show-passwords is a script that displays ALL of the passwords associated with Incredible PBX 2022. This includes SIP extension passwords, voicemail pins, conference pins, telephone reminders pin, and your Anveo Direct outbound calling pin (if configured). Note that voicemail pins are configured by the user of a SIP extension the first time the user accesses the voicemail system by dialing *97.
timezone-setup lets you reconfigure the correct time zone for your server.
purge-cdr-cel-records cleans out all existing entries in both the CDR and CEL tables of the Asterisk CDR database.
log-cleanup removes all entries from most of the logs in /var/log.
sig-fix disables module signature checking in FreePBX. It is automatically disabled upon installation.
readme-RonR.txt documents the scripts provided from RonR build. We do NOT recommend using the FCC Blacklist because of its current size.
update-asterisk16 is a utility that updates Asterisk 16 to the latest release. This should only be necessary when a security issue or bug is identified that affects the operation of your PBX.
update-IncrediblePBX is the Automatic Update Utility which checks for server updates from incrediblepbx.com every time you log into your server as root using SSH or Putty. Do NOT disable it as it is used to load important fixes and security updates when necessary. We recommend logging into your server at least once a week.
pbxstatus (shown above) displays status of all major components of Incredible PBX 2022.
Forwarding Calls to Your Cellphone. Keep in mind that inbound calls to your DIDs automatically ring all five SIP extensions, 701-705. The easiest way to also ring your cellphone is to set one of these five extensions to forward incoming calls to your cellphone. After logging into your PBX as root, issue the following command to forward calls from extension 705 to your cellphone: asterisk -rx "database put CF 705 6781234567"
To remove call forwarding: asterisk -rx "database del CF 705"
Keeping FreePBX 15 Modules Current
We strongly recommend that you periodically update all of your FreePBX modules to eliminate bugs and to reduce security vulnerabilities. Make a backup image with rpi-clone first! From the Linux CLI, log into your server as root and issue the following commands:
rm -f /tmp/*
fwconsole ma upgradeall
fwconsole reload
/root/sig-fix
systemctl restart apache2
/root/sig-fix
Upgrading Asterisk 16 to Asterisk 18
For those that enjoy living on the bleeding edge, we’ve create a script which makes it easy to upgrade Incredible PBX 2022 to Asterisk 18. The tutorial is available on the new Incredible PBX Wiki along with dozens of other tutorials.
Resolving an Expired Certificate Alert
1. Navigate to Admin -> Certificate Management in the FreePBX GUI
2. Click the Trashcan to delete the Self-Signed Certificate
3. Click New Certificate -> Generate Self-Signed Certificate
4. In the Description field, type: Default
5. Click Generate Certificate button
Continue Reading: Icing on the Cake for Incredible PBX and Raspberry Pi
Now Available: Amazon’s Polly TTS for Incredible PBX. Works great on the RasPi platform!
Originally published: Tuesday, March 24, 2022 Updated: Monday, February 22, 2021
Need help with Asterisk? Visit the VoIP-info Forum.
Special Thanks to Our Generous Sponsors
FULL DISCLOSURE: ClearlyIP, Skyetel, Vitelity, DigitalOcean, Vultr, VoIP.ms, 3CX, Sangoma, TelecomsXchange and VitalPBX have provided financial support to Nerd Vittles and our open source projects through advertising, referral revenue, and/or merchandise. As an Amazon Associate and Best Buy Affiliate, we also earn from qualifying purchases. We’ve chosen these providers not the other way around. Our decisions are based upon their corporate reputation and the quality of their offerings and pricing. Our recommendations regarding technology are reached without regard to financial compensation except in situations in which comparable products at comparable pricing are available from multiple sources. In this limited case, we support our sponsors because our sponsors support us.
BOGO Bonaza: Enjoy state-of-the-art VoIP service with a $10 credit and half-price SIP service on up to $500 of Skyetel trunking with free number porting when you fund your Skyetel account. No limits on number of simultaneous calls. Quadruple data center redundancy. $25 monthly minimum spend required. Tutorial and sign up details are here.
![]() The lynchpin of Incredible PBX 2020 and beyond is ClearlyIP components which bring management of FreePBX modules and SIP phone integration to a level never before available with any other Asterisk distribution. And now you can configure and reconfigure your new Incredible PBX phones from the convenience of the Incredible PBX GUI.
The lynchpin of Incredible PBX 2020 and beyond is ClearlyIP components which bring management of FreePBX modules and SIP phone integration to a level never before available with any other Asterisk distribution. And now you can configure and reconfigure your new Incredible PBX phones from the convenience of the Incredible PBX GUI.
VitalPBX is perhaps the fastest-growing PBX offering based upon Asterisk with an installed presence in more than 100 countries worldwide. VitalPBX has generously provided a customized White Label version of Incredible PBX tailored for use with all Incredible PBX and VitalPBX custom applications. Follow this link for a free test drive!
Special Thanks to Vitelity. Vitelity is now Voyant Communications and has halted new registrations for the time being. Our special thanks to Vitelity for their unwavering financial support over many years and to the many Nerd Vittles readers who continue to enjoy the benefits of their service offerings. We will keep everyone posted on further developments.
Free Asterisk Solutions
