
Home » Search results for 'orgasmatron' (Page 5)
Search Results for: orgasmatron
The Most Versatile VoIP Provider: FREE PORTING

 JUST RELEASED: Visit the Incredible PBX Wiki
Asterize Your Data: Taming ODBC with Asterisk
 One of the perks of participating in the Atlanta Asterisk Users Group InstallFest a couple weeks ago was getting to hear some terrific speakers. At the top of that list was Jared Smith, who heads up the Training Division at Digium®. We always had considered ODBC to be a bit overwhelming for those new to Asterisk®, but Jared disproved that theory in less than 30 minutes. For those of you that don't have an opportunity to hear it from the master, today we present our Mom-and-Pop version of how to get Asterisk interacting with all of your favorite databases whether they be parts and inventory data, CRM, or just about anything else. And our special thanks to Jared for providing the inspiration to tackle this.
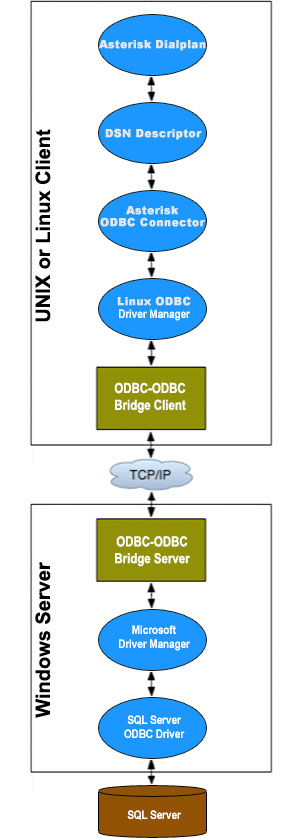
If you're new to the ODBC World, here's a quick primer. The idea behind Open Data Base Connectivity is to simplify the task of connecting up any flavor database management system so that it can talk to applications and foreign databases without having to write custom code to support every different DBMS. ODBC serves in much the same way as a translator who sits between you and foreign visitors. With the benefit of a translator, whatever is spoken is understood on both ends of the conversation.
The real beauty of ODBC is that it is conversant with almost every DBMS offering on the planet including Oracle, Informix, SAS, MS Access, DB2, SQL Server, MySQL, PostgreSQL, Sybase, and even dBase, FoxPro, and XDB. All you really need is the ODBC connector for your operating system plus one or more database drivers for the DBMS data sources you wish to use. Visit EasySoft if you want more background. They sum up the role of ODBC this way:
The goal of ODBC is to make it possible to access any data from any application, regardless of which database management system (DBMS) is handling the data. ODBC achieves this by inserting a middle layer called a database driver between an application and the DBMS. This layer translates the application's data queries into commands that the DBMS understands.
Our goal for today is to get ODBC working on your Asterisk system and to build a simple MySQL application that demonstrates how all the pieces should fit together. We've chosen MySQL because it is integrated into all of the major Asterisk aggregations and requires no additional installation. Even though our focus today is MySQL databases, the same process can be used to interconnect with virtually any foreign database regardless of where it happens to reside. And, in coming weeks, we will start cranking out some ODBC applications that actually are useful 🙂 ... much like what we've done in the Asterisk text-to-speech arena. Hopefully, this tutorial will encourage others to contribute ODBC applications for the benefit of everyone in the Asterisk community.
Getting ODBC working today also reinforces one of the key design strengths of PBX in a Flash. We strongly recommend you start with the latest build of PBX in a Flash. Then run our Orgasmatron Installer. It will provide you a feature rich and extremely stable base platform that just works! Unlike the RPM-based Asterisk aggregations such as trixbox and Elastix, it's incredibly easy with PBX in a Flash to recompile Asterisk to add ODBC functionality because Asterisk is actually built from Asterisk source code when PBX in a Flash is initially installed. That's not to suggest that any of this is impossible using the other aggregations. Just be aware that you may break the ability to later update your system once you manually bolt on additions such as ODBC by recompiling Asterisk. And, of course, you can add ODBC functionality to pure Asterisk systems as well. For an excellent tutorial, see Asterisk: The Future of Telephony (2nd Edition for Asterisk 1.4), by Jim van Meggelen, Jared Smith, and Leif Madsen.
Overview. Let's quickly review the installation steps to bring ODBC connectivity on line. First, we'll install several Linux RPMs to fill in the missing pieces to activate ODBC on your PBX in a Flash server. Second, we'll activate the Linux ODBC driver for MySQL. Third, we'll install a sample timeclock database in MySQL so we have something to play with. Fourth, we'll run a little Nerd Vittles script to tell Linux and Asterisk about all of your MySQL databases. Fifth, we'll recompile Asterisk so that it knows how to talk ODBC. Any time you create a new MySQL database, you'll want to run the script in Step #4 again to repopulate the ODBC information that tells Linux and Asterisk about your MySQL databases. The script only takes a few seconds. Once these steps are completed, you're ready to start creating your ODBC applications.
There are two parts to building any ODBC application with Asterisk. First, we'll define the SQL code to read and write to a particular table in one of your MySQL databases. Second, we'll insert some dialplan code in the new odbc.conf file in the /etc/asterisk directory. This dialplan code tells Asterisk how to behave when a database query is received from a telephone on your system. For each additional ODBC application, you just perform these two steps again. And we'll do that once more using our AsteriDex database just to show you how easy this really is. So let's get started.
1. Installing Linux RPMs. Log into your server as root and issue the following commands to install the necessary RPMs on your PBX in a Flash server. (NOTE: Skip this step if you're using PIAF-Green!)
yum -y install unixODBC-devel
yum -y install libdbi-dbd-mysql
yum -y install mysql-connector-odbc
2. Activating the MySQL ODBC Driver. While still logged into your server as root, issue the following commands to activate the MySQL ODBC driver on your system:
cd /root
wget http://pbxinaflash.net/source/odbc/mysql-odbc
chmod +x mysql-odbc
./mysql-odbc
3. Installing Sample MySQL Database. While still logged into your server as root, issue the following commands to install the sample MySQL database on your system:
cd /root
wget http://pbxinaflash.net/source/odbc/mysql-sample
chmod +x mysql-sample
mv /etc/asterisk/func_odbc.conf /etc/asterisk/func_odbc.conf.old
./mysql-sample
4. Defining MySQL Databases for Linux and Asterisk. The biggest pain in setting up ODBC used to be the creation of the text files telling Linux and Asterisk about your MySQL databases. We decided to write a script to automate the process. What this script does is query MySQL for the names of all your MySQL databases. It then generates the necessary settings in /etc/odbc.ini and /etc/asterisk/res_odbc.conf to support all of your MySQL databases. Don't forget to rerun it if you create new MySQL databases, or they won't be accessible through ODBC. Execute the following commands to run the script:
cd /root
wget http://pbxinaflash.net/source/odbc/odbc-gen.sh
chmod +x odbc-gen.sh
./odbc-gen.sh
Just a word of caution that this script overwrites both odbc.ini and res_odbc.conf after making backups of both existing files (odbc.old and res_odbc.conf.old). If you happen to be a whiz kid, and you've already made entries in odbc.ini and res_odbc.conf to connect to other databases, you'll need to put your entries back in place (from the backups) after running the script the first time. If you accidentally run the script twice, your connection data will be lost since the script only makes copies of the most recent versions of the two files.
5. Recompiling Asterisk. The final step in activating ODBC on your system is to recompile Asterisk so that it becomes ODBC conversant. You obviously want to do this when your PBX is not in service. While still logged in as root, issue these commands. (NOTE: Skip this step if you're using PIAF-Green!)
cd /usr/src/asterisk
make clean
./configure
make
make install
amportal restart
Building ODBC Applications With Asterisk. We cheated. We said there were two steps in building Asterisk ODBC apps. But we actually installed the code for our two samples when we installed the sample database. So let's review the two steps so you'll know how to roll your own down the road. The two files that manage ODBC queries with Asterisk are stored in /etc/asterisk. The queries are stored in func_odbc.conf. And the dialplan code is placed in odbc.conf. It could just as easily have been inserted in extensions_custom.conf, but we thought it was more straightforward to create a separate config file solely to manage ODBC dialplan code. If for no other reason, this way you'll know where to look when something goes wrong. 🙂
Step 1 is to create the SQL query statements that will be used by Asterisk to read and write to a table in one of your databases. We built a sample time card system which could be used to let employees clock in and clock out using a telephone on your Asterisk system. The SQL code to look up employee's names based upon their employee number is called a read in Asterisk 1.4 and readsql in Asterisk 1.6. It looks like the third line below. The SQL code to update information in the file is called write or writesql, and it's on the fourth line. Ignore the wordwrap. All of the read or write code must fit on a single line in func_odbc.conf in the /etc/asterisk directory. Once you add to or make changes in this file, you'll need to reload your Asterisk modules: asterisk -rx "module reload". You can check which ODBC custom functions are available on your system with this command: asterisk -rx "core show functions like ODBC". You'll note that, for every defined function, Asterisk tacks on an ODBC_ prefix. So TIMECLOCK becomes ODBC_TIMECLOCK. You use these functions to retrieve or populate data from within your dialplan as you'll see in a minute. You also can review the SQL commands for any functions you create with a command like this: core show function ODBC_TIMECLOCK. Here's what the demo TIMECLOCK function code in func_odbc.conf actually looks like:
[TIMECLOCK]
dsn=MySQL-timeclock
read=SELECT `comments` FROM `users` WHERE `empnum`='${SQL_ESC(${ARG1})}'
write=UPDATE `users` SET `empnum`='${SQL_ESC(${VAL1})}' WHERE `empnum`='${SQL_ESC(${ARG1})}'
Step 2 in building an ODBC Asterisk app is to write the dialplan code to assign an extension which will be used to answer a call for a database query, to prompt the caller for information, to issue a SQL query to the database (using one of the functions defined in Step 1), and to return the query results to the caller. All of this dialplan code goes in /etc/asterisk/odbc.conf. Let's take a brief look at the dialplan code we've written to look up an employee's name based upon a 5-digit employee number. It looks like this:
exten => 222,1,Answer
exten => 222,n,Wait(2)
exten => 222,n,Flite("Please enter the 5 digit employee number.")
exten => 222,n,Read(EMPNUM,beep,5)
exten => 222,n,NoOp(EMPNUM: ${EMPNUM})
exten => 222,n,Set(EMPNAME=${ODBC_TIMECLOCK(${EMPNUM})})
exten => 222,n,GotoIf($["${EMPNAME}foo" = "foo"]?notfound)
exten => 222,n,Flite("The employee name is ${EMPNAME}. Good bye.")
exten => 222,n,NoOp(Employee: ${EMPNAME})
exten => 222,n,Hangup
exten => 222,n(notfound),Flite("No such employee on file. Good bye.")
exten => 222,n,Hangup
This code does the following. It answers a call to extension 222, prompts the user for a 5-digit employee number (12345 and 23456 are in the sample file), stores the number to EMPNUM, outputs the number to the Asterisk CLI, and performs an ODBC query to ODBC_TIMECLOCK (note the addition of the ODBC_ prefix to the name we assigned above). If there is no matching employee name for the EMPNUM, the dialplan jumps to the notfound label and reports "no such employee." Otherwise, it speaks the employee name which the query stored in the EMPNAME variable.
We've also created an ODBC interface to AsteriDex. You obviously have to have AsteriDex 4 installed for this application to work. With this sample, you dial extension 223 and enter the 3-character DIALCODE which is the first three letters of a name in your AsteriDex database. Then the dialplan code retrieves the first matching entry providing both the matching name and phone number. It also gives the caller the option of calling the person whose number was retrieved. Before this sample will work, you'll need to populate the DIALCODEs. To do this, use a web browser and point it to the IP address of your Asterisk server and the directory housing your AsteriDex application, e.g. http://192.168.0.44/asteridex4/dialcode.php. Once you've run this application, dial 223 from any phone on your Asterisk system and enter A-M-E. This will return the default entry for American Airlines from your AsteriDex database. You can review all of the dialplan code by pulling up odbc.conf. Our code shows how easy it is to retrieve multiple fields from a database, parse those fields, and place an outbound call based upon a response from the caller. And all of this is accomplished with a couple dozens lines of simple dialplan code.
Where To Go From Here. We've covered the installation of ODBC and provided a couple of quick examples on how to extract data from ODBC-compatible databases using Asterisk. But to maximize your benefits with ODBC, learning the Structured Query Language (SQL) is the key that unlocks the castle. That's where the real work is performed. You want your good data to stay that way. And you want the answers to your queries to be right.
Our sample code in func_odbc.conf and odbc.conf will show you how to organize things and Asterize your SQL queries to pass information back and forth between Asterisk and MySQL. But mastering syntax alone won't earn you a Black Belt in SQL design. Here are two brand new O'Reilly books that will. The first book was just released, and the second one will be available shortly: Simply SQL and Learning SQL. Enjoy!
whos.amung.us If you're wondering what your fellow man is reading on Nerd Vittles these days, wonder no more. Visit our new whos.amung.us statistical web site and check out what's happening. It's a terrific resource both for us and for you.
Special Thanks to Our Generous Sponsors
FULL DISCLOSURE: ClearlyIP, Skyetel, Vitelity, DigitalOcean, Vultr, VoIP.ms, 3CX, Sangoma, TelecomsXchange and VitalPBX have provided financial support to Nerd Vittles and our open source projects through advertising, referral revenue, and/or merchandise. As an Amazon Associate and Best Buy Affiliate, we also earn from qualifying purchases. We’ve chosen these providers not the other way around. Our decisions are based upon their corporate reputation and the quality of their offerings and pricing. Our recommendations regarding technology are reached without regard to financial compensation except in situations in which comparable products at comparable pricing are available from multiple sources. In this limited case, we support our sponsors because our sponsors support us.
 BOGO Bonaza: Enjoy state-of-the-art VoIP service with a $10 credit and half-price SIP service on up to $500 of Skyetel trunking with free number porting when you fund your Skyetel account. No limits on number of simultaneous calls. Quadruple data center redundancy. $25 monthly minimum spend required. Tutorial and sign up details are here.
![]() The lynchpin of Incredible PBX 2020 and beyond is ClearlyIP components which bring management of FreePBX modules and SIP phone integration to a level never before available with any other Asterisk distribution. And now you can configure and reconfigure your new Incredible PBX phones from the convenience of the Incredible PBX GUI.
The lynchpin of Incredible PBX 2020 and beyond is ClearlyIP components which bring management of FreePBX modules and SIP phone integration to a level never before available with any other Asterisk distribution. And now you can configure and reconfigure your new Incredible PBX phones from the convenience of the Incredible PBX GUI.
 VitalPBX is perhaps the fastest-growing PBX offering based upon Asterisk with an installed presence in more than 100 countries worldwide. VitalPBX has generously provided a customized White Label version of Incredible PBX tailored for use with all Incredible PBX and VitalPBX custom applications. Follow this link for a free test drive!
 Special Thanks to Vitelity. Vitelity is now Voyant Communications and has halted new registrations for the time being. Our special thanks to Vitelity for their unwavering financial support over many years and to the many Nerd Vittles readers who continue to enjoy the benefits of their service offerings. We will keep everyone posted on further developments.
Some Recent Nerd Vittles Articles of Interest...
Why Wait? Build Your Own Skype Gateway to Asterisk
 As the world awaits the much-hyped Digium® commercial offering of a Skype for Asterisk® gateway, we began exploring existing alternatives last week that provide individuals1 the same functionality at what will no doubt be considerably less cost. The Gizmo5 offering is darn-near perfect for those that need a quick solution and don't mind spending $20 a year to let someone else wrestle with the technical complexities that invariably accompany maintenance of cross-platform gateways such as this one.
NOTE: Article has been updated. For the latest edition, follow this link.
We, of course, like the technical challenge that comes with the territory so today we turn our attention to Greg Dorfuss' SipToSis software which forms the lynchpin of Gizmo's offering and which lets any Asterisk user create much the same gateway at no cost other than the expense of any Skype Out calls you may choose to make. When we're finished, you'll be able to call any Skype user in the world from any extension on your Asterisk server by entering either a Skype username or any 10-digit telephone number preceded by an 8 to take advantage of SkypeOut calling rates. You'll also be able to receive incoming calls from any Skype user on any extension of your Asterisk system. In short, what you get is a transparent interface to several hundred million Skype users from your Asterisk server. And the time to set this up is less than 15 minutes assuming you already have one of the Nerd Vittles Orgasmatron Builds in operation. These are available for Dell PowerEdge servers, Everex gPC desktop systems and minis, and most of the new Atom-based systems. If you have a garden-variety FreePBX-based Asterisk server such as PBX in a Flash, trixbox, or Elastix, just add another 5 minutes to reconfigure a few things.
Prerequisites. For today's project, we're assuming you have an existing FreePBX-based Asterisk server with either CentOS 5.2 or the Fedora 10 Remix featured in our Atomic Flash build. You'll need both a keyboard and mouse! For inbound Skype calling to work with other implementations including generic PBX in a Flash systems, you'll need to create a SIP URI for your Asterisk server: mothership@127.0.0.1. We've previously explained how to set one up in this article. The Atomic Flash installer, VPN in a Flash build, and the Orgasmatron II and III builds include this SIP URI functionality out of the box. You'll also need Java 1.5. To see if it's included in your distribution, issue the following command: rpm -q jdk. Finally, we're assuming you already have an existing Skype account. If not, download the Skype software for your Mac or Windows PC, and sign up. Try out a demo from any Skype phone. Just call nerdvittles.
Installing JAVA. If your particular Asterisk distribution doesn't have JAVA 1.5 or higher installed (rpm -q jdk), here's how to do it. Go to Sun's Java SE Development Kit 6u12 website, choose Linux for the platform, and agree to the license agreement. Then click Continue. Download jdk-6u12-linux-i586-rpm.bin and copy it to your Asterisk server. Make the file executable (chmod +x jdk-6u12-linux-i586-rpm.bin) and then run it. Scroll down the wordy license agreement AGAIN and type yes. Java 1.6 then will be installed on your system. Whew!
Basic Installation. Now we're ready to get started. Log into your Asterisk server as root and issue the following commands.
cd /root
mkdir skype
cd skype
wget http://www.skype.com/go/getskype-linux-centos
#Atomic Flash builds including VPN in a Flash
#should skip the next 3 yum commands.
#Then pick up again after the next comment line.
yum install xorg-x11-server-Xvfb
yum install qt4
yum install xterm
#everyone continues on from here
yum install libXScrnSaver.i386
wget http://pbxinaflash.net/source/skype/siptosis.tgz
rpm -ivh skype*
cd /
tar zxvf /root/skype/siptosis.tgz
FreePBX Design. The FreePBX setup that we recommend goes something like this. For outbound Skype calls, you have two choices.
1. To place a call to a regular phone number using SkypeOut (which costs you money), you'll simply dial 8 plus the area code and number. Our foreign friends will have to adjust their dialplans and /siptosis/SkypeOutDialingRules.props accordingly. Today's setup assumes 10-digit phone numbers!
2. To place a call to a Skype username using a softphone that supports SIP URI dialing such as X-Lite, you simply precede the Skype username with an asterisk, e.g. *echo123 will connect you to the Skype Call Testing Service.
For incoming Skype calls, the default setup routes those calls to a SIP URI: mothership@127.0.0.1. Whether you point this URI to an extension, ring group, or IVR is up to you. In the default Orgasmatron and Atomic Flash builds, the mothership URI is pointed to the Stealth AutoAttendant, an IVR that plays a welcoming message and then transfers the call to a ring group if no digit is pressed by the caller.
Configuring FreePBX. To put this setup in place, use a web browser to access FreePBX on your Asterisk server. You'll need to create a Custom Trunk and then an Outbound Route.
1. Choose Setup, Add Trunk, Add Custom Trunk. Fill in the form so that it looks like the following using your own CallerID number obviously:
When you're finished, click the Submit Changes button and then reload the dialplan when prompted.
2. Next choose Setup, Outbound Routes, Add Route. Fill in the form so that it looks like this:
When you're finished, click the Submit Changes button. Be sure to move this new OutSkype route to the top position in your Outbound Routes listing in the right margin! Then reload the dialplan when prompted.
3. If you're not using one of our custom Asterisk builds, add a new DayNight Control 1 option while you're still in FreePBX. Just specify where you want calls routed for Day mode and Night mode. Then, here's the easy way to activate SIP URI support on your Asterisk/FreePBX server. Copy the [from-sip-external] context from the extensions.conf file in /etc/asterisk. Now copy the content into extensions_override_freepbx.conf. Be sure to preserve the context name in brackets! Now make it look like the following. The additions we're making are shown in bold below:
[from-sip-external]
;give external sip users congestion and hangup
; Yes. This is _really_ meant to be _. - I know asterisk whinges about it, but
; I do know what I'm doing. This is correct.
exten => _.,1,NoOp(Received incoming SIP connection from unknown peer to ${EXTEN})
exten => _.,n,Set(DID=${IF($["${EXTEN:1:2}"=""]?s:${EXTEN})})
exten => _.,n,Goto(s,1)
exten => s,1,GotoIf($["${ALLOW_SIP_ANON}"="yes"]?from-trunk,${DID},1)
exten => mothership,1,Goto(app-daynight,1,1)
exten => pbxinaflash,1,Goto(app-daynight,1,1)
exten => e164,1,Goto(from-trunk,e164,1)
exten => fax,1,Goto(from-trunk,fax,1)
exten => s,n,Set(TIMEOUT(absolute)=15)
exten => s,n,Answer
exten => s,n,Wait(2)
exten => s,n,Playback(ss-noservice)
exten => s,n,Playtones(congestion)
exten => s,n,Congestion(5)
exten => h,1,NoOp(Hangup)
exten => i,1,NoOp(Invalid)
exten => t,1,NoOp(Timeout)
Finally, reload your Asterisk dialplan, and we're finished with Asterisk and FreePBX setup:
asterisk -rx "dialplan reload"
Activating Your Skype Gateway. Now we're ready to place your Skype gateway in production. You'll need to perform these steps from the console on your Asterisk server since we have to run Skype in graphics mode. This may look a bit complicated. It's really not. It's just a bit tedious to figure out the sequence of steps, but we've done that part for you.
For those on a CentOS-based system, here are the steps:
1. Start up X-Windows: xinit
NOTE: If xinit won't start on your particular machine, you may need to create /etc/X11/xorg.conf. Here's a generic config file that should work fine for our purposes:
Section "ServerLayout"
Identifier "X.org Configured"
Screen 0 "Screen0" 0 0
EndSectionSection "Device"
Identifier "Card0"
Driver "vesa"
EndSectionSection "Screen"
Identifier "Screen0"
Device "Card0"
SubSection "Display"
Viewport 0 0
Depth 16
Modes "800x600"
EndSubSection
SubSection "Display"
Viewport 0 0
Depth 16
Modes "800x600"
EndSubSection
EndSection
2. Next we need to start up Skype, log in, set it to autologin whenever we start it, and then in the Skype configuration, set it to run minimized: skype
NOTE: Place a Skype Test Call (echo123) to be sure your audio settings are set correctly. If a test call fails with a bad audio message, go into Options, Sound Devices and reconfigure your Audio settings until you can place the test call successfully. Otherwise, none of the rest will work! If you're using a Dell server such as the PowerEdge T100, you're probably S.O.L. without an advanced degree in Rocket Science.
HINT: Intel Atom-based motherboards are a piece o' cake!
3. Once you've got Skype working and all of the Skype settings configured above, shut down Skype.
4. Now start Skype again in background mode: skype &
5. Be sure to write down the PID for Skype in case you need to kill the job if something goes wrong. 🙂
6. You should have a command prompt back now. So issue these commands:
cd /siptosis
./SipToSis_linux
7. A message from Skype should pop up asking if you want to authorize external use of Skype: yes. Also be sure to mark the Checkbox to save this setting for future connections!
8. Now go to a softphone connected to an extension on your Asterisk server and dial *echo123
9. Go to any extension connected to your Asterisk server and dial 8 + your home phone number. This will place the outbound call through SkypeOut at 2¢ a minute.
Finally, here are a few navigation tips for managing your Asterisk console on CentOS systems:
1. Ctrl-Alt-F2 gets you a new login prompt for your server
2. Ctrl-Alt-F7 gets you back to the SipToSis/Skype session. You can kill SipToSis by holding down Ctrl-C for several seconds. To kill Skype: kill pid# (that you wrote down). To restart Skype: skype & and to restart SipToSis, just issue the command again: ./SipToSis_Linux
3. Ctrl-Alt-F9 gets you to the Asterisk CLI.
Automating the Skype Gateway Startup. Once you're positive everything is working reliably and you've rebooted and tried it again just to make certain there are no prompts, here's how to fire up your Skype gateway whenever you reboot your server.
Log into your server as root and issue the following commands:
cd /root
wget http://pbxinaflash.net/source/skype/start-skype
chmod +x start-skype
echo "/root/start-skype" >> /etc/rc.d/rc.local
reboot
For those using one of our Fedora 10 builds such as VPN in a Flash or the Atomic Flash installer, these systems have a full implementation of X-Windows and KDE. Just start the system in mode5 (graphics mode), log in, run Skype in one window and start up SipToSis in a terminal window using the commands in Step 6 above. Authorize external use of Skype when prompted.
Setting Up Speed Dials for Skype Friends. One of the wrinkles with Skype is that Skype uses names for its users rather than numbers. If you don't have a SIP URI-capable softphone, there's still an easy way to place calls to your Skype friends using FreePBX. Just add a Speed Dial number to your FreePBX dialplan. Choose Extension, then select the Custom type, provide an Extension Number which is the Speed Dial number (this could actually spell your friend's name using a TouchTone phone), enter a Display Name for your friend, and add an optional SIP Alias. Then insert the following in the dial field replacing joeschmo with your friend's actual Skype name. Save your entries and reload the dialplan when prompted.
SIP/joeschmo@127.0.0.1:5070
Security Warning. One final note of caution. Do NOT expose UDP port 5070 to the Internet unless you first secure this port with a username and password to avoid Internet intruders using your gateway as a free Skype dialing platform! You do not need 5070 exposed to the Internet to implement today's gateway solution for inbound or outbound Skype calling from your Asterisk server so we recommend you keep it securely behind at least one firewall.
Where To Go From Here. Well, those are the basics. You now can make one outbound Skype call at a time from your Asterisk server, and you can receive an inbound Skype call on any Asterisk extension when Skype users call your regular Skype name. If you want to start up your own business (like Gizmo5), then you'll need to do some tweaking. What you'll need is the STS Trunk Builder toolkit which is free, but proprietary. Enjoy!
 Want a Bootable PBX in a Flash Drive? Our Atomic Flash bootable USB flash installer for PBX in a Flash has been quite the hit. Special thanks to all of our generous contributors! Atomic Flash provides all of the goodies in the VPN in a Flash system featured last month on Nerd Vittles. You can build a complete turnkey system using almost any current generation PC with a SATA drive and this USB flash installer in less than 15 minutes!
If you'd like to put your name in the hat for a chance to win a free one delivered to your door, just post a comment with your best PBX in a Flash story.2
Be sure to include your real email address which will not be posted. The winner will be chosen by drawing an email address out of a hat (the old fashioned way!) from all of the comments posted over the next several weeks.
And it still isn't too late to make a contribution of $50 or more to the PBX in a Flash project and get a free Atomic Flash installer delivered to your door as our special thank you gift. See this Nerd Vittles article for details.
Special Thanks to Our Generous Sponsors
FULL DISCLOSURE: ClearlyIP, Skyetel, Vitelity, DigitalOcean, Vultr, VoIP.ms, 3CX, Sangoma, TelecomsXchange and VitalPBX have provided financial support to Nerd Vittles and our open source projects through advertising, referral revenue, and/or merchandise. As an Amazon Associate and Best Buy Affiliate, we also earn from qualifying purchases. We’ve chosen these providers not the other way around. Our decisions are based upon their corporate reputation and the quality of their offerings and pricing. Our recommendations regarding technology are reached without regard to financial compensation except in situations in which comparable products at comparable pricing are available from multiple sources. In this limited case, we support our sponsors because our sponsors support us.
BOGO Bonaza: Enjoy state-of-the-art VoIP service with a $10 credit and half-price SIP service on up to $500 of Skyetel trunking with free number porting when you fund your Skyetel account. No limits on number of simultaneous calls. Quadruple data center redundancy. $25 monthly minimum spend required. Tutorial and sign up details are here.
![]() The lynchpin of Incredible PBX 2020 and beyond is ClearlyIP components which bring management of FreePBX modules and SIP phone integration to a level never before available with any other Asterisk distribution. And now you can configure and reconfigure your new Incredible PBX phones from the convenience of the Incredible PBX GUI.
The lynchpin of Incredible PBX 2020 and beyond is ClearlyIP components which bring management of FreePBX modules and SIP phone integration to a level never before available with any other Asterisk distribution. And now you can configure and reconfigure your new Incredible PBX phones from the convenience of the Incredible PBX GUI.
VitalPBX is perhaps the fastest-growing PBX offering based upon Asterisk with an installed presence in more than 100 countries worldwide. VitalPBX has generously provided a customized White Label version of Incredible PBX tailored for use with all Incredible PBX and VitalPBX custom applications. Follow this link for a free test drive!
Special Thanks to Vitelity. Vitelity is now Voyant Communications and has halted new registrations for the time being. Our special thanks to Vitelity for their unwavering financial support over many years and to the many Nerd Vittles readers who continue to enjoy the benefits of their service offerings. We will keep everyone posted on further developments.
Some Recent Nerd Vittles Articles of Interest...
- Skype and this suggested implementation are intended for individual use. Your use is, of course, governed by the Skype Terms of Service. [↩]
- This offer does not extend to those in jurisdictions in which our offer or your participation may be regulated or prohibited by statute or regulation. [↩]
Introducing Atomic Flash: 15-Minute Turnkey Asterisk Installs
PBX in a Flash offers a number of Asterisk- compatible PBX solutions to meet virtually every need. These range from base installs of Asterisk 1.4 and 1.6 in both 32-bit and 64-bit flavors. In addition, the Orgasmatron builds provide turnkey installs for Everex gPC systems and Dell PowerEdge SC440 and T100 servers. And our recent VPN in a Flash build for the Acer Aspire One NetBook introduced the ultimate portable, secure traveling communications server including the Hamachi VPN.
For 2009 we round out our offerings with the ultimate development tool, a bootable USB flash drive which can create turnkey, full-featured Asterisk PBX systems in 15 minutes or less. As its name suggests, this build was specially engineered for the new Atom-based motherboards found in most netbooks although it works just fine with Dell’s PowerEdge T100 servers as well. Many of the newer netbooks lack a CD/DVD drive so a bootable flash installer is ideal. In addition to a current generation computer, you’ll also need an 80GB or larger SATA disk drive which can be configured as sda1, sda2, and sda3. RAID setups are not yet supported unless you’re very familiar with reconfiguring Mondo Restores. With your new computer in hand, just plug in the Atomic Flash, and boot the computer from the flash drive. Type nuke and have a cup of coffee. When you return in 15 minutes and type a couple commands, your system will be ready for deployment. Add your trunk providers, match phones to the preconfigured extensions, secure passwords, and you’re all set. It’s that easy!
Make no mistake. This is a Bleeding Edge installer featuring a Fedora 10 Remix1 that’s less than a week old. It supports the latest and greatest motherboards, wired and WiFi networks, and it includes the KDE graphical user interface for those that love GUIs. Out of the box, it provides a functioning softphone as well as your own private Hamachi VPN connecting up to 15 additional systems so the entire setup can be deployed as a mobile communications hub in less time and for less money than most folks spend on their breakfast.
For those that demo systems for a living, no one will touch this presentation. Just show up at a customer site with a $300 Acer Aspire One NetBook and an Aastra 57i business phone. While the customer watches the Atomic Flash build a new PBX in a Flash server from the ruins of a Windows XP clunker, you can connect and configure the 57i and explain how simple VoIP networks can be.
When you finish your 10-minute slide show, your system will be operational. Dial any 800 number from your Aastra phone, and presto… instant, flawless communications! Now explain to the customer what the world of penny-a-minute communications is all about with every call between PBX in a Flash systems and other SIP phones absolutely free… worldwide.
Friends of PIAF. So how do you get one? If you don’t mind a preproduction version, which means we have to custom-build every flash drive, here’s how to get yours. First, this offer is for a limited time (until we get sick of cloning flash drives). And don’t expect to receive your unit overnight. In fact, it may be several weeks or more depending upon how busy we get with other Honey-Do’s. But we won’t forget you!
Now what? Just make a contribution of $50 or more to the PBX in a Flash project through PayPal, and we’ll give you one (as in gift for free), and we’ll even pay the shipping. Limit of one per contributor please! Keep in mind that $50 barely covers the cost of the 8GB flash drive, the shipping, the PayPal commission, and the labor (at 5¢ an hour) so your generosity is most appreciated. And when we get tired of working for 5¢ an hour, we’ll holler. 🙂
Once your Atomic Flash device arrives, please visit http://atomicflash.org or http://pbxonaflash.com for complete installation instructions.

The Perfect Complement. The stars have all lined up to provide a perfect opportunity for you to purchase a state-of-the-art NetBook. Click or hover on the image above for details. If you’d prefer a server, you now can grab a Dell Poweredge T100 server with dual 160GB SATA drives and 2GB of RAM saving $397 off the list price. Either hardware works great with Atomic Flash.
Are You Crazy? Why Are You Doing This? Well, yes and because it’s the First Anniversary of PBX in a Flash! We want everyone to experience PBX in a Flash in all its greatness now that we’ve got it down to a 15-minute walk in the park. These are tough economic times for many businesses around the world, and we want you to help us spread the word about the savings that can be realized through Voice Over IP. We also want to encourage those of you on the fence about a career to enter the Asterisk® reseller community, and we’re doing our part by providing the perfect sales and development tool.
So now’s your chance. We hope you’ll tell every business acquaintance and friend you have about PBX in a Flash. And you have our heartfelt thanks for your continuing support. It’s been a blast!
Special Thanks to Our Generous Sponsors
FULL DISCLOSURE: ClearlyIP, Skyetel, Vitelity, DigitalOcean, Vultr, VoIP.ms, 3CX, Sangoma, TelecomsXchange and VitalPBX have provided financial support to Nerd Vittles and our open source projects through advertising, referral revenue, and/or merchandise. As an Amazon Associate and Best Buy Affiliate, we also earn from qualifying purchases. We’ve chosen these providers not the other way around. Our decisions are based upon their corporate reputation and the quality of their offerings and pricing. Our recommendations regarding technology are reached without regard to financial compensation except in situations in which comparable products at comparable pricing are available from multiple sources. In this limited case, we support our sponsors because our sponsors support us.
BOGO Bonaza: Enjoy state-of-the-art VoIP service with a $10 credit and half-price SIP service on up to $500 of Skyetel trunking with free number porting when you fund your Skyetel account. No limits on number of simultaneous calls. Quadruple data center redundancy. $25 monthly minimum spend required. Tutorial and sign up details are here.
![]() The lynchpin of Incredible PBX 2020 and beyond is ClearlyIP components which bring management of FreePBX modules and SIP phone integration to a level never before available with any other Asterisk distribution. And now you can configure and reconfigure your new Incredible PBX phones from the convenience of the Incredible PBX GUI.
The lynchpin of Incredible PBX 2020 and beyond is ClearlyIP components which bring management of FreePBX modules and SIP phone integration to a level never before available with any other Asterisk distribution. And now you can configure and reconfigure your new Incredible PBX phones from the convenience of the Incredible PBX GUI.
VitalPBX is perhaps the fastest-growing PBX offering based upon Asterisk with an installed presence in more than 100 countries worldwide. VitalPBX has generously provided a customized White Label version of Incredible PBX tailored for use with all Incredible PBX and VitalPBX custom applications. Follow this link for a free test drive!
Special Thanks to Vitelity. Vitelity is now Voyant Communications and has halted new registrations for the time being. Our special thanks to Vitelity for their unwavering financial support over many years and to the many Nerd Vittles readers who continue to enjoy the benefits of their service offerings. We will keep everyone posted on further developments.
Some Recent Nerd Vittles Articles of Interest…
- Fedora and the Infinity design logo are trademarks of Red Hat, Inc. Asterisk is a registered trademark of Digium, Inc. All other trademarks and registered trademarks are property of their respective owners. This software aggregation is neither provided nor supported by the Fedora Project and contains non-Fedora and modified Fedora content. Official Fedora software is available through the Fedora Project website [↩]
Remotely Managing Your Asterisk Server with WebDAV
 It's been quite a while since we last explored WebDAV, and that was in the context of turning a Mac into an ISP-in-a-Box in 2005. Today we want to do much the same thing with your PBX in a Flash server, and the drill is quite similar. Over the course of the last four years, the uses of WebDAV have grown geometrically.
Overview. As you probably know, WebDAV is an acronym for Web-based Distributed Authoring and Versioning. Simply put, it is an HTTP protocol extension that allows people anywhere on the Internet to collaboratively edit and manage documents and other files using the same protocol and port used for surfing the web. In the Mac world, WebDAV provides a Disk Volume on your Desktop that “looks and feels” like any other networked hard disk. In the Windows world, WebDAV is called Web Folders. They can be used like any other mapped drive in Network Neighborhood. If you’re still a little fuzzy about the WebDAV concept, think of how you link to another drive on your local area network. WebDAV gives you the same functionality across the entire Internet with virtually the same ease of use. Depending upon user privileges, of course, you can copy files to and from a WebDAV volume, and the protocol imposes versioning control through file locking to assure that multiple people with access rights don’t change the same file at the same time.
For openers, WebDAV provides a simple vehicle to manage your PBX in a Flash web site by letting you create a file-sharing link to your server which is read and write-accessible (with a password) from almost anywhere. It also could be used to upload and/or download sensitive corporate data, or it could serve as a backup repository for your portable or desktop PC. Think of it as a Poor Man's Cloud Computing alternative. Install a couple of terabyte drives on a Dell T100 or SC440, and you've got a secure environment for storing all of your data on a single server.
Initial Setup of WebDAV. For today, we're assuming you already have a functioning PBX in a Flash server. It includes most of the WebDAV components necessary to get WebDAV working. If you're using some other Asterisk® platform, then take a look at our previous articles for some hints on the basic setup keeping in mind that most Asterisk distributions use asterisk as the web user account rather than apache. To keep things simple, we're going to set up a separate dav directory within your existing PBX in a Flash web server to use for WebDAV access. This means files and folders managed with WebDAV will appear in /var/www/html/dav on your server.
To complete the WebDAV setup on PBX in a Flash systems, log into your server as root and issue the following commands:
mkdir /var/www/html/dav

chown asterisk:asterisk /var/www/html/dav

chown asterisk:asterisk /var/lib/dav

cd /etc/pbx/httpdconf

wget http://pbxinaflash.net/source/webdav/dav.conf

apachectl restart
Configuring WebDAV. As installed, you'll need your username (maint) and your password to access your WebDAV server from either a browser (for read access) or via network access (for read and write access). You have several choices in how to reconfigure this setup to meet your own requirements. If you want to upload and manage files in this directory with a password and then allow anyone to access the files with a web browser with no password, you can simply uncomment the two Limit lines in the Apache dav.conf file in /etc/pbx/httpdconf. Just remove the leading # characters from both the lines in the configuration file. If you want to restrict network and web access to WebDAV to certain IP addresses, you can remove the Allow from all line in dav.conf and add lines that look like the following:
Allow from 192.168.0

Allow from 68.218.222.170
Remember to give yourself access on the private LAN as well as the public side if you plan to use WebDAV from outside your firewall. Our strongest recommendation remains to not expose your server to public web access without restricting access with either passwords or IP restrictions in .htaccess files for each directory as shown above.
Accessing WebDAV. To access your WebDAV folder with a browser for read-only access, point your browser to the IP address of your server and then the /dav subdirectory. For example, on your private LAN, the link might look like this: http://192.168.0.123/dav. On the public Internet, the link might look like this: http://pbx.dyndns.org/dav.
On a Windows machine, you can create a Web Folder for access to your new WebDAV directory like this:
My Network Places

Add a network place

Choose network location

http://192.168.0.123/dav (with no trailing slash!)

username: maint  password: yoursecretpassword

Name the link: PiaF WebDAV
Update: There is a glitch with Web Folder access with some Windows XP and Vista systems. Here's a link to the Microsoft Patch that addressed the problem.
On a Mac, click on your Desktop to open Finder and do the following:
Go

Connect to Server

http://192.168.0.123/dav (with no trailing slash!)

Connect

username: maint  password: yoursecretpassword

OK
Using WebDAV for Total Web Site Management. There may be some who actually want to use WebDAV to manage your entire PBX in a Flash web site. This means all directories from /var/www/html down. This WebDAV management need not be exclusive. In other words, you still can retain the WebDAV setup for the dav directory outlined above. To add an additional WebDAV service for your entire web site, you will need to edit /etc/httpd/conf/httpd.conf. Then search for this text:
<Directory "/var/www/html">
Once you find that line of code, scroll down to just above the </Directory> entry and insert the following lines of code. Save your additions and then restart Apache: apachectl restart.
 DAV on

 <Limit PUT POST DELETE PROPFIND PROPPATCH MKCOL COPY MOVE LOCK UNLOCK>

     AuthType Basic

     AuthName "WebDAV Web Server Access"

     AuthUserFile /usr/local/apache/passwd/wwwpasswd

     Require valid-user

     Order allow,deny

     Allow from all

 </Limit>
If you haven't also implemented the dav solution above, then make certain you issue the following command while logged into your server as root:
chown asterisk:asterisk /var/lib/dav
Now that you have your own WebDAV server, take a look at this terrific web site for some great ideas on what's possible in the open source and commercial world of WebDAV. Enjoy!
 It's Time For That New Dell, Dude. If you've been holding off until Dell put the PowerEdge T100 on sale again, then today's your lucky day. With a dual Core Intel® Pentium®E2180, 2.0GHz processor with 1MB Cache, an 800MHz FSB, an 80GB 7.2K RPM Serial ATA 3Gbps 3.5-in Cabled Hard Drive connected to the onboard SATA controller, 512MB of 667MHz DDR2 RAM, a DVD-ROM Drive, and an On-Board Single Gigabit Network Adapter, the T100 is on sale for $329. It's not as great a deal as sometimes, but it's still a steal. Be sure to upgrade to 2GB of RAM for $19! Once you have your system, just load our Orgasmatron III build and you'll be off to the races in under 15 minutes!
If you want a cash rebate on your Dell purchase, use our eBates link to Dell or click on the coupon image in the right column of this article. It takes less than 30 seconds to sign up, and you get $5 (and so do we!) plus you receive 2% cash back on your Dell small business purchases which can be deposited directly into your PayPal account.
Want a Bootable PBX in a Flash Drive? In a few weeks to celebrate the beginning of Nerd Vittles' Fifth Year, we'll be introducing our bootable USB flash installer for PBX in a Flash with all of the goodies in the VPN in a Flash system featured a few weeks ago on Nerd Vittles. You can build a complete turnkey system using almost any current generation PC with a SATA drive and our flash installer in less than 15 minutes!
If you'd like to put your name in the hat for a chance to win a free one delivered to your door, just post a comment at this link with your best PBX in a Flash story.1
Be sure to include your real email address which will not be posted. The winner will be chosen by drawing an email address out of a hat (the old fashioned way!) from all of the comments posted over the next couple weeks. Good luck to everyone and Happy New Year!!
Special Thanks to Our Generous Sponsors
FULL DISCLOSURE: ClearlyIP, Skyetel, Vitelity, DigitalOcean, Vultr, VoIP.ms, 3CX, Sangoma, TelecomsXchange and VitalPBX have provided financial support to Nerd Vittles and our open source projects through advertising, referral revenue, and/or merchandise. As an Amazon Associate and Best Buy Affiliate, we also earn from qualifying purchases. We’ve chosen these providers not the other way around. Our decisions are based upon their corporate reputation and the quality of their offerings and pricing. Our recommendations regarding technology are reached without regard to financial compensation except in situations in which comparable products at comparable pricing are available from multiple sources. In this limited case, we support our sponsors because our sponsors support us.
BOGO Bonaza: Enjoy state-of-the-art VoIP service with a $10 credit and half-price SIP service on up to $500 of Skyetel trunking with free number porting when you fund your Skyetel account. No limits on number of simultaneous calls. Quadruple data center redundancy. $25 monthly minimum spend required. Tutorial and sign up details are here.
![]() The lynchpin of Incredible PBX 2020 and beyond is ClearlyIP components which bring management of FreePBX modules and SIP phone integration to a level never before available with any other Asterisk distribution. And now you can configure and reconfigure your new Incredible PBX phones from the convenience of the Incredible PBX GUI.
The lynchpin of Incredible PBX 2020 and beyond is ClearlyIP components which bring management of FreePBX modules and SIP phone integration to a level never before available with any other Asterisk distribution. And now you can configure and reconfigure your new Incredible PBX phones from the convenience of the Incredible PBX GUI.
VitalPBX is perhaps the fastest-growing PBX offering based upon Asterisk with an installed presence in more than 100 countries worldwide. VitalPBX has generously provided a customized White Label version of Incredible PBX tailored for use with all Incredible PBX and VitalPBX custom applications. Follow this link for a free test drive!
Special Thanks to Vitelity. Vitelity is now Voyant Communications and has halted new registrations for the time being. Our special thanks to Vitelity for their unwavering financial support over many years and to the many Nerd Vittles readers who continue to enjoy the benefits of their service offerings. We will keep everyone posted on further developments.
Some Recent Nerd Vittles Articles of Interest...
- This offer does not extend to those in jurisdictions in which our offer or your participation may be regulated or prohibited by statute or regulation. [↩]
Introducing VPN in a Flash: The $499 Mobile Telephony Appliance with Asterisk
 We’ve spent a lot of time designing turnkey Asterisk®-based systems from the early Asterisk at Home days until the latest Orgasmatron Builds1 for PBX in a Flash. So, trust us! Nothing comes close to the new VPN in a Flash Mobile Telephony Appliance. Having endured more than a decade of preparations for national emergencies, we are well aware of the need for well-designed telephony systems which can be deployed on a moment’s notice anywhere. We also appreciate the need for a versatile, portable communications appliance which can be toted from hotel room to hotel room providing secure VoIP communications back to the mothership. And we fully grasp the need of thousands of businesses to transparently deploy remote communications devices at far away places but in a way that they still can be supported from home base. With all that in mind, Tom King and I have spent the last several months designing this VoIP telephony appliance. Now let us introduce you to the new world2 of VPN in a Flash.
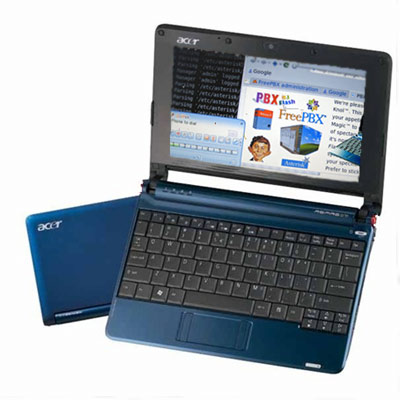
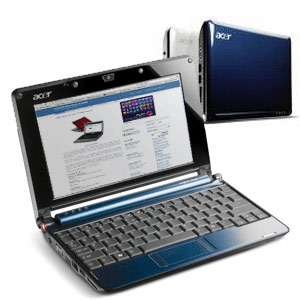
 Until six months ago, the hardware simply wasn’t available to provide the GUI performance necessary to create such a portable appliance. But the Intel Atom® processor changed all of that. And now Acer has stepped up with an almost perfect mobile implementation of the Atom motherboard in the Aspire One® Netbook. Weighing in at just over two pounds, it’s totally portable but also a powerhouse. And it’s quiet.
On the software side, the stars all lined up when Fedora® introduced Fedora 10 last week, an almost perfect rendition of the Linux® operating system with every imaginable bell and whistle including a low-overhead KDE® GUI that rivals the very best of Windows® and Mac OS X®. Our challenge was to put all the pieces together and add the very best of the Asterisk® telephony world to the mix. And, of course, we wanted to accomplish all of this while staying true to our open source roots. We think this Fedora Remix3 meets that goal in spades! You certainly could build your own system from the ground up, and we would encourage you to download Fedora 10 and do that when you have a few months of free time on your hands. The new Fedora 10 build is a perfect platform for Asterisk and the latest state-of-the-art hardware. In the meantime, our rendition which configures everything to better support Asterisk in a mobile telephony environment should save you about 500 man-hours. Try it. You’ll see. 😉
We also wanted the new system design to include every imaginable communications bell and whistle on the planet including a flexible, turnkey virtual private network implementation, transparent support for wired and wireless networks, a built-in preconfigured softphone which is ready for business, and all of the Nerd Vittles utilities and FreePBX® functionality that has made PBX in a Flash such a hit.
Finally, a new Mondo backup script has been included that lets you clone your entire system to a $20 bootable USB flash drive for incredibly easy system recovery in the event of a hardware catastrophe. And the 2008 introductory price for these built-to-order systems: just $499 plus shipping to US-48 destinations. And there’s loads of documentation, too. With a little luck, a self-installing, bootable flash drive appliance for our friends outside of the United States should be available by early next year.
About the Face Lift. Well, it’s been a painful few days at Nerd Vittles Headquarters. Our former hosting provider, BlueHost, apparently hired a new recruit that deemed our CPU utilization unworthy… in the middle of the night last Thursday. He promptly shut down our site. For any of you considering shared hosting, this is one of the dirty little secrets of the industry. They may promise you unlimited disk storage and unlimited bandwidth, but they don’t really mean it. I’m reminded of Mark Twain’s old adage about bankers: "Bankers are the folks that hand you an umbrella when the sun is shining and want it back the minute it starts to rain." Internet hosting providers have some of the same gene pool unfortunately.
The sad part of the story is that BlueHost is one of the better providers in the United States, and we, in fact, have recommended them. Hundreds of our readers took us up on our BlueHost recommendation. It gets even worse. We provided free Asterisk support to the BlueHost folks about a year ago when they were attempting to reconfigure their queues. We even brought in a local consultant in their area to assist. Do you think we even got a return call from our fair-weather friends when we were trying to figure out why our site suddenly became a problem? Our site utilization has been fairly steady for more than two years! Suffice it to say, the phone never rang. But that’s all history now. Nerd Vittles has moved to our new high-performance server at WestNIC that also hosts the PBX in a Flash Forum, and we’re happy to be there.
Nothing’s ever simple, of course. WestNIC employs PHP5 while BlueHost still was using PHP4. Even though cPanel made the server transition easy, our particular version of the WordPress blogging software was more than a little long in the tooth. Everything at first appeared to work fine. But it turned out that you could no longer read individual posts. Call us picky but that was a deal breaker. What to do? Suffice it to say that 17 version upgrades later, we’re now current. The only fatality was a few recent comments which got deleted by operator error… mine. 🙄
All good blogs deserve a facelift at least once every five years, don’t you think? Well, we’re about a month shy of our Fifth Anniversary, but it was worth the effort. And the performance boost is nothing short of amazing. We hope you agree. Enjoy!
Special Thanks to Our Generous Sponsors
FULL DISCLOSURE: ClearlyIP, Skyetel, Vitelity, DigitalOcean, Vultr, VoIP.ms, 3CX, Sangoma, TelecomsXchange and VitalPBX have provided financial support to Nerd Vittles and our open source projects through advertising, referral revenue, and/or merchandise. As an Amazon Associate and Best Buy Affiliate, we also earn from qualifying purchases. We’ve chosen these providers not the other way around. Our decisions are based upon their corporate reputation and the quality of their offerings and pricing. Our recommendations regarding technology are reached without regard to financial compensation except in situations in which comparable products at comparable pricing are available from multiple sources. In this limited case, we support our sponsors because our sponsors support us.
BOGO Bonaza: Enjoy state-of-the-art VoIP service with a $10 credit and half-price SIP service on up to $500 of Skyetel trunking with free number porting when you fund your Skyetel account. No limits on number of simultaneous calls. Quadruple data center redundancy. $25 monthly minimum spend required. Tutorial and sign up details are here.
![]() The lynchpin of Incredible PBX 2020 and beyond is ClearlyIP components which bring management of FreePBX modules and SIP phone integration to a level never before available with any other Asterisk distribution. And now you can configure and reconfigure your new Incredible PBX phones from the convenience of the Incredible PBX GUI.
The lynchpin of Incredible PBX 2020 and beyond is ClearlyIP components which bring management of FreePBX modules and SIP phone integration to a level never before available with any other Asterisk distribution. And now you can configure and reconfigure your new Incredible PBX phones from the convenience of the Incredible PBX GUI.
VitalPBX is perhaps the fastest-growing PBX offering based upon Asterisk with an installed presence in more than 100 countries worldwide. VitalPBX has generously provided a customized White Label version of Incredible PBX tailored for use with all Incredible PBX and VitalPBX custom applications. Follow this link for a free test drive!
Special Thanks to Vitelity. Vitelity is now Voyant Communications and has halted new registrations for the time being. Our special thanks to Vitelity for their unwavering financial support over many years and to the many Nerd Vittles readers who continue to enjoy the benefits of their service offerings. We will keep everyone posted on further developments.
Some Recent Nerd Vittles Articles of Interest…
- If you don’t know what an Orgasmatron Build is, use the search function at the top of this page. [↩]
- And speaking of new worlds, lawyers love footnotes so you’d better get used to these little numbers. 🙂 We’ll break you in easy today. There are just a few of them. [↩]
- Fedora and the Infinity design logo are trademarks of Red Hat, Inc. Asterisk is a registered trademark of Digium, Inc. All other trademarks and registered trademarks are property of their respective owners. This software aggregation is neither provided nor supported by the Fedora Project and contains non-Fedora and modified Fedora content. Official Fedora software is available through the Fedora Project website. [↩]
Cloud Computing 101: Using Amazon’s S3 (Simple Storage Service) for Off-Site Asterisk Backups
When we began the PBX in a Flash project, one of our key design requirements to distinguish our product from other Asterisk® aggregations was to include an automated, rock-solid reliable, backup solution that backed up not only Asterisk but your entire server in a way that could be restored painlessly without manually reinstalling the initial PBX in a Flash image. After almost a year in production, PBX in a Flash remains the only distribution with a complete backup solution. In the Orgasmatron builds of PBX in a Flash, we've gone a step further. Automated weekly backups to a flash drive are preconfigured. All it takes to get started is a $15 flash drive. Insert the stick and run the usbformat.sh script. Thereafter, a full backup is run each Sunday night, and the self-booting ISO images are conveniently placed on the flash drive for easy restoration of your entire system should the need ever arise.
We appreciate, however, that others running Asterisk and FreePBX need backup solutions as well. And, while today's tutorial won't get you a full system backup which is comparable to what's available on PBX in a Flash systems, what it will do is provide an automated off-site backup storage solution for all of your critical FreePBX data for pennies a day. Beginning last year, FreePBX started offering a backup solution for FreePBX data as an integral part of the FreePBX web interface. The FreePBX solution lets you define a schedule for backing up your voicemail, system recordings, system configuration, CDR, and operator panel. What the restore process won't do is put Humpty back together again without first reinstalling your operating system and Asterisk environment. For those using PBX in a Flash, you've got the best of all worlds with these two backup solutions. For everyone else, the FreePBX backup alternative is certainly better than nothing. It also is a terrific tool for moving from one distribution to another (hint!) or to a new server environment. So long as the versions of FreePBX on both systems match, users have reported excellent results.
In addition to the need to recreate your server environment from scratch, there's an additional problem with the FreePBX backup solution. It gets stored on the same drive as your Asterisk server. That works great until your hard disk dies or your house catches on fire. Backups are written to /var/lib/asterisk/backups and placed in subdirectories matching the Schedule Name you assign to the backup procedure. For reasons which will become obvious, it's a good idea to name your schedules without any spaces in the name, e.g. DailyBackup. The only thing we've really found missing in the FreePBX solution is an off-site storage option to protect you in the event of a catastrophe.
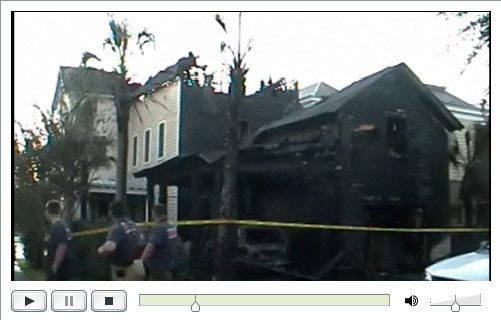
A Picture Is Worth A Thousand Words. We recently were reminded of the importance of off-site storage when a neighbor's house caught fire in the middle of the night. Fortunately, the entire family escaped without injury. But all of the contents of the home were destroyed either by the fire or by the water used to put out the fire. After being awakened by a neighbor in the middle of the night, there was less than 5 minutes to extract mom and dad and four young children from the house before it was totally engulfed in flames. Moving computers out of harm's way most assuredly was the furthest thing from their minds. Enter: Amazon S3 aka Cloud Storage. A recent InformationWeek poll found that "storage--including archiving and disaster recovery--was cited as the service category most likely to be outsourced to the cloud, ahead even of business applications."
If this is all news to you, here's a quick thumbnail on Amazon S3 from the Wikipedia:
"Amazon S3 (Simple Storage Service) is an online storage web service offered by Amazon Web Services. Amazon S3 provides unlimited storage through a simple web services interface. Amazon launched S3, its first publicly-available web service, in the United States in March 2006 and in Europe in November 2007. Since its inception, Amazon has charged end users $0.15 per gigabyte-month, with additional charges for bandwidth used in sending and receiving data. As of November 1, 2008, pricing will move to tiers where end users storing more than 50 terabytes per month will receive discounted pricing. Amazon claims that S3 uses the same scalable storage infrastructure that Amazon.com uses to run its own global e-commerce network. Amazon S3 is reported to store more than 29 billion objects as of October 2008. This is up from 14 billion objects as of January 2008, and from 10 billion in October 2007. S3 uses include web hosting, image hosting, and a back-up system. S3 comes with no guarantee that customer data will not be lost."
To give you some idea of pricing, our current FreePBX daily backups are roughly 50 megabytes in size. A new PBX in a Flash install yields a 20MB FreePBX backup. Using a cable modem connection, uploading our 50MB daily backup to Amazon S3 takes about 5 minutes and costs 2¢. Storage of a full month's worth of rotating backups would add another quarter to the monthly cost. Thus, the tab to upload and store 30 backups a month runs less than one dollar, pretty cheap insurance by any measure. And, unless you tinker with your system as much as we do, daily backups probably are overkill. The tab for weekly uploads and storage on Amazon S3 would run less than 25¢ a month assuming you remove all but the last five backups from S3 in each subsequent month. So... what are you waiting for?
Configuring Weekly Backups with FreePBX. The first step is to set up the automated backup process in FreePBX. Using a browser, open FreePBX and choose Tools, Backup & Restore. Click Add Backup Schedule and name the schedule WeeklyBackup. Select all of the radio buttons to backup everything possible with FreePBX. For the time of the backups, leave the Follow Schedule Below option selected. Choose a time for the backup by clicking on the appropriate settings. We recommend 3:05 a.m. which means you click on 5 in the minutes column and 3 in the hours column. Finally, click the Selected option button under Weekdays and then click Wednesday. Click Submit Changes to save your settings.
Creating an Amazon S3 Account. Before you can create backups on Amazon S3, you'll obviously need an account. Here's the link to sign up: http://www.amazon.com/s3. Once you sign up, you'll receive an email with this link to manage your new account. Log in using your Amazon username and password. Write down your Access Key ID. Next click on the button to generate a new Secret Access Key. Once it's generated, click on the link provided to display it. Write it down, too. You'll need both your Access Key and your Secret to use Amazon's S3 service.
Installing s3cmd to Manage Your S3 Backups. There are a number of tools available to interact with Amazon S3. We've chosen s3cmd which happens to be free and uses python which is preconfigured on PBX in a Flash systems. Another great tool is JungleDisk, but it costs $20. It uses s3sync and Ruby which you'd need to install: yum install ruby. It also requires SSL certificates which complicates things a bit. For an excellent tutorial, see Chris Sherwood's writeup. Of course, time marches on, and today we can do all of the same things at no cost. So let's get started.
To install and configure s3cmd, log into your server as root and issue the following commands:1
cd /root

wget http://downloads.sourceforge.net/s3tools/↩
 s3cmd-0.9.8.3.tar.gz?modtime=1217338796&big_mirror=0

tar zxvf s3cmd*

mv s3cmd-0.9.8.3 s3cmd

cd s3cmd

./s3cmd --configure
You'll be prompted to enter your Access Key and Secret Key to access Amazon S3. Next you'll be asked to provide an encryption password to protect your data while being transmitted to Amazon. Make up a random collection of letters and numbers. For the path to the GPG program, press Enter to choose the default: /usr/bin/gpg. Choose whether to use HTTPS to transmit your data. It's a little slower, but it's secure so we recommend choosing it. We're going to automate the backup process so you're not going to be watching the file transmission process anyway. Next, you'll be asked whether to test S3 access using the credentials you've supplied, Type y and be sure you get a success message. Otherwise, recheck your Access Key and Secret Key for typos. Finally, you'll be asked whether to save the settings. Choose Y. Your settings will be saved in /root/.s3cfg. Be sure to erase the file if you give your server to someone else!
Using the s3cmd Command Line Interface. s3cmd is a command line tool so we'll walk you through the basics before we automate the weekly backup process. There's an excellent tutorial for s3cmd that is available here, and more S3 tools are on the way. What you really need to know about S3 file storage is that files are stored in disk volumes which S3 calls buckets. You can have up to 100 buckets. Wildcards don't work the way Linux wildcards do, and S3 is picky about the use of periods. Our recommendation: don't use them for the time being. Also be aware that bucket names are like domain names. They must be unique across the S3 cloud. So... daily-backup and weekly-backup won't work on your system because we already own those buckets. The easiest naming convention is probably to use your full name or company name for the bucket name and then create directories below there for your data. For other tips, see the S3 FAQ. Now let's run down the basic list of commands in the order you typically would use them:
Create a New Bucket: s3cmd mb s3://weekly-backup (Unique on S3!)

List Your Buckets: s3cmd ls

List Bucket Contents: s3cmd ls s3://weekly-backup

Upload a File: s3cmd put file.xyz s3://weekly-backup/file.xyz

Download a File: s3cmd get s3://weekly-backup/file.xyz file.xyz

Delete a File: s3cmd del s3://weekly-backup/file.xyz

Delete a Bucket: s3cmd rb s3://weekly-backup (NOTE: Bucket must be empty!)
Automating the Off-Site Backups to Amazon S3. We now have all the pieces we need build a weekly cron script to automate the backup process to our new Amazon S3 storage facility. So let's build the script. For purposes of this example, we will assume that you have followed our instructions above in setting up the backup process with FreePBX. We obviously need to know when new backups are made so that we can configure a cron script at the proper time to copy the backup file up to the Amazon S3 server. We also need to know the name of the FreePBX directory with the backups and will assume that it's /var/lib/asterisk/backups/WeeklyBackup. Finally we need to know the name of the bucket to be created on Amazon S3 to store the backups and we'll assume it's s3://weekly-backup as we used in the examples above.
Step 1 is to build the script. Using your favorite editor, create a file and name it /root/s3backup.sh: nano -w /root/s3backup.sh. Here's what should go in it:2
#!/bin/bash

cd /var/lib/asterisk/backups/WeeklyBackup

thisbackup=`find *.gz -mtime -1 | tail -n 1`

/root/s3cmd/s3cmd put  ↩

 /var/lib/asterisk/backups/WeeklyBackup/$thisbackup  ↩

 s3://weekly-backup/$thisbackup
Save the file: Ctrl-X, Y, then Enter and make the script executable: chmod +x s3backup.sh. Note that, for this script to actually work, you must run it on the same day AND after FreePBX has first generated a backup.
Step 2 is to create a cron job that will execute the above script shortly after 3:05 a.m. on Wednesday morning making sure we leave enough time for FreePBX to complete the backup task. To be safe, we'll set it up for 4 a.m. every Wednesday. Edit /etc/crontab and add an entry at the bottom of the file that looks like the following:
0 4 * * 3 root /root/s3backup.sh > /dev/null
If you just wanted a basic backup system using Amazon S3, congratulations! You've graduated. But there's so much more if you don't mind getting your hands a little dirty.
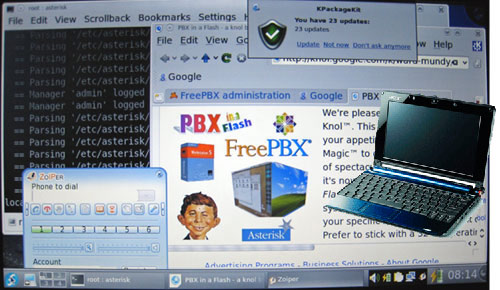 We're Getting Close. Before we tackle the techie stuff, let us pause for a moment and provide a progress report on the VPN in a Flash project. Thanks primarily to Tom King, we've made enormous progress in the last couple weeks. And, again, the accompanying picture says it better than words. We're also nearing completion of the documentation. The idea behind this project was to provide a mobile and transportable, full-featured VoIP PBX for under $500. For those with satellite offices or remote construction sites or branch offices, the Acer Aspire One is ideal. But it also can serve as a secure traveling companion for those that are often on the road. And, of course, it's an almost perfect fit for a home, a home office, a vacation home, or any hotel room with WiFi. Not only does it have an incredibly small footprint, but it also has computing power to spare with the new Intel Atom motherboard, a gig of RAM, and a 120GB hard disk. Yes, it's got wired AND wireless covered seamlessly, and it offers the Orgasmatron II build including fax capability plus the Hamachi VPN for secure connections within your own private network of servers and PCs. And our custom build offers the very latest KDE GUI with the brand-new Fedora 10 and performance to spare. The 1024x600 screen resolution you've simply got to see to believe. This photo doesn't do it justice. Plus we've added the Zoiper softphone which works nicely with the integrated microphone and speaker to let you place secure calls back through your home office PBX or directly through the fully-functional Asterisk 1.4 PBX which runs silently in the background with the new FreePBX 2.5 web interface. We hope to begin taking orders on or before the first anniversary of PBX in a Flash, November 14. For more details, click here or check out our forum posting. We now return you to your regularly scheduled program...
Using Fuse, s3fs, and Rsync with Amazon S3. At the outset, we want to express our special thanks to John Eberly for his article laying the foundation for much of what follows. The S3 technology has advanced dramatically since it first was introduced. So much so that you now can mount an Amazon S3 bucket as a local device on your server and use it like any other mounted device. This means you can use standard Linux tools to copy, list, delete, and move files. And you can use the built-in intelligence of tools such as rsync to actually keep directories in sync without recopying data that already exists in both locations and without manually deleting data which already has been removed from the source directory. For long time readers of Nerd Vittles, you know that rsync is one of our favorite Asterisk tools. It works flawlessly!
Unfortunately, with CentOS 5, the Linux Fuse file system installation process is a bit quirky, but here we go anyway. First, you'll need the Dag Wieers YUM repository to install some of these applications. The easiest way to activate the repository is to just execute the following commands while logged into your server as root. When we're finished with the repository, we'll delete /etc/yum.repos.d/dag.repo so that you don't accidentally use it unintentionally for other yum updates down the road:
cd /root

wget http://nerd.bz/q77p30

rpm -ivh fuse-devel*

wget http://downloads.sourceforge.net/fuse/fuse-2.7.4.tar.gz?↩

modtime=1217019944&big_mirror=0

tar zxvf fuse-2.7*

cd fuse-2.7.4

./configure

make

make install

cd ..
If you're a Linux whiz kid, you're probably scratching your head wondering why we would install an RPM version of fuse and then turn around and install it again by compiling it from source. The short answer is "hell if I know." The longer answer is that fuse won't work unless you do it this way. Sorry. If you really are a whiz kid, you can educate all of us as to why this is necessary by posting a comment.
Now that the Linux fuse file system is installed, we need one more application. It's the glue between Linux fuse and Amazon S3: s3fs. So let's download, compile, and install the s3 file system application:
cd /root

wget http://s3fs.googlecode.com/files/s3fs-r177-source.tar.gz

tar zxvf s3fs*

cd s3fs

make -f Makefile

mkdir /mnt/s3fs

cp s3fs /usr/bin/.

cd ..
Finally, to simplify mounting of your S3 file system, we need to store your Access Key and Secret Key in a config file just as was done with s3cmd above. So create a new file named /etc/passwd-s3fs and add your AccessKey:SecretKey in the file, e.g. 12345:67890
Mount S3 bucket (the unique one): s3fs weekly-backup /mnt/s3fs
Check available storage space: df -h /mnt/s3fs
Synch Backup directory with S3: rsync -avz --delete  ↩

 /var/lib/asterisk/backups/WeeklyBackup /mnt/s3fs
Dismount your S3 bucket: umount /mnt/s3fs
For the steps to integrate this directly into FreePBX to assure that your backups are automatically saved to S3, see Comment #1 below.
Hosting Provider Mega Deal. Just an FYI that the Nerd Vittles hosting provider, BlueHost, has raised the bar again on hosting services. For $6.95 a month, you can host unlimited domains with unlimited web hosting disk storage and unlimited monthly bandwidth. Free domain registration is included for as long as you have an account. It really doesn't get any better than that. And their hosting services are flawless! Just use our link. You get a terrific hosting service, and we get a little lunch money.
Special Thanks to Our Generous Sponsors
FULL DISCLOSURE: ClearlyIP, Skyetel, Vitelity, DigitalOcean, Vultr, VoIP.ms, 3CX, Sangoma, TelecomsXchange and VitalPBX have provided financial support to Nerd Vittles and our open source projects through advertising, referral revenue, and/or merchandise. As an Amazon Associate and Best Buy Affiliate, we also earn from qualifying purchases. We’ve chosen these providers not the other way around. Our decisions are based upon their corporate reputation and the quality of their offerings and pricing. Our recommendations regarding technology are reached without regard to financial compensation except in situations in which comparable products at comparable pricing are available from multiple sources. In this limited case, we support our sponsors because our sponsors support us.
BOGO Bonaza: Enjoy state-of-the-art VoIP service with a $10 credit and half-price SIP service on up to $500 of Skyetel trunking with free number porting when you fund your Skyetel account. No limits on number of simultaneous calls. Quadruple data center redundancy. $25 monthly minimum spend required. Tutorial and sign up details are here.
![]() The lynchpin of Incredible PBX 2020 and beyond is ClearlyIP components which bring management of FreePBX modules and SIP phone integration to a level never before available with any other Asterisk distribution. And now you can configure and reconfigure your new Incredible PBX phones from the convenience of the Incredible PBX GUI.
The lynchpin of Incredible PBX 2020 and beyond is ClearlyIP components which bring management of FreePBX modules and SIP phone integration to a level never before available with any other Asterisk distribution. And now you can configure and reconfigure your new Incredible PBX phones from the convenience of the Incredible PBX GUI.
VitalPBX is perhaps the fastest-growing PBX offering based upon Asterisk with an installed presence in more than 100 countries worldwide. VitalPBX has generously provided a customized White Label version of Incredible PBX tailored for use with all Incredible PBX and VitalPBX custom applications. Follow this link for a free test drive!
Special Thanks to Vitelity. Vitelity is now Voyant Communications and has halted new registrations for the time being. Our special thanks to Vitelity for their unwavering financial support over many years and to the many Nerd Vittles readers who continue to enjoy the benefits of their service offerings. We will keep everyone posted on further developments.
Some Recent Nerd Vittles Articles of Interest...
- Where you see ↩ means that you should join the text on the following line to the original line as a single line of text (usually with no intervening space). [↩]
- In the following code, the ↩ character means to join the three lines of text into a single line with a single space between the code on each line. The difference in the two examples is you don't usually have spaces in http: requests while commands issued on the command line obviously have spaces between different parts of command. [↩]
Free Asterisk Solutions
