
Home » Search results for 'sip uri' (Page 47)
Search Results for: sip uri
The Most Versatile VoIP Provider: FREE PORTING

 JUST RELEASED: Visit the Incredible PBX Wiki
Choosing the World’s Best Mobile Phone… Again!
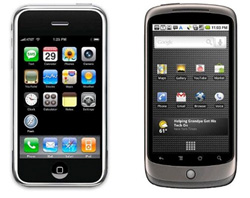 Up until now, we’ve resisted the temptation to wade into the iPhone vs. Nexus One battle. And there have been many thought-provoking contributions on both sides of the discussion. Our take on it is that, for many folks, it’s now come down to the Ford vs. Chevy debate. We know lots of Ford enthusiasts that would never set foot in a GM vehicle. And vice versa.
In the cellphone world, there are some differences between Apple and Google philosophically that you really don’t see in choosing between Ford and Chevy. If you’re looking for a cellphone that just works, that requires little involvement on your part, and that basically functions as a phone, a music player, and a handheld game device, then you’ll love the iPhone. Apple controls the entire user experience end-to-end, and they’ve gotten it just about right after three years of evolutionary development. If you’re looking for a cellphone that functions more as a mobile office, then the choice comes down to Blackberry vs. Nexus One at least in our book. The Blackberry still is the hands-down winner if your business runs on Microsoft Exchange although the Nexus One performs admirably. For everyone else, the Nexus One is your baby. That’s where we are today. But what about next year, and…
It’s Integration, Stupid! Unless you’ve been living under a rock, Cloud Computing should not be a new concept. The whole corporate world is moving there. Why? Because it’s too damn expensive to manage the complexities of modern data processing technology in house. And when it comes to Cloud Computing, there’s no one better at it than Google. The tight integration of email, messaging, voice communications, directories, calendaring/scheduling, and maps in the Google universe is legendary. And Google is damn close to Microsoft on the document preparation and spreadsheet front. Google’s search technology is simply the icing on the cake. But what icing! It ties all of these components together in a way that others only Bing about.
What the Nexus One brings to the table is a mobile computing platform that is fully capable of taking advantage of all of Google’s integration strengths. Email is always synchronized with your Gmail account. Your Address Book is always synchronized with your Google Address book. Your calendar is always synchronized with your Google Calendar and those of your coworkers. Your phone rings on your Nexus One at the same time it rings in your office or home. And your outbound calls, including your CallerID, can be processed just as if you were placing the same calls from your office or home. Simple, isn’t it? Can Apple do the same thing? To some extent, certainly. But the Apple MobileMe sync technology is archaic compared to the Google model. With Apple you’re synchronizing Address Books and Calendars from Apple-only desktop machines to a central server (for a fee) on a scheduled basis. That leaves 90% of corporate America out of the loop. With Google, there is only one Address Book and Calendar, and they’re both already stored in the Cloud. So you don’t have the endless problems associated with keeping a dozen or a hundred or thousands of users’ information in sync.
Long Live the Soup Nazi. For Seinfeld fans, no one can touch the Draconian deeds of the Soup Nazi. But Apple comes close: pushing out updates that reportedly bricked the iPhones of users that sought a bit more freedom in their software choices, telling the FCC that unlocked iPhones threaten the security of the national cellphone network, ruling the Apple Store with an iron fist. This is not acceptable corporate behavior in our book. For the average cellphone user, this conduct may not matter, but it should. The choice really comes down to spending your dollars with a company that fosters and encourages open source development versus a company that treats you as if you’re too dumb to know what’s good for you.
Our Pick: The Nexus One. We’ll leave you with our Baker’s Dozen reasons for choosing the Nexus One over the iPhone. YMMV! For the best and most balanced technical review to date, visit Ars Technica.
1. Google Apps Integration (see above)
2. Navigation integrated with Voice & Google Maps (video)
3. Phone-wide Speech-to-Text Voice Integration
4. Multitasking and Recent App Switcher Button
5. Back Button to non-destructively back out of anything
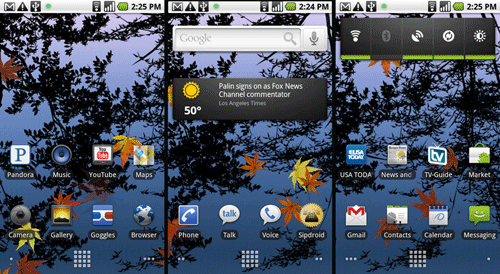
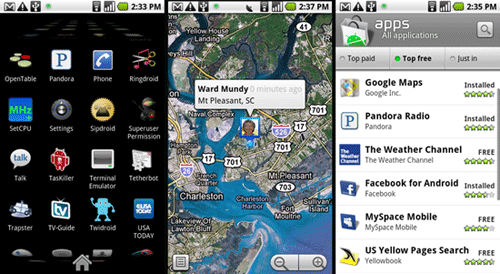
6. One-Touch App Directory plus 5 Custom Screens
7. Goggles & Dolphin Multi-Touch Browser
8. SIP and Google Voice integration with WiFi and Cell Nets
9. Intuitive store without corporate content control
10. Unlocked phone, easily rooted, Cyanogen
11. Replaceable battery
12. Expandable storage
13. Flash
In the immortal words of Bernie Mac, "Whatcha gonna do, America?"

Need help with Asterisk®? Visit the PBX in a Flash Forum.
Or Try the New, Free PBX in a Flash Conference Bridge.
whos.amung.us If you’re wondering what your fellow man is reading on Nerd Vittles these days, wonder no more. Visit our new whos.amung.us statistical web site and check out what’s happening. It’s a terrific resource both for us and for you.
Special Thanks to Our Generous Sponsors
FULL DISCLOSURE: ClearlyIP, Skyetel, Vitelity, DigitalOcean, Vultr, VoIP.ms, 3CX, Sangoma, TelecomsXchange and VitalPBX have provided financial support to Nerd Vittles and our open source projects through advertising, referral revenue, and/or merchandise. As an Amazon Associate and Best Buy Affiliate, we also earn from qualifying purchases. We’ve chosen these providers not the other way around. Our decisions are based upon their corporate reputation and the quality of their offerings and pricing. Our recommendations regarding technology are reached without regard to financial compensation except in situations in which comparable products at comparable pricing are available from multiple sources. In this limited case, we support our sponsors because our sponsors support us.
 BOGO Bonaza: Enjoy state-of-the-art VoIP service with a $10 credit and half-price SIP service on up to $500 of Skyetel trunking with free number porting when you fund your Skyetel account. No limits on number of simultaneous calls. Quadruple data center redundancy. $25 monthly minimum spend required. Tutorial and sign up details are here.
![]() The lynchpin of Incredible PBX 2020 and beyond is ClearlyIP components which bring management of FreePBX modules and SIP phone integration to a level never before available with any other Asterisk distribution. And now you can configure and reconfigure your new Incredible PBX phones from the convenience of the Incredible PBX GUI.
The lynchpin of Incredible PBX 2020 and beyond is ClearlyIP components which bring management of FreePBX modules and SIP phone integration to a level never before available with any other Asterisk distribution. And now you can configure and reconfigure your new Incredible PBX phones from the convenience of the Incredible PBX GUI.
 VitalPBX is perhaps the fastest-growing PBX offering based upon Asterisk with an installed presence in more than 100 countries worldwide. VitalPBX has generously provided a customized White Label version of Incredible PBX tailored for use with all Incredible PBX and VitalPBX custom applications. Follow this link for a free test drive!
 Special Thanks to Vitelity. Vitelity is now Voyant Communications and has halted new registrations for the time being. Our special thanks to Vitelity for their unwavering financial support over many years and to the many Nerd Vittles readers who continue to enjoy the benefits of their service offerings. We will keep everyone posted on further developments.
Some Recent Nerd Vittles Articles of Interest…
Tweet2Dial: Free Google Voice Calling & SMS with Twitter
 To celebrate the New Year, it seemed only fitting to bring Google Voice calling out of the cloud and into our favorite social hangout. For our special New Year's project, we're pleased to introduce Tweet2Dial. It lets you use Twitter or your favorite Twitter client to make free outbound calls through Google Voice to anyone in the United States or Canada. Just send a Direct Message to your new Twitter account and, in less than a minute, your phone will ring connecting you to the person's phone number you specified in your Twitter message. In addition, you also can send SMS messages to anyone with an SMS-capable device in the U.S. and Canada. All of this magic is managed on your existing Asterisk® server or almost any Linux server or Mac. There's no Asterisk overhead to process the calls and SMS messages because Asterisk isn't required! But, to start 2010 off on the right foot, we've included a little bonus at the end of this article for all the Asterisk administrators in the house. If you happen to be using an Asterisk server, you now can manage it from Twitter with Tweet2Dial, too.
 For those with cellphone plans that let you designate certain numbers for free, unlimited calling (such as Sprint, AT&T, Verizon, and T-Mobile), adding your Google Voice number to your preferred number list will mean that all of your Tweet2Dial-originated cellphone calls to anyone and everyone throughout the U.S. and Canada will now also be totally free with no impact on your bucket of call minutes.
Yes, we know Jajah is working on something similar for Twitter. But you have to be invited to participate in Jajah's beta (we didn't make the cut!), free calls are limited to two minutes, and both parties have to have a Twitter account which doesn't work too well for calling grandma. So why put up with all the limitations and restrictions of Jajah when you can do it yourself?
There's been some tech chatter that the procedure we've outlined below is complicated. If you can paint by number or bake cookies from the back of a Nestle's bag, trust me. You can handle this! Getting a Mac or a Linux server set up to support Tweet2Dial only takes a minute or two. So ignore the trade rags. Some of them can barely read. 🙂
 If you've already gone through our Google Voice tutorial which enables free Google Voice calling on your Asterisk server, or if you've installed our all-in-one Orgasmatron V build on your Asterisk server, or if you have a Mac or you've built your own Linux server without Asterisk, there's no need to wait for Jajah and no need to limit your calls to two minutes or to those with Twitter accounts! You can call anyone in the United States or Canada right now, talk as long as you like, and do it all for free with Tweet2Dial, Twitter, and Google Voice! If you're a Windows user, check out the Google Voice Dialer for Windows.
 Prerequisites. To get started, you can use your Asterisk server configured for Google Voice as we've outlined above. We won't actually be using Asterisk to place the calls, but our previous tutorials get your server properly set up with Google Voice and the latest, awesomest1 pygooglevoice to support Tweet2Dial. Any of the Asterisk aggregations such as PBX in a Flash will work great.
If you don't have a PBX in a Flash server with Google Voice already configured, shame on you! Just kidding. Actually, any recent CentOS or Fedora Linux server will work just as well today. Log into your server as root. Run rpm -q python to make sure you have at least Python 2.4 installed on your system. If not, run: yum update python. Then execute the following commands:
cd /root
yum install python-setuptools
easy_install simplejson
wget http://pygooglevoice.googlecode.com/files/pygooglevoice-0.5.tar.gz
tar zxvf pygooglevoice*
cd pygooglevoice-0.5
python setup.py install
Tweet2Dial also will run just fine on any Mac of recent vintage. We've actually tested it with Snow Leopard. Basically, to get Python and Apache set up properly, you have to enable root access, switch to root user access with su in Terminal, activate PHP support in Apache, turn on Web Sharing in System Preferences->Sharing, run easy_install simplejson as root to install simplejson (the Python Setup Tools already are in place!), using a browser download pygooglevoice to your Downloads folder, untar it as root in Terminal with the same command as above, and then while still logged into Terminal as root, go to the Downloads/pygooglevoice-0.5 folder and run the following command: python setup.py install. The only variations in the Tweet2Dial setup will be the storage location for Tweet2Dial (there is no root folder on a Mac) and the methodology for setting up the crontab entry (HINT: we'll run crontab -e to add a crontab entry since there is no /etc/crontab file). Just follow along using the Mac-specific instructions below for details, and everything will work swimmingly.
 To test whether your server is properly configured for Tweet2Dial, log in as root and type: gvoice. You should be prompted for an email address. If so, press Ctrl-C to exit. You're ready to roll. If not, pygooglevoice has not been properly installed on your server.
 You'll obviously need a Google Voice account. Request an invite here or just post a brilliant comment below, and one might magically appear in your inbox. Configure your Google Voice account with all the phone numbers from which you want to place outbound calls. One of these numbers will already be the go-between number for Google Voice and your PBX in a Flash server (IPkall or SIPgate) if you've followed our previous tutorials. Now simply add additional numbers that you want to use to place outbound Google Voice calls. This would include numbers such as your cellphone, your vacation home, and your direct-dial office number. You do not need to enable them for ringing when inbound calls arrive on your GV number.
 For today's project, you'll also need a new Twitter account even if you already have one. Why? Because you can't send a Direct Message to yourself with Twitter. So we'll use your primary Twitter account to send Direct Messages with dialing instructions to your secondary Twitter account. Then we'll use Tweet2Dial to poll your secondary account and retrieve the dialing instructions to actually place the outbound calls with pygooglevoice through your server. It sounds harder than it actually is. Honest! Assuming you already have Google Voice running on your Asterisk server, you'll be tweeting away in 10 minutes. If you have a current Linux server, add an extra 2 minutes to install pygooglevoice using the steps above.
 Usage Considerations. Before someone asks, let's address Question #1. Can others send messages to my Twitter account in order to make outbound calls through my server using Google Voice? And the answer is yes and no. We're going to configure your new secondary Twitter account with Protect My Tweets enabled. This means you have to approve friends and also become their friend before they could send a Direct Message to your secondary Twitter account. So, yes, if you approve, any Twitter user could theoretically place calls using your Twitter secondary account. For the average reader, we wouldn't recommend it for a couple of reasons. Here's why.
Google Voice only lets you link a handful of phone numbers to your GV account. So, for your friends to be able to place calls using your GV credentials, you'd have to forfeit one of your allotted quota of numbers for each person... or their phone would never ring to place the outbound calls. Yours unfortunately would! Remember, Google Voice always places two calls to complete a connection: one to you (using one of the phone numbers defined in your GV account) and one to the person with whom you wish to speak.
 The other reason for not opening this up to other callers is that Google Voice limits your account to one outbound call at a time. If others are using Twitter to make calls using your GV credentials, it means you can't. And there's no mechanism for easily identifying when a call already is in progress. So our recommendation is to keep your secondary Twitter account private and set up Following and Follower linkage only with your primary Twitter account. This will mean that Direct Messages to your secondary Twitter account can only originate from your primary Twitter account. You can still place outbound calls to anybody, but others can't!
 Having said all of that, we've designed Tweet2Dial so that you can allow others to use your secondary Twitter account to place Google Voice calls using their own GV credentials. This saves them the aggravation of setting all of this up, but it means they have to trust you enough to share their Google Voice credentials. After all, what are friends for? 😉 At the end of this article, we'll walk you through how to do this if you really have the urge. We would hasten to add that the actual processing load on your server is virtually zero so don't be deterred by performance concerns. Pygooglevoice sends the calling instructions to Google Voice, and then your server is completely out of the call loop. We've still limited outbound call setup to one call per minute, but these calls do not have any impact on Asterisk resources and only very minimal impact on your server. The only drawback to hosting Tweet2Dial for your friends is that, if five simultaneous Twitter messages are sitting in the queue, it would mean the last call request won't be processed until about 5 minutes after the Twitter message was sent. But, unless you have a bunch of extremely chatty friends, call request congestion shouldn't be a problem.
 One final word of caution. Twitter currently permits a maximum of 150 Twitter API calls per hour per account. There is some good news. Within the next few weeks, this limit will be increased to 1500 per hour, but it hasn't happened yet. This application is designed to poll your secondary Twitter account once a minute to retrieve and then discard your oldest, existing Direct Message. So it uses 120 of your allotted 150 API calls per hour to work its magic. You are well advised NOT to run any third-party Twitter applications with this secondary Twitter account, or you will quickly exceed the current connection limitation. When the API limit is reached, it means none of your pending call requests would be processed until the next hour rolls around... at least until Twitter raises this connection limit. Once Twitter raises the API limit, we may revisit our code and eliminate the current one call per minute limitation. So stay tuned!
Creating A Secondary Twitter Account. First, let's get your secondary Twitter account set up. Go to twitter.com and create a new account with a very secure password! You must enter a different email address than the one used for your primary account. Use one you can actually access! Log into your new account and choose Settings. Scroll down to Protect my tweets and check the box by clicking on it. Save your settings. NOTE: This check box is critically important. It keeps the entire world from being able to access your server! There are other layers in the security model, but this one is VERY IMPORTANT so verify it twice! Now log back into your primary account. Then goto http://twitter.com/SecondaryAccountName and request access. You'll get a message that your request for access has been sent. Log out and back into your secondary account once again. Authorize your primary account name as a Follower. Now log out and back into your Primary Account. We'll use it to send a Direct Message to your secondary account in a few minutes.
Installation and Configuration. To install Tweet2Dial, log into your server as root and issue the following commands:
cd /root
wget http://pbxinaflash.net/source/twitter/tweet2dial.tgz
tar zxvf tweet2dial.tgz
rm tweet2dial.tgz
If you're doing this on a Mac, there is no wget application and no root folder so you'll need to download tweet2dial.tgz with your browser. Save it to your Downloads folder. Then open a Terminal window and execute this command:
tar zxvf Downloads/tweet2dial.tgz
Now let's configure the application:
nano -w tweet2dial.php
At the top of the file, you'll see the following lines:
// Your SECONDARY Twitter account username and password
$username = "TwitterUsername";
$password = "TwitterPassword";// Authorized Twitter users with corresponding GV credentials go below
$user['twitname'][1]="YourPrimaryTwitterUsername";
$user['gvemail'][1]="YourGoogleVoiceEmailAddress@gmail.com";
$user['gvpass'][1]="YourGoogleVoicePassword";
$user['gvcall'][1]="6781234567";// *** Leave everything below this line alone. 🙂
Begin by entering your secondary Twitter name and password by replacing TwitterUsername and TwitterPassword with your actual credentials. Be careful here. Capitalization matters! If you set up your Twitter username as gvNerdUno, don't enter gvnerduno! Now move down to the four $user entries. The first is your primary Twitter account name. Replace YourPrimaryTwitterUsername with your actual Twitter account name. Again be careful of capitalization! Next, enter the login email address for your Google Voice account replacing YourGoogleVoiceEmailAddress@gmail.com. Next, enter your Google Voice password replacing YourGoogleVoicePassword. Finally, enter one of the 10-digit ringback numbers you've configured in your Google Voice account by replacing 6781234567. Do NOT use the one that's reserved for use by Asterisk! This is the number that will be called by default whenever you place an outbound call with Twitter. You'll have the option of overriding it, but this saves your having to enter both a destination phone number and a callback number each time you wish to place a call. Be sure to preserve the quotes around each of the entries. Once you've double-checked all of your entries for typos, save your changes: Ctrl-X, Y, then Enter.
 Tweet2Dial Test Drive. Now that everything is set up, let's place a test call to be sure everything is working. Log into your primary Twitter account. Click on Direct Messages. Choose your secondary Twitter account from the pulldown menu. In the block below Send a Direct Message, enter a 10-digit number in the U.S. or Canada that's different from your default callback number. Then click the Send button. It's that simple! Once Twitter tells you the message has been sent, log into your Asterisk server and execute the following commands.
cd /root
./tweet2dial.php
If you're on a Mac, just open a Terminal window and type ./tweet2dial.php. In either case, you should get a response indicating that your call has been placed, and your default phone number should begin to ring. When you answer it, Google Voice will place a call to the 10-digit number that you entered in your Twitter direct message above.
Now, just for fun, run Tweet2Dial again: ./tweet2dial.php. If everything is working properly, you will see the following message: Nothing to do.
Finally, assuming you have configured another callback number in Google Voice that is close at hand and not your Asterisk callback number, send another Twitter direct message with the following syntax: 8439876543:6781234567 where 8439876543 is the 10-digit number of someone you wish to call and 6781234567 is a 10-digit ringback number already set up in your Google Voice account. Once the message has been sent, run Tweet2Dial again from the command prompt.
When you're sure everything is working reliably, add the following entry to the bottom of /etc/crontab unless you're using a Mac. This will run the application once a minute around the clock looking for incoming Twitter messages:
* * * * * root /root/tweet2dial.php > /dev/null
If you're running this on a Mac, add an entry to your crontab like this. From the Terminal window, run: crontab -e. Once the vi editor opens, type:
* * * * * /users/youracct/tweet2dial.php
Substitute the name of your Mac account for youracct. Then press the Esc key followed by :wq. Check your work by typing: crontab -l. Your entry should look like this:
* * * * * /users/youracct/tweet2dial.php
 Sending SMS Messages with Twitter. To send SMS messages using Twitter, you'll use the same scenario outlined above to place free phone calls. Just send a direct message to your secondary Twitter account. Only those that you have authorized as friends can send direct messages to this account so it's as secure as you want it to be. The syntax for an SMS message looks like this where 6781234567 is the cellphone or Google Voice number of the SMS recipient:
SMS:6781234567:Here is a sample SMS message
Any replies to an SMS message which you send using Twitter will be forwarded to the email address that you used to set up your Google Voice account.
 For Whiz Kids Only. Now let's say you want to let your spouse use her Twitter account to place calls using her very own Google Voice credentials. First, you need to authorize her as a follower in your secondary Twitter Account. Second, you need to add a new block of code in tweet2dial.php that looks like the following. Place it immediately below the existing $user entries in the file:
$user['twitname'][2]="SpousePrimaryTwitterUsername";
$user['gvemail'][2]="SpouseGoogleVoiceEmailAddress@gmail.com";
$user['gvpass'][2]="SpouseGoogleVoicePassword";
$user['gvcall'][2]="6781234567";// *** Leave everything below this line alone. 🙂
Notice that the only change is this array subset is numbered [2] while the original was numbered [1]. You can add as many as you like so long as you increment this number and provide the credentials for each user. Now you have your own little Jajah-like sandbox, and it's absolutely free.
 For Asterisk Administrators Only. Want to manage your Asterisk server from Twitter? There's an app for that. We promised you a New Year's bonus so here it is. First, read our last article which explains how to manage your Asterisk server using email messages and the Asterisk CLI. Now you can do exactly the same thing using Twitter direct messages. The only Twitter user that can do this on your server is the Twitter account name you specified in the #1 $user slot above. So you don't have to worry about your pals trashing your Asterisk server if you give them privileges with Tweet2Dial. The syntax for issuing CLI commands using Tweet2Dial looks like this:
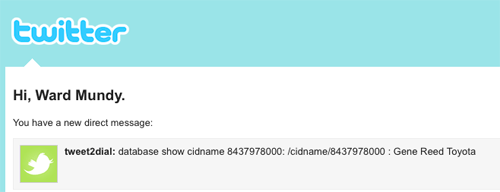
CLI: database show cidname 8437978000
Just be sure Direct Messages from your primary Twitter account begin with CLI in all CAPS followed by a colon, a space, and then the desired CLI command. That's all there is to it. You'll get a confirmation Direct Message in your main Twitter account once the command has been executed assuming you have established Following and Follower linkage between your primary and secondary Twitter accounts. Test sending DMs in both directions to double-check it. And if you've enabled email delivery for Direct Messages in your Twitter configuration, you'll get an email confirmation as well. Because of Twitter's 140 character limitation, some commands such as help don't provide all of the output you normally would receive from the CLI. You'll only get the last line. Aside from that, the CLI functionality is identical to interacting directly with the Asterisk CLI and the email implementation we outlined previously. Here's the CLI response:
Before you can use the CLI interface in Tweet2Dial, you have to enable it. Edit tweet2dial.php and change $CLIenable=false to $CLIenable=true. And, yes, we understand there are some of you that don't trust Twitter to keep your commands secure. Well, first of all, in order to penetrate your Asterisk server, someone would have to send a Twitter Direct Message from your primary Twitter account. So they'd need your password and they'd need to know the syntax for Asterisk CLI commands AND the syntax for sending them via Twitter. But, there's always a Cracker Rapper2 somewhere. Right? So we've also built a password into the system at your server's end so you can sleep more comfortably. The default password is CLI. But feel free to change it to anything you like. Just edit tweet2dial.php and find this line: $CLIpword = "CLI";. Replace CLI (between the quotes only!) with whatever password you'd like. After saving your changes, you'll need to adjust your Twitter messages accordingly. For example, if you changed your password to FooBar, then your future Twitter CLI command syntax would look like this: FooBar: help. Enjoy!
 Special Thanks. As Nerd Vittles prepares to celebrate its Fifth Birthday, we want to take a moment to thank those that have made Nerd Vittles and the PBX in a Flash project possible. Without the generous financial support of Vitelity and Google's AdSense program plus the unwavering support of our hosting providers who provide free downloads of PBX in a Flash around the globe, all of what we do would be much more difficult and expensive! It's not too late for you to kick in a nickel or two as well if a fleeting moment of generosity should strike. 😉 There's a Donate button at the top of the page. Finally, we want to thank Digium® for their continuing support of the Asterisk project and their generous contribution of hardware to the PBX in a Flash development team during 2009. Happy New Year everybody!
Need help with Asterisk? Visit the PBX in a Flash Forum.
Or Try the New, Free PBX in a Flash Conference Bridge.
whos.amung.us If you're wondering what your fellow man is reading on Nerd Vittles these days, wonder no more. Visit our new whos.amung.us statistical web site and check out what's happening. It's a terrific resource both for us and for you.
Special Thanks to Our Generous Sponsors
FULL DISCLOSURE: ClearlyIP, Skyetel, Vitelity, DigitalOcean, Vultr, VoIP.ms, 3CX, Sangoma, TelecomsXchange and VitalPBX have provided financial support to Nerd Vittles and our open source projects through advertising, referral revenue, and/or merchandise. As an Amazon Associate and Best Buy Affiliate, we also earn from qualifying purchases. We’ve chosen these providers not the other way around. Our decisions are based upon their corporate reputation and the quality of their offerings and pricing. Our recommendations regarding technology are reached without regard to financial compensation except in situations in which comparable products at comparable pricing are available from multiple sources. In this limited case, we support our sponsors because our sponsors support us.
BOGO Bonaza: Enjoy state-of-the-art VoIP service with a $10 credit and half-price SIP service on up to $500 of Skyetel trunking with free number porting when you fund your Skyetel account. No limits on number of simultaneous calls. Quadruple data center redundancy. $25 monthly minimum spend required. Tutorial and sign up details are here.
![]() The lynchpin of Incredible PBX 2020 and beyond is ClearlyIP components which bring management of FreePBX modules and SIP phone integration to a level never before available with any other Asterisk distribution. And now you can configure and reconfigure your new Incredible PBX phones from the convenience of the Incredible PBX GUI.
The lynchpin of Incredible PBX 2020 and beyond is ClearlyIP components which bring management of FreePBX modules and SIP phone integration to a level never before available with any other Asterisk distribution. And now you can configure and reconfigure your new Incredible PBX phones from the convenience of the Incredible PBX GUI.
VitalPBX is perhaps the fastest-growing PBX offering based upon Asterisk with an installed presence in more than 100 countries worldwide. VitalPBX has generously provided a customized White Label version of Incredible PBX tailored for use with all Incredible PBX and VitalPBX custom applications. Follow this link for a free test drive!
Special Thanks to Vitelity. Vitelity is now Voyant Communications and has halted new registrations for the time being. Our special thanks to Vitelity for their unwavering financial support over many years and to the many Nerd Vittles readers who continue to enjoy the benefits of their service offerings. We will keep everyone posted on further developments.
Some Recent Nerd Vittles Articles of Interest...
Free U.S. & Canada Calls: Google Voice Dialer for Windows
There now are a number of ways to make free calls to anyone in the U.S. and Canada using Google Voice without having to jump through the hoops of calling into your voicemail and having Google Voice call you back. There’s our Asterisk® implementation using pygooglevoice which lets you transparently place calls through Google Voice using any phone connected to your PBX in a Flash system. You also can set up a Sip Sorcery account and make free calls through that interface using a SIP phone. And now there’s Dogface05’s stand-alone Dialer for Windows that lets you place calls from the Windows command line in seconds. Because this is such a simple alternative, everyone should add it to their Windows toolkit. Here’s how.
Prerequisites. You’ll obviously need a Google Voice account. If you don’t have one, just register for an invite. Next, you’ll need a phone number to use for placing the outbound calls. And, finally, you’ll need to download and install Dogface05’s dialer on your Windows system.
 Google Voice Setup. Log into your Google Voice account and click Settings, Phones, Add Another Phone. Add the area code and phone number of the phone you’ll be using to place calls and mark it as an Office phone. You’ll have to go through Google’s confirmation drill to successfully register the number with Google Voice. After the number is confirmed, be sure there’s a check mark beside this Google Voice destination so that incoming calls to your GV number will be routed to this number.
While you’re still in the Google Voice Setup, click on the General tab. Uncheck Enable Call Screening. Turn Call Presentation Off. And set CallerID to Display Caller’s Number. Finally, uncheck Do Not Disturb. Now click the Save Changes button.
Dialer Setup for Windows. From your Windows machine, open a browser and download the Google Voice dialer to your Desktop. Unzip the downloaded file and drag gvdial.exe to your \windows directory so that it’s in your path.
 Placing a Call. Let’s first make sure everything is working properly. Open a command prompt window from the Windows Desktop and enter a dialing command using the following syntax:
gvdial username password destination ani [phonetype]
where:
- username = your Google Voice email address
- password = your Google Voice password
- destination = 10-digit number of person to call
- ani = your 10-digit phone number registered with Google Voice
- phonetype = 3
The phonetype is actually optional and can be ignored unless you happen to be using a Gizmo number in which case it needs to be 7. Never enter the brackets. That merely signifies that the entry is optional.
Assuming your registered email address with Google Voice is joe@gmail.com, your password is secret, the number you wish to call is 6781234567, and your number is 4049876543, the dial string should look like this:
gvdial joe@gmail.com secret 6781234567 4049876543
Your phone should ring at this point, and Google Voice will complete the outbound call to 678-123-4567.
Creating Speed Dial Batch Files. Using Notepad, you now can create batch files for frequently dialed numbers. For example, the entry above could be saved in a batch file called joe.bat. Then simply create a desktop icon for Joe and link it to joe.bat. Double-click on the Joe icon whenever you wish to place a call to Joe. Here’s how the batch file might look:
echo off
cls
gvdial joe@gmail.com secret 6781234567 4049876543
echo Press ENTER key after the called party answers.
pause
Surfing the Google Wave. We’ve got a dozen Google Wave invites to give away during the next week. Just post a comment on any Nerd Vittles article, and we’ll put your name in the hat. Be sure to provide a Gmail address with your comment as this is required to take advantage of the Google Wave Preview. Here’s a sample for you to try once you have Google Wave credentials:
Need help with Asterisk? Visit the PBX in a Flash Forum.
Or Try the New, Free PBX in a Flash Conference Bridge.
whos.amung.us If you’re wondering what your fellow man is reading on Nerd Vittles these days, wonder no more. Visit our new whos.amung.us statistical web site and check out what’s happening. It’s a terrific resource both for us and for you.
Special Thanks to Our Generous Sponsors
FULL DISCLOSURE: ClearlyIP, Skyetel, Vitelity, DigitalOcean, Vultr, VoIP.ms, 3CX, Sangoma, TelecomsXchange and VitalPBX have provided financial support to Nerd Vittles and our open source projects through advertising, referral revenue, and/or merchandise. As an Amazon Associate and Best Buy Affiliate, we also earn from qualifying purchases. We’ve chosen these providers not the other way around. Our decisions are based upon their corporate reputation and the quality of their offerings and pricing. Our recommendations regarding technology are reached without regard to financial compensation except in situations in which comparable products at comparable pricing are available from multiple sources. In this limited case, we support our sponsors because our sponsors support us.
BOGO Bonaza: Enjoy state-of-the-art VoIP service with a $10 credit and half-price SIP service on up to $500 of Skyetel trunking with free number porting when you fund your Skyetel account. No limits on number of simultaneous calls. Quadruple data center redundancy. $25 monthly minimum spend required. Tutorial and sign up details are here.
![]() The lynchpin of Incredible PBX 2020 and beyond is ClearlyIP components which bring management of FreePBX modules and SIP phone integration to a level never before available with any other Asterisk distribution. And now you can configure and reconfigure your new Incredible PBX phones from the convenience of the Incredible PBX GUI.
The lynchpin of Incredible PBX 2020 and beyond is ClearlyIP components which bring management of FreePBX modules and SIP phone integration to a level never before available with any other Asterisk distribution. And now you can configure and reconfigure your new Incredible PBX phones from the convenience of the Incredible PBX GUI.
VitalPBX is perhaps the fastest-growing PBX offering based upon Asterisk with an installed presence in more than 100 countries worldwide. VitalPBX has generously provided a customized White Label version of Incredible PBX tailored for use with all Incredible PBX and VitalPBX custom applications. Follow this link for a free test drive!
Special Thanks to Vitelity. Vitelity is now Voyant Communications and has halted new registrations for the time being. Our special thanks to Vitelity for their unwavering financial support over many years and to the many Nerd Vittles readers who continue to enjoy the benefits of their service offerings. We will keep everyone posted on further developments.
Some Recent Nerd Vittles Articles of Interest…
Meet The iPhone Terminator: The World’s Best Mobile Phone

With apologies to Arnold’s infamous line, all we can say to iPhone enthusiasts of the world is that once you try this Android phone, you won’t ever go back. Google has done for the mobile phone what Apple did with Mac OS X except Google also opened up the hardware platform. Unfortunately, Apple opted for locked and proprietary hardware and software in rolling out its iPhone. Now that the second-generation Android phones are appearing, the difference is palpable.
Update. There’s now a third-generation Android phone that’s even better than this one. You can read all about it in our latest article.
Choosing the World’s Best Cell Phone is obviously fraught with peril. All other things being equal we would have bestowed the honor on Nokia’s E71 which we reviewed recently and have personally used until a month ago. That’s when we jumped into the Android World which we will tell you up front is still a bit of a work in progress. But, all we can say is WOW! The openness, the technology, and the creativity showcased in the new Android phones point to an inescapable conclusion. Google once again has struck the Mother Lode. Seeing is believing as they say. And today we’ll digress from our usual format to bring you a pictorial tour of the HTC Magic. No. You don’t have to carry a white one like Arnold. Heh. A shiny black one is readily available. We actually had planned to walk through the process of rooting the phone, but we’ll leave that for another day primarily because this mobile phone provides sufficient flexibility in its native state to deliver an almost perfect cellphone experience even without root access.
We’ve already covered our objections to the iPhone in a previous article so we won’t repeat them here other than to note that SIP clients can’t run in the background on an iPhone which makes them next to worthless for inbound calls. Yes, there are kludgey workarounds, but these open yet another can of worms. We’ll dispose of the Nokia product line by telling you they’re headed in the wrong direction just like Microsoft with the wrong operating system(s), the wrong product design, and the wrong technology mix. Just when the world is finally looking for a mobile platform that provides flexibility in transitioning between the cellular networks, WiFi, and WiMax, Nokia kills the SIP stack and SIP client on its entire line of new cellphones. So a company that once was THE innovative cell phone manufacturer in the world suddenly is looking a bit like Yahoo, lots of thrashing around but no cigar. Sadly, it’s mostly the result of self-inflicted wounds. But we’re not going to dwell on the past today. We’re going to look at what the future holds in mobile communications. And the one word that best sums up our hopes for future mobile telephony is Google… more precisely, Google’s totally open source Android Platform.
 So let’s again go about this by the book… with a requirements analysis! You can match it to your own wish list. We want a cellphone that makes cellular calls from most locations, and we want the ability to decide which cell provider we use depending upon where we are. We want the option to make phone calls through our own SIP provider, or Asterisk® server, or Google Voice whenever we feel like it with or without a Wi-Fi connection. And, of course, we want VoIP Prioritization. This means we want our cell phone to prioritize incoming and outgoing calls by attempting to use VoIP services first, cellphone carrier second. We also want to be able to check our email using gMail, POP3 and IMAP servers at 3G data speeds. For the business community, we also think Microsoft Exchange support is indispensable. When we need to send or receive something on our notebook computer and there’s no WiFi around, we want our cellphone to provide data connectivity. We’re not going to be downloading movies and 1,000-page books all day long. We just want to get an important file attachment from the office so we can read it on a normal screen. If the cellphone provided a PDF viewer, so much the better. And, finally, we’d like a QWERTY keyboard for messaging, and we want to be able to change our own battery, add a memory chip, and swap out SIM cards whenever we’d like. We also want the ability to gain root access should we ever wish to do so. After all, it’s our phone! Bluetooth for phone calls and A2DP for music in the car would be great, and a good camera as well as GPS functionality would be nice to have on the phone as well. For those in the U.S., we’d add one additional requirement: support for AT&T’s 3G network so you’re not stuck with T-Mobile’s dog-slow (and incompatible) wireless data network. Most of the Android phones currently flunk this test leaving you with nothing but EDGE service if you use a provider other than T-Mobile. Of course, with T-Mobile, you get mostly EDGE service in the U.S. as well. 🙄
And the winner is…
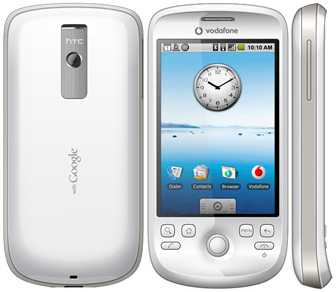
 Our pick is the unlocked Rogers HTC Magic phone, the only Android phone that we could find which supported rooting and AT&T’s 3G network in the U.S… albeit from a Canadian provider. That’s the price U.S. consumers pay for a government that continually rewards the telephone oligopoly with exclusivity rip-offs. So how does the HTC Magic stack up to our wish list? We’d give it a 94. It does everything on our Wish List… and more. The images which follow incidentally were taken using the screen capture utility that’s part of the Android 1.5 SDK. It is easily installed on either a Windows or Linux PC or your favorite Mac (except Snow Leopard for the moment). There’s a great tutorial on how to install the Android SDK as well as a YouTube video and tutorial on rooting the Rogers HTC Magic phone should you desire further information on those topics.
Getting Started. Before proceeding, set yourself up a Gmail account if you don’t already have one. As with most provider-specific cellphones, this HTC Magic phone is hard-coded to the Rogers network in Canada. Assuming you want to use AT&T’s network in the U.S., step #1 is to enter AT&T APN settings when you first turn on the phone. After inserting the AT&T SIM and booting the phone, press the Menu key before doing anything else. Next click Add APN. Enter the following values leaving the remaining fields blank:
Name: att
APN: wap.cingular
Password: CINGULAR1
Now press the Menu button again and choose Save. For other providers, try this Google Search.
Main Screen. Once you’ve entered your Gmail credentials, the phone will boot and display a Main menu. It actually is three screens wide. You can move to the other screens by swiping your finger to the left or to the right. You’ll notice a thumb tab at the bottom of the display. By dragging this up, you can access all of the other applications on the phone. Move it back out of the way by dragging it back down or pressing the Back button (←) which is the third from the left button just below the screen display.
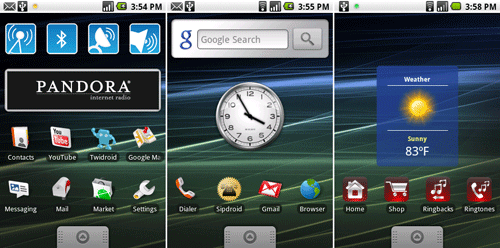
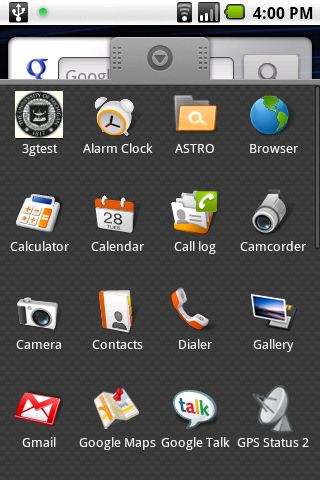 Applications. Here’s the first page of our Applications. You scroll through the list using the trackball, or you can drag your finger vertically on the screen to reposition the display up or down. Tapping on an entry starts the application. Pressing the Home button on the far left just below the screen display returns you to the Main Screen. Every app is displayed in this listing except for Widgets. Widgets are more like scripts and typically are used to toggle functions on and off. In the left Main screen above are four widgets to toggle WiFi, BlueTooth, GPS, and Ringer/Vibrate/Silent functions of the phone.
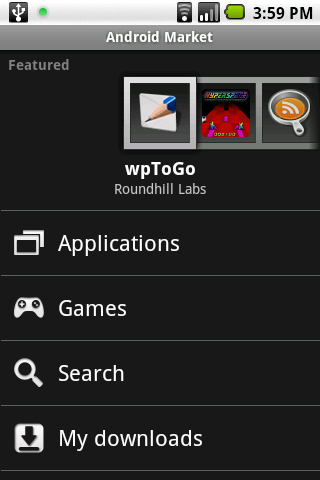 Android Market. All of these applications didn’t necessarily come with the phone. Google’s Android Market has been set up for developers to display their wares. You can become a developer, too. And, unlike the iPhone apps, most of the Android apps still are free. Just another advantage to open source technology. To access the Market from your phone, just choose the Market app and follow the intuitive menus. There’s a great Search function. Again, unlike the iPhone, these applications get stored on a MicroSD card. A 2GB card comes with the phone. Do yourself a favor and start with a $50 16GB card.
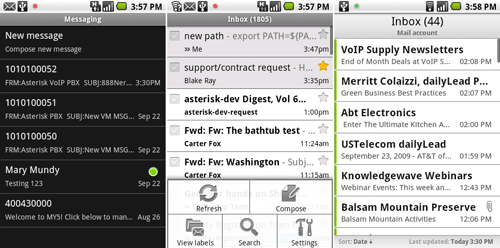
Messaging. As you might expect from Google, the Android platform excels at messaging of all flavors. Whether it’s text messaging, Gmail, or POP3/IMAP email connectivity, Android has you covered (see above). And the support for Microsoft Exchange is nothing short of brilliant. In the social networking department, there’s full-featured support for Twitter and Facebook, among others. Using the Search function in the Android Market, you can have your phone set up with your favorite tools in just a few minutes.
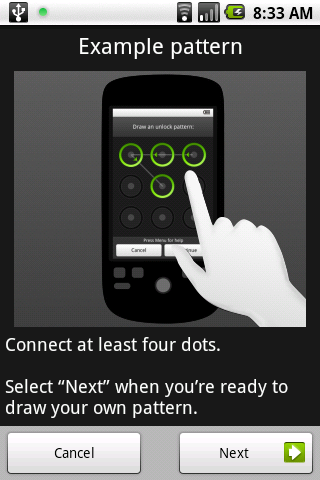 Android Security. Securing your phone is also nothing short of brilliant on the Android 1.5 platform. Simply draw an unlock code pattern using your finger, and that becomes the signature for future access to your cellphone. Also works pretty well as a sobriety test. 🙂 If you can’t unlock your phone, don’t unlock your car! You also can lock your SIM card to your phone and set a password if you’re nervous about losing your $500 crown jewel. What the security system really demonstrates is that the open source community has nothing to apologize for. The quality of this software is every bit as good if not better than the software produced by the other cellphone players.
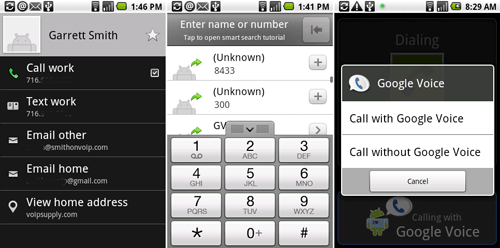
Placing Calls. Yes, we hear you. What about making phone calls? You’ll be pleased to know that the HTC Magic can do that, too. We were just saving the best for last. In fact, this phone can make calls in three different ways: through your cellphone provider, through SIP using your Asterisk server or another provider, and through Google Voice. Once you install the Google Voice application from the Android Market, simply configure it with either your cellphone number or an intermediate provider such as SIPgate or IPkall. You then have a choice of whether to make Google Voice the primary or secondary calling source. Or you can choose to be prompted for each call as shown above. Google Voice calls that go out through your WiFi data network connection incur no charges in the U.S. and Canada.
 SIP calls are placed using the SIPdroid application which also is available in the Android Market. Shown to the left is a sample setup for SIPdroid to connect to your Asterisk server on a private home network. In the SIPdroid Call Options, specify whether to use WiFi and/or 3G/EDGE for the SIP calls. And set a preference for how your calls should be placed, i.e. cellphone carrier or SIP. The only tricky part is the Extension Settings on your Asterisk server. Just create an extension in the usual way using FreePBX. But make sure your settings include the following entries: canreinvite=no, nat=yes, and qualify=no.
To route outbound calls through SipDroid instead of your cellphone provider, just append + to the end of the phone number. You can generate a + symbol on your phone keypad with a long press of the 0 button.

Android Backups. No article would be complete without some mention of backups. The Android platform currently supports four options: Android images, MyBackup, and Google and Exchange Synchronization. Android images can only be created if you gain root access to your phone or load a different image on your phone. MyBackup is a $9.95 app from the Android Market that lets you backup your Applications and Data separately onto your MicroSD card. Unless you’re a techie, it’s well worth the money. Google and Exchange Synchronization you will find under Settings, Data Synchronization. With Google Sync, you can back up your Gmail, Calendar, and Contacts data automatically and as a background task. Be sure to activate it. Finally, you’ll see displayed above a browser display from mundy.org/whereib that you may find helpful from time to time. It displays not only a map of your current location based upon your IP address, but also shows your public IP address.
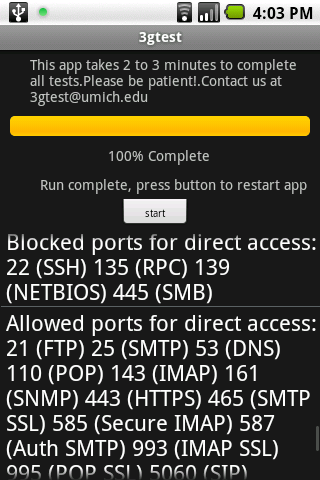 Android 3Gtest. We’ll leave you with a hot tip about one additional application: 3Gtest. Just download and install it from the Android Market and then run it. You’ll be amazed by the results. Not only will it tell you how good your upload and download speeds are, it also will tell you some interesting tidbits about whether your provider is living up to their oft-repeated promise of Net Neutrality. Our download 3G speed in Charleston, South Carolina was actually close to T-1 performance. Interestingly, our upload speed was pitiful… about as fast as a circa 1860’s telegraph machine.
Android System Backup. We said we weren’t going to cover rooting your phone, but we do want to point you in the right direction and also show you how to get a perfect image backup of your phone. If you’re not comfortable entering system commands, stop here! We are Mac snobs so what follows is the Mac way of doing things which is incredibly simple compared to the hassle with Windows in getting the correct USB driver loaded to make things function properly. If you’re determined to use Windows, be sure to install the Android SDK before you connect your phone to your PC. And read up on how to install the appropriate USB driver for Windows. With a Mac, all of this just works… out of the box. As we mentioned previously, we’ve only tested this with Leopard and Snow Leopard, and Snow Leopard does NOT work!
Before proceeding, you must enable USB Debugging on your phone. You’ll find it here: Settings->Applications->Development->USB Debugging
To get your Mac set up with the proper toolkit, do the following. There’s nothing tricky here. Just don’t skip any steps. And you only have to do this once! First, download the Android 1.5 SDK for the Mac from here. Unzip android-sdk-mac_x86-1.5_r3.zip on your Desktop and rename the folder to android-sdk. Now drag that folder into your Applications directory. Next, open a Terminal window and create/edit .bash_profile: nano -w .bash_profile. Add the following entry: export PATH=${PATH}:/Applications/android-sdk/tools. Then save the file: Ctrl-X, Y, Enter. Now run the same command from the CLI prompt to update your PATH now: export PATH=${PATH}:/Applications/android-sdk/tools. Next, download fastboot-mac onto your Desktop from the HTC Support site. Unzip the file and rename the file to fastboot. Then, download recovery-new.img to your Desktop. Drag both fastboot and recovery-new.img into the Applications/android-sdk/tools folder.
Now we’re ready to make your backup. Plug your phone into your Mac using the USB cable that came with the phone. Open a terminal window on your Mac and change to the SDK tools directory: cd /applications/android-sdk/tools. Run the following command and make certain your phone shows up in the listing: adb devices. You should get a display with the serial number of your phone:
List of devices attached
HT95RNK02843 device
Assuming your phone shows up in the list, you’re ready to proceed with a backup. Turn off your phone. Then, while pressing the Volume Down button, turn your phone back on. Hold down both buttons until you see a screen that says <BACK> FastBoot Mode with dancing Androids on skateboards at the bottom of the display. Press the BACK button (←) and the FASTBOOT USB menu will display. In your computer’s Terminal window (NOT on your phone), type: fastboot boot recovery-new.img. Your phone will reboot and display a screen with several options in blue. Use your phone’s trackball to carefully scroll down to the Nandroid Backup 2.1 option. Then depress the Trackball button to begin the backup. You’ll see a yellow display message indicating that the backup is proceeding. When the backup completes, choose the Reboot System Now option to restart your phone normally.
You’ll find the new backup on the SD card. To copy it to a safe place on your Mac, drag down the Message Bar at the top of the display after your phone has rebooted. Tap the USB Connected Select to copy files to/from your computer option. Then tap the Mount button. A new drive NO NAME will appear on your Desktop. Double-click on it and drag the nandroid folder to a safe place for permanent storage of your backup. To unmount the phone, do it on your Mac desktop first. Then reverse the mount process we initially used on the phone to mount it. Simple!
Rooting Your Phone. We have NOT done this so you’re on your own. You’ll probably void the warranty on your phone by proceeding. The best article we could find on the procedure for rooting and restoring your phone is here. But it doesn’t have the correct backup image. If you restore the wrong image, your phone’s radio may no longer work on your provider’s network. The consensus seems to be that the proper image for a rooted Rogers HTC Magic is here. The best tutorial for actually performing the magic appears to be here. But we would stress again that we have not actually tried this, and you really, really are on your own if you proceed past reading this article. It’s your $500 phone… or brick as the case may be. Before doing anything further, we would strongly recommend you make several backup images as outlined above and also spend some time doing a careful review of the postings in this forum until you are very comfortable with all of the wrinkles and procedures. If something goes wrong, post your problems there, not here. 🙂 We’re handing you the map, but it’s your choice whether to jump off the cliff. Enjoy!
Update: The unlocked Rogers HTC Magic phone used for this review is now available for purchase from Nerd Vittles. It supports 3G networks of both Rogers in Canada and AT&T in the United States. Just make us an offer we can’t refuse. It’s still a terrific phone!

The Future of Android. For a glimpse of what the future holds for Android, see this Giga OM article published on October 7.
 Web Site of the Week. For all of your favorite Nerd gifts, don’t miss the new Mashable collection.
Articles of the Week. For another excellent technical review of the HTC Magic, check out TechRadar UK’s review. And be sure to check out Justin West’s Free Homebrew VoIP with Google Voice and Intel Atom.
Enhanced Google Maps. In case you haven’t noticed, we’ve added yet another Google Map to Nerd Vittles. Now, in addition to showing our location with Google Latitude, we also are displaying your location based upon your IP address. We’ll show you how to add something similar to any LAMP-based Linux system in coming weeks. It’s a powerful technology that has enormous potential. If you’re unfamiliar with Google Maps, click on the Hybrid and Satellite buttons and then check out the scaling and navigation options. Double-click to zoom. Incredible!
whos.amung.us If you’re wondering what your fellow man is reading on Nerd Vittles these days, wonder no more. Visit our new whos.amung.us statistical web site and check out what’s happening. It’s a terrific resource both for us and for you.
Need help with Asterisk? Visit the PBX in a Flash Forum.
Or Try the New, Free PBX in a Flash Conference Bridge.
Special Thanks to Our Generous Sponsors
FULL DISCLOSURE: ClearlyIP, Skyetel, Vitelity, DigitalOcean, Vultr, VoIP.ms, 3CX, Sangoma, TelecomsXchange and VitalPBX have provided financial support to Nerd Vittles and our open source projects through advertising, referral revenue, and/or merchandise. As an Amazon Associate and Best Buy Affiliate, we also earn from qualifying purchases. We’ve chosen these providers not the other way around. Our decisions are based upon their corporate reputation and the quality of their offerings and pricing. Our recommendations regarding technology are reached without regard to financial compensation except in situations in which comparable products at comparable pricing are available from multiple sources. In this limited case, we support our sponsors because our sponsors support us.
BOGO Bonaza: Enjoy state-of-the-art VoIP service with a $10 credit and half-price SIP service on up to $500 of Skyetel trunking with free number porting when you fund your Skyetel account. No limits on number of simultaneous calls. Quadruple data center redundancy. $25 monthly minimum spend required. Tutorial and sign up details are here.
![]() The lynchpin of Incredible PBX 2020 and beyond is ClearlyIP components which bring management of FreePBX modules and SIP phone integration to a level never before available with any other Asterisk distribution. And now you can configure and reconfigure your new Incredible PBX phones from the convenience of the Incredible PBX GUI.
The lynchpin of Incredible PBX 2020 and beyond is ClearlyIP components which bring management of FreePBX modules and SIP phone integration to a level never before available with any other Asterisk distribution. And now you can configure and reconfigure your new Incredible PBX phones from the convenience of the Incredible PBX GUI.
VitalPBX is perhaps the fastest-growing PBX offering based upon Asterisk with an installed presence in more than 100 countries worldwide. VitalPBX has generously provided a customized White Label version of Incredible PBX tailored for use with all Incredible PBX and VitalPBX custom applications. Follow this link for a free test drive!
Special Thanks to Vitelity. Vitelity is now Voyant Communications and has halted new registrations for the time being. Our special thanks to Vitelity for their unwavering financial support over many years and to the many Nerd Vittles readers who continue to enjoy the benefits of their service offerings. We will keep everyone posted on further developments.
Some Recent Nerd Vittles Articles of Interest…
VoIP Prioritizing The World’s Best Traveling Phone
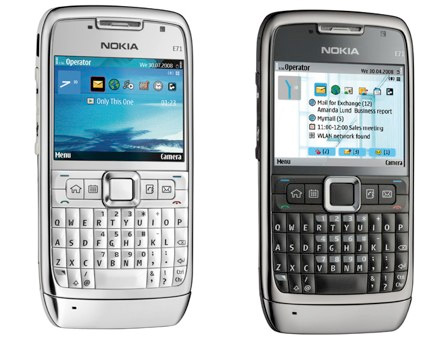
We follow a lot of really smart geeks on Twitter. As you might imagine, there’s a good bit of chatter about the world’s best cellphones. About half are die-hard iPhone users, and the rest are all over the map. Our iPhone is now a glorified iPod and, when you finish reading today, you’ll understand why.
 What always has set Macs apart from PCs in our humble opinion is flexibility. So why is it that Apple has gone out of its way to strip that feature from the iPhone? Well, we all know the answer. AT&T and the iTunes Store. Or in a word, money. So what’s missing? For openers, there’s no tethering, the ability to connect your PC to your cellphone when the power goes out so you can send an emergency message or check on your servers at work. And then there’s free calling: the ability to place free SIP calls or Google Voice calls using your cellphone from almost anywhere. And then there’s the money thing. If you’ve traveled to foreign countries with an AT&T-powered iPhone, we don’t have to finish this story. For everyone else, let’s just say the cost of using your iPhone in a foreign country or on a cruise ship is stratospheric.
 We’ve watched our friends and colleagues purchase all sorts of add-on gizmos to make up for the shortcomings in the iPhone. These have included secondary cellphones and more recently the MiFi devices which let you pay one of the companies in the American cellphone oligopoly another $60++ per month to tether your notebook and netbook to the cellular data network. Let’s get this straight. We pay a cellphone provider for an unlimited data plan as part of our service, but to transmit data to or from our PC through the plan, add another $60 a month for another data plan with a bandwidth cap. Huh? This is for a service that most of us use intermittently and would prefer to never use because of the lousy performance. Here’s our #1 traveling rule. Never stay in a hotel that doesn’t have WiFi, period. Why would you? The one next door has it!
So let’s go about this by the book… with a requirements analysis first! We want a cellphone that makes cellular calls from most locations, and we want the ability to decide which cell provider we use depending upon where we are. We want the option to make phone calls through our own SIP provider, or Asterisk® server, or Google Voice whenever we feel like it with or without a Wi-Fi connection. And, of course, we want VoIP Prioritization. This means we want our cell phone to prioritize incoming and outgoing calls by attempting to use VoIP services first, cellphone carrier second. Good luck with that one! We also want to be able to check our email using POP3 or IMAP servers. And, when we need to send or receive something on our notebook computer and there’s no WiFi around, we want our cellphone to provide data connectivity. We’re not going to be downloading movies and 1,000-page books all day long. We just want to get an important file attachment from the office so we can read it on a normal screen. And, finally, we’d like a QWERTY keyboard for messaging, and we want to be able to change our own battery, add a memory chip, and swap out SIM cards whenever we’d like. And the music, camera, and GPS functionality would be nice-to-haves on a phone.
 Is this so hard? Well, if you’re in the United States and you’re planning to purchase a phone through Sprint, T-Mobile, AT&T, or Verizon to get one of those sign-away-your-life phone discounts, the answer is IMPOSSIBLE! And, to those that are chomping at the bit to tell us how they’ve accomplished some of these miracles with their hacked iPhone, let me just remind you that Apple considers it a national security threat to hack your iPhone thus explaining why Apple also considers it honorable to brick your hacked iPhone at any time despite the fact that you paid for it. Ask yourself if you really want to invest your cellphone dollars with a company spewing forth this kind of
 bullshit stuff.
And the answer is…
 The unlocked U.S. version of the Nokia E71 costs $289.99 at NewEgg, and it’s worth every penny. We’ve been using ours all day, every day for the better part of a year. We’re not going to do a full review of the phone when there’s already an excellent one out there. Start with the allaboutsymbian review and then pick up again here. What isn’t covered in that review is the critical component that we believe sets this phone apart from everything else out there: incredibly simple SIP connectivity and VoIP setup with an Asterisk server because of the native SIP stack and SIP client which is built into the E71’s firmware. And, as you will soon discover, this transforms the E71 into the perfect traveling companion because it makes the E71 just another telephone extension on your home office Asterisk PBX. If secure communications matters, there’s VPN support as well.
 Implementing Incoming VoIP Prioritization. Here’s how we’ve set up connectivity to our E71. First, create an extension on your Asterisk server that will be dedicated to remote SIP access from your E71. Let’s use extension 371 in this example. Give it a very secure password because the IP address of your E71 will change as you move from place to place so we can’t really lock down the extension with anything other than a secure password, or you won’t be able to connect. Next, create another extension (372) and forward all incoming calls to that extension to the regular phone number of your E71, i.e. the one provided by your cellphone provider. Then create a Ring Group on your Asterisk server (373) and set up 371 as the only number in the ring group extension list. For the destination if no answer, choose extension 372. Finally, set up your Google Voice number with a destination extension that forwards calls to ring group 373. So the way this will work is that incoming calls to your Google Voice number will ring the SIP connection on your E71 (371) if your E71 is registered to your Asterisk server via SIP. And, when it’s not registered, the calls will be forwarded to the regular phone number of your E71 (372) without any delay since extension 371 isn’t registered with your server. If you get in the habit of searching for WiFi wherever you happen to light and connecting back to your Asterisk server, (as you’ll see, this is a one-click operation), then you’ll have dirt-cheap remote cellphone service on your E71 almost all of the time. And, if you travel to foreign countries, it means that any time your E71 is registered with a WiFi HotSpot, all incoming calls will be free instead of costing an arm-and-a-leg in per minute international roaming fees.
 SIP Setup for Nokia E71. John Rogers over at geek.com has written an excellent piece with lots of pretty pictures to show you how to configure your E71 with Asterisk. Rather than reinvent the wheel, here’s the link. It only takes a couple of minutes. We do have a few tips to get you started on the right foot. Make certain that the IP address you enter for your Asterisk server is the public IP address or fully-qualified domain name for your server, not the private IP address inside your firewall. As you roam from one WiFi network to the next, the E71 will automatically configure the phone for the new networks as soon as you choose WLAN Scanning, select a WiFi network, and choose to Connect to your Asterisk server. This is performed from the default screen on your phone so there’s no wading through layer upon layer of menus. After linking and unlinking to different networks about a dozen times, we have found it’s a good idea to shut down the phone, remove the battery momentarily, and then restart the phone. It keeps awkward connect problems from ever occurring. To enable VoIP Prioritization for outbound calling, all you have to do is change one default setting on the Nokia E71: Menu, Tools, Settings, Phone, Call, Default Call Type: Internet Call.
 Depending upon your choice of router, using the public IP address of your Asterisk server may cause connectivity issues when you attempt to make a connection through the same WiFi network on which your Asterisk server resides. You can solve this by investing in one of dLink’s Gaming Routers which also provide the necessary tools to prioritize VoIP traffic on your network. Second, make sure you load the latest Nokia firmware for the E71 before you begin configuring your phone. You can check which firmware is installed on your phone by pressing *#0000#. If it’s less than 200.21.118, you need to upgrade, and you’ll need a Windows machine to do it. Here’s the link to Nokia’s upgrade site.
![]() Where To Go From Here. Once you have your E71 performing as a remote Asterisk extension, there are some other must-have’s for your phone. First, you’ll want to purchase JoikuSpot Premium for 15.00€ (about $20). It turns your phone into a WiFi HotSpot whenever you need tethering. Next you’ll want to load Nokia’s OVI store which includes a number of free downloads including Internet Radio, Fring, Nimbuzz, and Web Server. With the web server, you can actually create a blog and let visitors share photos and take pictures using your E71. Try ours to get a taste of what’s available. We think you’ll also find Google Latitude to be a fascinating addition. It lets you produce a free, GPS-enabled map with your current location just like Where In the World Is Nerd Uno. In fact, that map is produced from GPS data generated on our Nokia E71.
Where To Go From Here. Once you have your E71 performing as a remote Asterisk extension, there are some other must-have’s for your phone. First, you’ll want to purchase JoikuSpot Premium for 15.00€ (about $20). It turns your phone into a WiFi HotSpot whenever you need tethering. Next you’ll want to load Nokia’s OVI store which includes a number of free downloads including Internet Radio, Fring, Nimbuzz, and Web Server. With the web server, you can actually create a blog and let visitors share photos and take pictures using your E71. Try ours to get a taste of what’s available. We think you’ll also find Google Latitude to be a fascinating addition. It lets you produce a free, GPS-enabled map with your current location just like Where In the World Is Nerd Uno. In fact, that map is produced from GPS data generated on our Nokia E71.
 A Word of Caution. Finally, we’ll close on a cautionary note. Tempting as it may be to buy Nokia’s latest and greatest cellphone, DON’T! Nokia quietly has dropped the native SIP stack and SIP client on almost all of its newest cellphones presumably to win the love and affection of companies like AT&T. These are the same companies that continue to claim in FCC filings that they have nothing against VoIP on cellphones.
 ![]() The list of VoIP-impaired Nokia cellphones includes the N97 as well as the AT&T-branded E71x. Nokia also has been less than clear about the new N900. Historically, this has meant that SIP functionality has disappeared. So beware of shiny new things… that may not work worth a damn. It’s too bad. Nokia was one of our favorite companies, but it looks like they’re ceding the VoIP technology business to Google’s Android which happens to be next on the Nerd Vittles Radar. Here’s a complete list of Nokia’s SIP-compatible phones. Enjoy!
The list of VoIP-impaired Nokia cellphones includes the N97 as well as the AT&T-branded E71x. Nokia also has been less than clear about the new N900. Historically, this has meant that SIP functionality has disappeared. So beware of shiny new things… that may not work worth a damn. It’s too bad. Nokia was one of our favorite companies, but it looks like they’re ceding the VoIP technology business to Google’s Android which happens to be next on the Nerd Vittles Radar. Here’s a complete list of Nokia’s SIP-compatible phones. Enjoy!
Enhanced Google Maps. In case you haven’t noticed, we’ve added yet another Google Map to Nerd Vittles. Now, in addition to showing our location with Google Latitude, we also are displaying your location based upon your IP address. We’ll show you how to add something similar to any LAMP-based Linux system in coming weeks. It’s a powerful technology that has enormous potential. If you’re unfamiliar with Google Maps, click on the Hybrid and Satellite buttons and then check out the scaling and navigation options. Double-click to zoom. Incredible!
whos.amung.us If you’re wondering what your fellow man is reading on Nerd Vittles these days, wonder no more. Visit our new whos.amung.us statistical web site and check out what’s happening. It’s a terrific resource both for us and for you.
Need help with Asterisk? Visit the PBX in a Flash Forum.
Or Try the New, Free PBX in a Flash Conference Bridge.
Special Thanks to Our Generous Sponsors
FULL DISCLOSURE: ClearlyIP, Skyetel, Vitelity, DigitalOcean, Vultr, VoIP.ms, 3CX, Sangoma, TelecomsXchange and VitalPBX have provided financial support to Nerd Vittles and our open source projects through advertising, referral revenue, and/or merchandise. As an Amazon Associate and Best Buy Affiliate, we also earn from qualifying purchases. We’ve chosen these providers not the other way around. Our decisions are based upon their corporate reputation and the quality of their offerings and pricing. Our recommendations regarding technology are reached without regard to financial compensation except in situations in which comparable products at comparable pricing are available from multiple sources. In this limited case, we support our sponsors because our sponsors support us.
BOGO Bonaza: Enjoy state-of-the-art VoIP service with a $10 credit and half-price SIP service on up to $500 of Skyetel trunking with free number porting when you fund your Skyetel account. No limits on number of simultaneous calls. Quadruple data center redundancy. $25 monthly minimum spend required. Tutorial and sign up details are here.
![]() The lynchpin of Incredible PBX 2020 and beyond is ClearlyIP components which bring management of FreePBX modules and SIP phone integration to a level never before available with any other Asterisk distribution. And now you can configure and reconfigure your new Incredible PBX phones from the convenience of the Incredible PBX GUI.
The lynchpin of Incredible PBX 2020 and beyond is ClearlyIP components which bring management of FreePBX modules and SIP phone integration to a level never before available with any other Asterisk distribution. And now you can configure and reconfigure your new Incredible PBX phones from the convenience of the Incredible PBX GUI.
VitalPBX is perhaps the fastest-growing PBX offering based upon Asterisk with an installed presence in more than 100 countries worldwide. VitalPBX has generously provided a customized White Label version of Incredible PBX tailored for use with all Incredible PBX and VitalPBX custom applications. Follow this link for a free test drive!
Special Thanks to Vitelity. Vitelity is now Voyant Communications and has halted new registrations for the time being. Our special thanks to Vitelity for their unwavering financial support over many years and to the many Nerd Vittles readers who continue to enjoy the benefits of their service offerings. We will keep everyone posted on further developments.
Some Recent Nerd Vittles Articles of Interest…
Nerd Nirvana: Free Google Voice Calling Returns to Asterisk
 In what can only be described as a telephony game changer, Google Voice this past weekend expanded the scope of its offering by providing transparent SIP connectivity through Gizmo5 for inbound and outbound calling. Simply stated, you now can connect virtually any telephone to Google Voice using a garden-variety Internet connection. And the phone can be almost any SIP telephone or a standard home telephone plugged into a $40 ATA. Letting folks make click-to-dial calls through a PC is too geeky for most. But today's offering is a new animal. Google Voice now works with regular telephones.
Did we mention that you get a free phone number of your choice in almost any area code? Did we mention that every call you make throughout the United States and Canada is free? And, believe it or not, transparent Asterisk® support works out of the box as well. If your bread and butter business is SIP termination services in the United States (Are you listening, Vonage and Comcast?), then today probably isn't going to be your lucky day. For everyone else, it may just be remembered as the most important telephony development since the breakup of Ma Bell's monopoly. And now it's clear why Google Voice reserved a million DIDs. They're going to need every one of them... and more! Meet your New Phone Company®, Goliath Google, Inc. What Google Voice was missing was a simple interface to standard telephones, softphones, and SIP. Gizmo5 provides all of those missing pieces... and so much more. How about an almost-free Skype interface for openers.
As many of you know, we were ecstatic when Google Voice arrived with free U.S. calling, voice mail transcription, and SIP connectivity to Asterisk. Our solution lasted less than a week until Google slammed the SIP door and spoiled our party. So we shifted gears and showed you how to use a free Gizmo account and a free Google Voice account to make free SIP calls using Asterisk. Well, that lasted about a week as well although Craig Walker, who founded GrandCentral and now serves as the Google Voice Product Manager, responded to my inquiry about SIP support saying it sounded like a good idea and they would consider it once the initial Google Voice rollout was complete. Guess what? They've kept their promise.
Ironically, we had planned to introduce a new Google Voice solution for Asterisk today and were putting the finishing touches on the article when this news broke over the weekend. We've decided to postpone that discussion because, frankly, the Google Voice-Gizmo5 SIP marriage is the right way to go. It's straight-forward. It's proven technology. It's rock-solid reliable. And it's FREE!
 Newly discovered issues with both security and Gizmo5's business model as pertains to making calls through Google Voice have given us pause in recommending the solution described below. In a nutshell, the solution below requires that you provide your Google email credentials to Gizmo5 in order to make the connection to Google Voice for free
 unlimited 20-minute 3-minute calling. Late yesterday, Gizmo5 announced a new 2¢ per minute fee for Google Voice calling (now described as Gizmo Voice). Yuck!
Even if you don't mind a stranger having unfettered access to your Gmail account, your Google credentials also may be used for other Google services including Google Checkout. Without a clearly defined business relationship between Google and Gizmo5, this would be a huge security risk. Having read several articles which hinted at a business relationship between Google and Gizmo5, we put our security concerns aside. However, when Gizmo5 began changing the ground rules for these calls (almost daily), it raised red flags that Google might not, in fact, be either a business partner or even a willing participant in Gizmo5's creation. As events continued to unfold, we have discovered that Gizmo5 may, in fact, be using a connection process that is not unlike the one we had planned to introduce this week anyway. And we have no business relationship with Google.
Bottom Line: Whether you are using an Asterisk server or not, WAIT! We have an equivalent, secure solution which is now available at no cost. We recommend you disable your Gizmo5-Google Voice setup if you already have put it in place and change your Gmail password! Then read the new Nerd Vittles article for a secure way to connect to Google Voice for free calling.
Our plan today is to show you the easy way to connect Asterisk to Google Voice through Gizmo5 to make free outbound phone calls and to receive free incoming calls. We'll leave the setup for a SIP phone, a generic Asterisk server, and an analog adapter such as the PAP2T-NA for another day. But we'll get to them sooner rather than later.
So, altogether now, welcome back... Googlified Messaging™. Before we begin...
Accounting 101. We hear you asking, "How long can the calls be free?" The short answer is probably not forever but long enough to run just about everyone else out of the business. Beyond that, what we see in our crystal ball pretty much lines up with Tim O'Reilly's talk at OSCON last week. And, at some point, Google may give you a choice of paying for the calls or perhaps volunteering to be their guinea pig for the mother of all indexing experiments. You'd agree to let them record your voice calls without identifying you individually. Then they could transcribe and index all of the keywords in your conversation and use those to identify buying trends, favorite movies, whatever. Remember, you can already say "Pizza" on your iPhone and get a list of nearby pizza parlors so this isn't as far-fetched as you may think. And keep in mind that, in some states, you only need the permission of one party to a telephone conversation to make a recording. Thanks to Amazon, it's been quite a resurgence for Big Brother. We thought we'd join the party with a little Orwellian hypothesizing of our own.
Step #1. If you're starting from scratch, the easiest way to get everything working today including Asterisk is to begin by installing PBX in a Flash, and then run the Orgasmatron Installer. This puts all the pieces in the proper places, and you'll be up and running in under an hour. For the complete soup-to-nuts tutorial, start here.
Step #2. You obviously still need a free Google Voice account to use Google Voice or Google Voice Dialing through Gizmo5. So that's next. If you don't have a Google Voice account, you can request an invite here. Our non-scientific survey suggests that it's taking less than a month to get an invite after you apply. YMMV! Once you have a Google Voice account and a local phone number (Google has reserved a million of them so... not to worry!), then you're all set.
Step #3. Next, you need a Gizmo5 account. If you don't have one, you can sign up for one within FreePBX once you run the Orgasmatron Installer. Or, you can download a Gizmo5 softphone and sign up that way. We're not sure it's required, but be charitable. Put a little money in your Gizmo5 Call Out account. You'll have it for a rainy day or international calling.
Step #4. We'll set up at least one forwarding phone number in your Google Voice account to match your Gizmo5 number. You don't have to actually use it, but it does have to be registered as one of your GV forwarding numbers. Unlike our previous SIP tutorials about Google Voice, you no longer have to configure your Google Voice account to forward all incoming calls to voicemail. As you may recall, this allowed you to call your Google Voice number and press a few keys to make an outbound call instead of listening to your voicemails. With the new Google Voice-Gizmo5 SIP offering, you no longer have to jump through all those hoops. It's a straight SIP-to-SIP-to-SIP connection from your Asterisk server to Gizmo5 to Google Voice.
Step #5. To use Asterisk for incoming calls through Google Voice, you can designate a forwarding number in Google Voice that connects to one or more extensions on your Asterisk system whenever anyone calls your Google Voice number. All you really need for this is one DID. This could be your Gizmo5 number, or it could be a free IPkall or SIPgate DID that's pointed to an extension or ring group on your Asterisk server. Since all of these calls are free, the area code of the DID really doesn't matter. The only number that will really matter to your callers is your main Google Voice number so be sure to select one for your hometown. Incidentally, you can add other forwarding numbers in Google Voice that will ring simultaneously with the DID on your Asterisk server. This could be your vacation home, your cell phone, or even your office phone.
Getting Started. We're going to be jumping back and forth between your Google Voice account, your Gizmo5 account, and the FreePBX web interface to your Asterisk server. So open each account in a separate tab with your web browser. To keep things simple, we're going to assume that you'll be using your Gizmo5 account to connect to your Asterisk server. In Asterisk lingo, the Gizmo5 account looks like any other DID on your Asterisk system.
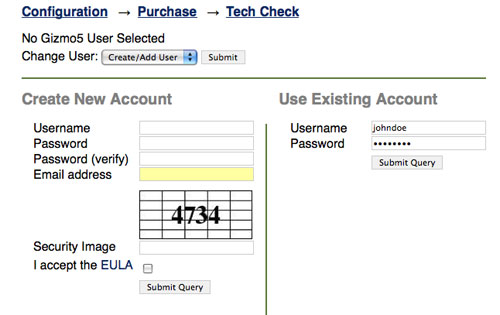
FreePBX Setup for Gizmo5. If you've run the Orgasmatron Installer, you'll have a new Gizmo5 Integration option under the Setup tab. When you click on that option, you have the choice of either creating a new Gizmo5 account or using your existing account. Fill in the blanks to activate or create your new Gizmo5 account.
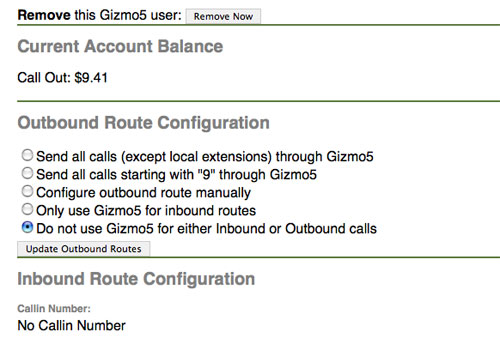
Once you've logged in, click Gizmo5 Integration Main Page. Choose Send all calls (except local extensions) through Gizmo5 and click Update Outbound Routes. For the time being, make certain that you have a default inbound route that rings one or more functioning extensions on your Asterisk system. You have to be able to answer an incoming call to complete the next steps. Finally, click on the Outbound Routes option. In the far right column, move the Gizmo5 entry to the top of the list and reload your dialplan when prompted.
If you're using a FreePBX-based system that doesn't have the Gizmo5 Integration option, you'll first need to establish an account at Gizmo5.com by downloading one of the softphones and signing up. After you have completed the sign up process, be sure that you disable automatic startup of the softphone. You can't have your Asterisk system AND the softphone registering to the same Gizmo5 account!
Next, using FreePBX, Add a new Trunk named Gizmo5. For the Peer Details, insert the following using your actual Gizmo5 phone number and password:
type=peer
insecure=very
host=proxy01.sipphone.com
username=1747XXXXXXX
fromuser=1747XXXXXXX
fromdomain=proxy01.sipphone.com
secret=password
context=from-gizmo5-trunk
qualify=yes
Leave the Incoming Settings section blank and then enter the Registration String using your actual Gizmo5 phone number and password:
1747XXXXXXX:password@proxy01.sipphone.com
Save your settings and reload your dialplan when prompted.
Next, create a Default Inbound Route so that calls from Google Voice will be routed to extensions on your server. Then, create an Outbound Route called OutGizmo with NXXNXXXXXX and 1NXXNXXXXXX as the Dial Patterns and Gizmo5 as the main Trunk Sequence . Move this route to the top of your outbound routes to assure that U.S. calls are placed using the Gizmo5 trunk. Reload your dialplan when prompted.
Finally, log into your Asterisk server as root and insert the following lines at the end of extensions_custom.conf in the /etc/asterisk directory. Then reload the dialplan: asterisk -rx "dialplan reload"
[from-gizmo5-trunk]
exten => s,1,Set(DID_EXTEN=${SIP_HEADER(To):5})
exten => s,n,Set(DID_EXTEN=${CUT(DID_EXTEN,@,1)})
exten => s,n,Goto(from-trunk,${DID_EXTEN},1)
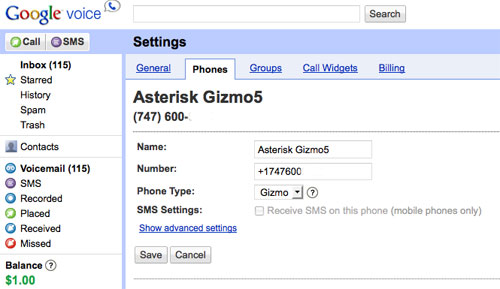
Google Voice Setup. Log into your Google Voice account and click Settings, Phones, Add Another Phone. This forwarding phone number should be the DID that you want Google Voice to call when you have incoming calls on your Google Voice number. Again, to keep things simple, add your Gizmo5 phone number (747XXXXXXX) and select Gizmo as the Phone Type. You then will be prompted to place a test call and provide a 2-digit number to verify that the number is working. Answer the extension on your Asterisk system when it rings and enter the 2-digit code that's provided.
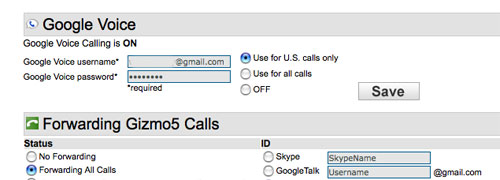
Gizmo5 Configuration. Log in to your Gizmo5 account using your 1747XXXXXXX account number or username and password. In the new Google Voice section of the form, insert your Google Voice email address and password. This is the email address you used to set up your Google Voice account. Choose "Use for U.S. calls only" and then click SAVE.
July 29 Update. Since this article was released, Gizmo5 has reduced the allowable calling time from unlimited to 20 minutes. Then today it was reduced to 3 minutes. That may be as long as you like to talk on the phone, but it's a major change from what was initially introduced 3 short days ago. Looks like we'll dust off our original article after all. Stay tuned...
Deals of the Week. The nation's premier provider of free directory assistance service, 1-800-FREE-411, now is offering free 5-minute phone calls to most destinations around the world. Just listen to two quick commercials and enjoy your free call. Thanks, @MichiganTelephone. And now you can send free SMS messages worldwide from your iPhone. Thanks, @TruVoIP. Finally, AT&T has the refurbished 8GB iPhone 3G for $49 with a two-year contract.
Originally published: July 26, 2009
Need help with Asterisk? Visit the PBX in a Flash Forum.
Or Try the New, Free PBX in a Flash Conference Bridge.
whos.amung.us If you're wondering what your fellow man is reading on Nerd Vittles these days, wonder no more. Visit our new whos.amung.us statistical web site and check out what's happening. It's a terrific resource both for us and for you.
Special Thanks to Our Generous Sponsors
FULL DISCLOSURE: ClearlyIP, Skyetel, Vitelity, DigitalOcean, Vultr, VoIP.ms, 3CX, Sangoma, TelecomsXchange and VitalPBX have provided financial support to Nerd Vittles and our open source projects through advertising, referral revenue, and/or merchandise. As an Amazon Associate and Best Buy Affiliate, we also earn from qualifying purchases. We’ve chosen these providers not the other way around. Our decisions are based upon their corporate reputation and the quality of their offerings and pricing. Our recommendations regarding technology are reached without regard to financial compensation except in situations in which comparable products at comparable pricing are available from multiple sources. In this limited case, we support our sponsors because our sponsors support us.
BOGO Bonaza: Enjoy state-of-the-art VoIP service with a $10 credit and half-price SIP service on up to $500 of Skyetel trunking with free number porting when you fund your Skyetel account. No limits on number of simultaneous calls. Quadruple data center redundancy. $25 monthly minimum spend required. Tutorial and sign up details are here.
![]() The lynchpin of Incredible PBX 2020 and beyond is ClearlyIP components which bring management of FreePBX modules and SIP phone integration to a level never before available with any other Asterisk distribution. And now you can configure and reconfigure your new Incredible PBX phones from the convenience of the Incredible PBX GUI.
The lynchpin of Incredible PBX 2020 and beyond is ClearlyIP components which bring management of FreePBX modules and SIP phone integration to a level never before available with any other Asterisk distribution. And now you can configure and reconfigure your new Incredible PBX phones from the convenience of the Incredible PBX GUI.
VitalPBX is perhaps the fastest-growing PBX offering based upon Asterisk with an installed presence in more than 100 countries worldwide. VitalPBX has generously provided a customized White Label version of Incredible PBX tailored for use with all Incredible PBX and VitalPBX custom applications. Follow this link for a free test drive!
Special Thanks to Vitelity. Vitelity is now Voyant Communications and has halted new registrations for the time being. Our special thanks to Vitelity for their unwavering financial support over many years and to the many Nerd Vittles readers who continue to enjoy the benefits of their service offerings. We will keep everyone posted on further developments.
Some Recent Nerd Vittles Articles of Interest...
Some Summertime Distractions for Asterisk Lovers

In addition to Spoleto and the Bridge Run, Charleston has many great traditions, one of which is a prompt transition from a rainy, cold winter into sweltering summer. We got a very long spring break this year, but now we’re paying for it. After spending a couple weeks on Balsam Mountain, it was nothing short of culture shock driving back into Charleston last night. But we’re glad to be home. And this week, we celebrate summer with a list of some of our favorite vacation discoveries that didn’t involve snakes and bears. Some are related to Asterisk®, and some aren’t. So here goes.
 Streaming Video with Roku. If you haven’t figured out why Time Warner and Comcast have been pushing for Internet bandwidth caps, here’s a hint. Streaming video not only is killing their pipes, but more importantly (to them) it’s killing their pay-per-view and HBO/Showtime monopolies. If you enjoy (or can even remember) great television and movies without thousands of commercials, then we’ve got two discoveries that will make your summer! The first one is Roku, a little $100 device about the size and weight of a couple packs of cigarettes. You plug it into your TV and the Internet, pop the popcorn, and you’re ready for some fun. With an $8.95 Netflix subscription (which buys you one-at-a-time DVD rentals by mail), you also get unlimited movies streamed to your Roku device. It’s not their entire catalog, but it’s a substantial subset including most of the Starz catalog. The Roku player supports composite, S-video, component, and HDMI video connections as well as stereo and optical audio. A new addition allows the rental or purchase of first-run movies from Amazon (at Blockbuster prices). More offerings are promised for later this summer. Can Hulu be far behind? If you’ve been holding off purchasing a Blu-Ray player, then here’s another option. LG’s new $200 BD370 Blu-Ray Disc Player incorporates this same technology in addition to YouTube access. We haven’t used the BD370 yet, but we sure do want one.
 Cellphones for Preteens. We laughed at our friends from Naples, Florida last summer when they were lamenting the fact that every child in their daughter’s second grade class had a cellphone except for theirs. They swore that they wouldn’t give in. That lasted until Christmas when the shiny new LG Xenon appeared. Chuckling all the way to spring, we recently met the same fate with the Samsung A767 Propel after our 9-year-old raised over $300 selling all of her old toys at the neighborhood yard sale. Bottom line: All the kids are going to have them by the time they turn 10. And with the family plans available from a number of providers, the costs are no longer prohibitive for most of us. You might as well get them trained to use cellphones responsibly while they’re young. Trust me. It’s a lot more difficult once they hit high school or college and know everything. There is a difference between adult and kid usage of cellphones. They rarely make a call. But you’ll want an unlimited texting plan. And none of the kids want an iPhone. They much prefer one the newer phones that includes a full keyboard for texting. Apple, are you listening?
If you go down this road with the rest of us that swore we wouldn’t do it, demand two things: (1) that your kids not use cellphones while driving and (2) that they not hold cellphones up to their ears while making calls. The jury is still out on whether cellphone usage leads to brain tumors. But it seems pretty obvious when you review the research provided by organizations not funded by the cellphone industry. Remember the tobacco companies swore that cigarettes were safe for decades, and they paid good money for authoritative-sounding research to back them up. Read this. And watch this. Then decide whether you want to gamble with the lives of your children. Better safe than sorry.
Deals, Deals, and More Deals. If you always shop for technology purchases at the same few stores, then send us a check for all the money we’re about to save you. There’s a green eBates coupon in the right pane just below that will usually save you 1-5% on all your technology and clothing purchases and just about anything else. It costs nothing to use it, and you’ll get $5 just for signing up. So do we. 🙂 To go with those savings, there are some bargain web sites that you won’t want to miss. Our old favorite is TechBargains, but there’s also a new kid on the block, DealNews. Check ’em out. You’ll find something you just can’t live without… at bargain basement prices.
 SMS Messaging with Asterisk. We’ve always lamented the fact that Asterisk had no built in SMS messaging capability. This is primarily because the cellphone providers keep a fairly tight lock on the SMS business since it’s their Cash Cow. There is a simple solution actually.
Virtually all of the cellphone providers have an Email-to-SMS gateway that can be used for sending SMS messages to their customers. For example, to send a message to a cellphone subscriber on the AT&T network, you just send an email message to 6781234567@txt.att.net. Click here for a complete list of the email gateway addresses.
That got us to thinking how simple it really would be to create a bash script that delivered the same message to every provider used by your friends. Who cares if all but one of the messages goes in the bit bucket. Your SMS message still will get delivered. For example, in the United States, if you’ve covered AT&T, Verizon, Alltel, Sprint, T-Mobile, US Cellular, Cricket, and Nextel, that pretty much gets 99% of the cellphones. If there’s a service that we’ve left out that you really need, just add another line to the bash script with the domain of that carrier.
So, log into your server as root and create a bash script named sms.sh that looks like the following: nano -w sms.sh
#!/bin/bash
# Script for sending SMS messages
# For additional cell carriers, see:
# http://en.wikipedia.org/wiki/List_of_carriers_providing_Email_or_Web_to_SMSmsg="Just testing the new SMS batch script."
subj="SMS Message"
num2call="8431234567″echo "$msg" | mail -s "$subj" $num2call@message.alltel.com
echo "$msg" | mail -s "$subj" $num2call@txt.att.net
echo "$msg" | mail -s "$subj" $num2call@sms.mycricket.com
echo "$msg" | mail -s "$subj" $num2call@messaging.nextel.com
echo "$msg" | mail -s "$subj" $num2call@messaging.sprintpcs.com
echo "$msg" | mail -s "$subj" $num2call@tmomail.net
echo "$msg" | mail -s "$subj" $num2call@email.uscc.net
echo "$msg" | mail -s "$subj" $num2call@vtext.com
Fill in the msg, subj, and num2call fields. Press Ctl-X, Y, then Enter to save your file. Then make it executable: chmod +x sms.sh. Now give it a try: ./sms.sh
You can alter the sender address for your emails from the default of root by inserting an entry like the following in /etc/mail/genericstable: root joeschmo@gmail.com. Then restart SendMail: service sendmail restart.
Micro$oft Bing. I have to admit that I’ve always had a soft spot for Microsoft. They came from humble beginnings and outsmarted almost everybody during the 80’s and 90’s… until Google entered the picture and did much the same thing to them. You’ve also got to hand it to Microsoft. They may not get it right the first, or second, or third time. But they don’t give up. And their reincarnated search engine, Bing, is worth a look. It includes an Explorer Pane that categorizes search results in a left panel that is customized to your search query. There’s also a Quick Preview providing website popups. The theory is to give you a sneak peak at a particular site to see if it’s what you’re looking for. As with many Microsoft creations, it’s just too slow at the moment to be of much value. Good idea. Not so good implementation.
A good bit already has been written about Bing’s picture and video search capabilities. Suffice it to say, once they tamed the content, it’s worth a look. Actually, it was worth a look even before they tamed the content. 🙂 But give Microsoft credit, they quickly recognized that there needs to be a way to make the web accessible to younger children and students without exposing them to an endless stream of pornography. What happened to the good old days of reading National Geographic to find all that stuff?
Microsoft’s Farecast technology also is interesting. It brings new, smart tools to the process of purchasing airline and hotel accommodations. Much of this toolkit was acquired by Microsoft, but it’s pretty slick. The downside of Bing, when compared to Google, is that there seems to be a tilt toward Microsoft content in results. And there still is a lot of drill-down (aka Windows) to find exactly what you’re looking for. Both are deeply rooted in the Microsoft psyche so I doubt it’ll ever go away. But have a look anyway. It’s an interesting, new product to at least have in your search toolkit.
Let There Be Music. All-you-can-eat streaming music plans have been around for a while. But there’s never been anything quite like the new Napster service from Best Buy. $5 a month for access to 7 million songs on either your PC or a Sonos sound system is just too good to pass up. We’ve previously written about this so we won’t repeat it all here. Have a look at the article if you’re a music addict. And, if streaming DRM’d music isn’t your thing, check out this PC Mag article on Virgin Media’s new offering. It will let you download an unlimited number of MP3’s from Universal’s entire music catalog for about $20 a month. Unbelievable!
People Tracking. If you glance over to the right margin, you’ll get a good sample of Google’s Latitude offering that pinpoints your location on a Google map using GPS data from your cellphone. AT&T offers something similar for "only" $10-$15 a month. This data can be either the location of the nearest cellphone tower or, if your phone is GPS-enabled, it can be the actual GPS coordinates of your phone. There are obviously privacy issues that need to be weighed, and Google has carefully addressed most of those issues. You can restrict access to select friends, or just family, or no one at all. In coming months, we’re going to build something similar with Google Maps to display a map with the default location of incoming calls on certain color SIP phones. Stay tuned. In the meantime, feel free to monitor our summer vacation as we move from Charleston, to the beach, and back to the mountains. Not too exciting, but it may give you some ideas for future uses of this technology. For those of you with young daughters, think of it as LoJack for Parents!
Footnote: Uh, oh. Google.everything just died. 8:30 a.m., June 16. Bad way to start your day. Good time to check out Bing. 🙂

Hurricane Tracking. If hurricanes are a part of your everyday life and you haven’t visited Stormpulse.com yet, you’re missing the ultimate storm tracking site on the net. Not only do they provide up-to-the-minute predictions from all of the world’s best sources, but you also get map overlays showing virtually anything you’d ever want to know that’s weather-related. Unbelievably good! And, for a ringside seat, visit our own Pawleys Island WebCam. We’ll wave to you later this week.
Promising New Asterisk Appliance. Every now and then we read an article about a new Asterisk appliance that really shows some promise. So it is with Michael Graves’ recent writeup of Jazinga, a $1095 Asterisk appliance that does just about anything and everything a small business would ever need in a phone system using a simple but intuitive web interface. Have a look. We think you’ll agree. Very slick, indeed. Only wish it were $595 instead of $1095.
Some Great Blogs. And, speaking of blogs, there are some other telephony blogs in addition to Graves on SOHO VoIP that are worth a look from time to time. Here’s another Baker’s Dozen of our favorites in no particular order:
- Asterisk.org Blog
- FierceVoIP
- truVoIPbuzz
- Smith On VoIP
- Asterisk Guru
- Scobleizer
- VoIP Watch
- GigaOM
- Tom Keating
- Alec Saunders
- Leif Madsen
- Smith on VoIP
- Michigan Telephone Blog
FreeNum Dialing System. Another new project worth a careful look is FreeNum. Taking a page from Nextel, FreeNum lets you make SIP calls from ordinary telephones after registering your organization. The format of a FreeNum dial string looks like 1234*567 where your extension is 1234 and your ITAD (Internet Telephony Administrative Domain) number is 567. FreeNUM relies upon DNS and, as such, is perfectly suited for transparent use over the Internet. In coming weeks, we’ll have more to say about FreeNUM including a methodology for letting all PBX in a Flash systems register with a shared ITAD for transparent communications worldwide. Here’s the article.
Twitter. The entire planet is aflutter with Twitter. We finally bit the bullet, and we’d be the first to admit that Twitter fills an important gap in today’s Internet-centric 21st century world. Not only does it provide instantaneous searches of very current content, it’s also quite useful as a micro-blogging tool if you like to keep current on technology happenings without always waiting for full-blown articles to appear. Many of the topics in this article were first introduced to Twitter users over the last few weeks. So there’s much more to Twitter than periodic reports of individuals’ bathroom and sleeping habits. You can get a sampling by reviewing our Twitter entries in the right pane of this blog. And there are literally hundreds of Twitter clients to meet your every need. Here’s a link to a great Twitter FAQ. Then give Twitter a try if you haven’t already. NerdUno is looking forward to hearing from you.
Wordle.net. We’ve mentioned Wordle before, but no article on Internet fun would be complete without at least a passing reference. The way Wordle works is that you pass it some text. It then rearranges the words in a hierarchical order that exposes the word usage count of the various words in the text it examined. You can see an example below which took the subject matter from the PBX in a Flash Help Forum and passed it through Wordle. You’ll note that "Resolved" is just about the same size as "problem" and "question." That actually speaks volumes about the quality of our forum. Give it a try. We think you’ll agree. We’ve done some other samples to give you some ideas: the Gettysburg Address, the Declaration of Independence, and MLK’s I Have A Dream speech. Try a few of your own. It’s a summertime blast. Enjoy!
Need help with Asterisk? Visit the PBX in a Flash Forum.
Or Try the New, Free PBX in a Flash Conference Bridge.
whos.amung.us If you’re wondering what your fellow man is reading on Nerd Vittles these days, wonder no more. Visit our new whos.amung.us statistical web site and check out what’s happening. It’s a terrific resource both for us and for you.
Special Thanks to Our Generous Sponsors
FULL DISCLOSURE: ClearlyIP, Skyetel, Vitelity, DigitalOcean, Vultr, VoIP.ms, 3CX, Sangoma, TelecomsXchange and VitalPBX have provided financial support to Nerd Vittles and our open source projects through advertising, referral revenue, and/or merchandise. As an Amazon Associate and Best Buy Affiliate, we also earn from qualifying purchases. We’ve chosen these providers not the other way around. Our decisions are based upon their corporate reputation and the quality of their offerings and pricing. Our recommendations regarding technology are reached without regard to financial compensation except in situations in which comparable products at comparable pricing are available from multiple sources. In this limited case, we support our sponsors because our sponsors support us.
BOGO Bonaza: Enjoy state-of-the-art VoIP service with a $10 credit and half-price SIP service on up to $500 of Skyetel trunking with free number porting when you fund your Skyetel account. No limits on number of simultaneous calls. Quadruple data center redundancy. $25 monthly minimum spend required. Tutorial and sign up details are here.
![]() The lynchpin of Incredible PBX 2020 and beyond is ClearlyIP components which bring management of FreePBX modules and SIP phone integration to a level never before available with any other Asterisk distribution. And now you can configure and reconfigure your new Incredible PBX phones from the convenience of the Incredible PBX GUI.
The lynchpin of Incredible PBX 2020 and beyond is ClearlyIP components which bring management of FreePBX modules and SIP phone integration to a level never before available with any other Asterisk distribution. And now you can configure and reconfigure your new Incredible PBX phones from the convenience of the Incredible PBX GUI.
VitalPBX is perhaps the fastest-growing PBX offering based upon Asterisk with an installed presence in more than 100 countries worldwide. VitalPBX has generously provided a customized White Label version of Incredible PBX tailored for use with all Incredible PBX and VitalPBX custom applications. Follow this link for a free test drive!
Special Thanks to Vitelity. Vitelity is now Voyant Communications and has halted new registrations for the time being. Our special thanks to Vitelity for their unwavering financial support over many years and to the many Nerd Vittles readers who continue to enjoy the benefits of their service offerings. We will keep everyone posted on further developments.
Some Recent Nerd Vittles Articles of Interest…
VoIP Over VPN: Securely Interconnecting Asterisk Servers
We’ve just returned from a week in the Pacific Northwest teaching an Asterisk® course for an organization that wants to interconnect satellite offices using Asterisk servers. This coincided with a support request from one of America’s premier airlines which wants to do much the same thing for all of its reservation counters in airports situated in feeder cities around the country. Suffice it to say, PBX in a Flash in conjunction with Asterisk and Hamachi VPNs is perfectly suited to let anyone build these interconnected systems in minutes rather than months. In fact, with less than a day’s worth of introduction to Asterisk and PBX in a Flash, a group of 16 network administrators with no previous Asterisk experience did just that in a one-hour lab session during our training seminar last week. At the risk of (further) destroying our ability to earn a living, here’s how we did it.
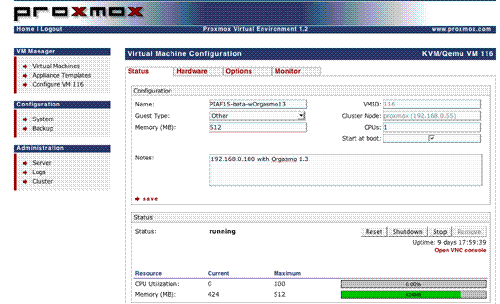
Proxmox as a Training Tool. Before we get into the nitty gritty of actually interconnecting Asterisk servers with Hamachi VPNs, let us provide the free tip of the week for those of you that want to experiment with interconnecting Asterisk servers or for those that like to test various Asterisk scenarios without rebuilding servers all day long. There is no finer tool for this than the Proxmox Virtual Environment, a free and easy to use Open Source virtualization platform for running Virtual Appliances and Virtual Machines. With a sale-priced Dell T105 with a Quad Core AMD Opteron processor and 8 gigs of RAM, you’ll have a perfect platform to run about 16 simultaneous PBX in a Flash servers. The trick is finding the machines on sale for half price which is about every other week. Our lab system which matches this configuration was less than $600 with RAM purchased from a third party. You can save most of the shipping cost by using our coupon link in the right column to shop at Dell’s small business site.
Proxmox lets you build virtual machines in two ways: OpenVZ templates or Qemu/KVM Templates and ISO images. While we intend to offer an OpenVZ template for PBX in a Flash soon, currently it’s easy to create your own ISO template using the standard PBX in a Flash ISO image. Once you’ve uploaded your ISO image into Proxmox, simply create a new virtual machine by giving it a name, specifying 512MB of RAM and a 30GB partition. In 10 seconds or less, your new VM will be ready to boot. Start your VM and then open the VNC console window within the Proxmox web interface and install PBX in a Flash just as if you were building a stand-alone machine. When the 15-minute install completes, run through the Orgasmatron Installer setup, and you’ll have your turnkey PBX in a Flash system ready for production in less than 30 minutes.
You don’t have to repeat this drill for every virtual machine. Instead, use the built-in Proxmox backup utility to make a backup image of what you built. Shut down the VM, create a /backup directory, and then schedule the compressed backup in the web browser. When the backup completes, you’ll have a backup image in /backup with a file name like this: vzdump-101.tgz.
To create a new virtual machine, you issue the following command while positioned in the /backup directory specifying the number for the new virtual machine:
vzdump --restore vzdump-101.tgz 102
In about 3 minutes, you’ll have a second virtual machine that’s a clone of the first one. Because it’s a true clone, it would obviously have the same MAC address for the virtual NIC. You don’t want that or all of your VMs would boot up using the same IP address. Using the Proxmox web interface, just edit the new VM 102 by switching from the Status tab to the Hardware tab, delete the existing Ethernet device, and then create a new Ethernet device under the hardware address list pulldown. This will create a new virtual NIC with a new MAC address. So, when you boot VM 102, it will be assigned a new IP address by your DHCP server. You can decipher the new IP address by opening the VNC console window for VM 102 after you boot it up. Now you’re an expert. You can create the additional Baker’s Dozen turnkey PBX in a Flash servers in about an hour. Start all of them up, and you’ve got an instant training facility and PBX in a Flash playground.
April, 2012 Update. See our new article for a current state-of-the-art VoIP VPN.
Creating Hamachi VPN. You obviously don’t need a virtual private network in order to interconnect Asterisk servers. But, as easy as the Hamachi VPN is to set up, especially with PBX in a Flash servers, why wouldn’t you want all of your inter-Asterisk communications secured and encrypted? In addition to the capacity limitation of the Proxmox server, there’s another reason we chose to build 16 PBX in a Flash VMs. That happens to be the number of servers you can interconnect with the Hamachi Virtual Private Network without incurring a charge.1 Why use the Hamachi VPN when OpenVPN is free with unlimited network connections and no strings? The short answer is it’s incredibly simple to set up without public and private key hassles, and it supports dynamic IP server addressing with zero configuration. We plan to cover OpenVPN in a subsequent article but, for many implementations, Hamachi VPNs offer a robust, flexible alternative that can be deployed in minutes.
If you’re not using PBX in a Flash, there are a million good Hamachi VPN tutorials available through a quick Google search. If you are using PBX in a Flash, we’ve done the work for you. With the Orgasmatron Installer build, you’ll find the Hamachi VPN installation script in /root/nv. For other PBX in a Flash systems, just download the install-hamachi.x script from here or, after logging into your server as root, issue the following commands:
wget http://pbxinaflash.net/source/hamachi/install-hamachi.x
chmod +x install-hamachi.x
./install-hamachi.x
Before beginning the Hamachi VPN install, it’s a good idea to make yourself a cheat sheet for the servers you plan to interconnect. We’re going to interconnect 3 servers today, but doing 16 is just more of the same. You’ll need a unique name for your virtual private network. Pick a name that distinguishes this VPN from others you may build down the road. For our example, we’re going to use piaf-vpn. Next, you need a very secure password for your VPN. We’re going to use password for demonstration purposes only. Finally, you need a unique nickname for each of your servers, e.g. piaf-server1, piaf-server2, and piaf-server3 for our example setup today.
For the first Hamachi install, we’ll need to create the new network. For the remaining installs, we’ll simply join the existing network. Keep in mind that you can only remove machines from the network using the same server that was used to create the other VPN accounts initially so build out your virtual private network by starting with your main server, piaf-server1 in our example.
To begin the Hamachi VPN install, run the script using the commands shown above. Type Y to agree to the installer license and then press the Enter key to kick off the install. For the piaf-server1 install, type N to create a new Hamachi network. For the remaining installs, you’d type J to join an existing Hamachi network. Enter the network name you chose above. For our sample, we used piaf-vpn. Type it twice when prompted. Now type your network password and then your nickname for this server when prompted to do so. Then standby while the Hamachi software is installed. It takes a few minutes depending upon the speed of your network connection. And remember, do NOT use our sample network name. Make up your own and don’t forget it. When the install completes, you can review the log if you’d like. Unless something has come unglued, Hamachi should now be running on your first server. Repeat the drill on your other servers.
The next step is to grab some of our scripts to make it easier to manage Hamachi on your servers.
cd /usr/local/bin

wget http://pbxinaflash.net/source/hamachi/hampiaf

wget http://pbxinaflash.net/source/hamachi/hamachi-servers

chmod +x ham*

cd /root

wget http://pbxinaflash.net/source/hamachi/hamachi.faq
The hamachi.faq document provides all of the commands you’ll need to manage Hamachi including the steps to start over with a totally new virtual private network. For now, let’s be sure your network is running. Type: hamachi-servers piaf-vpn using the network name you assigned to your own VPN. Then type it again, and it should display all of the servers on your VPN with their private VPN IP addresses:
root@pbx:~ $ hamachi-servers piaf-vpn
This server:
Identity 5.151.123.1
Nickname piaf-server1
AutoLogin yes
OnlineNet piaf-vpnGoing online in piaf-vpn .. failed, already online
Retrieving peers’ nicknames ..
* [piaf-vpn]
5.151.123.2 piaf-server2
5.151.123.3 piaf-server3
Finally, a word of caution about security. One of the drawbacks of the ease with which you can create Hamachi VPNs is the ease with which you can create Hamachi VPNs. Anyone that knows your network name and password can join your network with one simple command. You can kick them off from the main server where the VPN was created (hampiaf evict piaf-vpn 5.249.146.66), but you can’t keep them from joining. So, protect your network by making the password extremely secure. There currently is no way to change your network password. All you can do is create a new network with a new network name and a more secure password.
Interconnecting Asterisk Servers. Once your VPN is established and all of your servers are on line, then we’re ready to interconnect them with Asterisk and FreePBX. There are a number of ways to do this. For smaller networks, we’re going to show you the easy and secure way using IAX and the VPN you just created. As with the VPN setup, a cheat sheet comes in handy to avoid erroneous entries that would cause your calls between servers to fail. What we recommend is assigning and creating a block of extensions on each of your servers with different ranges of numbers. For example, we’re going to use four-digit extensions in the 1xxx range for piaf-server1, 2xxx for piaf-server2, and 3xxx for piaf-server3. The idea here is that the extensions are unique between your servers. This makes it easy to dial between offices without having to resort to dialing prefixes. So the first step in interconnecting your servers is to build the necessary extensions on each of your servers.
Now for the cheat sheet. Using the hamachi-servers tool above, decipher the VPN IP address of each of your servers and make a chart with the server names, the range of extension numbers, and the VPN IP address of each server. You’ll also need to think up a very secure password. We’re going to use the same one for all of the servers although you certainly don’t need to. So long as the password you choose is secure, there’s really no reason not to use the same one.
piaf-server1 1xxx 5.151.123.1 password
piaf-server2 2xxx 5.151.123.2 password
piaf-server3 3xxx 5.151.123.3 password
Creating Trunks. The next step is to create an IAX trunk on each server for each remaining server in your network. In our example, on piaf-server1, we’d want to create trunks for piaf-server2 and piaf-server3. On piaf-server2, we’d want to create trunks for piaf-server1 and piaf-server3. And so on.
NOTE: Because of a change in IAX design to fix a security issue that arose after this article was originally published, be sure to add the following line in the User Details of each trunk below:
requirecalltoken=no
On your first server (piaf-server1 in our example), using a web browser, open FreePBX and choose Admin, Setup, Trunks and then click Add IAX2 Trunk. Create the trunk to piaf-server2 with the following entries. Leave everything blank except the entries shown below:

While still on piaf-server1, repeat the process to create a trunk for piaf-server3:
On your second server (piaf-server2 in our example), using a web browser, open FreePBX and choose Admin, Setup, Trunks and then click Add IAX2 Trunk. Create the trunk to piaf-server1 with the following entries. Leave everything blank except the entries shown below:
While still on piaf-server2, repeat the process to create a trunk for piaf-server3:
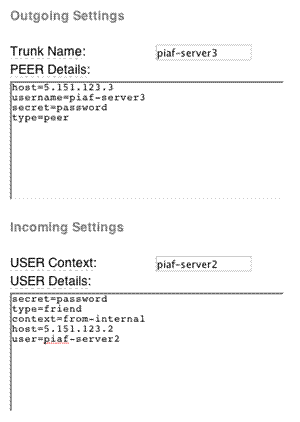
On your third server (piaf-server3 in our example), using a web browser, open FreePBX and choose Admin, Setup, Trunks and then click Add IAX2 Trunk. Create the trunk to piaf-server1 with the following entries. Leave everything blank except the entries shown below:
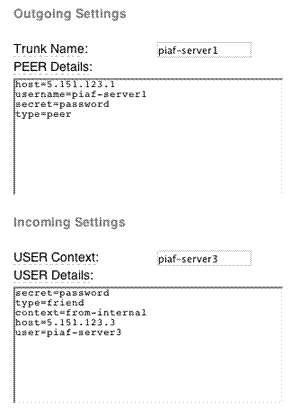
While still on piaf-server3, repeat the process to create a trunk for piaf-server2:
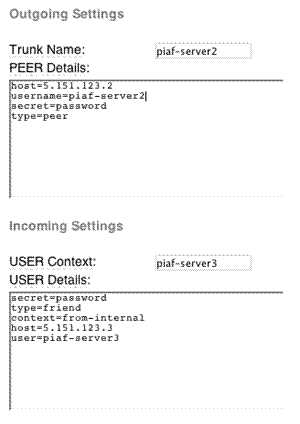
Creating Outbound Routes. Now we need to tell Asterisk how to route the calls between the servers. In a nutshell, we want calls to extensions in the 1xxx range routed to extensions on piaf-server1, calls to 2xxx extensions routed to piaf-server2, and calls to 3xxx extensions routed to piaf-server3. On each server, create an outbound route for each of the remaining servers. Name the routes server1, server2, and server3 as appropriate. The critical pieces of information in each outbound route are the dial string (which should match the extensions on the server we’re connecting to) and the Trunk Sequence (which should be the appropriate IAX trunk for the server we’re connecting to).
On piaf-server1, we’d have a server2 outbound route with a Dial String of 2xxx and a Trunk Sequence of IAX2/piaf-server2. Then we’d have another server3 route with a Dial String of 3xxx and a Trunk Sequence of IAX2/piaf-server3. If you have a catch-all outbound route, be sure to move these routes above the catch-all in the right column. Then reload your dialplan.
On piaf-server2, we’d have a server1 outbound route with a Dial String of 1xxx and a Trunk Sequence of IAX2/piaf-server1. Then we’d have another server3 route with a Dial String of 3xxx and a Trunk Sequence of IAX2/piaf-server3. If you have a catch-all outbound route, be sure to move these routes above the catch-all in the right column. Then reload your dialplan.
On piaf-server3, we’d have a server1 outbound route with a Dial String of 1xxx and a Trunk Sequence of IAX2/piaf-server1. Then we’d have another server2 route with a Dial String of 2xxx and a Trunk Sequence of IAX2/piaf-server2. If you have a catch-all outbound route, be sure to move these routes above the catch-all in the right column. Then reload your dialplan.
If you’re setting this up with PRI or T1 connections between your servers, you might also want to specify at least secondary trunk sequences for each of the outbound routes to provide some redundancy. For example, on piaf-server1, you might want a secondary Trunk Sequence for server2 that specified IAX2/piaf-server3. Then, if the primary connection between server1 and server2 was down, Asterisk would attempt to complete calls to 2xxx extensions by routing them to server3 and then on to server2 from there. To the caller and call recipient, they’d never know that the direct link between server1 and server2 had failed.
Alternate routing might also be appropriate where you have more capacity between certain servers. For example, if you had a single T1 line between server1 and server3 but you had PRI connections between server1 and server2 and between server2 and server3, then it might make more sense to indirectly route 3xxx calls from server1 through server2 and then on to server3 rather than the direct route from server1 to server3. Enjoy!
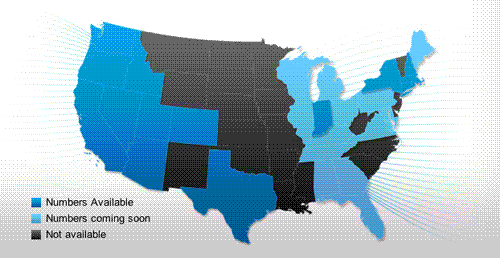
Free DIDs While They Last. Sipgate is giving away a free U.S. DID with free incoming calls plus 200 free minutes for outbound calls. Better hurry. Here’s the trunk setup for FreePBX-based systems:
Trunk name: sipgate
type=peer
username=ACCTNO
fromuser=ACCTNO
secret=ACCTPW
context=from-trunk
host=sipgate.com
fromdomain=sipgate.com
insecure=very
caninvite=no
canreinvite=no
nat=no
disallow=all
allow=ulaw&alawRegistration Strong: ACCTNO:ACCTPW@sipgate.com/YOUR-DID-NUMBER
ACCTNO is the account number assigned to your sipgate account. ACCTPW is the password for your account. YOUR-DID-NUMBER is your 10-digit DID.
Finally create an inbound route using your actual 10-digit DID and assign a destination for the inbound calls.
Need help with Asterisk? Visit the PBX in a Flash Forum.
Or Try the New, Free PBX in a Flash Conference Bridge.
Twitter Magic. If you haven’t noticed the right margin of Nerd Vittles lately, we’ve added a new link to our Twitter feed. If you explore a little, you’ll discover that the user interface now brings you instant access to every Twitter feed from the convenience of the Nerd Vittles desktop. Enjoy!
whos.amung.us If you’re wondering what your fellow man is reading on Nerd Vittles these days, wonder no more. Visit our new whos.amung.us statistical web site and check out what’s happening. It’s a terrific resource both for us and for you.
Special Thanks to Our Generous Sponsors
FULL DISCLOSURE: ClearlyIP, Skyetel, Vitelity, DigitalOcean, Vultr, VoIP.ms, 3CX, Sangoma, TelecomsXchange and VitalPBX have provided financial support to Nerd Vittles and our open source projects through advertising, referral revenue, and/or merchandise. As an Amazon Associate and Best Buy Affiliate, we also earn from qualifying purchases. We’ve chosen these providers not the other way around. Our decisions are based upon their corporate reputation and the quality of their offerings and pricing. Our recommendations regarding technology are reached without regard to financial compensation except in situations in which comparable products at comparable pricing are available from multiple sources. In this limited case, we support our sponsors because our sponsors support us.
BOGO Bonaza: Enjoy state-of-the-art VoIP service with a $10 credit and half-price SIP service on up to $500 of Skyetel trunking with free number porting when you fund your Skyetel account. No limits on number of simultaneous calls. Quadruple data center redundancy. $25 monthly minimum spend required. Tutorial and sign up details are here.
![]() The lynchpin of Incredible PBX 2020 and beyond is ClearlyIP components which bring management of FreePBX modules and SIP phone integration to a level never before available with any other Asterisk distribution. And now you can configure and reconfigure your new Incredible PBX phones from the convenience of the Incredible PBX GUI.
The lynchpin of Incredible PBX 2020 and beyond is ClearlyIP components which bring management of FreePBX modules and SIP phone integration to a level never before available with any other Asterisk distribution. And now you can configure and reconfigure your new Incredible PBX phones from the convenience of the Incredible PBX GUI.
VitalPBX is perhaps the fastest-growing PBX offering based upon Asterisk with an installed presence in more than 100 countries worldwide. VitalPBX has generously provided a customized White Label version of Incredible PBX tailored for use with all Incredible PBX and VitalPBX custom applications. Follow this link for a free test drive!
Special Thanks to Vitelity. Vitelity is now Voyant Communications and has halted new registrations for the time being. Our special thanks to Vitelity for their unwavering financial support over many years and to the many Nerd Vittles readers who continue to enjoy the benefits of their service offerings. We will keep everyone posted on further developments.
Some Recent Nerd Vittles Articles of Interest…
- See comment #1 below. [↩]
Free Asterisk Solutions
