Home » Search results for 'virtualbox' (Page 2)
Search Results for: virtualbox
Desktop Dream Machine: It’s Incredible PBX for VirtualBox
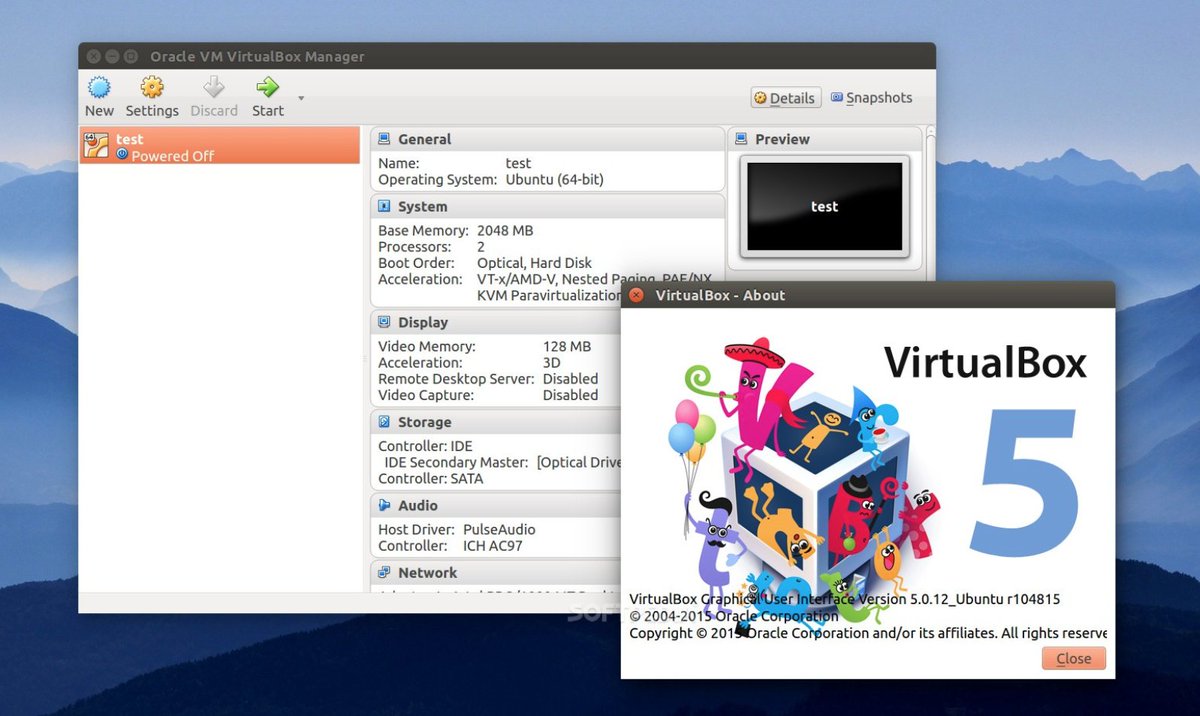
If you’re new to the VoIP world or just getting started with Google’s latest Google Voice creation, then we have a one minute setup solution today that doesn’t require you to buy anything ever. You can use almost any desktop computer you already own to bring up the VirtualBox® edition of Incredible PBX® in less than 60 seconds. Take another minute or two to install a Google Voice trunk, and you’ll have free calling in the U.S. and Canada until the cows come home. If you’ve followed Nerd Vittles over the years, you already know that VirtualBox from Oracle® is one of our favorite platforms. Once VirtualBox is installed on your desktop computer, adding Incredible PBX is a snap. Download our new GVSIP vbox image from SourceForge, double-click on the downloaded image, check the initialize MAC address box, and boom. In less than a minute, your PBX is ready to use. The really nice thing about playing along today is it won’t cost you a dime to try things out for yourself. And, if you really love it and we think you will, there’s no hidden fee or crippleware to hinder your continued use of Incredible PBX for as long as you like. Of course, the Incredible PBX feature set is included as well which brings you nearly three dozen applications for Asterisk® that will revolutionize your communications platform. Just add your credentials and speech-to-text, voice recognition, and a Siri-like telephony interface are as close as your nearest SIP phone.
Installing Oracle VM VirtualBox
Oracle’s virtual machine platform inherited from Sun is amazing. It’s not only free, but it’s pure GPL2 code. VirtualBox gives you a virtual machine platform that runs on top of any desktop operating system. In terms of limitations, we haven’t found any. We even tested this on an Atom-based Windows 7 machine with 2GB of RAM, and it worked without a hiccup. So step #1 today is to download one or more of the VirtualBox installers from VirtualBox.org or Oracle.com. Our recommendation is to put all of the 100MB installers on a 4GB thumb drive.1 Then you’ll have everything in one place whenever and wherever you happen to need it. Once you’ve downloaded the software, simply install it onto your favorite desktop machine. Accept all of the default settings, and you’ll be good to go. For more details, here’s a link to the Oracle VM VirtualBox User Manual.
Installing Incredible PBX 13-13 with GVSIP
To begin, download the Incredible PBX vbox image (2.3 GB) onto your desktop.
Next, double-click on the Incredible PBX .ova image on your desktop. Be sure to check the box to initialize the MAC address of the image and then click Import. Once the import is finished, you’ll see a new Incredible PBX virtual machine in the VM List of the VirtualBox Manager Window. Let’s make a couple of one-time adjustments to the Incredible PBX configuration to account for possible differences in sound and network cards on different host machines.
(1) Click once on the Incredible PBX virtual machine in the VM List. Then (2) click the Settings button. In the Audio tab, check the Enable Audio option and choose your sound card. In the Network tab for Adapter 1, check the Enable Network Adapter option. From the Attached to pull-down menu, choose Bridged Adapter. Then select your network card from the Name list. Then click OK. That’s all the configuration that is necessary for Incredible PBX.
Running Incredible PBX in VirtualBox
Once you’ve imported and configured the Incredible PBX Virtual Machine, you’re ready to go. Highlight the Incredible PBX virtual machine in the VM List on the VirtualBox Manager Window and click the Start button. The standard Linux boot procedure will begin and, within a few seconds, you’ll get the familiar Linux login prompt. During the bootstrap procedure, you’ll see a couple of dialogue boxes pop up that explain the keystrokes to move back and forth between your host operating system desktop and your virtual machine. Remember, you still have full access to your desktop computer. Incredible PBX is merely running as a task in a VM window. Always gracefully halt Incredible PBX just as you would on any computer.
Here’s what you need to know. To work in the Incredible PBX virtual machine, just left-click your mouse while it is positioned inside the VM window. To return to your host operating system desktop, press the right Option key on Windows machines or the left Command key on any Mac. For other operating systems, read the dialogue boxes for instructions on moving around. To access the Linux CLI, login as root with the default password: password. Change your passwords immediately by typing: /root/update-passwords.
Setting the Date and Time with VirtualBox
On some platforms, VirtualBox has a nasty habit of mangling the date and time of your virtual machine. Typing date will tell you whether your VM is affected. If it’s a problem, manually set the date and time and then update the hardware clock. Here’s how assuming 08130709 is the month, day, and correct time of your server:
date 08130709
clock -w
Obtaining Google Voice Credentials for GVSIP
You’ll need at least one dedicated Google Voice account to use the new Incredible PBX implementation of GVSIP with Asterisk. If you’re new to all of this, our Getting Started with Google Voice tutorial will walk you through setting up an account and obtaining your OAuth 2 refresh token for GVSIP.
Creating GVSIP Trunks with Incredible PBX
With your Google Voice refresh token and 10-digit phone number in hand, you’re ready to add the GVSIP trunk to your PBX. While logged into the Linux CLI as root, issue the following command: gvsip-naf/install-gvsip
You’ll be prompted whether you wish to create a GVSIP trunk, Type y and enter your refresh_token and 10-digit phone number for your existing Google Voice trunk. For each trunk, the installer will create the necessary code to support a PJSIP trunk and a GVSIPn Custom Trunk to use for outbound routing. To add additional trunks, simply run the installer again. Adding a new trunk takes about 10 seconds.
Should you ever want to refresh the patched version of Asterisk, copy pjsip_custom.conf from /etc/asterisk to a safe place, delete the contents of pjsip_custom.conf, rerun the installer, and then copy your version of pjsip_custom.conf back to /etc/asterisk and restart Asterisk: amportal restart. That way you won’t lose your previously configured trunks.
If you ever need to delete a GVSIP trunk that you previously have added, we’ve included a script which will perform the task for you. Just run del-trunk and specify the trunk to delete.
Once you have multiple GVSIP trunks on your PBX, we’ve added a utility to make it easy to decipher which trunk number is associated with each Google Voice trunk. Simply run: gvsip-naf/show-trunks
Configuring an Inbound Route for GVSIP Trunks
By default, incoming calls to GVSIP trunks on Incredible PBX servers will be sent to the Default Inbound Route configured on your PBX. As initially installed, that Default route points to Allison’s Demo IVR. This can be changed easily in the FreePBX GUI by modifying the Destination for the Default inbound route in Connectivity:Inbound Routes.
On other server platforms, you may not have a Default inbound route configured so you will need to create an inbound route to handle calls from each GVSIP trunk. Regardless of your server platform, we strongly recommend adding an Inbound Route for every GVSIP trunk using the 10-digit GVSIP phone number as the DID for the inbound route. Here’s an example of an Inbound Route created in Connectivity:Inbound Routes:Add Inbound Route:
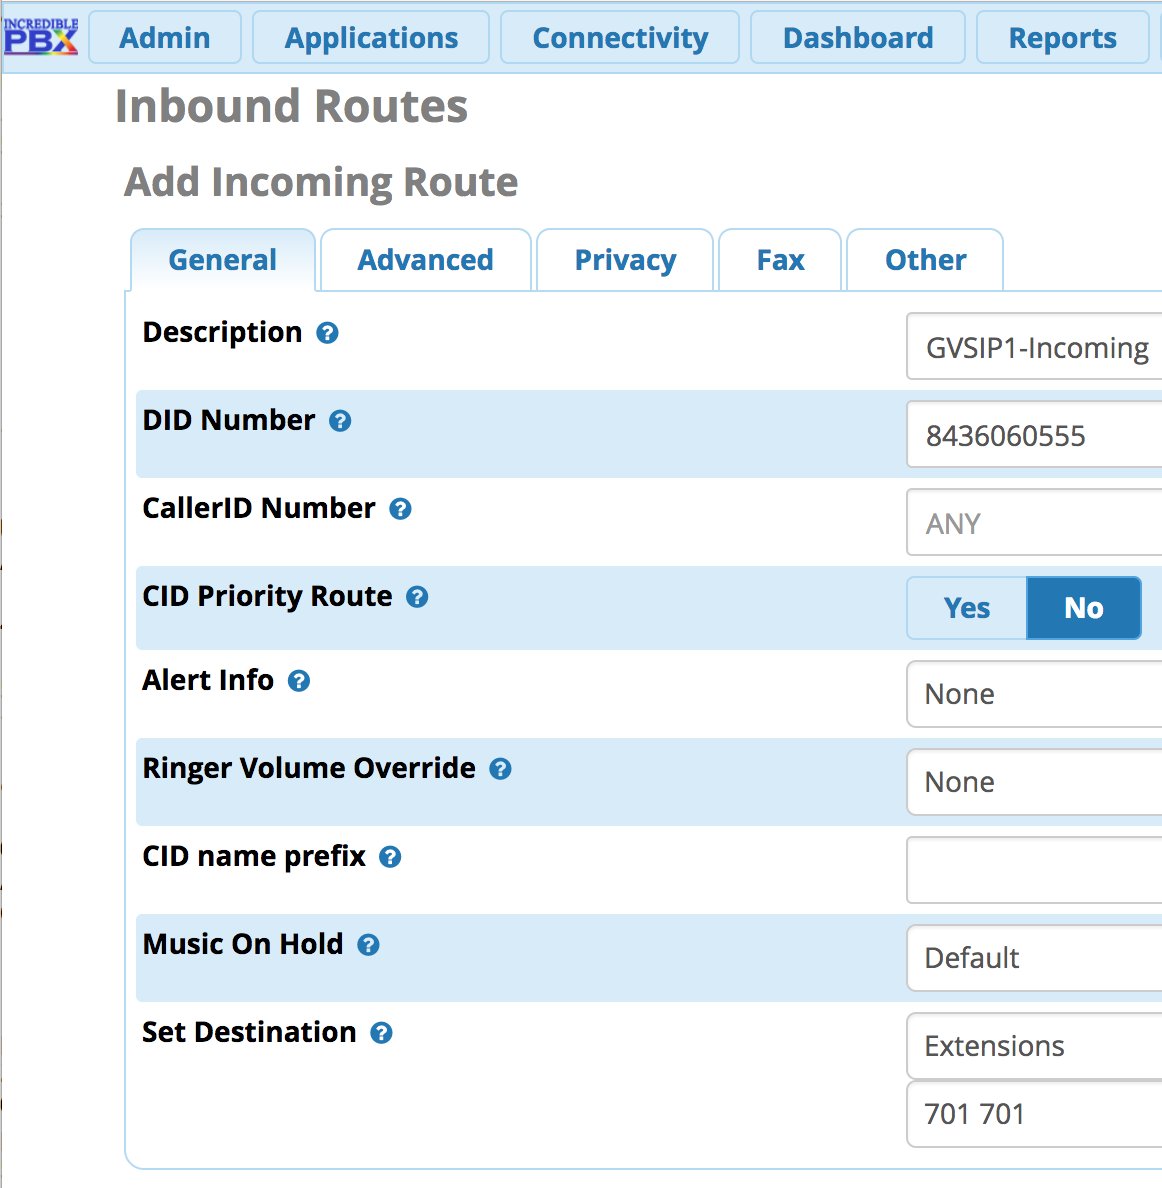
If you have installed the Incredible Fax add-on, you can enable Fax Detection under the Fax tab. And, if you’d like CallerID Name lookups using CallerID Superfecta, you can enable it under the Other tab before saving your setup and reloading your dialplan.
Configuring an Outbound Route for GVSIP Trunks
By default, you cannot place outbound calls using your new GVSIP trunks. For each trunk, you first will need to create an Outbound Route specifying a Dial Pattern to use with each GVSIP trunk in Connectivity:Outbound Routes:Add Outbound Route. If you only have a single Google Voice trunk on your PBX and no other trunks, then you would probably want to specify that outbound calls be routed out the GVSIP1 trunk with a Dial Pattern of NXXNXXXXXX with 1 as the Prepend. This tells FreePBX to dial 18005551212 using the GVSIP1 trunk when a PBX user dials 8005551212. Google only accepts calls that include a country code (1=US/CAN).

HINT: If you ever forget which GVSIP trunks are associated with which phone numbers, simply run /root/gvsip-naf/del-trunk for a list of your trunks. Just press ENTER to exit without deleting any of your trunks.
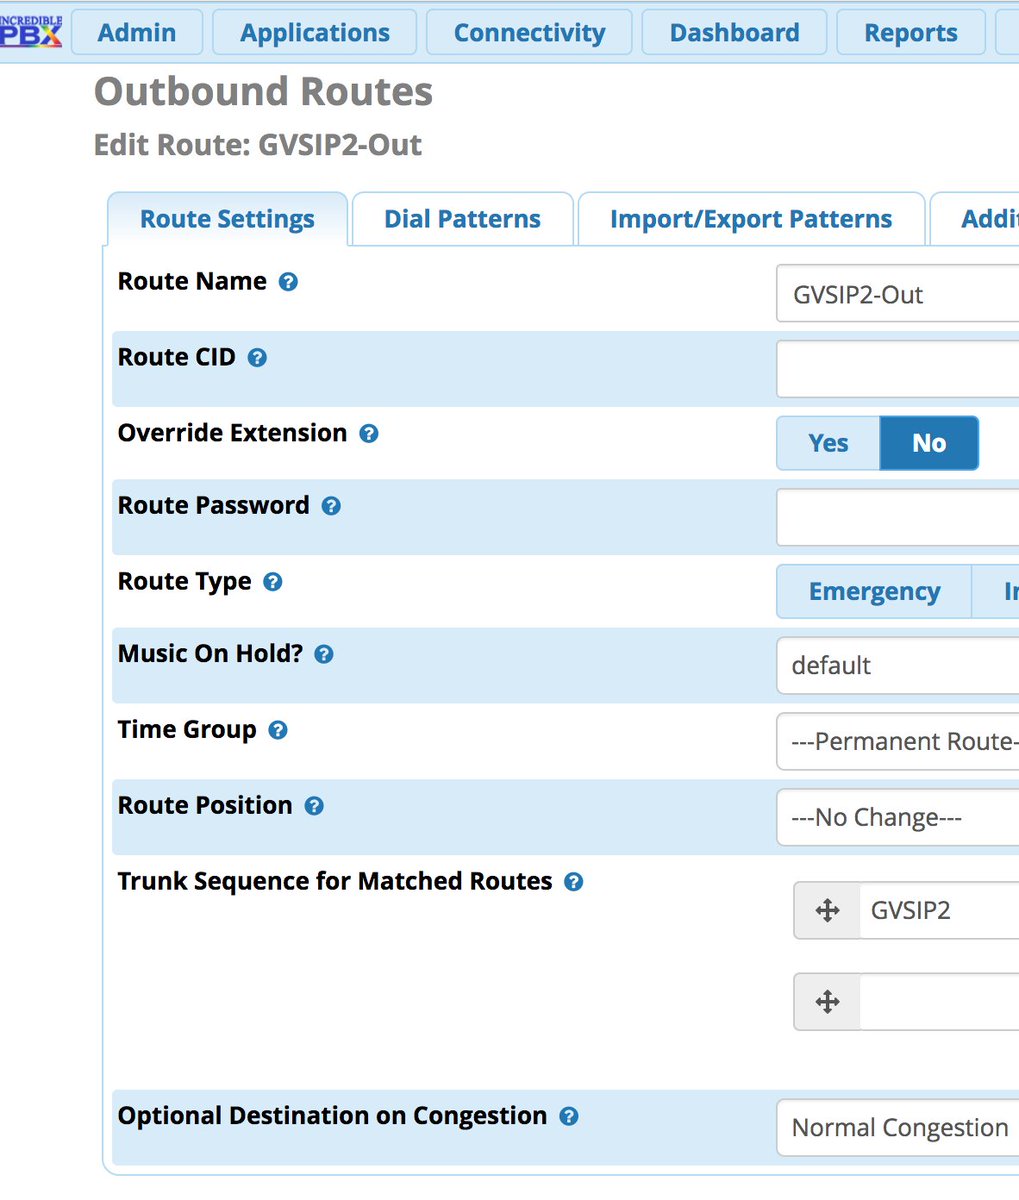
There are a million ways to design outbound calling schemes on PBXs with multiple trunks. One of the simplest ways is to use no dial prefix for the primary trunk and then use dialing prefixes for the remaining trunks. As part of the install, the dialing prefixes of *41 through *49 were reserved for GVSIP trunks if you would like to use them. That’s totally up to you. Here’s what an Outbound Route would look like using this scheme for the GVSIP2 trunk:
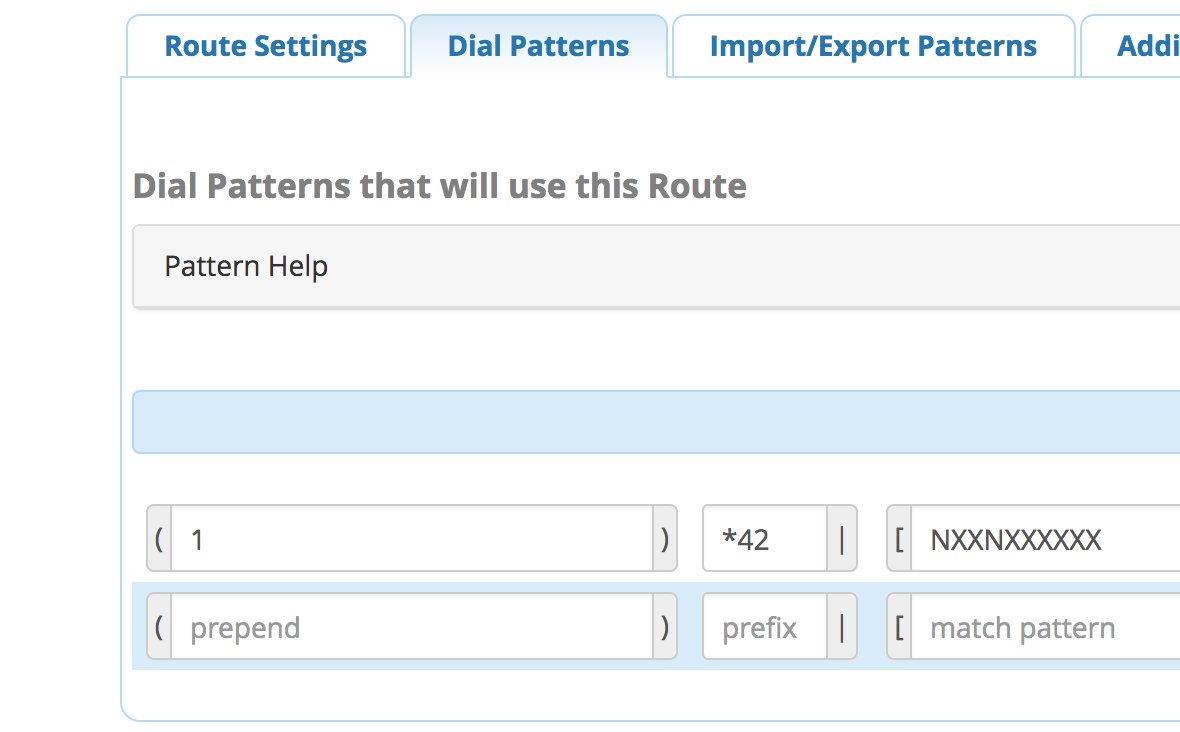
Another outbound calling scheme would be to assign specific DIDs to individual extensions on your PBX. Here you could use NXXNXXXXXX with the 1 Prepend as the Dial Pattern with every Outbound Route and change the Extension Number in the CallerID field of the Dial Pattern. With this setup, you’d need a separate Outbound Route for each group of extensions using a specific trunk on your PBX. Additional dial patterns can be added for each extension designated for a particular trunk. A lower priority Outbound Route then could be added without a CallerID entry to cover extensions that weren’t restricted or specified.
HINT: Keep in mind that Outbound Routes are processed by FreePBX in top-down order. The first route with a matching dial pattern is the trunk that is selected to place the outbound call. No other outbound routes are ever used even if the call fails or the trunk is unavailable. To avoid failed calls, consider adding additional trunks to the Trunk Sequence in every outbound route. In summary, if you have multiple routes with the exact same dial pattern, then the match nearest to the top of the Outbound Route list wins. You can rearrange the order of the outbound routes by dragging them into any sequence desired.
Configuring Incredible PBX for Incredible PBX
In order to take advantage of all the Incredible PBX applications, you’ll need to obtain IBM text-to-speech (TTS) and speech-to-text (STT) credentials as well as a (free) Application ID for Wolfram Alpha.
NOV. 1 UPDATE: IBM has moved the goal posts effective December 1, 2018:

This Nerd Vittles tutorial will walk you through getting your IBM account set up and obtaining both your TTS and STT credentials. Be sure to write down BOTH sets of credentials which you’ll need in a minute. For home and SOHO use, IBM access and services are FREE even though you must provide a credit card when signing up. The IBM signup process explains their pricing plans.
To use Wolfram Alpha, sign up for a free Wolfram Alpha API account. Just provide your email address and set up a password. It takes less than a minute. Log into your account and click on Get An App ID. Make up a name for your application and write down (and keep secret) your APP-ID code. That’s all there is to getting set up with Wolfram Alpha. If you want to explore costs for commercial use, there are links to let you get more information.
In addition to your Wolfram Alpha APPID, there are two sets of IBM credentials to plug into the Asterisk AGI scripts. Keep in mind that there are different usernames and passwords for the IBM Watson TTS and STT services. The TTS credentials will look like the following: $IBM_username and $IBM_password. The STT credentials look like this: $API_USERNAME and $API_PASSWORD. Don’t mix them up. 🙂
All of the scripts requiring credentials are located in /var/lib/asterisk/agi-bin so switch to that directory after logging into your server as root. Edit each of the following files and insert your TTS credentials in the variables already provided: nv-today2.php, ibmtts.php, and ibmtts2.php. Edit each of the following files and insert your STT credentials in the variables already provided: getquery.sh, getnumber.sh, and getnumber2.sh. Finally, edit 4747 and insert your Wolfram Alpha APPID.
Using Asteridex with Incredible PBX
AsteriDex is a web-based dialer and address book application for Asterisk and Incredible PBX. It lets you store and manage phone numbers of all your friends and business associates in an easy-to-use SQLite3 database. You simply call up the application with your favorite web browser: http://pbx-ip-address/asteridex4/. When you click on a contact that you wish to call, AsteriDex first calls you at extension 701, and then AsteriDex connects you to your contact through another outbound call made using your default outbound trunk that supports numbers in the 1NXXNXXXXXX format.
Taking Incredible PBX for a Test Drive
You can take Incredible PBX on a test drive by dialing D-E-M-O (3366) from any phone connected to your PBX.
With Allison’s Demo IVR, you can choose from the following options:
- 0. Chat with Operator — connects to extension 701
- 1. AsteriDex Voice Dialer – say "Delta Airlines" or "American Airlines" to connect
- 2. Conferencing – log in using 1234 as the conference PIN
- 3. Wolfram Alpha Almanac – say "What planes are flying overhead"
- 4. Lenny – The Telemarketer’s Worst Nightmare
- 5. Today’s News Headlines — courtesy of Yahoo! News
- 6. Weather by ZIP Code – enter any 5-digit ZIP code for today’s weather
- 7. Today in History — courtesy of OnThisDay.com
- 8. Chat with Nerd Uno — courtesy of SIP URI connection to 3CX iPhone Client
- 9. DISA Voice Dialer — say any 10-digit number to be connected
- *. Current Date and Time — courtesy of Incredible PBX
Originally published: Tuesday, August 14, 2018

Need help with Asterisk? Join our new MeWe Support Site.
Special Thanks to Our Generous Sponsors
FULL DISCLOSURE: ClearlyIP, Skyetel, Vitelity, DigitalOcean, Vultr, VoIP.ms, 3CX, Sangoma, TelecomsXchange and VitalPBX have provided financial support to Nerd Vittles and our open source projects through advertising, referral revenue, and/or merchandise. As an Amazon Associate and Best Buy Affiliate, we also earn from qualifying purchases. We’ve chosen these providers not the other way around. Our decisions are based upon their corporate reputation and the quality of their offerings and pricing. Our recommendations regarding technology are reached without regard to financial compensation except in situations in which comparable products at comparable pricing are available from multiple sources. In this limited case, we support our sponsors because our sponsors support us.
 BOGO Bonaza: Enjoy state-of-the-art VoIP service with a $10 credit and half-price SIP service on up to $500 of Skyetel trunking with free number porting when you fund your Skyetel account. No limits on number of simultaneous calls. Quadruple data center redundancy. $25 monthly minimum spend required. Tutorial and sign up details are here.
 The lynchpin of Incredible PBX 2020 and beyond is ClearlyIP components which bring management of FreePBX modules and SIP phone integration to a level never before available with any other Asterisk distribution. And now you can configure and reconfigure your new Incredible PBX phones from the convenience of the Incredible PBX GUI.
 VitalPBX is perhaps the fastest-growing PBX offering based upon Asterisk with an installed presence in more than 100 countries worldwide. VitalPBX has generously provided a customized White Label version of Incredible PBX tailored for use with all Incredible PBX and VitalPBX custom applications. Follow this link for a free test drive!
 Special Thanks to Vitelity. Vitelity is now Voyant Communications and has halted new registrations for the time being. Our special thanks to Vitelity for their unwavering financial support over many years and to the many Nerd Vittles readers who continue to enjoy the benefits of their service offerings. We will keep everyone posted on further developments.
- Many of our purchase links refer users to Amazon when we find their prices are competitive for the recommended products. Nerd Vittles receives a small referral fee from Amazon to help cover the costs of our blog. We never recommend particular products solely to generate Amazon commissions. However, when pricing is comparable or availability is favorable, we support Amazon because Amazon supports us. [↩]
One Minute Wonder: Introducing VitalPBX for VirtualBox

Last week we took VitalPBX to the Cloud with our rock-solid firewall. And this week we’ll show you how to get VitalPBX up and running on any desktop computer in less than a minute using VirtualBox®. If you’ve followed Nerd Vittles over the years, you already know that VirtualBox from Oracle® is one of our favorite platforms. Almost any desktop computer can serve as a VirtualBox hosting platform. And once VirtualBox is installed, adding VitalPBX is a snap. Download the VitalPBX image, initialize your MAC address, start up the VM, and boom. Instant PBX perfection! The really nice thing about our tutorials is it doesn’t cost you a dime to try things out for yourself. And the Incredible PBX® feature set is included as well. Just add your credentials and speech-to-text, voice recognition, and a Siri-like interface are as close as your nearest SIP phone. Splurge with a $4.99 one-time purchase to add Google Voice, and you’ve got unlimited free calling in the U.S. and Canada. So why wait? Let’s get started.
Installing Oracle VM VirtualBox

Oracle’s virtual machine platform inherited from Sun is amazing. It’s not only free, but it’s pure GPL2 code. VirtualBox gives you a virtual machine platform that runs on top of any desktop operating system. In terms of limitations, we haven’t found any. We even tested this on an Atom-based Windows 7 machine with 2GB of RAM, and it worked without a hiccup. So step #1 today is to download one or more of the VirtualBox installers from VirtualBox.org or Oracle.com. Our recommendation is to put all of the 100MB installers on a 4GB thumb drive.1 Then you’ll have everything in one place whenever and wherever you happen to need it. Once you’ve downloaded the software, simply install it onto your favorite desktop machine. Accept all of the default settings, and you’ll be good to go. For more details, here’s a link to the Oracle VM VirtualBox User Manual.
Installing Incredible PBX for VitalPBX VM
To begin, download the Incredible PBX for VitalPBX .ova image (1.0 GB) to the computer on which you installed VirtualBox.
Next, double-click on the VitalPBX .ova image on your desktop. Be sure to check the box to initialize the MAC address of the image and then click Import. Once the import is finished, you’ll see a new VitalPBX virtual machine in the VM List of the VirtualBox Manager Window. Let’s make a couple of one-time adjustments to the VitalPBX configuration to account for differences in sound and network cards on different host machines.
(1) Click once on the VitalPBX virtual machine in the VM List. Then (2) click the Settings button. In the Audio tab, check the Enable Audio option and choose your sound card. In the Network tab for Adapter 1, check the Enable Network Adapter option. From the Attached to pull-down menu, choose Bridged Adapter. Then select your network card from the Name list. Then click OK. That’s all the configuration that is necessary for VitalPBX.
Running VitalPBX in VirtualBox
Once you’ve imported and configured the VitalPBX Virtual Machine, you’re ready to go. Highlight the VitalPBX virtual machine in the VM List on the VirtualBox Manager Window and click the Start button. The standard CentOS boot procedure will begin and, within a few seconds, you’ll get the familiar Linux login prompt. During the bootstrap procedure, you’ll see a couple of dialogue boxes pop up that explain the keystrokes to move back and forth between your host operating system desktop and your virtual machine. Remember, you still have full access to your desktop computer. Incredible PBX for VitalPBX is merely running as a task in a VM window. Always gracefully halt VitalPBX just as you would on any computer.
Here’s what you need to know. To work in the VitalPBX virtual machine, just left-click your mouse while it is positioned inside the VM window. To return to your host operating system desktop, press the right Option key on Windows machines or the left Command key on any Mac. For other operating systems, read the dialogue boxes for instructions on moving around. To access the Linux CLI, login as root with the default password: password. Change your root password immediately by typing: passwd.
VitalPBX comes preconfigured so we need to login to the virtual machine for one primary reason, to obtain the IP address of VitalPBX. Once you’ve deciphered the IP address, point your favorite web browser at the IP address you wrote down. You’ll be prompted to create an admin password for your PBX and then you’ll be asked to register the PBX with Telesoft.
We’re assuming your VitalPBX VM is set up behind a hardware-based firewall. If not, you should immediately configure the firewall as documented in our VitalPBX in the Cloud article.
First, you’ll need to change the password for Extension 701: PBX:Extensions:Edit:701. The Edit option is the four-bar icon in the upper right corner of the VitalPBX dialog window. Click Save and Reload your Dialplan.
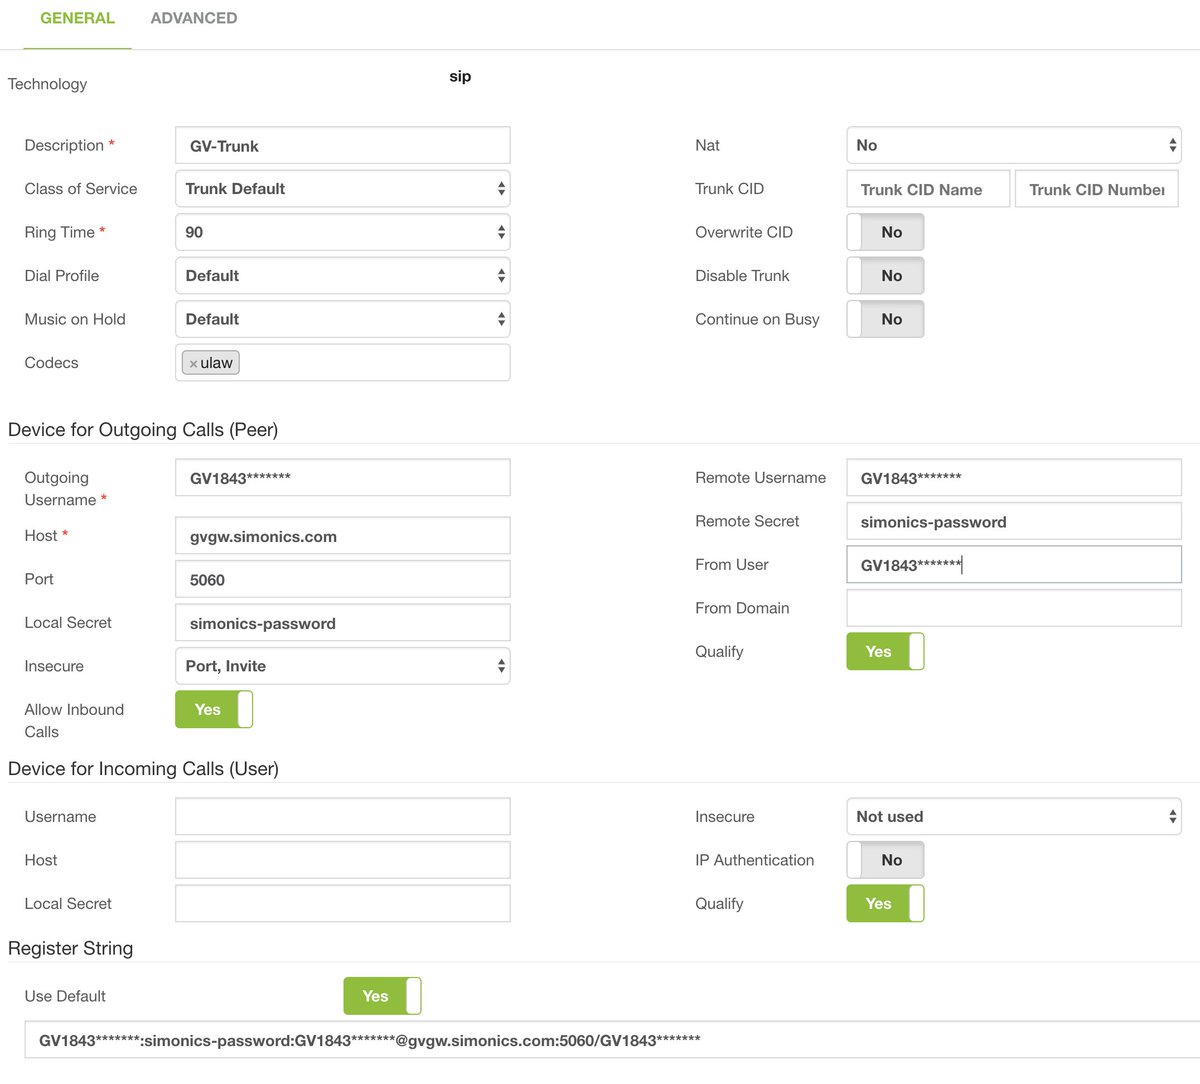
Next, you’ll need to register a Google Voice trunk with the Simonics SIP/GV Gateway for a one-time fee of $4.99. This gets you unlimited incoming and outgoing calls to the U.S. and Canada if you live in the U.S. Otherwise, set up a SIP trunk and enter your credentials in PBX:External:Trunks:SIP. If you’re using the Simonics gateway, the SIP trunk already has been set up. Just enter your credentials and change Disable Trunk to NO as shown below:
CAUTION: In choosing a DID for outbound calls with Incredible PBX, we strongly recommend that you use a Google Voice trunk. The reason is that, as long as your Google Voice account has no money allocated to it, Google will manage outbound calls to 10 and 11-digit phone numbers and block those that may incur enormous long distance charges from unscrupulous "merchants" in certain Caribbean countries. If you don’t heed our recommendation, we urge you NOT to link an Inbound Route to the Incredible PBX custom context. It’s your phone bill.
If you plan to use VitalPBX for "real work," then you’ll also want to change the Conference credentials for 2663 (C-O-N-F): PBX:Applications:Conference.
The VitalPBX virtual machine comes preconfigured to direct all incoming calls to Allison’s Demo IVR for Incredible PBX. If you’d prefer some other setup, change the Destination of the Default Inbound Route: PBX:External:Inbound Route:Default.
Configuring Incredible PBX for VitalPBX
In order to take advantage of all the Incredible PBX applications, you’ll need to obtain IBM text-to-speech (TTS) and speech-to-text (STT) credentials as well as a (free) Application ID for Wolfram Alpha.
NOV. 1 UPDATE: IBM has moved the goal posts effective December 1, 2018:

This Nerd Vittles tutorial will walk you through getting your IBM account set up and obtaining both your TTS and STT credentials. Be sure to write down BOTH sets of credentials which you’ll need in a minute. For home and SOHO use, IBM access and services are FREE even though you must provide a credit card when signing up. The IBM signup process explains their pricing plans.
To use Wolfram Alpha, sign up for a free Wolfram Alpha API account. Just provide your email address and set up a password. It takes less than a minute. Log into your account and click on Get An App ID. Make up a name for your application and write down (and keep secret) your APP-ID code. That’s all there is to getting set up with Wolfram Alpha. If you want to explore costs for commercial use, there are links to let you get more information.
In addition to your Wolfram Alpha APPID, there are two sets of IBM credentials to plug into the Asterisk AGI scripts. Keep in mind that there are different usernames and passwords for the IBM Watson TTS and STT services. The TTS credentials will look like the following: $IBM_username and $IBM_password. The STT credentials look like this: $API_USERNAME and $API_PASSWORD. Don’t mix them up. 🙂
All of the scripts requiring credentials are located in /var/lib/asterisk/agi-bin so switch to that directory after logging into your server as root. Edit each of the following files and insert your TTS credentials in the variables already provided: nv-today2.php, ibmtts.php, and ibmtts2.php. Edit each of the following files and insert your STT credentials in the variables already provided: getquery.sh, getnumber.sh, and getnumber2.sh. Finally, edit 4747 and insert your Wolfram Alpha APPID.
Using Asteridex with VitalPBX
AsteriDex is a web-based dialer and address book application for Asterisk and VitalPBX. It lets you store and manage phone numbers of all your friends and business associates in an easy-to-use SQLite3 database. You simply call up the application with your favorite web browser: http://vitalpbx-ip-address/asteridex4/. When you click on a contact that you wish to call, AsteriDex first calls you at extension 701, and then AsteriDex connects you to your contact through another outbound call made using your default outbound trunk that supports numbers in the 1NXXNXXXXXX format.
Before AsteriDex Click-to-Call will work, you must authorize AsteriDex to access Asterisk from your browser. After logging into your server as root, edit the following file in /etc/asterisk/ombutel: manager__50-ombutel-user.conf. For each public IP address you wish to authorize, add an entry like the following immediately below the existing permit entry in the file. The non-routable IP address subnets already have been configured so, if you’re using a browser behind the same firewall as VitalPBX, you can skip this step. Otherwise reload the dialplan after adding public IP addresses: asterisk -rx "dialplan reload"
permit=12.34.56.78
Taking Incredible PBX for a Test Drive
You can take Incredible PBX for VitalPBX on a test drive in two ways. You can call our server, and then you can try things out on your own server and compare the results. Call our IVR by dialing 1-843-606-0555. For our international friends, you can use the following SIP URI for a free call: 10159591015959@atlanta.voip.ms. For tips on setting up your own secure, hybrid SIP URI with VitalPBX, see our original tutorial. The FreePBX® setup is virtually identical except for the location of the custom SIP setting for match_auth_username=yes. On a VitalPBX server, you will enter it here: Settings:Technology Settings:SIP Settings:CUSTOM.
With Allison’s Demo IVR, you can choose from the following options:
- 0. Chat with Operator — connects to extension 701
- 1. AsteriDex Voice Dialer – say "Delta Airlines" or "American Airlines" to connect
- 2. Conferencing – log in using 1234 as the conference PIN
- 3. Wolfram Alpha Almanac – say "What planes are flying overhead"
- 4. Lenny – The Telemarketer’s Worst Nightmare
- 5. Today’s News Headlines — courtesy of Yahoo! News
- 6. Weather by ZIP Code – enter any 5-digit ZIP code for today’s weather
- 7. Today in History — courtesy of OnThisDay.com
- 8. Chat with Nerd Uno — courtesy of SIP URI connection to 3CX iPhone Client
- 9. DISA Voice Dialer — say any 10-digit number to be connected
- *. Current Date and Time — courtesy of VitalPBX
You can call your own IVR in two ways. From an internal VitalPBX phone, dial D-E-M-O (2663) to be connected. Or simply dial the number of the DID you routed to the Incredible PBX Custom Context. Either way, you should be connected to the Incredible PBX IVR running on your VitalPBX server. Be sure that you heed AND test the CAUTION documented above. Enjoy!
Originally published: Monday, April 9, 2018
Got Friends? 7 Countries Have Never Visited Nerd Vittles. 2018 Is Calling! https://t.co/wMfmlhAr16 #asterisk #freepbx #wazo #issabel #IncrediblePBX #3CX pic.twitter.com/kAmAEnwVIw
— Ward Mundy (@NerdUno) January 9, 2018

Need help with VitalPBX? Visit the VitalPBX Forum.
Special Thanks to Our Generous Sponsors
FULL DISCLOSURE: ClearlyIP, Skyetel, Vitelity, DigitalOcean, Vultr, VoIP.ms, 3CX, Sangoma, TelecomsXchange and VitalPBX have provided financial support to Nerd Vittles and our open source projects through advertising, referral revenue, and/or merchandise. As an Amazon Associate and Best Buy Affiliate, we also earn from qualifying purchases. We’ve chosen these providers not the other way around. Our decisions are based upon their corporate reputation and the quality of their offerings and pricing. Our recommendations regarding technology are reached without regard to financial compensation except in situations in which comparable products at comparable pricing are available from multiple sources. In this limited case, we support our sponsors because our sponsors support us.
 BOGO Bonaza: Enjoy state-of-the-art VoIP service with a $10 credit and half-price SIP service on up to $500 of Skyetel trunking with free number porting when you fund your Skyetel account. No limits on number of simultaneous calls. Quadruple data center redundancy. $25 monthly minimum spend required. Tutorial and sign up details are here.
 The lynchpin of Incredible PBX 2020 and beyond is ClearlyIP components which bring management of FreePBX modules and SIP phone integration to a level never before available with any other Asterisk distribution. And now you can configure and reconfigure your new Incredible PBX phones from the convenience of the Incredible PBX GUI.
 VitalPBX is perhaps the fastest-growing PBX offering based upon Asterisk with an installed presence in more than 100 countries worldwide. VitalPBX has generously provided a customized White Label version of Incredible PBX tailored for use with all Incredible PBX and VitalPBX custom applications. Follow this link for a free test drive!
 Special Thanks to Vitelity. Vitelity is now Voyant Communications and has halted new registrations for the time being. Our special thanks to Vitelity for their unwavering financial support over many years and to the many Nerd Vittles readers who continue to enjoy the benefits of their service offerings. We will keep everyone posted on further developments.

- Many of our purchase links refer users to Amazon when we find their prices are competitive for the recommended products. Nerd Vittles receives a small referral fee from Amazon to help cover the costs of our blog. We never recommend particular products solely to generate Amazon commissions. However, when pricing is comparable or availability is favorable, we support Amazon because Amazon supports us. [↩]
The 5-Minute PBX: Incredible PBX with Wazo for VirtualBox
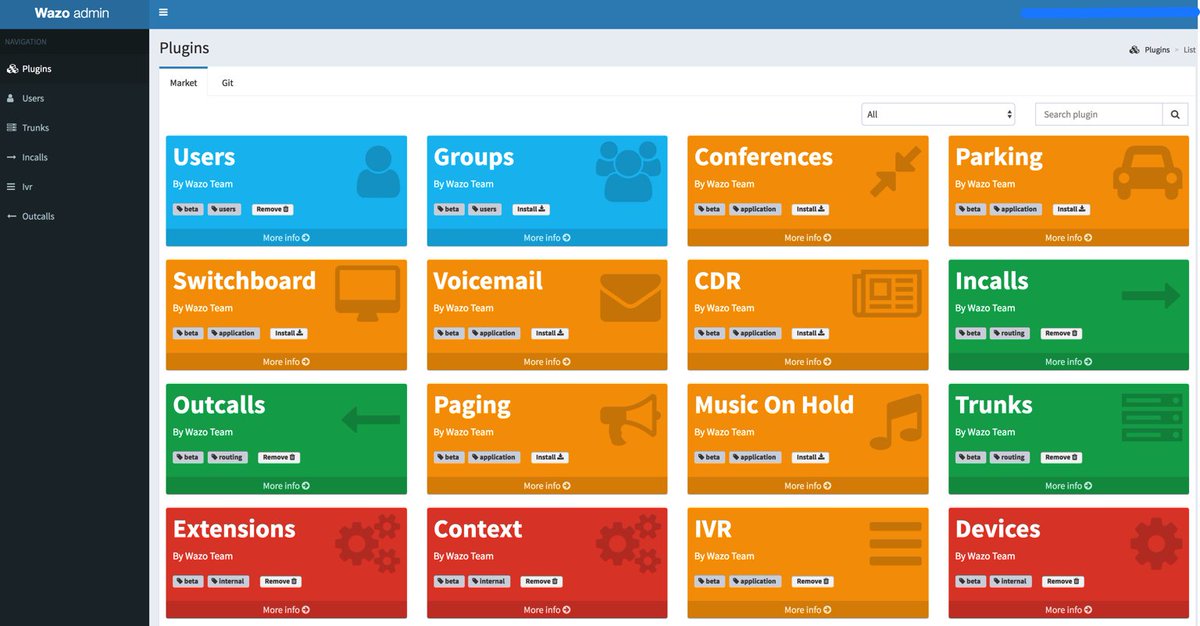
We’ve sung the praises of VirtualBox for many years because it provides a wonderful platform for experimentation as well as production-ready systems using almost any hardware and any operating system. Versions of VirtualBox are available for Windows PCs, Macs, Linux desktops, and even Solaris machines. And, once you have VirtualBox in place, you can load gigabyte-sized turnkey virtual machines in a couple minutes. It literally transforms complex computer setups into child’s play.
We’ve received dozens of emails about Wazo, and many of them go something like this:
I’d love to experiment with Wazo as an Asterisk® platform, but I worry that the environment is just too different and the learning curve too steep. I just wish there were a simple way to get started so that I could learn the basics.
Today, your prayers have been answered. You don’t have to buy any hardware. You can use the desktop computer you already have. We’ve taken the Incredible PBX for Wazo tutorial and turned it into a turnkey virtual machine for VirtualBox. You can load it in a couple minutes and be ready to go. It’s got all of the Incredible PBX bells and whistles, and extensions already are configured for a SIP phone and WebRTC so that you can hit the ground running. Just install VirtualBox. Next, load the Incredible PBX for Wazo image. Install your favorite SIP phone or run WebRTC in your browser. A complete WebRTC tutorial is available here. Once you finish configuring your SIP or WebRTC client, you’re ready to start making calls. You can add a SIP trunk using one of preconfigured setups by following one of SIP provider tutorials we’ve provided. Or, if you live in the United States, you can add a Google Voice trunk and make free calls in the U.S. and Canada. Let’s get started!
Installing Oracle VM VirtualBox

Oracle’s virtual machine platform inherited from Sun is amazing. It’s not only free, but it’s pure GPL2 code. VirtualBox gives you a virtual machine platform that runs on top of any desktop operating system. In terms of limitations, we haven’t found any. We even tested this on an Atom-based Windows 7 machine with 2GB of RAM, and it worked without a hiccup. So step #1 today is to download one or more of the VirtualBox installers from VirtualBox.org or Oracle.com. Our recommendation is to put all of the 100MB installers on a 4GB thumb drive.1 Then you’ll have everything in one place whenever and wherever you happen to need it. Once you’ve downloaded the software, simply install it onto your favorite desktop machine. Accept all of the default settings, and you’ll be good to go. For more details, here’s a link to the Oracle VM VirtualBox User Manual.
Installing Incredible PBX for Wazo VM
To begin, download Incredible PBX for Wazo .ova image (1.9 GB) to the computer on which you installed VirtualBox.
When the download completes, double-click on the .ova file you downloaded to load it into VirtualBox. When prompted, be sure to check the Reinitialize the Mac address of all network cards box, agree to the license agreement, and then click the Import button. Once the import is finished, you’ll see a new (1) Incredible PBX for Wazo virtual machine in the VM List of the VirtualBox Manager Window. We need to make a couple of one-time adjustments to the Incredible PBX for Wazo configuration to account for differences in sound and network cards on different host machines.
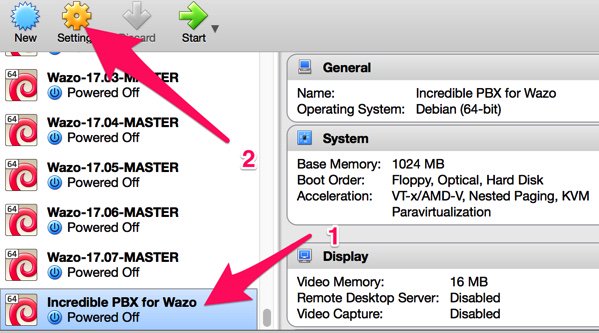
(1) Click once on the Incredible PBX for Wazo virtual machine in the VM List. Then (2) click the Settings button. In the Audio tab, check the Enable Audio option and choose your sound card. In the Network tab for Adapter 1, check the Enable Network Adapter option. From the Attached to pull-down menu, choose Bridged Adapter. Then select your network card from the Name list. Then click OK. That’s all the configuration that is necessary for your Incredible PBX for Wazo.
Running Incredible PBX for Wazo VM
Once you’ve imported and configured the Incredible PBX for Wazo Virtual Machine, you’re ready to go. Highlight Incredible PBX for Wazo virtual machine in the VM List on the VirtualBox Manager Window and click the Start button. The standard Wazo boot procedure will begin and, within a short time, you’ll get the familiar Linux login prompt. During the bootstrap procedure, you’ll see a couple of dialogue boxes pop up that explain the keystrokes to move back and forth between your host operating system desktop and your virtual machine. Remember, you still have full access to your desktop computer. Incredible PBX for Wazo is merely running as a task in a VirtualBox window. Always gracefully halt Incredible PBX just as you would on a dedicated computer.
Here’s what you need to know. To work in the Incredible PBX for Wazo virtual machine, just left-click your mouse while it is positioned inside the VM window. To return to your host operating system desktop, press the right Option key on Windows machines or the left Command key on any Mac. For other operating systems, read the dialogue boxes for instructions on moving around. To access the Linux CLI, login as root with the default password: password.
Once you log into your virtual machine, a startup script will briefly configure a few things and then advise you that it’s time to reboot. If prompted for the hostname, type xivo. Write down the IP address provided because for Phase 2 of the setup, we need to use SSH or Putty on the desktop that you will actually be using to manage your server. The reason for this is that Incredible PBX automatically creates a whitelist of IP addresses that the firewall will allow to access your server. If the IP address isn’t in your whitelist, you may lock yourself out except from the VirtualBox console window.
Once the VirtualBox console window shows that your server has rebooted by displaying the Linux login prompt, switch to SSH or Putty and login as root using the IP address you wrote down. You’ll then be prompted to change your root password for Linux as well as your root password for Wazo GUI access using a web browser. You’ll also need to set a PIN that will be used to authorize access to extension 123 to schedule Telephone Reminders on your server. This completes the configuration. You’ll get a final screen showing the credentials for the preconfigured 701 and 702 extensions as well as a reminder that your PortKnocker credentials are stored in /root/knock.FAQ in the event you ever lock yourself out of your machine. It’s a good idea to leave this screen displayed while you install and configure a softphone since you can cut-and-paste your extension 702 credentials without having to type anything. Extension 701 comes preconfigured to support WebRTC using a Chrome or Firefox browser.
Once you complete the SIP or WebRTC setup below, you can return to the SSH window and press ENTER to finish the install. The Incredible PBX Automatic Update Utility will run, and then you will be presented with the pbxstatus display. You can access the Asterisk CLI by typing: asterisk -rvvvvvvvvvv. Exit from the CLI by typing quit. As mentioned previously, always shut down your server gracefully by typing halt. When prompted for the hostname, type xivo. Once the shutdown procedure finishes, it’s safe to turn off your virtual machine.
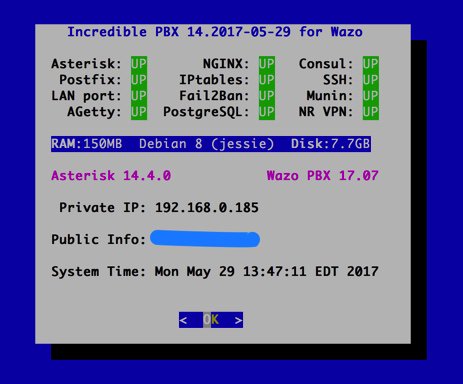
Choosing a SIP Softphone for Incredible PBX
Softphones tend to be a matter of taste for most folks so we’ll keep our suggestions to a minimum. On the Windows platform, it’s hard to go wrong with X-Lite. It works out of the box by simply plugging in the IP address of your server and your SIP username and password. It also happens to be free. The only downside is that X-Lite has a nasty habit of embedding time bombs in their free software so you may have to reinstall it from time to time. If you know what you’re doing, Zoiper is another alternative but be advised that it doesn’t work out of the box on servers behind NAT-based routers.
On the Mac platform, our favorite free softphone is Telephone. It’s a barebones SIP client that just works. As with X-Lite, you plug in your server’s IP address and SIP credentials, and you’re in business.
On the Linux or Solaris platforms, we assume that you know what you’re doing and that you are perfectly capable of choosing and installing a SIP phone that meets your requirements.
Incredible PBX Application Quick Start Guide
We’ve finished the basic Incredible PBX for Wazo setup. You now have a functioning PBX with dozens of applications for Asterisk that work out of the box. It’s probably a good idea to spend a little time getting acquainted with Incredible PBX for Wazo before you add trunks to communicate with the outside world.
Here’s a handy cheat sheet for some of the Incredible PBX applications that have been installed or are available as add-ons. There’s also a link for more information.
- Google Voice CLI interface and SMS Message Blasting (Add-On)
- CallerID Superfecta – Match Names to CallerID Numbers
- CallerID Blacklist – Block Calls from Spammers and Old Girlfriends
- CDR Reports in CSV Format
- CDR Reports in SQLite3 Format
- Asteridex – The Poor Man’s Rolodex (SQLite3 version)
- AsteriDex Click-to-Dial with Wazo Phonebook
- NeoRouter VPN for Wazo
- FCC RoboCall BlackList
- CallerID WhiteList Override
- Dial 123 – Telephone Reminders
- Dial 411 – Call by Name from AsteriDex
- Dial 947 – Weather Forecasts by ZIP Code
- Dial 951 – Latest Yahoo News
- Dial 2663 – Conference Call
- Dial 3472 – DISA Access
- Dial 4871 – Allison’s Sample IVR
- Dial *881400 – Schedule an Alarm for 2 p.m. (1400 military time)
- Dial 53669 – Meet Lenny, the Robocaller’s Worst Nightmare
Configuring Trunks and Routes with Wazo
The next step in your Wazo adventure is connecting your PBX to the outside world so that you can make and receive phone calls from anywhere in the world. For this you’ll need one or more trunks. Unlike the Ma Bell world, there’s no reason to put all your eggs in one basket. You can use one or more trunk providers for incoming calls with separate phone numbers for each. And you can use one or more trunk providers for outgoing calls and save money on calls to certain countries by choosing the best provider for where you want to call. And, of course, if you live in the United States, you can set up one or more Google Voice trunks and make calls to the U.S. and Canada for free. We’ve written a number of tutorials to make it easy to set up these trunks.
To get started, point a web browser to the IP address of your PBX. Login as root with the Wazo GUI password you set up above. If you ever forget your password, you can run /root/admin-pw-change to reconfigure it.
Wazo Trunk Implementation Tutorials
- Wazo Trunks Tutorial: Installing a Vitelity SIP Trunk2
- Wazo Trunks Tutorial: Installing a VoIP.ms SIP Trunk
- Wazo Trunks Tutorial: Installing a FreeVoipDeal (Betamax) SIP Trunk
- Wazo Trunks Tutorial: Installing a Google Voice-Simonics SIP Trunk
- Wazo Trunks Tutorial: Deploying Native Google Voice with OAuth Trunks
- Wazo Trunks Tutorial: Installing an Anveo Direct Outbound SIP Trunk
- Wazo Trunks Tutorial: Installing a Skype Connect SIP Trunk
Once you’ve added one or more trunks, you’ll need to tell Wazo how to route outgoing and incoming calls. Here are our step-by-step tutorials on setting up Outbound Calling Routes and Incoming Call Routes:
Wazo Call Routing Tutorials
- Wazo Call Routing Tutorial: Creating Outbound Routes for PSTN Calling
- Wazo Call Routing Tutorial: Creating Inbound Routes for DIDs
Now you’re ready to explore. We recommend you read through the Incredible PBX for Wazo tutorial to familiarize yourself with the inner workings of Wazo. Enjoy the ride!
Originally published: Monday, June 12, 2017

Need help with Asterisk? Visit the PBX in a Flash Forum.
Special Thanks to Our Generous Sponsors
FULL DISCLOSURE: ClearlyIP, Skyetel, Vitelity, DigitalOcean, Vultr, VoIP.ms, 3CX, Sangoma, TelecomsXchange and VitalPBX have provided financial support to Nerd Vittles and our open source projects through advertising, referral revenue, and/or merchandise. As an Amazon Associate and Best Buy Affiliate, we also earn from qualifying purchases. We’ve chosen these providers not the other way around. Our decisions are based upon their corporate reputation and the quality of their offerings and pricing. Our recommendations regarding technology are reached without regard to financial compensation except in situations in which comparable products at comparable pricing are available from multiple sources. In this limited case, we support our sponsors because our sponsors support us.
 BOGO Bonaza: Enjoy state-of-the-art VoIP service with a $10 credit and half-price SIP service on up to $500 of Skyetel trunking with free number porting when you fund your Skyetel account. No limits on number of simultaneous calls. Quadruple data center redundancy. $25 monthly minimum spend required. Tutorial and sign up details are here.
 The lynchpin of Incredible PBX 2020 and beyond is ClearlyIP components which bring management of FreePBX modules and SIP phone integration to a level never before available with any other Asterisk distribution. And now you can configure and reconfigure your new Incredible PBX phones from the convenience of the Incredible PBX GUI.
 VitalPBX is perhaps the fastest-growing PBX offering based upon Asterisk with an installed presence in more than 100 countries worldwide. VitalPBX has generously provided a customized White Label version of Incredible PBX tailored for use with all Incredible PBX and VitalPBX custom applications. Follow this link for a free test drive!
 Special Thanks to Vitelity. Vitelity is now Voyant Communications and has halted new registrations for the time being. Our special thanks to Vitelity for their unwavering financial support over many years and to the many Nerd Vittles readers who continue to enjoy the benefits of their service offerings. We will keep everyone posted on further developments.
Some Recent Nerd Vittles Articles of Interest…
- Many of our purchase links refer users to Amazon when we find their prices are competitive for the recommended products. Nerd Vittles receives a small referral fee from Amazon to help cover the costs of our blog. We never recommend particular products solely to generate Amazon commissions. However, when pricing is comparable or availability is favorable, we support Amazon because Amazon supports us. [↩]
- Vitelity is a platinum sponsor of Nerd Vittles, and they also happen to be the best in the business. You’ll find a discount coupon to get a great deal on a DID and 4-channel trunk toward the end of this article. [↩]
VirtualBox Magic: A Turnkey PBX in 5 Minutes Flat with XiVO
We’ve sung the praises of VirtualBox for many years because it provides a wonderful platform for experimentation as well as production-ready systems using almost any hardware and any operating system. Versions of VirtualBox are available for Windows PCs, Macs, Linux desktops, and even Solaris machines. And, once you have VirtualBox in place, you can load gigabyte-sized turnkey virtual machines in under a minute. It literally transforms complex computer setups into child’s play.
We’ve received dozens of emails about XiVO, and most of them go something like this:
I’d love to experiment with XiVO as an Asterisk® platform, but I worry that the environment is just too different and the learning curve too steep. I just wish there were a simple way to get started so that I could learn the basics.
Today, your prayers have been answered. You don’t have to buy any hardware. You can use the desktop computer you already have. We’ve taken the Incredible PBX for XiVO tutorial and turned it into a turnkey virtual machine for VirtualBox. You can load it in under a minute and be ready to go. It’s got all of the Incredible PBX bells and whistles, and an extension is already configured so that you can hit the ground running. Just install VirtualBox. Next, install Incredible PBX for XiVO. Install your favorite SIP phone. Plug in the SIP credentials provided. And you’re done in a few minutes. To make outgoing calls, you can add a SIP trunk using one of the numerous SIP provider tutorials we’ve provided. Or, if you live in the United States, you can add a Google Voice trunk in a couple minutes and make free calls in the U.S. and Canada. Let’s get started!
Installing Oracle VM VirtualBox

Oracle’s virtual machine platform inherited from Sun is amazing. It’s not only free, but it’s pure GPL2 code. VirtualBox gives you a virtual machine platform that runs on top of any desktop operating system. In terms of limitations, we haven’t found any. We even tested this on an Atom-based Windows 7 machine with 2GB of RAM, and it worked without a hiccup. So step #1 today is to download one or more of the VirtualBox installers from VirtualBox.org or Oracle.com. Our recommendation is to put all of the 100MB installers on a 4GB thumb drive.1 Then you’ll have everything in one place whenever and wherever you happen to need it. Once you’ve downloaded the software, simply install it onto your favorite desktop machine. Accept all of the default settings, and you’ll be good to go. For more details, here’s a link to the Oracle VM VirtualBox User Manual.
Downloading & Installing Incredible PBX for XiVO Virtual Machine
To begin, download Incredible PBX for XiVO .ova image (1.0 GB) to the computer on which you installed VirtualBox.
When the download completes, double-click on the .ova file you downloaded to load it into VirtualBox. When prompted, be sure to check the Reinitialize the Mac address of all network cards box, agree to the license agreement, and then click the Import button. Once the import is finished, you’ll see a new (1) Incredible PBX for XiVO virtual machine in the VM List of the VirtualBox Manager Window. We need to make a couple of one-time adjustments to the Incredible PBX for XiVO configuration to account for differences in sound and network cards on different host machines.
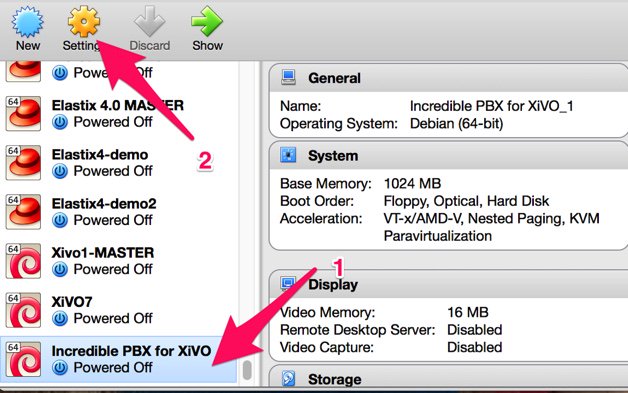
(1) Click once on the Incredible PBX for XiVO virtual machine in the VM List. Then (2) click the Settings button. In the Audio tab, check the Enable Audio option and choose your sound card. In the Network tab for Adapter 1, check the Enable Network Adapter option. From the Attached to pull-down menu, choose Bridged Adapter. Then select your network card from the Name list. Then click OK. That’s all the configuration that is necessary for your Incredible PBX for XiVO.
Running Incredible PBX for XiVO in VirtualBox
Once you’ve imported and configured the Incredible PBX for XiVO Virtual Machine, you’re ready to go. Highlight Incredible PBX for XiVO virtual machine in the VM List on the VirtualBox Manager Window and click the Start button. The standard XiVO boot procedure will begin and, within a short time, you’ll get the familiar Linux login prompt. During the bootstrap procedure, you’ll see a couple of dialogue boxes pop up that explain the keystrokes to move back and forth between your host operating system desktop and your virtual machine. Remember, you still have full access to your desktop computer. Incredible PBX for XiVO is merely running as a task in a VirtualBox window. Always gracefully halt Incredible PBX just as you would on a dedicated computer.
Here’s what you need to know. To work in the Incredible PBX for XiVO virtual machine, just left-click your mouse while it is positioned inside the VM window. To return to your host operating system desktop, press the right Option key on Windows machines or the left Command key on any Mac. For other operating systems, read the dialogue boxes for instructions on moving around. To access the Linux CLI, login as root with the default password: password.
Once you log into your virtual machine, a startup script will briefly configure a few things and then advise you that it’s time to reboot. Write down the IP address provided because for Phase 2 of the setup, we need to use SSH or Putty on the desktop that you will actually be using to manage your server. The reason for this is that Incredible PBX automatically creates a whitelist of IP addresses that the firewall will allow to access your server. If the IP address isn’t in your whitelist, you may lock yourself out except from the VirtualBox console window.
Once the VirtualBox console window shows that your server has rebooted by displaying the Linux login prompt, switch to SHH or Putty and login as root using the IP address you wrote down. You’ll then be prompted to change your root password for Linux as well as your root password for XiVO GUI access using a web browser. You’ll also need to set a PIN that will be used to authorize access to extension 123 to schedule Telephone Reminders on your server. This completes the configuration. You’ll get a final screen showing the credentials for the preconfigured extension 701 as well as a reminder that your PortKnocker credentials are stored in /root/knock.FAQ in the event you ever lock yourself out of your machine. It’s a good idea to leave this screen displayed while you install and configure a softphone since you can cut-and-paste your extension 701 credentials without having to type anything.
Once you complete the SIP softphone setup below, you can return to the SSH window and press ENTER to finish the install. The Incredible PBX Automatic Update Utility will run, and then you will be presented with the pbxstatus display. You can access the Asterisk CLI by typing: asterisk -rvvvvvvvvvv. Exit from the CLI by typing quit. As mentioned previously, always shut down your server gracefully by typing halt. When prompted for the hostname, type xivo. Once the shutdown procedure finishes, it’s save to turn off your virtual machine.
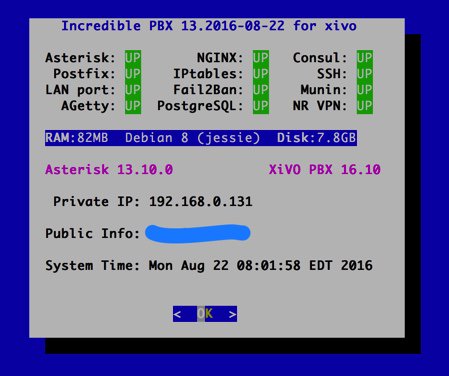
Choosing a SIP Softphone for Incredible PBX for XiVO
Softphones tend to be a matter of taste for most folks so we’ll keep our suggestions to a minimum. On the Windows platform, it’s hard to go wrong with X-Lite. It works out of the box by simply plugging in the IP address of your server and your SIP username and password. It also happens to be free. The only downside is that X-Lite has a nasty habit of embedding time bombs in their free software so you may have to reinstall it from time to time. If you know what you’re doing Zoiper is another alternative but be advised that it doesn’t work out of the box on servers behind NAT-based routers.
On the Mac platform, our favorite free softphone is Telephone. It’s a barebones SIP client that just works. As with X-Lite, you plug in your server’s IP address and SIP credentials, and you’re in business.
On the Linux or Solaris platforms, we assume that you know what you’re doing and that you are perfectly capable of choosing and installing a SIP phone that meets your requirements.
Incredible PBX Application Quick Start Guide
We’ve finished the basic Incredible PBX for XiVO setup. You now have a functioning PBX with dozens of applications for Asterisk that work out of the box. It’s probably a good idea to spend a little time getting acquainted with Incredible PBX for XiVO before you add trunks to communicate with the outside world.
Here’s a handy cheat sheet for some of the Incredible PBX applications that have been installed or are available as add-ons. There’s also a link for more information. This remains a work-in-progress so expect more applications in coming weeks.
- Google Voice CLI interface and SMS Message Blasting (Add-On)
- CallerID Superfecta – Match Names to CallerID Numbers
- CallerID Blacklist – Block Calls from Spammers and Old Girlfriends
- CDR Reports in CSV Format
- CDR Reports in SQLite3 Format
- Asteridex – The Poor Man’s Rolodex (SQLite3 version)
- AsteriDex Click-to-Dial with XiVO Phonebook
- NeoRouter VPN for XiVO
- FCC RoboCall BlackList
- CallerID WhiteList Override
- Dial 123 – Telephone Reminders
- Dial 411 – Call by Name from AsteriDex
- Dial 947 – Weather Forecasts by ZIP Code
- Dial 951 – Latest Yahoo News
- Dial 2663 – Conference Call
- Dial 3472 – DISA Access
- Dial 4871 – Allison’s Sample IVR
- Dial *881400 – Schedule an Alarm for 2 p.m. (1400 military time)
- Dial 53669 – Meet Lenny, the Robocaller’s Worst Nightmare
Configuring Trunks and Routes with Incredible PBX for XiVO
The next step in your XiVO adventure is connecting your PBX to the outside world so that you can make and receive phone calls from anywhere in the world. For this you’ll need one or more trunks. Unlike the Ma Bell world, there’s no reason to put all your eggs in one basket. You can use one or more trunk providers for incoming calls with separate phone numbers for each. And you can use one or more trunk providers for outgoing calls and save money on calls to certain countries by choosing the best provider for where you want to call. And, of course, if you live in the United States, you can set up one or more Google Voice trunks and make calls to the U.S. and Canada for free. We’ve written a number of tutorials to make it easy to set up these trunks.
To get started, point a web browser to the IP address of your PBX. Login as root with the XiVO GUI password you set up above. If you ever forget your password, you can run /root/admin-pw-change to reconfigure it.
XIVO Trunk Implementation Tutorials
- XiVO Trunks Tutorial: Installing a Vitelity SIP Trunk2
- XiVO Trunks Tutorial: Installing a VoIP.ms SIP Trunk
- XiVO Trunks Tutorial: Installing a RingPlus SIP Trunk
- XiVO Trunks Tutorial: Installing a FreeVoipDeal (Betamax) SIP Trunk
- XiVO Trunks Tutorial: Installing a Google Voice-Simonics SIP Trunk
- XiVO Trunks Tutorial: Deploying Native Google Voice with OAuth Trunks
- XiVO Trunks Tutorial: Installing an Anveo Direct Outbound SIP Trunk
- XiVO Trunks Tutorial: Installing a Skype Connect SIP Trunk
Once you’ve added one or more trunks, you’ll need to tell XiVO how to route outgoing and incoming calls. Here are our step-by-step tutorials on setting up Outbound Calling Routes and Incoming Call Routes:
XIVO Call Routing Tutorials
- XiVO Call Routing Tutorial: Creating Outbound Routes for PSTN Calling
- XiVO Call Routing Tutorial: Creating Inbound Routes for DIDs
Now you’re ready to explore. We recommend you pick up here in our Incredible PBX for XiVO tutorial. And be sure to check out the Last Minute Fixes that didn’t make it into the current build. Enjoy the ride!
Originally published: Monday, August 22, 2016
9 Countries Have Never Visited Nerd Vittles. Got a Friend in Any of Them https://t.co/wMfmlhiQ9y #asterisk #freepbx pic.twitter.com/TPFGZbqWB6
— Ward Mundy (@NerdUno) April 22, 2016

Need help with Asterisk? Visit the PBX in a Flash Forum.
Special Thanks to Our Generous Sponsors
FULL DISCLOSURE: ClearlyIP, Skyetel, Vitelity, DigitalOcean, Vultr, VoIP.ms, 3CX, Sangoma, TelecomsXchange and VitalPBX have provided financial support to Nerd Vittles and our open source projects through advertising, referral revenue, and/or merchandise. As an Amazon Associate and Best Buy Affiliate, we also earn from qualifying purchases. We’ve chosen these providers not the other way around. Our decisions are based upon their corporate reputation and the quality of their offerings and pricing. Our recommendations regarding technology are reached without regard to financial compensation except in situations in which comparable products at comparable pricing are available from multiple sources. In this limited case, we support our sponsors because our sponsors support us.
 BOGO Bonaza: Enjoy state-of-the-art VoIP service with a $10 credit and half-price SIP service on up to $500 of Skyetel trunking with free number porting when you fund your Skyetel account. No limits on number of simultaneous calls. Quadruple data center redundancy. $25 monthly minimum spend required. Tutorial and sign up details are here.
 The lynchpin of Incredible PBX 2020 and beyond is ClearlyIP components which bring management of FreePBX modules and SIP phone integration to a level never before available with any other Asterisk distribution. And now you can configure and reconfigure your new Incredible PBX phones from the convenience of the Incredible PBX GUI.
 VitalPBX is perhaps the fastest-growing PBX offering based upon Asterisk with an installed presence in more than 100 countries worldwide. VitalPBX has generously provided a customized White Label version of Incredible PBX tailored for use with all Incredible PBX and VitalPBX custom applications. Follow this link for a free test drive!
 Special Thanks to Vitelity. Vitelity is now Voyant Communications and has halted new registrations for the time being. Our special thanks to Vitelity for their unwavering financial support over many years and to the many Nerd Vittles readers who continue to enjoy the benefits of their service offerings. We will keep everyone posted on further developments.
Some Recent Nerd Vittles Articles of Interest…
- Many of our purchase links refer users to Amazon when we find their prices are competitive for the recommended products. Nerd Vittles receives a small referral fee from Amazon to help cover the costs of our blog. We never recommend particular products solely to generate Amazon commissions. However, when pricing is comparable or availability is favorable, we support Amazon because Amazon supports us. [↩]
- Vitelity is a platinum sponsor of Nerd Vittles, and they also happen to be the best in the business. You’ll find a discount coupon to get a great deal on a DID and 4-channel trunk toward the end of this article. [↩]
Wazo Platform Tutorial: Installing Wazo VM on VirtualBox

Getting Started
For VirtualBox installations of Wazo, begin by downloading the 64-bit Wazo Server ISO to your desktop.
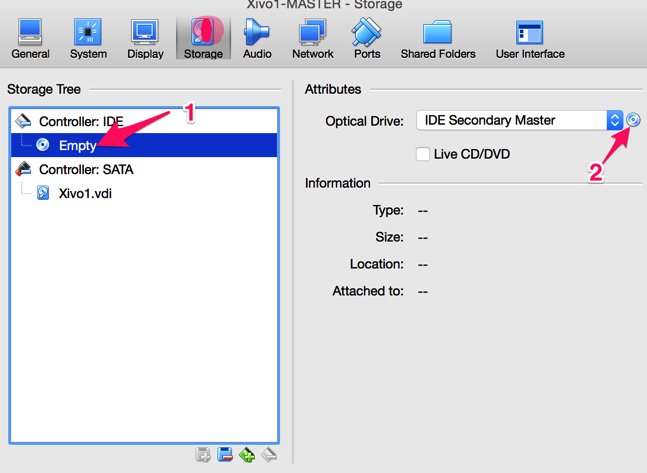
Open VirtualBox on your desktop computer, and create a VirtualBox 64-bit Debian VM platform with 1024 MB RAM and at least a 15GB virtual drive. In System Settings, enable I/O APIC and disable the other options. Select a Sound Card to match your machine and configure Network Adapter 1 as a Bridged Network Device. In the Storage Settings (shown below) for your (1) Empty IDE Controller, (2) select the downloaded Wazo ISO as your installation media. Start the VM and proceed through the initial install.
Debian/Wazo Installation
Click Install, choose your language, pick your time zone, choose your keyboard map, create a very secure root password, and choose a Debian mirror that’s close to your server. Choose /dev/sda as your bootloader assuming that’s the disk drive configured by VirtualBox. Then sit back and relax. In about 5 minutes, the install will complete and your virtual machine will reboot.
Enabling Root SSH Access
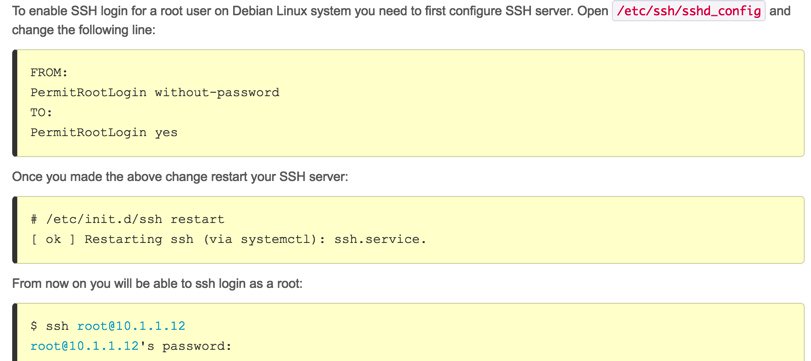
When you install Wazo from the XiVO ISO, root logins via SSH are disabled by default. Only enable it if you plan to also implement the firewall in the next step! To enable root logins via SSH, log into your VirtualBox console session as root and edit the SSH config file: nano -w /etc/ssh/sshd_config. Find the line in the Authentication section that begins with PermitRootLogin and change it to: PermitRootLogin yes. Save your change (Ctrl-X, y, ENTER) and then restart SSH: /etc/init.d/ssh restart.
When your setup is finished, use ifconfig to obtain the IP address of your server.
Now you can exit from the VirtualBox console window by pressing Ctrl-Alt and use a browser to complete the install by pointing to the IP address of your virtual machine.
Incredible PBX Installation
Log into your server again as root via SSH/Putty and issue the following commands to complete the Wazo and Incredible PBX setup.
cd /root
wget http://incrediblepbx.com/IncrediblePBX15-Wazo.sh
chmod +x IncrediblePBX15-Wazo.sh
./IncrediblePBX15-Wazo.sh
Managing Your Wazo Server
Almost everything else you do with XiVO can be handled using a web browser pointed to this IP address.
Open a web browser to the IP address of your server. Ignore the https credentials warning to access your server. The default username for access is root, and the password is the one set during the Configuration step above.
You now can proceed to Incredible PBX Initial Configuration tutorial to continue your setup.
Virtual Paradise: An Asterisk OVF Template for VMware and VirtualBox Fans
UPDATE: A newer Incredible PBX image for VMware is now available here.
Let’s face it. Virtual Machines are the future of server administration. Whether you prefer your own dedicated hardware or cloud-based resources managed by you or someone else, virtual platforms are the way to go. You get more bang for the buck out of your hardware by pooling resources for multiple tasks. Platforms such as VMware® and VirtualBox® make it easy.
What we were missing in the Asterisk® aggregation market was a simplified, open source installer that would let you deploy servers on the virtual platform of your choice without our having to maintain separate builds for each VM technology.
Today, we’re pleased to introduce the new Incredible PBX Unified Installer for VMware and VirtualBox with new OVF editions for Incredible PBX Full Enchilada as well as Lean & Mean. Download the OVF flavor of your choice to your desktop and fire up your favorite virtual machine GUI. With a few mouse clicks and a couple of minutes, you’ll have a Scientific Linux 6.7 platform in place with Incredible PBX just a single keystroke away. It doesn’t get any easier than that. And, unlike the static builds offered by the competition, with Incredible PBX you always get the very latest release of Asterisk 13 and the Incredible PBX GUI compiled on the fly from source code that you can actually examine, enhance, and share… just like the GPL license says. Feel free to compare our open source approach to Sangoma’s Gotcha Special. You have a very real choice!
July 20 NEWS FLASH: Google now has discontinued support of their XMPP interface to Google Voice so the latest CentOS/SL version of Incredible PBX (13-13.7) including the Incredible PBX ISO now incorporate NAF’s GVSIP interface to Google Voice. You can read all about it here. What has changed is you now add Google Voice trunks from the command line by running /root/gvsip-naf/install-gvsip. You can delete trunks by running /root/gvsip-naf/del-trunk. Once one or more trunks have been added, they are numbered GVSIP1 through GVSIPn. Using the GUI, you then add an Outbound Route and an Inbound Route for each trunk. You’ll need both your Google Voice 10-digit phone number and a Refresh Token to add a new trunk. This functionality is not yet available in the virtual machine builds, but you can easily add it. Once your virtual machine is up and running, head over to this GVSIP tutorial for step-by-step instructions. New virtual machine builds natively supporting GVSIP will be available soon.
Choosing a Virtual Machine Platform
Making the right deployment choice for your virtual machine platform depends upon a number of factors. We initially started out with Proxmox 4 which looked promising. After all, we had used and recommended earlier releases of Proxmox for many years until some security vulnerabilities caused us to look elsewhere. Those kernel issues are now a thing of the past, but Proxmox 4 introduced some new wrinkles. First, to stay current with software fixes and updates, you have to pay the piper by signing up for the annual support license. This turned out to be a deal breaker for a couple of reasons. It was expensive since it’s based upon the number of CPUs in your platform. In the case of the hardware shown below, that turned out to be 4 CPUs (by Proxmox’s calculation) which meant the annual support license would run nearly $400 per year. That buys an enormous number of virtual machines at Digital Ocean without having to babysit hardware at all. And, you get a $10 credit to try out the service just for signing up. We also ran into serious technical problems with Proxmox 4. While the server would run without hiccups for a day or so, connectivity failed regularly after that. A reboot would fix the problem for another day, and then it was more of the same. Whether this was a bug or a design choice to encourage paid software updates, we obviously don’t know. Regardless of the reason, we reluctantly concluded that Proxmox 4 wasn’t ready for production use.
That narrowed the selection to VMware or VirtualBox. VMware is rock-solid and has been for more than fifteen years. VirtualBox is equally good, but typically runs on a desktop computer rather than dedicated hardware. If you don’t have the funds for a hardware purchase to support your virtualization requirements, then VirtualBox is a no-brainer. For many, however, some separation of the virtualization environment from your desktop computing environment is desirable. And, again, the choice is a no-brainer. VMware wins that one, hands down.
Getting Started with VMware ESXi
Many of you have VMware platforms already in place at work. For you, installing Incredible PBX is as simple as downloading the OVF tarball to your desktop and importing it into your existing platform. If you’re new to VMware, here’s an easy way to get started, and the software won’t cost you a dime. VMware offers a couple of free products that will give you everything you need to run a robust VMware platform on relatively inexpensive hardware. Let’s start with the hardware.
A $500 VMware Platform for SOHO and Small Business Applications

You’re looking at all the components that make up the $500 Intel® NUC D54250WYK with a Core i5 dual-core processor, a 250GB mSATA drive, and 16GB of RAM. While you install the RAM and disk drive yourself, if you can unscrew 5 screws and have 5 minutes to spare, you can handle this.
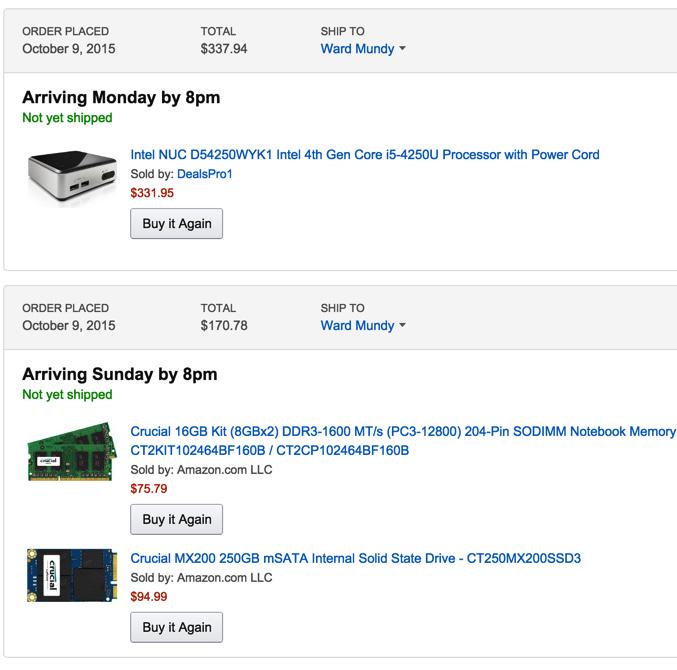
Here’s how we started. Of course, you can adjust the components and the merchant to meet your own requirements. For us, Amazon1 works great, and the prices are competitive. Who else delivers on Sunday? Despite the notice that the computer would be here on Monday, we knew better. And sure enough it was in the box with the other Sunday goodies. We removed the four screws from the bottom feet of the computer, and the case opened easily. Next, we unscrewed the screw from the bottom of the motherboard that holds the SSD drive in place securely. Snap in the mSATA drive and the two memory sticks, replace the screws, and we were in business.
NEWS FLASH: The Intel NUC pictured above is the 4th Generation Core i5 device. Now the 5th Generation edition is an even better deal. See the sidebar for the NUC5i5RYK link.
A Free VMware Software Platform for SOHO and Small Business Applications
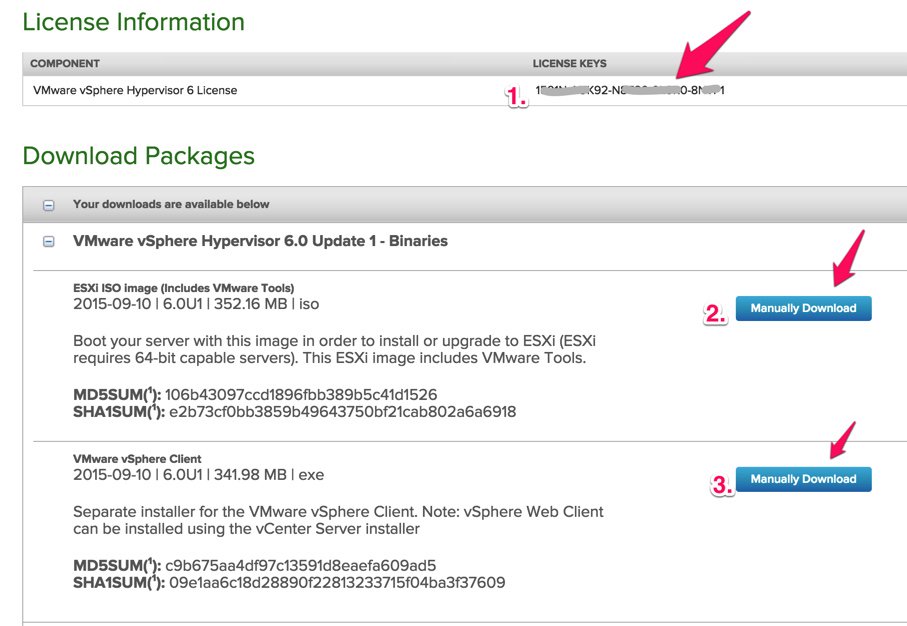
Before you can download either of the components for the free VMware ESXi platform, you’ll need to sign up for a free account at my.vmware.com. Once you’re signed up, log in and go to the ESXi 6 Download Center and sign up for a free ESXi license key:
- Write down your assigned License Key
- Manually download the VMware vSphere Hypervisor 6.0 Update 1 ISO
- Manually download the VMware vSphere Client 6.0U1
Next, burn the ISO to a CD/DVD and boot your dedicated VM hardware platform with it. Follow the instructions to complete the install. Next install the vSphere Client on a Windows computer. Don’t forget to add your ESXi License Key when you complete the installation. Once the ESXi server is up and running, you can stick the hardware on a shelf somewhere out of the way. You will rarely interact with it. That’s all handled using the VMware vSphere Client on your Windows Desktop. Yes, there is a web client as well, but you’ll have to pay for that one.
Deploying Incredible PBX OVF Templates with VMware vSphere Client
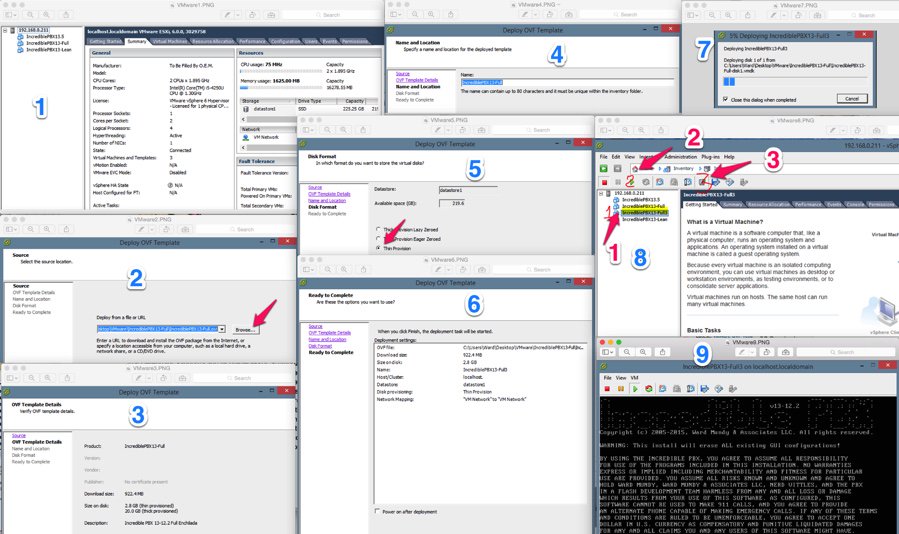
Deploying an Incredible PBX OVF template takes about two minutes, but first you need to download and unzip the desired Incredible PBX OVF templates from SourceForge onto your Windows Desktop.
Once you have the Incredible PBX OVF templates on your desktop, here are the deployment steps:
1. Login to the vSphere Client on your Windows Desktop using the root account you set up when you installed ESXi. Choose File, Deploy OVF Template.
2. Select the desired Incredible PBX .ovf template from your desktop PC after first unzipping the downloads.
3. Click Next.
4. Give the new Virtual Machine a name.
5. IMPORTANT: Choose Thin Provision option and click Next.
6. Review your entries and click Next to create the new Virtual Machine.
7. It takes about 2 minutes to create the new Virtual Machine.
8. The Main Client window will redisplay and your new VM should now be shown in the left panel. (1) Click on it. (2) Then click the Green start icon. (3) Click the Console Window icon.
9. When the VM’s Console Window opens, click in the window in the black area. Then press ENTER to kick off the Incredible PBX Phase 2 install. Review the Incredible PBX tutorial to get started.
Ctrl-Alt gets your mouse and keyboard out of the console window.
Installing the vSphere Web Client
If you’re lucky, you may not have a Windows machine. The downside is that the vSphere Client described above only works on the Windows platform. After hours of searching some of the most dreadful documentation on the planet, we finally uncovered a simple way to install the (experimental) vSphere Web Client. It is pure HTML5 with no Flash code! It’s also not ready for prime time. Most of the feature set looks pretty but doesn’t work if you have a free license. But it will give you an idea of where VMware is headed, and the bug reportedly will be fixed in the ESXi 6.0U2 release.
FYI: An easy way to apply License Key once it’s set up: Virtual Machines -> Licensing -> Apply License
1. Log into the console of your ESXi server as root using your root password.
2. Press F2 to Customized System.
3. Choose Troubleshooting Options.
4. Choose Enable SSH.
5. Using a Terminal window on a Mac or Linux machine or using Putty with Windows, log into the IP address of your ESXi server as root.
6. Issue the following command to install the vSphere Web Client vib:
esxcli software vib install -v http://download3.vmware.com/software/vmw-tools/esxui/esxui-2976804.vib
7. Using a web browser, login to the web client as root at https://ESXi-server-IP-address/ui
8. Should you ever wish to remove the web client from your server:
esxcli software vib remove -n esx-ui
9. Don’t forget to disable SSH access when you’re finished. Just repeat steps 1-4 above.
Installing Incredible PBX OVF Templates with VirtualBox
For those that opt for a desktop virtualization solution, there is no finer choice than VirtualBox. We’ve written about VirtualBox previously on Nerd Vittles so we won’t repeat the history here. If you need help setting it up, see this Nerd Vittles tutorial.
For today, we’ll show you how to take a VMware OVA template and build a VirtualBox VM:
1. Start up VirtualBox on your desktop.
2. Choose File, Import Appliance and select your Incredible PBX OVF template by clicking on the File Dialog icon. Click Continue when done.
3. In the Appliance Settings dialog, be sure "Reinitialize MAC Address of all network cards" is checked. Click Import.
4. Once the virtual machine is created, select it and click Settings. Name the VM in the General tab. Check Enable I/O APIC in the System tab. Set Video Memory to 16MB in the Display tab. Enable Audio and choose your sound card in the Audio tab. Enable Network and choose Bridged Network for Adapter 1 in the Network tab. Click OK to save your changes.
5. Click the Start icon to fire up your virtual machine. Press ENTER in the VM window to start Phase II of the Incredible PBX install.
6. Review the Incredible PBX tutorial to get started.
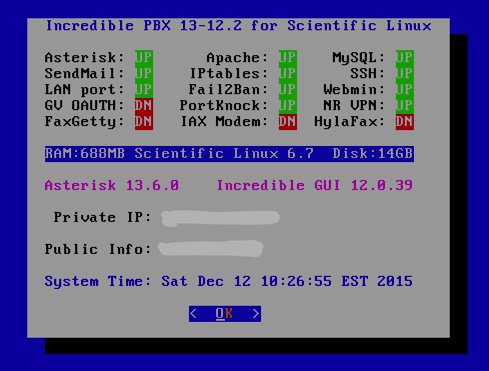
Initial Configuration of Incredible PBX
To complete the install, use SSH or putty to log into your VM as root. Default password: password. Then…
- Change your root password immediately: passwd
- Set your FreePBX admin password: /root/admin-pw-change
- Set your web apps admin password: htpasswd /etc/pbx/wwwpasswd admin
- Set your correct time zone: /root/timezone-setup
- Add WhiteList entries to firewall if needed: /root/add-ip or /root/add-fqdn
- Store PortKnocker credentials in a safe place: cat /root/knock.FAQ
- Login to your NeoRouter VPN server if desired: /root/nrclientcmd
- Run the Incredible Fax installer, if desired: /root/incrediblefax11.sh
- Set your admin password for AvantFax: /root/avantfax-pw-change
- Enable Google Voice OAUTH authentication support, if desired: http://nerd.bz/1JaO4ij (section 1b.)
Originally published: Monday, December 14, 2015
9 Countries Have Never Visited Nerd Vittles. Got a Friend in Any of Them https://t.co/wMfmlhiQ9y #asterisk #freepbx pic.twitter.com/TPFGZbqWB6
— Ward Mundy (@NerdUno) April 22, 2016
 Support Issues. With any application as sophisticated as this one, you’re bound to have questions. Blog comments are a terrible place to handle support issues although we welcome general comments about our articles and software. If you have particular support issues, we encourage you to get actively involved in the PBX in a Flash Forums. It’s the best Asterisk tech support site in the business, and it’s all free! Please have a look and post your support questions there. Unlike some forums, ours is extremely friendly and is supported by literally hundreds of Asterisk gurus and thousands of users just like you. You won’t have to wait long for an answer to your question.

Need help with Asterisk? Visit the PBX in a Flash Forum.
Special Thanks to Our Generous Sponsors
FULL DISCLOSURE: ClearlyIP, Skyetel, Vitelity, DigitalOcean, Vultr, VoIP.ms, 3CX, Sangoma, TelecomsXchange and VitalPBX have provided financial support to Nerd Vittles and our open source projects through advertising, referral revenue, and/or merchandise. As an Amazon Associate and Best Buy Affiliate, we also earn from qualifying purchases. We’ve chosen these providers not the other way around. Our decisions are based upon their corporate reputation and the quality of their offerings and pricing. Our recommendations regarding technology are reached without regard to financial compensation except in situations in which comparable products at comparable pricing are available from multiple sources. In this limited case, we support our sponsors because our sponsors support us.
 BOGO Bonaza: Enjoy state-of-the-art VoIP service with a $10 credit and half-price SIP service on up to $500 of Skyetel trunking with free number porting when you fund your Skyetel account. No limits on number of simultaneous calls. Quadruple data center redundancy. $25 monthly minimum spend required. Tutorial and sign up details are here.
 The lynchpin of Incredible PBX 2020 and beyond is ClearlyIP components which bring management of FreePBX modules and SIP phone integration to a level never before available with any other Asterisk distribution. And now you can configure and reconfigure your new Incredible PBX phones from the convenience of the Incredible PBX GUI.
 VitalPBX is perhaps the fastest-growing PBX offering based upon Asterisk with an installed presence in more than 100 countries worldwide. VitalPBX has generously provided a customized White Label version of Incredible PBX tailored for use with all Incredible PBX and VitalPBX custom applications. Follow this link for a free test drive!
 Special Thanks to Vitelity. Vitelity is now Voyant Communications and has halted new registrations for the time being. Our special thanks to Vitelity for their unwavering financial support over many years and to the many Nerd Vittles readers who continue to enjoy the benefits of their service offerings. We will keep everyone posted on further developments.
Some Recent Nerd Vittles Articles of Interest…
- Some of our purchase links refer users to Amazon and other sites when we find their prices are competitive for the recommended products. Nerd Vittles receives a small referral fee from merchants to help cover the costs of our blog. We never recommend particular products solely to generate commissions. However, when pricing is comparable or availability is favorable, we support Amazon and other merchants because they support us. [↩]
The Return of the 5-Minute PBX: Incredible PBX (Certified Edition) for VirtualBox
Today we’re paying a fresh visit to our favorite virtual machine platform and introducing a turnkey unified communications server for home, SOHO, and small business use. Unlike last week’s platform that required a $35 investment in a Raspberry Pi 2, this week’s offering requires zero hardware investment. And you still get the same software collection at the same great price, totally free… as in beer. The VirtualBox® platform runs atop any Windows PC, Mac, Linux desktop, or Solaris machine and uses a small portion of the desktop computer’s available resources. Other than that, everything works just as if you were running your PBX on standalone hardware.
Today’s release is built atop the new Scientific Linux™ 6.7 platform and features the latest LTS release of Asterisk® 13 and a terrific collection of GPL modules from FreePBX® 12. It also is our first opportunity to showcase one of our new Certified Incredible PBX™ builds. Certification is a new process that involves rigorous testing of the entire Incredible PBX platform to verify that every component is not only reliable but also works in harmony with the rest of the pieces of the unified communications suite. You’ll find all of them here. Think of Incredible PBX as the glue stick that assembles all the necessary VoIP components and holds them together seamlessly. As with all Incredible PBX builds, you also get the full complement of goodies including dozens of text-to-speech apps, voice recognition and dialing, SMS messaging, free fax support, reminders and wakeup calls, and SECURITY! The other major advantage of Incredible PBX on the VirtualBox platform is a turnkey install in less than 5 minutes! Just choose the Windows PC, Mac, Linux desktop, or Solaris machine and off you go.

Is VirtualBox merely a sandbox for experimentation? Absolutely not. With any of the beefier desktop computers available today, running Incredible PBX as a 24/7 VirtualBox image is every bit as feature rich with stellar performance that’s equivalent to using dedicated hardware. And there are some added advantages. Obviously, deploying a turnkey VoIP platform in under 5 minutes is a major plus. But, unlike using a dedicated Linux platform, you also get the ability to take snapshots of your system and do full backups in minutes instead of the hours required to bring down dedicated hardware, load a different backup application using a different operating system, perform a backup, and then reboot your VoIP server. And your backups won’t just run on the one server on which the backup was performed. You can restore the backup to any other computer that can run VirtualBox. For any of you that came from a network management background, you know what a big deal that really is. And there’s one more bonus. With Incredible Backup and Restore, you can move your image to dedicated hardware running the same operating system with Asterisk 13 and the same GUI platform in minutes.
Need to deploy VoIP servers at dozens of sites around the globe? Not a problem with VirtualBox. Just send a preconfigured VirtualBox image to each site and install VirtualBox on a local desktop computer. In 5 minutes, you have a functional VoIP server including interconnectivity to all of your other VoIP servers with a virtual private network already in place to provide secure VoIP connectivity between all of your sites.
Are there security compromises using the VirtualBox platform? Not at all. Incredible PBX still comes preconfigured with the Linux IPtables firewall that is locked down to a whitelist of local area networks, preferred providers, and your own IP addresses. You can expand the whitelist using the add-ip and add-fqdn scripts or use PortKnocker and Travelin’ Man 4 tools to let remote users gain instant access.
Getting Started. For today, we’ll provide a refresher course on loading VirtualBox and the new Incredible PBX virtual image. Then we want to spend a little time explaining the secret sauce that goes into building these images so that you can do it yourself either to migrate to a different network or to deploy at multiple sites. When we’re finished, you’ll know everything we’ve learned about deploying VirtualBox machines and, unlike Grandma, we won’t leave an important ingredient out of the recipe just to be sure you never forget how good Grandma’s cookies really were. So let’s get started.
Installing Oracle VM VirtualBox 5

Oracle’s virtual machine platform inherited from Sun is amazing. It’s not only free, but it’s pure GPL2 code. VirtualBox gives you a virtual machine platform that runs on top of any desktop operating system. In terms of limitations, we haven’t found any although VirtualBox 5 can be a little quirky on some platforms. If you have trouble with getting a clean status report with VirtualBox 5, just drop back to the final release of VirtualBox 4. We tested VirtualBox 4 on an Atom-based Windows 7 machine with 2GB of RAM, and it worked without a hiccup. So step #1 today is to download one or more of the VirtualBox installers from VirtualBox.org or Oracle.com. Our recommendation is to put all of the 100MB installers on a 4GB thumb drive.1 Then you’ll have everything in one place whenever and wherever you happen to need it. Once you’ve downloaded the software, simply install it onto your favorite desktop machine. Accept all of the default settings, and you’ll be good to go. And here’s a link to the latest Oracle VM VirtualBox User Manual.
Downloading the Incredible PBX Virtual Machine
A word of warning on the front end. The Incredible PBX image featuring Asterisk 13 for VirtualBox is huge, about 3GB! There are two ways to grab the .ova image. You can either download the image directly from here or from SourceForge. Or, for better performance, download the torrent and let multiple servers help you get the software quicker. Usually download times are cut by 70% or more. The MD5 checksum is 6037b8319ce9070270474889af76f86d.
Importing & Configuring the Incredible PBX Virtual Machine in VirtualBox
You only perform the import step one time. Once imported into VirtualBox, Incredible PBX is ready to use. There’s no further installation required, just like an OpenVZ template… only better. Double-click on the .ova file you downloaded to begin the procedure and load it into VirtualBox. When prompted, be sure to check the Reinitialize the Mac address of all network cards box and then click the Import button. Once the import is finished, you’ll see a new Incredible PBX virtual machine in your VM List on the VirtualBox Manager Window. We need to make a couple of one-time adjustments to the Incredible PBX VM configuration to account for differences in sound and network cards on different host machines.
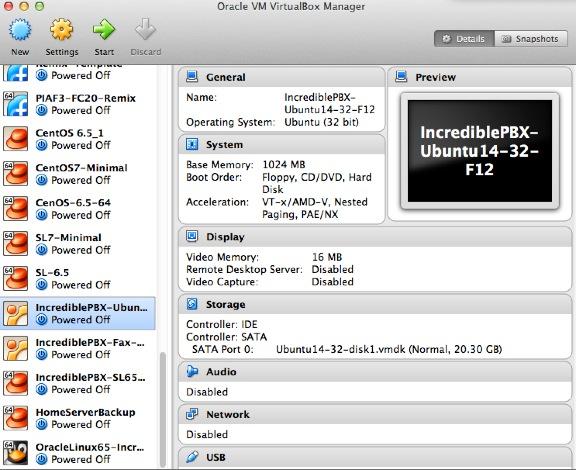
Click on the Incredible PBX Virtual Machine in the VM List. Then click Settings -> Audio and check the Enable Audio option and choose your sound card. Save your setup by clicking the OK button. Next click Settings -> Network. For Adapter 1, check the Enable Network Adapter option. From the Attached to pull-down menu, choose Bridged Adapter. Then select your network card from the Name list. Then click OK. That’s all the configuration that is necessary for your Incredible PBX Virtual Machine. The rest is automagic.
Running Incredible PBX Virtual Machine in VirtualBox
Once you’ve imported and configured the Incredible PBX Virtual Machine, you’re ready to go. Highlight IncrediblePBX Virtual Machine in the VM List on the VirtualBox Manager Window and click the Start button. The SL67 OS boot procedure will begin just as if you had installed Incredible PBX on a standalone machine. You’ll see a couple of dialogue boxes pop up that explain the keystrokes to move back and forth between your host operating system desktop and your virtual machine. Remember, you still have full access to your desktop computer. Incredible PBX is merely running as a task in a VirtualBox window. Always gracefully halt Incredible PBX just as you would on a dedicated computer.
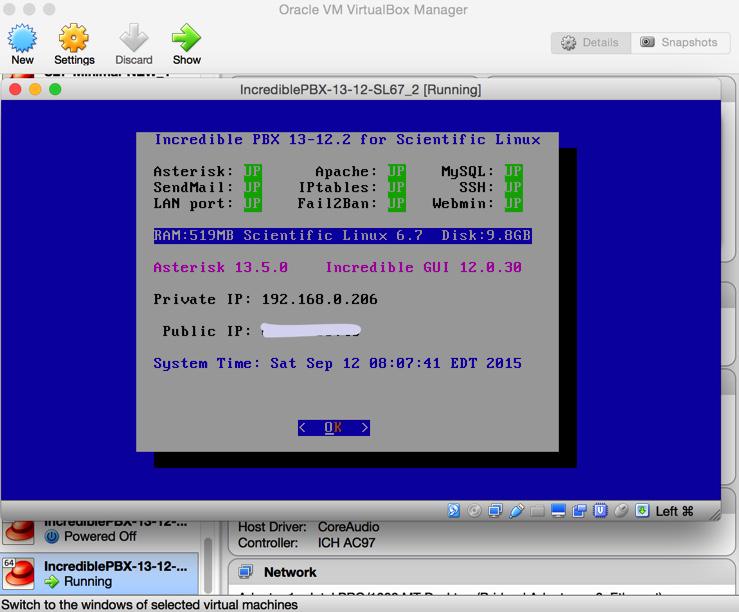
Here’s what you need to know. To work in the Incredible PBX Virtual Machine, just left-click your mouse while it is positioned inside the VM window. To return to your host operating system desktop, press the right Option key on Windows machines or the left Command key on any Mac. For other operating systems, read the dialogue boxes for instructions on moving around. To access the Linux CLI, login as root with the default password: password.
When logging in for the first time, Incredible PBX will go through some setup steps and then reboot. Login again to complete the setup. status will always provide a snapshot of your system. To shut down Incredible PBX gracefully, click in the VM window with your mouse, log in as root, and type: halt. Be sure to complete the following setup steps from the Linux CLI:
- Change your root password: passwd
- Set your FreePBX admin password: /root/admin-pw-change
- Set your admin password and email address for AvantFax: /root/avantfax-pw-change
- Set your web apps admin password: htpasswd /etc/pbx/wwwpasswd admin
- Set your correct time zone: /root/timezone-setup
- Add WhiteList entries to firewall if needed: /root/add-ip or /root/add-fqdn
- Store PortKnocker credentials in a safe place: cat /root/knock.FAQ
- Login to your NeoRouter VPN server if desired: /root/nrclientcmd
To access the Incredible PBX GUI with a browser, point to the IP address of your virtual machine and login as admin with admin password set above. We recommend that you log in to the Linux CLI at least once a week so that Incredible PBX updates get applied to your server regularly. This is critically important if you care about your phone bill.
Preparing Incredible PBX Virtual Machine for Migration
As the Linux operating systems have become more turnkey, one of the shortcuts that has been implemented on both the RedHat and Debian/Ubuntu platforms is storage of your network setup so that the server reboots more quickly. While that’s fine for rebooting on the same server, it’s a real problem if you attempt to move your setup to different hardware or a new network because eth0 will not load. That means no IP address! Here are two ways to assure that things will actually work after the move. Both assume that you will have a DHCP server at the new location just as you did at your existing site.
The Easy Way. If you have console access after the VM image is restored on the new platform (which means you don’t need a network IP address for the server in order to log in as root), then the easy way to prepare any of the Incredible PBX machines for relocation is to issue the following commands before you halt the system and make a VirtualBox backup:
touch /etc/update_hostconfig
touch /etc/update_serverconfig
Once you have halted the server, edit both the sound card and network card settings and disable both of them in VirtualBox Manager. Then choose File -> Export Appliance from the VirtualBox title bar and create a .ova backup image on your desktop. You now have an image that is similar to the Incredible PBX image that you originally downloaded, except it has all of your data and settings. All you have to do is repeat the install drill above at the new location using the .ova image you created and log in with whatever your current root password happens to be. You’ll get a two-pass automatic setup just as you did when you began today’s adventure.
The only drawback to this procedure is the fact that the extension 701 and default DISA passwords will be initialized when you first boot from your .ova image at the other location. Aside from that, you’ll have a clean platform with new SSH and DUNDI credentials as well as mostly sanitized log files.
The Hard Way. The other alternative is to manually prepare your existing system for migration before you shut it down. The primary reason for doing this would be to assure that you can log in with an SSH client at the other end as soon as the server is booted. The steps differ a bit depending upon whether you’re on the Ubuntu or Scientific Linux platform. But on both platforms you need to enter the IP address from which you will log in at the new site unless it is on one of the private LAN subnets that already is whitelisted in IPtables. Just issue the command /root/add-ip and choose 0 option to enable all services for the new IP address. Then…
On the Scientific Linux platform, issue the following commands:
touch /etc/update_hostconfig
touch /etc/update_serverconfig
rm -f /var/lib/dhcpd/*
rm -f /var/lib/dhclient/*
rm -f /etc/udev/rules.d/70*
halt
On the Ubuntu platform, issue the following commands:
touch /etc/update_hostconfig
touch /etc/update_serverconfig
rm -f /var/lib/dhcp/*
rm -f /etc/udev/rules.d/70*
halt
Once you have halted the server, edit both the sound card and network card settings and disable both of them in VirtualBox Manager. Then choose File -> Export Appliance from the VirtualBox title bar and create a .ova backup image on your desktop. Now you’re an expert. Enjoy!
Originally published: Monday, September 14, 2014
 Support Issues. With any application as sophisticated as this one, you’re bound to have questions. Blog comments are a terrible place to handle support issues although we welcome general comments about our articles and software. If you have particular support issues, we encourage you to get actively involved in the PBX in a Flash Forums. It’s the best Asterisk tech support site in the business, and it’s all free! Please have a look and post your support questions there. Our forum is extremely friendly and is supported by literally hundreds of Asterisk gurus.

Need help with Asterisk? Visit the PBX in a Flash Forum.
Special Thanks to Our Generous Sponsors
FULL DISCLOSURE: ClearlyIP, Skyetel, Vitelity, DigitalOcean, Vultr, VoIP.ms, 3CX, Sangoma, TelecomsXchange and VitalPBX have provided financial support to Nerd Vittles and our open source projects through advertising, referral revenue, and/or merchandise. As an Amazon Associate and Best Buy Affiliate, we also earn from qualifying purchases. We’ve chosen these providers not the other way around. Our decisions are based upon their corporate reputation and the quality of their offerings and pricing. Our recommendations regarding technology are reached without regard to financial compensation except in situations in which comparable products at comparable pricing are available from multiple sources. In this limited case, we support our sponsors because our sponsors support us.
 BOGO Bonaza: Enjoy state-of-the-art VoIP service with a $10 credit and half-price SIP service on up to $500 of Skyetel trunking with free number porting when you fund your Skyetel account. No limits on number of simultaneous calls. Quadruple data center redundancy. $25 monthly minimum spend required. Tutorial and sign up details are here.
 The lynchpin of Incredible PBX 2020 and beyond is ClearlyIP components which bring management of FreePBX modules and SIP phone integration to a level never before available with any other Asterisk distribution. And now you can configure and reconfigure your new Incredible PBX phones from the convenience of the Incredible PBX GUI.
 VitalPBX is perhaps the fastest-growing PBX offering based upon Asterisk with an installed presence in more than 100 countries worldwide. VitalPBX has generously provided a customized White Label version of Incredible PBX tailored for use with all Incredible PBX and VitalPBX custom applications. Follow this link for a free test drive!
 Special Thanks to Vitelity. Vitelity is now Voyant Communications and has halted new registrations for the time being. Our special thanks to Vitelity for their unwavering financial support over many years and to the many Nerd Vittles readers who continue to enjoy the benefits of their service offerings. We will keep everyone posted on further developments.
Some Recent Nerd Vittles Articles of Interest…
- Many of our purchase links refer users to Amazon when we find their prices are competitive for the recommended products. Nerd Vittles receives a small referral fee from Amazon to help cover the costs of our blog. We never recommend particular products solely to generate Amazon commissions. However, when pricing is comparable or availability is favorable, we support Amazon because Amazon supports us. [↩]
60 Seconds to Real Independence: Incredible PBX GUI Comes to VirtualBox
As we continue the march toward a truly free, RealGPL, open source VoIP platform for Asterisk®, we couldn’t think of a better time of the year for this announcement. Today we’re pleased to introduce our first virtual machine platform with an Incredible PBX™ GUI image that you can install in less than 60 seconds on virtually any desktop computer in the world. When the install is finished you’ll have the latest Asterisk 11 running atop Scientific Linux™ 6.6 with version 12 of the new Incredible PBX GUI. You’ll also have the very first Asterisk aggregation with native support for OAUTH authentication and secure communications using Google Voice. And it’s all FREE. No Gotchas!
Think of Incredible PBX as the glue stick that assembles all the necessary VoIP components into a state of the art Linux platform and holds them together seamlessly. As with all Incredible PBX builds, you also get the full complement of goodies including dozens of text-to-speech apps, voice dialing, SMS messaging, free fax support, reminders and wakeup calls, and SECURITY! The difference with the VirtualBox® platform is you get a turnkey install of everything on any desktop computer in less than one minute! That includes Windows PCs, Macs, Linux desktops, and even Solaris machines.

Is VirtualBox merely a sandbox for experimentation? Absolutely not. With any of the beefier desktop computers today, running Incredible PBX as a 24/7 VirtualBox image is every bit as feature rich with stellar performance, and it’s equivalent to using dedicated hardware. And there are some added advantages. Obviously, deploying a turnkey VoIP platform in under a minute is a major plus. But, unlike using a dedicated Linux platform, you also get the ability to take snapshots of your system and do full backups in minutes instead of the hours required to bring down dedicated hardware, load a different backup application using a different operating system, perform a backup, and then reboot your VoIP server. And your backups won’t just run on the one server on which the backup was performed. You can restore the backup to any other computer that can run VirtualBox. For any of you that came from a network management background, you know what a big deal that really is. And there’s one more bonus. With Incredible Backup and Restore, you can move to dedicated hardware running the same operating system with Asterisk 11 and the same version of the Incredible PBX GUI in minutes.
Need to deploy VoIP servers at dozens of sites around the globe? Not a problem with VirtualBox. Just send a preconfigured VirtualBox image to each site and install VirtualBox on a local desktop computer. In 60 seconds, you’ll have a functional VoIP server including interconnectivity to all of your other VoIP servers with a virtual private network already in place to provide secure VoIP connectivity between all of your sites.
Are there security compromises using the VirtualBox platform? Not at all. Incredible PBX comes preconfigured with the Linux IPtables firewall that is locked down to a whitelist of local area networks, preferred providers, and your own IP addresses. You can expand the whitelist using the add-ip and add-fqdn scripts or use PortKnocker and Travelin’ Man 4 tools to let remote users gain instant access.
So What’s All the GPL Fuss About? It’s about FREEDOM, the freedom to use or not use the GPL modules you wish to use without enduring false alerts that your system has been compromised and without being blocked from removing components that produce revenue for Sangoma®… as the GPL requires. It’s about FREEDOM to redistribute or resell the product AS IS… as the GPL requires. It’s about FREEDOM to examine and modify ALL of the source code using ALL of the tools and components necessary, not just ones Sangoma has chosen to provide… as the GPL requires. It’s about FREEDOM to add GUI components to your server with No Gotchas whether or not the individual modules were produced by Sangoma… as the GPL requires.
🇺🇸 An Independence Day Wish: #GPL Freedom for #FreePBX 🇺🇸 #asterisk http://t.co/pYuPndu87M #NoGotchas #NoCrippleware #NoMissingSource
— Ward Mundy (@NerdUno) June 30, 2015
If you support the GPL and use open source projects, then you owe it to yourself and to the GPL community to get up to speed and get involved! Can’t we all just get along? You bet… when everyone does what they’ve agreed to do. Spend an hour or two of your Independence Day reading some of the Nerd Vittles commentary on FreePBX® and the GPL.
- An Open Letter to Sangoma: Here’s to a New Beginning in 2015
- We Have a Dream, Too: The Return of (Gotcha-free) Open Source GPL Software
- Turning the Page on Asterisk GUIs: Here’s to a New Beginning with a GUI Facelift
- Wear Something Green for May Day: The Schmoozification of Sangoma
- Freedom and the FreePBX Cloud: Is an Apple-like Ecosystem GPL-Compliant?
- Holey Socks! It’s the Missing FreePBX GPL Source Code, Or Is It?
- Choosing the Asterisk Platform That’s Right for You
BUY 3 STAMPS and let Sangoma and Digium hear from you. Don’t be shy. It’s about your FREEDOM.
William J. Wignall, President and CEO
Sangoma Technologies
100 Renfrew Drive, Suite 100
Markham ON L3R 9R6 CANADADanny Windham, CEO
Digium, Inc.
445 Jan Davis Drive Northwest
Huntsville, AL 35806 USAMark Spencer, Founder and CTO
Digium, Inc.
445 Jan Davis Drive Northwest
Huntsville, AL 35806 USA
Getting Started. For today, we’ll provide a refresher course on loading VirtualBox and the Incredible PBX virtual image. Then we want to spend a little time explaining the secret sauce that goes into building these images so that you can do it yourself either to migrate to a different network or to deploy at multiple sites. It’s called open source for a reason! When we’re finished, you’ll know everything we’ve learned about deploying VirtualBox machines and, unlike Grandma and some GUI platforms, we won’t leave an important ingredient out of the recipe just to be sure you never forget how good Grandma’s cookies really were. So let’s get started.
Installing Oracle VM VirtualBox

Oracle’s virtual machine platform inherited from Sun is amazing. It’s not only free, but it’s pure GPL2 code. VirtualBox gives you a virtual machine platform that runs on top of any desktop operating system. In terms of limitations, we haven’t found any. We even tested this on an Atom-based Windows 7 machine with 2GB of RAM, and it worked without a hiccup. So step #1 today is to download one or more of the VirtualBox installers from VirtualBox.org or Oracle.com. Our recommendation is to put all of the 100MB installers on a 4GB thumb drive.1 Then you’ll have everything in one place whenever and wherever you happen to need it. Once you’ve downloaded the software, simply install it onto your favorite desktop machine. Accept all of the default settings, and you’ll be good to go. For more details, here’s a link to the Oracle VM VirtualBox User Manual.
Downloading the Incredible PBX GUI Virtual Machine
A word of warning on the front end. Today’s Incredible PBX image featuring Asterisk 11 for VirtualBox is huge! The Scientific Linux 6.6 image with version 12 of Incredible PBX GUI is nearly 3GB. Be patient. You only have to download it once. Just click on the 11-12.3 .OVA image in this SourceForge link and start the download to your desktop. Then go have a nice lunch.
Importing & Configuring Incredible PBX Virtual Machines in VirtualBox
You only perform the import step one time. Once imported into VirtualBox, Incredible PBX is ready to use. There’s no further installation required, just like an OpenVZ template… only better. Double-click on the .ova file you downloaded to begin the procedure and load it into VirtualBox. When prompted, be sure to check the Reinitialize the Mac address of all network cards box and then click the Import button. Once the import is finished, you’ll see a new Incredible PBX virtual machine in your VM List on the VirtualBox Manager Window. We need to make a couple of one-time adjustments to the Incredible PBX VM configuration to account for differences in sound and network cards on different host machines.
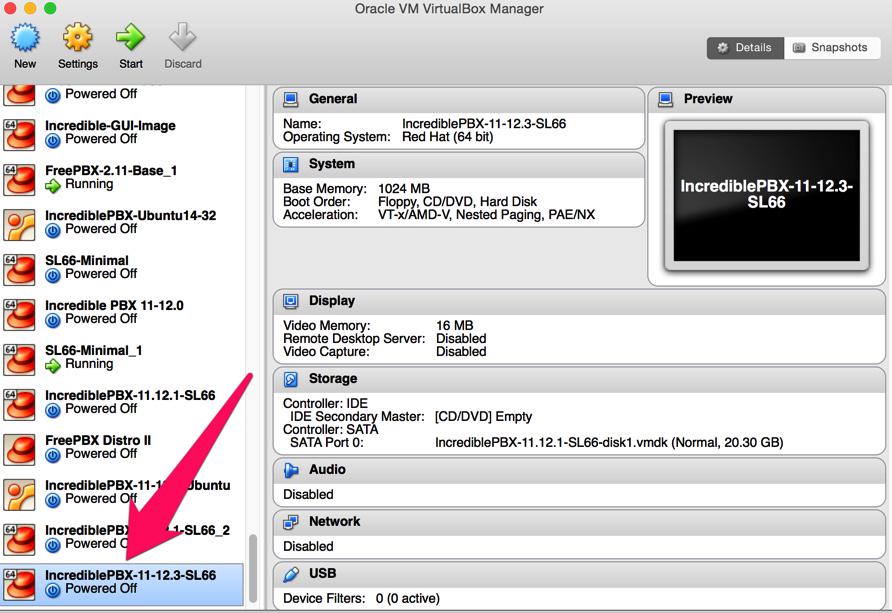
Click on the Incredible PBX Virtual Machine in the VM List. Then click Settings -> Audio and check the Enable Audio option and choose your sound card. Save your setup by clicking the OK button. Next click Settings -> Network. For Adapter 1, check the Enable Network Adapter option. From the Attached to pull-down menu, choose Bridged Adapter. Then select your network card from the Name list. Then click OK. Finally, click Settings -> System, uncheck Hardware clock in UTC time, and click OK. That’s all the configuration that is necessary for your Incredible PBX Virtual Machine. The rest is automagic.
Running Incredible PBX Virtual Machines in VirtualBox
Once you’ve imported and configured the Incredible PBX Virtual Machine, you’re ready to go. Highlight IncrediblePBX Virtual Machine in the VM List on the VirtualBox Manager Window and click the Start button. The boot procedure with your chosen operating system will begin just as if you had installed Incredible PBX on a standalone machine. You’ll see a couple of dialogue boxes pop up that explain the keystrokes to move back and forth between your host operating system desktop and your virtual machine. Remember, you still have full access to your desktop computer. Incredible PBX is merely running as a task in a VirtualBox window. Always gracefully halt Incredible PBX just as you would on a dedicated computer.
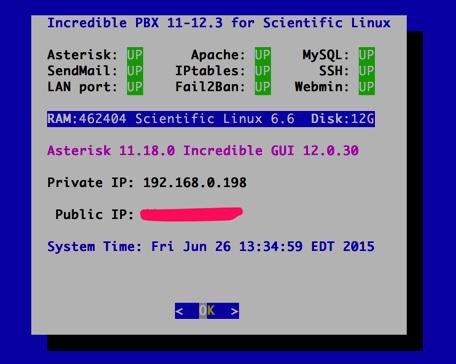
Here’s what you need to know. To work in the Incredible PBX Virtual Machine, just left-click your mouse while it is positioned inside the VM window. To return to your host operating system desktop, press the right Option key on Windows machines or the left Command key on any Mac. For other operating systems, read the dialogue boxes for instructions on moving around. To access the Linux CLI, login as root with the default password: password. To access Incredible PBX GUI with a browser, point to the IP address of your virtual machine. Then, in the Administrator window, click on Incredible GUI Administration. Login as admin with the admin password you set below. For the security of your server, we recommend that you log in to the Linux CLI at least once a week so that Incredible PBX updates get applied to your server regularly. This is critically important if you care about your phone bill.
When logging in for the first time, Incredible PBX will go through some setup steps and then reboot. Login again to complete the setup. status will always provide a snapshot of your system. To shut down Incredible PBX gracefully, click in the VM window with your mouse, log in as root, and type: halt. Be sure to complete the following setup steps from the Linux CLI:
- Change your root password: passwd
- Set your Incredible GUI admin password: /root/admin-pw-change
- Set the admin password for web apps: htpasswd /etc/pbx/wwwpasswd admin
- Set your correct time zone: /root/timezone-setup
- Add WhiteList entries to firewall if needed: /root/add-ip or /root/add-fqdn
- Store PortKnocker credentials in a safe place: cat /root/knock.FAQ
- Enable Incredible Fax support if desired: /root/incrediblefax11.sh
- Login to your NeoRouter VPN server if desired: /root/neorouter-login
Upgrading Modules with Module Admin in the GUI. The GUI includes a Module Administration component in the Admin tab which will let you check online for new modules and upgrade to newer releases. Once you have added or updated any modules, you will get some nasty error messages in the System Status display because we allow installation of all GPL-compatible modules, not just those of Sangoma. It’s one of the proprietary gotchas that we have been writing about. Simply click on the X option in the upper right corner of each window to remove the warnings. Log out of the GUI. Then login to your Linux CLI as root and issue the following command to permanently clear the error messages: gui-fix. Now you can log back in and the warning messages will be gone… until you add or update modules again. Sangoma calls it a feature. 🙄
Command Line Management of Incredible PBX with VirtualBox
One of the real beauties of VirtualBox is you don’t have to use the VirtualBox GUI at all. The entire process can be driven from the command line. Other than on a Mac, here is the procedure to import, configure, and run Incredible PBX:
VBoxManage import IncrediblePBX-11-12.3-SL66.ova

VBoxManage modifyvm "IncrediblePBX-11-12.3-SL66" --nic1 nat

VBoxManage modifyvm "IncrediblePBX-11-12.3-SL66" --acpi on --nic1 bridged

VBoxHeadless --startvm "IncrediblePBX-11-12.3-SL66" &

# Wait 1 minute for Incredible PBX to load. Then decipher IP address like this:

VBoxManage guestproperty get "IncrediblePBX-11-12.3-SL66" /VirtualBox/GuestInfo/Net/0/V4/IP

# Now you can use SSH to login to Incredible PBX at the displayed IP address

# Shutdown the Incredible PBX Virtual Machine with the following command:

VBoxManage controlvm "IncrediblePBX-11-12.3-SL66" acpipowerbutton
On a Mac, everything works the same way except for deciphering the IP address. Download our findip script for that. Be sure to plug in the correct name of your virtual machine: ./findip IncrediblePBX-11-12.3-SL66
Deploying Google Voice Secure Communications with Incredible PBX
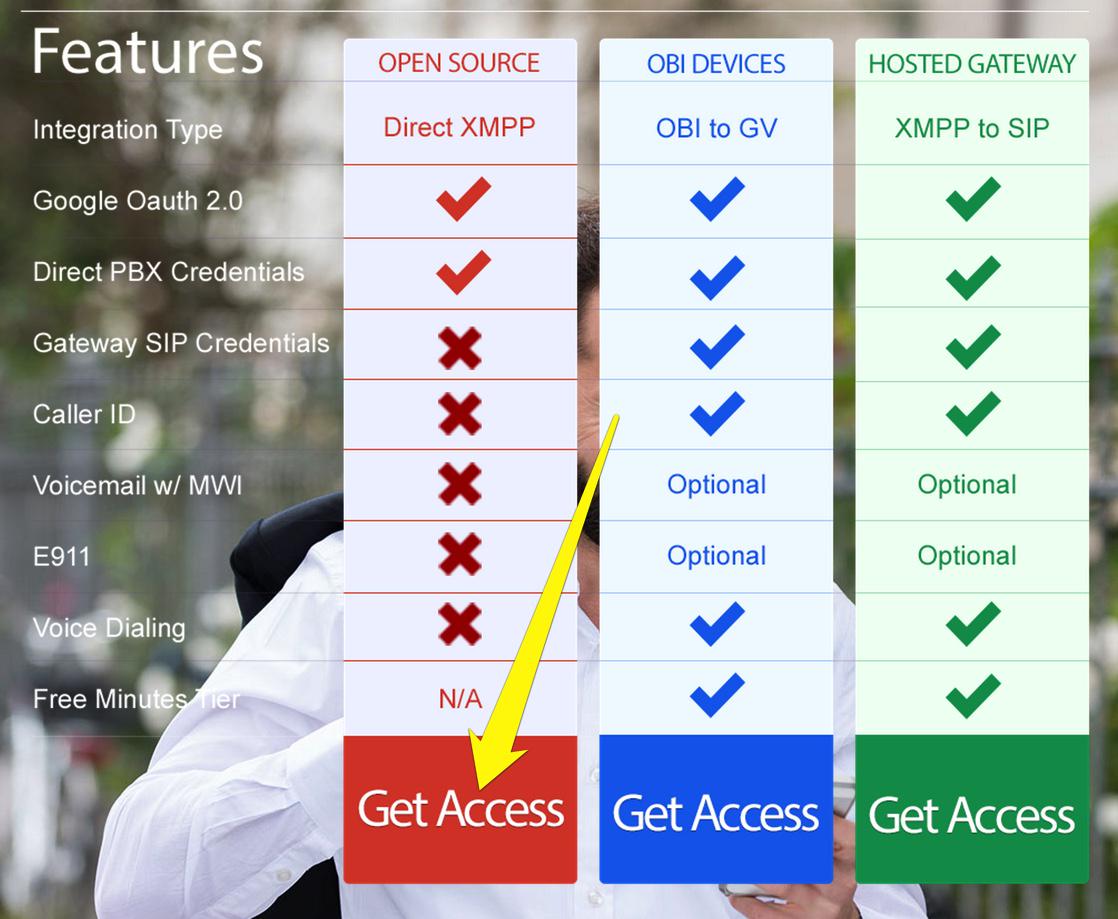
As with all prior releases of Incredible PBX, free calling in the U.S. and Canada with Google Voice is an integral component of this GPL platform. You still add Google Voice trunks using the GUI in exactly the same way: Connectivity -> Google Voice (Motif). What has changed under the covers with this release is what happens behind the scenes. Google has warned (for years) that they plan to phase out plain text passwords using your actual Google Voice credentials. This is for your protection! Unfortunately, until today, the only way to take advantage of the new OAUTH authentication method with Asterisk was to use one of the external SIP gateways to Google Voice. Now you no longer have to. The new 11-12.3 release of Incredible PBX adds native OAUTH authentication support to Asterisk and the Incredible PBX GUI. When prompted for the password in setting up your Google Voice accounts in the GUI, now you’ll enter your OAUTH token instead of your plain text password. It’s that easy. Obviously, you first need to obtain a free OAUTH token for each of your Google Voice accounts that you wish to activate. This tutorial on the PIAF Forum will walk you through the simple, one-time procedure.
IMPORTANT: Once you have added one or more Google Voice trunks in the GUI, you must restart Asterisk to activate the trunks: amportal restart


We want to take a moment and express our heartfelt thanks to Ryan Tilton of GVsip.com for setting up and maintaining the free platform to support OAUTH tokens for Google Voice. And a special shoutout to Martin Dindos (a.k.a. @dziny on the PIAF Forum) for his truly Herculean efforts in getting this to work properly with Asterisk 11, no small feat. This is yet another amazing testament to how the open source community should really function. Thank you!
Preparing Incredible PBX Virtual Machine for Backups & Migration
To us, the most compelling feature of the virtual machine platform is the ease with which you can make a perfect backup of your server in minutes! From that backup, you can restore a working platform in the same 60 seconds it took to build today’s platform on your desktop. One of the drawbacks as the Linux operating systems have become more turnkey is the shortcut that was implemented on both the RedHat and Debian/Ubuntu platforms to store your network setup so that the server reboots more quickly. While that’s fine for rebooting on the same server, it’s a real problem if you attempt to move your setup to different hardware or a new network because your network configuration will not load properly on the new platform. That means no IP address! Here’s the easy way to assure that things will actually work after the move. It assumes you will have a DHCP server at the new location just as you did at your existing site.
The Easy Way. If you have console access after the VM image is restored on the new platform (which means you don’t need a network IP address for the server in order to log in as root), then the easy way to prepare any of the Incredible PBX machines for relocation is to issue the following commands before you halt the system and make a VirtualBox backup:
touch /etc/update_hostconfig
touch /etc/update_serverconfig
rm -f /etc/ssh/ssh_host*
rpm -e openssh-server openssh-xinetd
yum -y install openssh-server openssh-xinetd
rm /etc/ssh/*.rpmsave
Once you have halted the server, edit both the sound card and network card settings and disable both of them in VirtualBox Manager. Then choose File -> Export Appliance from the VirtualBox title bar and create an .ova backup image on your desktop. You now have an image that is similar to the Incredible PBX image that you originally downloaded, except it has all of your data and settings. All you have to do is repeat the install drill above at the new location using the .ova image you created and log in with whatever your current root password happens to be. You’ll get a two-pass automatic setup just as you did when you began today’s adventure.
The only drawback to this procedure is the fact that the extension 701 and default DISA passwords as well as your firewall configuration will be initialized when you first boot from your .ova image at the other location. Aside from that, you’ll have a clean platform with new SSH and DUNDI credentials as well as mostly sanitized log files.
What’s Next. Now that you have a functioning server, it’s time to learn all about the Incredible PBX applications that are ready for use. Jump over to the latest Nerd Vittles application tutorial for a quick look at what’s available. Even though it was written for the Asterisk-GUI, everything will work exactly the same way. That’s the beauty of the Incredible PBX platform. Enjoy!
Originally published: Monday, June 29, 2015
 Support Issues. With any application as sophisticated as this one, you’re bound to have questions. Blog comments are a terrible place to handle support issues although we welcome general comments about our articles and software. If you have particular support issues, we encourage you to get actively involved in the PBX in a Flash Forums. It’s the best Asterisk tech support site in the business, and it’s all free! Please have a look and post your support questions there. Our forum is extremely friendly and is supported by literally hundreds of Asterisk gurus.

Need help with Asterisk? Visit the PBX in a Flash Forum.
Special Thanks to Our Generous Sponsors
FULL DISCLOSURE: ClearlyIP, Skyetel, Vitelity, DigitalOcean, Vultr, VoIP.ms, 3CX, Sangoma, TelecomsXchange and VitalPBX have provided financial support to Nerd Vittles and our open source projects through advertising, referral revenue, and/or merchandise. As an Amazon Associate and Best Buy Affiliate, we also earn from qualifying purchases. We’ve chosen these providers not the other way around. Our decisions are based upon their corporate reputation and the quality of their offerings and pricing. Our recommendations regarding technology are reached without regard to financial compensation except in situations in which comparable products at comparable pricing are available from multiple sources. In this limited case, we support our sponsors because our sponsors support us.
 BOGO Bonaza: Enjoy state-of-the-art VoIP service with a $10 credit and half-price SIP service on up to $500 of Skyetel trunking with free number porting when you fund your Skyetel account. No limits on number of simultaneous calls. Quadruple data center redundancy. $25 monthly minimum spend required. Tutorial and sign up details are here.
 The lynchpin of Incredible PBX 2020 and beyond is ClearlyIP components which bring management of FreePBX modules and SIP phone integration to a level never before available with any other Asterisk distribution. And now you can configure and reconfigure your new Incredible PBX phones from the convenience of the Incredible PBX GUI.
 VitalPBX is perhaps the fastest-growing PBX offering based upon Asterisk with an installed presence in more than 100 countries worldwide. VitalPBX has generously provided a customized White Label version of Incredible PBX tailored for use with all Incredible PBX and VitalPBX custom applications. Follow this link for a free test drive!
 Special Thanks to Vitelity. Vitelity is now Voyant Communications and has halted new registrations for the time being. Our special thanks to Vitelity for their unwavering financial support over many years and to the many Nerd Vittles readers who continue to enjoy the benefits of their service offerings. We will keep everyone posted on further developments.
Some Recent Nerd Vittles Articles of Interest…
- Many of our purchase links refer users to Amazon when we find their prices are competitive for the recommended products. Nerd Vittles receives a small referral fee from Amazon to help cover the costs of our blog. We never recommend particular products solely to generate Amazon commissions. However, when pricing is comparable or availability is favorable, we support Amazon because Amazon supports us. [↩]


 JUST RELEASED: Visit the Incredible PBX Wiki