
Home » Posts tagged 'asterisk' (Page 36)
Tag Archives: asterisk
The Most Versatile VoIP Provider: FREE PORTING

 JUST RELEASED: Visit the Incredible PBX Wiki
I Have A Dream: Free Cellular Service with Integrated Remote SIP Connectivity
As part of our Mobile Internet adventure this year, we’ve been scouring the countryside with two requirements in mind. First, we wanted a smartphone on which we could activate some type of free cellular service for making calls and sending text messages. Second, we wanted to integrate remote SIP connectivity using the same provider and phone number so that we could make and receive calls transparently using any SIP phone or Asterisk® server anywhere in the world. Sounds like a tall order, you say? Well, if you’ve enjoyed your Cloud@Cost Sandbox, you’re gonna love RingPlus!
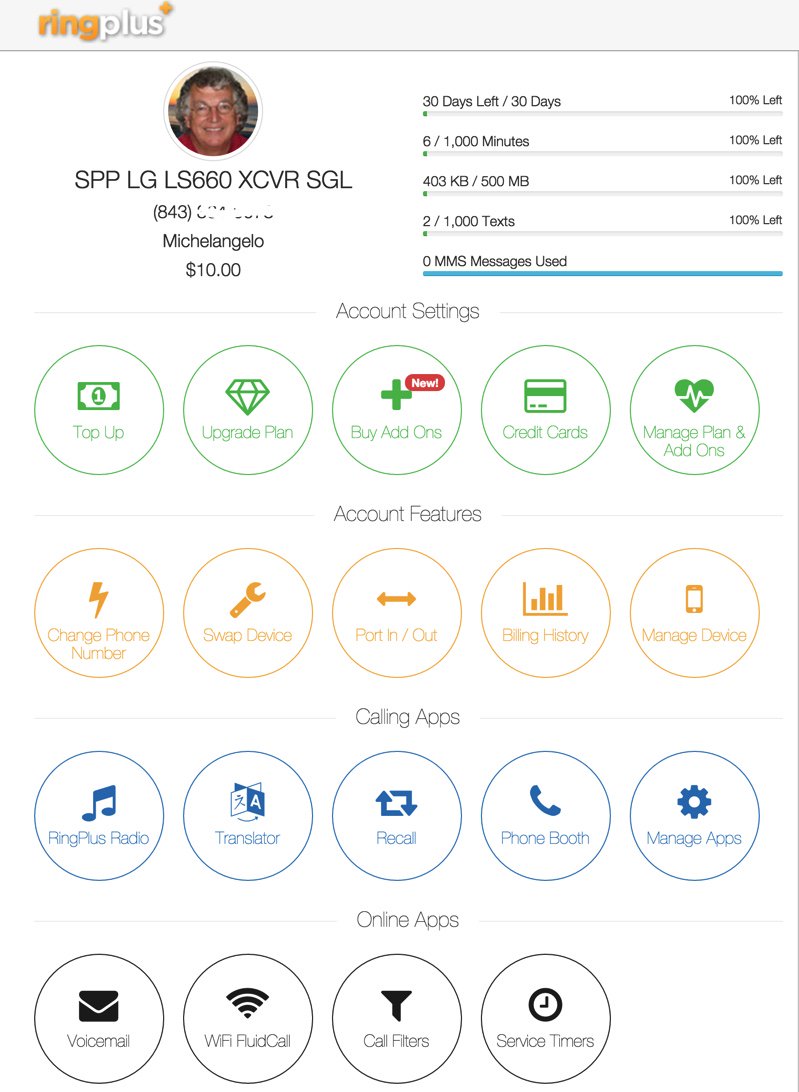
Yes, you’ll have to buy a compatible cellphone, but there are thousands to choose from. And, yes, you’ll need Sprint service in your neighborhood. Then you’ll have to cough up $10 to activate your cellular account. RingPlus offers dozens of plans.1 We recommend the Michelangelo plan which best meets what we’re trying to accomplish today, but the choice is all yours.2 With the Michelangelo plan, you can make and receive 1,000 minutes of free calls a month to anywhere in the U.S. (calls to Canada are 3¢ a minute), you can send and receive 1,000 free text messages a month, and you can use 500MB of free data service every month. You also can use your same account credentials with any SIP phone, softphone, or Asterisk server anywhere in the world to make and receive phone calls transparently using the same phone number as your smartphone. In other words, you can travel anywhere and make and receive phone calls just as if you were sitting in Atlanta, Georgia dialing from your smartphone. The SIP calls are deducted from your free minutes. No cellular service required at all. Meet RingPlus!
Starting at 3PM Eastern, free 1200 min./texts/MB cellular and/or SIP monthly https://t.co/l9It2xq14S #asterisk #voip pic.twitter.com/H6DP0sHuGx
— Ward Mundy (@NerdUno) February 9, 2016
So what’s the catch? How does RingPlus make money? Well, of course, they would prefer that you sign up for a plan with monthly fees. For those on the free plans, the only difference you will notice is an occasional ad which plays instead of a ring tone when you place outbound calls. This only occurs until the other party answers the call, and it can be all but eliminated by choosing a music selection in the RingPlus Radio feature in your RingPlus Dashboard.
Who are the ones most likely to use something like this? Well, for openers, all of your kids unless you like springing for a $500 phone and spending $40+ dollars a month for cellular service for each of them. One of the other real beauties of RingPlus is you can set up a whitelist of numbers that can be called from the phone. Blacklists are supported as well. It’s perfect for kids just getting started with a cellphone. A second potential user group would be those who travel outside the United States and prefer not to pay exorbitant roaming rates for calls. Using a SIP phone connected to your RingPlus account, all of the international calls suddenly are free. And the calls are delivered with the same CallerID number as calls placed from your actual smartphone. In fact, your smartphone doesn’t have to be in service at all. A third and perhaps most important use for us was to serve as a failover trunk on one or more Asterisk servers. When all else fails, you can route outbound calls to your RingPlus SIP trunk for free calling using your RingPlus account. Doesn’t get any better than that.
Official RingPlus WARNING: Starting April 17, 2016, per our carrier partner Sprint, Members and potential Members will no longer be able to activate prepaid devices which are not eligible under Sprint’s FED policies [Requires activation of prepaid phone on original Sprint MVNO network for at least one year!]. Such prepaid devices will no longer pass FED until actual eligibility date is met.
There are probably numerous ways to put all these pieces in place so that things function just as we’ve described. Today we’ll share with you the solution that actually worked for us. You can take it from there and avoid the thousands of horror stories about incompatible smartphones. Be advised that acquiring used cellphones or even incompatible cellphones is a very dangerous and expensive business. If you buy one that happens to be stolen, or that has a balance due on the account, or that is incompatible with RingPlus, then you’ve bought a tiny boat anchor and not much else. So, our best advice is buy one from the provider. That’s the one and only RingPlus, and the smartphones start at just under $100. Many Sprint post-paid phones also work, such as the new iPhone SE (Sprint Model) from any Apple Store.
If store employees will let you, find the Sprint postpaid phone that you like and look on the bottom of the box. There you will find the decimal value of the MEID. Log into http://nerd.bz/nvringplus and plug in the MEID to see if it is RingPlus compatible. If it passes, buy it. If it flunks, try another one. Whatever you do, DON’T BUY A PHONE IN AN OPENED BOX, AND DON’T OPEN THE BOX YET! Make certain there is a return policy in case things don’t work out as expected!
Funny story. The Radio Shack employees at our local store were very savvy and refused to let me look at the MEID claiming it was a security issue. Fair enough. Of course, they were also curious why I wanted a phone without letting them configure it. Once I told them the deal, they all wanted one, too. They asked for the link to the MEID verification site and said they’d do it for me. Once it worked, excitement broke out in the room with all the staff reading an early copy of this article. While Radio Shack typically charges a $35 restocking fee on cell phones, that fee is waived if you return the phone in an unopened box. So the only thing you’re wasting if they insist that you purchase the phone is a little bit of your time and a lot of Radio Shack employee time if, in fact, the MEID flunks the verification test.
Configuring Your Phone for RingPlus Service
Now sign up for a RingPlus free plan using the MEID and ICC ID you previously verified. Michelangelo is probably the best bet if you missed our Twitter tip this past weekend. Deposit $10 in your new account, and activate it. Log into your RingPlus Dashboard, click on your phone in the upper right frame, and choose Manage Device. Write down your MSID, your phone number, and MSL. Once your account is active, then and only then unbox and turn on your phone. Go through the minimal setup steps by choosing your Language and choosing an available WiFi network. During this setup, RingPlus should push a PRL update to your new phone, and it will reboot. Check in Settings -> General -> About Phone -> Status and see if you have a phone number. If so, you’re good to go. If not, open the Phone Dialer application and dial ##72786# which should force another PRL update to your phone with another reboot. When it finishes, check again for a phone number and place an outbound call.
Using a browser on your desktop computer, go back into the RingPlus Dashboard and sign in. Your phone device should show Active in the upper right corner of the screen. Click there and you’ll get a display like this:
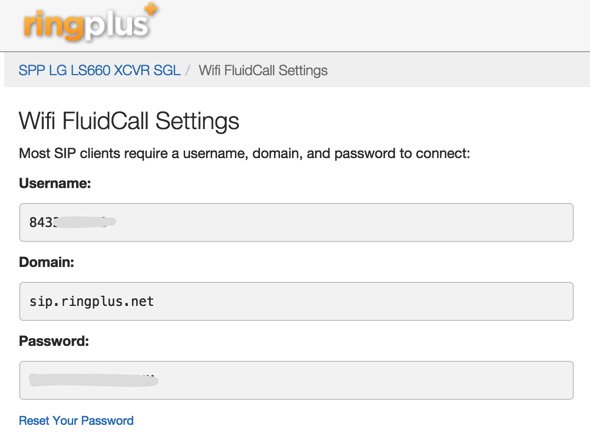
While still in the Device Settings Menu, click on the WiFi FluidCall option to decipher your SIP credentials. You’ll need these to set up your SIP phone or a SIP trunk on your Asterisk server. Your username is your 10-digit phone number, the domain name is sip.ringplus.net, and the password is a system-generated entry which you can recreate whenever you like. That’s probably a very good idea whenever you use public WiFi services to make calls with your SIP phone or a softphone.
By the way, this isn’t some kludgy SIP-GSM gateway where the calls actually are routed out through your cellphone device. The RingPlus SIP gateway connects your SIP device directly to the Internet and simply uses your existing RingPlus CallerID to identify the calls. In short, you get the best of both worlds: a dirt cheap or free cellphone service plus a dirt cheap or free SIP trunk for use anywhere in the world.
Configuring a RingPlus SIP Trunk with Asterisk
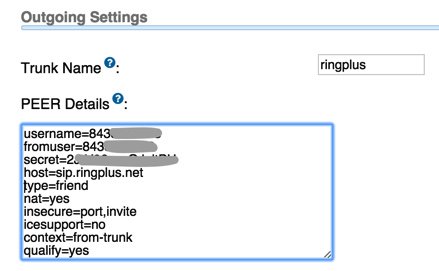
If you’d like to set up your RingPlus number as a failover trunk on your Asterisk server, here is the setup that worked for us with Incredible PBX using your assigned 10-digit phone number for your username and fromuser settings and your assigned password for your secret. If you include a registration string and configure an inbound route using your RingPlus DID, then inbound calling will work as well. If you skip the registration step, then you can use the same RingPlus trunk on multiple Asterisk servers for emergency outbound calling. No firewall adjustments should be necessary.
There are all sorts of other magic tricks you can implement using the RingPlus API, but you probably won’t need any of the features in light of the robust SIP connectivity RingPlus provides to an existing Asterisk server where the feature set is virtually unlimited. Be advised that you must make a call out at least once every 60 days to keep your account active. The simple way to do this is to set up a monthly reminder using your RingPlus trunk. Schedule the reminder to call out once every month using Telephone Reminders in Incredible PBX.
RingPlus Gotcha Checklist
Free service wouldn’t be free without a few land mines. So here’s a checklist to keep things running smoothly without any problems down the road. First, link your account to one of the social media options (Twitter, Facebook, or LinkedIn) when you sign up for service. You’ll find the link on your Dashboard under the Your Social Networks icon. Second, make at least one outbound call a month on every line you activate. As noted, this can be accomplished automatically using the Telephone Reminders application in Incredible PBX. Third, keep a valid credit card on file in your account at all times. Fourth, keep a positive balance in your account for each phone that you activate to avoid automatic replenishment at the original rate when you signed up for your plan. Fifth, be mindful of the Domino Effect. With some plans, if you allow a related plan to end (for example, Queen of Hearts when you also have an Ace of Hearts plan), then your better plan will be demoted in its feature set. Enjoy the Free Ride!
Originally published: Monday, February 8, 2016
9 Countries Have Never Visited Nerd Vittles. Got a Friend in Any of Them https://t.co/wMfmlhiQ9y #asterisk #freepbx pic.twitter.com/TPFGZbqWB6
— Ward Mundy (@NerdUno) April 22, 2016

Need help with Asterisk? Visit the PBX in a Flash Forum.
Special Thanks to Our Generous Sponsors
FULL DISCLOSURE: ClearlyIP, Skyetel, Vitelity, DigitalOcean, Vultr, VoIP.ms, 3CX, Sangoma, TelecomsXchange and VitalPBX have provided financial support to Nerd Vittles and our open source projects through advertising, referral revenue, and/or merchandise. As an Amazon Associate and Best Buy Affiliate, we also earn from qualifying purchases. We’ve chosen these providers not the other way around. Our decisions are based upon their corporate reputation and the quality of their offerings and pricing. Our recommendations regarding technology are reached without regard to financial compensation except in situations in which comparable products at comparable pricing are available from multiple sources. In this limited case, we support our sponsors because our sponsors support us.
 BOGO Bonaza: Enjoy state-of-the-art VoIP service with a $10 credit and half-price SIP service on up to $500 of Skyetel trunking with free number porting when you fund your Skyetel account. No limits on number of simultaneous calls. Quadruple data center redundancy. $25 monthly minimum spend required. Tutorial and sign up details are here.
![]() The lynchpin of Incredible PBX 2020 and beyond is ClearlyIP components which bring management of FreePBX modules and SIP phone integration to a level never before available with any other Asterisk distribution. And now you can configure and reconfigure your new Incredible PBX phones from the convenience of the Incredible PBX GUI.
The lynchpin of Incredible PBX 2020 and beyond is ClearlyIP components which bring management of FreePBX modules and SIP phone integration to a level never before available with any other Asterisk distribution. And now you can configure and reconfigure your new Incredible PBX phones from the convenience of the Incredible PBX GUI.
 VitalPBX is perhaps the fastest-growing PBX offering based upon Asterisk with an installed presence in more than 100 countries worldwide. VitalPBX has generously provided a customized White Label version of Incredible PBX tailored for use with all Incredible PBX and VitalPBX custom applications. Follow this link for a free test drive!
 Special Thanks to Vitelity. Vitelity is now Voyant Communications and has halted new registrations for the time being. Our special thanks to Vitelity for their unwavering financial support over many years and to the many Nerd Vittles readers who continue to enjoy the benefits of their service offerings. We will keep everyone posted on further developments.
Some Recent Nerd Vittles Articles of Interest…
- Be advised that future upgrades of these "free" plans may go away after February 15 unless you join the Member+ program, the cost of which changes almost weekly. This will not affect those that already are participating in the program according to RingPlus. [↩]
- In case you’re curious, a plan equivalent to the free Michelangelo plan at RingPlus would run you $41.00 per month at Ting. Ouch! [↩]
Mobile Internet: The 2016 Road Warrior’s Guide to Choosing New Wheels
OK. We’re not going to bring Mobile Computing down to the teepee level, but we have decided to dedicate a column regularly to Mobile Internet developments in the marketplace. Of course, our major focus will remain the impact on unified communications and especially Asterisk®, FreeSWITCH™, PBX in a Flash™, and Incredible PBX™. The idea here is to document a design that lets road warriors travel with the same communications dexterity that they have at home or in the home office. In other words, our vision is a mobile computing environment that makes travel status transparent. Things that worked a certain way in the office should work similarly on the road or in the comfort of your Motel 6 suite. 🙂
To get 2016 started on the right foot, we want to lay out some of the technology that’s available to the road warrior who spends a significant amount of time in an automobile. Our objective today is to help you choose that next set of wheels, the proverbial perfect vehicle. We began documenting some of what we’re looking for in our December Mobile Internet column. Today we’ll follow up with more details and some real-world feedback. What we’ll be covering in coming months applies equally to those that travel for pleasure as well as those that do it for a living. Unless you prefer hiding in your Man Cave, we hope you’ll find something useful that makes travel away from your home office amenities easier and less intimidating.
Let’s begin by documenting some of our inexpensive must-haves. These can round out your vehicle shopping list without much impact on the cost of a vehicle: cup holders (lots of them), cigarette lighter connections (lots of them), USB ports (lots of them), and compartments especially those with access to power or USB ports. Another must have for us was a fold down table for the back seat. These come standard in Mercedes S Class sedans as well as the Jaguar XJ. For other vehicles, you’ll need to consider aftermarket options which is a little surprising when you consider that every airline seat has had fold down tables FOREVER. In their haste to roll out the latest gee whiz features, many car manufacturers have forgotten the basic essentials that make all of this technology useful. But there’s hope. General Motors is among those that have finally awakened to the 21st century. Our best advice is this. Before you get swept away by the self-parking car, take a quick look inside the cabin and consider whether the vehicle has the road warrior essentials.
Now for the fun stuff. Take a quick look at this AutoBytel article which ticks off some of the more interesting high tech features that are available in the marketplace today: GPS-linked temperature control, a sensor that provides a text alert if someone is hiding in your car, a collection of audio and visual alerts if the car senses that you are distracted or falling asleep at the wheel, self-parking vehicles, night vision with pedestrian detection, adaptive cruise control that adjusts your speed based upon the speed of the vehicle in front of you, blind spot detection that provides visual warnings on your side view mirrors when a vehicle is cruising along beside you at 70+ mph, lane departure warnings which include console alerts, buzzing your seat, or adjusting your steering wheel to guide you back into your lane. And, last but not least, the latest Tesla which can drive itself under certain highway conditions. In case you haven’t guessed, none of this technology comes cheap. Typically, the features first appear in the high end cars and require the purchase of even higher priced, factory-installed options. Then they trickle down to less costly vehicles as the price of the technology drops.
Here’s our two cents worth of advice on some of these features. We happen to live in the southeastern United States so we really don’t need a GPS to tell us to turn on the air conditioner. Almost any road warrior’s dream machine will have automatic temperature control. That’s as much technology as you need to stay cool in the summer and warm in the winter.
A sensor to tell us someone is hiding inside our car is another clever idea, but we much prefer a vehicle that can lock itself when you leave the vehicle or when you place the vehicle in motion. Newer GM vehicles can also sound an alarm if someone sticks a hand into your window while you’re stopped at a traffic light. Works great unless people are passing you things while parked in a carpool line.

If you’re a road warrior that does a lot of night driving, all of the high tech features you can find that help you drive and stay awake at the wheel are terrific additions. Not mentioned in the AutoBytel article is one of our favorites that’s actually been around for decades. The head-up display (HUD) appears on the lower part of the driver’s windshield. It shows information such as your speed and the speed limit without taking your eyes off the road. For the science behind it, see this article.

If you’re a road warrior that spends considerable time commuting in heavy traffic or driving on interstates, adaptive cruise control is the best invention since sliced bread. It doesn’t completely drive the car for you, but it reduces your need to stay 99.9% focused on what’s in front of you every second of the trip. You simply set the separation distance between your vehicle and the vehicle in front of you, and radar in your vehicle does the rest, adjusting your speed to keep you at or below the cruise control speed you set for your vehicle while preserving the spacing you predefined. Newer versions of adaptive cruise control include support for bringing your vehicle to a complete stop at traffic signals. The best testimonial we can provide is this. Once you have a vehicle with adaptive cruise control, you’ll never buy another vehicle without it. It’s that good!

Blind spot detection is another radar-based feature. Visual side view mirror alerts are provided whenever something is hiding in your vehicle’s blind spot. Of course, you can accomplish much the same thing by adding supplemental wide-view (blindspot) mirrors to your existing side view mirrors at considerably less cost. However, the radar-enhanced version typically is bundled with features such as adaptive cruise control and lane departure alerts so there is no additional cost for the convenience. Just be sure to test them for accuracy before dispensing with turning your head to check for vehicles. We’ve actually had a vehicle in which the sensors were incorrectly positioned. Merging into traffic without any visual warning of what’s beside you is a quick ticket to the body shop, both for the car and for you.
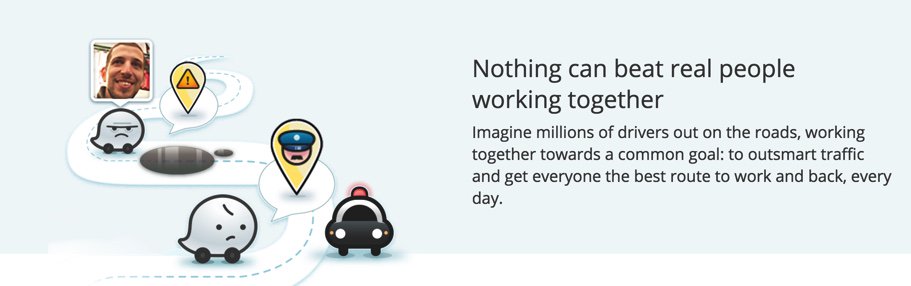
Lane departure alerts and autocorrection are equally important for those that spend endless hours on long stretches of boring highway. The other essential ingredient for every road warrior is the smartphone app, Waze. Between hazard alerts, speed trap notifications, and directions, it’s the single-most important traveling enhancement that’s come along in a very long time. Think of it as you free copilot. It can watch for things up ahead and alert you to problems before you actually encounter them. Because its data is based upon real-time data and feedback from thousands of road warriors, it has no equal in terms of accuracy. See our first article in this series for more details.

Wireless charging is another feature that has been touted by many of the Android device manufacturers. In the case of Samsung, the technology was available in the Galaxy Note 4 except for the back cover which can be replaced easily. Surprisingly, Apple has completely ignored it thus far. There are, of course, aftermarket cases that will bring wireless charging to any smartphone including the iPhones. Beginning with some 2014 models, General Motors, Chrysler, and Toyota began integrating wireless charging stations into the center consoles of some of their vehicles. By 2017, most car manufacturers probably will support it either as an included or add-on accessory.

No review of automotive technology would be complete without mention of Apple CarPlay and Android Auto, the two smartphone integration systems from America’s finest software development companies. One can only hope that the car manufacturers see the light and drop their insistence upon their own proprietary consoles. Both Apple CarPlay and Android Auto provide navigation, messaging, and numerous music platforms including Spotify, Pandora, Google Play Music, and Apple Music. Many newer vehicles offer one or the other, and some offer both. The systems also are available as aftermarket add-ons. For an excellent review of the two competing systems, take a look at this CNET review. Our only complaint with Apple CarPlay at the moment is the inability to add applications other than those that Apple has chosen for you. That means no Google Maps and no Waze, at least for now. For an excellent interview with the man behind both technologies at General Motors, see this article from The Verge.
So which vehicle did we choose for our Mobile Internet Lab? Well, come back next month and we’ll take you for a ride as we review the best WiFi Hotspots to complement that new set of wheels. We’ll consider offerings from Sprint, T-Mobile, Verizon, and AT&T so there will be something for almost everybody with a smartphone.
Originally published: Monday, January 18, 2016
9 Countries Have Never Visited Nerd Vittles. Got a Friend in Any of Them https://t.co/wMfmlhiQ9y #asterisk #freepbx pic.twitter.com/TPFGZbqWB6
— Ward Mundy (@NerdUno) April 22, 2016
Need help with Asterisk? Visit the PBX in a Flash Forum.
Special Thanks to Our Generous Sponsors
FULL DISCLOSURE: ClearlyIP, Skyetel, Vitelity, DigitalOcean, Vultr, VoIP.ms, 3CX, Sangoma, TelecomsXchange and VitalPBX have provided financial support to Nerd Vittles and our open source projects through advertising, referral revenue, and/or merchandise. As an Amazon Associate and Best Buy Affiliate, we also earn from qualifying purchases. We’ve chosen these providers not the other way around. Our decisions are based upon their corporate reputation and the quality of their offerings and pricing. Our recommendations regarding technology are reached without regard to financial compensation except in situations in which comparable products at comparable pricing are available from multiple sources. In this limited case, we support our sponsors because our sponsors support us.
BOGO Bonaza: Enjoy state-of-the-art VoIP service with a $10 credit and half-price SIP service on up to $500 of Skyetel trunking with free number porting when you fund your Skyetel account. No limits on number of simultaneous calls. Quadruple data center redundancy. $25 monthly minimum spend required. Tutorial and sign up details are here.
![]() The lynchpin of Incredible PBX 2020 and beyond is ClearlyIP components which bring management of FreePBX modules and SIP phone integration to a level never before available with any other Asterisk distribution. And now you can configure and reconfigure your new Incredible PBX phones from the convenience of the Incredible PBX GUI.
The lynchpin of Incredible PBX 2020 and beyond is ClearlyIP components which bring management of FreePBX modules and SIP phone integration to a level never before available with any other Asterisk distribution. And now you can configure and reconfigure your new Incredible PBX phones from the convenience of the Incredible PBX GUI.
VitalPBX is perhaps the fastest-growing PBX offering based upon Asterisk with an installed presence in more than 100 countries worldwide. VitalPBX has generously provided a customized White Label version of Incredible PBX tailored for use with all Incredible PBX and VitalPBX custom applications. Follow this link for a free test drive!
Special Thanks to Vitelity. Vitelity is now Voyant Communications and has halted new registrations for the time being. Our special thanks to Vitelity for their unwavering financial support over many years and to the many Nerd Vittles readers who continue to enjoy the benefits of their service offerings. We will keep everyone posted on further developments.
Some Recent Nerd Vittles Articles of Interest…
The Last Sunset: Say Goodbye to Google TTS… Hello Pico TTS

Despite the heroic efforts of Lefteris Zafiris to keep GoogleTTS afloat for use with Asterisk®, Google has made it increasingly clear that they intend to blow everyone’s apps out of the water (except theirs) if you choose to use their text to speech engine, even in open source, non-commercial products. As much as we’ve loved the voice quality and Google’s previous generosity in sharing their work product with the open source community, there comes a time when the mud wrestling simply is no longer worth the effort. Thanks to the pioneering efforts of Steven Mirabito, we all now have a choice. Steven took the work of Lefteris on GoogleTTS and retrofitted it to support the free SVOX Pico TTS engine. While Pico lacks a bit of the voice quality of GoogleTTS, it’s a quantum leap improvement over Festival and FLITE and perfectly suitable for Incredible PBX TTS apps.
[soundcloud url="https://api.soundcloud.com/tracks/240804855″ params="auto_play=false&hide_related=false&show_comments=true&show_user=true&show_reposts=false&visual=true" width="500″ height="300″ iframe="true" /]
Unlike FLITE which has no voice alternatives to Lurch, Pico for Android has a rich assortment of 40+ male/female voices supporting 25+ languages. Many of them are free. Hopefully, it’s only a matter of time until someone documents how to move them over to the Linux platforms. For today, our default install includes support for US English, British English, French, Spanish, and German. After the install, you’ll find them in /usr/share/pico/lang. Changing voices and languages in your Asterisk scripts is simple. Replace the default language identifier, en-US, with the voice of your choice, e.g. en-GB for British accents, fr-FR for French, es-ES for Spanish, and de-DE for German. If you wish to generate wave files at the command prompt, the syntax is shown below. Here’s the command we used to generate the sample sound file above.
pico2wave --wave sample.wav -l en-US "Here is a sample, using the PICO text to speech engine."
We’re getting a little ahead of ourselves here. Before you can use Pico TTS, we first need to get it installed. There are two different procedures depending upon whether Incredible PBX is running on the CentOS/Scientific Linux platform or Debian/Ubuntu/Raspbian. The installation procedure below will install all of the necessary components for Pico TTS on an existing Incredible PBX platform. It also will modify the Incredible PBX apps that currently rely upon GoogleTTS. And, as of yesterday, all new Incredible PBX 13 installs include Pico TTS by default.
To get started, log into your server as root and choose the installation steps documented below for your particular platform.1
Installing Pico TTS on the CentOS/Scientific Linux Platforms
cd /
wget http://incrediblepbx.com/picotts.tar.gz
tar zxvf picotts.tar.gz
cd /root
./picotts-install.sh
sed -i 's|en)|en-US)|' /etc/asterisk/extensions_custom.conf
sed -i 's|googletts|picotts|' /etc/asterisk/extensions_custom.conf
asterisk -rx "dialplan reload"
Installing Pico TTS on the Debian/Ubuntu Platforms
cd /
wget http://incrediblepbx.com/picotts.tar.gz
tar zxvf picotts.tar.gz
cd /root
rm -f picotts-install.sh
apt-get update
apt-get install -y libttspico-utils
sed -i 's|en)|en-US)|' /etc/asterisk/extensions_custom.conf
sed -i 's|googletts|picotts|' /etc/asterisk/extensions_custom.conf
asterisk -rx "dialplan reload"
Installing Pico TTS on the Raspberry Pi Raspbian Platform
cd /
wget http://incrediblepbx.com/picotts-raspi.tar.gz
tar zxvf picotts-raspi.tar.gz
rm -f picotts-raspi.tar.gz
cd /root
echo "Installing Pico TTS..."
./picotts-install.sh
Post-Install Testing of Pico TTS with Incredible PBX
The easiest way to make sure everything is working properly is to pick up a phone on your server and dial 951 for the latest Yahoo News headlines. Keep in mind that Google Speech Recognition (Google STT) still works for apps such as Voice Dialing (411), Voice Messaging (767), Wolfram Alpha (4747), and Star (8). However, these apps require a free API key before use. The procedure to obtain and install one is documented in this Nerd Vittles article.
Changing the Pico TTS Voice with Incredible PBX
All of the Incredible PBX application scripts are saved in extensions_custom.conf in the /etc/asterisk directory. To change the default voice for Pico TTS apps, simply search and replace en-US with the desired voice: en-GB, fr-FR, es-ES, or de-DE. Save your changes. And then reload your Asterisk dialplan: asterisk -rx "dialplan reload"
Originally published: Monday, January 11, 2016
9 Countries Have Never Visited Nerd Vittles. Got a Friend in Any of Them https://t.co/wMfmlhiQ9y #asterisk #freepbx pic.twitter.com/TPFGZbqWB6
— Ward Mundy (@NerdUno) April 22, 2016
Need help with Asterisk? Visit the PBX in a Flash Forum.
Special Thanks to Our Generous Sponsors
FULL DISCLOSURE: ClearlyIP, Skyetel, Vitelity, DigitalOcean, Vultr, VoIP.ms, 3CX, Sangoma, TelecomsXchange and VitalPBX have provided financial support to Nerd Vittles and our open source projects through advertising, referral revenue, and/or merchandise. As an Amazon Associate and Best Buy Affiliate, we also earn from qualifying purchases. We’ve chosen these providers not the other way around. Our decisions are based upon their corporate reputation and the quality of their offerings and pricing. Our recommendations regarding technology are reached without regard to financial compensation except in situations in which comparable products at comparable pricing are available from multiple sources. In this limited case, we support our sponsors because our sponsors support us.
BOGO Bonaza: Enjoy state-of-the-art VoIP service with a $10 credit and half-price SIP service on up to $500 of Skyetel trunking with free number porting when you fund your Skyetel account. No limits on number of simultaneous calls. Quadruple data center redundancy. $25 monthly minimum spend required. Tutorial and sign up details are here.
![]() The lynchpin of Incredible PBX 2020 and beyond is ClearlyIP components which bring management of FreePBX modules and SIP phone integration to a level never before available with any other Asterisk distribution. And now you can configure and reconfigure your new Incredible PBX phones from the convenience of the Incredible PBX GUI.
The lynchpin of Incredible PBX 2020 and beyond is ClearlyIP components which bring management of FreePBX modules and SIP phone integration to a level never before available with any other Asterisk distribution. And now you can configure and reconfigure your new Incredible PBX phones from the convenience of the Incredible PBX GUI.
VitalPBX is perhaps the fastest-growing PBX offering based upon Asterisk with an installed presence in more than 100 countries worldwide. VitalPBX has generously provided a customized White Label version of Incredible PBX tailored for use with all Incredible PBX and VitalPBX custom applications. Follow this link for a free test drive!
Special Thanks to Vitelity. Vitelity is now Voyant Communications and has halted new registrations for the time being. Our special thanks to Vitelity for their unwavering financial support over many years and to the many Nerd Vittles readers who continue to enjoy the benefits of their service offerings. We will keep everyone posted on further developments.
Some Recent Nerd Vittles Articles of Interest…
- If you’re using an older version of CentOS, see the install tips documented on the PIAF Forum. [↩]
Mobile Internet: A 2015 Update on Caribbean Cruising and WiFi-Enabled Travel

We decided to spend Christmas a little differently this year and joined 10,000 of our closest friends on cruises to the Western Caribbean taking in Cozumel and Grand Cayman with a few extra days at sea. If you haven’t tried it, put it on your bucket list. Christmas week is a bargain and about 50% cheaper than the same cruise to ring in the new year. Rates start at about $300 per person for the 5-day cruise. You’d be hard-pressed to dine out for a week in your home town at those prices. Today we want to provide an update on the dramatic changes in Internet connectivity not only aboard ship but also in navigating 1,000 miles of highway to get there. Let’s start with the glamorous part.
Surfing the Internet Aboard Ship
What a difference a couple years has made. On previous cruises to Alaska and the Eastern Caribbean, Internet service was spotty at best and cost prohibitive on sea days. Typical connection rates were $25 or more per hour. You found yourself scrambling to find a bar with cheap Internet service every time you hit a port. But that was then. Here’s our 2015 update.
Carnival which owns the majority of the cruise ship companies (9 different brands) prides itself on making cruising affordable for almost any traveler. So we qualified. They’ve also revolutionized Internet service with rates on some ships (including ours) as low as $5 a day for unlimited (but basic) Internet connectivity. Here’s a typical pricing plan, but ours was even less expensive. $70 got us unlimited premium Internet service including Skype (one user at a time) for the entire 5-day cruise, and performance was surprisingly good, roughly triple the speed of the $5 a day plan and equivalent to or better than cellular 3G service regardless of the time of day. During early mornings, dinner hours, and when docked at a port, the speed difference from DSL was barely noticeable. Part of this is due to Carnival’s new hybrid Internet technology which blends satellite service with strategically placed Internet towers along your itinerary. The way it works is simple. You login with your account number and birthday, and you can stay logged in as long as you like. If another member of your family wishes to use the service, they simply login on a different device with the same account number and birthday. They’ll be prompted whether to bump you off. Clicking YES transfers the Internet connection to their device and terminates your connection. With three people, it worked amazingly well and was a wonderful testament to what it means to share. Complete details of the WiFi@Sea Internet program are available here. The rollout will be complete by the end of the first quarter in 2016.

We made roughly a dozen Skype calls to test the quality of the calls. With a couple of exceptions, the calls were roughly equivalent to what you would expect using a cable modem connection. With the two bad calls, it was obvious within a couple seconds, and the simple solution was to hang up and try again.

If you’re an Asterisk user, connectivity to an office or home server was easy by making a free call with Skype Connect which we documented just last week. Once connected to an AutoAttendant on the home server, using DISA to make secondary calls to other destinations at minimal cost was a no-brainer. The setup is simple, and we showed how to do it over 10 years ago. Today, it’s built into the GUI. We routed the incoming Skype calls to a Stealth AutoAttendant on the Asterisk server. By pressing an unannounced key during the welcome message, we were prompted for our DISA password. After entering it successfully, we were prompted for a number to dial. In our setup, this includes any number supported by our dialplan: local extensions, 10-digit NANPA numbers throughout the U.S., Canada, and 18 other north American countries as well as special dial codes to retrieve voicemails and other Asterisk functions.
Bottom Line: Do your homework before you book a cruise. Decide what your must-have’s for the cruise are and then compare prices.
Surfing the Internet from Your Car or Motorhome

The other eye-opener was the advances in cellular service along America’s interstates. 4G service now is available almost everywhere. Average download speeds were in the 20-40 Mb range. We used 7.18GB of data during 16 hours of travel. That works out to roughly a half gig per hour of travel with three users. YMMV! Funny how quickly 4G service rolled out once the (not so) Baby Bells got their monopoly back and could charge by the megabyte. We were one of the lucky ones to snag one of the few remaining Verizon unlimited data plans on eBay. Verizon now has tightened the screws and doesn’t allow transfer of the plans to others. But, if you’re one of the lucky ones that still pays over $100 a month for an unlimited data plan (Verizon just quietly raised the monthly charge by $20), then here’s some information for you. First, as part of the FCC’s 4G spectrum auction, bidders (Verizon in this case) were required to agree to the following condition as laid out in 47 C.F.R. 27.16:
(b) Use of devices and applications. Licensees offering service on spectrum subject to this section shall not deny, limit, or restrict the ability of their customers to use the devices and applications of their choice on the licensee’s C Block network, except:
(1) Insofar as such use would not be compliant with published technical standards reasonably necessary for the management or protection of the licensee’s network, or
(2) As required to comply with statute or applicable government regulation.
When Verizon won the auction, they reluctantly acknowledged a customer’s ability to move a SIM card from one device to another so long as the new device was on Verizon’s approved devices list. It doesn’t mean Verizon hasn’t dragged its feet on adding new approved devices, however. The important takeaway from this is that moving between approved devices appears to be safe even though there have been some reported problems. You’ll know whether you’re using a Verizon-approved device by examining your Verizon account to see if a picture of the new device shows up once you insert your SIM card.

So what does all of this have to do with surfing the Internet from your vehicle? Well, you have two choices. You can use your existing smartphone, enable tethering, and have multiple passengers surfing the Internet at 4G speeds with unlimited bandwidth. Or you can purchase a Verizon-approved Novatel T1114 4G Router on eBay and move your SIM card there for trips. Just be sure you buy one with the required 3.5W power adapter. Then add a $20 150W Power Inverter, and you’ve got a Mobile WiFi powerhouse plus a POTS phone connection… in your car.

If you’re one of the unlucky ones that doesn’t have an unlimited data plan with Verizon Wireless, there’s now another option if you live in an area with Sprint service. HINT: Sprint works great along most interstate highways in the United States. For $50 or less per month, you can set up a WiFi HotSpot in your vehicle with unlimited data using Karma Go. If you use our signup link, you get $10 off, and we get a $10 referral credit. There’s a 45-day money-back guarantee. For a great review of Karma Go, go here. And 2016 promises more choices with most new GM vehicles sporting an integrated WiFi HotSpot.
Karma Go Bait-and-Switch: Before buying this "unlimited Internet" device, read the latest news. https://t.co/0tnPvKlDPU #asterisk #freepbx
— Ward Mundy (@NerdUno) January 8, 2016
UPDATE: Karma Go this week began backing off from its unlimited Internet pledge. Seems these companies never learn the bait-and-switch lessons from those that preceded them… or they don’t want to. You can read all about it here.
1/18 UPDATE: Karma Go today announced that they were restoring the original 5 Gbit performance of the product but would cap usage at 15GB/month after which performance would be throttled to "speeds good enough for emailing and messaging."
NEWS FLASH: Beginning January 12, 2016, unlimited Internet plans return to AT&T Wireless for those that also subscribe to DirecTV or U-Verse. Details available here.
There’s more good news from our 1,000 mile travel adventure. We were late to this party, but what an awesome addition for those that travel for a living or just for vacations. If you’ve never tried Waze, add it to your smartphone right now! Not only do you get turn-by-turn directions to any destinations, but you also get road hazard alerts, automatic traffic rerouting to avoid bottlenecks, cheap gas price alerts, and… did we mention that in 1,000 miles it didn’t miss alerting us to every single speed trap. Police departments are government bureaucracies that have grown just like the rest of federal, state, and local government agencies. We counted nearly 100 police vehicles doing nothing but traffic enforcement. On 70 mile per hour Interstate highways, our unscientific survey showed that speeds increased to 75 miles per hour with no police presence compared to 69 miles per hour when a speed trap had been identified. It was readily apparent that truckers and frequent travelers have been using Waze long before us. What we kept asking ourselves was whether the cost of 100 police officers + 100 police cars + an enormous fuel bill was really worth it to slow folks down (momentarily) by 6 miles per hour. We hear a lot about government waste, but the police seem to get a pass on frugality by claiming they’re saving lives. We just didn’t see much of a correlation. It looked more like a game of cat and mouse. Happy New Year everybody. Don’t Drink and Drive!
Originally published: Monday, December 28, 2015
9 Countries Have Never Visited Nerd Vittles. Got a Friend in Any of Them https://t.co/wMfmlhiQ9y #asterisk #freepbx pic.twitter.com/TPFGZbqWB6
— Ward Mundy (@NerdUno) April 22, 2016
Need help with Asterisk? Visit the PBX in a Flash Forum.
Special Thanks to Our Generous Sponsors
FULL DISCLOSURE: ClearlyIP, Skyetel, Vitelity, DigitalOcean, Vultr, VoIP.ms, 3CX, Sangoma, TelecomsXchange and VitalPBX have provided financial support to Nerd Vittles and our open source projects through advertising, referral revenue, and/or merchandise. As an Amazon Associate and Best Buy Affiliate, we also earn from qualifying purchases. We’ve chosen these providers not the other way around. Our decisions are based upon their corporate reputation and the quality of their offerings and pricing. Our recommendations regarding technology are reached without regard to financial compensation except in situations in which comparable products at comparable pricing are available from multiple sources. In this limited case, we support our sponsors because our sponsors support us.
BOGO Bonaza: Enjoy state-of-the-art VoIP service with a $10 credit and half-price SIP service on up to $500 of Skyetel trunking with free number porting when you fund your Skyetel account. No limits on number of simultaneous calls. Quadruple data center redundancy. $25 monthly minimum spend required. Tutorial and sign up details are here.
![]() The lynchpin of Incredible PBX 2020 and beyond is ClearlyIP components which bring management of FreePBX modules and SIP phone integration to a level never before available with any other Asterisk distribution. And now you can configure and reconfigure your new Incredible PBX phones from the convenience of the Incredible PBX GUI.
The lynchpin of Incredible PBX 2020 and beyond is ClearlyIP components which bring management of FreePBX modules and SIP phone integration to a level never before available with any other Asterisk distribution. And now you can configure and reconfigure your new Incredible PBX phones from the convenience of the Incredible PBX GUI.
VitalPBX is perhaps the fastest-growing PBX offering based upon Asterisk with an installed presence in more than 100 countries worldwide. VitalPBX has generously provided a customized White Label version of Incredible PBX tailored for use with all Incredible PBX and VitalPBX custom applications. Follow this link for a free test drive!
Special Thanks to Vitelity. Vitelity is now Voyant Communications and has halted new registrations for the time being. Our special thanks to Vitelity for their unwavering financial support over many years and to the many Nerd Vittles readers who continue to enjoy the benefits of their service offerings. We will keep everyone posted on further developments.
Some Recent Nerd Vittles Articles of Interest…
Just in Time for Santa: Return of The Glory Days with Skype Connect for Asterisk?
You’ve been good boys and girls all year, and today we have some great news for Asterisk® lovers. Skype is back! Oh, if it were only that simple. But let’s revel in the good news for a bit. Microsoft introduced Skype Connect™ about 5 years ago. Now it’s a SIP interface to Skype. And today we’ll take a fresh look at whether it’s a good fit with Asterisk. Skype Connect is part of Skype Manager™, a carefully considered and beautiful product offering that showcases Microsoft’s UI design skills. After shelling out our weekly allowance to join the party, we were ready to go. Here’s a quick overview from Microsoft:
Skype Connect provides connectivity between your business and the Skype community. By adding Skype Connect to your existing SIP-enabled PBX, your business can save on communication costs with little or no additional upgrades required.
With Skype Connect, your business can make great value Skype calls and receive calls from your customers using your desk phones. Customers can also contact your business for free by using Skype from a browser with Skype buttons, by calling [not for free] the Skype business accounts associated with your SIP-enabled PBX, or [by placing PSTN calls to Skype Numbers you may have purchased].
In addition to an Asterisk server, here’s what you’ll need to get started. First things first, sign up for a Skype Manager account if you don’t already have one. It’s easy and it’s free. Once you’re signed up and logged in, you’re going to need a little cash in your Skype credit account to get things going. $30 will get you started but finish reading the article before you invest.
Configuring Skype Connect for Asterisk
To get started, click Features in the toolbar, choose Skype Connect and click Set up a SIP Profile. Give the profile a name "SOHO Inc." and click Next. Next, choose the number of Channels you need at $6.95 per month. A channel gets you one simultaneous call in or out of Skype. Two channels gets you one call in and one call out simultaneously for $13.90 per month. You can take it from there but, sorry, you can only buy 300 channels at this time. You can add the U.S. Minute Bundles, and we’ll explain that in a minute.
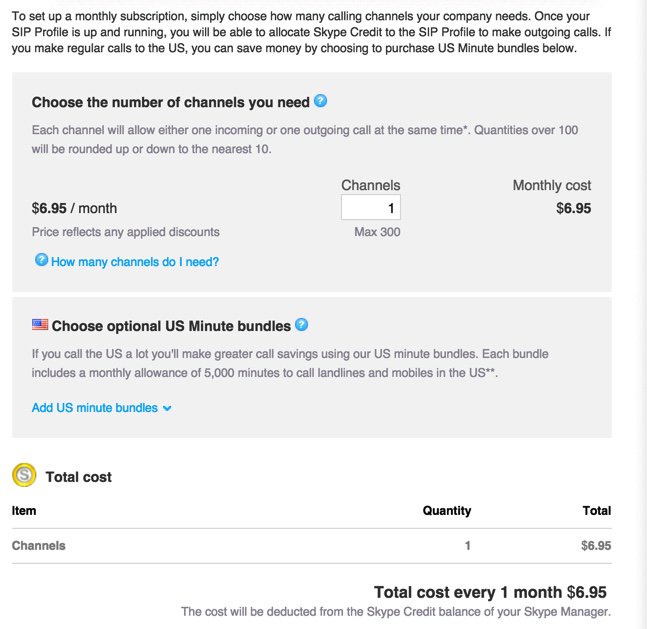
Don’t buy your channels just yet. For now, cancel out of the dialog by clicking Back. Microsoft will set up your profile anyway:
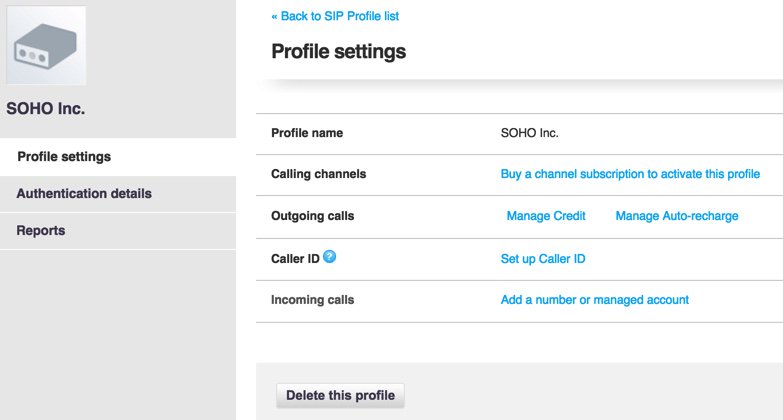
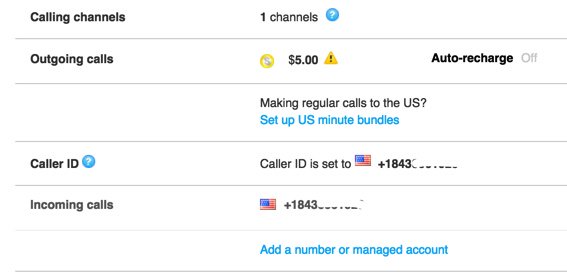
The money deposited into your Skype Manager account will be needed to fund Skype Connect in three separate ways: (1) monthly payments for Channels at $6.95 each, (2) monthly payments for Phone Numbers associated with those Channels at $6.30 each, and (3) allocation of funds in advance to pay for outbound calls from each profile you create. You’ll need at least one phone number (a.k.a. DID) to receive any inbound calls from POTS phones to the Skype Connect SIP account on your Asterisk server. You’ll also need at least one phone number before you can assign a CallerID to your outbound calls.1 Otherwise, they go out as Anonymous calls. Outgoing and incoming calls using traditional Skype Names are not supported.
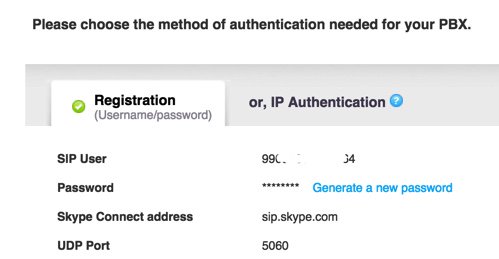
Once you get your finances in order, it’s time to set up your SIP credentials for your new profile. Click on Authentication Details to display the dialog. Leave the Registration tab highlighted, and click on Generate a New Password, and a new SIP password will be sent to the email address you used to register when you set up your Skype Manager account.
Configuring Asterisk for Skype Connect
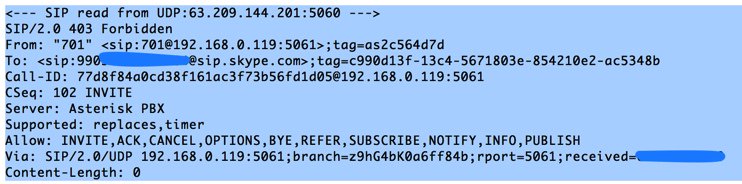
On your Asterisk server using your favorite GUI, create a new SkypeConnect SIP trunk with your CallerID and the number of channels you’ve paid for. For the Dialed Number Rule: Prepend: +1, Prefix: 759, Match Pattern: NXXNXXXXXX. Insert the following OutGoing Settings in PEER Details. Use skypeconnect for the peer name and your actual SIP user number and password from Microsoft:
username=990xxxxxxxxxxx
secret=YourRealPassword
type=peer
qualify=yes
insecure=invite
host=sip.skype.com
fromdomain=sip.skype.com
disallow=all
allow=ulaw
context=from-trunk
fromuser=990xxxxxxxxxxx
For the Register String, it’s your SIPusernumber:password@sip.skype.com/SIPusernumber
Finally, create an Incoming Route for your SIPusernumber and tell the GUI where to route the incoming calls. Create an Outbound Route for SkypeOut with a pattern of 759NXXNXXXXXX that points to your skypeconnect trunk. Calls can be placed by dialing the 759 prefix plus a 10-digit number. Adjust as necessary to meet your international requirements.
A Cost-Benefit Analysis of Skype Connect
If you’ve followed along so far and done the math for yourself, you’ve quickly discovered that Skype Connect’s beauty may only be skin deep depending upon your calling patterns. Let’s give Microsoft the benefit of the doubt and assume that they’re using first rate SIP trunks to carry your calls. Here’s our review of how Skype Connect stacks up to the competition.
Vitelity is one of our corporate sponsors. Their SIP trunking services are by no means the cheapest on the planet, but you get what you pay for so we’ll use them to compare prices against Skype Connect. For openers, if you haven’t figured it out already, Skype Connect doesn’t bear much resemblance to the Skype of yesteryear. It is essentially a pay-as-you-go SIP trunking service with very few of the historical benefits of Skype. None of the benefits are documented! According to Microsoft, no free calls except with Skype Buttons. This requires a web development effort and limits callers to browser-based phone calls, not exactly ideal. There’s another wrinkle. It doesn’t work. Skype URIs might, but we didn’t test it. No ability to call existing Skype users is supported except those that have purchased a $6.30/month telephone number to associate with their Skype account. And then you pay for the call… by the minute. There is a silver lining, however. By examining the Skype Connect logs, we discovered that Microsoft internally forwards incoming calls to DIDs back into Skype Connect account numbers before processing the calls. That suggested that Microsoft was using these account numbers for internal call routing. And, sure enough, that is the case. Although undocumented, existing Skype users can dial your Skype Connect account number with a + prefix, and the call will be connected to Skype Connect at no cost (see below). If your Skype Connect SIP trunk is registered to an Asterisk server, then the calls will flow directly into Asterisk.

Our attempts to apply a similar methodology using a remote SIP client, however, failed.2 Others have claimed it works or at least did at one time. Both direct calling approaches eliminate the need for Skype users on BOTH ends of a call to purchase dedicated phone numbers from Microsoft and to pay for long distance calls. The fact that Microsoft has chosen not to document this suggests that free Skype calling to Skype Connect using Skype clients may be short-lived. For today using Skype clients (only), calls will connect using our documented methodology.
Using the Nerd Vittles special Vitelity signup link below, $3.99 a month buys you a DID in your choice of area codes, unlimited incoming calls, and four channels. This means you can receive four simultaneous incoming calls without any caller receiving a busy signal. Now for the math. Identical service with Microsoft’s SIP trunking service and four channels would run you $34.10 per month, nearly 10 times the cost of Vitelity for comparable SIP service. That’s before you place your first outbound call.
Let’s consider some examples that factor into the outbound calling equation. For outbound calls, Microsoft wins if you only make tons of calls within the continental United States only. A U.S. bundle of 5,000 minutes runs $30 with Microsoft.3 That is a bargain at .6¢/min. if you use all 5,000 minutes every month. You can buy one bundle for each channel purchased. Vitelity’s rate to the continental U.S., Hawaii, and Canada is 1.44¢ per minute which works out to $72 for the same 5,000 minutes. Change the call mix to Canada only, and the Microsoft rate skyrockets to $115 while the Vitelity rate stays the same.
Using a more typical SOHO or home calling pattern of 2,000 outbound minutes a month, the Vitelity rate is $28.80 while Microsoft’s rate is $16. Combining the trunk charges, the Vitelity total comes to $32.75 while Microsoft comes in at $50.10. Translation: With the same trunks, channels, a single DID, and 2,000 minutes of outbound U.S. only calls, Vitelity saves you about a third of the monthly cost of the identical Microsoft configuration. For inbound only calling without factoring in free inbound Skype calls, Vitelity saves you 88%. For Canada calling with 2,000 minutes a month, Vitelity saves you about half.
Your actual costs obviously will vary depending upon the mix and number of simultaneous inbound/outbound calls as well as the origin and destination of the calls. For home and SOHO organizations, Skype Connect rarely will be your best choice unless you get a lot of calls from Skype users around the world. In that case, $6.95 a month for a Skype Connect channel (and nothing else) would be a bargain. For the most part, Microsoft’s focus seems to be larger organizations. For U.S.-based organizations that make substantial numbers of outbound calls to U.S. destinations, Skype Connect also could be financially attractive because of the U.S. calling bundles.
For an interesting look at Microsoft’s future in the telecom space, read this article.
Q: Is Skype Connect a good value?
A: It depends! Do the math. YMMV!
Originally published: Monday, December 21, 2015
9 Countries Have Never Visited Nerd Vittles. Got a Friend in Any of Them https://t.co/wMfmlhiQ9y #asterisk #freepbx pic.twitter.com/TPFGZbqWB6
— Ward Mundy (@NerdUno) April 22, 2016
Need help with Asterisk? Visit the PBX in a Flash Forum.
Special Thanks to Our Generous Sponsors
FULL DISCLOSURE: ClearlyIP, Skyetel, Vitelity, DigitalOcean, Vultr, VoIP.ms, 3CX, Sangoma, TelecomsXchange and VitalPBX have provided financial support to Nerd Vittles and our open source projects through advertising, referral revenue, and/or merchandise. As an Amazon Associate and Best Buy Affiliate, we also earn from qualifying purchases. We’ve chosen these providers not the other way around. Our decisions are based upon their corporate reputation and the quality of their offerings and pricing. Our recommendations regarding technology are reached without regard to financial compensation except in situations in which comparable products at comparable pricing are available from multiple sources. In this limited case, we support our sponsors because our sponsors support us.
BOGO Bonaza: Enjoy state-of-the-art VoIP service with a $10 credit and half-price SIP service on up to $500 of Skyetel trunking with free number porting when you fund your Skyetel account. No limits on number of simultaneous calls. Quadruple data center redundancy. $25 monthly minimum spend required. Tutorial and sign up details are here.
![]() The lynchpin of Incredible PBX 2020 and beyond is ClearlyIP components which bring management of FreePBX modules and SIP phone integration to a level never before available with any other Asterisk distribution. And now you can configure and reconfigure your new Incredible PBX phones from the convenience of the Incredible PBX GUI.
The lynchpin of Incredible PBX 2020 and beyond is ClearlyIP components which bring management of FreePBX modules and SIP phone integration to a level never before available with any other Asterisk distribution. And now you can configure and reconfigure your new Incredible PBX phones from the convenience of the Incredible PBX GUI.
VitalPBX is perhaps the fastest-growing PBX offering based upon Asterisk with an installed presence in more than 100 countries worldwide. VitalPBX has generously provided a customized White Label version of Incredible PBX tailored for use with all Incredible PBX and VitalPBX custom applications. Follow this link for a free test drive!
Special Thanks to Vitelity. Vitelity is now Voyant Communications and has halted new registrations for the time being. Our special thanks to Vitelity for their unwavering financial support over many years and to the many Nerd Vittles readers who continue to enjoy the benefits of their service offerings. We will keep everyone posted on further developments.
Some Recent Nerd Vittles Articles of Interest…
- According to this article, phone numbers registered to your company can also be used as a CallerID number. [↩]
- Attempts to register using a free DID at IPkall also were unsuccessful. [↩]
- In the fine print, Microsoft discloses that nearly 100 six-digit dialing prefixes in the U.S. are excluded from the bundle pricing. Download the User Guide here. [↩]
Virtual Paradise: An Asterisk OVF Template for VMware and VirtualBox Fans
UPDATE: A newer Incredible PBX image for VMware is now available here.
Let’s face it. Virtual Machines are the future of server administration. Whether you prefer your own dedicated hardware or cloud-based resources managed by you or someone else, virtual platforms are the way to go. You get more bang for the buck out of your hardware by pooling resources for multiple tasks. Platforms such as VMware® and VirtualBox® make it easy.
What we were missing in the Asterisk® aggregation market was a simplified, open source installer that would let you deploy servers on the virtual platform of your choice without our having to maintain separate builds for each VM technology.
Today, we’re pleased to introduce the new Incredible PBX Unified Installer for VMware and VirtualBox with new OVF editions for Incredible PBX Full Enchilada as well as Lean & Mean. Download the OVF flavor of your choice to your desktop and fire up your favorite virtual machine GUI. With a few mouse clicks and a couple of minutes, you’ll have a Scientific Linux 6.7 platform in place with Incredible PBX just a single keystroke away. It doesn’t get any easier than that. And, unlike the static builds offered by the competition, with Incredible PBX you always get the very latest release of Asterisk 13 and the Incredible PBX GUI compiled on the fly from source code that you can actually examine, enhance, and share… just like the GPL license says. Feel free to compare our open source approach to Sangoma’s Gotcha Special. You have a very real choice!
July 20 NEWS FLASH: Google now has discontinued support of their XMPP interface to Google Voice so the latest CentOS/SL version of Incredible PBX (13-13.7) including the Incredible PBX ISO now incorporate NAF’s GVSIP interface to Google Voice. You can read all about it here. What has changed is you now add Google Voice trunks from the command line by running /root/gvsip-naf/install-gvsip. You can delete trunks by running /root/gvsip-naf/del-trunk. Once one or more trunks have been added, they are numbered GVSIP1 through GVSIPn. Using the GUI, you then add an Outbound Route and an Inbound Route for each trunk. You’ll need both your Google Voice 10-digit phone number and a Refresh Token to add a new trunk. This functionality is not yet available in the virtual machine builds, but you can easily add it. Once your virtual machine is up and running, head over to this GVSIP tutorial for step-by-step instructions. New virtual machine builds natively supporting GVSIP will be available soon.
Choosing a Virtual Machine Platform
Making the right deployment choice for your virtual machine platform depends upon a number of factors. We initially started out with Proxmox 4 which looked promising. After all, we had used and recommended earlier releases of Proxmox for many years until some security vulnerabilities caused us to look elsewhere. Those kernel issues are now a thing of the past, but Proxmox 4 introduced some new wrinkles. First, to stay current with software fixes and updates, you have to pay the piper by signing up for the annual support license. This turned out to be a deal breaker for a couple of reasons. It was expensive since it’s based upon the number of CPUs in your platform. In the case of the hardware shown below, that turned out to be 4 CPUs (by Proxmox’s calculation) which meant the annual support license would run nearly $400 per year. That buys an enormous number of virtual machines at Digital Ocean without having to babysit hardware at all. And, you get a $10 credit to try out the service just for signing up. We also ran into serious technical problems with Proxmox 4. While the server would run without hiccups for a day or so, connectivity failed regularly after that. A reboot would fix the problem for another day, and then it was more of the same. Whether this was a bug or a design choice to encourage paid software updates, we obviously don’t know. Regardless of the reason, we reluctantly concluded that Proxmox 4 wasn’t ready for production use.
That narrowed the selection to VMware or VirtualBox. VMware is rock-solid and has been for more than fifteen years. VirtualBox is equally good, but typically runs on a desktop computer rather than dedicated hardware. If you don’t have the funds for a hardware purchase to support your virtualization requirements, then VirtualBox is a no-brainer. For many, however, some separation of the virtualization environment from your desktop computing environment is desirable. And, again, the choice is a no-brainer. VMware wins that one, hands down.
Getting Started with VMware ESXi
Many of you have VMware platforms already in place at work. For you, installing Incredible PBX is as simple as downloading the OVF tarball to your desktop and importing it into your existing platform. If you’re new to VMware, here’s an easy way to get started, and the software won’t cost you a dime. VMware offers a couple of free products that will give you everything you need to run a robust VMware platform on relatively inexpensive hardware. Let’s start with the hardware.
A $500 VMware Platform for SOHO and Small Business Applications
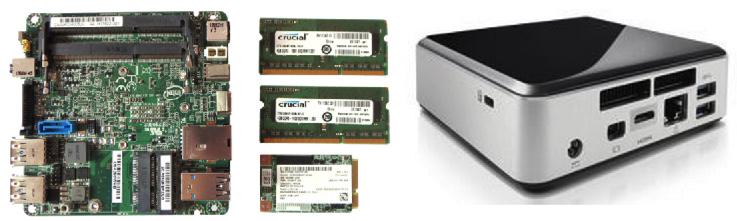
You’re looking at all the components that make up the $500 Intel® NUC D54250WYK with a Core i5 dual-core processor, a 250GB mSATA drive, and 16GB of RAM. While you install the RAM and disk drive yourself, if you can unscrew 5 screws and have 5 minutes to spare, you can handle this.
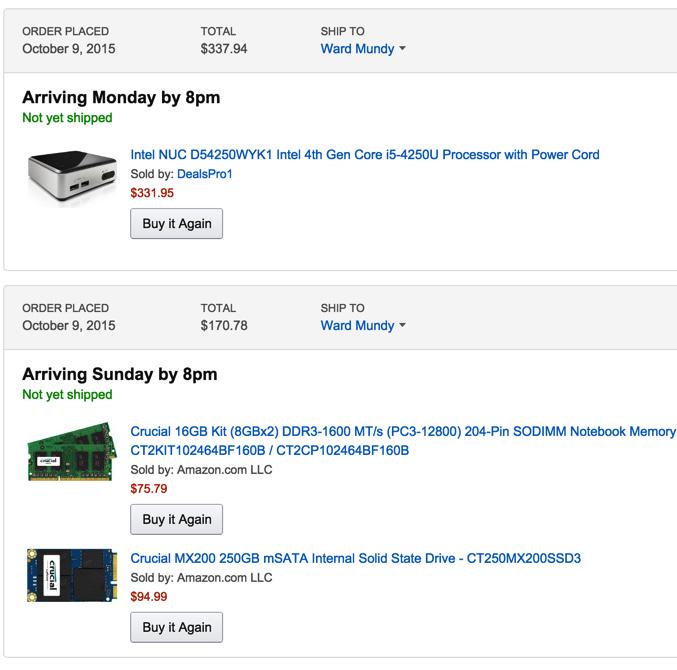
Here’s how we started. Of course, you can adjust the components and the merchant to meet your own requirements. For us, Amazon1 works great, and the prices are competitive. Who else delivers on Sunday? Despite the notice that the computer would be here on Monday, we knew better. And sure enough it was in the box with the other Sunday goodies. We removed the four screws from the bottom feet of the computer, and the case opened easily. Next, we unscrewed the screw from the bottom of the motherboard that holds the SSD drive in place securely. Snap in the mSATA drive and the two memory sticks, replace the screws, and we were in business.
NEWS FLASH: The Intel NUC pictured above is the 4th Generation Core i5 device. Now the 5th Generation edition is an even better deal. See the sidebar for the NUC5i5RYK link.
A Free VMware Software Platform for SOHO and Small Business Applications
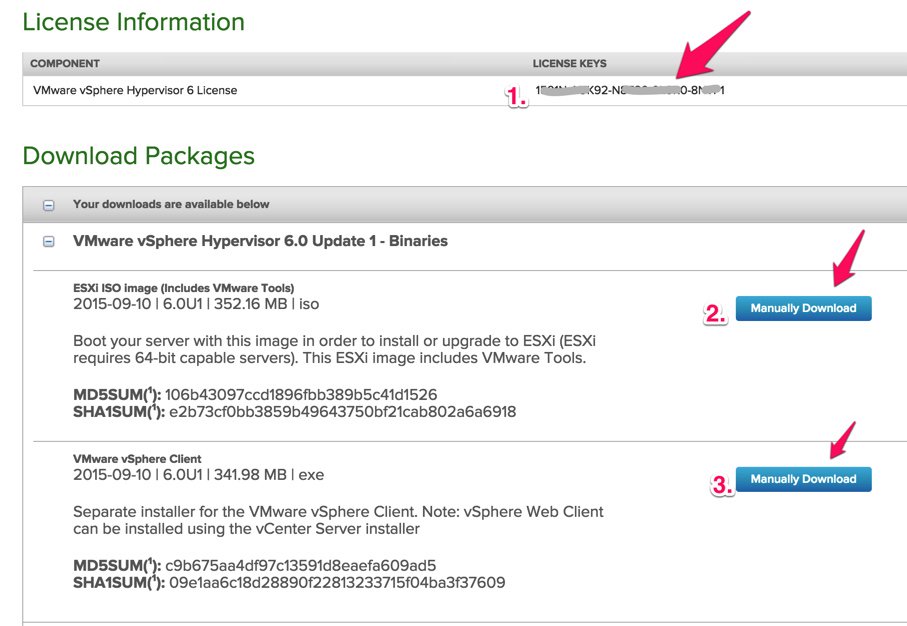
Before you can download either of the components for the free VMware ESXi platform, you’ll need to sign up for a free account at my.vmware.com. Once you’re signed up, log in and go to the ESXi 6 Download Center and sign up for a free ESXi license key:
- Write down your assigned License Key
- Manually download the VMware vSphere Hypervisor 6.0 Update 1 ISO
- Manually download the VMware vSphere Client 6.0U1
Next, burn the ISO to a CD/DVD and boot your dedicated VM hardware platform with it. Follow the instructions to complete the install. Next install the vSphere Client on a Windows computer. Don’t forget to add your ESXi License Key when you complete the installation. Once the ESXi server is up and running, you can stick the hardware on a shelf somewhere out of the way. You will rarely interact with it. That’s all handled using the VMware vSphere Client on your Windows Desktop. Yes, there is a web client as well, but you’ll have to pay for that one.
Deploying Incredible PBX OVF Templates with VMware vSphere Client

Deploying an Incredible PBX OVF template takes about two minutes, but first you need to download and unzip the desired Incredible PBX OVF templates from SourceForge onto your Windows Desktop.
Once you have the Incredible PBX OVF templates on your desktop, here are the deployment steps:
1. Login to the vSphere Client on your Windows Desktop using the root account you set up when you installed ESXi. Choose File, Deploy OVF Template.
2. Select the desired Incredible PBX .ovf template from your desktop PC after first unzipping the downloads.
3. Click Next.
4. Give the new Virtual Machine a name.
5. IMPORTANT: Choose Thin Provision option and click Next.
6. Review your entries and click Next to create the new Virtual Machine.
7. It takes about 2 minutes to create the new Virtual Machine.
8. The Main Client window will redisplay and your new VM should now be shown in the left panel. (1) Click on it. (2) Then click the Green start icon. (3) Click the Console Window icon.
9. When the VM’s Console Window opens, click in the window in the black area. Then press ENTER to kick off the Incredible PBX Phase 2 install. Review the Incredible PBX tutorial to get started.
Ctrl-Alt gets your mouse and keyboard out of the console window.
Installing the vSphere Web Client
If you’re lucky, you may not have a Windows machine. The downside is that the vSphere Client described above only works on the Windows platform. After hours of searching some of the most dreadful documentation on the planet, we finally uncovered a simple way to install the (experimental) vSphere Web Client. It is pure HTML5 with no Flash code! It’s also not ready for prime time. Most of the feature set looks pretty but doesn’t work if you have a free license. But it will give you an idea of where VMware is headed, and the bug reportedly will be fixed in the ESXi 6.0U2 release.
FYI: An easy way to apply License Key once it’s set up: Virtual Machines -> Licensing -> Apply License
1. Log into the console of your ESXi server as root using your root password.
2. Press F2 to Customized System.
3. Choose Troubleshooting Options.
4. Choose Enable SSH.
5. Using a Terminal window on a Mac or Linux machine or using Putty with Windows, log into the IP address of your ESXi server as root.
6. Issue the following command to install the vSphere Web Client vib:
esxcli software vib install -v http://download3.vmware.com/software/vmw-tools/esxui/esxui-2976804.vib
7. Using a web browser, login to the web client as root at https://ESXi-server-IP-address/ui
8. Should you ever wish to remove the web client from your server:
esxcli software vib remove -n esx-ui
9. Don’t forget to disable SSH access when you’re finished. Just repeat steps 1-4 above.
Installing Incredible PBX OVF Templates with VirtualBox
For those that opt for a desktop virtualization solution, there is no finer choice than VirtualBox. We’ve written about VirtualBox previously on Nerd Vittles so we won’t repeat the history here. If you need help setting it up, see this Nerd Vittles tutorial.
For today, we’ll show you how to take a VMware OVA template and build a VirtualBox VM:
1. Start up VirtualBox on your desktop.
2. Choose File, Import Appliance and select your Incredible PBX OVF template by clicking on the File Dialog icon. Click Continue when done.
3. In the Appliance Settings dialog, be sure "Reinitialize MAC Address of all network cards" is checked. Click Import.
4. Once the virtual machine is created, select it and click Settings. Name the VM in the General tab. Check Enable I/O APIC in the System tab. Set Video Memory to 16MB in the Display tab. Enable Audio and choose your sound card in the Audio tab. Enable Network and choose Bridged Network for Adapter 1 in the Network tab. Click OK to save your changes.
5. Click the Start icon to fire up your virtual machine. Press ENTER in the VM window to start Phase II of the Incredible PBX install.
6. Review the Incredible PBX tutorial to get started.
Initial Configuration of Incredible PBX
To complete the install, use SSH or putty to log into your VM as root. Default password: password. Then…
- Change your root password immediately: passwd
- Set your FreePBX admin password: /root/admin-pw-change
- Set your web apps admin password: htpasswd /etc/pbx/wwwpasswd admin
- Set your correct time zone: /root/timezone-setup
- Add WhiteList entries to firewall if needed: /root/add-ip or /root/add-fqdn
- Store PortKnocker credentials in a safe place: cat /root/knock.FAQ
- Login to your NeoRouter VPN server if desired: /root/nrclientcmd
- Run the Incredible Fax installer, if desired: /root/incrediblefax11.sh
- Set your admin password for AvantFax: /root/avantfax-pw-change
- Enable Google Voice OAUTH authentication support, if desired: http://nerd.bz/1JaO4ij (section 1b.)
Originally published: Monday, December 14, 2015
9 Countries Have Never Visited Nerd Vittles. Got a Friend in Any of Them https://t.co/wMfmlhiQ9y #asterisk #freepbx pic.twitter.com/TPFGZbqWB6
— Ward Mundy (@NerdUno) April 22, 2016
 Support Issues. With any application as sophisticated as this one, you’re bound to have questions. Blog comments are a terrible place to handle support issues although we welcome general comments about our articles and software. If you have particular support issues, we encourage you to get actively involved in the PBX in a Flash Forums. It’s the best Asterisk tech support site in the business, and it’s all free! Please have a look and post your support questions there. Unlike some forums, ours is extremely friendly and is supported by literally hundreds of Asterisk gurus and thousands of users just like you. You won’t have to wait long for an answer to your question.
Need help with Asterisk? Visit the PBX in a Flash Forum.
Special Thanks to Our Generous Sponsors
FULL DISCLOSURE: ClearlyIP, Skyetel, Vitelity, DigitalOcean, Vultr, VoIP.ms, 3CX, Sangoma, TelecomsXchange and VitalPBX have provided financial support to Nerd Vittles and our open source projects through advertising, referral revenue, and/or merchandise. As an Amazon Associate and Best Buy Affiliate, we also earn from qualifying purchases. We’ve chosen these providers not the other way around. Our decisions are based upon their corporate reputation and the quality of their offerings and pricing. Our recommendations regarding technology are reached without regard to financial compensation except in situations in which comparable products at comparable pricing are available from multiple sources. In this limited case, we support our sponsors because our sponsors support us.
BOGO Bonaza: Enjoy state-of-the-art VoIP service with a $10 credit and half-price SIP service on up to $500 of Skyetel trunking with free number porting when you fund your Skyetel account. No limits on number of simultaneous calls. Quadruple data center redundancy. $25 monthly minimum spend required. Tutorial and sign up details are here.
![]() The lynchpin of Incredible PBX 2020 and beyond is ClearlyIP components which bring management of FreePBX modules and SIP phone integration to a level never before available with any other Asterisk distribution. And now you can configure and reconfigure your new Incredible PBX phones from the convenience of the Incredible PBX GUI.
The lynchpin of Incredible PBX 2020 and beyond is ClearlyIP components which bring management of FreePBX modules and SIP phone integration to a level never before available with any other Asterisk distribution. And now you can configure and reconfigure your new Incredible PBX phones from the convenience of the Incredible PBX GUI.
VitalPBX is perhaps the fastest-growing PBX offering based upon Asterisk with an installed presence in more than 100 countries worldwide. VitalPBX has generously provided a customized White Label version of Incredible PBX tailored for use with all Incredible PBX and VitalPBX custom applications. Follow this link for a free test drive!
Special Thanks to Vitelity. Vitelity is now Voyant Communications and has halted new registrations for the time being. Our special thanks to Vitelity for their unwavering financial support over many years and to the many Nerd Vittles readers who continue to enjoy the benefits of their service offerings. We will keep everyone posted on further developments.
Some Recent Nerd Vittles Articles of Interest…
- Some of our purchase links refer users to Amazon and other sites when we find their prices are competitive for the recommended products. Nerd Vittles receives a small referral fee from merchants to help cover the costs of our blog. We never recommend particular products solely to generate commissions. However, when pricing is comparable or availability is favorable, we support Amazon and other merchants because they support us. [↩]
Rolling Your Own: Creating a Custom Incredible PBX ISO for Asterisk
We promised to provide the Incredible PBX 13.2 ISO build environment for those of you that wanted to learn how to roll your own ISO. Why would you want to do such thing? Well, we can think of a number of reasons. First, you may just want to learn how sh*t works. Or you may want to impress your boss by building a custom ISO with the corporate logo splattered all over the place. Then there are those that want to add a feature or function that we haven’t included yet so you can share your creation with your friends. For us, the motivation was to provide an Asterisk® aggregation that others could build upon without legal hassles about copyrights and trademarks… you know, a real open source project based upon the GPL license.
Regardless of your motivation, today’s your lucky day. We’re providing an exact duplicate of the build environment that was used to create the Incredible PBX 13.2 ISO. It’s released under the same GPL license that applies to the ISO itself. Copy it, enhance it, give it to your friends, and share your additions so that all of us can learn from you. In addition to the code, we’re actually going to document how to modify it and use it… you know, real instructions.
The Schmoozers were back in full force last week with one accusing us of "stealing" their code and another with this gem:
https://twitter.com/JamesFreePBX/status/672883656310972422
For the record, we use GPL code of others with full credit to the authors. That’s what the GPL and Asterisk aggregations have always been about. Let’s compare that to our Sangoma® friends who rip the covers off RedHat’s GPL ISO, brand it as their own, and then have the balls to distribute it as closed source code. Repeating a lie over and over doesn’t make it come true!

Getting Started. Before you can use today’s code, you’ll need a suitable platform on which to play. You’ve got a couple of choices. First, you can actually install Incredible PBX 13.2 using last week’s ISO. A second option is to build yourself a virtual machine or a cloud-based server with Scientific Linux 6.7 or even CentOS 6.7 minimal. We recommend 32-bit architecture because the Incredible PBX 3.2 ISO build environment as configured is 32-bit to assure maximum hardware compatibility. The server hardware platform doesn’t really matter. Cheaper means it takes a little longer, but you’ll get the same results.
Installing the Incredible PBX 13.2 ISO Build Environment. Once you have your server up and running, log in as root. This usually isn’t a good idea for a build environment, by the way. We’re doing it because we’re assuming you have a machine dedicated to just building ISOs on which to experiment. Issue these commands to put the ISO build platform in place:
cd /root
setenforce 0
yum -y install wget nano
wget http://incrediblepbx.com/create-ISO-new.tar.gz
tar zxvf create-ISO-new.tar.gz
rm -f create-ISO-new.tar.gz
Creating Your First ISO. Why waste time? Let’s actually build an Incredible PBX ISO to show you how easy it is. Issue the following command to kick off the process: /root/create-ISO-new. Depending upon your server’s specs, the whole build procedure should take a minute or two to complete. When it’s finished, you’ll have a shiny new ISO that can be burned to a DVD or USB thumb drive following the steps documented in our previous tutorial:
ls -all /root/kickstart_build/*.iso

-rw-r--r-- 1 root root 890241024 Nov 24 12:45 /root/kickstart_build/IncrediblePBX13.2.iso
ISO Design Overview. There are lots of ways to design an ISO architecture. We’ve chosen a hybrid approach with a two-phase install. When you first boot from the ISO installer, you get the operating system platform. The server then reboots, and Phase II downloads and then runs the latest Incredible PBX installer. Our main reason for choosing this design is that you don’t have to create a new ISO every time you make changes in the Incredible PBX installer. For those of you that remember the Asterisk@Home and trixbox days, this was a major shortcoming. The ISOs were released about every three to six months, and invariably a major glitch was discovered about a week after the new ISO was introduced. With our two-phase installer, slipstream changes are easy to implement by simply adding a line to the Incredible PBX install script. The ISO itself never has to be updated until a major operating system refresh is necessary.
Adding Packages to Your ISO. With Incredible PBX, RHEL 6.7-compatible packages are added to new servers in a couple of ways. First, there are packages actually included within the ISO itself that are loaded during Phase I of the install, i.e. when Scientific Linux 6.7 platform is installed. These packages must include all necessary dependencies. The kickstart process actually resolves and loads package dependencies as part of the Phase I ISO install procedure. Once the base install is completed, the end-user’s server reboots and then the Phase II install kicks off by downloading and running the Incredible PBX 13-12R installer. Additional RPM packages and a number of other applications in tarball format are downloaded and installed during this Phase II process. Today, we’ll show you how to modify both pieces of the ISO install procedure.
To add RPMs to the ISO itself, keep in mind that the new RPMs must match the architecture of the default build environment. In the case of Incredible PBX, it’s a 32-bit architecture which means you’ll need 32-bit versions of RPMs you wish to add. Otherwise, you will need to replace all of the packages in the build environment with their 64-bit cousins.
There are 3 steps to adding new packages to the ISO build environment.
First, create a temporary directory (/tmp/packages) to use for gathering up the RPMs to be added. This is so you can check your work without screwing up your build environment. To add an RPM, you first need to download it from a repository to your temporary directory. The syntax looks like this where NetworkManager is the name of the RPM you wish to install:
yum -y install --downloadonly --downloaddir=/tmp/packages NetworkManager
Second, move the RPMs from /tmp/packages into your build environment. This must include RPM package dependencies (as was the case when adding NetworkManager):
mv /tmp/packages/*.rpm /root/kickstart_build/isolinux/Packages/.
Third, add the names of your new RPMs to the kickstart config files (ks*.cfg) in /root/kickstart_build/isolinux. The package names go in the section of each kickstart file labeled %packages.
NOTE: You do not have to add the names of RPMs being added because of dependencies in step 3. You DO have to add the actual RPMs and RPM dependencies in step 2. For example, with NetworkManager, only NetworkManager itself needed to be added to the %packages list in the ks*.cfg config files. But the collection of NetworkManager RPMs and its dependencies for step 2 looked like this:
avahi-autoipd-0.6.25-15.el6.i686.rpm
dnsmasq-2.48-14.el6.i686.rpm
libdaemon-0.14-1.el6.i686.rpm
mobile-broadband-provider-info-1.20100122-4.el6.noarch.rpm
ModemManager-0.4.0-5.git20100628.el6.i686.rpm
NetworkManager-0.8.1-99.el6.i686.rpm
NetworkManager-glib-0.8.1-99.el6.i686.rpm
ppp-2.4.5-10.el6.i686.rpm
rp-pppoe-3.10-11.el6.i686.rpm
wpa_supplicant-0.7.3-6.el6.i686.rpm
Changing the ISO Default Boot Menu. Once you have burned the ISO to a DVD-ROM or USB flash drive and booted your server-to-be, a default kickstart menu will be presented: /root/kickstart_build/isolinux/isolinux.cfg. Edit it to customize the splash screen and make any desired changes in the screen title and options displayed to those using your ISO. WARNING: If you modify the ks*.cfg options in the file, you also will need to make similar modifications in the create-ISO-new build script as well as adding new matching ks config files in /root/kickstart_build/isolinux.
Modifying the Phase II ISO Install Procedure. The Phase I install setup already provided in the Incredible PBX ISO will work for any number of ISO requirements you might have because it provides a robust Scientific Linux 6.7 base platform. Now for the fun part. You can modify the Phase II install in any way you like by simply adjusting the download script and hosting it on your own public server.
The Phase II magic is housed in the %post section of the kickstart config files (ks*.cfg). The initial setup in this section will work for almost any setup. It addresses the quirks of getting a working network connection functioning on most server platforms. This got much more complicated with the introduction of UEFI on newer Intel-based servers. But we’ve addressed all of that. To customize the install to run your own Phase II script, you need only modify the last few lines of the %post section:
/bin/echo "cd /root" >> /tmp/firstboot
/bin/echo "/usr/bin/wget http://incrediblepbx.com/incrediblepbx13-12.2-centos.tar.gz" >> /tmp/firstboot
/bin/echo "/bin/tar zxvf incrediblepbx13-12.2-centos.tar.gz" >> /tmp/firstboot
/bin/echo "/bin/rm -f incrediblepbx13-12.2-centos.tar.gz" >> /tmp/firstboot
/bin/echo "./Inc*" >> /tmp/firstboot
/bin/chmod +x /tmp/firstboot
eject
%end
These last few lines tell the ISO installer where to find your Phase II script and manage the procedure for downloading it, untarring it, and then running it. To deploy your own Phase II install script, simply modify lines 2, 3, 4, and 5 above. In line 2, provide the public server location of your script in .tar.gz format. In line 3, untar the script in the /root folder of the new server. In line 4, remove the .tar.gz file after it’s been decompressed. In line 5, run the shell script included in your tarball. The remaining lines shown above should be preserved as shown. Once you finish making changes in ks.cfg, copy the %post section to your other kickstart config files and then rerun /root/create-ISO-new to build your new ISO. Enjoy!
Originally published: Friday, December 11, 2015
Support Issues. With any application as sophisticated as this one, you’re bound to have questions. Blog comments are a terrible place to handle support issues although we welcome general comments about our articles and software. If you have particular support issues, we encourage you to get actively involved in the PBX in a Flash Forums. It’s the best Asterisk tech support site in the business, and it’s all free! Please have a look and post your support questions there. Unlike some forums, ours is extremely friendly and is supported by literally hundreds of Asterisk gurus and thousands of users just like you. You won’t have to wait long for an answer to your question.
Need help with Asterisk? Visit the PBX in a Flash Forum.
Special Thanks to Our Generous Sponsors
FULL DISCLOSURE: ClearlyIP, Skyetel, Vitelity, DigitalOcean, Vultr, VoIP.ms, 3CX, Sangoma, TelecomsXchange and VitalPBX have provided financial support to Nerd Vittles and our open source projects through advertising, referral revenue, and/or merchandise. As an Amazon Associate and Best Buy Affiliate, we also earn from qualifying purchases. We’ve chosen these providers not the other way around. Our decisions are based upon their corporate reputation and the quality of their offerings and pricing. Our recommendations regarding technology are reached without regard to financial compensation except in situations in which comparable products at comparable pricing are available from multiple sources. In this limited case, we support our sponsors because our sponsors support us.
BOGO Bonaza: Enjoy state-of-the-art VoIP service with a $10 credit and half-price SIP service on up to $500 of Skyetel trunking with free number porting when you fund your Skyetel account. No limits on number of simultaneous calls. Quadruple data center redundancy. $25 monthly minimum spend required. Tutorial and sign up details are here.
![]() The lynchpin of Incredible PBX 2020 and beyond is ClearlyIP components which bring management of FreePBX modules and SIP phone integration to a level never before available with any other Asterisk distribution. And now you can configure and reconfigure your new Incredible PBX phones from the convenience of the Incredible PBX GUI.
The lynchpin of Incredible PBX 2020 and beyond is ClearlyIP components which bring management of FreePBX modules and SIP phone integration to a level never before available with any other Asterisk distribution. And now you can configure and reconfigure your new Incredible PBX phones from the convenience of the Incredible PBX GUI.
VitalPBX is perhaps the fastest-growing PBX offering based upon Asterisk with an installed presence in more than 100 countries worldwide. VitalPBX has generously provided a customized White Label version of Incredible PBX tailored for use with all Incredible PBX and VitalPBX custom applications. Follow this link for a free test drive!
Special Thanks to Vitelity. Vitelity is now Voyant Communications and has halted new registrations for the time being. Our special thanks to Vitelity for their unwavering financial support over many years and to the many Nerd Vittles readers who continue to enjoy the benefits of their service offerings. We will keep everyone posted on further developments.
Some Recent Nerd Vittles Articles of Interest…
Cyber Monday 2016: The Return of the Lean, Mean Asterisk Machine
We promised to deliver the Incredible PBX™ ISO build environment this week, but that didn’t really have much sex appeal for Cyber Monday. Instead, today we’re introducing the product that tops the 2016 Wish List from Nerd Vittles readers: a stripped down, lean and mean version of Incredible PBX 13 with just the operating system platform, the latest version of Asterisk® 13, and an uncluttered Incredible GUI with the basic collection of FreePBX® GPL modules… and No Gotchas.
Who would want such a thing? Well, lots of folks apparently. Developers and system integrators prefer a clean slate when they’re rolling out systems for new customers. And we want to provide a mix of solutions that meet everyone’s requirements. The three dozen Incredible PBX applications for Asterisk still can be added on an as needed basis. Or, if you change your mind and decide you’re missing all of those preconfigured, free applications, just run the Incredible PBX installer again and switch tutorials. As they say in the hood, "Different strokes for different folks."
The silver lining in the one week delay of the ISO Build Environment rollout means that next week you’ll have all the pieces as well as the templates needed to create two versions of Incredible PBX instead of one… plus some important bug fixes. And speaking of bugs, there was a Big One in the 11/29/2015 ISO that prevented installation of Incredible PBX Full Enchilada. This has been fixed in the 12/01/2015 release:
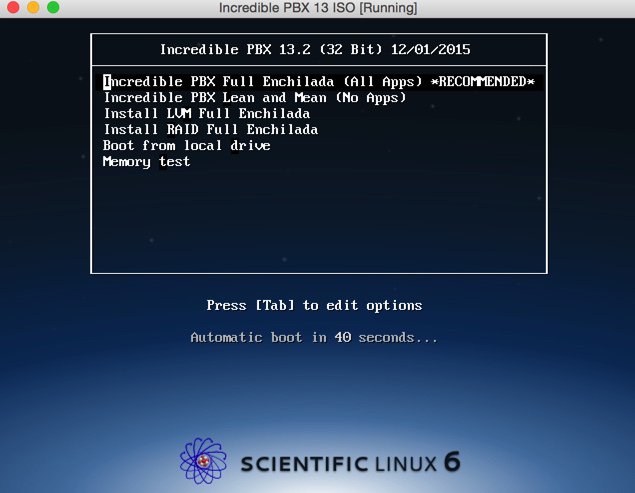
Initially, we had planned to roll out a separate ISO for Incredible PBX Lean. But that seemed kind of silly. After all, the beauty of an ISO is being able to present a menu of choices and then let the person installing the software make a selection that best meets their needs. So there’s an updated ISO on SourceForge that now lets you choose between the Full Enchilada and the Lean & Mean version of Incredible PBX 13. Last week’s tutorial will walk you through the Full Enchilada setup. Today we’ll cover what’s necessary to install and deploy the Lean & Mean version. And, yes, you can burn the new ISO to either a DVD-ROM or a 1GB or larger USB thumb drive.
Introducing the Incredible PBX 13.2 Lean Platform
Overview. The Incredible PBX Lean installation process couldn’t be easier. Download IncrediblePBX13.2.iso from SourceForge. Burn the ISO to a DVD-ROM or USB thumb drive. Four different methods are outlined below. Need some great hardware for under $200? Read our tutorial. Or, if you have an old PC lying around, that’ll work, too. Boot up the dedicated machine on which you want to install Incredible PBX. Highlight the Lean & Mean option on the ISO installation menu and press the ENTER key. Choose your time zone, create a really secure root password, and have a coffee break. When Scientific Linux 6.7 has been installed, your server will reboot. Accept the Incredible PBX license agreement and press the ENTER key. Go to lunch and, when you return, you should be good to go. Finish reading this tutorial to add the finishing touches and secure your server.
Let us take a moment to explain the Incredible PBX installation process using this ISO. We don’t hide stuff in our ISO or play games with your security. We don’t give ourselves or our application any secret permissions. There are just two steps to an Incredible PBX ISO install. When the install begins, it loads pure Scientific Linux 6.7 onto your server,1 not some homegrown concoction using proprietary repositories. Your server then reboots. After restarting, the very latest copy of the Incredible PBX 13-12 installer is downloaded and run. You’ll find the source code for the Incredible PBX installer in your /root directory after the install is completed: IncrediblePBX13-12L.sh. You’ll also find some other helpful scripts in /root including the optional (free) Incredible Fax installer. If you ever have a question about what was installed on your server, feel free to examine the source code of our installers or post a note on the PIAF Forum. It’s unencrypted GPL2 code. You’re free to use it, enhance it, and share it. Try that with Sangoma. It’s your choice!
Incredible PBX 13.2 ISO Installation Guide
Downloading the Incredible PBX 13.2 ISO. On the machine you’ll be using to create your installation media, download IncrediblePBX13.2.iso from SourceForge.
Burning a DVD-ROM from the ISO. If your server platform doesn’t have USB support, then burn the ISO to a DVD using a Mac or Windows machine.
Creating a USB Flash Drive Installer. If your server platform has USB ports, you have three ways to move the Incredible PBX 13.2 ISO to a 1GB or larger flash drive. You can use a Windows PC, a Mac, or a Linux machine to create the USB thumb drive installer.
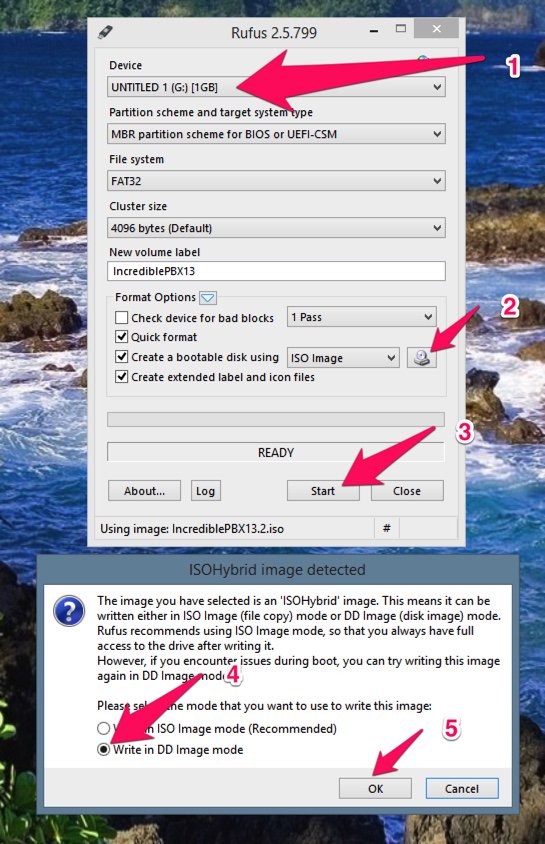
Creating a USB Flash Drive Installer with a Windows PC. In order to create a USB thumb drive using an ISO image, you’ll first need to install Rufus. It’s free. Once you’ve installed it, insert a blank USB thumb drive and run Rufus. Make your settings look like what’s shown above. Be very careful in choosing your Device. You don’t want to accidentally erase the wrong drive on your Windows machine. The correct choice is the USB thumb drive you just inserted. Don’t guess!! Step 2 is choosing the IncrediblePBX13.2.iso file that you downloaded from SourceForge. Step 3 is clicking Start. The ISOHybrid Window will be presented. Step 4 is changing the default setting to "Write in DD image mode." Step 5 is pressing OK. In a few minutes, your ISO image transfer to the USB flash drive will be finished. Give it 15 seconds just to be safe. Then remove the USB thumb drive and you’re ready to begin the install on your dedicated Incredible PBX server.
Creating a USB Flash Drive Installer with a Mac. To create a USB thumb drive using an ISO image on a Mac, first insert the USB thumb drive and partition it with a single MS-DOS partition using Disk Utility. Next, open a Terminal window and issue the command: diskutil list. Review the device names and find the one that matches the size of your thumb drive. It will be something like /dev/disk9. Again, be careful. You don’t want to accidentally erase the wrong drive on your Mac! Next, change to the directory into which you downloaded IncrediblePBX13.2.iso, e.g. cd Desktop. Now issue the following commands substituting the actual device name for /dev/disk9 below:
diskutil unmountDisk /dev/disk9
sudo dd if=IncrediblePBX13.2.iso bs=1m of=/dev/disk9
sudo sync
diskutil eject /dev/disk9
When the install completes, remove the USB thumb drive and you’re ready to begin the install on your dedicated Incredible PBX server. NOTE: There will be no feedback during the dd step above. It can take 15 minutes or more depending upon the horsepower of your Mac. Be patient!
Creating a USB Flash Drive Installer on a Linux machine. To create a USB thumb drive using an ISO image on a Linux machine, first log into your server as root. Insert a blank USB thumb drive. From the CLI, decipher the device name of your thumb drive: fdisk -l. The device name will be something like /dev/sdb. Be careful. You don’t want to accidentally erase the wrong drive on your Linux server! Change to the directory into which you downloaded IncrediblePBX13.2.iso, e.g. cd /root. To transfer the ISO to your thumb drive, issue the following commands replacing /dev/sdb with the actual device name for your thumb drive in lines 1 and 3 below:
dd if=IncrediblePBX13.2.iso bs=4M of=/dev/sdb
sync
udisks --detach /dev/sdb
When the install completes, remove the USB thumb drive and you’re ready to begin the install on your dedicated Incredible PBX server. NOTE: There will be no feedback during the dd step above. It can take 5 to 15 minutes depending upon the horsepower of your Linux machine.
Kicking Off the Incredible PBX 13 Lean Install. Now we’re ready to install Incredible PBX 13 Lean on your dedicated server platform. Simply insert the DVD-ROM or USB thumb drive in your server-to-be and boot. During the POST boot process, press the function key that displays a Boot Device Menu and choose your DVD-ROM drive or USB device. When the Incredible PBX 13 installation menu displays, choose the second option for the Lean & Mean Install and press ENTER. Choose your time zone, create a really secure root password, and have a coffee break. When Scientific Linux 6.7 has been installed, your server will reboot. Accept the Incredible PBX license agreement and press the ENTER key. Go to lunch and, when you return, you should be good to go. When the installation finishes, reboot your server and log in as root to apply the last minute updates for Incredible PBX.
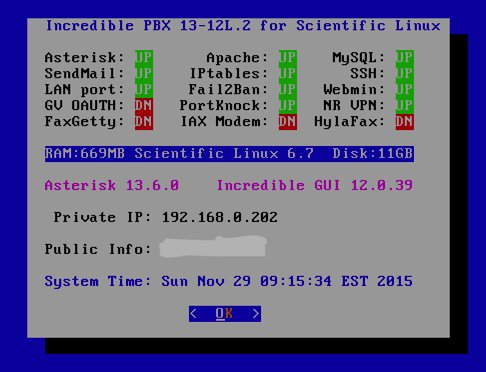
To complete the install, perform the following from the Linux CLI while logged in as root:
- Change your root password if it’s insecure: passwd
- Set your Incredible GUI admin password: /root/admin-pw-change
- Set your web apps admin password: htpasswd /etc/pbx/wwwpasswd admin
- Set your correct time zone: /root/timezone-setup
- Add WhiteList entries to firewall if needed: /root/add-ip or /root/add-fqdn
- Store PortKnocker credentials in a safe place: cat /root/knock.FAQ
- *** THE REMAINING FEATURES ARE OPTIONAL ADDITIONS ***
- Login to your NeoRouter VPN server: /root/nrclientcmd
- To enable free faxing: /root/incrediblefax11.sh
- Set admin password for AvantFax: /root/avantfax-pw-change
- To enable PPTP VPN: /root/pptp-install
- To enable Google Voice OAUTH authentication: http://nerd.bz/1JaO4ij (1b.)
- To install FCC RoboCall BlackList: http://nerdvittles.com/?p=15412
Managing Your Server with Incredible PBX Web-Based Tools
Most of your time initially configuring and managing your server will be spent using the web-based tools provided with Incredible PBX. Because most of the apps have been removed in the Lean version of Incredible PBX, the Kennonsoft Menu layer has been removed from the install. Using any modern browser, go to the IP address of your server as shown in the status display above. Choose Incredible GUI Administration. The default username is admin and the password is what you set during the final installation steps above. The Incredible PBX GUI’s Status will display with a clean slate. The only additions to the base install of the FreePBX GPL modules are a dozen preconfigured (but disabled) trunks from the leading trunk providers. This will save you some time, but you can delete any or all of them with a few mouse clicks. We’ve also removed module signature checking to streamline the addition of GPL modules from providers other than Sangoma®. We strongly recommend that you log into the Incredible GUI at least once a week and check the PBX in a Flash RSS News Feed for security alerts and bulletins.
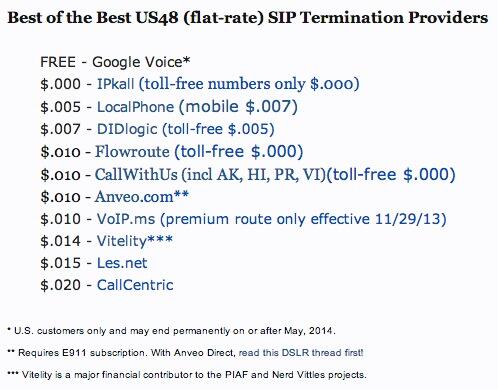
Configuring Google Voice
If you want to use Google Voice, you’ll need a dedicated Google Voice account to support Incredible PBX. If you want to use the inbound fax capabilities of Incredible Fax, then you’ll need an additional Google Voice line that can be routed to the FAX custom destination using the GUI. The more obscure the username (with some embedded numbers), the better off you will be. This will keep folks from bombarding you with unsolicited Gtalk chat messages, and who knows what nefarious scheme will be discovered using Google messaging six months from now. So keep this account a secret!
We’ve tested this extensively using an existing Gmail account, and inbound calling is just not reliable. The reason seems to be that Google always chooses Gmail chat as the inbound call destination if there are multiple registrations from the same IP address. So, be reasonable. Do it our way! Set up a dedicated Gmail and Google Voice account, and use it exclusively with Incredible PBX. It’s free at least through 2013. Google Voice no longer is by invitation only so, if you’re in the U.S. or have a friend that is, head over to the Google Voice site and register.
You must choose a telephone number (aka DID) for your new account, or Google Voice calling will not work… in either direction. Google used to permit outbound Gtalk calls using a fake CallerID, but that obviously led to abuse so it’s over! You also have to tie your Google Voice account to at least one working phone number as part of the initial setup process. Your cellphone number will work just fine. Don’t skip this step either. Just enter the provided 2-digit confirmation code when you tell Google to place the test call to the phone number you entered. Once the number is registered, you can disable it if you’d like in Settings, Voice Setting, Phones. But…
IMPORTANT: Be sure to enable the Google Chat option as one of your phone destinations in Settings, Voice Setting, Phones. That’s the destination we need for The Incredible PBX to work its magic! Otherwise, all inbound and outbound calls will fail. If you don’t see this option, you may need to call up Gmail and enable Google Chat there first. Then go back to the Google Voice Settings.
While you’re still in Google Voice Settings, click on the Calls tab. Make sure your settings match these:
- Call Screening – OFF
- Call Presentation – OFF
- Caller ID (In) – Display Caller’s Number
- Caller ID (Out) – Don’t Change Anything
- Do Not Disturb – OFF
- Call Options (Enable Recording) – OFF
- Global Spam Filtering – ON
Click Save Changes once you adjust your settings. Under the Voicemail tab, plug in your email address so you get notified of new voicemails. Down the road, receipt of a Google Voice voicemail will be a big hint that something has come unglued on your PBX.
One final word of caution is in order regardless of your choice of providers: Do NOT use special characters in any provider passwords, or nothing will work!
Now you’re ready to set up your Google Voice trunk in the GUI. After logging in with your browser, click the Connectivity tab and choose Google Voice/Motif. To Add a new Google Voice account, just fill out the form. Do NOT check the third box or incoming calls will never ring!
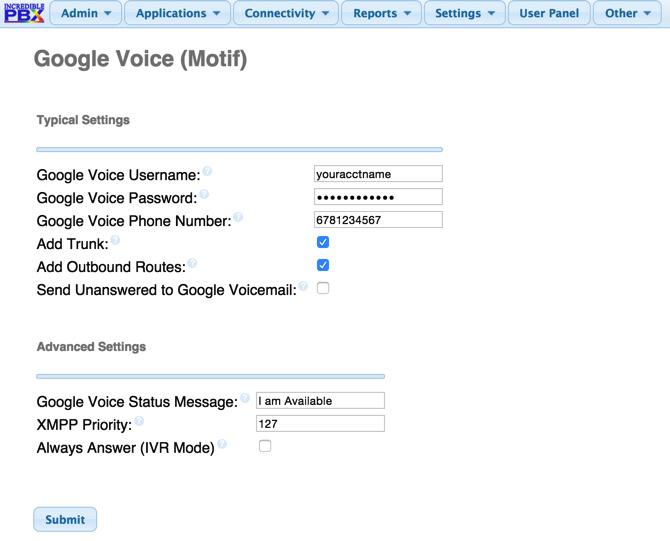
IMPORTANT LAST STEP: Google Voice will not work unless you restart Asterisk from the Linux command line at this juncture. Using SSH, log into your server as root and issue the following command: amportal restart.
If you have trouble getting Google Voice to work (especially if you have previously used your Google Voice account from a different IP address), try this Google Voice Reset Procedure. It usually fixes connectivity problems. If it still doesn’t work, enable Less Secure Apps using this Google tool.
Troubleshooting Audio and DTMF Problems
You can avoid one-way audio on calls and touchtones that don’t work with these simple settings in the GUI: Settings -> Asterisk SIP Settings. Just plug in your public IP address and your private IP subnet. Then set ULAW as the only Audio Codec.
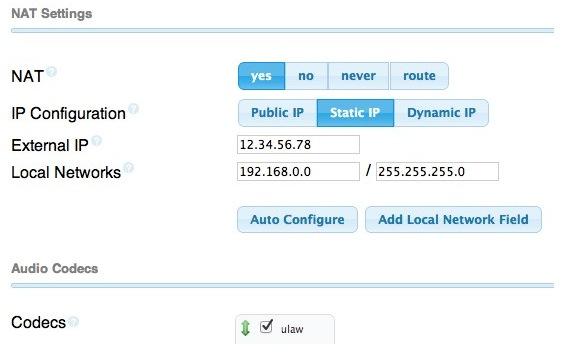
A Few Words about the Incredible PBX Security Model for SL 6.7
Incredible PBX for Scientific Linux joins our previous builds as our most secure turnkey PBX implementation. As configured, it is protected by both Fail2Ban and a hardened configuration of the IPtables Linux firewall. The latest release also includes Port Knocker for simple, secure access from any remote computer or smartphone. You can get up to speed on how the technology works by reading the Nerd Vittles tutorial. Your Port Knocker credentials are stored in /root/knock.FAQ together with activation instructions for your server and mobile devices. The NeoRouter VPN client also is included for rock-solid, secure connectivity to remote users. Read our previous tutorial for setup instructions. As configured, nobody can access your PBX without  your credentials AND
  an IP address that is either on your private network or that matches the IP address of your server or the PC from which you installed Incredible PBX. You can whitelist additional IP addresses by running the command-line utility /root/add-ip. You can remove whitelisted IP addresses by running /root/del-acct. Incredible PBX is preconfigured to let you connect to many of the leading SIP hosting providers without additional firewall tweaking. We always recommend you also add an extra layer of protection by running your server behind a hardware-based firewall with no Internet port exposure, but that’s your call. And it’s your phone bill. 😉
The IPtables firewall is a complex piece of software. If you need assistance with configuring it, visit the PIAF Forum for some friendly assistance.
Incredible Backup and Restore
We’re pleased to introduce our latest backup and restore utilities for Incredible PBX. Running /root/incrediblebackup will create a backup image of your server in /tmp. This backup image then can be copied to any other medium desired for storage. To restore it to another Incredible PBX server, simply copy the image to a server running Asterisk 13 and the same version of the Incredible PBX GUI. Then run /root/incrediblerestore. Doesn’t get much simpler than that.
Incredible PBX Automatic Update Utility
Every time you log into your server as root, Incredible PBX will ping the IncrediblePBX.com web site to determine whether one or more updates are available to bring your server up to current specs. We recommend you log in at least once a week just in case some new security vulnerability should come along. We originally had planned to make our fortune off update fees, but we changed our mind. So… contrary to the language in some of our builds, contributions to our projects are PURELY VOLUNTARY. You’ll get every update as it’s released whether you financially support our projects or not. Why haven’t we fixed the language? Good question. The short answer is it’s buried deep in the GUI image that would have to be regenerated from scratch. We’ll get to it one of these days. In the meantime, sleep soundly. No one will be breaking down your door for a donation.
We also encourage you to sign up for an account on the PIAF Forum and join the discussion. In addition to providing first-class, free support, we think you’ll enjoy the camaraderie. Enjoy!
Originally published: Monday, November 30, 2015
Support Issues. With any application as sophisticated as this one, you’re bound to have questions. Blog comments are a terrible place to handle support issues although we welcome general comments about our articles and software. If you have particular support issues, we encourage you to get actively involved in the PBX in a Flash Forums. It’s the best Asterisk tech support site in the business, and it’s all free! Please have a look and post your support questions there. Unlike some forums, ours is extremely friendly and is supported by literally hundreds of Asterisk gurus and thousands of users just like you. You won’t have to wait long for an answer to your question.
Need help with Asterisk? Visit the PBX in a Flash Forum.
Special Thanks to Our Generous Sponsors
FULL DISCLOSURE: ClearlyIP, Skyetel, Vitelity, DigitalOcean, Vultr, VoIP.ms, 3CX, Sangoma, TelecomsXchange and VitalPBX have provided financial support to Nerd Vittles and our open source projects through advertising, referral revenue, and/or merchandise. As an Amazon Associate and Best Buy Affiliate, we also earn from qualifying purchases. We’ve chosen these providers not the other way around. Our decisions are based upon their corporate reputation and the quality of their offerings and pricing. Our recommendations regarding technology are reached without regard to financial compensation except in situations in which comparable products at comparable pricing are available from multiple sources. In this limited case, we support our sponsors because our sponsors support us.
BOGO Bonaza: Enjoy state-of-the-art VoIP service with a $10 credit and half-price SIP service on up to $500 of Skyetel trunking with free number porting when you fund your Skyetel account. No limits on number of simultaneous calls. Quadruple data center redundancy. $25 monthly minimum spend required. Tutorial and sign up details are here.
![]() The lynchpin of Incredible PBX 2020 and beyond is ClearlyIP components which bring management of FreePBX modules and SIP phone integration to a level never before available with any other Asterisk distribution. And now you can configure and reconfigure your new Incredible PBX phones from the convenience of the Incredible PBX GUI.
The lynchpin of Incredible PBX 2020 and beyond is ClearlyIP components which bring management of FreePBX modules and SIP phone integration to a level never before available with any other Asterisk distribution. And now you can configure and reconfigure your new Incredible PBX phones from the convenience of the Incredible PBX GUI.
VitalPBX is perhaps the fastest-growing PBX offering based upon Asterisk with an installed presence in more than 100 countries worldwide. VitalPBX has generously provided a customized White Label version of Incredible PBX tailored for use with all Incredible PBX and VitalPBX custom applications. Follow this link for a free test drive!
Special Thanks to Vitelity. Vitelity is now Voyant Communications and has halted new registrations for the time being. Our special thanks to Vitelity for their unwavering financial support over many years and to the many Nerd Vittles readers who continue to enjoy the benefits of their service offerings. We will keep everyone posted on further developments.
Some Recent Nerd Vittles Articles of Interest…
- If you’re wondering what packages are installed with Scientific Linux 6.7, come back next week and download the entire Incredible PBX ISO build environment. All of the packages installed on your server are included in the build platform itself. Feel free to add to them or change them to your heart’s content. We don’t have a million dollar staff. That’s why we depend upon folks like you to offer suggestions and enhancements. In short, we treat Incredible PBX like a real open source project. Come join the fun! [↩]
Free Asterisk Solutions
