
Home » Posts tagged 'asterisk' (Page 41)
Tag Archives: asterisk
The Most Versatile VoIP Provider: FREE PORTING

 JUST RELEASED: Visit the Incredible PBX Wiki
The Gotcha-Free PBX: Harnessing SIP URIs for Free Worldwide Calling
We continue the Incredible PBX for Asterisk-GUI adventure today with a close look at SIP URIs, those email-like addresses that are the fundamental building blocks for VoIP technology. Consider this. If everyone in the world had a SIP address instead of a phone number, every call to every person in the world via the Internet would be free. That pretty much sums up why SIP URIs are important. The syntax for SIP URIs depends a bit upon your platform. In the Asterisk® world, they look like this: SIP/somenameORnumber@FQDN.yourdomain.com. On many SIP phones, you enter SIP URIs in the following format: sip:somenameORnumber@FQDN.yourdomain.com. Others use somenameORnumber@FQDN.yourdomain.com. Assuming you have a reliable Internet connection, once you have "dialed" a SIP URI, the destination SIP device will ring just as if they had a POTS phone. And Asterisk processes SIP URIs in much the same way as other calls originating from trunks. As noted, SIP URI calls of any duration to anywhere are free. And, of course, Incredible PBX is also free with No Gotchas!
In our original articles on Incredible PBX for Asterisk-GUI, we covered outbound calls to SIP URIs, and we’ll briefly review that procedure today. Then we’ll move on to setting up one or more SIP URIs for your own server so that you can receive incoming SIP URI calls. We’ll show you how to route them to any destination you like, both internal and external. We’ll also address the security implications of enabling SIP URI calling on your server. You don’t want the whole world calling into your server to make outbound calls on your nickel. We’ll also walk you through a safer SIP methodology in which you use a service provider as a SIP intermediary to better protect the security of your server. And finally, we’ll show you how to interconnect your new SIP URIs to real telephone numbers at zero cost. Then your friends without a SIP URI still can call you from any POTS or cellphone in the world.
SIP URI Calling with Incredible PBX for Asterisk-GUI
With one line of dialplan code, you can add Speed Dials for free SIP URI calling worldwide. The dialplan code is stored in the [CallingRule_SIP_URI] context in extensions_custom.conf. Just clone one of the existing entries, designate a speed dial number to connect to the SIP URI, and enter the SIP URI for the destination. Numerous SIP providers support assignment of SIP URI’s to existing DIDs for unlimited free calling from anywhere in the world. Here’s a sample using a speed dial code of 53669 (L-E-N-N-Y). Use it for your telemarketers: exten = 53669,1,Dial(SIP/2233435945@sip2sip.info).
Choosing a SIP URI Strategy with Incredible PBX for Asterisk-GUI
Before we actually create SIP URIs on your own server to receive anonymous calls, let’s walk through the available implementation strategies so that you can make an informed choice on how best to proceed. Keeping in mind that SIP URIs consist of an identifier and a fully-qualified domain name (FQDN) or IP address, one option is to use the same domain that you use for your company. We don’t recommend this approach because it makes it easy to guess where your SIP resources reside. Another option is to use a really obscure FQDN with your SIP URIs. Something like k43X20.mycompany.com or, for dynamic addresses, something like k43X20.dyndns.org makes more sense. In the next section, we’re going to lock down SIP access to your server to this FQDN so the more obscure the FQDN the safer you will be. Security through obscurity still works wonders. A third option is to use the IP address of your server instead of an FQDN. That’s a bad choice because of programs like SIPVicious that the bad guys use to scan the Internet for potential SIP targets to be hacked.
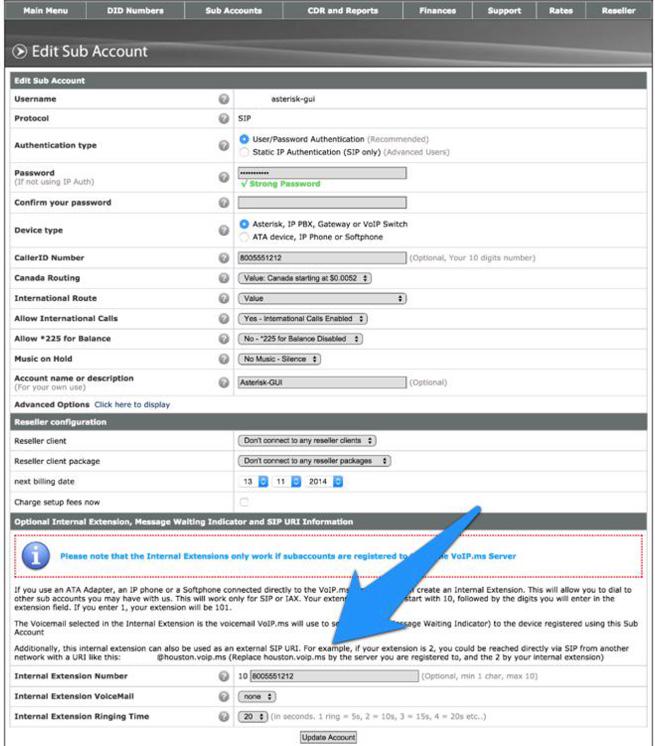
An alternative approach worth considering is to use a provider such as VoIP.ms as a SIP intermediary. In this scenario, you create a sub-account and assign an obscure extension number to that account. This in turn generates a SIP URI that can be used to connect to that account from your server by simply registering a VoIP.ms trunk in Incredible PBX. Once the trunk is registered, incoming SIP URI calls to your VoIP.ms sub-account will be forwarded (without cost) to your server without exposing Asterisk to SIP guest access at all. The wrinkle with this option is that VoIP.ms has often indicated that they plan to charge a reduced fee for these connections at some point. However, to date, they’ve never done it. If VoIP.ms shifts gears down the road, you obviously can as well. For the time being, we would encourage you to take advantage of this free service option. It remains our first choice for SIP URI implementation because there is no need to expose SIP resources on your server at all. VoIP.ms takes care of all the SIP security headaches leaving you to enjoy free calling. In the screenshot we’ve shown above, assuming your VoIP.ms account number was 12345, the SIP URI to connect to this sub-account would be 123458005551212@houston.voip.ms assuming you registered your trunk with the houston.voip.ms server.
Creating Your Own SIP URIs with Incredible PBX for Asterisk-GUI
The procedure for creating one or more SIP URIs on your own Incredible PBX server is straight-forward:
- For servers behind a hardware-based firewall, map UDP 5060 (SIP) to your server
- Enable allowguest access in [general] context of sip.conf
- Create desired SIP URIs in [public] context of extensions.conf
1. Unless your server is sitting on the public Internet without a hardware-based firewall, you’ll need to map UDP port 5060 (SIP) from the firewall to the private LAN address of your server. Otherwise incoming SIP calls will never reach Incredible PBX. Most routers have a Port Forwarding tab in which you designate the port to be forwarded, the type of port, and the destination IP address. Consult the manual for your router/firewall for detailed instructions.
2. Changing the allowguest setting in the [general] context of sip.conf is mandatory since the purpose of SIP URI calling is to accept calls from unregistered users. The risk, of course, is that anyone in the world with an Internet connection can attempt to connect to your server. More on that later. For now, issue this command after logging into your server as root:
sed -i 's|allowguest=no|allowguest=yes|' /etc/asterisk/sip.conf
Once you issue this command and restart Asterisk, the setup of Incredible PBX for Asterisk-GUI is to route anonymous SIP calls to the [public] context in extensions.conf. Only extensions in this context will be exposed to anonymous callers. This is important. NEVER change the destination context for these calls to one that provides unrestricted access to the calling resources on your server. The reason should be obvious. But, in case it isn’t, this would permit anonymous callers to use all of your trunks to place outbound calls to anywhere… on your nickel. $100,000 phone bills are the usual result.
3. There are two important facets in creating your own SIP URIs for anonymous access to your server. As touched upon previously, the first is choosing an obscure FQDN for your server. This is a really important layer of security for a couple of reasons: (1) your anonymous caller has to know the actual FQDN of your server in order to reach you and (2) in the next step we’re going to lock down your server to only allow anonymous SIP access from this FQDN. So choose carefully. The second consideration is deciding which server resources you wish to expose for SIP URI access. Do you wish to permit SIP URI calls only to a specific extension or ring group, or perhaps a custom IVR just for SIP URI callers, or perhaps a conference or DISA access (very dangerous)?
You can deploy more than one SIP URI. For each one, you’ll need a destination for the incoming call and an identifier or extension. Identifiers could be numeric, alphanumeric, or pure alpha characters. For example, 8005551212, joe6001, and accounting are all perfectly acceptable. The resultant SIP URI would be something like joe6001@k43X20.mycompany.com.
As noted, for each destination on your server that you wish to enable for SIP URI access, you add a line of dialplan code to the [public] context in extensions.conf. The syntax is identical to what you’ve previously used in routing incoming trunk calls to a destination except we’ll restrict connections to those matching the identifier you’ve chosen for each SIP URI. Here are some examples to get you started.
To route SIP URI accounting@k43X20.mycompany.com to Ring Group #1:
exten = accounting,n,Goto(ringroups-custom-1,s,1)
To route SIP URI joe6001@k43X20.mycompany.com to Extension 6001:
exten = joe6001,n,Goto(default,6001,1)
To route SIP URI demo@k43X20.mycompany.com to the Nerd Vittles demo IVR:
exten = demo,n,Goto(voicemenu-custom-2,s,1)
To route SIP URI lenny@k43X20.mycompany.com to an outside SIP URI:
exten = lenny,1,Dial(SIP/2233435945@sip2sip.info)
To route SIP URI conference@k43X20.mycompany.com to the default conference at extension 2663:
exten = conference,1,Goto(conf_bridge,2663,1)
To route SIP URI weather@k43X20.mycompany.com to the Weather by ZIP Code application:
exten = weather,1,Goto(CallingRule_extensions_custom,947,1)
To route SIP URI 800directory@k43X20.mycompany.com to Directory Assistance using Google Voice trunk:
exten = 800directory,1,Dial(Motif/GoogleVoice/18005551212@voice.google.com)
Securing Your Server with SIP URI Implementations
There are two important security steps once you have enabled anonymous SIP URI calling to your server. The first line of defense is to harden the IPtables Firewall to only permit anonymous SIP access to the specific FQDN you plan to use for your SIP URI callers. The second is to harden Asterisk to disallow requests for domains not serviced by your server.
1. Edit the IPv4 rules for your operating system. On the CentOS-compatible platforms, it’s /etc/sysconfig/iptables. On the Debian/Ubuntu/Raspbian platforms, it’s /etc/iptables/rules.v4. Toward the end of the file and just above the final fail2ban entries, insert the following code using your actual FQDN in the first line:
-A INPUT -p udp --dport 5060 -m string --string "@k43X20.mycompany.com" --algo bm -j ACCEPT
-A INPUT -p udp --dport 5060 -m string --string "REGISTER sip:" --algo bm -j DROP
-A INPUT -p udp --dport 5060 -m string --string "OPTIONS sip:" --algo bm -j DROP
-A INPUT -p udp -m udp --dport 5060 -j DROP
2. Run the following commands substituting your actual FQDN in the first line to lock down Asterisk to only your FQDN for anonymous SIP connections:
sed -i '/\\[general\\]/a ;domain=k43X20.mycompany.com' /etc/asterisk/sip.conf
sed -i '0,/;domain/s/;domain/domain/' /etc/asterisk/sip.conf
sed -i '0,/;allowtransfer=no/s/;allowtransfer=no/allowtransfer=no/' /etc/asterisk/sip.conf
sed -i '0,/; allowexternaldomains=no/s/; allowexternaldomains=no/allowexternaldomains=no/' /etc/asterisk/sip.conf
3. Restart your firewall: iptables-restart
4. Restart Asterisk: asterisk-restart
5. Done!
Interconnecting a SIP URI with a Free PSTN Phone Number
Wouldn’t it be nice if all your friends and business associates without SIP URI capability could still call you using a traditional PSTN number? Well, it’s your lucky day because www.ipkall.com provides just what you need, a free phone number in the Seattle area that you can connect to an existing SIP URI on your server.
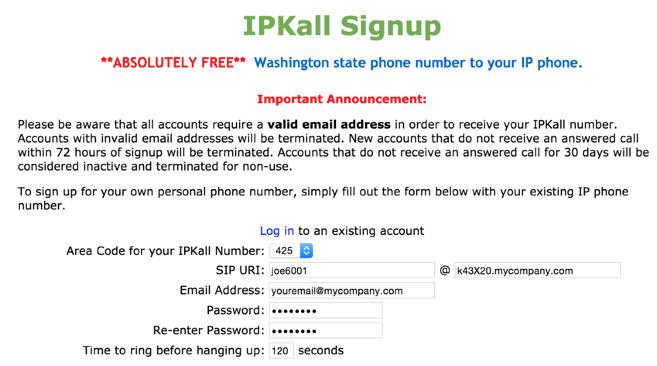
When folks call the Seattle number, they will be connected to your server using whatever routing you chose for the SIP URI in the previous section. So sign up for a number, enter your email address and the SIP URI for the calls, and wait for the confirmation email identifying your new telephone number. The only catch is that you need to receive at least one call a month to keep the number. Aside from that, there are no restrictions on use of the PSTN numbers. Enjoy!
 Don’t forget to List Yourself in Directory Assistance with your new IPkall PSTN number so everyone can find you by dialing 411. And be sure to add your new number to the Do Not Call Registry to block telemarketing calls.
Originally published: Wednesday, March 25, 2015
 Support Issues. With any application as sophisticated as this one, you’re bound to have questions. Blog comments are a terrible place to handle support issues although we welcome general comments about our articles and software. If you have particular support issues, we encourage you to get actively involved in the PBX in a Flash Forums. It’s the best Asterisk tech support site in the business, and it’s all free! Please have a look and post your support questions there. Unlike some forums, ours is extremely friendly and is supported by literally hundreds of Asterisk gurus and thousands of users just like you. You won’t have to wait long for an answer to your question.

Need help with Asterisk? Visit the PBX in a Flash Forum.
Special Thanks to Our Generous Sponsors
FULL DISCLOSURE: ClearlyIP, Skyetel, Vitelity, DigitalOcean, Vultr, VoIP.ms, 3CX, Sangoma, TelecomsXchange and VitalPBX have provided financial support to Nerd Vittles and our open source projects through advertising, referral revenue, and/or merchandise. As an Amazon Associate and Best Buy Affiliate, we also earn from qualifying purchases. We’ve chosen these providers not the other way around. Our decisions are based upon their corporate reputation and the quality of their offerings and pricing. Our recommendations regarding technology are reached without regard to financial compensation except in situations in which comparable products at comparable pricing are available from multiple sources. In this limited case, we support our sponsors because our sponsors support us.
 BOGO Bonaza: Enjoy state-of-the-art VoIP service with a $10 credit and half-price SIP service on up to $500 of Skyetel trunking with free number porting when you fund your Skyetel account. No limits on number of simultaneous calls. Quadruple data center redundancy. $25 monthly minimum spend required. Tutorial and sign up details are here.
![]() The lynchpin of Incredible PBX 2020 and beyond is ClearlyIP components which bring management of FreePBX modules and SIP phone integration to a level never before available with any other Asterisk distribution. And now you can configure and reconfigure your new Incredible PBX phones from the convenience of the Incredible PBX GUI.
The lynchpin of Incredible PBX 2020 and beyond is ClearlyIP components which bring management of FreePBX modules and SIP phone integration to a level never before available with any other Asterisk distribution. And now you can configure and reconfigure your new Incredible PBX phones from the convenience of the Incredible PBX GUI.
 VitalPBX is perhaps the fastest-growing PBX offering based upon Asterisk with an installed presence in more than 100 countries worldwide. VitalPBX has generously provided a customized White Label version of Incredible PBX tailored for use with all Incredible PBX and VitalPBX custom applications. Follow this link for a free test drive!
 Special Thanks to Vitelity. Vitelity is now Voyant Communications and has halted new registrations for the time being. Our special thanks to Vitelity for their unwavering financial support over many years and to the many Nerd Vittles readers who continue to enjoy the benefits of their service offerings. We will keep everyone posted on further developments.
Some Recent Nerd Vittles Articles of Interest…
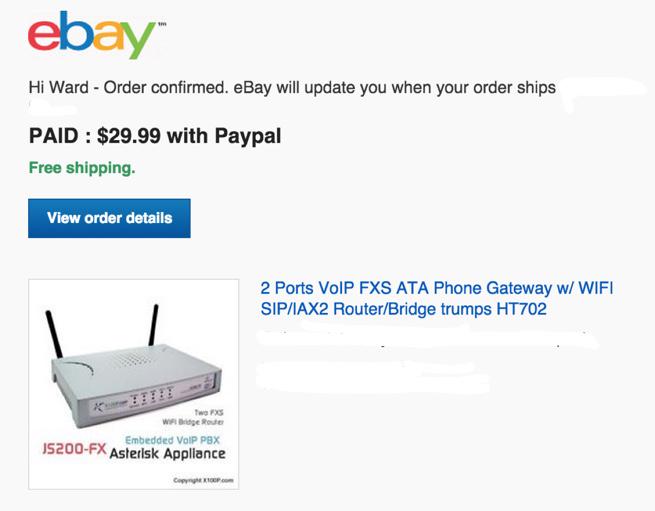
SOHO Delight: Introducing the Ultimate Asterisk Appliance for Under $30
We continue our journey to identify cost-effective, Gotcha-Free Asterisk® solutions. And, yes, we eat our own dog food! So this week we turn our attention to a real sleeper. It’s an Asterisk appliance with an almost unbelievable price and an even more incredible feature set. With the PBX in a Flash™ and Incredible PBX™ projects, we meet hundreds of thousands of new VoIP enthusiasts each year. But let’s face it. Even software products as simple to use as ours present a formidable challenge to some folks that are new to networking and dealing with complex hardware setups. There’s also the corner grocery store and the mom-and-pop restaurants and the shoe repair store and the tire store and the neighborhood bike shop that shouldn’t have to spend hundreds of dollars each month for basic phone service. And then there are those with a cabin in the mountains or a weekend beach house that just want a plug-and-play communications device that’s available when you need it. So this week’s VoIP solution is dedicated to those on a budget that have no interest in spending months learning the intricacies of VoIP technology. These folks just want basic phone service that works at an affordable price. Bells and whistles are nice but not if they add complexity or cost. And, boy, do we have an incredible find to share with you today. What you’ll need in addition to this Asterisk appliance is electricity and a working Internet connection with a router/firewall. That’s it.
WARNING: We do not recommend EVER connecting the JS-200FX directly to the Internet because of potential security issues with this older version of Asterisk.

We purchased our first JS-200FX Asterisk Appliance from X100P.com for $89.95 with $15 for shipping from the Far East. But others tipped us off that refurbished units (that means they’ve actually been tested and they work) are regularly available for considerably less cost. We’ve added a direct link to the manufacturer for your convenience. Either way, the JS-200FX is a steal. In addition to a router and firewall, the appliance includes two FXS ports to connect plain old telephones, integrated WiFi to connect softphones and SIP devices wirelessly, and best of all turnkey Google Voice support for two lines to make free calls in the United States and Canada. Because the Asterisk-GUI is an integral part of the appliance, setup time is under 5 minutes. And we’ll show you how. As we love to say, if you can handle slice-and-bake cookies, you can do this. So here’s the drill:
- Sign up for Google Voice service (do it twice for double the fun!)
- Boot and login to JS200-FX after connecting network cable from ETH2 to a computer
- Configure Networking and Connect CAT5 from ETH1 to Internet router
- Configure Google Voice and Make a Call
- Configure Asterisk (optional)
- Interconnect Remote Asterisk Server (optional)
1. Getting Started with Google Voice
With the JS200-FX, you can use any SIP provider including our platinum sponsor, Vitelity. See below for a deal you can’t refuse. But, if you live in the United States, you’d be crazy not to also use Google Voice. It’s free! To use Google Voice with the JS200-FX, you’ll need at least one dedicated Google Voice account. Create a Gmail account first. The more obscure the username (with some embedded numbers), the better off you will be. This will keep folks from bombarding you with unsolicited Gtalk chat messages. Then visit http://google.com/voice to set up your Google Voice account and phone number. Yes, you can port an existing number into Google Voice!
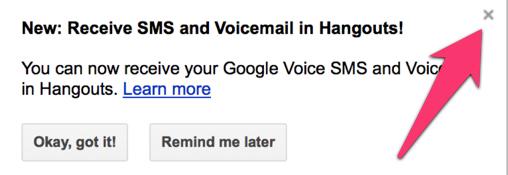
IMPORTANT: Do NOT under any circumstances take Google’s bait to switch from Google Chat to Hangouts. Click the X (shown above), or you will forever lose the ability to use Google Chat with your Asterisk appliance. Also be sure to enable the Google Chat option as one of your phone destinations in Settings, Voice Setting, Phones. That’s the destination we need for the Asterisk appliance to work its magic! Otherwise, all inbound and outbound calls will fail. Good News! You’re in luck. Google has apparently had a change of heart on discontinuing Google Chat support so it’s enabled by default in all new Google Voice accounts. Once you’ve created a Gmail and Google Voice account, go to Google Voice Settings and click on the Calls tab. Make sure your settings match these:
- Call Screening – OFF
- Call Presentation – OFF
- Caller ID (In) – Display Caller’s Number
- Caller ID (Out) – Don’t Change Anything
- Do Not Disturb – OFF
- Call Options (Enable Recording) – OFF
- Global Spam Filtering – ON
Click Save Changes once you’ve adjusted your settings. Under the Voicemail tab, plug in your email address so you get new voicemails delivered… and transcribed.
One final word of caution is in order regardless of your choice of providers: Do NOT use special characters in any provider passwords, or nothing will work! If you have trouble placing or receiving calls, try BOTH of these tips.
If you have difficulty finding the Google Chat option after setting up a new Google Voice account, follow this tutorial.
2. Connecting to JS200-FX Asterisk Appliance
Now you’re ready to begin the adventure. Turn the switch on the back of the JS200-FX to ON. Plug in the included CAT5 cable between ETH2 port on the JS200-FX and a desktop computer or notebook. Power on the device and wait about 2 minutes. From your computer, browse to 192.168.10.1 and login to Asterisk-GUI as user admin with password for your password. You’ll be prompted to change your password. Make it secure!
3. Configuring Networking on JS200-FX Asterisk Appliance
In a nutshell, you’ll be using the ETH1 port on the JS200-FX to connect to your Internet router. We’ll use ETH2 to directly connect to the JS200-FX from a computer when things go haywire. Assuming your router hands out private IP addresses with DHCP, you don’t really need to do much in the way of network configuration on the JS200-FX unless you want to set up a static IP address for the appliance. You’ll find that option under Networking -> WAN -> Connection Type. We typically recommend permanently assigning the IP address that was handed out by your router within the router’s configuration menu. The real trick at this point is deciphering what that IP address will be. You can figure that out by plugging a CAT5 cable between ETH1 and your router now. The address will appear in the WAN entry under Networking -> Status.
Next, we’ll want to configure the Wireless Networking. We recommend setting the device up as an Access Point under Wireless -> Basic Settings. Under the Wireless Security tab, switch to WPA2-PSK security and create an 8-character password to access the device on its WiFi gateway. This gives you a way to connect wirelessly and be assigned an IP address in the range 192.168.10.100-200. If that range duplicates the private LAN subnet of your router, change it to 192.168.0.
Finally, click on Firewall -> Remote Admin and activate remote access to Asterisk-GUI using port 80. Whatever you do, DO NOT MAP ANY PORTS FROM YOUR FIREWALL TO THIS ASTERISK APPLIANCE! It is an older version of Asterisk that probably is not without some security holes. So long as it’s safely ensconced behind a hardware-based firewall, you should have little to worry about especially if you only use Google Voice trunks for outside calling.
4. Configuring Google Voice on JS200-FX Asterisk Appliance
This is a 5-second task. In the Asterisk-GUI, click Google Voice. Plug in your Google Voice email address and password. If you wish to enable a second Google Voice account, click Enable Line #2 and enter your credentials for the second account. Save your settings and reload the dialplan when prompted. Now plug in a Plain Old Telephone to the TEL1 port on the JS200-FX. To dial out using the first Google Voice account, dial 941 + 1 + the 10-digit number. To retrieve your voicemail, dial 41. For the second Google Voice account, use the 942 prefix and 42 for voicemail.
VoIP 101: Learning the Basics of Asterisk-GUI Management
Everything from here on out is optional reading. But, if you plan to get the most out of your new PBX, you’ve got to master the basics of the lingo so you’ll know how to navigate through and manage the Asterisk-GUI. For the sake of simplicity, we’ll divide calls into three categories: local calls, incoming calls, and outgoing calls. The latter two categories are External calls from or to destinations outside your PBX.
Local Calls. These are Internal Calls between users of your PBX. Users typically are assigned a local phone number, an Extension, on which to receive calls. You connect a telephone to an extension in order to answer and make calls. Traditional analog phones are called POTS phones (a.k.a. Plain Old Telephones). They connect to an FXS port (only!) which is identified by the TEL1 or TEL2 jacks on the JS200-FX. SIP and IAX phones or softphones are digital devices that connect to extensions configured as SIP or IAX extensions/users.
Incoming Calls. As the name implies, these are calls coming into your PBX. You typically rent a phone number (DID) from a Provider. The provider assigns you credentials and registers the DID to a Trunk. On your PBX, you Create and Register a Trunk with credentials matching those assigned by the provider. When a call is placed to your DID, the provider passes the call to your PBX through the registered Trunk. The PBX then identifies both the DID and the CallerID of the incoming call and routes it to a Destination based upon the rules you establish in your Incoming Calling Rules (a.k.a. Inbound Routes). A typical destination would be an Extension or User, a Ring Group or collection of extensions, a Conference Room where multiple callers can converse at the same time, or a Voice Menu (a.k.a. IVR or AutoAttendant).
Outgoing Calls. These are calls destined for Termination on a telephone outside your PBX. It could be across the street or on the other side of the world. Some of these calls are free and some are not. Outgoing calls begin from a Phone connected to an Extension or User. Once a number is dialed, a Dial Plan determines whether the caller is authorized to make the call. If so, the call is passed to the Outgoing Calling Rules (a.k.a. Outbound Routes). These rules determine which Trunk will actually process the call. As with incoming trunks, you sign up for Termination service with a provider that may be the same or different from your DID provider. Outgoing call rules may send calls with a certain Dialing Prefix to a specified Trunk to take advantage of free calling or reduced cost. These calling rules may strip off dialing prefixes and/or add additional digits to the dialed number before it is passed to the Provider for termination on a remote phone.
5. Configuring Asterisk on JS200-FX Asterisk Appliance
Now that you’ve mastered the basics, there’s so much more you can do. In fact, we could write a book about it. Lucky for us (and for you), others have already done that. To get the most out of this terrific appliance, you’ll need to learn more about Asterisk and the Asterisk-GUI. Fortunately, there’s no shortage of tutorials. Start with the JS200-FX Quick Start Guide (PDF). Then take a careful look at Chapter 3 of Digium’s Asterisk Appliance™ Administrator Manual. Next, review Chapter 11 of The Asterisk Book (Second Edition). Finally, review these tutorials that have been written by other companies that incorporated Asterisk-GUI into their hardware products, e.g. Yeastar’s MyPBX SOHO User Manual and Grandstream’s UCM6100 User Manual.
6. Interconnecting JS200-FX Asterisk Appliance to Remote Asterisk Server
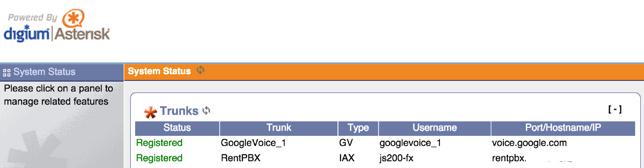
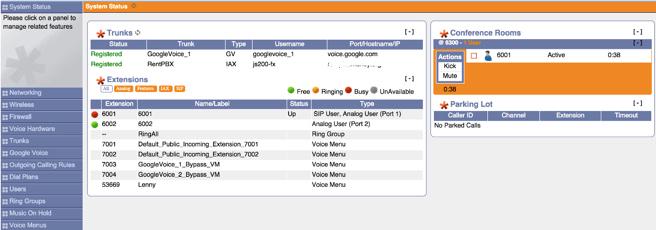
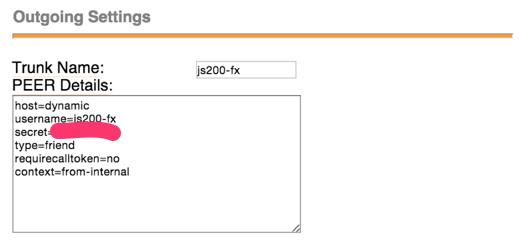
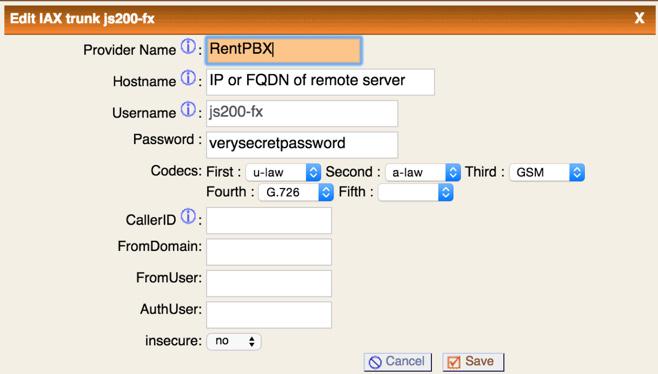
Interconnecting the new Asterisk appliance to a remote Asterisk server to share outbound trunks or to allow free calls to local extensions on the remote server is easy. First, create an IAX trunk on the remote Asterisk server using a very secure password. This setup will give callers on the Asterisk appliance access to the entire dialplan on the remote Asterisk server so be careful. Also make sure the Trunk Name and username are the same.
On the Asterisk appliance, there are 3 steps: create an IAX trunk to make the connection to the remote server, add an outbound route with a dialing prefix to route calls out the new trunk, and enable the new Trunk in your DefaultLocalContext dialplan.
Trunk setup: Trunks -> New IAX Trunk
You’ll need the IP address or FQDN of your remote server. In addition, the username and password must match what you set up (above) on the remote server.
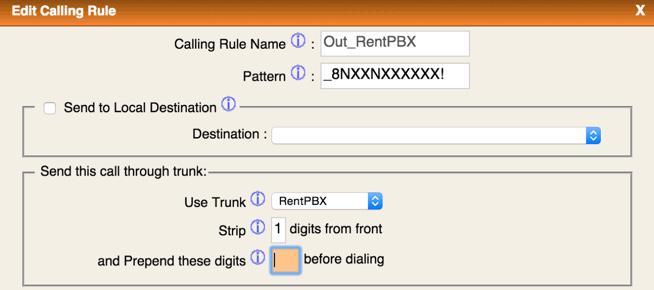
Outbound Route setup: Outgoing Call Rules -> New Calling Rule
In our example, we’re requiring an 8 prefix followed by a 10-digit number to send a call to the remote server for outbound call processing. If you wanted to force a different dialing prefix at the remote server end in order to send calls out through a specific trunk, that prefix should be Prepended in the highlighted field of the outbound route. This setup would not permit calls to local extensions on the remote PBX. To do that, you’d probably want to create an additional outbound route with a Dial Pattern such as _8XXXX! if the extensions on the remote server were all four digits. Don’t forget to also enable that second outbound route in the dialplan setup below!
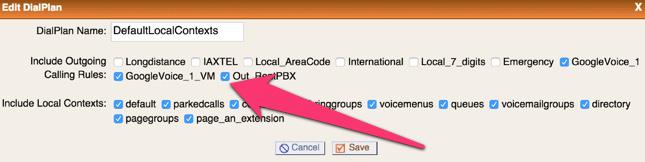
Dialplan setup: Dial Plans -> Edit DefaultLocalContexts
Just click on the Out_RentPBX checkbox and Save your update. Then reload the Asterisk dialplan, and you’re all set.
Making Free SIP URI Calls Worldwide
One of the hidden beauties of Asterisk is the ability to place SIP URI calls to anyone in the world and talk for free… for as long as you wish. SIP URIs look much like an email address with a name or number, followed by @, followed by an FQDN or IP address, e.g. 2233435945@sip2sip.info. While the SIP URI setup on the JS200-FX Asterisk Appliance is not exactly straightforward, it’s pretty easy once you know some of Asterisk-GUI’s magic tricks. The simplest method is to Create a New Voice Menu which will work like a Speed Dial for the new SIP URI. For example, here’s the setup to add Lenny to your appliance. Name the new voice menu Lenny and assign a number to the new voice menu (53669 spells L-E-N-N-Y). Now add two Actions by clicking Add New Step twice with the entries shown below. Save your Voice Menu. Then Reload the dialplan. Now dial 53669 to speak to Lenny. Or route telemarketers to this extension as part of your dial plan.
Answer
Macro trunkdial-failover-0.3,sip/2233435945@sip2sip.info,,,
If you’re comfortable using an editor, there’s an easier way using the same methodology included in Incredible PBX for Asterisk-GUI. We’ll actually add a new [CallingRule_SIP_URI] context in which to save SIP URI speed dials. Then we’ll add that new context to the default dialplan: [DLPN_DefaultLocalContexts]. In the future, you can easily add additional SIP URI speed dials to this context. Just give each one a unique extension number and plug in the SIP URI using the syntax shown below.
In the Asterisk-GUI, click Options -> Advanced Options -> Show Advanced Options. Then click on the new File Editor tab. In the Config Files pulldown, choose extensions.conf. Click Add Context button and name it: CallingRule_SIP_URI. The new context will be added to the bottom of the file so go there and click on + to edit its contents. Add the following line and click Save:
exten = 53669,1,Dial(SIP/2233435945@sip2sip.info)
Now we need to add the new context to the default dialplan so search through the contexts until you find [DLPN_DefaultLocalContexts]. Click on the + to edit the context. Then add the following line to the end of the existing list and click Save:
include=CallingRule_SIP_URI
Now click Apply Settings button to save your settings to NVRAM and reload the dialplan. That wasn’t so hard, was it?
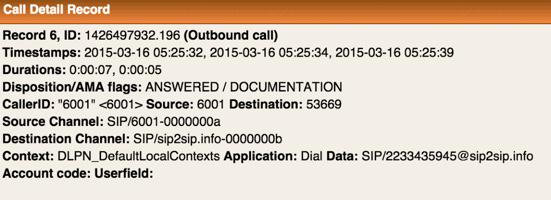
There’s another advantage to the second approach. Your Call Detail Records now will actually show the speed dial numbers that are called:
Setting Up Incoming SIP URIs for Your PBX
This is only recommended for those that are highly skilled in Asterisk and those that can afford an expensive phone bill. It requires that UDP port 5060 be exposed to the Internet through your firewall. You need to be extremely careful in setting up SIP URIs to avoid unintended consequences such as allowing strangers to place outbound calls through your PBX on your nickel. The steps are straight-forward. First, configure an FQDN for your server and, if your provider uses dynamic IP addresses, set up dynamic DNS refreshes using the facility included in Networking -> Dynamic DNS. Second, use the File Editor to edit the [general] context in sip.conf. Insert your FQDN into the fromdomain and domain variables. Next, insert the following line: allowexternaldomains=no. Then Save the file. Third, edit the [default-public] context in extensions.conf. Insert your desired SIP URIs in this context using the proper syntax. For example, to route a SIP URI for mothership@FQDN.yourdomain.com to extension 6001, the dialplan code would look like this: exten=mothership,1,Goto(default,6001,1). To route the same SIP URI to your first Voice Menu, the code would look like this: exten=mothership,1,Goto(voicemenu-custom-1,s,1). To route the same SIP URI to your first Ring Group, use: exten=mothership,1,Goto(ringroups-custom-1,s,1). To route the incoming SIP URI to an outgoing SIP URI, use: exten=mothership,1,Dial(SIP/somewhere@someFQDN.somedomain.com).

There’s a silver lining to activating an inbound SIP URI. Once it’s properly configured, you can sign up for a free phone number in the Seattle area and map that DID to the SIP URI of your server. All of the incoming calls are free! This gives you some redundancy in the event of a Google Voice outage. Just visit www.ipkall.com to sign up for your free number.
Hardening the JS200-FX Firewall
Particularly if you elect to support incoming SIP URIs, you’ll want to tighten up the SPI Firewall included in the JS200-FX. While we have no simple way to decipher the existing rules, you can add rules of your own to lessen the opportunity for mischief. This is especially important in the SIP arena. Just to be sure you don’t lock yourself out of your own server, we recommend a 4-step process: (1) allowing full access from private LAN subnets, (2) whitelisting the FQDNs and IP addresses from which you will access the JS200-FX, (3) whitelisting the providers that you intend to use as well as the IP addresses of external phone devices, and (4) locking down incoming SIP URI access to a single FQDN for your server. The fourth step keeps random strangers from attempting to gain SIP access by scanning blocks of IP addresses in search of vulnerable servers. It’s a good idea to use an obscure FQDN for your appliance which minimizes the ability of strangers to guess the acceptable SIP URIs, e.g. somefunkyFQDN.somedomain.net would block all incoming SIP URI attempts by either IP address or by guessing any other FQDN. In other words, the FQDN works just like a password. Thus, if you set up a mothership SIP URI (make up your own!), the only incoming SIP URI calls that would be allowed would be those calling mothership@somefunkyFQDN.somedomain.net. Don’t publish the actual SIP URI anywhere!
Also be advised that, if you use FQDNs in the step #2 white list and the dynamic IP address of these FQDNs changes, you will need to manually restart the JS200-FX to enable the new IP address. Currently, there is no ability to check for FQDN changes and automatically restart the appliance.
To create the new firewall rules, choose Firewall -> Custom Rules -> Enable ON. Then enter and SAVE & APPLY the following rules using your actual settings rather than the sample entries below. CAUTION: This data should be entered by accessing the JS200-FX via WiFi at the 192.168.10.1 address, or you may lock yourself out during the update process.
#1 private subnets and loopback - no changes needed in this section
-A INPUT -s 192.168.0.0/16 -j ACCEPT
-A INPUT -s 10.0.0.0/8 -j ACCEPT
-A INPUT -s 172.16.0.0/12 -j ACCEPT
-A INPUT -s 127.0.0.0/8 -j ACCEPT

#2 enter your own IP addresses for WhiteList access below
-A INPUT -s homeFQDN.dyndns.org -j ACCEPT
-A INPUT -s alternateFQDN.dyndns.org -j ACCEPT
-A INPUT -s 129.43.13.220 -j ACCEPT

#3 providers and interconnected servers and phone devices
## atlanta.voip.ms sample entry
-A INPUT -s 174.34.146.162/32 -p udp -m multiport --dports 5060,5061,5062,5063,5064,5065,5066,5067,5068,5069,5080,4569 -j ACCEPT

#4 SIP URI access - enter JS200-FX FQDN in next line and leave the rest
-A INPUT -p udp --dport 5060 -m string --string "REGISTER sip:somefunkyFQDN.somedomain.net" --algo bm -j ACCEPT
-A INPUT -p udp --dport 5060 -m string --string "REGISTER sip:" --algo bm -j DROP
-A INPUT -p udp --dport 5060 -m string --string "OPTIONS sip:" --algo bm -j DROP
-A INPUT -p udp --dport 5060 -j ACCEPT
Implementing 7-Digit Dialing with Your Favorite Area Code
Once you have at least one Google Voice account set up, here’s another trick to implement 7-digit dialing with your favorite area code. Just add an additional line to the [CallingRule_SIP_URI] context substituting your area code for 843:
exten=_NXXXXXX!,1,Macro(trunkdial-failover-0.3,${GoogleVoice_1}/1843${EXTEN},,GoogleVoice_1,)
OK, Smarty Pants: Show Me the Beef!
We know what some of you are thinking. "Do you really know as much about VoIP as Lenny does?? Before wasting 30 bucks on this, show me the beef!" Fair enough. Sit by your phone and click the Call Me icon below. Type in a fake name and your real phone number. Click the Connect button. Answer your phone when it rings. Then press 1. You’ll be connected to the Conferencing System running on the JS200-FX Asterisk Appliance. You can chat with other Nerd Vittles users that have joined before you. So… what are you waiting for? Click away and try the JS200-FX Appliance for yourself.
You can implement this Click-to-Dial technology using your own JS200-FX Asterisk Appliance in about 10 seconds. Once you have configured Google Voice as outlined in Step #1 above, click on the Call Widgets tab under Settings. Click Add a New Call Widget, give it a name, turn off ringing your home or office phone, turn off Call Presentation, and Save Changes. Now simply cut-and-paste the Embed code that’s provided and insert it into a public web page of your choice. Doesn’t get much easier than that, and all your family and friends can call you for free from the convenience of any available telephone in the U.S. or Canada by simply clicking on the Call Me widget on your web site’s home page.
Originally published: Monday, March 16, 2015
Support Issues. With any application as sophisticated as this one, you’re bound to have questions. Blog comments are a terrible place to handle support issues although we welcome general comments about our articles and software. If you have particular support issues, we encourage you to get actively involved in the PBX in a Flash Forums. It’s the best Asterisk tech support site in the business, and it’s all free! Please have a look and post your support questions there. Unlike some forums, ours is extremely friendly and is supported by literally hundreds of Asterisk gurus and thousands of users just like you. You won’t have to wait long for an answer to your question.
Need help with Asterisk? Visit the PBX in a Flash Forum.
Special Thanks to Our Generous Sponsors
FULL DISCLOSURE: ClearlyIP, Skyetel, Vitelity, DigitalOcean, Vultr, VoIP.ms, 3CX, Sangoma, TelecomsXchange and VitalPBX have provided financial support to Nerd Vittles and our open source projects through advertising, referral revenue, and/or merchandise. As an Amazon Associate and Best Buy Affiliate, we also earn from qualifying purchases. We’ve chosen these providers not the other way around. Our decisions are based upon their corporate reputation and the quality of their offerings and pricing. Our recommendations regarding technology are reached without regard to financial compensation except in situations in which comparable products at comparable pricing are available from multiple sources. In this limited case, we support our sponsors because our sponsors support us.
BOGO Bonaza: Enjoy state-of-the-art VoIP service with a $10 credit and half-price SIP service on up to $500 of Skyetel trunking with free number porting when you fund your Skyetel account. No limits on number of simultaneous calls. Quadruple data center redundancy. $25 monthly minimum spend required. Tutorial and sign up details are here.
![]() The lynchpin of Incredible PBX 2020 and beyond is ClearlyIP components which bring management of FreePBX modules and SIP phone integration to a level never before available with any other Asterisk distribution. And now you can configure and reconfigure your new Incredible PBX phones from the convenience of the Incredible PBX GUI.
The lynchpin of Incredible PBX 2020 and beyond is ClearlyIP components which bring management of FreePBX modules and SIP phone integration to a level never before available with any other Asterisk distribution. And now you can configure and reconfigure your new Incredible PBX phones from the convenience of the Incredible PBX GUI.
VitalPBX is perhaps the fastest-growing PBX offering based upon Asterisk with an installed presence in more than 100 countries worldwide. VitalPBX has generously provided a customized White Label version of Incredible PBX tailored for use with all Incredible PBX and VitalPBX custom applications. Follow this link for a free test drive!
Special Thanks to Vitelity. Vitelity is now Voyant Communications and has halted new registrations for the time being. Our special thanks to Vitelity for their unwavering financial support over many years and to the many Nerd Vittles readers who continue to enjoy the benefits of their service offerings. We will keep everyone posted on further developments.
Some Recent Nerd Vittles Articles of Interest…
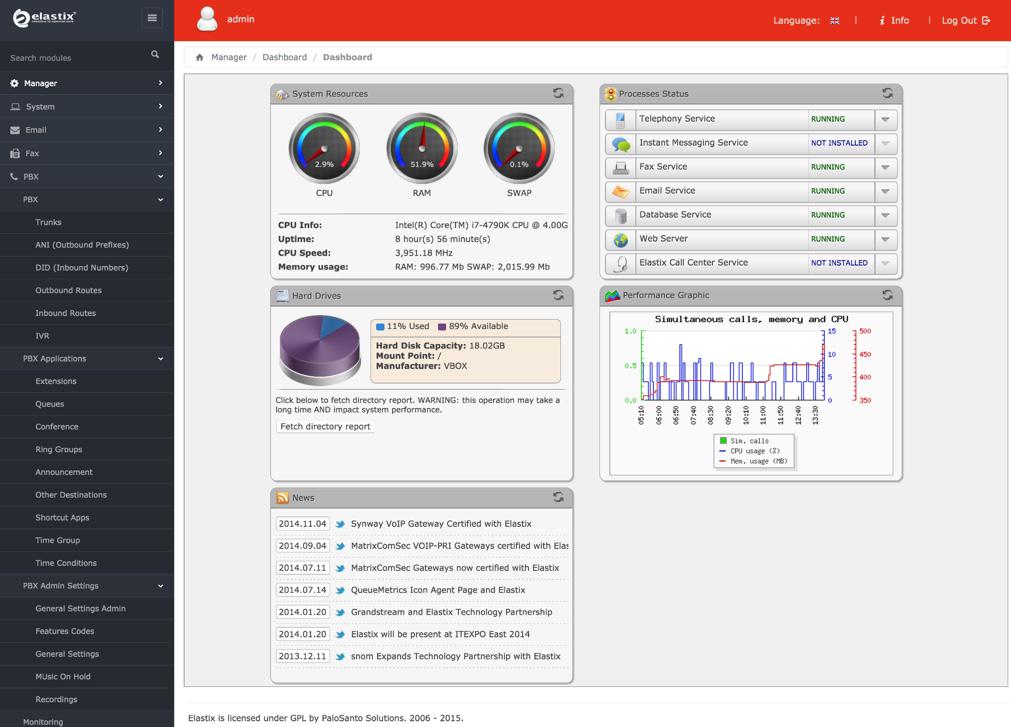
The Two Amigos Ride Again: Introducing Incredible PBX for Elastix 2.5
DEC. 7 NEWS FLASH: The Elastix project has been sold to 3CX. Elastix 4.0 and Elastix MT have been removed from production "due to a legal disagreement with another open source distribution."
We began our Elastix® adventure last week with the Bleeding Edge and our introduction of Incredible PBX for Elastix MT, the promising new multi-tenant edition of Elastix. Unfortunately, for production use, Elastix 3.0 is not quite there yet. So this week we’re introducing Incredible PBX™ for Elastix 2.5, an incredibly stable telephony platform with a loyal following and dozens of add-on components to satisfy almost any requirement. Having not looked at Elastix in more than a year, we were pleasantly surprised to find a very current version of Asterisk® 11 as well as a stable, gotcha-free Elastix fork of FreePBX® 2.11. It’s amazing what can be accomplished with a single command: yum upgrade. If you know how to use FreePBX, then the Elastix GUI will be a walk in the park.
We promised that 2015 would be the year of Gotcha-Free choices for the Asterisk platform, and today we deliver the third VoIP alternative with pure and honest GPL code minus the patent, trademark, and copyright minefields previously covered. Incredible PBX™ for Elastix 2.5 provides virtually the same feature set of applications for Asterisk as our previous releases. Just abide by the clear GPL licensing terms and copy, embellish, and redistribute to your heart’s content.
What Incredible PBX brings to the Elastix 2.5 platform are several dozen (free) applications for Asterisk in addition to a rock-solid firewall with a preconfigured WhiteList of your favorite VoIP providers and private LAN addresses. With the Elastix 2.5 version, you also get a dozen preconfigured trunks and extensions plus a familiar GUI that we’ve all used for the better part of a decade. And it’s all bundled in a graphical user interface that integrates telephony, faxing, instant messaging, email, and calendaring in a single desktop application. We’re glad to be part of the family.

Our deployment strategy remains consistent and straight-forward. Install a 64-bit bit version of Elastix 2.5 on the platform of your choice. Then run the Incredible PBX installer. In 5-10 minutes, you’re ready to roll. The installer first will bring Elastix 2.5 and CentOS up to current specs. Then it will work its magic and add an Incredible PBX tab to the existing Elastix 2.5 UI with all the bells and whistles to which you are accustomed. Text-to-speech applications, speech recognition, DISA, ODBC, SMS messaging, news, weather, conference bridge support, and a voice dialer are enabled out of the box.
A Word of Caution. If you’re new to Incredible PBX, install a clean version of Elastix 2.5 with NO MODIFICATIONS before you begin the Incredible PBX install. All of the existing Elastix 2.5 setup will be modified as part of the Incredible PBX install, and these changes will wipe out any additions you’ve previously made to Elastix. So don’t make any! Once the Incredible PBX install is completed, you can make all the changes you wish in your Elastix configuration. The only major design change we’ve made is to rework the Elastix MySQL database tables into MyISAM format from InnoDB. This facilitates making future backups and restores of your server as well as providing the necessary platform to install current and future Incredible PBX components.
Did We Mention Security? You also get a locked down, preconfigured IPtables Firewall WhiteList with all of the Travelin’ Man 3 tools plus the automatic update service to keep your server up to date and safe. There is a $20 voluntary annual license fee for the update service but, if you’d prefer to buy donuts, be our guest. But understand that voluntary is a two-way street. Running the update service costs us time and money and, when it ceases to be worthy of our time and financial investment, we reserve the right to discontinue the service down the road. The next time you log into your server after installing Incredible PBX, you’ll quickly appreciate why an automatic update service is important. We watch for and fix problems so you don’t have to.
|
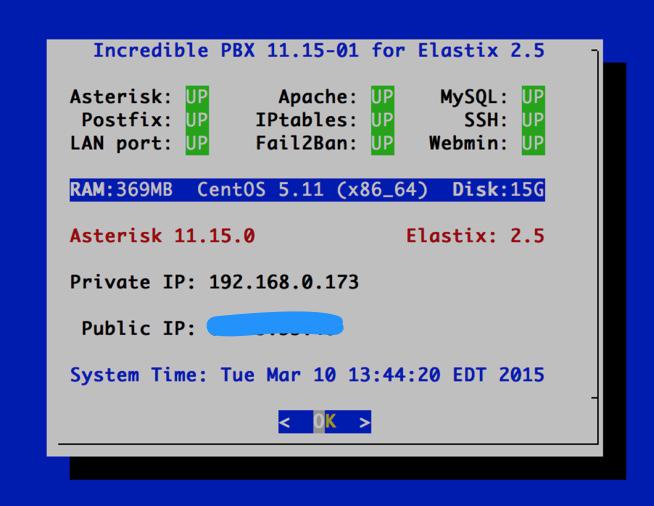
Target Audience: Small or Large Organization in need of a turnkey, Gotcha-Free PBX Default Configuration: Asterisk 11 with enhanced Elastix 2.5 GUI and Kennonsoft GUI Platform: CentOS 5.x running on Dedicated Server, Cloud-Based Server, or Virtual Machine Minimum Memory: 1024 MB Recommended Disk: 20 GB+
Feature Set: Fax, SMS messaging, NeoRouter/PPTP VPN, Reminders, ConfBridge Conferencing, AsteriDex, Voicemail, Email, IVR, News, Weather, Voice Dialer, Wolfram Alpha, Today in History, TM3 Firewall WhiteList, Speed Dialer, iNUM and SIP URI (free) worldwide calling, DISA, Call Forwarding, Tailorable CDRs Administrator Utilities: Incredible Backup/Restore, Automatic Updater, phpMyAdmin, Timezone Config, WebMin, Admin Password Configurator, ODBC/MySQL Database Configurator, Firewall WhiteList Tools |
Getting Started with Incredible PBX for Elastix 2.5
Here’s a quick overview of the installation and setup process for Incredible PBX for Elastix 2.5:
- Choose a Hardware Platform – Dedicated PC, Cloud Provider, or Virtual Machine
- Install Elastix 2.5 – 64-bit CentOS 5 platform
- Download and Install Incredible PBX for Elastix 2.5
- Set Up Passwords for Incredible PBX for Elastix 2.5
- Activate Trunks with Incredible PBX for Elastix 2.5
- Connect a Softphone to Incredible PBX for Elastix 2.5
- Configuring SMTP Mail with Incredible PBX for Elastix 2.5
1. Choose a Platform for Incredible PBX for Elastix 2.5
Incredible PBX for Elastix 2.5 works equally well on dedicated hardware, a cloud-based server, or a virtual machine. Just be sure you’ve met the minimum requirements outlined above and that you have a sufficiently robust Internet connection to support 100Kb of download and upload bandwidth for each simultaneous call you wish to handle with your new PBX.
For Dedicated Hardware, we recommend at least an Atom-based PC of recent vintage with at least a 30GB drive and 4GB of RAM. That will take care of an office with 10-20 extensions and a half dozen or more simultaneous calls if you have the Internet bandwidth to support it.
For Cloud-Based Servers, we recommend RentPBX, one of our financial supporters who also happens to size servers properly and restrict usage solely to VoIP. This avoids performance bottlenecks that cause problems with VoIP calls. Yes, we have a coupon code for you to get the $15/month rate: NOGOTCHAS. The new image to support Incredible PBX for Elastix 2.5 should be available shortly.
For Virtual Machine Installs, we recommend Oracle’s VirtualBox platform which runs atop almost any operating system including Windows, Macs, Linux, and Solaris. Here’s a link to our original VirtualBox tutorial to get you started. We suggest allocating 1GB of RAM and at least a 20GB disk image to your virtual machine for best performance. We actually used VirtualBox to build Incredible PBX for Elastix 2.5.
2. Install 64-bit Elastix 2.5 on Your Platform
Begin by downloading the 64-bit Elastix 2.5 ISO. For dedicated hardware, burn the ISO image to a CD/DVD and boot your server with the Elastix 2.5 ISO to begin the install. Here are the simplest installation steps:
Install or Upgrade in Graphical Mode by pressing ENTER
Choose: Install Language
Choose: Keyboard
Choose: Initialize Drive and Erase ALL DATA
Remove: All partitions on selected drive and YES you’re sure
Modify: Partitioning Layout (No is fine)
Configure: eth0 and disable IPv6 Support (unless required)
Choose: Dynamic IP (DHCP) configuration
Choose: Hostname Configuration Automatic
Choose: Time Zone and Disable System Clock Uses UTC
Set: Root Password (Make it Secure!)
Wait for Reboot to Complete
Set MySQL Password to: passw0rd (MANDATORY: with a zero!)
Choose Elastix admin Password: minimum 10 alphanumeric characters with upper & lowercase
For VirtualBox, create an Elastix 2.5 virtual machine of Linux (RedHat 64-bit) type by clicking New. Click Settings button. In System, enable I/O APIC and disable Hardware Clock in UTC Time. In Audio, enable Audio for your sound card. In Network, enable Bridged Adapter for Adapter 1. In Storage, click on Empty in the Storage Tree. Then click on the Disk icon to the right of CD/DVD Drive attributes. Choose the Elastix 2.5 ISO file that you downloaded. Click OK. Then start the virtual machine to begin the installation process. Follow the setup steps above to install Elastix 2.5 in your virtual machine.
3. Download and Install Incredible PBX for Elastix 2.5
After completing the Elastix 2.5 install, log into your server as root using SSH or Putty from a desktop machine that you will use to manage your server. This is important with the Incredible PBX IPtables Firewall WhiteList so you don’t get locked out of your own server! Then issue the following commands to begin the Incredible PBX install. You’ll actually run the installer twice, once to upgrade CentOS and Elastix and a second time to install Incredible PBX.
cd /root
wget http://incrediblepbx.com/incrediblepbx11elastix25.tar.gz
tar zxvf incrediblepbx11elastix25.tar.gz
rm -f incrediblepbx11elastix25.tar.gz
./IncrediblePBX11-Elastix25.sh
./IncrediblePBX11-Elastix25.sh
4. Initial Configuration of Incredible PBX for Elastix 2.5
Incredible PBX is installed with the preconfigured IPtables Linux firewall already in place. It implements WhiteList Security to limit server access to connected LANs, your server’s IP address, your desktop computer’s IP address, and a few of our favorite SIP providers. You can add additional entries to this WhiteList whenever you like using the add-ip and add-fqdn tools in /root. There’s also an Apache security layer for our web applications. And, of course, Elastix 2.5 has its own security methodology. Finally, we randomize extension and DISA passwords as part of the initial install process. Out of the starting gate, you won’t find a more secure VoIP server implementation anywhere. After all, it’s your phone bill.
Even with all of these layers of security, here are 6 Quick Steps to better safeguard your server. You only do this once, but failing to do it may lead to security issues you don’t want to have to deal with down the road. So DO IT NOW!
First, log out and back into your server as root with your root password to get the latest updates. Then do the following:
Make your root password very secure: passwd
Set your correct time zone: ./timezone-setup
Create admin password for web apps: htpasswd -b /etc/pbx/wwwpasswd admin newpassword
Set MySQL and Elastix admin PW: ./admin-pw-change (MySQL PW MUST be passw0rd with zero)
Make a copy of your other passwords: cat passwords.FAQ
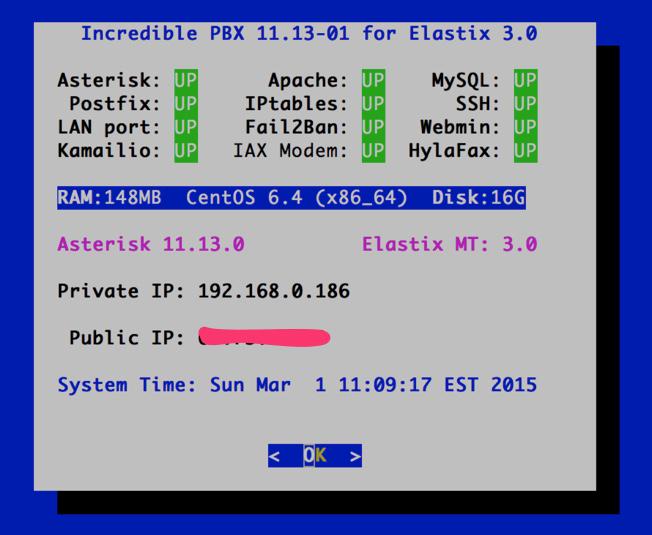
Decipher IP address and other info about your server: status
Last but not least, Incredible PBX includes an automatic update utility which downloads important updates whenever you log into your server as root. We recommend you log in once a week to keep your server current. If you haven’t already done so, NOW would be a good time to log out and back into your server at the Linux command line to bring your server current.
5. Activate Trunks with Incredible PBX for Elastix 2.5
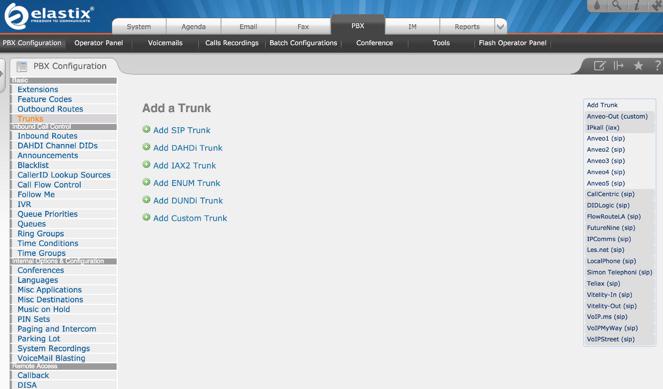
For those migrating from another aggregation including PBX in a Flash, this should be familiar territory for you. Using a browser, log into Elastix 2.5 at the IP address of your server. Before you can actually make or receive calls outside your PBX, you’ll need at least one trunk. In the Elastix 2.5 GUI, click PBX -> Trunks. Once you have your credentials from a provider, choose a provider from the list of preconfigured trunks on the right or create a new one. If you’re using one of the preconfigured options, remember to enable the trunk after adding your desired CallerID and credentials. Then save your settings and reload your Asterisk dialplan. That’s it. You’re ready to go.
6. Configure a Softphone with Incredible PBX for Elastix 2.5
Incredible PBX comes preconfigured with two extensions (701 and 702) that let you connect phones to your PBX. You can connect virtually any kind of telephone to your Elastix 2.5 PBX. Plain Old Phones require an analog telephone adapter (ATA) which can be a separate board in your computer from a company such as Digium. Or it can be a standalone SIP device such as ObiHai’s OBi100 or OBi110 (if you have a phone line from Ma Bell to hook up as well). SIP phones can be connected directly so long as they have an IP address. These could be hardware devices or software devices such as the YateClient softphone. We’ll start with a free one today so you can begin making calls. You can find dozens of recommendations for hardware-based SIP phones both on Nerd Vittles and the PIAF Forum when you’re ready to get serious about VoIP.
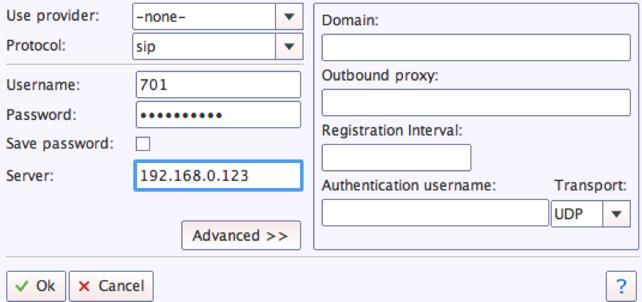
We recommend YateClient which is free. Download it from here. Run YateClient once you’ve installed it and enter the credentials for the 701 extension on Incredible PBX. You’ll need the IP address of your server plus your extension 701 password. You can find them in /root/passwords.FAQ. Fill in the blanks using the IP address of your server, 701 for your account name, and whatever password is assigned to the extension. Here’s what your entries should look like. Click OK to save your entries.
Once you are registered to extension 701, close the Account window. Then click on YATE’s Telephony Tab and place some test calls to the numerous apps that are preconfigured on Incredible PBX. Here are a few numbers to get you started:
123 - Reminders

947 - Weather by ZIP Code

951 - Yahoo News

222 - ODBC Lookup (try: 12345)

DEMO - Allison's IVR Demo

TODAY - Today in History
6. Configuring SMTP Mail with Incredible PBX for Elastix 2.5
Outbound email support using Postfix is preconfigured with Elastix 2.5. You can test whether it’s actually working by issuing the following command using your destination email address after logging in as root:
echo "test" | mail -s testmessage yourname@gmail.com
If you don’t receive the email message within a minute or two and you’ve checked your spam folder, chances are your ISP is blocking downstream SMTP servers in an effort to combat spam. Comcast is one of the usual suspects. To enable outbound email service for delivery of voicemail and other email messages with a provider blocking downstream SMTP servers, you first need to obtain the SMTP domain of your ISP, e.g. smtp.comcrap.net. Next, edit /etc/postfix/main.cf and add your SmartHost entry [in brackets] to the line that begins like this: relayhost =. The line should look like this: relayhost = [smtp.comcrap.net]. Save your addition and restart Postfix: service postfix restart. Be sure to try another email test message after completing the SmartHost update. To use Gmail as your mail relay, see this tutorial.
Configuring Google Voice
We have included the Python implementation of gvoice in /root for those that want to experiment by making calls and sending SMS blasts the "old-fashioned" way. While Elastix does not directly support native Asterisk 11 Google Voice functionality, you now can use a SIP gateway to access Google Voice and make free calls in the U.S. and Canada.
If you have difficulty finding the Google Chat option after setting up a new Google Voice account, follow this tutorial.
Homework Assignment: Mastering Incredible PBX for Elastix 2.5
We’ve put together a complete tutorial for the applications included in Incredible PBX for Asterisk-GUI. Most of it is fully applicable to Elastix 2.5 as well. That should be your next stop. Then you’ll be ready to tackle Elastix 2.5. Google is your friend. Do some exploring, and we’ll post links to great articles on this terrific platform as we discover them. Your suggestions are also welcomed!
In the meantime, if you have questions, join the PBX in a Flash Forums and take advantage of our awesome collection of gurus. There’s an expert available on virtually any topic, and the price is right. As with Incredible PBX, it’s absolutely free. The same applies to the Elastix forum.
And if all of that wasn’t enough, feast your eyes on the Elastix Add-Ons that are only a button click away:
[gview file="http://nerdvittles.com/wp-content/ElastixAddOns.pdf"]
Originally published: Tuesday, March 10, 2015
Support Issues. With any application as sophisticated as this one, you’re bound to have questions. Blog comments are a terrible place to handle support issues although we welcome general comments about our articles and software. If you have particular support issues, we encourage you to get actively involved in the PBX in a Flash Forums. It’s the best Asterisk tech support site in the business, and it’s all free! Please have a look and post your support questions there. Unlike some forums, ours is extremely friendly and is supported by literally hundreds of Asterisk gurus and thousands of users just like you. You won’t have to wait long for an answer to your question.
Need help with Asterisk? Visit the PBX in a Flash Forum.
Special Thanks to Our Generous Sponsors
FULL DISCLOSURE: ClearlyIP, Skyetel, Vitelity, DigitalOcean, Vultr, VoIP.ms, 3CX, Sangoma, TelecomsXchange and VitalPBX have provided financial support to Nerd Vittles and our open source projects through advertising, referral revenue, and/or merchandise. As an Amazon Associate and Best Buy Affiliate, we also earn from qualifying purchases. We’ve chosen these providers not the other way around. Our decisions are based upon their corporate reputation and the quality of their offerings and pricing. Our recommendations regarding technology are reached without regard to financial compensation except in situations in which comparable products at comparable pricing are available from multiple sources. In this limited case, we support our sponsors because our sponsors support us.
BOGO Bonaza: Enjoy state-of-the-art VoIP service with a $10 credit and half-price SIP service on up to $500 of Skyetel trunking with free number porting when you fund your Skyetel account. No limits on number of simultaneous calls. Quadruple data center redundancy. $25 monthly minimum spend required. Tutorial and sign up details are here.
![]() The lynchpin of Incredible PBX 2020 and beyond is ClearlyIP components which bring management of FreePBX modules and SIP phone integration to a level never before available with any other Asterisk distribution. And now you can configure and reconfigure your new Incredible PBX phones from the convenience of the Incredible PBX GUI.
The lynchpin of Incredible PBX 2020 and beyond is ClearlyIP components which bring management of FreePBX modules and SIP phone integration to a level never before available with any other Asterisk distribution. And now you can configure and reconfigure your new Incredible PBX phones from the convenience of the Incredible PBX GUI.
VitalPBX is perhaps the fastest-growing PBX offering based upon Asterisk with an installed presence in more than 100 countries worldwide. VitalPBX has generously provided a customized White Label version of Incredible PBX tailored for use with all Incredible PBX and VitalPBX custom applications. Follow this link for a free test drive!
Special Thanks to Vitelity. Vitelity is now Voyant Communications and has halted new registrations for the time being. Our special thanks to Vitelity for their unwavering financial support over many years and to the many Nerd Vittles readers who continue to enjoy the benefits of their service offerings. We will keep everyone posted on further developments.
Some Recent Nerd Vittles Articles of Interest…
Meet the Two Amigos: Introducing Incredible PBX for Elastix MT
DEC. 7 NEWS FLASH: The Elastix project has been sold to 3CX. Elastix 4.0 and Elastix MT have been removed from production "due to a legal disagreement with another open source distribution."
Q: But wait. Aren’t Elastix® and PBX in a Flash™ competitors? What’s going on here?
A: Think of us as Two Amigos! Edgar Landivar and his team have been fellow contributors to the Asterisk® open source community for as long as we have. They just happened to be on another continent. We’re not in the Asterisk Business, per se, so steering those in need of commercial components toward a company that respects the tenets of the GPL is great for all of us. The rewards are new products such as Elastix MT, a formidable multitenant PBX solution with a terrific new GUI. And the icing on the cake is an integrated, commercial Call Center Service for those that need it.
We promised that 2015 would be the year of Gotcha-Free choices for the Asterisk platform, and today we deliver the second VoIP alternative with pure and honest GPL code minus the patent, trademark, and copyright minefields that we’ve previously written about. Incredible PBX™ for Elastix MT provides virtually the same feature set of applications for Asterisk as our previous releases. Just abide by the clear GPL licensing terms and copy, embellish, and redistribute to your heart’s content. The silver lining is a fantastic (free) multi-tenant platform with a terrific new GUI courtesy of Elastix MT. WOW!
Elastix MT is relatively new and not without a few growing pains as is true with all new releases. But, prepare to be amazed. What a terrific platform on which to build an Asterisk 11-based server that can support multiple organizations out of the starting gate… at no cost. The Elastix MT feature set has no rival in the open source community: telephony, instant messaging, faxing, email server, ODBC database support, integrated call center, and on and on. For a great overview of Elastix MT (aka Elastix 3.0), watch this video from AstriCon:
Incredible PBX adds a huge collection of its own open source applications for Asterisk to give you the best of all worlds. Our design strategy was straight-forward. Install a 64-bit bit version of Elastix MT on the platform of your choice. Then run the Incredible PBX installer. In 5 minutes, you’re ready to roll. The installer will create a separate Incredible PBX organization with all the bells and whistles to which you are accustomed. Text-to-speech applications, speech recognition, DISA, ODBC, SMS messaging, news, weather, conference bridge support, and a voice dialer are enabled out of the box.
A Word of Caution. If you’re new to Incredible PBX, install a clean version of Elastix MT with NO MODIFICATIONS before you begin the Incredible PBX install. All of the existing Elastix MT setup will be modified as part of the Incredible PBX install, and these changes will wipe out any additions you’ve previously made to Elastix MT. Once the Incredible PBX install is completed, you can make all the changes you wish in your Elastix MT configuration. The only major design change we’ve made is to rework the Elastix MySQL database tables into MyISAM format from InnoDB. This facilitates making future backups and restores of your server as well as providing the necessary platform to install Incredible PBX components.
Did We Mention Security? You also get a locked down, preconfigured IPtables Firewall WhiteList with all of the Travelin’ Man 3 tools plus the automatic update service to keep your server up to date and safe. There is a $20 voluntary annual license fee for the update service but, if you’d prefer to buy donuts, be our guest. But understand that voluntary is a two-way street. Running the update service costs us time and money and, when it ceases to be worthy of our time and financial investment, we reserve the right to discontinue the service down the road. The next time you log into your server after installing Incredible PBX, you’ll quickly appreciate why an automatic update service is important. Every major Linux vulnerability from the past year will be patched without your ever lifting a finger.
With respect to the multi-tenant functionality of Elastix MT, you can elect to use the Incredible PBX platform exclusively moving forward. Or you can create additional organizations from the Elastix MT dashboard or by using the Elastix MT API. It’s all about choices, and Incredible PBX with Elastix MT delivers in spades!
|
Target Audience: Small or Large Organization in need of a turnkey, Gotcha-Free PBX Default Configuration: Asterisk 11 with enhanced Elastix 3.0 GUI and Kennonsoft GUI Platform: CentOS 6.4 running on Dedicated Server, Cloud-Based Server, or Virtual Machine Minimum Memory: 1024 MB Recommended Disk: 20 GB+
Feature Set: Fax, SMS messaging, NeoRouter/PPTP VPN, Reminders, ConfBridge Conferencing, AsteriDex, Voicemail, Email, IVR, News, Weather, Voice Dialer, Wolfram Alpha, Today in History, TM3 Firewall WhiteList, Speed Dialer, iNUM and SIP URI (free) worldwide calling, DISA, Call Forwarding, Tailorable CDRs Administrator Utilities: Incredible Backup/Restore, Automatic Updater, phpMyAdmin, Timezone Config, WebMin, Admin Password Configurator, ODBC/MySQL Database Configurator, Firewall WhiteList Tools |
Getting Started with Incredible PBX for Elastix MT
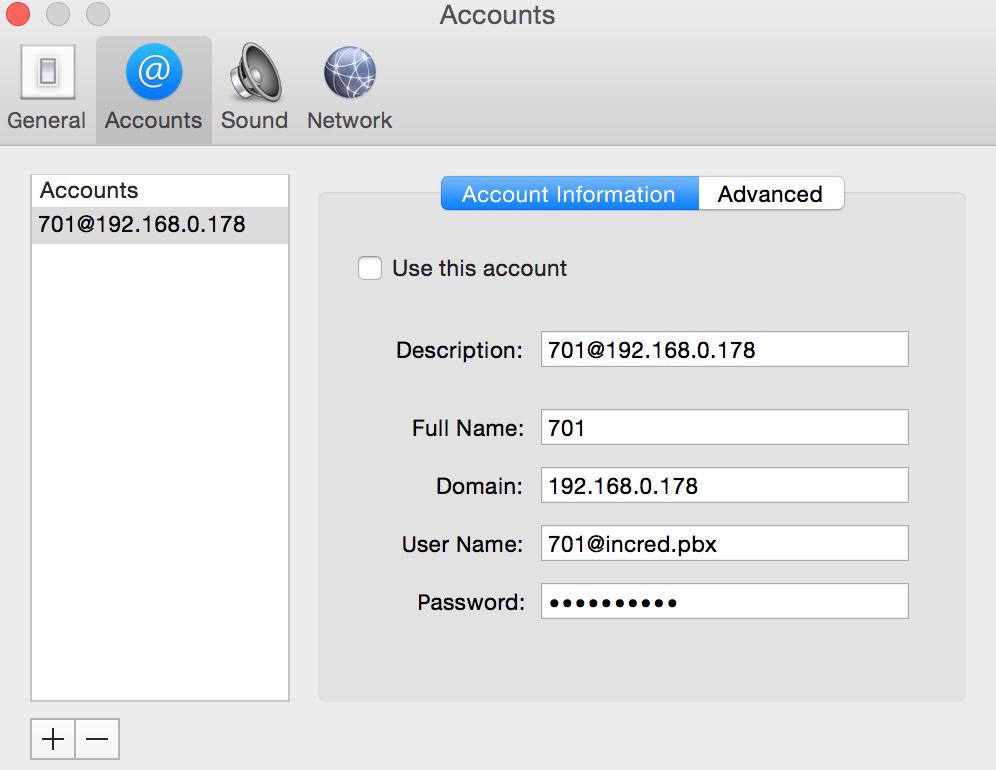
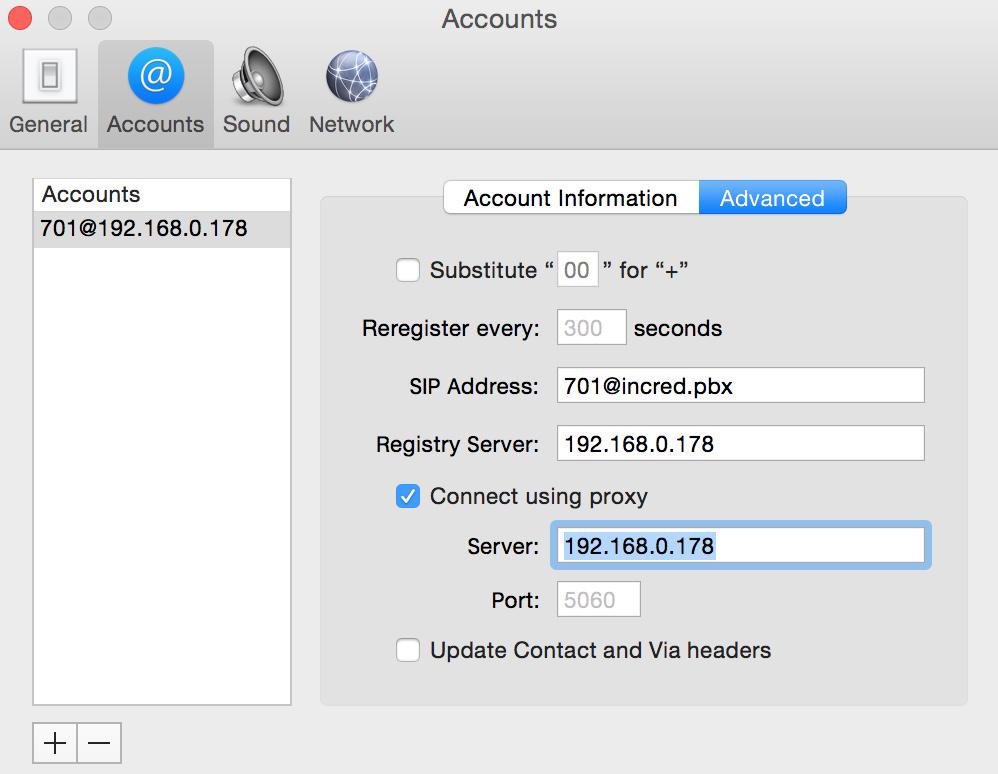
For those new to Asterisk or accustomed to single-tenant PBXs such as PBX in a Flash, there are some differences of which you need to be aware. First, extensions are unique to each organization on your PBX. For example, it is perfectly acceptable to have an extension 701 for each organization with Elastix MT. The extensions are differentiated with a suffix that identifies the organization’s domain, e.g. 701@incred.pbx. Fictitious domains are acceptable. The nomenclature required to register a phone with Incredible PBX for Elastix MT and a sample setup using the (free) Telephone app for the Mac is shown below:
The other major change is the Asterisk config files. In a traditional single-tenant PBX, all of the files are stored in /etc/asterisk. With Elastix MT, there is an additional storage location for the extensions config files. And note the new context name [incred.pbx-from-internal-custom] in extensions_custom.conf. Incredible PBX handles all of the under-the-covers work for you automatically, but we wanted to alert you to the differences in the event you wish to build your own organizations within Elastix MT.
root@localhost# ls /etc/asterisk/organizations/incred.pbx
extensions.conf extensions_custom.conf extensions_additionals.conf extensions_globals.conf
Here’s a quick overview of the installation and setup process for Incredible PBX for Elastix MT:
- Choose a Hardware Platform – Dedicated PC, Cloud Provider, or Virtual Machine
- Install Elastix MT – 64-bit CentOS 6.4 platform
- Download and Install Incredible PBX for Elastix MT
- Set Up Passwords for Incredible PBX for Elastix MT
- Configure Trunks with Incredible PBX for Elastix MT
- Connect a Softphone to Incredible PBX for Elastix MT
1. Choose a Platform for Incredible PBX for Elastix MT
Incredible PBX for Elastix MT works equally well on dedicated hardware, a cloud-based server, or a virtual machine. Just be sure you’ve met the minimum requirements outlined above and that you have a sufficiently robust Internet connection to support 100Kb of download and upload bandwidth for each simultaneous call you wish to handle with your new PBX.
For Dedicated Hardware, we recommend at least an Atom-based PC of recent vintage with at least a 30GB drive and 4GB of RAM. That will take care of an office with 10-20 extensions and a half dozen or more simultaneous calls if you have the Internet bandwidth to support it. For multi-tenant deployments, the hardware sky is the limit depending upon your requirements.
For Cloud-Based Servers, we recommend RentPBX, one of our financial supporters who also happens to size servers properly and restrict usage solely to VoIP. This avoids performance bottlenecks that cause problems with VoIP calls. Yes, we have a coupon code for you to get the $15/month rate: NOGOTCHAS. The new image to support Incredible PBX for Elastix MT should be available shortly.
For Virtual Machine Installs, we recommend Oracle’s VirtualBox platform which runs atop almost any operating system including Windows, Macs, Linux, and Solaris. Here’s a link to our original VirtualBox tutorial to get you started. We suggest allocating 1GB of RAM and at least a 20GB disk image to your virtual machine for best performance. We actually used VirtualBox to build Incredible PBX for Elastix MT.
2. Install 64-bit Elastix MT on Your Platform
Begin by downloading the 64-bit Elastix MT ISO. For dedicated hardware, burn the ISO image to a CD/DVD and boot your server with the Elastix MT ISO to begin the install. Here are the simplest installation steps:
Disable IPv6 Support (unless required) and Click Continue
Click: Discard All Data
Choose: Install Language
Choose: Keyboard
Choose: Time Zone
Set: Root Password
Choose Disk Setup: Use All Space
Wait for Reboot to Complete
Set MySQL Password to: passw0rd (MANDATORY: with a zero!)
Choose Elastix admin Password: minimum 10 alphanumeric characters with upper & lowercase
For VirtualBox, create an Elastix MT virtual machine of Linux (RedHat 64-bit) type by clicking New. Click Settings button. In System, enable I/O APIC and disable Hardware Clock in UTC Time. In Audio, enable Audio for your sound card. In Network, enable Bridged Adapter for Adapter 1. In Storage, click on Empty in the Storage Tree. Then click on the Disk icon to the right of CD/DVD Drive attributes. Choose the Elastix MT ISO file that you downloaded. Click OK. Then start the virtual machine to begin the installation process. Follow the setup steps above to install Elastix MT in your virtual machine.
CAUTION: For the time being, we would strongly recommend that you not run yum upgrade or yum update on the Elastix MT platform after the install is finished. This will be handled automatically by the Incredible PBX installer in the next step.
3. Download and Install Incredible PBX for Elastix MT
After completing the Elastix MT install, log into your server as root using SSH or Putty from a desktop machine that you will use to manage your server. This is important with the Incredible PBX IPtables Firewall WhiteList so you don’t get locked out of your own server! Then issue the following commands to begin the Incredible PBX install:
cd /root
wget http://incrediblepbx.com/incrediblepbx11elastix.tar.gz
tar zxvf incrediblepbx11elastix.tar.gz
rm -f incrediblepbx11elastix.tar.gz
./IncrediblePBX11-ElastixMT.sh
5. Initial Configuration of Incredible PBX for Elastix MT
Incredible PBX is installed with the preconfigured IPtables Linux firewall already in place. It implements WhiteList Security to limit server access to connected LANs, your server’s IP address, your desktop computer’s IP address, and a few of our favorite SIP providers. You can add additional entries to this WhiteList whenever you like using the add-ip and add-fqdn tools in /root. There’s also an Apache security layer for our web applications. And, of course, Elastix MT has its own security methodology. Finally, we randomize extension and DISA passwords as part of the initial install process. Out of the starting gate, you won’t find a more secure VoIP server implementation anywhere. After all, it’s your phone bill.
Even with all of these layers of security, here are 10 Quick Steps to better safeguard your server. You only do this once, but failing to do it may lead to security issues you don’t want to have to deal with down the road. So DO IT NOW!
First, log out and back into your server as root with your root password to get the latest updates. Then do the following:
Make your root password very secure: passwd
Set your correct time zone: ./timezone-setup
Create admin password for web apps: htpasswd -b /etc/pbx/wwwpasswd admin newpassword
Set MySQL and Elastix admin PW: ./admin-pw-change (MySQL PW MUST be passw0rd with zero)
Make a copy of your other passwords: cat passwords.FAQ
Decipher IP address and other info about your server: status
Second, log into Elastix MT as admin using a web browser pointed to your server’s IP address:
Click USERS tab in Incredible PBX GUI
Click Elastix MT Administration
Log in as user: admin with password from above
Change Extension 701 and 702 passwords (including Voicemail)
Last but not least, Incredible PBX includes an automatic update utility which downloads important updates whenever you log into your server as root. We recommend you log in once a week to keep your server current. If you haven’t already done so, NOW would be a good time to log out and back into your server at the Linux command line to bring your server current.
6. Configure Trunks with Incredible PBX for Elastix MT
Before you can actually make or receive calls outside your PBX, you’ll need at least one trunk. Open the Elastix MT GUI and click PBX -> PBX -> Trunks. Then click Create New Trunk. Once you have your credentials from a provider, here is a quick Cheat Sheet courtesy of Kristian Hare, to help you set up your trunk. Our original setups are available in this spreadsheet as well. Just click on the image below to open it in a new window. Then click on the redisplayed image to enlarge it.

For a great tutorial on Getting Started with Trunks in Elastix MT, go here. Google will handle the translation to English if you’re a little rusty on your español.
7. Configure a Softphone with Incredible PBX for Elastix MT
Incredible PBX comes preconfigured with two extensions (701 and 702) that let you connect phones to your PBX. You can connect virtually any kind of telephone to your Elastix MT PBX. Plain Old Phones require an analog telephone adapter (ATA) which can be a separate board in your computer from a company such as Digium. Or it can be a standalone SIP device such as ObiHai’s OBi100 or OBi110 (if you have a phone line from Ma Bell to hook up as well). SIP phones can be connected directly so long as they have an IP address. These could be hardware devices or software devices such as the YateClient softphone. We’ll start with a free one today so you can begin making calls. You can find dozens of recommendations for hardware-based SIP phones both on Nerd Vittles and the PIAF Forum when you’re ready to get serious about VoIP.
We recommend YateClient which is free. Download it from here. Run YateClient once you’ve installed it and enter the credentials for the 701 extension on Incredible PBX. You’ll need the IP address of your server plus your extension 701 password. You can find them in /root/passwords.FAQ. Fill in the blanks using the IP address of your server, 701@incred.pbx for your account name, and whatever password is assigned to the extension. Complete the other fields as shown. Click OK to save your entries.
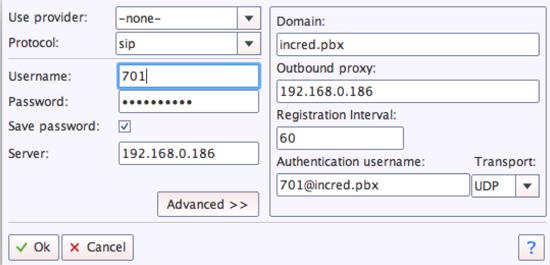
Once you are registered to extension 701, close the Account window. Then click on YATE’s Telephony Tab and place some test calls to the numerous apps that are preconfigured on Incredible PBX. Before you do anything else, dial yourself at 701 and press * to access the voicemail system. Change your password immediately. Next, dial 702 and press *. When prompted for the password, enter 702. Then change it. Now dial a few of these numbers just for fun:
123 - Reminders

947 - Weather by ZIP Code

951 - Yahoo News

222 - ODBC Lookup (try: 12345)

TODAY - Today in History
Creating your own extensions in Elastix MT is easy. Choose PBX -> PBX Apps -> Extensions. Then click Create New Extension and fill in the form using this example:
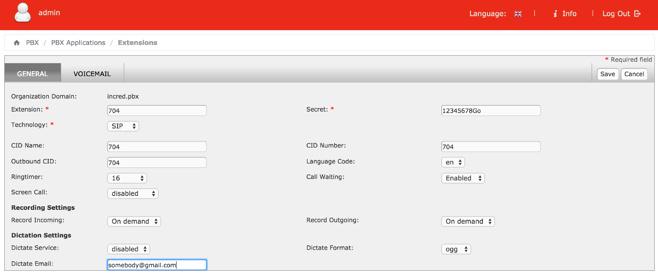
If you wish to enable voicemail on the new extension, click the Voicemail tab and complete the entries before clicking the Save button. For possible Voicemail Options, review ext. 701 voicemail configuration. The entries are self-explanatory.
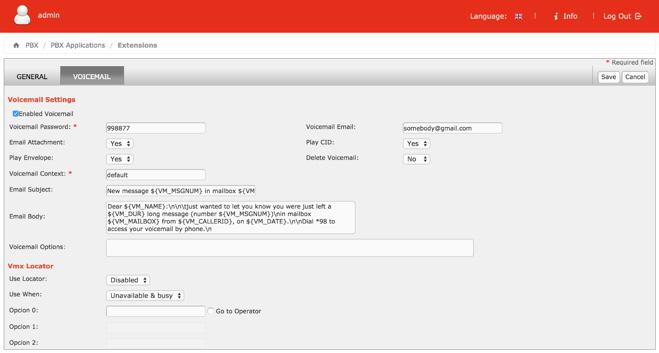
Configuring Google Voice
We have included the Python implementation of gvoice in /root for those that want to experiment by making calls and sending SMS blasts the "old-fashioned" way. While Elastix does not directly support native Asterisk 11 Google Voice functionality, you now can use a SIP gateway to access Google Voice and make free calls in the U.S. and Canada.
Homework Assignment: Mastering Incredible PBX for Elastix MT
We’ve put together a complete tutorial for the applications included in Incredible PBX for Asterisk-GUI. Most of it is fully applicable to Elastix MT as well. That should be your next stop. Then you’ll be ready to tackle Elastix NT. Google is your friend. Do some exploring, and we’ll post links to great articles on this new platform as we discover them. Your suggestions are also welcomed!
In the meantime, if you have questions, join the PBX in a Flash Forums and take advantage of our awesome collection of gurus. There’s an expert available on virtually any topic, and the price is right. As with Incredible PBX, it’s absolutely free. The same applies to the Elastix 3.0 forum.
Bugs & Fixes. Rather than perpetually updating this article with bug reports and fixes, we will post bugs and fixes as they become available in this thread on the forum. For openers, there are major issues with Trunks in Elastix MT, but we’re getting there so enjoy the ride!
Originally published: Monday, March 2, 2015
Support Issues. With any application as sophisticated as this one, you’re bound to have questions. Blog comments are a terrible place to handle support issues although we welcome general comments about our articles and software. If you have particular support issues, we encourage you to get actively involved in the PBX in a Flash Forums. It’s the best Asterisk tech support site in the business, and it’s all free! Please have a look and post your support questions there. Unlike some forums, ours is extremely friendly and is supported by literally hundreds of Asterisk gurus and thousands of users just like you. You won’t have to wait long for an answer to your question.
Need help with Asterisk? Visit the PBX in a Flash Forum.
Special Thanks to Our Generous Sponsors
FULL DISCLOSURE: ClearlyIP, Skyetel, Vitelity, DigitalOcean, Vultr, VoIP.ms, 3CX, Sangoma, TelecomsXchange and VitalPBX have provided financial support to Nerd Vittles and our open source projects through advertising, referral revenue, and/or merchandise. As an Amazon Associate and Best Buy Affiliate, we also earn from qualifying purchases. We’ve chosen these providers not the other way around. Our decisions are based upon their corporate reputation and the quality of their offerings and pricing. Our recommendations regarding technology are reached without regard to financial compensation except in situations in which comparable products at comparable pricing are available from multiple sources. In this limited case, we support our sponsors because our sponsors support us.
BOGO Bonaza: Enjoy state-of-the-art VoIP service with a $10 credit and half-price SIP service on up to $500 of Skyetel trunking with free number porting when you fund your Skyetel account. No limits on number of simultaneous calls. Quadruple data center redundancy. $25 monthly minimum spend required. Tutorial and sign up details are here.
![]() The lynchpin of Incredible PBX 2020 and beyond is ClearlyIP components which bring management of FreePBX modules and SIP phone integration to a level never before available with any other Asterisk distribution. And now you can configure and reconfigure your new Incredible PBX phones from the convenience of the Incredible PBX GUI.
The lynchpin of Incredible PBX 2020 and beyond is ClearlyIP components which bring management of FreePBX modules and SIP phone integration to a level never before available with any other Asterisk distribution. And now you can configure and reconfigure your new Incredible PBX phones from the convenience of the Incredible PBX GUI.
VitalPBX is perhaps the fastest-growing PBX offering based upon Asterisk with an installed presence in more than 100 countries worldwide. VitalPBX has generously provided a customized White Label version of Incredible PBX tailored for use with all Incredible PBX and VitalPBX custom applications. Follow this link for a free test drive!
Special Thanks to Vitelity. Vitelity is now Voyant Communications and has halted new registrations for the time being. Our special thanks to Vitelity for their unwavering financial support over many years and to the many Nerd Vittles readers who continue to enjoy the benefits of their service offerings. We will keep everyone posted on further developments.
Some Recent Nerd Vittles Articles of Interest…
The Gotcha-Free PBX in the Cloud: Introducing Incredible PBX @ RentPBX.com

We continue the Incredible PBX for Asterisk-GUI adventure today with an open source alternative for which many have been clamoring, an affordable Cloud-based Asterisk® platform with a no-strings-attached graphical user interface. As if the $15 a month hosting plan weren’t enough, the icing on the cake is the quick 2-minute setup on your choice of a dozen servers throughout the U.S. as well as Canada and Europe. If you can find the Enter key on a keyboard, then you can handle the complexity of the RentPBX setup. When you’re finished, you’ll have a turnkey PBX featuring some of the finest open source software on the planet. The software is all free, subject only to the terms of the open source licenses.
|
Target Audience: Home or SOHO/SBO in need of a turnkey, Gotcha-Free PBX in the Cloud Default Configuration: Asterisk 11 with enhanced Asterisk-GUI, Kennonsoft GUI, and NANPA dialplan Platform: CentOS 6.6 running on RentPBX Cloud-Based Server platform Memory: 385 MB with 415 MB swap Disk Size: 20 GB Default Trunks: Google Voice, CallCentric, DIDlogic, Future-Nine, IPcomms, Les.net, Vitelity, VoIP.ms1 Feature Set: Fax, SMS messaging, VPN, Reminders, ConfBridge Conferencing, AsteriDex, Voicemail, IVR, Email, News, Weather, Voice Dialer, Wolfram Alpha, Today in History, TM3 Firewall WhiteList, Speed Dialer, iNUM and SIP URI (free) worldwide calling, OpenCNAM CallerID lookups, DISA, Call Forwarding, CSV CDRs Administrator Utilities: Incredible Backup/Restore, Automatic Updater, Asterisk Upgrader, phpMyAdmin, Timezone Config, Plug-and-Play Trunk Configurator, WebMin, External IP Setup, Firewall WhiteList Tools |
Getting Started with Incredible PBX for Asterisk-GUI (Cloud Edition)
Here’s a quick overview of the installation and setup process for Incredible PBX for Asterisk-GUI @ RentPBX.com:
- Sign Up for Gotcha-Free PBX in the Cloud – Choose server location and await credentials
- Complete the Install of Incredible PBX and Incredible Fax
- Set Up Passwords for Incredible PBX for Asterisk-GUI
- Configure Trunks with Incredible PBX for Asterisk-GUI
- Connect a Softphone to Incredible PBX for Asterisk-GUI
1. Sign Up for Gotcha-Free PBX in the Cloud at RentPBX.com
Visit RentPBX.com and choose the PBX in a Flash builds and complete the following steps:
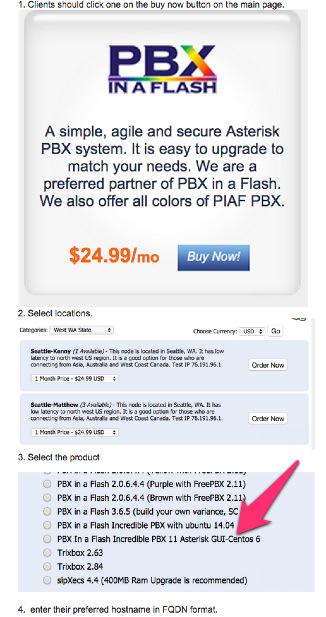
When you begin the payment and checkout phase, enter your coupon code to take advantage of the $15/month discounted rate: NOGOTCHAS. Wait for the confirmation email with your server credentials and dedicated IP address.
2. Complete the Install of Incredible PBX and Incredible Fax
Nothing tricky here. It’s a 2-minute setup process. Log into your server as root with your default password using SSH or Putty. Once you’re logged in, RentPBX will randomize all of your passwords for Incredible PBX. Next, you’ll be prompted for the email address to use for delivery of your faxes. Once entered, you’ll be prompted for various information to install HylaFax and AvantFax. Just press the Enter key at every prompt. In a couple minutes, your server will reboot to bring Incredible PBX and Incredible Fax on line. Log back into your server as root and let Incredible PBX run its Automatic Update Utility to bring your system current. That’s it. You now have a turnkey Asterisk® PBX that’s ready for configuration.

3. Initial Configuration of Incredible PBX for Asterisk-GUI
Incredible PBX is installed with the preconfigured IPtables Linux firewall already in place. It implements WhiteList Security to limit server access to your server’s IP address, your desktop computer’s IP address, and a few of our favorite SIP providers. You can add additional entries to this WhiteList whenever you like using the add-ip and add-fqdn tools in /root. There’s also an Apache security layer for web applications. And, of course, Asterisk-GUI has its own security methodology using Asterisk’s manager.conf. Finally, RentPBX randomized extension and DISA passwords as part of the initial setup process. Out of the starting gate, you won’t find a more secure VoIP server implementation anywhere. After all, it’s your phone bill.
Even with all of these layers of security, here are 10 Quick Steps to better safeguard your server. You only do this once, but failing to do it may lead to security issues you don’t want to have to deal with down the road. So DO IT NOW!
First, log into your server as root with your root password and do the following:
Make your root password very secure: passwd
Set your correct time zone: ./timezone-setup
Create admin password for web apps: htpasswd -b /etc/pbx/wwwpasswd admin newpassword
Make a copy of your other passwords: cat passwords.FAQ
Make a copy of your Knock codes: cat knock.FAQ
Decipher IP address and other info about your server: status
Second, log into your server as admin using a web browser pointed to your server’s IP address:
Click USERS tab in Incredible PBX GUI
Click Asterisk-GUI Administration
Log in as user: admin with password: password
Immediately change your admin password
Log in to Asterisk-GUI again with your new password. Expand the options available in the GUI (if required):
Options -> Advanced Options -> Show Advanced Options
Last but not least, Incredible PBX includes an automatic update utility which downloads important updates whenever you log into your server as root. We recommend you log in once a week to keep your server current.
4. Configure Trunks with Incredible PBX for Asterisk-GUI
Now for the fun part. If this is your first VoIP adventure, be advised that this ain’t your grandma’s phone system. You need not and should not put all your eggs in one basket when it comes to telephone providers. In order to connect to Plain Old Telephones, you still need at least one provider. But there is nothing wrong with having several. And a provider that handles an outbound call (termination) need not be the same one that handles an incoming call (origination) and provides your phone number (DID). We cannot recommend Vitelity highly enough, and it’s not just because they have financially supported our projects for almost a decade. They’re as good as VoIP providers get, and we use lots of them. If you’re lucky enough to live in the U.S., you’d be crazy not to set up a Google Voice account. It’s free as are all phone calls to anywhere in the U.S. and Canada. The remaining preconfigured providers included in Incredible PBX for Asterisk-GUI are equally good, and we’ve used and continue to use almost all of them. So pick a few and sign up. You only pay for the calls you make with each provider so you have little to lose by choosing several. The PIAF Forum includes dozens of recommendations on VoIP providers if you want additional information.
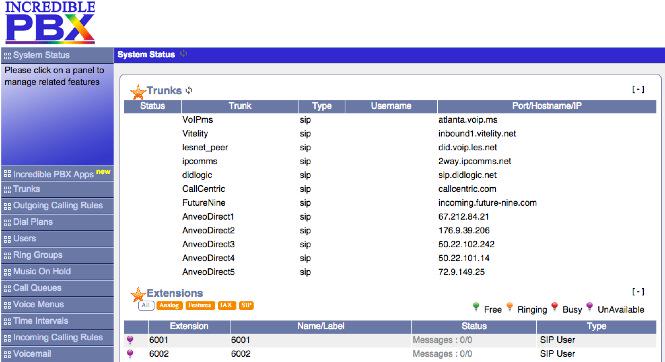
With the preconfigured trunks in Incredible PBX for Asterisk-GUI, all you need are your credentials for each provider and the FQDN of their server. Log into Asterisk-GUI Administration as admin using a browser. From the System Status screen, click Incredible PBX Apps. Click on each provider you have chosen and fill in the blanks with your credentials. When you’ve saved all of your settings, log into your server as root via SSH and type: service asterisk restart or asterisk-restart. You can also issue the command in the Asterisk-GUI by choosing the Asterisk CLI tab2 in the left column. Doesn’t get any simpler!
Update: It should be noted that Incredible PBX for Asterisk-GUI also supports Anveo Direct trunks; however, they are configured differently because of the way Anveo handles the calls. You’ll need the PIN provided by Anveo to set up your trunk, and Anveo supports CallerID spoofing so you can enter any CallerID number for the trunk that you are authorized to use. You’ll find the Anveo Direct setup link in the Incredible PBX Apps tab. To route an outgoing call through Anveo trunk, dial 2 + any desired 10-digit number.
Here is the complete list of dialing prefixes and the trunks to which they are associated:
- 1 – Google Voice
- 2 – Anveo Direct
- 3 – Future Nine
- 4 – CallCentric
- 5 – DIDlogic
- 6 – IPcomms
- 7 – Les.net
- 8 – Vitelity
- 9 – VoIP.ms
For free iNUM calling worldwide, the following dialing prefixes are supported in conjunction with the last seven digits of any destination iNUM DID. Free iNUM DIDs for your own PBX are available from both of these providers as well.
- 0XXXXXXX – CallCentric
- 90XXXXXXX – VoIP.ms
5. Configure a Softphone with Incredible PBX for Asterisk-GUI
We’re in the home stretch now. You can connect virtually any kind of telephone to your new Gotcha-Free PBX. Plain Old Phones require an analog telephone adapter (ATA). Because your server is actually in the RentPBX Cloud, a standalone SIP device is required. Good choices are ObiHai’s OBi100 or OBi110 (if you have a phone line from Ma Bell to hook up as well). SIP phones can be connected directly so long as they have an IP address. These could be hardware devices or software devices such as the YateClient softphone. We’ll start with a free one today so you can begin making calls. You can find dozens of recommendations for hardware-based SIP phones both on Nerd Vittles and the PIAF Forum when you’re ready to get serious about VoIP telephony. Don’t forget to WhiteList the IP address of each SIP phone you wish to connect using /root/add-ip or /root/add-fqdn.
We recommend the YateClient softphone which is free. Download it from here. Run YateClient once you’ve installed it and enter the credentials for the 6002 extension on Incredible PBX. You’ll need the IP address of your server plus your extension 6002 password. Choose Users -> 6002 and write down your SIP/IAX Password. You can also find it in /root/passwords.FAQ. Fill in the blanks using the IP address of your server, 6002 for your account name, and whatever password is assigned to the extension. Click OK to save your entries.

Once you are registered to extension 6002, close the Account window. Then click on YATE’s Telephony Tab and place some test calls to the numerous apps that are preconfigured on Incredible PBX. Dial a few of these to get started:
7001 - IVR Demo

123 - Reminders

947 - Weather by ZIP Code

951 - Yahoo News

*61 - Time of Day

TODAY - Today in History
If you are a Mac user, another great no-frills softphone is Telephone. Just download and install it from the Mac App Store.
Configuring Google Voice
If you want to use Google Voice, you’ll need a dedicated Google Voice account to support Incredible PBX. The more obscure the username (with some embedded numbers), the better off you will be. This will keep folks from bombarding you with unsolicited Gtalk chat messages, and who knows what nefarious scheme will be discovered using Google messaging six months from now. So keep this account a secret!
IMPORTANT: Do NOT under any circumstances take Google’s bait to switch from Google Chat to Hangouts, or you will forever lose the ability to use Google Chat with Incredible PBX. Also be sure to enable the Google Chat option as one of your phone destinations in Settings, Voice Setting, Phones. That’s the destination we need for The Incredible PBX to work its magic! Otherwise, all inbound and outbound calls will fail. Thus far, Google has apparently had a change of heart on discontinuing Google Chat support so it’s enabled by default in all new Google Voice accounts. Nothing free lasts forever so make some alternative arrangements before disaster strikes!
Once you’ve created a Gmail and Google Voice account, go to Google Voice Settings and click on the Calls tab. Make sure your settings match these:
- Call Screening – OFF
- Call Presentation – OFF
- Caller ID (In) – Display Caller’s Number
- Caller ID (Out) – Don’t Change Anything
- Do Not Disturb – OFF
- Call Options (Enable Recording) – OFF
- Global Spam Filtering – ON
Click Save Changes once you’ve adjusted your settings. Under the Voicemail tab, plug in your email address so you get notified of new voicemails. Down the road, receipt of a Google Voice voicemail will be a big hint that something has come unglued on your PBX.
One final word of caution is in order regardless of your choice of providers: Do NOT use special characters in any provider passwords, or nothing will work!
Now you’re ready to configure your Google Voice account in Incredible PBX. You can do it from within Asterisk-GUI by choosing Google Voice within the Incredible PBX Apps tab. Once you’ve entered your credentials, don’t forget to restart Asterisk, or Google Voice calls will fail. If you still have trouble placing or receiving calls, follow these tips.
OK, Smarty Pants: Show Me the Beef!
We know what some of you are thinking. "What does a fast food worker really know about VoIP and Gotcha-Free PBXs?? Before I waste a bunch of time on this, show me the beef!" Fair enough. Sit by your phone and click the Call Me icon below. Type in a fake name and your real phone number. Click the Connect button, answer your phone when it rings, and press 1. You’ll be connected to the Incredible PBX IVR for Asterisk-GUI. Pick an option from the menu of choices and take the Incredible PBX apps for a spin on our dime… actually it’s Google’s dime. Everything you see and hear is part of what you get with Incredible PBX for Asterisk-GUI including the ability to set up your own click-to-dial web interface exactly like this one. The demo just happens to be running on our Mac desktop. So… what are you waiting for? Click away and try Incredible PBX for yourself. And, by the way, nobody besides the NSA and Google will be monitoring your call. 😉
Nerd Vittles Demo IVR Options3
1 – Call by Name (say “Delta Airlines” or “American Airlines” to try it out)
2 – MeetMe Conference (password is 1234)
3 – Wolfram Alpha (say “What planes are overhead?”)
4 – Lenny (The Telemarketer’s Worst Nightmare)
5 – Today’s News Headlines
6 – Weather Forecast (say the city and state, province, or country)
7 – Today in History
8 – Speak to a Real Person (or maybe just voicemail if we’re out)
Homework Assignment: Mastering the Incredible Apps and Asterisk-GUI
Just Released: The Gotcha-Free Incredible PBX Application User’s Guide
Your next stop should be a careful reading of the new Incredible PBX Application User’s Guide. It documents the 31 apps for Asterisk that are included with your new PBX. You also need to learn all you can about Asterisk-GUI and how to make the best use of its powerful feature set. Here’s one word of warning. We mentioned that Incredible PBX was a hybrid system that combines some customized settings with the standard Asterisk-GUI interface. Before modifying existing settings for the default trunks, extensions, and default routes, take a look at the credentials* files in /etc/asterisk. If you modify any of these trunk entries or the Outgoing or Incoming Call Rules in Asterisk-GUI, you may break the Incredible PBX setup. So steer clear of that minefield until you know what you’re doing. Adding new extensions and additional trunks is perfectly fine and will not break anything.
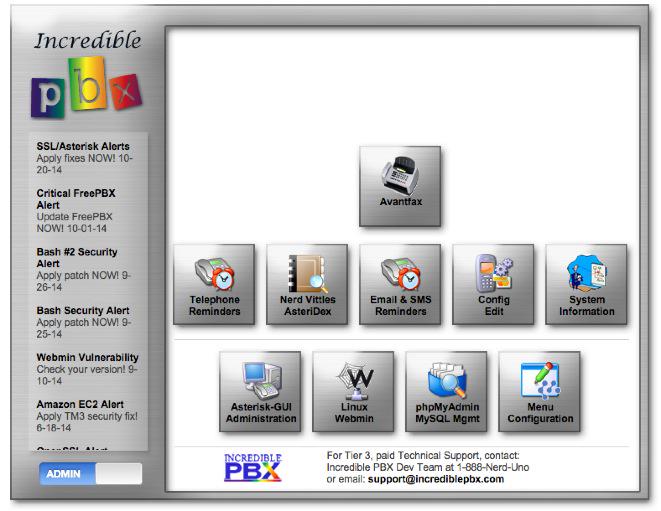
Rather than reinvent the wheel, we’ll point you to some excellent tutorials that already have been written. Start with Chapter 3 of Digium’s Asterisk Appliance™ Administrator Manual. Next, review Chapter 11 of The Asterisk Book (Second Edition). Finally, take a look at a couple of the tutorials that have been written by other companies that incorporated Asterisk-GUI into their hardware products, e.g. Yeastar’s MyPBX SOHO User Manual and Grandstream’s UCM6100 User Manual.
In the meantime, if you have questions, join the PBX in a Flash Forums and take advantage of our awesome collection of gurus. There’s an expert available on virtually any topic, and the price is right. As with Incredible PBX, it’s absolutely free.
We also are quickly building a collection of tutorials tailored specifically for Incredible PBX for Asterisk-GUI:
- Gotcha-Free PBX: Scripts 101
- Gotcha-Free PBX: Inbound Call Routing
- Gotcha-Free PBX: Outbound Call Routing
- Gotcha-Free PBX: Add-a-Trunk
- Gotcha-Free PBX: SMTP Mail Relay with SendMail or PostFix
- Gotcha-Free PBX: Music on Hold
- Gotcha-Free PBX: Changing TTS Engine
- Gotcha-Free PBX: Voicemail with Email Attachments
- Gotcha-Free PBX: Telephone and Web Reminders
- Gotcha-Free PBX: Sending Faxes
- Gotcha-Free PBX: VMobile Extension
- Gotcha-Free PBX: Anveo Direct
- Gotcha-Free PBX: Google Voice
- Gotcha-Free PBX: Voice Menus Setup
- Gotcha-Free PBX: Harnessing SIP URIs for Free Worldwide Calling
Enjoy your new Gotcha-Free PBX in the Cloud!
Don’t forget to List Yourself in Directory Assistance so everyone can find you by dialing 411. Add your new number to the Do Not Call Registry to block telemarketing calls. Or call 888-382-1222 from your new number.
Originally published: Monday, February 23, 2015
Support Issues. With any application as sophisticated as this one, you’re bound to have questions. Blog comments are a terrible place to handle support issues although we welcome general comments about our articles and software. If you have particular support issues, we encourage you to get actively involved in the PBX in a Flash Forums. It’s the best Asterisk tech support site in the business, and it’s all free! Please have a look and post your support questions there. Unlike some forums, ours is extremely friendly and is supported by literally hundreds of Asterisk gurus and thousands of users just like you. You won’t have to wait long for an answer to your question.
Need help with Asterisk? Visit the PBX in a Flash Forum.
Special Thanks to Our Generous Sponsors
FULL DISCLOSURE: ClearlyIP, Skyetel, Vitelity, DigitalOcean, Vultr, VoIP.ms, 3CX, Sangoma, TelecomsXchange and VitalPBX have provided financial support to Nerd Vittles and our open source projects through advertising, referral revenue, and/or merchandise. As an Amazon Associate and Best Buy Affiliate, we also earn from qualifying purchases. We’ve chosen these providers not the other way around. Our decisions are based upon their corporate reputation and the quality of their offerings and pricing. Our recommendations regarding technology are reached without regard to financial compensation except in situations in which comparable products at comparable pricing are available from multiple sources. In this limited case, we support our sponsors because our sponsors support us.
BOGO Bonaza: Enjoy state-of-the-art VoIP service with a $10 credit and half-price SIP service on up to $500 of Skyetel trunking with free number porting when you fund your Skyetel account. No limits on number of simultaneous calls. Quadruple data center redundancy. $25 monthly minimum spend required. Tutorial and sign up details are here.
![]() The lynchpin of Incredible PBX 2020 and beyond is ClearlyIP components which bring management of FreePBX modules and SIP phone integration to a level never before available with any other Asterisk distribution. And now you can configure and reconfigure your new Incredible PBX phones from the convenience of the Incredible PBX GUI.
The lynchpin of Incredible PBX 2020 and beyond is ClearlyIP components which bring management of FreePBX modules and SIP phone integration to a level never before available with any other Asterisk distribution. And now you can configure and reconfigure your new Incredible PBX phones from the convenience of the Incredible PBX GUI.
VitalPBX is perhaps the fastest-growing PBX offering based upon Asterisk with an installed presence in more than 100 countries worldwide. VitalPBX has generously provided a customized White Label version of Incredible PBX tailored for use with all Incredible PBX and VitalPBX custom applications. Follow this link for a free test drive!
Special Thanks to Vitelity. Vitelity is now Voyant Communications and has halted new registrations for the time being. Our special thanks to Vitelity for their unwavering financial support over many years and to the many Nerd Vittles readers who continue to enjoy the benefits of their service offerings. We will keep everyone posted on further developments.
Some Recent Nerd Vittles Articles of Interest…
- Vitelity, Google, and RentPBX provide financial support to Nerd Vittles and the Incredible PBX project. [↩]
- If, for some reason, the Asterisk CLI tab does not appear on your server, click Options -> Advanced Options -> Show Advanced Options. [↩]
- Allison is available to record custom voice prompts with the same quality as this one. [↩]
Where to Begin: A Comparison of Open Source Features in Asterisk Aggregations
[purehtml id=19]
We receive frequent inquiries requesting that we document the feature set in the open source Asterisk® distributions that Nerd Vittles writes about each week. So today we’re pleased to provide a Feature Matrix that we will attempt to keep current as we move forward. Just bookmark this page, and you can check back periodically to get a quick thumbnail sketch of what each of these distributions currently supports.1 A chart, of course, doesn’t tell the whole story. But it’s a good starting point.
Not covered this week are the Asterisk aggregations that are either non-GPL code or are produced by organizations whose primary focus is the sale of commercial hardware and/or software. But don’t despair. Nerd Vittles is weeks away from announcing a commercial solution with some surprises that may encourage non-hobbyists to reevaluate your options and to take a fresh look at commercial alternatives, some of which may soon be free. So… hold on to your checkbook a bit longer!
All of the Asterisk aggregations we’re covering today have several things in common. First, all of the products rely upon industry-standard operating system platforms including CentOS, Scientific Linux, Ubuntu, and Raspbian. Each has an enormous user base and technical support team to assure that your operating system remains stable, secure, and non-proprietary for the life of your PBX. All of today’s products also support open source, non-proprietary, and free fax solutions with installers customized to the various platforms. Unlike other alternatives, all of these aggregations compile Asterisk and the graphical user interface used to manage your PBX as part of the install process. That means your compiled code is tailored to your particular hardware, and the source code is always installed on your server to simplify the task of making changes or enhancements to the default install without spending hours scouring the Internet to track down dependencies and missing source components. Try finding 3-year-old source code of some of the other distributions (as the GPL requires), and you’ll appreciate our SourceForge repository which goes back almost 5 years. Last but not least, all of these aggregations support Google Voice directly with free calling and free faxing throughout the U.S. and Canada in just minutes.
Once you’ve identified the feature set that best meets your needs, the next step is finding a tutorial to get you started. Look no further than Nerd Vittles for step-by-step instructions tailored to your specific platform whether it’s dedicated hardware, a virtual machine, or a Cloud-based platform. You won’t find an equivalent resource anywhere else. And, of course, the most user-friendly forum on the planet stands ready to help should you ever hit a snag.
- PIAF-Green — CentOS Installer and Guide & VirtualBox Image and Install Guide & $15 RentPBX Cloud Install2
- PIAF-Black — CentOS Installer and Guide & $15 RentPBX Cloud Install
- Incredible PBX 11 with Incredible GUI — CentOS/Scientific Linux and Ubuntu 14 and Raspberry Pi 2
- Incredible PBX 11 (Legacy with FreePBX®) — CentOS/Scientific Linux, Ubuntu 14, Raspberry Pi B+, BeagleBone Black, CuBOX, PogoPlug
- Incredible PBX 12 (Legacy with FreePBX®) — Ubuntu 14 Installer and Guide for Asterisk 12 with FreePBX 12
- Gotcha-Free PBX 11 with Asterisk-GUI — CentOS/SL, Ubuntu, Raspberry Pi 2, The Cloud, App Users Guide
- Meet the Two Amigos: Introducing Incredible PBX for Elastix — Elastix MT or Elastix 2.5 or The Cloud
- SIP Gateways for Google Voice — GVsip and Simonics
Originally published: Tuesday, February 17, 2015
Need help with Asterisk? Visit the PBX in a Flash Forum.
Special Thanks to Our Generous Sponsors
FULL DISCLOSURE: ClearlyIP, Skyetel, Vitelity, DigitalOcean, Vultr, VoIP.ms, 3CX, Sangoma, TelecomsXchange and VitalPBX have provided financial support to Nerd Vittles and our open source projects through advertising, referral revenue, and/or merchandise. As an Amazon Associate and Best Buy Affiliate, we also earn from qualifying purchases. We’ve chosen these providers not the other way around. Our decisions are based upon their corporate reputation and the quality of their offerings and pricing. Our recommendations regarding technology are reached without regard to financial compensation except in situations in which comparable products at comparable pricing are available from multiple sources. In this limited case, we support our sponsors because our sponsors support us.
BOGO Bonaza: Enjoy state-of-the-art VoIP service with a $10 credit and half-price SIP service on up to $500 of Skyetel trunking with free number porting when you fund your Skyetel account. No limits on number of simultaneous calls. Quadruple data center redundancy. $25 monthly minimum spend required. Tutorial and sign up details are here.
![]() The lynchpin of Incredible PBX 2020 and beyond is ClearlyIP components which bring management of FreePBX modules and SIP phone integration to a level never before available with any other Asterisk distribution. And now you can configure and reconfigure your new Incredible PBX phones from the convenience of the Incredible PBX GUI.
The lynchpin of Incredible PBX 2020 and beyond is ClearlyIP components which bring management of FreePBX modules and SIP phone integration to a level never before available with any other Asterisk distribution. And now you can configure and reconfigure your new Incredible PBX phones from the convenience of the Incredible PBX GUI.
VitalPBX is perhaps the fastest-growing PBX offering based upon Asterisk with an installed presence in more than 100 countries worldwide. VitalPBX has generously provided a customized White Label version of Incredible PBX tailored for use with all Incredible PBX and VitalPBX custom applications. Follow this link for a free test drive!
Special Thanks to Vitelity. Vitelity is now Voyant Communications and has halted new registrations for the time being. Our special thanks to Vitelity for their unwavering financial support over many years and to the many Nerd Vittles readers who continue to enjoy the benefits of their service offerings. We will keep everyone posted on further developments.
Some Recent Nerd Vittles Articles of Interest…
- Our special thanks to Captain Anonymous for the terrific code that made an HTML layout of this feature comparison chart possible. [↩]
- RentPBX is a Platinum Sponsor of the PBX in a Flash project. Install PIAF in the Cloud for $15/mo. with Coupon Code: PIAF2015 [↩]
The Gotcha-Free PBX: Raspberry Pi 2, Meet Incredible PBX for Asterisk-GUI ❤

[iframe-popup id="3″]
NOTICE: This version is no longer supported because Digium® has discontinued support of Asterisk-GUI. Check out our latest fully-supported offerings featuring pure open source GPL code: Incredible PBX GUI for Asterisk 11 and Incredible PBX GUI for Asterisk 13.
OK. The Raspberry Pi 2 may not quite rival the Raspberry Pi supercomputer built at Boise State, but it’s getting closer. The supercomputer that included 32 Raspberry Pi’s a year ago can now be built with about 5 Raspberry Pi 2’s. While the footprint may look the same as the $35 Raspberry Pi that you knew and loved two years ago, the RasPi² sports a 900MHz ARMv7 quad core processor with a full gig of RAM under the hood. And even though the Raspberry Pi 2 may be camera-shy, there’s a good reason. It’s a screamer! Early testing indicates a six-fold increase in performance even though it still looks much the same. What hasn’t changed is the price. It’s still $35 in the U.S. if you can find one. We couldn’t wait so we headed to the Pimoroni Shop in the U.K. to order ours with a Pibow case. Shipped within hours, and we got it in 2 days!
Do we have a Valentine’s Treat for you! Today we’re pleased to introduce the all-new Raspberry Pi edition of Incredible PBX for Asterisk-GUI featuring the just-released Raspberry Pi 2 and the just-released Asterisk® 11.16. And, not to worry, if you ever get tired of running your own PBX (and we don’t think you will), Micro$oft announced last week that you’re going to get a free version of Windows 10 for the Raspberry Pi 2 later this year.
Last week we released a tutorial covering all of the new Gotcha Free PBX applications, and that guide applies to today’s Raspberry Pi 2 release as well. That’s the beauty of the new Incredible PBX modular design. And, speaking of design, we don’t build Incredible PBX servers with an included operating system any longer so we’ll walk you through getting the Raspberry Pi 2 squared away with the latest and greatest version of Raspbian before we actually install Incredible PBX.
|
Target Audience: Home or SOHO/SBO in need of a turnkey, Gotcha-Free PBX Default Configuration: Asterisk 11 with enhanced Asterisk-GUI, Kennonsoft GUI, and NANPA dialplan Platform: Raspbian 7 running on a Raspberry Pi 2 Standard Memory: 1024MB Recommended Disk: 16GB+ Default Trunks: Google Voice, CallCentric, DIDlogic, Future-Nine, IPcomms, Les.net, Vitelity, VoIP.ms1 Feature Set: SMS messaging, VPN, Reminders, ConfBridge Conferencing, AsteriDex, Voicemail, Email, IVR, News, Weather, Voice Dialer, Wolfram Alpha, Today in History, TM3 Firewall WhiteList, Speed Dialer, iNUM and SIP URI (free) worldwide calling, OpenCNAM CallerID lookups, DISA, Call Forwarding, CSV CDRs Administrator Utilities: Incredible Backup/Restore, Automatic Updater, Asterisk Upgrader, phpMyAdmin, Timezone Config, Plug-and-Play Trunk Configurator, WebMin, External IP Setup, Firewall WhiteList Tools |
Getting Started with Incredible PBX for Asterisk-GUI (RasPi 2 Edition)
Here’s a quick overview of the installation and setup process for Incredible PBX for Asterisk-GUI:
- Install Linux for Raspberry Pi 2 – Install Raspbian 7 Platform
- Configure Raspbian 7 – Optimize Raspbian 7 for Incredible PBX
- Download and Install Incredible PBX for Asterisk-GUI
- Install Incredible Fax for Asterisk-GUI (optional)
- Set Up Passwords for Incredible PBX for Asterisk-GUI
- Configure Trunks with Incredible PBX for Asterisk-GUI
- Connect a Softphone to Incredible PBX for Asterisk-GUI
1. Install Raspbian 7 Platform for Raspberry Pi 2
For those with Raspberry Pi experience, this is the same drill you’ve performed a dozen times before. For newbies, here’s the procedure. You’ll need a microSD card of at least 8GB, and we strongly recommend a 16GB or 32GB Type 10 card for Incredible PBX. We’ve tested both the SanDisk and Transcend cards, and they work great.
Begin by downloading the very latest RASPBIAN image from RaspberryPi.org to your desktop. After you’ve unzipped the image, you need to get it moved to your microSD card. RaspberryPi.org has excellent tutorials that will walk you through the process using a Linux, Mac, or Windows desktop platform. Don’t forget to unmount the card before removing it!
Once you have your microSD card ready to go, plug it into the slot on the back of the Raspberry Pi 2 and then plug in the power cord. On your attached monitor, you can follow the boot up process. When the login prompt appears, log in as user pi with the password raspberry.
2. Optimizing Raspbian 7 for Incredible PBX for Asterisk-GUI
The first time you boot up your Raspberry Pi 2 with Raspbian 7, it will run the raspi-config script. This allows you to make a number of changes to your Raspberry Pi environment to maximize performance. Let’s take advantage of it.
Option 1. Expand the File System to fill your SD card. Otherwise, there’s insufficient disk space to complete the install.
Option 3. Enable Boot to Desktop (top selection). No Linux GUI please!
Option 8. Change your Hostname under A2 to incrediblepi2.
Tab to the Finish option and press ENTER. Then choose Reboot and YES.
After the reboot, log back in as pi:raspberry and set a very secure root password: sudo passwd root. Decipher your IP address so that you can log in as root via SSH: ifconfig.
We recommend completing the install by logging in as root using a desktop computer via SSH or Putty (for Windows). This gives you the ability to scroll back up and find errors if something happens to come unglued during the install process.
3. Install Incredible PBX on Your Raspberry Pi 2
Adding Incredible PBX to the Raspberry Pi 2 is easy. To restate the obvious, your server needs a reliable Internet connection to proceed. Using SSH (or Putty on a Windows machine), log into your Raspberry Pi 2 as root at the IP address you deciphered in the ifconfig step at the end of the Raspbian install procedure above.
IMPORTANT: Before you begin the Incredible PBX install, expand your console window to at least 80×27, or the Asterisk compilation step may fail. If you’re in doubt about the window dimensions, just maximize the window to full-screen during the install process.
Now let’s begin the Incredible PBX install. After logging in as root, issue the following commands. The install takes less than an hour and runs unattended so there’s no need to watch unless you’re curious how sausage is made. Remember, we compile all of the major components for Incredible PBX as part of the build process. And you can review the open source GPL2 script to see how it’s done if you have an interest or wish to embellish. It’s Gotcha-Free code so go for it and share your discoveries. After all, that’s what open source is all about!
cd /root
wget http://incrediblepbx.com/incrediblepbx11guiPi.tar.gz
tar zxvf incrediblepbx11guiPi.tar.gz
rm -f incrediblepbx11guiPi.tar.gz
./IncrediblePBX11Pi-GUI.sh
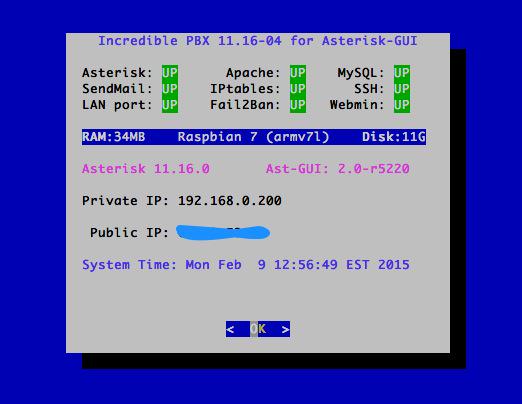
4. Install Incredible Fax for Asterisk-GUI (optional)
Administrators have been trying to stomp out faxing for at least two decades. Here’s a hint. It ain’t gonna happen. So go with the flow and add Gotcha-Free Faxing to your server. It’ll be there when you need it. And sooner or later, you’ll need it. This install script is simple enough for any monkey to complete. Run the script and enter the email address for delivery of your faxes. Then, if you’re in the U.S. or Canada, press the Enter key to accept every default entry during the HylaFax and AvantFax installation steps. For other countries, read the prompts and answer accordingly. When the installation finishes, reboot your server to bring faxing on line. Be sure to change your AvantFax admin password by logging in to AvantFax from the Incredible PBX GUI. By default, the admin password is password. You can also use the script included in the /root folder: avantfax-pw-change. REMINDER: Don’t forget to reboot your server!
cd /root
./incrediblefax11-GUI.sh
Outgoing faxes using standard document attachments can be created using the AvantFax GUI. The faxes will be sent out using your default outbound dial rules. For example, a 10-digit number will be sent using the default Google Voice trunk unless you haven’t configured it. Then the next configured trunk will be used. You can add a dial prefix in sending a fax with AvantFax to force the call out a particular trunk.
Incoming faxes will be delivered to the email address you specified when installing Incredible Fax; however, incoming faxes will be ignored until you configure a destination DID to accept the faxes. In the /etc/asterisk directory, edit extensions.conf. As noted, a dedicated DID is required to support incoming faxes! Find the desired incoming fax context which will be of the form: DID_TRUNKNAME_default, e.g. DID_GoogleVoice_default. Toward the end of the context, there will be several destination options for incoming calls to this DID. It looks like this:
;exten = _.,n,Gosub(macro-dumpvars,s,1())  ; in case you ever want to look at all of the Asterisk variables on the CLI
;exten = _.,n,Goto(default,6001,1)         ; routes incoming call to extension 6001
;exten = _.,n,Goto(ringroups-custom-1,s,1) ; routes incoming call to Ring Group #1
;exten = _.,n,Goto(voicemenu-custom-2,s,1) ; routes incoming call to Nerd Vittles Demo IVR
 exten = _.,n,Goto(voicemenu-custom-1,s,1)  ; routes incoming call to Stealth AutoAttendant and then to Ring Group #1
Comment out the destination entry that is not already commented out. Then add the following line just below that entry:
exten = _.,n,Goto(ext-fax,in_fax,1)
Now save the file and reload your Asterisk dialplan: asterisk-reload.
5. Initial Configuration of Incredible PBX for Asterisk-GUI
Incredible PBX is installed with the preconfigured IPtables Linux firewall already in place. It implements WhiteList Security to limit server access to connected LANs, your server’s IP address, your desktop computer’s IP address, and a few of our favorite SIP providers. You can add additional entries to this WhiteList whenever you like using the add-ip and add-fqdn tools in /root. There’s also an Apache security layer for our web applications. And, of course, Asterisk-GUI has its own security methodology using Asterisk’s manager.conf. Finally, we randomize extension and DISA passwords as part of the initial install process. Out of the starting gate, you won’t find a more secure VoIP server implementation anywhere. After all, it’s your phone bill.
Even with all of these layers of security, here are 10 Quick Steps to better safeguard your server. You only do this once, but failing to do it may lead to security issues you don’t want to have to deal with down the road. So DO IT NOW!
First, log into your server as root with your root password and do the following:
Make your root password very secure: passwd
Set your correct time zone: ./timezone-setup
Restart Asterisk: asterisk-restart
Create admin password for web apps: htpasswd -b /etc/pbx/wwwpasswd admin newpassword
Make a copy of your other passwords: cat passwords.FAQ
Make a copy of your Knock codes: cat knock.FAQ
Decipher IP address and other info about your server: status
Second, log into your server as admin using a web browser pointed to your server’s IP address:
Click USERS tab in Incredible PBX GUI
Click Asterisk-GUI Administration
Log in as user: admin with password: password
Immediately change your admin password and login again
Log in to Asterisk-GUI again with your new password. Expand the options available in the GUI:
Options -> Advanced Options -> Show Advanced Options
Last but not least, Incredible PBX includes an automatic update utility which downloads important updates whenever you log into your server as root. We recommend you log in once a week to keep your server current. Now would be a good time to log out and back into your server at the Linux command line to bring your Raspberry Pi 2 up to current specs.
6. Configure Trunks with Incredible PBX for Asterisk-GUI
Now for the fun part. If this is your first VoIP adventure, be advised that this ain’t your grandma’s phone system. You need not and should not put all your eggs in one basket when it comes to telephone providers. In order to connect to Plain Old Telephones, you still need at least one provider. But there is nothing wrong with having several. And a provider that handles an outbound call (termination) need not be the same one that handles an incoming call (origination) and provides your phone number (DID). We cannot recommend Vitelity highly enough, and it’s not just because they have financially supported our projects for almost a decade. They’re as good as VoIP providers get, and we use lots of them. If you’re lucky enough to live in the U.S., you’d be crazy not to set up a Google Voice account. It’s free as are all phone calls to anywhere in the U.S. and Canada. The remaining preconfigured providers included in Incredible PBX for Asterisk-GUI are equally good, and we’ve used and continue to use almost all of them. So pick a few and sign up. You only pay for the calls you make with each provider so you have little to lose by choosing several. The PIAF Forum includes dozens of recommendations on VoIP providers if you want additional information.
With the preconfigured trunks in Incredible PBX for Asterisk-GUI, all you need are your credentials for each provider and the FQDN of their server. Log into Asterisk-GUI Administration as admin using a browser. From the System Status screen, click Incredible PBX Apps. Click on each provider you have chosen and fill in the blanks with your credentials. When you’ve saved all of your settings, log into your server as root via SSH and type: service asterisk restart or asterisk-restart. You can also issue the command in the Asterisk-GUI by choosing the Asterisk CLI tab2 in the left column. Doesn’t get any simpler!
Update: It should be noted that Incredible PBX for Asterisk-GUI also supports Anveo Direct trunks; however, they are configured differently because of the way Anveo handles the calls. You’ll need the PIN provided by Anveo to set up your trunk, and Anveo supports CallerID spoofing so you can enter any CallerID number for the trunk that you are authorized to use. You’ll find the Anveo Direct setup link in the Incredible PBX Apps tab. To route an outgoing call through Anveo trunk, dial 2 + any desired 10-digit number.
Here is the complete list of dialing prefixes and the trunks to which they are associated:
- 1 – Google Voice
- 2 – Anveo Direct
- 3 – Future Nine
- 4 – CallCentric
- 5 – DIDlogic
- 6 – IPcomms
- 7 – Les.net
- 8 – Vitelity
- 9 – VoIP.ms
For free iNUM calling worldwide, the following dialing prefixes are supported in conjunction with the last seven digits of any destination iNUM DID. Free iNUM DIDs for your own PBX are available from both of these providers as well.
- 0XXXXXXX – CallCentric
- 90XXXXXXX – VoIP.ms
7. Configure a Softphone with Incredible PBX for Asterisk-GUI
We’re in the home stretch now. You can connect virtually any kind of telephone to your new Gotcha-Free PBX. Plain Old Phones require an analog telephone adapter (ATA) which can be a separate board in your computer from a company such as Digium. Or it can be a standalone SIP device such as ObiHai’s OBi100 or OBi110 (if you have a phone line from Ma Bell to hook up as well). SIP phones can be connected directly so long as they have an IP address. These could be hardware devices or software devices such as the YateClient softphone. We’ll start with a free one today so you can begin making calls. You can find dozens of recommendations for hardware-based SIP phones both on Nerd Vittles and the PIAF Forum when you’re ready to get serious about VoIP telephony.
We recommend YateClient which is free. Download it from here. Run YateClient once you’ve installed it and enter the credentials for the 6002 extension on Incredible PBX. You’ll need the IP address of your server plus your extension 6002 password. Choose Users -> 6002 and write down your SIP/IAX Password. You can also find it in /root/passwords.FAQ. Fill in the blanks using the IP address of your server, 6002 for your account name, and whatever password is assigned to the extension. Click OK to save your entries.
Once you are registered to extension 6002, close the Account window. Then click on YATE’s Telephony Tab and place some test calls to the numerous apps that are preconfigured on Incredible PBX. Dial a few of these to get started:
7001 - IVR Demo

123 - Reminders

947 - Weather by ZIP Code

951 - Yahoo News

*61 - Time of Day

TODAY - Today in History
If you are a Mac user, another great no-frills softphone is Telephone. Just download and install it from the Mac App Store.
Configuring Google Voice
If you want to use Google Voice, you’ll need a dedicated Google Voice account to support Incredible PBX. The more obscure the username (with some embedded numbers), the better off you will be. This will keep folks from bombarding you with unsolicited Gtalk chat messages, and who knows what nefarious scheme will be discovered using Google messaging six months from now. So keep this account a secret!
IMPORTANT: Do NOT under any circumstances take Google’s bait to switch from Google Chat to Hangouts, or you will forever lose the ability to use Google Chat with Incredible PBX. Also be sure to enable the Google Chat option as one of your phone destinations in Settings, Voice Setting, Phones. That’s the destination we need for The Incredible PBX to work its magic! Otherwise, all inbound and outbound calls will fail. Good News! You’re in luck. Google has apparently had a change of heart on discontinuing Google Chat support so it’s enabled by default in all new Google Voice accounts. Once you’ve created a Gmail and Google Voice account, go to Google Voice Settings and click on the Calls tab. Make sure your settings match these:
- Call Screening – OFF
- Call Presentation – OFF
- Caller ID (In) – Display Caller’s Number
- Caller ID (Out) – Don’t Change Anything
- Do Not Disturb – OFF
- Call Options (Enable Recording) – OFF
- Global Spam Filtering – ON
Click Save Changes once you’ve adjusted your settings. Under the Voicemail tab, plug in your email address so you get notified of new voicemails. Down the road, receipt of a Google Voice voicemail will be a big hint that something has come unglued on your PBX.
One final word of caution is in order regardless of your choice of providers: Do NOT use special characters in any provider passwords, or nothing will work!
Now you’re ready to configure your Google Voice account in Incredible PBX. You can do it from within Asterisk-GUI by choosing Google Voice within the Incredible PBX Apps tab. Once you’ve entered your credentials, don’t forget to restart Asterisk, or Google Voice calls will fail. If you still have trouble placing or receiving calls, try BOTH of these tips.
If you have difficulty finding the Google Chat option after setting up a new Google Voice account, follow this tutorial.
NOTE: There are all sorts of rumors circulating again that the Google Voice free ride may be coming to a close. We’ve heard this song before, but who knows?? Whether true or not, you are well advised to not rely solely on Google Voice for your phone calls. That’s the real beauty of a PBX. So take advantage of it!
OK, Smarty Pants: Show Me the Beef!
We know what some of you are thinking. "What does a fast food worker really know about VoIP and Gotcha-Free PBXs?? Before wasting a bunch of time on this, show me the beef!" Fair enough. Sit by your phone and click the Call Me icon below. Type in a fake name and your real phone number. Click the Connect button, answer your phone when it rings, and press 1. You’ll be connected to the Incredible PBX IVR for Asterisk-GUI. Pick an option from the menu of choices and take the Incredible PBX apps for a spin on our dime… actually it’s Google’s dime. Everything you see and hear is part of what you get with Incredible PBX for Asterisk-GUI including the ability to set up your own click-to-dial web interface exactly like this one. The demo just happens to be running on our Raspberry Pi 2 instead of yours. So… what are you waiting for? Click away and try Incredible PBX for yourself. And, by the way, nobody besides the NSA and Google will be monitoring your call. 😉
Nerd Vittles Demo IVR Options
1 – Call by Name (say “Delta Airlines” or “American Airlines” to try it out)
2 – MeetMe Conference (password is 1234)
3 – Wolfram Alpha (say “What planes are overhead?”)
4 – Lenny (The Telemarketer’s Worst Nightmare)
5 – Today’s News Headlines
6 – Weather Forecast (say the city and state, province, or country)
7 – Today in History
8 – Speak to a Real Person (or maybe just voicemail if we’re out)
Homework Assignment: Mastering the Asterisk-GUI
Now would be a good time to explore the Incredible PBX applications. Continue reading there. After you’ve played with the preconfigured features, it’s time to roll up your sleeves and learn about Asterisk-GUI and its powerful feature set. Here’s one word of warning. We mentioned that Incredible PBX was a hybrid system that combines some customized settings with the standard Asterisk-GUI interface. Before modifying existing settings for the default trunks, extensions, and default routes, take a look at the credentials* files in /etc/asterisk. If you modify any of these trunk entries or the Outgoing or Incoming Call Rules in Asterisk-GUI, you may break the Incredible PBX setup. So steer clear of that minefield until you know what you’re doing. Adding new extensions and additional trunks is perfectly fine and will not break anything.
Rather than reinvent the wheel, we’ll point you to some excellent tutorials that already exist. Start with Chapter 3 of Digium’s Asterisk Appliance™ Administrator Manual. Next, review Chapter 11 of The Asterisk Book (Second Edition). Finally, take a look at a couple of the tutorials that have been written by other companies that incorporated Asterisk-GUI into their hardware products, e.g. Yeastar’s MyPBX SOHO User Manual and Grandstream’s UCM6100 User Manual.
In the meantime, if you have questions, join the PBX in a Flash Forums and take advantage of our awesome collection of gurus. There’s an expert available on virtually any topic, and the price is right. As with Incredible PBX, it’s absolutely free.
We also are quickly building a collection of tutorials tailored specifically for Incredible PBX for Asterisk-GUI:
- Gotcha-Free PBX: Scripts 101
- Gotcha-Free PBX: Inbound Call Routing
- Gotcha-Free PBX: Outbound Call Routing
- Gotcha-Free PBX: Add-a-Trunk
- Gotcha-Free PBX: SMTP Mail Relay with SendMail or PostFix (if Incredible Fax installed)
- Gotcha-Free PBX: Music on Hold
- Gotcha-Free PBX: Changing TTS Engine
- Gotcha-Free PBX: Voicemail with Email Attachments
- Gotcha-Free PBX: Telephone and Web Reminders
- Gotcha-Free PBX: Sending Faxes
- Gotcha-Free PBX: VMobile Extension
- Gotcha-Free PBX: Anveo Direct
- Gotcha-Free PBX: Google Voice
- Gotcha-Free PBX: Voice Menus Setup
- Gotcha-Free PBX: Harnessing SIP URIs for Free Worldwide Calling
Just Released: The Gotcha-Free Incredible PBX Application User’s Guide
Originally published: Monday, February 9, 2015
Support Issues. With any application as sophisticated as this one, you’re bound to have questions. Blog comments are a terrible place to handle support issues although we welcome general comments about our articles and software. If you have particular support issues, we encourage you to get actively involved in the PBX in a Flash Forums. It’s the best Asterisk tech support site in the business, and it’s all free! Please have a look and post your support questions there. Unlike some forums, ours is extremely friendly and is supported by literally hundreds of Asterisk gurus and thousands of users just like you. You won’t have to wait long for an answer to your question.
Need help with Asterisk? Visit the PBX in a Flash Forum.
Some Recent Nerd Vittles Articles of Interest…
The Gotcha-Free PBX: Introducing Incredible PBX for Asterisk-GUI (Ubuntu)

WARNING: This version is no longer secure and use of it is strongly discouraged.
Remember the old adage that Rome wasn’t built in a day? Well, thanks to Mark Spencer and his team of incredibly talented programmers coupled with the modular design of Asterisk® and Asterisk-GUI, times have changed. It took about a month to put the CentOS version of Incredible PBX™ for Asterisk-GUI together. Today’s Ubuntu® version was created in one day! That should tell you all you need to know about the design. Better yet, with a cloud platform such as Digital Ocean,1 you can deploy Incredible PBX for Asterisk-GUI in about 15 minutes. Add another 5 minutes to configure some trunks and plug in a couple phones, and you’ll have a Gotcha-Free PBX in less time than it takes to wolf down a Waffle House breakfast.
We try to make new product tutorials stand on their own so you don’t have to jump around to figure everything out. But, if you’re generally familiar with the process of installing Incredible PBX, then this will be a walk in the park for you. Last week we released a tutorial covering all of the new Gotcha Free PBX applications, and that guide applies to today’s Ubuntu release as well. The names of a few components are different (such as the Incredible Fax installer), but functionally everything works in exactly the same way as the CentOS platform release. After all, that’s the beauty of the modular design.
|
Target Audience: Home or SOHO/SBO in need of a turnkey, Gotcha-Free PBX Default Configuration: Asterisk 11 with enhanced Asterisk-GUI, Kennonsoft GUI, and NANPA dialplan Platform: Ubuntu 14.04 (32/64-bit) running on Dedicated Server, Cloud-Based Server, or Virtual Machine Minimum Memory: 512MB Recommended Disk: 20GB+ Default Trunks: Google Voice, CallCentric, DIDlogic, Future-Nine, IPcomms, Les.net, Vitelity, VoIP.ms2 Feature Set: Fax, SMS messaging, VPN, Reminders, ConfBridge Conferencing, AsteriDex, Voicemail, Email, IVR, News, Weather, Voice Dialer, Wolfram Alpha, Today in History, TM3 Firewall WhiteList, Speed Dialer, iNUM and SIP URI (free) worldwide calling, OpenCNAM CallerID lookups, DISA, Call Forwarding, CSV CDRs Administrator Utilities: Incredible Backup/Restore, Automatic Updater, Asterisk Upgrader, phpMyAdmin, Timezone Config, Plug-and-Play Trunk Configurator, WebMin, External IP Setup, Firewall WhiteList Tools |
Getting Started with Incredible PBX for Asterisk-GUI (Ubuntu Edition)
Here’s a quick overview of the installation and setup process for Incredible PBX for Asterisk-GUI:
- Choose a Hardware Platform – Dedicated PC, Virtual Machine, or Cloud Provider
- Install a Linux Flavor – Install Ubuntu 14.04 Platform for Incredible PBX
- Download and Install Incredible PBX for Asterisk-GUI
- Install Incredible Fax for Asterisk-GUI (optional)
- Set Up Passwords for Incredible PBX for Asterisk-GUI
- Configure Trunks with Incredible PBX for Asterisk-GUI
- Connect a Softphone to Incredible PBX for Asterisk-GUI
1. Choose a Platform for Incredible PBX for Asterisk-GUI
Incredible PBX for Asterisk-GUI works equally well on dedicated hardware, a virtual machine, or a cloud-based server. Just be sure you’ve met the minimum requirements outlined above and that you have a sufficiently robust Internet connection to support 100Kb of download and upload bandwidth for each simultaneous call you wish to handle with your new PBX.
For Dedicated Hardware, we recommend an Atom-based PC of recent vintage with at least a 30GB drive and 4GB of RAM. That will take care of an office with 10-20 extensions and a half dozen or more simultaneous calls if you have the Internet bandwidth to support it.
For Virtual Machine Installs, we recommend Oracle’s VirtualBox platform which runs atop almost any operating system including Windows, Macs, Linux, and Solaris. Here’s a link to our original VirtualBox tutorial to get you started. We suggest allocating 1GB of RAM and at least a 20GB disk image to your virtual machine for best performance.
For Cloud-Based Servers, we recommend RentPBX, one of our financial supporters who also happens to size servers properly and restrict usage solely to VoIP. This avoids performance bottlenecks that cause problems with VoIP calls. If you’re just experimenting, then a 512MB Digital Ocean droplet is a cost-effective option at a cost of less than a penny an hour. In addition to a little referral revenue for Nerd Vittles, the nicest features of Digital Ocean are the availability of preconfigured CentOS images and a platform on which you can install Incredible PBX and be ready to start making calls very, very quickly. If you make a serious mistake during the install or setup, it’s a 30-second task to delete your droplet and create a new one. You’re only out a penny! And reloading Incredible PBX from scratch is never more than a 20-minute task. Remember to run the create-swapfile-DO script included in the Incredible PBX tarball before beginning your install to avoid out-of-memory conditions.
2. Install Ubuntu 14.04 Platform for Incredible PBX
For dedicated hardware installs, download the 32-bit or 64-bit Ubuntu 14.04 “Trusty Tahr” Minimal ISO. Burn it to a CD/DVD or thumb drive and boot your dedicated server from the image. Remember, you’ll be reformatting the drive in your server so pick a machine you don’t need for other purposes.
For virtual machine installs, download the same ISO and specify it as the boot drive for your virtual machine. If you’re using the VirtualBox platform, create a new virtual machine specifying either the 32-bit or 64-bit version of Ubuntu. Allocate 1024MB of RAM (512MB also works fine!) and at least 20GB of disk space using the default hard drive setup in all three steps. In Settings, click System and check Enable I/O APIC and uncheck Hardware Clock in UTC Time. Click Audio and Specify then Enable your sound card. Click Network and Enable Network Adapter for Adapter 1 and choose Bridged Adapter. Finally, in Storage, add the Ubuntu 14.04 mini.iso to your VirtualBox Storage Tree as shown below. Then click OK and start up your new virtual machine.
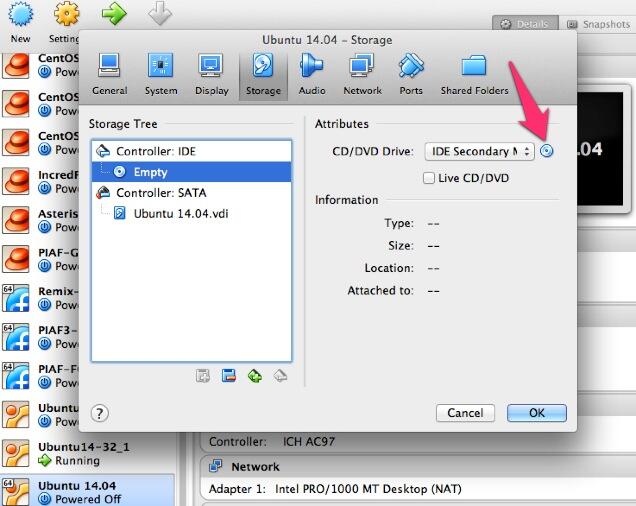
Here are the steps to get Ubuntu 14.04 set up on dedicated hardware or a virtual machine:
UBUNTU mini.iso install:

Choose language

Choose timezone

Detect keyboard

Hostname: incrediblepbx < continue >

Choose mirror for downloads

Confirm archive mirror

Leave proxy blank unless you need it < continue >

** couple minutes of whirring as initial components are loaded **

New user name: incredible < continue >

Account username: incredible < continue >

Account password: makeitsecure < continue >

Encrypt home directory < no >

Confirm time zone < yes >

Partition disks: Guided - use entire disk and set up LVM

Confirm disk to partition

Write changes to disks and configure LVM

Whole volume? < continue>

Write changes to disks < yes> < -- last chance to preserve your disk drive!
** about 15 minutes of whirring during base system install ** < no touchy anything>

** another 5 minutes of whirring during base software install ** < no touchy anything>

Upgrades? Install security updates automatically

** another 5 minutes of whirring during more software installs ** < no touchy anything>

Software selection: *Basic Ubuntu server (only!)

** another couple minutes of whirring during software installs ** < no touchy anything>

Grub boot loader: < yes>

UTC for system clock: < no>

Installation complete: < continue> after removing installation media

** on VirtualBox, PowerOff after reboot and remove [-] mini.iso from Storage Tree & restart VM

login as user: incredible

** enter user incredible's password **

sudo passwd

** enter incredible password again and then create secure root user password **

su root

** enter root password **

apt-get update

apt-get install ssh -y

sed -i 's|without-password|yes|' /etc/ssh/sshd_config

sed -i 's|yes"|without-password"|' /etc/ssh/sshd_config

sed -i 's|"quiet"|"quiet text"|' /etc/default/grub

update-grub

ifconfig

** write down the IP address of your server from ifconfig results

reboot

** login via SSH to continue **
For Cloud-based servers or virtual machines, typically the provider has done the hard work for you. Just choose either a 32-bit or 64-bit Ubuntu 14.04 platform with at least 512MB of RAM and 20GB of disk storage. If you have to roll your own from an ISO, just follow the steps above.
3. Install Incredible PBX on Your Ubuntu 14.04 Server
Adding Incredible PBX to a running Ubuntu 14.04 server is simple. To restate the obvious, your server needs a reliable Internet connection to proceed. Using SSH (or Putty on a Windows machine), log into your new server as root at the IP address you deciphered in the ifconfig step at the end of the Ubuntu install procedure above.
First, run the update and upgrade procedure for Ubuntu before you begin the install. This is especially important if using a cloud-based Ubuntu 14 server.
apt-get update && apt-get upgrade -y && reboot
WARNING: If you’re using a 512MB droplet at Digital Ocean, be advised that their Ubuntu setup does NOT include a swap file. This may cause serious problems when you run out of RAM. Uncomment ./create-swapfile-DO line below to create a 1GB swap file which will be activated whenever you exceed 90% RAM usage on Digital Ocean.
IMPORTANT: Before you begin the Incredible PBX install, expand your console window to at least 80×27, or the Asterisk compilation step may fail. If you’re in doubt about the window dimensions, just maximize the window to full-screen during the install process.
Now let’s begin the Incredible PBX install. Log back in as root and issue the following commands:
cd /root
wget http://incrediblepbx.com/incrediblepbx11guiU.tar.gz
tar zxvf incrediblepbx11guiU.tar.gz
#./create-swapfile-DO  #add this step for Digital Ocean droplets
rm -f incrediblepbx11guiU.tar.gz
sed -i 's|pbxinaflash.com|incrediblepbx.com|' IncrediblePBX11U-GUI.sh
./IncrediblePBX11U-GUI.sh
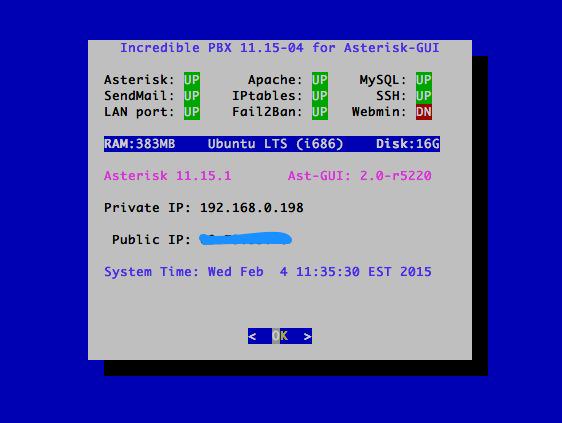
4. Install Incredible Fax for Asterisk-GUI (optional)
Administrators have been trying to stomp out faxing for at least two decades. Here’s a hint. It ain’t gonna happen. So go with the flow and add Gotcha-Free Faxing to your server. It’ll be there when you need it. And sooner or later, you’ll need it. This install script is simple enough for any monkey to complete. Run the script and enter the email address for delivery of your faxes. Then, if you’re in the U.S. or Canada, press the Enter key to accept every default entry during the HylaFax and AvantFax installation steps. For other countries, read the prompts and answer accordingly. When the installation finishes, reboot your server to bring faxing on line. Be sure to change your AvantFax admin password. By default, it is password. You can use the script included in the /root folder: avantfax-pw-change. REMINDER: Don’t forget to reboot your server!
cd /root
./incrediblefax11_ubuntu14.sh
./avantfax-pw-change
reboot
5. Initial Configuration of Incredible PBX for Asterisk-GUI
Incredible PBX is installed with the preconfigured IPtables Linux firewall already in place. It implements WhiteList Security to limit server access to connected LANs, your server’s IP address, your desktop computer’s IP address, and a few of our favorite SIP providers. You can add additional entries to this WhiteList whenever you like using the add-ip and add-fqdn tools in /root. There’s also an Apache security layer for our web applications. And, of course, Asterisk-GUI has its own security methodology using Asterisk’s manager.conf. Finally, we randomize extension and DISA passwords as part of the initial install process. Out of the starting gate, you won’t find a more secure VoIP server implementation anywhere. After all, it’s your phone bill.
Even with all of these layers of security, here are 10 Quick Steps to better safeguard your server. You only do this once, but failing to do it may lead to security issues you don’t want to have to deal with down the road. So DO IT NOW!
First, log into your server as root with your root password and do the following:
Make your root password very secure: passwd
Set your correct time zone: ./timezone-setup
Create admin password for web apps: htpasswd -b /etc/pbx/wwwpasswd admin newpassword
Make a copy of your other passwords: cat passwords.FAQ
Make a copy of your Knock codes: cat knock.FAQ
Decipher IP address and other info about your server: status
Second, log into your server as admin using a web browser pointed to your server’s IP address:
Click USERS tab in Incredible PBX GUI
Click Asterisk-GUI Administration
Log in as user: admin with password: password
Immediately change your admin password and login again
Log in to Asterisk-GUI again with your new password. Expand the options available in the GUI:
Options -> Advanced Options -> Show Advanced Options
Last but not least, Incredible PBX includes an automatic update utility which downloads important updates whenever you log into your server as root. We recommend you log in once a week to keep your server current. Now would be a good time to log out and back into your server at the Linux command line to bring your server up to current specs.
6. Configure Trunks with Incredible PBX for Asterisk-GUI
Now for the fun part. If this is your first VoIP adventure, be advised that this ain’t your grandma’s phone system. You need not and should not put all your eggs in one basket when it comes to telephone providers. In order to connect to Plain Old Telephones, you still need at least one provider. But there is nothing wrong with having several. And a provider that handles an outbound call (termination) need not be the same one that handles an incoming call (origination) and provides your phone number (DID). We cannot recommend Vitelity highly enough, and it’s not just because they have financially supported our projects for almost a decade. They’re as good as VoIP providers get, and we use lots of them. If you’re lucky enough to live in the U.S., you’d be crazy not to set up a Google Voice account. It’s free as are all phone calls to anywhere in the U.S. and Canada. The remaining preconfigured providers included in Incredible PBX for Asterisk-GUI are equally good, and we’ve used and continue to use almost all of them. So pick a few and sign up. You only pay for the calls you make with each provider so you have little to lose by choosing several. The PIAF Forum includes dozens of recommendations on VoIP providers if you want additional information.
With the preconfigured trunks in Incredible PBX for Asterisk-GUI, all you need are your credentials for each provider and the FQDN of their server. Log into Asterisk-GUI Administration as admin using a browser. From the System Status screen, click Incredible PBX Apps. Click on each provider you have chosen and fill in the blanks with your credentials. When you’ve saved all of your settings, log into your server as root via SSH and type: service asterisk restart or asterisk-restart. You can also issue the command in the Asterisk-GUI by choosing the Asterisk CLI tab3 in the left column. Doesn’t get any simpler!
Update: It should be noted that Incredible PBX for Asterisk-GUI also supports Anveo Direct trunks; however, they are configured differently because of the way Anveo handles the calls. You’ll need the PIN provided by Anveo to set up your trunk, and Anveo supports CallerID spoofing so you can enter any CallerID number for the trunk that you are authorized to use. You’ll find the Anveo Direct setup link in the Incredible PBX Apps tab. To route an outgoing call through Anveo trunk, dial 2 + any desired 10-digit number.
Here is the complete list of dialing prefixes and the trunks to which they are associated:
- 1 – Google Voice
- 2 – Anveo Direct
- 3 – Future Nine
- 4 – CallCentric
- 5 – DIDlogic
- 6 – IPcomms
- 7 – Les.net
- 8 – Vitelity
- 9 – VoIP.ms
For free iNUM calling worldwide, the following dialing prefixes are supported in conjunction with the last seven digits of any destination iNUM DID. Free iNUM DIDs for your own PBX are available from both of these providers as well.
- 0XXXXXXX – CallCentric
- 90XXXXXXX – VoIP.ms
7. Configure a Softphone with Incredible PBX for Asterisk-GUI
We’re in the home stretch now. You can connect virtually any kind of telephone to your new Gotcha-Free PBX. Plain Old Phones require an analog telephone adapter (ATA) which can be a separate board in your computer from a company such as Digium. Or it can be a standalone SIP device such as ObiHai’s OBi100 or OBi110 (if you have a phone line from Ma Bell to hook up as well). SIP phones can be connected directly so long as they have an IP address. These could be hardware devices or software devices such as the YateClient softphone. We’ll start with a free one today so you can begin making calls. You can find dozens of recommendations for hardware-based SIP phones both on Nerd Vittles and the PIAF Forum when you’re ready to get serious about VoIP telephony.
We recommend YateClient which is free. Download it from here. Run YateClient once you’ve installed it and enter the credentials for the 6002 extension on Incredible PBX. You’ll need the IP address of your server plus your extension 6002 password. Choose Users -> 6002 and write down your SIP/IAX Password. You can also find it in /root/passwords.FAQ. Fill in the blanks using the IP address of your server, 6002 for your account name, and whatever password is assigned to the extension. Click OK to save your entries.
Once you are registered to extension 6002, close the Account window. Then click on YATE’s Telephony Tab and place some test calls to the numerous apps that are preconfigured on Incredible PBX. Dial a few of these to get started:
7001 - IVR Demo

123 - Reminders

947 - Weather by ZIP Code

951 - Yahoo News

*61 - Time of Day

TODAY - Today in History
If you are a Mac user, another great no-frills softphone is Telephone. Just download and install it from the Mac App Store.
Configuring Google Voice
If you want to use Google Voice, you’ll need a dedicated Google Voice account to support Incredible PBX. The more obscure the username (with some embedded numbers), the better off you will be. This will keep folks from bombarding you with unsolicited Gtalk chat messages, and who knows what nefarious scheme will be discovered using Google messaging six months from now. So keep this account a secret!
IMPORTANT: Be sure to enable the Google Chat option as one of your phone destinations in Settings, Voice Setting, Phones. That’s the destination we need for The Incredible PBX to work its magic! Otherwise, all inbound and outbound calls will fail. Good News! You’re in luck. Google has apparently had a change of heart on discontinuing Google Chat support so it’s enabled by default in all new Google Voice accounts. Once you’ve created a Gmail and Google Voice account, go to Google Voice Settings and click on the Calls tab. Make sure your settings match these:
- Call Screening – OFF
- Call Presentation – OFF
- Caller ID (In) – Display Caller’s Number
- Caller ID (Out) – Don’t Change Anything
- Do Not Disturb – OFF
- Call Options (Enable Recording) – OFF
- Global Spam Filtering – ON
Click Save Changes once you’ve adjusted your settings. Under the Voicemail tab, plug in your email address so you get notified of new voicemails. Down the road, receipt of a Google Voice voicemail will be a big hint that something has come unglued on your PBX.
One final word of caution is in order regardless of your choice of providers: Do NOT use special characters in any provider passwords, or nothing will work!
Now you’re ready to configure your Google Voice account in Incredible PBX. You can do it from within Asterisk-GUI by choosing Google Voice within the Incredible PBX Apps tab. Once you entered your credentials, don’t forget to restart Asterisk, or Google Voice calls will fail. If you still have trouble placing or receiving calls, try these tips.
OK, Smarty Pants: Show Me the Beef!
We know what some of you are thinking. "What does a fast food worker really know about VoIP and Gotcha-Free PBXs?? Before I waste a bunch of time on this, show me the beef!" Fair enough. Sit by your phone and click the Call Me icon below. Type in a fake name and your real phone number. Click the Connect button, answer your phone when it rings, and press 1. You’ll be connected to the Incredible PBX IVR for Asterisk-GUI. Pick an option from the menu of choices and take the Incredible PBX apps for a spin on our dime… actually it’s Google’s dime. Everything you see and hear is part of what you get with Incredible PBX for Asterisk-GUI including the ability to set up your own click-to-dial web interface exactly like this one. The demo just happens to be running on our Mac desktop instead of yours. So… what are you waiting for? Click away and try Incredible PBX for yourself. And, by the way, nobody besides the NSA and Google will be monitoring your call. 😉
Nerd Vittles Demo IVR Options
1 – Call by Name (say “Delta Airlines” or “American Airlines” to try it out)
2 – MeetMe Conference (password is 1234)
3 – Wolfram Alpha (say “What planes are overhead?”)
4 – Lenny (The Telemarketer’s Worst Nightmare)
5 – Today’s News Headlines
6 – Weather Forecast (say the city and state, province, or country)
7 – Today in History
8 – Speak to a Real Person (or maybe just voicemail if we’re out)
Homework Assignment: Mastering the Asterisk-GUI
Now would be a good time to explore the Incredible PBX applications. Continue reading there. After you’ve played with the preconfigured features, it’s time to roll up your sleeves and learn about Asterisk-GUI and its powerful feature set. Here’s one word of warning. We mentioned that Incredible PBX was a hybrid system that combines some customized settings with the standard Asterisk-GUI interface. Before modifying existing settings for the default trunks, extensions, and default routes, take a look at the credentials* files in /etc/asterisk. If you modify any of these trunk entries or the Outgoing or Incoming Call Rules in Asterisk-GUI, you may break the Incredible PBX setup. So steer clear of that minefield until you know what you’re doing. Adding new extensions and additional trunks is perfectly fine and will not break anything.
Rather than reinvent the wheel, we’ll point you to some excellent tutorials that already exist. Start with Chapter 3 of Digium’s Asterisk Appliance™ Administrator Manual. Next, review Chapter 11 of The Asterisk Book (Second Edition). Finally, take a look at a couple of the tutorials that have been written by other companies that incorporated Asterisk-GUI into their hardware products, e.g. Yeastar’s MyPBX SOHO User Manual and Grandstream’s UCM6100 User Manual.
In the meantime, if you have questions, join the PBX in a Flash Forums and take advantage of our awesome collection of gurus. There’s an expert available on virtually any topic, and the price is right. As with Incredible PBX, it’s absolutely free.
We also are quickly building a collection of tutorials tailored specifically for Incredible PBX for Asterisk-GUI:
- Gotcha-Free PBX: Scripts 101
- Gotcha-Free PBX: Inbound Call Routing
- Gotcha-Free PBX: Outbound Call Routing
- Gotcha-Free PBX: Add-a-Trunk
- Gotcha-Free PBX: SMTP Mail Relay with SendMail or PostFix
- Gotcha-Free PBX: Music on Hold
- Gotcha-Free PBX: Changing TTS Engine
- Gotcha-Free PBX: Voicemail with Email Attachments
- Gotcha-Free PBX: Telephone and Web Reminders
- Gotcha-Free PBX: Sending Faxes
- Gotcha-Free PBX: VMobile Extension
- Gotcha-Free PBX: Anveo Direct
- Gotcha-Free PBX: Google Voice
- Gotcha-Free PBX: Voice Menus Setup
- Gotcha-Free PBX: Harnessing SIP URIs for Free Worldwide Calling
Enjoy your new Gotcha-Free PBX!
Just Released: The Gotcha-Free Incredible PBX Application User’s Guide
Originally published: Thursday, February 5, 2015
Support Issues. With any application as sophisticated as this one, you’re bound to have questions. Blog comments are a terrible place to handle support issues although we welcome general comments about our articles and software. If you have particular support issues, we encourage you to get actively involved in the PBX in a Flash Forums. It’s the best Asterisk tech support site in the business, and it’s all free! Please have a look and post your support questions there. Unlike some forums, ours is extremely friendly and is supported by literally hundreds of Asterisk gurus and thousands of users just like you. You won’t have to wait long for an answer to your question.
Need help with Asterisk? Visit the PBX in a Flash Forum.
Special Thanks to Our Generous Sponsors
FULL DISCLOSURE: ClearlyIP, Skyetel, Vitelity, DigitalOcean, Vultr, VoIP.ms, 3CX, Sangoma, TelecomsXchange and VitalPBX have provided financial support to Nerd Vittles and our open source projects through advertising, referral revenue, and/or merchandise. As an Amazon Associate and Best Buy Affiliate, we also earn from qualifying purchases. We’ve chosen these providers not the other way around. Our decisions are based upon their corporate reputation and the quality of their offerings and pricing. Our recommendations regarding technology are reached without regard to financial compensation except in situations in which comparable products at comparable pricing are available from multiple sources. In this limited case, we support our sponsors because our sponsors support us.
BOGO Bonaza: Enjoy state-of-the-art VoIP service with a $10 credit and half-price SIP service on up to $500 of Skyetel trunking with free number porting when you fund your Skyetel account. No limits on number of simultaneous calls. Quadruple data center redundancy. $25 monthly minimum spend required. Tutorial and sign up details are here.
![]() The lynchpin of Incredible PBX 2020 and beyond is ClearlyIP components which bring management of FreePBX modules and SIP phone integration to a level never before available with any other Asterisk distribution. And now you can configure and reconfigure your new Incredible PBX phones from the convenience of the Incredible PBX GUI.
The lynchpin of Incredible PBX 2020 and beyond is ClearlyIP components which bring management of FreePBX modules and SIP phone integration to a level never before available with any other Asterisk distribution. And now you can configure and reconfigure your new Incredible PBX phones from the convenience of the Incredible PBX GUI.
VitalPBX is perhaps the fastest-growing PBX offering based upon Asterisk with an installed presence in more than 100 countries worldwide. VitalPBX has generously provided a customized White Label version of Incredible PBX tailored for use with all Incredible PBX and VitalPBX custom applications. Follow this link for a free test drive!
Special Thanks to Vitelity. Vitelity is now Voyant Communications and has halted new registrations for the time being. Our special thanks to Vitelity for their unwavering financial support over many years and to the many Nerd Vittles readers who continue to enjoy the benefits of their service offerings. We will keep everyone posted on further developments.
Some Recent Nerd Vittles Articles of Interest…
- Nerd Vittles relies upon modest referral fees from some providers such as Digital Ocean to keep the lights on. But you get a free ride, too! Create an Ubuntu 14.04 (not 14.10!) 512MB droplet of the cheapest flavor ($5/mo.). A $10 credit will be added to your account when you sign up, and you can play with Incredible PBX on Digital Ocean’s nickel for a couple months risk-free. Add and delete droplets to your heart’s content and enjoy! [↩]
- Vitelity and Google provide financial support to Nerd Vittles and the Incredible PBX project. [↩]
- If, for some reason, the Asterisk CLI tab does not appear on your server, click Options -> Advanced Options -> Show Advanced Options. [↩]
Free Asterisk Solutions
