
Home » Posts tagged 'asterisk' (Page 50)
Tag Archives: asterisk
The Most Versatile VoIP Provider: FREE PORTING

 JUST RELEASED: Visit the Incredible PBX Wiki
Introducing The Eighth Wonder: Incredible PBX 3.11 for the $35 Raspberry Pi
 It’s been a wild ride with the $35 Raspberry Pi®. In addition to our tens of thousands of Happy Campers around the world, we now have nearly a dozen friends in our little neighborhood using a Raspberry Pi as their primary phone system. Can you believe it? The Raspberry Pi Foundation has already sold more than a million of these devices. If you’re new to the party, imagine squeezing a 700 mHz ARM processor with 512MB of RAM, 2 USB ports, a 10/100 Ethernet port, an HDMI port, composite video, a separate audio jack, an SDHC card slot, and a micro USB port onto a motherboard the size of a credit card weighing 1.6 ounces.
[iframe-popup id="3″]
Absolute perfection. Other than the slow write speeds to the sd card (you might add a warning note about that part), I had it swapped over to local extension numbers and trunked to existing asterisk servers in minutes… [I]t doesn’t get any cooler than this! — Scott P.
Trust us when we say the performance of this $35 computer is nothing short of amazing. Can it do everything a $300 dual-core Atom PC can do? No. Can it do 90% of everything for someone whose requirements do not exceed several simultaneous calls at a time but still wants a full-blown PBX for call routing, voicemail, IVRs, music on hold, and text-to-speech and speech-to-text apps for a home, a SOHO office, a Little League team, or a dorm room? Absolutely. As Scott mentioned, configuration changes may take you a few seconds longer than would normally be the case with an Atom-based PC and a hard disk. But, hey, you’re performing this magic on a $35 computer!
We’re now at the six-month mark with this project, and today we’re pleased to introduce Incredible PBX 3.11 for the Raspberry Pi featuring the very latest Asterisk 11 and FreePBX 2.11 versions for a near perfect telephony platform. Special thanks to the 300 pioneers that have given five iterations of this new release a healthy workout over the past few weeks.
What’s New in Incredible PBX 3.11. For those of you already running a previous version, here’s a quick thumbnail of the 3.11 feature set. As in the past, we’ve tried to mimic as much of the previous build functionality as possible. So you still get simple utilities to configure 1GHz overclocking and automatic expansion of the 3.11 image to run on any size SDHC card. But the major addition is implementation of Asterisk’s latest long-term support release, Asterisk 11, which provides a much more stable platform particularly for applications such as Google Voice. There’s also been major plumbing enhancements in FreePBX 2.11 to improve its stability and to enhance security. Of course, you still get Google Voice support for free calling in the U.S. and Canada as well as free faxing and SMS messaging plus most of the Incredible PBX feature set. If you’re one of the early pioneers that has an original 256MB Raspberry Pi, we would encourage you to plunk down another $35 for the 512MB version. The performance difference is amazing. And it makes a much more stable platform for Incredible PBX 3.11 and Incredible Fax.
UPDATE: As of 1 PM EDT on April 1, there’s new kernel and firmware support for the very latest Raspberry Pi boards.
Now for the bad news. There’s really no way to upgrade a previous Incredible PBX build to 3.11. There simply were too many under-the-covers modifications to make this feasible. Upgrading Asterisk alone is a 2+ hour knuckle drill on the Raspberry Pi, and we’ve made hundreds of additional tweaks to take advantage of the new platform. If your current system meets your needs, keep it. If you’re just getting started or like to tinker, move up to Incredible PBX 3.11.
Incredible PBX 3.5 and beyond added automatic detection and support of 512MB Raspberry Pi devices without touching anything. Beginning with version 3.7, we added an awesome fax server to Incredible PBX for those with a 512MB board. The complete tutorial is available here. update-my-pi in the /root folder of your server helps to safeguard your system by bringing it up to date with the latest fixes and enhancements. After running it the first time, it gets run automatically whenever you log in as root. For the safety of your server, don’t disable it! It’s free for the first ten updates, and then it’s just $20 a year. We have to eat, too. If you are philosophically opposed to ever spending a dime to support the open source movement, then feel free to load the latest version of Incredible PBX at no cost whenever you like. It will always be free! Then you can restore your settings using the backup and restore feature built into FreePBX.
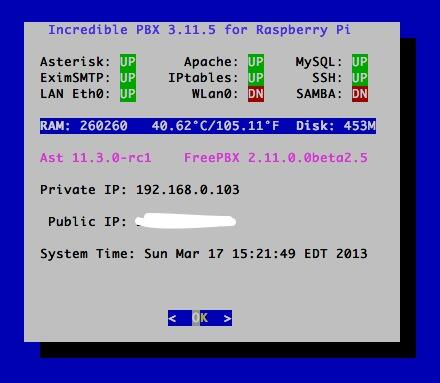
To enable overclocking at your own risk, run: raspi-config. Overclocking works for us. YMMV! The key is a good power supply. If you’re using an SD card larger than 4GB, version 3.3 and beyond now can resize your partitions on the fly. Just choose the option in raspi-config and reboot. Even though the kernel now monitors CPU temperature and manages overclocking, it’s always nice to see for yourself. To monitor the CPU temperature, just run the status program which provides a current snapshot anytime. Temperature data now is provided on the FreePBX Dashboard as well.
There’s more good news. Networking is much more stable; however, we’ve dropped support for the TP-Link WiFi adapters. If you still have one of these adapters, see this thread on the PIAF Forum for setup instructions. Otherwise you’ll need the recommended AirLink 101 N-150 if you want WiFi capability. In the 3.11 release, your server will automatically attempt to connect to any open WiFi network that it can find. We’ve also added two scripts in /root to let you restart either your wired or wireless network and designate it as the primary network: restart-eth0 and restart-wlan0. Time zone management was also a bit of mess with multiple file settings required to support both Linux and PHP. In the 3.11 release, you’ll be prompted to select your timezone when you first log in as root. The setup script will automatically apply your entry in all the right places. We’ve also replaced SendMail with Exim to simplify the process of using an SMTP mail gateway such as Gmail. We’ve documented the procedure for making the change here.
As part of the 3.11 migration, we’ve also eliminated the pi user account. Everything you need to do to configure Incredible PBX requires root permission. So goodbye sudo. Only the root user account is included, and the default password is raspberry. Change the password when you first log in. New SSH and DUNDI keys now are automatically generated when you first boot your server. The FreePBX Backup and Restore Utility is included in this new build. AsteriDex Speed Dialing has been enhanced for our friends across the Atlantic. Enter 3-digit Dial Codes in AsteriDex, and you can call by dialing 000nnn. In the 3.11 upgrade, Telephone Reminders again work.
X Windows is included in this build. This won’t work with SSH. For a demo slideshow, plug in a real monitor and log in as root. In the /root folder, enter the command: startx. To end the slideshow, press ESCape. To disable the slideshow: mv .xinitrc xinitrc. To add photos, copy .jpg images into /root/slideshow. No mouse is required for the slideshow but, if you run X Windows natively, you’ll need a USB mouse. The SMS Blasting app in /root now supports phone numbers (which use SMS) and email addresses (which use SendMail).
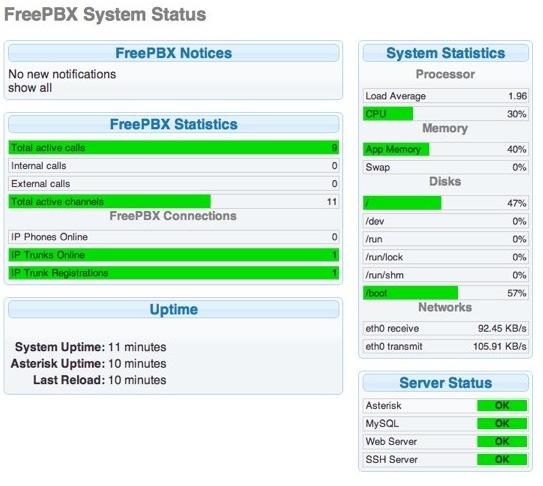
Last but not least, a sophisticated Conference Bridge has been added to Incredible PBX 3.11. If you route one of your inbound DIDs to the predefined IVR, users can press 0 and enter 1234 for the conference PIN to join the conference. Local extensions simply dial C-O-N-F. We’ve already tested a 9-person conference call with excellent results. But don’t take our word for it. Try it for yourself. Just call our demo Raspberry Pi AutoAttendant and take the Conference Bridge and a handful of other Incredible PBX™ apps for a test drive:

And here’s what the conference call looked like in the FreePBX Dashboard:
So you don’t have to jump around between articles, we’ve put together this Quick Start Guide that tells you everything you need to know to get up and running in about an hour. Most of that time will be consumed copying the Incredible Pi image to an SD card. So there’s plenty of time for lunch during the hour. Once your system is running and you’ve completed the setup steps below, then jump over to the application tutorial which explains how to use every one of the 35+ Incredible PBX Apps for the $35 Raspberry Pi.
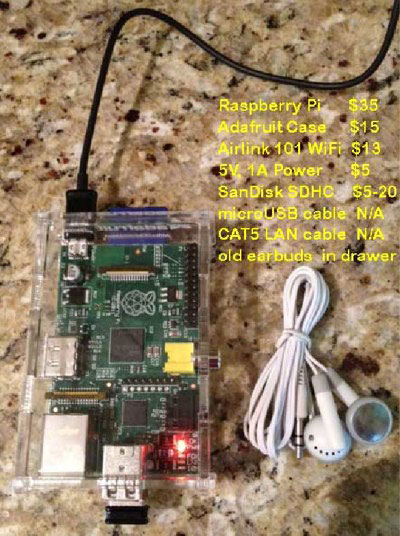
What to Buy. Here’s everything you need to get started.1 The case is optional. Yes, you can run the Raspberry Pi sitting on your desk with no case. It’s only 5 volts. WiFi is also optional. There’s a 10/100 port on the Raspberry Pi that gives you all the networking you need. Here are the links to buy the pieces. You also need a CAT5 cable and either a spare PC or Mac with Putty or SSH and a pair of earbuds or an HDMI cable to connect to a TV or monitor and a USB keyboard.
- $35 512MB Raspberry Pi from MCM or Newark or Amazon
- $10 Power Adapter (this one is rock solid!)
- $10 SanDisk 16GB SDHC Type 4 card
- $15 Adafruit Acrylic Case
- $13 AirLink 101 N150 WiFi Adapter or Adafruit Mini WiFi Adapter
Setting Up Google Voice. If you want free calling in the U.S. and Canada, then you’ll need a Google Voice account, and you’ll need one dedicated to Incredible Pi, or it won’t work. Log out after setting up the new Google Voice account!
- Register for Google Voice account (no funky characters in your password!)
- Enable Google Chat as Phone Destination
- Configure Google Voice Calls Settings:
- Call Screening – OFF
- Call Presentation – OFF
- Caller ID (In) – Display Caller’s Number
- Caller ID (Out) – Don’t Change Anything
- Do Not Disturb – OFF
- Call Options (Enable Recording) – OFF
- Global Spam Filtering – ON
- Place test call in and out using GMail Call Phone
Baking Your Incredible Pi. The disk drive for the Raspberry Pi is an SD card. So what you need to do is download Incredible Pi and copy the image onto an SDHC card. Mac and Linux installers are included. For Windows, just use Win32 Disk Imager. Here are the steps:
- Download the Incredible Pi package
- Decompress the tarball: tar zxvf incrediblepi-version.tar.gz
- Copy .img file to SDHC using image utility or script
- Insert SDHC card into Raspberry Pi
- Boot the Raspberry Pi from Incredible Pi SDHC card
Your First Bite of Incredible Pi. If you’re not using a monitor and keyboard, you can use SSH to gain root access to Incredible Pi. And you can use any web browser on your private network to access your server. There are a couple of hurdles. First, you need the network address of your new server. And, second you need an SSH client. With Incredible PBX 3.3 and beyond, you needn’t worry about the IP address. You now can access your server via SSH by logging in like this: root@incrediblepbx.local. And browser access to your server is available at the following address: http://incrediblepbx.local. You still can plug in some earbuds when the bootup process begins and listen for the Incredible Pi to tell you its IP address when the boot procedure completes (about 90 seconds). Then you can use that IP address instead of incrediblepbx.local. The latest releases of Incredible PBX also include a Java-based SSH client in the FreePBX web GUI: Admin -> Java SSH. Because of the almost weekly security problems with Java, we strongly recommend using a standalone SSH client such as Putty.
Here’s everything you need to know about security for Incredible Pi:
1. ALWAYS RUN INCREDIBLE PI BEHIND A SECURE HARDWARE-BASED FIREWALL/ROUTER
2. NEVER EXPOSE ANY INCREDIBLE PI PORTS DIRECTLY TO THE INTERNET
3. NEVER MAP INBOUND INTERNET PORTS FROM YOUR FIREWALL TO INCREDIBLE PI
Initial Setup. There also are a few setup steps to complete once your Incredible Pi finishes the bootup process. When you first login (username: root password: raspberry), you’ll be prompted to change your root password and to set your default time zone. If you’re using either a wired network or an open WiFi network, then everything just works. If you’re using secured WiFi, then you’ll need to plug in your credentials in /etc/wpa.conf and reboot. The wired network always takes precedence so unplug the cable if you want WiFi to be your primary network. /root/update-my-pi runs automatically when you log in as root. It will bring your server up to current specs. Finally, now’s the time to repartition your SD card if you’re using a card larger than 4GB (highly recommended!). While you’re at it, bump up the performance of your Raspberry Pi by 50% by setting the overclocking to turbo mode. It works great for us. YMMV! The key is a rock-solid power adapter such as the one we’ve recommended. Just run raspi-config and follow your nose.
Accessing Incredible Pi By GUI. You don’t have to be a Linux guru to use Incredible Pi. In fact, we’re just about finished with the Linux command prompt, but stay logged in until we finish the steps below. Most of your configuration of the PBX will be performed using the FreePBX® Web GUI.
If you’re new to Asterisk® and FreePBX, here’s the one paragraph primer on what needs to happen before you can make free calls with Google Voice. You’ll obviously need a free Google Voice account. This gets you a phone number for people to call you and a vehicle to place calls to plain old telephones throughout the U.S. and Canada at no cost. You’ll also need a softphone or SIP phone to actually place and receive calls. YATE makes a free softphone for PCs, Macs, and Linux machines so download your favorite and install it on your desktop. Phones connect to extensions in FreePBX to work with Incredible Pi. Extensions talk to trunks (like Google Voice) to make and receive calls. FreePBX uses outbound routes to direct outgoing calls from extensions to trunks, and FreePBX uses inbound routes to route incoming calls from trunks to extensions to make your phones ring. In a nutshell, that’s how a PBX works. There are lots of bells and whistles that you can explore down the road.
Let’s get started. Using a browser, enter the IP address of your server or just use incrediblepbx.local as the address. Choose FreePBX Administration. When prompted for a username and password, use admin for both. Here are the six steps you need to complete before making your first free call:
- Change FreePBX admin Password and Default Email
- Add Google Voice Account credentials
- Set Destination for Incoming Calls
- Change Extension 701 Passwords
- Eliminate Audio and DTMF Problems
- Install and Register a Softphone to Extension 701
1. Changing FreePBX admin Password and Default Email. From the main FreePBX GUI, click Admin => Administrators. Click on admin user in the far-right column. Enter a new Password and click Submit Changes button. Then click the Apply Config button. Next, set your default email address in the right margin of Admin -> Module Admin and save your entry.
2. Activating a Google Voice Trunk. To create a Trunk in FreePBX to handle calls to and from Google Voice, you’ll need three pieces of information from the Google Voice account you set up above: the 10-digit Google Voice phone number, your Google Voice account name, and your Google Voice password. Choose Connectivity -> Google Voice (Motif) from the FreePBX GUI. The following form will appear:
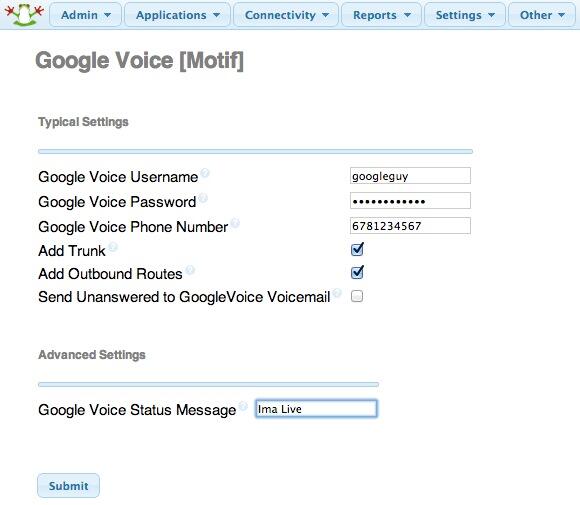
Fill in the blanks with your information and check only the top 2 boxes. If your Google Voice account name ends in @gmail.com, leave that out. Otherwise, include the full email address. Then click Submit Changes and Apply Config.
There’s one more step or your Google Voice account won’t work reliably with Incredible Pi! From the Linux command prompt while logged into your server as root, restart Asterisk: amportal restart
3. Setting a Destination for Incoming Calls. Now that you’ve created your Google Voice Trunk, we need to tell FreePBX how to process inbound calls when someone dials your Google Voice number. There are any number of choices. You could simply ring an extension. Or you could ring multiple extensions by first creating a Ring Group which is just a list of extension numbers. Or you could direct incoming calls to an Interactive Voice Response (IVR) system (we’ve actually set one up for you to play with).
By default, Incredible Pi is configured to route all incoming calls to a demo IVR that shows off some of the applications that come with Incredible Pi. You can change whenever you like by choosing Connectivity -> Inbound Routes -> Default. In the Set Destination section of the form, change the target to Extensions and then select 701 from the list. Then click Submit and Apply Config.
4. Changing Extension Passwords. From the main FreePBX GUI, choose Applications -> Extensions. Then click on 701 in the Extension List on the right side of your display. You’ll see a form that looks like this:
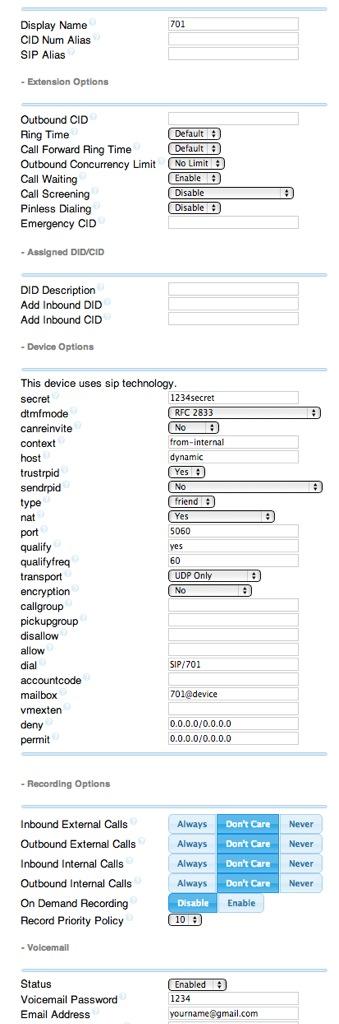
For now, we only need to make a few changes. First, you need a very secure password for both the extension itself and your voicemail account for this extension. The extension secret needs to be a combination of letters and numbers. The Voicemail Password needs to be all numbers, preferably six or more. Replace the existing 1234secret and 1234 with your own (very secure) entries. You also need to lock down this extension so that it is only accessible from devices on your private LAN. You do that with the deny and permit entries which currently are filled with zeroes. Leave the deny entry the way it is which tells Incredible Pi to block everybody except those allowed in the permit entry below. For the permit, we need the first three octets of your private LAN address, e.g. if your LAN is 192.168.0.something then the permit entry will be 192.168.0.0/255.255.255.0.
Finally, you need to plug in your actual email address in the Voicemail section so that voicemails can be delivered to you when someone leaves a message. You can also include a pager email address if you want a text message alert with incoming voicemails. If you want the voicemails to automatically be deleted from the server after they are emailed to you (a good idea considering the disk storage limitations of an SDHC card), change the Delete Voicemail option from No to Yes. That’s it. Now save your settings by clicking the Submit button. Then reload the dialplan by clicking on the red prompt when it appears.
In case you’re curious, unless you’ve chosen to automatically delete voicemails after emailing them, you can retrieve your voicemails by dialing *98701 from any extension on your phone system. You’ll be prompted to enter the voicemail password you set up. In addition to managing your voicemails, you’ll also be given the opportunity to either return the call to the number of the person that called or to transfer the voicemail to another extension’s voicemail box. And you can always leave a voicemail for someone by dialing their extension number preceded by an asterisk, e.g. *701 would let someone leave you a voicemail without actually calling you.
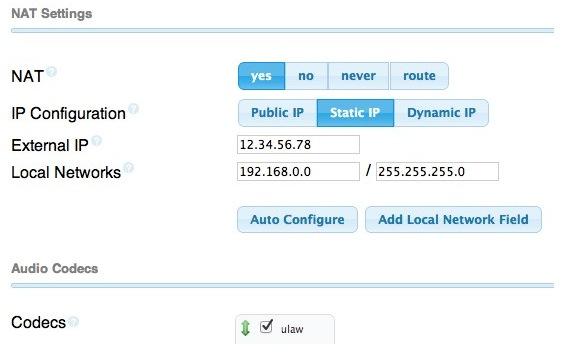
5. Eliminating Audio and DTMF Problems. You can avoid one-way audio on calls and touchtones that don’t work with these simple settings in FreePBX: Settings -> Asterisk SIP Settings. Just plug in your public IP address and your private IP subnet. Then set ULAW as the only Audio Codec.
6. Setting Up a Desktop Softphone. Incredible Pi supports all kinds of telephones, but we’ll start with the easy (free) one today. You can move on to "real phones" once you’re smitten with the VoIP bug. For today, you’ll need to download a softphone to your desktop PC or Mac.
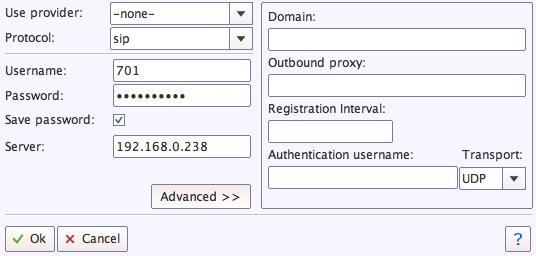
As we mentioned, the easiest way to get started with Incredible Pi is to set up a YATE softphone on your Desktop computer. Versions are available at no cost for Macs, PCs, and Linux machines. Just download the appropriate one and install it from this link. Once installed, it’s a simple matter to plug in your extension 701 credentials and start making calls. Run the application and choose Settings -> Accounts and click the New button. Fill in the blanks using the IP address of Incredible Pi, 701 for your account name, and whatever password you created for the extension. Click OK.
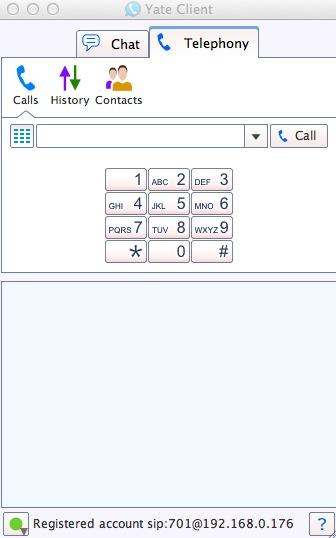
Once you are registered to extension 701, close the Account window. Then click on YATE’s Telephony Tab and place your first call. It’s that easy!
Monitoring Call Progress with Asterisk. That about covers the basics. We’ll leave you with a tip on how to monitor what’s happening with your PBX. There are several good tools within the FreePBX GUI. You’ll find them under the Reports tab. In addition, Asterisk has its own Command Line Interface (CLI) that is accessible from the Linux command prompt. Just execute the following command while logged in as root: asterisk -rvvvvvvvvvv.
Activating SAMBA for Windows Networking. SAMBA is included for transparent access using the Windows Networking Protocol from PCs, Macs, and other Linux machines. As delivered, SAMBA is deactivated. For obvious reasons, we recommend you never activate root login access to SAMBA without a very secure password. If you wish to enable SAMBA on your server, here are the steps while logged in as root:
- 1. Set SAMBA password for user root: smbpasswd -a root
- 2. Change Windows workgroup from WORKGROUP, if needed: nano -w /etc/samba/smb.conf
- 3. Manually start SAMBA from command prompt: service samba start
- 4. If desired, set SAMBA to start on boot: rcconf and activate SAMBA option
Activating the PPTP VPN Client. If you’ve followed the Nerd Vittles tutorial and previously set up a PPTP VPN Server for your devices, then it’s pretty simple to add Incredible Pi to the mix by activating its PPTP VPN client. You’ll need the FQDN or public IP address of your VPN server as well as a username and password for VPN access to your VPN server. Once you have those in hand, log into Incredible Pi as root.
Lest we forget to mention, you cannot log into your PPTP server from an IP address on the same private LAN so you’d only use the PPTP VPN when your Incredible Pi is at a remote location.
Edit the connection template: nano -w /etc/ppp/peers/my-pptp-server. Insert the following text and replace myfqdn.org with the FQDN of your PPTP server, replace myname with your PPTP username, and replace mypassword with your PPTP password. Then save the file: Ctrl-X, Y, then Enter.
To test it, issue the following command: /etc/init.d/pptp start. When you run ifconfig, you should now see a ppp0 entry:
ppp0      Link encap:Point-to-Point Protocol

          UP POINTOPOINT RUNNING NOARP MULTICAST  MTU:1500  Metric:1

          RX packets:0 errors:0 dropped:0 overruns:0 frame:0

          TX packets:0 errors:0 dropped:0 overruns:0 carrier:0

          collisions:0 txqueuelen:3

          RX bytes:0 (0.0 B)  TX bytes:0 (0.0 B)
Remember, it won’t show an IP address if the Raspberry Pi and your PPTP VPN Server are on the same subnet (like ours). Once you install your Raspberry Pi in a remote location, you now can access it at the first IP address in your reserved PPTP IP address pool.
To permanently activate the PPTP VPN client on your Incredible Pi server, run rcconf. Scroll to the bottom of the list and highlight pptp. Press the space bar to select it for automatic startup when you boot your server. Then tab to OK and press Enter.
Activating Incredible Fax. With a 512MB Raspberry Pi, here are the 5 Simple Steps to activate Incredible Fax. The original tutorial is available here.
- Download and Install Incredible PBX 3.11
- Run the /root/fax-enable Script to Automatically Configure HylaFax
- Using FreePBX, Add Additional, Dedicated DID and Inbound Route to Handle Incoming Faxes
- Install Any Desktop HylaFax Client to Send Faxes via Print-to-Fax using any PDF
- Reboot Your Server and Enjoy
Incredible Trunks. When you’re ready to try some other SIP providers, here is a quick Cheat Sheet courtesy of Kristian Hare, who translated our original setups into a spreadsheet. Just click on the image below to open it in a new window. Then click on the redisplayed image to enlarge it.

Configuring CallerID Superfecta. In order to match names with phone numbers, Incredible PBX includes a FreePBX application named CallerID Superfecta. Out of the box, Incredible PBX 3.11 will work fine if you remember to activate CallerID Superfecta whenever you create a new Inbound Route. The CNAM entries also will be displayed in your CDR reports. For those not in the United States, you may prefer to use a lookup source for your numbers other than the ones preconfigured in CallerID Superfecta. You will find all of the available modules on the POSSA GitHub site. Just download the ones desired into /var/www/html/admin/superfecta/sources and then activate the desired sources in Admin -> CID Superfecta -> Default. You can test your results and the performance using the Debug facility that’s built into the module.
Shutting Down Your Server. Last but not least, never just pull the plug when you want to shut down your server, or you may end up with corrupted MySQL databases. Then nothing will run. Instead, log into your server as root, and issue the following command: shutdown -h now. Enjoy!
Where To Go Next. Once you’ve done a little exploring, take a few minutes to read the complete tutorial on all 35 Incredible PBX applications for Raspberry Pi. A few require a bit of configuration before you start using them. And then you’ll want to explore Interconnecting Asterisk Servers with Incredible PBX and the Raspberry Pi. Enjoy!
 Don’t forget to List Yourself in Directory Assistance so everyone can find you by dialing 411. And add your new number to the Do Not Call Registry to block telemarketing calls. Or just call 888-382-1222 from your new number.
Originally published: Monday, March 18, 2013
 Support Issues. With any application as sophisticated as this one, you’re bound to have questions. Blog comments are a terrible place to handle support issues although we welcome general comments about our articles and software. If you have particular support issues, we encourage you to get actively involved in the PBX in a Flash Forums. It’s the best Asterisk tech support site in the business, and it’s all free! In fact, there is an entire forum dedicated to support of Incredible PBX for the Raspberry Pi. Please have a look and post your support questions there. Unlike some forums, ours is extremely friendly and is supported by literally hundreds of Asterisk gurus and thousands of ordinary users just like you. You won’t have to wait long for an answer to your question.

Need help with Asterisk? Visit the PBX in a Flash Forum.
Special Thanks to Our Generous Sponsors
FULL DISCLOSURE: ClearlyIP, Skyetel, Vitelity, DigitalOcean, Vultr, VoIP.ms, 3CX, Sangoma, TelecomsXchange and VitalPBX have provided financial support to Nerd Vittles and our open source projects through advertising, referral revenue, and/or merchandise. As an Amazon Associate and Best Buy Affiliate, we also earn from qualifying purchases. We’ve chosen these providers not the other way around. Our decisions are based upon their corporate reputation and the quality of their offerings and pricing. Our recommendations regarding technology are reached without regard to financial compensation except in situations in which comparable products at comparable pricing are available from multiple sources. In this limited case, we support our sponsors because our sponsors support us.
 BOGO Bonaza: Enjoy state-of-the-art VoIP service with a $10 credit and half-price SIP service on up to $500 of Skyetel trunking with free number porting when you fund your Skyetel account. No limits on number of simultaneous calls. Quadruple data center redundancy. $25 monthly minimum spend required. Tutorial and sign up details are here.
![]() The lynchpin of Incredible PBX 2020 and beyond is ClearlyIP components which bring management of FreePBX modules and SIP phone integration to a level never before available with any other Asterisk distribution. And now you can configure and reconfigure your new Incredible PBX phones from the convenience of the Incredible PBX GUI.
The lynchpin of Incredible PBX 2020 and beyond is ClearlyIP components which bring management of FreePBX modules and SIP phone integration to a level never before available with any other Asterisk distribution. And now you can configure and reconfigure your new Incredible PBX phones from the convenience of the Incredible PBX GUI.
 VitalPBX is perhaps the fastest-growing PBX offering based upon Asterisk with an installed presence in more than 100 countries worldwide. VitalPBX has generously provided a customized White Label version of Incredible PBX tailored for use with all Incredible PBX and VitalPBX custom applications. Follow this link for a free test drive!
 Special Thanks to Vitelity. Vitelity is now Voyant Communications and has halted new registrations for the time being. Our special thanks to Vitelity for their unwavering financial support over many years and to the many Nerd Vittles readers who continue to enjoy the benefits of their service offerings. We will keep everyone posted on further developments.
Some Recent Nerd Vittles Articles of Interest…
- Many of our purchase links refer users to Amazon when we find their prices are competitive for the recommended products. Nerd Vittles receives a small referral fee from Amazon to help cover the costs of our blog. We never recommend particular products solely to generate Amazon commissions. However, when pricing is comparable or availability is favorable, we support Amazon because Amazon supports us. [↩]
The Good, the Bad, and the Ugly: Windows 8 Touchscreen Roundup
We began our Windows 8 adventure a few weeks ago with a look at Microsoft’s promising Surface Pro. As much as we liked the concept, there were a few too many compromises for us, and we ended up returning the machine. The deal breaker really was figuring out what to do with the awkward keyboard when you wanted to use the Surface Pro as a tablet. The connector sticks out of the end of the keyboard so there would always be a concern that it was going to somehow get damaged. There was also intermittent confusion between the Surface Pro and Windows 8 as to whether the external keyboard was plugged in or not. This sometimes left you with a tablet and no popup keyboard. We couldn’t even log in. The solution seemed to be making sure you always removed or added the keyboard only when the machine was completely turned off. So much for hot swappable. We’re sure that these shortcomings will get sorted out over the next few months, but we weren’t that interested in being a paying pioneer.
We still needed a good Windows 8 machine on which to test and run our telephony applications. As much as we love our 27″ iMac and MacBook Air, we never like to get too far away from the Microsoft tent especially when Apple is showing signs of returning to their old proprietary ways. Hope springs eternal that the great M$FT comeback is just around the next corner. So what to do?
Portability was a key consideration because we spend considerable time away from home base during the summer. For us, the choice came down to either a good UltraBook or a desktop machine that was easy to move from place to place. As mentioned in our Surface Pro review, the machine also had to be capable of running the BlueStacks Android emulator as well as Oracle’s VirtualBox to host our Linux development platform.

Let’s begin with The Good. For our UltraBook selection, we chose the new Asus Ultrabook UX31A Touch. What a mouthful. The specs were nothing out of the ordinary: 13.3″ Full HD (1920×1080), Intel Core i5 (1.7Ghz) processor, 4GB DDR3 RAM, Intel HD Graphics, WiFi, Bluetooth, and a 128GB SSD with Windows 7 Home Premium. But what a surprise. This machine is a MacBook Air killer. Close your eyes and imagine a MacBook Air with Windows 8 and a touchscreen. Quiet. Excellent performance. Stunning display. Awesome lighted keyboard. Terrific battery life. Ultra lightweight (under 3 pounds). 8 seconds to boot up. And thin (.7″ to be exact). We love this machine. If you’re looking for a portable Windows 8 computer, look no further. Nobody is going to top this one unless the same unit is offered by another retailer with a price tag below Best Buy’s current sale price of $1100.

And Now: The Bad and The Ugly. Sony is the hands-down winner of both awards on the same machine. When you look at the spec sheet, Sony’s new VAIO Tap 20 Mobile Desktop should be the ultimate Dream Machine with its Core i7 processor and 8 gigs of RAM. Add a battery and a semi-portable, but beautiful, 20-inch screen, and it had all the makings of a perfect desktop replacement. And then we turned it on. 45 seconds to boot. A 5400 RPM drive that performs more like a floppy drive when matched against the Asus Ultrabook. "Unbelievably poor performance when loading and running applications" is being kind. For example, taking a screenshot with the Asus Ultrabook is a split-second operation with the image instantly available in the Metro Photos app. Repeating the drill on the Tap 20 took a good 20 seconds for the screenshot to even appear in the Photos collection. We intentionally held off ordering one of these machines until the i7 processor was available because the reviews of the i5 model were so bad. And to think Best Buy actually sells an i3 version of this machine. Hopefully, they leave it on overnight with a large cache enabled.
What’s sad about this is we’ve been a huge fan of Sony products for over 40 years. They always represented best of breed and usually were years ahead of the competition in features. Little wonder that Steve Jobs copied everything he could from Sony when he returned to Apple. Sony made awesome tape recorders including reel-to-reel, 8-track, cassette, and even BetaMax. Their computers and televisions always stood out from the crowd. The Walkman was over 21 years old when the iPod finally hit the market! So what happened?
This machine is a a bit of an embarrassment. 1600×900 resolution on a 20-inch display. Seriously? It means you can’t even watch an HD movie. Putting a 5400 RPM drive in a Core i7 machine is just plain silly. To save five bucks? The computer is so slow that Windows 8 repeatedly locked up just handling trivial tasks. Alerts from Norton routinely popped up warning of impending doom from the poorly performing drive. It’s the only Windows 8 machine that we’ve ever seen hang shutting down when no applications were even running on the desktop. Sorry, Sony, you really blew it. This one’s coming back.
Serenity Now. Just when we had all but given up hope of finding the perfect Windows 8 touchscreen desktop, we decided to forego portability and settle for anything that could truly match the 27″ iMac in performance and features. And, yes, we wanted a great price as well. We’ve always been a big fan of refurbished machines because you know that someone has actually tested the unit to make sure it works. Well, guess what $1,200 will buy? The Dell XPS One 2710T is finally available as an almost half-price, refurbished machine sporting a 3.10 GHz Quad-core i7 processor, 8GB RAM, NVIDIA GeForce GT 640M 2GB GDDR5 Graphics card, 2TB 7200 RPM and DVD+/-RW drives, magnificent 27″ touchscreen display, and a one-year Dell warranty. Add a $50 Crucial m4 32GB mSATA SSD accelerator,1 and you’ve got a gen-u-wine rocketship! It was the well-deserved PCMag Editor’s Choice for 2012. This one’s not going back!
We quickly downloaded our favorite Android VoIP app, Groove IP, from Google’s Play Store using BlueStacks. Then we performed a couple of quick calls using a Google Voice account. The calls were flawless even with our shaky DSL connection on a very snowy day in the mountains. Adding BlueStack’s Cloud Connect will let you push existing apps from your Android phone or tablet to your Windows 8 desktop.
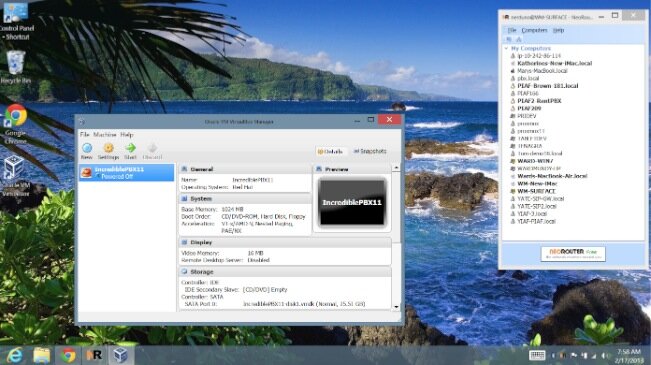
SAMBA connections work fine after the usual tweaks to the Windows Registry and a reboot. NeoRouter as a VPN client or server functions just as you would expect after telling Windows 8 to run the main programs as Administrator. Windows 8 is a bit more picky about this even when you’re logged in as an Administrator. Oracle’s VirtualBox as a virtual machine platform for Linux appliances works swimmingly, and performance is AMAZING. We built an Incredible PBX server using the latest .ova template in under 5 minutes, and we were making free calls and sending out faxes through Google Voice in under 10 minutes.

PBX in a Flash News. If you don’t subscribe to the PBX in a Flash Forum, you probably should. We’ve added a spiffy What’s New Web Portal that will tell you everything you need to know about what’s going on in the Asterisk World. The most important items this week include the release of CentOS 6.4 this past weekend which broke new PBX in a Flash installs briefly. Unlike the other distros, PIAF compiles from source and always gives you the latest updates to CentOS. Sometimes that bites us. But all is well today. The other big news is a major bug in Asterisk 11.2.1 which caused Google Voice to stop working after a period of time until Asterisk was restarted. This has been addressed in Asterisk 11.3 RC1, and we’ll have updates available shortly. In the meantime, you can discover the real beauty of a source-based distribution like PIAF, and upgrade yourself. It’s easy! Here’s how:
amportal stop

cd /usr/src

wget http://downloads.asterisk.org/pub/telephony/asterisk/releases/asterisk-11.3.0-rc1.tar.gz

tar zxvf asterisk-11.3.0-rc1.tar.gz

mv asterisk asterisk-last

mv asterisk-11.3.0-rc1 asterisk

cd asterisk

make clean

./configure

contrib/scripts/get_mp3_source.sh

make menuselect

make

make install

cd ..

cd asterisk-flite

make clean

make

make install

ldconfig

amportal start

echo "Check whether Flite is functioning..."

asterisk -rx "core show application flite"

echo "Check whether CDR reporting is functioning..."

asterisk -rx "module show like mysql"

cd /root

status
The only tricky part is when the menuselect screen appears. Here’s your cheat sheet for the proper settings with PBX in a Flash. Use the cursor keys to move around. Use the Enter key to select/deselect entries. If no section is listed below, leave the default settings. Tab to Save & Exit when you’re finished and press Enter. That’s it.
- Add-ons – Select top 4 entries in –extended–
- Channel Drivers – Deselect chan_gtalk and chan_jingle
- Extra Sound Packages – Select EXTRA-SOUNDS-EN-GSM
Fail2Ban Fails After Midnight. We’re adding this update because of a serious bug discovered on computers running CentOS 6.3 and below. When your logs are automatically rotated, Fail2Ban ceases to function. So, while you’re sleeping like a baby, SO IS Fail2Ban! There’s a simple fix that you’ll find on the PBX in a Flash Forum. Basically, you need to restart Fail2Ban just after your logs are rotated. The bug has been partially addressed in the CentOS 6.4 release.
Originally published: Monday, March 11, 2013 Last Updated: Thursday, March 14, 2013
Need help with Asterisk? Visit the PBX in a Flash Forum.
Special Thanks to Our Generous Sponsors
FULL DISCLOSURE: ClearlyIP, Skyetel, Vitelity, DigitalOcean, Vultr, VoIP.ms, 3CX, Sangoma, TelecomsXchange and VitalPBX have provided financial support to Nerd Vittles and our open source projects through advertising, referral revenue, and/or merchandise. As an Amazon Associate and Best Buy Affiliate, we also earn from qualifying purchases. We’ve chosen these providers not the other way around. Our decisions are based upon their corporate reputation and the quality of their offerings and pricing. Our recommendations regarding technology are reached without regard to financial compensation except in situations in which comparable products at comparable pricing are available from multiple sources. In this limited case, we support our sponsors because our sponsors support us.
BOGO Bonaza: Enjoy state-of-the-art VoIP service with a $10 credit and half-price SIP service on up to $500 of Skyetel trunking with free number porting when you fund your Skyetel account. No limits on number of simultaneous calls. Quadruple data center redundancy. $25 monthly minimum spend required. Tutorial and sign up details are here.
![]() The lynchpin of Incredible PBX 2020 and beyond is ClearlyIP components which bring management of FreePBX modules and SIP phone integration to a level never before available with any other Asterisk distribution. And now you can configure and reconfigure your new Incredible PBX phones from the convenience of the Incredible PBX GUI.
The lynchpin of Incredible PBX 2020 and beyond is ClearlyIP components which bring management of FreePBX modules and SIP phone integration to a level never before available with any other Asterisk distribution. And now you can configure and reconfigure your new Incredible PBX phones from the convenience of the Incredible PBX GUI.
VitalPBX is perhaps the fastest-growing PBX offering based upon Asterisk with an installed presence in more than 100 countries worldwide. VitalPBX has generously provided a customized White Label version of Incredible PBX tailored for use with all Incredible PBX and VitalPBX custom applications. Follow this link for a free test drive!
Special Thanks to Vitelity. Vitelity is now Voyant Communications and has halted new registrations for the time being. Our special thanks to Vitelity for their unwavering financial support over many years and to the many Nerd Vittles readers who continue to enjoy the benefits of their service offerings. We will keep everyone posted on further developments.
Some Recent Nerd Vittles Articles of Interest…
- There are conflicting reports on how to add an after-market mSATA SSD to the Dell XPS One and get it functioning as a fast cache for your computer. Here’s what worked for us. Lay the computer monitor-side-down on a blanket with the top of the machine facing away from you. With a small Phillips head screwdriver, loosen the two screws on each end of the bottom of the panel, and then slide the back cover towards the top of the machine and remove it. The large metal plate covering the motherboard has to be removed. It’s held in place by 8 screws. Once it’s out of the way, you’ll see two openings for an mSATA card. Gently insert the SSD card in the right one at a 45 degree angle. Then press it down and secure it with the two screws included with the card. Reassemble the computer. Turn it on and press F2 when the Dell logo appears. Go into the Advanced settings, Onboard Device Configuration, SATA Mode. Change the primary drive to RAID. Save your changes with F10 and reboot. When Windows 8 appears, access Control Panel and choose Intel Rapid Storage Technology. Choose the Accelerate option and accept the defaults. Reboot and you’re good to go. [↩]
WebRTC: Asterisk Joins the Brave New World of Real Time Communications
This week we’ll be wading into the world of real time communications and the Asterisk® 11 implementation of WebRTC, a JavaScript API that makes it easy to build click-to-call systems and softphone interfaces using nothing more than a web page. To simplify the task of creating an Asterisk 11/WebRTC platform, we’ve created a free virtual appliance for you that can be deployed in a matter of minutes on any Windows®, Mac®, Linux® or Solaris® desktop using Oracle’s VirtualBox®. In producing this WebRTC implementation, the Asterisk Dev Team has introduced an impressive new set of (stable) features formerly lacking in Asterisk: SRTP for secure communications, ICE, STUN, and TURN to allow NAT clients to better communicate with Asterisk. As the old saying goes, a picture is worth a thousand words. So let’s begin with a one-minute video that actually demonstrates Asterisk WebRTC in action. Using nothing more than a Chrome browser, we’re connecting to a web site hosted on the PBX in a Flash™ appliance to dial a news application that’s part of the included Incredible PBX™ 11 build.
Before we walk you through deploying your own WebRTC platform with Asterisk 11, let’s quickly cover some of the WebRTC basics as they apply in the Asterisk environment.

Rolling Your Own. If you’re one of the purists that prefers to roll your own server, then the starting point for your build should be the Asterisk Wiki. The other important component is sipml5, Doubango Telecom‘s terrific HTML5 SIP client. It’s the actual interface demonstrated in the YouTube video above. And this link provides a failsafe recipe for bringing up WebRTC on any Asterisk 11 server. Our appliance just saves you the one-hour hassle. We’ve chosen not to deploy WebRTC2SIP, the middleware that’s currently necessary if you want to add video support to Asterisk WebRTC. And our current build only works with the latest Chrome browser; however, WebRTC4all is available if you prefer Safari, Opera, Firefox, or Internet Explorer. All of the documentation for these components is provided in the links above for our pioneers.
Why WebRTC? Some of you may be asking, "What’s the big deal? Why would I want to deploy WebRTC?" The short answer is that it eliminates the need to install and configure a proprietary softphone on every customers’ desktop computer before they can communicate. Instead, all they need is a web browser that supports Real-Time Communications. By pointing their browser to a server address that you provide, the customer instantly gains a communications platform that’s as feature-rich as you choose to make it. And it’s comparable to the dedicated clients of old… without the cost or hassle of marrying a softphone to every customer’s particular desktop operating system! And your web page could easily provide a directory of supported contact names and numbers as part of the user interface.
http://www.youtube.com/watch?v=MsAWR_rJ5n8
The other beauty of WebRTC is it allows you to create your own (secure) Skype-like communications system without a Man in the Middle. And all you need is a browser at both ends. The WebRTC video above demonstrates a video conversation between a Chrome user at Google and a Firefox user at Mozilla.
Deploying PIAF-Green-WebRTC. So much for the theory. Let’s get your own server set up so you can experiment with this yourself. Here are the steps. It’s about a 10-minute procedure once you’ve downloaded our virtual machine appliance from SourceForge.
- Install Oracle’s VirtualBox on your Desktop computer
- Download PIAF-Green-WebRTC
- Import PIAF-Green-WebRTC into VirtualBox
- Start the PIAF-Green-WebRTC Appliance
- Using Chrome, Access the WebRTC Page Hosted on PIAF-Green-WebRTC
- Configure sipml5 to Make a Connection Using an Asterisk Extension
- Place Your First Call
1. Install Oracle’s VirtualBox. Download the VirtualBox installer for your desktop platform from VirtualBox.org. Run the installer and accept the default settings. For details, here’s a link to Oracle’s VM VirtualBox User Manual.
2. Download PIAF-Green-WebRTC. To get PIAF-Green-WebRTC installed on your desktop is quick and easy. Because the image tips the scales at over 2GB and due to the 2GB file size limit on many systems, we’ve chosen to split the download into two pieces. You need both of them! Just download them onto any flavor desktop from SourceForge. Once you’ve downloaded the two files, reassemble them into a single file known as an Open Virtualization Appliance (.ova). Then verify the checksums for the reassembled file to be sure everything is in its proper place. Finally, double-click on the .ova file which will initiate the import process into VirtualBox.
So let’s begin by downloading the two halves from SourceForge: PIAF20631aa and PIAF20631ab.
The reassembly procedure depends upon your desktop operating system. For Windows PCs, you’ll need to drop down to the Command Prompt, change to the directory in which you downloaded the two files, and type the following command:
copy /b PIAF20631aa + PIAF20631ab PIAF-Green-WebRTC.ova
To check the MD5/SHA1 checksums in Windows, download and run Microsoft’s File Checksum Integrity Verifier.
For Mac or Linux desktops, open a Terminal window, change to the directory in which you downloaded the two files, and type the following commands:
cat PIAF20631a{a..b} > PIAF-Green-WebRTC.ova

md5 PIAF-Green-WebRTC.ova (use md5sum for Linux)

openssl sha1 PIAF-Green-WebRTC.ova
The MD5 checksum for PIAF-Green-WebRTC.ova is 946c149c6adb53602ccfcd3ace10e13b. The SHA1 checksum is 285a5b999c761fcbef13d1a97b4c335a81e1cb0d. If you have a match, proceed. Otherwise, rinse and repeat.
3. Import PIAF-Green-WebRTC into VirtualBox. You only perform the import step one time. Once imported into VirtualBox, PIAF-Green-WebRTC is ready to use. There’s no further installation required, just like an OpenVZ template… only better. Double-click on the .ova file you downloaded to begin the procedure and load VirtualBox. When prompted, be sure to check the Reinitialize the Mac address of all network cards box. Read and accept the license agreement. Then click the Import button. Once the import is finished, you’ll see a new PIAF-Green-WebRTC virtual machine in your VM List on the VirtualBox Manager Window. You need to make a couple of one-time adjustments to the PIAF-Green-WebRTC Virtual Machine configuration to account for differences in sound and network cards on different host machines.
Click on PIAF-Green-WebRTC Virtual Machine in the VM List. Then click Settings -> Audio and check the Enable Audio option and choose your sound card. Save your setup by clicking the OK button. Next click Settings -> Network. For Adapter 1, check the Enable Network Adapter option. From the Attached to pull-down menu, choose Bridged Adapter. Then select your network card from the Name list. Then click OK to save your setup. Finally, click Settings -> System, uncheck Hardware clock in UTC time, and click OK. That’s all the configuration that is necessary for the PIAF-Green-WebRTC Virtual Machine. If you blinked, you probably missed it.
4. Start the PIAF-Green-WebRTC Appliance. Once you’ve imported and configured your new Virtual Machine, you’re ready to go. Highlight the appliance in the VM List on the VirtualBox Manager Window and click the Start button. The boot procedure with CentOS 6.3 will begin just as if you had installed PBX in a Flash and Incredible PBX on a standalone machine. You’ll see a couple of dialogue boxes pop up that explain the keystrokes to move back and forth between your host operating system desktop and Incredible PBX.
Here’s what you need to know. To work in the Virtual Machine, just left-click your mouse while it is positioned inside the VM window. To return to your host operating system desktop, press the right Option key on Windows machines or the left Command key on any Mac. For other operating systems, read the dialogue boxes for instructions on moving around. Always shut down your virtual machine gracefully! Click in the VM window with your mouse, log in as root, and type: shutdown -h now. Or, from the VirtualBox Manager Window, Ctl-Click on the PIAF-Green-WebRTC VM and choose Close -> ACPI Shutdown.
Always run Virtual Machines behind a hardware-based firewall with no Internet port exposure!
To begin, position your mouse over the VM window and left-click. Once the virtual machine has booted, log in as root with password as the password. Change your root password immediately by typing passwd at the command prompt. Now set up a secure maint password for FreePBX as well. Type passwd-master. If you’re not in the Eastern U.S. time zone, then you’ll want to adjust your timezone setting so that reminders and other time-sensitive events happen at the correct time. Issue the following command to pick your time zone: /root/timezone-setup. Now type status and write down the IP address of your appliance. Finally, edit /etc/asterisk/sip_custom.conf and replace the secret=8000 entry with a very secure password. This is your WebRTC extension password. Restart Asterisk: amportal restart.
5. Access WebRTC Page Hosted on PIAF-Green-WebRTC Using the latest Chrome browser from a machine on the same subnet as your appliance, point to the WebRTC web page of your appliance using the actual IP address of your virtual machine: http://192.168.0.141/myphone/call.htm.
6. Configure sipml5 to Make a Connection to Asterisk. There are two configuration steps before you can log in and start making calls through your Asterisk server. First, click on the Expert Mode button. Fill out the form as shown below using the actual IP address of your server. Click Save when you’re finished, close this browser window, and return to the main WebRTC page.
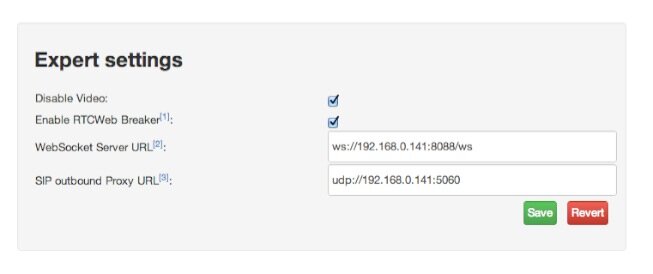
Next, fill out the Registration section using the actual IP address of your server and the extension 8000 password that you created above. Private Identity is 8000, Public Identity is sip:8000@ipaddress, Realm is Asterisk ipaddress.

Once you’ve completed your entries, click Login to make a connection to your Asterisk server.
7. Placing a Call with WebRTC. Once you’re logged in, it’s just as if you had registered a softphone to your Asterisk server. Calls from other extensions can reach you by dialing extension 8000. And you can place outbound calls using the Call Control panel. To demonstrate how this works, try the following. To retrieve Today’s News Headlines, enter 951. Then click the Call button. To retrieve the latest Weather Forecast for your city, dial 949 and say the city and state when prompted. You can’t enter touchtone keys so just ignore the "press pound" instruction and wait for the timeout.
We have intentionally not walked you through configuring an outbound trunk even though one can easily be used to make outbound calls. Before doing so, make very certain that your appliance is behind a hardware-based firewall with no Internet port exposure. It’s your phone bill. Enjoy!

WebRTC Conference and Expo. The 2013 WebRTC Conference and Expo is returning to Atlanta on June 25. For everything you ever wanted to know about WebRTC, that’s the place to be. You can sign up now at WebRTCWorld.com. The Half-Price Early Bird discount ends on March 1. And you can save an additional 15% by using Coupon Code: AA.
Originally published: Tuesday, February 26, 2013
Need help with Asterisk? Visit the PBX in a Flash Forum.
Some Recent Nerd Vittles Articles of Interest…
Allison Smith: State of the IVR Address
We’re delighted to welcome Allison Smith as our first (and only) Guest Columnist. We had asked Allison to provide us an update on IVR technology, and she was gracious enough to accept our invitation. For most of our readers, Allison is best known for her pioneering work as the Voice of Asterisk®. But her accomplishments as the professional telephone voice for Verizon, Qwest, Cingular, Sprint, and Bell Canada among others are legendary. So… here’s Allison!
 We’ve come a long way from the mindset of thirty years ago, where people approached the writing of their IVR prompts with the intention of guiding their callers through this strange, unfamiliar, automated land. Where we needed to point out that this is not an actual, live person speaking. Where we felt it was necessary to point out that if they simply listen to and follow these instructions, they will be rewarded with an answer, obeying an almost Oz-like mission, deciding which attribute best describes what you’re after and selecting the right department which will fulfill your dreams.
We are now so attuned to the idea of encountering an automated “gating” system when calling practically any entity – be they local dry cleaner or multinational – that we are in shock if the call is answered by an actual breathing person. Whereas before, designers of IVR trees were in the position of almost enticing or inviting the caller to “participate” in the exercise of finding the right department which best suits their needs, by now, everyone knows that this is a necessity to get where they want to go; and everyone knows the drill: I need to make a decision as to where my call should go – and it will be a big waste of my time if I choose incorrectly.
We’ve also come a long way towards streamlining and simplifying IVR instructions – through trial and error, we’ve got a clearer idea than ever as to the caller’s capacity for information – and their tolerance for time-wasting nonsense.
Instead of lengthy and complicated instructions on how clients can reach your physical location, I’m frequently voicing the phrase I’ve long campaigned for: “For directions to our facility, program our address into your GPS-enabled device…” Gone are hackneyed requests to “Please listen carefully, as our menu options have recently changed..” or “Please leave a detailed message after the tone…” (Nobody – especially first-time callers – care if your phone tree has changed. Also: people are well aware of what information to leave in a phone message.) And most importantly: I’m seeing a huge awareness in the fact that customers do not have an infinite amount of time or patience; get the callers sorted as efficiently and as quickly as possible, and be done with deluging them with too much information or anything which sounds even remotely like a commercial or sales pitch. They’ve been to your website. They’re sold on you. Now show them – through your phone tree – how effortless and easy it is to transact with you. –Allison Smith
Special Thanks to Our Generous Sponsors
FULL DISCLOSURE: ClearlyIP, Skyetel, Vitelity, DigitalOcean, Vultr, VoIP.ms, 3CX, Sangoma, TelecomsXchange and VitalPBX have provided financial support to Nerd Vittles and our open source projects through advertising, referral revenue, and/or merchandise. As an Amazon Associate and Best Buy Affiliate, we also earn from qualifying purchases. We’ve chosen these providers not the other way around. Our decisions are based upon their corporate reputation and the quality of their offerings and pricing. Our recommendations regarding technology are reached without regard to financial compensation except in situations in which comparable products at comparable pricing are available from multiple sources. In this limited case, we support our sponsors because our sponsors support us.
BOGO Bonaza: Enjoy state-of-the-art VoIP service with a $10 credit and half-price SIP service on up to $500 of Skyetel trunking with free number porting when you fund your Skyetel account. No limits on number of simultaneous calls. Quadruple data center redundancy. $25 monthly minimum spend required. Tutorial and sign up details are here.
![]() The lynchpin of Incredible PBX 2020 and beyond is ClearlyIP components which bring management of FreePBX modules and SIP phone integration to a level never before available with any other Asterisk distribution. And now you can configure and reconfigure your new Incredible PBX phones from the convenience of the Incredible PBX GUI.
The lynchpin of Incredible PBX 2020 and beyond is ClearlyIP components which bring management of FreePBX modules and SIP phone integration to a level never before available with any other Asterisk distribution. And now you can configure and reconfigure your new Incredible PBX phones from the convenience of the Incredible PBX GUI.
VitalPBX is perhaps the fastest-growing PBX offering based upon Asterisk with an installed presence in more than 100 countries worldwide. VitalPBX has generously provided a customized White Label version of Incredible PBX tailored for use with all Incredible PBX and VitalPBX custom applications. Follow this link for a free test drive!
Special Thanks to Vitelity. Vitelity is now Voyant Communications and has halted new registrations for the time being. Our special thanks to Vitelity for their unwavering financial support over many years and to the many Nerd Vittles readers who continue to enjoy the benefits of their service offerings. We will keep everyone posted on further developments.
Originally published: Friday, February 22, 2013
Need help with Asterisk? Visit the PBX in a Flash Forum.
Some Recent Nerd Vittles Articles of Interest…
The Ultimate Android Tablet: Meet the Microsoft Surface Pro

We were fully prepared to hate the Microsoft Surface Pro. After all, it was designed and produced by Microsoft, and we haven’t seen many flashes of brilliance from Redmond since the XBox. That was more than eleven years ago! Yes, Microsoft has new smartphones, but they’re too little, too late in our opinion. So why is the Surface Pro different? For openers, it runs pure Windows 8, not the Windows RT crippleware. While we’re not much of a Windows cheerleader any more (we were for the first 25 years), it is worth noting that Apple has one operating system for desktops and notebooks and a different (crippled) one for smartphones and tablets. And Google has one operating system for its notebooks and a very different one for its smartphones and tablets. Microsoft, on the other hand, had a better idea. The same operating system runs on both its desktop computers, its notebooks, and its latest tablet, the Surface Pro. What that means is the same application that runs on your desktop computer can now perform equally well on a tablet. And it can do it with or without the Surface’s revolutionary, portable keyboard. Application portability is huge especially if your company happens to still be a pure Microsoft shop. And it’s especially important if you or your employees happen to travel for a living.

It Just Works. So much for the theory. The bottom line for us was whether our existing PBX in a Flash, Incredible PBX, and Android platforms could live and breathe on the Surface Pro. The short answer is a resounding YES. This is not the crippled, proprietary Windows RT platform found in the original (klunky) Surface. This is a fully functional Windows 8 machine with an Intel processor, blazing performance, and both microSD and USB 3.0 slots, nice additions that you won’t find on a lot of tablets. If an app will run with Windows 7 or Windows XP, it works just as well or better on the Surface Pro. And with BlueStacks, you can run 750,000 Android apps on your Surface Pro as well. We quickly downloaded our favorite Android VoIP app, Groove IP, from Google’s Play Store using BlueStacks. Then we performed a couple of quick calls using a Google Voice account. The calls were flawless even with our shaky DSL connection on a very snowy day in the mountains. Adding BlueStack’s Cloud Connect will let you push existing apps from your Android phone or tablet to your Surface Pro. Pretty cool.
For a complete technical review of the Surface Pro, visit ZDnet or TechRadar. Just pray you never need repairs.
The only thing we’ve found missing hardware-wise on the Surface Pro is a PrintScreen key on the awesome keyboard which is a must-have, by the way. To print screens, you’ll need to use the tablet trick: VolDown + Home. But, as you can see from the screenshot above, it works fine. Because of the high resolution screen however, you lose something shrinking the images down to 650 pixels. On the software front, there were few surprises. WiFi is rock solid, and links to MiFi devices make the Surface Pro truly portable. If ass-backwards scrolling with the touchpad drives you crazy, use RegEdit and search for the mouse entry for FlipFlopHScroll. Change the decimal value from 0 to 1. The Chrome browser works fine with the keyboard and mousepad, but you’ll be using Internet Explorer to work with the touchscreen in tablet mode. Hopefully, that will get fixed shortly.
SAMBA connections work fine after the usual tweaks to the Windows Registry and a reboot. NeoRouter as a VPN client or server functions just as you would expect after telling Windows 8 to run the main programs as Administrator. Windows 8 is a bit more picky about this even when you’re logged in as an Administrator. Oracle’s VirtualBox as a virtual machine platform for Linux appliances works swimmingly, and performance is AMAZING. We built an Incredible PBX server using the latest .ova template in under 5 minutes, and we were making free calls and sending out faxes through Google Voice in under 10 minutes. Amazing!
Family Feud. There’s only one major shortcoming worth noting. Microsoft has taken their feud with Google to a whole new level with Windows 8. It’s not so much the Bingification of every Windows utility that bothers us. It’s what appears to be a conscious effort to banish Google from the Windows platform entirely. Think Apple! Those using two-step authentication for Google services are S.O.L. when it comes to Gmail. You’re left having to deploy Gmail as an IMAP mail service to get your mail at all. Giving Microsoft the benefit of the doubt, you could give them a pass on this if it had just been the initial Windows 8 release. But there have been plenty of patches and updates since Day One, and two-step authentication for Google services remains MIA. If the United States is going to retain its lead in the software development arena, Microsoft and Google and Apple had best bury the hatchet and learn how to work together to make their offerings complimentary. Consumers aren’t going to tolerate this kind of seventh grader nonsense in this day and age. So, wake up, Microsoft. Ruining an otherwise promising platform while trying to shaft Google is a lousy business decision, and it’s going to backfire. Consumers will simply move exclusively to their platform of choice, and guess what? That platform isn’t going to be Microsoft. More importantly, this article is a testament to what actually can be accomplished in Googlifying a Surface Pro with a little Yankee ingenuity. For all practical purposes, our Surface Pro is the best Android tablet we’ve ever owned, and we’ve owned a few. So here’s a little tip for Microsoft: Remember what made Windows a hit! Ubiquity, not exclusivity!
Originally published: Monday, February 18, 2013
Need help with Asterisk? Visit the PBX in a Flash Forum.
whos.amung.us If you’re wondering what your fellow man is reading on Nerd Vittles these days, wonder no more. Visit our new whos.amung.us statistical web site and check out what’s happening. It’s a terrific resource both for us and for you.
Special Thanks to Our Generous Sponsors
FULL DISCLOSURE: ClearlyIP, Skyetel, Vitelity, DigitalOcean, Vultr, VoIP.ms, 3CX, Sangoma, TelecomsXchange and VitalPBX have provided financial support to Nerd Vittles and our open source projects through advertising, referral revenue, and/or merchandise. As an Amazon Associate and Best Buy Affiliate, we also earn from qualifying purchases. We’ve chosen these providers not the other way around. Our decisions are based upon their corporate reputation and the quality of their offerings and pricing. Our recommendations regarding technology are reached without regard to financial compensation except in situations in which comparable products at comparable pricing are available from multiple sources. In this limited case, we support our sponsors because our sponsors support us.
BOGO Bonaza: Enjoy state-of-the-art VoIP service with a $10 credit and half-price SIP service on up to $500 of Skyetel trunking with free number porting when you fund your Skyetel account. No limits on number of simultaneous calls. Quadruple data center redundancy. $25 monthly minimum spend required. Tutorial and sign up details are here.
![]() The lynchpin of Incredible PBX 2020 and beyond is ClearlyIP components which bring management of FreePBX modules and SIP phone integration to a level never before available with any other Asterisk distribution. And now you can configure and reconfigure your new Incredible PBX phones from the convenience of the Incredible PBX GUI.
The lynchpin of Incredible PBX 2020 and beyond is ClearlyIP components which bring management of FreePBX modules and SIP phone integration to a level never before available with any other Asterisk distribution. And now you can configure and reconfigure your new Incredible PBX phones from the convenience of the Incredible PBX GUI.
VitalPBX is perhaps the fastest-growing PBX offering based upon Asterisk with an installed presence in more than 100 countries worldwide. VitalPBX has generously provided a customized White Label version of Incredible PBX tailored for use with all Incredible PBX and VitalPBX custom applications. Follow this link for a free test drive!
Special Thanks to Vitelity. Vitelity is now Voyant Communications and has halted new registrations for the time being. Our special thanks to Vitelity for their unwavering financial support over many years and to the many Nerd Vittles readers who continue to enjoy the benefits of their service offerings. We will keep everyone posted on further developments.
Some Recent Nerd Vittles Articles of Interest…
The Next Plateau: VoIP Communications with Asterisk in Amazon’s EC2 Cloud

We’ve spent considerable effort exploring and enhancing the VoIP cloud offerings for our followers, and today we’re delighted to introduce another terrific service: Amazon’s Elastic Compute Cloud (EC2). This is one of several Amazon Web Service (AWS) offerings that provides resizable compute capacity in the cloud and is designed to make web-scale computing easier for developers. That’s the Amazon pitch for their service. Ours is a bit different. For anyone with mission-critical operations or that has ever given a moment’s thought to business continuity planning (THINK: hurricanes, tornados, earthquakes, blizzards, fires, floods, bombs), you need an EC2 backup plan for VoIP communications. It really doesn’t matter whether your organization uses a proprietary phone system, or Asterisk®, or good ol’ black telephones, the point is simply this. When your lights go out and you still need a communications system for your employees and your customers, what’s your plan? Staying home in bed isn’t a choice for most folks. So our focus is not to persuade anybody to move their primary communications platform to Amazon EC2 although it’s certainly worth considering. For today, let’s tackle emergency planning and Disaster Recovery 101 for that dreadful day when you really don’t have a choice. And D-Day is a really bad day to start thinking about communications alternatives. You’ll have plenty of other things to do.
We’re going to make this fun today and provide all the tools you’ll need to set up shop in Amazon’s EC2 Cloud. The good news is that EC2 is almost free for your first year so getting started isn’t going to be a financial burden. Once you have everything built, you can turn it off and hope you never have to use it. On the other hand, it’s dirt cheap for an entire year so enjoy yourself and learn why VoIP communications can revolutionize your business at a fraction of the cost of a proprietary communications system. For our Asterisk aficionados that have already discovered the beauty of free VoIP communications, we’ve got some additional goodies today, Incredible Backup and Incredible Restore, that will let you quickly move your communications platform back and forth between EC2 and a local server or virtual machine effortlessly.
For those just getting started, the real beauty of VoIP communications is that, once your server platform is operational, you can bring up communications services for your employees without any hardware investment. A notebook computer and a free SIP softphone will let you make and receive calls through your EC2 communications system. By adding trunks from Google Voice or any SIP service provider, you complete the communications circle to connect to any phone in the world. We do this for a living so, if your business needs some hand-holding to get started, drop us a note. We like to travel.
The Choice is Yours: PIAF-Purple with Asterisk 1.8 or PIAF-Green with Asterisk 11
Getting Started. For your communications platform, we’ve built two new versions of PBX in a Flash™ for Amazon EC2: PIAF-Purple and PIAF-Green. You can’t beat the price. Both are free! These two builds are based upon the two long-term support (LTS) releases of Asterisk: 1.8 and 11. In our testing, both are rock solid and production-ready. If tried and true is your cup of tea, then PIAF-Purple with Asterisk 1.8 and FreePBX 2.10 is your baby. If you want to get a jump on the future, then PIAF-Green with Asterisk 11 and FreePBX 2.11 is worth a careful look. But, to use either one, you first need to get set up with an Amazon EC2 account. So head over to Amazon and click on Sign Up Now. A word to the wise here. You don’t want the bad guys breaking into your account unless you have an unlimited budget. There are lots of non-free Amazon EC2 services that could max out your credit card quickly. So, in addition to signing up for your Amazon account, also activate Multi-Factor Authentication. It’s your bank account!
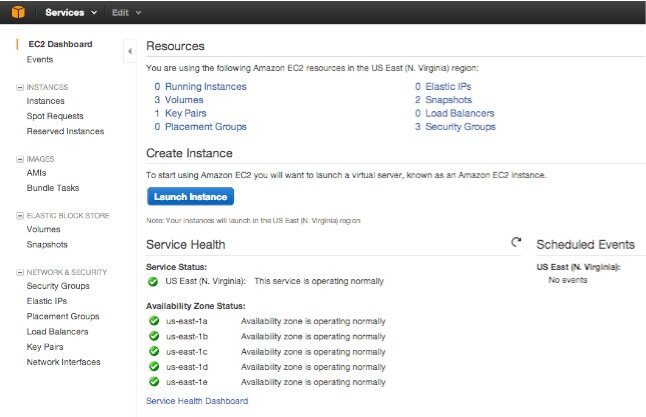
Once your account is activated, sign in to the Amazon Management Console. After entering both your passwords, the AWS Management Console will appear. Click on EC2 to bring up the EC2 Dashboard (shown above). This is home base in EC2. The Launch Instance button is used to start a new virtual machine. We’ll walk you through that process in a minute. In the left margin are the functions you’ll be using most often. Instances displays your existing virtual machines, both running and stopped. Volumes are the virtual hard disks associated with your virtual machines or instances in Amazon-speak. A volume gets created as part of the VM launching process. When you delete instances, it’s important to also delete the associated volume, or you get billed for it separately. Elastic IPs lets you assign an IP address to an Instance using Amazon’s DHCP servers. You access your virtual machines using SSH and, without an IP address, you can’t gain access. For SSH security, EC2 uses Key Pairs. As part of launching a new virtual machine, we’ll walk you through creating one. Amazon EC2 also has its own firewalls called Security Groups. Basically, all services are blocked until you open them up. We’ll also walk you through that process as well. Once you’ve created your Key Pair and Security Group, you can use them with multiple instances. Now you’re an expert so let’s Launch a New Instance.
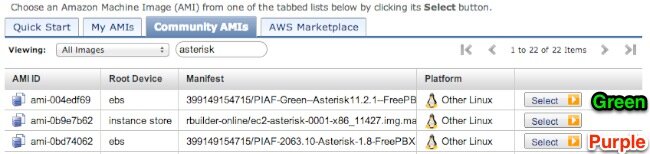
Creating a New Virtual Machine. Click on the blue Launch Instance button in the EC2 Dashboard to begin. Choose Classic Wizard. You build a new instance by starting with one that someone else has already built. Be careful here. There are literally thousands to choose from and, unless you know the creator, use Name Brand, trusted instances only. Anybody can hide anything in an instance that they’ve made publicly available. Think of your worst Trojan Horse horror story, and there’s probably a public Amazon instance to match it. For our purposes, the magic number you need to know is 399149154715. That’s our Amazon EC2 account number, and it means any instances prefixed with that number or our mugshot were created by us. So click on the Cloud Market and search for PIAF. In about a minute, both PIAF2 AMIs will appear. Pick your favorite but be sure the file name displays our smiling face. Then click Select. For the Instance Type, make sure T1 Micro is chosen. That’s the only free option during your first year. Leave the Availability Zone at No Preference and Number of Instances set to 1. Click Continue. In Advanced Instance Options, accept all of the defaults and click Continue. For Storage Device Configuration, accept the defaults by clicking Continue. Next, you’ll be prompted to add Tags to your Instance. This is a short-hand description to help you distinguish one instance from another. For the Name Value, enter something like PIAF-Purple-64 or PIAF-Green-64 and click Continue. Next, you’ll be prompted to create a Key Pair to use with the instance. If you don’t already have one, click Create New Key Pair and Continue. Once the key pair is created, the .pem file will be downloaded to your desktop computer. Change the permissions on the .pem file to what SSH requires: chmod 700 mykey.pem. You’ll need this key file to log into your instance with SSH so move it to a safe place. Next, you’ll create or use an existing Security Group. This sets up the firewall rules to use with your instance. For PBX in a Flash, you’ll need at least the following Inbound Rules in your Security Group: TCP 22 (SSH), TCP 80 (Web), TCP 1723 (for PPTP VPN only), and TCP 9001 (for WebMin access). For VoIP services, you’ll need UDP 5060 (SIP), UDP 10000-20000 (RTP), UDP 4569 (IAX), and UDP 69 (TFTP, if desired). EC2 lets you lock down Security Group entries to individual IP addresses. We strongly recommend this for SSH, Web, SIP, IAX, and TFTP services. If you need access from multiple IP addresses, just add additional Security Group rules for each address and service. Finally, you’ll be shown a summary of all your selections. If everything looks OK, click Launch to start the instance. While it’s starting up, click Elastic IPs from the left column of the EC2 Dashboard. Choose Allocate New Address and then Associate Address to connect it with the instance that just launched. Write down the IP address. You’ll need it for SSH access. Finally, click Instances and wait for your virtual machine to come on line with a green check mark.
Your First Login. Now you can log into your EC2 instance via SSH using your key file and the IP address associated with the instance: ssh -i mykey.pem -v ec2-user@54.235.12.34. If you’re using a Windows machine with Putty, use PuttyGen.exe to convert your .pem key into something Putty can understand before attempting to log in. Once you’re logged in, you need to immediately change all the default passwords:
- sudo passwd (to change your ec2-user password)
- sudo passwd root (to change your root password)
- su root (to switch to the root account with your new password)
- passwd-master (to change your FreePBX and web passwords)
- cd /root (to switch to the /root directory)
Keep in mind that PBX in a Flash is a little different than a standard Linux install. It has been designed for use as the root user only. So, whenever you log into a PIAF instance in EC2, always execute the following command: su root && cd /root. Most Linux and PBX in a Flash utilities will not work properly if you attempt to execute them as the ec2-user! For web access and management of your server, point your browser to the IP address of your EC2 instance. If you’re new to PBX in a Flash, stop here and read the PBX in a Flash 2.0.6.3 Quick Start Guide. It’ll tell you everything you need to know to get started with PBX in a Flash.
Installing Incredible PBX. We’ve got a few more surprises for you today. First, there are new, GPL2-licensed releases of Incredible PBX: version 10 for FreePBX 2.10 and version 11 for FreePBX 2.11. If you’re new to all of this, Incredible PBX provides some additional layers of security for your server while also giving you dozens of turnkey Asterisk applications including text-to-speech, speech-to-text, SMS messaging, news, weather, stocks, and tide reports, and much more. You can read the Incredible PBX tutorial here. To install Incredible PBX while logged into your EC2 instance as root, issue the following commands and plug in your passwd-master password when prompted. If you’re using the PIAF-Green AMI, replace incrediblepbx10 with incrediblepbx11 below.
cd /root

wget http://incrediblepbx.com/incrediblepbx10.gz

gunzip incrediblepbx10.gz

chmod +x incrediblepbx10

./incrediblepbx10
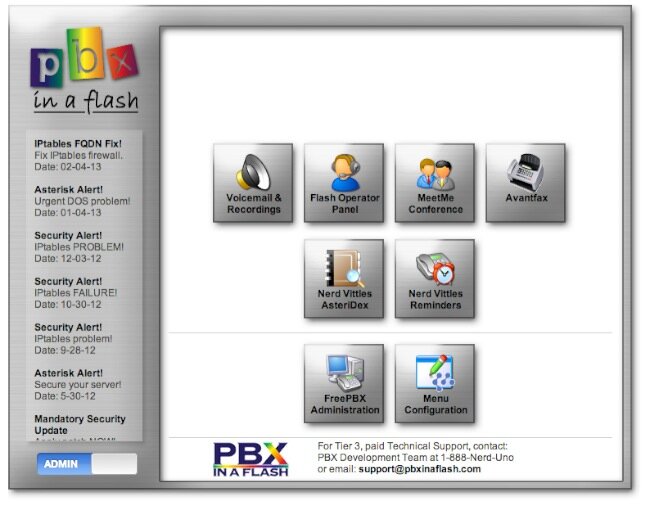
Installing Incredible Fax. Yes, there’s more. Incredible Fax also works just fine on the EC2 platform. If you want the added convenience of having your Incredible PBX double as a free fax machine, run install-incredfax2 after the Incredible PBX 10 install completes. For Incredible PBX 11, run /root/incrediblefax11.sh. Plug in your email address for delivery of incoming faxes and enter your home area code when prompted. For every other prompt, just press the Enter key. If you’d like to also add the optional OCR utility, just choose it when prompted. For complete documentation, see this Nerd Vittles article. Don’t forget that a REBOOT OF YOUR SERVER is required when the install is finished, or faxing won’t work! Then log in to AvantFax through the PBX in a Flash GUI using maint:password. Be sure to change your password!
Also be sure to set up a second, dedicated Google Voice number if you want support for inbound faxing. Once the Google Voice credentials are configured in FreePBX for the additional Google Voice line, simply add an Inbound Route for this DID to point to the fax destination. Just plug in your 10-digit Google Voice number and other entries shown in the form below. Save your setup and reload FreePBX. Done!
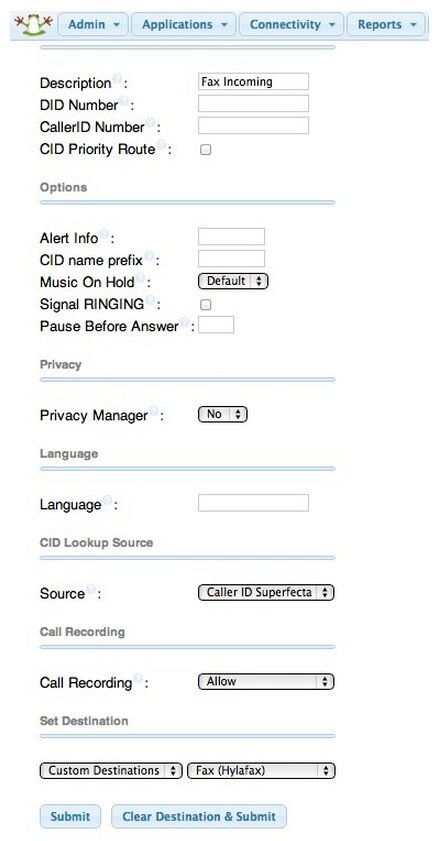
Introducing Incredible Backup and Restore. Last, but not least, we have new GPL2-licensed backup and restore utilities to simplify the task of moving PBX in a Flash setups between Amazon EC2 and other standalone or virtual machine platforms. To complement these new utilities, we’ve also released a new 64-bit PIAF-Purple Virtual Machine image for VirtualBox. PIAF-Purple-64.ova is a free download from SourceForge and will run under VirtualBox on any Windows, Mac, Linux, or Solaris desktop computer. Our VirtualBox tutorial is available here. You also have the option of downloading the current 64-bit PIAF-20631 ISO from SourceForge and building your own server or virtual machine. All three platforms (Amazon EC2 AMI, VirtualBox OVA, or PIAF 64-bit ISO) are 100% compatible with Incredible PBX, Incredible Fax, and the new Incredible Backup. Once you have matching platforms, you can backup your PIAF or Incredible PBX setup on one platform and then restore it to a different platform by simply copying the backup image to the new platform and running Incredible Restore. The entire procedure takes only a couple of minutes.
To install the backup and restore utilities on either of the platforms, simply issue the following commands:
cd /usr/local/sbin

wget http://incrediblepbx.com/incrediblebackup10.tar.gz

tar zxvf incrediblebackup10.tar.gz

rm incrediblebackup10.tar.gz
Because Incredible Backup shuts down Asterisk, MySQL, and Apache, do NOT run this when folks are using your PBX! To make a backup, log into your server as root and type: incrediblebackup.
The restore procedure essentially erases ALL of your existing FreePBX, Asterisk, TFTP, and web data. To restore a backup, copy the backup file to be restored to /tmp on the new server. Make sure the new server has Asterisk, FreePBX, and Incredible PBX versions that match what’s shown in the backup filename. There is NO error checking presently. To restore, log into your server as root, write down the filename of the backup file, and type: incrediblerestore /tmp/filename.tar.gz. If this is a new server and you’re still using your old one as well, then remove the DUNDI secret and secretexpiry entries from the Asterisk DB and restart Asterisk once the restore is completed:
asterisk -rx "database del dundi secret"

asterisk -rx "database del dundi secretexpiry"

amportal restart
For additional usage instructions and tips, see this thread on the PIAF Forum. Enjoy!
Originally published: Monday, February 11, 2013 Updated: Thursday, February 14, 2013
Support Issues. With any application as sophisticated as this one, you’re bound to have questions. Blog comments are a terrible place to handle support issues although we welcome general comments about our articles and software. If you have particular support issues, we encourage you to get actively involved in the PBX in a Flash Forum. It’s the best Asterisk tech support site in the business, and it’s all free! Unlike some forums, ours is extremely friendly and is supported by literally hundreds of Asterisk gurus and thousands of users just like you.
Need help with Asterisk? Visit the PBX in a Flash Forum.
whos.amung.us If you’re wondering what your fellow man is reading on Nerd Vittles these days, wonder no more. Visit our new whos.amung.us statistical web site and check out what’s happening. It’s a terrific resource both for us and for you.
Special Thanks to Our Generous Sponsors
FULL DISCLOSURE: ClearlyIP, Skyetel, Vitelity, DigitalOcean, Vultr, VoIP.ms, 3CX, Sangoma, TelecomsXchange and VitalPBX have provided financial support to Nerd Vittles and our open source projects through advertising, referral revenue, and/or merchandise. As an Amazon Associate and Best Buy Affiliate, we also earn from qualifying purchases. We’ve chosen these providers not the other way around. Our decisions are based upon their corporate reputation and the quality of their offerings and pricing. Our recommendations regarding technology are reached without regard to financial compensation except in situations in which comparable products at comparable pricing are available from multiple sources. In this limited case, we support our sponsors because our sponsors support us.
BOGO Bonaza: Enjoy state-of-the-art VoIP service with a $10 credit and half-price SIP service on up to $500 of Skyetel trunking with free number porting when you fund your Skyetel account. No limits on number of simultaneous calls. Quadruple data center redundancy. $25 monthly minimum spend required. Tutorial and sign up details are here.
![]() The lynchpin of Incredible PBX 2020 and beyond is ClearlyIP components which bring management of FreePBX modules and SIP phone integration to a level never before available with any other Asterisk distribution. And now you can configure and reconfigure your new Incredible PBX phones from the convenience of the Incredible PBX GUI.
The lynchpin of Incredible PBX 2020 and beyond is ClearlyIP components which bring management of FreePBX modules and SIP phone integration to a level never before available with any other Asterisk distribution. And now you can configure and reconfigure your new Incredible PBX phones from the convenience of the Incredible PBX GUI.
VitalPBX is perhaps the fastest-growing PBX offering based upon Asterisk with an installed presence in more than 100 countries worldwide. VitalPBX has generously provided a customized White Label version of Incredible PBX tailored for use with all Incredible PBX and VitalPBX custom applications. Follow this link for a free test drive!
Special Thanks to Vitelity. Vitelity is now Voyant Communications and has halted new registrations for the time being. Our special thanks to Vitelity for their unwavering financial support over many years and to the many Nerd Vittles readers who continue to enjoy the benefits of their service offerings. We will keep everyone posted on further developments.
Some Recent Nerd Vittles Articles of Interest…
Paradise Found: The Holy Grail of Mobile Communications » Meet the OBi202
 Much has been written about the quest for Unified Communications where all real-time communications services are transparently accessible by phone, by email, or via the web using multiple devices and various media types. But the Holy Grail of Business Communications is a bit different from our perspective. For the modern business person, business telecommunications comes down to a 3-way time slice between a home or home office, a real office with a real phone, and a cellphone whenever the person morphs into a road warrior or telecommuter. What the business person really wants is transparent integration of his or her smartphone into existing home and office phone setups. In other words, when we’re at home with a cell phone, we want to answer incoming cell phone calls on a house phone rather than scrambling to find a ringing cellphone on the other side of the house. And when we’re at the office, we want incoming cellphone calls to either ring on our desktop phone or be redirected to the office PBX when we’re unavailable. For many businesses, the only phone number that a customer ever has is the business person’s smartphone number. So, when we place outbound calls from home, or the office, or the cellphone, we want the customer to always see the cellphone number in the CallerID display. For accounting purposes, we’d also like all of the calls to be recorded in the cellphone log so that we can actually track call activity without reviewing logs in three different places. Well, we’ve finally got it!
Google Voice™ solved some of this cellphone integration with its new service. You can actually have calls ring on multiple devices simultaneously including your cellphone, your office phone, and your home phone. But there are several limitations. First, it’s only available in the United States. Second, some folks just don’t want Google knowing everything about your call history. Third, there’s a flexibility issue when using Google Voice to forward calls to your home or office. Without a lot of hands-on daily management, the incoming calls get forwarded to your alternate numbers whether you’re there or not. So, for example, if you’re on the road, you probably don’t want incoming business calls to your cellphone picked up by either your spouse or the office switchboard because there’s no way to easily route the calls back to you.
And that brings us to a pair of terrific new products from ObiHai. Last year we were provided a prerelease version of the OBi202™ at no cost, but frankly we hadn’t had time to play with it until a business opportunity presented the perfect case for the OBi202. In addition to being a terrific standalone VoIP phone system, the OBi202 also supports an analog fax machine using Google Voice as well as T.38 digital faxing with a CallCentric trunk. And then we discovered the OBiBT™ Bluetooth® Adapter which we actually purchased. Lo and behold, for under $100, the Holy Grail of Mobile Phone Communications was staring us in the face. So let’s begin with a quick summary of how all of this works, and then we’ll show you how to do it yourself. As with all of our Amazon links, you are obviously free to buy products wherever you like. Where prices are competitive or availability is a factor, we often recommend Amazon because Amazon provides financial support to Nerd Vittles through its referral links. That really does help keep the lights on so thanks in advance for your understanding.

The way The Holy Grail works in our SOHO setup goes something like this. I carry a Bluetooth-enabled, Galaxy Note II smartphone. While away from the house, the smartphone works like any other cellphone. I can make and receive calls as well as email and SMS messages. The only difference is that I have the phone connected through a Google Voice number so that incoming SMS messages are also delivered as Gmail messages. When I return home, the OBi202 with the OBiBT adapter senses that a smartphone is within range. You can pair and prioritize up to 10 of them. Incoming calls still ring on the cellphone, but they also ring on some POTS cordless phones scattered around the office. The POTS phones are connected to the first of two phone connections on the OBi202. CallerID actually shows the same thing as the cellphone CallerID. And incoming SMS messages also appear in the CallerID display of the cordless phones. If an incoming call is not answered in two rings, the OBi202 transfers the call to our Incredible PBX™ running on a Raspberry Pi®. It then processes the call through an AutoAttendant and delivers the call either to all of the house phones or to the desired person in the house. If there’s no answer, the call is handled by the voicemail system in Incredible PBX, and the message is also emailed to the desired recipient.
While at home base, outbound calls from the POTS phones in the office are always placed through my cellphone using the Bluetooth connection in the OBi202. Depending upon how you set up your Google Voice interaction with your cellphone, outbound calls will show either your cell phone number or Google Voice number as the CallerID. When we leave the office, the office phones no longer ring, just the Galaxy Note II. And outbound calls from the SOHO cordless phones are handled using a preconfigured SIP provider or Google Voice trunk in the OBi202 instead of via Bluetooth and the smartphone.
This may sound trivial to some of you. Suffice it to say, it’s not. You won’t find any commercial PBX that can do it. And the Asterisk Dev Team has been working on a Bluetooth connector called chan_mobile for as long as we can remember. It still doesn’t work reliably. You can follow the progress of our half dozen chan_mobile pioneers here.
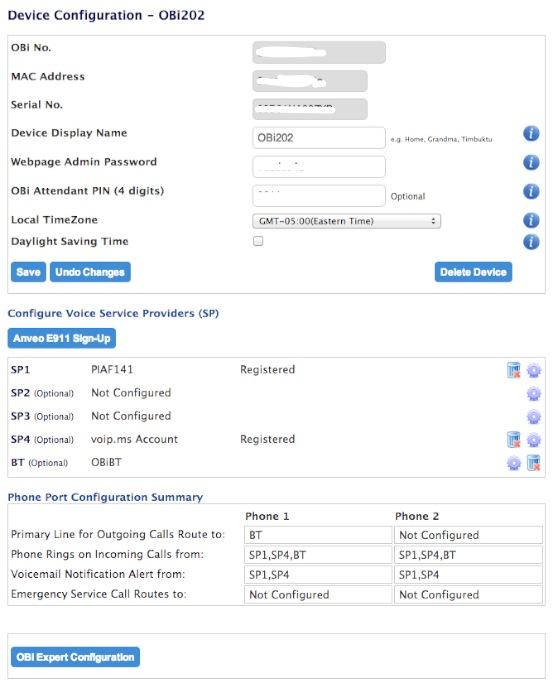
Getting Started with the OBi202. Before you can tackle Bluetooth, you need to get a perfectly functioning OBi202. Plug it in with a network cable behind your router which must provide a DHCP address to the device. Plug a POTS phone into PHONE 1. Now make a test call to OBiTALK by dialing **9 222 222 222. Next, decipher the IP address of your device by dialing ***1. Make sure your device is running the latest software by dialing ***6. Using a browser, go to http://www.obitalk.com. Create an account and then log in. Choose Add Device and follow the prompts to get your new device registered. If you want to use Google Voice, now is the time to set up your account. Choose Configure Voice Service Providers, choose your provider, and specify what phone port to use for the service. By default, both phone ports will work with whatever service provider you first configure. If you want to register your OBi202 as an extension on your Asterisk® server, now’s the time to do that as well. We also recommend you create an account with VoIP.ms and obtain a free INUM trunk. You can read how to set this up and why in this Nerd Vittles article. The advantage of having this trunk is that you can use it to route calls between your OBi202 and your Asterisk server at no cost. Just create and then register separate subaccounts on VoIP.ms for both your Asterisk server and your OBi202. Build a trunk and an inbound route on your Asterisk server to route calls from your INUM DID to wherever you’d like incoming INUM calls to go, e.g. an extension, a ring group, or an IVR. INUM DIDs look like this: 88351000XXXXXXX where the last seven digits are your personal number. Use SP4 on your OBi202 to set up your VoIP.ms subaccount. Be sure all of the accounts you create get properly registered.
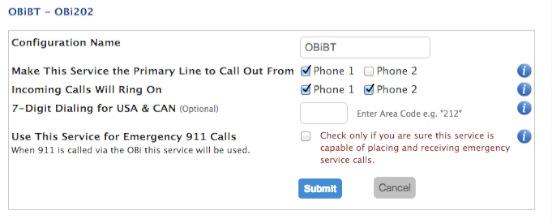
Configuring Bluetooth on the OBi202. Setting up the Bluetooth functionality is straightforward. Plug in the OBiBT. Dial *28 from a phone connected to the OBi202. Within two minutes, open the Bluetooth network settings menu on your smartphone and pair it with the OBi202. If prompted for a passcode, it’s 0000. Refresh your OBi Dashboard, and click on Edit BT icon in the Voice Service Providers frame. Set the device up as shown above. Click the Submit button.
At this point, incoming calls on your cellphone will also ring on the POTS phones connected to your OBi202. And calls that you place using a phone connected to the OBi202 will be routed out through your cellphone. This may be sufficient for many of you. We wanted the added functionality of routing inbound calls to our PBX when there was no answer on the OBi202-connected phones. At least with AT&T and StraightTalk, two rings is about the most you can allow without risking a voicemail pickup through your cellphone provider. Here’s how to set it up.
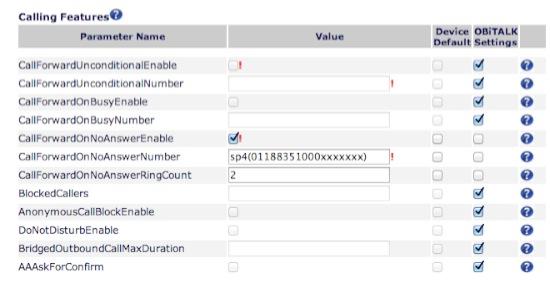
From the OBi202 Device Configuration Menu, click on the blue OBi Expert Configuration button. Acknowledge that you know what you’re doing and then click on the blue Enter OBi Expert button. In the left column under Voice Service, click OBiBlueTooth. Edit the Calling Features section and make it look like what’s shown above, replacing xxxxxxx with your personal INUM DID assigned from VoIP.ms. Click the Submit button when you’re finished. Now incoming calls will ring twice on your OBi202-connected phones and then be transferred to the INUM DID configured in Asterisk.
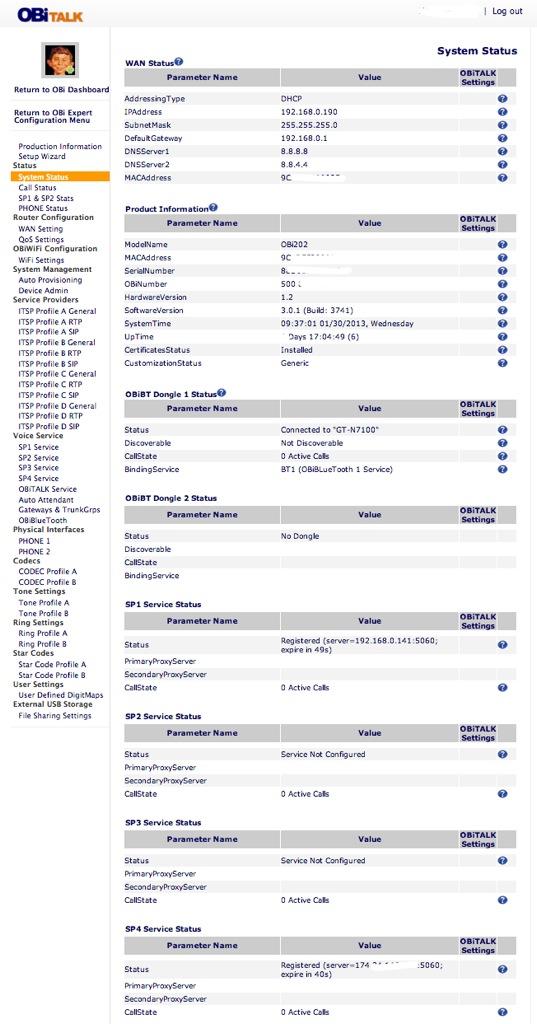
You can check the status of your OBi202 at any time by launching OBi Expert and clicking System Status. Enjoy!
Originally published: Monday, February 4, 2013
Support Issues. With any application as sophisticated as this one, you’re bound to have questions. Blog comments are a terrible place to handle support issues although we welcome general comments about our articles and software. If you have particular support issues, we encourage you to get actively involved in the PBX in a Flash Forum. It’s the best Asterisk tech support site in the business, and it’s all free! Unlike some forums, ours is extremely friendly and is supported by literally hundreds of Asterisk gurus and thousands of users just like you.
Need help with Asterisk? Visit the PBX in a Flash Forum.
whos.amung.us If you’re wondering what your fellow man is reading on Nerd Vittles these days, wonder no more. Visit our new whos.amung.us statistical web site and check out what’s happening. It’s a terrific resource both for us and for you.
Special Thanks to Our Generous Sponsors
FULL DISCLOSURE: ClearlyIP, Skyetel, Vitelity, DigitalOcean, Vultr, VoIP.ms, 3CX, Sangoma, TelecomsXchange and VitalPBX have provided financial support to Nerd Vittles and our open source projects through advertising, referral revenue, and/or merchandise. As an Amazon Associate and Best Buy Affiliate, we also earn from qualifying purchases. We’ve chosen these providers not the other way around. Our decisions are based upon their corporate reputation and the quality of their offerings and pricing. Our recommendations regarding technology are reached without regard to financial compensation except in situations in which comparable products at comparable pricing are available from multiple sources. In this limited case, we support our sponsors because our sponsors support us.
BOGO Bonaza: Enjoy state-of-the-art VoIP service with a $10 credit and half-price SIP service on up to $500 of Skyetel trunking with free number porting when you fund your Skyetel account. No limits on number of simultaneous calls. Quadruple data center redundancy. $25 monthly minimum spend required. Tutorial and sign up details are here.
![]() The lynchpin of Incredible PBX 2020 and beyond is ClearlyIP components which bring management of FreePBX modules and SIP phone integration to a level never before available with any other Asterisk distribution. And now you can configure and reconfigure your new Incredible PBX phones from the convenience of the Incredible PBX GUI.
The lynchpin of Incredible PBX 2020 and beyond is ClearlyIP components which bring management of FreePBX modules and SIP phone integration to a level never before available with any other Asterisk distribution. And now you can configure and reconfigure your new Incredible PBX phones from the convenience of the Incredible PBX GUI.
VitalPBX is perhaps the fastest-growing PBX offering based upon Asterisk with an installed presence in more than 100 countries worldwide. VitalPBX has generously provided a customized White Label version of Incredible PBX tailored for use with all Incredible PBX and VitalPBX custom applications. Follow this link for a free test drive!
Special Thanks to Vitelity. Vitelity is now Voyant Communications and has halted new registrations for the time being. Our special thanks to Vitelity for their unwavering financial support over many years and to the many Nerd Vittles readers who continue to enjoy the benefits of their service offerings. We will keep everyone posted on further developments.
Some Recent Nerd Vittles Articles of Interest…
Introducing Incredible PBX 11 & Incredible Fax for Asterisk 11 and FreePBX 2.11
 In celebration of the start of Nerd Vittles 9th Year, it seemed only fitting to introduce a terrific new VoIP product that takes advantage of the latest and greatest feature sets in both Asterisk® and FreePBX®. For years, bleeding edge Asterisk software was more blood than most folks could tolerate. But we’ve been pleasantly surprised. Asterisk 11 is a different beast. For a new release, it has less bugs and more new features than we’ve ever previously seen. And even the beta releases of FreePBX 2.11 are much improved with major plumbing changes that make for a much flexible and feature-rich product. So we started with the new Asterisk 11 and FreePBX 2.11 platform and built what we believe is the ultimate turnkey PBX solution. Incredible PBX™ 11 gives you the best of all worlds plus all of the very best, preconfigured Asterisk applications we could find. And the installer together with all of the apps are pure open source so you can learn how to build a system like this for yourself if that happens to be your thing. Installation is a breeze. Set up a new 32-bit PBX in a Flash™ 2.0.6.3 server with PIAF-Green and FreePBX 2.11, download the Incredible PBX 11 installer, and five minutes later you’re ready to begin your VoIP adventure. And it’s all FREE!
News Flash: And now Incredible PBX 11 and Incredible Fax are available for the $35 Raspberry Pi.
So what’s new? Dozens of upgraded Asterisk Apps. 9-Layer Security. 20 Preconfigured VoIP Provider Trunks. 1-Click Installers for Asterisk.everything. Certified Asterisk support. All-new Google Voice connectivity with Asterisk Motif. Voice-enabled SMS messaging and script-based SMS message blasting. Incredible PBX Automatic Update Utility. Incredible Fax™ 11 delivers free faxing with HylaFax™ and AvantFax®. Incredible PBX and Incredible Fax are now GPL2-licensed.
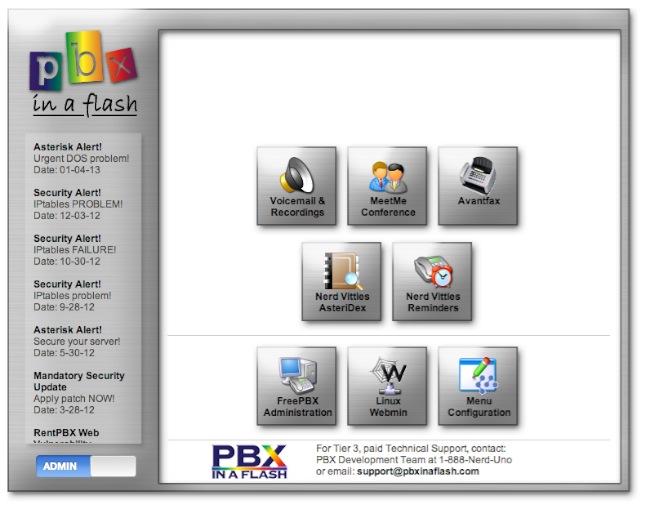
 The Incredible PBX 11 Inventory. For those that have never heard of The Incredible PBX, here’s the current 11.0 feature set in addition to the base install of PBX in a Flash with the CentOS 6.3, Asterisk 11, FreePBX 2.11, and Apache, SendMail, MySQL, PHP, phpMyAdmin, IPtables Linux firewall, Fail2Ban, and WebMin. Incredible Fax, NeoRouter and PPTP VPNs, and all sorts of backup solutions are still just one command away and may be installed using the scripts included with Incredible PBX 11 and PBX in a Flash. Type help-pbx and browse /root for dozens of one-click install scripts.
- AsteriDex
- CallerID Superfecta (FreePBX Module adds Names to CID Numbers)
- CallWho for Asterisk (Dial 411)
- Digium Phone Support (install-digiphones)
- Preconfigured Email That Works with SendMail and Incredible Fax
- OSS Endpoint Manager
- Extensions (1 preconfigured with random password)
- Festival Server and Festival TTS for Asterisk (festival –server &)
- Flite TTS for Asterisk
- FreePBX Backups
- Google Dictionary by Phone (Dial 333)
- Google News by Phone (Dial 951)
- Google Stocks by Phone (Dial 950)
- Google Voice (FreePBX GV/Motif Module)
- Hotel-Style Wakeup Calls (FreePBX Module)
- Incredible Backups… and Restores (install-incredbackup2)
- ISN: FreeNum SIP Calling from Any Phone
- MeetMe Conference Bridge (just dial C-O-N-F)
- Mondo Full System Backups (install-diskbackup)
- Incredible Fax 11 (/root/incrediblefax11.sh)
- Incremental Daily Backups (install-dailybackup)
- Munin Reports (install-munin)
- NeoRouter VPN Client (nrclientcmd)
- NewsClips from Yahoo
- ODBC Database Support (Dial 222, 223)
- OpenFire Instant Messaging & Chat Server (install-openfire)
- New PBX in a Flash Registry (show-registry)
- PPTP VPN for PIAF (/root/install-pptp)
- Reminders by Phone and Web
- SAMBA Windows Networking (configure-samba)
- SMS Dictator with Google Voice (Dial S-M-S)
- Speech-to-Text Directory Assistance (Dial 411)
- Stealth AutoAttendant
- TFTP Server (setup-tftp)
- Tide Reports with xTide (Dial T-I-D-E)
- Travelin’ Man 2 & 3 (Secure, remote access)
- Trunks (Vitelity, Gtalk, SIPgate, IPkall, VoIP.ms, and more)
- Weather by ZIP Code
- Worldwide Weather by Phone (Dial 949)
- Wolfram Alpha by Phone (/root/wolfram)
And then there’s the Incredible Freebie! As they say, "Never look a gift horse in the mouth." What began as a kludgey, dual-call, dual-provider Google Voice implementation to take advantage of Google’s free PSTN calling in the U.S. and Canada with Asterisk 1.4 and 1.6 is now a zippy-quick, Gtalk-based calling platform that rivals the best SIP-to-SIP calls on the planet. The Incredible PBX Google Voice implementation provides virtually instantaneous PSTN connections to almost anybody, anywhere. Trust us! Except for the price which is still free, you’ll never know you weren’t connected via Ma Bell’s overpriced long-distance lines and neither will the Little Mrs.
To get started, download the latest 32-bit PBX in a Flash 2.0.6.3 ISO from SourceForge, burn to then boot from the PIAF2 CD, choose the PIAF-Green option to load Asterisk 11, and pick FreePBX 2.11 when prompted. Take a look at the PIAF Quick Start Guide for step-by-step installation instructions. Once the PIAF2 install is completed, just download and run the new Incredible PBX 11 installer.
A Few Words About Security. Thanks to its Zero Internet Footprint™ design, Incredible PBX is different. It remains the most secure Asterisk-based PBX around. What this means is The Incredible PBX has been engineered to sit safely behind a NAT-based, hardware firewall with no Internet port exposure to your actual server. For those needing remote telephone support, Incredible PBX loads Travelin’ Man 2 and 3 for you so your IPtables Linux Firewall can be either self-managed by end-users or set up with predefined IP addresses and FQDNs for all of your remote sites. Read about this Asterisk SIP vulnerability. Then you’ll understand why WhiteList-based server security has become absolutely essential. WhiteList Security means only those devices with a registered IP address in your WhiteList can get to your server’s resources. To everyone else, your server doesn’t even exist. Their only way to connect to you is with a POTS telephone and your published phone number.
For those with multiple servers to interconnect, we’ve provided one-click installers for not one but two VPN solutions: NeoRouter and PPTP. Suffice it to say, Incredible PBX has Security in Spades™: customized IPtables Linux Firewall, Fail2Ban tweaked for Asterisk security monitoring, FreePBX Extension Lockdown by IP address, randomized FreePBX extension passwords, Travelin’ Man 2 and 3 WhiteList Security, multiple VPN solutions for encrypted server-to-server communications, plus a bottom-up design focused on flawless operation behind a hardware-based firewall. You won’t find a more secure Personal Branch Exchange™ at any price.
Here’s the Incredible PBX 9-Layer Security Model:
- Hardware-based Firewall
- IPtables
- Fail2Ban
- Randomized Extension Passwords
- IP-Address Lockdown for Extensions
- Travelin’ Man 2 User-Managed WhiteList
- Travelin’ Man 3 Administrator-Managed WhiteList
- NeoRouter VPN
- PPTP VPN
書呆子Vittles: Did we mention that all of this telephone goodness is still absolutely FREE!
Prerequisites. Here’s what we recommend to get started properly:
- Broadband Internet connection
- $200 Dual-Core Atom PC, 4GB RAM, 60GB SSD (no moving parts!)
- dLink Router/Firewall. Low Cost: $35 WBR-2310 Best: DGL-4500 Latest: DIR-826-L
- 2 Dedicated Google Voice accounts (voice and fax)
We’ve shifted gears on our recommended Atom platform for PIAF2 after excellent results with both the single-core and dual-core Atom kits manufactured by Foxconn (pictured on the left below). That’s the dLink Gaming Router on the right. Seems kinda silly to spend twice as much for a machine that you can build yourself in under 5 minutes. Basically you remove four screws, insert a Phillips screwdriver in one of the holes and gently pry the cover away from the box. Then you pop off the back by inserting a small flat-blade screwdriver, remove four more screws, slide in a solid-state drive (SSD) and a 4GB stick of notebook computer RAM, and you’re done in a couple minutes. Replace the screws and the cover, and you have a perfect PIAF2 platform with terrific performance and no moving parts for about $200. The link above will take you to the PIAF Forum thread for these machines. They go on sale almost weekly. See the right column of Nerd Vittles (just below our tweets) for this week’s special at Amazon. The dual-core Atom box typically is under $150. It could easily handle an office with 50+ employees sitting on a bookshelf with an Internet connection (wired or wireless!). No noise. Very little heat. Low power requirements. Perfect!
Installing Incredible PBX 11. The installation process is simple. Here are the 3 Easy Steps to Free Calling, and The Incredible PBX will be ready to receive and make free U.S./Canada calls immediately:
1. Install PIAF-Green with FreePBX 2.11 using 32-bit PIAF2 ISO or PIAF-Green VM
2. Run Incredible PBX 4 installer
3. Configure Google Voice and a softphone or SIP phone
 Configuring Google Voice. If you plan to use Google Voice, you’ll need a dedicated Google Voice account to support Incredible PBX 11. If you want to use the inbound fax capabilities of Incredible Fax 11, then you’ll need an additional Google Voice line that can be routed to the FAX custom destination using FreePBX. The more obscure the username (with some embedded numbers), the better off you will be. This will keep folks from bombarding you with unsolicited Gtalk chat messages, and who knows what nefarious scheme will be discovered using Google messaging six months from now. So keep this account a secret!
We’ve tested this extensively using an existing Gmail account, and inbound calling is just not reliable. The reason seems to be that Google always chooses Gmail chat as the inbound call destination if there are multiple registrations from the same IP address. So, be reasonable. Do it our way! Set up a dedicated Gmail and Google Voice account, and use it exclusively with Incredible PBX 11. It’s free at least through 2013. Google Voice no longer is by invitation only so, if you’re in the U.S. or have a friend that is, head over to the Google Voice site and register.
You must choose a telephone number (aka DID) for your new account, or Google Voice calling will not work… in either direction. Google used to permit outbound Gtalk calls using a fake CallerID, but that obviously led to abuse so it’s over! You also have to tie your Google Voice account to at least one working phone number as part of the initial setup process. Your cellphone number will work just fine. Don’t skip this step either. Just enter the provided 2-digit confirmation code when you tell Google to place the test call to the phone number you entered. Once the number is registered, you can disable it if you’d like in Settings, Voice Setting, Phones. But…
IMPORTANT: Be sure to enable the Google Chat option as one of your phone destinations in Settings, Voice Setting, Phones. That’s the destination we need for The Incredible PBX to work its magic! Otherwise, all inbound and outbound calls will fail. If you don’t see this option, you may need to call up Gmail and enable Google Chat there first. Then go back to the Google Voice Settings.
While you’re still in Google Voice Settings, click on the Calls tab. Make sure your settings match these:
- Call Screening – OFF
- Call Presentation – OFF
- Caller ID (In) – Display Caller’s Number
- Caller ID (Out) – Don’t Change Anything
- Do Not Disturb – OFF
- Call Options (Enable Recording) – OFF
- Global Spam Filtering – ON
Click Save Changes once you adjust your settings. Under the Voicemail tab, plug in your email address so you get notified of new voicemails. Down the road, receipt of a Google Voice voicemail will be a big hint that something has come unglued on your PBX.
Incredible PBX 11 Installation. Log into your server as root and issue the following commands to run The Incredible PBX 4 installer:
cd /root
wget http://incrediblepbx.com/incrediblepbx11.gz
gunzip incrediblepbx11.gz
chmod +x incrediblepbx11
./incrediblepbx11
Now have a quick cup of coffee while the installer works its magic. While you’re waiting just make sure that you’ve heeded our advice and installed your server behind a hardware-based firewall. No ports need to be opened on your firewall to support Incredible PBX. Leave it that way!
One final word of caution is in order regardless of your choice of providers: Do NOT use special characters in any provider passwords, or nothing will work!
FINAL STEPS. Once the Incredible PBX install completes, there are two optional steps for those that will have remote phones or users outside your firewall. Install both Travelin’ Man 2 and 3 for an ultra-secure system.
Logging in to FreePBX 2.11. Using a web browser, you access the FreePBX GUI by pointing your browser to the IP address of Incredible PBX. Click on the Users tab. It will change to Admin. Now click the FreePBX Admin button. When prompted for a username, it’s maint. When prompted for the password, it’s whatever you set up as your maint password when you installed PBX in a Flash. If you forget it, you can always reset it by logging into your server as root and running passwd-master.
Configuring Google Voice Trunks in FreePBX. All trunk configurations now are managed within FreePBX, including Google Voice. This makes it easy to customize your Incredible PBX to meet your specific needs. If you plan to use Google Voice, here’s how to quickly configure one or more Google Voice trunks within FreePBX. After logging into FreePBX with your browser, click the Connectivity tab and choose Google Voice/Motif. To Add a new Google Voice account, just fill out the form. Do NOT check the third box or incoming calls will never ring!
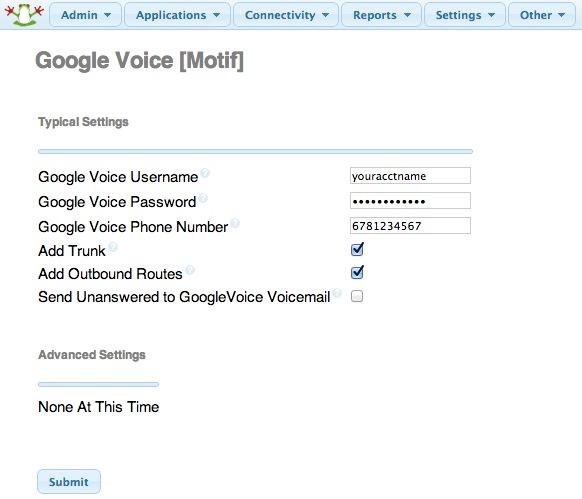
While you’re still in FreePBX, choose Applications, Extensions, and click on the 701 extension. Write down your extension and voicemail passwords. You’ll need them to configure a phone in a minute.
IMPORTANT LAST STEP: Google Voice will not work unless you restart Asterisk from the Linux command line at this juncture. Using SSH, log into your server as root and issue the following command: amportal restart.
Incredible Fax 11 Installation. If you want the added convenience of having your Incredible PBX double as a free fax machine, run /root/incrediblefax11.sh after the Incredible PBX 4 install completes. Plug in your email address for delivery of incoming faxes and enter your home area code when prompted. For every other prompt, just press the Enter key. If you’d like to also add the optional OCR utility, just choose it when prompted. For complete documentation, see this Nerd Vittles article. Don’t forget that a REBOOT OF YOUR SERVER is required when the install is finished, or faxing won’t work! Then log in through the PIAF GUI using maint:password. You’ll find the AvantFax GUI on the Admin menu.
Also be sure to set up a second, dedicated Google Voice number if you want support for inbound faxing. Once the Google Voice credentials are configured in FreePBX for the additional Google Voice line, simply add an Inbound Route for this DID to point to the Custom Destination: Fax (Hylafax). This comes preconfigured with Incredible PBX 11.
Eliminating Audio and DTMF Problems. You can avoid one-way audio on calls and touchtones that don’t work with these simple settings in FreePBX: Settings -> Asterisk SIP Settings. Just plug in your public IP address and your private IP subnet. Then set ULAW as the only Audio Codec.
Setting Up a Desktop Softphone. PBX in a Flash supports all kinds of telephones, but we’ll start with the easy (free) one today. You can move on to "real phones" once you’re smitten with the VoIP bug. For today, you’ll need to download a softphone to your desktop PC or Mac.
The easiest way to get started is to set up a YATE softphone on your Desktop computer. Versions are available at no cost for Macs, PCs, and Linux machines. Just download the appropriate one and install it from this link. Once installed, it’s a simple matter to plug in your extension credentials and start making calls. Run the application and choose Settings -> Accounts and click the New button. Fill in the blanks using the IP address of your server, 201 for your account name, and whatever password you created for the extension. Click OK.
Once you are registered to extension 201, close the Account window. Then click on YATE’s Telephony Tab and place your first call. It’s that easy!
Incredible PBX Test Flight. The proof is in the pudding as they say. So let’s try two simple tests. First, let’s place an outbound call. Using the softphone, dial your 10-digit cellphone number. Google Voice should transparently connect you. Answer the call and make sure you can send and receive voice on both phones. Second, from another phone, call the Google Voice number that you’ve dedicated to The Incredible PBX. Your softphone should begin ringing shortly. The call will be answered by the Nerd Vittles sample IVR. You can explore all of the preconfigured options at your leisure.

Learn First. Explore Second. Even though the installation process has been completed, we strongly recommend you do some reading before you begin your VoIP adventure. VoIP PBX systems have become a favorite target of the hackers and crackers around the world and, unless you have an unlimited bank account, you need to take some time learning where the minefields are in today’s VoIP world. Start by reading our Primer on Asterisk Security. We’ve secured all of your passwords except your root password and your passwd-master password. We’re assuming you’ve put very secure passwords on those accounts as if your phone bill depended upon it. It does! There’s loads of additional documentation on the PBX in a Flash documentation web site.
Incredible PBX 11 Automatic Update Utility. With Incredible PBX 11, we are introducing a new automatic update utility to assist in keep your system current and secure. It runs each time you log into your server as root. The first ten updates are at no cost. You then can elect to continue the service by subscribing to the update service which is available for a modest $20 for calendar year 2013. Whether you subscribe or not, new releases of PBX in a Flash and Incredible PBX will always be free! This simply is a way for us to recover our costs in providing a service that many of our users have asked for. We hope you like it.
![]() Choosing VoIP Providers. Nothing beats free when it comes to long distance calls. But nothing lasts forever. And, in the VoIP World, redundancy is dirt cheap. So we strongly recommend you set up another account with Vitelity using our special link below. This gives your PBX a secondary way to communicate with every telephone in the world, and it also gets you a second real phone number for your new system… so that people can call you. Here’s how it works. You pay Vitelity a deposit for phone service. They then will bill you $3.99 a month for your new phone number. This $3.99 also covers the cost of unlimited inbound calls (two at a time) delivered to your PBX for the month. For outbound calls, you pay by the minute and the cost is determined by where you’re calling. If you’re in the U.S., outbound calls to anywhere in the U.S. are a little over a penny a minute. If you change your mind about Vitelity and want a refund of the balance in your account, all you have to do is ask. The trunks for Vitelity already are preconfigured with The Incredible PBX. Just insert your credentials using FreePBX and uncheck the Disable Trunk checkbox. Then add the Vitelity trunk as the third destination for your default outbound route. That’s it. Congratulations! You now have a totally redundant phone system.
Choosing VoIP Providers. Nothing beats free when it comes to long distance calls. But nothing lasts forever. And, in the VoIP World, redundancy is dirt cheap. So we strongly recommend you set up another account with Vitelity using our special link below. This gives your PBX a secondary way to communicate with every telephone in the world, and it also gets you a second real phone number for your new system… so that people can call you. Here’s how it works. You pay Vitelity a deposit for phone service. They then will bill you $3.99 a month for your new phone number. This $3.99 also covers the cost of unlimited inbound calls (two at a time) delivered to your PBX for the month. For outbound calls, you pay by the minute and the cost is determined by where you’re calling. If you’re in the U.S., outbound calls to anywhere in the U.S. are a little over a penny a minute. If you change your mind about Vitelity and want a refund of the balance in your account, all you have to do is ask. The trunks for Vitelity already are preconfigured with The Incredible PBX. Just insert your credentials using FreePBX and uncheck the Disable Trunk checkbox. Then add the Vitelity trunk as the third destination for your default outbound route. That’s it. Congratulations! You now have a totally redundant phone system.
Incredible PBX includes preconfigured trunk setups for all of your favorite trunk providers. Just plug in your credentials and activate the trunks you need. In less than a minute, you’re done. Here’s the Incredible PBX Top 20 Trunk List with some reasons why these providers made our short list:
- AxVoice ($14.99/mo. Business Plan; $16.58/mo. Unlimited Calls to 45 Countries)
- CallCentric (Good International Calling Rates)
- DIDforSale (20 channels per DID; unlimited DID calls for $8.99/mo.)
- ENUM
- FlowRoute (Good International Calling Rates)
- FreeNum
- Future-Nine (Supports CallerID Spoofing)
- Google Voice (Free DIDs and free U.S./Canada calling)
- IPkall (Free SIP/IAX DIDs)
- Les.net (Supports CallerID Spoofing; very low rates)
- LocalPhone (Dirt-cheap DIDs and calling rates worldwide; Free iNum DID)
- Simon Telephonics (Free SIP-to-GoogleVoice Gateway)
- SIPgate (Free residential DIDs sometimes)
- Skype (Free Skype-to-Skype calls worldwide)
- Teliax (Unlimited inbound DID $5/mo.)
- Vitelity (Our supporter and the Best in the Business!)
- VoIPms (CallerID spoofing; Free iNum calling; Very low rates)
- VoIPMyWay (Residential Unlimited: $15.50/mo. Business Unlimited: $40/mo.)
- VoIPStreet (Free DID)
Configuring Email. You’re going to want to be notified when updates are available for FreePBX, and you may also want notifications when new voicemails arrive. Everything already is set up for you except actually entering your email notification address. Using a web browser, open the FreePBX GUI by pointing your browser to the IP address of your Incredible PBX. Then click Administration and choose FreePBX. To set your email address for FreePBX updates, go to Admin -> Module Admin and click on the shield on the right margin. To configure emails to notify you of incoming voicemails, go to Applications -> Extensions -> 701 and scroll to the bottom of the screen. Then follow your nose. Be sure to reload FreePBX when prompted after saving your changes.
A Final Word About Security. In case you couldn’t tell, security matters to us, and it should matter to you. Not only is the safety of your system at stake but also your wallet and the safety of other folks’ systems. Unless you subscribe to the new Automatic Update Utility, our only means of alerting you to security issues which arise is through the RSS Feed that we maintain for the PBX in a Flash project. This feed is prominently displayed in the web GUI which you can access with any browser pointed to the IP address of your server. Check It Daily! Or add our RSS Feed to your favorite RSS Reader. We also recommend you follow @NerdUno on Twitter. We’ll keep you entertained and provide immediate notification of security problems that we hear about. Finally, visit the PIAF Forums regularly. You’ll be surprised what you can learn in 10 minutes of browsing. Be safe!
Kicking the Tires. OK. That’s enough tutorial for today. Let’s play. Using your new softphone, begin your adventure by dialing these extensions:
- D-E-M-O – Incredible PBX Demo (running on your PBX)
- Z-I-P – Enter a five digit zip code for any U.S. weather report
- T-I-D-E – Get today’s tides and lunar schedule for any U.S. port
- 4-1-1 – Phonebook lookup/dialer with AsteriDex
- C-O-N-F – Set up a MeetMe Conference on the fly (PIN: 1234)
- 1-2-3 – Schedule regular/recurring reminder (PW: 12345678)
- 2-2-2 – ODBC/Timeclock Lookup Demo (Empl No: 12345)
- 2-2-3 – ODBC/AsteriDex Lookup Demo (Code: AME)
- 3-3-3 – Look up a definition for any word or term
- 9-4-9 – Weather forecast for any city in the world
- 9-5-0 – Retrieve stock report by stock symbol
- 9-5-1 – Latest Google News headlines
- Dial *68 – Schedule a hotel-style wakeup call from any extension
Don’t forget to List Yourself in Directory Assistance so everyone can find you by dialing 411. And add your new number to the Do Not Call Registry to block telemarketing calls. Or just call 888-382-1222 from your new number. Enjoy!
Originally published: Saturday, January 19, 2013
Support Issues. With any application as sophisticated as this one, you’re bound to have questions. Blog comments are a terrible place to handle support issues although we welcome general comments about our articles and software. If you have particular support issues, we encourage you to get actively involved in the PBX in a Flash Forums. It’s the best Asterisk tech support site in the business, and it’s all free! In fact, there is a thread dedicated to support of Incredible PBX 11. Please have a look and post your support questions there. Unlike some forums, ours is extremely friendly and is supported by literally hundreds of Asterisk gurus and thousands of ordinary users just like you. You won’t have to wait long for an answer to your question.
Need help with Asterisk? Visit the PBX in a Flash Forum.
whos.amung.us If you’re wondering what your fellow man is reading on Nerd Vittles these days, wonder no more. Visit our new whos.amung.us statistical web site and check out what’s happening. It’s a terrific resource both for us and for you.
Special Thanks to Our Generous Sponsors
FULL DISCLOSURE: ClearlyIP, Skyetel, Vitelity, DigitalOcean, Vultr, VoIP.ms, 3CX, Sangoma, TelecomsXchange and VitalPBX have provided financial support to Nerd Vittles and our open source projects through advertising, referral revenue, and/or merchandise. As an Amazon Associate and Best Buy Affiliate, we also earn from qualifying purchases. We’ve chosen these providers not the other way around. Our decisions are based upon their corporate reputation and the quality of their offerings and pricing. Our recommendations regarding technology are reached without regard to financial compensation except in situations in which comparable products at comparable pricing are available from multiple sources. In this limited case, we support our sponsors because our sponsors support us.
BOGO Bonaza: Enjoy state-of-the-art VoIP service with a $10 credit and half-price SIP service on up to $500 of Skyetel trunking with free number porting when you fund your Skyetel account. No limits on number of simultaneous calls. Quadruple data center redundancy. $25 monthly minimum spend required. Tutorial and sign up details are here.
![]() The lynchpin of Incredible PBX 2020 and beyond is ClearlyIP components which bring management of FreePBX modules and SIP phone integration to a level never before available with any other Asterisk distribution. And now you can configure and reconfigure your new Incredible PBX phones from the convenience of the Incredible PBX GUI.
The lynchpin of Incredible PBX 2020 and beyond is ClearlyIP components which bring management of FreePBX modules and SIP phone integration to a level never before available with any other Asterisk distribution. And now you can configure and reconfigure your new Incredible PBX phones from the convenience of the Incredible PBX GUI.
VitalPBX is perhaps the fastest-growing PBX offering based upon Asterisk with an installed presence in more than 100 countries worldwide. VitalPBX has generously provided a customized White Label version of Incredible PBX tailored for use with all Incredible PBX and VitalPBX custom applications. Follow this link for a free test drive!
Special Thanks to Vitelity. Vitelity is now Voyant Communications and has halted new registrations for the time being. Our special thanks to Vitelity for their unwavering financial support over many years and to the many Nerd Vittles readers who continue to enjoy the benefits of their service offerings. We will keep everyone posted on further developments.
Some Recent Nerd Vittles Articles of Interest…
Free Asterisk Solutions
