
Home » Posts tagged 'asterisk' (Page 51)
Tag Archives: asterisk
The Most Versatile VoIP Provider: FREE PORTING

 JUST RELEASED: Visit the Incredible PBX Wiki
The Definitive VoIP Quick Start Guide: Introducing PBX in a Flash 2.0.6.3
Whether you’re just getting started with VoIP telephony or merely want to kick the tires of PBX in a Flash™ 2.0.6.3.1, this guide is for you. We’ll try to cover the basics as well as the fine points to get your PBX in a Flash system running on almost any platform. Let’s begin by telling you why PIAF™ is different and why it matters. PBX in a Flash is the only Asterisk® and FreePBX® aggregation in which most of the components are compiled as part of the install. PIAF is also the only platform that lets you choose a stand-alone server platform, or a turnkey virtual machine appliance for any Windows, Mac, Linux, or Solaris desktop, or a hosted platform from RentPBX for only $15 a month! If you’re cost conscious or just want to tinker, we’ve got a simplified version with dozens of utilities for the $35 Raspberry Pi.
Why does this matter? First, you get the very latest updates to the CentOS® 6.3 operating system. Second, you get your choice of numerous Asterisk versions including 1.8, 1.8-Certified, 10, and 11. Each is compiled from source on the fly. Third, you get your choice of FreePBX versions as well: 2.8, 2.9., 2.10, or 2.11. Fourth, you have a bloat-free platform that will let you easily add and compile almost any Linux or Asterisk add-on in a matter of minutes but only if you need it. One size fits all simply doesn’t work for everybody in the VoIP world. Fifth, you can adjust and fine-tune the existing PIAF setup to meet your own requirements any time you like. This was especially handy last week when Digium announced that all prior versions of Asterisk had some major security flaws. By tweaking a simple script, any PIAF server could be updated to the latest version of Asterisk in under 30 minutes without losing any of the existing configuration. Of course you’ll also have access to the largest collection of free Asterisk utilities and add-ons anywhere on the planet. If you don’t need a particular function, don’t add it. If you do, it’s there for the taking on the PIAF Forum and can be installed in minutes. For the newbies that just want a system that works, you can run the Incredible PBX script to generate a turnkey system that’s ready to plug in phones once you complete the installation. In less than 5 minutes, you’ll have over 50 Asterisk applications with free Google Voice calling in the U.S. and Canada. Last, but not least, we have the best VoIP resource and collection of experts you’ll find anywhere on the PIAF Forum. And it’s free!
Where to Begin?
Thinking back to when I began exploring VoIP telephony, I would suggest your first order of business should be to have a seat in a quiet room and carefully sketch out your objectives. Many want to test the waters privately before recommending VoIP telephony to an employer. If that’s your situation, then start with the Incredible PBX 11 Virtual Machine for VirtualBox. Once you’ve downloaded the software, you can install it and be up and running on almost any modern desktop computer in under 5 minutes. It also works with VMware. We have an airline using PBX in a Flash worldwide that started in just this way.
About half of our readers don’t live in the United States. They live in 201 other countries scattered around the globe (see our Flag Counter). But they’re unable to take advantage of Google’s free phone service offering for calls in the U.S. and Canada. That’s an integral part of all PIAF installs although you certainly can use any SIP or IAX provider as well as traditional PSTN lines if you want to. If that’s your situation, take a careful look at the RentPBX Cloud offering. They’re the best in the business and also one of our project sponsors. For $15 a month, you can enjoy everything that’s available to any U.S. resident with a hosted PBX in a Flash or Incredible PBX account on one of their servers. It’s a great way to take advantage of Google Voice and establish a corporate presence in the U.S.
For those that just want a cheap VoIP solution with lots of bells and whistles for your home or home office, a $35 Raspberry Pi running Incredible PBX can’t be beat. You get almost the full feature set of Asterisk for the cost of an evening meal. What’s included? We could write a book about it. In fact, we almost have. Start here. Then go here.
Making a Hardware Selection
For the rest of you, the adventure begins here. We’re going to assume that you need a VoIP telephony solution that will support an office of up to several dozen employees and that you have an Internet connection that will support whatever your simultaneous call volume happens to be. This is above and beyond your normal Internet traffic. To keep it simple, you need 100Kbps of bandwidth in both directions for each call.1 And you need a router/firewall that can prioritize VoIP traffic so that all your employees playing FarmVille won’t cause degradation in VoIP call quality. Almost any good home router can now provide this functionality. Remember to disable ALG on your router, and it’s smooth sailing.
For computer hardware, you’ll need a dedicated machine. There are many good choices. Unless you have a burning desire to preserve your ties with Ma Bell, we recommend limiting your Ma Bell lines to your main number. Most phone companies can provide a service called multi-channel forwarding that lets multiple inbound calls to your main number be routed to one or more VoIP DIDs much like companies do with 800-number calls. If this works for you, then any good dual-core Atom computer will suffice. You’ll find lots of suggestions in this thread. And the prices generally are in the $200-$400 range. For larger companies and Asterisk’s capacity with beefier hardware, see these stress test results.
If your requirements involve retention of dozens of Ma Bell lines and complex routing of calls to multiple offices, then we would strongly recommend you spend a couple thousand dollars with one of our consultants. They’re the best in the business, and they do this for a living. They can easily save you the cost of their services by guiding you through the hardware selection process. They also have turnkey phone systems using much the same technology as you’ll find in PBX in a Flash. You won’t hurt our feelings. 🙂
Choosing the Right PIAF Platform
We get asked this question about a hundred times a week on the forums so here goes. There are more than two dozen permutations and combinations of CentOS, Asterisk, and FreePBX to choose from when you decide to deploy PBX in a Flash. We always recommend the latest version of CentOS because it tends to be the most stable and also supports the most new hardware. You have a choice to make between a 32-bit OS or 64-bit. Our preference is the 32-bit platform because it is better supported. The performance difference is virtually unnoticeable for most VoIP applications. With Asterisk, we always recommend an LTS release because those have long-term support. That narrows your choices to Asterisk 1.8 or the just released Asterisk 11. If you plan to use Digium® Phones (and we’ll get to that), then you’ll want either Certified Asterisk 1.8 or Asterisk 11. The conventional wisdom in the Asterisk community has been to avoid just released Asterisk versions like the plague. We think we’ve turned the corner on that approach. Asterisk 1.8 is close to end of life, and with Asterisk 11, you’re in great shape from a support standpoint for many years to come. We personally run Asterisk 11 and have yet to find something that functionally would qualify as a show stopper. That’s not to say there aren’t some bugs and security issues from time to time. A pretty serious collection of them was found just last week, but it affected all versions of Asterisk. So… our bottom line is that Asterisk 11 is the latest and greatest with the best feature set. If we were building a system for a commercial business, it would be our hands-down choice. In the PBX in a Flash world, we have colors for various versions of PBX in a Flash that support different versions of Asterisk. Asterisk 11 happens to be PIAF-Green, Asterisk 1.8=PIAF-Purple, Asterisk 10=PIAF-Red, Certified Asterisk 1.8=PIAF-Brown.
Choosing the Right Phones
If there is one thing that will kill any new VoIP deployment, it’s choosing the wrong phones. If you value your career, you’ll let that be an organization-driven decision after carefully reviewing at least 6-12 phones that won’t cause you daily heartburn. You and your budget team can figure out the price points that work in your organization keeping in mind that not everyone needs the same type of telephone. Depending upon your staffing, the issue becomes how many different phone sets are you and your colleagues capable of supporting and maintaining on a long term basis.

On February 1, Schmooze Com will release a public beta of their commercial End Point Manager (EPM) at a price point of $25 per server. They’ve been using the application internally to support their commercial customers for over a year so it is not your typical beta software. Suffice it to say, it’s the best $25 you will ever spend. You can sign up for an account with Schmooze through our commercial support site and purchase the software as soon as it becomes available. After taking a look at the Admin User Guide, if you’re a true pioneer, drop us a note and we’ll get you a sneak peek. The beauty of this software is it gives you the flexibility to support over 150 different VoIP phones as well as other devices almost effortlessly. Using a browser, you can configure and reconfigure almost any phone on the market in a matter of minutes. So the question becomes which phones should you show your business associates. That again should be a decision by you and your management and budget teams, but collect some information from end-users first. Choose a half dozen representative users in your company and get each of them to fill out a questionnaire documenting their 10 most frequent daily phone calls and listing each step of how they processed those calls. That will give you a good idea about types and variety of phones you need to consider for different groups of users. Cheaper rarely is better. There’s a reason that everybody bought IBM Selectric typewriters. It had nothing to do with cost. And phones can last a very long time, even lousy ones. So don’t blow it!
The phone brands that we would seriously consider include Cisco, Aastra, Snom, Digium, Mitel, Polycom, Yealink, and Grandstream. Do you need BLF, call parking or multiple line buttons, a hold button, conferencing, speakerphone, HD voice, power over Ethernet support, distinctive ringtones for internal and various types of external calls, Bluetooth, WiFi, web, SMS, or email access, an extra network port for a computer, headset support, customizable buttons (how many?), quick dial keys, custom software, XML provisioning, VPN support? How easy is it to transfer a call? Do you need to mimic key telephones? Also consider color screens, touch screens, busy lamp indicators, extension modules (what capacity?). What do we personally use: several Digium phones of various types, a couple of Aastra phones, a Grandstream GXP2200, and a collection of Panasonic cordless DECT phones, a fax machine, and Samsung Galaxy Note II connected through an OBi202 with an OBiBT Bluetooth Adapter to our PIAF server. Good luck!
Installing PBX in a Flash
With the office politics out of the way, let’s get to the fun stuff.
- Download PIAF 2.0.6.3.1 ISO from SourceForge
- Burn the ISO to a USB Thumb Drive or a DVD using a Mac or Windows machine
- Boot dedicated server using PIAF Flash Drive or DVD
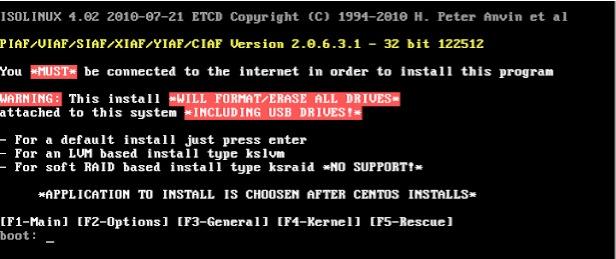
For most deployments, choose the default install by pressing Enter.
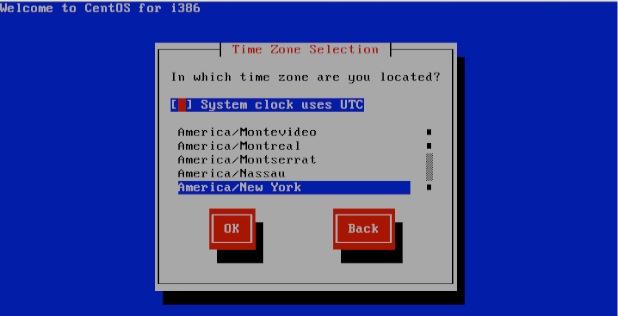
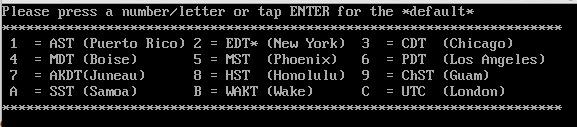
Leave the UTC System Clock option unchecked and pick your Time Zone. Tab to OK and press Enter.
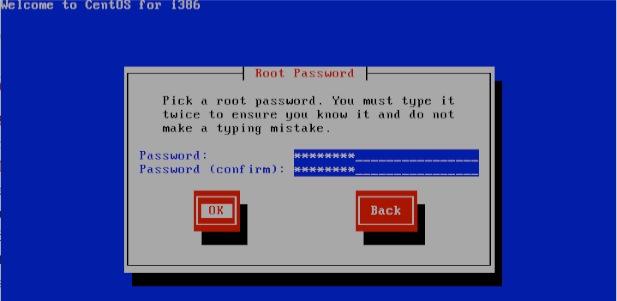
Choose a very secure Root Password. Tab to OK and press Enter. Your server will whir away for 5-10 minutes installing CentOS 6.3. When the reboot begins, remove the DVD or USB thumb drive.
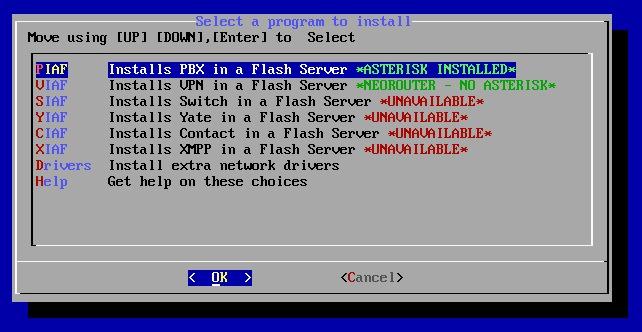
For today, we’re installing PBX in a Flash. So leave it highlighted, tab to OK, and press Enter.
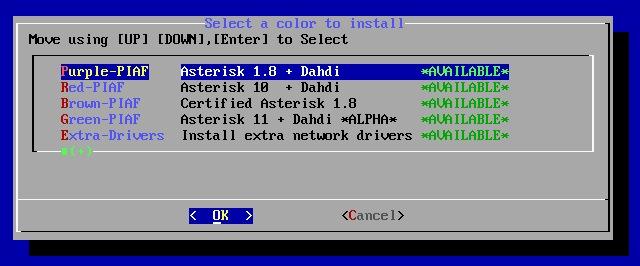
Now pick your PIAF flavor, tab to OK, and press Enter.
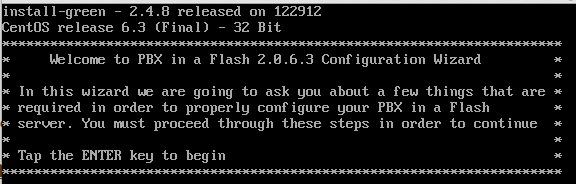
The PIAF Configuration Wizard will load. Press Enter to begin.
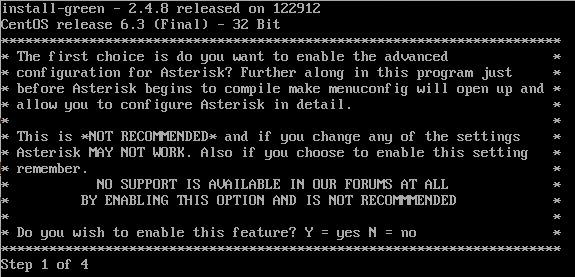
Unlike any other aggregation, PIAF gives you the opportunity to fully configure Asterisk using make menuconfig if you know what you’re doing. For everyone else, type N and then confirm your choice.
Next, you’ll need to choose your Time Zone again for PHP and FreePBX. Don’t worry if yours is missing. A new timezone-setup utility is available in /root to reconfigure this to any worldwide time zone.
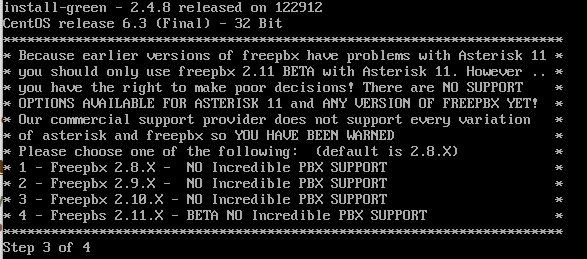
Next, choose your version of FreePBX to install. Ignore the screen info regarding Incredible PBX. It’s out of date. The following limitations apply if you plan to also install Incredible PBX and Incredible Fax:
Incredible PBX 3 requires PIAF-Purple and FreePBX 2.9
Incredible PBX 4 requires PIAF-Purple and FreePBX 2.10 (32-bit only)
Incredible PBX 11 will require PIAF-Green and FreePBX 2.11
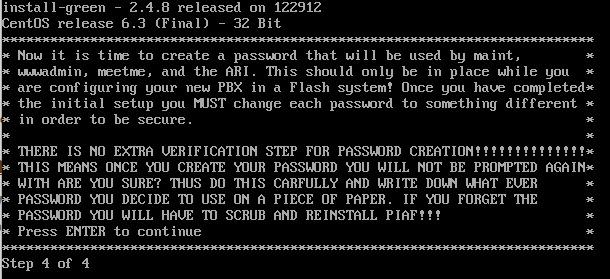
Finally, you need to choose a very secure maint password for access to FreePBX using a browser. You can pick your own, or the installer will generate one for you. Don’t forget it.
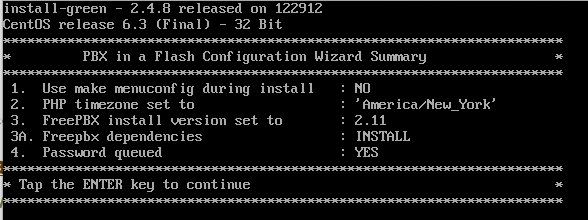
The installer will give you one last chance to make changes. If everything looks correct, press the Enter key and go have lunch. Be sure you have a working Internet connection to your server before you leave. 😉
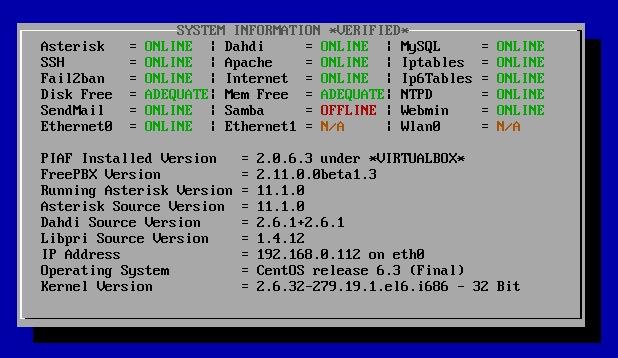
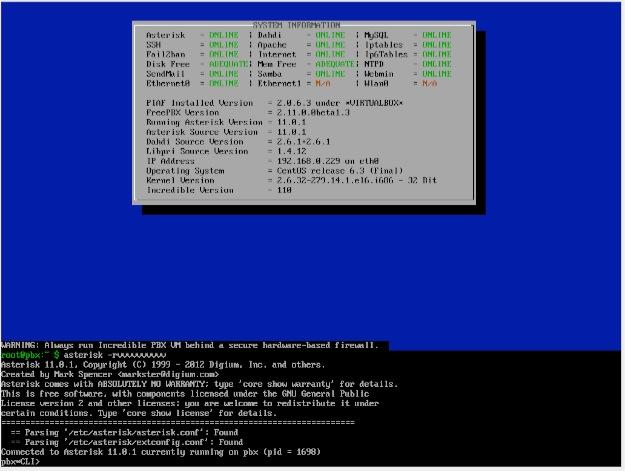
In about an hour, your server will reboot. You should be able to log in as root using your root password. Write down the IP address of your server from the status display (above) and verify that everything installed properly. Note that Samba is disabled by default. If you want to use your server with Windows Networking, run configure-samba once your server is up and running and you’ve logged in.
Configuring PBX in a Flash

Most PIAF Configuration is accomplished using the FreePBX Web GUI. Point your browser to the IP address shown in the status display above to display your PIAF Home Page. Click on the Users tab. Click FreePBX Administration. When prompted for your username and password, the username is maint. The password will be the FreePBX master password you chose in the Config Module phase of the PBX in a Flash installation procedure above.

If you’re new to Asterisk and FreePBX, here’s the one paragraph primer on what needs to happen before you can make free calls with Google Voice. You’ll obviously need a free Google Voice account. This gets you a phone number for people to call you and a vehicle to place calls to plain old telephones throughout the U.S. and Canada at no cost. You’ll also need a softphone or SIP phone to actually place and receive calls. YATE makes a free softphone for PCs, Macs, and Linux machines so download your favorite and install it on your desktop. Phones connect to extensions in FreePBX to work with PBX in a Flash. Extensions talk to trunks (like Google Voice) to make and receive calls. FreePBX uses outbound routes to direct outgoing calls from extensions to trunks, and FreePBX uses inbound routes to route incoming calls from trunks to extensions to make your phones ring. In a nutshell, that’s how a PBX works. There are lots of bells and whistles that you can explore down the road.
To get a minimal system functioning to make and receive calls, here’s the 2-minute drill. You’ll need to set up at least one extension with voicemail, and we’ll configure a free Google Voice account for free calls in the U.S. and Canada. Next, we’ll set up inbound and outbound routes to manage incoming and outgoing calls. Finally, we’ll add a phone with your extension credentials.
A Few Words About Security. PBX in a Flash has been engineered to run on a server sitting safely behind a hardware-based firewall with NO port exposure from the Internet. Leave it that way! It’s your wallet and phone bill that are at stake. If you’re running PBX in a Flash in a hosted environment with no hardware-based firewall, then immediately read and heed our setup instructions for Securing Your VoIP in the Cloud Server. We would encourage you to visit your PIAF Home Page regularly. It’s our primary way of alerting you to security issues which arise. You’ll see them posted (with links) in the RSS Feed shown above. If you prefer, you can subscribe to the PIAF RSS Feed or follow us on Twitter. For late-breaking enhancements, you also should regularly visit the Bug Reporting & Fixes Topic on the PIAF Forum.
Extension Setup. Now let’s set up an extension to get you started. A good rule of thumb for systems with less than 50 extensions is to reserve the IP addresses from 192.x.x.201 to 192.x.x.250 for your phones. Then you can create extension numbers in FreePBX to match those IP addresses. This makes it easy to identify which phone on your system goes with which IP address and makes it easy for end-users to access the phone’s GUI to add bells and whistles. In FreePBX 2.10 or 2.11, to create extension 201 (don’t start with 200), click Applications, Extensions, Generic SIP Device, Submit. Then fill in the following blanks USING VERY SECURE PASSWORDS and leaving the defaults in the other fields for the time being.
User Extension … 201
Display Name … Home
Outbound CID … [your 10-digit phone number if you have one; otherwise, leave blank]
Emergency CID … [your 10-digit phone number for 911 ID if you have one; otherwise, leave blank]Device Options
secret … 1299864Xyz [randomly generated]
dtmfmode … rfc2833
Voicemail Status … Enabled
voicemail password … 14332 [make this unique AND secure!]
email address … yourname@yourdomain.com [if you want voicemail messages emailed to you]
pager email address … yourname@yourdomain.com [if you want to be paged when voicemail messages arrive]
email attachment … yes [if you want the voicemail message included in email]
play CID … yes [if you want the CallerID played when you retrieve message]
play envelope … yes [if you want date/time of the message played before the message]
delete Vmail … yes [if you want the voicemail message deleted after it’s emailed to you]
vm options … callback=from-internal [to enable automatic callbacks by pressing 3,2 after playing a voicemail message]
vm context … default
Write down the passwords. You’ll need them to configure your SIP phone.
Extension Security. We cannot overstress the need to make your extension passwords secure. All the firewalls in the world won’t protect you from malicious phone calls on your nickel if you use your extension number or something like 1234 for your extension password if your SIP or IAX ports happen to be exposed to the Internet.
In addition to making up secure passwords, the latest versions of FreePBX also let you define the IP address or subnet that can access each of your extensions. Use it!!! Once the extensions are created, edit each one and modify the permit field to specify the actual IP address or subnet of each phone on your system. A specific IP address entry should look like this: 192.168.1.142/255.255.255.255. If most of your phones are on a private LAN, you may prefer to use a subnet entry in the permit field like this: 192.168.1.0/255.255.255.0 using your actual subnet.
Adding a Google Voice Trunk. There are lots of trunk providers, and one of the real beauties of having your own PBX is that you don’t have to put all of your eggs in the same basket… unlike the AT&T days. We would encourage you to take advantage of this flexibility. With most providers, you don’t pay anything except when you actually use their service so you have nothing to lose.
For today, we’re going to take advantage of Google’s current offer of free calling in the U.S. and Canada through the end of 2013. You also get a free phone number in your choice of area codes. PBX in a Flash now installs a Google Voice module under FreePBX -> Connectivity that lets you set up your Google Voice account with PBX in a Flash in just a few seconds once you have your credentials.
A Word to the Wise: All good things come to an end… especially those that are free. So plan ahead with some alternate providers that keep your phones working should Google decide to pull the plug or change the terms with Google Voice.
Signing Up for Google Voice. You’ll need a dedicated Google Voice account to support PBX in a Flash. The more obscure the username (with some embedded numbers), the better off you will be. This will keep folks from bombarding you with unsolicited Gtalk chat messages, and who knows what nefarious scheme will be discovered using Google messaging six months from now. So keep this account a secret!
We’ve tested this extensively using an existing Gmail account rather than creating a separate account. Take our word for it. Inbound calling is just not reliable. The reason seems to be that Google always chooses Gmail chat as the inbound call destination if there are multiple registrations from the same IP address. So… set up a dedicated Gmail and Google Voice account2, and use it exclusively with PBX in a Flash. Google Voice no longer is by invitation only. If you’re in the U.S. or have a friend that is, head over to the Google Voice site and register. If you’re living on another continent, see MisterQ’s posting for some tips on getting set up.
You must choose a telephone number (aka DID) for your new account, or Google Voice calling will not work… in either direction. You also have to tie your Google Voice account to at least one working phone number as part of the initial setup process. Your cellphone number will work just fine. Don’t skip this step either. Just enter the provided confirmation code when you tell Google to place the test call to the phone number you entered. Once the number is registered, you can disable it if you’d like in Settings, Voice Setting, Phones. But…
IMPORTANT: Be sure to enable the Google Chat option as one of your phone destinations in Settings, Voice Setting, Phones. That’s the destination we need for PBX in a Flash to function with Google Voice! Otherwise, inbound and/or outbound calls will fail. If you don’t see this option, you may need to call up Gmail and enable Google Chat there first. Then go back to the Google Voice Settings and enable it. Be sure to try one call each way from Google Chat in Gmail. Then disable Google Chat in GMail for this account. Otherwise, it won’t work with PIAF.
While you’re still in Google Voice Settings, click on the Calls tab. Make sure your settings match these:
- Call Screening – OFF
- Call Presentation – OFF
- Caller ID (In) – Display Caller’s Number
- Caller ID (Out) – Don’t Change Anything
- Do Not Disturb – OFF
- Call Options (Enable Recording) – OFF
- Global Spam Filtering – ON
Click Save Changes once you adjust your settings. Under the Voicemail tab, plug in your email address so you get notified of new voicemails. Down the road, receipt of a Google Voice voicemail will be a big hint that something has come unglued on your PBX.
Configuring Google Voice Trunk in FreePBX. All trunk configurations now are managed within FreePBX, including Google Voice. This makes it easy to customize PBX in a Flash to meet your specific needs. Click the Connectivity tab in FreePBX 2.11 and choose Google Voice [Motif]. To Add a new Google Voice account, just fill out the form. NOTE: The form has changed from prior releases of FreePBX. Do NOT check the last box: Send Unanswered to GoogeVoice Voicemail, or you’ll have problems receiving incoming calls.

Google Voice Username is your Google Voice account name without @gmail.com. Password is your Google Voice password. NOTE: Don’t use 2-stage password protection in this Google Voice account! Phone Number is your 10-digit Google Voice number. Next, check only the first two boxes: Add Trunk and Add Outbound Routes. Then click Submit Changes and reload FreePBX. Down the road, you can add additional Google Voice numbers by clicking Add GoogleVoice Account option in the right margin and repeating the drill. For Google Apps support, see this post on the PIAF Forum.
Outbound Routes. The idea behind multiple outbound routes is to save money. Some providers are cheaper to some places than others. It also provides redundancy which costs you nothing if you don’t use the backup providers. The Google Voice module actually configures an Outbound Route for 10-digit Google Voice calling as part of the automatic setup. If this meets your requirements, then you can skip this step for today.
Inbound Routes. An Inbound Route tells PBX in a Flash how to route incoming calls. The idea here is that you can have multiple DIDs (phone numbers) that get routed to different extensions or ring groups or departments. For today, we’ll build a simple route that directs your Google Voice calls to extension 201. Choose Connectivity -> Inbound Routes, leave all of the settings at their default values except enter your 10-digit Google Voice number in the DID Number field. Enable CallerID lookups by choosing CallerID Superfecta in the CID Lookup Source pulldown. Then move to the Set Destination section and choose Extensions in the left pull-down and 201 in the extension pull-down. Now click Submit and save your changes. That will assure that incoming Google Voice calls are routed to extension 201.
IMPORTANT: Before Google Voice calling will actually work, you must restart Asterisk from the Linux command line interface. Log into your server as root and issue this command: amportal restart.
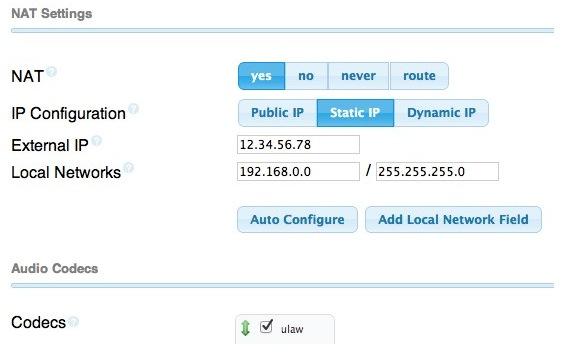
Eliminating Audio and DTMF Problems. You can avoid one-way audio on calls and touchtones that don’t work with these simple settings in FreePBX: Settings -> Asterisk SIP Settings. Just plug in your public IP address and your private IP subnet. Then set ULAW as the only Audio Codec.
General Settings. Last, but not least, we need to enter an email address for you so that you are notified when new FreePBX updates are released. In FreePBX 2.11, choose Admin -> Module Admin and click on the Upgrade Notifications shield on the right. Plug in your email address, click Submit, and save your changes. Done!
Setting Up a Desktop Softphone. PBX in a Flash supports all kinds of telephones, but we’ll start with the easy (free) one today. You can move on to "real phones" once you’re smitten with the VoIP bug. For today, you’ll need to download a softphone to your desktop PC or Mac.
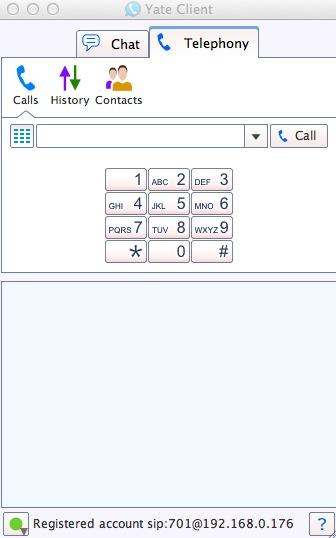
The easiest way to get started is to set up a YATE softphone on your Desktop computer. Versions are available at no cost for Macs, PCs, and Linux machines. Just download the appropriate one and install it from this link. Once installed, it’s a simple matter to plug in your extension credentials and start making calls. Run the application and choose Settings -> Accounts and click the New button. Fill in the blanks using the IP address of your server, 201 for your account name, and whatever password you created for the extension. Click OK.
Once you are registered to extension 201, close the Account window. Then click on YATE’s Telephony Tab and place your first call. It’s that easy!
Monitoring Call Progress with Asterisk. That about covers the basics. We’ll leave you with a tip on how to monitor what’s happening with your PBX. There are several good tools within the FreePBX GUI. You’ll find them under the Reports tab. In addition, Asterisk has its own Command Line Interface (CLI) that is accessible from the Linux command prompt. Just execute the following command while logged in as root: asterisk -rvvvvvvvvvv.
What’s Next? We’ve barely scratched the surface of what you can do with PBX in a Flash. Log into your server as root and type help-pbx for a list of simple install scripts that can add almost any function you can imagine. And Incredible PBX 11 is just around the corner. You can try it out in the Incredible PBX 11 Virtual Machine today.

Special Thanks. In just ten days, Nerd Vittles kicks off its 9th year of publication. We wanted to express our thanks to all of you for visiting. In just the last three months, we’ve again begun compiling a list of countries that are represented in the Nerd Vittles Fan Club. Nerd Vittles has spread to 204 awesome countries so far. Just click on the Google Map and have a look for yourself. Very inspiring. Thanks again for your support and Happy New Year!
Originally published: Thursday, January 10, 2013
Need help with Asterisk? Visit the PBX in a Flash Forum.
Or Try the New, Free PBX in a Flash Conference Bridge.
whos.amung.us If you’re wondering what your fellow man is reading on Nerd Vittles these days, wonder no more. Visit our new whos.amung.us statistical web site and check out what’s happening. It’s a terrific resource both for us and for you.
Special Thanks to Our Generous Sponsors
FULL DISCLOSURE: ClearlyIP, Skyetel, Vitelity, DigitalOcean, Vultr, VoIP.ms, 3CX, Sangoma, TelecomsXchange and VitalPBX have provided financial support to Nerd Vittles and our open source projects through advertising, referral revenue, and/or merchandise. As an Amazon Associate and Best Buy Affiliate, we also earn from qualifying purchases. We’ve chosen these providers not the other way around. Our decisions are based upon their corporate reputation and the quality of their offerings and pricing. Our recommendations regarding technology are reached without regard to financial compensation except in situations in which comparable products at comparable pricing are available from multiple sources. In this limited case, we support our sponsors because our sponsors support us.
 BOGO Bonaza: Enjoy state-of-the-art VoIP service with a $10 credit and half-price SIP service on up to $500 of Skyetel trunking with free number porting when you fund your Skyetel account. No limits on number of simultaneous calls. Quadruple data center redundancy. $25 monthly minimum spend required. Tutorial and sign up details are here.
![]() The lynchpin of Incredible PBX 2020 and beyond is ClearlyIP components which bring management of FreePBX modules and SIP phone integration to a level never before available with any other Asterisk distribution. And now you can configure and reconfigure your new Incredible PBX phones from the convenience of the Incredible PBX GUI.
The lynchpin of Incredible PBX 2020 and beyond is ClearlyIP components which bring management of FreePBX modules and SIP phone integration to a level never before available with any other Asterisk distribution. And now you can configure and reconfigure your new Incredible PBX phones from the convenience of the Incredible PBX GUI.
 VitalPBX is perhaps the fastest-growing PBX offering based upon Asterisk with an installed presence in more than 100 countries worldwide. VitalPBX has generously provided a customized White Label version of Incredible PBX tailored for use with all Incredible PBX and VitalPBX custom applications. Follow this link for a free test drive!
 Special Thanks to Vitelity. Vitelity is now Voyant Communications and has halted new registrations for the time being. Our special thanks to Vitelity for their unwavering financial support over many years and to the many Nerd Vittles readers who continue to enjoy the benefits of their service offerings. We will keep everyone posted on further developments.
Some Recent Nerd Vittles Articles of Interest…
- There obviously are ways to dramatically reduce VoIP bandwidth. Here’s a table that provides the details. The tradeoff is that you’ll need a beefier computer to compress and decompress VoIP packets if you elect to use a codec such as G.729. [↩]
- You also can use a dedicated Google Apps account for Google Voice with the latest version of the FreePBX module. Don’t use your regular Google Apps email address with Google Voice, or inbound calling will not work! [↩]
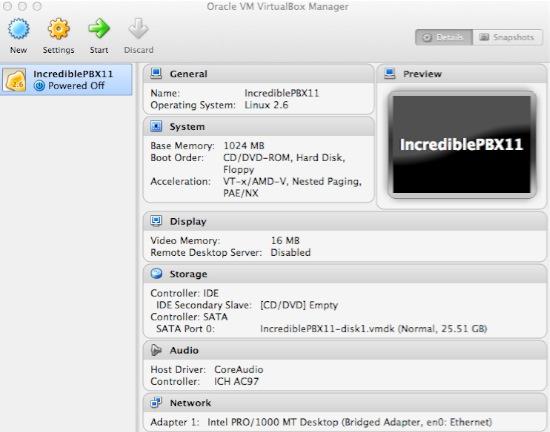
The 5-Minute PBX: It’s Incredible PBX 11 Virtual Machine for VirtualBox
In our last article, we introduced the PBX in a Flash Virtual Machine for Oracle’s VirtualBox. To commemorate the end of the world today, we wanted to go out with a bang. So we’re pleased to introduce Incredible PBX 11 Virtual Machine. As with the PIAF-Green Virtual Machine, this new appliance features CentOS 6.3, Asterisk® 11, and FreePBX® 2.11 beta. In addition, it includes Incredible Fax with HylaFax and AvantFax, SMS speech-to-text messaging as well as SMS message blasting with Google Voice, and several dozen turnkey Asterisk applications including a speech-to-text phonebook dialer, text-to-speech news, weather, tide, and stock reports, a conference bridge for MeetMe conferencing, NeoRouter and PPTP VPN support, SAMBA for Windows Networking, ODBC database integration, Telephone Reminders and Hotel-Style Wakeup Calls, CallerID Superfecta, PBX End Point Manager, and Wolfram Alpha to name but a few. With the addition of free Google Voice accounts, you still get free voice and fax calling in 2013 throughout the United States and Canada. And, yes, Incredible PBX 11 still installs and is ready to go in under 5 minutes on any Windows, Mac, Linux, or Solaris desktop.

The Ultimate VoIP Appliance: Incredible PBX 11 Virtual Machine for VirtualBox
We broke new ground in the virtual machine development arena last week with the introduction of the PIAF Virtual Machine. Today we take it to the next plateau with a turnkey VoIP appliance that can be deployed and functional in less time than it takes you to shave. Today’s Incredible PBX Virtual Machine still gives you everything a bare metal install from source code would have provided. And, most importantly, the components are truly portable. They can be copied to a 4GB flash drive1 for the price of a good hamburger and installed from there onto any type of machine that happens to be in front of you. Five minutes later, you have a fully functional Asterisk server with FreePBX and exactly the same feature set and source code that you would have had installing Incredible PBX onto a dedicated server. Before you ask any questions, we urge you to try this VoIP appliance for yourself. The install process is as easy as 1-2-3:
- Download and install VirtualBox onto a Desktop Machine of your choice
- Download and double-click on Incredible PBX 11 Virtual Machine to import it into VirtualBox
- Select the Incredible PBX 11 Virtual Machine in VirtualBox Manager Window and click the Start button
Introducing Oracle VM VirtualBox

Here’s a quick review if you missed our last article. VirtualBox®, Oracle’s virtual machine platform inherited from Sun, is really something. It’s not only free, but it’s pure GPL2 code. VirtualBox gives you a virtual machine platform that runs on top of any desktop operating system. In terms of limitations, we haven’t found any. We even tested this on an Atom-based Windows 7 machine with 2GB of RAM, and it worked without a hiccup. So step #1 is to download one or more of the VirtualBox installers from VirtualBox.org or Oracle.com. As mentioned, our recommendation is to put all of the 100MB installers on a 4GB thumb drive. Then you’ll have everything in one place whenever and wherever you happen to need it. Once you’ve downloaded the software, simply install it onto your favorite desktop machine. Accept all of the default settings, and you’ll be good to go. For details, here’s a link to Oracle’s VM VirtualBox User Manual.
Introducing Incredible PBX Virtual Machine
To get Incredible PBX VM installed on your desktop is quick and easy. Because the image tips the scales at over 2GB and due to the 2GB file size limit on many systems, we’ve chosen to split this download into two pieces. You need both of them. Just download them onto any flavor desktop from SourceForge. Once you’ve downloaded the two files, reassemble them into a single file known as an Open Virtualization Appliance (.ova). Then verify the checksums for the reassembled file to be sure everything is in its proper place. Finally, double-click on the .ova file which will initiate the import process into VirtualBox.
So let’s begin by downloading the two halves from SourceForge: INCREDIBLEPBX11aa and INCREDIBLEPBX11ab.
The reassembly procedure depends upon your desktop operating system. For Windows PCs, you’ll need to drop down to the Command Prompt, change to the directory in which you downloaded the two files, and type the following command:
copy /b INCREDIBLEPBX11aa + INCREDIBLEPBX11ab IncrediblePBX11.ova
To check the MD5/SHA1 checksums in Windows, download and run Microsoft’s File Checksum Integrity Verifier.
For Mac or Linux desktops, open a Terminal window, change to the directory in which you downloaded the two files, and type the following commands:
cat INCREDIBLEPBX11a{a..b} > IncrediblePBX11.ova

md5 IncrediblePBX11.ova (use md5sum for Linux)

openssl sha1 IncrediblePBX11.ova
The MD5 checksum for IncrediblePBX11.ova is b17655785ef00381ffd70899a19375f9. The SHA1 checksum is 86ccd31d64d3b51e10a8e7429548be6ce15ecd9b. If you have a match, proceed. Otherwise, rinse and repeat.
Importing Incredible PBX 11 Virtual Machine into VirtualBox
You only perform the import step one time. Once imported into VirtualBox, Incredible PBX is ready to use. There’s no further installation required, just like an OpenVZ template… only better. Double-click on the .ova file you downloaded to begin the procedure and load VirtualBox. When prompted, be sure to check the Reinitialize the Mac address of all network cards box. Read and accept the license agreement. Then click the Import button. Once the import is finished, you’ll see a new IncrediblePBX11 virtual machine in your VM List on the VirtualBox Manager Window. You need to make a couple of one-time adjustments to the IncrediblePBX11 Virtual Machine configuration to account for differences in sound and network cards on different host machines.
Click on IncrediblePBX11 Virtual Machine in the VM List. Then click Settings -> Audio and check the Enable Audio option and choose your sound card. Save your setup by clicking the OK button. Next click Settings -> Network. For Adapter 1, check the Enable Network Adapter option. From the Attached to pull-down menu, choose Bridged Adapter. Then select your network card from the Name list. Then click OK to save your setup. Finally, click Settings -> System, uncheck Hardware clock in UTC time, and click OK. That’s all the configuration that is necessary for Incredible PBX Virtual Machine. If you blinked, you probably missed it.
Running Incredible PBX Virtual Machine in VirtualBox
Once you’ve imported and configured Incredible PBX Virtual Machine, you’re ready to go. Highlight the appliance in the VM List on the VirtualBox Manager Window and click the Start button. The boot procedure with CentOS 6.3 will begin just as if you had installed PBX in a Flash and Incredible PBX on a standalone machine. You’ll see a couple of dialogue boxes pop up that explain the keystrokes to move back and forth between your host operating system desktop and Incredible PBX.
Here’s what you need to know. To work in the Incredible PBX Virtual Machine, just left-click your mouse while it is positioned inside the VM window. To return to your host operating system desktop, press the right Option key on Windows machines or the left Command key on any Mac. For other operating systems, read the dialogue boxes for instructions on moving around. Always shut down Incredible PBX gracefully! Click in the VM window with your mouse, log in as root, and type: shutdown -h now. Or, from the VirtualBox Manager Window, Ctl-Click on the IncrediblePBX11 VM and choose Close -> ACPI Shutdown.
Always run Incredible PBX VM behind a hardware-based firewall with no Internet port exposure!
Linux CLI Setup. To begin, position your mouse over the VM window and left-click. Once the virtual machine has booted, log in as root with password as the password. Change your root password immediately by typing passwd at the command prompt. Now set up a secure maint password for FreePBX as well. Type passwd-master. If you’re not in the Eastern U.S. time zone, then you’ll want to adjust your timezone setting so that reminders and other time-sensitive events happen at the correct time. Issue the following command to pick your time zone: /root/timezone-setup. If you plan to use Incredible Fax to send and receive faxes, set an email address for delivery of incoming faxes: /root/incrediblefax-setup. To use SMS messaging in Incredible PBX, you’ll need a Google Voice account which is covered below. Once you have your credentials, edit extensions_custom.conf in /etc/asterisk and insert your username and password in the 767 extension. To use SAMBA for Windows networking, replace the Interfaces IP address in /etc/samba/smb.conf with your actual IP address. Next, run smbpasswd and assign a password for root access to your server. Then restart SAMBA: service smb restart.
FreePBX Setup. Use a browser to log into your Incredible PBX server by pointing to the IP address of the virtual machine displayed in the status window of the CLI. Click on the User button to display the Admin choices in the Main PIAF Menu. Click on the FreePBX Admin option to load the FreePBX GUI. You will be prompted for a username and password. For the username, use maint. For the password, use whatever password you set up with passwd-master above.
You’ll want to keep FreePBX up to date. The easiest way is to configure FreePBX for email notifications when there are updates. In the FreePBX GUI, choose Admin -> Module Admin -> Upgrade Notifications and plug in your email address. Updates are installed in this same window. Click Check Online -> Upgrade All -> Process and Confirm. Scroll to the bottom of the Status window and click Return. Then click Apply Config. Now you try it.
GOOGLE VOICE ALERT: For old-timers that used the previous Google Voice module in FreePBX 2.x, it’s a little different in FreePBX 2.11. It now is called Google Voice (Motif), and you’ll find it under the Connectivity tab instead of the Other tab. More importantly, the form has changed. Do NOT check all 3 checkboxes as you did previously, or your incoming calls won’t be answered. Leave last checkbox "Send Unanswered to GoogleVoice Voicemail" UNCHECKED!!
Incredible PBX supports SIP, IAX, and Google Voice trunks to handle your outbound and incoming calls. The easiest way to get started it to set up a couple of Google Voice trunks, one for voice calls and one for faxing. These trunks must be dedicated for exclusive use with Incredible PBX. If you’re logged into these Google Voice accounts elsewhere, Incredible PBX won’t receive incoming calls. Read our Incredible PBX Quick Start Guide for the procedure to register for new Google Voice accounts. Once you have your credentials and phone numbers, choose Connectivity -> Google Voice in FreePBX to set up the accounts in FreePBX. For each trunk, you also need to set up an Inbound Route to tell FreePBX how to route the incoming calls. For your Fax trunk, here’s the drill. Choose Connectivity -> Inbound Routes. Insert your 10-digit Google Voice number in the DID Number field. Check Enable CID Superfecta and, for Set Destination, choose Custom Destinations -> Fax (HylaFax). Click Submit and then click Apply Config.
Before your Google Voice trunks will work reliably, there are two final steps. First, restart Asterisk from the Linux CLI: amportal restart. Then, make at least one outbound call using each Google Voice trunk.
We’ve preconfigured SIP trunks for all of the major VoIP providers in Incredible PBX. All you have to do is sign up for a few accounts. This isn’t like the old Ma Bell days so take advantage of the redundancy that using multiple VoIP providers gives you. There’s a very special offer from one of the major sponsors of the PBX in a Flash and Nerd Vittles projects below. Take advantage of it and support our open source projects.
1-7-13 Security Alert: We’ve just released Incredible PBX 11.1.2 which includes Asterisk 11.1.2 and the latest FreePBX 2.11 beta. The Asterisk Dev Team announced a serious security vulnerability in Asterisk 1.8, 10, and 11 late last week. This update addresses that. You can read all about it in the readme file on SourceForge. If you still are using an earlier version of Incredible PBX 11, make certain that it is behind a hardware-based firewall with no Internet port exposure. And you should immediately patch your server or, better yet, switch to this new release.
Now read the latest Incredible PBX Quick Start Guide and begin your VoIP adventure. Then you’ll want to do some reading on VirtualBox. We’ve barely scratched the surface. Setting up Headless VMs that run in the background on any server is a breeze. From the command line, here’s an article to get you started. But you also can start Headless VMs from within the GUI by highlighting the VM and clicking Shift->Start. REMEMBER: Always shut down VMs gracefully: Close->ACPI Shutdown. You’ll find more great tips at virtualbox.org and GitHub.
One of the real beauties of VirtualBox is you don’t have to use a GUI at all. The entire process can be driven from the command line. Other than on a Mac, here is the procedure to import, configure, and run Incredible PBX 11 Virtual Machine:
VBoxManage import IncrediblePBX11.ova

VBoxManage modifyvm "IncrediblePBX11" --nic1 nat

VBoxManage modifyvm "IncrediblePBX11" --acpi on --nic1 bridged

VBoxHeadless --startvm "IncrediblePBX11" &

# Wait 1 minute for IncrediblePBX11 to load. Then decipher IP address like this:

VBoxManage guestproperty get "IncrediblePBX11" /VirtualBox/GuestInfo/Net/0/V4/IP

# Now you can use SSH to login to IncrediblePBX11 at the displayed IP address

# Shutdown the IncrediblePBX11 Virtual Machine with the following command:

VBoxManage controlvm "IncrediblePBX11" acpipowerbutton
On a Mac, everything works the same way except for deciphering the IP address. Download our findip script for that.
Have a very Merry Christmas!
Originally published: Friday, December 21, 2012 Updated: Saturday, December 22, 2012

Need help with Asterisk? Visit the PBX in a Flash Forum.
Special Thanks to Our Generous Sponsors
FULL DISCLOSURE: ClearlyIP, Skyetel, Vitelity, DigitalOcean, Vultr, VoIP.ms, 3CX, Sangoma, TelecomsXchange and VitalPBX have provided financial support to Nerd Vittles and our open source projects through advertising, referral revenue, and/or merchandise. As an Amazon Associate and Best Buy Affiliate, we also earn from qualifying purchases. We’ve chosen these providers not the other way around. Our decisions are based upon their corporate reputation and the quality of their offerings and pricing. Our recommendations regarding technology are reached without regard to financial compensation except in situations in which comparable products at comparable pricing are available from multiple sources. In this limited case, we support our sponsors because our sponsors support us.
BOGO Bonaza: Enjoy state-of-the-art VoIP service with a $10 credit and half-price SIP service on up to $500 of Skyetel trunking with free number porting when you fund your Skyetel account. No limits on number of simultaneous calls. Quadruple data center redundancy. $25 monthly minimum spend required. Tutorial and sign up details are here.
![]() The lynchpin of Incredible PBX 2020 and beyond is ClearlyIP components which bring management of FreePBX modules and SIP phone integration to a level never before available with any other Asterisk distribution. And now you can configure and reconfigure your new Incredible PBX phones from the convenience of the Incredible PBX GUI.
The lynchpin of Incredible PBX 2020 and beyond is ClearlyIP components which bring management of FreePBX modules and SIP phone integration to a level never before available with any other Asterisk distribution. And now you can configure and reconfigure your new Incredible PBX phones from the convenience of the Incredible PBX GUI.
VitalPBX is perhaps the fastest-growing PBX offering based upon Asterisk with an installed presence in more than 100 countries worldwide. VitalPBX has generously provided a customized White Label version of Incredible PBX tailored for use with all Incredible PBX and VitalPBX custom applications. Follow this link for a free test drive!
Special Thanks to Vitelity. Vitelity is now Voyant Communications and has halted new registrations for the time being. Our special thanks to Vitelity for their unwavering financial support over many years and to the many Nerd Vittles readers who continue to enjoy the benefits of their service offerings. We will keep everyone posted on further developments.
Some Recent Nerd Vittles Articles of Interest…
- Many of our purchase links refer users to Amazon when we find their prices are competitive for the recommended products. Nerd Vittles receives a small referral fee from Amazon to help cover the costs of our blog. We never recommend particular products solely to generate Amazon commissions. However, when pricing is comparable or availability is favorable, we support Amazon because Amazon supports us. [↩]
The 5-Minute PBX: PIAF Virtual Machine for VirtualBox (Windows, Mac, or Linux)
For most of us, today marks the last time we’ll ever see the day, month, and year line up on the calendar in perfect harmony so Happy 12-12-12 to everyone. It’ll be 88+ years before it happens again. And the Mayans believe the world will be ending in 9 more days so there may be no need to worry about the 88 years anyway. Whatever happens, it seemed like an appropriate time to take stock of how we’re doing in the development of the Perfect PBX™. Such an assessment, of course, is in the eyes of the beholder. From our perspective, in addition to being feature-rich, it has to have three components: ease of installation, ease of use, and flexibility. The first two are self-explanatory but flexibility needs some explanation. Flexibility to us means a feature set that’s appealing not only to those just beginning the journey but also to those of us that need to make frequent changes and additions to the platform to keep it current or make it better. After all, that’s what open source is all about.
The real beauty of PBX in a Flash has not been that someone with sufficient expertise couldn’t assemble something just as good or even better. Watch the AstriCon presentations from this year if you have any doubts. The beauty of PIAF is it puts this technology down where the goats can get it. It provides a toolset that encourages further development by simplifying the learning curve for a broad cross-section of the VoIP community while not compromising functionality or flexibility. The source code for the major components is included in the build so you can customize and recompile Asterisk or load a new version of Asterisk or any additional Linux app in minutes without losing your existing setup.
As many of you know, we have literally hundreds of gurus on the PIAF Forum. That doesn’t mean any particular person or group knows everything. It’s merely a designation that a particular individual is an expert at something. The collective wisdom of the group is what makes PBX in a Flash as a project better because we’ve put in place a platform that experts from many different disciplines can build upon without needing to learn everything about everything. Simply stated, you can be a terrific chef without knowing how to build a stove!
Turning to Asterisk® 11 and FreePBX® 2.11, from everything we’re seeing, these new releases are shaping up to be a remarkable step forward both in terms of toolset and in the new mindset of the development community. That’s a good thing. For our part, we’ve wanted to get our latest preview release of PBX in a Flash with CentOS 6.3, Asterisk 11 and the new FreePBX 2.11 beta into as many hands as possible keeping in mind the objectives we outlined above.
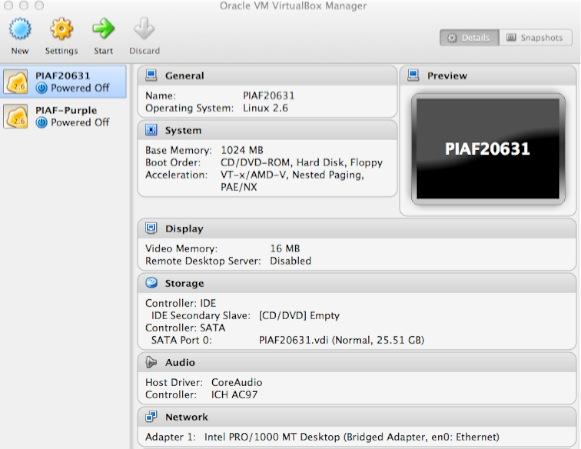
The Ultimate VoIP Appliance: PIAF Virtual Machine for VirtualBox
Today brings us to a new plateau in the virtual machine development era. Thanks to the masterful work of Tom King on PBX in a Flash 2.0.6.3.1, we’re pleased to introduce a new product that can be installed in under 5 minutes and will run on any Windows PC, Mac, or Linux machine as well as Solaris. And, unlike the dedicated machine platforms and OpenVZ compromises of years past, today’s PIAF Virtual Machine gives you everything a bare metal install from source code would have provided. Most importantly, the components are truly portable. They can be copied to a 4GB flash drive1 for the price of a good hamburger and installed from there onto any type of machine that happens to be in front of you. Five minutes later, you have a fully functional Asterisk server with FreePBX and exactly the same feature set and source code that you would have had doing a bare metal PIAF install to a dedicated server. And we’ve built both a production-ready PIAF-Purple VM with Asterisk 1.8 and FreePBX 2.10 as well as a Pioneer edition PIAF-Green VM with Asterisk 11 and FreePBX 2.11 beta. The choice is yours. No Internet access required to perform the install. Sound too good to be true? Keep reading or, better yet, try the PIAF appliance for yourself. The install process is simple:
- Download and install VirtualBox onto a Desktop Machine of your choice
- Download and double-click on the PIAF Virtual Machine to import it into VirtualBox
- Select the PIAF Virtual Machine in VirtualBox Manager Window and click the Start button
Introducing Oracle VM VirtualBox
We’re late to the party, but Virtual Box®, Oracle’s virtual machine platform inherited from Sun, is really something. It’s not only free, but it’s pure GPL2 code. VirtualBox gives you a virtual machine platform that runs on top of any desktop operating system. In terms of limitations, we haven’t found any. We even tested this on an Atom-based Windows 7 machine with 2GB of RAM, and it worked without a hiccup. So step #1 is to download one or more of the VirtualBox installers from VirtualBox.org or Oracle.com. As mentioned, our recommendation is to put all of the 100MB installers on a 4GB thumb drive. Then you’ll have everything in one place whenever and wherever you happen to need it. Once you’ve downloaded the software, simply install it onto your favorite desktop machine. Accept all of the default settings, and you’ll be good to go. For more details, here’s a link to the Oracle VM VirtualBox User Manual.
Introducing the PIAF Virtual Machine
We’ll walk you through installing the PIAF-Green Virtual Machine. It’s basically the same procedure with PIAF-Purple except you get to skip the reassembly step since the PIAF-Purple.ova image is only 1.3GB.
The PIAF-Green Virtual Machine tips the scales at over 2GB. Because of the 2GB file size limit on many systems, we’ve chosen to split this download into two pieces. You need both of them. Just download them onto any flavor desktop from SourceForge. Once you’ve downloaded the two files, we need to reassemble them into a single file known as an Open Virtualization Appliance (.ova). Then verify the checksums for the reassembled file to be sure everything is in its proper place. Finally, we’ll double-click on the .ova file which will initiate the import process into VirtualBox.
So let’s begin by downloading the two halves of PIAF-Green from SourceForge: PIAFGREENaa and PIAFGREENab. If you’d prefer production-ready code, just download PIAF-Purple.ova and skip the reassembly step. There’s also a new surprise offering that’s covered in the comments to this article. 🙂
The reassembly procedure depends upon your desktop operating system. For Windows PCs, you’ll need to drop down to the Command Prompt, change to the directory in which you downloaded the two files, and type the following command:
copy /b PIAFGREENaa + PIAFGREENab PIAF-Green.ova
To check the MD5/SHA1 checksums in Windows, download and run Microsoft’s File Checksum Integrity Verifier.
For Mac or Linux desktops, open a Terminal window, change to the directory in which you downloaded the two files, and type the following commands:
cat PIAFGREENa{a..b} > PIAF-Green.ova

md5 PIAF-Green.ova (use md5sum for Linux)

openssl sha1 PIAF-Green.ova
The correct MD5 checksum for PIAF-Green ( PIAF-Green.ova) is a86a018466c7045372e51100cddd42ea. For PIAF-Purple.ova, it’s 664b1afe75c3b1877029531b0fe28063. The correct SHA1 checksum for PIAF-Green is d883c5e137ac19ecb45c1e6f127180b78a9cd0af. For PIAF-Purple, it’s 15f94352745ca989fd9939d9a8ee8b765fc8388c. If you have a match, proceed. Otherwise, rinse and repeat.
Importing the PIAF Virtual Machine into VirtualBox
You only perform the import step one time. Once imported into VirtualBox, PBX in a Flash is ready to use. There’s no further installation required, just like an OpenVZ template… only better. Double-click on the .ova file you downloaded to begin the procedure and load VirtualBox. When prompted, be sure to check the Reinitialize the Mac address of all network cards box and then click the Import button. Once the import is finished, you’ll see a new PIAF virtual machine in your VM List on the VirtualBox Manager Window. Regardless of flavor, you’ll need to make a couple of one-time adjustments to the PIAF Virtual Machine configuration to account for differences in sound and network cards on different host machines.
Click on the PIAF Virtual Machine in the VM List. Then click Settings -> Audio and check the Enable Audio option and choose your sound card. Save your setup by clicking the OK button. Next click Settings -> Network. For Adapter 1, check the Enable Network Adapter option. From the Attached to pull-down menu, choose Bridged Adapter. Then select your network card from the Name list. Then click OK. Finally, click Settings -> System, uncheck Hardware clock in UTC time, and click OK. That’s all the configuration that is necessary for your PIAF Virtual Machine. The rest is automagic.
Running the PIAF Virtual Machine in VirtualBox
Once you’ve imported and configured the PIAF Virtual Machine, you’re ready to go. Highlight PIAF Virtual Machine in the VM List on the VirtualBox Manager Window and click the Start button. The PIAF boot procedure with CentOS 6.3 will begin just as if you had installed PBX in a Flash on a standalone machine. You’ll see a couple of dialogue boxes pop up that explain the keystrokes to move back and forth between your host operating system desktop and your PIAF VM.

Here’s what you need to know. To work in the PIAF Virtual Machine, just left-click your mouse while it is positioned inside the VM window. To return to your host operating system desktop, press the right Option key on Windows machines or the left Command key on any Mac. For other operating systems, read the dialogue boxes for instructions on moving around. Always shut down PIAF gracefully! Click in the VM window with your mouse, log in as root, and type: shutdown -h now.
Run the PIAF Virtual Machine behind a hardware-based firewall with no Internet port exposure!
To begin, position your mouse over the VM window and left-click. Once the PIAF VM has booted, log in as root with password as the password. Change your root password immediately by typing passwd at the command prompt. Now set up a secure maint password for FreePBX as well. Type passwd-master. If you’re not in the Eastern U.S. time zone, then you’ll want to adjust your timezone setting so that reminders and other time-sensitive events happen at the correct time. While logged into your server as root, issue these commands to download and run the timezone-setup script:
cd /root

wget http://pbxinaflash.com/timezone-setup.tar.gz

tar zxvf timezone-setup.tar.gz

./timezone-setup
Next, use a browser to log into your PIAF server by pointing to the IP address of the PIAF VM that’s displayed in the status window of the CLI. Click on the User button to display the Admin choices in the main PIAF Menu. Click on the FreePBX option to load the FreePBX GUI. You will be prompted for an Apache username and password. For the username, use maint. For the password, use whatever password you set up with passwd-master.
Now read the latest PIAF Quick Start Guide and begin your VoIP adventure. Then you’ll want to do some reading on VirtualBox. We’ve barely scratched the surface. Setting up Headless VMs that run in the background on any server is a breeze. From the command line, here’s an article to get you started. But you also can start Headless VMs from within the GUI by highlighting the VM and clicking Shift->Start. Always shut down VMs gracefully: Close->ACPI Shutdown. You’ll find more great tips at virtualbox.org and GitHub.
One of the real beauties of VirtualBox is you don’t have to use a GUI at all. The entire process can be driven from the command line. Other than on a Mac, here is the procedure to import, configure, and run PIAF-Purple Virtual Machine:
VBoxManage import PIAF-Purple.ova

VBoxManage modifyvm "PIAF-Purple" --nic1 nat

VBoxManage modifyvm "PIAF-Purple" --acpi on --nic1 bridged

VBoxHeadless --startvm "PIAF-Purple" &

# Wait 1 minute for PIAF-Purple to load. Then decipher IP address like this:

VBoxManage guestproperty get "PIAF-Purple" /VirtualBox/GuestInfo/Net/0/V4/IP

# Now you can use SSH to login to PIAF-Purple at the displayed IP address

# Shutdown the PIAF-Purple Virtual Machine with the following command:

VBoxManage controlvm "PIAF-Purple" acpipowerbutton
On a Mac, everything works the same way except for deciphering the IP address. Download our findip script for that.
Enjoy!
Originally published: Wednesday, December 12, 2012
Need help with Asterisk? Visit the PBX in a Flash Forum.
Special Thanks to Our Generous Sponsors
FULL DISCLOSURE: ClearlyIP, Skyetel, Vitelity, DigitalOcean, Vultr, VoIP.ms, 3CX, Sangoma, TelecomsXchange and VitalPBX have provided financial support to Nerd Vittles and our open source projects through advertising, referral revenue, and/or merchandise. As an Amazon Associate and Best Buy Affiliate, we also earn from qualifying purchases. We’ve chosen these providers not the other way around. Our decisions are based upon their corporate reputation and the quality of their offerings and pricing. Our recommendations regarding technology are reached without regard to financial compensation except in situations in which comparable products at comparable pricing are available from multiple sources. In this limited case, we support our sponsors because our sponsors support us.
BOGO Bonaza: Enjoy state-of-the-art VoIP service with a $10 credit and half-price SIP service on up to $500 of Skyetel trunking with free number porting when you fund your Skyetel account. No limits on number of simultaneous calls. Quadruple data center redundancy. $25 monthly minimum spend required. Tutorial and sign up details are here.
![]() The lynchpin of Incredible PBX 2020 and beyond is ClearlyIP components which bring management of FreePBX modules and SIP phone integration to a level never before available with any other Asterisk distribution. And now you can configure and reconfigure your new Incredible PBX phones from the convenience of the Incredible PBX GUI.
The lynchpin of Incredible PBX 2020 and beyond is ClearlyIP components which bring management of FreePBX modules and SIP phone integration to a level never before available with any other Asterisk distribution. And now you can configure and reconfigure your new Incredible PBX phones from the convenience of the Incredible PBX GUI.
VitalPBX is perhaps the fastest-growing PBX offering based upon Asterisk with an installed presence in more than 100 countries worldwide. VitalPBX has generously provided a customized White Label version of Incredible PBX tailored for use with all Incredible PBX and VitalPBX custom applications. Follow this link for a free test drive!
Special Thanks to Vitelity. Vitelity is now Voyant Communications and has halted new registrations for the time being. Our special thanks to Vitelity for their unwavering financial support over many years and to the many Nerd Vittles readers who continue to enjoy the benefits of their service offerings. We will keep everyone posted on further developments.
Some Recent Nerd Vittles Articles of Interest…
- Many of our purchase links refer users to Amazon when we find their prices are competitive for the recommended products. Nerd Vittles receives a small referral fee from Amazon to help cover the costs of our blog. We never recommend particular products solely to generate Amazon commissions. However, when pricing is comparable or availability is favorable, we support Amazon because Amazon supports us. [↩]
The Amazing $35 Raspberry Pi: And Now It’s a Fax Machine

It was just a matter of time but David Cuthbert finally tamed HylaFax for the Raspberry Pi. So today we’re pleased to introduce Incredible PBX 3.7 incorporating his masterpiece, the born-again Incredible Fax. You still get all the terrific features of Incredible PBX 3.5 plus a whopper bonus, free faxing with any 512MB Raspberry Pi. Notice we said a 512MB Raspberry Pi. Unfortunately, the 256MB boards just don’t have the necessary memory to run Asterisk, Apache, MySQL, PHP, an SMTP mail server, and FreePBX plus IAXmodem, HylaFax, and all the image conversion utilities needed to support integrated faxing with document conversion to and from PDFs. Keep in mind we’re talking about doing this on a $35 computer without a hiccup with simultaneous voice and fax communications. Scary indeed!
07/01/2019 NEWS FLASH: Just released Incredible PBX LITE for the Raspberry Pi 2, 3, and 4 featuring Raspbian 10 Buster. Tutorial here.
For those with a 256MB Raspberry Pi, not to worry. Incredible PBX 3.7 installs just fine, and you get the full Incredible PBX 3.5 feature set minus faxing. With a 512MB Raspberry Pi, here are the 5 Simple Steps to activate Incredible Fax:
- Download and Install Incredible PBX 3.7 or 3.11
- Run the /root/fax-enable Script to Automatically Configure HylaFax
- Using FreePBX, Add a Dedicated DID and Inbound Route to Handle Incoming Faxes
- Install Any Desktop HylaFax Client to Send Faxes via Print-to-Fax using any PDF
- Reboot Your Server and Enjoy
The question we’ve heard a lot from our pioneers is whether to upgrade from Incredible PBX 3.5 and, if so, how? And the answer is that it depends. If you’re like us and only send a couple of faxes a week, then moving to 3.7 as an all-in-one platform makes perfect sense. If, on the other hand, you send dozens of faxes all day long or send lengthy fax documents which consume a lot of processing resources, then our best advice is buy another Pi and dedicate it to faxing. Be advised that the default setup (/etc/hylafax/config.ttyIAX0-ttyIAX3) sets MaxRecvPages to 25. You can change this to meet your own requirements.
1. Download and Install Incredible PBX 3.7 or 3.11
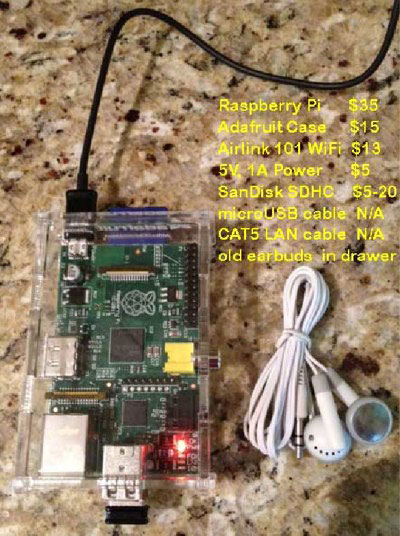
What to Buy. Here’s everything you need to get started.1 The case is optional. Yes, you can run the Raspberry Pi sitting on your desk with no case. It’s only 5 volts. WiFi is also optional. There’s a 10/100 port on the Raspberry Pi that gives you all the networking you need. Here are the links to buy the pieces. You also need a CAT5 cable and either a spare PC or Mac with Putty or SSH and a pair of earbuds or an HDMI cable to connect to a TV or monitor and a USB keyboard.
- $35 512MB Raspberry Pi from MCM or Newark or Amazon
- $10 Power Adapter (this one is rock solid!)
- $10 SanDisk 16GB SDHC Type 4 card
- $15 Adafruit Acrylic Case
- $13 AirLink 101 N150 WiFi Adapter or Adafruit Mini WiFi Adapter
Setting Up Google Voice. If you want free calling in the U.S. and Canada, then you’ll need a Google Voice account, and you’ll need one dedicated to Incredible Pi, or it won’t work. Log out after setting up the new Google Voice account!
- Register for Google Voice account (no funky characters in your password!)
- Enable Google Chat as Phone Destination
- Configure Google Voice Calls Settings:
- Call Screening – OFF
- Call Presentation – OFF
- Caller ID (In) – Display Caller’s Number
- Caller ID (Out) – Don’t Change Anything
- Do Not Disturb – OFF
- Call Options (Enable Recording) – OFF
- Global Spam Filtering – ON
- Place test call in and out using GMail Call Phone
Baking Your Incredible Pi. The disk drive for the Raspberry Pi is an SD card. So what you need to do is download Incredible Pi and copy the image onto an SDHC card. Mac and Linux installers are included. For Windows, just use Win32 Disk Imager. Here are the steps:
- Download the Incredible Pi package
- Decompress the tarball: tar zxvf incrediblepi-version.tar.gz
- Copy .img file to SDHC using image utility or script
- Insert SDHC card into Raspberry Pi
- Boot the Raspberry Pi from Incredible Pi SDHC card
Your First Bite of Incredible Pi. If you’re not using a monitor and keyboard, you can use SSH to gain root access to Incredible Pi. And you can use any web browser on your private network to access your server. There are a couple of hurdles. First, you need the network address of your new server. And, second you need an SSH client. With Incredible PBX 3.3 and beyond, you needn’t worry about the IP address. You now can access your server via SSH by logging in like this: root@incrediblepbx.local. And browser access to your server is available at the following address: http://incrediblepbx.local. You still can plug in some earbuds when the bootup process begins and listen for the Incredible Pi to tell you its IP address when the boot procedure completes (about 90 seconds). Then you can use that IP address instead of incrediblepbx.local. Version 3.3 and beyond also include a Java-based SSH client in the FreePBX web GUI: Admin -> Java SSH.
Here’s everything you need to know about security for Incredible Pi:
1. ALWAYS RUN INCREDIBLE PI BEHIND A SECURE HARDWARE-BASED FIREWALL/ROUTER
2. NEVER EXPOSE ANY INCREDIBLE PI PORTS DIRECTLY TO THE INTERNET
3. NEVER MAP INBOUND INTERNET PORTS FROM YOUR FIREWALL TO INCREDIBLE PI
Initial Setup. There also are a few setup steps to complete once your Incredible Pi finishes the bootup process. When you first login (username: root password: raspberry), you’ll be prompted to change your root password and to set your default time zone. If you’re using either a wired network or an open WiFi network, then everything just works. If you’re using secured WiFi, then you’ll need to plug in your credentials in /etc/wpa.conf and reboot. The wired network always takes precedence so unplug the cable if you want WiFi to be your primary network. Next, run /root/update-my-pi to bring your server up to current specs. Finally, now’s the time to repartition your SD card if you’re using a card larger than 4GB. With the addition of faxing, a 4GB card is 80% full before your first call. While you’re at it, bump up the performance of your Raspberry Pi by 50% by setting the overclocking to turbo mode. It works great for us. YMMV! The key is a rock-solid power adapter such as the one we’ve recommended. Just run raspi-config and follow your nose.
Accessing Incredible Pi By GUI. You don’t have to be a Linux guru to use Incredible Pi. In fact, we’re just about finished with the Linux command prompt, but stay logged in until we finish the steps below. Most of your configuration of the PBX will be performed using the FreePBX® Web GUI. You also can access SSH through the FreePBX interface.
If you’re new to Asterisk® and FreePBX, here’s the one paragraph primer on what needs to happen before you can make free calls with Google Voice. You’ll obviously need a free Google Voice account. This gets you a phone number for people to call you and a vehicle to place calls to plain old telephones throughout the U.S. and Canada at no cost. You’ll also need a softphone or SIP phone to actually place and receive calls. YATE makes a free softphone for PCs, Macs, and Linux machines so download your favorite and install it on your desktop. Phones connect to extensions in FreePBX to work with Incredible Pi. Extensions talk to trunks (like Google Voice) to make and receive calls. FreePBX uses outbound routes to direct outgoing calls from extensions to trunks, and FreePBX uses inbound routes to route incoming calls from trunks to extensions to make your phones ring. In a nutshell, that’s how a PBX works. There are lots of bells and whistles that you can explore down the road.
Let’s get started. Using a browser, enter the IP address of your server or just use incrediblepbx.local as the address. Choose FreePBX Administration. When prompted for a username and password, use admin for both. Here are the six steps you need to complete before making your first free call:
- Change FreePBX admin Password and Default Email
- Add Google Voice Account credentials
- Set Destination for Incoming Calls
- Change Extension 701 Passwords
- Eliminate Audio and DTMF Problems
- Install and Register a Softphone to Extension 701
1. Changing FreePBX admin Password and Default Email. From the main FreePBX GUI, click Admin => Administrators. Click on admin user in the far-right column. Enter a new Password and click Submit Changes button. Then click the Apply Config button. Next, set your default email address at the bottom of Settings -> General Settings. Repeat the procedure above to save your entry.
2. Activating a Google Voice Trunk. To create a Trunk in FreePBX to handle calls to and from Google Voice, you’ll need three pieces of information from the Google Voice account you set up above: the 10-digit Google Voice phone number, your Google Voice account name, and your Google Voice password. Choose Other -> Google Voice from the FreePBX GUI. The following blank form will appear:
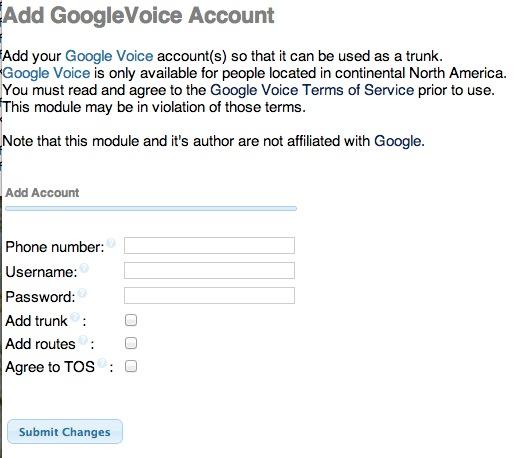
Fill in the blanks with your information and check all 3 boxes. If your Google Voice account name ends in @gmail.com, you can leave that out. Otherwise, include the full email address. Then click Submit Changes and Apply Config.
There’s one more step or your Google Voice account won’t work reliably with Incredible Pi! From the Linux command prompt while logged into your server as root, restart Asterisk: amportal restart
3. Setting a Destination for Incoming Calls. Now that you’ve created your Google Voice Trunk, we need to tell FreePBX how to process inbound calls when someone dials your Google Voice number. There are any number of choices. You could simply ring an extension. Or you could ring multiple extensions by first creating a Ring Group which is just a list of extension numbers. Or you could direct incoming calls to an Interactive Voice Response (IVR) system (we’ve actually set one up for you to play with).
By default, Incredible Pi is configured to route all incoming calls to a demo IVR that shows off some of the applications that come with Incredible Pi. You can change whenever you like by choosing Connectivity -> Inbound Routes -> Default. In the Set Destination section of the form, change the target to Extensions and then select 701 from the list. Then click Submit and Apply Config.
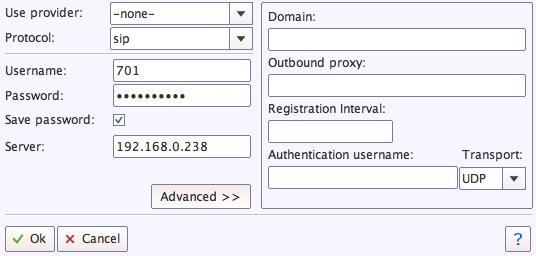
4. Changing Extension Passwords. From the main FreePBX GUI, choose Applications -> Extensions. Then click on 701 in the Extension List on the right side of your display. You’ll see a form that looks like this:
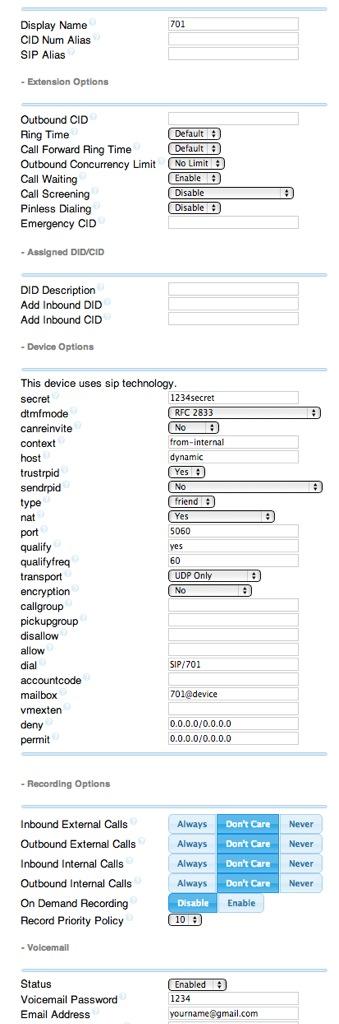
For now, we only need to make a few changes. First, you need a very secure password for both the extension itself and your voicemail account for this extension. The extension secret needs to be a combination of letters and numbers. The Voicemail Password needs to be all numbers, preferably six or more. Replace the existing 1234secret and 1234 with your own (very secure) entries. You also need to lock down this extension so that it is only accessible from devices on your private LAN. You do that with the deny and permit entries which currently are filled with zeroes. Leave the deny entry the way it is which tells Incredible Pi to block everybody except those allowed in the permit entry below. For the permit, we need the first three octets of your private LAN address, e.g. if your LAN is 192.168.0.something then the permit entry will be 192.168.0.0/255.255.255.0.
Finally, you need to plug in your actual email address in the Voicemail section so that voicemails can be delivered to you when someone leaves a message. You can also include a pager email address if you want a text message alert with incoming voicemails. If you want the voicemails to automatically be deleted from the server after they are emailed to you (a good idea considering the disk storage limitations of an SDHC card), change the Delete Voicemail option from No to Yes. That’s it. Now save your settings by clicking the Submit button. Then reload the dialplan by clicking on the red prompt when it appears.
In case you’re curious, unless you’ve chosen to automatically delete voicemails after emailing them, you can retrieve your voicemails by dialing *98701 from any extension on your phone system. You’ll be prompted to enter the voicemail password you set up. In addition to managing your voicemails, you’ll also be given the opportunity to either return the call to the number of the person that called or to transfer the voicemail to another extension’s voicemail box. And you can always leave a voicemail for someone by dialing their extension number preceded by an asterisk, e.g. *701 would let someone leave you a voicemail without actually calling you.
5. Eliminating Audio and DTMF Problems. You can avoid one-way audio on calls and touchtones that don’t work with these simple settings in FreePBX: Settings -> Asterisk SIP Settings. Just plug in your public IP address and your private IP subnet. Then set ULAW as the only Audio Codec.
6. Setting Up a Desktop Softphone. Incredible Pi supports all kinds of telephones, but we’ll start with the easy (free) one today. You can move on to "real phones" once you’re smitten with the VoIP bug. For today, you’ll need to download a softphone to your desktop PC or Mac.
As we mentioned, the easiest way to get started with Incredible Pi is to set up a YATE softphone on your Desktop computer. Versions are available at no cost for Macs, PCs, and Linux machines. Just download the appropriate one and install it from this link. Once installed, it’s a simple matter to plug in your extension 701 credentials and start making calls. Run the application and choose Settings -> Accounts and click the New button. Fill in the blanks using the IP address of Incredible Pi, 701 for your account name, and whatever password you created for the extension. Click OK.
Once you are registered to extension 701, close the Account window. Then click on YATE’s Telephony Tab and place your first call. It’s that easy!
Monitoring Call Progress with Asterisk. That about covers the basics. We’ll leave you with a tip on how to monitor what’s happening with your PBX. There are several good tools within the FreePBX GUI. You’ll find them under the Reports tab. In addition, Asterisk has its own Command Line Interface (CLI) that is accessible from the Linux command prompt. Just execute the following command while logged in as root: asterisk -rvvvvvvvvvv.
Activating SAMBA for Windows Networking. SAMBA is included for transparent access using the Windows Networking Protocol from PCs, Macs, and other Linux machines. As delivered, SAMBA is deactivated. For obvious reasons, we recommend you never activate root login access to SAMBA without a very secure password. If you wish to enable SAMBA on your server, here are the steps while logged in as root:
- 1. Set SAMBA password for user root: smbpasswd -a root
- 2. Change Windows workgroup from WORKGROUP, if needed: nano -w /etc/samba/smb.conf
- 3. Manually start SAMBA from command prompt: service samba start
- 4. If desired, set SAMBA to start on boot: rcconf and activate SAMBA option
If you’d like to update your status application to display SAMBA status instead of WLan1, here are the steps:
cd /usr/local/sbin

wget http://incrediblepbx.com/sambastatus.tgz

tar zxvf sambastatus.tgz

rm sambastatus.tgz
Activating the PPTP VPN Client. If you’ve followed the Nerd Vittles tutorial and previously set up a PPTP VPN Server for your devices, then it’s pretty simple to add Incredible Pi to the mix by activating its PPTP VPN client. You’ll need the FQDN or public IP address of your VPN server as well as a username and password for VPN access to your VPN server. Once you have those in hand, log into Incredible Pi as root.
Lest we forget to mention, you cannot log into your PPTP server from an IP address on the same private LAN so you’d only use the PPTP VPN when your Incredible Pi is at a remote location.
Edit the connection template: nano -w /etc/ppp/peers/my-pptp-server. Insert the following text and replace myfqdn.org with the FQDN of your PPTP server, replace myname with your PPTP username, and replace mypassword with your PPTP password. Then save the file: Ctrl-X, Y, then Enter.
To test it, issue the following command: /etc/init.d/pptp start. When you run ifconfig, you should now see a ppp0 entry:
ppp0      Link encap:Point-to-Point Protocol

          UP POINTOPOINT RUNNING NOARP MULTICAST  MTU:1500  Metric:1

          RX packets:0 errors:0 dropped:0 overruns:0 frame:0

          TX packets:0 errors:0 dropped:0 overruns:0 carrier:0

          collisions:0 txqueuelen:3

          RX bytes:0 (0.0 B)  TX bytes:0 (0.0 B)
Remember, it won’t show an IP address if the Raspberry Pi and your PPTP VPN Server are on the same subnet (like ours). Once you install your Raspberry Pi in a remote location, you now can access it at the first IP address in your reserved PPTP IP address pool.
To permanently activate the PPTP VPN client on your Incredible Pi server, run rcconf. Scroll to the bottom of the list and highlight pptp. Press the space bar to select it for automatic startup when you boot your server. Then tab to OK and press Enter.
Shutting Down Your Server. Last but not least, never just pull the plug when you want to shut down your server, or you may end up with corrupted MySQL databases. Then nothing will run. Instead, log into your server as root, and issue the following command: shutdown -h now.
2. Run fax-enable Script to Configure HylaFax
To automatically configure Incredible Fax with HylaFax, log into your server as root with the root password you initially set up for your server. Before running the fax-enable script in the /root folder, make sure you have the following pieces of information:
- DID Number to Receive Inbound Fax Calls (HINT: Google Voice works great!)
- Your Country Code (Default is 1 for U.S.)
- Your Local Area Code (Default is 843, our area code)
- Long Distance Dial Prefix (Default is 1)
- International Prefix (Default is 011)
- Email Address to Receive Incoming Faxes in PDF Format
- Fax Identifier to Attach to Outbound Faxes (Default is IncredibleFax)
Now run the script: /root/fax-enable. Fill in the blanks. And, this is important. Double-check your entries very carefully to make sure there are no typos. Once you press Enter to activate HylaFax, you’ll have to manually edit the files in /etc/hylafax to make corrections. With the exception of your incoming fax email address, the rest of the settings are stored in config.ttyIAX0, config.ttyIAX1, config.ttyIAX2, and config.ttyIAX3. Email address is stored in FaxDispatch.
3. Configuring FreePBX for Incredible Fax
Adding a Dedicated Google Voice Trunk for Incoming Faxes. As noted, you need a dedicated DID to support incoming fax calls since the system has no way to detect a fax. The easiest solution is to add an additional Google Voice trunk to your server and dedicate it to handling incoming faxes. You can also use a DID from a SIP provider of your choice; however, some support analog faxing better than others. And some don’t support fax transmissions at all. To add an additional Google Voice trunk, open FreePBX with your browser and choose Other -> Google Voice. Fill in the blanks with your Google Voice number and account credentials. Check off the three checkboxes, and save your settings. Click the Red reload button when prompted.
Adding an Inbound Route for Incoming Faxes. We don’t want Incredible Fax to use your default inbound route for incoming faxes, or it would simply ring a telephone or IVR. Instead, we want to create a new route just for incoming faxes. While still in FreePBX, choose Connectivity -> Inbound Routes -> Add Incoming Route. Fill in the blanks as shown below using the 10-digit DID of your dedicated fax number. Click Submit and Reload when prompted.
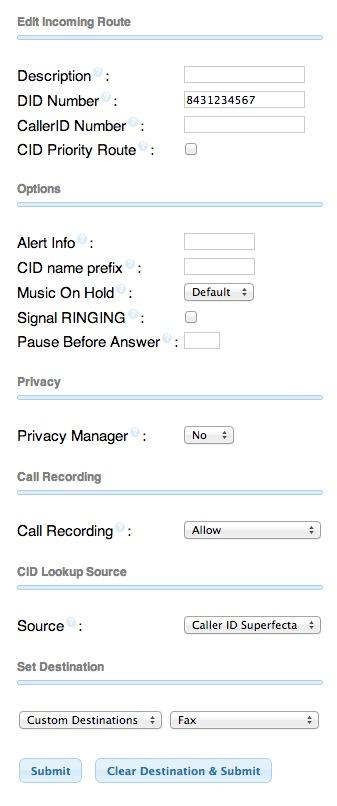
4. Installing a Desktop HylaFax Client to Send Faxes
You can skip this step if you only want to receive faxes at the email address you set up with fax-enable. If you want to be able to send faxes as well, then you’ll need to install a free or commercially available HylaFax client on your desktop machine. Here’s the complete list of HylaFax clients. Regardless of the client you choose, you’ll need to enter the credentials for your HylaFax server. This includes the IP address of Incredible PBX on your private LAN, your username (root), and your root password. For a free Windows client, we recommend WinPrint. For Mac machines, use Fax90. Both of these clients are so-called Print-to-Fax applications. This means you first must convert whatever document you wish to send into a PDF document. Then call it up on your screen and "print" the file to the Fax Device that was installed as part of the HylaFax client setup. It sounds harder than it really is. Free PDF conversion tools are available for Windows machines, and Macs include a PDF export utility as part of the operating system itself. HylaFax clients also are available for Linux machines and Android devices, but not the iJunk. Google is your friend. 🙂
5. Reboot and Enjoy!
Last, but not least, you’ll need to reboot your server before any of this will work. If you have a keyboard plugged into your Raspberry Pi, then press Ctrl-Alt-Del to restart your server. If not, log in as root and type: reboot. Happy Faxing!
Originally published: Monday, December 3, 2012
Need help with Asterisk? Visit the PBX in a Flash Forum.
Special Thanks to Our Generous Sponsors
FULL DISCLOSURE: ClearlyIP, Skyetel, Vitelity, DigitalOcean, Vultr, VoIP.ms, 3CX, Sangoma, TelecomsXchange and VitalPBX have provided financial support to Nerd Vittles and our open source projects through advertising, referral revenue, and/or merchandise. As an Amazon Associate and Best Buy Affiliate, we also earn from qualifying purchases. We’ve chosen these providers not the other way around. Our decisions are based upon their corporate reputation and the quality of their offerings and pricing. Our recommendations regarding technology are reached without regard to financial compensation except in situations in which comparable products at comparable pricing are available from multiple sources. In this limited case, we support our sponsors because our sponsors support us.
BOGO Bonaza: Enjoy state-of-the-art VoIP service with a $10 credit and half-price SIP service on up to $500 of Skyetel trunking with free number porting when you fund your Skyetel account. No limits on number of simultaneous calls. Quadruple data center redundancy. $25 monthly minimum spend required. Tutorial and sign up details are here.
![]() The lynchpin of Incredible PBX 2020 and beyond is ClearlyIP components which bring management of FreePBX modules and SIP phone integration to a level never before available with any other Asterisk distribution. And now you can configure and reconfigure your new Incredible PBX phones from the convenience of the Incredible PBX GUI.
The lynchpin of Incredible PBX 2020 and beyond is ClearlyIP components which bring management of FreePBX modules and SIP phone integration to a level never before available with any other Asterisk distribution. And now you can configure and reconfigure your new Incredible PBX phones from the convenience of the Incredible PBX GUI.
VitalPBX is perhaps the fastest-growing PBX offering based upon Asterisk with an installed presence in more than 100 countries worldwide. VitalPBX has generously provided a customized White Label version of Incredible PBX tailored for use with all Incredible PBX and VitalPBX custom applications. Follow this link for a free test drive!
Special Thanks to Vitelity. Vitelity is now Voyant Communications and has halted new registrations for the time being. Our special thanks to Vitelity for their unwavering financial support over many years and to the many Nerd Vittles readers who continue to enjoy the benefits of their service offerings. We will keep everyone posted on further developments.
Some Recent Nerd Vittles Articles of Interest…
- Many of our purchase links refer users to Amazon when we find their prices are competitive for the recommended products. Nerd Vittles receives a small referral fee from Amazon to help cover the costs of our blog. We never recommend particular products solely to generate Amazon commissions. However, when pricing is comparable or availability is favorable, we support Amazon because Amazon supports us. [↩]
Introducing PBX in a Phone: Grandstream GXP2200 featuring Incredible PBX

One of the long-term goals of the PBX in a Flash™ Project has always been the desire to integrate a full-featured PBX directly into a desktop phone. For those that travel or support small branch offices, this would be the best of all possible worlds. We never quite achieved it with PBX in a Flash, but thanks to the Raspberry Pi™, Grandstream’s new GXP2200, a couple of screws, and a power drill, we’ve found the perfect couple. Imagine managing a virtual private network with your branch office PBX whirring away beneath your desktop phone and nothing more than a touchscreen browser built into your phone. And now you can appreciate what a milestone this is for the VoIP telephony community.
We introduced the GXP2200 in our Black Friday roundup last week, but here are the highlights for those of you that may have missed it. While there have been other VoIP phones built around Android, this is the first affordable unit (under $200)1 that also includes access to Google’s Play Store thanks to Grandstream’s firmware update released last week. This is significant because proprietary app stores mean the phone manufacturer keeps total control of what you can install on your phone while access to Google’s Play Store makes available virtually all of the Android software in the commercial (and free) marketplace.
Why Android Matters with a VoIP Phone
Using Android as the underlying operating system for a VoIP phone provides the best of all worlds with SIP access to your favorite Asterisk® server or Incredible PBX™ for the Raspberry Pi plus Skype, Google Voice, Microsoft Lync, YouTube, Pandora, Facebook, Twitter, and Angry Birds without leaving your chair. The GXP2200 supports six SIP lines, five-way conference calls, HD audio, Bluetooth, integrated PoE, and VPNs of many flavors. You also can add four 20-button sidecar expansion modules. GrooVe IP can be installed from the Google Play Store for plug-and-play Google Voice calling. That gives you the "VoIP Big Three" on a single desktop phone: SIP, Skype, and Google Voice. Plug in an SD card with your favorite tunes and videos, and they’ll play back flawlessly on the GXP2200. The PBX in a Flash RSS Security Feed can also be installed on the desktop of this phone. With the $5 IP Cam Viewer app, you can use your phone to monitor dozens of IP cameras in your organization or anyone else anywhere in the world. AsteriDex also can be used from the phone’s browser to provide click-to-dial calling with any SIP trunk you’ve set up on the phone. And, as we noted, the touchscreen browser lets you access FreePBX® to configure and manage Incredible PBX and your Asterisk server directly from your phone. Did we mention the 1,000-client phone directory and Google Calendar plus dedicated voicemail, call transfer, and conferencing buttons right on the phone? All of them work flawlessly with Asterisk as well as PBX in a Flash and Incredible PBX. While the version of Android is a bit long in the tooth, we haven’t found that to be a distraction when paired with a desktop phone. One of the consultants on the PIAF Forum mentioned that he had taken this phone to a customer site last week. The employees were so impressed with the GXP2200 that they told the boss they would subsidize the cost of the phones if he would purchase them for the office. When is the last time you had that conversation with your boss?
Hooking Up the Raspberry Pi with a GXP2200
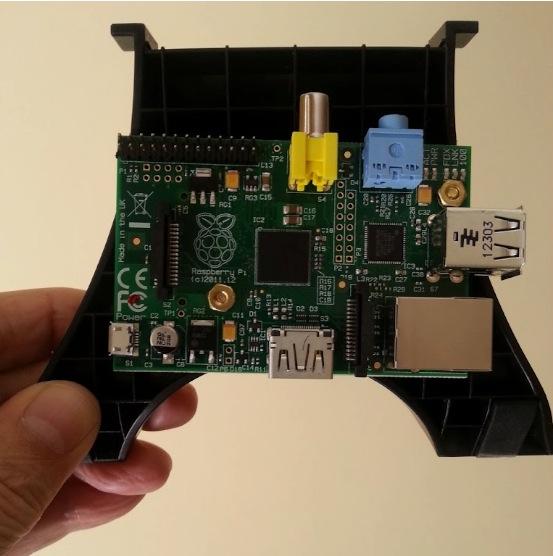
The Raspberry Pi integration is accomplished easily because of the new design of the 512MB Raspberry Pi boards with two mounting holes (covered by the two brass-colored nuts above) plus the unique phone stand that is provided with Grandstream’s GXP2200. A quick trip to the hardware store for two one-inch screws and a couple minutes with a power drill, and it was easy enough for any fifth grader to mount the Raspberry Pi on the inner side of the plastic phone stand. Once you slide the stand into place on the phone, the Raspberry Pi is completely hidden inside the phone stand with plenty of ventilation to operate unobtrusively for years. A 6-inch CAT5 cable will let you take advantage of the spare network jack on the back of the phone to add network connectivity for the Raspberry Pi. Insert your SD card with Incredible PBX, power up the Raspberry Pi with a 5-volt adapter, and your branch office PBX comes to life. Fire up your phone’s browser, log in to http://incrediblepbx.local, and your entire PBX is quite literally at your fingertips:
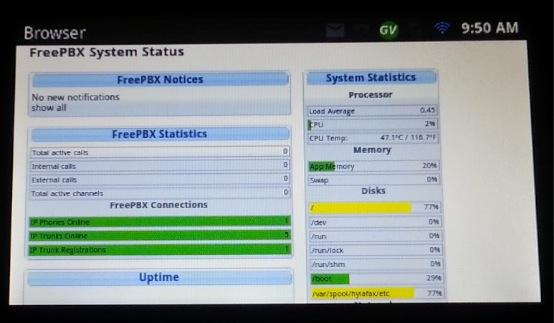
By the time your GXP2200 is delivered, Incredible PBX 3.6 for the Raspberry Pi will be on the street featuring Incredible Fax.2 Then you’ll have everything any remote office could ever ask for, and it’ll all be neatly tucked away beneath your telephone with management convenience like you’ve never experienced. Enjoy!
Originally published: Monday, November 26, 2012
Need help with Asterisk? Visit the PBX in a Flash Forum.
Special Thanks to Our Generous Sponsors
FULL DISCLOSURE: ClearlyIP, Skyetel, Vitelity, DigitalOcean, Vultr, VoIP.ms, 3CX, Sangoma, TelecomsXchange and VitalPBX have provided financial support to Nerd Vittles and our open source projects through advertising, referral revenue, and/or merchandise. As an Amazon Associate and Best Buy Affiliate, we also earn from qualifying purchases. We’ve chosen these providers not the other way around. Our decisions are based upon their corporate reputation and the quality of their offerings and pricing. Our recommendations regarding technology are reached without regard to financial compensation except in situations in which comparable products at comparable pricing are available from multiple sources. In this limited case, we support our sponsors because our sponsors support us.
BOGO Bonaza: Enjoy state-of-the-art VoIP service with a $10 credit and half-price SIP service on up to $500 of Skyetel trunking with free number porting when you fund your Skyetel account. No limits on number of simultaneous calls. Quadruple data center redundancy. $25 monthly minimum spend required. Tutorial and sign up details are here.
![]() The lynchpin of Incredible PBX 2020 and beyond is ClearlyIP components which bring management of FreePBX modules and SIP phone integration to a level never before available with any other Asterisk distribution. And now you can configure and reconfigure your new Incredible PBX phones from the convenience of the Incredible PBX GUI.
The lynchpin of Incredible PBX 2020 and beyond is ClearlyIP components which bring management of FreePBX modules and SIP phone integration to a level never before available with any other Asterisk distribution. And now you can configure and reconfigure your new Incredible PBX phones from the convenience of the Incredible PBX GUI.
VitalPBX is perhaps the fastest-growing PBX offering based upon Asterisk with an installed presence in more than 100 countries worldwide. VitalPBX has generously provided a customized White Label version of Incredible PBX tailored for use with all Incredible PBX and VitalPBX custom applications. Follow this link for a free test drive!
Special Thanks to Vitelity. Vitelity is now Voyant Communications and has halted new registrations for the time being. Our special thanks to Vitelity for their unwavering financial support over many years and to the many Nerd Vittles readers who continue to enjoy the benefits of their service offerings. We will keep everyone posted on further developments.
Some Recent Nerd Vittles Articles of Interest…
- Some of our purchase links refer users to Amazon when we find their prices are competitive for the recommended products. Nerd Vittles receives a small referral fee from Amazon to help cover the costs of our blog. We never recommend particular products solely to generate Amazon commissions. However, when pricing is comparable or availability is favorable, we support Amazon because Amazon supports us. [↩]
- If you have that pioneering spirit, you can take the Preview Edition of Incredible PBX 3.6 for a spin today. [↩]
Black Friday Deals: Buyers’ Guide to VoIP and Mobile Stocking Stuffers for 2012

Tech toys continue to proliferate and, to get you in the Christmas spirit, we thought we would run down our short list of Must Have’s for 2012 so that you’ll be prepared for your Black Friday shopping spree. It’s just 10 days away!
Cell Phone Paradise
In the smartphone category, the iPhone 5 ranks up there as one of the most disappointing offerings of the year in our book. Apple continues to force obsolescence with a new nano SIM card and an all-new dock connector that only supports USB 2.0. Near Field Communication (NFC) is nowhere to be found. Did we mention the endless LITIGATION that seems to have replaced INNOVATION at Apple? Before you buy from Apple, ask yourself if you really want to encourage this type of corporate behavior. It’s ruining software development, and spare us the B.S. about Apple inventing all of this stuff. They didn’t!

Three out of four new cellphones reportedly are Android phones. There are lots of reasons why. We’ve been a huge fan of Samsung’s Galaxy S III as the best cellphone on the market… until we tried the new Galaxy Note II. We had planned to do a full-fledged review of the device until we read AnandTech’s writeup. It covers everything you’d ever want to know. What can we say? Easily rooted. A 5.5 inch diagonal screen with 1280×720 resolution leaves everything else in the dust. Add Android Jelly Bean with a quad-core processor and support for Samsung’s S-Pen, two fantastic cameras, a replaceable battery, 64GB microSD card support, an 11.78 watt-hour battery, cellular support for category 3 LTE FDD and TDD, Release 9 DC-HSPA+, GSM/EDGE, and TD-SCDMA along with onboard gpsOneGen 8A GNSS, and it’s damn close to perfect. It brings you the best of all possible non-proprietary worlds. And, yes, it still fits comfortably in your jeans pocket. Honest, you will love The Phablet, and it’s available with free 2-day shipping using Amazon Prime.1 Or check out the Black Friday deals.
Best Cell Phone Plans
The United States cellphone provider market continues to be dominated by the Bell sisters, AT&T and Verizon, with Sprint and T-Mobile competing in the also-ran category. The good news is there now are some terrific cellphone pay-as-you-go bargains using three of the four major providers. Monthly pricing of these plans is typically 50 to 75% less than comparable plan offerings from AT&T and Verizon. Here are our favorites.
Straight Talk Unlimited. Straight Talk in conjunction with WalMart offers a $45 monthly plan ($495 a year) with unlimited talk, text, and web access. Buy a SIM for $9.99 and a refill card, port your number, and you’ll be up and running in about an hour. Better yet, buy them together and use coupon code SIMSAVE, and the SIM card is free with free shipping as well. It uses the identical AT&T network infrastructure as AT&T, and Straight Talk SIMs are interchangeable using any existing AT&T cellphone. On an Android phone, the feature set is identical to what you’d get with an AT&T plan. On an iPhone, you lose Visual Voicemail. If the phone is not jailbroken, you may lose multimedia messaging (MMS). For configuration details, see this post. Also available for T-Mobile, if you prefer. No tethering!

T-Mobile Unlimited Data Plan. T-Mobile in conjunction with WalMart offers a pay-as-you-go plan with 100 voice minutes, unlimited texting, and unlimited data (5GB at 4G speed and 2G speed thereafter) for $30 a month. Extra voice minutes are 10¢. It’s not only an amazing deal, but the fine print doesn’t seem to preclude tethering. You can use it with any T-Mobile phone including all of Google’s Android phones. For tethering support, any rootable Android phone works as well as the unmodified $349 Galaxy Nexus 4 purchased directly from Google starting today at noon Eastern time. The Nexus 4 gives you 4G performance over HSPA+, but no LTE radio support! Today’s AnandTech review here. If you don’t care about tethering but want 4G performance, then take a look at the $175 Samsung T679 available at WalMart. Beware: Most AT&T GSM phones will also work with T-Mobile, but you’ll only get 2G data performance because of the different radio frequencies used by AT&T and T-Mobile for 3G and 4G service.
If you have T-Mobile coverage in your area or if you spend a lot of time on the interstates and want network coverage for your laptops while you’re on the move, this is the plan for you. We call it the Stealth Plan because neither WalMart nor T-Mobile says much about it. It’s only available when you first sign up for service with your newly purchased T-Mobile SIM. Despite lots of chatter to the contrary, this plan is available (but unadvertised) by purchasing a 99¢ SIM directly from T-Mobile. Trust us. You’re only risking a buck. But, beware, if you ever switch to a different plan (or if you sign up for the wrong $30 plan originally… T-Mobile and WalMart both push a lousy plan that includes 1500 talk minutes with 30MB of data for the same $30), you can never go back to the good plan without purchasing another T-Mobile SIM. To activate your T-Mobile SIM once you have your T-Mobile phone in hand, go here. Remember. Make your initial selection carefully. To buy $30 refills, here’s the link.
Virgin Mobile (not quite) Unlimited Plan. If you have good Sprint coverage, would like to use an iPhone with or without tethering, and don’t mind data limits then the Virgin Mobile Plan isn’t too bad. $35 a month gets you 300 minutes, unlimited messaging, and 2.5GB of data. For $15 more, you get 3.5GB of data with tethering. $10 more gets you 1200 talk minutes a month while $20 more gets you unlimited talk. It’s been reported that the Virgin Mobile iPhone 4S will be available in Target stores for $500 with a free $100 Target gift card beginning at 9 p.m. on Nov. 22.
VoIP Desktop Phone of the Year

It was just a matter of time until someone produced a reasonably priced, rock-solid SIP desktop phone based upon Android. The combination provides the best of both worlds with SIP access to your favorite Asterisk® server or Incredible PBX for the Raspberry Pi plus Skype, Google Voice, Microsoft Lync, YouTube, Facebook, Twitter, and Angry Birds without leaving your chair. Meet the $200 Grandstream GXP-2200. We got to spend some time with it at AstriCon 2012 a few weeks ago. With support for six lines, five-way conference calls, HD audio, Bluetooth, integrated PoE, and VPNs of many flavors, the GXP2200 takes top honors as our VoIP Desktop Phone of the Year. It’s still in limited supply but should be available everywhere soon.
Thanksgiving Update: Since we originally published this article, Grandstream has released a firmware update that resolved virtually all outstanding issues. The Google Play Store now is available which means many Android apps you previously have purchased can now be installed on the GXP2200 at no cost. Skype with incoming video now works well. There’s no outbound video because there is no camera built into the phone. Not sure whether a USB camera would solve that as we haven’t tested it (yet). GrooVe IP can be installed from the Play Store for plug-and-play Google Voice calling. That gives you the "VoIP Big Three" on a single desktop phone: SIP, Skype, and Google Voice. AsteriDex also can be used from the phone’s browser to provide click-to-dial calling with any SIP trunk you’ve set up on the phone. The PBX in a Flash RSS Security Feed can also be installed on the desktop of this phone. With the $5 IP Cam Viewer app, you can use your phone to monitor dozens of IP cameras in your organization or anywhere around the globe. In short, we can find nothing not to like about this phone! For up-to-the-minute news updates, visit the PIAF Forum.
Hosted VoIP Provider of the Year
We’re delighted that one of our corporate sponsors is the hands-down winner of Hosted VoIP Provider of the Year. With your choice of servers throughout the United States, Canada, and Europe, not only is RentPBX’s service and support second to none, but their $14.99 a month pricing for cloud-based hosting of PBX in a Flash is in a league of its own. Be sure to use coupon code PIAF2012 for your first hosted PBX order to take advantage of this special pricing.
VoIP Computer of the Year

No surprise here. The $35 Raspberry Pi now with 512MB RAM takes top honors. Add a power supply, plug into your LAN, burn Incredible PBX 3.5 to an SD card, and boot to a near perfect (free) VoIP platform with Google Voice, SIP support, unlimited extensions with voicemail, IVR support, text-to-speech and speech-to-text functionality. Take our 35 apps for a spin, and you’ll agree the choice is a No Brainer. And this week you can add free fax support to the already incredible feature set. Review the Quick Start Guide and then the Fab 35 Apps Tutorial. Then finish off your adventure by Interconnecting Raspberry Pi devices in less than 5 minutes. If money is no object and you want one in two days, take a look at the Amazon ad in the right column which provides a good refresher in the law of supply and demand.
Our runner-up for best all-purpose VoIP computer remains the Foxconn NT535 Dual-Core Atom machine which is back on sale for $154.99 at Amazon today with free 2-day shipping with Amazon Prime. Details in our previous article.
VoIP Tablet of the Year

C|Net has done a great Roundup of the 7-Inchers. Jokes aside and absent special requirements, Google’s Nexus 7 is the clear winner. You get an open platform, easily rootable, state-of-the-art quad-core tablet running the latest version of Android. And it supports every VoIP requirement you can dream up: Google Voice, SIP, Skype, and VPN support. The 16MB version is available for $199 directly from Google, WalMart, or Staples. That’s over $100 less than the comparable, but inferior, iPad Mini. Because the iPad Mini lacks GPS support in the WiFi model, turn-by-turn navigation is out of the equation. At least for us, it is one of the major must-have features for any tablet device.
Happy Thanksgiving!
Originally published: Tuesday, November 13, 2012
Need help with Asterisk? Visit the PBX in a Flash Forum.
Special Thanks to Our Generous Sponsors
FULL DISCLOSURE: ClearlyIP, Skyetel, Vitelity, DigitalOcean, Vultr, VoIP.ms, 3CX, Sangoma, TelecomsXchange and VitalPBX have provided financial support to Nerd Vittles and our open source projects through advertising, referral revenue, and/or merchandise. As an Amazon Associate and Best Buy Affiliate, we also earn from qualifying purchases. We’ve chosen these providers not the other way around. Our decisions are based upon their corporate reputation and the quality of their offerings and pricing. Our recommendations regarding technology are reached without regard to financial compensation except in situations in which comparable products at comparable pricing are available from multiple sources. In this limited case, we support our sponsors because our sponsors support us.
BOGO Bonaza: Enjoy state-of-the-art VoIP service with a $10 credit and half-price SIP service on up to $500 of Skyetel trunking with free number porting when you fund your Skyetel account. No limits on number of simultaneous calls. Quadruple data center redundancy. $25 monthly minimum spend required. Tutorial and sign up details are here.
![]() The lynchpin of Incredible PBX 2020 and beyond is ClearlyIP components which bring management of FreePBX modules and SIP phone integration to a level never before available with any other Asterisk distribution. And now you can configure and reconfigure your new Incredible PBX phones from the convenience of the Incredible PBX GUI.
The lynchpin of Incredible PBX 2020 and beyond is ClearlyIP components which bring management of FreePBX modules and SIP phone integration to a level never before available with any other Asterisk distribution. And now you can configure and reconfigure your new Incredible PBX phones from the convenience of the Incredible PBX GUI.
VitalPBX is perhaps the fastest-growing PBX offering based upon Asterisk with an installed presence in more than 100 countries worldwide. VitalPBX has generously provided a customized White Label version of Incredible PBX tailored for use with all Incredible PBX and VitalPBX custom applications. Follow this link for a free test drive!
Special Thanks to Vitelity. Vitelity is now Voyant Communications and has halted new registrations for the time being. Our special thanks to Vitelity for their unwavering financial support over many years and to the many Nerd Vittles readers who continue to enjoy the benefits of their service offerings. We will keep everyone posted on further developments.
Some Recent Nerd Vittles Articles of Interest…
- Some of our purchase links refer users to Amazon when we find their prices are competitive for the recommended products. Nerd Vittles receives a small referral fee from Amazon to help cover the costs of our blog. We never recommend particular products solely to generate Amazon commissions. However, when pricing is comparable or availability is favorable, we support Amazon because Amazon supports us. [↩]
VoIP on Steroids: Introducing Incredible PBX 3.7 for the $35 Raspberry Pi
 We feel like a kid in a candy store with our new $35 Raspberry Pi® Model B. Imagine squeezing a 700 mHz ARM processor with 512MB of RAM, 2 USB ports, a 10/100 Ethernet port, an HDMI port, composite video, a separate audio jack, an SDHC card slot, and a micro USB port onto a motherboard the size of a credit card with a total weight of 1.6 ounces and a typical power draw of 3.5 watts. Thanks to Gernot and his Asterisk for Raspberry Pi project, a full LAMP stack with Asterisk® and FreePBX® gave us a head start on turning the Raspberry Pi into yet another Incredible PBX™ platform complete with free Google Voice™ calling through 2013.1
[iframe-popup id="3″]
07/01/2019 NEWS FLASH: Just released Incredible PBX LITE for the Raspberry Pi 2, 3, and 4 featuring Raspbian 10 Buster. Tutorial here.
Trust us when we say the performance of this $35 computer is nothing short of amazing. Can it do everything a $200 dual-core Atom PC can do? No. Can it do 90% of everything for someone whose requirements do not exceed a few simultaneous calls at a time but still wants a full-blown PBX for call routing, voicemail, IVRs, music on hold, and text-to-speech and speech-to-text apps for a home, a SOHO office, a Little League team, or a dorm room? Absolutely. We’re now at the two-month mark with this project, and the Raspberry Pi Foundation already has released a 512MB version of the computer at the same price AND new firmware that autodetects the proper memory setup depending upon whether you have a 256MB or 512MB Pi. Version 3.5 and beyond incorporates the new firmware into Incredible PBX.
The honeymoon isn’t over yet. Incredible Pi™ 3.5 featured the very latest Debian 7 firmware specifically tailored for the Raspberry Pi™ from its developers. You can read all about it here. Is it better? Can you spell ROCKET SHIP? With a reliable power supply, you now can overclock the Raspberry Pi and join the 1GHz Club. That represents a 50% performance improvement. And doubling the RAM to 512MB now makes the Raspberry Pi a near perfect VoIP platform. Better yet, the Raspbian kernel handles management of the overclocking so you never have to confront Fried Raspberry Pi. When the CPU temperature gets too high, the kernel will throttle things back to avoid a disaster. And version 3.7 adds Incredible Fax to the platform for those with a 512MB Raspberry Pi. The complete tutorial is available here.
Eben Upton Visits Charleston. The developer of the Raspberry Pi, Eben Upton, and his lovely wife, Liz, made a brief appearance in Our Town last Thursday night. Makelab Charleston, in cooperation with the College of Charleston and the Lowcountry Graduate Center, hosted the event. With an SRO crowd, we all got to hear the Raspberry Pi story first hand. If you missed the presentation, you missed a real treat.
What’s New in Incredible PBX 3.x. For those of you already running a previous version, here’s a quick thumbnail of the other new features in addition to overclocking. We’ve tried to mimic as much of the previous builds as possible. But keep in mind that this is a new creation from the ground up because there was no migration path from Debian Squeeze and Wheezy to Raspbian. But we keep good notes, and Gernot did much of the heavy lifting. 😉
SECURITY ALERT: Incredible PBX 3.7 addresses a serious security flaw in prior versions of Asterisk. With the exception of the new Asterisk release incorporated into this release, the functionality is identical to Incredible PBX 3.6.
Incredible PBX 3.5 and beyond added automatic detection and support of 512MB Raspberry Pi devices without touching anything. And the latest version 3.7 adds an awesome fax server to Incredible PBX for those with a 512MB board. The complete tutorial is available here. update-my-pi in the /root folder of your server helps to safeguard your system by bringing it up to date with the latest fixes and enhancements. After running it the first time, it gets run automatically whenever you log in as root. For the safety of your server, don’t disable it! It’s free for the first ten updates, and then it’s just $20 a year. We have to eat, too. If you are philosophically opposed to ever spending a dime to support the open source movement, then feel free to load the latest version of Incredible PBX at no cost whenever you like. It will always be free! Then you can restore your settings using the backup and restore feature built into FreePBX.
To enable overclocking at your own risk, run: raspi-config. Overclocking works for us. YMMV! The key is a good power supply. If you’re using an SD card larger than 4GB, version 3.3 and beyond now can resize your partitions on the fly. Just choose the option in raspi-config and reboot. Even though the kernel now monitors CPU temperature and manages overclocking, it’s always nice to see for yourself. To monitor the CPU temperature, just run the status program which provides a current snapshot anytime. Temperature data now is provided on the FreePBX Dashboard as well.
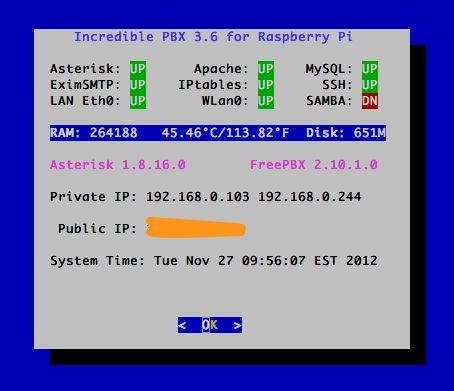
There’s more good news. Networking is much more stable; however, we’ve dropped support for the TP-Link WiFi adapters. If you still have one of these, see the setup instructions in the PIAF Forum. Otherwise you’ll need the recommended AirLink 101 N-150 if you want WiFi capability. In the 3.3 release and beyond, your server will automatically attempt to connect to any open WiFi network that it can find. We’ve also added two scripts in /root to let you restart either your wired or wireless network and designate it as the primary network: restart-eth0 and restart-wlan0. Time zone management was also a bit of mess with multiple file settings required to support both Linux and PHP. In the 3.3 update and beyond, you’ll be prompted to select your timezone when you first log in as root. The setup script will automatically apply your entry in all the right places. We’ve also replaced SendMail with Exim to simplify the process of using an SMTP mail gateway such as Gmail. We’ve documented the procedure for making the change here.
As part of the 3.x migration, we’ve also eliminated the pi user account. Everything you need to do to configure Incredible PBX requires root permission. So goodbye sudo. Only the root user account is included, and the default password is raspberry. Change the password when you first log in. New SSH and DUNDI keys now are automatically generated when you first boot your server. The FreePBX Backup and Restore Utility is included in this new build. AsteriDex SpeedDials have been fixed. Enter 3-digit Dial Codes in AsteriDex, and you can call by dialing 00nnn. In the latest update, Telephone Reminders again work.
X Windows is included in this build. This won’t work with SSH. For a demo slideshow, plug in a real monitor and log in as root. In the /root folder, enter the command: startx. To end the slideshow, press ESCape. To disable the slideshow: mv .xinitrc xinitrc. To add photos, copy .jpg images into /root/slideshow. No mouse is required for the slideshow but, if you run X Windows natively, you’ll need a USB mouse. The SMS Blasting app in /root now supports phone numbers (which use SMS) and email addresses (which use SendMail).
Last but not least, a sophisticated Conference Bridge has been added to Incredible PBX 3.x releases. If you route one of your inbound DIDs to the predefined IVR, users can press 0 and enter 1234 for the conference PIN to join the conference. Local extensions simply dial C-O-N-F. We’ve already tested a 9-person conference call with excellent results. But don’t take our word for it. Try it for yourself. Just call our demo Raspberry Pi AutoAttendant and take the Conference Bridge and a handful of other Incredible PBX™ apps for a test drive:

And here’s what the conference call looked like in the FreePBX Dashboard:
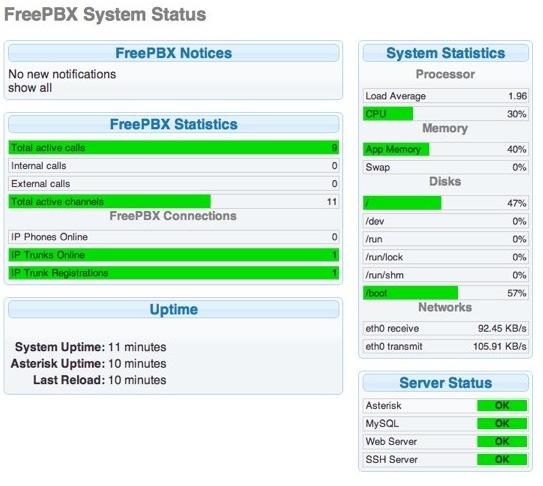
So you don’t have to jump around between articles, we’ve put together this Quick Start Guide that tells you everything you need to know to get up and running in about an hour. Most of that time will be consumed copying the Incredible Pi image to an SD card. So there’s plenty of time for lunch during the hour. Once your system is running and you’ve completed the setup steps below, then jump over to the application tutorial which explains how to use every one of the 35 Incredible PBX Apps for the $35 Raspberry Pi.
What to Buy. Here’s everything you need to get started.2 The case is optional. Yes, you can run the Raspberry Pi sitting on your desk with no case. It’s only 5 volts. WiFi is also optional. There’s a 10/100 port on the Raspberry Pi that gives you all the networking you need. Here are the links to buy the pieces. You also need a CAT5 cable and either a spare PC or Mac with Putty or SSH and a pair of earbuds or an HDMI cable to connect to a TV or monitor and a USB keyboard.
- $35 512MB Raspberry Pi from MCM or Newark or Amazon
- $10 Power Adapter (this one is rock solid!)
- $10 SanDisk 16GB SDHC Type 4 card
- $15 Adafruit Acrylic Case
- $13 AirLink 101 N150 WiFi Adapter or Adafruit Mini WiFi Adapter
Setting Up Google Voice. If you want free calling in the U.S. and Canada, then you’ll need a Google Voice account, and you’ll need one dedicated to Incredible Pi, or it won’t work. Log out after setting up the new Google Voice account!
- Register for Google Voice account (no funky characters in your password!)
- Enable Google Chat as Phone Destination
- Configure Google Voice Calls Settings:
- Call Screening – OFF
- Call Presentation – OFF
- Caller ID (In) – Display Caller’s Number
- Caller ID (Out) – Don’t Change Anything
- Do Not Disturb – OFF
- Call Options (Enable Recording) – OFF
- Global Spam Filtering – ON
- Place test call in and out using GMail Call Phone
Baking Your Incredible Pi. The disk drive for the Raspberry Pi is an SD card. So what you need to do is download Incredible Pi and copy the image onto an SDHC card. Mac and Linux installers are included. For Windows, just use Win32 Disk Imager. Here are the steps:
- Download the Incredible Pi package
- Decompress the tarball: tar zxvf incrediblepi-version.tar.gz
- Copy .img file to SDHC using image utility or script
- Insert SDHC card into Raspberry Pi
- Boot the Raspberry Pi from Incredible Pi SDHC card
Your First Bite of Incredible Pi. If you’re not using a monitor and keyboard, you can use SSH to gain root access to Incredible Pi. And you can use any web browser on your private network to access your server. There are a couple of hurdles. First, you need the network address of your new server. And, second you need an SSH client. With Incredible PBX 3.3 and beyond, you needn’t worry about the IP address. You now can access your server via SSH by logging in like this: root@incrediblepbx.local. And browser access to your server is available at the following address: http://incrediblepbx.local. You still can plug in some earbuds when the bootup process begins and listen for the Incredible Pi to tell you its IP address when the boot procedure completes (about 90 seconds). Then you can use that IP address instead of incrediblepbx.local. The latest releases of Incredible PBX also include a Java-based SSH client in the FreePBX web GUI: Admin -> Java SSH.
Here’s everything you need to know about security for Incredible Pi:
1. ALWAYS RUN INCREDIBLE PI BEHIND A SECURE HARDWARE-BASED FIREWALL/ROUTER
2. NEVER EXPOSE ANY INCREDIBLE PI PORTS DIRECTLY TO THE INTERNET
3. NEVER MAP INBOUND INTERNET PORTS FROM YOUR FIREWALL TO INCREDIBLE PI
Initial Setup. There also are a few setup steps to complete once your Incredible Pi finishes the bootup process. When you first login (username: root password: raspberry), you’ll be prompted to change your root password and to set your default time zone. If you’re using either a wired network or an open WiFi network, then everything just works. If you’re using secured WiFi, then you’ll need to plug in your credentials in /etc/wpa.conf and reboot. The wired network always takes precedence so unplug the cable if you want WiFi to be your primary network. Next, run /root/update-my-pi to bring your server up to current specs. Finally, now’s the time to repartition your SD card if you’re using a card larger than 4GB. While you’re at it, bump up the performance of your Raspberry Pi by 50% by setting the overclocking to turbo mode. It works great for us. YMMV! The key is a rock-solid power adapter such as the one we’ve recommended. Just run raspi-config and follow your nose.
Accessing Incredible Pi By GUI. You don’t have to be a Linux guru to use Incredible Pi. In fact, we’re just about finished with the Linux command prompt, but stay logged in until we finish the steps below. Most of your configuration of the PBX will be performed using the FreePBX® Web GUI. You also can access SSH through the FreePBX interface.
If you’re new to Asterisk® and FreePBX, here’s the one paragraph primer on what needs to happen before you can make free calls with Google Voice. You’ll obviously need a free Google Voice account. This gets you a phone number for people to call you and a vehicle to place calls to plain old telephones throughout the U.S. and Canada at no cost. You’ll also need a softphone or SIP phone to actually place and receive calls. YATE makes a free softphone for PCs, Macs, and Linux machines so download your favorite and install it on your desktop. Phones connect to extensions in FreePBX to work with Incredible Pi. Extensions talk to trunks (like Google Voice) to make and receive calls. FreePBX uses outbound routes to direct outgoing calls from extensions to trunks, and FreePBX uses inbound routes to route incoming calls from trunks to extensions to make your phones ring. In a nutshell, that’s how a PBX works. There are lots of bells and whistles that you can explore down the road.
Let’s get started. Using a browser, enter the IP address of your server or just use incrediblepbx.local as the address. Choose FreePBX Administration. When prompted for a username and password, use admin for both. Here are the six steps you need to complete before making your first free call:
- Change FreePBX admin Password and Default Email
- Add Google Voice Account credentials
- Set Destination for Incoming Calls
- Change Extension 701 Passwords
- Eliminate Audio and DTMF Problems
- Install and Register a Softphone to Extension 701
1. Changing FreePBX admin Password and Default Email. From the main FreePBX GUI, click Admin => Administrators. Click on admin user in the far-right column. Enter a new Password and click Submit Changes button. Then click the Apply Config button. Next, set your default email address at the bottom of Settings -> General Settings. Repeat the procedure above to save your entry.
2. Activating a Google Voice Trunk. To create a Trunk in FreePBX to handle calls to and from Google Voice, you’ll need three pieces of information from the Google Voice account you set up above: the 10-digit Google Voice phone number, your Google Voice account name, and your Google Voice password. Choose Other -> Google Voice from the FreePBX GUI. The following blank form will appear:
Fill in the blanks with your information and check all 3 boxes. If your Google Voice account name ends in @gmail.com, you can leave that out. Otherwise, include the full email address. Then click Submit Changes and Apply Config.
There’s one more step or your Google Voice account won’t work reliably with Incredible Pi! From the Linux command prompt while logged into your server as root, restart Asterisk: amportal restart
3. Setting a Destination for Incoming Calls. Now that you’ve created your Google Voice Trunk, we need to tell FreePBX how to process inbound calls when someone dials your Google Voice number. There are any number of choices. You could simply ring an extension. Or you could ring multiple extensions by first creating a Ring Group which is just a list of extension numbers. Or you could direct incoming calls to an Interactive Voice Response (IVR) system (we’ve actually set one up for you to play with).
By default, Incredible Pi is configured to route all incoming calls to a demo IVR that shows off some of the applications that come with Incredible Pi. You can change whenever you like by choosing Connectivity -> Inbound Routes -> Default. In the Set Destination section of the form, change the target to Extensions and then select 701 from the list. Then click Submit and Apply Config.
4. Changing Extension Passwords. From the main FreePBX GUI, choose Applications -> Extensions. Then click on 701 in the Extension List on the right side of your display. You’ll see a form that looks like this:
For now, we only need to make a few changes. First, you need a very secure password for both the extension itself and your voicemail account for this extension. The extension secret needs to be a combination of letters and numbers. The Voicemail Password needs to be all numbers, preferably six or more. Replace the existing 1234secret and 1234 with your own (very secure) entries. You also need to lock down this extension so that it is only accessible from devices on your private LAN. You do that with the deny and permit entries which currently are filled with zeroes. Leave the deny entry the way it is which tells Incredible Pi to block everybody except those allowed in the permit entry below. For the permit, we need the first three octets of your private LAN address, e.g. if your LAN is 192.168.0.something then the permit entry will be 192.168.0.0/255.255.255.0.
Finally, you need to plug in your actual email address in the Voicemail section so that voicemails can be delivered to you when someone leaves a message. You can also include a pager email address if you want a text message alert with incoming voicemails. If you want the voicemails to automatically be deleted from the server after they are emailed to you (a good idea considering the disk storage limitations of an SDHC card), change the Delete Voicemail option from No to Yes. That’s it. Now save your settings by clicking the Submit button. Then reload the dialplan by clicking on the red prompt when it appears.
In case you’re curious, unless you’ve chosen to automatically delete voicemails after emailing them, you can retrieve your voicemails by dialing *98701 from any extension on your phone system. You’ll be prompted to enter the voicemail password you set up. In addition to managing your voicemails, you’ll also be given the opportunity to either return the call to the number of the person that called or to transfer the voicemail to another extension’s voicemail box. And you can always leave a voicemail for someone by dialing their extension number preceded by an asterisk, e.g. *701 would let someone leave you a voicemail without actually calling you.
5. Eliminating Audio and DTMF Problems. You can avoid one-way audio on calls and touchtones that don’t work with these simple settings in FreePBX: Settings -> Asterisk SIP Settings. Just plug in your public IP address and your private IP subnet. Then set ULAW as the only Audio Codec.
6. Setting Up a Desktop Softphone. Incredible Pi supports all kinds of telephones, but we’ll start with the easy (free) one today. You can move on to "real phones" once you’re smitten with the VoIP bug. For today, you’ll need to download a softphone to your desktop PC or Mac.
As we mentioned, the easiest way to get started with Incredible Pi is to set up a YATE softphone on your Desktop computer. Versions are available at no cost for Macs, PCs, and Linux machines. Just download the appropriate one and install it from this link. Once installed, it’s a simple matter to plug in your extension 701 credentials and start making calls. Run the application and choose Settings -> Accounts and click the New button. Fill in the blanks using the IP address of Incredible Pi, 701 for your account name, and whatever password you created for the extension. Click OK.
Once you are registered to extension 701, close the Account window. Then click on YATE’s Telephony Tab and place your first call. It’s that easy!
Monitoring Call Progress with Asterisk. That about covers the basics. We’ll leave you with a tip on how to monitor what’s happening with your PBX. There are several good tools within the FreePBX GUI. You’ll find them under the Reports tab. In addition, Asterisk has its own Command Line Interface (CLI) that is accessible from the Linux command prompt. Just execute the following command while logged in as root: asterisk -rvvvvvvvvvv.
Activating SAMBA for Windows Networking. SAMBA is included for transparent access using the Windows Networking Protocol from PCs, Macs, and other Linux machines. As delivered, SAMBA is deactivated. For obvious reasons, we recommend you never activate root login access to SAMBA without a very secure password. If you wish to enable SAMBA on your server, here are the steps while logged in as root:
- 1. Set SAMBA password for user root: smbpasswd -a root
- 2. Change Windows workgroup from WORKGROUP, if needed: nano -w /etc/samba/smb.conf
- 3. Manually start SAMBA from command prompt: service samba start
- 4. If desired, set SAMBA to start on boot: rcconf and activate SAMBA option
If you’d like to update your status application to display SAMBA status instead of WLan1, here are the steps:
cd /usr/local/sbin

wget http://incrediblepbx.com/sambastatus.tgz

tar zxvf sambastatus.tgz

rm sambastatus.tgz
Activating the PPTP VPN Client. If you’ve followed the Nerd Vittles tutorial and previously set up a PPTP VPN Server for your devices, then it’s pretty simple to add Incredible Pi to the mix by activating its PPTP VPN client. You’ll need the FQDN or public IP address of your VPN server as well as a username and password for VPN access to your VPN server. Once you have those in hand, log into Incredible Pi as root.
Lest we forget to mention, you cannot log into your PPTP server from an IP address on the same private LAN so you’d only use the PPTP VPN when your Incredible Pi is at a remote location.
Edit the connection template: nano -w /etc/ppp/peers/my-pptp-server. Insert the following text and replace myfqdn.org with the FQDN of your PPTP server, replace myname with your PPTP username, and replace mypassword with your PPTP password. Then save the file: Ctrl-X, Y, then Enter.
To test it, issue the following command: /etc/init.d/pptp start. When you run ifconfig, you should now see a ppp0 entry:
ppp0      Link encap:Point-to-Point Protocol

          UP POINTOPOINT RUNNING NOARP MULTICAST  MTU:1500  Metric:1

          RX packets:0 errors:0 dropped:0 overruns:0 frame:0

          TX packets:0 errors:0 dropped:0 overruns:0 carrier:0

          collisions:0 txqueuelen:3

          RX bytes:0 (0.0 B)  TX bytes:0 (0.0 B)
Remember, it won’t show an IP address if the Raspberry Pi and your PPTP VPN Server are on the same subnet (like ours). Once you install your Raspberry Pi in a remote location, you now can access it at the first IP address in your reserved PPTP IP address pool.
To permanently activate the PPTP VPN client on your Incredible Pi server, run rcconf. Scroll to the bottom of the list and highlight pptp. Press the space bar to select it for automatic startup when you boot your server. Then tab to OK and press Enter.
Shutting Down Your Server. Last but not least, never just pull the plug when you want to shut down your server, or you may end up with corrupted MySQL databases. Then nothing will run. Instead, log into your server as root, and issue the following command: shutdown -h now. Enjoy!
3.7 Update: Activating Incredible Fax. With a 512MB Raspberry Pi, here are the 5 Simple Steps to activate Incredible Fax. The complete tutorial is available here.
- Download and Install Incredible PBX 3.7
- Run the /root/fax-enable Script to Automatically Configure HylaFax
- Using FreePBX, Add Additional, Dedicated DID and Inbound Route to Handle Incoming Faxes
- Install Any Desktop HylaFax Client to Send Faxes via Print-to-Fax using any PDF
- Reboot Your Server and Enjoy
Where To Go Next. Once you’ve done a little exploring, take a few minutes to read the complete tutorial on all 35 Incredible PBX applications for Raspberry Pi. A few require a bit of configuration before you start using them. And then you’ll want to explore Interconnecting Asterisk Servers with Incredible PBX and the Raspberry Pi. Enjoy!
 Don’t forget to List Yourself in Directory Assistance so everyone can find you by dialing 411. And add your new number to the Do Not Call Registry to block telemarketing calls. Or just call 888-382-1222 from your new number.
Originally published: Tuesday, September 25, 2012 Updated: Sunday, October 21, 2012 Updated: Tuesday, November 27, 2012
 Support Issues. With any application as sophisticated as this one, you’re bound to have questions. Blog comments are a terrible place to handle support issues although we welcome general comments about our articles and software. If you have particular support issues, we encourage you to get actively involved in the PBX in a Flash Forums. It’s the best Asterisk tech support site in the business, and it’s all free! In fact, there is a thread dedicated to support of Incredible Pi. Please have a look and post your support questions there. Unlike some forums, ours is extremely friendly and is supported by literally hundreds of Asterisk gurus and thousands of ordinary users just like you. You won’t have to wait long for an answer to your question.
Bug Fixes. A few bugs are to be expected. If you’re using Incredible Pi, please review these on the PIAF Forum.

Astricon 2012. Astricon 2012 will be in Atlanta at the Sheraton beginning October 23 through October 25. We hope to see many of you there. We called Atlanta home for over 25 years so we’d love to show you around. Be sure to tug on my sleeve and mention you’d like a free PIAF Thumb Drive. We’ll have a bunch of them to pass out to our loyal supporters. Nerd Vittles readers also can save 20% on your registration by using coupon code: AC12VIT.
Need help with Asterisk? Visit the PBX in a Flash Forum.
whos.amung.us If you’re wondering what your fellow man is reading on Nerd Vittles these days, wonder no more. Visit our new whos.amung.us statistical web site and check out what’s happening. It’s a terrific resource both for us and for you.
Special Thanks to Our Generous Sponsors
FULL DISCLOSURE: ClearlyIP, Skyetel, Vitelity, DigitalOcean, Vultr, VoIP.ms, 3CX, Sangoma, TelecomsXchange and VitalPBX have provided financial support to Nerd Vittles and our open source projects through advertising, referral revenue, and/or merchandise. As an Amazon Associate and Best Buy Affiliate, we also earn from qualifying purchases. We’ve chosen these providers not the other way around. Our decisions are based upon their corporate reputation and the quality of their offerings and pricing. Our recommendations regarding technology are reached without regard to financial compensation except in situations in which comparable products at comparable pricing are available from multiple sources. In this limited case, we support our sponsors because our sponsors support us.
BOGO Bonaza: Enjoy state-of-the-art VoIP service with a $10 credit and half-price SIP service on up to $500 of Skyetel trunking with free number porting when you fund your Skyetel account. No limits on number of simultaneous calls. Quadruple data center redundancy. $25 monthly minimum spend required. Tutorial and sign up details are here.
![]() The lynchpin of Incredible PBX 2020 and beyond is ClearlyIP components which bring management of FreePBX modules and SIP phone integration to a level never before available with any other Asterisk distribution. And now you can configure and reconfigure your new Incredible PBX phones from the convenience of the Incredible PBX GUI.
The lynchpin of Incredible PBX 2020 and beyond is ClearlyIP components which bring management of FreePBX modules and SIP phone integration to a level never before available with any other Asterisk distribution. And now you can configure and reconfigure your new Incredible PBX phones from the convenience of the Incredible PBX GUI.
VitalPBX is perhaps the fastest-growing PBX offering based upon Asterisk with an installed presence in more than 100 countries worldwide. VitalPBX has generously provided a customized White Label version of Incredible PBX tailored for use with all Incredible PBX and VitalPBX custom applications. Follow this link for a free test drive!
Special Thanks to Vitelity. Vitelity is now Voyant Communications and has halted new registrations for the time being. Our special thanks to Vitelity for their unwavering financial support over many years and to the many Nerd Vittles readers who continue to enjoy the benefits of their service offerings. We will keep everyone posted on further developments.
Some Recent Nerd Vittles Articles of Interest…
- Google Voice calling is free throughout the United States and Canada at least through the end 0f 2012. Extensions typically have been announced during the last week of December each year… but nothing lasts forever. [↩]
- Many of our purchase links refer users to Amazon when we find their prices are competitive for the recommended products. Nerd Vittles receives a small referral fee from Amazon to help cover the costs of our blog. We never recommend particular products solely to generate Amazon commissions. However, when pricing is comparable or availability is favorable, we support Amazon because Amazon supports us. [↩]
What’s As Good As a $35 Raspberry Pi? How About 35 Free Incredible PBX Apps
We spent a lot of time building Incredible PBX™ for Raspberry Pi™. But, what many developers forget to do is to answer the question: What Can It Do? Today we’ll walk you through all 35 Incredible PBX applications that we’ve managed to squeeze onto the $35 Raspberry Pi. And, you don’t have to pick Raspberry Pi or Incredible Pi™. It’s $35 for the hardware AND this ginormous collection of free software. Our special thanks goes out to the dozens of developers that have spent years building all of these terrific applications. If you’re just getting started, you’ll want to begin by reviewing our Version 3.7 Quick Start Guide or the just released Version 3.11 Quick Start Guide.
Once you have Incredible PBX 3.7 or 3.11 installed and running, read on to learn what you can do with your new toy. Here’s a quick thumbnail. In addition to free Google Voice calling in the U.S. and Canada, Incredible Pi supports 5+ simultaneous calls which is more than ample for most homes and small businesses. And you get virtually everything that a full-blown PBX offers: voicemail, music on hold, call forwarding and follow-me, IVRs and AutoAttendants, call blacklists, and even a preconfigured, rock-solid Linux firewall with IP address whitelisting. But, what separates Incredible PBX from the pack is its 35 bundled, preconfigured applications. You’d be hard pressed to add them to any commercial PBX without also giving them your new car. So, from A to Z, meet the Incredible PBX “Fab 35” for the $35 Raspberry Pi…
Call our demo Raspberry Pi (1-843-284-6844) and take it for a spin to judge the quality for yourself.
1. AsteriDex. A MySQL-based address book that can be managed inside the FreePBX® GUI: Other -> AsteriDex. Can be used for CallerID lookups with CallerID Superfecta, e.g. unpublished cell phone numbers of your friends. Can be used for Speed Dials by embedding 3-digit Dial Codes in each entry. Dial 00 + 3 digits to connect. Use 000 with Incredible PBX 3.11. Can be used for Speech-to-Text Calling by Name. Dial 411, say the name of an entry in your AsteriDex database, and press pound (#). Or access AsteriDex with a browser and click on any entry to place a call after designating an extension on your system to handle calls placed with AsteriDex. Click-to-Dial Bug Fix for 3.3 here. No patch required with 3.5 or later releases.
2. Asterisk Info. Accessible in FreePBX GUI: Reports -> Asterisk Info. Displays Asterisk® SIP, IAX, and Google Voice/Jabber Connections, Registrations, Active Channels, Peers, and much more.
3. Blacklist. Block Annoying Callers, Ex-Spouses, and Anonymous Callers by simply entering the numbers to block and checking the Block Anonymous box. Accessible in FreePBX GUI: Admin -> Blacklist.
4. CallerID Superfecta. Open-source app that provides CallerID name lookups from dozens of sources. Accessible in FreePBX GUI: Other -> CID Superfecta. Choose Default setup. Then choose the desired lookup sources. Select the order of the lookups. First hit wins. Also includes testing facility to assist in choosing quickest and best lookup sources.
5. CallWho. Speech-to-Text Dialing in conjunction with AsteriDex database. Dial 411 and say the name of the person or company to call. Press pound (#). Looks up names by firstname, lastname AND lastname, firstname. For certain names like Katherine, you may need to add duplicate AsteriDex entry for Catherine since CallWho uses soundex codes for lookups. Watch Asterisk CLI to see what CallWho thinks you said. Then make appropriate additions to AsteriDex.
6. CDR Reports. Call Detail Reports of various flavors to show incoming and outgoing calls from Incredible PBX. Accessible in FreePBX GUI: Reports -> CDR Reports. Includes Boolean searches, call graphs, and CSV data exports.
7. Config Edit. A web-based editor to manage Asterisk configuration files that are "safe" to edit and won’t be overwritten by FreePBX reloads. You still need to be very careful. Accessible in FreePBX GUI: Other -> Config Edit.
8. Email and TTS Announcements of IP Addresses. For those lacking a monitor, you now can totally manage Incredible Pi using a web browser from any PC or Mac. But, to access Incredible Pi via SSH (#16 below), you’ll need to know the DHCP-assigned IP address. We provide two ways to obtain it. First, you can plug in a set of earbuds when you boot Incredible Pi, and the system will tell you its IP address at the end of the boot process. With version 3.x, you can carefully edit1 /etc/init.d/freepbx and uncomment line 70 after inserting your actual email address.
There’s another little trick you might want to try. Beginning with the 3.x releases, you can take advantage of Bonjour to access your server via SSH using root@incrediblepbx.local. It also works with a browser to access the FreePBX GUI: http://incrediblepbx.local. So you no longer need an IP address to gain access.
9. Feature Codes. Incredible Pi includes an expandable and tailorable list of Feature Codes that can be used from phones connected as extensions on your system. The 50 predefined Feature Codes are accessible in the FreePBX GUI: Admin -> Feature Codes. Here’s the default list:
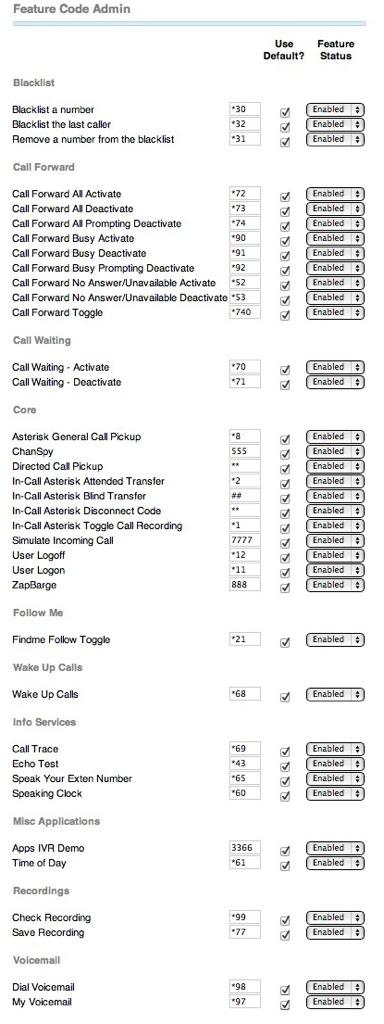
10. Follow Me and VmX Locater™. Two very sophisticated FreePBX call forwarding applications that provide enormous flexibility in determining how incoming calls to various extensions should be routed. It is accessible in the FreePBX GUI: Applications -> Follow Me and also through the ARI interface on the web page at the IP address of your server. Here’s a link to the complete tutorial.
11. Gmail SMTP Relay. If your ISP blocks downstream mail servers, it means your server won’t be able to send email messages directly to recipients. Not to worry! Just run the /root/use-gmail-smtp-relay script to reconfigure SendMail to use any Gmail account as an SMTP relay host. Thank you, Comcast!
12. Google News by Phone. Need a quick news update? Pick up any phone on your system and dial 951. Or you can offer it to callers by leaving nv-ivr as the default inbound route for your Google Voice trunks. Choose 1 from IVR menu.
13. Google Stocks by Phone. Keep up with your favorite stocks. Dial 950 and say the name of the company you’d like to track. For best results, use phonetic words for the stock symbol letters. For example, Apple would be Alpha, Alpha, Papa, Lima. Also works from the IVR menu. Just press 3.
14.Hotel-Style Wakeup Calls. Works exactly like the wakeup calls in your favorite hotel. Pick up any phone on your system and dial *68. Includes snooze. Configuration available through FreePBX GUI: Other -> Wake Up Calls to let you schedule wake up calls for others using designated extensions.
15. Interactive Voice Response (IVR) System. A full-featured, menu-driven IVR editor is included in FreePBX: Applications -> IVR. We’ve included a sample to get you started. Just click on nv-ivr to display its settings. You can delete and add options to your IVRs in seconds. The sound file that you play to introduce your IVR need not include all the available choices. We call this a Stealth AutoAttendant because callers need not know that an IVR is even available. Here’s how we’ve actually reconfigured the demo IVR that you can reach by dialing 1-843-284-6844. You’ll note that some of the IVR selections have been removed, and a 0 option has been added to access the new Conference Bridge in version 3.3 and beyond.
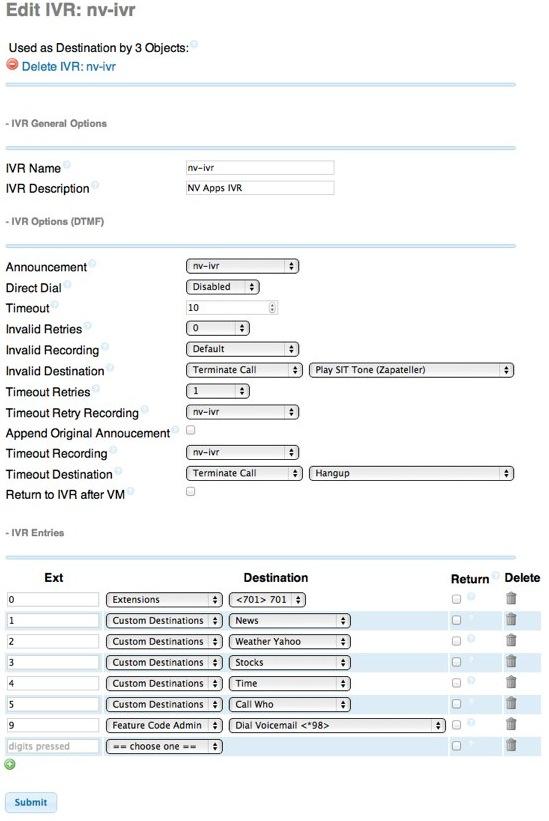
16. JAVA SSH Web Client. No external SSH app is required to access your server. You can log into your Incredible PBX 3.7 server via SSH from within the FreePBX GUI: Admin -> Java SSH. Disregard the maint login instructions. That’s for PBX in a Flash servers.
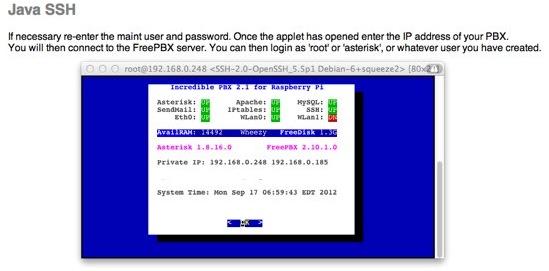
17. Music on Hold Management. You can easily manage your Music on Hold collection within the FreePBX GUI: Settings -> Music on Hold. MP3 files are not recommended on the Raspberry Pi because of performance issues. So use WAV files with Sample Rate: 8 KHz, Bit Depth: 8 bits, and Channels: 1. Here’s how to convert any MP3 file to WAV for use with Asterisk: sox sample.mp3 -c 1 -r 8000 sample.wav.
18. phpMyAdmin. Manage all of your MySQL databases from within the FreePBX GUI: Other -> phpMyAdmin. phpMyAdmin is one of the best database management tools in the business.
19. PPTP Virtual Private Networking. Quickly enable the PPTP VPN client on Incredible Pi to securely access all of the resources on any existing PPTP VPN. To set up a PPTP VPN, read the Nerd Vittles tutorial. To enable the Incredible Pi PPTP VPN client, edit /etc/ppp/peers/my-pptp-server and insert your credentials. Run rcconf as root and activate pptp and pppd-dns. Then reboot.
20. Reminder Scheduling by Phone or Web. Telephone Reminders are awesome even if we did write it. To schedule a reminder or recurring reminder, pick up any phone and dial 123. You can also schedule and manage reminders within the FreePBX GUI: Other -> Reminders. A password can be added by uncommenting the 123,n,Authenticate line and changing the default entry in /etc/asterisk/extensions_custom.conf. Bug Fix for 3.3 here. No patch required with 3.7.

21. Ring Groups. Ring Groups allow you to Ring a Group of extensions by dialing a certain number. You also can specify a Destination when nobody answers, e.g. an IVR or a voicemail account. Add, Delete, and Manage Ring Group entries within the FreePBX GUI: Applications -> Ring Groups.
22. SAMBA Windows Networking. If you’re a Microsoft Windows fan and use Windows Networking, it’s easy to add Incredible Pi as a note on your network. While logged into your server as root, set up a SAMBA password for user root: smbpasswd -a root. Edit /etc/samba/smb.conf and set the appropriate Windows workgroup. Run rcconf as root and activate samba. Then reboot.
23. SMS Dictator. Pick up any phone and dial 767 (S-M-S). Dictate an SMS message to deliver. When prompted, say the name of someone in your AsteriDex database whose phone number has SMS capability. Before this will work, edit /etc/asterisk/extensions_custom.conf and add your Google Voice credentials (GVACCT and GVPASS) in ext. 767.
24. SMS Message Blasting. Send out SMS messages to a group of individuals with this handy script. Log into your server as root. Edit /root/smsmsg.txt and insert the SMS message you wish to send. Edit /root/smslist.txt and add either phone numbers or email addresses with (optional) names of the recipients. Run the script to send the messages via SMS for phone numbers or via SendMail for email entries: /root/smsblast.
25. Speed Dial with AsteriDex (00+). Assign a 3-digit Dial Code in AsteriDex for each of your contacts, e.g. the telephone keypad numbers matching the first three letters in a contact’s name like 263 for American Airlines. Then, to call that contact with Speed Dial, dial 00263 using any phone.
26. Stealth AutoAttendant. Create a generic recording to thank callers for contacting you: Admin -> System Recordings. Or just use our generic welcoming message: nv-GenericWelcome. Create an IVR using one of these recordings as your Announcement message. Create an IVR menu of features on your PBX that you want to enable for "those in the know." Make this IVR the Inbound Route destination for one or more of your Trunks.
27. Status Reporting for FreePBX. Within the FreePBX GUI, you can get a real-time display of how your server is functioning: Reports -> FreePBX System Status.
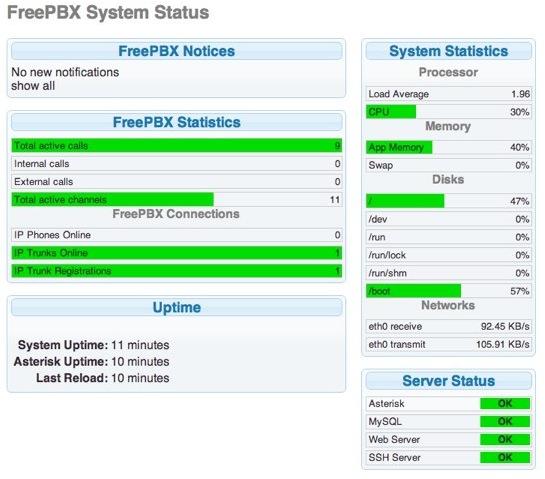
28. Status Reporting for Incredible PBX. Whenever you log into your server, you’ll get a status snapshot of how your server is functioning. You also can run it at any time with the command: status. Check it regularly. Clean out your mail often by typing: mail. Check the size of your log files: ls -all /var/log. And be alert to low memory or disk conditions. Memory can usually be restored to sane levels by clearing the cache: /root/clear-cache.
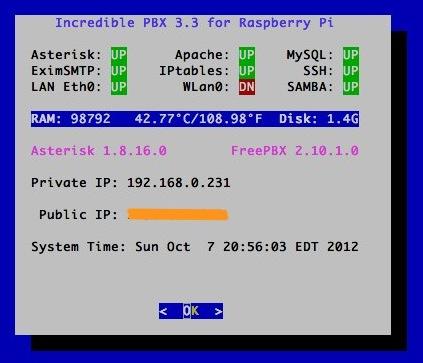
29. System Recordings. FreePBX includes a facility to create recordings and integrate them into the FreePBX GUI: Admin -> System Recordings. You can either import a recording or create a new one by selecting an extension on your system and then by dialing *77 from that extension.
30. Time of Day. We’ve added a Time of Day feature that mimics the old Ma Bell system. From the default IVR, choose option 4. You can integrate this into your IVRs by adding Custom Destination -> Time as an IVR option.
31. Travelin’ Man 3 WhiteLists. We strongly recommend that you always run Incredible PBX behind a hardware-based firewall with no Internet port exposure to your server. But, for those with telephones at remote sites, we appreciate that sometimes this isn’t always possible. So your server includes a preconfigured Linux firewall, iptables, that is preconfigured to block access except for private (non-routable) networks and trusted VoIP providers. You can add additional safe IP addresses and FQDNs using the Travelin’ Man 3 tools included in the /root directory. Before using any of these tools, please read the Travelin’ Man 3 tutorial.
32. Voicemail Delivery by Phone or Email. FreePBX includes all of the necessary tools to let you manage voicemail on your server. For each FreePBX extension, you can determine whether to enable voicemail and specify notification options as well as how the voicemails can be retrieved, either by phone (*98), email, or text message. You can also specify whether incoming voicemails should be deleted after sending them to an email address. You obviously would want to test this throughly before implementing it to make certain the voicemails arrive reliably.
33. Weather by Zip Code (NOAA). Get the latest weather forecast for almost any zip code in the United States courtesy of the National Weather Service. Dial 947 (Z-I-P) and key in the 5-digit zip code desired.
34. Worldwide Weather by Phone (Weather Underground). You’ll need a free Weather Underground API key to use this one. Once you have it, insert it on line 21 of nv-weather-wunderground.php in /var/lib/asterisk/agi-bin. Now you can get what we think are the best worldwide weather forecasts in the business. Dial 949 and say the name of the city and state or, for worldwide weather forecasts, say the name of the city and country.
35. Worldwide Weather by Phone (Yahoo). Get the latest weather forecast for almost any city in the world. Dial 948 and say the name of the city and state or, for worldwide weather forecasts, say the name of the city and country. Also works from the IVR menu. Just press 2.
36. BONUS: Conference Bridge. If you’ve installed version 3.3 or later, there’s an awesome bonus application, a full-featured Conference Bridge. We’ve tested it with up to 9 callers chatting away. If you have the Internet bandwidth (100K per caller) to support it, you’re in for quite a treat. Just point a trunk at nv-ivr and tell callers to call the number and press zero to join the conference. Then enter 1234 when prompted for the conference PIN. For phones connected directly to Incredible PBX, just dial C-O-N-F to join the conference. Complete details are available in the 3.7 Quick Start Guide.
37. BONUS 3.2 App: SysInfo. The popular SysInfo application has been added in FreePBX Reports.
38. BONUS 3.2 App: Bluetooth Proximity Detection. The modules and code required to support Bluetooth Proximity Detection and forward your calls to your cell when you’re away has been added. Read the documentation. Insert your credentials in /etc/proximity. Then activate the proximity monitor by uncommenting the command in /etc/crontab.
39. Interconnecting Asterisk Servers with Incredible PBX and the Raspberry Pi.
40. Incredible Fax for 512MB Raspberry Pi. The complete tutorial is available here.
41. Just Released: Incredible PBX 3.11. Complete tutorial available here.
Whew. Enjoy!
Originally published: Monday, September 17, 2012
Astricon 2012. Astricon 2012 will be in Atlanta at the Sheraton beginning October 23 through October 25. We hope to see many of you there. We called Atlanta home for over 25 years so we’d love to show you around. Be sure to tug on my sleeve and mention you’d like a free PIAF Thumb Drive. We’ll have a bunch of them to pass out to our loyal supporters. Nerd Vittles readers also can save 20% on your registration by using coupon code: AC12VIT.
Need help with Asterisk? Visit the PBX in a Flash Forum.
whos.amung.us If you’re wondering what your fellow man is reading on Nerd Vittles these days, wonder no more. Visit our new whos.amung.us statistical web site and check out what’s happening. It’s a terrific resource both for us and for you.
Special Thanks to Our Generous Sponsors
FULL DISCLOSURE: ClearlyIP, Skyetel, Vitelity, DigitalOcean, Vultr, VoIP.ms, 3CX, Sangoma, TelecomsXchange and VitalPBX have provided financial support to Nerd Vittles and our open source projects through advertising, referral revenue, and/or merchandise. As an Amazon Associate and Best Buy Affiliate, we also earn from qualifying purchases. We’ve chosen these providers not the other way around. Our decisions are based upon their corporate reputation and the quality of their offerings and pricing. Our recommendations regarding technology are reached without regard to financial compensation except in situations in which comparable products at comparable pricing are available from multiple sources. In this limited case, we support our sponsors because our sponsors support us.
BOGO Bonaza: Enjoy state-of-the-art VoIP service with a $10 credit and half-price SIP service on up to $500 of Skyetel trunking with free number porting when you fund your Skyetel account. No limits on number of simultaneous calls. Quadruple data center redundancy. $25 monthly minimum spend required. Tutorial and sign up details are here.
![]() The lynchpin of Incredible PBX 2020 and beyond is ClearlyIP components which bring management of FreePBX modules and SIP phone integration to a level never before available with any other Asterisk distribution. And now you can configure and reconfigure your new Incredible PBX phones from the convenience of the Incredible PBX GUI.
The lynchpin of Incredible PBX 2020 and beyond is ClearlyIP components which bring management of FreePBX modules and SIP phone integration to a level never before available with any other Asterisk distribution. And now you can configure and reconfigure your new Incredible PBX phones from the convenience of the Incredible PBX GUI.
VitalPBX is perhaps the fastest-growing PBX offering based upon Asterisk with an installed presence in more than 100 countries worldwide. VitalPBX has generously provided a customized White Label version of Incredible PBX tailored for use with all Incredible PBX and VitalPBX custom applications. Follow this link for a free test drive!
Special Thanks to Vitelity. Vitelity is now Voyant Communications and has halted new registrations for the time being. Our special thanks to Vitelity for their unwavering financial support over many years and to the many Nerd Vittles readers who continue to enjoy the benefits of their service offerings. We will keep everyone posted on further developments.
Some Recent Nerd Vittles Articles of Interest…
- To configure some of the Incredible PBX apps, you are instructed to edit a specific config file. Some of these files are not accessible using Config Edit. This is our shorthand way of saying: (1) log into your server via SSH as root using your root password and (2) edit the specified file using a text editor, e.g. nano -w filename and (3) save your changes to the file: Ctrl-X, Y, then Enter and (4) logout of your server. [↩]
Free Asterisk Solutions
