
Home » Posts tagged 'freepbx' (Page 30)
Tag Archives: freepbx
The Most Versatile VoIP Provider: FREE PORTING

 JUST RELEASED: Visit the Incredible PBX Wiki
The 30-Second PBX: Introducing Proxmox 4 for the Intel NUC and Asterisk 13

With the advent of cloud-based computing and desktop virtual machine platforms like VirtualBox, we haven’t played with dedicated hardware for Asterisk® in a couple of years. WOW! It’s just amazing the quantum leaps in miniaturization, price, and performance that have transpired during our absence. Last week, we introduced a dedicated server platform for under $200 that could serve as a small business PBX for almost any 20-30 person organization. Today, meet Big Brother. You’re looking at all the components that make up the $500 Intel® NUC D54250WYK with a Core i5 dual-core processor, a 250GB mSATA drive, and 16GB of RAM. While you install the RAM and disk drive yourself, if you can unscrew 5 screws and have 5 minutes to spare, you can handle this. With the addition of the just released (free) Proxmox 4 virtualization platform, it can run a half dozen powerful stand-alone applications without ever breaking a sweat. Little wonder that Digital Ocean and CloudAtCost are all but giving away server resources. They almost have to given the developments in stand-alone hardware.
Buying Your Hardware

So here’s how we started. Of course, you can adjust the components and the merchant to meet your own requirements. For us, Amazon1 works great, and the prices are competitive. Who else delivers on Sunday? Despite the notice that the computer would be here on Monday, we knew better. And sure enough it was in the box with the other Sunday goodies. Remove the four screws from the bottom feet of the computer, and the case opens easily. Next, unscrew the screw from the bottom of the motherboard that holds the SSD drive in place securely. Snap in the mSATA drive and the two memory sticks, replace the screws, and you’re in business.
Initial Setup of the Intel NUC Platform
Our unit actually came with the latest BIOS preinstalled, but you’ll want to always upgrade the BIOS on any Intel motherboard. Everything generally gets better with each new upgrade. The rest of the firmware is fine as is unless you plan to use the computer as a Windows machine. You’ll find all the downloads here. The firmware you want is version 0041, and the file you want is WY0041.BIO. Copy it to the top level directory of a DOS-formatted USB flash drive using any desktop computer. On the Intel NUC, plug in a USB keyboard and mouse as well as the USB flash drive and a USB CD/DVD drive. Then connect a network cable. Finally, connect a monitor using a microHDMI to HDMI cable, and you’re all set. Once we’re finished configuring the Intel NUC, you can stick it on a shelf that has power and a network connection. No other peripherals are necessary as everything can be managed through SSH or a web browser.
To upgrade the BIOS, boot the computer by plugging it in and pressing the power button on top. Press F7 during the initial POST, choose the USB flash drive, select the .BIO file, and press ENTER. Once the BIOS is loaded, the machine will reboot.
Introducing Proxmox 4.0 Virtual Environment
When it comes to virtualization, we’ve been big fans of Proxmox for a very long time. We introduced Proxmox for VoIP virtualization over six years ago. Things have come a long way since then. And Proxmox VE 4.0 is the culmination of years of hard work by a very talented development team. You can read all about the new feature set and support for KVM and Linux Containers here. Our own take on virtualization is that OpenVZ templates were appealing because they installed and loaded quickly. The downside was they shared a single (proprietary) kernel which often led to security issues and made firewall implementation at the virtual machine level difficult. Of course, any applications such as DAHDI that required kernel implementation were extremely complex to implement and use. Now that almost all of Intel’s and AMD’s processors support virtualization extensions (Intel VT or AMD-V), we were not one to shed tears when Proxmox dropped support for OpenVZ and replaced it with Linux Containers. In fact, for our purposes, they could have left out Linux Containers as well. They suffer from some of the same quirks that made OpenVZ implementations problematic. The platform we’ve chosen for VoIP implementation has full support for virtualization extensions which means you can load and run complex applications such as Windows and Incredible PBX just as if you were using standalone hardware. The only real difference is we’re going to provide a template for building KVM-based Incredible PBX virtual machines in under 30 seconds. So you’ll get the best of both worlds, standalone computer functionality coupled with jaw-dropping implementation speed. For those that train or support multiple independent organizations as well as those that love to tinker and experiment, our solution has no equal.
To begin, download the Proxmox VE 4.0 ISO and burn it to a CD or DVD.
As we mentioned last week, if you don’t happen to have one, LG’s tiny USB-powered DVD Writer is the best $25 you will ever spend. And they keep getting cheaper!

Installing Proxmox VE 4.0 on the Intel NUC
Now we’re ready to get started. Insert the Proxmox VE 4.0 CD into the drive connected to your Intel NUC and boot the machine. Press F10 during POST and choose the CD/DVD drive to start the Proxmox install. Accept the license agreement and fill in the blanks. The important piece is to give your server a hostname. Just be sure it starts with proxmox4, e.g. proxmox4.incrediblepbx.com or use your own domain: proxmox4.yourdomain.com. The actual domain becomes important only if your server will be directly connected to the Internet in which case the FQDN obviously matters. Otherwise, Proxmox needs the hostname to manage things internally. Assign a permanent IP address for your server or use DHCP to obtain an IP address and then reserve that IP address for use by Proxmox in your router’s settings. Either way works fine, but you don’t want the IP address changing down the road.
BIOS Adjustments to Support Proxmox VE 4.0
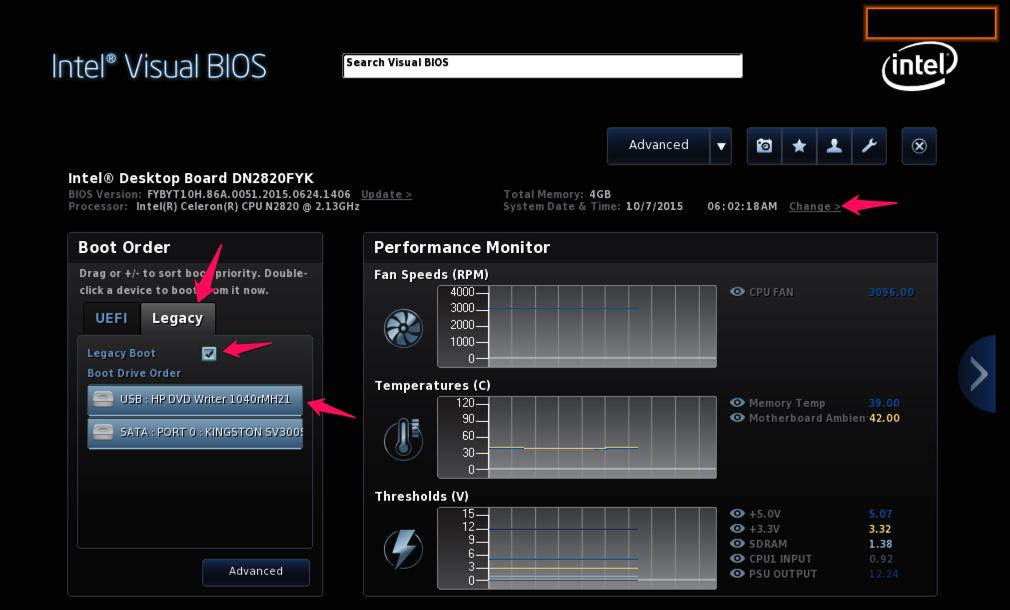
Once the Proxmox install completes, it’s time to reboot. During the POST, press F2 to access Intel’s Visual BIOS. If you followed along last week, you’ll recall that we made some changes to accommodate Legacy booting of the server in lieu of UEFI. This week we need a different approach because of some quirks in the Proxmox server implementation procedure. We pulled our hair out (what little is left) for a couple days wrestling with this because the server wouldn’t automatically boot in either Legacy boot mode OR UEFI mode. The reason is because Proxmox puts a GPT label on the drive signifying that it’s a UEFI-compatible device whether UEFI is disabled in the BIOS or not. This confuses the Intel NUC bootloader. So you end up with a boot failure and the cryptic message "No boot device found." Proxmox blames Intel for a buggy BIOS even though Intel developed the GPT specification. If you enjoy food fights, break out the popcorn and enjoy the dialog on the Proxmox Forum. Suffice it to say, there’s a difference of opinion about who should fix this. Here’s the easy way to resolve the impasse.
In Visual BIOS, click Advanced tab. Click Boot tab. Click Boot Priority. Make it look like this:
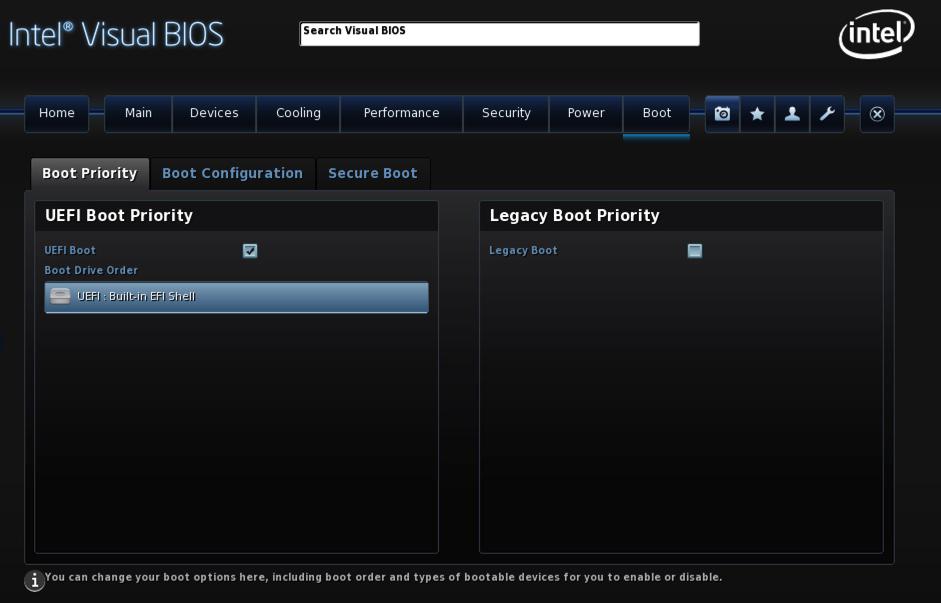
If the BuiltIn EFI Shell option doesn’t appear, don’t worry about it. Just press F10 to save your changes anyway. When your server reboots, it will drop into the EFI shell. Type the following commands pressing ENTER after each entry:
fs0:

echo "fs0:\EFI\proxmox\grubx64.efi" > fs0:\startup.nsh

startup.nsh
At this point, your server should boot into Proxmox. On reboot, the EFI shell will appear momentarily followed by an automatic boot into Proxmox. Solved!
Using Incredible PBX with Proxmox 4.0
You now have a functioning Proxmox server. When you reboot and login as root, the server will tell you how to access the Proxmox GUI with your browser. Before we put the necessary pieces in place to support Incredible PBX, we want to provide a very brief technical overview of how best to use Proxmox virtualization based upon our testing. Using a methodology similar to that demonstrated by AVOXI using Docker at this year’s AstriCon meeting, we use a backup image to instantiate "KVM containers." We hear some of you saying, "There’s no such animal." And right you are. The nomenclature is different, but the concept is similar. In fact, our simulated KVM Containers work exactly like OpenVZ and Linux Containers with none of the drawbacks of a shared kernel. And the good news is Proxmox 4 implements this perfectly through its backup and restore mechanisms. New kernel-based virtual machines can be created in under 30 seconds. Following initial login to a new KVM as root from the console, we individualize the KVM by randomizing passwords, creating new SSH credentials, and setting up a custom whitelist for the Incredible PBX IPtables firewall. The initialization procedure takes less than a minute and is only run the first time you log into your new KVM as root. The bash init script is here: /etc/profile.d/helloworld.sh.
Preliminary Setup Steps with Proxmox 4.0
The most important setup step is to put your Proxmox server behind a hardware-based firewall or configure the built-in firewall to keep out the bad guys. Proxmox has had their share of security vulnerabilities over the years so this is really critical. It’s beyond the scope of this article to walk through the entire firewall setup process, but you’ll find plenty of literature on the Proxmox Wiki and Forum as well as on the Internet. Each of your KVMs will have its own preconfigured whitelist using the IPtables firewall, and any of the Incredible PBX tutorials can walk you through adding and changing entries in those whitelists.
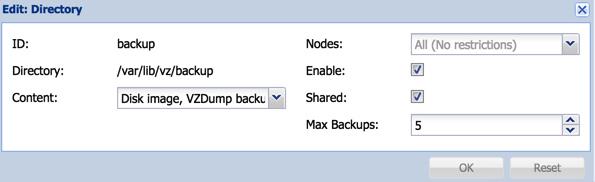
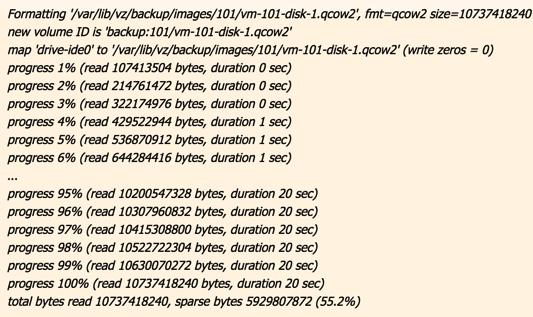
To use the backup and restore functionality of Proxmox, you’ll need to create a backup storage directory in the Proxmox GUI. After logging in as root, click Datacenter in the Server View, click the Storage tab, click the Add button, and choose Directory from the pulldown list. Fill in the blanks like this using VZDump Backup File for the Content type:
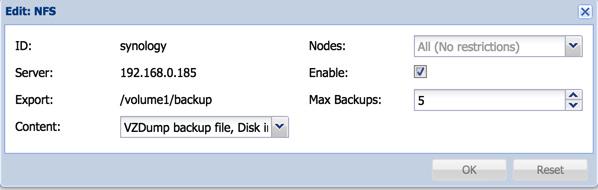
If you have access to a Cloud-based or local NFS device, it’s just as easy to create an additional backup directory on your NFS server. Follow the same steps and choose NFS from the Storage pulldown. With NFS, you must first set up a storage directory with NFS permissions for the IP address of your Proxmox server.
Last, but not least, you need to learn your way around in the GUI. proxmox4 is the name of your server if you followed our recommended setup for your hostname. Under the server, you will find entries for each of your KVM, Linux Containers (LXC), and other drives, e.g. local, backup, and synology.
To add a new LXC image to your server, choose local -> Content -> Templates, pick the desired LXC image, and click Download.
To add new ISO images to your server for building KVMs, choose local -> Content -> Upload, pick ISO Image as the Content type, choose the ISO from your desktop by pressing Select File, then click Upload button.
To start up Virtual Machines once you have created them, click on the VM number under proxmox and click Start. To access the virtual machine once it has begun booting, click Console.
To shutdown a KVM, click on the VM number under proxmox and click Shutdown. Or you can type halt after logging into the KVM as root from the KVM’s Console.
For a list of all available content, choose proxmox4 -> local -> Content.
Loading the Incredible PBX 13 Components into Proxmox 4.0
We need to put two pieces into place to get things rolling with Incredible PBX 13. There are two ways to create Incredible PBX 13 KVMs. You can do it manually from the IncrediblePBX13.iso just as you would on a stand-alone machine. Or you can restore from the IncrediblePBX13 KVM backup image to create a new KVM. The first method takes about 30 minutes. The second method takes less than 30 seconds. The choice is all yours. The results are exactly the same.
Before you can create KVMs, we need to put the Incredible PBX 13 backup image and the Incredible PBX 13 ISO in their proper places. To save some time and steps, we’re going to load the backup image by logging into the Proxmox server as root. For the ISO image, we’ll use the GUI.
To install the Incredible PBX 13 backup image, log into your server as root using SSH and issue these commands:
cd /
wget 'http://downloads.sourceforge.net/project/pbxinaflash/IncrediblePBX13-12 with Incredible PBX GUI/IncrediblePBX13-KVM.tar.gz'
tar zxvf IncrediblePBX13-KVM.tar.gz
rm IncrediblePBX13-KVM.tar.gz
To install the Incredible PBX 13 ISO image, first use a web browser to download IncrediblePBX13.iso to your desktop from SourceForge. Next, login to your Proxmox GUI and choose proxmox4 -> local -> Content -> Upload, pick ISO Image as the Content type, choose IncrediblePBX13.iso from your desktop by pressing Select File, then click the Upload button.
Your Incredible PBX 13 backup image should now appear under proxmox4 -> backup -> Content.
Your Incredible PBX 13 ISO image should now appear under proxmox4 -> local -> Content.
Building Your First Incredible PBX 13 Virtual Machine
To create a new Incredible PBX Virtual Machine, click the options in the order shown on the image above. Use any VM number desired. In less than 30 seconds, you’ll have your first 10GB Incredible PBX 13 Virtual Machine in place:
Initializing KVM Network Device MAC Address. If you ever create more than one KVM from the same backup image, you must initialize the network device’s MAC address before starting the KVM. Otherwise, you will get a conflicting network connection and a mess. Best practice: ALWAYS initialize the network device MAC address when you first create a new KVM from a backup. Click on the VM number in the left column under proxmox4. Then click the Hardware tab, click Network Device, and Edit. Erase the existing MAC address and click OK. Now it’s safe to start the KVM. The telltale sign that you forgot to do this will be a flaky network connection on one or more of your KVMs. If it happens, just delete the offending KVM and create a new one. You won’t forget but once. 😉
To start your new Incredible PBX Virtual Machine, click on the VM number in the left column under proxmox4. Then click the Start button on the right side of the Proxmox GUI header. The Tasks list at the bottom of the GUI will show it loading. Now click on the Console button at the top of the GUI to open a QEMU console session with your virtual machine. At the login prompt, login in as root with the default password: password. The startup script will complete the customization of your server in less than a minute. Then you’re ready to go. Complete the same configuration steps that you would on any new Incredible PBX server:
Change your root password and make it very secure: passwd
Create admin PW to access Incredible GUI and FreePBX® GPL modules: /root/admin-pw-change
Set your correct time zone: /root/timezone-setup
Create admin PW for web apps: htpasswd /etc/pbx/wwwpasswd admin
Make a copy of your Knock codes: cat /root/knock.FAQ
Decipher IP address and other info about your server: status
Now it’s time to pick up the Incredible PBX 13 tutorial for CentOS and continue on with your adventure if you’ve never done this before. Then take a good look at the Incredible PBX Application User’s Guide to get the most out of your new server.
Building a second, third, and fourth KVM is just as easy as building the first one.
Backing Up Incredible PBX 13 Virtual Machines
The real beauty of virtualization and Proxmox in particular is that you can make instantaneous backups of your virtual machine at any time whether the virtual machine is running or not. Those backups can be copied to off-site storage for safe keeping. The critical component of any server is the reliability of and ease with which you can recover from a catastrophic failure. It doesn’t get any easier than this.
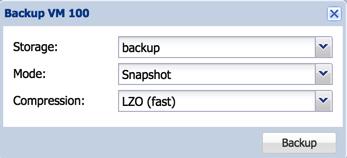
To make a backup of your virtual machine to your backup directory, click on the VM ID number in the left column. Then click Backup -> Backup Now. Fill in the blanks of the backup template.
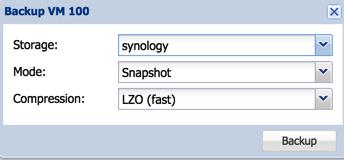
To make a backup of your virtual machine to a local or off-site NFS device, it’s just as easy. Click on the VM ID number in the left column. Then click Backup -> Backup Now. Fill in the blanks of the backup template. Makes you want to run right out and buy a Synology NAS/NFS device, doesn’t it?
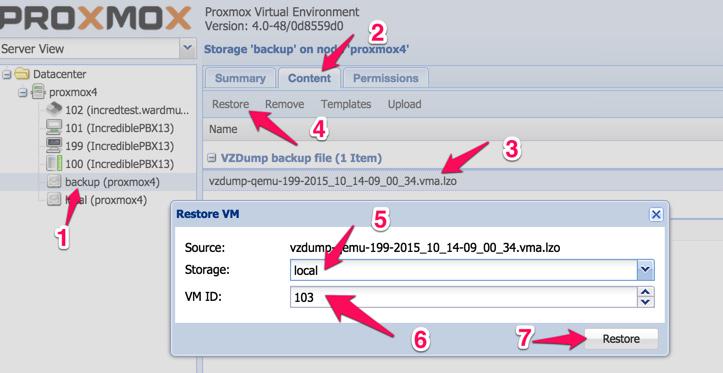
Restoring a virtual machine from a backup is just as easy as it was to create the virtual machine image from our backup above. Just choose your backup image instead of the one we provided.
Backing up your virtual machines is only half the story, of course. It also is important to get a backup of the whole enchilada, i.e. the entire Proxmox server. Luckily, the latest version of Clonezilla works perfectly after you have applied the UEFI BIOS patch as documented above. Enjoy!
Originally published: Monday, October 19, 2015
9 Countries Have Never Visited Nerd Vittles. Got a Friend in Any of Them https://t.co/wMfmlhiQ9y #asterisk #freepbx pic.twitter.com/TPFGZbqWB6
— Ward Mundy (@NerdUno) April 22, 2016

Need help with Asterisk? Visit the PBX in a Flash Forum.
Special Thanks to Our Generous Sponsors
FULL DISCLOSURE: ClearlyIP, Skyetel, Vitelity, DigitalOcean, Vultr, VoIP.ms, 3CX, Sangoma, TelecomsXchange and VitalPBX have provided financial support to Nerd Vittles and our open source projects through advertising, referral revenue, and/or merchandise. As an Amazon Associate and Best Buy Affiliate, we also earn from qualifying purchases. We’ve chosen these providers not the other way around. Our decisions are based upon their corporate reputation and the quality of their offerings and pricing. Our recommendations regarding technology are reached without regard to financial compensation except in situations in which comparable products at comparable pricing are available from multiple sources. In this limited case, we support our sponsors because our sponsors support us.
 BOGO Bonaza: Enjoy state-of-the-art VoIP service with a $10 credit and half-price SIP service on up to $500 of Skyetel trunking with free number porting when you fund your Skyetel account. No limits on number of simultaneous calls. Quadruple data center redundancy. $25 monthly minimum spend required. Tutorial and sign up details are here.
![]() The lynchpin of Incredible PBX 2020 and beyond is ClearlyIP components which bring management of FreePBX modules and SIP phone integration to a level never before available with any other Asterisk distribution. And now you can configure and reconfigure your new Incredible PBX phones from the convenience of the Incredible PBX GUI.
The lynchpin of Incredible PBX 2020 and beyond is ClearlyIP components which bring management of FreePBX modules and SIP phone integration to a level never before available with any other Asterisk distribution. And now you can configure and reconfigure your new Incredible PBX phones from the convenience of the Incredible PBX GUI.
 VitalPBX is perhaps the fastest-growing PBX offering based upon Asterisk with an installed presence in more than 100 countries worldwide. VitalPBX has generously provided a customized White Label version of Incredible PBX tailored for use with all Incredible PBX and VitalPBX custom applications. Follow this link for a free test drive!
 Special Thanks to Vitelity. Vitelity is now Voyant Communications and has halted new registrations for the time being. Our special thanks to Vitelity for their unwavering financial support over many years and to the many Nerd Vittles readers who continue to enjoy the benefits of their service offerings. We will keep everyone posted on further developments.
Some Recent Nerd Vittles Articles of Interest…
- Some of our purchase links refer users to Amazon and other sites when we find their prices are competitive for the recommended products. Nerd Vittles receives a small referral fee from merchants to help cover the costs of our blog. We never recommend particular products solely to generate commissions. However, when pricing is comparable or availability is favorable, we support Amazon and other merchants because they support us. [↩]
The SOHO Dream Machine: A Unified Communications Platform for Under $200
Remember when you could buy an awesome server for under $200? Thanks to Intel® and Yogi Berra, it’s déjà vu all over again! Years ago we discovered a machine called the Acer Revo that could be had for about $200. It met all of the Unified Communications requirements that a home office or small office could dream of, but then they doubled in price. That led us to the Raspberry Pi 2. While it met the basic needs for most SOHO environments, it involved a bit more hardware tinkering than many folks were comfortable with. And it’s overall performance was something less than robust.

Say what you will about Intel hardware. They may not get things quite right out of the starting gate. But give them a little time, and issues get addressed and fixed. And you end up with incredible hardware at a terrific price. So it is with the $119 third-generation Intel NUC DN2820FYKH. Slip in a 4GB stick of RAM and an economical SSD drive to complement the built-in WiFi and Bluetooth, and you’ve got an amazing hardware platform that takes up 4″ x 4″ of real estate in your office. While its 2.4 GHz Celeron dual-core processor isn’t exactly a screamer compared to some Intel chips, it’s an energy-efficient rocketship compared to the Raspberry Pi 2. Intel VT-x virtualization support1 also is included. The average BOGOMIPS rating of the current Raspberry Pi is 96. The Intel NUC’s BOGOMIPS average is 5332! In Plain English, it would take 55 Raspberry Pi 2’s to match the processing power of one Intel NUC.
Performance, of course, is only half of the equation. There’s also price. Let’s be completely fair and spec out the Raspberry Pi with one-quarter of the RAM and disk storage of the Intel NUC. Cost of the board itself ($41+) + case ($10) + power adapter ($10) + 32GB microSD Type 10 card ($20) + WiFi Dongle ($10) comes to at least $90. Here’s what our Intel NUC set us back on Amazon2 with quadruple the RAM and disk storage, basically the cost of 2 RasPi setups. The FreePBX® Phone System 50 with similar specs starts at $579 and takes up a healthy chunk of your office space. With Incredible PBX and the Intel NUC, you not only save on space, but it’s also about a third of the cost of the FreePBX alternative. For power users, you’re probably wondering whether you can scale up from Celeron-based system. The answer is ABSOLUTELY. The Core i5 model with 16GB of RAM and a 250GB SSD drive runs about $500. And, of course, Incredible PBX imposes no artificial limitations on user accounts or number of simultaneous calls regardless of the hardware platform you choose. No Gotchas!
Initial Setup of the Intel NUC Platform
Once you receive your hardware, the first step is installation of the memory card and SATA drive. HINT: You’d be crazy not to use an SSD drive. They’re dirt cheap and FAST! Start your adventure by reviewing the User’s Guide from Intel. As you can see below, it walks you through the hardware installation process which takes about 10 minutes.
[gview file="https://downloadmirror.intel.com/23417/eng/DN2820FYKH_UserGuide02.pdf"]
The most important step comes next. Until you get the BIOS upgraded on the hardware, it will NOT boot. Visit the Download Page for the Intel NUC and grab the latest BIOS Update from here. The only piece you need is FY0051.BIO. Copy it to a DOS-formatted USB flash drive using any desktop computer. Once you’ve done that, insert the flash drive into the front slot on the Intel NUC, plug in a USB keyboard, HDMI monitor, USB DVD drive, and network cable. Turn on the machine. Press F7 after the beep. Follow the instructions to upgrade the BIOS and identify the firmware file you copied to your flash drive. Agree to the license and let the firmware update proceed. It takes about 10 minutes.
While you’re waiting, burn the Incredible PBX 13 ISO to a DVD to use with an external USB DVD drive and your Intel NUC. Tutorial is here.
Once the BIOS has been upgraded, your Intel NUC will reboot. You must change a few BIOS settings to complete the hardware setup, or nothing will work. After the machine reboots, press F2 to access Intel’s new Visual BIOS. First, enable the Legacy Boot Procedure, not UEFI (as shown above). Next, make certain that booting from the DVD drive has priority. And, last but not least, set the correct date and time for the computer. Without accurate time, Asterisk will not compile, and you’ll have to repeat the drill! Once you’ve made these changes, save your settings by pressing F10. Your machine will again reboot. Hardware setup is complete. To install Incredible PBX, reboot and press F10 for the boot menu. Pick your USB DVD drive.
If you don’t happen to have one, LG’s tiny USB-powered DVD Writer is the best $25 you will ever spend.
And, if you really want to splurge, take the plunge with this awesome 10″ HDMI (and everything else) monitor:

Installing Incredible PBX 13 on the Intel NUC
Choose the Basic Install, set your time zone, and create a very secure root password. It takes about 20 minutes to install the Scientific Linux 6.7 platform. After a reboot, press Enter to accept the Incredible PBX license agreement and complete the install. We initially were concerned that RedHat-based platforms would not load on the Intel NUC since they are not mentioned in the Intel compatibility chart. Not to worry. SL 6.7 works fine. This may very well be because of the latest BIOS upgrade. In any case, you can follow along in our Incredible PBX 13 ISO tutorial for the details. Adding free fax support with Incredible Fax is equally easy. Just run the Hylafax/AvantFax installer: /root/installfax11.sh. If you want to enable encrypted OAUTH2 authentication for your Google Voice accounts, follow this tutorial beginning at step #1b. When you get everything humming along, check out our tutorial for the three dozen Incredible Apps that are bundled with Incredible PBX.
Finally, tidy up the status display to accomodate the Intel NUC’s generous RAM and Disk sizes:
sed -i 's|$OSrelease|<> Sci Linux 6.7 <>|' /usr/local/sbin/status

Setting Up WiFi Connectivity on the Intel NUC
You probably noticed that two private IP addresses are listed on the status display shown above. The first is the wired network connection. The second is either the wireless network connection or the NeoRouter VPN address depending upon how you’ve set up your server. Incredible PBX can be run using either the eth0 or wlan0 interface. You really don’t want both, and we’ll show you how to turn one of them off. Here’s how to activate WiFi on your server. Follow the steps carefully and don’t be intimidated that you’re venturing down into the network weeds. It’s a number of steps but nothing difficult.
WARNING: We strongly recommend installing Incredible Fax before you enable WiFi connectivity to avoid problems. Trust us on this one. We learned the hard way, and you can only run the Incredible Fax installer once!
1. Install wpa_supplicant to manage WiFi access: yum -y install wpa_supplicant
2. Download and install the latest WiFi driver. Just cut-and-paste the code below while logged in as root:
cd /root
wget --no-check-certificate https://wireless.wiki.kernel.org/_media/en/users/drivers/iwlwifi-7260-ucode-25.30.14.0.tgz
tar zxvf iwlwifi-7260-ucode-25.30.14.0.tgz
cd iwlwifi-7260-ucode-25.30.14.0
cp iwlwifi-7260-14.ucode /lib/firmware/.
reboot
3. Edit /etc/sysconfig/wpa_supplicant. Modify line 3 to look like this: INTERFACES="-iwlan0"
4. Edit /etc/wpa_supplicant/wpa_supplicant.conf. Insert the following lines at the end of the file after replacing the ssid and psk entries below with the actual name and password needed to access your WiFi network:
update_config=1
network={
 ssid="yourSSID"
 psk="yourSSIDpassword"
 key_mgmt=WPA-PSK
 scan_ssid=1
}
5. Edit /etc/sysconfig/network-scripts/ifcfg-wlan0. Change ONBOOT=no to ONBOOT=yes
6. Edit /etc/sysconfig/network. Add CRDA_DOMAIN=US
7. Edit /etc/sysconfig/knockd. Add OPTIONS="-i wlan0"
8. Set up a couple services to start on bootup (default=off):
chkconfig messagebus on
chkconfig wpa_supplicant on
9. Edit /etc/rc.local. Add the following lines immediately above the iptables-restart line in the file:
/sbin/ifup wlan0
/usr/local/sbin/amportal kill
/usr/local/sbin/amportal start
/etc/init.d/knockd restart
For those that are curious, step #9 is necessary because the system attempts to start these services before the wireless network is properly configured. And they fail. So… we simply restart them at the end of the boot procedure.
10. Reboot to bring everything on line properly. Check status for results.
11. We have observed interference issues between the wired and wireless networks occasionally. For that reason, once you have verified that your wireless network is functioning properly, we strongly recommend disabling eth0. Edit /etc/sysconfig/network-scripts/ifcfg-eth0. Change ONBOOT=yes to ONBOOT=no. Then reboot your server, and the interference problems disappear.
12. Down the road, if you’d prefer to use the wired network, just undo the settings in steps 5 – 9 and 11. Then reboot.
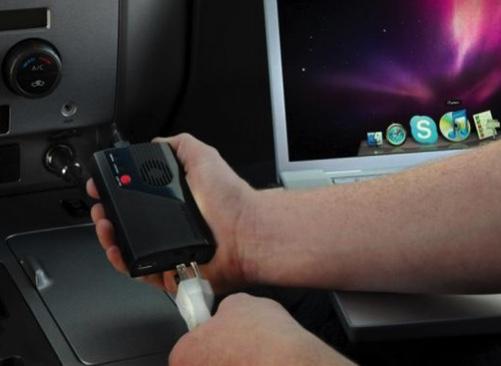
Deploying a Mobile Office with the Intel NUC
Some are probably wondering why you’d ever need WiFi with a Unified Communications platform. One reason for those that travel regularly is that you might want your PBX to ride along with you. Still others might want to use the Intel NUC for demonstrations at events such as this week’s AstriCon in Orlando. Using the Mobile HotSpot feature on your smartphone, WiFi access is easy even when there’s no local WiFi connection. Once configured, there’s no need for a keyboard or monitor with the Intel NUC. You can use Putty or SSH to access the server. While the Intel NUC is now a 12 volt device, you may not want to wrestle with building the necessary cable to connect it directly to a vehicle. An easier solution is to install an inexpensive power inverter and then use the standard power brick that came with the Intel NUC. The inVERT 100 Watt Portable Power Inverter does the trick for $35, or you might prefer this 150-watt BESTEK inverter from Amazon for $19. Don’t forget to adjust your SmartHost setting to accommodate your cellphone carrier’s SMTP host! Better yet, use gMail as your SMTP Relay host and never have to worry about it again. Then add the following line to your /etc/rc.local startup file with your email address, and your DHCP address will be sent to you whenever and wherever your server boots up:
echo "`cat /etc/hostip`" | mail -s "Intel NUC is UP" yourname@youremailserver.net
Enjoy your new Unified Communications System…
Originally published: Monday, October 12, 2015
9 Countries Have Never Visited Nerd Vittles. Got a Friend in Any of Them https://t.co/wMfmlhiQ9y #asterisk #freepbx pic.twitter.com/TPFGZbqWB6
— Ward Mundy (@NerdUno) April 22, 2016
Need help with Asterisk? Visit the PBX in a Flash Forum.
Special Thanks to Our Generous Sponsors
FULL DISCLOSURE: ClearlyIP, Skyetel, Vitelity, DigitalOcean, Vultr, VoIP.ms, 3CX, Sangoma, TelecomsXchange and VitalPBX have provided financial support to Nerd Vittles and our open source projects through advertising, referral revenue, and/or merchandise. As an Amazon Associate and Best Buy Affiliate, we also earn from qualifying purchases. We’ve chosen these providers not the other way around. Our decisions are based upon their corporate reputation and the quality of their offerings and pricing. Our recommendations regarding technology are reached without regard to financial compensation except in situations in which comparable products at comparable pricing are available from multiple sources. In this limited case, we support our sponsors because our sponsors support us.
BOGO Bonaza: Enjoy state-of-the-art VoIP service with a $10 credit and half-price SIP service on up to $500 of Skyetel trunking with free number porting when you fund your Skyetel account. No limits on number of simultaneous calls. Quadruple data center redundancy. $25 monthly minimum spend required. Tutorial and sign up details are here.
![]() The lynchpin of Incredible PBX 2020 and beyond is ClearlyIP components which bring management of FreePBX modules and SIP phone integration to a level never before available with any other Asterisk distribution. And now you can configure and reconfigure your new Incredible PBX phones from the convenience of the Incredible PBX GUI.
The lynchpin of Incredible PBX 2020 and beyond is ClearlyIP components which bring management of FreePBX modules and SIP phone integration to a level never before available with any other Asterisk distribution. And now you can configure and reconfigure your new Incredible PBX phones from the convenience of the Incredible PBX GUI.
VitalPBX is perhaps the fastest-growing PBX offering based upon Asterisk with an installed presence in more than 100 countries worldwide. VitalPBX has generously provided a customized White Label version of Incredible PBX tailored for use with all Incredible PBX and VitalPBX custom applications. Follow this link for a free test drive!
Special Thanks to Vitelity. Vitelity is now Voyant Communications and has halted new registrations for the time being. Our special thanks to Vitelity for their unwavering financial support over many years and to the many Nerd Vittles readers who continue to enjoy the benefits of their service offerings. We will keep everyone posted on further developments.
Some Recent Nerd Vittles Articles of Interest…
- We’ll have much more to say about virtualization soon as Proxmox has just introduced Proxmox VE 4.0 with support for KVM and Linux Containers. Stay tuned! [↩]
- Some of our links refer users to Amazon or other service providers when we find their prices are competitive for the recommended products. Nerd Vittles receives a small referral fee from these providers to help cover the costs of our blog. We never recommend particular products solely to generate commissions. However, when pricing is comparable or availability is favorable, we support these providers because they support us. [↩]
The Voice Recognition Revolution: Move Over Siri and Meet the New Kids
The automobile manufacturers had the right idea years ago. Make it easy to change the temperature in your vehicle. Just say "cooler" or "warmer." That project went about as well as their GPS interfaces are progressing today. So let’s give credit where credit is due. Apple’s Siri revolutionized voice recognition by making it something really useful on the smartphone. If you’ve wondered who Siri actually is, wonder no more. You’re in for a pleasant surprise. Meet Siri from Australia. And Siri U.S.A.:
Google, of course, is not one to be left behind. There was a reason they were offering to transcribe your voicemails for free all those years. They were putting in place the building blocks for a similar system on Android-based phones. Hey, Siri. Meet "OK, Google." And the competition has transformed both products into incredibly useful additions to every smartphone.
Then the latest Silicon Valley Wannabe got into the picture. Let me introduce Alexa for your kitchen or living room masquerading as Amazon’s Echo, a fascinating new half-baked product. If the Echo weren’t so transfixed with selling you music and other stuff from Amazon, it could be a terrific product. Not to be outdone, Google wasted little time introducing their look-alike, OnHub, which makes half-baked look really useful. OnHub does absolutely nothing but serve as a home router with more antennas than the Mars Rover. And now both Apple and Google are circling back to the automobile promising to revolutionize the way in which you talk to or even drive your car. Stay tuned. It’s going to get interesting. And, on the living room front, you’re probably going to need to buy another round of hardware. Even though many building blocks were in place with OnHub, Google left out a microphone… unless they use the one on your smartphone or watch. 😉
So what does all of this have to do with Asterisk® and VoIP telephony? Well, nothing actually… until today. Most of the cool things you can do with your smartphone or sitting in your living room simply weren’t available using a Plain Old telephone. We decided to fix that.
For the tinkerers and experimenters of the world, Google has generously offered free access to their voice recognition software. And today we’ll show you how to put it to good use. In the time it takes to drink your morning coffee, you’ll have a platform on your PBX that’s every bit as capable as Siri. And it’s all free!
Meet Star! When we’re finished today, you’ll be able to pick up any telephone and dial * to obtain the latest weather, news, stock prices, sports scores, time of day, and anything else that an almanac at your fingertips provides. In addition, you’ll be able to call anyone by saying their name or phone number. Not bad for free, huh? Down the road, we’ll work on adding text messaging, email, and scheduling reminders. But today’s release should whet your appetite for what’s possible.
Putting in Place the Star Platform
We don’t own or control most of the components that actually make Star work! That means you’ll need to sign up (for free) for a couple key pieces before the puzzle actually takes shape. Here’s the three-step process.
First, install one of the Certified Incredible PBX builds on either a dedicated server, a virtual machine, or in the Cloud. This tutorial will walk you through the easiest 20-minute installation procedure.
Second, you’ll need to obtain and set up the credentials for two of the third-party components that will bring Star to life. You’ll need  a Google Speech Recognition key and
  a Wolfram Alpha App-ID. Then add an AsteriDex entry to tell Star the zip code of your hometown, and you’re ready to go.
Third, you’ll spend less than a minute installing the Star software on your server.
1. Adding Speech Recognition Support to Incredible PBX
To support many of the Star features, we rely upon Google’s speech recognition service and Lefteris Zafiris’ terrific speech-recog AGI script. Unfortunately (for some), Google now has tightened up the terms of use for their free speech recognition service. Now you can only use it for "personal and development use." If you meet those criteria, keep reading. Here’s how to activate speech recognition on Incredible PBX. Don’t skip any steps!
Finally, let’s be sure you have all the necessary packages in place to support text-to-speech and speech recognition:
yum -y install perl-XML-Simple libesd.so.0 sox perl-libwww-perl
If you’re not on the Incredible PBX platform: yum -y install mpg123
2. Adding Wolfram Alpha Support to Incredible PBX
To use Wolfram Alpha by phone, you first must obtain a free Wolfram Alpha APP-ID. Then issue the following command replacing APP-ID with your actual ID. Do NOT change the yourID portion of the command:
sed -i "s|yourID|APP-ID|" /var/lib/asterisk/agi-bin/4747
3. Adding Your Hometown ZIP Code to AsteriDex
1. Using a browser, visit the IP address of your server.
2. Click on the Nerd Vittles AsteriDex button in the Kennonsoft GUI.
3. Click on the Admin tab in AsteriDex.
4. In the Add Entry column, enter the following data using your hometown ZIP code:
Contact Name: Weather

Contact Phone: 947

Dial Code: your local 5-digit ZIP code
5. Click the Add New Record button to save your entry.
Installing or Upgrading Star
We’ve designed the Star install so that you also can easily update the application by simply running the install-star command again. After logging into your server as root, here are the commands to install or upgrade your Star application:
cd /root
wget http://incrediblepbx.com/install-star.tar.gz
tar zxvf install-star.tar.gz
rm -f install-star.tar.gz
./install-star
10/10 UPDATE: Star apparently was too popular for Google to absorb, and they’ve imposed new limits on TTS playback. So, for the time being, we’ve switched Star back to FLITE for text-to-speech. To update your server, just run the installer again: /root/install-star
Taking Star for a Spin
Here’s a quick summary of the available commands that Star currently supports:
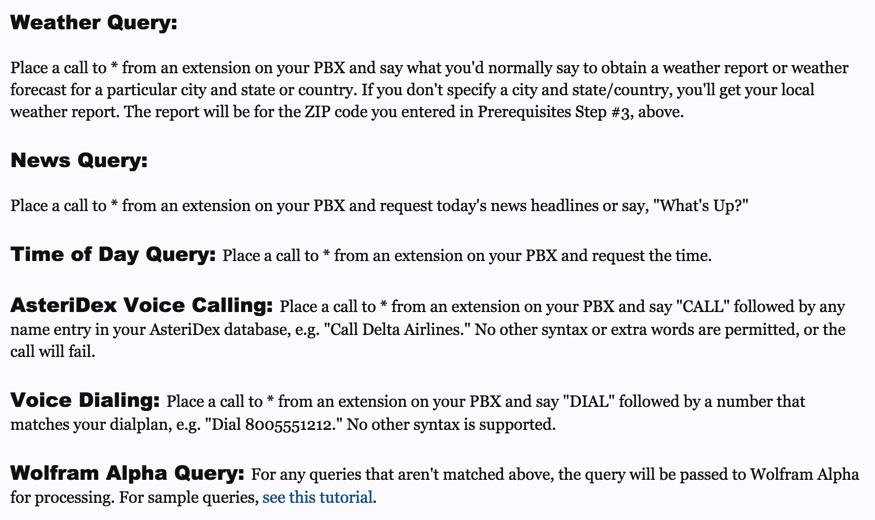
And here are some sample Wolfram Alpha queries to get you started:
Weather in Charleston South Carolina
Weather forecast for Washington D.C.
Next solar eclipse
Otis Redding
Define politician
Who won the 1969 Superbowl? (Broadway Joe)
What planes are overhead? (flying over your server’s location)
Ham and cheese sandwich (nutritional information)
Holidays 2015 (summary of all holidays for 2015 with dates and DOW)
Medical University of South Carolina (history of MUSC)
Star Trek (show history, air dates, number of episodes, and more)
Apollo 11 (everything you ever wanted to know)
Cheapest Toaster (brand and price)
Battle of Gettysburg (sad day 🙂 )
Daylight Savings Time 2015 (date ranges and how to set your clocks)
Tablets by Samsung (pricing, models, and specs)
Doughnut (you don’t wanna know)
Snickers bar (ditto)
Weather (local weather at your server’s location)
For late-breaking updates and news about the Star platform, visit this thread on the PIAF Forum. Enjoy!
Originally published: Tuesday, October 6, 2015
Need help with Asterisk? Visit the PBX in a Flash Forum.
Special Thanks to Our Generous Sponsors
FULL DISCLOSURE: ClearlyIP, Skyetel, Vitelity, DigitalOcean, Vultr, VoIP.ms, 3CX, Sangoma, TelecomsXchange and VitalPBX have provided financial support to Nerd Vittles and our open source projects through advertising, referral revenue, and/or merchandise. As an Amazon Associate and Best Buy Affiliate, we also earn from qualifying purchases. We’ve chosen these providers not the other way around. Our decisions are based upon their corporate reputation and the quality of their offerings and pricing. Our recommendations regarding technology are reached without regard to financial compensation except in situations in which comparable products at comparable pricing are available from multiple sources. In this limited case, we support our sponsors because our sponsors support us.
BOGO Bonaza: Enjoy state-of-the-art VoIP service with a $10 credit and half-price SIP service on up to $500 of Skyetel trunking with free number porting when you fund your Skyetel account. No limits on number of simultaneous calls. Quadruple data center redundancy. $25 monthly minimum spend required. Tutorial and sign up details are here.
![]() The lynchpin of Incredible PBX 2020 and beyond is ClearlyIP components which bring management of FreePBX modules and SIP phone integration to a level never before available with any other Asterisk distribution. And now you can configure and reconfigure your new Incredible PBX phones from the convenience of the Incredible PBX GUI.
The lynchpin of Incredible PBX 2020 and beyond is ClearlyIP components which bring management of FreePBX modules and SIP phone integration to a level never before available with any other Asterisk distribution. And now you can configure and reconfigure your new Incredible PBX phones from the convenience of the Incredible PBX GUI.
VitalPBX is perhaps the fastest-growing PBX offering based upon Asterisk with an installed presence in more than 100 countries worldwide. VitalPBX has generously provided a customized White Label version of Incredible PBX tailored for use with all Incredible PBX and VitalPBX custom applications. Follow this link for a free test drive!
Special Thanks to Vitelity. Vitelity is now Voyant Communications and has halted new registrations for the time being. Our special thanks to Vitelity for their unwavering financial support over many years and to the many Nerd Vittles readers who continue to enjoy the benefits of their service offerings. We will keep everyone posted on further developments.
Some Recent Nerd Vittles Articles of Interest…
Introducing the Incredible PBX 13 ISO: A Turnkey Asterisk 13 Server for Everyman

[iframe-popup id="5″]
11/22/2015: The Incredible PBX 13 ISO has been updated to support USB Flash installers. Click here for the latest tutorial.
We’ve spent much of 2015 developing a new GPL VoIP platform for virtually every Linux flavor in the universe with Incredible PBX installers for CentOS, Ubuntu, Debian, and Raspbian for the Raspberry Pi. Along the way we introduced the first turnkey aggregations for Asterisk® 13, an incredible new platform that’s been under development for several years. Until now, we’ve left the initial deployment of the operating system platform up to you. There were two principal reasons for shifting to this two-step install. First, there was the sale of CentOS to RedHat which set off red flags as to whether RedHat would now raise legal objections to bundling a superset of GPL applications with the base CentOS install, something which the original CentOS developers swore they would never do. Second, we didn’t want to get in the operating system business with maintenance of an independent repository to address security issues and to avoid legal issues from the RedHat folks.
But we heard from more than a few that the two-step process could be tedious especially for those that were new to Linux. Luckily, there’s another derivative of RHEL called Scientific Linux. As the name implies, it is used and was developed primarily to support the worldwide scientific community. Many have contributed to the Scientific Linux build over the years, but its principal sponsor is Fermi Lab which is managed by the Fermi Research Alliance LLC for the U.S. Department of Energy Office of Science. As a National Laboratory funded by the federal government, Fermi Lab’s work products including Scientific Linux constitute U.S. Government Works. As such, in addition to its GPL license, Scientific Linux can be used by others to create derivative works. That’s a long-winded explanation of why we’re now comfortable getting back into the ISO business and building an incredibly powerful unified communications system atop the Scientific Linux GNU platform. For those that have dealt with Asterisk aggregations over the past 10 years, this design is nothing particularly new. What is unique is the mix of features in the Incredible PBX aggregation. We begin with a preconfigured Asterisk 13 platform. Then we’ve added a large collection of FreePBX® GPL modules to create the web-based Incredible GUI for management of your server. Finally, we’ve integrated over three dozen applications for Asterisk as well as a preconfigured, functioning firewall to give you a rock-solid, secure UC VoIP platform with an unrivaled feature set for your home office or small business.
Installing Incredible PBX 13 with Scientific Linux 6.7

The installation procedure with the Incredible PBX 13 ISO couldn’t be easier. Start by downloading the 32-bit ISO from SourceForge to your desktop computer. The file name is IncrediblePBX13.iso. If you prefer a torrent, that’s available as well. The file name is IncrediblePBX13-12.2-SL67-ISO.torrent. After completing the download, if you’ll be using dedicated hardware for your platform, burn the ISO to a DVD using a Mac or Windows machine. Then boot your hardware from the device you just created. If you’re using a virtual machine such as VirtualBox, then designate the ISO as the VM boot device. Then start the virtual machine to begin the install.
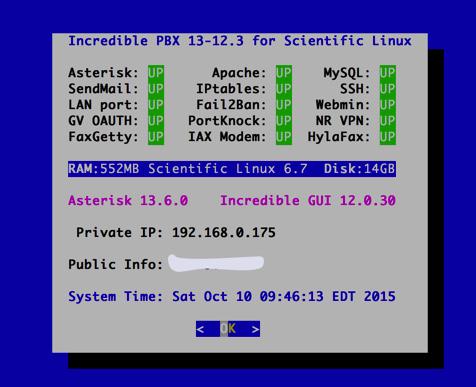
When the installation begins, choose your time zone and create a very secure root password. After about 5 minutes, the Scientific Linux platform will be in place and your system will reboot. Agree to the Incredible PBX license agreement and press ENTER to complete the install. After one more reboot, you’ll be in business. Log in as root with your new password. After the Automatic Update Utility brings your system current, press ENTER after reviewing the status display for errors. To install Incredible Fax, issue this command and accept all the defaults by pressing ENTER: /root/incrediblefax11.sh
If you prefer secure OAUTH2 authentication for your Google Voice accounts, follow this tutorial beginning at step #1b.
UPDATE: Today’s build of Incredible PBX is now available in the RentPBX Cloud with your choice of Asterisk 11 or 13 in the following locales: Seattle, Los Angeles, Mountain View, Dallas, Chicago, Atlanta, Tampa, Miami, Ashburn/Washington D.C., New Jersey, Montreal, Toronto, Berlin, and Northern U.K. Use coupon code NOGOTCHAS for $15/month pricing.
To complete the install, perform the following from the Linux CLI while logged in as root:
- Change your root password if it’s insecure: passwd
- Set your FreePBX admin password: /root/admin-pw-change
- Set your web apps admin password: htpasswd /etc/pbx/wwwpasswd admin
- Set your admin password for AvantFax: /root/avantfax-pw-change
- Set your correct time zone: /root/timezone-setup
- Add WhiteList entries to firewall if needed: /root/add-ip or /root/add-fqdn
- Store PortKnocker credentials in a safe place: cat /root/knock.FAQ
- Login to your NeoRouter VPN server if desired: /root/nrclientcmd
Managing Your Server with Incredible PBX Web-Based Tools
Most of your time initially configuring and managing your server will be spent using the web-based tools provided with Incredible PBX. Using any modern browser, go to the IP address of your server as shown in the status display above. This will bring up the Kennonsoft GUI that provides access to all of the web-based applications. Toggle between User and Admin apps by clicking on the blue tab in the lower left section of the display. This GUI also displays the latest security alerts and bug fixes from the PIAF RSS Feed. We recommend you check it at least once a week.

The other GUI to configure the FreePBX® GPL modules is accessed from the Admin menu in the Kennonsoft menus. Choose Incredible GUI Administration. The default username is admin and the password is what you set during the final installation steps above. Once the Incredible PBX GUI appears, edit extension 701 so you can figure out (or change) the randomized passwords that were set up for your 701 extension and voicemail account: Applications -> Extensions -> 701. If you’re behind a hardware-based firewall, verify the NAT setting is set to YES.
Setting Up a Soft Phone to Use with Incredible PBX
Now you’re ready to set up a telephone so that you can play with Incredible PBX. We recommend YateClient which is free. Download it from here. Run YateClient once you’ve installed it and enter the credentials for the 701 extension on Incredible PBX. You’ll need the IP address of your server plus your extension 701 password. Choose Settings -> Accounts and click the New button. Fill in the blanks using the IP address of your server, 701 for your account name, and whatever password you created for the extension. Click OK.
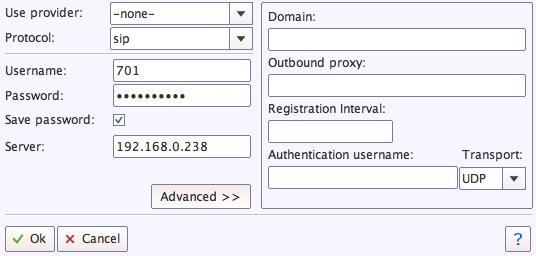
Once you are registered to extension 701, close the Account window. Then click on YATE’s Telephony Tab and place some test calls to the numerous apps that are preconfigured on Incredible PBX. Dial a few of these to get started:
DEMO - Allison's IVR Demo

947 - Weather by ZIP Code

951 - Yahoo News

*61 - Time of Day

*68 - Wakeup Call

TODAY - Today in History
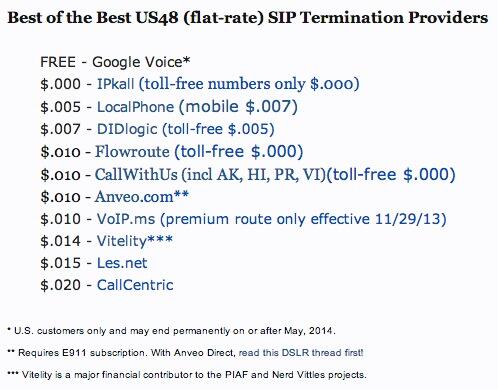
Now you’re ready to connect to the telephones in the rest of the world. If you live in the U.S., the easiest way (at least for now) is to set up a free Google Voice account. Google has threatened to shut this down but as this is written, it still works. Upgrading your server for OAUTH authentication is covered here. Start at step #1b. The safer long-term solution is to choose several SIP providers and set up redundant trunks for your incoming and outbound calls. The PIAF Forum includes dozens of recommendations to get you started.
Configuring Google Voice
If you want to use Google Voice, you’ll need a dedicated Google Voice account to support Incredible PBX. If you want to use the inbound fax capabilities of Incredible Fax, then you’ll need an additional Google Voice line that can be routed to the FAX custom destination using the GUI. The more obscure the username (with some embedded numbers), the better off you will be. This will keep folks from bombarding you with unsolicited Gtalk chat messages, and who knows what nefarious scheme will be discovered using Google messaging six months from now. So keep this account a secret!
We’ve tested this extensively using an existing Gmail account, and inbound calling is just not reliable. The reason seems to be that Google always chooses Gmail chat as the inbound call destination if there are multiple registrations from the same IP address. So, be reasonable. Do it our way! Set up a dedicated Gmail and Google Voice account, and use it exclusively with Incredible PBX. It’s free at least through 2013. Google Voice no longer is by invitation only so, if you’re in the U.S. or have a friend that is, head over to the Google Voice site and register.
You must choose a telephone number (aka DID) for your new account, or Google Voice calling will not work… in either direction. Google used to permit outbound Gtalk calls using a fake CallerID, but that obviously led to abuse so it’s over! You also have to tie your Google Voice account to at least one working phone number as part of the initial setup process. Your cellphone number will work just fine. Don’t skip this step either. Just enter the provided 2-digit confirmation code when you tell Google to place the test call to the phone number you entered. Once the number is registered, you can disable it if you’d like in Settings, Voice Setting, Phones. But…
IMPORTANT: Be sure to enable the Google Chat option as one of your phone destinations in Settings, Voice Setting, Phones. That’s the destination we need for The Incredible PBX to work its magic! Otherwise, all inbound and outbound calls will fail. If you don’t see this option, you may need to call up Gmail and enable Google Chat there first. Then go back to the Google Voice Settings.
While you’re still in Google Voice Settings, click on the Calls tab. Make sure your settings match these:
- Call Screening – OFF
- Call Presentation – OFF
- Caller ID (In) – Display Caller’s Number
- Caller ID (Out) – Don’t Change Anything
- Do Not Disturb – OFF
- Call Options (Enable Recording) – OFF
- Global Spam Filtering – ON
Click Save Changes once you adjust your settings. Under the Voicemail tab, plug in your email address so you get notified of new voicemails. Down the road, receipt of a Google Voice voicemail will be a big hint that something has come unglued on your PBX.
One final word of caution is in order regardless of your choice of providers: Do NOT use special characters in any provider passwords, or nothing will work!
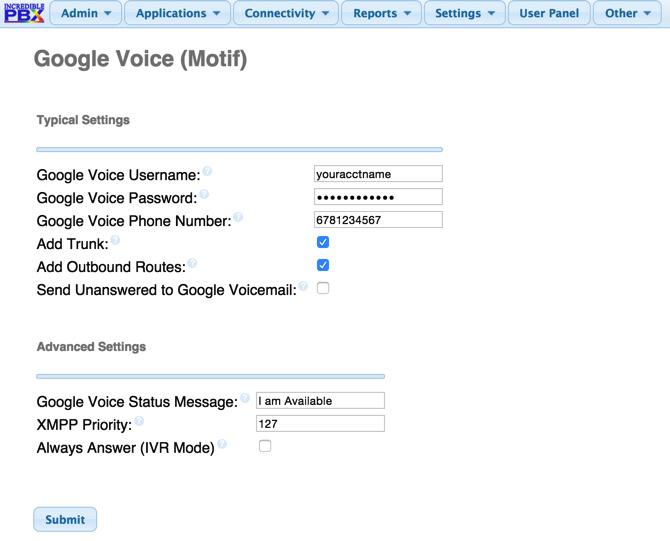
Now you’re ready to set up your Google Voice trunk in the GUI. After logging in with your browser, click the Connectivity tab and choose Google Voice/Motif. To Add a new Google Voice account, just fill out the form. Do NOT check the third box or incoming calls will never ring!
IMPORTANT LAST STEP: Google Voice will not work unless you restart Asterisk from the Linux command line at this juncture. Using SSH, log into your server as root and issue the following command: amportal restart.
If you have trouble getting Google Voice to work (especially if you have previously used your Google Voice account from a different IP address), try this Google Voice Reset Procedure. It usually fixes connectivity problems. If it still doesn’t work, enable Less Secure Apps using this Google tool.
Troubleshooting Audio and DTMF Problems
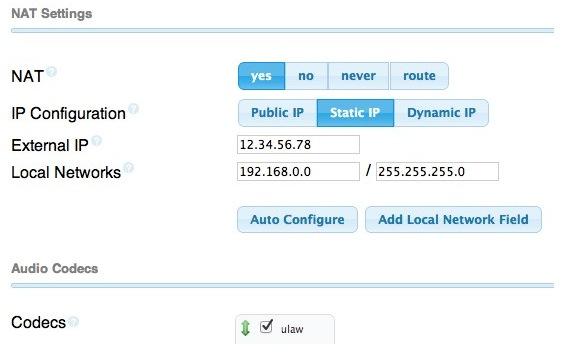
You can avoid one-way audio on calls and touchtones that don’t work with these simple settings in the GUI: Settings -> Asterisk SIP Settings. Just plug in your public IP address and your private IP subnet. Then set ULAW as the only Audio Codec.
A Few Words about the Incredible PBX Security Model for SL 6.7
Incredible PBX for Scientific Linux joins our previous builds as our most secure turnkey PBX implementation. As configured, it is protected by both Fail2Ban and a hardened configuration of the IPtables Linux firewall. The latest release also includes Port Knocker for simple, secure access from any remote computer or smartphone. You can get up to speed on how the technology works by reading the Nerd Vittles tutorial. Your Port Knocker credentials are stored in /root/knock.FAQ together with activation instructions for your server and mobile devices. The NeoRouter VPN client also is included for rock-solid, secure connectivity to remote users. Read our previous tutorial for setup instructions. As configured, nobody can access your PBX without  your credentials AND
  an IP address that is either on your private network or that matches the IP address of your server or the PC from which you installed Incredible PBX. You can whitelist additional IP addresses by running the command-line utility /root/add-ip. You can remove whitelisted IP addresses by running /root/del-acct. Incredible PBX is preconfigured to let you connect to many of the leading SIP hosting providers without additional firewall tweaking. We always recommend you also add an extra layer of protection by running your server behind a hardware-based firewall with no Internet port exposure, but that’s your call. And it’s your phone bill. 😉
The IPtables firewall is a complex piece of software. If you need assistance with configuring it, visit the PIAF Forum for some friendly assistance.
Incredible Backup and Restore
We’re pleased to introduce our latest backup and restore utilities for Incredible PBX. Running /root/incrediblebackup will create a backup image of your server in /tmp. This backup image then can be copied to any other medium desired for storage. To restore it to another Incredible PBX server, simply copy the image to a server running Asterisk 13 and the same version of the Incredible PBX GUI. Then run /root/incrediblerestore. Doesn’t get much simpler than that.
Incredible PBX Automatic Update Utility
Every time you log into your server as root, Incredible PBX will ping the IncrediblePBX.com web site to determine whether one or more updates are available to bring your server up to current specs. We recommend you log in at least once a week just in case some new security vulnerability should come along.
In the meantime, we encourage you to sign up for an account on the PIAF Forum and join the discussion. In addition to providing first-class, free support, we think you’ll enjoy the camaraderie.
Incredible PBX Application Users Guide
Your next stop ought to be learning about the three dozen applications included in Incredible PBX. We’ve put together this tutorial to get you started. Enjoy!

And, to our friends at Google, thank you!
Originally published: Sunday, September 27, 2015
 Support Issues. With any application as sophisticated as this one, you’re bound to have questions. Blog comments are a terrible place to handle support issues although we welcome general comments about our articles and software. If you have particular support issues, we encourage you to get actively involved in the PBX in a Flash Forums. It’s the best Asterisk tech support site in the business, and it’s all free! Please have a look and post your support questions there. Unlike some forums, ours is extremely friendly and is supported by literally hundreds of Asterisk gurus and thousands of users just like you. You won’t have to wait long for an answer to your question.
9 Countries Have Never Visited Nerd Vittles. Got a Friend in Any of Them https://t.co/wMfmlhiQ9y #asterisk #freepbx pic.twitter.com/TPFGZbqWB6
— Ward Mundy (@NerdUno) April 22, 2016
Need help with Asterisk? Visit the PBX in a Flash Forum.
Special Thanks to Our Generous Sponsors
FULL DISCLOSURE: ClearlyIP, Skyetel, Vitelity, DigitalOcean, Vultr, VoIP.ms, 3CX, Sangoma, TelecomsXchange and VitalPBX have provided financial support to Nerd Vittles and our open source projects through advertising, referral revenue, and/or merchandise. As an Amazon Associate and Best Buy Affiliate, we also earn from qualifying purchases. We’ve chosen these providers not the other way around. Our decisions are based upon their corporate reputation and the quality of their offerings and pricing. Our recommendations regarding technology are reached without regard to financial compensation except in situations in which comparable products at comparable pricing are available from multiple sources. In this limited case, we support our sponsors because our sponsors support us.
BOGO Bonaza: Enjoy state-of-the-art VoIP service with a $10 credit and half-price SIP service on up to $500 of Skyetel trunking with free number porting when you fund your Skyetel account. No limits on number of simultaneous calls. Quadruple data center redundancy. $25 monthly minimum spend required. Tutorial and sign up details are here.
![]() The lynchpin of Incredible PBX 2020 and beyond is ClearlyIP components which bring management of FreePBX modules and SIP phone integration to a level never before available with any other Asterisk distribution. And now you can configure and reconfigure your new Incredible PBX phones from the convenience of the Incredible PBX GUI.
The lynchpin of Incredible PBX 2020 and beyond is ClearlyIP components which bring management of FreePBX modules and SIP phone integration to a level never before available with any other Asterisk distribution. And now you can configure and reconfigure your new Incredible PBX phones from the convenience of the Incredible PBX GUI.
VitalPBX is perhaps the fastest-growing PBX offering based upon Asterisk with an installed presence in more than 100 countries worldwide. VitalPBX has generously provided a customized White Label version of Incredible PBX tailored for use with all Incredible PBX and VitalPBX custom applications. Follow this link for a free test drive!
Special Thanks to Vitelity. Vitelity is now Voyant Communications and has halted new registrations for the time being. Our special thanks to Vitelity for their unwavering financial support over many years and to the many Nerd Vittles readers who continue to enjoy the benefits of their service offerings. We will keep everyone posted on further developments.
Some Recent Nerd Vittles Articles of Interest…
The Call Center Revolution: Introducing VoiceNation’s OpenAnswer (GPL TAS)

We confess that Call Centers have never been on our telephony radar primarily because we deal in the open source market, and Telephone Answering Service (TAS) technology always has been at the opposite end of the cost spectrum. Typical call center setups can cost upwards of $1,000 per seat… until now. In addition to its revolutionary AGPLv3 license, two additional things caught our attention with OpenAnswer.
The company behind OpenAnswer, VoiceNation, has been in the Internet telephony and call center business for more than 15 years and is a well-respected industry leader. Their clients read like Who’s Who:

The second facet of OpenAnswer that caught our eye was its GPL platform. If you already have a PBX in a Flash™, Incredible PBX™, or FreePBX® Distro server in production, then you’ve got everything you need to get started. The recommended server should have at least a 2 GHz processor with a minimum 8GB of RAM. At least a 1.5 Mb (T-1 or equivalent) Internet connection is recommended to avoid call quality issues. The software mix will be familiar: Asterisk® 11 (recommended) or 13, FreePBX or Incredible GUI, MySQL, Apache, Linux, PF Sense, PHP, and jQuery. The operator screens run directly in any of the leading web browsers. The operator screens are highly configurable using OpenAnswer’s call types admin screen. Operators can be provided as little or as much information as desired, and reporting is tightly integrated into the software platform. Additional features such as "minders" and messages to each agent can be configured as needed. Particularly impressive were the drag-and-drop agent setup scripts and time-sensitive agent scripts that let you configure different agent scripts based upon date/time ranges. In short, this is not teaser software or crippleware designed to hook you into a paid platform. It is a full-featured Call Center out of the GPL box. The beauty of open source software, of course, is you can try it for yourself. And it doesn’t cost you a dime.
We don’t have to tell most of you that the shortcoming of many open source projects is the lack of documentation. With OpenAnswer, you’re in for a pleasant surprise. A detailed online tutorial walks you through all the steps: installation, configuration, taking calls, outbound calls, dispatcher/minders panel setup, message review, reports, and OpenQview for realtime monitoring. It’s the best open source documentation we’ve seen in a very long time. There’s even a step-by-step tutorial to walk you through installation on the FreePBX Distro platform.
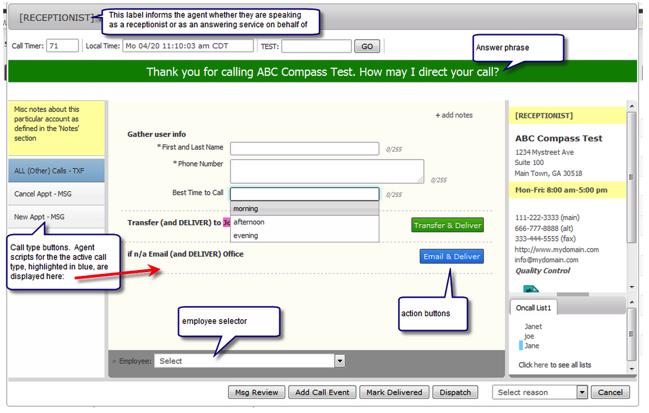
If you are contemplating getting into the Call Center business or if your current Call Center is prohibitively expensive, then you owe it to yourself and your wallet to take a careful look at OpenAnswer. Our special tip of the hat goes to Rick Friesen at DSS Consortium for his terrific discovery.
Originally published: Wednesday, September 23, 2015
Need help with Asterisk? Visit the PBX in a Flash Forum.
Special Thanks to Our Generous Sponsors
FULL DISCLOSURE: ClearlyIP, Skyetel, Vitelity, DigitalOcean, Vultr, VoIP.ms, 3CX, Sangoma, TelecomsXchange and VitalPBX have provided financial support to Nerd Vittles and our open source projects through advertising, referral revenue, and/or merchandise. As an Amazon Associate and Best Buy Affiliate, we also earn from qualifying purchases. We’ve chosen these providers not the other way around. Our decisions are based upon their corporate reputation and the quality of their offerings and pricing. Our recommendations regarding technology are reached without regard to financial compensation except in situations in which comparable products at comparable pricing are available from multiple sources. In this limited case, we support our sponsors because our sponsors support us.
BOGO Bonaza: Enjoy state-of-the-art VoIP service with a $10 credit and half-price SIP service on up to $500 of Skyetel trunking with free number porting when you fund your Skyetel account. No limits on number of simultaneous calls. Quadruple data center redundancy. $25 monthly minimum spend required. Tutorial and sign up details are here.
![]() The lynchpin of Incredible PBX 2020 and beyond is ClearlyIP components which bring management of FreePBX modules and SIP phone integration to a level never before available with any other Asterisk distribution. And now you can configure and reconfigure your new Incredible PBX phones from the convenience of the Incredible PBX GUI.
The lynchpin of Incredible PBX 2020 and beyond is ClearlyIP components which bring management of FreePBX modules and SIP phone integration to a level never before available with any other Asterisk distribution. And now you can configure and reconfigure your new Incredible PBX phones from the convenience of the Incredible PBX GUI.
VitalPBX is perhaps the fastest-growing PBX offering based upon Asterisk with an installed presence in more than 100 countries worldwide. VitalPBX has generously provided a customized White Label version of Incredible PBX tailored for use with all Incredible PBX and VitalPBX custom applications. Follow this link for a free test drive!
Special Thanks to Vitelity. Vitelity is now Voyant Communications and has halted new registrations for the time being. Our special thanks to Vitelity for their unwavering financial support over many years and to the many Nerd Vittles readers who continue to enjoy the benefits of their service offerings. We will keep everyone posted on further developments.
Some Recent Nerd Vittles Articles of Interest…
The Return of the 5-Minute PBX: Incredible PBX (Certified Edition) for VirtualBox
Today we’re paying a fresh visit to our favorite virtual machine platform and introducing a turnkey unified communications server for home, SOHO, and small business use. Unlike last week’s platform that required a $35 investment in a Raspberry Pi 2, this week’s offering requires zero hardware investment. And you still get the same software collection at the same great price, totally free… as in beer. The VirtualBox® platform runs atop any Windows PC, Mac, Linux desktop, or Solaris machine and uses a small portion of the desktop computer’s available resources. Other than that, everything works just as if you were running your PBX on standalone hardware.
Today’s release is built atop the new Scientific Linux™ 6.7 platform and features the latest LTS release of Asterisk® 13 and a terrific collection of GPL modules from FreePBX® 12. It also is our first opportunity to showcase one of our new Certified Incredible PBX™ builds. Certification is a new process that involves rigorous testing of the entire Incredible PBX platform to verify that every component is not only reliable but also works in harmony with the rest of the pieces of the unified communications suite. You’ll find all of them here. Think of Incredible PBX as the glue stick that assembles all the necessary VoIP components and holds them together seamlessly. As with all Incredible PBX builds, you also get the full complement of goodies including dozens of text-to-speech apps, voice recognition and dialing, SMS messaging, free fax support, reminders and wakeup calls, and SECURITY! The other major advantage of Incredible PBX on the VirtualBox platform is a turnkey install in less than 5 minutes! Just choose the Windows PC, Mac, Linux desktop, or Solaris machine and off you go.

Is VirtualBox merely a sandbox for experimentation? Absolutely not. With any of the beefier desktop computers available today, running Incredible PBX as a 24/7 VirtualBox image is every bit as feature rich with stellar performance that’s equivalent to using dedicated hardware. And there are some added advantages. Obviously, deploying a turnkey VoIP platform in under 5 minutes is a major plus. But, unlike using a dedicated Linux platform, you also get the ability to take snapshots of your system and do full backups in minutes instead of the hours required to bring down dedicated hardware, load a different backup application using a different operating system, perform a backup, and then reboot your VoIP server. And your backups won’t just run on the one server on which the backup was performed. You can restore the backup to any other computer that can run VirtualBox. For any of you that came from a network management background, you know what a big deal that really is. And there’s one more bonus. With Incredible Backup and Restore, you can move your image to dedicated hardware running the same operating system with Asterisk 13 and the same GUI platform in minutes.
Need to deploy VoIP servers at dozens of sites around the globe? Not a problem with VirtualBox. Just send a preconfigured VirtualBox image to each site and install VirtualBox on a local desktop computer. In 5 minutes, you have a functional VoIP server including interconnectivity to all of your other VoIP servers with a virtual private network already in place to provide secure VoIP connectivity between all of your sites.
Are there security compromises using the VirtualBox platform? Not at all. Incredible PBX still comes preconfigured with the Linux IPtables firewall that is locked down to a whitelist of local area networks, preferred providers, and your own IP addresses. You can expand the whitelist using the add-ip and add-fqdn scripts or use PortKnocker and Travelin’ Man 4 tools to let remote users gain instant access.
Getting Started. For today, we’ll provide a refresher course on loading VirtualBox and the new Incredible PBX virtual image. Then we want to spend a little time explaining the secret sauce that goes into building these images so that you can do it yourself either to migrate to a different network or to deploy at multiple sites. When we’re finished, you’ll know everything we’ve learned about deploying VirtualBox machines and, unlike Grandma, we won’t leave an important ingredient out of the recipe just to be sure you never forget how good Grandma’s cookies really were. So let’s get started.
Installing Oracle VM VirtualBox 5

Oracle’s virtual machine platform inherited from Sun is amazing. It’s not only free, but it’s pure GPL2 code. VirtualBox gives you a virtual machine platform that runs on top of any desktop operating system. In terms of limitations, we haven’t found any although VirtualBox 5 can be a little quirky on some platforms. If you have trouble with getting a clean status report with VirtualBox 5, just drop back to the final release of VirtualBox 4. We tested VirtualBox 4 on an Atom-based Windows 7 machine with 2GB of RAM, and it worked without a hiccup. So step #1 today is to download one or more of the VirtualBox installers from VirtualBox.org or Oracle.com. Our recommendation is to put all of the 100MB installers on a 4GB thumb drive.1 Then you’ll have everything in one place whenever and wherever you happen to need it. Once you’ve downloaded the software, simply install it onto your favorite desktop machine. Accept all of the default settings, and you’ll be good to go. And here’s a link to the latest Oracle VM VirtualBox User Manual.
Downloading the Incredible PBX Virtual Machine
A word of warning on the front end. The Incredible PBX image featuring Asterisk 13 for VirtualBox is huge, about 3GB! There are two ways to grab the .ova image. You can either download the image directly from here or from SourceForge. Or, for better performance, download the torrent and let multiple servers help you get the software quicker. Usually download times are cut by 70% or more. The MD5 checksum is 6037b8319ce9070270474889af76f86d.
Importing & Configuring the Incredible PBX Virtual Machine in VirtualBox
You only perform the import step one time. Once imported into VirtualBox, Incredible PBX is ready to use. There’s no further installation required, just like an OpenVZ template… only better. Double-click on the .ova file you downloaded to begin the procedure and load it into VirtualBox. When prompted, be sure to check the Reinitialize the Mac address of all network cards box and then click the Import button. Once the import is finished, you’ll see a new Incredible PBX virtual machine in your VM List on the VirtualBox Manager Window. We need to make a couple of one-time adjustments to the Incredible PBX VM configuration to account for differences in sound and network cards on different host machines.
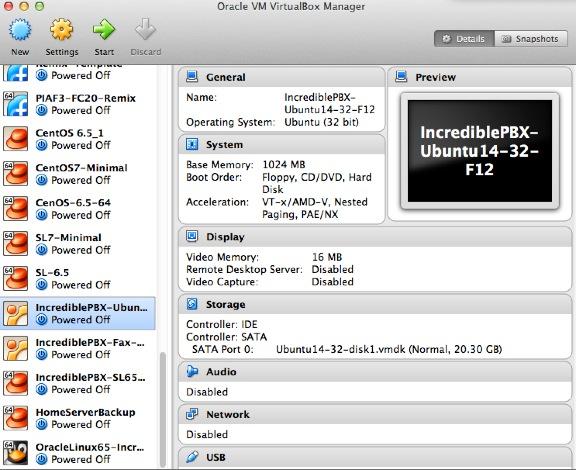
Click on the Incredible PBX Virtual Machine in the VM List. Then click Settings -> Audio and check the Enable Audio option and choose your sound card. Save your setup by clicking the OK button. Next click Settings -> Network. For Adapter 1, check the Enable Network Adapter option. From the Attached to pull-down menu, choose Bridged Adapter. Then select your network card from the Name list. Then click OK. That’s all the configuration that is necessary for your Incredible PBX Virtual Machine. The rest is automagic.
Running Incredible PBX Virtual Machine in VirtualBox
Once you’ve imported and configured the Incredible PBX Virtual Machine, you’re ready to go. Highlight IncrediblePBX Virtual Machine in the VM List on the VirtualBox Manager Window and click the Start button. The SL67 OS boot procedure will begin just as if you had installed Incredible PBX on a standalone machine. You’ll see a couple of dialogue boxes pop up that explain the keystrokes to move back and forth between your host operating system desktop and your virtual machine. Remember, you still have full access to your desktop computer. Incredible PBX is merely running as a task in a VirtualBox window. Always gracefully halt Incredible PBX just as you would on a dedicated computer.
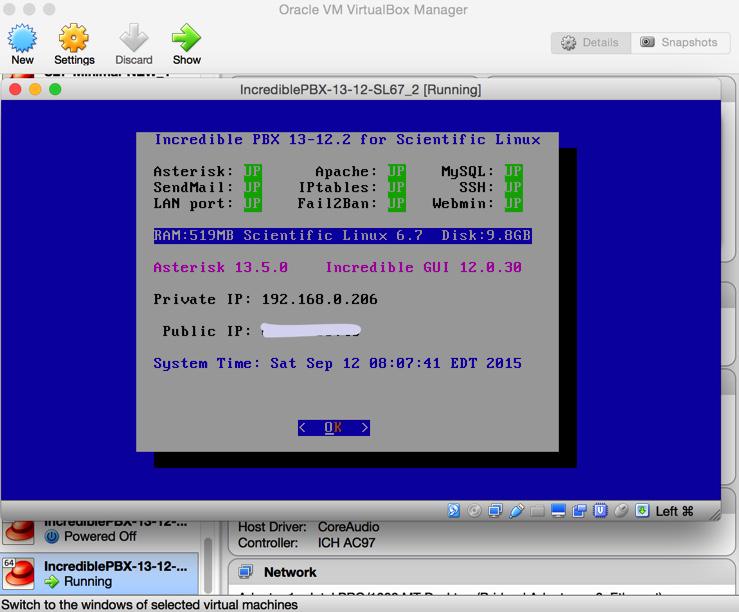
Here’s what you need to know. To work in the Incredible PBX Virtual Machine, just left-click your mouse while it is positioned inside the VM window. To return to your host operating system desktop, press the right Option key on Windows machines or the left Command key on any Mac. For other operating systems, read the dialogue boxes for instructions on moving around. To access the Linux CLI, login as root with the default password: password.
When logging in for the first time, Incredible PBX will go through some setup steps and then reboot. Login again to complete the setup. status will always provide a snapshot of your system. To shut down Incredible PBX gracefully, click in the VM window with your mouse, log in as root, and type: halt. Be sure to complete the following setup steps from the Linux CLI:
- Change your root password: passwd
- Set your FreePBX admin password: /root/admin-pw-change
- Set your admin password and email address for AvantFax: /root/avantfax-pw-change
- Set your web apps admin password: htpasswd /etc/pbx/wwwpasswd admin
- Set your correct time zone: /root/timezone-setup
- Add WhiteList entries to firewall if needed: /root/add-ip or /root/add-fqdn
- Store PortKnocker credentials in a safe place: cat /root/knock.FAQ
- Login to your NeoRouter VPN server if desired: /root/nrclientcmd
To access the Incredible PBX GUI with a browser, point to the IP address of your virtual machine and login as admin with admin password set above. We recommend that you log in to the Linux CLI at least once a week so that Incredible PBX updates get applied to your server regularly. This is critically important if you care about your phone bill.
Preparing Incredible PBX Virtual Machine for Migration
As the Linux operating systems have become more turnkey, one of the shortcuts that has been implemented on both the RedHat and Debian/Ubuntu platforms is storage of your network setup so that the server reboots more quickly. While that’s fine for rebooting on the same server, it’s a real problem if you attempt to move your setup to different hardware or a new network because eth0 will not load. That means no IP address! Here are two ways to assure that things will actually work after the move. Both assume that you will have a DHCP server at the new location just as you did at your existing site.
The Easy Way. If you have console access after the VM image is restored on the new platform (which means you don’t need a network IP address for the server in order to log in as root), then the easy way to prepare any of the Incredible PBX machines for relocation is to issue the following commands before you halt the system and make a VirtualBox backup:
touch /etc/update_hostconfig
touch /etc/update_serverconfig
Once you have halted the server, edit both the sound card and network card settings and disable both of them in VirtualBox Manager. Then choose File -> Export Appliance from the VirtualBox title bar and create a .ova backup image on your desktop. You now have an image that is similar to the Incredible PBX image that you originally downloaded, except it has all of your data and settings. All you have to do is repeat the install drill above at the new location using the .ova image you created and log in with whatever your current root password happens to be. You’ll get a two-pass automatic setup just as you did when you began today’s adventure.
The only drawback to this procedure is the fact that the extension 701 and default DISA passwords will be initialized when you first boot from your .ova image at the other location. Aside from that, you’ll have a clean platform with new SSH and DUNDI credentials as well as mostly sanitized log files.
The Hard Way. The other alternative is to manually prepare your existing system for migration before you shut it down. The primary reason for doing this would be to assure that you can log in with an SSH client at the other end as soon as the server is booted. The steps differ a bit depending upon whether you’re on the Ubuntu or Scientific Linux platform. But on both platforms you need to enter the IP address from which you will log in at the new site unless it is on one of the private LAN subnets that already is whitelisted in IPtables. Just issue the command /root/add-ip and choose 0 option to enable all services for the new IP address. Then…
On the Scientific Linux platform, issue the following commands:
touch /etc/update_hostconfig
touch /etc/update_serverconfig
rm -f /var/lib/dhcpd/*
rm -f /var/lib/dhclient/*
rm -f /etc/udev/rules.d/70*
halt
On the Ubuntu platform, issue the following commands:
touch /etc/update_hostconfig
touch /etc/update_serverconfig
rm -f /var/lib/dhcp/*
rm -f /etc/udev/rules.d/70*
halt
Once you have halted the server, edit both the sound card and network card settings and disable both of them in VirtualBox Manager. Then choose File -> Export Appliance from the VirtualBox title bar and create a .ova backup image on your desktop. Now you’re an expert. Enjoy!
Originally published: Monday, September 14, 2014
Support Issues. With any application as sophisticated as this one, you’re bound to have questions. Blog comments are a terrible place to handle support issues although we welcome general comments about our articles and software. If you have particular support issues, we encourage you to get actively involved in the PBX in a Flash Forums. It’s the best Asterisk tech support site in the business, and it’s all free! Please have a look and post your support questions there. Our forum is extremely friendly and is supported by literally hundreds of Asterisk gurus.
Need help with Asterisk? Visit the PBX in a Flash Forum.
Special Thanks to Our Generous Sponsors
FULL DISCLOSURE: ClearlyIP, Skyetel, Vitelity, DigitalOcean, Vultr, VoIP.ms, 3CX, Sangoma, TelecomsXchange and VitalPBX have provided financial support to Nerd Vittles and our open source projects through advertising, referral revenue, and/or merchandise. As an Amazon Associate and Best Buy Affiliate, we also earn from qualifying purchases. We’ve chosen these providers not the other way around. Our decisions are based upon their corporate reputation and the quality of their offerings and pricing. Our recommendations regarding technology are reached without regard to financial compensation except in situations in which comparable products at comparable pricing are available from multiple sources. In this limited case, we support our sponsors because our sponsors support us.
BOGO Bonaza: Enjoy state-of-the-art VoIP service with a $10 credit and half-price SIP service on up to $500 of Skyetel trunking with free number porting when you fund your Skyetel account. No limits on number of simultaneous calls. Quadruple data center redundancy. $25 monthly minimum spend required. Tutorial and sign up details are here.
![]() The lynchpin of Incredible PBX 2020 and beyond is ClearlyIP components which bring management of FreePBX modules and SIP phone integration to a level never before available with any other Asterisk distribution. And now you can configure and reconfigure your new Incredible PBX phones from the convenience of the Incredible PBX GUI.
The lynchpin of Incredible PBX 2020 and beyond is ClearlyIP components which bring management of FreePBX modules and SIP phone integration to a level never before available with any other Asterisk distribution. And now you can configure and reconfigure your new Incredible PBX phones from the convenience of the Incredible PBX GUI.
VitalPBX is perhaps the fastest-growing PBX offering based upon Asterisk with an installed presence in more than 100 countries worldwide. VitalPBX has generously provided a customized White Label version of Incredible PBX tailored for use with all Incredible PBX and VitalPBX custom applications. Follow this link for a free test drive!
Special Thanks to Vitelity. Vitelity is now Voyant Communications and has halted new registrations for the time being. Our special thanks to Vitelity for their unwavering financial support over many years and to the many Nerd Vittles readers who continue to enjoy the benefits of their service offerings. We will keep everyone posted on further developments.
Some Recent Nerd Vittles Articles of Interest…
- Many of our purchase links refer users to Amazon when we find their prices are competitive for the recommended products. Nerd Vittles receives a small referral fee from Amazon to help cover the costs of our blog. We never recommend particular products solely to generate Amazon commissions. However, when pricing is comparable or availability is favorable, we support Amazon because Amazon supports us. [↩]
VoIP at Your Fingertips: Incredible PBX GUI for Raspberry Pi 2 with Asterisk 13

[iframe-popup id="3″]
NEWS FLASH: New Incredible PBX release with Raspbian 8 Jessie supports BOTH the Raspberry Pi 3 and the Raspberry Pi 2. Much improved installer and overall performance! Check out the new tutorial and download the new image here.
07/01/2019 NEWS FLASH: Just released Incredible PBX LITE for the Raspberry Pi 2, 3, and 4 featuring Raspbian 10 Buster. Tutorial here.
Today we’re pleased to introduce the ultimate hobbyist platform to learn about and then to deploy and use VoIP and unified communications in your home, home office, or small business. You’ll need a couple hours and a $35 Raspberry Pi 2 with its quad-core processor and gig of RAM.1 Everything else is free… as in beer. And what a collection it is. You’ll get the very latest, production-ready version of Asterisk® 13, the new Incredible PBX GUI featuring a superset of FreePBX®-compatible modules, the newest Google Voice refinements with secure OAUTH 2 authentication for free calling and faxing in the U.S. and Canada, a rock-solid, preconfigured, Linux firewall, a free virtual private network client for NeoRouter that’s ready for your credentials, preconfigured trunks for the very best SIP providers in the world, a turnkey GPL fax solution featuring a HylaFax/AvantFax combination that delivers incoming faxes in PDF format using the included SendMail email server, free SMS messaging, a free conference bridge, SCCP encrypted communications support, and literally dozens of free applications for Asterisk including a news service, weather reports, the world’s best on-line almanac, telephone reminders, voice recognition for hands-free calling, and more. Do you need to be a Linux, network, or communications engineer? Not at all. If you can read, you’ve met the only prerequisite to implement Incredible PBX. The sky’s the limit on where to go next. Enjoy!
|
Target Audience: Home or SOHO/SBO seeking a GPL PBX with a web-based Graphical User Interface Default Configuration: Asterisk 13 with Incredible PBX GUI, Kennonsoft GUI, and NANPA dialplan Platform: Raspbian 7 running on a Raspberry Pi 2 Standard Memory: 1024MB Recommended Disk: 16GB+ Default Trunks: Google Voice, CallCentric, DIDlogic, Future-Nine, IPcomms, Les.net, Vitelity, VoIP.ms2 Feature Set: SMS messaging, VPN, Reminders, ConfBridge Conferencing, AsteriDex, Voicemail, Email, IVR, News, Weather, Voice Dialer, Wolfram Alpha, Today in History, TM3 Firewall WhiteList, Speed Dialer, iNUM and SIP URI (free) worldwide calling, OpenCNAM CallerID lookups, DISA, Call Forwarding, SCCP, CDRs Administrator Utilities: Incredible Backup/Restore, Automatic Updater, Asterisk Upgrader, phpMyAdmin, Timezone Config, Plug-and-Play Trunk Configurator, WebMin, External IP Setup, Firewall WhiteList Tools |
As with all Incredible PBX products, your server is protected out of the box by our 10-Layer Network Security Model:
- Preconfigured IPtables Linux Firewall (IPv4)
- Preconfigured Travelin’ Man 3 WhiteLists
- Randomized Port Knocker for Remote Access
- TM4 WhiteListing by Telephone (optional)
- Fail2Ban Log Monitoring for SSH, Apache, Asterisk
- Randomized Ultra-Secure Passwords
- Automatic Security Updates & Bug Fixes
- Asterisk Manager Lockdown to localhost
- Apache htaccess Security for Vulnerable Web Apps
- Security Alerts via RSS Feeds in Kennonsoft and Incredible PBX GUIs
Getting Started with Incredible PBX and Incredible PBX GUI (RasPi 2 Edition)
Here’s a quick overview of the installation and setup process for Incredible PBX featuring the Incredible PBX GUI:
- Install the Raspberry Pi 2 OS in text mode (No GUI) – Raspbian Wheezy
- Configure Raspbian 7 – Optimize Raspbian Wheezy for Incredible PBX
- Download and Install Incredible PBX + Incredible PBX GUI
- Install Incredible Fax with HylaFax/AvantFax (optional)
- Set Up Passwords for Incredible PBX
- Configure Trunks using Incredible PBX GUI
- Connect a Softphone using Incredible PBX GUI

1. Install Raspbian 7 Platform for Raspberry Pi 2
For those with Raspberry Pi experience, this is the same drill you’ve performed a dozen times before. For newbies, here’s the procedure. You’ll need a microSD card of at least 8GB, and we strongly recommend a 16GB or 32GB Type 10 card for Incredible PBX. We’ve tested both the SanDisk and Transcend cards, and they both work great.
Begin by downloading the latest RASPBIAN Wheezy image from RaspberryPi.org to your desktop. For the time being, DO NOT USE Raspbian Jessie! After you’ve unzipped the image, you need to get it moved to your microSD card. RaspberryPi.org has excellent tutorials that will walk you through the process using a Linux, Mac, or Windows desktop platform. Don’t forget to unmount the card before removing it. Building the SD card with Raspbian 7 takes about 30 minutes.
Once you have your microSD card ready to go, plug it into the slot on the back of the Raspberry Pi 2 and then plug in the power cord. On your attached monitor, you can follow the boot up process. If a login prompt appears, log in as user pi with the password raspberry and run: raspi-config. Usually this isn’t necessary.

2. Optimizing Raspbian 7 for Incredible PBX
The first time you boot up your Raspberry Pi 2 with Raspbian 7, it will run the raspi-config script. This allows you to make a number of changes to your Raspberry Pi environment to maximize performance. Let’s take advantage of it. Choose text mode for the bootup since we don’t need the RasPi GUI at all.
Advanced Options. Enable Remote SSH access to your Raspberry Pi 2.
Option 1. Expand the File System to fill your SD card. Otherwise, there’s insufficient disk space to complete the install.
Tab to the Finish option and press ENTER. Then choose Reboot and NO.
At the Linux command prompt, set a very secure root password: sudo passwd root. Decipher your IP address so that you can log in as root via SSH: ifconfig. Now reboot the system: sudo reboot.
We strongly recommend completing the rest of the install by logging in as root using a desktop computer via SSH or Putty (for Windows). This gives you the ability to scroll back up and find errors if something happens to come unglued during the install. It also assures that your desktop computer will be whitelisted in the automated setup of the IPtables firewall for IPv4.
3. Install Incredible PBX on Your Raspberry Pi 2
Adding Incredible PBX to the Raspberry Pi 2 is easy. To restate the obvious, your server needs a reliable Internet connection to proceed. Using SSH (or Putty on a Windows machine), log into your Raspberry Pi 2 as root at the IP address you deciphered in the ifconfig step at the end of the Raspbian install procedure above.
Now let’s begin the Incredible PBX install. After logging in as root, issue the following commands. The install takes an hour or more and runs unattended so there’s no need to watch unless you’re curious about how sausage is made. Remember, as part of the build process, we compile all of the major components for Incredible PBX from source. That takes some time. If you’re curious, you can review the open source GPL script to see how it’s done or to embellish it. Incredible PBX is GPL open source, 100% Gotcha-Free code so go for it and share your discoveries. That’s what open source is all about!
cd /root
wget http://incrediblepbx.com/incrediblepbx13-12.3.raspbian.tar.gz
tar zxvf incrediblepbx13-12.3.raspbian.tar.gz
rm -f incrediblepbx13-12.3.raspbian.tar.gz
./IncrediblePBX13-12.3-raspbian.sh
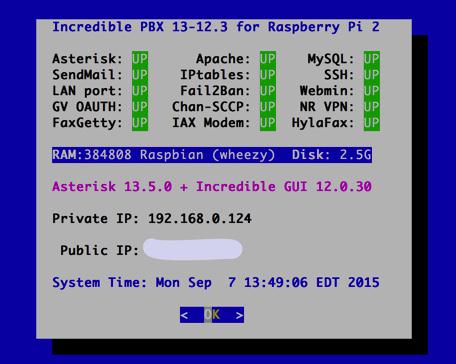
4. Install Incredible Fax for Incredible PBX (optional)
Administrators have been trying to stomp out faxing for at least two decades. Here’s a hint. It ain’t gonna happen. So go with the flow and add Gotcha-Free Faxing to your server. It’ll be there when you need it. And sooner or later, you’ll need it. This install script is simple enough for any monkey to complete. Run the script and enter the email address for delivery of your faxes. Then, press the Enter key to accept every default entry during the HylaFax and AvantFax installation steps.
cd /root
./incrediblefax11_raspi2.sh
When the installation finishes, reboot your server to bring faxing on line. After rebooting, you can access the AvantFax GUI with your browser by logging in as admin with the default password: password. Follow the prompts to update your admin password. You also can log into AvantFax from within the Incredible PBX GUI itself by clicking on the Other tab and choosing AvantFax.
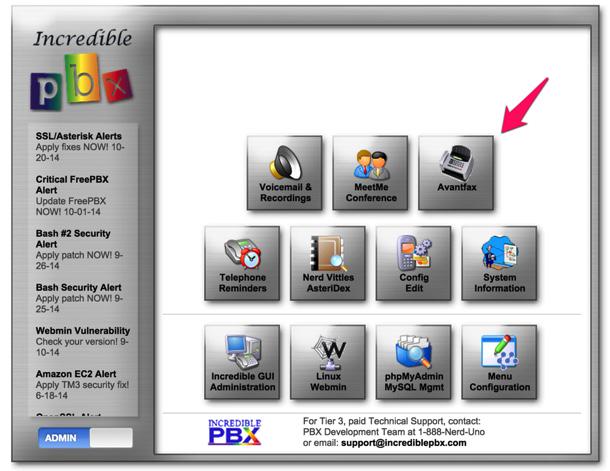
Outgoing faxes using standard document attachments can be created using the AvantFax GUI. The faxes will be sent out using your default outbound dial rules. You can add a dial prefix for sending a fax with AvantFax to force the call out a particular trunk that has been preconfigured in the Incredible PBX GUI.
Incoming faxes will be delivered to the email address you specified when installing Incredible Fax; however, incoming faxes will be ignored until you configure a destination DID to accept the faxes. You’ll want a dedicated line for incoming faxes! A free Google Voice trunk works fine. Keep reading for DID setup instructions. For the incoming route of the destination DID for your faxes, specify: 
If you ever forget your admin password for AvantFax, you can reset it by running the script: /root/avantfax-pw-change.
5. Initial Configuration of Incredible PBX
Incredible PBX is installed with the preconfigured IP4tables Linux firewall already in place. It implements WhiteList Security to limit server access to private LANs, your server’s IP address, your desktop computer’s IP address, and a few of our favorite SIP providers. You can add additional entries to this WhiteList whenever you like using the add-ip and add-fqdn tools in /root. There’s also an Apache security layer for our web applications. And the Incredible PBX GUI has its own security methodology. Finally, we randomize extension and DISA passwords as part of the initial install process. Out of the starting gate, you won’t find a more secure VoIP server implementation anywhere. After all, it’s your phone bill.
Even with all of these layers of security, here are 10 Quick Steps to better safeguard your server. You only do this once, but failing to do it may lead to security issues you don’t want to have to deal with down the road. So DO IT NOW!
First, log into your server as root with your root password and do the following:
Make your root password very secure: passwd
Set your correct time zone: /root/timezone-setup
Restart Asterisk: amportal restart
Create admin password for Incredible GUI: /root/admin-pw-change
Create admin password for web apps: htpasswd -b /etc/pbx/wwwpasswd admin newpassword
Make a copy of your Knock codes: cat /root/knock.FAQ
Decipher IP address and other info about your server: status
Second, use a web browser pointed to your server’s IP address. Click on the Users tab (bottom left below RSS Feed in Main Menu) to bring up the Administrator Menu. Click the Incredible GUI Administration button (bottom left). When the Incredible GUI Menu appears (shown above), click the Server Administration icon on the left. Login as admin with the password you set using admin-pw-change above. Now change your extension 701 extension and voicemail passwords.
Click Applications tab
Choose Extensions from the pull-down menu
Click on 701 in the far-right Extensions list
Don’t forget to click Submit and then Apply Settings to save your new entries.
Last but not least, Incredible PBX includes an Automatic Update Utility which downloads important updates whenever you log into your server as root. We recommend you log in once a week to keep your server current. Now would be a good time to log out and back into your server at the Linux command line to bring your Raspberry Pi 2 up to current specs.
6. Configure Trunks with Incredible PBX
Now for the fun part. If this is your first VoIP adventure, be advised that this ain’t your grandma’s phone system. You need not and should not put all your eggs in one basket when it comes to telephone providers. In order to connect to Plain Old Telephones, you still need at least one provider. But there is nothing wrong with having several. And a provider that handles an outbound call (termination) need not be the same one that handles an incoming call (origination) and provides your phone number (DID). We cannot recommend Vitelity highly enough, and it’s not just because they have financially supported our projects for almost a decade. They’re as good as VoIP providers get, and we use lots of them. If you’re lucky enough to live in the U.S., you’d be crazy not to set up a Google Voice account. It’s free as are all phone calls to anywhere in the U.S. and Canada. The remaining preconfigured providers included in Incredible PBX are equally good, and we’ve used and continue to use almost all of them. So pick a few and sign up. You only pay for the calls you make with each provider so you have little to lose by choosing several. The PIAF Forum includes dozens of recommendations on VoIP providers if you want additional information.
With the preconfigured trunks in Incredible PBX, all you need are your credentials for each provider and the FQDN of their server. Log into Incredible PBX GUI Administration as admin using a browser. From the System Status menu, click Connectivity -> Trunks. Click on each provider you have chosen and fill in your credentials including the host entry. Be sure to uncheck the Disable Trunk checkbox! Fill in the appropriate information for the Register String. Save your settings by clicking Submit Changes. Then click the red Apply Config button.
7. Configure a Softphone for Incredible PBX
We’re in the home stretch now. You can connect virtually any kind of telephone to your new PBX. Plain Old Phones require an analog telephone adapter (ATA) which can be a separate board in your computer from a company such as Digium. Or it can be a standalone SIP device such as ObiHai’s OBi100 or OBi110 (if you have a phone line from Ma Bell to hook up as well). SIP phones can be connected directly so long as they have an IP address. These could be hardware devices or software devices such as the YateClient softphone. We’ll start with a free one today so you can begin making calls. You can find dozens of recommendations for hardware-based SIP phones both on Nerd Vittles and the PIAF Forum when you’re ready to get serious about VoIP telephony.
We recommend YateClient which is free. Download it from here. Run YateClient once you’ve installed it and enter the credentials for the 701 extension on Incredible PBX. You’ll need the IP address of your server plus your extension 701 password. Choose Applications _> Extensions -> 701 and write down your SIP/IAX Password. You can also find it in /root/passwords.FAQ. Fill in the blanks using the IP address of your server, 701 for your account name, and whatever password is assigned to the extension. Click OK to save your entries.

Once you are registered to extension 701, close the Account window. Then click on YATE’s Telephony Tab and place some test calls to the numerous apps that are preconfigured on Incredible PBX. Dial a few of these to get started:
DEMO - Apps Demo

123 - Reminders

947 - Weather by City and State or Country*

951 - Yahoo News

*61 - Time of Day

TODAY - Today in History
* Voice recognition apps require Google credentials. Keep reading.
If you are a Mac user, another great no-frills softphone is Telephone. Just download and install it from the Mac App Store.
8. Configuring Google Voice on the Google Side
If you want to use Google Voice, you’ll need a dedicated Google Voice account to support Incredible PBX. The more obscure the username (with some embedded numbers), the better off you will be. This will keep folks from bombarding you with unsolicited Gtalk chat messages, and who knows what nefarious scheme will be discovered using Google messaging six months from now. So keep this account a secret!
IMPORTANT: Do NOT under any circumstances take Google’s bait to switch from Google Chat to Hangouts, or you will forever lose the ability to use Google Chat with Incredible PBX. Also be sure to enable the Google Chat option as one of your phone destinations in Settings, Voice Setting, Phones. That’s the destination we need for The Incredible PBX to work its magic! Otherwise, all inbound and outbound calls will fail. Good News! You’re in luck. Google has apparently had a change of heart on discontinuing Google Chat support so it’s enabled by default in all new Google Voice accounts. Once you’ve created a Gmail and Google Voice account, go to Google Voice Settings and click on the Calls tab. Make sure your settings match these:
- Call Screening – OFF
- Call Presentation – OFF
- Caller ID (In) – Display Caller’s Number
- Caller ID (Out) – Don’t Change Anything
- Do Not Disturb – OFF
- Call Options (Enable Recording) – OFF
- Global Spam Filtering – ON
Click Save Changes once you’ve adjusted your settings. Under the Voicemail tab, plug in your email address so you get notified of new voicemails. Down the road, receipt of a Google Voice voicemail will be a big hint that something has come unglued on your PBX.
One final word of caution is in order regardless of your choice of providers: Do NOT use special characters in any provider passwords, or nothing will work!
This release of Incredible PBX implements OAUTH2 authentication for Google Voice trunks. Even though it’s a bit more work on the front end, the good news is you won’t have to worry about your Google Voice trunks failing when Google phases out plain-text passwords. The other good news is you won’t be passing your plain-text Google Voice credentials across the open Internet for everyone in the world to see.
While you’re still logged into your Google Voice account, you need to obtain a refresh_token which is what you’ll use instead of a password when setting up your Google Voice account in the GUI. Here’s how.
1. Be sure you are still logged into your Google Voice account. If not, log back in at https://www.google.com/voice.
2. Go to the Google OAUTH Playground using your browser while still logged into your Google Voice account.
3. Once logged in to Google OAUTH Playground, click on the Gear icon in upper right corner (as shown below).
3a. Check the box: Use your own OAuth credentials
3b. Enter Incredible PBX OAuth Client ID:
466295438629-prpknsovs0b8gjfcrs0sn04s9hgn8j3d.apps.googleusercontent.com
3c. Enter Incredible PBX OAuth Client secret: 4ewzJaCx275clcT4i4Hfxqo2
3d. Click Close
4. Click Step 1: Select and Authorize APIs (as shown below)
4a. In OAUTH Scope field, enter: https://www.googleapis.com/auth/googletalk
4b. Click Authorize APIs (blue) button.
5. Click Step 2: Exchange authorization code for tokens
5a. Click Exchange authorization code for tokens (blue) button
5b. When the tokens have been generated, Step 2 will close.
6. Reopen Step 2 and copy your Refresh_Token. This is the "password" you will need to enter (together with your Gmail account name and 10-digit GV phone number) when you add your GV trunk in the Incredible PBX GUI. Store this refresh_token in a safe place. Google doesn’t permanently store it!
7. Authorization tokens NEVER expire! If you ever need to remove your authorization tokens, go here and delete Incredible PBX Google Voice OAUTH entry by clicking on it and choosing DELETE option.
Yes, this is a convoluted process. Setting up a secure computing environment often is. Just follow the steps and don’t skip any. It’s easy once you get the hang of it. And you’ll sleep better.
9. Configuring Google Voice in the Incredible PBX GUI
Now you’re ready to configure your Google Voice account in Incredible PBX. You do it from within the Incredible PBX GUI by choosing Connectivity -> Google Voice. Just plug in your Google Voice Username, enter your refresh_token from Step #6 above as your Google Voice Password, enter your 10-digit Google Voice Phone Number, and check the first two boxes: Add Trunk and Add Outbound Routes. Then click Submit and Apply Settings to save your new entries.
IMPORTANT: Once you’ve entered your credentials, you MUST restart Asterisk from the Linux command line, or Google Voice calls will fail: amportal restart
10. Troubleshooting Google Voice Connectivity Problems
If you have trouble getting Google Voice to work (especially if you have previously used your Google Voice account from a different IP address), try this Google Voice Reset Procedure. It usually fixes connectivity problems. If it still doesn’t work, enable Less Secure Apps using this Google tool.
If you have difficulty finding the Google Chat option after setting up a new Google Voice account, follow this tutorial.
Another option is to use one of the inexpensive SIP Gateways to Google Voice. HINT: The Simonics trunk in the Incredible PBX GUI is preconfigured. All you’ll need are your credentials.
Adding Speech Recognition Support to Incredible PBX
To support many of our applications, Incredible PBX has included Google’s speech recognition service for years. These applications include Weather Reports by City (949), AsteriDex Voice Dialing by Name (411), and Wolfram Alpha for Asterisk (4747), all of which use Lefteris Zafiris’ terrific speech-recog AGI script. Unfortunately (for some), Google now has tightened up the terms of use for their free speech recognition service. Now you can only use it for "personal and development use." If you meet those criteria, keep reading. Here’s how to activate speech recognition on Incredible PBX. Don’t skip any steps!
To use Wolfram Alpha by phone, you first must obtain a free Wolfram Alpha APP-ID. Then issue the following command replacing APP-ID with your actual ID. Do NOT change the yourID portion of the command:
sed -i "s|yourID|APP-ID|" /var/lib/asterisk/agi-bin/4747
Now you’re ready to try out the speech recognition apps. Dial 949 and say the name of a city and state/province/country to get a current weather forecast from Yahoo. Dial 411 and say "American Airlines" to be connected to American.
To access Wolfram Alpha by phone, dial 4747 and enter your query, e.g. "What planes are overhead." Read the Nerd Vittles tutorial for additional examples and tips.
Implementing WiFi on the Raspberry Pi 2
You don’t need to rely upon a wired network connection once you get your Raspberry Pi 2. WiFi works just as well. You’ll need a compatible USB WiFi Dongle. We recommend the AirLink 101 from Amazon or the Adafruit 814. Insert it into a free USB slot on your RasPi and boot up. Log in as root and edit /etc/wpa_supplicant/wpa_supplicant.conf. Add the following lines to the bottom of the file using your actual SSID and password. Then reboot after disconnecting your LAN cable.
network={
 ssid="your-SSID"
 psk="SSID-password"
}
You can test the performance of your WiFi connection by installing speedtest-cli and then running it:
easy_install speedtest-cli
speedtest-cli
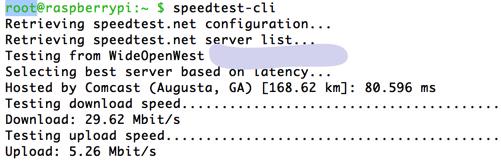
Implementing SCCP for Secure, Encrypted Communications with Asterisk
Today marks our first effort to include and support the extended SCCP Channel Driver for Asterisk 13. All you’ll need to do is add the SCCP and device configuration files, and the rest should work. For a good overview of SCCP, start here. For excellent documentation on SCCP setup, go here. For PIAF Forum support, start here.
Homework Assignment: Mastering the Incredible PBX Feature Set
Now would be a good time to explore the Incredible PBX applications. Continue reading there. If you have questions, join the PBX in a Flash Forums and take advantage of our awesome collection of gurus. There’s an expert available on virtually any topic, and the price is right. As with Incredible PBX, it’s absolutely free.
Originally published: Monday, September 7, 2015
Support Issues. With any application as sophisticated as this one, you’re bound to have questions. Blog comments are a terrible place to handle support issues although we welcome general comments about our articles and software. If you have particular support issues, we encourage you to get actively involved in the PBX in a Flash Forums. It’s the best Asterisk tech support site in the business, and it’s all free! Please have a look and post your support questions there. Unlike some forums, ours is extremely friendly and is supported by literally hundreds of Asterisk gurus and thousands of users just like you. You won’t have to wait long for an answer to your question.
Need help with Asterisk? Visit the PBX in a Flash Forum.
Special Thanks to Our Generous Sponsors
FULL DISCLOSURE: ClearlyIP, Skyetel, Vitelity, DigitalOcean, Vultr, VoIP.ms, 3CX, Sangoma, TelecomsXchange and VitalPBX have provided financial support to Nerd Vittles and our open source projects through advertising, referral revenue, and/or merchandise. As an Amazon Associate and Best Buy Affiliate, we also earn from qualifying purchases. We’ve chosen these providers not the other way around. Our decisions are based upon their corporate reputation and the quality of their offerings and pricing. Our recommendations regarding technology are reached without regard to financial compensation except in situations in which comparable products at comparable pricing are available from multiple sources. In this limited case, we support our sponsors because our sponsors support us.
BOGO Bonaza: Enjoy state-of-the-art VoIP service with a $10 credit and half-price SIP service on up to $500 of Skyetel trunking with free number porting when you fund your Skyetel account. No limits on number of simultaneous calls. Quadruple data center redundancy. $25 monthly minimum spend required. Tutorial and sign up details are here.
![]() The lynchpin of Incredible PBX 2020 and beyond is ClearlyIP components which bring management of FreePBX modules and SIP phone integration to a level never before available with any other Asterisk distribution. And now you can configure and reconfigure your new Incredible PBX phones from the convenience of the Incredible PBX GUI.
The lynchpin of Incredible PBX 2020 and beyond is ClearlyIP components which bring management of FreePBX modules and SIP phone integration to a level never before available with any other Asterisk distribution. And now you can configure and reconfigure your new Incredible PBX phones from the convenience of the Incredible PBX GUI.
VitalPBX is perhaps the fastest-growing PBX offering based upon Asterisk with an installed presence in more than 100 countries worldwide. VitalPBX has generously provided a customized White Label version of Incredible PBX tailored for use with all Incredible PBX and VitalPBX custom applications. Follow this link for a free test drive!
Special Thanks to Vitelity. Vitelity is now Voyant Communications and has halted new registrations for the time being. Our special thanks to Vitelity for their unwavering financial support over many years and to the many Nerd Vittles readers who continue to enjoy the benefits of their service offerings. We will keep everyone posted on further developments.
Some Recent Nerd Vittles Articles of Interest…
- If you don’t have an HDMI-compatible monitor, you now can add the official Raspberry Pi 7″ touch display for $60. [↩]
- Vitelity and Google provide financial support to Nerd Vittles and the Incredible PBX projects. [↩]
Asterisk Server Troubleshooting: Finding and Fixing Bugs & Gremlins in Your PBX
Ashton-Tate of dBASE® fame used to call them anomalies. Sheer arrogance kept them from ever quite admitting there was an actual bug in their software. We don’t claim to be quite so perfect. If you use any software for very long, you’re going to encounter bugs. But not all reported problems turn out to be bugs. Many turn out to be errors generated by users that don’t quite know what they’re doing because they never bothered to RTFM. Whether they’re bugs or self-inflicted wounds, the result is still pretty much the same. The code doesn’t work as advertised.
As part of our Back to School series, today we’re going to introduce you to a methodology to keep your Asterisk® server running smoothly… warts and all. That process begins by your clicking the Getting Started Guide at the top of the Nerd Vittles page, identifying your particular platform, and reading the applicable tutorial from front to back. About nine times out of ten, that will tell you whether you’ve encountered a bug or just a feature that you haven’t quite mastered.
Unlike the other Asterisk aggregations, Incredible PBX™ includes an Automatic Update Utility. It gets run whenever you log into your server as root and is there primarily to address security issues. Depending upon the severity of the bug, we address some non-security related bugs as well. The problem from our perspective is that we’re dealing with a moving target with almost a dozen different versions and platforms. On each of those platforms, there are literally hundreds of software applications that are maintained and "improved" by various developers around the world. Sometimes things break. The other fact of life is there are only so many hours in the day and about 95% of all users of open source software never contribute a dime toward any open source project. Translation: We depend upon volunteers rather than paid staff to report and fix our bugs and those of other projects upon which we depend.
We’re happy to provide the latest software with the latest bug fixes at no cost. The rest is pretty much up to you. If the bugs in your current version become intolerable, then install a newer release and chances are that most of the problems will have been resolved. Yes, you will have to manually reconfigure your extensions and trunks and routes, but everything else will pretty much be the same. That’s the only real cost of using free software.
We want to identify the most common reported problems with Incredible PBX today and show you how to fix some of these issues yourself. After all, this is supposed to be a learning experience. And learning to fix things for yourself or at least knowing where to turn to get the answers is the best thing you can do to assure you have a stable platform for years to come. There are two terrific sources of information to keep your system current and stable. The first is the RSS Feeds for Asterisk, FreePBX®, and PBX in a Flash/Incredible PBX. The second is the Forums for these three platforms: Asterisk, FreePBX, and PBX in a Flash/Incredible PBX, especially the Bug Thread. If you’re going to use open source software, then you owe it to yourself and your server to check all of these sources at least once a week and address any new issues that have been identified. The downside of not heeding this advice is you are exposing your server to potential attacks that may compromise not only your server but the servers of others as well once your system has been transmogrified into a Zombie.
Top 10 List of Problems Encountered by New Asterisk Users

1. Login Failures: Linux CLI, Incredible PBX GUI, Web Apps, AvantFax, WebMin
There are four different passwords that cause problems for new users. On the Incredible PBX platform, these get set in different ways. The confusion typically arises when the user attempts to access a server resource and a password prompt appears. Fixing the problem depends upon which password is being requested. Be advised that more than two attempts to guess a password may get you locked out of your server for several hours because of Fail2Ban. Then you have two problems to contend with rather than one.
Linux CLI Root Password. Regardless of the Linux platform, the root password gets set when you install the operating system. If you can’t log in as root from the server console, chances are pretty good that you’ve forgotten the password or typed it incorrectly. Fixing this problem is major surgery and often you will be better served by reinstalling your server. If you’d prefer to reset the password, then follow the steps in this Linux Gazette article. While it doesn’t apply to Incredible PBX builds, you may encounter a failed root login using SSH or Putty if the server has been configured to deny root SSH access or to require an SSH key to log in. This can be remedied by logging in from the console and reconfiguring the login parameters for either the CentOS/Scientific Linux or Ubuntu/Debian/Raspbian OS.

Incredible PBX GUI’s admin Password. If you’re using a browser to access the Incredible PBX GUI and you’ve chosen the GUI Administration option from the Incredible GUI Main Menu (shown immediately above), then you arrived at a screen that looks something like what’s shown above. Clicking on Incredible PBX Administration will generate a prompt requesting your username and password. There can be any number of account names to access various Incredible PBX GUI resources, but there will always be an admin account. Reset this password by logging into your server as root and running the script: /root/admin-pw-change
If you’ve gotten fancy and added a password to the Incredible PBX Main Menu (shown at the top of this Top 10 List) using Admin -> Menu Configuration, then it won’t be too long until you forget what it was. You’ll need it to get back into the Admin options on the Main Menu. To retrieve the password, display the contents of the following file and look at the entry between the first two commas:

Incredible PBX User Control Panel Access. Also shown above is an icon to access the User Control Panel (UCP). This typically is used to allow end-users to manage one or more extensions on your PBX. Account names and passwords for UCP access are created in the Incredible PBX GUI by choosing: Admin -> User Management -> Add New User
Incredible PBX Web Application Access. From the Incredible PBX Main Menu and/or from the Maintenance tab in Incredible PBX GUI, users and administrators can gain access to a number of Incredible PBX web applications including AsteriDex, Telephone Reminders, phpMyAdmin, AvantFax, and others. All of these web applications require Apache login credentials consisting of a username and password. In the case of AvantFax, you will also need an AvantFax username and password that is requested after your Apache credentials have been provided. All of these applications can be accessed using the admin Apache account. To set the admin password: htpasswd -b /etc/pbx/wwwpasswd admin newpassword
Separate end-user accounts also can be created for applications such as AsteriDex and Telephone Reminders. To set up each of these accounts, use the following syntax: htpasswd -b /etc/pbx/wwwpasswd acctname acctpassword
The admin account and password are required to access phpMyAdmin and other administrator applications.
AvantFax Web Admin Access. As noted above, you first must enter any valid Apache web credentials to access AvantFax from the Incredible PBX Main Menu or from the AvantFax tab within the Incredible PBX GUI. After successfully entering your web credentials, you will be prompted for an AvantFax username and password. The admin user account for AvantFax can be set by logging into your server as root and issuing the command: /root/avantfax-pw-change

Once you gain admin access to AvantFax, you can create additional user accounts and passwords by clicking the Dashboard icon shown above and choosing: Menu -> New User
WebMin GUI Access. WebMin is a tool for use by skilled Linux administrators only. You can seriously and irreparably damage your PBX by making changes within WebMin. You’ve been warned. To access WebMin on Incredible PBX servers, click on the icon in the Main Administrator Menu. Or you can access WebMin using https://ServerIPaddress:9001. The username must be root, and the password is your Linux root password.
2. Emails/Voicemails Don’t Get Sent/Delivered
Identifying the Problem. 99% of the problems with delivery of emails with voicemail attachments from your server have little to do with your server. They are the result of one of two things. Either your email client has placed the incoming email messages in its SPAM or JUNK folder, or your Internet Service Provider (ISP) is blocking downstream SMTP mail servers from sending email. The ISPs claim this is a security precaution to reduce SPAM generated from compromised servers.
Testing Email Delivery. Try this: echo "test" | mail -s testmessage yourname@emailserver.com
Fixing the SPAM problem. If you find the test email message in your SPAM or JUNK folder, there are two ways to go about fixing the problem. The simplest is to mark the sending email address (whatever it happens to be in the email message) as NOT SPAM in your email client. For Gmail, simply create a filter for the email sender and specify "Never send it to SPAM" and "Mark it important." The alternative is to assign a Fully-Qualified Domain Name (FQDN) to your server. This could be done using a Dynamic DNS Server such as dyndns.org. Once you’ve set up your FQDN, this thread on the PIAF Forum will walk you through assignment of the FQDN to your server.
Fixing ISP Blocking of Downstream SMTP Traffic. If your ISP happens to be one of those that blocks emails from downstream SMTP servers (e.g. Comcast), you will first need the FQDN of your ISP’s SMTP gateway. We will reconfigure SendMail to use your ISP’s mail gateway as the SmartHost for your server and send emails out using their SMTP gateway instead of yours. This usually means they will tack on some hidden information to the email messages so that they can identify the sender if a SPAM problem is reported. Once you have the name of your ISP’s SMTP gateway, log in as root and edit /etc/mail/sendmail.cf. Search for DS and append your ISP’s SMTP FQDN with no space, e.g. DSsmtp.comcast.net
Save the file and restart SendMail: service sendmail restart.
3. Asterisk Won’t Start/Restart
Identifying the Problem. This part is easy. Restart Asterisk and see what happens: amportal restart
The Fix. This part isn’t. Keep in mind that, on FreePBX-enabled Asterisk servers, FreePBX actually starts up Asterisk as part of its initialization process. Unfortunately, the error messages are cryptic. The causes can be just as obscure. If you’ve recently made changes to an Asterisk config file in /etc/asterisk, start there. The next thing to test is whether MySQL is functioning properly. Without MySQL, FreePBX won’t start. Here’s the simple test: /etc/init.d/mysqld restart
If MySQL fails to start, have you changed your passwords for MySQL? If so, change the root password back to passw0rd. Then test access from the Linux CLI: mysql -u root -ppassw0rd. Next, find your asteriskuser password in /etc/freepbx.conf. Now test MySQL access again using the password you deciphered: mysql -u asteriskuser -p
The other critical piece for a successful startup is PHP. If it isn’t functioning properly, Asterisk with FreePBX won’t start. From the Linux CLI, issue this command and look for errors: echo "< ?php phpinfo(); ?>" | php
If all else fails, Google is your friend.
4. IPtables Firewall Testing
There’s one component of Incredible PBX that separates the men from the boys. That’s a secure and functioning firewall with a WhiteList of those authorized any type of access to your server. Obviously, if it’s not functioning, you’re not secure. Running the status command from the Linux CLI should tell you whether IPtables is working properly. To be doubly sure, issue the following command: iptables -nL. If the result looks like this, you’re missing the IPtables config file and need to head to the PIAF Forum for some help:
Chain INPUT (policy ACCEPT)
target prot opt source destinationChain FORWARD (policy ACCEPT)
target prot opt source destinationChain OUTPUT (policy ACCEPT)
target prot opt source destination
Next, issue the restart command and fix any reported errors: iptables-restart
Finally, there’s one more configuration setting that should be checked. Because the Travelin’ Man 3 WhiteList feature allows you to enter either IP addresses or FQDNs, we need to be sure IPtables is started up after DNS services are enabled on your server, or IPtables startup will fail. By default on many servers, IPtables startup occurs first. That means a manual configuration change is required to be sure IPtables startup is successful. Issue the following command to display the custom startup for your CentOS server: cat /etc/rc.d/rc.local. On Ubuntu/Debian/Raspbian platforms, issue the command: cat /etc/rc.local. The results should include: /usr/local/sbin/iptables-restart. If not, add it before exit 0.
5. Fail2Ban Log Scanner Testing
Fail2Ban is a log scanner that searches for certain text strings which indicate failed attempts to access your server. It is NOT failsafe because these text strings change from time to time and because your server must have sufficient horsepower to scan complete logs before the bad guys find a hole in your security. That often is difficult if the bad guys are using high-powered servers such as Amazon EC2. Nevertheless, it’s another layer of security that is worth having, and we need to make sure it’s functioning properly. Whenever IPtables is restarted, Fail2Ban needs to be restarted. This should be handled in the iptables-restart script. To be sure, issue the following command: grep fail2ban /usr/local/sbin/iptables-restart. It should return the following result: service fail2ban restart. If not, add it to the script by issuing the following command after logging into your server as root:
echo "service fail2ban restart" >> /usr/local/sbin/iptables-restartTo verify that Fail2Ban is functioning, issue the command: iptables -nL
The final lines of the listing should look something like this:
Chain fail2ban-ASTERISK (1 references)

target     prot opt source               destination

RETURN     all  --  0.0.0.0/0            0.0.0.0/0
Chain fail2ban-BadBots (1 references)
target prot opt source destination
RETURN all -- 0.0.0.0/0 0.0.0.0/0
Chain fail2ban-SSH (1 references)
target prot opt source destination
RETURN all -- 0.0.0.0/0 0.0.0.0/0
Chain fail2ban-asterisk-udp (1 references)
target prot opt source destination
RETURN all -- 0.0.0.0/0 0.0.0.0/0
6. HylaFax/AvantFax in Limbo.
For those using Incredible Fax, there are two main problems: not being able to log in to AvantFax and the dreaded "IAXmodem please wait" message once you get there. On the CentOS platform, the most important fix is making sure you’re using the latest Incredible Fax install script. If you’ve already encountered the problem on CentOS servers, just download the new script, tar zxvf incrediblefax11-centos*, and run the installer again. We know: you’re not supposed to. If that doesn’t address your problem and you’ve already reset your admin password as documented in section 1, see this PIAF Forum thread for some helpful hints.
7. Asterisk Server Log Rotation
Identifying the Problem. Some Incredible PBX servers were missing the script required to rotate the Asterisk logs which means your /var/log/asterisk/full file continues to grow. To test whether your server is missing the log rotator, run this command: if [ ! -f /etc/logrotate.d/asterisk ]; then echo "Missing"; fi
The Fix. If the test above reports Missing, then issue the following commands as root to fix the problem:
 cd /etc/logrotate.d

 wget http://incrediblepbx.com/asterisk-logrotate.tar.gz

 tar zxvf asterisk-logrotate*

 rm -f asterisk-logrotate*
8. Detecting Trunk Failures
One of our most requested utilities is a script to notify administrators when a trunk goes off-line. Just issue the following commands to install it. Then edit /root/trunkcheck.sh and insert your email address. Works for SIP, IAX, and GV trunks.
cd /root

wget http://incrediblepbx.com/trunkcheck.tar.gz

tar zxvf trunkcheck.tar.gz

rm -f trunkcheck.tar.gz

echo "5 * * * * root /root/trunkcheck.sh > /dev/null 2>&1" >> /etc/crontab

nano -w /root/trunkcheck.sh
9. Detecting Whether Asterisk Is Running As Root
Don’t ask us why but on some servers Asterisk ends up running as the root user rather than the asterisk user. Given the current design of FreePBX which assigns almost all privileges to the asterisk user anyway, it’s more an academic problem than a real one. If an intruder gains asterisk user access to your server, your system is toast whether the intruder has root privileges or not.
Identifying the Problem. To test whether the main Asterisk program is running as root, just issue the following command: ps aux | grep sbin/asterisk. If the first column of the first entry in the list shows root, then apply the fix.
The Fix. Issue the following commands to reset the Asterisk application to run as the asterisk user:
amportal kill

chown -R asterisk:asterisk /var/run/asterisk

sed -i '/END INIT INFO/a AST_USER="asterisk"\nAST_GROUP="asterisk"' /etc/init.d/asterisk

amportal restart
10. Inability to Activate Repository Tabs in Module Admin
Identifying the Problem. Some users have reported a problem activating the various repository tabs within the GUI’s Module Admin component.
The Fix. Issue the following commands from the Linux CLI to correct the problem:
amportal a ma uninstall digium_phones
gui-fix
Special thanks to Lorne Gaetz and Andrew Nagy for the fix.
Originally published: Wednesday, September 2, 2015
Support Issues. With any application as sophisticated as this one, you’re bound to have questions. Blog comments are a terrible place to handle support issues although we welcome general comments about our articles and software. If you have particular support issues, we encourage you to get actively involved in the PBX in a Flash Forums. It’s the best Asterisk tech support site in the business, and it’s all free! Please have a look and post your support questions there. Unlike some forums, ours is extremely friendly and is supported by literally hundreds of Asterisk gurus and thousands of users just like you. You won’t have to wait long for an answer to your question.
Need help with Asterisk? Visit the PBX in a Flash Forum.
Special Thanks to Our Generous Sponsors
FULL DISCLOSURE: ClearlyIP, Skyetel, Vitelity, DigitalOcean, Vultr, VoIP.ms, 3CX, Sangoma, TelecomsXchange and VitalPBX have provided financial support to Nerd Vittles and our open source projects through advertising, referral revenue, and/or merchandise. As an Amazon Associate and Best Buy Affiliate, we also earn from qualifying purchases. We’ve chosen these providers not the other way around. Our decisions are based upon their corporate reputation and the quality of their offerings and pricing. Our recommendations regarding technology are reached without regard to financial compensation except in situations in which comparable products at comparable pricing are available from multiple sources. In this limited case, we support our sponsors because our sponsors support us.
BOGO Bonaza: Enjoy state-of-the-art VoIP service with a $10 credit and half-price SIP service on up to $500 of Skyetel trunking with free number porting when you fund your Skyetel account. No limits on number of simultaneous calls. Quadruple data center redundancy. $25 monthly minimum spend required. Tutorial and sign up details are here.
![]() The lynchpin of Incredible PBX 2020 and beyond is ClearlyIP components which bring management of FreePBX modules and SIP phone integration to a level never before available with any other Asterisk distribution. And now you can configure and reconfigure your new Incredible PBX phones from the convenience of the Incredible PBX GUI.
The lynchpin of Incredible PBX 2020 and beyond is ClearlyIP components which bring management of FreePBX modules and SIP phone integration to a level never before available with any other Asterisk distribution. And now you can configure and reconfigure your new Incredible PBX phones from the convenience of the Incredible PBX GUI.
VitalPBX is perhaps the fastest-growing PBX offering based upon Asterisk with an installed presence in more than 100 countries worldwide. VitalPBX has generously provided a customized White Label version of Incredible PBX tailored for use with all Incredible PBX and VitalPBX custom applications. Follow this link for a free test drive!
Special Thanks to Vitelity. Vitelity is now Voyant Communications and has halted new registrations for the time being. Our special thanks to Vitelity for their unwavering financial support over many years and to the many Nerd Vittles readers who continue to enjoy the benefits of their service offerings. We will keep everyone posted on further developments.
Some Recent Nerd Vittles Articles of Interest…
Free Asterisk Solutions
