
Home » Posts tagged 'freepbx' (Page 34)
Tag Archives: freepbx
The Most Versatile VoIP Provider: FREE PORTING

 JUST RELEASED: Visit the Incredible PBX Wiki
A Night with the Stars: The Future of Asterisk and Open Source Telephony

We recently had an opportunity to spend one of Charleston’s coldest nights with David Duffett and Mark Spencer solving most of the world’s problems. For those of you that don’t know, Mark was the creator of Asterisk® and the founder and current CTO of Digium® while David is the Director of the Worldwide Asterisk Community which means he’s never seen an airplane he didn’t like. As it happens, Mark shares a passion for aviation, and we’ll get to that.

Mark and David flew into Charleston’s "international airport" on one of my favorite airplanes. It speaks volumes about our small aviation hub when there are only a handful of reserved parking places and the names of two car dealers and Darius Rucker appear on three of them. Welcome to Charleston. For those that are airplane buffs, if you haven’t heard of the Very Light Jet revolution in commercial aviation, take a look at this article and then go talk to your boss about ditching commercial aircraft travel. "The variable operating cost per hour of the Eclipse 500 (insurance, maintenance, fuel, and replacement parts) is estimated at $372." That’s less than 25% of the typical operating cost of most private jets. To give you another point of reference, the Eclipse made the trip in one hour and one minute. The 500-mile, 8-hour trip from Huntsville to Charleston in a rented SUV is over $200 a day. One-way, refundable commercial airfare from Huntsville to Charleston is $842.10 per person and takes roughly four hours. Life’s too short! Now where were we?
Our reading of the tea leaves suggests that the days of using copper for communications are coming to a close which means the sales of analog cards for PSTN connectivity will continue to diminish. Since this has been Digium’s bread and butter for many years, we were curious about the future direction of the company. To his credit, Mark was smart enough to appreciate early on that being a great programmer doesn’t necessarily provide the skill set needed to manage a technology business. That responsibility has been turned over to Danny Windham, who has done a terrific job in positioning Digium for future growth with a broad mix of products. In the hardware department, Digium’s new line of high-end "smart" phones and failover appliances are a big hit. Digium’s commercial unified communications system aka Switchvox has perhaps the best graphical user interface of any commercial product on the market at a fraction of the cost. Then there are new cloud offerings including Respoke which brings communications to your web site with zero hardware costs. And finally there is Digium’s new SIP trunking which offers extremely competitive pricing for commercial enterprises. Whew!
On the open source front, Digium continues to lead the Asterisk charge with the release of Asterisk 13 last month. To its credit, Digium was smart enough to appreciate its development limitations even though Matt Jordan and his team have done a masterful job advancing Asterisk to a whole new level. The kludgey SIP days are officially over. Unfortunately, what was left by the wayside was Mark’s open source Asterisk-GUI which was incorporated into AsteriskNOW for many years. The latest releases now include a rebranded version of FreePBX®.
When Mark inquired about what we had been up to lately, we couldn’t help but chuckle in acknowledging that we’d been playing with Asterisk-GUI. While we don’t typically dig up bones in the graveyard, Asterisk-GUI is a little different. It’s a product that was dropped from the Digium lineup not because of its technical shortcomings but because of a lack of resources to properly support and further develop it as a Digium-funded open source product. Other companies have wasted little time incorporating Asterisk-GUI into their commercial PBX offerings. That includes Grandstream as well as Yeastar and ATCOM. And, of course, Digium’s AA50 also uses Asterisk-GUI. We’ve been looking at Asterisk-GUI as a low overhead alternative to FreePBX that could better support hobbyist platforms running Asterisk: the Raspberry Pi, BeagleBone Black, CuBOX, and even old Pogoplug hardware.
What’s different about Asterisk-GUI compared to FreePBX is its memory footprint and performance. Reloading FreePBX after making changes in the GUI is a laborious process on these tiny devices. On the other hand, reloading Asterisk-GUI is virtually instantaneous. Is it as feature-rich as FreePBX? No. Do most hobbyists and SOHO businesses need the product sophistication of FreePBX? Probably not.
Our focus with Asterisk-GUI is to develop a secure hobbyist platform which others then can embellish to keep the product current in the traditional open source manner. We plan to start with Asterisk 11 and see how it goes. We also plan to encourage participation by lots of current Asterisk-GUI development partners including Grandstream. Technical assistance still could be provided through the existing PBX in a Flash Forum for those that want to participate in development or just like to play. We got into open source telephony to experiment as a hobbyist, not to make money. We have been enormously successful… at least with respect to our financial objective.
To make a long story short, we sent Mark and David packing with Pogoplugs in their bags. So who knows what the future holds? Perhaps it will rekindle the development spirit that first led to Asterisk and Asterisk-GUI. And, whether it does or not, suffice it to say the Asterisk-GUI is an impressive software product and one we hope to tame in coming weeks for use with some of our favorite hardware.
In the meantime, Mark is busy bringing his open source enthusiasm to the aviation world. But, as I joked to Mark, there are a lot more telephones in the world than there are airplanes. So we’ll see what we see. One thing is for sure. We all can expect great things in coming years from Mark. He remains one of the most talented and prolific programmers in the country, and we’re looking forward to spending some time with his next creation regardless of the platform.
Originally published: Wednesday, November 19, 2014

Need help with Asterisk? Visit the PBX in a Flash Forum.
Special Thanks to Our Generous Sponsors
FULL DISCLOSURE: ClearlyIP, Skyetel, Vitelity, DigitalOcean, Vultr, VoIP.ms, 3CX, Sangoma, TelecomsXchange and VitalPBX have provided financial support to Nerd Vittles and our open source projects through advertising, referral revenue, and/or merchandise. As an Amazon Associate and Best Buy Affiliate, we also earn from qualifying purchases. We’ve chosen these providers not the other way around. Our decisions are based upon their corporate reputation and the quality of their offerings and pricing. Our recommendations regarding technology are reached without regard to financial compensation except in situations in which comparable products at comparable pricing are available from multiple sources. In this limited case, we support our sponsors because our sponsors support us.
 BOGO Bonaza: Enjoy state-of-the-art VoIP service with a $10 credit and half-price SIP service on up to $500 of Skyetel trunking with free number porting when you fund your Skyetel account. No limits on number of simultaneous calls. Quadruple data center redundancy. $25 monthly minimum spend required. Tutorial and sign up details are here.
![]() The lynchpin of Incredible PBX 2020 and beyond is ClearlyIP components which bring management of FreePBX modules and SIP phone integration to a level never before available with any other Asterisk distribution. And now you can configure and reconfigure your new Incredible PBX phones from the convenience of the Incredible PBX GUI.
The lynchpin of Incredible PBX 2020 and beyond is ClearlyIP components which bring management of FreePBX modules and SIP phone integration to a level never before available with any other Asterisk distribution. And now you can configure and reconfigure your new Incredible PBX phones from the convenience of the Incredible PBX GUI.
 VitalPBX is perhaps the fastest-growing PBX offering based upon Asterisk with an installed presence in more than 100 countries worldwide. VitalPBX has generously provided a customized White Label version of Incredible PBX tailored for use with all Incredible PBX and VitalPBX custom applications. Follow this link for a free test drive!
 Special Thanks to Vitelity. Vitelity is now Voyant Communications and has halted new registrations for the time being. Our special thanks to Vitelity for their unwavering financial support over many years and to the many Nerd Vittles readers who continue to enjoy the benefits of their service offerings. We will keep everyone posted on further developments.
Some Recent Nerd Vittles Articles of Interest…
Zero Day Vulnerability Protection and More: Introducing Cover Your Asterisk
It’s been a difficult couple of weeks for the Linux® and Asterisk® communities with the back-to-back disclosures of the BASH Shellshock bug and then the FreePBX® Asterisk Recording Interface (ARI) bug a few days later. Both of these vulnerabilities have been circulating in the wild for years. We won’t repeat Wikipedia’s Zero Day Attack analysis other than to note that what makes these particular bugs so scary is not only the fact that both went undetected and unpatched for years but also that the attack vectors for both bugs were so simple. Anyone with a web server exposed to the Internet that was running any flavor of Linux or any Asterisk server with the FreePBX GUI was fair game for a seriously compromised server.
For those with shared servers in a hosted environment running under cPanel, your web platform typically runs with the equivalent of root privileges which means that any web intrusion inherits the same server privileges that you as the administrator had. This is similar to the way FreePBX runs with Asterisk. The same user account used for web access controls all of the Asterisk assets on your server. While it’s convenient, it’s also dangerous whenever there’s a web vulnerability because the entire Asterisk platform has exposure.
We always chuckle when one of the anonymous forum trolls launches a tirade claiming that these alerts are nothing more than Monday morning quarterbacking disguised as Chicken Little. What’s more amazing is that anyone would take the comments of an anonymous poster seriously especially on a matter involving server security. It’s one thing to label folks as alarmists for suggesting that the sky is falling when it isn’t. It’s quite another to launch these anonymous personal attacks even when there is documented evidence that the Internet sky was indeed caving in. Kinda reminds us of the global warming naysayers when the polar ice caps are melting beneath their feet.
According to the naysayers, we’re all doomed when it comes to cyberterrorism so why fight it. Here’s why. While reacting to security vulnerabilities has always been a defensive game of cat and mouse, that doesn’t mean you shouldn’t proactively do what you can to patch serious security holes in your servers. The alternative is to give cybercriminals a blank check to launch bots from your server that generate spam or participate in large-scale zombie attacks on our most trusted resources whether they’re DNS root servers, utility infrastructure and our electric grid, banking assets, and even national security resources. So let’s circle back and address what you can do to assure that you’re part of the solution rather than part of the problem.
The Way It Is: Do I Need a Public Web Server with Asterisk?
For purposes of this discussion, our focus today is Asterisk server security. And the number one thing you can do to insulate your server from these vulnerabilities is to make certain that your web server is not exposed to Internet access by the general public. Neither Asterisk nor FreePBX requires public web server access to manage your server. In fact, neither Asterisk nor FreePBX requires any public access to your server to properly perform all required telecommunications functions. And the second paragraph above explains why this is especially dangerous with servers running both Asterisk and FreePBX.
So why do people still publicly expose their web servers and UDP ports 5060 and 10000-20000 to the Internet? As much as we hate to say it, it’s because it’s always been done that way. It’s also because there are a handful of SIP providers that still require UDP 5060 access to make and receive calls. Most do not! And even for those that do require UDP 5060 access, their requirements can be satisfied with a properly configured firewall that supports whitelisting of "safe" IP addresses for limited access. Incredible PBX comes preconfigured with a locked down WhiteList. The same can be added to PBX in a Flash by installing Travelin’ Man 3. We hope the other aggregations will follow suit. It’s long overdue.
Public web server access often is because there are more than a few (lazy) VoIP providers that install systems in a way that makes it easy for them to manage remote sites. Of course, a VPN would provide secure access to the same resources but that’s a little more work on the deployment end. With NeoRouter VPN, it’s a 5-minute job!
There also are companies with remote users or traveling salesmen that claim their servers must be open to the Internet to keep the company running. First, it’s hard to imagine a company whose salespeople don’t have cellphones that require no link to home base. Second, there are numerous solutions for safe connectivity with a home office: VPNs, FQDNs with dynamic DNS support, Port Knocker, and Travelin’ Man 4 to name just a few of the ones we previously have recommended. With the exception of the lazy VoIP installer, you will note that none of the above scenarios ever require web access to a VoIP server. So the rationale for public exposure of an Asterisk web server is all but non-existent.
The bottom line is that, if your server is not and has never been accessible from the Internet by typing its IP address into a public web browser and assuming your root password has not been compromised, then the BASH and ARI vulnerabilities are purely an academic discussion from your vantage point. Should you apply the patches anyway? Absolutely. Will your server be compromised if you don’t? Probably not… at least not from these two vulnerabilities.
Life Is Good: Why Do I Need ‘Cover Your Asterisk’
That brings us to our topic for today. Having said all of the above, how do you really know if your server has been compromised by some zero day attack vector that none of us yet know about? After all, there are tens of thousands of applications installed on a typical Linux server. And a zero day vulnerability could be hiding almost anywhere.
First, a few words about what Cover Your Asterisk is not. This application won’t detect previously compromised servers! Wearing a condom the day after your wild night on the town isn’t all that helpful. If your server has been running as a public web server for the last 5 years, then our best advice is to start with a fresh install to a new, secured server. Then manually copy the settings (not the files!) from your old server to the new platform. Now you’re ready to protect your server.
Second, more than a few words about the VoIP environment in which we find ourselves. If you’re running any of the so-called Asterisk aggregations including PBX in a Flash, Incredible PBX, AsteriskNOW, FreePBX Distro, or Elastix, then your server includes some flavor of the FreePBX GUI, a web-based application to manage and configure Asterisk. As part of the FreePBX GUI setup, you give FreePBX 2.11 and beyond an expansive set of privileges on your server. These include read, write, and delete access to all of your web assets, all of your VoIP-related MySQL database assets, and all of your Asterisk assets. You also grant FreePBX rights to inventory and monitor critical pieces of information about your server so that you can be informed about pertinent FreePBX updates. We don’t see this as a bad thing. But, even with the incredibly talented FreePBX development team, this application design can be dangerous for a number of reasons not the least of which is the events of the past week. Consider for a moment a scenario in which a disgruntled employee or a web vulnerability allows somebody to modify a critical Asterisk configuration file such as manager.conf which controls access to the Asterisk Manager Interface, or to adjust MySQL’s admin.ampusers table which controls web access to the FreePBX GUI, or even to insert a malicious module into FreePBX which "looks and feels" like part of FreePBX. When you don’t know what you’re looking for, detecting subtle changes can be extremely difficult even for the most talented people in the business. For everyone else, it’s next to impossible. This is especially true when the changes aren’t noticeable in the standard day-to-day operation of your server. That was what led us to conclude that an additional detection mechanism was essential to highlight hidden changes made to any of the critical components that make up the Asterisk platform. Thus was born Cover Your Asterisk.
The Elastix folks apparently weren’t comfortable with this arrangement and forked FreePBX years ago and moved to a self-managed environment. The drawback has been their pace of releasing updates and patches, and that apparently applies to the unaddressed ARI bug as well.
The remaining aggregations all function as we’ve described. Before we delve into Cover Your Asterisk, here’s a little known tip. On the output side, FreePBX is basically a code-generator for Asterisk. Once you’ve configured your server using the FreePBX GUI, there is no Asterisk-FreePBX linkage of which we’re aware that requires your web server to remain operational. That turns out to be a good thing. What this means is you can shut down Apache and still have a fully functional Asterisk server with all of the functionality of your FreePBX-designed configuration. Given the times in which we live, that may not be such a bad idea.
An Overview of Cover Your Asterisk
So what does Cover Your Asterisk do? What we’ve sought to do with this GPL2 application is to take a snapshot of your most valuable Asterisk and FreePBX assets and then create checksums of all the individual components. This includes the /etc/asterisk, /var/www/html/admin, and /var/lib/asterisk/agi-bin directories as well as the Asterisk DB and MySQL’s asterisk database. Periodically, you then run another script which compares your current setup to the previous snapshot and identifies the changes for further examination. Once you are satisfied that any reported changes are legitimate, you then take a new snapshot of your server and periodically check it to make certain no unexpected modifications have crept into your system. A duplicate of these production assets is always maintained in a separate directory structure (/etc/asterisk.snapshot) accessible only by root. It can easily be converted into a gzipped tarball: tar -cvzf cya.tar.gz /etc/asterisk.snapshot. Then simply store the tarball off site for a rainy day emergency… when the sky falls once again.
Because this application was designed for production servers, its testing and scope have been limited to the Asterisk 11 and FreePBX 2.11 platform. For our installed base, that translates into PIAF-Green with FreePBX 2.11 and all flavors of Incredible PBX 11 running atop CentOS, Scientific Linux, Ubuntu 14, Debian, and Raspbian platforms on both Intel and ARM hardware including the Raspberry Pi, BeagleBone Black, CuBox, and PogoPlug.
Installation and Operation of Cover Your Asterisk
Log into your Asterisk 11 server as root and issue the following commands to install the Cover Your Asterisk software:
cd /root
wget http://incrediblepbx.com/cover-your-Asterisk.tar.gz
tar zxvf cover-your-Asterisk.tar.gz
rm -f cover-your-Asterisk.tar.gz
To take the original snapshot of your server, run: /root/protect-your-ASSets.sh
To check your current setup against the snapshot, run: /root/check-your-ASSets.sh
To compare a file with its snapshot, run: diff /dirpath/filename /etc/asterisk.snapshot/dirpath/filename
To restore a snapshot file to your current Asterisk configuration, run these commands:
cp -p /etc/asterisk.snapshot/etc/asterisk/filename /etc/asterisk/filename
amportal restart
For Raspberry Pi and BeagleBone Black users, change the MySQL root password in both scripts:
sed -i 's|passw0rd|raspberry|' /root/protect-your-ASSets.sh
sed -i 's|passw0rd|raspberry|' /root/check-your-ASSets.sh
Finally, let us close with several recommendations. First, before making changes to your server with FreePBX, always run check-your-ASSets.sh, correct any detected problems, and then run protect-your-ASSets.sh to create a new snapshot of your server. After making any changes with the FreePBX GUI, run check-your-ASSets.sh again to verify that the changes you sought to make were, in fact, the changes that actually were made to your server. Then finish up by taking a new snapshot. These scripts take less than 30 seconds to run on a typical server so this is not a cumbersome process.
Before you restore any snapshot file or if you are puzzled by any changes you see listed after running check-your-ASSets.sh, we strongly recommend that you first seek advice from the gurus on the PIAF Forum. They can help you identify the severity of the problem, if any, and recommend an appropriate course of action for correction of the problem.
Finally, a cautionary note. Cover Your Asterisk is still a project in development. This means there will be changes/improvements as the coming weeks go by. One wrinkle with updates is your previous snapshots will have to be checked before you update. And then the newest protect-your-ASSets.sh script will need to be run following the update. To keep track of future releases and what’s included, visit this development thread on the PIAF Forum. Enjoy!
Originally published: Monday, October 6, 2014
Need help with Asterisk? Visit the PBX in a Flash Forum.
Special Thanks to Our Generous Sponsors
FULL DISCLOSURE: ClearlyIP, Skyetel, Vitelity, DigitalOcean, Vultr, VoIP.ms, 3CX, Sangoma, TelecomsXchange and VitalPBX have provided financial support to Nerd Vittles and our open source projects through advertising, referral revenue, and/or merchandise. As an Amazon Associate and Best Buy Affiliate, we also earn from qualifying purchases. We’ve chosen these providers not the other way around. Our decisions are based upon their corporate reputation and the quality of their offerings and pricing. Our recommendations regarding technology are reached without regard to financial compensation except in situations in which comparable products at comparable pricing are available from multiple sources. In this limited case, we support our sponsors because our sponsors support us.
BOGO Bonaza: Enjoy state-of-the-art VoIP service with a $10 credit and half-price SIP service on up to $500 of Skyetel trunking with free number porting when you fund your Skyetel account. No limits on number of simultaneous calls. Quadruple data center redundancy. $25 monthly minimum spend required. Tutorial and sign up details are here.
![]() The lynchpin of Incredible PBX 2020 and beyond is ClearlyIP components which bring management of FreePBX modules and SIP phone integration to a level never before available with any other Asterisk distribution. And now you can configure and reconfigure your new Incredible PBX phones from the convenience of the Incredible PBX GUI.
The lynchpin of Incredible PBX 2020 and beyond is ClearlyIP components which bring management of FreePBX modules and SIP phone integration to a level never before available with any other Asterisk distribution. And now you can configure and reconfigure your new Incredible PBX phones from the convenience of the Incredible PBX GUI.
VitalPBX is perhaps the fastest-growing PBX offering based upon Asterisk with an installed presence in more than 100 countries worldwide. VitalPBX has generously provided a customized White Label version of Incredible PBX tailored for use with all Incredible PBX and VitalPBX custom applications. Follow this link for a free test drive!
Special Thanks to Vitelity. Vitelity is now Voyant Communications and has halted new registrations for the time being. Our special thanks to Vitelity for their unwavering financial support over many years and to the many Nerd Vittles readers who continue to enjoy the benefits of their service offerings. We will keep everyone posted on further developments.
Some Recent Nerd Vittles Articles of Interest…
Hold On to Your Wallet: Another Huge VoIP Phone Bill May Be Lurking
We interrupt our regularly scheduled content to bring you an urgent security alert. A couple days ago, a FreePBX® user reported unusual call activity. He traced the calls to a System Admin Dashboard module that was linked back to an IP address in the Netherlands. When the problem was reported, the FreePBX Community Manager quite accurately noted that it wasn’t FreePBX code. When a second user reported the exact same exploit, alarm bells apparently went off.
Further digging by the FreePBX Dev Team found that the legacy ARI module (once again) had been compromised, this time with a Remote Code Execution and Privilege Escalation exploit. Previous security vulnerabilities in this module led the PBX in a Flash developers many years ago to abandon the FreePBX security model in favor of Apache security so that we could totally block ARI access unless the user had administrator privileges. We want to stress that this wasn’t the fault of any of the current FreePBX developers. Instead, our move to Apache security was based upon our realization that this old legacy code was difficult to maintain because none of the original developers were still around. To their credit, the FreePBX developers have introduced a new User Control Panel with the strongest recommendation that the older ARI module be abandoned. Unfortunately, it still exists on all but the very latest FreePBX 12 systems including FreePBX 12 systems which were upgraded from a previous release. In addition, FreePBX 12 now provides checksum protection for all registered modules which will go a long way toward eliminating attacks such as this. So what can you do to protect your servers and your wallet today? For openers, upgrade your FreePBX fw_ari module NOW and clean the malicious module off your server:
rm -rf AMPWEBROOT/admin/modules/admindashboard
amportal a ma upgrade fw_ari
If you encounter an error that FreePBX cannot connect to the Asterisk Manager, do the following from the Linux CLI:
sed -i 's|localhost|127.0.0.1|' /etc/freepbx.conf
amportal restart
amportal a r
Protecting Your Server from Remote VoIP Attacks
Let’s approach the long-term solution on several levels starting with vulnerability exposure. If you can access TCP ports 22 (SSH) and 80 (HTTP) and TCP/UDP port 5060 (SIP) of any of your Asterisk® and FreePBX-based servers anonymously from the Internet, you’re either nuts or rich.
We’ve cautioned against this for nearly a decade and yet even some developers still configure Asterisk and FreePBX-based servers with port 80 Internet exposure. Why? We can only assume it’s because it makes their job of accessing and maintaining these systems easy. Don’t do it! There still are numerous ways to gain access to the FreePBX GUI on any server. Here’s our short list…
Safest. Put your server behind a hardware-based firewall with no Internet port exposure. Then use a VPN to access the FreePBX GUI. In a perfect world, you can run a VPN on all of your VoIP phones so that you have end-to-end protection for your server and all of your users.
Safer. If a hardware-based firewall isn’t possible, use the Linux IPtables firewall and lock down all the ports on your server, especially TCP ports 22 and 80 and TCP/UDP port 5060. Then create a WhiteList of IP addresses that need access privileges. It’s worth stressing that Fail2Ban is completely worthless when it comes to security vulnerabilities such as the ARI RCE flaw because the bad guys walk right in without even being challenged for a password.
Safe. If you need remote access from various remote locations and these sites have dynamic IP addresses, then deploy the Port Knocker technology in addition to locking down your server with the IPtables firewall. This lets you gain temporary access to your server without providing a blank check (literally) to everybody on the Internet. There’s a reason it’s called the World Wide Web and not the Good Guys Web!
Worse. Exposing TCP port 5060 and UDP port 5060 to public Internet access is dangerous. Some providers unfortunately still require direct access to 5060 to make VoIP calls with SIP. TIP: Switch to a provider that allows SIP registrations so that you don’t have to expose port 5060 directly to the Internet EVER!
Worser. Pardon our grammar, but exposing TCP port 22 to public Internet access is a bad idea. At the very least, change the SSH port so that typical port scanners don’t discover your open SSH port. SSH has been compromised in the past. It probably will happen again, or it may have already happened and we just don’t (yet) know about it. Fail2Ban helps with SSH attacks, but it’s not infallible particularly when high performance servers are used in the attacks. Fail2Ban has to scan your logs and, before it can do that, it has to have a sufficient time slice to accomplish the scan, something that may never happen with an attack launched from a platform such as Amazon EC2.
Worst. Never expose TCP port 80 to public Internet access. If you do, then you obviously haven’t had the pleasure of trying to maintain a public web server. TIP: Unless you are a web expert or sleep with one, don’t do it EVER! Earlier this week BASH provided a revolving door to your Internet assets using simple web requests. Earlier this year, OpenSSL was compromised. There will be another vulnerability because it’s the easiest attack target. So it’s just a matter of time until your server is compromised unless you deploy an effective firewall that blocks public access to port 80.
Server Design Still Matters
For our own PBX in a Flash and Incredible PBX users, you can sleep well tonight. Today’s vulnerability is mostly academic for you. PBX in a Flash blocks all access to ARI without the maint password. Incredible PBX blocks all access to ARI through its IPtables WhiteList. It’s still a good idea to apply the FreePBX update just to be double-safe. And Incredible PBX users will have the patch applied the next time they log into their server as root. For everyone else using FreePBX, keep reading.
With our Incredible PBX open source project, we provide state-of-the-art security methodology. While it is not infallible, all of the code is freely available for any and all VoIP developers to review, improve, and deploy. We would encourage our fellow VoIP developers to do so. There were reasons in the past for not deploying Apache security. After all, it lacks the flexibility of the FreePBX security model, and Apache also can be compromised. But we can’t think of any reason today for not deploying a hardened, preconfigured IPtables firewall AND a functional WhiteList as an integral component in every VoIP server install. This is especially important for any product deployed with the FreePBX GUI. Our Travelin’ Man 3 WhiteList implementation has been available for more than 2½ years! While there are downsides to any sort of push technology, we also believe the Incredible PBX (opt-in) update service is worth a careful look. It has been a godsend for us. With every new login, the server checks for important updates and processes them unless the administrator chooses not to use the service.
Keep in mind that FreePBX masquerading as the asterisk user has complete read/write privileges to virtually every Asterisk and web asset on your server. Any compromise is extremely dangerous because the asterisk user on these platforms has such expansive privileges. We recently encountered a trojan authorization lurking inside the permissions list of Asterisk’s manager.conf table. The matter is still under investigation so we can’t reveal much more other than to note that the entry was harmless on the few affected Incredible PBX servers because of the hardened IPtables WhiteList which is a key component of every Incredible PBX server. Had this happened on a server with no firewall protection, the intruder would have had complete access to the Asterisk AMI which pretty much gives the intruder a blank check to Asterisk… using your checkbook. The silver lining was the Incredible PBX update utility which provided a quick way to remove the vulnerability.
The FreePBX Dev Team’s efforts to design and deploy a checksum-based system for FreePBX 12 modules is certainly a step in the right direction. We think more safeguards are warranted. We already are exploring new ways to provide alerts when critical Asterisk or FreePBX resources are modified on PBX in a Flash and Incredible PBX servers. Something akin to the Mac’s admin authorization requirement before critical Asterisk or FreePBX changes are made would be ideal, but we have some other ideas as well. Stay tuned!
Originally published: Wednesday, October 1, 2014
Need help with Asterisk? Visit the PBX in a Flash Forum.
Special Thanks to Our Generous Sponsors
FULL DISCLOSURE: ClearlyIP, Skyetel, Vitelity, DigitalOcean, Vultr, VoIP.ms, 3CX, Sangoma, TelecomsXchange and VitalPBX have provided financial support to Nerd Vittles and our open source projects through advertising, referral revenue, and/or merchandise. As an Amazon Associate and Best Buy Affiliate, we also earn from qualifying purchases. We’ve chosen these providers not the other way around. Our decisions are based upon their corporate reputation and the quality of their offerings and pricing. Our recommendations regarding technology are reached without regard to financial compensation except in situations in which comparable products at comparable pricing are available from multiple sources. In this limited case, we support our sponsors because our sponsors support us.
BOGO Bonaza: Enjoy state-of-the-art VoIP service with a $10 credit and half-price SIP service on up to $500 of Skyetel trunking with free number porting when you fund your Skyetel account. No limits on number of simultaneous calls. Quadruple data center redundancy. $25 monthly minimum spend required. Tutorial and sign up details are here.
![]() The lynchpin of Incredible PBX 2020 and beyond is ClearlyIP components which bring management of FreePBX modules and SIP phone integration to a level never before available with any other Asterisk distribution. And now you can configure and reconfigure your new Incredible PBX phones from the convenience of the Incredible PBX GUI.
The lynchpin of Incredible PBX 2020 and beyond is ClearlyIP components which bring management of FreePBX modules and SIP phone integration to a level never before available with any other Asterisk distribution. And now you can configure and reconfigure your new Incredible PBX phones from the convenience of the Incredible PBX GUI.
VitalPBX is perhaps the fastest-growing PBX offering based upon Asterisk with an installed presence in more than 100 countries worldwide. VitalPBX has generously provided a customized White Label version of Incredible PBX tailored for use with all Incredible PBX and VitalPBX custom applications. Follow this link for a free test drive!
Special Thanks to Vitelity. Vitelity is now Voyant Communications and has halted new registrations for the time being. Our special thanks to Vitelity for their unwavering financial support over many years and to the many Nerd Vittles readers who continue to enjoy the benefits of their service offerings. We will keep everyone posted on further developments.
Some Recent Nerd Vittles Articles of Interest…
The 5-Minute PBX: A Fresh Look at Oracle’s VirtualBox with Incredible PBX
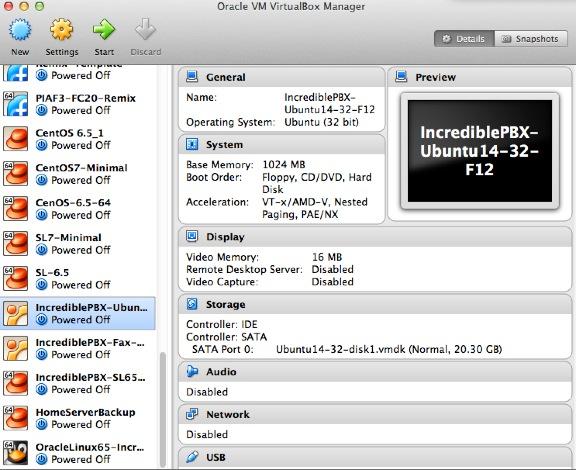
Today we’re paying another visit to our favorite virtual machine platform and introducing four new VoIP images that let you compare features and performance of Asterisk® 11 running atop Ubuntu® 14 or Scientific Linux™ 6.5 with FreePBX® 2.11 or the just-released version 12 release candidate. Think of Incredible PBX™ as the VoIP glue stick that assembles all the necessary VoIP components and holds them together seamlessly. As with all Incredible PBX builds, you also get the full complement of goodies including dozens of text-to-speech apps, voice dialing, SMS messaging, fax support, reminders and wakeup calls, and SECURITY! The difference with the VirtualBox® platform is you get a turnkey install of everything on any desktop computer in less than 5 minutes! That includes Windows PCs, Macs, Linux desktops, and even Solaris machines.

Is VirtualBox merely a sandbox for experimentation? Absolutely not. With any of the beefier desktop computers available today, running Incredible PBX as a 24/7 VirtualBox image is every bit as feature rich with stellar performance that’s equivalent to using dedicated hardware. And there are some added advantages. Obviously, deploying a turnkey VoIP platform in under 5 minutes is a major plus. But, unlike using a dedicated Linux platform, you also get the ability to take snapshots of your system and do full backups in minutes instead of the hours required to bring down dedicated hardware, load a different backup application using a different operating system, perform a backup, and then reboot your VoIP server. And your backups won’t just run on the one server on which the backup was performed. You can restore the backup to any other computer that can run VirtualBox. For any of you that came from a network management background, you know what a big deal that really is. And there’s one more bonus. With Incredible Backup and Restore, you can move your image to dedicated hardware running the same operating system with Asterisk 11 and the same version of FreePBX in minutes.
Need to deploy VoIP servers at dozens of sites around the globe? Not a problem with VirtualBox. Just send a preconfigured VirtualBox image to each site and install VirtualBox on a local desktop computer. In 5 minutes, you have a functional VoIP server including interconnectivity to all of your other VoIP servers with a virtual private network already in place to provide secure VoIP connectivity between all of your sites.
Are there security compromises using the VirtualBox platform? Not at all. Incredible PBX still comes preconfigured with the Linux IPtables firewall that is locked down to a whitelist of local area networks, preferred providers, and your own IP addresses. You can expand the whitelist using the add-ip and add-fqdn scripts or use PortKnocker and Travelin’ Man 4 tools to let remote users gain instant access.
Why four different Incredible PBX images? Glad you asked. Ubuntu and Scientific Linux are a bit like French and Spanish. They’re both languages for communicating, but many of the words are different. Some prefer one or the other so now you have a choice. As for the FreePBX options, let us put in a plug for the FreePBX 12 release candidate. The FreePBX Dev Team has invested thousands of hours in this new software. It shows! Please take it for a spin and give the developers some feedback. To move to Asterisk 12 and 13, you’re going to need FreePBX 12 so you might as well start getting used to it. While there are many similarities in the user interface, the under-the-covers work that the FreePBX team has invested in this new product is nothing short of amazing. There’s very little of the FreePBX 2.11 code that hasn’t been either cleaned up or completely rewritten. We think you’ll like it so give it a try. Those that need a production environment probably should stick with FreePBX 2.11 for the time being. The new Virtual Box images also give you an opportunity to compare performance between the two operating systems and the two FreePBX versions. This isn’t 1999. Take advantage of the opportunity. It only takes a few minutes to spin up a new virtual machine and go for a test drive.
Getting Started. For today, we’ll provide a refresher course on loading VirtualBox and one of the Incredible PBX virtual images. Then we want to spend a little time explaining the secret sauce that goes into building these images so that you can do it yourself either to migrate to a different network or to deploy at multiple sites. When we’re finished, you’ll know everything we’ve learned about deploying VirtualBox machines and, unlike Grandma, we won’t leave an important ingredient out of the recipe just to be sure you never forget how good Grandma’s cookies really were. So let’s get started.
Installing Oracle VM VirtualBox

Oracle’s virtual machine platform inherited from Sun is amazing. It’s not only free, but it’s pure GPL2 code. VirtualBox gives you a virtual machine platform that runs on top of any desktop operating system. In terms of limitations, we haven’t found any. We even tested this on an Atom-based Windows 7 machine with 2GB of RAM, and it worked without a hiccup. So step #1 today is to download one or more of the VirtualBox installers from VirtualBox.org or Oracle.com. Our recommendation is to put all of the 100MB installers on a 4GB thumb drive.1 Then you’ll have everything in one place whenever and wherever you happen to need it. Once you’ve downloaded the software, simply install it onto your favorite desktop machine. Accept all of the default settings, and you’ll be good to go. For more details, here’s a link to the Oracle VM VirtualBox User Manual.
Downloading the Incredible PBX Virtual Machines
A word of warning on the front end. Incredible PBX images featuring Asterisk 11 for VirtualBox are huge! The two Ubuntu images for FreePBX 2.11 and 12 are 1.5GB. The two Scientific Linux 6.5 images for FreePBX 2.11 and 12 are 2.3GB. We’ve added SourceForge hotlinks. So simply click on the desired images and download them to your desktop. Then go to lunch.
Importing & Configuring Incredible PBX Virtual Machines in VirtualBox
You only perform the import step one time. Once imported into VirtualBox, Incredible PBX is ready to use. There’s no further installation required, just like an OpenVZ template… only better. Double-click on the .ova file you downloaded to begin the procedure and load it into VirtualBox. When prompted, be sure to check the Reinitialize the Mac address of all network cards box and then click the Import button. Once the import is finished, you’ll see a new Incredible PBX virtual machine in your VM List on the VirtualBox Manager Window. We need to make a couple of one-time adjustments to the Incredible PBX VM configuration to account for differences in sound and network cards on different host machines.
Click on the Incredible PBX Virtual Machine in the VM List. Then click Settings -> Audio and check the Enable Audio option and choose your sound card. Save your setup by clicking the OK button. Next click Settings -> Network. For Adapter 1, check the Enable Network Adapter option. From the Attached to pull-down menu, choose Bridged Adapter. Then select your network card from the Name list. Then click OK. Finally, click Settings -> System, uncheck Hardware clock in UTC time, and click OK. That’s all the configuration that is necessary for your Incredible PBX Virtual Machine. The rest is automagic.
Running Incredible PBX Virtual Machines in VirtualBox
Once you’ve imported and configured the Incredible PBX Virtual Machine, you’re ready to go. Highlight IncrediblePBX Virtual Machine in the VM List on the VirtualBox Manager Window and click the Start button. The boot procedure with your chosen operating system will begin just as if you had installed Incredible PBX on a standalone machine. You’ll see a couple of dialogue boxes pop up that explain the keystrokes to move back and forth between your host operating system desktop and your virtual machine. Remember, you still have full access to your desktop computer. Incredible PBX is merely running as a task in a VirtualBox window. Always gracefully halt Incredible PBX just as you would on a dedicated computer.
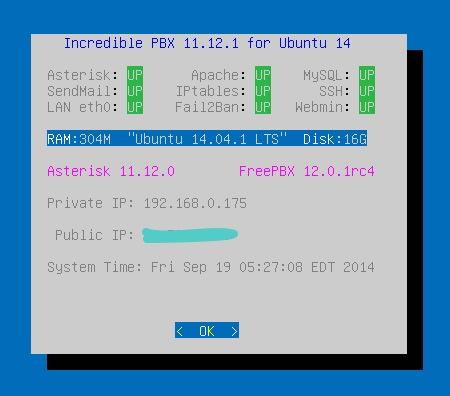
Here’s what you need to know. To work in the Incredible PBX Virtual Machine, just left-click your mouse while it is positioned inside the VM window. To return to your host operating system desktop, press the right Option key on Windows machines or the left Command key on any Mac. For other operating systems, read the dialogue boxes for instructions on moving around. To access the Linux CLI, login as root with the default password: password. To access FreePBX with a browser, point to the IP address of your virtual machine and login as admin with admin password set below. For the security of your server, we recommend that you log in to the Linux CLI at least once a week so that Incredible PBX updates get applied to your server regularly. This is critically important if you care about your phone bill.
When logging in for the first time, Incredible PBX will go through some setup steps and then reboot. Login again to complete the setup. status will always provide a snapshot of your system. To shut down Incredible PBX gracefully, click in the VM window with your mouse, log in as root, and type: halt. Be sure to complete the following setup steps from the Linux CLI:
- Change your root password: passwd
- Set your FreePBX admin password: /root/admin-pw-change
- Set your correct time zone: /root/timezone-setup
- Add WhiteList entries to firewall if needed: /root/add-ip or /root/add-fqdn
- Store PortKnocker credentials in a safe place: cat /root/knock.FAQ
- Enable SAMBA if desired: /root/samba-enable.sh
- Enable Incredible Fax support if desired: (script in /root)
- Login to your NeoRouter VPN server if desired: /root/nrclientcmd
Preparing Incredible PBX Virtual Machines for Migration
As the Linux operating systems have become more turnkey, one of the shortcuts that has been implemented on both the RedHat and Debian/Ubuntu platforms is storage of your network setup so that the server reboots more quickly. While that’s fine for rebooting on the same server, it’s a real problem if you attempt to move your setup to different hardware or a new network because eth0 will not load. That means no IP address! Here are two ways to assure that things will actually work after the move. Both assume that you will have a DHCP server at the new location just as you did at your existing site.
The Easy Way. If you have console access after the VM image is restored on the new platform (which means you don’t need a network IP address for the server in order to log in as root), then the easy way to prepare any of the Incredible PBX machines for relocation is to issue the following commands before you halt the system and make a VirtualBox backup:
touch /etc/update_hostconfig
touch /etc/update_serverconfig
Once you have halted the server, edit both the sound card and network card settings and disable both of them in VirtualBox Manager. Then choose File -> Export Appliance from the VirtualBox title bar and create a .ova backup image on your desktop. You now have an image that is similar to the Incredible PBX image that you originally downloaded, except it has all of your data and settings. All you have to do is repeat the install drill above at the new location using the .ova image you created and log in with whatever your current root password happens to be. You’ll get a two-pass automatic setup just as you did when you began today’s adventure.
The only drawback to this procedure is the fact that the extension 701 and default DISA passwords will be initialized when you first boot from your .ova image at the other location. Aside from that, you’ll have a clean platform with new SSH and DUNDI credentials as well as mostly sanitized log files.
The Hard Way. The other alternative is to manually prepare your existing system for migration before you shut it down. The primary reason for doing this would be to assure that you can log in with an SSH client at the other end as soon as the server is booted. The steps differ a bit depending upon whether you’re on the Ubuntu or Scientific Linux platform. But on both platforms you need to enter the IP address from which you will log in at the new site unless it is on one of the private LAN subnets that already is whitelisted in IPtables. Just issue the command /root/add-ip and choose 0 option to enable all services for the new IP address. Then…
On the Ubuntu platform, issue the following commands:
touch /etc/update_hostconfig
touch /etc/update_serverconfig
rm -f /var/lib/dhcp/*
rm -f /etc/udev/rules.d/70*
halt
On the Scientific Linux platform, issue the following commands:
touch /etc/update_hostconfig
touch /etc/update_serverconfig
rm -f /var/lib/dhcpd/*
rm -f /var/lib/dhclient/*
rm -f /etc/udev/rules.d/70*
halt
Once you have halted the server, edit both the sound card and network card settings and disable both of them in VirtualBox Manager. Then choose File -> Export Appliance from the VirtualBox title bar and create a .ova backup image on your desktop. Now you’re an expert. Enjoy!
Originally published: Monday, September 22, 2014
 Support Issues. With any application as sophisticated as this one, you’re bound to have questions. Blog comments are a terrible place to handle support issues although we welcome general comments about our articles and software. If you have particular support issues, we encourage you to get actively involved in the PBX in a Flash Forums. It’s the best Asterisk tech support site in the business, and it’s all free! Please have a look and post your support questions there. Our forum is extremely friendly and is supported by literally hundreds of Asterisk gurus.
Need help with Asterisk? Visit the PBX in a Flash Forum.
Special Thanks to Our Generous Sponsors
FULL DISCLOSURE: ClearlyIP, Skyetel, Vitelity, DigitalOcean, Vultr, VoIP.ms, 3CX, Sangoma, TelecomsXchange and VitalPBX have provided financial support to Nerd Vittles and our open source projects through advertising, referral revenue, and/or merchandise. As an Amazon Associate and Best Buy Affiliate, we also earn from qualifying purchases. We’ve chosen these providers not the other way around. Our decisions are based upon their corporate reputation and the quality of their offerings and pricing. Our recommendations regarding technology are reached without regard to financial compensation except in situations in which comparable products at comparable pricing are available from multiple sources. In this limited case, we support our sponsors because our sponsors support us.
BOGO Bonaza: Enjoy state-of-the-art VoIP service with a $10 credit and half-price SIP service on up to $500 of Skyetel trunking with free number porting when you fund your Skyetel account. No limits on number of simultaneous calls. Quadruple data center redundancy. $25 monthly minimum spend required. Tutorial and sign up details are here.
![]() The lynchpin of Incredible PBX 2020 and beyond is ClearlyIP components which bring management of FreePBX modules and SIP phone integration to a level never before available with any other Asterisk distribution. And now you can configure and reconfigure your new Incredible PBX phones from the convenience of the Incredible PBX GUI.
The lynchpin of Incredible PBX 2020 and beyond is ClearlyIP components which bring management of FreePBX modules and SIP phone integration to a level never before available with any other Asterisk distribution. And now you can configure and reconfigure your new Incredible PBX phones from the convenience of the Incredible PBX GUI.
VitalPBX is perhaps the fastest-growing PBX offering based upon Asterisk with an installed presence in more than 100 countries worldwide. VitalPBX has generously provided a customized White Label version of Incredible PBX tailored for use with all Incredible PBX and VitalPBX custom applications. Follow this link for a free test drive!
Special Thanks to Vitelity. Vitelity is now Voyant Communications and has halted new registrations for the time being. Our special thanks to Vitelity for their unwavering financial support over many years and to the many Nerd Vittles readers who continue to enjoy the benefits of their service offerings. We will keep everyone posted on further developments.
Some Recent Nerd Vittles Articles of Interest…
- Many of our purchase links refer users to Amazon when we find their prices are competitive for the recommended products. Nerd Vittles receives a small referral fee from Amazon to help cover the costs of our blog. We never recommend particular products solely to generate Amazon commissions. However, when pricing is comparable or availability is favorable, we support Amazon because Amazon supports us. [↩]
VoIP Navigation Guide: Getting Started with Asterisk and FreePBX
When you were just getting started with Asterisk® in the early days, you had two choices: hire a consultant to build you an Asterisk system or start with Asterisk@Home and learn it yourself. That was a disaster for many folks. Times have changed, and there are literally dozens of aggregations and platforms from which to choose. But the question we continue to hear is "What’s the best way to get started?" Today’s VoIP Navigation Guide will help you make the right choices.
Before we begin, you need to do a little head-scratching yourself. Sit down with a pencil and paper (or a computer if you must) and jot down answers to our Top 10 Preliminary Questions:
- Is this for home or office use?
- How many simultaneous calls?
- How many users on the system?
- Will there be remote or traveling users?
- Is this a mission-critical system for you/others?
- What type & speed Internet service? Wi-Fi only?
- What is the skillset of those supporting the system?
- Do you want to babysit hardware for your system?
- What’s your initial and monthly budget for the project?
- What should happen to calls if your house/office burns down?
Skillset Matters! Let’s start with the obvious. The technical skillset of you and any other people that will be managing your VoIP server are critically important. This isn’t the old days where you only had to monitor people making long distance calls from within your own house. Once you connect a VoIP server to the Internet, anybody and everybody around the world can take a shot at your server and run up huge phone bills on your nickel unless you know what you’re doing or unless you deploy a server on which access is locked down to just you and trusted users and service providers.
We preach (regularly) that firewalls are essential if you’re going to deploy a VoIP server. In the home or office environment, that means that, in addition to your VoIP server, you also need a hardware-based firewall/router with no mapped ports to the VoIP server, period. Any other setup and it’s just a matter of time until you’re hacked.
In the hosted or cloud environment, it means at the very least a software-based firewall on your VoIP server with all access restricted to a whitelist of trusted users and providers. Any other setup and it’s just a matter of time until you’re hacked.
If you’re not qualified to manage either a hardware or software firewall, then your VoIP choices are limited. None of the major aggregations including PBX in a Flash, the FreePBX® Distro, AsteriskNOW, and Elastix provide any firewall protection as installed. While Fail2Ban is included, it is basically a log scanner which searches for failed login attempts and blocks IP addresses that make excessive login attempts. The major problem with Fail2Ban is that it takes time to run and, if your server is attacked from powerful servers, that may not happen until thousands of hack attempts have been executed.
We have attempted to address this problem with this summer’s new releases of Incredible PBX. In these new releases, whitelist access is locked down as part of the installation process. You have a choice of platforms.
On Cloud-based servers and depending upon your installation skills, we recommend:
- Incredible PBX for Ubuntu 14 in the RentPBX Cloud (preconfigured; $15/mo.)
- Incredible PBX for Ubuntu 14 in Digital Ocean Cloud (manual install; cost varies)
- Incredible PBX for CentOS 6.5 in Digital Ocean Cloud (manual install; cost varies)
On self-managed servers, you typically install the Linux operating system and then run the Incredible PBX installer. On smaller devices, we handle that for you. We recommend the following setups with the caveat that the old adage still applies: "You get what you pay for!" All four of the small hardware offerings below support WiFi-only operation. Just add the recommended WiFi USB dongle. For the CuBox-i, it’s built in. The VirtualBox setup takes less than 10 minutes.
- Incredible PBX for Ubuntu 14 (any hardware under 3 yrs. old)
- Incredible PBX for CentOS (any hardware under 3 yrs. old)
- Incredible PBX for VirtualBox (any Windows, Mac, or Linux desktop)
- Incredible PBX for Pogoplug (~$20)
- Incredible PBX for Raspberry Pi B+ (~$35)
- Incredible PBX for BeagleBone Black (~$50)
- Incredible PBX for CuBox-i (~$130)
Sizing Your Platform. Appropriate server and Internet capacity obviously turns on most of the answers you wrote down in the preliminary questionnaire. If the system will be used by less than a handful of people, you’re probably safe with the cloud-based solutions we’ve identified or one of the four low-cost devices listed above. Keep in mind that you need roughly 100Kbps of Internet bandwidth for each simultaneous VoIP call. If you have existing POTS lines from Ma Bell, those don’t consume Internet bandwidth but do consume local network resources. POTS line integration also requires additional hardware for each line. For less than 5 POTS lines, the OBi110 is an excellent choice. You’ll find it advertised in the right column of Nerd Vittles for under $50.
For up to a couple dozen low-call-volume employees, the RentPBX Cloud offering is a terrific bargain. It includes the necessary bandwidth not only to make calls but also to connect your extensions. When you get above those numbers of users or with heavy call volume, scaling matters. You don’t want to purchase a server only to discover on Day Two that it can’t handle the call volume. Here’s where the PBX in a Flash Forum can be a tremendous help. Describe your environment using the Top 10 Checklist from above. One of our hundreds of experts will lend a hand in recommending what you need to get started. Better yet, hire one of the gurus to handle the setup for you. It’ll save you thousands of dollars in headaches and easily pay for itself in future savings.
The PBX in a Flash Alternative. We haven’t mentioned PBX in a Flash as a solution for those just beginning their VoIP adventure. The reason is simple. The firewall is not preconfigured on PBX in a Flash, and somebody has got to do it unless your server is sitting behind a rock-solid, hardware-based firewall. The beauty of PBX in a Flash is that it’s incredibly flexible. You can choose not only the version of Asterisk and FreePBX to install, but you also can compile Asterisk with any collection of features desired. Once you get your feet wet with Incredible PBX, it’s our VoIP tool of choice, but it takes some skills on your part to run it safely. A good place to begin is the Nerd Vittles Quickstart Guide for PBX in a Flash 3. Enjoy!
Originally published: Wednesday, September 17, 2014
Support Issues. With any application as sophisticated as this one, you’re bound to have questions. Blog comments are a terrible place to handle support issues although we welcome general comments about our articles and software. If you have particular support issues, we encourage you to get actively involved in the PBX in a Flash Forums. It’s the best Asterisk tech support site in the business, and it’s all free! Please have a look and post your support questions there. Our forum is extremely friendly and is supported by literally hundreds of Asterisk gurus.
Need help with Asterisk? Visit the PBX in a Flash Forum.
Special Thanks to Our Generous Sponsors
FULL DISCLOSURE: ClearlyIP, Skyetel, Vitelity, DigitalOcean, Vultr, VoIP.ms, 3CX, Sangoma, TelecomsXchange and VitalPBX have provided financial support to Nerd Vittles and our open source projects through advertising, referral revenue, and/or merchandise. As an Amazon Associate and Best Buy Affiliate, we also earn from qualifying purchases. We’ve chosen these providers not the other way around. Our decisions are based upon their corporate reputation and the quality of their offerings and pricing. Our recommendations regarding technology are reached without regard to financial compensation except in situations in which comparable products at comparable pricing are available from multiple sources. In this limited case, we support our sponsors because our sponsors support us.
BOGO Bonaza: Enjoy state-of-the-art VoIP service with a $10 credit and half-price SIP service on up to $500 of Skyetel trunking with free number porting when you fund your Skyetel account. No limits on number of simultaneous calls. Quadruple data center redundancy. $25 monthly minimum spend required. Tutorial and sign up details are here.
![]() The lynchpin of Incredible PBX 2020 and beyond is ClearlyIP components which bring management of FreePBX modules and SIP phone integration to a level never before available with any other Asterisk distribution. And now you can configure and reconfigure your new Incredible PBX phones from the convenience of the Incredible PBX GUI.
The lynchpin of Incredible PBX 2020 and beyond is ClearlyIP components which bring management of FreePBX modules and SIP phone integration to a level never before available with any other Asterisk distribution. And now you can configure and reconfigure your new Incredible PBX phones from the convenience of the Incredible PBX GUI.
VitalPBX is perhaps the fastest-growing PBX offering based upon Asterisk with an installed presence in more than 100 countries worldwide. VitalPBX has generously provided a customized White Label version of Incredible PBX tailored for use with all Incredible PBX and VitalPBX custom applications. Follow this link for a free test drive!
Special Thanks to Vitelity. Vitelity is now Voyant Communications and has halted new registrations for the time being. Our special thanks to Vitelity for their unwavering financial support over many years and to the many Nerd Vittles readers who continue to enjoy the benefits of their service offerings. We will keep everyone posted on further developments.
Some Recent Nerd Vittles Articles of Interest…
VoIP Hardware Deal of the Year: Meet the $20 Pogoplug 4 with Incredible PBX

This week’s project is not for mere mortals. It’s for techies that also happen to be cheapskates frugal. You may recall the Pogoplug from yesteryear. Well, the Pogoplug 4 still is around and can be yours for under $20 with free 2-day shipping if you’re an Amazon Prime member. But the clock is ticking on these bad boys. Once they’re gone, they’re gone.1
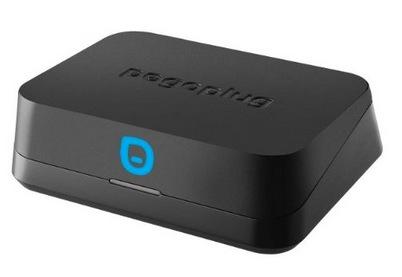
UPDATE: There’s more good news. Now the cost with the Pogoplug Backup & Sharing model is just $10.95! For our purposes, the main difference is one less USB port, but it still has one which is all you need for wireless networking.
So we took the dare and decided to see whether the Pogoplug 4 could actually run Asterisk 11® and FreePBX® 2.11 and Incredible PBX™. And guess what? It may not be pretty, but it works. If you happen to have a Google Voice number and a kid away at school or a grandma in a distant city with an Internet connection or if you have a vacation home or rental property that needs phone service (but not often), then this $20 project may be for you. Configure the device, add a cheap SIP phone, and presto! You’ve got free calling in the U.S. and Canada with your very own phone number for as long as you have Internet service and Google chooses to keep paying your phone bill. 😉
Don’t take our word for it. Call our Pogoplug for a quick IVR demo compliments of Allison: 
- Call by Name (just say "American Airlines" to try it out)
- Conference Call (enter 1234# to join the conference)
- Wolfram Alpha (try this: "What planes are overhead?")
- Lenny (the Telemarketers’ Worst Nightmare)
- Yahoo News Headlines
- Weather Forecasts (say a city and state or country)
- Today in History
- Ring the House Phones (sends you back to Lenny)
Our tip of the hat this week goes to Qui Hong without whom none of this would have been possible. His tutorial on transforming the Pogoplug 4 into a Debian server is a true masterpiece. And his blog is where we begin our adventure once you have the correct Pogoplug 4 in hand: POGO-V4-A3-01. Our link has the correct one, but double-check the Model Number just to be sure.
Converting the Pogoplug 4 into a Debian Platform
Once you have your Pogoplug, you’ll need to scurry over to Qui Hong’s blog and carefully work through his tutorial to convert your Pogoplug into a Debian server. As we’ve said many times before, if you can follow a cookie recipe and end up with edible cookies, then you can do this. Just be very careful of typos. One bad keystroke can turn your Pogoplug into a burnt cookie. Then it becomes a $40 project. 🙂
Installing Incredible PBX 11.12.0 on the Pogoplug 4
Once your Pogoplug has been Debianized, there are five simple steps to get Incredible PBX up and running on your Pogoplug 4:
- Purchase a storage device
- Download Incredible PBX image
- Untar the image on your desktop
- Burn the image to an SD card
- Insert the SD card in the Pogoplug and boot
Choosing a Storage Platform. The first step is to purchase a suitable SD card. We recommend at least a 16GB Class 10 card from Transcend, SanDisk, or Kingston. All of them are about $10 on Amazon and many include free 2-day shipping for Prime customers.
Downloading Incredible PBX for Pogoplug. From your favorite desktop computer, download the latest build of Incredible PBX from SourceForge. Depending upon your network connection and the SourceForge mirror, it can take awhile. It’s a whopping 1.5GB image!
Untarring Incredible PBX for Pogoplug. Depending upon your desktop platform, untarring incrediblepbx.4.pogoplug.D7.latest.tar.gz is as simple as double-clicking on it in the Downloads folder (on a Mac). On the Windows platform, here are 3 utilities that will do the job. On a Linux desktop, open a Terminal window and…
tar zxvf incrediblepbx.4.pogoplug.D7.latest.tar.gz
Burning the Incredible PBX image to SD card. Once you’ve untarred the file, you’ll find two scripts that make burning the image to an SD card simple if you’re on a Mac or Linux desktop. On a Windows machine, it’s a little more complicated. Most SD cards come preformatted with a DOS partition so your Windows machine should recognize the SD card when it’s inserted. If not, format the card using a utility such as SD Card Formatter. Next, you’ll need Win32 Disk Imager to burn pogoplug.img to your card. Once the image has been transferred, gracefully unmount the card from your desktop.
Booting Incredible PBX on the Pogoplug. Insert the SD card (electronics side down) into your Pogoplug 4. Then apply power to the device after connecting an Ethernet cable to a network with Internet connectivity that can also hand out DHCP addresses. Visit your router to decipher the IP address assigned to the Pogoplug and reserve the IP address so that it doesn’t suddenly change down the road. Log into Incredible PBX as root with pogoplug as your password. Your SSH credentials, Asterisk DUNDI secrets, logs, and network connection options will be initialized. When prompted, press Enter to reboot your server. With some SD cards, you may find yourself waiting an eternity for the promised reboot. After seeing the "rebooting" message, count to ten. If your server still hasn’t rebooted, remove and reapply power. This quirk goes away after the first reboot.
After the reboot, log in again as root with password: pogoplug. Your firewall setup will be initialized to lock down your whitelist to your server’s public and private IP addresses AND the IP address of the machine from which you’re logging in. All of your FreePBX passwords will be randomized as well. The whole process only takes a few seconds.
When the second pass configuration is complete, you will be greeted by a welcoming message. STOP and read it. It has loads of important information about your server’s configuration and your next steps. Press ENTER to review status:
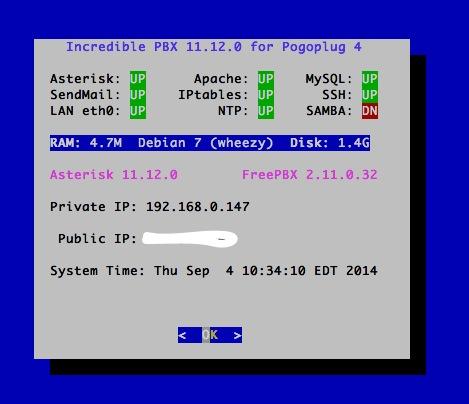
The Next 10 Steps. Before you do anything else, complete the following steps. It only takes a minute to secure and properly configure your server:
- Change your root password: passwd
- Change your FreePBX admin password: /root/admin-pw-change
- Set your correct time zone: /root/timezone-setup
- Expand partition to match SD card size: /root/resize-partition
- Add any desired IP addresses to WhiteList: /root/add-ip
- Decipher the randomized password for extension 701. It’s in the data field:
mysql -uroot -ppassw0rd -e "select * from asterisk.sip where id=701 and keyword='secret'"
- Decipher the randomized voicemail password for extension 701. It’s the first entry:
cat /etc/asterisk/voicemail.conf | grep 701 | cut -f 3 -d " "
- Enable Windows Networking, if desired: /root/samba-enable.sh
- Configure PPTP Network, if desired: cat /root/pptp-faq
- Check status to be sure everything is working: status
A Few Important Tips. Every operating system and service provider has their quirks. Ask Bill Gates! Debian and especially Comcast are no different. Fortunately, with Debian, it’s a very short list.
1. Use the following commands (only!) to shutdown and restart your server: halt and reboot. These commands are reworked in Incredible PBX to gracefully shutdown important services so that files don’t get damaged. Please use them!
2. If you ever want to move your server to a different network, complete these steps before you leave your existing network. First, using add-ip or add-fqdn, add the new WhiteList addresses for your new location using Option 0 (all privileges). Otherwise, you won’t be able to access your server once you move. Then issue the commands below. This will trigger a new Phase I update (outlined above) on the default network (eth0) using DHCP the next time you boot your Pogoplug.
touch /etc/update_hostconfig
halt
3. You really do need email connectivity to get the most out of Incredible PBX. It’s the way you receive important notifications from FreePBX, and it’s also how voicemail messages are delivered. From the Linux CLI, test your server to be sure you can send emails reliably:
echo "test" | mail -s testmessage yourname@gmail.com
After checking your spam folder, if you really didn’t get the email, it may be that your service provider is blocking downstream SMTP traffic. You can use your provider’s SMTP server as a smarthost to send out mail with Exim4. Just run the following program to reconfigure the Exim mail server: dpkg-reconfigure exim4-config. Choose the SmartHost option and enter your provider’s SMTP address, e.g. smtp.comcast.net or smtp.knology.net. Exim will restart.
4. If you’d like to activate ODBC support for Asterisk including our ODBC sample applications including Speed Dial, here are the steps. Log into your server as root and issue the following commands:
cd /root
wget http://incrediblepbx.com/odbc-pogoplug.tar.gz
tar zxvf odbc-pogoplug.tar.gz
rm odbc-pogoplug.tar.gz
./mysql-sample
./mysql-odbc
./odbc-gen.sh
Now you can try things out by dialing 222 from a phone connected to your server. When prompted for the employee number, enter 12345. Or dial 223 and, when prompted for the AsteriDex Dial Code, enter 263 (the first 3 letters of the American Airlines entry).
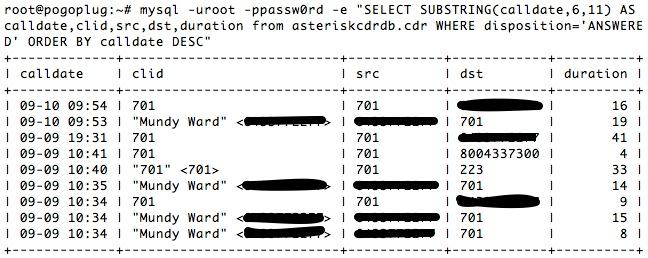
5. Want a list of your completed calls without using FreePBX? It’s easy:
mysql -uroot -ppassw0rd -e "SELECT SUBSTRING(calldate,6,11) AS calldate,clid,src,dst,duration from asteriskcdrdb.cdr WHERE disposition='ANSWERED' ORDER BY calldate DESC"
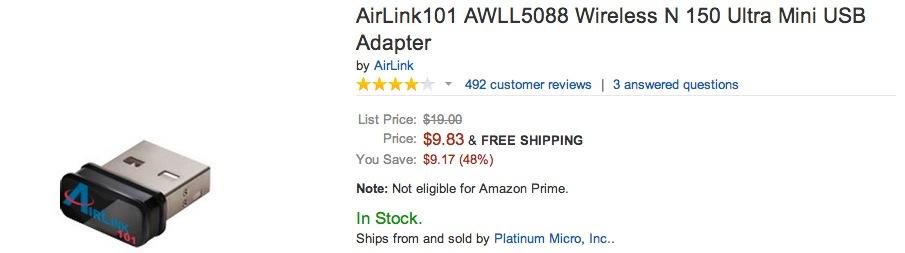
6. There may be situations in which it is desirable to use wireless networking instead of a wired connection with your Pogoplug. For under $10, you now can add WiFi. Here’s our post on the PIAF Forum to show you how.
Managing FreePBX with Incredible Backup and Restore
Unlike other releases of Incredible PBX, the backup and restore tools can be helpful on the Pogoplug platform. Even though Asterisk runs smoothly, calls sound great, and performance is pretty amazing, the FreePBX GUI is usable but a bit sluggish on the Pogoplug platform. If the performance bothers you, there’s a workaround. Create an Incredible Backup image of your Pogoplug, restore that image on a more normal Ubuntu 14 platform with ample RAM, and then make your FreePBX changes there using the FreePBX GUI. When you’re finished, make a backup of the changes, and then restore that backup to your Pogoplug. It sounds more complicated than it actually is. In essence, you’ll be transforming FreePBX into an Asterisk code generator. In fact, once a backup is restored, you can shut down your web server, and almost everything will still work. We were able to perform the entire procedure including updating all of the FreePBX modules and adding a Google Voice trunk in about 15 minutes using a snapshot of an Incredible PBX for Ubuntu 14 droplet we previously had created. Here are the actual steps to perform the first time:
1. Take an image snapshot of your server with Incredible Backup: /root/incrediblebackup
HINT: No need to do it initially. One is included: /backup/DU-2014.09.07.19.46-A11.12.0-F2.11-I11.12.0.tar.gz
2. Create a 512MB Droplet on Digital Ocean using Ubuntu 14 and Incredible PBX for Ubuntu. Follow the Nerd Vittles tutorial which also has a signup link to assist our projects. Coupon code: ALLSSD10 gets you a $10 credit this month. Once you’re up and running, you may want to take a snapshot so that you can quickly recreate droplets while also avoiding hourly charges for the one you’ve previously built (whether running or not!). Digital Ocean 512MB droplets cost less than a penny an hour so this is not a big ticket item. When you finish with the droplet, just destroy it (once you’ve made a snapshot!). Then the money meter stops. First time build takes about 30 minutes.
3. After creating /backup folder on DO droplet, copy your backup image from step #1 to this folder.
4. Restore the image: /root/incrediblerestore /backup/DU-somefilename.tar.gz
5. Open FreePBX on DO with a browser and log in as admin with your admin password.
6. Make all the changes desired using the tutorial below. Reload FreePBX (red bar) when prompted before exiting!
7. Make a DO backup of your new setup: /root/incrediblebackup
8. Copy the DO backup file to /backup on your Pogoplug.
9. Restore the DO backup: /root/incrediblerestore /backup/DU-somefilename.tar.gz
10. Log out and back into your Pogoplug as root.
Getting Started with VoIP and FreePBX
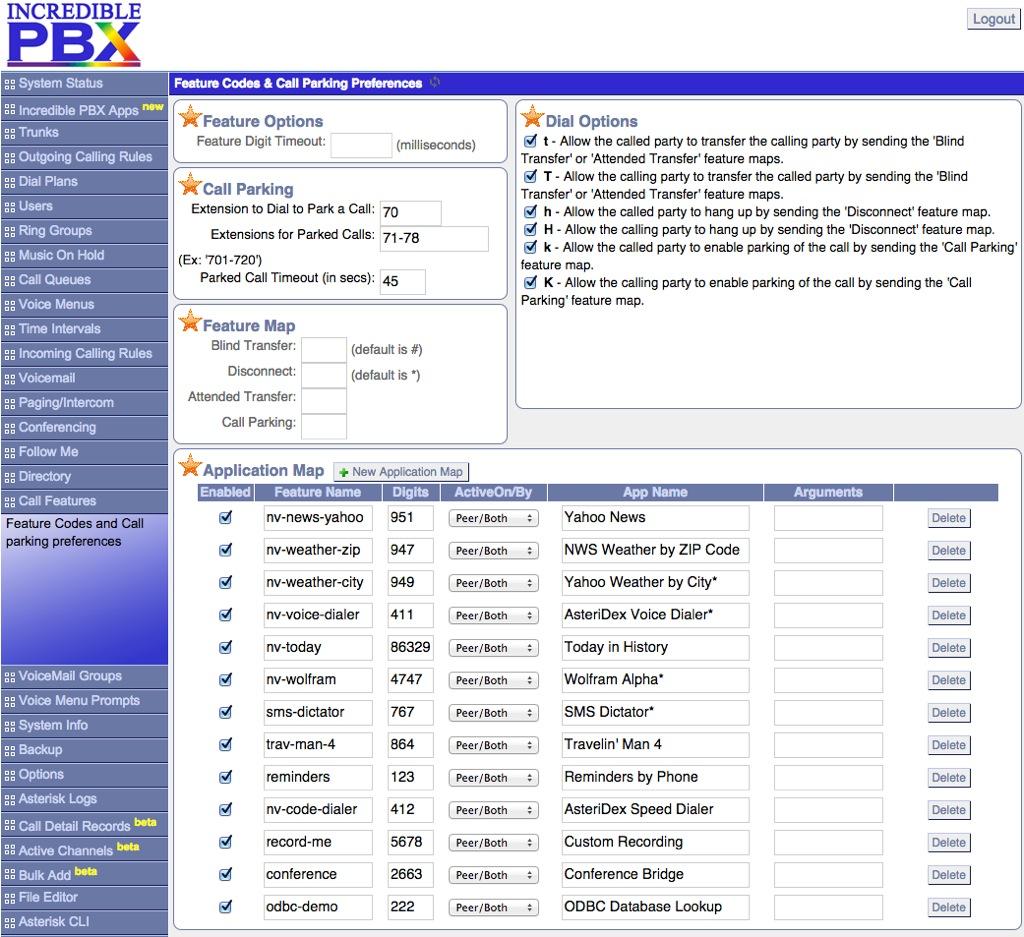
To access FreePBX, just point to the IP address of the server. The main control panel looks like this:
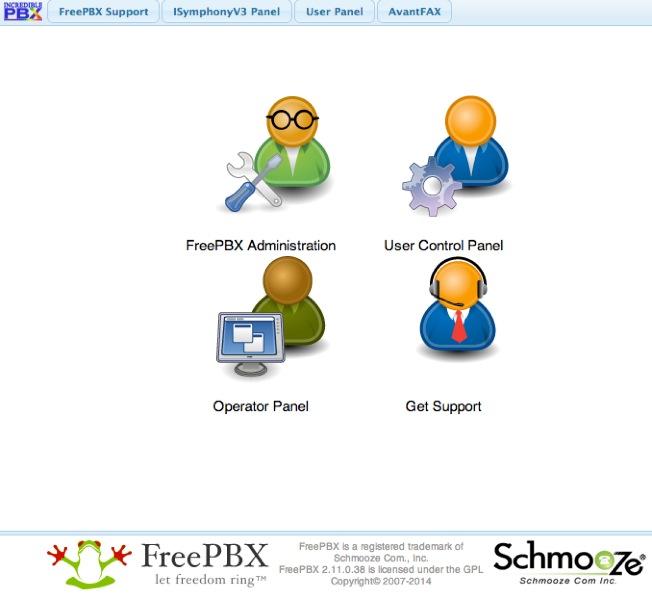
As configured, the default user account for FreePBX administration is admin. The password is whatever you set in the initial setup above. If you ever forget it, you can reset it easily: /root/admin-pw-change.
For those new to Asterisk and FreePBX, here’s a brief primer on what needs to happen before you can make and receive calls. If you have an existing Google Voice account, lucky you. This gets you a phone number for your PBX so people can call you. And it provides a vehicle to place free calls to plain old telephones in the U.S. and Canada so long as Google continues to provide the free service.
If you don’t have a Google Voice account or a shiny new smartphone, then you will need to purchase a SIP trunk from one of the numerous vendors around the world. Our favorite (because they provide terrific service at a modest price AND provide financial support to the Nerd Vittles, PBX in a Flash, and Incredible PBX projects) is Vitelity. Their special rates and a link for a discount are included at the end of today’s article.
Unlike POTS phone service from Ma Bell, the SIP World is a little different. First, you don’t need to put all your eggs in one basket. A trunk that gets you a phone number for incoming calls need not be with the same vendor that provides a trunk to place outbound calls. In fact, you may want multiple trunks for outbound calls just to have some redundancy. A list of our favorites in the U.S. and Canada is available on the PIAF Forum. Of course, there also are providers that offer all-you-can-eat calling plans. Two of our favorites are Vestalink and Future-Nine.
You’ll also need a softphone or SIP phone to actually place and receive calls. YATE makes a free softphone for PCs, Macs, and Linux machines so download your favorite and install it on your desktop.
Phones connect to extensions in FreePBX to work with Incredible PBX. Extensions talk to trunks (like Google Voice) to make and receive calls. FreePBX uses outbound routes to direct outgoing calls from extensions to trunks, and FreePBX uses inbound routes to route incoming calls from trunks to extensions to make your phones ring. In a nutshell, that’s how a PBX works.
There are lots of bells and whistles that you can explore down the road including voicemail, conferencing, IVRs, autoattendants, paging, intercoms, CallerID lookups, announcements, DISA, call parking and pickup, queues, ring groups, and on and on. And then there’s all of the Incredible PBX applications which are covered separately in this Nerd Vittles article. Once you’re comfortable with one server, you or your company will want some more. This Nerd Vittles article will walk you through interconnecting them into a seamless mesh network so that you can call from one office to another transparently. Yes, those articles were written for the Raspberry Pi. But the beauty of Incredible PBX is that it runs (almost) identically on every server platform.
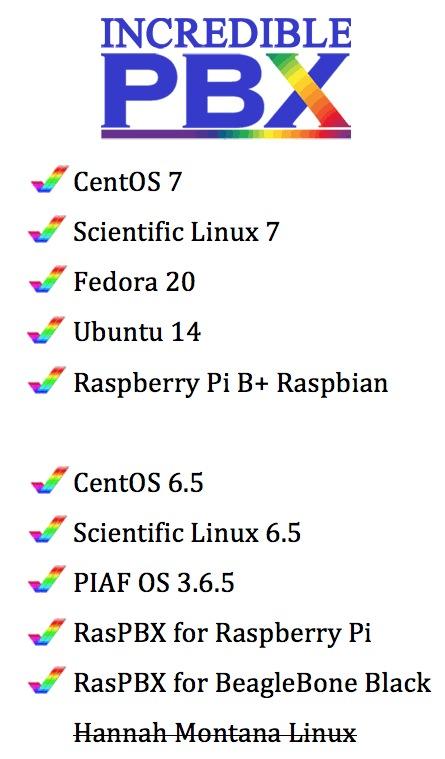
Here’s our 7-Step Checklist to Getting Started with FreePBX:
1. Setting Up Google Voice. If you want free calling in the U.S. and Canada, then you’ll need an existing Google Voice account that includes the Google Chat feature. You’ll need one dedicated to Incredible PBX, or it won’t work. Log out after setting up the new Google Voice account! Also note that Google Voice may cease to function at any time after May 15, 2014. You can read all about it here.
- Log into existing Google Voice account
- Enable Google Chat as Phone Destination
- Configure Google Voice Calls Settings:
- Call Screening – OFF
- Call Presentation – OFF
- Caller ID (In) – Display Caller’s Number
- Caller ID (Out) – Don’t Change Anything
- Do Not Disturb – OFF
- Call Options (Enable Recording) – OFF
- Global Spam Filtering – ON
- Place test call in and out using GMail Call Phone
- Log out of your Google Voice account
If this fails, then Google may have blocked your IP address. Here’s how to unblock it.
2. Activating a Google Voice Trunk. To create a Trunk in FreePBX to handle calls to and from Google Voice, you’ll need three pieces of information from the Google Voice account you set up above: the 10-digit Google Voice phone number, your Google Voice account name, and your Google Voice password. Choose Connectivity -> Google Voice (Motif) from the FreePBX GUI. The following form will appear:
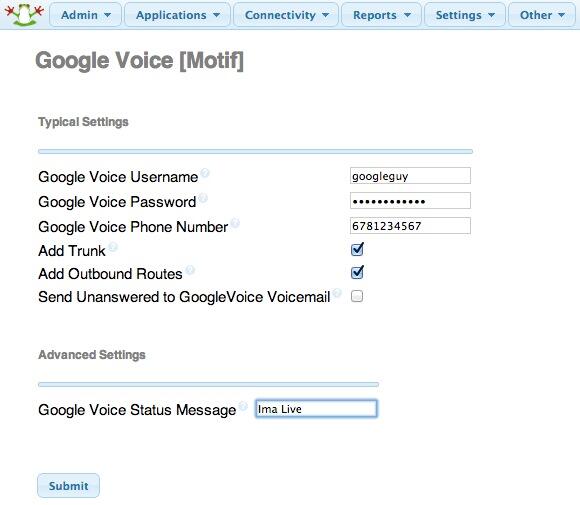
Fill in the blanks with your information and check only the top 2 boxes. If your Google Voice account name ends in @gmail.com, leave that out. Otherwise, include the full email address. Then click Submit Changes and Apply Config.
To activate a Google Voice trunk, you must restart Asterisk on the Pogoplug platform: amportal restart.
3. Setting a Destination for Incoming Calls. Now that you’ve created your Google Voice Trunk, we need to tell FreePBX how to process inbound calls when someone dials your Google Voice number. There are any number of choices. You could simply ring an extension. Or you could ring multiple extensions by first creating a Ring Group which is just a list of extension numbers. Or you could direct incoming calls to an Interactive Voice Response (IVR) system. By default, Incredible PBX is configured to route all incoming calls to extension 701. You can change the setting whenever you like by choosing Connectivity -> Inbound Routes -> Default. In the Set Destination section of the form, change the target destination from the pull-down lists.
Always click Submit and then click Apply Config to save new settings in FreePBX. This is especially important on the Pogoplug platform because you cannot actually do it once you restore the backup image to the Pogoplug.
4. Activating Additional Trunks with FreePBX. As we mentioned, there are lots of SIP providers to choose from. Once you have signed up for service, configuring the trunk is easy. Here is a quick Cheat Sheet courtesy of Kristian Hare, who translated our original setups into a spreadsheet. Just click on the image below to open it in a new window. Then click on the redisplayed image to enlarge it. The left and right cursor keys will move you around in the image. Click on the image again to shrink it.

5. Changing Extension Passwords. From the main FreePBX GUI, choose Applications -> Extensions. Then click on 701 in the Extension List on the right side of your display. You’ll see a form that looks like this:
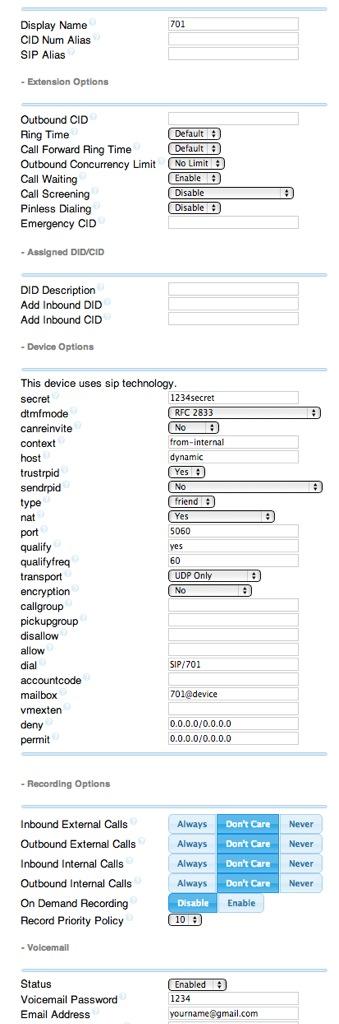
For now, we only need to make a few changes. First, you need a very secure password for both the extension itself and your voicemail account for this extension. The extension secret needs to be a combination of letters and numbers. The Voicemail Password needs to be all numbers, preferably six or more. Replace the existing password entries with your own (very secure) entries. You also need to lock down this extension so that it is only accessible from devices on your private LAN. You do that with the deny and permit entries which currently are filled with zeroes. Leave the deny entry the way it is which tells Incredible PBX to block everybody except those allowed in the permit entry below. For the permit, we need the first three octets of your private LAN address, e.g. if your LAN is 192.168.0.something then the permit entry will be 192.168.0.0/255.255.255.0.
Finally, you need to plug in your actual email address in the Voicemail section so that voicemails can be delivered to you when someone leaves a message. You can also include a pager email address if you want a text message alert with incoming voicemails. If you want the voicemails to automatically be deleted from the server after they are emailed to you (a good idea considering the disk storage limitations of your microSD card), change the Delete Voicemail option from No to Yes. That’s it. Now save your settings by clicking the Submit button. Then reload the dialplan by clicking on the red prompt when it appears.
In case you’re curious, unless you’ve chosen to automatically delete voicemails after emailing them, you can retrieve your voicemails by dialing *98701 from any extension on your phone system. You’ll be prompted to enter the voicemail password you set up. In addition to managing your voicemails, you’ll also be given the opportunity to either return the call to the number of the person that called or to transfer the voicemail to another extension’s voicemail box. And you can always leave a voicemail for someone by dialing their extension number preceded by an asterisk, e.g. *701 would let someone leave you a voicemail without actually calling you.
6. Eliminating Audio and DTMF Problems. You can avoid one-way audio on calls and touchtones that don’t work with these simple settings in FreePBX: Settings -> Asterisk SIP Settings. Just plug in your public IP address and your private IP subnet. Then set ULAW as the only Audio Codec.
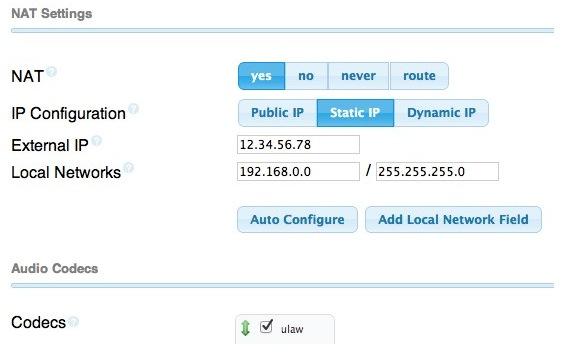
7. Configuring CallerID Superfecta. In order to match names with phone numbers, Incredible PBX includes a FreePBX application named CallerID Superfecta. Out of the box, Incredible PBX will work fine if you remember to activate CallerID Superfecta whenever you create a new Inbound Route. The CNAM entries also will be displayed in your CDR reports. For those not in the United States, you may prefer to use a lookup source for your numbers other than the ones preconfigured in CallerID Superfecta. You will find all of the available modules on the POSSA GitHub site. Just download the ones desired into /var/www/html/admin/superfecta/sources and then activate the desired sources in Admin -> CID Superfecta -> Default. You can test your results and the performance using the Debug facility that’s built into the module.
If you’re using FreePBX on an Ubuntu server in the Cloud, now is the time to drop down to the Linux command prompt, log in as root, and make a backup: /root/incrediblebackup. Copy the backup from /backup to the same folder on your Pogoplug and restore it: /root/incrediblerestore /backup/DU-somefilename.tar.gz. Then restart Asterisk on your Pogoplug: amportal restart. Finally, log out and back into your Pogoplug to assure that FreePBX will function properly on that platform.
Adding Speech Recognition for Incredible PBX Applications
We used to include Google’s Speech-to-Text service in earlier Incredible PBX builds. Unfortunately, Google has changed the rules a bit. Assuming your server still meets the "personal and development" standard, you can obtain an API key from Google and reactivate speech-to-text functionality for many of the Incredible PBX applications including Weather Reports by City (949), AsteriDex Voice Dialing by Name (411), SMS Dictator (767), and Wolfram Alpha for Asterisk (4747). To activate the STT service, just complete the steps in our tutorial. Then sign up for a Wolfram Alpha App ID (tutorial here), and run the following install scripts:
/root/wolfram/wolframalpha-oneclick.sh
cp /root/pygooglevoice/bin/gvoice /usr/bin
ln -s /usr/bin/gvoice /usr/local/sbin/gvoice
cd /root/pygooglevoice
python setup.py install
/root/smsdictator/sms-dictator.sh
Configuring a YATE Softphone for Pogoplug
As we mentioned, the easiest way to get started with Incredible PBX is to set up a free YATE softphone on your Desktop computer. Versions are available at no cost for Macs, PCs, and Linux machines. Just download the appropriate one and install it from this link. Once installed, it’s a simple matter to plug in your extension 701 credentials and start making calls. Run the application and choose Settings -> Accounts and click the New button. Fill in the blanks using the IP address of Incredible PBX on the Pogoplug, 701 for your account name, and whatever password you’re using for the extension. Click OK.
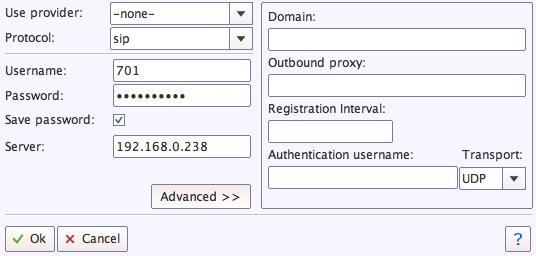
Once you are registered to extension 701, close the Account window. Then click on YATE’s Telephony Tab and place your first call. It’s that easy!
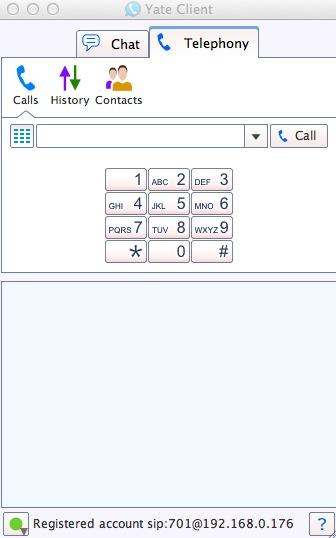
Introducing Incredible PBX 11.12.0 for the Pogoplug
For those of you that missed last week’s article on the CuBox platform and are new to Asterisk and the world of VoIP telephony, let us take a moment and explain how Incredible PBX fits into the puzzle. For lack of a better term, Incredible PBX is a turnkey aggregation in a bootable image that is based upon a superset of Debian 7 packages plus Asterisk, the FreePBX GUI, and a sizable collection of applications for the Asterisk platform. You download a tarball, decompress it, write the image file to an SD card, insert the card into your Pogoplug 4, and presto! You’ve got a turnkey PBX. Add credentials for a trunk or two to make and receive calls, connect some phones, and your SOHO office or home will come alive with a versatile PBX platform that used to cost organizations hundreds of thousands of dollars. What’s included in Incredible PBX? Glad you asked. Here’s a 3-minute video showcasing a few of our favorite Incredible PBX text-to-speech applications:
The Incredible PBX 11 Inventory. Here’s the current feature set on the Pogoplug platform. In addition to its superset of hundreds of Debian 7 packages, Asterisk 11, and FreePBX 2.11 with the Lighttpd web server, Exim 4 mail server, MySQL, PHP, phpMyAdmin, and the IPtables Linux firewall, check out these additions:
- AsteriDex: The Poor Man’s Rolodex®
- Asterisk Upgrade Utility (/root/upgrade-asterisk-cubox-bt)
- CallerID Superfecta (FreePBX Module adds Names to CID Numbers)
- CallWho for Asterisk (Dial by Voice from AsteriDex: 411)
- Preconfigured Email That Works with Exim 4
- OSS Endpoint Manager (Phone Configuration FreePBX module)
- Extensions (1 preconfigured with voicemail and randomized passwords)
- Google Speech Recognition for Incredible PBX apps (follow setup tutorial)
- Flite TTS for Asterisk (text-to-speech with Igor)
- GoogleTTS for Asterisk (Lefteris Zafiris’ state-of-the-art TTS)
- Google Voice (FreePBX GV/Motif Module for free U.S./Canada calls)
- Hotel-Style Wakeup Calls (FreePBX Module to simulate your favorite Holiday Inn)
- Incredible Backups… and Restores (see /root)
- Automated Incredible PBX Update Utility
- Lenny: The Telemarketer’s Worst Nightmare (dial L-E-N-N-Y)
- ODBC Database Support (Dial 222 with Employee Number 12345 to see what’s possible)
- Parking Lot Attendant (dial ## then 70 to simulate key telephones)
- Partition Resizing Utility for SD card expansion (/root/resize-partition)
- Phone Conference Bridge (Dial C-O-N-F for Private Conferences)
- PPTP Virtual Private Network (interconnect with other computers in minutes)
- Reminders by Phone and Web (supports recurring reminders and TTS delivery)
- SAMBA Windows Networking (Windows Networking Made Easy)
- SMS Dictator with Google Voice (Dial S-M-S to dictate and send an SMS message)
- Speech-to-Text Directory Assistance (Dial 411)
- Speed Dialer with AsteriDex (Dial 223 and enter first 3 letters of AsteriDex entry)
- Stealth AutoAttendant
- TimeZone Setup Utility (see /root)
- Today in History (Dial T-O-D-A-Y for today’s major events)
- Travelin’ Man 3 (IPtables WhiteList for rock-solid network security)
- Voice Dictation by Phone (Dial 5678)
- Weather by ZIP Code (Dial Z-I-P and enter any 5-digit zip code)
- Worldwide Weather by Phone (Dial 949 and say the name of your favorite city)
- Wolfram Alpha by Phone (/root/wolfram to install the world’s best almanac)
- Yahoo News by Phone (Dial 951 for the latest news headlines)
A Few Words About Security. Thanks to its Zero Internet Footprint™ design, Incredible PBX is different. It remains the most secure Asterisk-based PBX around. What this means is Incredible PBX has been engineered to sit anywhere, either behind a NAT-based, hardware firewall or directly on the Internet. No device other than those on your private LAN, a few of the major (trusted) SIP providers around the world, and those that you authorize on your WhiteList can even see your server. Additional IP addresses can be added to the WhiteList by the administrator registering new IP addresses using add-ip or add-fqdn from the Linux CLI. Read about this $100,000 VoIP phone bill, and you’ll better appreciate why WhiteList-based server security has become absolutely essential. WhiteList Security means only those devices with a registered IP address in your WhiteList can get to your server’s resources. To the NSA and everyone else, your server doesn’t even show up on the radar. Their only way to contact you is a POTS telephone using your published phone number. Our complete tutorial on Travelin’ Man 3 is available here. With Incredible PBX for the Pogoplug 4, it’s installed and preconfigured. Enjoy!
 Don’t forget to List Yourself in Directory Assistance so everyone can find you by dialing 411. And add your new number to the Do Not Call Registry to block telemarketing calls. Or just call 888-382-1222 from your new number.
Originally published: Monday, September 8, 2014
Support Issues. With any application as sophisticated as this one, you’re bound to have questions. Blog comments are a terrible place to handle support issues although we welcome general comments about our articles and software. If you have particular support issues, we encourage you to get actively involved in the PBX in a Flash Forums. It’s the best Asterisk tech support site in the business, and it’s all free! Please have a look and post your support questions there. Our forum is extremely friendly and is supported by literally hundreds of Asterisk gurus. In fact, we already have a thread underway on the Pogoplug adventure.
Need help with Asterisk? Visit the PBX in a Flash Forum.
Special Thanks to Our Generous Sponsors
FULL DISCLOSURE: ClearlyIP, Skyetel, Vitelity, DigitalOcean, Vultr, VoIP.ms, 3CX, Sangoma, TelecomsXchange and VitalPBX have provided financial support to Nerd Vittles and our open source projects through advertising, referral revenue, and/or merchandise. As an Amazon Associate and Best Buy Affiliate, we also earn from qualifying purchases. We’ve chosen these providers not the other way around. Our decisions are based upon their corporate reputation and the quality of their offerings and pricing. Our recommendations regarding technology are reached without regard to financial compensation except in situations in which comparable products at comparable pricing are available from multiple sources. In this limited case, we support our sponsors because our sponsors support us.
BOGO Bonaza: Enjoy state-of-the-art VoIP service with a $10 credit and half-price SIP service on up to $500 of Skyetel trunking with free number porting when you fund your Skyetel account. No limits on number of simultaneous calls. Quadruple data center redundancy. $25 monthly minimum spend required. Tutorial and sign up details are here.
![]() The lynchpin of Incredible PBX 2020 and beyond is ClearlyIP components which bring management of FreePBX modules and SIP phone integration to a level never before available with any other Asterisk distribution. And now you can configure and reconfigure your new Incredible PBX phones from the convenience of the Incredible PBX GUI.
The lynchpin of Incredible PBX 2020 and beyond is ClearlyIP components which bring management of FreePBX modules and SIP phone integration to a level never before available with any other Asterisk distribution. And now you can configure and reconfigure your new Incredible PBX phones from the convenience of the Incredible PBX GUI.
VitalPBX is perhaps the fastest-growing PBX offering based upon Asterisk with an installed presence in more than 100 countries worldwide. VitalPBX has generously provided a customized White Label version of Incredible PBX tailored for use with all Incredible PBX and VitalPBX custom applications. Follow this link for a free test drive!
Special Thanks to Vitelity. Vitelity is now Voyant Communications and has halted new registrations for the time being. Our special thanks to Vitelity for their unwavering financial support over many years and to the many Nerd Vittles readers who continue to enjoy the benefits of their service offerings. We will keep everyone posted on further developments.
Some Recent Nerd Vittles Articles of Interest…
- Some of our links refer users to Amazon or other service providers when we find their prices are competitive for the recommended products. Nerd Vittles receives a small referral fee from these providers to help cover the costs of our blog. We never recommend particular products solely to generate commissions. However, when pricing is comparable or availability is favorable, we support these providers because they support us. [↩]
Hardware Device of the Year: Meet the CuBox-i with Incredible PBX for Ubuntu

It’s been many years since we’ve written back-to-back articles about the same device. That should tell you how really special the CuBox-i is. After two weeks of 14-hour days developing the new Incredible PBX platform for CuBox, we are thrilled to crown this jewel as Nerd Vittles Hardware Device of the Year. Flawless design, incredible performance, tiny size, feature-rich components, minimal power consumption, and completely silent operation are merely the tip of the iceberg with this 2x2x2 cubic zircon. On the $130 CuBox-i4PRO, there’s a Quad Core processor, 2 gigs of RAM, a 10/100/1000 Ethernet port, a 1080p HDMI port, two powered USB 2 ports, an eSATA II port for an external drive, a realtime clock with backup battery, an Optical S/PDIF Audio Out port, a microSD port, an infrared receiver and transmitter, WiFi 11n, and Bluetooth plus a power adapter to match either American or European power sources. Whew! And here’s the best part. Everything works while squeezed in a tiny case that’s a third the size of Rubic’s Cube.

A SOHO Swiss Army Knife That Fits in Your Cupholder: Voice, Fax, SMS, TTS, Email, PBX, Incredible!
Did we mention it’s a near perfect VoIP platform for any home office or small business? Well, it is. And everything we’ve learned about Asterisk® and FreePBX® and Internet security over the past decade is rolled into today’s release of our crown jewel edition of Incredible PBX™ for the CuBox. First, you’ll need to purchase one and we strongly recommend the CuBox-i4PRO with its Quad Core ARM processor and built-in WiFi and Bluetooth. In the U.S, there’s NewEgg or NewEgg (10% off on i4PRO with promo code SW829NE10 = $117 until 9/4). In the U.K, there’s NewIT. For everyone else, you can buy directly from SolidRun, the creator.
Before we dive into Incredible PBX, we want to express our deepest appreciation to Zhando and Josh North of PIAF Forum fame. Zhando’s pioneering efforts with Ubuntu and Incredible PBX on the CuBox platform and Josh North’s morphing of Incredible Fax for deployment with Ubuntu paved the way for everything you’re about to read. It reinforces the spectacular results which can be achieved in the open source community when a talented group of even a few folks put their heads together. The Ubuntu developers and the tens of thousands of open source contributors from around the world also deserve a well-earned tip of the hat for producing a Linux platform that is rock-solid reliable and incredibly versatile. Nearly 1,000 open source packages are included in the latest Incredible PBX build. Click on the link to view the package list in PDF format and prepare to be amazed. We couldn’t have done it without all of you!
Introducing Incredible PBX 11.12.0 for the CuBox-i4PRO
If you’re new to Asterisk and the world of VoIP telephony, let us take a moment and explain how Incredible PBX fits into the puzzle. For lack of a better term, Incredible PBX on the CuBox platform is a turnkey aggregation in a bootable image that is based upon a superset of Ubuntu 14 packages plus Asterisk, the FreePBX GUI, and a sizable collection of applications for the Asterisk platform. You download a tarball, decompress it, write the image file to a microSD card, insert the card into your CuBox-i, and presto! You’ve got a turnkey PBX. Add credentials for a trunk or two to make and receive calls, connect some phones, and your whole office will come alive with a versatile PBX platform that used to cost organizations hundreds of thousands of dollars. What’s included in Incredible PBX? Glad you asked. Here’s a 3-minute video showcasing a few of our favorite Incredible PBX text-to-speech applications:
The Incredible PBX 11 Inventory. Here’s the current feature set on the CuBox platform. It’s the most robust ever! In addition to its superset of nearly 1,000 Ubuntu 14 packages, Asterisk 11, and FreePBX 2.11 with Apache, SendMail, MySQL, PHP, phpMyAdmin, Fail2Ban, WebMin, and the IPtables Linux firewall, check out these additions:
- AsteriDex: The Poor Man’s Rolodex®
- Asterisk Upgrade Utility (/root/upgrade-asterisk-cubox-bt)
- AvantFax Management Utilities (see /root folder)
- Bluetooth Integration turns your cellphone into an Asterisk Trunk
- CallerID Superfecta (FreePBX Module adds Names to CID Numbers)
- CallWho for Asterisk (Dial by Voice from AsteriDex: 411)
- Preconfigured Email That Works with SendMail and Incredible Fax
- OSS Endpoint Manager (Phone Configuration FreePBX module)
- eSATA External Hard Drive Integration
- Extensions (1 preconfigured with voicemail and randomized passwords)
- Fax to PDF Conversion with EMail Delivery (/root/avantfax-email-dest)
- Google Speech Recognition for Incredible PBX apps (follow setup tutorial)
- Flite TTS for Asterisk (text-to-speech with Igor)
- GoogleTTS for Asterisk (Lefteris Zafiris’ state-of-the-art TTS)
- Google Voice (FreePBX GV/Motif Module for free U.S./Canada calls)
- Hotel-Style Wakeup Calls (FreePBX Module to simulate your favorite Holiday Inn)
- Incredible Backups… and Restores (see /root)
- Incredible Fax 11 with HylaFax/AvantFax
- ODBC Database Support (Dial 222 with Employee Number 12345 to see what’s possible)
- Automated Incredible PBX Update Utility
- Lenny: The Telemarketer’s Worst Nightmare (dial L-E-N-N-Y)
- Network Management Utilities for Wired and Wireless Networking (see /root)
- Parking Lot Attendant (dial ## then 70 to simulate key telephones)
- Partition Resizing Tutorial for eSATA external drives
- Partition Resizing Utility for SD card expansion (/root/resize-partition)
- Phone Conference Bridge (Dial C-O-N-F for Private Conferences)
- PortKnocker for Quick Remote Access (cat /root/knock.FAQ)
- PPTP Virtual Private Network (interconnect with other computers in minutes)
- Reminders by Phone and Web (supports recurring reminders and TTS delivery)
- SAMBA Windows Networking (Windows Networking Made Easy)
- SMS Dictator with Google Voice (Dial S-M-S to dictate and send an SMS message)
- Speech-to-Text Directory Assistance (Dial 411)
- Stealth AutoAttendant
- TimeZone Setup Utility (see /root)
- Today in History (Dial T-O-D-A-Y for today’s major events)
- Travelin’ Man 3 (IPtables WhiteList for rock-solid network security)
- Travelin’ Man 4 (Dialup to WhiteList any IP address: 864)
- Voice Dictation by Phone (Dial 5678)
- Weather by ZIP Code (Dial Z-I-P and enter any 5-digit zip code)
- Worldwide Weather by Phone (Dial 949 and say the name of your favorite city)
- Wolfram Alpha by Phone (/root/wolfram to install the world’s best almanac)
- Yahoo News by Phone (Dial 951 for the latest news headlines)
A Few Words About Security. Thanks to its Zero Internet Footprint™ design, Incredible PBX is different. It remains the most secure Asterisk-based PBX around. What this means is Incredible PBX has been engineered to sit anywhere, either behind a NAT-based, hardware firewall or directly on the Internet. No device other than those on your private LAN, a few of the major (trusted) SIP providers around the world, and those that you authorize on your WhiteList can even see your server. Additional IP addresses can be added to the WhiteList in three ways:
- An administrator registers new IP addresses using add-ip or add-fqdn from the Linux CLI
- A remote user sends the (correct) randomized PortKnock code assigned to your CuBox
- A remote user dials in from a standard telephone to register a new remote IP address
Read about this $100,000 VoIP phone bill, and you’ll better appreciate why WhiteList-based server security has become absolutely essential. WhiteList Security means only those devices with a registered IP address in your WhiteList can get to your server’s resources. To the NSA and everyone else, your server doesn’t even show up on the radar. Their only way to contact you is a POTS telephone using your published phone number. Our complete tutorial on Travelin’ Man 3 is available here. With Incredible PBX for CuBox, it’s installed and preconfigured.
Installing Incredible PBX 11.12.0 on the CuBox-i
There are five simple steps to get Incredible PBX up and running on your CuBox:
- Purchase a storage device
- Download Incredible PBX image
- Untar the image on your desktop
- Burn the image to a microSD card
- Insert microSD card in CuBox and boot
Choosing a Storage Platform. Unless you plan to run your server with an external eSATA hard drive (CuBox-i4PRO tutorial here), the first step is to purchase a suitable microSD card. We recommend at least a 32GB Class 10 card from Transcend, SanDisk, or Kingston. All of them are under $20 on Amazon and most include free 2-day shipping for Prime customers. If using an eSATA drive, you still need a microSD card to boot up, but any 4GB or 8GB card will suffice.1
Downloading Incredible PBX for CuBox. From your favorite desktop computer, download the latest build of Incredible PBX from SourceForge. Depending upon your network connection and the SourceForge mirror, it can take awhile. It’s a whopping 1.3GB!
Untarring Incredible PBX for CuBox. Depending upon your desktop platform, untarring incrediblepbx.4.cubox.U14.latest.tar.gz is as simple as double-clicking on it in the Downloads folder (on a Mac). On the Windows platform, here are 3 utilities that will do the job. On a Linux desktop, open a Terminal window and…
tar zxvf incrediblepbx.4.cubox.U14.latest.tar.gz
Burning the Incredible PBX image to microSD. Once you’ve untarred the file, you’ll find two scripts that make burning the image to a microSD card simple if you’re on a Mac or Linux desktop. On a Windows machine, it’s a little more complicated. Most SD cards come preformatted with a DOS partition so your Windows machine should recognize the microSD card when it’s inserted. If not, format the card using a utility such as SD Card Formatter. Next, you’ll need Win32 Disk Imager to burn cubox.img to your card. Once the image has been transferred, gracefully unmount the card from your desktop, and then remove the card from the SD card adapter.
Booting Incredible PBX on the CuBox. Insert the microSD card (electronics side up) into your CuBox-i. Then apply power to the CuBox after connecting a USB keyboard, HDMI monitor, and Ethernet cable to a network with Internet connectivity that can also hand out DHCP addresses. Log into Incredible PBX as root with cubox as your password. Your SSH credentials, Asterisk DUNDI secrets, logs, and network connection options will be initialized and then your server will reboot. You may need to hit the Enter key once or twice during the SSH credentials initialization to move things along. And, with some SD cards, you may find yourself waiting an eternity for the promised reboot. After seeing the "rebooting" message, count to ten. If your server still hasn’t rebooted, remove and reapply power. This quirk goes away after the first reboot.
After the reboot, log in again as root with password: cubox. Your firewall setup will be initialized to lock down your whitelist to your server’s public and private IP addresses AND the IP address of the machine from which you’re logging in. All of your FreePBX passwords will be randomized and your secret PortKnocker codes will be generated. The whole process only takes a few seconds.
When the second pass configuration is complete, you will be greeted by a welcoming message. STOP and read it. It has loads of important information about your server’s configuration and your next steps. Press ENTER to review status:
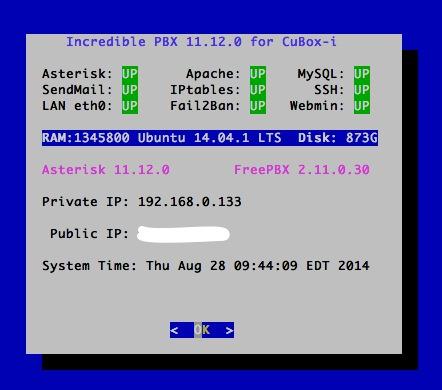
The Next 10 Steps. Before you do anything else, complete the following steps. It only takes a minute to secure and properly configure your server:
- Change your root password: passwd
- Change your FreePBX admin password: /root/admin-pw-change
- Set your correct time zone: /root/timezone-setup
- Expand partition to match microSD card size: /root/resize-partition
- Add any desired IP addresses to WhiteList: /root/add-ip
- Put PortKnocker credentials in a safe place: cat /root/knock.FAQ
- Change AvantFax admin password: /root/avantfax-pw-change
- Set Email Address for Incoming Faxes: /root/avantfax-email-dest
- Check status to be sure everything is working: status
- If using an eSATA external drive, do the migration drill (note the free disk space in status above)
A Few Important Tips. Every operating system and service provider has their quirks. Ask Bill Gates! Ubuntu and especially Comcast are no different. Fortunately, with Ubuntu, it’s a very short list.
1. Use the following commands (only!) to shutdown and restart your server: halt and reboot. These commands are reworked in Incredible PBX to gracefully shutdown important services so that files don’t get damaged. Please use them!
2. If you ever want to move your server to a different network, complete these three simple steps before you leave your existing network. This will trigger a new Phase I update (outlined above) and set the default network back to wired eth0 using DHCP the next time you boot your server.
touch /etc/update_hostconfig
/root/enable-eth0-only
# press Ctrl-C when prompted to reboot. then type:
halt
3. You really do need email connectivity to get the most out of Incredible PBX. It’s the way you receive important notifications from FreePBX, and it’s also how faxes and voicemail messages are delivered. From the Linux CLI, test your server to be sure you can send emails reliably:
echo "test" | mail -s testmessage yourname@gmail.com
After checking your spam folder, if you really didn’t get the email, it may be that your service provider is blocking downstream SMTP traffic. You can use your provider’s SMTP server as a smarthost to send out mail with SendMail. Just edit /etc/mail/sendmail.cf, search for DS, and add the provider’s SMTP server address immediately after it (no spaces!), e.g. DSsmtp.comcast.net or DSsmtp.knology.net. Then restart SendMail: service sendmail restart.
Once you’ve logged into FreePBX below, be sure to set your default email address in the right margin of Admin -> Module Admin and save your entry. This will assure receipt of timely notifications of FreePBX updates for your server.
4. If you’re sure you’ll never need remote access in an emergency, you can disable PortKnocker at startup and save about 5% of your processing cycles. Our complete PortKnocker tutorial is available here. To disable startup on boot, issue the following command from the Linux CLI:
update-rc.d -f knockd disable
5. The same applies to WebMin. We actually introduced one of the first tutorials for WebMin… over 9 years ago. A word to the wise: WebMin is a terrific tool for looking at stuff about your system. But be very careful making system changes with WebMin. You usually will break some of the customized settings in Incredible PBX. This is particularly true in the case of the IPtables firewall. To access WebMin, use a browser and the actual IP address of your server to go to: https://12.34.56.78:9001. Log in as root with your root password. To disable automatic startup of WebMin on boot:
update-rc.d -f webmin disable
Setting Up WiFi with the CuBox-i4PRO
This may sound simple now, but two weeks ago it was quite a different story. For those with a CuBox-i4Pro, WiFi is built into the hardware. The trick was getting it to work. Well, with Incredible PBX, it does. In the /root folder, you’ll find several self-explanatory scripts to do the heavy lifting for you. For options 2 and 3, you’ll need the SSID of the WiFi network you’ll be using as well as the SSID password.
- enable-eth0-only (the default setting)
- enable-wifi-eth0 (enables both but eth0 works with Asterisk)
- enable-wifi-only (runs your server purely on WiFi)
Getting Started with VoIP and FreePBX
Up to now, all of your time has been spent using the Linux CLI. That will be a rarity once you get this far. Henceforth, 90% of your time setting up Incredible PBX will be done using the FreePBX GUI and your favorite web browser. To access it, just point to the IP address of your server. status will tell you the address if you’ve forgotten it. The main control panel looks like this:
As configured, the default user account for both FreePBX and AvantFax administration is admin. The passwords are whatever you set in steps #2 and #7 above. As configured, email delivery of faxes with AvantFax is automatic so no further setup is required other than setting a delivery mechanism for faxes within FreePBX.
For those new to Asterisk and FreePBX, here’s a brief primer on what needs to happen before you can make and receive calls. If you have an existing Google Voice account or a smartphone that’s less than 2 years old, lucky you. This gets you a phone number for your PBX so people can call you. And it provides a vehicle to place calls to plain old telephones at little or no cost.
If you don’t have a Google Voice account or a shiny new smartphone, then you will need to purchase a SIP trunk from one of the numerous vendors around the world. Our favorite (because they provide terrific service at a modest price AND provide financial support to the Nerd Vittles, PBX in a Flash, and Incredible PBX projects) is Vitelity. Their special rates and a link for a discount are included at the end of today’s article.
Unlike POTS phone service from Ma Bell, the SIP World is a little different. First, you don’t need to put all your eggs in one basket. A trunk that gets you a phone number for incoming calls need not be with the same vendor that provides a trunk to place outbound calls. In fact, you may want multiple trunks for outbound calls just to have some redundancy. A list of our favorites in the U.S. and Canada is available on the PIAF Forum. Of course, there also are providers that offer all-you-can-eat calling plans. Two of our favorites are Vestalink and Future-Nine.
You’ll also need a softphone or SIP phone to actually place and receive calls. YATE makes a free softphone for PCs, Macs, and Linux machines so download your favorite and install it on your desktop.
Phones connect to extensions in FreePBX to work with Incredible PBX. Extensions talk to trunks (like Google Voice) to make and receive calls. FreePBX uses outbound routes to direct outgoing calls from extensions to trunks, and FreePBX uses inbound routes to route incoming calls from trunks to extensions to make your phones ring. In a nutshell, that’s how a PBX works.
There are lots of bells and whistles that you can explore down the road including voicemail, conferencing, IVRs, autoattendants, paging, intercoms, CallerID lookups, announcements, DISA, call parking and pickup, queues, ring groups, and on and on. And then there’s all of the Incredible PBX applications which are covered separately in this Nerd Vittles article. Once you’re comfortable with one server, you or your company will want some more. This Nerd Vittles article will walk you through interconnecting them into a seamless mesh network so that you can call from one office to another transparently. Yes, those articles were written for the Raspberry Pi. But the beauty of Incredible PBX is that it runs identically on virtually every server platform.
Here’s our 10-Step Checklist to Getting Started with FreePBX:
1. Setting Up Google Voice. If you want free calling in the U.S. and Canada, then you’ll need an existing Google Voice account that includes the Google Chat feature. You’ll need one dedicated to Incredible PBX, or it won’t work. Log out after setting up the new Google Voice account! Also note that Google Voice may cease to function at any time after May 15, 2014. You can read all about it here.
- Log into existing Google Voice account
- Enable Google Chat as Phone Destination
- Configure Google Voice Calls Settings:
- Call Screening – OFF
- Call Presentation – OFF
- Caller ID (In) – Display Caller’s Number
- Caller ID (Out) – Don’t Change Anything
- Do Not Disturb – OFF
- Call Options (Enable Recording) – OFF
- Global Spam Filtering – ON
- Place test call in and out using GMail Call Phone
- Log out of your Google Voice account
2. Activating a Google Voice Trunk. To create a Trunk in FreePBX to handle calls to and from Google Voice, you’ll need three pieces of information from the Google Voice account you set up above: the 10-digit Google Voice phone number, your Google Voice account name, and your Google Voice password. Choose Connectivity -> Google Voice (Motif) from the FreePBX GUI. The following form will appear:
Fill in the blanks with your information and check only the top 2 boxes. If your Google Voice account name ends in @gmail.com, leave that out. Otherwise, include the full email address. Then click Submit Changes and Apply Config.
There’s one more step or your Google Voice account won’t work reliably with Incredible PBX! From the Linux command prompt while logged into your server as root, restart Asterisk: amportal restart
3. Setting a Destination for Incoming Calls and Managing Faxes. Now that you’ve created your Google Voice Trunk, we need to tell FreePBX how to process inbound calls when someone dials your Google Voice number. There are any number of choices. You could simply ring an extension. Or you could ring multiple extensions by first creating a Ring Group which is just a list of extension numbers. Or you could direct incoming calls to an Interactive Voice Response (IVR) system. By default, Incredible PBX is configured to route all incoming calls to extension 701. You can change the setting whenever you like by choosing Connectivity -> Inbound Routes -> Default. In the Set Destination section of the form, change the target destination from the pull-down lists.
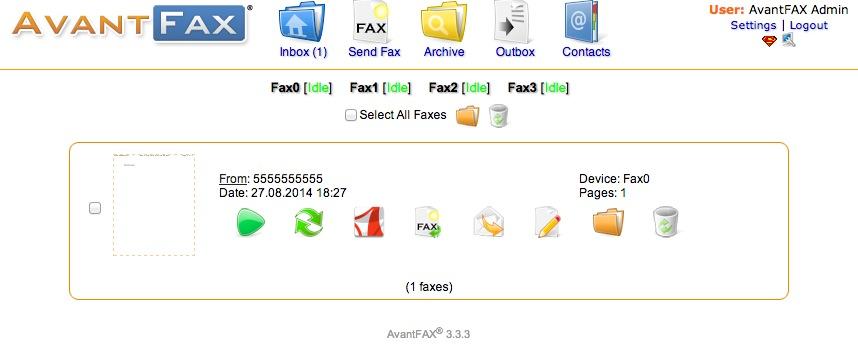
If you want your default inbound route to also handle incoming faxes, then go to the Fax Detect section of the Default inbound route. Change Detect Faxes to Yes. Change Fax Detection Type to SIP. Leave the Detection Time setting at 4. And change the Fax Destination to Custom Destinations: Fax (Hylafax). To Send Faxes, open AvantFax in FreePBX’s Other pulldown menu.
Always click Submit and then click Apply Config to save new settings in FreePBX.
4. Activating a Smartphone Trunk Using Bluetooth. One of the more exotic features of Incredible PBX on the CuBox platform is the ability to add your smartphone as an Asterisk trunk using Bluetooth. We’ve written a short recipe to get things working. So have a look at our Bluetooth tutorial and see if you’re up for the challenge. Moral of the story: the newer the cellphone, the better.
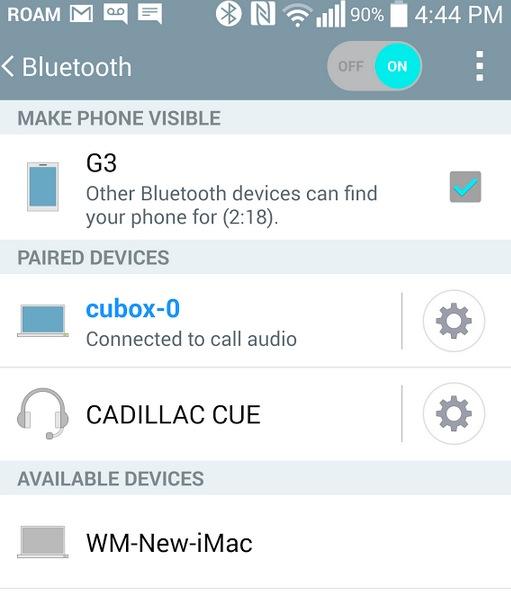
The LG G3 is the best of the lot, at least of the numerous cellphones we tested. Even better is an LG G3 paired with StraightTalk’s (AT&T-hosted) unlimited talk, text, and data plan for $45 a month. With Samsung smartphones older than a Galaxy S4, don’t waste your time. Ditto with Apple iPhones other than perhaps the very latest. Our iPhone 4S failed miserably. We gave up on Apple phones after that. Someday I’ll test my daughter’s 5c and report back.
5. Activating Additional Trunks with FreePBX. As we mentioned, there are lots of SIP providers to choose from. Once you have signed up for service, configuring the trunk is easy. Here is a quick Cheat Sheet courtesy of Kristian Hare, who translated our original setups into a spreadsheet. Just click on the image below to open it in a new window. Then click on the redisplayed image to enlarge it. The left and right cursor keys will move you around in the image. Click on the image again to shrink it.
6. Changing Extension Passwords. From the main FreePBX GUI, choose Applications -> Extensions. Then click on 701 in the Extension List on the right side of your display. You’ll see a form that looks like this:
For now, we only need to make a few changes. First, you need a very secure password for both the extension itself and your voicemail account for this extension. The extension secret needs to be a combination of letters and numbers. The Voicemail Password needs to be all numbers, preferably six or more. Replace the existing password entries with your own (very secure) entries. You also need to lock down this extension so that it is only accessible from devices on your private LAN. You do that with the deny and permit entries which currently are filled with zeroes. Leave the deny entry the way it is which tells Incredible PBX to block everybody except those allowed in the permit entry below. For the permit, we need the first three octets of your private LAN address, e.g. if your LAN is 192.168.0.something then the permit entry will be 192.168.0.0/255.255.255.0.
Finally, you need to plug in your actual email address in the Voicemail section so that voicemails can be delivered to you when someone leaves a message. You can also include a pager email address if you want a text message alert with incoming voicemails. If you want the voicemails to automatically be deleted from the server after they are emailed to you (a good idea considering the disk storage limitations of your microSD card), change the Delete Voicemail option from No to Yes. That’s it. Now save your settings by clicking the Submit button. Then reload the dialplan by clicking on the red prompt when it appears.
In case you’re curious, unless you’ve chosen to automatically delete voicemails after emailing them, you can retrieve your voicemails by dialing *98701 from any extension on your phone system. You’ll be prompted to enter the voicemail password you set up. In addition to managing your voicemails, you’ll also be given the opportunity to either return the call to the number of the person that called or to transfer the voicemail to another extension’s voicemail box. And you can always leave a voicemail for someone by dialing their extension number preceded by an asterisk, e.g. *701 would let someone leave you a voicemail without actually calling you.
7. Eliminating Audio and DTMF Problems. You can avoid one-way audio on calls and touchtones that don’t work with these simple settings in FreePBX: Settings -> Asterisk SIP Settings. Just plug in your public IP address and your private IP subnet. Then set ULAW as the only Audio Codec.
8. Configuring Your YATE Softphone. As we mentioned, the easiest way to get started with Incredible PBX is to set up a free YATE softphone on your Desktop computer. Versions are available at no cost for Macs, PCs, and Linux machines. Just download the appropriate one and install it from this link. Once installed, it’s a simple matter to plug in your extension 701 credentials and start making calls. Run the application and choose Settings -> Accounts and click the New button. Fill in the blanks using the IP address of Incredible PBX, 701 for your account name, and whatever password you created for the extension. Click OK.
Once you are registered to extension 701, close the Account window. Then click on YATE’s Telephony Tab and place your first call. It’s that easy!
9. Configuring CallerID Superfecta. In order to match names with phone numbers, Incredible PBX includes a FreePBX application named CallerID Superfecta. Out of the box, Incredible PBX will work fine if you remember to activate CallerID Superfecta whenever you create a new Inbound Route. The CNAM entries also will be displayed in your CDR reports. For those not in the United States, you may prefer to use a lookup source for your numbers other than the ones preconfigured in CallerID Superfecta. You will find all of the available modules on the POSSA GitHub site. Just download the ones desired into /var/www/html/admin/superfecta/sources and then activate the desired sources in Admin -> CID Superfecta -> Default. You can test your results and the performance using the Debug facility that’s built into the module.
10. Adding Speech Recognition for Incredible Applications. We used to include Google’s Speech-to-Text service in Incredible PBX builds. Unfortunately, Google has changed the rules a bit. Assuming your server still meets the "personal and development" standard, you can obtain an API key from Google and reactivate speech-to-text functionality for many of the Incredible PBX applications including Weather Reports by City (949), AsteriDex Voice Dialing by Name (411), SMS Dictator (767), and Wolfram Alpha for Asterisk (4747). To activate the STT service, just complete the steps in our tutorial. Then sign up for a Wolfram Alpha App ID (tutorial here), and run the following install scripts:
/root/wolfram/wolframalpha-oneclick.sh
/root/smsdictator/sms-dictator.sh
Enabling SAMBA Windows Networking with Ubuntu
It only takes a minute to enable SAMBA Windows Networking on your CuBox. We’ve reproduced our quick tutorial to show you how. Just follow the steps below to interconnect Incredible PBX with all the other computers on your LAN.
apt-get -y install samba samba-common python-glade2 system-config-samba
cd /etc/samba
mv smb.conf smb.orig.conf
wget http://incrediblepbx.com/samba-ubuntu.tar.gz
tar zxvf samba-ubuntu.tar.gz
rm *.tar.gz
sed -i '/# End of Trusted Provider Section/r '/etc/samba/smb.iptables'' /etc/iptables/rules.v4
iptables-restart
service smbd restart
service nmbd restart
sed -i 's|/usr/local/sbin/amportal restart|service smbd restart\\nservice nmbd restart\\n/usr/local/sbin/amportal restart|' /etc/rc.local
# set up root password for SAMBA access with full RW privileges
smbpasswd -a root
Incredible Backup and Restore
Once you have everything configured, it’s time to take a snapshot of your system and store it in a safe place. The new Incredible Backup lets you do that. From the Linux CLI, login as root and run: /root/incrediblebackup. The backup image will be saved to the /tmp folder and can be copied to a different server easily. To restore the backup to another system, you simply bring the other system up to the same version of Asterisk (11) and FreePBX (2.11), and then run /root/incrediblerestore with your backed up image. It’s the cheapest insurance you can buy! For detailed instructions on restoring backups, see this thread on the PIAF Forum.
Don’t forget to List Yourself in Directory Assistance so everyone can find you by dialing 411. And add your new number to the Do Not Call Registry to block telemarketing calls. Or just call 888-382-1222 from your new number.
Originally published: Monday, September 1, 2014
Support Issues. With any application as sophisticated as this one, you’re bound to have questions. Blog comments are a terrible place to handle support issues although we welcome general comments about our articles and software. If you have particular support issues, we encourage you to get actively involved in the PBX in a Flash Forums. It’s the best Asterisk tech support site in the business, and it’s all free! Please have a look and post your support questions there. Our forum is extremely friendly and is supported by literally hundreds of Asterisk gurus.
Need help with Asterisk? Visit the PBX in a Flash Forum.
Special Thanks to Our Generous Sponsors
FULL DISCLOSURE: ClearlyIP, Skyetel, Vitelity, DigitalOcean, Vultr, VoIP.ms, 3CX, Sangoma, TelecomsXchange and VitalPBX have provided financial support to Nerd Vittles and our open source projects through advertising, referral revenue, and/or merchandise. As an Amazon Associate and Best Buy Affiliate, we also earn from qualifying purchases. We’ve chosen these providers not the other way around. Our decisions are based upon their corporate reputation and the quality of their offerings and pricing. Our recommendations regarding technology are reached without regard to financial compensation except in situations in which comparable products at comparable pricing are available from multiple sources. In this limited case, we support our sponsors because our sponsors support us.
BOGO Bonaza: Enjoy state-of-the-art VoIP service with a $10 credit and half-price SIP service on up to $500 of Skyetel trunking with free number porting when you fund your Skyetel account. No limits on number of simultaneous calls. Quadruple data center redundancy. $25 monthly minimum spend required. Tutorial and sign up details are here.
![]() The lynchpin of Incredible PBX 2020 and beyond is ClearlyIP components which bring management of FreePBX modules and SIP phone integration to a level never before available with any other Asterisk distribution. And now you can configure and reconfigure your new Incredible PBX phones from the convenience of the Incredible PBX GUI.
The lynchpin of Incredible PBX 2020 and beyond is ClearlyIP components which bring management of FreePBX modules and SIP phone integration to a level never before available with any other Asterisk distribution. And now you can configure and reconfigure your new Incredible PBX phones from the convenience of the Incredible PBX GUI.
VitalPBX is perhaps the fastest-growing PBX offering based upon Asterisk with an installed presence in more than 100 countries worldwide. VitalPBX has generously provided a customized White Label version of Incredible PBX tailored for use with all Incredible PBX and VitalPBX custom applications. Follow this link for a free test drive!
Special Thanks to Vitelity. Vitelity is now Voyant Communications and has halted new registrations for the time being. Our special thanks to Vitelity for their unwavering financial support over many years and to the many Nerd Vittles readers who continue to enjoy the benefits of their service offerings. We will keep everyone posted on further developments.
Some Recent Nerd Vittles Articles of Interest…
- Some of our links refer users to Amazon or other service providers when we find their prices are competitive for the recommended products. Nerd Vittles receives a small referral fee from these providers to help cover the costs of our blog. We never recommend particular products solely to generate commissions. However, when pricing is comparable or availability is favorable, we support these providers because they support us. [↩]
Pioneers, Start Your Engines: Introducing Incredible PBX for CuBox-i with Ubuntu

In our never-ending quest for better, faster, and cooler VoIP technology, we bit the bullet last week and purchased the $130 top-of-the line CuBox-i4Pro, a state-of-the-art Quad-Core, all-in-one computer that’s 2x2x2 inches small. If you hurry, NewEggFlash has the i4PRO on sale for $119 with free shipping until Tuesday, August 26. If you’re not feeling especially wealthy this week, the $85 Dual-Core CuBoX-i2 should work just well minus WiFi and Bluetooth. And there are a few other specs worth writing home about:

Did we mention it’s based on Ubuntu® 14? And runs Asterisk® 11? And FreePBX® 2.11? And Incredible PBX™ 11? Well, it’s all true. And we’ve got the preview production-ready edition of this rocket ship ready and waiting for you on SourceForge. We owe an extra special thanks to @zhando from the PIAF Forum for his initial work in getting Ubuntu 14 ported to the CuBox-i and also for the many hours he invested getting the basic components of Incredible PBX loaded. We spent a few more. 😉
There’s some good news and some bad news. Let’s start with the bad news. This is prerelease software, and a few things are still works in progress. It’s a short list and the top item is GoogleTTS which you may recall was also broken on the BeagleBone Black platform originally. We’re hopeful that Lefteris Zafiris will again work his magic, but it’s not soup yet. Also on the dead list is WiFi. The top-of-the-line CuBox-i comes with a WiFi adapter built in, but it’s not working with the current kernel, and it now works perfectly. We had to use a very new kernel to get IPtables and Fail2Ban functioning, and that caused some initial issues with WiFi, but that’s all history now. Because this is new technology, there always is a chance that some other gotcha is lurking under the covers. We’ll post updates below as new discoveries and fixes are made.
FYI #1: Ubuntu can be a little finicky with shutdowns and reboots. We’ve added our own scripts which should eliminate the (frequent) system hangs. Use halt and reboot to shutdown and restart your server, and these issues should be a thing of the past.
FYI #2: Thanks to @zhando, wireless networking is now available for the CuBox-i4PRO. Just log in as root to get the automatic update. Then run one of the /root/enable-wifi-* scripts with your SSID and password, and you’re all set.
FYI #3: The August 20 build and the August 21 patch from Lefteris Zafiris resolve the GoogleTTS problem with MPG123. Thanks as always to our selfless TTS hero. Applications such as Yahoo News (dial 951) work flawlessly. With some microSD cards, there remains a minor wrinkle with reboots during the initial install procedure. If your monitor shows "restarting" and it doesn’t after you count to 10, just remove the power cord and plug it back in. This issue resolves itself once you’ve run /root/resize-partition to expand the image to fill all the space on your chosen microSD card.
FYI #4: The August 24 build now supports Bluetooth calling with a smartphone and Bluetooth proximity detection. See this PIAF Forum thread for setup instructions.
FYI #5: Add a beefy eSATA hard drive to run Incredible PBX with your CuBox-i4PRO. Here’s how.
FYI #6: And now Incredible PBX for CuBox includes Incredible Fax, the ultimate fax machine with HylaFax and AvantFax. Two-minute setup instructions available here.
The really good news is that Asterisk 11 and FreePBX 2.11 and virtually all of the Incredible PBX stable of applications run swimmingly… and FAST! This is NOT a Raspberry Pi when it comes to performance. The installation drill is almost identical to the Raspberry Pi platform. Download and untar the latest image from SourceForge. Then burn it to a microSD card1 of your favorite size (at least 8GB recommended). Boot up the CuBox-i with your new card after connecting to a network with a DHCP server. That gets you to the Internet. Log into your new server as root with the password: cubox. The initial setup is automatic but requires a reboot. Once it finishes, change the password by running passwd. Change the FreePBX password by running /root/admin-pw-change. Set your correct timezone by running /root/timezone-setup. Expand the image on your SD card to match the size of the card by running /root/resize-partition. After you’ve completed these initial steps, you’re all set. If Incredible PBX is new territory for you, read the latest Raspberry Pi tutorial. It’ll walk you through the basics of configuring your server. Other than what’s been mentioned, all remaining commands and apps are the same on the CuBox-i platform. To restore the functionality of Google’s speech recognition service for many of the Incredible PBX apps, follow the steps in the tutorial posted here.
Anyone looking for a perfectly-sized, perfectly-priced Asterisk server platform for a small to medium-sized business, This Bud’s for You. For the latest tips & tricks for the CuBox-i, see this thread on the PIAF Forum. Enjoy!
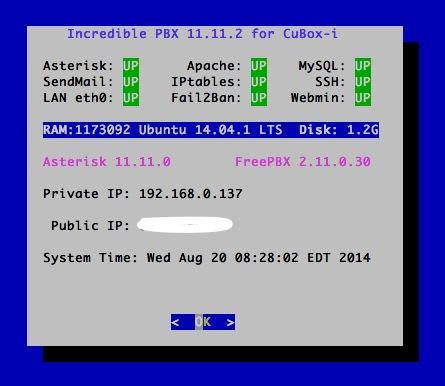
Performance. We’ve received some inquiries about the performance of a QuadCore ARM chip compared to one of the Foxconn dual-core Atom machines that have been our long-time favorite for small business VoIP implementations. See this thread on the PIAF Forum for a quick comparison.
Originally published: Monday, August 18, 2014
Support Issues. With any application as sophisticated as Incredible PBX, you’re bound to have questions. Blog comments are a terrible place to handle support issues although we welcome general comments about our articles and software. If you have particular support issues, we encourage you to get actively involved in the PBX in a Flash Forums. It’s the best Asterisk tech support site in the business, and it’s all free! Please have a look and post your support questions there. Unlike some forums, ours is extremely friendly and is supported by literally hundreds of Asterisk gurus and thousands of ordinary users just like you. You won’t have to wait long for an answer to your question.
Need help with Asterisk? Visit the PBX in a Flash Forum.
Special Thanks to Our Generous Sponsors
FULL DISCLOSURE: ClearlyIP, Skyetel, Vitelity, DigitalOcean, Vultr, VoIP.ms, 3CX, Sangoma, TelecomsXchange and VitalPBX have provided financial support to Nerd Vittles and our open source projects through advertising, referral revenue, and/or merchandise. As an Amazon Associate and Best Buy Affiliate, we also earn from qualifying purchases. We’ve chosen these providers not the other way around. Our decisions are based upon their corporate reputation and the quality of their offerings and pricing. Our recommendations regarding technology are reached without regard to financial compensation except in situations in which comparable products at comparable pricing are available from multiple sources. In this limited case, we support our sponsors because our sponsors support us.
BOGO Bonaza: Enjoy state-of-the-art VoIP service with a $10 credit and half-price SIP service on up to $500 of Skyetel trunking with free number porting when you fund your Skyetel account. No limits on number of simultaneous calls. Quadruple data center redundancy. $25 monthly minimum spend required. Tutorial and sign up details are here.
![]() The lynchpin of Incredible PBX 2020 and beyond is ClearlyIP components which bring management of FreePBX modules and SIP phone integration to a level never before available with any other Asterisk distribution. And now you can configure and reconfigure your new Incredible PBX phones from the convenience of the Incredible PBX GUI.
The lynchpin of Incredible PBX 2020 and beyond is ClearlyIP components which bring management of FreePBX modules and SIP phone integration to a level never before available with any other Asterisk distribution. And now you can configure and reconfigure your new Incredible PBX phones from the convenience of the Incredible PBX GUI.
VitalPBX is perhaps the fastest-growing PBX offering based upon Asterisk with an installed presence in more than 100 countries worldwide. VitalPBX has generously provided a customized White Label version of Incredible PBX tailored for use with all Incredible PBX and VitalPBX custom applications. Follow this link for a free test drive!
Special Thanks to Vitelity. Vitelity is now Voyant Communications and has halted new registrations for the time being. Our special thanks to Vitelity for their unwavering financial support over many years and to the many Nerd Vittles readers who continue to enjoy the benefits of their service offerings. We will keep everyone posted on further developments.
Some Recent Nerd Vittles Articles of Interest…
- SanDisk, Kingston, and Transcend Class 10 microSD cards all worked for us. [↩]
Free Asterisk Solutions
