
Home » Posts tagged 'gvoice' (Page 10)
Tag Archives: gvoice
The Most Versatile VoIP Provider: FREE PORTING

 JUST RELEASED: Visit the Incredible PBX Wiki
Four Months in Paradise: Free International VoIP Calling From Your Cellphone

Following our article documenting how to set up free cellphone service in the United States using the Sprint reseller, RingPlus, we received a number of questions seeking ways to add free or low cost international calling to the RingPlus offerings. Today we’ll provide a quick tutorial on how to turn any cellphone into a terrific platform to make free international calls, lots of them. As of this writing, for every 10 euros ($11.27) you deposit into your account, you’ll get 300 minutes a week of free calls to 44 countries for 120 days. You can also call anywhere else in the world at very reasonable per minute rates that compare favorably with other SIP providers around the world. In addition to the freebies, for the mathematically challenged, today we’ll also show you how to minimize international calling charges on any U.S. cellphone using Incredible PBX with DISA and your choice of SIP providers. Some provide all-you-can-eat international calling to certain countries for a monthly fee while others charge by the minute depending upon the destination. Do some Googling. The beauty of a PBX and SIP trunks is you can mix and match as many providers as you like to take advantage of favorable calling rates to multiple countries. We’re going to start with the almost-free option because we like to share great deals.
There are a few things you need to know about the so-called Betamax VoIP services up front. Most importantly, they change rates and free countries more frequently than college kids change partners. Betamax also has dozens of companies offering similar services with differing rates and freebies. You can keep track of the daily changes on this Facebook page. Here’s a 5-year old spreadsheet that will give you a good idea of what you’re up against. Don’t depend upon it for the current rates. You’ll need to visit the actual site(s) of your choice for their current rate tables or visit the site maintained by Betamax for a country-by-country comparison by provider. That’s another way of saying DON’T BLAME US IF YOUR 3-HOUR CALL TO ANTARCTICA CHANGED FROM 20¢ PER MINUTE TO $1 PER MINUTE OVERNIGHT. IT PROBABLY WON’T, BUT THEN AGAIN IT MIGHT. Before making a lengthy call to a remote destination, spend the two minutes it takes to look up the current rate and make a snapshot of the web page for your records. Here’s another tip. If you make frequent calls to Antarctica, spend a little time doing your homework. Review the latest Betamax spreadsheet to track down the cheapest rates. Then double-check the actual sites for the current rates. There’s a $150 difference in the cost of a 3-hour call at €.20/minute from one Betamax site versus the €.906/minute rate at another Betamax site. THIS CAN AND OFTEN DOES CHANGE! As it happens, two of the lowest cost providers still offer the calls at the same two-year-old €.20/minute rate.
Today we’ll be focusing on the company we’ve tracked for many years, FreeVoipDeal.com. Except for the domain name, the setup with other Betamax providers is similar but not identical. And, of course, you’ll have to kick in another deposit to make free calls from each site. The length of the Freebie period also may vary so read the terms carefully. FreeVoipDeal actually hasn’t changed much since our last visit about two years ago. In fact, we still had most of our ten euro credit so we could play all we wanted even though the calls were no longer free since our four month window had long since expired.
Here’s the April 19, 2017 Freebie list by country compared to several years ago. Don’t depend upon it! Check their actual web site or the Betamax country summary for current freebies and current rates. Here’s another neat little trick to remember. When you visit the FreeVoipDeal Rate Table, just click on the Out of Minutes tab for a quick listing of all the Free Calling Countries as well as the rates once you use up your four months of free calls. With few exceptions, most of the "free countries" still had a rate of 1.1¢ per minute even after you ran out of minutes. Not bad!

Here’s How the Free International Calling Procedure Works
There are really two ways to make international calls from your smartphone. You can either load an app to make the calls if your cellphone supports it. Or you can dial a secondary number using the traditional dialer on your cellphone, enter an access code, and then dial the international number. We’re going to begin with the latter option because it works with any cellphone and it’s safer in numerous ways. At the end of the article, we’ll also show you how to load an app and make the calls that way if you like living dangerously.
So let’s start with the basics. The way this will work when we’re finished today is you’ll pick up your cellphone and dial a phone number assigned to your own Incredible PBX. The call will be answered and a sweet lady named Allison will ask you for a password. Once you enter it correctly, you’ll get a secondary dial tone. You then can dial any international number that you have preauthorized on your PBX, and the call will be routed out through your FreeVoipDeal trunk to its destination. When the person answers, you will have made your first free international call using your cellphone.
The key components include the Incredible PBX platform with the DISA application to provide secondary dialtone for processing international calls. A phone number and trunk will receive incoming calls bound for DISA from your cellphone. An inbound route will only forward incoming calls to DISA that match your cellphone number. A secondary trunk from FreeVoipDeal or other providers will be used to process outgoing international calls that are dialed using DISA. We’ll create an outbound route or rule for every country to which you want to authorize international calling. Each of these outbound routes will point to the least expensive (or free) trunk to complete the call. In the VoIP world, you actually could have dozens of outbound trunks that handle international calls based upon the country codes of each international call. This lets you take advantage of the best calling rates for each country. We will block international calls to country codes you have not specifically authorized.
Just to restate the obvious, a misconfigured DISA application that allows the world to make international calls on your nickel can get expensive quickly. We’ll protect today’s setup with two layers of protection. First, we’ll require that the CallerID of the incoming call match your cellphone number. While this isn’t failsafe since CallerID numbers can be spoofed, it does reduce the risk considerably because the bad guys will have to know BOTH your cellphone number and the incoming phone number managing DISA on your PBX. Without those two phone numbers, nobody gets to the DISA application at all. Second, for incoming Incredible PBX calls from a number matching your cellphone number, the caller will be prompted for a six-digit password, and you can make it longer if you will sleep better. Just remember, compromising DISA on your PBX is just as risky as handing out your credit card to a stranger so follow the setup steps carefully. And then TEST, TEST, TEST to make sure strangers can’t access your DISA setup. We’ll show you how.
Eight Is Enough: Choosing an Incredible PBX Platform for International Calling
Before any of this will work, you’ll obviously need an Incredible PBX. The software is free. The cost of the hardware depends upon the Incredible PBX platform you choose. This could be a PBX hosted in the Cloud, or it could be a PBX running as a virtual machine on your desktop computer or VMware corporate server, or it could be a PBX running on dedicated hardware in your home or office. Here are some choices with approximate prices and links to the tutorials to set them up. After downloading the Incredible PBX software from SourceForge, the setup process only takes 30 minutes or less.
- Incredible PBX in the Cloud at CloudAtCost ($10.50 one-time fee)
- Incredible PBX in the Digital Ocean Cloud ($5 a month after 2 free months)
- Incredible PBX in the RentPBX Cloud ($15 a month with Coupon Code: NOGOTCHAS)
- Incredible PBX running under VirtualBox on your Desktop PC (free)
- Incredible PBX running on your company’s VMware server (free)
- Incredible PBX running on standalone Raspberry Pi 3 ($35++)
- Incredible PBX running on standalone Intel NUC ($200)
- Incredible PBX running on your favorite old clunker (free)
Configuring Incredible PBX for International Calling with DISA
Here’s an overview of the setup drill for today once you have Incredible PBX running. We’ll walk through each of the six steps below. Don’t get frustrated. There are a lot of steps, but none of them are difficult. Just don’t skip any.
- Set Up Your Trunk to Process Incoming DISA Calls
- Set Up Your Trunk(s) to Process Outgoing International Calls
- Configure DISA with a Very Secure Password
- Configure an Inbound Route to Limit Incoming DISA Calls to Your Cellphone #
- Configure an Outbound Route for Each International Country Code
- Test, Test, Test
1. Setting Up a Trunk to Process Incoming DISA Calls
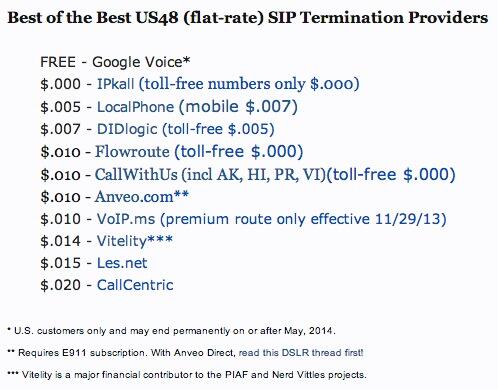
Before you can make calls to your PBX, it’ll need a phone number (known affectionately as a DID). As installed, Incredible PBX includes preconfigured SIP trunks from about a dozen SIP providers. All you’ll need is credentials from the company you wish to use. Most providers of DID trunks offer a monthly flat rate for unlimited incoming calls. There’s a great deal from our Platinum Sponsor, Vitelity, at the end of this article. And their international calling rates are extremely competitive.
In addition to SIP trunks, Incredible PBX is preconfigured to support Google Voice trunks for those living in the United States. These trunks are free and provide unlimited incoming and outgoing calls throughout the U.S. and Canada. Because this option is free, you’d be crazy not to use it for today’s application if it’s available where you live. The setup procedure is covered in detail in all of the Incredible PBX installation tutorials referenced above. So start there.
2. Setting Up a Trunk to Process Outgoing International Calls
We’re going to walk you through setting up a trunk with FreeVoipDeal to handle free international calls to certain countries documented above. This may not be the best fit for you depending upon the international destinations you wish to call. Figure that out first! Then adjust the trunk settings below to match each SIP provider trunk you wish to create. There’s no limit to the number you can have. And, with most of these providers, you pay by the minute for international calls anyway so there is no harm in configuring multiple trunks to take advantage of the best rates calling the countries of your choice. The same applies to all-you-can-eat and "free" trunks except there are varying fees for using the services so you’re probably not going to want a dozen of them even if some of the calls are free after making a periodic deposit. One other word of warning. Some Betamax sites such as powervoip.com have good calling rates, but they tack on a 3.9¢ connection fee to every call. If you make lengthy calls, it’s not a big deal. If you make numerous short calls, it drives your discount calling rates through the roof. So start with the pink and green entries on the old spreadsheet we referenced for the cheapest historical rates and then visit the actual sites and read the fine print. One of our favorite Betamax sites for many tourist destinations is HotVoIP.com.

To add new trunks to Incredible PBX, use a browser to access the IP address of your server. Choose Incredible GUI Administration from the Admin menu of the Kennonsoft GUI (shown above) by clicking on User to switch. The default username is admin and the password is what you set when the install completed. Once the Incredible PBX GUI appears, click the Connectivity tab and choose Trunks -> Add SIP (chan_sip) Trunk.
For Trunk Name, enter FreeVoipDeal. In the Dialed Number Manipulation Rules section, add a rule for each country code you wish to activate. You can decipher the Country Code for any country at this link. For example, for the United Kingdom, you’d enter a rule like this where 44 is the Country Code and each X represents a required digit in the local area code and phone number. The trailing period means the number includes one or more additional digits. NOTE: DISA calls will not have to be prefixed with 011 to place international calls. Just enter the country code and number to be called. And, I am told that only 441, 442, and perhaps 443 calls to the U.K. are free since those are the designated landline prefixes.
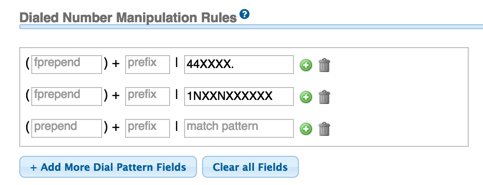
If there are other countries, you wish to support with this trunk provider, you’d click Add More Dial Pattern Fields and insert an additional rule for each country following the example above. If you’ll be using this trunk to make calls in the U.S. and Canada as well, the correct Match Pattern is 1NXXNXXXXXX, and calls will need to be dialed with the 1 to avoid conflicts with international dialing. And, by the way, calls to Alaska and Hawaii are also free!
Next, we need to enter the Outgoing Settings. For the Trunk Name, enter freevoipdeal. Clear out the entries in Peer Details section and enter the following using your actual FreeVoipDeal credentials for yourusername and yourpassword:
authuser=yourusername
username=yourusername
secret=yourpassword
type=peer
qualify=yes
nat=yes
insecure=port,invite
host=sip.freevoipdeal.com
fromdomain=sip.freevoipdeal.com
dtmfmode=auto
disallow=all
canreinvite=no
allow=alaw&ulaw
Finally, clear out the default entries in User Details and click the Submit Changes button and then red Apply Config button to save your new trunk.
Spoofing Your CallerID. When setting up your FreeVoipDeal account, you can set up one or more numbers to use as your CallerID number on FreeVoipDeal calls. You simply verify the number with a code sent by SMS or phone call from their service. Once you’ve gone through the verification procedure, you can spoof the outbound CallerID on FreeVoipDeal calls using your actual cellphone number. Just add the following entries to your Trunk settings replacing 9991234567 with your cellphone number. Special thanks to @hillclimber on the PIAF Forum for the tip.
fromuser=0019991234567
sendrpid=yes
3. Configuring DISA to Support International Calling
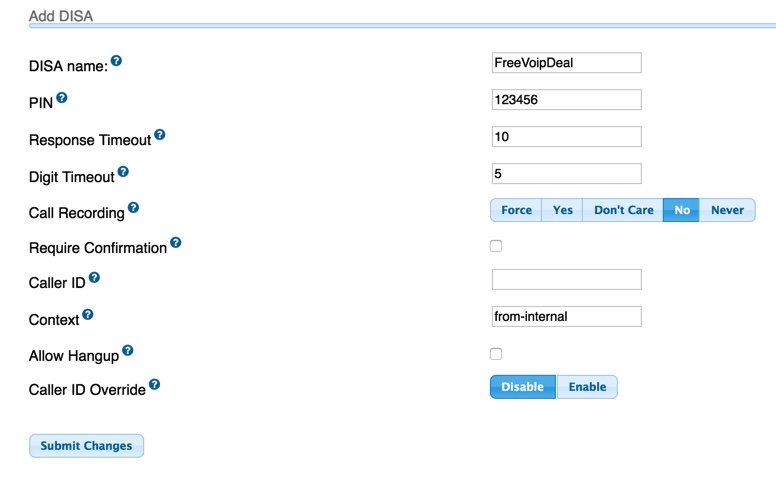
In the Incredible PBX GUI, we’ll set up DISA by clicking the Applications tab and choosing DISA. Add your new DISA configuration by following this sample. Use a VERY secure password. It’s your phone bill. Once you’ve finished, click the Submit Changes button and then red Apply Config button to save your new DISA setup.
4. Configuring an Inbound Route for Your Incoming DISA Calls
Here’s where we lock down your setup so that Incredible PBX only accepts DISA calls from your cellphone number. If you want to allow additional people to use your DISA setup or if you have multiple cellphones, then simply create multiple inbound routes with the 10-digit numbers of each phone to be supported.
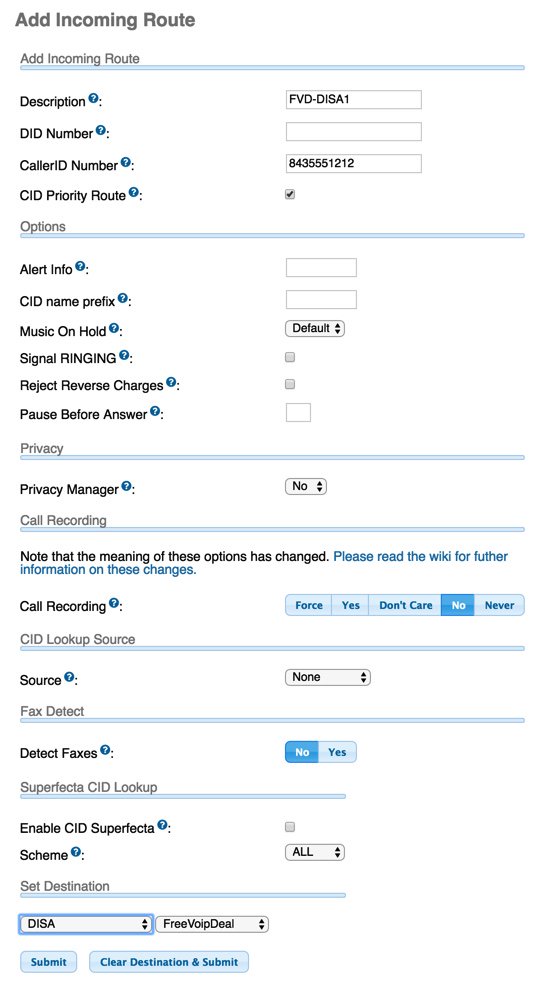
In the Incredible PBX GUI, we’ll set up a new Inbound Route by clicking the Connectivity tab and choosing Inbound Routes. If you plan to support multiple phones, then create multiple inbound routes and give each of them a unique Description and CallerID Number that matches the phone number of the cellphone to be supported. Be sure to check the CID Priority Route checkbox and set the correct Destination for your incoming calls. Just fill in the blanks appropriately using this template as a guide. Once you’ve finished, click the Submit button and then red Apply Config button to save your new Inbound Route.
5. Configuring an Outbound Route for Each International Country Code
The DISA application is going to obtain the phone number to be dialed and will pass that to the Outbound Routes module. The job of the Outbound Routes module is to examine the phone number passed to it from DISA to figure out which trunk to use to make the outbound call. It then will pass the call to the appropriate trunk which sends the outgoing call on its way to the destination.
For each Dialed Number Manipulation Rule in every Trunk that you set up in Step #2 above, you’ll need a matching Outbound Route if your PBX is used to place calls using multiple trunks. If you’re only using one provider for all of your outbound calls, then we can use a more generic Outbound Route. It’s always a good idea to create the one-to-one match between Outbound Routes and Trunks to make certain that outbound calls are sent to the correct Trunk for processing. So let’s do that using the U.K. trunk we created above.
In the Incredible PBX GUI, we’ll set up a new Outbound Route by clicking the Connectivity tab and choosing Outbound Routes. When the template appears, notice in the far right column that there’s a listing of all your existing Outbound Routes. Calls are actually processed sequentially using the order that these Outbound Routes appear in the list. If there’s no number match in the top route or if the call via the top route fails, processing drops to the next route in the list until there is a match AND a successful connection. You can adjust the sequence by dragging the Outbound Routes to a different position in the priority list.
It’s important to use specificity in your Outbound Routes (especially with International calling) to make certain that a call isn’t inadvertently processed by a secondary trunk. For example, if you have a Google Voice trunk in addition to a FreeVoipDeal trunk, we want to make certain that calls to England are processed by the FreeVoipDeal trunk and that 10-digit numbers starting with area code 440 (Cleveland) are routed out through Google Voice. The easiest way to do this is to require the Outbound Route Match Pattern for U.K. calls to be at least 11 digits, e.g. 44XXXXXXXX. (the trailing period is important in that it requires at least one more digit for a match). And we can force a Hangup if the FreeVoipDeal trunk is not available for some reason by adjusting the Destination on Congestion setting. This keeps the call routing from dropping down to the next available Outbound Route in the list if FreeVoipDeal happens to be off-line at some point. So our Outbound Route for U.K. calls should look something like this:
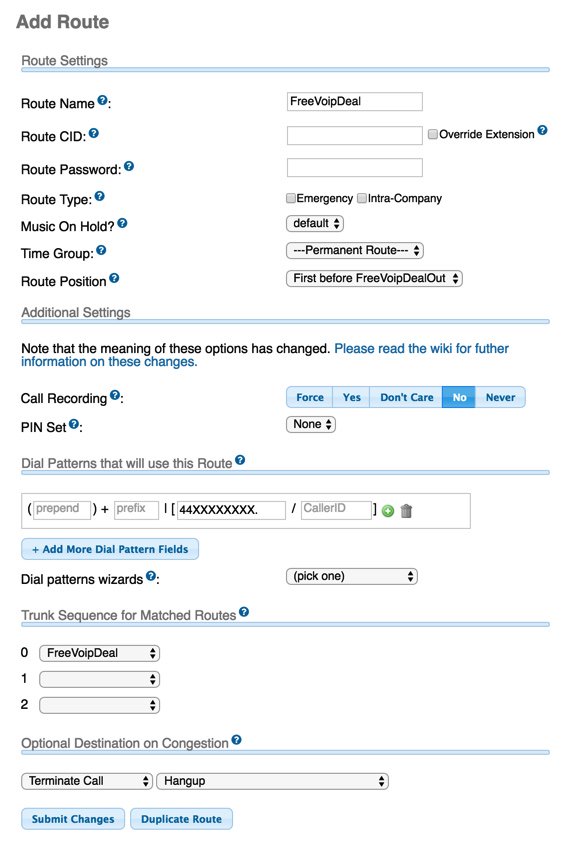
The final step is to move the new Outbound Route for U.K. calls to the top of the Outbound Routes listing in the right column to assure that it is processed first. Once you’ve done that, click the Submit Changes button and then red Apply Config button to save your new Outbound Route AND the adjusted Outbound Route Priority List.
Another alternative in creating Outbound Routes is to use a Dial Prefix that never matches a real phone number to direct calls to a particular trunk. For example, you might use 08 as a dial prefix for FreeVoipDeal calls. By placing 08 in the Prefix column of the Dial Pattern, it will get stripped off before the number is actually passed to the FreeVoipDeal trunk for processing. We actually prefer this setup because it adds an additional layer of security for international calls. If someone were to break into your DISA application by knowing your cellphone number AND your DID AND your DISA password, it’s unlikely they’d also know to prefix outgoing international calls with some arbitrary dial prefix. Just don’t use 08 in case they’re a Nerd Vittles reader. 😉
6. Test, Test, Test!
The easiest way to test the new setup is to place a couple of calls and to watch the Asterisk CLI (asterisk -rvvvvvvvvvv) and see how the calls are processed and who answers at the other end. Then you can apologize for reaching the wrong number.
You can make up your own test methodology, but here’s one that works for us. There are several tests you need to make. First, call your Incredible PBX DID from your authorized cellphone and enter a correct DISA password to see if you get dial tone to make an international call. Then repeat the drill with an invalid password and make sure you don’t get a dial tone. Next, call your Incredible PBX DID from a phone other than your authorized cellphone. You should not get a prompt for a DISA password. Finally, we use the first three digits of a U.K. number to identify a matching NANPA area code. Then, we find hotels in the two matching cities. For example, one might attempt to call a hotel in Bath, England (44 1… ……) and a hotel in Bermuda (441-…-….). The U.K. call should go through, and the Bermuda call should fail. If you pass all three tests with flying colors, you’re good to go.
Using FreeVoipDeal’s MobileVoIP App Instead of Incredible PBX with DISA
FreeVoIPDeal also offers a MobileVoIP app that can be used directly on your smartphone (Android, iOS, and Windows phone versions available) using any Wi-Fi, UMTS, 4G/LTE, 3G, GPRS or EDGE connection. The drawback is the lack of the three extra layers of security protection that Incredible PBX using DISA offers. MobileVOIP lets you log in with your registered Betamax credentials and offers the option to use your existing VoIP credit from your smartphone. The downside is that anyone with the app and your credentials can call anywhere and talk for as long as they like on your nickel using any of your registered CallerIDs. You’ve been warned. For more information or to download the app for your mobile device, go here. Remember to dial the "+1″ country code prefix for U.S./Canada calls. Enjoy!
Originally published: Monday, March 21, 2016
 Support Issues. With any application as sophisticated as this one, you’re bound to have questions. Blog comments are a terrible place to handle support issues although we welcome general comments about our articles and software. If you have particular support issues, we encourage you to get actively involved in the PBX in a Flash Forums. It’s the best Asterisk tech support site in the business, and it’s all free! Please have a look and post your support questions there. Unlike some forums, ours is extremely friendly and is supported by literally hundreds of Asterisk gurus and thousands of users just like you. You won’t have to wait long for an answer to your question.

Need help with Asterisk? Visit the PBX in a Flash Forum.
Special Thanks to Our Generous Sponsors
FULL DISCLOSURE: ClearlyIP, Skyetel, Vitelity, DigitalOcean, Vultr, VoIP.ms, 3CX, Sangoma, TelecomsXchange and VitalPBX have provided financial support to Nerd Vittles and our open source projects through advertising, referral revenue, and/or merchandise. As an Amazon Associate and Best Buy Affiliate, we also earn from qualifying purchases. We’ve chosen these providers not the other way around. Our decisions are based upon their corporate reputation and the quality of their offerings and pricing. Our recommendations regarding technology are reached without regard to financial compensation except in situations in which comparable products at comparable pricing are available from multiple sources. In this limited case, we support our sponsors because our sponsors support us.
 BOGO Bonaza: Enjoy state-of-the-art VoIP service with a $10 credit and half-price SIP service on up to $500 of Skyetel trunking with free number porting when you fund your Skyetel account. No limits on number of simultaneous calls. Quadruple data center redundancy. $25 monthly minimum spend required. Tutorial and sign up details are here.
![]() The lynchpin of Incredible PBX 2020 and beyond is ClearlyIP components which bring management of FreePBX modules and SIP phone integration to a level never before available with any other Asterisk distribution. And now you can configure and reconfigure your new Incredible PBX phones from the convenience of the Incredible PBX GUI.
The lynchpin of Incredible PBX 2020 and beyond is ClearlyIP components which bring management of FreePBX modules and SIP phone integration to a level never before available with any other Asterisk distribution. And now you can configure and reconfigure your new Incredible PBX phones from the convenience of the Incredible PBX GUI.
 VitalPBX is perhaps the fastest-growing PBX offering based upon Asterisk with an installed presence in more than 100 countries worldwide. VitalPBX has generously provided a customized White Label version of Incredible PBX tailored for use with all Incredible PBX and VitalPBX custom applications. Follow this link for a free test drive!
 Special Thanks to Vitelity. Vitelity is now Voyant Communications and has halted new registrations for the time being. Our special thanks to Vitelity for their unwavering financial support over many years and to the many Nerd Vittles readers who continue to enjoy the benefits of their service offerings. We will keep everyone posted on further developments.
Some Recent Nerd Vittles Articles of Interest…
The Best of Both Worlds: Taking Incredible PBX from the Cloud to the Ocean
We’ve spent a good bit of time documenting a dirt cheap way to learn about VoIP in the Cloud with our Incredible PBX offering using a $10.50 virtual machine at CloudAtCost. Is it production ready? Probably not. But we’re reminded of the old saying that pizza is a lot like sex: "When it’s good, it’s really good. And, when it’s bad, it’s still pretty good." That pretty much sums up CloudAtCost. And it’s not like a one-time investment for the cost of a pizza lunch is going to break the bank.
Today we turn our attention to a more reliable, long term Cloud solution with a fresh look at Incredible PBX with Digital Ocean. This setup runs about $5 a month after a free $10 trial using our referral link. If you continue to use the service, it also generates a little revenue for Nerd Vittles to keep the lights on.
It’s been about two years since we first introduced the Digital Ocean platform. Back then, it was the experimental platform. But a lot has changed, and it’s all for the better. First, you get a Cloud Server on which you can create virtually any Linux platform you like including CentOS, Fedora, Debian, Ubuntu, and more. Second, you get your choice of seven datacenters all around the world: New York, San Francisco, Toronto, London, Frankfurt, Amsterdam, and Singapore. Third, you get enormous scalability. You can start with the $5/month flavor with 512MB of RAM and a single CPU, 20GB of SSD storage, and 1TB of bandwidth. As your requirements grow and with a couple clicks, you can scale up through 8 multiples of capacity to a whopping 64GB of RAM with 20 CPUs, 640GB of storage, and 9TB of bandwidth for less than a dollar an hour. Just make a Snapshot of any off-line Droplet, and then use that Snapshot as the image for your new server in lieu of a Linux Distribution.

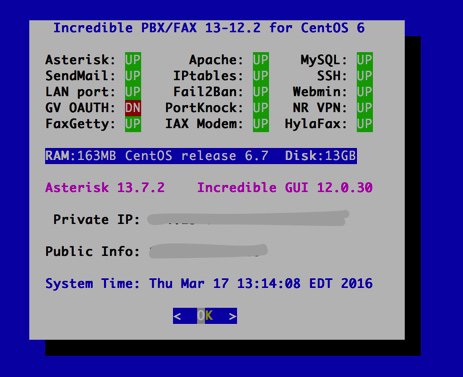
For our purposes today and for home and SOHO business users, the $5/month Digital Ocean platform is a perfect fit for both the CentOS 6.7 and Ubuntu 14.04 flavors of Incredible PBX. Once you’ve created your Digital Ocean Droplet with your choice of operating system, the Incredible PBX install procedure takes about 25 minutes. This includes the time necessary to compile and install the latest release of Asterisk® 13 from source code. When you’re finished, you’ll have a rock-solid PBX that is fully secured using the Linux firewall. For out-of-the-gate security, no other PBX comes close… at any price. Incredible PBX is and always will be pure open source GPL code and, of course, it’s FREE!
Creating Your First Digital Ocean Droplet
CentOS 6.7 remains our Gold Standard of Linux operating systems. We’ll start there and walk you through the Incredible PBX install procedure. Begin by signing up for a Digital Ocean account and creating a 512MB $5 droplet in your choice of data centers. Choose the CentOS 6.7 x32 platform just to keep things simple, and pick a hostname such as centos.incrediblepbx.com. It doesn’t matter if it is not resolvable, but it does need to be in FQDN format.
By the way, you only pay for the time your droplet actually exists so build several and play for a couple hours. Your total cost will be about 5¢. And, as we noted, your first $10 of server charges are actually free. So you have nothing to lose by experimenting. If you make a mistake, delete your droplet and start over. No big deal. Once your droplet has been created, Digital Ocean will send you an email with your root user credentials and the IP address of your new server. Login with SSH or Putty, and you’ll be prompted to immediately change your root password. Make it secure… as if your bank account depended upon it. 😉
Installing Incredible PBX 13 for CentOS 6.7
Now we’re ready to begin the Incredible PBX install. It’s a two-step procedure. First, we’ll get CentOS up to date and reboot. Then we’ll kick off the actual install. Just cut-and-paste the following commands while logged into your droplet as root:
setenforce 0
yum -y upgrade --skip-broken
yum -y install net-tools nano wget tar
reboot
Once your server reboots, login again as root and cut-and-paste the following commands. Take a 30-minute break while the installer does its thing. If you’re one that likes to watch, don’t worry if you see some error messages. They all get sorted out before the installation finishes.
cd /root
wget http://incrediblepbx.com/incrediblepbx13-12.2-centos.tar.gz
tar zxvf incrediblepbx*
./create-swapfile-DO
./IncrediblePBX*
reboot
Let’s login to your server one more time to get the latest Incredible PBX updates and set up your passwords and time zone. Then you’ll be ready to handle future server admin using your browser:
Make your root password very secure: passwd
Create admin password for GUI access: /root/admin-pw-change
Create admin password for web apps: htpasswd /etc/pbx/wwwpasswd admin
Set your correct time zone: /root/timezone-setup
Make a copy of your Knock codes: cat /root/knock.FAQ
Review current info about your server: status OR pbxstatus (depends on release)
If you want to add fax support to your PBX, we’ve got one more installer to run, and you’ll be all set. Just run the following command and press the ENTER key each time you are prompted for input (about 21 times):
cd /root
./incrediblefax11.sh
Success!
It’s a GUI, GUI World Out There
Most management of Incredible PBX will be handled using your favorite browser and one of two GUIs: the Kennonsoft menu which appears when you access the IP address of your server using a browser AND the Incredible GUI which is available on the Admin page of the Kennonsoft menu.
Choose Incredible GUI Administration from the Admin menu of the Kennonsoft GUI (shown above) by clicking on User to switch. The default username is admin and the password is what you set in the preceding step. Now edit extension 701 so you can decipher or change the randomized passwords that was assigned to the 701 extension and its voicemail account: Applications -> Extensions -> 701.
Setting Up a Soft Phone to Use with Incredible PBX
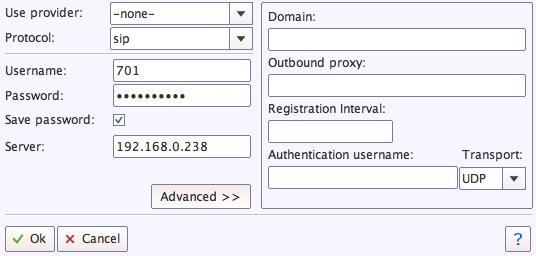
Now you’re ready to set up a telephone so that you can play with Incredible PBX. We recommend YateClient which is free. Download it from here. Run YateClient once you’ve installed it and enter the credentials for the 701 extension on Incredible PBX. You’ll need the IP address of your server plus your extension
701 password. Choose Settings -> Accounts and click the New button. Fill in the blanks using the IP address of your server, 701 for your account name, and whatever password you created for the extension. Click OK.
Once you are registered to extension 701, close the Account window. Then click on YATE’s Telephony Tab and place some test calls to the numerous apps that are preconfigured on Incredible PBX. Dial a few of these to get started:
DEMO - Allison's IVR Demo

947 - Weather by ZIP Code

951 - Yahoo News

*61 - Time of Day

*68 - Wakeup Call

TODAY - Today in History
Now you’re ready to connect to the telephones in the rest of the world. If you live in the U.S., the easiest way (at least for now) is to set up a free Google Voice account. Google has threatened to shut this down but as this is written, it still works. An update supporting Google Voice OAUTH 2 authentication is available here with a complete tutorial. Just start at step #1b. A better long-term solution is to choose several SIP providers and set up redundant trunks for your incoming and outbound calls. The PIAF Forum includes dozens of recommendations to get you started. You’ll also find an incredible deal from our platinum sponsor, Vitelity, at the end of this article.
Configuring Google Voice
If you want to use Google Voice, you’ll need a dedicated Google Voice account to support Incredible PBX. If you want to use the inbound fax capabilities of Incredible Fax, then you’ll need an additional Google Voice line that can be routed to the FAX custom destination using the GUI. The more obscure the username (with some embedded numbers), the better off you will be. This will keep folks from bombarding you with unsolicited Gtalk chat messages, and who knows what nefarious scheme will be discovered using Google messaging six months from now. So keep this account a secret!
We’ve tested this extensively using an existing Gmail account, and inbound calling is just not reliable. The reason seems to be that Google always chooses Gmail chat as the inbound call destination if there are multiple registrations from the same IP address. So, be reasonable. Do it our way! Set up a dedicated Gmail and Google Voice account, and use it exclusively with Incredible PBX. It’s free at least through 2013. Google Voice no longer is by invitation only so, if you’re in the U.S. or have a friend that is, head over to the Google Voice site and register.
You must choose a telephone number (aka DID) for your new account, or Google Voice calling will not work… in either direction. Google used to permit outbound Gtalk calls using a fake CallerID, but that obviously led to abuse so it’s over! You also have to tie your Google Voice account to at least one working phone number as part of the initial setup process. Your cellphone number will work just fine. Don’t skip this step either. Just enter the provided 2-digit confirmation code when you tell Google to place the test call to the phone number you entered. Once the number is registered, you can disable it if you’d like in Settings, Voice Setting, Phones. But…
IMPORTANT: Be sure to enable the Google Chat option as one of your phone destinations in Settings, Voice Setting, Phones. That’s the destination we need for The Incredible PBX to work its magic! Otherwise, all inbound and outbound calls will fail. If you don’t see this option, you may need to call up Gmail and enable Google Chat there first. Then go back to the Google Voice Settings.
While you’re still in Google Voice Settings, click on the Calls tab. Make sure your settings match these:
- Call Screening – OFF
- Call Presentation – OFF
- Caller ID (In) – Display Caller’s Number
- Caller ID (Out) – Don’t Change Anything
- Do Not Disturb – OFF
- Call Options (Enable Recording) – OFF
- Global Spam Filtering – ON
Click Save Changes once you adjust your settings. Under the Voicemail tab, plug in your email address so you get notified of new voicemails. Down the road, receipt of a Google Voice voicemail will be a big hint that something has come unglued on your PBX.
One final word of caution is in order regardless of your choice of providers: Do NOT use special characters in any provider passwords, or nothing will work!
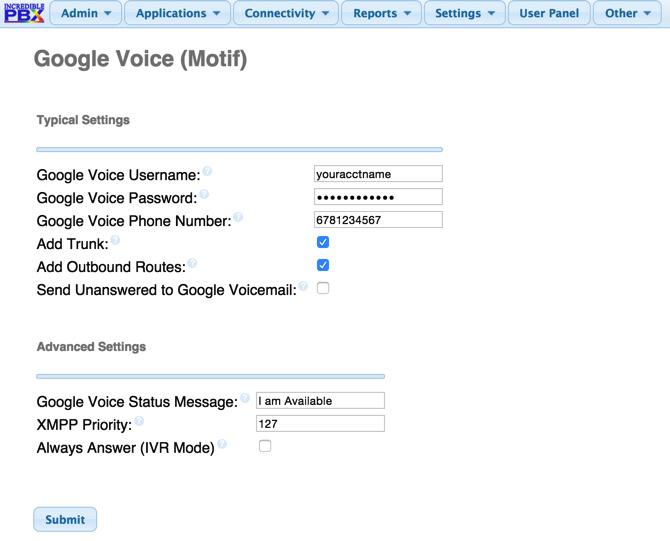
Now you’re ready to set up your Google Voice trunk in the GUI. After logging in with your browser, click the Connectivity tab and choose Google Voice/Motif. To Add a new Google Voice account, just fill out the form. Do NOT check the third box or incoming calls will never ring!
IMPORTANT LAST STEP: Google Voice will not work unless you restart Asterisk from the Linux command line at this juncture. Using SSH, log into your server as root and issue the following command: amportal restart.
If you have trouble getting Google Voice to work (especially if you have previously used your Google Voice account from a different IP address), try this Google Voice Reset Procedure. It usually fixes connectivity problems. If it still doesn’t work, enable Less Secure Apps using this Google tool.
Troubleshooting Audio and DTMF Problems
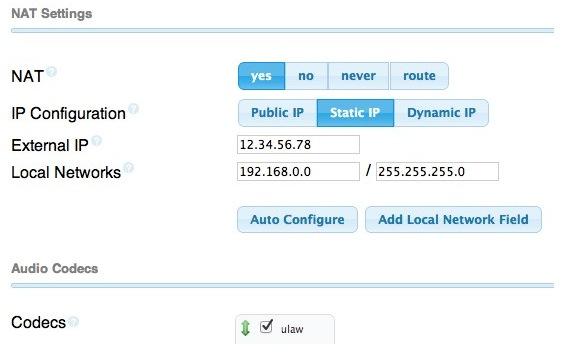
You can avoid one-way audio on calls and touchtones that don’t work with these simple settings in the GUI: Settings -> Asterisk SIP Settings. Just plug in your public IP address and your private IP subnet. Then set ULAW as the only Audio Codec.
A Few Words about the Incredible PBX Security Model for CentOS
Incredible PBX for CentOS joins our previous Ubuntu build as our most secure turnkey PBX implementation. As configured, it is protected by both Fail2Ban and a hardened configuration of the IPtables Linux firewall. The latest release also includes Port Knocker for simple, secure access from any remote computer or smartphone. You can get up to speed on how the technology works by reading the Nerd Vittles tutorial. Your Port Knocker credentials are stored in /root/knock.FAQ together with activation instructions for your server and mobile devices. The NeoRouter VPN client also is included for rock-solid, secure connectivity to remote users. Read our previous tutorial for setup instructions. As configured, nobody can access your PBX without  your credentials AND
  an IP address that is either on your private network or that matches the IP address of your server or the PC from which you installed Incredible PBX. You can whitelist additional IP addresses by running the command-line utility /root/add-ip. You can remove whitelisted IP addresses by running /root/del-acct. Incredible PBX is preconfigured to let you connect to many of the leading SIP hosting providers without additional firewall tweaking. We always recommend you also add an extra layer of protection by running your server behind a hardware-based firewall with no Internet port exposure, but that’s your call. And it’s your phone bill. 😉
The IPtables firewall is a complex piece of software. If you need assistance with configuring it, visit the PIAF Forum for some friendly assistance.
Incredible Backup and Restore
We’re also pleased to offer our latest backup and restore utilities for Incredible PBX. Running /root/incrediblebackup will create a backup image of your server in /tmp. This backup image then can be copied to any other medium desired for storage. To restore it to another Incredible PBX server, simply copy the image to a server running Asterisk 13 and the same version of the Incredible PBX GUI. Then run /root/incrediblerestore. Doesn’t get much simpler than that.
Incredible PBX Automatic Update Utility
Every time you log into your server as root, Incredible PBX will ping the IncrediblePBX.com web site to determine whether one or more updates are available to bring your server up to current specs. We recommend you log in at least once a week just in case some new security vulnerability should come along.
In the meantime, we encourage you to sign up for an account on the PIAF Forum and join the discussion. In addition to providing first-class, free support, we think you’ll enjoy the camaraderie.
Originally published: Thursday, March 17, 2016
Support Issues. With any application as sophisticated as this one, you’re bound to have questions. Blog comments are a terrible place to handle support issues although we welcome general comments about our articles and software. If you have particular support issues, we encourage you to get actively involved in the PBX in a Flash Forums. It’s the best Asterisk tech support site in the business, and it’s all free! Please have a look and post your support questions there. Unlike some forums, ours is extremely friendly and is supported by literally hundreds of Asterisk gurus and thousands of users just like you. You won’t have to wait long for an answer to your question.

Need help with Asterisk? Visit the PBX in a Flash Forum.
Special Thanks to Our Generous Sponsors
FULL DISCLOSURE: ClearlyIP, Skyetel, Vitelity, DigitalOcean, Vultr, VoIP.ms, 3CX, Sangoma, TelecomsXchange and VitalPBX have provided financial support to Nerd Vittles and our open source projects through advertising, referral revenue, and/or merchandise. As an Amazon Associate and Best Buy Affiliate, we also earn from qualifying purchases. We’ve chosen these providers not the other way around. Our decisions are based upon their corporate reputation and the quality of their offerings and pricing. Our recommendations regarding technology are reached without regard to financial compensation except in situations in which comparable products at comparable pricing are available from multiple sources. In this limited case, we support our sponsors because our sponsors support us.
BOGO Bonaza: Enjoy state-of-the-art VoIP service with a $10 credit and half-price SIP service on up to $500 of Skyetel trunking with free number porting when you fund your Skyetel account. No limits on number of simultaneous calls. Quadruple data center redundancy. $25 monthly minimum spend required. Tutorial and sign up details are here.
![]() The lynchpin of Incredible PBX 2020 and beyond is ClearlyIP components which bring management of FreePBX modules and SIP phone integration to a level never before available with any other Asterisk distribution. And now you can configure and reconfigure your new Incredible PBX phones from the convenience of the Incredible PBX GUI.
The lynchpin of Incredible PBX 2020 and beyond is ClearlyIP components which bring management of FreePBX modules and SIP phone integration to a level never before available with any other Asterisk distribution. And now you can configure and reconfigure your new Incredible PBX phones from the convenience of the Incredible PBX GUI.
VitalPBX is perhaps the fastest-growing PBX offering based upon Asterisk with an installed presence in more than 100 countries worldwide. VitalPBX has generously provided a customized White Label version of Incredible PBX tailored for use with all Incredible PBX and VitalPBX custom applications. Follow this link for a free test drive!
Special Thanks to Vitelity. Vitelity is now Voyant Communications and has halted new registrations for the time being. Our special thanks to Vitelity for their unwavering financial support over many years and to the many Nerd Vittles readers who continue to enjoy the benefits of their service offerings. We will keep everyone posted on further developments.
Some Recent Nerd Vittles Articles of Interest…
2016, The Year of (real) VoIP Choice: Introducing Elastix 4.0 with Incredible PBX

DEC. 7 NEWS FLASH: The Elastix project has been sold to 3CX. Elastix 4.0 and Elastix MT have been removed from production "due to a legal disagreement with another open source distribution."
Our crystal ball suggests that 2016 is shaping up to be a fantastic year full of VoIP surprises and excitement. We’ll be there to cover every new development. When it comes to graphical user interfaces for Asterisk®, the days of the one trick pony are officially over. Free At Last! And leave it to Edgar Landivar and Team Elastix® to be first out of the gate with Elastix 4.0. What a terrific new product it is! The Elastix project began nearly a decade ago, and every release continues to demonstrate why Elastix remains at the top of the leader board when it comes to true open source unified communications solutions. Whether you’re building a commercial call center or seeking an open source telephony platform for your organization, Elastix competes favorably with the best commercial brands in the business. We’ll put a little icing on the cake today by offering an all-new Incredible PBX release for Elastix 4.0. It adds a preconfigured and locked down firewall plus dozens of applications for Asterisk including text-to-speech and voice recognition applications as well as new SIP gateways to RingPlus cellular service and Google Voice communications. So let’s begin and take Elastix 4.0 for a spin! Download the ISO here.
Celebrate with us!
Elastix, 10 years delivering Open Source Communications #opensource #voip #asterisk pic.twitter.com/r29QPL4eFu— Elastix (@elastix) March 23, 2016
A Word of Caution. If you’re new to Incredible PBX, install a clean version of Elastix 4.0 with NO MODIFICATIONS before you begin the Incredible PBX install. All of the existing Elastix 4.0 setup will be modified as part of the Incredible PBX install, and these changes will wipe out any additions you’ve previously made to Elastix. So don’t make any! Once the Incredible PBX install is completed, you can make all the changes you wish in your Elastix configuration. The only major design change we’ve made is to rework the Elastix MySQL database tables into MyISAM format from InnoDB. This facilitates making future backups and restores of your server as well as providing the necessary platform to install current and future Incredible PBX components.
Did We Mention Security? You also get a locked down, preconfigured IPtables Firewall WhiteList with all of the Travelin’ Man 3 tools plus the automatic update service to keep your server up to date and safe. There is a $20 voluntary annual license fee for the update service but, if you’d prefer to buy donuts, be our guest. But understand that voluntary is a two-way street. Running the update service costs us time and money and, when it ceases to be worthy of our time and financial investment, we reserve the right to discontinue the service down the road. The next time you log into your server after installing Incredible PBX, you’ll quickly appreciate why an automatic update service is important. We watch for and fix problems so you don’t have to.
Getting Started with Incredible PBX and Elastix 4.0
Here’s a quick overview of the installation and setup process for Incredible PBX for Elastix 4.0:
- Choose a Hardware Platform – Dedicated PC, Cloud Provider, or Virtual Machine
- Install Elastix 4.0 – 64-bit CentOS 7 platform
- Download and Install Incredible PBX for Elastix 4.0
- Set Up Passwords for Incredible PBX for Elastix 4.0
- Activate Trunks with Incredible PBX for Elastix 4.0
- Connect a Softphone to Incredible PBX for Elastix 4.0
- Configuring SMTP Mail with Incredible PBX for Elastix 4.0
1. Choose a Platform for Incredible PBX and Elastix 4.0
Incredible PBX for Elastix 4.0 works equally well on dedicated hardware, a cloud-based server, or a virtual machine. Just be sure you have a sufficiently robust Internet connection to support 100Kb of download and upload bandwidth for each simultaneous call you wish to handle with your new PBX.
For Dedicated Hardware, we recommend at least an Atom-based PC of recent vintage with at least a 30GB drive and 4GB of RAM. That will take care of an office with 10-20 extensions and a half dozen or more simultaneous calls if you have the Internet bandwidth to support it. Our favorite hardware platform remains the $200 Intel NUC, and you can read all about it here.
For Cloud-Based Servers, we recommend RentPBX, one of our financial supporters who also happens to size servers properly and restrict usage solely to VoIP. This avoids performance bottlenecks that cause problems with VoIP calls. Yes, we have a coupon code for you to get the $15/month rate: NOGOTCHAS. The new image to support Incredible PBX for Elastix 4.0 should be available shortly.
Or you can install Elastix 4.0 on top of an existing CentOS 7 platform by following this tutorial.
For Virtual Machine Installs, we recommend Oracle’s VirtualBox platform which runs atop almost any operating system including Windows, Macs, Linux, and Solaris. Here’s a link to our original VirtualBox tutorial to get you started. We suggest allocating 1GB of RAM and at least a 20GB disk image to your virtual machine for best performance. We actually used VirtualBox to build Incredible PBX for Elastix 4.0.
2. Install 64-bit Elastix 4.0 on Your Platform
Begin by downloading the 64-bit Elastix 4.0 ISO. For dedicated hardware, burn the ISO image to a DVD and boot your server with the Elastix 4.0 ISO to begin the install. You’ll be presented with the CentOS 7 Installation GUI:
Choose: Time Zone (click)
Choose: Keyboard (click)
Choose: Install Drive (double-click)
Choose: Root Password (Make it Secure!)
Wait for Install and Reboot to Complete
Set MySQL Password to: passw0rd (MANDATORY: with a zero!)
Set Elastix admin Password: minimum 10 alphanumeric characters with upper & lowercase
For VirtualBox, create an Elastix 4.0 virtual machine of Linux (RedHat 64-bit) type by clicking New. Click Settings button. In System, enable I/O APIC and disable Hardware Clock in UTC Time. In Audio, enable Audio for your sound card. In Network, enable Bridged Adapter for Adapter 1. In Storage, click on Empty in the Storage Tree. Then click on the Disk icon to the right of CD/DVD Drive attributes. Choose the Elastix 4.0 ISO file that you downloaded. Click OK. Then start the virtual machine to begin the installation process. Follow the setup steps above to install Elastix 4.0 in your virtual machine.
3. Download and Install Incredible PBX for Elastix 4.0
After completing the Elastix 4.0 install, log into your server as root using SSH or Putty from a desktop machine that you will use to manage your server. This is important with the Incredible PBX IPtables Firewall WhiteList so you don’t get locked out of your own server! Then issue the following commands to begin the Incredible PBX install. You’ll actually run the installer twice, once to upgrade CentOS 7 and Elastix 4.0 and a second time to install Incredible PBX.
cd /root
yum -y install wget
wget http://incrediblepbx.com/incrediblepbx11elastix40.tar.gz
tar zxvf incrediblepbx11elastix40.tar.gz
rm -f incrediblepbx11elastix40.tar.gz
./IncrediblePBX*
# after reboot, login again as root and...
./IncrediblePBX*
4. Initial Configuration of Incredible PBX for Elastix 4.0
Incredible PBX is installed with the preconfigured IPtables Linux firewall already in place. It implements WhiteList Security to limit server access to connected LANs, your server’s IP address, your desktop computer’s IP address, and a few of our favorite SIP providers. You can add additional entries to this WhiteList whenever you like using the add-ip and add-fqdn tools in /root. There’s also an Apache security layer for our web applications. And, of course, Elastix 4.0 has its own security methodology. Finally, we randomize various passwords as part of the initial install process. You’ll also be prompted to set your MySQL and Elastix admin password again. Be sure your MySQL password is passw0rd with a zero, or nothing will work! Out of the starting gate, you won’t find a more secure VoIP server implementation anywhere. After all, it’s your phone bill.
Even with all of these layers of security, here are 6 Quick Steps to better safeguard your server. You only do this once, but failing to do it may lead to security issues you don’t want to have to deal with down the road. So DO IT NOW!
First, log out and back into your server as root with your root password to get the latest updates. Then do the following:
Make your root password very secure: passwd
Set your correct time zone: ./timezone-setup
Create admin password for web apps: htpasswd -b /etc/pbx/wwwpasswd admin newpassword
Set MySQL and Elastix admin PW: ./admin-pw-change (MySQL PW MUST be passw0rd with zero)
Make a copy of your other passwords: cat passwords.FAQ
Decipher IP address and other info about your server: pbxstatus
Last but not least, Incredible PBX includes an automatic update utility which downloads important updates whenever you log into your server as root. We recommend you log in once a week to keep your server current. If you haven’t already done so, NOW would be a good time to log out and back into your server at the Linux command line to bring your server current.
Incredible PBX Stand-Alone Apps. Currently, there are several standalone applications included with Incredible PBX that cannot be accessed from within the Elastix Dashboard because the Elastix Developer component for Elastix 4.0 still is under development. For all of these web applications except WebMin, you will need to set up Apache web credentials using the web apps password syntax documented above. Once you’ve done that, you can access the applications using a browser with the username admin. Just substitute your server’s IP address for 192.168.0.1 in the examples below. For WebMin only, use root as your username and your root password for access.
- Config Edit: https://192.168.0.1/maint/configedit
- phpMyAdmin: https://192.168.0.1/maint/phpMyAdmin
- Sys Info: https://192.168.0.1/maint/sysinfo
- Telephone Reminders: https://192.168.0.1/reminders
- WebMin: https://192.168.0.1:9001
5. Activate Trunks with Incredible PBX for Elastix 4.0
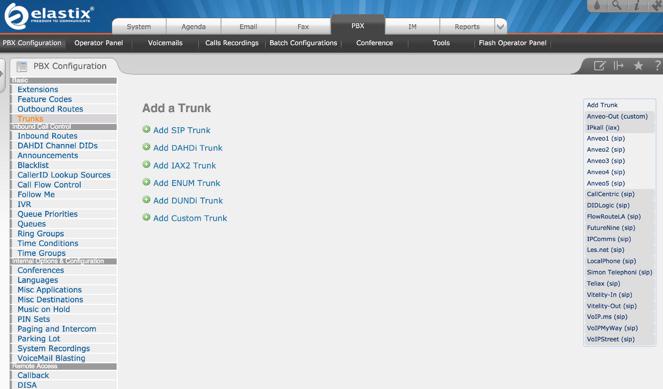
For those migrating from another aggregation including PBX in a Flash, this should be familiar territory for you. Using a browser, log into Elastix 4.0 at the IP address of your server using your admin password. Before you can actually make or receive calls outside your PBX, you’ll need at least one trunk. In the Elastix 4.0 GUI, click PBX -> PBX Configuration -> Trunks. Once you have your credentials from a provider, choose a provider from the list of preconfigured trunks on the right or create a new one. If you’re using one of the preconfigured options, remember to enable the trunk after adding your desired CallerID and credentials. Then save your settings and reload your Asterisk dialplan. That’s it. You’re ready to go.
To display your trunk registrations: asterisk -rx "sip show registry"
Google Voice Setup. If you wish to use Google Voice for free calling in the U.S. and Canada, you’ll need to sign up for an account with Simonics SIP to Google Voice Gateway service. Complete documentation is here.
RingPlus SIP Gateway. If you’ve signed up for (free) RingPlus cellular service, you also can use your cellular account as a SIP gateway to Elastix. Complete documentation is here.
Connection Issues. If you experience problems getting trunks to register with providers, add or remove the following entry in /etc/asterisk/sip_custom.conf: nat=yes. Then restart Asterisk: amportal restart.
6. Configure a Softphone with Incredible PBX for Elastix 4.0
Incredible PBX comes preconfigured with two extensions (701 and 702) that let you connect phones to your PBX. You can connect virtually any kind of telephone to your Elastix 4.0 PBX. Plain Old Phones require an analog telephone adapter (ATA) which can be a separate board in your computer from a company such as Digium. Or it can be a standalone SIP device such as ObiHai’s OBi100 or OBi110 (if you have a phone line from Ma Bell to hook up as well). SIP phones can be connected directly so long as they have an IP address. These could be hardware devices or software devices such as the YateClient softphone. We’ll start with a free one today so you can begin making calls. You can find dozens of recommendations for hardware-based SIP phones both on Nerd Vittles and the PIAF Forum when you’re ready to get serious about VoIP.
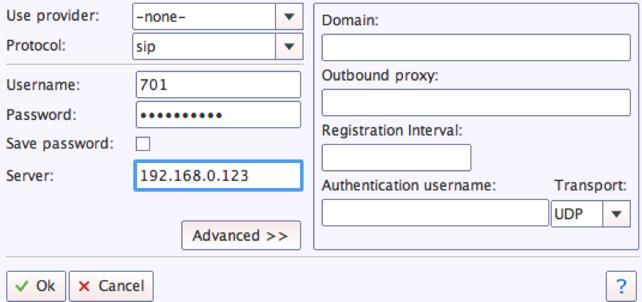
We recommend YateClient which is free. Download it from here. Run YateClient once you’ve installed it and enter the credentials for the 701 extension on Incredible PBX. You’ll need the IP address of your server plus your extension 701 password. You can find them in /root/passwords.FAQ. Fill in the blanks using the IP address of your server, 701 for your account name, and whatever password is assigned to the extension. Here’s what your entries should look like. Click OK to save your entries.
Once you are registered to extension 701, close the Account window. Then click on YATE’s Telephony Tab and place some test calls to the numerous apps that are preconfigured on Incredible PBX. Here are a few numbers to get you started:
123 - Reminders

222 - ODBC Demo (use: 12345)

947 - Weather by ZIP Code

951 - Yahoo News

DEMO - Allison's IVR Demo

TODAY - Today in History
7. Configuring SMTP Mail with Incredible PBX for Elastix 4.0
Outbound email support using Postfix is preconfigured with Elastix 4.0. You can test whether it’s actually working by issuing the following command using your destination email address after logging in as root:
echo "test" | mail -s testmessage yourname@gmail.com
If you don’t receive the email message within a minute or two and you’ve checked your spam folder, chances are your ISP is blocking downstream SMTP servers in an effort to combat spam. Comcast is one of the usual suspects. To enable outbound email service for delivery of voicemail and other email messages with a provider blocking downstream SMTP servers, you first need to obtain the SMTP domain of your ISP, e.g. smtp.comcrap.net. Next, edit /etc/postfix/main.cf and add your SmartHost entry [in brackets] to the line that begins like this: relayhost =. The line should look like this: relayhost = [smtp.comcrap.net]. Save your addition and restart Postfix: service postfix restart. Be sure to try another email test message after completing the SmartHost update. To use Gmail as your mail relay, see this tutorial.
8. Homework Assignment: Mastering Incredible PBX for Elastix 4.0
We’ve put together a complete tutorial for the applications included in Incredible PBX for Asterisk-GUI. Most of it is fully applicable to Elastix 4.0 as well. That should be your next stop. Then you’ll be ready to tackle Elastix 4.0. Google is your friend. Do some exploring, and we’ll post links to great articles on this terrific platform as we discover them. Your suggestions are also welcomed!
9 Countries Have Never Visited Nerd Vittles. Got a Friend in Any of Them https://t.co/wMfmlhiQ9y #asterisk #freepbx pic.twitter.com/TPFGZbqWB6
— Ward Mundy (@NerdUno) April 22, 2016
In the meantime, if you have questions, join the PBX in a Flash Forums and take advantage of our awesome collection of gurus. There’s an expert available on virtually any topic, and the price is right. As with Incredible PBX, it’s absolutely free. The same applies to the Elastix forum.
And if all of that wasn’t enough, feast your eyes on the Elastix Add-Ons that are only a button click away:
[gview file="http://nerdvittles.com/wp-content/ElastixAddOns.pdf"]
Originally published: Monday, February 22, 2016
Need help with Asterisk? Visit the PBX in a Flash Forum.
Special Thanks to Our Generous Sponsors
FULL DISCLOSURE: ClearlyIP, Skyetel, Vitelity, DigitalOcean, Vultr, VoIP.ms, 3CX, Sangoma, TelecomsXchange and VitalPBX have provided financial support to Nerd Vittles and our open source projects through advertising, referral revenue, and/or merchandise. As an Amazon Associate and Best Buy Affiliate, we also earn from qualifying purchases. We’ve chosen these providers not the other way around. Our decisions are based upon their corporate reputation and the quality of their offerings and pricing. Our recommendations regarding technology are reached without regard to financial compensation except in situations in which comparable products at comparable pricing are available from multiple sources. In this limited case, we support our sponsors because our sponsors support us.
BOGO Bonaza: Enjoy state-of-the-art VoIP service with a $10 credit and half-price SIP service on up to $500 of Skyetel trunking with free number porting when you fund your Skyetel account. No limits on number of simultaneous calls. Quadruple data center redundancy. $25 monthly minimum spend required. Tutorial and sign up details are here.
![]() The lynchpin of Incredible PBX 2020 and beyond is ClearlyIP components which bring management of FreePBX modules and SIP phone integration to a level never before available with any other Asterisk distribution. And now you can configure and reconfigure your new Incredible PBX phones from the convenience of the Incredible PBX GUI.
The lynchpin of Incredible PBX 2020 and beyond is ClearlyIP components which bring management of FreePBX modules and SIP phone integration to a level never before available with any other Asterisk distribution. And now you can configure and reconfigure your new Incredible PBX phones from the convenience of the Incredible PBX GUI.
VitalPBX is perhaps the fastest-growing PBX offering based upon Asterisk with an installed presence in more than 100 countries worldwide. VitalPBX has generously provided a customized White Label version of Incredible PBX tailored for use with all Incredible PBX and VitalPBX custom applications. Follow this link for a free test drive!
Special Thanks to Vitelity. Vitelity is now Voyant Communications and has halted new registrations for the time being. Our special thanks to Vitelity for their unwavering financial support over many years and to the many Nerd Vittles readers who continue to enjoy the benefits of their service offerings. We will keep everyone posted on further developments.
Some Recent Nerd Vittles Articles of Interest…
Cyber Monday 2016: The Return of the Lean, Mean Asterisk Machine
We promised to deliver the Incredible PBX™ ISO build environment this week, but that didn’t really have much sex appeal for Cyber Monday. Instead, today we’re introducing the product that tops the 2016 Wish List from Nerd Vittles readers: a stripped down, lean and mean version of Incredible PBX 13 with just the operating system platform, the latest version of Asterisk® 13, and an uncluttered Incredible GUI with the basic collection of FreePBX® GPL modules… and No Gotchas.
Who would want such a thing? Well, lots of folks apparently. Developers and system integrators prefer a clean slate when they’re rolling out systems for new customers. And we want to provide a mix of solutions that meet everyone’s requirements. The three dozen Incredible PBX applications for Asterisk still can be added on an as needed basis. Or, if you change your mind and decide you’re missing all of those preconfigured, free applications, just run the Incredible PBX installer again and switch tutorials. As they say in the hood, "Different strokes for different folks."
The silver lining in the one week delay of the ISO Build Environment rollout means that next week you’ll have all the pieces as well as the templates needed to create two versions of Incredible PBX instead of one… plus some important bug fixes. And speaking of bugs, there was a Big One in the 11/29/2015 ISO that prevented installation of Incredible PBX Full Enchilada. This has been fixed in the 12/01/2015 release:
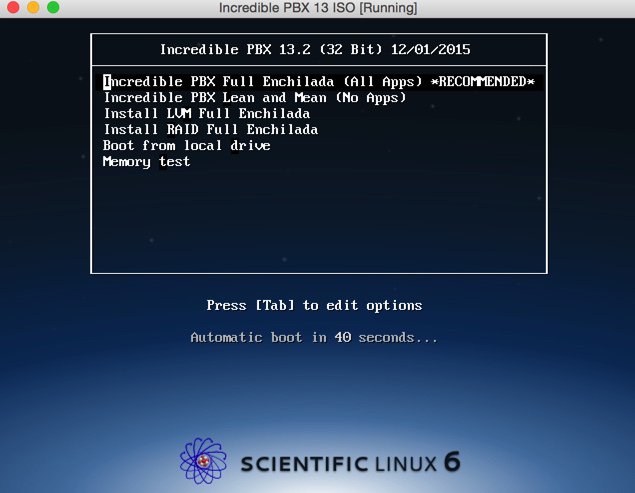
Initially, we had planned to roll out a separate ISO for Incredible PBX Lean. But that seemed kind of silly. After all, the beauty of an ISO is being able to present a menu of choices and then let the person installing the software make a selection that best meets their needs. So there’s an updated ISO on SourceForge that now lets you choose between the Full Enchilada and the Lean & Mean version of Incredible PBX 13. Last week’s tutorial will walk you through the Full Enchilada setup. Today we’ll cover what’s necessary to install and deploy the Lean & Mean version. And, yes, you can burn the new ISO to either a DVD-ROM or a 1GB or larger USB thumb drive.
Introducing the Incredible PBX 13.2 Lean Platform
Overview. The Incredible PBX Lean installation process couldn’t be easier. Download IncrediblePBX13.2.iso from SourceForge. Burn the ISO to a DVD-ROM or USB thumb drive. Four different methods are outlined below. Need some great hardware for under $200? Read our tutorial. Or, if you have an old PC lying around, that’ll work, too. Boot up the dedicated machine on which you want to install Incredible PBX. Highlight the Lean & Mean option on the ISO installation menu and press the ENTER key. Choose your time zone, create a really secure root password, and have a coffee break. When Scientific Linux 6.7 has been installed, your server will reboot. Accept the Incredible PBX license agreement and press the ENTER key. Go to lunch and, when you return, you should be good to go. Finish reading this tutorial to add the finishing touches and secure your server.
Let us take a moment to explain the Incredible PBX installation process using this ISO. We don’t hide stuff in our ISO or play games with your security. We don’t give ourselves or our application any secret permissions. There are just two steps to an Incredible PBX ISO install. When the install begins, it loads pure Scientific Linux 6.7 onto your server,1 not some homegrown concoction using proprietary repositories. Your server then reboots. After restarting, the very latest copy of the Incredible PBX 13-12 installer is downloaded and run. You’ll find the source code for the Incredible PBX installer in your /root directory after the install is completed: IncrediblePBX13-12L.sh. You’ll also find some other helpful scripts in /root including the optional (free) Incredible Fax installer. If you ever have a question about what was installed on your server, feel free to examine the source code of our installers or post a note on the PIAF Forum. It’s unencrypted GPL2 code. You’re free to use it, enhance it, and share it. Try that with Sangoma. It’s your choice!
Incredible PBX 13.2 ISO Installation Guide
Downloading the Incredible PBX 13.2 ISO. On the machine you’ll be using to create your installation media, download IncrediblePBX13.2.iso from SourceForge.
Burning a DVD-ROM from the ISO. If your server platform doesn’t have USB support, then burn the ISO to a DVD using a Mac or Windows machine.
Creating a USB Flash Drive Installer. If your server platform has USB ports, you have three ways to move the Incredible PBX 13.2 ISO to a 1GB or larger flash drive. You can use a Windows PC, a Mac, or a Linux machine to create the USB thumb drive installer.
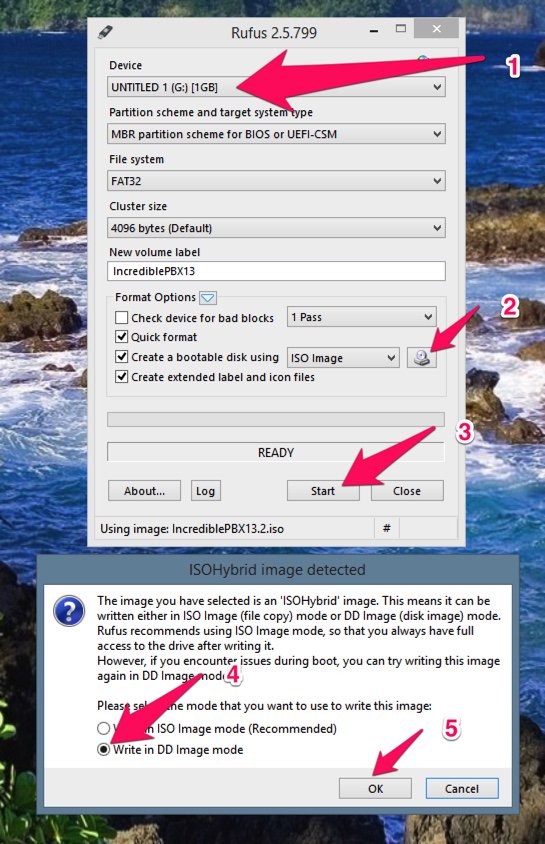
Creating a USB Flash Drive Installer with a Windows PC. In order to create a USB thumb drive using an ISO image, you’ll first need to install Rufus. It’s free. Once you’ve installed it, insert a blank USB thumb drive and run Rufus. Make your settings look like what’s shown above. Be very careful in choosing your Device. You don’t want to accidentally erase the wrong drive on your Windows machine. The correct choice is the USB thumb drive you just inserted. Don’t guess!! Step 2 is choosing the IncrediblePBX13.2.iso file that you downloaded from SourceForge. Step 3 is clicking Start. The ISOHybrid Window will be presented. Step 4 is changing the default setting to "Write in DD image mode." Step 5 is pressing OK. In a few minutes, your ISO image transfer to the USB flash drive will be finished. Give it 15 seconds just to be safe. Then remove the USB thumb drive and you’re ready to begin the install on your dedicated Incredible PBX server.
Creating a USB Flash Drive Installer with a Mac. To create a USB thumb drive using an ISO image on a Mac, first insert the USB thumb drive and partition it with a single MS-DOS partition using Disk Utility. Next, open a Terminal window and issue the command: diskutil list. Review the device names and find the one that matches the size of your thumb drive. It will be something like /dev/disk9. Again, be careful. You don’t want to accidentally erase the wrong drive on your Mac! Next, change to the directory into which you downloaded IncrediblePBX13.2.iso, e.g. cd Desktop. Now issue the following commands substituting the actual device name for /dev/disk9 below:
diskutil unmountDisk /dev/disk9
sudo dd if=IncrediblePBX13.2.iso bs=1m of=/dev/disk9
sudo sync
diskutil eject /dev/disk9
When the install completes, remove the USB thumb drive and you’re ready to begin the install on your dedicated Incredible PBX server. NOTE: There will be no feedback during the dd step above. It can take 15 minutes or more depending upon the horsepower of your Mac. Be patient!
Creating a USB Flash Drive Installer on a Linux machine. To create a USB thumb drive using an ISO image on a Linux machine, first log into your server as root. Insert a blank USB thumb drive. From the CLI, decipher the device name of your thumb drive: fdisk -l. The device name will be something like /dev/sdb. Be careful. You don’t want to accidentally erase the wrong drive on your Linux server! Change to the directory into which you downloaded IncrediblePBX13.2.iso, e.g. cd /root. To transfer the ISO to your thumb drive, issue the following commands replacing /dev/sdb with the actual device name for your thumb drive in lines 1 and 3 below:
dd if=IncrediblePBX13.2.iso bs=4M of=/dev/sdb
sync
udisks --detach /dev/sdb
When the install completes, remove the USB thumb drive and you’re ready to begin the install on your dedicated Incredible PBX server. NOTE: There will be no feedback during the dd step above. It can take 5 to 15 minutes depending upon the horsepower of your Linux machine.
Kicking Off the Incredible PBX 13 Lean Install. Now we’re ready to install Incredible PBX 13 Lean on your dedicated server platform. Simply insert the DVD-ROM or USB thumb drive in your server-to-be and boot. During the POST boot process, press the function key that displays a Boot Device Menu and choose your DVD-ROM drive or USB device. When the Incredible PBX 13 installation menu displays, choose the second option for the Lean & Mean Install and press ENTER. Choose your time zone, create a really secure root password, and have a coffee break. When Scientific Linux 6.7 has been installed, your server will reboot. Accept the Incredible PBX license agreement and press the ENTER key. Go to lunch and, when you return, you should be good to go. When the installation finishes, reboot your server and log in as root to apply the last minute updates for Incredible PBX.
To complete the install, perform the following from the Linux CLI while logged in as root:
- Change your root password if it’s insecure: passwd
- Set your Incredible GUI admin password: /root/admin-pw-change
- Set your web apps admin password: htpasswd /etc/pbx/wwwpasswd admin
- Set your correct time zone: /root/timezone-setup
- Add WhiteList entries to firewall if needed: /root/add-ip or /root/add-fqdn
- Store PortKnocker credentials in a safe place: cat /root/knock.FAQ
- *** THE REMAINING FEATURES ARE OPTIONAL ADDITIONS ***
- Login to your NeoRouter VPN server: /root/nrclientcmd
- To enable free faxing: /root/incrediblefax11.sh
- Set admin password for AvantFax: /root/avantfax-pw-change
- To enable PPTP VPN: /root/pptp-install
- To enable Google Voice OAUTH authentication: http://nerd.bz/1JaO4ij (1b.)
- To install FCC RoboCall BlackList: http://nerdvittles.com/?p=15412
Managing Your Server with Incredible PBX Web-Based Tools
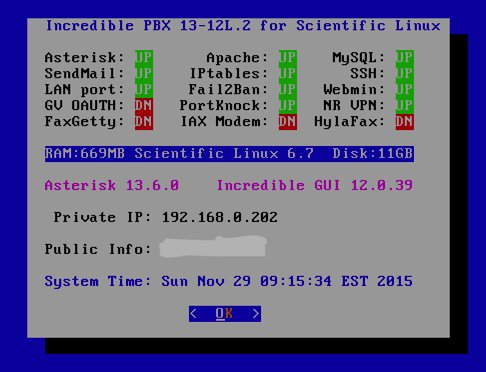
Most of your time initially configuring and managing your server will be spent using the web-based tools provided with Incredible PBX. Because most of the apps have been removed in the Lean version of Incredible PBX, the Kennonsoft Menu layer has been removed from the install. Using any modern browser, go to the IP address of your server as shown in the status display above. Choose Incredible GUI Administration. The default username is admin and the password is what you set during the final installation steps above. The Incredible PBX GUI’s Status will display with a clean slate. The only additions to the base install of the FreePBX GPL modules are a dozen preconfigured (but disabled) trunks from the leading trunk providers. This will save you some time, but you can delete any or all of them with a few mouse clicks. We’ve also removed module signature checking to streamline the addition of GPL modules from providers other than Sangoma®. We strongly recommend that you log into the Incredible GUI at least once a week and check the PBX in a Flash RSS News Feed for security alerts and bulletins.
Configuring Google Voice
If you want to use Google Voice, you’ll need a dedicated Google Voice account to support Incredible PBX. If you want to use the inbound fax capabilities of Incredible Fax, then you’ll need an additional Google Voice line that can be routed to the FAX custom destination using the GUI. The more obscure the username (with some embedded numbers), the better off you will be. This will keep folks from bombarding you with unsolicited Gtalk chat messages, and who knows what nefarious scheme will be discovered using Google messaging six months from now. So keep this account a secret!
We’ve tested this extensively using an existing Gmail account, and inbound calling is just not reliable. The reason seems to be that Google always chooses Gmail chat as the inbound call destination if there are multiple registrations from the same IP address. So, be reasonable. Do it our way! Set up a dedicated Gmail and Google Voice account, and use it exclusively with Incredible PBX. It’s free at least through 2013. Google Voice no longer is by invitation only so, if you’re in the U.S. or have a friend that is, head over to the Google Voice site and register.
You must choose a telephone number (aka DID) for your new account, or Google Voice calling will not work… in either direction. Google used to permit outbound Gtalk calls using a fake CallerID, but that obviously led to abuse so it’s over! You also have to tie your Google Voice account to at least one working phone number as part of the initial setup process. Your cellphone number will work just fine. Don’t skip this step either. Just enter the provided 2-digit confirmation code when you tell Google to place the test call to the phone number you entered. Once the number is registered, you can disable it if you’d like in Settings, Voice Setting, Phones. But…
IMPORTANT: Be sure to enable the Google Chat option as one of your phone destinations in Settings, Voice Setting, Phones. That’s the destination we need for The Incredible PBX to work its magic! Otherwise, all inbound and outbound calls will fail. If you don’t see this option, you may need to call up Gmail and enable Google Chat there first. Then go back to the Google Voice Settings.
While you’re still in Google Voice Settings, click on the Calls tab. Make sure your settings match these:
- Call Screening – OFF
- Call Presentation – OFF
- Caller ID (In) – Display Caller’s Number
- Caller ID (Out) – Don’t Change Anything
- Do Not Disturb – OFF
- Call Options (Enable Recording) – OFF
- Global Spam Filtering – ON
Click Save Changes once you adjust your settings. Under the Voicemail tab, plug in your email address so you get notified of new voicemails. Down the road, receipt of a Google Voice voicemail will be a big hint that something has come unglued on your PBX.
One final word of caution is in order regardless of your choice of providers: Do NOT use special characters in any provider passwords, or nothing will work!
Now you’re ready to set up your Google Voice trunk in the GUI. After logging in with your browser, click the Connectivity tab and choose Google Voice/Motif. To Add a new Google Voice account, just fill out the form. Do NOT check the third box or incoming calls will never ring!
IMPORTANT LAST STEP: Google Voice will not work unless you restart Asterisk from the Linux command line at this juncture. Using SSH, log into your server as root and issue the following command: amportal restart.
If you have trouble getting Google Voice to work (especially if you have previously used your Google Voice account from a different IP address), try this Google Voice Reset Procedure. It usually fixes connectivity problems. If it still doesn’t work, enable Less Secure Apps using this Google tool.
Troubleshooting Audio and DTMF Problems
You can avoid one-way audio on calls and touchtones that don’t work with these simple settings in the GUI: Settings -> Asterisk SIP Settings. Just plug in your public IP address and your private IP subnet. Then set ULAW as the only Audio Codec.
A Few Words about the Incredible PBX Security Model for SL 6.7
Incredible PBX for Scientific Linux joins our previous builds as our most secure turnkey PBX implementation. As configured, it is protected by both Fail2Ban and a hardened configuration of the IPtables Linux firewall. The latest release also includes Port Knocker for simple, secure access from any remote computer or smartphone. You can get up to speed on how the technology works by reading the Nerd Vittles tutorial. Your Port Knocker credentials are stored in /root/knock.FAQ together with activation instructions for your server and mobile devices. The NeoRouter VPN client also is included for rock-solid, secure connectivity to remote users. Read our previous tutorial for setup instructions. As configured, nobody can access your PBX without your credentials AND an IP address that is either on your private network or that matches the IP address of your server or the PC from which you installed Incredible PBX. You can whitelist additional IP addresses by running the command-line utility /root/add-ip. You can remove whitelisted IP addresses by running /root/del-acct. Incredible PBX is preconfigured to let you connect to many of the leading SIP hosting providers without additional firewall tweaking. We always recommend you also add an extra layer of protection by running your server behind a hardware-based firewall with no Internet port exposure, but that’s your call. And it’s your phone bill. 😉
The IPtables firewall is a complex piece of software. If you need assistance with configuring it, visit the PIAF Forum for some friendly assistance.
Incredible Backup and Restore
We’re pleased to introduce our latest backup and restore utilities for Incredible PBX. Running /root/incrediblebackup will create a backup image of your server in /tmp. This backup image then can be copied to any other medium desired for storage. To restore it to another Incredible PBX server, simply copy the image to a server running Asterisk 13 and the same version of the Incredible PBX GUI. Then run /root/incrediblerestore. Doesn’t get much simpler than that.
Incredible PBX Automatic Update Utility
Every time you log into your server as root, Incredible PBX will ping the IncrediblePBX.com web site to determine whether one or more updates are available to bring your server up to current specs. We recommend you log in at least once a week just in case some new security vulnerability should come along. We originally had planned to make our fortune off update fees, but we changed our mind. So… contrary to the language in some of our builds, contributions to our projects are PURELY VOLUNTARY. You’ll get every update as it’s released whether you financially support our projects or not. Why haven’t we fixed the language? Good question. The short answer is it’s buried deep in the GUI image that would have to be regenerated from scratch. We’ll get to it one of these days. In the meantime, sleep soundly. No one will be breaking down your door for a donation.
We also encourage you to sign up for an account on the PIAF Forum and join the discussion. In addition to providing first-class, free support, we think you’ll enjoy the camaraderie. Enjoy!
Originally published: Monday, November 30, 2015
Support Issues. With any application as sophisticated as this one, you’re bound to have questions. Blog comments are a terrible place to handle support issues although we welcome general comments about our articles and software. If you have particular support issues, we encourage you to get actively involved in the PBX in a Flash Forums. It’s the best Asterisk tech support site in the business, and it’s all free! Please have a look and post your support questions there. Unlike some forums, ours is extremely friendly and is supported by literally hundreds of Asterisk gurus and thousands of users just like you. You won’t have to wait long for an answer to your question.
Need help with Asterisk? Visit the PBX in a Flash Forum.
Special Thanks to Our Generous Sponsors
FULL DISCLOSURE: ClearlyIP, Skyetel, Vitelity, DigitalOcean, Vultr, VoIP.ms, 3CX, Sangoma, TelecomsXchange and VitalPBX have provided financial support to Nerd Vittles and our open source projects through advertising, referral revenue, and/or merchandise. As an Amazon Associate and Best Buy Affiliate, we also earn from qualifying purchases. We’ve chosen these providers not the other way around. Our decisions are based upon their corporate reputation and the quality of their offerings and pricing. Our recommendations regarding technology are reached without regard to financial compensation except in situations in which comparable products at comparable pricing are available from multiple sources. In this limited case, we support our sponsors because our sponsors support us.
BOGO Bonaza: Enjoy state-of-the-art VoIP service with a $10 credit and half-price SIP service on up to $500 of Skyetel trunking with free number porting when you fund your Skyetel account. No limits on number of simultaneous calls. Quadruple data center redundancy. $25 monthly minimum spend required. Tutorial and sign up details are here.
![]() The lynchpin of Incredible PBX 2020 and beyond is ClearlyIP components which bring management of FreePBX modules and SIP phone integration to a level never before available with any other Asterisk distribution. And now you can configure and reconfigure your new Incredible PBX phones from the convenience of the Incredible PBX GUI.
The lynchpin of Incredible PBX 2020 and beyond is ClearlyIP components which bring management of FreePBX modules and SIP phone integration to a level never before available with any other Asterisk distribution. And now you can configure and reconfigure your new Incredible PBX phones from the convenience of the Incredible PBX GUI.
VitalPBX is perhaps the fastest-growing PBX offering based upon Asterisk with an installed presence in more than 100 countries worldwide. VitalPBX has generously provided a customized White Label version of Incredible PBX tailored for use with all Incredible PBX and VitalPBX custom applications. Follow this link for a free test drive!
Special Thanks to Vitelity. Vitelity is now Voyant Communications and has halted new registrations for the time being. Our special thanks to Vitelity for their unwavering financial support over many years and to the many Nerd Vittles readers who continue to enjoy the benefits of their service offerings. We will keep everyone posted on further developments.
Some Recent Nerd Vittles Articles of Interest…
- If you’re wondering what packages are installed with Scientific Linux 6.7, come back next week and download the entire Incredible PBX ISO build environment. All of the packages installed on your server are included in the build platform itself. Feel free to add to them or change them to your heart’s content. We don’t have a million dollar staff. That’s why we depend upon folks like you to offer suggestions and enhancements. In short, we treat Incredible PBX like a real open source project. Come join the fun! [↩]
Free at Last: Incredible PBX 13.2 ISO Supporting Bootable DVD-ROM and USB Flash Drives

[iframe-popup id="5″]
The Incredible PBX 13 ISO was getting long in the tooth. It’s been on the street almost two months. So we’re pleased to accept the Sangoma challenge and introduce the second-generation Incredible PBX 13.2 ISO. Like its predecessor, it’s 100% open source and GPL code. Perhaps now Sangoma will follow suit with their closed source ISO.
The new Incredible PBX 13.2 ISO can be burned to either a DVD-ROM or a 1GB or larger USB flash drive using a Mac, a Windows PC, or almost any Linux machine. And, unlike the FreePBX Distro, you’re more than welcome to share our code and the ISO with all of your friends and business associates. In fact, next week we’re releasing the entire Incredible PBX build platform for those of you that want to roll your own ISO. Share your enhancements and tweaks or make a customized ISO for just your company and pass it around. We’d be delighted. And our previous tutorial will even show you how to set up and maintain your own Cloud Repository for Incredible PBX. FREEDOM: THAT’S WHAT OPEN SOURCE IS ALL ABOUT!
NEWS FLASH: Check out the new Incredible PBX 13-13 ISO. Complete tutorial available here.
Introducing the Incredible PBX 13.2 ISO
Overview. The Incredible PBX installation process couldn’t be easier. Download IncrediblePBX13.2.iso from SourceForge. Burn the ISO to a DVD-ROM or USB thumb drive. Four different methods are outlined below. Need some great hardware for under $200? Read our tutorial. Or, if you have an old PC lying around, that’ll work, too. Boot up the dedicated machine on which you want to install Incredible PBX. Choose whether you prefer the Incredible PBX Whole Enchilada with 30+ applications for Asterisk or the Lean & Mean version which has its own separate tutorial here. Press the ENTER key. Choose your time zone, create a really secure root password, and have a coffee break. When Scientific Linux 6.7 has been installed, your server will reboot. Accept the Incredible PBX license agreement and press the ENTER key. Go to lunch and, when you return, you should be good to go. Finish reading this tutorial to add the finishing touches and secure your server. Then read the Incredible PBX Application Users Guide to learn all about the three dozen FREE applications for Asterisk® that are included in the build. DONE!
Let us take a moment to explain the Incredible PBX installation process using this ISO. We don’t hide stuff in our ISO or play games with your security. We don’t give ourselves or our application any secret permissions. There are just two steps to an Incredible PBX ISO install. When the install begins, it loads pure Scientific Linux onto your server,1 not some homegrown concoction using proprietary repositories. Your server then reboots. After restarting, the very latest copy of the Incredible PBX 13-12 installer is downloaded and run (see the actual source code of the script below). You’ll find the source code for the Incredible PBX installer in your /root directory after the install is completed: IncrediblePBX13-12R.sh. You’ll also find some other helpful scripts in /root including the optional (free) Incredible Fax installer. If you ever have a question about what was installed on your server, feel free to examine the source code of our installers or post a note on the PIAF Forum. It’s unencrypted GPL2 code. You’re free to use it, enhance it, and share it. Try that with Sangoma. It’s your choice!
%post
###############################################################
#
# Post Script - this script runs on Incredible PBX server
# immediately after Scientific Linux 6.7 install finishes
#
###############################################################
/usr/sbin/ntpdate -su pool.ntp.org
rpm -e readahead
/bin/sed -i 's|rhgb quiet||' /boot/grub/grub.conf
/bin/echo "/tmp/firstboot" >> /etc/rc.d/rc.local
/bin/echo "#!/bin/bash" > /tmp/firstboot
/bin/echo " " >> /tmp/firstboot
/bin/echo "NETDN=\`/bin/ping -c 1 incrediblepbx.com | /bin/grep incrediblepbx.com\`" >> /tmp/firstboot
/bin/echo "if [[ -z \$NETDN ]]; then" >> /tmp/firstboot
/bin/echo " read -p 'Network is down. Please fix. Then press RETURN to reboot and retry.'" >> /tmp/firstboot
/bin/echo " /sbin/reboot" >> /tmp/firstboot
/bin/echo " exit" >> /tmp/firstboot
/bin/echo "fi" >> /tmp/firstboot
/bin/echo "sed -i '/firstboot/d' /etc/rc.d/rc.local" >> /tmp/firstboot
/bin/echo "sed -i 's|NO_DM |NO_DM rhgb quiet|' /boot/grub/grub.conf" >> /tmp/firstboot
/bin/echo "cd /root" >> /tmp/firstboot
/bin/echo "wget http://incrediblepbx.com/incrediblepbx13-12.2-centos.tar.gz" >> /tmp/firstboot
/bin/echo "tar zxvf incrediblepbx13-12.2-centos.tar.gz" >> /tmp/firstboot
/bin/echo "rm -f incrediblepbx13-12.2-centos.tar.gz" >> /tmp/firstboot
/bin/echo "./Inc*" >> /tmp/firstboot
/bin/chmod +x /tmp/firstboot
eject
%end
Incredible PBX 13.2 ISO Installation Guide
Downloading the Incredible PBX 13.2 ISO. On the machine you’ll be using to create your installation media, download IncrediblePBX13.2.iso from SourceForge. Update: The 11/29/2015 version of the ISO had a bug that prevented proper installation of Incredible PBX Full Enchilada. The 12/01/2015 release fixed the problem.
Burning a DVD-ROM from the ISO. If your server platform doesn’t have USB support, then burn the ISO to a DVD using a Mac or Windows machine.
Creating a USB Flash Drive Installer. If your server platform has USB ports, you have three ways to move the Incredible PBX 13.2 ISO to a 1GB or larger flash drive. You can use a Windows PC, a Mac, or a Linux machine to create the USB thumb drive installer.
Creating a USB Flash Drive Installer with a Windows PC. In order to create a USB thumb drive using an ISO image, you’ll first need to install Rufus. It’s free. Once you’ve installed it, insert a blank USB thumb drive and run Rufus. Make your settings look like what’s shown above. Be very careful in choosing your Device. You don’t want to accidentally erase the wrong drive on your Windows machine. The correct choice is the USB thumb drive you just inserted. Don’t guess!! Step 2 is choosing the IncrediblePBX13.2.iso file that you downloaded from SourceForge. Step 3 is clicking Start. The ISOHybrid Window will be presented. Step 4 is changing the default setting to "Write in DD image mode." Step 5 is pressing OK. In a few minutes, your ISO image transfer to the USB flash drive will be finished. Give it 15 seconds just to be safe. Then remove the USB thumb drive and you’re ready to begin the install on your dedicated Incredible PBX server.
Creating a USB Flash Drive Installer with a Mac. To create a USB thumb drive using an ISO image on a Mac, first insert the USB thumb drive and partition it with a single MS-DOS partition using Disk Utility. Next, open a Terminal window and issue the command: diskutil list. Review the device names and find the one that matches the size of your thumb drive. It will be something like /dev/disk9. Again, be careful. You don’t want to accidentally erase the wrong drive on your Mac! Next, change to the directory into which you downloaded IncrediblePBX13.2.iso, e.g. cd Desktop. Now issue the following commands substituting the actual device name for /dev/disk9 below:
diskutil unmountDisk /dev/disk9
sudo dd if=IncrediblePBX13.2.iso bs=1m of=/dev/disk9
sudo sync
diskutil eject /dev/disk9
When the install completes, remove the USB thumb drive and you’re ready to begin the install on your dedicated Incredible PBX server. NOTE: There will be no feedback during the dd step above. It can take 15 minutes or more depending upon the horsepower of your Mac. Be patient!
Creating a USB Flash Drive Installer on a Linux machine. To create a USB thumb drive using an ISO image on a Linux machine, first log into your server as root. Insert a blank USB thumb drive. From the CLI, decipher the device name of your thumb drive: fdisk -l. The device name will be something like /dev/sdb. Be careful. You don’t want to accidentally erase the wrong drive on your Linux server! Change to the directory into which you downloaded IncrediblePBX13.2.iso, e.g. cd /root. To transfer the ISO to your thumb drive, issue the following commands replacing /dev/sdb with the actual device name for your thumb drive in lines 1 and 3 below:
dd if=IncrediblePBX13.2.iso bs=4M of=/dev/sdb
sync
udisks --detach /dev/sdb
When the install completes, remove the USB thumb drive and you’re ready to begin the install on your dedicated Incredible PBX server. NOTE: There will be no feedback during the dd step above. It can take 5 to 15 minutes depending upon the horsepower of your Linux machine.
Kicking Off the Incredible PBX 13 Install. Now we’re ready to install Incredible PBX 13 on your dedicated server platform. Simply insert the DVD-ROM or USB thumb drive in your server-to-be and boot. During the POST boot process, press the function key that displays a Boot Device Menu and choose your DVD-ROM drive or USB device. When the Incredible PBX 13 installation menu displays, choose Basic Install and press ENTER. Choose your time zone, create a really secure root password, and have a coffee break. When Scientific Linux 6.7 has been installed, your server will reboot. Accept the Incredible PBX license agreement and press the ENTER key. Go to lunch and, when you return, you should be good to go. When the installation finishes, reboot your server and log in as root to apply the last minute updates for Incredible PBX.
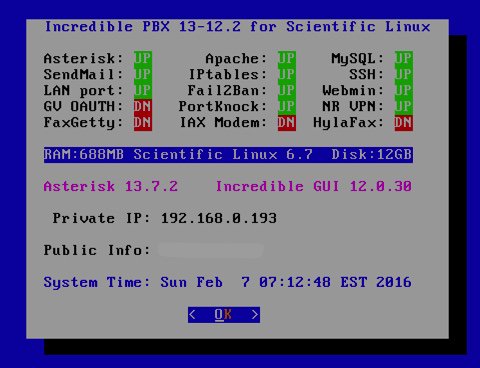
To complete the install, perform the following from the Linux CLI while logged in as root:
- Change your root password if it’s insecure: passwd
- Set your Incredible GUI admin password: /root/admin-pw-change
- Set your web apps admin password: htpasswd /etc/pbx/wwwpasswd admin
- Set your correct time zone: /root/timezone-setup
- Add WhiteList entries to firewall if needed: /root/add-ip or /root/add-fqdn
- Store PortKnocker credentials in a safe place: cat /root/knock.FAQ
- *** THE REMAINING FEATURES ARE OPTIONAL ADDITIONS ***
- Login to your NeoRouter VPN server: /root/nrclientcmd
- Download latest Incredible Fax installer: http://nerd.bz/2nSeHKs
- To enable free faxing: /root/incrediblefax11.sh
- Set admin password for AvantFax: /root/avantfax-pw-change
- To enable PPTP VPN: /root/pptp-install
- To enable Google Voice OAUTH authentication: http://nerd.bz/1JaO4ij (1b.)
- To remove GPL Module Signature Checking in GUI: http://nerd.bz/1fpwZJL
- To install FCC RoboCall BlackList: http://nerdvittles.com/?p=15412
- To upgrade Asterisk to current release2: /root/upgrade-asterisk-to-current
- To upgrade all FreePBX GPL Modules: /var/lib/asterisk/bin/module_admin upgradeall && rm -f /tmp/* && amportal a r
Managing Your Server with Incredible PBX Web-Based Tools
Most of your time initially configuring and managing your server will be spent using the web-based tools provided with Incredible PBX. Using any modern browser, go to the IP address of your server as shown in the status display above. This will bring up the Kennonsoft GUI that provides access to all of the web-based applications. Toggle between User and Admin apps by clicking on the blue tab in the lower left section of the display. This GUI also displays the latest security alerts and bug fixes from the PIAF RSS Feed. We recommend you check it at least once a week.
The other GUI to configure the FreePBX® GPL modules is accessed from the Admin menu in the Kennonsoft menus. Choose Incredible GUI Administration. The default username is admin and the password is what you set during the final installation steps above. Once the Incredible PBX GUI appears, edit extension 701 so you can figure out (or change) the randomized passwords that were set up for your 701 extension and voicemail account: Applications -> Extensions -> 701. If you’re behind a hardware-based firewall, verify the NAT setting is set to YES.
Setting Up a Soft Phone to Use with Incredible PBX
Now you’re ready to set up a telephone so that you can play with Incredible PBX. We recommend YateClient which is free. Download it from here. Run YateClient once you’ve installed it and enter the credentials for the 701 extension on Incredible PBX. You’ll need the IP address of your server plus your extension 701 password. Choose Settings -> Accounts and click the New button. Fill in the blanks using the IP address of your server, 701 for your account name, and whatever password you created for the extension. Click OK.
Once you are registered to extension 701, close the Account window. Then click on YATE’s Telephony Tab and place some test calls to the numerous apps that are preconfigured on Incredible PBX. Dial a few of these to get started:
DEMO - Allison's IVR Demo

947 - Weather by ZIP Code

951 - Yahoo News

*61 - Time of Day

*68 - Wakeup Call

TODAY - Today in History
Now you’re ready to connect to the telephones in the rest of the world. If you live in the U.S., the easiest way (at least for now) is to set up a free Google Voice account. Google has threatened to shut this down but as this is written, it still works. Upgrading your server for OAUTH authentication is covered here. Start at step #1b. The safer long-term solution is to choose several SIP providers and set up redundant trunks for your incoming and outbound calls. The PIAF Forum includes dozens of recommendations to get you started.
Configuring Google Voice
If you want to use Google Voice, you’ll need a dedicated Google Voice account to support Incredible PBX. If you want to use the inbound fax capabilities of Incredible Fax, then you’ll need an additional Google Voice line that can be routed to the FAX custom destination using the GUI. The more obscure the username (with some embedded numbers), the better off you will be. This will keep folks from bombarding you with unsolicited Gtalk chat messages, and who knows what nefarious scheme will be discovered using Google messaging six months from now. So keep this account a secret!
We’ve tested this extensively using an existing Gmail account, and inbound calling is just not reliable. The reason seems to be that Google always chooses Gmail chat as the inbound call destination if there are multiple registrations from the same IP address. So, be reasonable. Do it our way! Set up a dedicated Gmail and Google Voice account, and use it exclusively with Incredible PBX. It’s free at least through 2013. Google Voice no longer is by invitation only so, if you’re in the U.S. or have a friend that is, head over to the Google Voice site and register.
You must choose a telephone number (aka DID) for your new account, or Google Voice calling will not work… in either direction. Google used to permit outbound Gtalk calls using a fake CallerID, but that obviously led to abuse so it’s over! You also have to tie your Google Voice account to at least one working phone number as part of the initial setup process. Your cellphone number will work just fine. Don’t skip this step either. Just enter the provided 2-digit confirmation code when you tell Google to place the test call to the phone number you entered. Once the number is registered, you can disable it if you’d like in Settings, Voice Setting, Phones. But…
IMPORTANT: Be sure to enable the Google Chat option as one of your phone destinations in Settings, Voice Setting, Phones. That’s the destination we need for The Incredible PBX to work its magic! Otherwise, all inbound and outbound calls will fail. If you don’t see this option, you may need to call up Gmail and enable Google Chat there first. Then go back to the Google Voice Settings.
While you’re still in Google Voice Settings, click on the Calls tab. Make sure your settings match these:
- Call Screening – OFF
- Call Presentation – OFF
- Caller ID (In) – Display Caller’s Number
- Caller ID (Out) – Don’t Change Anything
- Do Not Disturb – OFF
- Call Options (Enable Recording) – OFF
- Global Spam Filtering – ON
Click Save Changes once you adjust your settings. Under the Voicemail tab, plug in your email address so you get notified of new voicemails. Down the road, receipt of a Google Voice voicemail will be a big hint that something has come unglued on your PBX.
UPDATE: Google has improved things… again. You may not see the options documented above at all. Instead, you may be presented with the new Google Voice interface which does not include the Google Chat option. But fear not. At least for now there’s still a way to get there. After you have set up your new phone number, click on (1) Settings -> Phone Numbers and then click (2) Transfer (as shown below). That returned the old UI. Make sure the Google Chat option is selected and disable forwarding calls to default phone number.

One final word of caution is in order regardless of your choice of providers: Do NOT use special characters in any provider passwords, or nothing will work!
Now you’re ready to set up your Google Voice trunk in the GUI. After logging in with your browser, click the Connectivity tab and choose Google Voice/Motif. To Add a new Google Voice account, just fill out the form. Do NOT check the third box or incoming calls will never ring!
IMPORTANT LAST STEP: Google Voice will not work unless you restart Asterisk from the Linux command line at this juncture. Using SSH, log into your server as root and issue the following command: amportal restart.
If you have trouble getting Google Voice to work (especially if you have previously used your Google Voice account from a different IP address), try this Google Voice Reset Procedure. It usually fixes connectivity problems. If it still doesn’t work, enable Less Secure Apps using this Google tool.
Troubleshooting Audio and DTMF Problems
You can avoid one-way audio on calls and touchtones that don’t work with these simple settings in the GUI: Settings -> Asterisk SIP Settings. Just plug in your public IP address and your private IP subnet. Then set ULAW as the only Audio Codec.
A Few Words About Our Security Model
Incredible PBX for Scientific Linux joins our previous builds as our most secure turnkey PBX implementation. As configured, it is protected by both Fail2Ban and a hardened configuration of the IPtables Linux firewall. The latest release also includes Port Knocker for simple, secure access from any remote computer or smartphone. You can get up to speed on how the technology works by reading the Nerd Vittles tutorial. Your Port Knocker credentials are stored in /root/knock.FAQ together with activation instructions for your server and mobile devices. The NeoRouter VPN client also is included for rock-solid, secure connectivity to remote users. Read our previous tutorial for setup instructions. As configured, nobody can access your PBX without your credentials AND an IP address that is either on your private network or that matches the IP address of your server or the PC from which you installed Incredible PBX. You can whitelist additional IP addresses by running the command-line utility /root/add-ip. You can remove whitelisted IP addresses by running /root/del-acct. Incredible PBX is preconfigured to let you connect to many of the leading SIP hosting providers without additional firewall tweaking. We always recommend you also add an extra layer of protection by running your server behind a hardware-based firewall with no Internet port exposure, but that’s your call. And it’s your phone bill. 😉
The IPtables firewall is a complex piece of software. If you need assistance with configuring it, visit the PIAF Forum for some friendly assistance.
Incredible Backup and Restore
We’re pleased to introduce our latest backup and restore utilities for Incredible PBX. Running /root/incrediblebackup will create a backup image of your server in /tmp. This backup image then can be copied to any other medium desired for storage. To restore it to another Incredible PBX server, simply copy the image to a server running Asterisk 13 and the same version of the Incredible PBX GUI. Then run /root/incrediblerestore. Doesn’t get much simpler than that.
Incredible PBX Automatic Update Utility
Every time you log into your server as root, Incredible PBX will ping the IncrediblePBX.com web site to determine whether one or more updates are available to bring your server up to current specs. We recommend you log in at least once a week just in case some new security vulnerability should come along. We originally had planned to make our fortune off update fees, but we changed our mind. So… contrary to the language in some of our builds, contributions to our projects are PURELY VOLUNTARY. You’ll get every update as it’s released whether you financially support our projects or not. Why haven’t we fixed the language? Good question. The short answer is it’s buried deep in the GUI image that would have to be regenerated from scratch. We’ll get to it one of these days. In the meantime, sleep soundly. No one will be breaking down your door for a donation.
We also encourage you to sign up for an account on the PIAF Forum and join the discussion. In addition to providing first-class, free support, we think you’ll enjoy the camaraderie.
Incredible PBX Application Users Guide
Your next stop ought to be learning about the three dozen applications included in Incredible PBX. We’ve put together this tutorial to get you started. Enjoy!
Originally published: Sunday, November 22, 2015
Support Issues. With any application as sophisticated as this one, you’re bound to have questions. Blog comments are a terrible place to handle support issues although we welcome general comments about our articles and software. If you have particular support issues, we encourage you to get actively involved in the PBX in a Flash Forums. It’s the best Asterisk tech support site in the business, and it’s all free! Please have a look and post your support questions there. Unlike some forums, ours is extremely friendly and is supported by literally hundreds of Asterisk gurus and thousands of users just like you. You won’t have to wait long for an answer to your question.
VULTR VPS $20 Free Trial: Perfect Platform for #Asterisk & #IncrediblePBX https://t.co/Nwg2nFN99B #XiVO pic.twitter.com/xO0VpROUq8
— Ward Mundy (@NerdUno) July 20, 2016
Special Thanks to Our Generous Sponsors
FULL DISCLOSURE: ClearlyIP, Skyetel, Vitelity, DigitalOcean, Vultr, VoIP.ms, 3CX, Sangoma, TelecomsXchange and VitalPBX have provided financial support to Nerd Vittles and our open source projects through advertising, referral revenue, and/or merchandise. As an Amazon Associate and Best Buy Affiliate, we also earn from qualifying purchases. We’ve chosen these providers not the other way around. Our decisions are based upon their corporate reputation and the quality of their offerings and pricing. Our recommendations regarding technology are reached without regard to financial compensation except in situations in which comparable products at comparable pricing are available from multiple sources. In this limited case, we support our sponsors because our sponsors support us.
BOGO Bonaza: Enjoy state-of-the-art VoIP service with a $10 credit and half-price SIP service on up to $500 of Skyetel trunking with free number porting when you fund your Skyetel account. No limits on number of simultaneous calls. Quadruple data center redundancy. $25 monthly minimum spend required. Tutorial and sign up details are here.
![]() The lynchpin of Incredible PBX 2020 and beyond is ClearlyIP components which bring management of FreePBX modules and SIP phone integration to a level never before available with any other Asterisk distribution. And now you can configure and reconfigure your new Incredible PBX phones from the convenience of the Incredible PBX GUI.
The lynchpin of Incredible PBX 2020 and beyond is ClearlyIP components which bring management of FreePBX modules and SIP phone integration to a level never before available with any other Asterisk distribution. And now you can configure and reconfigure your new Incredible PBX phones from the convenience of the Incredible PBX GUI.
VitalPBX is perhaps the fastest-growing PBX offering based upon Asterisk with an installed presence in more than 100 countries worldwide. VitalPBX has generously provided a customized White Label version of Incredible PBX tailored for use with all Incredible PBX and VitalPBX custom applications. Follow this link for a free test drive!
Special Thanks to Vitelity. Vitelity is now Voyant Communications and has halted new registrations for the time being. Our special thanks to Vitelity for their unwavering financial support over many years and to the many Nerd Vittles readers who continue to enjoy the benefits of their service offerings. We will keep everyone posted on further developments.
Some Recent Nerd Vittles Articles of Interest…
- If you’re wondering what packages are installed with Scientific Linux, come back next week and download the entire Incredible PBX ISO build environment. All of the packages installed on your server are included in the build platform itself. Feel free to add to them or change them to your heart’s content. We don’t have a million dollar staff. That’s why we depend upon folks like you to offer suggestions and enhancements. In short, we treat Incredible PBX like a real open source project. Come join the fun! [↩]
- This is unnecessary when you first install Incredible PBX because it automatically installs the latest version of Asterisk 13. [↩]
Sleep Well: Deploy Certified Incredible PBX Builds for Mission Critical Systems
2015 marks the year we finally settled upon an Asterisk® platform that was not only feature rich but also easy to deploy and maintain. Incredible PBX™ began as an add-on feature set for PBX in a Flash™. But we really wanted a pure open source platform that was built from the ground up. So we introduced a number of stand-alone installers that could be deployed using existing Linux platforms: CentOS, Ubuntu, Debian, Raspbian, and even FreePBX® Distro’s SHMZ. These continue to be our "best sellers" even though we give them away. With the exception of SHMZ, the beauty of the other stand-alone installers is you can use them anywhere whether it’s a Raspberry Pi® or in the Cloud1 with RentPBX or Digital Ocean. But there were some that preferred either dedicated hardware or in-house virtual machine platforms such as VirtualBox and Proxmox. For these platforms, a two-step OS and Incredible PBX install procedure was a hassle. So we introduced an ISO build of Incredible PBX with a superset of Scientific Linux 6.7 preconfigured. And finally we added snapshot images for VirtualBox and Proxmox. What used to take hours has been reduced to less than 30 seconds on the Proxmox 4 KVM platform. With Incredible PBX, it’s all about choice and the FREEDOM to choose with NoGotchas!
Along the way, we experimented with a number of other hardware platforms, and we even tried several other management GUI’s for Asterisk. But there comes a time when you have to sharpen your focus and produce a product that is something other than experimental. And that’s why we are pleased to introduce the new Certified Incredible PBX Builds. These are robust unified communications solutions that we not only test regularly but also use ourselves. Yes, we eat our own dog food.
So where do you begin? We documented a simple, 3-Step Decision Tree to guide you through the process of choosing a GPL platform and VoIP communications solution that’s right for you. You can take it for a spin here or read the complete tutorial.
The more difficult question is deciding how to host your Unified Communications server. Do you want to maintain it yourself, or do you prefer that someone else maintain either the hardware or software or both? We can’t really answer that for you without a great deal of additional information. What we can tell you is that experimentation is a wonderful thing, and you’ll learn an awful lot in the process. Take advantage of the PIAF Forum. There are hundreds of VoIP experts and 10,000+ members to help with your new adventure. Building systems with Incredible PBX is a process that, in the worst case, takes under an hour. And, in the best case, it takes under 30 seconds. So our advice is try several Cloud approaches and, if you have some old hardware lying around the house, try that option as well. We would hasten to add that we don’t recommend running your phone system on old hardware permanently. If you choose the stand-alone server route, invest $200 and get our recommended Intel® NUC or invest $100 and put a Raspberry Pi 2 platform into production. Both are easy to back up and restore. If you’re a dedicated iMac user with processing power and RAM to spare, then the VirtualBox solution really is a no-brainer. It doesn’t cost you a dime, and you’ll never know your phone system is operating as a virtual machine.
The Incredible PBX Gold Standard
We get emails all the time that go something like this. "Cut the crap. You’re the expert. Just tell me the platform that you use and would recommend." Fair enough. Here you go. We experiment on Cloud-based servers almost daily. We have a virtual machine at RentPBX that has run non-stop for years without a hiccup. Use our $15/month coupon code if you sign up: NOGOTCHAS. We build and tear down systems at Digital Ocean and CloudAtCost and Wable almost daily. These three have the added advantage of letting you take snapshots of your virtual machines. Snapshots can be restored in minutes. While CloudAtCost is a good sandbox, don’t even think about using it in production!
The system we recommend for SOHO and small businesses is $200 dedicated hardware, an Intel NUC. The software is Incredible PBX 13 ISO. The server is powerful, quiet, tiny, and easy to back up using Clonezilla and an external USB drive. Our production machine doesn’t change much for months at a time. Once configured, yours probably won’t either. Don’t go update crazy! Apply updates and upgrades only when something doesn’t work or you need a new feature. If it ain’t broke…
A Few Words About Incredible PBX Applications for Asterisk
Asterisk is a complex telephony platform. Don’t expect to learn it all in a day. We’ve been at it for 10 years, and there’s still much that we don’t know. On top of Asterisk, we’ve added over three dozen Asterisk applications. And, yes, there is documentation. Spend a little time with the tutorial, and it will improve your appreciation for Asterisk 1000%.
A Few Words About Google Voice OAUTH Authentication
We have been a strong proponent of Google Voice for many years. Why? Because in the United States, you can make limitless calls to the U.S. and Canada for free. Faxes work, too. Just don’t put all of your eggs in the Google Voice basket. It does break, and Google regularly "improves" things. Thus far, we’ve always managed to get things going again thanks to some very talented telephony gurus around the globe. The one component of Google Voice that Google continues to threaten to shut down is the use of plain text passwords for authentication. With Incredible PBX, you can do something about that by implementing OAUTH authentication on your server. We’ve written a simple tutorial to guide you through implementation and use of OAUTH 2.0 with Google Voice. Please read it before your Google Voice trunks suddenly drop dead.
A Few Words About Security and Firewalls
If you have a phone system that is exposed to the Internet, the bad guys are going to attempt to make calls on your nickel forever. No firewall means sooner or later you’re going to get hit with a very expensive phone bill. Some of the horror stories include charges of over $100,000 in a single month.
Incredible PBX includes a sophisticated firewall that is locked down to private networks, preferred (by us) VoIP providers, and the IP addresses of your desktop computer and your server. Don’t disable it!
We do not recommend using Incredible PBX on the Amazon EC2 platform for the simple reason that Amazon treats all customers as part of the same private LAN. This defeats the security provided by the Incredible PBX firewall and leaves your extension and trunk passwords as your only line of defense. Yes, there are bad guys using Amazon. You’ve been warned.
If you opt to host your own dedicated server for Incredible PBX, we strongly recommend that you place the server behind a hardware-based firewall in addition to the IPtables firewall provided as part of every Incredible PBX build. Two firewalls are almost always better than one. It’s one more nut to crack for the bad guys.
Finally, a word about the new FreePBX Firewall. Don’t. Good network practices suggest that a firewall should be as separated from your applications as possible. The IPtables firewall used by Incredible PBX is only accessible through SSH or the console with root login. It also requires root permissions for any type of modification to its setup. The FreePBX firewall is an integral component of FreePBX and is accessible through the FreePBX GUI itself using the standard FreePBX admin credentials. In addition, during the first week, a vulnerability was reported which resulted in a root vulnerability. What’s puzzling about that is the fact that FreePBX itself traditionally has not operated with root permissions which suggests that other changes have been made in the GUI so that the user account separation between the asterisk user account and the root user account has now been compromised, a very dangerous new development. If this is ever explained, we will pass it on.
https://twitter.com/0x00string/status/655513518578339841
A Few Words About Module Repositories
FreePBX 12 GPL modules are an integral component of Incredible PBX. Why don’t we use "pure" FreePBX 12? The short answer is Sangoma® has integrated a hidden module repository into FreePBX 12. It is comprised of modified FreePBX 12 modules that are not provided on any publicly-accessible web site. Yes, FreePBX 12 GPL modules are available through their GIT repository, but these modules differ from the ones that actually make FreePBX 12 work properly (see next section). As a result, we have chosen to build and use a public module repository for FreePBX 12 GPL modules included in Incredible PBX. For further details, see this Nerd Vittles article. To access our public repository of FreePBX 12 GPL modules, go here.
A Few Words About Module Signatures
With FreePBX 12, Sangoma also has chosen to bar use of competitor’s commercial modules within the product. In addition, Sangoma has implemented a module signature scheme which results in nasty security alerts whenever a compatible FreePBX module is included in the GUI that was not produced or approved for inclusion by Sangoma giving the impression that your server has been compromised. As a result, we have chosen to disable module signature checking by default with Incredible PBX. As changes are made within the GUI, the nasty warnings reappear. We have included the gui-fix script to again disable signature checking. A permanent fix which eliminates signature checking permanently is available here.
A Few Words About Asterisk Upgrades
When you install Incredible PBX, you automatically get the latest and greatest version of Asterisk. Depending upon the installer used, you get either Asterisk 11 or 13. Both versions of Asterisk get regular upgrades provided by Digium®. As with updates, our recommendation is to not apply upgrades unless you actually need a new feature or your existing server is experiencing problems related to the version of Asterisk you are running. We have provided an upgrade utility to make the upgrade process painless. It will NOT move you from Asterisk 11 to 13. It only moves you to the latest release in the version of Asterisk you already have installed.2 In the case of Asterisk 13, the upgrade utility will preserve Google Voice OAUTH authentication if you have previously applied the Asterisk 13 patch as documented above. To upgrade your server, log in as root and issue the following commands:
cd /root
wget http://incrediblepbx.com/upgrade-asterisk-to-current.tar.gz
tar zxvf upgrade-asterisk-to-current.tar.gz
rm -f upgrade-asterisk-to-current.tar.gz
./upgrade-asterisk-to-current
A Few Words About Backups
There are two kinds of administrators in the world: those that make regular backups and those that don’t. Only the first category of administrators generally keep their jobs. Whether you do this for a living or for fun, you are strongly encouraged to make regular backups of your server. There are two types of backups: full system backups and incremental backups using the incrediblebackup script. You need both. For dedicated servers, we recommend you obtain the free Clonezilla application for full system backups. Used in conjunction with an external USB drive, it provides excellent results. For those using Incredible PBX in a virtualized environment, we recommend you use the snapshot utility included on your platform to make periodic backups. Backups should always be stored in a location separate from that of your server or virtual machine.
Originally published: Monday, October 26, 2015
Support Issues. With any application as sophisticated as this one, you’re bound to have questions. Blog comments are a terrible place to handle support issues although we welcome general comments about our articles and software. If you have particular support issues, we encourage you to get actively involved in the PBX in a Flash Forums. It’s the best Asterisk tech support site in the business, and it’s all free! Please have a look and post your support questions there. Unlike some forums, ours is extremely friendly and is supported by literally hundreds of Asterisk gurus and thousands of users just like you. You won’t have to wait long for an answer to your question.
Need help with Asterisk? Visit the PBX in a Flash Forum.
Special Thanks to Our Generous Sponsors
FULL DISCLOSURE: ClearlyIP, Skyetel, Vitelity, DigitalOcean, Vultr, VoIP.ms, 3CX, Sangoma, TelecomsXchange and VitalPBX have provided financial support to Nerd Vittles and our open source projects through advertising, referral revenue, and/or merchandise. As an Amazon Associate and Best Buy Affiliate, we also earn from qualifying purchases. We’ve chosen these providers not the other way around. Our decisions are based upon their corporate reputation and the quality of their offerings and pricing. Our recommendations regarding technology are reached without regard to financial compensation except in situations in which comparable products at comparable pricing are available from multiple sources. In this limited case, we support our sponsors because our sponsors support us.
BOGO Bonaza: Enjoy state-of-the-art VoIP service with a $10 credit and half-price SIP service on up to $500 of Skyetel trunking with free number porting when you fund your Skyetel account. No limits on number of simultaneous calls. Quadruple data center redundancy. $25 monthly minimum spend required. Tutorial and sign up details are here.
![]() The lynchpin of Incredible PBX 2020 and beyond is ClearlyIP components which bring management of FreePBX modules and SIP phone integration to a level never before available with any other Asterisk distribution. And now you can configure and reconfigure your new Incredible PBX phones from the convenience of the Incredible PBX GUI.
The lynchpin of Incredible PBX 2020 and beyond is ClearlyIP components which bring management of FreePBX modules and SIP phone integration to a level never before available with any other Asterisk distribution. And now you can configure and reconfigure your new Incredible PBX phones from the convenience of the Incredible PBX GUI.
VitalPBX is perhaps the fastest-growing PBX offering based upon Asterisk with an installed presence in more than 100 countries worldwide. VitalPBX has generously provided a customized White Label version of Incredible PBX tailored for use with all Incredible PBX and VitalPBX custom applications. Follow this link for a free test drive!
Special Thanks to Vitelity. Vitelity is now Voyant Communications and has halted new registrations for the time being. Our special thanks to Vitelity for their unwavering financial support over many years and to the many Nerd Vittles readers who continue to enjoy the benefits of their service offerings. We will keep everyone posted on further developments.
Some Recent Nerd Vittles Articles of Interest…
- Some of our links refer users to service providers when we find their prices are competitive for the recommended products. Nerd Vittles receives a small referral fee or advertising revenue from some of these providers to help cover the costs of our blog. We never recommend particular products solely to generate commissions. However, when pricing is comparable or availability is favorable, we support these providers because they support us. [↩]
- Some of the FreePBX Distro cheerleaders have touted the beauty of their NagWare noting that you can move back and forth between Asterisk 11 and 13. The question is why would anyone ever want to move back to Asterisk 11 after migrating to Asterisk 13. So we’re talking about a one-time reinstall followed by a restore using Incredible Backup and Restore from your Asterisk 11 server. Can you say lunch break? [↩]
The SOHO Dream Machine: A Unified Communications Platform for Under $200
Remember when you could buy an awesome server for under $200? Thanks to Intel® and Yogi Berra, it’s déjà vu all over again! Years ago we discovered a machine called the Acer Revo that could be had for about $200. It met all of the Unified Communications requirements that a home office or small office could dream of, but then they doubled in price. That led us to the Raspberry Pi 2. While it met the basic needs for most SOHO environments, it involved a bit more hardware tinkering than many folks were comfortable with. And it’s overall performance was something less than robust.

Say what you will about Intel hardware. They may not get things quite right out of the starting gate. But give them a little time, and issues get addressed and fixed. And you end up with incredible hardware at a terrific price. So it is with the $119 third-generation Intel NUC DN2820FYKH. Slip in a 4GB stick of RAM and an economical SSD drive to complement the built-in WiFi and Bluetooth, and you’ve got an amazing hardware platform that takes up 4″ x 4″ of real estate in your office. While its 2.4 GHz Celeron dual-core processor isn’t exactly a screamer compared to some Intel chips, it’s an energy-efficient rocketship compared to the Raspberry Pi 2. Intel VT-x virtualization support1 also is included. The average BOGOMIPS rating of the current Raspberry Pi is 96. The Intel NUC’s BOGOMIPS average is 5332! In Plain English, it would take 55 Raspberry Pi 2’s to match the processing power of one Intel NUC.
Performance, of course, is only half of the equation. There’s also price. Let’s be completely fair and spec out the Raspberry Pi with one-quarter of the RAM and disk storage of the Intel NUC. Cost of the board itself ($41+) + case ($10) + power adapter ($10) + 32GB microSD Type 10 card ($20) + WiFi Dongle ($10) comes to at least $90. Here’s what our Intel NUC set us back on Amazon2 with quadruple the RAM and disk storage, basically the cost of 2 RasPi setups. The FreePBX® Phone System 50 with similar specs starts at $579 and takes up a healthy chunk of your office space. With Incredible PBX and the Intel NUC, you not only save on space, but it’s also about a third of the cost of the FreePBX alternative. For power users, you’re probably wondering whether you can scale up from Celeron-based system. The answer is ABSOLUTELY. The Core i5 model with 16GB of RAM and a 250GB SSD drive runs about $500. And, of course, Incredible PBX imposes no artificial limitations on user accounts or number of simultaneous calls regardless of the hardware platform you choose. No Gotchas!
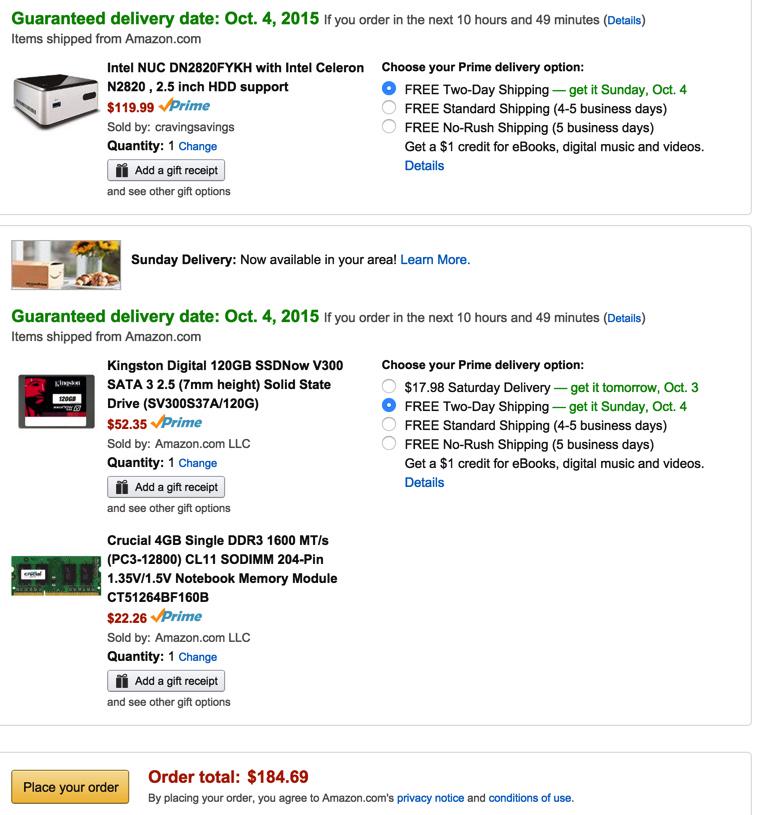
Initial Setup of the Intel NUC Platform
Once you receive your hardware, the first step is installation of the memory card and SATA drive. HINT: You’d be crazy not to use an SSD drive. They’re dirt cheap and FAST! Start your adventure by reviewing the User’s Guide from Intel. As you can see below, it walks you through the hardware installation process which takes about 10 minutes.
[gview file="https://downloadmirror.intel.com/23417/eng/DN2820FYKH_UserGuide02.pdf"]
The most important step comes next. Until you get the BIOS upgraded on the hardware, it will NOT boot. Visit the Download Page for the Intel NUC and grab the latest BIOS Update from here. The only piece you need is FY0051.BIO. Copy it to a DOS-formatted USB flash drive using any desktop computer. Once you’ve done that, insert the flash drive into the front slot on the Intel NUC, plug in a USB keyboard, HDMI monitor, USB DVD drive, and network cable. Turn on the machine. Press F7 after the beep. Follow the instructions to upgrade the BIOS and identify the firmware file you copied to your flash drive. Agree to the license and let the firmware update proceed. It takes about 10 minutes.
While you’re waiting, burn the Incredible PBX 13 ISO to a DVD to use with an external USB DVD drive and your Intel NUC. Tutorial is here.
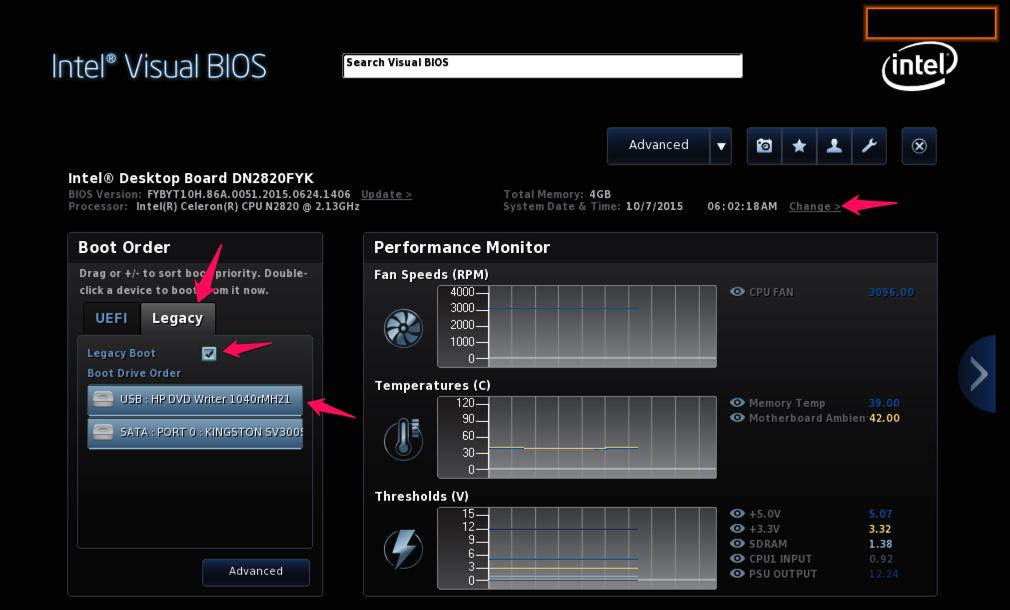
Once the BIOS has been upgraded, your Intel NUC will reboot. You must change a few BIOS settings to complete the hardware setup, or nothing will work. After the machine reboots, press F2 to access Intel’s new Visual BIOS. First, enable the Legacy Boot Procedure, not UEFI (as shown above). Next, make certain that booting from the DVD drive has priority. And, last but not least, set the correct date and time for the computer. Without accurate time, Asterisk will not compile, and you’ll have to repeat the drill! Once you’ve made these changes, save your settings by pressing F10. Your machine will again reboot. Hardware setup is complete. To install Incredible PBX, reboot and press F10 for the boot menu. Pick your USB DVD drive.
If you don’t happen to have one, LG’s tiny USB-powered DVD Writer is the best $25 you will ever spend.
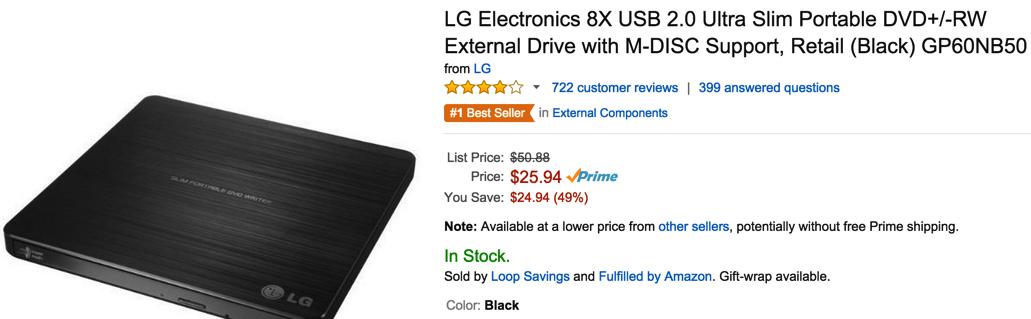
And, if you really want to splurge, take the plunge with this awesome 10″ HDMI (and everything else) monitor:

Installing Incredible PBX 13 on the Intel NUC
Choose the Basic Install, set your time zone, and create a very secure root password. It takes about 20 minutes to install the Scientific Linux 6.7 platform. After a reboot, press Enter to accept the Incredible PBX license agreement and complete the install. We initially were concerned that RedHat-based platforms would not load on the Intel NUC since they are not mentioned in the Intel compatibility chart. Not to worry. SL 6.7 works fine. This may very well be because of the latest BIOS upgrade. In any case, you can follow along in our Incredible PBX 13 ISO tutorial for the details. Adding free fax support with Incredible Fax is equally easy. Just run the Hylafax/AvantFax installer: /root/installfax11.sh. If you want to enable encrypted OAUTH2 authentication for your Google Voice accounts, follow this tutorial beginning at step #1b. When you get everything humming along, check out our tutorial for the three dozen Incredible Apps that are bundled with Incredible PBX.
Finally, tidy up the status display to accomodate the Intel NUC’s generous RAM and Disk sizes:
sed -i 's|$OSrelease|<> Sci Linux 6.7 <>|' /usr/local/sbin/status

Setting Up WiFi Connectivity on the Intel NUC
You probably noticed that two private IP addresses are listed on the status display shown above. The first is the wired network connection. The second is either the wireless network connection or the NeoRouter VPN address depending upon how you’ve set up your server. Incredible PBX can be run using either the eth0 or wlan0 interface. You really don’t want both, and we’ll show you how to turn one of them off. Here’s how to activate WiFi on your server. Follow the steps carefully and don’t be intimidated that you’re venturing down into the network weeds. It’s a number of steps but nothing difficult.
WARNING: We strongly recommend installing Incredible Fax before you enable WiFi connectivity to avoid problems. Trust us on this one. We learned the hard way, and you can only run the Incredible Fax installer once!
1. Install wpa_supplicant to manage WiFi access: yum -y install wpa_supplicant
2. Download and install the latest WiFi driver. Just cut-and-paste the code below while logged in as root:
cd /root
wget --no-check-certificate https://wireless.wiki.kernel.org/_media/en/users/drivers/iwlwifi-7260-ucode-25.30.14.0.tgz
tar zxvf iwlwifi-7260-ucode-25.30.14.0.tgz
cd iwlwifi-7260-ucode-25.30.14.0
cp iwlwifi-7260-14.ucode /lib/firmware/.
reboot
3. Edit /etc/sysconfig/wpa_supplicant. Modify line 3 to look like this: INTERFACES="-iwlan0"
4. Edit /etc/wpa_supplicant/wpa_supplicant.conf. Insert the following lines at the end of the file after replacing the ssid and psk entries below with the actual name and password needed to access your WiFi network:
update_config=1
network={
 ssid="yourSSID"
 psk="yourSSIDpassword"
 key_mgmt=WPA-PSK
 scan_ssid=1
}
5. Edit /etc/sysconfig/network-scripts/ifcfg-wlan0. Change ONBOOT=no to ONBOOT=yes
6. Edit /etc/sysconfig/network. Add CRDA_DOMAIN=US
7. Edit /etc/sysconfig/knockd. Add OPTIONS="-i wlan0"
8. Set up a couple services to start on bootup (default=off):
chkconfig messagebus on
chkconfig wpa_supplicant on
9. Edit /etc/rc.local. Add the following lines immediately above the iptables-restart line in the file:
/sbin/ifup wlan0
/usr/local/sbin/amportal kill
/usr/local/sbin/amportal start
/etc/init.d/knockd restart
For those that are curious, step #9 is necessary because the system attempts to start these services before the wireless network is properly configured. And they fail. So… we simply restart them at the end of the boot procedure.
10. Reboot to bring everything on line properly. Check status for results.
11. We have observed interference issues between the wired and wireless networks occasionally. For that reason, once you have verified that your wireless network is functioning properly, we strongly recommend disabling eth0. Edit /etc/sysconfig/network-scripts/ifcfg-eth0. Change ONBOOT=yes to ONBOOT=no. Then reboot your server, and the interference problems disappear.
12. Down the road, if you’d prefer to use the wired network, just undo the settings in steps 5 – 9 and 11. Then reboot.
Deploying a Mobile Office with the Intel NUC
Some are probably wondering why you’d ever need WiFi with a Unified Communications platform. One reason for those that travel regularly is that you might want your PBX to ride along with you. Still others might want to use the Intel NUC for demonstrations at events such as this week’s AstriCon in Orlando. Using the Mobile HotSpot feature on your smartphone, WiFi access is easy even when there’s no local WiFi connection. Once configured, there’s no need for a keyboard or monitor with the Intel NUC. You can use Putty or SSH to access the server. While the Intel NUC is now a 12 volt device, you may not want to wrestle with building the necessary cable to connect it directly to a vehicle. An easier solution is to install an inexpensive power inverter and then use the standard power brick that came with the Intel NUC. The inVERT 100 Watt Portable Power Inverter does the trick for $35, or you might prefer this 150-watt BESTEK inverter from Amazon for $19. Don’t forget to adjust your SmartHost setting to accommodate your cellphone carrier’s SMTP host! Better yet, use gMail as your SMTP Relay host and never have to worry about it again. Then add the following line to your /etc/rc.local startup file with your email address, and your DHCP address will be sent to you whenever and wherever your server boots up:
echo "`cat /etc/hostip`" | mail -s "Intel NUC is UP" yourname@youremailserver.net
Enjoy your new Unified Communications System…
Originally published: Monday, October 12, 2015
9 Countries Have Never Visited Nerd Vittles. Got a Friend in Any of Them https://t.co/wMfmlhiQ9y #asterisk #freepbx pic.twitter.com/TPFGZbqWB6
— Ward Mundy (@NerdUno) April 22, 2016
Need help with Asterisk? Visit the PBX in a Flash Forum.
Special Thanks to Our Generous Sponsors
FULL DISCLOSURE: ClearlyIP, Skyetel, Vitelity, DigitalOcean, Vultr, VoIP.ms, 3CX, Sangoma, TelecomsXchange and VitalPBX have provided financial support to Nerd Vittles and our open source projects through advertising, referral revenue, and/or merchandise. As an Amazon Associate and Best Buy Affiliate, we also earn from qualifying purchases. We’ve chosen these providers not the other way around. Our decisions are based upon their corporate reputation and the quality of their offerings and pricing. Our recommendations regarding technology are reached without regard to financial compensation except in situations in which comparable products at comparable pricing are available from multiple sources. In this limited case, we support our sponsors because our sponsors support us.
BOGO Bonaza: Enjoy state-of-the-art VoIP service with a $10 credit and half-price SIP service on up to $500 of Skyetel trunking with free number porting when you fund your Skyetel account. No limits on number of simultaneous calls. Quadruple data center redundancy. $25 monthly minimum spend required. Tutorial and sign up details are here.
![]() The lynchpin of Incredible PBX 2020 and beyond is ClearlyIP components which bring management of FreePBX modules and SIP phone integration to a level never before available with any other Asterisk distribution. And now you can configure and reconfigure your new Incredible PBX phones from the convenience of the Incredible PBX GUI.
The lynchpin of Incredible PBX 2020 and beyond is ClearlyIP components which bring management of FreePBX modules and SIP phone integration to a level never before available with any other Asterisk distribution. And now you can configure and reconfigure your new Incredible PBX phones from the convenience of the Incredible PBX GUI.
VitalPBX is perhaps the fastest-growing PBX offering based upon Asterisk with an installed presence in more than 100 countries worldwide. VitalPBX has generously provided a customized White Label version of Incredible PBX tailored for use with all Incredible PBX and VitalPBX custom applications. Follow this link for a free test drive!
Special Thanks to Vitelity. Vitelity is now Voyant Communications and has halted new registrations for the time being. Our special thanks to Vitelity for their unwavering financial support over many years and to the many Nerd Vittles readers who continue to enjoy the benefits of their service offerings. We will keep everyone posted on further developments.
Some Recent Nerd Vittles Articles of Interest…
- We’ll have much more to say about virtualization soon as Proxmox has just introduced Proxmox VE 4.0 with support for KVM and Linux Containers. Stay tuned! [↩]
- Some of our links refer users to Amazon or other service providers when we find their prices are competitive for the recommended products. Nerd Vittles receives a small referral fee from these providers to help cover the costs of our blog. We never recommend particular products solely to generate commissions. However, when pricing is comparable or availability is favorable, we support these providers because they support us. [↩]
Introducing the Incredible PBX 13 ISO: A Turnkey Asterisk 13 Server for Everyman
[iframe-popup id="5″]
11/22/2015: The Incredible PBX 13 ISO has been updated to support USB Flash installers. Click here for the latest tutorial.
We’ve spent much of 2015 developing a new GPL VoIP platform for virtually every Linux flavor in the universe with Incredible PBX installers for CentOS, Ubuntu, Debian, and Raspbian for the Raspberry Pi. Along the way we introduced the first turnkey aggregations for Asterisk® 13, an incredible new platform that’s been under development for several years. Until now, we’ve left the initial deployment of the operating system platform up to you. There were two principal reasons for shifting to this two-step install. First, there was the sale of CentOS to RedHat which set off red flags as to whether RedHat would now raise legal objections to bundling a superset of GPL applications with the base CentOS install, something which the original CentOS developers swore they would never do. Second, we didn’t want to get in the operating system business with maintenance of an independent repository to address security issues and to avoid legal issues from the RedHat folks.
But we heard from more than a few that the two-step process could be tedious especially for those that were new to Linux. Luckily, there’s another derivative of RHEL called Scientific Linux. As the name implies, it is used and was developed primarily to support the worldwide scientific community. Many have contributed to the Scientific Linux build over the years, but its principal sponsor is Fermi Lab which is managed by the Fermi Research Alliance LLC for the U.S. Department of Energy Office of Science. As a National Laboratory funded by the federal government, Fermi Lab’s work products including Scientific Linux constitute U.S. Government Works. As such, in addition to its GPL license, Scientific Linux can be used by others to create derivative works. That’s a long-winded explanation of why we’re now comfortable getting back into the ISO business and building an incredibly powerful unified communications system atop the Scientific Linux GNU platform. For those that have dealt with Asterisk aggregations over the past 10 years, this design is nothing particularly new. What is unique is the mix of features in the Incredible PBX aggregation. We begin with a preconfigured Asterisk 13 platform. Then we’ve added a large collection of FreePBX® GPL modules to create the web-based Incredible GUI for management of your server. Finally, we’ve integrated over three dozen applications for Asterisk as well as a preconfigured, functioning firewall to give you a rock-solid, secure UC VoIP platform with an unrivaled feature set for your home office or small business.
Installing Incredible PBX 13 with Scientific Linux 6.7

The installation procedure with the Incredible PBX 13 ISO couldn’t be easier. Start by downloading the 32-bit ISO from SourceForge to your desktop computer. The file name is IncrediblePBX13.iso. If you prefer a torrent, that’s available as well. The file name is IncrediblePBX13-12.2-SL67-ISO.torrent. After completing the download, if you’ll be using dedicated hardware for your platform, burn the ISO to a DVD using a Mac or Windows machine. Then boot your hardware from the device you just created. If you’re using a virtual machine such as VirtualBox, then designate the ISO as the VM boot device. Then start the virtual machine to begin the install.
When the installation begins, choose your time zone and create a very secure root password. After about 5 minutes, the Scientific Linux platform will be in place and your system will reboot. Agree to the Incredible PBX license agreement and press ENTER to complete the install. After one more reboot, you’ll be in business. Log in as root with your new password. After the Automatic Update Utility brings your system current, press ENTER after reviewing the status display for errors. To install Incredible Fax, issue this command and accept all the defaults by pressing ENTER: /root/incrediblefax11.sh
If you prefer secure OAUTH2 authentication for your Google Voice accounts, follow this tutorial beginning at step #1b.
UPDATE: Today’s build of Incredible PBX is now available in the RentPBX Cloud with your choice of Asterisk 11 or 13 in the following locales: Seattle, Los Angeles, Mountain View, Dallas, Chicago, Atlanta, Tampa, Miami, Ashburn/Washington D.C., New Jersey, Montreal, Toronto, Berlin, and Northern U.K. Use coupon code NOGOTCHAS for $15/month pricing.
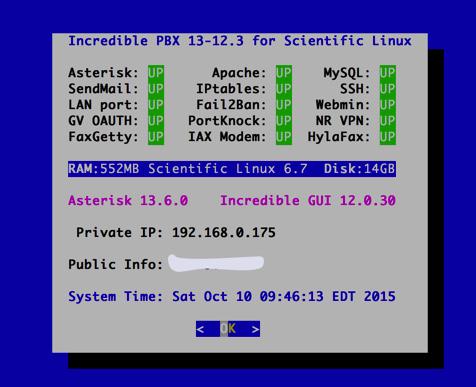
To complete the install, perform the following from the Linux CLI while logged in as root:
- Change your root password if it’s insecure: passwd
- Set your FreePBX admin password: /root/admin-pw-change
- Set your web apps admin password: htpasswd /etc/pbx/wwwpasswd admin
- Set your admin password for AvantFax: /root/avantfax-pw-change
- Set your correct time zone: /root/timezone-setup
- Add WhiteList entries to firewall if needed: /root/add-ip or /root/add-fqdn
- Store PortKnocker credentials in a safe place: cat /root/knock.FAQ
- Login to your NeoRouter VPN server if desired: /root/nrclientcmd
Managing Your Server with Incredible PBX Web-Based Tools
Most of your time initially configuring and managing your server will be spent using the web-based tools provided with Incredible PBX. Using any modern browser, go to the IP address of your server as shown in the status display above. This will bring up the Kennonsoft GUI that provides access to all of the web-based applications. Toggle between User and Admin apps by clicking on the blue tab in the lower left section of the display. This GUI also displays the latest security alerts and bug fixes from the PIAF RSS Feed. We recommend you check it at least once a week.
The other GUI to configure the FreePBX® GPL modules is accessed from the Admin menu in the Kennonsoft menus. Choose Incredible GUI Administration. The default username is admin and the password is what you set during the final installation steps above. Once the Incredible PBX GUI appears, edit extension 701 so you can figure out (or change) the randomized passwords that were set up for your 701 extension and voicemail account: Applications -> Extensions -> 701. If you’re behind a hardware-based firewall, verify the NAT setting is set to YES.
Setting Up a Soft Phone to Use with Incredible PBX
Now you’re ready to set up a telephone so that you can play with Incredible PBX. We recommend YateClient which is free. Download it from here. Run YateClient once you’ve installed it and enter the credentials for the 701 extension on Incredible PBX. You’ll need the IP address of your server plus your extension 701 password. Choose Settings -> Accounts and click the New button. Fill in the blanks using the IP address of your server, 701 for your account name, and whatever password you created for the extension. Click OK.
Once you are registered to extension 701, close the Account window. Then click on YATE’s Telephony Tab and place some test calls to the numerous apps that are preconfigured on Incredible PBX. Dial a few of these to get started:
DEMO - Allison's IVR Demo

947 - Weather by ZIP Code

951 - Yahoo News

*61 - Time of Day

*68 - Wakeup Call

TODAY - Today in History
Now you’re ready to connect to the telephones in the rest of the world. If you live in the U.S., the easiest way (at least for now) is to set up a free Google Voice account. Google has threatened to shut this down but as this is written, it still works. Upgrading your server for OAUTH authentication is covered here. Start at step #1b. The safer long-term solution is to choose several SIP providers and set up redundant trunks for your incoming and outbound calls. The PIAF Forum includes dozens of recommendations to get you started.
Configuring Google Voice
If you want to use Google Voice, you’ll need a dedicated Google Voice account to support Incredible PBX. If you want to use the inbound fax capabilities of Incredible Fax, then you’ll need an additional Google Voice line that can be routed to the FAX custom destination using the GUI. The more obscure the username (with some embedded numbers), the better off you will be. This will keep folks from bombarding you with unsolicited Gtalk chat messages, and who knows what nefarious scheme will be discovered using Google messaging six months from now. So keep this account a secret!
We’ve tested this extensively using an existing Gmail account, and inbound calling is just not reliable. The reason seems to be that Google always chooses Gmail chat as the inbound call destination if there are multiple registrations from the same IP address. So, be reasonable. Do it our way! Set up a dedicated Gmail and Google Voice account, and use it exclusively with Incredible PBX. It’s free at least through 2013. Google Voice no longer is by invitation only so, if you’re in the U.S. or have a friend that is, head over to the Google Voice site and register.
You must choose a telephone number (aka DID) for your new account, or Google Voice calling will not work… in either direction. Google used to permit outbound Gtalk calls using a fake CallerID, but that obviously led to abuse so it’s over! You also have to tie your Google Voice account to at least one working phone number as part of the initial setup process. Your cellphone number will work just fine. Don’t skip this step either. Just enter the provided 2-digit confirmation code when you tell Google to place the test call to the phone number you entered. Once the number is registered, you can disable it if you’d like in Settings, Voice Setting, Phones. But…
IMPORTANT: Be sure to enable the Google Chat option as one of your phone destinations in Settings, Voice Setting, Phones. That’s the destination we need for The Incredible PBX to work its magic! Otherwise, all inbound and outbound calls will fail. If you don’t see this option, you may need to call up Gmail and enable Google Chat there first. Then go back to the Google Voice Settings.
While you’re still in Google Voice Settings, click on the Calls tab. Make sure your settings match these:
- Call Screening – OFF
- Call Presentation – OFF
- Caller ID (In) – Display Caller’s Number
- Caller ID (Out) – Don’t Change Anything
- Do Not Disturb – OFF
- Call Options (Enable Recording) – OFF
- Global Spam Filtering – ON
Click Save Changes once you adjust your settings. Under the Voicemail tab, plug in your email address so you get notified of new voicemails. Down the road, receipt of a Google Voice voicemail will be a big hint that something has come unglued on your PBX.
One final word of caution is in order regardless of your choice of providers: Do NOT use special characters in any provider passwords, or nothing will work!
Now you’re ready to set up your Google Voice trunk in the GUI. After logging in with your browser, click the Connectivity tab and choose Google Voice/Motif. To Add a new Google Voice account, just fill out the form. Do NOT check the third box or incoming calls will never ring!
IMPORTANT LAST STEP: Google Voice will not work unless you restart Asterisk from the Linux command line at this juncture. Using SSH, log into your server as root and issue the following command: amportal restart.
If you have trouble getting Google Voice to work (especially if you have previously used your Google Voice account from a different IP address), try this Google Voice Reset Procedure. It usually fixes connectivity problems. If it still doesn’t work, enable Less Secure Apps using this Google tool.
Troubleshooting Audio and DTMF Problems
You can avoid one-way audio on calls and touchtones that don’t work with these simple settings in the GUI: Settings -> Asterisk SIP Settings. Just plug in your public IP address and your private IP subnet. Then set ULAW as the only Audio Codec.
A Few Words about the Incredible PBX Security Model for SL 6.7
Incredible PBX for Scientific Linux joins our previous builds as our most secure turnkey PBX implementation. As configured, it is protected by both Fail2Ban and a hardened configuration of the IPtables Linux firewall. The latest release also includes Port Knocker for simple, secure access from any remote computer or smartphone. You can get up to speed on how the technology works by reading the Nerd Vittles tutorial. Your Port Knocker credentials are stored in /root/knock.FAQ together with activation instructions for your server and mobile devices. The NeoRouter VPN client also is included for rock-solid, secure connectivity to remote users. Read our previous tutorial for setup instructions. As configured, nobody can access your PBX without your credentials AND an IP address that is either on your private network or that matches the IP address of your server or the PC from which you installed Incredible PBX. You can whitelist additional IP addresses by running the command-line utility /root/add-ip. You can remove whitelisted IP addresses by running /root/del-acct. Incredible PBX is preconfigured to let you connect to many of the leading SIP hosting providers without additional firewall tweaking. We always recommend you also add an extra layer of protection by running your server behind a hardware-based firewall with no Internet port exposure, but that’s your call. And it’s your phone bill. 😉
The IPtables firewall is a complex piece of software. If you need assistance with configuring it, visit the PIAF Forum for some friendly assistance.
Incredible Backup and Restore
We’re pleased to introduce our latest backup and restore utilities for Incredible PBX. Running /root/incrediblebackup will create a backup image of your server in /tmp. This backup image then can be copied to any other medium desired for storage. To restore it to another Incredible PBX server, simply copy the image to a server running Asterisk 13 and the same version of the Incredible PBX GUI. Then run /root/incrediblerestore. Doesn’t get much simpler than that.
Incredible PBX Automatic Update Utility
Every time you log into your server as root, Incredible PBX will ping the IncrediblePBX.com web site to determine whether one or more updates are available to bring your server up to current specs. We recommend you log in at least once a week just in case some new security vulnerability should come along.
In the meantime, we encourage you to sign up for an account on the PIAF Forum and join the discussion. In addition to providing first-class, free support, we think you’ll enjoy the camaraderie.
Incredible PBX Application Users Guide
Your next stop ought to be learning about the three dozen applications included in Incredible PBX. We’ve put together this tutorial to get you started. Enjoy!

And, to our friends at Google, thank you!
Originally published: Sunday, September 27, 2015
Support Issues. With any application as sophisticated as this one, you’re bound to have questions. Blog comments are a terrible place to handle support issues although we welcome general comments about our articles and software. If you have particular support issues, we encourage you to get actively involved in the PBX in a Flash Forums. It’s the best Asterisk tech support site in the business, and it’s all free! Please have a look and post your support questions there. Unlike some forums, ours is extremely friendly and is supported by literally hundreds of Asterisk gurus and thousands of users just like you. You won’t have to wait long for an answer to your question.
9 Countries Have Never Visited Nerd Vittles. Got a Friend in Any of Them https://t.co/wMfmlhiQ9y #asterisk #freepbx pic.twitter.com/TPFGZbqWB6
— Ward Mundy (@NerdUno) April 22, 2016
Need help with Asterisk? Visit the PBX in a Flash Forum.
Special Thanks to Our Generous Sponsors
FULL DISCLOSURE: ClearlyIP, Skyetel, Vitelity, DigitalOcean, Vultr, VoIP.ms, 3CX, Sangoma, TelecomsXchange and VitalPBX have provided financial support to Nerd Vittles and our open source projects through advertising, referral revenue, and/or merchandise. As an Amazon Associate and Best Buy Affiliate, we also earn from qualifying purchases. We’ve chosen these providers not the other way around. Our decisions are based upon their corporate reputation and the quality of their offerings and pricing. Our recommendations regarding technology are reached without regard to financial compensation except in situations in which comparable products at comparable pricing are available from multiple sources. In this limited case, we support our sponsors because our sponsors support us.
BOGO Bonaza: Enjoy state-of-the-art VoIP service with a $10 credit and half-price SIP service on up to $500 of Skyetel trunking with free number porting when you fund your Skyetel account. No limits on number of simultaneous calls. Quadruple data center redundancy. $25 monthly minimum spend required. Tutorial and sign up details are here.
![]() The lynchpin of Incredible PBX 2020 and beyond is ClearlyIP components which bring management of FreePBX modules and SIP phone integration to a level never before available with any other Asterisk distribution. And now you can configure and reconfigure your new Incredible PBX phones from the convenience of the Incredible PBX GUI.
The lynchpin of Incredible PBX 2020 and beyond is ClearlyIP components which bring management of FreePBX modules and SIP phone integration to a level never before available with any other Asterisk distribution. And now you can configure and reconfigure your new Incredible PBX phones from the convenience of the Incredible PBX GUI.
VitalPBX is perhaps the fastest-growing PBX offering based upon Asterisk with an installed presence in more than 100 countries worldwide. VitalPBX has generously provided a customized White Label version of Incredible PBX tailored for use with all Incredible PBX and VitalPBX custom applications. Follow this link for a free test drive!
Special Thanks to Vitelity. Vitelity is now Voyant Communications and has halted new registrations for the time being. Our special thanks to Vitelity for their unwavering financial support over many years and to the many Nerd Vittles readers who continue to enjoy the benefits of their service offerings. We will keep everyone posted on further developments.
Some Recent Nerd Vittles Articles of Interest…
Free Asterisk Solutions
