
Home » Posts tagged 'IncrediblePBX' (Page 22)
Tag Archives: IncrediblePBX
The Most Versatile VoIP Provider: FREE PORTING

 JUST RELEASED: Visit the Incredible PBX Wiki
SIP Happens! Deploying a Publicly-Accessible Asterisk PBX – replaced

We’ve previously documented the benefits of SIP URI calling. Because the calls are free from and to anywhere in the world, the use case is compelling. The drawbacks, particularly with Asterisk® servers, have primarily centered around the security implications of exposing SIP on a publicly-accessible server. Today we want to take a fresh look at a possible SIP implementation for Asterisk based upon the pioneering work of Dr. Lin Song back in the PBX in a Flash heyday. We’ve embellished Lin’s original IPtables creation with additional security mechanisms now available with Fail2Ban, Asterisk, FreePBX®, and Travelin’ Man 3 as well as a terrific tutorial from JavaPipe. All of Lin’s work and ours is open source GPL3 code which you are more than welcome to use or improve pursuant to the terms of the GPL3 license.
Consider this. If everyone in the world had an accessible SIP address instead of a phone number, every call to every person in the world via the Internet would be free. That pretty much sums up why SIP URIs are important. The syntax for SIP URIs depends upon your platform. With Asterisk they look like this: SIP/somebody@FQDN.yourdomain.com. On SIP phones, SIP URIs look like this: sip:somenameORnumber@FQDN.yourdomain.com. Others use somenameORnumber@FQDN.yourdomain.com. Assuming you have a reliable Internet connection, once you have “dialed” a SIP URI, the destination SIP device will ring just as if the called party had a POTS phone. Asterisk® processes SIP URIs in much the same way as calls originating from commercial trunk providers, but anonymous SIP calls are blocked.
Before we get too deep in the weeds, let us take a moment to stress that we don’t recommend this SIP design for mission-critical PBXs because there still are some security risks with denial of service attacks and other vulnerabilities. For these deployments, Incredible PBX® coupled with the Travelin’ Man 3 firewall which blocks SIP access except from whitelisted IP addresses and FQDNs has no equal. When properly deployed, the bad guys cannot even see your server much less attack it. A typical use case for today’s new SIP design would be a public Asterisk server that provides anonymous SIP access to the general public without any exposure to corporate jewels. For example, we’ve put up a demonstration server that provides news and weather reports. In the corporate world, an equivalent deployment might provide access to a product database with pricing and availability details. Our rule of thumb before deploying today’s platform would be to ask yourself what damage could be inflicted if your server were totally compromised. If the answer is zero, then proceed. Otherwise, stick with Incredible PBX and the Travelin’ Man 3 firewall. The ideal platform for deployment using the same rule of thumb as above is one of these $7 to $15/year OpenVZ cloud platforms.
Overview. There are a number of moving parts in today’s implementation. So let’s briefly go through the steps. Begin with a cloud-based installation of Incredible PBX. Next, we’ll upgrade the Fail2Ban setup to better secure a publicly-accessible Asterisk server. We’ll also customize the port for SSH access to reduce the attack rate on the SSH port. You’ll need a fully-qualified domain name (FQDN) for your server because we’ll be blocking all access to your server by IP address. If you want to allow SIP URI calls to your server, you’ll need this FQDN. If you want to also allow SIP registrations from this same FQDN, then a single FQDN will suffice; however, with OpenVZ platforms, we recommend using a different (and preferably more obscure) FQDN for SIP registrations since registered users have an actual extension on your PBX that is capable of making outbound calls which usually cost money. In this case, the obscure FQDN performs double-duty as the equivalent of a password to your PBX. For example, an FQDN such as hk76dl34z.yourdomain.com would rarely be guessed by an anonymous person while sip.yourdomain.com would be fairly obvious to attempted intruders. But that’s your call.
Using whatever FQDN you’ve chosen for SIP registrations, we’ll add an entry to /etc/asterisk/sip_custom.conf that looks like this: domain=hk76dl34z.yourdomain.com. That will block all SIP registration attempts except from that domain. It will not block SIP invitations! The next step will be to add a new [from-sip-external] context to extensions_override_freepbx.conf. Inside that context, we’ll specify the FQDN used for public SIP URI connections to your server, e.g. sip.yourdomain.com. This will block SIP invitations except SIP URIs containing that domain name. We’ll also define all of the extensions on your Asterisk server which can be reached with SIP URI invitations. These could be actual extensions, or ring groups, or IVRs, or Asterisk applications. The choice is yours. These SIP URI authorizations can be either numeric (701@sip.yourdomain.com) or alpha (weather@sip.yourdomain.com) or alphanumeric (channel7@sip.abc.com). Finally, we’ll put the new IPtables firewall rules in place and adjust your existing iptables-custom setup to support the new publicly-accessible PBX. For example, we’ll still use whitelist entries for web access to your server since anonymous users would cause nothing but mischief if TCP ports 80 and 443 were exposed. It’s worth noting that KVM platforms provide a more robust implementation of IPtables that can block more types of nefarious traffic. We’ve supplemented the original article with a KVM update below. With OpenVZ platforms, we have to rely upon Asterisk to achieve IP address blocking and some types of packet filtering. So why not choose a KVM platform? It’s simple. These platforms typically cost twice as much as equivalent OpenVZ offerings. With this type of deployment, KVM is worth it.
Installing Incredible PBX Base Platform
Today’s design requires an Incredible PBX platform on a cloud-based server. Start by following this tutorial to put the pieces in place. We recommend you also install the Whole Enchilada addition once the base install is finished. Make sure everything is functioning reliably before continuing.
Upgrading the Fail2Ban Platform
Because this will be a publicly-accessible server, we’re going to tighten up the Asterisk configuration in Fail2Ban and lengthen the bantime and findtime associated with Fail2Ban’s Asterisk log monitoring. We also recommend that you whitelist the IP addresses associated with your server and PCs from which you plan to access your server so that you don’t inadvertently block yourself.
Log into your server as root and issue the following commands. When the jail.conf file opens in the nano editor, scroll down to line 34 and add the IP addresses you’d like to whitelist to the existing ignoreip settings separating each IP address with a space. Then press Ctrl-X, Y, then Enter to save your changes. Verify that Fail2Ban restarts successfully.
cd /etc/fail2ban
wget http://incrediblepbx.com/fail2ban-public.tar.gz
tar zxvf fail2ban-public.tar.gz
rm -f fail2ban-public.tar.gz
nano -w jail.conf
service fail2ban restart
If you ever get locked out of your own server, you can use the Serial Console in your VPS Control Panel to log into your server. Then verify that your IP address has been blocked by issuing the command: iptables -nL. If your IP is shown as blocked, issue this command with your address to unblock it: fail2ban-client set asterisk unbanip 12.34.56.78
Obtaining an FQDN for Your Server
Because we’ll be blocking IP address SIP access to your server, you’ll need to obtain one or perhaps two FQDNs for your server. If you manage DNS for a domain that you own, this is easy. If not, you can obtain a free FQDN from ChangeIP here. Thanks, @mbellot.
For the FQDN that you’ll be using for SIP registrations on your server, configure Asterisk to use it by logging into your server as root and issuing the following command using your new FQDN, e.g. xyz.yourdomain.com. Thanks, @ou812.
echo "domain=xyz.yourdomain.com" >> /etc/asterisk/sip_custom.conf
SECURITY ALERT: Never use the SIP URI MOD on a server such as this one with a publicly-exposed SIP port as it is possible for some nefarious individual to spoof your FQDN in the headers of a SIP packet and easily gain outbound calling access using your server’s trunk credentials.
Customizing the [sip-external-custom] Context
All FreePBX-based servers include a sip-external-custom context as part of the default installation; however, we need a customized version to use for a publicly-accessible PBX. You can’t simply update the context in /etc/asterisk/extensions.conf because FreePBX will overwrite the changes the next time you reload your dialplan. Instead we have to copy the context into extensions_override_freepbx.conf and make the changes there. So let’s start by copying the new template there with the following commands:
cd /tmp
wget http://incrediblepbx.com/from-sip-external.txt
cd /etc/asterisk
cat /tmp/from-sip-external.txt >> extensions_override_freepbx.conf
rm -f /tmp/from-sip-external.txt
nano -w extensions_override_freepbx.conf
When the nano editor opens the override file, navigate to line #10 of the [from-sip-external] context and replace xyz.domain.com with the FQDN you want to use for SIP invites to your server. These are the connections that are used to actually connect to an extension on your server (NOT to register). As noted previously, this can be a different FQDN than the one used to actually register to an extension on your server. Next, scroll down below line #24, and you will see a series of lines that actually authorize anonymous SIP connections with your server. There are two numeric entries and also two alpha entries to access the News and Weather apps on your server. The 13th position in the dialplan is required for all authorized calls.
exten => 947,13,Dial(local/947@from-internal)
exten => 951,13,Dial(local/951@from-internal)
exten => news,13,Dial(local/951@from-internal)
exten => weather,13,Dial(local/947@from-internal)
You can leave these in place, remove them, or add new entries depending upon which extensions you want to make publicly accessible on your server. Here are some syntax examples for other types of server access that may be of interest.
; Call VoIP Users Conference
exten => 882,13,Dial(SIP/vuc@vuc.me)
exten => vuc,13,Dial(SIP/vuc@vuc.me)
; Call Default CONF app
exten => 2663,13,Dial(local/${EXTEN}@from-internal)
exten => conf,13,Dial(local/2663@from-internal)
; Call Bob at Local Extension 701
exten => 701,13,Dial(local/${EXTEN}@from-internal)
exten => bob,13,Dial(local/701@from-internal)
; Call Default Inbound Route thru Time Condition
exten => home,13,Goto(timeconditions,1,1)
; Call Inbound Trunk 8005551212
exten => 8005551212,13,Goto(from-trunk,${DID},1)
; Call Lenny
exten => 53669,13,Dial(local/${EXTEN}@from-internal)
exten => lenny,13,Dial(SIP/2233435945@sip2sip.info)
; Call any toll-free number (AT&T Directory Assistance in example)
exten => information,13,Dial(SIP/18005551212@switch.starcompartners.com)
Once you’ve added your FQDN and authorized SIP URI extensions, save the file: Ctrl-X, Y, then Enter.
One final piece is required to enabled anonymous SIP URI connections to your server:
echo "allowguest=yes" >> /etc/asterisk/sip_general_custom.conf
Now restart Asterisk: amportal restart
UPDATE for DialPlan Junkies: We received a few inquiries following publication inquiring about the dialplan design. We’ve taken advantage of a terrific feature of Asterisk which lets calls fall through to the next line of a dialplan if there is no match on a Goto(${EXTEN},13) command. For example, if a caller dials ward@sip.domain.com and there is a line 12 in the dialplan directing the call to ward,13 which exists, call processing will continue there. However, if the extension does not exist, the call will not be terminated. Instead, if there exists a more generic line 13 in the dialplan, e.g. exten => _X.,13,Goto(s,1), call processing will continue there. We use this trick to then redirect the call to an ‘s’ extension sequence to announce that the called extension could not be reached. It’s the reason all of the whitelisted extensions have to have the same line 13 designation so that call processing can continue with the generic line 13 when a specific extension match fails.
Configuring IPtables for Public SIP Access
You may recall that, with Incredible PBX, we bring up the basic IPtables firewall using the /etc/sysconfig/iptables rules. Then we add a number of whitelist entries using /usr/local/sbin/iptables-custom. We’re going to do much the same thing with today’s setup except the rule sets are a bit different. Let’s start by putting the default iptables-custom file in place:
cd /usr/local/sbin
wget http://incrediblepbx.com/iptables-custom-public.tar.gz
tar zxvf iptables-custom-public.tar.gz
rm -f iptables-custom-public.tar.gz
nano -w iptables-custom
When the nano editor opens, scroll to the bottom of the file. You’ll note that we’ve started a little list of notorious bad guys to get you started. Fail2Ban will actually do a pretty good job of managing these, but for the serious recidivists, blocking them permanently is probably a good idea. In addition to the bad guys, you’ll want to whitelist your own IP addresses and domains so that you don’t get blocked from FreePBX web access to your server. The syntax looks like the following two examples:
/usr/sbin/iptables -I INPUT -s pbxinaflash.dynamo.org -j ACCEPT
/usr/sbin/iptables -I INPUT -s 8.8.8.8                -j ACCEPT
Whenever you make changes to your IPtables configuration, remember to restart IPtables using the following command ONLY: iptables-restart
Now let’s put the final IPtables piece in place with the default IPtables config file:
cd /etc/sysconfig
wget http://incrediblepbx.com/iptables-public.tar.gz
tar zxvf iptables-public.tar.gz
rm -f iptables-public.tar.gz
nano -w iptables
When the nano editor opens the file, scroll down to line 51 which controls the TCP port for SSH access to your server. We strongly recommend you change this from 22 to something in the 1000-2000 range. HINT: Your birth year is easy to remember. In the next step, we’ll make the change in your SSH configuration as well.
Next, scroll down to lines 143 and 144. Replace YOUR_HOSTNAME.no-ip.com on both lines with the FQDN of your server that will be used to accept SIP invitations (connections) on your server. These entries have no effect on SIP registrations which we covered above!
Once you’ve made these changes, save the file BUT DO NOT RESTART IPTABLES JUST YET.
Securing the SSH Access Port
TCP port 22 is probably one of the most abused ports on the Internet because it controls access to SSH and the crown jewels by default. Assuming you changed this port in the IPtables firewall setup above, we now need to change it in your SSH config file as well. Edit /etc/ssh/sshd_config and scroll down to line 12. Change the entry to: Port 1999 assuming 1999 is the port you’ve chosen. Be sure to remove the comment symbol (#) at the beginning of the line if it exists. Then save the file. Now reboot your server, and you should be all set.
Dealing with the Bad Guys
You’ll be amazed how quickly and how many new friends you’ll make on the public Internet within the first few hours. You can watch the excitement from the Asterisk CLI by logging into your server as root and issuing the command: asterisk -rvvvvvvvvvv. Another helpful tool is to monitor your IPtables status which will show IP addresses that have been temporarily blocked by Fail2Ban: iptables -nL. This will catch most of the bad guys and block them. But some are smarter than others, and many know how to spoof IP addresses in SIP packets as you will quickly see. Unlike on KVM platforms, IPtables on most OpenVZ platforms cannot search packets for text strings which is a simple way to block many of these attackers. HINT: You get what you pay for. And, in some cases, attackers disguise their address or use yours. We’ve now found that ${SIPURI} holds the caller’s true identity so we’ve updated the code accordingly. Whether to permanently block these guys is completely up to you. A typical SIP INVITE before such a call is dropped only consumes about 100 bytes so it’s usually not a big deal. You also can manually block callers using the Fail2Ban client with the desired IP address: fail2ban-client set asterisk banip 12.34.56.78.
Additional Security on KVM Platforms
As we mentioned above, a KVM platform provides considerably more security for your public-facing server because you can block entire countries using the ipset extension to IPtables. You can read all about it here. After considerable discussion and suggestions on the PIAF Forum, we would offer the following code which blocks the countries we have identified as causing the majority of problems. First, modify your /etc/sysconfig/iptables configuration and insert the following code in the IPSPF section of the script around line 93. You can change the list of blocked countries to meet your own needs. Just be sure to make the same country-code changes in the blockem.sh script which we will cover in step 2. A list of available country codes can be found here. Save your changes, but do NOT restart IPtables just yet.
-A IPSPF -m set --match-set cn src -j DROP
-A IPSPF -m set --match-set ru src -j DROP
-A IPSPF -m set --match-set ps src -j DROP
-A IPSPF -m set --match-set kp src -j DROP
-A IPSPF -m set --match-set ua src -j DROP
-A IPSPF -m set --match-set md src -j DROP
-A IPSPF -m set --match-set nl src -j DROP
-A IPSPF -m set --match-set fr src -j DROP
Second, we want to add a new /etc/blockem.sh script and make it executable (chmod +x /etc/blockem.sh). Make sure the country list in line #5 matches the dropped countries list you added to IPtables in step #1 above.
#!/bin/bash
cd /etc
wget -qO - http://www.ipdeny.com/ipblocks/data/countries/all-zones.tar.gz| tar zxvf -
for i in \\
cn ru ps kp ua md nl fr
do
/usr/sbin/ipset create -exist $i hash:net
for j in $(cat $i.zone); do /usr/sbin/ipset add -exist $i $j; done
done
wait
sleep 5
service iptables restart
wait
service fail2ban restart
exit 0
Third, try things out by running the script: /etc/blockem.sh. Verify that IPtables is, in fact, blocking the listed countries: iptables -nL.
BUG: Some early releases had a missing line which caused the IPSPF section of code in the IPtables script not to be executed. You can test whether you’re missing the necessary line by issuing the following command:
grep "INPUT -j IPSPF" /etc/sysconfig/iptables
If the result is a blank line, then issue the following command to fix the problem:
sed -i 's|-A INPUT -j ASIP|-A INPUT -j IPSPF\\n-A INPUT -j ASIP|' /etc/sysconfig/iptables
Finally, we recommend adding the script to /etc/rc.d/rc.local so that it gets run whenever you reboot your server.
In choosing a KVM platform, we’ve had good luck with the $5/month Digital Ocean platform where you still can get a $100 credit to kick the tires for 60 days, Vultr (similar pricing to D.O. without the 60-day credit). With either of these providers, you can add automatic backups for an extra dollar a month. In the bargain basement (may not be here tomorrow) category, we like (and use) both the SnowVPS KVM $15/year and AlphaRacks KVM $22/year offerings. Many other low-cost options are documented on the LowEndBox site. Just don’t invest more than you can afford to lose… and make a backup.1
Connecting a SIP Phone to Kamailio or LinPhone
If you followed along in our initial Kamailio adventure, then it’s easy to test some SIP URI calls to your new server. You can connect virtually any kind of SIP telephone or endpoint to Kamailio. Another easy way to try out SIP calling is to first set up a free LinPhone SIP Account.
You can find dozens of recommendations for hardware-based SIP phones both on Nerd Vittles and the PIAF Forum. For today we’ll get you started with one of our favorite (free) softphones, YateClient. It’s available for almost all desktop platforms. Download YateClient from here. Run YateClient once you’ve installed it and enter the credentials for your Kamailio or LinPhone account you’ve previously created. You’ll need the IP address of your Kamailio server or LinPhone’s FQDN (sip.linphone.org) plus your account’s password. Fill in the Yate Client template using the IP address or FQDN as well as your Username and whatever Password you assigned to the account when you created it. Click OK to save your entries.
Once the Yate softphone shows that it is registered, try a test call to one of the SIP URIs you authorized on your new Asterisk server: sip:947@sip.yourdomain.com.
If you don’t happen to have a Kamailio server or a LinPhone SIP account to play with but you have another Asterisk server, then the simple way to enable SIP URI extensions is by editing /etc/asterisk/extensions_custom.conf. In the [from-internal-custom] context, add an extension that can be used to contact any desired SIP URI. Then reload your dialplan: asterisk -rx "dialplan reload". Now dial that extension (2468 in the following example) from any phone connected to your Asterisk server. The entry would look something like this to call the SIP URI on your new server for the latest weather forecast:
exten => 2468,1,Dial(SIP/weather@sip.yourdomain.com)
Originally published: Monday, January 28, 2019 Updated: Wednesday, February 6, 2019

Need help with Asterisk? Visit the VoIP-info Forum.
Special Thanks to Our Generous Sponsors
FULL DISCLOSURE: ClearlyIP, Skyetel, Vitelity, DigitalOcean, Vultr, VoIP.ms, 3CX, Sangoma, TelecomsXchange and VitalPBX have provided financial support to Nerd Vittles and our open source projects through advertising, referral revenue, and/or merchandise. As an Amazon Associate and Best Buy Affiliate, we also earn from qualifying purchases. We’ve chosen these providers not the other way around. Our decisions are based upon their corporate reputation and the quality of their offerings and pricing. Our recommendations regarding technology are reached without regard to financial compensation except in situations in which comparable products at comparable pricing are available from multiple sources. In this limited case, we support our sponsors because our sponsors support us.
 BOGO Bonaza: Enjoy state-of-the-art VoIP service with a $10 credit and half-price SIP service on up to $500 of Skyetel trunking with free number porting when you fund your Skyetel account. No limits on number of simultaneous calls. Quadruple data center redundancy. $25 monthly minimum spend required. Tutorial and sign up details are here.
![]() The lynchpin of Incredible PBX 2020 and beyond is ClearlyIP components which bring management of FreePBX modules and SIP phone integration to a level never before available with any other Asterisk distribution. And now you can configure and reconfigure your new Incredible PBX phones from the convenience of the Incredible PBX GUI.
The lynchpin of Incredible PBX 2020 and beyond is ClearlyIP components which bring management of FreePBX modules and SIP phone integration to a level never before available with any other Asterisk distribution. And now you can configure and reconfigure your new Incredible PBX phones from the convenience of the Incredible PBX GUI.
 VitalPBX is perhaps the fastest-growing PBX offering based upon Asterisk with an installed presence in more than 100 countries worldwide. VitalPBX has generously provided a customized White Label version of Incredible PBX tailored for use with all Incredible PBX and VitalPBX custom applications. Follow this link for a free test drive!
 Special Thanks to Vitelity. Vitelity is now Voyant Communications and has halted new registrations for the time being. Our special thanks to Vitelity for their unwavering financial support over many years and to the many Nerd Vittles readers who continue to enjoy the benefits of their service offerings. We will keep everyone posted on further developments.

- Digital Ocean and Vultr provide modest referral credits to Nerd Vittles for those that use our referral code. It in no way colors our recommendations regarding these two providers, both of whom we use extensively. [↩]
Introducing Skyetel: A VoIP Provider for All Seasons

Having been around the block more times than we can remember, suffice it to say it takes a lot to get us excited about a VoIP provider. Let us tick off some criteria to even get our attention: terrific pricing, failsafe reliability, and first class performance. So just imagine our excitement to discover that an early follower of Nerd Vittles now provides one of the most compelling VoIP services we’ve ever tested with triple redundancy in multiple data centers. And Skyetel now has added what, for some, was the most important piece: support for VoIP servers with dynamic IP addresses. While it’s still beta code, it’s easy to use and reliable. There’s yet another hidden benefit. Incredible PBX coupled with Skyetel makes a perfect platform for redundant servers. We’ll cover it in a future article, but here’s the basic design.
Let’s sweeten the pot a bit more. We were looking for a service provider that could offer a compelling price for the hobbyist and home user while also having the depth to provide millions of minutes to organizations and resellers that actually have such a need. Skyetel now offers Nerd Vittles readers two special offers. First, you can claim a $10 credit for your new account simply by opening a ticket once you sign up. Once you have kicked the tires and are satisfied with the service, you won’t want to miss the Nerd Vittles BOGO offer. Skyetel will match your original deposit up to $250. Deposit $50 and Skyetel will double it. Or plan ahead with a $250 deposit and Skyetel will still double it. That translates into $500 of half-price VoIP service! Once you have funded your account with your money, Skyetel will provide free porting of your DIDs for the first 60 days after you open your account plus a 10% reduction in your current origination rate and DID costs by presenting your last month’s bill.1 Effective 10/1/2023, $25/month minimum spend required. For resellers and high volume users, document your requirements on your Nerd Vittles signup form and let us put you in touch with someone at Skyetel that will make you a deal you can’t refuse. And what does Nerd Vittles get out of this? Glad you asked. We’re delighted to have Skyetel as a platinum sponsor to keep the lights burning and the deals flowing for another decade of articles and open source offerings for our dedicated followers.
| Original Skyetel Deposit | Skyetel Deposit Match | Available SIP Service $'s |
|---|---|---|
| $20 | $20 | $40 |
| $50 | $50 | $100 |
| $100 | $100 | $200 |
| $200 | $200 | $400 |
| $250 | $250 | $500 |
We want to also address the elephant in the room. Some have asked about our relationship with Vitelity, a long time sponsor of Nerd Vittles and our open source projects. They’re alive and well. However, the company has gone through several acquisitions in the past few years, and their focus now has shifted more to the reseller and wholesale market. ALL EXISTING VITELITY CUSTOMERS ARE UNAFFECTED BY THIS CHANGE IN DIRECTION. And we are more than happy to put new resellers and wholesalers in touch with someone at Vitelity that can address your requirements. The good news is that you’ll now have two companies to compare while new home users and small businesses have a viable alternative moving forward.
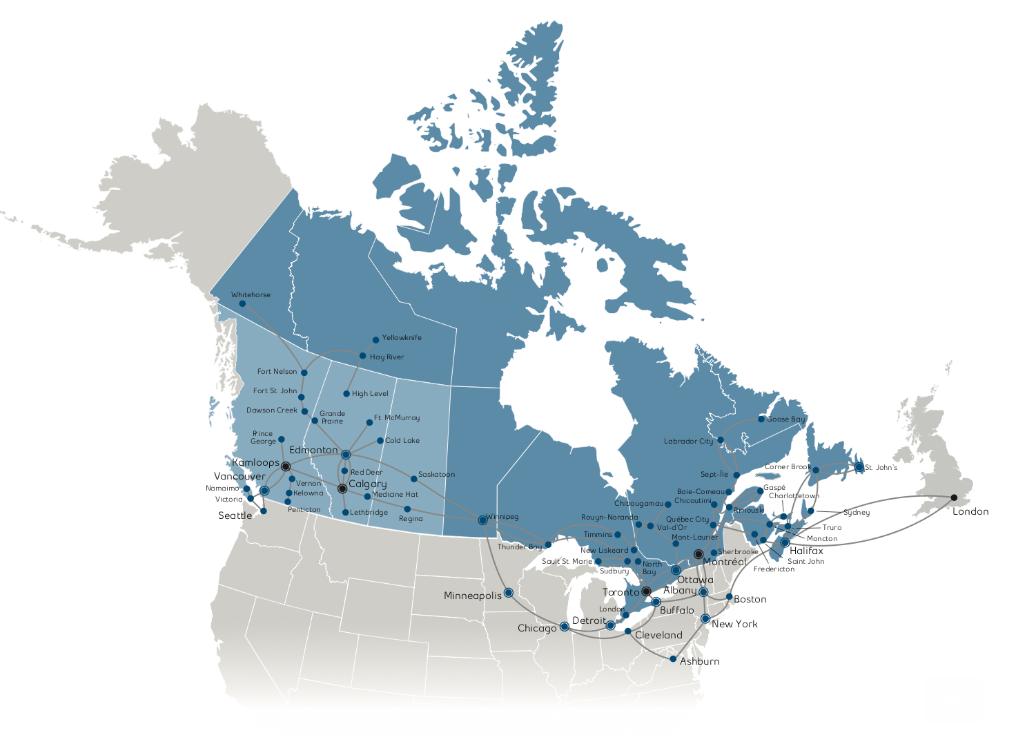
Skyetel’s State-of-the-Art Network Design
.png?version=1&modificationDate=1501343815612&cacheVersion=1&api=v2&width=561&height=541)
Because Skyetel’s system architecture is radically different from most other VoIP providers, we wanted to spend a minute documenting their setup. Typically, a VoIP provider may offer a failover server in case their primary server fails. But all calls flow through the primary server unless there is a system failure. As we noted previously, Skyetel’s current setup includes three redundant data centers, all of which receive incoming calls while being firewalled from each other. Once you place or receive a call from the Skyetel network, their data center is completely removed from the audio path of the call which flows directly between your server and the outside party. Thus, even if the data center experienced a total system failure in the middle of your call, neither you nor the other party would ever know it. This design also eliminates the potential of a man-in-the-middle attack from your VoIP provider’s server.
Skyetel Pricing Overview
This summary is not intended to be an exhaustive listing of all Skyetel services. Follow this link for a complete summary of fees and services. Traditional DIDs are $1 per month. Toll free numbers an additional 20¢ per month. Outbound conversational calls are $0.012 per minute. DIDs can be SMS/MMS enabled for 10¢ per month. E911 service is $1.50 per month. Incoming conversational calls are a penny a minute. CallerID lookups are $0.004 per call. Voicemail transcription is available for 10¢ per message.
Signing Up for Skyetel Service
So here’s the drill to sign up for Skyetel service and take advantage of the Nerd Vittles specials. First, complete the Prequalification Form here. You then will be provided a link to the Skyetel site to complete your registration. Once you have registered on the Skyetel site and your account has been activated, open a support ticket and request your free $10 credit to kick the tires. You cannot port in numbers at no cost until you actually fund your account out of your own pocket. Once you have funded your account, open another ticket for the BOGO credit for your account by referencing the Nerd Vittles special offer. You then can initiate your free number porting requests on the portal and request a credit for the porting fees. BOGO credit is limited to one per person/company/address/location. If you want to take advantage of the 10% discount on your current service, attach a copy of your last month’s bill. See footnote 1 for the fine print. If you have high call volume requirements, document these in your Prequalification Form, and we will be in touch. Easy Peasy!
For those that may be concerned that one day, after your credit expires, you could be paying a penny a minute for phone calls, let me provide a little Ma Bell history lesson for you. When my roommate and I were in law school, our typical phone bill often exceeded $200 a month because we both had girlfriends a couple hundred miles up the road. In today’s dollars, that phone bill translates into roughly $1,200 a month. That would have been 120,000 minutes a month at a penny a minute in today’s dollars. So, yes, VoIP is having a profound influence on the AT&T and Verizon Bell Sisters.
Skyetel Endpoint Group Configuration
Unlike many VoIP providers, Skyetel does not use SIP registrations to make connections to your PBX. Instead, Skyetel utilizes Endpoint Groups to identify which servers can communicate with the Skyetel service. An Endpoint Group consists of a Name, an IP address, a UDP or TCP port for the connection, and a numerical Priority for the group. For incoming calls destined to your PBX, DIDs are associated with an Endpoint Group to route the calls to your PBX. For outgoing calls from your PBX, a matching Endpoint Group is required to authorize outbound calls through the Skyetel network. Thus, the first step in configuring the Skyetel side for use with your PBX is to set up an Endpoint Group. A typical setup for use with Incredible PBX®, Asterisk®, or FreePBX® would look like the following:
- Name: MyPBX
- Priority: 1
- IP Address: PBX-Public-IP-Address
- Port: 5060
- Protocol: UDP
- Description: server1.incrediblepbx.com
Skyetel DID Configuration
To receive incoming PSTN calls, you’ll need at least one DID. On the Skyetel site, you acquire DIDs under the Phone Numbers tab. You have the option of Porting in Existing Numbers (free for the first 60 days after you sign up for service) or purchasing new ones under the Buy Phone Numbers menu option.
Once you have acquired one or more DIDs, navigate to the Local Numbers or Toll Free Numbers tab and specify the desired SIP Format and Endpoint Group for each DID. Add SMS/MMS and E911 support, if desired. Call Forwarding and Failover are also supported. That completes the VoIP setup on the Skyetel side. System Status is always available here.
Incredible PBX Firewall Setup for Skyetel
The Travelin’ Man 3 firewall included with all Incredible PBX platforms limits access to your server based upon whitelisted IP addresses of outside providers and users. In order to receive calls from the multiple Skyetel data centers, the following entries need to be included in the whitelist of your PBX. For new installs of Incredible PBX 13-13 for CentOS, the entries already are included. Otherwise, issue the following commands from the Linux CLI and choose the 0 option using the add-ip utility in /root:
- /root/add-ip Skyetel-NW 52.41.52.34
- /root/add-ip Skyetel-SW 52.8.201.128
- /root/add-ip Skyetel-NE 52.60.138.31
- /root/add-ip Skyetel-SE 50.17.48.216
- /root/add-ip Skyetel-EU 35.156.192.164
NOTE: If your PBX is sitting behind a NAT-based router, then you will also need to forward UDP port 5060 from your router to the internal IP address of your PBX. Otherwise, incoming calls from Skyetel will fail. You also may need to add a NAT=yes entry to each of the Skyetel trunk configurations using the GUI. The telltale sign that the NAT entry is required will be incoming calls with one-way or no audio.
Incredible PBX Trunk Setups for Skyetel
Because Skyetel uses multiple data centers without trunk registrations, you’ll actually need to configure 6 separate Skyetel trunks in the Incredible PBX GUI. The same setup applies for those using generic FreePBX aggregations. We’ve created a script to create all of the trunks for you. Just issue the following commands. The last command assures that you don’t accidentally run the script a second time which would cause all sorts of issues. Feel free to review the code if you want to learn how to create trunks in FreePBX from the command line.
cd /root
wget http://incrediblepbx.com/add-skyetel
chmod +x add-skyetel
# uncomment next line if your incoming calls all have 10-digit numbers
# sed -i 's|from-trunk|from-pstn-e164-us|' add-skyetel
./add-skyetel
chmod -x add-skyetel
Incredible PBX Inbound Routing for Skyetel
Next we need to tell your PBX how to route incoming calls from Skyetel. Using a browser, log into the IP address of your PBX using your admin credentials. Because there is no trunk registration with Skyetel trunks, you will need to create an Inbound Route for every Skyetel DID. You cannot rely upon a Default inbound route because FreePBX treats the calls as blocked anonymous calls without an Inbound Route pointing to the 11-digit number of each Skyetel DID. From the GUI, choose Connectivity -> Inbound Routes -> Add Inbound Route. For both the Description and DID fields, enter the 11-digit phone number beginning with a 1. Set the Destination for the incoming DID as desired and click Submit. Reload the Dialplan when prompted. Place a test call to each of your DIDs after configuring the Inbound Routes.
Incredible PBX Outbound Routing to Skyetel
If Skyetel will be your primary provider, you can use both 10-digit and 11-digit dialing to process outbound calls through your Skyetel account. From the GUI, choose Connectivity -> Outbound Routes -> Add Outbound Route. For the setup, we recommend the following using the CallerID Number you wish to associate with your outbound calls through Skyetel:
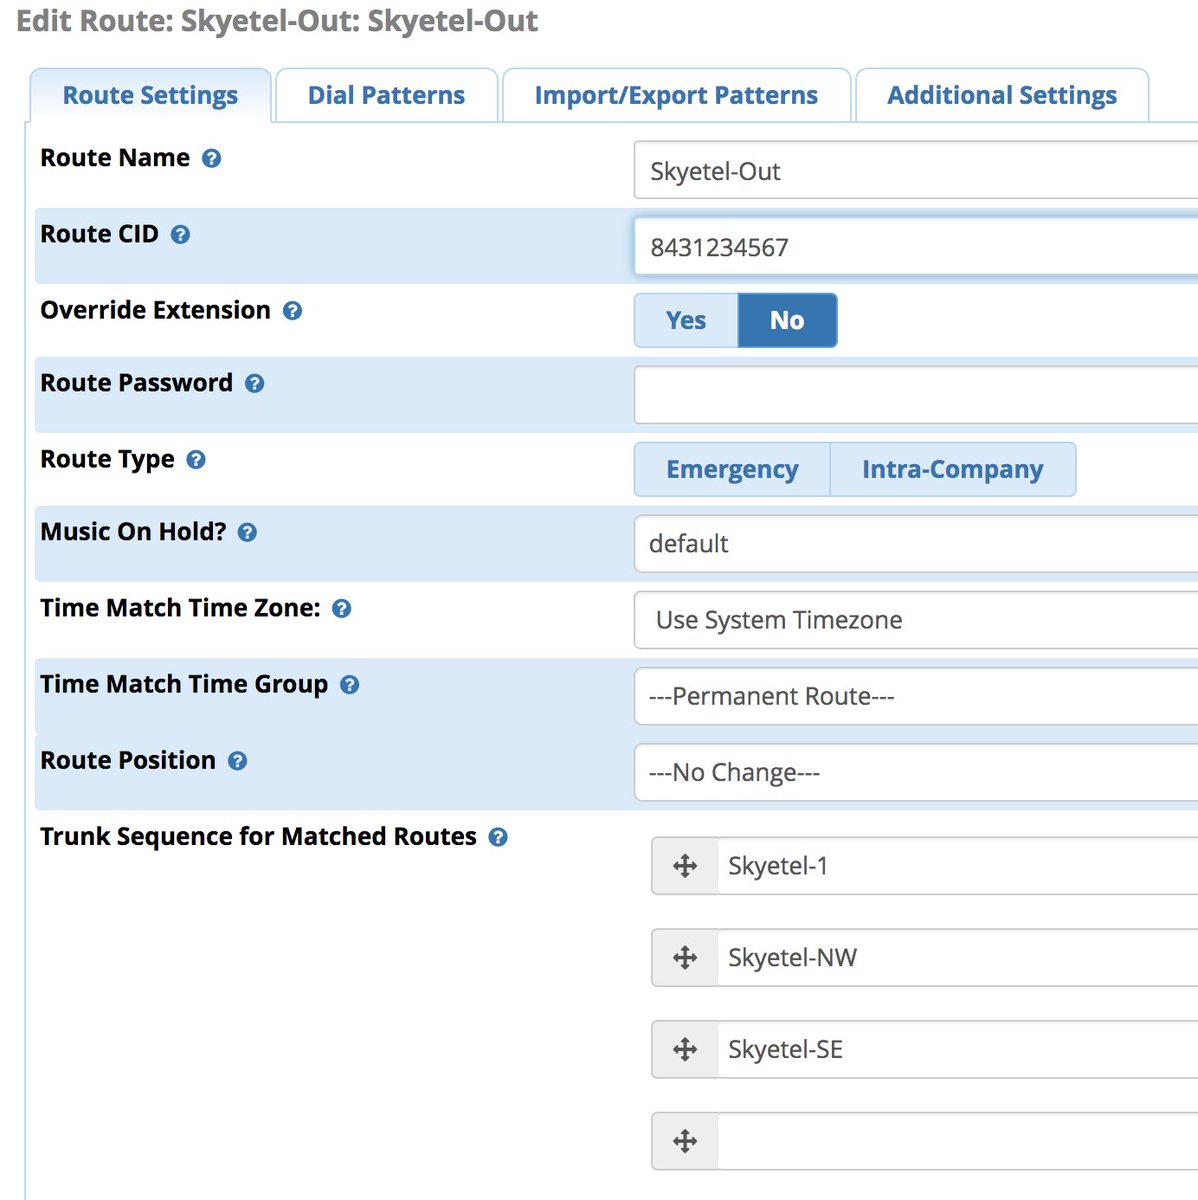
Enter the Dial Patterns under the Dial Patterns tab before saving your outbound route. Here’s what you would enter for 10-digit and 11-digit dialing. If you want to require a dialing prefix to use the Skyetel Outbound Route, enter it in the Prefix field for both dial strings.

Audio Issues with Skyetel
If you experience one-way or no audio on some calls, make sure you have filled in the NAT Settings section in the GUI under Settings -> Asterisk SIP Settings -> General. In addition to adding your external and internal IP addresses there, be sure to add your external IP address in /etc/asterisk/sip_general_custom.conf like the following example and restart Asterisk:
externip=xxx.xxx.xxx.xxx
If you’re using PJSIP trunks or extensions on your PBX, implement this fix as well.
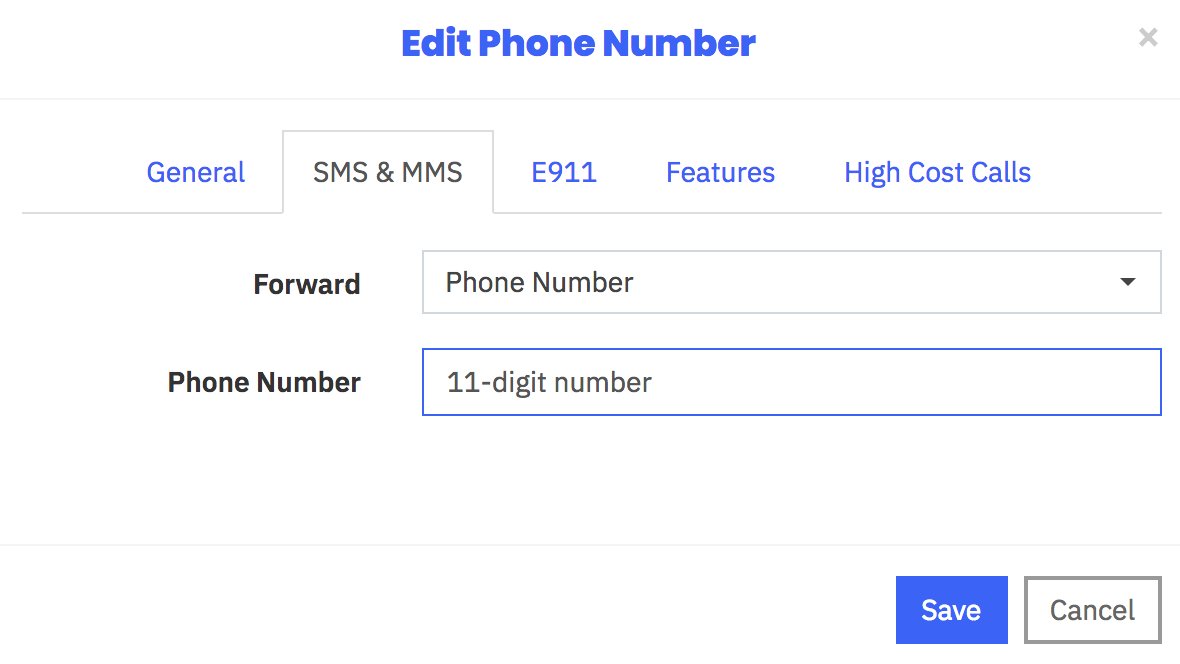
Receiving SMS Messages Through Skyetel
Most Skyetel DIDs support SMS messaging. Once you have purchased one or more DIDs, you can edit each number and, under the SMS &MMS tab, you can redirect incoming SMS messages to an email or SMS destination of your choice using the following example:
Sending SMS Messages Through Skyetel
We’ve created a simple script that will let you send SMS messages from the Linux CLI using your Skyetel DIDs. In order to send SMS messages, you first will need to create a SID key and password in the Skyetel portal. From the Settings icon, choose API Keys -> Create. Once the credentials appear, copy both your SID and Password. Then click SAVE.
Next, from the Linux CLI, issue the following commands to download the sms-skyetel script into in your /root folder. Then edit the file and insert your SID, secret, and DID credentials in the fields at the top of the script. Save the file, and you’re all set.
cd /root
wget http://incrediblepbx.com/sms-skyetel
chmod +x sms-skyetel
nano -w sms-skyetel
To send an SMS message, use the following syntax where 18005551212 is the 11-digit SMS destination: sms-skyetel 18005551212 "Some message"
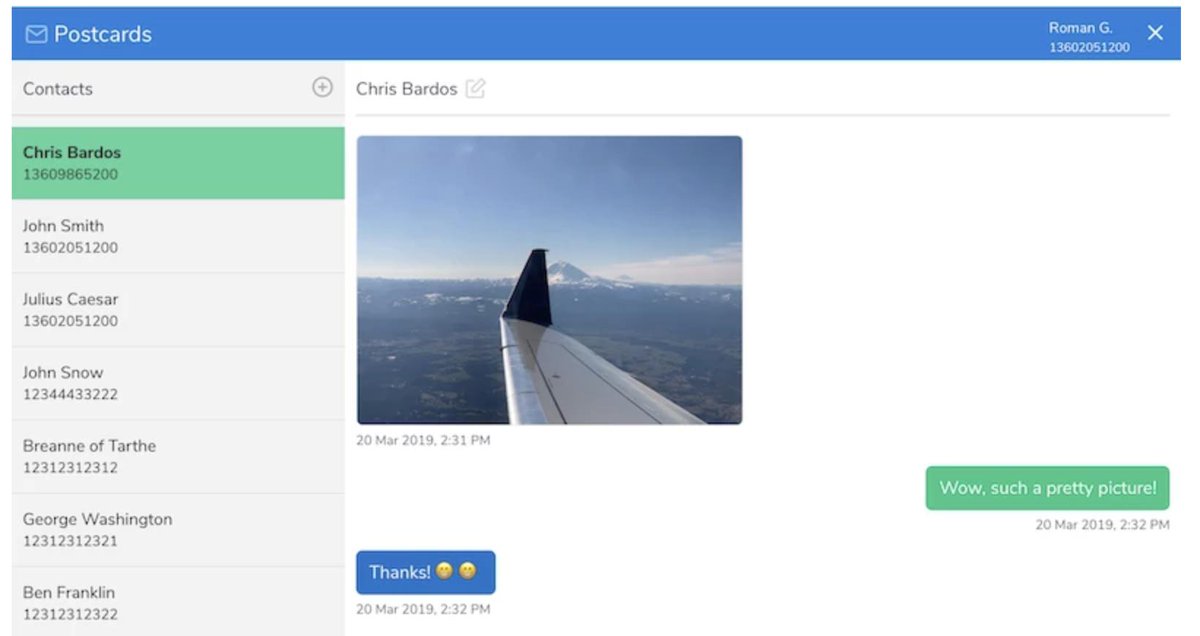
SMS and MMS Messaging with Postcards
Skyetel now has released a terrific, open source Docker app, Postcards, that lets you build an SMS and MMS messaging platform for your entire organization. Suffice it to say, anything you ever wanted to do with SMS and MMS messaging, you can do with Postcards. We won’t repeat Skyetel’s excellent tutorial, but you certainly need to visit their site and take Postcards for a spin.
NEW: Skyetel Support for Dynamic IP Addresses
You asked for it, and Skyetel has delivered. For Nerd Vittles users running servers with dynamic IP addresses, Skyetel now provides support for your platform. Log into your server as root and cd /usr/src. Then review this tutorial which describes the steps to put the pieces in place. Be advised that this is beta software at this juncture. If you run into issues, please post your questions on the PIAF Forum. Here are the actual steps:
(1) Log in to your Skyetel portal and Add a New Endpoint Group for your server giving it the name and current public IP address of your server.
(2) While still logged in, tap the Gear icon to open Settings dialog and choose API Keys tab.
(3) Add a new API key and write down your new SID and SID password.
(4) If your server is behind a router or firewall, log into that device and map UDP 5060 and UDP 10000-20000 to the private LAN address of your server.
NOTE: If your server is on the Debian, Ubuntu, or Raspbian platform, substitute the following command for the first two yum commands in step #5 below:
apt-get -y install coreutils curl git jq
(5) Log into your server and issue the following commands to install the EndPoint Updater:
yum -y install coreutils curl git epel-release
yum -y --enablerepo=epel install jq
cd /usr/src
git clone https://bitbucket.org/skyetel/ip-endpoint-group-update.git
cd ip-endpoint-group-update
./ip-update-endpointgroup.sh
(6) Fill in your credentials when prompted, and the cron script will be installed to keep your server’s dynamic IP address registered with Skyetel.
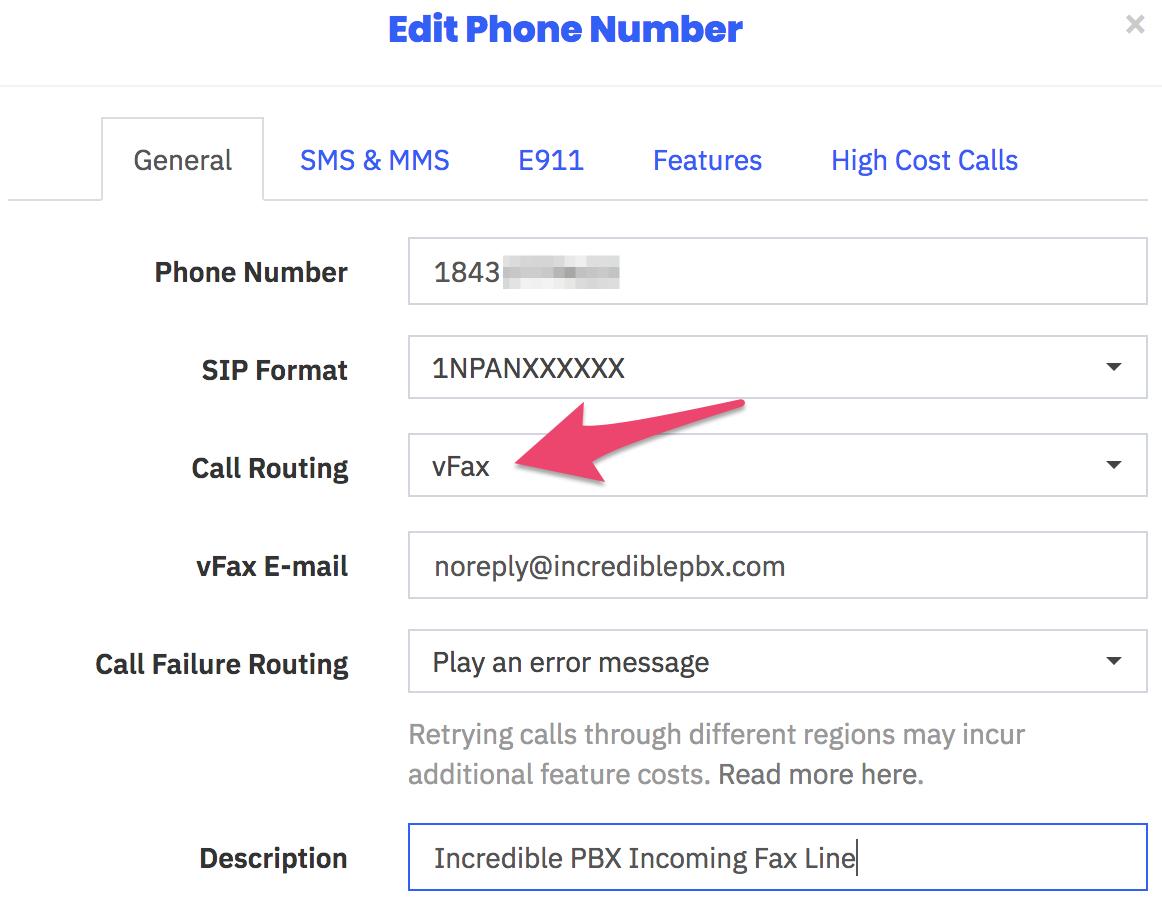
Introducing Skyetel’s New Fax Platform
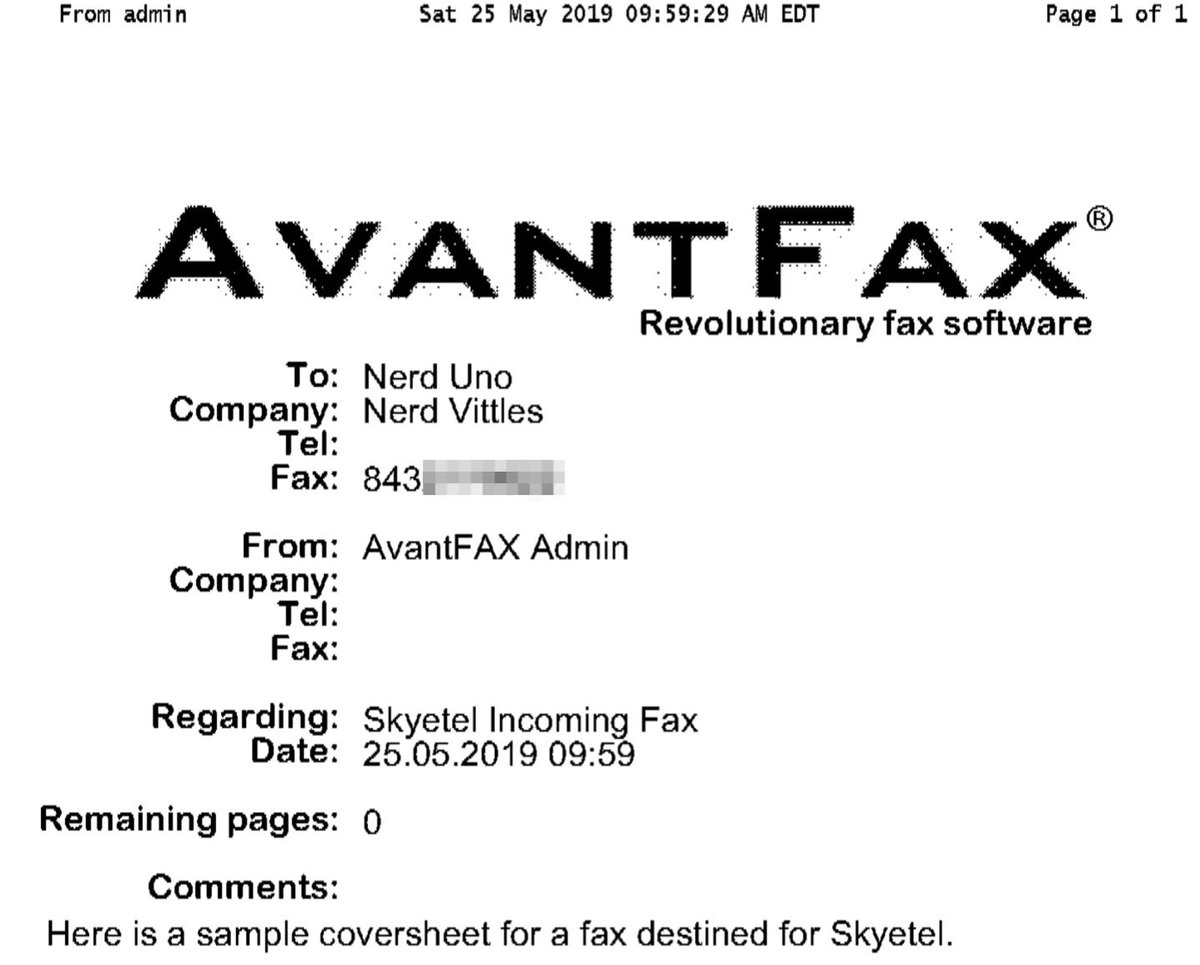
Every time we read an article predicting the demise of fax technology, we have to chuckle. We’ve been reading the articles for about 30 years now, and fax still is the goto solution for many organizations. Can you spell HIPPA? Finally, Skyetel has dipped its toes in the fax waters by offering an easy-to-use fax solution for receipt of traditional and T.38 faxes. Simply purchase a Skyetel DID and configure it for vFax routing. Enter an email address for delivery of the faxes, and you’re done.
Sending faxes from the Skyetel portal still is on the drawing boards, but it’s coming. In the meantime, Incredible Fax™ which is bundled with all Incredible PBX® platforms will let you send faxes ’til the cows come home with our easy-to-use Hylafax/AvantFax implementation.
Implementing the New Spam Call Filter
One of the most often requested features for any PBX is spam call filtering. Skyetel takes it to the next level by dealing with the spammers before the calls ever reach your PBX. For each of your Skyetel phone numbers, click on the Features tab and set the Spam Call Filter as desired.
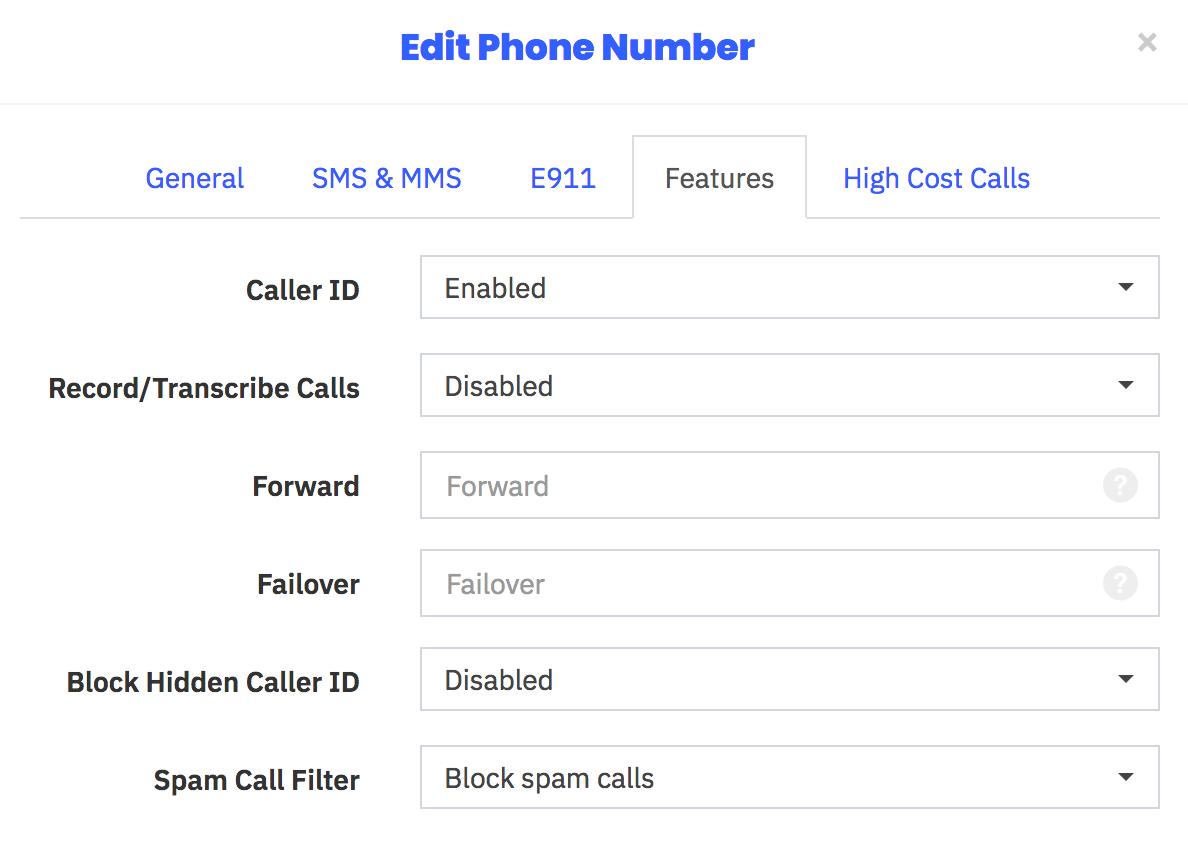
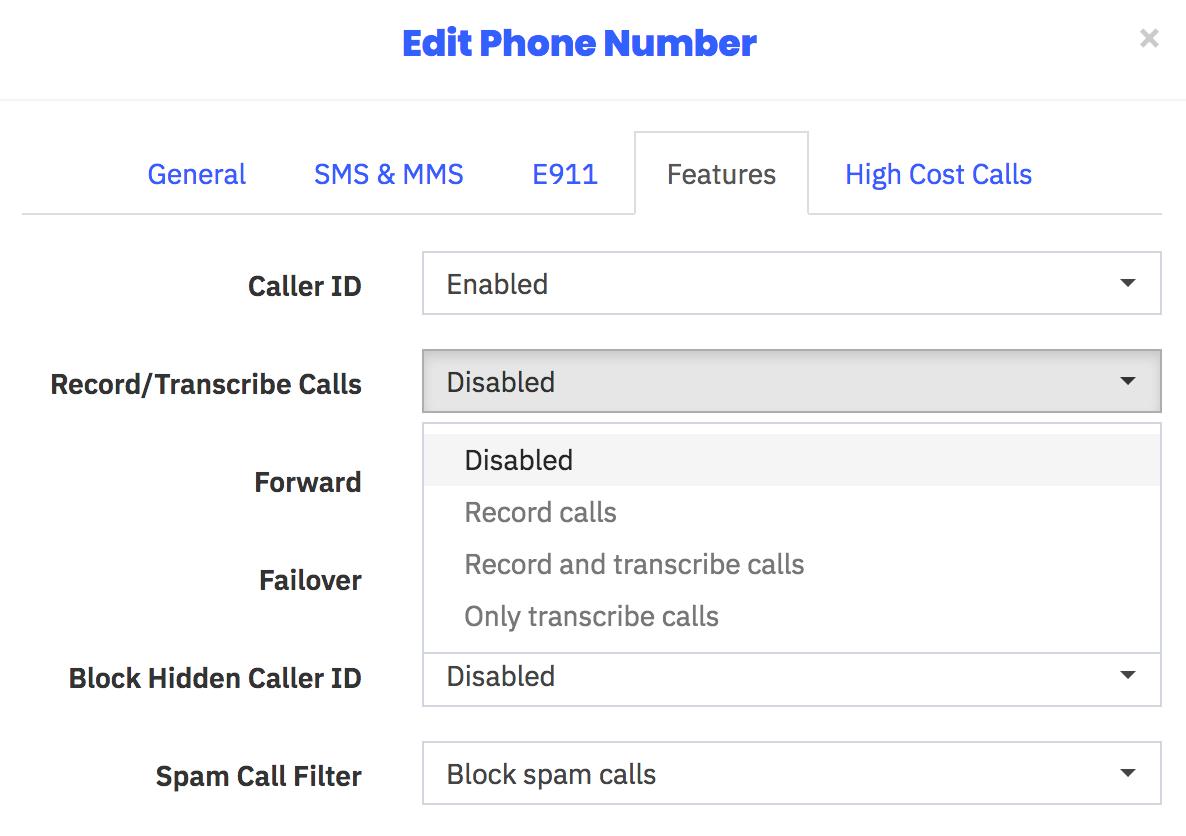
Recording and Transcribing Skyetel Calls
As with spam call filtering, recording and/or transcribing Skyetel calls is only a click away. For each of your Skyetel phone numbers, click on the Features tab and set the option desired for Recording and/or Transcribing calls. Recordings and Transcriptions can be managed from your Skyetel Dashboard. Storage is free for up to 30 days, after which they are deleted.
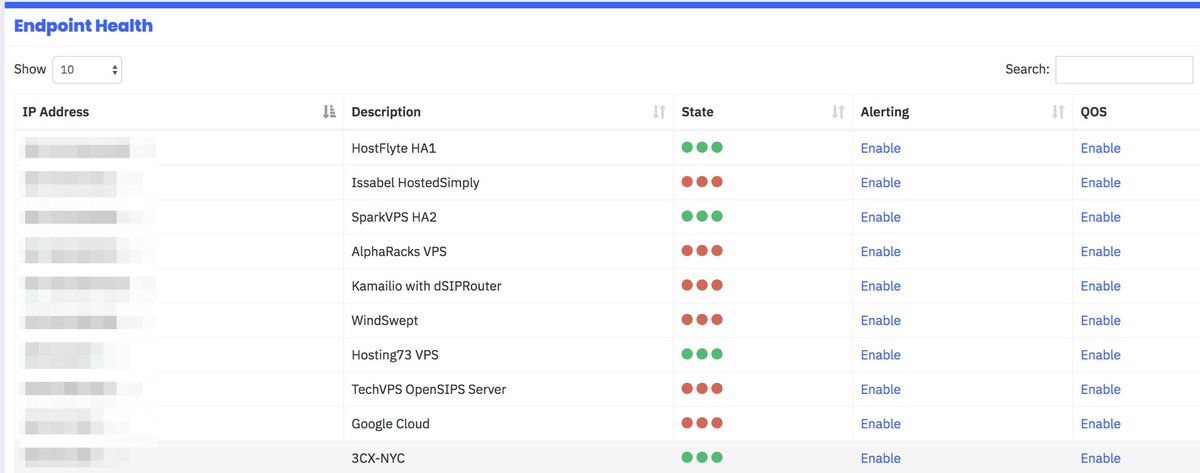
Skyetel Monitoring of Endpoint Health
In addition to monitoring and reporting the health of all Skyetel services in your web portal, this latest addition allows you to configure Skyetel to not only monitor the State of every registered endpoint but also its Health with realtime metrics of the Latency, Packet Loss, and Jitter of each of your endpoints. Simply check the Network QOS options desired.
Skyetel Expansion for Canadian Users
Here’s some great news for our Canadian friends. Skyetel has been listening!
- Porting to Skyetel in Canada now is significantly easier and faster
- Awesome reductions in audio round trip times
- Epic reductions in time-to-deliver
- Faster response times to technical issues (and fewer of them!)
- Audio for Canadian calls will now originate from Canadian data centers
- SMS and MMS available on Canadian ported numbers
Originally published: Thursday, November 1, 2018 Updated: Wednesday, June 12, 2019
 Support Issues. With any application as sophisticated as this one, you’re bound to have questions. Blog comments are a difficult place to address support issues although we welcome general comments about our articles and software. If you have particular support issues, we encourage you to get actively involved in the PBX in a Flash Forum. It’s the best Asterisk tech support site in the business, and it’s all free! Please have a look and post your support questions there. Unlike some forums, the PIAF Forum is extremely friendly and is supported by literally hundreds of Asterisk gurus and thousands of users just like you. You won’t have to wait long for an answer to your question.
Need help with Asterisk? Visit the VoIP-info Forum.
Special Thanks to Our Generous Sponsors
FULL DISCLOSURE: ClearlyIP, Skyetel, Vitelity, DigitalOcean, Vultr, VoIP.ms, 3CX, Sangoma, TelecomsXchange and VitalPBX have provided financial support to Nerd Vittles and our open source projects through advertising, referral revenue, and/or merchandise. As an Amazon Associate and Best Buy Affiliate, we also earn from qualifying purchases. We’ve chosen these providers not the other way around. Our decisions are based upon their corporate reputation and the quality of their offerings and pricing. Our recommendations regarding technology are reached without regard to financial compensation except in situations in which comparable products at comparable pricing are available from multiple sources. In this limited case, we support our sponsors because our sponsors support us.
BOGO Bonaza: Enjoy state-of-the-art VoIP service with a $10 credit and half-price SIP service on up to $500 of Skyetel trunking with free number porting when you fund your Skyetel account. No limits on number of simultaneous calls. Quadruple data center redundancy. $25 monthly minimum spend required. Tutorial and sign up details are here.
![]() The lynchpin of Incredible PBX 2020 and beyond is ClearlyIP components which bring management of FreePBX modules and SIP phone integration to a level never before available with any other Asterisk distribution. And now you can configure and reconfigure your new Incredible PBX phones from the convenience of the Incredible PBX GUI.
The lynchpin of Incredible PBX 2020 and beyond is ClearlyIP components which bring management of FreePBX modules and SIP phone integration to a level never before available with any other Asterisk distribution. And now you can configure and reconfigure your new Incredible PBX phones from the convenience of the Incredible PBX GUI.
VitalPBX is perhaps the fastest-growing PBX offering based upon Asterisk with an installed presence in more than 100 countries worldwide. VitalPBX has generously provided a customized White Label version of Incredible PBX tailored for use with all Incredible PBX and VitalPBX custom applications. Follow this link for a free test drive!
Special Thanks to Vitelity. Vitelity is now Voyant Communications and has halted new registrations for the time being. Our special thanks to Vitelity for their unwavering financial support over many years and to the many Nerd Vittles readers who continue to enjoy the benefits of their service offerings. We will keep everyone posted on further developments.

- In the unlikely event that Skyetel cannot provide a 10% reduction in your current origination rate and/or DID costs, Skyetel will give you an additional $50 credit to use with the Skyetel service. [↩]
Celebrating 2019: Return of the One-Minute Desktop PBX
If you’re new to the VoIP world and aren’t quite ready to dive into the Nerd Vittles cloud computing offerings, then we have a one minute setup solution today that doesn’t require you to buy anything ever. You can use almost any desktop computer you already own to bring up the VirtualBox® edition of Incredible PBX® in less than 60 seconds. If you’ve followed Nerd Vittles over the years, you already know that VirtualBox from Oracle® is one of our favorite platforms. Once VirtualBox is installed on your desktop computer, adding Incredible PBX is a snap. Download the new Incredible PBX vbox image from SourceForge, double-click on the downloaded image, check the initialize MAC address box, and boom. In less than a minute, your PBX is ready to use.
The really nice thing about playing along today is it won’t cost you a dime to try things out for yourself. And, if you really love it and we think you will, there’s no hidden fee or crippleware to hinder your continued use of Incredible PBX for as long as you like. Of course, the Incredible PBX feature set is included as well which brings you nearly three dozen applications for Asterisk® that will revolutionize your communications platform. Just add your credentials and speech-to-text, voice recognition, and a Siri-like telephony interface are as close as your nearest SIP phone. If you later decide you’d like to migrate your server to an inexpensive cloud-based platform, Incredible Backup and Restore make it a 15-minute turnkey task.
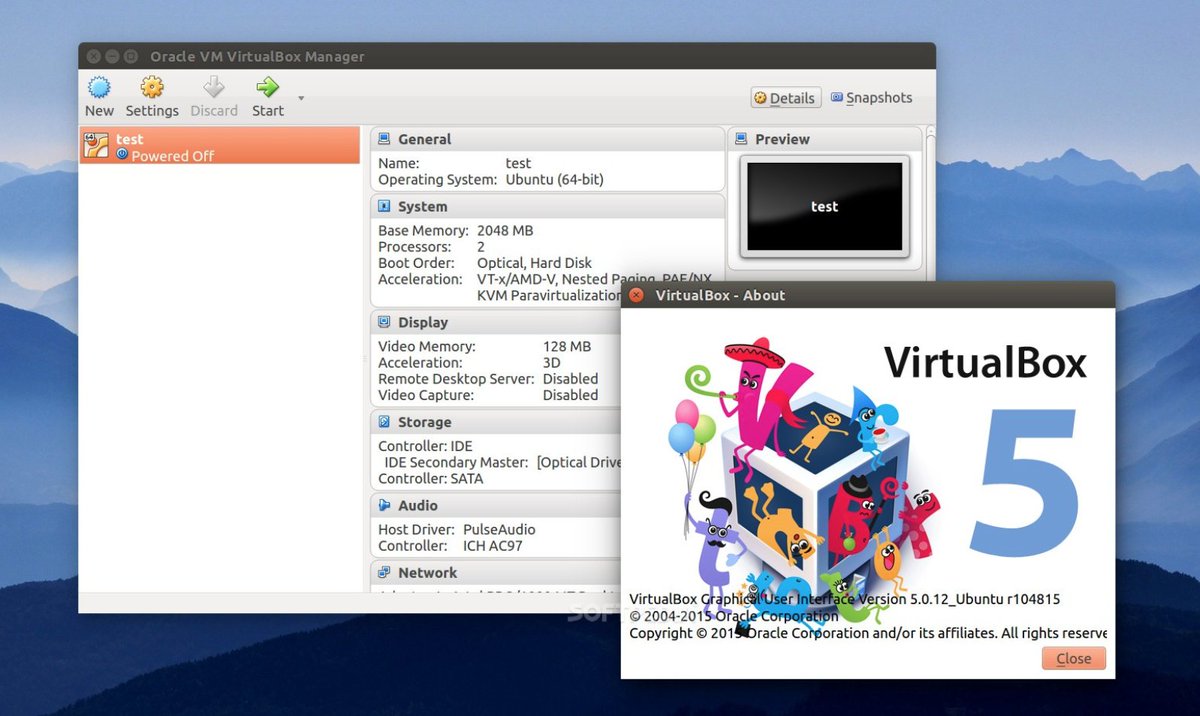
Installing Oracle VM VirtualBox

Oracle’s virtual machine platform inherited from Sun is amazing. It’s not only free, but it’s pure GPL2 code. VirtualBox gives you a virtual machine platform that runs on top of any desktop operating system. In terms of limitations, we haven’t found any. We even tested this on an Atom-based Windows 7 machine with 2GB of RAM, and it worked without a hiccup. So step #1 today is to download one or more of the VirtualBox installers from VirtualBox.org or Oracle.com. Our recommendation is to put all of the 100MB installers on a 4GB thumb drive.1 Then you’ll have everything in one place whenever and wherever you happen to need it. Once you’ve downloaded the software, simply install it onto your favorite desktop machine. Accept all of the default settings, and you’ll be good to go. For more details, here’s a link to the Oracle VM VirtualBox User Manual.
Installing Incredible PBX 13 with VirtualBox
To begin, download the latest Incredible PBX vbox image (2.6 GB) onto your desktop. Incredible PBX 13-13.10 includes all of the very latest FreePBX® 13 modules.
Next, double-click on the Incredible PBX .ova image on your desktop. Be sure to check the box to initialize the MAC address of the image and then click Import. Once the import is finished, you’ll see a new Incredible PBX virtual machine in the VM List of the VirtualBox Manager Window. Let’s make a couple of one-time adjustments to the Incredible PBX configuration to account for possible differences in sound and network cards on different host machines.
(1) Click once on the Incredible PBX virtual machine in the VM List. Then (2) click the Settings button. In the Audio tab, check the Enable Audio option and choose your sound card. In the Network tab for Adapter 1, check the Enable Network Adapter option. From the Attached to pull-down menu, choose Bridged Adapter. Then select your network card from the Name list. Then click OK. That’s all the configuration that is necessary for Incredible PBX.
Running Incredible PBX in VirtualBox
Once you’ve imported and configured the Incredible PBX Virtual Machine, you’re ready to go. Highlight the Incredible PBX virtual machine in the VM List on the VirtualBox Manager Window and click the Start button. The standard Linux boot procedure will begin and, within a few seconds, you’ll get the familiar Linux login prompt. During the bootstrap procedure, you’ll see a couple of dialogue boxes pop up that explain the keystrokes to move back and forth between your host operating system desktop and your virtual machine. Remember, you still have full access to your desktop computer. Incredible PBX is merely running as a task in a VM window. Always gracefully halt Incredible PBX just as you would on any computer.
Here’s what you need to know. To work in the Incredible PBX virtual machine, just left-click your mouse while it is positioned inside the VM window. To return to your host operating system desktop, press the right Option key on Windows machines or the left Command key on any Mac. For other operating systems, read the dialogue boxes for instructions on moving around. To access the Linux CLI, login as root with the default password: password. Change your passwords immediately by typing: /root/update-passwords.
Setting the Date and Time with VirtualBox
On some platforms, VirtualBox has a nasty habit of mangling the date and time of your virtual machine. Typing date will tell you whether your VM is affected. If it’s a problem, manually set the date and time and then update the hardware clock. Here’s how assuming 01070709 is the month, day, and correct time of your server:
date 01070709
clock -w
Overview of the Initial Asterisk Setup Process
For those new to PBXs, here’s a two paragraph summary of how Voice over IP (VoIP) works. Phones connected to your PBX are registered with Extensions so that they can make and receive calls. When a PBX user picks up a phone and dials a number, an Outbound Route tells the PBX which Trunk to use to place the call based upon established dialing rules. Unless the dialed number is a local extension, a Trunk registered with some service provider accepts the call, and the PBX sends the call to that provider. The provider then routes the call to its destination where the recipient’s phone rings to announce the incoming call. When the recipient picks up the phone, the conversation begins.
Looking at things from the other end, when a caller somewhere in the world wishes to reach you, the caller picks up a telephone and dials a number known as a DID that is assigned to you by a provider with whom you have established service. When the provider receives the call to your DID, it routes the call to your PBX based upon destination information you established with the provider. Your PBX receives the call with information identifying the DID of the call as well as the CallerID name and number of the caller. An Inbound Route on your PBX then determines where to send the call based upon that DID and CallerID information. Typically, a call is routed to an Extension, a group of Extensions known as a Ring Group, or an IVR or AutoAttendant giving the caller choices on routing the call to the desired destination. Once the call is routed to an Extension, the PBX rings the phone registered to that Extension. When you pick up the phone, the conversation begins.
Configuring Asterisk to Support NAT-Based Routing
With a VoIP server, many PBXs and Extensions are housed behind a NAT-based router that is found in most homes and businesses. These routers assign private IP addresses that are not accessible from the Internet. This causes SIP routing headaches because there are actually two legs to every call, one on the private IP address of your server or extension and another on the public Internet with an entirely different IP address. Routers supposedly handle this handoff of the call using Network Address Translation (NAT) and SIP ALG. With Asterisk-based PBXs, we want the PBX itself to handle the NAT chores so it is critically important to do three things when setting up your PBX. First, turn off SIP ALG on every router used by your PBX and every extension connected to your PBX. Second, tell your PBX about your public and private IP address setup. Step #2 is done in the Incredible PBX GUI with a browser. Login as admin and choose Settings:Asterisk SIP Settings. In the NAT Settings section of the form, click Detect Network Settings. Make sure your public and private IP addresses are correctly listed. Then click Submit and reload your dialplan when prompted. Failure to perform BOTH of these steps typically results in calls with one-way audio, i.e. where either you or the called party can’t hear the other party in the conversation. The third rule to remember is to always configure SIP Extensions on your PBX with NAT Mode=YES. This is rarely harmful and failure to configure SIP extensions in this way typically causes one-way audio in calls as well. IAX extensions avoid NAT issues.
Configuring Extensions with Incredible PBX GUI
Extensions are created using the Incredible PBX GUI: Applications:Extensions. Many SIP phones expect extensions to communicate on UDP port 5060. If this is the case with your SIP phone or softphone, then always create Chan_SIP extensions which communicate on UDP 5060. If your SIP phone or softphone provide port flexibility, then you have a choice in the type of SIP extension to create: Chan_SIP or the more versatile PJSIP. Just remember to always configure SIP extensions with NAT Mode=YES in the Advanced tab. If your VoIP phones or softphones support IAX connectivity, you may wish to consider IAX extensions which avoid NAT problems.
When you create a new Extension, a new entry is automatically created in the PBX Internal Directory. If you wish to allow individual users to manage their extensions or use the WebRTC softphone, then you will also have to create a (very) secure password for User Control Panel (UCP) access. Choose Admin:User Management and click on the key icon of the desired extension to assign a password for UCP and WebRTC access.
Configuring SIP Phones with Incredible PBX GUI
SIP phones and softphones typically require three pieces of information: the IP address of your server, the extension number, and the extension password. If you’re using a PJSIP extension, you also will need to change the port to UDP 5061. If your server is behind a NAT-based router, SIP phones also behind the same router need to use the private LAN address rather than the public IP address. If the SIP phones are outside the router protecting the PBX, then use the public IP address and make certain that you also map ports 5060 and 5061 from your router to the private LAN address of your PBX. Beginning with Incredible PBX 13-13.10, you now can make free SIP URI calls worldwide from almost any SIP phone or softphone. Our SIP URI tutorial covers everything you need to know.
The PIAF Forum can provide you with helpful information in choosing high quality SIP phones. Yealink phones are highly recommended with minimal issues. Cisco phones are the most difficult to configure. Insofar as free softphones, we recommend the Zoiper 3 offerings for Windows, Mac, iOS, and Android. Zoiper 5 still is experiencing some growing pains. A key advantage of the Zoiper softphone is it supports IAX extensions which eliminate the NAT issues entirely. On the Mac platform, we also recommend the Telephone app which is available in the App Store. For SRTP communications, use Grandstream Wave.
Configuring Trunks with Incredible PBX GUI
Perhaps the most difficult component to configure in the PBX is the Trunk. Almost every provider has a different way of doing things. We’ve taken some of the torture out of the exercise by providing configuration settings for dozens of providers. All you need to do is edit the desired Trunk (Connectivity:Trunks), change the Disable Trunk entry to No, and insert your credentials in both the PEER Details and Registration string of the SIP Settings Outgoing and Incoming tabs.
UPDATE: Whether your desktop PBX has a static IP address on the Internet or not, you now can take advantage of a terrific Nerd Vittles Skyetel offer of $50 in free service using Skyetel’s just released support for dynamic IP addressing. Start by mapping UDP ports 5060 and 10000-20000 to your server from your router. The firewall settings and Skyetel trunk setups are preconfigured in this VirtualBox image. Once you get this far, you’re ready to install Skyetel’s new dynamic IP address updater. This is required since you never actually register a trunk with Skyetel. Here’s how. Log into your server as root and cd /usr/src. Then follow this tutorial to put the pieces in place. While this is beta software at this juncture, we have tested it with excellent results. However, if you run into issues, please post your questions on the PIAF Forum. Now jump over to our Skyetel Tutorial to claim your $50 credit and to get your account set up and configured. Effective 10/1/2023, $25/month minimum spend required.
Of course, Incredible PBX comes preconfigured with setups for dozens of other providers that let you register a new trunk on the provider’s server. VoIP.ms (free iNUM), CircleNet, CallCentric (free DID and iNUM), LocalPhone (25¢/mo. iNUM), Future-Nine, AnveoDirect, and V1VoIP are excellent options.2 Most don’t cost you anything unless you make calls. Review our complete SIP tutorial here: Developing a Cost-Effective SIP Strategy.
Configuring Inbound Routes in Incredible PBX GUI
Inbound Routes, as the name implies, are used to direct incoming calls to a specific destination. That destination could be an extension, a ring group, an IVR or AutoAttendant, or even a conference or DISA extension to place outbound calls (hopefully with a very secure password). Inbound Routes can be identified by DID, CallerID number, or both. To create Inbound Routes, choose Connectivity:Inbound Routes and then click Add Inbound Route. Provide at least a Description for the route, a DID to be matched, and the Destination for the incoming calls that match. If you only want certain callers to be able to reach certain extensions, add a CallerID number to your matching criteria. You can add Call Recording and CallerID CNAM Lookups under the Other tab.
Configuring Outbound Routes in Incredible PBX GUI
Outbound Routes serve a couple of purposes. First, they assure that calls placed by users of your PBX are routed out through an appropriate trunk to reach their destination in the least costly manner. Second, they serve as a security mechanism by either blocking or restricting certain calls by requiring a PIN to complete the calls. For example, if you only permit 10-digit calls and route all of those calls out through a specific trunk with a $20 account balance, there is little risk of running up an exorbitant phone bill because of unauthorized calls unless you’ve deposited a lot of money in your account or activated automatic funds replenishment. This raises another important security tip. Never authorize recurring charges on credit cards registered with your VoIP providers and, if possible, place pricing limits on calls with your providers. If a bad guy were to break into your PBX, you don’t want to give the intruder a blank check to make unauthorized calls. And you certainly don’t want to join the $100,000 Phone Bill Club.
To create outbound routes in the Incredible PBX GUI, navigate to Connectivity:Outbound Routes and click Add Outbound Route. In the Route Settings tab, give the Outbound Route a name and choose one or more trunks to use for the outbound calls. In the Dial Patterns tab, specify the dial strings that must be matched to use this Outbound Route. NXXNXXXXXX would require only 10-digit numbers with the first and fourth digits being a number between 2 and 9. Note that Outbound Routes are searched from the top entry to the bottom until there is a match. Make certain that you order your routes correctly and then place test calls watching the Asterisk CLI to make sure the calls are routed as you intended.
Design Methodology for Outbound Routes
There are a million ways to design outbound calling schemes on PBXs with multiple trunks. One of the simplest ways is to use no dial prefix for the primary trunk and then use dialing prefixes such as *1 and *2 for the remaining trunks.
Another outbound calling scheme would be to assign specific DIDs to individual extensions on your PBX. Here you could use NXXNXXXXXX with the 1 Prepend as the Dial Pattern with every Outbound Route and change the Extension Number in the CallerID field of the Dial Pattern. With this setup, you’d need a separate Outbound Route for each group of extensions using a specific trunk on your PBX. Additional dial patterns can be added for each extension designated for a particular trunk. A lower priority Outbound Route then could be added without a CallerID entry to cover extensions that weren’t restricted or specified.
HINT: Keep in mind that Outbound Routes are processed by FreePBX in top-down order. The first route with a matching dial pattern is the trunk that is selected to place the outbound call. No other outbound routes are ever used even if the call fails or the trunk is unavailable. To avoid failed calls, consider adding additional trunks to the Trunk Sequence in every outbound route. In summary, if you have multiple routes with the exact same dial pattern, then the match nearest to the top of the Outbound Route list wins. You can rearrange the order of the outbound routes by dragging them into any sequence desired.
Configuring Incredible PBX for VirtualBox
In order to take advantage of all the Incredible PBX applications, you’ll need to obtain IBM text-to-speech (TTS) and speech-to-text (STT) credentials as well as a (free) Application ID for Wolfram Alpha.
NOV. 1 UPDATE: IBM moved the goal posts effective December 1, 2018:
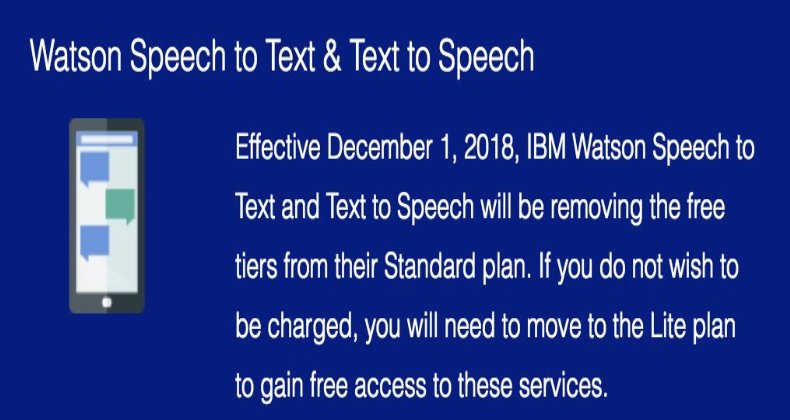
This Nerd Vittles tutorial will walk you through getting your IBM account set up and obtaining both your TTS and STT credentials. Be sure to write down BOTH sets of credentials which you’ll need in a minute. For home and SOHO use, IBM access and services are FREE even though you must provide a credit card when signing up. The IBM signup process explains their pricing plans.
To use Wolfram Alpha, sign up for a free Wolfram Alpha API account. Just provide your email address and set up a password. It takes less than a minute. Log into your account and click on Get An App ID. Make up a name for your application and write down (and keep secret) your APP-ID code. That’s all there is to getting set up with Wolfram Alpha. If you want to explore costs for commercial use, there are links to let you get more information.
In addition to your Wolfram Alpha APPID, there are two sets of IBM credentials to plug into the Asterisk AGI scripts. Keep in mind that there are different usernames and passwords for the IBM Watson TTS and STT services. The TTS credentials will look like the following: $IBM_username and $IBM_password. The STT credentials look like this: $API_USERNAME and $API_PASSWORD. Don’t mix them up. 🙂
All of the scripts requiring credentials are located in /var/lib/asterisk/agi-bin so switch to that directory after logging into your server as root. Edit each of the following files and insert your TTS credentials in the variables already provided: nv-today2.php, ibmtts.php, and ibmtts2.php. Edit each of the following files and insert your STT credentials in the variables already provided: getquery.sh, getnumber.sh, and getnumber2.sh. Finally, edit 4747 and insert your Wolfram Alpha APPID.
Using Asteridex with Incredible PBX
AsteriDex is a web-based dialer and address book application for Asterisk and Incredible PBX. It lets you store and manage phone numbers of all your friends and business associates in an easy-to-use SQLite3 database. You simply call up the application with your favorite web browser: http://pbx-ip-address/asteridex4/. When you click on a contact that you wish to call, AsteriDex first calls you at extension 701, and then AsteriDex connects you to your contact through another outbound call made using your default outbound trunk that supports numbers in the 1NXXNXXXXXX format.
Taking Incredible PBX for a Test Drive
You can take Incredible PBX on a test drive by dialing D-E-M-O (3366) from any phone connected to your PBX.
With Allison’s Demo IVR, you can choose from the following options:
- 0. Chat with Operator — connects to extension 701
- 1. AsteriDex Voice Dialer – say "Delta Airlines" or "American Airlines" to connect
- 2. Conferencing – log in using 1234 as the conference PIN
- 3. Wolfram Alpha Almanac – say "What planes are flying overhead"
- 4. Lenny – The Telemarketer’s Worst Nightmare
- 5. Today’s News Headlines — courtesy of Yahoo! News
- 6. Weather by ZIP Code – enter any 5-digit ZIP code for today’s weather
- 7. Today in History — courtesy of OnThisDay.com
- 8. Chat with Nerd Uno — courtesy of SIP URI connection to 3CX iPhone Client
- 9. DISA Voice Dialer — say any 10-digit number to be connected
- *. Current Date and Time — courtesy of Incredible PBX
News Flash: Turn Incredible PBX into a Fault-Tolerant HA Platform for $1/Month
Continue Reading: Configuring Extensions, Trunks & Routes
Don’t Miss: Incredible PBX Application User’s Guide covering the 31 Whole Enchilada apps
Originally published: Monday, January 7, 2019 Updated: Sunday, January 20, 2019
Need help with Asterisk? Visit the VoIP-info Forum.
Special Thanks to Our Generous Sponsors
FULL DISCLOSURE: ClearlyIP, Skyetel, Vitelity, DigitalOcean, Vultr, VoIP.ms, 3CX, Sangoma, TelecomsXchange and VitalPBX have provided financial support to Nerd Vittles and our open source projects through advertising, referral revenue, and/or merchandise. As an Amazon Associate and Best Buy Affiliate, we also earn from qualifying purchases. We’ve chosen these providers not the other way around. Our decisions are based upon their corporate reputation and the quality of their offerings and pricing. Our recommendations regarding technology are reached without regard to financial compensation except in situations in which comparable products at comparable pricing are available from multiple sources. In this limited case, we support our sponsors because our sponsors support us.
BOGO Bonaza: Enjoy state-of-the-art VoIP service with a $10 credit and half-price SIP service on up to $500 of Skyetel trunking with free number porting when you fund your Skyetel account. No limits on number of simultaneous calls. Quadruple data center redundancy. $25 monthly minimum spend required. Tutorial and sign up details are here.
![]() The lynchpin of Incredible PBX 2020 and beyond is ClearlyIP components which bring management of FreePBX modules and SIP phone integration to a level never before available with any other Asterisk distribution. And now you can configure and reconfigure your new Incredible PBX phones from the convenience of the Incredible PBX GUI.
The lynchpin of Incredible PBX 2020 and beyond is ClearlyIP components which bring management of FreePBX modules and SIP phone integration to a level never before available with any other Asterisk distribution. And now you can configure and reconfigure your new Incredible PBX phones from the convenience of the Incredible PBX GUI.
VitalPBX is perhaps the fastest-growing PBX offering based upon Asterisk with an installed presence in more than 100 countries worldwide. VitalPBX has generously provided a customized White Label version of Incredible PBX tailored for use with all Incredible PBX and VitalPBX custom applications. Follow this link for a free test drive!
Special Thanks to Vitelity. Vitelity is now Voyant Communications and has halted new registrations for the time being. Our special thanks to Vitelity for their unwavering financial support over many years and to the many Nerd Vittles readers who continue to enjoy the benefits of their service offerings. We will keep everyone posted on further developments.
- Some of our purchase links refer users to Amazon when we find their prices are competitive for the recommended products. Nerd Vittles receives a small referral fee from Amazon to help cover the costs of our blog. We never recommend particular products solely to generate Amazon commissions. However, when pricing is comparable or availability is favorable, we support Amazon because Amazon supports us. [↩]
- Some of our links refer users to sites or service providers when we find their prices are competitive for the recommended products. Nerd Vittles receives a small referral fee from these providers to help cover the costs of our blog. We never recommend particular products solely to generate commissions. [↩]
A Sobering Look at Asterisk and the 2019 VoIP Landscape

Every six months or so we like to gaze into our crystal ball for a quick look at the VoIP landscape. 2018 has been quite the transformative year with the acquisition of Digium® and Asterisk® by Sangoma®. Unfortunately, as we predicted, the Digium layoffs have already begun, and 2019 may only get worse. While we have no inside information, we wouldn’t be surprised to see Digium’s headquarters in Huntsville closed within six months in an effort to balance the books. Part of the problem may be attributable to the terms of the purchase itself. However, we sense there’s a more troubling development. And that is the reality that VoIP is becoming less and less appealing to home users and small businesses as more and more folks migrate purely to cell phones. Those with teenagers already know this transformation is underway. With services such as Google Fi starting at $20 for unlimited calling and texting, it’s difficult to justify VoIP services even at bargain basement prices. Making the cellular switch even more appealing are offers such as a $400 credit with the purchase of an LG G7 smartphone from Google or a free LG G7 with new Sprint service.
What you lose with a pure cellular platform are many of the features that have made PBXs popular in the VoIP space: call routing, text-to-speech and voice recognition applications, conferencing, SPAM call blocking, and much more. But 2018 also was the year that Google finally pulled the plug on free calling through your PBX. Instead, you now have to purchase and configure a $50 OBi200 to continue with Google Voice, and the integration is painful to put it charitably. The demise of Google Voice added one more nail to the free VoIP coffin. And, as many of you know, Vitelity, our long-time platinum sponsor, now has bowed out of the VoIP retail business due to a change in focus from Voyant, the company’s new owner. Finally, our bargain-basement cloud provider for experimentation, HiFormance, appears to have bitten the dust. Details here. Suggestions here. Reminder: "You get what you pay for."
It’s not all bad news for 2019. First, all of the Incredible PBX platforms are still alive and well. And they will remain open source GPL code. Second, we’ve found a terrific new VoIP provider, Skyetel, that will give you a $50 credit so you can kick the tires for a good long while. Effective 10/1/2023, $25/month minimum spend required. Third, if you’re looking for a robust Cloud platform, Digital Ocean still is offering a $100 signup credit for your first 60 days of service, and Incredible PBX runs swimmingly on their $5/month platform with CentOS. Spend another $1 a month, and you get automatic backups of your cloud-based server. It’s cheap insurance for something as important as your phone system.
If you’re like us, you may be getting a little nervous about the future of Asterisk. We’ve already provided a series of articles on FusionPBX for FreeSWITCH. Our original tutorial and the follow-on articles showing how to create voice prompts using IBM Watson and how to create and deploy TTS applications such as news and weather reports are worth a careful read. And, if you consider yourself a pioneer, then you owe it to yourself to try out the FreeSWITCH developers’ new cloud-based platform, SignalWire. Here’s the $55 Promo code that worked for us: ITEXPO2019. That should get you off to a great start. And check out the pricing: U.S. DIDs are $0.08 per month, U.S. Origination rate (incoming) is $0.00325 per minute, U.S. Termination rate (outgoing) is $0.0072 per minute, U.S. SMS Outbound is $0.0009 per message, and U.S. SMS Inbound messages are free. MMS also available. Once verified, you can spoof any CallerID name and number that you own! What’s not to like? Asterisk Trunk setup example available here.
CAUTIONARY NOTE: SignalWire should be considered EXPERIMENTAL SOFTWARE and is not yet suitable for production use.
That should be enough excitement to keep all of you entertained over the holidays. We’re planning a few days off to be with family and friends. Let us be the first to wish each of you a very Merry Christmas. We’re looking forward to an exciting 2019!
Originally published: Monday, December 17, 2018
Need help with Asterisk? Visit the VoIP-info Forum.
Special Thanks to Our Generous Sponsors
FULL DISCLOSURE: ClearlyIP, Skyetel, Vitelity, DigitalOcean, Vultr, VoIP.ms, 3CX, Sangoma, TelecomsXchange and VitalPBX have provided financial support to Nerd Vittles and our open source projects through advertising, referral revenue, and/or merchandise. As an Amazon Associate and Best Buy Affiliate, we also earn from qualifying purchases. We’ve chosen these providers not the other way around. Our decisions are based upon their corporate reputation and the quality of their offerings and pricing. Our recommendations regarding technology are reached without regard to financial compensation except in situations in which comparable products at comparable pricing are available from multiple sources. In this limited case, we support our sponsors because our sponsors support us.
BOGO Bonaza: Enjoy state-of-the-art VoIP service with a $10 credit and half-price SIP service on up to $500 of Skyetel trunking with free number porting when you fund your Skyetel account. No limits on number of simultaneous calls. Quadruple data center redundancy. $25 monthly minimum spend required. Tutorial and sign up details are here.
![]() The lynchpin of Incredible PBX 2020 and beyond is ClearlyIP components which bring management of FreePBX modules and SIP phone integration to a level never before available with any other Asterisk distribution. And now you can configure and reconfigure your new Incredible PBX phones from the convenience of the Incredible PBX GUI.
The lynchpin of Incredible PBX 2020 and beyond is ClearlyIP components which bring management of FreePBX modules and SIP phone integration to a level never before available with any other Asterisk distribution. And now you can configure and reconfigure your new Incredible PBX phones from the convenience of the Incredible PBX GUI.
VitalPBX is perhaps the fastest-growing PBX offering based upon Asterisk with an installed presence in more than 100 countries worldwide. VitalPBX has generously provided a customized White Label version of Incredible PBX tailored for use with all Incredible PBX and VitalPBX custom applications. Follow this link for a free test drive!
Special Thanks to Vitelity. Vitelity is now Voyant Communications and has halted new registrations for the time being. Our special thanks to Vitelity for their unwavering financial support over many years and to the many Nerd Vittles readers who continue to enjoy the benefits of their service offerings. We will keep everyone posted on further developments.
Skyetel Smorgasborg: SMS Blasting, SMS Dictator, and more

Just in time for Santa, we’ve got a great treat for those of you that have taken advantage of the Nerd Vittles special offer from Skyetel which gets you a $50 credit on their powerful VoIP platform. Today we’re adding not one, but three, SMS messaging utilities to the Incredible PBX UC platform. Effective 10/1/2023, $25/month minimum spend required. In addition to a command line utility to send SMS messages, we’re also introducing SMS Message Blasting which lets you send an SMS message to as many recipients as you would like. It’s perfect for sports team and community group messaging. To round out the trifecta, we’ve updated our SMS Dictator utility by integrating Skyetel messaging with IBM’s powerful voice recognition software.1 Simply dial S-M-S (767) from any extension on your PBX and dictate an SMS message to send to a recipient of your choice. Gone are the days of wrestling with Google’s ever-changing voice recognition platform. Good riddance!
To get started, you’ll need to have an IBM Watson account with an APIkey for their Speech-to-Text (STT) engine. Next, you will need a Skyetel SMS-enabled DID. Before we install today’s SMS scripts, it should be noted that SMS messages must be sent from the PBX registered as the Skyetel Endpoint Group for the SMS-enabled DID specified in the Skyetel SMS scripts. So let’s begin with the configuration steps to put all the pieces in place.
Getting Started with IBM Watson STT Service
We’ve created a separate tutorial to walk you through obtaining and configuring your IBM Watson credentials. Start there.
Now let’s get IBM’s Speech to Text service activated. Log back in to the IBM Cloud. Click on the (upper left) Menu icon and select Dashboard. Click on the Speech to Text app. Choose a Region to deploy in, choose your Organization from the pull-down menu, and select STT as your Space. Choose the Standard Pricing Plan or LITE Plan. Then click Create. When Speech to Text Portal opens, click the Service Credentials tab. In the Actions column, click View Credentials and copy down your STT APIkey. Then logout of IBM Watson.
Getting Started with Skyetel Messaging
If you haven’t already signed up for a Skyetel account, read our tutorial and take advantage of the $50 coupon for free service. Sign up for a DID and activate the SMS feature for your number. Create an Endpoint Group with the public IP address of your PBX. Then edit your phone number and link it to the Endpoint Group of your server. If you want to forward incoming SMS messages to either an email address or to your smartphone’s messaging service, configure it under the SMS & MMS tab. Finally, click on the settings icon beside your account name in the upper right corner of the Skyetel portal and then click the API Keys tab. Click the Create button and copy down your SID and SECRET for Skyetel’s API service. This secret is not retrievable once you close the window so put the credentials in a safe place for subsequent use. Then logout of the Skyetel portal.
Installing the SMS Components on Your PBX
There are three separate applications which we will install on your PBX: (1) a stand-alone utility that lets you send SMS messages from the Linux CLI by entering a recipients 11-digit phone number and an SMS message surrounded by quotes, (2) an SMS message blasting utility that lets you send a previously prepared SMS message to a group of recipients whose 11-digit SMS numbers have been entered into a text file, and (3) the SMS Dictator application which lets you pick up any phone on your PBX and dial S-M-S (767) to dictate a message and send it to a recipient whose number you’ve key in from your phone. For those not residing in North America, the number of phone number digits can easily be changed in all of the scripts. After we install the three applications, we’ll edit each of the scripts to insert your IBM STT and Skyetel API credentials. Then you’re ready to start messaging.
First, let’s install the stand-alone and message blasting SMS utilities. Log into your server as root and issue the following commands:
cd /root
mkdir sms-skyetel
cd sms-skyetel
wget http://incrediblepbx.com/smsblast-skyetel.tgz
tar zxvf smsblast-skyetel.tgz
rm -f smsblast-skyetel.tgz
Next, let’s install the SMS Dictator application while still logged into your server:
cd /var/lib/asterisk/agi-bin
wget http://incrediblepbx.com/sms-767-skyetel.tgz
tar zxvf sms-767-skyetel.tgz
rm -f sms-767-skyetel.tgz
./install-sms767-dialplan.sh
Configuring the Skyetel SMS Components
While still positioned in the agi-bin directory, edit smsgen.sh. Insert apikey as your API_USERNAME and your actual STT APIkey as API_PASSWORD in the fields provided. Insert your Skyetel SID, SECRET, and 11-digit DID in the fields provided. Then save the file.
Next, change directories to /root/sms-skyetel and edit BOTH sms-skyetel and smsblast and insert your Skyetel credentials and DID in the fields provided at the top of both files.
Finally, when you’re ready to use the message blasting application (smsblast), first insert your SMS message in the smsmsg.txt file. Then insert the list of SMS numbers in smslist.txt.
Testing the Skyetel SMS Components
To try out the SMS Dictator application, dial S-M-S (767) from a phone connected to your PBX. When prompted, enter the 11-digit number of the SMS recipient. When prompted, dictate the message to be sent and press #.
To try out the stand-alone SMS application, navigate to /root/sms-skyetel and issue the following command using the 11-digit number of the SMS recipient followed by a space and an SMS message to be sent surrounded by quotes: ./sms-skyetel 18005551212 "Howdy."
To try out the message blasting SMS application, navigate to /root/sms-skyetel. Enter the message to be sent in smsmsg.txt and enter the list of SMS numbers in smslist.txt. Kick off the message blast by entering the command: ./smsblast.
Originally published: Monday, December 10, 2018
Support Issues. With any application as sophisticated as this one, you’re bound to have questions. Blog comments are a difficult place to address support issues although we welcome general comments about our articles and software. If you have particular support issues, we encourage you to get actively involved in the PBX in a Flash Forum. It’s the best Asterisk tech support site in the business, and it’s all free! Please have a look and post your support questions there. Unlike some forums, the PIAF Forum is extremely friendly and is supported by literally hundreds of Asterisk gurus and thousands of users just like you. You won’t have to wait long for an answer to your question.
Need help with Asterisk? Join our new MeWe Support Site.
Special Thanks to Our Generous Sponsors
FULL DISCLOSURE: ClearlyIP, Skyetel, Vitelity, DigitalOcean, Vultr, VoIP.ms, 3CX, Sangoma, TelecomsXchange and VitalPBX have provided financial support to Nerd Vittles and our open source projects through advertising, referral revenue, and/or merchandise. As an Amazon Associate and Best Buy Affiliate, we also earn from qualifying purchases. We’ve chosen these providers not the other way around. Our decisions are based upon their corporate reputation and the quality of their offerings and pricing. Our recommendations regarding technology are reached without regard to financial compensation except in situations in which comparable products at comparable pricing are available from multiple sources. In this limited case, we support our sponsors because our sponsors support us.
BOGO Bonaza: Enjoy state-of-the-art VoIP service with a $10 credit and half-price SIP service on up to $500 of Skyetel trunking with free number porting when you fund your Skyetel account. No limits on number of simultaneous calls. Quadruple data center redundancy. $25 monthly minimum spend required. Tutorial and sign up details are here.
![]() The lynchpin of Incredible PBX 2020 and beyond is ClearlyIP components which bring management of FreePBX modules and SIP phone integration to a level never before available with any other Asterisk distribution. And now you can configure and reconfigure your new Incredible PBX phones from the convenience of the Incredible PBX GUI.
The lynchpin of Incredible PBX 2020 and beyond is ClearlyIP components which bring management of FreePBX modules and SIP phone integration to a level never before available with any other Asterisk distribution. And now you can configure and reconfigure your new Incredible PBX phones from the convenience of the Incredible PBX GUI.
VitalPBX is perhaps the fastest-growing PBX offering based upon Asterisk with an installed presence in more than 100 countries worldwide. VitalPBX has generously provided a customized White Label version of Incredible PBX tailored for use with all Incredible PBX and VitalPBX custom applications. Follow this link for a free test drive!
Special Thanks to Vitelity. Vitelity is now Voyant Communications and has halted new registrations for the time being. Our special thanks to Vitelity for their unwavering financial support over many years and to the many Nerd Vittles readers who continue to enjoy the benefits of their service offerings. We will keep everyone posted on further developments.
- Skyetel outbound SMS messages are billed at 1¢/message plus a monthly SMS surcharge of 10¢ per SMS-enabled DID. With IBM’s STT service, users have a choice of the LITE tier providing 100 minutes a month of free transcription or the STANDARD tier providing unlimited message transcription at a cost of 2¢/minute. [↩]
Spam Phone Call Blocker and CNAM Caching for FreePBX

Blocking spam phone calls has been a challenge to put it charitably. Thanks to some earlier work by Stewart Nelson on the DSLR forum as well as Stewart’s considerable hand-holding in the development of today’s tutorial, we want to introduce a new approach to blocking these calls. The way it works is first time callers that pass the TrueCNAM SPAM check will be prompted to "press 5 to connect." Since most spam calls sit in a queue for several seconds before a live person chimes in, that person won’t hear the prompt. After 10 seconds or an invalid response, a SIT tone is played and the call is disconnected. If you’d prefer, you can send the failed calls to voicemail by uncommenting a single line in your dialplan. When a successful caller calls again, the caller will be connected without encountering the press 5 prompt.1 While today’s approach won’t block every robocaller, our testing suggests that, in combination with TrueCNAM, it will catch more than 95% of the spam callers. Using CallerID Superfecta with CNAM lookups from OpenCNAM coupled with AsteriDex and the Asterisk® Phonebook will provide an extremely low-cost solution both for blocking spammers AND for displaying accurate CNAM data for incoming calls since you’ll only pay for CNAM and TrueCNAM lookups from legitimate callers once.
Here’s the actual dialplan addition that will monitor your incoming calls:
[sub-log-caller]
exten => s,1,NoOp(*** begin sub-log-caller ***)
exten => s,n,GotoIf(${DB_EXISTS(cidname/${CALLERID(num)})}?CNAMCHECK)
exten => s,n,GotoIf($[${DB_EXISTS(SPAMCHECK/deactivate)} = 0]?ACTIVATE)
exten => s,n,GotoIf($[${DB(SPAMCHECK/deactivate)} = 1]?CONNECTNOW)
exten => s,n(ACTIVATE),NoOp(Not yet WhiteListed)
exten => s,n,AGI(truecnam.sh,${CALLERID(number)})
exten => s,n,GotoIf($["${SPAM}"="SPAM"]?FLUNKED)
exten => s,n,Playback(silence/1)
exten => s,n,Playback(to-call-num-press)
exten => s,n,Playback(digits/5)
exten => s,n,Read(MYCODE,beep,1,n,1,10)
exten => s,n,GotoIf($["${MYCODE}" = "5"]?ANONTEST)
exten => s,n(FLUNKED),NoOp(*** Caller FLUNKED screening ***)
;exten => s,n,Dial(local/*701@from-internal) ; uncomment to send to 701 VM
exten => s,n,Zapateller()
exten => s,n,Hangup
exten => s,n,Return()
exten => s,n(ANONTEST),GotoIf($[${CALLERID(num)} > 0]?WHITELIST:CONNECTNOW)
exten => s,n(CNAMCHECK),Set(CNAM1=${CALLERID(name)})
exten => s,n,Set(CNAM2=${DB(cidname/${CALLERID(number)})})
exten => s,n,GotoIf($["${CNAM1}" = "${CNAM2}"]?WHITELISTED
exten => s,n(WHITELIST),Set(DB(cidname/${CALLERID(number)})=${CALLERID(name)})
exten => s,n,Set(CALLERID(all)="${CALLERID(name)} < ${CALLERID(number)}>")
exten => s,n(WHITELISTED),NoOp(WhiteListed: ${CALLERID(all)})
exten => s,n(CONNECTNOW),NoOp(*** end of sub-log-caller ***)
exten => s,n,Return()
We first introduced some of the CallerID caching concepts in our previous article last May. That article also documented the procedure for adding inbound call processing logic into FreePBX. If you already have implemented the steps outlined in that article, then the only modification required to deploy today’s new spam blocking technique is to replace the [sub-log-caller] context and reload the Asterisk dialplan. NOTE: Some deployments of CallerID Superfecta have an incorrect database password in the Default setup for AsteriDex. The original article will walk you through making the necessary change.
If you’re starting from scratch, stop here for a bit and follow all of the steps in our previous article which now incorporates the spam blocking code as well. Here’s the link to get started. Return here once you’ve completed the initial setup.
If you’re updating a previous deployment, here are the steps. Edit extensions_custom.conf in /etc/asterisk and remove the [sub-log-caller] context toward the end of the file. Then save the file. Next, issue the following commands to move the TrueCNAM script into place and insert the updated [sub-log-caller] context as well as the new [macro-dialout-trunk-predial-hook] context. Then reload your Asterisk dialplan. The dialplan additions will populate the Asterisk Phonebook and also whitelist calls from your PBX as well as incoming calls making it through the Spam Blocker.
cd /tmp
wget http://incrediblepbx.com/sub-log-caller.tar.gz
tar zxvf sub-log-caller.tar.gz
rm -f sub-log-caller.tar.gz
mv truecnam.sh /var/lib/asterisk/agi-bin
cd /etc/asterisk
cat /tmp/sub-log-caller.txt >> extensions_custom.conf
asterisk -rx "dialplan reload"
Rotary Dial Phones & Blocked Numbers
If someone you know and love still has a rotary dial phone, then you will need to manually add their number to either AsteriDex or your Asterisk Phonebook. Otherwise, the calls will never make it through the Spam Catcher. You can do this within the FreePBX GUI by accessing Admin -> Asterisk Phonebook. Click + Add Phonebook Entry and enter the 10-digit number for Grandma as well as her name. Add a second entry with Grandma’s 11-digit number in case some of your VoIP providers happen to send 11-digit CallerID numbers. We hasten to add you should normalize the formatting of your CallerID numbers as quickly as you can to avoid double entries. For those in the U.S. and Canada, we recommend the from-pstn-e164-us context for all of your trunks.
If you have lots of friends with rotary dial phones or if you get calls from important, but unknown numbers such as medical offices where Caller ID numbers are blocked, then you probably should consider uncommenting the voicemail option in [sub-log-caller]. Then you at least will get voicemail notifications when one of these callers attempts to contact you. You still will have to manually add them to AsteriDex or the Asterisk Phonebook so they can contact you directly in the future. HINT: Most medical office calls now spoof the main number of the office so you only need to add the office number just as you did with grandma.
Toggling Spam Blocker On and Off
We’ve also included the ability to turn off the Spam Blocker should you ever wish to do so. To disable the Spam Blocker, issue the following command at the Asterisk CLI:
database put SPAMCHECK deactivate 1
To once again enable the Spam Blocker, issue the following command at the Asterisk CLI:
database deltree SPAMCHECK
WhiteListing Previous Callers
We appreciate that you may not want to aggravate callers that have been calling you for years by making them jump through hoops the next time they call. So here’s a quick way to populate your Asterisk Phonebook with the names and numbers of previous callers. For entries where the CNAM is merely the CallerID Number, future calls from these numbers still will be looked up with OpenCNAM to obtain an actual CNAM match. We’ve made a couple of assumptions that you are more than welcome to adjust to meet your own needs. First, we’ve limited the list to callers from the past two calendar years. Second, we’ve only captured calls that lasted more than 15 seconds. We’ll drop down to the Linux CLI to build the list of callers to import. Then we’ll use the FreePBX GUI to import the list into the Asterisk Phonebook. While we’re building the import list, you’ll have two opportunities to prune the list using your favorite text editor. To get started, issue the following commands from the Linux CLI:
mysql -u root -ppassw0rd asteriskcdrdb -Ns -e "select distinct src, clid \\
from cdr where calldate > '2017/01/01' and duration > 15 \\
order by clid asc" > 2YR-full
Now edit the 2YR-full file and remove any complete lines you don’t want to import.
Next, we’ll reformat the CallerID Numbers and Names into a format needed for the import:
cat 2YR-full | cut -f 1 -d '"' | sed 's|[[:space:]]||' > 2YR-numbers
cat 2YR-full | cut -f 2 -d '"' > 2YR-names
paste 2YR-numbers 2YR-names | awk '{print $1,$2,$3,$4}' > 2YR-all
awk '{print $2 " " $3 $4 ";" $1";"}' 2YR-all > 2YR-freepbx.csv
Now we should have our 2YR=freepbx.csv file in its final form for import. Open the file in your favorite editor. The syntax of the entries should be CallerID Name, then a semicolon, then CallerID Number, and then a semicolon. Discard any additional lines you wish to exclude from the import. Once you have all the entries squared away, copy the file to your desktop PC and open FreePBX in your browser. Navigate to Admin -> Asterisk Phonebook. Click Import Phonebook and then Browse. Select the 2YR-freepbx.csv file from your desktop. Then click Upload. Take a final look at the new entries in your Asterisk Phonebook to make sure nothing came unglued, and you’re all set.
TrueCNAM: The Icing on the Spam Cake
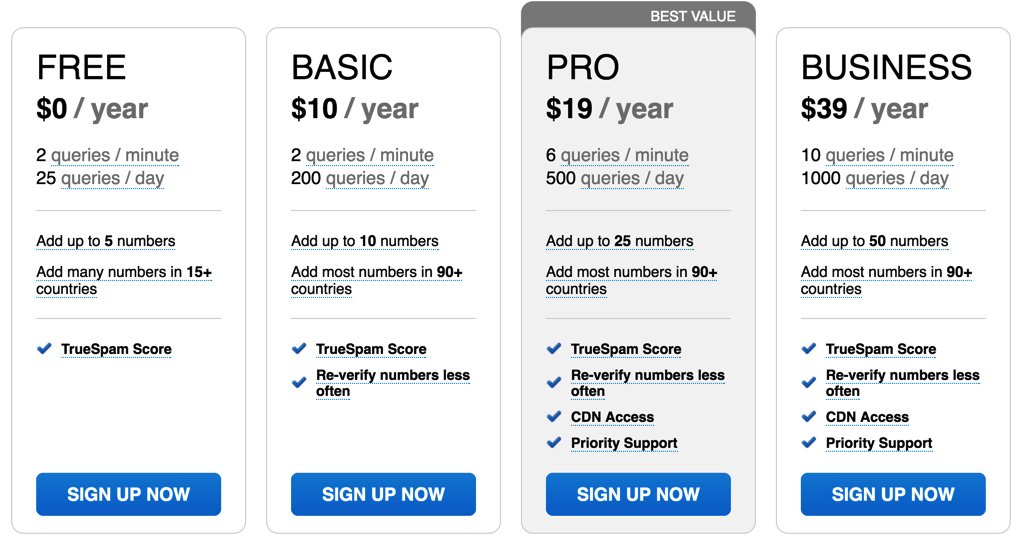
A couple years ago we introduced TrueCNAM, a service that provides not only CNAM data but also Caller Reputation scoring. Those that flunk using the revolving caller reputation matrix get disconnected automatically. We strongly encourage you to add the TrueCNAM service to your PBX. The service includes a free tier as well as incredibly reasonable commercial tiers. For background on the service, here’s a link to our previous TrueCNAM tutorial. For today, start by signing up for a TrueCNAM account and obtain an APIkey and APIpassword. Then register at least one of your DIDs with the service. Once you have your credentials and your DID number in hand, edit truecnam.sh in /var/lib/asterisk/agi-bin. Insert these three items at the top of the file and save it to activate TrueCNAM. It doesn’t get much easier than that.
Now make a few test calls to your PBX to assure that everything is working as documented. Enjoy!
Originally published: Monday, November 26, 2018
Support Issues. With any application as sophisticated as this one, you’re bound to have questions. Blog comments are a difficult place to address support issues although we welcome general comments about our articles and software. If you have particular support issues, we encourage you to get actively involved in the PBX in a Flash Forum. It’s the best Asterisk tech support site in the business, and it’s all free! Please have a look and post your support questions there. Unlike some forums, the PIAF Forum is extremely friendly and is supported by literally hundreds of Asterisk gurus and thousands of users just like you. You won’t have to wait long for an answer to your question.
Need help with Asterisk? Join our new MeWe Support Site.
Special Thanks to Our Generous Sponsors
FULL DISCLOSURE: ClearlyIP, Skyetel, Vitelity, DigitalOcean, Vultr, VoIP.ms, 3CX, Sangoma, TelecomsXchange and VitalPBX have provided financial support to Nerd Vittles and our open source projects through advertising, referral revenue, and/or merchandise. As an Amazon Associate and Best Buy Affiliate, we also earn from qualifying purchases. We’ve chosen these providers not the other way around. Our decisions are based upon their corporate reputation and the quality of their offerings and pricing. Our recommendations regarding technology are reached without regard to financial compensation except in situations in which comparable products at comparable pricing are available from multiple sources. In this limited case, we support our sponsors because our sponsors support us.
BOGO Bonaza: Enjoy state-of-the-art VoIP service with a $10 credit and half-price SIP service on up to $500 of Skyetel trunking with free number porting when you fund your Skyetel account. No limits on number of simultaneous calls. Quadruple data center redundancy. $25 monthly minimum spend required. Tutorial and sign up details are here.
![]() The lynchpin of Incredible PBX 2020 and beyond is ClearlyIP components which bring management of FreePBX modules and SIP phone integration to a level never before available with any other Asterisk distribution. And now you can configure and reconfigure your new Incredible PBX phones from the convenience of the Incredible PBX GUI.
The lynchpin of Incredible PBX 2020 and beyond is ClearlyIP components which bring management of FreePBX modules and SIP phone integration to a level never before available with any other Asterisk distribution. And now you can configure and reconfigure your new Incredible PBX phones from the convenience of the Incredible PBX GUI.
VitalPBX is perhaps the fastest-growing PBX offering based upon Asterisk with an installed presence in more than 100 countries worldwide. VitalPBX has generously provided a customized White Label version of Incredible PBX tailored for use with all Incredible PBX and VitalPBX custom applications. Follow this link for a free test drive!
Special Thanks to Vitelity. Vitelity is now Voyant Communications and has halted new registrations for the time being. Our special thanks to Vitelity for their unwavering financial support over many years and to the many Nerd Vittles readers who continue to enjoy the benefits of their service offerings. We will keep everyone posted on further developments.
- Once installed, you can change the voice prompt to a number other than 5 by modifying lines 10 and 12 of the context sub-log-caller which you will find in extensions_custom.conf in the /etc/asterisk directory at the completion of this install. [↩]
R.I.P. GVSIP: A Final Farewell to Google Voice

It’s been a death by a thousand cuts, but today marks the end of the Google Voice era with Asterisk®. Since Google removed XMPP support and transitioned to their new GVSIP platform, many have held out hope that Google hadn’t moved to a purely commercial platform with their ObiHai deal. Yesterday, the head of the Google Voice project requested that all Asterisk GVSIP implementations be discontinued citing Google’s Terms of Service. We hinted this was coming back in July and have reproduced our tweet below. We have since removed all of our articles pertaining to GVSIP, and we would encourage all of our readers to honor Google’s wishes and move on. We’ve made it easy with a $50 gift certificate from Skyetel (expires March 31, 2019). It will buy you many months of free VoIP service.

You still have several options with your Google Voice trunks. First, you can forward all incoming calls to Google Voice to another phone or DID of your choosing. This costs you nothing other than a minute to set it up. Second, you can port out your Google Voice number to another provider. Skyetel will cover your porting expense at their end during your first 60 days of service. Google charges $3 to port out your number unless you originally ported it into Google in which case it is free. Here’s how. Although we’re not big fans, a third option is to purchase an OBi200 device and continue to use your Google Voice trunk with Asterisk. Our tutorial from last May will show you how. Effective 10/1/2023, $25/month minimum spend at Skyetel is required.
As we’ve mentioned often, the beauty of VoIP is not having to put all of your telephony eggs in a single basket. Google’s latest move reinforces how important it actually is to configure several VoIP trunks on your server. While Skyetel and Vitelity are both excellent primary trunks and rarely experience an outage, it’s still a good idea to have a backup. VoIP.ms (free iNUM), CircleNet, CallCentric ($1/mo. DID and iNUM), LocalPhone (25¢/mo. iNUM), Future-Nine, AnveoDirect, and V1VoIP are excellent options. Most don’t cost you anything unless you make calls. Review our complete SIP tutorial here: Developing a Cost-Effective SIP Strategy.
Dale Carnegie Award: ObiHai Man of the Year
Originally published: Friday, November 16, 2018
Need help with Asterisk? Join our new MeWe Support Site.
Special Thanks to Our Generous Sponsors
FULL DISCLOSURE: ClearlyIP, Skyetel, Vitelity, DigitalOcean, Vultr, VoIP.ms, 3CX, Sangoma, TelecomsXchange and VitalPBX have provided financial support to Nerd Vittles and our open source projects through advertising, referral revenue, and/or merchandise. As an Amazon Associate and Best Buy Affiliate, we also earn from qualifying purchases. We’ve chosen these providers not the other way around. Our decisions are based upon their corporate reputation and the quality of their offerings and pricing. Our recommendations regarding technology are reached without regard to financial compensation except in situations in which comparable products at comparable pricing are available from multiple sources. In this limited case, we support our sponsors because our sponsors support us.
BOGO Bonaza: Enjoy state-of-the-art VoIP service with a $10 credit and half-price SIP service on up to $500 of Skyetel trunking with free number porting when you fund your Skyetel account. No limits on number of simultaneous calls. Quadruple data center redundancy. $25 monthly minimum spend required. Tutorial and sign up details are here.
![]() The lynchpin of Incredible PBX 2020 and beyond is ClearlyIP components which bring management of FreePBX modules and SIP phone integration to a level never before available with any other Asterisk distribution. And now you can configure and reconfigure your new Incredible PBX phones from the convenience of the Incredible PBX GUI.
The lynchpin of Incredible PBX 2020 and beyond is ClearlyIP components which bring management of FreePBX modules and SIP phone integration to a level never before available with any other Asterisk distribution. And now you can configure and reconfigure your new Incredible PBX phones from the convenience of the Incredible PBX GUI.
VitalPBX is perhaps the fastest-growing PBX offering based upon Asterisk with an installed presence in more than 100 countries worldwide. VitalPBX has generously provided a customized White Label version of Incredible PBX tailored for use with all Incredible PBX and VitalPBX custom applications. Follow this link for a free test drive!
Special Thanks to Vitelity. Vitelity is now Voyant Communications and has halted new registrations for the time being. Our special thanks to Vitelity for their unwavering financial support over many years and to the many Nerd Vittles readers who continue to enjoy the benefits of their service offerings. We will keep everyone posted on further developments.
Free Asterisk Voicemail Transcription with IBM Watson STT

There are many commercial voicemail transcription services for Asterisk® PBXs, but none hold a candle to the speech-to-text (STT) quality of the IBM Cloud offering known as Watson® STT, formerly known as Bluemix TTS. Despite a recent price increase that takes effect in December, the pricing remains competitive. On the Standard Pricing Plan, voicemail transcription is 2¢ per minute. Or you can try things out on the LITE plan which offers 100 minutes a month at no cost. When the messages are delivered by email, you get the voicemail recording in MP3 format AND transcribed text courtesy of Watson TTS. With IBM services, there no longer are username:password credentials. Instead, you will have a new apikey.
Those with existing configurations can update your credentials by inserting a new apikey using the following commands, or you can simply insert apikey as your $API_USERNAME and enter your actual APIkey as your $API_PASSWORD.
cd /usr/local/sbin
sed -i 's|$API_USERNAME:$API_PASSWORD|"apikey:x-yy-zzz"|' sendmailmp3
sed -i 's|$API_USERNAME:$API_PASSWORD|"apikey:x-yy-zzz"|' bluemix-test
IBM Cloud’s STT solution is a real game-changer for one simple reason. Their STT API performs more accurately than any speech recognition engine in the world. As an added bonus, you won’t have to worry about Google breaking our middleware every month. It’s worth noting that IBM doesn’t round up minutes. Transcribing two 30-second messages counts as one minute.
https://youtu.be/JWnLgZ58zsw
Overview. What we’ve done today is integrate the Watson STT API directly into existing Asterisk voicemail systems. We started with Nicolas Bernaerts’ terrific sendmailmp3 script. It works on both the Wazo and FreePBX® platforms. If you have deployed Incredible PBX®, then the setup takes a couple of minutes. For everyone else, there’s an additional configuration step using your favorite GUI. To get started, you’ll sign up for an IBM Cloud account and obtain your credentials. Next, you download today’s script for your platform and insert your credentials. Finally, you set up voicemail on the extensions desired and insert an email address for each voicemail account. On generic FreePBX systems, you’ll need to add the name of our script to manage your voicemail recordings. And, regardless of your PBX platform, you obviously need outgoing SMTP email working reliably.
Start by sending yourself a test email and get that working first:
echo "test" | mail -s testmessage yourname@your-email-domain.com
What About the Quality? Here’s the bottom line. Speech recognition isn’t all that useful if it fails miserably in recognizing everyday speech. The good news is that IBM Watson’s speech recognition engine is now the best in the business. If you want more details, read the article below which will walk you through IBM’s latest speech recognition breakthrough:
Why IBM's speech recognition breakthrough matters for AI and IoT. Via @techrepublic https://t.co/AJi8MA3E20
— IBM Developer (@IBMDeveloper) March 15, 2017
Obtaining IBM Cloud Speech to Text Credentials
Follow this link to set up your IBM account and obtain credentials for both Speech to Text (STT) and Text to Speech (TTS) services. Please note that your STT and TTS API keys will NOT be the same. So don’t accidentally use the wrong one.
Installing STT Engine with Incredible PBX for Wazo
1. After logging into your Incredible PBX for Wazo server as root using SSH/Putty:
cd /usr/sbin
wget http://incrediblepbx.com/sendmailibm.tar.gz
tar zxvf sendmailibm.tar.gz
rm -f sendmailibm.tar.gz
2. Edit sendmailibm and insert IBM STT API_KEY and URL.
3. Edit bluemix-test and insert IBM STT API_KEY and URL.
4. Apply the patch documented above if using LITE plan using sendmail filename instead of sendmailmp3.
5. Copy the updated sendmailibm file to sendmail:
cd /usr/sbin
cp -p sendmailibm sendmail
6. Test your Bluemix STT setup: bluemix-test
7. Result should be: please record your message after the beep
8. Set up voicemail account for a Wazo extension with your email address.
9. Place a test call to the extension and record a voicemail when prompted.
10. Your message will be transcribed and delivered via email.
Installing STT Engine with Incredible PBX for RasPi
1. After logging into your Raspberry Pi server as root using SSH/Putty:
cd /usr/sbin
wget http://incrediblepbx.com/sendmailibm-raspi.tar.gz
tar zxvf sendmailibm-raspi.tar.gz
rm -f sendmailibm-raspi.tar.gz
2. Edit sendmailmp3.ibm and insert your Bluemix STT API_KEY and URL. Save file.
3. Edit bluemix-test and insert your Bluemix STT API_KEY and URL. Save the file.
4. Copy the updated sendmailmp3.ibm file to sendmailmp3:
cd /usr/sbin
cp -p sendmailmp3.ibm sendmailmp3
5. Apply the patch documented above if using LITE plan.
6. Test your Bluemix STT setup: bluemix-test
7. Result should be: your dictation is now being processed and emailed please wait
8. Set up voicemail for a RasPi extension with your email address.
9. Place a test call to the extension and record a voicemail when prompted.
10. Your message will be transcribed and delivered via email.
Installing STT Engine with Incredible PBX 13-13
1. After logging into your Incredible PBX 13 server as root using SSH/Putty:
cd /usr/local/sbin
wget http://incrediblepbx.com/sendmailibm-13.tar.gz
tar zxvf sendmailibm-13.tar.gz
rm -f sendmailibm-13.tar.gz
2. Edit sendmailmp3.ibm and insert your IBM STT API_KEY and URL. Save file.
3. Edit bluemix-test and insert your IBM STT API_KEY and URL. Save the file.
4. Copy the updated sendmailmp3.ibm file to sendmailmp3:
cd /usr/local/sbin
cp -p sendmailmp3.ibm sendmailmp3
5. Test your Bluemix STT setup: bluemix-test
6. Result should be: we are now transferring you out of the company directory…
7. Set up voicemail for an extension and include your email address.
8. Place a test call to the extension and record a voicemail when prompted.
9. Your message will be transcribed and delivered via email.
Installing STT Engine with VitalPBX
For those using VitalPBX with or without Incredible PBX, we’ve written a new tutorial to walk you through the procedure to get voicemail transcription with IBM Watson STT up and running. Here’s the link.
Installing STT Engine with Legacy FreePBX Servers
1. Follow steps #1 through #8 from the Incredible PBX 13 tutorial above.
2. Choose Settings -> Voicemail Admin -> Settings in the GUI.
3. In the format field, insert: wav|wav49
4. In the mailcmd field, insert: /usr/local/sbin/sendmailmp3
5. Click Submit to save your settings and then Reload the FreePBX Dialplan.
6. Place a test call to the extension and record a voicemail when prompted.
7. Your message will be transcribed and delivered via email.
Update: Matt Darnell reports that, depending upon your existing setup, you may need to add the unix2dos and lame packages with legacy FreePBX servers to get MP3 messages delivered correctly.
Originally published: Monday, March 12, 2018 Updated: Monday, November 12, 2018
Got Friends? 7 Countries Have Never Visited Nerd Vittles. 2018 Is Calling! https://t.co/wMfmlhAr16 #asterisk #freepbx #wazo #issabel #IncrediblePBX #3CX pic.twitter.com/kAmAEnwVIw
— Ward Mundy (@NerdUno) January 9, 2018
Need help with Asterisk? Visit the PBX in a Flash Forum.
Special Thanks to Our Generous Sponsors
FULL DISCLOSURE: ClearlyIP, Skyetel, Vitelity, DigitalOcean, Vultr, VoIP.ms, 3CX, Sangoma, TelecomsXchange and VitalPBX have provided financial support to Nerd Vittles and our open source projects through advertising, referral revenue, and/or merchandise. As an Amazon Associate and Best Buy Affiliate, we also earn from qualifying purchases. We’ve chosen these providers not the other way around. Our decisions are based upon their corporate reputation and the quality of their offerings and pricing. Our recommendations regarding technology are reached without regard to financial compensation except in situations in which comparable products at comparable pricing are available from multiple sources. In this limited case, we support our sponsors because our sponsors support us.
BOGO Bonaza: Enjoy state-of-the-art VoIP service with a $10 credit and half-price SIP service on up to $500 of Skyetel trunking with free number porting when you fund your Skyetel account. No limits on number of simultaneous calls. Quadruple data center redundancy. $25 monthly minimum spend required. Tutorial and sign up details are here.
![]() The lynchpin of Incredible PBX 2020 and beyond is ClearlyIP components which bring management of FreePBX modules and SIP phone integration to a level never before available with any other Asterisk distribution. And now you can configure and reconfigure your new Incredible PBX phones from the convenience of the Incredible PBX GUI.
The lynchpin of Incredible PBX 2020 and beyond is ClearlyIP components which bring management of FreePBX modules and SIP phone integration to a level never before available with any other Asterisk distribution. And now you can configure and reconfigure your new Incredible PBX phones from the convenience of the Incredible PBX GUI.
VitalPBX is perhaps the fastest-growing PBX offering based upon Asterisk with an installed presence in more than 100 countries worldwide. VitalPBX has generously provided a customized White Label version of Incredible PBX tailored for use with all Incredible PBX and VitalPBX custom applications. Follow this link for a free test drive!
Special Thanks to Vitelity. Vitelity is now Voyant Communications and has halted new registrations for the time being. Our special thanks to Vitelity for their unwavering financial support over many years and to the many Nerd Vittles readers who continue to enjoy the benefits of their service offerings. We will keep everyone posted on further developments.
Some Recent Nerd Vittles Articles of Interest…
Free Asterisk Solutions
