
Home » Posts tagged 'IncrediblePBX' (Page 24)
Tag Archives: IncrediblePBX
The Most Versatile VoIP Provider: FREE PORTING

 JUST RELEASED: Visit the Incredible PBX Wiki
Dare to Compare: The Best (free) VoIP Offerings for 2018

Last week we showed you how to get 10 months of free hosting for your Incredible PBX® in the Cloud. And today we present our semi-annual survey of the latest and greatest VoIP offerings for 2018. The beauty of the cloud platform is you can try all of them for less than a penny an hour and decide for yourself which free offering best meets your needs. This year we’ve ushered in new Asterisk® 13 LTS releases of Incredible PBX® on the CentOS, Ubuntu, and Raspberry Pi platforms as well as new versions for Issabel 4 and VitalPBX. To sweeten the pot even further, we nailed down a new Cloud-based offering for $10 a year that makes a perfect VOIP sandbox for our CentOS platform. For 2018, we also secured new (free) DID offerings in the U.S. and announced a Nerd Vittles exclusive providing access to 300+ VoIP providers worldwide, all at wholesale prices. And, last but not least, we introduced Digium’s newest IP phones for Asterisk including a $59 model that makes a perfect VoIP companion.

Choosing the Best VoIP Platform for Your Needs
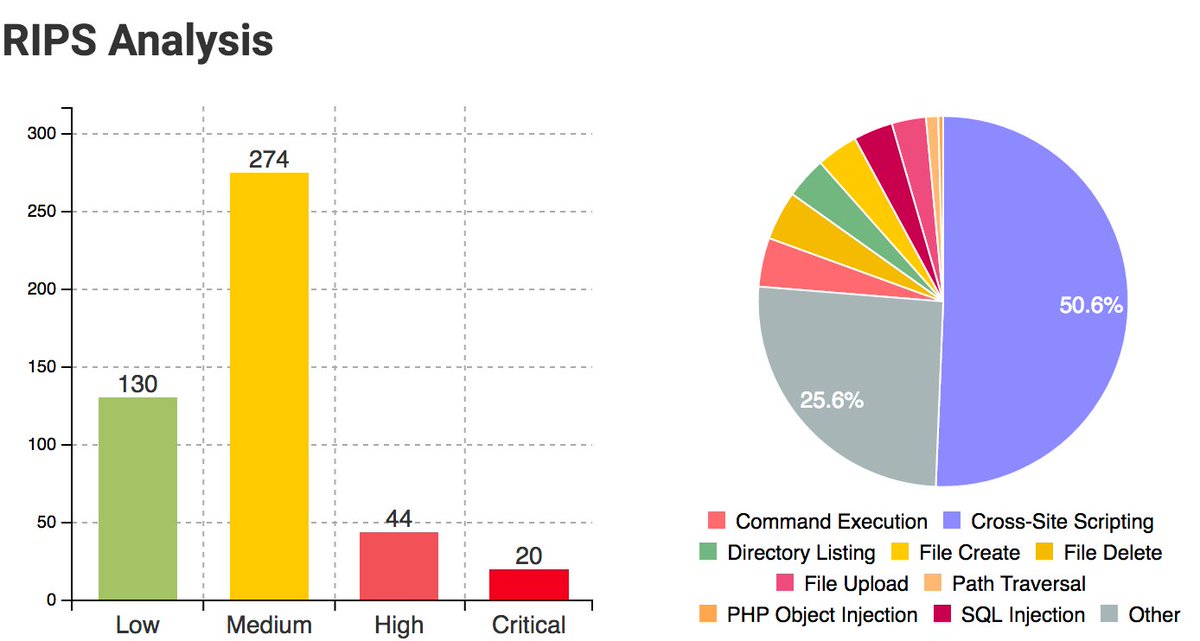
Choosing a VoIP platform is partially a subjective decision, but there also are some glaring red flags to consider. We suggest you begin by deciding whether your preferences include any must-have’s. Do your requirements mandate an open source solution? Do you need text-to-speech and voice recognition? Does the operating system have to be Linux-based and, if so, must it be CentOS, Debian, or Ubuntu? If you’ll be using SIP phones, must the platform include phone provisioning software for your phones, or is the ability to purchase it as an add-on sufficient? Is paid support important in making your platform decision and how much are you prepared to pay? Are automatic or pain-free software updates critical in making your selection? Is migration from an existing platform a factor? Does a preconfigured, secure firewall matter, or are you prepared to do it yourself or take your chances? Before choosing to ignore security, read this RIPS analysis of FreePBX®. Here’s a snippet from the article. Read it carefully. It’s your phone bill.
Since FreePBX is written completely in PHP, we decided to throw it into our code analysis tool RIPS. The results were more than surprising and should tell you why a rock-solid firewall is absolutely essential.
The total amount of detected vulnerabilities is very high. Luckily, the majority of the detected vulnerabilities are inside the administration control panel, such that attackers either need to steal a valid account or they have to trick an administrator into visiting a malicious website that triggers one of the critical vulnerabilities. For example, a remote command execution vulnerability could be triggered by a less critical cross-site scripting vulnerability. By chaining both vulnerabilities, the severity is increased drastically and can lead to full server compromise.
In choosing which platforms to include today, we eliminated platforms which we considered too complicated for the average new user to configure. We also eliminated any platform that did not offer at least a free tier of service with a reasonably complete feature set as part of their offering. So here’s our Pick of the Litter.
We must confess that we are partial to the Incredible PBX offerings because they provide a turnkey GPL platform with minimal configuration required on your part. Regardless of platform, all come standard with a preconfigured firewall and about three dozen applications for Asterisk that will help you learn everything there is to know about VoIP telephony.
VoIP Platform Feature Summary
Aggregation: Incredible PBX 13-13 for CentOS/SL
License: Open Source GPL
VoIP Platform: Asterisk 13
GUI: FreePBX 13 GPL modules
O/S: CentOS/SL 6.9 or 7
Phone Provisioning: Open Source
Text-to-Speech/Voice Recognition: Yes/Yes
Software Updates: Automatic Update Utility included
Migration Tools: No
Security: Fail2Ban + Preconfigured Firewall Whitelist
Security Rating (as delivered): Secure
Comments: Lean & Mean or Whole Enchilada installers as well as ISO available
Aggregation: Incredible PBX 13-13 for Raspbian
License: Open Source GPL
VoIP Platform: Asterisk 13
GUI: FreePBX 13 GPL modules
O/S: Raspbian 7
Phone Provisioning: Open Source
Text-to-Speech/Voice Recognition: Yes/Yes
Software Updates: Automatic Update Utility included
Migration Tools: No
Security: Fail2Ban + Preconfigured Firewall Whitelist
Security Rating (as delivered): Secure
Aggregation: Incredible PBX 13-13 for Ubuntu
License: Open Source GPL
VoIP Platform: Asterisk 13
GUI: FreePBX 13 GPL modules
O/S: Ubuntu 18.04
Phone Provisioning: Open Source
Text-to-Speech/Voice Recognition: Yes/Yes
Software Updates: Automatic Update Utility included
Migration Tools: No
Security: Fail2Ban + Preconfigured Firewall Whitelist
Security Rating (as delivered): Secure
Comments: Lean & Mean or Whole Enchilada installers
Aggregation: VitalPBX
License: Closed Source
VoIP Platform: Asterisk 13
GUI: Free and Commercial modules
O/S: CentOS 7
Phone Provisioning: Free
Text-to-Speech/Voice Recognition: Optional/Optional
Software Updates: Automatic
Migration Tools: Yes
Security: Fail2Ban + User-Configurable Firewall
Security Rating (as delivered): Insecure
Comments: Incredible PBX add-on now available including TM3 firewall.
Aggregation: Incredible PBX for Issabel 4
License: Open Source GPL
VoIP Platform: Asterisk 13
GUI: FreePBX 11 GPL modules
O/S: CentOS 7
Phone Provisioning: Open Source
Text-to-Speech/Voice Recognition: No/No
Software Updates: Semi-Automatic
Migration Tools: No
Security: Fail2Ban + Unconfigured Firewall
Security Rating (as delivered): Secure with Incredible PBX add-on
Comments: Incredible PBX add-on provides secure platform
Aggregation: FusionPBX for FreeSWITCH
License: Open Source MPL 1.1
VoIP Platform: FreeSWITCH 1.6
GUI: FusionPBX
O/S: Debian 8
Phone Provisioning: Free
Text-to-Speech/Voice Recognition: Optional/Optional
Software Updates: Automatic
Security: Fail2Ban + User-Configurable Firewall
Security Rating (as delivered): Secure with mods below
Comments: Incredible PBX firewall add-on now available .
Aggregation: Incredible PBX for Wazo
License: GPL3 Open Source
VoIP Platform: Asterisk 15 RealTime
GUI: Wazo GPL3 modules
O/S: Debian 9
Phone Provisioning: Extensive Open Source
Text-to-Speech/Voice Recognition: Yes/Yes
Software Updates: Automatic or 2-minute Manual
Migration Tools: No
Security: Fail2Ban + Preconfigured Firewall
Security Rating (as delivered): Secure WhiteList with Incredible PBX add-on
Comments: High Availability & Call Center GPL3 Modules
Aggregation: FreePBX Distro a.k.a. AsteriskNOW
License: Closed Source
VoIP Platform: Asterisk 13/14/15
GUI: FreePBX GPL and Commercial modules
O/S: Closed-source CentOS fork
Phone Provisioning: Open Source (minimal) or Commercial
Text-to-Speech/Voice Recognition: Optional/No
Software Updates: Manual from Hidden Repo
Migration Tools: Yes
Security: Fail2Ban + User-Configurable Firewall
Security Rating (as delivered): Insecure
Comments: Extensive commercial NagWare preinstalled
Deploying a Local Server vs. Cloud Platform
We’ve always been big fans of local servers because you have almost total control of your own destiny. This was especially true when the Raspberry Pi came along to take the financial pain out of the server equation. But the price of Cloud-based servers has continued to plummet. For 2018, you can run any of our favorites on the least expensive platform at Vultr or Digital Ocean for $2.50 a month. And, if you hurry, your first 10 months are free at Vultr. Spending another 50 cents buys you automatic backups.1 And, for the Incredible PBX 13-13 build with CentOS 6.9 (64-bit), we’ve found a deal at HiFormance that offers a high-performance OpenVZ platform at an annual cost of just $10. The technical specs are impressive (even better if you sign up for 3 years), and we don’t think you’ll find a comparable deal with anything near comparable performance and specs anywhere, period. You get your choice of hosting sites including New York, Chicago, Los Angeles, Buffalo, Atlanta, and Dallas. Complete tutorial available here.
NOTE: OpenVZ/SolusVM platforms not suitable for CentOS 7, Debian 9, or Ubuntu 18 implementations, and some providers do not yet support Ubuntu 18.04 platform although Vultr and Digital Ocean both do.

Available Free Trunks for VoIP Servers
For many years, we’ve offered free Google Voice connectivity with our VoIP platforms. And that remains true at least for a few more weeks. On all of the Incredible PBX platforms, Google Voice trunks can be set up to make free calls in the U.S. and Canada provided you have a U.S. residence and a U.S. cellphone number to verify that you are who you say you are. There’s even a ray of hope that the Simonics gateway may allow you to continue using Google Voice after Google Voice’s mid-June drop-dead date for XMPP. Details here. But what about the rest of the world. For 2018, we solved the problem by offering free DID trunks for inbound calls and a collection of 300 wholesale VoIP carriers worldwide to make outbound calls at the same wholesale rates offered to the very largest resellers. Simply pay a 13% surcharge in lieu of the $650 annual fee, and TelecomsXchange (TCXC) will provide you access to their entire suite of wholesale carriers together with state-of-the-art tools to manage all of the services.2 The Nerd Vittles setup tutorial is available here. Enjoy!
Published: Monday, March 5, 2018 Updated: Sunday, May 27, 2018

Need help with Asterisk? Visit the PBX in a Flash Forum.
Special Thanks to Our Generous Sponsors
FULL DISCLOSURE: ClearlyIP, Skyetel, Vitelity, DigitalOcean, Vultr, VoIP.ms, 3CX, Sangoma, TelecomsXchange and VitalPBX have provided financial support to Nerd Vittles and our open source projects through advertising, referral revenue, and/or merchandise. As an Amazon Associate and Best Buy Affiliate, we also earn from qualifying purchases. We’ve chosen these providers not the other way around. Our decisions are based upon their corporate reputation and the quality of their offerings and pricing. Our recommendations regarding technology are reached without regard to financial compensation except in situations in which comparable products at comparable pricing are available from multiple sources. In this limited case, we support our sponsors because our sponsors support us.
 BOGO Bonaza: Enjoy state-of-the-art VoIP service with a $10 credit and half-price SIP service on up to $500 of Skyetel trunking with free number porting when you fund your Skyetel account. No limits on number of simultaneous calls. Quadruple data center redundancy. $25 monthly minimum spend required. Tutorial and sign up details are here.
![]() The lynchpin of Incredible PBX 2020 and beyond is ClearlyIP components which bring management of FreePBX modules and SIP phone integration to a level never before available with any other Asterisk distribution. And now you can configure and reconfigure your new Incredible PBX phones from the convenience of the Incredible PBX GUI.
The lynchpin of Incredible PBX 2020 and beyond is ClearlyIP components which bring management of FreePBX modules and SIP phone integration to a level never before available with any other Asterisk distribution. And now you can configure and reconfigure your new Incredible PBX phones from the convenience of the Incredible PBX GUI.
 VitalPBX is perhaps the fastest-growing PBX offering based upon Asterisk with an installed presence in more than 100 countries worldwide. VitalPBX has generously provided a customized White Label version of Incredible PBX tailored for use with all Incredible PBX and VitalPBX custom applications. Follow this link for a free test drive!
 Special Thanks to Vitelity. Vitelity is now Voyant Communications and has halted new registrations for the time being. Our special thanks to Vitelity for their unwavering financial support over many years and to the many Nerd Vittles readers who continue to enjoy the benefits of their service offerings. We will keep everyone posted on further developments.
Some Recent Nerd Vittles Articles of Interest…
- On the Vultr and Digital Ocean $2.50 platforms, be sure to (1) create a 1GB swapfile once you’ve chosen your operating system. (2) Then, for Vultr, issue the following command before beginning the Incredible PBX install: apt-get install cloud-init.
(3) Now complete the steps outlined in your preferred Nerd Vittles tutorial, and you’ll be all set in about 15 minutes. [↩] - Our special thanks to TelecomsXchange. They have generously offered to contribute a portion of the wholesale surcharge to support the Incredible PBX open source project. [↩]
Cloud 9: Free Incredible PBX in the Cloud Hosting until 2019

These deals don’t come along every day so we’re interrupting our regular programming to alert you to a terrific, limited time cloud hosting offer for first-time users of Vultr. If you hurry, you can take advantage of a $25 credit on Vultr which translates into 10 free months of cloud hosting service. We can’t say enough about Vultr. They’ve been one of our key resources for development and testing of new releases of Incredible PBX for many years. Historically, they’ve supported our open source projects through generous referral revenue although that does not apply with this special offer. If you’ve always wondered whether cloud hosting was a viable alternative to on-premise solutions, now’s your chance to kick the tires at zero cost. And the other good news is you have your choice of the following Incredible PBX offerings. Simply load the required OS or upload the ISO for the platform of your choice and follow the linked tutorials below. Enjoy!
- Incredible PBX for CentOS 6 or 7
- Incredible PBX with Incredible PBX 13-13 ISO
- Incredible PBX for Ubuntu 18.04
- Incredible PBX with VitalPBX 2.0 ISO
- Incredible PBX with Jan. 2018 Issabel ISO
- Incredible PBX with Wazo 17.17 (Debian 8)
Originally published: Friday, May 25, 2018
 Support Issues. With any application as sophisticated as this one, you’re bound to have questions. Blog comments are a terrible place to handle support issues although we welcome general comments about our articles and software. If you have particular support issues, we encourage you to get actively involved in the PBX in a Flash Forums. It’s the best Asterisk tech support site in the business, and it’s all free! Please have a look and post your support questions there. Unlike some forums, ours is extremely friendly and is supported by literally hundreds of Asterisk gurus and thousands of users just like you. You won’t have to wait long for an answer to your question.
Need help with Asterisk? Visit the PBX in a Flash Forum.
Special Thanks to Our Generous Sponsors
FULL DISCLOSURE: ClearlyIP, Skyetel, Vitelity, DigitalOcean, Vultr, VoIP.ms, 3CX, Sangoma, TelecomsXchange and VitalPBX have provided financial support to Nerd Vittles and our open source projects through advertising, referral revenue, and/or merchandise. As an Amazon Associate and Best Buy Affiliate, we also earn from qualifying purchases. We’ve chosen these providers not the other way around. Our decisions are based upon their corporate reputation and the quality of their offerings and pricing. Our recommendations regarding technology are reached without regard to financial compensation except in situations in which comparable products at comparable pricing are available from multiple sources. In this limited case, we support our sponsors because our sponsors support us.
BOGO Bonaza: Enjoy state-of-the-art VoIP service with a $10 credit and half-price SIP service on up to $500 of Skyetel trunking with free number porting when you fund your Skyetel account. No limits on number of simultaneous calls. Quadruple data center redundancy. $25 monthly minimum spend required. Tutorial and sign up details are here.
![]() The lynchpin of Incredible PBX 2020 and beyond is ClearlyIP components which bring management of FreePBX modules and SIP phone integration to a level never before available with any other Asterisk distribution. And now you can configure and reconfigure your new Incredible PBX phones from the convenience of the Incredible PBX GUI.
The lynchpin of Incredible PBX 2020 and beyond is ClearlyIP components which bring management of FreePBX modules and SIP phone integration to a level never before available with any other Asterisk distribution. And now you can configure and reconfigure your new Incredible PBX phones from the convenience of the Incredible PBX GUI.
VitalPBX is perhaps the fastest-growing PBX offering based upon Asterisk with an installed presence in more than 100 countries worldwide. VitalPBX has generously provided a customized White Label version of Incredible PBX tailored for use with all Incredible PBX and VitalPBX custom applications. Follow this link for a free test drive!
Special Thanks to Vitelity. Vitelity is now Voyant Communications and has halted new registrations for the time being. Our special thanks to Vitelity for their unwavering financial support over many years and to the many Nerd Vittles readers who continue to enjoy the benefits of their service offerings. We will keep everyone posted on further developments.
Some Recent Nerd Vittles Articles of Interest…
Creating an OBi200 Google Voice Trunk to Use with Asterisk

Since Asterisk® will no longer be able to "talk" to Google Voice after June 17, we promised to hold our nose and document how to salvage your Google Voice trunks. Our exercise for today is to show you how to deploy an OBi 200-series device which can speak the new Google Voice language and use it as a traditional SIP bridge between Google Voice’s proprietary SIP platform and your Asterisk server. We will skip the editorializing on why Google is making a terrible mistake by discarding XMPP and forcing users to a proprietary solution necessitating a hardware purchase without first offering an open standards solution as Google’s Community Manager promised here. Promises, of course, don’t keep your phones ringing. For the whole story, see our article from last Saturday. For today, you’ll need to shell out $50 for an OBi 200 device. Once you have it in hand, feel free to read on and we’ll get you back in business. For security reasons, it should be noted that today’s setup assumes you are running an Incredible PBX® server and OBi device locally behind a NAT-based router. This will work equally well with the Incredible PBX-enhanced versions of Issabel and VitalPBX. We’ll leave it to the FreePBX® folks to figure out a solution for their proprietary distro.
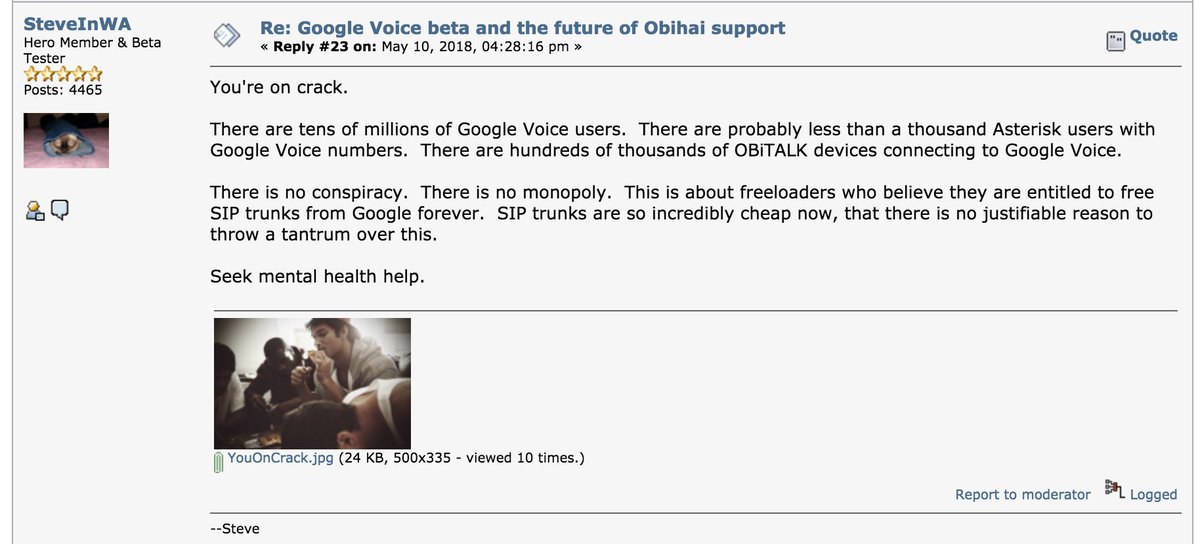
Everything we’re covering below will work just as well using any of the OBi 200-series devices. We’ve simply chosen to use an OBi202 in our examples today because it supports an extra phone port. But an OBi200 works just as well if you will only be deploying Google Voice trunks (up to 3 and perhaps more) for your PBX. They retail for approximately $50 and are readily available at Amazon through the link in the right column which also provides a few shekels for Nerd Vittles to keep the lights on. As mentioned last week, Obihai crippled the OBi 110-series devices which will no longer work with the new Google Voice setup. Such a fine company that we once praised for producing our Device of the Year. And don’t worry. If you ever visit their forum, you can expect a cheery reception from the Obihai forum moderator. Here’s the response we got1 when raising concerns about the demise of Google Voice XMPP:
Registering Your OBi2x Device with OBiTALK
A Quick Start Guide accompanies your OBi hardware. Following along in the tutorial will get your OBi set up using a free (so far) OBiTALK account. When you get to Step 5, you’ll be ready to set up your Google Voice account by clicking the Google Voice Set-Up button.
Before you begin the Google Voice setup, we strongly recommend that you plug a POTS phone into your OBi device and dial ***6 to update your firmware to the latest release. Depending upon where you purchased your device, it may or may not have the latest firmware which is required to communicate with Google Voice on or after June 17.
We also recommend that you dial ***1 and obtain the DHCP-assigned IP address for your OBi. You’ll need this in a few minutes. And, while you’re at it, be sure to set the OBi up behind a NAT-based router to protect it from intrusion. Once someone gains access to your OBi, they’ve essentially got the keys to your telecom castle. So always deploy an OBi behind a hardware-based firewall that is on the same private LAN as your Asterisk PBX. Finally, on your router, be sure to reserve the DHCP-assigned IP address of your OBi for permanent use by the OBi hardware. Otherwise, the IP address of your OBi may change, and this will break the SIP gateway connection to your Asterisk server.
Finally, a word about the new OBi setup. All of your settings are now stored and managed in the OBiTALK cloud. Obihai then pushes the configuration to your OBi device. To put it charitably, this usually works but sometimes it doesn’t, and you end up with a quirky OBi setup that looks correct in the cloud but simply doesn’t work. We’ve found the simplest solution is to unplug the device and then restart it. Then check all of your cloud-based settings when the OBi device comes back to life to be sure none of your settings disappeared. Sometimes they do! In the old days, you had the option of configuring your OBi device locally; however, Obihai (now Polycom) has disabled that functionality with the new Google Voice setup presumably to disguise what they are doing under the covers to connect to Google.
Configuring a Google Voice Trunk on OBi200
To give credit where credit is due, configuring a Google Voice trunk on the OBi 200-series devices is dead simple. Login into your OBiTALK account, click on your OBi device, and then click the Google Voice Set-Up button.

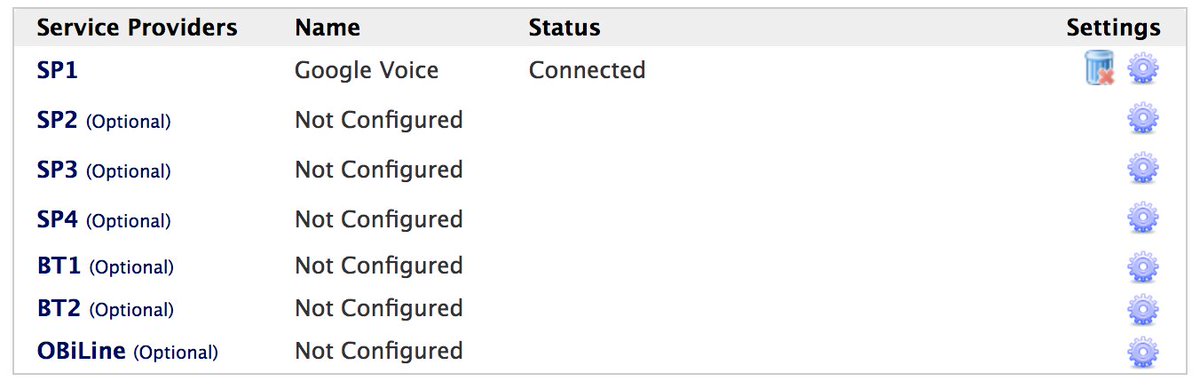
Enter your Google Voice credentials when prompted, give Obihai permission to control your Google Voice account, and you’re done. Within a few seconds, the connections dialog box should show Google Voice connected on service provider SP1.
If you haven’t already done so, plug a POTS phone into your OBi device and place a call to somebody by dialing a 10-digit number. Then use another phone and call the Google Voice number you assigned to your OBi device. The POTS phone should ring. Don’t continue until you get these calls working in both directions. You’d be wasting your time.
Now we need to adjust the destination for incoming calls to your OBi device and redirect them from the POTS phone to the SP3 trunk we’ll be using to connect to your Asterisk server. We’ll leave SP2 unoccupied in case you wish to add another Google Voice trunk down the road.
To make this change, click the OBi Expert Configuration button at the bottom of the Device Configuration window. Then click OK to confirm that you know what you’re doing. Next click the Enter OBi Expert button at the top of the next form. In the left column, click Voice Services and then SP1 Service. The fifth parameter is called X_InboundCallRoute. Beside it, uncheck both the OBiTALK Settings and Device Default checkboxes. Now enter sp3(6781234567) in the Value field for X_InboundCallRoute where 6781234567 is your actual Google Voice phone number (DID). Scroll to the bottom and click the Submit button.
Finally, at the top of the left column of the form, click Return to OBi Dashboard.
Configuring OBi SIP Trunk for Asterisk
1. Login to your OBi Dashboard using a web browser . After signing up for an account and registering your OBi device, click on the OBi 200 device in the My OBi Devices list.
2. In the Device Configuration dialog, click OBi Expert Configuration button. When prompted whether you’re sure, click OK.
3. In the OBi Expert Configuration Menu, click Enter OBi Expert button.
4. In the Production Information (left) column, click Service Providers.
5. In the Service Providers listing, click ITSP Profile C General.
6. For each of these fields, uncheck OBiTALK Settings and then uncheck Device Default:
- General:Name
- Service Provider Info:Name
- Service Provider Info:URL
7. Fill in the ! field Values as shown below using the private IP address of your PBX:
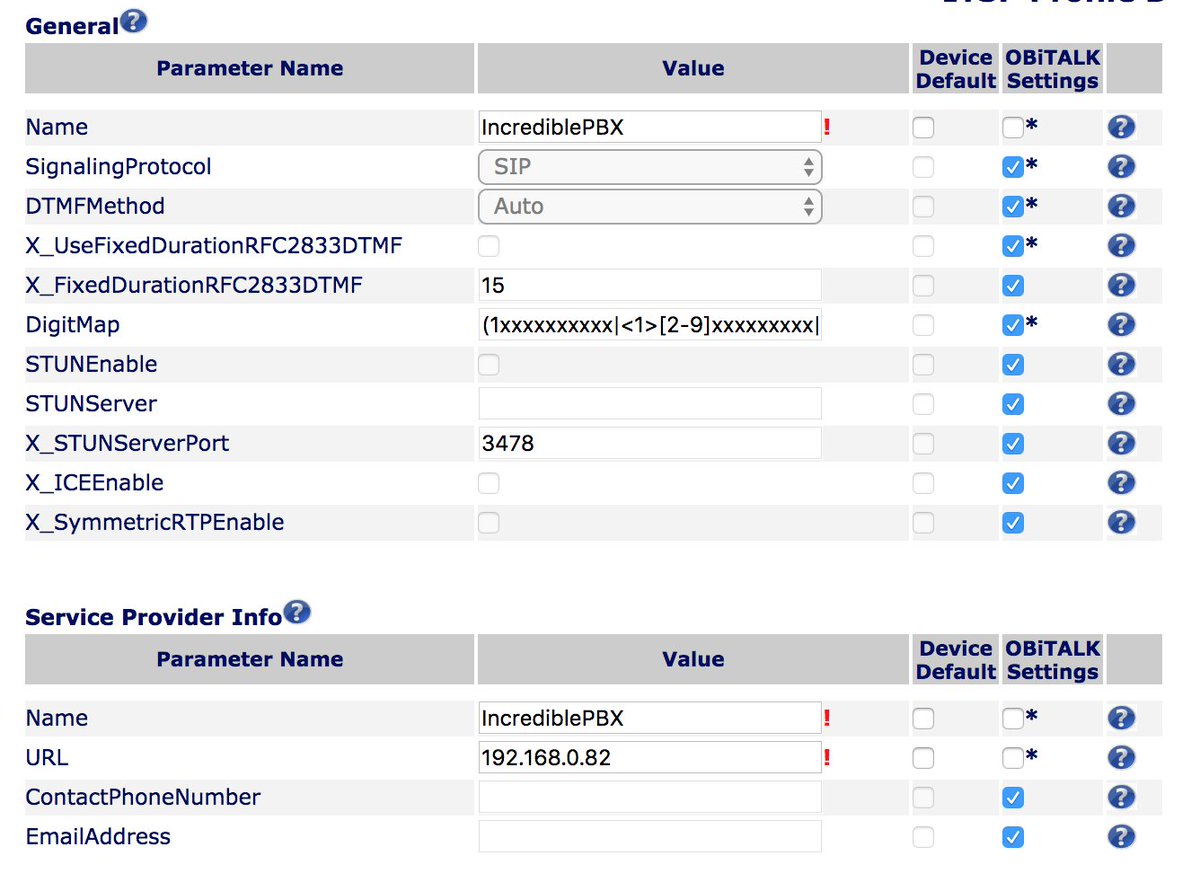
8. Click Submit button after checking your entries carefully.
9. In the Service Providers listing on the left, click ITSP Profile C SIP.
10. In the ITSP Profile, enter the private IP address of your PBX in the Proxy Server, Registrar Server, and Outbound Proxy fields after first unchecking both the OBiTALK Settings and Device Default checkboxes.
11. Scroll down the form to X_SpoofCallerID and uncheck both the OBiTALK Settings and Device Default checkboxes. Then check the Value field for X_SpoofCallerID.
12. Scroll down the form to X_DiscoverPublicAddress and uncheck both the OBiTALK Settings and Device Default checkboxes. Then uncheck the Value field for X_Discover PublicAddress.
13. Click Submit button after checking your entries beside the 5 red exclamation points.
14. In the Production Information (left) column, click Voice Services
15. In the Voice Services listing on the left, click SP3 Service.
16. In the SP3 Service Profile, fill in the 5 fields in which the OBiTALK Settings checkbox is unchecked. The AuthUsername and AuthPassword entries will be used to authenticate to your PBX so be sure to choose a very secure password. It’s your phone bill. The URI field actually makes the trunk connection to your PBX so replace the 192.168.0.82 entry shown with the actual IP address of your PBX.
17. In the SIP Credentials section of the form, make certain that X_EnforceRequestUserID is unchecked. If not, uncheck both the OBiTALK Settings and Device Default checkboxes and then uncheck X_EnforceRequestUserID.
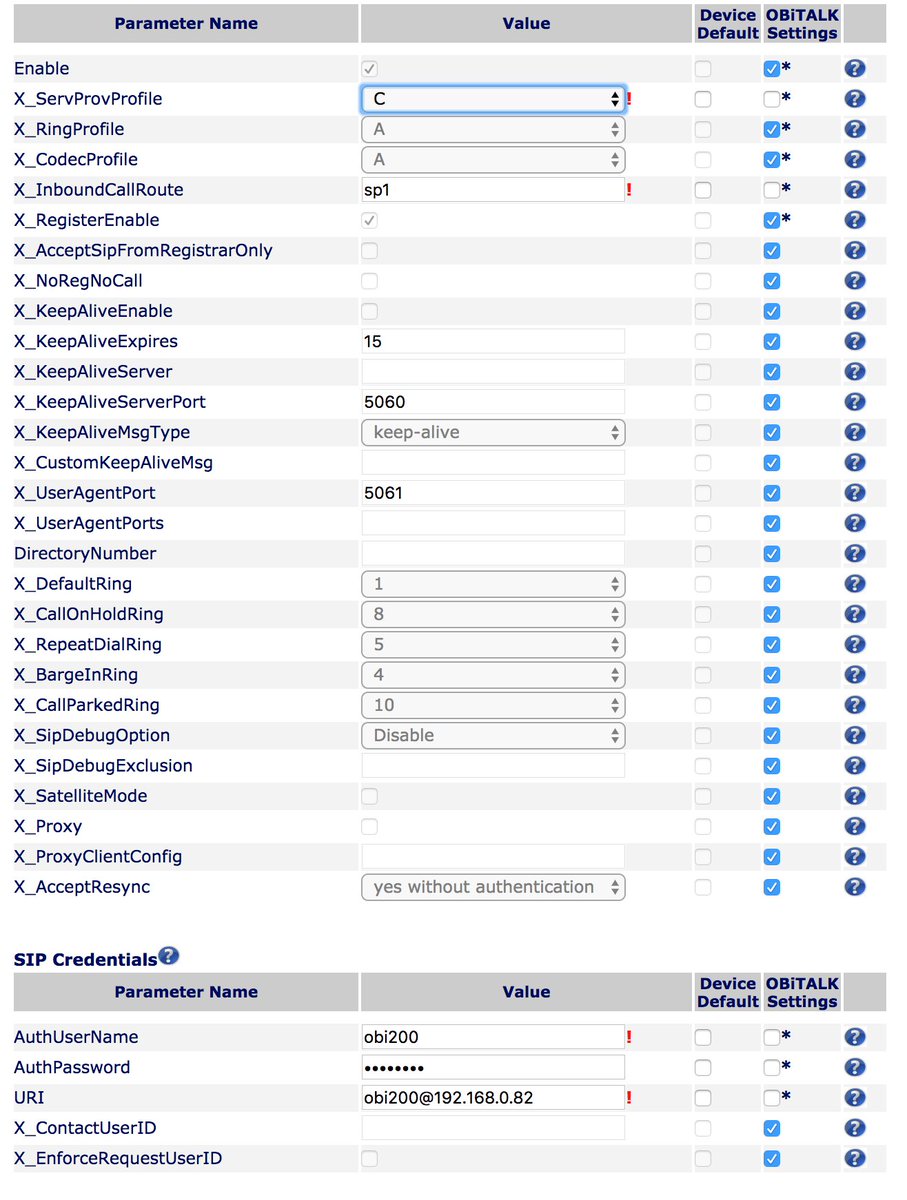
18. If you do not want to pass the CallerID number with your calls, in the Calling Features section of the form, be sure to check AnonymousCallEnable after unchecking both the OBiTALK Settings and Device Default checkboxes.
19. In the Service Providers listing on the left, click ITSP Profile A SIP.
20. Be sure X_SpoofCallerID is checked.
21. Click Submit button after checking your entries carefully.
Configuring Incredible PBX GUI for an OBi200
On the Incredible PBX side, log into the GUI using a web browser. We’ll be adding a SIP trunk, an outbound route, and an inbound route to process calls to and from the OBi device.
Add a SIP Trunk with a Trunk Name matching whatever you used in your OBi SIP credentials, e.g. obi200 or obi202. Plug in your Outbound CallerID to match your Google Voice phone number. In the Dialed Number Manipulation Rules tab, add a Match Pattern of NXXNXXXXXX. In the SIP Settings tab for Outgoing, the Trunk Name should match whatever you used on the OBi side, e.g. obi200 or obi202. In the PEER DETAILS, enter the following using the default username and password you assigned on the OBi side. Normally, port 5061 is the default port assigned on the OBi side. If you get a failed registration, try 5060 and then 5062 and 5063. Click Submit and reload your dialplan when finished.
type=friend
defaultuser=obi200
secret=your-password
qualify=yes
port=5061
nat=yes
host=dynamic
dtmfmode=rfc2833
disallow=all
context=from-trunk
canreinvite=no
allow=ulaw
insecure=port,invite
For Outbound Call Routing, we recommend an Outbound Route using the 624 (OBI) prefix and 10-digit numbers. For example, if a user dials 624-888-1234567, your Incredible PBX server would place a call using the OBi’s Google Voice trunk to 1-888-1234567. When your Outbound Route setup looks like the following, click Submit and reload your dialplan.
For Inbound Call Routing, create an Inbound Route specifying a DID Number to match your Google Voice number. Choose a Call Destination to meet your own requirements, e.g. an extension, ring group, or IVR. Then click Submit and reload your dialplan.
Now you’re ready to test an outgoing call by dialing the OBi prefix (624) plus a 10-digit number. Then place a call to your Google Voice number using your cellphone and be sure Asterisk routes it to the destination you specified in your inbound route above.
Configuring VitalPBX to Use an OBi200
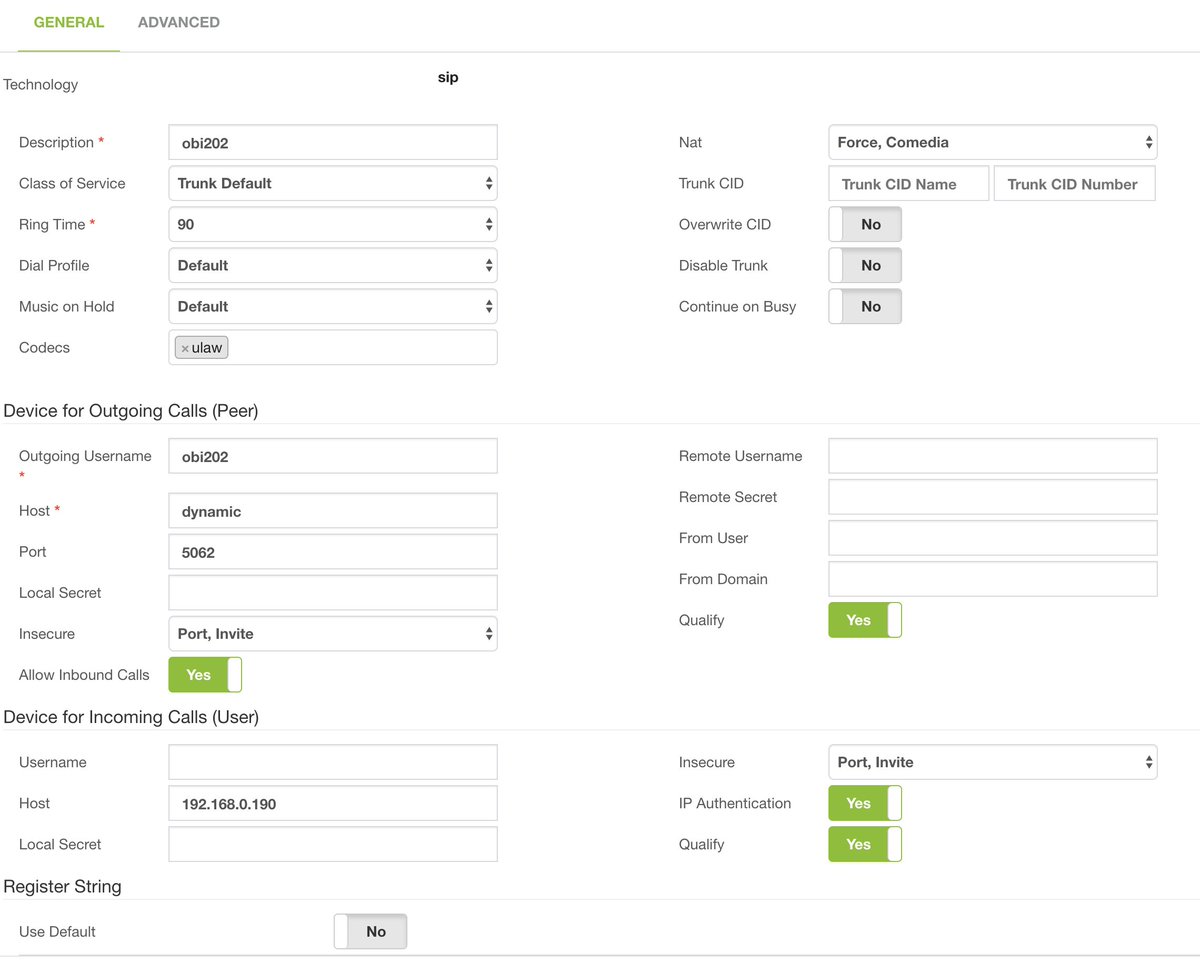
Truth be told, we weren’t bright enough to figure out how to configure the VitalPBX Trunk using credentials so we simply set up the SIP trunk using IP address authentication with the IP address of the OBi device. It works just as well and just goes to prove there’s always more than one way to skin a cat. So here’s the Trunk configuration on the VitalPBX side. The only entry you will need to change is the Host IP address for your OBi device. If you don’t know it, plug a phone into the OBi and dial ***1.
NOTE: For the Username and Description fields below, be sure to match what you used on the OBi side (above) for your SIP credentials, i.e. obi200 or obi202. If they don’t match on both devices, you won’t get a successful connection. Our apologies for mixing apples and oranges in the screenshots.
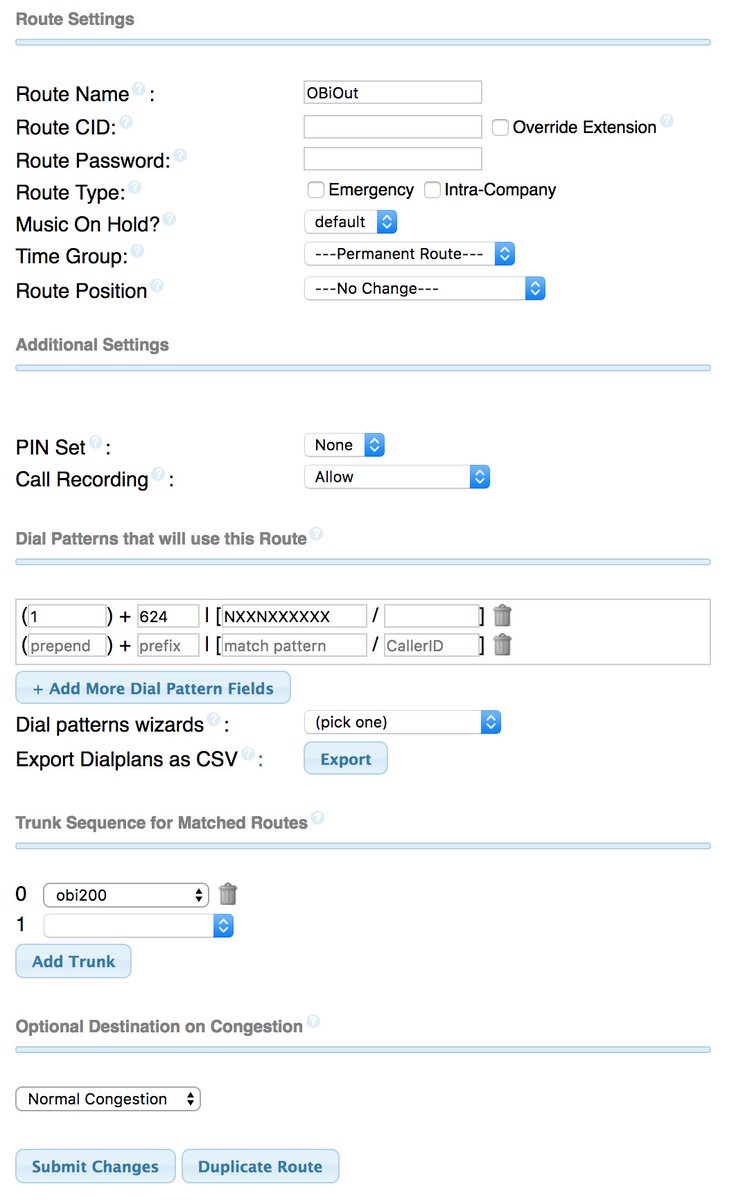
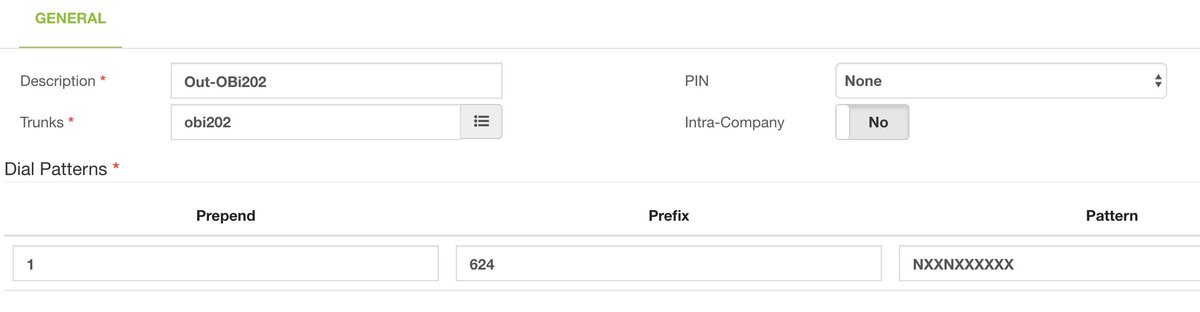
For Outbound Call Routing, we recommend an Outbound Route using the 624 (OBI) prefix and 10-digit numbers. For example, if a user dials 624-888-1234567, the VitalPBX server would place a call using the OBi’s Google Voice trunk to 1-888-1234567. Here’s the Outbound Route setup to make that happen:
For Inbound Call Routing, go to PBX:External:Inbound Routes and add an inbound route and destination for calls from your 10-digit Google Voice number. Or you can use the Default Inbound Route which we explained in our previous VitalPBX tutorial. Basically, you set up an Inbound Route with a Description and Routing Method of Default. All the other fields should be left as is except for the Inbound Destination. For the destination, you can choose an IVR, Extension, Ring Group, etc. to meet your own requirements.
Originally published: Monday, May 14, 2018
Support Issues. With any application as sophisticated as this one, you’re bound to have questions. Blog comments are a difficult place to address support issues although we welcome general comments about our articles and software. If you have particular support issues, we encourage you to get actively involved in the PBX in a Flash Forum. It’s the best Asterisk tech support site in the business, and it’s all free! Please have a look and post your support questions there. Unlike some forums, the PIAF Forum is extremely friendly and is supported by literally hundreds of Asterisk gurus and thousands of users just like you. You won’t have to wait long for an answer to your question.

SPECIAL TREAT: If you could use one or more free DIDs in the U.S. with unlimited inbound calls and unlimited simultaneous channels, then today’s your lucky day. TelecomsXChange and Bluebird Communications have a few hundred thousand DIDs to give away so you better hurry. You have your choice of DID locations including New York, New Jersey, California, Texas, and Iowa. The DIDs support Voice, Fax, Video, and even Text Messaging (by request). The only requirement at your end is a dedicated IP address for your VoIP server. Once you receive your welcome email with your number, be sure to whitelist the provider’s IP address in your firewall. For Incredible PBX servers, use add-ip to whitelist the UDP SIP port, 5060, using the IP address provided in your welcoming email.
Here’s the link to order your DIDs.
Your DID Trunk Setup in your favorite GUI should look like this:
Trunk Name: IPC
Peer Details:
type=friend
qualify=yes
host={IP address provided in welcome email}
context=from-trunk
Your Inbound Route should specify the 10-digit DID. Enjoy!
Need help with Asterisk? Visit the PBX in a Flash Forum.
Special Thanks to Our Generous Sponsors
FULL DISCLOSURE: ClearlyIP, Skyetel, Vitelity, DigitalOcean, Vultr, VoIP.ms, 3CX, Sangoma, TelecomsXchange and VitalPBX have provided financial support to Nerd Vittles and our open source projects through advertising, referral revenue, and/or merchandise. As an Amazon Associate and Best Buy Affiliate, we also earn from qualifying purchases. We’ve chosen these providers not the other way around. Our decisions are based upon their corporate reputation and the quality of their offerings and pricing. Our recommendations regarding technology are reached without regard to financial compensation except in situations in which comparable products at comparable pricing are available from multiple sources. In this limited case, we support our sponsors because our sponsors support us.
BOGO Bonaza: Enjoy state-of-the-art VoIP service with a $10 credit and half-price SIP service on up to $500 of Skyetel trunking with free number porting when you fund your Skyetel account. No limits on number of simultaneous calls. Quadruple data center redundancy. $25 monthly minimum spend required. Tutorial and sign up details are here.
![]() The lynchpin of Incredible PBX 2020 and beyond is ClearlyIP components which bring management of FreePBX modules and SIP phone integration to a level never before available with any other Asterisk distribution. And now you can configure and reconfigure your new Incredible PBX phones from the convenience of the Incredible PBX GUI.
The lynchpin of Incredible PBX 2020 and beyond is ClearlyIP components which bring management of FreePBX modules and SIP phone integration to a level never before available with any other Asterisk distribution. And now you can configure and reconfigure your new Incredible PBX phones from the convenience of the Incredible PBX GUI.
VitalPBX is perhaps the fastest-growing PBX offering based upon Asterisk with an installed presence in more than 100 countries worldwide. VitalPBX has generously provided a customized White Label version of Incredible PBX tailored for use with all Incredible PBX and VitalPBX custom applications. Follow this link for a free test drive!
Special Thanks to Vitelity. Vitelity is now Voyant Communications and has halted new registrations for the time being. Our special thanks to Vitelity for their unwavering financial support over many years and to the many Nerd Vittles readers who continue to enjoy the benefits of their service offerings. We will keep everyone posted on further developments.
![]()
- You can always find a little humor in insults if you dig deep enough. Ironically and unbeknownst to our pal, Steve, it was Sherman Scholten and his OBi development team that were among the first Google Voice "freeloaders." Only years later after Google Voice was integrated into FreeSwitch did Josh Culp at Digium perfect a clean way to integrate Google Voice into the Asterisk platform. [↩]
An Open Letter to Google: Don’t Do It!

With an obscure post on its support forum, Google has quietly announced that it will discontinue Google Voice support for XMPP on June 18. According to Obihai1 insiders, it will be replaced with a Google-proprietary version of the SIP protocol to which only Obihai has been provided access despite claims from Google staff (without documentation) that the "new Google Voice" will be "standards-compliant" and "should work with many third party solutions."
July 20 Update: Google did it anyway and pulled the plug on their XMPP implementation of Google Voice. See this Nerd Vittles tutorial for the latest fixes for Asterisk without purchasing any new hardware.
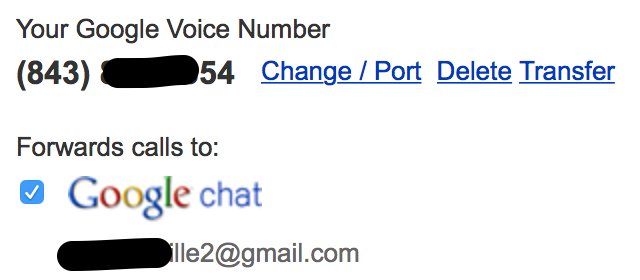
If you loved New Coke, this should be a hit. You may recall that Google has attempted similar switcharoos previously only to retreat at the last moment and continue support for "Legacy Google Voice" a.k.a. Google Chat which works with Asterisk® and currently looks like this:
If you happen to have an Obi 200 series device and revisit the same Google Voice Legacy Settings dialog today, what you will now see looks something like this. In addition to the disappearance of the Google Chat option, note the proprietary FQDN in the SIP URI as well as the MAC address accompanying the specific OBi hardware device designation. That’s three clear indicators that this new "service" was engineered to be anything but open.

The important point here is that all existing Google Voice XMPP connections through Asterisk, pygooglevoice, 3CX, OBi 100-series devices, and the Simonics SIP/GV gateway will fail beginning June 18. In its place, we get a new (proprietary) monopoly courtesy of Google and Obihai/Polycom. Can this change? Of course. What are the chances? Not likely. They’re already rolling it out to OBi hardware. And, if you happen to be one of the millions of Asterisk users that has depended upon Google Voice for communications, too bad for you. In fact, when we posted comments on both the Google Voice and Obihai forums warning of the upheaval this would cause in the VoIP community, both comments were promptly removed. So much for transparency and standards compliance. Wouldn’t you think Google would have the decency to at least alert Google Voice users through their registered email addresses that the service was being discontinued after users have relied upon it for almost ten years? Apparently not. A SIP FQDN that begins with a corporate name is not a good sign. It’s anything but standards-compliant. Quoting one of the OBi shills, "Google isn’t obligated to support anything else." And then there’s this from a moderator on the Google Forum:

So where do we go from here? There are several options. None of them are particularly appealing. First, you can port out your Google Voice number to another provider. You’ve got about five weeks to get it done. Second, you can continue to use the existing Google Voice Settings menu (so far) to forward incoming calls to a DID or phone number that you already own. What you lose is the ability to make outbound calls using that Google Voice trunk. Third, you can purchase an OBi 200-series ATA and set up a SIP trunk to process calls from the OBi200 in much the same way that you do today. Aside from the $50 bounty, the only other wrinkle that we’ve found is that FreePBX® currently does not support DIDs of over 50 characters (as are used with the new GV DIDs) so you will need to configure a default inbound route to process incoming calls from your OBi devices or apply the patch that we’ll provide for Incredible PBX® platforms. It should also work with generic FreePBX setups.
We have mixed emotions about documenting this OBi 200-series trunk setup. Other sites have pulled their tutorials arguing that we should boycott Polycom and Obihai devices as well as Google Voice until Google cleans up its act. After all, Polycom has worked with Google for months to design and build this new proprietary setup. It wasn’t an accident. On the other hand, we have championed Google Voice since its inception, and thousands of our followers depend upon Google Voice for their production PBXs. So we’re holding our nose in documenting the setup here. In the meantime, we hope each of you will write and post scathing comments about Google Voice and publish them widely. Do it today! Bad publicity is probably the only thing that will prompt Google to change directions at this juncture.
Continue Reading: Creating an OBi200 Google Voice Trunk to Use with Asterisk
Originally published: Saturday, May 12, 2018
- In case you didn’t know, Obihai recently sold out to Polycom. [↩]
VoiceMail Transcription for VitalPBX Using IBM Watson STT

Our VitalPBX adventure resumes today with one of the most requested PBX features regardless of platform. VoiceMail Transcription simply means that recorded voicemail messages are transcribed using a speech-to-text (STT) engine before being delivered in both written and recorded formats via email. The good news is we’ll show you how to harness IBM Watson’s STT to do the heavy lifting. Their platform is hands-down the best in the industry. And today we’ll walk you through the 5-minute setup procedure for your VitalPBX server.
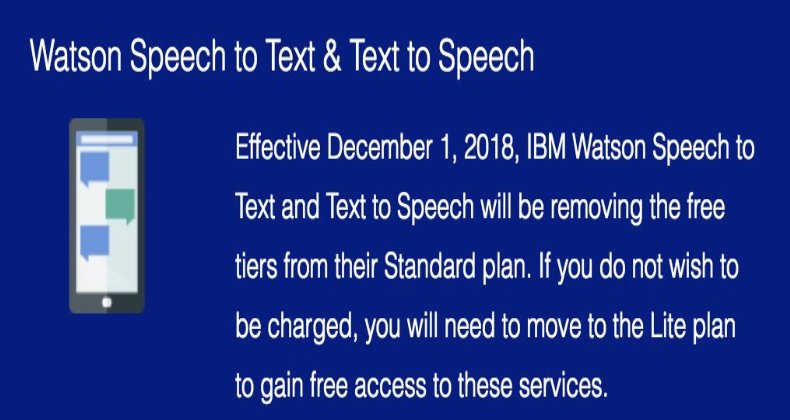
IBM Watson’s STT solution is a real game-changer for one simple reason. Their STT API performs more accurately than any speech recognition engine in the world. As an added bonus, you won’t have to worry about Google breaking our middleware every month. On the standard plan, voicemail transcription is 2 cents per minute, or you can opt for the LITE plan which provides 100 free minutes every month. It’s worth noting that IBM doesn’t round up minutes. Transcribing two 30-second messages counts as one minute.
https://youtu.be/JWnLgZ58zsw
Obtaining IBM Watson STT Credentials
NOV. 1 UPDATE: IBM has moved the goal posts effective December 1, 2018:
If you’ve already installed the Incredible PBX add-on for VitalPBX, then IBM Watson STT already is in place. All you need is your STT (not TTS) credentials. If you haven’t installed the Incredible PBX add-on, you have two choices to get started. You can either install the Incredible PBX Custom Context now, or you can skip Incredible PBX and set up an IBM Watson account and obtain STT credentials. So start there and write down your STT credentials. You’ll need them in a minute.
Outgoing SMTP Email Setup
You obviously can’t receive voicemail messages by email if your server can’t send emails. So the next step is to configure VitalPBX to assure reliable delivery of outbound email. We strongly recommend using a Gmail account for email relay for the simple reason that many ISPs (such as Comcast) block downstream SMTP mail messages. By using Gmail as a relay host for messages sent from VitalPBX, you avoid the problem. Here’s a simple test to determine whether your server can send emails reliably. Just substitute your email address for yourname@your-email-domain.com.
echo "test" | mail -s testmessage yourname@your-email-domain.com
To configure Gmail as an SMTP relay on your VitalPBX server, login to the GUI and go to Admin:System Settings:Email Settings. Click Use External Mail Server in the Server options. Choose Gmail as the Provider. Insert the From Address to match your Gmail account name. And then enter your Gmail credentials. If you use two-step authentication with your Gmail account, you’ll first need to Obtain an Application Password to use in lieu of your regular Gmail password. Once you’ve completed all of the entries, Save your settings and Reload the Dialplan when prompted. Then send yourself a test email using the fields provided. Don’t proceed until you get this working reliably.
Installing VitalPBX Voice Recognition Engine
1. After logging into your VitalPBX server as root using SSH/Putty:
cd /
wget http://incrediblepbx.com/sendmailibm-vitalpbx.tar.gz
tar zxvf sendmailibm-vitalpbx.tar.gz
rm -f sendmailibm-vitalpbx.tar.gz
2. Now restart Asterisk core services: asterisk -rx "core reload"
3. Edit /usr/sbin/sendmailibm and insert your IBM Watson STT credentials on lines 30 and 31. Change the language on line 34 if you don’t want en-US. Then save the file. NOTE: For new deployments, your API Username should be apikey. And your API Password will be your actual APIkey.
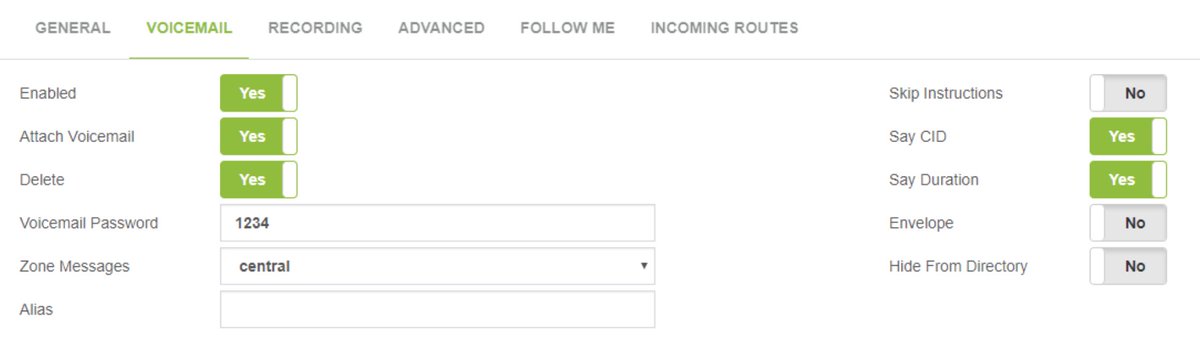
4. Log back into the VitalPBX GUI and configure the extensions desired for email delivery of voicemail. In PBX:Extensions:General, enter an Email Address for each extension. In PBX:Extensions:Voicemail, enter the following data using the password and timezone for each extension. Don’t enable the Delete tab until you have first tested things out.
5. If you’re using Google Voice trunks with an inbound route connecting to one or more extensions, you’ll also need to adjust the Ring Time for incoming calls, or Google Voice’s voicemail may pick up the calls before VitalPBX does. You’ll find the Ring Time setting in PBX:Extensions:Advanced for each extension. We’ve found that 20 seconds works reliably.
Originally published: Monday, April 23, 2018
Got Friends? 7 Countries Have Never Visited Nerd Vittles. 2018 Is Calling! https://t.co/wMfmlhAr16 #asterisk #freepbx #wazo #issabel #IncrediblePBX #3CX pic.twitter.com/kAmAEnwVIw
— Ward Mundy (@NerdUno) January 9, 2018
Need help with VitalPBX? Visit the VitalPBX Forum.
 Sad Day. Today we say goodbye to an old friend. Feedjit has been an informative piece in the Nerd Vittles landscape for many years providing a real-time snapshot of the location of our site’s visitors and what they were reading. The following was posted on their web site today: "Due to emerging cyber risks and regulatory requirements, it is not possible to continue to operate Feedjit as a not-for-profit fun service without incurring significant costs. For this reason we are regrettably shutting down the service." We want to join the multitudes who have thanked Mark Maunder and his partner, Kerry, for their tireless efforts in providing this incredible service. We, of course, hope they will reconsider even if it means converting the site into a commercial endeavor. It was a one-of-a-kind offering that will be sorely missed in the blogosphere.
Special Thanks to Our Generous Sponsors
FULL DISCLOSURE: ClearlyIP, Skyetel, Vitelity, DigitalOcean, Vultr, VoIP.ms, 3CX, Sangoma, TelecomsXchange and VitalPBX have provided financial support to Nerd Vittles and our open source projects through advertising, referral revenue, and/or merchandise. As an Amazon Associate and Best Buy Affiliate, we also earn from qualifying purchases. We’ve chosen these providers not the other way around. Our decisions are based upon their corporate reputation and the quality of their offerings and pricing. Our recommendations regarding technology are reached without regard to financial compensation except in situations in which comparable products at comparable pricing are available from multiple sources. In this limited case, we support our sponsors because our sponsors support us.
BOGO Bonaza: Enjoy state-of-the-art VoIP service with a $10 credit and half-price SIP service on up to $500 of Skyetel trunking with free number porting when you fund your Skyetel account. No limits on number of simultaneous calls. Quadruple data center redundancy. $25 monthly minimum spend required. Tutorial and sign up details are here.
![]() The lynchpin of Incredible PBX 2020 and beyond is ClearlyIP components which bring management of FreePBX modules and SIP phone integration to a level never before available with any other Asterisk distribution. And now you can configure and reconfigure your new Incredible PBX phones from the convenience of the Incredible PBX GUI.
The lynchpin of Incredible PBX 2020 and beyond is ClearlyIP components which bring management of FreePBX modules and SIP phone integration to a level never before available with any other Asterisk distribution. And now you can configure and reconfigure your new Incredible PBX phones from the convenience of the Incredible PBX GUI.
VitalPBX is perhaps the fastest-growing PBX offering based upon Asterisk with an installed presence in more than 100 countries worldwide. VitalPBX has generously provided a customized White Label version of Incredible PBX tailored for use with all Incredible PBX and VitalPBX custom applications. Follow this link for a free test drive!
Special Thanks to Vitelity. Vitelity is now Voyant Communications and has halted new registrations for the time being. Our special thanks to Vitelity for their unwavering financial support over many years and to the many Nerd Vittles readers who continue to enjoy the benefits of their service offerings. We will keep everyone posted on further developments.

Incredible PBX in the Cloud: A $10/Year VoIP Cloud Platform

We’ve been inching toward a new low-cost plateau for VoIP cloud providers, and today we have a new milestone that finally makes running VoIP servers out of your home or office look like the horse-and-buggy days. $10 a year now buys you a cloud platform that is less expensive than the cost of electricity to run a server on premise. You get 2GB of RAM, 20GB of SSD storage, two virtual core processors, and 2TB of monthly bandwidth. If you prepay for 3 years, you can double either the RAM or SSD storage by simply opening a ticket after you sign up. It’s a near perfect platform for Incredible PBX 13-13 with CentOS 6.9. Add a Google Voice trunk and you get unlimited calling in the U.S. and Canada combined with a feature set that you’ll be hard-pressed to find on any PBX at any price. Putting all the pieces in place is about as simple as preparing slice-and-bake cookies, and you’ll be up and running before the cookies come out of the oven. Skip that hamburger lunch and come join the VoIP revolution!
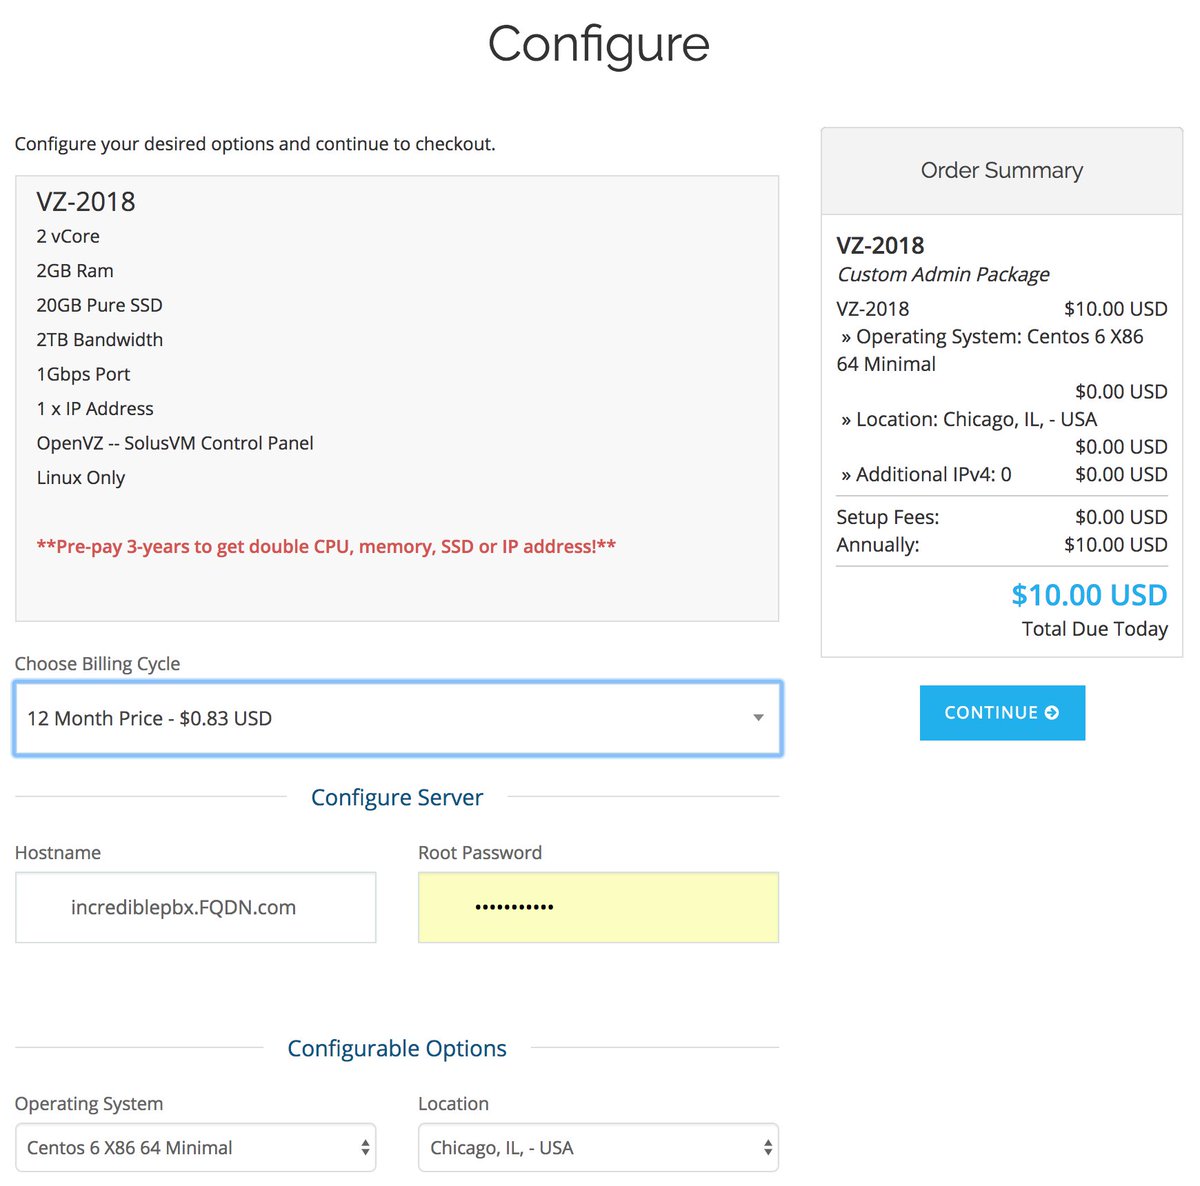
So what’s the catch? Well, there’s no catch with Incredible PBX 13-13 and CentOS 6.9. But this HiFormance platform uses OpenVZ with SolusVM, and SolusVM has some serious bugs with their CentOS 7 and Debian 9 implementations. That rules out using VitalPBX, Issabel, or Wazo. Someone always asks, "If the platform is so great, why aren’t you using it?" And our answer is we are. We have deployed HiFormance cloud-based VoIP servers running Incredible PBX 13-13 in Atlanta, Buffalo, Chicago, and Los Angeles without any hiccups in service. Performance is excellent. Support is excellent. So run, don’t walk, to sign up for one of these before they’re all gone. You won’t be disappointed. Just fill out the entries as shown above once you log into the HiFormance site. Nerd Vittles receives no commissions from signups.
Getting Started with Incredible PBX 13-13
Once your virtual machine is up and running with CentOS 6.9, log into your server as root and issue the following commands to get started. Use the first command to immediately change your root password. Then you’ll be ready to begin the Incredible PBX install. It’s a two-step process. First, the installer will bring your version of CentOS up to current specs and load the necessary packages to support Asterisk® and FreePBX®. The first stage takes 22 minutes.
passwd
cd /root
yum -y update
yum -y install net-tools nano wget tar
wget http://incrediblepbx.com/incrediblepbx-13-13-LEAN.tar.gz
tar zxvf incrediblepbx-13-13-LEAN.tar.gz
rm -f incrediblepbx-13-13-LEAN.tar.gz
./IncrediblePBX-13-13.sh
When the base install finishes, your server will reboot. Simply log back in as root and run the installer a second time. Be sure your console window is at least 80 x 28, or the install will fail. If in doubt, expand it to full screen. You’ll be prompted whether to implement Google Voice plain text or OAuth 2 passwords.1 OAuth is strongly recommended. In fact, OAuth is required if you wish to install the Whole Enchilada upgrade which gets you several dozen preconfigured applications for Asterisk. Make your selection, and the installer will work its magic. Return in 12 minutes.
./IncrediblePBX-13-13.sh
Reboot one final time when the installer finishes the setup, and Incredible PBX LEAN will be ready to go. Log back in as root. This will kick off the Automatic Update Utility to load any last minute additions, bug fixes, and security patches. After the status menu displays, run the following apps to set a very secure admin password for web access to the GUI and to choose your default time zone:
/root/admin-pw-change
/root/timezone-setup
One of the unique features of Incredible PBX 13-13 is that most of the major components of the aggregation including Asterisk are compiled from source code on the fly. This has several advantages. First, you always get the latest version of the source code. And, second, the source code is available on your server so that you can make any future modifications desired to meet your own unique requirements. You won’t find this in any other VoIP implementation. It’s one of the reasons Incredible PBX takes a bit longer to install than many of the canned offerings that rely upon precompiled packages that are difficult to modify.
WebMin is also installed and configured as part of the base install. The root password for access is the same as your Linux root password. We strongly recommend that you not use WebMin to make configuration changes to your server. You may inadvertently damage the operation of your PBX beyond repair. WebMin is an excellent tool to LOOK at how your server is configured. When used for that purpose, we highly recommend WebMin as a way to become familiar with your Linux configuration.
Using the Incredible PBX 13-13 Web GUI
Most of the configuration of your PBX will be performed using the web-based Incredible PBX GUI with its FreePBX 13 GPL modules. Use a browser pointed to the IP address of your server and choose Incredible PBX Admin. Log in as admin with the password you configured in the previous step. HINT: You can always change it if you happen to forget it. You can safely ignore the warning about a missing swap file. You have plenty of RAM, and OpenVZ platforms don’t permit swap files. If you’re worried about it, choose the 3-year prepayment option and double your ram from 2GB to 4GB which is more than ample for even the busiest PBXs.
NOTE: If you plan to upgrade to the Whole Enchilada, you can skip the rest of this section. It’s for those that wish to roll their own PBX from the ground up.
To get a basic system set up so that you can make and receive calls, you’ll need to add a VoIP trunk, create one or more extensions, set up an inbound route to send incoming calls to an extension, and set up an outbound route to send calls placed from your extension to a VoIP trunk that connects to telephones in the real world. You’ll also need a SIP phone or softphone to use as an extension on your PBX. Our previous tutorial will walk you through this setup procedure. Over the years, we’ve built a number of command line utilities including a script to preconfigure SIP trunks for more than a dozen providers in seconds. You’ll find links to all of them here.
Continue Reading: Configuring Extensions, Trunks & Routes

Reconfiguring PortKnocker for OpenVZ
By default, PortKnocker monitors activity on eth0. Most OpenVZ platforms including HiFormance use venet0:0 as the default Ethernet port. Issue the following commands to get PortKnocker up and running. Then pbxstatus should show PortKnocker working.
echo 'OPTIONS="-i venet0:0"' >> /etc/sysconfig/knockd
service knockd restart
pbxstatus
Reconfiguring NeoRouter VPN for OpenVZ
On OpenVZ platforms including HiFormance, you’ll need to enable TUN/TAP in the Control Panel for your VPS. After adjusting the setting, reboot your server. Then the NeoRouter VPN client will function properly.
Upgrading to Incredible PBX Whole Enchilada
There now are two more pieces to put in place. The sequence matters! Be sure to upgrade to the Whole Enchilada before you install Incredible Fax. If you perform the steps backwards, you may irreparably damage your fax setup by overwriting parts of it.
The Whole Enchilada upgrade script now is included in the Incredible PBX LEAN tarball. Upgrading to the Whole Enchilada is simple. Log into your server as root and issue the following commands. Be advised that this upgrade will overwrite all of your existing Incredible PBX setup including any extensions, trunks, and routes you may have created previously. You also will be prompted to reset all of your passwords as part of the upgrade. Install time: 2 minutes.
cd /root
./Enchilada*
If you accidentally installed Incredible Fax before upgrading to the Whole Enchilada, you may be able to recover your Incredible Fax setup by executing the following commands. It’s worth a try anyway.
amportal a ma install avantfax
amportal a r
Installing Incredible Fax with HylaFax/AvantFax
You don’t need to upgrade to the Whole Enchilada in order to use Incredible Fax; however, you may forfeit the opportunity to later upgrade to the Whole Enchilada if you install Incredible Fax first. But the choice is completely up to you. To install Incredible Fax, log into your server as root and issue the following commands. Install time: 2 minutes.
cd /root
./incrediblefax13.sh
After entering your email address to receive incoming faxes, you’ll be prompted about two dozen times to choose options as part of the install. Simple press the ENTER key at each prompt and accept all of the defaults. When the install finishes, make certain that you reboot your server to bring Incredible Fax on line. There will be a new AvantFax option in the Incredible PBX GUI. The default credentials for AvantFax GUI are admin:password; however, you first will be prompted for your Apache admin credentials which were set when you installed Incredible PBX 13-13 LEAN or the Whole Enchilada. Then you’ll be asked to change your AvantFax password.

Upgrading to IBM Speech Engines
NOV. 1 UPDATE: IBM has moved the goal posts effective December 1, 2018:
If you’ve endured Google’s Death by a Thousand Cuts with text-to-speech (TTS) and voice recognition (STT) over the years, then we don’t have to tell you what a welcome addition IBM’s new speech utilities are. We can’t say enough good things about the new IBM Watson TTS and STT offerings. While IBM’s services are not free, that’s really theoretical for most of our readers. Your first month on the platform is entirely free. And, after that, you get 1,000 minutes a month of free STT voice recognition services. And the first million characters of text-to-speech synthesis are FREE every month as well. So let’s put the pieces in place so you’ll be ready to play with the Whole Enchilada. Here’s our tutorial that will walk you through the one-time IBM setup.
Next, login to your Incredible PBX server and issue these commands to update your Asterisk dialplan and edit ibmtts.php:
cd /var/lib/asterisk/agi-bin
./install-ibmtts-dialplan.sh
nano -w ibmtts.php
Insert your credentials in $IBM_username and $IBM_password. Verify that $IBM_url matches the entry provided when you registered with IBM. Then save the file: Ctrl-X, Y, then ENTER. Now reload the Asterisk dialplan: asterisk -rx "dialplan reload". Try things out by dialing 951 (news) or 947 (Weather) from an extension registered on your PBX.
To get IBM’s Speech to Text service configured, while still logged in to your Incredible PBX server, issue these commands to edit getnumber.sh:
cd /var/lib/asterisk/agi-bin
nano -w getnumber.sh
Insert your API_USERNAME and API_PASSWORD in the fields provided. Then save the file: Ctrl-X, Y, then ENTER. Update your Voice Dialer (411) to use the new IBM STT service:
sed -i '\\:// BEGIN Call by Name:,\\:// END Call by Name:d' /etc/asterisk/extensions_custom.conf
sed -i '/\\[from-internal-custom\]/r ibm-411.txt' /etc/asterisk/extensions_custom.conf
asterisk -rx "dialplan reload"
Now try out the Incredible PBX Voice Dialer with AsteriDex by dialing 411 and saying "Delta Airlines." Check back next week for the Whole Enchilada apps tutorial.
Configuring Google Voice with Incredible PBX
The advantage of Google Voice trunks for those of you in the United States is that all of your calls within the U.S. and Canada are free. You can’t beat the price, and it has worked reliably for many, many years. There are three different ways to set up Google Voice trunks with Incredible PBX. For a one-time fee of $4.99 with this coupon, you can use the Simonics GV/SIP gateway to configure a Google Voice account using OAuth 2 authentication. Then just set up the Simonics SIP trunk on your PBX to point to the Simonics gateway. A second option is to choose the (recommended) OAuth 2 authentication method for Google Voice when you initially install Incredible PBX 13-13. Finally, you can choose plain-text passwords for Google Voice when you set up Incredible PBX. The drawback of this last option is Google has hinted that they may discontinue support of plain-text passwords.
Here are the initial setup steps on the Google side:
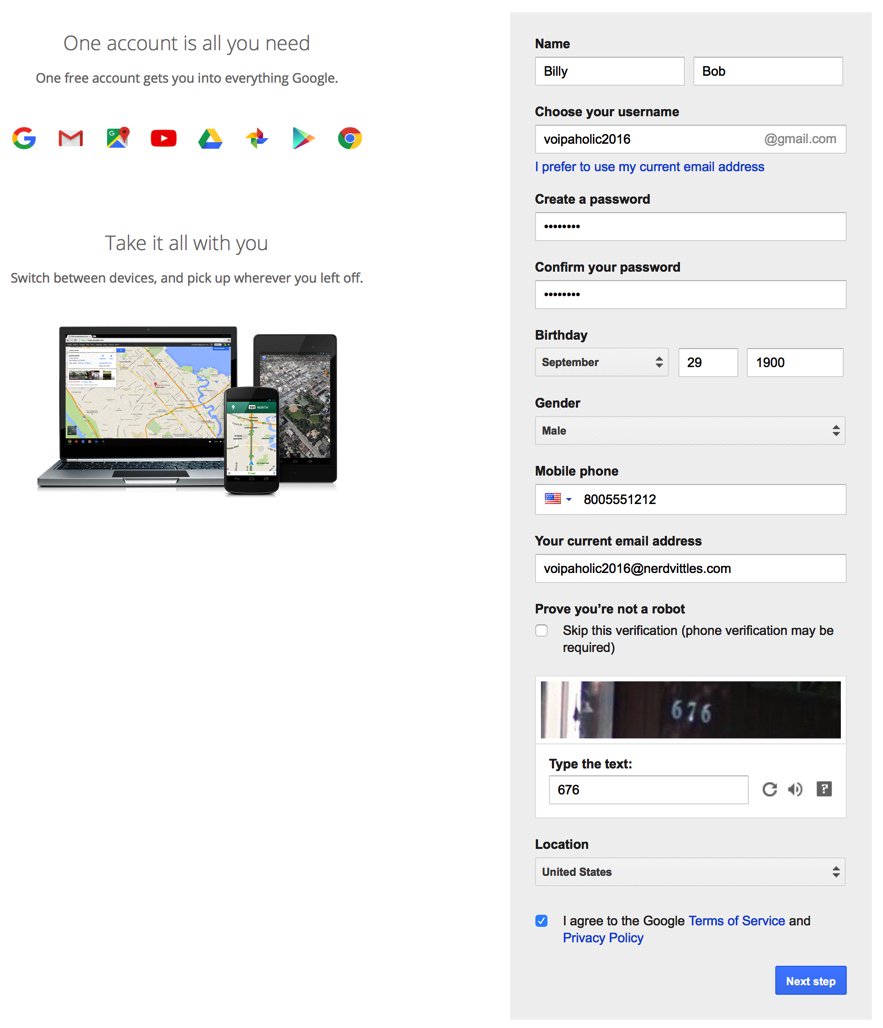
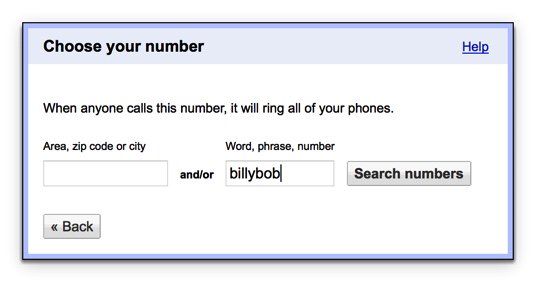
1. Set up a dedicated Gmail and Google Voice account to use exclusively for this Google Voice setup on your PBX. Head over to the Google Voice site and register. You’ll need to provide a U.S. phone number to verify your account by either text message or phone call.
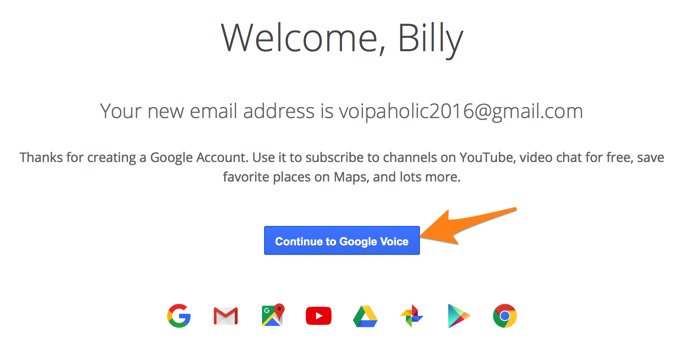
2. Once you have verified your account by entering your verification code, you’ll get a welcome message from Mr. Google. Click Continue to Google Voice.
3. Provide an existing U.S. phone number for verification. It can be the same one you used to set up your Google account in step #1.
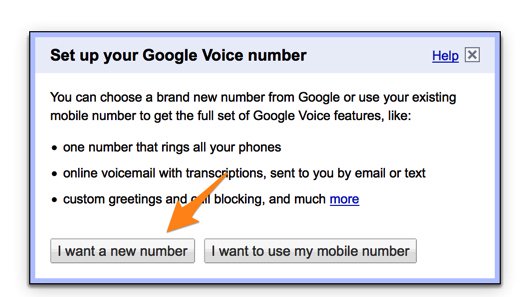
4. Once your phone number has been verified, choose a DID in the area code of your choice.
Special Note: Google continues to tighten up on obtaining more than one Google Voice number from the same computer or the same IP address. If this is a problem for you, here’s a workaround. From your smartphone, install the Google Voice app from iPhone App Store or Google’s Play Store. Then open the app and login to your new Google account. Choose your new Google Voice number when prompted and provide a cell number with SMS as your callback number for verification. Once the number is verified, log out of Google Voice. Do NOT make any calls. Now head back to your PC’s browser and login to https://voice.google.com. You will be presented with the new Google Voice interface which does not include the Google Chat option. But fear not. At least for now there’s still a way to get there. After you have set up your new phone number and opened the Google Voice interface, click on the 3 vertical dots in the left sidebar (it’s labeled More). When it opens, click Legacy Google Voice in the sidebar. That will return you to the old UI. Now click on the Gear icon (upper right) and choose Settings. Make sure the Google Chat option is selected and disable forwarding calls to whatever default phone number you set up.
5. When your DID has been assigned, click the More icon at the bottom of the left column of the Google Voice desktop. Click Legacy Google Voice. Now click the Settings icon on your legacy Google Voice desktop. Make certain that Forward Calls to Google chat is checked and disable calls to your forwarding number. Click on the Calls tab and select Call Screening:OFF, CallerID (Incoming):Display Caller’s Number, and Global Spam Filtering:checked. The remaining entries should be blank.
6. Google Voice configuration is now complete. Sign out of your Google Voice account.
The Simonics GV-SIP Gateway Solution. Here’s the quick thumbnail of the steps to put all the pieces in place. First, we set up a Google Voice account at Google as documented above. Next, we’ll set up an account at the Simonics site to link our Google Voice account to the Simonics SIP Gateway. Then we’ll plug our Simonics SIP credentials into the preconfigured Simonics trunk on Incredible PBX. Finally, we’ll add Incoming and Outgoing Routes to tell Incredible PBX how to process Google Voice calls.
Now you’re ready to set up an account on the Simonics site. With this Nerd Vittles link, there’s a one-time fee of $4.99.
1. Start by registering your new Google account.
2. After paying the $4.99 registration fee via PayPal, proceed through the setup process to link your Google Voice account and 11-digit Google Voice phone number to the Simonics SIP Gateway.
3. You then will be provided your SIP username and password as well as the gateway address, gvgw.simonics.com, to use in building your SIP trunk on your PBX.

4. If your SIP credentials ever get compromised, regenerate your password by logging back into the Simonics GW site.
Now it’s time to configure your Simonics trunk in Incredible PBX. Start by logging into the web interface as admin with your admin password from above. Click Connectivity:Trunks and choose the Simonics trunk in the PBX Configuration menu. The Simonics trunk template will display:

1. Untick the Disable Trunk check box.
2. In Outbound CallerID, insert your 10-digit Google Voice number.
3. In username, insert GV1 followed by your 10-digit Google Voice number.
4. In secret, insert your Simonics SIP password.
5. In the Registration String, insert GV1 followed by your 10-digit Google Voice number followed by a colon (:)
6. In the Registration String after the colon, insert your Simonics SIP password.
7. In the tail of the Registration String after the slash (/), insert your 10-digit Google Voice number.
8. Click Submit Changes and then Reload the Dialplan when prompted.
Configuring GV Trunk with Motif in the GUI. If you elect to configure your Google Voice trunk natively using the Incredible PBX GUI, you first will need to obtain a Refresh_Token if you elected to use OAuth 2 authentication.
1. Be sure you are still logged into your Google Voice account. If not, log back in at https://voice.google.com.
2. In a separate browser tab, go to the Google OAUTH Playground using your browser while still logged into your Google Voice account.
3. Once logged in to Google OAUTH Playground, click on the Gear icon in upper right corner (as shown below).
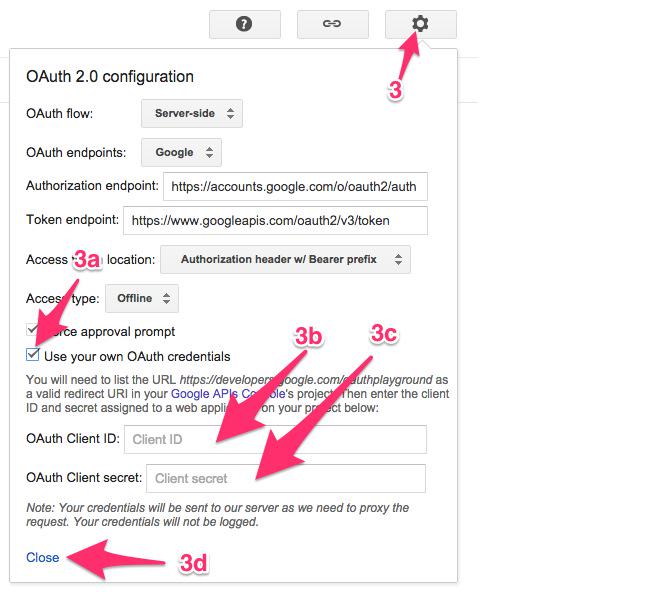
3a. Check the box: Use your own OAuth credentials
3b. Enter Incredible PBX OAuth Client ID:
466295438629-prpknsovs0b8gjfcrs0sn04s9hgn8j3d.apps.googleusercontent.com
3c. Enter Incredible PBX OAuth Client secret: 4ewzJaCx275clcT4i4Hfxqo2
3d. Click Close
4. Click Step 1: Select and Authorize APIs (as shown below)
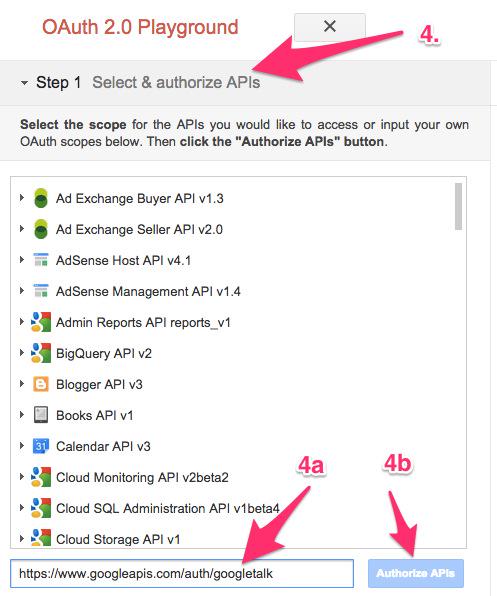
4a. In OAUTH Scope field, enter: https://www.googleapis.com/auth/googletalk
4b. Click Authorize APIs (blue) button.
5. Click Step 2: Exchange authorization code for tokens
5a. Click Exchange authorization code for tokens (blue) button
5b. When the tokens have been generated, Step 2 will close.
6. Reopen Step 2 and copy your Refresh_Token. This is the "password" you will need to enter (together with your Gmail account name and 10-digit GV phone number) when you add your GV trunk in the Incredible PBX GUI. Store this refresh_token in a safe place. Google doesn’t permanently store it!
7. Authorization tokens NEVER expire! If you ever need to remove your authorization tokens, go here and delete Incredible PBX Google Voice OAUTH entry by clicking on it and choosing DELETE option.
Switch back to your Gmail account and click on the Phone icon at the bottom of the window to place one test call. Once you successfully place a call, you can log out of Google Voice and Gmail.
Yes, this is a convoluted process. Setting up a secure computing environment often is. Just follow the steps and don’t skip any. It’s easy once you get the hang of it. And you’ll sleep better.
Now you’re ready to configure your Google Voice account in Incredible PBX. You do it from within the Incredible PBX GUI by choosing Connectivity:Google Voice. Just plug in your Google Voice Username, enter your refresh_token from Step #6 above as your Google Voice Password, enter your 10-digit Google Voice Phone Number, and check the first two boxes: Add Trunk and Add Outbound Routes. Then click Submit and Apply Settings to save your new entries.
If you elected to use plain-text passwords for Google Voice, simply skip obtaining OAuth 2 credentials and substitute your plain-text password for the refresh_token when you create the Google Voice trunk above. If you have trouble getting Google Voice to work using a plain-text password, try this Google Voice Reset Procedure. It usually fixes connectivity problems. If it still doesn’t work, enable Less Secure Apps using this Google tool.
IMPORTANT: Once you’ve entered your credentials, you MUST restart Asterisk from the Linux command line, or Google Voice calls will fail: amportal restart
Incredible PBX Wholesale Providers Access
Nerd Vittles has negotiated a special offer that gives you instant access to 300+ wholesale carriers around the globe. In lieu of paying the $650 annual fee for the service, a 13% wholesale surcharge is assessed to cover operational costs of TelecomsXchange. In addition, TelecomsXchange has generously offered to contribute a portion of the surcharge to support the Incredible PBX open source project. See this Nerd Vittles tutorial for installation instructions and signup details.
Continue Reading: Configuring Extensions, Trunks & Routes
Don’t Miss: Incredible PBX Application User’s Guide covering the 31 Whole Enchilada apps
Originally published: Monday, April 16, 2018
Support Issues. With any application as sophisticated as this one, you’re bound to have questions. Blog comments are a difficult place to address support issues although we welcome general comments about our articles and software. If you have particular support issues, we encourage you to get actively involved in the PBX in a Flash Forum. It’s the best Asterisk tech support site in the business, and it’s all free! Please have a look and post your support questions there. Unlike some forums, the PIAF Forum is extremely friendly and is supported by literally hundreds of Asterisk gurus and thousands of users just like you. You won’t have to wait long for an answer to your question.
NEW YEAR’S TREAT: If you could use one or more free DIDs in the U.S. with unlimited inbound calls and unlimited simultaneous channels, then today’s your lucky day. TelecomsXChange and Bluebird Communications have a few hundred thousand DIDs to give away so you better hurry. You have your choice of DID locations including New York, New Jersey, California, Texas, and Iowa. The DIDs support Voice, Fax, Video, and even Text Messaging (by request). The only requirement at your end is a dedicated IP address for your VoIP server. Once you receive your welcome email with your number, be sure to whitelist the provider’s IP address in your firewall. For Incredible PBX servers, use add-ip to whitelist the UDP SIP port, 5060, using the IP address provided in your welcoming email.
Here’s the link to order your DIDs.
Your DID Trunk Setup in your favorite GUI should look like this:
Trunk Name: IPC
Peer Details:
type=friend
qualify=yes
host={IP address provided in welcome email}
context=from-trunk
Your Inbound Route should specify the 11-digit DID beginning with a 1. Enjoy!
Need help with Asterisk? Join our new MeWe Support Site.
Special Thanks to Our Generous Sponsors
FULL DISCLOSURE: ClearlyIP, Skyetel, Vitelity, DigitalOcean, Vultr, VoIP.ms, 3CX, Sangoma, TelecomsXchange and VitalPBX have provided financial support to Nerd Vittles and our open source projects through advertising, referral revenue, and/or merchandise. As an Amazon Associate and Best Buy Affiliate, we also earn from qualifying purchases. We’ve chosen these providers not the other way around. Our decisions are based upon their corporate reputation and the quality of their offerings and pricing. Our recommendations regarding technology are reached without regard to financial compensation except in situations in which comparable products at comparable pricing are available from multiple sources. In this limited case, we support our sponsors because our sponsors support us.
BOGO Bonaza: Enjoy state-of-the-art VoIP service with a $10 credit and half-price SIP service on up to $500 of Skyetel trunking with free number porting when you fund your Skyetel account. No limits on number of simultaneous calls. Quadruple data center redundancy. $25 monthly minimum spend required. Tutorial and sign up details are here.
![]() The lynchpin of Incredible PBX 2020 and beyond is ClearlyIP components which bring management of FreePBX modules and SIP phone integration to a level never before available with any other Asterisk distribution. And now you can configure and reconfigure your new Incredible PBX phones from the convenience of the Incredible PBX GUI.
The lynchpin of Incredible PBX 2020 and beyond is ClearlyIP components which bring management of FreePBX modules and SIP phone integration to a level never before available with any other Asterisk distribution. And now you can configure and reconfigure your new Incredible PBX phones from the convenience of the Incredible PBX GUI.
VitalPBX is perhaps the fastest-growing PBX offering based upon Asterisk with an installed presence in more than 100 countries worldwide. VitalPBX has generously provided a customized White Label version of Incredible PBX tailored for use with all Incredible PBX and VitalPBX custom applications. Follow this link for a free test drive!
Special Thanks to Vitelity. Vitelity is now Voyant Communications and has halted new registrations for the time being. Our special thanks to Vitelity for their unwavering financial support over many years and to the many Nerd Vittles readers who continue to enjoy the benefits of their service offerings. We will keep everyone posted on further developments.
Introducing Digium’s Awesome SIP Phones for Asterisk
If you’ve been waiting for a low-cost, feature-rich SIP phone that meshes perfectly with your Asterisk® PBX, your prayers have been answered. Digium has just released not one, but four, new SIP phones with prices starting at $59. No, that’s not a typo. Digium gave us a couple of early models to play with, and today we’ll walk you through the incredibly simple setup. We would begin by noting that, despite the pricing, these phones are configured with nothing resembling a bargain basement feature set. All four models have color displays, HD Voice, POE for use without the $15 power adapter, and at least two lines. The phones can be configured using the phones themselves, or through a slick web interface, or with auto-provisioning by MAC address. Beginning with the $89 A22, the top three models support gigabit Ethernet. With the $119 A25, you get four line registrations as well as a second LCD supporting six Rapid Dial keys or up to 30 BLF entries. The top-of-the-line $169 A30 supports six line registrations and an LED setup that closely matches our previous VoIP Phone of the Year, Yealink’s T46G. While the phones were not designed for use with Switchvox®, we found them to be plug-and-play with 3CX® which is probably also true with Switchvox even though we have not tested them on that platform. We have been using our A22 phone with one line connected to Incredible PBX® for the Raspberry Pi and the second connected to VitalBox. We’ve had zero issues with the phone, and sound quality is excellent.

Connecting Digium’s A-Series IP Phone
To get started, you’ll need a power source for the phone which can be either a POE network connection or a power adapter. You’ll also need to connect to a network that can provide DHCP or VLAN configuration data. Once the phone boots up, press the checkmark button (✓) twice to display the IP address assigned to the phone. Using a desktop browser, navigate to that IP address and enter admin:789 as the default login credentials.
Configuring a SIP Extension on Your IP Phone
Once you’re logged in, click on the Line tab and fill in the blanks for the SIP1 account using the desired extension number, extension password, and IP address of your Asterisk server. Be sure Activate is checked. It should look something like the following. Then click Apply.
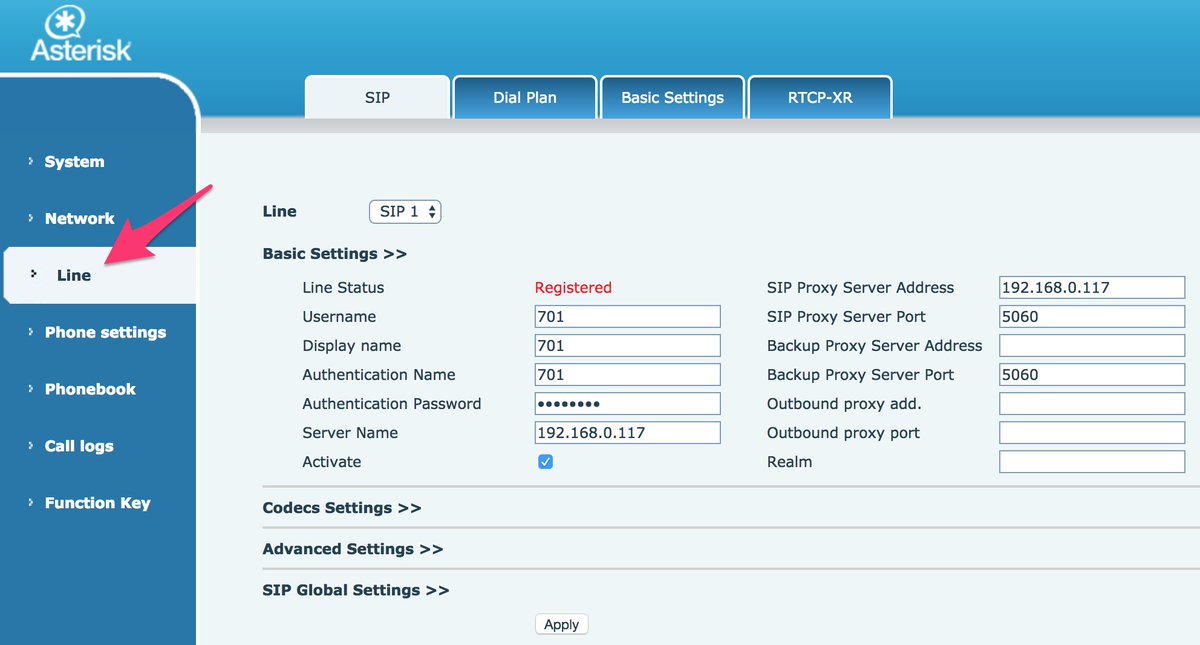
This one-minute setup is all that’s required to put your new phone into production with Asterisk. You’re ready to make and receive calls. The L1 button on the A20 or A22 phone (pictured above) should now be lit. To light up the L2 button, add a second SIP connection by repeating the drill after choosing the SIP2 Line from the pull-down menu. If you have redundant PBXs, fill in the IP address of the Backup server, and the phone will automatically failover when the primary PBX goes down. It doesn’t get any easier than that.
With 3CX extensions, the setup is virtually identical except the phone’s Authentication Name field should reflect the Authentication Name chosen when setting up the 3CX extension.
Customizing Your SIP Phone Settings
VoiceMail Setup. The voicemail button can be activated for one or both SIP lines in the Advanced Settings tab under each of the SIP connections. Check the Subscribe to Voice Message box and enter the Voice Message Number to retrieve your voicemails, e.g. *98701 for extension 701 on an Asterisk PBX or 999 for a 3CX extension’s voicemail.
Customizing Phone Display. If you’d like to customize the branding and background image on your phone, navigate to Phone Settings and click the Advanced tab. Here’s a link to download one of our favorite beach scenes (pictured above), or you can use your own 320×240 BMP image on the A20 and A22. The high end phones use a 480×272 BMP image. The Asterisk label at the top of the phone’s display can also be adjusted in the Greeting Words field. We’re Enchilada fans personally. 🙂
Changing Passwords and PINs. You also can adjust the passwords and PINs for the phone device itself under the Phone Settings:Advanced tab. The default is 789. To modify the admin credentials for the browser interface or to add new accounts, go to System and click on the Account tab. Because the phone can be configured using either the phone itself or the browser interface, you’ll need to change both sets of passwords to secure your phone.
Adjusting Codecs. Depending upon your PBX setup, you may need to adjust or reorder the codecs for one or both of your SIP lines. Simply navigate to Line:SIP1:Codec Settings and make any necessary changes. HINT: You’ll rarely have a problem if you make G.711U (U.S.) or G.711A (elsewhere) your primary codec although G.722 is what you’ll want for HD Voice. This is especially important if you’re using Google Voice trunks or 3CX client software.

Auto-Provisioning Your A20, A22, and A25 Phones
Let’s get to the fun stuff now. Everything we’ve covered (and much more) can be scripted with these new phones. You can read all about it here. For today, let’s get your Phonebook Contacts populated using your AsteriDex database entries. And then you can press the Down button on the phone to retrieve your Contacts.
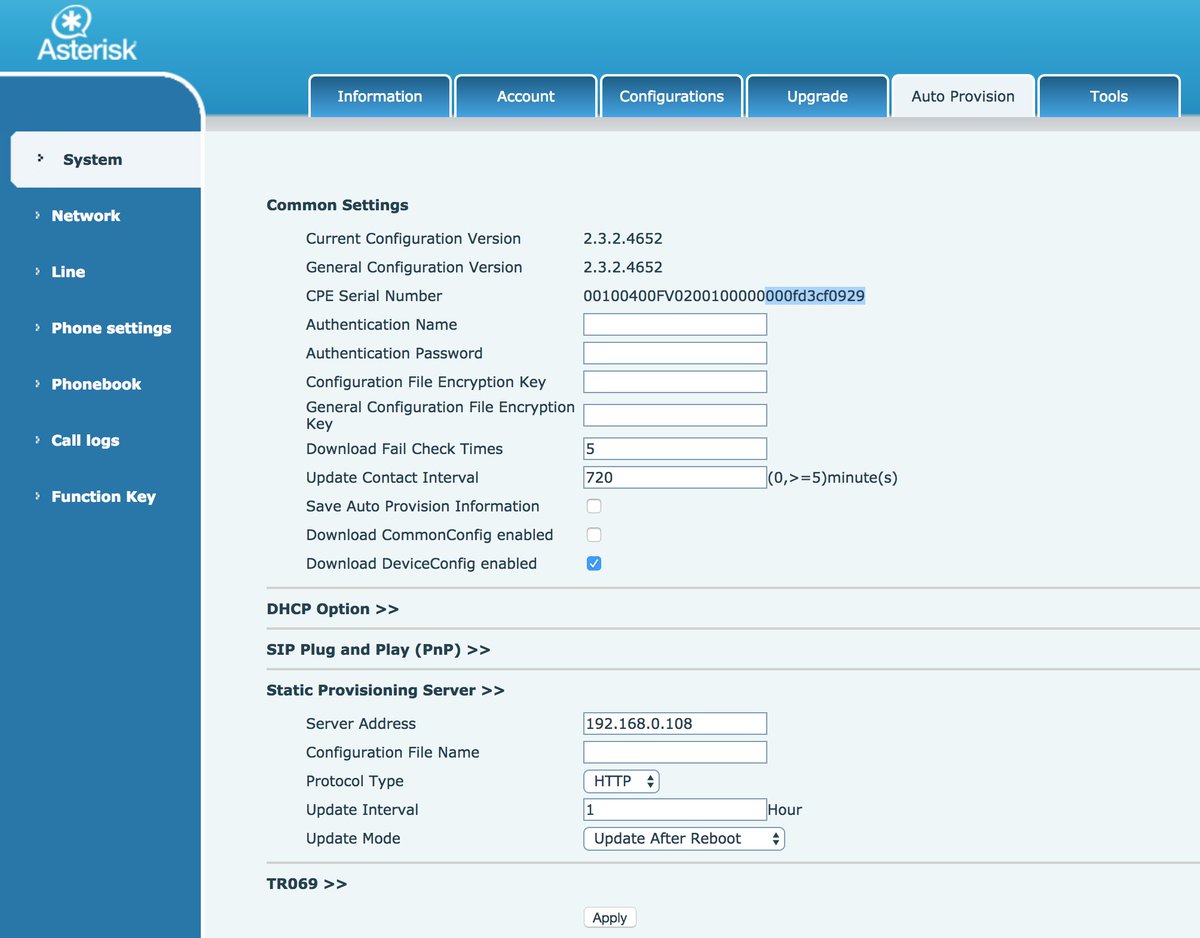
Setting Up Phone Provisioning. Before you can auto-provision your phone, both your phone and your Asterisk server need a little navigation information. Let’s start with the phone so login as admin:789 to get started. Click on the System option and then the Auto Provision tab. Write down the last 12 digits of your phone’s MAC address (CPE Serial Number highlighted above). Check the DownloadDeviceConfig option (as shown). Disable the DHCP Option and the SIP Plug and Play options by clicking on the respective tabs. Then open the Static Provisioning Server option (as shown). Enter the local IP address of your server assuming your phone and server are both behind a firewall. For the Protocol Type, choose HTTP. For the Update Mode, choose Update After Reboot. Then click the Apply button.
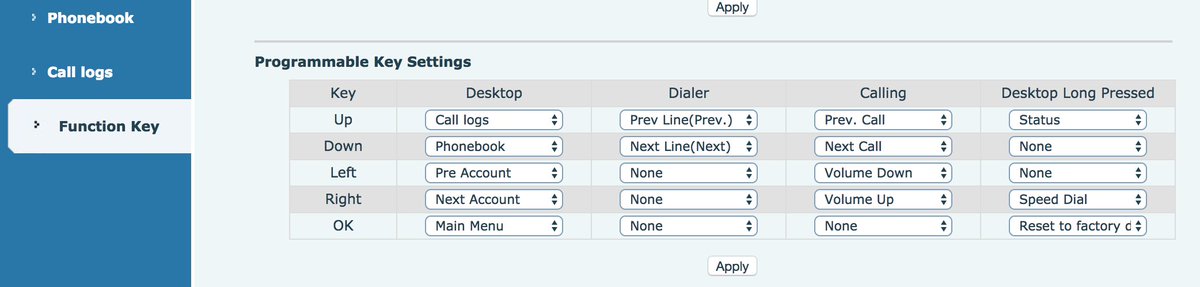
Next, let’s configure the phone so that you can press the Down arrow button to access your Phonebook Contacts. Click on the Function Key option in the left margin. Then look in the Programmable Keys section and locate the row with the settings for the Down button. Change the entry in the Desktop column to Phonebook. Then click the Apply button.
Configuring Asterisk for Phone Provisioning. Now we need to get your server set up to support phone provisioning. The way provisioning works is we will set up a provisioning profile for each phone which will be processed by your web server whenever a phone is rebooted. This profile will also tell the phone where to find your Phonebook Contacts XML file. To get started, navigate to /var/www/html and create a new .cfg file for each of your phones using the 12-character MAC address of the phone, e.g. 000123456789.cfg. The file should look like the following with the exception of the Auto Pbook Url entry which should reflect the local IP address of your server:
<<VOIP CONFIG FILE>>Version:2.0.0.0

<PHONE CONFIG MODULE>
LCD Title          :IncredblePBX

<AUTOUPDATE CONFIG MODULE>
Download CommonConf:0
Download DeviceConf:1
Check FailTimes    :5
update PB Interval :720
Clr PB B4 Import   :1
Trust Certification:0
Enable Auto Upgrade:0
Upgrade Server 1   :
Upgrade Server 2   :
Auto Upgrade intval:24
Auto Pbook Url     :http://192.168.0.108/phonebook.xml

<<END OF FILE>>
Populating Phonebook Contacts with AsteriDex. Now we’re ready to build the Phonebook Contacts file (phonebook.xml) using the AsteriDex 4 database. Just issue the following commands and then reboot each of your phones (Menu+8+Yes):
cd /var/www/html/asteridex4
wget http://incrediblepbx.com/asterisk-phonebook.tar.gz
tar zxvf asterisk-phonebook.tar.gz
rm -f asterisk-phonebook.tar.gz
php asterisk-phonebook.php
Digium A-Series IP Phone User Guide
Last but not least, take a look at Digium’s A-Series IP Phone User Guide (PDF) for more tips.
Final Thoughts on A-Series IP Phones
If you couldn’t already tell, we’re quite impressed with the new A-Series phones from Digium. If you’re on a budget, the $59 model is one terrific bargain for home or SOHO use. The only thing you’re really forfeiting with this phone is the gigabit Ethernet port which will have zero impact on small and medium-sized network implementations of a VoIP server. Rather than buying power adapters for your phones, drop by your favorite WalMart and purchase a network switch that includes POE support. They start at about $30. Then pick one of these phones up from your favorite provider and let us know what you think. You’ll also be helping to fund Digium’s open source Asterisk project. Enjoy!
Originally published: Friday, April 13, 2018
Got Friends? 7 Countries Have Never Visited Nerd Vittles. 2018 Is Calling! https://t.co/wMfmlhAr16 #asterisk #freepbx #wazo #issabel #IncrediblePBX #3CX pic.twitter.com/kAmAEnwVIw
— Ward Mundy (@NerdUno) January 9, 2018
Need help with VitalPBX? Visit the VitalPBX Forum.
Special Thanks to Our Generous Sponsors
FULL DISCLOSURE: ClearlyIP, Skyetel, Vitelity, DigitalOcean, Vultr, VoIP.ms, 3CX, Sangoma, TelecomsXchange and VitalPBX have provided financial support to Nerd Vittles and our open source projects through advertising, referral revenue, and/or merchandise. As an Amazon Associate and Best Buy Affiliate, we also earn from qualifying purchases. We’ve chosen these providers not the other way around. Our decisions are based upon their corporate reputation and the quality of their offerings and pricing. Our recommendations regarding technology are reached without regard to financial compensation except in situations in which comparable products at comparable pricing are available from multiple sources. In this limited case, we support our sponsors because our sponsors support us.
BOGO Bonaza: Enjoy state-of-the-art VoIP service with a $10 credit and half-price SIP service on up to $500 of Skyetel trunking with free number porting when you fund your Skyetel account. No limits on number of simultaneous calls. Quadruple data center redundancy. $25 monthly minimum spend required. Tutorial and sign up details are here.
![]() The lynchpin of Incredible PBX 2020 and beyond is ClearlyIP components which bring management of FreePBX modules and SIP phone integration to a level never before available with any other Asterisk distribution. And now you can configure and reconfigure your new Incredible PBX phones from the convenience of the Incredible PBX GUI.
The lynchpin of Incredible PBX 2020 and beyond is ClearlyIP components which bring management of FreePBX modules and SIP phone integration to a level never before available with any other Asterisk distribution. And now you can configure and reconfigure your new Incredible PBX phones from the convenience of the Incredible PBX GUI.
VitalPBX is perhaps the fastest-growing PBX offering based upon Asterisk with an installed presence in more than 100 countries worldwide. VitalPBX has generously provided a customized White Label version of Incredible PBX tailored for use with all Incredible PBX and VitalPBX custom applications. Follow this link for a free test drive!
Special Thanks to Vitelity. Vitelity is now Voyant Communications and has halted new registrations for the time being. Our special thanks to Vitelity for their unwavering financial support over many years and to the many Nerd Vittles readers who continue to enjoy the benefits of their service offerings. We will keep everyone posted on further developments.
One Minute Wonder: Introducing VitalPBX for VirtualBox
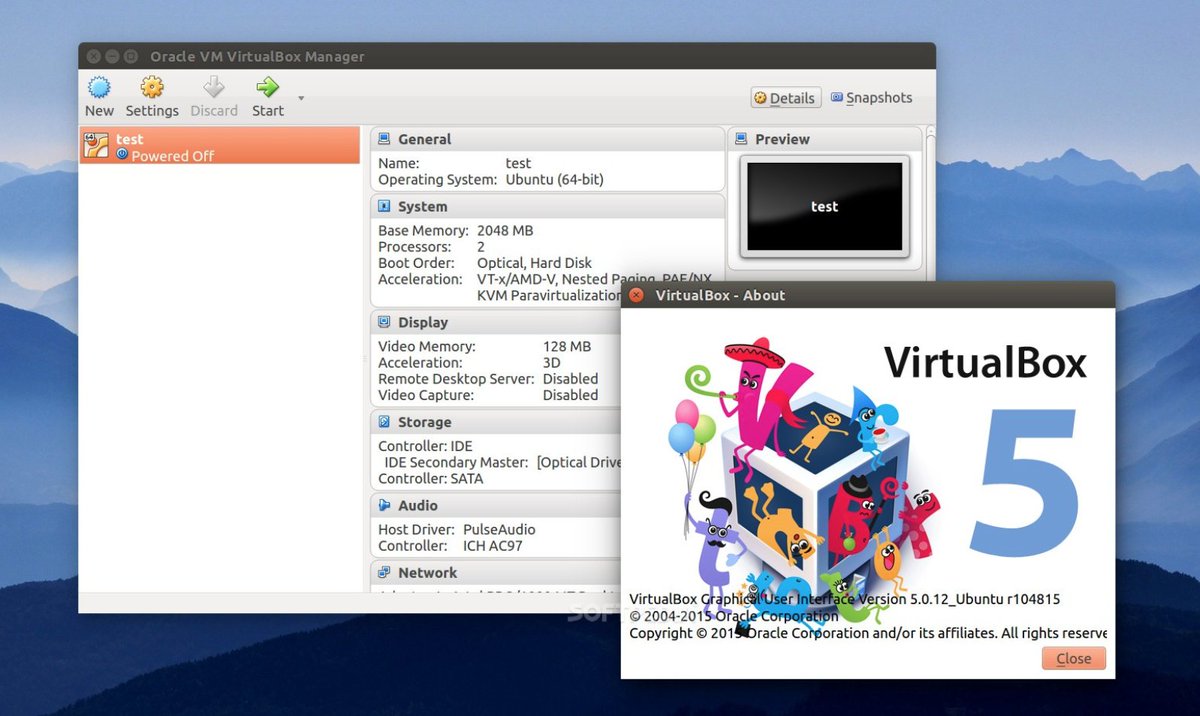
Last week we took VitalPBX to the Cloud with our rock-solid firewall. And this week we’ll show you how to get VitalPBX up and running on any desktop computer in less than a minute using VirtualBox®. If you’ve followed Nerd Vittles over the years, you already know that VirtualBox from Oracle® is one of our favorite platforms. Almost any desktop computer can serve as a VirtualBox hosting platform. And once VirtualBox is installed, adding VitalPBX is a snap. Download the VitalPBX image, initialize your MAC address, start up the VM, and boom. Instant PBX perfection! The really nice thing about our tutorials is it doesn’t cost you a dime to try things out for yourself. And the Incredible PBX® feature set is included as well. Just add your credentials and speech-to-text, voice recognition, and a Siri-like interface are as close as your nearest SIP phone. Splurge with a $4.99 one-time purchase to add Google Voice, and you’ve got unlimited free calling in the U.S. and Canada. So why wait? Let’s get started.
Installing Oracle VM VirtualBox

Oracle’s virtual machine platform inherited from Sun is amazing. It’s not only free, but it’s pure GPL2 code. VirtualBox gives you a virtual machine platform that runs on top of any desktop operating system. In terms of limitations, we haven’t found any. We even tested this on an Atom-based Windows 7 machine with 2GB of RAM, and it worked without a hiccup. So step #1 today is to download one or more of the VirtualBox installers from VirtualBox.org or Oracle.com. Our recommendation is to put all of the 100MB installers on a 4GB thumb drive.1 Then you’ll have everything in one place whenever and wherever you happen to need it. Once you’ve downloaded the software, simply install it onto your favorite desktop machine. Accept all of the default settings, and you’ll be good to go. For more details, here’s a link to the Oracle VM VirtualBox User Manual.
Installing Incredible PBX for VitalPBX VM
To begin, download the Incredible PBX for VitalPBX .ova image (1.0 GB) to the computer on which you installed VirtualBox.
Next, double-click on the VitalPBX .ova image on your desktop. Be sure to check the box to initialize the MAC address of the image and then click Import. Once the import is finished, you’ll see a new VitalPBX virtual machine in the VM List of the VirtualBox Manager Window. Let’s make a couple of one-time adjustments to the VitalPBX configuration to account for differences in sound and network cards on different host machines.
(1) Click once on the VitalPBX virtual machine in the VM List. Then (2) click the Settings button. In the Audio tab, check the Enable Audio option and choose your sound card. In the Network tab for Adapter 1, check the Enable Network Adapter option. From the Attached to pull-down menu, choose Bridged Adapter. Then select your network card from the Name list. Then click OK. That’s all the configuration that is necessary for VitalPBX.
Running VitalPBX in VirtualBox
Once you’ve imported and configured the VitalPBX Virtual Machine, you’re ready to go. Highlight the VitalPBX virtual machine in the VM List on the VirtualBox Manager Window and click the Start button. The standard CentOS boot procedure will begin and, within a few seconds, you’ll get the familiar Linux login prompt. During the bootstrap procedure, you’ll see a couple of dialogue boxes pop up that explain the keystrokes to move back and forth between your host operating system desktop and your virtual machine. Remember, you still have full access to your desktop computer. Incredible PBX for VitalPBX is merely running as a task in a VM window. Always gracefully halt VitalPBX just as you would on any computer.
Here’s what you need to know. To work in the VitalPBX virtual machine, just left-click your mouse while it is positioned inside the VM window. To return to your host operating system desktop, press the right Option key on Windows machines or the left Command key on any Mac. For other operating systems, read the dialogue boxes for instructions on moving around. To access the Linux CLI, login as root with the default password: password. Change your root password immediately by typing: passwd.
VitalPBX comes preconfigured so we need to login to the virtual machine for one primary reason, to obtain the IP address of VitalPBX. Once you’ve deciphered the IP address, point your favorite web browser at the IP address you wrote down. You’ll be prompted to create an admin password for your PBX and then you’ll be asked to register the PBX with Telesoft.
We’re assuming your VitalPBX VM is set up behind a hardware-based firewall. If not, you should immediately configure the firewall as documented in our VitalPBX in the Cloud article.
First, you’ll need to change the password for Extension 701: PBX:Extensions:Edit:701. The Edit option is the four-bar icon in the upper right corner of the VitalPBX dialog window. Click Save and Reload your Dialplan.
Next, you’ll need to register a Google Voice trunk with the Simonics SIP/GV Gateway for a one-time fee of $4.99. This gets you unlimited incoming and outgoing calls to the U.S. and Canada if you live in the U.S. Otherwise, set up a SIP trunk and enter your credentials in PBX:External:Trunks:SIP. If you’re using the Simonics gateway, the SIP trunk already has been set up. Just enter your credentials and change Disable Trunk to NO as shown below:
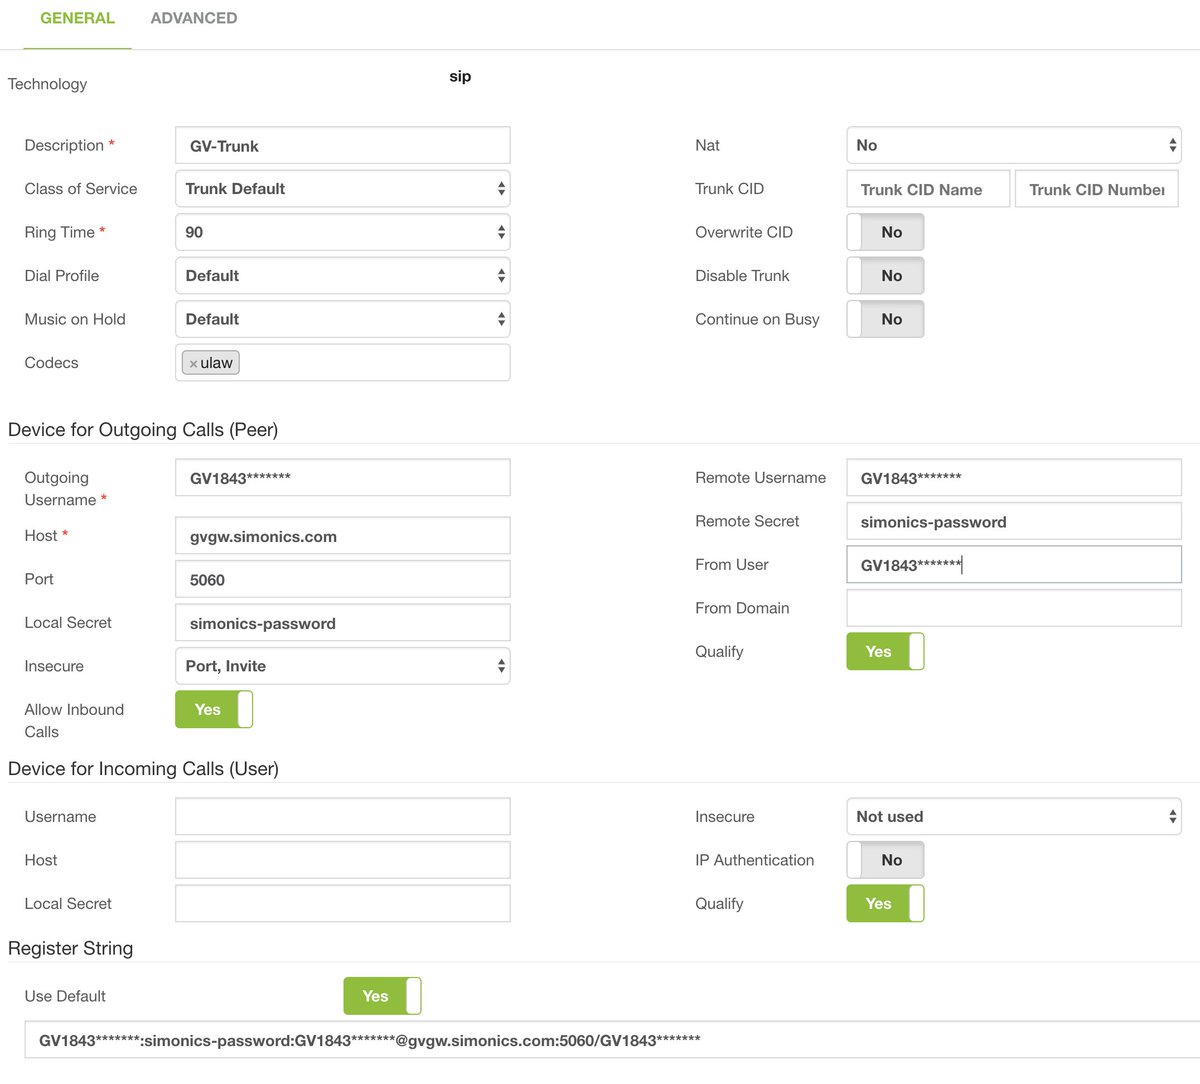
CAUTION: In choosing a DID for outbound calls with Incredible PBX, we strongly recommend that you use a Google Voice trunk. The reason is that, as long as your Google Voice account has no money allocated to it, Google will manage outbound calls to 10 and 11-digit phone numbers and block those that may incur enormous long distance charges from unscrupulous "merchants" in certain Caribbean countries. If you don’t heed our recommendation, we urge you NOT to link an Inbound Route to the Incredible PBX custom context. It’s your phone bill.
If you plan to use VitalPBX for "real work," then you’ll also want to change the Conference credentials for 2663 (C-O-N-F): PBX:Applications:Conference.
The VitalPBX virtual machine comes preconfigured to direct all incoming calls to Allison’s Demo IVR for Incredible PBX. If you’d prefer some other setup, change the Destination of the Default Inbound Route: PBX:External:Inbound Route:Default.
Configuring Incredible PBX for VitalPBX
In order to take advantage of all the Incredible PBX applications, you’ll need to obtain IBM text-to-speech (TTS) and speech-to-text (STT) credentials as well as a (free) Application ID for Wolfram Alpha.
NOV. 1 UPDATE: IBM has moved the goal posts effective December 1, 2018:
This Nerd Vittles tutorial will walk you through getting your IBM account set up and obtaining both your TTS and STT credentials. Be sure to write down BOTH sets of credentials which you’ll need in a minute. For home and SOHO use, IBM access and services are FREE even though you must provide a credit card when signing up. The IBM signup process explains their pricing plans.
To use Wolfram Alpha, sign up for a free Wolfram Alpha API account. Just provide your email address and set up a password. It takes less than a minute. Log into your account and click on Get An App ID. Make up a name for your application and write down (and keep secret) your APP-ID code. That’s all there is to getting set up with Wolfram Alpha. If you want to explore costs for commercial use, there are links to let you get more information.
In addition to your Wolfram Alpha APPID, there are two sets of IBM credentials to plug into the Asterisk AGI scripts. Keep in mind that there are different usernames and passwords for the IBM Watson TTS and STT services. The TTS credentials will look like the following: $IBM_username and $IBM_password. The STT credentials look like this: $API_USERNAME and $API_PASSWORD. Don’t mix them up. 🙂
All of the scripts requiring credentials are located in /var/lib/asterisk/agi-bin so switch to that directory after logging into your server as root. Edit each of the following files and insert your TTS credentials in the variables already provided: nv-today2.php, ibmtts.php, and ibmtts2.php. Edit each of the following files and insert your STT credentials in the variables already provided: getquery.sh, getnumber.sh, and getnumber2.sh. Finally, edit 4747 and insert your Wolfram Alpha APPID.
Using Asteridex with VitalPBX
AsteriDex is a web-based dialer and address book application for Asterisk and VitalPBX. It lets you store and manage phone numbers of all your friends and business associates in an easy-to-use SQLite3 database. You simply call up the application with your favorite web browser: http://vitalpbx-ip-address/asteridex4/. When you click on a contact that you wish to call, AsteriDex first calls you at extension 701, and then AsteriDex connects you to your contact through another outbound call made using your default outbound trunk that supports numbers in the 1NXXNXXXXXX format.
Before AsteriDex Click-to-Call will work, you must authorize AsteriDex to access Asterisk from your browser. After logging into your server as root, edit the following file in /etc/asterisk/ombutel: manager__50-ombutel-user.conf. For each public IP address you wish to authorize, add an entry like the following immediately below the existing permit entry in the file. The non-routable IP address subnets already have been configured so, if you’re using a browser behind the same firewall as VitalPBX, you can skip this step. Otherwise reload the dialplan after adding public IP addresses: asterisk -rx "dialplan reload"
permit=12.34.56.78
Taking Incredible PBX for a Test Drive
You can take Incredible PBX for VitalPBX on a test drive in two ways. You can call our server, and then you can try things out on your own server and compare the results. Call our IVR by dialing 1-843-606-0555. For our international friends, you can use the following SIP URI for a free call: 10159591015959@atlanta.voip.ms. For tips on setting up your own secure, hybrid SIP URI with VitalPBX, see our original tutorial. The FreePBX® setup is virtually identical except for the location of the custom SIP setting for match_auth_username=yes. On a VitalPBX server, you will enter it here: Settings:Technology Settings:SIP Settings:CUSTOM.
With Allison’s Demo IVR, you can choose from the following options:
- 0. Chat with Operator — connects to extension 701
- 1. AsteriDex Voice Dialer – say "Delta Airlines" or "American Airlines" to connect
- 2. Conferencing – log in using 1234 as the conference PIN
- 3. Wolfram Alpha Almanac – say "What planes are flying overhead"
- 4. Lenny – The Telemarketer’s Worst Nightmare
- 5. Today’s News Headlines — courtesy of Yahoo! News
- 6. Weather by ZIP Code – enter any 5-digit ZIP code for today’s weather
- 7. Today in History — courtesy of OnThisDay.com
- 8. Chat with Nerd Uno — courtesy of SIP URI connection to 3CX iPhone Client
- 9. DISA Voice Dialer — say any 10-digit number to be connected
- *. Current Date and Time — courtesy of VitalPBX
You can call your own IVR in two ways. From an internal VitalPBX phone, dial D-E-M-O (2663) to be connected. Or simply dial the number of the DID you routed to the Incredible PBX Custom Context. Either way, you should be connected to the Incredible PBX IVR running on your VitalPBX server. Be sure that you heed AND test the CAUTION documented above. Enjoy!
Originally published: Monday, April 9, 2018
Got Friends? 7 Countries Have Never Visited Nerd Vittles. 2018 Is Calling! https://t.co/wMfmlhAr16 #asterisk #freepbx #wazo #issabel #IncrediblePBX #3CX pic.twitter.com/kAmAEnwVIw
— Ward Mundy (@NerdUno) January 9, 2018
Need help with VitalPBX? Visit the VitalPBX Forum.
Special Thanks to Our Generous Sponsors
FULL DISCLOSURE: ClearlyIP, Skyetel, Vitelity, DigitalOcean, Vultr, VoIP.ms, 3CX, Sangoma, TelecomsXchange and VitalPBX have provided financial support to Nerd Vittles and our open source projects through advertising, referral revenue, and/or merchandise. As an Amazon Associate and Best Buy Affiliate, we also earn from qualifying purchases. We’ve chosen these providers not the other way around. Our decisions are based upon their corporate reputation and the quality of their offerings and pricing. Our recommendations regarding technology are reached without regard to financial compensation except in situations in which comparable products at comparable pricing are available from multiple sources. In this limited case, we support our sponsors because our sponsors support us.
BOGO Bonaza: Enjoy state-of-the-art VoIP service with a $10 credit and half-price SIP service on up to $500 of Skyetel trunking with free number porting when you fund your Skyetel account. No limits on number of simultaneous calls. Quadruple data center redundancy. $25 monthly minimum spend required. Tutorial and sign up details are here.
![]() The lynchpin of Incredible PBX 2020 and beyond is ClearlyIP components which bring management of FreePBX modules and SIP phone integration to a level never before available with any other Asterisk distribution. And now you can configure and reconfigure your new Incredible PBX phones from the convenience of the Incredible PBX GUI.
The lynchpin of Incredible PBX 2020 and beyond is ClearlyIP components which bring management of FreePBX modules and SIP phone integration to a level never before available with any other Asterisk distribution. And now you can configure and reconfigure your new Incredible PBX phones from the convenience of the Incredible PBX GUI.
VitalPBX is perhaps the fastest-growing PBX offering based upon Asterisk with an installed presence in more than 100 countries worldwide. VitalPBX has generously provided a customized White Label version of Incredible PBX tailored for use with all Incredible PBX and VitalPBX custom applications. Follow this link for a free test drive!
Special Thanks to Vitelity. Vitelity is now Voyant Communications and has halted new registrations for the time being. Our special thanks to Vitelity for their unwavering financial support over many years and to the many Nerd Vittles readers who continue to enjoy the benefits of their service offerings. We will keep everyone posted on further developments.
- Many of our purchase links refer users to Amazon when we find their prices are competitive for the recommended products. Nerd Vittles receives a small referral fee from Amazon to help cover the costs of our blog. We never recommend particular products solely to generate Amazon commissions. However, when pricing is comparable or availability is favorable, we support Amazon because Amazon supports us. [↩]
Free Asterisk Solutions
