
Home » Posts tagged 'linux' (Page 2)
Tag Archives: linux
The Most Versatile VoIP Provider: FREE PORTING

 JUST RELEASED: Visit the Incredible PBX Wiki
Our Best VoIP Cloud Platform Recommendations for 2021

Once upon a time, spending $15 to $50 a month for a cloud-based KVM platform to manage your Asterisk® PBX was considered a good deal. But, in the words of Bob Dylan, Times They Are A-Changin’. Our testing over the past couple years confirms that paying premium prices for Google or Amazon EC2 VoIP platforms is nothing short of a waste of money. Today we’re pleased to recommend five cloud providers to host your VoIP server that range in price from $2 to $5 a month. We’ve used all five and have never experienced a single hiccup. Better yet, you won’t have to worry about power outages, IP address changes, and hardware failures. All five of these providers offer Debian 10 and CentOS 7 platforms to complement Incredible PBX 2021, Incredible PBX 2021 PUBLIC, and Incredible PBX 2020 and PUBLIC implementations.
What separates our two $5 a month providers from the rest of the pack are three noteworthy considerations: business longevity, location diversity, and scalability. While Vultr and Digital Ocean both provide referral credits to Nerd Vittles, suffice it to say that has no bearing on our unqualified endorsement of these two platforms. Both also offer system backups for an additional 20% of the monthly platform cost. For those with PBX platform requirements that don’t exceed 10 simultaneous calls, the $5 offerings are more than adequate. And, if your requirements change moving forward, it’s easy to scale up to a more robust platform.
In the middle of the pack price-wise is OVH starting at $3.50 a month for their 100Mbps Starter KVM with a free snapshot. For those in the United States, their nearest data center is in Eastern Canada; however, multiple locations are available in Europe and the Asian Pacific.
Last but not least are two more recent providers. HotlineServers offers a $3 a month platform using our coupon code of voip2021. You can add off-site backups for an additional 80¢ a month. Their data center offerings include New York, Chicago, Miami, and Los Angeles with some of the best performance specs we have ever seen. CrownCloud offers a $25 a year platform with a free snapshot and data centers in Los Angeles, Atlanta, and Western Europe. By request, they also will load an Incredible PBX 2020 image that installs in under a minute.
For our latest recommendations on all things VoIP, check out the new Incredible PBX Wiki.
Originally published: Monday, January 11, 2021

Need help with Asterisk? Visit the VoIP-info Forum.
Special Thanks to Our Generous Sponsors
FULL DISCLOSURE: ClearlyIP, Skyetel, Vitelity, DigitalOcean, Vultr, VoIP.ms, 3CX, Sangoma, TelecomsXchange and VitalPBX have provided financial support to Nerd Vittles and our open source projects through advertising, referral revenue, and/or merchandise. As an Amazon Associate and Best Buy Affiliate, we also earn from qualifying purchases. We’ve chosen these providers not the other way around. Our decisions are based upon their corporate reputation and the quality of their offerings and pricing. Our recommendations regarding technology are reached without regard to financial compensation except in situations in which comparable products at comparable pricing are available from multiple sources. In this limited case, we support our sponsors because our sponsors support us.
 BOGO Bonaza: Enjoy state-of-the-art VoIP service with a $10 credit and half-price SIP service on up to $500 of Skyetel trunking with free number porting when you fund your Skyetel account. No limits on number of simultaneous calls. Quadruple data center redundancy. $25 monthly minimum spend required. Tutorial and sign up details are here.
![]() The lynchpin of Incredible PBX 2020 and beyond is ClearlyIP components which bring management of FreePBX modules and SIP phone integration to a level never before available with any other Asterisk distribution. And now you can configure and reconfigure your new Incredible PBX phones from the convenience of the Incredible PBX GUI.
The lynchpin of Incredible PBX 2020 and beyond is ClearlyIP components which bring management of FreePBX modules and SIP phone integration to a level never before available with any other Asterisk distribution. And now you can configure and reconfigure your new Incredible PBX phones from the convenience of the Incredible PBX GUI.
 VitalPBX is perhaps the fastest-growing PBX offering based upon Asterisk with an installed presence in more than 100 countries worldwide. VitalPBX has generously provided a customized White Label version of Incredible PBX tailored for use with all Incredible PBX and VitalPBX custom applications. Follow this link for a free test drive!
 Special Thanks to Vitelity. Vitelity is now Voyant Communications and has halted new registrations for the time being. Our special thanks to Vitelity for their unwavering financial support over many years and to the many Nerd Vittles readers who continue to enjoy the benefits of their service offerings. We will keep everyone posted on further developments.

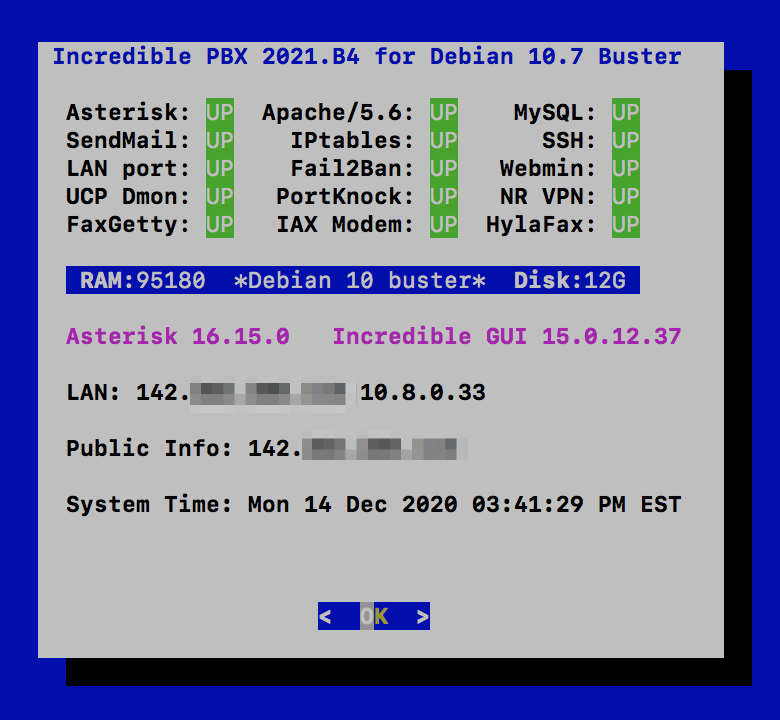
Happy New Year: Introducing Incredible PBX 2021 for Debian

Shifting gears is never easy, and sometimes it takes ill-advised corporate blunders to move the needle. But IBM®’s decimation of the CentOS project last month coupled with the Sangoma® Ransomware fiasco were just the motivation we needed to shift into overdrive and explore alternatives for the Incredible PBX® 2021 project. After six beta releases, we are delighted to introduce Incredible PBX 2021 with ClearlyIP’s FreePBX® 15 module protection and your choice of either Asterisk® 16 or the Asterisk 18 LTS release.
Before we get started, we want to offer our special thanks to the many talented individuals on the VoIP-Info.org Forum and the ClearlyIP development team who helped to bring this open source product to fruition. Keep in mind that it was produced during this holiday season without missing a beat and in spite of 2020’s Covid-19 pandemic and the Sangoma® infamous security breach, the handling of which was so bad that we can’t muster enough tact to write about it. With Incredible PBX 2021, Sangoma Ransomware protection is available.
Setting Up a Debian Platform for Incredible PBX 2021
If you’re using on-premise hardware, begin by downloading the netinst ISO image of Debian 10 for amd64. Follow our previous tutorials for tips on installation with VirtualBox or VMware ESXi. If you’d prefer to experiment in the cloud for about a penny an hour, open an account at Vultr or Digital Ocean using our referral links that support the Nerd Vittles project. You’ll also get some free credit to try out the service. Then create a new $5/month Debian 10, 64-bit instance in your favorite city.
If you’re using other cloud platforms with a Debian 10 offering, we strongly recommend a KVM platform. Also be advised that all Debian 10 releases are not equal. So be sure to upgrade to the latest Debian 10 release before you proceed. Here are the steps:
apt-get update --allow-releaseinfo-change
apt-get upgrade
# GRUB prompt: install to /dev/vda
#  SSH prompt: keep local version
reboot
If your PBX is sitting behind a NAT-based router, you’ll need to redirect incoming UDP 5060-5061 and UDP 10000-20000 traffic to the private IP address of your server. This is required for all of the SIP providers included in the Incredible PBX 2021 build. Otherwise, all inbound calls will fail.
Installing Incredible PBX 2021 on Debian 10 Server
Once your Debian 10 platform is up and running, login as root using SSH or Putty. If you wish to use the default Asterisk 18 platform, issue the commands below to kick off the install. If you’d prefer to stick with Asterisk 16 for the time being and perhaps upgrade to Asterisk 18 later with the included upgrade script, then edit the script once you download it and change 18 to 16 in line 34 of the script before executing it.
wget http://incrediblepbx.com/IncrediblePBX2021.sh
chmod +x IncrediblePBX2021.sh
./IncrediblePBX2021.sh
At about 5 minutes into the install procedure, you’ll be prompted for your telephone country code. It’s 1 for Canada and the United States. Just before the install completes, you’ll be prompted to save your default IPtables setup. Once the installation completes, reboot and you should be good to go.
After you log back in following a reboot, check the version of Debian 10 in the pbxstatus display. If it’s less than 10.7, issue the following commands to bring your server up to Debian 10.10 or later, not Debian 11. Do NOT do this before the base install is finished, or Asterisk may fail to install properly.
apt-get update
apt-get upgrade -y

Next Steps with Incredible PBX 2021
Before you can manage your PBX through a web browser, you first will need to set the admin passwords for FreePBX, Apache web apps such as Reminders and AsteriDex, and AvantFax (if you are using Incredible Fax). These all can be set by logging into your server as root and issuing the following commands: admin-pw-change, apache-pw-change, and avantfax-pw-change. The AvantFax password can also be reset with a browser by first logging in as admin with a password of password.
Outbound mail functionality needs to be working so that you can receive voicemail messages and faxes by email. To prevent SPAM, most ISPs and ITSPs block messages from downstream mail servers. That would be you. The easiest way to resolve this is to configure SendMail using Gmail as an SMTP Smarthost. You obviously need a Gmail account to implement this and, if you have turned on two-factor authentication for your Gmail account, you also will need to obtain an App password for your Gmail account, and use that in lieu of your regular Gmail password when configuring SendMail. With your Gmail username and password in hand, log into your server as root and run: /root/enable-gmail-smarthost-for-sendmail.
If your Incredible PBX 2021 is hosted with a cloud provider, be advised that many providers do not include a swap file as part of their offering. FreePBX requires a swap file. To add one, issue this command after logging into your server as root: /root/create-swapfile-DO.
To correctly set the time on your PBX, run: /root/timezone-setup.
By default, the voicemail password for each of the configured extensions (701-705) is set to the extension number. This means the user will be prompted to set a voicemail password on the first login to voicemail for each extension. A phone must be registered to the actual extension to access its voicemail account. For example, once a phone is registered to extension 701, the voicemail setup can be accessed by dialing *98701.
If you want to send and receive faxes with Incredible PBX 2021, run the following script while logged into your server as root: /root/incrediblefax2020-debian10.sh. When prompted, accept all the defaults. Once the HylaFax and AvantFax components are installed, reboot your server. To send faxes, click on the AvantFax tab in the FreePBX GUI and enter your login credentials (default: admin/password). To receive incoming faxes once you have configured a trunk and DID for your PBX, login to the FreePBX GUI as admin. Navigate to Connectivity -> Inbound Routes. For each of your DIDs on which you wish to receive faxes, select the inbound route and click the Fax tab. Review the Default Inbound Route Fax settings for proper setup.
NOTE: If you get a database error when you attempt to access AvantFax from a web browser, log into your server as root and reinstall the AvantFax database: ./avantfax-db-replace.
Overview of the Initial Asterisk Setup Process
For those new to PBXs, here’s a two paragraph summary of how Voice over IP (VoIP) works. Phones connected to your PBX are registered with Extensions so that they can make and receive calls. When a PBX user picks up a phone and dials a number, an Outbound Route tells the PBX which Trunk to use to place the call based upon established dialing rules. Unless the dialed number is a local extension, a Trunk registered with some service provider accepts the call, and the PBX sends the call to that provider. The provider then routes the call to its destination where the recipient’s phone rings to announce the incoming call. When the recipient picks up the phone, the conversation begins.
Looking at things from the other end, when a caller somewhere in the world wishes to reach you, the caller picks up a telephone and dials a number known as a DID that is assigned to you by a provider with whom you have established service. When the provider receives the call to your DID, it routes the call to your PBX based upon destination information you established with the provider. Your PBX receives the call with information identifying the DID of the call as well as the CallerID name and number of the caller. An Inbound Route on your PBX then determines where to send the call based upon that DID and CallerID information. Typically, a call is routed to an Extension, a group of Extensions known as a Ring Group, or an IVR or AutoAttendant giving the caller choices on routing the call to the desired destination. Once the call is routed to an Extension, the PBX rings the phone registered to that Extension. When you pick up the phone, the conversation begins.
Configuring Trunks with Incredible PBX GUI
Perhaps the most difficult component to configure in the PBX is the Trunk. Almost every provider has a different way of doing things. We’ve taken some of the torture out of the exercise by providing a script which will configure settings for dozens of providers in seconds. Once installed, all you need to do is edit the desired Trunk (Connectivity:Trunks), change the Disable Trunk entry to No, and insert your credentials in both the PEER Details and Registration string of the SIP Settings Outgoing and Incoming tabs. Skyetel is enabled by default and needs no setup on the PBX side.
Configuring Skyetel for Incredible PBX 2021
If you’ve decided to go with Skyetel, here’s the drill. Sign up for Skyetel service and take advantage of the Nerd Vittles specials. First, complete the Prequalification Form here. You then will be provided a link to the Skyetel site to complete your registration. Once you have registered on the Skyetel site and your account has been activated, open a support ticket and request the $10 credit for your account by referencing the Nerd Vittles special offer. Once you are satisfied with the service, fund your account as desired, and Skyetel will match your deposit of up to $250 simply by opening another ticket. That gets you up to $500 of half-price calling. Credit is limited to one per person/company/address/location. Effective 10/1/2023, $25/month minimum spend required.
Skyetel does not use SIP registrations to make connections to your PBX. Instead, Skyetel utilizes Endpoint Groups to identify which servers can communicate with the Skyetel service. An Endpoint Group consists of a Name, an IP address, a UDP or TCP port for the connection, and a numerical Priority for the group. For incoming calls destined to your PBX, DIDs are associated with an Endpoint Group to route the calls to your PBX. For outgoing calls from your PBX, a matching Endpoint Group is required to authorize outbound calls through the Skyetel network. Thus, the first step in configuring the Skyetel side for use with your PBX is to set up an Endpoint Group. Here’s a typical setup for Incredible PBX 2021:
- Name: MyPBX
- Priority: 1
- IP Address: PBX-Public-IP-Address
- Port: 5060
- Protocol: UDP
- Description: my.incrediblepbx.com
To receive incoming PSTN calls, you’ll need at least one DID. On the Skyetel site, you acquire DIDs under the Phone Numbers tab. You have the option of Porting in Existing Numbers (free for the first 60 days after you sign up for service) or purchasing new ones under the Buy Phone Numbers menu option.
Once you have acquired one or more DIDs, navigate to the Local Numbers or Toll Free Numbers tab and specify the desired SIP Format and Endpoint Group for each DID. Add SMS/MMS and E911 support, if desired. Call Forwarding and Failover are also supported. That completes the VoIP setup on the Skyetel side. System Status is always available here.
Configuring VoIP.ms for Incredible PBX 2021
To sign up for VoIP.ms service, may we suggest you use our signup link so that Nerd Vittles gets a referral credit for your signup. Once your account is set up, you’ll need to set up a SIP SubAccount and, for Authentication Type, choose Static IP Authentication and enter your Incredible PBX 2021 server’s public IP address. For Transport, choose UDP. For Device Type, choose Asterisk, IP PBX, Gateway or VoIP Switch. Order a DID in their web panel, and then point the DID to the SubAccount you just created. Be sure to specify atlanta1.voip.ms as the POP from which to receive incoming calls. In the Incredible PBX GUI, be sure to enable the VoIP.ms trunk.
Configuring V1VoIP for Incredible PBX 2021
To sign up for V1VoIP service, sign up on their web site. Then login to your account and order a DID under the DIDs tab. Once the DID has been assigned, choose View DIDs and click on the Forwarding button beside your DID. For Option #1, choose Forward to IP Address/PBX. For the Forwarding Address, enter the public IP address of your server. For the T/O (timeout) value, set it to 2o seconds. Then click the Update button. Under the Termination tab, create a new Endpoint with the public IP address of your server so that you can place outbound calls through V1VoIP. In the Incredible PBX GUI, be sure to enable all of the V1VoIP trunks.
Configuring Anveo Direct for Incredible PBX 2021
To sign up for Anveo Direct service, sign up on their web site and then login. After adding funds to your account, purchase a DID under Inbound Service -> Order DID. Next, choose Configure Destination SIP Trunk. Give the Trunk a name. For the Primary SIP URI, enter $[E164]$@server-IP-address. For Call Options, select your new DID from the list. You also must whitelist your public IP address under Outbound Service -> Configure. Create a new Call Termination Trunk and name it to match your server. For Dialing Prefix, choose six alphanumeric characters beginning with a zero. In Authorized IP Addresses, enter the public IP address of your server. Set an appropriate rate cap. We like $0.01 per minute to be safe. Set a concurrent calls limit. We like 2. For the Call Routing Method, choose Least Cost unless you’re feeling extravagant. For Routes/Carriers, choose Standard Routes. Write down your Dialing Prefix and then click the Save button.
Before you can make outbound calls through Anveo Direct from your PBX, you first must configure the Dialing Prefix that you wrote down in the previous step. Log into the GUI as admin using a web browser and edit the Anveo-Out trunk in Connectivity -> Trunks. Enable the Trunk. Then click on the custom-Settings tab and replace anveo-pin with your actual Dialing Prefix. Click Submit and Apply Config to complete the setup. In the Incredible PBX GUI, be sure to enable all of the remaining Anveo trunks.
By default, incoming Anveo Direct calls will be processed by the Default inbound route on your PBX. If you wish to redirect incoming Anveo Direct calls using DID-specific inbound routes, then you’ve got a bit more work to do. In addition to creating the inbound route using the 11-digit Anveo Direct DID, enter the following commands after logging into your server as root using SSH/Putty:
cd /etc/asterisk
echo "[from-anveo]" >> extensions_custom.conf
echo "exten => _.,1,Ringing" >> extensions_custom.conf
echo "exten => _.,n,Goto(from-trunk,\\${SIP_HEADER(X-anveo-e164)},1)" >> extensions_custom.conf
asterisk -rx "dialplan reload"
Configuring Extensions with Incredible PBX GUI
Extensions are created using the Incredible PBX GUI: Applications:Extensions. Many SIP phones expect extensions to communicate on UDP port 5060. If this is the case with your SIP phone or softphone, then always create Chan_SIP extensions which communicate on UDP 5060. If your SIP phone or softphone provide port flexibility, then you have a choice in the type of SIP extension to create: Chan_SIP or the more versatile PJSIP (UDP 5061). Just remember to always configure SIP extensions with NAT Mode=YES in the Advanced tab. If your VoIP phones or softphones support IAX connectivity, you may wish to consider IAX extensions which avoid NAT problems.
When you create a new Extension, a new entry is automatically created in the PBX Internal Directory. If you wish to allow individual users to manage their extensions or use the WebRTC softphone, then you will also have to create a (very) secure password for User Control Panel (UCP) access. Choose Admin:User Management and click on the key icon of the desired extension to assign a password for UCP and WebRTC access.
Configuring a Desktop Softphone for Incredible PBX
We’re in the home stretch now. You can connect virtually any kind of telephone to your new PBX. Plain Old Phones require an analog telephone adapter (ATA) which can be a separate board in your computer from a company such as Digium. Or it can be a standalone SIP device such as ObiHai’s OBi100 or OBi110 (if you have a phone line from Ma Bell to hook up as well). SIP phones can be connected directly so long as they have an IP address. These could be hardware devices or software devices such as the YateClient softphone. We’ll start with a free one today so you can begin making calls. You can find dozens of recommendations for hardware-based SIP phones both on Nerd Vittles and the PIAF Forum when you’re ready to get serious about VoIP telephony.
We recommend YateClient for Windows which is free. Download it from here. Run YateClient once you’ve installed it and enter the credentials for the 701 extension on Incredible PBX. You can find them by running /root/show-passwords. You’ll need the IP address of your server plus your extension 701 password. In the YateClient, fill in the blanks using the IP address of your Server, 701 for your Username, and whatever Password was assigned to the extension when you installed Incredible PBX. Click OK to save your entries.

Once you are registered to extension 701, close the Account window. Then click on YATE’s Telephony Tab and place some test calls to the numerous apps that are preconfigured on Incredible PBX. Dial a few of these to get started:
DEMO - Apps Demo
123 - Reminders
947 - Weather by ZIP Code
951 - Yahoo News
TODAY - Today in History
LENNY - The Telemarketer's Worst Nightmare
If you are a Mac user, another great no-frills softphone is Telephone. Just download and install it from the Mac App Store. For Android users, check out the terrific new VitalPBX Communicator. Works flawlessly with Incredible PBX.
Configuring a Softphone Extension on a Smartphone
Adding an Incredible PBX extension to your smartphone gets a little trickier. Whether you’re an iPhone or Android lover, all smartphones use batteries, and you don’t want to drain your battery by running a softphone as a foreground app all the time. Fortunately, you now have some choices in softphones engineered to work without draining your battery. While they all cost money, it’s not much money. We’ve written about all the choices, and you’ll find the links in our Softphone Provider Recommendations on the new Incredible PBX Wiki.
With PJsip extensions, you’re not limited to a single phone connection at a time, and we’ve preconfigured extension 701 to support five simultaneous connections. The setup on the softphone side is simple. For the server, enter the actual IP address of your PBX in the following format: 22.33.44.55:5061. Then enter 701 for the username and enter the password assigned to the 701 extension on your PBX. When an incoming call arrives, all the phones registered to extension 701 will ring simultaneously. Simply answer the call on the phone that is most convenient.
Configuring Outbound Routes in Incredible PBX GUI
Outbound Routes serve a couple of purposes. First, they assure that calls placed by users of your PBX are routed out through an appropriate trunk to reach their destination in the least costly manner. Second, they serve as a security mechanism by either blocking or restricting certain calls by requiring a PIN to complete the calls. Never authorize recurring charges on credit cards registered with your VoIP providers and, if possible, place pricing limits on calls with your providers. If a bad guy were to break into your PBX, you don’t want to give the intruder a blank check to make unauthorized calls. And you certainly don’t want to join the $100,000 Phone Bill Club.
To create outbound routes in the Incredible PBX GUI, navigate to Connectivity:Outbound Routes and click Add Outbound Route. In the Route Settings tab, give the Outbound Route a name and choose one or more trunks to use for the outbound calls. In the Dial Patterns tab, specify the dial strings that must be matched to use this Outbound Route. NXXNXXXXXX would require only 10-digit numbers with the first and fourth digits being a number between 2 and 9. Note that Outbound Routes are searched from the top entry to the bottom until there is a match. Make certain that you order your routes correctly and then place test calls watching the Asterisk CLI to make sure the calls are routed as you intended.
Configuring Inbound Routes in Incredible PBX GUI
Inbound Routes, as the name implies, are used to direct incoming calls to a specific destination. That destination could be an extension, a ring group, an IVR or AutoAttendant, or even a conference or DISA extension to place outbound calls (hopefully with a very secure password). Inbound Routes can be identified by DID, CallerID number, or both. To create Inbound Routes, choose Connectivity:Inbound Routes and then click Add Inbound Route. Provide at least a Description for the route, a DID to be matched, and the Destination for the incoming calls that match. If you only want certain callers to be able to reach certain extensions, add a CallerID number to your matching criteria. You can add Call Recording and CallerID CNAM Lookups under the Other tab.
Audio Issues with Incredible PBX 2021
If you experience one-way or no audio on some calls, add your external IP address and LAN subnet in the GUI by navigating to Settings -> Asterisk SIP Settings. In the NAT Settings section, click Detect Network Settings. Click Submit and Apply Settings to save your changes.
Security Considerations with Incredible PBX 2021
Incredible PBX 2021 includes a rock-solid firewall that limits access to preferred providers and individuals whose IP addresses you have whitelisted. Unfortunately, this may not insulate your server from FreePBX 15 irregularities if, in fact, Sangoma’s signing key was compromised in the October 2020 Ransomware Attack. Sangoma either doesn’t know or isn’t telling. Keep in mind that Sangoma didn’t mention the October breach either until someone else exposed it. Sangoma’s latest press release is available here.
The good news is Incredible PBX 2020 and 2021 platforms include a unique ClearlyIP feature that lets us manage which modules and versions can be installed. It works exactly like what ClearlyIP has documented in their must-read blog post, and we’ve built a locked version that rolls back all of the modules to dates before the Sangoma breach. The good news is, with Incredible PBX, you don’t have to jump through all the hoops covered in the ClearlyIP article to fully insulate your server from the Ransomware breach. We’ve done the work for you.
For those with mission-critical platforms, we’d recommend immediate implementation of what follows. For everyone else, it’s your choice whether to wait and see if there is a breach of the signing certificate with malicious modules. If you opt to wait and see, MAKE FREQUENT BACKUPS.
Here’s how to roll back all of your modules to dates before the breach. Login to the FreePBX GUI as admin and navigate to Settings > Advanced Settings. Drop down to the Lock Version field and change 15.19.11.001 to 15.19.11.003. Save your changes and reload your dialplan. Then use Module Admin to roll back any installed modules that are newer than the safe versions shown.
Our extra special thanks goes to Tony Lewis and the ClearlyIP team for providing this invaluable resource. Somehow we knew it would come in handy sooner or later. Unfortunately, that day has come.
Adding Incredible PBX 2021 to an OpenVPN Network
We previously have documented the procedure for creating an OpenVPN server as well as OpenVPN client templates (.ovpn). If you need a refresher, the tutorial is here. To add your Incredible PBX 2021 server to an existing OpenVPN network, begin by creating an incrediblepbx2021.ovpn template on your OpenVPN server. Be sure to comment out or delete the setenv line in the template. Then copy this template to /etc on your Incredible PBX 2021 server. Next, issue the following commands to put the remaining pieces in place:
cp -p /root/openvpn-start /etc/.
echo "[Unit]
Description=openvpn2021
ConditionPathExists=/etc/openvpn-start
After=rclocal.service
[Service]
Type=forking
ExecStart=/etc/openvpn-start /etc/incrediblepbx2021.ovpn
TimeoutSec=0
StandardOutput=tty
RemainAfterExit=yes
PermissionsStartOnly=true
SysVStartPriority=99
[Install]
WantedBy=multi-user.target" > /etc/systemd/system/openvpn2021.service
Finally, enable the new openvpn2021.service and reboot your server. The OpenVPN IP address should now appear on the LAN line in pbxstatus:
systemctl enable openvpn2021.service
reboot
Incredible PBX 2021 Administration
We’ve eased the pain of administering your new PBX with a collection of scripts which you will find in the /root folder after logging in with SSH or Putty. Here’s a quick summary of what each of the scripts does.
add-fqdn is used to whitelist a fully-qualified domain name in the firewall. Because Incredible PBX 2021 blocks all traffic from IP addresses that are not whitelisted, this is what you use to authorize an external user for your PBX. The advantage of an FQDN is that you can use a dynamic DNS service to automatically update the IP address associated with an FQDN so that you never lose connectivity.
add-ip is used to whitelist a public IP address in the firewall. See the add-fqdn explanation as to why this matters.
del-acct is used to remove an IP address or FQDN from the firewall’s whitelist.
admin-pw-change is used to set the admin password for access to the FreePBX/Incredible PBX web GUI using a browser pointed to the local IP address of your server.
apache-pw-change is used to set the admin password for access to Apache/Incredible PBX apps including AsteriDex and Reminders. This provides a password layer of protection for access to these applications.
avantfax-email-change is used to change the destination email address for incoming faxes.
avantfax-pw-change is used to change your admin password for the AvantFax web console.
iaxmodem-restart is used to restart the modems used to send and deliver faxes. The pbxstatus display will tell you whether the IAXmodems are down.
incrediblebackup2021 makes a backup of critical components on your PBX to a tarball saved in /backup. This should be copied to safe location off-site for a rainy day.
incrediblerestore2021 restores a backup file which has been copied to the /backup folder.
ipchecker is a script which deciphers the public IP addresses associated with whitelisted FQDNs created with add-fqdn on your server. If any of the addresses have changed, the firewall is restarted after updating the IP addresses. By default, it is executed every 10 minutes by /etc/crontab.
licenses.sh displays the license associated with each of the FreePBX modules on your server.
logos-b-gone removes proprietary artwork from your PBX and is no longer necessary with the included IncrediblePBX FreePBX module.
mime-construct is a command-line utility to send emails with attachments.
neorouter-login is a script to add your PBX to a NeoRouter VPN. Tutorial here.
odbc-gen.sh is a script that was run to generate the ODBC settings for Asterisk. Do NOT use it.
openvpn-start is a script to add your PBX to an existing OpenVPN network using an .ovpn config file. Tutorial here.
pbxstatus displays status of all major components of Incredible PBX 2021.
pptp-install is a script to create a PPTP network connection for your PBX. Tutorial here.
purge-cdr-cel-records removes all CDR and CEL records from the MySQL database.
reset-conference-pins is a script that automatically and randomly resets the user and admin pins for access to the preconfigured conferencing application. Dial C-O-N-F from any registered SIP phone to connect to the conference.
reset-extension-passwords is a script that automatically and randomly resets ALL of the SIP passwords for extensions 701-705. Be careful using this one, or you may disable existing registered phones and cause Fail2Ban to blacklist the IP addresses of those users. HINT: You can place a call to the Ring Group associated with all five extensions by dialing 777.
reset-reminders-pin is a script that automatically and randomly resets the pin required to access the Telephone Reminders application by dialing 123. It’s important to protect this application because a nefarious user could set up a reminder to call a number anywhere in the world assuming your SIP provider’s account was configured to allow such calls.
show-feature-codes is a cheat sheet for all of the feature codes which can be dialed from any registered SIP phone. It documents how powerful a platform Incredible PBX 2021 actually is. A similar listing is available in the GUI at Admin -> Feature Codes.
show-passwords is a script that displays most of the passwords associated with Incredible PBX 2021. This includes SIP extension passwords, voicemail pins, conference pins, telephone reminders pin, and your Anveo Direct outbound calling pin (if configured). Note that voicemail pins are configured by the user of a SIP extension the first time the user accesses the voicemail system by dialing *97.
sig-fix disables Module Signature Checking in the FreePBX GUI. This should not be necessary unless you have added or edited FreePBX Modules with missing module signatures.
sms-skyetel is a script to send SMS messages using a Skyetel trunk.
sms-voip.ms is a script to send SMS messages using a VoIP.ms trunk.
sms-blast, sms-blaster, and sms-dictator are scripts for message blasting. Tutorial here.
switch-to-php5.6 is a script to disable PHP 7.3 and set PHP 5.6 as the default version for your PBX. PHP 5.6 is required to use AvantFax. It is the default configuration for Incredible PBX 2021. The current default PHP version is displayed in the Apache listing of pbxstatus.
switch-to-php7.3 is a script to disable PHP 5.6 and set PHP 7.3 as the default version for your PBX. You cannot use AvantFax when PHP 7.3 is the default.
timezone-setup is a script to set the timezone for your PBX.
update-IncrediblePBX is a script that runs the Automatic Update Utility whenever you login to your server as root. These updates typically resolve bugs and security issues with your PBX. Do NOT remove it.
upgrade-asterisk16 is a script that runs on Asterisk 16 platforms to upgrade your PBX to the latest release of Asterisk 16.
upgrade-asterisk18 is a script that runs on both Asterisk 16 and 18 platforms to upgrade your PBX to the latest release of Asterisk 18.
wolfram is a script to deploy Wolfram Alpha on your PBX. Tutorial here.
Forwarding Calls to Your Cellphone. Keep in mind that inbound calls to your DIDs automatically ring all five SIP extensions, 701-705. The easiest way to also ring your cellphone is to set one of these five extensions to forward incoming calls to your cellphone. After logging into your PBX as root, issue the following command to forward calls from extension 705 to your cellphone: asterisk -rx "database put CF 705 6781234567"
To remove call forwarding: asterisk -rx "database del CF 705"
Keeping FreePBX 15 Modules Current
We strongly recommend that you periodically update all of your FreePBX modules to eliminate bugs and to reduce security vulnerabilities. From the Linux CLI, log into your server as root and issue the following commands:
rm -rf /tmp/*
fwconsole ma upgradeall
fwconsole reload
/root/sig-fix
systemctl restart apache2
/root/sig-fix
Ready to turn Incredible PBX 2021 into a PUBLIC-Facing PBX? Here’s how.

Originally published: Friday, January 1, 2021
Need help with Asterisk? Visit the VoIP-info Forum.
Special Thanks to Our Generous Sponsors
FULL DISCLOSURE: ClearlyIP, Skyetel, Vitelity, DigitalOcean, Vultr, VoIP.ms, 3CX, Sangoma, TelecomsXchange and VitalPBX have provided financial support to Nerd Vittles and our open source projects through advertising, referral revenue, and/or merchandise. As an Amazon Associate and Best Buy Affiliate, we also earn from qualifying purchases. We’ve chosen these providers not the other way around. Our decisions are based upon their corporate reputation and the quality of their offerings and pricing. Our recommendations regarding technology are reached without regard to financial compensation except in situations in which comparable products at comparable pricing are available from multiple sources. In this limited case, we support our sponsors because our sponsors support us.
BOGO Bonaza: Enjoy state-of-the-art VoIP service with a $10 credit and half-price SIP service on up to $500 of Skyetel trunking with free number porting when you fund your Skyetel account. No limits on number of simultaneous calls. Quadruple data center redundancy. $25 monthly minimum spend required. Tutorial and sign up details are here.
![]() The lynchpin of Incredible PBX 2020 and beyond is ClearlyIP components which bring management of FreePBX modules and SIP phone integration to a level never before available with any other Asterisk distribution. And now you can configure and reconfigure your new Incredible PBX phones from the convenience of the Incredible PBX GUI.
The lynchpin of Incredible PBX 2020 and beyond is ClearlyIP components which bring management of FreePBX modules and SIP phone integration to a level never before available with any other Asterisk distribution. And now you can configure and reconfigure your new Incredible PBX phones from the convenience of the Incredible PBX GUI.
VitalPBX is perhaps the fastest-growing PBX offering based upon Asterisk with an installed presence in more than 100 countries worldwide. VitalPBX has generously provided a customized White Label version of Incredible PBX tailored for use with all Incredible PBX and VitalPBX custom applications. Follow this link for a free test drive!
Special Thanks to Vitelity. Vitelity is now Voyant Communications and has halted new registrations for the time being. Our special thanks to Vitelity for their unwavering financial support over many years and to the many Nerd Vittles readers who continue to enjoy the benefits of their service offerings. We will keep everyone posted on further developments.

Deploying an Incredible PBX 2021 PUBLIC Server

With the almost overnight popularity of the new Clearly Anywhere softphone which provides Incredible PBX connectivity from virtually anywhere, we wanted to add a missing piece to our Incredible PBX 2021 release. Because softphones need connectivity on both cellular networks and using Wi-Fi with dynamic IP addresses in multiple locations, exclusive whitelist-based access to Incredible PBX platforms simply was no longer feasible. Additionally, due to Clearly Anywhere’s tight integration with the FreePBX® User Control Panel (UCP), remote access to UCP for mobile users has become more important particularly with the new QR Code auto-configuration option for Clearly Anywhere clients.
Safely deploying a public-facing Asterisk® server with full FreePBX functionality has become the Holy Grail for Nerd Vittles in 2020. Today we tackle it with the new Incredible PBX® 2021 Debian platform featuring the latest releases of Asterisk 16 and FreePBX 15. The icing on today’s cake is an additional offer from Skyetel that supplements the current Nerd Vittles BOGO offer of up to $500 in half-priced VoIP services. Skyetel now starts you off with a $10 credit just for opening an account here. Then, after you have had an opportunity to kick the tires and perhaps purchase a DID for a buck, you can make $9 worth of phone calls before deciding whether to take advantage of the BOGO special by making a purchase of up to $250 and having Skyetel match your contribution. Once you have funded your account, you then can also take advantage of Skyetel’s free number porting offer for the next 60 days. To get your $10 credit, just open a ticket and request the $10 Nerd Vittles credit once you’ve signed up. To get the Nerd Vittles BOGO price match and take advantage of free number porting, simply open another ticket once you have added up to $250 to your account. Effective 10/1/2023, $25/month minimum spend required.
Making the Case for a Public-Facing PBX
We’ve had folks using our Incredible PBX PUBLIC implementation for over a year, and today we expand the offering to support the new Incredible PBX 2021 with Debian 10. Early on, the first question we got was why anyone would want to do this. After all, PBX in a Flash 3 and Incredible PBX for the better part of a decade have been deployed with a whitelist using the Travelin’ Man 3 firewall, and there’s never been a security issue. So why switch horses now? The short answer is mobile users with dynamic IP addresses. If all the users of your PBX are sitting behind the same NAT-based router with static IP addresses, the Travelin’ Man 3 design is perfect. The bad guys could never even see your server. But if some of your users either reside or travel outside your home base or if you want calls to follow you on your smartphone with Clearly Anywhere when you leave home or the office, then Travelin’ Man 3 blocked SIP access from these remote phones until their new IP addresses were whitelisted. Multiply this by dozens or hundreds of users, and network management suddenly became a full-time job. Yes, we’ve had tools such as dynamic DNS and PortKnocker to ease the pain, but it still was a knuckle-drill for mobile users. And, in today’s Covid world, much of the workforce is quickly morphing into mobile users without a traditional desk at any office. What we were also beginning to see were homegrown "improvements" to the IPtables firewall where users that didn’t appreciate the risks were exposing their servers to SIP attacks simply to ease the pain of connecting remotely.
The world also is becoming more SIP savvy. Just as folks are learning that a $35 antenna can provide an awesome collection of 4K Ultra HD TV channels without the expense of a monthly cable bill, others are learning that a SIP telephone or softphone app on your smartphone can provide free calls to and from anybody with a SIP URI without sharing your communications with Facebook or Microsoft. A public-facing PBX makes free worldwide SIP calling a reality.
Building the Base Platform for Incredible PBX PUBLIC
To get started today, begin by installing Incredible PBX 2021 using our latest tutorial. We strongly recommend a cloud-based KVM platform with a static IP address on the Internet.
Once you have set up your Incredible PBX 2021 server, the next step is to assign one or two fully-qualified domain names (FQDNs) to your server. You can have one FQDN for registering SIP extensions and a different one for anonymous SIP (invite) access to your server, or you can use the same FQDN for both. Security through obscurity provides an extra layer of protection for your server so choose your FQDNs carefully. sip.yourname.com provides almost no protection while f246g.yourname.com pretty much assures that nobody is going to guess your domain name. This is particularly important with the FQDN for SIP registrations because registered extensions on your PBX can obviously make phone calls that cost money. If you don’t have your own domain, you can always obtain a free FQDN from a service such as NoIP.com.
By default, Incredible PBX 2021 configures five extensions (701-705) and a Ring Group for those extensions (777) as well as four trunks. With Skyetel, your PBX is ready to make and receive calls as soon as you sign up. With the other three trunk providers, you only need to enable the trunk. You can add as many additional providers and extensions as you like and modify the ring group to meet your needs. To get started, be sure to configure the correct time zone for your server as this affects delivery of reminders. Run /root/timezone-setup. Next, set a secure password for admin access to the FreePBX GUI modules. Run /root/admin-pw-change. Then set a secure password for admin access to web applications such as AsteriDex, Reminders, and User Control Panel. Run /root/apache-pw-change. In addition to reviewing your extensions and ring group, review the default inbound route and choose the destination for the incoming calls from your provider. Finally, configure the outbound route to use the provider sequence desired. By default, it uses Skyetel for outbound calls.
If you plan to use Clearly Anywhere, you’ll need to add at least one PJsip extension on your PBX or use the preconfigured PJsip extension 701. Simply navigate to Applications -> Extensions in the FreePBX GUI. Choose Add Extension -> Add PJsip Extension. In the General tab, insert an extension number in User Extension and Display Name, e.g. 707. In the Advanced tab, set Max Contacts to 11 which will let you connect up to 5 Clearly Anywhere softphones to the extension. Click Submit and Reload Dialplan when prompted. Go back into the new extension and make note of your new credentials for User Manager. You’ll need these for Clearly Anywhere. Remember to also add the PJsip extension to the Inbound Route for your incoming calls.
Going Public with Incredible PBX 2021
Once you’ve tested making and receiving calls with your new server, you’re ready to convert it into a public-facing PBX. Before proceeding, remove any whitelist entries you’ve added using add-ip and add-fqdn by running del-acct. These can be added back after the GO-PUBLIC-2021 install script is run. In order to run the install script below, you’ll need your FQDNs that you chose above, plus a port number for future SSH/Putty access to your server, plus a list of the extensions you wish to make available for public access to your PBX. These whitelisted extensions can be reached via SIP URI from anywhere in the world by anybody. It works just like your old MaBell phone. Anybody, anywhere can dial your number. What’s changed is now the calls are free. So choose your list carefully. We recommend using the year you were born for your SSH port to keep things simple for you. Once the GO-PUBLIC-2021 script has been run, you can only access your PBX via SSH/Putty at the new port, for example: ssh -p 1990 root@yourFQDN.com
Now we’re ready to run the install script. It takes less than a minute. Before you begin, log out of ALL SIP extensions you have previously registered with Incredible PBX 2021 and change the server destination from an IP address to the FQDN you plan to assign to SIP registrations. Otherwise, these IP addresses will get banned while the install script is running below!
cd /root
wget http://incrediblepbx.com/go-public-2021.tar.gz
tar zxvf go-public-2021.tar.gz
rm -f go-public-2021.tar.gz
./GO-PUBLIC-2021
A Few Words About Incredible PBX PUBLIC Security
As with all Incredible PBX servers, Incredible PBX 2021-PUBLIC includes the Automatic Update Utility. Please don’t disable it. It’s our only way to push updates to you if some vulnerability is discovered down the road. It gets run whenever you login to your server as root using SSH/Putty. Do so regularly and follow us on Twitter for security alerts. There’s also an Incredible PBX RSS Feed that is displayed when you login to the Incredible PBX GUI with a browser. It, too, includes security alerts and should be checked regularly. It’s your phone bill.
Incredible PBX 2021-PUBLIC uses the ipset utility in conjunction with the IPtables firewall to block several countries that have inordinately high concentrations of folks that try to break into VoIP servers. In addition, your public PBX includes the VoIP Blacklist which includes another 100,000 bad guys from around the globe. These blacklists get updated every night by a script which is run from /etc/crontab. For your own safety, don’t disable or delete /etc/update-voipbl.sh or the other components upon which it relies.
Here are some other things you should do regularly to assure that your server remains secure. Login via SSH/Putty as root and check pbxstatus after the Automatic Update Utility is run. With the exception of the fax components, all the other items should be green all the time. From the Linux CLI, run: iptables -nL. This will show your firewall rules and whether any IP addresses have been banned by Fail2Ban. If there are banned IP addresses that are not your own, please open a thread on the VoIP-Info Forum and let us know about it. If there are dozens of banned IP addresses, shutdown your server immediately until the problem is identified and resolved. If the IP addresses happen to be your own users because of using incorrect passwords or because of using a server IP address instead of its FQDN for SIP registrations, unban the IP address:
fail2ban-client set asterisk unbanip xxx.xxx.xxx.xxx
Finally, watch the Asterisk CLI periodically for abnormal activity: asterisk -rvvvvvvvvvv
Tightening Up SSH Server Access
You obviously need a very secure root password for access to your server using SSH/Putty. Changing the TCP port for SSH access avoids the script kiddies, but it doesn’t offer much protection from a determined cracker. SSH login attempts are monitored by Fail2Ban, but Fail2Ban has issues when a determined intruder is using a powerful computing platform such as Amazon EC2. The prudent solution is to disable SSH password access and use SSH Public Key Authentication as documented in the linked tutorial. Always, always use ssh-copy-id to copy your credentials to more than one desktop machine so that you don’t inadvertently lock yourself out of your PBX in case of a hardware failure. Then set PasswordAuthentication no in /etc/ssh/sshd_config and restart SSH: systemctl restart sshd.
Web Access to Incredible PBX 2021 PUBLIC
By default, web access to all apps including FreePBX, UCP, AvantFax, AsteriDex, and Reminders is limited to whitelisted IP addresses. For some implementations, particularly those using Clearly Anywhere, this may not be ideal as UCP can assist with user management of the PBX as well as QR code provisioning of Clearly Anywhere. The Apache web server can be used to manage web access so long as you understand the need to apply Apache security patches in a timely manner.
Assign the same FQDN that you use for SIP access to port 80 for the UCP application. Deploy OpenVPN on your server and use the PBX’s OpenVPN IP address for general access to all web applications we listed above. If you’d like public access to the FreePBX GUI, assign web access for it to another random port, e.g. 8080 in our example below. Block web access to your server from the public IP address of your PBX on both port 80 and 8080 in our example below. Here’s how to accomplish that. Create a new file in /etc/pbx/httpdconf. Create public.conf with the following contents:
Listen 8080

<virtualhost *:80>
ServerAdmin you@gmail.com
ServerName 111.112.113.114
Redirect 403 /
UseCanonicalName Off
UserDir disabled
</virtualhost>

<virtualhost *:8080>
ServerAdmin you@gmail.com
ServerName 111.112.113.114
Redirect 403 /
UseCanonicalName Off
UserDir disabled
</virtualhost>

<virtualhost *:80>
ServerAdmin you@gmail.com
ServerName server-fqdn.com
DocumentRoot /var/www/html/ucp
ErrorLog /var/log/httpd/error_log
CustomLog /var/log/httpd/access_log common
</virtualhost>

<virtualhost *:80>
ServerAdmin you@gmail.com
ServerName 10.8.0.123
DocumentRoot /var/www/html
ErrorLog /var/log/httpd/error_log
CustomLog /var/log/httpd/access_log common
</virtualhost>

<virtualhost *:8080>
ServerAdmin you@gmail.com
ServerName server-fqdn.com
DocumentRoot /var/www/html
ErrorLog /var/log/httpd/error_log
CustomLog /var/log/httpd/access_log common
</virtualhost>

<virtualhost 127.0.0.1:80>
ServerAdmin you@gmail.com
ServerName 127.0.0.1
ServerAlias localhost
DocumentRoot /var/www/html
</virtualhost>
In the ServerAdmin lines, insert your email address. Replace 111.112.113.114 with the public IP address of your server. Replace server-fqdn.com with the FQDN assigned for SIP registration access to your PBX. Replace 10.8.0.123 with the OpenVPN private IP address of your PBX. Replace 8080 with the port you chose for FreePBX access to your server. Save the file and then restart Apache: systemctl restart httpd.
Now it should be safe to open TCP port 80 and 8080 (or whatever port you chose) for web access to your server. Let’s also whitelist TCP 2267 for Clearly Anywhere access while we’re at it. On the Debian 10 platform, here are the commands:
cd /etc/iptables
sed -i 's/10000:20000 -j ACCEPT/&\\n-A INPUT -p tcp -m tcp --dport 8080 -j ACCEPT/' rules.v4
sed -i 's/10000:20000 -j ACCEPT/&\\n-A INPUT -p tcp -m tcp --dport 80 -j ACCEPT/' rules.v4
sed -i 's/10000:20000 -j ACCEPT/&\\n-A INPUT -p tcp -m tcp --dport 2267 -j ACCEPT/' rules.v4
iptables-restart
Be sure to test all three access methods to verify that you haven’t left a security hole.
Keeping FreePBX 15 Modules Current
We strongly recommend that you periodically update all of your FreePBX modules to eliminate bugs and to reduce security vulnerabilities. From the Linux CLI, log into your server as root and issue the following commands:
rm -f /tmp/*
fwconsole ma upgradeall
fwconsole reload
/root/sig-fix
systemctl restart apache2
/root/sig-fix
Special Thanks: We want to give an extra special tip of the hat to the VoIP-Info Forum members who assisted in working the kinks out of the Incredible PBX 2021 PUBLIC offering. We also wish to thank JavaPipe LLC for a number of DDOS tips and tricks in securing Linux with IPtables.
Originally published: Monday, December 21, 2020
Need help with Asterisk? Visit the VoIP-info Forum.
Special Thanks to Our Generous Sponsors
FULL DISCLOSURE: ClearlyIP, Skyetel, Vitelity, DigitalOcean, Vultr, VoIP.ms, 3CX, Sangoma, TelecomsXchange and VitalPBX have provided financial support to Nerd Vittles and our open source projects through advertising, referral revenue, and/or merchandise. As an Amazon Associate and Best Buy Affiliate, we also earn from qualifying purchases. We’ve chosen these providers not the other way around. Our decisions are based upon their corporate reputation and the quality of their offerings and pricing. Our recommendations regarding technology are reached without regard to financial compensation except in situations in which comparable products at comparable pricing are available from multiple sources. In this limited case, we support our sponsors because our sponsors support us.
BOGO Bonaza: Enjoy state-of-the-art VoIP service with a $10 credit and half-price SIP service on up to $500 of Skyetel trunking with free number porting when you fund your Skyetel account. No limits on number of simultaneous calls. Quadruple data center redundancy. $25 monthly minimum spend required. Tutorial and sign up details are here.
![]() The lynchpin of Incredible PBX 2020 and beyond is ClearlyIP components which bring management of FreePBX modules and SIP phone integration to a level never before available with any other Asterisk distribution. And now you can configure and reconfigure your new Incredible PBX phones from the convenience of the Incredible PBX GUI.
The lynchpin of Incredible PBX 2020 and beyond is ClearlyIP components which bring management of FreePBX modules and SIP phone integration to a level never before available with any other Asterisk distribution. And now you can configure and reconfigure your new Incredible PBX phones from the convenience of the Incredible PBX GUI.
VitalPBX is perhaps the fastest-growing PBX offering based upon Asterisk with an installed presence in more than 100 countries worldwide. VitalPBX has generously provided a customized White Label version of Incredible PBX tailored for use with all Incredible PBX and VitalPBX custom applications. Follow this link for a free test drive!
Special Thanks to Vitelity. Vitelity is now Voyant Communications and has halted new registrations for the time being. Our special thanks to Vitelity for their unwavering financial support over many years and to the many Nerd Vittles readers who continue to enjoy the benefits of their service offerings. We will keep everyone posted on further developments.
A New Day: Introducing Incredible PBX 2021 Beta for Debian

Shifting gears is never easy, and sometimes it takes an ill-advised corporate blunder to move the needle. But IBM’s decimation of the CentOS project last week was just the motivation we needed to begin exploring alternatives for the Incredible PBX project. We are delighted to introduce the beta release of Incredible PBX 2021 for Debian 10 for those with a pioneering spirit that would like to participate in development of this promising new platform.
Before we get started, a few cautionary notes. This is not production-ready software. It’s been in development for less than a week by a single individual. As much as we believe in miracles, this probably is not one of them. Having said that, many talented individuals on the VoIP-Info.org Forum have taken this for a spin and offered numerous suggestions. You, too, can follow our progress and participate. With a little luck, we’ll have a production-ready release before the end of 2020. We’ve successfully built a fully-functional version of Incredible PBX 2021 with on-premise hardware using VirtualBox and VMware ESXi. And we’ve deployed virtual machines at Vultr and Digital Ocean without a hiccup.
For those that would like to roll up your sleeves and contribute to this open source project, here’s how to get started. If you’re using on-premise hardware, begin by downloading the netinst ISO image of Debian 10.7 for amd64. Follow our previous tutorials for tips on installation with VirtualBox or VMware ESXi. If you’d prefer to experiment in the cloud for about a penny an hour, open an account at Vultr or Digital Ocean using our referral links that support the Nerd Vittles project. You’ll also get some free credit to try out the service. Then create a new $5/month Debian 10, 64-bit instance in your favorite city.
Once your Debian 10 platform is up and running, login as root using SSH or Putty and issue the following commands:
wget http://incrediblepbx.com/IncrediblePBX2021.sh
chmod +x IncrediblePBX2021.sh
./IncrediblePBX2021.sh
At about 5 minutes into the install procedure, you’ll be prompted for your telephone country code. It’s 1 for Canada and the United States. Just before the install completes, you’ll be prompted to save your default IPtables setup. Once the installation completes, reboot and you should be good to go. For tips on next steps, review the Incredible PBX 2020 CentOS 7 tutorial.
After you log back in following a reboot, check the version of Debian 10 in the pbxstatus display. If it’s less than 10.7, issue the following commands to bring your server up to Debian 10.7. Do NOT do this before the base install is finished, or Asterisk may fail to install properly.
apt-get update
apt-get upgrade -y
Next Steps with Incredible PBX 2021
Before you can manage your PBX through a web browser, you first will need to set the admin passwords for FreePBX, Apache web apps such as Reminders and AsteriDex, and AvantFax (if you are using Incredible Fax). These all can be set by logging into your server as root and issuing the following commands: admin-pw-change, apache-pw-change, and avantfax-pw-change. The AvantFax password can also be reset with a browser by first logging in as admin with a password of password.
Outbound mail functionality needs to be working so that you can receive voicemail messages and faxes by email. To prevent SPAM, most ISPs and ITSPs block messages from downstream mail servers. That would be you. The easiest way to resolve this is to configure SendMail using Gmail as an SMTP Smarthost. You obviously need a Gmail account to implement this and, if you have turned on two-factor authentication for your Gmail account, you also will need to obtain an App password for your Gmail account, and use that in lieu of your regular Gmail password when configuring SendMail. With your Gmail username and password in hand, log into your server as root and run: /root/enable-gmail-smarthost-for-sendmail.
If your Incredible PBX 2021 is hosted with a cloud provider, be advised that many providers do not include a swap file as part of their offering. FreePBX requires a swap file. To add one, issue this command after logging into your server as root: /root/create-swapfile-DO.
To correctly set the time on your PBX, run: /root/timezone-setup.
By default, the voicemail password for each of the configured extensions (701-705) is set to the extension number. This means the user will be prompted to set a voicemail password on the first login to voicemail for each extension. A phone must be registered to the actual extension to access its voicemail account. For example, once a phone is registered to extension 701, the voicemail setup can be accessed by dialing *98701.
If you want to send and receive faxes with Incredible PBX 2021, run the following script while logged into your server as root: /root/incrediblefax2020-debian10.sh. When prompted, accept all the defaults. Once the HylaFax and AvantFax components are installed, reboot your server. To send faxes, click on the AvantFax tab in the FreePBX GUI and enter your login credentials (default: admin/password). To receive incoming faxes once you have configured a trunk and DID for your PBX, login to the FreePBX GUI as admin. Navigate to Connectivity -> Inbound Routes. For each of your DIDs on which you wish to receive faxes, select the inbound route and click the Fax tab. Review the Default Inbound Route Fax settings for proper setup.
NOTE: If you get a database error when you attempt to access AvantFax from a web browser, log into your server as root and reinstall the AvantFax database: ./avantfax-db-replace.
Audio Issues with Incredible PBX 2021
If you experience one-way or no audio on some calls, add your external IP address and LAN subnet in the GUI by navigating to Settings -> Asterisk SIP Settings. In the NAT Settings section, click Detect Network Settings. Click Submit and Apply Settings to save your changes.
Adding Incredible PBX 2021 to an OpenVPN Network
We previously have documented the procedure for creating an OpenVPN server as well as OpenVPN client templates (.ovpn). If you need a refresher, the tutorial is here. To add your Incredible PBX 2021 server to an existing OpenVPN network, begin by creating an incrediblepbx2021.ovpn template on your OpenVPN server. Be sure to comment out or delete the setenv line in the template. Then copy this template to /etc on your Incredible PBX 2021 server. Next, issue the following commands to put the remaining pieces in place:
cp -p /root/openvpn-start /etc/.
echo "[Unit]
Description=openvpn2021
ConditionPathExists=/etc/openvpn-start
After=rclocal.service
[Service]
Type=forking
ExecStart=/etc/openvpn-start /etc/incrediblepbx2021.ovpn
TimeoutSec=0
StandardOutput=tty
RemainAfterExit=yes
PermissionsStartOnly=true
SysVStartPriority=99
[Install]
WantedBy=multi-user.target" > /etc/systemd/system/openvpn2021.service
Finally, enable the new openvpn2021.service and reboot your server. The OpenVPN IP address should now appear on the LAN line in pbxstatus:
systemctl enable openvpn2021.service
reboot
Incredible PBX 2021 Administration
We’ve eased the pain of administering your new PBX with a collection of scripts which you will find in the /root folder after logging in with SSH or Putty. Here’s a quick summary of what each of the scripts does.
add-fqdn is used to whitelist a fully-qualified domain name in the firewall. Because Incredible PBX 2021 blocks all traffic from IP addresses that are not whitelisted, this is what you use to authorize an external user for your PBX. The advantage of an FQDN is that you can use a dynamic DNS service to automatically update the IP address associated with an FQDN so that you never lose connectivity.
add-ip is used to whitelist a public IP address in the firewall. See the add-fqdn explanation as to why this matters.
del-acct is used to remove an IP address or FQDN from the firewall’s whitelist.
admin-pw-change is used to set the admin password for access to the FreePBX/Incredible PBX web GUI using a browser pointed to the local IP address of your server.
apache-pw-change is used to set the admin password for access to Apache/Incredible PBX apps including AsteriDex and Reminders. This provides a password layer of protection for access to these applications.
avantfax-email-change is used to change the destination email address for incoming faxes.
avantfax-pw-change is used to change your admin password for the AvantFax web console.
iaxmodem-restart is used to restart the modems used to send and deliver faxes. The pbxstatus display will tell you whether the IAXmodems are down.
incrediblebackup2021 makes a backup of critical components on your PBX to a tarball saved in /backup. This should be copied to safe location off-site for a rainy day.
incrediblerestore2021 restores a backup file which has been copied to the /backup folder.
ipchecker is a script which deciphers the public IP addresses associated with whitelisted FQDNs created with add-fqdn on your server. If any of the addresses have changed, the firewall is restarted after updating the IP addresses. By default, it is executed every 10 minutes by /etc/crontab.
licenses.sh displays the license associated with each of the FreePBX modules on your server.
logos-b-gone removes proprietary artwork from your PBX and is no longer necessary with the included IncrediblePBX FreePBX module.
mime-construct is a command-line utility to send emails with attachments.
neorouter-login is a script to add your PBX to a NeoRouter VPN. Tutorial here.
odbc-gen.sh is a script that was run to generate the ODBC settings for Asterisk. Do NOT use it.
openvpn-start is a script to add your PBX to an existing OpenVPN network using an .ovpn config file. Tutorial here.
pbxstatus displays status of all major components of Incredible PBX 2021.
pptp-install is a script to create a PPTP network connection for your PBX. Tutorial here.
purge-cdr-cel-records removes all CDR and CEL records from the MySQL database.
reset-conference-pins is a script that automatically and randomly resets the user and admin pins for access to the preconfigured conferencing application. Dial C-O-N-F from any registered SIP phone to connect to the conference.
reset-extension-passwords is a script that automatically and randomly resets ALL of the SIP passwords for extensions 701-705. Be careful using this one, or you may disable existing registered phones and cause Fail2Ban to blacklist the IP addresses of those users. HINT: You can place a call to the Ring Group associated with all five extensions by dialing 777.
reset-reminders-pin is a script that automatically and randomly resets the pin required to access the Telephone Reminders application by dialing 123. It’s important to protect this application because a nefarious user could set up a reminder to call a number anywhere in the world assuming your SIP provider’s account was configured to allow such calls.
show-feature-codes is a cheat sheet for all of the feature codes which can be dialed from any registered SIP phone. It documents how powerful a platform Incredible PBX 2021 actually is. A similar listing is available in the GUI at Admin -> Feature Codes.
show-passwords is a script that displays most of the passwords associated with Incredible PBX 2021. This includes SIP extension passwords, voicemail pins, conference pins, telephone reminders pin, and your Anveo Direct outbound calling pin (if configured). Note that voicemail pins are configured by the user of a SIP extension the first time the user accesses the voicemail system by dialing *97.
sig-fix disables Module Signature Checking in the FreePBX GUI. This should not be necessary unless you have added or edited FreePBX Modules with missing module signatures.
sms-skyetel is a script to send SMS messages using a Skyetel trunk.
sms-voip.ms is a script to send SMS messages using a VoIP.ms trunk.
sms-blast, sms-blaster, and sms-dictator are scripts for message blasting. Tutorial here.
switch-to-php5.6 is a script to disable PHP 7.3 and set PHP 5.6 as the default version for your PBX. PHP 5.6 is required to use AvantFax. It is the default configuration for Incredible PBX 2021. The current default PHP version is displayed in the Apache listing of pbxstatus.
switch-to-php7.3 is a script to disable PHP 5.6 and set PHP 7.3 as the default version for your PBX. You cannot use AvantFax when PHP 7.3 is the default.
timezone-setup is a script to set the timezone for your PBX.
update-IncrediblePBX is a script that runs the Automatic Update Utility whenever you login to your server as root. These updates typically resolve bugs and security issues with your PBX. Do NOT remove it.
wolfram is a script to deploy Wolfram Alpha on your PBX. Tutorial here.
Forwarding Calls to Your Cellphone. Keep in mind that inbound calls to your DIDs automatically ring all five SIP extensions, 701-705. The easiest way to also ring your cellphone is to set one of these five extensions to forward incoming calls to your cellphone. After logging into your PBX as root, issue the following command to forward calls from extension 705 to your cellphone: asterisk -rx "database put CF 705 6781234567"
To remove call forwarding: asterisk -rx "database del CF 705"
Keeping FreePBX 15 Modules Current
We strongly recommend that you periodically update all of your FreePBX modules to eliminate bugs and to reduce security vulnerabilities. From the Linux CLI, log into your server as root and issue the following commands:
rm -f /tmp/*
fwconsole ma upgradeall
fwconsole reload
/root/sig-fix
systemctl restart apache2
/root/sig-fix
Originally published: Monday, December 14, 2020
Need help with Asterisk? Visit the VoIP-info Forum.
Special Thanks to Our Generous Sponsors
FULL DISCLOSURE: ClearlyIP, Skyetel, Vitelity, DigitalOcean, Vultr, VoIP.ms, 3CX, Sangoma, TelecomsXchange and VitalPBX have provided financial support to Nerd Vittles and our open source projects through advertising, referral revenue, and/or merchandise. As an Amazon Associate and Best Buy Affiliate, we also earn from qualifying purchases. We’ve chosen these providers not the other way around. Our decisions are based upon their corporate reputation and the quality of their offerings and pricing. Our recommendations regarding technology are reached without regard to financial compensation except in situations in which comparable products at comparable pricing are available from multiple sources. In this limited case, we support our sponsors because our sponsors support us.
BOGO Bonaza: Enjoy state-of-the-art VoIP service with a $10 credit and half-price SIP service on up to $500 of Skyetel trunking with free number porting when you fund your Skyetel account. No limits on number of simultaneous calls. Quadruple data center redundancy. $25 monthly minimum spend required. Tutorial and sign up details are here.
![]() The lynchpin of Incredible PBX 2020 and beyond is ClearlyIP components which bring management of FreePBX modules and SIP phone integration to a level never before available with any other Asterisk distribution. And now you can configure and reconfigure your new Incredible PBX phones from the convenience of the Incredible PBX GUI.
The lynchpin of Incredible PBX 2020 and beyond is ClearlyIP components which bring management of FreePBX modules and SIP phone integration to a level never before available with any other Asterisk distribution. And now you can configure and reconfigure your new Incredible PBX phones from the convenience of the Incredible PBX GUI.
VitalPBX is perhaps the fastest-growing PBX offering based upon Asterisk with an installed presence in more than 100 countries worldwide. VitalPBX has generously provided a customized White Label version of Incredible PBX tailored for use with all Incredible PBX and VitalPBX custom applications. Follow this link for a free test drive!
Special Thanks to Vitelity. Vitelity is now Voyant Communications and has halted new registrations for the time being. Our special thanks to Vitelity for their unwavering financial support over many years and to the many Nerd Vittles readers who continue to enjoy the benefits of their service offerings. We will keep everyone posted on further developments.
Capitalism 101: IBM Castrates CentOS to "Improve" RHEL

If you loved the PC Jr. and New Coke, you’re going to love yesterday’s technology news. Claiming the best of intentions, IBM® cut the 8-year life span of CentOS® 8 to one year after which CentOS will become CentOS Stream, an experimental development platform sandwiched between Fedora® and Red Hat Enterprise Linus®. If you’ve spent the last year or two planning for or deploying CentOS 8, too bad. You can either pay up for RHEL licenses going forward or switch to a new platform. The government-sponsored Scientific Linux project folded into CentOS so that option no longer exists. Oracle Linux® remains an option but, considering Oracle’s track record with MySQL, that might give many organizations pause. For organizations with thousands of CentOS platforms, the remaining alternatives are PAINFUL. Both Debian and Ubuntu would require major software plumbing changes. There’s always a chance that the original CentOS developers will come to the rescue with a new product, but we’re not holding our breath.
So here we are. How does this affect Incredible PBX? As most of you know, we’ve had Incredible PBX 2020 versions for both CentOS 7 and Raspbian 10 for the Raspberry Pi®. There will be no CentOS 8 release of Incredible PBX, but you’ve got four more years of CentOS 7 support unless IBM welches on that commitment as well. Because Raspbian 10 is a derivative of Debian 10, moving forward it makes perfect sense to consolidate onto the Debian 10 platform. And Incredible PBX 2021 will do just that with versions for Debian 10 and Raspbian.
With a little help from Santa, we hope to have a beta release of Incredible PBX 2021 for Debian before the end of this month. Stay tuned. The world will not end.
Originally published: Wednesday, December 9, 2020
Need help with Asterisk? Visit the VoIP-info Forum.
Special Thanks to Our Generous Sponsors
FULL DISCLOSURE: ClearlyIP, Skyetel, Vitelity, DigitalOcean, Vultr, VoIP.ms, 3CX, Sangoma, TelecomsXchange and VitalPBX have provided financial support to Nerd Vittles and our open source projects through advertising, referral revenue, and/or merchandise. As an Amazon Associate and Best Buy Affiliate, we also earn from qualifying purchases. We’ve chosen these providers not the other way around. Our decisions are based upon their corporate reputation and the quality of their offerings and pricing. Our recommendations regarding technology are reached without regard to financial compensation except in situations in which comparable products at comparable pricing are available from multiple sources. In this limited case, we support our sponsors because our sponsors support us.
BOGO Bonaza: Enjoy state-of-the-art VoIP service with a $10 credit and half-price SIP service on up to $500 of Skyetel trunking with free number porting when you fund your Skyetel account. No limits on number of simultaneous calls. Quadruple data center redundancy. $25 monthly minimum spend required. Tutorial and sign up details are here.
![]() The lynchpin of Incredible PBX 2020 and beyond is ClearlyIP components which bring management of FreePBX modules and SIP phone integration to a level never before available with any other Asterisk distribution. And now you can configure and reconfigure your new Incredible PBX phones from the convenience of the Incredible PBX GUI.
The lynchpin of Incredible PBX 2020 and beyond is ClearlyIP components which bring management of FreePBX modules and SIP phone integration to a level never before available with any other Asterisk distribution. And now you can configure and reconfigure your new Incredible PBX phones from the convenience of the Incredible PBX GUI.
VitalPBX is perhaps the fastest-growing PBX offering based upon Asterisk with an installed presence in more than 100 countries worldwide. VitalPBX has generously provided a customized White Label version of Incredible PBX tailored for use with all Incredible PBX and VitalPBX custom applications. Follow this link for a free test drive!
Special Thanks to Vitelity. Vitelity is now Voyant Communications and has halted new registrations for the time being. Our special thanks to Vitelity for their unwavering financial support over many years and to the many Nerd Vittles readers who continue to enjoy the benefits of their service offerings. We will keep everyone posted on further developments.
Meet Acer Spin 713: A Phenomenal Computer for All Seasons

It’s a portable office. It’s a movie theater. It’s a LAMP server. It’s a desktop PC. It’s a tablet computer. It’s a Chrome browser. It’s an Android platform. It’s a Linux server. And it gets almost 8 years of free software and firmware updates. Meet the $629 Acer Chromebook Spin 713. And, if you hurry, it’s $80 off at Best Buy today.
The checklist of superlatives is almost too lengthy to mention: a touchscreen of unrivaled quality, a 12-hour battery, dongle-free ports galore: HDMI, USB-C, USB 3.0, microSD slot, and headphone jack. While Chromium notebooks began as little more than a Chrome browser, that was then. The 2020 iteration includes complete Android integration as well as a feature-complete Debian 10 virtual machine platform supporting Apache, PHP 7, and the latest MariaDB/MySQL. If movies and television are your thing, Netflix and Sling TV transform the Chromebook into a near perfect viewing platform. As they say, seeing is believing. So here’s a snapshot from an iPhone that captures the quality of the 2256×1504-pixel (3:2 QHD) display. Suffice it to say, the display is as good or better than our $3,000 MacBook Pro’s screen.

Did we mention Best Buy’s $629 price. This 2-in-1 is a steal. It’s $200 below today’s Amazon pricing and is $400 below the closest comparable Chromebook models. Some may recall that we reviewed the System76 Lemur Pro Linux notebook in August and raved about its pricing at $1322, more than double the cost of Acer’s Spin 713. Having used both machines, I can honestly say you lose nothing by choosing the Acer device, and you gain access to the entire Android platform including Google Play as well as Linux. And the Spin 713 converts into a touchscreen tablet simply by flipping the screen. The only downside is, if these machines go on sale for Black Friday, you will be hard-pressed to find one to buy.
Deploying a LAMP Server with a Chromebook
If you pick up one of these bad boys, here’s a quick primer on setting up a LAMP server on the Linux virtual machine. Begin by enabling it in the Settings tab. Next, click on the Linux Terminal option in your Applications. At the Linux prompt, set up a new root user password: sudo passwd root. Switch to the root user account: su root. Now enter these commands:
cd ~
apt update
apt upgrade
apt install apache2 apache2-utils -y
systemctl start apache2
systemctl enable apache2
chown www-data:www-data /var/www/html/ -R
apt install mariadb-server mariadb-client -y
systemctl start mariadb
systemctl enable mariadb
mysql_secure_installation
apt install php7.3 libapache2-mod-php7.3 php7.3-mysql php-common \\
php7.3-cli php7.3-common php7.3-json php7.3-opcache php7.3-readline \\
php7.3-mbstring php7.3-dev -y
systemctl restart apache2
echo "<?php phpinfo(); ?>" > /var/www/html/info.php
echo "ip a" > /usr/local/bin/ifconfig
chmod +x /usr/local/bin/ifconfig
ifconfig | grep "inet "
Make note of your Linux machine’s IP address (last command above) and use a browser to access and verify the PHP info for your server: http://Spin-IP-Address/info.php
In the alternative, use this FQDN: http://penguin.linux.test/info.php
In keeping with their tradition of idiotic obsolescence, the PHP developers dropped support for mysqli in PHP 7 which means the mysql_connect function to interact with MySQL databases fails. Here’s how to restore it:
mkdir /usr
mkdir /usr/src
apt install build-essential git
cd /usr/src
git clone https://github.com/wardmundy/pecl-database-mysql mysql --recursive
cd mysql
phpize
./configure
make
make install
cd /etc/php/7.3/apache2
echo "extension=/usr/lib/php/20180731/mysql.so" >> php.ini
systemctl restart apache2
The mysql and mysqli sections will now magically reappear in your phpinfo() listing.
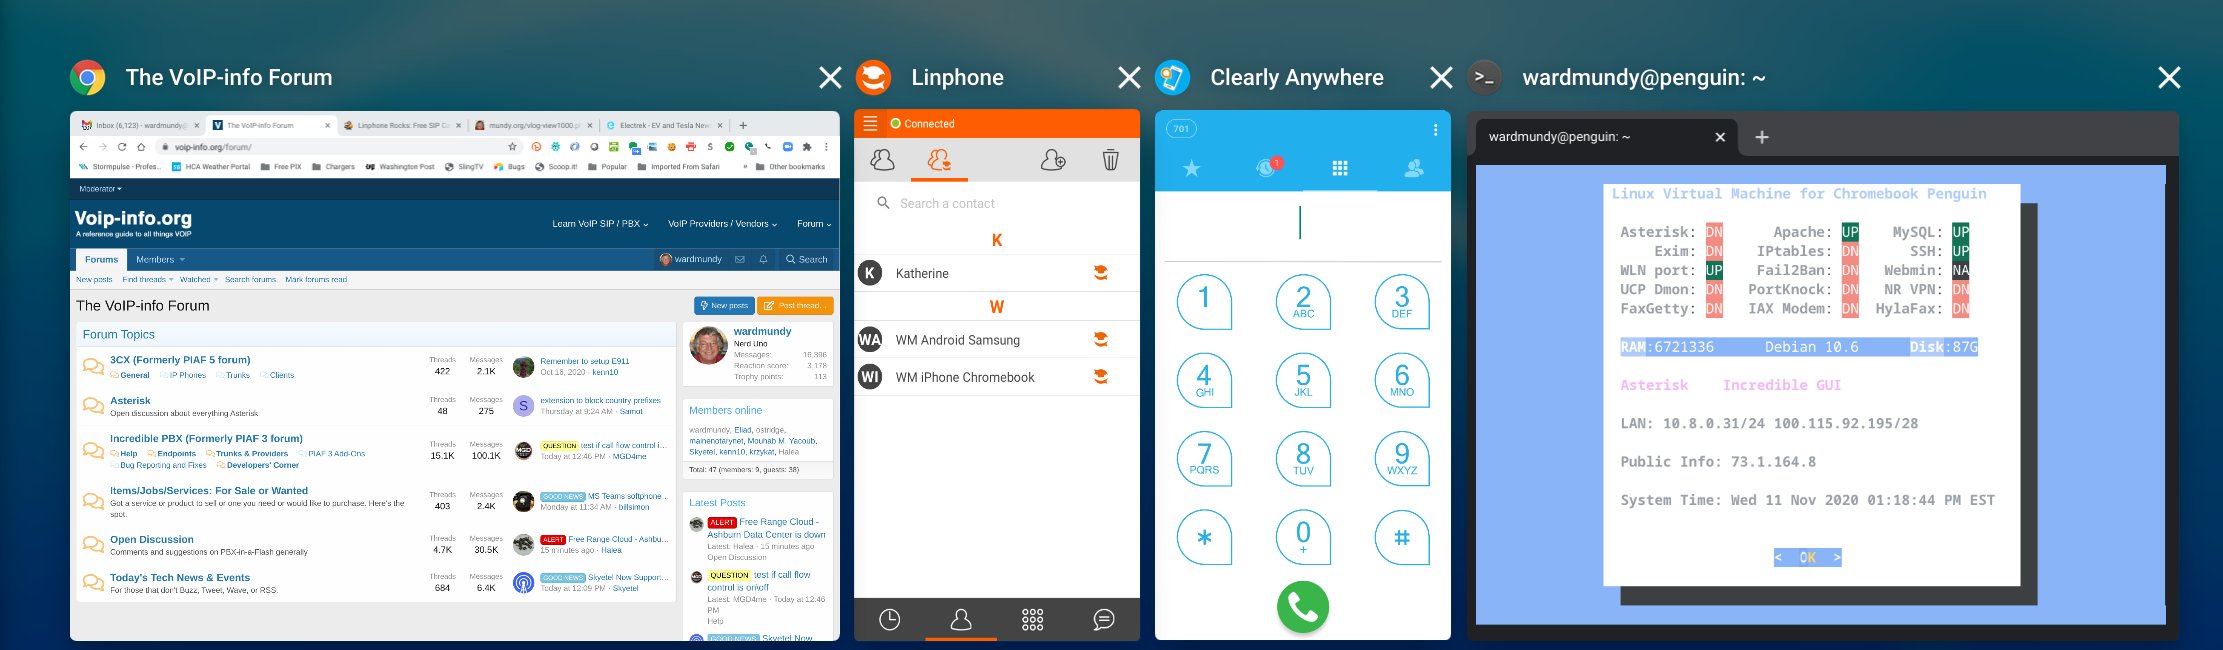
Adding Clearly Anywhere Softphone to the Spin 713
As noted, the Spin 713 also is a fully functional Android platform so adding the Clearly Anywhere softphone is easy. Simply download the software from Google Play. Then run the app and enter your extension credentials and FQDN of Incredible PBX 2020 PUBLIC server.
Adding Linphone Softphone to the Spin 713
Adding the Linphone softphone is equally easy. Simply download the software from Google Play. Then run the app and enter your Linphone SIP credentials with the configuration setup documented in our tutorial. Linphone calls to other Linphone users and to Incredible PBX 2020 PUBLIC users or anyone with a SIP URI worldwide are free.
Installing OpenVPN for Android on the Spin 713
There are several ways to install OpenVPN on the Spin 713 platform. You can use the traditional method we’ve documented for Linux installs; however, you will lose the ability to use OpenVPN IP addresses from your desktop and browser. The better method is to install the OpenVPN for Android client from the Play Store. Next, send yourself an email with the .ovpn file you created for the Chromebook. Open the message using Gmail on the Chromebook and save the received file in your Downloads folder. Open the OpenVPN for Android app on your desktop. Choose the + icon to create a new Profile and select the .ovpn file from Downloads. Once installed, edit the Settings. In the IP and DNS tab, disable No Local Binding. Enable Override DNS Settings and specify 8.8.8.8 and 8.8.4.4 for your DNS servers. Enable PULL Settings.In the ROUTING tab, enable Bypass VPN for Local Networks and Block IPv6. Then Start the VPN Client by clicking on your saved Profile.
Installing Zoom for Debian 10 on the Spin 713
No computer platform would be complete without Zoom. Begin by downloading Zoom for Debian here. In the File Manager (Alt-Shift-m), navigate to your Downloads folder and double-click on zoom_amd64.deb to install the application. Once installed, it will appear in your Linux apps container. Right-click (HINT: tap touchpad with two fingers) on Zoom icon to add Zoom to your Shelf.
Installing phpMyAdmin for PHP 7.3 on the Spin 713
No development platform would be complete without phpMyAdmin. We found an excellent tutorial to get everything set up properly with a few minor changes. Your LAMP platform already is in place so skip down to Step 2 in the tutorial. There’s one important correction in the instructions. Step 4, item 1 should be: sudo mkdir /var/www/html/phpmyadmin. And accessing phpMyAdmin once installed should be: http://Spin-IP-address/phpmyadmin.
Mastering Chromebook Shortcuts on the Spin 713
If you learn no other keyboard shortcut, remember this one: Ctrl + Alt + /. That gets you the entire list of keyboard shortcuts on the Chromebook. These keyboard shortcuts are a bit like memorizing multiplication tables. The sooner you learn them, the happier you will be using your Chromebook. If you’re an avid Linux user, be advised that the Linux virtual machine and the Chromebook desktop share the same clipboard so you can easily copy-and-paste between the two environments. On the desktop, Ctrl-c copies to the clipboard, and Ctrl-v pastes data from the clipboard. In the Linux virtual machine, Ctrl-Shift-C copies to the clipboard, and Ctrl-Shift-V pastes data from the clipboard. Learn a few new shortcuts each time you use your Chromebook. You’ll be amazed how quickly your productivity improves.
Where To Go From Here?
While you’re getting your feet wet, here are some must-have’s for your Spin 713. For openers, feast your eyes on the 4K Nature Videos on YouTube. Prepare to be blown away.
Next, you’ll want a free Office Suite for your Chromebook. Our favorite is WPS Office which provides Microsoft-compatible versions of Word, Excel, Powerpoint and a PDF Viewer/Editor.
For video editing, nothing comes close to PowerDirector. Also check out YouTube Studio.
For photo editing, Adobe Lightroom is the hands-down winner. Google Photos and Snapseed (our personal favorite) are also worth a careful look. Both are free compliments of Google.
For Nerds, check out the Crostini Wiki on Reddit. And master the Crosh terminal commands.
Originally published: Monday, November 16, 2020 Updated: Monday, December 7, 2020
Need help with Asterisk? Visit the VoIP-info Forum.
Special Thanks to Our Generous Sponsors
FULL DISCLOSURE: ClearlyIP, Skyetel, Vitelity, DigitalOcean, Vultr, VoIP.ms, 3CX, Sangoma, TelecomsXchange and VitalPBX have provided financial support to Nerd Vittles and our open source projects through advertising, referral revenue, and/or merchandise. As an Amazon Associate and Best Buy Affiliate, we also earn from qualifying purchases. We’ve chosen these providers not the other way around. Our decisions are based upon their corporate reputation and the quality of their offerings and pricing. Our recommendations regarding technology are reached without regard to financial compensation except in situations in which comparable products at comparable pricing are available from multiple sources. In this limited case, we support our sponsors because our sponsors support us.
BOGO Bonaza: Enjoy state-of-the-art VoIP service with a $10 credit and half-price SIP service on up to $500 of Skyetel trunking with free number porting when you fund your Skyetel account. No limits on number of simultaneous calls. Quadruple data center redundancy. $25 monthly minimum spend required. Tutorial and sign up details are here.
![]() The lynchpin of Incredible PBX 2020 and beyond is ClearlyIP components which bring management of FreePBX modules and SIP phone integration to a level never before available with any other Asterisk distribution. And now you can configure and reconfigure your new Incredible PBX phones from the convenience of the Incredible PBX GUI.
The lynchpin of Incredible PBX 2020 and beyond is ClearlyIP components which bring management of FreePBX modules and SIP phone integration to a level never before available with any other Asterisk distribution. And now you can configure and reconfigure your new Incredible PBX phones from the convenience of the Incredible PBX GUI.
VitalPBX is perhaps the fastest-growing PBX offering based upon Asterisk with an installed presence in more than 100 countries worldwide. VitalPBX has generously provided a customized White Label version of Incredible PBX tailored for use with all Incredible PBX and VitalPBX custom applications. Follow this link for a free test drive!
Special Thanks to Vitelity. Vitelity is now Voyant Communications and has halted new registrations for the time being. Our special thanks to Vitelity for their unwavering financial support over many years and to the many Nerd Vittles readers who continue to enjoy the benefits of their service offerings. We will keep everyone posted on further developments.
Finding the Perfect Laptop: Meet the System76 Lemur Pro

While we’ve been hunkered down in Vero Beach dodging the Covid-19 bullets, we spent a little time searching for a turnkey Linux notebook computer that could do everything a MacBook Pro could do… and more. The machine had to offer PORTS WITHOUT DONGLES plus the added benefits that only a pure Linux platform could provide. For $1099, our dream machine has arrived. The Lemur Pro is custom-built which means you order the 2.2 pound base computer with its 14-hour battery and then choose your operating system, CPU, RAM, storage devices, and warranty period. Shipping in the U.S. is free. We ended up at $1,322.21. In addition to 2 USB 3.0 Type-A slots, an HDMI port, a USB 3.1 Type-C w/ DisplayPort 1.2a, touchpad, stereo speakers, an audio jack, a webcam, and a backlit keyboard, the icing on the cake was a microSD slot which made the machine perfect for Raspberry Pi development.
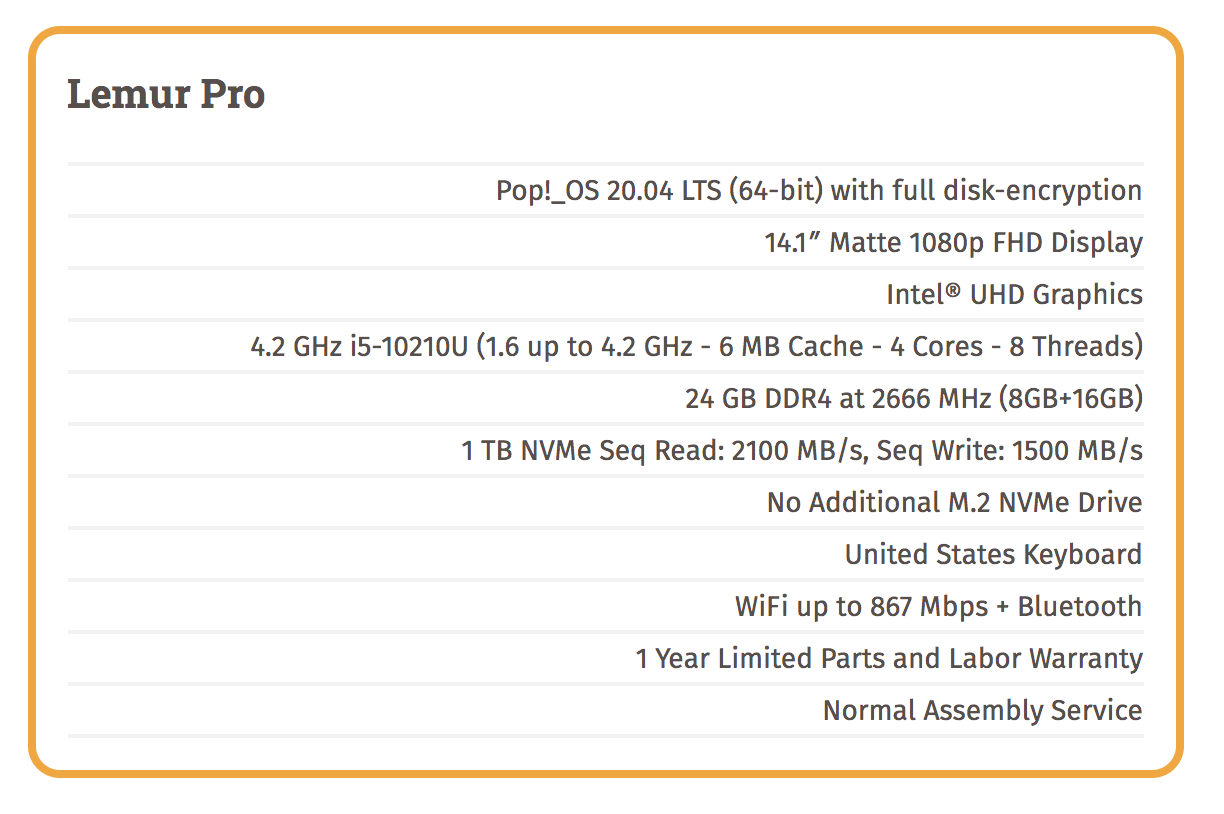
Software, of course, has always been what separated the Mac from the Linux desktops. No more! The System76 developers of the Lemur Pro have released their own flavor of Ubuntu. It’s a refined and open source desktop environment with most of the modern feature set available in either Windows or Mac OS. You can read all about Pop!_OS here. You can even download an ISO suitable for installation in VirtualBox if you just want to try it out for free.

In addition to a robust desktop solution out of the box, Pop!_OS also includes an Automatic Update Utility to push out security fixes and software updates. And they have a terrific Pop!_Shop, an apt front-end, which is similar to Android’s Play Store or Apple’s App Store. All of the apps in Pop!_Shop have been engineered to work within Pop!_OS seamlessly, and they do. We also encountered no issues installing a traditional LAMP stack, PHPmyAdmin, VirtualBox, OpenVPN, or Twinkle, a SIP client to connect to Asterisk® and IncrediblePBX®. Of course you also can run the VirtualBox image of Incredible PBX 2020 on the Lemur Pro. And, if you’re ever curious how we build Incredible PBX images for the Raspberry Pi, here’s our soup-to-nuts tutorial using the Lemur Pro. We’ve also built the images for CrownCloud and VirtualBox on the Lemur Pro. So life is good.
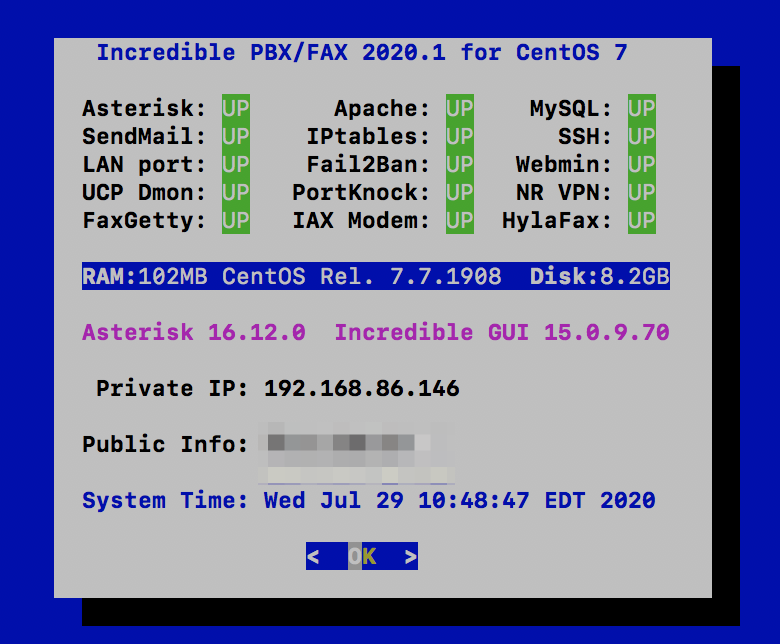
Booted up a Windows machine, or a Mac, or even an iPad Pro lately? Then you already know it takes about as long as making your own breakfast. Imagine our surprise with the Lemur Pro when the login prompt appeared in less than 10 seconds. There are other clever touches that are too numerous to mention. One that jumps out is our pet peeve about the MacBook Pro. Whenever your wrist happens to slide over the touchpad while you’re typing, the cursor magically jumps to some random place in your document as you continue to type. With the Lemur Pro, the touchpad is disabled whenever you are actively typing. Brilliant!

Did we mention the tutorials? They are equally brilliant. Here’s one of many examples. In addition to a Quick Start Guide, there’s even a service manual. Remember those?
System76 purchases come with a 30-day, money back guarantee. What are you waiting for?
Originally published: Tuesday, August 4, 2020
Need help with Asterisk? Visit the VoIP-info Forum.
Special Thanks to Our Generous Sponsors
FULL DISCLOSURE: ClearlyIP, Skyetel, Vitelity, DigitalOcean, Vultr, VoIP.ms, 3CX, Sangoma, TelecomsXchange and VitalPBX have provided financial support to Nerd Vittles and our open source projects through advertising, referral revenue, and/or merchandise. As an Amazon Associate and Best Buy Affiliate, we also earn from qualifying purchases. We’ve chosen these providers not the other way around. Our decisions are based upon their corporate reputation and the quality of their offerings and pricing. Our recommendations regarding technology are reached without regard to financial compensation except in situations in which comparable products at comparable pricing are available from multiple sources. In this limited case, we support our sponsors because our sponsors support us.
BOGO Bonaza: Enjoy state-of-the-art VoIP service with a $10 credit and half-price SIP service on up to $500 of Skyetel trunking with free number porting when you fund your Skyetel account. No limits on number of simultaneous calls. Quadruple data center redundancy. $25 monthly minimum spend required. Tutorial and sign up details are here.
![]() The lynchpin of Incredible PBX 2020 and beyond is ClearlyIP components which bring management of FreePBX modules and SIP phone integration to a level never before available with any other Asterisk distribution. And now you can configure and reconfigure your new Incredible PBX phones from the convenience of the Incredible PBX GUI.
The lynchpin of Incredible PBX 2020 and beyond is ClearlyIP components which bring management of FreePBX modules and SIP phone integration to a level never before available with any other Asterisk distribution. And now you can configure and reconfigure your new Incredible PBX phones from the convenience of the Incredible PBX GUI.
VitalPBX is perhaps the fastest-growing PBX offering based upon Asterisk with an installed presence in more than 100 countries worldwide. VitalPBX has generously provided a customized White Label version of Incredible PBX tailored for use with all Incredible PBX and VitalPBX custom applications. Follow this link for a free test drive!
Special Thanks to Vitelity. Vitelity is now Voyant Communications and has halted new registrations for the time being. Our special thanks to Vitelity for their unwavering financial support over many years and to the many Nerd Vittles readers who continue to enjoy the benefits of their service offerings. We will keep everyone posted on further developments.
Knock Three Times: Pain-Free Remote Access to Your Asterisk or Linux Server

No. We’re not going to make you relive the 1970’s with us today although now you can listen to this Number 1 Hit and a million others for free with Amazon’s new Prime Music. No, we don’t get a commission if you sign up for Amazon Prime. Yes, we make millions when you buy something from Amazon using our links. Thank you! What we have for you today is a Number 1 Utility, and it works on virtually any Linux platform. If your fraternity or sorority had a secret knock to gain access, then you already know the basic concept. Port Knocker (aka knockd) from Judd Vinet is a terrific utility that runs as a daemon on your server and does just what you’d expect. It listens for knocks. When it detects three knocks on the correct three ports in the proper sequence and from the same IP address, it opens the IPtables Linux Firewall for remote access from that IP address to your server for a predefined period of time. This would allow you to log into your server with SSH or make SIP phone calls using a softphone registered to your remote Asterisk® server. What makes Port Knocker especially useful is the existence of knocking clients for virtually any smartphone, tablet, or desktop computer. For the Travelin’ Man, it’s another must have utility.
We introduced a turnkey implementation of Port Knocker in Incredible PBX for Ubuntu 14 late last week. If you were a pioneer earlier in the week, go back and install it again to take advantage of Port Knocker. Or better yet, follow along and we’ll show you how to install it on your own RedHat/CentOS or Ubuntu/Debian server in just a couple of minutes.
Prerequisites. We’ve built open source installation scripts for both the RedHat/CentOS platform as well as the Ubuntu/Debian operating systems. These knockd installers assume that you have a fully functional and locked down IPtables firewall with an existing WhiteList of authorized users. We’d recommend Travelin’ Man 3 if you need to deploy this technology and haven’t done so already. Last week’s Incredible PBX for Ubuntu 14 already includes Travelin’ Man 3 whitelisting technology. Read the article for full details.
Today’s knockd installers are fairly generic but, if you’re running a version of CentOS earlier than 6.x or Ubuntu earlier than 14 or Debian.anything, be advised that we haven’t tested these installers on those platforms so you’re on your own. Finally, if your server is sitting behind a hardware-based firewall (as we ALWAYS recommend), then you’ll also need to map the service you wish to access (e.g. UDP 5060 for SIP or TCP 22 for SSH) plus the three TCP ports from your hardware-based firewall to your server so that legitimate "knocks" can find their way to your server. The "knock" ports themselves do not need to be opened in your IPtables firewall configuration! We’re just knocking, not entering. 🙂
Overview. As configured, today’s installation scripts will install and preconfigure knockd to load automatically when you boot up your server. Three random TCP ports will be assigned for your server, and this port sequence is what remote users will need to have in order to gain access. Yes, you can change almost everything. How secure is it? Well, we’re randomizing the 3-port knock sequence using over 3,900 ports so you can do the math to figure out the odds of a bad guy guessing the correct sequence. HINT: 3900 x 3900 x 3900. Keep in mind that these "knocks" must all be received from the same IP address within a 15-second window. So sleep well but treat the port sequence just as if it were a password. It is! Once a successful knock sequence has been received, the default Port Knocker configuration will open all ports on your server for remote access from the knocking IP address for a period of one hour. During this time, "The Knocker" can log in using SSH or make SIP calls using trunks or extensions on the server. Port Knocker does not alleviate the need to have legitimate credentials to log into your server. It merely opens the door so that you can use them. At the bewitching (end of the) hour, all ports will be closed for this IP address unless "The Knocker" adds a whitelist entry for the IP address to IPtables during the open period. Yes, all of this can be modified to meet your individual requirements. For example, the setup could limit the range of ports available to "The Knocker." Or the setup could leave the ports open indefinitely until another series of knocks were received telling knockd to close the IPtables connection. Or perhaps you would want to leave the ports open for a full day or a week instead of an hour. We’ll show you how to modify all of the settings.
Server Installation. To get started, log into your server as root and download and run the appropriate installer for your operating system platform.
For RedHat/Fedora/CentOS/ScientificLinux servers, issue the following commands:
cd /root
wget http://nerdvittles.com/wp-content/knock-R.tar.gz
tar zxvf knock*
rm knock-R.tar.gz
./knock*
For Ubuntu/Debian servers, issue the following commands:
cd /root
wget http://nerdvittles.com/wp-content/knock-U.tar.gz
tar zxvf knock*
rm knock-U.tar.gz
./knock*
For ARM-based servers, issue the following commands:
cd /root
wget http://nerdvittles.com/wp-content/knock-ARM.tar.gz
tar zxvf knock*
rm knock-ARM.tar.gz
./knock*
Server Navigation Guide. On both the RedHat/CentOS/Fedora and Ubuntu/Debian platforms, the knockd configuration is managed in /etc/knockd.conf. Before making changes, always shutdown knockd. Then make your changes. Then restart knockd. On RedHat systems, use service knockd stop and start. On Ubuntu, use /etc/init.d/knockd stop and start. By default, knockd monitors activity on eth0. If your setup is different, on Ubuntu, you’ll need to change the port in /etc/default/knockd: KNOCKD_OPTS="-i wlan0". On RedHat, the config file to modify is /etc/sysconfig/knockd and the syntax: OPTIONS="-i venet0:0".
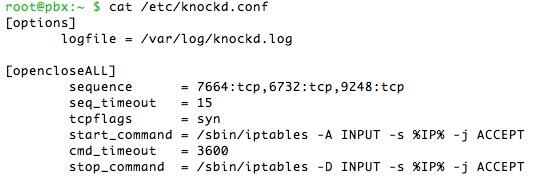
In /etc/knockd.conf, create an additional context to either start or stop an activity. It can also be used do both as shown in the example code above. More examples here. There’s no reason these activities have to be limited to opening and closing the IPtables firewall ports. You could also use a knock sequence to turn on home lighting or a sprinkler system with the proper software on your server.
To change the knock ports, edit sequence. Both tcp and udp ports are supported. seq_timeout is the number of seconds knockd waits for the complete knock sequence before discarding what it’s already received. We’ve had better luck on more servers setting tcpflags=syn. start_command is the command to be executed when the sequence matches. cmd_timeout and stop_command tell knockd what to do after a certain number of seconds have elapsed since the start_command was initiated. If you’re only starting or stopping some activity (rather than both), use command instead of start_command and stop_command to specify the activity.
IPtables 101. The default setup gives complete server access to anyone that gets the knock right. That doesn’t mean they get in. In the PIAF World, it means they get rights equivalent to what someone else on your LAN would have, i.e. they can attempt to log in or they can use a browser to access FreePBX® provided they know the server’s root or FreePBX credentials.
If you would prefer to limit access to a single port or just a few ports, you can modify command or start_command and stop_command. Here are a few examples to get you started.
To open SSH access (TCP port 22):
/sbin/iptables -A INPUT -s %IP% -p tcp --dport 22 -j ACCEPT
To close SSH access (TCP port 22):
/sbin/iptables -D INPUT -s %IP% -p tcp --dport 22 -j ACCEPT
To open a range of SIP ports (UDP 5060 to 5069):
/sbin/iptables -A INPUT -s %IP% -p udp --dport 5060:5069 -j ACCEPT
To close a range of SIP ports (UDP 5060 to 5069):
/sbin/iptables -D INPUT -s %IP% -p udp --dport 5060:5069 -j ACCEPT
Here’s a gotcha to be aware of. If you’re using the Travelin’ Man 3 WhiteList setup on your server, be especially careful in crafting your IPtables rules so that you don’t accidentally remove an existing Travelin’ Man 3 rule in closing some port with knockd. You will note that the syntax of the knockd commands is intentionally a bit different than what you will find in your Travelin’ Man 3 setup. This avoids clobbering something accidentally.
Monitoring Activity. Here are the two best tools to monitor knockd activity to make certain your setup is performing as expected. The knockd log (/var/log/knockd.log) will tell you when a knocking attempt has occurred and whether it was successful:
[2014-07-06 14:44] starting up, listening on eth0

[2014-07-06 15:29] 79.299.148.11: opencloseSSH: Stage 1

[2014-07-06 15:29] 79.299.148.11: opencloseSSH: Stage 2

[2014-07-06 15:29] 79.299.148.11: opencloseSSH: Stage 3

[2014-07-06 15:29] 79.299.148.11: opencloseSSH: OPEN SESAME

[2014-07-06 15:29] opencloseSSH: running command: /sbin/iptables -A INPUT -s 79.299.148.11 -p tcp --dport 22 -j ACCEPT
Next, verify that the IPtables command did what it was supposed to do. iptables -nL will tell you whether port 22 access was, in fact, enabled for 79.299.148.11. The entry will appear just above the closing Chain entries in the listing:
ACCEPT tcp -- 79.299.148.11 0.0.0.0/0 tcp dpt:22
Two things typically can go wrong. Either the knock from a client computer or cellphone wasn’t successful (knockd.log will tell you that) or IPtables didn’t open the port(s) requested in your knockd command (the iptables -nL query will show you that). In the latter case, it’s usually a syntax error in your knockd command. Or it could be the timing of the knocks. See /var/log/knockd.log.
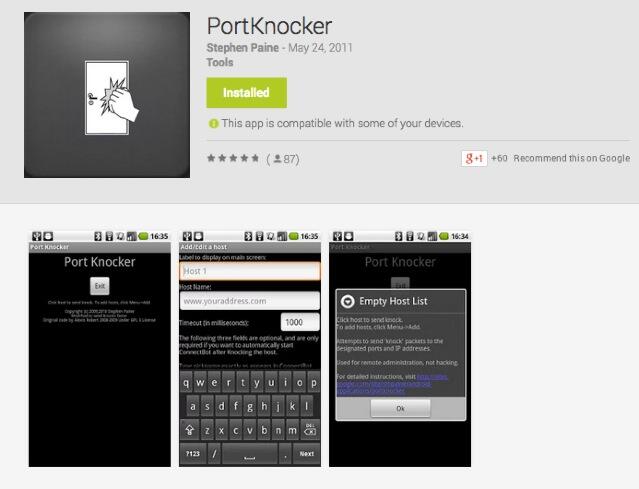
Port Knocker Clients. The idea behind Port Knocker is to make remote access easy both for system administrators and end-users. From the end-user perspective, the simplest way to do that is to load an app on the end-user’s smartphone so that even a monkey could push a button to gain remote access to a server. If the end-user’s cellphone has WiFi connectivity sitting behind a firewall in a hotel somewhere, then executing a port knock from the smartphone should open up connectivity for any other devices in the hotel room including any notebook computers and tablets. All the devices typically will have the same public IP address, and this is the IP address that will be enabled with a successful knock from the smartphone.
Gotta love Apple’s search engine. Google, they’re not…
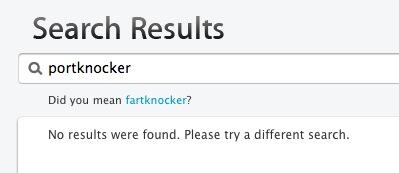
There actually are numerous port knocking clients for both Android and iOS devices. Here are two that we’ve tested that work: PortKnock for the iPhone and iPad is 99¢ and PortKnocker for Android is free. Some clients work better than others, and some don’t work at all or work only once. DroidKnocker always worked great the first time. Then it wouldn’t work again until the smartphone was restarted. KnockOnD for the iPhone, which is free, worked fine with our office-based server but wouldn’t work at all with a cloud-based server at RentPBX. With all the clients, we had better results particularly with cloud-based servers by changing the timing between knocks to 200 or 500 milliseconds. How and when the three knocks are sent seems to matter! Of all the clients on all the platforms, PortKnocker was the least temperamental and offered the most consistent results. And you can’t beat the price. A typical setup is to specify the address of the server and the 3 ports to be knocked. Make sure you have set the correct UDP/TCP option for each of the three knocks (the default setup uses 3 TCP ports), and make sure the IP address or FQDN for your server is correct.
Another alternative is to use nmap to send the knocks from a remote computer. The knock.FAQ file in your server’s /root directory will tell you the proper commands to send to successfully execute a connection with your server’s default Port Knocker setup. Enjoy!
Originally published: Monday, July 7, 2014
 Support Issues. With any application as sophisticated as this one, you’re bound to have questions. Blog comments are a terrible place to handle support issues although we welcome general comments about our articles and software. If you have particular support issues, we encourage you to get actively involved in the PBX in a Flash Forums. It’s the best Asterisk tech support site in the business, and it’s all free! Please have a look and post your support questions there. Unlike some forums, ours is extremely friendly and is supported by literally hundreds of Asterisk gurus and thousands of users just like you. You won’t have to wait long for an answer to your question.
Need help with Asterisk? Visit the PBX in a Flash Forum.
Special Thanks to Our Generous Sponsors
FULL DISCLOSURE: ClearlyIP, Skyetel, Vitelity, DigitalOcean, Vultr, VoIP.ms, 3CX, Sangoma, TelecomsXchange and VitalPBX have provided financial support to Nerd Vittles and our open source projects through advertising, referral revenue, and/or merchandise. As an Amazon Associate and Best Buy Affiliate, we also earn from qualifying purchases. We’ve chosen these providers not the other way around. Our decisions are based upon their corporate reputation and the quality of their offerings and pricing. Our recommendations regarding technology are reached without regard to financial compensation except in situations in which comparable products at comparable pricing are available from multiple sources. In this limited case, we support our sponsors because our sponsors support us.
BOGO Bonaza: Enjoy state-of-the-art VoIP service with a $10 credit and half-price SIP service on up to $500 of Skyetel trunking with free number porting when you fund your Skyetel account. No limits on number of simultaneous calls. Quadruple data center redundancy. $25 monthly minimum spend required. Tutorial and sign up details are here.
![]() The lynchpin of Incredible PBX 2020 and beyond is ClearlyIP components which bring management of FreePBX modules and SIP phone integration to a level never before available with any other Asterisk distribution. And now you can configure and reconfigure your new Incredible PBX phones from the convenience of the Incredible PBX GUI.
The lynchpin of Incredible PBX 2020 and beyond is ClearlyIP components which bring management of FreePBX modules and SIP phone integration to a level never before available with any other Asterisk distribution. And now you can configure and reconfigure your new Incredible PBX phones from the convenience of the Incredible PBX GUI.
VitalPBX is perhaps the fastest-growing PBX offering based upon Asterisk with an installed presence in more than 100 countries worldwide. VitalPBX has generously provided a customized White Label version of Incredible PBX tailored for use with all Incredible PBX and VitalPBX custom applications. Follow this link for a free test drive!
Special Thanks to Vitelity. Vitelity is now Voyant Communications and has halted new registrations for the time being. Our special thanks to Vitelity for their unwavering financial support over many years and to the many Nerd Vittles readers who continue to enjoy the benefits of their service offerings. We will keep everyone posted on further developments.
Some Recent Nerd Vittles Articles of Interest…
Free Asterisk Solutions
