
Home » Posts tagged 'piaf' (Page 5)
Tag Archives: piaf
The Most Versatile VoIP Provider: FREE PORTING

 JUST RELEASED: Visit the Incredible PBX Wiki
4 Months in Paradise: The Return of Free International VoIP Calling
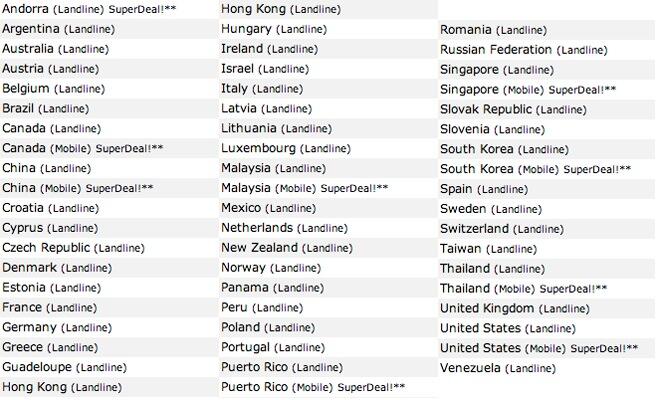
With the impending implosion of Google Voice, it seemed appropriate to begin our quest for alternative termination providers. One of the real beauties of VoIP technology is you don’t have to put all of your eggs in one basket particularly in the termination department. It costs almost nothing to set up accounts with multiple providers for outbound calling. In addition to redundancy, the other clear advantage in using multiple providers for outbound calls is that you can take advantage of special rates to different destinations. So here’s the bargain of the week. If you have loved ones traveling to South America, Europe or Asia this summer, now’s your chance to sign up for VoIP service with FreeVoipDeal and enjoy four months of free calling to more than 50 countries around the world for every $15 of credits you purchase on their web site. Please note the fine print: "FreeVoipDeal reserves the right after a certain amount of calls to start charging the default rate." There is no mention of what that "certain amount" happens to be. When your free calling finally ends, you can either purchase $15 of additional credits for 120 more "free" days or continue to call all of the previously free destinations for about 2¢ a minute.
The company behind FreeVoIPDeal is betamax which hosts over 30 sites offering varying deals to different countries. BEWARE: The prices change regularly. So a country that’s free today may suddenly cost money tomorrow. How does a mere mortal keep track? Well, betamax probably hopes that you won’t. But an enterprising individual named Robert Siemer has done the work for you. His backsla.sh/betamax web site automatically updates the pricing for all betamax sites every day! If this sounds like a lot of work to save a few cents a minute, you’d be right. And Vitelity which sponsors both the Nerd Vittles and PBX in a Flash projects offers consistently low rates to all of these countries. You’ll find a DID special at the end of this article, and their excellent international rate table is available at this link.
Setting Up an Account. Before you can set up a trunk in PBX in a Flash, you’ll first need to create a FreeVoipDeal account. In the "old days" this required use of their Windows client to obtain your credentials. Now you can simply create an account on the web site at this link. You’ll need either a regular land line or a cell phone number to verify your registration. Once you’re set up and you’ve deposited at least 10 euros (about $15) in your account, it’s time to set up a SIP trunk and outbound route in PBX in a Flash.
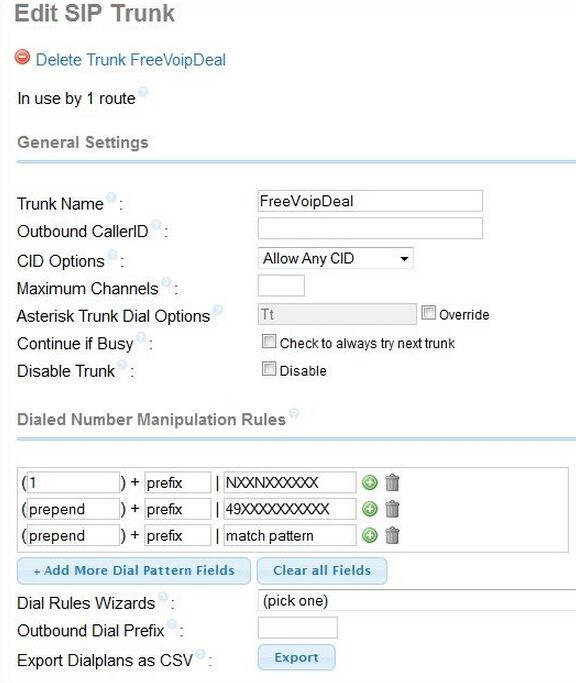
Configuring a Trunk with PBX in a Flash. Assuming you already have a phone registered to an extension in PBX in a Flash, it’s a one-minute drill to configure a trunk and outbound route to support FreeVoipDeal. Using a browser, log into FreePBX® using your maint username and password. Choose Connectivity -> Trunks -> Add SIP Trunk. Name the trunk: FreeVoipDeal. For the Dialed Number Manipulation Rules, enter Prepend: 1 and Match Pattern: NXXNXXXXXX. Clear out all of the default entries in Outgoing and Incoming Settings. Then, in Outgoing Settings, enter Trunk Name: freevoipdeal. For the PEER Details, enter the following using your actual account USERNAME and PASSWORD. Then SAVE your settings and reload FreePBX.
username=USERNAME

authuser=USERNAME

secret=PASSWORD

type=peer

qualify=yes

nat=yes

insecure=port,invite

host=sip.freevoipdeal.com

fromdomain=sip.freevoipdeal.com

dtmfmode=auto

disallow=all

canreinvite=no

allow=ulaw
There’s no need to enter a CallerID number. All of the outgoing calls will be delivered as ANONYMOUS. You also won’t need to register with the provider since Asterisk® can handle this on the fly using your credentials entered above.
Configuring an Outbound Route with PBX in a Flash. One more step, and you’ll be ready to start making calls. Choose Connectivity -> Outbound Routes. For the Route Name, enter: FreeVoIPDeal. For the Dial Pattern to make U.S. calls, enter: NXXNXXXXXX. If you want to force callers to dial a prefix to use the FreeVoipDeal trunk, then enter a 9 or some other number in the Prefix field. For Trunk Sequence 0, choose: FreeVoipDeal. Click Submit Changes and restart FreePBX when prompted. You’re done!
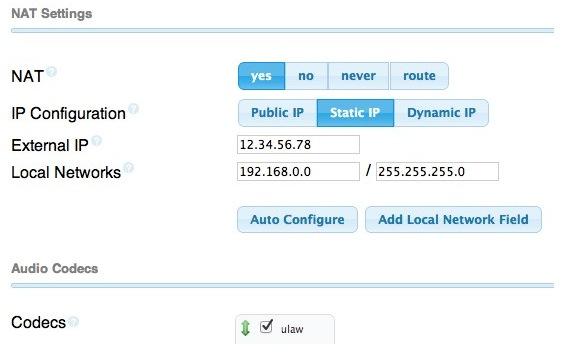
Making Your First Call. Using a phone or softphone logged into your server, dial the prefix (if any) plus the 10-digit number of someone in the United States. When the called party answers, make sure you can hear the called party and vice versa. If not, open Settings -> SIP Settings in FreePBX and add your External IP and Local Network settings. Also make certain the NAT entry is set to YES.
Configuring Your Server for International Calls. We do not recommend configuring your server to permit international calls to everywhere. The reason is simple. If strangers manage to access one of your extensions, they can run up your phone bill in a hurry. For this reason, we also strongly recommend that you do not configure automatic credit card replenishment with any VoIP provider!
For international calling, we recommend you add a separate Dial Pattern to both your FreeVoipDeal trunk AND the outbound route for each country code you wish to enable. Here is the complete list of codes. For example, to allow calls to Germany from another country, you’d add 49XXXXXXXXXX, save your changes, and reload FreePBX.
Spoofing Your CallerID. If you first verify that you own a number by using the web portal, you then can spoof the outbound CallerID using the number you verified. Just add the following entries to your trunk settings replacing 9991234567 with your verified CallerID number. Special thanks to @hillclimber on the PIAF Forum for the tip.
fromuser=0019991234567

sendrpid=yes
Originally published: Friday, April 25, 2014

Need help with Asterisk? Visit the PBX in a Flash Forum.
Special Thanks to Our Generous Sponsors
FULL DISCLOSURE: ClearlyIP, Skyetel, Vitelity, DigitalOcean, Vultr, VoIP.ms, 3CX, Sangoma, TelecomsXchange and VitalPBX have provided financial support to Nerd Vittles and our open source projects through advertising, referral revenue, and/or merchandise. As an Amazon Associate and Best Buy Affiliate, we also earn from qualifying purchases. We’ve chosen these providers not the other way around. Our decisions are based upon their corporate reputation and the quality of their offerings and pricing. Our recommendations regarding technology are reached without regard to financial compensation except in situations in which comparable products at comparable pricing are available from multiple sources. In this limited case, we support our sponsors because our sponsors support us.
 BOGO Bonaza: Enjoy state-of-the-art VoIP service with a $10 credit and half-price SIP service on up to $500 of Skyetel trunking with free number porting when you fund your Skyetel account. No limits on number of simultaneous calls. Quadruple data center redundancy. $25 monthly minimum spend required. Tutorial and sign up details are here.
![]() The lynchpin of Incredible PBX 2020 and beyond is ClearlyIP components which bring management of FreePBX modules and SIP phone integration to a level never before available with any other Asterisk distribution. And now you can configure and reconfigure your new Incredible PBX phones from the convenience of the Incredible PBX GUI.
The lynchpin of Incredible PBX 2020 and beyond is ClearlyIP components which bring management of FreePBX modules and SIP phone integration to a level never before available with any other Asterisk distribution. And now you can configure and reconfigure your new Incredible PBX phones from the convenience of the Incredible PBX GUI.
 VitalPBX is perhaps the fastest-growing PBX offering based upon Asterisk with an installed presence in more than 100 countries worldwide. VitalPBX has generously provided a customized White Label version of Incredible PBX tailored for use with all Incredible PBX and VitalPBX custom applications. Follow this link for a free test drive!
 Special Thanks to Vitelity. Vitelity is now Voyant Communications and has halted new registrations for the time being. Our special thanks to Vitelity for their unwavering financial support over many years and to the many Nerd Vittles readers who continue to enjoy the benefits of their service offerings. We will keep everyone posted on further developments.
Some Recent Nerd Vittles Articles of Interest…
The Perfect VoIP Sandbox or Is It? Meet Digital Ocean Cloud Hosting
After a week of testing, we’re taking a second look at Digital Ocean, a terrific cloud platform for experimenting with VoIP. Our initial testing was performed during a week that many folks were on Spring Break. After Easter weekend, our own testing suggested a very different level of performance. That warranted a more sober reevaluation in our judgment. Before we get to the specifics, let us emphatically stress that we do not recommend Digital Ocean as a long-term, cloud-based VoIP solution because of some mixed reviews on overall service reliability. Go here for details. Our own testing confirms that performance can be problematic because of what looks to be server capacity issues. To their credit, Digital Ocean provides bleeding edge technology which is regularly updated. But, if rock-solid platform stability and reliable performance are your primary requirements, there is no finer service than RentPBX, a long-time supporter and contributor to the PBX in a Flash project. With the PIAF2012 coupon code, your first turnkey PBX in the cloud is still $15 a month with server locations throughout the world. The cost difference is negligible if the quality of your phone calls actually matter to you. RentPBX has a proven record as an extremely reliable provider. And, if your business depends upon reliable VoIP technology, RentPBX remains one of the best bargains on the planet.
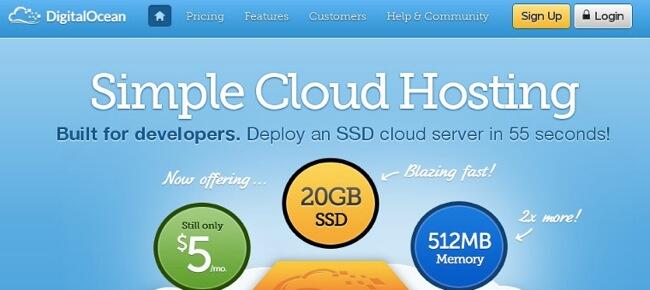
For today, we’re exploring Digital Ocean which we believe offers a good platform for learning about Asterisk® and VoIP because of its flexibility in creating and deleting virtual machines in the cloud environment. As you can see from the screenshot above, the base Digital Ocean offering appears to be ideal as a cloud-based Asterisk server. The 512MB memory option with 20GB of SSD storage and a terabyte of monthly bandwidth costs $5 a month. You actually pay $0.007 an hour until you reach the $5 monthly cap. Unfortunately, depending upon server load, performance can be hit and miss.
Digital Ocean calls their images droplets, and you’ll have to pardon us for using the terms interchangeably. The bottom line is we were able to create a PBX in a Flash server with Incredible PBX 11 running atop CentOS 6.5 in less than an hour. And we played with it for another hour. See below for the total cost. Note that the meter continues to run with your droplets until you physically Destroy them from the Digital Ocean Control Panel. What our initial testing did not reveal was that at busy times of the day the droplet creation process can vary from almost instantaneous to a couple of hours.
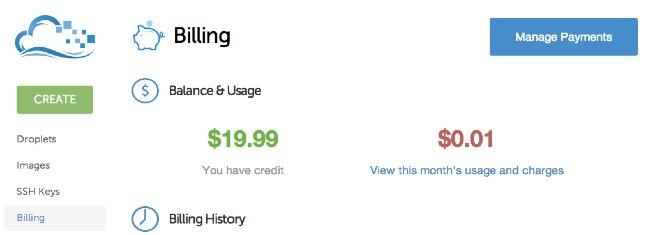
Getting Started. Let’s walk through the entire process of creating a PBX in a Flash server and adding Incredible PBX 11 using a Digital Ocean droplet, and we’ll assume you hit a Digital Ocean server on a good day. First, you’ll need an account. You can sign up with our referral code and provide a little financial support to the Nerd Vittles project. That doesn’t cost you a dime. Here’s the link. As part of the sign up procedure, you’ll be prompted to enter a coupon code. SSDMAY10 will get you a $10 credit if you hurry. You still need to add at least $5 to your account either using a credit card or PayPal. We strongly recommend that you start with a minimal investment to make certain that Digital Ocean’s performance will meet your requirements. Test it regularly during your free trial period.
Once you’re registered, you can create your first Droplet by clicking on Droplets in the Digital Ocean Control Panel and then clicking the Create Droplet button. You’ll be prompted for a Hostname, the size Droplet you wish to create, the Region for your cloud-based server, and the Image Type for your server. We used PIAF512 for the hostname. The 512MB memory droplet will work just fine for experimentation. Choose a region that’s close to the provider you wish to use for VoIP calls. For the image type, choose a CentOS 6.5 32-bit server. In the Settings, leave Enable VirtIO checked and skip the Private Networking and Enable Backups options for the time being. Click Create Droplet to initiate the droplet build process which takes under a minute. Your new Droplet credentials will be emailed to you when the procedure is complete.
Installing PBX in a Flash. At this point, you have the option of logging into the Droplet from the Digital Ocean Control Panel, or you can use SSH to log in as root using the IP address provided in your Droplet creation email. Once you’ve logged in, issue the following command to set up your new server for the PIAF3 installer:
yum -y install wget nano
Now you’re ready to kick off the PBX in a Flash 3 installation. Here are the commands:
cd /root

wget http://pbxinaflash.com/piaf3-install.tar.gz

tar zxvf piaf3-install.tar.gz

./piaf3-install
The server will whir away for about 5 minutes (on a good day) configuring a CentOS superset of over 500 additional RPMs to support PBX in a Flash 3. When the setup is complete, your droplet will reboot. Count to 30 and then log back in as root and choose option A to install PBX in a Flash. Then choose PIAF from the menu of choices. Accept the license agreement and select PIAF-Green as your desired flavor. This gets you the latest Asterisk 11 release. When the Configuration Wizard loads, choose N to avoid loading Make MenuConfig for customization of Asterisk. Confirm your choice. At Step 2, choose your Time Zone and confirm your choice. At Step 3, choose FreePBX® 2.11 as your GUI and confirm your choice. At Step 4, create a master password for GUI and utility access. Tap Enter to confirm all of your selections one final time. Then take a coffee break. Depending upon server load, you’ll have a shiny new PBX in a Flash 3 server with CentOS 6.5, Asterisk 11, and FreePBX 2.11 in either 30 minutes (on a good day) or a couple of hours (on a not-so-good time of day).
Installing Incredible PBX 11. Once your server has rebooted following completion of the PIAF install, you’re ready to install Incredible PBX 11. This gets you dozens of preconfigured applications for Asterisk as well as a base configuration of FreePBX. You’ll still need to add a VoIP trunk to handle incoming and outgoing calls as well as configuring a phone to use your extension 701 credentials. Log back into your server and issue the following commands to install Incredible PBX 11:
wget http://incrediblepbx.com/incrediblepbx11.gz

gunzip incrediblepbx11.gz

chmod +x incrediblepbx11

./incrediblepbx11
You can complete the configuration of your server using the FreePBX GUI. Using a browser, visit the IP address of your server. Click the Users button to display the PIAF Admin Control Panel. Then click the FreePBX option. Log in with username maint and the maint password you created above. Sign up for VoIP service with your favorite VoIP provider. Then create a trunk for that provider or edit and enable one of the preconfigured trunks that’s included in Incredible PBX. Download a softphone to your desktop and configure it using the credentials provided for the 701 extension in FreePBX. Then you’re ready to make your first call. See last week’s Nerd Vittles article for complete details.
Originally published: Thursday, April 17, 2014 Second Look: Wednesday, April 23, 2014
Need help with Asterisk? Visit the PBX in a Flash Forum.
Special Thanks to Our Generous Sponsors
FULL DISCLOSURE: ClearlyIP, Skyetel, Vitelity, DigitalOcean, Vultr, VoIP.ms, 3CX, Sangoma, TelecomsXchange and VitalPBX have provided financial support to Nerd Vittles and our open source projects through advertising, referral revenue, and/or merchandise. As an Amazon Associate and Best Buy Affiliate, we also earn from qualifying purchases. We’ve chosen these providers not the other way around. Our decisions are based upon their corporate reputation and the quality of their offerings and pricing. Our recommendations regarding technology are reached without regard to financial compensation except in situations in which comparable products at comparable pricing are available from multiple sources. In this limited case, we support our sponsors because our sponsors support us.
BOGO Bonaza: Enjoy state-of-the-art VoIP service with a $10 credit and half-price SIP service on up to $500 of Skyetel trunking with free number porting when you fund your Skyetel account. No limits on number of simultaneous calls. Quadruple data center redundancy. $25 monthly minimum spend required. Tutorial and sign up details are here.
![]() The lynchpin of Incredible PBX 2020 and beyond is ClearlyIP components which bring management of FreePBX modules and SIP phone integration to a level never before available with any other Asterisk distribution. And now you can configure and reconfigure your new Incredible PBX phones from the convenience of the Incredible PBX GUI.
The lynchpin of Incredible PBX 2020 and beyond is ClearlyIP components which bring management of FreePBX modules and SIP phone integration to a level never before available with any other Asterisk distribution. And now you can configure and reconfigure your new Incredible PBX phones from the convenience of the Incredible PBX GUI.
VitalPBX is perhaps the fastest-growing PBX offering based upon Asterisk with an installed presence in more than 100 countries worldwide. VitalPBX has generously provided a customized White Label version of Incredible PBX tailored for use with all Incredible PBX and VitalPBX custom applications. Follow this link for a free test drive!
Special Thanks to Vitelity. Vitelity is now Voyant Communications and has halted new registrations for the time being. Our special thanks to Vitelity for their unwavering financial support over many years and to the many Nerd Vittles readers who continue to enjoy the benefits of their service offerings. We will keep everyone posted on further developments.
Some Recent Nerd Vittles Articles of Interest…
The 5-Minute PBX: Incredible PBX 11 and Incredible Fax for PBX in a Flash 3
With the release of version 3 of PBX in a Flash™, it seemed only fitting to reintroduce our one-click wonder that takes advantage of the latest and greatest feature sets in both Asterisk® 11 and FreePBX® 2.11. Incredible PBX™ 11 gives you the best of all worlds plus all of the very best, preconfigured Asterisk applications we could find. And the installer together with all of the apps are pure open source so you can learn how to build a system like this for yourself if that happens to be your thing.
You’ll need two components to get started: a CentOS 6.5-compatible operating system and the latest PIAF-Green which includes Asterisk® 11 and FreePBX® 2.11. Once you have these components in place and before you make any additions to your server, download and run the Incredible PBX 11 installer. If you wish to add fax support, run the Incredible Fax 11 installer. It’s easy enough for a fifth grader! Five minutes later you’re ready to begin the VoIP adventure. It’s FREE!
News Flash: Incredible PBX 11 and Incredible Fax also are available for the $35 Raspberry Pi and BeagleBone Black.
So what’s included? Dozens of upgraded Asterisk Apps. 9-Layer Security. 20 Preconfigured VoIP Provider Trunks. One-Click Installers for Asterisk.everything. Certified Asterisk support. Google Voice connectivity with Asterisk Motif until May 15. (HINT: It’s time to start looking elsewhere!) Voice-enabled SMS messaging and script-based SMS message blasting. Incredible PBX Automatic Updates. And Incredible Fax™ 11 delivers free faxing with HylaFax™ and AvantFax®. Both the Incredible PBX and Incredible Fax installers now are GPL2-licensed so add all the tweaks you like. And you’re licensed to use our trademarks so long as you retain the original functionality of the Incredible PBX and Incredible Fax collection of applications.
 The Incredible PBX 11 Inventory. For those that have never heard of The Incredible PBX, here’s the current 11.9 feature set in addition to the base install of PBX in a Flash with a CentOS 6.5-compatible OS, Asterisk 11, FreePBX 2.11, and Apache, SendMail, MySQL, PHP, phpMyAdmin, IPtables Linux firewall, Fail2Ban, and WebMin. Incredible Fax, NeoRouter and PPTP VPNs, and all sorts of backup solutions are still just one command away and may be installed using the scripts included with Incredible PBX 11 and PBX in a Flash. Type help-pbx and browse /root for dozens of one-click installation scripts.
- AsteriDex
- CallerID Superfecta (FreePBX Module adds Names to CID Numbers)
- CallWho for Asterisk (Dial 411)
- Digium Phone Support (install-digiphones)
- Preconfigured Email That Works with SendMail and Incredible Fax
- OSS Endpoint Manager
- Extensions (1 preconfigured with random password)
- Festival Server and Festival TTS for Asterisk (festival –server &)
- Flite TTS for Asterisk
- FreePBX Backups
- Google Dictionary by Phone (Dial 333)
- Google News by Phone (Dial 951)
- Google Stocks by Phone (Dial 950)
- Google Voice (FreePBX GV/Motif Module)
- Hotel-Style Wakeup Calls (FreePBX Module)
- Incredible Backups… and Restores (install-incredbackup2)
- ISN: FreeNum SIP Calling from Any Phone
- MeetMe Conference Bridge (just dial C-O-N-F)
- Mondo Full System Backups (install-diskbackup)
- Download latest Incredible Fax installer: http://nerd.bz/2nSeHKs
- Incredible Fax 11 (/root/incrediblefax11.sh)
- Incremental Daily Backups (install-dailybackup)
- Munin Reports (install-munin)
- NeoRouter VPN Client (nrclientcmd)
- NewsClips from Yahoo
- ODBC Database Support (Dial 222, 223)
- OpenFire Instant Messaging & Chat Server (install-openfire)
- New PBX in a Flash Registry (show-registry)
- PPTP VPN for PIAF (/root/install-pptp)
- Reminders by Phone and Web
- SAMBA Windows Networking (configure-samba)
- SMS Dictator with Google Voice (Dial S-M-S)
- Speech-to-Text Directory Assistance (Dial 411)
- Stealth AutoAttendant
- TFTP Server (setup-tftp)
- Tide Reports with xTide (Dial T-I-D-E)
- Travelin’ Man 2 & 3 (Secure, remote access)
- Trunks (Vitelity, Gtalk, SIPgate, IPkall, VoIP.ms, and more)
- Weather by ZIP Code
- Worldwide Weather by Phone (Dial 949)
- Wolfram Alpha by Phone (/root/wolfram)
And then there’s the Incredible Freebie! As they say, "Never look a gift horse in the mouth." What began as a kludgey, dual-call, dual-provider Google Voice implementation to take advantage of Google’s free PSTN calling in the U.S. and Canada with Asterisk 1.4 and 1.6 is now a zippy-quick, Gtalk-based calling platform that rivals the best SIP-to-SIP calls on the planet. The Incredible PBX Google Voice implementation provides virtually instantaneous PSTN connections to almost anybody, anywhere. Trust us! Except for the price which is still free, you’ll never know you weren’t connected via Ma Bell’s overpriced long-distance lines and neither will the Little Mrs.
Creating the Base Linux Platform for PBX in a Flash
We’re not doing anything special here. In fact, you can build your base Linux platform for PBX in a Flash on a standalone server, on a virtual machine of your choice, or in the cloud using a provider such as Amazon or RentPBX. You can use CentOS 6.5, Scientific Linux 6.5, or the PIAF 6.5 OS. The easiest way is documented here because the ISO is the smallest to download and install. The results will be the same with the other Linux OS flavors documented above.
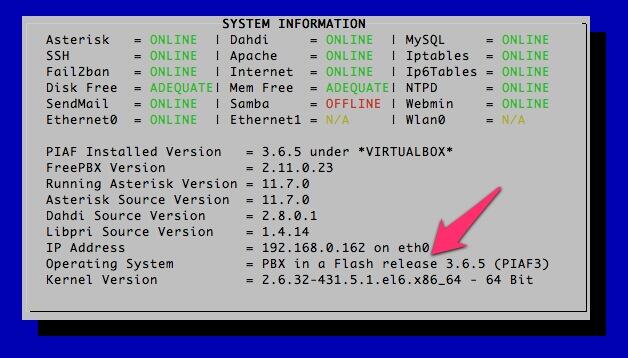
Start by downloading the 32-bit or 64-bit CentOS 6.5 minimal install ISO. You can do exactly the same thing using Scientific Linux if you prefer. The PIAF 3.0.6.5 OS images and torrents for VirtualBox are available on SourceForge. With the ISOs, go through the usual drill of preparing an installer from the ISO. Burn the ISO to a USB Thumb Drive or a CD/DVD using a Mac or Windows machine. With VirtualBox .ova images, you can build a virtual machine in under 2 minutes. So pick your favorite methodology and create your Linux platform on the hardware of your choice. If you want your drive partitions configured without LVM in the standard PIAF2 methodology, follow this tutorial.
IMPORTANT NOTE: Neither CentOS nor Scientific Linux installs with network connectivity enabled. This is one of the primary reasons that we previously have customized CentOS for use with PBX in a Flash. After performing a minimal OS install, log in as root and issue the following commands to prepare your server for PBX in a Flash:
sed -i 's|no|yes|' /etc/sysconfig/network-scripts/ifcfg-eth0

ifup eth0

yum -y install wget nano
Creating a PBX in a Flash 3.0.6.5 Server
Now you’re ready to install PIAF-Green with Asterisk 11 and FreePBX 2.11. Just download the PIAF3 Installer and run it. It works exactly as it always has. The installer is plain text so feel free to customize it to meet your own requirements. If you need the complete PIAF installation tutorial, jump to this link.
cd /root

wget http://pbxinaflash.com/piaf3-install.tar.gz

tar zxvf piaf3-install.tar.gz

./piaf3-install
Installing Incredible PBX 11
The installation process is simple. Log into your server as root and issue the following commands:
cd /root

wget http://incrediblepbx.com/incrediblepbx11.gz

gunzip incrediblepbx11.gz

chmod +x incrediblepbx11

./incrediblepbx11
When the installation finishes, you’ll be prompted whether to install Travelin’ Man 3 and Travelin’ Man 2. As documented below, Incredible PBX is designed for use behind a hardware-based firewall with no Internet port exposure. If you need phones at remote locations that are not behind your firewall, then you also need a way to protect your server from the bad guys since you’ll have to allow port 5060 and 10000-20000 UDP access to your server through the firewall. Travelin’ Man 3 does this by setting up a whitelist of safe Internet addresses and domains. Travelin’ Man 2 lets end-users take control by creating safe IP addresses using a web browser. If you don’t have external phones, you don’t need either of these resources so you can just cancel the rest of the Incredible PBX install by pressing Ctrl-C. Then restart Asterisk with this command: amportal restart.
A Few Words About Security. Thanks to its Zero Internet Footprint™ design, Incredible PBX is different. It remains the most secure Asterisk-based PBX around. What this means is The Incredible PBX has been engineered to sit safely behind a NAT-based, hardware firewall with no Internet port exposure to your actual server. For those needing remote telephone support, Incredible PBX optionally loads Travelin’ Man 2 and 3 for you so your IPtables Linux Firewall can be either self-managed by end-users or set up with predefined IP addresses and FQDNs for all of your remote sites. Read about this Asterisk SIP vulnerability. Then you’ll understand why WhiteList-based server security has become absolutely essential. WhiteList Security means only those devices with a registered IP address in your WhiteList can get to your server’s resources. To the NSA and everyone else, your server doesn’t even exist. Their only way to connect to you is with a POTS telephone and your published phone number. Can you hear me now?
For those with multiple servers to interconnect, we’ve provided one-click installers for not one but two VPN solutions: NeoRouter and PPTP. Suffice it to say, Incredible PBX has Security in Spades™: customized IPtables Linux Firewall, Fail2Ban tweaked for Asterisk security monitoring, FreePBX Extension Lockdown by IP address, randomized FreePBX extension passwords, Travelin’ Man 2 and 3 WhiteList Security, multiple VPN solutions for encrypted server-to-server communications, plus a bottom-up design focused on flawless operation behind a hardware-based firewall. You won’t find a more secure Personal Branch Exchange™ at any price.
Here’s the Incredible PBX 9-Layer Security Model:
- Hardware-based Firewall
- IPtables
- Fail2Ban
- Randomized Extension Passwords
- IP-Address Lockdown for Extensions
- Travelin’ Man 2 User-Managed WhiteList
- Travelin’ Man 3 Administrator-Managed WhiteList
- NeoRouter VPN
- PPTP VPN
Prerequisites. For standalone hardware buffs, here’s what we recommend to get started properly:
- Broadband Internet connection
- $200 Dual-Core Atom PC, 4GB RAM, 60GB SSD (no moving parts!)
- dLink Router/Firewall. Low Cost: $35 WBR-2310 Best: DGL-4500 Latest: DIR-826-L
- 2 Dedicated Google Voice accounts (voice and fax)
We’ve shifted gears on our recommended Atom platform for PIAF3 after excellent results with both the single-core and dual-core Atom kits manufactured by Foxconn (pictured on the left below). That’s the dLink Gaming Router on the right. Seems kinda silly to spend twice as much for a machine that you can build yourself in under 5 minutes. Basically you remove four screws, insert a Phillips screwdriver in one of the holes and gently pry the cover away from the box. Then you pop off the back by inserting a small flat-blade screwdriver, remove four more screws, slide in a solid-state drive (SSD) and a 4GB stick of notebook computer RAM, and you’re done in a couple minutes. Replace the screws and the cover, and you have a perfect PIAF2 platform with terrific performance and no moving parts for about $200. The link above will take you to the PIAF Forum thread for these machines. They go on sale almost weekly. See the right column of Nerd Vittles (just below our tweets) for this week’s special at Amazon. The dual-core Atom box typically is under $150. It could easily handle an office with 50+ employees sitting on a bookshelf with an Internet connection (wired or wireless!). No noise. Very little heat. Low power requirements. Perfect!
Configuring Google Voice
If you plan to use Google Voice, be advised that, according to Google, it’s going away in less than 6 weeks on May 15. If you want to use it anyway, you’ll need a dedicated Google Voice account to support Incredible PBX 11. If you want to use the inbound fax capabilities of Incredible Fax 11, then you’ll need an additional Google Voice line that can be routed to the FAX custom destination using FreePBX. The more obscure the username (with some embedded numbers), the better off you will be. This will keep folks from bombarding you with unsolicited Gtalk chat messages, and who knows what nefarious scheme will be discovered using Google messaging six months from now. So keep this account a secret!
We’ve tested this extensively using an existing Gmail account, and inbound calling is just not reliable. The reason seems to be that Google always chooses Gmail chat as the inbound call destination if there are multiple registrations from the same IP address. So, be reasonable. Do it our way! Set up a dedicated Gmail and Google Voice account, and use it exclusively with Incredible PBX 11. It’s free at least through 2013. Google Voice no longer is by invitation only so, if you’re in the U.S. or have a friend that is, head over to the Google Voice site and register.
You must choose a telephone number (aka DID) for your new account, or Google Voice calling will not work… in either direction. Google used to permit outbound Gtalk calls using a fake CallerID, but that obviously led to abuse so it’s over! You also have to tie your Google Voice account to at least one working phone number as part of the initial setup process. Your cellphone number will work just fine. Don’t skip this step either. Just enter the provided 2-digit confirmation code when you tell Google to place the test call to the phone number you entered. Once the number is registered, you can disable it if you’d like in Settings, Voice Setting, Phones. But…
IMPORTANT: Be sure to enable the Google Chat option as one of your phone destinations in Settings, Voice Setting, Phones. That’s the destination we need for The Incredible PBX to work its magic! Otherwise, all inbound and outbound calls will fail. If you don’t see this option, you may need to call up Gmail and enable Google Chat there first. Then go back to the Google Voice Settings.
While you’re still in Google Voice Settings, click on the Calls tab. Make sure your settings match these:
- Call Screening – OFF
- Call Presentation – OFF
- Caller ID (In) – Display Caller’s Number
- Caller ID (Out) – Don’t Change Anything
- Do Not Disturb – OFF
- Call Options (Enable Recording) – OFF
- Global Spam Filtering – ON
Click Save Changes once you adjust your settings. Under the Voicemail tab, plug in your email address so you get notified of new voicemails. Down the road, receipt of a Google Voice voicemail will be a big hint that something has come unglued on your PBX.
One final word of caution is in order regardless of your choice of providers: Do NOT use special characters in any provider passwords, or nothing will work!
[purehtml id=10]
Accessing The FreePBX 2.11 GUI
Using a web browser, you access the FreePBX GUI by pointing your browser to the IP address of Incredible PBX 11. Click on the Users tab. It will change to Admin. Now click the FreePBX Admin button. When prompted for a username, it’s maint. When prompted for the password, it’s whatever you set up as your maint password when you installed PBX in a Flash. If you forget it, you can always reset it by logging into your server as root and running passwd-master.
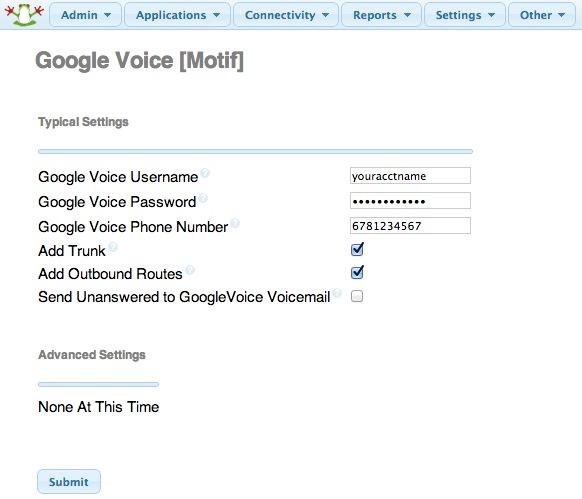
Configuring Google Voice Trunks in FreePBX. All trunk configurations now are managed within FreePBX, including Google Voice. This makes it easy to customize your Incredible PBX to meet your specific needs. If you plan to use Google Voice, here’s how to quickly configure one or more Google Voice trunks within FreePBX. After logging into FreePBX with your browser, click the Connectivity tab and choose Google Voice/Motif. To Add a new Google Voice account, just fill out the form. Do NOT check the third box or incoming calls will never ring!
While you’re still in FreePBX, choose Applications, Extensions, and click on the 701 extension. Write down your extension and voicemail passwords. You’ll need them to configure a phone in a minute.
IMPORTANT LAST STEP: Google Voice will not work unless you restart Asterisk from the Linux command line at this juncture. Using SSH, log into your server as root and issue the following command: amportal restart.
Installing Incredible Fax 11
If you want the added convenience of having your Incredible PBX double as a free fax machine, run /root/incrediblefax11.sh after the Incredible PBX 11 install completes. Plug in your email address for delivery of incoming faxes and enter your home area code when prompted. For every other prompt, just press the Enter key. If you’d like to also add the optional OCR utility, just choose it when prompted. For complete documentation, see this Nerd Vittles article. Don’t forget that a REBOOT OF YOUR SERVER is required when the install is finished, or faxing won’t work! Then log in through the PIAF GUI as maint with your password. You’ll find the AvantFax GUI on the Admin menu.
Also be sure to set up a second, dedicated DID or Google Voice trunk if you want support for inbound faxing. Once the credentials are configured in FreePBX for the additional line, simply add an Inbound Route for this DID to point to the Custom Destination: Fax (Hylafax). This comes preconfigured with Incredible PBX 11.
Troubleshooting Audio and DTMF Problems
You can avoid one-way audio on calls and touchtones that don’t work with these simple settings in FreePBX: Settings -> Asterisk SIP Settings. Just plug in your public IP address and your private IP subnet. Then set ULAW as the only Audio Codec.
Configuring a Desktop Softphone
PBX in a Flash supports all kinds of telephones, but we’ll start with the easy (free) one today. You can move on to "real phones" once you’re smitten with the VoIP bug. For today, you’ll need to download a softphone to your desktop PC or Mac.
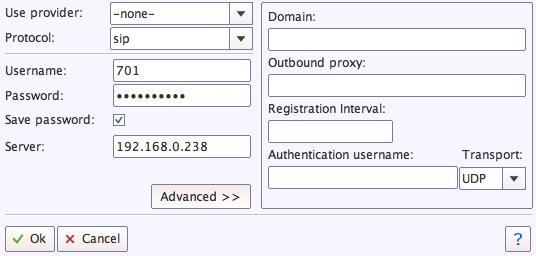
The easiest way to get started is to set up a YATE softphone on your Desktop computer. Versions are available at no cost for Macs, PCs, and Linux machines. Just download the appropriate one and install it from this link. Once installed, it’s a simple matter to plug in your extension credentials and start making calls. Run the application and choose Settings -> Accounts and click the New button. Fill in the blanks using the IP address of your server, 201 for your account name, and whatever password you created for the extension. Click OK.
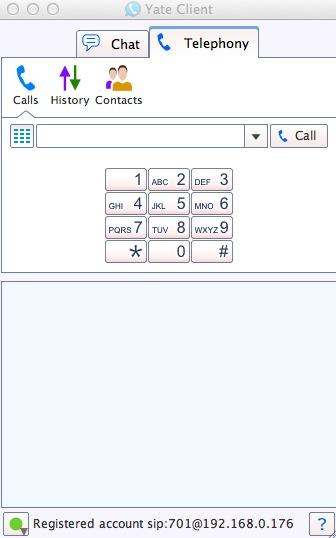
Once you are registered to extension 701, close the Account window. Then click on YATE’s Telephony Tab and place your first call. It’s that easy!
Taking Incredible PBX 11 for a Spin
The proof is in the pudding as they say. So let’s try two simple tests. First, let’s place an outbound call. Using the softphone, dial your 10-digit cellphone number. Google Voice or your other SIP trunk should transparently connect you. Answer the call and make sure you can send and receive voice on both phones. Second, from another phone, call the number that you’ve dedicated to The Incredible PBX. Your softphone should begin ringing shortly. The call will be answered by the Nerd Vittles sample IVR. You can explore all of the preconfigured options at your leisure.

Learn First. Explore Second. Even though the installation process has been completed, we strongly recommend you do some reading before you begin your VoIP adventure. VoIP PBX systems have become a favorite target of the hackers and crackers around the world and, unless you have an unlimited bank account, you need to take some time learning where the minefields are in today’s VoIP world. Start by reading our Primer on Asterisk Security. We’ve secured all of your passwords except your root password and your passwd-master password. We’re assuming you’ve put very secure passwords on those accounts as if your phone bill depended upon it. It does! There’s loads of additional documentation on the PBX in a Flash documentation web site.
Incredible PBX 11 Automatic Update Utility
Incredible PBX 11 includes an automatic update utility to assist in keeping your system current and secure. It runs each time you log into your server as root. The first ten updates are at no cost. You then can elect to continue the service by subscribing to the update service which is available for a modest $20 for the remainder of the calendar year. Whether you subscribe or not, new releases of PBX in a Flash and Incredible PBX will always be free! This simply is a way for us to recover our costs in providing a service that many of our users have asked for. We hope you like it.
Choosing VoIP Providers
![]() Nothing beats free when it comes to long distance calls. But nothing lasts forever. And, in the VoIP World, redundancy is dirt cheap. So we strongly recommend you set up another account with Vitelity using our special link below. This gives your PBX a secondary way to communicate with every telephone in the world, and it also gets you a second real phone number for your new system… so that people can call you. Here’s how it works. You pay Vitelity a deposit for phone service. They then will bill you $3.99 a month for your new phone number. This $3.99 also covers the cost of unlimited inbound calls (two at a time) delivered to your PBX for the month. For outbound calls, you pay by the minute and the cost is determined by where you’re calling. If you’re in the U.S., outbound calls to anywhere in the U.S. are a little over a penny a minute. If you change your mind about Vitelity and want a refund of the balance in your account, all you have to do is ask. The trunks for Vitelity already are preconfigured with The Incredible PBX. Just insert your credentials using FreePBX and uncheck the Disable Trunk checkbox. Then add the Vitelity trunk as the third destination for your default outbound route. That’s it. Congratulations! You now have a totally redundant phone system.
Nothing beats free when it comes to long distance calls. But nothing lasts forever. And, in the VoIP World, redundancy is dirt cheap. So we strongly recommend you set up another account with Vitelity using our special link below. This gives your PBX a secondary way to communicate with every telephone in the world, and it also gets you a second real phone number for your new system… so that people can call you. Here’s how it works. You pay Vitelity a deposit for phone service. They then will bill you $3.99 a month for your new phone number. This $3.99 also covers the cost of unlimited inbound calls (two at a time) delivered to your PBX for the month. For outbound calls, you pay by the minute and the cost is determined by where you’re calling. If you’re in the U.S., outbound calls to anywhere in the U.S. are a little over a penny a minute. If you change your mind about Vitelity and want a refund of the balance in your account, all you have to do is ask. The trunks for Vitelity already are preconfigured with The Incredible PBX. Just insert your credentials using FreePBX and uncheck the Disable Trunk checkbox. Then add the Vitelity trunk as the third destination for your default outbound route. That’s it. Congratulations! You now have a totally redundant phone system.
Incredible PBX 11 includes preconfigured trunk setups for all of your favorite trunk providers. Just plug in your credentials and activate the trunks you need. In less than a minute, you’re done. Here’s the Incredible PBX Top 20 Trunk List with some reasons why these providers made our short list:
- AxVoice ($14.99/mo. Business Plan; $16.58/mo. Unlimited Calls to 45 Countries)
- CallCentric (Good International Calling Rates)
- DIDforSale (20 channels per DID; unlimited DID calls for $8.99/mo.)
- ENUM
- FlowRoute (Good International Calling Rates)
- FreeNum
- Future-Nine (Supports CallerID Spoofing)
- Google Voice (Free DIDs and free U.S./Canada calling)
- IPkall (Free SIP/IAX DIDs)
- Les.net (Supports CallerID Spoofing; very low rates)
- LocalPhone (Dirt-cheap DIDs and calling rates worldwide; Free iNum DID)
- Simon Telephonics (Free SIP-to-GoogleVoice Gateway)
- SIPgate (Free residential DIDs sometimes)
- Skype (Free Skype-to-Skype calls worldwide)
- Teliax (Unlimited inbound DID $5/mo.)
- Vitelity (Our supporter and the Best in the Business!)
- VoIPms (CallerID spoofing; Free iNum calling; Very low rates)
- VoIPMyWay (Residential Unlimited: $15.50/mo. Business Unlimited: $40/mo.)
- VoIPStreet (Free DID)
Configuring Email Noticing in FreePBX
You’re going to want to be notified when updates are available for FreePBX, and you may also want notifications when new voicemails arrive. Everything already is set up for you except actually entering your email notification address. Using a web browser, open the FreePBX GUI by pointing your browser to the IP address of your Incredible PBX. Then click Administration and choose FreePBX. To set your email address for FreePBX updates, go to Admin -> Module Admin and click on the shield on the right margin. To configure emails to notify you of incoming voicemails, go to Applications -> Extensions -> 701 and scroll to the bottom of the screen. Then follow your nose. Be sure to reload FreePBX when prompted after saving your changes.
A Final Word About Security
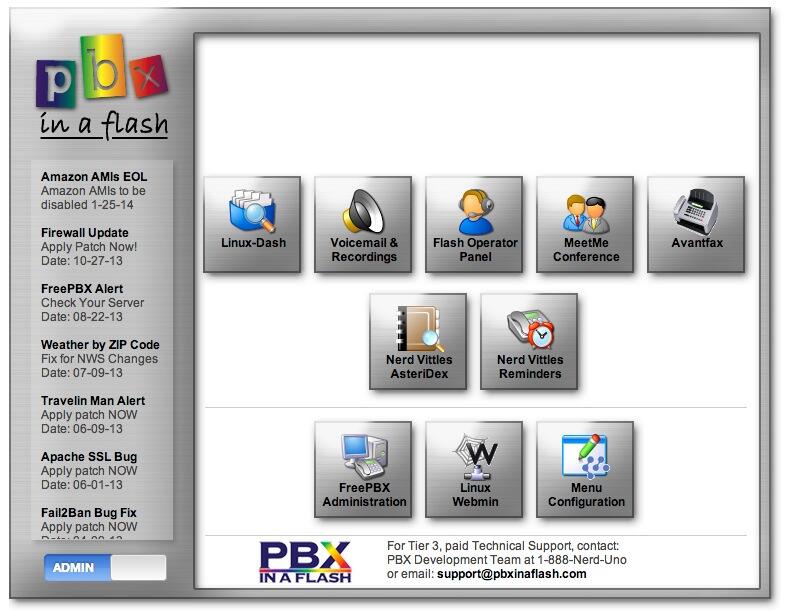
In case you couldn’t tell, security matters to us, and it should matter to you. Not only is the safety of your system at stake but also your wallet and the safety of other folks’ systems. Unless you subscribe to the new Automatic Update Utility, our only means of alerting you to security issues which arise is through the RSS Feed that we maintain for the PBX in a Flash project. This feed is prominently displayed in the web GUI which you can access with any browser pointed to the IP address of your server. Check It Daily! Or add our RSS Feed to your favorite RSS Reader. We also recommend you follow @NerdUno on Twitter. We’ll keep you entertained and provide immediate notification of security problems that we hear about. Finally, visit the PIAF Forums regularly. You’ll be surprised what you can learn in 10 minutes of browsing. Be safe!
Kicking the Tires
NEWS FLASH: Google Speech Recognition was an integral part of several Incredible PBX apps including the 949 Weather Reports and 411 Phonebook Directory Lookups with AsteriDex. Google changed their API to now require a personal API key for further use of the service. Thanks to Lefteris Zafiris, the speech recognition engine has been restored to operation. For instructions on obtaining your own API key and for properly reconfiguring your system to support speech-to-text, see this thread on the PIAF Forum. Google’s API is for personal and development use only!
That’s enough tutorial for today. Let’s play. Using your new softphone, begin your adventure by dialing these extensions:
- D-E-M-O – Incredible PBX Demo (running on your PBX)
- T-I-D-E – Get today’s tides and lunar schedule for any U.S. port
- 4-1-1 – Phonebook lookup/dialer with AsteriDex
- C-O-N-F – Set up a MeetMe Conference on the fly (PIN: 1234)
- 1-2-3 – Schedule regular/recurring reminder (PW: 12345678)
- 2-2-2 – ODBC/Timeclock Lookup Demo (Empl No: 12345)
- 2-2-3 – ODBC/AsteriDex Lookup Demo (Code: AME)
- 3-3-3 – Look up a definition for any word or term
- 9-4-9 – Weather forecast for any city in the world
- 9-5-0 – Retrieve stock report by stock symbol
- 9-5-1 – Latest Google News headlines
- Dial *68 – Schedule a hotel-style wakeup call from any extension
 Don’t forget to List Yourself in Directory Assistance so everyone can find you by dialing 411. And add your new number to the Do Not Call Registry to block telemarketing calls. Or just call 888-382-1222 from your new number.
Deals of the Week. A relatively new company called Copy.com is offering 20GB of free cloud storage with no restrictions on file size uploads (which are all too common with other free offers). Copy.com has free sync apps for Windows, Macs, and Linux systems. To take advantage of the offer, just click on our referral link here. We get 5GB of extra storage, too, which will assist with our disaster recovery plan.
Originally published: Thursday, April 3, 2014
Need help with Asterisk? Visit the PBX in a Flash Forum.
Special Thanks to Our Generous Sponsors
FULL DISCLOSURE: ClearlyIP, Skyetel, Vitelity, DigitalOcean, Vultr, VoIP.ms, 3CX, Sangoma, TelecomsXchange and VitalPBX have provided financial support to Nerd Vittles and our open source projects through advertising, referral revenue, and/or merchandise. As an Amazon Associate and Best Buy Affiliate, we also earn from qualifying purchases. We’ve chosen these providers not the other way around. Our decisions are based upon their corporate reputation and the quality of their offerings and pricing. Our recommendations regarding technology are reached without regard to financial compensation except in situations in which comparable products at comparable pricing are available from multiple sources. In this limited case, we support our sponsors because our sponsors support us.
BOGO Bonaza: Enjoy state-of-the-art VoIP service with a $10 credit and half-price SIP service on up to $500 of Skyetel trunking with free number porting when you fund your Skyetel account. No limits on number of simultaneous calls. Quadruple data center redundancy. $25 monthly minimum spend required. Tutorial and sign up details are here.
![]() The lynchpin of Incredible PBX 2020 and beyond is ClearlyIP components which bring management of FreePBX modules and SIP phone integration to a level never before available with any other Asterisk distribution. And now you can configure and reconfigure your new Incredible PBX phones from the convenience of the Incredible PBX GUI.
The lynchpin of Incredible PBX 2020 and beyond is ClearlyIP components which bring management of FreePBX modules and SIP phone integration to a level never before available with any other Asterisk distribution. And now you can configure and reconfigure your new Incredible PBX phones from the convenience of the Incredible PBX GUI.
VitalPBX is perhaps the fastest-growing PBX offering based upon Asterisk with an installed presence in more than 100 countries worldwide. VitalPBX has generously provided a customized White Label version of Incredible PBX tailored for use with all Incredible PBX and VitalPBX custom applications. Follow this link for a free test drive!
Special Thanks to Vitelity. Vitelity is now Voyant Communications and has halted new registrations for the time being. Our special thanks to Vitelity for their unwavering financial support over many years and to the many Nerd Vittles readers who continue to enjoy the benefits of their service offerings. We will keep everyone posted on further developments.
Some Recent Nerd Vittles Articles of Interest…
BYOB: Easy Peasy PIAF-Green with Asterisk 11.8.1 and ‘Genuine’ CentOS 6.5

Let’s put aside the debate over Red Hat CentOS licensing and the GPL for a moment and talk about everyone’s favorite party. And we confess up front to being big fans of Patrón tequila. But let’s suppose for a moment that the Patrón family added some fine print to the label on their tequila bottles that said you cannot distribute margaritas with Patrón tequila and claim they are made with genuine Patrón tequila because the drink is no longer pure Patrón. In other words, for your Margaritaville invitations, you now have to state that each invitee BYOB, and you’ll provide the mixers and ice. WOW! What a party!

So that’s where we find ourselves in the current CentOS standoff with Red Hat. To demonstrate just how silly this entire trademark gimmick is, today we’re going to show you how to Bring Your Own CentOS platform and build a genuine PBX in a Flash server with Asterisk and FreePBX in about the same time as in the good ol’ days. When you’re finished you’ll have exactly the same PBX in a Flash server running on a genuine CentOS platform. Have we diluted CentOS or the CentOS brand? Not at all. In fact, we’ve made the exact same margarita! What this little experiment demonstrates is the real motivation behind the Red Hat licensing restrictions which have little or nothing to do with brand dilution.
Creating the Base CentOS Platform for PBX in a Flash
We’re not doing anything special here. In fact, you can build your base CentOS platform for PBX in a Flash on a standalone server, on a virtual machine of your choice, or in the cloud using a provider such as Amazon or RentPBX.
Start by downloading the 32-bit or 64-bit CentOS 6.5 minimal install ISO. You can do exactly the same thing using Scientific Linux if you prefer. Go through the usual drill of preparing an installer from the ISO. Burn the ISO to a USB Thumb Drive or a CD/DVD using a Mac or Windows machine. Then create your CentOS 6.5 platform on the hardware of your choice.
By default, neither CentOS nor Scientific Linux installs with network connectivity enabled. This is one of the primary reasons that we always have customized CentOS for use with PBX in a Flash. After performing a minimal OS install, log in as root and issue the following commands to prepare your server for PBX in a Flash:
sed -i 's|no|yes|' /etc/sysconfig/network-scripts/ifcfg-eth0

ifup eth0

yum -y install wget nano
Creating a PBX in a Flash 3.0.6.5 Server
Now you’re ready to make a margarita. Just download the PIAF3 Installer and run it. It works exactly as it always has. The installer is plain text so feel free to customize it to meet your own requirements. If you need the complete PIAF installation tutorial, jump to this link. Party on!
cd /root

wget http://pbxinaflash.com/piaf3-install.tar.gz

tar zxvf piaf3-install.tar.gz

./piaf3-install
Originally published: Tuesday, March 18, 2014
Need help with Asterisk? Visit the PBX in a Flash Forum.
Special Thanks to Our Generous Sponsors
FULL DISCLOSURE: ClearlyIP, Skyetel, Vitelity, DigitalOcean, Vultr, VoIP.ms, 3CX, Sangoma, TelecomsXchange and VitalPBX have provided financial support to Nerd Vittles and our open source projects through advertising, referral revenue, and/or merchandise. As an Amazon Associate and Best Buy Affiliate, we also earn from qualifying purchases. We’ve chosen these providers not the other way around. Our decisions are based upon their corporate reputation and the quality of their offerings and pricing. Our recommendations regarding technology are reached without regard to financial compensation except in situations in which comparable products at comparable pricing are available from multiple sources. In this limited case, we support our sponsors because our sponsors support us.
BOGO Bonaza: Enjoy state-of-the-art VoIP service with a $10 credit and half-price SIP service on up to $500 of Skyetel trunking with free number porting when you fund your Skyetel account. No limits on number of simultaneous calls. Quadruple data center redundancy. $25 monthly minimum spend required. Tutorial and sign up details are here.
![]() The lynchpin of Incredible PBX 2020 and beyond is ClearlyIP components which bring management of FreePBX modules and SIP phone integration to a level never before available with any other Asterisk distribution. And now you can configure and reconfigure your new Incredible PBX phones from the convenience of the Incredible PBX GUI.
The lynchpin of Incredible PBX 2020 and beyond is ClearlyIP components which bring management of FreePBX modules and SIP phone integration to a level never before available with any other Asterisk distribution. And now you can configure and reconfigure your new Incredible PBX phones from the convenience of the Incredible PBX GUI.
VitalPBX is perhaps the fastest-growing PBX offering based upon Asterisk with an installed presence in more than 100 countries worldwide. VitalPBX has generously provided a customized White Label version of Incredible PBX tailored for use with all Incredible PBX and VitalPBX custom applications. Follow this link for a free test drive!
Special Thanks to Vitelity. Vitelity is now Voyant Communications and has halted new registrations for the time being. Our special thanks to Vitelity for their unwavering financial support over many years and to the many Nerd Vittles readers who continue to enjoy the benefits of their service offerings. We will keep everyone posted on further developments.
Some Recent Nerd Vittles Articles of Interest…
Closing the Book on CentOS: Introducing PBX in a Flash 3 with PIAF 3.0.6.5 OS
Over the past few weeks, we’ve attempted to document some of the issues that have arisen as a result of what Red Hat claims it has been assigned from a few of the current CentOS developers. The CentOS trademark issues boil down to these: (1) ownership, (2) prior assignments and licenses, (3) dilution, and (4) GPL2. You can only sell that which you own. You can’t undo licenses that previously have been issued and relied upon. Generic use of a term over a lengthy period of years raises a strong presumption of genericide particularly when there has never been any attempt to protect the mark. And you can’t breathe a trademark exemption into GPL2 just because you’d like it to be a GPL3 license.
These issues obviously aren’t going to be settled overnight. Indeed, there are "the usual suspects" that put a not in front of virtually anything we suggest. That’s perfectly fine. We all have the right to our own opinions. But, absent some flexibility from Red Hat, these issues will work their way through a very cumbersome legal process over many years regardless of the views of the armchair quarterbacks. We’ll be watching and, if it becomes necessary, participating. There’s almost a decade of history on CentOS that some appear to have forgotten or perhaps never knew. Suffice it to say, CentOS has had a bit of a checkered past. We’ll cover some of it in coming months to give everyone a better appreciation of the issues that are at stake. In the meantime, PBX in a Flash has a loyal following, and we owe it to our users and supporters to remove the CentOS distraction and move on.
Today we are pleased to introduce PBX in a Flash 3 with an all-new GPL2 operating system, our own. It is compatible with the LAAMP stack that has been deployed by all of the Asterisk aggregations over the past decade including PBX in a Flash, Asterisk@Home, trixbox, Elastix, AsteriskNOW, and the FreePBX Distro. Simply stated, nothing has changed except the removal of the items to which Red Hat now asserts some ownership interest.
We’re rolling PIAF3 out in three stages, two of which we’re introducing today. There are new 32-bit and 64-bit virtual machine images. There are migration scripts to transform a PIAF2 server into PIAF3. And there will be new ISO images down the road a bit. The PIAF Dev Team is a group of individuals that do this for fun, not for profit. So eating comes first. Then we work on PBX in a Flash as time permits. No, we haven’t gotten filthy rich from donations and advertising. And, yes, we have sufficient resources to maintain the infrastructure necessary to continue to support the project indefinitely. If you’d like to volunteer to assist, by all means do so. The more, the merrier!
Movin’ On Up: Migrating Your PIAF2 Server to PIAF3
We’ve documented a simple procedure on the PIAF Forum to convert your PIAF2 server into a PIAF3 server. We fully appreciate that some may need a little hand-holding even though the scripts are provided and are in plain text. If you’d like to perform the procedure, set aside about an hour when your server is not in use AND only after you have made a full backup of your current system. For backup tips, go here and here and here. Then follow this link to begin. If you run into issues, just post your question on the forum. We have hundreds of gurus that stand ready to help you… cheerfully.
The Ultimate VoIP Appliance: PIAF3 Virtual Machine for VirtualBox
Today brings us to a new plateau in the virtual machine development era. We’re pleased to introduce a new product that can be installed in under 5 minutes and will run on any Windows PC, Mac, or Linux machine as well as Solaris. And, unlike the dedicated machine platforms and OpenVZ compromises of years past, today’s PIAF-Green Virtual Machine is state-of-the-art giving you everything a bare metal install from source code would have provided. Most importantly, the components are truly portable. They can be copied to a 4GB flash drive1 for the price of a good hamburger and installed from there onto any type of machine that happens to be in front of you. Five minutes later, you have a fully functional Asterisk server with FreePBX and exactly the same feature set and source code that you would have had doing a bare metal PIAF install to a dedicated server. And we’ve built 32-bit and 64-bit production-ready PIAF-Green Virtual Machines with Asterisk 11.7 and FreePBX 2.11. No Internet access required to perform the install. Sound too good to be true? Keep reading or, better yet, try the PIAF appliance for yourself. The install process is simple:
- Download and install VirtualBox onto a Desktop Machine of your choice
- Download and double-click on the PIAF-Green Virtual Machine to import it into VirtualBox
- Select the PIAF-Green Virtual Machine in VirtualBox Manager Window and click the Start button
Introducing Oracle VM VirtualBox

We’re late to the party, but Virtual Box®, Oracle’s virtual machine platform inherited from Sun, is really something. It’s not only free, but it’s pure GPL2 code. VirtualBox gives you a virtual machine platform that runs on top of any desktop operating system. In terms of limitations, we haven’t found any. We even tested this on an Atom-based Windows 7 machine with 2GB of RAM, and it worked without a hiccup. So step #1 is to download one or more of the VirtualBox installers from VirtualBox.org or Oracle.com. As mentioned, our recommendation is to put all of the 100MB installers on a 4GB thumb drive. Then you’ll have everything in one place whenever and wherever you happen to need it. Once you’ve downloaded the software, simply install it onto your favorite desktop machine. Accept all of the default settings, and you’ll be good to go. For more details, here’s a link to the Oracle VM VirtualBox User Manual.
Installing the PIAF3 Virtual Machine
Step #1 is to download the PIAF-Green Open Virtualization Appliance (.ova) of your choice from SourceForge. If you prefer torrents, they are there as well thanks to the work of Isaac McDonald.
Step #2: Verify the checksums for the .ova appliance to be sure everything got downloaded properly. To check the MD5/SHA1 checksums in Windows, download and run Microsoft’s File Checksum Integrity Verifier.
For Mac or Linux desktops, open a Terminal window, change to the directory in which you downloaded the .ova file and type the following commands:
md5 PIAF-Green-3.6.5.-32.ova (use md5sum for Linux)    MD5: a0562d213a31ace848b8a00bfb3d9218

openssl sha1 PIAF-Green-3.6.5-32.ova    SHA1: 7aa74ffdc6a0f2b5a2ec0557c7bb78f8fe9cfb23
md5 PIAF-Green-3.6.5.-64.ova (use md5sum for Linux)    MD5: d146ce1381b58effcaaaf3ef095806ab

openssl sha1 PIAF-Green-3.6.5-64.ova    SHA1: 19a9981094047eb25d585f9a2d0198a056d56a98
Step #3: Double-click on the downloaded .ova file which will begin the import process into VirtualBox. It only takes a couple minutes, and you only do it once. IMPORTANT: Be sure to check the Reinitialize the Mac address of all network cards box before clicking the Import button.
Once the import is finished, you’ll see the new PIAF-Green virtual machine in the VM List of your VirtualBox Manager Window. You’ll need to make a couple of one-time adjustments to the VM configuration to account for differences in sound and network cards on different host machines.
Click on the PIAF-Green Virtual Machine in the VM List. Then click Settings -> Audio and check the Enable Audio option and choose your sound card. Save your setup by clicking the OK button. Next click Settings -> Network. For Adapter 1, check the Enable Network Adapter option. From the Attached to pull-down menu, choose Bridged Adapter. Then select your network card from the Name list. Then click OK. On some VM platforms in order to successfully boot the VM, you may need to manually enable PAE/NX support under System -> Proccessor. On most platforms, it’s enabled by default. That’s all the configuration that is ever necessary for your PIAF-Green Virtual Machine. The rest is automagic.
Running the PIAF-Green Virtual Machine in VirtualBox
Once you’ve imported and configured the PIAF3 Virtual Machine, you’re ready to go. Highlight PIAF3 Virtual Machine in the VM List on the VirtualBox Manager Window and click the Start button. The PIAF3 boot procedure will begin just as if you had installed PBX in a Flash on a standalone machine. You’ll see a couple of dialogue boxes pop up that explain the keystrokes to move back and forth between your host operating system desktop and your PIAF VM.
Here’s what you need to know. To work in the PIAF3 Virtual Machine, just left-click your mouse while it is positioned inside the VM window. To return to your host operating system desktop, press the right Option key on Windows machines or the left Command key on any Mac. For other operating systems, read the dialogue boxes for instructions on moving around. Always shut down PIAF gracefully! Click in the VM window with your mouse, log in as root, and type: shutdown -h now.
Run the PIAF3 Virtual Machine behind a hardware-based firewall with no Internet port exposure!
To begin, position your mouse over the VM window and left-click. Once the PIAF VM has booted, log in as root with password as the password. Change your root password immediately by typing passwd at the command prompt. Now set up a secure maint password for FreePBX as well. Type passwd-master. If you’re not in the Eastern U.S. time zone, then you’ll want to adjust your timezone setting so that reminders and other time-sensitive events happen at the correct time. While logged into your server as root, issue this command:
setup-timezone
Next, use a browser to log into your PIAF3 server by pointing to the IP address of the PIAF3 VM that’s displayed in the status window of the CLI. Click on the User button to display the Admin choices in the main PIAF3 Menu. Click on the FreePBX option to load the FreePBX GUI. You will be prompted for an Apache username and password. For the username, use maint. For the password, use whatever password you set up with passwd-master.
Now read the latest PIAF Quick Start Guide and begin your VoIP adventure. Then you’ll want to do some reading on VirtualBox. We’ve barely scratched the surface. Setting up Headless VMs that run in the background on any server is a breeze. From the command line, here’s an article to get you started. But you also can start Headless VMs from within the GUI by highlighting the VM and clicking Shift->Start. Always shut down VMs gracefully: Close->ACPI Shutdown. You’ll find more great tips at virtualbox.org and GitHub.
One of the real beauties of VirtualBox is you don’t have to use a GUI at all. The entire process can be driven from the command line. Other than on a Mac, here is the procedure to import, configure, and run the PIAF-Green Virtual Machine:
VBoxManage import PIAF-Green-3.6.5-32.ova

VBoxManage modifyvm "PIAF-Green-3.6.5-32" --nic1 nat

VBoxManage modifyvm "PIAF-Green-3.6.5-32" --acpi on --nic1 bridged

VBoxHeadless --startvm "PIAF-Green-3.6.5-32" &

# Wait 1 minute for PIAF-Green-3.6.5-32 to load. Then decipher IP address like this:

VBoxManage guestproperty get "PIAF-Green-3.6.5-32" /VirtualBox/GuestInfo/Net/0/V4/IP

# Now you can use SSH to login to PIAF-Green-3.6.5-32 at the displayed IP address

# Shutdown the PIAF-Green-3.6.5-32 Virtual Machine with the following command:

VBoxManage controlvm "PIAF-Green-3.6.5-32" acpipowerbutton
On a Mac, everything works the same way except for deciphering the IP address. Download our findip script for that.
Adding Incredible PBX 11 and Incredible Fax
You can read all about the Incredible PBX 11 and Incredible Fax feature set in our recent Nerd Vittles article. If you decide you’d like to add one or both to your PIAF-Green Virtual Machine, just log into your server as root and issue the following commands. NOTE: You must install Incredible Fax after installing Incredible PBX, or you will lose the ability to install Incredible PBX at a later time. With Incredible Fax, there are a number of prompts during the install. With the exception of the prompt asking for your local area code, just press Enter at every other prompt.
cd /root

wget http://incrediblepbx.com/incrediblepbx11.gz

gunzip incrediblepbx11.gz

chmod +x incrediblepbx11

./incrediblepbx11

./incrediblefax11.sh
The Incredible PBX 11 Inventory. For those that have never heard of The Incredible PBX, here’s the current 11.0 feature set in addition to the base install of PBX in a Flash with PIAF 3.0.6.5, Asterisk 11, FreePBX 2.11, and Apache, SendMail, MySQL, PHP, phpMyAdmin, IPtables Linux firewall, Fail2Ban, and WebMin. Incredible Fax, NeoRouter and PPTP VPNs, and all sorts of backup solutions are still just one command away and may be installed using the scripts included with Incredible PBX 11 and PBX in a Flash 3. Type help-pbx and browse /root for dozens of one-click install scripts.
- AsteriDex
- CallerID Superfecta (FreePBX Module adds Names to CID Numbers)
- CallWho for Asterisk (Dial 411)
- Digium Phone Support (install-digiphones)
- Preconfigured Email That Works with SendMail and Incredible Fax
- OSS Endpoint Manager
- Extensions (1 preconfigured with random password)
- Festival Server and Festival TTS for Asterisk (festival –server &)
- Flite TTS for Asterisk
- FreePBX Backups
- Google Dictionary by Phone (Dial 333)
- Google News by Phone (Dial 951)
- Google Stocks by Phone (Dial 950)
- Google Voice (FreePBX GV/Motif Module)
- Hotel-Style Wakeup Calls (FreePBX Module)
- Incredible Backups… and Restores (install-incredbackup2)
- ISN: FreeNum SIP Calling from Any Phone
- MeetMe Conference Bridge (just dial C-O-N-F)
- Mondo Full System Backups (install-diskbackup)
- Incredible Fax 11 (/root/incrediblefax11.sh)
- Incremental Daily Backups (install-dailybackup)
- Munin Reports (install-munin)
- NeoRouter VPN Client (nrclientcmd)
- NewsClips from Yahoo
- ODBC Database Support (Dial 222, 223)
- OpenFire Instant Messaging & Chat Server (install-openfire)
- New PBX in a Flash Registry (show-registry)
- PPTP VPN for PIAF (/root/install-pptp)
- Reminders by Phone and Web
- SAMBA Windows Networking (configure-samba)
- SMS Dictator with Google Voice (Dial S-M-S)
- Speech-to-Text Directory Assistance (Dial 411)
- Stealth AutoAttendant
- TFTP Server (setup-tftp)
- Tide Reports with xTide (Dial T-I-D-E)
- Travelin’ Man 2 & 3 (Secure, remote access)
- Trunks (Vitelity, Gtalk, SIPgate, IPkall, VoIP.ms, and more)
- Weather by ZIP Code
- Worldwide Weather by Phone (Dial 949)
- Wolfram Alpha by Phone (/root/wolfram)
Originally published: Friday, February 21, 2014
Need help with Asterisk? Visit the PBX in a Flash Forum.
Special Thanks to Our Generous Sponsors
FULL DISCLOSURE: ClearlyIP, Skyetel, Vitelity, DigitalOcean, Vultr, VoIP.ms, 3CX, Sangoma, TelecomsXchange and VitalPBX have provided financial support to Nerd Vittles and our open source projects through advertising, referral revenue, and/or merchandise. As an Amazon Associate and Best Buy Affiliate, we also earn from qualifying purchases. We’ve chosen these providers not the other way around. Our decisions are based upon their corporate reputation and the quality of their offerings and pricing. Our recommendations regarding technology are reached without regard to financial compensation except in situations in which comparable products at comparable pricing are available from multiple sources. In this limited case, we support our sponsors because our sponsors support us.
BOGO Bonaza: Enjoy state-of-the-art VoIP service with a $10 credit and half-price SIP service on up to $500 of Skyetel trunking with free number porting when you fund your Skyetel account. No limits on number of simultaneous calls. Quadruple data center redundancy. $25 monthly minimum spend required. Tutorial and sign up details are here.
![]() The lynchpin of Incredible PBX 2020 and beyond is ClearlyIP components which bring management of FreePBX modules and SIP phone integration to a level never before available with any other Asterisk distribution. And now you can configure and reconfigure your new Incredible PBX phones from the convenience of the Incredible PBX GUI.
The lynchpin of Incredible PBX 2020 and beyond is ClearlyIP components which bring management of FreePBX modules and SIP phone integration to a level never before available with any other Asterisk distribution. And now you can configure and reconfigure your new Incredible PBX phones from the convenience of the Incredible PBX GUI.
VitalPBX is perhaps the fastest-growing PBX offering based upon Asterisk with an installed presence in more than 100 countries worldwide. VitalPBX has generously provided a customized White Label version of Incredible PBX tailored for use with all Incredible PBX and VitalPBX custom applications. Follow this link for a free test drive!
Special Thanks to Vitelity. Vitelity is now Voyant Communications and has halted new registrations for the time being. Our special thanks to Vitelity for their unwavering financial support over many years and to the many Nerd Vittles readers who continue to enjoy the benefits of their service offerings. We will keep everyone posted on further developments.
Some Recent Nerd Vittles Articles of Interest…
- Many of our purchase links refer users to Amazon when we find their prices are competitive for the recommended products. Nerd Vittles receives a small referral fee from Amazon to help cover the costs of our blog. We never recommend particular products solely to generate Amazon commissions. However, when pricing is comparable or availability is favorable, we support Amazon because Amazon supports us. [↩]
Crippleware: Is Red Hat Rewriting the GPL and the Future of Open Source?

We’ve always been a believer that things happen for a reason. And so it is with the recent CentOS "acquisition" by Red Hat. It’s no secret that CentOS was cutting into Red Hat’s revenue stream. While Red Hat had announced plans to create its own CentOS-like spinoff, the actual absorption of CentOS and its development team into Red Hat, Inc. was a surprise. So was the claim by Karanbir Singh that he individually owned the CentOS trademark. As we previously described, the whole CentOS story is more than a little murky. What began as a rebellion by some open source developers to the heavy-handed Red Hat reinvention of what open source and the GPL were all about abruptly morphed into something quite different. We hope Red Hat has the best of intentions, but some may see things differently given Red Hat’s history in the open source space. Did one or more developers just throw in the towel in exchange for some undisclosed money and a cushy job? Only the developer(s) know the answer to that. From Red Hat’s perspective, it gives them complete control of the best known, free, competitive and compatible product that was making inroads into their cash cow, Enterprise Linux. Only time will tell whether the goal of this acquisition was to make CentOS a better product. Nothing now prevents Red Hat from diminishing the compatibility between Enterprise Linux and CentOS.
In the VoIP world, CentOS has played a leading role in the evolution of Asterisk-compatible turnkey systems. That history includes Asterisk@Home, trixbox, Elastix, PBX in a Flash, Asterisk Now, and the FreePBX platform. Just as Excel relies upon Windows to run, all of these distributions have relied upon CentOS as the underlying Linux operating system for their VoIP platform. And this has been the case for almost a decade with no objection from the CentOS folks. In fact, some of us that contributed to the CentOS project received tacit approval to do exactly what we’ve been doing by bundling CentOS with the PBX in a Flash VoIP platform. After all, CentOS is GPL2 software, and we can read.
Having said that, the PBX in a Flash Dev Team is shifting gears. Down the road we plan to release 32-bit and 64-bit Scientific Linux-based ISOs. By popular demand, over the next few weeks, we will release the PIAF3-Installer, a freeware installation program that installs PBX in a Flash 3.0.6.5 on an existing Linux platform. You first install the operating system of your choice, and then the PIAF3-Installer takes it from there. The first release will support 32-bit or 64-bit CentOS 6.5 or the Scientific Linux 6.5 minimal install. Future releases will support additional Linux operating systems, and we’ll keep you posted on what those platforms will be. All of the installs have been designed to look and feel and perform exactly as the PIAF 2.0.6.5 ISO works today. The installer also has been designed to work with our cloud partner, RentPBX. And it should work well on other cloud platforms as well as virtual machines including VirtualBox. The PIAF-Green Virtual Machine featuring Scientific Linux 6.5 is already available and was built using the new PIAF3-Installer. For the time being, the PIAF3-Installer gets us out of the operating system business until some of the legal issues are resolved. There’s lots of exciting new PIAF3 software coming your way very shortly. So stay tuned.
So what’s the big deal with the Red Hat acquisition?
Red Hat has a different view of the open source universe and the GNU General Public license (GPL2) under which CentOS is distributed. And, make no mistake, Red Hat has no choice about using the GPL2 license because their aggregations include thousands of components, most of which are licensed under GPL2. One of the fundamental precepts of GPL licensing is you are free to use or add to others’ GPL-licensed products so long as you also license your software under the same terms, i.e. the GPL2 license. Historically, Red Hat has applied its own GPL interpretation.
Here’s where it gets interesting. Red Hat aggregated thousands of these GPL2 products and configured them so that they worked harmoniously. And thus was born Enterprise Linux, a wildly profitable Linux "operating system" which consisted primarily of other developers’ free open source software components. And what did Red Hat bring to the table? A trademarked name and logo consisting of some artwork, a method of installing and configuring the various components so that they played nice with each other, and a marketing, support, and legal department. In pulling off this hat trick, Red Hat sprinkled its trademarked name and copyrighted artwork in various files throughout the operating system in such a way that the system wouldn’t function if you removed or renamed some of the files under which the Enterprise Linux operating system was running. Then Red Hat barred others from using its trademarks and copyrighted artwork in competitive products that sought to fork, use, and enhance the Enterprise Linux GPL2-licensed code claiming brand confusion. Merriam-Webster calls it a gotcha. We do, too.
With CentOS, the developers (perhaps with some Red Hat coaching) were sufficiently savvy to remove the Red Hat branding and artwork and then recompiled the source code substituting their own branding and artwork while never disclosing exactly how they did what they did. Scientific Linux did much the same thing a bit later. Was there a non-disclosure agreement between CentOS and Red Hat that was part of their legal settlement? Who knows? The bottom line was that the CentOS project operating under the cAOS Foundation made bold claims that they’d never act like RedHat in dealing with others that wanted to use their free product. And, more importantly, they kept their word and never did… at least until the 2014 Red Hat acquisition when CentOS license terms abruptly changed.
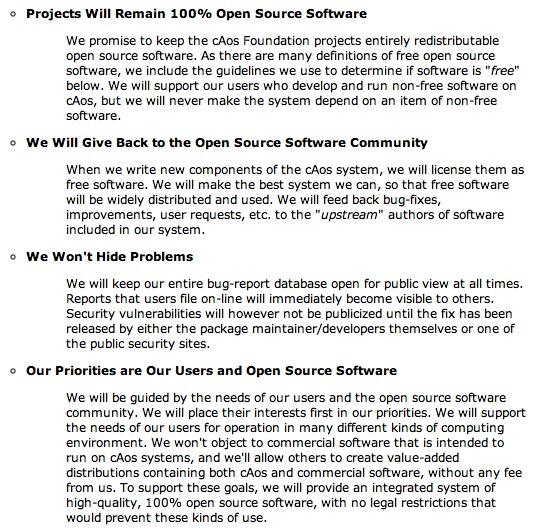
Here’s the key language that all of us relied upon as far as CentOS licensing and integration into other products:
[W]e will never make the system depend on an item of non-free software.
We won’t object to commercial software that is intended to run on cAos systems, and we’ll allow others to create value-added distributions containing both cAos and commercial software, without any fee from us. To support these goals, we will provide an integrated system of high quality, 100% open source software, with no legal restrictions that would prevent these kinds of use. (Emphasis added)
Indeed, this licensing approach is exactly what GPL2 requires! The Red Hat theory of open source licensing goes something like this. You are free to use our source code (only) to develop your own GPL2 product provided you recompile the executables after removing all of our trademarks and copyrighted artwork from the source before you proceed. And here’s the rub with that approach: the GPL2 license. Three important components of the GPL2 license are listed below. Red Hat’s new CentOS license only partially complies with sections 1 and 2 while ignoring sections 3 and 7.
Sections 1 and 2 of GPL2 give users the right to copy, modify, and redistribute source code provided appropriate notices are attached and the new source code is licensed under GPL2. There’s no authorization to restrict or limit reuse or modification of individual components in the GPL2 program.
Section 3 of GPL2 gives users the right to copy and use or modify the object code provided in the original work. There’s no authorization to restrict or limit reuse or modification of individual executable components in the program.
Section 7 of GPL2 is the enforcement mechanism of the license. If the licensor uses a patent "or any other reason (not limited to patent issues)" to restrict the use of a GPL2-licensed product then the licensor has two options: (1) remove the restriction on use or (2) stop distributing the product pursuant to GPL2. If the licensor insists upon enforcement of a patent, a trademark, or copyright claim whether real or contrived, then "the only way you could satisfy both it and this License would be to refrain entirely from distribution of the Program." The quoted passages couldn’t be more clear.
Red Hat wants to have its cake and eat it, too: sell a product using everyone else’s free GPL2 products without restriction and then tie up its own GPL2 product with trademark and copyright land mines that deter others from using the product except in an inoperative form. This is nothing new. Back in the shareware days, we called it Crippleware. Stated another way, Red Hat wants to permit GPL2 use of modified CentOS in source code format only minus the CentOS marks and images and without any object code or executables and without telling you how to restore functionality after removing the required pieces to which RedHat claims ownership. Simply stated, the boat won’t float without major plumbing changes from any user that wants to keep the boat from sinking. And Red Hat won’t tell you where the boat is leaking or how to fix the leaks. Never mind that Red Hat didn’t mind using thousands of other developers’ trademarks and copyrighted artwork in the Enterprise Linux and CentOS aggregations. There’s a reason. Such restrictions are impermissible under the GPL2 license. Indeed, it’s one of the primary reasons that the GPL license came about in the first place. Assuming Red Hat ever obtains the CentOS registered trademark (which we plan to challenge if no one else does), Red Hat has two options under section 7 of GPL2: drop the trademark and artwork removal requirements or stop marketing CentOS and Enterprise Linux as GPL products (which they obviously cannot do since they are using thousands of other folks’ open source trademarked GPL2 products in "their work" at no cost).
Here’s a modest proposal that we believe would make everybody happy. First, many folks don’t give a rip about using either the RHEL or CentOS marks or artwork. It’s the source AND executable code that was released under the GPL that users are after just as they were promised under GPL2 and under CentOS previously published licensing terms. What we’re not going to do is invest hundreds of programming hours rebranding and maintaining what is touted and distributed as a GPL2 product. Personally, I’d prefer to spend the hours on a legal brief blowing Red Hat’s GPL2 reincarnation of open source out of the water. It’s dead wrong based upon the clear language of the GPL2 license. Paying lawyers or experts to twist the meaning of the GPL2 language that’s perfectly clear on its face simply isn’t going to fly. We’ve been down this road before. And David and Goliath is still one of our favorite Bible stories.
If Red Hat wants a generic, mark-free, image-free distribution of CentOS in lieu of waiving its trademark and copyright claims, then Red Hat can produce a clone with binaries AND keep it current as new versions of RHEL and CentOS are released! Make it a 100% RHEL-compatible and call it MugWump™. Use the Nerd Vittles logo for the artwork. Or come up with any other name and logo so long as there are no restrictions on use by others. If Red Hat uses our proposed name and logo, we will license everyone to use the product, the copyrighted artwork and the MugWump trademark pursuant to GPL2 at no cost. If Red Hat chooses its own new name and logo, then Red Hat agrees to license the product under the same terms we have proffered. The end result: everybody will be happy while saving Red Hat hundreds of thousands of dollars in legal fees. What’s not acceptable is distribution of a product which purports to be GPL2 code but places unreasonable and unachievable restrictions on use without hundreds of hours of development work by potential end users. That’s not what GPL2 was ever about. Hopefully the federal courts won’t have to say so.
Originally published: Tuesday, February 11, 2014
Need help with Asterisk? Visit the PBX in a Flash Forum.
Special Thanks to Our Generous Sponsors
FULL DISCLOSURE: ClearlyIP, Skyetel, Vitelity, DigitalOcean, Vultr, VoIP.ms, 3CX, Sangoma, TelecomsXchange and VitalPBX have provided financial support to Nerd Vittles and our open source projects through advertising, referral revenue, and/or merchandise. As an Amazon Associate and Best Buy Affiliate, we also earn from qualifying purchases. We’ve chosen these providers not the other way around. Our decisions are based upon their corporate reputation and the quality of their offerings and pricing. Our recommendations regarding technology are reached without regard to financial compensation except in situations in which comparable products at comparable pricing are available from multiple sources. In this limited case, we support our sponsors because our sponsors support us.
BOGO Bonaza: Enjoy state-of-the-art VoIP service with a $10 credit and half-price SIP service on up to $500 of Skyetel trunking with free number porting when you fund your Skyetel account. No limits on number of simultaneous calls. Quadruple data center redundancy. $25 monthly minimum spend required. Tutorial and sign up details are here.
![]() The lynchpin of Incredible PBX 2020 and beyond is ClearlyIP components which bring management of FreePBX modules and SIP phone integration to a level never before available with any other Asterisk distribution. And now you can configure and reconfigure your new Incredible PBX phones from the convenience of the Incredible PBX GUI.
The lynchpin of Incredible PBX 2020 and beyond is ClearlyIP components which bring management of FreePBX modules and SIP phone integration to a level never before available with any other Asterisk distribution. And now you can configure and reconfigure your new Incredible PBX phones from the convenience of the Incredible PBX GUI.
VitalPBX is perhaps the fastest-growing PBX offering based upon Asterisk with an installed presence in more than 100 countries worldwide. VitalPBX has generously provided a customized White Label version of Incredible PBX tailored for use with all Incredible PBX and VitalPBX custom applications. Follow this link for a free test drive!
Special Thanks to Vitelity. Vitelity is now Voyant Communications and has halted new registrations for the time being. Our special thanks to Vitelity for their unwavering financial support over many years and to the many Nerd Vittles readers who continue to enjoy the benefits of their service offerings. We will keep everyone posted on further developments.
Some Recent Nerd Vittles Articles of Interest…
A New Star Is Born: The PIAF-Green Virtual Machine featuring Scientific Linux 6.5
 We are delighted to announce our first of many releases of PBX in a Flash™ 3.0.6.5 running atop the just released Scientific Linux™ 6.5. In keeping with our historical methodology (minus CentOS™), today’s PIAF-Green™ VM release with Asterisk 11® and FreePBX® 2.11 provides everyone an opportunity to kick the tires and provide some feedback before the tailorable PIAF™ 3.0.6.5 hits the street. What’s missing is the CentOS operating system. Good riddance! See last week’s article for why. We are pleased to introduce our new OS platform:
"From the beginning Scientific Linux was designed to be a community project. We solicited input from the labs and Universities that originally contacted [Fermilab™ computer scientists], as well as other interested parties. We also designed the sites area to make it easy for sites to create their own distribution, as well as add to the mirrors without disturbing the main core distribution."
Feel free to read up on its history, its legal footing, and its incredible growth over the past decade. If you’d like to build your own creation from Scientific Linux, there’s a well-documented tutorial to get you there. Incredible Linux™ here we come! And what a terrific contribution to the open source community by the Scientific Linux developers. Imagine actually being able to spin off GPL code into enhanced products just as the GPL license envisioned. What a concept!
We’ll have more news about Scientific Linux in coming weeks. But, for today, we hope you’ll take the new PIAF-Green Virtual Machine for a spin. This new release was put together within days of the release of Scientific Linux 6.5. That speaks volumes about SL platform stability and its enthusiastic community. We’re delighted to be the newest member!
The Ultimate VoIP Appliance: PIAF Virtual Machine for VirtualBox
Today brings us to a new plateau in the virtual machine development era. We’re pleased to introduce a new product that can be installed in under 5 minutes and will run on any Windows PC, Mac, or Linux machine as well as Solaris. And, unlike the dedicated machine platforms and OpenVZ compromises of years past, today’s PIAF-Green Virtual Machine is state-of-the-art giving you everything a bare metal install from source code would have provided. Most importantly, the components are truly portable. They can be copied to a 4GB flash drive1 for the price of a good hamburger and installed from there onto any type of machine that happens to be in front of you. Five minutes later, you have a fully functional Asterisk server with FreePBX and exactly the same feature set and source code that you would have had doing a bare metal PIAF install to a dedicated server. And we’ve built this 32-bit production-ready PIAF-Green Virtual Machine with Asterisk 11.7 and FreePBX 2.11. No Internet access required to perform the install. Sound too good to be true? Keep reading or, better yet, try the PIAF appliance for yourself. The install process is simple:
- Download and install VirtualBox onto a Desktop Machine of your choice
- Download and double-click on the PIAF-Green Virtual Machine to import it into VirtualBox
- Select the PIAF-Green Virtual Machine in VirtualBox Manager Window and click the Start button
Introducing Oracle VM VirtualBox
We’re late to the party, but Virtual Box®, Oracle’s virtual machine platform inherited from Sun, is really something. It’s not only free, but it’s pure GPL2 code. VirtualBox gives you a virtual machine platform that runs on top of any desktop operating system. In terms of limitations, we haven’t found any. We even tested this on an Atom-based Windows 7 machine with 2GB of RAM, and it worked without a hiccup. So step #1 is to download one or more of the VirtualBox installers from VirtualBox.org or Oracle.com. As mentioned, our recommendation is to put all of the 100MB installers on a 4GB thumb drive. Then you’ll have everything in one place whenever and wherever you happen to need it. Once you’ve downloaded the software, simply install it onto your favorite desktop machine. Accept all of the default settings, and you’ll be good to go. For more details, here’s a link to the Oracle VM VirtualBox User Manual.
Installing the PIAF Virtual Machine
Step #1 is to download the PIAF-Green Open Virtualization Appliance (.ova) from SourceForge.
Step #2: Verify the checksums for the 32-bit .ova appliance to be sure everything got downloaded properly. To check the MD5/SHA1 checksums in Windows, download and run Microsoft’s File Checksum Integrity Verifier.
For Mac or Linux desktops, open a Terminal window, change to the directory in which you downloaded the .ova file and type the following commands:
md5 PIAF-Green-SL.ova (use md5sum for Linux)    MD5: 33fcda3badc7cae025905b59d59f8213

openssl sha1 PIAF-Green-SL.ova    SHA1: f3aa8d966cd8e7bed1d0d6e16d29806056b81e6a
Step #3: Double-click on the downloaded .ova file which will begin the import process into VirtualBox. It only takes a couple minutes, and you only do it once. IMPORTANT: Be sure to check the Reinitialize the Mac address of all network cards box before clicking the Import button.
Once the import is finished, you’ll see the new PIAF-Green virtual machine in the VM List of your VirtualBox Manager Window. You’ll need to make a couple of one-time adjustments to the VM configuration to account for differences in sound and network cards on different host machines.
Click on the PIAF-Green-SL Virtual Machine in the VM List. Then click Settings -> Audio and check the Enable Audio option and choose your sound card. Save your setup by clicking the OK button. Next click Settings -> Network. For Adapter 1, check the Enable Network Adapter option. From the Attached to pull-down menu, choose Bridged Adapter. Then select your network card from the Name list. Then click OK. That’s all the configuration that is ever necessary for your PIAF-Green Virtual Machine. The rest is automagic.
Running the PIAF-Green Virtual Machine in VirtualBox
Once you’ve imported and configured the PIAF Virtual Machine, you’re ready to go. Highlight PIAF Virtual Machine in the VM List on the VirtualBox Manager Window and click the Start button. The PIAF boot procedure with Scientific Linux 6.5 will begin just as if you had installed PBX in a Flash on a standalone machine. You’ll see a couple of dialogue boxes pop up that explain the keystrokes to move back and forth between your host operating system desktop and your PIAF VM.
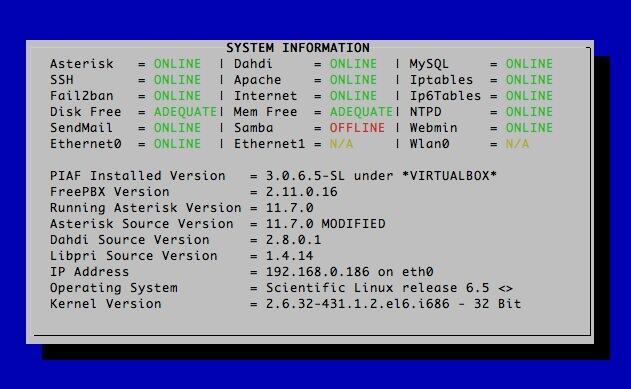
Here’s what you need to know. To work in the PIAF Virtual Machine, just left-click your mouse while it is positioned inside the VM window. To return to your host operating system desktop, press the right Option key on Windows machines or the left Command key on any Mac. For other operating systems, read the dialogue boxes for instructions on moving around. Always shut down PIAF gracefully! Click in the VM window with your mouse, log in as root, and type: shutdown -h now.
Run the PIAF Virtual Machine behind a hardware-based firewall with no Internet port exposure!
To begin, position your mouse over the VM window and left-click. Once the PIAF VM has booted, log in as root with password as the password. Change your root password immediately by typing passwd at the command prompt. Now set up a secure maint password for FreePBX as well. Type passwd-master. If you’re not in the Eastern U.S. time zone, then you’ll want to adjust your timezone setting so that reminders and other time-sensitive events happen at the correct time. While logged into your server as root, issue this command:
setup-timezone
Next, use a browser to log into your PIAF server by pointing to the IP address of the PIAF VM that’s displayed in the status window of the CLI. Click on the User button to display the Admin choices in the main PIAF Menu. Click on the FreePBX option to load the FreePBX GUI. You will be prompted for an Apache username and password. For the username, use maint. For the password, use whatever password you set up with passwd-master.
Now read the latest PIAF Quick Start Guide and begin your VoIP adventure. Then you’ll want to do some reading on VirtualBox. We’ve barely scratched the surface. Setting up Headless VMs that run in the background on any server is a breeze. From the command line, here’s an article to get you started. But you also can start Headless VMs from within the GUI by highlighting the VM and clicking Shift->Start. Always shut down VMs gracefully: Close->ACPI Shutdown. You’ll find more great tips at virtualbox.org and GitHub.
One of the real beauties of VirtualBox is you don’t have to use a GUI at all. The entire process can be driven from the command line. Other than on a Mac, here is the procedure to import, configure, and run the PIAF-Green-32 Virtual Machine:
VBoxManage import PIAF-Green-SL.ova

VBoxManage modifyvm "PIAF-Green-SL" --nic1 nat

VBoxManage modifyvm "PIAF-Green-SL" --acpi on --nic1 bridged

VBoxHeadless --startvm "PIAF-Green-SL" &

# Wait 1 minute for PIAF-Green-SL to load. Then decipher IP address like this:

VBoxManage guestproperty get "PIAF-Green-SL" /VirtualBox/GuestInfo/Net/0/V4/IP

# Now you can use SSH to login to PIAF-Green-SL at the displayed IP address

# Shutdown the PIAF-Green-SL Virtual Machine with the following command:

VBoxManage controlvm "PIAF-Green-SL" acpipowerbutton
On a Mac, everything works the same way except for deciphering the IP address. Download our findip script for that.
Adding Incredible PBX 11 and Incredible Fax
You can read all about the Incredible PBX 11 and Incredible Fax feature set in our recent Nerd Vittles article. If you decide you’d like to add one or both to your PIAF-Green Virtual Machine, just log into your server as root and issue the following commands. NOTE: You must install Incredible Fax after installing Incredible PBX, or you will lose the ability to install Incredible PBX at a later time. With Incredible Fax, there are a number of prompts during the install. With the exception of the prompt asking for your local area code, just press Enter at every other prompt.
cd /root

wget http://incrediblepbx.com/incrediblepbx11.gz

gunzip incrediblepbx11.gz

chmod +x incrediblepbx11

./incrediblepbx11

./incrediblefax11.sh
The Incredible PBX 11 Inventory. For those that have never heard of The Incredible PBX, here’s the current 11.0 feature set in addition to the base install of PBX in a Flash with Scientific Linux 6.5, Asterisk 11, FreePBX 2.11, and Apache, SendMail, MySQL, PHP, phpMyAdmin, IPtables Linux firewall, Fail2Ban, and WebMin. Incredible Fax, NeoRouter and PPTP VPNs, and all sorts of backup solutions are still just one command away and may be installed using the scripts included with Incredible PBX 11 and PBX in a Flash. Type help-pbx and browse /root for dozens of one-click install scripts.
- AsteriDex
- CallerID Superfecta (FreePBX Module adds Names to CID Numbers)
- CallWho for Asterisk (Dial 411)
- Digium Phone Support (install-digiphones)
- Preconfigured Email That Works with SendMail and Incredible Fax
- OSS Endpoint Manager
- Extensions (1 preconfigured with random password)
- Festival Server and Festival TTS for Asterisk (festival –server &)
- Flite TTS for Asterisk
- FreePBX Backups
- Google Dictionary by Phone (Dial 333)
- Google News by Phone (Dial 951)
- Google Stocks by Phone (Dial 950)
- Google Voice (FreePBX GV/Motif Module)
- Hotel-Style Wakeup Calls (FreePBX Module)
- Incredible Backups… and Restores (install-incredbackup2)
- ISN: FreeNum SIP Calling from Any Phone
- MeetMe Conference Bridge (just dial C-O-N-F)
- Mondo Full System Backups (install-diskbackup)
- Incredible Fax 11 (/root/incrediblefax11.sh)
- Incremental Daily Backups (install-dailybackup)
- Munin Reports (install-munin)
- NeoRouter VPN Client (nrclientcmd)
- NewsClips from Yahoo
- ODBC Database Support (Dial 222, 223)
- OpenFire Instant Messaging & Chat Server (install-openfire)
- New PBX in a Flash Registry (show-registry)
- PPTP VPN for PIAF (/root/install-pptp)
- Reminders by Phone and Web
- SAMBA Windows Networking (configure-samba)
- SMS Dictator with Google Voice (Dial S-M-S)
- Speech-to-Text Directory Assistance (Dial 411)
- Stealth AutoAttendant
- TFTP Server (setup-tftp)
- Tide Reports with xTide (Dial T-I-D-E)
- Travelin’ Man 2 & 3 (Secure, remote access)
- Trunks (Vitelity, Gtalk, SIPgate, IPkall, VoIP.ms, and more)
- Weather by ZIP Code
- Worldwide Weather by Phone (Dial 949)
- Wolfram Alpha by Phone (/root/wolfram)
Originally published: Wednesday, January 29, 2014
Need help with Asterisk? Visit the PBX in a Flash Forum.
Special Thanks to Our Generous Sponsors
FULL DISCLOSURE: ClearlyIP, Skyetel, Vitelity, DigitalOcean, Vultr, VoIP.ms, 3CX, Sangoma, TelecomsXchange and VitalPBX have provided financial support to Nerd Vittles and our open source projects through advertising, referral revenue, and/or merchandise. As an Amazon Associate and Best Buy Affiliate, we also earn from qualifying purchases. We’ve chosen these providers not the other way around. Our decisions are based upon their corporate reputation and the quality of their offerings and pricing. Our recommendations regarding technology are reached without regard to financial compensation except in situations in which comparable products at comparable pricing are available from multiple sources. In this limited case, we support our sponsors because our sponsors support us.
BOGO Bonaza: Enjoy state-of-the-art VoIP service with a $10 credit and half-price SIP service on up to $500 of Skyetel trunking with free number porting when you fund your Skyetel account. No limits on number of simultaneous calls. Quadruple data center redundancy. $25 monthly minimum spend required. Tutorial and sign up details are here.
![]() The lynchpin of Incredible PBX 2020 and beyond is ClearlyIP components which bring management of FreePBX modules and SIP phone integration to a level never before available with any other Asterisk distribution. And now you can configure and reconfigure your new Incredible PBX phones from the convenience of the Incredible PBX GUI.
The lynchpin of Incredible PBX 2020 and beyond is ClearlyIP components which bring management of FreePBX modules and SIP phone integration to a level never before available with any other Asterisk distribution. And now you can configure and reconfigure your new Incredible PBX phones from the convenience of the Incredible PBX GUI.
VitalPBX is perhaps the fastest-growing PBX offering based upon Asterisk with an installed presence in more than 100 countries worldwide. VitalPBX has generously provided a customized White Label version of Incredible PBX tailored for use with all Incredible PBX and VitalPBX custom applications. Follow this link for a free test drive!
Special Thanks to Vitelity. Vitelity is now Voyant Communications and has halted new registrations for the time being. Our special thanks to Vitelity for their unwavering financial support over many years and to the many Nerd Vittles readers who continue to enjoy the benefits of their service offerings. We will keep everyone posted on further developments.
Some Recent Nerd Vittles Articles of Interest…
- Many of our purchase links refer users to Amazon when we find their prices are competitive for the recommended products. Nerd Vittles receives a small referral fee from Amazon to help cover the costs of our blog. We never recommend particular products solely to generate Amazon commissions. However, when pricing is comparable or availability is favorable, we support Amazon because Amazon supports us. [↩]
Putting the Genie Back in the Bottle: More RedHat Legal Shenanigans with CentOS

As we celebrate the 10th anniversary of CentOS, the Community Enterprise Operating System, all is not well in Open Source Land. If you haven’t heard, CentOS "joined forces" with Red Hat while you were enjoying the Christmas holiday. And RedHat wasted little time attempting to morph CentOS into a Trademark Minefield much as RedHat has done with its other "open source" projects. If you look at the new CentOS.org web site, RedHat proclaims a New Look and New CentOS. New, indeed. You won’t see many changes other than a healthy mention of RedHat and a vast new Legal section proclaiming RedHat’s ownership of the CentOS trademark and severely restricting acceptable use of the CentOS product. It’s more than a little ironic that RedHat actually pulled off a similar stunt against CentOS back in 2005. The initial problem this time around is that RedHat doesn’t actually own the trademark, nor has RedHat attempted to register it. There are some good reasons why, and we’ll get to those in a minute.
The RedHat Legal Theory of Trademarks goes something like this. We just don’t want people to confuse other products with our brand even though we all use the same, freely available open source brands. Get it? Well let’s try again. RedHat doesn’t mind using Apache’s brand name, and SendMail’s, and MySQL’s, and about 40,000 other trademarked and copyrighted products of open source developers. But God help you if the word "RedHat" appears anywhere in your open source software aggregation.
Now RedHat would like to extend this philosophy to CentOS for the betterment of the community, of course. If successful, RedHat bullying would wipe out virtually all of the current CentOS packages available from the following providers, and thousands more would disappear as well. Here’s the list from CentOS’ own web site, but don’t expect the list to remain around very long. The mere existence of this list proves CentOS acquiescence in the development methodology employed by Amazon Linux AMIs that include CentOS as part of the AMI, AsteriskNOW, BlueOnyx, BlueQuartz, CactiEZ, CentServer, ClarkConnect, ClearOS, Elastix, FAN, FreePBX Distro, OpenNode, OpenVZ, OS Office, OVH, Parallels Virtuozzo Containers, PBX in a Flash, Proxmox images that include CentOS, SipX, SME Server, Snaplogic, trixbox, trixswitch, VicidialNOW, most of the Virtual Machines and hosted platforms that rely upon CentOS with any other included application. And the list goes on. To give you some idea of how pervasive CentOS is in the products of other developers, try Googling: built atop centos. It returns over 21 million results.
In a nutshell, the new RedHat Terms of Service outlaw use of CentOS in any product "unless the combined distribution is an official CentOS distribution." In short, the open source community would be transformed into the functional equivalent of the Windows and Mac platforms. End-users could independently install CentOS and then acquire apps to run under CentOS, but CentOS could no longer be included with the application itself. Well, not so fast, Mr. RedHat.
Even though the evidence trail is quickly disappearing, there’s still plenty of CentOS history that suggests things may not work out quite as well for RedHat this time around. First, there is the CentOS "Social Contract" with the Open Source Software Community and The cAos Foundation’s Open Source Software Guidelines, both of which have conveniently disappeared from the CentOS web site. For history buffs, the cAos Foundation was the developer of the CentOS aggregation. If there’s one overriding principle in both trademark law and open source software development under the GPL, it’s this: YOU CAN’T UNRING A BELL. A license once given cannot be withdrawn at the whim of a new owner, even RedHat. Here’s an excerpt from their "Social Contract." Pay particular attention to the last paragraph:
Another problematic issue is ownership of the trademark itself. You can certainly own a trademark without registering it with the U.S. Patent & Trademark Office. But… since inception, the cAos Foundation has gone to great lengths not to ever enforce, proclaim™, or protect its trademark in CentOS. The reason is simple. They viewed CentOS as a community project which was free for everyone in the community to use and integrate as they saw fit. Thus it is more than a little puzzling that a single developer would finally file a USPTO trademark application for "CENTOS" (note the capitalization and compare to RedHat’s view of the universe) six months ago claiming that he individually owned the mark. Quite the contrary, the cAos Foundation referenced its CentOS brand as early as 2004.
This, of course, raises some additional problems with RedHat’s claim of CentOS trademark and service mark ownership. From a legal standpoint, owners of trademarks are obligated to police the use of their marks to avoid Dilution either by third parties or by tarnishment. Without delving too deeply in the legal weeds, suffice it to say the CentOS mark suffers from dilution on both counts over a period of almost 10 years! This is as it should be actually. CentOS was intended to be a community resource for everyone in the community to be able to use, integrate, and build upon. Because of its inherent non-commercial character, it was never intended to be a brand for independent marketing.
A third trademark infirmity for the CentOS brand is the fact that it’s suffering from genericide. In Plain English, CentOS has become a household word. In the Linux community, it signifies a generic open source Linux operating system. Just as with aspirin and thermos bottles, "a majority of the relevant public [has] appropriated the name of the product… [and, in essence,] the owners are victims of their own success."
And then there’s the matter of licensing. In addition to the "Social Contract" referenced above and upon which many developers relied, there’s also a financial angle. Individual developers reportedly have been given either express or implied authorization to integrate CentOS into their software products in exchange for financial contributions to the "CentOS project." We’ll have more to say about that in our Petition for Cancellation and Opposition to Registration of the CentOS trademark, if the trademark is ever approved for publication. We trust many other developers will file petitions as well. You can review the procedure here. You can follow the CentOS trademark saga here. Be advised that an Opposition to Registration (section 202) must be filed with the Trademark Trial and Appeal Board within 30 days of the date a mark is approved for publication in the USPTO’s Official Gazette. A sample Petition for Cancellation (section 307) is available here. You do not have to be a lawyer to file it. You do have to pay the $300 filing fee. The safest way to monitor approval is by regularly checking the Status of the CENTOS Trademark and Service Mark Application.
Licensing issues aside, there’s a more serious issue moving forward. Most companies used CentOS so they wouldn’t have to pay for Red Hat Enterprise Linux. Now Red Hat has bought CentOS. Guess what? Is it just a matter of time until CentOS is crippled so that it cannot serve as a drop-in replacement for Red Hat’s Cash Cow? Duh! Did the CentOS development team care about this? Probably not. Might not have even considered it. They got money and cushy jobs out of the deal. But, just because Red Hat offers financial rewards to a handful of CentOS developers is no reason to scuttle the development efforts of thousands of independent developers over the last decade. Better think twice, RedHat. The open source community will be watching.
Originally published: Monday, January 20, 2014
Need help with Asterisk? Visit the PBX in a Flash Forum.
whos.amung.us If you’re wondering what your fellow man is reading on Nerd Vittles these days, wonder no more. Visit our whos.amung.us statistical web site and check out what’s happening. It’s a terrific resource both for all of us.
Special Thanks to Our Generous Sponsors
FULL DISCLOSURE: ClearlyIP, Skyetel, Vitelity, DigitalOcean, Vultr, VoIP.ms, 3CX, Sangoma, TelecomsXchange and VitalPBX have provided financial support to Nerd Vittles and our open source projects through advertising, referral revenue, and/or merchandise. As an Amazon Associate and Best Buy Affiliate, we also earn from qualifying purchases. We’ve chosen these providers not the other way around. Our decisions are based upon their corporate reputation and the quality of their offerings and pricing. Our recommendations regarding technology are reached without regard to financial compensation except in situations in which comparable products at comparable pricing are available from multiple sources. In this limited case, we support our sponsors because our sponsors support us.
BOGO Bonaza: Enjoy state-of-the-art VoIP service with a $10 credit and half-price SIP service on up to $500 of Skyetel trunking with free number porting when you fund your Skyetel account. No limits on number of simultaneous calls. Quadruple data center redundancy. $25 monthly minimum spend required. Tutorial and sign up details are here.
![]() The lynchpin of Incredible PBX 2020 and beyond is ClearlyIP components which bring management of FreePBX modules and SIP phone integration to a level never before available with any other Asterisk distribution. And now you can configure and reconfigure your new Incredible PBX phones from the convenience of the Incredible PBX GUI.
The lynchpin of Incredible PBX 2020 and beyond is ClearlyIP components which bring management of FreePBX modules and SIP phone integration to a level never before available with any other Asterisk distribution. And now you can configure and reconfigure your new Incredible PBX phones from the convenience of the Incredible PBX GUI.
VitalPBX is perhaps the fastest-growing PBX offering based upon Asterisk with an installed presence in more than 100 countries worldwide. VitalPBX has generously provided a customized White Label version of Incredible PBX tailored for use with all Incredible PBX and VitalPBX custom applications. Follow this link for a free test drive!
Special Thanks to Vitelity. Vitelity is now Voyant Communications and has halted new registrations for the time being. Our special thanks to Vitelity for their unwavering financial support over many years and to the many Nerd Vittles readers who continue to enjoy the benefits of their service offerings. We will keep everyone posted on further developments.
Some Recent Nerd Vittles Articles of Interest…
Free Asterisk Solutions
