
The Most Versatile VoIP Provider: FREE PORTING

 JUST RELEASED: Visit the Incredible PBX Wiki
Google Dips Its Toes in the Icy SIP Waters… and Retreats

In case you missed it, Google announced at the end of last week that it will discontinue support of Gizmo5 on April 3. Many of us suspected this was the death knell for Google support of SIP given the popularity of its recent Gtalk enhancements to Google Voice. Well, not so fast! As Todd Vierling pointed out on his blog this past Saturday, Google has quietly added outbound SIP support to reach any Google Voice number. So, assuming your Google Voice number is 678-123-4567, anyone in the world can now call you via SIP by dialing +16781234567@sip.voice.google.com.
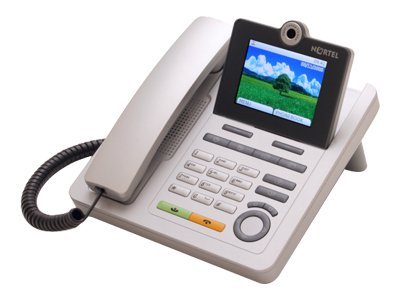
For those using Asterisk® and FreeSwitch systems , here’s what you need to do immediately. Register all of your Google Voice numbers in the ENUM systems so that other Asterisk and FreeSwitch systems worldwide can connect with you using your new Google SIP URI without any communications charges. This also means that SIP phones such as the Nortel 1535 Color Videophone using services such as sip2sip.info can call you for free. And all they’ll need to do is dial your 10-digit Google Voice number!
To sign up for ENUM service, go to both e164.org and enumplus.org and register your 10-digit Google Voice number. Be sure to use the syntax shown above for the SIP URI (including the + symbol), or the calls will fail. It only takes a minute to register. ENUM is implemented for outbound calls by default in all Incredible PBX and Orgasmatron builds. So, just by registering your Google Voice number with these two sites, it means every ENUM-enabled server can place free SIP calls to your Google Voice number via ENUM before using any other outbound trunk for which there might be a charge.
Of course, everyone won’t register their Google Voice number with the ENUM services. So how do you call those folks via SIP without incurring charges for the call? For those that install Incredible PBX (beginning yesterday), it’s automagic. Just dial any 10-digit number, and Incredible PBX will attempt to place the call via SIP before falling back to Google Voice. The call processing is instantaneous so don’t worry about call delay. Remember, we’re living in a Digital World.
FreePBX Setup. If you have an existing FreePBX-based Asterisk system or an earlier release of Incredible PBX, here’s how to retrofit your system to support free SIP calling to Google Voice numbers. Whenever an Asterisk server attempts to place a SIP call, it sends a SIP Invite packet to the receiving server. In the case of Google, if the number is not one of theirs, you’ll immediately get a Congestion message from FreePBX. In the FreePBX design, this means that the attempt to place the outbound call will drop down to the next available trunk in the current Outbound Route. So the trick here is to create a custom trunk to handle the SIP calls to Google. And then we’ll add that trunk above your existing trunks in the Outbound Route that handles calls matching 1NXXNXXXXXX and NXXNXXXXXX. So the recommended Trunk Sequence in your Default Outbound Route would look like this:
1. ENUM
2. google-sip
3. gvoice
4. vitel-outbound
5. OtherProvider
Using a web browser, open FreePBX and choose Setup, Trunks, Add Custom Trunk. Create the new Google-SIP Trunk so that it looks like the following. Don’t forget the 1 Prepend and + Dial Prefix entries!
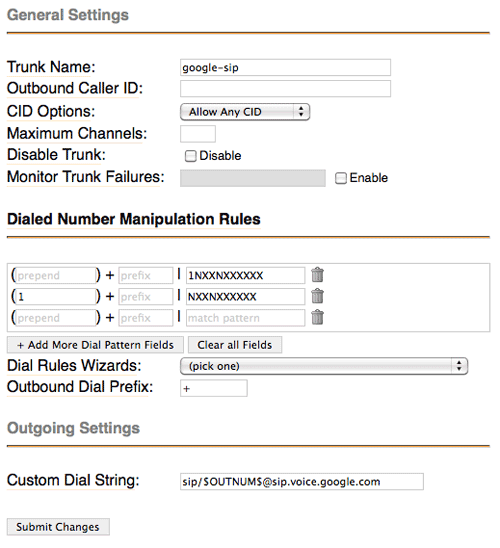
Click Submit Changes to save your entries and then reload FreePBX when prompted.
Now choose Setup, Outbound Routes, and choose your Default outbound route. Modify the Trunk Sequence so that it matches what was outlined above. Click Submit Changes to save your entries and then reload FreePBX when prompted.
You’re done. Enjoy your new SIP-based Google Voice calling addition.
 Don’t forget to List Yourself in Directory Assistance so everyone can find you by dialing 411. And add your new number to the Do Not Call Registry to block telemarketing calls. Or just call 888-382-1222 from your new Google Voice number. Enjoy!
March 8 Update. Well, that was a quick dip. Beware the Ides of March! It was almost exactly two years ago that Google shut down SIP connectivity the first time. Hopefully, we’re not in for another two year wait. Read our original article about this and have a chuckle. But it looks like they’ve done it again. To restore your system to normal functionality, remove the Google-SIP trunk from your Outbound Route and be sure to delete your Google Voice numbers from the SIP registries at e164.org and enumplus.org. To suggest this is short-sighted (not to mention monetarily wasteful) would be an understatement. But perhaps Google wasn’t prepared for the onslaught of delighted users. Let’s hope so. 🙄
March 16 Update. It’s working again this morning! But now it’s not morning, and we’re dead in the water once more. Did we mention this might qualify as E-X-P-E-R-I-M-E-N-T-A-L?? See the comments below for up-to-the-minute updates.
Security Reminder. We mentioned this two years ago, but it’s worth repeating since it still has not been addressed. Google protects phone access to your Google Voice account with only a 4-digit PIN. When unanswered calls roll over to their voicemail system, anyone has the option of pressing * to be prompted for this PIN. It only takes 10,000 calls at most to guess any PIN, and that doesn’t take very long with SIP and an automated dialer. Once someone has your PIN, in addition to listening to your voicmail messages, they also can press 2 to place an outbound call to anywhere in the world… on your nickel. So… don’t load up your account with your entire life savings unless you don’t mind losing it. 🙄
Originally published: Monday, March 7, 2011

Need help with Asterisk? Visit the PBX in a Flash Forum or Wiki.
Or Try the New, Free PBX in a Flash Conference Bridge.
whos.amung.us If you’re wondering what your fellow man is reading on Nerd Vittles these days, wonder no more. Visit our new whos.amung.us statistical web site and check out what’s happening. It’s a terrific resource both for us and for you.
Special Thanks to Our Generous Sponsors
FULL DISCLOSURE: ClearlyIP, Skyetel, Vitelity, DigitalOcean, Vultr, VoIP.ms, 3CX, Sangoma, TelecomsXchange and VitalPBX have provided financial support to Nerd Vittles and our open source projects through advertising, referral revenue, and/or merchandise. As an Amazon Associate and Best Buy Affiliate, we also earn from qualifying purchases. We’ve chosen these providers not the other way around. Our decisions are based upon their corporate reputation and the quality of their offerings and pricing. Our recommendations regarding technology are reached without regard to financial compensation except in situations in which comparable products at comparable pricing are available from multiple sources. In this limited case, we support our sponsors because our sponsors support us.
 BOGO Bonaza: Enjoy state-of-the-art VoIP service with a $10 credit and half-price SIP service on up to $500 of Skyetel trunking with free number porting when you fund your Skyetel account. No limits on number of simultaneous calls. Quadruple data center redundancy. $25 monthly minimum spend required. Tutorial and sign up details are here.
![]() The lynchpin of Incredible PBX 2020 and beyond is ClearlyIP components which bring management of FreePBX modules and SIP phone integration to a level never before available with any other Asterisk distribution. And now you can configure and reconfigure your new Incredible PBX phones from the convenience of the Incredible PBX GUI.
The lynchpin of Incredible PBX 2020 and beyond is ClearlyIP components which bring management of FreePBX modules and SIP phone integration to a level never before available with any other Asterisk distribution. And now you can configure and reconfigure your new Incredible PBX phones from the convenience of the Incredible PBX GUI.
 VitalPBX is perhaps the fastest-growing PBX offering based upon Asterisk with an installed presence in more than 100 countries worldwide. VitalPBX has generously provided a customized White Label version of Incredible PBX tailored for use with all Incredible PBX and VitalPBX custom applications. Follow this link for a free test drive!
 Special Thanks to Vitelity. Vitelity is now Voyant Communications and has halted new registrations for the time being. Our special thanks to Vitelity for their unwavering financial support over many years and to the many Nerd Vittles readers who continue to enjoy the benefits of their service offerings. We will keep everyone posted on further developments.
Some Recent Nerd Vittles Articles of Interest…
Motorola Xoom: A Disappointing Introduction to Android 3.0

As the old saying goes, "Beauty is only skin deep." And so it is with Motorola’s new overhyped Xoom tablet featuring Android 3.0. We really wanted to like this device. The form factor sounded appealing, Android 3.0 is awesome, and dual cameras plus a dual-core processor had us chomping at the bit for a chance to try out this bad boy. It’s hard to find a new toy we don’t like, but then along comes the Xoom. It may weigh the same as an iPad, but it feels much more bulky. We personally like the form factor of Samsung’s Galaxy Tab compared to this monstrosity. And the dual core processor was a disappointment as well. We noticed very little difference in performance during our real world testing. You’re not going to hold this device with one hand for very long. It’s too heavy in all the wrong places. So we kept asking ourselves, "Where would you use it?" And the most likely places would be in bed or sitting on it’s $149 speaker dock connected to a big monitor. For both of those options, there are better solutions with an Apple TV and an iMac. The biggest fail may be the power button, positioned on the back of the unit at the exact spot most folks will use to hold the device to watch a movie.
Vaporware: 3.0 Strikes & You’re Out. We’ve saved the real Parade of Horrors for last. Motorola basically ruined the introduction of Android 3.0, designed specifically for the tablet form factor, by prematurely releasing this half-baked product. They hyped Verizon’s 4G network, but there’s not one 4G component in the device. You’ll have to send it back to Motorola for a week to get that upgrade… someday. Motorola advertised Adobe Flash support which still is the Achilles’ Heel of the iPad. But there’s no Flash to be found. Talk about ironic, you can’t view Motorola’s XOOM web site from the device. Flash, too, will be an upgrade… someday. Then there’s the non-functional microSD slot. Yep, you guessed it. Someday. Sorry, but $800++ for a prototype device is insulting. It also says something about Google’s lack of control over manufacturers. Seems to us it wouldn’t be that difficult to write a license agreement that says, if you want to use our trademarks on your device, you won’t release the product until a specified list of functions actually work. And pardon us for stating the obvious but advertising should be something more than a big pile of bullsh*t.
For those that are silly enough to buy the Xoom, there is some good news. The device was rooted in a matter of hours. So you can load all your favorite utilities and functions easily. Here’s a link to the cookbook. Be aware that rooting the device may deprive you of the ability to ever get the vaporware upgraded for 4G, Flash, and a functioning microSD slot. Of course, maybe that was the plan all along.
There are many good reviews of the Xoom and Android 3.0 if you want the usual Silicon Valley PR fluff from the folks that received the evaluation units. Start here and here. Suffice it to say, it’s a major upgrade to Android. We like the new UI; however, we’re not all that keen on the lack of buttons and particularly the placement of the Home and Back icons in the lower left corner of the screen. 90% of the world is right-handed. So why you’d position the most used screen real estate in the most difficult place to access it with your right hand while holding the device in your left hand is a real head-scratcher.
Finally, a word about data plans. In order to purchase our unit at full retail from Best Buy, we had to buy at least one month of Verizon service. In our law school days, this used to be called tying in antitrust law. Since it makes corporations extra money, it’s probably fine today. Verizon, however, has taken greed to a whole new level. And this is just for 3G service. 4G reportedly will cost a few cents more. 1GB of data will cost you $20 a month. That’s about two 4-hour car trips with a teenager using the device. 3GB of data will cost you $35, 5GB runs $50, and 10GB is a whopping $80. As a point of reference, AT&T’s 2GB data plan with equivalent 3G service is $25 for the iPad. So, yes, you’ll be using WiFi a lot thanks to the greed of Verizon and AT&T. Of course, you can’t buy a WiFi-only unit. That’ll be available someday after Verizon has gotten their initial pound of flesh. And, at least for us, WiFi performance compared with the iPad and Galaxy Tab was no great shakes. What is certain is that, with this device, you probably will want to consider tethering from a cellphone that still has an unlimited data plan unless you’re willing to give up eating lunch in order to pay your monthly Verizon bill. HINT: Read our review of the Optimus V and Virgin Mobile’s $25 a month unlimited 3G data deal. Or Sprint’s Mobile HotSpot for the HTC Evo runs $1 a day and provides unlimited 4G data at a fraction of the cost of Verizon’s 3G offerings.
Footnote: Following our return of the device and cancellation of the service, we received a bill from Verizon which included an undisclosed $35 activation fee in addition to the prorated charges for data service. AT&T charges no activation fees on iPads and other tablets. With this addition, it boosts the cost of the Motorola Xoom sufficiently to make it more costly than even the top-of-the-line iPad 2. After 30 minutes on the phone with Verizon "customer care," a supervisor finally waived the $35 fee. And you thought no company could rival AT&T’s dismal track record. Think again.
My 10-year-old daughter echoed our sentiments about the Motorola Xoom: "Thanks. I’ll keep my iPad." In case you’ve forgotten, Apple will announce a new iPad later this week, and we wouldn’t be surprised to see a new processor and (working) microSD slot in addition to the oft-reported camera additions. We recommend you wait for a better alternative! There will be many, not someday, but very soon. And, indeed, there now are. See our recent article.
Originally published: Monday, February 28, 2011
Need help with Asterisk®? Visit the PBX in a Flash Forum or Wiki.
Or Try the New, Free PBX in a Flash Conference Bridge.
whos.amung.us If you’re wondering what your fellow man is reading on Nerd Vittles these days, wonder no more. Visit our new whos.amung.us statistical web site and check out what’s happening. It’s a terrific resource both for us and for you.
Special Thanks to Our Generous Sponsors
FULL DISCLOSURE: ClearlyIP, Skyetel, Vitelity, DigitalOcean, Vultr, VoIP.ms, 3CX, Sangoma, TelecomsXchange and VitalPBX have provided financial support to Nerd Vittles and our open source projects through advertising, referral revenue, and/or merchandise. As an Amazon Associate and Best Buy Affiliate, we also earn from qualifying purchases. We’ve chosen these providers not the other way around. Our decisions are based upon their corporate reputation and the quality of their offerings and pricing. Our recommendations regarding technology are reached without regard to financial compensation except in situations in which comparable products at comparable pricing are available from multiple sources. In this limited case, we support our sponsors because our sponsors support us.
BOGO Bonaza: Enjoy state-of-the-art VoIP service with a $10 credit and half-price SIP service on up to $500 of Skyetel trunking with free number porting when you fund your Skyetel account. No limits on number of simultaneous calls. Quadruple data center redundancy. $25 monthly minimum spend required. Tutorial and sign up details are here.
![]() The lynchpin of Incredible PBX 2020 and beyond is ClearlyIP components which bring management of FreePBX modules and SIP phone integration to a level never before available with any other Asterisk distribution. And now you can configure and reconfigure your new Incredible PBX phones from the convenience of the Incredible PBX GUI.
The lynchpin of Incredible PBX 2020 and beyond is ClearlyIP components which bring management of FreePBX modules and SIP phone integration to a level never before available with any other Asterisk distribution. And now you can configure and reconfigure your new Incredible PBX phones from the convenience of the Incredible PBX GUI.
VitalPBX is perhaps the fastest-growing PBX offering based upon Asterisk with an installed presence in more than 100 countries worldwide. VitalPBX has generously provided a customized White Label version of Incredible PBX tailored for use with all Incredible PBX and VitalPBX custom applications. Follow this link for a free test drive!
Special Thanks to Vitelity. Vitelity is now Voyant Communications and has halted new registrations for the time being. Our special thanks to Vitelity for their unwavering financial support over many years and to the many Nerd Vittles readers who continue to enjoy the benefits of their service offerings. We will keep everyone posted on further developments.
Some Recent Nerd Vittles Articles of Interest…
The Perfect Valentine: $149 Android + $25 Virgin Mobile Plan
 Just when AT&T and Verizon thought they’d suckered everyone on the planet into paying $100 a month for 24 months to get a functional cellphone with either an iPhone or Android phone, along comes a breath of fresh air. Close your eyes and try to picture Google’s Nexus One paired with a $25 3G cellphone plan with unlimited data, unlimited messaging and 300 minutes a month. Did we mention NO CONTRACT? Flash support? Nope.1 But tethering is possible for talented geeks and nerds as well. For those that don’t spend their whole life yacking on a telephone, this combination hits the sweet spot. It’s especially appealing for both the older generation who need the security of a cellphone but rarely use it and those under 25 that seldom converse other than in sparkling text messages.
With the addition of the free CSipSimple app from the Android Market, you can place SIP calls through your favorite SIP provider or PBX in a Flash server for little or no cost using either a WiFi or 3G data connection. Or you can use the free OBiTalk for Android app in conjunction with a $49 OBi device we previously reviewed to make free Google Voice calls in the U.S. and Canada.
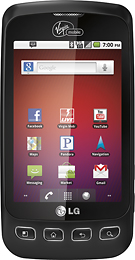
First, the bad news. It’s not a Nexus One. And now the good news. It’s even better. It’s LG’s new $149 Optimus V for Virgin Mobile. Yes, it weighs an ounce more and is perhaps a few millimeters thicker than a Nexus One, but in return you get Android Froyo 2.2. Aside from that, the phones are virtually identical: beautiful screen, quality feel, 3.2 megapixel camera, Facebook, Twitter, full integration of Google Apps including Google Market, Gmail, Google Voice, Maps, Latitude, Voice-Enabled Navigation with GPS, WiFi, Bluetooth (cell phone and audio pairing finally work reliably in Froyo!), and 3G service on Sprint’s rock-solid nationwide network. The phone is rated at 6 hours talk time and 168 hours standby… and it can be rooted in a couple of minutes if you hurry. The phones went on sale this week at Best Buy, Radio Shack, and other Virgin Mobile retailers. But they won’t last long at least without a patch to close the rooting door. So, yes, it is the Perfect Valentine’s Day gift. Stop reading and start calling until you find one. They’re that good, and they’re available on line as well. Best Buy currently has them for $129.99. Be sure to check out the Comments to this article for late-breaking discounts.
Virgin Mobile actually offers three cellphone plans for the Optimus V. All are contract-free! And all include unlimited messaging, email, data and web services. The only difference is in the cellphone minutes per month. $25 a month gets you 300 minutes. $40 gets you 1200 minutes. And $60 gets you unlimited minutes. The signup process only takes a couple of minutes, and you have the option of recurring billing by credit card only if you choose it. Unlike AT&T and Verizon, international calling is downright reasonable. The big cities in Mexico are 2¢ a minute, most of Europe is 25¢ and other countries are all over the map (literally). Pakistan, for example, is 5¢. So there are no gotchas, at least that we could find.
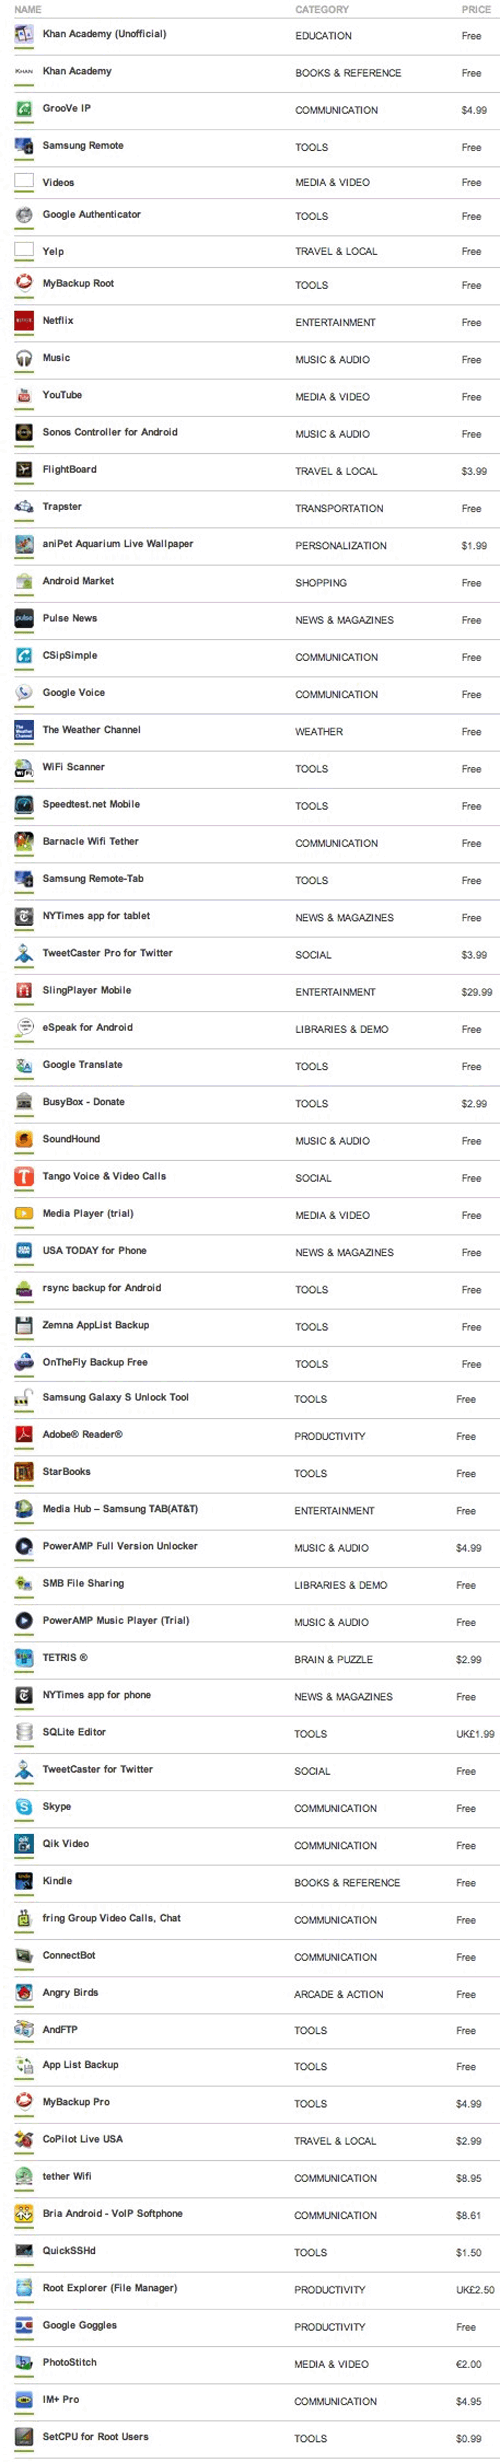
Once the phone is enabled, you’ll want to hurry over to the Android Central Forum which will walk you through rooting the phone using your favorite Windows machine. The only trick is finding the Windows USB drivers for LG phones. HINT: Look here. Once you get Sun’s JRE and the Android SDK installed, SuperOneClick handles the heavy lifting in a few seconds. Once the phone is rooted, you can download SuperUser, TitaniumBackup, and Barnacle WiFi Tethering from the Google Market. The only trick to Barnacle is to choose Skip wpa_supplicant in Settings. Finally, you’ll want to disable over-the-air (OTA) updates so that the provider doesn’t mess up your perfect phone down the road. Here’s how. Renaming the keys file is all that is required, and the easiest way to do it is using Root Explorer (available in the Google Market for a couple bucks) which is money well spent. Happy Valentine’s Day to all. We’ve listed a few of our favorite Android apps below to get your started. Enjoy!
Originally published: Friday, February 11, 2011
Need help with Asterisk®? Visit the PBX in a Flash Forum or Wiki.
Or Try the New, Free PBX in a Flash Conference Bridge.
whos.amung.us If you’re wondering what your fellow man is reading on Nerd Vittles these days, wonder no more. Visit our new whos.amung.us statistical web site and check out what’s happening. It’s a terrific resource both for us and for you.
Special Thanks to Our Generous Sponsors
FULL DISCLOSURE: ClearlyIP, Skyetel, Vitelity, DigitalOcean, Vultr, VoIP.ms, 3CX, Sangoma, TelecomsXchange and VitalPBX have provided financial support to Nerd Vittles and our open source projects through advertising, referral revenue, and/or merchandise. As an Amazon Associate and Best Buy Affiliate, we also earn from qualifying purchases. We’ve chosen these providers not the other way around. Our decisions are based upon their corporate reputation and the quality of their offerings and pricing. Our recommendations regarding technology are reached without regard to financial compensation except in situations in which comparable products at comparable pricing are available from multiple sources. In this limited case, we support our sponsors because our sponsors support us.
BOGO Bonaza: Enjoy state-of-the-art VoIP service with a $10 credit and half-price SIP service on up to $500 of Skyetel trunking with free number porting when you fund your Skyetel account. No limits on number of simultaneous calls. Quadruple data center redundancy. $25 monthly minimum spend required. Tutorial and sign up details are here.
![]() The lynchpin of Incredible PBX 2020 and beyond is ClearlyIP components which bring management of FreePBX modules and SIP phone integration to a level never before available with any other Asterisk distribution. And now you can configure and reconfigure your new Incredible PBX phones from the convenience of the Incredible PBX GUI.
The lynchpin of Incredible PBX 2020 and beyond is ClearlyIP components which bring management of FreePBX modules and SIP phone integration to a level never before available with any other Asterisk distribution. And now you can configure and reconfigure your new Incredible PBX phones from the convenience of the Incredible PBX GUI.
VitalPBX is perhaps the fastest-growing PBX offering based upon Asterisk with an installed presence in more than 100 countries worldwide. VitalPBX has generously provided a customized White Label version of Incredible PBX tailored for use with all Incredible PBX and VitalPBX custom applications. Follow this link for a free test drive!
Special Thanks to Vitelity. Vitelity is now Voyant Communications and has halted new registrations for the time being. Our special thanks to Vitelity for their unwavering financial support over many years and to the many Nerd Vittles readers who continue to enjoy the benefits of their service offerings. We will keep everyone posted on further developments.
Some Recent Nerd Vittles Articles of Interest…
- Incompatible processor precludes Flash. Sorry. [↩]
2011 VoIP Device of the Year: Obihai OBi110 for Google Voice
It’s only January, but we already have a winner for 2011 VoIP Device of the Year. Once in a very long while, a device comes along that’s not only revolutionary but also incredibly useful while being downright simple to use. Did we mention inexpensive? So it is with the Obihai OBi110 which fills a niche that’s been screaming for a simple solution.
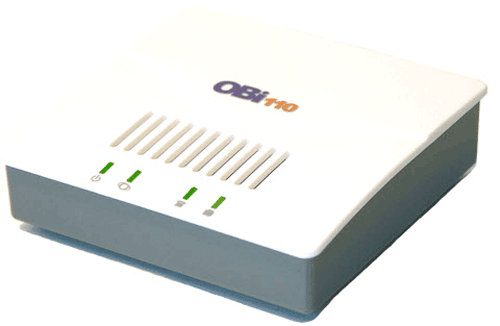
Google turned the telephony world upside down last year by offering U.S. residents a free local phone number and free calling in the U.S. and Canada. But you had to use a PC to make the calls, or you had to become at least a junior rocket scientist with either Asterisk® or FreeSwitch to make Google Voice calls using a regular telephone. Well, as they say, that’s so yesterday. Meet the unassuming Obihai OBi110. It’s a little box about the size of a pack of cigarettes if you remember those. But, under the covers, this is no ordinary ATA device. Plug it into your DSL or cable modem, attach a standard telephone or your favorite cordless phone, and in less than a minute you’ll be making and receiving calls with your Google Voice credentials.
If you’ve followed our previous articles on Google Voice, you already know that you’ll need a dedicated Google account to get things working properly because the OBi110 uses the Google Talk protocol just as Gmail does. So sign up for a new Gmail account, then log into google.com/voice with your new Gmail credentials. Choose a number in your favorite area code and use an existing phone number to activate the account. Once registered, click on Settings, Voice Settings. Check the Google Chat option to activate Google Talk. Then click on the Calls tab, turn off Call Screening, and click Save Settings. That’s all there is to setting up your new Google Voice account for use.
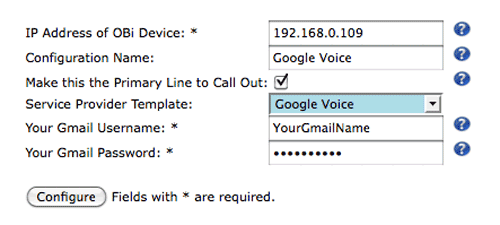
Now plug in your OBi110, connect it to your network so that it can obtain an IP address from a DHCP server, and plug in a Plain Old Telephone. Pick up the phone and dial * * * 1 to obtain the IP address of your OBi110. Now, with your web browser open, click on this link. Fill in the blanks using the IP address of the OBi110 on your LAN and your Gmail name and password. Click the Configure button, and you’re done. After the device restarts, download the latest firmware for your OBi to your desktop, and then install it from the web interface to your OBi by choosing System Management -> Device Update.
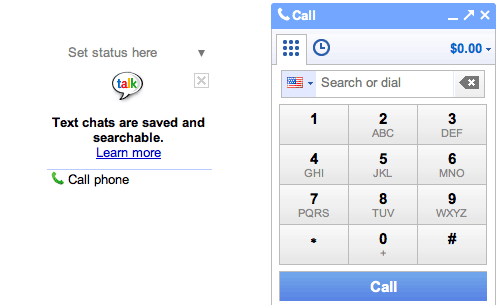
Before you can actually make outbound calls with the OBi110, you may need to make one call from your browser by clicking the Call Phone option under Chat in the Gmail account you just created. When the dialer appears, enter a 10-digit phone number and press the Enter key. This lets you acknowledge that Google Voice does not support 911 emergency calling. Be sure to log out of this Gmail account once you complete the test call. You can’t be logged in and also use the OBi110. That’s why we set up a dedicated Google account for this device. Guess what? You’re done.
You can buy the Obihai OBi110 from Amazon for $50 including free shipping. It’s the best $50 you’ll ever spend!
2/6 Update: Since this article was released, over 85,000 folks that frequent SlickDeals.net have been pointed here so there’s a momentary shortage of OBi devices. 🙂 They should be back in stock at Amazon at the original $50 price by early next week so don’t buy from the resellers that doubled the price. Start searching for OBihai and OBi110 on Amazon about Monday, February 7. In the meantime, there are over 25 pages of comments on SlickDeals.net to keep you entertained. Here’s a golden nugget from AllThumbs to get those of you that snagged a unit started using the numerous OBi features in addition to Google Voice:
Simply connect a regular telephone cable between the LINE port of the OBi110 and the PHONE jack of an Ooma, MagicJack, Vonage adapter, Comcast phone adapter, etc. and the inbound calls from your other service will ring on the desktop phones or cordless phones connected to the OBi’s PHONE port. For outbound calls, you can pick up a phone connected to the OBi PHONE port and dial **8 plus a 10-digit number to send the call out through your other service while dialing a regular 10-digit number will send the call out through Google Voice. You can also enable a Circle of Friends by CallerID that can dial into the OBi from anywhere using the OBi Google Voice number, enter a PIN, and dial out through any of the other OBi-enabled service providers.
If you configure the other OBi SIP connection (no wire required other than the network connection) to an extension on an Asterisk/PBX in a Flash machine or a SIP provider such as Vitelity, voip.ms, les.net, DIDforsale, or SIPgate, then you can make outbound calls for a penny or two a minute in the U.S. by dialing **2 plus a 10-digit number. None of these features or service providers take more than a couple minutes to set up, and all have web-based configuration utilities. When you’re finished with the set up, you’ll have a phone system with triple redundancy as long as your network connection stays up. And, if that worries you and you want network redundancy as well, plug your Ma Bell phone line into the LINE port instead of an Ooma or MagicJack.
For the Whiz Kids. We’ve barely scratched the surface of what you can do with the OBi110. It’s easy to configure it for use with other SIP services or your own Asterisk server. Start by reading Marcelo Rodriguez’s Setup Guide on Voxilla and then read the excellent series of articles on the Michigan Telephone Blog. Enjoy!
Originally published: Thursday, February 3, 2011
Need help with Asterisk? Visit the PBX in a Flash Forum or Wiki.
Or Try the New, Free PBX in a Flash Conference Bridge.
whos.amung.us If you’re wondering what your fellow man is reading on Nerd Vittles these days, wonder no more. Visit our new whos.amung.us statistical web site and check out what’s happening. It’s a terrific resource both for us and for you.
Special Thanks to Our Generous Sponsors
FULL DISCLOSURE: ClearlyIP, Skyetel, Vitelity, DigitalOcean, Vultr, VoIP.ms, 3CX, Sangoma, TelecomsXchange and VitalPBX have provided financial support to Nerd Vittles and our open source projects through advertising, referral revenue, and/or merchandise. As an Amazon Associate and Best Buy Affiliate, we also earn from qualifying purchases. We’ve chosen these providers not the other way around. Our decisions are based upon their corporate reputation and the quality of their offerings and pricing. Our recommendations regarding technology are reached without regard to financial compensation except in situations in which comparable products at comparable pricing are available from multiple sources. In this limited case, we support our sponsors because our sponsors support us.
BOGO Bonaza: Enjoy state-of-the-art VoIP service with a $10 credit and half-price SIP service on up to $500 of Skyetel trunking with free number porting when you fund your Skyetel account. No limits on number of simultaneous calls. Quadruple data center redundancy. $25 monthly minimum spend required. Tutorial and sign up details are here.
![]() The lynchpin of Incredible PBX 2020 and beyond is ClearlyIP components which bring management of FreePBX modules and SIP phone integration to a level never before available with any other Asterisk distribution. And now you can configure and reconfigure your new Incredible PBX phones from the convenience of the Incredible PBX GUI.
The lynchpin of Incredible PBX 2020 and beyond is ClearlyIP components which bring management of FreePBX modules and SIP phone integration to a level never before available with any other Asterisk distribution. And now you can configure and reconfigure your new Incredible PBX phones from the convenience of the Incredible PBX GUI.
VitalPBX is perhaps the fastest-growing PBX offering based upon Asterisk with an installed presence in more than 100 countries worldwide. VitalPBX has generously provided a customized White Label version of Incredible PBX tailored for use with all Incredible PBX and VitalPBX custom applications. Follow this link for a free test drive!
Special Thanks to Vitelity. Vitelity is now Voyant Communications and has halted new registrations for the time being. Our special thanks to Vitelity for their unwavering financial support over many years and to the many Nerd Vittles readers who continue to enjoy the benefits of their service offerings. We will keep everyone posted on further developments.
Some Recent Nerd Vittles Articles of Interest…
Incredible PBX 1.8: New OpenVZ and Cloud Editions

Another exciting week in the Asterisk® community with the introduction of Asterisk 1.8.2 last Friday. It's now the official PIAF-Purple payload so you can simply download the current ISO to take it for a spin. Most of the pesky bugs in Asterisk 1.8.0 and 1.8.1 now have been addressed. Let us know if you find some new ones.
While the Asterisk Dev Team has been hard at work on Asterisk 1.8.2, we've turned our attention to the cloud and VoIP virtualization. We have three new products to introduce today. The first lets you install PIAF-Purple with Asterisk 1.8.2 using a new OpenVZ template. The second lets you run Incredible PBX 1.8 as a virtual machine using the new PIAF-Purple 1.8.2 OpenVZ template. Finally, we'll show you how to run Incredible PBX 1.8 in the cloud with hosted VoIP service from RentPBX.com for $15 a month with a free local phone number and free Google Voice calling in the U.S. and Canada. So let's get started.
Using the OpenVZ PIAF-Purple Template. If you haven't heard of OpenVZ templates before, you've missed one of the real technological breakthroughs of the last decade. Rather than wading through the usual 30-minute ISO installation drill, with an OpenVZ template, all of the work is done for you. And it's quick. You can build a dozen PIAF-Purple systems using an OpenVZ template in about 15 minutes with a per system cost of less than $50. See Comment #2 below for an extra special Dell half-price server deal this week. And it's incredibly easy to then tie all of these systems together using either SIP or IAX trunks. Just follow our previous tutorial. For resellers and developers that want to try various Asterisk configurations before implementation and for trainers and others that want to host dedicated Asterisk systems for customers, the OpenVZ platform is a perfect fit. Read our original two-part article to get up to speed on Proxmox, virtualization, and IPtables with OpenVZ. Then continue on here.
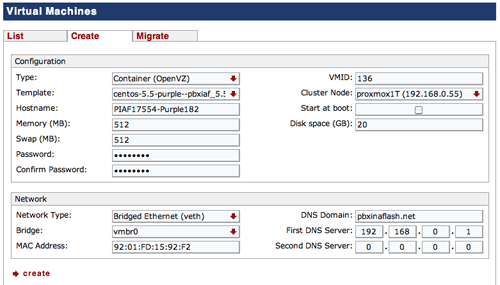
Thanks to Darrell Dillman (aka dad311 on the PIAF Forums), there already is a 64-bit OpenVZ template of PIAF-Purple with Asterisk 1.8.2. Just download the template to your Desktop and then, using the Proxmox console, choose Appliance Templates, Upload File to upload the OpenVZ template into your Proxmox server platform. Once installed, you can build Asterisk 1.8.2 virtual machines to your heart's content... in less than a minute apiece. Just choose Virtual Machine, Create to create a new virtual machine using the OpenVZ template you just uploaded. In the Configuration section, choose OpenVZ for the Type and pick your new OpenVZ template from the pulldown list. Fill in a Host Name, Disk Space maximum (in GB), and (root) Password. The other defaults should be fine. In the Network section of the form, change to the Bridged Ethernet (veth) option which means the VM will obtain its IP address from your DHCP server. Make sure your DNS settings are correct for your LAN. Here's how a typical OpenVZ creation form will look:
Once the image is created, start up the virtual machine, wait about 70 seconds for the system to load, and then click on Open VNC Console. Asterisk will be loaded and running. You can verify this on the status display. You can safely ignore the status messages pertaining to IPtables assuming iptables -nL shows that IPtables is functioning properly. With the exception of text-to-speech (TTS), you now have a PIAF-Purple base platform running Asterisk 1.8.2 and FreePBX 2.8. Be sure you always run it behind a hardware-based firewall with no port exposure to the Internet.
Before you do anything else, run passwd-master to secure the passwords for FreePBX GUI access to your system. Don't forget!
If you're planning to install Incredible PBX below or if you don't need text-to-speech on your system, you can skip this next step which gets 64-bit TTS installed. Otherwise, here are the commands to get it working:
cd /root
./install-flite
Note to Our Pioneers. To those that tested the new OpenVZ template this past week, THANK YOU! Be advised that we now have incorporated several of the recommended tweaks which were documented in the PIAF Forums. The install procedure outlined above explains the new behavior of the slightly improved OpenVZ template which now is available for download. We recommend you switch.
Asterisk CLI Change. Finally, just a heads up that (once again) the Asterisk Dev Team appears to have changed the default behavior of the Asterisk CLI. With Asterisk 1.8.2, if you make outbound calls after loading the CLI, you will notice that call progress no longer appears in the CLI. To restore the standard behavior (since Moses), issue the following command: core set verbose 3. 🙄

Installing Incredible PBX on OpenVZ Systems. We won't repeat the entire Incredible PBX article here. If you want the background on the product, read the latest article. To get everything working with an OpenVZ system, there are only three steps:
1. Set Up Your Google Voice Account
2. Run the Incredible PBX VM Installer
3. Configure a Softphone
 Configuring Google Voice. You'll need a dedicated Google Voice account to support The Incredible PBX. The more obscure the username (with some embedded numbers), the better off you will be. This will keep folks from bombarding you with unsolicited Gtalk chat messages, and who knows what nefarious scheme will be discovered using Google messaging six months from now. So why take the chance. Keep this account a secret!
We've tested this extensively using an existing Gmail account, and inbound calling is just not reliable. The reason seems to be that Google always chooses Gmail chat as the inbound call destination if there are multiple registrations from the same IP address. So, be reasonable. Do it our way! Set up a dedicated Gmail and Google Voice account, and use it exclusively with The Incredible PBX. Google Voice no longer is by invitation only so, if you're in the U.S. or have a friend that is, head over to the Google Voice site and register. If you're living on another continent, see MisterQ's posting for some tips on getting set up.
You must choose a telephone number (aka DID) for your new account, or Google Voice calling will not work... in either direction. Google used to permit outbound Gtalk calls using a fake CallerID, but that obviously led to abuse so it's over! You also have to tie your Google Voice account to at least one working phone number as part of the initial setup process. Your cellphone number will work just fine. Don't skip this step either. Just enter the provided 2-digit confirmation code when you tell Google to place the test call to the phone number you entered. Once the number is registered, you can disable it if you'd like in Settings, Voice Setting, Phones. But...
IMPORTANT: Be sure to enable the Google Chat option as one of your phone destinations in Settings, Voice Setting, Phones. That's the destination we need for The Incredible PBX to work its magic! Otherwise, all inbound and outbound calls will fail. If you don't see this option, you may need to call up Gmail and enable Google Chat there first. Then go back to the Google Voice Settings.
While you're still in Google Voice Settings, click on the Calls tab. Make sure your settings match these:
- Call Screening - OFF
- Call Presentation - OFF
- Caller ID (In) - Display Caller's Number
- Caller ID (Out) - Don't Change Anything
- Do Not Disturb - OFF
Click Save Changes once you adjust your settings. Under the Voicemail tab, plug in your email address so you get notified of new voicemails. Down the road, receipt of a Google Voice voicemail will be a big hint that something has come unglued on your PBX.
Running The Incredible PBX Installer. Log into your server as root and issue the following commands to set up The Incredible PBX:
cd /root
rm incrediblepbx18-vm.x
wget http://incrediblepbx.com/incrediblepbx18-vm.x
chmod +x incredible*
./incrediblepbx18-vm.x
passwd-master
When The Incredible PBX install begins, you'll be prompted for the following:
Google Voice Account Name
Google Voice Password
Google Voice 10-digit Phone Number
Gmail Notification Address
FreePBX maint Password
The Google Voice Account Name is the Gmail address for your new dedicated account, e.g. joeschmo@gmail.com. Don't forget @gmail.com! The Google Voice Password is the password for this dedicated account. The Google Voice Phone Number is the 10-digit DID for this dedicated account. We need this if we ever need to go back to the return call methodology for outbound calling. For now, it's not necessary. But who knows what the future holds. 🙄 The Gmail Notification Address is the email address where you wish to receive alerts when incoming and outgoing Google Voice calls are placed using The Incredible PBX. And your FreePBX maint Password is the password you'll use to access FreePBX. You'll actually set it by running passwd-master after The Incredible PBX completes. We need this password to properly configure the CallerID Superfecta for you. By the way, none of this confidential information ever leaves your machine... just in case you were wondering.
Now have another 5-minute cup of coffee, and consider a modest donation to Nerd Vittles... for all of our hard work. 😉 You'll find a link at the top of the page. While you're waiting (and so you don't forget), go ahead and configure your hardware-based firewall to support Google Voice. See the next section for what's required. Without completing this firewall configuration step, no calls will work! When the installer finishes, READ THE SCREEN just for grins.
Here's a short video demonstration of the original Incredible PBX installer process. It still works just about the same way except there's no longer a second step to get things working.
One final word of caution is in order regardless of your choice of providers: Do NOT use special characters in any provider passwords, or nothing will work!
Before you do anything else, run passwd-master again to resecure the passwords for FreePBX GUI access to your system. Don't forget!
Firewall Configuration. We hope you've taken our advice and installed a hardware-based firewall in front of The Incredible PBX. It's your phone bill. You'll need to make one adjustment on the firewall. Map UDP 5222 traffic to the internal IP address of The Incredible PBX. This is the port that Google Voice uses for phone calls and Google chat. You can decipher the IP address of your server by logging into the server as root and typing status.
Extension Password Discovery. If you're too lazy to look up your extension 701 password using the FreePBX GUI, you can log into your server as root and issue the following command to obtain the password for extension 701 which we'll need to configure your softphone or color videophone in the next step:
mysql -uroot -ppassw0rd -e"select id,data from asterisk.sip where id='701' and keyword='secret'"
The result will look something like the following where 701 is the extension and 18016 is the randomly-generated extension password exclusively for your Incredible PBX:
+-----+-------+
id data
+-----+-------+
701 18016
+-----+-------+
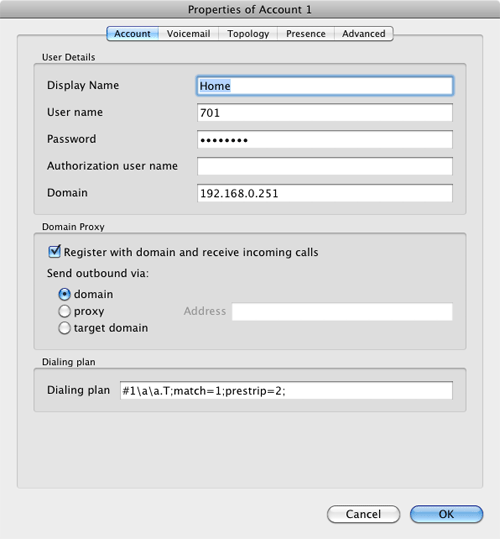
 Configuring a SIP Phone. There are hundreds of terrific SIP telephones and softphones for Asterisk-based systems. Once you get things humming along, you'll want a real SIP telephone such as the $50 Nortel color videophone we've recommended above. You'll also find lots of additional recommendations on Nerd Vittles and in the PBX in a Flash Forum. If you're like us, we want to make damn sure this stuff works before you shell out any money. So, for today, let's download a terrific (free) softphone to get you started. We recommend X-Lite because there are versions for Windows, Mac, and Linux. So download your favorite from this link. Install and run X-Lite on your Desktop. At the top of the phone, click on the Down Arrow and choose SIP Account Settings, Add. Enter the following information using your actual password for extension 701 and the actual IP address of your Incredible PBX server instead of 192.168.0.251. Click OK when finished. Your softphone should now show: Available.
 Incredible PBX Test Flight. The proof is in the pudding as they say. So let's try two simple tests. First, let's place an outbound call. Using the softphone, dial your 10-digit cellphone number. Google Voice should transparently connect you. Answer the call and make sure you can send and receive voice on both phones. Second, from another phone, call the Google Voice number that you've dedicated to The Incredible PBX. Your softphone should begin ringing shortly. If not, make certain you are not logged into Google Chat on a Gmail account with these same credentials. If everything is working, congratulations!
Here's a brief video demonstration showing how to set up a softphone to use with your Incredible PBX, and it also walks you through several of the dozens of Asterisk applications included in your system.
Solving One-Way Audio Problems. If you experience one-way audio on some of your phone calls, you may need to adjust the settings in /etc/asterisk/sip_custom.conf. Just uncomment the first two lines by removing the semicolons. Then replace 173.15.238.123 with your public IP address, and replace 192.168.0.0 with the subnet address of your private network. There are similar settings in gtalk.conf that can be activated although we've never had to use them. In fact, we've never had to use any of these settings. After making these changes, save the file(s) and restart Asterisk: amportal restart.
 Running Incredible PBX in the Cloud. We've saved the best for last today. For many folks, you may want to experiment with VoIP technology without making a hardware investment and without having to master the intricacies of managing your own server and network. That's what Cloud Computing is all about. And we've searched far and wide to find you the perfect platform. As with many of you, one of our top priorities is always cost. While many providers were willing to provide Nerd Vittles with a few sheckles for pitching their product, only one stepped forward with a price point that we think is irresistible. And, for the record, we waived any compensation other than a few test accounts to get things working properly, so that all of the savings could be passed on to you! So here's the deal. $15 a month gets you your own PIAF-Purple server in the cloud at RentPBX.com. Just use this coupon code: BACK10, pick an east coast or west coast server to host your new system, choose the PIAF-Purple 1.7.5.5.4 install option, set up a username and very secure password, and you're off to the races. Once your account is established, here's the 5-minute procedure to install the special RentPBX-edition of Incredible PBX to begin making free calls in the U.S. and Canada through Google Voice.
Begin by Configuring Google Voice as outlined above. Then log into your RentPBX account using SSH and the port assigned to your account. For Windows users, download Putty from here. The SSH command will look something like this:
ssh -p 21422 root@209.249.149.108
Issue the following commands to download and run The Incredible PBX installer for RentPBX:
cd /root
wget http://incrediblepbx.com/incrediblepbx18-rentpbx.x
chmod +x incrediblepbx18-rentpbx.x
./incrediblepbx18-rentpbx.x
passwd-master
Now just follow along in the Incredible PBX virtual machine tutorial which we've included above. Remember that your new Incredible PBX is sitting directly on the Internet! So don't forget to run passwd-master when you finish the install, or your system is vulnerable. Ours was attacked within minutes!
 Securing Your RentPBX Server. With the exception of our WhiteList application, everything is working on your RentPBX server. While we continue to work on the WhiteList component (reread this section of the article in a week or so to get the latest updates), you need to secure your system to avoid endless hack attempts on your SIP resources. Here's how. First, write down the IP addresses of your RentPBX server and your home network. Second, print out your existing IPtables configuration. The file to print is /etc/sysconfig/iptables. Third, make a backup copy of the file. While logged into your server with SSH, the easiest way is like this:
cd /etc/sysconfig
cp iptables iptables.bak
Now we need to edit the iptables file itself: nano -w iptables. Then search for the line that contains 5060: Ctrl-W, 5060, Enter. At the beginning of this line, add # to comment out the line. With the cursor still on this line, press Ctrl-K then Ctrl-U twice. This will duplicate the line. Move to the second commented line and remove #. Use the right cursor to move across the line to --dport. Then insert the following using the IP address of your RentPBX server, e.g.
-s 229.149.129.248
Be sure there's at least one space before and after the new text. Now duplicate that line with Ctrl-K and Ctrl-U twice. Change the IP address on the second line to the public IP address of your home or office network. Repeat this process for every IP address where you intend to use a SIP phone connected to your RentPBX server. Make additional entries for your SIP providers as well. If you want to sleep better, you can make similar changes to the SSH port entry to restrict it to your home/office IP address. It's the line immediately above the 5060 entry. Ditto for port 80 which is web access. Be very careful here. A typo will lock you out of your own server! When you're finished, save the changes: Ctrl-X, Y, Enter. Then restart IPtables: service iptables restart.
As always, we strongly recommend that you not put all of your VoIP eggs in one basket. Google Voice does go down from time to time. Vitelity is a perfect complement because the costs are low and you only pay for the service you use. A discount sign up link is below. And Vitelity has contributed generously to both the Nerd Vittles and PBX in a Flash projects. So please support them. Enjoy!
Originally published: Monday, January 17, 2011
Need help with Asterisk? Visit the PBX in a Flash Forum.
Or Try the New, Free PBX in a Flash Conference Bridge.
whos.amung.us If you're wondering what your fellow man is reading on Nerd Vittles these days, wonder no more. Visit our new whos.amung.us statistical web site and check out what's happening. It's a terrific resource both for us and for you.
Special Thanks to Our Generous Sponsors
FULL DISCLOSURE: ClearlyIP, Skyetel, Vitelity, DigitalOcean, Vultr, VoIP.ms, 3CX, Sangoma, TelecomsXchange and VitalPBX have provided financial support to Nerd Vittles and our open source projects through advertising, referral revenue, and/or merchandise. As an Amazon Associate and Best Buy Affiliate, we also earn from qualifying purchases. We’ve chosen these providers not the other way around. Our decisions are based upon their corporate reputation and the quality of their offerings and pricing. Our recommendations regarding technology are reached without regard to financial compensation except in situations in which comparable products at comparable pricing are available from multiple sources. In this limited case, we support our sponsors because our sponsors support us.
BOGO Bonaza: Enjoy state-of-the-art VoIP service with a $10 credit and half-price SIP service on up to $500 of Skyetel trunking with free number porting when you fund your Skyetel account. No limits on number of simultaneous calls. Quadruple data center redundancy. $25 monthly minimum spend required. Tutorial and sign up details are here.
![]() The lynchpin of Incredible PBX 2020 and beyond is ClearlyIP components which bring management of FreePBX modules and SIP phone integration to a level never before available with any other Asterisk distribution. And now you can configure and reconfigure your new Incredible PBX phones from the convenience of the Incredible PBX GUI.
The lynchpin of Incredible PBX 2020 and beyond is ClearlyIP components which bring management of FreePBX modules and SIP phone integration to a level never before available with any other Asterisk distribution. And now you can configure and reconfigure your new Incredible PBX phones from the convenience of the Incredible PBX GUI.
VitalPBX is perhaps the fastest-growing PBX offering based upon Asterisk with an installed presence in more than 100 countries worldwide. VitalPBX has generously provided a customized White Label version of Incredible PBX tailored for use with all Incredible PBX and VitalPBX custom applications. Follow this link for a free test drive!
Special Thanks to Vitelity. Vitelity is now Voyant Communications and has halted new registrations for the time being. Our special thanks to Vitelity for their unwavering financial support over many years and to the many Nerd Vittles readers who continue to enjoy the benefits of their service offerings. We will keep everyone posted on further developments.
Some Recent Nerd Vittles Articles of Interest...
Samsung Galaxy Tab: The Good, The Bad, and The Ugly

We purchased AT&T’s U.S. edition of Samsung’s Galaxy Tab on the release date in November, 2010. It’s been a wild ride ever since. First, the good news. Steve Jobs is dead wrong. A 7″ tablet is far from being DOA. In fact, the Galaxy Tab is the ideal form factor for a business person that wears a suit, sport coat, or jacket. The device fits perfectly in almost all coat pockets. Unlike the iPad, you can hold the Galaxy Tab in one hand rather than balancing the device between your knees. The screen is dazzling. Performance is respectable, Flash works reliably, two cameras are included (even though no app yet uses the front-facing camera), and at least so far, the SIM chip in your AT&T iPad is interchangeable with the AT&T Galaxy Tab using a $2 Micro SIM to SIM card adapter. So all of the shortcomings of the iPad have been addressed. With more than 200,000 apps in Google’s Market, you now can find comparable applications to most that are available for the iPad. And, while the Android apps weren’t specifically designed for a tablet, we never noticed. This contrasts dramatically with the half-baked iPhone/iPad app conversions that Apple attempted to pull off.
With Android’s open platform and near perfect hardware, what could possibly be wrong with this device? Well, just about everything unfortunately. Between Google, Samsung, and AT&T (and we assume the other U.S. oligopolists aren’t far behind), the device has been crippled in just about every possible way. Not only is the tablet locked to the specific carrier even though you paid full retail ($700+) for the unit, but cell phone usage also is blocked by all four U.S. carriers. No collusion, of course. 🙄 This functionality is available on all European models. Fortunately, for those in the U.S., Bria for Android will let you make SIP phone calls using any SIP provider you wish to use.
To add insult to injury, applications for the device are locked down to only apps available in the Google Market. This means, for example, that you cannot load thousands of tech books available in .apk format from O’Reilly. More importantly, you can’t restore your device from a backup. And, yes, Google has been quick to respond to requests to remove any apps that would let you root or tether the device. All of this might be understandable if AT&T offered an unlimited data plan and had to worry about users eating up their precious bandwidth. You may recall that AT&T’s only unlimited data plan offering lasted less than a week with the iPad. But AT&T now charges for Internet service on a pay-as-you-go basis. So there’s really no rational explanation for crippling the device for which you paid full retail and which you own.
While you still can root the device with a little creativity, flipping the setting to permit downloads of non-market apps using the latest Samsung firmware now bricks the unit since Samsung has added a checksum to the configuration file.
It would be easy to blame AT&T for being evil. They seem to regard it as a badge of honor. But Samsung and Google have aided and abetted the carriers’ wishes enthusiastically, albeit secretly. In fact, Samsung reportedly will announce the Galaxy Tab II this week at the Consumer Electronics Show with checksummed firmware that will take device crippling to new lows, far beyond what Apple has been willing to do on the iPad platform. In other words, you can kiss custom ROMs goodbye on Samsung’s "open" Android platform. For all of these reasons, AT&T’s device wins our 2010 Award as the Most Crippled Device of the Year, with dishonorable mentions to both Samsung and Google.
Fortunately, U.S. consumers have a choice. Just refuse to buy any more of this junk until the carriers and manufacturers clean up their act. We really could love this device, and it’s puzzling why the carriers and the manufacturer and Google feel compelled to cripple these devices in the U.S. market when all four of the major service providers offer the same device at the same price with the same (crippled) feature set. It’s almost like it’s part of their DNA to cripple everything they sell that has their name on it. Little wonder that folks are looking elsewhere to purchase new technology.
The other sad reality is that the technical writers in the U.S. for the most part roll over and play dead with these companies in order to secure the latest story and to get the free pass to the Vegas tea parties to yuck it up with their pals. And, of course, for some there are still loads of free toys. It’s easy to find glowing reviews of the Galaxy Tab from so-called pundits, but just try to find an article laying out what we’ve documented. We’re not tooting our own horn here, just wondering why folks that get paid for reviewing these products as their livelihood don’t do their homework instead of regurgitating manufacturer press releases. Unfortunately, it’s much the same reason that all of the cell phone companies are so chummy and cookie cutter comparable.
We couldn’t end this disappointing review without a word about Samsung’s service operation. Apple it’s not! A week after purchasing our device, we accidentally dropped it down a flight of brick steps. HINT: Buy a case. It’s too bulky to hold in one hand while you’re walking unless you have hands the size of Seinfeld’s old girlfriend. One-handed operation works fine sitting in a chair. If you’ve ever seen what a baseball can do to a plate glass window, then you have a pretty good image of what our Galaxy Tab looked like. The device still worked perfectly if you didn’t mind slicing your finger. That was Thanksgiving Day. Three weeks later we still were arguing with the Samsung Repair Facility in Texas which insisted that the IMEI number of their own device wasn’t in their computer system. Thus, they refused to repair it even though we were willing to pay for the repair. After dozens of calls, we finally reached the head of Samsung USA service who managed to manually enter the IMEI into the system so that we could get a quote on the repair. Samsung has only sold a million units. Wouldn’t you think someone might have thought about repairs? Incidentally, the cost was $170 including shipping in both directions which we thought was quite reasonable. And a week later the device arrived with a new screen AND the new crippled firmware which everyone else will get to enjoy shortly.
As for us, thanks to a law degree, it’s only a quick trip to the courthouse next week to drag Samsung into court to explain why they erased our device and installed newly improved crippleware rather than simply replacing the screen which we contracted with Samsung to repair. We’ll keep you posted.
Our Bottom Line for those that haven’t been to law school: JUST SAY NO!
Originally published: Monday, January 3, 2011
Need help with Asterisk®? Visit the PBX in a Flash Forum.
Or Try the New, Free PBX in a Flash Conference Bridge.
whos.amung.us If you’re wondering what your fellow man is reading on Nerd Vittles these days, wonder no more. Visit our new whos.amung.us statistical web site and check out what’s happening. It’s a terrific resource both for us and for you.
Special Thanks to Our Generous Sponsors
FULL DISCLOSURE: ClearlyIP, Skyetel, Vitelity, DigitalOcean, Vultr, VoIP.ms, 3CX, Sangoma, TelecomsXchange and VitalPBX have provided financial support to Nerd Vittles and our open source projects through advertising, referral revenue, and/or merchandise. As an Amazon Associate and Best Buy Affiliate, we also earn from qualifying purchases. We’ve chosen these providers not the other way around. Our decisions are based upon their corporate reputation and the quality of their offerings and pricing. Our recommendations regarding technology are reached without regard to financial compensation except in situations in which comparable products at comparable pricing are available from multiple sources. In this limited case, we support our sponsors because our sponsors support us.
BOGO Bonaza: Enjoy state-of-the-art VoIP service with a $10 credit and half-price SIP service on up to $500 of Skyetel trunking with free number porting when you fund your Skyetel account. No limits on number of simultaneous calls. Quadruple data center redundancy. $25 monthly minimum spend required. Tutorial and sign up details are here.
![]() The lynchpin of Incredible PBX 2020 and beyond is ClearlyIP components which bring management of FreePBX modules and SIP phone integration to a level never before available with any other Asterisk distribution. And now you can configure and reconfigure your new Incredible PBX phones from the convenience of the Incredible PBX GUI.
The lynchpin of Incredible PBX 2020 and beyond is ClearlyIP components which bring management of FreePBX modules and SIP phone integration to a level never before available with any other Asterisk distribution. And now you can configure and reconfigure your new Incredible PBX phones from the convenience of the Incredible PBX GUI.
VitalPBX is perhaps the fastest-growing PBX offering based upon Asterisk with an installed presence in more than 100 countries worldwide. VitalPBX has generously provided a customized White Label version of Incredible PBX tailored for use with all Incredible PBX and VitalPBX custom applications. Follow this link for a free test drive!
Special Thanks to Vitelity. Vitelity is now Voyant Communications and has halted new registrations for the time being. Our special thanks to Vitelity for their unwavering financial support over many years and to the many Nerd Vittles readers who continue to enjoy the benefits of their service offerings. We will keep everyone posted on further developments.
Some Recent Nerd Vittles Articles of Interest…
Introducing: New PBX in a Flash Installer for USB Flash Drives
 Since inception, one of the goals of the PBX in a Flash project has been to provide an install option that works reliably from a USB Flash Drive. This has become even more important as many of the newer netbooks have dropped CD/DVD drive support to conserve space and reduce cost. Just in time for Santa, we’re pleased to announce that, thanks to the Herculean efforts of bmore on the PIAF Forums, a USB Flash Drive installer is now available. This new build obviously is E-X-P-E-R-I-M-E-N-T-A-L. As with all PIAF 1.7.5.5 installs, you get your choice of Asterisk® and FreePBX® payloads with this new installer:
- Gold – Asterisk 1.4.21.2 with FreePBX 2.6
- Silver – Latest Asterisk 1.4 Release with FreePBX 2.6
- Bronze – Latest Asterisk 1.6 Release with FreePBX 2.6
- Purple – Latest Asterisk 1.8 Release with FreePBX 2.8
Here’s the 5-minute drill to get your bootable USB flash drive loaded with the PIAF installer. Once you get that far, hop over to the Nerd Vittles Installation Tutorial for PIAF 1.7.5.5 or The Incredible PBX for details on the install process.
Prerequisites. To get everything installed on your USB Flash Drive, you’ll obviously need at least a 1GB Flash Drive. HINT: 2GB flash drives may actually be cheaper! And we can tell you that Kingston DataTraveler models may be problematic. Reportedly, the Corsair GT and Kingston 102 models work fine. YMMV! Please report your results in a comment below. Next you’ll need to download the latest, greatest version of UNetbootin from SourceForge. There are versions for Windows and a number of flavors of Linux. Finally, you’ll need to download the Flash-Only ISO of PIAF 1.7.5.5.5 from SourceForge.
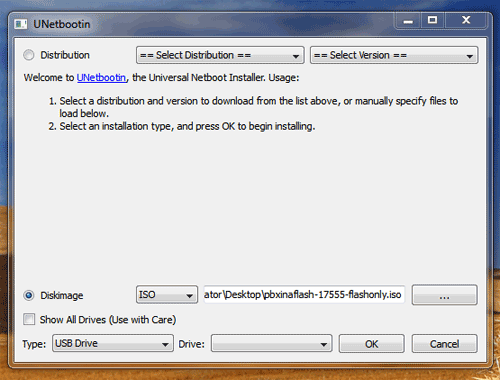
Creating USB Flash Drive. Step #1 is to partition and format your USB flash drive as a FAT32 device. On Windows 7 and Vista machines, you can format the drive as a DOS device, and it will automatically format it as FAT32. Once the device is properly formatted, run UNetbootin and select the Disk Image option. Then, with the ISO on your Desktop, choose the PIAF-17555-flashonly.iso from the pull-down menu. Make certain that the destination device is your USB flash drive. Then choose OK to begin. Do NOT reboot your machine when prompted to do so. You don’t really want to install PIAF on this same computer! Remember to Eject the flash drive on Windows machines before removing it.
If your Windows machine happens to crash at the end of the USB Flash install process (ask us how we know 🙂 ), all may not be lost. Restart your Windows PC, insert the flash drive again, go through the Windows error fixup procedure when prompted, and then open the drive with Windows explorer. If the only file missing from the root folder is syslinux.cfg, you’re in luck. Just download the file from here and copy the file into the top directory of your flash drive. Done!

Using the USB Flash Installer. When using the new flash installer, remember that we need to boot your new machine from the flash drive. On most newer Atom-based computers, you accomplish this by inserting the flash drive, turning the machine on, and then pressing F12 during the boot sequence to choose the boot device. You’ll just have to watch the screen of your new computer to see if some other key is used to pull up the boot selection screen. If all else fails, you can adjust the boot sequence in the BIOS settings to boot first from the USB device. If you change your BIOS boot sequence, just remember to remove the device when the initial install of CentOS completes and the reboot sequence is initiated. If instead you again see the initial PIAF install screen warning you that your disk is about to be erased, then remove the flash drive and reboot the machine once again. Then choose the PIAF payload you’d like to install. Enjoy!
And Merry Christmas!
Originally published: Tuesday, December 21, 2010
Need help with Asterisk? Visit the PBX in a Flash Forum.
Or Try the New, Free PBX in a Flash Conference Bridge.
whos.amung.us If you’re wondering what your fellow man is reading on Nerd Vittles these days, wonder no more. Visit our new whos.amung.us statistical web site and check out what’s happening. It’s a terrific resource both for us and for you.
Special Thanks to Our Generous Sponsors
FULL DISCLOSURE: ClearlyIP, Skyetel, Vitelity, DigitalOcean, Vultr, VoIP.ms, 3CX, Sangoma, TelecomsXchange and VitalPBX have provided financial support to Nerd Vittles and our open source projects through advertising, referral revenue, and/or merchandise. As an Amazon Associate and Best Buy Affiliate, we also earn from qualifying purchases. We’ve chosen these providers not the other way around. Our decisions are based upon their corporate reputation and the quality of their offerings and pricing. Our recommendations regarding technology are reached without regard to financial compensation except in situations in which comparable products at comparable pricing are available from multiple sources. In this limited case, we support our sponsors because our sponsors support us.
BOGO Bonaza: Enjoy state-of-the-art VoIP service with a $10 credit and half-price SIP service on up to $500 of Skyetel trunking with free number porting when you fund your Skyetel account. No limits on number of simultaneous calls. Quadruple data center redundancy. $25 monthly minimum spend required. Tutorial and sign up details are here.
![]() The lynchpin of Incredible PBX 2020 and beyond is ClearlyIP components which bring management of FreePBX modules and SIP phone integration to a level never before available with any other Asterisk distribution. And now you can configure and reconfigure your new Incredible PBX phones from the convenience of the Incredible PBX GUI.
The lynchpin of Incredible PBX 2020 and beyond is ClearlyIP components which bring management of FreePBX modules and SIP phone integration to a level never before available with any other Asterisk distribution. And now you can configure and reconfigure your new Incredible PBX phones from the convenience of the Incredible PBX GUI.
VitalPBX is perhaps the fastest-growing PBX offering based upon Asterisk with an installed presence in more than 100 countries worldwide. VitalPBX has generously provided a customized White Label version of Incredible PBX tailored for use with all Incredible PBX and VitalPBX custom applications. Follow this link for a free test drive!
Special Thanks to Vitelity. Vitelity is now Voyant Communications and has halted new registrations for the time being. Our special thanks to Vitelity for their unwavering financial support over many years and to the many Nerd Vittles readers who continue to enjoy the benefits of their service offerings. We will keep everyone posted on further developments.
Some Recent Nerd Vittles Articles of Interest…
Incredible PBX for Asterisk 1.8: Back from the Brink
 Ever had one of those weeks? It was a wild ride these past 7 days with the introduction of Asterisk® 1.8.1 and some new Google Voice twists. And then there was our DNS provider Omnis.com that trashed name resolution for our primary domain, pbxinaflash.net, while claiming with a straight face that they didn't provide tech support for their own stupidity. Yikes! But where there's a will, there's always a way. And by Friday night, not only were all the issues sorted out but the Google Voice Gtalk interface in Asterisk 1.8 for free calling in the U.S. and Canada is now better than ever. Our special thanks to the Asterisk Dev Team and Tom King of the PIAF Dev Team for restoring peace in the valley. No more callback hoops for outbound calling. Free DIDs in most area codes. Instantaneous connections. Crystal clear calls. You can almost hear a pin drop. And Incredible PBX now brings you all this magic in a turnkey install that even a monkey could handle.
As if we needed another one, our other surprise last week was the Ebay appearance of a Nortel SIP Videophone labeled as a 1535, but it had no WiFi in either the hardware or in the particular software build. The merchant was as surprised as we were to discover the missing WiFi component and now has corrected the ad. But that won't make the WiFi reappear. For those of you still purchasing these phones (and they're worth it), read the fine print if WiFi or firmware upgrades matter to you. The Turkish models have neither. As anyone that tracks Ebay auctions will tell you, the law of supply and demand controls the price. These began in the $30 range and as recently as two weeks ago were selling for almost $80. They've now dropped back into the $50-$60 range. You're usually better off calling the merchant, and the more you buy, the better the price. Five Stars Telecom usually stocks the U.S. models. But ask to be sure.
So here's the drill today. Just download the brand new PBX in a Flash 1.7.5.5.4 ISO with the newly patched Asterisk 1.8 Purple payload. Then burn the ISO to a CD and boot your server from the PIAF CD. Choose the Purple Edition after CentOS installs which will load Asterisk 1.8.1 with FreePBX 2.8. Finally, run through the 5-minute install of Incredible PBX for Asterisk 1.8.1. In less than an hour, you'll have a turnkey, secure PBX with a local phone number and free calling in the U.S. and Canada via your own Google Voice account plus dozens and dozens of terrific Asterisk applications to keep your head spinning for months. Not only can you start enjoying free phone service immediately, but you'll have a robust PBX platform that will keep your eyes popping for months learning about all the features that would have cost you hundreds of thousands of dollars less than a decade ago. Did we mention that all of this telephone goodness is absolutely FREE!
Thanks to its Zero Internet Footprint™ design, The Incredible PBX also remains the most secure Asterisk-based PBX around. What this means is The Incredible PBX™ has been engineered to sit safely behind a NAT-based, hardware firewall with minimal port exposure to your actual server. And you won't find a more full-featured Personal Branch Exchange™ at any price.
 The Incredible PBX Inventory. For those that have never heard of The Incredible PBX, here's a feature list of components you get in addition to the base install of PBX in a Flash with CentOS 5.5, Asterisk 1.8, FreePBX 2.8, and Apache, SendMail, MySQL, PHP, phpMyAdmin, IPtables Linux firewall, Fail2Ban, and WebMin. Cepstral TTS, Hamachi VPN, and Mondo Backups are just one command away and may be installed using some of the PBX in a Flash-provided scripts.
- Amazon S3 Cloud Computing
- AsteriDex
- Baseball Scores & Schedules
- CallerID Superfecta (FreePBX Module adds Names to CID Numbers)
- SIP Color Videophone Support
- CallWho for Asterisk
- Cepstral TTS for 32-bit, Asterisk 1.81 (/root/nv/install-cepstral)
- Preconfigured Email That Works with SendMail
- ENUMPLUS (Use FreePBX to configure)
- Extensions (16 preconfigured with random passwords)
- FAX with HylaFax & AvantFax (/root/incrediblefax.sh)
- Festival Server and Festival TTS for Asterisk (festival --server &)
- Flite TTS for Asterisk
- FONmail
- FreePBX Backups
- Gizmo5 (Free Calls to Gizmo5 users worldwide: 1747xxxxxxx*1089)
- Google Voice (preconfigured)
- Free Hamachi VPN (install-hamachi)
- Hotel-Style Wakeup Calls (FreePBX Module)
- ISN: FreeNum SIP Calling from Any Phone
- MeetMe Conference Bridge (just dial C-O-N-F)
- Mondo Full System Backups (install-diskbackup)
- Incremental Daily Backups (install-dailybackup)
- Munin Reports (install-munin)
- NewsClips from Yahoo
- ODBC Database Support
- New PBX in a Flash Registry (show-registry)
- PogoPlug Cloud Computing
- Reminders by Phone and Web
- SAMBA Windows Networking (setup-samba)
- SIP URI Outbound Calling (call any SIP URI worldwide for free)
- Free Skype Inbound & Outbound Calling (for personal use)
- Stealth AutoAttendant
- TeleYapper
- TFTP Server (setup-tftp)
- Tide Reports with xTide
- Trunk Lister Script (/root/nv/trunks.sh)
- Trunks (Vitelity, Gtalk, SIPgate, IPkall, and ENUM)
- Twitter Interface (Make Free Calls and Send SMS Messages)
- Weather by Airport Code
- Weather by ZIP Code
- Worldwide Weather
Prerequisites. Here's what we recommend to get started properly:
- Broadband Internet connection
- $250 Dual-Core Atom PC2 on which to run The Incredible PBX
- dLink Router/Firewall. Low Cost: $35 WBR-2310 Best: DGL-4500
- Dedicated Google Voice account (not your main Gmail account!)
Installing The Incredible PBX. The installation process is simple and straight-forward. Here are the 5 Easy Steps to Free Calling, and The Incredible PBX will be ready to receive and make free U.S./Canada calls immediately:
1. Install PBX in a Flash 1.7.5.5.4 Purple Edition
2. Download & run The Incredible PBX 1.8 installer
3. Run passwd-master on your PIAF server
4. Map UDP 5222 on firewall to PIAF server
5. Configure a softphone or SIP telephone
 Installing PBX in a Flash. Here's a quick tutorial to get PBX in a Flash installed. To use Incredible PBX for Asterisk 1.8, we recommend the very latest 32-bit version of PBX in a Flash 1.7.5.5.4.3 If you installed it last week, that's not new enough. The ISO hasn't changed, but the Purple payload is radically different since this morning! Unlike other Asterisk aggregations, PBX in a Flash utilizes a two-step install process. The ISO only installs the CentOS 5.5 operating system. That hasn't changed. But, once CentOS is installed, the server reboots and downloads a payload file that includes Asterisk, FreePBX, and many other VoIP and Linux utilities including all of the new Google Voice components. To get the patched version of Asterisk 1.8.1, use today's new 1.7.5.5.4 ISO. Choose the new Purple Payload, and our special Asterisk 1.8 patched release and all of the Google Voice goodies will be configured automatically. And you won't have to worry about the CDR crashing your new server either.
You can download the 32-bit PIAF 1.7.5.5.4 from SourceForge or one of our download mirrors. Burn the ISO to a CD. Then boot from the installation CD and press the Enter key to begin.
WARNING #1: This install will completely erase, repartition, and reformat EVERY DISK (including USB flash drives) connected to your system so disable any disk you wish to preserve! Press Ctrl-C to cancel the install.
WARNING #2: The PIAF Dev Team currently classifies PIAF-Purple and Asterisk 1.8 as E-X-P-E-R-I-M-E-N-T-A-L. Remember the Pioneers! If you have a low threshold for pain, if you depend upon your PBX to actually make and receive phone calls, or if you understand the WAF and prefer sleeping with both eyes closed, abort this install now and choose PIAF-Gold, PIAF-Silver, or PIAF-Bronze. Otherwise, enjoy the ride!
On some systems you may get a notice that CentOS can't find the kickstart file. Just tab to OK and press Enter. Don't change the name or location of the kickstart file! This will get you going. Think of it as a CentOS 'feature'. 🙂 If your system still won't boot, then you have an incompatible drive controller.
At the keyboard prompt, tab to OK and press Enter. At the time zone prompt, tab once, highlight your time zone, tab to OK and press Enter. At the password prompt, make up a VERY secure root password. Type it twice. Tab to OK, press Enter. Get a cup of coffee. Come back in about 5 minutes. When the system has installed CentOS, it will reboot. Remove the CD promptly. After the reboot, choose PIAF-Purple option. Have a 15-minute cup of coffee. After installation is complete, the machine will reboot a second time. You now have a PBX in a Flash base install. On a stand-alone machine, it takes about 30 minutes. On a virtual machine, it takes about half that time. Write down the IP address of your new PIAF server. You'll need it to configure your hardware-based firewall in a minute.
NOTE: For previous users of PBX in a Flash, be aware that this new version automatically runs update-programs and update-fixes for you. You still should set your FreePBX passwords by running passwd-master after The Incredible PBX installer finishes!
Configuring Google Voice. You'll need a dedicated Google Voice account to support The Incredible PBX. The more obscure the username (with some embedded numbers), the better off you will be. This will keep folks from bombarding you with unsolicited Gtalk chat messages, and who knows what nefarious scheme will be discovered using Google messaging six months from now. So why take the chance. Keep this account a secret!
We've tested this extensively using an existing Gmail account, and inbound calling is just not reliable. The reason seems to be that Google always chooses Gmail chat as the inbound call destination if there are multiple registrations from the same IP address. So, be reasonable. Do it our way! Set up a dedicated Gmail and Google Voice account, and use it exclusively with The Incredible PBX. Google Voice no longer is by invitation only so, if you're in the U.S. or have a friend that is, head over to the Google Voice site and register. If you're living on another continent, see MisterQ's posting for some tips on getting set up.
You must choose a telephone number (aka DID) for your new account, or Google Voice calling will not work... in either direction. Google used to permit outbound Gtalk calls using a fake CallerID, but that obviously led to abuse so it's over! You also have to tie your Google Voice account to at least one working phone number as part of the initial setup process. Your cellphone number will work just fine. Don't skip this step either. Just enter the provided 2-digit confirmation code when you tell Google to place the test call to the phone number you entered. Once the number is registered, you can disable it if you'd like in Settings, Voice Setting, Phones. But...
IMPORTANT: Be sure to enable the Google Chat option as one of your phone destinations in Settings, Voice Setting, Phones. That's the destination we need for The Incredible PBX to work its magic! Otherwise, all inbound and outbound calls will fail. If you don't see this option, you may need to call up Gmail and enable Google Chat there first. Then go back to the Google Voice Settings.
While you're still in Google Voice Settings, click on the Calls tab. Make sure your settings match these:
- Call Screening - OFF
- Call Presentation - OFF
- Caller ID (In) - Display Caller's Number
- Caller ID (Out) - Don't Change Anything
- Do Not Disturb - OFF
Click Save Changes once you adjust your settings. Under the Voicemail tab, plug in your email address so you get notified of new voicemails. Down the road, receipt of a Google Voice voicemail will be a big hint that something has come unglued on your PBX.
Running The Incredible PBX Installer. Log into your server as root and issue the following commands to download and run The Incredible PBX installer:
cd /root
wget http://incrediblepbx.com/incrediblepbx18.x
chmod +x incrediblepbx18.x
./incrediblepbx18.x
passwd-master
If you've installed the previous version of The Incredible PBX, you'll recall that there was a two-step install process after configuring another trunk with either SIPgate or IPkall. That's now a thing of the past. All you need to do after The Incredible PBX script completes is run passwd-master to set up your master password for FreePBX.
When The Incredible PBX install begins, you'll be prompted for the following:
Google Voice Account Name
Google Voice Password
Google Voice 10-digit Phone Number
Gmail Notification Address
FreePBX maint Password
The Google Voice Account Name is the Gmail address for your new dedicated account, e.g. joeschmo@gmail.com. Don't forget @gmail.com! The Google Voice Password is the password for this dedicated account. The Google Voice Phone Number is the 10-digit DID for this dedicated account. We need this if we ever need to go back to the return call methodology for outbound calling. For now, it's not necessary. But who knows what the future holds. 🙄 The Gmail Notification Address is the email address where you wish to receive alerts when incoming and outgoing Google Voice calls are placed using The Incredible PBX. And your FreePBX maint Password is the password you'll use to access FreePBX. You'll actually set it by running passwd-master after The Incredible PBX completes. We need this password to properly configure the CallerID Superfecta for you. By the way, none of this confidential information ever leaves your machine... just in case you were wondering.
Now have another 5-minute cup of coffee, and consider a modest donation to Nerd Vittles... for all of our hard work. 😉 You'll find a link at the top of the page. While you're waiting (and so you don't forget), go ahead and configure your hardware-based firewall to support Google Voice. See the next section for what's required. Without completing this firewall configuration step, no calls will work! When the installer finishes, READ THE SCREEN just for grins.
Here's a short video demonstration of the original Incredible PBX installer process. It still works just about the same way except there's no longer a second step to get things working.
One final word of caution is in order regardless of your choice of providers: Do NOT use special characters in any provider passwords, or nothing will work!
Firewall Configuration. We hope you've taken our advice and installed a hardware-based firewall in front of The Incredible PBX. It's your phone bill. You'll need to make one adjustment on the firewall. Map UDP 5222 traffic to the internal IP address of The Incredible PBX. This is the port that Google Voice uses for phone calls and Google chat. You can decipher the IP address of your server by logging into the server as root and typing status.
Logging in to FreePBX. Using a web browser, you access the FreePBX GUI by pointing your browser to the IP address of your Incredible PBX. Click on the Admin tab and choose FreePBX. When prompted for a username, it's maint. When prompted for the password, it's whatever you set up as your maint password when you installed Incredible PBX. If you forget it, you can always reset it by logging into your server as root and running passwd-master.
Extension Password Discovery. If you're too lazy to look up your extension 701 password using the FreePBX GUI, you can log into your server as root and issue the following command to obtain the password for extension 701 which we'll need to configure your softphone or color videophone in the next step:
mysql -uroot -ppassw0rd -e"select id,data from asterisk.sip where id='701' and keyword='secret'"
The result will look something like the following where 701 is the extension and 18016 is the randomly-generated extension password exclusively for your Incredible PBX:
+-----+-------+
id data
+-----+-------+
701 18016
+-----+-------+
Configuring a SIP Phone. There are hundreds of terrific SIP telephones and softphones for Asterisk-based systems. Once you get things humming along, you'll want a real SIP telephone such as the $50 Nortel color videophone we've recommended above. You'll also find lots of additional recommendations on Nerd Vittles and in the PBX in a Flash Forum. If you're like us, we want to make damn sure this stuff works before you shell out any money. So, for today, let's download a terrific (free) softphone to get you started. We recommend X-Lite because there are versions for Windows, Mac, and Linux. So download your favorite from this link. Install and run X-Lite on your Desktop. At the top of the phone, click on the Down Arrow and choose SIP Account Settings, Add. Enter the following information using your actual password for extension 701 and the actual IP address of your Incredible PBX server instead of 192.168.0.251. Click OK when finished. Your softphone should now show: Available.
Incredible PBX Test Flight. The proof is in the pudding as they say. So let's try two simple tests. First, let's place an outbound call. Using the softphone, dial your 10-digit cellphone number. Google Voice should transparently connect you. Answer the call and make sure you can send and receive voice on both phones. Second, from another phone, call the Google Voice number that you've dedicated to The Incredible PBX. Your softphone should begin ringing shortly. If not, make certain you are not logged into Google Chat on a Gmail account with these same credentials. If everything is working, congratulations!
Here's a brief video demonstration showing how to set up a softphone to use with your Incredible PBX, and it also walks you through several of the dozens of Asterisk applications included in your system.
 Solving One-Way Audio Problems. If you experience one-way audio on some of your phone calls, you may need to adjust the settings in /etc/asterisk/sip_custom.conf. Just uncomment the first two lines by removing the semicolons. Then replace 173.15.238.123 with your public IP address, and replace 192.168.0.0 with the subnet address of your private network. There are similar settings in gtalk.conf that can be activated although we've never had to use them. In fact, we've never had to use any of these settings. After making these changes, save the file(s) and restart Asterisk with the command: amportal restart.
Learn First. Explore Second. Even though the installation process has been completed, we strongly recommend you do some reading before you begin your VoIP adventure. VoIP PBX systems have become a favorite target of the hackers and crackers around the world and, unless you have an unlimited bank account, you need to take some time learning where the minefields are in today's VoIP world. Start by reading our Primer on Asterisk Security. We've secured all of your passwords except your root password and your passwd-master password, and we're assuming you've put very secure passwords on those accounts as if your phone bill depended upon it. It does! Also read our PBX in a Flash and VPN in a Flash knols. If you're still not asleep, there's loads of additional documentation on the PBX in a Flash documentation web site.
Adding Multiple Google Voice Trunks. Thanks to rentpbx on our forums, adding support for multiple Google Voice trunks is now a five-minute operation. Once you have your initial setup running smoothly, hop on over to the forums and check out this Incredible solution.
![]() Choosing a VoIP Provider for Redundancy. Nothing beats free when it comes to long distance calls. But nothing lasts forever. And, in the VoIP World, redundancy is dirt cheap. So we strongly recommend you set up another account with Vitelity using our special link below. This gives your PBX a secondary way to communicate with every telephone in the world, and it also gets you a second real phone number for your new system... so that people can call you. Here's how it works. You pay Vitelity a deposit for phone service. They then will bill you $3.99 a month for your new phone number. This $3.99 also covers the cost of unlimited inbound calls (two at a time) delivered to your PBX for the month. For outbound calls, you pay by the minute and the cost is determined by where you're calling. If you're in the U.S., outbound calls to anywhere in the U.S. are a little over a penny a minute. If you change your mind about Vitelity and want a refund of the balance in your account, all you have to do is ask. The trunks for Vitelity already are preconfigured with The Incredible PBX. Just insert your credentials using FreePBX. Then add the Vitelity trunk as the third destination for your default outbound route. That's it. Congratulations! You now have a totally redundant phone system.
Choosing a VoIP Provider for Redundancy. Nothing beats free when it comes to long distance calls. But nothing lasts forever. And, in the VoIP World, redundancy is dirt cheap. So we strongly recommend you set up another account with Vitelity using our special link below. This gives your PBX a secondary way to communicate with every telephone in the world, and it also gets you a second real phone number for your new system... so that people can call you. Here's how it works. You pay Vitelity a deposit for phone service. They then will bill you $3.99 a month for your new phone number. This $3.99 also covers the cost of unlimited inbound calls (two at a time) delivered to your PBX for the month. For outbound calls, you pay by the minute and the cost is determined by where you're calling. If you're in the U.S., outbound calls to anywhere in the U.S. are a little over a penny a minute. If you change your mind about Vitelity and want a refund of the balance in your account, all you have to do is ask. The trunks for Vitelity already are preconfigured with The Incredible PBX. Just insert your credentials using FreePBX. Then add the Vitelity trunk as the third destination for your default outbound route. That's it. Congratulations! You now have a totally redundant phone system.
Using ENUMPlus. Another terrific money-saving tool is ENUM. Your system comes with ENUMPlus installed. The advantage of ENUM is that numbers registered with any of the ENUM services such as e164.org can be called via SIP for free. You can read all about it in this Nerd Vittles' article. To activate ENUMPlus, you'll need to register and obtain an API Key at enumplus.org. It's free! Sign up, log in, and click on the Account tab to get your API key. Once you have your key, copy it to your clipboard and open FreePBX with your browser. Then choose SetUp, ENUMPlus and paste in your API Key. Save your entry, and you're all set. After entering your key, all outbound calls will be checked for a free ENUM calling path first before using other outbound trunks.
Stealth AutoAttendant. When incoming calls arrive, the caller is greeted with a welcoming message from Allison which says something like "Thanks for calling. Please hold a moment while I locate someone to take your call." To the caller, it's merely a greeting. To those "in the know," it's actually an autoattendant (aka IVR system) that gives you the opportunity to press a button during the message to trigger the running of some application on your Incredible PBX. As configured, the only option that works is 0 which fires up the Nerd Vittles Apps IVR. It's quite easy to add additional features such as voicemail retrieval or DISA for outbound calling. Just edit the MainIVR option in FreePBX under Setup, IVR. Keep in mind that anyone (anywhere in the world) can choose these options. So be extremely careful not to expose your system to security vulnerabilities by making certain that any options you add have very secure passwords! It's your phone bill. 😉
Configuring Email. You're going to want to be notified when updates are available for FreePBX, and you may also want notifications when new voicemails arrive. Everything already is set up for you except actually entering your email notification address. Using a web browser, open the FreePBX GUI by pointing your browser to the IP address of your Incredible PBX. Then click Administration and choose FreePBX. To set your email address for FreePBX updates, go to Setup, General Settings and scroll to the bottom of the screen. To configure emails to notify you of incoming voicemails, go to Setup, Extensions, 701 and scroll to the bottom of the screen. Then follow your nose. Be sure to reload FreePBX when prompted after saving your changes.
A Word About Security. Security matters to us, and it should matter to you. Not only is the safety of your system at stake but also your wallet and the safety of other folks' systems. Our only means of contacting you with security updates is through the RSS Feed that we maintain for the PBX in a Flash project. This feed is prominently displayed in the web GUI which you can access with any browser pointed to the IP address of your server. Check It Daily! Or add our RSS Feed to your favorite RSS Reader. We also recommend you follow @NerdUno on Twitter. We'll keep you entertained and provide immediate notification of security problems that we hear about. Be safe!
This latest version of Incredible PBX locks down your server to private networks and existing, registered Asterisk devices. Should you need to enable additional IP addresses for other devices or providers at a later date, simply add the new IP addresses to /etc/firewall.whitelist and then rerun /root/firewall-whitelist.sh. For additional background, read this article.
Enabling Google Voicemail. Some have requested a way to retain Google's voicemail system for unanswered calls in lieu of using Asterisk voicemail. The advantage is that Google offers a free transcription service for voicemail messages. To activate this, you'll need to edit the [googlein] context in extensions_custom.conf in /etc/asterisk. Just modify the last four lines in the context so that they look like this and then restart Asterisk: amportal restart
;exten => s,n(regcall),Answer
;exten => s,n,SendDTMF(1)
exten => s,n(regcall),Set(DIAL_OPTIONS=${DIAL_OPTIONS}aD(:1))
exten => s,n,Goto(from-trunk,gv-incoming,1)
Kicking the Tires. OK. That's enough tutorial for today. Let's play. Using your new softphone, begin your adventure by dialing these extensions:
- D-E-M-O - Incredible PBX Demo (running on your PBX)
- 1234*1061 - Nerd Vittles Demo via ISN FreeNum connection to NV
- 17476009082*1089 - Nerd Vittles Demo via ISN to Google/Gizmo5
- Z-I-P - Enter a five digit zip code for any U.S. weather report
- 6-1-1 - Enter a 3-character airport code for any U.S. weather report
- 5-1-1 - Get the latest news and sports headlines from Yahoo News
- T-I-D-E - Get today's tides and lunar schedule for any U.S. port
- F-A-X - Send a fax to an email address of your choice
- 4-1-2 - 3-character phonebook lookup/dialer with AsteriDex
- M-A-I-L - Record a message and deliver it to any email address
- C-O-N-F - Set up a MeetMe Conference on the fly
- 1-2-3 - Schedule regular/recurring reminder (PW: 12345678)
- 2-2-2 - ODBC/Timeclock Lookup Demo (Empl No: 12345)
- 2-2-3 - ODBC/AsteriDex Lookup Demo (Code: AME)
- Dial *68 - Schedule a hotel-style wakeup call from any extension
- 1061*1061 - PIAF Support Conference Bridge (Conf#: 1061)
- 882*1061 - VoIP Users Conference every Friday at Noon (EST)
PBX in a Flash SQLite Registry. Last, but not least, we want to introduce you to the new PBX in a Flash Registry which uses SQLite, a zero-configuration SQL-compatible database engine. After logging into your server as root, just type show-registry for a listing of all of the applications, versions, and install dates of everything on your new server. Choosing the A option will generate registry.txt in the /root folder while the other options will let you review the applications by category on the screen. For example, the G option displays all of The Incredible PBX add-ons that have been installed. Here's the complete list of options:
- A - Write the contents of the registry to registry.txt
- B - PBX in a Flash install details
- C - Extra programs install details
- D - Update-fixes status and details
- E - RPM install details
- F - FreePBX modules install details
- G - Incredible PBX install details
- Q - Quit this program
And here's a sample from an install we just completed. We'll have more details and additional utilities for your use in coming weeks.
 Special Thanks. It's hard to know where to start in expressing our gratitude for all of the participants that made today's incredibly simple-to-use product possible. Please bear with us. To Mark Spencer, Malcolm Davenport, and the rest of the Asterisk development team, thanks for a much improved Asterisk. To Philippe Sultan and his co-developers, thank you for getting the final kinks out of Jabber with Asterisk. To Philippe Lindheimer & Co., thanks for FreePBX 2.8 which really makes Asterisk shine. To Lefteris Zafiris, thank you for making Flite work with Asterisk 1.8 thereby preserving all of the Nerd Vittles text-to-speech applications. To Darren Sessions, thanks for whipping app_swift into shape and restoring Cepstral and commercial TTS applications to the land of the living with Asterisk 1.8. And to our pal, Tom King, we couldn't have done it without you. You rolled up your sleeves and really turned Asterisk 1.8.1 into something special. No one will quite understand what an endeavor that was until they try it themselves. And, finally, to our legion of beta testers, THANK YOU! We've implemented almost all of your suggestions.
 Additional Goodies. Be sure to log into your server as root and look through the scripts added in the /root/nv folder. You'll find all sorts of goodies to keep you busy. The 32-bit install-cepstral script does just what it says. With Allison's Cepstral voice, you'll have the best TTS implementation for Asterisk available. ipscan is a little shell script that will tell you every working IP device on your LAN. trunks.sh tells you all of the Asterisk trunks configured on your system. purgeCIDcache.sh will clean out the CallerID cache in the Asterisk database. convert2gsm.sh shows you how to convert a .wav file to .gsm. munin.pbx will install Munin on your system while awstats.pbx installs AWstats. s3cmd.faq tells you how to quickly activate the Amazon S3 Cloud Computing service. All the other scripts and apps in /root/nv already have been installed for you so don't install them again.
If you've heeded our advice and purchased a PogoPlug, you can link to your home-grown cloud as well. Just add your credentials to /root/pogo-start.sh. Then run the script to enable the PogoPlug Cloud on your server. All of your cloud resources are instantly accessible in /mnt/pogoplug. It's perfect for off-site backups and is included as one of the backup options in the PBX in a Flash backup utilities.
Don't forget to List Yourself in Directory Assistance so everyone can find you by dialing 411. And add your new number to the Do Not Call Registry to block telemarketing calls. Or just call 888-382-1222 from your new number. Enjoy!
Originally published: Monday, December 13, 2010
Quirks & Bugs. Well, there aren't any that we know of. But we'll keep a running list here so you can check back from time to time if you don't participate in the PBX in a Flash Forums.
VoIP Virtualization with Incredible PBX: OpenVZ and Cloud Solutions
Safely Interconnecting Asterisk Servers for Free Calling
Adding Skype to The Incredible PBX
Adding Incredible Backup... and Restore to The Incredible PBX
Adding Remotes, Preserving Security with The Incredible PBX
Remote Phone Meets Travelin' Man with The Incredible PBX
 Support Issues. With any application as sophisticated as this one, you're bound to have questions. Blog comments are a terrible place to handle support issues although we welcome general comments about our articles and software. If you have particular support issues, we encourage you to get actively involved in the PBX in a Flash Forums. It's the best Asterisk tech support site in the business, and it's all free! We maintain a thread with the latest Patches and Bug Fixes for Incredible PBX. Please have a look. Unlike some forums, ours is extremely friendly and is supported by literally hundreds of Asterisk gurus and thousands of ordinary users just like you. So you won't have to wait long for an answer to your questions.
Need help with Asterisk? Visit the PBX in a Flash Forum.
Or Try the New, Free PBX in a Flash Conference Bridge.
whos.amung.us If you're wondering what your fellow man is reading on Nerd Vittles these days, wonder no more. Visit our new whos.amung.us statistical web site and check out what's happening. It's a terrific resource both for us and for you.
Special Thanks to Our Generous Sponsors
FULL DISCLOSURE: ClearlyIP, Skyetel, Vitelity, DigitalOcean, Vultr, VoIP.ms, 3CX, Sangoma, TelecomsXchange and VitalPBX have provided financial support to Nerd Vittles and our open source projects through advertising, referral revenue, and/or merchandise. As an Amazon Associate and Best Buy Affiliate, we also earn from qualifying purchases. We’ve chosen these providers not the other way around. Our decisions are based upon their corporate reputation and the quality of their offerings and pricing. Our recommendations regarding technology are reached without regard to financial compensation except in situations in which comparable products at comparable pricing are available from multiple sources. In this limited case, we support our sponsors because our sponsors support us.
BOGO Bonaza: Enjoy state-of-the-art VoIP service with a $10 credit and half-price SIP service on up to $500 of Skyetel trunking with free number porting when you fund your Skyetel account. No limits on number of simultaneous calls. Quadruple data center redundancy. $25 monthly minimum spend required. Tutorial and sign up details are here.
![]() The lynchpin of Incredible PBX 2020 and beyond is ClearlyIP components which bring management of FreePBX modules and SIP phone integration to a level never before available with any other Asterisk distribution. And now you can configure and reconfigure your new Incredible PBX phones from the convenience of the Incredible PBX GUI.
The lynchpin of Incredible PBX 2020 and beyond is ClearlyIP components which bring management of FreePBX modules and SIP phone integration to a level never before available with any other Asterisk distribution. And now you can configure and reconfigure your new Incredible PBX phones from the convenience of the Incredible PBX GUI.
VitalPBX is perhaps the fastest-growing PBX offering based upon Asterisk with an installed presence in more than 100 countries worldwide. VitalPBX has generously provided a customized White Label version of Incredible PBX tailored for use with all Incredible PBX and VitalPBX custom applications. Follow this link for a free test drive!
Special Thanks to Vitelity. Vitelity is now Voyant Communications and has halted new registrations for the time being. Our special thanks to Vitelity for their unwavering financial support over many years and to the many Nerd Vittles readers who continue to enjoy the benefits of their service offerings. We will keep everyone posted on further developments.
Some Recent Nerd Vittles Articles of Interest...
- For 64-bit systems with Asterisk 1.8, use the Cepstral install procedures outlined in this Nerd Vittles article. [↩]
- If you use the recommended Acer Aspire Revo, be advised that it does NOT include a CD/DVD drive. You will need an external USB drive to load the software. Some of these work with CentOS, and some don't. Most HP and Sony drives work; however, we strongly recommend you purchase an external DVD drive from a merchant that will accept returns, e.g. Best Buy, WalMart, Office Depot, Office Max, Staples. You also can run The Incredible PBX on a virtual machine such as the free Proxmox server. Another less costly (but untested) option might be this Shuttle from NewEgg: $185 with free shipping. Use Promo Code: EMCYTZT220 [↩]
- HINT: Version 1.7.5.5.3 ISO also works just fine. [↩]
Free Asterisk Solutions
