
The Most Versatile VoIP Provider: FREE PORTING

 JUST RELEASED: Visit the Incredible PBX Wiki
Whole House iPod + $5/mo. Gets You Every Song on the Planet
 We’ve previously written about the incredible Sonos whole-house audio system that is priced (literally) tens of thousands of dollars below the cost of a comparable "turnkey" system that you typically would purchase from a home audio consultant. Another revolutionary development occurred yesterday so it was a good time for an update.
Yesterday’s development was an announcement from Napster, which was recently acquired by Best Buy, that lets you download 5 DRM-free songs per month from Napster’s entire catalog for $5 a month. Nothing very exciting there. The kicker is that, for no additional fee, you now get unlimited (but DRM’d) streaming of all 7 million songs in Napster’s vast music collection to any PC you happen to own. And $60 buys you a full year plus 70 DRM-free songs!
 We hear you mumbling. Why would anyone want to only listen to music on their PC? Well, this is where your Sonos music system comes into play. Instead of buying a cheap PC (such as this $199 Acer netbook from CompUSA) and subscribing to Napster to play the music on your PC, U.S. customers now have instant access on your Sonos system to over 7 million music tracks in the Napster library any time you like. And this isn’t canned playlists although Napster has plenty of those. With today’s new offer, you can stream songs of your choice in your own playlists to one or many rooms in your house depending upon how many Sonos ZonePlayers you’ve configured. Or use your Sonos controller to search the entire Napster catalog by artist, album, or song title. And the total cost: just $5 a month.
Sonos Background. For those that are new to Sonos, you basically buy a little $500 Wi-Fi box for each room in your home or office where you want to play music. There are special system bundles at this link if you hurry. You plug in a pair of speakers and connect to your NAS-savvy music library. We recommend dLink’s DNS-323 which provides RAID1 mirrored SATA drives in any size you desire (about $180 delivered from NewEgg plus SATA drives). Be sure the drives you pick are on dLink’s compatibility list! If you happen to use Comcast for your broadband service, you also receive a free Rhapsody subscription which can be played on every Sonos system in your house for free, but you’ll have to connect a Windows PC to your Sonos system through the line in jack to take advantage of this. With the new Napster offering, you can skip the hassle for $5 a month. The Sonos system also supports streaming audio from more than 300 Internet radio stations, also free.
Some other reviews of the Sonos system are worth a look. Check out the Home Theater View, Audioholics, Playlist Magazine, and PC Magazine. You’ll find dozens more here.
There are few companies in the world (much less the United States) that provide flawless hardware and software, free software updates (that always work), and regular updates that consistently add value to your initial purchase. Sonos is at the top of that very, very short list. Run, don’t walk, to add this system to your home or office. You’ll thank us for years to come. We installed eight systems with four remotes in just over two hours. We haven’t quit listening since. Today’s Napster announcement is simply icing on the cake. Enjoy!
Update. We don’t often revise our articles but a Tweet from @Sonos last night sent us back to the drawing board. While we knew that Napster already was available in Sonos music players, the price point was substantially higher. Since Napster’s announcement had clearly stated that the $5 a month special only applied to use of the library on a PC, we had assumed that it wouldn’t work directly in the Sonos system. Wrong! It works perfectly on the Sonos players with the functional simplicity that is the hallmark of Sonos software. Napster should take a lesson! Lo and behold, it appears that Napster views the Sonos system as just another Linux PC so the entire Napster music library is available in any Sonos music system without resorting to any external PC. Seven million songs for $5 a month strikes us as a deal you’d be crazy to pass up. Better hurry while it lasts.
Some Recent Nerd Vittles Articles of Interest…
Asterisk CallerID Perfected: CallerID Superfecta 2.0
 If you’re new to VoIP and Internet Telephony, it may come as a shock when you discover that incoming calls no longer display the names of your callers unlike your POTS CallerID service. The problem is that most telephone providers deliver only a CallerID number when sending calls. Your DID service provider is responsible for looking up the incoming number in their directory and supplying a matching name. Simply stated, CallerID numbers are pushed to recipients, but CallerID names must be pulled from in-house databases. With Ma Bell and siblings, this was easy because they had a monopoly on all of the records. They’ve done their best to preserve that advantage. For example, Google provides very good CallerID information for people in the traditional phone book but provides no facility for adding numbers of those that don’t have a Ma Bell line. Coincidence? Probably not. With Internet Telephony Hosting Providers, CNAM lookups are few and far between. A few now will provide CallerID lookups but only on a per call fee basis.
A similar problem arises for outbound VoIP calls that you place. Even though you may provide a CallerID name and number, most telephone companies throw the supplied CallerID name in the bit bucket and do their own lookups. If you’re not in their directory, your number or nothing will be supplied instead of your actual name. Bottom line: This is one major piece of the telephone monopoly that Judge Greene forgot to address. And it’s only going to get worse now that more people own cellphones than Ma Bell landlines.
With Asterisk®, the simplest solution is to do your own CNAM lookups. And today we’re delighted to introduce CallerID Superfecta 2.0, a FreePBX module with incredible flexibility. It also serves as a living testament to how open source development actually should work.
The History Lesson. We originally wrote an AGI script for Asterisk@Home known as the CallerID Trifecta. As sources of CNAM lookups expanded, a number of other individuals contributed code to support those lookups. The original application morphed into the CallerID Superfecta when these new sources were added, but all the code still resided in a difficult-to-maintain PHP/AGI script. Tony Shiffer picked up the ball last year and converted the CallerID Trifecta into a FreePBX module which made it incredibly easy to install the application and configure the providers you wished to use. Fast forward to today, and now Jeremy Jacobs, with help from other members of the PBX in a Flash Forum community, has taken the original work of a number of PBX in a Flash Forum participants and released a real masterpiece, CallerID Superfecta 2.0. It’s not only easy to install and configure, but now it’s incredibly flexible and simple to expand as more and more people begin contributing lookup routines to this open source project. And Tony has put the icing on the cake with a new SVN development site to track bugs and feature requests for this project and others as we move forward.
The CallerID Superfecta Design. As originally implemented, CallerID Superfecta let you choose one or more lookup sources for incoming CallerID numbers. When an inbound call arrived, the sources were queried in a specified order, and the first source that provided a matching CallerID name won. The CNAM search result was returned to Asterisk for display on your phone instruments, and the lookup procedure ended. The problem with the original design was that newer and better lookup providers continued to appear, the hard-coded search order wasn’t necessarily ideal for every user or organization, and the providers kept changing formats to make lookups more challenging. CallerID Superfecta 2.0 fixes all of that!
What’s New. For openers there are a number of new lookup sources as well as some tweaks to older sources that stamped out a few bugs from our previous, sloppy code. 🙂 The web user interface (UI) for FreePBX also has been totally reworked. Now you can prioritize the lookups in the order that best meets your needs. And, as new CNAM lookup sources become available, they are automatically added to the new UI. The code also has been modularized with separate templates for each provider. This makes the addition of new lookup sources incredibly simple to implement. There’s also a new debug function built directly into the web user interface. By entering a telephone number in the new debug field and pressing the debug button on the form, the results from your selected lookup sources together with the latency of each enabled data source are displayed on the form for you to review. This new debug function greatly enhances troubleshooting while serving as a terrific tool to assist in fine tuning which providers to actually enable and in what order. Providers who can’t be reached, or who perform too slowly, or who provide lousy results can be turned off completely or moved to the bottom of the search order. Finally, CallerID Superfecta 2.0 introduces prefix code hooks. This gives developers the ability to trigger an additional outside process when the Caller ID function is initiated. For example, this feature might be used in a call center to allow the system to automatically perform an ODBC query and bring up a customer record for use by a customer service representative.
Installing CallerID Superfecta 2.0. Installation and setup should be a snap on any of the FreePBX-based Asterisk aggregations including PBX in a Flash. First, using a browser on your desktop PC, download CallerID Superfecta 2.0 from the Superfecta repository. Do not decompress the .tgz archive. Second, open FreePBX with your browser and choose Admin, Module Admin, Upload Module. Browse and select the superfecta-2.x.x.tgz module from your desktop and click the Upload button. When the upload completes, click local module administration. Scroll down and click CID Superfecta. Click the Install or Upgrade radio button depending upon whether you have previously installed the Superfecta FreePBX module. Click Process, Confirm, Return to install the new module. Reload the Asterisk dialplan when prompted.
Configuring CallerID Superfecta 2.0. There really are only two steps to bring CallerID Superfecta on line. First , we’ll configure the lookup sources and search order of the lookups. And then, for each inbound route on your Asterisk system, we’ll tell FreePBX to use CallerID Superfecta as the CallerID lookup source.
To configure CallerID Superfecta, click Admin, Setup, CID Superfecta in FreePBX. If you’re using PBX in a Flash or trixbox, be sure to insert the UserName maint and your FreePBX maint password in the fields provided under General Options. Then choose the Services you’d like to use for queries by clicking on the corresponding Enabled buttons. If you’re unfamiliar with previous versions of the product, we’d recommend you start with Addresses, White Pages, Yellow Pages, Any Who, and Telco Data. If you use the Asterisk Phonebook, AsteriDex, or SugarCRM, enable those options as well. Our rule of thumb in prioritizing the searches is to move your personal directories (Asterisk Phonebook, AsteriDex, and SugarCRM) to the top of the list. For the remaining choices, we recommend you start with the following search order: Addresses, White Pages, Yellow Pages, Any Who, and then Telco Data. Telco Data normally returns only the city and state of the caller, not the caller’s name. Who Called requires registration. Once you get everything squared away, click the Save button. Then key in a few known phone numbers in the Debug section of the form and click the Debug button to make sure everything is working as you expected. Take note of the retrieval times and the results and adjust the search order to meet your needs. Remember, the first match on a name using the search sources from top to bottom wins. The other search sources are never consulted for this number.
For additional configuration options and tips on configuring SugarCRM, see this thread on the PBX in a Flash Forum.
Once you’re satisfied with your lookup sources and the search order, the only remaining step is to designate CID Superfecta as the CallerID lookup source in your inbound routes. For each inbound route on which you want CallerID lookups performed, click Admin, Setup, Inbound Routes and choose the desired route from the column of routes on the right margin. Scroll to the CID Lookup Source section of the form and choose CID Superfecta from the dropdown box. Click Submit, Apply Config Changes, Continue to save your entry. Enjoy!
Good Things Are Coming. Sometimes you can just sense that something really terrific is about to happen with a project that’s been properly nurtured. So it is with PBX in a Flash. Many of us invested countless hours in the Asterisk@Home project, but it just never quite took off in terms of fostering independent development. And that is what open source is all about. When we started the PBX in a Flash project with Tom King and Joe Roper, we wanted something different, a participatory platform that could get folks excited about Internet telephony and open source development. As long time readers of this column know, we’ve pumped lots of applications into PBX in a Flash in hopes of encouraging others to catch the spark. Well, we’ve made it. CallerID Superfecta 2.0 is a perfect example of a creation from a developer who hasn’t previously contributed to any open source project. And there now are many more in the works. So we’re excited for the Asterisk community. Seeing your baby grow up is quite a thrill. We’re quickly building a network of application developers and contributors of many varieties, and it is starting to transform a really good telephony toolbox into a really spectacular application platform. Have a look at this new project to get a glimpse of what lies ahead.
This isn’t a private club. If you’d like to participate in a big or a small way, please visit our new, non-denominational Development Site and kick the tires. The objective is to create applications that can run on any of the FreePBX-based Asterisk distributions. So, while we’re a little biased, you don’t have to be to join in on the fun. Just click the Register link at the top of the form. Welcome!!!
Other Coming Attractions. Well, we got distracted again this week because CallerID Superfecta 2.0 was such as terrific new product. We’ll wrap up the Orgasmatron Installer tutorial in our next column. Stay tuned!
Security Alert. Secunia has published some security vulnerabilities in FreePBX. Upgrade all of your FreePBX modules at your earliest convenience.
Twitter Magic. If you haven’t noticed the right margin of Nerd Vittles lately, we’ve added a new link to our Twitter feed. If you explore a little, you’ll discover that the user interface now brings you instant access to every Twitter feed from the convenience of the Nerd Vittles desktop. Enjoy!
whos.amung.us If you’re wondering what your fellow man is reading on Nerd Vittles these days, wonder no more. Visit our new whos.amung.us statistical web site and check out what’s happening. It’s a terrific resource both for us and for you.
Special Thanks to Our Generous Sponsors
FULL DISCLOSURE: ClearlyIP, Skyetel, Vitelity, DigitalOcean, Vultr, VoIP.ms, 3CX, Sangoma, TelecomsXchange and VitalPBX have provided financial support to Nerd Vittles and our open source projects through advertising, referral revenue, and/or merchandise. As an Amazon Associate and Best Buy Affiliate, we also earn from qualifying purchases. We’ve chosen these providers not the other way around. Our decisions are based upon their corporate reputation and the quality of their offerings and pricing. Our recommendations regarding technology are reached without regard to financial compensation except in situations in which comparable products at comparable pricing are available from multiple sources. In this limited case, we support our sponsors because our sponsors support us.
 BOGO Bonaza: Enjoy state-of-the-art VoIP service with a $10 credit and half-price SIP service on up to $500 of Skyetel trunking with free number porting when you fund your Skyetel account. No limits on number of simultaneous calls. Quadruple data center redundancy. $25 monthly minimum spend required. Tutorial and sign up details are here.
![]() The lynchpin of Incredible PBX 2020 and beyond is ClearlyIP components which bring management of FreePBX modules and SIP phone integration to a level never before available with any other Asterisk distribution. And now you can configure and reconfigure your new Incredible PBX phones from the convenience of the Incredible PBX GUI.
The lynchpin of Incredible PBX 2020 and beyond is ClearlyIP components which bring management of FreePBX modules and SIP phone integration to a level never before available with any other Asterisk distribution. And now you can configure and reconfigure your new Incredible PBX phones from the convenience of the Incredible PBX GUI.
 VitalPBX is perhaps the fastest-growing PBX offering based upon Asterisk with an installed presence in more than 100 countries worldwide. VitalPBX has generously provided a customized White Label version of Incredible PBX tailored for use with all Incredible PBX and VitalPBX custom applications. Follow this link for a free test drive!
 Special Thanks to Vitelity. Vitelity is now Voyant Communications and has halted new registrations for the time being. Our special thanks to Vitelity for their unwavering financial support over many years and to the many Nerd Vittles readers who continue to enjoy the benefits of their service offerings. We will keep everyone posted on further developments.
Some Recent Nerd Vittles Articles of Interest…
Asterisk on Steroids: The Orgasmatron Installer, Part III
 Happy Cinco de Mayo! And you can celebrate the event by installing two dozen turnkey Asterisk® applications in under 5 minutes! We recently introduced our new Orgasmatron Installer for PBX in a Flash. And today the saga continues with Part III in our series. Faxing and email work out of the box. More than a dozen extensions and a number of hosting provider trunks are preconfigured. Delivery of CallerID names with numbers is available from a half dozen providers of your choice. ODBC database connectivity is now painless. And the Flite text-to-speech engine is preconfigured with Cepstral TTS only a few keystrokes away. Also included are FreePBX 2.5, and Apache, SendMail, MySQL, PHP, phpMyAdmin, IPtables Linux firewall, Fail2Ban, and WebMin. Here's the complete list of what 5 minutes of your time brings to your Asterisk server platform:
- AsteriDex
- CallerID Superfecta (FreePBX Module)
- CallWho for Asterisk
- Cepstral TTS (installer script only)
- Email That Works with SendMail
- Extensions (15 preconfigured)
- Fax Module using nvFax
- FONmail
- FreePBX Backups
- Gizmo5 (FreePBX Module)
- Hamachi VPN (installer script only)
- Hotel-Style Wakeup Calls (FreePBX Module)
- Interconnecting Asterisk Servers with IAX
- MeetMe Conferences on the Fly
- Mondo Full System Backups
- NewsClips from Yahoo
- ODBC Database Support
- Reminders by Phone and Web
- SIP URI support (fax, mothership, e164, nv-demo)
- TeleYapper
- Tide Reports with xTide
- Trunk Lister Script
- Trunks (Vitelity, Fonica, Gizmo, ENUM, Remote Peer)
- Weather by Airport Code
- Weather by ZIP Code
- Worldwide Weather
- Zaptel Updater (script only)
In Part II of this series, we walked you through securing your system and configuring a few of the major applications: AsteriDex, CallerID Superfecta, CallWho, Cepstral, and Emailing with SendMail. Today, we'll tackle nine more applications in the list.
Fax Module with nvFax. The NVfax module provides basic incoming and outgoing fax functionality for your PBX in a Flash system. It's not perfect because faxing with VoIP providers is hit and miss at best! As installed, inbound faxing works after a simple configuration. Here are the three steps:
#1. Log into your server as root and edit fax-process.pl in the /var/lib/asterisk/bin folder. Change the following default parameter to make it your default MAILTO email address:
my $to = "JoeSchmoe\@gmail.com";
NOTE: Always edit system files like this: nano -w filename
#2. Using a web browser, log into FreePBX and choose Admin, Setup, General Settings. In the Fax Machine section of the form, choose system as the extension for receiving faxes, enter the destination email address for incoming faxes, and enter an email from address for outbound faxes.
#3. While still in FreePBX, you need to define how you want faxes processed when they are received from outside your PBX. Choose Admin, Setup, Inbound Routes. For each incoming route on your PBX where you want to enable receipt of faxes, click on that incoming route definition. In the Fax Handling section of the form, choose system as the fax extension, enter the fax email destination address, choose nvfax as the fax detection type, and use 5 as the fax detection delay setting. Save your settings for each inbound destination and then reload your dialplan.
You can test it by plugging a real fax machine into a VoIP phone adapter such as the Linksys SPA-2102 and assigning the ATA an extension number on your PBX. Using the fax machine, simply send a fax to extension 329 (F-A-X). It should arrive as a PDF in your email inbox within a couple minutes.
Once you get fax delivery of faxes from inside your PBX working reliably, then you're ready to graduate to the Big League and get faxing from outside your PBX working. This is 99% dependent upon the quality of inbound calls from your DID provider. If your DID provider doesn't support ULAW, give up or switch providers. We have successfully tested inbound faxing with TelaSIP, Teliax, voip.ms, and Future-Nine. With Teliax and Future-Nine, you will need to add the following settings to your Incoming Trunk Configuration in FreePBX:
t38pt_rtp=no
t38pt_tcp=no
t38pt_udptl=no
For additional tips and tricks, read our Best of Nerd Vittles article on faxing.
FONmail for Asterisk. FONmail is one of several applications that works in conjunction with AsteriDex. It lets you pick up a telephone connected to your Asterisk system, dial 6245 (M-A-I-L), and dictate a message for email delivery to someone in your AsteriDex database. You'll be prompted for the phone number of your recipient, or you can look up a person using the first three letters of their name in the AsteriDex database. Once you record your message and choose the recipient, the dictated message is emailed to the recipient using the email address you've entered for that person in AsteriDex.
For FONmail to work, you obviously have to add entries into AsteriDex (with email addresses) for the recipients you intend to select, and you need to populate the new dialcodes for AsteriDex by following the instructions in Part II of this tutorial. The final piece is specifying your return email address for the outbound emails. Set your return email address by editing the $email entry at the top of nv-mailit.php. The file is stored in /var/lib/asterisk/agi-bin.
FreePBX Backups. A disaster recovery plan is a critical component with any computer system, and PBX in a Flash is no different. You need to have a plan for recovering from a disaster whether that disaster is an Act of God, or man-made, or the result of a hardware failure. Our recommended strategy goes like this. Make weekly full disk backups with Mondo to at least a pair of USB flash drives. Replace the drive each week and take the other drive off site. In addition, make daily or weekly FreePBX backups and copy them to a safe place. Amazon S3 offers a convenient, inexpensive off-site storage facility for FreePBX backups. FreePBX backups let you restore FreePBX components to a machine state at the time the backup was made. Here's how to set up FreePBX automatic backups. Be sure you clean out old backups from time to time as they take up disk space. The backups are stored in folders under /var/lib/asterisk/backups based upon the name you assign to your backup schedule.
Here's how to set one up to make a backup on demand:
1. Open FreePBX with your web browser.
2. Choose Admin, Tools, Backup and Restore, Add Backup.
3. Give the backup schedule a name, e.g. RightNow.
4. Change all Radio buttons to Yes to backup everything.
5. Backup schedule: Run Backup Now.
6. Click Submit Changes button to kick off the backup.
Here's how to set one up to make a weekly backup every Sunday night:
1. Open FreePBX with your web browser.
2. Choose Admin, Tools, Backup and Restore, Add Backup.
3. Give the backup schedule a name, e.g. Daily.
4. Change all Radio buttons to Yes to backup everything.
5. Backup schedule: Run Backup Weekly (on Sunday).
6. Click Submit Changes to save new backup schedule.
Gizmo5 FreePBX Module. One of the VoIP providers that provides enormous flexibility in getting the most out of your new system is Gizmo5. For very little money and virtually no configuration hassles, Gizmo5 can't be beat. One of the slick functions that Gizmo5 provides is the ability to make 5-minute phone calls to any Skype user at no cost. For $20 a year, you can make as many 2-hour Skype calls as you like to your ten best friends. For more details, see our article. The Orgasmatron installer puts everything in place for you to set up a Gizmo account quickly from within the FreePBX interface. Just choose Admin, Setup, Gizmo5 Integration. Just follow the prompts to create your new account and make an initial deposit.
Installing the Hamachi VPN. Once you've run the Orgasmatron Installer, you have the option of installing the Hamachi virtual private network (VPN) which supports the interconnection of 16 computers at no cost. Simply run the install-hamachi.x script which you'll find in your /root/nv folder. For complete configuration instructions, read the install-hamachi.pdf file and hamachi.faq, both of which are also in the same directory.
Interconnecting Asterisk Servers with IAX. If you don't plan to interconnect your Asterisk server with one or more other Asterisk servers, then delete the Remote-Host outbound route in FreePBX and then delete the remote-peer trunk. If you plan to use the ODBC demo examples on extensions 222 and 223, you at least will need to change the Dial Pattern for the Remote-Host outbound route by deleting the 2XX entry as explained elsewhere in this article. What this provided was a simple way to interconnect extensions in the 200-299 range of numbers on a remote PBX.
If you do plan to interconnect Asterisk servers, then change this 2XX Dial Pattern to match the extension numbers on your remote PBX. For example, if the remote Asterisk server uses extensions in the 7000-7999 range of numbers, you'd want to include a 7XXX entry in your Remote-Host Dial Pattern.
To enable, interconnection of your new server to another Asterisk server, edit the remote-peer trunk and insert the actual IP address of your remote host. Also change the secret in the Peer and User sections to a very secure entry and use the same secret entry in your remote host trunk setup.
On the remote server, create a new IAX trunk with settings like the following using your correct secret and the IP address of your new server that was built with the Orgasmatron Installer:

MeetMe Conferences On the Fly. If you're accustomed to spending hundreds of dollars to schedule and run phone conferences with dozens of people, those days are officially over with PBX in a Flash. You now can purchase a phone number in 2600+ rate centers in the United States with support for 20 simultaneous calls for under $9 a month. Once you have purchased your DIDforSale DID and configured the new trunk on your server, simply point the inbound route for that trunk to Misc Destination: MeetMe CONF.
To set up a conference at any time, pick up any phone on your PBX and dial 2663 (C-O-N-F). When prompted for the conference number, make one up, e.g. 30303. When prompted for a conference PIN, make one up, e.g. 1234. Now notify all conference participants to dial the Conference DID (or 2663 for internal users) and to use 30303# for the conference number and 1234# for the PIN. When everyone hangs up, the conference ends. Simple as that!
ODBC Database Connectivity. All of the necessary components to support ODBC database integration with Asterisk have been installed for versions of the Orgasmatron Installer after May 1. Also included are two sample dialplan components that demonstrate how to build ODBC applications. These two samples are explained in the Nerd Vittles ODBC article. The extensions used by these two samples are 222 and 223. If you used an older version of the Orgasmatron Installer, you'll have to manually add ODBC support and the sample extensions conflict with the default routing rules for interconnecting your server to another Asterisk server. So you have two options. Either change the Dial Pattern for interconnecting to the remote server by deleting the 2XX entry or modify the extension numbers for the ODBC demos in /etc/asterisk/odbc.conf. Once you have addressed this inconsistency, you can activate the ODBC demo applications by inserting the following line in the [from-internal-custom] context of extensions_custom.conf in /etc/asterisk: #include odbc.conf
Then reload your Asterisk dialplan: asterisk -rx "dialplan reload"
Reminders by Phone and by Web. The latest version of the Best of Nerd Vittles Telephone Reminders 4.0 application is included in the Orgasmatron Installer. You can schedule reminders by telephone by dialing 1-2-3 from a phone connected to your Asterisk PBX. The default password is 12345678. To keep strangers from using your reminder system, you need to change this password. Edit extensions_custom.conf in /etc/asterisk and search for the 123 extension. Change the password entry in the Authenticate entry and reload your dialplan as shown above.
You also can schedule reminders using a web browser. There's an option in FreePBX: Admin, Tools, Reminders. You also can access the reminders application separate and apart from FreePBX using the IP address of your Asterisk server: http://ipaddress/reminders.
The CallerID number for the application, the TTS engine, and your email address all can be adjusted to meet your needs. See the Best of Nerd Vittles article for details on making these changes.
Continue reading Part IV (Monday, May 25).
Twitter Magic. If you haven't noticed the right margin of Nerd Vittles lately, we've added a new link to our Twitter feed. If you explore a little, you'll discover that the user interface now brings you instant access to every Twitter feed from the convenience of the Nerd Vittles desktop. Enjoy!
whos.amung.us If you're wondering what your fellow man is reading on Nerd Vittles these days, wonder no more. Visit our new whos.amung.us statistical web site and check out what's happening. It's a terrific resource both for us and for you.
Special Thanks to Our Generous Sponsors
FULL DISCLOSURE: ClearlyIP, Skyetel, Vitelity, DigitalOcean, Vultr, VoIP.ms, 3CX, Sangoma, TelecomsXchange and VitalPBX have provided financial support to Nerd Vittles and our open source projects through advertising, referral revenue, and/or merchandise. As an Amazon Associate and Best Buy Affiliate, we also earn from qualifying purchases. We’ve chosen these providers not the other way around. Our decisions are based upon their corporate reputation and the quality of their offerings and pricing. Our recommendations regarding technology are reached without regard to financial compensation except in situations in which comparable products at comparable pricing are available from multiple sources. In this limited case, we support our sponsors because our sponsors support us.
BOGO Bonaza: Enjoy state-of-the-art VoIP service with a $10 credit and half-price SIP service on up to $500 of Skyetel trunking with free number porting when you fund your Skyetel account. No limits on number of simultaneous calls. Quadruple data center redundancy. $25 monthly minimum spend required. Tutorial and sign up details are here.
![]() The lynchpin of Incredible PBX 2020 and beyond is ClearlyIP components which bring management of FreePBX modules and SIP phone integration to a level never before available with any other Asterisk distribution. And now you can configure and reconfigure your new Incredible PBX phones from the convenience of the Incredible PBX GUI.
The lynchpin of Incredible PBX 2020 and beyond is ClearlyIP components which bring management of FreePBX modules and SIP phone integration to a level never before available with any other Asterisk distribution. And now you can configure and reconfigure your new Incredible PBX phones from the convenience of the Incredible PBX GUI.
VitalPBX is perhaps the fastest-growing PBX offering based upon Asterisk with an installed presence in more than 100 countries worldwide. VitalPBX has generously provided a customized White Label version of Incredible PBX tailored for use with all Incredible PBX and VitalPBX custom applications. Follow this link for a free test drive!
Special Thanks to Vitelity. Vitelity is now Voyant Communications and has halted new registrations for the time being. Our special thanks to Vitelity for their unwavering financial support over many years and to the many Nerd Vittles readers who continue to enjoy the benefits of their service offerings. We will keep everyone posted on further developments.
Some Recent Nerd Vittles Articles of Interest...
Asterize Your Data: Taming ODBC with Asterisk
 One of the perks of participating in the Atlanta Asterisk Users Group InstallFest a couple weeks ago was getting to hear some terrific speakers. At the top of that list was Jared Smith, who heads up the Training Division at Digium®. We always had considered ODBC to be a bit overwhelming for those new to Asterisk®, but Jared disproved that theory in less than 30 minutes. For those of you that don't have an opportunity to hear it from the master, today we present our Mom-and-Pop version of how to get Asterisk interacting with all of your favorite databases whether they be parts and inventory data, CRM, or just about anything else. And our special thanks to Jared for providing the inspiration to tackle this.
If you're new to the ODBC World, here's a quick primer. The idea behind Open Data Base Connectivity is to simplify the task of connecting up any flavor database management system so that it can talk to applications and foreign databases without having to write custom code to support every different DBMS. ODBC serves in much the same way as a translator who sits between you and foreign visitors. With the benefit of a translator, whatever is spoken is understood on both ends of the conversation.
The real beauty of ODBC is that it is conversant with almost every DBMS offering on the planet including Oracle, Informix, SAS, MS Access, DB2, SQL Server, MySQL, PostgreSQL, Sybase, and even dBase, FoxPro, and XDB. All you really need is the ODBC connector for your operating system plus one or more database drivers for the DBMS data sources you wish to use. Visit EasySoft if you want more background. They sum up the role of ODBC this way:
The goal of ODBC is to make it possible to access any data from any application, regardless of which database management system (DBMS) is handling the data. ODBC achieves this by inserting a middle layer called a database driver between an application and the DBMS. This layer translates the application's data queries into commands that the DBMS understands.
Our goal for today is to get ODBC working on your Asterisk system and to build a simple MySQL application that demonstrates how all the pieces should fit together. We've chosen MySQL because it is integrated into all of the major Asterisk aggregations and requires no additional installation. Even though our focus today is MySQL databases, the same process can be used to interconnect with virtually any foreign database regardless of where it happens to reside. And, in coming weeks, we will start cranking out some ODBC applications that actually are useful 🙂 ... much like what we've done in the Asterisk text-to-speech arena. Hopefully, this tutorial will encourage others to contribute ODBC applications for the benefit of everyone in the Asterisk community.
Getting ODBC working today also reinforces one of the key design strengths of PBX in a Flash. We strongly recommend you start with the latest build of PBX in a Flash. Then run our Orgasmatron Installer. It will provide you a feature rich and extremely stable base platform that just works! Unlike the RPM-based Asterisk aggregations such as trixbox and Elastix, it's incredibly easy with PBX in a Flash to recompile Asterisk to add ODBC functionality because Asterisk is actually built from Asterisk source code when PBX in a Flash is initially installed. That's not to suggest that any of this is impossible using the other aggregations. Just be aware that you may break the ability to later update your system once you manually bolt on additions such as ODBC by recompiling Asterisk. And, of course, you can add ODBC functionality to pure Asterisk systems as well. For an excellent tutorial, see Asterisk: The Future of Telephony (2nd Edition for Asterisk 1.4), by Jim van Meggelen, Jared Smith, and Leif Madsen.
Overview. Let's quickly review the installation steps to bring ODBC connectivity on line. First, we'll install several Linux RPMs to fill in the missing pieces to activate ODBC on your PBX in a Flash server. Second, we'll activate the Linux ODBC driver for MySQL. Third, we'll install a sample timeclock database in MySQL so we have something to play with. Fourth, we'll run a little Nerd Vittles script to tell Linux and Asterisk about all of your MySQL databases. Fifth, we'll recompile Asterisk so that it knows how to talk ODBC. Any time you create a new MySQL database, you'll want to run the script in Step #4 again to repopulate the ODBC information that tells Linux and Asterisk about your MySQL databases. The script only takes a few seconds. Once these steps are completed, you're ready to start creating your ODBC applications.
There are two parts to building any ODBC application with Asterisk. First, we'll define the SQL code to read and write to a particular table in one of your MySQL databases. Second, we'll insert some dialplan code in the new odbc.conf file in the /etc/asterisk directory. This dialplan code tells Asterisk how to behave when a database query is received from a telephone on your system. For each additional ODBC application, you just perform these two steps again. And we'll do that once more using our AsteriDex database just to show you how easy this really is. So let's get started.
1. Installing Linux RPMs. Log into your server as root and issue the following commands to install the necessary RPMs on your PBX in a Flash server. (NOTE: Skip this step if you're using PIAF-Green!)
yum -y install unixODBC-devel
yum -y install libdbi-dbd-mysql
yum -y install mysql-connector-odbc
2. Activating the MySQL ODBC Driver. While still logged into your server as root, issue the following commands to activate the MySQL ODBC driver on your system:
cd /root
wget http://pbxinaflash.net/source/odbc/mysql-odbc
chmod +x mysql-odbc
./mysql-odbc
3. Installing Sample MySQL Database. While still logged into your server as root, issue the following commands to install the sample MySQL database on your system:
cd /root
wget http://pbxinaflash.net/source/odbc/mysql-sample
chmod +x mysql-sample
mv /etc/asterisk/func_odbc.conf /etc/asterisk/func_odbc.conf.old
./mysql-sample
4. Defining MySQL Databases for Linux and Asterisk. The biggest pain in setting up ODBC used to be the creation of the text files telling Linux and Asterisk about your MySQL databases. We decided to write a script to automate the process. What this script does is query MySQL for the names of all your MySQL databases. It then generates the necessary settings in /etc/odbc.ini and /etc/asterisk/res_odbc.conf to support all of your MySQL databases. Don't forget to rerun it if you create new MySQL databases, or they won't be accessible through ODBC. Execute the following commands to run the script:
cd /root
wget http://pbxinaflash.net/source/odbc/odbc-gen.sh
chmod +x odbc-gen.sh
./odbc-gen.sh
Just a word of caution that this script overwrites both odbc.ini and res_odbc.conf after making backups of both existing files (odbc.old and res_odbc.conf.old). If you happen to be a whiz kid, and you've already made entries in odbc.ini and res_odbc.conf to connect to other databases, you'll need to put your entries back in place (from the backups) after running the script the first time. If you accidentally run the script twice, your connection data will be lost since the script only makes copies of the most recent versions of the two files.
5. Recompiling Asterisk. The final step in activating ODBC on your system is to recompile Asterisk so that it becomes ODBC conversant. You obviously want to do this when your PBX is not in service. While still logged in as root, issue these commands. (NOTE: Skip this step if you're using PIAF-Green!)
cd /usr/src/asterisk
make clean
./configure
make
make install
amportal restart
Building ODBC Applications With Asterisk. We cheated. We said there were two steps in building Asterisk ODBC apps. But we actually installed the code for our two samples when we installed the sample database. So let's review the two steps so you'll know how to roll your own down the road. The two files that manage ODBC queries with Asterisk are stored in /etc/asterisk. The queries are stored in func_odbc.conf. And the dialplan code is placed in odbc.conf. It could just as easily have been inserted in extensions_custom.conf, but we thought it was more straightforward to create a separate config file solely to manage ODBC dialplan code. If for no other reason, this way you'll know where to look when something goes wrong. 🙂
Step 1 is to create the SQL query statements that will be used by Asterisk to read and write to a table in one of your databases. We built a sample time card system which could be used to let employees clock in and clock out using a telephone on your Asterisk system. The SQL code to look up employee's names based upon their employee number is called a read in Asterisk 1.4 and readsql in Asterisk 1.6. It looks like the third line below. The SQL code to update information in the file is called write or writesql, and it's on the fourth line. Ignore the wordwrap. All of the read or write code must fit on a single line in func_odbc.conf in the /etc/asterisk directory. Once you add to or make changes in this file, you'll need to reload your Asterisk modules: asterisk -rx "module reload". You can check which ODBC custom functions are available on your system with this command: asterisk -rx "core show functions like ODBC". You'll note that, for every defined function, Asterisk tacks on an ODBC_ prefix. So TIMECLOCK becomes ODBC_TIMECLOCK. You use these functions to retrieve or populate data from within your dialplan as you'll see in a minute. You also can review the SQL commands for any functions you create with a command like this: core show function ODBC_TIMECLOCK. Here's what the demo TIMECLOCK function code in func_odbc.conf actually looks like:
[TIMECLOCK]
dsn=MySQL-timeclock
read=SELECT `comments` FROM `users` WHERE `empnum`='${SQL_ESC(${ARG1})}'
write=UPDATE `users` SET `empnum`='${SQL_ESC(${VAL1})}' WHERE `empnum`='${SQL_ESC(${ARG1})}'
Step 2 in building an ODBC Asterisk app is to write the dialplan code to assign an extension which will be used to answer a call for a database query, to prompt the caller for information, to issue a SQL query to the database (using one of the functions defined in Step 1), and to return the query results to the caller. All of this dialplan code goes in /etc/asterisk/odbc.conf. Let's take a brief look at the dialplan code we've written to look up an employee's name based upon a 5-digit employee number. It looks like this:
exten => 222,1,Answer
exten => 222,n,Wait(2)
exten => 222,n,Flite("Please enter the 5 digit employee number.")
exten => 222,n,Read(EMPNUM,beep,5)
exten => 222,n,NoOp(EMPNUM: ${EMPNUM})
exten => 222,n,Set(EMPNAME=${ODBC_TIMECLOCK(${EMPNUM})})
exten => 222,n,GotoIf($["${EMPNAME}foo" = "foo"]?notfound)
exten => 222,n,Flite("The employee name is ${EMPNAME}. Good bye.")
exten => 222,n,NoOp(Employee: ${EMPNAME})
exten => 222,n,Hangup
exten => 222,n(notfound),Flite("No such employee on file. Good bye.")
exten => 222,n,Hangup
This code does the following. It answers a call to extension 222, prompts the user for a 5-digit employee number (12345 and 23456 are in the sample file), stores the number to EMPNUM, outputs the number to the Asterisk CLI, and performs an ODBC query to ODBC_TIMECLOCK (note the addition of the ODBC_ prefix to the name we assigned above). If there is no matching employee name for the EMPNUM, the dialplan jumps to the notfound label and reports "no such employee." Otherwise, it speaks the employee name which the query stored in the EMPNAME variable.
We've also created an ODBC interface to AsteriDex. You obviously have to have AsteriDex 4 installed for this application to work. With this sample, you dial extension 223 and enter the 3-character DIALCODE which is the first three letters of a name in your AsteriDex database. Then the dialplan code retrieves the first matching entry providing both the matching name and phone number. It also gives the caller the option of calling the person whose number was retrieved. Before this sample will work, you'll need to populate the DIALCODEs. To do this, use a web browser and point it to the IP address of your Asterisk server and the directory housing your AsteriDex application, e.g. http://192.168.0.44/asteridex4/dialcode.php. Once you've run this application, dial 223 from any phone on your Asterisk system and enter A-M-E. This will return the default entry for American Airlines from your AsteriDex database. You can review all of the dialplan code by pulling up odbc.conf. Our code shows how easy it is to retrieve multiple fields from a database, parse those fields, and place an outbound call based upon a response from the caller. And all of this is accomplished with a couple dozens lines of simple dialplan code.
Where To Go From Here. We've covered the installation of ODBC and provided a couple of quick examples on how to extract data from ODBC-compatible databases using Asterisk. But to maximize your benefits with ODBC, learning the Structured Query Language (SQL) is the key that unlocks the castle. That's where the real work is performed. You want your good data to stay that way. And you want the answers to your queries to be right.
Our sample code in func_odbc.conf and odbc.conf will show you how to organize things and Asterize your SQL queries to pass information back and forth between Asterisk and MySQL. But mastering syntax alone won't earn you a Black Belt in SQL design. Here are two brand new O'Reilly books that will. The first book was just released, and the second one will be available shortly: Simply SQL and Learning SQL. Enjoy!
whos.amung.us If you're wondering what your fellow man is reading on Nerd Vittles these days, wonder no more. Visit our new whos.amung.us statistical web site and check out what's happening. It's a terrific resource both for us and for you.
Special Thanks to Our Generous Sponsors
FULL DISCLOSURE: ClearlyIP, Skyetel, Vitelity, DigitalOcean, Vultr, VoIP.ms, 3CX, Sangoma, TelecomsXchange and VitalPBX have provided financial support to Nerd Vittles and our open source projects through advertising, referral revenue, and/or merchandise. As an Amazon Associate and Best Buy Affiliate, we also earn from qualifying purchases. We’ve chosen these providers not the other way around. Our decisions are based upon their corporate reputation and the quality of their offerings and pricing. Our recommendations regarding technology are reached without regard to financial compensation except in situations in which comparable products at comparable pricing are available from multiple sources. In this limited case, we support our sponsors because our sponsors support us.
BOGO Bonaza: Enjoy state-of-the-art VoIP service with a $10 credit and half-price SIP service on up to $500 of Skyetel trunking with free number porting when you fund your Skyetel account. No limits on number of simultaneous calls. Quadruple data center redundancy. $25 monthly minimum spend required. Tutorial and sign up details are here.
![]() The lynchpin of Incredible PBX 2020 and beyond is ClearlyIP components which bring management of FreePBX modules and SIP phone integration to a level never before available with any other Asterisk distribution. And now you can configure and reconfigure your new Incredible PBX phones from the convenience of the Incredible PBX GUI.
The lynchpin of Incredible PBX 2020 and beyond is ClearlyIP components which bring management of FreePBX modules and SIP phone integration to a level never before available with any other Asterisk distribution. And now you can configure and reconfigure your new Incredible PBX phones from the convenience of the Incredible PBX GUI.
VitalPBX is perhaps the fastest-growing PBX offering based upon Asterisk with an installed presence in more than 100 countries worldwide. VitalPBX has generously provided a customized White Label version of Incredible PBX tailored for use with all Incredible PBX and VitalPBX custom applications. Follow this link for a free test drive!
Special Thanks to Vitelity. Vitelity is now Voyant Communications and has halted new registrations for the time being. Our special thanks to Vitelity for their unwavering financial support over many years and to the many Nerd Vittles readers who continue to enjoy the benefits of their service offerings. We will keep everyone posted on further developments.
Some Recent Nerd Vittles Articles of Interest...
Googlified Messaging Returns: The Gizmo-Asterisk Marriage
 As many of you know, we were ecstatic when Google Voice arrived with free U.S. calling, voice mail transcription, and SIP connectivity to Asterisk®. That lasted less than a week until Google slammed the SIP door and spoiled our party. But... "Where there's a will, there's a way" goes the old adage, and so it is with Google Voice and free Asterisk calling. It returns today, back from the dead, thanks to another column of Gizmo tips and tricks that we wrote several months ago. Turns out our friends at Gizmo are considerably more persuasive with the Google moguls than we are because they still have SIP connectivity to Google Voice. That got us to thinking. If we have a free Gizmo account and a free Google Voice account, why can't we do a quick SIP marriage of convenience between the two accounts and restore free calling to Asterisk? Lo and behold, it turns out you can. And today we'll show you how. Admittedly, this isn't as exciting as other 3-ways you may have tried, but it's still fun! Once we get all the pieces in place, you'll be able to pick up any phone on your Asterisk system and place a call to anywhere in the United States for free. All you have to dial is GV + the area code and phone number. Couldn't be any easier!
Update: The original SIP interface to Google Voice described in this posting no longer works. A new approach that really works is now available on Nerd Vittles at this link.
Within the past few months, we've added several hundred million free phone numbers to our Asterisk PBX by creating a Skype Gateway as well as Gizmo Backdoor Dialing1 and ENUM interfaces that didn't cost us a dime. When we add all the phones in the U.S. to that free calling list, we're getting very close to a billion free numbers. So welcome back... Googlified Messaging™.
Today's New Design. Much of today's column is a cut-and-paste job from previous tutorials because we really are marrying two previous tutorials to get this working. Here's the design. You need both a free Google Voice account and a Gizmo5 account. It's also free or almost free. Then we'll set up the Google Voice account to forward all incoming calls to voicemail. This allows you to call your Google Voice number and press a few keys to make an outbound call instead of listening to your voicemails. Next we'll set up our Gizmo5 account to forward all incoming calls to the SIP URI of our Google Voice number. We can get to Gizmo5 with a SIP call, but we can no longer place a direct SIP call to Google Voice. But Gizmo can! With a little dialplan voodoo, we'll tell Asterisk to place a SIP call to our Gizmo number. Gizmo then passes the call along with a SIP call to Google Voice. Asterisk counts to ten while the call is transferred to Google Voice. Then Asterisk acts like an auto-dialer by sending *, entering our Google Voice password, pressing 2, and finally dialing a 10-digit number plus # to place a free call to somewhere in the U.S. You'll never know any of this is happening behind the scenes until Aunt Betty answers her phone. And here's the best part of the story. The SIP call from your Asterisk server to your Gizmo number is free. The SIP connection from Gizmo transferring the call to your Google Voice number is free. And the phone call to any phone in the U.S. through Google Voice is free. FREE + FREE + FREE = FREE! And the sound quality is fantastic. The silver lining is that you can accomplish all of this and still use Google Voice as a message transcription service for your voicemails.
To get everything working, there are four steps: (1) configuring your Google Voice number to go directly to voicemail, (2) configuring your Gizmo5 number to forward all calls and send them via SIP to your Google Voice phone number, configuring FreePBX to route all calls with a GV prefix to your Gizmo5 SIP URI, and (4) configuring Asterisk to jump through the autodialer hoops to place an outbound call to any U.S. number through the Google Voice telephone interface. It sounds more complicated than it is. So hang on to your hat. Here we go!
Google Voice Design. To integrate free voicemail transcription and free U.S. calling into Asterisk, what we first must do is turn your Google Voice account into a glorified answering machine and message distribution system. When calls arrive on your Google Voice number, they will immediately trigger a greeting message that says something like this:
Thank you for calling Nerd Vittles. No one is available at the moment to take your call. After the tone, please identify yourself, leave a callback number, and a brief message. Your message will be transcribed and delivered to us. We will get back to you promptly. Please begin speaking after the tone.
Once a voicemail message is received, we want Google Voice to transcribe it and email us both the voicemail message and the transcribed text. The other feature we want is the ability to press *, enter our PIN, choose option 2 to place an outbound call, and dial a 10-digit number to any phone in the U.S. for free!
Google Voice Setup. Log into your Google Voice account and click Settings, General. In the Voicemail Greeting section of the form, record your greeting message as outlined above. In the Notifications section, identify the email and SMS addresses for delivery of your voicemail messages. In Voicemail Transcripts, check the option to transcribe voicemails. Now click on the Do Not Disturb check box to forward all inbound calls to voicemail.
Configuring Gizmo5. You can learn all about the host of features that Gizmo5 offers to the VoIP community by reading our previous article. Once you've set up your Gizmo account, log in and, in the Forwarding Gizmo5 Calls section of the form, click the Forward All Calls button. Next, click on the SIP option and enter your actual Google Voice phone number (instead of 6175171234) in SIP URI format: 6175171234@216.239.37.15:5061. Don't change anything else. Now click the Save button to save your settings.
Integrating Google Voice into Asterisk. This setup lets you place a call through Gizmo and Google Voice from any Asterisk phone by dialing the GV prefix plus a 10-digit number. So, to place a call to President Obama in Washington through Google Voice, you'd dial 48-202-456-1111. Good luck with that, but here's how...
17473456789 - Your Gizmo5 DID
8888 - Your Google Voice PIN
First, log into your Asterisk server as root and edit extensions_custom.conf. It's in the /etc/asterisk folder. Go to the very bottom of the file and insert the following code. Use your Gizmo phone number instead of 17473456789. Use your actual Google Voice PIN instead of 8888. Remember to expand the two-line dial string so it fits on a single line with no spaces! Save your changes and reload the dialplan: asterisk -rx "dialplan reload"
[custom-google-voice]
exten => _X.,1,Dial(SIP/17473456789@sipphone.com
,30,rD(wwwwwwwwwwwwww*www8888www2wwww${EXTEN}#))
exten => _X.,n,Hangup
Next, open FreePBX with a web browser and choose Setup, Trunks, Add Custom Trunk. Insert the following Custom Dial String on the form and Submit Changes and reload the dialplan:
local/$OUTNUM$@custom-google-voice
Finally, choose Setup, Outbound Routes, Add Route and fill in the following entries on the form:
Route Name: GoogleVoice
Dial Pattern: 48|NXXNXXXXXX
Trunk Seq: local/$OUTNUM$@custom-google-voice
Save your changes and reload the Asterisk dial plan one more time to complete the setup. Now you're all set to call the President whenever the urge strikes: 48-202-456-1111. And, remember, it's a free call... at least for now.
Creating Google Voice Favorites in Asterisk. If there are friends that you frequently call in distant places, you may find it more convenient to create Speed Dial numbers for them. Here's how to do it in Asterisk and still take advantage of free calling through Google Voice.
Log into your Asterisk server as root and again edit extensions_custom.conf in the /etc/asterisk folder. In the [from-internal-custom] context, add one or more entries for people you wish to call giving each of them their own extension on your PBX. Be sure to make the following substitutions and match your Gizmo and Google Voice credentials:
999 - Extension number to call
17473456789 - Your Gizmo5 DID
8888 - Your Google Voice PIN
1234567890 - Phone number of person to call
And here's the default entry which should be one continuous entry on one line:
exten =>999,1,Dial(SIP/17473456789@sipphone.com
,30,mD(wwwwwwwwwwww*ww8888ww2ww1234567890#))
When you finish making all the extension entries desired, save the file. Then reload your Asterisk dialplan: asterisk -rx "dialplan reload"
Google Dialer for Asterisk. Another approach for outbound calling with Google Voice would be to create a simple dialer in your Asterisk dialplan. The idea here is that anyone can pick up a phone and dial *GV (which is *48) to place a call. They then will be prompted to enter the 10-digit number to call. This code would be inserted in the same [from-internal-custom] context, and remember to insert your actual Google Voice PIN and Gizmo DID in the dial string. Keep the entire Dial command on a single line (which we can't do in this blog's template). Reload the Asterisk dialplan when you're finished.
exten => *48,1,Answer
exten => *48,n,Wait(1)
exten => *48,n,Set(TIMEOUT(digit)=15)
exten => *48,n,Set(TIMEOUT(response)=20)
exten => *48,n,Playback(pls-entr-num-uwish2-call)
exten => *48,n,Read(NUM2CALL,beep,10)
exten => *48,n,Playback(pls-wait-connect-call)
exten => *48,n,Dial(SIP/17473456789@sipphone.com
,30,mD(wwwwwwwwwwww*ww8888ww2ww${NUM2CALL}#))
exten => *48,n,Hangup
So... the ball is back in Google's court once again. Let's hope they make the right choice this time and leave SIP connectivity in place. Otherwise, S-K-Y-P-E is only a few small footsteps away. Enjoy!
Special Thanks to Our Generous Sponsors
FULL DISCLOSURE: ClearlyIP, Skyetel, Vitelity, DigitalOcean, Vultr, VoIP.ms, 3CX, Sangoma, TelecomsXchange and VitalPBX have provided financial support to Nerd Vittles and our open source projects through advertising, referral revenue, and/or merchandise. As an Amazon Associate and Best Buy Affiliate, we also earn from qualifying purchases. We’ve chosen these providers not the other way around. Our decisions are based upon their corporate reputation and the quality of their offerings and pricing. Our recommendations regarding technology are reached without regard to financial compensation except in situations in which comparable products at comparable pricing are available from multiple sources. In this limited case, we support our sponsors because our sponsors support us.
BOGO Bonaza: Enjoy state-of-the-art VoIP service with a $10 credit and half-price SIP service on up to $500 of Skyetel trunking with free number porting when you fund your Skyetel account. No limits on number of simultaneous calls. Quadruple data center redundancy. $25 monthly minimum spend required. Tutorial and sign up details are here.
![]() The lynchpin of Incredible PBX 2020 and beyond is ClearlyIP components which bring management of FreePBX modules and SIP phone integration to a level never before available with any other Asterisk distribution. And now you can configure and reconfigure your new Incredible PBX phones from the convenience of the Incredible PBX GUI.
The lynchpin of Incredible PBX 2020 and beyond is ClearlyIP components which bring management of FreePBX modules and SIP phone integration to a level never before available with any other Asterisk distribution. And now you can configure and reconfigure your new Incredible PBX phones from the convenience of the Incredible PBX GUI.
VitalPBX is perhaps the fastest-growing PBX offering based upon Asterisk with an installed presence in more than 100 countries worldwide. VitalPBX has generously provided a customized White Label version of Incredible PBX tailored for use with all Incredible PBX and VitalPBX custom applications. Follow this link for a free test drive!
Special Thanks to Vitelity. Vitelity is now Voyant Communications and has halted new registrations for the time being. Our special thanks to Vitelity for their unwavering financial support over many years and to the many Nerd Vittles readers who continue to enjoy the benefits of their service offerings. We will keep everyone posted on further developments.
Some Recent Nerd Vittles Articles of Interest...
- Backdoor Dialing unfortunately has bitten the dust at least temporarily. [↩]
Asterisk on Steroids: The Orgasmatron Installer, Part II
In our last column, we introduced you to the new Orgasmatron Installer for PBX in a Flash. After a one-week break to prepare for our visit to the Atlanta Asterisk® Users Group 3d Annual InstallFest, we're back in the saddle today to flesh out the new baby.
For those that are new to all of this, let's briefly review what the Orgasmatron Installer has added to your Lean, Mean Asterisk Machine. Faxing and email now work out of the box. More than a dozen extensions and a number of hosting provider trunks are preconfigured as well. Delivery of CallerID names with numbers is now available from a half dozen providers of your choice. And, of course, the Flite text-to-speech engine is preconfigured with Cepstral TTS only a few keystrokes away. Also included are FreePBX 2.5, and Apache, SendMail, MySQL, PHP, phpMyAdmin, IPtables Linux firewall, Fail2Ban, and WebMin. And here's the complete list with all of your new Nerd Vittles applications:
- AsteriDex
- CallerID Superfecta (FreePBX Module)
- CallWho for Asterisk
- Cepstral TTS (installer script only)
- Email That Works with SendMail
- Extensions (15 preconfigured)
- Fax Module using nvFax
- FONmail
- FreePBX Backups
- Gizmo5 (FreePBX Module)
- Hamachi VPN (installer script only)
- Hotel-Style Wakeup Calls (FreePBX Module)
- MeetMe Conferences on the Fly
- Mondo Full System Backups
- NewsClips from Yahoo
- ODBC Database Support
- Reminders by Phone and Web
- SIP URI support (fax, mothership, e164, nv-demo)
- TeleYapper
- Tide Reports with xTide
- Trunk Lister Script
- Trunks (Vitelity, Fonica, Gizmo, ENUM, Remote Peer)
- Weather by Airport Code
- Weather by ZIP Code
- Worldwide Weather
- Zaptel Updater (script only)
Security First! Because your phone bill matters, today we begin with security. The design of virtually all of the open source Asterisk PBX aggregations is to leave SIP and IAX ports on your new server exposed to the Internet. This is done to facilitate communications with your hosting providers as well as telephone extensions which may be connected to your server from the other side of the globe. The wrinkle with this design is that, if a bad guy can guess an extension number on your system and its password, they get a free ticket to do whatever could be done from that extension on your PBX. In the case of one unlucky company, this resulted in a phone bill of over $100,000. For details, read our Primer on Asterisk Security. So... Security Matters!
Anyone obviously can download PBX in a Flash and the Orgasmatron Installer. Thus, you need to assume that everyone on the planet knows your default passwords. We walked you through changing some of the important ones with the passwd-master script last week. Use it regularly. Now let's turn our attention to your extensions and trunk passwords.
Extension Security. There now are a couple of ways to secure your extensions from the bad guys. First, you need to establish very secure passwords for your extensions and voicemail boxes. Second, you need to specify the IP addresses that are authorized to access every extension on your PBX. And third, remember do repeat this drill every time you add a new extension to your system.
To change an extension password, open FreePBX using a web browser pointed to the IP address of your server: http://ipaddress/admin/. On PBX in a Flash systems, you'll be prompted for a username (maint) and whatever password you set when you ran passwd-master. Now click the Setup tab and then the Extensions option. You'll see the list of configured extensions on your PBX in the right column. Click on each of those extensions, and you'll see a form like this:
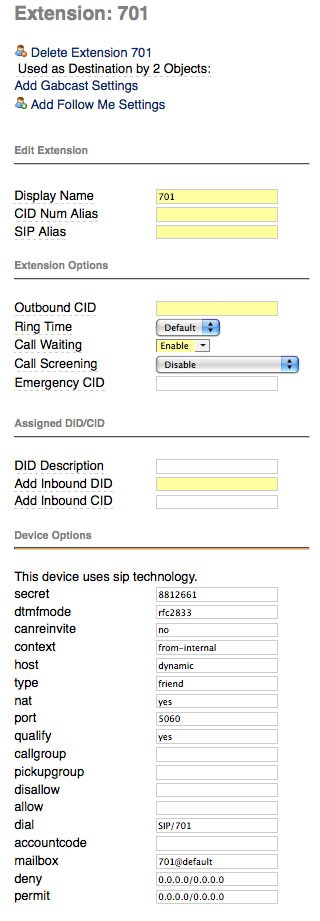
The password for this extension is stored in a field called secret. Make up a very secure password for every extension on your PBX. You will embed this password in the telephone connected to this extension. There's no other place you'll need it so a long and complex numeric password is essential.
The authorized IP addresses for this extension are stored in a field called permit. The way this works is that you first specify which IP addresses should be denied access (the deny field), and then you poke a little hole in the dike, if you're smart, to permit only one or a few IP addresses to connect to the extension. Leave the deny entry as it is. The default permit entry 0.0.0.0/0.0.0.0 opens the floodgates. It means any IP address can log into this extension. To restrict extension access to IP addresses on a private LAN of 192.168.1, the entry would look like this: 192.168.1.0/255.255.255.0. To further restrict extension access to a specific IP address (recommended!), the entry would look like this: 192.168.1.44/255.255.255.255. Use a permit entry that makes you sleep well at night. After all, it's your phone bill.
The third entry you'll want to change is further down the same data entry form, and that's the Voicemail Password field. This entry determines who can actually retrieve voicemails left for this extension. Set it accordingly.
Once you've made the three changes above, save your entries by clicking the Submit button at the bottom of the form. Repeat the drill for every extension, and then click the orange Apply Configuration Changes tab at the top of the screen and then Continue with Reload to reload your Asterisk dialplan.
Trunk Security. Securing the trunks on your PBX is equally important to securing extensions. Keep in mind that, with your trunk credentials, anyone can set up your trunk on their PBX to make calls on your nickel! Unlike the extensions, there are no working usernames and passwords in the default trunks with one exception. If you plan to use the providers we've preconfigured, simply insert your own username, fromuser, and secret settings in the fields provided, and you'll be making calls in a matter of seconds. The process is similar to the one we used for extensions. Choose Setup, Trunks and then click on each trunk and make your entries. Submit your entries and then reload the dialplan when you're finished.
In the case of the remote-peer trunk, this trunk is designed to make it extremely easy to interconnect Asterisk servers for interoffice communications. But it also means that a bad guy can easily interconnect with your server and start dialing. If you don't plan to connect to another Asterisk server, delete this trunk! If you do plan to connect to another Asterisk server, change the trunk secret and IP address of the host to which you are connecting. Do NOT leave the default secret in either the outgoing or incoming settings! Also change the password for the outbound route: Remote-Host. You may want to ultimately remove this password if you actually start interconnecting servers. Otherwise, users will have to enter this password whenever they may a call to an extension on the interconnected Asterisk server.
To interconnect your server to another server, you would simply add a new trunk called main-peer on the other server that looks like this (using your new password and correct IP address):
Configuring AsteriDex. AsteriDex is plug-and-play for most users. However, as configured, your AsteriDex web site is reachable from the Internet if you have mapped port 80 on your hardware-based firewall to your PBX in a Flash server or if you don't have a hardware-based firewall and your server is directly exposed to the Internet. If you don't mind people seeing your contact list or making prank calls that ring your extensions, this may be okay. If it's of concern to you, the easiest security precaution is to rename the asteridex4 directory to an obscure name that only you know, e.g. bahbah143. Here are the commands to issue after logging into your server as root. By using all of these commands, AsteriDex still will be accessible through FreePBX and the PBX in a Flash GUI:
cd /var/www/html
mv asteridex4 bahbah143
sed -i 's|asteridex4|bahbah143|' admin/modules/asteridex/page.asteridex.php
sed -i 's|asteridex4|bahbah143|' welcome/.htindex.cfg
The other adjustment you may need to make to AsteriDex is to configure who can access the Admin tab to add, modify, and delete entries in your database. As configured, the Admin tab is available to any computer with an IP address that begins with 192.168. This may not match your private subnet, and not all 192.168 IP address are non-routable. So you may wish to tighten this restriction to match your internal subnet. In the /var/www/html/asteridex4 folder (or whatever name you've chosen above), you'll find a configuration file: config.inc.php. Simply edit this file and change the $local_net entry. You also can set the long distance prefix ($LDprefix), your CallerID number ($CallerID), and the default extension to ring for click-to-dial from the web interface ($INtrunk and $defaultExt). The extension to dial can now be set from the web interface as well. Unless you really know what you're doing, leave everything else the way it is.
CallerID Superfecta. Most hosting providers deliver CallerID numbers as part of your payment for using their DIDs. Almost none deliver CallerID names without an additional charge. CallerID Superfecta is designed to fill that gap... for free. A number of us have worked on this project for years. And it now has been integrated directly into FreePBX. There are two steps to getting everything working properly on your new PBX. First, you need to identify which CallerID lookup sources you wish to use on your system. Then, you need to specify CallerID Superfecta as the lookup source on each Inbound Route where you want CallerID names looked up for incoming calls.
Open FreePBX with your web browser and navigate to Setup, CID Superfecta. You'll get a form that looks like this:
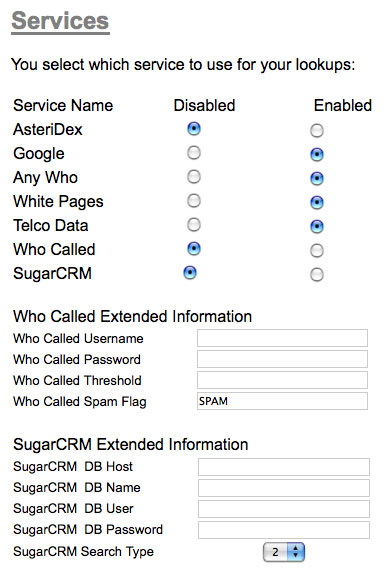
With the exception of AsteriDex and SugarCRM lookups which are almost instantaneous, keep in mind that each lookup takes a little time and slows down receipt of your inbound call. So long as you have a good Internet connection, you shouldn't have a problem using all of the sources. The way the CallerID Superfecta works is that, once it gets a name match in any of the sources beginning with AsteriDex and SugarCRM, it ends the lookups and provides the CallerID name it found to Asterisk for display on the extensions which are ringing in the designated inbound route. Filling out the form is self-explanatory for the most part. Tick off the lookup sources you wish to use. If you plan to use whocalled.us, you'll need to sign up for an account and provide your credentials before the lookup will work. With SugarCRM, fill in the blanks to match your implementation of SugarCRM. Click the SAVE button when you have CallerID Superfecta configured to meet your needs.
The final step in implementing CallerID Superfecta is to designate it as the CallerID Lookup Source for your Inbound Routes. Click on Setup, Inbound Routes and a list of your existing routes will be displayed in the right column. As installed, there will only be one: Any DID / Any CID. Click on this entry to display the form. Scroll down to the CallerID Lookup Source dropdown box and choose CallerID Superfecta. You'd do the same with any other inbound route you create down the road. Click the Submit button and reload your dialplan to enable CallerID Superfecta. Now sit back and wait on your first call.
CallWho for Asterisk. CallWho for Asterisk is a little script we put together to make it easy to look up and dial the numbers of people in your AsteriDex database. When you dial 4-1-2, you'll be prompted to enter the first three letters of the name of the person you wish to call. Once you key in the three letters, CallWho for Asterisk will look up every matching entry in your AsteriDex database and read you the list of matches. For example, if you had Joe Schmo and Joe The Plumber in your database, CallWho would say something like this:
Press 1 for Joe Schmo.
Press 2 for Joe The Plumber.
When you press 2, CallWho will place a call to Joe The Plumber. Not sure why you'd ever want to do that, but now you understand the way it works.
Before CallWho for Asterisk will work at all, you need to run the script which associates three letter codes with every entry in your AsteriDex database. And, whenever you add new entries to your database, you need to run it again. Using a web browser, here's the program to run. Be sure to use the correct IP address for your Asterisk server and your newly designated AsteriDex location instead of asteridex4:
http://192.168.0.44/asteridex4/dialcode.php
Cepstral TTS for Asterisk. PBX in a Flash is delivered with the Flite text-to-speech engine already enabled. But, unless you like the voices of Lurch and Fred Munster, you may wish to cough up a little cash and install Cepstral on your server. Cepstral now has a synthesized voice of Allison which exactly matches all of the other voice prompts in Asterisk. I'm embarrassed to report that we can't seem to get the correct installation script deposited in our Orgasmatron builds... ever! So, if you want to use Cepstral, here are the steps to download the real, working installation script and to install Cepstral:
cd /root/nv
rm install-cepstral
wget http://pbxinaflash.net/source/cepstral/install-cepstral
chmod +x install-cepstral
./install-cepstral
Once the 65MB download completes, you'll be prompted to agree to the license. You do this by pressing the Enter key to scroll down the license agreement. When you reach 100%, type yes to continue with the install. Press Enter to accept /opt/swift as the install directory. Very important: Type y to create the directory. The default is No which will mess up the installation. Now type yes to complete the install. Once the install completes, you can purchase a license for the Allison voice at this link. Under Voices, choose Language: US English, Voice: Allison-8kHz, and Platform: Linux. For non-commercial use, the $30 voice registration is all you need. For commercial use, you also need to acquire Concurrency Licenses which authorize a certain number of simultaneous voice ports on your system for Cepstral voices. These run $50 per port in 2-port multiples and are in addition to the $30 Allison voice license. For Nerd Vittles readers, you can save 15% on your purchase by sending an email to sales at cepstral.com explaining how you plan to use Cepstral and requesting the discount code.
We'll have an in-depth article on Cepstral in coming weeks. For those that want a head start, each of the Nerd Vittles text-to-speech applications typically includes dialplan code and one or more PHP/AGI scripts. The dialplan code can be found in /etc/asterisk/extensions_custom.conf. When you scroll through the dialplan code you will see entries like the following for each of the TTS applications:
exten => 611,5,Flite("Enter a 3 character airport code.")
;exten => 611,5,Swift("Enter a 3 character airport code.")
exten => 611,6,Read(APCODE,beep,3)
exten => 611,7,Flite("Please hold a moment.")
;exten => 611,7,Swift("Please hold a moment.")
The semicolon at the beginning of a line tells Asterisk this is a comment and to ignore it. To change the voice from the Munsters to Allison, just comment out the Flite lines and uncomment the Swift lines by deleting the leading semicolons. When you're finished making the changes, save the file and then reload your dialplan: asterisk -rx "dialplan reload". So, in the example above, the code would now look like this:
;exten => 611,5,Flite("Enter a 3 character airport code.")
exten => 611,5,Swift("Enter a 3 character airport code.")
exten => 611,6,Read(APCODE,beep,3)
;exten => 611,7,Flite("Please hold a moment.")
exten => 611,7,Swift("Please hold a moment.")
You also need to modify the PHP/AGI scripts that go with each application. All of these files are stored in /var/lib/asterisk/agi-bin. Typically the filenames begin with nv- and end in .php:
-rwxrwxr-x 1 asterisk asterisk  6835 Sep 16  2008 nv-callwho.php
-rwxrwxr-x 1 asterisk asterisk   201 Jul 12  2006 nv-config-555.php
-rwxrwxr-x 1 asterisk asterisk   201 Apr  2 13:08 nv-config.php
-rwxrwxr-x 1 asterisk asterisk 14329 Feb 10  2008 nv-mailcall.php
-rwxrwxr-x 1 asterisk asterisk  6072 Sep 24  2008 nv-mailit.php
-rwxrwxr-x 1 asterisk asterisk 10490 Apr 20 10:34 nv-news.php
-rwxrwxr-x 1 asterisk asterisk  6545 Apr 12 15:10 nv-today.php
-rwxrwxr-x 1 asterisk asterisk 21537 Apr  2 13:07 nv-weather.php
-rwxrwxr-x 1 asterisk asterisk 12043 Apr  2 13:07 nv-weather-world.php
-rwxrwxr-x 1 asterisk asterisk 22243 Apr  2 13:07 nv-weather-zip.php
In each of these scripts, you'll find a variable near the top that controls the TTS engine: $ttspick = 0 ;
To use Cepstral as the TTS engine instead of Flite, just change the $ttspick value from 0 to 1 and save the file.
Email That Works With SendMail. It's always been a knuckle drill to get your new server to reliably send outbound emails. Assuming your Internet service provider doesn't block downstream mail servers, the Orgasmatron Installer will get this working reliably. You can test it out by logging into your server as root and issuing the following command using your real email address. If you get the email, you can move on.
echo "test" | mail -s testmessage yourname@gmail.com
If you didn't get the email, you probably have a provider such as Comcast that blocks port 25 in many areas of the country. The easiest way to solve this is to set up a free Gmail account and use Gmail to deliver outbound messages from your server. This message thread on the PBX in a Flash Forum will walk you through the setup process. There's also a Comcast solution if you'd prefer not to use Gmail.
Stay Tuned. Your eyes are probably glazing over about now. I know mine are. So we'll quit here for today. In our next episode, we'll tackle the rest of the goodies that make up the Orgasmatron Installer. Enjoy!
Continue reading Part IV (Monday, May 25).
Tip of the Week. Ever wanted a 20-seat conference bridge for under $9 a month with a local phone number in any of 2600+ rate centers all over United States? You can add load balancing and automatic failover for an extra $1 per month. After you use the Orgasmatron Installer, just set up a conference extension in FreePBX and then head over to the PBX in a Flash Forum to read all about the latest rage in DID providers.
whos.amung.us If you're wondering what your fellow man is reading on Nerd Vittles these days, wonder no more. Visit our new whos.amung.us statistical web site and check out what's happening. It's a terrific resource both for us and for you.
Special Thanks to Our Generous Sponsors
FULL DISCLOSURE: ClearlyIP, Skyetel, Vitelity, DigitalOcean, Vultr, VoIP.ms, 3CX, Sangoma, TelecomsXchange and VitalPBX have provided financial support to Nerd Vittles and our open source projects through advertising, referral revenue, and/or merchandise. As an Amazon Associate and Best Buy Affiliate, we also earn from qualifying purchases. We’ve chosen these providers not the other way around. Our decisions are based upon their corporate reputation and the quality of their offerings and pricing. Our recommendations regarding technology are reached without regard to financial compensation except in situations in which comparable products at comparable pricing are available from multiple sources. In this limited case, we support our sponsors because our sponsors support us.
BOGO Bonaza: Enjoy state-of-the-art VoIP service with a $10 credit and half-price SIP service on up to $500 of Skyetel trunking with free number porting when you fund your Skyetel account. No limits on number of simultaneous calls. Quadruple data center redundancy. $25 monthly minimum spend required. Tutorial and sign up details are here.
![]() The lynchpin of Incredible PBX 2020 and beyond is ClearlyIP components which bring management of FreePBX modules and SIP phone integration to a level never before available with any other Asterisk distribution. And now you can configure and reconfigure your new Incredible PBX phones from the convenience of the Incredible PBX GUI.
The lynchpin of Incredible PBX 2020 and beyond is ClearlyIP components which bring management of FreePBX modules and SIP phone integration to a level never before available with any other Asterisk distribution. And now you can configure and reconfigure your new Incredible PBX phones from the convenience of the Incredible PBX GUI.
VitalPBX is perhaps the fastest-growing PBX offering based upon Asterisk with an installed presence in more than 100 countries worldwide. VitalPBX has generously provided a customized White Label version of Incredible PBX tailored for use with all Incredible PBX and VitalPBX custom applications. Follow this link for a free test drive!
Special Thanks to Vitelity. Vitelity is now Voyant Communications and has halted new registrations for the time being. Our special thanks to Vitelity for their unwavering financial support over many years and to the many Nerd Vittles readers who continue to enjoy the benefits of their service offerings. We will keep everyone posted on further developments.
Some Recent Nerd Vittles Articles of Interest...
Asterisk on Steroids: Introducing the Orgasmatron Installer
If an Asterisk® distribution with every bell and whistle on the planet is at the top of your Wish List, then the new Orgasmatron Installer may just be your cup of tea. Let’s face it. The Asterisk learning curve is horrendous. As some of you know, we have built some custom PBX in a Flash systems for the Dell, Everex, and Atom platforms. These builds differ from the PBX in a Flash base install in that they were turnkey PBXs with dozens and dozens of custom applications, extensions, and trunks already preconfigured. While you still needed to change some passwords and plug in some phones, the Orgasmatron builds reduce the Asterisk learning curve to almost zero. Out of the box, email works. Faxing works. ENUM works. Interconnecting Asterisk servers for free calling works. And extensions for 15 phones already are in place. Plug in your Vitelity credentials, and you can place calls to any phone in the world using your new VoIP PBX in a couple of minutes. That’s the good news.
The problem with these builds lies in their basic architecture. To date, all of them were really Mondo backups. And once you strayed from the platform on which the original system was built, your odds of getting a successful restore went down the toilet quickly. Well, that was then. And this is now!
Today we introduce an installation script for PBX in a Flash that lets you build a PBX in a Flash base system, run the Orgasmatron Installer script, and boom! Within a few minutes, you’ve got an Asterisk-based Orgasmatron server on the computer platform of your choice regardless of processor, disk controller, disk drive, network card, and video adapter. And it works equally well in a virtual environment using an open source platform such as the fantastic and free Proxmox Virtual Environment.
Update: Be sure to check out the latest Orgasmatron V Installer at this link.
For those that are wondering what’s included in this new Orgasmatron build, here’s a feature list of the components you get in addition to the base PBX in a Flash build with Asterisk 1.4 or 1.6, FreePBX 2.5, and Apache, SendMail, MySQL, PHP, phpMyAdmin, IPtables Linux firewall, Fail2Ban, and WebMin:
- AsteriDex
- CallerID Superfecta (FreePBX Module)
- CallWho for Asterisk
- Cepstral TTS (installer script only)
- Email That Works with SendMail
- Extensions (15 preconfigured)
- Fax Module using nvFax
- FONmail
- FreePBX Backups
- Gizmo5 (FreePBX Module)
- Hamachi VPN (installer script only)
- Hotel-Style Wakeup Calls (FreePBX Module)
- MeetMe Conferences
- Mondo Full System Backups
- NewsClips from Yahoo
- ODBC Database Support
- Reminders by Phone and Web
- SIP URI support (fax, mothership, e164, nv-demo)
- TeleYapper
- Tide Reports with xTide
- Trunk Lister Script
- Trunks (Vitelity, Fonica, Gizmo, ENUM, Remote Peer)
- Weather by Airport Code
- Weather by ZIP Code
- Worldwide Weather
- Zaptel Updater (script only)
Getting Started. Even though the installation process is now a No-Brainer, you are well-advised to do some reading before you begin. VoIP PBX systems have become a favorite target of the hackers and crackers around the world and, unless you have an unlimited bank account, you need to take some precautions to protect your phone bill. Start by reading our Primer on Asterisk Security. Then read our PBX in a Flash and VPN in a Flash knols. If you’re still not asleep, there’s loads of additional documentation on the PBX in a Flash documentation web site.
Installation. Here’s a quick tutorial to get you started. First, install the 32-bit version of PBX in a Flash with Asterisk 1.4. Boot your system from the installation CD and type ksalt to begin. When your machine reboots, remove the CD and choose option A to load the most stable payload. When the install completes, reboot your system once again and login as root with the password you chose when you built your system. Now issue the following commands to bring your system current and protect your system passwords: update-scripts, update-fixes, passwd-master. You now have a PBX in a Flash base install. On a stand-alone machine, it takes about 30 minutes. On a virtual machine, it takes about half that time.
Now you’re ready to run the Orgasmatron Installer. While still logged into your new server as root, issue the following commands:
cd /root
wget http://pbxinaflash.net/orgasmatron/orgasmatron.x
chmod +x orgasmatron.x
./orgasmatron.x
reboot
Stick around while the install script is running. Parts of it are interactive. For now, choose the Flite option when you’re prompted for text-to-speech preferences. That way you’ll have a working system when you’re finished. Once the installer script is finished, type status and write down the IP address of your server. You’ll need it in the next step to log into FreePBX.
Using a web browser, open FreePBX on your new server with a command like this (substituting the IP address you wrote down above). When prompted for your account name, type maint and use the password you assigned when running passwd-master above:
http://192.168.0.123/admin/
You’re NOT done yet!
These next four steps are important. They get all of the FreePBX modules installed and then restore the FreePBX backup set that’s at the heart of the Orgasmatron build. Just follow along here, and don’t skip any steps. It’s easy.
1. Choose Module Admin, Check for Updates online, Upgrade All, Process, Confirm, Return, Apply Config Changes, Continue.
2. Choose Module Admin, Check for Updates online, Download All, Process, Confirm, Return, Apply Config Changes, Continue.
3. Repeat the above #2 commands a second time.
4. Click on the Tools tab and choose Backup & Restore, Restore, RightNow, and select the .tar.gz file that is displayed. Then choose Restore Entire Backup Set, OK, Apply Config Changes, and Continue.
Securing Your System. You’re almost done. We always like to reboot the server just to make sure nothing got lost in the shuffle. When the reboot is finished, log into FreePBX with a browser again. Before you do anything else, choose each of the 16 preconfigured extensions on your new server and change the extension AND voicemail passwords. Here’s the drill: Setup, Extensions, 501, Submit after changing secret and Voicemail Password. Repeat with the next extension number instead of 501. Then Apply Config Changes, Continue when you’ve finished with all of them.
Now let’s change the default DISA password: Setup, DISA, DISAmain, PIN, Submit Changes, Apply Config Changes, Continue. Whew! Your system now is relatively secure. Follow the steps in the tutorials we recommended, and you’re ready to experiment. Plug in a SIP phone or softphone and configure it using one of the available extensions together with the secret for that extension.
Finally, be sure to change the credentials on all of your trunks to match those assigned by your providers. And, in the case of the remote-peer trunk, change the secret and IP address to match the identity on your host Asterisk server. If you don’t have another Asterisk server, change the password anyway so no one can break into your system. Better yet, just delete the trunk unless you plan to use it down the road. We’ll have more to say about this next week. For now, just make up your own, secure password to protect this trunk from outside access by unwanted visitors.
Choosing a VoIP Provider. For this week, we’ll point you to some things to play with on your new server. Then next week, we’ll cover in detail how to customize every application that’s been loaded. For openers, we recommend you set up an account with Vitelity using our special link below. This gives your PBX a way to communicate with every telephone in the world, and it also gets you a real phone number for your new system… so that people can call you. Here’s how it works. You pay Vitelity a deposit for phone service. They then will bill you $3.99 a month for your new phone number. This $3.99 also covers the cost of unlimited inbound calls (two at a time) delivered to your PBX for the month. For outbound calls, you pay by the minute and the cost is determined by where you’re calling. If you’re in the U.S., outbound calls to anywhere in the U.S. are a little over a penny a minute. If you change your mind about Vitelity and want a refund of the balance in your account, all you have to do is ask.
The VoIP world is new territory for some of you. Unlike the Ma Bell days, there’s really no reason not to have multiple VoIP providers especially for outbound calls. Depending upon where you are calling, calls may be cheaper using different providers for calls to different locations. So we recommend having at least two providers. Visit the PBX in a Flash Forum to get some ideas on choosing alternative providers.
Kicking the Tires. OK. That’s enough tutorial for today. Let’s play. After you’ve connected a phone to your new system, begin your adventure by dialing these 10 numbers:
- D-E-M-O – Check out the Nerd Vittles Orgasmatron Demo
- Z-I-P – Enter a five digit zip code for any U.S. weather report
- 6-1-1 – Enter a 3-character airport code for any U.S. weather report
- 5-1-1 – Get the latest news and sports headlines from Yahoo News
- T-I-D-E – Get today’s tides and lunar schedule for any U.S. port
- F-A-X – Send a fax to an email address of your choice
- 4-1-2 – 3-character phonebook lookup/dialer with AsteriDex
- M-A-I-L – Record a message and deliver it to any email address
- C-O-N-F – Set up a MeetMe Conference on the fly
- 1-2-3 – Schedule a regular or recurring phone reminder
- Dial *68 – Schedule a hotel-style wakeup call on any extension
Homework. Your homework for this week is to do some exploring. FreePBX is a treasure trove of functionality, and the Orgasmatron build adds a bunch of additional options. See if you can find all of them. Then log into your server as root and look through the scripts added in the /root/nv folder. You’ll find all sorts of goodies to keep you busy. Enjoy!
Continue reading Part IV (Monday, May 25).
whos.amung.us If you’re wondering what your fellow man is reading on Nerd Vittles these days, wonder no more. Visit our new whos.amung.us statistical web site and check out what’s happening. It’s a terrific resource both for us and for you.
Special Thanks to Our Generous Sponsors
FULL DISCLOSURE: ClearlyIP, Skyetel, Vitelity, DigitalOcean, Vultr, VoIP.ms, 3CX, Sangoma, TelecomsXchange and VitalPBX have provided financial support to Nerd Vittles and our open source projects through advertising, referral revenue, and/or merchandise. As an Amazon Associate and Best Buy Affiliate, we also earn from qualifying purchases. We’ve chosen these providers not the other way around. Our decisions are based upon their corporate reputation and the quality of their offerings and pricing. Our recommendations regarding technology are reached without regard to financial compensation except in situations in which comparable products at comparable pricing are available from multiple sources. In this limited case, we support our sponsors because our sponsors support us.
BOGO Bonaza: Enjoy state-of-the-art VoIP service with a $10 credit and half-price SIP service on up to $500 of Skyetel trunking with free number porting when you fund your Skyetel account. No limits on number of simultaneous calls. Quadruple data center redundancy. $25 monthly minimum spend required. Tutorial and sign up details are here.
![]() The lynchpin of Incredible PBX 2020 and beyond is ClearlyIP components which bring management of FreePBX modules and SIP phone integration to a level never before available with any other Asterisk distribution. And now you can configure and reconfigure your new Incredible PBX phones from the convenience of the Incredible PBX GUI.
The lynchpin of Incredible PBX 2020 and beyond is ClearlyIP components which bring management of FreePBX modules and SIP phone integration to a level never before available with any other Asterisk distribution. And now you can configure and reconfigure your new Incredible PBX phones from the convenience of the Incredible PBX GUI.
VitalPBX is perhaps the fastest-growing PBX offering based upon Asterisk with an installed presence in more than 100 countries worldwide. VitalPBX has generously provided a customized White Label version of Incredible PBX tailored for use with all Incredible PBX and VitalPBX custom applications. Follow this link for a free test drive!
Special Thanks to Vitelity. Vitelity is now Voyant Communications and has halted new registrations for the time being. Our special thanks to Vitelity for their unwavering financial support over many years and to the many Nerd Vittles readers who continue to enjoy the benefits of their service offerings. We will keep everyone posted on further developments.
Some Recent Nerd Vittles Articles of Interest…
Google Voice: Is the SIP and Asterisk Honeymoon Over?
 "Well. That was quick." Not encouraging words to hear from your new best friend. Google doesn’t make many mistakes so let’s give their decision to shut down SIP connectivity to Google Voice a little more time to percolate before concluding that they’ve thrown the baby out with the bathwater. The knee-jerk reaction is simply to write off Google as having about as much technical and business savvy in the VoIP market as AOL demonstrated… twice. But that’s not the Google many of us have known and done business with. And it’s the antithesis of everything Google Android and the company have sought to promote.
Update: The original SIP interface to Google Voice described in this posting no longer works. A new approach that really works is now available on Nerd Vittles at this link.
For the record, let’s back up a minute and review what transpired. Last Monday we (and others) released a tutorial showing users how to almost transparently connect Google Voice to Asterisk® PBXs as either a SIP extension or a trunk. The beauty of this was that it added a great new, low-cost telephony provider to the worldwide mix. The short-term advantage to Asterisk users was that calls within the U.S. currently were free although Google already has announced that those darn "accountants" have told them that they’re going to be forced to charge for the service one day soon. Cough cough!
In the process of testing this SIP connectivity, what we discovered was the only layer of protection standing between your wallet and free worldwide phone calls for every creep on the planet was a 4-digit PIN. That translates into 10,000 SIP calls to break into any user’s account. Even without the assistance of BOTs, that afforded your shiny new Google Voice account less than an hour of protection with a well-written SIP dialer and no added protection from Google Voice. By Friday, Google had closed the hole and blocked all SIP connectivity except for Gizmo.
The simple solution to open up safe SIP connectivity to Google Voice would be the addition of either an IP address field or a SIP URI in the Google Voice configuration options. SIP calls to and from that address would be allowed. All other calls would be blocked.
And why is this a good idea? First, it promotes the SIP open source standard. See Andy Abramson’s blog for a thought-provoking analysis of where this could ultimately lead. Second, it brings Google Voice connectivity to an enormous pool of users most of whom are tech-savvy and influential in the VoIP marketplace. Millions of Asterisk systems already have been deployed worldwide. Third, it’s the right business decision. Can you spell S-K-Y-P-E? At a time when Skype is opening up its network to SIP connectivity through Skype for SIP and Skype for Asterisk not to mention corded and cordless telephones, what possible business case could be made for introduction of a closed-platform VoIP service with no outside connectivity except through MaBell landlines? Hello!
This may come as a shocker to the Google accountants, but the call pricing and the double-hoop outbound dialing through Click2Dial aren’t that great. Comparable SIP call pricing is available from thousands of providers worldwide. And voice transcription through the Click2Dial voicemail service is downright horrendous. We proved that quickly with our Google Voice demo system.
It comes down to this. The one truly distinguishing factor with Google Voice is Google. At a time when Google has been at the forefront of open source telephony in the cellphone space with Android, the current Google Voice design is a giant step backwards. Rumor has it that Ma Bell had an offering that rang phones in multiple locations about 70 years ago. It was called a Party Line. How are they doing with that? We hope Google does the right thing and opens its new service to safe SIP connectivity. It’s the right and the bright thing to do.
The Honeymoon Ain’t Over… The Return of Googlified Messaging With Free U.S. Calling
Special Thanks to Our Generous Sponsors
FULL DISCLOSURE: ClearlyIP, Skyetel, Vitelity, DigitalOcean, Vultr, VoIP.ms, 3CX, Sangoma, TelecomsXchange and VitalPBX have provided financial support to Nerd Vittles and our open source projects through advertising, referral revenue, and/or merchandise. As an Amazon Associate and Best Buy Affiliate, we also earn from qualifying purchases. We’ve chosen these providers not the other way around. Our decisions are based upon their corporate reputation and the quality of their offerings and pricing. Our recommendations regarding technology are reached without regard to financial compensation except in situations in which comparable products at comparable pricing are available from multiple sources. In this limited case, we support our sponsors because our sponsors support us.
BOGO Bonaza: Enjoy state-of-the-art VoIP service with a $10 credit and half-price SIP service on up to $500 of Skyetel trunking with free number porting when you fund your Skyetel account. No limits on number of simultaneous calls. Quadruple data center redundancy. $25 monthly minimum spend required. Tutorial and sign up details are here.
![]() The lynchpin of Incredible PBX 2020 and beyond is ClearlyIP components which bring management of FreePBX modules and SIP phone integration to a level never before available with any other Asterisk distribution. And now you can configure and reconfigure your new Incredible PBX phones from the convenience of the Incredible PBX GUI.
The lynchpin of Incredible PBX 2020 and beyond is ClearlyIP components which bring management of FreePBX modules and SIP phone integration to a level never before available with any other Asterisk distribution. And now you can configure and reconfigure your new Incredible PBX phones from the convenience of the Incredible PBX GUI.
VitalPBX is perhaps the fastest-growing PBX offering based upon Asterisk with an installed presence in more than 100 countries worldwide. VitalPBX has generously provided a customized White Label version of Incredible PBX tailored for use with all Incredible PBX and VitalPBX custom applications. Follow this link for a free test drive!
Special Thanks to Vitelity. Vitelity is now Voyant Communications and has halted new registrations for the time being. Our special thanks to Vitelity for their unwavering financial support over many years and to the many Nerd Vittles readers who continue to enjoy the benefits of their service offerings. We will keep everyone posted on further developments.
Some Recent Nerd Vittles Articles of Interest…
Free Asterisk Solutions
