
The Most Versatile VoIP Provider: FREE PORTING

 JUST RELEASED: Visit the Incredible PBX Wiki
Quick & Easy: Configuring Remote Phone Access to an Asterisk PBX
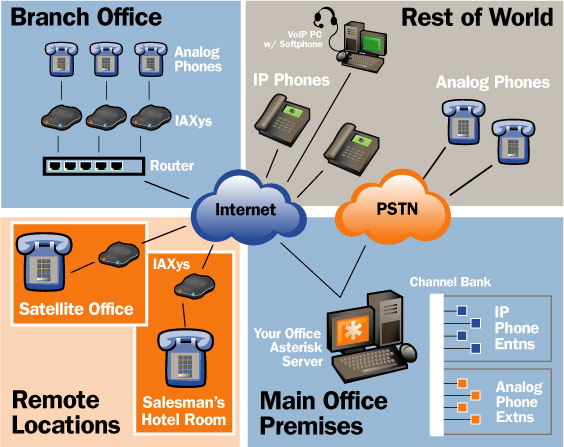 The real payoff for installing that fancy Asterisk PBX in your basement comes when you’re on the road and want to make free phone calls either to or through your home system. There are probably a million ways to do this. Most of them are painful. This is particularly true with SIP-based telephones and all the problems associated with configuring NAT and firewalls and STUN servers. So, as usual, we’re going to take the low road and do things the easy way. We’ll give you one solution that really works … every time! When we’re finished, you’ll have a device about the size and weight of a pack of cigarettes to carry on your trip. And all you’ll need when you arrive at your destination is a 10/100 network connection with a cable and a plain old telephone with a plain old phone cord. Once you connect the two devices, you simply pick up the phone and dial calls just as if you were sitting in your kitchen at home. And incoming calls work just as if you had added another phone in your upstairs bedroom. It’ll even flash at you when you have voicemail waiting. For those with kids in college, this is the perfect addition for the dorm room if you want to avoid cellphone hell. And the one-time, non-recurring cost: under $100.
To make all this magic work, you’ll need to purchase Digium®’s S101I, affectionately known as the IAXy Version 2, a NAT-transparent, FXS device providing a POTS telephone interface to your Asterisk® PBX using an IAX connection. You can buy one directly from Digium, the makers of Asterisk, by going here. Be sure you order it with a power adapter for your particular country. Buying the device directly from Digium is an especially good idea because you can call them should you ever have a configuration problem. Hopefully you won’t after you finish reading this article.
IAXy IP Configuration. Once your IAXy arrives, it’s configuration time. First things first. You can download Digium’s installation guide or just keep reading for a bit more hand-holding. The device needs to be connected to a network that has a DHCP server so that an IP address is automatically handed out to the IAXy when you plug it in. Before you power up the unit, plug in a plain old telephone and connect the IAXy to your router using a 10/100 network cable. Then plug in the power adapter. The hardest part of this drill is probably figuring out what IP address was assigned to the device. On most routers, you can use a web browser to access the router configuration. Usually there’s an option to display Attached Devices. Typically, the last device you plug in gets the highest IP address so take a look and write it down. Write down the MAC address of the unit, too. Luckily, you can ping the IAXy to see whether it’s alive. So, from your desktop machine, ping the IP address you wrote down, e.g. ping 192.168.0.123. If you don’t get a reply, that’s the wrong number. Try another one. If you do get a reply, unplug the IAXy and ping the same IP address again. If you get a reply, that’s obviously not your IAXy because it’s unplugged so start over. If you don’t get a reply, you’ve got the right number. Now plug it back in and do it one last time to be sure you still have the same number. Before you forget, go into your router configuration now and permanently assign this IP address to the IAXy. It’s usually named something like Reserved IP Table, and you’ll find it in the LAN IP setup screen on most routers. Finally, if your Asterisk server is behind your router/firewall, you’ll need to open UDP Port 4569 on your router and map it to the private IP address of your Asterisk server, not your IAXy. On most routers, you’ll find port mapping under a heading of Services or Rules. IAX is not a common protocol so you may need to create it. Just name it IAX, specify UDP as the protocol, choose port 4569, and save your settings. Then add a rule that maps this IAX port to the private IP address of your Asterisk machine. Whew!
IAXy Provisioning Utility. One more knuckle drill, and then it’s pretty smooth sailing. This isn’t the Windows world so you’ll need to compile the IAXy provisioning utility on your particular flavor of Linux. We use this utility to actually configure the IAXy device. Nothing here is difficult. Just follow the steps in order. Go to your Asterisk server, switch to root user access, and issue the following commands to download and compile the source code for the IAXy provisioning utility:
$ cd /usr/src

$ export CVSROOT=:pserver:anoncvs@cvs.digium.com:/usr/cvsroot

$ cvs login (the password is anoncvs)

$ cvs co iaxyprov

$ cd iaxyprov

$ make

$ chmod 775 iaxyprov
Configuring Asterisk to Support IAXy. We need to take a break here an actually set up an extension for your IAXy device to use. If you’re using Asterisk@Home or at least the Asterisk Management Panel, go to AMP->Setup->Extensions and click Add Extension. Enter the following using whatever extension and password you prefer:
phone protocol: IAX2

extension number: 222

extension password: 1234

full name: IAXY
If you want to activate voice mail for this extension, choose Voicemail and Directory Enabled and make the VoiceMail Password match your extension password. If you want email delivery of your voicemail messages, fill in the appropriate blanks. Then save your settings by clicking Add Extension. Click the Red Bar to reload your Asterisk configuration.
IAXy Configuration File. The next step is to decide where you will be using your IAXy device. If it will always be outside your firewall, then we only need to configure the device to use the public IP address of your Asterisk machine. If it will always be inside your firewall, then we just need to assign the private IP address of your Asterisk machine (assuming it’s behind your router/firewall). If you want to be able to move the device inside and outside your firewall, then we need to assign two IP addresses: the public and private IP addresses of your Asterisk server. The only other gotcha here is that if your Internet Service Provider assigns you a dynamic IP address, you will need to reconfigure the public IP address of your IAXy device every time your ISP changes your dynamic address. There is no DynDNS support for the IAXy at this time.
We’re going to initially configure your IAXy device for use inside your firewall where your Asterisk server also lives. Then we can play with it to make sure it’s working. Then we’ll walk through the steps to change the configuration. The IAXy configuration file and the provisioning utility we built earlier live in the /etc/src/iaxyprov directory on your Asterisk machine. It’s a good idea to switch to root user access whenever you work here just to keep all the files protected from snoopy people. Let’s make a duplicate of the IAXy config file just in case something gets screwed up: cp /usr/src/iaxyprov/iaxy.conf.sample /usr/src/iaxyprov/iaxy.conf. Now open iaxy.conf using your favorite editor: nano iaxy.conf. It should look like this:
;

; IAXY Provisioning description

;

dhcp

;ip: 216.207.244.130

;netmask: 255.255.255.192

;gateway: 216.207.244.129

codec: ulaw

;codec: adpcm

server: 192.168.0.1

;altserver: 192.168.0.2

user: myuser

pass: mypass

register

;heartbeat

;debug

;

; Feature tuning (default is all enabled)

;
You only need to change three items in the file. For server, replace this IP address with the private IP address of your Asterisk server. For user, plug in the extension number you assigned to the IAXy. And for pass, enter the password you assigned to this extension. Save your changes and exit from the editor: Ctrl-X, y, enter. To actually load the configuraton into the IAXy, issue the following command using the IP address assigned to your IAXy:
./iaxyprov 192.168.0.100 iaxy.conf
If there is no error in your config file, you will get a screenful of feedback from the IAXy device within about 10 seconds. Just disconnect power to the IAXy and then reconnect it, and you’re in business. If you get nothing on the screen after issuing the above command, then there is an error in your config file or your IAXy device is not connected to the network with the IP address shown in the iaxyprov command line you entered. Check your work and try again.
Reprovisioning the IAXy. Loading a new configuration into the IAXy is easy now that you know the drill. It’s always a good idea to reset the IAXy to its factory default settings before loading a new configuration. Here’s how:
Once the IAXy is restored to its factory defaults, you simply repeat the configuration steps above to reprovision the unit. To use the unit on the outside of your firewall, edit the iaxy.conf file and change the server IP address to the public IP address of your Asterisk server. Save your change and then load the new settings with the same iaxyprov command line we used above (assuming your IAXy is still plugged in behind your firewall). Note that you will not be able to test the device behind your firewall so take the unit to a friend’s house (with broadband) and try it out with any plain old telephone. If you want to use the IAXy both inside and outside your firewall, we’ve had good luck simply plugging in both IP addresses. Leave your private IP address in the server line, and uncomment the altserver line by removing the leading semicolon. Then enter your public IP address here, and reprovision the unit as previously explained.
Asterisk Dialplan Quirk. If you’re used to ringing all your phones for incoming calls, you’ll quickly discover that the addition of an IAX phone device complicated things a bit. You can’t mix and match device types in a Dial command. For example, exten => 1234,1,Dial(IAX2/277&SIP/204,20,r) won’t work. There’s a simple way to get around this limitation. Use a ring group which includes both SIP devices and IAX2 devices such as the IAXy. The syntax for the Dial command would look like this assuming 299 was your Ring Group: Dial(local/299@from-internal,20,m).
Activating MD5 password encryption. One great addition to the version 2 IAXy was support for MD5 password encryption. If you’ll be using the device in public places or hotels, you’ll want to use this. One quick change in your Asterisk configuration is all that’s required. Using AMP->Maintenance->Config Edit, edit the iax.conf file. Just add the following line in the [general] section of the file:
auth=md5
Save your change and restart Asterisk, and you’re all set to hit the road. Enjoy!
Coming Attractions. We’ve been working on another web application using Asterisk that builds on our previous CallMe application. For lack of a better name, we call this one The Poor Man’s Rolodex. When it’s soup, it will let you create a protected web page with the names and phone numbers of all your favorite people and places. Making a selection on the web page passes a command to a PHP script that talks to your Asterisk PBX. It first rings one or more phones in your home or business. Only when the call is answered does it place an outgoing call to the person or place you selected on the web page. It then automatically connects them to the phone you picked up. If you happen to have GrandStream’s GXP-2000, you can even configure that phone to go off-hook and turn on the speakerphone when the incoming call from your ‘Rolodex’ arrives. In short, this little ditty will give you everything Microsoft’s TAPI gateway provides without any of Microsoft’s proprietary baggage.
Some Recent Nerd Vittles Articles of Interest…
Phone Home Revisited: Getting Remote Dialtone With Asterisk — Three Great Solutions
 One of the really terrific features of Asterisk® is it’s ability using DISA (Direct Inward System Access) to provide dial tone to an incoming caller. This allows a caller to Phone Home and place outgoing calls through a remote Asterisk server to take advantage of all those VoIP cost savings we’ve been discussing ad nauseum. You obviously need to be thinking about security before you implement DISA but, properly secured, DISA is one of the most powerful functions of your Asterisk PBX so why not use it to your advantage. But there are some wrinkles. Suppose you’re traveling in a foreign country that charges a $14 minimum for any completed call to the U.S. regardless of duration. Or you may just be at a neighbor’s house and want to make a quick call on your nickel to check on Aunt Betty in Paris. Or you may be on a Nextel free incoming call plan and don’t want to burn up your cellphone minutes placing outgoing calls directly with your cellphone.
Several weeks ago, we provided a quick and dirty HOW-TO on activating a DISA callback using a web browser and entering a specific command to your Asterisk@Home’s web server. But there may be folks that don’t want the security risks associated with supporting a web server. So today we want to revisit our original Phone Home column and give you three different ways to implement DISA. The three methods are the following: (1) the AutoAttendant, (2) the CallMe Web Interface, and (3) the One Ringy-Dingy. These obviously can be mixed and matched to meet your own specific requirements.
AutoAttendant DISA. The simplest DISA implementation is to add an option to your AutoAttendant. With this option, you phone home, pay the costs of the call, and while still connected make another call through your Asterisk server by picking the DISA selection when your AutoAttendant plays. You’ll be prompted for a password and, after entering it correctly, Asterisk will provide dialtone for your use. The drawback of this option is obviously the cost, if any, of the call to your home base. If that’s not a problem, then this is a great solution. And it’s very easy to implement. Take a look at the [from-external-custom] code in our Securing Your Asterisk@Home PBX article for all the details. But basically you only need to add a couple of lines to your AutoAttendant to support DISA. Choose the number that people will press to activate DISA and pick a very secure password, and you’re all set. Assuming the number to press is 4 and your chosen password was 1234588, here’s how to set up the AutoAttendant code to implement DISA. It doesn’t get much easier than this.
exten => 4,1,Authenticate(1234588)

exten => 4,2,Background(pls-wait-connect-call)

exten => 4,3,DISA(no-password|from-internal)
CallMe Web Interface. We’ve put together a little web application (actually a PHP script) so that, using a web browser on the road, you can tell your Asterisk server to call you and provide dialtone to any number you specify. The only prerequisite here is that we don’t want to sell the farm, i.e. provide free dial tone service and unlimited international calling for all the world’s hackers and crackers. We also don’t want to have to go through a bunch of authentication steps to access the web site and put the call in motion. So here’s the design. We have a PHP script which you can download here. It needs to be renamed to callme.php. Then copy it into the /var/www/html directory on your Asterisk server. You’ll also need to tell your firewall/router to route HTTP or port 80 traffic to the internal IP address of your Asterisk server. This is usually done under the Services or Rules menus on most routers. You’ll want to specify that all port 80 traffic be allowed through the firewall all of the time. Be sure you’ve changed ALL of your Asterisk passwords before you do this!
To use this script from the Internet, you’ll probably want to have to have a more permanent fully-qualified domain name associated with your Asterisk server. We explained here how to do this using dyndns.org. If you use a SIP provider with your Asterisk server, the syntax is as follows: http://asterisk.dyndns.org/callme.php?number=sip/bv/4045551212 where asterisk.dyndns.org is the fully-qualified domain name for your Asterisk server and 4045551212 is the area code and number where you wish to accept a call with dialtone, and bv is the outgoing trunk name of your SIP provider. If you use an IAX provider with your Asterisk server, the syntax is as follows: http://asterisk.dyndns.org/callme.php?number=iax2/goiax/14045551212 where asterisk.dyndns.org is the fully-qualified domain name for your Asterisk server and 14045551212 is the all-important 1 followed by the area code and number where you wish to accept a call with dialtone, and goiax is the outgoing trunk name of your free IAX provider. Nothing else needs to be changed. To dial a local extension, use this syntax: http://asterisk.dyndns.org/callme.php?number=sip/204 where asterisk.dyndns.org is the fully-qualified domain name for your Asterisk server and 204 is the local number to ring. Beginning on the first ring, Asterisk will start prompting for a password. It doesn’t care whether the call is answered or not, and it times out after 10 seconds. After three unsuccessful password attempts (each timeout counts as 1), Asterisk hangs up. Stated another way, you have about 30 seconds to enter your password after the phone first rings. Then Asterisk disconnects the call. To enter your password, key in the touchtone numbers which match the numerical password code you specified in your [callout] context (see below). Then press the pound (#) key. Note that a web page will not display at this web address unless you enter the portion of the address following the question mark. Nor will a call be placed unless the sip/bv/ syntax precedes a phone number. We did this for security reasons.
Before the above script will work, you also need to add the following context to the bottom of the extensions_custom.conf configuration file discussed above. Make sure you change the password 24681234 to something very secure. After all, it’s your phone bill! Once you make this change, it won’t take effect until you restart Asterisk. The easiest way to do that is to access setup within AMP, click Incoming Calls, then click the Submit Changes button, then click on the red bar which appears. Count to 10 and your changes should be operational.
[callout]

exten => s,1,Authenticate(24681234)

exten => s,2,DISA(no-password|from-internal)
One Ringy-Dingy. As we mentioned at the beginning of this article, there may be times when you don’t have access to a web browser and the cost of completed outgoing calls is astronomical. Or you may just find it more convenient to place a quick call to your Asterisk server rather than firing up a web browser. For the One Ringy-Dingy option to work, you must place a call to your Asterisk server from a phone that can accept incoming calls directly (not most hotel rooms or pay phones), and you must call from a phone with a legitimate CallerID number. Ideally, for this option to work in an unattended way all the time, you’d want to have a separate Direct-Inward-Dial (DID) number dedicated to this task. Why? Because, once Asterisk detects one ring on this number, it will issue a Congestion tone (fast busy) and immediately build and then process a DISA script to call you back. That obviously isn’t a desirable response on your regular phone number. We still will configure DISA to prompt for a password when the return call is answered, but callers may be a little surprised if they call you at home, hear a fast busy, and then immediately get a return call from your home asking them for a password.
Here are the steps to get this set up. We’ll tweak our Asterisk@Home/AMP dial-in context to turn on support for tracking incoming calls by DID. Then, for security, we’ll build a separate context for this DID number to isolate it from our default AutoAttendant which manages the rest of our incoming calls. Once we have the DID context created, we’ll build a DID entry in AMP to support this incoming line. Next, we’ll drop in the code to actually process the incoming call and build and execute the scripts necessary to make the return call. There are several new and very important Asterisk features that we’ll be taking advantage of. First, we’ll be executing code based upon a ringing phone line as opposed to an answered call. Second, we’ll show you how to execute context code and scripts after a call ends. And finally, we’ll be setting a maximum call limit on the outgoing DISA calls just to provide some food for thought on how you can better harrass your teenagers. So let’s get started.
Tweaking the Dial-In Context. From our previous articles, you will recall that Asterisk@Home and other Asterisk systems using the Asterisk Management Portal (AMP), rely upon the [from-sip-external] context in extensions.conf to process incoming calls. Right now, we have that context pointed to our AutoAttendant context which we built in the extensions_custom.conf file. You can read all about how to build the AutoAttendant here. The AutoAttendant implementation effectively disabled support for AMP’s DID Routes, but it secured your Asterisk system by reducing the number of points of attack to one, i.e. every incoming call had to flow through our one AutoAttendant. For those just getting started with Asterisk, this was a good thing. But, now that you’re an expert, we need a little more flexibility because we want to set up a DID line just to handle requests for DISA services, and we don’t want incoming calls on that line going to our AutoAttendant. Why? Because, with a separate DISA DID, we can eliminate any costs in placing calls to the Asterisk server requesting remote dial tone. How? This DID will never be answered. All it will do is ring once or twice before handing out a Congestion tone, and that activity will be sufficient to capture the incoming call’s CallerID and then set in motion the DISA return call process … hence the name One Ringy-Dingy. Won’t the telemarketers be thrilled! Just think of this DID as a toll-free number without having to pay for a toll-free number. To turn on support for AMP’s DID Route management, just add the following line to your [from-sip-external] context, and be sure you add it immediately below the [from-sip-external] label. See how easy this is when there’s some documentation (HINT!).
include => ext-did
Configuring an AMP DID Route. Now that we’ve activated DID Route support for Asterisk, let’s actually build a DID Route to show you how it’s done. This presupposes that you’ve ordered an additional DID from one of your providers and that you already have a trunk for that provider set up. When you order the additional DID, make sure that you specify that you do not want voicemail activated on this DID. Or, if you have control of the voicemail setup for this DID, turn it off. The reason is that, when incoming calls to this number get a congestion tone from Asterisk, that will activate the voicemail option with most providers. That, in turn, defeats our purpose of not answering calls ringing on this DID line to save money.
To create the DISA DID route, use a web browser to access the Asterisk Management Portal. Then choose AMP->Setup->DID Routes. Plug in the DID phone number you wish to assign to DISA duty. For the Destination, click on the Custom App button, and then enter the following: custom-teliax-in,8435551212,1 substituting your actual DID number. Click the Submit button and then the red bar to reset Asterisk. Note that AMP does no error checking for this custom context other than looking for the word "custom." Remember, we haven’t even built this context yet! But let’s do it now.
DISA Custom Contexts. For our One Ringy Dingy example, we’re going to use two different providers. The DID line is rented from Teliax.com. That’s where you call to trigger a callback. But Teliax is just too expensive for actual outgoing or incoming calls so we’re using two TelaSIP trunks (with permission): one to return the call to the original caller (that’s you or me) and one to place our outgoing DISA call (to the callee). If you happen to use TelaSIP, remember that you don’t need two separate accounts for the outbound calls since TelaSIP gives you two voice paths with your single line account.
There are three separate contexts we need to create at the bottom of extensions_custom.conf file to make all of this work. Keep in mind that there are three steps in the One Ringy-Dingy process: (1) you place a call to your DID number, and your Asterisk server detects the incoming call; (2) your Asterisk server calls you back, and you’re given dialtone after successfully entering your DISA password; and (3) your Asterisk server lets you to place an outgoing DISA call for a specified length of time to anywhere permitted in this context’s custom DISA dialplan. Here are the three contexts to support the three functions: (1) [custom-teliax-in] listens to the DID line for an incoming call and then sets up and executes the code setting the return call in motion; (2) [custom-telasip-callout] actually manages the return call once someone answers and authenticates the user for DISA service; and (3) [custom-telasip] sets the dialplan and timeout options for the call and then actually connects and times the call if the caller satisfies the dialplan rules. If you’re a little confused at this point, an example may help. Skip down to the Free Samples section below and actually try a test call to see how all this works. Then come back, and we’ll finish building it for your own Asterisk system.
Incoming Call Context. So a user first calls your DID number to initiate a DISA callback. Let’s start with the code that handles the incoming call on your DID line:
[custom-teliax-in]

exten => 8436541010,1,NoOp(Incoming call from Teliax #8436541010)

exten => 8436541010,2,Congestion

exten => 8436541010,3,Hangup

exten => h,1,SetCIDNum(${CALLERIDNUM:2})

exten => h,2,System(echo channel: SIP/telasip-gw/${CALLERIDNUM} > /tmp/${CALLERIDNUM})

exten => h,3,System(echo context: custom-telasip-callout >> /tmp/${CALLERIDNUM})

exten => h,4,System(echo extension: ${CALLERIDNUM} >> /tmp/${CALLERIDNUM})

exten => h,5,System(echo priority: 1 >> /tmp/${CALLERIDNUM})

exten => h,6,System(echo callerid: 2025560000 >> /tmp/${CALLERIDNUM})  ; Your CallerID for your TelaSIP account goes here

exten => h,7,System(echo sleep 30 > /tmp/${CALLERIDNUM}.2)

exten => h,8,System(echo cp /tmp/${CALLERIDNUM} /var/spool/asterisk/outgoing >> /tmp/${CALLERIDNUM}.2)

exten => h,9,System(chmod 775 /tmp/${CALLERIDNUM}.2)

exten => h,10,System(/tmp/${CALLERIDNUM}.2)

exten => h,11,Hangup()
Let’s walk through each line of the script so that you’ll know what needs to be changed on your own system if you use this. The first three lines get processed every time someone calls your dedicated DISA DID number. Adjust the numbers in each line to match your DISA line’s 10-digit CallerID number. Line 1 just outputs a message to the console indicating that there’s an incoming call on this line. Line 2 sends the Congestion tone back to the incoming caller. Line 3 is just a safety net to be sure the call is hung up as far as Asterisk is concerned. The next 11 lines beginning with exten=>h tell Asterisk what to do when it detects that the caller has hung up on the call. This code gets processed after the caller hangs up or after Asterisk processes the Hangup command in the third line.
Line h,1 is very important. Different providers relay CallerID numbers in different ways. Teliax sends a U.S. number as +14041234567. Many providers (including BroadVoice and TelaSIP) just send the ten-digit number for incoming U.S. calls. You need to know this because we’ll need to format the CallerID number properly to match what your outgoing provider expects to see when you process the return call in step 2. So how do you know what the CALLERIDNUM format is? Run asterisk -r from a command window and watch the information about an incoming call on the DID line you plan to use. If the format is a 10-digit number, then change SetCIDNum(${CALLERIDNUM:2}) to SetCIDNum(${CALLERIDNUM:0}) which means "use every digit as received." If the number is in the format 1+8901234567 then leave the expression the way it is. It basically says strip off the first two digits and store the rest as the CallerID number.
Line h,2 is where you identify which of your VoIP providers will be used to place the return call in step 2. If you’re using TelaSIP (as we are here), then just make sure the outbound trunk name matches your entry for this provider under AMP->Setup->Trunks. If you’re using an IAX provider instead of a SIP provider, change SIP to IAX2 as well. Finally, be sure what is now a 10-digit CallerID number is formatted properly for the return call through your dialback provider. TelaSIP wants a 10-digit number. GoIAX, for example, expects to receive a 1 and then the area code and number. For GoIAX, just insert a 1 before the CallerID number.
Line h,3 identifies the context which will actually place the return call. Line h,6 is where you specify the CallerID number of your Asterisk trunk that will be placing the return call. Teliax, for example, lets you spoof the CallerID for your calls so this is where you would enter the main number of the White House (if that’s your thing): 2024561414. Finally, in line h,7 you can set how much of a delay will be imposed before your Asterisk system places the return call. It’s set to 30, but you can change it to meet your requirements. The rest of this code should work as is.
Callback Context. Now we’re ready for Asterisk to place the return call. The previous code actually sets the call in motion with a 30 second delay and then a call to the CallerID number specified using the [custom-telasip-callout] context. But here’s the code that actually manages the callback. It also prompts for the DISA password once someone answers. Line s,3 is where you set the DISA password. Make it secure! Remember: IT’S YOUR PHONE BILL!
[custom-telasip-callout]

exten => s,1,Background(silence/2)

exten => s,2,Background(asterisk-friend)

exten => s,3,Authenticate(6373)

exten => s,4,Background(pls-wait-connect-call)

exten => s,5,DISA(no-password|custom-telasip)
When someone answers the return phone call, Asterisk counts to 2 and then says, "Asterisk is your friend. Please enter your password and press the pound key." That’s the person’s clue to enter their DISA password. Three guesses and Asterisk hangs up. If the password is successfully entered, Asterisk provides dialtone and passes the call to the [custom-telasip] context in s,5.
DISA Outbound Call Context. Once dialtone is provided, the user can enter whatever digits are permitted in the [custom-telasip] context’s dialplan. Here’s ours:
[custom-telasip]

exten => _1NXXNXXXXXX,1,AbsoluteTimeout(600)

exten => _1NXXNXXXXXX,2,Macro(dialout-trunk,8,${EXTEN:1},)

exten => _1NXXNXXXXXX,3,Macro(outisbusy)	; No available circuits

exten => T,1,Playback(thank-you-for-calling)

exten => T,2,Playback(goodbye)

exten => T,3,Hangup
Lines 1, 2, and 3 specify that the user has one and only one dialing option: dial 1 and then a 3-digit U.S. area code and then a 7-digit U.S. phone number. Line 1 is where you set the maximum duration for the call in seconds (600=10 minutes). Line 2 is where you really have to be careful. It has three gotcha’s. First, you need to identify which trunk will be used to place the DISA call. If your provider only offers one dial path per circuit, then this trunk cannot be the same one as what’s specified in custom-telasip-in,h,2 above or you’ll get an "all circuits are busy" message. In short, you need one outbound trunk for the callback and another outbound trunk to place the actual DISA call from dialtone. If you use TelaSIP’s residential plan, then you can use the same trunk for both. Second, you need to know the number of the dialout trunk to be used for the DISA call. AMP numbers all of your outbound trunks. If you look in the [globals] context at the top of the extensions_additional.conf file, you’ll see all of your outbound trunks labeled as OUT_1, OUT_2, etc. Find the number of the one that matches the name of the outbound trunk you want to use for your DISA call. Replace the "8″ in line 2 of [custom-telasip] with the appropriate number you wrote down. Don’t use OUT_8, just 8. Third, you’ve got to get the DISA number dialed by the user properly formatted for the provider that will be handling the call. In our case, we accepted only numbers beginning with 1 plus a U.S. area code plus a 7-digit number, but TelaSIP doesn’t want the 1 so we strip it off. If, however, your provider (such as GoIAX) expects a 10-digit number with a leading 1, then you’d adjust line 2 above to look like this: exten => _1NXXNXXXXXX,2,Macro(dialout-trunk,8,${EXTEN},). This tells Asterisk not to strip off the first digit before sending the rest to dialout-trunk 8. The extension entries beginning with an upper case T tell Asterisk what to do when the maximum duration of a call expires.
That about does it. To complete your work, save the three new contexts to extensions_custom.conf and then restart Asterisk.
Making a Test Call. To be sure everything is working as it should, start up Asterisk in interactive mode using the Command Line Interface (CLI) so that you can actually watch what’s happening when calls are placed and received. This works best if you connect to your Asterisk server through SSH from a Mac or PC. SSH comes with every Mac and the syntax is simple: ssh root@AsteriskIPaddress. If you’re still chained to Microsoft, download Putty from the Mother Country, and you can do the same thing using a Windows machine. Once you’re logged in as root, issue the following command: asterisk -r. Quit ends your Asterisk CLI session, and exit logs you out of your SSH session. Now issue the command: set verbose 10 to get maximum information. Then place a call to your DISA DID number from your cellphone and watch what happens. You should see the call being processed without being answered. Asterisk will then issue a Congested tone and disconnect. Your CLI display will remain quiet for 20 seconds, and then the return call will be placed. When you answer the call, you’ll be prompted for your password. Enter it, wait for dial tone, dial a number with 1, then area code, then 7-digit number and watch what happens. If the call fails, exit from CLI by typing Quit. Change to the /tmp directory: cd /tmp. Do a directory listing in reverse date order: ls -all -t -r. At the bottom of the list should be two files with the area code and number of your cellphone. One will have a .2 extension. Display the contents of the file without the extension: cat 6781234567 using your cellphone number. The contents should look something like this. If not, check your typing in the contexts we added and try again. Keep in mind that editing either of these two files is pointless. They both get built on the fly in the h section of the [custom-teliax-in] context depending upon the CallerID of the caller. Linux will automatically handle deletion of files from the /tmp directory in due course.
[root@asterisk1 tmp]# cat 6781234567

channel: SIP/telasip-gw/16781234567

context: custom-telasip-callout

extension: 6781234567

priority: 1

callerid: 2025560000
And, yes, we know the extension specified does not match the extension (s) actually entered in the [custom-telasip-callout] context. But, fear not, your call will fall back to the s extension when Asterisk can’t find an entry matching your cell phone number. Why did we do this? Well, you may want to have Asterisk do something special when it knows it’s you calling from your cellphone or one of your kids calling from your house at the lake. For example, you might want to provide a wide open dialplan for yourself with a different password as well. Remember, people can spoof your CallerID number so make the password VERY SECURE! Here’s how it would look. Substitute your own cellphone number and a new password. Once you make the changes, restart Asterisk and then place another call from your cellphone to your DISA DID and try entering a local extension or a foreign phone number if your regular dialplan supports it. Enjoy!
[custom-telasip-callout]

exten => 6781234567,1,Background(silence/2)

exten => 6781234567,2,Background(asterisk-friend)

exten => 6781234567,3,Authenticate(63738488537)

exten => 6781234567,4,Background(pls-wait-connect-call)

exten => 6781234567,5,DISA(no-password|from-internal)
exten => s,1,Background(silence/2)
exten => s,2,Background(asterisk-friend)
exten => s,3,Authenticate(6373)
exten => s,4,Background(pls-wait-connect-call)
exten => s,5,DISA(no-password|custom-telasip)
 Free Samples. Everybody loves free samples so here’s one for you. You may remember Gene Willingham and the good folks at TelaSIP, the winner and least expensive provider in our unlimited U.S. long distance calling shootout. In a moment of weakness, TelaSIP’s agreed to let you try out our One Ringy-Dingy service (known affectionately around our house as the One Rinky-Dink Service because of the amount of time we’ve wasted on this). Anyway, it uses our Asterisk server and TelaSIP’s long distance bandwidth. Calls are limited to 10 minutes after which the callee will hear "Goodbye" followed by a click. You’ll get two beeps followed by a fast busy. In other words, time’s up! Here’s how to use this free service. Call from a phone in the U.S. with CallerID. Call the number shown on the map (inset) which is one of our DIDs in Charleston, South Carolina. The call will never be answered so you won’t be billed for the long distance call. Within 10 seconds, you should hear a fast busy. Just hang up, and our Asterisk server will call you back within 30 seconds. Listen carefully! You’ll be provided a random password for your call, and then you’ll be prompted to key it in. With your phone keypad, just do that and press the pound key (#). If you get a message that it’s incorrect, just try again (HINT: I told you to listen carefully). We used to have a fixed password, but the war-dialers were abusing the system so now it’s random. Back to the drawing boards, boys! Once you successfully enter the password, you’ll then get a DISA dial tone. Dial 1 and then the area code and phone number of someone you love (in the United States only). This is an excellent way for you to check out the voice quality of TelaSIP calls without spending a dime. Just don’t abuse the offer or this paragraph may magically disappear … as will the free calls. For those that don’t know us, we don’t record your calls, and we don’t store the number of the person you’re calling although the Asterisk logs probably have it for a while anyway. For security purposes, we do log your CallerID and the time of your call just in case you do something you shouldn’t be doing and the FBI traces the call back to us. If any of the above offends you, exercise your constitutional right to not use this free service. And a final reminder: none of this works if you don’t have CallerID enabled when you call. How would we know where to call you back? You won’t believe how many calls we receive with a CallerID of Asterisk. That obviously won’t work either.
Homework. There’s really a fourth DISA option. Under this scenario, you would call your home number, have the AutoAttendant answer, and then press 4 for DISA. After providing your password, Asterisk would hang up and call you back with DISA dial tone using the same type scripts we implemented in One Ringy Dingy above. The advantage of this approach is you don’t need a separate DID line to support DISA. The disadvantage is you have to pay for a one minute phone call to your home number each time you want remote dial tone. But it would save the expense of lengthy calls to your home just to use your outbound trunks. We’ll leave it to you to figure this one out. It shouldn’t take you long now that you understand how all the pieces fit together.
Some Recent Nerd Vittles Articles of Interest…
Internet Telephony Shootout: Finding the Best VoIP Provider for the Asterisk PBX
 If you’re one of the 75,000+ Broadband Reports VoIP Forum subscribers who took advantage of the Staples/Vonage million dollar giveaway of easily unlocked Linksys PAP2 terminal adapters this past week and now you’d like to do more with VoIP than just make phone calls, welcome! For the rest of us including those that have been following our Asterisk articles these past few months, you already know that the hardest part of using Asterisk@Home or any other flavor Asterisk PBX is finding reliable, cost-effective VoIP providers that support home users of Asterisk. For business users, the prospects are even more bleak! With pay-as-you-go service, most providers don’t care what you connect with including Asterisk, and our experience suggests that Voxee.com (1¢ – 2¢ for most of the world with six second billing increments for U.S. calls) remains the best and most economical alternative, but it’s for outgoing calls only. And, yes, we love GoIAX.com with their free outbound calls within the U.S., and we love IPkall and Stanaphone for free incoming calls as long as you don’t mind a Washington state or New York City phone number. But, if there is one thing you can count on in the VoIP world, it’s this: free calling in or out probably won’t last forever. You do the math! Footnote: Matthew Simpson, who started the GoIAX service, promises us he’ll keep it going "forever" provided the cost of stamping out abusers doesn’t start outweighing the benefits of keeping the free service operational. We obviously wish him all the luck in the world and hereby donate this terrific, new (and free) firewall to assist in his efforts. He’s probably going to need it.
More problematic is finding a provider in the United States that supports Asterisk with an unlimited residential calling plan and a local phone number at a decent price. While BroadVoice advertises incredibly cheap international calling plans as unlimited with local phone numbers in most U.S. area codes, their fine print and the number of complaints of backbilling and other financial shenanigans posted on the Voxilla forum suggest that you’d better be extremely careful if you elect to use one of BroadVoice’s so-called Unlimited* Calling Plans with much of any call volume. As your Mama used to say, "If something sounds too good to be true, it probably is." For our review of international calling plans, go here. Last week we reviewed Yahoo’s dialpad service, but the voice quality of the calls just wasn’t satisfactory at least for our purposes, and there was no support for incoming calls with a local phone number. We personally liked Teliax, but they charged 2¢ a minute (rounded to whole minutes) for outgoing and incoming calls plus $5 a month for a local number (DID). And, when something comes unglued at their end, good luck getting it fixed. We had a DID that worked reliably and then all of a sudden you got a fast busy when folks called the number. In short, the calls never made it to our Asterisk server at all, and we showed them our logs to prove it. Unfortunately, explaining the situation to the Teliax support folks was a bit like talking to a toddler. They heard the words, but … Suffice it to say, the line remained dead in the water for almost a week before magically coming back to life. So we’re kissing Teliax goodbye for breaking Telecom Rule #1: When someone calls, our phone needs to ring! Then we looked at VoicePulse Connect with free incoming calls and a local number of your choice, but it’s $11 a month, and you then have to pay 4¢ a minute for outgoing U.S. calls. Yes, VoicePulse has all-you-can-eat plans, but they won’t support Asterisk. They will let you purchase a second line for Asterisk and pay 4¢ a minute for U.S. calls. We can do about as well with a WalMart phone card. So where does that leave us? Exhausted but persevering…
 Just when we thought the Asterisk landscape was looking pretty bleak in the U.S. all-you-can-eat department, we stumbled upon a VoIP provider that loves and actually uses Asterisk, has state-of-the-art servers and a network backbone to match, demonstrates incredible depth of experience in the VoIP market, doesn’t play mind games with unconscionable terms of service (i.e. unlimited long distance calling means unlimited long distance calling), and has dirt cheap all-you-can-eat U.S. residential calling plans with local phone numbers for incoming calls. How much? $14.95 a month with no hidden "recovery" fees. For business users, you won’t find a better collection of business offerings on the planet. There are cradle-to-grave plans, or you can do-it-yourself for $40 per trunk with $1 DID’s and unlimited U.S. local and long distance calling. Even with its $100 monthly minimum, the latter is a great deal on PSTN origination and termination service for almost any size business. If you’re a small business and these plans don’t quite meet your needs, send them an email, and I’m pretty sure they’ll work out some cost-effective arrangement that meets your needs. Having tried dozens of VoIP providers over the past few months, suffice it to say, we’ve learned to spot the duds, the con artists, and the crappy providers just about as quickly as you can sign up for service. What you won’t get with this provider is a splashy web site with flashing signs promising you the moon … only to learn (later) that your free trip was just one way. Nor will there be a lot of hand-holding support although we received a return support call from the founder of the company in less than 30 minutes, and he didn’t know us from Adam. If you want handholding, then Vonage with a locked PAP2 phone adapter and no Asterisk server may be your best ticket to experience VoIP. Or here’s a cheaper alternative. BellSouth will sell you residential CallerID in Atlanta for only $8 a month … no phone line, no free calls to anywhere, no dial tone, no phone, just CallerID. And they wonder why their customers are leaving in droves.
So, where were we? If you’re comfortable with Asterisk and just looking for rock-solid reliable calls and an unlimited U.S. calling plan where you can actually hear the person at the other end of the line, then we’ve found a provider for you at a very reasonable price. Have we dragged this out long enough? The winner is VoipXpress aka TelaSIP. Congratulations to Jacob Brassington, who correctly guessed the winner in a posted comment following last week’s column. We didn’t publish the wrong guesses to protect the innocent. Our recommendation is that you try the $14.95 VoipXpress Premium plan for yourself. And, yes, the company founder, Gene Willingham, will give you your money back if you’re not satisfied. Or, if you just don’t trust anybody without a little personal testing, sign up for the VoipXpress Basic plan which is free with 4¢ per minute pay-as-you-go domestic calls.
Full Disclosure & Freebies. Like most other VoIP providers, VoipXpress helps a bit to defray the costs of the bandwidth for this blog if you sign up using the link we’ve provided. Sorry, but we’re addicted to referral credits, and you, too, can get them once you sign up for service. Anyway, it costs you nothing and helps us a little. But, if the referral stuff bothers you, just delete the PARTNER portion of the link to VoipXpress once you arrive on their web site. We like their service with or without referral credits. You will get a freebie, however, if you use our link. During October, VoipXpress will give you a second DID number in your choice of area code at no additional charge. Their DID’s are normally $1.95 a month, the best residential DID bargain around for those that need or want numbers in multiple places. Just mention Nerd Vittles when you sign up during October to get your second DID in almost any area code at no cost.
Configuring Asterisk@Home for VoipXpress. Now let’s get VoipXpress working with your Asterisk@Home system. The VoipXpress servers are actually maintained by their parent company, TelaSIP. We need to add a simple context to process incoming calls and then add a new trunk in our Asterisk@Home system. Finally we’ll reconfigure the outbound dialing routes to take advantage of the VoipXpress unlimited calling plan. Here’s how.
Point your web browser to your Asterisk@Home server’s IP address and choose AMP->Maintenance->Config Edit and choose extensions_custom.conf. We’re assuming you heeded our advice in our Securing Asterisk column and have already added a [from-external-custom] context to your extensions_custom file. If not, do that first! Now scroll to the bottom of the file and add the following new context substituting your Telasip assigned phone number for 4561234567. If you received two DIDs from TelaSIP, add three additional exten lines with your second number. Then click the Update button to save your changes.
[telasip-in]

exten => 4561234567,1,NoOp(Incoming call from TelaSIP #4561234567)

exten => 4561234567,2,Goto(from-external-custom,s,1)

exten => 4561234567,3,Hangup
Now let’s add a trunk for TelaSIP. Choose AMP->Setup->Trunks. Then click Add SIP Trunk. Why SIP and not IAX? The simple answer is there’s less call overhead between you and the provider. With SIP, only signalling information is passed to your provider while the data for the call itself (i.e. the heavy lifting) is strictly between you and the person you’re calling. Now where were we? For your Outbound Caller ID, fill in the local phone number provided by Telasip. For Maximum Channels, enter 2. That means that, unlike most providers of unlimited service, your account can handle two simultaneous calls in or out of your house with TelaSIP. For Dial Rules, enter the following substituting your local area code for 404:
1|NXXNXXXXXX

NXXNXXXXXX

404+NXXXXXX
In the Outgoing Settings section, name your trunk telasip-gw and then enter the following PEER details using your TelaSIP-assigned username and password:
context=telasip-in

dtmfmode=rfc2833

host=gw3.telasip.com

insecure=very

secret=yourpassword

type=peer

username=yourusername
Leave the Incoming Settings User Context and User Details blank. For your Registration string, enter the following: yourusername:yourpassword@gw3.telasip.com using your actual username and password assigned by TelaSIP. Click Submit Changes and then the red bar to restart Asterisk.
Adjusting Your Dialplans To Support VoipXpress/TelaSIP. If you’re using the Outbound Dialplans that we’ve built in the last few episodes, then it’s a simple matter to move SIP/telasip-gw up this list of priorities. Using AMP->Setup, click the Outbound Routing tab and then select each of the following routes: Local, Tollfree, and US. For each route, add a new Trunk Sequence by clicking the Add button and choosing SIP/telasip-gw. Then move it to the top of your Trunk Sequence list for each route to make it your first outbound dialing priority. Save your changes and restart Asterisk.
Making a Test Call Using TelaSIP. To be sure everything is working swimmingly, start up Asterisk in interactive mode using the Command Line Interface (CLI) so that you can actually watch what’s happening when calls are placed and received. This works best if you connect to your Asterisk server through SSH from a Mac or PC. SSH comes with every Mac and the syntax is simple: ssh root@AsteriskIPaddress. If you’re still chained to Microsoft, download Putty from the Mother Country, and you can do the same thing using a Windows machine. Once you’re logged in as root, issue the following command: asterisk -r. Quit ends your Asterisk CLI session, and exit logs you out of your SSH session. Now issue the command: set verbose 10 to get maximum information. Then place a U.S. long distance call and watch what happens. You should see something similar to the following which shows that the call was placed using the new telasip-gw trunk:
-- Called telasip-gw/8435551212

-- SIP/telasip-gw-2cbf is ringing
Coming Attractions. Next week, we still have Digium®’s IAXy device to configure so that you can take a phone with you on the road and connect back to your Asterisk® server to make calls. And with the IAXy 2 (now shipping), you can even use MD5 encryption for your passwords to further protect your Asterisk system. We’ll show you how. Then we’ll turn our attention to faxing and show you how to reconfigure Asterisk@Home to perform double-duty as not only a versatile PBX but also a sophisticated fax machine. You won’t need any special fax detection hardware to make this work, and Asterisk@Home will automatically detect and capture incoming faxes using your VoIP line. No dedicated fax line required! Then Asterisk@Home will convert the faxes into PDF documents and forward them to any email address you choose. This works great with your SIP line from TelaSIP by the way and works rarely with VoIP service from BroadVoice … yet another reason to put on your traveling shoes.
For those on the West Coast, don’t forget that next week is the big Asterisk convention in Anaheim: Astricon 2005. It’s not too late to register. And all your favorite nerds will be there, except us unfortunately. It should be a great time to learn all about Asterisk and to hear and see what’s on the drawing boards.
Last but not least, we previously walked you through adding entries to extensions_custom.conf to blacklist your "favorite" callers. But, in a coming article, we’ll show you how to do the same thing automatically at the touch of a button on your phone. In addition, there are some easy tools to manually add and remove blacklisted callers from Asterisk’s internal database, and we’ll show you how to access them from your phone. As the holiday and election seasons approach, you’ll be glad you’ve mastered blacklisting. Have a great weekend.
Other Tutorials. There are numerous additional articles in this Asterisk HOW-TO series to keep you busy. You can read all of them by clicking here and scrolling down the page. We recommend reading at least the first four or five articles from the bottom up so that the learning curve is less painful. Finally, if you just want to brush up on your phone etiquette, don’t miss Lily Tomlin’s "This Is A Recording" (See inset of "Ernestine" pictured with a vintage tip-and-ring switchboard). There is no finer tutorial on the planet: "We don’t care. We don’t have to. We’re the phone company."
Securing Your Asterisk@Home PBX: Here’s How
 Now that you've gotten your feet wet with our Asterisk@Home series, we want to catch our breath today and make sure your system is locked down. After all, you don't want the entire world making free phone calls on your nickel! Just as unsecured SendMail servers can be used as SPAM relay hosts, misconfigured Asterisk® servers also can be used as relay hosts to place calls to anywhere by anybody. In our second article we covered the basics of resetting all of the default passwords that come with Asterisk@Home. If you skipped that step, now would be a great time to be sure you've changed ALL of them. Just go back and reread the Securing Asterisk section of that article for the details.
Update: For the latest information, please read our Primer on Asterisk Security.
One of our few criticisms of Asterisk is its support of the goto command coupled with undocumented context subroutines and macros which are scattered across more than a dozen configuration files in applications such as the Asterisk Management Portal (AMP). For those of you that cut your teeth on the BASIC programming language, you know the tendency of applications to turn into spaghetti code, i.e. code so convoluted with goto's and undocumented subroutine calls that it's difficult to trace how an application actually plays out when it's executed. This, in turn, makes it extremely difficult to secure such applications because of the complexity of tracing through all the hoops executed when the program is in use.
Particularly for home or small office use, the major security risk with an Asterisk system is incoming call vulnerability. Someone connects to your system through the Internet and then places an outgoing call through your system to a coconspirator on some desert island on the other side of the globe that legally charges $12.00 a minute for calls. Cruise ships charge about the same thing! If you're not careful, you get stuck with the phone bill. Our solution to this incoming call vulnerability is to circle our wagons and strictly limit the number of Asterisk contexts used to process incoming calls. If you're lost in the ozone at this point, don't worry. Just keep reading, and we'll walk you through what all this means and what you can do to easily protect your system.
In Asterisk@Home, the context that controls incoming calls via IP is [from-sip-external] which can be found in extensions.conf using AMP->Maintenance->Config Edit. We previously showed you how to set up a Stealth AutoAttendant. We strongly recommend you use that or something similar to manage all incoming calls to your Asterisk server. This is the main reason we recommend against DID routing with Asterisk@Home. Using a single AutoAttendant assures that every incoming call lands in the same place and callers can only do the things you permit in this one context. Keep in mind that any extension command you have set up anywhere in the [from-internal-custom] context can be executed using this AutoAttendant. It doesn't really matter whether it is above or below the AutoAttendant code! And, of course, if you provide access to Asterisk's DISA service with either an insecure password or no password or if you took our advice and built speed-dial numbers but the calls are routed to Hong Kong, then you're on your own. IT'S YOUR PHONE BILL!
Why did we place the AutoAttendant code in the [from-internal-custom] context? Because we needed access to it for our Sipura SPA-3000 to handle incoming PSTN calls. In summary, you just need to be careful what options you provide in your AutoAttendant and the remainder of the [from-internal-custom] context because anyone can call you and choose any available option throughout that context. And keep in mind that your phone doesn't necessarily ring when someone hits your AutoAttendant so you may not know your system is being attacked unless you review your call logs frequently: AMP->Reports->Call Logs. Remember, any other Asterisk server on the planet can call your server via an IP connection. All it takes is the domain name or IP address of your Asterisk server, and they can at least attempt to make a connection. The only question is what can they do once they get there. And that's up to you! Finally, you need to carefully test your system by placing calls to yourself and pressing every button on your phone including 0, *, and #. Then try placing calls to local and long distance numbers while the AutoAttendant is playing. If they go through, you've got a problem. Last but not least, go into your VoiceMail system (just as a caller would) and dial the same numbers as above making sure there is no back door there that you don't know about. Remember, we showed you how to open the DISA backdoor in VoiceMail so make sure all of your voicemail passwords are secure if you implemented that tip.
Assuming you have deployed the Stealth AutoAttendant and added it to your [from-internal-custom] context in the extensions_custom.conf file, here is our recommended configuration for the [from-sip-external] context in the extensions.conf file. Be sure every other line in this context is commented out with a semicolon at the beginning of each line. Then restart Asterisk.
exten => _.,1,Wait(1)

exten => _.,2,Goto(from-internal-custom,111,1)
Our personal preference is to create a duplicate AutoAttendant context for your incoming VoIP connections. This eliminates the risk of inadvertently exposing some other extension code lurking elsewhere in your [from-internal-custom] context with IP connections. This new context can use identical code to the Stealth AutoAttendant we previously built, or you can customize it as desired. Place the new context at the bottom of the extensions_custom.conf file and then adjust your [from-sip-external] code to look like the following. Don't forget to restart Asterisk.
exten => _.,1,Wait(1)

exten => _.,2,Goto(from-external-custom,s,1)
Update: If you want to retain the flexibility to use the Asterisk Management Panel's DID Routes functionality to map incoming calls from certain trunks to different contexts or extensions, then insert the following code just below the [from-sip-external] label:
include => ext-did
And here's the sample code to insert in your extensions_custom.conf file. If you cut-and-paste the code below, don't forget to replace the opening and closing typographic quote characters with the standard quotation mark character or you'll get unexpected results with Asterisk.
[from-external-custom]

exten => s,1,Zapateller(answer|nocallerid)

exten => s,2,Wait(1)

exten => s,3,SetMusicOnHold(default)

exten => s,4,GotoIf($["${CALLERIDNUM}" = ""]?who-r-u,s,1)

exten => s,5,GotoIf($["foo${CALLERIDNUM}" = "foo"]?who-r-u,s,1)

exten => s,6,GotoIf($["${CALLERIDNAME:0:9}" = "Anonymous"]?who-r-u,s,1)

exten => s,7,GotoIf($["${CALLERIDNAME:0:7}" = "Unknown"]?who-r-u,s,1)

exten => s,8,GotoIf($["${CALLERIDNUM:0:7}" = "Private"]?who-r-u,s,1)

exten => s,9,GotoIf($["${CALLERIDNAME:0:7}" = "Private"]?who-r-u,s,1)

exten => s,10,GotoIf($["${CALLERIDNUM:0:10}" = "Restricted"]?who-r-u,s,1)

exten => s,11,GotoIf($["${CALLERIDNUM:0:4}" = "PSTN"]?who-r-u,s,1)

exten => s,12,DigitTimeout,3

exten => s,13,ResponseTimeout,3

exten => s,14,Background(custom/welcome)
exten => 0,1,Background(pls-hold-while-try)
exten => 0,2,AGI(directory,general,ext-local,${DIRECTORY:0:1}${DIRECTORY_OPTS})
exten => 0,3,VoiceMail(204@default)
exten => 0,4,Hangup
exten => 1,1,Background(pls-hold-while-try)
exten => 1,2,Dial(local/222@from-internal,20,m)
exten => 1,3,VoiceMail(204@default)
exten => 1,4,Hangup
exten => 4,1,Authenticate(1234588)
exten => 4,2,Background(pls-wait-connect-call)
exten => 4,3,DISA(no-password|from-internal)
exten => 2XX,1,Background(pls-hold-while-try)
exten => 2XX,2,Dial(local/${EXTEN}@from-internal,20,m)
exten => 2XX,3,VoiceMail(${EXTEN}@default)
exten => 2XX,4,Hangup
exten => 2XX,103,Voicemail(${EXTEN}@default)
exten => 2XX,104,Hangup
exten => t,1,Background(pls-hold-while-try)
exten => t,2,Dial(local/204@from-internal,20,m)
exten => t,3,VoiceMail(204@default)
exten => t,4,Hangup
exten => o,1,Dial(local/204@from-internal,20,m)
exten => o,2,VoiceMail(204@default)
exten => o,3,Hangup
exten => i,1,Playback(wrong-try-again-smarty)
exten => i,2,Goto(s,16)
Here's how the AutoAttendant code above works. Pressing zero activates the directory, pressing 1 rings the ring group (222) for all extensions, pressing 4 gives access to external dial tone if the password 1234588 is correctly entered, pressing no key (the t timeout entries) rings the main home phone extension, 204. Users can also enter 3-digit extension numbers beginning with a 2. If you didn't insert the following two contexts from our previous Asterisk column, then you'll need to add them to the bottom of [from-external-custom] to manage callers without CallerID:
[who-r-u]

exten => s,1,Background(privacy-unident)

exten => s,2,Background(vm-rec-name)

exten => s,3,Wait(2)

exten => s,4,Record(/tmp/asterisk-stranger:gsm|5|15)

exten => s,5,Background(pls-hold-while-try)

exten => s,6,Goto(ext-park,70,1)

exten => s,7,VoiceMail(204@default)

exten => s,8,Playback(Goodbye)

exten => s,9,Hangup
[ext-park]
exten => 70,1,Answer
exten => 70,2,SetMusicOnHold(default)
exten => 70,3,SetCIDNum(200|a)
exten => 70,4,SetCIDName(Parked Call Info|a)
exten => 70,5,ParkAndAnnounce(silence/9:asterisk-friend:/tmp/asterisk-stranger:vm-isonphone:at-following-number:PARKED|40|local/204@from-internal|who-r-u,s,7)
exten => 70,6,Hangup
MySQL Security Alert. Recently, we happened to look at how security was set up on MySQL with Asterisk@Home. This may also apply to those using plain-old Asterisk with the Asterisk Management Portal. In any case, you need to check your system NOW! Using the Asterisk Management Portal, go to AMP->Maintenance->phpMyAdmin. Then click on the Database pulldown in the left pane and choose mysql. When the tables display, click on the user table. Now click the Browse tab at the top of the right pane. The entry we care about is the second one: asterisk1.local for root user access. If your password field is blank, you've got a potential security problem. What this entry means in layman's terms is anyone on the Internet can connect to your MySQL databases as root with no password. The only roadblock is being able to spoof the default hostname of your Asterisk@Home server. And hostname spoofing has been a reported vulnerability of MySQL so it's just not worth taking a chance. Keep in mind that all of your VoIP account usernames and passwords are stored in a MySQL table when you use the Asterisk Management Portal (AMP). Not a healthy situation when it's your wallet that's at risk. To fix the problem permanently, just click on the pencil beside the second record. When the record displays, click on the function pulldown in the password row and choose Encrypt. Then make up a password that's secure and enter it in the password value field. Click Go to save your update. Now click the Browse tab again and be sure an encrypted password is shown for both root user entries in the table. We don't care about the blank password for the blank user because you'll note that all the database privileges are set to N for this account. Fixed!
Other Security Advisories. We also recommend that you frequently review the Secunia web site for Asterisk security advisories. They also have an RSS Feed for those of us who are forgetful.
Other Asterisk Articles. There are numerous additional articles in this Asterisk HOW-TO series to keep you busy. You can read all of them by clicking here and scrolling down the page. We recommend reading the articles from the bottom up so that the learning curve is less painful. Sleep well. Your Asterisk server is now at least a little bit more secure, and you know a good bit more about how the pieces actually fit together and why.

Taming Yahoo’s DialPad Service for Use with Asterisk: Here’s How
 In our unending quest to find the best and cheapest VoIP providers that work reliably with Asterisk®, today we turn our attention to dialpad, a company which recently was acquired by Yahoo! As it turns out, that may not be a good thing for Asterisk lovers, but it was probably a pretty good day for the dialpad owners. For those that don’t know, dialpad offers the least costly (aka cheapest) unlimited U.S. and Canada outbound residential VoIP service on the planet: $11.99 a month for all you can eat with no hidden fees or add-on’s. For those that enjoy legal mumbo jumbo, if you review their Terms of Service, you’ll see lots of language that looks vaguely familiar to what you’ll find in the BroadVoice language minus the $100 penalties which BroadVoice lawyers seem to have concocted on their very own.
It used to be you could subscribe to dialpad and had your choice of a Sipura SPA-2000 ATA or a softphone client. Since the Yahoo purchase, the ATA option has quietly disappeared even though (to date) they still are supporting customers with ATA’s. Yahoo apparently wants dialpad to integrate a softphone into their instant messenger service to compete with Skype. Skype is free so you do the math. What does all this have to do with Asterisk, you might be asking. Well, plenty. As long as there is an ATA configuration floating around, we can usually look at the settings and make the service work equally well with Asterisk. And it turns out that is still the case with dialpad. Just don’t expect it to last forever… but, you’ve heard that advice with other providers as well so welcome to the VoIP rollercoaster. And, for those who care, Dialpad’s terms of service don’t (yet) prohibit use of a PBX. Didn’t know you were going to have to go back to law school just to use your damn Asterisk server at home, did you?
So how do we get dialpad to work with Asterisk? Well, first you sign up for the service. That gets you an account with a username and password. Then you’ll need a quick lesson in how to install the G.729 codec for Asterisk. This is the codec that dialpad uses for communications so you have to use it at your end, too. Otherwise, you get a fast busy every time you connect through dialpad. Unless water torture is your thing, you have to pay for G.729, but it’s only $10 for one simultaneous connection which is what you get with dialpad anyway. Once we get G.729 working, you add a trunk for dialpad and then integrate dialpad into your outbound dialplans. And presto, dialpad works!
Before we begin, let me take my obligatory moment to again rail against VoIP providers who are so short-sighted that they don’t see the Golden Opportunity they are missing by not supporting Asterisk directly. Asterisk users are pioneers. VoIP users are either pioneers … or idiots. Which would you rather deal with? Asterisk users have money. Almost half of American families with median incomes over $150,000 a year and residential broadband service also have some type of PBX in their homes! Skype is free and competing with free isn’t a big money-maker. So why is it that most VoIP providers can’t figure the rest of this out for themselves? Beats me.
Signing Up for dialpad Service. To get a dialpad account, just visit their web site and make a selection. The only real deal is the all-you-can-eat U.S. and Canada dialpadUSA plan for $11.99, and you have to live in the U.S. or Canada to subscribe. Remember, too, that this is for residential use only. The rest of the offerings are reasonable but not the best deals available compared to providers such as Voxee and BroadVoice which we previously have covered. Don’t bother to download the softphone client. We won’t be using it. Just write down your username and password. That’s what we’ll be needing to connect through Asterisk.
Installing the G.729 Codec for Asterisk. The G.279 codec is used to reduce the bandwidth necessary to process voice calls. Instead of 64Kbps of data for a voice call, G.729 stuffs the call into 8Kbps. What MP3 did for music, G.729 does for voice calls. To install the G.729 codec, you first need to download the version that matches the processor in your Asterisk box. There are codecs available for both Linux and FreeBSD systems here. You’ll also need to download the registration utility. If you’re using Asterisk@Home, you’ll need the glibc_2.3 utility available here. If you don’t know what version of glibc is running on your Asterisk server, go to a command prompt and type ldd –version. Note: There should be two dashes before the word "version." Now that you’ve downloaded codec_g729a.so, you’ll need to copy it to /usr/lib/asterisk/modules on your Asterisk server while logged in as root. Next, copy the register program to any convenient place on your Asterisk server, e.g. /tmp will do. Modify the permissions for the register program so that it is executable: chmod a+x register. Now pay your $10 and wait for your registration key to be emailed to you. When you get the key, go to your Asterisk server and issue the following command from the directory where you placed the register program: ./register G729-1234ABCD substituting your actual key for G729-1234ABCD. Your Asterisk server must have Internet access to complete the registration process. Once you get a message that the registration was successful, restart Asterisk, and you’re in business: amportal stop then amportal start. Finally, note that the G.729 registration is locked to the MAC addresses of the network cards in your Asterisk server. If you change NICs, you’ll need to reregister the G.729 codec. You get two bites at the apple without contacting Digium® for a new code.
Adding the dialpad Trunk. Fire up your web browser and point it at your Asterisk@Home server now. Go to AMP->Setup->Trunks and choose Add SIP Trunk. You can leave the CallerID field blank since you set this on the dialpad site. For maximum channels, enter 1. For the Dial Rules, enter the following:
1+NXXNXXXXXX

1NXXNXXXXXX
In the Outgoing Settings, name the Trunk: dialpad. For the Peer Details, enter the following substituting your own username and password where necessary. The only trick here is that we’re going to tell dialpad that we’re a Sipura ATA device instead of an Asterisk server just to avoid anyone at dialpad getting their panties in a wad if Asterisk PBX entries started appearing in the dialpad log files. Right now dialpad doesn’t block Asterisk devices but who knows what the future holds so we’ll just masquerade as the device the dialpad service already supports and avoid any future problems.
allow=g729

canreinvite=no

disallow=all

fromuser=yourusername

host=66.35.222.58

insecure=very

secret=yourpassword

type=peer

useragent=Sipura/SPA2000-2.0.9(d)

username=yourusername
Leave the Incoming Settings section blank since we won’t be receiving calls from dialpad. For the Registration string, enter the following using your username and password: yourusername:yourpassword@66.35.222.58. Now save your entries and then click the red bar to restart Asterisk. Almost done.
Adjusting Your Dialplans To Support dialpad. If you’re using the Outbound Dialplans that we’ve built in the last few episodes, then it’s a simple matter to move dialpad up this list of priorities. Using AMP->Setup, click the Outbound Routing tab and then select each of the following routes: Local, Tollfree, and US. For each route, add a new Trunk Sequence by clicking the Add button and choose SIP/dialpad. Then move it to the top of your Trunk Sequence list for each route to make it your first outbound dialing priority. Save your changes and restart Asterisk.
Making a Test Call Using dialpad. To be sure everything is working swimmingly, start up Asterisk in interactive mode using the Command Line Interface (CLI) so that you can actually watch what’s happening when calls are placed and received. This works best if you connect to your Asterisk server through SSH from a Mac or PC. SSH comes with every Mac and the syntax is simple: ssh root@AsteriskIPaddress. If you’re still chained to Microsoft, download Putty from the Mother Country, and you can do the same thing using a Windows machine. Once you’re logged in as root, issue the following command: asterisk -r. Quit ends your Asterisk CLI session, and exit logs you out of your SSH session. Now issue the command: set verbose 5 to get maximum information. Now place a U.S. long distance call and watch what happens. You should see something similar to the following which shows that the call was placed using the new dialpad trunk:
-- Called dialpad/16785551212

-- SIP/dialpad-a47a is making progress passing it to SIP/101-d762

-- SIP/dialpad-a47a answered SIP/101-d762
Call Quality with dialpad. Now that we have everything working, you’re probably asking, "Well, How Is It?" On a scale of 1 to 10, we give dialpad sound quality a 5. This is always a subjective thing, but there seem to be considerably more echoing calls, calls without sound at one end, and other annoyances that remind you of the snowy television era. Your mileage may vary, of course, depending upon where you are and who you’re calling. Just keep in mind that dialpad doesn’t have a trial period, and they don’t give refunds so you’ll end up spending $11.99 for the experiment, whether it works out or not. Instant messaging isn’t the same technology as voice calls and, if the voice calls are managed similarly to Yahoo’s IM traffic using the same type servers and bandwidth management techniques, that would probably account for the mediocre voice quality, but the price is right.
 Coming Attractions. If you’ve already got dialpad or BroadVoice service, then enjoy the rest of your current month subscription using Asterisk, but start lacing up your switching shoes. If you’re new to VoIP, we’d recommend you pass on dialpad despite the price. We’ll have a rock-solid performer for you next week for $3 more with real Asterisk support and unlimited U.S. residential calling plus two free incoming DID’s from any of the blue states shown on the U.S. map (inset). For all the poor BroadVoice users out there, you’ll finally have something to cheer about. And this provider offers simultaneous outbound calling at no extra cost! Are you listening Teenagers of America? It’s all backed by a company with in-depth Asterisk know-how which doesn’t mean you can bug them to death for $14.95 a month, but it does assure all of us that the Asterisk@Home configuration we lay out is one which has passed their scrutiny with flying colors. The good news for businesses is that these folks know their stuff and have an infrastructure to assure that your communications system remains rock-solid reliable … even with VoIP. They’ll even preconfigure phones for you. And it all runs on the best fiber backbone in the country. Last but not least, the dialpad and BroadVoice (obnoxious) terms of service will be just a bit of ancient history once we introduce this provider so I can take off my legal eagle thinking cap for a while. Did we mention their calls sound better than Ma Bell?
Also coming soon, we’ll cover Digium’s S101I, affectionately known as the IAXy√¢‚Äû¬¢ Version 2, a NAT-transparent, FXS device providing a POTS telephone interface to your Asterisk PBX using an IAX connection. The real beauty of the IAXy is that you can travel with it and never again have to worry about firewalls, NAT, and STUN servers. Just open one UDP port, and you’re done. Remote access to your Asterisk@Home server from anywhere on the planet becomes a one-minute drill instead of a nightmare. For parents bankrupted by college kids’ cell phone bills, the IAXy is the perfect addition for that college dorm room or apartment.
Oldies But Goodies. There are numerous additional articles in this Asterisk HOW-TO series to keep you busy. You can read all of them by clicking here and scrolling down the page. We recommend reading the articles from the bottom up so that the learning curve is less painful. Enjoy!
Free U.S. Calls with Asterisk: Here’s How
 It’s Birthday Week at Nerd Vittles and, as you’ve come to expect, we do things a little differently around here. We like to savor birthdays for a whole week (sometimes more) and, to celebrate, we have a special gift for you: a tip on how to make free long distance calls in the United States using your new, free Asterisk® server.
In our column last week, you learned how to configure and reconfigure Asterisk to take advantage of the best communications deals in the marketplace. And today we have a deal you can’t refuse: free calls to anywhere in the United States using the newest IAX2-compatible provider on the block, GoIAX.com. Just sign up for a free account with your email address and a password of your choice, add a trunk using the Asterisk Management Portal (AMP) or Asterisk@Home, make a minor adjustment in your Outbound Routing, and start dialing for free. Will it last? Probably not. But who cares? It’ll work for a while, and then something else will come along. So enjoy it while you can and … Happy Birthday!
NOTE: The GoIAX service is temporarily restricted to toll-free calls only. See their web site for current status updates.
Adding the GoIAX Trunk with AMP. Using your web browser pointed to your Asterisk server, go to AMP->Setup->Trunks->Add New IAX2 Trunk. Fill in the Outbound CallerID with the GoIAX phone number you were provided when you registered. For Outgoing Dialing Rules, use the following:
1+NXXNXXXXXX

1NXXNXXXXXX
In Outgoing Settings, use goiax for the Trunk Name and the following for the Trunk Details substituting your own GoIAX phone number and password:
allow=gsm

auth=md5

disallow=all

host=server1.goiax.com

secret=yourpassword

type=peer

username=878201234567
For Incoming Settings, use iax.goiax.com for the USER Context and the following for the USER Details substituting your own GoIAX phone number and password. NOTE: If you have signed up for a DID number from GoIAX, then you’ll need to rename your USER context from iax.goiax.com to your GoIAX account number, not your DID number. E.g. 878201234567.
allow=gsm

auth=md5

context=from-pstn

disallow=all

host=server1.goiax.com

secret=yourpassword

type=friend

username=878201234567
For the Registration String, use the following with your GoIAX phone number and password: 878201234567:yourpassword@server1.goiax.com. Now Save your changes and click the Red Bar to restart Asterisk.
Adjusting Outbound Routing for Free U.S. calls. Last week, we made Voxee.com our top priority for outbound long distance calls since they provided penny-a-minute calls within the U.S. This week we want to move them down a notch since we have a new provider that’s free. In Asterisk-speak, we want to make goiax our first priority for outbound U.S. long distance calls and move Voxee down to the second spot. If GoIAX stops working, Asterisk will automatically route the calls to Voxee without any user intervention. Here’s how.
Go to AMP->Setup->Outbound Routing and click on the US route which we created last week. It should show a Trunk Sequence of IAX2/voxee, then IAX2/teliax, and then SIP/pstn if you have a PSTN (POTS) line. Just click on the pull-down beside each trunk and substitute IAX2/goiax as your #0 choice, IAX2/voxee as your #1 choice, and IAX2/teliax as your #2 selection. Click the Add button and insert SIP/pstn as your #3 pick. Click Submit Changes and then the Red Bar to restart Asterisk.
That’s it. You’re done in just a couple of minutes. All future U.S. long distance calls will be routed out using your new Outbound US dial plan.
Making a Test Call Using GoIAX. To be sure everything is working swimmingly, start up Asterisk in interactive mode using the Command Line Interface (CLI) so that you can actually watch what’s happening when calls are placed and received. This works best if you connect to your Asterisk server through SSH from a Mac or PC. SSH comes with every Mac and the syntax is simple: ssh root@AsteriskIPaddress. If you’re still chained to Microsoft, download Putty from the Mother Country, and you can do the same thing using a Windows machine. Once you’re logged in as root, issue the following command: asterisk -r. Quit ends your Asterisk CLI session, and exit logs you out of your SSH session. Now issue the command: set verbose 5 to get maximum information. Now place a U.S. long distance call and watch what happens. You should see something similar to the following which shows that the call was placed using the new goiax trunk:
-- Called goiax/12345678910

-- Call accepted by 204.13.233.114 (format gsm)

-- Format for call is gsm

-- IAX2/goiax/1 is ringing
For those that would prefer a long-term player to handle your long distance calling and don’t mind paying a little, we’ll have another suggestion for you later this week. With this provider, you get unlimited residential calling to anywhere in the U.S. and Canada for only $11.99 a month. That’s less than half the cost of most of the all-you-can-eat plans including Vonage. And, it’s roughly the same cost as BroadVoice’s in-state calling plan after adding all of BroadVoice’s hidden fees. Even though Asterisk isn’t directly supported by the provider, we’ll walk you through setting up the service to work reliably with Asterisk. Can you say Yahoo! In the meantime, there are numerous additional articles in this Asterisk HOW-TO series to keep you busy for a few days. You can read all of them by clicking here and scrolling down the page.
Save Millions on VoIP Costs: Here’s How
Lesson #6: In the VoIP Wild West, don't believe every flashing sign that you see or every headline that you read. But rest assured, the Federal Trade Commission will be coming to your rescue ... some day.
And, yes, this is the sixth article in our Asterisk@Home series, and we will show you how to save some money on your current phone bills using Asterisk® Dial Plans, but maybe not quite millions. Everything in this article applies to anyone using Asterisk@Home or a pure Asterisk® PBX with the Asterisk Management Portal (AMP). Read the first five parts (I, II, III, IV, and V), and then you'll be ready to continue on here.
Perhaps the greatest feature of Asterisk@Home is the ease with which you can automatically route outgoing calls based upon the number dialed. And you can do it with or without dialing prefixes such as dialing 8 or 9, and then a 1, and then an area code, and then a phone number. You can use this dialing plan intelligence to route specific types of calls to different VoIP providers thereby taking advantage of cost savings offered by the different providers. For example, Voxee.com has a 1.1¢ per minute rate for calls within the United States with 6 second billing increments. And Free World Dialup (FWD) has free outgoing calls to 800 numbers in the United States. In addition to worldwide calling plans, BroadVoice also has a $9.95 in-state residential calling plan that hopefully will prove to be less controversial than their worldwide plans. It provides unlimited (sort of) in-state calling. The "sort of" is a warning that BroadVoice recently inserted an asterisk (Unlimited*) after all of their so-called Unlimited Dialing Plans despite their continuing ads to the contrary (inset). In the fine print, BroadVoice indicates that they now can retroactively determine that you are not using the plans as they intended them to be used. It's still a bit of a mystery as to what the BroadVoice formula is; however, you are forewarned to be prepared for a legal battle if you exceed their undisclosed calling thresholds. When your international calling gets into the thousands (not billions) of minutes, expect to be converted to a business plan where you'll be billed by the minute at prevailing rates.
 Here's the actual text of their Terms and Conditions. On the Voxilla forums, some customers report being "converted" to business accounts merely for calling their girlfriends too frequently. Compare that conduct to the ad now running on Voxilla (see inset) and judge for yourself. Suffice it to say, if you take BroadVoice's bait and attempt to use a billion minutes, you should fully expect a bill for millions of dollars rather than the $19.95 advertised price. Bottom Line: If you choose BroadVoice, protect yourself after signing up by switching to a prepaid debit card with no more than a three-month cash balance: $66.50.
You agree that if BroadVoice determines in its sole discretion that you have used the Service, and/or anyone else has used the Service for any activities and purposes prohibited by this section it may immediately charge you BroadVoice's higher rates for its Business service for all periods, including past periods, in which you use, or used, the Service for such prohibited activities together with a US$100.00 administrative fee for same, and that BroadVoice may immediately charge such amounts on your credit card.
The AMP Approach to Dialing Plans. There are, of course, about A Billion ways to set up Asterisk dialing plans, too. We'll provide one approach that works. When we're finished, you'll have a VoIP dial plan that provides toll-free calling to millions of phone numbers, free calling to anyone in your state, and penny-a-minute long distance calls within the United States with billing increments of six seconds. The total monthly cost is $9.95 plus however many penny-a-minute U.S. long distance calls you make. International savings are equally remarkable. Suffice it to say, you can call Paris, London, Hong Kong, and Tokyo for less than 2¢ a minute with numerous VoIP providers. Check the Voxilla forums for the best current deals. You, of course, can take what you learn here today and embellish these dial plans to meet your unique circumstances. But, we're getting ahead of ourselves. First, you need to know a bit about how Asterisk@Home and especially the Asterisk Management Portal (AMP) process outgoing calls. It's quite different than the pure Asterisk way of doing things so, if you plan to use AMP or Asterisk@Home which uses AMP, learn the AMP way of doing things. It's very powerful and downright easy once you get the hang of it. The only problem is that no one ever bothered to write down HOW ... until NOW!
When you dial a number, AMP compares the dialed number against the Dial Patterns you've set up in your AMP->Setup->Outbound Routing rules. When AMP finds the first matching dial pattern in any Route (going down the list of routes from top to bottom), it then looks there to see what your first Trunk Sequence priority is and applies the Outgoing Dial Rules for that trunk. You set these dial rules in AMP->Setup->Trunks by editing your Trunk configurations. The important point is that the Dial Pattern in your Outbound Routing rule gets processed first, and then the Dial Rules for the Trunk that will actually do the dialing are processed. If this Trunk isn't available for some reason, Asterisk repeats the process using your second Trunk Sequence priority, and so forth until all of the Trunk Sequences are exhausted or the call is successfully dialed. Let's walk through a good example which uses these configurations so you can see how to put one together and what goes where. You'll note that this sequence is exactly backwards from the way you configure new VoIP providers using AMP, i.e. you first set up the trunk and then the outbound rule to support the trunk. As unintuitive as it may appear, it really works quite well ... if you first sit down with a pencil and figure out what you're trying to do. It turns out that's pretty good advice for most programming tasks.
Since we know that FWD provides free outbound dialing for toll-free (800 number) calls, let's use FWD as our top Trunk Sequence priority for placing outbound 800 calls. You can't beat free! We'll assume you've already set up your free FWD account. If not, go here first. Now we want to create a FWD trunk entry using AMP->Setup->Trunks->Add IAX2 Trunk. IAX2 is the native protocol that Asterisk speaks so use it whenever you can to eliminate pesky NAT problems. Just be sure UDP port 4569 on your firewall is redirected to the internal IP address of your Asterisk server. Now back to AMP. In the General Settings, plug in a Caller ID entry, e.g. "DOE JOHN <695695>" where John Doe is your name and 695695 is your FWD number. FWD expects 800 number calls to be in the following format: *18002221212, but that isn't really the way you dial them since there isn't an asterisk on your phone. In the Outgoing Dial Rules for your FWD trunk, enter the following which tells Asterisk to add an asterisk (*) prefix before dialing 18xx calls or add 1 plus an asterisk (*) before dialing 8xx calls. This way FWD can correctly handle calls whether you dial 18002221212 or 8002221212 on your phone. The main point to remember here is that you use Trunk Dial Rules to reformat a dialed number into something the VoIP provider is expecting to see when the call arrives from your Asterisk server. And typically you use Outbound Dial Patterns to interpret the numbers dialed on a telephone instrument and to route the call accordingly. So here's the code for the Outgoing Dial Rules in your Trunk setup for FWD:
*+18XXNXXXXXX

*1+8XXNXXXXXX
Here's the rest of the code you'll need to make and receive calls using FWD. In the FWD Trunk's Outgoing settings, enter fwd for the Trunk Name, and enter the following for the Peer Details using your callerid, username, and password from FWD registration. WARNING: If you cut and paste code from these articles and the code contains quotation marks (such as below), be sure to replace the WordPress-inserted, front and back quotes with normal quotation marks, or you'll send Asterisk into the ozone.
allow=ulaw

auth=md5

callerid="DOE JOHN" <695695>

disallow=all

host=iax2.fwdnet.net

qualify=yes

secret=yourFWDpasswordhere

type=peer

username=695695
For your FWD Incoming Settings, name your User Context iaxfwd and enter the following for the User Details:
allow=ulaw

auth=rsa

context=fwd-in

disallow=all

inkeys=freeworlddialup

type=user
For the Registration String, enter 695695:yourpasswordhere@iax2.fwdnet.net using your actual FWD phone number and password. Now save your settings and click the Red Bar to restart Asterisk.
You'll note in the Incoming Settings above, we're using a special context to manage incoming FWD calls: fwd-in. So we need to add some code to process the incoming FWD calls at the bottom of the extensions_custom.conf file. Do that now before you forget it. Don't forget to plug in your own FWD phone number in each line below and then save your file by clicking the Update button. Here's the code to cut and paste:
[fwd-in]

exten => 695695,1,NoOp(Incoming call for FWD #695695)

exten => 695695,2,Goto(from-internal-custom,111,1)

exten => 695695,3,Hangup
The above code will assure that your incoming FWD calls are processed by the autoattendant we built last week just like your other incoming calls.
Now we're ready to add an Outbound Route for our toll-free calls. Choose AMP->Setup->Outbound Routing. In the Add Route screen, name your new route TollFree. For Dial Patterns, enter the following:
1800NXXXXXX

1822NXXXXXX

1833NXXXXXX

1844NXXXXXX

1855NXXXXXX

1866NXXXXXX

1877NXXXXXX

1888NXXXXXX

800NXXXXXX

822NXXXXXX

833NXXXXXX

844NXXXXXX

855NXXXXXX

866NXXXXXX

877NXXXXXX

888NXXXXXX
The above code covers all of the existing and planned toll-free area codes in the United States and will be triggered whenever you dial 1 and a matching 8XX area code or just 8XX and a 7-digit number. For the primary Trunk Sequence, choose IAX2/fwd. If you also have an SPA-3000 connected to a PSTN (POTS) line, click add and choose SIP/pstn for the second Trunk Sequence. Click Submit Changes to add the new Outbound Route. Use the Up arrow beside the TollFree Outbound Route to move it up your list of routes so that it is just above all of your other long distance routes. Otherwise, these calls would be processed by the first matching long distance route which would mean you'd have to pay for the call with most VoIP providers. Now click the red bar to restart Asterisk. Note that 10-digit 800 calls (i.e. without a 1) using your PSTN line will fail unless you add 1+NXXNXXXXXX to the Outgoing Dial Rules for your SIP/pstn Trunk. Once you get all the changes entered, make a test call to an 800 number after starting the Asterisk Command Line Interface (CLI) which we covered in the last article. Your output on the CLI screen should look something like the following. You'll note that the highlighted text shows the call was placed using the proper Outbound Trunk: IAX2/fwd.
 -- Executing Dial("SIP/204-4c88", "IAX2/fwd/*18005551212") in new stack

 -- Called fwd/*18005551212

 -- Call accepted by 65.39.205.121 (format ulaw)

 -- Format for call is ulaw
 Implementing Prefix Dialing. There's one more Dial Plan concept you need to get under your belt, and we can demonstrate it by designing an Outbound Route to actually place calls to others with FWD phone numbers. Then, for your homework, we'll leave it to you to design Dial Plans that allow you to place calls to other VoIP providers' customers with whom FWD has peering agreements. There's a long list of them here, and all of these calls are absolutely FREE to anywhere in the world. Another one that's not in the list is using FWD to call BroadVoice numbers: **282 + Area Code + Number. And you also can call FWD numbers from BroadVoice but there may be a charge depending upon your plan: 011+0+393+FWDnumber. Post a comment with a correct dial plan that provides access to all the peering agreement customers' numbers, and you may or may not (more likely) win a prize. We'll only publish correct answers so don't worry about being embarrassed by an incorrect suggestion.
Now, for the missing piece, we need another FWD dial plan that let's you force calls to go out through your FWD trunk. This comes in handy for other providers as well. For example, you might want to dial an 8 prefix to force a call to be sent out to Voxee or 9 to force a call to be sent out through your PSTN (home phone) line. We use 393 (FWD spelled with the phone keys) as a prefix to place FWD calls. All of their numbers have either 5 or 6 digits so the numbers you'd dial would be 393-12345 or 393-123456. What we want the Outbound Route to do is strip off the 393 and then send the call along to our IAX2/fwd trunk for processing. Use AMP->Setup->Outbound Routing and in the Add Route screen, fill in OutFWD as the Route Name. For the Dial Pattern, use 393|XXXX. and don't forget the trailing period. The period tells Asterisk to accept any number (but at least one more) digit following seven initial digits which begin with 393. The 393| expression tells Asterisk to look for a number beginning with 393 and then discard the 393 prefix before sending the call on to the outbound trunk. Note that this dial pattern will avoid interference with local phone numbers beginning with 393 of exactly seven digits ... for those of you that still have local 7-digit dialing. The reason is that you'll have to dial at least 8 digits for this dial plan to be triggered. For the Trunk Sequence, choose IAX2/fwd. Click the Submit Changes button and then move the OutFWD route to the top of your Outbound Routes list. We do this to assure that Asterisk always processes dialed calls beginning with 393 by first examining whether the call can be handled by FWD. Now click the red bar to restart Asterisk. You can try placing a call to yourself by dialing 393 plus your FWD phone number. If you want a test incoming call from elsewhere, go to the Free World Dialup site here and log in with your FWD phone number and password.
Using the samples above, you now should be able to structure a Dial Plan for your Asterisk server which takes maximum advantage of the strong points and cost savings offered by various VoIP providers. For example, our own Asterisk@Home server now has the following Outbound Routes in the following order (from top to bottom):
The real beauty of structuring a Dial Plan with AMP along the lines that we've shown above is that, when a new VoIP provider comes along with a more cost effective plan down the road, you can add a new trunk for that provider and, in under a minute, adjust the outbound routes of your Asterisk system to take maximum advantage of that provider's strong points. Thereafter, every call placed on your system will use the new Dial Plan without any further training of end-users and without any disruption in service. Try that on your $250,000 Nortel or AT&T system. We'll be talking about the last entry in a future column so stay tuned.
Disclaimer: Some of what you've read above might be construed by some as legal advice. It's not. It's merely advice learned the hard way through the school of hard knocks. If it saves you some grief or some money, great! But, if you need or want legal advice, hire a lawyer. Remember, you get what you pay for ... and you haven't paid us a dime.
Finally, we're really sorry if we misled you with our headline. We really didn't mean it. Don't expect to ever hear that from a VoIP provider! And, yes, there are numerous additional articles in this series. You can read all of them by clicking here.
Why Asterisk Matters: It’s Katrina, Stupid!
 Over the past eight weeks, we’ve written the better part of a book on how to quickly and effectively deploy Asterisk@Home PBX systems using hardware which many folks and virtually every corporation in America have sitting around gathering dust in a back room. For anyone that’s been reading between the lines, you already know that, with these Asterisk® servers running on low-end Pentium III hardware, you could quickly and inexpensively build and deploy a meshed communications network supporting the needs of tens if not hundreds of thousands of users. What Google did for searches with lots of small, networked, redundant PCs, Asterisk could do for communications using virtually identical (low-cost) hardware. And the typical build time: under an hour! If you’re in the continuity of operations or disaster recovery business, you need to take a hard, careful look at Asterisk and especially Asterisk@Home. Our tutorials will get you started.
Also during the past month, our country endured one of the worst natural disasters in its history, Hurricane Katrina. If you’ve been following the news, you’ve probably reached the same conclusions that we have. There were at least four major shortcomings which arose after Katrina: food, water, security, and communications. We’ll leave the first three to others who are more qualified to solve them. We’re more concerned about the last one. The total absence of a communications solution during this disaster appears to be merely the tip of a very large iceberg: the lack of creative technical talent in our country with the capacity to solve basic technical problems which don’t follow a preordained script especially after a catastrophic event. It seems the key ingredient in everyone’s disaster recovery plan was cellphones. Wrong!
Where were our self-proclaimed technology geniuses after Katrina: Bill Gates, Steve Jobs, Eric Schmidt, Larry Ellison, Michael Dell, Andy Grove, Larry Page, and on and on? Where were our whiz kids when the country desperately needed some technical help? Was there a trade show that we all missed somewhere? Oh, I almost forgot. There was a new iPhone to introduce. Too bad they don’t work without a functioning cellphone tower. Hint to all billionaires: You Can’t Take It With You. And where were all those football blimps when we could have used them for something other than a 15-second panoramic shot above the SuperDome? Is all the glorious talk of WiMax just hot air? Was there no better place to try out this technology than New Orleans these last couple weeks? Come on, folks! The feds, of course, had no problem ordering up the most costly solution on the planet to meet their own communications needs. But what would you expect from an aerospace contractor selling $500 toilet seats?
 What became abundantly clear very quickly was that there weren’t any technical geniuses (or any other genius flavors) in FEMA or elsewhere in the federal government, state governments, or local municipalities. Is there only one Rudi Guiliani, Crisis Manager, in the whole damn country? We probably should have anticipated our government’s technical shortcomings after reading how the FBI has been trying to build a unified database for one government agency, itself, FOR TEN YEARS. But wouldn’t you think the same folks that can communicate from Earth to Mars could wire some tin cans together when folks really needed some help getting in touch with their loved ones. As someone who served in the federal government for over 30 years, I’m embarrassed to see how little talent remains and how many bureaucrats and politicians are on the payroll who care about nothing more than themselves and their next photo op. And you wondered why everybody was outsourcing their technology jobs to India!
Some of you are probably snickering saying "but there weren’t any phone lines or cable modems, dummy." Ah, but you can buy a modified Pringles can that will transmit and receive the data equivalent of ten T1 lines for a distance of 10 MILES for under $50. You can even buy them at CompUSA (or you could have stolen them with the police if you were in New Orleans). Or you could build two yourself for under $10! Think what $10,000 could have built. And just think of the media coverage Pringles would have gotten … for free. After all, that’s what seems to matter. Now we need electricity. Fine. You can walk in any Home Depot or Lowe’s and buy a generator with networking power to spare for under $500. Add another $30 for a week’s worth of gasoline and presto: instant network and communications for thousands of people. 200 generators, 400 Pringles cans, and a truckload of clunker PCs and wireless access points comes to a little over $100,000, and there would have been communications to spare. Is there no one left at any level of government that can create a functional, low-tech solution that works without turning to AT&T or Sprint … who was also dead in the water, literally. Guess where Sprint’s major network hub was located? You guessed it: New Orleans, Louisiana. Now there’s a technology breakthrough: build your communications hub below sea level.
Think what $1 million could have built for the people in the hands of a creative technology group of Americans. The only trouble with Microsoft and America’s other technology giants is there are too many overweight millionaires on the payroll that care about little else than the value of their stock portfolios. Here’s something to ponder. When some of those nutty guys in the Middle East decide its time to blow up something new and they choose one of your corporate campuses, what’s your stock going to be worth then? At least put yourself together an Asterisk box so you and your colleagues can conference and whine together.
I’m sleeping better now knowing that New Orleans is going to be rebuilt … whatever it costs. After all, George Bush told the world he used to party there. But what about the poor folks in Mississippi and L.A. That’s Lower Alabama for those of you who’ve never been there. Hopefully someone will come along who still can make a difference in the communities that don’t have and really don’t want another Bourbon Street.
Update. CNN carried the following story about this very subject on Wednesday, October 5, 2005.
Who Is This Guy? Ward Mundy is a retired attorney who spent more than 30 years providing legal and technology assistance to the federal courts in the United States.
Free Asterisk Solutions
