
Home » Posts tagged 'centOS' (Page 2)
Tag Archives: centOS
The Most Versatile VoIP Provider: FREE PORTING

 JUST RELEASED: Visit the Incredible PBX Wiki
Some Fresh CallerID Magic for Incredible PBX 13-13
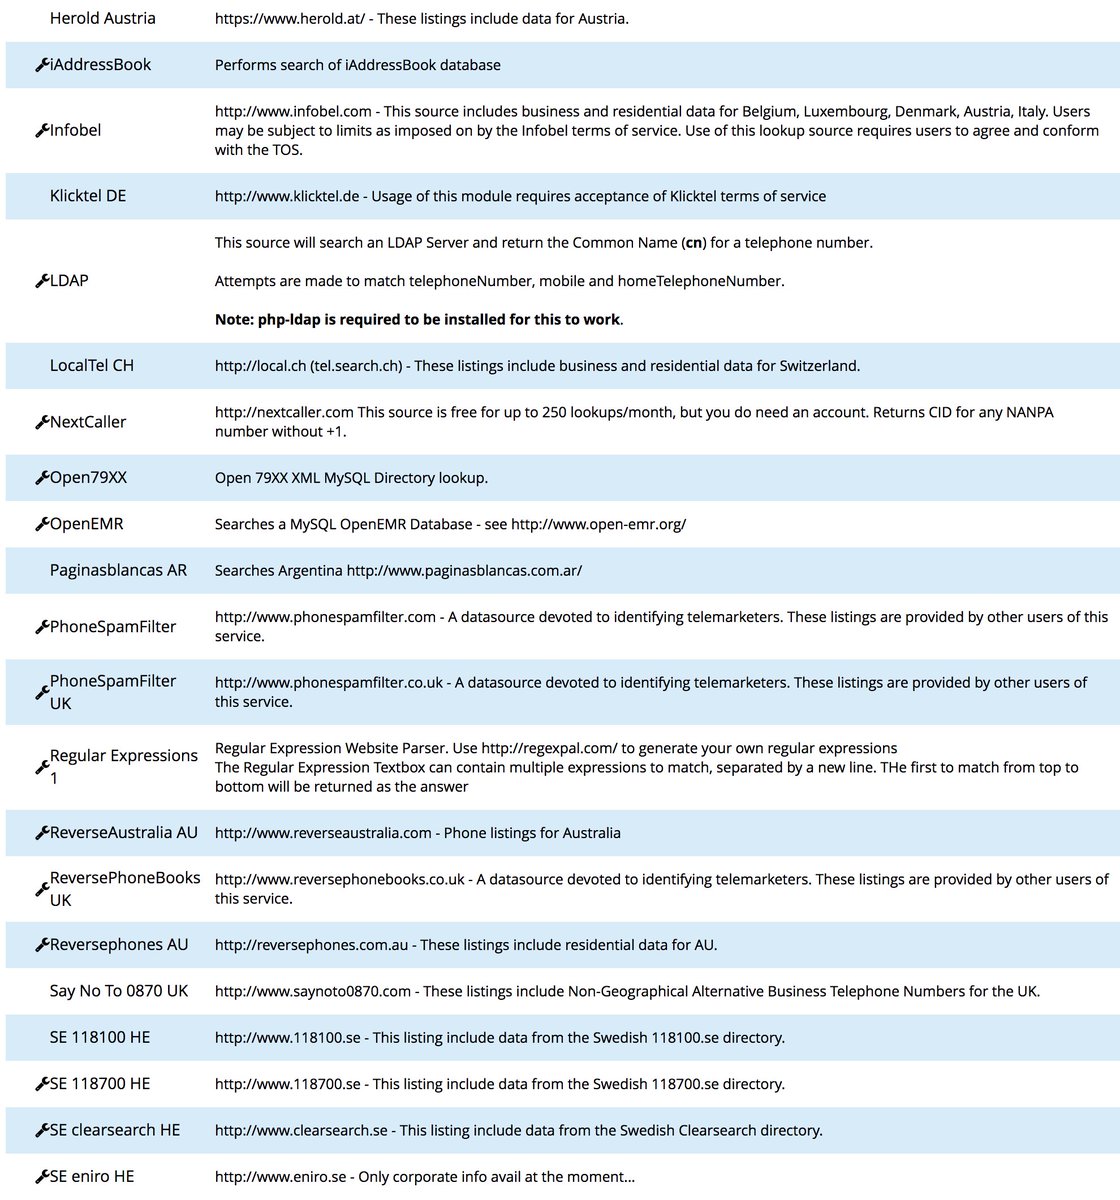
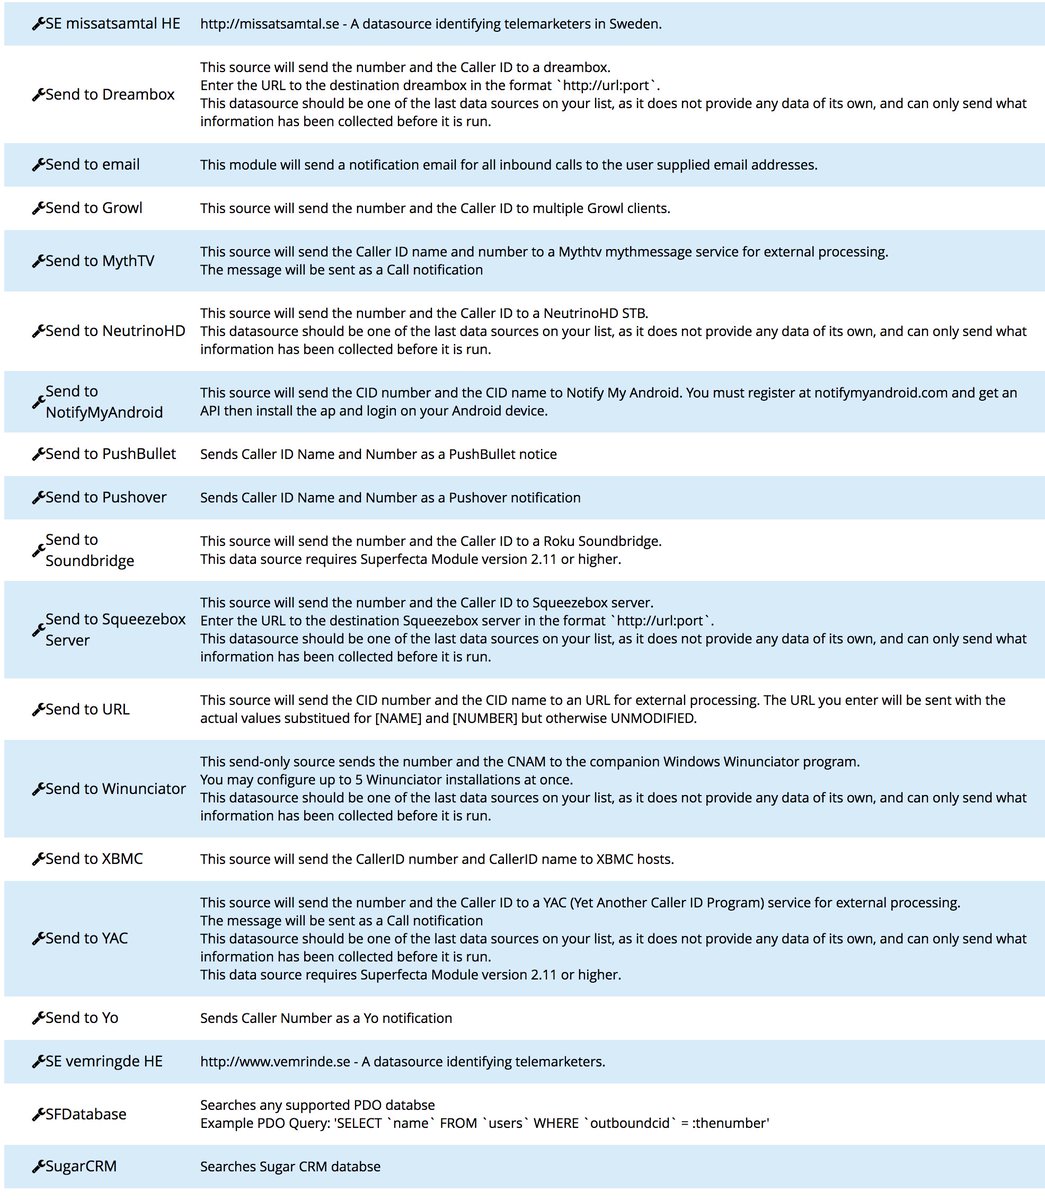
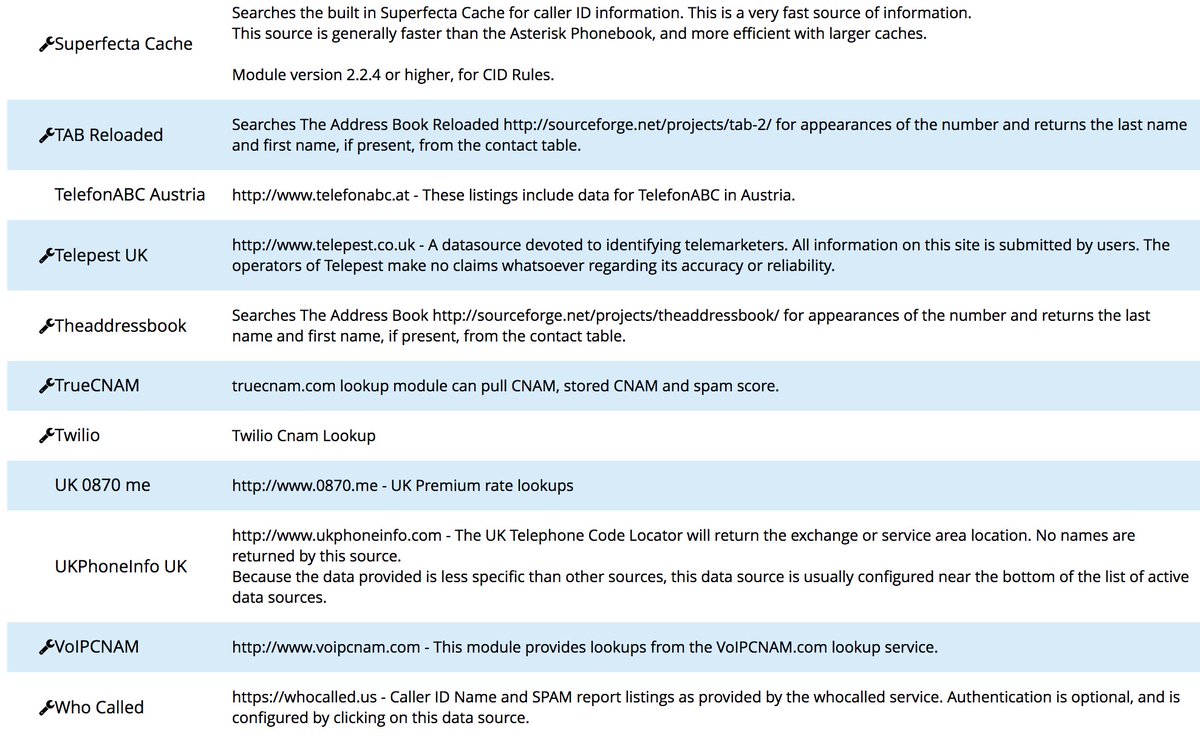
 It’s been more than 10 years since we first introduced CallerID Trifecta for Asterisk® and the FreePBX® platform. A few months later it morphed into CallerID Superfecta and, as they say, the rest is history. Today CallerID Superfecta is used by over a million people around the globe to obtain CallerID Name (CNAM) information from over 70 different lookup sources. WOW! Just call me the Proud Papa. What a journey it has been, and our special thanks to the dozens of contributors.
Unfortunately, for those in the United States, most of the lookup sources now are commercial enterprises much like the original Bell Sisters that monopolized CallerID information by keeping it proprietary instead of forwarding CallerID Name data together with the CallerID number of incoming calls. In fact, for many users, the cost of CallerID lookups now is more expensive than the cost of the VoIP trunks carrying the calls. While we can’t solve the problem, we can make the cost of these CallerID lookup services considerably cheaper using a neat little trick with CallerID Superfecta.

Here’s the problem. Many cell phone users don’t subscribe to any service that keeps track of the caller’s identity. The same is true for those using services such as Google Voice. When you receive a call from one of these users, the CNAM provided for the caller will either show something like "Mobile Phone User" or the city and state of the caller’s cellphone provider. This doesn’t keep the commercial CNAM providers from dinging you every time you receive one of these calls. And if your girlfriend calls you a hundred times a month, the commercial CNAM providers charge you for a hundred lookups even when the calls are from the same caller. That ends today. Once you implement this new CallerID add-on, you’ll only get billed for a single CNAM lookup regardless of how many times that person calls your PBX. Better yet, with a little effort, you can quickly replace the CNAM entries of the mystery cellphone and Google Voice callers by inserting their actual names into your Asterisk phonebook using either the FreePBX GUI or the Asterisk CLI. We’ll show you how.
Here’s the trick. CallerID Superfecta lets you prioritize source lookups when incoming calls hit your PBX. For example, you can lookup the CallerID number in AsteriDex and the Asterisk Phonebook in a fraction of a second at no cost. Once there’s a match on the CallerID number of the caller, additional lookups stop. So what we want to do is prioritize the lookups so that the free sources are used before any commercial lookup service is triggered. For the commercial CNAM source in the U.S., we’re going to use OpenCNAM in our examples because their service is one of the easiest and least expensive to implement. All OpenCNAM lookup options are less than a half a cent per lookup. By placing OpenCNAM third in the Default Superfecta lookup sequence, it will only be used when there is no match in either AsteriDex or the Asterisk Phonebook.

Getting Started. It would obviously be a hassle to have to add every caller to one of these phonebooks every time a call arrives on your PBX. So the other half of today’s magic is to automatically add an entry to the Asterisk Phonebook every time a call hits your PBX. Then, the next time you receive a call from that same number, CallerID Superfecta will be able to find it in your free databases instead of querying OpenCNAM for yet another commercial lookup. As a general rule, in the United States, phonebook data is not copyrightable. However, you should consult an attorney for questions regarding the legality of this methodology as it applies to any particular CNAM lookup service.
We’re aware that CallerID Superfecta has had a caching option which provides similar functionality; however, users have reported mixed results and data corruption with that feature so we’ll be implementing a slightly different solution that relies on Asterisk’s extremely reliable SQLite3 database. This also provides the flexibility to customize the entries after completion of a call for more accurate CNAM information on subsequent calls. Unfortunately, a CNAM entry of ATLANTA, GA doesn’t tell you much about the caller even though you paid for the lookup. By inserting these call entries in the Asterisk Phonebook, you then have the option of easily customizing them in multiple ways. Not only will this provide better CNAM data on subsequent inbound calls, but the phonebook can also be used to make outgoing calls and to produce an alphabetized phonebook listing as well.
cd /var/lib/asterisk
sqlite3 astdb.sqlite3 "select key,value from astdb where key LIKE '%cidname/%' order by value"
Upgrading Asterisk Phonebook Module. Before we get too deep in the weeds, let’s get your Asterisk Phonebook module in FreePBX upgraded to resolve a bug in the version that ships with Incredible PBX which won’t let you edit phonebook entries without also adding a speed dial number for each entry. For generic FreePBX platforms, you can use Module Admin to upgrade the Phonebook module. For Incredible PBX platforms, log into your server as root and issue these commands:
cd /root
./gpl-install-fpbx phonebook
Activating CallerID Superfecta. There are three steps in activating CallerID Superfecta. First, configure the Default Scheme for CallerID Superfecta in Admin:CID Superfecta using the settings we previously displayed. Use the Arrow keys to properly order the three lookup sources: AsteriDex, Asterisk Phonebook, and OpenCNAM.
Be advised that there is a credentials mismatch in the Default setup for AsteriDex. To correct this, open the Default configuration for Superfecta and click on the Tool icon to the left of AsteriDex. The username must be root, and the password is passw0rd with a zero. Save your settings.
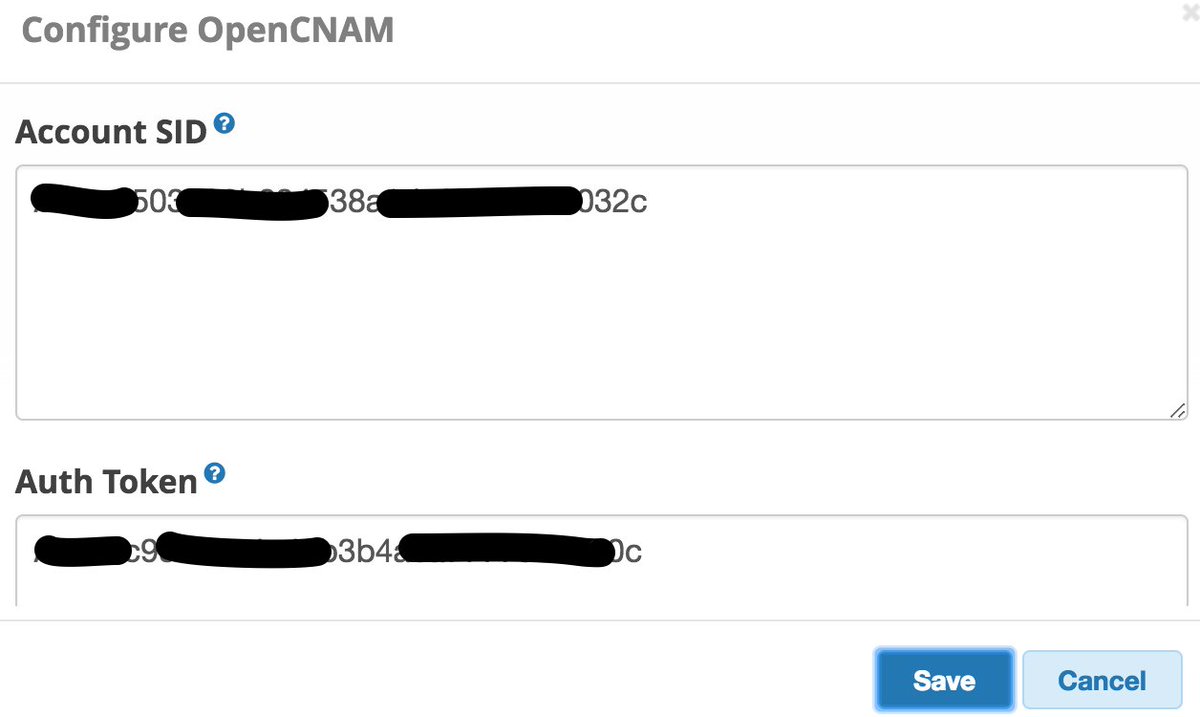
Next, you need to create and fund an account at OpenCNAM.com. Once your account is established, copy your credentials and insert them into the OpenCNAM lookup source by clicking on OpenCNAM’s tool icon ![]() :
:
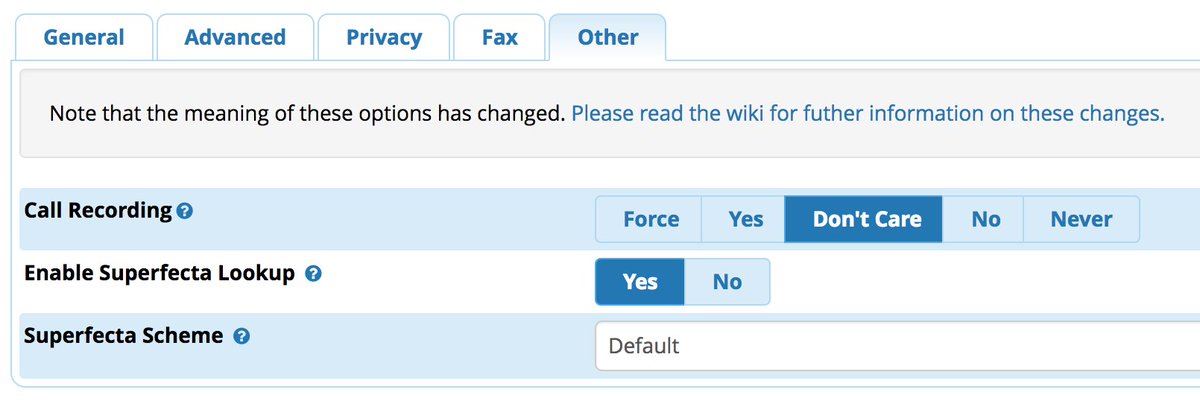
Once you have saved the Default Scheme, then you need to enable CallerID Superfecta for each of your Inbound Routes under the Other tab in Connectivity:Inbound Routes:
Adding Hook for Inbound Call Processing. One of the decade-old shortcomings of FreePBX has always been the inability to insert dialplan code into the Inbound Call process without forever damaging your ability to add additional DIDs moving forward. While extensions_override_freepbx.conf lets you extract and manipulate large chunks of FreePBX code, the drawback is that once you do that, the flexibility provided by the GUI goes up in smoke unless you remember to always move the newly generated dialplan code back into the override context.
We much prefer a simpler way of inserting custom dialplan code into the Inbound Call processing routine, but it requires a change in the FreePBX Core module. We would caution you about using this except on Incredible PBX 13-13 servers running under CentOS 6 or 7 or Ubuntu 18.04 with Signature Checking Disabled. It will trigger nasty signature checking errors on the FreePBX Dashboard. See the next section for a workaround on generic FreePBX 13 platforms. On Incredible PBX 13 servers, login as root and issue the following commands making sure that you expand the last two lines into a single command before executing it:
cd /var/www/html/admin/modules/core
sed -i "s|new ext_noop('CallerID Entry Point')|new ext_gosub('1','s','sub-log-caller')|" \\
functions.inc.php
mysql -u root -ppassw0rd asterisk -e "update admin set value='true' \\
where variable='need_reload'"
amportal a r
Next, we need to add some supplemental dialplan code to extensions_custom.conf. This code actually populates the Asterisk Phonebook with the new call entries each time a call is received by your PBX:
cd /tmp
wget http://incrediblepbx.com/sub-log-caller.tar.gz
tar zxvf sub-log-caller.tar.gz
rm -f sub-log-caller.tar.gz
cd /etc/asterisk
cat /tmp/sub-log-caller.txt >> extensions_custom.conf
fwconsole reload
amportal restart
Disabling Module Signature Checking. If you’re running FreePBX 13 behind a secure firewall that blocks web access to FreePBX for anonymous users, then here’s a simple way that you can apply the patch above and take advantage of the sub-log-caller functionality without having to endure module signature errors within FreePBX. Simply disable Module Signature Checking. Here’s how:
cd /var/www/html/admin/libraries
sed -i 's|"SIGNATURECHECK", true|"SIGNATURECHECK", false|' modulefunctions.class.php
mysql -u root -ppassw0rd asterisk -e "UPDATE notifications SET candelete =  '1' WHERE  true;"
mysql -u root -ppassw0rd asterisk -e "DELETE FROM notifications WHERE true;"
mysql -u root -ppassw0rd asterisk -e "UPDATE freepbx_settings SET value='0' WHERE \\
keyword='SIGNATURECHECK';"
amportal restart
Adding CNAM data to CDR Listings. One of our concerns with the current CDR implementation in FreePBX is the lack of display of CNAM data for most entries in CDR listings. Currently, the only way to decipher the CNAM information is to use your mouse to hover over each of the CallerID numbers. We much prefer displaying both CallerID Name and Number in the CallerID column of CDR Reports. Here’s how to fix it:
cd /var/www/html/admin/modules/cdr
sed -i "s|cdr_formatSrc(\$row\['src'], \$row\['clid']);|cdr_formatSrc(\$row\['clid'], \\
\$row\['clid']);|" page.cdr.php
amportal a r
Managing Your Asterisk Phonebook. As we mentioned, there are a couple of ways to display and/or update entries in your Asterisk Phonebook that have been populated with OpenCNAM lookups. From the Asterisk CLI, you can display entries like this: database show cidname.
You also can add or update entries using the Asterisk CLI like this:
database put cidname 8431234567 "Mundy, Ward"
The simplest method to manage your Asterisk Phonebook is from within the FreePBX GUI. Simply navigate to Admin:Asterisk Phonebook. There you can edit individual entries and replace generic CNAM entries such as Atlanta, GA within something more descriptive of the caller’d identity. You also have the ability to export the data and even create speed dial entries for frequently called parties. Once Speed Dial numbers have been created, you can reach the party from any phone connected to your PBX by dialing *0 plus the speed dial number.
Finally, you need to complete some additional steps to implement the Spam Call Blocker as documented in this tutorial. Enjoy!
Originally published: Wednesday, May 30, 2018 Updated: Monday, November 26, 2018
 Support Issues. With any application as sophisticated as this one, you’re bound to have questions. Blog comments are a terrible place to handle support issues although we welcome general comments about our articles and software. If you have particular support issues, we encourage you to get actively involved in the PBX in a Flash Forums. It’s the best Asterisk tech support site in the business, and it’s all free! Please have a look and post your support questions there. Unlike some forums, ours is extremely friendly and is supported by literally hundreds of Asterisk gurus and thousands of users just like you. You won’t have to wait long for an answer to your question.

Need help with Asterisk? Visit the PBX in a Flash Forum.
Special Thanks to Our Generous Sponsors
FULL DISCLOSURE: ClearlyIP, Skyetel, Vitelity, DigitalOcean, Vultr, VoIP.ms, 3CX, Sangoma, TelecomsXchange and VitalPBX have provided financial support to Nerd Vittles and our open source projects through advertising, referral revenue, and/or merchandise. As an Amazon Associate and Best Buy Affiliate, we also earn from qualifying purchases. We’ve chosen these providers not the other way around. Our decisions are based upon their corporate reputation and the quality of their offerings and pricing. Our recommendations regarding technology are reached without regard to financial compensation except in situations in which comparable products at comparable pricing are available from multiple sources. In this limited case, we support our sponsors because our sponsors support us.
 BOGO Bonaza: Enjoy state-of-the-art VoIP service with a $10 credit and half-price SIP service on up to $500 of Skyetel trunking with free number porting when you fund your Skyetel account. No limits on number of simultaneous calls. Quadruple data center redundancy. $25 monthly minimum spend required. Tutorial and sign up details are here.
![]() The lynchpin of Incredible PBX 2020 and beyond is ClearlyIP components which bring management of FreePBX modules and SIP phone integration to a level never before available with any other Asterisk distribution. And now you can configure and reconfigure your new Incredible PBX phones from the convenience of the Incredible PBX GUI.
The lynchpin of Incredible PBX 2020 and beyond is ClearlyIP components which bring management of FreePBX modules and SIP phone integration to a level never before available with any other Asterisk distribution. And now you can configure and reconfigure your new Incredible PBX phones from the convenience of the Incredible PBX GUI.
 VitalPBX is perhaps the fastest-growing PBX offering based upon Asterisk with an installed presence in more than 100 countries worldwide. VitalPBX has generously provided a customized White Label version of Incredible PBX tailored for use with all Incredible PBX and VitalPBX custom applications. Follow this link for a free test drive!
 Special Thanks to Vitelity. Vitelity is now Voyant Communications and has halted new registrations for the time being. Our special thanks to Vitelity for their unwavering financial support over many years and to the many Nerd Vittles readers who continue to enjoy the benefits of their service offerings. We will keep everyone posted on further developments.
Some Recent Nerd Vittles Articles of Interest…
Twofer Tuesday: Incredible PBX 13 to the Rescue

With the Digium announcement last week that four and a half year’s worth of Asterisk® servers were vulnerable to the RTP eavesdropping bug, it prompted us to dust off our Incredible PBX® 13 for CentOS build and bring it up to current specs including the Digium patch for RTPbleed. And then along came Hurricane Issabel to remind us that sh*t happens, and it pays to have a backup plan for your telecommunications infrastructure. So today we’re pleased to introduce two new Asterisk solutions: a cloud-based server for $1 a month and a VirtualBox image that will run on any Windows or Mac computer. We would stress that these should be part of a comprehensive backup plan and may not be suitable to implement as your primary communications platform. But, for those impacted by Harvey’s or Issabel’s devastation, either of today’s solutions will get you a very stable PBX platform as soon as you have Internet or cellular connectivity.
Cloud Hosting for $1/month in NYC, Miami or LA
For today’s emergency cloud platform, we’ve chosen WootHosting which provides a rock-solid VPS in your choice of locations starting at $12 a year. That buys you the following:
2 CPU Core Allocations
1024MB Dedicated RAM
1024MB vSwap
50GB Secured Disk Space
3000GB Premium Bandwidth
1 IPv4 Address
100Mbps Port Speed
Choose New York Grand Opening Specials under the left tab. You still get your choice of cities for the $12/year VPS! Just configure the VPS as a CentOS 6, 64-bit platform. Login to the server as root using SSH or Putty and issue these commands:
setenforce 0
yum -y install net-tools nano wget tar
yum -y upgrade --skip-broken
wget http://incrediblepbx.com/incrediblepbx13-12.2-centos.tar.gz
tar zxvf incrediblepbx*
./create-swapfile-DO
./IncrediblePBX*
On some platforms (not WootHosting’s VPS), your server may automatically reboot midway through the install. On these platforms, log back in as root and run the installer a second time to complete the install:
./IncrediblePBX*
After restarting the server at the conclusion of the install, log back in as root and perform the following steps to complete your setup:
Make your root password very secure: passwd
Create admin password for GUI access: /root/admin-pw-change
Set your correct time zone: /root/timezone-setup
Create admin password for web apps: htpasswd /etc/pbx/wwwpasswd admin
Make a copy of your Knock codes: cat /root/knock.FAQ
Decipher your Reminders password: cat /root/reminders.FAQ
InsertOPTIONS="-i venet0:0"in /etc/sysconfig/knockd
Decipher IP address and other info about your server: status
Your server will be up and running in about an hour. Remember, we are compiling all of the components including Asterisk from source which means customization and updates are easy. Continue your adventure by following our previous tutorial.
Incredible PBX 13 with VirtualBox in Under 5 Minutes
If you’re in a time crunch or prefer to set up a PBX locally, there is no better solution than VirtualBox. It runs on any desktop PC, Mac, Linux or Solaris machine, and the new Incredible PBX 13 image for VirtualBox can be installed and configured in under 5 minutes. With a single button click, you can backup your entire PBX in a couple of minutes and save it for a rainy day.
Today’s release is built atop the CentOS 6.9 platform and features the latest release of Asterisk 13 and a terrific collection of GPL modules from FreePBX® 12. Think of Incredible PBX as the glue stick that assembles all the necessary VoIP components and holds them together seamlessly. As with all Incredible PBX builds, you also get the full complement of goodies including dozens of text-to-speech apps, voice recognition and dialing, SMS messaging, Google Voice and free fax support, reminders and wakeup calls, and SECURITY!
Is VirtualBox merely a sandbox for experimentation? Absolutely not. With any of the beefier desktop computers available today, running Incredible PBX as a 24/7 VirtualBox image is every bit as feature rich with stellar performance that’s equivalent to using dedicated hardware. And there are some added advantages. Obviously, deploying a turnkey VoIP platform in under 5 minutes is a major plus. But, unlike using a dedicated Linux platform, you also get the ability to take snapshots of your system and do full backups in minutes instead of the hours required to bring down dedicated hardware, load a different backup application using a different operating system, perform a backup, and then reboot your VoIP server. And your backups won’t just run on the one server on which the backup was performed. You can restore the backup to any other computer that can run VirtualBox. For any of you that came from a network management background, you know what a big deal that really is. And there’s one more bonus. With Incredible Backup and Restore, you can move your image to dedicated hardware running the same operating system with Asterisk 13 and the same GUI platform in minutes.
Are there security compromises using the VirtualBox platform? Not at all. Incredible PBX still comes preconfigured with the Linux IPtables firewall that is locked down to a whitelist of local area networks, preferred providers, and your own IP addresses. You can expand the whitelist using the add-ip and add-fqdn scripts or use PortKnocker and Travelin’ Man 4 tools to let remote users gain instant access.
Getting Started with VirtualBox. Step #1 today is to download one or more of the 64-bit VirtualBox installers from VirtualBox.org or Oracle.com. Our recommendation is to put all of the 100MB installers on a 4GB thumb drive.1 Then you’ll have everything in one place whenever and wherever you happen to need it. Once you’ve downloaded the software, simply install it onto your favorite desktop machine. Accept all of the default settings, and you’ll be good to go. And here’s a link to the latest Oracle VM VirtualBox User Manual.
Downloading the Incredible PBX 13 Virtual Machine. A word of warning on the front end. The new Incredible PBX image featuring Asterisk 13 for VirtualBox is huge, about 2.3GB! Download the image from SourceForge onto your desktop by clicking here.
Importing Incredible PBX 13 into VirtualBox. Double-click on the .ova file you downloaded to begin the import procedure and load it into VirtualBox. When prompted, be sure to check the Reinitialize the Mac address of all network cards box and then click the Import button. Once the import is finished, you’ll see a new Incredible PBX 13 for CentOS 6.9 virtual machine in your VM List on the VirtualBox Manager Window. We need to make a couple of one-time adjustments to the Incredible PBX VM configuration to account for differences in sound and network cards on different host machines.
Click on the Incredible PBX Virtual Machine in the VM List. Then click Settings -> Audio. Verify that Enable Audio option is checked and choose your sound card. Then click OK. Next click Settings -> Network. For Adapter 1, be sure the Enable Network Adapter option is checked. From the Attached to pull-down menu, choose Bridged Adapter. Then select your network card from the Name list. Then click OK. That’s all the configuration that is necessary for your Incredible PBX Virtual Machine.
Running Incredible PBX 13 on VirtualBox. Once you’ve imported and configured the Incredible PBX Virtual Machine, you’re ready to go. Highlight Incredible PBX 13 for CentOS 6.9 Virtual Machine in the VM List on the VirtualBox Manager Window and click the Start button. The CentOS 6.9 boot procedure will begin just as if you had installed Incredible PBX on a standalone machine. You’ll see a couple of dialogue boxes pop up that explain the keystrokes to move back and forth between your host operating system desktop and your virtual machine. Remember, you still have full access to your desktop computer. Incredible PBX is merely running as a task in a VirtualBox window. Always gracefully halt Incredible PBX just as you would on a dedicated computer.
Here’s what you need to know. To work in the Incredible PBX Virtual Machine, just left-click your mouse while it is positioned inside the VM window. To return to your host operating system desktop, press the right Option key on Windows machines or the left Command key on any Mac. For other operating systems, read the dialogue boxes for instructions on moving around. To access the Linux CLI, login as root with the default password: password.
When logging in for the first time, Incredible PBX will go through some setup steps and then reboot. Login again to complete the setup. status will always provide a snapshot of your system. To shut down Incredible PBX gracefully, click in the VM window with your mouse, log in as root, and type: halt. Be sure to complete the following setup steps from the Linux CLI:
- Change your root password: passwd
- Set your FreePBX admin password: /root/admin-pw-change
- Set your web apps admin password: htpasswd /etc/pbx/wwwpasswd admin
- Set your correct time zone: /root/timezone-setup
- Add WhiteList entries to firewall if needed: /root/add-ip or /root/add-fqdn
- Store PortKnocker credentials in a safe place: cat /root/knock.FAQ
- Decipher your Reminders password: cat /root/reminders.FAQ
- Login to your NeoRouter VPN server if desired: /root/nrclientcmd
To access the Incredible PBX GUI with a browser, point to the IP address of your virtual machine and login as admin with admin password set above. We recommend that you log in to the Linux CLI as root at least once a week so that Incredible PBX updates get applied to your server regularly. This is critically important if you care about your phone bill. Enjoy!
Published: Tuesday, September 12, 2017
Need help with Asterisk? Visit the PBX in a Flash Forum.
Special Thanks to Our Generous Sponsors
FULL DISCLOSURE: ClearlyIP, Skyetel, Vitelity, DigitalOcean, Vultr, VoIP.ms, 3CX, Sangoma, TelecomsXchange and VitalPBX have provided financial support to Nerd Vittles and our open source projects through advertising, referral revenue, and/or merchandise. As an Amazon Associate and Best Buy Affiliate, we also earn from qualifying purchases. We’ve chosen these providers not the other way around. Our decisions are based upon their corporate reputation and the quality of their offerings and pricing. Our recommendations regarding technology are reached without regard to financial compensation except in situations in which comparable products at comparable pricing are available from multiple sources. In this limited case, we support our sponsors because our sponsors support us.
BOGO Bonaza: Enjoy state-of-the-art VoIP service with a $10 credit and half-price SIP service on up to $500 of Skyetel trunking with free number porting when you fund your Skyetel account. No limits on number of simultaneous calls. Quadruple data center redundancy. $25 monthly minimum spend required. Tutorial and sign up details are here.
![]() The lynchpin of Incredible PBX 2020 and beyond is ClearlyIP components which bring management of FreePBX modules and SIP phone integration to a level never before available with any other Asterisk distribution. And now you can configure and reconfigure your new Incredible PBX phones from the convenience of the Incredible PBX GUI.
The lynchpin of Incredible PBX 2020 and beyond is ClearlyIP components which bring management of FreePBX modules and SIP phone integration to a level never before available with any other Asterisk distribution. And now you can configure and reconfigure your new Incredible PBX phones from the convenience of the Incredible PBX GUI.
VitalPBX is perhaps the fastest-growing PBX offering based upon Asterisk with an installed presence in more than 100 countries worldwide. VitalPBX has generously provided a customized White Label version of Incredible PBX tailored for use with all Incredible PBX and VitalPBX custom applications. Follow this link for a free test drive!
Special Thanks to Vitelity. Vitelity is now Voyant Communications and has halted new registrations for the time being. Our special thanks to Vitelity for their unwavering financial support over many years and to the many Nerd Vittles readers who continue to enjoy the benefits of their service offerings. We will keep everyone posted on further developments.
Some Recent Nerd Vittles Articles of Interest…
Incredible PBX for CentOS 7: A Free Cloud Server for 4 Months

[iframe-popup id="4″]
We don’t want anyone to think Incredible PBX is a one-trick pony. 2016 is all about choices and Gotcha-Free VoIP alternatives. We spent last week in the mountains taking a careful look at Ubuntu 16.04 and CentOS 7. Despite the promises that LTS releases of Ubuntu wouldn’t break things that used to work, Ubuntu 16.04 breaks things. Specifically, ODBC as we know it is non-existent. And MySQL is a very different beast with InnoDB now a mandatory component. Those were deal-breakers for us because we no longer could load Incredible PBX database snapshots and because current ODBC code won’t work at all. We had much better luck with CentOS 7, and today we’re pleased to introduce Incredible PBX for CentOS 7.
Some still consider CentOS 7 to be an experimental platform, and we want to take the guesswork out of the equation. So we’re offering up a free cloud platform until December to let you kick the tires. It won’t impact your production servers while letting you explore the possibilities offered by another state-of-the-art Asterisk 13 platform. No, your server won’t blow up when you add a new module. No, Asterisk won’t refuse to start because you chose to upgrade an existing component. No, you won’t be Nickle and Dimed into buying critical platform enhancements. And, no, you won’t be charged hundreds of dollars for "support" only to be told that you need to switch to a more proprietary platform. XiVO remains our platform of choice, but to each his own. You can’t teach some old dogs new tricks so today’s Incredible PBX release is for you. 🙂
There’s more good news. VULTR is a relatively new cloud provider that now hosts virtual machines in over a dozen cities around the world. For new subscribers, they are offering a $20 credit when you sign up using our referral link. And, yes, your registration provides a few shekels to Nerd Vittles to keep the lights on. The great news is that $20 buys you a full four months of Incredible PBX cloud hosting service. You won’t find a better do-it-yourself platform at any price, let alone free.
Building the CentOS 7 Platform at Vultr for Incredible PBX
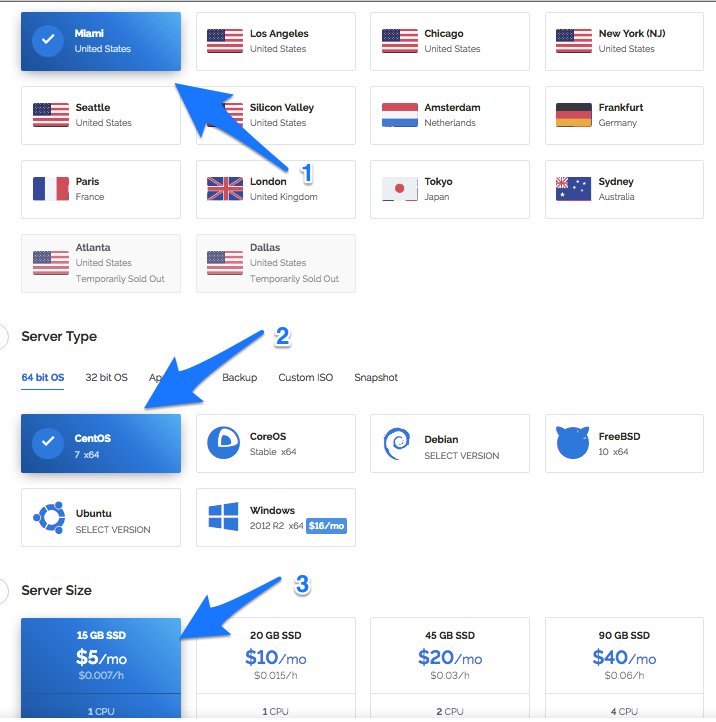
The first step in your CentOS 7 adventure is to sign up for a Vultr account with your $20 credit using the Nerd Vittles referral link. Once you’ve done that, it’s time to build your CentOS 7 virtual machine to host Incredible PBX in the Cloud. (1) Choose your favorite city to host your server, (2) pick the CentOS 7 64-bit platform (only!), and (3) choose the $5/month server size. Feel free to leave the Server Hostname & Label blank.
Once your virtual machine is up and running, log in with SSH or Putty using the IP address and root password provided. Do NOT install Incredible PBX from the console, or you will lock yourself out of your own server! Change your root password immediately: passwd.
Installing Incredible PBX for CentOS 7 in the Vultr Cloud
While still logged into your server as root using SSH/Putty, issue the following commands to get started. This will set up a swap file and then kick off the Incredible PBX installer:
cd /root
wget http://incrediblepbx.com/incrediblepbx13-12.2-centos.tar.gz
tar zxvf incrediblepbx*
./create-swapfile-DO
./IncrediblePBX*
The initial setup brings your CentOS 7 server up to current specs, and then the virtual machine will reboot at about the 10 minute mark. After rebooting, log into your server again as root with your new root password. Issue the following command to complete the Incredible PBX installation:
./IncrediblePBX*
Along the way, you may be prompted once or twice to enter information. Just press the ENTER key to accept the defaults. When the installation finishes in about 20 minutes, press the ENTER key to reboot your server and activate the Travelin’ Man 3 firewall. Then log back in as root. Perform the following steps to finish things up and set your passwords:
Make your root password very secure: passwd
Create admin password for GUI access: /root/admin-pw-change
Set your correct time zone: /root/timezone-setup
Create admin password for web apps: htpasswd /etc/pbx/wwwpasswd admin
Make a copy of your Knock codes: cat /root/knock.FAQ
Decipher IP address and other info about your server: status

Now you’re ready to switch to a web browser to finish the setup. Complete the steps using our brief tutorial. Enjoy!
Originally published: Tuesday, August 2, 2016
9 Countries Have Never Visited Nerd Vittles. Got a Friend in Any of Them https://t.co/wMfmlhiQ9y #asterisk #freepbx pic.twitter.com/TPFGZbqWB6
— Ward Mundy (@NerdUno) April 22, 2016
Need help with Asterisk? Visit the PBX in a Flash Forum.
Special Thanks to Our Generous Sponsors
FULL DISCLOSURE: ClearlyIP, Skyetel, Vitelity, DigitalOcean, Vultr, VoIP.ms, 3CX, Sangoma, TelecomsXchange and VitalPBX have provided financial support to Nerd Vittles and our open source projects through advertising, referral revenue, and/or merchandise. As an Amazon Associate and Best Buy Affiliate, we also earn from qualifying purchases. We’ve chosen these providers not the other way around. Our decisions are based upon their corporate reputation and the quality of their offerings and pricing. Our recommendations regarding technology are reached without regard to financial compensation except in situations in which comparable products at comparable pricing are available from multiple sources. In this limited case, we support our sponsors because our sponsors support us.
BOGO Bonaza: Enjoy state-of-the-art VoIP service with a $10 credit and half-price SIP service on up to $500 of Skyetel trunking with free number porting when you fund your Skyetel account. No limits on number of simultaneous calls. Quadruple data center redundancy. $25 monthly minimum spend required. Tutorial and sign up details are here.
![]() The lynchpin of Incredible PBX 2020 and beyond is ClearlyIP components which bring management of FreePBX modules and SIP phone integration to a level never before available with any other Asterisk distribution. And now you can configure and reconfigure your new Incredible PBX phones from the convenience of the Incredible PBX GUI.
The lynchpin of Incredible PBX 2020 and beyond is ClearlyIP components which bring management of FreePBX modules and SIP phone integration to a level never before available with any other Asterisk distribution. And now you can configure and reconfigure your new Incredible PBX phones from the convenience of the Incredible PBX GUI.
VitalPBX is perhaps the fastest-growing PBX offering based upon Asterisk with an installed presence in more than 100 countries worldwide. VitalPBX has generously provided a customized White Label version of Incredible PBX tailored for use with all Incredible PBX and VitalPBX custom applications. Follow this link for a free test drive!
Special Thanks to Vitelity. Vitelity is now Voyant Communications and has halted new registrations for the time being. Our special thanks to Vitelity for their unwavering financial support over many years and to the many Nerd Vittles readers who continue to enjoy the benefits of their service offerings. We will keep everyone posted on further developments.
Some Recent Nerd Vittles Articles of Interest…
BYOB: Easy Peasy PIAF-Green with Asterisk 11.8.1 and ‘Genuine’ CentOS 6.5

Let’s put aside the debate over Red Hat CentOS licensing and the GPL for a moment and talk about everyone’s favorite party. And we confess up front to being big fans of Patrón tequila. But let’s suppose for a moment that the Patrón family added some fine print to the label on their tequila bottles that said you cannot distribute margaritas with Patrón tequila and claim they are made with genuine Patrón tequila because the drink is no longer pure Patrón. In other words, for your Margaritaville invitations, you now have to state that each invitee BYOB, and you’ll provide the mixers and ice. WOW! What a party!

So that’s where we find ourselves in the current CentOS standoff with Red Hat. To demonstrate just how silly this entire trademark gimmick is, today we’re going to show you how to Bring Your Own CentOS platform and build a genuine PBX in a Flash server with Asterisk and FreePBX in about the same time as in the good ol’ days. When you’re finished you’ll have exactly the same PBX in a Flash server running on a genuine CentOS platform. Have we diluted CentOS or the CentOS brand? Not at all. In fact, we’ve made the exact same margarita! What this little experiment demonstrates is the real motivation behind the Red Hat licensing restrictions which have little or nothing to do with brand dilution.
Creating the Base CentOS Platform for PBX in a Flash
We’re not doing anything special here. In fact, you can build your base CentOS platform for PBX in a Flash on a standalone server, on a virtual machine of your choice, or in the cloud using a provider such as Amazon or RentPBX.
Start by downloading the 32-bit or 64-bit CentOS 6.5 minimal install ISO. You can do exactly the same thing using Scientific Linux if you prefer. Go through the usual drill of preparing an installer from the ISO. Burn the ISO to a USB Thumb Drive or a CD/DVD using a Mac or Windows machine. Then create your CentOS 6.5 platform on the hardware of your choice.
By default, neither CentOS nor Scientific Linux installs with network connectivity enabled. This is one of the primary reasons that we always have customized CentOS for use with PBX in a Flash. After performing a minimal OS install, log in as root and issue the following commands to prepare your server for PBX in a Flash:
sed -i 's|no|yes|' /etc/sysconfig/network-scripts/ifcfg-eth0

ifup eth0

yum -y install wget nano
Creating a PBX in a Flash 3.0.6.5 Server
Now you’re ready to make a margarita. Just download the PIAF3 Installer and run it. It works exactly as it always has. The installer is plain text so feel free to customize it to meet your own requirements. If you need the complete PIAF installation tutorial, jump to this link. Party on!
cd /root

wget http://pbxinaflash.com/piaf3-install.tar.gz

tar zxvf piaf3-install.tar.gz

./piaf3-install
Originally published: Tuesday, March 18, 2014
Need help with Asterisk? Visit the PBX in a Flash Forum.
Special Thanks to Our Generous Sponsors
FULL DISCLOSURE: ClearlyIP, Skyetel, Vitelity, DigitalOcean, Vultr, VoIP.ms, 3CX, Sangoma, TelecomsXchange and VitalPBX have provided financial support to Nerd Vittles and our open source projects through advertising, referral revenue, and/or merchandise. As an Amazon Associate and Best Buy Affiliate, we also earn from qualifying purchases. We’ve chosen these providers not the other way around. Our decisions are based upon their corporate reputation and the quality of their offerings and pricing. Our recommendations regarding technology are reached without regard to financial compensation except in situations in which comparable products at comparable pricing are available from multiple sources. In this limited case, we support our sponsors because our sponsors support us.
BOGO Bonaza: Enjoy state-of-the-art VoIP service with a $10 credit and half-price SIP service on up to $500 of Skyetel trunking with free number porting when you fund your Skyetel account. No limits on number of simultaneous calls. Quadruple data center redundancy. $25 monthly minimum spend required. Tutorial and sign up details are here.
![]() The lynchpin of Incredible PBX 2020 and beyond is ClearlyIP components which bring management of FreePBX modules and SIP phone integration to a level never before available with any other Asterisk distribution. And now you can configure and reconfigure your new Incredible PBX phones from the convenience of the Incredible PBX GUI.
The lynchpin of Incredible PBX 2020 and beyond is ClearlyIP components which bring management of FreePBX modules and SIP phone integration to a level never before available with any other Asterisk distribution. And now you can configure and reconfigure your new Incredible PBX phones from the convenience of the Incredible PBX GUI.
VitalPBX is perhaps the fastest-growing PBX offering based upon Asterisk with an installed presence in more than 100 countries worldwide. VitalPBX has generously provided a customized White Label version of Incredible PBX tailored for use with all Incredible PBX and VitalPBX custom applications. Follow this link for a free test drive!
Special Thanks to Vitelity. Vitelity is now Voyant Communications and has halted new registrations for the time being. Our special thanks to Vitelity for their unwavering financial support over many years and to the many Nerd Vittles readers who continue to enjoy the benefits of their service offerings. We will keep everyone posted on further developments.
Some Recent Nerd Vittles Articles of Interest…
Introducing PIAF2 and Incredible PBX 2.9 with CentOS 6.1

We're pleased to introduce the latest and greatest PBX in a Flash™ 2.0.6.1 featuring CentOS® 6.11 and the brand-new Incredible PBX™ 2.9 with an incomparable VoIP feature set. PIAF2™ provides turnkey installs of Asterisk® 1.8 or 2.0 with your choice of FreePBX® 2.8, 2.9, or 2.10. And, for those choosing to install Incredible PBX 2.9, it's been engineered to work flawlessly with the 32-bit version of PIAF2 using Asterisk 1.8 and FreePBX 2.9. For the ultimate in performance, a 64-bit version of PIAF2 is also available; however, because of its size, a DVD is required to burn the ISO. And, as noted, it is not compatible with Incredible PBX 2.9.
12/17 Update: Shortly after PIAF2 hit the street, Digium released Asterisk 1.8.8.0 and the first non-beta version of Asterisk 10. New 32-bit and 64-bit PIAF 2.0.6.1.2 ISOs will be available on SourceForge today that incorporate these new builds. In addition, a CentOS 6 video quirk has been identified on some Atom hardware. So the new ISOs include an install option to disable the problematic video testing by kicking off the install with one of the following commands instead of merely pressing the Enter key: ks-nomode, ksraid-nomode, or kslvm-nomode. You'll know if you have the problem if your server locks up. 😉 Finally, because there now are multiple stable versions of Asterisk, we have added the option to selectively choose a version of Asterisk to install. Instead of picking PIAF-Purple or PIAF-Red, you can drop down to the Linux command prompt, log in as root, and issue a command using the following syntax: piafdl -p beta_1872_purple.

Free Google Voice calling in the U.S. and Canada has been extended for calendar year 2012 and now can be configured using the simple FreePBX 2.9 GUI. And you can use it with or without Incredible PBX. Set up one or many Google Voice connections in less than 10 seconds per line. With Incredible PBX, we've also included Andrew Nagy's terrific EndPoint Manager that lets you configure dozens of SIP phones with the click of a button. You'll also find Kennonsoft's terrific new PBX in a Flash UI with HTML5 and CSS3 support for the latest Firefox, Chrome, and IE browsers. And, of course, you still get almost every Asterisk application on the planet preconfigured and ready to use.
With PIAF2, the installation process has been streamlined considerably. At the outset, you will be prompted for some basic information and a root password. Once the CentOS 6.1 install completes and you remove the CD/DVD during the server reboot, you will be prompted for whether you wish to tailor Asterisk using menuconfig, your time zone, the version of FreePBX you wish to install, and your master password for FreePBX access. Once you've answered these few questions, you can kick off the PIAF2 install and walk away. Depending upon the performance of your server, come back in 15-30 minutes. While it's not the quickest install on the planet, it will always be the most current because PIAF2 always loads the latest patches to CentOS as well as Asterisk and FreePBX. In other words, it's worth the wait to know you're installing a secure and up-to-date system. And, as your high school girlfriend probably taught you, faster is not always better.
 The Incredible PBX 2.9 Inventory. For those that have never heard of The Incredible PBX, here's the current 2.9 feature set in addition to the base install of PBX in a Flash with the CentOS 6.1, Asterisk 1.8, FreePBX 2.9, and Apache, SendMail, MySQL, PHP, phpMyAdmin, IPtables Linux firewall, Fail2Ban, and WebMin. Cepstral TTS, Faxing, Hamachi VPN, and Mondo Backups are still just one command away and may be installed using the scripts included with base Incredible PBX 2.9 installation.
- Amazon S3 Cloud Computing
- AsteriDex
- Asternic CDR Reports
- Baseball Scores & Schedules
- CallerID Superfecta (FreePBX Module adds Names to CID Numbers)
- SIP Color Videophone Support
- CallWho for Asterisk
- Cepstral TTS for 32-bit, Asterisk 1.8 (/root/nv/install-cepstral)
- Preconfigured Email That Works with SendMail
- PIAF Endpoint Manager
- ENUMPLUS (Use FreePBX to configure)
- Extensions (16 preconfigured with random passwords)
- Festival Server and Festival TTS for Asterisk (festival --server &)
- Flite TTS for Asterisk
- FONmail
- FreePBX Backups
- Google Voice (preconfigured)
- Free Hamachi VPN (install-hamachi)
- Hotel-Style Wakeup Calls (FreePBX Module)
- Incredible Backups... and Restores
- ISN: FreeNum SIP Calling from Any Phone
- MeetMe Conference Bridge (just dial C-O-N-F)
- Mondo Full System Backups (install-diskbackup)
- Incremental Daily Backups (install-dailybackup)
- Munin Reports (install-munin)
- NewsClips from Yahoo
- ODBC Database Support
- New PBX in a Flash Registry (show-registry)
- PogoPlug Cloud Computing
- Reminders by Phone and Web
- SAMBA Windows Networking (configure-samba)
- SIP URI Outbound Calling (call any SIP URI worldwide for free)
- Free Skype Inbound & Outbound Calling (for personal use)
- SMS Messaging with Google Voice
- Stealth AutoAttendant
- TeleYapper
- TFTP Server (setup-tftp)
- Tide Reports with xTide
- Trunk Lister Script (/root/nv/trunks.sh)
- Trunks (Vitelity, Gtalk, SIPgate, IPkall, VoIP.ms, and ENUM)
- Twitter Interface (Make Free Calls and Send SMS Messages)
- Weather by Airport Code
- Weather by ZIP Code
- Worldwide Weather
Update: Incredible Fax is not yet compatible with PIAF2, but we're working on it.
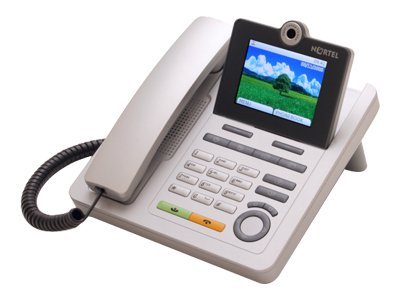
What began as a kludgey, dual-call, dual-provider Google Voice implementation to take advantage of Google's free PSTN calling in the U.S. and Canada with Asterisk 1.4 and 1.6 is now a zippy-quick, Gtalk-based calling platform that rivals the best SIP-to-SIP calls on the planet and provides virtually instantaneous PSTN connections to almost anybody, anywhere. Trust us! Except for the price which is still free, you'll never know you weren't connected via Ma Bell's overpriced long-distance lines and neither will the Little Mrs. And, yes, our recommended $50 Nortel SIP videophone is plug-and-play.
Just download the latest 32-bit PBX in a Flash 2.0.6.1 ISO from SourceForge, burn to then boot from the PIAF2 CD, choose the PIAF-Purple option to load Asterisk 1.8, and pick FreePBX 2.9 when prompted. Once the PIAF2 install is completed, just run the new Incredible PBX 2.9 installer. In less than an hour, you'll have a turnkey PBX with a local phone number and free calling in the U.S. and Canada via your own Google Voice account plus dozens and dozens of terrific Asterisk applications to keep you busy exploring for months.
Thanks to its Zero Internet Footprint™ design, Incredible PBX 2.9 remains the most secure Asterisk-based PBX around. What this means is The Incredible PBX™ has been engineered to sit safely behind a NAT-based, hardware firewall with no port exposure to your actual server. And you won't find a more full-featured Personal Branch Exchange™ at any price.
Did we mention that all of this telephone goodness is still absolutely FREE!
Prerequisites. Here's what we recommend to get started properly:
- Broadband Internet connection
- $200-$300 Atom PC2
- dLink Router/Firewall. Low Cost: $35 WBR-2310 Best: DGL-4500
- Dedicated Google Voice account (not your main Gmail account!)
Installing Incredible PBX 2.9. The installation process is simple and straight-forward. We're down to 3 Easy Steps to Free Calling, and The Incredible PBX will be ready to receive and make free U.S./Canada calls immediately:
1. Install PIAF-Purple & FreePBX 2.9 using 32-bit PIAF2 ISO
2. Download & run Incredible PBX 2.9 installer
3. Configure Google Voice and a softphone or SIP telephone
 Installing PBX in a Flash. Here's a quick tutorial to get PBX in a Flash 2.0 installed. To use Incredible PBX 2.9, just install the latest 32-bit version of PBX in a Flash 2.0. Unlike other Asterisk aggregations, PBX in a Flash utilizes a two-step install process. The ISO only installs the CentOS 6.1 operating system. Once CentOS is installed, the server reboots and downloads a payload file that includes Asterisk, FreePBX, and many other VoIP and Linux utilities including all of the new Google Voice components. Just choose the PIAF-Purple payload to get the latest Asterisk 1.8. You'll then be prompted to choose your flavor of FreePBX. Choose FreePBX 2.9. Then set your time zone and set up a password for FreePBX access, and you're all set. As part of the install, yum now will automatically update your operating system to CentOS 6.2 minus the 6.2 kernel.

You can download the 32-bit PIAF2 from SourceForge. Burn the ISO to a CD. Then boot from the installation CD and press the Enter key to begin.
WARNING: This install will completely erase, repartition, and reformat EVERY DISK (including USB flash drives) connected to your system so disable any disk you wish to preserve AND remove any USB flash drives! Press Ctrl-C to cancel.
At the keyboard prompt, tab to OK and press Enter. At the time zone prompt, tab once, highlight your time zone, tab to OK and press Enter. At the password prompt, make up a VERY secure root password. Type it twice. Tab to OK, press Enter. Get a cup of coffee. Come back in about 5 minutes. When the system has installed CentOS 6.1, it will reboot. Remove the CD promptly. After the reboot, choose PIAF-Purple. In less than a minute, you'll be prompted for the FreePBX version you wish to install. Choose 2.9 and fill in your choices for the remaining prompts. Then have a 15-minute cup of coffee. After installation is complete, the machine will reboot a second time. You now have a PBX in a Flash base install. On a stand-alone machine, it takes 30-60 minutes. On a virtual machine, it takes about half that time. Log into your server with your root password and write down the server's IP address. You'll need it to access FreePBX with your browser.
NOTE: For previous users of PBX in a Flash, be aware that this new version automatically runs update-programs, update-fixes, and passwd-master for you. So your system is relatively secure out of the box! See the Proxmox cautionary alert in the footnotes to this article!
 Configuring Google Voice. You'll need a dedicated Google Voice account to support Incredible PBX 2.9. If you plan to use the inbound fax capabilities of Incredible PBX 2.9, then you'll want an additional Google Voice line that can be routed to the FAX miscellaneous destination using FreePBX. The more obscure the username (with some embedded numbers), the better off you will be. This will keep folks from bombarding you with unsolicited Gtalk chat messages, and who knows what nefarious scheme will be discovered using Google messaging six months from now. So keep this account a secret!
We've tested this extensively using an existing Gmail account, and inbound calling is just not reliable. The reason seems to be that Google always chooses Gmail chat as the inbound call destination if there are multiple registrations from the same IP address. So, be reasonable. Do it our way! Set up a dedicated Gmail and Google Voice account, and use it exclusively with The Incredible PBX. Google Voice no longer is by invitation only so, if you're in the U.S. or have a friend that is, head over to the Google Voice site and register. If you're living on another continent, see MisterQ's posting for some tips on getting set up.
You must choose a telephone number (aka DID) for your new account, or Google Voice calling will not work... in either direction. Google used to permit outbound Gtalk calls using a fake CallerID, but that obviously led to abuse so it's over! You also have to tie your Google Voice account to at least one working phone number as part of the initial setup process. Your cellphone number will work just fine. Don't skip this step either. Just enter the provided 2-digit confirmation code when you tell Google to place the test call to the phone number you entered. Once the number is registered, you can disable it if you'd like in Settings, Voice Setting, Phones. But...
IMPORTANT: Be sure to enable the Google Chat option as one of your phone destinations in Settings, Voice Setting, Phones. That's the destination we need for The Incredible PBX to work its magic! Otherwise, all inbound and outbound calls will fail. If you don't see this option, you may need to call up Gmail and enable Google Chat there first. Then go back to the Google Voice Settings.
While you're still in Google Voice Settings, click on the Calls tab. Make sure your settings match these:
- Call Screening - OFF
- Call Presentation - OFF
- Caller ID (In) - Display Caller's Number
- Caller ID (Out) - Don't Change Anything
- Do Not Disturb - OFF
- Call Options (Enable Recording) - OFF
- Global Spam Filtering - ON
Click Save Changes once you adjust your settings. Under the Voicemail tab, plug in your email address so you get notified of new voicemails. Down the road, receipt of a Google Voice voicemail will be a big hint that something has come unglued on your PBX.
Incredible PBX 2.9 Installation. Log into your server as root and issue the following commands to download and run The Incredible PBX installer:
cd /root
wget http://incrediblepbx.com/incrediblepbx29.x
chmod +x incrediblepbx29.x
./incrediblepbx29.x
When The Incredible PBX install begins, you'll be prompted for your FreePBX maint password. This is required to properly configure CallerID Superfecta for you. Your credentials never leave your server!
Now have another 15-minute cup of coffee, and consider a modest donation to Nerd Vittles... for all of our hard work. 😉 You'll find a link at the top of the page. While you're waiting just make sure that you've heeded our advice and installed your server behind a hardware-based firewall. No ports need to be opened on your firewall to support Incredible PBX. Leave it that way!
One final word of caution is in order regardless of your choice of providers: Do NOT use special characters in any provider passwords, or nothing will work!
Logging in to FreePBX 2.9. Using a web browser, you access the FreePBX GUI by pointing your browser to the IP address of your Incredible PBX. Click on the Users tab. It will change to Admin. Now click the FreePBX button. When prompted for a username, it's maint. When prompted for the password, it's whatever you set up as your maint password when you installed Incredible PBX 2.9. If you forget it, you can always reset it by logging into your server as root and running passwd-master.
Configuring Google Voice Trunks in FreePBX. All trunk configurations now are managed within FreePBX, including Google Voice. This makes it easy to customize your Incredible PBX to meet your specific needs. If you plan to use Google Voice, here's how to quickly configure one or more Google Voice trunks within FreePBX. After logging into FreePBX with your browser, click the Setup tab and choose Google Voice in the Third Party Addons. To Add a new Google Voice account, just fill out the form:

Phone number is your 10-digit Google Voice number. Username is your Google Voice account name without @gmail.com. NOTE: You must use a Gmail.com address in the current version of this module! Password is your Google Voice password. NOTE: Don't use 2-stage password protection in this Google Voice account! Be sure to check all three boxes: Add trunk, Add routes, and Agree to TOS. Then click Submit Changes and reload FreePBX. You can add additional Google Voice numbers by clicking Add GoogleVoice Account option in the right margin and repeating the drill.
While you're still in FreePBX, choose Setup, Extensions, and click on the 701 extension. Write down your extension password which you'll need to configure a phone in a minute.
IMPORTANT LAST STEP: Google Voice will not work unless you restart Asterisk from the Linux command line at this juncture. Using SSH, log into your server as root and issue the following command: amportal restart.
Incredible Fax Installation. If you want the added convenience of having your Incredible PBX double as a free fax machine, run /root/incrediblefax.sh shell script when the Incredible PBX install completes. Plug in your email address for delivery of incoming faxes and enter your home area code when prompted. For every other prompt, just press the Enter key. For complete documentation, see this Nerd Vittles article. Don't forget to REBOOT YOUR SERVER when the install is finished, or faxing won't work!
Also be sure to set up a second, dedicated Google Voice number if you want support for inbound faxing. Once the Google Voice credentials are configured in FreePBX for the additional Google Voice line, simply add an Inbound Route for this DID to point to the FAX misc. destination that comes preconfigured with Incredible PBX 2.9. Just substitute your 10-digit Google Voice number for the DID number shown below. Save your entries and reload FreePBX.

Extension Password Discovery. If you're too lazy to look up your extension 701 password using the FreePBX GUI, you can log into your server as root and issue the following command to obtain the password for extension 701 which we'll need to configure your softphone or color videophone in the next step:
mysql -uroot -ppassw0rd -e"select id,data from asterisk.sip where id='701' and keyword='secret'"
The result will look something like the following where 701 is the extension and 18016 is the randomly-generated extension password exclusively for your Incredible PBX:
+-----+-------+
id data
+-----+-------+
701 18016
+-----+-------+
 Configuring a SIP Phone. There are hundreds of terrific SIP telephones and softphones for Asterisk-based systems. Once you get things humming along, you'll want a real SIP telephone such as the $50 Nortel color videophone we've recommended above. You'll also find lots of additional recommendations on Nerd Vittles and in the PBX in a Flash Forum. If you're like us, we want to make damn sure this stuff works before you shell out any money. So, for today, let's download a terrific (free) softphone to get you started. We recommend X-Lite because there are versions for Windows, Mac, and Linux. So download your favorite from this link. Install and run X-Lite on your Desktop. At the top of the phone, click on the Down Arrow and choose SIP Account Settings, Add. Enter the following information using your actual password for extension 701 and the actual IP address of your Incredible PBX server instead of 192.168.0.251. Click OK when finished. Your softphone should now show: Available.
 Incredible PBX Test Flight. The proof is in the pudding as they say. So let's try two simple tests. First, let's place an outbound call. Using the softphone, dial your 10-digit cellphone number. Google Voice should transparently connect you. Answer the call and make sure you can send and receive voice on both phones. Second, from another phone, call the Google Voice number that you've dedicated to The Incredible PBX. Your softphone should begin ringing shortly. Answer the call, press 1 to accept the call, and then make sure you can send and receive voice on both phones. Hang up. If everything is working, congratulations!
Here's a brief video demonstration showing how to set up a softphone to use with your Incredible PBX, and it also walks you through several of the dozens of Asterisk applications included in your system.
 Solving One-Way Audio Problems. If you experience one-way audio on some of your phone calls, you may need to adjust the settings in /etc/asterisk/sip_custom.conf. Just uncomment the first two lines by removing the semicolons. Then replace 173.15.238.123 with your public IP address, and replace 192.168.0.0 with the subnet address of your private network. There are similar settings in gtalk.conf that can be activated although we've never had to use them. In fact, we've never had to use any of these settings. After making these changes, save the file(s) and restart Asterisk with the command: amportal restart.
Learn First. Explore Second. Even though the installation process has been completed, we strongly recommend you do some reading before you begin your VoIP adventure. VoIP PBX systems have become a favorite target of the hackers and crackers around the world and, unless you have an unlimited bank account, you need to take some time learning where the minefields are in today's VoIP world. Start by reading our Primer on Asterisk Security. We've secured all of your passwords except your root password and your passwd-master password. We're assuming you've put very secure passwords on those accounts as if your phone bill depended upon it. It does! Also read our PBX in a Flash and VPN in a Flash knols. If you're still not asleep, there's loads of additional documentation on the PBX in a Flash documentation web site.
![]() Choosing a VoIP Provider for Redundancy. Nothing beats free when it comes to long distance calls. But nothing lasts forever. And, in the VoIP World, redundancy is dirt cheap. So we strongly recommend you set up another account with Vitelity using our special link below. This gives your PBX a secondary way to communicate with every telephone in the world, and it also gets you a second real phone number for your new system... so that people can call you. Here's how it works. You pay Vitelity a deposit for phone service. They then will bill you $3.99 a month for your new phone number. This $3.99 also covers the cost of unlimited inbound calls (two at a time) delivered to your PBX for the month. For outbound calls, you pay by the minute and the cost is determined by where you're calling. If you're in the U.S., outbound calls to anywhere in the U.S. are a little over a penny a minute. If you change your mind about Vitelity and want a refund of the balance in your account, all you have to do is ask. The trunks for Vitelity already are preconfigured with The Incredible PBX. Just insert your credentials using FreePBX and uncheck the Disable Trunk checkbox. Then add the Vitelity trunk as the third destination for your default outbound route. That's it. Congratulations! You now have a totally redundant phone system.
Choosing a VoIP Provider for Redundancy. Nothing beats free when it comes to long distance calls. But nothing lasts forever. And, in the VoIP World, redundancy is dirt cheap. So we strongly recommend you set up another account with Vitelity using our special link below. This gives your PBX a secondary way to communicate with every telephone in the world, and it also gets you a second real phone number for your new system... so that people can call you. Here's how it works. You pay Vitelity a deposit for phone service. They then will bill you $3.99 a month for your new phone number. This $3.99 also covers the cost of unlimited inbound calls (two at a time) delivered to your PBX for the month. For outbound calls, you pay by the minute and the cost is determined by where you're calling. If you're in the U.S., outbound calls to anywhere in the U.S. are a little over a penny a minute. If you change your mind about Vitelity and want a refund of the balance in your account, all you have to do is ask. The trunks for Vitelity already are preconfigured with The Incredible PBX. Just insert your credentials using FreePBX and uncheck the Disable Trunk checkbox. Then add the Vitelity trunk as the third destination for your default outbound route. That's it. Congratulations! You now have a totally redundant phone system.
We've also included Trunk configurations for a dozen of our favorite hosting providers to get you started. You can sign up for service with any of them, insert your credentials in the existing trunk, uncheck the Disable Trunk checkbox, and then adjust your outbound route and add an inbound route for your new DID (if you get one).

Stealth AutoAttendant. When incoming calls arrive, the caller is greeted with a welcoming message from Allison which says something like "Thanks for calling. Please hold a moment while I locate someone to take your call." To the caller, it's merely a greeting. To those "in the know," it's actually an AutoAttendant (aka IVR system) that gives you the opportunity to press a button during the message to trigger the running of some application on your Incredible PBX. As configured, the only option that works is 0 which fires up the Nerd Vittles Apps IVR. It's quite easy to add additional features such as voicemail retrieval or DISA for outbound calling. Just edit the MainIVR option in FreePBX under Setup, IVR. Keep in mind that anyone (anywhere in the world) can choose these options. So be extremely careful not to expose your system to security vulnerabilities by making certain that any options you add have very secure passwords! It's your phone bill. 😉
Configuring Email. You're going to want to be notified when updates are available for FreePBX, and you may also want notifications when new voicemails arrive. Everything already is set up for you except actually entering your email notification address. Using a web browser, open the FreePBX GUI by pointing your browser to the IP address of your Incredible PBX. Then click Administration and choose FreePBX. To set your email address for FreePBX updates, go to Setup, General Settings and scroll to the bottom of the screen. To configure emails to notify you of incoming voicemails, go to Setup, Extensions, 701 and scroll to the bottom of the screen. Then follow your nose. Be sure to reload FreePBX when prompted after saving your changes.
A Word About Security. Security matters to us, and it should matter to you. Not only is the safety of your system at stake but also your wallet and the safety of other folks' systems. Our only means of contacting you with security updates is through the RSS Feed that we maintain for the PBX in a Flash project. This feed is prominently displayed in the web GUI which you can access with any browser pointed to the IP address of your server. Check It Daily! Or add our RSS Feed to your favorite RSS Reader. We also recommend you follow @NerdUno on Twitter. We'll keep you entertained and provide immediate notification of security problems that we hear about. Be safe!
Enabling Google Voicemail. Some have requested a way to retain Google's voicemail system for unanswered calls in lieu of using Asterisk voicemail. The advantage is that Google offers a free transcription service for voicemail messages. To activate this, you'll need to edit the [googlein] context in extensions_custom.conf in /etc/asterisk. Just modify the last four lines in the context so that they look like this and then restart Asterisk: amportal restart
;exten => s,n(regcall),Answer
;exten => s,n,SendDTMF(1)
exten => s,n(regcall),Set(DIAL_OPTIONS=${DIAL_OPTIONS}aD(:1))
exten => s,n,Goto(from-trunk,gv-incoming,1)
Kicking the Tires. OK. That's enough tutorial for today. Let's play. Using your new softphone, begin your adventure by dialing these extensions:
- D-E-M-O - Incredible PBX Demo (running on your PBX)
- 1234*1061 - Nerd Vittles Demo via ISN FreeNum connection to NV
- 17476009082*1089 - Nerd Vittles Demo via ISN to Google/Gizmo5
- Z-I-P - Enter a five digit zip code for any U.S. weather report
- 6-1-1 - Enter a 3-character airport code for any U.S. weather report
- 5-1-1 - Get the latest news and sports headlines from Yahoo News
- T-I-D-E - Get today's tides and lunar schedule for any U.S. port
- F-A-X - Send a fax to an email address of your choice
- 4-1-2 - 3-character phonebook lookup/dialer with AsteriDex
- M-A-I-L - Record a message and deliver it to any email address
- C-O-N-F - Set up a MeetMe Conference on the fly
- 1-2-3 - Schedule regular/recurring reminder (PW: 12345678)
- 2-2-2 - ODBC/Timeclock Lookup Demo (Empl No: 12345)
- 2-2-3 - ODBC/AsteriDex Lookup Demo (Code: AME)
- Dial *68 - Schedule a hotel-style wakeup call from any extension
- 1061*1061 - PIAF Support Conference Bridge (Conf#: 1061)
- 882*1061 - VoIP Users Conference every Friday at Noon (EST)

PBX in a Flash SQLite Registry. Last, but not least, we want to introduce you to the new PBX in a Flash Registry which uses SQLite, a zero-configuration SQL-compatible database engine. After logging into your server as root, just type show-registry for a listing of all of the applications, versions, and install dates of everything on your new server. Choosing the A option will generate registry.txt in the /root folder while the other options will let you review the applications by category on the screen. For example, the G option displays all of The Incredible PBX add-ons that have been installed. Here's the complete list of options:
- A - Write the contents of the registry to registry.txt
- B - PBX in a Flash install details
- C - Extra programs install details
- D - Update-fixes status and details
- E - RPM install details
- F - FreePBX modules install details
- G - Incredible PBX install details
- Q - Quit this program
And here's a sample from an install we recently completed.
 Special Thanks. It's hard to know where to start in expressing our gratitude for all of the participants that made today's incredibly simple-to-use product possible. To Philippe Sultan and the rest of the Asterisk development team, thank you for finally making Jabber jabber with Asterisk. To Leif Madsen, our special thanks for your early pioneering work with Gtalk and Jabber which got this ball rolling. To Philippe Lindheimer, Tony Lewis, and the rest of the FreePBX development team, thanks for FreePBX 2.9 which really makes Asterisk shine. To Lefteris Zafiris, thank you for making Flite work with Asterisk 1.8 thereby preserving all of the Nerd Vittles text-to-speech applications. To Darren Sessions, thanks for whipping app_swift into shape and restoring Cepstral and commercial TTS applications to the land of the living with Asterisk 1.8. And to our pal, Tom King, we couldn't have done it without you. You rolled up your sleeves and really made CentOS 6 and Asterisk 1.8 and 10 sit up and bark. No one will quite understand what an endeavor that is until they try it themselves. You won't find another CentOS 6 implementation of Asterisk, and Tom has made it look incredibly easy. It wasn't! In fact, when CentOS released 6.1 this week, Tom actually shifted gears (again) and rebuilt PIAF2 (in a couple of days) to take advantage of CentOS 6.1. And, last but not least, to our dozens of beta testers, THANK YOU! We've implemented almost all of your suggestions.
 Additional Goodies. Be sure to log into your server as root and look through the scripts added in the /root and /root/nv folders. You'll find all sorts of goodies to keep you busy. There's an all-new incrediblefax.sh script that painlessly installs and configures HylaFax and AvantFax for state-of-the-art faxing. The 32-bit install-cepstral script does just what it says. With Allison's Cepstral voice, you'll have the best TTS implementation for Asterisk available. ipscan is a little shell script that will tell you every working IP device on your LAN. trunks.sh tells you all of the Asterisk trunks configured on your system. purgeCIDcache.sh will clean out the CallerID cache in the Asterisk database. convert2gsm.sh shows you how to convert a .wav file to .gsm. munin.pbx will install Munin on your system while awstats.pbx installs AWstats. s3cmd.faq tells you how to quickly activate the Amazon S3 Cloud Computing service. All the other scripts and apps in /root/nv already have been installed for you so don't install them again.
If you've heeded our advice and purchased a PogoPlug, you can link to your home-grown cloud as well. Just add your credentials to /root/pogo-start.sh. Then run the script to enable the PogoPlug Cloud on your server. All of your cloud resources are instantly accessible in /mnt/pogoplug. It's perfect for off-site backups and is included as one of the backup options in the PBX in a Flash backup utilities.
 Don't forget to List Yourself in Directory Assistance so everyone can find you by dialing 411. And add your new number to the Do Not Call Registry to block telemarketing calls. Or just call 888-382-1222 from your new number. Enjoy!
Originally published: Thursday, December 15, 2011
VoIP Virtualization with Incredible PBX: OpenVZ and Cloud Solutions
Safely Interconnecting Asterisk Servers for Free Calling
Adding Skype to The Incredible PBX
Adding Incredible Fax to The Incredible PBX
Adding Incredible Backup... and Restore to The Incredible PBX
Adding Remotes, Preserving Security with The Incredible PBX
Remote Phone Meets Travelin' Man with The Incredible PBX
Support Issues. With any application as sophisticated as this one, you're bound to have questions. Blog comments are a terrible place to handle support issues although we welcome general comments about our articles and software. If you have particular support issues, we encourage you to get actively involved in the PBX in a Flash Forums. It's the best Asterisk tech support site in the business, and it's all free! We maintain a thread with Information, Patches and Bug Fixes for Incredible PBX 2.9. Please have a look. Unlike some forums, ours is extremely friendly and is supported by literally hundreds of Asterisk gurus and thousands of ordinary users just like you. You won't have to wait long for an answer to your question.
Need help with Asterisk? Visit the PBX in a Flash Forum.
Or Try the New, Free PBX in a Flash Conference Bridge.
whos.amung.us If you're wondering what your fellow man is reading on Nerd Vittles these days, wonder no more. Visit our new whos.amung.us statistical web site and check out what's happening. It's a terrific resource both for us and for you.
Special Thanks to Our Generous Sponsors
FULL DISCLOSURE: ClearlyIP, Skyetel, Vitelity, DigitalOcean, Vultr, VoIP.ms, 3CX, Sangoma, TelecomsXchange and VitalPBX have provided financial support to Nerd Vittles and our open source projects through advertising, referral revenue, and/or merchandise. As an Amazon Associate and Best Buy Affiliate, we also earn from qualifying purchases. We’ve chosen these providers not the other way around. Our decisions are based upon their corporate reputation and the quality of their offerings and pricing. Our recommendations regarding technology are reached without regard to financial compensation except in situations in which comparable products at comparable pricing are available from multiple sources. In this limited case, we support our sponsors because our sponsors support us.
BOGO Bonaza: Enjoy state-of-the-art VoIP service with a $10 credit and half-price SIP service on up to $500 of Skyetel trunking with free number porting when you fund your Skyetel account. No limits on number of simultaneous calls. Quadruple data center redundancy. $25 monthly minimum spend required. Tutorial and sign up details are here.
![]() The lynchpin of Incredible PBX 2020 and beyond is ClearlyIP components which bring management of FreePBX modules and SIP phone integration to a level never before available with any other Asterisk distribution. And now you can configure and reconfigure your new Incredible PBX phones from the convenience of the Incredible PBX GUI.
The lynchpin of Incredible PBX 2020 and beyond is ClearlyIP components which bring management of FreePBX modules and SIP phone integration to a level never before available with any other Asterisk distribution. And now you can configure and reconfigure your new Incredible PBX phones from the convenience of the Incredible PBX GUI.
VitalPBX is perhaps the fastest-growing PBX offering based upon Asterisk with an installed presence in more than 100 countries worldwide. VitalPBX has generously provided a customized White Label version of Incredible PBX tailored for use with all Incredible PBX and VitalPBX custom applications. Follow this link for a free test drive!
Special Thanks to Vitelity. Vitelity is now Voyant Communications and has halted new registrations for the time being. Our special thanks to Vitelity for their unwavering financial support over many years and to the many Nerd Vittles readers who continue to enjoy the benefits of their service offerings. We will keep everyone posted on further developments.
Some Recent Nerd Vittles Articles of Interest...
- As part of the yum update process, you'll actually end up with CentOS 6.2 minus the 6.2 kernel. [↩]
- If you use the recommended Acer Aspire Revo, be advised that it does NOT include a CD/DVD drive. You will need an external USB CD/DVD drive to load the software. Some of these work with CentOS, and some don't. Most HP and Sony drives work; however, we strongly recommend you purchase an external DVD drive from a merchant that will accept returns, e.g. Best Buy, WalMart, Office Depot, Office Max, Staples. You also can run Incredible PBX 2.9 on a virtual machine such as the free Proxmox server. A security vulnerability has been reported in the Proxmox browser so be sure to run your server behind a secure, hardware-based firewall with no port exposure to the actual Proxmox server from the Internet. [↩]
The Ultimate VoIP Sandbox: PBX in a Flash 2 with CentOS 6
Today we're delighted to introduce the new PBX in a Flash 2™ beta built atop the latest release of CentOS® 6. Featuring superior scalability, improved performance, better resource management, and unmatched device support, PBX in a Flash 2.0.6.0 brings you the most versatile Asterisk® platform on the planet with the latest and greatest releases of virtually every major open source product in the marketplace. In addition to providing your choice of Asterisk 1.8 versions or Asterisk 10, PIAF2™ also gives you a choice of FreePBX® 2.8, 2.9, or 2.10. For those wanting to experiment, PIAF2 also provides direct access to Asterisk's menuconfig system to customize the selection of Asterisk modules you wish to deploy. And, of course, PIAF2 continues to provide the only turnkey Google Voice solution providing immediate free calling throughout the U.S. and Canada. We'll walk you through the 2-minute drill to deploy Google Voice for inbound and outbound calling with FreePBX. Incredible PBX is not yet compatible!
NEWS FLASH: Looks like free Google Voice calling in the U.S. and Canada will be continued for 2012. See our Google+ post for details.

[iframe-popup id="6"]
Our special tip of the hat again goes to Tom King, who has spent the better part of four months integrating PIAF2 into the new CentOS 6 release. To suggest that this was not a job for mere mortals doesn't begin to paint the picture of this long and winding road. The good news is we think you'll be delighted with the results. The PBX in a Flash install process now has been streamlined into three distinct components. After downloading the ISO and burning a DVD to install your new server, here's how it works. First, you get to choose the file system for your new CentOS server. The PIAF2 installer will whir away for about 15 minutes installing CentOS6. When your system reboots, remove the DVD and Phase 2 begins. Here you get to choose your flavor of Asterisk to deploy. We continue to recommend PIAF2-Purple as the stable product for all but pioneers. Within a minute or so, your chosen Asterisk installer will load. In Phase 3 (the Config Module), you pick your flavor of FreePBX and choose a password for access, set your time zone, and decide whether you want to further customize Asterisk using menuconfig. Once you've made your selections, everything else installs on autopilot unless you opted to use menuconfig. If so, come back in 15 minutes and tailor away. Then press x to save your settings and finish the install. Depending on the speed of your server or virtual machine, the complete install usually takes 30-60 minutes.
After the final reboot, you'll have a working PIAF2 server. Open up FreePBX with a browser, enter your Google Voice credentials, create an extension, link an inbound route to that extension to accept calls, restart Asterisk from the command prompt, and you'll have a fully operational PBX in less than 2 minutes.
PIAF2 in the Cloud. We've been experimenting with several new (free) Cloud storage offerings. Because of the enormous size of the new ISO (1.79 GB), we've decided to host the PIAF2 beta ISO with two of these cloud providers in addition to some of our regular mirrors. This will let you judge the spectacular download performance of these new cloud offerings for yourself. Incidentally, you can sign up for your own free cloud storage at both sites. Our favorite is minus.com which offers 10GB of free cloud storage for life plus an extra gigabyte for you and for the PIAF Dev Team when you use our special signup link. You've got nothing to lose, and it helps the PBX in a Flash project as well. The other free offering is from one of our old favorites, PogoPlug. Just visit their site and grab your 5GB of free storage. Just a footnote that C|NET was offering 10GB of free PogoPlug storage last week, but you missed the window unless you're a PIAF Forum regular. HINT!
Creating a PIAF2 DVD. To get started, download the 1.79GB PIAF2 ISO. The MD5 checksum for the 32-bit ISO is 13d9302ef408feae726c2ca2b2c42a7c. The 64-bit MD5 is 3e7264e27099e35b631e7c7acca65c95. Here are the current download links.
Special Note: Upcoming Incredible PBX 2.9 only works with 32-bit ISO using PIAF-Purple (Asterisk 1.8) and FreePBX 2.9.
Minus Cloud (32-bit): Folder or ISO or Wget Link
Minus Cloud (64-bit): Folder or ISO or Wget Link
PogoPlug Cloud: Folder or 32-bit ISO
Google Cloud: Folder or 32-bit ISO
Vitelity: 32-bit ISO Download Link
SourceForge: Folder or 32-bit ISO or 64-bit ISO
Once you have the ISO image in hand, the next step is to burn the ISO image to a DVD. If you've never done it before, here's a tutorial that will show you how on either a Windows machine or a Mac.
Using PIAF2 with Proxmox. For those using Proxmox to host PIAF2 virtual machines, the easiest approach is to log into your server as root, change to the /var/lib/vz/template/iso directory, and issue a wget command using the Wget Link above. Once the download completes, don't forget to rename the ISO to pbxinaflash20601-i386.iso. The naming convention really matters with Proxmox! In building KVM virtual machines with Proxmox, you'll need to allocate at least 768MB of RAM (1024MB recommended) for each image. CentOS 6 has a much larger memory footprint than CentOS 5. Reminder: Be sure Proxmox is sitting behind a secure hardware-based firewall. It is NOT secure on the open Internet!
Atom-based PC Platform. Unless you're using PIAF2 on a virtual hosting platform, you'll need a dedicated PC. For the least expensive hardware alternative, pick up an Atom-based PC. We previously have recommended against an EEE PC because of the network driver incompatibility with CentOS 5. We'll have to leave it to the pioneers to tell us whether this still applies with CentOS 6. We do know that the refurbished Acer desktops work fine. Someone has actually tested them! And they can easily support a small business with dozens of phones.

FreePBX Setup. After the PIAF2 install finishes, your server will reboot once again. Log into the Linux CLI as root using your root password. Write down the IP address of your server from the status display and verify that everything installed properly. Note that Samba is disabled by default. If you want to use it for Windows Networking, run configure-samba once your server is up and running.
Most of your life with PBX in a Flash will be spent using the FreePBX web GUI and your favorite browser. The PIAF Web GUI (shown above) is undergoing some upgrades to assure compatibility with the new PHP release. If you point a browser to the IP address of your server and see no icons or RSS Feed (as shown above), then apply the update patch below.
Update: Here's the two-line patch to address the PHP 5.3 change in behavior. The PHP opening tag syntax of <? is no longer allowed by default. To force PHP 5.3 to conform to the prior (permissible) syntax, log into your server as root and issue the following two commands:
sed -i 's|short_open_tag = Off|short_open_tag = On|' /etc/php.ini
service httpd restart
This restores the PIAF GUI to its former operation. Be sure to check the RSS Feed daily by pointing your browser to the IP address of your server. The RSS Feed is displayed in the left column of the GUI and will alert you to any newly discovered security vulnerabilities.

You also can access the FreePBX GUI directly by pointing your browser to the IP address of your PIAF2 server: http://ipaddress/admin. When prompted for your username and password, the username is maint. The password will be the FreePBX master password you chose in Phase 3 of the PIAF install. Because of the PHP 5.3 issues mentioned above, we recommend FreePBX 2.9 which already is compatible with this new release.

To get a minimal system functioning to make and receive calls, here's the 2-minute drill. You'll need to set up at least one extension with voicemail and configure a free Google Voice account for free calls in the U.S. and Canada. Next, configure inbound and outbound routes to manage incoming and outgoing calls. Finally, add a phone with your extension credentials, and you're done.
A Word About Security. PBX in a Flash has been engineered to run on a server sitting safely behind a hardware-based firewall with NO port exposure from the Internet. Leave it that way! It's your wallet and phone bill that are at stake.
Extension Setup. Now let's set up an extension to get you started. A good rule of thumb for systems with less than 50 extensions is to reserve the IP addresses from 192.x.x.201 to 192.x.x.250 for your phones. Then you can create extension numbers in FreePBX to match those IP addresses. This makes it easy to identify which phone on your system goes with which IP address and makes it easy for end-users to access the phone's GUI to add bells and whistles. To create extension 201 (don't start with 200), click Setup, Extensions, Generic SIP Device, Submit. Then fill in the following blanks USING VERY SECURE PASSWORDS and leaving the defaults in the other fields for the time being.
User Extension ... 201
Display Name ... Home
Outbound CID ... [your 10-digit phone number if you have one; otherwise, leave blank]
Emergency CID ... [your 10-digit phone number for 911 ID if you have one; otherwise, leave blank]Device Options
secret ... 1299864Xyz [make this unique AND secure!]
dtmfmode ... rfc2833
Voicemail & Directory ... Enabled
voicemail password ... 14332 [make this unique AND secure!]
email address ... yourname@yourdomain.com [if you want voicemail messages emailed to you]
pager email address ... yourname@yourdomain.com [if you want to be paged when voicemail messages arrive]
email attachment ... yes [if you want the voicemail message included in the email message]
play CID ... yes [if you want the CallerID played when you retrieve a message]
play envelope ... yes [if you want the date/time of the message played before the message is read to you]
delete Vmail ... yes [if you want the voicemail message deleted after it's emailed to you]
vm options ... callback=from-internal [to enable automatic callbacks by pressing 3,2 after playing a voicemail message]
vm context ... default
Write down the passwords. You'll need them to configure your SIP phone.
Extension Security. We cannot overstress the need to make your extension passwords secure. All the firewalls in the world won't protect you from malicious phone calls on your nickel if you use your extension number or something like 1234 for your extension password if your SIP or IAX ports happen to be exposed to the Internet.
In addition to making up secure passwords, the latest versions of FreePBX also let you define the IP address or subnet that can access each of your extensions. Use it!!! Once the extensions are created, edit each one and modify the permit field to specify the actual IP address or subnet of each phone on your system. A specific IP address entry should look like this: 192.168.1.142/255.255.255.255. If most of your phones are on a private LAN, you may prefer to use a subnet entry in the permit field like this: 192.168.1.0/255.255.255.0 using your actual subnet.

Adding a Google Voice Trunk. There are lots of trunk providers, and one of the real beauties of having your own PBX is that you don't have to put all of your eggs in the same basket... unlike the AT&T days. We would encourage you to take advantage of this flexibility. With most providers, you don't pay anything except when you actually use their service so you have nothing to lose.
For today, we're going to take advantage of Google's current offer of free calling in the U.S. and Canada through the end of this year. You also get a free phone number in your choice of area codes. PBX in a Flash now installs a Google Voice module for FreePBX that lets you set up your Google Voice account with PBX in a Flash in just a few seconds once you have your credentials.
Signing Up for Google Voice. You'll need a dedicated Google Voice account to support PBX in a Flash. The more obscure the username (with some embedded numbers), the better off you will be. This will keep folks from bombarding you with unsolicited Gtalk chat messages, and who knows what nefarious scheme will be discovered using Google messaging six months from now. So keep this account a secret!
We've tested this extensively using an existing Gmail account rather than creating a separate account. Take our word for it. Inbound calling is just not reliable. The reason seems to be that Google always chooses Gmail chat as the inbound call destination if there are multiple registrations from the same IP address. So... set up a dedicated Gmail and Google Voice account, and use it exclusively with PBX in a Flash. Google Voice no longer is by invitation only. If you're in the U.S. or have a friend that is, head over to the Google Voice site and register. If you're living on another continent, see MisterQ's posting for some tips on getting set up.
You must choose a telephone number (aka DID) for your new account, or Google Voice calling will not work... in either direction. You also have to tie your Google Voice account to at least one working phone number as part of the initial setup process. Your cellphone number will work just fine. Don't skip this step either. Just enter the provided confirmation code when you tell Google to place the test call to the phone number you entered. Once the number is registered, you can disable it if you'd like in Settings, Voice Setting, Phones. But...
IMPORTANT: Be sure to enable the Google Chat option as one of your phone destinations in Settings, Voice Setting, Phones. That's the destination we need for PBX in a Flash to function with Google Voice! Otherwise, inbound and/or outbound calls will fail. If you don't see this option, you may need to call up Gmail and enable Google Chat there first. Then go back to the Google Voice Settings and enable it. Be sure to try one call each way from Google Chat in Gmail. Then disable Google Chat in GMail for this account. Otherwise, it won't work with PIAF.
While you're still in Google Voice Settings, click on the Calls tab. Make sure your settings match these:
- Call Screening - OFF
- Call Presentation - OFF
- Caller ID (In) - Display Caller's Number
- Caller ID (Out) - Don't Change Anything
- Do Not Disturb - OFF
- Call Options (Enable Recording) - OFF
- Global Spam Filtering - ON
Click Save Changes once you adjust your settings. Under the Voicemail tab, plug in your email address so you get notified of new voicemails. Down the road, receipt of a Google Voice voicemail will be a big hint that something has come unglued on your PBX.
Configuring Google Voice Trunk in FreePBX. All trunk configurations now are managed within FreePBX, including Google Voice. This makes it easy to customize PBX in a Flash to meet your specific needs. Click the Setup tab and choose Google Voice in the Third Party Addons. To Add a new Google Voice account, just fill out the form:
Phone number is your 10-digit Google Voice number. Username is your Google Voice account name without @gmail.com. NOTE: You must use a Gmail.com address in the current version of this module! Password is your Google Voice password. NOTE: Don't use 2-stage password protection in this Google Voice account! Be sure to check all three boxes: Add trunk, Add routes, and Agree to TOS. Then click Submit Changes and reload FreePBX. Down the road, you can add additional Google Voice numbers by clicking Add GoogleVoice Account option in the right margin and repeating the drill. For Google Apps support, see this post on the PIAF Forum.
Outbound Routes. The idea behind multiple outbound routes is to save money. Some providers are cheaper to some places than others. It also provides redundancy which costs you nothing if you don't use the backup providers. The Google Voice module actually configures an Outbound Route for 10-digit Google Voice calling as part of the automatic setup. If this meets your requirements, then you can skip this step for today.
Inbound Routes. An Inbound Route tells PBX in a Flash how to route incoming calls. The idea here is that you can have multiple DIDs (phone numbers) that get routed to different extensions or ring groups or departments. For today, we'll build a simple route that directs your Google Voice calls to extension 201. Choose Inbound Routes, leave all of the settings at their default values except enter your 10-digit Google Voice number in the DID Number field. Enable CallerID lookups by choosing CallerID Superfecta in the CID Lookup Source pulldown. Then move to the Set Destination section and choose Extensions in the left pull-down and 201 in the extension pull-down. Now click Submit and save your changes. That will assure that incoming Google Voice calls are routed to extension 201.
IMPORTANT: Before Google Voice calling will actually work, you must restart Asterisk from the Linux command line interface. Log into your server as root and issue this command: amportal restart.
General Settings. Last, but not least, we need to enter an email address for you so that you are notified when new FreePBX updates are released. Scroll to the bottom of the General Settings screen after selecting it from the left panel. Plug in your email address, click Submit, and save your changes. Done!
Adding Plain Old Phones. Before your new PBX will be of much use, you're going to need something to make and receive calls, i.e. a telephone. For today, you've got several choices: a POTS phone, a softphone, or a SIP phone. Option #1 and the best home solution is to use a Plain Old Telephone or your favorite cordless phone set (with 8-10 extensions) if you purchase a little device known as a Sipura SPA-3102. It's under $70. Be sure you specify that you want an unlocked device, meaning it doesn't force you to use a particular service provider. This device also supports connection of your PBX to a standard office or home phone line as well as a telephone.
Configuring a SIP Phone. There are hundreds of terrific SIP telephones and softphones for Asterisk-based systems. Once you get things humming along, you'll want a real SIP telephone such as the $50 Nortel color videophone we've recommended previously. You'll also find lots of additional recommendations on Nerd Vittles and in the PBX in a Flash Forum. If you're like us, we want to make damn sure this stuff works before you shell out any money. So, for today, let's download a terrific (free) softphone to get you started. We recommend X-Lite because there are versions for Windows, Mac, and Linux. So download your favorite from this link. Install and run X-Lite on your Desktop. At the top of the phone, click on the Down Arrow and choose SIP Account Settings, Add. Enter the following information using 201 for your extension and your actual password for extension 201. Then plug in the actual IP address of your PBX in a Flash server instead of 192.168.0.251. Click OK when finished. Your softphone should now show: Available.
Enabling Google Voicemail. Some have requested a way to retain Google's voicemail system for unanswered calls in lieu of using Asterisk voicemail. The advantage is that Google offers a free transcription service for voicemail messages. To activate this, you'll need to edit the [googlein] context in extensions_custom.conf in /etc/asterisk. Just modify the last four lines in the context so that they look like this and then restart Asterisk: amportal restart
;exten => s,n(regcall),Answer
;exten => s,n,SendDTMF(1)
exten => s,n(regcall),Set(DIAL_OPTIONS=${DIAL_OPTIONS}aD(:1))
exten => s,n,Goto(from-trunk,gv-incoming,1)
But I Don't Want to Use Google Voice. If you'd prefer not to use Google Voice at all with PBX in a Flash, that's okay, too. Here's how to disable it and avoid the chatter in the Asterisk CLI. Log into your server as root and edit /etc/asterisk/modules.conf. Change the first three lines in the [modules] context so that they look like this. Then restart Asterisk: amportal restart.
autoload=yes
noload => res_jabber.so
noload => chan_gtalk.so
Incredible PBX. Just a cautionary note that Incredible PBX 2 was not designed for use with CentOS 6. Don't try it! Give us a few weeks to make some needed adjustments, and we'll let you know when it is safe to have a go at it.

A Final Word About Beta Software. We take great pride in our software. Before it reaches beta stage, you can rest assured that it's not only been tested, but it actually works. That doesn't mean it's bug free. You can help enormously by reporting bugs. Just leave a comment here, or log into the PIAF Forum and let us know about any issues you encounter. We hope you're as thrilled with this new release as we are. Happy Thanksgiving!
Originally published: Monday, November 21, 2011
Need help with Asterisk? Visit the PBX in a Flash Forum.
Or Try the New, Free PBX in a Flash Conference Bridge.
whos.amung.us If you're wondering what your fellow man is reading on Nerd Vittles these days, wonder no more. Visit our new whos.amung.us statistical web site and check out what's happening. It's a terrific resource both for us and for you.
Special Thanks to Our Generous Sponsors
FULL DISCLOSURE: ClearlyIP, Skyetel, Vitelity, DigitalOcean, Vultr, VoIP.ms, 3CX, Sangoma, TelecomsXchange and VitalPBX have provided financial support to Nerd Vittles and our open source projects through advertising, referral revenue, and/or merchandise. As an Amazon Associate and Best Buy Affiliate, we also earn from qualifying purchases. We’ve chosen these providers not the other way around. Our decisions are based upon their corporate reputation and the quality of their offerings and pricing. Our recommendations regarding technology are reached without regard to financial compensation except in situations in which comparable products at comparable pricing are available from multiple sources. In this limited case, we support our sponsors because our sponsors support us.
BOGO Bonaza: Enjoy state-of-the-art VoIP service with a $10 credit and half-price SIP service on up to $500 of Skyetel trunking with free number porting when you fund your Skyetel account. No limits on number of simultaneous calls. Quadruple data center redundancy. $25 monthly minimum spend required. Tutorial and sign up details are here.
![]() The lynchpin of Incredible PBX 2020 and beyond is ClearlyIP components which bring management of FreePBX modules and SIP phone integration to a level never before available with any other Asterisk distribution. And now you can configure and reconfigure your new Incredible PBX phones from the convenience of the Incredible PBX GUI.
The lynchpin of Incredible PBX 2020 and beyond is ClearlyIP components which bring management of FreePBX modules and SIP phone integration to a level never before available with any other Asterisk distribution. And now you can configure and reconfigure your new Incredible PBX phones from the convenience of the Incredible PBX GUI.
VitalPBX is perhaps the fastest-growing PBX offering based upon Asterisk with an installed presence in more than 100 countries worldwide. VitalPBX has generously provided a customized White Label version of Incredible PBX tailored for use with all Incredible PBX and VitalPBX custom applications. Follow this link for a free test drive!
Special Thanks to Vitelity. Vitelity is now Voyant Communications and has halted new registrations for the time being. Our special thanks to Vitelity for their unwavering financial support over many years and to the many Nerd Vittles readers who continue to enjoy the benefits of their service offerings. We will keep everyone posted on further developments.
Some Recent Nerd Vittles Articles of Interest...
Introducing Phone Genie for Asterisk (Email Edition)
 Almost two years ago, we introduced Phone Genie for Asterisk®. It let you reconfigure your Asterisk system remotely using your favorite web browser. This included the ability to set and adjust call forwarding, call waiting, and Do Not Disturb for any Asterisk extension. In addition, you could enter Asterisk CLI commands and execute a number of Linux system commands, all from the convenience of your web browser. Phone Genie for Asterisk remains one of the all-time favorite downloads of our readers.
Unfortunately, you don't always have access to a web browser when you're away from your Asterisk server. So today we introduce the perfect complement to the original Phone Genie with our new Email Edition. By following this quick tutorial, you can configure your Asterisk server to respond to any Asterisk CLI command which can be sent from almost any email client on the planet. And we'll perform all this magic with less than a dozen lines of bash scripting. Asterisk CLI commands have almost limitless possibilities. Use Phone Genie to check the status or change the functionality of just about any component on your server.
How It Works. The best way to explain how all of this works is to use a simple example. Let's assume you've left home and forgot to transfer your inbound calls for extension 701 to your cellphone. What we'll do is send a simple email message to a special user account on your Asterisk server that we've set up specifically to handle email directives for your server. Unlike most email addresses, we want this one to be unintuitive so strangers aren't sending messages to your server all the time. Let's assume the address is kxt1498@myserver.dyndns.org for this example. Using any email client, just address a message to that account. For the subject of the message, we'll use the following:
Asterisk: database put CF 701 6781234567
It doesn't really matter whether you include a message with the email. As long as the subject of the email is in the proper form, that's all that matters. The command above activates call forwarding for extension 701 and sends the calls to 6781234567. The command uses standard Asterisk CLI syntax.
On your Asterisk server, we'll have a simple bash script that runs every minute or two to check for new emails in the kxt1498 user's mailbox. If it finds a new message, it will parse the subject line, make certain there is a password match, and then send the command (unaltered) to the Asterisk Command Line Interface for processing. Here's an overview of all the CLI commands. The results of executing the command will be emailed to the address you've configured in the script. This works as both confirmation that your command has been executed and a security alert that your Asterisk system has been accessed using the Email Edition of Phone Genie. In the above example, you would receive an email at the address you've configured in the script with a subject of PhoneGenie. The body of the email would look like this:
Updated database successfully...database put CF 701 6781234567
Prerequisites. This software assumes you are using one of the Asterisk aggregations built on CentOS 5. We've tested it with PBX in a Flash. You'll also need an SMTP server (SendMail or Postfix) that is configured to send and receive emails to and from destinations on the Internet. You do not need a POP3 or IMAP mail server! We've tested this with Asterisk 1.4, but it should work fine with Asterisk 1.6 as well. FreePBX 2.5 or later is required for some functions.
Security Warning. Before we begin, let's pause for a moment to review the enormity of your problems if you do this wrong and to remind you that YOU ARE PROCEEDING AT YOUR OWN RISK. PBX in a Flash in particular is shipped with all outside access to your SMTP server blocked. We've obviously got to remove that layer of security for this software to function properly. But you need to be especially careful with SMTP servers because they can be used to relay SPAM to the entire world if you fiddle with settings that you don't understand. So... DON'T MAKE IMPROVEMENTS THAT AREN'T COVERED HERE UNLESS YOU KNOW WHAT YOU'RE DOING!
This software also gives certain email messages elevated privileges on your Asterisk server so that Asterisk itself can be reconfigured. If you compromise the email account name and password for this application, anybody worldwide can pretty much destroy the functionality of your server. In addition, calls to a certain extension could be rerouted to a very expensive destination on a cruise ship sailing around the world. If your dialplan permitted these calls and you had an account with automatic replenishment from a credit card or bank account, you've got a very expensive problem on your hands. That's one reason that reliable email notification of every Phone Genie transaction is critically important. If you're not getting timely notifications of each Phone Genie transaction, DO NOT USE THIS SOFTWARE until that problem is resolved!
Should you detect that your system has been compromised by receiving an email that indicates a command has been executed on your Asterisk server that you did not initiate, you should immediately disable or remove the script so that no further Phone Genie emails are processed on your server. Be sure to preserve any unprocessed Phone Genie emails for authorities as these may contain important information regarding the source of the emails. These email messages usually are deleted once Phone Genie completes execution of the associated Asterisk commands.
Overview. Here's the drill for today. First, we'll adjust both your hardware- based and IPtables firewalls to allow inbound email delivery to your Asterisk server. Second, we'll remove SendMail from your system and install and configure Postfix to handle the SMTP email chores. This will greatly simplify the security issues in locking down your server from unwanted emails. Depending upon your Internet service provider, installation of Postfix may break outbound email delivery from your server if your provider happens to block outbound traffic on port 25. We'll show you how to fix it. Third, we'll add a new user account on your Asterisk server that will be used exclusively to handle Phone Genie messages. Fourth, you're going to need a fully-qualified domain name for your Asterisk server so that email can be delivered reliably to your server. We'll walk you through getting this set up. Fifth, we'll install and configure the Phone Genie software and run some simple tests to make certain everything is working as it should. Sixth, we'll add the Phone Genie script as a cron job which will be run every couple of minutes to check for incoming Phone Genie emails. Finally, we'll review some of the Asterisk commands that can be executed using the Email Edition of Phone Genie for Asterisk.
Security Design. We've obviously given a great deal of thought to the security issues surrounding this application. The security model we've adopted works like this. First, for an email to get through to your Asterisk server, one and only one email address will work from the Internet. All other inbound email from the Internet will be rejected by Postfix. We strongly suggest you leave it that way. Your email address consists of the special username that we will create on your server plus a (hopefully new) fully-qualified domain name that points to your server. You are well advised to use and keep secret both a non-intuitive and complicated username AND a non-intuitive and complicated, fully-qualified domain name. Only this combination will let the email message through the Postfix filter! Using the correct username and a different FQDN that may also point to your server's correct IP address will nevertheless be rejected by Postfix. The third piece in the security model is the password. If you examine the sample Subject above, you will note that it begins with the word "Asterisk" followed by a colon, a space, and then the Asterisk CLI command. The word "Asterisk" is actually the password, and it can be changed to any password you like. So, if you change your password to FooBaR, then the subject of your message should look like this. Note that the colon followed by a space are also required!
FooBaR: database put CF 701 6781234567
Finally, it should be obvious but... DON'T SEND THESE EMAILS FROM AN UNTRUSTED CLIENT OR A PC IN A PUBLIC PLACE because your email message may get stored in a place that someone else could decipher how to access your server. If you wouldn't leave a $1000 bill beside the computer from which you're sending the email, don't send it! Otherwise, you may lose a good bit more than $1,000. To give you some idea of what's at risk with a compromised system, try sending the following email using your correct email address and password:
FooBaR: help
</sermon>
Firewall Configuration. For purposes of our example today, we're assuming that your Asterisk server is sitting behind a hardware-based firewall/router on a private subnet and that your Asterisk server includes a functioning software-based IPtables Linux firewall. This is the default PBX in a Flash setup that we always recommend. On your hardware-based firewall, you will need to redirect incoming TCP port 25 traffic to TCP port 25 on the private IP address of your Asterisk server. This change often requires a reboot of your firewall/router. Once that change is complete, log into your Asterisk server as root and edit /etc/sysconfig/iptables on PBX in a Flash systems. We need to add a new rule to IPtables which allows incoming TCP port 25 traffic through the firewall. Scroll to the bottom of the file and insert the following lines just above the COMMIT line:
# Allow inbound SMTP traffic on TCP port 25
-A INPUT -p tcp -m tcp --dport 25 -j ACCEPT
Save your additions to the file and then reload IPtables and your network:
service iptables stop
service iptables start
service network restart
service iptables status | grep "tcp dpt:25"
The last command should return an entry from IPtables showing TCP port 25 traffic is now being ACCEPTed into the server. If not, check your entries and repeat the process until this works.
Postfix Installation. Let's continue by removing SendMail from your server and installing Postfix. They both perform the same email functions, but the complexity of SendMail makes the likelihood of a configuration error too risky for us to sleep well. If you understand the intricacies of SendMail and feel comfortable implementing the security model we've described above, by all means, have at it. We'll be happy to share your results with the rest of our user community. In the meantime, here's the Postfix solution. While still logged into your server as root, issue the following commands to uninstall SendMail and install Postfix:
rpm -e --nodeps sendmail
yum -y install postfix
Choosing a Username and FQDN. Before we configure Postfix, you need to decide upon a user account name for your Asterisk server to manage Phone Genie messages. And you also need a fully-qualified domain name which points to the public IP address of your Asterisk server. As mentioned above, we strongly recommend that the username and FQDN be obscure and unguessable. For example, a combination of letters and numbers that don't spell words are good choices. Something like dlrpzh7b3@dhf34.nerdvittles.com will help you sleep well. If you don't have a static IP address and dedicated domain for your server that you can manage, then use an equally obscure FQDN from a provider such as dyndns.org. Something like dhf34.dyndns.org works. You then can configure your Asterisk server to automatically keep your dynamic IP address current. We're going to use these entries as examples below. Obviously, you should choose different entries!
To create the new user account on your server using whatever name you have chosen, here are the commands to issue while still logged into your server as root. Just substitute your chosen username for dlrpzh7b3 in both commands. Be sure to choose a secure password, too.
useradd dlrpzh7b3
passwd dlrpzh7b3
Configuring Postfix. Now let's get Postfix set up for maximum protection. First, move to postfix directory: cd /etc/postfix. Now edit main.cf: nano -w main.cf. Search for the inet_interfaces line in the file: Ctrl-W, inet_interfaces =. Add a hash mark to the beginning of each uncommented inet_interfaces line so that your entries look like this:
#inet_interfaces = $myhostname
#inet_interfaces = $myhostname, localhost
#inet_interfaces = localhost
Next, search for mydestination in the file: Ctrl-W,mydestination =. Comment out each of the lines except the one that looks like this:
mydestination = $myhostname, localhost.$mydomain, localhost
Now add the private IP address of your Asterisk server and your FQDN chosen above to the line so that it looks like this. Don't forget the commas and keep everything on one line.
mydestination = $myhostname, localhost.$mydomain, localhost, 192.168.0.118, dhf34.nerdvittles.com
Finally, move to the last line in the file and make it look like this, all on one line:
smtpd_recipient_restrictions = check_recipient_access hash:/etc/postfix/access, permit_mynetworks, reject_unauth_destination
Save your changes to the file: Ctrl-X, Y, then Enter. Now edit /etc/postfix/access. Move to the very bottom of the file and add two new lines with the following entries using the actual email address and FQDN you chose above instead of the examples. The first line tells Postfix to allow emails addressed to the specified email recipient. The next line tells Postfix to reject all other emails addressed to anyone at this domain. Other domains and public IP addressing are blocked by our mydestination entry above.
dlrpzh7b3@dhf34.nerdvittles.com OK
dhf34.nerdvittles.com REJECT recipient rejected
Save your changes to the file: Ctrl-X, Y, then Enter. Now issue the following two commands:
postmap /etc/postfix/access
service postfix restart
Testing Postfix. Now comes the important part. We need to make sure that outbound emails from your Asterisk server are delivered. And we need to make sure that incoming emails ONLY to the one email address you've designated are received and that all other emails from the Internet are rejected. We can't stress enough how important all three of these tests are. If your Postfix implementation doesn't pass all three, DO NOT PROCEED!
Testing outbound email with Postfix is easy. While logged into your server as root, issue the following command using a destination email address (instead of yourname@gmail.com) where you regularly receive emails:
echo "Hi there" | mail -s Test yourname@gmail.com
Count to 20 and refresh your email's Inbox. If the message is there, you've passed Test #1. If not, check your junk mail folder. If it's still not there, try another email address if you have one. Still no cigar? Then your Internet Service Provider is probably blocking email generated from downstream email servers. For tips on remedying the problem, see this message thread on the PBX in a Flash forums. You might also want to review the Postfix tutorial on dyndns.com. Here's another good tutorial on setting up a Gmail relay using Postfix. Then run the test again until you achieve success.
Testing inbound email to your designated email address is Test #2. Use a web client and send an email message to dlrpzh7b3@dhf34.nerdvittles.com substituting the actual email address you have chosen for your server. Count to 20, log into your server as root and type the following command to retrieve email for user dlrpzh7b3: mail -u dlrpzh7b3. The server should report that you have one new message. Type "d 1" and then "q" to delete the message and quit the mail app. If no email arrives, check the Inbox on your sending client to see if the message bounced and, if so, why. Check your email entries in /etc/postfix/access and /etc/postfix/main.cf for typos and review the steps in Configuring Postfix above. Then repeat the test until you successfully send a message to your designated email address.
Testing inbound email to an unauthorized email address on your Asterisk server is Test #3. For this test, we want to make sure that an email sent to the root account on your server fails. What you'll need for this test is the FQDN that was chosen above. Then, using a mail client, send an email message to root@dhf34.nerdvittles.com using your actual FQDN. Count to 20, log into your server as root, and type: mail. The message you sent should NOT be in the Inbox. Repeat the test by sending a message to root and dlrpzh7b3 @the actual IP address of your Asterisk server. These, too, should both fail. Once you get a passing grade on all three tests, we can move on. The hard part is behind you!
Installing Phone Genie. While logged into your server as root, issue the following commands:
cd /root
wget http://pbxinaflash.net/source/nv/phonegenie.tgz
tar zxvf phonegenie.tgz
rm phonegenie.tgz
Configuring Phone Genie. While still logged into your server as root, edit phonegenie.sh. You will note that there are 3 fields that need to be configured at the top of the file: user, pw, and notify. The user field is the designated user account name that will be used for incoming emails (dlrpzh7b3 in our example). The pw field is the word in every email Subject that precedes the colon, space, and Asterisk CLI command (Asterisk in our example). The notify field is a reliable email address where you regularly receive emails promptly. This is where the results of your Phone Genie email commands will be sent. Choose this email address wisely, as if your bank account depended upon it. It does! Once you have filled in the 3 fields (preserving the quotation marks around each entry), save the file with your changes.
Testing Phone Genie. Now we're ready to try everything out. Using an email client, send an email message to dlrpzh7b3@dhf34.nerdvittles.com (using your actual Phone Genie email name and FQDN). For the Subject, enter the following (substituting the password you created above for Asterisk)... Asterisk: help
After counting to 20, log into your Asterisk server as root and issue the following command:
/root/phonegenie.sh
You should see a display of all of the Asterisk CLI commands and within a minute or so, you should receive an email with the same information at the email address you entered into the notify field in phonegenie.sh in the previous step.
Installing Phone Genie as a Cron Job. Once you have tested several Phone Genie emails manually and you're satisfied that everything is working reliably, you can set up the Phone Genie shell script as a cron job. It should be set to execute every minute or every couple of minutes throughout the day and night. Edit /etc/crontab and insert the command shown below to have the script execute every 2 minutes:
*/2 * * * * root /root/phonegenie.sh > /dev/null
Sample Phone Genie Commands. In addition to all of the traditional Asterisk CLI commands, Phone Genie also supports a number of commands that are specific to FreePBX. These additional commands let you configure call forwarding, call waiting, do not disturb, system speed dials, and blacklist entries on your Asterisk server. For Asterisk CLI command syntax, consult voip-info.org. For FreePBX command syntax, see the listing below. Enjoy!
database put CF 302 8338116666 * Call Forwarding Enable
database del CF 302 * Call Forwarding Disabledatabase put CFB 302 8238221234 * Call Forwarding on Busy Enable
database del CFB 302 * Call Forwarding on Busy Disabledatabase put CFU 302 8038445689 * Call Forwarding Unavailable Enable
database del CFU 302 * Call Forwarding Unavailable Disabledatabase put CW 302 ENABLED * Call Waiting Enable
database del CW 302 * Call Waiting Disabledatabase put DND 302 YES * Do Not Disturb Enable
database del DND 302 * Do Not Disturb Disabledatabase put blacklist 6781234567 1 * Blacklist a number
database del blacklist 6781234567 * Remove blacklisted numberdatabase put sysspeeddials 99 6781234567 * Set up Speed Dial 99
database del sysspeeddials 99 * Remove Speed Dial 99
(NOTE: Be sure you enable Feature Code *0 prefix in FreePBX!)
We wish all of you a very Merry Christmas! 
Need help with Asterisk? Visit the PBX in a Flash Forum.
Or Try the New, Free PBX in a Flash Conference Bridge.
whos.amung.us If you're wondering what your fellow man is reading on Nerd Vittles these days, wonder no more. Visit our new whos.amung.us statistical web site and check out what's happening. It's a terrific resource both for us and for you.
Special Thanks to Our Generous Sponsors
FULL DISCLOSURE: ClearlyIP, Skyetel, Vitelity, DigitalOcean, Vultr, VoIP.ms, 3CX, Sangoma, TelecomsXchange and VitalPBX have provided financial support to Nerd Vittles and our open source projects through advertising, referral revenue, and/or merchandise. As an Amazon Associate and Best Buy Affiliate, we also earn from qualifying purchases. We’ve chosen these providers not the other way around. Our decisions are based upon their corporate reputation and the quality of their offerings and pricing. Our recommendations regarding technology are reached without regard to financial compensation except in situations in which comparable products at comparable pricing are available from multiple sources. In this limited case, we support our sponsors because our sponsors support us.
BOGO Bonaza: Enjoy state-of-the-art VoIP service with a $10 credit and half-price SIP service on up to $500 of Skyetel trunking with free number porting when you fund your Skyetel account. No limits on number of simultaneous calls. Quadruple data center redundancy. $25 monthly minimum spend required. Tutorial and sign up details are here.
![]() The lynchpin of Incredible PBX 2020 and beyond is ClearlyIP components which bring management of FreePBX modules and SIP phone integration to a level never before available with any other Asterisk distribution. And now you can configure and reconfigure your new Incredible PBX phones from the convenience of the Incredible PBX GUI.
The lynchpin of Incredible PBX 2020 and beyond is ClearlyIP components which bring management of FreePBX modules and SIP phone integration to a level never before available with any other Asterisk distribution. And now you can configure and reconfigure your new Incredible PBX phones from the convenience of the Incredible PBX GUI.
VitalPBX is perhaps the fastest-growing PBX offering based upon Asterisk with an installed presence in more than 100 countries worldwide. VitalPBX has generously provided a customized White Label version of Incredible PBX tailored for use with all Incredible PBX and VitalPBX custom applications. Follow this link for a free test drive!
Special Thanks to Vitelity. Vitelity is now Voyant Communications and has halted new registrations for the time being. Our special thanks to Vitelity for their unwavering financial support over many years and to the many Nerd Vittles readers who continue to enjoy the benefits of their service offerings. We will keep everyone posted on further developments.
Some Recent Nerd Vittles Articles of Interest...
Rolling Your Own Asterisk ISOs with Joe’s WonderScript
 One of the enormous drawbacks of Asterisk@Home and earlier versions of trixbox was the need to generate new ISOs whenever there was a newer version of Asterisk® or the CentOS operating system. In fact, it was one of the primary motivations for creating PBX in a Flash which separated the Asterisk payload from the Linux ISO itself. Now Asterisk updates can be generated in days instead of months.
Fast forward to today when Joe Roper, one of the initial developers of PBX in a Flash, turned out a new script that lets you take a yum-updated version of PBX in a Flash and generate a new PBX in a Flash ISO that includes the very latest (as in this morning) CentOS operating system. Then, with our existing payload files, you can choose your favorite Asterisk version in both 1.4 and 1.6 flavors with Zaptel or Dahdi. Simply stated, in about an hour, you now can roll your own PBX in a Flash ISO with the very latest version of CentOS whenever you’d like. The good news for us: this decentralizes Upgrade Hell to your desktop and gets it off our plate. It also, of course, lets us generate current PBX in a Flash ISOs in just a few minutes whenever the need arises because of security issues or new operating system releases. Both of these are good things because it frees up the developers to work on new gee whiz stuff without devoting literally months each year to the task of keeping ISOs current. The other terrific part of Joe’s script is it will broaden the base of developers enormously and encourage others to add new components to these builds whenever the urge strikes. One day soon you should be able to do all of the ISO and payload generation in house by simply running a few scripts.
To give you a feel for how well this works, let us run through the process. Then you can either download our new CentOS 5.4 ISO which was built earlier today in less than an hour… or you can roll your own with Joe’s new script. The script incidentally is distributed under the GPL2 license so feel free to use it, enhance it, or rewrite it under the terms of the license.
Getting Started. If you ever watched your mom or wife bake sourdough bread, then you already know that the critical ingredient is the "bread starter" mixture. Without that, you don’t get a new loaf. The same applies here. Before you can build a new PBX in a Flash ISO, you’ll need to have a current version up and running. The current script has been engineered assuming that you’ll be starting with PBX in a Flash 1.5 beta which relies upon CentOS 5.3 as the Linux operating system. Install it in the usual fashion with your choice of Asterisk versions on either a dedicated machine or as a KVM on a virtual machine such as Proxmox. Once the install is complete, run update-scripts, update-fixes, update-source, and update-fixes. When running update-source, be sure to choose to update the operating system AND the kernel to the latest version of CentOS. When prompted, tell update-source to also run yum update. Reboot the system and make certain that Asterisk loads properly. You need not configure FreePBX at this juncture.
At this point, you actually have a version of PBX in a Flash with the latest CentOS 5.4 operating system. The problem with this approach on multiple machines is that it’s an hour-long process to update each machine using this process. Instead, what we’d like to do is take a snapshot of this newly updated system and turn it into an ISO that can be used to create additional systems with CentOS 5.4 without the hassle of the update knuckle drill.
Generating an ISO. Here are the steps to generate your new ISO. Log into your server as root and issue the following commands:
cd /root
wget http://pbxinaflash.net/source/iso/create-updated-iso.sh
chmod +x create-updated-iso.sh
./create-updated-iso.sh
When the process completes, your new ISO can be found in /root/createISO. Copy it to your favorite operating system and burn a CD from the ISO image. Boot a new machine or virtual machine using the ISO, and presto! You’ve got a PBX in a Flash boot disk featuring CentOS 5.4. Make the usual selections of keyboard, time zone, and password. Then you’re off to the races. When the Linux install completes, remove the CD before the system reboots. Then choose your favorite flavor of Asterisk and Zaptel/Dahdi once the PBX in a Flash payload file downloads. Doesn’t get much simpler than that. If you’d like to take our generated 5.4 ISO for a whirl, you can download it from the PBX in a Flash beta site. Enjoy!
Twitter Feeds on Nerd Vittles. If you glance over to the right column just above the Google Maps, you’ll see the current Twitter feed for @NerdUno. But did you know you also can read anyone else’s tweets or list from the same UI? Just scroll to the bottom of the frame and try one of these: voipusers (for the VoIP Users Conference feed) or voipusers/voip-users-conference (for recent tweets from all members of VUC). No need to type @. We’ll handle that keystroke for you. 🙂
Enhanced Google Maps. In case you haven’t noticed, we’ve added yet another Google Map to Nerd Vittles. Now, in addition to showing our location with Google Latitude, we also are displaying your location based upon your IP address. We’ll show you how to add something similar to any LAMP-based Linux system in coming weeks. It’s a powerful technology that has enormous potential. If you’re unfamiliar with Google Maps, click on the Hybrid and Satellite buttons and then check out the scaling and navigation options. Double-click to zoom. Incredible!
whos.amung.us If you’re wondering what your fellow man is reading on Nerd Vittles these days, wonder no more. Visit our new whos.amung.us statistical web site and check out what’s happening. It’s a terrific resource both for us and for you.
Need help with Asterisk? Visit the PBX in a Flash Forum.
Or Try the New, Free PBX in a Flash Conference Bridge.
Special Thanks to Our Generous Sponsors
FULL DISCLOSURE: ClearlyIP, Skyetel, Vitelity, DigitalOcean, Vultr, VoIP.ms, 3CX, Sangoma, TelecomsXchange and VitalPBX have provided financial support to Nerd Vittles and our open source projects through advertising, referral revenue, and/or merchandise. As an Amazon Associate and Best Buy Affiliate, we also earn from qualifying purchases. We’ve chosen these providers not the other way around. Our decisions are based upon their corporate reputation and the quality of their offerings and pricing. Our recommendations regarding technology are reached without regard to financial compensation except in situations in which comparable products at comparable pricing are available from multiple sources. In this limited case, we support our sponsors because our sponsors support us.
BOGO Bonaza: Enjoy state-of-the-art VoIP service with a $10 credit and half-price SIP service on up to $500 of Skyetel trunking with free number porting when you fund your Skyetel account. No limits on number of simultaneous calls. Quadruple data center redundancy. $25 monthly minimum spend required. Tutorial and sign up details are here.
![]() The lynchpin of Incredible PBX 2020 and beyond is ClearlyIP components which bring management of FreePBX modules and SIP phone integration to a level never before available with any other Asterisk distribution. And now you can configure and reconfigure your new Incredible PBX phones from the convenience of the Incredible PBX GUI.
The lynchpin of Incredible PBX 2020 and beyond is ClearlyIP components which bring management of FreePBX modules and SIP phone integration to a level never before available with any other Asterisk distribution. And now you can configure and reconfigure your new Incredible PBX phones from the convenience of the Incredible PBX GUI.
VitalPBX is perhaps the fastest-growing PBX offering based upon Asterisk with an installed presence in more than 100 countries worldwide. VitalPBX has generously provided a customized White Label version of Incredible PBX tailored for use with all Incredible PBX and VitalPBX custom applications. Follow this link for a free test drive!
Special Thanks to Vitelity. Vitelity is now Voyant Communications and has halted new registrations for the time being. Our special thanks to Vitelity for their unwavering financial support over many years and to the many Nerd Vittles readers who continue to enjoy the benefits of their service offerings. We will keep everyone posted on further developments.
Some Recent Nerd Vittles Articles of Interest…
Free Asterisk Solutions
