
Home » Posts tagged 'iptables' (Page 4)
Tag Archives: iptables
The Most Versatile VoIP Provider: FREE PORTING

 JUST RELEASED: Visit the Incredible PBX Wiki
Midnight Madness: Introducing Incredible PBX 12 with Asterisk 12 and FreePBX
[iframe-popup id="4″]
The number "12″ always has held mystical prominence in our culture and so it is with Asterisk®. Just over 12 months ago, Digium first introduced Asterisk 12 at AstriCon in Atlanta and heralded a major change in the direction of the product. It was more than a wholesale revamping of the Asterisk feature set. There was a revolutionary new development methodology thanks to the untiring efforts of Matt Jordan and his incredibly talented development team. Unlike Asterisk releases of old, there were no serious breakages in existing applications and, where there were changes, they were carefully documented for all the world to see. Thank you, Matt & Co.
The release of Asterisk 12 also set in motion the development of FreePBX® 12 by the equally talented FreePBX Dev Team. What began as an effort simply to integrate all of the new components in Asterisk 12 quickly evolved into a major rewrite of the graphical user interface for Asterisk, no small feat given its history of starts and stops spanning nearly a decade of development. Just last week, FreePBX 12 was pronounced stable and production ready. If you thought Asterisk 12 was revolutionary, just wait until you try FreePBX 12. Simply amazing work by the FreePBX Development Team. Thank you.
While PBX in a Flash has offered a preview edition of Asterisk 12 and FreePBX 12 for quite a while, we’ve held off releasing the stand-alone Incredible PBX 12 for a number of reasons. First and foremost, we wanted Incredible PBX 12 to remain pure open source to point the way for others that want to enhance Asterisk 12 and FreePBX 12. Second, there were more than a few rough edges with both products that simply needed some time to evolve. The one year anniversary of Asterisk 12 and the stable release of FreePBX 12 seemed a fitting occasion to add our turnkey implementation of Incredible PBX to the mix.

The real beauty of Incredible PBX: there is no smoke and there are no mirrors. What you see is what you get. You begin with a base install of the Linux operating system. And then the open source Incredible PBX installer adds all of the pieces to integrate air-tight security with Asterisk 12, FreePBX 12, text-to-speech technology and dozens of applications for Asterisk into a seamless platform for either experimentation or production use. You can review the source code and embellish it as you see fit! Protecting your deployment is the IPtables firewall with a WhiteList for authorized user access coupled with Fail2Ban to monitor access attempts. This isn’t merely a security toolkit. Your server is actually locked down from the moment you complete the Incredible PBX install. Authorizing additional users is accomplished using simple administrator scripts. Or end-users can employ PortKnocker and Travelin’ Man 4 to simplify remote access. Automatic updates for security fixes and enhancements are an integral component of Incredible PBX. If the security alerts of the past month haven’t convinced you that updates are critically important, you probably should stop hosting your own PBX. Backups and restores also are simple. And the complete open source feature set of both Asterisk and FreePBX is activated to facilitate your development efforts. In short, you gain nothing by installing the individual components yourself, and you may lose a lot. With Incredible PBX, the heavy lifting has all been done for you with documented, open source code that makes it simple to add your own tweaks as desired. That’s what open source is all about!
We’ve chosen Ubuntu 14.04 as the platform on which to begin the Incredible PBX 12 adventure. More releases will follow in due course. But Ubuntu 14.04 is an extremely stable and well-supported LTS release of Linux that warrants a careful look. After all, the primary objective here is a stable telephony platform. The Ubuntu 14.04 LTS platform offers that in spades.
Building an Ubuntu 14.04 Platform for Incredible PBX 12
As a result of the trademark and copyright morass, we’ve steered away from the bundled operating system in favor of a methodology that relies upon you to put in place the operating system platform on which to run PBX in a Flash or Incredible PBX. The good news is it’s easy! With many cloud-based providers1, you can simply click a button to choose your favorite OS flavor and within minutes, you’re ready to go. With many virtual machine platforms such as VirtualBox, it’s equally simple to find a pre-built Ubuntu 14.04 image or roll your own.
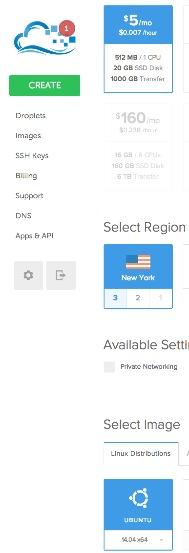 If you’re new to VoIP or to Nerd Vittles, here’s our best piece of advice. Don’t take our word for anything! Try it for yourself in the Cloud! You can build an Ubuntu 14.04 image on Digital Ocean in under one minute and install Incredible PBX 12 for Ubuntu 14.04 in under 30 minutes. Then try it out for two full months. It won’t cost you a dime. Use our referral link to sign up for an account. Enter a valid credit card to verify you’re who you say you are. Create an Ubuntu 14.04 (not 14.10!) 512MB droplet of the cheapest flavor ($5/mo.). Go to the Billing section of the site, and enter the following promo code: UBUNTUDROPLET. That’s all there is to it. A $10 credit will be added to your account, and you can play to your heart’s content. Delete droplets, add droplets, and enjoy the free ride!
For today, we’ll walk you through building your own stand-alone server using the Ubuntu 14.04 mini.iso. If you’re using Digital Ocean in the Cloud, skip down to Installing Incredible PBX 12. If you’re using your own hardware, to get started, download the 32-bit or 64-bit Ubuntu 14.04 "Trusty Tahr" Minimal ISO from here. Then burn it to a CD/DVD or thumb drive and boot your dedicated server from the image. Remember, you’ll be reformatting the drive in your server so pick a machine you don’t need for other purposes.
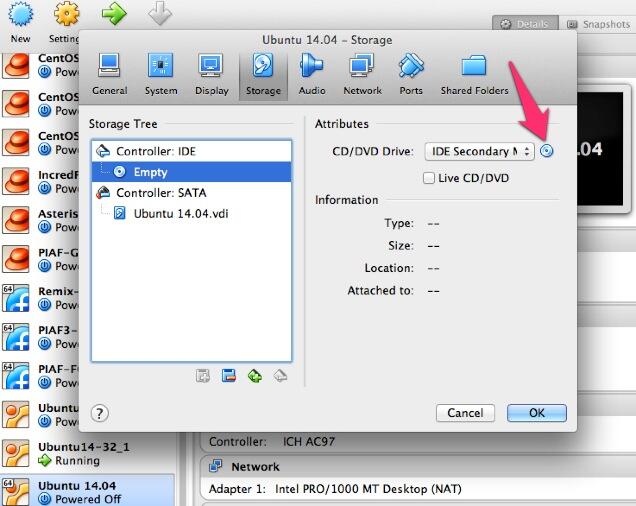
For those that would prefer to build your Ubuntu 14.04 Wonder Machine using VirtualBox on any Windows, Mac, or existing Linux Desktop, here are the simple steps. Create a new virtual machine specifying either the 32-bit or 64-bit version of Ubuntu. Allocate 1024MB of RAM (512MB also works fine!) and at least 20GB of disk space using the default hard drive setup in all three steps. In Settings, click System and check Enable I/O APIC and uncheck Hardware Clock in UTC Time. Click Audio and Specify then Enable your sound card. Click Network and Enable Network Adapter for Adapter 1 and choose Bridged Adapter. Finally, in Storage, add the Ubuntu 14.04 mini.iso to your VirtualBox Storage Tree as shown below. Then click OK and start up your new virtual machine. Simple!
Here are the steps to get Ubuntu 14.04 humming on your new server or virtual machine once you’ve booted up. If you can bake cookies from a recipe, you can do this:
UBUNTU mini.iso install:
Choose language
Choose timezone
Detect keyboard
Hostname: incrediblepbx < continue >
Choose mirror for downloads
Confirm archive mirror
Leave proxy blank unless you need it < continue >
** couple minutes of whirring as initial components are loaded **
New user name: incredible < continue >
Account username: incredible < continue >
Account password: makeitsecure
Encrypt home directory < no >
Confirm time zone < yes >
Partition disks: Guided - use entire disk and set up LVM
Confirm disk to partition
Write changes to disks and configure LVM
Whole volume? < continue>
Write changes to disks < yes> < -- last chance to preserve your disk drive!
** about 15 minutes of whirring during base system install ** < no touchy anything>
** another 5 minutes of whirring during base software install ** < no touchy anything>
Upgrades? Install security updates automatically
** another 5 minutes of whirring during more software installs ** < no touchy anything>
Software selection: *Basic Ubuntu server (only!)
** another couple minutes of whirring during software installs ** < no touchy anything>
Grub boot loader: < yes>
UTC for system clock: < no>
Installation complete: < continue> after removing installation media
** on VirtualBox, PowerOff after reboot and remove [-] mini.iso from Storage Tree & restart VM
login as user: incredible
** enter user incredible's password **
sudo passwd
** enter incredible password again and then create secure root user password **
su root
** enter root password **
apt-get update
apt-get install ssh -y
sed -i 's|without-password|yes|' /etc/ssh/sshd_config
sed -i 's|yes"|without-password"|' /etc/ssh/sshd_config
ifconfig
** write down the IP address of your server from ifconfig results
reboot
** login via SSH to continue **
Installing Incredible PBX 12 on Your Ubuntu 14.04 Server
Adding Incredible PBX 12 to a running Ubuntu 14.04 server is a walk in the park. To restate the obvious, your server needs a reliable Internet connection to proceed. Using SSH (or Putty on a Windows machine), log into your new server as root at the IP address you deciphered in the ifconfig step at the end of the Ubuntu install procedure above.
WARNING: If you’re using a 512MB droplet at Digital Ocean, be advised that their Ubuntu setup does NOT include a swap file. This may cause serious problems when you run out of RAM. Uncomment ./create-swapfile-DO line below to create a 1GB swap file which will be activated whenever you exceed 90% RAM usage on Digital Ocean.
Now let’s begin the Incredible PBX 12 install. Log back in as root and issue the following commands:
cd /root
wget http://incrediblepbx.com/incrediblepbx12.tar.gz
tar zxvf incrediblepbx12.tar.gz
rm incrediblepbx12.tar.gz
#./create-swapfile-DO
./IncrediblePBX12.sh
The installer will first upgrade your Ubuntu 14.04 build to the latest modules. Then it will reboot. Rerun the installer again to kick off the Incredible PBX 12 installation process. Once you have agreed to the license agreement and terms of use, press Enter and go have a 30-minute cup of coffee. The Incredible PBX 12 installer runs unattended so find something to do for a bit unless you just like watching code compile. When you see "Have a nice day", your installation is complete. Write down your your three "knock" ports for PortKnocker. You can retrieve your PortKnocker setup like this: cat /root/knock.FAQ. Next, set your admin password for FreePBX 12 by running /root/admin-pw-change. Set your correct time zone by running /root/timezone-setup. To be sure your FreePBX module signatures are current, issue the following two commands:
amportal a ma refreshsignatures
amportal a r
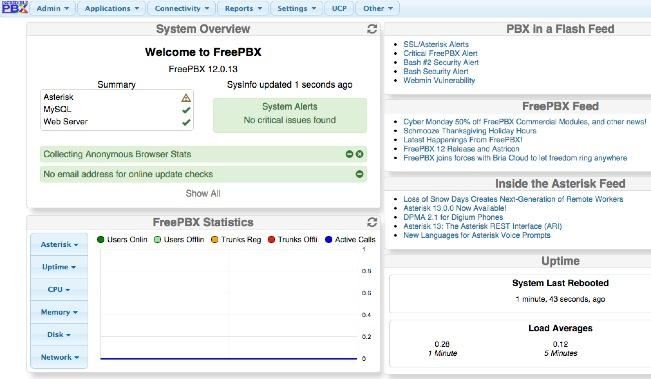
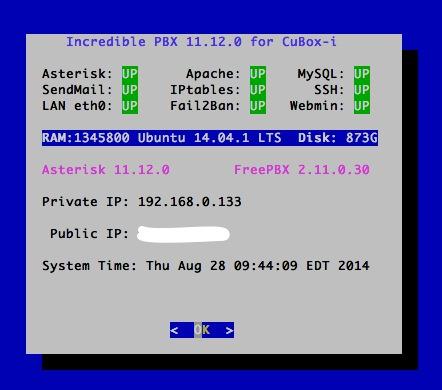
Log out and back in as root and the automatic update utility will bring your system current with security fixes and enhancements. Then you will be greeted with a status display shown at the top of this article.
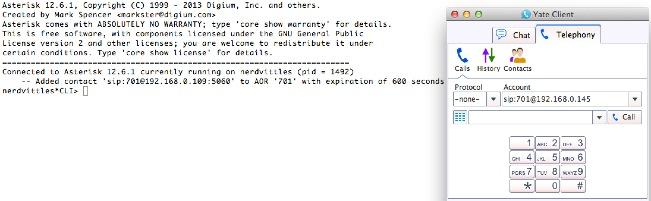
You can access the Asterisk 12 CLI by typing: asterisk -rvvvvvvvvvv
You can access the FreePBX 12 GUI using your favorite web browser to configure your server. Just enter the IP address shown in the status display. The default username is admin with the admin password you set up above. If desired, you also can change it in FreePBX Administration by clicking Admin -> Administrators -> admin. Enter a new password and click Submit Changes then Apply Config. Now edit extension 701 so you can figure out (or change) the randomized passwords that were set up for default 701 extension and voicemail: Applications -> Extensions -> 701.

Setting Up a Soft Phone to Use with Incredible PBX
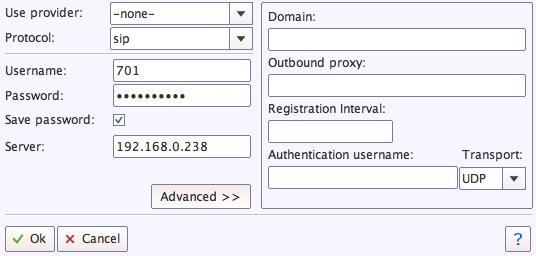
Now you’re ready to set up a telephone so that you can play with Incredible PBX 12. We recommend YateClient which is free. Download it from here. Run YateClient once you’ve installed it and enter the credentials for the 701 extension on Incredible PBX. You’ll need the IP address of your server plus your extension 701 password. Choose Settings -> Accounts and click the New button. Fill in the blanks using the IP address of your server, 701 for your account name, and whatever password you created for the extension. Click OK.
Once you are registered to extension 701, close the Account window. Then click on YATE’s Telephony Tab and place some test calls to the numerous apps that are preconfigured on Incredible PBX. Dial a few of these to get started:
123 - Reminders

222 - ODBC Demo (use acct: 12345)

947 - Weather by ZIP Code

951 - Yahoo News

*61 - Time of Day

*68 - Wakeup Call

TODAY - Today in History
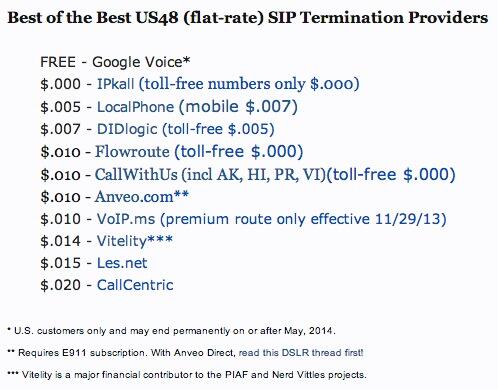
Now you’re ready to connect to the telephones in the rest of the world. If you live in the U.S., the easiest way (at least for now) is to use an existing (free) Google Voice account. Google has threatened to shut this down but as this is written, it still works with previously set up Google Voice accounts. The more desirable long-term solution is to choose several SIP providers and set up redundant trunks for your incoming and outbound calls. The PIAF Forum includes dozens of recommendations to get you started.
Configuring Google Voice
If you want to use Google Voice, you’ll need a dedicated Google Voice account to support Incredible PBX 12. If you want to use the inbound fax capabilities of Incredible Fax, then you’ll need an additional Google Voice line that can be routed to the FAX custom destination using FreePBX. The more obscure the username (with some embedded numbers), the better off you will be. This will keep folks from bombarding you with unsolicited Gtalk chat messages, and who knows what nefarious scheme will be discovered using Google messaging six months from now. So keep this account a secret!
We’ve tested this extensively using an existing Google Voice account, and inbound calling is just not reliable. The reason seems to be that Google always chooses Gmail chat as the inbound call destination if there are multiple registrations from the same IP address. So, be reasonable. Do it our way! Use a previously configured and dedicated Gmail and Google Voice account, and use it exclusively with Incredible PBX 12.
IMPORTANT: Be sure to enable the Google Chat option as one of your phone destinations in Settings, Voice Setting, Phones. That’s the destination we need for The Incredible PBX to work its magic! Otherwise, all inbound and outbound calls will fail. If you don’t see this option, you’re probably out of luck. Google has disabled the option in newly created accounts as well as some old ones that had Google Chat disabled. Now go back to the Google Voice Settings.
While you’re still in Google Voice Settings, click on the Calls tab. Make sure your settings match these:
- Call Screening – OFF
- Call Presentation – OFF
- Caller ID (In) – Display Caller’s Number
- Caller ID (Out) – Don’t Change Anything
- Do Not Disturb – OFF
- Call Options (Enable Recording) – OFF
- Global Spam Filtering – ON
Click Save Changes once you adjust your settings. Under the Voicemail tab, plug in your email address so you get notified of new voicemails. Down the road, receipt of a Google Voice voicemail will be a big hint that something has come unglued on your PBX.
One final word of caution is in order regardless of your choice of providers: Do NOT use special characters in any provider passwords, or nothing will work!
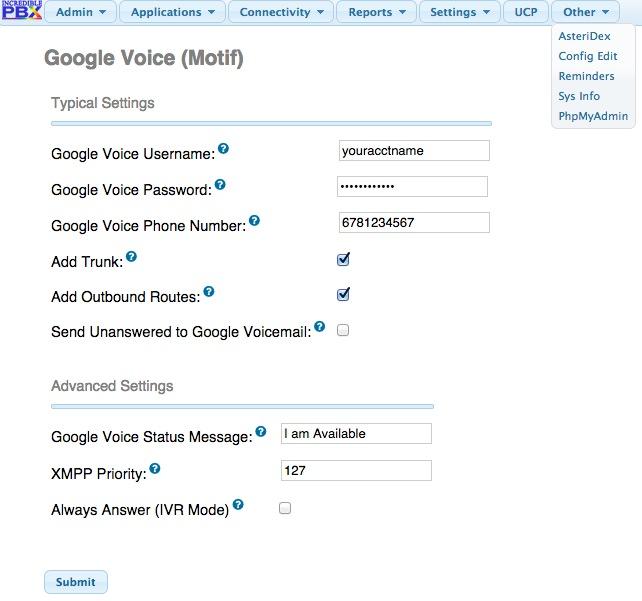
Now you’re ready to set up your Google Voice trunk in FreePBX 12. After logging into FreePBX with your browser, click the Connectivity tab and choose Google Voice/Motif. To Add a new Google Voice account, just fill out the form. If you want unanswered calls to be routed to Google Voice for transcription, check the box. Be advised that IVR calls typically are not "answered" so check that box as well if you plan to use an IVR to respond to incoming Google Voice calls.
IMPORTANT LAST STEP: Google Voice will not work unless you restart Asterisk from the Linux command line at this juncture. Using SSH, log into your server as root and issue the following command: amportal restart.
If you have trouble getting Google Voice to work (especially if you have previously used your Google Voice account from a different IP address), try this Google Voice Reset Procedure. It usually fixes connectivity problems. If it still doesn’t work, enable Less Secure Apps using this Google tool.
Troubleshooting Audio and DTMF Problems
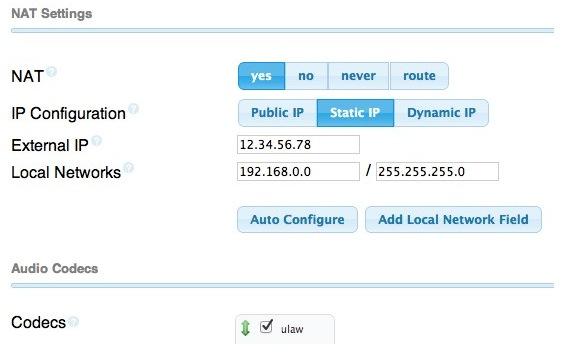
You can avoid one-way audio on calls and touchtones that don’t work with these simple settings in FreePBX: Settings -> Asterisk SIP Settings. Just plug in your public IP address and your private IP subnet. Then set ULAW as the only Audio Codec.
Adding Speech Recognition to Incredible PBX 12
To support many of our applications, Incredible PBX has included Google’s speech recognition service for years. These applications include Weather Reports by City (949), AsteriDex Voice Dialing by Name (411), and Wolfram Alpha for Asterisk (4747), all of which use Lefteris Zafiris’ terrific speech-recog AGI script. Unfortunately (for some), Google now has tightened up the terms of use for their free speech recognition service. Now you can only use it for "personal and development use." If you meet those criteria, keep reading. Here’s how to activate speech recognition on Incredible PBX. Don’t skip any steps!
1. Using an existing Google/Gmail account to join the Chrome-Dev Group.
2. Using the same account, create a new Speech Recognition Project.

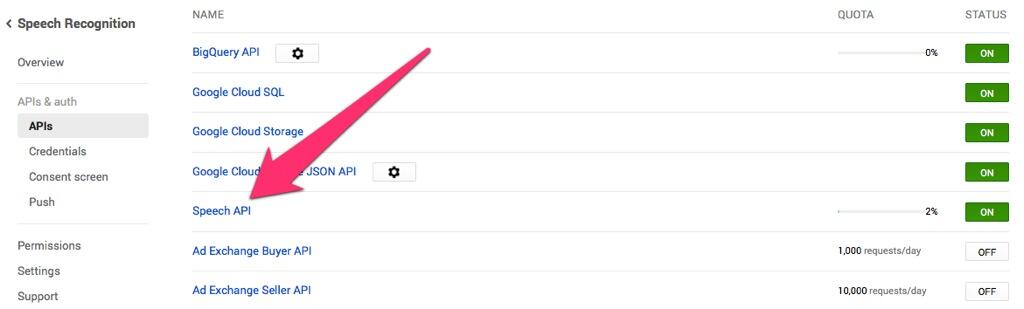
3. Click on your newly created project and choose APIs & auth.
4. Turn ON Speech API by clicking on its Status button in the far right margin.
5. Click on Credentials in APIs & auth and choose Create New Key -> Server key. Leave the IP address restriction blank!
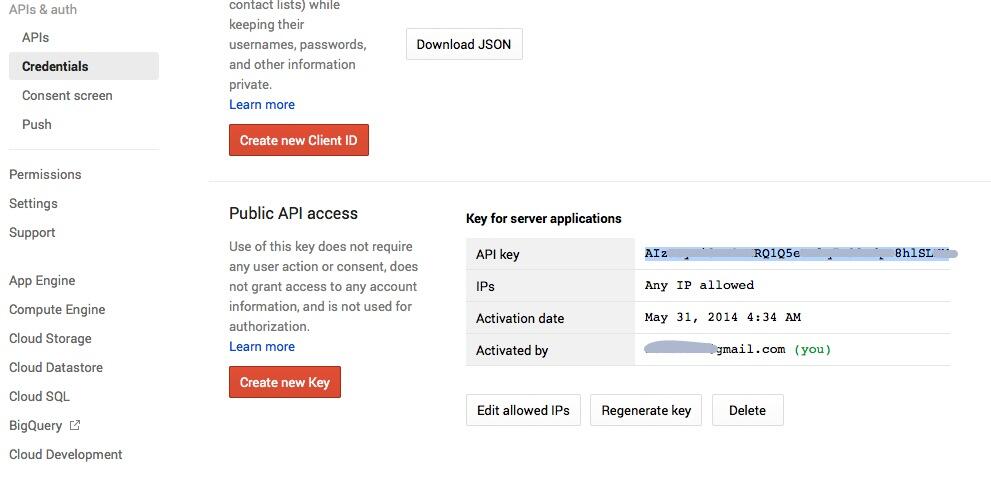
6. Write down your new API key or copy it to the clipboard.
7. Log into your server as root and issue the following commands:
# for Ubuntu and Debian platforms
apt-get clean
apt-get install libjson-perl flac -y
# for RedHat and CentOS platforms
# yum -y install perl-JSON
# for all Linux platforms
cd /var/lib/asterisk/agi-bin
mv speech-recog.agi speech-recog.last.agi
wget --no-check-certificate https://raw.githubusercontent.com/zaf/asterisk-speech-recog/master/speech-recog.agi
chown asterisk:asterisk speech*
chmod 775 speech*
nano -w speech-recog.agi
8. When the nano editor opens, go to line 70 of speech-recog.agi: my $key = "". Insert your API key from Step #6 above between the quotation marks and save the file: Ctrl-X, Y, then Enter.
Now you’re ready to try out the speech recognition apps. Dial 949 and say the name of a city and state/province/country to get a current weather forecast from Yahoo. Dial 411 and say "American Airlines" to be connected to American.
To use Wolfram Alpha by phone, you first must install it. Obtain your free Wolfram Alpha APP-ID here. Then run the one-click installer: /root/wolfram/wolframalpha-oneclick.sh. Insert your APP-ID when prompted. Now dial 4747 to access Wolfram Alpha by phone and enter your query, e.g. "What planes are overhead." Read the Nerd Vittles tutorial for additional examples and tips.
A Few Words about the Incredible PBX 12 Security Model for Ubuntu
Incredible PBX 12 for Ubuntu 14.04 is an extremely secure turnkey PBX implementation. As configured, it is protected by both Fail2Ban and a hardened configuration of the IPtables Linux firewall. As installed, nobody can access your PBX without  your credentials AND
  an IP address that is either on your private network or that matches the IP address of your server or the PC from which you installed Incredible PBX. Incredible PBX 12 is preconfigured to let you connect to many of the leading SIP hosting providers without additional firewall tweaking.
You can whitelist additional IP addresses for remote access in several ways. First, you can use the command-line utilities: /root/add-ip and /root/add-fqdn. You can also remove whitelisted IP addresses by running /root/del-acct. Second, you can dial into extension 864 (or use a DID pointed to extension 864 aka TM4) and enter an IP address to whitelist. Before Travelin’ Man 4 will work, you’ll need to add credentials for each caller using the tools in /root/tm4. You must add at least one account before dial-in whitelisting will be enabled. Third, you can temporarily whitelist an IP address by successfully executing the PortKnocker 3-knock code established for your server. You’ll find the details and the codes in /root/knock.FAQ. Be advised that IP addresses whitelisted with PortKnocker (only!) go away whenever your server is rebooted or the IPtables firewall is restarted. For further information on the PortKnocker technology and available clients for iOS and Android devices, review the Nerd Vittles tutorial.
HINT: The reason that storing your PortKnocker codes in a safe place is essential is because it may be your only available way to gain access to your server if your IP address changes. You obviously can’t use the command-line tools to whitelist a new IP address if you cannot gain access to your server at the new IP address.
We always recommend you also add an extra layer of protection by running your server behind a hardware-based firewall with no Internet port exposure, but that’s your call. If you use a hardware-based firewall, be sure to map the three PortKnocker ports to the internal IP address of your server!
The NeoRouter VPN client also is included for rock-solid, secure connectivity for remote users. Read our previous tutorial for setup instructions.
As one would expect, the IPtables firewall is a complex piece of software. If you need assistance configuring it, visit the PIAF Forum for some friendly assistance.
Incredible Backup and Restore
We’re pleased to introduce our latest backup and restore utilities for Incredible PBX. Running /root/incrediblebackup will create a backup image of your server in /tmp. This backup image then can be copied to any other medium desired for storage. To restore it to another Incredible PBX 12 server, simply copy the image to a server running Asterisk 12 and FreePBX 12 and run /root/incrediblerestore. Doesn’t get much simpler than that.
A Word About FreePBX Module Signatures
FreePBX 12 has implemented a new checksum mechanism to assure that modules are intact. Special thanks to the FreePBX Development Team for their work in extending this feature to modules outside the FreePBX-support modules. If other modules (other than ODBC configuration files) show invalid or missing signatures, you should do some investigating promptly!
Adding Incredible Fax to Your Server
Once you’ve completed the Incredible PBX install, log out and log back in to load the latest automatic updates. Then reboot. Now you’re ready to continue your adventure by installing Incredible Fax for Ubuntu. Special thanks to Josh North for all his hard work on this!
cd /root
rm incrediblefax11_ubuntu14.sh
wget http://incrediblepbx.com/incrediblefax11_ubuntu14.sh
chmod +x incrediblefax11_ubuntu14.sh
./incrediblefax11_ubuntu14.sh
Just plug in your email address for delivery of your incoming faxes in PDF format. Then accept all of the defaults during the installation process. Once you complete the install, reboot your server. Then log in as root again and set your AvantFax admin password: /root/avantfax-pw-change. Now you can access both FreePBX 12 and AvantFax by pointing your browser to the IP address of your server. Please note that we’ve had problems logging into AvantFax with some versions of the Chrome browser. Works great with Firefox!
Next, log into FreePBX and set an Inbound Route for incoming faxes to Custom Destination: Fax (hylafax). Then try sending a fax to the phone number and be sure it arrives in your email.
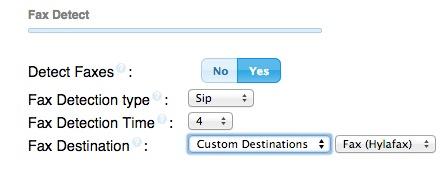
You also can try enabling fax detection with any Google Voice number. Just edit the inbound route for the DID and make it look like this:
Incredible PBX 12 Automatic Update Utility
Every time you log into your server as root, Incredible PBX 12 will ping the IncrediblePBX.com web site to determine whether one or more updates are available to bring your server up to current specs. We recommend you log in at least once a week just in case some new security vulnerability should come along (again).
Where To Go Next?
Once you get Incredible PBX installed, you’ll want to read up on the dozens of applications for Asterisk which are included in the Incredible PBX feature set. We’ve previously covered this in a separate article for the Raspberry Pi platform, but the applications are the same. Here’s a link to the tutorials.
You can follow updates to Incredible PBX 12 in this thread on the PIAF Forum.
We would also encourage you to sign up for an account on the PIAF Forum and join the discussion. In addition to providing first-class, free support, we think you’ll enjoy the camaraderie. Come join us!
Originally published: Monday, November 3, 2014 Updated: Monday, December 1, 2014
 Support Issues. With any application as sophisticated as this one, you’re bound to have questions. Blog comments are a terrible place to handle support issues although we welcome general comments about our articles and software. If you have particular support issues, we encourage you to get actively involved in the PBX in a Flash Forums. It’s the best Asterisk tech support site in the business, and it’s all free! Please have a look and post your support questions there. Unlike some forums, ours is extremely friendly and is supported by literally hundreds of Asterisk gurus and thousands of users just like you. You won’t have to wait long for an answer to your question.

Need help with Asterisk? Visit the PBX in a Flash Forum.
Special Thanks to Our Generous Sponsors
FULL DISCLOSURE: ClearlyIP, Skyetel, Vitelity, DigitalOcean, Vultr, VoIP.ms, 3CX, Sangoma, TelecomsXchange and VitalPBX have provided financial support to Nerd Vittles and our open source projects through advertising, referral revenue, and/or merchandise. As an Amazon Associate and Best Buy Affiliate, we also earn from qualifying purchases. We’ve chosen these providers not the other way around. Our decisions are based upon their corporate reputation and the quality of their offerings and pricing. Our recommendations regarding technology are reached without regard to financial compensation except in situations in which comparable products at comparable pricing are available from multiple sources. In this limited case, we support our sponsors because our sponsors support us.
 BOGO Bonaza: Enjoy state-of-the-art VoIP service with a $10 credit and half-price SIP service on up to $500 of Skyetel trunking with free number porting when you fund your Skyetel account. No limits on number of simultaneous calls. Quadruple data center redundancy. $25 monthly minimum spend required. Tutorial and sign up details are here.
![]() The lynchpin of Incredible PBX 2020 and beyond is ClearlyIP components which bring management of FreePBX modules and SIP phone integration to a level never before available with any other Asterisk distribution. And now you can configure and reconfigure your new Incredible PBX phones from the convenience of the Incredible PBX GUI.
The lynchpin of Incredible PBX 2020 and beyond is ClearlyIP components which bring management of FreePBX modules and SIP phone integration to a level never before available with any other Asterisk distribution. And now you can configure and reconfigure your new Incredible PBX phones from the convenience of the Incredible PBX GUI.
 VitalPBX is perhaps the fastest-growing PBX offering based upon Asterisk with an installed presence in more than 100 countries worldwide. VitalPBX has generously provided a customized White Label version of Incredible PBX tailored for use with all Incredible PBX and VitalPBX custom applications. Follow this link for a free test drive!
 Special Thanks to Vitelity. Vitelity is now Voyant Communications and has halted new registrations for the time being. Our special thanks to Vitelity for their unwavering financial support over many years and to the many Nerd Vittles readers who continue to enjoy the benefits of their service offerings. We will keep everyone posted on further developments.
Some Recent Nerd Vittles Articles of Interest…
- With some providers including ones linked in this article, Nerd Vittles receives referral fees which assist in keeping the Nerd Vittles lights burning brightly. [↩]
Hardware Device of the Year: Meet the CuBox-i with Incredible PBX for Ubuntu

It’s been many years since we’ve written back-to-back articles about the same device. That should tell you how really special the CuBox-i is. After two weeks of 14-hour days developing the new Incredible PBX platform for CuBox, we are thrilled to crown this jewel as Nerd Vittles Hardware Device of the Year. Flawless design, incredible performance, tiny size, feature-rich components, minimal power consumption, and completely silent operation are merely the tip of the iceberg with this 2x2x2 cubic zircon. On the $130 CuBox-i4PRO, there’s a Quad Core processor, 2 gigs of RAM, a 10/100/1000 Ethernet port, a 1080p HDMI port, two powered USB 2 ports, an eSATA II port for an external drive, a realtime clock with backup battery, an Optical S/PDIF Audio Out port, a microSD port, an infrared receiver and transmitter, WiFi 11n, and Bluetooth plus a power adapter to match either American or European power sources. Whew! And here’s the best part. Everything works while squeezed in a tiny case that’s a third the size of Rubic’s Cube.

A SOHO Swiss Army Knife That Fits in Your Cupholder: Voice, Fax, SMS, TTS, Email, PBX, Incredible!
Did we mention it’s a near perfect VoIP platform for any home office or small business? Well, it is. And everything we’ve learned about Asterisk® and FreePBX® and Internet security over the past decade is rolled into today’s release of our crown jewel edition of Incredible PBX™ for the CuBox. First, you’ll need to purchase one and we strongly recommend the CuBox-i4PRO with its Quad Core ARM processor and built-in WiFi and Bluetooth. In the U.S, there’s NewEgg or NewEgg (10% off on i4PRO with promo code SW829NE10 = $117 until 9/4). In the U.K, there’s NewIT. For everyone else, you can buy directly from SolidRun, the creator.
Before we dive into Incredible PBX, we want to express our deepest appreciation to Zhando and Josh North of PIAF Forum fame. Zhando’s pioneering efforts with Ubuntu and Incredible PBX on the CuBox platform and Josh North’s morphing of Incredible Fax for deployment with Ubuntu paved the way for everything you’re about to read. It reinforces the spectacular results which can be achieved in the open source community when a talented group of even a few folks put their heads together. The Ubuntu developers and the tens of thousands of open source contributors from around the world also deserve a well-earned tip of the hat for producing a Linux platform that is rock-solid reliable and incredibly versatile. Nearly 1,000 open source packages are included in the latest Incredible PBX build. Click on the link to view the package list in PDF format and prepare to be amazed. We couldn’t have done it without all of you!
Introducing Incredible PBX 11.12.0 for the CuBox-i4PRO
If you’re new to Asterisk and the world of VoIP telephony, let us take a moment and explain how Incredible PBX fits into the puzzle. For lack of a better term, Incredible PBX on the CuBox platform is a turnkey aggregation in a bootable image that is based upon a superset of Ubuntu 14 packages plus Asterisk, the FreePBX GUI, and a sizable collection of applications for the Asterisk platform. You download a tarball, decompress it, write the image file to a microSD card, insert the card into your CuBox-i, and presto! You’ve got a turnkey PBX. Add credentials for a trunk or two to make and receive calls, connect some phones, and your whole office will come alive with a versatile PBX platform that used to cost organizations hundreds of thousands of dollars. What’s included in Incredible PBX? Glad you asked. Here’s a 3-minute video showcasing a few of our favorite Incredible PBX text-to-speech applications:
The Incredible PBX 11 Inventory. Here’s the current feature set on the CuBox platform. It’s the most robust ever! In addition to its superset of nearly 1,000 Ubuntu 14 packages, Asterisk 11, and FreePBX 2.11 with Apache, SendMail, MySQL, PHP, phpMyAdmin, Fail2Ban, WebMin, and the IPtables Linux firewall, check out these additions:
- AsteriDex: The Poor Man’s Rolodex®
- Asterisk Upgrade Utility (/root/upgrade-asterisk-cubox-bt)
- AvantFax Management Utilities (see /root folder)
- Bluetooth Integration turns your cellphone into an Asterisk Trunk
- CallerID Superfecta (FreePBX Module adds Names to CID Numbers)
- CallWho for Asterisk (Dial by Voice from AsteriDex: 411)
- Preconfigured Email That Works with SendMail and Incredible Fax
- OSS Endpoint Manager (Phone Configuration FreePBX module)
- eSATA External Hard Drive Integration
- Extensions (1 preconfigured with voicemail and randomized passwords)
- Fax to PDF Conversion with EMail Delivery (/root/avantfax-email-dest)
- Google Speech Recognition for Incredible PBX apps (follow setup tutorial)
- Flite TTS for Asterisk (text-to-speech with Igor)
- GoogleTTS for Asterisk (Lefteris Zafiris’ state-of-the-art TTS)
- Google Voice (FreePBX GV/Motif Module for free U.S./Canada calls)
- Hotel-Style Wakeup Calls (FreePBX Module to simulate your favorite Holiday Inn)
- Incredible Backups… and Restores (see /root)
- Incredible Fax 11 with HylaFax/AvantFax
- ODBC Database Support (Dial 222 with Employee Number 12345 to see what’s possible)
- Automated Incredible PBX Update Utility
- Lenny: The Telemarketer’s Worst Nightmare (dial L-E-N-N-Y)
- Network Management Utilities for Wired and Wireless Networking (see /root)
- Parking Lot Attendant (dial ## then 70 to simulate key telephones)
- Partition Resizing Tutorial for eSATA external drives
- Partition Resizing Utility for SD card expansion (/root/resize-partition)
- Phone Conference Bridge (Dial C-O-N-F for Private Conferences)
- PortKnocker for Quick Remote Access (cat /root/knock.FAQ)
- PPTP Virtual Private Network (interconnect with other computers in minutes)
- Reminders by Phone and Web (supports recurring reminders and TTS delivery)
- SAMBA Windows Networking (Windows Networking Made Easy)
- SMS Dictator with Google Voice (Dial S-M-S to dictate and send an SMS message)
- Speech-to-Text Directory Assistance (Dial 411)
- Stealth AutoAttendant
- TimeZone Setup Utility (see /root)
- Today in History (Dial T-O-D-A-Y for today’s major events)
- Travelin’ Man 3 (IPtables WhiteList for rock-solid network security)
- Travelin’ Man 4 (Dialup to WhiteList any IP address: 864)
- Voice Dictation by Phone (Dial 5678)
- Weather by ZIP Code (Dial Z-I-P and enter any 5-digit zip code)
- Worldwide Weather by Phone (Dial 949 and say the name of your favorite city)
- Wolfram Alpha by Phone (/root/wolfram to install the world’s best almanac)
- Yahoo News by Phone (Dial 951 for the latest news headlines)
A Few Words About Security. Thanks to its Zero Internet Footprint™ design, Incredible PBX is different. It remains the most secure Asterisk-based PBX around. What this means is Incredible PBX has been engineered to sit anywhere, either behind a NAT-based, hardware firewall or directly on the Internet. No device other than those on your private LAN, a few of the major (trusted) SIP providers around the world, and those that you authorize on your WhiteList can even see your server. Additional IP addresses can be added to the WhiteList in three ways:
- An administrator registers new IP addresses using add-ip or add-fqdn from the Linux CLI
- A remote user sends the (correct) randomized PortKnock code assigned to your CuBox
- A remote user dials in from a standard telephone to register a new remote IP address
Read about this $100,000 VoIP phone bill, and you’ll better appreciate why WhiteList-based server security has become absolutely essential. WhiteList Security means only those devices with a registered IP address in your WhiteList can get to your server’s resources. To the NSA and everyone else, your server doesn’t even show up on the radar. Their only way to contact you is a POTS telephone using your published phone number. Our complete tutorial on Travelin’ Man 3 is available here. With Incredible PBX for CuBox, it’s installed and preconfigured.
Installing Incredible PBX 11.12.0 on the CuBox-i
There are five simple steps to get Incredible PBX up and running on your CuBox:
- Purchase a storage device
- Download Incredible PBX image
- Untar the image on your desktop
- Burn the image to a microSD card
- Insert microSD card in CuBox and boot
Choosing a Storage Platform. Unless you plan to run your server with an external eSATA hard drive (CuBox-i4PRO tutorial here), the first step is to purchase a suitable microSD card. We recommend at least a 32GB Class 10 card from Transcend, SanDisk, or Kingston. All of them are under $20 on Amazon and most include free 2-day shipping for Prime customers. If using an eSATA drive, you still need a microSD card to boot up, but any 4GB or 8GB card will suffice.1
Downloading Incredible PBX for CuBox. From your favorite desktop computer, download the latest build of Incredible PBX from SourceForge. Depending upon your network connection and the SourceForge mirror, it can take awhile. It’s a whopping 1.3GB!
Untarring Incredible PBX for CuBox. Depending upon your desktop platform, untarring incrediblepbx.4.cubox.U14.latest.tar.gz is as simple as double-clicking on it in the Downloads folder (on a Mac). On the Windows platform, here are 3 utilities that will do the job. On a Linux desktop, open a Terminal window and…
tar zxvf incrediblepbx.4.cubox.U14.latest.tar.gz
Burning the Incredible PBX image to microSD. Once you’ve untarred the file, you’ll find two scripts that make burning the image to a microSD card simple if you’re on a Mac or Linux desktop. On a Windows machine, it’s a little more complicated. Most SD cards come preformatted with a DOS partition so your Windows machine should recognize the microSD card when it’s inserted. If not, format the card using a utility such as SD Card Formatter. Next, you’ll need Win32 Disk Imager to burn cubox.img to your card. Once the image has been transferred, gracefully unmount the card from your desktop, and then remove the card from the SD card adapter.
Booting Incredible PBX on the CuBox. Insert the microSD card (electronics side up) into your CuBox-i. Then apply power to the CuBox after connecting a USB keyboard, HDMI monitor, and Ethernet cable to a network with Internet connectivity that can also hand out DHCP addresses. Log into Incredible PBX as root with cubox as your password. Your SSH credentials, Asterisk DUNDI secrets, logs, and network connection options will be initialized and then your server will reboot. You may need to hit the Enter key once or twice during the SSH credentials initialization to move things along. And, with some SD cards, you may find yourself waiting an eternity for the promised reboot. After seeing the "rebooting" message, count to ten. If your server still hasn’t rebooted, remove and reapply power. This quirk goes away after the first reboot.
After the reboot, log in again as root with password: cubox. Your firewall setup will be initialized to lock down your whitelist to your server’s public and private IP addresses AND the IP address of the machine from which you’re logging in. All of your FreePBX passwords will be randomized and your secret PortKnocker codes will be generated. The whole process only takes a few seconds.
When the second pass configuration is complete, you will be greeted by a welcoming message. STOP and read it. It has loads of important information about your server’s configuration and your next steps. Press ENTER to review status:
The Next 10 Steps. Before you do anything else, complete the following steps. It only takes a minute to secure and properly configure your server:
- Change your root password: passwd
- Change your FreePBX admin password: /root/admin-pw-change
- Set your correct time zone: /root/timezone-setup
- Expand partition to match microSD card size: /root/resize-partition
- Add any desired IP addresses to WhiteList: /root/add-ip
- Put PortKnocker credentials in a safe place: cat /root/knock.FAQ
- Change AvantFax admin password: /root/avantfax-pw-change
- Set Email Address for Incoming Faxes: /root/avantfax-email-dest
- Check status to be sure everything is working: status
- If using an eSATA external drive, do the migration drill (note the free disk space in status above)
A Few Important Tips. Every operating system and service provider has their quirks. Ask Bill Gates! Ubuntu and especially Comcast are no different. Fortunately, with Ubuntu, it’s a very short list.
1. Use the following commands (only!) to shutdown and restart your server: halt and reboot. These commands are reworked in Incredible PBX to gracefully shutdown important services so that files don’t get damaged. Please use them!
2. If you ever want to move your server to a different network, complete these three simple steps before you leave your existing network. This will trigger a new Phase I update (outlined above) and set the default network back to wired eth0 using DHCP the next time you boot your server.
touch /etc/update_hostconfig
/root/enable-eth0-only
# press Ctrl-C when prompted to reboot. then type:
halt
3. You really do need email connectivity to get the most out of Incredible PBX. It’s the way you receive important notifications from FreePBX, and it’s also how faxes and voicemail messages are delivered. From the Linux CLI, test your server to be sure you can send emails reliably:
echo "test" | mail -s testmessage yourname@gmail.com
After checking your spam folder, if you really didn’t get the email, it may be that your service provider is blocking downstream SMTP traffic. You can use your provider’s SMTP server as a smarthost to send out mail with SendMail. Just edit /etc/mail/sendmail.cf, search for DS, and add the provider’s SMTP server address immediately after it (no spaces!), e.g. DSsmtp.comcast.net or DSsmtp.knology.net. Then restart SendMail: service sendmail restart.
Once you’ve logged into FreePBX below, be sure to set your default email address in the right margin of Admin -> Module Admin and save your entry. This will assure receipt of timely notifications of FreePBX updates for your server.
4. If you’re sure you’ll never need remote access in an emergency, you can disable PortKnocker at startup and save about 5% of your processing cycles. Our complete PortKnocker tutorial is available here. To disable startup on boot, issue the following command from the Linux CLI:
update-rc.d -f knockd disable
5. The same applies to WebMin. We actually introduced one of the first tutorials for WebMin… over 9 years ago. A word to the wise: WebMin is a terrific tool for looking at stuff about your system. But be very careful making system changes with WebMin. You usually will break some of the customized settings in Incredible PBX. This is particularly true in the case of the IPtables firewall. To access WebMin, use a browser and the actual IP address of your server to go to: https://12.34.56.78:9001. Log in as root with your root password. To disable automatic startup of WebMin on boot:
update-rc.d -f webmin disable
Setting Up WiFi with the CuBox-i4PRO
This may sound simple now, but two weeks ago it was quite a different story. For those with a CuBox-i4Pro, WiFi is built into the hardware. The trick was getting it to work. Well, with Incredible PBX, it does. In the /root folder, you’ll find several self-explanatory scripts to do the heavy lifting for you. For options 2 and 3, you’ll need the SSID of the WiFi network you’ll be using as well as the SSID password.
- enable-eth0-only (the default setting)
- enable-wifi-eth0 (enables both but eth0 works with Asterisk)
- enable-wifi-only (runs your server purely on WiFi)
Getting Started with VoIP and FreePBX
Up to now, all of your time has been spent using the Linux CLI. That will be a rarity once you get this far. Henceforth, 90% of your time setting up Incredible PBX will be done using the FreePBX GUI and your favorite web browser. To access it, just point to the IP address of your server. status will tell you the address if you’ve forgotten it. The main control panel looks like this:
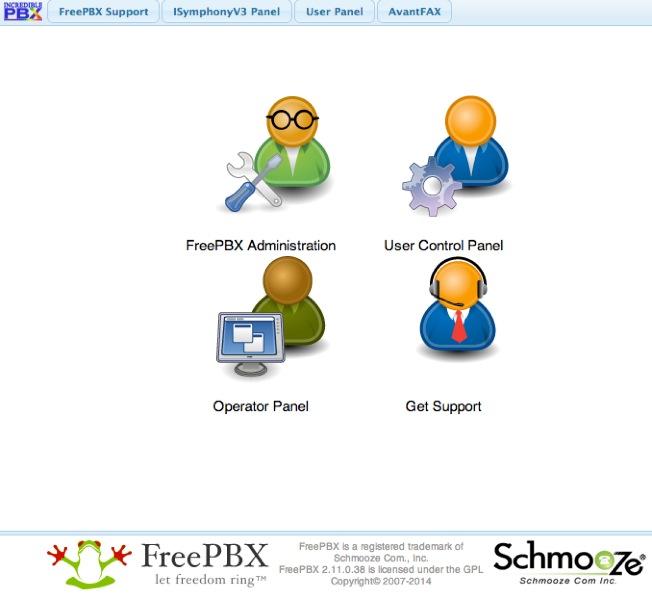
As configured, the default user account for both FreePBX and AvantFax administration is admin. The passwords are whatever you set in steps #2 and #7 above. As configured, email delivery of faxes with AvantFax is automatic so no further setup is required other than setting a delivery mechanism for faxes within FreePBX.
For those new to Asterisk and FreePBX, here’s a brief primer on what needs to happen before you can make and receive calls. If you have an existing Google Voice account or a smartphone that’s less than 2 years old, lucky you. This gets you a phone number for your PBX so people can call you. And it provides a vehicle to place calls to plain old telephones at little or no cost.
If you don’t have a Google Voice account or a shiny new smartphone, then you will need to purchase a SIP trunk from one of the numerous vendors around the world. Our favorite (because they provide terrific service at a modest price AND provide financial support to the Nerd Vittles, PBX in a Flash, and Incredible PBX projects) is Vitelity. Their special rates and a link for a discount are included at the end of today’s article.
Unlike POTS phone service from Ma Bell, the SIP World is a little different. First, you don’t need to put all your eggs in one basket. A trunk that gets you a phone number for incoming calls need not be with the same vendor that provides a trunk to place outbound calls. In fact, you may want multiple trunks for outbound calls just to have some redundancy. A list of our favorites in the U.S. and Canada is available on the PIAF Forum. Of course, there also are providers that offer all-you-can-eat calling plans. Two of our favorites are Vestalink and Future-Nine.
You’ll also need a softphone or SIP phone to actually place and receive calls. YATE makes a free softphone for PCs, Macs, and Linux machines so download your favorite and install it on your desktop.
Phones connect to extensions in FreePBX to work with Incredible PBX. Extensions talk to trunks (like Google Voice) to make and receive calls. FreePBX uses outbound routes to direct outgoing calls from extensions to trunks, and FreePBX uses inbound routes to route incoming calls from trunks to extensions to make your phones ring. In a nutshell, that’s how a PBX works.
There are lots of bells and whistles that you can explore down the road including voicemail, conferencing, IVRs, autoattendants, paging, intercoms, CallerID lookups, announcements, DISA, call parking and pickup, queues, ring groups, and on and on. And then there’s all of the Incredible PBX applications which are covered separately in this Nerd Vittles article. Once you’re comfortable with one server, you or your company will want some more. This Nerd Vittles article will walk you through interconnecting them into a seamless mesh network so that you can call from one office to another transparently. Yes, those articles were written for the Raspberry Pi. But the beauty of Incredible PBX is that it runs identically on virtually every server platform.

Here’s our 10-Step Checklist to Getting Started with FreePBX:
1. Setting Up Google Voice. If you want free calling in the U.S. and Canada, then you’ll need an existing Google Voice account that includes the Google Chat feature. You’ll need one dedicated to Incredible PBX, or it won’t work. Log out after setting up the new Google Voice account! Also note that Google Voice may cease to function at any time after May 15, 2014. You can read all about it here.
- Log into existing Google Voice account
- Enable Google Chat as Phone Destination
- Configure Google Voice Calls Settings:
- Call Screening – OFF
- Call Presentation – OFF
- Caller ID (In) – Display Caller’s Number
- Caller ID (Out) – Don’t Change Anything
- Do Not Disturb – OFF
- Call Options (Enable Recording) – OFF
- Global Spam Filtering – ON
- Place test call in and out using GMail Call Phone
- Log out of your Google Voice account
2. Activating a Google Voice Trunk. To create a Trunk in FreePBX to handle calls to and from Google Voice, you’ll need three pieces of information from the Google Voice account you set up above: the 10-digit Google Voice phone number, your Google Voice account name, and your Google Voice password. Choose Connectivity -> Google Voice (Motif) from the FreePBX GUI. The following form will appear:
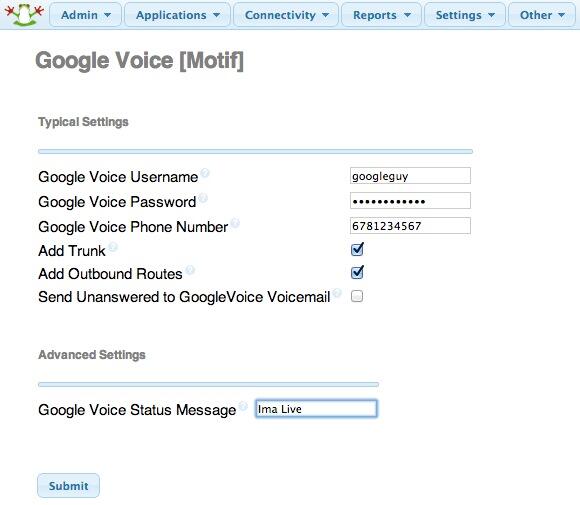
Fill in the blanks with your information and check only the top 2 boxes. If your Google Voice account name ends in @gmail.com, leave that out. Otherwise, include the full email address. Then click Submit Changes and Apply Config.
There’s one more step or your Google Voice account won’t work reliably with Incredible PBX! From the Linux command prompt while logged into your server as root, restart Asterisk: amportal restart
3. Setting a Destination for Incoming Calls and Managing Faxes. Now that you’ve created your Google Voice Trunk, we need to tell FreePBX how to process inbound calls when someone dials your Google Voice number. There are any number of choices. You could simply ring an extension. Or you could ring multiple extensions by first creating a Ring Group which is just a list of extension numbers. Or you could direct incoming calls to an Interactive Voice Response (IVR) system. By default, Incredible PBX is configured to route all incoming calls to extension 701. You can change the setting whenever you like by choosing Connectivity -> Inbound Routes -> Default. In the Set Destination section of the form, change the target destination from the pull-down lists.
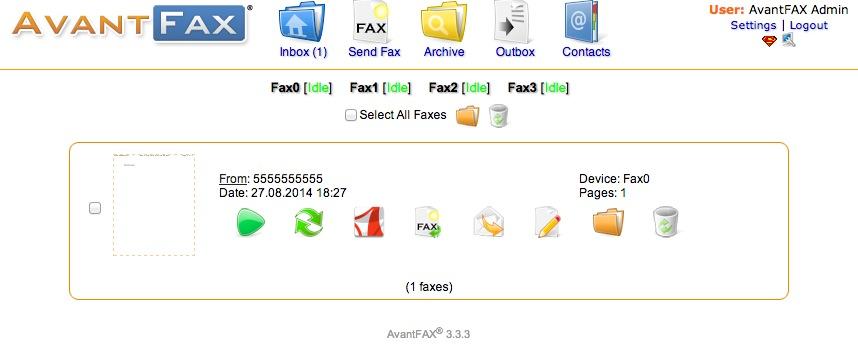
If you want your default inbound route to also handle incoming faxes, then go to the Fax Detect section of the Default inbound route. Change Detect Faxes to Yes. Change Fax Detection Type to SIP. Leave the Detection Time setting at 4. And change the Fax Destination to Custom Destinations: Fax (Hylafax). To Send Faxes, open AvantFax in FreePBX’s Other pulldown menu.
Always click Submit and then click Apply Config to save new settings in FreePBX.
4. Activating a Smartphone Trunk Using Bluetooth. One of the more exotic features of Incredible PBX on the CuBox platform is the ability to add your smartphone as an Asterisk trunk using Bluetooth. We’ve written a short recipe to get things working. So have a look at our Bluetooth tutorial and see if you’re up for the challenge. Moral of the story: the newer the cellphone, the better.
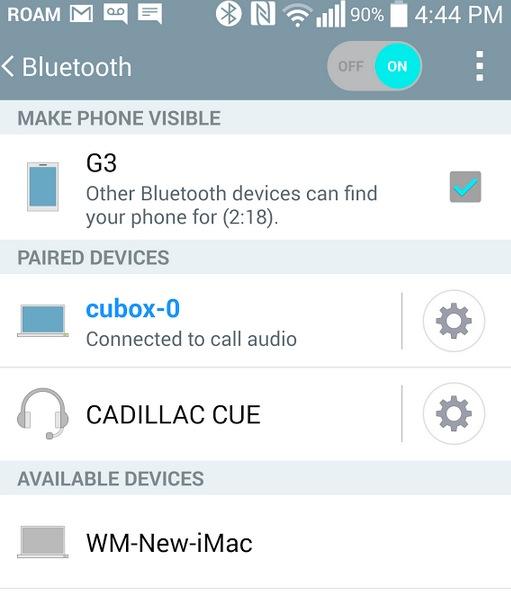
The LG G3 is the best of the lot, at least of the numerous cellphones we tested. Even better is an LG G3 paired with StraightTalk’s (AT&T-hosted) unlimited talk, text, and data plan for $45 a month. With Samsung smartphones older than a Galaxy S4, don’t waste your time. Ditto with Apple iPhones other than perhaps the very latest. Our iPhone 4S failed miserably. We gave up on Apple phones after that. Someday I’ll test my daughter’s 5c and report back.
5. Activating Additional Trunks with FreePBX. As we mentioned, there are lots of SIP providers to choose from. Once you have signed up for service, configuring the trunk is easy. Here is a quick Cheat Sheet courtesy of Kristian Hare, who translated our original setups into a spreadsheet. Just click on the image below to open it in a new window. Then click on the redisplayed image to enlarge it. The left and right cursor keys will move you around in the image. Click on the image again to shrink it.

6. Changing Extension Passwords. From the main FreePBX GUI, choose Applications -> Extensions. Then click on 701 in the Extension List on the right side of your display. You’ll see a form that looks like this:
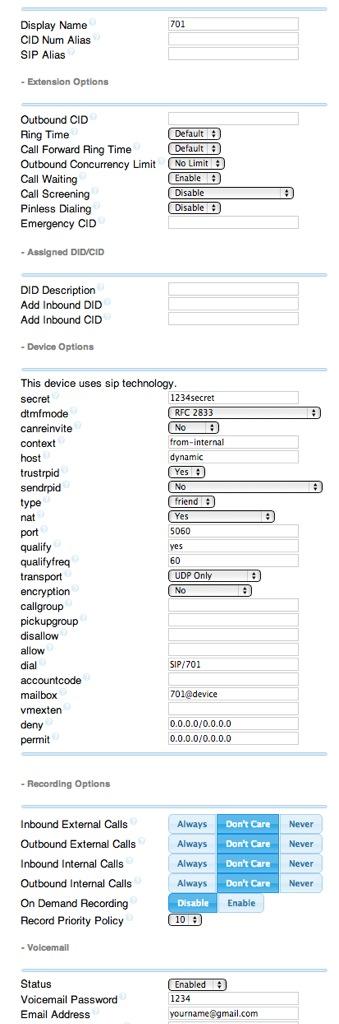
For now, we only need to make a few changes. First, you need a very secure password for both the extension itself and your voicemail account for this extension. The extension secret needs to be a combination of letters and numbers. The Voicemail Password needs to be all numbers, preferably six or more. Replace the existing password entries with your own (very secure) entries. You also need to lock down this extension so that it is only accessible from devices on your private LAN. You do that with the deny and permit entries which currently are filled with zeroes. Leave the deny entry the way it is which tells Incredible PBX to block everybody except those allowed in the permit entry below. For the permit, we need the first three octets of your private LAN address, e.g. if your LAN is 192.168.0.something then the permit entry will be 192.168.0.0/255.255.255.0.
Finally, you need to plug in your actual email address in the Voicemail section so that voicemails can be delivered to you when someone leaves a message. You can also include a pager email address if you want a text message alert with incoming voicemails. If you want the voicemails to automatically be deleted from the server after they are emailed to you (a good idea considering the disk storage limitations of your microSD card), change the Delete Voicemail option from No to Yes. That’s it. Now save your settings by clicking the Submit button. Then reload the dialplan by clicking on the red prompt when it appears.
In case you’re curious, unless you’ve chosen to automatically delete voicemails after emailing them, you can retrieve your voicemails by dialing *98701 from any extension on your phone system. You’ll be prompted to enter the voicemail password you set up. In addition to managing your voicemails, you’ll also be given the opportunity to either return the call to the number of the person that called or to transfer the voicemail to another extension’s voicemail box. And you can always leave a voicemail for someone by dialing their extension number preceded by an asterisk, e.g. *701 would let someone leave you a voicemail without actually calling you.
7. Eliminating Audio and DTMF Problems. You can avoid one-way audio on calls and touchtones that don’t work with these simple settings in FreePBX: Settings -> Asterisk SIP Settings. Just plug in your public IP address and your private IP subnet. Then set ULAW as the only Audio Codec.
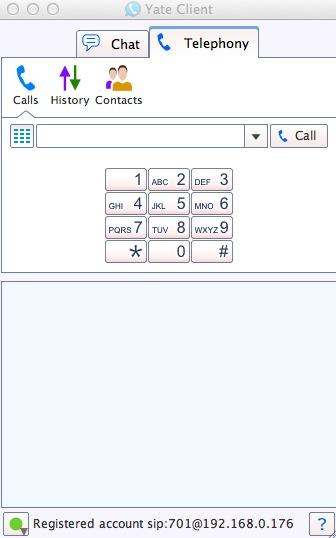
8. Configuring Your YATE Softphone. As we mentioned, the easiest way to get started with Incredible PBX is to set up a free YATE softphone on your Desktop computer. Versions are available at no cost for Macs, PCs, and Linux machines. Just download the appropriate one and install it from this link. Once installed, it’s a simple matter to plug in your extension 701 credentials and start making calls. Run the application and choose Settings -> Accounts and click the New button. Fill in the blanks using the IP address of Incredible PBX, 701 for your account name, and whatever password you created for the extension. Click OK.
Once you are registered to extension 701, close the Account window. Then click on YATE’s Telephony Tab and place your first call. It’s that easy!
9. Configuring CallerID Superfecta. In order to match names with phone numbers, Incredible PBX includes a FreePBX application named CallerID Superfecta. Out of the box, Incredible PBX will work fine if you remember to activate CallerID Superfecta whenever you create a new Inbound Route. The CNAM entries also will be displayed in your CDR reports. For those not in the United States, you may prefer to use a lookup source for your numbers other than the ones preconfigured in CallerID Superfecta. You will find all of the available modules on the POSSA GitHub site. Just download the ones desired into /var/www/html/admin/superfecta/sources and then activate the desired sources in Admin -> CID Superfecta -> Default. You can test your results and the performance using the Debug facility that’s built into the module.
10. Adding Speech Recognition for Incredible Applications. We used to include Google’s Speech-to-Text service in Incredible PBX builds. Unfortunately, Google has changed the rules a bit. Assuming your server still meets the "personal and development" standard, you can obtain an API key from Google and reactivate speech-to-text functionality for many of the Incredible PBX applications including Weather Reports by City (949), AsteriDex Voice Dialing by Name (411), SMS Dictator (767), and Wolfram Alpha for Asterisk (4747). To activate the STT service, just complete the steps in our tutorial. Then sign up for a Wolfram Alpha App ID (tutorial here), and run the following install scripts:
/root/wolfram/wolframalpha-oneclick.sh
/root/smsdictator/sms-dictator.sh
Enabling SAMBA Windows Networking with Ubuntu
It only takes a minute to enable SAMBA Windows Networking on your CuBox. We’ve reproduced our quick tutorial to show you how. Just follow the steps below to interconnect Incredible PBX with all the other computers on your LAN.
apt-get -y install samba samba-common python-glade2 system-config-samba
cd /etc/samba
mv smb.conf smb.orig.conf
wget http://incrediblepbx.com/samba-ubuntu.tar.gz
tar zxvf samba-ubuntu.tar.gz
rm *.tar.gz
sed -i '/# End of Trusted Provider Section/r '/etc/samba/smb.iptables'' /etc/iptables/rules.v4
iptables-restart
service smbd restart
service nmbd restart
sed -i 's|/usr/local/sbin/amportal restart|service smbd restart\\nservice nmbd restart\\n/usr/local/sbin/amportal restart|' /etc/rc.local
# set up root password for SAMBA access with full RW privileges
smbpasswd -a root
Incredible Backup and Restore
Once you have everything configured, it’s time to take a snapshot of your system and store it in a safe place. The new Incredible Backup lets you do that. From the Linux CLI, login as root and run: /root/incrediblebackup. The backup image will be saved to the /tmp folder and can be copied to a different server easily. To restore the backup to another system, you simply bring the other system up to the same version of Asterisk (11) and FreePBX (2.11), and then run /root/incrediblerestore with your backed up image. It’s the cheapest insurance you can buy! For detailed instructions on restoring backups, see this thread on the PIAF Forum.
 Don’t forget to List Yourself in Directory Assistance so everyone can find you by dialing 411. And add your new number to the Do Not Call Registry to block telemarketing calls. Or just call 888-382-1222 from your new number.
Originally published: Monday, September 1, 2014
Support Issues. With any application as sophisticated as this one, you’re bound to have questions. Blog comments are a terrible place to handle support issues although we welcome general comments about our articles and software. If you have particular support issues, we encourage you to get actively involved in the PBX in a Flash Forums. It’s the best Asterisk tech support site in the business, and it’s all free! Please have a look and post your support questions there. Our forum is extremely friendly and is supported by literally hundreds of Asterisk gurus.
Need help with Asterisk? Visit the PBX in a Flash Forum.
Special Thanks to Our Generous Sponsors
FULL DISCLOSURE: ClearlyIP, Skyetel, Vitelity, DigitalOcean, Vultr, VoIP.ms, 3CX, Sangoma, TelecomsXchange and VitalPBX have provided financial support to Nerd Vittles and our open source projects through advertising, referral revenue, and/or merchandise. As an Amazon Associate and Best Buy Affiliate, we also earn from qualifying purchases. We’ve chosen these providers not the other way around. Our decisions are based upon their corporate reputation and the quality of their offerings and pricing. Our recommendations regarding technology are reached without regard to financial compensation except in situations in which comparable products at comparable pricing are available from multiple sources. In this limited case, we support our sponsors because our sponsors support us.
BOGO Bonaza: Enjoy state-of-the-art VoIP service with a $10 credit and half-price SIP service on up to $500 of Skyetel trunking with free number porting when you fund your Skyetel account. No limits on number of simultaneous calls. Quadruple data center redundancy. $25 monthly minimum spend required. Tutorial and sign up details are here.
![]() The lynchpin of Incredible PBX 2020 and beyond is ClearlyIP components which bring management of FreePBX modules and SIP phone integration to a level never before available with any other Asterisk distribution. And now you can configure and reconfigure your new Incredible PBX phones from the convenience of the Incredible PBX GUI.
The lynchpin of Incredible PBX 2020 and beyond is ClearlyIP components which bring management of FreePBX modules and SIP phone integration to a level never before available with any other Asterisk distribution. And now you can configure and reconfigure your new Incredible PBX phones from the convenience of the Incredible PBX GUI.
VitalPBX is perhaps the fastest-growing PBX offering based upon Asterisk with an installed presence in more than 100 countries worldwide. VitalPBX has generously provided a customized White Label version of Incredible PBX tailored for use with all Incredible PBX and VitalPBX custom applications. Follow this link for a free test drive!
Special Thanks to Vitelity. Vitelity is now Voyant Communications and has halted new registrations for the time being. Our special thanks to Vitelity for their unwavering financial support over many years and to the many Nerd Vittles readers who continue to enjoy the benefits of their service offerings. We will keep everyone posted on further developments.
Some Recent Nerd Vittles Articles of Interest…
- Some of our links refer users to Amazon or other service providers when we find their prices are competitive for the recommended products. Nerd Vittles receives a small referral fee from these providers to help cover the costs of our blog. We never recommend particular products solely to generate commissions. However, when pricing is comparable or availability is favorable, we support these providers because they support us. [↩]
State of the Art: The New Incredible PBX Security Model for Asterisk
About once a year, we try to shine the spotlight on Asterisk® security in hopes of saving lots of organizations and individuals a little bit (or a lot) of money. The problem with open source phone systems is they’re open source phone systems. So the bad guys can figure out how they work just like the good guys. That’s not to suggest that proprietary phone systems are any more secure. They’re not. It just may take the bad guys a little longer to figure out where the holes are.

Olle Johansson has been one of the primary shakers and movers when it comes to educating folks on Asterisk security and inspiring developers to do a better job designing these systems. If you didn’t attend last year’s AstriCon and haven’t watched the Security Master Class, put it on your Bucket List. It’s free and well worth your time.
When we began building out Incredible PBX™ on other platforms this summer, we decided it was an opportune time to revisit our Asterisk security model and make it as bullet-proof as possible given the number of people now deploying Asterisk servers in the cloud. As a practical matter, there are no hardware-based firewalls to protect you with many of the cloud-based systems. So you literally live or die based upon the strength of your own software-based security model.
As in the past, security is all about layers of protection. A bundle of sticks is harder to break than a single stick. In the last month, we have rolled out new Incredible PBX systems for CentOS 7, Scientific Linux 7, Ubuntu 14, and the latest Raspbian OS for the Raspberry Pi B+. We’re in the final testing stage for a new Incredible PBX for CentOS 6.5 and Scientific Linux 6.5 as well as Ubuntu 14. All of these releases include the new Incredible PBX security model, and we will retrofit it to Fedora 20 and our standard builds for PBX in a Flash and RasPBX in coming weeks. Here’s how it works…
The 7 Security Layers include the following, and we will go into the details below:
- Preconfigured IPtables Linux Firewall
- Preconfigured Travelin’ Man 3 WhiteLists
- Randomized Port Knocker for Remote Access
- TM4 WhiteListing by Telephone (optional)
- Fail2Ban
- Randomized Ultra-Secure Passwords
- Automatic Security Updates & Bug Fixes
1. IPtables Linux Firewall. Yes, we’ve had IPtables in place with PBX in a Flash for many years. And, yes, it was partially locked down in previous Incredible PBX releases if you chose to deploy Travelin’ Man 3. Now it’s automatically locked down, period. As installed, the new Incredible PBX limits login access to your server to those on your private LAN (if any) and anyone logging in from the server’s public or private IP address and the public IP address of the desktop machine used to install the Incredible PBX software. If you or your users need access from other computers or phones, those addresses can be added quickly using either the Travelin’ Man 3 tools (add-ip and add-fqdn) or using the Port Knocker application running on your desktop or smartphone. All you need is your randomized 3 codes for the knock. You can also enable a remote IP address by telephone. Keep reading!

2. Travelin’ Man 3 WhiteLists. As in the past, many of the major SIP providers have been whitelisted in the default setup so that you can quickly add new service without worrying about firewall access. These are providers that we’ve used over the years. The preconfigured providers include Vitelity (outbound1.vitelity.net and inbound1.vitelity.net), Google Voice (talk.google.com), VoIP.ms (city.voip.ms), DIDforsale (209.216.2.211), CallCentric (callcentric.com), and also VoIPStreet.com (chi-out.voipstreet.com plus chi-in.voipstreet.com), Les.net (did.voip.les.net), Future-Nine, AxVoice (magnum.axvoice.com), SIP2SIP (proxy.sipthor.net), VoIPMyWay (sip.voipwelcome.com), Obivoice/Vestalink (sms.intelafone.com), Teliax, and IPkall. You are, of course, free to add other providers or users using the whitelist tools being provided. add-ip lets you add an IP address to your whitelist. add-fqdn lets you add a fully-qualified domain name to your whitelist. del-acct lets you remove an entry from your whitelist. Because FQDNs cause problems with IPtables if the FQDN happens to be invalid or non-functional, we’ve provided a customized iptables-restart tool which will filter out bad FQDNs and start up IPtables without the problematic entries.
Be advised that whitelist entries created with PortKnocker are stored in RAM, not in your IPtables file. These RAM entries will get blown out of the water whenever your system is restarted OR if IPtables is restarted. Stated another way, PortKnocker should be used as a stopgap tool to get new IP addresses qualified quickly. If these addresses need access for more than a few hours, then the Travelin’ Man 3 tools should be used to add them to your IPtables whitelist. If your whitelist setup includes dynamic IP addresses, be aware that using ipchecker in a cron job to test for changing dynamic IP addresses will remove PortKnocker whitelist RAM entries whenever an IP address change triggers an iptables-restart.
For more detail on Travelin’ Man 3, review our original tutorial.

3. PortKnocker WhiteListing. We wrote about PortKnocker several weeks ago and won’t repeat the article here. In a nutshell, it lets you knock on three ports on a host machine in the proper order to gain access. If you get the timing and sequence right, the IP address from which you knocked gets whitelisted for access to the server… with appropriate admin or root passwords, of course. The knocking can be accomplished with either a command line tool or an iOS or Android app using your smartphone or tablet. As noted above, it’s a terrific stopgap tool to let you or your users gain quick access to your server. For the reasons we’ve documented, don’t forget that it’s a stopgap tool. Don’t use it as a replacement for Travelin’ Man 3 whitelists unless you don’t plan to deploy dynamic IP address automatic updating. Just to repeat, PortKnocker whitelists get destroyed whenever IPtables is restarted or your server is rebooted. You’ve been warned.
4. TM4 WhiteListing by Telephone. Newer releases of Incredible PBX are preconfigured with ODBC support for telephony applications. One worth mentioning is our new Travelin’ Man 4 utility which lets a remote user dial into a dedicated DID and register an IP address to be whitelisted on the server. Within a couple minutes, the user will be sent an email confirming that the IP address has been whitelisted and remote access is now enabled. For phone systems and administrators supporting hundreds of remote users, this new feature will be a welcome addition. It can be configured in a couple minutes by following the Installation instructions in the Travelin’ Man 4 tutorial. Unlike PortKnocker, whitelisted IP addresses added with TM4 are permanent until modified by the remote user or deleted by the administrator.

5. Fail2Ban. We’ve never been a big fan of Fail2Ban which scans your logs and blacklists IP addresses after several failed attempts to log in or register with SSH or Apache or Asterisk. The reason is because of documented cases where attacks from powerful servers (think: Amazon) completely overpower a machine and delay execution of Fail2Ban log scanning until tens of thousands of registration attempts have been launched. The FreePBX folks are working on a methodology to move failed login attempts to a separate (smaller) log which would go a long way toward eliminating the log scanning bottleneck. In the the meantime, Fail2Ban is included, and it works when it works. But don’t count on it as your only security layer.

6. Randomized Passwords. With the new security model described above, we’ve dispensed with Apache security to protect FreePBX® access. These new Incredible PBX releases rely upon the FreePBX security model which relies upon encrypted passwords stored in MySQL or MariaDB. As part of the installation process, Incredible PBX randomizes ALL FreePBX passwords including those for the default 701 extension as well as the admin password. When your new Incredible PBX install completes, the most important things to remember are your (randomized) FreePBX admin password AND the (randomized) 3 ports required for Port Knocker access. Put them in a safe place. Sooner or later, you’ll need them. You can review your PortKnocker settings in /root/knock.FAQ. We’ve also included admin-pw-change in the /root folder for those that are too lazy to heed our advice. With the new security model, there is no way to look up your admin password. All you can do is change it… assuming you haven’t also forgotten your root password. 😉
7. Automatic Update Service. All new Incredible PBX builds include an automatic update service to provide security patches and bug fixes whenever you log into your server as root. If you don’t want the updates for some reason, you can delete the /root/update* file from your server. If the cost of maintaining this service becomes prohibitive, we may implement a pay-for-service fee, but it presently is supported by voluntary contributions from our users. It has worked extremely well and provided a vehicle for pushing out updates that affect the reliability and security of your server.
A Word About IPv6. Sooner or later Internet Protocol version 6 will be upon us because of the exhaustion of IPv4 IP addresses. Incredible PBX is IPv6-aware and IPtables has been configured to support it as well. As deployed, outbound IPv6 is not restricted. Inbound access is limited to localhost. You, of course, are free to modify it in any way desired. Be advised that disabling IPv6 localhost inbound access will block access to the FreePBX GUI. Don’t ask us how we know. 🙂
Originally published: Monday, August 11, 2014
Support Issues. With any application as sophisticated as firewall security, you’re bound to have questions. Blog comments are a terrible place to handle support issues although we welcome general comments about our articles and software. If you have particular support issues, we encourage you to get actively involved in the PBX in a Flash Forums. It’s the best Asterisk tech support site in the business, and it’s all free! Please have a look and post your support questions there. Unlike some forums, ours is extremely friendly and is supported by literally hundreds of Asterisk gurus and thousands of ordinary users just like you. You won’t have to wait long for an answer to your question.
Need help with Asterisk? Visit the PBX in a Flash Forum.
Special Thanks to Our Generous Sponsors
FULL DISCLOSURE: ClearlyIP, Skyetel, Vitelity, DigitalOcean, Vultr, VoIP.ms, 3CX, Sangoma, TelecomsXchange and VitalPBX have provided financial support to Nerd Vittles and our open source projects through advertising, referral revenue, and/or merchandise. As an Amazon Associate and Best Buy Affiliate, we also earn from qualifying purchases. We’ve chosen these providers not the other way around. Our decisions are based upon their corporate reputation and the quality of their offerings and pricing. Our recommendations regarding technology are reached without regard to financial compensation except in situations in which comparable products at comparable pricing are available from multiple sources. In this limited case, we support our sponsors because our sponsors support us.
BOGO Bonaza: Enjoy state-of-the-art VoIP service with a $10 credit and half-price SIP service on up to $500 of Skyetel trunking with free number porting when you fund your Skyetel account. No limits on number of simultaneous calls. Quadruple data center redundancy. $25 monthly minimum spend required. Tutorial and sign up details are here.
![]() The lynchpin of Incredible PBX 2020 and beyond is ClearlyIP components which bring management of FreePBX modules and SIP phone integration to a level never before available with any other Asterisk distribution. And now you can configure and reconfigure your new Incredible PBX phones from the convenience of the Incredible PBX GUI.
The lynchpin of Incredible PBX 2020 and beyond is ClearlyIP components which bring management of FreePBX modules and SIP phone integration to a level never before available with any other Asterisk distribution. And now you can configure and reconfigure your new Incredible PBX phones from the convenience of the Incredible PBX GUI.
VitalPBX is perhaps the fastest-growing PBX offering based upon Asterisk with an installed presence in more than 100 countries worldwide. VitalPBX has generously provided a customized White Label version of Incredible PBX tailored for use with all Incredible PBX and VitalPBX custom applications. Follow this link for a free test drive!
Special Thanks to Vitelity. Vitelity is now Voyant Communications and has halted new registrations for the time being. Our special thanks to Vitelity for their unwavering financial support over many years and to the many Nerd Vittles readers who continue to enjoy the benefits of their service offerings. We will keep everyone posted on further developments.
Some Recent Nerd Vittles Articles of Interest…
Top 3 Asterisk Security Tips for 2014: WhiteLists, WhiteLists, and WhiteLists

We’ve devoted a lot of energy to Asterisk security over the years with our Primer on Avoiding the $100,000 Phone Bill and our 20 Failsafe Tips and our SIP Navigation Guide plus numerous tutorials on deployment of Virtual Private Networks to secure your servers and phones including NeoRouter, PPTP, and Easy OpenVPN among others. But, when it comes to ease of installation and use with rock-solid security, nothing comes close to deployment of WhiteLists with the IPtables Linux firewall that’s included at no cost with every major Linux distribution and with all of the Asterisk® aggregations including PBX in a Flash™ and Incredible PBX™. So we’re kicking off the summer with a careful look at the methodology behind IPtables and the Travelin’ Man™ tools developed to reduce the learning curve for new users.
Security, of course, is all about the "bundle of sticks." As we learned from Aesop’s Fables, the more sticks you bundle together, the more difficult it is to break the stick. We are by no means advocating that you drop all of the other tools at your disposal to improve the security of your Asterisk security. So, before we dive into WhiteLists, let’s spend a little time covering some of the other tools that are available and why those tools should not be relied upon exclusively.
1. Hardware-based Firewall. The PBX in a Flash project has cautioned users for years not to run Asterisk-based servers connected to the Internet without a hardware-based firewall between your server and the public Internet. Is it failsafe? No. Some hardware-based firewalls have been compromised either by the bad guys or by the NSA. Pardon the redundancy. The other problem with hardware-based firewalls is that they’re generally not available with cloud-based solutions. As the price of cloud computing has dropped and the cost and headaches of maintaining your own hardware has increased, more and more folks are considering cloud-based alternatives. Yes. Hardware-based firewalls should be deployed whenever possible. No. They won’t resolve all security concerns.
2. Fail2Ban. Once upon a time, a number of us thought that Fail2Ban was the answer to all security issues with Asterisk-based servers. In a nutshell, Fail2Ban scans your logs searching for failed attempts to log in to either SSH, FTP, Apache, SIP, or an email account. After a small number of failed attempts, Fail2Ban blocks further access from the IP address initiating the requests. There are two problems with Fail2Ban. First, software developers of the affected services continue to "improve" things with new and different error messages when login failures occur. Since Fail2Ban is searching for specific word matches to identify unsuccessful logins, the whole security mechanism fails when the "magic words" change unless everyone is extremely vigilant in maintaining the "magic word" lists AND updating the Fail2Ban rules on all of your servers. Our experience suggests that the bad guys find the new "magic words" long before everyone else which means there are gaping holes in Fail2Ban regularly. The other problem is supercomputers such as Amazon EC2 which makes enormous computing resources available to every Tom, Dick, and Harry. We’re mostly worried about the Dick that can hammer your little server every second with hundreds of thousands of attempts to crack your SIP or SSH passwords. The problem this poses is that most Linux servers never allocate a sufficient time slice to Fail2Ban to scan your Asterisk, Apache, and SendMail logs. Instead of blocking a bad guy after 3 failed login attempts, a bad guy using EC2 may be able to perform several hundred thousand login attempts before Fail2Ban ever detects a problem. Yes. Fail2Ban helps against the bad guy manually keying in passwords. No. Fail2Ban is all but worthless against a sophisticated denial of service attack on your server.
3. Virtual Private Networks. The beauty of virtual private networks (VPNs) is that all of your Internet traffic is encrypted and tunneled through private IP addresses that others can’t intercept. That was the theory until Edward Snowden came along and spoiled the NSA’s party. Yes. We’ve known that PPTP VPNs were vulnerable for a good long while. No. We didn’t know that the NSA (and presumably others) may have had the keys to your castle much longer… regardless of the VPN topology you may be using. The other problem with VPNs is that you need VPN connections for every device connecting to your server. Unfortunately, VPN technology is only available on a small number of SIP telephones, and the supported OpenVPN topology is one of the more difficult VPNs to deploy on a Linux server. Are VPNs better than nothing? Absolutely. Does a VPN provide failsafe communications security over the open Internet? Probably not.
4. Nothing Beats Secure Passwords. Amen. There was a time when some Asterisk-based servers were routinely set up with extension passwords of 1234 or the extension number itself. And outbound SIP trunks were deployed with no dialing rules. And administrators opened accounts with SIP providers with automatic credit card replenishment whenever the accounts ran out of money to cover calls. And no safeguards were put in place to restrict international calling. Little did these folks know that registering to a SIP extension on an Asterisk server provided a blank check for making unlimited calls to anywhere on the planet. Thus was born the $100,000 phone bill. Yes. Nothing Beats Secure Passwords for root, for SIP accounts, and for SIP and IAX trunks connected to commercial providers. But you also need to implement dialing rules for outbound calls that allow your callers to reach only the destinations desired, not the world. And your accounts with providers should always include limits and restrictions on international calls and should never include automatic credit card replenishment.
5. BlackLists. There was a time when blacklisting IP addresses was believed to be the ultimate solution to Internet security problems. Sounds great, doesn’t it? Just set up a database with the IP addresses of all the bad guys in the world, and all our problems will be solved. Problem #1: A new bad guy is born every minute. Problem #2: The bad guys learned how to use VPNs and other random IP address masquerading sites to disguise their true identity. Problem #3: Security vulnerabilities in many Windows-based machines allowed the bad guys to take control of these computers and do their dirty work from there. Problem #4: There are actually some good guys that live in Russia and China. Problem #5: The bad guys learned to poison the "bad guy list" to block essential services such as DNS, Google, Amazon, Netflix, Pandora, and your favorite bank and credit card companies. Yes. The theory of blacklists sounded great. No. Blacklists not only don’t work. They’re downright dangerous.
WhiteLists with IPtables: The Knight in Shining Armor
For the past few years, our Internet security focus has turned toward defining a methodology that works with all PBX in a Flash and Incredible PBX servers, whether they’re dedicated servers behind a hardware-based firewall or public on a cloud-based shared host. And the conclusion we’ve reached is that nothing beats the IPtables Linux firewall for rock-solid Internet security. The reason is its deep integration into the Linux kernel itself through Netfilter, "a set of hooks inside the Linux kernel that allows kernel modules to register callback functions with the network stack." Wikipedia provides an excellent overview for those with an interest. For our purposes, suffice it to say that IPtables examines inbound and outbound packets before any further processing occurs on your server. With our default setup, we typically allow all outbound traffic from your server. For inbound traffic, if the iptables rules permit access, the packet comes in for processing. If not, the packet dies at the door with no acknowledgement that it was even received. In laymen’s terms, if someone attempts to scan your server to determine whether web or SIP services are available, there will be no response at all unless packets from the scanning server’s IP address are permitted in the iptables rules configured on your server. You can determine which rules are in force with this command: iptables -nL.
The basic configuration and syntax of iptables rules can be daunting to those unfamiliar with the territory. And thus was born Travelin’ Man 3, our open source tool to simplify configuration of IPtables by allowing administrators to define WhiteList entries describing the types of services that were allowed access to a server from specified external IP addresses. The basic rules of the Travelin’ Man 3 setup for iptables are these: (1) outbound packets are unrestricted, (2) forwarded, established, and related packets are permitted, (3) inbound packets from the private LAN are unrestricted, but (4) inbound packets from the public Internet are dropped unless permitted by a specific iptables rule. Those rules include certain basic services such as time synchronization (TCP 123) as well as WhiteListed IP address entries for specific or generic services.
Installation is easy. Log into your PBX in a Flash as root and issue the following commands. NOTE: Travelin’ Man 3 is optionally available as part of Incredible PBX installs on the CentOS, Scientific Linux, and PIAF OS platforms. It is preinstalled on the Raspberry Pi and BeagleBone Black platforms with RasPBX. You can determine if it’s already installed on your server with this command: ls /root/secure-iptables. If the script exists, you’ve already got Travelin’ Man installed, but it may not be running so keep reading…
cd /root

wget http://incrediblepbx.com/travelinman3.tar.gz

tar zxvf travelinman3.tar.gz

yum -y install bind-utils

./secure-iptables
Because PBX in a Flash and Incredible PBX servers are primarily designed to support telephony, Travelin’ Man 3 further simplifies the iptables setup by whitelisting the IP addresses of a number of the leading VoIP providers. These include Vitelity (outbound1.vitelity.net and inbound1.vitelity.net), Google Voice (talk.google.com), VoIP.ms (city.voip.ms), DIDforsale (209.216.2.211), CallCentric (callcentric.com), and also VoIPStreet.com (chi-out.voipstreet.com plus chi-in.voipstreet.com), Les.net (did.voip.les.net), Future-Nine, AxVoice (magnum.axvoice.com), SIP2SIP (proxy.sipthor.net), VoIPMyWay (sip.voipwelcome.com), Obivoice/Vestalink (sms.intelafone.com), Teliax, and IPkall. For the complete list: cat /etc/sysconfig/iptables (CentOS) or cat /etc/network/iptables (RasPBX).
The real beauty of Travelin’ Man 3 is you aren’t limited to our WhiteList. You can add your own entries easily using the TM3 scripts that are included in the /root directory. secure-iptables initializes your iptables setup and also lets you define a primary IP address or fully-qualified domain name (FQDN) that will always have access to your server. You must run this script at least once to activate IPtables on all platforms!
Once you have run secure-iptables, you can whitelist additional IP addresses by running add-ip. You can whitelist additional FQDNs by running add-fqdn. You can delete either IP addresses or FQDNs by running del-acct. As noted previously, you can check what’s authorized with the command: iptables -nL.
We’ve also included a custom script to restart IPtables gracefully: iptables-restart. The reason is because using the traditional restarting mechanism in IPtables will leave your server vulnerable (and IPtables inoperative) if a particular FQDN cannot be resolved. The iptables-restart script takes another approach and removes the offending rule from your whitelist, alerts you to the problem, and then restarts iptables without the offending entry. So all existing rules are put back in place and function as you would expect.
Finally, Travelin’ Man 3 includes a script that allows you to utilize FQDNs for users that may have ever-changing dynamic IP addresses. Steps #4, #5, and #6 in the original Travelin’ Man 3 tutorial will walk you through the Administrator set up which only takes a minute or two and never has to be touched again. Basically, a cron job script is employed to check for changes in the dynamic IP addresses you have identified with FQDNs. If changes are found, IPtables is restarted which updates the IP addresses accordingly.
Unfortunately, there was one group of end-users that weren’t covered by the Travelin’ Man 3 setup. This group included traveling salespeople or vacationing individuals that may land in a different city every night. Rather than relying upon an administrator to provide access to home base, these frequent travelers needed their own tool to manage their IP address as it changed. While this was supported through a web interface in Travelin’ Man 2, that setup exposed your web server to the public Internet and was burdensome for administrators to initially configure. Most importantly, it didn’t manage remote IP address access using IPtables which made coexistence with TM3 difficult. Thus was born Travelin’ Man 4.
Introducing Travelin’ Man 4: Managing WhiteList Access by Telephone
Travelin’ Man 4 is a new add-on for an existing Travelin’ Man 3 setup. It’s for those that wish to allow traveling individuals to manage their own whitelist access to PBX in a Flash or Incredible PBX using a telephone. An Administrator preconfigures accounts and passwords for the travelers together with the services to which they will have access on the server. Using any cellphone or hotel phone, the traveler simply dials a preconfigured number to access an IVR that will prompt the user for an account number and PIN. Unless you have a spare DID, you can grab a free one from IPkall.com to use with your Travelin’ Man 4 IVR. Once a user is successfully logged in, the IVR will prompt for the user’s IP address to be whitelisted on the server. Enter it using this format: 12*34*56*78.
Within a couple minutes, the new IP address will be properly formatted and then whitelisted in IPtables, and the traveler will be sent an email acknowledging that the account has been activated. Once the account is activated, the traveler can use a SIP softphone application such as Zoiper on any iPhone or Android phone or a softphone on any desktop computer to place and receive calls as well as to check voicemail on the remote PBX in a Flash server. For anyone that doesn’t know their current IP address, a quick visit to WhatIsMyIP.com will tell you. Travelin’ Man 4 is licensed under GPL2 so download a free copy. Then read the tutorial and give it a whirl. Enjoy!
Originally published: Wednesday, May 21, 2014
Need help with Asterisk? Visit the PBX in a Flash Forum.
Special Thanks to Our Generous Sponsors
FULL DISCLOSURE: ClearlyIP, Skyetel, Vitelity, DigitalOcean, Vultr, VoIP.ms, 3CX, Sangoma, TelecomsXchange and VitalPBX have provided financial support to Nerd Vittles and our open source projects through advertising, referral revenue, and/or merchandise. As an Amazon Associate and Best Buy Affiliate, we also earn from qualifying purchases. We’ve chosen these providers not the other way around. Our decisions are based upon their corporate reputation and the quality of their offerings and pricing. Our recommendations regarding technology are reached without regard to financial compensation except in situations in which comparable products at comparable pricing are available from multiple sources. In this limited case, we support our sponsors because our sponsors support us.
BOGO Bonaza: Enjoy state-of-the-art VoIP service with a $10 credit and half-price SIP service on up to $500 of Skyetel trunking with free number porting when you fund your Skyetel account. No limits on number of simultaneous calls. Quadruple data center redundancy. $25 monthly minimum spend required. Tutorial and sign up details are here.
![]() The lynchpin of Incredible PBX 2020 and beyond is ClearlyIP components which bring management of FreePBX modules and SIP phone integration to a level never before available with any other Asterisk distribution. And now you can configure and reconfigure your new Incredible PBX phones from the convenience of the Incredible PBX GUI.
The lynchpin of Incredible PBX 2020 and beyond is ClearlyIP components which bring management of FreePBX modules and SIP phone integration to a level never before available with any other Asterisk distribution. And now you can configure and reconfigure your new Incredible PBX phones from the convenience of the Incredible PBX GUI.
VitalPBX is perhaps the fastest-growing PBX offering based upon Asterisk with an installed presence in more than 100 countries worldwide. VitalPBX has generously provided a customized White Label version of Incredible PBX tailored for use with all Incredible PBX and VitalPBX custom applications. Follow this link for a free test drive!
Special Thanks to Vitelity. Vitelity is now Voyant Communications and has halted new registrations for the time being. Our special thanks to Vitelity for their unwavering financial support over many years and to the many Nerd Vittles readers who continue to enjoy the benefits of their service offerings. We will keep everyone posted on further developments.
Some Recent Nerd Vittles Articles of Interest…
Incredible PBX 1.8: New OpenVZ and Cloud Editions

Another exciting week in the Asterisk® community with the introduction of Asterisk 1.8.2 last Friday. It's now the official PIAF-Purple payload so you can simply download the current ISO to take it for a spin. Most of the pesky bugs in Asterisk 1.8.0 and 1.8.1 now have been addressed. Let us know if you find some new ones.
While the Asterisk Dev Team has been hard at work on Asterisk 1.8.2, we've turned our attention to the cloud and VoIP virtualization. We have three new products to introduce today. The first lets you install PIAF-Purple with Asterisk 1.8.2 using a new OpenVZ template. The second lets you run Incredible PBX 1.8 as a virtual machine using the new PIAF-Purple 1.8.2 OpenVZ template. Finally, we'll show you how to run Incredible PBX 1.8 in the cloud with hosted VoIP service from RentPBX.com for $15 a month with a free local phone number and free Google Voice calling in the U.S. and Canada. So let's get started.
Using the OpenVZ PIAF-Purple Template. If you haven't heard of OpenVZ templates before, you've missed one of the real technological breakthroughs of the last decade. Rather than wading through the usual 30-minute ISO installation drill, with an OpenVZ template, all of the work is done for you. And it's quick. You can build a dozen PIAF-Purple systems using an OpenVZ template in about 15 minutes with a per system cost of less than $50. See Comment #2 below for an extra special Dell half-price server deal this week. And it's incredibly easy to then tie all of these systems together using either SIP or IAX trunks. Just follow our previous tutorial. For resellers and developers that want to try various Asterisk configurations before implementation and for trainers and others that want to host dedicated Asterisk systems for customers, the OpenVZ platform is a perfect fit. Read our original two-part article to get up to speed on Proxmox, virtualization, and IPtables with OpenVZ. Then continue on here.
Thanks to Darrell Dillman (aka dad311 on the PIAF Forums), there already is a 64-bit OpenVZ template of PIAF-Purple with Asterisk 1.8.2. Just download the template to your Desktop and then, using the Proxmox console, choose Appliance Templates, Upload File to upload the OpenVZ template into your Proxmox server platform. Once installed, you can build Asterisk 1.8.2 virtual machines to your heart's content... in less than a minute apiece. Just choose Virtual Machine, Create to create a new virtual machine using the OpenVZ template you just uploaded. In the Configuration section, choose OpenVZ for the Type and pick your new OpenVZ template from the pulldown list. Fill in a Host Name, Disk Space maximum (in GB), and (root) Password. The other defaults should be fine. In the Network section of the form, change to the Bridged Ethernet (veth) option which means the VM will obtain its IP address from your DHCP server. Make sure your DNS settings are correct for your LAN. Here's how a typical OpenVZ creation form will look:
Once the image is created, start up the virtual machine, wait about 70 seconds for the system to load, and then click on Open VNC Console. Asterisk will be loaded and running. You can verify this on the status display. You can safely ignore the status messages pertaining to IPtables assuming iptables -nL shows that IPtables is functioning properly. With the exception of text-to-speech (TTS), you now have a PIAF-Purple base platform running Asterisk 1.8.2 and FreePBX 2.8. Be sure you always run it behind a hardware-based firewall with no port exposure to the Internet.
Before you do anything else, run passwd-master to secure the passwords for FreePBX GUI access to your system. Don't forget!
If you're planning to install Incredible PBX below or if you don't need text-to-speech on your system, you can skip this next step which gets 64-bit TTS installed. Otherwise, here are the commands to get it working:
cd /root
./install-flite
Note to Our Pioneers. To those that tested the new OpenVZ template this past week, THANK YOU! Be advised that we now have incorporated several of the recommended tweaks which were documented in the PIAF Forums. The install procedure outlined above explains the new behavior of the slightly improved OpenVZ template which now is available for download. We recommend you switch.
Asterisk CLI Change. Finally, just a heads up that (once again) the Asterisk Dev Team appears to have changed the default behavior of the Asterisk CLI. With Asterisk 1.8.2, if you make outbound calls after loading the CLI, you will notice that call progress no longer appears in the CLI. To restore the standard behavior (since Moses), issue the following command: core set verbose 3. 🙄

Installing Incredible PBX on OpenVZ Systems. We won't repeat the entire Incredible PBX article here. If you want the background on the product, read the latest article. To get everything working with an OpenVZ system, there are only three steps:
1. Set Up Your Google Voice Account
2. Run the Incredible PBX VM Installer
3. Configure a Softphone
 Configuring Google Voice. You'll need a dedicated Google Voice account to support The Incredible PBX. The more obscure the username (with some embedded numbers), the better off you will be. This will keep folks from bombarding you with unsolicited Gtalk chat messages, and who knows what nefarious scheme will be discovered using Google messaging six months from now. So why take the chance. Keep this account a secret!
We've tested this extensively using an existing Gmail account, and inbound calling is just not reliable. The reason seems to be that Google always chooses Gmail chat as the inbound call destination if there are multiple registrations from the same IP address. So, be reasonable. Do it our way! Set up a dedicated Gmail and Google Voice account, and use it exclusively with The Incredible PBX. Google Voice no longer is by invitation only so, if you're in the U.S. or have a friend that is, head over to the Google Voice site and register. If you're living on another continent, see MisterQ's posting for some tips on getting set up.
You must choose a telephone number (aka DID) for your new account, or Google Voice calling will not work... in either direction. Google used to permit outbound Gtalk calls using a fake CallerID, but that obviously led to abuse so it's over! You also have to tie your Google Voice account to at least one working phone number as part of the initial setup process. Your cellphone number will work just fine. Don't skip this step either. Just enter the provided 2-digit confirmation code when you tell Google to place the test call to the phone number you entered. Once the number is registered, you can disable it if you'd like in Settings, Voice Setting, Phones. But...
IMPORTANT: Be sure to enable the Google Chat option as one of your phone destinations in Settings, Voice Setting, Phones. That's the destination we need for The Incredible PBX to work its magic! Otherwise, all inbound and outbound calls will fail. If you don't see this option, you may need to call up Gmail and enable Google Chat there first. Then go back to the Google Voice Settings.
While you're still in Google Voice Settings, click on the Calls tab. Make sure your settings match these:
- Call Screening - OFF
- Call Presentation - OFF
- Caller ID (In) - Display Caller's Number
- Caller ID (Out) - Don't Change Anything
- Do Not Disturb - OFF
Click Save Changes once you adjust your settings. Under the Voicemail tab, plug in your email address so you get notified of new voicemails. Down the road, receipt of a Google Voice voicemail will be a big hint that something has come unglued on your PBX.
Running The Incredible PBX Installer. Log into your server as root and issue the following commands to set up The Incredible PBX:
cd /root
rm incrediblepbx18-vm.x
wget http://incrediblepbx.com/incrediblepbx18-vm.x
chmod +x incredible*
./incrediblepbx18-vm.x
passwd-master
When The Incredible PBX install begins, you'll be prompted for the following:
Google Voice Account Name
Google Voice Password
Google Voice 10-digit Phone Number
Gmail Notification Address
FreePBX maint Password
The Google Voice Account Name is the Gmail address for your new dedicated account, e.g. joeschmo@gmail.com. Don't forget @gmail.com! The Google Voice Password is the password for this dedicated account. The Google Voice Phone Number is the 10-digit DID for this dedicated account. We need this if we ever need to go back to the return call methodology for outbound calling. For now, it's not necessary. But who knows what the future holds. 🙄 The Gmail Notification Address is the email address where you wish to receive alerts when incoming and outgoing Google Voice calls are placed using The Incredible PBX. And your FreePBX maint Password is the password you'll use to access FreePBX. You'll actually set it by running passwd-master after The Incredible PBX completes. We need this password to properly configure the CallerID Superfecta for you. By the way, none of this confidential information ever leaves your machine... just in case you were wondering.
Now have another 5-minute cup of coffee, and consider a modest donation to Nerd Vittles... for all of our hard work. 😉 You'll find a link at the top of the page. While you're waiting (and so you don't forget), go ahead and configure your hardware-based firewall to support Google Voice. See the next section for what's required. Without completing this firewall configuration step, no calls will work! When the installer finishes, READ THE SCREEN just for grins.
Here's a short video demonstration of the original Incredible PBX installer process. It still works just about the same way except there's no longer a second step to get things working.
One final word of caution is in order regardless of your choice of providers: Do NOT use special characters in any provider passwords, or nothing will work!
Before you do anything else, run passwd-master again to resecure the passwords for FreePBX GUI access to your system. Don't forget!
Firewall Configuration. We hope you've taken our advice and installed a hardware-based firewall in front of The Incredible PBX. It's your phone bill. You'll need to make one adjustment on the firewall. Map UDP 5222 traffic to the internal IP address of The Incredible PBX. This is the port that Google Voice uses for phone calls and Google chat. You can decipher the IP address of your server by logging into the server as root and typing status.
Extension Password Discovery. If you're too lazy to look up your extension 701 password using the FreePBX GUI, you can log into your server as root and issue the following command to obtain the password for extension 701 which we'll need to configure your softphone or color videophone in the next step:
mysql -uroot -ppassw0rd -e"select id,data from asterisk.sip where id='701' and keyword='secret'"
The result will look something like the following where 701 is the extension and 18016 is the randomly-generated extension password exclusively for your Incredible PBX:
+-----+-------+
id data
+-----+-------+
701 18016
+-----+-------+
 Configuring a SIP Phone. There are hundreds of terrific SIP telephones and softphones for Asterisk-based systems. Once you get things humming along, you'll want a real SIP telephone such as the $50 Nortel color videophone we've recommended above. You'll also find lots of additional recommendations on Nerd Vittles and in the PBX in a Flash Forum. If you're like us, we want to make damn sure this stuff works before you shell out any money. So, for today, let's download a terrific (free) softphone to get you started. We recommend X-Lite because there are versions for Windows, Mac, and Linux. So download your favorite from this link. Install and run X-Lite on your Desktop. At the top of the phone, click on the Down Arrow and choose SIP Account Settings, Add. Enter the following information using your actual password for extension 701 and the actual IP address of your Incredible PBX server instead of 192.168.0.251. Click OK when finished. Your softphone should now show: Available.
 Incredible PBX Test Flight. The proof is in the pudding as they say. So let's try two simple tests. First, let's place an outbound call. Using the softphone, dial your 10-digit cellphone number. Google Voice should transparently connect you. Answer the call and make sure you can send and receive voice on both phones. Second, from another phone, call the Google Voice number that you've dedicated to The Incredible PBX. Your softphone should begin ringing shortly. If not, make certain you are not logged into Google Chat on a Gmail account with these same credentials. If everything is working, congratulations!
Here's a brief video demonstration showing how to set up a softphone to use with your Incredible PBX, and it also walks you through several of the dozens of Asterisk applications included in your system.
Solving One-Way Audio Problems. If you experience one-way audio on some of your phone calls, you may need to adjust the settings in /etc/asterisk/sip_custom.conf. Just uncomment the first two lines by removing the semicolons. Then replace 173.15.238.123 with your public IP address, and replace 192.168.0.0 with the subnet address of your private network. There are similar settings in gtalk.conf that can be activated although we've never had to use them. In fact, we've never had to use any of these settings. After making these changes, save the file(s) and restart Asterisk: amportal restart.
 Running Incredible PBX in the Cloud. We've saved the best for last today. For many folks, you may want to experiment with VoIP technology without making a hardware investment and without having to master the intricacies of managing your own server and network. That's what Cloud Computing is all about. And we've searched far and wide to find you the perfect platform. As with many of you, one of our top priorities is always cost. While many providers were willing to provide Nerd Vittles with a few sheckles for pitching their product, only one stepped forward with a price point that we think is irresistible. And, for the record, we waived any compensation other than a few test accounts to get things working properly, so that all of the savings could be passed on to you! So here's the deal. $15 a month gets you your own PIAF-Purple server in the cloud at RentPBX.com. Just use this coupon code: BACK10, pick an east coast or west coast server to host your new system, choose the PIAF-Purple 1.7.5.5.4 install option, set up a username and very secure password, and you're off to the races. Once your account is established, here's the 5-minute procedure to install the special RentPBX-edition of Incredible PBX to begin making free calls in the U.S. and Canada through Google Voice.
Begin by Configuring Google Voice as outlined above. Then log into your RentPBX account using SSH and the port assigned to your account. For Windows users, download Putty from here. The SSH command will look something like this:
ssh -p 21422 root@209.249.149.108
Issue the following commands to download and run The Incredible PBX installer for RentPBX:
cd /root
wget http://incrediblepbx.com/incrediblepbx18-rentpbx.x
chmod +x incrediblepbx18-rentpbx.x
./incrediblepbx18-rentpbx.x
passwd-master
Now just follow along in the Incredible PBX virtual machine tutorial which we've included above. Remember that your new Incredible PBX is sitting directly on the Internet! So don't forget to run passwd-master when you finish the install, or your system is vulnerable. Ours was attacked within minutes!
 Securing Your RentPBX Server. With the exception of our WhiteList application, everything is working on your RentPBX server. While we continue to work on the WhiteList component (reread this section of the article in a week or so to get the latest updates), you need to secure your system to avoid endless hack attempts on your SIP resources. Here's how. First, write down the IP addresses of your RentPBX server and your home network. Second, print out your existing IPtables configuration. The file to print is /etc/sysconfig/iptables. Third, make a backup copy of the file. While logged into your server with SSH, the easiest way is like this:
cd /etc/sysconfig
cp iptables iptables.bak
Now we need to edit the iptables file itself: nano -w iptables. Then search for the line that contains 5060: Ctrl-W, 5060, Enter. At the beginning of this line, add # to comment out the line. With the cursor still on this line, press Ctrl-K then Ctrl-U twice. This will duplicate the line. Move to the second commented line and remove #. Use the right cursor to move across the line to --dport. Then insert the following using the IP address of your RentPBX server, e.g.
-s 229.149.129.248
Be sure there's at least one space before and after the new text. Now duplicate that line with Ctrl-K and Ctrl-U twice. Change the IP address on the second line to the public IP address of your home or office network. Repeat this process for every IP address where you intend to use a SIP phone connected to your RentPBX server. Make additional entries for your SIP providers as well. If you want to sleep better, you can make similar changes to the SSH port entry to restrict it to your home/office IP address. It's the line immediately above the 5060 entry. Ditto for port 80 which is web access. Be very careful here. A typo will lock you out of your own server! When you're finished, save the changes: Ctrl-X, Y, Enter. Then restart IPtables: service iptables restart.
As always, we strongly recommend that you not put all of your VoIP eggs in one basket. Google Voice does go down from time to time. Vitelity is a perfect complement because the costs are low and you only pay for the service you use. A discount sign up link is below. And Vitelity has contributed generously to both the Nerd Vittles and PBX in a Flash projects. So please support them. Enjoy!
Originally published: Monday, January 17, 2011
Need help with Asterisk? Visit the PBX in a Flash Forum.
Or Try the New, Free PBX in a Flash Conference Bridge.
whos.amung.us If you're wondering what your fellow man is reading on Nerd Vittles these days, wonder no more. Visit our new whos.amung.us statistical web site and check out what's happening. It's a terrific resource both for us and for you.
Special Thanks to Our Generous Sponsors
FULL DISCLOSURE: ClearlyIP, Skyetel, Vitelity, DigitalOcean, Vultr, VoIP.ms, 3CX, Sangoma, TelecomsXchange and VitalPBX have provided financial support to Nerd Vittles and our open source projects through advertising, referral revenue, and/or merchandise. As an Amazon Associate and Best Buy Affiliate, we also earn from qualifying purchases. We’ve chosen these providers not the other way around. Our decisions are based upon their corporate reputation and the quality of their offerings and pricing. Our recommendations regarding technology are reached without regard to financial compensation except in situations in which comparable products at comparable pricing are available from multiple sources. In this limited case, we support our sponsors because our sponsors support us.
BOGO Bonaza: Enjoy state-of-the-art VoIP service with a $10 credit and half-price SIP service on up to $500 of Skyetel trunking with free number porting when you fund your Skyetel account. No limits on number of simultaneous calls. Quadruple data center redundancy. $25 monthly minimum spend required. Tutorial and sign up details are here.
![]() The lynchpin of Incredible PBX 2020 and beyond is ClearlyIP components which bring management of FreePBX modules and SIP phone integration to a level never before available with any other Asterisk distribution. And now you can configure and reconfigure your new Incredible PBX phones from the convenience of the Incredible PBX GUI.
The lynchpin of Incredible PBX 2020 and beyond is ClearlyIP components which bring management of FreePBX modules and SIP phone integration to a level never before available with any other Asterisk distribution. And now you can configure and reconfigure your new Incredible PBX phones from the convenience of the Incredible PBX GUI.
VitalPBX is perhaps the fastest-growing PBX offering based upon Asterisk with an installed presence in more than 100 countries worldwide. VitalPBX has generously provided a customized White Label version of Incredible PBX tailored for use with all Incredible PBX and VitalPBX custom applications. Follow this link for a free test drive!
Special Thanks to Vitelity. Vitelity is now Voyant Communications and has halted new registrations for the time being. Our special thanks to Vitelity for their unwavering financial support over many years and to the many Nerd Vittles readers who continue to enjoy the benefits of their service offerings. We will keep everyone posted on further developments.
Some Recent Nerd Vittles Articles of Interest...
Avoiding a $100,000 Phone Bill: VoIP WhiteList for IPtables
 It’s been almost a year since we last wrestled with VoIP security for Asterisk®. With Christmas just around the corner, it seemed like a fitting time for a report card. Suffice it to say, the bad guys have not stood still. Attacks have become much more frequent and more sophisticated as VoIP systems have proliferated. A year ago we saw brute force attacks with thousands of password attempts on VoIP servers. These attacks could easily be detected by Fail2Ban. What we are seeing today are one and two hit drive-bys that usually are initiated from Windows zombies or hosted accounts established with stolen credit cards. These VoIP attacks fly under the radar unless you review your logs every day. Have the creeps gotten more patient? No, just smarter. They now understand the VoIP security model that has been deployed on systems like PBX in a Flash, and they simply work around it. Two hits per server, and they’re off to the next IP address only to return in a few hours to try two more. Are these attempts successful? Well, here’s the latest recipient of a $100,000 phone bill so the answer would appear to be affirmative.
We continue to wrestle with new security approaches to better protect Asterisk VoIP systems, and we’ve stumbled upon another golden arrow for your security quiver. Our Incredible PBX platform continues to offer the very best security solution because it is designed to sit safely behind a hardware-based firewall with virtually no exposure to the Internet. But such deployments assume that both your server and your phones are all safely ensconced behind a hardware-based firewall. If it turns out that you want to deploy a SIP phone for use by grandma or you’ve decided you’d like to try hosted PBX service from a provider such as rentpbx.com,1 then there either need to be holes opened in the firewall or there is no hardware firewall protection in the case of hosted service.
Over the past few weeks, we’ve explored a number of new security approaches to better protect your Asterisk server. These include The SunshineNetworks Knock as well as VoIP Black Lists and VoIP White Lists. If you’re technically savvy, you’ll want to carefully consider "The Knock" for all of your SIP phones exposed to the Internet.
We spent a good bit of time considering various VoIP BlackList solutions. As the name implies, a list of the bad guys’ IP addresses is fed into IPtables which then blocks access to your server from these addresses. Sounds good, right? One approach with a BlackList is to block all IP addresses from "problem countries." The methodology to implement this solution can be found in this thread on the PIAF Forums. The problem, of course, is identifying the "problem countries." Another option was to implement an IPtables Blacklist based upon the work of the VoIP Blacklist Project. Perhaps ironically, the VoIP Blacklist Project actually blocks the IP addresses of both Nerd Vittles and PBX in a Flash, and emails requesting removal of our IP address were ignored. To save time, the VoIP Blacklist Project employs CIDR Masks which can blacklist hundreds of thousands of IP addresses in one fell swoop. Problem is that a lot of innocent people get caught in the net, and there’s no easy way out without maintaining the blacklist yourself. The final dagger in the black list approach is zombies. Insecure Windows machines have been compromised by the droves worldwide and particularly in the United States. So identifying all of these now-malicious systems is not unlike playing Whack-a-Mole. When you block one of them, six more pop up. So, after giving it the good old college try, our view of VoIP Blacklists should be obvious. No, thanks. There are very real risks that the bad guys can and have poisoned existing blacklists with safe IP addresses, and the number of Windows zombies grows geometrically making it all but impossible to have or maintain a blacklist that affords any real protection.
These results with black lists led us to the conclusion that the only real security mechanism that could protect many VoIP servers today was a VoIP WhiteList for IPtables. As the name implies, we want to identify the IP addresses of every SIP and IAX trunk and extension on your server and then feed those addresses into IPtables so that the only access to VoIP resources on your server is from these addresses. Today’s VoIP WhiteList for IPtables consists of two bash scripts: one queries the MySQL database in which FreePBX stores all of the trunk and extension information for your server and the other populates IPtables with the results of the queries. We would hasten to add that a similar white list is equally important for SSH access to your server although we think it is better to implement an SSH WhiteList on your hardware-based firewall. In this way, you can adjust the SSH white list via web browser while traveling without locking yourself out of your Asterisk server.
Prerequisites. To use today’s VoIP WhiteList for IPtables, you’ll need either a current version of PBX in a Flash or Incredible PBX. Other aggregations will also work provided your system is FreePBX-based (version 2.6 or later), has IPtables already installed and functioning properly, and has an /etc/sysconfig/iptables configuration file that closely matches the stock PBX in a Flash design. We’ll leave it to you to make that call after reviewing the scripts.
VoIP WhiteList Design. We’ve designed the VoIP WhiteList for IPtables to be modular. There’s a firewall-whitelist-gen.sh script which extracts from MySQL the list of IP addresses used by your trunks and extensions. This text-based list is stored in /etc/firewall.whitelist. You can manually add and delete entries from the list once it is populated.You also can rerun the script at any time to generate a fresh catalog of WhiteList IP addresses based upon your current trunk and extension settings. This script also enables access to your server from the public IP address of your server as well as all non-routable IP addresses. Finally, it modifies /etc/sudoers slightly so that Travelin’ Man can be used to add dynamic IP addresses on the fly. We’ll cover that below.
The second script is firewall-whitelist.sh, and it is used to actually implement your new VoIP WhiteList in IPtables. The changes take effect immediately. It also can be run again to update these entries if you manually add or delete IP addresses in /etc/firewall.whitelist. This script always creates a backup copy of your previous /etc/sysconfig/iptables file and names it iptables.timestamp where the timestamp is the date and time of your last update, e.g. iptables.12012010-083841 was created on Dec. 1, 2010 at 08:38:41. If you should ever shoot yourself in the foot, simply copy one of the iptables backup files to /etc/sysconfig/iptables and then restart IPtables: service iptables restart.
WARNINGS: In order to implement the WhiteList, the script removes the existing IPtables entries which permit SIP and IAX access from anywhere using UDP ports 4569 and 5000 to 5082. If you have edited these entries in any way, you’ll need to remove them and restart IPtables before running firewall-whitelist.sh. Otherwise, your more general firewall entries will leave your system vulnerable to access from IP addresses not in your VoIP WhiteList.
If your system is running on a hosted server, you’ll need to make a couple of additions to /etc/sysconfig/iptables and restart IPtables (service iptables restart) before running firewall-whitelist.sh, or you may lock yourself out of your own server. Be sure to add the public IP address of your server, and also add the IP address from which you are making changes to your server. Each entry should look like the following example using your actual IP addresses. And the entries should be added above the COMMIT line in the same section of the iptables file as the existing UDP 10000:20000 ACCEPT entry:
-A INPUT -s 222.222.222.222 -j ACCEPT
Installing the VoIP WhiteList for IPtables. Installation is easy. Just log into your server as root and issue the following commands:
cd /root
wget http://incrediblepbx.com/firewall-whitelist.tar.gz
tar zxvf firewall-whitelist.tar.gz
./firewall-whitelist-gen.sh
./firewall-whitelist.sh
If you installed one of the beta versions of the VoIP WhiteList from the PIAF Forums, then you’ll need to do a little housecleaning before actually running either of the scripts. Just edit /etc/sysconfig/iptables and clean out all of the entries that contain 5000:5082 as well as any entries nearby that include the non-routable IP addresses, e.g. 192.168.0.0. Finally, if there are entries beginning with -A WHITELIST, delete those as well. Then restart IPtables: service iptables restart. Thank you for your testing and feedback!
Deploying Remote SIP Phones. What remains is some method for connecting remote SIP phones with dynamic IP addresses. Our Travelin’ Man application was specifically designed to provide this support although the initial version only opened the necessary IP address for Asterisk access. The latest release also provides the necessary IPtables support. You have two options: either remove the old version and supporting directories under /var/www/travelman or edit the index.php file in each subdirectory you’ve created and make the change shown in this post on the PIAF Forums. Enjoy!
Need help with Asterisk? Visit the PBX in a Flash Forum.
Or Try the New, Free PBX in a Flash Conference Bridge.
whos.amung.us If you’re wondering what your fellow man is reading on Nerd Vittles these days, wonder no more. Visit our new whos.amung.us statistical web site and check out what’s happening. It’s a terrific resource both for us and for you.
Special Thanks to Our Generous Sponsors
FULL DISCLOSURE: ClearlyIP, Skyetel, Vitelity, DigitalOcean, Vultr, VoIP.ms, 3CX, Sangoma, TelecomsXchange and VitalPBX have provided financial support to Nerd Vittles and our open source projects through advertising, referral revenue, and/or merchandise. As an Amazon Associate and Best Buy Affiliate, we also earn from qualifying purchases. We’ve chosen these providers not the other way around. Our decisions are based upon their corporate reputation and the quality of their offerings and pricing. Our recommendations regarding technology are reached without regard to financial compensation except in situations in which comparable products at comparable pricing are available from multiple sources. In this limited case, we support our sponsors because our sponsors support us.
BOGO Bonaza: Enjoy state-of-the-art VoIP service with a $10 credit and half-price SIP service on up to $500 of Skyetel trunking with free number porting when you fund your Skyetel account. No limits on number of simultaneous calls. Quadruple data center redundancy. $25 monthly minimum spend required. Tutorial and sign up details are here.
![]() The lynchpin of Incredible PBX 2020 and beyond is ClearlyIP components which bring management of FreePBX modules and SIP phone integration to a level never before available with any other Asterisk distribution. And now you can configure and reconfigure your new Incredible PBX phones from the convenience of the Incredible PBX GUI.
The lynchpin of Incredible PBX 2020 and beyond is ClearlyIP components which bring management of FreePBX modules and SIP phone integration to a level never before available with any other Asterisk distribution. And now you can configure and reconfigure your new Incredible PBX phones from the convenience of the Incredible PBX GUI.
VitalPBX is perhaps the fastest-growing PBX offering based upon Asterisk with an installed presence in more than 100 countries worldwide. VitalPBX has generously provided a customized White Label version of Incredible PBX tailored for use with all Incredible PBX and VitalPBX custom applications. Follow this link for a free test drive!
Special Thanks to Vitelity. Vitelity is now Voyant Communications and has halted new registrations for the time being. Our special thanks to Vitelity for their unwavering financial support over many years and to the many Nerd Vittles readers who continue to enjoy the benefits of their service offerings. We will keep everyone posted on further developments.
Some Recent Nerd Vittles Articles of Interest…
- We gratefully acknowledge the contributions of rentpbx.com to the PBX in a Flash Development Team. In addition to hosted accounts to test PBX in a Flash in the hosted environment, rentpbx.com also has contributed technical assistance particularly as it relates to our Google Voice-Asterisk integration efforts. [↩]
Introducing Phone Genie for Asterisk (Email Edition)
 Almost two years ago, we introduced Phone Genie for Asterisk®. It let you reconfigure your Asterisk system remotely using your favorite web browser. This included the ability to set and adjust call forwarding, call waiting, and Do Not Disturb for any Asterisk extension. In addition, you could enter Asterisk CLI commands and execute a number of Linux system commands, all from the convenience of your web browser. Phone Genie for Asterisk remains one of the all-time favorite downloads of our readers.
Unfortunately, you don't always have access to a web browser when you're away from your Asterisk server. So today we introduce the perfect complement to the original Phone Genie with our new Email Edition. By following this quick tutorial, you can configure your Asterisk server to respond to any Asterisk CLI command which can be sent from almost any email client on the planet. And we'll perform all this magic with less than a dozen lines of bash scripting. Asterisk CLI commands have almost limitless possibilities. Use Phone Genie to check the status or change the functionality of just about any component on your server.
How It Works. The best way to explain how all of this works is to use a simple example. Let's assume you've left home and forgot to transfer your inbound calls for extension 701 to your cellphone. What we'll do is send a simple email message to a special user account on your Asterisk server that we've set up specifically to handle email directives for your server. Unlike most email addresses, we want this one to be unintuitive so strangers aren't sending messages to your server all the time. Let's assume the address is kxt1498@myserver.dyndns.org for this example. Using any email client, just address a message to that account. For the subject of the message, we'll use the following:
Asterisk: database put CF 701 6781234567
It doesn't really matter whether you include a message with the email. As long as the subject of the email is in the proper form, that's all that matters. The command above activates call forwarding for extension 701 and sends the calls to 6781234567. The command uses standard Asterisk CLI syntax.
On your Asterisk server, we'll have a simple bash script that runs every minute or two to check for new emails in the kxt1498 user's mailbox. If it finds a new message, it will parse the subject line, make certain there is a password match, and then send the command (unaltered) to the Asterisk Command Line Interface for processing. Here's an overview of all the CLI commands. The results of executing the command will be emailed to the address you've configured in the script. This works as both confirmation that your command has been executed and a security alert that your Asterisk system has been accessed using the Email Edition of Phone Genie. In the above example, you would receive an email at the address you've configured in the script with a subject of PhoneGenie. The body of the email would look like this:
Updated database successfully...database put CF 701 6781234567
Prerequisites. This software assumes you are using one of the Asterisk aggregations built on CentOS 5. We've tested it with PBX in a Flash. You'll also need an SMTP server (SendMail or Postfix) that is configured to send and receive emails to and from destinations on the Internet. You do not need a POP3 or IMAP mail server! We've tested this with Asterisk 1.4, but it should work fine with Asterisk 1.6 as well. FreePBX 2.5 or later is required for some functions.
Security Warning. Before we begin, let's pause for a moment to review the enormity of your problems if you do this wrong and to remind you that YOU ARE PROCEEDING AT YOUR OWN RISK. PBX in a Flash in particular is shipped with all outside access to your SMTP server blocked. We've obviously got to remove that layer of security for this software to function properly. But you need to be especially careful with SMTP servers because they can be used to relay SPAM to the entire world if you fiddle with settings that you don't understand. So... DON'T MAKE IMPROVEMENTS THAT AREN'T COVERED HERE UNLESS YOU KNOW WHAT YOU'RE DOING!
This software also gives certain email messages elevated privileges on your Asterisk server so that Asterisk itself can be reconfigured. If you compromise the email account name and password for this application, anybody worldwide can pretty much destroy the functionality of your server. In addition, calls to a certain extension could be rerouted to a very expensive destination on a cruise ship sailing around the world. If your dialplan permitted these calls and you had an account with automatic replenishment from a credit card or bank account, you've got a very expensive problem on your hands. That's one reason that reliable email notification of every Phone Genie transaction is critically important. If you're not getting timely notifications of each Phone Genie transaction, DO NOT USE THIS SOFTWARE until that problem is resolved!
Should you detect that your system has been compromised by receiving an email that indicates a command has been executed on your Asterisk server that you did not initiate, you should immediately disable or remove the script so that no further Phone Genie emails are processed on your server. Be sure to preserve any unprocessed Phone Genie emails for authorities as these may contain important information regarding the source of the emails. These email messages usually are deleted once Phone Genie completes execution of the associated Asterisk commands.
Overview. Here's the drill for today. First, we'll adjust both your hardware- based and IPtables firewalls to allow inbound email delivery to your Asterisk server. Second, we'll remove SendMail from your system and install and configure Postfix to handle the SMTP email chores. This will greatly simplify the security issues in locking down your server from unwanted emails. Depending upon your Internet service provider, installation of Postfix may break outbound email delivery from your server if your provider happens to block outbound traffic on port 25. We'll show you how to fix it. Third, we'll add a new user account on your Asterisk server that will be used exclusively to handle Phone Genie messages. Fourth, you're going to need a fully-qualified domain name for your Asterisk server so that email can be delivered reliably to your server. We'll walk you through getting this set up. Fifth, we'll install and configure the Phone Genie software and run some simple tests to make certain everything is working as it should. Sixth, we'll add the Phone Genie script as a cron job which will be run every couple of minutes to check for incoming Phone Genie emails. Finally, we'll review some of the Asterisk commands that can be executed using the Email Edition of Phone Genie for Asterisk.
Security Design. We've obviously given a great deal of thought to the security issues surrounding this application. The security model we've adopted works like this. First, for an email to get through to your Asterisk server, one and only one email address will work from the Internet. All other inbound email from the Internet will be rejected by Postfix. We strongly suggest you leave it that way. Your email address consists of the special username that we will create on your server plus a (hopefully new) fully-qualified domain name that points to your server. You are well advised to use and keep secret both a non-intuitive and complicated username AND a non-intuitive and complicated, fully-qualified domain name. Only this combination will let the email message through the Postfix filter! Using the correct username and a different FQDN that may also point to your server's correct IP address will nevertheless be rejected by Postfix. The third piece in the security model is the password. If you examine the sample Subject above, you will note that it begins with the word "Asterisk" followed by a colon, a space, and then the Asterisk CLI command. The word "Asterisk" is actually the password, and it can be changed to any password you like. So, if you change your password to FooBaR, then the subject of your message should look like this. Note that the colon followed by a space are also required!
FooBaR: database put CF 701 6781234567
Finally, it should be obvious but... DON'T SEND THESE EMAILS FROM AN UNTRUSTED CLIENT OR A PC IN A PUBLIC PLACE because your email message may get stored in a place that someone else could decipher how to access your server. If you wouldn't leave a $1000 bill beside the computer from which you're sending the email, don't send it! Otherwise, you may lose a good bit more than $1,000. To give you some idea of what's at risk with a compromised system, try sending the following email using your correct email address and password:
FooBaR: help
</sermon>
Firewall Configuration. For purposes of our example today, we're assuming that your Asterisk server is sitting behind a hardware-based firewall/router on a private subnet and that your Asterisk server includes a functioning software-based IPtables Linux firewall. This is the default PBX in a Flash setup that we always recommend. On your hardware-based firewall, you will need to redirect incoming TCP port 25 traffic to TCP port 25 on the private IP address of your Asterisk server. This change often requires a reboot of your firewall/router. Once that change is complete, log into your Asterisk server as root and edit /etc/sysconfig/iptables on PBX in a Flash systems. We need to add a new rule to IPtables which allows incoming TCP port 25 traffic through the firewall. Scroll to the bottom of the file and insert the following lines just above the COMMIT line:
# Allow inbound SMTP traffic on TCP port 25
-A INPUT -p tcp -m tcp --dport 25 -j ACCEPT
Save your additions to the file and then reload IPtables and your network:
service iptables stop
service iptables start
service network restart
service iptables status | grep "tcp dpt:25"
The last command should return an entry from IPtables showing TCP port 25 traffic is now being ACCEPTed into the server. If not, check your entries and repeat the process until this works.
Postfix Installation. Let's continue by removing SendMail from your server and installing Postfix. They both perform the same email functions, but the complexity of SendMail makes the likelihood of a configuration error too risky for us to sleep well. If you understand the intricacies of SendMail and feel comfortable implementing the security model we've described above, by all means, have at it. We'll be happy to share your results with the rest of our user community. In the meantime, here's the Postfix solution. While still logged into your server as root, issue the following commands to uninstall SendMail and install Postfix:
rpm -e --nodeps sendmail
yum -y install postfix
Choosing a Username and FQDN. Before we configure Postfix, you need to decide upon a user account name for your Asterisk server to manage Phone Genie messages. And you also need a fully-qualified domain name which points to the public IP address of your Asterisk server. As mentioned above, we strongly recommend that the username and FQDN be obscure and unguessable. For example, a combination of letters and numbers that don't spell words are good choices. Something like dlrpzh7b3@dhf34.nerdvittles.com will help you sleep well. If you don't have a static IP address and dedicated domain for your server that you can manage, then use an equally obscure FQDN from a provider such as dyndns.org. Something like dhf34.dyndns.org works. You then can configure your Asterisk server to automatically keep your dynamic IP address current. We're going to use these entries as examples below. Obviously, you should choose different entries!
To create the new user account on your server using whatever name you have chosen, here are the commands to issue while still logged into your server as root. Just substitute your chosen username for dlrpzh7b3 in both commands. Be sure to choose a secure password, too.
useradd dlrpzh7b3
passwd dlrpzh7b3
Configuring Postfix. Now let's get Postfix set up for maximum protection. First, move to postfix directory: cd /etc/postfix. Now edit main.cf: nano -w main.cf. Search for the inet_interfaces line in the file: Ctrl-W, inet_interfaces =. Add a hash mark to the beginning of each uncommented inet_interfaces line so that your entries look like this:
#inet_interfaces = $myhostname
#inet_interfaces = $myhostname, localhost
#inet_interfaces = localhost
Next, search for mydestination in the file: Ctrl-W,mydestination =. Comment out each of the lines except the one that looks like this:
mydestination = $myhostname, localhost.$mydomain, localhost
Now add the private IP address of your Asterisk server and your FQDN chosen above to the line so that it looks like this. Don't forget the commas and keep everything on one line.
mydestination = $myhostname, localhost.$mydomain, localhost, 192.168.0.118, dhf34.nerdvittles.com
Finally, move to the last line in the file and make it look like this, all on one line:
smtpd_recipient_restrictions = check_recipient_access hash:/etc/postfix/access, permit_mynetworks, reject_unauth_destination
Save your changes to the file: Ctrl-X, Y, then Enter. Now edit /etc/postfix/access. Move to the very bottom of the file and add two new lines with the following entries using the actual email address and FQDN you chose above instead of the examples. The first line tells Postfix to allow emails addressed to the specified email recipient. The next line tells Postfix to reject all other emails addressed to anyone at this domain. Other domains and public IP addressing are blocked by our mydestination entry above.
dlrpzh7b3@dhf34.nerdvittles.com OK
dhf34.nerdvittles.com REJECT recipient rejected
Save your changes to the file: Ctrl-X, Y, then Enter. Now issue the following two commands:
postmap /etc/postfix/access
service postfix restart
Testing Postfix. Now comes the important part. We need to make sure that outbound emails from your Asterisk server are delivered. And we need to make sure that incoming emails ONLY to the one email address you've designated are received and that all other emails from the Internet are rejected. We can't stress enough how important all three of these tests are. If your Postfix implementation doesn't pass all three, DO NOT PROCEED!
Testing outbound email with Postfix is easy. While logged into your server as root, issue the following command using a destination email address (instead of yourname@gmail.com) where you regularly receive emails:
echo "Hi there" | mail -s Test yourname@gmail.com
Count to 20 and refresh your email's Inbox. If the message is there, you've passed Test #1. If not, check your junk mail folder. If it's still not there, try another email address if you have one. Still no cigar? Then your Internet Service Provider is probably blocking email generated from downstream email servers. For tips on remedying the problem, see this message thread on the PBX in a Flash forums. You might also want to review the Postfix tutorial on dyndns.com. Here's another good tutorial on setting up a Gmail relay using Postfix. Then run the test again until you achieve success.
Testing inbound email to your designated email address is Test #2. Use a web client and send an email message to dlrpzh7b3@dhf34.nerdvittles.com substituting the actual email address you have chosen for your server. Count to 20, log into your server as root and type the following command to retrieve email for user dlrpzh7b3: mail -u dlrpzh7b3. The server should report that you have one new message. Type "d 1" and then "q" to delete the message and quit the mail app. If no email arrives, check the Inbox on your sending client to see if the message bounced and, if so, why. Check your email entries in /etc/postfix/access and /etc/postfix/main.cf for typos and review the steps in Configuring Postfix above. Then repeat the test until you successfully send a message to your designated email address.
Testing inbound email to an unauthorized email address on your Asterisk server is Test #3. For this test, we want to make sure that an email sent to the root account on your server fails. What you'll need for this test is the FQDN that was chosen above. Then, using a mail client, send an email message to root@dhf34.nerdvittles.com using your actual FQDN. Count to 20, log into your server as root, and type: mail. The message you sent should NOT be in the Inbox. Repeat the test by sending a message to root and dlrpzh7b3 @the actual IP address of your Asterisk server. These, too, should both fail. Once you get a passing grade on all three tests, we can move on. The hard part is behind you!
Installing Phone Genie. While logged into your server as root, issue the following commands:
cd /root
wget http://pbxinaflash.net/source/nv/phonegenie.tgz
tar zxvf phonegenie.tgz
rm phonegenie.tgz
Configuring Phone Genie. While still logged into your server as root, edit phonegenie.sh. You will note that there are 3 fields that need to be configured at the top of the file: user, pw, and notify. The user field is the designated user account name that will be used for incoming emails (dlrpzh7b3 in our example). The pw field is the word in every email Subject that precedes the colon, space, and Asterisk CLI command (Asterisk in our example). The notify field is a reliable email address where you regularly receive emails promptly. This is where the results of your Phone Genie email commands will be sent. Choose this email address wisely, as if your bank account depended upon it. It does! Once you have filled in the 3 fields (preserving the quotation marks around each entry), save the file with your changes.
Testing Phone Genie. Now we're ready to try everything out. Using an email client, send an email message to dlrpzh7b3@dhf34.nerdvittles.com (using your actual Phone Genie email name and FQDN). For the Subject, enter the following (substituting the password you created above for Asterisk)... Asterisk: help
After counting to 20, log into your Asterisk server as root and issue the following command:
/root/phonegenie.sh
You should see a display of all of the Asterisk CLI commands and within a minute or so, you should receive an email with the same information at the email address you entered into the notify field in phonegenie.sh in the previous step.
Installing Phone Genie as a Cron Job. Once you have tested several Phone Genie emails manually and you're satisfied that everything is working reliably, you can set up the Phone Genie shell script as a cron job. It should be set to execute every minute or every couple of minutes throughout the day and night. Edit /etc/crontab and insert the command shown below to have the script execute every 2 minutes:
*/2 * * * * root /root/phonegenie.sh > /dev/null
Sample Phone Genie Commands. In addition to all of the traditional Asterisk CLI commands, Phone Genie also supports a number of commands that are specific to FreePBX. These additional commands let you configure call forwarding, call waiting, do not disturb, system speed dials, and blacklist entries on your Asterisk server. For Asterisk CLI command syntax, consult voip-info.org. For FreePBX command syntax, see the listing below. Enjoy!
database put CF 302 8338116666 * Call Forwarding Enable
database del CF 302 * Call Forwarding Disabledatabase put CFB 302 8238221234 * Call Forwarding on Busy Enable
database del CFB 302 * Call Forwarding on Busy Disabledatabase put CFU 302 8038445689 * Call Forwarding Unavailable Enable
database del CFU 302 * Call Forwarding Unavailable Disabledatabase put CW 302 ENABLED * Call Waiting Enable
database del CW 302 * Call Waiting Disabledatabase put DND 302 YES * Do Not Disturb Enable
database del DND 302 * Do Not Disturb Disabledatabase put blacklist 6781234567 1 * Blacklist a number
database del blacklist 6781234567 * Remove blacklisted numberdatabase put sysspeeddials 99 6781234567 * Set up Speed Dial 99
database del sysspeeddials 99 * Remove Speed Dial 99
(NOTE: Be sure you enable Feature Code *0 prefix in FreePBX!)
We wish all of you a very Merry Christmas! 
Need help with Asterisk? Visit the PBX in a Flash Forum.
Or Try the New, Free PBX in a Flash Conference Bridge.
whos.amung.us If you're wondering what your fellow man is reading on Nerd Vittles these days, wonder no more. Visit our new whos.amung.us statistical web site and check out what's happening. It's a terrific resource both for us and for you.
Special Thanks to Our Generous Sponsors
FULL DISCLOSURE: ClearlyIP, Skyetel, Vitelity, DigitalOcean, Vultr, VoIP.ms, 3CX, Sangoma, TelecomsXchange and VitalPBX have provided financial support to Nerd Vittles and our open source projects through advertising, referral revenue, and/or merchandise. As an Amazon Associate and Best Buy Affiliate, we also earn from qualifying purchases. We’ve chosen these providers not the other way around. Our decisions are based upon their corporate reputation and the quality of their offerings and pricing. Our recommendations regarding technology are reached without regard to financial compensation except in situations in which comparable products at comparable pricing are available from multiple sources. In this limited case, we support our sponsors because our sponsors support us.
BOGO Bonaza: Enjoy state-of-the-art VoIP service with a $10 credit and half-price SIP service on up to $500 of Skyetel trunking with free number porting when you fund your Skyetel account. No limits on number of simultaneous calls. Quadruple data center redundancy. $25 monthly minimum spend required. Tutorial and sign up details are here.
![]() The lynchpin of Incredible PBX 2020 and beyond is ClearlyIP components which bring management of FreePBX modules and SIP phone integration to a level never before available with any other Asterisk distribution. And now you can configure and reconfigure your new Incredible PBX phones from the convenience of the Incredible PBX GUI.
The lynchpin of Incredible PBX 2020 and beyond is ClearlyIP components which bring management of FreePBX modules and SIP phone integration to a level never before available with any other Asterisk distribution. And now you can configure and reconfigure your new Incredible PBX phones from the convenience of the Incredible PBX GUI.
VitalPBX is perhaps the fastest-growing PBX offering based upon Asterisk with an installed presence in more than 100 countries worldwide. VitalPBX has generously provided a customized White Label version of Incredible PBX tailored for use with all Incredible PBX and VitalPBX custom applications. Follow this link for a free test drive!
Special Thanks to Vitelity. Vitelity is now Voyant Communications and has halted new registrations for the time being. Our special thanks to Vitelity for their unwavering financial support over many years and to the many Nerd Vittles readers who continue to enjoy the benefits of their service offerings. We will keep everyone posted on further developments.
Some Recent Nerd Vittles Articles of Interest...
Welcome to IP Country: A New Layer of Asterisk Security
 One of the problems with writing a blog like Nerd Vittles is it's more than double the work of your typical blog where a writer pontificates about something and then moves on. What makes Nerd Vittles a little different is that, with help from a number of very gifted developers, we actually create useful applications and then write about how to use them. So you get a bonus for the same low price: free! This obviously imposes some time constraints in order to get fresh material into your hot little hands every week.
This week we turn our attention to Asterisk® Security again and unfortunately the Whole Enchilada is not yet ready. So today you get Chapter I of this topic with a comment that we're still mulling over some enhancements. When those pieces are finished or at least properly evaluated, we'll produce a sequel. Software houses spend years developing applications. And sometimes it takes us more than a week. 🙂
Let's start with a few observations which should be quite obvious to those who have wrestled with VoIP or Asterisk for a while. Internet security is a bitch. And Asterisk security is much, much worse. When a few disgruntled people can bring Twitter to its knees because they're mad about some particular tweet or Twitter user, it tells you what we're all up against. Hate to say it but we can all thank Microsoft for years of security neglect that rendered the Windows operating system less than optimum in preventing the spread and deployment of BOTs. And the tools have gotten more dangerous as well. Strangers (our euphemism for these folks) write new software, too. 
If you're using PBX in a Flash (and you really should be!), you know that we've devoted enormous resources to Asterisk security. Two years ago when PBX in a Flash was introduced, the majority of people using Asterisk still were using 1234 as the extension password on all or most of their extensions. A couple $100,000 phone bills and lots of public education, and that situation hopefully is behind us. Two years ago, no Asterisk aggregation included a firewall... except PBX in a Flash. Believe it or not, there were individuals running Asterisk servers on the public Internet with a default root password of password. That added more than a few more BOTs to the Internet kettle of fish. Then there were the brute force password hacks that hit Asterisk servers thousands of times per minute guessing passwords. Nothing stood in the way of these attacks until PBX in a Flash introduced Fail2Ban which automatically blacklisted IP addresses after a certain number of failed login attempts. We followed Fail2Ban with our Atomic Flash product which provided a turnkey Hamachi VPN implementation for rock-solid safe remote computing. And, of course, there was a one-minute Hamachi VPN install script for standard PBX in a Flash systems. No other aggregation has it to this day.
The purpose of the history lesson isn't to crow about PBX in a Flash although we're mighty proud of it. Rather we wanted to make you aware that precious little development effort is actually going into security while enormous resources are devoted to things such as Internet faxing, Skype, and Google Voice integration. We'll be the first to admit that we love the latest gee whiz gizmos as much as anybody. But come on. A handful of us who do this purely for fun somehow manage to turn out loads of security enhancements while huge, for-profit companies are devoting virtually zero resources to making Asterisk, SIP, and the VoIP community safer. SIP is about as secure as whispering at a movie theater. Google releases Google Voice with SIP access protected by a 4-digit password. 🙄 That approach to security needs to change, or we're all going to wake up sorry one day soon. If this is preaching to the choir, then feel free to pass this article on to one of your brethren who has not yet seen the light! Start by reading our Primer on Asterisk Security.
If you have extremely secure passwords on your Asterisk extensions and trunks, and you have deployed a properly configured firewall with Fail2Ban to protect against brute force attacks, then you're ahead of the curve insofar as Asterisk security is concerned. But what we think is still missing is access restrictions based upon what the military calls a "need to know." Simply stated, it means folks shouldn't get access of any kind to your Asterisk server unless they have a need to be there. And, if we find someone there that doesn't belong, they should be kicked off and banned from further access.
So today we have a new security tool for your Asterisk toolbox: IP Country, country-based network filtering by IP address. In a nutshell, it means configuring your Asterisk server to dramatically reduce the number of IP addresses which can reach your server at all. If you receive anonymous SIP connections from all around the globe that you actually need or if you're attacked from a BOT running on grandma's Windows machine down the block, this may not work for you, but it's another tool in your quiver of arrows. For most servers, it has the potential to reduce the vulnerability from random outside threats substantially. It's taken a lot of research to come up with much of what follows, and we want to express our special thanks to Sandro Gauci and Joe Roper for their assistance. Some of this technology has been around for many years, but unfortunately it was expensive. So we also want to express our special appreciation to MaxMind for releasing their open source GeoLite Country database which is now free for downloading. That is the critical ingredient in much of what follows. So here's a word from our sponsor:
This product includes GeoLite data created by MaxMind, available from http://www.maxmind.com/.
Scope of Protection. An obvious question is just exactly what are we trying to protect. In our view, it's several things. First, we don't want strangers logging in to extensions on our server and making free calls around the globe using pilfered or hacked passwords. We also don't want strangers using our extensions to masquerade as us for any other purpose. Second, we don't want strangers randomly calling our server using SIP URI's that they've dreamed up. And third, we don't want strangers accessing any other applications on our server including SSH and FTP as well as web and email services.
IP Country Design. As with other security features in Asterisk, FreePBX, and IPtables, our implementation of IP Country uses permit and deny access tables that consist of authorized and unauthorized ranges of IP addresses. There's also a table with the latest GeoLite Country information which is used as the data source for your permit table. When a connection to the server is made, the IP address is checked against the permit table of authorized addresses. If there's no match, we'll consider the connection a stranger. If there is a match, then we'll check the deny table to make certain this particular IP address hasn't been banned. Unless you alter all of our scripts, your system must be using the default MySQL account name of root with a password of passw0rd. As configured in PBX in a Flash, this is NOT a security risk since MySQL access is limited to your server, and your server requires root credentials to log in.
Today's Objective. To get everyone started, we're going to tackle the first two objectives today. The solutions offered should work fine on any FreePBX-based Asterisk system... even those that hide the existence of FreePBX.
For outgoing calls, we'll introduce a new script which runs periodically to examine the IP addresses attached to every SIP and IAX extension and trunk on your Asterisk server. If a stranger's IP address is identified (as explained above), we'll add an IPtables firewall rule to permanently block access to your server from this IP address. These rules are stored in /etc/sysconfig/iptables should you ever need to remove an IP address that has been blocked. You can adjust the script execution frequency based upon the thickness of your wallet. After all, it's your phone bill. This functionality is mutually independent from the incoming call protection outlined below so you can use either or both of the functions to meet your own requirements. For systems that use enormous numbers of SIP URI's for communications around the globe, you might choose to implement just this piece for extension and trunk IP Country protection without altering your incoming dialplan at all. Keep in mind that FreePBX now supports permit and deny IP address filters on extensions, something you really should be using even if you decide against implementing the IP Country security protection layer.
For incoming calls, we're going to modify FreePBX's existing Blacklist functionality to also look up the calling IP address in our IP Country permit and deny tables. If the IP address is authorized, the call will go through. Otherwise, the call will be treated just as if the caller's number were blacklisted. Be aware that incoming calls to one of your commercial DIDs may reflect the IP address of your provider since the caller may be calling from a Plain Old Telephone rather than an IP address. The existing Blacklist functionality can be used to block these unwanted callers. If you live in the United States, you'll probably also want to call 888-382-1222 and place your DIDs in the Do Not Call database. Just call from a phone using the CallerID of the number you wish to block.
Installing GeoLite Country. To get started, log into your server as root and issue the following commands:
cd /
wget http://bestof.nerdvittles.com/applications/ipcountry/ipcountry.tgz
tar zxvf ipcountry.tgz
rm ipcountry.tgz
cd /root/ipcountry
./nv-ipcountry
Once the nv-ipcountry script begins to run, it will download and install the GeoLite Country database into MySQL. You then will be asked whether to add countries to your permit table. Since your permit table is empty at this point, the answer should be yes. You'll then get a list of country codes. Choose the two-character country code desired and type it in UPPERCASE, e.g. US. If you want to add one or more additional countries, just rerun ./nv-ipcountry and do NOT initialize the permit table (which erases all of its contents).
New GeoLite Country databases are released every month or two so get used to the procedure. You'll be using it periodically to keep your list of IP addresses current. We'll cover the update procedure after we get you up and running.
Remember: If no IP addresses for any country are added to the permit table, you will not be able to make calls or register trunks with your providers! The only default entries added to the permit table are the non-routable, private IP address ranges, e.g. 192.168.0, etc. The geolite table is merely a data repository of the latest GeoLite Country database and has no effect on the daily operation of your system! You use it only as a data source for populating your permit table.
Testing IP Country. Before we actually turn anything on, we need to be sure we're not going to blow your Asterisk system out of the water! In short, we want to make sure that every extension that's supposed to be able to make a connection to your PBX still can. And we need to make sure all of your trunk registrations still are working. While you're still in the /root/ipcountry directory, issue the following command: ./test.sh. This script will display all of your SIP and IAX connections and then will tell you whether each connection will pass muster with IP Country security in place. Each IP address should display ok. If any of them show ko, you have a problem. This means that you have an extension or trunk with an IP address that is not included in your permit table. You can scan through the show peers listings in the display to figure out which providers or extensions are associated with any problem IP addresses. Be sure it's not a bad guy first. Then you have a couple of options. You can either manually add the IP address to the permit table as outlined below. Or you can add additional countries which include the missing IP address(es). To decipher the country of any problem IP address, go to this link and plug in the IP address. Once you've made entries in your permit table to cover all of your needed IP addresses, run the test script again just to be sure everything shows ok. Do NOT proceed until you get all ok's, and don't write us if you do.
Manually Adding IP Addresses to IP Country. We've provided a command-line utility which makes it easy to add IP addresses and address ranges to either the permit or deny tables of IP Country. Be very careful using this tool! There's limited error-checking which means it's easy to create a mess. You'll find iputility.php in the /root/ipcountry folder. Since all IP addresses are stored as integers, you can use it to merely discover the integer value of an IP address, or you can actually insert IP addresses into either the permit or deny tables. Here are a few examples to show how the utility works:
./iputility.php 156.130.20.10
Returns the integer value for this IP address; no database update
./iputility.php 156.130.20.10 156.130.20.255
Returns integer values for this IP address range; no database update
./iputility.php 156.130.20.10 deny
Adds this IP address to IP Country deny table
./iputility.php 156.130.20.10 156.130.20.255 permit
Adds this address range to IP Country permit table)
A couple of points worth noting. First, all custom entries in your permit and deny tables using iputility will show a country code of AA. This makes them easy to find using phpMyAdmin if you make a mistake. Second, if you attempt to enter the same IP address range more than once, you'll get a database error since all entries in the tables must be unique. Third, remember that entries in the deny table take precedence over entries in the permit table. So, if the same IP address or address range is in both tables, access will be denied. The reason for this is to make it easy to exclude a few bad apples from a country that you might otherwise find unobjectionable. Finally, keep in mind that manual entries added to the permit table will have to be added again each time you initialize the table and insert new country IP codes after a GeoLite Country refresh. The deny table is unaffected by database refreshes. So make yourself a list of entries you manually insert into the permit table and keep it in a safe place for future reference.
Activating the IP Address Checker. In the /root/ipcountry directory, you'll find the script that we'll use to check your system periodically to be sure all of the extensions and trunks are registered at permitted IP addresses. To run the script manually, log into your server as root and type: /root/ipcountry/ip-checker.sh. When you run it, you shouldn't see any modifications to IPtables, just a string of ok's. So now we want to added the script as a cron job that will be run periodically to watch your system. Edit /etc/crontab and insert the following line at the bottom of the file:
*/1 means run the script once a minute, all day and night, every day. */5 means every 5 minutes. You make the call on how safe you'd like your system to be. If you'd like to receive an email or text message every time an IP address is blocked by ip-checker.sh, just edit the filecheck.php script, uncomment the two lines that begin with // and replace yourname@gmail.com with your email or text message address.
WARNING: For ip-checker.sh to work properly with IPtables, there are a couple of prerequisites. First, IPtables must be running on your system with the iptables file located in /etc/sysconfig. Second, your IPtables setup must include an SSH permit rule that looks like this:
-A INPUT -p tcp -m tcp --dport ssh -j ACCEPT We use this rule as a place finder to determine where to insert new rules to block stranger's IP addresses. If you don't have the above rule, filecheck.php (used by ip-checker.sh) won't be able to insert new rules. So you'll need to manually edit filecheck.php to provide a "hook" that can be used to insert rules into your iptables file. PBX in a Flash systems come preconfigured to support this. With other aggregations, YMMV!
Activating the Incoming Call Checker. To screen incoming calls using your IP Country permit and deny tables, the setup is straight-forward assuming you are running the latest version of FreePBX 2.5. We're going to adjust the Blacklist context to also perform IP address lookups from IP Country when new calls arrive on your PBX. Just log into your server as root and add the following lines to the bottom of the extensions_override_freepbx.conf file in /etc/asterisk:
[app-blacklist-check]
include => app-blacklist-check-custom
exten => s,1,LookupBlacklist()
exten => s,n,GotoIf($["${LOOKUPBLSTATUS}"="FOUND"]?blacklisted)
exten => s,n,Set(TESTAT=${CUT(SIP_HEADER(From),@,2)})
exten => s,n,GotoIf($["${TESTAT}" != ""]?hasat)
exten => s,n,Set(FROM_IP=${CUT(CUT(SIP_HEADER(From),>,1),:,2)})
exten => s,n,Goto(gotip)
exten => s,n(hasat),Set(FROM_IP=${CUT(CUT(CUT(SIP_HEADER(From),@,2),>,1),:,1)})
exten => s,n(gotip),NoOp(Gateway IP is ${FROM_IP})
exten => s,n,NoOp(IP Country Lookup in Progress...)
; put authorized special calls like sipgate's Google Voice ringbacks below
exten => s,n,GotoIf($["${FROM_IP}"="sipgate.com"]?keepon)
exten => s,n,AGI(nv-ipcountry.php|${FROM_IP})
exten => s,n,GotoIf($["${STRANGER}"="true"]?blacklisted)
exten => s,n(keepon),NoOp(** AUTHORIZED CALLER **)
exten => s,n,Return()
exten => s,n(blacklisted),Answer
exten => s,n,Wait(1)
exten => s,n,Zapateller()
exten => s,n,Playback(ss-noservice)
exten => s,n,Hangup
Make sure you remove the line-wrap in the s,n(hasat) line and any others that may have wrapped in the display above! Then save the file and reload your Asterisk dialplan: asterisk -rx "dialplan reload". You're all set! If you'd like email notices when a stranger calls and is blacklisted, edit nv-ipcountry.php in /var/lib/asterisk/agi-bin. Plug in your actual email address in the $email variable and set $emailalerts = 1.
Housekeeping 101. As we mentioned above, the pool and location of IP addresses continues to change so periodic updates are necessary, or you'll end up blocking calls that otherwise should be permitted. MaxMind updates GeoLite Country on the first day of every month so add it to your TO-DO list. We strongly recommend that you perform these steps through an SSH connection from a remote PC. Why? Because, if you forget step 1 while logged directly into your server, you could inadvertently lock yourself out of your own system if the ip-checker script happens to run while your permit table is empty. If you do it from a remote machine, you can simply move to another machine and follow these instructions properly. Otherwise, you've got a serious problem on your main server. If this server provides phones to your business, do the update when the server is idle. So here's the drill:
- Comment out the ip-checker.sh /etc/crontab entry
- Download new GeoLite Country database from MaxMind
- Initialize the ipcountry.permit table
- Add authorized countries back into ipcountry.permit table
- Add back any custom entries to permit table
- Test your IP Country system to make sure you get all ok's
- Reactivate ip-checker.sh in /etc/crontab
1. Log into your server as root. To comment out the ip-checker.sh line in /etc/crontab, just add # as the first character on the line and save the file.
2. Change to the /root/ipcountry directory and run ./nv-GeoIPrefresh.
3. While still in the /root/ipcountry directory, run ./nv-ipcountry and choose 1-Yes to initialize your ipcountry.permit table.
4. Continue running or rerun ./nv-ipcountry to add each desired country to your ipcountry.permit table.
5. Run ./iputility.php to add custom IP address entries to your ipcountry.permit table. You do NOT need to reenter addresses in the deny table. It is unaffected by this update procedure.
6. Test your system again to make sure all extensions and trunks get an ok by running ./test.sh.
7. Edit /etc/crontab and remove the # at the beginning of the ip-checker.sh line and save the file.
What's Next. We're still exploring another possibility with IP Country, and that is integrating GeoLite Country directly into IPtables. This would validate every packet coming into your firewall using IP Country-like rules in IPtables. If you want to look at how it could be done, see this excellent writeup. Well, not so fast. Unfortunately, it won't compile under CentOS 5.2. Here's a link to the problem code if there are any Linux gurus in the house. Our reluctance in doing this has to do with performance. Keep in mind that, without stateful packet inspection, every single packet coming into your server would presumably trigger a database lookup. On a busy telephony system generating hundreds of thousands of packets per second, it would take a beast of a server with sufficient memory to cache the entire IP Country database in order to handle the processing load. So now we've got to either learn about or find an expert on the IPtables State Machine. If anyone wants to experiment, please share your expertise with the rest of us. There's a Google Voice invite in it for you, too.
whos.amung.us If you're wondering what your fellow man is reading on Nerd Vittles these days, wonder no more. Visit our new whos.amung.us statistical web site and check out what's happening. It's a terrific resource both for us and for you.
Need help with Asterisk? Visit the PBX in a Flash Forum.
Or Try the New, Free PBX in a Flash Conference Bridge.
Special Thanks to Our Generous Sponsors
FULL DISCLOSURE: ClearlyIP, Skyetel, Vitelity, DigitalOcean, Vultr, VoIP.ms, 3CX, Sangoma, TelecomsXchange and VitalPBX have provided financial support to Nerd Vittles and our open source projects through advertising, referral revenue, and/or merchandise. As an Amazon Associate and Best Buy Affiliate, we also earn from qualifying purchases. We’ve chosen these providers not the other way around. Our decisions are based upon their corporate reputation and the quality of their offerings and pricing. Our recommendations regarding technology are reached without regard to financial compensation except in situations in which comparable products at comparable pricing are available from multiple sources. In this limited case, we support our sponsors because our sponsors support us.
BOGO Bonaza: Enjoy state-of-the-art VoIP service with a $10 credit and half-price SIP service on up to $500 of Skyetel trunking with free number porting when you fund your Skyetel account. No limits on number of simultaneous calls. Quadruple data center redundancy. $25 monthly minimum spend required. Tutorial and sign up details are here.
![]() The lynchpin of Incredible PBX 2020 and beyond is ClearlyIP components which bring management of FreePBX modules and SIP phone integration to a level never before available with any other Asterisk distribution. And now you can configure and reconfigure your new Incredible PBX phones from the convenience of the Incredible PBX GUI.
The lynchpin of Incredible PBX 2020 and beyond is ClearlyIP components which bring management of FreePBX modules and SIP phone integration to a level never before available with any other Asterisk distribution. And now you can configure and reconfigure your new Incredible PBX phones from the convenience of the Incredible PBX GUI.
VitalPBX is perhaps the fastest-growing PBX offering based upon Asterisk with an installed presence in more than 100 countries worldwide. VitalPBX has generously provided a customized White Label version of Incredible PBX tailored for use with all Incredible PBX and VitalPBX custom applications. Follow this link for a free test drive!
Special Thanks to Vitelity. Vitelity is now Voyant Communications and has halted new registrations for the time being. Our special thanks to Vitelity for their unwavering financial support over many years and to the many Nerd Vittles readers who continue to enjoy the benefits of their service offerings. We will keep everyone posted on further developments.
Some Recent Nerd Vittles Articles of Interest...
Free Asterisk Solutions
