
Home » Posts tagged 'issabel' (Page 2)
Tag Archives: issabel
The Most Versatile VoIP Provider: FREE PORTING

 JUST RELEASED: Visit the Incredible PBX Wiki
Introducing Digium’s Awesome SIP Phones for Asterisk

If you’ve been waiting for a low-cost, feature-rich SIP phone that meshes perfectly with your Asterisk® PBX, your prayers have been answered. Digium has just released not one, but four, new SIP phones with prices starting at $59. No, that’s not a typo. Digium gave us a couple of early models to play with, and today we’ll walk you through the incredibly simple setup. We would begin by noting that, despite the pricing, these phones are configured with nothing resembling a bargain basement feature set. All four models have color displays, HD Voice, POE for use without the $15 power adapter, and at least two lines. The phones can be configured using the phones themselves, or through a slick web interface, or with auto-provisioning by MAC address. Beginning with the $89 A22, the top three models support gigabit Ethernet. With the $119 A25, you get four line registrations as well as a second LCD supporting six Rapid Dial keys or up to 30 BLF entries. The top-of-the-line $169 A30 supports six line registrations and an LED setup that closely matches our previous VoIP Phone of the Year, Yealink’s T46G. While the phones were not designed for use with Switchvox®, we found them to be plug-and-play with 3CX® which is probably also true with Switchvox even though we have not tested them on that platform. We have been using our A22 phone with one line connected to Incredible PBX® for the Raspberry Pi and the second connected to VitalBox. We’ve had zero issues with the phone, and sound quality is excellent.

Connecting Digium’s A-Series IP Phone
To get started, you’ll need a power source for the phone which can be either a POE network connection or a power adapter. You’ll also need to connect to a network that can provide DHCP or VLAN configuration data. Once the phone boots up, press the checkmark button (✓) twice to display the IP address assigned to the phone. Using a desktop browser, navigate to that IP address and enter admin:789 as the default login credentials.
Configuring a SIP Extension on Your IP Phone
Once you’re logged in, click on the Line tab and fill in the blanks for the SIP1 account using the desired extension number, extension password, and IP address of your Asterisk server. Be sure Activate is checked. It should look something like the following. Then click Apply.
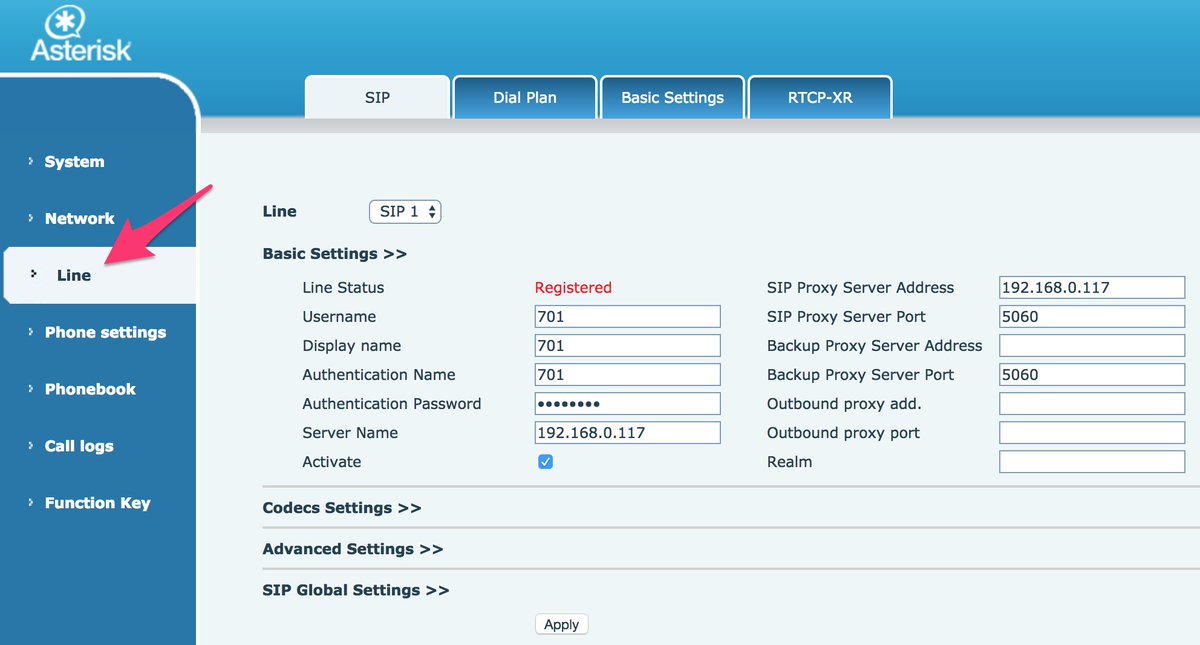
This one-minute setup is all that’s required to put your new phone into production with Asterisk. You’re ready to make and receive calls. The L1 button on the A20 or A22 phone (pictured above) should now be lit. To light up the L2 button, add a second SIP connection by repeating the drill after choosing the SIP2 Line from the pull-down menu. If you have redundant PBXs, fill in the IP address of the Backup server, and the phone will automatically failover when the primary PBX goes down. It doesn’t get any easier than that.
With 3CX extensions, the setup is virtually identical except the phone’s Authentication Name field should reflect the Authentication Name chosen when setting up the 3CX extension.
Customizing Your SIP Phone Settings
VoiceMail Setup. The voicemail button can be activated for one or both SIP lines in the Advanced Settings tab under each of the SIP connections. Check the Subscribe to Voice Message box and enter the Voice Message Number to retrieve your voicemails, e.g. *98701 for extension 701 on an Asterisk PBX or 999 for a 3CX extension’s voicemail.
Customizing Phone Display. If you’d like to customize the branding and background image on your phone, navigate to Phone Settings and click the Advanced tab. Here’s a link to download one of our favorite beach scenes (pictured above), or you can use your own 320×240 BMP image on the A20 and A22. The high end phones use a 480×272 BMP image. The Asterisk label at the top of the phone’s display can also be adjusted in the Greeting Words field. We’re Enchilada fans personally. 🙂
Changing Passwords and PINs. You also can adjust the passwords and PINs for the phone device itself under the Phone Settings:Advanced tab. The default is 789. To modify the admin credentials for the browser interface or to add new accounts, go to System and click on the Account tab. Because the phone can be configured using either the phone itself or the browser interface, you’ll need to change both sets of passwords to secure your phone.
Adjusting Codecs. Depending upon your PBX setup, you may need to adjust or reorder the codecs for one or both of your SIP lines. Simply navigate to Line:SIP1:Codec Settings and make any necessary changes. HINT: You’ll rarely have a problem if you make G.711U (U.S.) or G.711A (elsewhere) your primary codec although G.722 is what you’ll want for HD Voice. This is especially important if you’re using Google Voice trunks or 3CX client software.

Auto-Provisioning Your A20, A22, and A25 Phones
Let’s get to the fun stuff now. Everything we’ve covered (and much more) can be scripted with these new phones. You can read all about it here. For today, let’s get your Phonebook Contacts populated using your AsteriDex database entries. And then you can press the Down button on the phone to retrieve your Contacts.
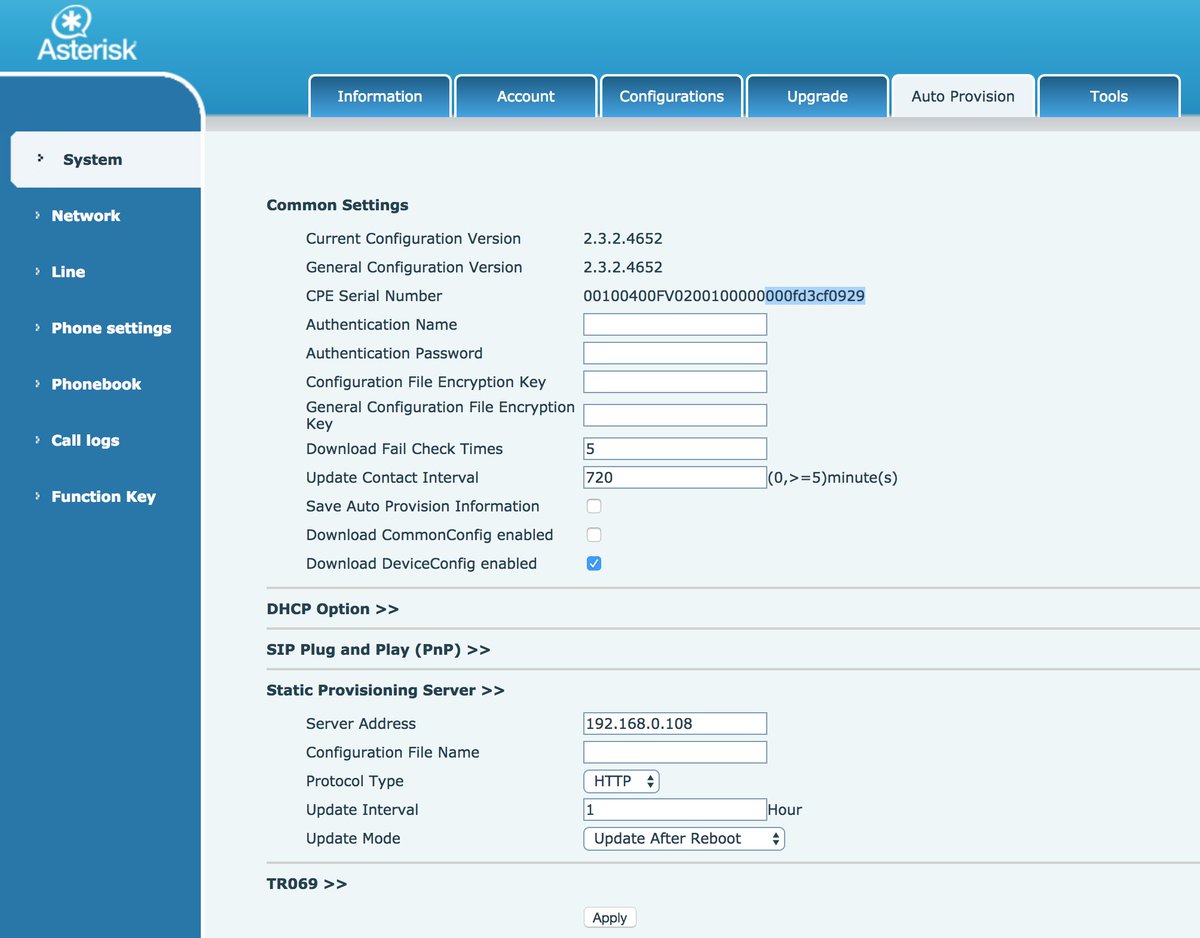
Setting Up Phone Provisioning. Before you can auto-provision your phone, both your phone and your Asterisk server need a little navigation information. Let’s start with the phone so login as admin:789 to get started. Click on the System option and then the Auto Provision tab. Write down the last 12 digits of your phone’s MAC address (CPE Serial Number highlighted above). Check the DownloadDeviceConfig option (as shown). Disable the DHCP Option and the SIP Plug and Play options by clicking on the respective tabs. Then open the Static Provisioning Server option (as shown). Enter the local IP address of your server assuming your phone and server are both behind a firewall. For the Protocol Type, choose HTTP. For the Update Mode, choose Update After Reboot. Then click the Apply button.
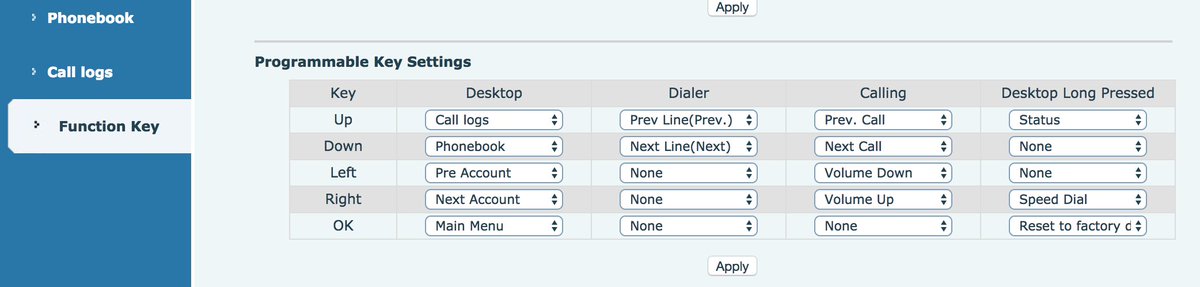
Next, let’s configure the phone so that you can press the Down arrow button to access your Phonebook Contacts. Click on the Function Key option in the left margin. Then look in the Programmable Keys section and locate the row with the settings for the Down button. Change the entry in the Desktop column to Phonebook. Then click the Apply button.
Configuring Asterisk for Phone Provisioning. Now we need to get your server set up to support phone provisioning. The way provisioning works is we will set up a provisioning profile for each phone which will be processed by your web server whenever a phone is rebooted. This profile will also tell the phone where to find your Phonebook Contacts XML file. To get started, navigate to /var/www/html and create a new .cfg file for each of your phones using the 12-character MAC address of the phone, e.g. 000123456789.cfg. The file should look like the following with the exception of the Auto Pbook Url entry which should reflect the local IP address of your server:
<<VOIP CONFIG FILE>>Version:2.0.0.0

<PHONE CONFIG MODULE>
LCD Title          :IncredblePBX

<AUTOUPDATE CONFIG MODULE>
Download CommonConf:0
Download DeviceConf:1
Check FailTimes    :5
update PB Interval :720
Clr PB B4 Import   :1
Trust Certification:0
Enable Auto Upgrade:0
Upgrade Server 1   :
Upgrade Server 2   :
Auto Upgrade intval:24
Auto Pbook Url     :http://192.168.0.108/phonebook.xml

<<END OF FILE>>
Populating Phonebook Contacts with AsteriDex. Now we’re ready to build the Phonebook Contacts file (phonebook.xml) using the AsteriDex 4 database. Just issue the following commands and then reboot each of your phones (Menu+8+Yes):
cd /var/www/html/asteridex4
wget http://incrediblepbx.com/asterisk-phonebook.tar.gz
tar zxvf asterisk-phonebook.tar.gz
rm -f asterisk-phonebook.tar.gz
php asterisk-phonebook.php
Digium A-Series IP Phone User Guide
Last but not least, take a look at Digium’s A-Series IP Phone User Guide (PDF) for more tips.
Final Thoughts on A-Series IP Phones
If you couldn’t already tell, we’re quite impressed with the new A-Series phones from Digium. If you’re on a budget, the $59 model is one terrific bargain for home or SOHO use. The only thing you’re really forfeiting with this phone is the gigabit Ethernet port which will have zero impact on small and medium-sized network implementations of a VoIP server. Rather than buying power adapters for your phones, drop by your favorite WalMart and purchase a network switch that includes POE support. They start at about $30. Then pick one of these phones up from your favorite provider and let us know what you think. You’ll also be helping to fund Digium’s open source Asterisk project. Enjoy!
Originally published: Friday, April 13, 2018
Got Friends? 7 Countries Have Never Visited Nerd Vittles. 2018 Is Calling! https://t.co/wMfmlhAr16 #asterisk #freepbx #wazo #issabel #IncrediblePBX #3CX pic.twitter.com/kAmAEnwVIw
— Ward Mundy (@NerdUno) January 9, 2018

Need help with VitalPBX? Visit the VitalPBX Forum.
Special Thanks to Our Generous Sponsors
FULL DISCLOSURE: ClearlyIP, Skyetel, Vitelity, DigitalOcean, Vultr, VoIP.ms, 3CX, Sangoma, TelecomsXchange and VitalPBX have provided financial support to Nerd Vittles and our open source projects through advertising, referral revenue, and/or merchandise. As an Amazon Associate and Best Buy Affiliate, we also earn from qualifying purchases. We’ve chosen these providers not the other way around. Our decisions are based upon their corporate reputation and the quality of their offerings and pricing. Our recommendations regarding technology are reached without regard to financial compensation except in situations in which comparable products at comparable pricing are available from multiple sources. In this limited case, we support our sponsors because our sponsors support us.
 BOGO Bonaza: Enjoy state-of-the-art VoIP service with a $10 credit and half-price SIP service on up to $500 of Skyetel trunking with free number porting when you fund your Skyetel account. No limits on number of simultaneous calls. Quadruple data center redundancy. $25 monthly minimum spend required. Tutorial and sign up details are here.
![]() The lynchpin of Incredible PBX 2020 and beyond is ClearlyIP components which bring management of FreePBX modules and SIP phone integration to a level never before available with any other Asterisk distribution. And now you can configure and reconfigure your new Incredible PBX phones from the convenience of the Incredible PBX GUI.
The lynchpin of Incredible PBX 2020 and beyond is ClearlyIP components which bring management of FreePBX modules and SIP phone integration to a level never before available with any other Asterisk distribution. And now you can configure and reconfigure your new Incredible PBX phones from the convenience of the Incredible PBX GUI.
 VitalPBX is perhaps the fastest-growing PBX offering based upon Asterisk with an installed presence in more than 100 countries worldwide. VitalPBX has generously provided a customized White Label version of Incredible PBX tailored for use with all Incredible PBX and VitalPBX custom applications. Follow this link for a free test drive!
 Special Thanks to Vitelity. Vitelity is now Voyant Communications and has halted new registrations for the time being. Our special thanks to Vitelity for their unwavering financial support over many years and to the many Nerd Vittles readers who continue to enjoy the benefits of their service offerings. We will keep everyone posted on further developments.

Incredible PBX Backup & Restore for Cloud-Based Servers

One of the perplexing realities with VoIP-based servers is how few people actually back up their systems. For anyone who has ventured into the IT world over the past 40 years, there’s one maxim worth remembering: "It’s not a question of whether your server will fail. It’s only a question of when." Incredible PBX® always has provided a backup mechanism in standalone servers to recover from disasters. But then cloud-based computing came along. Two of our favorite providers, Digital Ocean and Vultr, offer a backup snapshot option for 20% of the monthly cost of your platform. But many others do not. And snapshots in the same facility only insulate you from catastrophic failures that don’t take down the entire facility. Think: DNS, bombs, floods, earthquakes, hurricanes, and disgruntled employees.
We obviously can’t solve all of the world’s problems. But what we can do is provide a generic backup mechanism that will work with most cloud implementations of Incredible PBX. It allows you to make a complete backup of your server, copy the image off site, and restore it at another cloud location or by deploying a virtual machine in your home or office with VirtualBox®. Today we’ll show you how.

Methodology. We’re assuming you are using the latest Incredible PBX 13-13 platform with either CentOS® or Scientific Linux™ 6 or 7 running Asterisk® 13. We’re also assuming your primary server is cloud-based. Your backup server can be cloud-based or a virtual machine running under VirtualBox on a desktop PC. The trick is to build the backup platform at or near the creation time of your primary server so that both are using nearly identical Linux components, the same version of Asterisk, the same version of Incredible PBX, and the same versions of the 1,000+ packages that comprise an Incredible PBX VoIP platform. This is easy at the time you create your primary server. It’s much more difficult 5 or 10 years down the road. So don’t be a procrastinator. Build your backup platform. And do it now! In the case of VirtualBox, you can create the virtual machine and turn it off until that rainy day occurs. It won’t cost you a dime other than a little disk storage space.
Overview. Here are the 5 Steps to put your backup implementation plan into place:
- Build & Configure Incredible PBX 13-13 Primary Server in the Cloud
- Build Barebones Incredible PBX 13-13 Server at Secondary Site
- Make a Backup of Your Primary Server Every Week
- Copy Weekly Backup Image to One or More Off-Site Locations
- Periodically Test Restoring Backup to Secondary Server
1. Build & Configure Primary Server
We’ve covered the procedure for building an Incredible PBX 13-13 server starting from a CentOS platform or from the Incredible PBX 13-13 ISO. We continue to recommend the CentOS or Scientific Linux 6.9 platform. Whether to create a Lean, Mean implementation or the Whole Enchilada is your call to make. Configure your Extensions, Trunks, and Routes, and you’re ready for business.
2. Build a Barebones Secondary Server
The hardest part of Step #2 is deciding where to build your secondary Incredible PBX 13-13 server. It doesn’t need to be in the cloud unless you prefer that option. Part of this decision may turn on how many servers you actually support. If you have a dozen primary servers, then it probably makes sense to add #13 as your backup server. Then it will be available in case of a failure of any of the other servers. Just make sure it’s in a location 1,000+ miles away from the primary server which should provide ample protection from North Korea’s Rocket Man. You can install the Lean, Mean version of Incredible PBX 13-13 with no additional configuration. Make sure the version of CentOS or Scientific Linux matches your primary server. As noted, VirtualBox is a perfectly adequate backup platform.
3. Make a Weekly Backup of Primary Server
We’re offering the following script for your use pursuant to the GPL2 license. By using the script at no cost, you agree to assume all risks and absolve us from any liability regarding bugs, performance, or any other failure in the code. If that’s acceptable to you, copy the commands below and create a backup-full script in the /root folder of your primary server. After saving the script, make it executable: chmod +x backup-full.
#!/bin/bash
# backup-full for Incredible PBX, Copyright (c) 2008-2018, Ward Mundy & Associates, LLC
# Licensed pursuant to GPL2. See /root/COPYING on any Incredible PBX server for details
amportal stop
service mysqld stop
service httpd stop
service sendmail stop
cd /
tar -cf /tmp/backup.tar /bin /etc /home /lib /lib64 /media /mnt /opt /root /sbin /usr /var
service sendmail start
service httpd start
service mysqld start
amportal start
tar --delete -f /tmp/backup.tar etc/udev/rules.d
tar --delete -f /tmp/backup.tar etc/sysconfig/network-scripts
tar --delete -f /tmp/backup.tar var/lib/dhclient
tar --delete -f /tmp/backup.tar etc/fstab
tar --delete -f /tmp/backup.tar etc/resolv.conf
tar --delete -f /tmp/backup.tar etc/hosts
tar --delete -f /tmp/backup.tar etc/hostname
gzip /tmp/backup.tar
echo "Your backup is available: /tmp/backup.tar.gz"
echo "Copy it and test it in a safe place OFF SITE"
echo " "
To run the script, execute the following command: /root/backup-full
We recommend running the backup-full script during hours when your PBX is not in active use since Asterisk and other services typically are shut down for 5-10 minutes. Depending upon the size and performance of your server, the backup typically takes 15-20 minutes. Once the backup script finishes, copy /tmp/backup.tar.gz to a safe place away from the primary server every week. You can automate the backup and the copying procedure with a cron job if desired. If your primary PBX doesn’t change regularly, alter the backup schedule.
UPDATE: As many of you appreciate, VMware platforms are a very different beast. The same is true of some cloud platforms which don’t play nicely with full backups from other environments. The telltale sign is abrupt reboots when you attempt to login to the web GUI using a browser. If you will be backing up FROM or restoring TO a VMware virtual machine or some other incompatible platform, here’s a workaround. The backup methodology needs to be adjusted to collect all of your PBX configuration data without messing with the underlying operating system configuration. This is similar to the original Incredible Backup methodology. You may also find it handy whenever you have a backup cloud server that is similarly configured to your main cloud server.
First, you need to assure that your versions of the major components are the same on both your primary and backup server. As noted before, the easiest way to do this is to build the two platforms simultaneously. If you plan to use either the Full Enchilada or Incredible Fax add-ons on your primary server, then they also need to be installed and configured on your backup server. Once the two servers are operational, you can shut down the backup server for the time being. Then make your customizations on the primary server and make a backup. The backup script above will work with the exception of the tar command line which should be replaced with the following (as a single line command):
tar -cf /tmp/backup.tar /var/www /var/lib/mysql /var/lib/asterisk /root /etc/asterisk /etc/crontab /etc/pbx /var/spool/asterisk /etc/freepbx.conf /etc/amportal.conf
The restore scenario outlined below will be the same for VMware-style backups except your passwords on the restored platform will be your original backup server passwords with the exception of your FreePBX® GUI and Apache web passwords which will be inherited from the primary server at the time of the backup image.
4. Copy Backup Image to Off-Site Location(s)
Once the backup script finishes, copy /tmp/backup.tar.gz to a safe place away from the primary server every week. You can automate the backup and the copying procedure with a cron job if desired. If your primary PBX doesn’t change regularly, alter the backup schedule.
5. How to Restore Backup to Secondary Server
Before patting yourself on the back from having made a successful backup, let’s try restoring it to your secondary server to be sure everything still works. Here are a couple of tips before we get started. First, in the event of an actual emergency, you will find recovery is simplified if you use fully-qualified domain names in registering extensions to your primary server. In this way, you can simply alter the IP address of the FQDN in your DNS server to point to the backup server without having to reconfigure every extension on your PBX. Second, trunks that are registered from your primary PBX will automatically be registered from your secondary PBX when you bring it on line. For that reason, test your secondary server during non-working hours and always be sure to shut down Asterisk on the primary server (amportal stop) before bringing up your secondary server. Finally, trunks that are supported by IP address configuration rather than registration will need to be manually reconfigured with the secondary IP address before they will be available for use.
We’re offering the following script for your use pursuant to the GPL2 license. By using the script at no cost, you agree to assume all risks and absolve us from any liability regarding bugs, performance, or any other failure in the code. If that’s acceptable to you, copy the commands below and create a restore-full script in the /root folder of your backup server(s). After saving the script, make it executable: chmod +x restore-full.
#!/bin/bash
# restore-full for Incredible PBX, Copyright (c) 2008-2018, Ward Mundy & Associates, LLC
# Licensed pursuant to GPL2. See /root/COPYING on any Incredible PBX server for details
amportal stop
service mysqld stop
service httpd stop
service sendmail stop
chattr +i /etc/resolv.conf
cd /
tar zxvf /tmp/backup.tar.gz
echo "Shut off Asterisk on primary server now."
read -p "Press any key to continue with reboot..."
reboot
To restore the backup, begin by copying the backup.tar.gz file to /tmp on your backup server. Then run the script you created above: /root/restore-full.
Once the restore is completed, your server will reboot. Log back in using the credentials from your primary server and make sure everything is working.
NOTE: If your primary server is using eth0 for its Ethernet connection and your backup server is using venet0, then you’ll need to modify /etc/sysconfig/knockd and then restart PortKnocker on the backup platform: service knockd restart. The command to add looks like this:
OPTIONS="-i venet0:0"
If you’re backing up from a venet0 platform and restoring to an eth0 platform, then you’d need to reverse the process by removing the above entry from /etc/sysconfig/knockd and restarting PortKnocker. Enjoy!
Published: Tuesday, January 23, 2018

NEW YEAR’S TREAT: If you could use one or more free DIDs in the U.S. with unlimited inbound calls and unlimited simultaneous channels, then today’s your lucky day. TelecomsXChange and Bluebird Communications have a few hundred thousand DIDs to give away so you better hurry. You have your choice of DID locations including New York, New Jersey, California, Texas, and Iowa. The DIDs support Voice, Fax, Video, and even Text Messaging (by request). The only requirement at your end is a dedicated IP address for your VoIP server. Once you receive your welcome email with your number, be sure to whitelist the provider’s IP address in your firewall. For Incredible PBX servers, use add-ip to whitelist the UDP SIP port, 5060, using the IP address provided in your welcoming email.
Here’s the link to order your DIDs.
Your DID Trunk Setup in your favorite GUI should look like this:
Trunk Name: IPC
Peer Details:
type=friend
qualify=yes
host={IP address provided in welcome email}
context=from-trunk
Your Inbound Route should specify the 10-digit DID. Enjoy!
Need help with Asterisk? Visit the PBX in a Flash Forum.
Special Thanks to Our Generous Sponsors
FULL DISCLOSURE: ClearlyIP, Skyetel, Vitelity, DigitalOcean, Vultr, VoIP.ms, 3CX, Sangoma, TelecomsXchange and VitalPBX have provided financial support to Nerd Vittles and our open source projects through advertising, referral revenue, and/or merchandise. As an Amazon Associate and Best Buy Affiliate, we also earn from qualifying purchases. We’ve chosen these providers not the other way around. Our decisions are based upon their corporate reputation and the quality of their offerings and pricing. Our recommendations regarding technology are reached without regard to financial compensation except in situations in which comparable products at comparable pricing are available from multiple sources. In this limited case, we support our sponsors because our sponsors support us.
BOGO Bonaza: Enjoy state-of-the-art VoIP service with a $10 credit and half-price SIP service on up to $500 of Skyetel trunking with free number porting when you fund your Skyetel account. No limits on number of simultaneous calls. Quadruple data center redundancy. $25 monthly minimum spend required. Tutorial and sign up details are here.
![]() The lynchpin of Incredible PBX 2020 and beyond is ClearlyIP components which bring management of FreePBX modules and SIP phone integration to a level never before available with any other Asterisk distribution. And now you can configure and reconfigure your new Incredible PBX phones from the convenience of the Incredible PBX GUI.
The lynchpin of Incredible PBX 2020 and beyond is ClearlyIP components which bring management of FreePBX modules and SIP phone integration to a level never before available with any other Asterisk distribution. And now you can configure and reconfigure your new Incredible PBX phones from the convenience of the Incredible PBX GUI.
VitalPBX is perhaps the fastest-growing PBX offering based upon Asterisk with an installed presence in more than 100 countries worldwide. VitalPBX has generously provided a customized White Label version of Incredible PBX tailored for use with all Incredible PBX and VitalPBX custom applications. Follow this link for a free test drive!
Special Thanks to Vitelity. Vitelity is now Voyant Communications and has halted new registrations for the time being. Our special thanks to Vitelity for their unwavering financial support over many years and to the many Nerd Vittles readers who continue to enjoy the benefits of their service offerings. We will keep everyone posted on further developments.
Some Recent Nerd Vittles Articles of Interest…
Beginner’s Navigation Guide to VoIP PBXs and Nerd Vittles

Here at Nerd Vittles, we cover a lot of VoIP territory over the course of a year. To kick off the new year, we thought it might be helpful for those just beginning their VoIP adventure to sketch out the VoIP lay of the land for you. We’re assuming that you came to our site because you wanted a VoIP solution that gives you something to play with and to learn from. That’s not for everybody, and there are less flexible, turnkey VoIP solutions that function pretty much like a toaster. At the top of that short list would be the Ooma Telo and OBi200. Both offer (almost) free calling in the U.S. and Canada.
Keep in mind that all of us started as beginners so there’s no reason to be intimidated if you choose to deploy your own PBX. We’ve gotten a dozen years of enjoyment out of our adventures with VoIP telephony, and there’s no reason you can’t do the same. Let’s begin.
Choosing a Hardware Platform for Your VoIP PBX
First, you’ll need to choose a platform for your VoIP-based PBX: dedicated hardware, virtual machine, or cloud-based PBX. In no small part, this choice depends upon the target audience for your PBX. If it’s for home use or a SOHO business, a $35 Raspberry Pi may suffice. On the other hand, if your PBX will be supporting more than a dozen users or more than a handful of simultaneous calls, we’d look elsewhere. Many of Intel’s Atom-based PCs work very well. And a VirtualBox virtual PBX running atop an iMac or beefy Dell PC can support dozens of users if you have the necessary Internet bandwidth to handle your call volume. Cloud-based servers come in all shapes and sizes as well. As prices have plummeted, cloud solutions have become our favorite. For $3 to $6 a month, you now can host your PBX in the cloud with automatic image backups of your entire server every week. If you’re willing to forfeit backups, here is a cloud solution that will only set you back about a dollar a month. If your server is primarily for business use, we strongly recommend our Platinum Sponsor, RentPBX, that offers dozens of VoIP choices for $14.99 a month with coupon code: NOGOTCHAS.
Choosing the Best PBX to Meet Your Requirements
Once you’ve nailed down your hardware platform, the next step is choosing an operating system and PBX to support your individual requirements. As you might have guessed, there are dozens from which to choose. In both the open source and commercial PBX world, most systems require a specific version of Linux so your operating system choice typically is dependent upon the PBX you choose. In the open source world, the PBX learning curve is often related to the feature set being offered. More sophisticated feature sets typically have a steeper learning curve. If you’re just getting started with VoIP and you want a platform for learning, experimenting, or home use, you can’t beat Incredible PBX 13-13 Whole Enchilada. It was designed by us to be a turnkey PBX for first-time users with rock-solid security and all of the features you will ever need. It includes 31 applications for Asterisk® that cover every imaginable function that can be performed with a telephone including faxing, voice dialing, SMS messaging, wakeup calls and telephone reminders, free calling, conferencing, text-to-speech applications such as News Headlines and Weather Forecasts, Wolfram Alpha for Siri-like queries, plus all the usual PBX features: blacklists, call forwarding, call waiting, call transfer, call parking, call recording, intercom, voicemail including voicemail transcription with email delivery, IVRs, paging, AutoAttendants, DISA, and many more.
If you’re an experienced Asterisk developer that just wants a lean PBX where you can customize it to meet individual customer’s requirements, then Incredible PBX 13-13 Lean should be just the ticket. All of its components are configurable including Asterisk which can be recompiled from the included source code.
At the sophisticated end of the spectrum is Incredible PBX for Wazo which is based upon the Wazo PBX, an Asterisk 15 realtime implementation with full support for High Availability redundancy, multi-party videoconferencing, WebRTC, and automatic nightly backups. It includes API libraries from which you literally can build your own customized PBX from the ground up. The Incredible PBX feature set provides a platform with virtually identical applications to those found in Incredible PBX 13-13.
Sandwiched in between Incredible PBX 13-13 and Incredible PBX for Wazo is Incredible PBX 13 for Issabel. Issabel is an enhanced fork of the previous Elastix 4.0 PBX. The 2018 release includes Asterisk 13, the LTS version of the Asterisk platform. With the new Incredible PBX 13 add-on, you get the best of all worlds with Google Voice support and dozens of applications for Asterisk. Issabel provides a Unified Communications platform that is second to none in the open source world.
Thus far, all of our recommendations have been to open source, GPL-licensed PBX platforms. But you’d be making a mistake to limit your search for business telephony platforms to open source offerings. Our corporate sponsor, 3CX, offers a full year of their commercial PBX running in the Google Cloud at no cost. It’s incredibly simple to install and configure. And the beauty of the 3CX commercial platform is it can scale to any size as your business grows. And the 3CX feature set can be expanded geometrically as your business requirements mature. We added free text-to-speech applications for News and Weather reports just last week. Our favorite open source deployment strategy is to install a 3CX PBX alongside Incredible PBX which yields literally the best of both worlds. The 3CX clients for Windows and Macs, Android, and iOS make VoIP telephony available from anywhere with a couple of button clicks, and 3CX users experience none of the traditional communications problems that invariably crop up on platforms deployed by novice VoIP users running Asterisk.
Getting Started with Extensions, Trunks, and Routes
The Big 3 when it comes to PBX configuration are extensions, trunks, and routes. Extensions carry calls between phones on the PBX and other phones either inside or outside your home or office. Trunks actually provide the links between your PBX and the outside telephony world. Inbound routes tell your PBX where to send incoming calls while Outbound routes tell your PBX which trunk to use when calls are made to numbers outside your PBX. We’ve covered this in more detail including dozens of trunk setups in this Nerd Vittles tutorial.
Making Free U.S./Canada Calls within the United States
There are three ways to make free calls using your PBX. If you’re in the United States, you can use Google Voice to make free calls to the U.S. and Canada if your PBX supports Google Voice trunks, e.g. Incredible PBX 13-13 Whole Enchilada and Incredible PBX for Issabel. An alternative, if your PBX does not directly support Google Voice trunks, e.g. Incredible PBX for Wazo and 3CX, is to use the Simonics SIP to Google Voice Gateway service. For Nerd Vittles users, there is a one-time $4.99 signup fee with no additional charges ever. Whether you live in the U.S or not, all the PBXs we’ve covered today can make free SIP calls to anyone in the world that has a SIP URI address and a SIP phone. Most SIP softphones are free.
Mastering the Incredible PBX Feature Set
Configuring the Travelin’ Man 3 Firewall
All Incredible PBX servers include a firewall that is configured automatically as part of the installation process. On the 3CX platform, you’ll need to add the Travelin’ Man 3 firewall after installing your 3CX PBX. Here’s how:
Configuring a Firewall WhiteList:
WhiteListing Users with Travelin’ Man 3 and IPtables Firewall
Learning to Build Effective IVRs
Interactive Voice Response (IVR) systems and AutoAttendants are the bread-and-butter applications for businesses. If you’ve ever called a business and actually spoken to a live person without encountering an IVR, lucky you! But, believe it or not, IVRs can actually be a useful tool including our Stealth AutoAttendant which lets you intercept incoming calls with a greeting which provides a slight delay to allow the caller (or you) to reroute the call to a specific destination before the default destination kicks in. Nerd Vittles and the Incredible PBX offerings provide all of the tools you’ll need to build any type of IVR imaginable. Mastering Allison Smith’s Top 15 is an excellent starting point.
Harnessing Nerd Vittles Resources
Google is your friend when it comes to finding tutorials of interest in the VoIP world. To narrow searches to just Nerd Vittles, use the following syntax:
stealth autoattendant site:nerdvittles.com
And the Nerd Vittles site itself provides several powerful ways to drill down into topics of interest. In the upper right column of any article, you’ll find a search function which will return a list of matching articles to peruse. At the bottom of every article, check out the all-new Articles of Interest section of Nerd Vittles arranged by topic. Also in the right column of Nerd Vittles, you’ll find a listing of Categories with Nerd Vittles articles conveniently grouped by topic. And, finally, you can quickly jump to the lead article on every major Incredible PBX implementation in the color-coded tabs labeled: GPL VOIP SOLUTIONS FOR ALL.
Happy New Year!

Originally published: Monday, January 1, 2018
 Support Issues. With any application as sophisticated as a VoIP PBX, you’re bound to have questions. Blog comments are a terrible place to handle support issues although we welcome general comments about our articles and software. If you have particular support issues, we encourage you to get actively involved in the PBX in a Flash Forums. It’s the best Asterisk tech support site in the business, and it’s all free! Please have a look and post your support questions there. Unlike some forums, ours is extremely friendly and is supported by literally hundreds of Asterisk and 3CX gurus and thousands of users just like you. You won’t have to wait long for an answer to your question.
NEW YEAR’S TREAT: If you could use one or more free DIDs in the U.S. with unlimited inbound calls and unlimited simultaneous channels, then today’s your lucky day. TelecomsXChange and Bluebird Communications have a few hundred thousand DIDs to give away so you better hurry. You have your choice of DID locations including New York, New Jersey, California, Texas, and Iowa. The DIDs support Voice, Fax, Video, and even Text Messaging (by request). The only requirement at your end is a dedicated IP address for your VoIP server. Once you receive your welcome email with your number, be sure to whitelist the provider’s IP address in your firewall. For Incredible PBX servers, use add-ip to whitelist the UDP SIP port, 5060, using the IP address provided in your welcoming email.
Here’s the link to order your DIDs.
Your DID Trunk Setup in your favorite GUI should look like this:
Trunk Name: IPC
Peer Details:
type=friend
qualify=yes
host={IP address provided in welcome email}
context=from-trunk
Your Inbound Route should specify the 11-digit DID beginning with a 1. Enjoy!
Need help with Asterisk or 3CX? Visit the PBX in a Flash Forum.
Special Thanks to Our Generous Sponsors
FULL DISCLOSURE: ClearlyIP, Skyetel, Vitelity, DigitalOcean, Vultr, VoIP.ms, 3CX, Sangoma, TelecomsXchange and VitalPBX have provided financial support to Nerd Vittles and our open source projects through advertising, referral revenue, and/or merchandise. As an Amazon Associate and Best Buy Affiliate, we also earn from qualifying purchases. We’ve chosen these providers not the other way around. Our decisions are based upon their corporate reputation and the quality of their offerings and pricing. Our recommendations regarding technology are reached without regard to financial compensation except in situations in which comparable products at comparable pricing are available from multiple sources. In this limited case, we support our sponsors because our sponsors support us.
BOGO Bonaza: Enjoy state-of-the-art VoIP service with a $10 credit and half-price SIP service on up to $500 of Skyetel trunking with free number porting when you fund your Skyetel account. No limits on number of simultaneous calls. Quadruple data center redundancy. $25 monthly minimum spend required. Tutorial and sign up details are here.
![]() The lynchpin of Incredible PBX 2020 and beyond is ClearlyIP components which bring management of FreePBX modules and SIP phone integration to a level never before available with any other Asterisk distribution. And now you can configure and reconfigure your new Incredible PBX phones from the convenience of the Incredible PBX GUI.
The lynchpin of Incredible PBX 2020 and beyond is ClearlyIP components which bring management of FreePBX modules and SIP phone integration to a level never before available with any other Asterisk distribution. And now you can configure and reconfigure your new Incredible PBX phones from the convenience of the Incredible PBX GUI.
VitalPBX is perhaps the fastest-growing PBX offering based upon Asterisk with an installed presence in more than 100 countries worldwide. VitalPBX has generously provided a customized White Label version of Incredible PBX tailored for use with all Incredible PBX and VitalPBX custom applications. Follow this link for a free test drive!
Special Thanks to Vitelity. Vitelity is now Voyant Communications and has halted new registrations for the time being. Our special thanks to Vitelity for their unwavering financial support over many years and to the many Nerd Vittles readers who continue to enjoy the benefits of their service offerings. We will keep everyone posted on further developments.
Some Recent Nerd Vittles Articles of Interest…
The New Hybrid PBX: Why Settle for a One Trick Pony?

Let’s face it. It’s hard not to like the application development flexibility that Asterisk® offers, especially if you’re part of an organization that has very specific telephony needs. But the price you pay for "free" and putting all of your eggs in the Asterisk basket is painful. Here are a few of the hurdles that come to mind: security, NAT, one-way audio, remote users, CRM support, conferencing, painful upgrades to address frequent bug fixes, and, more generally, telephone management and support. We love Asterisk, but…
Most folks don’t buy all of their cars or groceries or computer software from a single company. So why do it with your phone system when you can take advantage of the best of all worlds, open source and commercial? To us, that’s the compelling case for integrating a 3CX commercial PBX into your Asterisk infrastructure. It’s a new iteration of what we used to call a hybrid PBX. And you can do it without cost for a full year to kick the 3CX tires and provide your mobile users with transparent phone service regardless of where they are roaming. Using the special Nerd Vittles signup link, you get a custom version of 3CX that supports 4 simultaneous calls, 10-user web meetings, unlimited trunks, and 10 or more extensions. After the first year, you can either spring for less than $100 a year to maintain the 3CX free PBX platform and mobile clients with pain-free updates, or you can upgrade to a more robust 3CX Pro commercial offering with a much expanded feature set including call center technology and seamless CRM integration with MS Exchange, Salesforce, Microsoft Dynamics, Microsoft Outlook, Office 365, Google Contacts, Exact Online, Freshdesk, Datev, Zendesk, Nutshell, vtiger, EBP, Insightly, amoCRM, Bitrix24 and Act. What’s not to like?
If you’re a frequent Nerd Vittles visitor, you already know that the 3CX clients for iOS, Android, Windows, and Macs are one of our favorite telephony apps of all time. The ease with which the 3CX client can be configured with a single click on an email attachment is revolutionary. And, once configured, the fact that you never again experience a NAT problem with a SIP call is nothing short of miraculous. As we’ve previously mentioned, the 3CX Client provides a nearly perfect mobile client for those that rely upon Asterisk. Now 3CX is poised to release an even easier configuration procedure for their mobile clients in update 2 for version 15.5. Simply log into your 3CX web client on a PC or Mac and choose the Settings:QR Code option from the menu bar. 3CX will present a QR code to activate the 3CX Client for your smartphone. Scan it using the 3CX Client app on your smartphone and, presto, your phone is instantly provisioned. It doesn’t get any easier than this…
Let’s spend a little time reviewing our favorite Hybrid PBX setup. In this scenario which is perfect for small businesses with a mobile workforce, the setup looks like this. An Asterisk server is deployed to manage company trunks including Google Voice, voicemail, IVRs, custom apps, and extensions for every employee. Then we add a 3CX free PBX, interconnect it with the Asterisk PBX, and assign a 3CX extension for every employee. The 3CX extensions will all tie back to the employee extensions on the Asterisk PBX. It obviously simplifies things if you keep your number schemes consistent. For example, extension 7000 on the Asterisk PBX could be matched to extension 000 on the 3CX PBX. Then we set up outbound trunks on both the Asterisk PBX and 3CX to dial a 9 prefix to reach extensions on the other PBX. So dialing 9000 on the Asterisk PBX would connect the caller to extension 000 on the 3CX PBX. On the 3CX side, dialing 9000 would connect the caller to extension 7000 on the Asterisk PBX in our example. And, of course, 3CX Clients can reach any number worldwide using Asterisk outbound trunks by dialing a 9 prefix and then the long distance number. Our previous tutorials will walk you through setting this up with Incredible PBX® 13, Issabel™, any FreePBX®-based PBX, or even Wazo. Once you complete the 5-minute setup, mobile users can take advantage of all the powerful features on any 3CX Client platform while still receiving their incoming calls from the Asterisk-based office PBX by simply forwarding their extension to their matching 9XXX destination on the 3CX platform. This will ring their 3CX Client anywhere in the world with nothing but a Wi-Fi connection! And it’s a free call.
Published: Monday, October 16, 2017
Need help with Asterisk? Visit the PBX in a Flash Forum.
Special Thanks to Our Generous Sponsors
FULL DISCLOSURE: ClearlyIP, Skyetel, Vitelity, DigitalOcean, Vultr, VoIP.ms, 3CX, Sangoma, TelecomsXchange and VitalPBX have provided financial support to Nerd Vittles and our open source projects through advertising, referral revenue, and/or merchandise. As an Amazon Associate and Best Buy Affiliate, we also earn from qualifying purchases. We’ve chosen these providers not the other way around. Our decisions are based upon their corporate reputation and the quality of their offerings and pricing. Our recommendations regarding technology are reached without regard to financial compensation except in situations in which comparable products at comparable pricing are available from multiple sources. In this limited case, we support our sponsors because our sponsors support us.
BOGO Bonaza: Enjoy state-of-the-art VoIP service with a $10 credit and half-price SIP service on up to $500 of Skyetel trunking with free number porting when you fund your Skyetel account. No limits on number of simultaneous calls. Quadruple data center redundancy. $25 monthly minimum spend required. Tutorial and sign up details are here.
![]() The lynchpin of Incredible PBX 2020 and beyond is ClearlyIP components which bring management of FreePBX modules and SIP phone integration to a level never before available with any other Asterisk distribution. And now you can configure and reconfigure your new Incredible PBX phones from the convenience of the Incredible PBX GUI.
The lynchpin of Incredible PBX 2020 and beyond is ClearlyIP components which bring management of FreePBX modules and SIP phone integration to a level never before available with any other Asterisk distribution. And now you can configure and reconfigure your new Incredible PBX phones from the convenience of the Incredible PBX GUI.
VitalPBX is perhaps the fastest-growing PBX offering based upon Asterisk with an installed presence in more than 100 countries worldwide. VitalPBX has generously provided a customized White Label version of Incredible PBX tailored for use with all Incredible PBX and VitalPBX custom applications. Follow this link for a free test drive!
Special Thanks to Vitelity. Vitelity is now Voyant Communications and has halted new registrations for the time being. Our special thanks to Vitelity for their unwavering financial support over many years and to the many Nerd Vittles readers who continue to enjoy the benefits of their service offerings. We will keep everyone posted on further developments.
Some Recent Nerd Vittles Articles of Interest…
The Ultimate Voice Dialer for Asterisk and Incredible PBX

Let’s face it. Voice recognition with Google has been hit and miss, and that’s on a good day. So we’re delighted to shift gears and introduce a new platform powered by IBM Watson’s Speech-to-Text (STT) engine. While it’s not free, that’s really theoretical for most of our readers. Your first month on the platform is entirely free. And, after that, you get 1,000 minutes a month of free voice recognition services. If you still want more, it’s 2¢ a minute.
We first introduced IBM’s STT platform back in March when we documented how to use the service to transcribe voicemails and deliver them via email. Today, we’re introducing the Incredible Voice Dialer for Asterisk. It runs on all of the major Incredible PBX platforms: CentOS, Wazo, and Issabel. It’s married to our AsteriDex phonebook application that is deployed with Incredible PBX using MySQL, MariaDB, or SQLite3 depending upon platform.
The way it works is a user picks up an extension on your PBX and dials 411. The caller will be prompted for the name of the person or company to call. Once the caller says the name, the Incredible Voice Dialer will send the recording to IBM’s Watson STT engine for transcription. The result is then passed to AsteriDex where the text will be matched against the phone number saved for that person or company. The number is then passed to your default outbound trunk to place the call. All of the magic happens in less than two seconds, and the call begins ringing at your destination. You can try it out for yourself on our demo server this week. Just dial:  , choose option 1 when the IVR answers, and then say "Delta Airlines" or "American Airlines" when prompted for a name. The queries support wildcard matching. If you say "Delta", you’ll still be connected to Delta Airlines.
What About the Quality? Here’s the bottom line. Speech recognition isn’t all that useful if it fails miserably in recognizing everyday speech. The good news is that IBM Watson’s speech recognition engine is now the best in the business. If you want more details, read the article below which will walk you through IBM’s latest speech recognition breakthrough:
Why IBM's speech recognition breakthrough matters for AI and IoT. Via @techrepublic https://t.co/AJi8MA3E20
— IBM Developer (@IBMDeveloper) March 15, 2017
Creating an IBM Bluemix Speech to Text Account
NOV. 1 UPDATE: IBM has moved the goal posts effective December 1, 2018:
1. Create Bluemix account here.
2. Confirm your registration by replying to email from IBM.
3. Login to Bluemix using your new credentials.
4. Agree to terms and conditions, name your organization, and name your space (STT).
5. Choose Watson Speech to Text service and click Create.
6. When Speech to Text-kb opens, click Service Credentials tab (on the left).
7. In Actions column, click View Credentials. Write down your username and password.
8. Logout by clicking on image icon in upper right corner of dialog window.
Install Voice Dialer with Incredible PBX for Wazo
1. Login to your server as root using SSH/Putty and issue the following commands:
cd /
wget http://incrediblepbx.com/ibmstt-411-wazo.tar.gz
tar zxvf ibmstt-411-wazo.tar.gz
rm -f ibmstt-411-wazo.tar.gz
sed -i '\\:// BEGIN Call by Name:,\\:// END Call by Name:d' /etc/asterisk/extensions_extra.d/xivo-extrafeatures.conf
sed -i '/\\[xivo-extrafeatures\\]/r /tmp/411.txt' /etc/asterisk/extensions_extra.d/xivo-extrafeatures.conf
asterisk -rx "dialplan reload"
2. Edit /var/lib/asterisk/agi-bin/getnumber.sh and insert your IBM credentials from step #7 above into these variables:
API_USERNAME="XXXXXXXX-XXXX-XXXX-XXXX-XXXXXXXXXXXX"
API_PASSWORD="XXXXXXXXXXXX"
3. Save the file.
Install Voice Dialer on Other Incredible PBX Platforms
1. Login to your server as root using SSH/Putty and issue the following commands:
cd /
wget http://incrediblepbx.com/ibmstt-411.tar.gz
tar zxvf ibmstt-411.tar.gz
rm -f ibmstt-411.tar.gz
sed -i '\\:// BEGIN Call by Name:,\\:// END Call by Name:d' /etc/asterisk/extensions_custom.conf
sed -i '/\\[from-internal-custom\\]/r /tmp/411.txt' /etc/asterisk/extensions_custom.conf
asterisk -rx "dialplan reload"
2. Edit /var/lib/asterisk/agi-bin/getnumber.sh and insert your IBM credentials from step #7 above into these variables:
API_USERNAME="XXXXXXXX-XXXX-XXXX-XXXX-XXXXXXXXXXXX"
API_PASSWORD="XXXXXXXXXXXX"
3. Save the file.
Take Incredible Voice Dialer for a Test Drive
1. From an extension connected to your PBX, dial 411. When prompted for the name to call, say "Delta Airlines" or "American Airlines."
2. Quicker than you could actually dial the number, you’ll be connected.
Building Voice-Enabled Applications with Asterisk
All of our code is open source, GPL2 code so you’re more than welcome to use it, learn from it, and then build your own voice-enabled applications. Just abide by the terms of the license and share. When you review /var/lib/asterisk/agi-bin/getnumber.sh, you’ll see that it’s incredibly easy to change the backend database. Here’s the Wazo flavor of the script:
API_USERNAME="XXXXXXXX-XXXX-XXXX-XXXX-XXXXXXXXXXXX"
API_PASSWORD="XXXXXXXXXXXX"

thisfile="$1"

# sending the recording to IBM Watson for transcription
curl -k -u $API_USERNAME:$API_PASSWORD -X POST --limit-rate 40000 --header "Content-Type: audio/wav" --data-binary @/tmp/$thisfile.wav "https://stream.watsonplatform.net/speech-to-text/api/v1/recognize?continuous=true&model=en-US_NarrowbandModel" 1>/tmp/$thisfile.txt

# grabbing the text out of the IBM Watson response
msg=`cat /tmp/$thisfile.txt | grep transcript | cut -f 2 -d ":" | cut -f 2 -d '"' | sed 's| *$||' | sed -e "s/\b\(.\)/\u\1/g"`%

# passing text to MySQL (1st line) or SQLite3 (2nd line) for name lookup. answer is num2call.
#num2call=$(mysql -uroot -ppassw0rd asteridex -ss -N -e "SELECT user1.out FROM user1 where name LIKE '$msg'");
num2call=`/usr/bin/sqlite3 /var/lib/asterisk/agi-bin/asteridex.sqlite "select out from user1 where name LIKE '$msg'"`

# clearing out our temporary files
rm -f /tmp/$thisfile.*

# passing the results to the Asterisk dialplan
echo "SET VARIABLE PTY2CALL "\""$msg"\"""
echo "SET VARIABLE NUM2CALL "\""$num2call"\"""

# we're done with the AGI bash script so let's exit gracefully
exit 0
The Asterisk dialplan code could be modified for any number of applications. Here’s what it looks like on the Incredible PBX 13 platform. It’s slightly different with Wazo to accomodate their dialplan syntax.
;# // BEGIN Call by Name
exten => 411,1,Answer
exten => 411,n,Playback(custom/411)
exten => 411,n,Set(RANDFILE=${RAND(8000,8599)})
exten => 411,n,Record(/tmp/${RANDFILE}.wav,3,10)
exten => 411,n,Playback(/tmp/${RANDFILE})
exten => 411,n,AGI(getnumber.sh,${RANDFILE})
exten => 411,n,NoOp(Party to call : ${PTY2CALL})
exten => 411,n,NoOp(Number to call: ${NUM2CALL})
exten => 411,n,Goto(outbound-allroutes,${NUM2CALL},1)
exten => 411,n,Hangup()
;# // END Call by Name
There’s nothing magical about it. (1) It answers the call to 411. (2) It plays back a recording that prompts the user to say the name of the person or company to call. (3) It generates a random number to use for the filenames associated with the STT process. (4) It records the caller’s speech and saves it to the random filename as a .wav file which IBM STT can understand. (5) It passes the call to the AGI bash script to send the recording to IBM Watson and obtain the transcription and to pass the text to MySQL or SQLite3 to lookup the text in the AsteriDex database. (6) We display the called party’s name on the Asterisk CLI. (7) We display the called party’s phone number on the Asterisk CLI. (8) We place the call using the PBX’s default outbound route. (9) We hangup the call when it’s completed.
Published: Monday, October 9, 2017
Need help with Asterisk? Visit the PBX in a Flash Forum.
Special Thanks to Our Generous Sponsors
FULL DISCLOSURE: ClearlyIP, Skyetel, Vitelity, DigitalOcean, Vultr, VoIP.ms, 3CX, Sangoma, TelecomsXchange and VitalPBX have provided financial support to Nerd Vittles and our open source projects through advertising, referral revenue, and/or merchandise. As an Amazon Associate and Best Buy Affiliate, we also earn from qualifying purchases. We’ve chosen these providers not the other way around. Our decisions are based upon their corporate reputation and the quality of their offerings and pricing. Our recommendations regarding technology are reached without regard to financial compensation except in situations in which comparable products at comparable pricing are available from multiple sources. In this limited case, we support our sponsors because our sponsors support us.
BOGO Bonaza: Enjoy state-of-the-art VoIP service with a $10 credit and half-price SIP service on up to $500 of Skyetel trunking with free number porting when you fund your Skyetel account. No limits on number of simultaneous calls. Quadruple data center redundancy. $25 monthly minimum spend required. Tutorial and sign up details are here.
![]() The lynchpin of Incredible PBX 2020 and beyond is ClearlyIP components which bring management of FreePBX modules and SIP phone integration to a level never before available with any other Asterisk distribution. And now you can configure and reconfigure your new Incredible PBX phones from the convenience of the Incredible PBX GUI.
The lynchpin of Incredible PBX 2020 and beyond is ClearlyIP components which bring management of FreePBX modules and SIP phone integration to a level never before available with any other Asterisk distribution. And now you can configure and reconfigure your new Incredible PBX phones from the convenience of the Incredible PBX GUI.
VitalPBX is perhaps the fastest-growing PBX offering based upon Asterisk with an installed presence in more than 100 countries worldwide. VitalPBX has generously provided a customized White Label version of Incredible PBX tailored for use with all Incredible PBX and VitalPBX custom applications. Follow this link for a free test drive!
Special Thanks to Vitelity. Vitelity is now Voyant Communications and has halted new registrations for the time being. Our special thanks to Vitelity for their unwavering financial support over many years and to the many Nerd Vittles readers who continue to enjoy the benefits of their service offerings. We will keep everyone posted on further developments.
Some Recent Nerd Vittles Articles of Interest…
Game Changer: Hooking Up Facebook with Incredible PBX

There aren’t many VoIP discoveries that get us this excited about the future of telecom. But merging with 1.5 billion users plus Facebook’s enormous talent pool and technology resources is definitely something worthy of your attention. What a Facebook marriage with the VoIP platform could mean for the future of telecommunications is nothing short of earth-shattering. Few people still have home phones. Almost everyone has a Facebook account and a cellphone. If VoIP solutions for businesses fail to take those last two sentences into account, commercial PBX’s days are numbered… and it’s not a big number.
So why integrate Facebook Messenger into your PBX? The screenshot above says it all.
Think of the possibilities. Using Facebook Messenger on your smartphone or desktop PC, you could query a CRM database running on your VoIP server and instantly connect to anyone in the world by making a free call or sending a free text message. Using Facebook Messenger, you or any designated employee could receive instant alerts when a new voicemail or fax arrived on your PBX. Using Facebook Messenger, the Call Center possibilities are virtually endless as documented here. Using Facebook Messenger, you as an administrator could literally manage your entire fleet of PBXs from the convenience of your smartphone… anywhere in the world. While the Facebook Messenger platform does not independently support phone calls between its users today, it’s just a matter of time. Look at the name of the product. Is there any doubt where this project is headed given the fact that Apple already supports free calling with Facetime, Microsoft supports free calling with Skype, Google supports free calling with Google Voice, and Amazon supports free calling with its Echo platform?
Facebook integration is revolutionary in another way as well. It heralds the arrival of chatbots to do the heavy lifting for telecom businesses as well as system administrators. Just as ATMs revolutionized banking, chatbots are poised to do much the same thing for communications and Internet support. Down the road, we’ll document how to take advantage of this chatbot technology using Facebook Messenger.
We need to learn to walk before we can run. So today we’ve developed a Facebook webhooks integration project for Incredible PBX® that is perfect for administrators, whether you manage a home PBX or a dozen PBXs for an organization. We’ll get to some of the other possibilities in future articles. Setting this up is the best way we can think of to get your creative juices flowing to consider what’s possible and to identify where to go next. When we’re finished, you’ll have a Facebook Messenger platform from which you can issue any Linux® or Asterisk® command to your server. And, you’ll be able to send messages from your PBX to Facebook Messenger to identify any events you wish to monitor, whether it’s phone calls, or voicemails, or receipt of faxes, or even VoIP provider outages. In addition, you can even reroute calls by entering simple call forwarding commands in Messenger.
Before we get started, let’s get all of the legal stuff out of the way up front. WE PROVIDE OPEN SOURCE, GPL CODE TO OUR READERS AT NO COST. ALWAYS HAVE. ALWAYS WILL. THE TRADEOFF IS YOU MUST AGREE TO ACCEPT ALL RISKS INHERENT IN USING THE SOFTWARE, WHETHER THOSE RISKS ARE KNOWN OR UNKNOWN TO YOU OR TO US. THE SOFTWARE IS PROVIDED "AS IS" AND MAY BE USED AS DELIVERED, OR YOU MAY MODIFY IT TO MEET YOUR OWN NEEDS SUBJECT TO THE TERMS OF THE GPL 2 LICENSE AVAILABLE HERE. IF YOU ARE UNWILLING TO AGREE TO THESE TERMS AND CONDITIONS, STOP READING HERE AND MOVE ON TO SOME OTHER WEB SITE. OTHERWISE, LET’S BEGIN WHAT WE PROMISE WILL BE A TERRIFIC ADVENTURE.
Overview of Facebook Messenger Webhooks Project
Here is a thumbnail sketch of what we’ll be covering today. Once you get an SSL certificate installed for your server, the remaining steps are a walk in the park. When we’re finished, you’ll have a Facebook Messenger platform that is seamlessly integrated with your PBX. The current software release supports Incredible PBX 13 with CentOS 6, Incredible PBX for Issabel, and Incredible PBX for Wazo. Minor tweaking required for other Asterisk platforms.
- SSL Certificate – Obtaining and installing an SSL certificate for your web server
- Security – Locking down your server for safe, secure Facebook Messenger access
- Incredible PBX Webhooks App – Installing the server-side webhooks software
- Facebook Integration – Interconnecting Facebook Messenger and Incredible PBX
- Outbound Call Setup – Configuring Incredible PBX to make outbound calls from FB
- Incoming Call Alerts – Configuring Incredible PBX for FB Messenger call alerts
- Webhooks Feature Set – Our tutorial covering all supported webhook commands
- SMS Messaging – Configuring Incredible PBX for SMS Messaging support with FB
- Webhooks Tips & Tricks – Adjusting our code to meet your own requirements
Obtaining and Installing an SSL Certificate
Believe it or not, the hardest part of today’s project was covered in last week’s Nerd Vittles tutorial. It walked you through obtaining and installing an SSL Certificate on any of the major Incredible PBX platforms. This gets your server configured to use secure and encrypted web communications via HTTPS which is both a Facebook requirement and a smart idea. There’s no need to read further until you get your server working properly with an SSL certificate because the Facebook integration component will fail until you get HTTPS access squared away. So start there and return here when you’re finished.
The Most Important Piece of the Puzzle: SECURITY
If you’ve been following Nerd Vittles over the years, you already know that our most important consideration with any PBX deployment is security. A PBX without a secure firewall is an invitation for an astronomical phone bill. Today’s setup assumes you already have deployed Incredible PBX with its Travelin’ Man 3 firewall that provides a whitelist of IP addresses that may access (or even see) your server. By definition, Facebook Messenger is a public platform available to everyone in the world. So how do we safely integrate it into your PBX while preserving the security of your server and its telecom resources? We do it in several ways. First, Facebook Messenger Webhooks are tied to a commercial Facebook page even though you don’t need a business in order to create the page. As the owner of that Facebook Page, you have to authorize users to access the page. DON’T! Make this a page that is solely dedicated to managing your PBX through Messenger. DO NOT USE THIS FACEBOOK PAGE AS THE PUBLIC FACE FOR YOUR BUSINESS! Also make certain that your Facebook credentials include a very secure password… as if the integrity of your PBX depended upon it. IT DOES! So long as you follow these guidelines, Facebook’s own security mechanisms will protect your PBX from intrusion. If this discussion makes you nervous, our last topic today will show you how to remove components from the code to eliminate any functionality you wish to turn off.
As configured, Facebook Messenger Webhooks won’t work at all with Incredible PBX because the firewall should block all web access to your server. This requires a change on the Incredible PBX for Wazo platform which we will cover momentarily. The way we will provide Facebook access is by adding the Facebook server IP addresses to the existing whitelist, and then we’ll run a bash script every night to keep the Facebook IP addresses current.
In the past, we opened TCP port 443 (HTTPS) to public access on the firewall with Incredible PBX for Wazo. Instead, we relied upon web server authentication for access to the Wazo, Telephone Reminders, and AsteriDex services. That needs to be changed before you interconnect with Facebook Messenger, and we’ll include that in the commands to whitelist the Facebook servers below.
1. To secure port 443 in your firewall, be sure that the port is not exposed in /etc/sysconfig/iptables (CentOS) or /etc/iptables/rules.v4 (Debian/Ubuntu/Raspbian). And then restart the Incredible PBX firewall.
sed -i 's|443|450|' /etc/sysconfig/iptables
sed -i 's|443|450|' /etc/iptables/rules.v4
iptables-restart
2. Verify your new configuration: iptables -nL. Search for 443 and make certain it is NOT in the whitelist.
3. Verify that the whois package is installed on your server by issuing the command: whois. If you get a file not found error, install the package using the top line for CentOS and the bottom line for Debian/Ubuntu/Raspbian:
yum install whois
apt-get install whois
4a. For Issabel and Incredible PBX 13, add to the end of /usr/local/sbin/iptables-restart these lines to whitelist the FB servers. Then restart the firewall: iptables-restart
whois -h whois.radb.net -- '-i origin AS32934' | grep ^route: | sed "s|route:     |/usr/sbin/iptables -A INPUT -s |" | sed "s|$| -p tcp -m tcp --dport 443 -j ACCEPT|" > /usr/local/sbin/iptables-facebook
chmod +x /usr/local/sbin/iptables-facebook
/usr/local/sbin/iptables-facebook
4b. For Incredible PBX for Wazo, add to end of /usr/local/sbin/iptables-restart these lines to whitelist the FB servers. Then restart the firewall: iptables-restart
whois -h whois.radb.net -- '-i origin AS32934' | grep ^route: | sed "s|route:     |/sbin/iptables -A INPUT -s |" | sed "s|$| -p tcp -m tcp --dport 443 -j ACCEPT|" > /usr/local/sbin/iptables-facebook
chmod +x /usr/local/sbin/iptables-facebook
/usr/local/sbin/iptables-facebook
5. Verify your new configuration: iptables -nL. You should see numerous whitelist entries for port 443 at the end of the listing.
6. Add the following command at the bottom of /etc/crontab to assure that the Facebook server IP addresses are kept current:
20 0 * * * root /usr/local/sbin/iptables-restart >/dev/null 2>&1
7a. For Issabel and Incredible PBX 13, create new web directory, set ownership/permissions to house the Facebook Messenger webhooks, and add a sample web page:
mkdir /var/www/html/fb
echo "Hello World" > /var/www/html/fb/index2.php
chown -R asterisk:asterisk /var/www/html/fb
7b. For Incredible PBX for Wazo, create web directory, set ownership/permissions to house the Facebook Messenger webhooks, and add a sample web page:
mkdir /var/www/html/fb
echo "Hello World" > /var/www/html/fb/index2.php
chown -R asterisk:www-data /var/www/html/fb
chmod -R 775 /var/www/html/fb
8a. For Issabel and Incredible PBX 13, no further configuration is required.
8b. For Incredible PBX for Wazo, we need to enable access to the fb web directory. Edit /etc/nginx/locations/https-available/01_incrediblepbx:
At the top of the file, add the following:
location ~* ^/fb/. *\(?:ico|css|js|gif|jpe?g|png)${
 root /var/www/html;
}
At the bottom of the file, add the following:
location ~ /fb/ {
 root /var/www/html;
 index index.php;
 try_files $uri $uri/ =404;
 fastcgi_param SCRIPT_FILENAME $document_root$fastcgi_script_name;
 fasstcgi_index index.php;
 include fastcgi_params;
 fastcgi_pass unix:/var/run/php5-fpm.sock;
}
Finally, restart the NGINX web server: service nginx restart
9. Using a browser, verify access to sample page: https://SERVER-FQDN/fb/index2.php
Installing Incredible PBX Webhooks Application
Now it’s time to install the Incredible PBX webhooks application on your PBX:
cd /var/www/html/fb
wget http://incrediblepbx.com/incrediblewebhooks.tar.gz
tar zxvf incrediblewebhooks.tar.gz
rm incrediblewebhooks.tar.gz
For Issabel and Incredible PBX 13, adjust the file ownership and permissions like this:
chown -R asterisk:asterisk /var/www/html/fb
chmod -R 775 /var/www/html/fb
For Incredible PBX for Wazo, adjust the file ownership and permissions like this:
chown -R asterisk:www-data /var/www/html/fb
chmod -R 775 /var/www/html/fb
Hooking Up with Facebook
1. Visit the Facebook Developer’s Page and click Add a New App. Give your app a Display Name and provide your Contact Email. Match the letters in the box to get past the Security Check to display the Facebook Product List.
2. When the Facebook Product List appears, click Messenger and choose Setup.
3. In the Token Generation section, click Create a new Facebook Business Page to open a separate browser tab. Do NOT use a page that you use for other purposes! Company, Organization, or Institution is a good choice because there’s a Telecom Company category. Give your new page a Descriptive Name: incrediblepbx-podunk.
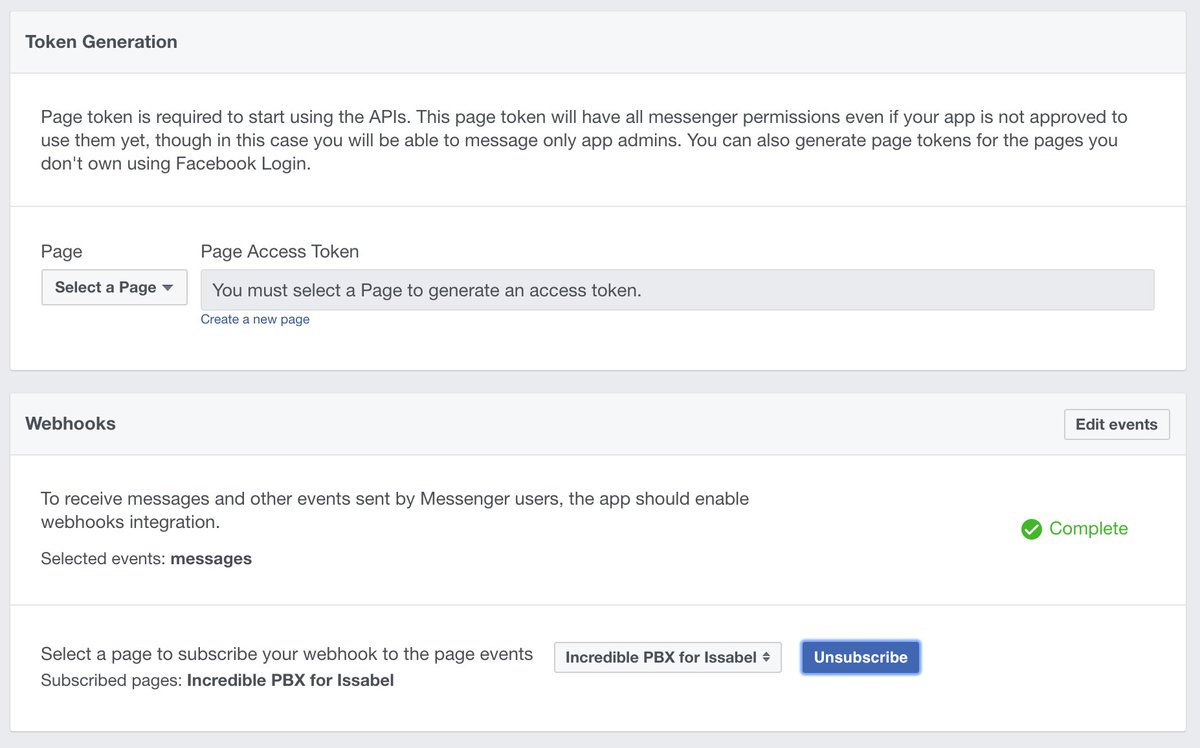
4. Return to your Token Generation browser tab and Select the Page you just created from the pull-down list (see Token Generation section of image below). Click Continue and OK to accept the default settings. Facebook then will generate a Page Access Token.
5. Copy the Page Access Token to your clipboard and paste it into the $access_token variable in the config.inc.php template in /var/www/html/fb. Write it down and keep it in a safe place. You’ll always need it to create new webhooks applications. This is the important link to talk to your Facebook Webhooks.
6. In the Webhooks section, click Setup Webhooks. In the Page Subscription form, enter the callback URL for your page. This is the https address to access your Facebook directory with a browser, e.g. https://YOUR-FQDN/fb. Make up a very secure Verify Token and enter it on the form and in the $verify_token variable in the config.inc.php template. This is the code Facebook will send to initially shake hands with your web page. The two entries must match to successfully set up your webhooks linkage. For Subscription Fields, check the Messages box. Then click Verify and Save. If it worked, you’ll get a Complete checkmark in the Webhooks section (see below). The last step is to again Select your Page in the Webhooks section to interconnect Facebook with your PBX. After choosing your page, be sure to click Subscribe or nothing will work. Here’s what a successful setup looks like:
7. To test things out, open Facebook Messenger on a desktop PC, Mac, or smartphone. Search Messenger for the Facebook page you linked to in the previous step. Then click on it to open it. Type howdy in the Message Box at the bottom of the dialog and click Send.
8. You should get an automated response that looks like this:
Hi there and welcome to BotWorld. SenderID: 13824822489535983
9. Copy the SenderID and paste it into cli-message.php together with Page Access Token from step #5, above.
Outbound Call Setup for Facebook Messenger
Outbound calling with Facebook Messenger works like this. You can connect to a specific number using the dial command. Or you can use the call command to look up an entry in your AsteriDex database. Messenger then will display the matching phone number and give you the option of placing the call. When the call is initiated, Incredible PBX will first call your designated CALL-PICKUP-NUMBER. It could be an extension or ring group of your choice. You could even specify a mobile phone number as the pickup destination provided your PBX supports at least two simultaneous outbound calls. Google Voice and many SIP providers can handle this with a single DID. Our personal preference is to route the pickup call to a trunk on a 3CX server which then sends the call to every 3CX client registered with the 3CX server. No NAT issues ever! Once you pick up the call on your designated phone, Incredible PBX will place the second call to the number you requested in Facebook Messenger. The two calls then are connected as if you had placed the call directly. The brief video below demonstrates how this works and the flexibility of using Acer’s $250 Chromebook Flip with Messenger and a 3CX client as a (free) WiFi-based web communications platform with Google Voice. It lets you place and take calls from anywhere in the world so long as you have Wi-Fi access. It’s a dirt cheap travel companion.
To make all of this work, you need to designate a phone in /var/www/html/fb/.cli-call to take outbound calls initiated from Facebook Messenger. This is either an extension number or a 10-digit CALL-PICKUP-NUMBER in the examples below. To set this up, edit .cli-call and choose one of the following examples. Comment out the other Channel options.
For Issabel and Incredible PBX 13, choose from the following:
#echo "Channel: SIP/701" > /tmp/cli.call
#echo "Channel: SIP/vitel-outbound/1CALL-PICKUP-NUMBER" > /tmp/cli-call
echo "Channel: Motif/gSOME-GV-NAMEgmailcom/1CALL-PICKUP-NUMBER@voice.google.com" > /tmp/cli.call
For Incredible PBX for Wazo, choose from the following:
echo "Channel: Local/701@default" > /tmp/cli.call
#echo "Channel: Local/CALL-PICKUP-NUMBER@default" > /tmp/cli.call
Incoming Call Alerts with Facebook Messenger
If you’ve always wished for screenpops to announce your incoming calls, you’re going to drool at the FB Messenger Webhooks implementation with Incredible PBX. It works (simultaneously) on desktop PCs, Macs, iPhones/iPads, Android devices, and Apple Watch:
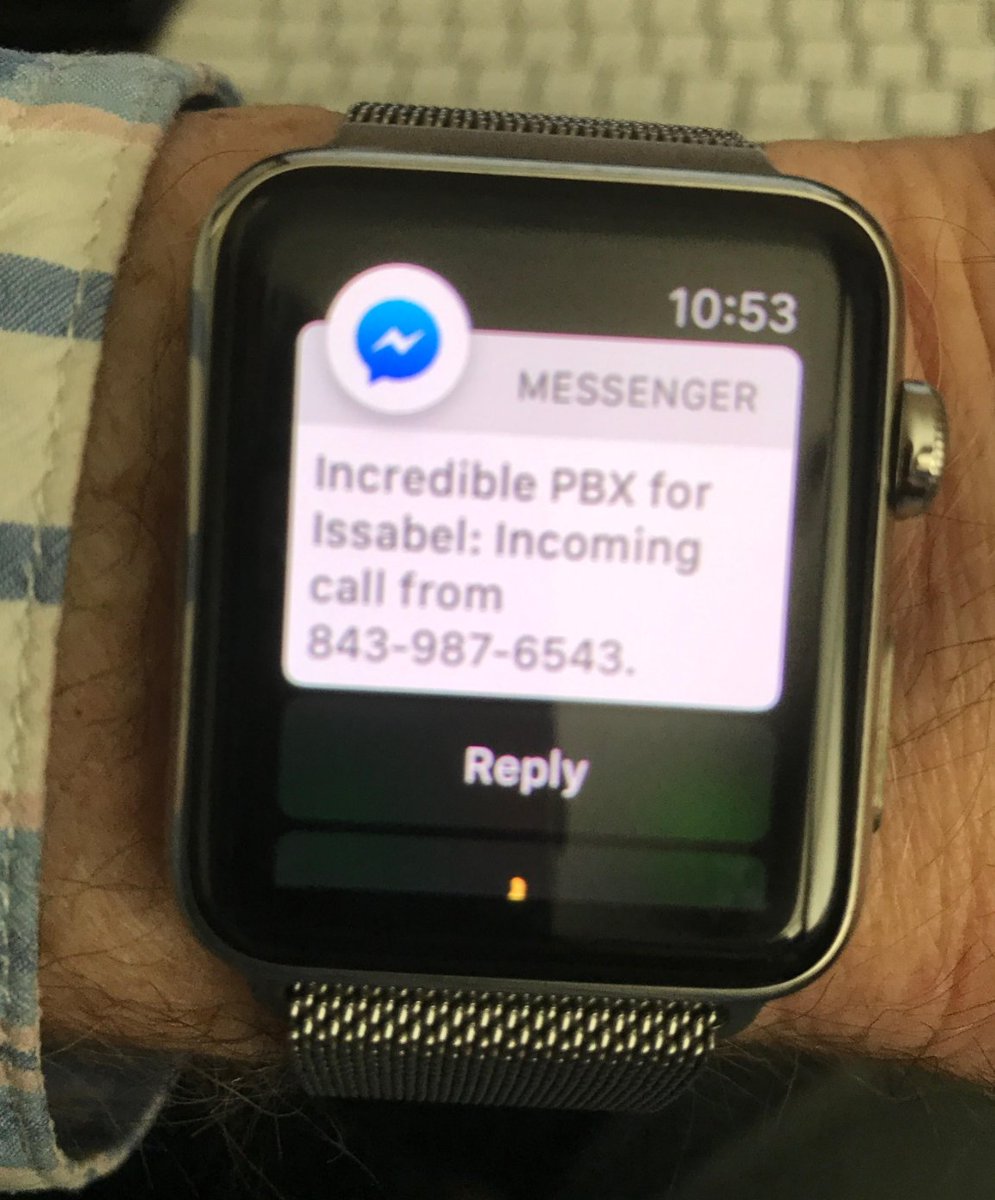
To set up incoming call alerts with Facebook Messenger, just issue the commands for your platform as outlined below.
For Incredible PBX 13, add the following to the end of extensions_override_freepbx.conf in /etc/asterisk directory. Then reload Asterisk dialplan: asterisk -rx "dialplan reload"
[cidlookup]
include => cidlookup-custom
exten => cidlookup_1,1,Set(CURLOPT(httptimeout)=7)
exten => cidlookup_1,n,Set(CALLERID(name)=${CURL(https://api.opencnam.com/v2/phone/${CALLERID(num)}?format=pbx&ref=freepbx)})
exten => cidlookup_1,n,Set(current_hour=${STRFTIME(,,%Y-%m-%d %H)})
exten => cidlookup_1,n,Set(last_query_hour=${DB(cidlookup/opencnam_last_query_hour)})
exten => cidlookup_1,n,Set(total_hourly_queries=${DB(cidlookup/opencnam_total_hourly_queries)})
exten => cidlookup_1,n,ExecIf($["${last_query_hour}" != "${current_hour}"]?Set(DB(cidlookup/opencnam_total_hourly_queries)=0))
exten => cidlookup_1,n,ExecIf($["${total_hourly_queries}" = ""]?Set(DB(cidlookup/opencnam_total_hourly_queries)=0))
exten => cidlookup_1,n,Set(DB(cidlookup/opencnam_total_hourly_queries)=${MATH(${DB(cidlookup/opencnam_total_hourly_queries)}+1,i)})
exten => cidlookup_1,n,ExecIf($[${DB(cidlookup/opencnam_total_hourly_queries)} >= 60]?System(${ASTVARLIBDIR}/bin/opencnam-alert.php))
exten => cidlookup_1,n,Set(DB(cidlookup/opencnam_last_query_hour)=${current_hour})
exten => cidlookup_1,n,System(/usr/bin/php /var/www/html/fb/cli-message.php "Incoming call: ${CALLERID(number)} - ${CALLERID(name)}.")
exten => cidlookup_1,n,Return()

exten => cidlookup_return,1,ExecIf($["${DB(cidname/${CALLERID(num)})}" != ""]?Set(CALLERID(name)=${DB(cidname/${CALLERID(num)})}))
exten => cidlookup_return,n,Return()

;--== end of [cidlookup] ==--;
For Incredible PBX for Issabel, add this to the end of extensions_override_issabel.conf in /etc/asterisk directory. Then reload Asterisk dialplan: asterisk -rx "dialplan reload"
[cidlookup]
include => cidlookup-custom
exten => cidlookup_5,1,Set(CURLOPT(httptimeout)=7)
exten => cidlookup_5,n,Set(CALLERID(name)=${CURL(https://api.opencnam.com/v2/phone/${CALLERID(num)}?format=pbx&ref=issabelpbx)})
exten => cidlookup_5,n,Set(current_hour=${STRFTIME(,,%Y-%m-%d %H)})
exten => cidlookup_5,n,Set(last_query_hour=${DB(cidlookup/opencnam_last_query_hour)})
exten => cidlookup_5,n,Set(total_hourly_queries=${DB(cidlookup/opencnam_total_hourly_queries)})
exten => cidlookup_5,n,ExecIf($["${last_query_hour}" != "${current_hour}"]?Set(DB(cidlookup/opencnam_total_hourly_queries)=0))
exten => cidlookup_5,n,ExecIf($["${total_hourly_queries}" = ""]?Set(DB(cidlookup/opencnam_total_hourly_queries)=0))
exten => cidlookup_5,n,Set(DB(cidlookup/opencnam_total_hourly_queries)=${MATH(${DB(cidlookup/opencnam_total_hourly_queries)}+1,i)})
exten => cidlookup_5,n,ExecIf($[${DB(cidlookup/opencnam_total_hourly_queries)} >= 60]?System(${ASTVARLIBDIR}/bin/opencnam-alert.php))
exten => cidlookup_5,n,Set(DB(cidlookup/opencnam_last_query_hour)=${current_hour})
exten => cidlookup_5,n,System(/usr/bin/php /var/www/html/fb/cli-message.php "Incoming call: ${CALLERID(number)} - ${CALLERID(name)}.")
exten => cidlookup_5,n,Return()

exten => cidlookup_return,1,ExecIf($["${DB(cidname/${CALLERID(num)})}" != ""]?Set(CALLERID(name)=${DB(cidname/${CALLERID(num)})}))
exten => cidlookup_return,n,Return()

;--== end of [cidlookup] ==--;
For Incredible PBX for Wazo, edit /etc/asterisk/extensions_extra.d/cid-superfecta.conf. In the [xivo-subrgbl-did] context just below the n(keepon),Gosub(cid-superfecta,s,1) line, insert the following. Then reload the Asterisk dialplan: asterisk -rx "dialplan reload"
same = n,System(/usr/bin/php /var/www/html/fb/cli-message.php "Incoming call: ${XIVO_SRCNUM} - ${CALLERID(name)}.")
Incredible PBX Webhooks Feature Set
Now that we’ve got all the pieces in place and properly configured, let’s briefly walk through the various options that are available. With all commands, you use Facebook Messenger with your designated web page on any platform supported by Messenger.
dial 8005551212 – connects to designated extension and then calls 8005551212
call Delta – looks up Delta in AsteriDex and provides button to place the call
lookup Delta – looks up Delta in AsteriDex and provides button to place the call
!command – executes a Linux command, e.g. !asterisk -rx "sip show registry"
howdy – returns greeting and SENDER ID of your FB page (Hookup, item #9)
help – provides links to phone help as well as PIAF and Asterisk forums
sms 10-digit-SMS-number "Some message" – sends SMS message through GV
update – updates Messenger platform for Incredible PBX to the latest & greatest
anything else – returns whatever you typed as a response (for now)
Configuring Incredible PBX for SMS Messaging
We’ve implemented a traditional SMS messaging function in this build that let’s you send an SMS message to any phone if you have a Google Voice account and assuming you have pygooglevoice functioning properly on your PBX. The Google Voice account need not be registered as a trunk on the PBX. To use the feature, insert your Google Voice credentials including your plain-text password for a working Google Voice account in /var/www/html/fb/.smssend. Then test the SMS functionality by issuing the following command from the Linux CLI:
/var/www/html/fb/.smssend 10-DIGIT-SMS-NUMBER "Hello SMS World"
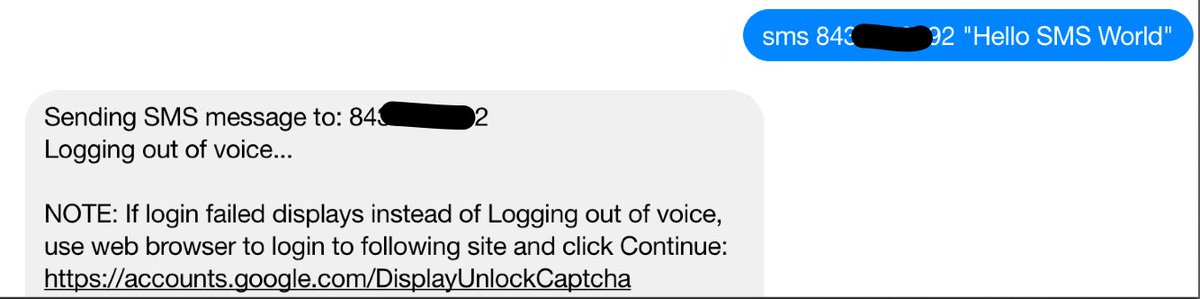
If an error occurs, the script will tell you what to try to fix it. Begin by Enabling Less Secure Apps. Then follow this link to relax Google Voice security on your account. If it still fails after trying both of these methods, you may have an old build of pygooglevoice. Here are the commands to bring your system up to current specs. Then try again.
cd /root
rm -r pygooglevoice
git clone https://github.com/wardmundy/pygooglevoice.git
cd pygooglevoice
python setup.py install
cp -p bin/gvoice /usr/bin/.
Once you’ve sent an SMS message successfully using .smssend, you can start sending SMS messages from within Messenger. Syntax: sms 10-digit-SMS-number "Some message"
Incredible PBX Webhooks Tips & Tricks
There’s lots to learn with Facebook Messenger Webhooks. When we started two weeks ago, there were no PHP resources on the web that offered much help. Lucky for you, our pain is your gain. The meat of the coconut is primarily stored in the index.php in your fb directory. Print it out and it will tell you everything you ever wanted to know about coding webhooks with PHP.
Disabling Shell Access. While shell access only provides asterisk or www-data permissions depending upon your platform, we’ve nevertheless heard from more than one source exclaiming what a dumb idea it is to put a webhooks shell command out in the wild. We trust our readers to use it responsibly and to always place it behind a firewall with public access to TCP port 443 blocked. If that design and the Facebook security mechanisms still leave you queasy, the short answer is to remove that block of code on your server or change the access code from ! to something much more obscure, e.g. YuKFoo!. This is easy to do but just be aware that if you change the access code or even remove the block of code, running the update command to load the latest release from Incredible PBX Headquarters will overwrite your changes. So it’s probably a better idea to rename the update command (line 248) as well so you don’t accidentally run it. You’ll find the shell command block of code beginning at line 64 in the 170928 version. If you change the access code to a different string, remember to change the substring "1″ reference in that line and the subsequent line to the actual length of your access code, e.g. YukFoo! is seven characters long so the number 1 would be replaced with 7 in BOTH lines 64 and 65.
Other Security Measures. We don’t trust anybody (and that includes Facebook) when it comes to accessing resources from our paid VoIP providers. We would encourage you to run this application on a dedicated Incredible PBX in the Cloud server that has only a single Google Voice trunk with no funds balance in that particular Google account. In this way, if your server is compromised, the worst thing that can happen is your Google account gets compromised or some stranger makes U.S. and Canadian calls without financial cost to you. Now that Cloud servers are available for less than $2 a month, it makes good sense to separate out applications that pose heightened security issues for you and yours. If you do decide to use a SIP provider rather than a Google Voice trunk, we strongly recommend restricting international calls and keeping a minimal balance in your account with no automatic replenishment enabled.
Getting Rid of Lenny. The help command included in the feature set provided is more of a traditional web page with buttons simulating hot links. We’ve included a nifty telephone option in the help features. It let’s you embed a phone number that is called using client-side integration whenever help is entered and the "Talk to Lenny" option is clicked:
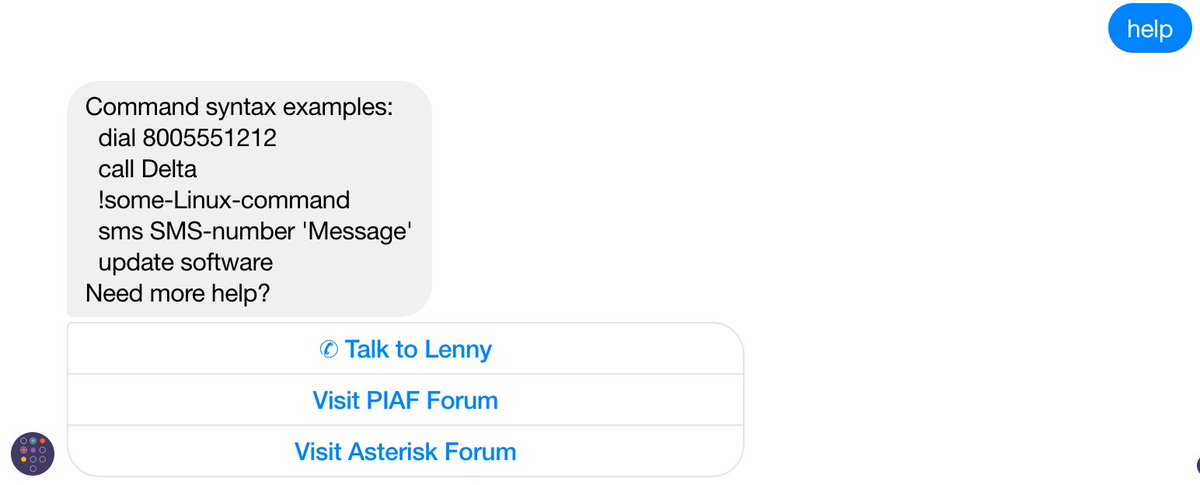
What client-side integration means is the calls use any dialer available on the Messenger client’s platform. They are not sent to your PBX for processing. On a Mac or iPhone, Facetime provides free calls. On Windows, Skype provides paid calls. On Android devices, the Google Hangouts Dialer provides free calls. Facebook basically passes tel: +18005551212 to the client’s browser, and it’s up to the client’s browser to figure out how to process the call. We currently have the feature configured to "Talk to Lenny," but you could change it to Phone Home or Call the Office and enter your own phone number. Here are the commands to do it. Just replace "Phone Home" in the first command below with whatever label desired. Replace "8005551212″ in the second line with the number to be called. Leave the other Lenny entry and phone number as they are since they will be overwritten by these two commands. As noted above, your modifications will be overwritten whenever you execute the update command.
sed -i 's|Talk to Lenny|Phone Home|' /var/www/html/fb/index.php
sed -i 's|8436060444|8005551212|' /var/www/html/fb/index.php
Enhanced Calling Option. Beginning with the October 1 update which you can obtain by entering the update command in Messenger, you now have two calling options on some smartphone platforms. The call command still triggers an AsteriDex lookup on your PBX. But now you have a choice in how to place the call. (1) You can click the dial button to place the outbound call through your PBX, or (2) you can click on the retrieved phone number link to place the outbound call using the client-side resource available on your Messenger platform, e.g. Facetime, Skype, or Google Hangouts. In some circumstances, the client-side call may be preferable since it avoids the two-step calling procedure used by Asterisk. The choice is yours and may depend upon the availability and cost of the client-side call when placed from your calling location.
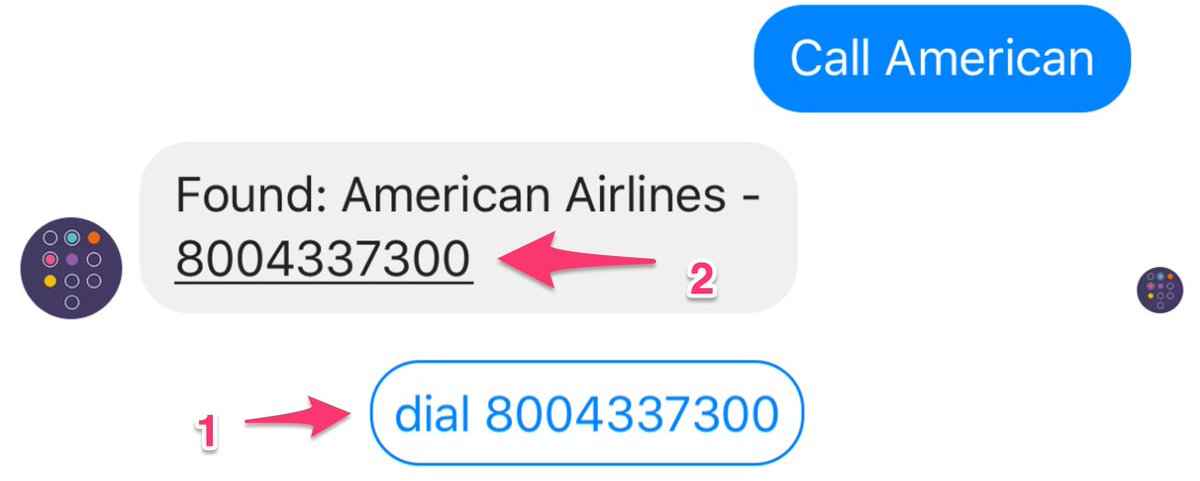
Special Thanks. Our special hat tip to Scott T. Tabor (@ABSGINC) for his pioneering work on Facebook Webhooks. You can visit the PIAF Forum and Scott’s blog to review how far we have come in just two weeks. Thanks, Scott.
Published: Monday, October 2, 2017
Need help with Asterisk? Visit the PBX in a Flash Forum.
Special Thanks to Our Generous Sponsors
FULL DISCLOSURE: ClearlyIP, Skyetel, Vitelity, DigitalOcean, Vultr, VoIP.ms, 3CX, Sangoma, TelecomsXchange and VitalPBX have provided financial support to Nerd Vittles and our open source projects through advertising, referral revenue, and/or merchandise. As an Amazon Associate and Best Buy Affiliate, we also earn from qualifying purchases. We’ve chosen these providers not the other way around. Our decisions are based upon their corporate reputation and the quality of their offerings and pricing. Our recommendations regarding technology are reached without regard to financial compensation except in situations in which comparable products at comparable pricing are available from multiple sources. In this limited case, we support our sponsors because our sponsors support us.
BOGO Bonaza: Enjoy state-of-the-art VoIP service with a $10 credit and half-price SIP service on up to $500 of Skyetel trunking with free number porting when you fund your Skyetel account. No limits on number of simultaneous calls. Quadruple data center redundancy. $25 monthly minimum spend required. Tutorial and sign up details are here.
![]() The lynchpin of Incredible PBX 2020 and beyond is ClearlyIP components which bring management of FreePBX modules and SIP phone integration to a level never before available with any other Asterisk distribution. And now you can configure and reconfigure your new Incredible PBX phones from the convenience of the Incredible PBX GUI.
The lynchpin of Incredible PBX 2020 and beyond is ClearlyIP components which bring management of FreePBX modules and SIP phone integration to a level never before available with any other Asterisk distribution. And now you can configure and reconfigure your new Incredible PBX phones from the convenience of the Incredible PBX GUI.
VitalPBX is perhaps the fastest-growing PBX offering based upon Asterisk with an installed presence in more than 100 countries worldwide. VitalPBX has generously provided a customized White Label version of Incredible PBX tailored for use with all Incredible PBX and VitalPBX custom applications. Follow this link for a free test drive!
Special Thanks to Vitelity. Vitelity is now Voyant Communications and has halted new registrations for the time being. Our special thanks to Vitelity for their unwavering financial support over many years and to the many Nerd Vittles readers who continue to enjoy the benefits of their service offerings. We will keep everyone posted on further developments.
Some Recent Nerd Vittles Articles of Interest…
VoIP Security: Installing SSL Certificates with Incredible PBX
We’ve got some revolutionary VoIP projects coming your way over the next several weeks, but I’m sorry to say the hardest part of them is getting your server configured to use secure and encrypted web communications via HTTPS. This is quickly becoming a universal requirement of most of the major technology players. So what might not be the most glamorous VoIP topic for a Monday morning is not only necessary but long overdue. The good news is that obtaining, installing, configuring, and maintaining an SSL certificate for your VoIP server is not the royal pain that it once was. And, by this time next week, you’ll be glad you went through the exercise. Thankfully, the EFF’s Certbot project is available to assist in installing free certificates from Let’s Encrypt.
Before we begin, here’s a word to the wise. You will save yourself a thousand headaches by deploying your Incredible PBX server in the cloud where you get a dedicated IP address and can easily assign a fully-qualified domain name (FQDN) to your server. Options now are available for as little as $1.50 to $3.50/month including Vultr which provides an incredibly reliable platform in many cities for as little as $2.50 a month. And another 50¢ buys you weekly image backups without lifting a finger. They can be restored with one click! If reliability and redundancy matter, you can’t beat Vultr’s price or the feature set, and we have tutorials to get you started with either Wazo or Issabel. If cost is your sole criteria, you can’t beat WootHosting at $1.50 a month. You’ll find a tutorial here. If performance is critical, you can’t beat OVH at $3.50/month with a Wazo tutorial here and an Issabel tutorial here. Finally, if you’re technically challenged, our corporate sponsor, RentPBX, will do all of the cloud migration for you and provide a turnkey, high performance VoIP platform for just $15/month. So what are you waiting for? Now’s the time. No excuses! It’s not going to get any cheaper or more reliable. And next week you’ll be thanking us. For these reasons, we’re saying goodbye our home-based servers sitting behind NAT-based firewalls. With the projects coming down the pike, the mountain is just too steep to continue that trek unless you have the technical expertise to pull it off yourself.
Obtaining and Installing an SSL Certificate
For CentOS 6 running Incredible PBX 13 or CentOS 7 running Incredible PBX for Issabel 4, begin by making certain that you can access your site using its FQDN with HTTP, e.g. http://myserver.mydomain.org. Get that working first. Next, log into your server as root using SSH/Putty and issue the following commands:
yum -y install python-devel python-pip python-setuptools python-virtualenv --enablerepo=epel
yum -y install centos-release-scl
yum -y install python27
scl enable python27 bash
pip -V # should show python 2.7
pip install --upgrade pip
pip install requests registry urllib3 pyOpenSSL --force --upgrade
pip install certbot-apache --force --upgrade
cd /root
wget https://dl.eff.org/certbot-auto
chmod a+x certbot-auto
service iptables stop
./certbot-auto --authenticator webroot --installer apache -w /var/www/html -d FQDN.here
iptables-restart
service httpd restart
exit
During the automated setup, you can decide whether to force all web traffic to the secure site. We recommend it. Once the install finishes, test access to your server by going to your FQDN using HTTPS. Don’t continue with the setup until you get HTTPS working and your browser shows you have a SECURE site! Remember that you must renew your free certificate every 90 days by using the following /root/certbot-update script:
#!/bin/bash
echo "Before you begin, type: scl enable python27 bash"
echo "Then rerun this update script and press ENTER."
read -p "If you already have done so, press Enter. Otherwise, Ctrl-C now"
service iptables stop
./certbot-auto --authenticator webroot --installer apache -w /var/www/html -d FQDN.here
iptables-restart
echo "Type exit when this script completes."
exit
For Debian 8 running Incredible PBX for Wazo, things are a bit more complicated because Wazo forces HTTPS access even though you do not yet have a certificate for your FQDN. Because of its NGINX web server platform, with Wazo you’ll have to manually install and configure certificates with certbot and LetsEncrypt. The silver lining with Wazo is HTTPS access gets you a WebRTC phone with a couple button clicks. Go to this link, click on the Config wheel (bottom right), click on the Pencil icon and plug in the FQDN of your server. Click SAVE. Enter your login name as 701 and the password assigned to the extension which you can obtain by running: /root/show-701-pw. That’s probably the quickest phone setup you’ll ever find. But we’re getting ahead of ourselves…
1. Let’s get certbot installed. Login to your server as root using SSH or Putty and issue the following commands:
cd /etc/apt
echo "deb http://ftp.debian.org/debian jessie-backports main" >>  sources.list
apt-get update
apt-get install certbot -t jessie-backports
2. Temporarily, turn off HTTPS since the certificate install requires HTTP access. In /etc/nginx/sites-enabled/xivo, comment out these 3 lines and save the updated file:
In server section for port 80:
 #   include /etc/nginx/locations/http-enabled/*;
In server section for port 443:
 #   listen 443 default_server;
 #   server_name $domain;
Then restart the web server: /etc/init.d/nginx restart. Now you have a basic http web server. If you want to verify that it’s working, use a browser and go to http://YOUR-FQDN/asteridex4/index.php. It should download the file to your desktop which isn’t desirable, but this is only temporary.
3. In /var/www/html, issue the following commands:
cd /var/www/html
mkdir .well-known
cd .well-known
mkdir acme-challenge
cd acme-challenge
chown -R asterisk:www-data /var/www/html/.well-known
Leave this SSH/Putty session running temporarily and open a second SSH/Putty connection to your server logging in as root.
4. Disable your firewall temporarily: /etc/init.d/netfilter-persistent flush
5. Start the certbot installation script: certbot certonly –manual
6. You’ll be prompted for the FQDN of your server to generate the certificates. Then you’ll be given an oddball name AND an expected oddball response. With these two entries in hand, temporarily switch back to your other SSH session and issue these commands while positioned in /var/www/html/.well-known/acme-challenge:
mkdir ODDBALL-NAME
cd ODDBALL-NAME
echo "ODDBALL-RESPONSE > index.html"
chown -R asterisk:www-data /var/www/html/.well-known
7. Use a browser to (quickly) go to http://YOUR-FQDN/.well-known/acme-challenge/ODDBALL-NAME/ and be sure your web server displays the expected ODDBALL-RESPONSE. You’ve got to get this working before you continue with the certbot install or it will fail. You only have a few minutes to do this before certbot will change the ODDBALL-NAME and ODDBALL-RESPONSE credentials. 3 consecutive failures and you have to wait an hour to try again. Guess how we know?
8. Once you get the expected response, switch back to your SSH session running the certbot installer and press ENTER to continue with the certificate install. When it completes, you’ll get a congratulatory note and a reminder that, in less than 90 days, you’ll need to run certbot renew to update your certificate.
9. Install the new certificates in NGINX and put things back together again:
cd /etc/nginx/sites-enabled
nano -w xivo
10. Begin by removing the 3 # signs that we inserted to get HTTP working in step #2.
11. Near the bottom of the file, comment out these existing certificate lines:
#    ssl_certificate /usr/share/xivo-certs/server.crt;
#    ssl_certificate_key /usr/share/xivo-certs/server.key;
#    ssl_ciphers ALL:!aNULL:!eNULL:!LOW:!EXP:!RC4:!3DES:!SEED:+HIGH:+MEDIUM;
12. Add the following new lines just below the lines you commented out. Be sure to replace YOUR.FQDN in each line with the actual FQDN of your server:
    ssl_certificate /etc/letsencrypt/live/YOUR.FQDN/fullchain.pem;
    ssl_certificate_key /etc/letsencrypt/live/YOUR.FQDN/privkey.pem;
    ssl_ciphers HIGH:MEDIUM:!aNULL:!MD5:!SEED:!IDEA;
13. Save the file and then restart your firewall and NGINX:
iptables-restart
/etc/init.d/nginx restart
14. Edit /etc/apt/sources.list and comment out the jessie-backports line from step #1.
15. Reload your aptitude sources: apt-get update
16. Remember that you must renew your free certificate every 90 days by issuing this command: certbot renew --quiet.
Better yet, issue the following command to set up a cron job to auto-renew your certificate every week:
echo "5 3 * * 0 root /usr/bin/certbot renew --quiet > /dev/null 2>&1" >> /etc/crontab
17. Test things out with a web browser by visiting your FQDN. Your browser should now show the site as SECURE.
18. Now try out that new WebRTC phone.
Published: Monday, September 25, 2017
Need help with Asterisk? Visit the PBX in a Flash Forum.
Special Thanks to Our Generous Sponsors
FULL DISCLOSURE: ClearlyIP, Skyetel, Vitelity, DigitalOcean, Vultr, VoIP.ms, 3CX, Sangoma, TelecomsXchange and VitalPBX have provided financial support to Nerd Vittles and our open source projects through advertising, referral revenue, and/or merchandise. As an Amazon Associate and Best Buy Affiliate, we also earn from qualifying purchases. We’ve chosen these providers not the other way around. Our decisions are based upon their corporate reputation and the quality of their offerings and pricing. Our recommendations regarding technology are reached without regard to financial compensation except in situations in which comparable products at comparable pricing are available from multiple sources. In this limited case, we support our sponsors because our sponsors support us.
BOGO Bonaza: Enjoy state-of-the-art VoIP service with a $10 credit and half-price SIP service on up to $500 of Skyetel trunking with free number porting when you fund your Skyetel account. No limits on number of simultaneous calls. Quadruple data center redundancy. $25 monthly minimum spend required. Tutorial and sign up details are here.
![]() The lynchpin of Incredible PBX 2020 and beyond is ClearlyIP components which bring management of FreePBX modules and SIP phone integration to a level never before available with any other Asterisk distribution. And now you can configure and reconfigure your new Incredible PBX phones from the convenience of the Incredible PBX GUI.
The lynchpin of Incredible PBX 2020 and beyond is ClearlyIP components which bring management of FreePBX modules and SIP phone integration to a level never before available with any other Asterisk distribution. And now you can configure and reconfigure your new Incredible PBX phones from the convenience of the Incredible PBX GUI.
VitalPBX is perhaps the fastest-growing PBX offering based upon Asterisk with an installed presence in more than 100 countries worldwide. VitalPBX has generously provided a customized White Label version of Incredible PBX tailored for use with all Incredible PBX and VitalPBX custom applications. Follow this link for a free test drive!
Special Thanks to Vitelity. Vitelity is now Voyant Communications and has halted new registrations for the time being. Our special thanks to Vitelity for their unwavering financial support over many years and to the many Nerd Vittles readers who continue to enjoy the benefits of their service offerings. We will keep everyone posted on further developments.
Some Recent Nerd Vittles Articles of Interest…
RTPbleed Security Alert: Asterisk Calls Can Be Intercepted

If you’ve installed Asterisk® during the past 4½ years, your server has a MAJOR security problem. If you didn’t already know, with Asterisk, your VoIP conversations actually are carried over a random UDP port using the Real Time Protocol (RTP), not the SIP port (UDP 5060) which handles the setup and teardown of your VoIP connections. It turns out that, since March 2013, all of that RTP traffic and thus your conversations could be intercepted and redirected by anyone on the Internet. As this recent article in The Register noted:
The problem occurs when [communications] systems like IP telephony have to get past network address translation (NAT) firewalls. The traffic has to find its way from the firewall’s public IP address to the internal address of the device or server, and to do that, RTP learns the IP and port addresses to associate with a call.
The problem is, the process doesn’t use any kind of authentication.
This is exacerbated by the fact that, by default, Asterisk and FreePBX® traditionally use the NAT=yes setting (whether needed or not) to enable this navigational magic just in case your calls need it. Without it, you may end up with no audio or one-way audio on your calls. Traditional wisdom was that an attacker needed to be positioned between the caller and the Asterisk server in order to intercept this media stream. As luck would have it, it turns out the man in the middle didn’t need to be in the middle after all. He could be anywhere on the Internet. The old adage to talk on the phone as if someone else were listening turns out to have been pretty good advice in the case of Asterisk communications. Even if you had a firewall, chances are you protected UDP port 5060 while exposing and forwarding UDP 10000-20000 to Asterisk without any safeguards.
According to last week’s Asterisk advisory, “To exploit this issue, an attacker needs to send RTP packets to the Asterisk server on one of the ports allocated to receive RTP. When the target is vulnerable, the RTP proxy responds back to the attacker with RTP packets relayed from the other party. The payload of the RTP packets can then be decoded into audio.” Specifically, if UDP ports 10000-20000 are publicly exposed to the Internet, anybody and everybody can intercept your communications without credentials of any kind. WOW!
So, there’s a patch to fix this, right? Well, not exactly:
Note that as for the time of writing, the official Asterisk fix is vulnerable to a race condition. An attacker may continuously spray an Asterisk server with RTP packets. This allows the attacker to send RTP within those first few packets and still exploit this vulnerability.
The other recommended "solutions" aren’t much better:
- When possible the nat=yes option should be avoided
- To protect against RTP injection, encrypt media streams with SRTP
- Add config option for SIP peers to prioritize RTP packets
The nat=no option doesn’t work if you or your provider employs NAT-based routers. The SRTP option only works on more recent releases of Asterisk, and it also requires SRTP support on every SIP phone. Prioritizing RTP packets is not a task for mere mortals.
Surprisingly, the one solution that is not even mentioned is hardening your firewall to block incoming UDP 10000-20000 traffic that originates outside your server. Our recognized SIP expert on the PIAF Forum had the simple solution. Bill Simon observed:
If the SDP in the INVITE or subsequent re-INVITE contains routable IP addresses, then use them for media. If the SDP contains non-routable IP addresses, then the client is behind a NAT and not using any NAT traversal techniques like SIP ALG, ICE/STUN, so send to the originating IP. Why are we making allowances here for media to come from anywhere? I think you can probably clamp down your firewall as much as you want, because symmetric RTP should allow media to get through by way of establishing an outbound stream (inbound stream comes back on the same path).
Our testing confirms that simply blocking incoming RTP traffic on your firewall solves the problem without any Asterisk patch. In short, RTP traffic cannot originate from anonymous sources on the Internet.
For those using Incredible PBX® or Travelin’ Man 3 or an IPtables firewall, the fix is easy. Simply remove or comment out the INPUT rule that looks like this and restart IPtables:
-A INPUT -p udp -m udp --dport 10000:20000 -j ACCEPT
On RedHat/CentOS servers, the rule is in /etc/sysconfig/iptables. On Debian/Ubuntu and Raspbian servers, you’ll find the rule in /etc/iptables/rules.v4. On Incredible PBX for Issabel servers, you’ll find the rule in /usr/local/sbin/iptables-custom. On all Incredible PBX platforms, remember to restart IPtables using only this command: iptables-restart.
Published: Friday, September 8, 2017
Need help with Asterisk? Visit the PBX in a Flash Forum.
Special Thanks to Our Generous Sponsors
FULL DISCLOSURE: ClearlyIP, Skyetel, Vitelity, DigitalOcean, Vultr, VoIP.ms, 3CX, Sangoma, TelecomsXchange and VitalPBX have provided financial support to Nerd Vittles and our open source projects through advertising, referral revenue, and/or merchandise. As an Amazon Associate and Best Buy Affiliate, we also earn from qualifying purchases. We’ve chosen these providers not the other way around. Our decisions are based upon their corporate reputation and the quality of their offerings and pricing. Our recommendations regarding technology are reached without regard to financial compensation except in situations in which comparable products at comparable pricing are available from multiple sources. In this limited case, we support our sponsors because our sponsors support us.
BOGO Bonaza: Enjoy state-of-the-art VoIP service with a $10 credit and half-price SIP service on up to $500 of Skyetel trunking with free number porting when you fund your Skyetel account. No limits on number of simultaneous calls. Quadruple data center redundancy. $25 monthly minimum spend required. Tutorial and sign up details are here.
![]() The lynchpin of Incredible PBX 2020 and beyond is ClearlyIP components which bring management of FreePBX modules and SIP phone integration to a level never before available with any other Asterisk distribution. And now you can configure and reconfigure your new Incredible PBX phones from the convenience of the Incredible PBX GUI.
The lynchpin of Incredible PBX 2020 and beyond is ClearlyIP components which bring management of FreePBX modules and SIP phone integration to a level never before available with any other Asterisk distribution. And now you can configure and reconfigure your new Incredible PBX phones from the convenience of the Incredible PBX GUI.
VitalPBX is perhaps the fastest-growing PBX offering based upon Asterisk with an installed presence in more than 100 countries worldwide. VitalPBX has generously provided a customized White Label version of Incredible PBX tailored for use with all Incredible PBX and VitalPBX custom applications. Follow this link for a free test drive!
Special Thanks to Vitelity. Vitelity is now Voyant Communications and has halted new registrations for the time being. Our special thanks to Vitelity for their unwavering financial support over many years and to the many Nerd Vittles readers who continue to enjoy the benefits of their service offerings. We will keep everyone posted on further developments.
Some Recent Nerd Vittles Articles of Interest…
Free Asterisk Solutions
