
Home » Posts tagged 'Telephony' (Page 3)
Tag Archives: Telephony
The Most Versatile VoIP Provider: FREE PORTING

 JUST RELEASED: Visit the Incredible PBX Wiki
The Perfect Pair: Flawless VoIP with Issabel 4 and 3CX

We continue our Issabel 4 adventure today with a VoIP match made in heaven. Today, we’ll take advantage of the Nerd Vittles free 3CX server offering and interconnect it with an Issabel 4 PBX to enjoy the best of both worlds. From Issabel extensions, you can call your 3CX Clients by dialing 4 digits. From 3CX Clients, you can call Issabel extensions as well as your Asterisk® applications in the same way with the added bonus of being able to make outbound calls through your Issabel trunks by dialing any number with a 9 prefix. Once you have both of your PBXs running, the setup time to interconnect them is under 5 minutes.
Why would you want to maintain two PBXs? The simple answer is the added flexibility you achieve coupled with a 99% reduction in VoIP headaches. If you haven’t yet used 3CX Clients on a PC or Mac desktop or on an iOS or Android device, you have missed perhaps the greatest VoIP advancement of the last decade. As the name suggests 3CX Clients connect to a 3CX server with less than a one-minute setup. They work flawlessly from anywhere using WiFi or cellular. As an added bonus, you can kiss all of your Asterisk NAT woes goodbye! If you ever travel or if you need remote phone access to your PBX infrastructure, you owe it to yourself to try a 3CX Client. We promise. You’ll never again use a traditional SIP client.
Building Your Issabel and 3CX Server Platforms
The prerequisite for interconnecting Issabel and 3CX servers is, of course, to install the two PBXs on platforms of your choice. Our preference is cloud-based servers because it avoids many of the stumbling blocks with NAT-based routers. If you know what you’re doing, you obviously can deploy the PBXs in any way you like. For the Issabel 4 PBX, start with our introductory tutorial to install Issabel 4. Then follow the Incredible PBX for Issabel tutorial to add security and the Asterisk bells and whistles. For 3CX, start with our introductory tutorial which includes a link to obtain a free perpetual license supporting 4 simultaneous calls and unlimited trunks. Then secure your server by adding the Travelin’ Man 3 firewall for 3CX. Once both servers are up and running, whitelist the IP address or FQDN of the Issabel PBX on the 3CX server and vice versa. You’ll find the add-ip and add-fqdn utilities in /root of each server.
Overview of Interconnection Methodology
If you’re new to all of this, suffice it to say that 3CX is a powerful, commercial PBX while Issabel relies upon Asterisk and FreePBX® for its basic telephony operation. The two systems are quite different in terms of their approaches to interconnectivity. While you can transparently interconnect one 3CX server to another one, you cannot accomplish the same thing when the second PBX is Asterisk-based. Instead, the Issabel PBX is configured as a SIP trunk on the 3CX platform. The limitation this causes is that extensions on the Issabel PBX can only direct dial extensions on the 3CX platform. Issabel-based extensions cannot utilize 3CX trunks to place outbound calls. There’s more flexibility on the 3CX side of things. 3CX extensions can place direct calls to Issabel extensions. They also can take advantage of Issabel-based trunks to place outbound calls. Additionally, as we noted above, 3CX extensions can take advantage of every Asterisk application hosted on the Issabel platform including all of the Incredible PBX® enhancements. This actually works out perfectly because you can deploy 3CX Clients for your end-users, and they can take advantage of all the extension and trunk resources on both the 3CX and Issabel platforms. It also greatly simplifies remote deployment by removing NAT one-way audio hassles while allowing almost instantaneous setup of remote 3CX Clients, even by end-users.
For our setup today, we’re assuming you have elected to use 3-digit extensions on both the Issabel and 3CX platforms. To call extensions connected directly to the alternate server, we will simply dial 9 + the extension number on the remote PBX. To make external calls from 3CX extensions using Issabel trunks, we will dial 9 + a 10-digit number. For international users, you can adjust the dialplan on both PBXs accordingly.
By default, SIP trunks are associated with a DID on the 3CX platform. We will register the 3CX DID trunk with Issabel to maintain connectivity; however, we will not register the corresponding trunk on the Issabel side with the 3CX server. Keep in mind that you can only route a 3CX DID to a single destination, i.e. an extension, a ring group, or an IVR. But we can use 3CX’s CallerID routing feature to send calls to specific 3CX extensions from Issabel extensions even using a single 3CX trunk. For each 3CX extension, we’ll create an Outbound Route on the Issabel side with a CallerID number that matches the 3CX extension number we wish to reach. On the 3CX side, we’ll create an Inbound CID Rule that specifies the extension number to which each matching CallerID number should be routed. This sounds harder than it actually is. So keep reading, and it’ll all make sense momentarily. Once you’ve set all of this up, we think you’ll agree that it makes sense to create the bulk of your extensions exclusively on the 3CX side.
Configuring Issabel PBX for Interconnection to 3CX
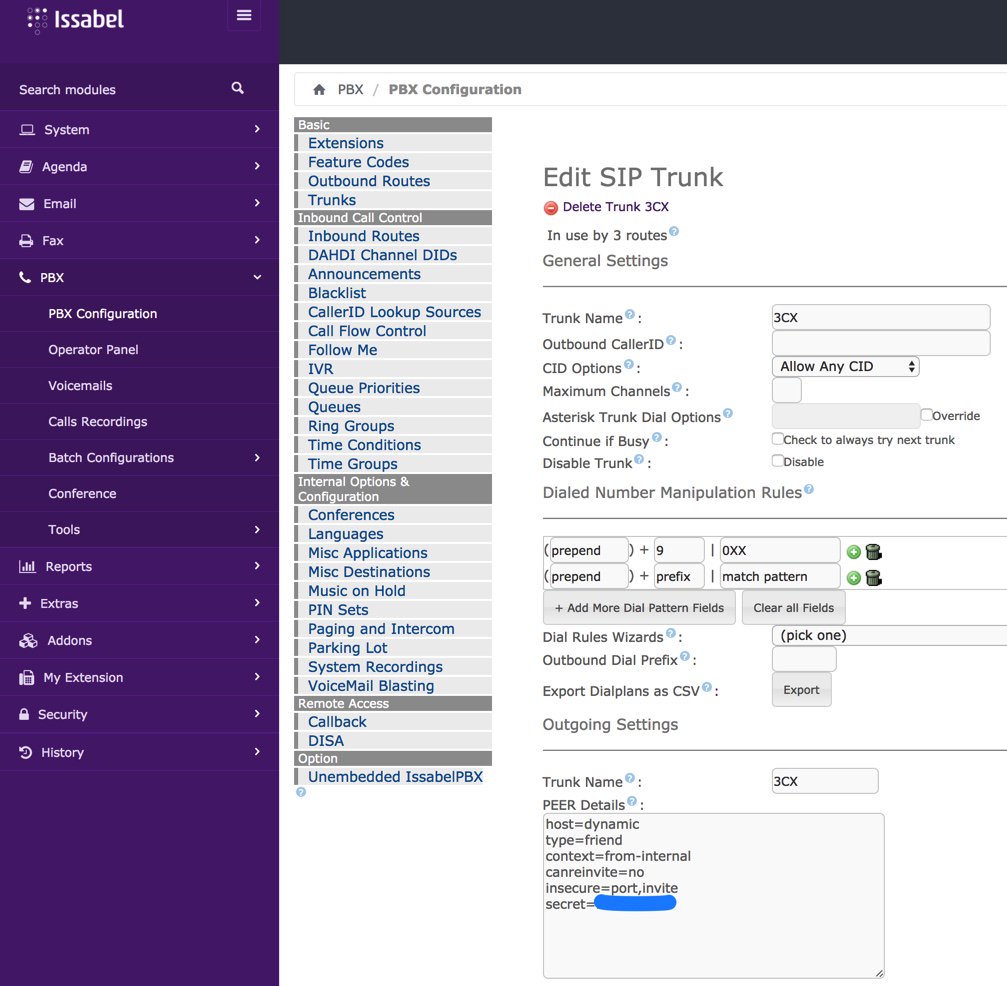
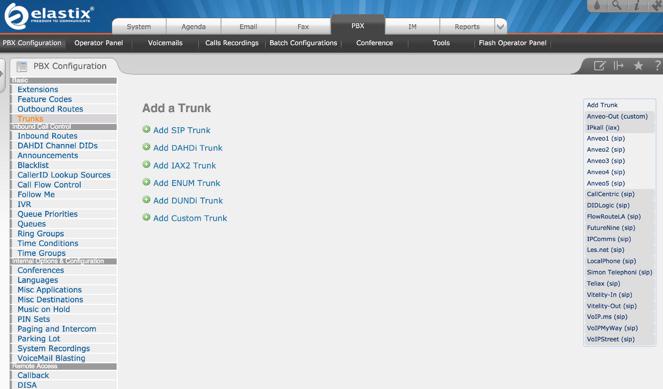
Let’s begin by creating a Trunk on the Issabel PBX to connect to your 3CX server. In the Issabel GUI, choose PBX:PBX Config:Trunks and Add a SIP Trunk. Fill in the blanks as shown below. Make up a very secure secret for your Trunk and be sure to leave the Outbound CallerID field blank. Click on the image below if you need to enlarge it.
Because we set up the 3CX trunk with a from-internal destination context, we don’t need an Incoming Route for the 3CX Trunk. The calls will be processed exactly as if they were dialed from a local extension on the Issabel PBX, i.e. local calls will be routed to extensions and outgoing calls through trunks will be routed using your existing Outbound Routes.
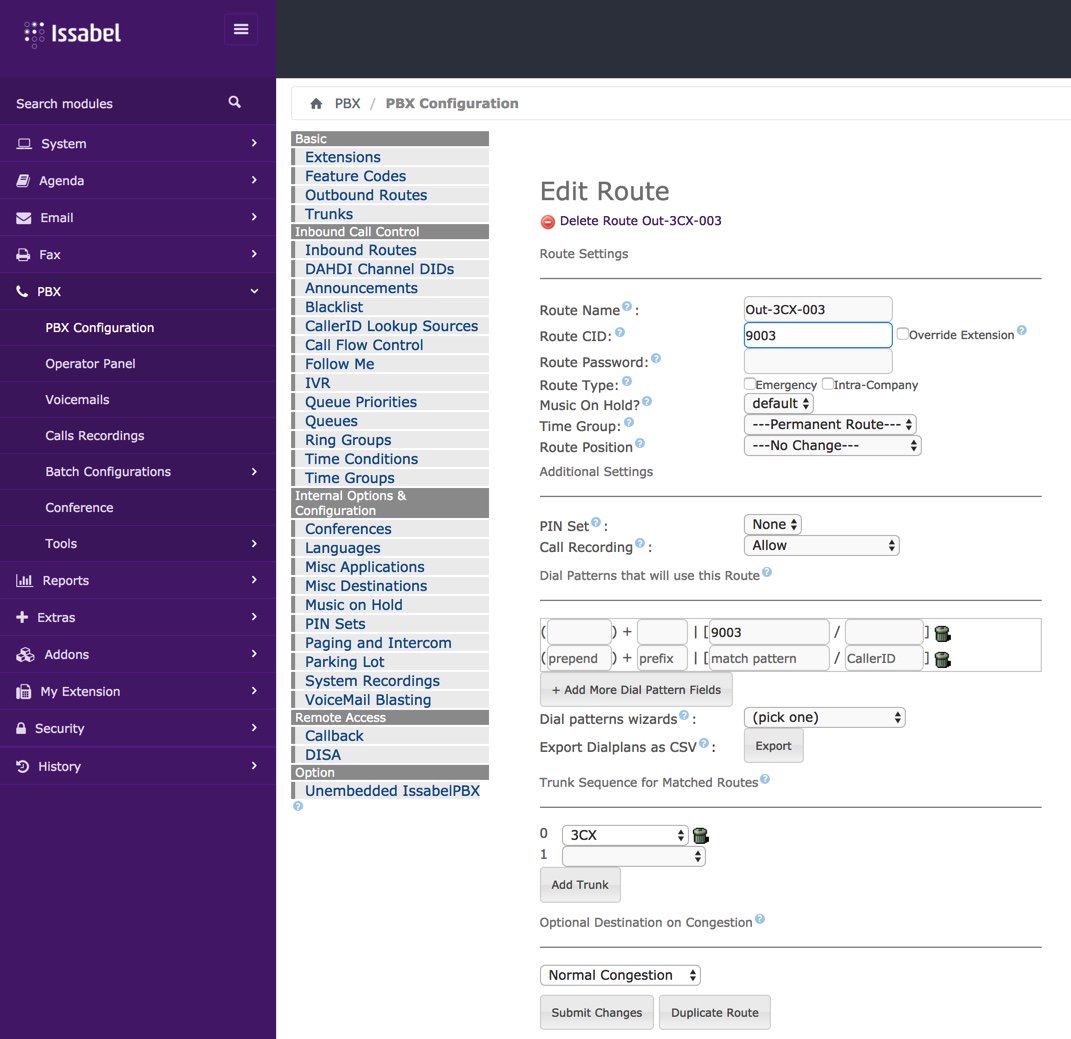
Finally, we need to create the Outbound Routes for calls originating from Issabel extensions that should be directed to specific extensions on the 3CX platform. You’ll need a list of the 3CX extension numbers you wish to enable on the Issabel platform, and we’ll need to create a separate Outbound Route for each 3CX extension to be enabled. Create the Outbound Routes using the template below. We recommend including the 3CX extension in the Route Name. The Route CID and Route Pattern should be a 9 followed by the 3CX extension number for each Outbound Route you create. In the template below, we’re telling Issabel to route a call dialed as 9003 to extension 003 on the 3CX PBX. The Dial Manipulation Rule in the 3CX Trunk settings tells Issabel to strip off the 9 before sending the call to the 3CX PBX.
Configuring 3CX for Interconnection to Issabel PBX
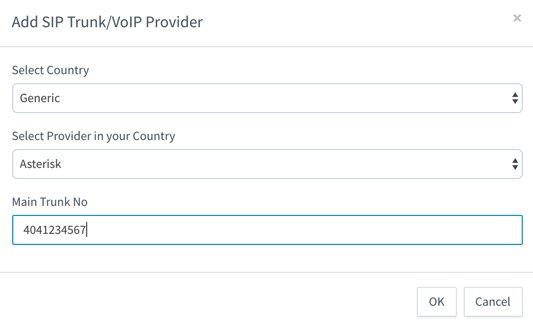
Now we’re ready to set up the 3CX side to interconnect with your Issabel PBX. Start by creating a SIP Trunk and fill out the template as shown below using one of the phone numbers associated with your Issabel PBX as the Main Trunk No.
Fill in the Trunk Details using the example below. Be sure to specify the actual IP address or FQDN of your Issabel server as well as the SIP credentials of 3CX for username and the actual password you set up on the Issabel side of things. The Main Trunk No will be the same as you entered in the previous step. Choose a Default Destination for the Trunk.
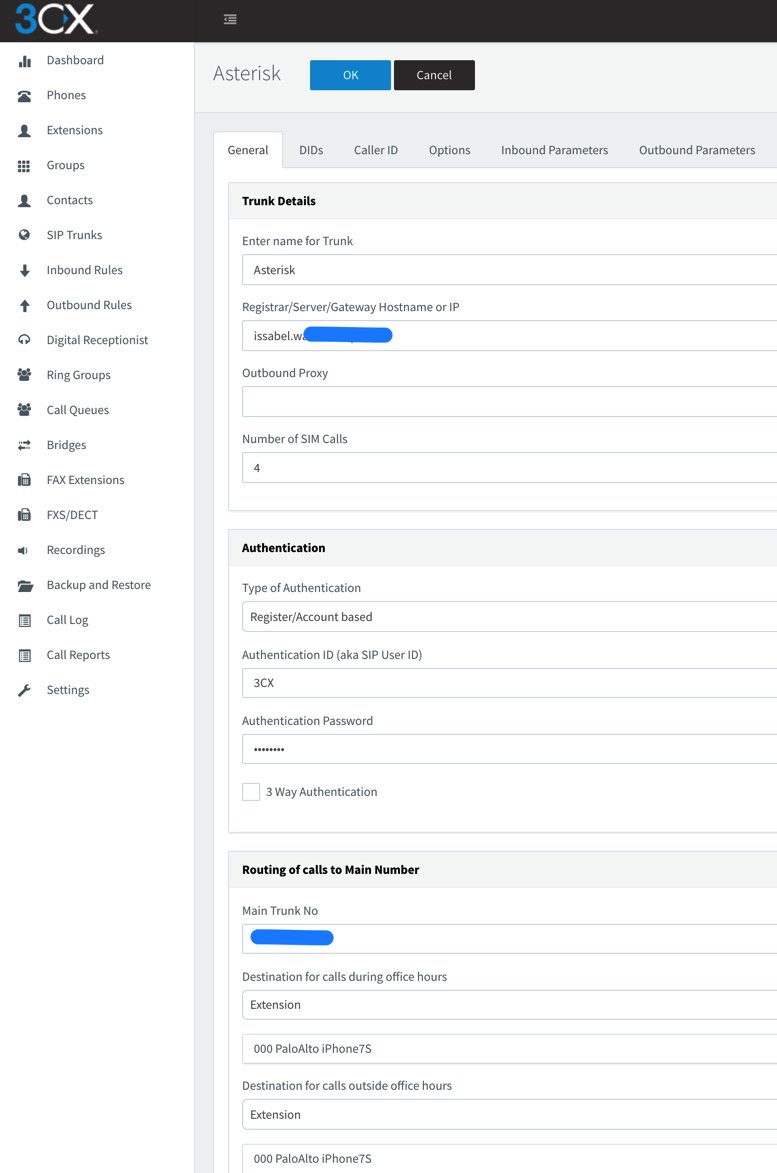
When the SIP Trunks listing redisplays, highlight your new Asterisk trunk and click Refresh Registration. The icon beside the Trunk should turn green. If not, be sure your IP address and password match the settings on the Issabel side. Don’t proceed until you get a green light!
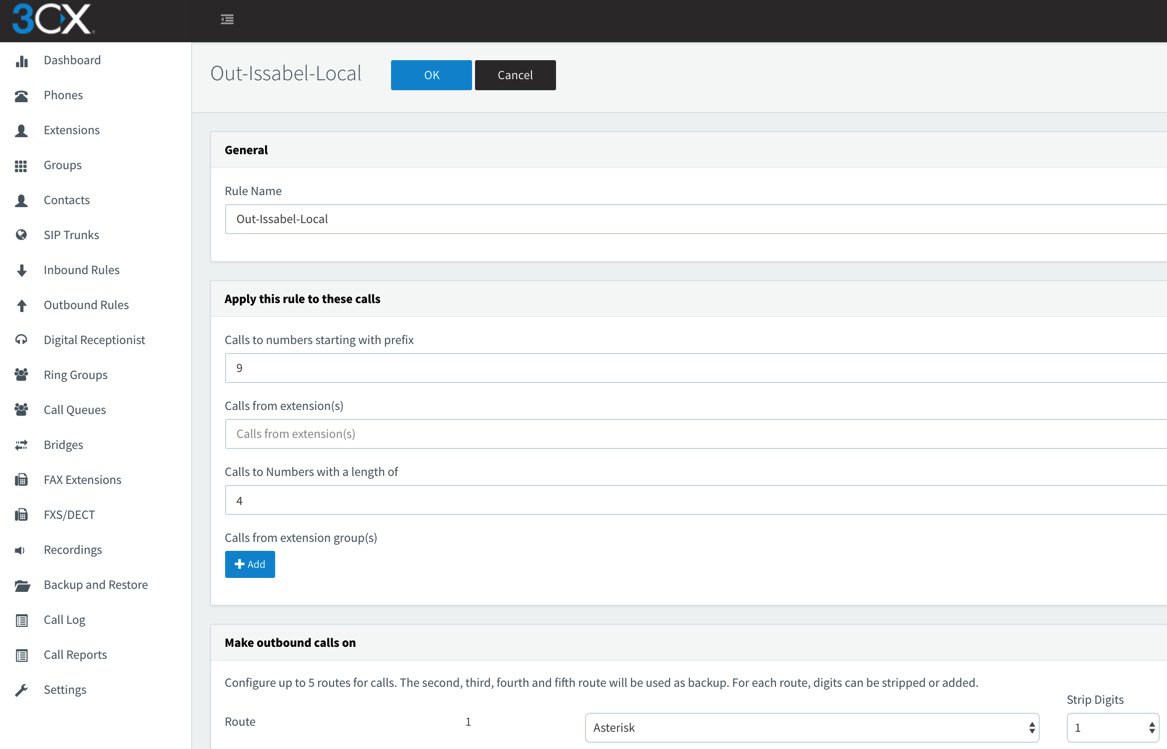
Now we need two Outbound Routes for calls placed from 3CX extensions. One will handle calls destined for Local Extensions on the Issabel side. Our design is to place calls to Issabel extensions by dialing 9 + the 3-digit extension number. Adjust this to meet your own requirements. Be sure to set the Route as Asterisk with a value of 1 for Strip Digits.
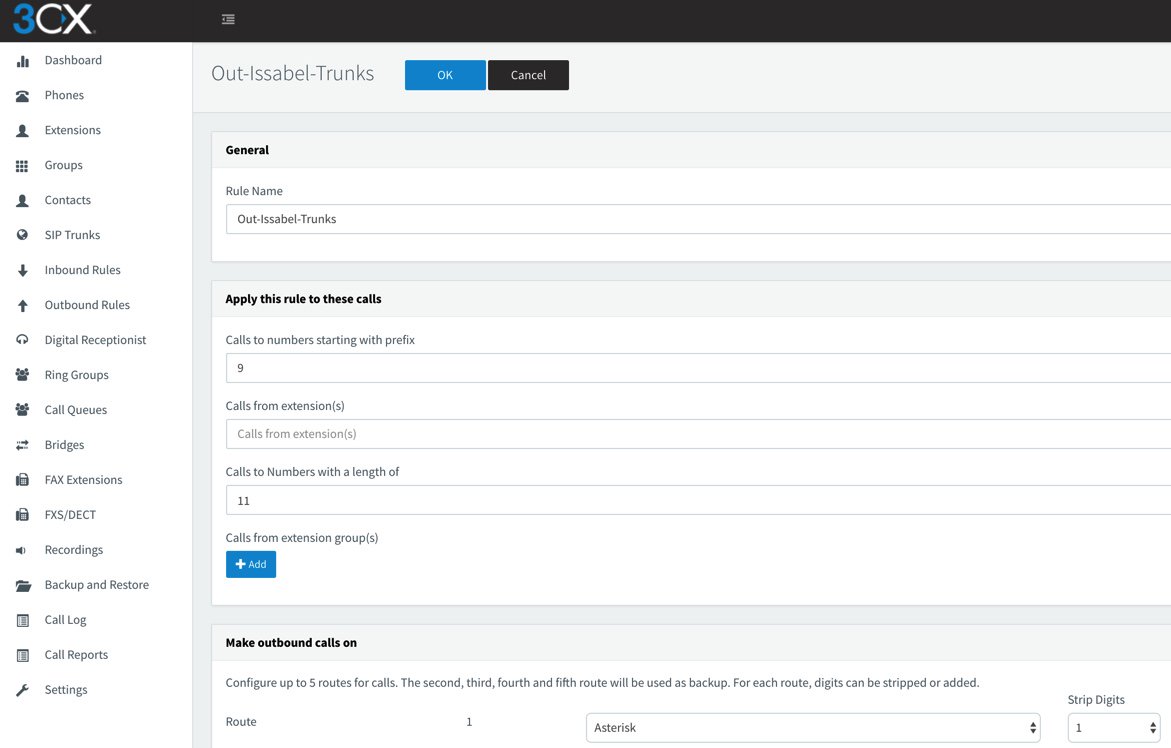
The other Outbound Route will handle calls destined for external calling with an Issabel trunk using a similar methodology. 3CX users will dial 9 + 10-digit number for calls to be processed by Trunks on the Issabel server.
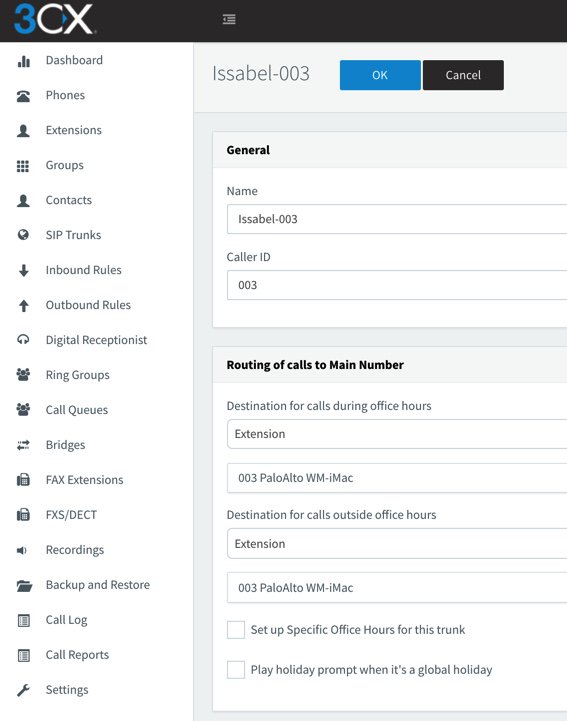
Finally, we need an Inbound Rule for every 3CX extension that you wish to enable for remote calling from Issabel extensions. Use the Add CID Rule option to create each Inbound Rule using the sample below. In our example, we’re authorizing incoming calls to 3CX extension 003 where the CallerID number of the incoming call is 003.
Test Drive Your Interconnected Servers
Now we’re ready to try things out. From an extension on the 3CX server, dial 9 plus any 3-digit extension that exists on the Issabel server. Next, dial 9 plus a 10-digit number such as your smartphone. The call should be routed out of your Issabel server using the Trunk associated with the NXXNXXXXXX rule in your Issabel Outbound Routes. Finally, from an extension on your Issabel PBX, dial 9 plus 000 which should route the call to extension 000 on your 3CX server. Enjoy!
Published: Wednesday, July 19, 2017
 Support Issues. With any application as sophisticated as this one, you’re bound to have questions. Blog comments are a difficult place to address support issues although we welcome general comments about our articles and software. If you have particular support issues, we encourage you to get actively involved in the PBX in a Flash Forum. It’s the best Asterisk tech support site in the business, and it’s all free! Please have a look and post your support questions there. Unlike some forums, the PIAF Forum is extremely friendly and is supported by literally hundreds of Asterisk gurus and thousands of users just like you. You won’t have to wait long for an answer to your question.

Need help with Asterisk? Visit the PBX in a Flash Forum.
Special Thanks to Our Generous Sponsors
FULL DISCLOSURE: ClearlyIP, Skyetel, Vitelity, DigitalOcean, Vultr, VoIP.ms, 3CX, Sangoma, TelecomsXchange and VitalPBX have provided financial support to Nerd Vittles and our open source projects through advertising, referral revenue, and/or merchandise. As an Amazon Associate and Best Buy Affiliate, we also earn from qualifying purchases. We’ve chosen these providers not the other way around. Our decisions are based upon their corporate reputation and the quality of their offerings and pricing. Our recommendations regarding technology are reached without regard to financial compensation except in situations in which comparable products at comparable pricing are available from multiple sources. In this limited case, we support our sponsors because our sponsors support us.
 BOGO Bonaza: Enjoy state-of-the-art VoIP service with a $10 credit and half-price SIP service on up to $500 of Skyetel trunking with free number porting when you fund your Skyetel account. No limits on number of simultaneous calls. Quadruple data center redundancy. $25 monthly minimum spend required. Tutorial and sign up details are here.
![]() The lynchpin of Incredible PBX 2020 and beyond is ClearlyIP components which bring management of FreePBX modules and SIP phone integration to a level never before available with any other Asterisk distribution. And now you can configure and reconfigure your new Incredible PBX phones from the convenience of the Incredible PBX GUI.
The lynchpin of Incredible PBX 2020 and beyond is ClearlyIP components which bring management of FreePBX modules and SIP phone integration to a level never before available with any other Asterisk distribution. And now you can configure and reconfigure your new Incredible PBX phones from the convenience of the Incredible PBX GUI.
 VitalPBX is perhaps the fastest-growing PBX offering based upon Asterisk with an installed presence in more than 100 countries worldwide. VitalPBX has generously provided a customized White Label version of Incredible PBX tailored for use with all Incredible PBX and VitalPBX custom applications. Follow this link for a free test drive!
 Special Thanks to Vitelity. Vitelity is now Voyant Communications and has halted new registrations for the time being. Our special thanks to Vitelity for their unwavering financial support over many years and to the many Nerd Vittles readers who continue to enjoy the benefits of their service offerings. We will keep everyone posted on further developments.
Some Recent Nerd Vittles Articles of Interest…
Leap Into Summer: Introducing Incredible PBX for Issabel

NEWS FLASH: A new release of Incredible PBX for Issabel is now available. Tutorial is here.
If you didn’t already know, we’ve always liked free. No strings, no gotchas, no demoware, and no legal shenanigans. That’s why our introduction of Issabel 4 last week was such a breath of fresh air. While there’s now an awesome free version of 3CX, the open source community has had a very long dry spell. So today we celebrate a decade of adding fun to phone systems with the introduction of Incredible PBX® for Issabel 4. It includes our next generation, preconfigured Travelin’ Man 3 firewall, additional text-to-speech engines (FLITE, GoogleTTS, and PicoTTS), voice recognition, turnkey trunk and extension setups with preconfigured tollfree calling, Google Voice support with OAuth 2 or plain text passwords for free calling in the U.S. and Canada, SMS messaging, telephone reminders, turnkey fax support, AsteriDex phone book with both voice and speed dialing, Wolfram Alpha, sample ODBC apps, and a boatload of dialplan code and AGI scripts to help anyone wanting to learn how to develop custom applications with Asterisk®.
Installing Incredible PBX for Issabel 4
Let’s start with the basics and get all of the Incredible PBX components loaded. As with all Incredible PBX builds, running the Incredible PBX installer will erase ALL of your existing Issabel configuration. So begin with a clean, unaltered Issabel 4 platform with no added components or configuration changes. Be sure to use either the June or July ISO for base Issabel install. We will update it from there as part of the Incredible PBX install. Just follow last week’s tutorial to bring up Issabel 4 on a dedicated server or a virtual machine.
JUST RELEASED: A new tutorial to walk you through Getting Started: Issabel in the Cloud.

The Travelin’ Man 3 firewall is installed and configured as part of the install. It whitelists certain IP addresses and blocks everyone else from even seeing your server on the Internet. For this reason, it is critically important that you perform the Incredible PBX install using SSH or Putty from a PC that you will use to manage your Issabel server. Otherwise, you risk locking yourself out of your own server. Whitelisted IP addresses include the Issabel server itself, the public and private IP addresses of your desktop PC, all non-routable, private LAN addresses, and the Nerd Vittles collection of recommended SIP hosting providers. You can add as many additional providers or users to the whitelist using the simple tools provided as part of the install and further documented below. Do NOT activate Issabel’s firewall.
As part of the install process, you’ll be prompted during both passes to create a password for MySQL/MariaDB and an admin password for the Issabel web GUI. The MySQL password MUST be passw0rd (with a zero), or you will get a permanent mess. The admin password can be anything you like. Passwords can be updated by running /root/admin-pw-change. Many of the Incredible PBX apps depend upon this MySQL password so don’t change it. Your MySQL databases remain secure and can only be accessed on localhost or after a successful root login to your server from a whitelisted IP address.
Begin the Incredible PBX install by logging into your Issabel server as root from a desktop PC using SSH or Putty and execute the following commands:
cd /root
wget http://incrediblepbx.com/IncrediblePBX11-Issabel4.sh
chmod +x IncrediblePBX11-Issabel4.sh
./IncrediblePBX11-Issabel4.sh
Introducing the (new) Travelin’ Man 3 Firewall
Issabel 4 includes an IPtables firewall component. Do NOT activate it because Incredible PBX includes its own preconfigured IPtables firewall, better known as Travelin’ Man 3. With the Issabel 4 firewall, the administrator is responsible for setting all of the firewall rules. With Travelin’ Man 3, all the heavy lifting is done for you. The design is also markedly different. Issabel 4 opens ports which you define, but it gives worldwide access to those ports by any user. Travelin’ Man 3 employs a WhiteList rather than opening ports for everyone. If you’re on the WhiteList, you get access to the limited collection of ports assigned to that IP address. If you’re not on the WhiteList, you cannot even see the Issabel PBX from the Internet. For those without remote telephones or traveling employees, this provides total protection of your server with virtually no further firewall management.
If you have remote users of your PBX or if you wish to deploy softphones on mobile devices and rely upon WiFi facilities at random locations, Travelin’ Man 3 provides several utilities to assist. If the remote users have static IP addresses, then those IP addresses can be added to the WhiteList by running /root/add-ip. Better yet, a NeoRouter VPN is provided that lets remote users access Issabel using NeoRouter private LAN addresses that already are WhiteListed as part of the installation process. These require little to no configuration with static or dynamic IP addresses even when switching between WiFi networks. For those with dynamic IP addresses and no VPN, FQDNs can be assigned using a service such as dyn.com and a dynamic DNS client can be loaded on the smartphone to keep the current IP address synchronized with the FQDN. On the Incredible PBX side, these FQDNs can be added using /root/add-fqdn, and the IP addresses will be updated automatically every 10 minutes. The final option to provide remote users the 3-digit PortKnocker codes from knock.FAQ and let them automatically whitelist their own IP addresses by running the PortKnocker client from any smartphone or Linux server. When the Issabel server detects a successful knock sequence, the source IP of the knock sequence is whitelisted until the next reload of the firewall. If an administrator prefers to allow permanent additions to the WhiteList that survive a reboot or restart of the firewall, the administrator need only run the following command one time: iptables-knock activate. WhiteListed entries can be removed using the /root/del-acct utility. Further details on the new Travelin’ Man 3 design are available here.
Update: The July Issabel ISO introduced a quirk into our Travelin’ Man 3 setup. For a reason that we have not yet tracked down, it is no longer possible to whitelist an IP address and use that address to access the Issabel GUI with a browser. Until we can track down the problem, we have modified the security methodology to access the Issabel web GUI. While we have opened port 443 for public access, we have added another layer of security by requiring Apache htaccess credentials before you can access any web site on your Issabel server. As the last step of the Incredible PBX installation procedure, you will be prompted to enter your admin password again. The username admin and the admin password are used BOTH for Apache authentication AND Issabel GUI authentication. Should you ever need to change your Issabel GUI admin password using /root/admin-pw-change, you also will need to execute the following command to change the admin password for Apache authentication: htpasswd -c /etc/pbx/wwwpasswd admin.
Setting Up a Softphone with Issabel 4
If you’re a Mac user, you’re lucky (and smart). Download and install Telephone from the Mac App Store. Start up the application and choose Telephone:Preference:Accounts. Click on the + icon to add a new account. To set up your softphone, you need 3 pieces of information: the IP address of your server (Domain), and your Username and Password. You can decipher your server’s IP address by running pbxstatus. If you wish to use one of the preconfigured extensions (701 and 702), you’ll find the randomized passwords in /root/passwords.FAQ. Now copy or cut-and-paste your Username and Password into the Accounts dialog of the Telephone app. Click Done when you’re finished, and your new softphone will come to life and should show Available. Dial the IVR (D-E-M-O) to try things out. With Telephone, you can use over two dozen soft phones simultaneously.
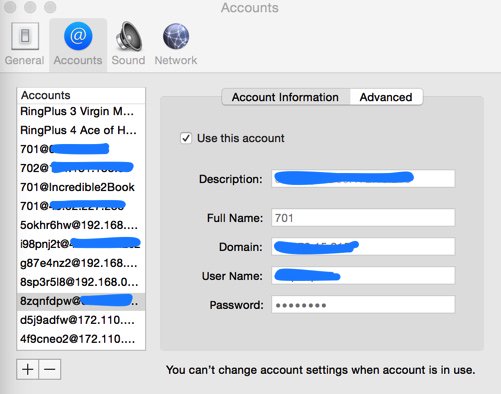
For everyone else, we recommend the YateClient softphone which is free. Download it from here. Run YateClient once you’ve installed it and enter the credentials for the Issabel extension. You’ll need the IP address of your server plus your extension number and password associated with either the 701 or 702 extension.

Configuring Google Voice Natively or Using Simonics
Everybody likes free calling, and nobody does it better than Google. Will it last? Well, the naysayers (including me) have been predicting its demise for over 5 years. Yet it keeps on ticking. If you live in the U.S. and want to take advantage of free calls in the U.S. and Canada, you’d be crazy not to deploy a Google Voice trunk on your PBX. Voice quality is near perfect. And the price is right.
The original release of Incredible PBX for Issabel did not support Google Voice trunks so we suggested an intermediary to provide the functionality through a SIP gateway. It works flawlessly using OAuth 2 password authentication, but it’ll set you back $5. If you prefer free, we’ve added the original Google Voice plain-text password solution from the FreePBX® 2.11 days in the latest Incredible PBX release using the July Issabel ISO. It is far from perfect. While you can make and receive calls and faxes to and from Issabel extensions, you cannot direct incoming calls to an IVR because of an old NAT quirk in Asterisk 11. If this isn’t a problem for you, keep reading. Otherwise, skip down to the Simonics tutorial below after completing the initial Google Voice setup which follows.
Here are the initial setup steps on the Google side:
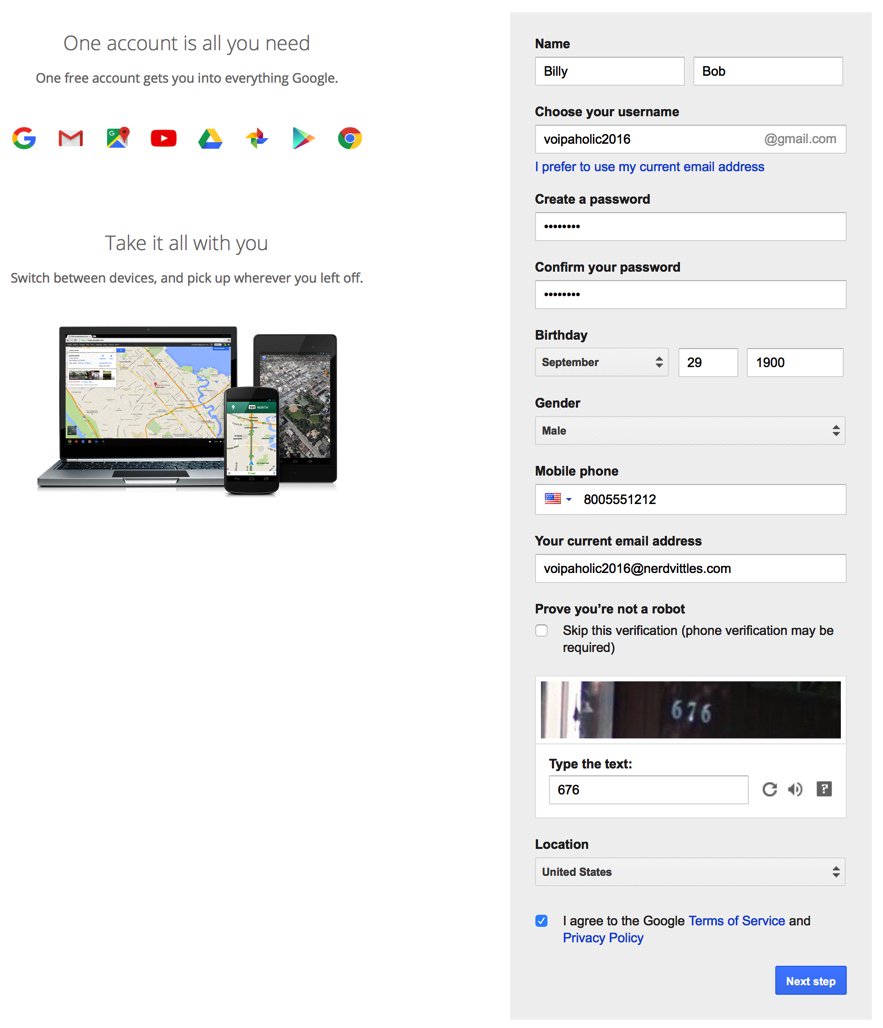
1. Set up a dedicated Gmail and Google Voice account to use exclusively for this new SIP gateway. Head over to the Google Voice site and register. You’ll need to provide a U.S. phone number to verify your account by either text message or phone call.
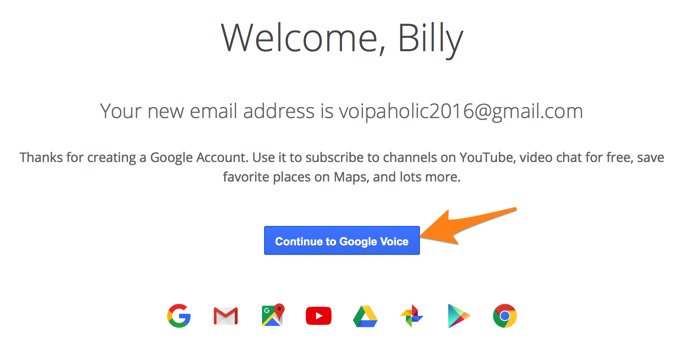
2. Once you have verified your account by entering your verification code, you’ll get a welcome message from Mr. Google. Click Continue to Google Voice.
3. Provide an existing U.S. phone number for verification. It can be the same one you used to set up your Google account in step #1.
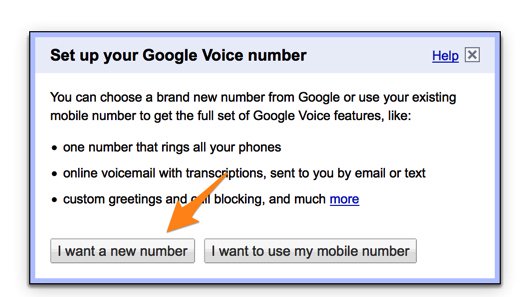
4. Once your phone number has been verified, choose a DID in the area code of your choice.
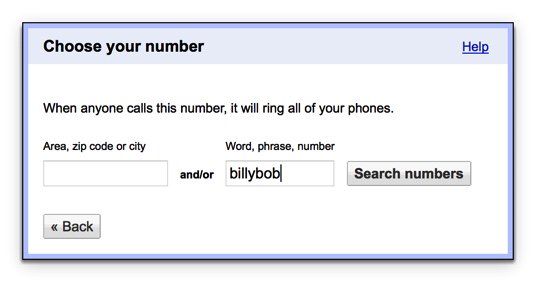
5. When your DID has been assigned, click the More icon at the bottom of the left column of the Google Voice desktop. Click Legacy Google Voice. Now click the Settings icon on your legacy Google Voice desktop. Make certain that Forward Calls to Google chat is checked and disable calls to your forwarding number. Click on the Calls tab and select Call Screening:OFF, CallerID (Incoming):Display Caller’s Number, and Global Spam Filtering:checked. The remaining entries should be blank.
6. Google Voice configuration is now complete. Sign out of your Google Voice account.
The Native Google Voice Solution using FreePBX Motif Module. Here’s a quick thumbnail of the steps to put all the pieces in place using the FreePBX Google Voice/Motif module. First, we set up a Google Voice account at Google as documented above. Next, we’ll set up the Google Voice account in the Issabel GUI to activate the Google Voice trunk. Next, we’ll add an Incoming Route to tell Issabel how to process Google Voice calls. Then we need to tell Google to relax the rules on use of plain text passwords. And, finally, we’ll restart Asterisk from the Linux CLI.
1. Login to the Issabel web interface with your admin password and choose PBX:PBX Config:Google Voice. Enter your Google Voice account name, password, and 10-digit phone number. Be sure to check all three boxes to Add a Trunk, Add an Outbound Route, and Send Unanswered Calls to Google Voicemail. Click Submit and then reload your dialplan when prompted.
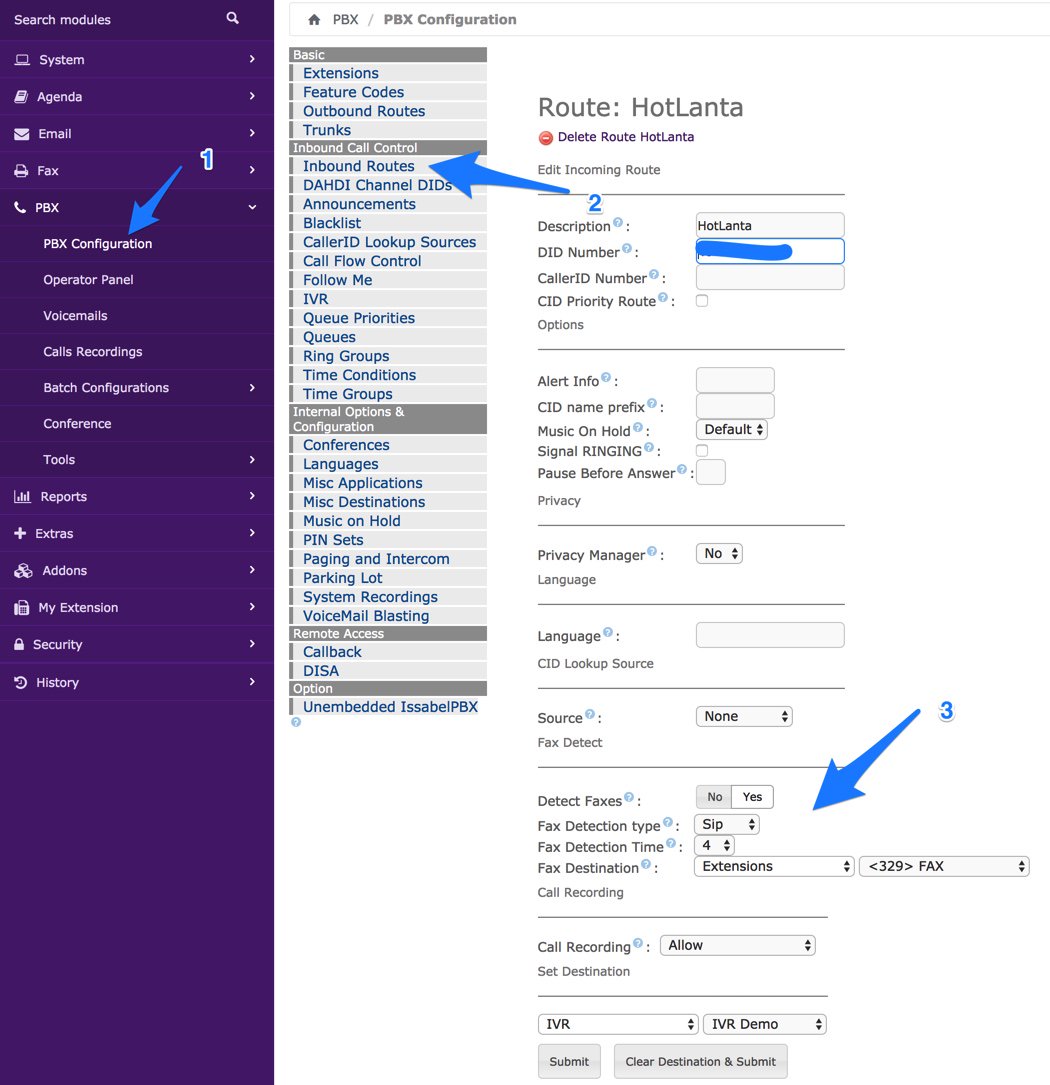
2. Configure an Inbound Route for your incoming Google Voice calls. Click Inbound Routes in the PBX Configuration Menu. Then click Add Incoming Route and enter a Description for the route and enter the DID Number using your 10-digit Google Voice number. If you want to activate CNAM (CallerID Name) lookups, choose OpenCNAM from the Source list. Choose an appropriate Destination for the calls from the pull-down menu of choices. Use only an extension or a ring group. Then SAVE your settings and reload dialplan. To activate fax detection, change Detect Faxes to YES, Detection type to SIP, Detection time to 4, and Destination to Extension 329 (F-A-X). Click Submit and then reload your dialplan again.
3. On the Google site, login into your Google Voice account again. Then follow this link to Enable Less Secure Apps. Then follow this link to activate the Google Voice Reset Procedure. Now log out of your Google Voice account.
4. Login to your Issabel server with SSH/Putty as root and restart Asterisk: amportal restart
5. Now connect a SIP phone to extension 701 and place a call to any number in the U.S. or Canada.
6. Once you have placed an outbound call, incoming calls should work by dialing your Google Voice number from any phone. If you have trouble getting Google to answer the call, this is fairly typical. Try adjusting the NAT settings for your extension from YES to NEVER and place another call. Then change then back to NAT = yes, and you should be good to go.
7. For additional Google Voice trunks, rinse and repeat.
The Simonics GV-SIP Gateway Solution. Here’s the quick thumbnail of the steps to put all the pieces in place. First, we set up a Google Voice account at Google as documented above. Next, we’ll set up an account at the Simonics site to link our Google Voice account to the Simonics SIP Gateway. Then we’ll plug our Simonics SIP credentials into the preconfigured Simonics trunk on Incredible PBX. Finally, we’ll add Incoming and Outgoing Routes to tell Issabel how to process Google Voice calls.
Now you’re ready to set up an account on the Simonics site. With this Nerd Vittles link, there’s a one-time fee of $4.99.
1. Start by registering your new Google account.
2. After paying the $4.99 registration fee via PayPal, proceed through the setup process to link your Google Voice account and 11-digit Google Voice phone number to the Simonics SIP Gateway.
3. You then will be provided your SIP username and password as well as the gateway address, gvgw.simonics.com, to use in building your SIP trunk on your Issabel PBX.

4. If your SIP credentials ever get compromised, regenerate your password by logging back into the Simonics GW site.
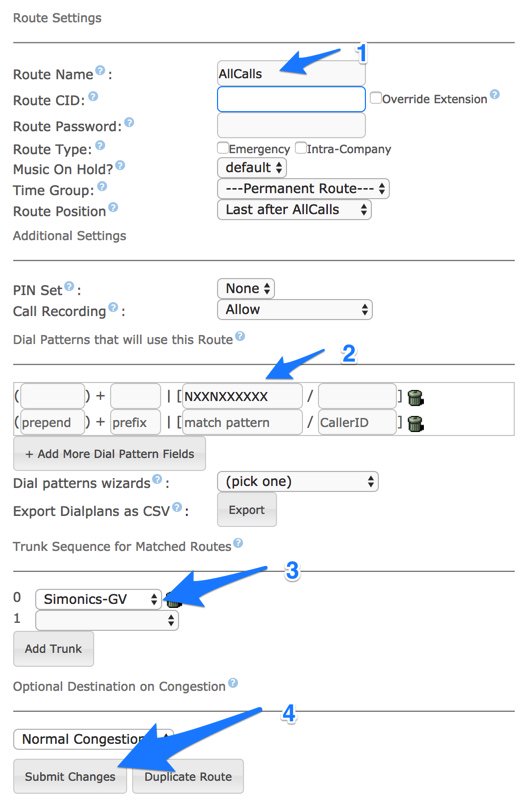
Now it’s time to configure your Simonics trunk in Incredible PBX for Issabel. Start by logging into the Issabel web interface as admin with your admin password from above. Next, click PBX:PBX Configuration in the left Issabel menu. Click Trunks:Simonics-GV in the PBX Configuration menu. The Simonics-GV trunk template will display:

1. Untick the Disable Trunk check box.
2. In Outbound CallerID, insert your 10-digit Google Voice number.
3. In username, insert GV1 followed by your 10-digit Google Voice number.
4. In secret, insert your Simonics SIP password.
5. In the Registration String, insert GV1 followed by your 10-digit Google Voice number followed by a colon (:)
6. In the Registration String after the colon, insert your Simonics SIP password.
7. In the tail of the Registration String after the slash (/), insert your 10-digit Google Voice number.
8. Click Submit Changes and then Reload the Dialplan when prompted.
Now you’re ready to configure an Outbound Route for your Google Voice calls. Click Outbound Routes in the PBX Configuration Menu. Then click Add Route and fill out the form as shown below, save your settings, and reload the dialplan.
Finally, let’s configure an Inbound Route for your incoming Google Voice calls. Click Inbound Routes in the PBX Configuration Menu. Then click Add Incoming Route and enter a Description for the route and enter the DID Number using your 10-digit Google Voice number. If you want to activate CNAM (CallerID Name) lookups, choose OpenCNAM from the Source list. Choose an appropriate Destination for the calls from the pull-down menu of choices, e.g. extension, ring group, IVR, etc. Then SAVE your settings and reload dialplan.
Your Google Voice trunk through the Simonics SIP Gateway should now be working. You can verify this by entering sip show registry in the Asterisk CLI. Place a test call from a softphone connected to your Issabel PBX by dialing a 10-digit number. Then place a call to your Google Voice number from a mobile phone or home/office phone. The Asterisk CLI displays progress of calls by activating it from Linux CLI: asterisk -rvvvvvvvvvv
If you have trouble getting Google Voice to work (especially if you have previously used your Google Voice account from a different IP address), try this Google Voice Reset Procedure. It usually fixes connectivity problems. If it still doesn’t work, enable Less Secure Apps using this Google tool.
If you want to display your primary phone number on the pbxstatus dialog, simply enter the number in /etc/pbx/.phone.
Adding Speech Recognition Support to Incredible PBX
To support many of our applications, Incredible PBX has included Google’s speech recognition service. These applications include AsteriDex Voice Dialing by Name (411) and Wolfram Alpha for Asterisk (4747), all of which use Lefteris Zafiris’ terrific speech-recog AGI script. Unfortunately (for some), Google now has tightened up the terms of use for their free speech recognition service. Now you can only use it for "personal and development use." If you meet those criteria, keep reading. Here’s how to activate speech recognition on Incredible PBX. Don’t skip any steps!
If you like Siri, you’ll love Wolfram Alpha. To use Wolfram Alpha by phone, you first must obtain a free Wolfram Alpha APP-ID. Then issue the following command replacing APP-ID with your actual ID. Don’t change the yourID portion of the command:
sed -i "s|yourID|APP-ID|" /var/lib/asterisk/agi-bin/4747
Now you’re ready to try out the speech recognition apps. Dial 411 and say "American Airlines" to be connected to American.
To access Wolfram Alpha by phone, dial 4747 and enter your query, e.g. "What planes are overhead now?" Read the Nerd Vittles tutorial for additional examples and tips.
Configuring the Issabel Fax Server
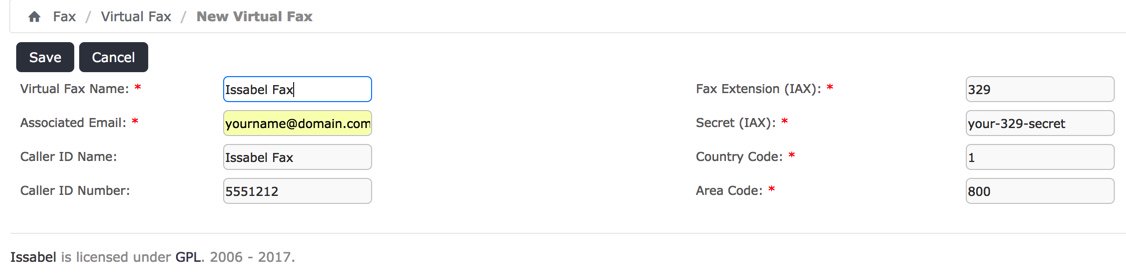
Incredible PBX for Issabel includes turnkey fax support with Issabel. Once you have added a trunk that supports VoIP faxing (HINT: Google Voice trunks work great!), fax configuration with Issabel only takes a minute. Start by logging into the Issabel web interface as admin. First, navigate to PBX:PBX Configuration:Extensions:Fax and obtain your password for extension 329. Next, navigate to Fax:Virtual Fax:New Virtual Fax. Fill in the form as shown below using your actual email address and phone number for receiving faxes as well as your actual extension 329 secret. Then click SAVE. Assuming you typed your secret correctly, you will see a status notification showing virtual fax machine "Running and idle on ttyIAX1."
Assuming you already have set up a Google Voice trunk as outlined above, the next step is to modify the Inbound Route for this trunk to support fax detection. In that way, incoming fax calls will automatically be redirected to extension 329 and the received faxes will be emailed to you in PDF format. Set the email address in Fax:Fax Master. In addition, the faxes can be downloaded and managed from Fax:Virtual Fax:Fax Viewer. Modify your Inbound Route to match the #3 settings shown below. Then save/reload your changes.
To receive the incoming faxes by email, navigate to Fax:Fax Master and enter your email address. Then click SAVE.
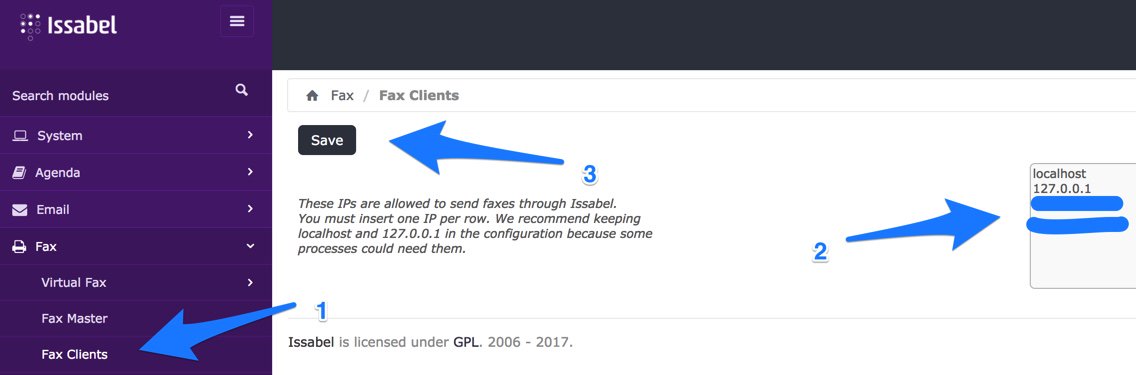
The final step is to designate the IP addresses of those authorized to send faxes using Issabel. Navigate to Fax:Fax Clients and specify the public and private IP addresses (one per line) authorized to send faxes. Then click SAVE. Hylafax clients can be used remotely, or you can use the web utility included with Issabel: Fax:Virtual Fax:Send Fax.
The best way to test things out is to send yourself a test fax. FaxZERO lets you send 5 free faxes of up to 3 pages every day. Give it a whirl.
To send a fax out from your server from the Linux CLI using either a text document or PDF file, the syntax looks like the following:
sendfax -n -d 8005551212 smsmsg.txt
Sampling Other Incredible PBX Applications
As installed, Incredible PBX includes dozens of additional applications for Asterisk. Here’s how to sample some of them using a softphone connected to your Issabel PBX. A good place to start is Allison’s Demo IVR (dial D-E-M-O) using any phone connected to your PBX:
Nerd Vittles Demo IVR Options
1 – 411 -Call by Name (say "American Airlines")
2 – 2663 – MeetMe Conference
3 – 4747 – Wolfram Alpha
4 – 53669 – Lenny (The Telemarketer’s Worst Nightmare)
5 – 951 – Today’s News Headlines
6 – 947 – Weather Forecast (enter a 5-digit ZIP code)
7 – 86329 – Today in History
8 – 701 – Speak to a Real Person
For ODBC demos, dial 222 and enter 12345 for the employee number for a sample database application. Or dial 223 for a sample ODBC dialer using AsteriDex. Enter 263 (first three letters of American Airlines) to place the call. Sample dialplan code is stored in /etc/asterisk/odbc.conf. Dial L-E-N-N-Y (53669) to call or forward telemarketer calls to Lenny. Dial T-I-M-E (8463) for Time of Day. Dial *88HHMM to set an Alarm for HH:MM where HH is the hour of the day in military time. Dial C-O-N-F (2663) for MeetMe conference. Conference credentials are in /root/passwords.FAQ. Voice Dialer (411) works with any database entry in AsteriDex. Access AsteriDex with a browser at https://Issabel-IP-Address/asteridex4. Telephone Reminders can be scheduled by phone (123) or via the web: https://Issabel-IP-Address/reminders. Sample code for the FLITE, GoogleTTS, and PicoTTS engines is in 951 (Yahoo News) context of /etc/asterisk/extensions_custom.conf. All of your FreePBX "old favorites" including blacklists, call transfers and forwarding, dictation, recordings and more are still available as well: PBX:PBX Config:Feature Codes.
Update: We’ve added Allison’s Demo IVR to our own Issabel server at Vultr ($2.50/mo.)1 so you can judge the call quality and feature set for yourself. You can even send us a fax or SMS message if you’d like to try out those features: 
For VoIP callers, use this free SIP URI: 1015954772235642@tampa.voip.ms
Published: Monday, July 10, 2017 Updated: Tuesday, July 25, 2017
Support Issues. With any application as sophisticated as this one, you’re bound to have questions. Blog comments are a difficult place to address support issues although we welcome general comments about our articles and software. If you have particular support issues, we encourage you to get actively involved in the PBX in a Flash Forum. It’s the best Asterisk tech support site in the business, and it’s all free! Please have a look and post your support questions there. Unlike some forums, the PIAF Forum is extremely friendly and is supported by literally hundreds of Asterisk gurus and thousands of users just like you. You won’t have to wait long for an answer to your question.
Need help with Asterisk? Visit the PBX in a Flash Forum.
Special Thanks to Our Generous Sponsors
FULL DISCLOSURE: ClearlyIP, Skyetel, Vitelity, DigitalOcean, Vultr, VoIP.ms, 3CX, Sangoma, TelecomsXchange and VitalPBX have provided financial support to Nerd Vittles and our open source projects through advertising, referral revenue, and/or merchandise. As an Amazon Associate and Best Buy Affiliate, we also earn from qualifying purchases. We’ve chosen these providers not the other way around. Our decisions are based upon their corporate reputation and the quality of their offerings and pricing. Our recommendations regarding technology are reached without regard to financial compensation except in situations in which comparable products at comparable pricing are available from multiple sources. In this limited case, we support our sponsors because our sponsors support us.
BOGO Bonaza: Enjoy state-of-the-art VoIP service with a $10 credit and half-price SIP service on up to $500 of Skyetel trunking with free number porting when you fund your Skyetel account. No limits on number of simultaneous calls. Quadruple data center redundancy. $25 monthly minimum spend required. Tutorial and sign up details are here.
![]() The lynchpin of Incredible PBX 2020 and beyond is ClearlyIP components which bring management of FreePBX modules and SIP phone integration to a level never before available with any other Asterisk distribution. And now you can configure and reconfigure your new Incredible PBX phones from the convenience of the Incredible PBX GUI.
The lynchpin of Incredible PBX 2020 and beyond is ClearlyIP components which bring management of FreePBX modules and SIP phone integration to a level never before available with any other Asterisk distribution. And now you can configure and reconfigure your new Incredible PBX phones from the convenience of the Incredible PBX GUI.
VitalPBX is perhaps the fastest-growing PBX offering based upon Asterisk with an installed presence in more than 100 countries worldwide. VitalPBX has generously provided a customized White Label version of Incredible PBX tailored for use with all Incredible PBX and VitalPBX custom applications. Follow this link for a free test drive!
Special Thanks to Vitelity. Vitelity is now Voyant Communications and has halted new registrations for the time being. Our special thanks to Vitelity for their unwavering financial support over many years and to the many Nerd Vittles readers who continue to enjoy the benefits of their service offerings. We will keep everyone posted on further developments.
Some Recent Nerd Vittles Articles of Interest…
- Some of our links refer users to providers that support Nerd Vittles through referral fees or advertising. These funds help cover the costs of our blog. We never recommend particular products solely to generate revenue. However, when pricing is comparable or particular features warrant our recommendation, we support these vendors and deeply appreciate their financial support of our software development efforts. [↩]
Independence Day for Elastix 4: Introducing Issabel 4

There was more than a little disappointment when PaloSanto Solutions closed up their Elastix® shop last year. The good news was that 3CX stepped in with a terrific free offer on their commercial PBX for Elastix users. And, of course, Sangoma® quickly learned Spanish to tout their closed source crippleware, the FreePBX® Distro. But today’s a new day, and there’s another great surprise as the discontinued Elastix 4 open source product is reincarnated as Issabel 4. Featuring a respin of CentOS 7 plus Asterisk® 11 and FreePBX GPL components (only), Issabel is the first new open source project in the Asterisk community in many, many years. And what a terrific GPL platform it is.
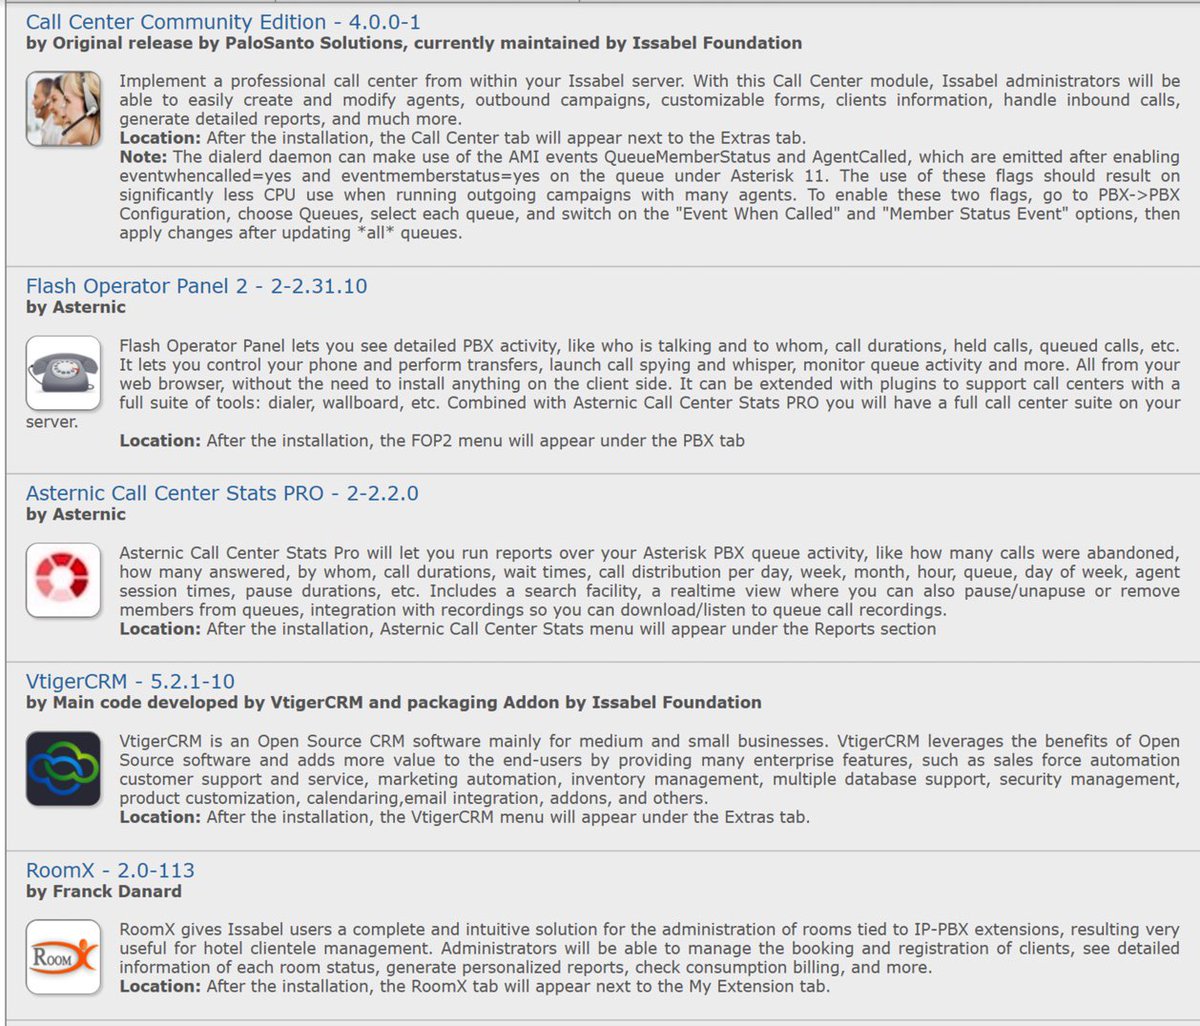
If you liked Elastix 4, you’re going to love Issabel. Its feature set not only matches Elastix 4, but it further enhances it with a collection of bells and whistles you won’t find anywhere else for free. In addition to a modern GUI and Dashboard, you’ll find a rich collection of add-ons to further enhance the FreePBX GPL components without any NagWare. There’s a native email server, a firewall, a fax server, chat service, Festival TTS, and optional add-ons for a Call Center, FOP 2, Vtiger CRM, and RoomX for hotel management.
2018 NEWS FLASH: Incredible PBX® 13 for the 2018 edition of Issabel supporting Asterisk 13 is now available for download. Complete tutorial available at this link.
For today, let’s get Issabel up and running. Installation is a breeze. Just download the 64-bit ISO from SourceForge. Be sure to use the January 2018 release. We will upgrade it from there when we install Incredible PBX 13 for Issabel in this new tutorial. Then burn the image to a CD or, better yet, load it up on your desktop PC with VirtualBox and take it for a quick spin. We think you’ll be thrilled.
Once you’ve installed the image and created your passwords, simply log into the Issabel GUI as admin with your GUI password. Click on PBX in the left column of the Dashboard. Set up a SIP trunk with an inbound and outbound route. Add an extension and a softphone, and you’ll be making your first call in minutes. If you’re unfamiliar with Elastix and FreePBX GPL components, here’s a quick tutorial to get you started.
Getting Started with Issabel 4
Here’s a quick overview of the installation and setup process for Issabel 4:
- Choose HW Platform – Dedicated PC, Cloud, Virtual Machine
- Install Issabel 4 – 64-bit CentOS 7 platform
- Activate Trunks for Issabel 4
- Connect a Softphone to Issabel 4
- Configuring SMTP Mail with Issabel 4
1. Choose a Platform for Issabel 4
Issabel 4 works equally well on dedicated hardware, a cloud-based server, or a virtual machine. Just be sure you have a sufficiently robust Internet connection to support 100Kb of download and upload bandwidth for each simultaneous call you wish to handle with your new PBX.
For Dedicated Hardware, we recommend at least an Atom-based PC of recent vintage with at least a 30GB drive and 4GB of RAM. That will take care of an office with 10-20 extensions and a half dozen or more simultaneous calls if you have the Internet bandwidth to support it. Our favorite hardware platform remains the $200 Intel NUC, and you can read all about it here.
For Cloud-Based Servers, we recommend RentPBX, one of our financial supporters who also happens to size servers properly and restrict usage solely to VoIP. This avoids performance bottlenecks that cause problems with VoIP calls. Yes, we have a coupon code for you to get the $15/month rate: NOGOTCHAS.1 The new image to support Issabel 4 should be available shortly. In the meantime, you can roll your own VPS using the Issabel ISO at Vultr for just $5 $2.50 a month using our referral code. First, upload the ISO by choosing Servers -> ISO -> Add ISO after login. ISO image link: http://nerd.bz/2ukpAXC
Next, create a new Instance by clicking the + icon in Servers. Choose a Server Location close to you. For Server Type, choose Upload ISO and pick your new ISO image. Use $2.50/month Server Size. Enter issabel for your Hostname. Leave everything else at default settings. Click Deploy Now. Click the Manage tab once your Cloud Instance is up and running. Make note of your server’s IP address. You’ll need it shortly.
Wait about a minute and then click View the Console to connect to VNC with your booted Issabel installer. Expand the console window so you can see the entire screen. Highlight Install and press ENTER. Choose the default Installation Destination, and then click Begin Installation. Click Root Password and set a very secure root password. Click Done to proceed with install. Have a cup of coffee while you wait. At about the 60% mark in the post-installation setup, the install may appear to be hung. Relax. It’s not. While you’re waiting, on the Vultr console, go to Settings -> Custom ISO under Server Details for your instance and locate the button to remove the ISO from the instance. Don’t do it yet. Switch back to the console window and wait for the instance to reboot and redisplay the Issabel installer menu. Now switch back to the Vultr window in your browser and click the Remove ISO button, and your server will reboot again. Close the Console window and then reopen it. Enter passw0rd (with a zero) for your MySQL password when prompted and create a very secure admin password for the web interface. Once the installer finishes, you can login to the IP address of your instance using user account admin and the web password you just created. If you ever need to reset them, login with SSH as root using your root password and issue the following command: issabel-admin-passwords --change
Update: On other cloud platforms that do not directly support ISO image installs, you can begin by installing a minimal, 64-bit version of CentOS 7. Then issue the following commands via SSH or Putty after logging into your server as root. NOTE: The 2018 release of Issabel featuring Asterisk 13 is NOT yet supported:
yum -y install wget nano openssh-server
wget -O - http://repo.issabel.org/issabel4-netinstall.sh | bash
For Virtual Machine Installs, we recommend Oracle’s VirtualBox platform which runs atop almost any operating system including Windows, Macs, Linux, and Solaris. Here’s a link to our original VirtualBox tutorial to get you started. We suggest allocating 1GB of RAM and at least a 20GB disk image to your virtual machine for best performance. We actually used VirtualBox to build our first Issabel 4 platform.
2. Install 64-bit Issabel 4 on Your Platform
Begin by downloading the 64-bit Issabel 4 ISO. For dedicated hardware, burn the ISO image to a DVD and boot your server with the Issabel 4 ISO to begin the install. You’ll be presented with the CentOS 7 Installation GUI:
Choose: Time Zone (click)
Choose: Keyboard (click)
Choose: Install Drive (double-click)
Choose: Root Password (Make it Secure!)
Wait for Install and Reboot to Complete
Set MySQL Password to: passw0rd (MANDATORY: with a zero!)
Set Issabel admin Password: minimum 10 alphanumeric characters with upper & lowercase
For VirtualBox, create an Issabel 4 virtual machine of Linux (RedHat 64-bit) type by clicking New. Click Settings button. In System, enable I/O APIC and disable Hardware Clock in UTC Time. In Audio, enable Audio for your sound card. In Network, enable Bridged Adapter for Adapter 1. In Storage, click on Empty in the Storage Tree. Then click on the Disk icon to the right of CD/DVD Drive attributes. Choose the Issabel 4 ISO file that you downloaded. Click OK. Then start the virtual machine to begin the installation process. Follow the setup steps above to install Issabel 4 in your virtual machine.
3. Activate Trunks with Issabel 4
For those migrating from another aggregation including PIAF 3, this should be familiar territory for you. Using a browser, log into Issabel 4 at the IP address of your server using your admin password. Before you can actually make or receive calls outside your PBX, you’ll need at least one trunk. In the Issabel 4 GUI, click PBX -> PBX Configuration -> Trunks. Once you have your credentials from a provider, choose a provider from the list of preconfigured trunks on the right or create a new one. If you’re using one of the preconfigured options, remember to enable the trunk after adding your desired CallerID and credentials. Then save your settings and reload your Asterisk dialplan. That’s it. You’re ready to go.
To display your trunk registrations: asterisk -rx "sip show registry"
Google Voice Setup. If you wish to use Google Voice for free calling in the U.S. and Canada, you’ll need to sign up for an account with Simonics SIP to Google Voice Gateway service. Complete documentation is here. With the latest version of Incredible PBX 13 for Issabel, Google Voice support is included in the GUI.
Connection Issues. If you experience problems getting trunks to register with providers, add or remove the following entry in /etc/asterisk/sip_custom.conf: nat=yes. Then restart Asterisk: amportal restart.
4. Configure a Softphone for Issabel 4
You can connect virtually any kind of telephone to your Issabel 4 PBX after you first create a SIP extension. Plain Old Phones require an analog telephone adapter (ATA) which can be a separate board in your computer from a company such as Digium. Or it can be a standalone SIP device such as ObiHai’s OBi100 or OBi110 (if you have a phone line from Ma Bell to hook up as well). SIP phones can be connected directly so long as they have an IP address. These could be hardware devices or software devices such as the YateClient softphone. We’ll start with a free one today so you can begin making calls. You can find dozens of recommendations for hardware-based SIP phones both on Nerd Vittles and the PIAF Forum when you’re ready to get serious about VoIP.
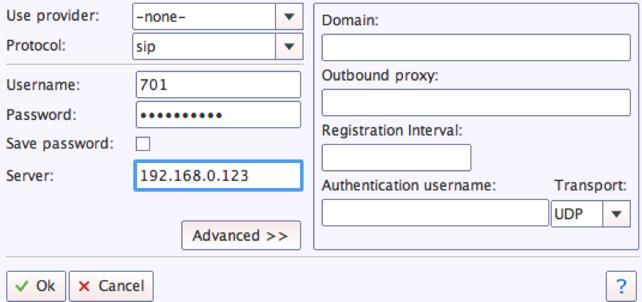
We recommend YateClient which is free. Download it from here. Run YateClient once you’ve installed it and enter your credentials once you create a 701 extension in Issabel 4. You’ll need the IP address of your server plus your extension 701 password. Fill in the blanks using the IP address of your server, 701 for your account name, and whatever password is assigned to the extension. Here’s what your entries should look like. Click OK to save your entries.
Once you are registered to extension 701, close the Account window. Then click on YATE’s Telephony Tab and place some test calls.
5. Configuring SMTP Mail with Issabel 4
Outbound email support using Postfix is preconfigured with Issabel 4. You can test whether it’s actually working by issuing the following command using your destination email address after logging in as root:
echo "test" | mail -s testmessage yourname@gmail.com
If you don’t receive the email message within a minute or two and you’ve checked your spam folder, chances are your ISP is blocking downstream SMTP servers in an effort to combat spam. Comcast is one of the usual suspects. To enable outbound email service for delivery of voicemail and other email messages with a provider blocking downstream SMTP servers, just follow our recent tutorial to reconfigure Postfix on your server.
Published: Monday, July 3, 2017
Support Issues. With any application as sophisticated as this one, you’re bound to have questions. Blog comments are a difficult place to address support issues although we welcome general comments about our articles and software. If you have particular support issues, we encourage you to get actively involved in the PBX in a Flash Forum. It’s the best Asterisk tech support site in the business, and it’s all free! Please have a look and post your support questions there. Unlike some forums, the PIAF Forum is extremely friendly and is supported by literally hundreds of Asterisk gurus and thousands of users just like you. You won’t have to wait long for an answer to your question.
Need help with Asterisk? Visit the PBX in a Flash Forum.
Special Thanks to Our Generous Sponsors
FULL DISCLOSURE: ClearlyIP, Skyetel, Vitelity, DigitalOcean, Vultr, VoIP.ms, 3CX, Sangoma, TelecomsXchange and VitalPBX have provided financial support to Nerd Vittles and our open source projects through advertising, referral revenue, and/or merchandise. As an Amazon Associate and Best Buy Affiliate, we also earn from qualifying purchases. We’ve chosen these providers not the other way around. Our decisions are based upon their corporate reputation and the quality of their offerings and pricing. Our recommendations regarding technology are reached without regard to financial compensation except in situations in which comparable products at comparable pricing are available from multiple sources. In this limited case, we support our sponsors because our sponsors support us.
BOGO Bonaza: Enjoy state-of-the-art VoIP service with a $10 credit and half-price SIP service on up to $500 of Skyetel trunking with free number porting when you fund your Skyetel account. No limits on number of simultaneous calls. Quadruple data center redundancy. $25 monthly minimum spend required. Tutorial and sign up details are here.
![]() The lynchpin of Incredible PBX 2020 and beyond is ClearlyIP components which bring management of FreePBX modules and SIP phone integration to a level never before available with any other Asterisk distribution. And now you can configure and reconfigure your new Incredible PBX phones from the convenience of the Incredible PBX GUI.
The lynchpin of Incredible PBX 2020 and beyond is ClearlyIP components which bring management of FreePBX modules and SIP phone integration to a level never before available with any other Asterisk distribution. And now you can configure and reconfigure your new Incredible PBX phones from the convenience of the Incredible PBX GUI.
VitalPBX is perhaps the fastest-growing PBX offering based upon Asterisk with an installed presence in more than 100 countries worldwide. VitalPBX has generously provided a customized White Label version of Incredible PBX tailored for use with all Incredible PBX and VitalPBX custom applications. Follow this link for a free test drive!
Special Thanks to Vitelity. Vitelity is now Voyant Communications and has halted new registrations for the time being. Our special thanks to Vitelity for their unwavering financial support over many years and to the many Nerd Vittles readers who continue to enjoy the benefits of their service offerings. We will keep everyone posted on further developments.
Some Recent Nerd Vittles Articles of Interest…
- Some of our links refer users to providers that support Nerd Vittles through referral fees or advertising. These funds help cover the costs of our blog. We never recommend particular products solely to generate revenue. However, when pricing is comparable or particular features warrant our recommendation, we support these vendors and deeply appreciate their financial support of our software development efforts. [↩]
2016, The Year of (real) VoIP Choice: Introducing Elastix 4.0 with Incredible PBX

DEC. 7 NEWS FLASH: The Elastix project has been sold to 3CX. Elastix 4.0 and Elastix MT have been removed from production "due to a legal disagreement with another open source distribution."
Our crystal ball suggests that 2016 is shaping up to be a fantastic year full of VoIP surprises and excitement. We’ll be there to cover every new development. When it comes to graphical user interfaces for Asterisk®, the days of the one trick pony are officially over. Free At Last! And leave it to Edgar Landivar and Team Elastix® to be first out of the gate with Elastix 4.0. What a terrific new product it is! The Elastix project began nearly a decade ago, and every release continues to demonstrate why Elastix remains at the top of the leader board when it comes to true open source unified communications solutions. Whether you’re building a commercial call center or seeking an open source telephony platform for your organization, Elastix competes favorably with the best commercial brands in the business. We’ll put a little icing on the cake today by offering an all-new Incredible PBX release for Elastix 4.0. It adds a preconfigured and locked down firewall plus dozens of applications for Asterisk including text-to-speech and voice recognition applications as well as new SIP gateways to RingPlus cellular service and Google Voice communications. So let’s begin and take Elastix 4.0 for a spin! Download the ISO here.
Celebrate with us!
Elastix, 10 years delivering Open Source Communications #opensource #voip #asterisk pic.twitter.com/r29QPL4eFu— Elastix (@elastix) March 23, 2016
A Word of Caution. If you’re new to Incredible PBX, install a clean version of Elastix 4.0 with NO MODIFICATIONS before you begin the Incredible PBX install. All of the existing Elastix 4.0 setup will be modified as part of the Incredible PBX install, and these changes will wipe out any additions you’ve previously made to Elastix. So don’t make any! Once the Incredible PBX install is completed, you can make all the changes you wish in your Elastix configuration. The only major design change we’ve made is to rework the Elastix MySQL database tables into MyISAM format from InnoDB. This facilitates making future backups and restores of your server as well as providing the necessary platform to install current and future Incredible PBX components.
Did We Mention Security? You also get a locked down, preconfigured IPtables Firewall WhiteList with all of the Travelin’ Man 3 tools plus the automatic update service to keep your server up to date and safe. There is a $20 voluntary annual license fee for the update service but, if you’d prefer to buy donuts, be our guest. But understand that voluntary is a two-way street. Running the update service costs us time and money and, when it ceases to be worthy of our time and financial investment, we reserve the right to discontinue the service down the road. The next time you log into your server after installing Incredible PBX, you’ll quickly appreciate why an automatic update service is important. We watch for and fix problems so you don’t have to.
Getting Started with Incredible PBX and Elastix 4.0
Here’s a quick overview of the installation and setup process for Incredible PBX for Elastix 4.0:
- Choose a Hardware Platform – Dedicated PC, Cloud Provider, or Virtual Machine
- Install Elastix 4.0 – 64-bit CentOS 7 platform
- Download and Install Incredible PBX for Elastix 4.0
- Set Up Passwords for Incredible PBX for Elastix 4.0
- Activate Trunks with Incredible PBX for Elastix 4.0
- Connect a Softphone to Incredible PBX for Elastix 4.0
- Configuring SMTP Mail with Incredible PBX for Elastix 4.0
1. Choose a Platform for Incredible PBX and Elastix 4.0
Incredible PBX for Elastix 4.0 works equally well on dedicated hardware, a cloud-based server, or a virtual machine. Just be sure you have a sufficiently robust Internet connection to support 100Kb of download and upload bandwidth for each simultaneous call you wish to handle with your new PBX.
For Dedicated Hardware, we recommend at least an Atom-based PC of recent vintage with at least a 30GB drive and 4GB of RAM. That will take care of an office with 10-20 extensions and a half dozen or more simultaneous calls if you have the Internet bandwidth to support it. Our favorite hardware platform remains the $200 Intel NUC, and you can read all about it here.
For Cloud-Based Servers, we recommend RentPBX, one of our financial supporters who also happens to size servers properly and restrict usage solely to VoIP. This avoids performance bottlenecks that cause problems with VoIP calls. Yes, we have a coupon code for you to get the $15/month rate: NOGOTCHAS. The new image to support Incredible PBX for Elastix 4.0 should be available shortly.
Or you can install Elastix 4.0 on top of an existing CentOS 7 platform by following this tutorial.
For Virtual Machine Installs, we recommend Oracle’s VirtualBox platform which runs atop almost any operating system including Windows, Macs, Linux, and Solaris. Here’s a link to our original VirtualBox tutorial to get you started. We suggest allocating 1GB of RAM and at least a 20GB disk image to your virtual machine for best performance. We actually used VirtualBox to build Incredible PBX for Elastix 4.0.
2. Install 64-bit Elastix 4.0 on Your Platform
Begin by downloading the 64-bit Elastix 4.0 ISO. For dedicated hardware, burn the ISO image to a DVD and boot your server with the Elastix 4.0 ISO to begin the install. You’ll be presented with the CentOS 7 Installation GUI:
Choose: Time Zone (click)
Choose: Keyboard (click)
Choose: Install Drive (double-click)
Choose: Root Password (Make it Secure!)
Wait for Install and Reboot to Complete
Set MySQL Password to: passw0rd (MANDATORY: with a zero!)
Set Elastix admin Password: minimum 10 alphanumeric characters with upper & lowercase
For VirtualBox, create an Elastix 4.0 virtual machine of Linux (RedHat 64-bit) type by clicking New. Click Settings button. In System, enable I/O APIC and disable Hardware Clock in UTC Time. In Audio, enable Audio for your sound card. In Network, enable Bridged Adapter for Adapter 1. In Storage, click on Empty in the Storage Tree. Then click on the Disk icon to the right of CD/DVD Drive attributes. Choose the Elastix 4.0 ISO file that you downloaded. Click OK. Then start the virtual machine to begin the installation process. Follow the setup steps above to install Elastix 4.0 in your virtual machine.
3. Download and Install Incredible PBX for Elastix 4.0
After completing the Elastix 4.0 install, log into your server as root using SSH or Putty from a desktop machine that you will use to manage your server. This is important with the Incredible PBX IPtables Firewall WhiteList so you don’t get locked out of your own server! Then issue the following commands to begin the Incredible PBX install. You’ll actually run the installer twice, once to upgrade CentOS 7 and Elastix 4.0 and a second time to install Incredible PBX.
cd /root
yum -y install wget
wget http://incrediblepbx.com/incrediblepbx11elastix40.tar.gz
tar zxvf incrediblepbx11elastix40.tar.gz
rm -f incrediblepbx11elastix40.tar.gz
./IncrediblePBX*
# after reboot, login again as root and...
./IncrediblePBX*
4. Initial Configuration of Incredible PBX for Elastix 4.0
Incredible PBX is installed with the preconfigured IPtables Linux firewall already in place. It implements WhiteList Security to limit server access to connected LANs, your server’s IP address, your desktop computer’s IP address, and a few of our favorite SIP providers. You can add additional entries to this WhiteList whenever you like using the add-ip and add-fqdn tools in /root. There’s also an Apache security layer for our web applications. And, of course, Elastix 4.0 has its own security methodology. Finally, we randomize various passwords as part of the initial install process. You’ll also be prompted to set your MySQL and Elastix admin password again. Be sure your MySQL password is passw0rd with a zero, or nothing will work! Out of the starting gate, you won’t find a more secure VoIP server implementation anywhere. After all, it’s your phone bill.
Even with all of these layers of security, here are 6 Quick Steps to better safeguard your server. You only do this once, but failing to do it may lead to security issues you don’t want to have to deal with down the road. So DO IT NOW!
First, log out and back into your server as root with your root password to get the latest updates. Then do the following:
Make your root password very secure: passwd
Set your correct time zone: ./timezone-setup
Create admin password for web apps: htpasswd -b /etc/pbx/wwwpasswd admin newpassword
Set MySQL and Elastix admin PW: ./admin-pw-change (MySQL PW MUST be passw0rd with zero)
Make a copy of your other passwords: cat passwords.FAQ
Decipher IP address and other info about your server: pbxstatus
Last but not least, Incredible PBX includes an automatic update utility which downloads important updates whenever you log into your server as root. We recommend you log in once a week to keep your server current. If you haven’t already done so, NOW would be a good time to log out and back into your server at the Linux command line to bring your server current.
Incredible PBX Stand-Alone Apps. Currently, there are several standalone applications included with Incredible PBX that cannot be accessed from within the Elastix Dashboard because the Elastix Developer component for Elastix 4.0 still is under development. For all of these web applications except WebMin, you will need to set up Apache web credentials using the web apps password syntax documented above. Once you’ve done that, you can access the applications using a browser with the username admin. Just substitute your server’s IP address for 192.168.0.1 in the examples below. For WebMin only, use root as your username and your root password for access.
- Config Edit: https://192.168.0.1/maint/configedit
- phpMyAdmin: https://192.168.0.1/maint/phpMyAdmin
- Sys Info: https://192.168.0.1/maint/sysinfo
- Telephone Reminders: https://192.168.0.1/reminders
- WebMin: https://192.168.0.1:9001
5. Activate Trunks with Incredible PBX for Elastix 4.0
For those migrating from another aggregation including PBX in a Flash, this should be familiar territory for you. Using a browser, log into Elastix 4.0 at the IP address of your server using your admin password. Before you can actually make or receive calls outside your PBX, you’ll need at least one trunk. In the Elastix 4.0 GUI, click PBX -> PBX Configuration -> Trunks. Once you have your credentials from a provider, choose a provider from the list of preconfigured trunks on the right or create a new one. If you’re using one of the preconfigured options, remember to enable the trunk after adding your desired CallerID and credentials. Then save your settings and reload your Asterisk dialplan. That’s it. You’re ready to go.
To display your trunk registrations: asterisk -rx "sip show registry"
Google Voice Setup. If you wish to use Google Voice for free calling in the U.S. and Canada, you’ll need to sign up for an account with Simonics SIP to Google Voice Gateway service. Complete documentation is here.
RingPlus SIP Gateway. If you’ve signed up for (free) RingPlus cellular service, you also can use your cellular account as a SIP gateway to Elastix. Complete documentation is here.
Connection Issues. If you experience problems getting trunks to register with providers, add or remove the following entry in /etc/asterisk/sip_custom.conf: nat=yes. Then restart Asterisk: amportal restart.
6. Configure a Softphone with Incredible PBX for Elastix 4.0
Incredible PBX comes preconfigured with two extensions (701 and 702) that let you connect phones to your PBX. You can connect virtually any kind of telephone to your Elastix 4.0 PBX. Plain Old Phones require an analog telephone adapter (ATA) which can be a separate board in your computer from a company such as Digium. Or it can be a standalone SIP device such as ObiHai’s OBi100 or OBi110 (if you have a phone line from Ma Bell to hook up as well). SIP phones can be connected directly so long as they have an IP address. These could be hardware devices or software devices such as the YateClient softphone. We’ll start with a free one today so you can begin making calls. You can find dozens of recommendations for hardware-based SIP phones both on Nerd Vittles and the PIAF Forum when you’re ready to get serious about VoIP.
We recommend YateClient which is free. Download it from here. Run YateClient once you’ve installed it and enter the credentials for the 701 extension on Incredible PBX. You’ll need the IP address of your server plus your extension 701 password. You can find them in /root/passwords.FAQ. Fill in the blanks using the IP address of your server, 701 for your account name, and whatever password is assigned to the extension. Here’s what your entries should look like. Click OK to save your entries.
Once you are registered to extension 701, close the Account window. Then click on YATE’s Telephony Tab and place some test calls to the numerous apps that are preconfigured on Incredible PBX. Here are a few numbers to get you started:
123 - Reminders

222 - ODBC Demo (use: 12345)

947 - Weather by ZIP Code

951 - Yahoo News

DEMO - Allison's IVR Demo

TODAY - Today in History
7. Configuring SMTP Mail with Incredible PBX for Elastix 4.0
Outbound email support using Postfix is preconfigured with Elastix 4.0. You can test whether it’s actually working by issuing the following command using your destination email address after logging in as root:
echo "test" | mail -s testmessage yourname@gmail.com
If you don’t receive the email message within a minute or two and you’ve checked your spam folder, chances are your ISP is blocking downstream SMTP servers in an effort to combat spam. Comcast is one of the usual suspects. To enable outbound email service for delivery of voicemail and other email messages with a provider blocking downstream SMTP servers, you first need to obtain the SMTP domain of your ISP, e.g. smtp.comcrap.net. Next, edit /etc/postfix/main.cf and add your SmartHost entry [in brackets] to the line that begins like this: relayhost =. The line should look like this: relayhost = [smtp.comcrap.net]. Save your addition and restart Postfix: service postfix restart. Be sure to try another email test message after completing the SmartHost update. To use Gmail as your mail relay, see this tutorial.
8. Homework Assignment: Mastering Incredible PBX for Elastix 4.0
We’ve put together a complete tutorial for the applications included in Incredible PBX for Asterisk-GUI. Most of it is fully applicable to Elastix 4.0 as well. That should be your next stop. Then you’ll be ready to tackle Elastix 4.0. Google is your friend. Do some exploring, and we’ll post links to great articles on this terrific platform as we discover them. Your suggestions are also welcomed!
9 Countries Have Never Visited Nerd Vittles. Got a Friend in Any of Them https://t.co/wMfmlhiQ9y #asterisk #freepbx pic.twitter.com/TPFGZbqWB6
— Ward Mundy (@NerdUno) April 22, 2016
In the meantime, if you have questions, join the PBX in a Flash Forums and take advantage of our awesome collection of gurus. There’s an expert available on virtually any topic, and the price is right. As with Incredible PBX, it’s absolutely free. The same applies to the Elastix forum.
And if all of that wasn’t enough, feast your eyes on the Elastix Add-Ons that are only a button click away:
[gview file="http://nerdvittles.com/wp-content/ElastixAddOns.pdf"]
Originally published: Monday, February 22, 2016
Need help with Asterisk? Visit the PBX in a Flash Forum.
Special Thanks to Our Generous Sponsors
FULL DISCLOSURE: ClearlyIP, Skyetel, Vitelity, DigitalOcean, Vultr, VoIP.ms, 3CX, Sangoma, TelecomsXchange and VitalPBX have provided financial support to Nerd Vittles and our open source projects through advertising, referral revenue, and/or merchandise. As an Amazon Associate and Best Buy Affiliate, we also earn from qualifying purchases. We’ve chosen these providers not the other way around. Our decisions are based upon their corporate reputation and the quality of their offerings and pricing. Our recommendations regarding technology are reached without regard to financial compensation except in situations in which comparable products at comparable pricing are available from multiple sources. In this limited case, we support our sponsors because our sponsors support us.
BOGO Bonaza: Enjoy state-of-the-art VoIP service with a $10 credit and half-price SIP service on up to $500 of Skyetel trunking with free number porting when you fund your Skyetel account. No limits on number of simultaneous calls. Quadruple data center redundancy. $25 monthly minimum spend required. Tutorial and sign up details are here.
![]() The lynchpin of Incredible PBX 2020 and beyond is ClearlyIP components which bring management of FreePBX modules and SIP phone integration to a level never before available with any other Asterisk distribution. And now you can configure and reconfigure your new Incredible PBX phones from the convenience of the Incredible PBX GUI.
The lynchpin of Incredible PBX 2020 and beyond is ClearlyIP components which bring management of FreePBX modules and SIP phone integration to a level never before available with any other Asterisk distribution. And now you can configure and reconfigure your new Incredible PBX phones from the convenience of the Incredible PBX GUI.
VitalPBX is perhaps the fastest-growing PBX offering based upon Asterisk with an installed presence in more than 100 countries worldwide. VitalPBX has generously provided a customized White Label version of Incredible PBX tailored for use with all Incredible PBX and VitalPBX custom applications. Follow this link for a free test drive!
Special Thanks to Vitelity. Vitelity is now Voyant Communications and has halted new registrations for the time being. Our special thanks to Vitelity for their unwavering financial support over many years and to the many Nerd Vittles readers who continue to enjoy the benefits of their service offerings. We will keep everyone posted on further developments.
Some Recent Nerd Vittles Articles of Interest…
The Future of VoIP Telephony in an Asterisk World
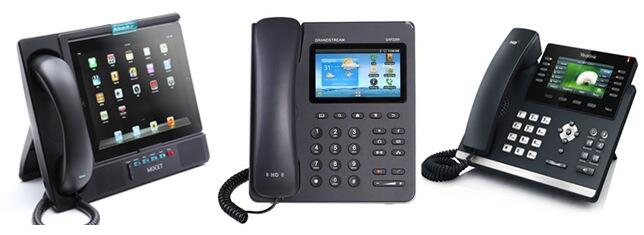
If you don’t think there’s a telephony revolution underway, then take a look at this year’s crop of new VoIP telephones. No doubt that Alexander Graham Bell would be a happy camper. We’ve picked three of our favorites to take for a spin this week. Pictured above (left to right) are the Mocet Communicator, Grandstream’s GXP2200, and Yealink’s T46G. These three devices offer three dramatically different, but equally effective, approaches to the future of VoIP telephony.
The Mocet Communicator is what we’d call a BYOI (bring-your-own-iPad) device. With it, you get a full-featured HD telephony platform plus all the feature comforts of a full-fledged iPad including Skype, a variety of free messaging apps such as iMessage and FaceTime, Google Voice featuring GV Connect, and any other app of any type you choose to install on your iPad. After installing the free IP Commander app from the App Store, the phone interconnects with iOS and your iPad seamlessly. It’s a one-minute operation to set up a SIP connection with PBX in a Flash™, Incredible PBX™, and Asterisk®. For the ultimate in ease of use, the FreePBX™ (commercial) EndPoint Manager fully supports all the Mocet devices. EPM is the best $25 you could ever spend on your server. The phone itself worked flawlessly inside a private LAN as well as from a remote site with either a direct IP connection or VPN connection to home base. For the ultimate in flexibility, you can add an inexpensive WiFi adapter. HD Voice quality with even an entry level DSL connection was spectacular. And, if the wow factor of causing your nerdy friends to wet their pants is a consideration, then this is the hands-down winner. Click this link for a rundown of the impressive feature set. Incidentally, you can still receive calls and make emergency calls even without the iPad connected.
Now let’s turn to what PBX in a Flash, Incredible PBX, and Nerd Vittles bring to the table with this new phone. We actually configured the "Red Hotline Button" a little differently than President Obama. Ours dials the Nerd Vittles CallWho™ application. The app is included in all Incredible PBX bundles as well. CallWho lets you place hands-free calls from your AsteriDex phonebook using simple voice commands. You can click on the YouTube video above for a one-minute demo.
If the Mocet Communicator has a drawback, it’s probably price, but hopefully that will improve in the next few months. The device itself retails for $229.95 with free 2-day Prime shipping using our Amazon link.1 Adding an iPad will set you back another $300+, but we love this phone. Its novel approach to hybrid VoIP technology is clearly the future direction of VoIP telephony, and the Mocet software will only get better with time.
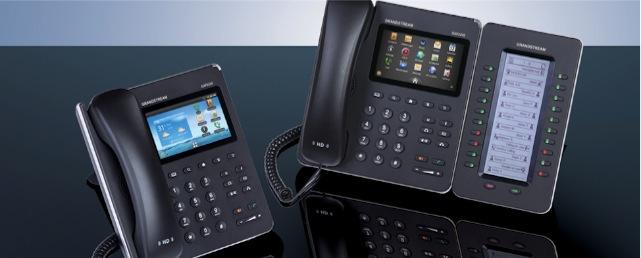
Grandstream’s GXP2200 is proof positive that these hybrid VoIP phones are the wave of the future. Nerd Vittles reviewed this phone last November, and the feature set continues to improve. The GXP2200 is another approach to hybrid VoIP technology with Android serving as the base operating system for the phone itself. This brings you the best of all worlds for under $200 with no additional tablet to purchase. And you still get a terrific HD Voice platform with all the comforts of Android under the hood. See the Amazon link in our sidebar for the latest pricing. As with the Mocet Communicator’s iOS integration, Android brings a wealth of applications to the GXP2200 desktop including Skype, Facebook and Facebook Messenger, GrooVe IP for Google Voice, OBiON for free calling through any OBi device, dozens of additional messaging apps, and your choice of literally thousands of apps from the Google Play Store and Grandstream’s GS Market which features applications specifically tailored for the GXP2200. Since our original article appeared, Grandstream has released the expansion module for this phone. The addition of the 40-button sidecar with full BLF support for under $100 makes this a near perfect desktop phone for use with Asterisk. It’s one of a select few phones that we personally use all day, every day. It supports six SIP connections, and we use it to connect to several PBX in a Flash, RentPBX, and Incredible Pi servers scattered across the U.S. as well as a few SIP subaccounts hosted at Vitelity, VoIP.ms, and les.net. Performance is nearly flawless!

Yealink’s T46G Executive IP Phone may still be our top pick even with the new generation of hybrid phones. See the Nerd Vittles sidebar for an incredible deal on this phone with a show-stopping feature set: HD Voice, dual-port gigabit Ethernet connections, USB support for Bluetooth and WiFi (soon), integrated POE support plus included power adapter, multiple phonebook options with up to 1,000 entries, VLAN and OpenVPN integration, 10 line keys with 27 programmable buttons, SRTP encrypted communications, and a stunning color display. Two years ago this would have been a $500 phone, and now it’s a lunch tab away from the price of Digium’s entry-level SIP phone. Pretty amazing. For the latest tips and tricks in getting the T46G properly configured, come join the PIAF Forum discussion.
UPDATE: Having now used the T46G for a few days, our first impression is that this phone is an industrial-grade, feature-rich, state-of-the-art SIP device with all of the feature comforts a large organization would want in rolling out a new company-wide phone system. Sophisticated server redundancy is built into the phones to support automatic failover to a backup VoIP server in the event of a catastrophic system failure. Encrypted SRTP communications as well as OpenVPN support is integrated into each phone. The T46G also includes the XML programming functionality available in the Aastra and Digium phones. You can try out our demo XML apps by visiting the PIAF Forum. In addition, basic web server interaction is provided through event triggers on the phone that can generate Action URIs to receive and process HTTP GET requests and Action URLs to send HTTP GET requests when a specified telephone event occurs.
The phonebook implementation is exactly what a large organization would want: three phone numbers plus a phone, ring tone, and group entry per person plus customizable accounts and groups. Import and export of XML or CSV data through a web interface is a snap. In fact, the CSV format even supports export of images linked to every phonebook entry. For a large organization, it means the HR department could maintain a single phonebook database of up to 1,000 records with photos of every employee. That database then could be pushed to every phone in the organization by one HR employee using a web browser without ever touching or rebooting a single telephone. LDAP directories are also supported for the purists. Enjoy!
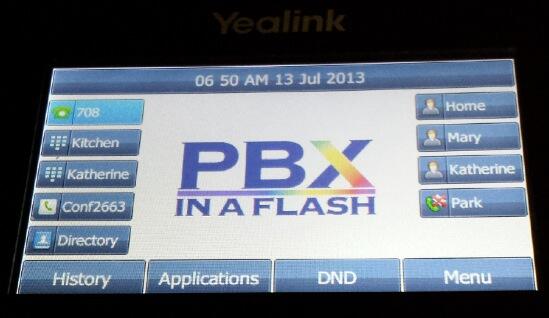
Deals of the Week. There are a couple of amazing deals still on the street, but you’d better hurry. First, for new customers, Sangoma is offering a board of your choice from a very impressive list at 75% off. For details, see this thread on the PIAF Forum. Second, a new company called Copy.com is offering 20GB of free cloud storage with no restrictions on file size uploads (which are all too common with other free offers). Copy.com has free sync apps for Windows, Macs, and Linux systems. To take advantage of the offer, just click on our referral link here. We get 5GB of extra storage, too, which will help avoid another PIAF Forum disaster.
Originally published: Tuesday, July 9, 2013
Need help with Asterisk? Visit the PBX in a Flash Forum.

Don’t miss the first-ever FreePBX World on August 27-28 at the Mandalay Bay in Las Vegas. For complete details, see this post on the FreePBX blog.

We are pleased to once again be able to offer Nerd Vittles’ readers a 20% discount on registration to attend this year’s 10th Anniversary AstriCon in Atlanta. And, if you hurry, you also can take advantage of the early bird registration discount. Here’s the Nerd Vittles Discount Code: AC13NERD.
Special Thanks to Our Generous Sponsors
FULL DISCLOSURE: ClearlyIP, Skyetel, Vitelity, DigitalOcean, Vultr, VoIP.ms, 3CX, Sangoma, TelecomsXchange and VitalPBX have provided financial support to Nerd Vittles and our open source projects through advertising, referral revenue, and/or merchandise. As an Amazon Associate and Best Buy Affiliate, we also earn from qualifying purchases. We’ve chosen these providers not the other way around. Our decisions are based upon their corporate reputation and the quality of their offerings and pricing. Our recommendations regarding technology are reached without regard to financial compensation except in situations in which comparable products at comparable pricing are available from multiple sources. In this limited case, we support our sponsors because our sponsors support us.
BOGO Bonaza: Enjoy state-of-the-art VoIP service with a $10 credit and half-price SIP service on up to $500 of Skyetel trunking with free number porting when you fund your Skyetel account. No limits on number of simultaneous calls. Quadruple data center redundancy. $25 monthly minimum spend required. Tutorial and sign up details are here.
![]() The lynchpin of Incredible PBX 2020 and beyond is ClearlyIP components which bring management of FreePBX modules and SIP phone integration to a level never before available with any other Asterisk distribution. And now you can configure and reconfigure your new Incredible PBX phones from the convenience of the Incredible PBX GUI.
The lynchpin of Incredible PBX 2020 and beyond is ClearlyIP components which bring management of FreePBX modules and SIP phone integration to a level never before available with any other Asterisk distribution. And now you can configure and reconfigure your new Incredible PBX phones from the convenience of the Incredible PBX GUI.
VitalPBX is perhaps the fastest-growing PBX offering based upon Asterisk with an installed presence in more than 100 countries worldwide. VitalPBX has generously provided a customized White Label version of Incredible PBX tailored for use with all Incredible PBX and VitalPBX custom applications. Follow this link for a free test drive!
Special Thanks to Vitelity. Vitelity is now Voyant Communications and has halted new registrations for the time being. Our special thanks to Vitelity for their unwavering financial support over many years and to the many Nerd Vittles readers who continue to enjoy the benefits of their service offerings. We will keep everyone posted on further developments.
Some Recent Nerd Vittles Articles of Interest…
- Many of our purchase links refer users to Amazon when we find their prices are competitive for the recommended products. Nerd Vittles receives a small referral fee from Amazon to help cover the costs of our blog. We never recommend particular products solely to generate Amazon commissions. However, when pricing is comparable or availability is favorable, we support Amazon because Amazon supports us. [↩]
If You Won’t Eat Your Own Dog Food, At Least Taste It

The last few weeks have certainly reinforced the notion that one should never ASS-U-ME anything unless you’re willing to learn the hard way when things go south. We’ve also uncovered a new twist to the Golden Rule: "He who has the gold makes the rules." In the Digium®-centric Asterisk® world, it goes something like this. When life is good, we reserve the right to cash in on the proceeds. When things go wrong, the Asterisk community needs to do better testing. It’s a free product, and you get what you pay for.
We wish we could say that our suggestion that Digium eat its own dog food before releasing new Asterisk versions to the public was well received. Quite the contrary, and we probably should have learned several years ago about the tenor of responses one could expect when suggestions were made to change the Digium Way of doing things. In the previous case, we had suggested that altering dialplan syntax and punctuation between Asterisk versions was counter-productive because it broke almost every existing Asterisk application. That was sloughed off as being someone else’s problem since the Digium developers could not possibly anticipate all of the problems that would be caused by changing verbs and syntax in the dialplan.
Think of what would happen if you moved the location of the brake pedal on every new car, and you get some idea of the scope of the problem for Asterisk application developers, assuming you still can find the ones that wrote your company’s application.
Testing Methodology… NOT! With the release of Asterisk 1.8.4, we suddenly encountered a new can of worms. Virtually all Cisco SIP and Polycom TLS phones no longer worked. Keep in mind that this is the only "fully supported" (whatever that means) version of Asterisk that is still available. In the case of the Cisco phones, Digium managers claimed that they didn’t have every piece of equipment on the planet so it wasn’t their fault. In the case of Polycom, it turned out that Digium’s multi-million dollar headquarters reportedly is chock full of Polycom phones, but they’re all plugged into a commercial PBX that didn’t have the problems engineered into Asterisk 1.8.4.
That brings us to the Hobson’s Choice now facing existing and would-be Asterisk users. Wouldn’t you think that a company that profits enormously off hardware and software sales because of their "free" Asterisk product would have some rudimentary test lab in place with a dozen or two phones from the major VoIP manufacturers so that new releases could be checked out before the production-ready release is distributed? Well, apparently not. Kinda reminds us of an old Huntsville comment about the Apollo moon missions. Would you want to fly to the moon in a spacecraft built by the lowest bidder? For Huntsville’s Digium Corporation, the question might be phrased a little differently. Why would any organization want to stake its livelihood on an untested Asterisk PBX?
Does free really matter if your phones don’t work?1
As one of Asterisk’s primary cheerleaders for many, many years, this latest revelation that there is an almost complete lack of testing before production versions of Asterisk are released is disappointing to us not to mention incredibly short-sighted on Digium’s part. Since Digium appears unwilling to actually use their own product internally, we’d like to propose a dog food alternative.

First, instead of more leather chairs for the new Digium headquarters2, how about a 200 square foot test lab in the attic with a few $250 Atom-based PCs and a couple of under $1,000 Dell servers running Proxmox and VMware virtual machines with a couple dozen flavors of Asterisk. Then add a dozen SIP phones from the leading VoIP providers as well as a few of the leading ATAs. $5,000 would easily cover the total cost of the lab. How do we know? Well, the PBX in a Flash Dev Team (with no VC funding) has had a similar setup in two locations for years. We even do testing for outside organizations from time to time. 🙂
Make Lemonade Out of Lemons. Better yet, if we were king, the testing facility would be moved front and center to the first floor behind a glass showcase so that every visitor could see that Digium was just as serious about testing its products as it was about its revenue-generating training room and its foosball table. Click on Tom Keating’s photo of the Digium facility for the corporate tour. Testing is a matter of corporate pride in most organizations, not something to be ashamed of… unless you don’t happen to do much of it. Indeed, the comments we’ve received from Paul Belanger suggest that at least some of the Digium folks have their hearts in the right place about all of this. And, just because some Asterisk developers are not on the corporate payroll, the buck clearly stops with Digium, The Asterisk Company, to make certain that the Asterisk product is rock-solid reliable before it goes out the door.
Second, build a checklist of functions that must pass muster before any new Asterisk version is released. Ever heard of a Digium card that didn’t work with a new Asterisk release? Didn’t think so. We’re guessing this is something more than coincidence. The overall software reliability of Asterisk affects Digium’s bottom line just like hardware reliability even if the software product is touted as being free. Digium profits from Asterisk hardware sales, Asterisk consulting, Asterisk training, Asterisk conventions, Asterisk support, and numerous Asterisk software add-ons that cost money. If the reliability of Asterisk goes down the tubes, so goes the commercial side of Digium’s business as well.
Third, don’t depend solely upon software-driven tests in checking out new releases. Nothing beats a human at the controls for a day to give new software a proper workout. Make calls from every phone to every other phone on the same and on a different network to verify call quality and reliability. Then do the same thing using POTS phones connected to ATAs. When all of that works, move on to a short list of major Asterisk features to make sure they remain stable. Sounds simple, doesn’t it? It is. We do it regularly with no profit motive at all. Here’s our short list of two dozen deal-breakers, and our readers can probably suggest a couple dozen more. We’ll add them to the list as they arrive. If you don’t want to design a system for testing, then feel free to use The Incredible PBX with our compliments. All of these turnkey features are available out of the chute, and you can install it from a thumb drive on almost any hardware.
Text-to-Speech Apps
Conferencing
Music on Hold
Call Transfers
Call Forwarding
Call Waiting
Call Pickup
Call Recording
Call Parking
Do Not Disturb
Voicemail
Caller ID
IVR Samples
Faxing
Video Calls
Queues
Ring Groups
Zap Barge
Intercom
AGI Scripts
Google Talk/Jabber/Jingle
SIP Server Connectivity
IAX Server Connectivity
VPN Server Connectivity
Here’s hoping that we all get something positive back from Digium management this time around. Hopefully, they’ll realize before it’s too late that their future really does depend upon a reliable Asterisk product. And, no, we’re not going to print any response suggesting that users turn back to Asterisk 1.4 and 1.6.2 when Digium and the Asterisk developers are on record as being unwilling to address a bug such as the one that occurred in Asterisk 1.8.4 if instead it had arisen in either of the older versions of Asterisk that are barely on life support.
Every organization has defining moments. This is an important one for Digium. Take responsibility for the quality of your product! And, rather than focusing upon whether to call the next version of Asterisk 1.10 or 2.0, spend the necessary time and money to get the Asterisk 1.8 house in order. Otherwise, the VC-funded office building may belong to another fish in the growing sea of VoIP providers one day soon. It’s worth remembering that Digital Research of CP/M fame3 as well as WordStar, Ashton-Tate, Lotus, and WordPerfect all were household names and seemingly invincible software development houses once upon a time. History has a way of repeating itself. Wonder why?
Continue reading Part I, Part III, and Part IV…
Originally published: Wednesday, June 1, 2011
Changes in PBX in a Flash Distribution. In light of the events outlined in our recent Nerd Vittles article and the issues with Asterisk 1.8.4, the PIAF Dev Team has made some changes in our distribution methodology. As many of you know, PBX in a Flash is the only distribution that compiles Asterisk from source code during the install. This has provided us enormous flexibility to distribute new releases with the latest Asterisk code. Unfortunately, Asterisk 1.8 is still a work in progress to put it charitably. We also feel some responsibility to insulate our users from show-stopping Asterisk releases. Going forward, the plan is to reserve the PIAF-Purple default install for the most stable version of Asterisk 1.8. As of June 1, Asterisk 1.8.4.1 is the new PIAF-Purple default install. Other versions of Asterisk 1.8 (newer and older) will be available through a new configuration utility which now is incorporated into the PIAF 1.7.5.6.2 ISO.
Here’s how it works. Begin the install of a new PIAF system in the usual way by booting from your USB flash drive and pressing Enter to load the most current version of CentOS 5.6. When the CentOS install finishes, your system will reboot. Accept the license agreement, and choose the PIAF-Purple option to load the latest stable version of Asterisk 1.8. Or exit to the Linux CLI if you want a different version. Log into CentOS as root. Then issue a command like this: piafdl -p beta_1842 (loads Asterisk 1.8.4.2), piafdl -p beta_1841 (loads Asterisk 1.8.4.1), piafdl -p 184 (loads Asterisk 1.8.4), piafdl -p 1833 (loads Asterisk 1.8.3.3), or piafdl -p 1832 (loads Asterisk 1.8.3.2). If there should ever be an outage on one of the PBX in a Flash mirrors, you can optionally choose a different mirror for the payload download by adding piafdl -c for the .com site, piafdl -d for the .org site, or piafdl -e for the .net site. Then add the payload switch, e.g. piafdl -c -p beta_1842.

Bottom Line: If you use the piafdl utility to choose a particular version of Asterisk 1.8, you are making a conscious decision to accept the consequences of your particular choice. We would have preferred implementation of a testing methodology at Digium before distribution of new Asterisk releases; however, that doesn’t appear to be in the cards. So, as new Asterisk 1.8 releases hit the street, they will be made available through the piafdl utility until such time as our PIAF Pioneers independently establish their reliability.
Need help with Asterisk? Visit the PBX in a Flash Forum.
Or Try the New, Free PBX in a Flash Conference Bridge.
whos.amung.us If you’re wondering what your fellow man is reading on Nerd Vittles these days, wonder no more. Visit our new whos.amung.us statistical web site and check out what’s happening. It’s a terrific resource both for us and for you.
Special Thanks to Our Generous Sponsors
FULL DISCLOSURE: ClearlyIP, Skyetel, Vitelity, DigitalOcean, Vultr, VoIP.ms, 3CX, Sangoma, TelecomsXchange and VitalPBX have provided financial support to Nerd Vittles and our open source projects through advertising, referral revenue, and/or merchandise. As an Amazon Associate and Best Buy Affiliate, we also earn from qualifying purchases. We’ve chosen these providers not the other way around. Our decisions are based upon their corporate reputation and the quality of their offerings and pricing. Our recommendations regarding technology are reached without regard to financial compensation except in situations in which comparable products at comparable pricing are available from multiple sources. In this limited case, we support our sponsors because our sponsors support us.
BOGO Bonaza: Enjoy state-of-the-art VoIP service with a $10 credit and half-price SIP service on up to $500 of Skyetel trunking with free number porting when you fund your Skyetel account. No limits on number of simultaneous calls. Quadruple data center redundancy. $25 monthly minimum spend required. Tutorial and sign up details are here.
![]() The lynchpin of Incredible PBX 2020 and beyond is ClearlyIP components which bring management of FreePBX modules and SIP phone integration to a level never before available with any other Asterisk distribution. And now you can configure and reconfigure your new Incredible PBX phones from the convenience of the Incredible PBX GUI.
The lynchpin of Incredible PBX 2020 and beyond is ClearlyIP components which bring management of FreePBX modules and SIP phone integration to a level never before available with any other Asterisk distribution. And now you can configure and reconfigure your new Incredible PBX phones from the convenience of the Incredible PBX GUI.
VitalPBX is perhaps the fastest-growing PBX offering based upon Asterisk with an installed presence in more than 100 countries worldwide. VitalPBX has generously provided a customized White Label version of Incredible PBX tailored for use with all Incredible PBX and VitalPBX custom applications. Follow this link for a free test drive!
Special Thanks to Vitelity. Vitelity is now Voyant Communications and has halted new registrations for the time being. Our special thanks to Vitelity for their unwavering financial support over many years and to the many Nerd Vittles readers who continue to enjoy the benefits of their service offerings. We will keep everyone posted on further developments.
Some Recent Nerd Vittles Articles of Interest…
- There’s been a lively debate about all of this in the Comments to the original article and on the PIAF Forum and the FreePBX Forum, three eyeopeners you won’t want to miss. [↩]
- Digium HQ photo courtesy of Tom Keating. Click on the photo for a tour. [↩]
- Gary Kildall flew his own airplane, too. He reportedly was off on a flying adventure while Bill Gates was meeting with IBM to seal the DOS deal. The rest, as they say, is history. [↩]
Samsung Galaxy Tab: The Good, The Bad, and The Ugly

We purchased AT&T’s U.S. edition of Samsung’s Galaxy Tab on the release date in November, 2010. It’s been a wild ride ever since. First, the good news. Steve Jobs is dead wrong. A 7″ tablet is far from being DOA. In fact, the Galaxy Tab is the ideal form factor for a business person that wears a suit, sport coat, or jacket. The device fits perfectly in almost all coat pockets. Unlike the iPad, you can hold the Galaxy Tab in one hand rather than balancing the device between your knees. The screen is dazzling. Performance is respectable, Flash works reliably, two cameras are included (even though no app yet uses the front-facing camera), and at least so far, the SIM chip in your AT&T iPad is interchangeable with the AT&T Galaxy Tab using a $2 Micro SIM to SIM card adapter. So all of the shortcomings of the iPad have been addressed. With more than 200,000 apps in Google’s Market, you now can find comparable applications to most that are available for the iPad. And, while the Android apps weren’t specifically designed for a tablet, we never noticed. This contrasts dramatically with the half-baked iPhone/iPad app conversions that Apple attempted to pull off.
With Android’s open platform and near perfect hardware, what could possibly be wrong with this device? Well, just about everything unfortunately. Between Google, Samsung, and AT&T (and we assume the other U.S. oligopolists aren’t far behind), the device has been crippled in just about every possible way. Not only is the tablet locked to the specific carrier even though you paid full retail ($700+) for the unit, but cell phone usage also is blocked by all four U.S. carriers. No collusion, of course. 🙄 This functionality is available on all European models. Fortunately, for those in the U.S., Bria for Android will let you make SIP phone calls using any SIP provider you wish to use.
To add insult to injury, applications for the device are locked down to only apps available in the Google Market. This means, for example, that you cannot load thousands of tech books available in .apk format from O’Reilly. More importantly, you can’t restore your device from a backup. And, yes, Google has been quick to respond to requests to remove any apps that would let you root or tether the device. All of this might be understandable if AT&T offered an unlimited data plan and had to worry about users eating up their precious bandwidth. You may recall that AT&T’s only unlimited data plan offering lasted less than a week with the iPad. But AT&T now charges for Internet service on a pay-as-you-go basis. So there’s really no rational explanation for crippling the device for which you paid full retail and which you own.
While you still can root the device with a little creativity, flipping the setting to permit downloads of non-market apps using the latest Samsung firmware now bricks the unit since Samsung has added a checksum to the configuration file.
It would be easy to blame AT&T for being evil. They seem to regard it as a badge of honor. But Samsung and Google have aided and abetted the carriers’ wishes enthusiastically, albeit secretly. In fact, Samsung reportedly will announce the Galaxy Tab II this week at the Consumer Electronics Show with checksummed firmware that will take device crippling to new lows, far beyond what Apple has been willing to do on the iPad platform. In other words, you can kiss custom ROMs goodbye on Samsung’s "open" Android platform. For all of these reasons, AT&T’s device wins our 2010 Award as the Most Crippled Device of the Year, with dishonorable mentions to both Samsung and Google.
Fortunately, U.S. consumers have a choice. Just refuse to buy any more of this junk until the carriers and manufacturers clean up their act. We really could love this device, and it’s puzzling why the carriers and the manufacturer and Google feel compelled to cripple these devices in the U.S. market when all four of the major service providers offer the same device at the same price with the same (crippled) feature set. It’s almost like it’s part of their DNA to cripple everything they sell that has their name on it. Little wonder that folks are looking elsewhere to purchase new technology.
The other sad reality is that the technical writers in the U.S. for the most part roll over and play dead with these companies in order to secure the latest story and to get the free pass to the Vegas tea parties to yuck it up with their pals. And, of course, for some there are still loads of free toys. It’s easy to find glowing reviews of the Galaxy Tab from so-called pundits, but just try to find an article laying out what we’ve documented. We’re not tooting our own horn here, just wondering why folks that get paid for reviewing these products as their livelihood don’t do their homework instead of regurgitating manufacturer press releases. Unfortunately, it’s much the same reason that all of the cell phone companies are so chummy and cookie cutter comparable.
We couldn’t end this disappointing review without a word about Samsung’s service operation. Apple it’s not! A week after purchasing our device, we accidentally dropped it down a flight of brick steps. HINT: Buy a case. It’s too bulky to hold in one hand while you’re walking unless you have hands the size of Seinfeld’s old girlfriend. One-handed operation works fine sitting in a chair. If you’ve ever seen what a baseball can do to a plate glass window, then you have a pretty good image of what our Galaxy Tab looked like. The device still worked perfectly if you didn’t mind slicing your finger. That was Thanksgiving Day. Three weeks later we still were arguing with the Samsung Repair Facility in Texas which insisted that the IMEI number of their own device wasn’t in their computer system. Thus, they refused to repair it even though we were willing to pay for the repair. After dozens of calls, we finally reached the head of Samsung USA service who managed to manually enter the IMEI into the system so that we could get a quote on the repair. Samsung has only sold a million units. Wouldn’t you think someone might have thought about repairs? Incidentally, the cost was $170 including shipping in both directions which we thought was quite reasonable. And a week later the device arrived with a new screen AND the new crippled firmware which everyone else will get to enjoy shortly.
As for us, thanks to a law degree, it’s only a quick trip to the courthouse next week to drag Samsung into court to explain why they erased our device and installed newly improved crippleware rather than simply replacing the screen which we contracted with Samsung to repair. We’ll keep you posted.
Our Bottom Line for those that haven’t been to law school: JUST SAY NO!
Originally published: Monday, January 3, 2011
Need help with Asterisk®? Visit the PBX in a Flash Forum.
Or Try the New, Free PBX in a Flash Conference Bridge.
whos.amung.us If you’re wondering what your fellow man is reading on Nerd Vittles these days, wonder no more. Visit our new whos.amung.us statistical web site and check out what’s happening. It’s a terrific resource both for us and for you.
Special Thanks to Our Generous Sponsors
FULL DISCLOSURE: ClearlyIP, Skyetel, Vitelity, DigitalOcean, Vultr, VoIP.ms, 3CX, Sangoma, TelecomsXchange and VitalPBX have provided financial support to Nerd Vittles and our open source projects through advertising, referral revenue, and/or merchandise. As an Amazon Associate and Best Buy Affiliate, we also earn from qualifying purchases. We’ve chosen these providers not the other way around. Our decisions are based upon their corporate reputation and the quality of their offerings and pricing. Our recommendations regarding technology are reached without regard to financial compensation except in situations in which comparable products at comparable pricing are available from multiple sources. In this limited case, we support our sponsors because our sponsors support us.
BOGO Bonaza: Enjoy state-of-the-art VoIP service with a $10 credit and half-price SIP service on up to $500 of Skyetel trunking with free number porting when you fund your Skyetel account. No limits on number of simultaneous calls. Quadruple data center redundancy. $25 monthly minimum spend required. Tutorial and sign up details are here.
![]() The lynchpin of Incredible PBX 2020 and beyond is ClearlyIP components which bring management of FreePBX modules and SIP phone integration to a level never before available with any other Asterisk distribution. And now you can configure and reconfigure your new Incredible PBX phones from the convenience of the Incredible PBX GUI.
The lynchpin of Incredible PBX 2020 and beyond is ClearlyIP components which bring management of FreePBX modules and SIP phone integration to a level never before available with any other Asterisk distribution. And now you can configure and reconfigure your new Incredible PBX phones from the convenience of the Incredible PBX GUI.
VitalPBX is perhaps the fastest-growing PBX offering based upon Asterisk with an installed presence in more than 100 countries worldwide. VitalPBX has generously provided a customized White Label version of Incredible PBX tailored for use with all Incredible PBX and VitalPBX custom applications. Follow this link for a free test drive!
Special Thanks to Vitelity. Vitelity is now Voyant Communications and has halted new registrations for the time being. Our special thanks to Vitelity for their unwavering financial support over many years and to the many Nerd Vittles readers who continue to enjoy the benefits of their service offerings. We will keep everyone posted on further developments.
Some Recent Nerd Vittles Articles of Interest…
It’s TeleYapper 5.0: The Ultimate RoboDialer for Asterisk
 We don't normally take a month off at Nerd Vittles which should tell you something about today's 10/10/10 column. We're pleased to introduce TeleYapper 5.0, a completely rewritten, Asterisk® 1.4 and 1.6.2-compatible version of our telephone broadcasting service.1 Using Cepstral text-to-speech, TeleYapper 5.0 brings individualized, text-based messaging and customized reminders coupled with the ability to capture recorded responses from every call.
WARNING: Because of changes in Cepstral, this application now requires an additional $200 license from Cepstral. We no longer recommend Cepstral for obvious reasons and will have a comparable system using Google's new Speech-to-Text application soon. Our apologies.
As part of the message delivery process, you now can customize and capture any one of four different responses from those that are called. And TeleYapper 5.0 will email you a CSV and/or XML file with the RoboResponse™ results when the calling process is completed including a list of failed calls and calls that were answered by an answering machine. In addition, you can have TeleYapper email certain call results to various individuals as the calls are processed if your requirements demand it.
For those with multiple outbound trunks, TeleYapper 5.0 supports simultaneous calls using multiple trunks. And now there are significant enhancements that detect answering machines and real people. This lets you deliver customized messages depending upon whether an actual human answers the phone.
Version 5 has been tested extensively with the Gold, Silver, and Bronze editions of PBX in a Flash 1.7.5.5, which provides support for the latest and greatest versions of Asterisk 1.4 and 1.6.2. And it should work well with other Asterisk aggregations with MySQL, Cepstral TTS support, and FreePBX 2.5 or later.
Overview. For those that have never used TeleYapper, here's a quick summary of how the new version works. It's an automated message broadcasting service commonly known as a call blasting or phone blasting system. In addition to loads of creepy uses, phone blasting has legitimate purposes as well. TeleYapper is licensed in several different ways for the following purposes: prerecorded phone messages for neighborhood association announcements, medical appointment reminders, school closings, tornado alerts, little league practices, municipal government reminders. It's free to use for non-profit, civic, and non-political purposes provided you don't solicit money or seek to sway someone's opinion or encourage a particular vote on an issue or candidate. All other uses require a commercial license. For commercial, political, and medical applications, please review our licensing terms below.
How it Works. Step #1 is to create a CSV or XML export from your favorite database application with the information that will be used to send the messages or reminders. This could be as simple as a list of phone numbers or as complex as a listing of doctors and patients with the dates, times, and places of their next medical appointments together with special patient instructions for activity preceding their visit, e.g. "Please remember to start flossing a month before your next dental appointment."
Step #2 is to create a config file with the robodial settings as well as the text which will actually be spoken during each customized call. If you remember form letters from your word processing days, TeleYapper's config file offers the same flexibility. A message can be as simple as "Take cover immediately. A tornado has been spotted at the end of your street." Or it could be a medical appointment reminder such as the following:
Hi. This is Allison from Charleston Family Clinic calling to confirm Jan's appointment with Doctor Quack on Tuesday, October 5th, 2010, at 10:30 a.m. in our Charleston office. Please remember not to eat or drink anything after midnight on the night before your scheduled appointment.
To confirm your appointment, press 1. To reschedule your appointment, press 2. To cancel your appointment, press 3. If we have reached you in error or if you do not wish to receive further automated medical appointment reminders, press 4. To hear this message again, please press 5 now.
And you can create a separate message which would be delivered in the event an answering machine takes the call:
Hi. This is Allison from Charleston Family Clinic calling to confirm Jan's appointment with Doctor Quack on Tuesday, October 5th, 2010, at 10:30 a.m. in our Charleston office. Please remember not to eat or drink anything after midnight on the night before your scheduled appointment.
If you need to change or cancel your appointment or if we have reached you in error, please call our office at your earliest convenience. The number is 800-123-4567. Goodbye.
Step #3 is to use your web browser to access a password-protected web page that will let you upload your CSV or XML data and your config file to kick off the dialing spree. Once the files have been uploaded, everything else is automatic.
Step #4 is to sit back and relax while TeleYapper executes your instructions and calling list. When the calling has been completed, the email address in your config file will be sent both CSV and XML reports of the results of all the calls. Either of these reports is suitable for import and manipulation using most spreadsheet applications.
Status Codes. Every call that is processed gets a status code entry whether the call is successful or fails. A status code of 0 means a call failed to both phone numbers provided for a particular callee. The second phone number is entirely optional. A status code of 5 means the call was answered but no response was provided by the called party. This typically would mean the call was picked up by an answering machine although it could mean Granny answered the call using a rotary dial phone. 🙄 Status codes of 1 through 4 have whatever meaning you choose to assign to each option when setting up a configuration for a particular calling campaign.
Legalese. TeleYapper 5.0 is free for use by non-profit, civic, and non-political organizations provided you absolve us from all financial and other responsibility in conjunction with your use of the software. Non-profit use further requires that no financial benefit be derived from the substance of the calls. Simply stated, your Little League team can use the software at no cost to remind kids to attend practice, but it cannot be used to solicit charitable contributions or to sell doughnuts without obtaining a commercial license.
By using this software, you also agree to strictly comply with federal and state regulations including 16 C.F.R. Part 310. In addition, you agree to assume all risks associated with use of the software. NO WARRANTIES EXPRESS OR IMPLIED INCLUDING ITS FITNESS FOR USE OR MERCHANTABILITY ARE PROVIDED WITH THIS SOFTWARE.
WARNING: With certain limited exceptions, most robocalling now requires prior written approval from those being called. See this link for a summary of the federal requirements. Be advised that improper use of this software may subject the user to penalties of up to $16,000 per call plus monetary damages to injured consumers.
 Licensing. You are licensed to use this software under certain conditions. You do not own it. We do, and we also own the copyright. It is licensed for use under the terms of the Creative Commons Attribution Non-Commercial license. A Plain English summary is available here. We've done this primarily to do our part to stamp out the telemarketing creeps of the world. Those wishing to use TeleYapper for commercial or political purposes must first request and then purchase a commercial license after outlining your proposed terms of use. Telemarketers need not apply! For doctors, lawyers, and others falling outside the scope of our free license who wish to obtain a commercial use license, please contact us for pricing and details. Be sure to summarize your intended use in your request together with a sufficient factual summary to demonstrate that your use is in compliance with 16 C.F.R. Part 310. Please also indicate whether you will require assistance with installation and setup.
Prerequisites. As mentioned, you'll need a Linux-based Asterisk aggregation such as PBX in a Flash to use TeleYapper 5.0. This means you need a system with Asterisk 1.4 or 1.6 as well as FreePBX 2.5 or higher. For quality reasons, we strongly recommend you purchase a commercial Cepstral text-to-speech license for your server. While Flite would technically work, most folks don't respond well to calls from Egor so we have customized the code for use solely with Cepstral. You'll find Cepstral installation instructions in this Nerd Vittles article. The TeleYapper 5.0 code also relies heavily on Apache and PHP, both of which are included in every PBX in a Flash system.
Installing Cepstral. Cepstral installation is not the simplest application to get working with Asterisk so here are the commands for those running 32-bit systems with Asterisk 1.4 or 1.6.2. For details on purchasing and registering Cepstral (and a discount) and for 64-bit installs, read our previous article including the comments.
For Asterisk 1.4 systems running under 32-bit CentOS, log into your server as root and issue the following commands accepting the Cepstral defaults. Be sure to create the Cepstral directory when prompted!
cd /root
wget http://nerd.bz/bnTVjX
tar -zxvf Cepstral*
cd Cepstral_Allison-8kHz_i386-linux_5.1.0
./install.sh
echo /opt/swift/lib > /etc/ld.so.conf.d/cepstral.conf
ldconfig
cd /usr/src
wget http://pbxinaflash.net/source/app_swift/app_swift-1.4.2.tar.gz
tar -zxvf app_swift*
cd app_swift-1.4.2
make
make install
ln -s /opt/swift/bin/swift /usr/bin/swift
sed -i 's|David-8kHz|Allison-8kHz|' /etc/asterisk/swift.conf
amportal restart
asterisk -rx "core show application swift"
ls /opt/swift/voices
swift --reg-voice
For Asterisk 1.6.2 systems running under 32-bit CentOS, log into your server as root and issue the following commands accepting the Cepstral defaults. Be sure to create the Cepstral directory when prompted!
cd /root
wget http://nerd.bz/bnTVjX
tar -zxvf Cepstral*
cd Cepstral_Allison-8kHz_i386-linux_5.1.0
./install.sh
echo /opt/swift/lib > /etc/ld.so.conf.d/cepstral.conf
ldconfig
cd /usr/src
wget http://pbxinaflash.net/source/app_swift/app_swift-1.6.2.tar.gz
tar -zxvf app_swift*
cd app_swift-1.6.2
make
make install
ln -s /opt/swift/bin/swift /usr/bin/swift
sed -i 's|David-8kHz|Allison-8kHz|' /etc/asterisk/swift.conf
amportal restart
asterisk -rx "core show application swift"
ls /opt/swift/voices
swift --reg-voice
Installing TeleYapper 5.0 The real beauty of PBX in a Flash as an Asterisk platform is demonstrated by the ease with which you can install new applications such as this one. The drill is very simple. You download an install script, make it executable, and run it. Less than a minute later, the TeleYapper install is done. Here are the commands to execute to install TeleYapper 5.0 after logging into your PBX in a Flash system as root. On other systems, you are well advised to carefully review the install script and tailor it to meet the individual requirements of the platform on which you are installing it.
cd /root
wget http://bestof.nerdvittles.com/applications/teleyapper5/teleyapper5.pbx
chmod +x teleyapper5.pbx
./teleyapper5.pbx
The TeleYapper Database. We use the MySQL database management system to manage the list of callees for TeleYapper to dial. It can handle a database of almost any size and generally stands up well in performance comparisons with Oracle. So you're covered on the database front. For most users, you never should need to access the MySQL database directly. TeleYapper 5.0 handles the importing of CSV or XML files for processing, manages the call queue, and processes and emails CSV and/or XML-formatted reports to you when the calls are completed.
The install script creates the MySQL database to support TeleYapper 5.0. Should you need or want to manage the database directly, the easiest tool to use is phpMyAdmin which is accessible through the Tools tab in FreePBX on PBX in a Flash systems. You'll need to login as maint with your maint password to access phpMyAdmin. After phpMyAdmin loads, click on the reminders database in the left column. Then click the reminders table entry in the left column to open the file. Unless you really, really know what you are doing and appreciate how much coding will be required to support new or different fields in the reminders file, don't improve it.
Here's the layout of the MySQL database table for TeleYapper 5.0:
- id - System generated record ID
- acctno - Account Number (12 alphanumeric characters)
- provider - Provider Name (30 alphanumeric characters)
- recipient - Recipient Name (30 alphanumeric characters)
- apptdt - Appointment Date (MM/DD/YY format)
- appttime - Appointment Time (HHMM format using 24-hr clock)
- apptplace - Appointment Location (30 alphanumeric characters)
- instructions - Free-form text (65535 alphanumeric characters)
- phone1 - Primary Phone (NNN-NNN-NNNN or NNNNNNNNNN)
- phone2 - Alternate Phone (NNN-NNN-NNNN or NNNNNNNNNN)
- status - Status: 0=failedcall 5=ansmachine 1,2,3,4=user-defined
- failedcalls - System Generated Number of Failed Calls
Tweaking PHP for TeleYapper. Depending upon your PHP setup and the number of calls you plan to process, you may need to adjust the default PHP resource settings on your server. The main reason is because TeleYapper generates a custom sound file for every call to be processed before the calling ever starts. If you plan to make thousands of calls, this can take some time. The PHP settings are stored in /etc/php.ini. You must log in as root and restart Apache after making changes to these settings: service httpd restart. The settings that matter are the following:
max_execution_time = 30 (we recommend 900 which is 15 minutes to process)
max_input_time = 60 (we recommend 300 which is 5 minutes to upload a file)
memory_limit = 100M (OK as is)post_max_size = 8M (we recommend 100 megabytes which should be ample)
file_uploads = On (OK as is on most systems)
upload_max_filesize = 100M (we recommend 100 megabytes which should be ample)
Tweaking Crontab. TeleYapper relies upon a cron job to kick off its calling sprees so you'll need the following entry in your /etc/crontab file unless you used the install script which inserts it automatically:
* * * * * root /var/www/html/appt-reminders/gen-reminders.php > /dev/null 2>&1
Formatting CSV Data For Import. You don't necessarily need an external database in order to use TeleYapper 5.0 although it is designed to support almost any database or spreadsheet application in the marketplace so long as it can export data in CSV or XML format. A CSV (comma-separated values) or XML file is the middleware that makes everything work. Each line in a CSV file represents an entry to be processed by TeleYapper 5.0 when the CSV file is uploaded. Each item in a line is called a field. Every field begins and ends with double-quotes, and fields are separated from each other with commas. Do NOT include any quotation marks in your actual text, or you'll get a disaster. All fields are required, by the way, but only the Phone1 field must have an actual entry. The remaining fields may each consist of nothing more than a pair of double-quotes. Note also that the id, status, and failedcalls fields (shown in red below) must consist of a pair of double-quotes and nothing more. Here's the actual CSV format which must be used, and all of the data must appear on the same line so disregard the WordPress formatting below:
"id","acctno","provider","recipient","apptdt","appttime","apptplace","instructions","phone1","phone2",
"status","failedcalls"
Here's what the CSV entry used for our sample medical reminder shown near the top of this article would look like. We've excluded the special instructions and Phone2 entries below only to simplify the display because of constraints inherent in our blog formatting:
"","12345","Quack","Jan","10/05/10","1030","Charleston","","4049876543","","",""
The XML Alternative. If you'd prefer to upload XML file templates for your calls instead of CSV data, a sample XML file is included in the distribution to show you the proper formatting. Here's a sample entry that matches the CSV data above:
<!-- Database: reminders -->
<reminders>
<!-- Table: reminders -->
<reminders>
<id></id>
<acctno>12345</acctno>
<provider>Quack</provider>
<recipient>Jan</recipient>
<apptdt>10/05/10</apptdt>
<appttime>1030</appttime>
<apptplace>Charleston</apptplace>
<instructions></instructions>
<phone1>4049876543</phone1>
<phone2></phone2>
<status></status>
<failedcalls></failedcalls>
</reminders>
</reminders>
Direct Uploading with SAMBA. If you've activated SAMBA on your Asterisk server, you can upload TeleYapper files for processing directly. Be sure to name your CSV or XML file as reminders.csv or reminders.xml. And name your config file: config.php. Copy the files to the /var/www/html/appt-reminders/upload directory on your Asterisk server. That's all there is to it. If you need hints on SAMBA installation, see our Best of Nerd Vittles tutorial. Pay particular attention to the sections on Security Considerations and Firewall Settings. Before using the SAMBA, be sure to upload some test CSV/XML files using the web interface. There is no error checking when you use the SAMBA option!
Configuring TeleYapper 5.0 Calling Scripts. Now let's address how we transform a CSV or XML entry such as the ones shown above into a personalized phone call to Jan, the actual patient in our example. Every TeleYapper session can have an individual configuration file associated with it. If none is specified, then a default configuration is used. In this way, you can customize call procedures and calling scripts for different tasks. The easiest approach is to always upload a config file with your CSV or XML data file. Then you won't get unexpected results when the calling begins.
HINT: It's a very good idea to create a sample upload with your own phone number and some sample configuration data to test things out before you start calling thousands of clients.
A default configuration file (config.default.php) as well as sample CSV and XML templates (reminders.csv and reminders.xml) come with TeleYapper 5.0 and can be found on your Asterisk server in the /var/www/html/appt-reminders directory. Make a copy of them, and move the copies to your Mac or PC. Then, using TextEdit or Notepad, open the files and have a look. Before addressing other configuration options in config.php, let's tackle the setup procedure for calling scripts.
The actual boilerplate message to be delivered to the called party is stored in $msg. Notice that you can substitute data out of your database in the boilerplate template by enclosing any desired fields in braces. Just make sure the fieldname exactly matches one of the fields in the reminders database. So our entry for the sample call above would look like this:
$msg="Hi: This is Allison from Charleston Family Clinic calling to confirm an appointment for {recipient}, with Doctor {provider}, on {apptdt}, at {appttime}, in our {apptplace} office. {instructions}";
Just a comment that, for those with large data processing systems, you may find it more convenient to generate the actual text for each reminder on your mega-machine. In this case, all of the data (up to 65,535 characters) could be loaded into the instructions field for each callee. So each upload record might consist of nothing more than phone numbers and instructions. In this scenario, the $msg entry in config.php would look like this: $msg="{instructions}";
The key press choices that are provided to the called party are configured using the $options field which would look like this for our example:
$options = "To confirm your appointment, please press 1. To reschedule your appointment, press 2. To cancel your appointment, press 3. If we have reached you in error or if you do not wish to receive appointment reminders, press 4. To hear this message again, please press 5 now.";
Don't confuse the 5 option which is automatically included in the TeleYapper dialplan code with status code 5 which means an answering machine picked up a call. Status code 5 is system-generated and is not stored based upon a callee choosing to listen to a recorded message more than once. The two 5's are not the same even though options 1-4 are actually used to define what the first four status codes mean on your system.
As we mentioned, the system has the smarts to usually figure out if an answering machine took the call. When it detects this, the $ansmach message is played instead of $options. A sample entry might look like this:
$ansmach = "If you need to cancel or reschedule this appointment, if we reached you in error, or if you do not wish to receive appointment reminders in the future, please call 777-123-4567 at your earliest convenience. Thank you for your assistance. Goodbye.";
Finally, for each of the four choices (1 through 4), there is a response message which is played if the callee chooses that option. Here's a sample template to get you started:
$chose1 = "Thank you for making Charleston Family Clinic your medical home. Your appointment has been confirmed. Goodbye.";
$chose2 = "Thank you. A representative will be calling you to reschedule your appointment. Goodbye.";
$chose3 = "Thank you for making Charleston Family Clinic your medical home. Your appointment has been cancelled. Goodbye.";
$chose4 = "Thank you. We will update our systems and apologize for the call. Goodbye.";
Thus, when a callee responds to the boilerplate call by pressing 1, $chose1 is played in response. If an email address has been entered for $chose1email, then a copy of the log entry for that call is sent to the specified email address using the customized email subjects (shown below) in addition to being placed in the master call log. The same process occurs when the other options are chosen. Particularly with medical appointment cancellations, it may be important to receive immediate notification when an appointment is canceled or a patient requests a change in scheduling. So the software includes the flexibility to generate instant emails to various email addresses depending upon which option is pressed. As noted, the optional instant emails will be generated using the email subjects entered for the following fields in your customized configuration file:
$chose1subj = "APPOINTMENT NOTIFICATION CONFIRMED BY PHONE";
$chose2subj = "APPOINTMENT RESCHEDULING REQUEST BY PHONE";
$chose3subj = "APPOINTMENT CANCELLATION REQUEST BY PHONE";
$chose4subj = "APPOINTMENT SCHEDULING ERROR REPORTED BY PHONE";
$chose5subj = "APPOINTMENT NOTIFICATION LEFT ON ANSWERING MACHINE";
Uploading Data & Config Files to TeleYapper. Simple web pages are used to upload CSV and XML data with config files to TeleYapper 5.0. WARNING: These web pages have NOT been sanitized for use on the Internet. They are designed for use on your local area network behind a secure firewall. On PBX in a Flash systems, the web pages are password-protected and require a valid user account login for access. This will NOT be the case on other Asterisk aggregations without tweaking your Apache configuration. Sample entries can be found in teleyapper.conf in the /var/www/html/appt-reminders directory. On PBX in a Flash systems, you can log in using maint, wwwadmin, or meetme accounts. Or you can create an additional account to use with TeleYapper 5.0:
There are separate web pages depending upon whether you wish to upload CSV or XML data. For CSV data, the web address is http://ipaddress/appt-reminders/uploadcsv/. For XML data, the web address is http://ipaddress/appt-reminders/uploadxml/. Substitute the private IP address of your Asterisk server for ipaddress. Here's a sample of the CSV web form. You can, of course, substitute your own logo on the right if desired.

Other TeleYapper 5.0 Config Options. In addition to the boilerplate text for TeleYapper calls, there are a number of other settings which can be adjusted to meet your individual requirements.
The database settings should never need adjusting so just leave them alone. They look like this:
$db="reminders";
$fi="reminders";
$dbuser="root";
$dbpass="passw0rd";
You can manually set a starting and ending time to begin and end the calling sequence for a particular upload. Never set these in the default configuration! Only set them in a config file to be uploaded. If the entries are blank, calls will commence shortly after the upload completes and will end when all of the entries have been processed. Note that there is no current flexibility to schedule individual calls based upon the time of the appointment. This typically would be handled by selecting particular records for processing in your primary database. For example, for medical appointments, you would select records in which an appointment is scheduled for tomorrow and then upload the list to TeleYapper which would place the calls today. We probably will expand this functionality down the road, but it's not there yet. So it's up to you to upload call lists which basically are ripe for calling now.
If you wish to use the $startcalls and $endcalls features in your custom config files, the syntax should look like this: YYYYMMDD,HHMM where YYYY is a 4-digit year, MM is a 2-digit month, DD is a 2-digit day of the month, HH is the 2-digit hour based upon a 24-hour clock (aka Military Time), and MM is the 2-digit minute. Note that calls will not end precisely at the $endcalls time. Any existing calls already in process will be completed including redials and calls to an alternate $phone2 number. This process can take up to 10 minutes to complete.
CAUTION: Be very careful using the $startcalls option! Nothing precludes your scheduling a thousand reminder calls to kick off at 0200 which is 2 a.m. Not really a good thing if job security matters to you.
To restart the calling process on the following day, log into your server as root and switch to the /var/www/html/appt-reminders directory. Then edit config.php and adjust the $startcalls and $endcalls for the remaining calls. Then run: ./gen-calls.php. Any existing database entry with a status=0 will be called when the calling process resumes. You can monitor the calling process by running: ./showcalls.sh. Press Ctrl-C to terminate the call display. It usually takes a minute or two for the first call to be placed.
$callerid is used to set the CallerID of outbound calls if your telephony provider supports it.
$trunk is used to set the outbound dialing trunk for calls. The default works for most purposes.
$channel is used to set the outbound dialing channel for calls. The default works for most purposes.
$maxcalls and $spacing are used to set the number of simultaneous calls and spacing between calls respectively. Be very careful with these settings. You must have sufficient outbound trunks to handle the number of simultaneous calls you schedule with $maxcalls, or you will get circuit busy conditions which are recorded as calls to busy numbers. Keep in mind that TeleYapper tries every call twice with 2 minutes of separation. So, if you only have two outbound trunks, don't set $maxcalls above 1, or you will get trunk busy conditions whenever original calls to an individual fail, i.e. line busy or no answer situations. In addition, remember that TeleYapper 5.0 supports a second phone number for each called party. These are triggered whenever the original two calls to the primary number fail and must also be considered in setting $maxcalls properly. If your logs show a disproportionate number of failed calls (status=0), this may be a tell-tale sign of trunk busy conditions.
$waittime is the number of seconds a call to any given number will ring. 45 seconds is about 7 rings.
$email is the email address that will be used to send the logs at the completion of the calling process. $chose1email through $chose5email are the optional email addresses if you want instantaneous feedback on certain types of status results. This means you get an immediate email if a certain call results in a certain status code. Leave the ones blank for $status conditions on which you want no immediate feedback and simply wait for the logs to arrive.
$csvreport and $xmlreport are used to set which type of completion report you wish to receive. If you want both of them, set them both to 1. Otherwise, set the one you don't want to 0.
The Old Fashioned Way. For those of you that preferred the older method of entering data directly into MySQL, you still can use phpMyAdmin or some other front-end tool to enter the data directly into the reminders.reminders table. Just leave the id field blank since it automatically gets generated by MySQL. And either leave the status and failedcalls fields blank or set them to 0. They also are system-generated. Once you have your data in place, log into your server as root, and...
cd /var/www/html/appt-reminders
Configure config.php for your calling campaign
Run ./gen-mysql.php to kick off TeleYapper 5.0
In Closing... Finally, let us issue our usual tinkerer's warning. Don't delete anything from the /var/www/html/appt-reminders directory tree. Just because you don't know its function doesn't mean it doesn't have one. Aside from that, the documentation above should get you started today. Be advised that TeleYapper 5.0 still is a work in progress. So check back every week or so for new comments on this article to see what's been changed, added, or fixed since you originally downloaded the application. Enjoy!
Need help with Asterisk? Visit the PBX in a Flash Forum.
Or Try the New, Free PBX in a Flash Conference Bridge.
whos.amung.us If you're wondering what your fellow man is reading on Nerd Vittles these days, wonder no more. Visit our new whos.amung.us statistical web site and check out what's happening. It's a terrific resource both for us and for you.
Special Thanks to Our Generous Sponsors
FULL DISCLOSURE: ClearlyIP, Skyetel, Vitelity, DigitalOcean, Vultr, VoIP.ms, 3CX, Sangoma, TelecomsXchange and VitalPBX have provided financial support to Nerd Vittles and our open source projects through advertising, referral revenue, and/or merchandise. As an Amazon Associate and Best Buy Affiliate, we also earn from qualifying purchases. We’ve chosen these providers not the other way around. Our decisions are based upon their corporate reputation and the quality of their offerings and pricing. Our recommendations regarding technology are reached without regard to financial compensation except in situations in which comparable products at comparable pricing are available from multiple sources. In this limited case, we support our sponsors because our sponsors support us.
BOGO Bonaza: Enjoy state-of-the-art VoIP service with a $10 credit and half-price SIP service on up to $500 of Skyetel trunking with free number porting when you fund your Skyetel account. No limits on number of simultaneous calls. Quadruple data center redundancy. $25 monthly minimum spend required. Tutorial and sign up details are here.
![]() The lynchpin of Incredible PBX 2020 and beyond is ClearlyIP components which bring management of FreePBX modules and SIP phone integration to a level never before available with any other Asterisk distribution. And now you can configure and reconfigure your new Incredible PBX phones from the convenience of the Incredible PBX GUI.
The lynchpin of Incredible PBX 2020 and beyond is ClearlyIP components which bring management of FreePBX modules and SIP phone integration to a level never before available with any other Asterisk distribution. And now you can configure and reconfigure your new Incredible PBX phones from the convenience of the Incredible PBX GUI.
VitalPBX is perhaps the fastest-growing PBX offering based upon Asterisk with an installed presence in more than 100 countries worldwide. VitalPBX has generously provided a customized White Label version of Incredible PBX tailored for use with all Incredible PBX and VitalPBX custom applications. Follow this link for a free test drive!
Special Thanks to Vitelity. Vitelity is now Voyant Communications and has halted new registrations for the time being. Our special thanks to Vitelity for their unwavering financial support over many years and to the many Nerd Vittles readers who continue to enjoy the benefits of their service offerings. We will keep everyone posted on further developments.
Some Recent Nerd Vittles Articles of Interest...
- Special thanks to my dear wife, Mary, who did much of the system design work for this project, and to Community Health Centers of Florida for underwriting some of the design and development costs. [↩]
Free Asterisk Solutions
