
Home » Technology » Microsoft & PCs (Page 2)
Category Archives: Microsoft & PCs
The Most Versatile VoIP Provider: FREE PORTING

 JUST RELEASED: Visit the Incredible PBX Wiki
Introducing NeoRouter VPN: A Star Is Born
In our last article, we introduced PPTP VPNs for interconnecting remote users and branch offices to a central network hub. Known as a hub-and-spoke VPN, the advantage of this design is it lets remote users participate as peers in an existing home office LAN. It’s simple to set up and easy to maintain. The drawback is vulnerability to man-in-the-middle attacks.

Today, we want to turn our attention to the more traditional client-server VPN which still relies upon a central server but uses a star topology to connect remote nodes. The major difference is that only registered devices participate in the virtual private network so there is no direct access to other machines on the LANs of the registered devices. If you have servers scattered all over the countryside, this is an excellent way to manage and interconnect them. All data and communications between the nodes can then be routed through the encrypted VPN tunnel for rock-solid security.
With NeoRouter’s free software, you can set up your VPN server using a PC, a Mac, a Linux or FreeBSD machine, OpenWrt Backfire, and Tomato. VPN clients are available for PCs, Macs, Linux and FreeBSD PCs, OpenWrt, Tomato as well as Android phones and tablets. There’s even an HTML5 web application in addition to a Chrome browser plug-in. With the OpenWrt and Tomato devices or if you’re an extreme techie, you can broaden your NeoRouter star configuration to include bridging of remote LANs. See pp. 47-50 of the NeoRouter User’s Manual. And you can interconnect up to 256 devices at no cost. For $999, you can enlarge your VPN to support 1,000 devices. Screen sharing, remote desktop connections, HTTP, and SSH access all work transparently using private IP addresses of the VPN nodes which are automatically assigned to the 10.0.0.0 private network.
You may be wondering why we’ve moved on from Hamachi. Suffice it to say, LogMeIn has put the squeeze on the free version to the point that it’s now next to worthless. In fact, you’d be hard-pressed to find any mention of a free version of Hamachi (other than a trial edition) on LogMeIn’s current web site. Here’s a feature comparison which says it better than we could.
Today we are introducing the first of two NeoRouter VPN solutions. First, we have a simple installation script that works with any PBX in a Flash 2™ server. See also our more recent column for the dedicated server edition of NeoRouter VPN known as VPN in a Flash. It’s suitable for use on a dedicated server or running as a virtual machine. For smaller VPNs, we prefer the add-on module for PBX in a Flash. For larger deployments, you probably should opt for the dedicated machine. It also isolates your VPN server from your PBX which generally is the better network strategy. Regardless of the installation scenario you choose, keep in mind that neither option requires exposure of your entire server to the Internet. Only a single TCP port needs to be opened in your hardware-based firewall and IPtables Linux firewall.
NeoRouter Setup with PIAF2™. We’re assuming you already have a PBX in a Flash 2 server set up behind a hardware-based firewall. If not, start there. Next, we’ll need to download and run the installer for your new NeoRouter Server. It also installs the client. Just log into your server as root and issue the following commands:
wget http://incrediblepbx.com/install-neorouter
chmod +x install-neorouter
./install-neorouter
The installer will walk you through these five installation steps, but we’ll repeat them here so you have a ready reference down the road.
First, on your hardware-based firewall, map TCP port 32976 to the private IP address of your PIAF2 server. This tells the router to send all NeoRouter VPN traffic to your PIAF2 server when it hits your firewall. If you forget this step, your NeoRouter VPN will never work!
Second, we’re going to use your server’s public IP address as the destination for incoming traffic to your NeoRouter VPN. If this is a dynamic IP address, you’ll need an FQDN that’s kept current by a service such as DynDNS.com.
Third, each administrator and user is going to need a username to access your NeoRouter VPN. You can use the same credentials to log in from multiple client machines, something you may or may not want to do. We’re going to set up credentials for one administrator as part of the install. You can add extra ones by adding entries with one of the following commands using the keyword admin or user. Don’t use any special characters in the username and password!
nrserver -adduser username password admin
nrserver -adduser username password user
Fourth, make up a very secure password to access your NeoRouter VPN. No special characters.
You’re done. Review your entries very carefully. If all is well, press Enter. If you blink, you may miss the completion of the install process. It’s that quick.
Fifth, after your NeoRouter VPN is installed, you can optionally go to the NeoRouter web site and register your new VPN by clicking Create Standalone Domain. Make up a name you can easily remember with no periods or spaces. You’ll be prompted for the IP address of your server in the second screen. FQDNs are NOT permitted.
When a VPN client attempts to login to your server, the server address is always checked against this NeoRouter database first before any attempt is made to resolve an IP address or FQDN using DNS. If no matching entry is found, it will register directly to your server using a DNS lookup of the FQDN. Whether to register your VPN is totally up to you. Logins obviously occur quicker using this registered VPN name, but logins won’t happen at all if your server’s dynamic IP address changes and you’ve hard-coded a different IP address into your registration at neorouter.com.
Setting Up a NeoRouter Client. As mentioned previously, there are NeoRouter clients available for almost every platform imaginable, except iPhones and iPads. Hopefully, they’re in the works. So Step #1 is to download whatever clients are appropriate to meet your requirements. Here’s the NeoRouter Download Link. Make sure you choose a client for the Free version of NeoRouter. And make sure it is a version 1.7 client! Obviously, the computing platform needs to match your client device. The clients can be installed in the traditional way with Windows machines, Macs, etc.
CentOS NeoRouter Client. As part of the installation above, we have automatically installed the NeoRouter client for your particular flavor of CentOS 6, 32-bit or 64-bit. In order to access resources on your NeoRouter server from other clients, you will need to activate the client on your server as well. This gets the server a private IP address in the 10.0.0.0 network.
To activate the client, type: nrclientcmd. You’ll be prompted for your Domain, Username, and Password. You can use the registered domain name from neorouter.com if you completed step #5. Or you can use the private IP address of your server. If your router supports hairpin NAT, you can use the public IP address or server’s FQDN, if you have one.
To exit from NeoRouter Explorer, type: quit. The NeoRouter client will continue to run so you can use the displayed private IP addresses to connect to any other online devices in your NeoRouter VPN. All traffic from connections to devices in the 10.0.0.0 network will flow through NeoRouter’s encrypted VPN tunnel. This includes inter-office SIP and IAX communications between Asterisk® endpoints.
Admin Tools for NeoRouter. Here are a few helpful commands for monitoring and managing your NeoRouter VPN.
Browser access to NeoRouter Configuration Explorer (requires user with Admin privileges)
Browser access to NeoRouter Network Explorer (user with Admin or User privileges)
To access your NeoRouter Linux client: nrclientcmd
To restart NeoRouter Linux client: /etc/rc.d/init.d/nrservice.sh restart
To restart NeoRouter Linux server: /etc/rc.d/init.d/nrserver.sh restart
To set domain: nrserver -setdomain YOUR-VPN-NAME domainpassword
For a list of client devices: nrserver -showcomputers
For a list of existing user accounts: nrserver -showusers
For the settings of your NeoRouter VPN: nrserver -showsettings
To add a user account: nrserver -adduser username password user
To add admin account: nrserver -adduser username password admin
Test VPN access: http://www.neorouter.com/checkport.php
For a complete list of commands: nrserver –help
To change client name from default pbx.local1:
- Edit /etc/hosts
- Edit /etc/sysconfig/network
- Edit /etc/sysconfig/network-scripts/ifcfg-eth0
- Edit /etc/asterisk/vm_general.inc
- reboot
For the latest NeoRouter happenings, follow the NeoRouter blog on WordPress.com.
GPL2 License. The install-neorouter application is open source software licensed under GPL2. The NeoRouter Server and Client software is freeware but not open source. This installer has been specifically tailored for use on PBX in a Flash 2 servers, but it can easily be adjusted to work with virtually any Linux-based Asterisk system. If you make additions or changes, we hope you’ll share them on our forums for the benefit of the entire VoIP community. Enjoy!
Originally published: Wednesday, April 18, 2012

Need help with Asterisk? Visit the NEW PBX in a Flash Forum.
whos.amung.us If you’re wondering what your fellow man is reading on Nerd Vittles these days, wonder no more. Visit our new whos.amung.us statistical web site and check out what’s happening. It’s a terrific resource both for us and for you.
Special Thanks to Our Generous Sponsors
FULL DISCLOSURE: ClearlyIP, Skyetel, Vitelity, DigitalOcean, Vultr, VoIP.ms, 3CX, Sangoma, TelecomsXchange and VitalPBX have provided financial support to Nerd Vittles and our open source projects through advertising, referral revenue, and/or merchandise. As an Amazon Associate and Best Buy Affiliate, we also earn from qualifying purchases. We’ve chosen these providers not the other way around. Our decisions are based upon their corporate reputation and the quality of their offerings and pricing. Our recommendations regarding technology are reached without regard to financial compensation except in situations in which comparable products at comparable pricing are available from multiple sources. In this limited case, we support our sponsors because our sponsors support us.
 BOGO Bonaza: Enjoy state-of-the-art VoIP service with a $10 credit and half-price SIP service on up to $500 of Skyetel trunking with free number porting when you fund your Skyetel account. No limits on number of simultaneous calls. Quadruple data center redundancy. $25 monthly minimum spend required. Tutorial and sign up details are here.
![]() The lynchpin of Incredible PBX 2020 and beyond is ClearlyIP components which bring management of FreePBX modules and SIP phone integration to a level never before available with any other Asterisk distribution. And now you can configure and reconfigure your new Incredible PBX phones from the convenience of the Incredible PBX GUI.
The lynchpin of Incredible PBX 2020 and beyond is ClearlyIP components which bring management of FreePBX modules and SIP phone integration to a level never before available with any other Asterisk distribution. And now you can configure and reconfigure your new Incredible PBX phones from the convenience of the Incredible PBX GUI.
 VitalPBX is perhaps the fastest-growing PBX offering based upon Asterisk with an installed presence in more than 100 countries worldwide. VitalPBX has generously provided a customized White Label version of Incredible PBX tailored for use with all Incredible PBX and VitalPBX custom applications. Follow this link for a free test drive!
 Special Thanks to Vitelity. Vitelity is now Voyant Communications and has halted new registrations for the time being. Our special thanks to Vitelity for their unwavering financial support over many years and to the many Nerd Vittles readers who continue to enjoy the benefits of their service offerings. We will keep everyone posted on further developments.
Some Recent Nerd Vittles Articles of Interest…
11/11/11: To Celebrate Nerd New Year’s, Please Welcome…

Just click on the image above to visit the site. Content is updated at least twice daily. As always, we welcome your content suggestions. Enjoy!
Originally published: Friday, November 11, 2011
Great News! Google Plus is available to everyone. Sign up here and circle us. Click these links to view the Asterisk feed or PBX in a Flash feed on Google+.
Need help with Asterisk? Visit the PBX in a Flash Forum.
Or Try the New, Free PBX in a Flash Conference Bridge.
whos.amung.us If you’re wondering what your fellow man is reading on Nerd Vittles these days, wonder no more. Visit our new whos.amung.us statistical web site and check out what’s happening. It’s a terrific resource both for us and for you.
Special Thanks to Our Generous Sponsors
FULL DISCLOSURE: ClearlyIP, Skyetel, Vitelity, DigitalOcean, Vultr, VoIP.ms, 3CX, Sangoma, TelecomsXchange and VitalPBX have provided financial support to Nerd Vittles and our open source projects through advertising, referral revenue, and/or merchandise. As an Amazon Associate and Best Buy Affiliate, we also earn from qualifying purchases. We’ve chosen these providers not the other way around. Our decisions are based upon their corporate reputation and the quality of their offerings and pricing. Our recommendations regarding technology are reached without regard to financial compensation except in situations in which comparable products at comparable pricing are available from multiple sources. In this limited case, we support our sponsors because our sponsors support us.
BOGO Bonaza: Enjoy state-of-the-art VoIP service with a $10 credit and half-price SIP service on up to $500 of Skyetel trunking with free number porting when you fund your Skyetel account. No limits on number of simultaneous calls. Quadruple data center redundancy. $25 monthly minimum spend required. Tutorial and sign up details are here.
![]() The lynchpin of Incredible PBX 2020 and beyond is ClearlyIP components which bring management of FreePBX modules and SIP phone integration to a level never before available with any other Asterisk distribution. And now you can configure and reconfigure your new Incredible PBX phones from the convenience of the Incredible PBX GUI.
The lynchpin of Incredible PBX 2020 and beyond is ClearlyIP components which bring management of FreePBX modules and SIP phone integration to a level never before available with any other Asterisk distribution. And now you can configure and reconfigure your new Incredible PBX phones from the convenience of the Incredible PBX GUI.
VitalPBX is perhaps the fastest-growing PBX offering based upon Asterisk with an installed presence in more than 100 countries worldwide. VitalPBX has generously provided a customized White Label version of Incredible PBX tailored for use with all Incredible PBX and VitalPBX custom applications. Follow this link for a free test drive!
Special Thanks to Vitelity. Vitelity is now Voyant Communications and has halted new registrations for the time being. Our special thanks to Vitelity for their unwavering financial support over many years and to the many Nerd Vittles readers who continue to enjoy the benefits of their service offerings. We will keep everyone posted on further developments.
Some Recent Nerd Vittles Articles of Interest…
Incredible Fax: Free Faxing Returns to Incredible PBX 1.8
It’s been a rocky road getting an open source (free) faxing alternative to work reliably with Asterisk® 1.8. To further complicate things, CentOS 5.6 was finally released which brought us a few more Asterisk 1.8 headaches and updates finally leading up to an all-new and nearly perfect PBX in a Flash 1.7.5.6 thanks in large part to Tom King. The new release also forced some under-the-covers modifications in Incredible PBX. Now you’re caught up on last week’s news. But what have we done for you lately?

Well, one alternative was to shift gears to the commercial Fax for Asterisk from Digium® which is supported in FreePBX 2.8 and 2.9 and includes one free license. But we’re open source fans and, of course, nothing beats free. Thanks to the efforts of a number of folks on the PBX in a Flash forums including our old pal, Joe Roper, there is an alternative that folks have been wrestling with for over two years. The combination of Hylafax, Avantfax, and IAXmodem is a compelling open source solution if you don’t need T.38-compatible faxing.1 The drawback has been the learning curve to install all the components and get them working reliably together. Well, for those using Incredible PBX 1.8 with PIAF-Purple and Asterisk 1.8, today we have a newly minted installation script that is simple enough that even a monkey can use it. If you know your own email address and your local area code AND you can find the Enter key on your keyboard, you are fully qualified to perform today’s installation. It’ll take you under 5 minutes! We’ve also got a nice little surprise for you toward the end of this article.
Prerequisites. You’ll first need to install the latest version of PBX in a Flash with the PIAF-Purple (Asterisk 1.8) payload. Then sign up for a free Google Voice account and install Incredible PBX 1.8. You’ll find complete installation instructions for everything here. Can you just wing it and run this installation script on a garden-variety Asterisk 1.8 machine? No. And the reason is that all of these components have dependencies which are too complex to cover in a 5-minute article. You might want to have a look at the A-Fax Project which is where we started. Suffice it to say, the combination of PIAF-Purple and Incredible PBX 1.8 provides the ideal platform on which to install Incredible Fax. If you prefer to do-it-yourself, by all means have at it. We lost about 10 years worth of hair even starting with the work of a dozen very talented Linux gurus who have been wrestling with this for over two years! But, hey, YMMV! We never claimed to be the sharpest tool in the shed. 😉
Installing Incredible Fax. Once you have your Incredible PBX 1.8 platform up and running, adding Incredible Fax is a stroll in the park. Just log into your server as root and issue the following commands. If you’ve downloaded Incredible PBX in the last few days, the script may already be on your system. In this case, just type /root/incrediblefax.sh to run it.
cd /root
wget http://incrediblepbx.com/incrediblefax.sh
chmod +x incrediblefax.sh
./incrediblefax.sh
After checking to make sure Incredible PBX 1.8 is installed, the script will prompt you to enter an email address where incoming faxes should be delivered. Then all of the necessary components will be installed after which the Avantfax install script will be run. With the exception of entering your local area code when prompted to do so, the correct response to every other question is to press the Enter key if you live in the U.S. or Canada. Don’t "improve" anything if you expect the end product to work reliably. For those outside North America, you’ll need to also make the usual adjustments to account for your country and city codes.
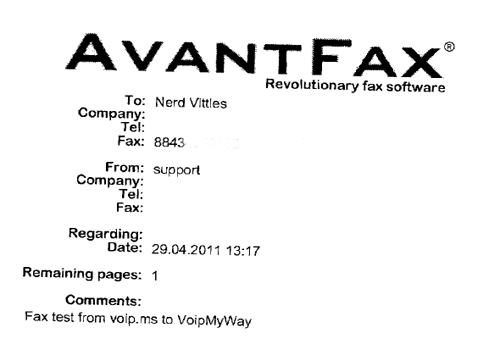
Avantfax has its own security model, but we’ve grown to appreciate the Apache authentication model which is built into PBX in a Flash so it’s been incorporated into Incredible Fax as well. When the install completes, just reboot your server to get everything working. On the PBX in a Flash web GUI, there will be a new Admin icon for Faxing. Or you can access Avantfax with a browser by going to http://serverIPaddress/avantfax. When prompted for your username and password, use maint and whatever your maint password happens to be. These can be reset with passwd-master. Literally everything has been preconfigured in Avantfax to get you going. Here’s a 3-minute video to show you how easy it is. Just don’t forget to reboot once the install completes.
If you want to be able to print to fax from Windows-based machines, then you’ll need to make one addition. Click on the small Toolbar icon in the upper right corner of the AvantFax home screen and choose New User from the pull-down Menu. For the user, enter Fax for the Name, fax for the Username, a secure password for Password, and an email address that is DIFFERENT from the one you used to set up Incredible Fax. Check the boxes for User Can Delete Faxes and User Can Fax From Any Modem. Finally, check the boxes for all four IAXmodems. Then click the Save button to add this new user.
A Word About Reliable Faxing. Suffice it to say that analog faxing over VoIP trunks is something less than ideal. If you want reliable analog faxing, then you’ll need a PSTN line from your favorite local telephone company. It doesn’t need any fancy add-ons like CallerID which doubles the price in many cities. Then you’ll need a properly configured analog telephone adapter (ATA) with at least one FXO port to support your Ma Bell phone line. Our favorite is the OBi110 which also can double as an additional Google Voice trunk for your PBX. But an SPA3102 will work equally well. It just costs more and gives you less.
Now that we’ve covered the obligatory warnings… will Incredible Fax work with a pure VoIP connection? Absolutely. We do it all the time. Is it flawless? No. Are there certain providers that are better than others? You bet. Do some providers not support faxing at all? Correct. Based on our 5+ years wrestling with this, here’s our recommendation. First, you’ll need a DID (i.e. phone number) from one of our recommended providers to handle inbound faxes. With the latest release of Asterisk 1.8, you no longer need a DID dedicated to faxing. In other words, you can use the same DID to receive incoming voice calls as well. The good news is that pay-as-you-go DIDs are dirt cheap. Some providers such as voip.ms offer DIDs for under $1 a month with 1¢ per minute calls. VoIP.ms also has unlimited inbound calling DIDs for under $4 a month. Other providers whose trunks we have found work reliably for VoIP faxing include Vitelity (see our special sign up deal below), Axvoice, Teliax, VoIPMyWay ($45 for first year with unlimited outbound and inbound calling with a local DID), and Future-Nine2. Google Voice trunks are hit and miss. We’re batting about .250 in our testing with Google Voice lines. Bottom Line: If VoIP faxing doesn’t work after you complete the install, it’s probably the fault of your VoIP trunk, not the setup. To make absolutely sure, connect a standard fax machine to an extension using an FXS telephone adapter and send a fax to that extension from the Avantfax web interface. You’ll find it works every time!
Configuring FreePBX for Incredible Fax. Here are the steps you’ll need to complete to get analog faxing working reliably with FreePBX. First, set up an account with one of the companies we’ve mentioned above. With voip.ms, create a subaccount on their site with credentials to use with the DID you purchased to link to that subaccount.
Unless you’re using today’s release of Incredible PBX, you’ll need to activate FreePBX’s Fax Configuration Module if you want to take advantage of Asterisk 1.8’s fax detection capabilities. It didn’t work reliably in previous Asterisk 1.8 releases. This module already is either available or already installed on your server. In the FreePBX GUI using a browser, choose Tools, Module Admin and then click on Fax Configuration. A drop-down list will provide several choices. Choose either Install or Enable depending upon the version of Incredible PBX you currently are running. Then click the Process button and finally Reload the settings when prompted.
Unless you installed Incredible PBX today, you’ll need to create a SIP trunk for your new provider in FreePBX using the credentials you set up on the provider’s web site. The VoIP.ms template now is included in Incredible PBX so you can just edit the existing one to add your credentials. And, at least with VoIP.ms, you can set the outbound CallerID to anything you like (as long as it’s legal). Unless you want a knock at your door, we wouldn’t recommend using the main number at the White House. Then put all of the settings below in the Outgoing Settings PEER Details where 1234567 is your main account number, subacctname is the name of the subaccount you created, and atlanta is your closest voip.ms server location:
username=1234567_subacctname
type=friend
trustrpid=yes
sendrpid=yes
secret=subacctpassword
nat=yes
insecure=port,invite
host=atlanta.voip.ms
fromuser=1234567_subacctname
disallow=all
context=from-trunk
canreinvite=nonat
allow=ulaw
For the registration string, it should look like the following. If you’re planning to only use the trunk for outbound faxing, then you can leave off the trailing DID number.
username:password@atlanta.voip.ms:5060/10-digit-DID
In addition to setting up the Trunk for your provider, you’ll also need to create an Outbound Route for sending faxes out through this trunk AND an Inbound Route to receive incoming faxes on the DID you purchased from your provider.
For the Outbound Route, we recommend setting the Dial Pattern with a prefix not otherwise used on your Incredible PBX so that you can make fax calls easily by dialing this prefix. For example, on our sample system, we used 7 so that fax calls could be made by dialing 7 plus a 10-digit number in the U.S. and Canada. Here’s how our Outbound Route for VoIP.ms looks in FreePBX, and the latest Incredible PBX release already has it in place as shown below:

For the Inbound Route, you want to specify the DID from your provider which must match the 10-digit number you affixed to the end of the trunk registration string above. If you don’t want to share this number for voice and fax calls, then simply direct these inbound fax calls to the Fax Custom Destination. Extension (329 spells F-A-X) also can be used to process incoming faxes and route them to your email address as well as the Avantfax web GUI.
Our experience suggests that using a single trunk for both voice and fax delivery is hit and miss so you may wish to consider adding an additional trunk just to support faxing. You’ll find the templates for adding a second Google Voice trunk in the /tmp directory, and complete instructions are available on the PIAF Forums. We’ve also provided preconfigured trunk settings for both Vitelity and VoIP.ms if you’d like to try those options as well. Just plug in your credentials and configure an inbound route to map incoming faxes to the Fax Custom Destination.

AvantFax in a Nutshell. Here’s a quick summary of the main features in the AvantFax web GUI. You can access the GUI by pointing a browser to the IP address of your server + /avantfax. After you enter your maint account name and maint password, the following screen will display with your Inbox. As noted, all of these incoming faxes also will be emailed to the account you set up when you ran the Incredible Fax install script.

The icons to the right of each thumbnail fax let you View, Rotate, Download PDF, Reply to Fax, Email PDF, Add a Note, Archive the Fax, and Permanently Delete the Fax.
At the top of the screen just to the right of Inbox is the option to Send a Fax. Here you’d specify the phone number to dial. Don’t forget the 7 and then a 10-digit number. Next you can attach a document from your local disk. Finally, fill in the blanks for the Fax Cover Sheet, and then click Send. Your fax will be on its way. You can monitor the progress of the fax transmission by clicking on Outbox. It’s also a good idea to fire up an SSH session to your server and run asterisk -rvvvvvvvvvv to monitor the first few calls to be sure all is well in Incredible FaxLand.
 Where to Go Next. HylaFax and AvantFax are very mature open source products with a huge international following. We apologize for focusing primarily on U.S. and Canadian users today, but anything is possible with this software. The first piece you probably will want to tackle is adding Print to Fax capability on your Windows machine. The software you’ll need can be downloaded here. You’ll find excellent documentation on the setup by visiting the PBX in a Flash Forum. One little footnote for those using Windows 7. Microsoft and Apple are back to their old tricks so there are no Apple postscript print drivers in Windows 7. We’ve had equally good results using Dell’s 3100cn PS driver. Incidentally, there’s a similar print-to-fax utility for Mac OS X, but it’ll set you back $36. Here’s the link. HylaFax also maintains a terrific resource list for those that want additional goodies for PCs, Macs and Linux systems.
Originally published: Monday, May 2, 2011
Changes in PBX in a Flash Distribution. In light of the events outlined in our recent Nerd Vittles article and the issues with Asterisk 1.8.4, the PIAF Dev Team has made some changes in our distribution methodology. As many of you know, PBX in a Flash is the only distribution that compiles Asterisk from source code during the install. This has provided us enormous flexibility to distribute new releases with the latest Asterisk code. Unfortunately, Asterisk 1.8 is still a work in progress to put it charitably. We also feel some responsibility to insulate our users from show-stopping Asterisk releases. Going forward, the plan is to reserve the PIAF-Purple default install for the most stable version of Asterisk 1.8. As of June 1, Asterisk 1.8.4.1 is the new PIAF-Purple default install. Other versions of Asterisk 1.8 (newer and older) will be available through a new configuration utility which now is incorporated into the PIAF 1.7.5.6.2 ISO.
Here’s how it works. Begin the install of a new PIAF system in the usual way by booting from your USB flash drive and pressing Enter to load the most current version of CentOS 5.6. When the CentOS install finishes, your system will reboot. Accept the license agreement, and choose the PIAF-Purple option to load the latest stable version of Asterisk 1.8. Or exit to the Linux CLI if you want a different version. Log into CentOS as root. Then issue a command like this: piafdl -p beta_1841 (loads Asterisk 1.8.4.1), piafdl -p 184 (loads Asterisk 1.8.4), piafdl -p 1833 (loads Asterisk 1.8.3.3), or piafdl -p 1832 (loads Asterisk 1.8.3.2). If there should ever be an outage on one of the PBX in a Flash mirrors, you can optionally choose a different mirror for the payload download by adding piafdl -c for the .com site, piafdl -d for the .org site, or piafdl -e for the .net site. Then add the payload switch, e.g. piafdl -c -p beta_1841.

Bottom Line: If you use the piafdl utility to choose a particular version of Asterisk 1.8, you are making a conscious decision to accept the consequences of your particular choice. We would have preferred implementation of a testing methodology at Digium before distribution of new Asterisk releases; however, that doesn’t appear to be in the cards. So, as new Asterisk 1.8 releases hit the street, they will be made available through the piafdl utility until such time as our PIAF Pioneers independently establish their reliability.
Need help with Asterisk? Visit the PBX in a Flash Forum or Wiki.
Or Try the New, Free PBX in a Flash Conference Bridge.
whos.amung.us If you’re wondering what your fellow man is reading on Nerd Vittles these days, wonder no more. Visit our new whos.amung.us statistical web site and check out what’s happening. It’s a terrific resource both for us and for you.
Special Thanks to Our Generous Sponsors
FULL DISCLOSURE: ClearlyIP, Skyetel, Vitelity, DigitalOcean, Vultr, VoIP.ms, 3CX, Sangoma, TelecomsXchange and VitalPBX have provided financial support to Nerd Vittles and our open source projects through advertising, referral revenue, and/or merchandise. As an Amazon Associate and Best Buy Affiliate, we also earn from qualifying purchases. We’ve chosen these providers not the other way around. Our decisions are based upon their corporate reputation and the quality of their offerings and pricing. Our recommendations regarding technology are reached without regard to financial compensation except in situations in which comparable products at comparable pricing are available from multiple sources. In this limited case, we support our sponsors because our sponsors support us.
BOGO Bonaza: Enjoy state-of-the-art VoIP service with a $10 credit and half-price SIP service on up to $500 of Skyetel trunking with free number porting when you fund your Skyetel account. No limits on number of simultaneous calls. Quadruple data center redundancy. $25 monthly minimum spend required. Tutorial and sign up details are here.
![]() The lynchpin of Incredible PBX 2020 and beyond is ClearlyIP components which bring management of FreePBX modules and SIP phone integration to a level never before available with any other Asterisk distribution. And now you can configure and reconfigure your new Incredible PBX phones from the convenience of the Incredible PBX GUI.
The lynchpin of Incredible PBX 2020 and beyond is ClearlyIP components which bring management of FreePBX modules and SIP phone integration to a level never before available with any other Asterisk distribution. And now you can configure and reconfigure your new Incredible PBX phones from the convenience of the Incredible PBX GUI.
VitalPBX is perhaps the fastest-growing PBX offering based upon Asterisk with an installed presence in more than 100 countries worldwide. VitalPBX has generously provided a customized White Label version of Incredible PBX tailored for use with all Incredible PBX and VitalPBX custom applications. Follow this link for a free test drive!
Special Thanks to Vitelity. Vitelity is now Voyant Communications and has halted new registrations for the time being. Our special thanks to Vitelity for their unwavering financial support over many years and to the many Nerd Vittles readers who continue to enjoy the benefits of their service offerings. We will keep everyone posted on further developments.
Some Recent Nerd Vittles Articles of Interest…
- Yes, we’re aware that HylaFax theoretically supports T.38 with the right hardware. Feel free to point us to someone who has it actually working with Asterisk 1.8. 🙄 [↩]
- Vitelity, Teliax, VoIPMyWay, and Future-Nine trunks require the following additional entries in your Inbound trunk settings: t38pt_rtp=no, t38pt_tcp=no, t38pt_udptl=no [↩]
Orgasmatron 5.2: The Secure Swiss Army Knife for Asterisk
 It’s been an exciting couple of weeks watching the overwhelmingly positive response to our release of Orgasmatron 5.1. With this version, we introduced a new Asterisk® security model that took into account the ever-increasing security risks posed by exposing web and telephony servers to direct Internet access. The bottom line is this. If your telecom requirements still can be accomplished by placing a server securely behind a $35 hardware-based Internet firewall with no Internet exposure, then it makes absolutely no sense to dangle such a tempting target in front of the world’s most nefarious creeps.
News Flash: Incredible PBX 4.0 is now available with FreePBX 2.10 support!
Coming January 19: Incredible PBX 11 & Incredible Fax for Asterisk 11 and FreePBX 2.11
Our experience suggests that the only trade off with this new approach is the inability to receive anonymous SIP calls… a small price to pay considering the potential financial and computer risks involved. You still can place outbound VoIP calls as well as placing and receiving calls using any of the phone numbers registered on your new PBX in a Flash server. And, thanks to Google Voice, SIPgate, and IPkall, all inbound calls are free, and all outbound calls to numbers in the U.S. and Canada are free as well.
If a SIP URI and your own Freenum/ISN number are simply features you can’t live without, sign up for a voip.ms IAX account, and you’ll get a SIP URI for free. Inbound SIP URI and Freenum/ISN calls will set you back $1 for every 1,000 minutes billed in 6 second increments.
Or you can sign up for a free IP Freedom CallCentric account and configure a new SIP trunk in FreePBX by following these directions. Once configured, your new server SIP URI will be 1777xxxxxxx@in.callcentric.com where xxxxxxx is your assigned 7-digit CallCentric number.
Keep in mind that a new security vulnerability has been found with either Asterisk or FreePBX almost monthly. The chart below tells you why. With virtually limitless attack surfaces because of the number of interrelated components in CentOS, Asterisk, and FreePBX comes enormous and recurring potential for remote compromise of these systems. Rather than play this cat-and-mouse security game with the underworld, the Orgasmatron design changes the paradigm. It lets you use any (secure or insecure) version of Asterisk and FreePBX without worrying about any outside attacks. Do passwords on your new server matter? Not really… unless there is someone inside your firewall that you don’t trust. 🙄 Are we going to secure them anyway? Absolutely. But instead of the constant worry over new security vulnerabilities, Orgasmatron 5.2 lets you enjoy exploring the world of Asterisk and VoIP telephony with an incredibly rich feature set that you won’t find anywhere else, period! We’ll resist making any other device analogies, but the idea here is to protect the good guy (you!) while keeping the bad guys out. No penetration. No worries. Simple as that.

In our former life working for a living, we actually procured and managed multimillion dollar PBXs as part of our "other duties as assigned." Without qualification, we can tell you that the feature set that Orgasmatron 5.2 brings to the table for free runs circles around anything you could buy (then or now) in the commercial marketplace. And, at one time or another, we purchased every Nortel feature good money could buy. There’s one other difference. Orgasmatron 5.2 runs swimmingly on a $200 Atom-based PC that you can purchase at any Best Buy as well as hundreds of other stores including Amazon, NewEgg, and Buy.com. We paid more than $200 to provision an additional extension on our Nortel switch! You, of course, can add as many extensions as you like. De nada.
So, why a new version of Orgasmatron in only a few weeks? Well, it’s not security-related. In fact, there is nothing wrong with continuing on with Orgasmatron 5.1. Unfortunately, it relied exclusively upon SIPgate to make free Google Voice calls in the U.S. and Canada. And SIPgate required an invite using an SMS message from a U.S.-based cellphone. That pretty well knocked out all of our friends living outside the United States. Today’s version fixes that by letting anyone sign up for a free IPkall phone number in Washington state. All you need is a valid email address. The setup process is a bit more complex because IPkall doesn’t support registered connections to their servers. But we’ll walk you through the additional steps and, once completed, your server will be just as secure as the SIPgate approach we set up with Orgasmatron 5.1. And few, if any, Linux skills are required to set up or manage Orgasmatron 5.2. As we’ve noted previously, if you can handle slice and bake cookies, you’ve got the necessary skillset! Be aware this is about a one-hour project, and you need to track through the article carefully, or the entire house of cards comes down.
 New Asterisk Security Model. Orgasmatron 5.2 maintains our design goal of running an absolutely secure Asterisk PBX from behind a hardware-based firewall with either NO INBOUND PORTS exposed to the Internet with SIPgate or an IP-address-restricted IAX port for IPkall. Don’t defeat this security mechanism by exposing additional ports on your PBX in a Flash server to Internet access. And choose your NAT-based firewall/router carefully. All of these devices are not created equally. Not only do some perform better than others, but certain models are notoriously bad at handling NAT-based routing tasks, a critical requirement in the Asterisk VoIP environment. In almost every case of problems with one-way audio, the real culprit can be traced back to a crappy router. For $35, you really can’t go wrong with the dLink WBR-2310. If you want traffic shaping functionality as well, take a look at dLink’s Gaming Router, our personal favorite.
As long as your router, Google Voice, SIPgate, and IPkall passwords are secure, you can sleep like a baby. We use an intermediate SIP provider for Google Voice to set up free outbound Google Voice calls in the U.S. and Canada because Google Voice actually places two calls to connect you to your destination. First, you get a call back. And then the party you’re calling is connected. The SIPgate or IPkall trunk is used by Google Voice to call you back so the inbound call is always free. We handle the interconnection magic with Asterisk transparently so your calls appear to be processed as if you were using a standard telephone to dial out. Just refrain from using extension 75 in Asterisk for personal conferencing!
The choice is yours. You can use SIPgate with no incoming ports exposed to your server from the Internet. Or you can use IPkall and map UDP port 4569 (IAX2) on your hardware-based firewall to the internal IP address of your new PBX in a Flash server. Even with the IPkall setup, we’ve locked down IPtables (our Linux firewall) to restrict IAX access to several specific IP addresses so your server remains absolutely secure. We’ve also included support for FonicaTec’s IAX offering for those that want a backup IAX provider. We’ll have much more to say about IPtables in coming weeks.
If you’ve already installed Orgasmatron 5.1 and it’s working for you, do you need to upgrade? NO. With the exception of the new IAX support for IPkall, the code in Orgasmatron 5.2 is identical.
We, of course, continue to recommend that you sign up with Vitelity so you have an alternate communications vehicle in the event of a problem with your free service. Vitelity also can provide 911 emergency service for your home or home office. You can save a little money while supporting the PBX in a Flash project by using the links at the end of this article.
 Swiss Army Knife Inventory. There’s no need for a Swiss Army Knife if you don’t know what all the blades are for. So, for those that are wondering what’s included in the Orgasmatron 5.2 build, here’s a feature list of the components you get in addition to the base PBX in a Flash build with CentOS 5.4, Asterisk 1.4, FreePBX 2.6, and Apache, SendMail, MySQL, PHP, phpMyAdmin, IPtables Linux firewall, Fail2Ban, and WebMin. Please note that A2Billing, Cepstral TTS, Hamachi VPN, and Mondo Backups are optional and may be installed using the scripts that are provided.
- A2Billing (/root/nv/install-a2billing)
- Amazon S3 Cloud Computing
- AsteriDex
- CallerID Superfecta (FreePBX Module)
- CallWho for Asterisk
- Cepstral TTS (/root/nv/install-cepstral.sh)
- Preconfigured Email That Works with SendMail
- Extensions (16 preconfigured)
- Fax Module using nvFax
- FONmail
- FreePBX Backups
- Gizmo5 (Free Calls to Gizmo5 users worldwide: 1747xxxxxxx*1089)
- Google Voice (preconfigured)
- Hamachi VPN (/root/nv/install-hamachi.x)
- Hotel-Style Wakeup Calls (FreePBX Module)
- ISN: FreeNum SIP Calling from Any Phone
- MeetMe Conference Bridge (just dial C-O-N-F)
- Mondo Full System Backups (/root/nv/install-diskbackup.x)
- NewsClips from Yahoo
- ODBC Database Support
- PogoPlug Cloud Computing
- Reminders by Phone and Web
- SIP URI Outbound Calling (call any SIP URI worldwide for free)
- TeleYapper
- Tide Reports with xTide
- Trunk Lister Script (/root/nv/trunks.sh)
- Trunks (Vitelity, Fonica, SIPgate, IPkall, and ENUM)
- Twitter Interface (Make Free Calls and Send SMS Messages)
- Weather by Airport Code
- Weather by ZIP Code
- Worldwide Weather
- Zaptel Updater (/root/nv/zaptel-update.sh)
Prerequisites. Here’s what you’ll need to get started:
- Broadband Internet connection
- Rock-solid NAT router/firewall. Recommend: $35 dLink WBR-2310
- $200 PC on which to run PBX in a Flash or a Proxmox Virtual Machine
- Free Google Voice account (HINT: Under $2 on eBay)
- Free SIPgateOne residential account (Use cell to get SMS invite) OR
- Free IPkall IAX account
Learn First. Install Second. Even though the installation process is now a No-Brainer, you are well-advised to do some reading before you begin. VoIP PBX systems have become a favorite target of the hackers and crackers around the world and, unless you have an unlimited bank account, you need to take some time learning where the minefields are in today’s VoIP world. Start by reading our Primer on Asterisk Security. Then read our PBX in a Flash and VPN in a Flash knols. If you’re still not asleep, there’s loads of additional documentation on the PBX in a Flash documentation web site.
Today’s Drill. The installation process is straight-forward, but a little different than the Orgasmo 5.1 scenario because of the need to accommodate IPkall. Just don’t skip any steps. In a nutshell, here are the 6 Steps to Free Calling and an incredibly versatile, preconfigured Asterisk PBX:
1. Install the latest version of PBX in a Flash
2. Run the Orgasmatron 5.2 Installer
3. Configure a softphone or SIP telephone
4. Configure Providers for Orgasmatron 5.2
5. Enter your Google Voice and SIPgate/IPkall credentials
6. Change existing passwords to secure your system
 Installing PBX in a Flash. Here’s a quick tutorial to get PBX in a Flash installed. We recommend you install the latest PIAF 1.6 beta on a new Atom-based PC. This beta is virtually identical to version 1.4 except it uses CentOS 5.4 instead of CentOS 5.2. This means it works better with newer hardware including Atom-based computers and newer network cards. Unlike other Asterisk aggregations, PBX in a Flash utilizes a two-step install process. The ISO only installs the CentOS operating system. Once installed, the server reboots and downloads a payload file that includes Asterisk, FreePBX, and many other VoIP and Linux utilities. We use the identical payload for versions 1.3, 1.4, 1.5, and 1.6 of PBX in a Flash. The beta label simply means we haven’t had time to sufficiently test CentOS. But this is not a Microsoft-style beta so fear not!
Download the 32-bit, PIAF 1.6 version from SourceForge, Vitelity, Cybernetic Networks, or AdHoc Electronics. The MD5 checksum for the file is e8a3fc96702d8aa9ecbd2a8afb934d36. Burn the ISO to a CD. Then boot from the installation CD and type ksalt to begin.
WARNING: This install will completely erase, repartition, and reformat ALL disks on your system! Press Ctrl-C to cancel the install.
On some systems you may get a notice that CentOS can’t find the kickstart file. Just tab to OK and press Enter. Don’t change the name or location of the kickstart file! This will get you going. Think of it as a CentOS ‘feature’. 🙂
At the keyboard prompt, tab to OK and press Enter. At the time zone prompt, tab once, highlight your time zone, tab to OK and press Enter. At the password prompt, make up a VERY secure root password. Type it twice. Tab to OK, press Enter. Get a cup of coffee. Come back in about 5 minutes. When the system has installed CentOS, it will reboot. Remove the CD promptly. After the reboot, choose A option. Have a 10-minute cup of coffee. After installation is complete, the machine will reboot a second time. Log in as root with your new password and execute the following commands:
update-scripts
update-fixes
When prompted, change the ARI password to something really obscure. You’re never going to use it! You now have a PBX in a Flash base install. On a stand-alone machine, it takes about 30 minutes. On a virtual machine, it takes about half that time.
NOTE: So long as your system is safely sitting behind a hardware-based firewall, we do NOT recommend running update-source on the Orgasmatron builds because of parking lot issues in the latest releases of Asterisk.
Running the Orgasmatron 5.2 Installer. Log into your server as root and issue the following commands to run the Orgasmatron 5.2 installer:
cd /root
wget http://pbxinaflash.net/orgasmo52.x
chmod +x orgasmo52.x
./orgasmo52.x
Have another 15-minute cup of coffee. It’s a great time to consider a modest donation to the Nerd Vittles project. You’ll find a link at the top of the page. When the installer finishes, READ THE SCREEN!
Now run passwd-master1. Set your FreePBX passwords to something very secure but different from your Linux root password.
Next, type status2 and press Enter. Write down the IP address of your new server.
If you’re using IPkall, now’s the time to log in to your hardware-based firewall/router and map UDP port 45693 to the private IP address that you just wrote down. This tells your firewall to pass all IAX2 traffic from the Internet directly to your new server. Don’t worry. We have severely restricted which IP addresses can actually send IAX data through the PBX in a Flash IPtables firewall which is an integral part of this build. And, remember, no hardware firewall adjustments are necessary if you’re using SIPgate instead of IPkall.
For good measure, we recommend you reboot your server at this point. The command to type is simple: reboot4
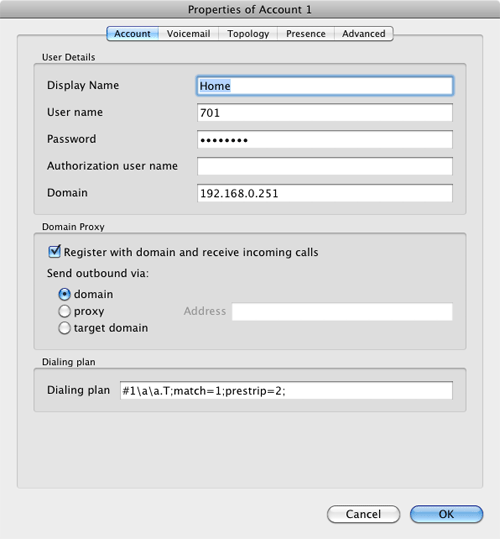
 Configuring a SIP Phone. There are hundreds of terrific SIP telephones and softphones for Asterisk-based systems. Once you get things humming along, you’ll want a real SIP telephone, and you’ll find lots of recommendations on Nerd Vittles. For today, let’s download a terrific (free) softphone to get you started. We recommend X-Lite because there are versions for Windows, Mac, and Linux. So download your favorite from this link. Install and run X-Lite on your Desktop. At the top of the phone, click on the Down Arrow and choose SIP Account Settings, Add. Enter the following information using 82812661 as the password for extension 701 and the actual IP address of your PBX in a Flash server instead of 192.168.0.251. Click OK when finished. Your softphone should now show: Available.
 Don’t Forget! After you change your extension passwords later in this tutorial, you will need to update the password entry in X-Lite, or you will no longer be able to place calls! In fact, you will get locked out of your server for 90 minutes after three failed password attempts. So put this on a sticky note so you don’t forget, or you’ll regret it in about 15 minutes.
Either a free SIPgate One residential phone number or an IPkall number is a key component in today’s project. And there’s really no reason you can’t use both if they’re available in your location. Do NOT use special characters in your provider passwords, or nothing will work! Continue reading whichever section below applies to you.
 Configuring SIPgate. If you live in the U.S. and have a cellphone, we’d recommend the SIPgate option since no adjustment of your hardware-based firewall is required. Otherwise, skip to the IPkall setup below. Step #1 is to request a SIPgate invite at this link. You’ll need to enter your U.S. cellphone number to receive the SMS message with your invitation code. Don’t worry. You can erase your cellphone number from your account once it is set up. Once you receive the invite code, enter it and choose the option to set up a residential account. Next, choose a phone number and write it down. The area code really doesn’t matter because Google Voice is the only one that will be calling this number after we get things set up. For now, leave your cellphone number in place so that you can receive your confirmation call from Google Voice in the next step. After that, you’ll want to revisit SIPgate and remove all parallel calling numbers. Finally, click on the Settings link and write down your SIP ID and SIP Password. You’ll need these in a few minutes to configure PBX in a Flash. Now place a call to your new SIPgate number and make certain that your cellphone rings before proceeding.
Configuring IPkall. If you’ve opted to use IPkall, here’s the drill. First, you’ll need to register for a free IPkall number. This is actually a two-step process. Set it up as a SIP connection when you first register. Then we’ll change it to IAX once your new phone number is provided. So your initial IPkall request should look like this:
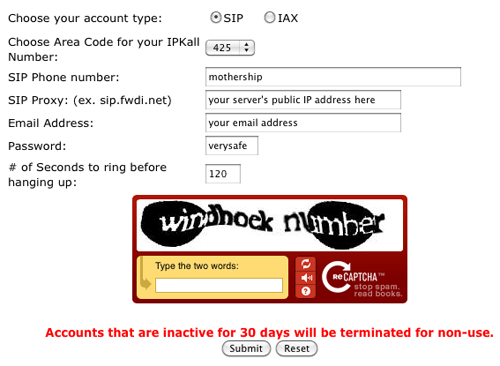
We recommend area code 425 for your requested number because IPkall appears to have lots of them. If they don’t have an available number, your request apparently goes in the bit bucket. You’ll know because IPkall typically turns these requests around in a few minutes. Don’t worry about the mothership entry. We’ll change it shortly. The other issue here is your public IP address. If you have a dedicated IP address, no worries. Just plug in the IP address for SIP Proxy. If it’s dynamic, then you’ll need to set up a fully-qualified domain name (FQDN) with a provider such as dyndns.com. Once you’ve got it set up, enter your credentials in the Dynamic DNS tab of your hardware-based firewall to assure that your dynamic IP address is always synchronized with your FQDN. Then enter the FQDN for your SIP Proxy address in the IPkall form. Be sure to make up a VERY secure password. Now send it off and wait for the return email with your new phone number.
When you receive your new phone number, you’ll need to revisit the IPkall site and log in with your phone number and the password you chose above. Make the changes shown below using your actual IPkall phone number instead of 4259876543:
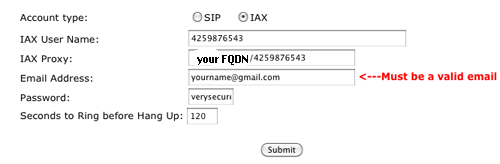
It’s worth stressing that these settings are extremely important so check your work carefully. Be sure the IAX option is selected. Be sure there are no typos in your two phone number entries. And be sure your FQDN or public IP address is correct. Then save your new settings.
We’re going to be making some entries in FreePBX which is the web-GUI that manages PBX in a Flash. For now, we simply need to enter your new IPkall phone number so that incoming calls to your IPkall number will actually ring on your softphone. Later, we’ll make some further adjustments once we get Google Voice humming along.
Using a web browser from your desktop, log in to FreePBX 2.6 at the following link substituting your server’s private IP address for ipaddress: http://ipaddress/admin. You’ll be prompted for a user name (maint) and password (the one you just created with passwd-master).
When FreePBX loads, choose Setup, Trunks, ipkall (iax). In the USER Context field, enter your 10-digit IPkall phone number. Click Submit Changes, Apply Configuration Changes, Continue with Reload to save your settings.
TIP: Be aware that IPkall cancels an assigned phone number after 30 consecutive days of inactivity. If you will be using your number infrequently, it’s a good idea to schedule a Weekly Reminder to call the number with a prerecorded message. This will assure that your number stays functional.
Now let’s test your new phone number. Call your IPkall number from a cellphone or some other phone. Your softphone should ring. Answer the call, and be sure you have voice in both directions! Do not proceed without success here, or the rest of the adventure is a waste of your time.
Configuring Google Voice. Google Voice still is by invitation only so the first thing you’ll need is an invite. If you’re in a hurry, then stroll over to eBay where you’ll find lots of them for under $2. Once you have your invite in hand, click on the email link to set up your account. After you’ve chosen a telephone number, plug in your new SIPgate or IPkall number as the destination for your Google Voice calls and choose Office as the Phone Type. Trust us.
Google then will place a call to your number and ask you to enter a confirmation code that’s been provided. When your cellphone (SIPgate) or softphone (IPkall) rings, answer it and punch in the number. Wait for confirmation. Then hang up.
As we mentioned earlier, there’s no reason you can’t set up both SIPgate and IPkall forwarding numbers in Google Voice. Just repeat the drill with the other provider’s number if you wish to activate both numbers for use with Google Voice. They’re not both going to ring simultaneously as you will see in a minute.
While you’re still in Google Voice Settings, click on the Calls tab. Make sure your settings match these:
- Call Screening – OFF
- Call Presentation – OFF
- Caller ID (In) – Display Caller’s Number
- Caller ID (Out) – Don’t Change Anything
- Do Not Disturb – OFF
Click Save Changes once you adjust your settings. Under the Voicemail tab, plug in your email address so you get notified of new voicemails. Down the road, receipt of a Google Voice voicemail will be a big hint that something has come unglued on your PBX.
Finally, place a test call to your new Google Voice number and be sure your cellphone or softphone rings. Don’t move forward until you’ve been able to successfully place a call to your phone by dialing your Google Voice number. Once this is working, revisit SIPgate and remove all parallel calling numbers including your cell number.
 Adding Your Credentials to PBX in a Flash. We’re ready to insert your Google Voice credentials and SIPgate/IPkall number into PBX in a Flash. You’ll need four pieces of information: your 10-digit Google Voice phone number, your Google Voice account name (which is the email address you used to set up your GV account), your GV password (no spaces!), and your 11-digit SIPgate or IPkall RingBack DID (beginning with a 1). Don’t get the 10-digit GV number mixed up with the 11-digit SIPgate/IPkall RingBack DID, or nothing will work. 🙂
Log back into your server as root and issue the following command: ./configure-gv. Check your entries carefully. If you make a typo in entering any of your data, press Ctrl-C to cancel the script and then run it again!!
 Configuring FreePBX. Now shift back to your Desktop and, using a web browser, log in to FreePBX 2.6 at the following link substituting your actual IP address for ipaddress: http://ipaddress/admin. You’ll be prompted for a user name (maint) and password (the one you just created with passwd-master). Depending upon which intermediate provider you’re using, do the following:
SIPgate Setup. When FreePBX loads, choose Setup, Trunks, sipgate. In Peer Details, replace both instances of sipID with your actual SipGate SIP ID. In Peer Details, replace sipPassword with your actual SipGate SIP Password. In Register String, replace sipID with your SipGate SIP ID, replace sipPassword with your SipGate SIP Password, and replace 3333333333 with your 10-digit SipGate Phone Number. When finished, the Register String should look something like the following:
7004484f0:B8TTW3@sipgate.com/4155201234
Click Submit, Apply Configuration Changes, Continue with Reload to save your changes.
SIPgate and IPkall Setup. While still in FreePBX with your browser, click Setup, Inbound Routes, gv-ringback. In DID Number, replace 3333333333 with your 10-digit SIPGate or IPkall Phone Number. In CallerID Number, replace 7777777777 with your 10-digit Google Voice Number.
Click Submit, Apply Configuration Changes, Continue with Reload to save your changes.
Securing FreePBX. You’re almost done. While still in FreePBX, choose each of the 16 preconfigured extensions on your new server and change the extension AND voicemail passwords. Here’s the drill: Setup, Extensions, 501, Submit. After changing secret and Voicemail Password, repeat with the next extension number instead of 501. Then Apply Config Changes, Continue when you’ve finished with all of them.
Now change the default DISA password: Setup, DISA, DISAmain, PIN, Submit Changes, Apply Config Changes, Continue.
Don’t forget to adjust your X-Lite password to match the password entry you made for extension 701!
 Orgasmatron Test Flight. The proof is in the pudding as they say. So let’s try two simple tests. First, from another phone, call your Google Voice number. Your softphone should begin ringing shortly. Answer the call and make sure you can send and receive voice on both phones. Hang up. Now let’s place an outbound call. Using the softphone, dial your cellphone number. Google Voice should transparently connect you. Answer the call and make sure you can send and receive voice on both phones. If everything is working, congratulations!
 Solving One-Way Audio Problems. If you experience one-way audio on some of your phone calls, you may need to adjust the settings in /etc/asterisk/sip_custom.conf. Just uncomment the first two lines by removing the semicolons. Then replace 173.15.238.123 with your public IP address, and replace 192.168.0.0 with the subnet address of your private network. Save the file and restart Asterisk with the command: amportal restart.
![]() Choosing a VoIP Provider. For this week, we’ll point you to some things to play with on your new server. Then, in the subsequent articles below, we’ll cover in detail how to customize every application that’s been loaded. Nothing beats free when it comes to long distance calls. But nothing lasts forever. So we’d recommend you set up another account with Vitelity using our special link below. This gives your PBX a secondary way to communicate with every telephone in the world, and it also gets you a second real phone number for your new system… so that people can call you. Here’s how it works. You pay Vitelity a deposit for phone service. They then will bill you $3.99 a month for your new phone number. This $3.99 also covers the cost of unlimited inbound calls (two at a time) delivered to your PBX for the month. For outbound calls, you pay by the minute and the cost is determined by where you’re calling. If you’re in the U.S., outbound calls to anywhere in the U.S. are a little over a penny a minute. If you change your mind about Vitelity and want a refund of the balance in your account, all you have to do is ask.
Choosing a VoIP Provider. For this week, we’ll point you to some things to play with on your new server. Then, in the subsequent articles below, we’ll cover in detail how to customize every application that’s been loaded. Nothing beats free when it comes to long distance calls. But nothing lasts forever. So we’d recommend you set up another account with Vitelity using our special link below. This gives your PBX a secondary way to communicate with every telephone in the world, and it also gets you a second real phone number for your new system… so that people can call you. Here’s how it works. You pay Vitelity a deposit for phone service. They then will bill you $3.99 a month for your new phone number. This $3.99 also covers the cost of unlimited inbound calls (two at a time) delivered to your PBX for the month. For outbound calls, you pay by the minute and the cost is determined by where you’re calling. If you’re in the U.S., outbound calls to anywhere in the U.S. are a little over a penny a minute. If you change your mind about Vitelity and want a refund of the balance in your account, all you have to do is ask.
The VoIP world is new territory for some of you. Unlike the Ma Bell days, there’s really no reason not to have multiple VoIP providers especially for outbound calls. Depending upon where you are calling, calls may be cheaper using different providers for calls to different locations. So we recommend having at least two providers. Visit the PBX in a Flash Forum to get some ideas on choosing alternative providers.
Kicking the Tires. OK. That’s enough tutorial for today. Let’s play. Using your new softphone, begin your adventure by dialing these extensions:
- D-E-M-O – Nerd Vittles Orgasmatron Demo (running on your PBX)
- 1234*1061 – Nerd Vittles Demo via ISN FreeNum connection to NV
- 17476009082*1089 – Nerd Vittles Demo via ISN to Google/Gizmo5
- Z-I-P – Enter a five digit zip code for any U.S. weather report
- 6-1-1 – Enter a 3-character airport code for any U.S. weather report
- 5-1-1 – Get the latest news and sports headlines from Yahoo News
- T-I-D-E – Get today’s tides and lunar schedule for any U.S. port
- F-A-X – Send a fax to an email address of your choice
- 4-1-2 – 3-character phonebook lookup/dialer with AsteriDex
- M-A-I-L – Record a message and deliver it to any email address
- C-O-N-F – Set up a MeetMe Conference on the fly
- 1-2-3 – Schedule regular/recurring reminder (PW: 12345678)
- 2-2-2 – ODBC/Timeclock Lookup Demo (Empl No: 12345)
- 2-2-3 – ODBC/AsteriDex Lookup Demo (Code: AME)
- Dial *68 – Schedule a hotel-style wakeup call from any extension
- 1061*1061 – PBX in a Flash Support Conference Bridge
- 882*1061 – VoIP Users Conference every Friday at Noon (EST)
 Homework. Your homework for this week is to do some exploring. FreePBX is a treasure trove of functionality, and the Orgasmatron build adds a bunch of additional options. See if you can find all of them. For starters, you’ll want to activate CallerID Lookups in FreePBX. Choose Setup, CID Superfecta, Default and enter the maint password you created with passwd-master. Then choose Tools, Module Administration, CallerID Lookup, Enable, Process and Save the Settings. Then edit each of the Inbound Routes and choose CallerID Superfecta as the CID Lookup Source. Save your changes. Finally, choose Setup, CallerID Lookup Sources, CallerID Superfecta and be sure your maint password created with passwd-master is correct here, too. If not, update it. For additional tips, visit the forums.
 Be sure to log into your server as root and look through the scripts added in the /root/nv folder. You’ll find all sorts of goodies to keep you busy. s3cmd.faq tells you how to quickly activate the Amazon S3 Cloud Computing service. And, if you’ve heeded our advice and purchased a PogoPlug, you can link to your home-grown cloud. Just add your credentials to /root/pogo-start.sh. Then run the script to enable the PogoPlug Cloud on your server. All of your cloud resources are instantly accessible in /mnt/pogoplug. It’s also perfect for off-site backups!
Also check out Tweet2Dial which lets you use Twitter to make Google Voice calls, send free SMS messages, and manage your new Asterisk server. Don’t forget to List Yourself in Directory Assistance so everyone can find you by dialing 411. And add your new number to the Do Not Call Registry to block telemarketing calls. Or just call 888-382-1222 from your new number. Finally, try out the included Stealth AutoAttendant by dialing your own number and pressing 0 while the greeting is played. This will reroute your call to the demo applications option in the IVR.
 Support Issues. With any application as sophisticated as this one, you’re bound to have questions. Blog comments are a terrible place to handle support issues although we welcome general comments about our articles and software. If you have particular support issues, we encourage you to get actively involved in the PBX in a Flash Forums. It’s the best Asterisk tech support site in the business, and it’s all free! We maintain a thread with the latest Patches for Orgasmatron 5.1 and 5.2. Please have a look. Unlike some forums, ours is extremely friendly and is supported by literally hundreds of Asterisk gurus and thousands of ordinary users just like you. So you won’t have to wait long for an answer to your questions.
Coming Attractions. In our next episode, we’ll walk you through the process of adding a second, third, fourth, and fifth Google Voice line to your server so that you’ll never run out of free calling on your server. Enjoy!
Need help with Asterisk? Visit the PBX in a Flash Forum.
Or Try the New, Free PBX in a Flash Conference Bridge.
whos.amung.us If you’re wondering what your fellow man is reading on Nerd Vittles these days, wonder no more. Visit our new whos.amung.us statistical web site and check out what’s happening. It’s a terrific resource both for us and for you.
Special Thanks to Our Generous Sponsors
FULL DISCLOSURE: ClearlyIP, Skyetel, Vitelity, DigitalOcean, Vultr, VoIP.ms, 3CX, Sangoma, TelecomsXchange and VitalPBX have provided financial support to Nerd Vittles and our open source projects through advertising, referral revenue, and/or merchandise. As an Amazon Associate and Best Buy Affiliate, we also earn from qualifying purchases. We’ve chosen these providers not the other way around. Our decisions are based upon their corporate reputation and the quality of their offerings and pricing. Our recommendations regarding technology are reached without regard to financial compensation except in situations in which comparable products at comparable pricing are available from multiple sources. In this limited case, we support our sponsors because our sponsors support us.
BOGO Bonaza: Enjoy state-of-the-art VoIP service with a $10 credit and half-price SIP service on up to $500 of Skyetel trunking with free number porting when you fund your Skyetel account. No limits on number of simultaneous calls. Quadruple data center redundancy. $25 monthly minimum spend required. Tutorial and sign up details are here.
![]() The lynchpin of Incredible PBX 2020 and beyond is ClearlyIP components which bring management of FreePBX modules and SIP phone integration to a level never before available with any other Asterisk distribution. And now you can configure and reconfigure your new Incredible PBX phones from the convenience of the Incredible PBX GUI.
The lynchpin of Incredible PBX 2020 and beyond is ClearlyIP components which bring management of FreePBX modules and SIP phone integration to a level never before available with any other Asterisk distribution. And now you can configure and reconfigure your new Incredible PBX phones from the convenience of the Incredible PBX GUI.
VitalPBX is perhaps the fastest-growing PBX offering based upon Asterisk with an installed presence in more than 100 countries worldwide. VitalPBX has generously provided a customized White Label version of Incredible PBX tailored for use with all Incredible PBX and VitalPBX custom applications. Follow this link for a free test drive!
Special Thanks to Vitelity. Vitelity is now Voyant Communications and has halted new registrations for the time being. Our special thanks to Vitelity for their unwavering financial support over many years and to the many Nerd Vittles readers who continue to enjoy the benefits of their service offerings. We will keep everyone posted on further developments.
Some Recent Nerd Vittles Articles of Interest…
- passwd-master is the PIAF utility for setting a master password for FreePBX access with the maint user account. [↩]
- status is the PIAF utility program that displays the current status of most major applications running on your server. [↩]
- Mapping a port on your firewall to a private IP address unblocks certain Internet packets and allows them to pass through your firewall directly to an IP device "inside" your firewall for further processing. [↩]
- reboot is the Linux command for restarting your server. It’s functionally equivalent to shutdown -r now. [↩]
Introducing PogoPlug: Cloud Computing for $100 per Terabyte
Ever wished you could build and manage your own Cloud Computing Center with minimal cost and no recurring charges… ever? Well, today’s your lucky day.
It takes a lot to get us excited about a new product offering. But this one is a real winner! For under $130, Cloud Engines provides you your very own PogoPlug 2.0 device that connects to your router and shares up to four USB drives over the Internet. At today’s prices and ignoring sales tax, that means you can put eight terabytes of Cloud Storage on line for a one-time cost of about $100/terabyte. To give you a point of reference, Google will rent you the same space for $256/terabyte… per year. And Google is one of the least expensive Cloud Computing resources out there. Here’s the math for naysayers:
4 – WalMart1 2TB WD MyBook Drives @ $169 each = $676
1 – PogoPlug 2.0 Device @ $129 each = $129
ONE-TIME, NON-RECURRING COST: $805/8TB or $100/TB
For those that don’t need 8 terabytes, the 2 terabyte setup including the drive and PogoPlug device is still just over half the one-year rental rate of equivalent storage from Google. And, just to be clear, this isn’t merely a storage device (like Amazon S3) requiring downloads before the files can actually be used. PogoPlug’s software makes these USB drives an integral part of your Desktop just like any other attached storage devices. Think WebDAV! So it makes a perfect home for your music, movie, and photo collections. There also are loads of Open Source applications for PogoPlug for those that like to tinker. And you can use PogoPlug to keep synchronized backups of your important files.
Other Options. Be aware that for about $50 less, you can purchase the Seagate FreeAgent DockStar Network Adapter which includes a single year of PogoPlug Internet support. After that, it’s $30 annually. Translation: By the end of the second year, you’re better off with the PogoPlug. So the choice is a No-Brainer in our book. But, the fact that Seagate is also standing behind the PogoPlug design should make everyone sleep more soundly.
Deployment. After a one-minute, one-time setup over the Internet, you can securely access all of your USB drive resources via PogoPlug using either a web browser or one of several free desktop applications that are available for Windows, Mac OS X, Linux as well as Android phones, iPhones, and (earlier today) Blackberrys. And you get free support and a terrific forum. The device works flawlessly behind either a DSL or cable modem AND a NAT-based router so there are no firewall issues to address. Just enter the serial number on the bottom of your device when you access the PogoPlug web site, and configuration is automatic.
Uploading Files. One of PogoPlug’s slickest features is its automatic cataloging of files which are uploaded. Once uploaded, you can view your Music, Movies, and Pictures by simply clicking on one of the buttons. Photos are cataloged into directories by the month in which the photos were taken. Music is indexed by artist, album, and genre. In addition, music by artist, album and genre as well as photo albums can be shared by entering email addresses for those that can access the materials, by enabling public viewing (assuming you have legal rights to do so), or by sharing items using your Twitter, Facebook, and MySpace credentials. We’ve shared a photo album just to give you an idea of how this works. The security and logistical nuts and bolts all are managed by Cloud Engines’ servers. You can review and modify the materials you’re sharing by clicking on the Files I Share link in your browser. Finally you can automatically alert those with share privileges when folder content is updated. Very slick!
Give PogoPlug a try. By clicking on one of our links, you also help support the Nerd Vittles project. We think you’ll be as thrilled as we are with this terrific new creation. Enjoy!
Need help with Asterisk®? Visit the PBX in a Flash Forum.
Or Try the New, Free PBX in a Flash Conference Bridge.
whos.amung.us If you’re wondering what your fellow man is reading on Nerd Vittles these days, wonder no more. Visit our new whos.amung.us statistical web site and check out what’s happening. It’s a terrific resource both for us and for you.
Special Thanks to Our Generous Sponsors
FULL DISCLOSURE: ClearlyIP, Skyetel, Vitelity, DigitalOcean, Vultr, VoIP.ms, 3CX, Sangoma, TelecomsXchange and VitalPBX have provided financial support to Nerd Vittles and our open source projects through advertising, referral revenue, and/or merchandise. As an Amazon Associate and Best Buy Affiliate, we also earn from qualifying purchases. We’ve chosen these providers not the other way around. Our decisions are based upon their corporate reputation and the quality of their offerings and pricing. Our recommendations regarding technology are reached without regard to financial compensation except in situations in which comparable products at comparable pricing are available from multiple sources. In this limited case, we support our sponsors because our sponsors support us.
BOGO Bonaza: Enjoy state-of-the-art VoIP service with a $10 credit and half-price SIP service on up to $500 of Skyetel trunking with free number porting when you fund your Skyetel account. No limits on number of simultaneous calls. Quadruple data center redundancy. $25 monthly minimum spend required. Tutorial and sign up details are here.
![]() The lynchpin of Incredible PBX 2020 and beyond is ClearlyIP components which bring management of FreePBX modules and SIP phone integration to a level never before available with any other Asterisk distribution. And now you can configure and reconfigure your new Incredible PBX phones from the convenience of the Incredible PBX GUI.
The lynchpin of Incredible PBX 2020 and beyond is ClearlyIP components which bring management of FreePBX modules and SIP phone integration to a level never before available with any other Asterisk distribution. And now you can configure and reconfigure your new Incredible PBX phones from the convenience of the Incredible PBX GUI.
VitalPBX is perhaps the fastest-growing PBX offering based upon Asterisk with an installed presence in more than 100 countries worldwide. VitalPBX has generously provided a customized White Label version of Incredible PBX tailored for use with all Incredible PBX and VitalPBX custom applications. Follow this link for a free test drive!
Special Thanks to Vitelity. Vitelity is now Voyant Communications and has halted new registrations for the time being. Our special thanks to Vitelity for their unwavering financial support over many years and to the many Nerd Vittles readers who continue to enjoy the benefits of their service offerings. We will keep everyone posted on further developments.
Some Recent Nerd Vittles Articles of Interest…
- The in-store pricing at WalMart is actually cheaper than on line for these particular drives. [↩]
Tweaking Asterisk for Free Google Voice Calling
 Now that the Asterisk® and Google Voice marriage is finally underway, we wanted to step back today and revise the original methodology a bit to take advantage of some of the terrific comments which were offered in response to our last article. First, the good news. U.S. calls through Google Voice using Asterisk work! They sound great, and they're free. The not so good news was that the MeetMe conferencing trick to join your outbound call with the Google Voice click-to-dial return call from your destination worked great so long as a real person answered the phone. But, if an answering machine picked up or no one answered the call at all, there were problems because these calls already had been transferred to the MeetMe conference and there was no simple way to disconnect them. And the need for two DIDs to support a single Google Voice interface just seemed a bit wasteful.
9/1/2010 Update: A good bit has changed with Google Voice since this article was first published. For the definitive guide and installation procedure, we highly recommend The Incredible PBX and accompanying article which can be found at this link. Google Voice (and much more) already is included in our new PBX which is literally Plug-and-Play. If you prefer to roll your own, be sure to also have a look at this excellent update on the Michigan Telephone Blog.
Today we want to try to eliminate these two quirks while stiill providing a seamless interface between Google Voice and Asterisk. We also appreciate that thousands of you already have implemented the previous approach. So we want your transition to the new way of doing things to be as painless as possible. On the other hand, for frequent readers, we hope you'll bear with us as we repeat some of what already has been covered in previous articles so new visitors don't have to jump around between articles to get the complete picture of what we're trying to accomplish.
The objective remains the same. We want a methodology that lets us make outbound calls from any Asterisk phone using the Google Voice service to take advantage of free calling in the United States and Canada. And we want calls to our Google Voice number delivered to our Asterisk system for transparent call processing. Yes, SIP is still on our wish list for both outbound and inbound calls with Google Voice, but we'll make do with PSTN calls particularly while Google is footing the bill for all of the calls.
Update: There's now a turnkey Asterisk solution that implements Google Voice calling without getting your hands dirty. Check out our new Orgasmatron V.
 Tweaked Design. Here's the new design. You obviously still need a free Google Voice account. If you don't have one, you can request an invite here. At last report, it's only taking a few days from application to invite which is really great news. Don't use a space in your Google Voice password! Once you have a Google Voice account and phone number (Google has reserved a million of them so... not to worry!), then you'll need a DID that provides unlimited, free incoming calls. Once you get your DID set up on your Asterisk system, we'll set up a forwarding phone number for this DID in your Google Voice account so that Google Voice calls can be connected to your Asterisk server.
For outbound calls, we'll combine a little dialplan voodoo with pygooglevoice to instruct Asterisk to place a click-to-dial call using your Google Voice forwarding number. Then we'll stuff in the destination U.S. phone number. When you dial GV-678-1234567 from any of your Asterisk phones, Asterisk will park your initial call in a reserved parking lot slot and then join the called party to the originally parked call. The entire procedure is virtually transparent both to the caller and the callee. And, unlike the MeetMe conference, the parking lot fades out of the picture as soon as the call is connected. Thus, if either party hangs up, the active channel for the call is terminated on your Asterisk server.
For inbound calls from your Google Voice number, we'll tweak the dialplan so that it can distinguish between a RingBack call that Google Voice initiated and a true inbound call. We'll peel off the real inbound calls and route them to a separate Inbound Route in FreePBX for processing in any way you desire.
Finally, for those that implemented the methodology in our previous article, we'll walk you through the steps to revise your existing setup to take advantage of these new tweaks. You can skip over the initial installation process if you already have gone through the Google Voice setup from our earlier article. Just skip down to Tweaking Previous Setups.
 Special Thanks. At the outset, we again want to express our sincere appreciation to Jacob Feisley and Paul Marks for their pioneering work on a Python interface to Google Voice. We also stumbled upon another Python development project, Google Voice for Python. While we originally had planned to rely upon Jacob and Paul's script, we ultimately decided to implement pygooglevoice because of the additional flexibility it provided for down the road. With pygooglevoice, you not only can make Google Voice calls, but you also can send SMS messages with no muss or fuss. Jacob Feisley has now joined that project as well. So, our special tip of the hat goes to the entire Google Voice for Python development team. It's a terrific product as you will see.
Prerequisites. Today's setup requires a CentOS-based Asterisk aggregation with a current version of FreePBX. Be aware that today's solution requires Python 2.4 or higher and reportedly will not work with Python 2.3 found in some Linux distributions. We've tested everything with PBX in a Flash and, on that platform, you're good to go. The install script should work equally well with the other CentOS-based Asterisk aggregations, but we haven't tested them. Be our guest, and let us know if you encounter any problems. Finally, a word of caution. We don't ordinarily distribute solutions using development tools we don't use. Our knowledge of Python wouldn't fill a thimble. We've made an exception today because of the extraordinary interest in Google Voice by the Asterisk community. But, if something comes unglued, we can't fix it. So have a backup plan in place just in case. 🙂
Today's Drill. To get everything working today, there are six steps: (1) obtaining and configuring a DID to manage calls between Google Voice and Asterisk, (2) configuring a Google Voice forwarding number for this DID to manage your outbound and inbound calls, (3) configuring FreePBX to route all outbound calls with a GV prefix to your special Google Voice dialplan context, (4) configuring an inbound route to manage incoming calls from your Google Voice number, (5) setting up a series of Parked Call extensions, one of which will be used to manage your outbound Google Voice calls, and (6) running our install script which adds the dialplan code for Google Voice calling with your credentials and puts the Python application into place on your server. It sounds more complicated than it is. So hang on to your hat. Here we go!
 Dedicated DID. Before you can use Google Voice with Asterisk, you'll need a DID that can be dedicated to your Google Voice interface to Asterisk. We'd recommend a free IPkall or SIPgate DID. To get started, use one of the links above to obtain and configure the DID. Temporarily point the DID to an extension on your Asterisk system that can be used to verify your requests for the number. Since all of these calls are free, the area code of the DID really doesn't matter because you're never going to publish the fact that it exists.
The easiest method for setting up the DID is to first create a SIP URI for the DID on your Asterisk system. Next route the SIP URI to an Inbound Route in FreePBX where you can manage the destination for calls to that DID. Initially, you want the destination to be an extension on your Asterisk system that you can answer to verify both the DID setup and the GV setup below. Finally, point the DID you obtained to the SIP URI defined above.
HINT: The entry in extensions_override_freepbx.conf would look something like this for a SIP URI called ipkall-1:
exten => ipkall-1,1,Goto(from-trunk,${DID},1)
Then you would create an inbound route named ipkall-1 using FreePBX and designate some existing extension on your server as the destination for these inbound calls.
When you set up the SIP forwarding for the DID at ipkall.com, you'd specify the SIP URI as:
ipkall-1@ipaddress_of_your-Asterisk_server
We've previously covered in detail how to do this so read the article if you need a refresher course. To reiterate, the area code of this DID really doesn't matter because you're never going to give out the number. So use one of the free sources and save yourself some money. The real trick is you want to use a DID with unlimited, free inbound calls. Both IPkall and SIPgate provide that functionality at no cost.
Google Voice Setup. Log into your Google Voice account and click Settings, Phones, Add Another Phone. Add the area code and phone number of your DID. Be sure the DID is pointed to an extension on your PBX that you can answer since you have to go through Google's confirmation drill to successfully register the number. After the DID is confirmed, be sure there's a check mark beside this Google Voice destination so that incoming calls to your GV number will be routed to your Asterisk server.
While you're still in the Google Voice Setup, click on the General tab. Uncheck Enable Call Screening. Turn Call Presentation Off. And set CallerID to Display Caller's Number. Be aware that IPkall DIDs only forward your IPkall number as the CallerID number while SIPgate DIDs reportedly forward the actual number of the person calling you. If this matters to you, then you may prefer the SIPgate DID option. Finally, uncheck Do Not Disturb. Now click the Save Changes button.
Integrating Google Voice into Asterisk with FreePBX. Open FreePBX with a web browser and choose Setup, Trunks, Add Custom Trunk. Insert your GV number in the Outbound CallerID field and add the following Custom Dial String on the form and Submit Changes and reload the dialplan:
local/$OUTNUM$@custom-gv
Next, choose Setup, Outbound Routes, Add Route and fill in the following entries on the form:
Route Name: GoogleVoice
Dial Pattern: 48|NXXNXXXXXX
Trunk Seq: local/$OUTNUM$@custom-gv
 Inbound Routes. Next, we need two Inbound Routes to get everything working. In setting up your DID with IPkall or SIPgate, you already should have created one inbound route for that provider. It already should be routing calls to an extension on your PBX. Now we need to create a Custom Destination for this inbound route and then reroute these calls there. In that way, your RingBack calls will be routed to some special dialplan code that drops these calls into a custom parking lot where the RingBack call is married up to the extension from which you placed the original call. Then we need to create another inbound route to manage normal incoming calls that are forwarded to your PBX whenever someone dials your Google Voice number.
To begin, choose Tools, Custom Destinations, Add Custom Destination and add an entry like this and then click the Submit Changes button:
Custom Destination: custom-park,s,1
Description: Custom GV-Park
Next choose Setup, Inbound Route and click on the inbound route you created previously for IPkall or SIPgate. Change the destination for these calls to Custom Destination: Custom GV-Park.
Now click on Add Incoming Route and create a new route for your incoming Google Voice calls. Give it any description you like but, for the DID number, it must be gv-incoming. You can leave most of the other defaults. Just be sure you set a destination for your incoming calls from Google Voice. It could be an extension, ring group, IVR, or whatever best meets your needs. The important entry here is gv-incoming for the DID number. Click the Submit button to save your entries. Ignore the warning that you've entered an oddball DID. We know what we're doing. 🙂
 Setting Up the Parking Lot. While still in FreePBX, we need to create or adjust your existing settings in Setup, Parking Lot. The parking lot is used by FreePBX to simulate old key telephones where you could place a call on hold and then someone else in the office could pick up the call by clicking on the blinking key on their phone. The Asterisk equivalent is to press the flash hook and dial your Parking Lot Extension which then places the call in a Parking Lot space and tells you what the space number is. Someone else then can dial the number of that space to pick up the call. Our little trick today works like this. When you place an outbound call through Google Voice, your extension will be dumped into a reserved parking lot space. When Google Voice initiates the RingBack call before connecting the destination number you've dialed, that call will be sent to the same reserved parking lot space. The two calls then are joined, and you'll hear the parking lot number followed by ring tones as your call is connected by GV to its final destination. Our special thanks to Richard Bateman for his comment on the previous article and this terrific tip! He wins an Atomic Flash installer from Nerd Vittles. In addition, A. Godong wins an Atomic Flash installer for his tip on consolidating two DIDs into a single DID to manage both inbound and outbound GV calls. Just send us your addresses.
Now, where were we? Most FreePBX systems have a default setup for the Parking Lot. What we need to do is be sure you have reserved one more space in the parking lot than you actually need for day to day operation of your PBX. We'll use the last parking lot space number to manage outbound calling through Google Voice. Our entries look like the following:
Enable Parking Lot Feature: checked
Parking Lot Extension: 70
Number of Slots: 5
Parking Timeout: 30 seconds
Parking Lot Context: parkedcallsDestination for Orphaned Calls: Terminate Call: Hangup
If you use our setup above, the Magic Number is 75 which is the fifth slot in the Parking Lot. If you use a different Parking Lot extension or number of slots, here's how to calculate the Magic Number. Start counting the slots beginning with one more than the Parking Lot Extension. When you get to the last slot in the number of slots you've specified, that's your Parking Lot Magic Number. Write it down. You'll need it in a second when you run our GV installation script.
Save your entries and reload the Asterisk dialplan when prompted.
Integrating pygooglevoice. Now we're ready to complete the setup by running our revised script which loads pygooglevoice and sets up your dialplan in extensions_custom.conf. You'll need 5 pieces of information to run the script so write them down before you begin:
1. Your 10-digit Google Voice phone number
2. Your Google Voice email address
3. Your Google Voice password (no spaces!)
4. Your 11-digit RingBack DID (16781234567)
5. Your Parking Lot Magic Number
 A word of caution: If you used a gMail address to set up your Google Voice account, it's possible to have different gMail and Google Voice passwords. For this to work, you'll need to enter your gMail password, not your Google Voice password (assuming they're different).
Now log into your Asterisk server as root and issue the following commands:
cd /root
wget http://bestof.nerdvittles.com/applications/gv/install-gv-new
chmod +x install-gv-new
./install-gv-new
Google Voice Speed Dials. For frequently called numbers, you can add speed dials by inserting entries in the [from-internal-custom] context of extensions_custom.conf that look like the example below where 333 is the speed dial number and 6781234567 is the area code and number to call. Be sure to reload your Asterisk dialplan to activate them.
exten => 333,1,Dial(local/6781234567@custom-gv,300)
Congratulations! You now have what we hope will be flawless and free U.S. calling on your Asterisk system using Google Voice. No gimmicks, no strings, no cost. Enjoy!
Finally, one additional word of caution. Both Google Voice and this call design are set up for a single call at a time. There are no safeguards to prevent multiple calls, but that may violate the Google Voice terms of service.
Asterisk 1.6 Solution. Several readers now have documented the procedure for implementing the Asterisk 1.6 bridge technology to make outbound Google Voice calls. You can read all about it here.
 Tweaking Previous Setups. If you installed pygooglevoice using our previous tutorial, here's what you need to do. First, log into your Asterisk server as root and issue the following commands:
cd /etc/asterisk
nano -w extensions_custom.conf
Scroll to the bottom of the file by pressing Ctrl-W then Ctrl-V. Move up the file using up arrow until you reach [custom-gv]. Press Ctrl-K repeatedly to delete all of the lines in the [custom-gv] context. If you get to another line that starts with a label in brackets like [this], STOP deleting. Once you've deleted all of the lines in the [custom-gv] context, save the file: Ctrl-X, Y, and press Enter.
Now continue reading this article by jumping up to the Google Voice Setup topic. The Custom Trunk entry and the GoogleVoice outbound route will already be in your FreePBX system so there's no need to repeat those two steps. You will need to perform the remaining FreePBX steps beginning at the Inbound Routes topic and continuing on with Setting Up the Parking Lot. Finally, when you run the new installation script, it will detect that pygooglevoice is already on your system and will skip that step but will install the new custom contexts in extensions_custom.conf using your new settings. Enjoy!
Thought for the Day. Which is more arbitrary: (1) Apple snubs Google Voice or (2) Google Voice snubs SIP? Pays to look in the mirror occasionally.
Best Read of the Week. Memo to Steve Jobs and Apple: Stop Being A Jerk!
Need help with Asterisk? Visit the PBX in a Flash Forum.
Or Try the New, Free PBX in a Flash Conference Bridge.
whos.amung.us If you're wondering what your fellow man is reading on Nerd Vittles these days, wonder no more. Visit our new whos.amung.us statistical web site and check out what's happening. It's a terrific resource both for us and for you.
Special Thanks to Our Generous Sponsors
FULL DISCLOSURE: ClearlyIP, Skyetel, Vitelity, DigitalOcean, Vultr, VoIP.ms, 3CX, Sangoma, TelecomsXchange and VitalPBX have provided financial support to Nerd Vittles and our open source projects through advertising, referral revenue, and/or merchandise. As an Amazon Associate and Best Buy Affiliate, we also earn from qualifying purchases. We’ve chosen these providers not the other way around. Our decisions are based upon their corporate reputation and the quality of their offerings and pricing. Our recommendations regarding technology are reached without regard to financial compensation except in situations in which comparable products at comparable pricing are available from multiple sources. In this limited case, we support our sponsors because our sponsors support us.
BOGO Bonaza: Enjoy state-of-the-art VoIP service with a $10 credit and half-price SIP service on up to $500 of Skyetel trunking with free number porting when you fund your Skyetel account. No limits on number of simultaneous calls. Quadruple data center redundancy. $25 monthly minimum spend required. Tutorial and sign up details are here.
![]() The lynchpin of Incredible PBX 2020 and beyond is ClearlyIP components which bring management of FreePBX modules and SIP phone integration to a level never before available with any other Asterisk distribution. And now you can configure and reconfigure your new Incredible PBX phones from the convenience of the Incredible PBX GUI.
The lynchpin of Incredible PBX 2020 and beyond is ClearlyIP components which bring management of FreePBX modules and SIP phone integration to a level never before available with any other Asterisk distribution. And now you can configure and reconfigure your new Incredible PBX phones from the convenience of the Incredible PBX GUI.
VitalPBX is perhaps the fastest-growing PBX offering based upon Asterisk with an installed presence in more than 100 countries worldwide. VitalPBX has generously provided a customized White Label version of Incredible PBX tailored for use with all Incredible PBX and VitalPBX custom applications. Follow this link for a free test drive!
Special Thanks to Vitelity. Vitelity is now Voyant Communications and has halted new registrations for the time being. Our special thanks to Vitelity for their unwavering financial support over many years and to the many Nerd Vittles readers who continue to enjoy the benefits of their service offerings. We will keep everyone posted on further developments.
Some Recent Nerd Vittles Articles of Interest...
VoIP Over VPN: Securely Interconnecting Asterisk Servers
We’ve just returned from a week in the Pacific Northwest teaching an Asterisk® course for an organization that wants to interconnect satellite offices using Asterisk servers. This coincided with a support request from one of America’s premier airlines which wants to do much the same thing for all of its reservation counters in airports situated in feeder cities around the country. Suffice it to say, PBX in a Flash in conjunction with Asterisk and Hamachi VPNs is perfectly suited to let anyone build these interconnected systems in minutes rather than months. In fact, with less than a day’s worth of introduction to Asterisk and PBX in a Flash, a group of 16 network administrators with no previous Asterisk experience did just that in a one-hour lab session during our training seminar last week. At the risk of (further) destroying our ability to earn a living, here’s how we did it.
Proxmox as a Training Tool. Before we get into the nitty gritty of actually interconnecting Asterisk servers with Hamachi VPNs, let us provide the free tip of the week for those of you that want to experiment with interconnecting Asterisk servers or for those that like to test various Asterisk scenarios without rebuilding servers all day long. There is no finer tool for this than the Proxmox Virtual Environment, a free and easy to use Open Source virtualization platform for running Virtual Appliances and Virtual Machines. With a sale-priced Dell T105 with a Quad Core AMD Opteron processor and 8 gigs of RAM, you’ll have a perfect platform to run about 16 simultaneous PBX in a Flash servers. The trick is finding the machines on sale for half price which is about every other week. Our lab system which matches this configuration was less than $600 with RAM purchased from a third party. You can save most of the shipping cost by using our coupon link in the right column to shop at Dell’s small business site.
Proxmox lets you build virtual machines in two ways: OpenVZ templates or Qemu/KVM Templates and ISO images. While we intend to offer an OpenVZ template for PBX in a Flash soon, currently it’s easy to create your own ISO template using the standard PBX in a Flash ISO image. Once you’ve uploaded your ISO image into Proxmox, simply create a new virtual machine by giving it a name, specifying 512MB of RAM and a 30GB partition. In 10 seconds or less, your new VM will be ready to boot. Start your VM and then open the VNC console window within the Proxmox web interface and install PBX in a Flash just as if you were building a stand-alone machine. When the 15-minute install completes, run through the Orgasmatron Installer setup, and you’ll have your turnkey PBX in a Flash system ready for production in less than 30 minutes.
You don’t have to repeat this drill for every virtual machine. Instead, use the built-in Proxmox backup utility to make a backup image of what you built. Shut down the VM, create a /backup directory, and then schedule the compressed backup in the web browser. When the backup completes, you’ll have a backup image in /backup with a file name like this: vzdump-101.tgz.
To create a new virtual machine, you issue the following command while positioned in the /backup directory specifying the number for the new virtual machine:
vzdump --restore vzdump-101.tgz 102
In about 3 minutes, you’ll have a second virtual machine that’s a clone of the first one. Because it’s a true clone, it would obviously have the same MAC address for the virtual NIC. You don’t want that or all of your VMs would boot up using the same IP address. Using the Proxmox web interface, just edit the new VM 102 by switching from the Status tab to the Hardware tab, delete the existing Ethernet device, and then create a new Ethernet device under the hardware address list pulldown. This will create a new virtual NIC with a new MAC address. So, when you boot VM 102, it will be assigned a new IP address by your DHCP server. You can decipher the new IP address by opening the VNC console window for VM 102 after you boot it up. Now you’re an expert. You can create the additional Baker’s Dozen turnkey PBX in a Flash servers in about an hour. Start all of them up, and you’ve got an instant training facility and PBX in a Flash playground.
April, 2012 Update. See our new article for a current state-of-the-art VoIP VPN.
Creating Hamachi VPN. You obviously don’t need a virtual private network in order to interconnect Asterisk servers. But, as easy as the Hamachi VPN is to set up, especially with PBX in a Flash servers, why wouldn’t you want all of your inter-Asterisk communications secured and encrypted? In addition to the capacity limitation of the Proxmox server, there’s another reason we chose to build 16 PBX in a Flash VMs. That happens to be the number of servers you can interconnect with the Hamachi Virtual Private Network without incurring a charge.1 Why use the Hamachi VPN when OpenVPN is free with unlimited network connections and no strings? The short answer is it’s incredibly simple to set up without public and private key hassles, and it supports dynamic IP server addressing with zero configuration. We plan to cover OpenVPN in a subsequent article but, for many implementations, Hamachi VPNs offer a robust, flexible alternative that can be deployed in minutes.
If you’re not using PBX in a Flash, there are a million good Hamachi VPN tutorials available through a quick Google search. If you are using PBX in a Flash, we’ve done the work for you. With the Orgasmatron Installer build, you’ll find the Hamachi VPN installation script in /root/nv. For other PBX in a Flash systems, just download the install-hamachi.x script from here or, after logging into your server as root, issue the following commands:
wget http://pbxinaflash.net/source/hamachi/install-hamachi.x
chmod +x install-hamachi.x
./install-hamachi.x
Before beginning the Hamachi VPN install, it’s a good idea to make yourself a cheat sheet for the servers you plan to interconnect. We’re going to interconnect 3 servers today, but doing 16 is just more of the same. You’ll need a unique name for your virtual private network. Pick a name that distinguishes this VPN from others you may build down the road. For our example, we’re going to use piaf-vpn. Next, you need a very secure password for your VPN. We’re going to use password for demonstration purposes only. Finally, you need a unique nickname for each of your servers, e.g. piaf-server1, piaf-server2, and piaf-server3 for our example setup today.
For the first Hamachi install, we’ll need to create the new network. For the remaining installs, we’ll simply join the existing network. Keep in mind that you can only remove machines from the network using the same server that was used to create the other VPN accounts initially so build out your virtual private network by starting with your main server, piaf-server1 in our example.
To begin the Hamachi VPN install, run the script using the commands shown above. Type Y to agree to the installer license and then press the Enter key to kick off the install. For the piaf-server1 install, type N to create a new Hamachi network. For the remaining installs, you’d type J to join an existing Hamachi network. Enter the network name you chose above. For our sample, we used piaf-vpn. Type it twice when prompted. Now type your network password and then your nickname for this server when prompted to do so. Then standby while the Hamachi software is installed. It takes a few minutes depending upon the speed of your network connection. And remember, do NOT use our sample network name. Make up your own and don’t forget it. When the install completes, you can review the log if you’d like. Unless something has come unglued, Hamachi should now be running on your first server. Repeat the drill on your other servers.
The next step is to grab some of our scripts to make it easier to manage Hamachi on your servers.
cd /usr/local/bin

wget http://pbxinaflash.net/source/hamachi/hampiaf

wget http://pbxinaflash.net/source/hamachi/hamachi-servers

chmod +x ham*

cd /root

wget http://pbxinaflash.net/source/hamachi/hamachi.faq
The hamachi.faq document provides all of the commands you’ll need to manage Hamachi including the steps to start over with a totally new virtual private network. For now, let’s be sure your network is running. Type: hamachi-servers piaf-vpn using the network name you assigned to your own VPN. Then type it again, and it should display all of the servers on your VPN with their private VPN IP addresses:
root@pbx:~ $ hamachi-servers piaf-vpn
This server:
Identity 5.151.123.1
Nickname piaf-server1
AutoLogin yes
OnlineNet piaf-vpnGoing online in piaf-vpn .. failed, already online
Retrieving peers’ nicknames ..
* [piaf-vpn]
5.151.123.2 piaf-server2
5.151.123.3 piaf-server3
Finally, a word of caution about security. One of the drawbacks of the ease with which you can create Hamachi VPNs is the ease with which you can create Hamachi VPNs. Anyone that knows your network name and password can join your network with one simple command. You can kick them off from the main server where the VPN was created (hampiaf evict piaf-vpn 5.249.146.66), but you can’t keep them from joining. So, protect your network by making the password extremely secure. There currently is no way to change your network password. All you can do is create a new network with a new network name and a more secure password.
Interconnecting Asterisk Servers. Once your VPN is established and all of your servers are on line, then we’re ready to interconnect them with Asterisk and FreePBX. There are a number of ways to do this. For smaller networks, we’re going to show you the easy and secure way using IAX and the VPN you just created. As with the VPN setup, a cheat sheet comes in handy to avoid erroneous entries that would cause your calls between servers to fail. What we recommend is assigning and creating a block of extensions on each of your servers with different ranges of numbers. For example, we’re going to use four-digit extensions in the 1xxx range for piaf-server1, 2xxx for piaf-server2, and 3xxx for piaf-server3. The idea here is that the extensions are unique between your servers. This makes it easy to dial between offices without having to resort to dialing prefixes. So the first step in interconnecting your servers is to build the necessary extensions on each of your servers.
Now for the cheat sheet. Using the hamachi-servers tool above, decipher the VPN IP address of each of your servers and make a chart with the server names, the range of extension numbers, and the VPN IP address of each server. You’ll also need to think up a very secure password. We’re going to use the same one for all of the servers although you certainly don’t need to. So long as the password you choose is secure, there’s really no reason not to use the same one.
piaf-server1 1xxx 5.151.123.1 password
piaf-server2 2xxx 5.151.123.2 password
piaf-server3 3xxx 5.151.123.3 password
Creating Trunks. The next step is to create an IAX trunk on each server for each remaining server in your network. In our example, on piaf-server1, we’d want to create trunks for piaf-server2 and piaf-server3. On piaf-server2, we’d want to create trunks for piaf-server1 and piaf-server3. And so on.
NOTE: Because of a change in IAX design to fix a security issue that arose after this article was originally published, be sure to add the following line in the User Details of each trunk below:
requirecalltoken=no
On your first server (piaf-server1 in our example), using a web browser, open FreePBX and choose Admin, Setup, Trunks and then click Add IAX2 Trunk. Create the trunk to piaf-server2 with the following entries. Leave everything blank except the entries shown below:

While still on piaf-server1, repeat the process to create a trunk for piaf-server3:
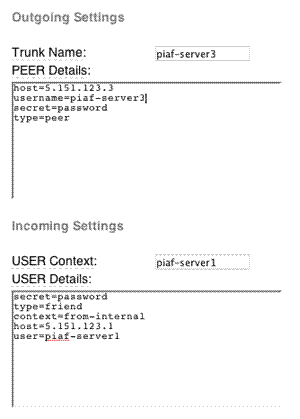
On your second server (piaf-server2 in our example), using a web browser, open FreePBX and choose Admin, Setup, Trunks and then click Add IAX2 Trunk. Create the trunk to piaf-server1 with the following entries. Leave everything blank except the entries shown below:
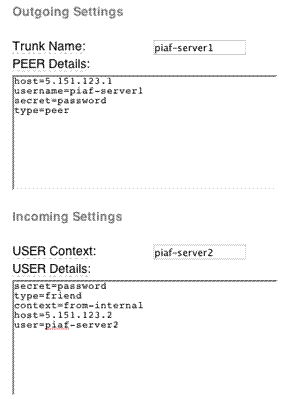
While still on piaf-server2, repeat the process to create a trunk for piaf-server3:
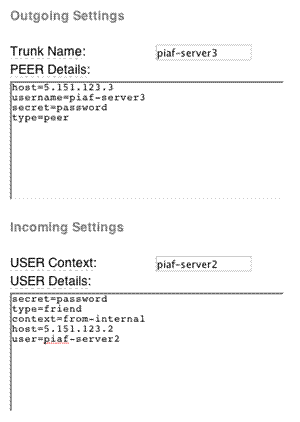
On your third server (piaf-server3 in our example), using a web browser, open FreePBX and choose Admin, Setup, Trunks and then click Add IAX2 Trunk. Create the trunk to piaf-server1 with the following entries. Leave everything blank except the entries shown below:
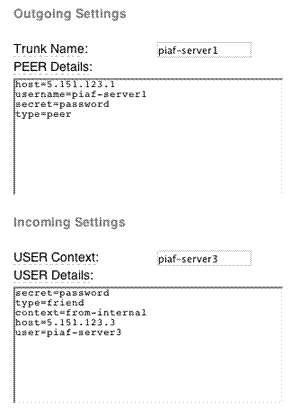
While still on piaf-server3, repeat the process to create a trunk for piaf-server2:
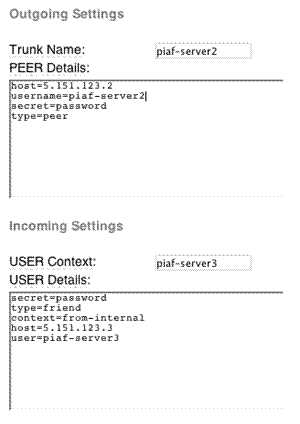
Creating Outbound Routes. Now we need to tell Asterisk how to route the calls between the servers. In a nutshell, we want calls to extensions in the 1xxx range routed to extensions on piaf-server1, calls to 2xxx extensions routed to piaf-server2, and calls to 3xxx extensions routed to piaf-server3. On each server, create an outbound route for each of the remaining servers. Name the routes server1, server2, and server3 as appropriate. The critical pieces of information in each outbound route are the dial string (which should match the extensions on the server we’re connecting to) and the Trunk Sequence (which should be the appropriate IAX trunk for the server we’re connecting to).
On piaf-server1, we’d have a server2 outbound route with a Dial String of 2xxx and a Trunk Sequence of IAX2/piaf-server2. Then we’d have another server3 route with a Dial String of 3xxx and a Trunk Sequence of IAX2/piaf-server3. If you have a catch-all outbound route, be sure to move these routes above the catch-all in the right column. Then reload your dialplan.
On piaf-server2, we’d have a server1 outbound route with a Dial String of 1xxx and a Trunk Sequence of IAX2/piaf-server1. Then we’d have another server3 route with a Dial String of 3xxx and a Trunk Sequence of IAX2/piaf-server3. If you have a catch-all outbound route, be sure to move these routes above the catch-all in the right column. Then reload your dialplan.
On piaf-server3, we’d have a server1 outbound route with a Dial String of 1xxx and a Trunk Sequence of IAX2/piaf-server1. Then we’d have another server2 route with a Dial String of 2xxx and a Trunk Sequence of IAX2/piaf-server2. If you have a catch-all outbound route, be sure to move these routes above the catch-all in the right column. Then reload your dialplan.
If you’re setting this up with PRI or T1 connections between your servers, you might also want to specify at least secondary trunk sequences for each of the outbound routes to provide some redundancy. For example, on piaf-server1, you might want a secondary Trunk Sequence for server2 that specified IAX2/piaf-server3. Then, if the primary connection between server1 and server2 was down, Asterisk would attempt to complete calls to 2xxx extensions by routing them to server3 and then on to server2 from there. To the caller and call recipient, they’d never know that the direct link between server1 and server2 had failed.
Alternate routing might also be appropriate where you have more capacity between certain servers. For example, if you had a single T1 line between server1 and server3 but you had PRI connections between server1 and server2 and between server2 and server3, then it might make more sense to indirectly route 3xxx calls from server1 through server2 and then on to server3 rather than the direct route from server1 to server3. Enjoy!
Free DIDs While They Last. Sipgate is giving away a free U.S. DID with free incoming calls plus 200 free minutes for outbound calls. Better hurry. Here’s the trunk setup for FreePBX-based systems:
Trunk name: sipgate
type=peer
username=ACCTNO
fromuser=ACCTNO
secret=ACCTPW
context=from-trunk
host=sipgate.com
fromdomain=sipgate.com
insecure=very
caninvite=no
canreinvite=no
nat=no
disallow=all
allow=ulaw&alawRegistration Strong: ACCTNO:ACCTPW@sipgate.com/YOUR-DID-NUMBER
ACCTNO is the account number assigned to your sipgate account. ACCTPW is the password for your account. YOUR-DID-NUMBER is your 10-digit DID.
Finally create an inbound route using your actual 10-digit DID and assign a destination for the inbound calls.
Need help with Asterisk? Visit the PBX in a Flash Forum.
Or Try the New, Free PBX in a Flash Conference Bridge.
Twitter Magic. If you haven’t noticed the right margin of Nerd Vittles lately, we’ve added a new link to our Twitter feed. If you explore a little, you’ll discover that the user interface now brings you instant access to every Twitter feed from the convenience of the Nerd Vittles desktop. Enjoy!
whos.amung.us If you’re wondering what your fellow man is reading on Nerd Vittles these days, wonder no more. Visit our new whos.amung.us statistical web site and check out what’s happening. It’s a terrific resource both for us and for you.
Special Thanks to Our Generous Sponsors
FULL DISCLOSURE: ClearlyIP, Skyetel, Vitelity, DigitalOcean, Vultr, VoIP.ms, 3CX, Sangoma, TelecomsXchange and VitalPBX have provided financial support to Nerd Vittles and our open source projects through advertising, referral revenue, and/or merchandise. As an Amazon Associate and Best Buy Affiliate, we also earn from qualifying purchases. We’ve chosen these providers not the other way around. Our decisions are based upon their corporate reputation and the quality of their offerings and pricing. Our recommendations regarding technology are reached without regard to financial compensation except in situations in which comparable products at comparable pricing are available from multiple sources. In this limited case, we support our sponsors because our sponsors support us.
BOGO Bonaza: Enjoy state-of-the-art VoIP service with a $10 credit and half-price SIP service on up to $500 of Skyetel trunking with free number porting when you fund your Skyetel account. No limits on number of simultaneous calls. Quadruple data center redundancy. $25 monthly minimum spend required. Tutorial and sign up details are here.
![]() The lynchpin of Incredible PBX 2020 and beyond is ClearlyIP components which bring management of FreePBX modules and SIP phone integration to a level never before available with any other Asterisk distribution. And now you can configure and reconfigure your new Incredible PBX phones from the convenience of the Incredible PBX GUI.
The lynchpin of Incredible PBX 2020 and beyond is ClearlyIP components which bring management of FreePBX modules and SIP phone integration to a level never before available with any other Asterisk distribution. And now you can configure and reconfigure your new Incredible PBX phones from the convenience of the Incredible PBX GUI.
VitalPBX is perhaps the fastest-growing PBX offering based upon Asterisk with an installed presence in more than 100 countries worldwide. VitalPBX has generously provided a customized White Label version of Incredible PBX tailored for use with all Incredible PBX and VitalPBX custom applications. Follow this link for a free test drive!
Special Thanks to Vitelity. Vitelity is now Voyant Communications and has halted new registrations for the time being. Our special thanks to Vitelity for their unwavering financial support over many years and to the many Nerd Vittles readers who continue to enjoy the benefits of their service offerings. We will keep everyone posted on further developments.
Some Recent Nerd Vittles Articles of Interest…
- See comment #1 below. [↩]
Asterisk on Steroids: The Orgasmatron Installer, Part II
 In our last column, we introduced you to the new Orgasmatron Installer for PBX in a Flash. After a one-week break to prepare for our visit to the Atlanta Asterisk® Users Group 3d Annual InstallFest, we're back in the saddle today to flesh out the new baby.
For those that are new to all of this, let's briefly review what the Orgasmatron Installer has added to your Lean, Mean Asterisk Machine. Faxing and email now work out of the box. More than a dozen extensions and a number of hosting provider trunks are preconfigured as well. Delivery of CallerID names with numbers is now available from a half dozen providers of your choice. And, of course, the Flite text-to-speech engine is preconfigured with Cepstral TTS only a few keystrokes away. Also included are FreePBX 2.5, and Apache, SendMail, MySQL, PHP, phpMyAdmin, IPtables Linux firewall, Fail2Ban, and WebMin. And here's the complete list with all of your new Nerd Vittles applications:
- AsteriDex
- CallerID Superfecta (FreePBX Module)
- CallWho for Asterisk
- Cepstral TTS (installer script only)
- Email That Works with SendMail
- Extensions (15 preconfigured)
- Fax Module using nvFax
- FONmail
- FreePBX Backups
- Gizmo5 (FreePBX Module)
- Hamachi VPN (installer script only)
- Hotel-Style Wakeup Calls (FreePBX Module)
- MeetMe Conferences on the Fly
- Mondo Full System Backups
- NewsClips from Yahoo
- ODBC Database Support
- Reminders by Phone and Web
- SIP URI support (fax, mothership, e164, nv-demo)
- TeleYapper
- Tide Reports with xTide
- Trunk Lister Script
- Trunks (Vitelity, Fonica, Gizmo, ENUM, Remote Peer)
- Weather by Airport Code
- Weather by ZIP Code
- Worldwide Weather
- Zaptel Updater (script only)
Security First! Because your phone bill matters, today we begin with security. The design of virtually all of the open source Asterisk PBX aggregations is to leave SIP and IAX ports on your new server exposed to the Internet. This is done to facilitate communications with your hosting providers as well as telephone extensions which may be connected to your server from the other side of the globe. The wrinkle with this design is that, if a bad guy can guess an extension number on your system and its password, they get a free ticket to do whatever could be done from that extension on your PBX. In the case of one unlucky company, this resulted in a phone bill of over $100,000. For details, read our Primer on Asterisk Security. So... Security Matters!
Anyone obviously can download PBX in a Flash and the Orgasmatron Installer. Thus, you need to assume that everyone on the planet knows your default passwords. We walked you through changing some of the important ones with the passwd-master script last week. Use it regularly. Now let's turn our attention to your extensions and trunk passwords.
Extension Security. There now are a couple of ways to secure your extensions from the bad guys. First, you need to establish very secure passwords for your extensions and voicemail boxes. Second, you need to specify the IP addresses that are authorized to access every extension on your PBX. And third, remember do repeat this drill every time you add a new extension to your system.
To change an extension password, open FreePBX using a web browser pointed to the IP address of your server: http://ipaddress/admin/. On PBX in a Flash systems, you'll be prompted for a username (maint) and whatever password you set when you ran passwd-master. Now click the Setup tab and then the Extensions option. You'll see the list of configured extensions on your PBX in the right column. Click on each of those extensions, and you'll see a form like this:
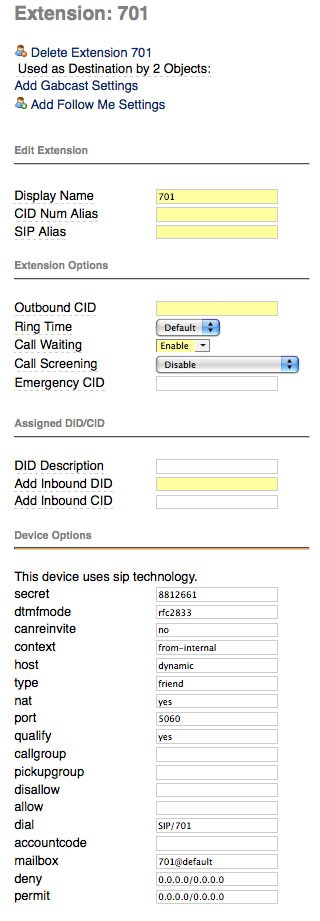
The password for this extension is stored in a field called secret. Make up a very secure password for every extension on your PBX. You will embed this password in the telephone connected to this extension. There's no other place you'll need it so a long and complex numeric password is essential.
The authorized IP addresses for this extension are stored in a field called permit. The way this works is that you first specify which IP addresses should be denied access (the deny field), and then you poke a little hole in the dike, if you're smart, to permit only one or a few IP addresses to connect to the extension. Leave the deny entry as it is. The default permit entry 0.0.0.0/0.0.0.0 opens the floodgates. It means any IP address can log into this extension. To restrict extension access to IP addresses on a private LAN of 192.168.1, the entry would look like this: 192.168.1.0/255.255.255.0. To further restrict extension access to a specific IP address (recommended!), the entry would look like this: 192.168.1.44/255.255.255.255. Use a permit entry that makes you sleep well at night. After all, it's your phone bill.
The third entry you'll want to change is further down the same data entry form, and that's the Voicemail Password field. This entry determines who can actually retrieve voicemails left for this extension. Set it accordingly.
Once you've made the three changes above, save your entries by clicking the Submit button at the bottom of the form. Repeat the drill for every extension, and then click the orange Apply Configuration Changes tab at the top of the screen and then Continue with Reload to reload your Asterisk dialplan.
Trunk Security. Securing the trunks on your PBX is equally important to securing extensions. Keep in mind that, with your trunk credentials, anyone can set up your trunk on their PBX to make calls on your nickel! Unlike the extensions, there are no working usernames and passwords in the default trunks with one exception. If you plan to use the providers we've preconfigured, simply insert your own username, fromuser, and secret settings in the fields provided, and you'll be making calls in a matter of seconds. The process is similar to the one we used for extensions. Choose Setup, Trunks and then click on each trunk and make your entries. Submit your entries and then reload the dialplan when you're finished.
In the case of the remote-peer trunk, this trunk is designed to make it extremely easy to interconnect Asterisk servers for interoffice communications. But it also means that a bad guy can easily interconnect with your server and start dialing. If you don't plan to connect to another Asterisk server, delete this trunk! If you do plan to connect to another Asterisk server, change the trunk secret and IP address of the host to which you are connecting. Do NOT leave the default secret in either the outgoing or incoming settings! Also change the password for the outbound route: Remote-Host. You may want to ultimately remove this password if you actually start interconnecting servers. Otherwise, users will have to enter this password whenever they may a call to an extension on the interconnected Asterisk server.
To interconnect your server to another server, you would simply add a new trunk called main-peer on the other server that looks like this (using your new password and correct IP address):

Configuring AsteriDex. AsteriDex is plug-and-play for most users. However, as configured, your AsteriDex web site is reachable from the Internet if you have mapped port 80 on your hardware-based firewall to your PBX in a Flash server or if you don't have a hardware-based firewall and your server is directly exposed to the Internet. If you don't mind people seeing your contact list or making prank calls that ring your extensions, this may be okay. If it's of concern to you, the easiest security precaution is to rename the asteridex4 directory to an obscure name that only you know, e.g. bahbah143. Here are the commands to issue after logging into your server as root. By using all of these commands, AsteriDex still will be accessible through FreePBX and the PBX in a Flash GUI:
cd /var/www/html
mv asteridex4 bahbah143
sed -i 's|asteridex4|bahbah143|' admin/modules/asteridex/page.asteridex.php
sed -i 's|asteridex4|bahbah143|' welcome/.htindex.cfg
The other adjustment you may need to make to AsteriDex is to configure who can access the Admin tab to add, modify, and delete entries in your database. As configured, the Admin tab is available to any computer with an IP address that begins with 192.168. This may not match your private subnet, and not all 192.168 IP address are non-routable. So you may wish to tighten this restriction to match your internal subnet. In the /var/www/html/asteridex4 folder (or whatever name you've chosen above), you'll find a configuration file: config.inc.php. Simply edit this file and change the $local_net entry. You also can set the long distance prefix ($LDprefix), your CallerID number ($CallerID), and the default extension to ring for click-to-dial from the web interface ($INtrunk and $defaultExt). The extension to dial can now be set from the web interface as well. Unless you really know what you're doing, leave everything else the way it is.
CallerID Superfecta. Most hosting providers deliver CallerID numbers as part of your payment for using their DIDs. Almost none deliver CallerID names without an additional charge. CallerID Superfecta is designed to fill that gap... for free. A number of us have worked on this project for years. And it now has been integrated directly into FreePBX. There are two steps to getting everything working properly on your new PBX. First, you need to identify which CallerID lookup sources you wish to use on your system. Then, you need to specify CallerID Superfecta as the lookup source on each Inbound Route where you want CallerID names looked up for incoming calls.
Open FreePBX with your web browser and navigate to Setup, CID Superfecta. You'll get a form that looks like this:
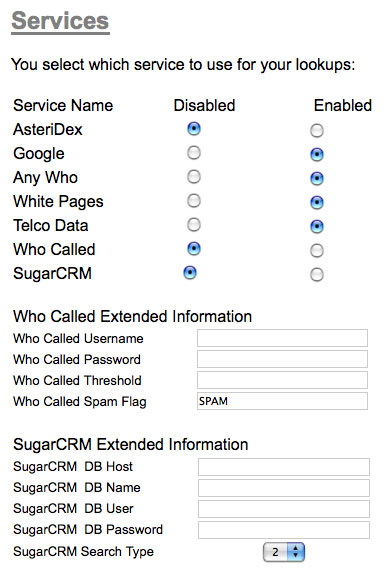
With the exception of AsteriDex and SugarCRM lookups which are almost instantaneous, keep in mind that each lookup takes a little time and slows down receipt of your inbound call. So long as you have a good Internet connection, you shouldn't have a problem using all of the sources. The way the CallerID Superfecta works is that, once it gets a name match in any of the sources beginning with AsteriDex and SugarCRM, it ends the lookups and provides the CallerID name it found to Asterisk for display on the extensions which are ringing in the designated inbound route. Filling out the form is self-explanatory for the most part. Tick off the lookup sources you wish to use. If you plan to use whocalled.us, you'll need to sign up for an account and provide your credentials before the lookup will work. With SugarCRM, fill in the blanks to match your implementation of SugarCRM. Click the SAVE button when you have CallerID Superfecta configured to meet your needs.
The final step in implementing CallerID Superfecta is to designate it as the CallerID Lookup Source for your Inbound Routes. Click on Setup, Inbound Routes and a list of your existing routes will be displayed in the right column. As installed, there will only be one: Any DID / Any CID. Click on this entry to display the form. Scroll down to the CallerID Lookup Source dropdown box and choose CallerID Superfecta. You'd do the same with any other inbound route you create down the road. Click the Submit button and reload your dialplan to enable CallerID Superfecta. Now sit back and wait on your first call.
CallWho for Asterisk. CallWho for Asterisk is a little script we put together to make it easy to look up and dial the numbers of people in your AsteriDex database. When you dial 4-1-2, you'll be prompted to enter the first three letters of the name of the person you wish to call. Once you key in the three letters, CallWho for Asterisk will look up every matching entry in your AsteriDex database and read you the list of matches. For example, if you had Joe Schmo and Joe The Plumber in your database, CallWho would say something like this:
Press 1 for Joe Schmo.
Press 2 for Joe The Plumber.
When you press 2, CallWho will place a call to Joe The Plumber. Not sure why you'd ever want to do that, but now you understand the way it works.
Before CallWho for Asterisk will work at all, you need to run the script which associates three letter codes with every entry in your AsteriDex database. And, whenever you add new entries to your database, you need to run it again. Using a web browser, here's the program to run. Be sure to use the correct IP address for your Asterisk server and your newly designated AsteriDex location instead of asteridex4:
http://192.168.0.44/asteridex4/dialcode.php
Cepstral TTS for Asterisk. PBX in a Flash is delivered with the Flite text-to-speech engine already enabled. But, unless you like the voices of Lurch and Fred Munster, you may wish to cough up a little cash and install Cepstral on your server. Cepstral now has a synthesized voice of Allison which exactly matches all of the other voice prompts in Asterisk. I'm embarrassed to report that we can't seem to get the correct installation script deposited in our Orgasmatron builds... ever! So, if you want to use Cepstral, here are the steps to download the real, working installation script and to install Cepstral:
cd /root/nv
rm install-cepstral
wget http://pbxinaflash.net/source/cepstral/install-cepstral
chmod +x install-cepstral
./install-cepstral
Once the 65MB download completes, you'll be prompted to agree to the license. You do this by pressing the Enter key to scroll down the license agreement. When you reach 100%, type yes to continue with the install. Press Enter to accept /opt/swift as the install directory. Very important: Type y to create the directory. The default is No which will mess up the installation. Now type yes to complete the install. Once the install completes, you can purchase a license for the Allison voice at this link. Under Voices, choose Language: US English, Voice: Allison-8kHz, and Platform: Linux. For non-commercial use, the $30 voice registration is all you need. For commercial use, you also need to acquire Concurrency Licenses which authorize a certain number of simultaneous voice ports on your system for Cepstral voices. These run $50 per port in 2-port multiples and are in addition to the $30 Allison voice license. For Nerd Vittles readers, you can save 15% on your purchase by sending an email to sales at cepstral.com explaining how you plan to use Cepstral and requesting the discount code.
We'll have an in-depth article on Cepstral in coming weeks. For those that want a head start, each of the Nerd Vittles text-to-speech applications typically includes dialplan code and one or more PHP/AGI scripts. The dialplan code can be found in /etc/asterisk/extensions_custom.conf. When you scroll through the dialplan code you will see entries like the following for each of the TTS applications:
exten => 611,5,Flite("Enter a 3 character airport code.")
;exten => 611,5,Swift("Enter a 3 character airport code.")
exten => 611,6,Read(APCODE,beep,3)
exten => 611,7,Flite("Please hold a moment.")
;exten => 611,7,Swift("Please hold a moment.")
The semicolon at the beginning of a line tells Asterisk this is a comment and to ignore it. To change the voice from the Munsters to Allison, just comment out the Flite lines and uncomment the Swift lines by deleting the leading semicolons. When you're finished making the changes, save the file and then reload your dialplan: asterisk -rx "dialplan reload". So, in the example above, the code would now look like this:
;exten => 611,5,Flite("Enter a 3 character airport code.")
exten => 611,5,Swift("Enter a 3 character airport code.")
exten => 611,6,Read(APCODE,beep,3)
;exten => 611,7,Flite("Please hold a moment.")
exten => 611,7,Swift("Please hold a moment.")
You also need to modify the PHP/AGI scripts that go with each application. All of these files are stored in /var/lib/asterisk/agi-bin. Typically the filenames begin with nv- and end in .php:
-rwxrwxr-x 1 asterisk asterisk  6835 Sep 16  2008 nv-callwho.php
-rwxrwxr-x 1 asterisk asterisk   201 Jul 12  2006 nv-config-555.php
-rwxrwxr-x 1 asterisk asterisk   201 Apr  2 13:08 nv-config.php
-rwxrwxr-x 1 asterisk asterisk 14329 Feb 10  2008 nv-mailcall.php
-rwxrwxr-x 1 asterisk asterisk  6072 Sep 24  2008 nv-mailit.php
-rwxrwxr-x 1 asterisk asterisk 10490 Apr 20 10:34 nv-news.php
-rwxrwxr-x 1 asterisk asterisk  6545 Apr 12 15:10 nv-today.php
-rwxrwxr-x 1 asterisk asterisk 21537 Apr  2 13:07 nv-weather.php
-rwxrwxr-x 1 asterisk asterisk 12043 Apr  2 13:07 nv-weather-world.php
-rwxrwxr-x 1 asterisk asterisk 22243 Apr  2 13:07 nv-weather-zip.php
In each of these scripts, you'll find a variable near the top that controls the TTS engine: $ttspick = 0 ;
To use Cepstral as the TTS engine instead of Flite, just change the $ttspick value from 0 to 1 and save the file.
Email That Works With SendMail. It's always been a knuckle drill to get your new server to reliably send outbound emails. Assuming your Internet service provider doesn't block downstream mail servers, the Orgasmatron Installer will get this working reliably. You can test it out by logging into your server as root and issuing the following command using your real email address. If you get the email, you can move on.
echo "test" | mail -s testmessage yourname@gmail.com
If you didn't get the email, you probably have a provider such as Comcast that blocks port 25 in many areas of the country. The easiest way to solve this is to set up a free Gmail account and use Gmail to deliver outbound messages from your server. This message thread on the PBX in a Flash Forum will walk you through the setup process. There's also a Comcast solution if you'd prefer not to use Gmail.
Stay Tuned. Your eyes are probably glazing over about now. I know mine are. So we'll quit here for today. In our next episode, we'll tackle the rest of the goodies that make up the Orgasmatron Installer. Enjoy!
Continue reading Part IV (Monday, May 25).
Tip of the Week. Ever wanted a 20-seat conference bridge for under $9 a month with a local phone number in any of 2600+ rate centers all over United States? You can add load balancing and automatic failover for an extra $1 per month. After you use the Orgasmatron Installer, just set up a conference extension in FreePBX and then head over to the PBX in a Flash Forum to read all about the latest rage in DID providers.
whos.amung.us If you're wondering what your fellow man is reading on Nerd Vittles these days, wonder no more. Visit our new whos.amung.us statistical web site and check out what's happening. It's a terrific resource both for us and for you.
Special Thanks to Our Generous Sponsors
FULL DISCLOSURE: ClearlyIP, Skyetel, Vitelity, DigitalOcean, Vultr, VoIP.ms, 3CX, Sangoma, TelecomsXchange and VitalPBX have provided financial support to Nerd Vittles and our open source projects through advertising, referral revenue, and/or merchandise. As an Amazon Associate and Best Buy Affiliate, we also earn from qualifying purchases. We’ve chosen these providers not the other way around. Our decisions are based upon their corporate reputation and the quality of their offerings and pricing. Our recommendations regarding technology are reached without regard to financial compensation except in situations in which comparable products at comparable pricing are available from multiple sources. In this limited case, we support our sponsors because our sponsors support us.
BOGO Bonaza: Enjoy state-of-the-art VoIP service with a $10 credit and half-price SIP service on up to $500 of Skyetel trunking with free number porting when you fund your Skyetel account. No limits on number of simultaneous calls. Quadruple data center redundancy. $25 monthly minimum spend required. Tutorial and sign up details are here.
![]() The lynchpin of Incredible PBX 2020 and beyond is ClearlyIP components which bring management of FreePBX modules and SIP phone integration to a level never before available with any other Asterisk distribution. And now you can configure and reconfigure your new Incredible PBX phones from the convenience of the Incredible PBX GUI.
The lynchpin of Incredible PBX 2020 and beyond is ClearlyIP components which bring management of FreePBX modules and SIP phone integration to a level never before available with any other Asterisk distribution. And now you can configure and reconfigure your new Incredible PBX phones from the convenience of the Incredible PBX GUI.
VitalPBX is perhaps the fastest-growing PBX offering based upon Asterisk with an installed presence in more than 100 countries worldwide. VitalPBX has generously provided a customized White Label version of Incredible PBX tailored for use with all Incredible PBX and VitalPBX custom applications. Follow this link for a free test drive!
Special Thanks to Vitelity. Vitelity is now Voyant Communications and has halted new registrations for the time being. Our special thanks to Vitelity for their unwavering financial support over many years and to the many Nerd Vittles readers who continue to enjoy the benefits of their service offerings. We will keep everyone posted on further developments.
Some Recent Nerd Vittles Articles of Interest...
Free Asterisk Solutions
