
Home » Technology » Networking (Page 2)
Category Archives: Networking
The Most Versatile VoIP Provider: FREE PORTING

 JUST RELEASED: Visit the Incredible PBX Wiki
Meet Acer Spin 713: A Phenomenal Computer for All Seasons

It’s a portable office. It’s a movie theater. It’s a LAMP server. It’s a desktop PC. It’s a tablet computer. It’s a Chrome browser. It’s an Android platform. It’s a Linux server. And it gets almost 8 years of free software and firmware updates. Meet the $629 Acer Chromebook Spin 713. And, if you hurry, it’s $80 off at Best Buy today.
The checklist of superlatives is almost too lengthy to mention: a touchscreen of unrivaled quality, a 12-hour battery, dongle-free ports galore: HDMI, USB-C, USB 3.0, microSD slot, and headphone jack. While Chromium notebooks began as little more than a Chrome browser, that was then. The 2020 iteration includes complete Android integration as well as a feature-complete Debian 10 virtual machine platform supporting Apache, PHP 7, and the latest MariaDB/MySQL. If movies and television are your thing, Netflix and Sling TV transform the Chromebook into a near perfect viewing platform. As they say, seeing is believing. So here’s a snapshot from an iPhone that captures the quality of the 2256×1504-pixel (3:2 QHD) display. Suffice it to say, the display is as good or better than our $3,000 MacBook Pro’s screen.

Did we mention Best Buy’s $629 price. This 2-in-1 is a steal. It’s $200 below today’s Amazon pricing and is $400 below the closest comparable Chromebook models. Some may recall that we reviewed the System76 Lemur Pro Linux notebook in August and raved about its pricing at $1322, more than double the cost of Acer’s Spin 713. Having used both machines, I can honestly say you lose nothing by choosing the Acer device, and you gain access to the entire Android platform including Google Play as well as Linux. And the Spin 713 converts into a touchscreen tablet simply by flipping the screen. The only downside is, if these machines go on sale for Black Friday, you will be hard-pressed to find one to buy.
Deploying a LAMP Server with a Chromebook
If you pick up one of these bad boys, here’s a quick primer on setting up a LAMP server on the Linux virtual machine. Begin by enabling it in the Settings tab. Next, click on the Linux Terminal option in your Applications. At the Linux prompt, set up a new root user password: sudo passwd root. Switch to the root user account: su root. Now enter these commands:
cd ~
apt update
apt upgrade
apt install apache2 apache2-utils -y
systemctl start apache2
systemctl enable apache2
chown www-data:www-data /var/www/html/ -R
apt install mariadb-server mariadb-client -y
systemctl start mariadb
systemctl enable mariadb
mysql_secure_installation
apt install php7.3 libapache2-mod-php7.3 php7.3-mysql php-common \\
php7.3-cli php7.3-common php7.3-json php7.3-opcache php7.3-readline \\
php7.3-mbstring php7.3-dev -y
systemctl restart apache2
echo "<?php phpinfo(); ?>" > /var/www/html/info.php
echo "ip a" > /usr/local/bin/ifconfig
chmod +x /usr/local/bin/ifconfig
ifconfig | grep "inet "
Make note of your Linux machine’s IP address (last command above) and use a browser to access and verify the PHP info for your server: http://Spin-IP-Address/info.php
In the alternative, use this FQDN: http://penguin.linux.test/info.php
In keeping with their tradition of idiotic obsolescence, the PHP developers dropped support for mysqli in PHP 7 which means the mysql_connect function to interact with MySQL databases fails. Here’s how to restore it:
mkdir /usr
mkdir /usr/src
apt install build-essential git
cd /usr/src
git clone https://github.com/wardmundy/pecl-database-mysql mysql --recursive
cd mysql
phpize
./configure
make
make install
cd /etc/php/7.3/apache2
echo "extension=/usr/lib/php/20180731/mysql.so" >> php.ini
systemctl restart apache2
The mysql and mysqli sections will now magically reappear in your phpinfo() listing.
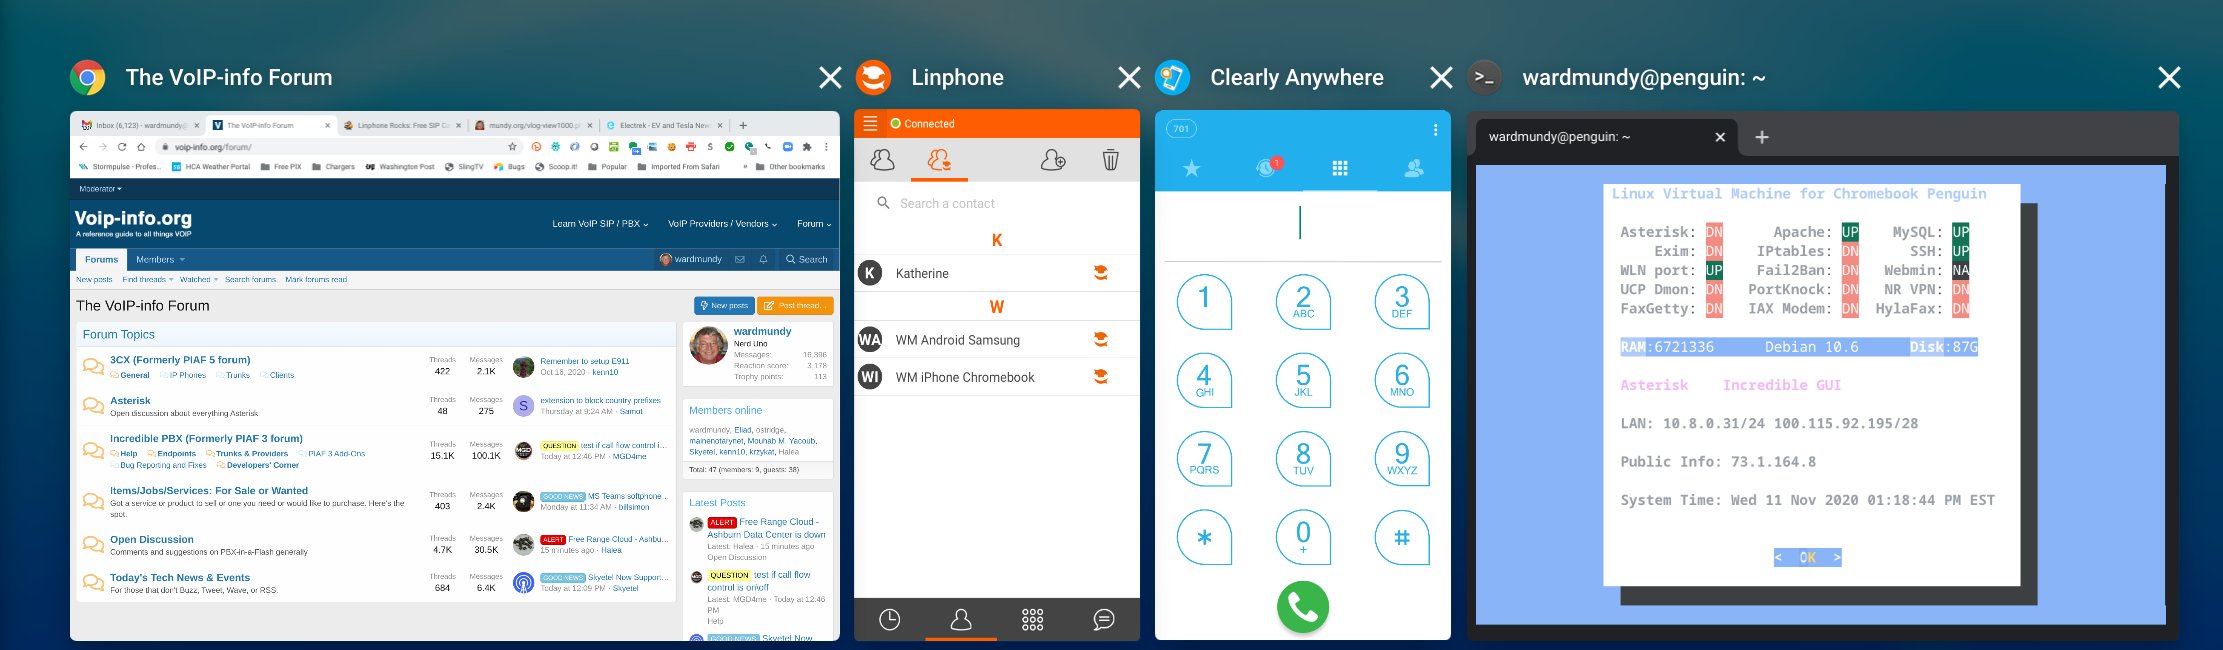
Adding Clearly Anywhere Softphone to the Spin 713
As noted, the Spin 713 also is a fully functional Android platform so adding the Clearly Anywhere softphone is easy. Simply download the software from Google Play. Then run the app and enter your extension credentials and FQDN of Incredible PBX 2020 PUBLIC server.
Adding Linphone Softphone to the Spin 713
Adding the Linphone softphone is equally easy. Simply download the software from Google Play. Then run the app and enter your Linphone SIP credentials with the configuration setup documented in our tutorial. Linphone calls to other Linphone users and to Incredible PBX 2020 PUBLIC users or anyone with a SIP URI worldwide are free.
Installing OpenVPN for Android on the Spin 713
There are several ways to install OpenVPN on the Spin 713 platform. You can use the traditional method we’ve documented for Linux installs; however, you will lose the ability to use OpenVPN IP addresses from your desktop and browser. The better method is to install the OpenVPN for Android client from the Play Store. Next, send yourself an email with the .ovpn file you created for the Chromebook. Open the message using Gmail on the Chromebook and save the received file in your Downloads folder. Open the OpenVPN for Android app on your desktop. Choose the + icon to create a new Profile and select the .ovpn file from Downloads. Once installed, edit the Settings. In the IP and DNS tab, disable No Local Binding. Enable Override DNS Settings and specify 8.8.8.8 and 8.8.4.4 for your DNS servers. Enable PULL Settings.In the ROUTING tab, enable Bypass VPN for Local Networks and Block IPv6. Then Start the VPN Client by clicking on your saved Profile.
Installing Zoom for Debian 10 on the Spin 713
No computer platform would be complete without Zoom. Begin by downloading Zoom for Debian here. In the File Manager (Alt-Shift-m), navigate to your Downloads folder and double-click on zoom_amd64.deb to install the application. Once installed, it will appear in your Linux apps container. Right-click (HINT: tap touchpad with two fingers) on Zoom icon to add Zoom to your Shelf.
Installing phpMyAdmin for PHP 7.3 on the Spin 713
No development platform would be complete without phpMyAdmin. We found an excellent tutorial to get everything set up properly with a few minor changes. Your LAMP platform already is in place so skip down to Step 2 in the tutorial. There’s one important correction in the instructions. Step 4, item 1 should be: sudo mkdir /var/www/html/phpmyadmin. And accessing phpMyAdmin once installed should be: http://Spin-IP-address/phpmyadmin.
Mastering Chromebook Shortcuts on the Spin 713
If you learn no other keyboard shortcut, remember this one: Ctrl + Alt + /. That gets you the entire list of keyboard shortcuts on the Chromebook. These keyboard shortcuts are a bit like memorizing multiplication tables. The sooner you learn them, the happier you will be using your Chromebook. If you’re an avid Linux user, be advised that the Linux virtual machine and the Chromebook desktop share the same clipboard so you can easily copy-and-paste between the two environments. On the desktop, Ctrl-c copies to the clipboard, and Ctrl-v pastes data from the clipboard. In the Linux virtual machine, Ctrl-Shift-C copies to the clipboard, and Ctrl-Shift-V pastes data from the clipboard. Learn a few new shortcuts each time you use your Chromebook. You’ll be amazed how quickly your productivity improves.
Where To Go From Here?
While you’re getting your feet wet, here are some must-have’s for your Spin 713. For openers, feast your eyes on the 4K Nature Videos on YouTube. Prepare to be blown away.
Next, you’ll want a free Office Suite for your Chromebook. Our favorite is WPS Office which provides Microsoft-compatible versions of Word, Excel, Powerpoint and a PDF Viewer/Editor.
For video editing, nothing comes close to PowerDirector. Also check out YouTube Studio.
For photo editing, Adobe Lightroom is the hands-down winner. Google Photos and Snapseed (our personal favorite) are also worth a careful look. Both are free compliments of Google.
For Nerds, check out the Crostini Wiki on Reddit. And master the Crosh terminal commands.
Originally published: Monday, November 16, 2020 Updated: Monday, December 7, 2020

Need help with Asterisk? Visit the VoIP-info Forum.
Special Thanks to Our Generous Sponsors
FULL DISCLOSURE: ClearlyIP, Skyetel, Vitelity, DigitalOcean, Vultr, VoIP.ms, 3CX, Sangoma, TelecomsXchange and VitalPBX have provided financial support to Nerd Vittles and our open source projects through advertising, referral revenue, and/or merchandise. As an Amazon Associate and Best Buy Affiliate, we also earn from qualifying purchases. We’ve chosen these providers not the other way around. Our decisions are based upon their corporate reputation and the quality of their offerings and pricing. Our recommendations regarding technology are reached without regard to financial compensation except in situations in which comparable products at comparable pricing are available from multiple sources. In this limited case, we support our sponsors because our sponsors support us.
 BOGO Bonaza: Enjoy state-of-the-art VoIP service with a $10 credit and half-price SIP service on up to $500 of Skyetel trunking with free number porting when you fund your Skyetel account. No limits on number of simultaneous calls. Quadruple data center redundancy. $25 monthly minimum spend required. Tutorial and sign up details are here.
![]() The lynchpin of Incredible PBX 2020 and beyond is ClearlyIP components which bring management of FreePBX modules and SIP phone integration to a level never before available with any other Asterisk distribution. And now you can configure and reconfigure your new Incredible PBX phones from the convenience of the Incredible PBX GUI.
The lynchpin of Incredible PBX 2020 and beyond is ClearlyIP components which bring management of FreePBX modules and SIP phone integration to a level never before available with any other Asterisk distribution. And now you can configure and reconfigure your new Incredible PBX phones from the convenience of the Incredible PBX GUI.
 VitalPBX is perhaps the fastest-growing PBX offering based upon Asterisk with an installed presence in more than 100 countries worldwide. VitalPBX has generously provided a customized White Label version of Incredible PBX tailored for use with all Incredible PBX and VitalPBX custom applications. Follow this link for a free test drive!
 Special Thanks to Vitelity. Vitelity is now Voyant Communications and has halted new registrations for the time being. Our special thanks to Vitelity for their unwavering financial support over many years and to the many Nerd Vittles readers who continue to enjoy the benefits of their service offerings. We will keep everyone posted on further developments.

Frozen in Time: Sangoma at a Crossroads or the Cliff

We are fast approaching the 18 month anniversary since the mass exodus of talent from Sangoma and Digium. During that time, Asterisk® and FreePBX® have languished in limbo with FreePBX commercial modules mired in discontinued encryption methods and the Asterisk and FreePBX feature set frozen. Sangoma’s acquisition of Digium gave the company a well-respected business phone system in Switchvox® while relegating FreePBX deployments with commercial modules to second-class citizen status.
Now Sangoma has a difficult and expensive decision to make. In order to continue to deploy FreePBX commercial modules on a current operating system and PHP platform, they are facing a multi-million dollar investment to retool all of the commercial modules using an entirely different encryption platform which will generate additional headaches with their module repositories which now must manage and maintain two different sets of modules. Think of it as migrating from an English-based operation to one in which the customer base speaks either English or French, but not both. In the meantime, Asterisk 17 is fast approaching end-of-life while Asterisk 16 is getting long in the tooth with only minor fixes of late. And there’s FreePBX 15 which hasn’t seen significant upgrades since the departure of the former Schmoozecom staff in April of 2019.
While we have never agreed with the Sangoma CEO about much of anything, let’s take over the management reins for a moment and look at the landscape. The Digium acquisition coupled with some other purchases has left Sangoma with a mountain of debt in the middle of a global pandemic. Coronavirus also has forced many businesses to reassess their long-term office strategy. With nearly everyone on the planet now carrying a smartphone and most current employees having high-speed Internet connectivity at home neither of which the company has to pay for, does a fancy office for every employee still make good business sense? When you have a well-positioned business phone offering in Switchvox, does it make good business sense to continue to pump boatloads of money into a competing FreePBX commercial product simply to preserve its functionality? At the same time, Sangoma’s open source Asterisk and FreePBX products need a serious shot in the arm to remain viable. For example, FreePBX 15 with its User Control Panel won’t run on CentOS 8, and CentOS 7 reaches EOL status in December.
So here’s our first act as Sangoma CEO. Convert all of the existing FreePBX commercial modules into open source, GPL code while offering existing FreePBX commercial module customers a 50% discount to migrate to Switchvox within the next six months. We would stagger conversion of the commercial modules to GPL code by releasing three on the first day of every month. This would keep Sangoma in the news for many months to come. The move would not only restore Asterisk and FreePBX to their well-deserved position at the forefront of the open source community, but it would also give Switchvox a leg up in the commercial phone system marketplace. By keeping the identity of the monthly releases a secret, it would build much needed momentum for Sangoma’s open source offerings while reinforcing Sangoma’s commitment to the open source community. Give it some thought, Sangoma!
Originally published: Tuesday, September 8, 2020
Need help with Asterisk? Visit the VoIP-info Forum.
Special Thanks to Our Generous Sponsors
FULL DISCLOSURE: ClearlyIP, Skyetel, Vitelity, DigitalOcean, Vultr, VoIP.ms, 3CX, Sangoma, TelecomsXchange and VitalPBX have provided financial support to Nerd Vittles and our open source projects through advertising, referral revenue, and/or merchandise. As an Amazon Associate and Best Buy Affiliate, we also earn from qualifying purchases. We’ve chosen these providers not the other way around. Our decisions are based upon their corporate reputation and the quality of their offerings and pricing. Our recommendations regarding technology are reached without regard to financial compensation except in situations in which comparable products at comparable pricing are available from multiple sources. In this limited case, we support our sponsors because our sponsors support us.
BOGO Bonaza: Enjoy state-of-the-art VoIP service with a $10 credit and half-price SIP service on up to $500 of Skyetel trunking with free number porting when you fund your Skyetel account. No limits on number of simultaneous calls. Quadruple data center redundancy. $25 monthly minimum spend required. Tutorial and sign up details are here.
![]() The lynchpin of Incredible PBX 2020 and beyond is ClearlyIP components which bring management of FreePBX modules and SIP phone integration to a level never before available with any other Asterisk distribution. And now you can configure and reconfigure your new Incredible PBX phones from the convenience of the Incredible PBX GUI.
The lynchpin of Incredible PBX 2020 and beyond is ClearlyIP components which bring management of FreePBX modules and SIP phone integration to a level never before available with any other Asterisk distribution. And now you can configure and reconfigure your new Incredible PBX phones from the convenience of the Incredible PBX GUI.
VitalPBX is perhaps the fastest-growing PBX offering based upon Asterisk with an installed presence in more than 100 countries worldwide. VitalPBX has generously provided a customized White Label version of Incredible PBX tailored for use with all Incredible PBX and VitalPBX custom applications. Follow this link for a free test drive!
Special Thanks to Vitelity. Vitelity is now Voyant Communications and has halted new registrations for the time being. Our special thanks to Vitelity for their unwavering financial support over many years and to the many Nerd Vittles readers who continue to enjoy the benefits of their service offerings. We will keep everyone posted on further developments.

Coping with Coronavirus: Working from Home with Asterisk

If one can only claim to be an expert in one subject matter, ours would be working from home building and deploying Asterisk®-based VoIP servers. We’ve been doing it for more than a decade. And, as the need for social distancing becomes imperative with the spread of COVID-19, working from home is by far the best antidote. For those with jobs in an actual office, you still need your computer and you still need transparent office phone call access. With an Internet connection, we will assume you can handle setting up a home computer on your own. So our focus today will be on showing you how to add your office phone to your home with VoIP to make and receive business calls with less pain than a WalMart checkout lane.
Here’s what you need:
- Home Internet Connection (15DN/5UP Mbps or faster)
- WiFi Router (Google Nest strongly recommended)
- Desktop or Notebook Computer (recent vintage)
- SIP Telephone (Incredible PBX SIP Phone recommended)
- Incredible PBX 2020 platform (VirtualBox or Raspberry Pi – both are free)
- VirtualBox software for your PC/Mac or a Raspberry Pi 4 for stand-alone PBX
- A quiet room at home with no screaming kids or barking dogs
- Smartphone with SIP software (optional for those that continue to travel)
We’ve written extensively about most of the components listed above so we will refer you to appropriate articles as we proceed. The plan is to build a free Incredible PBX® platform in your home and use it to receive calls from your office number and to make calls spoofing your office number so that those on the other end of the calls never know you’re not sitting at your desk in the office but are instead working from home.
Choosing an Incredible PBX Platform for Home Use
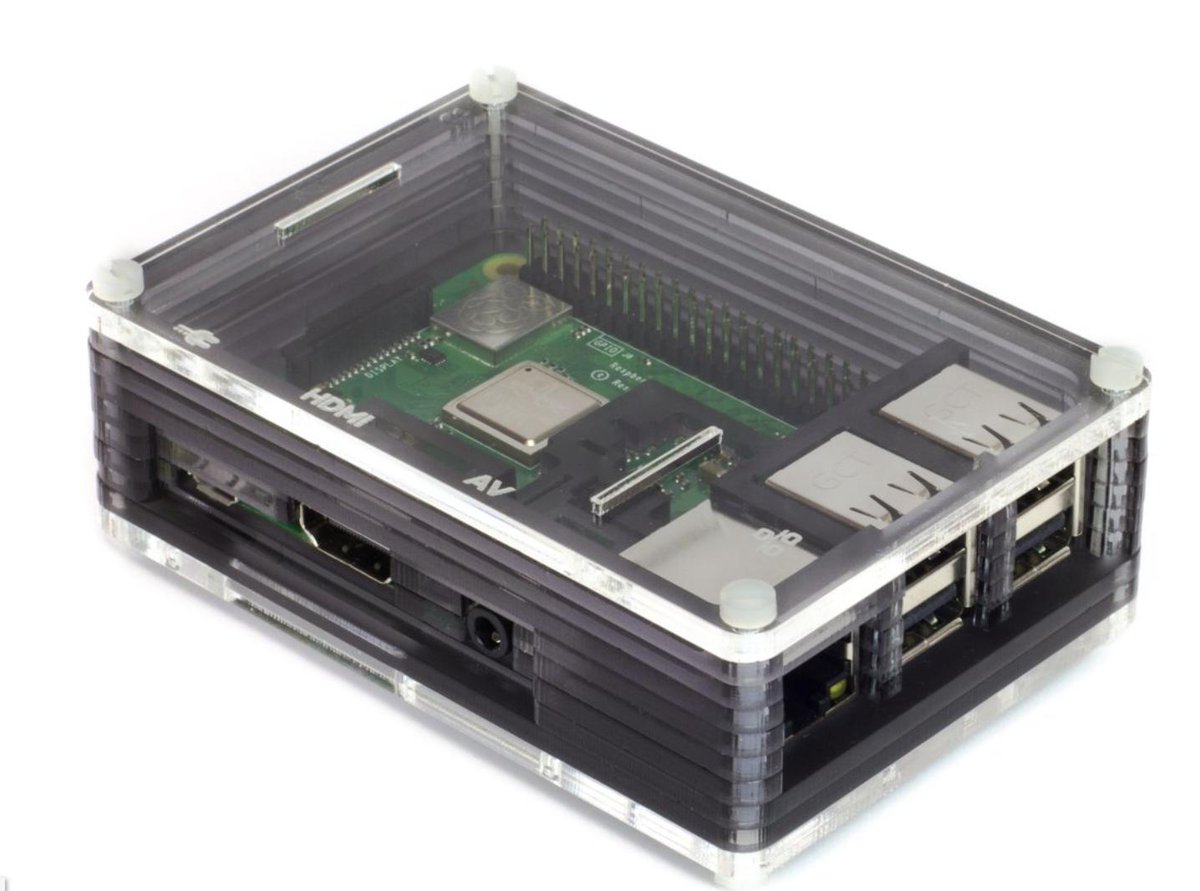
Once you have your network and desktop PC, Mac, or notebook computer set up at home, you have a decision to make. You can either run Incredible PBX as a task on this computer using VirtualBox, which means the computer needs to be operational all the time, or you can elect to build your Incredible PBX platform on a $35 Raspberry Pi 4 in which case your PBX is independent from your desktop or notebook computer. If you elect to run Incredible PBX on your home computer as a VirtualBox virtual machine, then follow this tutorial to install VirtualBox and the Incredible PBX 2020 virtual machine. If you decide to go the stand-alone route using a Raspberry Pi 4 as a dedicated platform for Incredible PBX 2020, then follow this tutorial to put all the pieces in place.
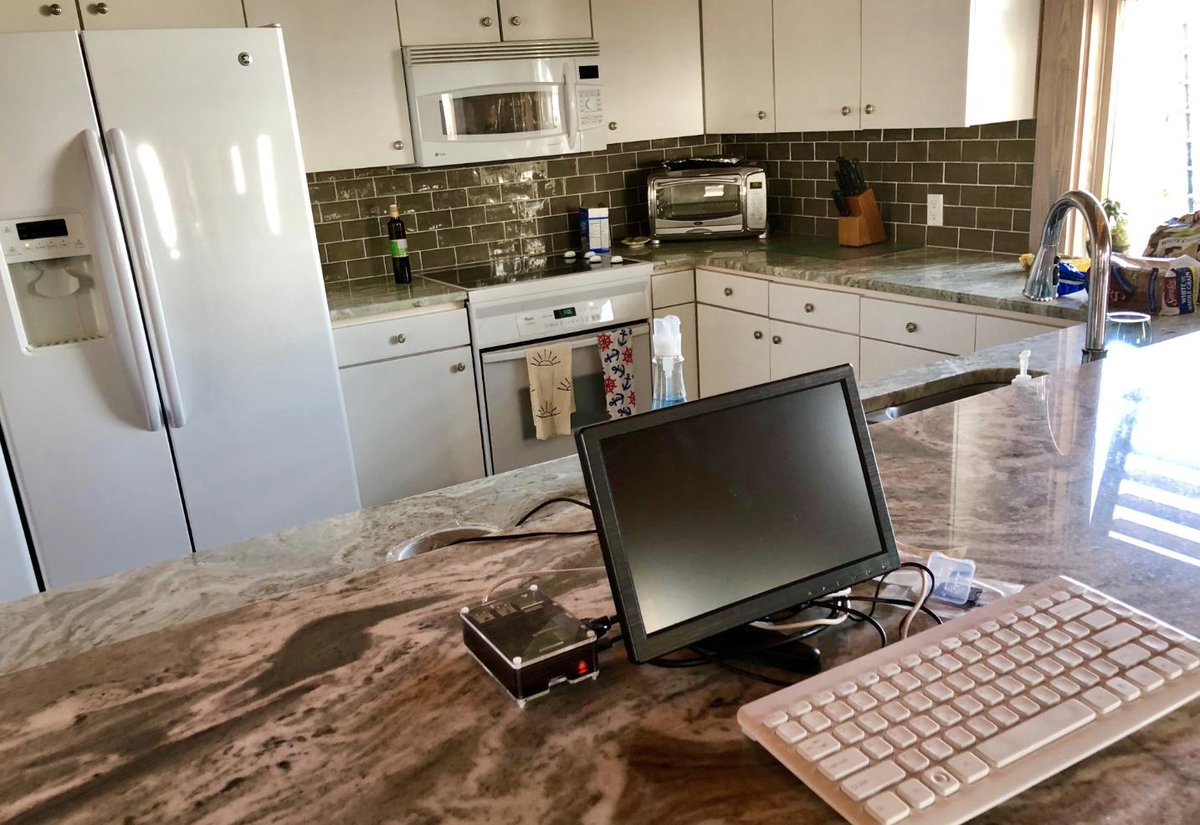
We typically run our remote systems using a Raspberry Pi 4 and a SIP phone, both with Wi-Fi connections. This means you can find a quiet place in your home to set up your office without worrying about network cables. Assuming you have good Internet service and a modern WiFi router such as the Google Nest device, you’ll never miss a beat. You can even drink on the job.

Choosing a VoIP Provider To Make & To Receive Calls
Even with your own PBX, you still need a connection to one or more VoIP service providers before you can communicate with those outside your network. Because we want to emulate your office phone environment, you probably will want a dedicated phone number and separate telephone to receive incoming calls from your office. This preserves the caller’s perception that he or she is dealing with you in your business capacity. We don’t want Junior answering incoming calls and shouting, "Daddy, somebody wants to talk to you."
We’re assuming that most business phone systems have the capacity to forward incoming calls to an external number. In this case, we recommend a new phone number known as a DID in the VoIP world. For outbound calls from your dedicated SIP phone, we will show you how to reset the outbound CallerID number to match your existing office phone number. Thus, both incoming and outgoing calls will appear to be emanating from your office.
As some of you know, in the VoIP world with Incredible PBX, the VoIP merchant providing your DID for incoming calls need not be the same as the company providing outbound call service. The cost of DIDs typically ranges from a few cents a month to a dollar or more. Most impose a per minute charge of about a penny a minute or less for both incoming and outgoing calls. The only mandatory requirement is that you choose an outbound call service that allows you to spoof your office’s CallerID number on the outbound calls. You probably will also want a CallerID Name (CNAM) service that associates names with incoming calls.
Both the Incredible PBX for VirtualBox and IncrediblePBX for the Raspberry Pi articles (links above) have extensive tutorials to deploy the various VoIP providers that we recommend. Just keep in mind that you usually get what you pay for. Cheaper isn’t always better when it comes to business communications.
Setting Up a SIP Phone for Incredible PBX 2020
You can connect virtually any kind of telephone to your new PBX. You don’t want callers and people you call to think you’re living in a tunnel so we recommend dedicated hardware for your SIP phone. The Incredible PBX SIP Phones are second to none and are very reasonably priced. In the FreePBX® GUI, simply navigate to Settings -> Clearly Devices. Here’s a tutorial to get you started and link your phone to the preconfigured SIP extension 701 on your PBX.
If price is your primary consideration, take a look at the Grandstream WiFi SIP phones. Refurbished Grandstream GXV3240 phones (a favorite of ours) are available for under $120.
Configuring an Inbound Route for Your Business Calls
For purposes of this tutorial, we will assume that you connected your new SIP phone to extension 701 on your PBX. Now we need to tell the PBX to route incoming calls from your office to your newly registered SIP phone on extension 701. Using a web browser, open the FreePBX GUI by pointing to the IP address of your PBX. Login as admin using the password you configured with /root/admin-pw-change. Once the FreePBX Dashboard displays, navigate to Connectivity -> Inbound Routes. Add a new route using the 10-digit number of the DID you acquired. As the Destination for the calls, choose Extension: 701. Click SAVE and reload your dialplan when prompted. Be sure you have also forwarded your office number to the new DID. Then place a test call to your office to verify everything is working properly.
Configuring an Outbound Route for Your Business Calls
A Default Outbound Route is automatically configured for Incredible PBX 2020. We need to modify it to route calls to your preferred trunk provider AND to specify the Outbound CallerID number for the calls as your 10-digit office number. In the FreePBX GUI, navigate to Connectivity -> Outbound Routes. Click on the pencil icon to the right of the Default route. In the Route CID field, enter the 10-digit number of your office. Change the Override Extension field from NO to YES. In the top entry of Trunk Sequences, use the pulldown menu to choose the Trunk Provider you want to use for outbound calls. Then click Submit and reload the dialplan when prompted. Place a test call from your SIP phone to a smartphone and make certain the incoming call displays your office phone number. If not, check with your SIP provider for the necessary steps to enable CallerID number spoofing.
Taking The Show On The Road
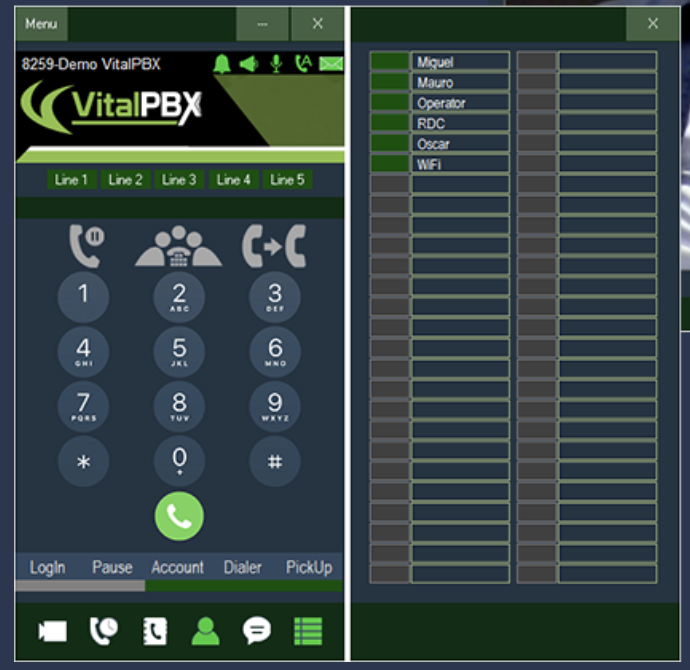
Once your home PBX is operational, there’s no reason you have to be tied to your desk at home all day. It’s easy to take the show on the road with an Android phone to make and receive your office calls. We use Android phone advisedly. Our experience with VoIP softphone connections using iPhones has always been hit and miss. And, with your business calls, we don’t think the platform is sufficiently reliable to recommend it. When you get incoming calls from your PBX, you want your smartphone to ring. When you make or receive calls on your smartphone, you want both ends of the conversation to be crystal clear. On the Android platform using the VitalPBX Communicator (free), it just works. We’ve had very different results using an iPhone.
If all you care about is receiving business calls (not making them) when away from your home, then an iPhone will work just as well as an Android phone. To set this up, just add your 10-digit cellphone number plus a # symbol after the number to the 777 Ring Group and make that ring group the destination for the Inbound Route for your office number in the FreePBX GUI. But if you prefer to make calls in both directions just as if you were sitting at your office desk, you’ll need a softphone on an Android device. Keep reading to learn how to set this up.
To get started, you’ll need to set up an OpenVPN server on some platform with a static IP address. Many businesses already have an OpenVPN server in which case you can ride on that one. Our OpenVPN tutorial will walk you through setting up your own and adding OpenVPN clients to both your Raspberry Pi and your Android smartphone. Once you have the clients installed, write down the private VPN addresses of both the Raspberry Pi and your Android phone. Next, on your Android phone, download and install the VitalPBX Communicator from the Google Play Store. In the FreePBX GUI, choose one of your preinstalled extensions to host the Android softphone and make note of the extension number and its password. Then use the Account Assistant in the Communicator to configure the connection on the smartphone end. Once it is registered, place a test call to make sure everything is working. Next we recommend changing the destination of the inbound calls to Ring Group 777 which will attempt to ring all five of the default extensions. Place a call to your office number and make sure that both your SIP phone and VitalPBX Communicator on your Android phone ring.
Continue Reading: Interconnecting a Mobile PBX to the Asterisk Mothership
Originally published: March 15, 2020
Need help with Asterisk? Visit the VoIP-info Forum.
Special Thanks to Our Generous Sponsors
FULL DISCLOSURE: ClearlyIP, Skyetel, Vitelity, DigitalOcean, Vultr, VoIP.ms, 3CX, Sangoma, TelecomsXchange and VitalPBX have provided financial support to Nerd Vittles and our open source projects through advertising, referral revenue, and/or merchandise. As an Amazon Associate and Best Buy Affiliate, we also earn from qualifying purchases. We’ve chosen these providers not the other way around. Our decisions are based upon their corporate reputation and the quality of their offerings and pricing. Our recommendations regarding technology are reached without regard to financial compensation except in situations in which comparable products at comparable pricing are available from multiple sources. In this limited case, we support our sponsors because our sponsors support us.
BOGO Bonaza: Enjoy state-of-the-art VoIP service with a $10 credit and half-price SIP service on up to $500 of Skyetel trunking with free number porting when you fund your Skyetel account. No limits on number of simultaneous calls. Quadruple data center redundancy. $25 monthly minimum spend required. Tutorial and sign up details are here.
![]() The lynchpin of Incredible PBX 2020 and beyond is ClearlyIP components which bring management of FreePBX modules and SIP phone integration to a level never before available with any other Asterisk distribution. And now you can configure and reconfigure your new Incredible PBX phones from the convenience of the Incredible PBX GUI.
The lynchpin of Incredible PBX 2020 and beyond is ClearlyIP components which bring management of FreePBX modules and SIP phone integration to a level never before available with any other Asterisk distribution. And now you can configure and reconfigure your new Incredible PBX phones from the convenience of the Incredible PBX GUI.
VitalPBX is perhaps the fastest-growing PBX offering based upon Asterisk with an installed presence in more than 100 countries worldwide. VitalPBX has generously provided a customized White Label version of Incredible PBX tailored for use with all Incredible PBX and VitalPBX custom applications. Follow this link for a free test drive!
Special Thanks to Vitelity. Vitelity is now Voyant Communications and has halted new registrations for the time being. Our special thanks to Vitelity for their unwavering financial support over many years and to the many Nerd Vittles readers who continue to enjoy the benefits of their service offerings. We will keep everyone posted on further developments.
Travelin’ Man 3: A Plug-and-Play Firewall for Incredible PBX

Seven years ago we introduced Travelin’ Man 3 to simplify the task of securing the Incredible PBX® VoIP platforms. Today we want to reexamine the Travelin’ Man 3 firewall design for the benefit of those that are new to Asterisk® and FreePBX®. In the old days, FreePBX-based VoIP servers were notoriously vulnerable because of numerous bugs in the original FreePBX code which was developed by dozens of developers around the world with very different skill sets. Not only did you risk having your server compromised, but there also was a very real risk of receiving a staggering phone bill for calls that neither you nor your users made.

Travelin’ Man 3 introduced a new security model by providing a whitelist-based, plug-and-play firewall for Incredible PBX servers using the Linux IPtables firewall platform. If the IP address of a device wasn’t listed in the firewall, then that device could not even see your PBX much less access it. SSH access, web access, SIP and IAX2 access all were blocked.
The whitelist design worked great so long as your PBX and all of your phones shared the same private network. But then came deployment of PBXs in the cloud on the wide open Internet. And, of course, there were traveling salesmen that moved from place to place with new IP addresses at every new hotel. And then there were the users with dynamic IP addresses whose IP address identity changed without much warning.
To address these limitations, Travelin’ Man 3 provided the add-ip script to whitelist new IP addresses. The setup included the ability to limit IP addresses to a certain group of features on the PBX such as SIP, IAX2, SSH, and web access. Or the administrator could enable full access to the PBX for a given IP address.
That solved the new IP address issue, but it wasn’t of much use to those with ever-changing dynamic IP addresses. Thus was born the add-fqdn addition which could be used in combination with a dynamic DNS provider to assign a fully-qualified domain name to a device and keep it regularly updated. An additional ipchecker script was also added as a cron job to pass IP address changes along to the IPtables firewall every 10 minutes.
To round out the Incredible PBX whitelist design, we added PortKnocker to protect administrators from locking themselves out of their own server. We added Travelin’ Man 4, OpenVPN and the NeoRouter VPN to facilitate easy access without resorting to the add-ip and add-fqdn utilities. Private LAN addresses are automatically whitelisted with Travelin’ Man 3 so deploying SIP phones with native VPN capability remains the simplest and safest connectivity option.
One key feature that sets Travelin’ Man 3 apart from other firewall alternatives is the fact that it’s plug-and-play. When you install any of the Incredible PBX 2020 platforms, your IPtables firewall and whitelist are automatically configured. The only requirement is that you perform the second phase of the Incredible PBX install using SSH or Putty from a desktop machine that will be used to manage your PBX. In that way, your desktop PC gets automatically whitelisted as part of the install process. And, as previously noted, all devices on the same private LAN or VPN as your Incredible PBX server have total access without jumping through any additional configuration hoops.
Let’s take a moment to examine how Travelin’ Man 3 works under the covers. First, it’s important to note that IPtables does not support FQDNs, only IP addresses. So, if you add an FQDN entry to the IPtables startup file, it gets translated into a static IP address when IPtables is started. More importantly, if that FQDN happens to be unresolvable when IPtables is started because the remote computer is off-line for some reason, then IPtables crashes and never deploys any of its other rules leaving your PBX totally exposed. For this reason, Travelin’ Man 3 handles firewall startup in a unique way. First, it loads some basic firewall rules, all of which have static IP addresses. These rules are found in the startup script: /etc/sysconfig/iptables on RedHat and CentOS platforms and /etc/iptables/rules.v4 on Debian, Ubuntu, and Raspbian platforms. Then, once IPtables is running, it executes the /usr/local/sbin/iptables-custom script with individual IPtables commands to deploy the remaining whitelist entries including FQDNs. When an individual IPtables command fails in this BASH script, the script simply moves on to the next rule without burning down the house. The only damage is an individual FQDN is not whitelisted. But the computer with this FQDN was off-line anyway so there’s no impact on the operation of your PBX. Once that computer comes back on line, it’s simple enough to whitelist the FQDN again. This is a long-winded explanation of why it’s important on Incredible PBX platforms to start and restart IPtables with the iptables-restart script rather than using systemctl restart iptables. The latter would only load the basic IPtables rules in the startup script and not iptables-custom.
Now that you know how Travelin’ Man 3 works, you may be wondering why FQDN support was never integrated into the IPtables design. We’ve wondered much the same thing and never got much of an answer from the developers other than a cryptic response that IPtables worked as designed. Oh well. What we also have found is there is substantial institutional resistance to whitelist firewall implementations even though they provide the most secure computing environment for most deployments. Blacklists, standing alone, simply don’t work because either the bad guys poison the blacklist with legitimate IP addresses (such as the DNS servers upon which you rely) or the bad guys move on to a new IP address which has not yet been added to the blacklist.
We’d be the first to admit that additional flexibility may be desirable in certain edge cases particularly where end-users must rely upon a smartphone on the road with little more than a softphone app available to connect back to the mothership. But, again, we would strongly recommend deploying OpenVPN on all your devices and sticking with a whitelist solution for most scenarios. For those that can’t or won’t, take a look at the Incredible PBX PUBLIC offering as an alternative. It strikes a good balance using a combination of blacklists, some security through obscurity tricks, and implementation of rules blocking most script kiddies.
Originally published: Monday, March 9, 2020
Need help with Asterisk? Visit the VoIP-info Forum.
Special Thanks to Our Generous Sponsors
FULL DISCLOSURE: ClearlyIP, Skyetel, Vitelity, DigitalOcean, Vultr, VoIP.ms, 3CX, Sangoma, TelecomsXchange and VitalPBX have provided financial support to Nerd Vittles and our open source projects through advertising, referral revenue, and/or merchandise. As an Amazon Associate and Best Buy Affiliate, we also earn from qualifying purchases. We’ve chosen these providers not the other way around. Our decisions are based upon their corporate reputation and the quality of their offerings and pricing. Our recommendations regarding technology are reached without regard to financial compensation except in situations in which comparable products at comparable pricing are available from multiple sources. In this limited case, we support our sponsors because our sponsors support us.
BOGO Bonaza: Enjoy state-of-the-art VoIP service with a $10 credit and half-price SIP service on up to $500 of Skyetel trunking with free number porting when you fund your Skyetel account. No limits on number of simultaneous calls. Quadruple data center redundancy. $25 monthly minimum spend required. Tutorial and sign up details are here.
![]() The lynchpin of Incredible PBX 2020 and beyond is ClearlyIP components which bring management of FreePBX modules and SIP phone integration to a level never before available with any other Asterisk distribution. And now you can configure and reconfigure your new Incredible PBX phones from the convenience of the Incredible PBX GUI.
The lynchpin of Incredible PBX 2020 and beyond is ClearlyIP components which bring management of FreePBX modules and SIP phone integration to a level never before available with any other Asterisk distribution. And now you can configure and reconfigure your new Incredible PBX phones from the convenience of the Incredible PBX GUI.
VitalPBX is perhaps the fastest-growing PBX offering based upon Asterisk with an installed presence in more than 100 countries worldwide. VitalPBX has generously provided a customized White Label version of Incredible PBX tailored for use with all Incredible PBX and VitalPBX custom applications. Follow this link for a free test drive!
Special Thanks to Vitelity. Vitelity is now Voyant Communications and has halted new registrations for the time being. Our special thanks to Vitelity for their unwavering financial support over many years and to the many Nerd Vittles readers who continue to enjoy the benefits of their service offerings. We will keep everyone posted on further developments.
The Very Best Cellphone Plans and Smartphones for 2019

You can read reviews of the best cellphone plans and smartphones until your eyes glaze over and still end up scratching your head when it comes to making a decision. Our approach is a little different. It’s about making smart choices based upon the specific requirements for you and your family. Let’s get the obvious criteria out of the way first. The cellphone provider that you choose has to work in your home, on your way to work, at your office, and in the places to which you typically travel. In the United States, that used to rule out everyone except AT&T, Verizon, and their MVNOs. Not any more. T-Mobile’s coverage now rivals that of the Bell Sisters, and Sprint isn’t far behind. The second important criteria is how many phones you need. If it’s a plan just for you or you and your spouse, it’s a very different landscape than finding suitable providers for a family of four or five. Age also matters. If it’s just two of you and one of you is at least 55 years old, there’s at least one incredible deal. Another important consideration is how much of your cellular usage is from locations with good Wi-Fi coverage. With most providers and newer smartphones, WiFi usage doesn’t cost you anything when it comes to your monthly cellphone bill. And, last but not least, is a careful analysis of how you use your phones. Binge watching Netflix and sending hundreds of high resolution photos every day through cellular connections is very different than using a phone primarily to make calls, send text messages, and retrieve text-based email. Equally important is whether you need your smartphone to also provide Internet connectivity for a tethered computer or tablet.
Let’s get the easy choices out of the way first. If you’re shopping for no more than two phones and one of you is at least 55 years old and one or both of you consumes enormous amounts of data without WiFi every month, T-Mobile is the hands-down winner at $70 a month with no tax/fees for two phones with unlimited talk as well as text and 50GB of data in 210+ countries. You may wish to consider the T-Mobile One Plus add-on if you do considerable traveling or regularly use tethering.
Excluding WiFi, the average cell phone user today consumes between 2GB and 8GB of data per month. If you have an existing cellphone plan, check your bill and see where your usage typically falls. If you’re within the range of 3GB and 12GB per phone per month with no WiFi coverage, then MintMobile’s $15 (3GB), $20 (8GB), and $25 (12GB) plans with unlimited talk and text using the T-Mobile network are the clear winner. HotSpot tethering with a PC is allowed. The only wrinkle is having to pay for a year of service after your 3-month trial ends.
If you’re part of a family of four or five with heavy cellphone usage, the best "unlimited" deal is probably Cricket Wireless which is an AT&T subsidiary and uses the AT&T network. If you don’t mind data speeds reduced to 3 Mbps with unlimited streaming at 480p, then their $100/month plan for four phones is a great deal even with the usual AT&T throttling after 22GB of data usage per month. Add a fifth phone for $25. Tethering is an extra $10/phone.
If Sprint works well in your surroundings and you have your own compatible phones, then Sprint’s Unlimited Kickstart offering is worth a careful look. Up to 5 lines can be purchased for $25/month each, but there is no guarantee as to network speeds, streaming is limited to 480p, and there is no tethering. You can move up to their Unlimited Basic Plan with up to 5 phones for a total of $100/month plus taxes and fees for 2 to 5 phones until June 30, 2020.
MetoPCS from T-Mobile has an offer similar to Sprint’s for 4 lines with unlimited data up to 35GB/month for $100/month with no taxes or additional fees. Pricing escalates to $40/line for two phones and $30/line for three. Tethering is not supported.
If Verizon is your preference, the least costly unlimited plan is offered by their Visible subsidiary at $40/month with data speeds limited to 5 Mbps and video streaming limited to 480p DVD quality. Tethering is permitted. iPhones and Galaxy S9/S9+ phones are supported. Or you can purchase for $99 or swap any Android phone for the Visible R2 phone from ZTE.
Things get murkier and more expensive from here. One consideration we haven’t touched upon with the low cost providers is bundling. Depending upon your Internet service provider and cable TV provider, the cost of your cellphone plan can change dramatically. For example, AT&T bundles DirecTV service for 4 TVs plus 4 cellphones sharing 15GB of monthly data for $200/month with lots of fine print. Xfinity/Comcast mobile service on Verizon’s network is available to existing Xfinity Internet customers for $12/GB with no line access fees on up to 5 smartphones. Or you can sign up for "unlimited" service at $45/phone with 20GB throttling. Spectrum has a similar mobile offer using Verizon at $14/GB or $45/phone for Spectrum Internet customers. And Google offers their GoogleFi service for $20/phone plus $10/GB of data actually used. Additional lines are $15. Google uses both T-Mobile and Sprint for service.
The elephant in the room with all of these cellphone plans is data throttling. All of the providers do it with impunity, and the short answer is you’ll simply have to choose a provider whose terms of service you can live with. While T-Mobile’s 50GB cap is considerably higher than AT&T’s 22GB, there are plenty of weasel words in T-Mobile’s terms that allow them to do what is necessary to "protect" their network. On the other hand, AT&T actually has locations (including ours) where data throttling reportedly isn’t used at all. We actually have a MiFi device on AT&T’s network that, during some months, has recorded over 100GB of data usage without throttling. So the bottom line is your mileage may vary, and it behooves you to shop around until you find a provider with whom you are comfortable based upon your own usage patterns.

We haven’t touched upon choosing a smartphone up until now. We all have our favorites and some providers have extremely favorable pricing if you bundle phones as part of your initial signup. If you don’t mind a 2-year-old model of an iPhone, these often can be free. The same holds for older Android top tier phones from Samsung and other providers. Just last week, Google offered its latest Pixel phones at half price for new GoogleFi customers. Whatever we listed today would probably be old news before you finished reading about it. We will mention one incredibly versatile Android phone, and that’s Motorola’s one-year-old Corning® Gorilla® glass, unlocked Moto G6 which can be found for under $200. In appearance it is indistinguishable from Samsung’s Galaxy S7 Edge, and it compares favorably to almost every feature in Apple’s latest $1,000+ iPhone with the possible exception of the camera (see photo above). It’s compatible with all of the carriers mentioned above except Visible. As with many of the newer smartphones, the G6 supports Wi-Fi calling as well as OpenVPN connectivity.
Originally published: Monday, May 6, 2019
Need help with Asterisk? Visit the VoIP-info Forum.
Special Thanks to Our Generous Sponsors
FULL DISCLOSURE: ClearlyIP, Skyetel, Vitelity, DigitalOcean, Vultr, VoIP.ms, 3CX, Sangoma, TelecomsXchange and VitalPBX have provided financial support to Nerd Vittles and our open source projects through advertising, referral revenue, and/or merchandise. As an Amazon Associate and Best Buy Affiliate, we also earn from qualifying purchases. We’ve chosen these providers not the other way around. Our decisions are based upon their corporate reputation and the quality of their offerings and pricing. Our recommendations regarding technology are reached without regard to financial compensation except in situations in which comparable products at comparable pricing are available from multiple sources. In this limited case, we support our sponsors because our sponsors support us.
BOGO Bonaza: Enjoy state-of-the-art VoIP service with a $10 credit and half-price SIP service on up to $500 of Skyetel trunking with free number porting when you fund your Skyetel account. No limits on number of simultaneous calls. Quadruple data center redundancy. $25 monthly minimum spend required. Tutorial and sign up details are here.
![]() The lynchpin of Incredible PBX 2020 and beyond is ClearlyIP components which bring management of FreePBX modules and SIP phone integration to a level never before available with any other Asterisk distribution. And now you can configure and reconfigure your new Incredible PBX phones from the convenience of the Incredible PBX GUI.
The lynchpin of Incredible PBX 2020 and beyond is ClearlyIP components which bring management of FreePBX modules and SIP phone integration to a level never before available with any other Asterisk distribution. And now you can configure and reconfigure your new Incredible PBX phones from the convenience of the Incredible PBX GUI.
VitalPBX is perhaps the fastest-growing PBX offering based upon Asterisk with an installed presence in more than 100 countries worldwide. VitalPBX has generously provided a customized White Label version of Incredible PBX tailored for use with all Incredible PBX and VitalPBX custom applications. Follow this link for a free test drive!
Special Thanks to Vitelity. Vitelity is now Voyant Communications and has halted new registrations for the time being. Our special thanks to Vitelity for their unwavering financial support over many years and to the many Nerd Vittles readers who continue to enjoy the benefits of their service offerings. We will keep everyone posted on further developments.
Interconnecting a Mobile PBX to the Asterisk Mothership
The Holy Grail for a mobile VoIP solution is a simple way to connect back to your primary Asterisk® PBX via Wi-Fi from anywhere in the world to make and receive calls as if you never left. Let’s tick off the potential problems. First, many home-based PBXs are sitting behind NAT-based routers. Second, almost all remote Wi-Fi connections are made through a NAT-based router. Third, chances are the remote hosting platform blocks outgoing email from downstream servers such as a mobile PBX. Fourth, deciphering the IP address of your remote connection can be problematic. Fifth, the chances of experiencing one-way audio or no audio on your VoIP calls is high because of NAT-based routers at both ends of your connection.
Last week we introduced OpenVPN as a solution for those with multiple VoIP sites to interconnect. But there’s a much simpler solution for those that travel regularly and want to avoid the complexity of configuring OpenVPN. Here is a quick thumbnail of the setup we recommend as your mobile companion, and you’ll never have a one-way audio problem again. In terms of hardware, you’ll need a Raspberry Pi 3B+ with its native WiFi support and a Windows or Mac notebook computer for traveling. You’ll also need a NeoRouter VPN server to make this process seamless. If you’ve already set up an OpenVPN server platform, it will work equally well. One advantage of NeoRouter is that clients can be added from the client side without having to create a config file on the VPN server. All you need is a username and password. But the choice of VPN platform is totally a matter of preference. The objective using either OpenVPN or NeoRouter is secure communications to your home base. We don’t want to have to reconfigure either your home PBX or your traveling PBX or your notebook PC based upon changes in your public and private IP addresses.
Today we’ll walk you through the easiest way to set up a (free) NeoRouter server on the Internet. It can be used to connect up to 254 devices on an encrypted private LAN. We’re delighted to have finally found a perfect use for the (free) Google Cloud instance.
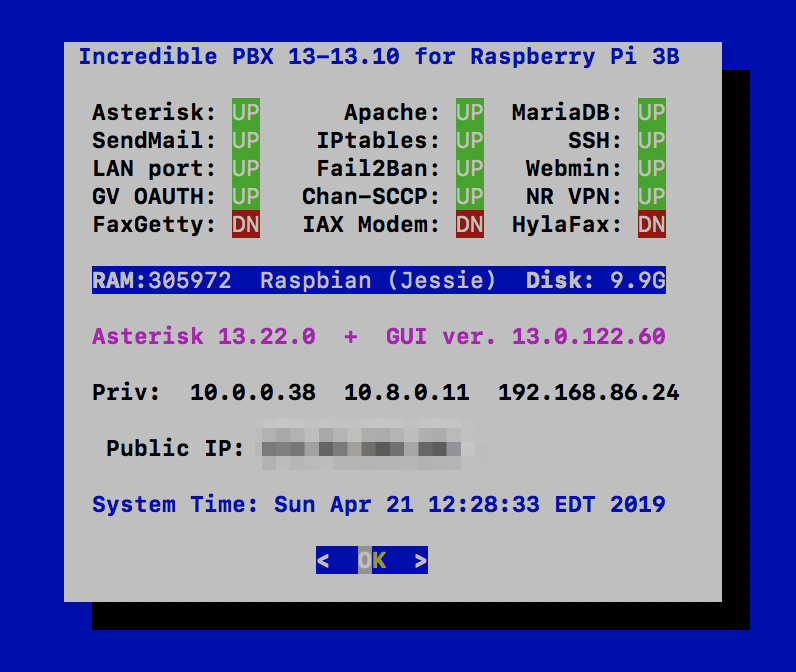
Using a RaspberryPi 3B+, build an Incredible PBX 13-13.10 platform by following our previous tutorial. We’ll set this up on your home WiFi network so that you only have to throw the Raspberry Pi and its power supply in your suitcase when you travel. As part of the setup, we’ll download NeoRouter and activate private IP addresses for your notebook computer as well as both of your PBXs (using nrclientcmd). Next, we’ll interconnect the two PBXs using SIP trunks and the NeoRouter private LAN IP addresses. We’ll take advantage of a neat little Raspberry Pi trick by storing a wpa_supplicant.conf template on your PC for the remote WiFi setup even though we don’t yet know anything about the remote LAN. Once we know the SSID and password at the remote destination, we’ll use your notebook computer to edit the template and transfer the file to the /boot folder of your RasPi’s microSD card. When the card then is inserted and the RasPi is booted, it will automatically move the template to the proper /etc/wpa_supplicant folder to successfully activate your WiFi connection. We’ll also load links, a fast text-based browser, just in case you encounter a hotel that requires some sort of acknowledgement or password before establishing your WiFi connection to the Internet.

Setting Up a (free) NeoRouter Server in the Cloud
Because NeoRouter uses a star-based VPN architecture, that means the NeoRouter Server must always be available at the same IP address for all of the NeoRouter Clients (aka Nodes) to talk to. If you already have a cloud-based server that has a static IP address and can handle the traffic cop duties of NeoRouter Server, then that’s an ideal place to install NeoRouter Server. Simply download the Free flavor of NeoRouter Server that matches your existing platform and install it. Add an FQDN for your server’s IP address, and you’re all set. A detailed summary of available management options is included in our previous NeoRouter v2 article.
We devoted a couple weeks to Google Cloud instances last month, and it turned out to be a pretty awful platform for hosting Asterisk. But the free offering looks to be a perfect fit as a hosting platform for NeoRouter Server. You also won’t have to worry about Google going out of business anytime soon. So let us walk you through an abbreviated setup process on the Google Cloud platform. If you’re just getting started with Google Cloud, read our previous article to take advantage of Google’s generous $300 offer to get you started and to generally familiarize yourself with the mechanics of setting up an instance in the Google Cloud.
For NeoRouter Server, navigate to https://console.cloud.google.com. Click the 3-bar image ![]() in the upper left corner of your Dashboard. This exposes the Navigation Menu. In the COMPUTE section of the Dashboard, click Compute Engine -> VM Instances. Then click CREATE PROJECT and name it. Now click CREATE INSTANCE and Name it nrserver. The instance name becomes the hostname for your virtual machine. If you want to remain in the Free Tier, choose f1-micro instance as the Machine Type and choose a U.S. Region (us-central1, us-east1 or us-west1). For the Boot Disk, choose CentOS 6 and expand the disk storage to at least 20GB (30GB is available with the Free Tier). For the Firewall setting, leave HTTP and HTTPS disabled. Check your entries carefully and then click the Create button.
in the upper left corner of your Dashboard. This exposes the Navigation Menu. In the COMPUTE section of the Dashboard, click Compute Engine -> VM Instances. Then click CREATE PROJECT and name it. Now click CREATE INSTANCE and Name it nrserver. The instance name becomes the hostname for your virtual machine. If you want to remain in the Free Tier, choose f1-micro instance as the Machine Type and choose a U.S. Region (us-central1, us-east1 or us-west1). For the Boot Disk, choose CentOS 6 and expand the disk storage to at least 20GB (30GB is available with the Free Tier). For the Firewall setting, leave HTTP and HTTPS disabled. Check your entries carefully and then click the Create button.
When your virtual machine instance comes on line, jot down the assigned public IP address. We’ll need it in a minute. Now click on the SSH pull-down tab and choose Open in a Browser Window. Now we need to set a root password and adjust the SSH settings so that you can login from your desktop computer using SSH or Putty:
sudo passwd root
su root
nano -w /etc/ssh/sshd_config
When the editor opens the SSH config file, add the following entries. Then save the file and restart SSH: service sshd restart
PermitRootLogin yes
PasswordAuthentication yes
You now should be able to log in to your instance as root from your desktop computer using SSH or Putty. Test it to be sure: ssh root@server-IP-address
Before we leave the Google Cloud Dashboard, let’s make the assigned public IP address permanent so that it doesn’t get changed down the road. Keep in mind that, if you ever delete your instance, you also need to remove the assigned static IP address so you don’t continue to get billed for it. From Home on the Dashboard, scroll down to the NETWORKING section and choose VPS Network -> External IP Addresses. Change the Type of your existing address to Static and Name it staticip. Next, choose Firewall Rules in the VPS Network section and click CREATE FIREWALL RULE. Fill in the template like the following leaving the other fields with their default entries. Then click CREATE.
- Name: neorouter
- Target Tags: neorouter
- Source IP Range: 0.0.0.0/0
- Protocols/Ports: check tcp: 32976
CAUTION: Before this firewall rule will be activated for your instance, it also must be specified in the Network Tags section for your instance. Shut down your instance and add the neorouter tag by editing your instance. Then restart your instance.
Now we’re ready to install NeoRouter Free v2 Server on your instance. Be sure to choose the Free v2 variety. Log back into your server as root using SSH/Putty and issue these commands:
yum -y update
yum -y install nano
wget http://download.neorouter.com/Downloads/NRFree/Update_2.3.1.4360/Linux/CentOS/nrserver-2.3.1.4360-free-centos-x86_64.rpm
rpm -Uvh nrserver-2.3.1.4360-free-centos-x86_64.rpm
/etc/rc.d/init.d/nrserver.sh restart
nrserver -setdomain <DOMAINNAME> <DOMAINPASSWORD>
nrserver -adduser <USERNAME> <PASSWORD> admin
nrserver -enableuser <USERNAME>
nrserver -showsettings
Finally, add the following command to /etc/rc.local so that NeoRouter Server gets started whenever your instance is rebooted:
echo "/etc/rc.d/init.d/nrserver.sh start" >> /etc/rc.local
Installing Incredible PBX 13-13.10 on a Raspberry Pi
Configuring NeoRouter Client on Your Computers
On Linux-based (non-GUI) platforms, setting up the NeoRouter Client is done by issuing the command: nrclientcmd. You’ll be prompted for your NeoRouter Server FQDN as well as your username and password credentials. Perform this procedure on both your home PBX and the Raspberry Pi.
To add your Windows or Mac notebook to the NeoRouter VPN, download the appropriate client and run the application which will prompt for your NeoRouter Server FQDN as well as your NeoRouter credentials. Once completed, you should see all three machines in your NeoRouter Free Client Dashboard: your PC as well as your home PBX and Raspberry Pi-based Incredible PBX. Make note of the private VPN addresses (10.0.0.X) of both your home PBX and your Raspberry Pi. These VPN addresses never change, and we’ll need them to interconnect your PBXs and to set up a softphone on your notebook computer.
Admininistrative Tools to Manage NeoRouter
Here are a few helpful commands for monitoring and managing your NeoRouter VPN.
To access your NeoRouter Linux client: nrclientcmd
To restart NeoRouter Linux client: /etc/rc.d/init.d/nrservice.sh restart
To restart NeoRouter Linux server: /etc/rc.d/init.d/nrserver.sh restart
To set domain: nrserver -setdomain YOUR-VPN-NAME domainpassword
For a list of client devices: nrserver -showcomputers
For a list of existing user accounts: nrserver -showusers
For the settings of your NeoRouter VPN: nrserver -showsettings
To add a user account: nrserver -adduser username password user
To add admin account: nrserver -adduser username password admin
For a complete list of commands: nrserver –help
Interconnecting Your Raspberry Pi and Home PBX
To keep things simple, our setup examples below assume the following NeoRouter VPN addresses: Home PBX (10.0.0.1) and Raspberry Pi (10.0.0.2). Using a browser, you’ll need to login to the GUI of your Home PBX and Raspberry Pi and add a Trunk to each PBX. Be sure to use the same secret on BOTH trunk setups. We don’t recommend forwarding incoming calls from your Home PBX to your Raspberry Pi because most folks won’t be sitting in their hotel room all day to answer incoming calls. Instead, add the number of your smartphone to a Ring Group on the Home PBX and don’t forget the # symbol at the end of the number. On the Raspberry Pi side, we are assuming that whenever a call is dialed from a registered softphone with the 9 prefix, the call will be sent to the Home PBX for call processing (without the 9). For example, 98005551212 would send 800-555-1212 to the Home PBX for outbound routing and 9701 would send 701 to the Home PBX for routing to the 701 extension. You can obviously adjust your dialplan to meet your own local requirements.
On the Home PBX, the chan_sip trunk entries should look like this:
Trunk Name: raspi-remote

PEER DETAILS

host=10.0.0.2
type=friend
context=from-internal
username=home-pbx
fromuser=home-pbx
secret=some-password
canreinvite=no
insecure=port,invite
qualify=yes
nat=yes
On the Raspberry Pi, the chan_sip trunk entries should look like this:
Trunk Name: home-pbx

PEER DETAILS

host=10.0.0.1
type=friend
context=from-internal
username=raspi-remote
fromuser=raspi-remote
secret=some-password
canreinvite=no
insecure=port,invite
qualify=yes
nat=yes
On the Raspberry Pi, add an Outbound Route named Out9-home-pbx pointed to home-pbx Trunk with the following Dial Patterns. For each Dial Pattern, prepend=blank and prefix=9:
dial string: 1NXXNXXXXXX
dial string: NXXNXXXXXX
dial string: *98X.
dial string: XXX
dial string: XXXX
dial string: XXXXX
Tweaking Your Raspberry Pi for WiFi Mobility
wpa_supplicant.conf config file to the /boot directory on the card once you arrive at your destination and know the SSID and password of the local WiFi network. When the Raspberry Pi is subsequently booted, the operating system will move the config file to the /etc/wpa_supplicant directory so that your WiFi network will come on line. Here’s what a typical wpa_supplicant.conf file should look like using your actual credentials. The last network section handles open WiFi network connections (think: McDonald’s) if you want to enable them:
country=US
update_config=1

network={
 ssid="your-SSID"
 psk="your-SSID-password"
 key_mgmt=WPA-PSK
 scan_ssid=1
 priority=5
}

network={
 key_mgmt=NONE
 priority=1
}
The other gotcha is that some public WiFi networks require some type of web login procedure before you can actually access the Internet even though an IP address may have been assigned to your Raspberry Pi. To handle this situation, you’ll need a text-based web browser on the Raspberry Pi that can be accessed through your notebook PC using SSH and your Raspberry Pi’s VPN address. Our favorite is links which can be installed on your Raspberry Pi before you pack up.
apt-get install links -y
Once you arrive at your destination, connect both your notebook PC and Raspberry Pi to the same WiFi network, login to the RasPi with SSH at the VPN address assigned to your RasPi, and run links to start the browser. Press <esc> to access the links menu options. If you can’t access your RasPi at the VPN IP address, try its WiFi-assigned local IP address.
Adding a Softphone to Your Notebook PC
We recommend YateClient which is free. Download it from here. Run YateClient once you’ve installed it and enter the credentials for an extension on your Raspberry Pi. Then enter the VPN IP address of your server plus your extension’s password. Click OK to save your entries.

If you are a Mac user, another great no-frills softphone is Telephone. Just download and install it from the Mac App Store.
Adding a Softphone to Your Smartphone
Enjoy your pain-free traveling!
Originally published: Monday, April 22, 2019
Need help with Asterisk? Visit the VoIP-info Forum.
Special Thanks to Our Generous Sponsors
FULL DISCLOSURE: ClearlyIP, Skyetel, Vitelity, DigitalOcean, Vultr, VoIP.ms, 3CX, Sangoma, TelecomsXchange and VitalPBX have provided financial support to Nerd Vittles and our open source projects through advertising, referral revenue, and/or merchandise. As an Amazon Associate and Best Buy Affiliate, we also earn from qualifying purchases. We’ve chosen these providers not the other way around. Our decisions are based upon their corporate reputation and the quality of their offerings and pricing. Our recommendations regarding technology are reached without regard to financial compensation except in situations in which comparable products at comparable pricing are available from multiple sources. In this limited case, we support our sponsors because our sponsors support us.
BOGO Bonaza: Enjoy state-of-the-art VoIP service with a $10 credit and half-price SIP service on up to $500 of Skyetel trunking with free number porting when you fund your Skyetel account. No limits on number of simultaneous calls. Quadruple data center redundancy. $25 monthly minimum spend required. Tutorial and sign up details are here.
![]() The lynchpin of Incredible PBX 2020 and beyond is ClearlyIP components which bring management of FreePBX modules and SIP phone integration to a level never before available with any other Asterisk distribution. And now you can configure and reconfigure your new Incredible PBX phones from the convenience of the Incredible PBX GUI.
The lynchpin of Incredible PBX 2020 and beyond is ClearlyIP components which bring management of FreePBX modules and SIP phone integration to a level never before available with any other Asterisk distribution. And now you can configure and reconfigure your new Incredible PBX phones from the convenience of the Incredible PBX GUI.
VitalPBX is perhaps the fastest-growing PBX offering based upon Asterisk with an installed presence in more than 100 countries worldwide. VitalPBX has generously provided a customized White Label version of Incredible PBX tailored for use with all Incredible PBX and VitalPBX custom applications. Follow this link for a free test drive!
Special Thanks to Vitelity. Vitelity is now Voyant Communications and has halted new registrations for the time being. Our special thanks to Vitelity for their unwavering financial support over many years and to the many Nerd Vittles readers who continue to enjoy the benefits of their service offerings. We will keep everyone posted on further developments.
A New VPN for All Seasons: Introducing OpenVPN for Asterisk

This month marks our twentieth anniversary wrestling with virtual private networks. Here’s a quick walk down memory lane. Our adventure began with the Altiga 3000 series VPN concentrators which we introduced in the federal courts in 1999. It was a near perfect plug-and-play hardware solution for secure communications between remote sites using less than secure Windows PCs. Cisco quickly saw the potential, gobbled up the company, and promptly doubled the price of the rebranded concentrators. About 10 years ago, we introduced Hamachi® VPNs to interconnect Asterisk® and PBX in a Flash servers. At the time, Hamachi was free, but that was short-lived when they were subsequently acquired by LogMeIn®. What followed was a short stint with PPTP VPNs which worked great with Macs, Windows PCs, and many phones but suffered from an endless stream of security vulnerabilities. Finally, in April 2012, we introduced the free NeoRouter® VPN. Version 2 still is an integral component in every Incredible PBX® platform today, and PPTP still is available as well. While easy to set up and integrate into multi-site Asterisk deployments, the Achilles’ Heel of NeoRouter remains its inability to directly interconnect many smartphones and stand-alone SIP phones, some of which support the OpenVPN platform and nothing else.

The main reason we avoided OpenVPN® over the years was its complexity to configure and deploy.1 In addition, it was difficult to use with clients whose IP addresses were frequently changing. Thanks to the terrific work of Nyr, Stanislas Angristan, and more than a dozen contributors, OpenVPN now has been tamed. And the new server-based, star topology design makes it easy to deploy for those with changing or dynamic IP addresses. Today we’ll walk you through building an OpenVPN server as well as the one-minute client setup for almost any Asterisk deployment and most PCs, routers, smartphones, and VPN-compatible soft phones and SIP phones including Yealink, Grandstream, Snom, and many more. And the really great news is that OpenVPN clients can coexist with your current NeoRouter VPN.
Finally, a word about the OpenVPN Client installations below. We’ve tested all of these with current versions of Incredible PBX 13-13, 16-15, and Incredible PBX 2020. They should work equally well with other server platforms which have been properly configured. However, missing dependencies on other platforms are, of course, your responsibility.
Building an OpenVPN Server Platform
There are many ways to create an OpenVPN server platform. The major prerequisites are a supported operating system, a static IP address for your server, and a platform that is extremely reliable and always available. If the server is off line, all client connections will also fail. While we obviously have not tested all the permutations and combinations, we have identified a platform that just works™. It’s the CentOS 7, 64-bit cloud offering from Vultr. If you use our referral link at Vultr, you not only will be supporting Nerd Vittles through referral revenue, but you also will be able to take advantage of their $50 free credit for new customers. For home and small business deployments, we have found the $5/month platform more than adequate, and you can add automatic backups for an additional $1 a month. Cheap insurance!
To get started, create your CentOS 7 Vultr instance and login as root using SSH or Putty. Immediately change your password and update and install the necessary CentOS 7 packages:
passwd
yum -y update
yum -y install net-tools nano wget tar iptables-services
systemctl stop firewalld
systemctl disable firewalld
systemctl enable iptables
We recommend keeping your OpenVPN server platform as barebones as possible to reduce the vulnerability risk. By default, this installer routes all client traffic through the VPN server which wastes considerable bandwidth. The sed commands below modify this design to only route client VPN traffic through the OpenVPN server.
cd /root
curl -O https://raw.githubusercontent.com/Angristan/openvpn-install/master/openvpn-install.sh
chmod +x openvpn-install.sh
sed -i "s|\\techo 'push \\"redirect-gateway|#\\techo 'push \\"redirect-gateway|" openvpn-install.sh
sed -i "s|push \\"redirect-gateway|#push \\"redirect-gateway|" openvpn-install.sh
sed -i 's|tls-client|tls-client\\npull-filter ignore "redirect-gateway"|' openvpn-install.sh
./openvpn-install.sh
Here are the recommended entries in running the OpenVPN installer:
- Server IP Address: using FQDN strongly recommended to ease migration issues
- Enabled IPv6 (no): accept default
- Port (1194): accept default
- Protocol (UDP): accept default
- DNS (3): change to 9 (Google)
- Compression (no): accept default
- Custom encrypt(no): accept default
- Generate Server
- Client name: firstclient
- Passwordless (1): accept default
In the following steps, we will use IPtables to block all server access except via SSH or the VPN tunnel. Then we’ll start your OpenVPN server:
cd /etc/sysconfig
wget http://incrediblepbx.com/iptables-openvpn.tar.gz
tar zxvf iptables-openvpn.tar.gz
rm -f iptables-openvpn.tar.gz
echo "net.ipv4.ip_forward = 1" >> /etc/sysctl.conf
sysctl -p
systemctl -f enable openvpn@server.service
systemctl start openvpn@server.service
systemctl status openvpn@server.service
systemctl enable openvpn@server.service
systemctl restart iptables
Once OpenVPN is enabled, the server can be reached through the VPN at 10.8.0.1. OpenVPN clients will be assigned by DHCP in the range of 10.8.0.2 through 10.8.0.254. You can list your VPN clients like this: cat /etc/openvpn/ipp.txt. You can list active VPN clients like this: cat /var/log/openvpn/status.log | grep 10.8. And you can add new clients or delete old ones by rerunning /root/openvpn-install.sh.
For better security, change the SSH access port replacing 1234 with desired port number:
PORT=1234
sed -i "s|#Port 22|Port $PORT|" /etc/ssh/sshd_config
systemctl restart sshd
sed -i "s|dport 22|dport $PORT|" /etc/sysconfig/iptables
systemctl restart iptables
04/16 UPDATE: We’ve made changes in the Angristan script to adjust client routing. By default, all packets from every client flowed through the OpenVPN server which wasted considerable bandwidth. Our preference is to route client packets destined for the Internet directly to their destination rather than through the OpenVPN server. The sed commands added to the base install above do this; however, if you’ve already installed and run the original Angristan script, your existing clients will be configured differently. Our recommendation is to remove the existing clients, make the change below, and then recreate the clients again by rerunning the script. In the alternative, you can execute the command below to correct future client creations and then run it again on each existing client platform substituting the name of the /root/.ovpn client file for client-template.txt and then restart each OpenVPN client.
cd /etc/openvpn
sed -i 's|tls-client|tls-client\\npull-filter ignore "redirect-gateway"|' client-template.txt
Creating OpenVPN Client Templates
In order to assign different private IP addresses to each of your OpenVPN client machines, you’ll need to create a separate client template for each computer. You do this by running /root/openvpn-install.sh again on the OpenVPN server. Choose option 1 to create a new .ovpn template. Give each client machine template a unique name and do NOT require a password for the template. Unless the client machine is running Windows, edit the new .ovpn template and comment out the setenv line: #setenv. Save the file and copy it to the /root folder of the client machine. Follow the instructions below to set up OpenVPN on the client machine and before starting up OpenVPN replace firstclient.ovpn in the command line with the name of .ovpn you created for the individual machine.

Renewing OpenVPN Server’s Expired Certificate
The server certificate will expire after 1080 days, and clients will no longer be able to connect. Here’s what to do next:
systemctl stop openvpn@server.service
cd /etc/openvpn/easy-rsa
./easyrsa gen-crl
cp /etc/openvpn/easy-rsa/pki/crl.pem /etc/openvpn/crl.pem
systemctl start openvpn@server.service
Installing an OpenVPN Client on CentOS/RHEL
cd /root
yum -y install epel-release
yum --enablerepo=epel install openvpn -y
# copy /root/firstclient.ovpn from server to client /root
# and then start up the VPN client
openvpn --config /root/firstclient.ovpn --daemon
# adjust Incredible PBX 13-13 firewall below
iptables -A INPUT -s 10.8.0.0/24 -j ACCEPT
cd /usr/local/sbin
echo "iptables -A INPUT -s 10.8.0.0/24 -j ACCEPT" >> iptables-custom
Running ifconfig should now show the VPN client in the list of network ports:
tun0 Link encap:UNSPEC  HWaddr 00-00-00-00-00-00-00-00-00-00-00-00-00-00-00-00
     inet addr:10.8.0.2  P-t-P:10.8.0.2  Mask:255.255.255.0
     UP POINTOPOINT RUNNING NOARP MULTICAST  MTU:1500  Metric:1
     RX packets:9 errors:0 dropped:0 overruns:0 frame:0
     TX packets:39 errors:0 dropped:0 overruns:0 carrier:0
     collisions:0 txqueuelen:100
     RX bytes:855 (855.0 b)  TX bytes:17254 (16.8 KiB)
And you should be able to login to the VPN server using its VPN IP address:
# enter actual SSH port replacing 1234
PORT=1234
ssh -p $PORT root@10.8.0.1
Installing an OpenVPN Client on Ubuntu 18.04.2
cd /root
apt-get update
apt-get install openvpn unzip
dpkg-reconfigure tzdata
# copy /root/firstclient.ovpn from server to client /root
# and then start up the VPN client
openvpn --config /root/firstclient.ovpn --daemon
# adjust Incredible PBX 13-13 firewall below
iptables -A INPUT -s 10.8.0.0/24 -j ACCEPT
cd /usr/local/sbin
echo "iptables -A INPUT -s 10.8.0.0/24 -j ACCEPT" >> iptables-custom
Running ifconfig should now show the VPN client in the list of network ports:
tun0 Link encap:UNSPEC  HWaddr 00-00-00-00-00-00-00-00-00-00-00-00-00-00-00-00
     inet addr:10.8.0.2  P-t-P:10.8.0.2  Mask:255.255.255.0
     UP POINTOPOINT RUNNING NOARP MULTICAST  MTU:1500  Metric:1
     RX packets:9 errors:0 dropped:0 overruns:0 frame:0
     TX packets:39 errors:0 dropped:0 overruns:0 carrier:0
     collisions:0 txqueuelen:100
     RX bytes:855 (855.0 b)  TX bytes:17254 (16.8 KiB)
And you should be able to login to the VPN server using its VPN IP address:
# enter actual SSH port replacing 1234
PORT=1234
ssh -p $PORT root@10.8.0.1
Installing an OpenVPN Client on Raspbian
Good news and bad news. First the bad news. Today’s OpenVPN server won’t work because of numerous unavailable encryption modules on the Raspberry Pi side. The good news is that NeoRouter is a perfect fit with Raspbian, and our upcoming article will show you how to securely interconnect a Raspberry Pi with any Asterisk server in the world… at no cost.
04/16 Update: We now have OpenVPN working with Incredible PBX for the Raspberry Pi. The trick is that you’ll need to build the latest version of OpenVPN from source before beginning the client install. Here’s how. Login to your Raspberry Pi as root and issue these commands:
apt-get remove openvpn
apt-get update
apt-get install libssl-dev liblzo2-dev libpam0g-dev build-essential -y
cd /usr/src
wget https://swupdate.openvpn.org/community/releases/openvpn-2.4.7.tar.gz
tar zxvf openvpn-2.4.7.tar.gz
cd openvpn-2.4.7
./configure --prefix=/usr
make
make install
openvpn --version
Now you should be ready to install a client config file, start up OpenVPN, and adjust firewall:
cd /root
dpkg-reconfigure tzdata
# copy /root/firstclient.ovpn from server to client /root
# and then start up the VPN client
openvpn --config /root/firstclient.ovpn --daemon
# adjust Incredible PBX 13-13 firewall below
iptables -A INPUT -s 10.8.0.0/24 -j ACCEPT
cd /usr/local/sbin
echo "iptables -A INPUT -s 10.8.0.0/24 -j ACCEPT" >> iptables-custom
Installing an OpenVPN Client on a Mac
While there are numerous OpenVPN clients for Mac OS X, none hold a candle to Tunnelblick in terms of ease of installation and use. First, create a new client config on your server and copy it (/root/*.ovpn) to a folder on your Mac where you can find it. Download Tunnelblick and install it. Run Tunnelblick and then open Finder. Click and drag your client config file to the Tunnelblick icon in the top toolbar. Choose Connect when prompted. Done.
Installing an OpenVPN Client for Windows 10
The installation procedure for Windows is similar to the Mac procedure above. Download the OpenVPN Client for Windows. Double-click on the downloaded file to install it. Create a new client config on your server and copy it (/root/*.ovpn) to a folder on your PC where you can find it. Start up the OpenVPN client and click on the OpenVPN client in the activity tray. Choose Import File and select the config file you downloaded from your OpenVPN Server. Right-click on the OpenVPN icon again and choose Connect. Done.
Installing an OpenVPN Client for Android
Our favorite OpenVPN client for Android is called OpenVPN for Android and is available in the Google Play Store. Download and install it as you would any other Android app. Upload a client config file from your OpenVPN server to your Google Drive. Run the app and click + to install a new profile. Navigate to your Google Drive and select the config file you uploaded.
Installing an OpenVPN Client for iOS Devices
The OpenVPN Connect client for iOS is available in the App Store. Download and install it as you would any other iOS app. Before uploading a client config file, open the OpenVPN Connect app and click the 4-bar Settings icon in the upper left corner of the screen. Click Settings and change the VPN Protocol to UDP and IPv6 to IPV4-ONLY Tunnel. Accept remaining defaults.
To upload a client config file, the easiest way is to use Gmail to send yourself an email with the config file as an attachment. Open the message with the Gmail app on your iPhone or iPad and click on the attachment. Then choose the Upload icon in the upper right corner of the dialog. Next, choose Copy to OpenVPN in the list of apps displayed. When the import listing displays in OpenVPN Connect, click Add to import the new profile. Click ADD again when the Profile has been successfully imported. You’ll be prompted for permission to Add VPN Configurations. Click Allow. Enter your iOS passcode when prompted. To connect, tap once on the OpenVPN Profile. To disconnect, tap on the Connected slider. When you reopen the OpenVPN Connect app, the OVPN Profiles menu will display by default. Simply tap once on your profile to connect thereafter.
Installing a Web Interface to Display Available Clients
One advantage of NeoRouter is a simple way for any VPN client to display a listing of all VPN clients that are online at any given time. While that’s not possible with OpenVPN, we can do the next best thing and create a simple web page that can be accessed using a browser but only from a connected OpenVPN client pointing to http://10.8.0.1.
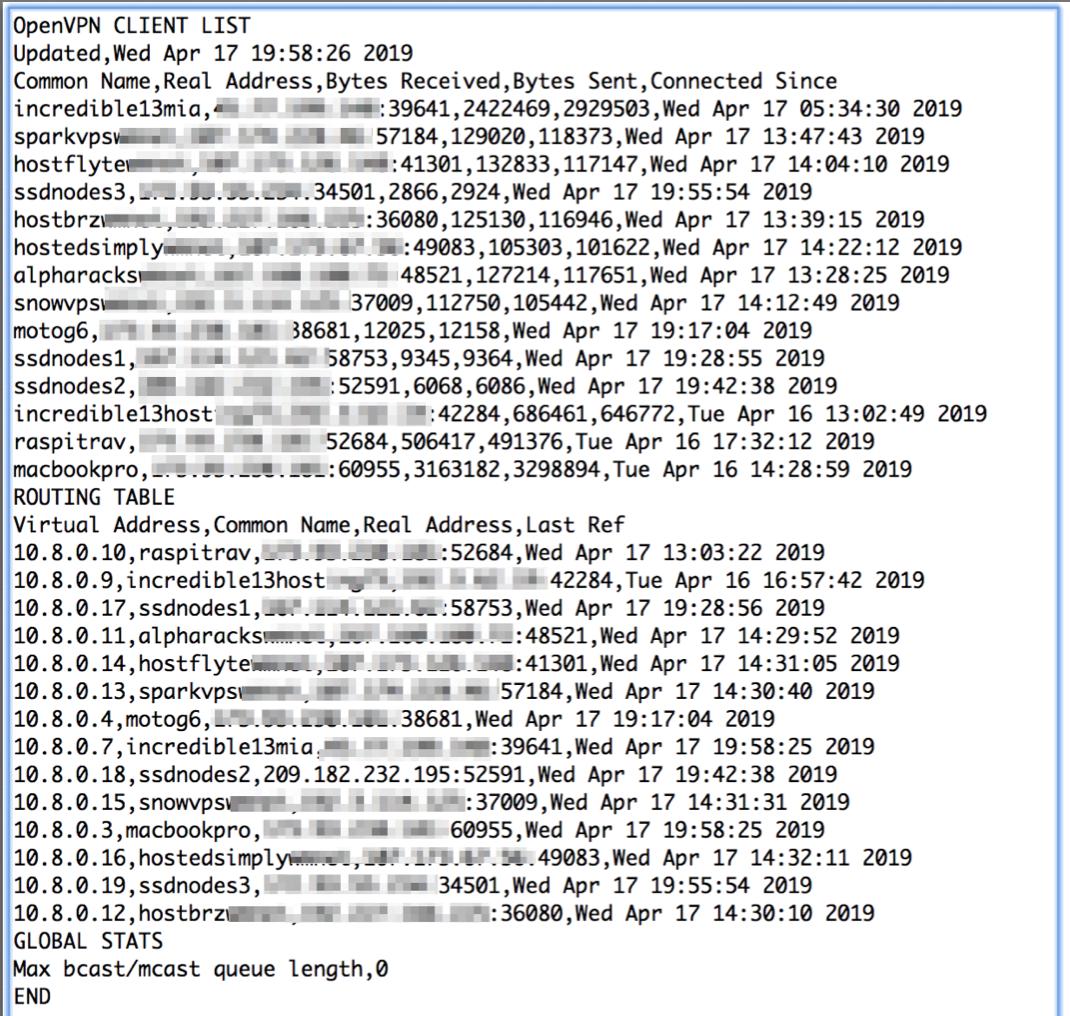
To set this up, log in to your OpenVPN server as root and issue the following commands:
yum --enablerepo=epel install lighttpd -y
systemctl start lighttpd.service
systemctl enable lighttpd.service
chown root:lighttpd /var/log/openvpn/status.log
chmod 640 /var/log/openvpn/status.log
cd /var/www
rm -rf lighttpd
wget http://incrediblepbx.com/lighttpd.tar.gz
tar zxvf lighttpd.tar.gz
ln -s /var/log/openvpn/status.log /var/www/lighttpd/status.log
sed -i 's|#server.bind = "localhost"|server.bind = "10.8.0.1"|' /etc/lighttpd/lighttpd.conf
systemctl restart lighttpd.service
Latest VPN Security Alerts
https://nakedsecurity.sophos.com/2019/04/16/security-weakness-in-popular-vpn-clients/
Originally published: Monday, April 15, 2019 Updated: Saturday, February 29, 2020
Need help with Asterisk? Visit the VoIP-info Forum.
Special Thanks to Our Generous Sponsors
FULL DISCLOSURE: ClearlyIP, Skyetel, Vitelity, DigitalOcean, Vultr, VoIP.ms, 3CX, Sangoma, TelecomsXchange and VitalPBX have provided financial support to Nerd Vittles and our open source projects through advertising, referral revenue, and/or merchandise. As an Amazon Associate and Best Buy Affiliate, we also earn from qualifying purchases. We’ve chosen these providers not the other way around. Our decisions are based upon their corporate reputation and the quality of their offerings and pricing. Our recommendations regarding technology are reached without regard to financial compensation except in situations in which comparable products at comparable pricing are available from multiple sources. In this limited case, we support our sponsors because our sponsors support us.
BOGO Bonaza: Enjoy state-of-the-art VoIP service with a $10 credit and half-price SIP service on up to $500 of Skyetel trunking with free number porting when you fund your Skyetel account. No limits on number of simultaneous calls. Quadruple data center redundancy. $25 monthly minimum spend required. Tutorial and sign up details are here.
![]() The lynchpin of Incredible PBX 2020 and beyond is ClearlyIP components which bring management of FreePBX modules and SIP phone integration to a level never before available with any other Asterisk distribution. And now you can configure and reconfigure your new Incredible PBX phones from the convenience of the Incredible PBX GUI.
The lynchpin of Incredible PBX 2020 and beyond is ClearlyIP components which bring management of FreePBX modules and SIP phone integration to a level never before available with any other Asterisk distribution. And now you can configure and reconfigure your new Incredible PBX phones from the convenience of the Incredible PBX GUI.
VitalPBX is perhaps the fastest-growing PBX offering based upon Asterisk with an installed presence in more than 100 countries worldwide. VitalPBX has generously provided a customized White Label version of Incredible PBX tailored for use with all Incredible PBX and VitalPBX custom applications. Follow this link for a free test drive!
Special Thanks to Vitelity. Vitelity is now Voyant Communications and has halted new registrations for the time being. Our special thanks to Vitelity for their unwavering financial support over many years and to the many Nerd Vittles readers who continue to enjoy the benefits of their service offerings. We will keep everyone posted on further developments.
- Our discussion today is focused on the free, MIT-licensed version of OpenVPN. For details on their commercial offerings, follow this link. [↩]
VitalPBX in the Cloud: Providers, Backups, & Airtight Security

Last month we introduced VitalPBX, a terrific new (free) VoIP platform that’s about as intuitive as software can get. We followed up with a dozen Incredible PBX applications that really showed off the flexibility of this new Asterisk® platform. And today we’re pleased to introduce two new cloud solutions that offer our whitelist firewall design for security plus automatic backups. Both Digital Ocean and Vultr offer terrific performance coupled with a $5/month price point that is easy on your wallet. Our tip of the hat goes to Digital Ocean this month because they are again offering a $10 credit on new accounts while also generously supporting Nerd Vittles. That translates into two free months of VitalPBX in the Cloud service for you to kick the tires. If you like what you see, you can spring for the extra $1 a month and add automatic backups to your $5/mo. bill going forward. With a $10 credit, what’s to lose?
To get started, set up an account with one of these cloud providers and create a $5 a month server with 64-bit CentOS 7 in your choice of cities. Once you have your root password, log into your new server as root using SSH or Putty. On Digital Ocean, you will be prompted to change your password the first time you login. On Vultr, you have to manually do it by issuing the command: passwd. Then you’re ready to begin the VitalPBX install. Just issue the following commands and then grab a cup of coffee.
cd /root
yum -y install wget nano tar
wget https://raw.githubusercontent.com/wardmundy/VPS/master/vps.sh
chmod +x vps.sh
./vps.sh
The base install takes less than 15 minutes to complete. When it’s finished, use a web browser from your desktop PC and log into the IP address of your new VitalPBX server. You’ll be prompted to set up an admin password for GUI access and then you register your server with Telesoft. Should you ever forget your admin password, here’s how to force a reset on your next login from a browser:
mysql ombutel -e 'update ombu_settings set value = "yes" where name = "reset_pwd"'
After logging in, you’ll be presented with the VitalPBX Dashboard:
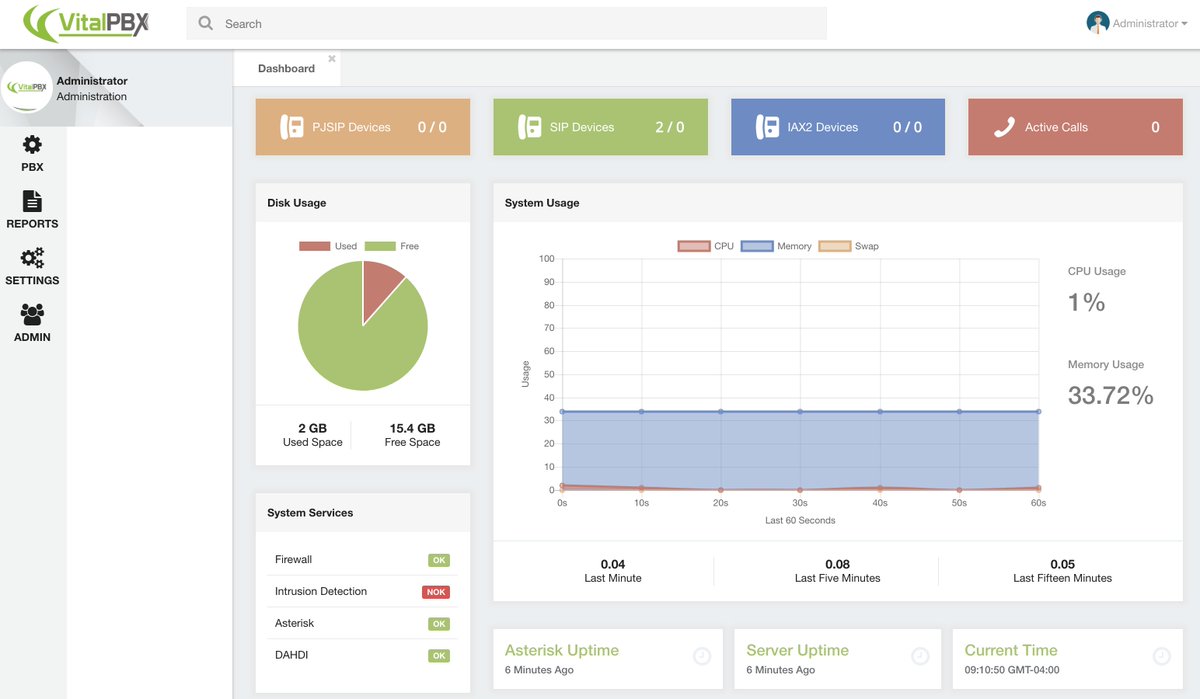
From here, the drill is pretty much the same as what was outlined in our original VitalPBX tutorial. So jump over there to complete your set up and configure extensions, trunks, routes, and a few other settings for your new PBX. Then pick back up here to secure your server!
Security Methodology. What is different on the cloud platform is you don’t have a hardware-based firewall to protect your server. So we’ll need to configure VitalPBX using its built-in firewalld and Fail2Ban applications. Our preference is to use a whitelist of IP addresses to access your server and its resources. In that way, the Bad Guys never even see your server on the Internet. Our security philosophy is simple. If you can’t see it, you can’t hack it.
In addition to a WhiteList of public IP addresses, we also will enable a secure NeoRouter VPN front door to your server as well as a PortKnocker backdoor thereby providing three separate and secure ways to gain server access without publicly exposing VitalPBX to the Internet. If you have a better way, by all means go for it. After all, it’s your phone bill.
Firewall and Fail2Ban Setup. To begin, login to the VitalPBX GUI with a browser using your admin credentials. Then do the following:
(1.) Add NeoRouter VPN Protocol TCP Port 32976 in Admin:Security:Firewall:Services.
(2.) Add NeoRouter VPN Action ACCEPT rule in Admin:Security:Firewall:Rules.
(3.a.) WhiteList your client and server IP addresses in Admin:Security:Firewall:WhiteList.
(3.b.) WhiteList 127.0.0.1 (for localhost) and 10.0.0.0/24 (for NeoRouter VPN).
(3.c.) WhiteList the IP addresses of any potential unregistered trunk providers.
(3.d.) WhiteList the public IP addresses of any extensions you plan to install.
(4.) Enable Fail2Ban in Admin:Security:Intrusion Detection.
(5.a.) WhiteList your client IP address(es) in Admin:Security:Intrusion Detection:Whitelist.
(5.b.) WhiteList the NeoRouter VPN subnet, 10.0.0.0/24, as well.
(6.) Remove the following rules from Admin:Security:Firewall:Rules
SIP
HTTP
HTTPS
SSH
IAX2
PJSIP
(7.) Reload the VitalPBX dialplan by clicking the Red indicator (upper right of the GUI).
(8.) Verify IPtables WhiteList: iptables -nL | grep ACCEPT
(9.) Verify Fail2Ban WhiteList: grep -r ignoreip /etc/fail2ban/jail.d/*
Travelin’ Man 3 Addition. One of the major shortcomings in the firewalld implementation of IPtables is the lack of any support for fully-qualified domain names in their WhiteList. For those that want to use dynamic DNS updating services with custom FQDNs to manage remote user access to your server, this is a serious limitation even though PortKnocker alleviates some of the misery. So here’s our solution. We have reworked the Travelin’ Man 3 toolkit for VitalPBX so that you can use command line scripts to add (add-ip and add-fqdn), remove (del-acct), and manage (ipchecker) your WhiteList using either IP addresses (add-ip) or FQDNs (add-fqdn). The automatic update utility (ipchecker) will keep your FQDNs synchronized with your dynamic IP address service by updating the WhiteList every 10 minutes between 5 a.m. and 10 p.m. daily. Keep in mind that this is a supplement to the existing VitalPBX firewall setup documented above. And we only recommend that you add it if you plan to implement automatic management of dynamic IP addresses with FQDNs for your extensions and remote users.
If you plan to use the TM3 addition, you are strongly urged to not make further firewall changes using the VitalPBX GUI unless (1) you can also remember to keep your desktop PC’s IP address whitelisted in VitalPBX and (2) you remember to restart IPtables (iptables-restart) in the CLI after having made firewall changes in the VitalPBX GUI. Otherwise, you will lose your Travelin’ Man 3 WhiteList entries which means folks will get locked out of your server until the TM3 WhiteList is updated by running iptables-restart. All TM3 WhiteListed entries are stored and managed in individual text files in /root with a file extension of .iptables. Do not manually delete them!
To install the TM3 addition, issue the following commands:
cd /
wget http://incrediblepbx.com/tm3-vitalpbx.tar.gz
tar zxvf tm3-vitalpbx.tar.gz
rm -f tm3-vitalpbx.tar.gz
echo "/usr/local/sbin/iptables-boot" >> /etc/rc.d/rc.local
chmod +x /etc/rc.d/rc.local
systemctl enable rc-local
echo "*/10 5-22 * * * root /usr/local/sbin/ipchecker > /dev/null 2>&1" >> /etc/crontab
Using DynDNS to Manage FQDNs. The key ingredient with Travelin’ Man 3 is automatic management of dynamic IP addresses. When a user or even the administrator moves to a different location or IP address, we don’t want to have to manually adjust anything. So what you’ll first need is a DynDNS account. Other free providers are available but are less flexible. For $40 a year, DynDNS lets you set up 30 FQDNs and keep the IP addresses for those hostnames current. That’s more than ample for almost any small business but, if you need more horsepower, DynDNS.com can handle it. What we recommend is setting up a separate FQDN for each phone on your system that uses a dynamic IP address. This can include the administrator account if desired because it works in exactly the same way. When the administrator extension drops off the radar, a refresh of IPtables will bring all FQDNs back to life including the administrator’s account. Sounds simple? It is.
Getting Started with Travelin’ Man 3. Here are the 5 tools that are included in the TM3 suite for VitalPBX:
- add-ip some-label ip-address – Allows you to add an IP address to the WhiteList
- add-fqdn some-label FQDN – Allows you to add an FQDN to the WhiteList
- del-acct some-label.iptables – Deletes an IP address or FQDN from WhiteList
- ipchecker – Runs every 10 minutes to synchronize FQDNs; do NOT run manually
- iptables-restart – Restarts IPtables and adds TM3 WhiteListed IPs and FQDNs
- iptables-boot – Loads TM3 WhiteListed IPs and FQDNs on boot only
- show-whitelist – Displays contents of both VitalPBX and TM3 WhiteLists
Using Email to Manage Your WhiteList. We have one new addition to Travelin’ Man 3 for the VitalPBX platform. Now your authorized users can send an email to the VitalPBX server to whitelist an IP address and gain access. Two different passwords are supported and can be handed out to different classes of PBX users, e.g. administrators and ordinary users. Using the "permanent" password lets someone add an IP address to the VitalPBX whitelist permanently. Using the "temporary" password lets a user add an IP address to the whitelist until the next reboot or firewall restart. In both cases, the administrator gets an immediate email showing the whitelisted IP address, who requested it, and the type of whitelist entry that was requested. The syntax for the email request is straight-forward. Just send an email to the special email account set up to handle these requests and include a Subject for the message that looks exactly like this where 8.8.8.8 is the IP address to be whitelisted and some-password is one of the two passwords: WhiteList 8.8.8.8 PW some-password
As most of you know, we’re sticklers for security, and there’s plenty of it here. First, we recommend you use an obscure FQDN for your server so that it is not easily guessed by someone wanting to do harm. Second, we assume your IP address also won’t be published. Third, the email account name also should be obscure. Think of it as another password. For example, martin432 would be a good choice while whitelist would be pretty lousy. Keep in mind that the only people sending mail to this account will be folks that need immediate access to your PBX. Finally, BOTH of the passwords to use the email feature need to be long and difficult to decipher. A mix of alphanumeric characters and upper and lowercase letters is strongly recommended because it makes successful penetration nearly impossible.
To begin, we need to reconfigure your VitalPBX Firewall to accept incoming email on TCP port 25. In Admin:Security:Firewall:Services, Add a new service that looks like the following: Name: SMTP Protocol: TCP Port: 25. Then SAVE your entry.
Next, we need to add a VitalPBX Firewall Rule that allows incoming SMTP traffic. In Admin:Security:Firewall:Rules, Add a new rule: Service: SMTP Action: Accept. Then SAVE.
Next, we need to log into the Linux CLI as root to do a couple of things. First, we need to reconfigure Postfix to accept emails from outside our server. Replace 8.8.8.8 with the actual IP address of your server. Replace smtp.myserver.com with the actual FQDN of your server. If you don’t have one, simply remove the FQDN from the command.
yum -y install mailx
postconf -e "mynetworks = 127.0.0.0/8, 8.8.8.8"
postconf -e "mydestination = smtp.myserver.com, localhost.localdomain, localhost"
postconf -e "inet_interfaces = all"
postconf -e "recipient_delimiter = +"
service postfix restart
Second, we need to add an email account to process the incoming emails. Replace someuser on each line with that obscure account name you plan to use for incoming emails. Then send yourself a test email and be sure it arrives. The last command cleans out the mail account.
adduser someuser --shell=/bin/false --no-create-home --system -U
echo "test" | mail -s "Hello World" someuser
mail -u someuser
> /var/mail/someuser
Finally, we need to set up your passwords and admin email address in /root/mailcheck. To begin, insert your actual mail account name in the following command by replacing realuser and then execute the command:
sed -i 's|someuser|realuser|' /root/mailcheck
Now edit /root/mailcheck with nano or your favorite editor and change the TempPW, PermPW, and MyEMail entries. Then save the file and add the following entry to /etc/crontab:
*/3 5-22 * * * root /root/mailcheck > /dev/null 2>&1
CAUTION: Because of the bifurcated nature of the integration of TM3’s WhiteList into the VitalPBX firewall setup, be advised that you never want to make a change in the VitalPBX GUI’s firewall configuration without assuring that the desktop machine from which you are making that change is already included in the VitalPBX Whitelist (see #3.a., above). The same applies to issuing an iptables-restart from the Linux CLI. The reason is there are two separate whitelists and either of these actions would temporarily disable the TM3 WhiteList until the iptables-restart procedure was executed AND completed. In both situations, you most probably would be locked out of web and SSH access to your own server. A VitalPBX firewall reload only restarts firewalld with the VitalPBX WhiteList, and an iptables-restart from the CLI first restarts firewalld without the TM3 WhiteList rules and then adds the TM3 WhiteList rules after the firewalld reload is completed. We have added safeguards to some of the TM3 utilities to keep you from shooting yourself in the foot by requiring the VitalPBX WhiteList addition before you can use the TM3 iptables-restart and del-acct utilities; however, this is not the case with ipchecker which typically runs as a cron job from localhost. Because there is no safeguard mechanism, do NOT run it manually unless you’re sure you first have whitelisted your desktop PC’s IP address in the VitalPBX GUI (see #3.a., above). Without getting down in the weeds, we also have no ability to control the internal workings of the VitalPBX firewall. Should you get locked out of your server, there are three remedies. The first is the email solution documented above. The second is to use PortKnocker to regain access. The third is to use the localhost console in the Digital Ocean or Vultr control panel to issue the iptables-restart command. You might want to print this out for a rainy day. 🙂
PortKnocker Installation. You may not know the remote IP addresses of everyone using your PBX, and some of your users may travel to different sites and need a temporary IP address whitelisted while using a WiFi hotspot. And, not that it would happen to you, but once in a while an administrator locks himself out of his own server by changing IP addresses without first whitelisting the new address. The solution to all of these problems is easy with PortKnocker. The user simply sends three sequential pings to ports known only by you and your users using the machine or smartphone that needs access. You can read our original tutorial for more detail. For today, let’s get PortKnocker installed and configured with your three random ports. You can review the assignment at any time by displaying /root/knock.FAQ which also explains how to send the knocks using a desktop machine or a smartphone.
cd /root
wget http://incrediblepbx.com/knock-vitalpbx.sh
chmod +x knock-vitalpbx.sh
./knock-vitalpbx.sh
As with other Incredible PBX Travelin’ Man 3 implementations, IP addresses whitelisted using PortKnocker only last until the next reboot, or until you issue the following command firewall-cmd --reload (does not reload TM3 WhiteList), or until you execute a firewall update from within the VitalPBX GUI (does not reload TM3 WhiteList), or until you issue the command iptables-restart which restarts the firewall AND loads the TM3 WhiteList entries. To permanently WhiteList IP addresses, follow the procedure in Step #3 above or add the entries using the TM3 utilities documented in the previous section.
NeoRouter Installation. A virtual private network (VPN) is perhaps the safest way to access any server including VitalPBX. All of your communications is securely encrypted and you connect to the server through a network tunnel using a non-routable, private IP address. There are many VPNs from which to choose. Our personal favorite is NeoRouter because up to 256 devices can be interconnected at zero cost, and you can set the whole thing up in minutes with virtually no networking expertise. If you want all of the background on NeoRouter, see our latest tutorial.
NeoRouter uses a star topology which means you must run the NeoRouter Server application on a computer platform that is accessible over the Internet all the time. Then each of the remote devices or servers runs the NeoRouter Client application, connects to the server to obtain a private IP address, and then can communicate with all of the other devices connected to the VPN. If you already have a NeoRouter Server in place, then you can skip the server installation step and skip down to installing the NeoRouter Client on your VitalPBX server.
NeoRouter Server Setup. If you’re just getting started with NeoRouter, the first step is setting up the NeoRouter Server on a platform of your choice. If you’re using the Automatic Backup feature of Digital Ocean or Vultr, then your VitalPBX server is probably as good a site as any. NeoRouter Server uses minimal resources, and outages shouldn’t be a problem except for hurricanes, tornados, and bombs. But, just so you know, if the NeoRouter Server is down, none of the NeoRouter Clients can access the VPN or any other clients so you’d have to resort to public IP addresses for network access.
To install NeoRouter Server on your VitalPBX platform, log into your server as root and issue the following commands:
cd /root
wget http://download.neorouter.com/Downloads/NRFree/Update_2.3.1.4360/Linux/CentOS/nrserver-2.3.1.4360-free-centos-x86_64.rpm
rpm -Uvh nrserver-2.3.1.4360-free-centos-x86_64.rpm
Next, create at least one account with administrator privileges and one account with user privileges to your NeoRouter VPN:
nrserver -adduser admin-name admin-password admin
nrserver -adduser user-name user-password user
The commands to manage NeoRouter Server are a little different on the CentOS 7 platform. Here’s what you’ll need:
Start on boot: systemctl enable nrserver.service
Check status: systemctl status nrserver.service
Restart server: systemctl restart nrserver.service
Change settings: nrserver -help
NeoRouter Client Setup. Whether you’re running NeoRouter Server on your VitalPBX platform or not, you’ll still need to install and configure the NeoRouter Client software in order to access the server through the VPN using a remote computer, smartphone, or tablet. NeoRouter Clients for Linux, Windows, Macs, FreeBSD, Mobile, OpenWRT, Tomato, and HTML5 are available here. Be sure to choose the NRFree V2 platform tab before downloading a client, or you’ll get the wrong client software and nothing will work! Ask us how we know.
To install NeoRouter Client on your VitalPBX platform, log into your server as root and issue the following commands:
cd /root
wget http://download.neorouter.com/Downloads/NRFree/Update_2.3.1.4360/Linux/CentOS/nrclient-2.3.1.4360-free-centos-x86_64.rpm
rpm -Uvh nrclient-2.3.1.4360-free-centos-x86_64.rpm
As with NeoRouter Server, the commands to manage NeoRouter Client are a little different on the CentOS 7 platform. Here’s what you’ll need:
Start on boot: systemctl enable nrservice.service
Check status: systemctl status nrservice.service
Restart client: systemctl restart nrservice.service
Login to VPN: nrclientcmd
The main requirement after installing the software is to login to your VPN: nrclientcmd. You’ll be prompted for the FQDN or IP address of your NeoRouter Server and then the admin or user credentials. If successful, you’ll get a display of all the machines logged into the VPN, including the VitalPBX server.
NeoRouter Network Explorer – somebody@vultr.guest
> My Computers
10.0.0.2 vultr.guest
Available Commands: changeview, wakeonlan, setproxy, changepassword, quit
Enter command:
The next step is to download and install NeoRouter Client software on your desktop computer and smartphone. Then you can remotely connect to your VitalPBX server from those platforms. In our example above, you could login to 10.0.0.2 with either SSH or your web browser and never have to worry about whitelisting your remote machines with VitalPBX.
Checking VitalPBX Status. As with other Incredible PBX platforms, we have reworked the pbxstatus utility to support VitalPBX. Running it from the command prompt will display the status of all of the key services on your PBX. Note the addition of the VPN’s IP address which tells you that NeoRouter Client is alive and well:
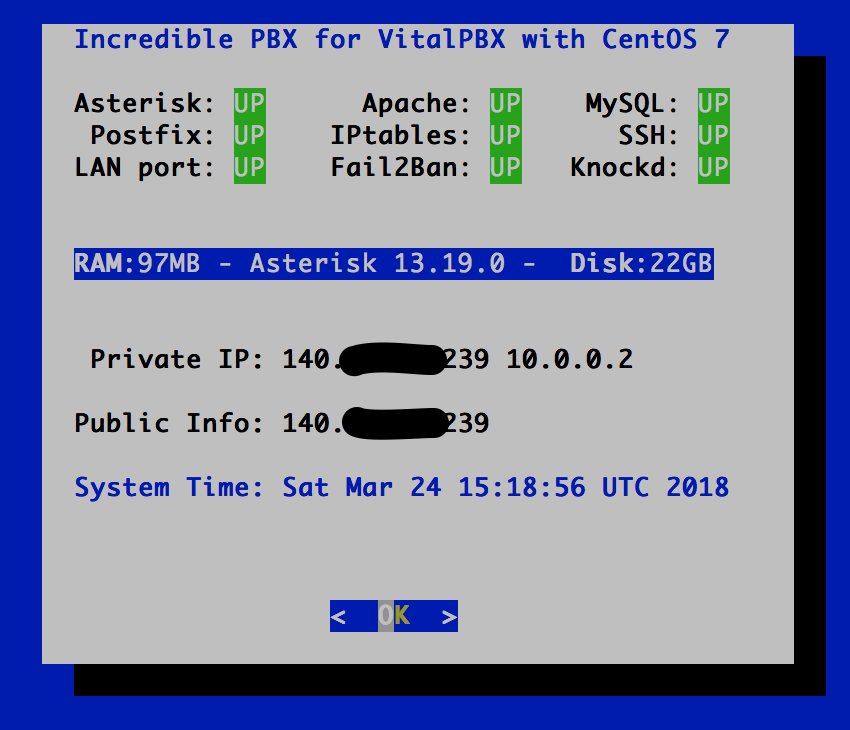
Configuring Automatic Backups. When you’re ready to enable backups for a Digital Ocean droplet, navigate to the list of droplets for your account. Click the Droplet name for which you’d like to enable backups, and then click the Backups menu item. This will display the cost of backups for the given droplet. Click the Enable Backups button to enable backups.
The Vultr setup is similar. Automatic backup settings are managed through the Vultr control panel. Once you log into your account, visit the server’s management area, click on your server in the dialog, and then click on the "Backups" tab for your VPS. Click Enable Backups. On either platform, the backup option adds a $1 a month to the cost of the $5 server. That’s pretty cheap insurance.
Originally published: Monday, April 2, 2018
Got Friends? 7 Countries Have Never Visited Nerd Vittles. 2018 Is Calling! https://t.co/wMfmlhAr16 #asterisk #freepbx #wazo #issabel #IncrediblePBX #3CX pic.twitter.com/kAmAEnwVIw
— Ward Mundy (@NerdUno) January 9, 2018
Need help with VitalPBX? Visit the VitalPBX Forum.
Special Thanks to Our Generous Sponsors
FULL DISCLOSURE: ClearlyIP, Skyetel, Vitelity, DigitalOcean, Vultr, VoIP.ms, 3CX, Sangoma, TelecomsXchange and VitalPBX have provided financial support to Nerd Vittles and our open source projects through advertising, referral revenue, and/or merchandise. As an Amazon Associate and Best Buy Affiliate, we also earn from qualifying purchases. We’ve chosen these providers not the other way around. Our decisions are based upon their corporate reputation and the quality of their offerings and pricing. Our recommendations regarding technology are reached without regard to financial compensation except in situations in which comparable products at comparable pricing are available from multiple sources. In this limited case, we support our sponsors because our sponsors support us.
BOGO Bonaza: Enjoy state-of-the-art VoIP service with a $10 credit and half-price SIP service on up to $500 of Skyetel trunking with free number porting when you fund your Skyetel account. No limits on number of simultaneous calls. Quadruple data center redundancy. $25 monthly minimum spend required. Tutorial and sign up details are here.
![]() The lynchpin of Incredible PBX 2020 and beyond is ClearlyIP components which bring management of FreePBX modules and SIP phone integration to a level never before available with any other Asterisk distribution. And now you can configure and reconfigure your new Incredible PBX phones from the convenience of the Incredible PBX GUI.
The lynchpin of Incredible PBX 2020 and beyond is ClearlyIP components which bring management of FreePBX modules and SIP phone integration to a level never before available with any other Asterisk distribution. And now you can configure and reconfigure your new Incredible PBX phones from the convenience of the Incredible PBX GUI.
VitalPBX is perhaps the fastest-growing PBX offering based upon Asterisk with an installed presence in more than 100 countries worldwide. VitalPBX has generously provided a customized White Label version of Incredible PBX tailored for use with all Incredible PBX and VitalPBX custom applications. Follow this link for a free test drive!
Special Thanks to Vitelity. Vitelity is now Voyant Communications and has halted new registrations for the time being. Our special thanks to Vitelity for their unwavering financial support over many years and to the many Nerd Vittles readers who continue to enjoy the benefits of their service offerings. We will keep everyone posted on further developments.
Free Asterisk Solutions
