Google Dips Its Toes in the Icy SIP Waters… and Retreats
Today we’ll show you how to add free SIP calling to any Google Voice number on the planet using several different calling methodologies…


Today we’ll show you how to add free SIP calling to any Google Voice number on the planet using several different calling methodologies…

Today we are pleased to introduce the revolutionary new Incredible PBX for Asterisk 1.8 featuring instantaneous (and free) Google Voice calling in the U.S. and Canada via Gtalk. An intermediate provider is no longer required. All of the Nerd Vittles TTS apps now work reliably as well. And you get dozens of terrific new Asterisk 1.8.0 features.

Today we’ll walk you through the 10-minute process of setting up a free Skype Gateway to Asterisk on The Incredible PBX. After installation, you’ll have free inbound and outbound Skype calling just like Skype for Asterisk minus the $66 license fee.
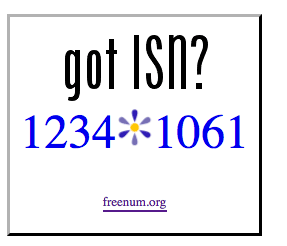
Today we’ll walk you through setting up ISN on your Asterisk server for free SIP calling from the convenience of your nearest Asterisk telephone. In less than 10 minutes, you can test it out by dialing **1234*1061 to sample a dozen Nerd Vittles text-to-speech applications.
Today we introduce two new post-dial applications for Asterisk. The first lets you decipher whether to place free calls through Gizmo based upon a database lookup. The second provides email alerts whenever anyone places a 911 emergency call on your Asterisk PBX.

What do Asterisk calls to Sprint, Verizon, and T-Mobile cellphones plus 40 million Asterisk systems around the world have in common? They’re all free calls! And today we’ll show you how…


 JUST RELEASED: Visit the Incredible PBX Wiki