Home » Posts tagged 'flite'

Tag Archives: flite

The Most Versatile VoIP Provider: FREE PORTING

Raspberry Pi One-Minute Wonder: A Turnkey and Truly Incredible PBX for XiVO


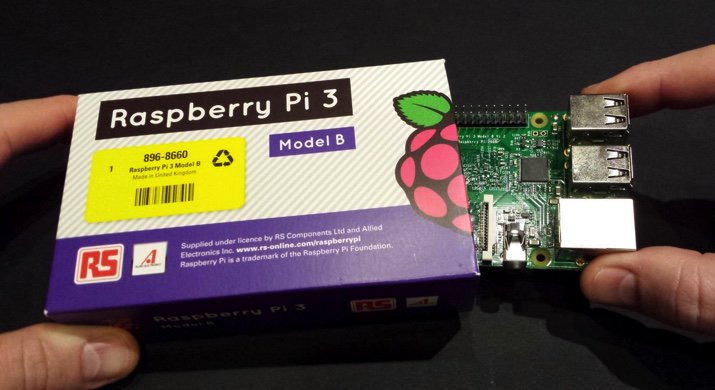
Hard to believe it’s been 4½ years since the introduction of the original Raspberry Pi®. We love half-birthdays, and we’ve got a blockbuster gift for you today as we celebrate the fact that almost 10 million RasPi’s have been shipped. Yes, our love affair with the Raspberry Pi lives on. The sensational Raspberry Pi 3 sports a 1.2GHz 64-bit quad-core ARM Cortex-A53 CPU with ten times the performance of the original Raspberry Pi. Of particular interest to the VoIP community will be the RasPi 3’s integrated 802.11n wireless LAN and Bluetooth 4.1 hardware. And, of course, the RasPi 3 retains its compatibility with the Raspberry Pi 1 and 2. Did we mention it’s still just $35? Because we like to celebrate half birthdays, too, we’re pleased to introduce a brand new Incredible PBX™ for XiVO image for the Raspberry Pi 3 featuring Raspbian 8, the latest release of Asterisk® 13, and XiVO. This one installs in under a minute. And, yes, it’s still FREE with pure open source GPL code.

Special Thanks. First things first. We want to extend our extra special thanks to Iris-Network for their awesome Raspivo – XiVO build. Without it and their repositories, none of this would have been possible.

Raspberry Pi 3 Performance. Gone are the days of worrying about Raspberry Pi performance. Both the user interface and call quality now match what you’d expect to find on a $300-$500 VoIP server. For best results, we recommend 32GB Class 10 microSD cards which now are plentiful at the $10 price point.1

Raspberry Pi 3 Shopping List. Before you can install Incredible PBX for XiVO, you’ll need a compatible Raspberry Pi 3 platform. Here’s the short list that, when coupled with the Incredible PBX image, turns today’s adventure into kid’s play:

  • $35* Raspberry Pi 3 from MCM or Newark or Amazon
  • $10 Power Adapter (2.5 amps minimum!)
  • $10 32GB microSDHC Class 10 card (Don’t use SanDisk Ultra!)
  • £12.95 Pibow 3 case or $7.50 Official RasPi 3 case
  • About That Asterisk. We write about Asterisk® regularly, but the asterisk we’re talking about is the one accompanying the $35* price tag for the Raspberry Pi 3. Yes, that’s the advertised price. And, no, if you want one quickly, you may pay a bit more. Right now you can snag one on Amazon for $35.99 with two-day Prime shipping. We’re assuming you already own a USB keyboard and an HDMI-compatible monitor. If so, today’s going rate for all of our recommended pieces is under $65, not bad for a fully-equipped, quad-core computer. Did we mention that Incredible PBX for XiVO is FREE with NoGotchas!

    Incredible PBX Feature Set. Where to begin? Let’s start with the Alphabet Stew: IAX, SIP, SMS, FAX, SRTP, and OAuth functionality. Voice Recognition and Text-to-Speech VoIP application support using Festival and Google. Free calling with Google Voice, Simonics SIP gateway, or RingPlus cellular service. And all of your Nerd Vittles favorites: AsteriDex, Click-to-Dial, News, Weather, Reminders, and even an Alarm Clock. Plus hundreds of features that typically are found in commercial PBXs: Conferencing, IVRs and AutoAttendants, Simultaneous Ringing on your Smartphone, Email Delivery of Voicemail, Voicemail Blasting, Automatic Backups, High Availability Support, Automatic Phone Setups, and much more…

    Incredible PBX Network Security Model. Most phone calls cost money. Unlike many of the other "free" VoIP solutions, our most important criteria for VoIP is rock-solid security. If your free server ends up costing you thousands of dollars in phone bills due to fraud, it isn’t free at all. Once you plug in that network cable, you’ve painted a bullseye on your checkbook.

    No single network security system can protect you against zero-day vulnerabilities that no one has ever seen. Deploying multiple layers of security is not only smart, it’s essential with today’s Internet topology. It works much like the Bundle of Sticks from Aesop’s Fables. The more sticks there are in your bundle, the more difficult it is to break them apart. If a vulnerability suddenly appears in the Linux kernel, or in Asterisk, or in your web server, or in your favorite web GUI, you can continue to sleep well knowing that other layers of security have your back. No one else in the telecommunications industry has anything close. You can’t hack what you can’t see, and the Incredible PBX automatically configures a WhiteList as part of the one-minute setup. And it’s all open source GPL code that you can share with anybody and everybody unlike the so-called "freeware" products. Freeware with Asterisks is anything but free!

    Do your part and do your homework. Comparison shop as if your phone bill matters! 😉 Incredible PBX provides:

    1. Preconfigured IPtables Linux Firewall
    2. Preconfigured Travelin’ Man 3 WhiteLists
    3. Randomized Port Knocker for Remote Access
    4. Fail2Ban Log Monitoring for SSH, Apache, Asterisk
    5. Randomized Ultra-Secure Passwords
    6. Automatic Update Utility for Security & Bug Fixes
    7. Asterisk Manager Lockdown to localhost
    8. Security Alerts via the PIAF Forum

    Incredible PBX for XiVO Installation & Setup Tutorial

    Here’s everything need to know about installation and setup of Incredible PBX for XiVO. "Automatic" means you just watch.

    1. Download and unzip Incredible PBX for XiVO image from SourceForge (includes GV OAuth support)
    2. Transfer Incredible PBX image to microSD card
    3. Boot Raspberry Pi from new microSD card
    4. Login to RasPi console as root:password to initialize your server (Automatic) and expand image to match SD card
    5. Reboot after writing down your server IP address (Automatic)
    6. Login via SSH as root:password to set up passwords (You Pick ’em) & configure firewall (Automatic)
    7. Enjoy!

    Running Incredible PBX for XiVO on the Raspberry Pi

    The standard XiVO boot procedure will begin once you insert your microSD card into the Raspberry Pi 3 and apply power. Within a short time, you’ll get the familiar Linux login prompt. Login as root with a password of password.

    Once you log in, a startup script will briefly configure a few things and then advise you that it’s time to reboot. Write down the IP address provided because for Phase 2 of the setup, we need to use SSH or Putty on the desktop that you will actually be using to manage your server. The reason for this is that Incredible PBX automatically creates a whitelist of IP addresses that the firewall will allow to access your server. If the IP address isn’t in your whitelist, you may lock yourself out except from the RasPi’s console window.

    Once the console window shows that your server has rebooted by displaying the Linux login prompt, switch to SSH or Putty and login as root using the IP address you wrote down. You’ll then be prompted to change your root password for Linux as well as your root password for XiVO GUI access using a web browser. You’ll also need to set a PIN that will be used to authorize access to extension 123 to schedule Telephone Reminders on your server. This completes the configuration. You’ll get a final screen showing the credentials for the preconfigured extension 701 as well as a reminder that your PortKnocker credentials are stored in /root/knock.FAQ in the event you ever lock yourself out of your machine. It’s a good idea to leave this screen displayed while you install and configure a softphone since you can cut-and-paste your extension 701 credentials without having to type anything.

    Once you complete the SIP softphone setup below, you can return to the SSH window and press ENTER to finish the install. The Incredible PBX Automatic Update Utility will run, and then you will be presented with the pbxstatus display. You can access the Asterisk CLI by typing: asterisk -rvvvvvvvvvv. Exit from the CLI by typing quit. As mentioned previously, always shut down your server gracefully by typing halt. When prompted for the hostname, type xivo. Once the shutdown procedure finishes, it’s safe to disconnect the power cord from your Raspberry Pi.

    Beginning with the September 1 release, many of the log files have been disabled to help prolong the life of microSD cards since XiVO tends to be very chatty. If you are running an earlier release, you can follow this tutorial to disable most logging on your Raspberry Pi.

    Enabling WiFi on the Raspberry Pi 3

    With the Raspberry Pi 3, wi-fi hardware is included. The next step is configuring it to connect to your WiFi router. Simply open /etc/wpa_supplicant/wpa_supplicant.conf with nano and (1) edit the SSID name and password fields to authorize access to your local, password-protected WiFi router as well as any open WiFi network. (2) Also update the country code for your WiFi region, e.g. country=US. Then (3) save your changes: Ctrl-X, Y, then press ENTER.

    network={
     ssid="YourSSID"
     psk="YourSSIDpassword"
     key_mgmt=WPA-PSK
     scan_ssid=1
     priority=5
    }
    
    network={
     key_mgmt=NONE
     priority=1
    }
    

    Next, enable automatic startup of the wlan0 network interface:

    sed -i 's|#allow-hotplug wlan0|allow-hotplug wlan0|' /etc/network/interfaces
    

    Finally, stop and restart the wlan0 interface, count to 15, and check pbxstatus to decipher the added private IP address for your WiFi connection:

    ifdown wlan0
    ifup wlan0
    pbxstatus
    

    If you want to run your Raspberry Pi exclusively off the WiFi connection going forward, simply unplug the network cable from your RasPi and reboot your server.

    Choosing a SIP Softphone for Incredible PBX for XiVO

    Softphones tend to be a matter of taste for most folks so we’ll keep our suggestions to a minimum. On the Windows platform, it’s hard to go wrong with X-Lite. It works out of the box by simply plugging in the IP address of your server and your SIP username and password. It also happens to be free. The only downside is that X-Lite has a nasty habit of embedding time bombs in their free software so you may have to reinstall it from time to time. If you know what you’re doing Zoiper is another alternative but be advised that it doesn’t work out of the box on servers behind NAT-based routers.

    On the Mac platform, our favorite free softphone is Telephone. It’s a barebones SIP client that just works. As with X-Lite, you plug in your server’s IP address and SIP credentials, and you’re in business.

    On the Linux or Solaris platforms, we assume that you know what you’re doing and that you are perfectly capable of choosing and installing a SIP phone that meets your requirements.

    Incredible PBX Application Quick Start Guide

    We’ve finished the basic Incredible PBX for XiVO setup. You now have a functioning PBX with dozens of applications for Asterisk that work out of the box. It’s probably a good idea to spend a little time getting acquainted with Incredible PBX for XiVO before you add trunks to communicate with the outside world.

    Here’s a handy cheat sheet for some of the Incredible PBX applications that have been installed or are available as add-ons. There’s also a link for more information. This remains a work-in-progress so expect more applications in coming weeks.

    How To Make Easily Compressed Backups of Incredible PBX

    MicroSD cards WILL wear out especially on XiVO servers with lots of activity. So it’s important to make regular backups of your media so you don’t get surprised when things come unglued down the road. After considerable discussion on the PIAF Forum, here’s the collective wisdom.

    You’ll need another machine (such as a Mac or Linux box) on which to plug in the microSD card in order to make a backup image of it since you can’t back up a card that is actually providing the live platform for your PBX. The recommended methodology goes like this. Before shutting down your PBX and removing the microSD card to make the backup, convert all of the unused space on the card to zeros so that the unused space can be easily compressed when you create the backup image. You do this by issuing the following command after logging into the Linux CLI as root on your RasPi 3. Be sure to do it during a period of inactivity on your PBX as it is processor intensive. Then halt the machine and remove the microSD card.

    xivo-service stop
    cat /dev/zero > wipe.it ; rm wipe.it
    halt
    

    Insert the card into an SD card slot on the machine you will use to make the backup image and issue the following commands after deciphering the correct device name for your card (/dev/disk4 in this example) using the df utility:

    sudo df -h
    sudo dd bs=1m if=/dev/disk4 | gzip -c > incrediblepbx-xivo.img.gz
    sudo sync
    sudo diskutil eject /dev/disk4s1
    echo "It's safe to remove the microSD card now."
    

    Now return the microSD card to your Raspberry Pi 3 and boot. Store your backups in a safe place!

    Configuring Trunks and Routes with Incredible PBX for XiVO

    The next step in your XiVO adventure is connecting your PBX to the outside world so that you can make and receive phone calls from anywhere in the world. For this you’ll need one or more trunks. Unlike the Ma Bell world, there’s no reason to put all your eggs in one basket. You can use one or more trunk providers for incoming calls with separate phone numbers for each. And you can use one or more trunk providers for outgoing calls and save money on calls to certain countries by choosing the best provider for where you want to call. And, of course, if you live in the United States, you can set up one or more Google Voice trunks and make calls to the U.S. and Canada for free. We’ve written a number of tutorials to make it easy to set up these trunks.

    To get started, point a web browser to the IP address of your PBX. Login as root with the XiVO GUI password you set up above. If you ever forget your password, you can run /root/admin-pw-change to reconfigure it.

    XIVO Trunk Implementation Tutorials

    Once you’ve added one or more trunks, you’ll need to tell XiVO how to route outgoing and incoming calls. Here are our step-by-step tutorials on setting up Outbound Calling Routes and Incoming Call Routes:

    XIVO Call Routing Tutorials

    Enabling Bluetooth & Proximity Detection on the Raspberry Pi


    Where To Go Next with Incredible PBX for XiVO

    Now you’re ready to explore. We recommend you pick up here in our Incredible PBX for XiVO tutorial. And be sure to check out the Last Minute Fixes that didn’t make it into the current build. Enjoy the ride!

    Originally published: Monday, August 29, 2016


    Need help with Asterisk? Visit the PBX in a Flash Forum.


    Special Thanks to Our Generous Sponsors


    FULL DISCLOSURE: ClearlyIP, Skyetel, Vitelity, DigitalOcean, Vultr, VoIP.ms, 3CX, Sangoma, TelecomsXchange and VitalPBX have provided financial support to Nerd Vittles and our open source projects through advertising, referral revenue, and/or merchandise. As an Amazon Associate and Best Buy Affiliate, we also earn from qualifying purchases. We’ve chosen these providers not the other way around. Our decisions are based upon their corporate reputation and the quality of their offerings and pricing. Our recommendations regarding technology are reached without regard to financial compensation except in situations in which comparable products at comparable pricing are available from multiple sources. In this limited case, we support our sponsors because our sponsors support us.

    BOGO Bonaza: Enjoy state-of-the-art VoIP service with a $10 credit and half-price SIP service on up to $500 of Skyetel trunking with free number porting when you fund your Skyetel account. No limits on number of simultaneous calls. Quadruple data center redundancy. $25 monthly minimum spend required. Tutorial and sign up details are here.

    The lynchpin of Incredible PBX 2020 and beyond is ClearlyIP components which bring management of FreePBX modules and SIP phone integration to a level never before available with any other Asterisk distribution. And now you can configure and reconfigure your new Incredible PBX phones from the convenience of the Incredible PBX GUI.

    VitalPBX is perhaps the fastest-growing PBX offering based upon Asterisk with an installed presence in more than 100 countries worldwide. VitalPBX has generously provided a customized White Label version of Incredible PBX tailored for use with all Incredible PBX and VitalPBX custom applications. Follow this link for a free test drive!
     

    Special Thanks to Vitelity. Vitelity is now Voyant Communications and has halted new registrations for the time being. Our special thanks to Vitelity for their unwavering financial support over many years and to the many Nerd Vittles readers who continue to enjoy the benefits of their service offerings. We will keep everyone posted on further developments.


    Some Recent Nerd Vittles Articles of Interest…

    1. Many of our purchase links refer users to Amazon when we find their prices are competitive for the recommended products. Nerd Vittles receives a small referral fee from Amazon to help cover the costs of our blog. We never recommend particular products solely to generate Amazon commissions. However, when pricing is comparable or availability is favorable, we support Amazon because Amazon supports us. []
    2. Vitelity is a platinum sponsor of Nerd Vittles, and they also happen to be the best in the business. You’ll find a discount coupon to get a great deal on a DID and 4-channel trunk toward the end of this article. []

    The Last Sunset: Say Goodbye to Google TTS… Hello Pico TTS

    Despite the heroic efforts of Lefteris Zafiris to keep GoogleTTS afloat for use with Asterisk®, Google has made it increasingly clear that they intend to blow everyone’s apps out of the water (except theirs) if you choose to use their text to speech engine, even in open source, non-commercial products. As much as we’ve loved the voice quality and Google’s previous generosity in sharing their work product with the open source community, there comes a time when the mud wrestling simply is no longer worth the effort. Thanks to the pioneering efforts of Steven Mirabito, we all now have a choice. Steven took the work of Lefteris on GoogleTTS and retrofitted it to support the free SVOX Pico TTS engine. While Pico lacks a bit of the voice quality of GoogleTTS, it’s a quantum leap improvement over Festival and FLITE and perfectly suitable for Incredible PBX TTS apps.


    [soundcloud url="https://api.soundcloud.com/tracks/240804855″ params="auto_play=false&hide_related=false&show_comments=true&show_user=true&show_reposts=false&visual=true" width="500″ height="300″ iframe="true" /]

    Unlike FLITE which has no voice alternatives to Lurch, Pico for Android has a rich assortment of 40+ male/female voices supporting 25+ languages. Many of them are free. Hopefully, it’s only a matter of time until someone documents how to move them over to the Linux platforms. For today, our default install includes support for US English, British English, French, Spanish, and German. After the install, you’ll find them in /usr/share/pico/lang. Changing voices and languages in your Asterisk scripts is simple. Replace the default language identifier, en-US, with the voice of your choice, e.g. en-GB for British accents, fr-FR for French, es-ES for Spanish, and de-DE for German. If you wish to generate wave files at the command prompt, the syntax is shown below. Here’s the command we used to generate the sample sound file above.

    pico2wave --wave sample.wav -l en-US "Here is a sample, using the PICO text to speech engine."
    

    We’re getting a little ahead of ourselves here. Before you can use Pico TTS, we first need to get it installed. There are two different procedures depending upon whether Incredible PBX is running on the CentOS/Scientific Linux platform or Debian/Ubuntu/Raspbian. The installation procedure below will install all of the necessary components for Pico TTS on an existing Incredible PBX platform. It also will modify the Incredible PBX apps that currently rely upon GoogleTTS. And, as of yesterday, all new Incredible PBX 13 installs include Pico TTS by default.

    To get started, log into your server as root and choose the installation steps documented below for your particular platform.1

    Installing Pico TTS on the CentOS/Scientific Linux Platforms

    cd /
    wget http://incrediblepbx.com/picotts.tar.gz
    tar zxvf picotts.tar.gz
    cd /root
    ./picotts-install.sh
    sed -i 's|en)|en-US)|' /etc/asterisk/extensions_custom.conf
    sed -i 's|googletts|picotts|' /etc/asterisk/extensions_custom.conf
    asterisk -rx "dialplan reload"
    

    Installing Pico TTS on the Debian/Ubuntu Platforms

    cd /
    wget http://incrediblepbx.com/picotts.tar.gz
    tar zxvf picotts.tar.gz
    cd /root
    rm -f picotts-install.sh
    apt-get update
    apt-get install -y libttspico-utils
    sed -i 's|en)|en-US)|' /etc/asterisk/extensions_custom.conf
    sed -i 's|googletts|picotts|' /etc/asterisk/extensions_custom.conf
    asterisk -rx "dialplan reload"
    

    Installing Pico TTS on the Raspberry Pi Raspbian Platform

    cd /
    wget http://incrediblepbx.com/picotts-raspi.tar.gz
    tar zxvf picotts-raspi.tar.gz
    rm -f picotts-raspi.tar.gz
    cd /root
    echo "Installing Pico TTS..."
    ./picotts-install.sh
    

    Post-Install Testing of Pico TTS with Incredible PBX

    The easiest way to make sure everything is working properly is to pick up a phone on your server and dial 951 for the latest Yahoo News headlines. Keep in mind that Google Speech Recognition (Google STT) still works for apps such as Voice Dialing (411), Voice Messaging (767), Wolfram Alpha (4747), and Star (8). However, these apps require a free API key before use. The procedure to obtain and install one is documented in this Nerd Vittles article.

    Changing the Pico TTS Voice with Incredible PBX

    All of the Incredible PBX application scripts are saved in extensions_custom.conf in the /etc/asterisk directory. To change the default voice for Pico TTS apps, simply search and replace en-US with the desired voice: en-GB, fr-FR, es-ES, or de-DE. Save your changes. And then reload your Asterisk dialplan: asterisk -rx "dialplan reload"

    Originally published: Monday, January 11, 2016


    Need help with Asterisk? Visit the PBX in a Flash Forum.


    Special Thanks to Our Generous Sponsors


    FULL DISCLOSURE: ClearlyIP, Skyetel, Vitelity, DigitalOcean, Vultr, VoIP.ms, 3CX, Sangoma, TelecomsXchange and VitalPBX have provided financial support to Nerd Vittles and our open source projects through advertising, referral revenue, and/or merchandise. As an Amazon Associate and Best Buy Affiliate, we also earn from qualifying purchases. We’ve chosen these providers not the other way around. Our decisions are based upon their corporate reputation and the quality of their offerings and pricing. Our recommendations regarding technology are reached without regard to financial compensation except in situations in which comparable products at comparable pricing are available from multiple sources. In this limited case, we support our sponsors because our sponsors support us.

    BOGO Bonaza: Enjoy state-of-the-art VoIP service with a $10 credit and half-price SIP service on up to $500 of Skyetel trunking with free number porting when you fund your Skyetel account. No limits on number of simultaneous calls. Quadruple data center redundancy. $25 monthly minimum spend required. Tutorial and sign up details are here.

    The lynchpin of Incredible PBX 2020 and beyond is ClearlyIP components which bring management of FreePBX modules and SIP phone integration to a level never before available with any other Asterisk distribution. And now you can configure and reconfigure your new Incredible PBX phones from the convenience of the Incredible PBX GUI.

    VitalPBX is perhaps the fastest-growing PBX offering based upon Asterisk with an installed presence in more than 100 countries worldwide. VitalPBX has generously provided a customized White Label version of Incredible PBX tailored for use with all Incredible PBX and VitalPBX custom applications. Follow this link for a free test drive!
     

    Special Thanks to Vitelity. Vitelity is now Voyant Communications and has halted new registrations for the time being. Our special thanks to Vitelity for their unwavering financial support over many years and to the many Nerd Vittles readers who continue to enjoy the benefits of their service offerings. We will keep everyone posted on further developments.


    Some Recent Nerd Vittles Articles of Interest…

    1. If you’re using an older version of CentOS, see the install tips documented on the PIAF Forum. []

    VoIP Hardware Deal of the Year: Meet the $20 Pogoplug 4 with Incredible PBX

    This week’s project is not for mere mortals. It’s for techies that also happen to be cheapskates frugal. You may recall the Pogoplug from yesteryear. Well, the Pogoplug 4 still is around and can be yours for under $20 with free 2-day shipping if you’re an Amazon Prime member. But the clock is ticking on these bad boys. Once they’re gone, they’re gone.1

    UPDATE: There’s more good news. Now the cost with the Pogoplug Backup & Sharing model is just $10.95! For our purposes, the main difference is one less USB port, but it still has one which is all you need for wireless networking.

    So we took the dare and decided to see whether the Pogoplug 4 could actually run Asterisk 11® and FreePBX® 2.11 and Incredible PBX™. And guess what? It may not be pretty, but it works. If you happen to have a Google Voice number and a kid away at school or a grandma in a distant city with an Internet connection or if you have a vacation home or rental property that needs phone service (but not often), then this $20 project may be for you. Configure the device, add a cheap SIP phone, and presto! You’ve got free calling in the U.S. and Canada with your very own phone number for as long as you have Internet service and Google chooses to keep paying your phone bill. 😉

    Don’t take our word for it. Call our Pogoplug for a quick IVR demo compliments of Allison:

    1. Call by Name (just say "American Airlines" to try it out)
    2. Conference Call (enter 1234# to join the conference)
    3. Wolfram Alpha (try this: "What planes are overhead?")
    4. Lenny (the Telemarketers’ Worst Nightmare)
    5. Yahoo News Headlines
    6. Weather Forecasts (say a city and state or country)
    7. Today in History
    8. Ring the House Phones (sends you back to Lenny)

    Our tip of the hat this week goes to Qui Hong without whom none of this would have been possible. His tutorial on transforming the Pogoplug 4 into a Debian server is a true masterpiece. And his blog is where we begin our adventure once you have the correct Pogoplug 4 in hand: POGO-V4-A3-01. Our link has the correct one, but double-check the Model Number just to be sure.

    Converting the Pogoplug 4 into a Debian Platform

    Once you have your Pogoplug, you’ll need to scurry over to Qui Hong’s blog and carefully work through his tutorial to convert your Pogoplug into a Debian server. As we’ve said many times before, if you can follow a cookie recipe and end up with edible cookies, then you can do this. Just be very careful of typos. One bad keystroke can turn your Pogoplug into a burnt cookie. Then it becomes a $40 project. 🙂

    Installing Incredible PBX 11.12.0 on the Pogoplug 4

    Once your Pogoplug has been Debianized, there are five simple steps to get Incredible PBX up and running on your Pogoplug 4:

    1. Purchase a storage device
    2. Download Incredible PBX image
    3. Untar the image on your desktop
    4. Burn the image to an SD card
    5. Insert the SD card in the Pogoplug and boot

    Choosing a Storage Platform. The first step is to purchase a suitable SD card. We recommend at least a 16GB Class 10 card from Transcend, SanDisk, or Kingston. All of them are about $10 on Amazon and many include free 2-day shipping for Prime customers.

    Downloading Incredible PBX for Pogoplug. From your favorite desktop computer, download the latest build of Incredible PBX from SourceForge. Depending upon your network connection and the SourceForge mirror, it can take awhile. It’s a whopping 1.5GB image!

    Untarring Incredible PBX for Pogoplug. Depending upon your desktop platform, untarring incrediblepbx.4.pogoplug.D7.latest.tar.gz is as simple as double-clicking on it in the Downloads folder (on a Mac). On the Windows platform, here are 3 utilities that will do the job. On a Linux desktop, open a Terminal window and…

    tar zxvf incrediblepbx.4.pogoplug.D7.latest.tar.gz
    

    Burning the Incredible PBX image to SD card. Once you’ve untarred the file, you’ll find two scripts that make burning the image to an SD card simple if you’re on a Mac or Linux desktop. On a Windows machine, it’s a little more complicated. Most SD cards come preformatted with a DOS partition so your Windows machine should recognize the SD card when it’s inserted. If not, format the card using a utility such as SD Card Formatter. Next, you’ll need Win32 Disk Imager to burn pogoplug.img to your card. Once the image has been transferred, gracefully unmount the card from your desktop.

    Booting Incredible PBX on the Pogoplug. Insert the SD card (electronics side down) into your Pogoplug 4. Then apply power to the device after connecting an Ethernet cable to a network with Internet connectivity that can also hand out DHCP addresses. Visit your router to decipher the IP address assigned to the Pogoplug and reserve the IP address so that it doesn’t suddenly change down the road. Log into Incredible PBX as root with pogoplug as your password. Your SSH credentials, Asterisk DUNDI secrets, logs, and network connection options will be initialized. When prompted, press Enter to reboot your server. With some SD cards, you may find yourself waiting an eternity for the promised reboot. After seeing the "rebooting" message, count to ten. If your server still hasn’t rebooted, remove and reapply power. This quirk goes away after the first reboot.

    After the reboot, log in again as root with password: pogoplug. Your firewall setup will be initialized to lock down your whitelist to your server’s public and private IP addresses AND the IP address of the machine from which you’re logging in. All of your FreePBX passwords will be randomized as well. The whole process only takes a few seconds.

    When the second pass configuration is complete, you will be greeted by a welcoming message. STOP and read it. It has loads of important information about your server’s configuration and your next steps. Press ENTER to review status:

    The Next 10 Steps. Before you do anything else, complete the following steps. It only takes a minute to secure and properly configure your server:

    1. Change your root password: passwd
    2. Change your FreePBX admin password: /root/admin-pw-change
    3. Set your correct time zone: /root/timezone-setup
    4. Expand partition to match SD card size: /root/resize-partition
    5. Add any desired IP addresses to WhiteList: /root/add-ip
    6. Decipher the randomized password for extension 701. It’s in the data field:
      mysql -uroot -ppassw0rd -e "select * from asterisk.sip where id=701 and keyword='secret'"
      
    7. Decipher the randomized voicemail password for extension 701. It’s the first entry:
      cat /etc/asterisk/voicemail.conf | grep 701 | cut -f 3 -d " "
      
    8. Enable Windows Networking, if desired: /root/samba-enable.sh
    9. Configure PPTP Network, if desired: cat /root/pptp-faq
    10. Check status to be sure everything is working: status

    A Few Important Tips. Every operating system and service provider has their quirks. Ask Bill Gates! Debian and especially Comcast are no different. Fortunately, with Debian, it’s a very short list.

    1. Use the following commands (only!) to shutdown and restart your server: halt and reboot. These commands are reworked in Incredible PBX to gracefully shutdown important services so that files don’t get damaged. Please use them!

    2. If you ever want to move your server to a different network, complete these steps before you leave your existing network. First, using add-ip or add-fqdn, add the new WhiteList addresses for your new location using Option 0 (all privileges). Otherwise, you won’t be able to access your server once you move. Then issue the commands below. This will trigger a new Phase I update (outlined above) on the default network (eth0) using DHCP the next time you boot your Pogoplug.

    touch /etc/update_hostconfig
    halt
    

    3. You really do need email connectivity to get the most out of Incredible PBX. It’s the way you receive important notifications from FreePBX, and it’s also how voicemail messages are delivered. From the Linux CLI, test your server to be sure you can send emails reliably:

    echo "test" | mail -s testmessage yourname@gmail.com
    

    After checking your spam folder, if you really didn’t get the email, it may be that your service provider is blocking downstream SMTP traffic. You can use your provider’s SMTP server as a smarthost to send out mail with Exim4. Just run the following program to reconfigure the Exim mail server: dpkg-reconfigure exim4-config. Choose the SmartHost option and enter your provider’s SMTP address, e.g. smtp.comcast.net or smtp.knology.net. Exim will restart.

    4. If you’d like to activate ODBC support for Asterisk including our ODBC sample applications including Speed Dial, here are the steps. Log into your server as root and issue the following commands:

    cd /root
    wget http://incrediblepbx.com/odbc-pogoplug.tar.gz
    tar zxvf odbc-pogoplug.tar.gz
    rm odbc-pogoplug.tar.gz
    ./mysql-sample
    ./mysql-odbc
    ./odbc-gen.sh
    

    Now you can try things out by dialing 222 from a phone connected to your server. When prompted for the employee number, enter 12345. Or dial 223 and, when prompted for the AsteriDex Dial Code, enter 263 (the first 3 letters of the American Airlines entry).

    5. Want a list of your completed calls without using FreePBX? It’s easy:

    mysql -uroot -ppassw0rd -e "SELECT SUBSTRING(calldate,6,11) AS calldate,clid,src,dst,duration from asteriskcdrdb.cdr WHERE disposition='ANSWERED' ORDER BY calldate DESC"
    

    6. There may be situations in which it is desirable to use wireless networking instead of a wired connection with your Pogoplug. For under $10, you now can add WiFi. Here’s our post on the PIAF Forum to show you how.

    Managing FreePBX with Incredible Backup and Restore

    Unlike other releases of Incredible PBX, the backup and restore tools can be helpful on the Pogoplug platform. Even though Asterisk runs smoothly, calls sound great, and performance is pretty amazing, the FreePBX GUI is usable but a bit sluggish on the Pogoplug platform. If the performance bothers you, there’s a workaround. Create an Incredible Backup image of your Pogoplug, restore that image on a more normal Ubuntu 14 platform with ample RAM, and then make your FreePBX changes there using the FreePBX GUI. When you’re finished, make a backup of the changes, and then restore that backup to your Pogoplug. It sounds more complicated than it actually is. In essence, you’ll be transforming FreePBX into an Asterisk code generator. In fact, once a backup is restored, you can shut down your web server, and almost everything will still work. We were able to perform the entire procedure including updating all of the FreePBX modules and adding a Google Voice trunk in about 15 minutes using a snapshot of an Incredible PBX for Ubuntu 14 droplet we previously had created. Here are the actual steps to perform the first time:

    1. Take an image snapshot of your server with Incredible Backup: /root/incrediblebackup

    HINT: No need to do it initially. One is included: /backup/DU-2014.09.07.19.46-A11.12.0-F2.11-I11.12.0.tar.gz

    2. Create a 512MB Droplet on Digital Ocean using Ubuntu 14 and Incredible PBX for Ubuntu. Follow the Nerd Vittles tutorial which also has a signup link to assist our projects. Coupon code: ALLSSD10 gets you a $10 credit this month. Once you’re up and running, you may want to take a snapshot so that you can quickly recreate droplets while also avoiding hourly charges for the one you’ve previously built (whether running or not!). Digital Ocean 512MB droplets cost less than a penny an hour so this is not a big ticket item. When you finish with the droplet, just destroy it (once you’ve made a snapshot!). Then the money meter stops. First time build takes about 30 minutes.

    3. After creating /backup folder on DO droplet, copy your backup image from step #1 to this folder.

    4. Restore the image: /root/incrediblerestore /backup/DU-somefilename.tar.gz

    5. Open FreePBX on DO with a browser and log in as admin with your admin password.

    6. Make all the changes desired using the tutorial below. Reload FreePBX (red bar) when prompted before exiting!

    7. Make a DO backup of your new setup: /root/incrediblebackup

    8. Copy the DO backup file to /backup on your Pogoplug.

    9. Restore the DO backup: /root/incrediblerestore /backup/DU-somefilename.tar.gz

    10. Log out and back into your Pogoplug as root.

    Getting Started with VoIP and FreePBX

    To access FreePBX, just point to the IP address of the server. The main control panel looks like this:

    As configured, the default user account for FreePBX administration is admin. The password is whatever you set in the initial setup above. If you ever forget it, you can reset it easily: /root/admin-pw-change.

    For those new to Asterisk and FreePBX, here’s a brief primer on what needs to happen before you can make and receive calls. If you have an existing Google Voice account, lucky you. This gets you a phone number for your PBX so people can call you. And it provides a vehicle to place free calls to plain old telephones in the U.S. and Canada so long as Google continues to provide the free service.

    If you don’t have a Google Voice account or a shiny new smartphone, then you will need to purchase a SIP trunk from one of the numerous vendors around the world. Our favorite (because they provide terrific service at a modest price AND provide financial support to the Nerd Vittles, PBX in a Flash, and Incredible PBX projects) is Vitelity. Their special rates and a link for a discount are included at the end of today’s article.

    Unlike POTS phone service from Ma Bell, the SIP World is a little different. First, you don’t need to put all your eggs in one basket. A trunk that gets you a phone number for incoming calls need not be with the same vendor that provides a trunk to place outbound calls. In fact, you may want multiple trunks for outbound calls just to have some redundancy. A list of our favorites in the U.S. and Canada is available on the PIAF Forum. Of course, there also are providers that offer all-you-can-eat calling plans. Two of our favorites are Vestalink and Future-Nine.

    You’ll also need a softphone or SIP phone to actually place and receive calls. YATE makes a free softphone for PCs, Macs, and Linux machines so download your favorite and install it on your desktop.

    Phones connect to extensions in FreePBX to work with Incredible PBX. Extensions talk to trunks (like Google Voice) to make and receive calls. FreePBX uses outbound routes to direct outgoing calls from extensions to trunks, and FreePBX uses inbound routes to route incoming calls from trunks to extensions to make your phones ring. In a nutshell, that’s how a PBX works.

    There are lots of bells and whistles that you can explore down the road including voicemail, conferencing, IVRs, autoattendants, paging, intercoms, CallerID lookups, announcements, DISA, call parking and pickup, queues, ring groups, and on and on. And then there’s all of the Incredible PBX applications which are covered separately in this Nerd Vittles article. Once you’re comfortable with one server, you or your company will want some more. This Nerd Vittles article will walk you through interconnecting them into a seamless mesh network so that you can call from one office to another transparently. Yes, those articles were written for the Raspberry Pi. But the beauty of Incredible PBX is that it runs (almost) identically on every server platform.

    Here’s our 7-Step Checklist to Getting Started with FreePBX:

    1. Setting Up Google Voice. If you want free calling in the U.S. and Canada, then you’ll need an existing Google Voice account that includes the Google Chat feature. You’ll need one dedicated to Incredible PBX, or it won’t work. Log out after setting up the new Google Voice account! Also note that Google Voice may cease to function at any time after May 15, 2014. You can read all about it here.

    • Log into existing Google Voice account
    • Enable Google Chat as Phone Destination
    • Configure Google Voice Calls Settings:
      • Call ScreeningOFF
      • Call PresentationOFF
      • Caller ID (In)Display Caller’s Number
      • Caller ID (Out)Don’t Change Anything
      • Do Not DisturbOFF
      • Call Options (Enable Recording)OFF
      • Global Spam FilteringON

    • Place test call in and out using GMail Call Phone
    • Log out of your Google Voice account

    If this fails, then Google may have blocked your IP address. Here’s how to unblock it.

    2. Activating a Google Voice Trunk. To create a Trunk in FreePBX to handle calls to and from Google Voice, you’ll need three pieces of information from the Google Voice account you set up above: the 10-digit Google Voice phone number, your Google Voice account name, and your Google Voice password. Choose Connectivity -> Google Voice (Motif) from the FreePBX GUI. The following form will appear:

    Fill in the blanks with your information and check only the top 2 boxes. If your Google Voice account name ends in @gmail.com, leave that out. Otherwise, include the full email address. Then click Submit Changes and Apply Config.

    To activate a Google Voice trunk, you must restart Asterisk on the Pogoplug platform: amportal restart.

    3. Setting a Destination for Incoming Calls. Now that you’ve created your Google Voice Trunk, we need to tell FreePBX how to process inbound calls when someone dials your Google Voice number. There are any number of choices. You could simply ring an extension. Or you could ring multiple extensions by first creating a Ring Group which is just a list of extension numbers. Or you could direct incoming calls to an Interactive Voice Response (IVR) system. By default, Incredible PBX is configured to route all incoming calls to extension 701. You can change the setting whenever you like by choosing Connectivity -> Inbound Routes -> Default. In the Set Destination section of the form, change the target destination from the pull-down lists.

    Always click Submit and then click Apply Config to save new settings in FreePBX. This is especially important on the Pogoplug platform because you cannot actually do it once you restore the backup image to the Pogoplug.

    4. Activating Additional Trunks with FreePBX. As we mentioned, there are lots of SIP providers to choose from. Once you have signed up for service, configuring the trunk is easy. Here is a quick Cheat Sheet courtesy of Kristian Hare, who translated our original setups into a spreadsheet. Just click on the image below to open it in a new window. Then click on the redisplayed image to enlarge it. The left and right cursor keys will move you around in the image. Click on the image again to shrink it.

    5. Changing Extension Passwords. From the main FreePBX GUI, choose Applications -> Extensions. Then click on 701 in the Extension List on the right side of your display. You’ll see a form that looks like this:

    For now, we only need to make a few changes. First, you need a very secure password for both the extension itself and your voicemail account for this extension. The extension secret needs to be a combination of letters and numbers. The Voicemail Password needs to be all numbers, preferably six or more. Replace the existing password entries with your own (very secure) entries. You also need to lock down this extension so that it is only accessible from devices on your private LAN. You do that with the deny and permit entries which currently are filled with zeroes. Leave the deny entry the way it is which tells Incredible PBX to block everybody except those allowed in the permit entry below. For the permit, we need the first three octets of your private LAN address, e.g. if your LAN is 192.168.0.something then the permit entry will be 192.168.0.0/255.255.255.0.

    Finally, you need to plug in your actual email address in the Voicemail section so that voicemails can be delivered to you when someone leaves a message. You can also include a pager email address if you want a text message alert with incoming voicemails. If you want the voicemails to automatically be deleted from the server after they are emailed to you (a good idea considering the disk storage limitations of your microSD card), change the Delete Voicemail option from No to Yes. That’s it. Now save your settings by clicking the Submit button. Then reload the dialplan by clicking on the red prompt when it appears.

    In case you’re curious, unless you’ve chosen to automatically delete voicemails after emailing them, you can retrieve your voicemails by dialing *98701 from any extension on your phone system. You’ll be prompted to enter the voicemail password you set up. In addition to managing your voicemails, you’ll also be given the opportunity to either return the call to the number of the person that called or to transfer the voicemail to another extension’s voicemail box. And you can always leave a voicemail for someone by dialing their extension number preceded by an asterisk, e.g. *701 would let someone leave you a voicemail without actually calling you.

    6. Eliminating Audio and DTMF Problems. You can avoid one-way audio on calls and touchtones that don’t work with these simple settings in FreePBX: Settings -> Asterisk SIP Settings. Just plug in your public IP address and your private IP subnet. Then set ULAW as the only Audio Codec.

    7. Configuring CallerID Superfecta. In order to match names with phone numbers, Incredible PBX includes a FreePBX application named CallerID Superfecta. Out of the box, Incredible PBX will work fine if you remember to activate CallerID Superfecta whenever you create a new Inbound Route. The CNAM entries also will be displayed in your CDR reports. For those not in the United States, you may prefer to use a lookup source for your numbers other than the ones preconfigured in CallerID Superfecta. You will find all of the available modules on the POSSA GitHub site. Just download the ones desired into /var/www/html/admin/superfecta/sources and then activate the desired sources in Admin -> CID Superfecta -> Default. You can test your results and the performance using the Debug facility that’s built into the module.

    If you’re using FreePBX on an Ubuntu server in the Cloud, now is the time to drop down to the Linux command prompt, log in as root, and make a backup: /root/incrediblebackup. Copy the backup from /backup to the same folder on your Pogoplug and restore it: /root/incrediblerestore /backup/DU-somefilename.tar.gz. Then restart Asterisk on your Pogoplug: amportal restart. Finally, log out and back into your Pogoplug to assure that FreePBX will function properly on that platform.

    Adding Speech Recognition for Incredible PBX Applications

    We used to include Google’s Speech-to-Text service in earlier Incredible PBX builds. Unfortunately, Google has changed the rules a bit. Assuming your server still meets the "personal and development" standard, you can obtain an API key from Google and reactivate speech-to-text functionality for many of the Incredible PBX applications including Weather Reports by City (949), AsteriDex Voice Dialing by Name (411), SMS Dictator (767), and Wolfram Alpha for Asterisk (4747). To activate the STT service, just complete the steps in our tutorial. Then sign up for a Wolfram Alpha App ID (tutorial here), and run the following install scripts:

    /root/wolfram/wolframalpha-oneclick.sh
    cp /root/pygooglevoice/bin/gvoice /usr/bin
    ln -s /usr/bin/gvoice /usr/local/sbin/gvoice
    cd /root/pygooglevoice
    python setup.py install
    /root/smsdictator/sms-dictator.sh
    

    Configuring a YATE Softphone for Pogoplug

    As we mentioned, the easiest way to get started with Incredible PBX is to set up a free YATE softphone on your Desktop computer. Versions are available at no cost for Macs, PCs, and Linux machines. Just download the appropriate one and install it from this link. Once installed, it’s a simple matter to plug in your extension 701 credentials and start making calls. Run the application and choose Settings -> Accounts and click the New button. Fill in the blanks using the IP address of Incredible PBX on the Pogoplug, 701 for your account name, and whatever password you’re using for the extension. Click OK.

    Once you are registered to extension 701, close the Account window. Then click on YATE’s Telephony Tab and place your first call. It’s that easy!

    Introducing Incredible PBX 11.12.0 for the Pogoplug

    For those of you that missed last week’s article on the CuBox platform and are new to Asterisk and the world of VoIP telephony, let us take a moment and explain how Incredible PBX fits into the puzzle. For lack of a better term, Incredible PBX is a turnkey aggregation in a bootable image that is based upon a superset of Debian 7 packages plus Asterisk, the FreePBX GUI, and a sizable collection of applications for the Asterisk platform. You download a tarball, decompress it, write the image file to an SD card, insert the card into your Pogoplug 4, and presto! You’ve got a turnkey PBX. Add credentials for a trunk or two to make and receive calls, connect some phones, and your SOHO office or home will come alive with a versatile PBX platform that used to cost organizations hundreds of thousands of dollars. What’s included in Incredible PBX? Glad you asked. Here’s a 3-minute video showcasing a few of our favorite Incredible PBX text-to-speech applications:


    The Incredible PBX 11 Inventory. Here’s the current feature set on the Pogoplug platform. In addition to its superset of hundreds of Debian 7 packages, Asterisk 11, and FreePBX 2.11 with the Lighttpd web server, Exim 4 mail server, MySQL, PHP, phpMyAdmin, and the IPtables Linux firewall, check out these additions:

    A Few Words About Security. Thanks to its Zero Internet Footprint™ design, Incredible PBX is different. It remains the most secure Asterisk-based PBX around. What this means is Incredible PBX has been engineered to sit anywhere, either behind a NAT-based, hardware firewall or directly on the Internet. No device other than those on your private LAN, a few of the major (trusted) SIP providers around the world, and those that you authorize on your WhiteList can even see your server. Additional IP addresses can be added to the WhiteList by the administrator registering new IP addresses using add-ip or add-fqdn from the Linux CLI. Read about this $100,000 VoIP phone bill, and you’ll better appreciate why WhiteList-based server security has become absolutely essential. WhiteList Security means only those devices with a registered IP address in your WhiteList can get to your server’s resources. To the NSA and everyone else, your server doesn’t even show up on the radar. Their only way to contact you is a POTS telephone using your published phone number. Our complete tutorial on Travelin’ Man 3 is available here. With Incredible PBX for the Pogoplug 4, it’s installed and preconfigured. Enjoy!


    Don’t forget to List Yourself in Directory Assistance so everyone can find you by dialing 411. And add your new number to the Do Not Call Registry to block telemarketing calls. Or just call 888-382-1222 from your new number.

    Originally published: Monday, September 8, 2014


    Support Issues. With any application as sophisticated as this one, you’re bound to have questions. Blog comments are a terrible place to handle support issues although we welcome general comments about our articles and software. If you have particular support issues, we encourage you to get actively involved in the PBX in a Flash Forums. It’s the best Asterisk tech support site in the business, and it’s all free! Please have a look and post your support questions there. Our forum is extremely friendly and is supported by literally hundreds of Asterisk gurus. In fact, we already have a thread underway on the Pogoplug adventure.


    Need help with Asterisk? Visit the PBX in a Flash Forum.


    Special Thanks to Our Generous Sponsors


    FULL DISCLOSURE: ClearlyIP, Skyetel, Vitelity, DigitalOcean, Vultr, VoIP.ms, 3CX, Sangoma, TelecomsXchange and VitalPBX have provided financial support to Nerd Vittles and our open source projects through advertising, referral revenue, and/or merchandise. As an Amazon Associate and Best Buy Affiliate, we also earn from qualifying purchases. We’ve chosen these providers not the other way around. Our decisions are based upon their corporate reputation and the quality of their offerings and pricing. Our recommendations regarding technology are reached without regard to financial compensation except in situations in which comparable products at comparable pricing are available from multiple sources. In this limited case, we support our sponsors because our sponsors support us.

    BOGO Bonaza: Enjoy state-of-the-art VoIP service with a $10 credit and half-price SIP service on up to $500 of Skyetel trunking with free number porting when you fund your Skyetel account. No limits on number of simultaneous calls. Quadruple data center redundancy. $25 monthly minimum spend required. Tutorial and sign up details are here.

    The lynchpin of Incredible PBX 2020 and beyond is ClearlyIP components which bring management of FreePBX modules and SIP phone integration to a level never before available with any other Asterisk distribution. And now you can configure and reconfigure your new Incredible PBX phones from the convenience of the Incredible PBX GUI.

    VitalPBX is perhaps the fastest-growing PBX offering based upon Asterisk with an installed presence in more than 100 countries worldwide. VitalPBX has generously provided a customized White Label version of Incredible PBX tailored for use with all Incredible PBX and VitalPBX custom applications. Follow this link for a free test drive!
     

    Special Thanks to Vitelity. Vitelity is now Voyant Communications and has halted new registrations for the time being. Our special thanks to Vitelity for their unwavering financial support over many years and to the many Nerd Vittles readers who continue to enjoy the benefits of their service offerings. We will keep everyone posted on further developments.


    Some Recent Nerd Vittles Articles of Interest…

    1. Some of our links refer users to Amazon or other service providers when we find their prices are competitive for the recommended products. Nerd Vittles receives a small referral fee from these providers to help cover the costs of our blog. We never recommend particular products solely to generate commissions. However, when pricing is comparable or availability is favorable, we support these providers because they support us. []

    Introducing Incredible Pi: $35 for Asterisk, FreePBX & Google Voice Utopia

    It’s Back-to-School Time in most of the United States, and the Nerd Vittles crew needed a good fall project to distract us from all of this year’s dreadful politicians. We feel like a kid in a candy store with our new $35 Raspberry Pi® Model B. Imagine squeezing a 700 mHz ARM processor with 256MB of RAM, 2 USB ports, a 10/100 Ethernet port,if an HDMI port, composite video, a separate audio jack, an SDHC card slot, and a micro USB port onto a motherboard the size of a credit card with a total weight of 1.6 ounces and a typical power draw of 3.5 watts. Thanks to Gernot and his Asterisk for Raspberry Pi project, a full LAMP stack with Asterisk® and FreePBX® gave us a head start on turning the Raspberry Pi into yet another Incredible PBX™ platform complete with Google Voice™ for free inbound and outbound calling throughout the United States and Canada.

    Trust us when we say the performance of this $35 computer is nothing short of amazing. Can it do everything a $200 dual-core Atom PC can do? No. Can it do 90% of everything for someone whose requirements do not exceed a few simultaneous calls at a time but still wants a full-blown PBX for call routing, voicemail, IVRs, music on hold, and text-to-speech and speech-to-text apps for a home, a SOHO office, a Little League team, or a dorm room? Absolutely.

    Call our Raspberry Pi at 1-843-284-6844 and check out the Incredible Pi Smörgåsbord for yourself.

    Other Incredible Pi Resources: Quick Start Guide for Incredible Pi 3.1 and 35 Free Incredible Pi Apps Tutorial

    Incredible PBX for Raspberry Pi: What’s Included

    If you’ve never heard of The Incredible PBX, here’s the Top 20 for the Raspberry Pi platform. In addition to the base install with Debian 6, Asterisk 1.8, FreePBX 2.10, Apache, SendMail, MySQL, PHP, and phpMyAdmin, Incredible Pi offers the following built-in PBX components using a wired or wireless network connection:

    Ordering Information: What It Takes to Get Started

    A complete Incredible PBX build for the Raspberry Pi (Incredible Pi™) is finally finished, and we wanted to give you a head start on ordering the pieces you’ll need to get things going since there is a three to five week delay on some of the components due to huge demand. Nothing is ever just $35, of course. So here’s what you’ll need. The Raspberry Pi itself can be ordered from Newark or MCM. Delivery times and stock vary so check both sites. At the time we ordered, they were quoting 5 weeks. We actually got one from Newark in one week, and as of now MCM has some in stock for immediate shipping. You also need a power adapter. If you have a micro USB power brick for your cellphone, chances are it will work. As long as it’s at least 1 amp and 5 volts, you’re good to go. The recommended 700 mA adapters have reportedly caused issues for some folks so splurge and order a good one. They’re $10 from Amazon while supporting Nerd Vittles.1 If you plan to add the WiFi adapter covered below, you will need at least 1.2 amps to avoid lockups. Next, you’ll need an SDHC card which serves as your hard disk. Be very careful here. The Type 10 cards which arguably would provide the best performance turn out to be a nightmare. Many of them simply don’t work. For a basic system, we’d recommend you start with either the SanDisk 4GB or 16GB SDHC Type 4 card. The 4GB card is available almost everywhere for under $10, or you can order two from Amazon with free Prime shipping for about the same money. If you already have a USB keyboard and a monitor or TV with an available HDMI port or composite video and audio ports, then you’ve got everything you need to get started. Actually, you can do without the monitor and use SSH if you’re either using Incredible Pi 1.3 or if you can decipher the DHCP address of Incredible Pi by reviewing your firewall log. With version 1.3 and beyond, you can plug in a pair of earbuds, and the server will whisper your IP address in your ear after the boot process completes. By the way, you may also want to put your name in the queue for a Pibow case, completely unnecessary but very cute with a long waiting list. It costs almost as much as the computer.

    For down the road, suffice it to say, you’re probably not going to want to run Asterisk, FreePBX, and Google Voice on a disk platform of 4 gigabytes although our demo system does exactly that. Between Debian 6.0, Asterisk 1.8, FreePBX 2.10 plus numerous Incredible PBX utilities, well over half of the available 4GB will be consumed by software. For distribution purposes, we’re providing an image that you can write directly to the SDHC card. Unfortunately, the image size determines the amount of space it will actually use on an SDHC card. We will cover below how you can install the 4GB image onto a 16GB card and then expand the size of the main partition to fill the remaining space on the card. But it wouldn’t make sense to distribute a 16GB image because of bandwidth issues. So we’d recommend you purchase a 16GB SanDisk Type 4 SDHC card for production use. Take our advice. Don’t get creative in choosing your SDHC card. Use the one that we’ve already tested and that we know works. If you want to skip the 4GB card completely, that’s perfectly fine, too. The 16GB Type 4 SanDisk card is under $10 from Amazon with free Prime 2-day shipping, or you can pay double and pick one up at your neighborhood Radio Shack store. We’ll also show you how to back up your SDHC card (any size) with your own settings and restore it onto a 16GB card without missing a beat. Unfortunately, once you migrate and expand the main partition on the 16GB card, you’re stuck with that topology. There’s no going back without starting over, and your backups will consume 16GB of storage rather than 4GB. But it sure is convenient… and easy. By the way, here’s a more reasonably priced case and here’s an awesome clear case if you just want something that’s functional.

    Finally, you’re going to need an existing Linux server or Mac on which to create your bootable SDHC cards for use with Raspberry Pi. You’ll also need this server to make backups of your existing setup. DD is a wonderful low-level disk copying utility found in Linux, and we’re going to be using it a lot. PBX in a Flash with or without Incredible PBX makes an ideal platform because all of the necessary SDHC disk management utilities already are installed. If you’re not using our recommended Foxconn server, then you’ll need a server with an SDHC card slot, or you can purchase an inexpensive USB-to-SDHC adapter from Amazon for under $2. Without the case, you can build an awesome Asterisk platform for home or SOHO use for under $50, and it can handle 3 simultaneous SIP calls without noticeable degradation.

    Here’s a shot of our favorite Incredible Pi setup. You’ll need the LAN cable for the initial boot so that you can SSH into the device to plug in your WiFi SSID name and password. You’ll need the earbuds for the first and second boot to decipher the IP address of the device on your LAN, wired and wireless. No monitor connection is ever required. Just log in with SSH from your Mac or PC. After the first two boots, you can dispense with the CAT5 cable and the earbuds. All of the components are covered in this article.


    Creating a Bootable Incredible Pi SDHC Card

    SanDisk SDHC Type 4 cards come pre-formatted so all you need to do is insert the card into the SDHC slot of your Asterisk server and reboot it. If you prefer to use a Mac, go here for the tutorial. Before you insert your SDHC card and reboot, log in as root and run the following command: fdisk -l. This will tell you what the existing disk topology of your server is. Write it down. What you don’t want to do is accidentally choose your main Linux drive as the device to copy the Incredible Pi image to, or you end up with a mess. Now insert your SDHC card and reboot your Asterisk server so your SDHC card will be visible. Then run fdisk -l again to decipher the device node of your card. It should be at the bottom of the list and will be something like /dev/sdb. We don’t use /dev/sdb1 in the dd transfer step below, just the base devnode: /dev/sdb or whatever letter your SDHC drive happens to be.

    Next, using a web browser, download the latest Incredible Pi image and transfer it to the /root directory of the Linux computer you’ll be using to copy the image to your SDHC card. As we said, we recommend a PBX in a Flash server because it has all of the SDHC utilities already included. Incredible Pi is a free download from SourceForge. The feature sets are described in the SourceForge readme.txt file. Once you’ve copied the desired tarball to your Linux server, decompress it: tar zxvf incrediblepi-1.x.tgz where x is the version you downloaded. Verify the integrity of the image file using md5sum:


    1.7: md5sum debian6-incrediblepi-10-09-2012.img => e601ecd890a400de2e03009c034353c2
    2.1: md5sum debian7-incrediblepi-16-09-2012.img => 007efb9d2cdf86f054c5cf26c4f5de9a

    Finally, run the Linux install script: ./make-sdhc. It takes about 30-60 minutes to copy the image to your SDHC card. If you have a Mac, copy make-sdhc-mac to your Downloads folder and use it.

    While you’re waiting, you can read about all the latest changes and additions to Incredible Pi here.

    If you’re using our recommended 16GB SanDisk Type 4 SDHC card, then what you have at this juncture is a 16GB card on which only 4GB is being used. Here’s how to expand the main partition to use the other 12GB of space on the card while logged in as root. First, we need to make sure your card’s geometry matches our card setup. From the command prompt, issue the following commands using the proper device node (/dev/sdb) of your card:

    parted /dev/sdb
    (parted) unit chs
    (parted) print

    Here’s what you should see:

    If the geometry of your card doesn’t match what’s shown above, do NOT use our commands below to adjust your card. Instead, review the original tutorial explaining what needs to be done.

    If your geometry matches our geometry above, issue the following commands while still in parted:

    move 3 239943,0,0
    [press enter to accept default End]
    rm 2
    mkpart primary 1232,0,0 239942,3,31
    print

    After entering the above commands, your new card geometry should look like this:

    Now type quit. Then complete the resizing by issuing the following commands using your correct device node:

    e2fsck -f /dev/sdb2
    resize2fs /dev/sdb2
    sync

    Remove the card from your Linux machine and insert it into the SDHC card slot on the Raspberry Pi.

    We’ve also found one 32GB Type 10 card that’s reliable, the Kingston Ultimate X (SD10G2/32gb) which costs about $40 at Amazon. We’ve included the resizing steps below:

    fdisk -l
    parted /dev/sdb
    unit chs
    print
    move 3 483887,0,0
    [press enter to accept End address]
    rm 2
    mkpart primary 1232,0,0 483886,3,31
    print
    quit
    e2fsck -f /dev/sdb2
    resize2fs /dev/sdb2
    sync


    Preparing the Raspberry Pi for Blastoff

    Once the card is in place, there are a few more preliminary steps before you apply power to the device. Plug in a CAT5 LAN cable that is connected to your firewall-protected private network. Make certain that your router is handing out DHCP addresses properly since the Raspberry Pi can’t boot without a network connection to obtain the correct time from an NTP server on the Internet. It has no onboard time clock! Plug in a USB keyboard to one of the two USB ports on the Raspberry Pi. Connect either an HDMI or composite video cable between the Raspberry Pi and a monitor or TV. Finally, plug in a reliable power adapter and insert its micro USB connector into the slot on the Raspberry Pi. You should immediately see a raspberry on your screen with a scrolling list of commands that are executing while the Raspberry Pi is booting. Watch carefully. If you see a bunch of "waiting for hardware interrupt" notices, then you didn’t heed our advice on the type of SDHC card to use. Your card is not compatible for use on the Raspberry Pi so reformat it and use it with your camera. Then go buy the SanDisk card we recommended. The entire boot process should take about 30 seconds. With an incompatible card, that can stretch out to more than an hour. When the boot process completes, the IP address of your Incredible Pi should be displayed with a Linux login prompt. Write down your IP address. You’ll need it in a minute.

    Securing Incredible Pi

    Congratulations! You’re now ready to begin the Incredible Pi adventure. But, before we get started, first things first. Let’s secure your server. Log in with the username: pi. The password is raspberry. Now change the password to something really secure by issuing the command: passwd. Now do the same thing for the root password of the device: sudo passwd root.

    Next, we need to set the default timezone on your machine for both Linux and PHP5. First, switch to the root user account so we don’t have to type sudo before each command: su root. Enter your new root password when prompted. Then run this command to set the default timezone with Debian: dpkg-reconfigure tzdata. For PHP5, you have to manually enter the timezone in the php.ini file: nano -w /etc/php5/apache2/php.ini. Press Ctrl-W to search for timezone. Be sure the line is uncommented and plug in your correct timezone. If you don’t know the magic words to use for your timezone, here’s the list. Save the file: Ctrl-X, Y, and press Enter. Now restart Apache: service apache2 restart.

    First, we need to remove the default DUNDI secrets from Asterisk so fresh ones can be automatically generated when you restart Asterisk.

    asterisk -rx "database del dundi secret"
    asterisk -rx "database del dundi secretexpiry"
    amportal restart

    Now we need to do the same thing for your SSH keys:

    rm /etc/ssh/ssh_host_* && dpkg-reconfigure openssh-server

    Now let’s be sure Asterisk is up and running. Then you can continue your adventure using a web browser and the FreePBX GUI. Before we switch, start up the Asterisk CLI: asterisk -rvvvvvvvvvv. Verify that Flite is functioning for TTS: core show application like flite. And make sure the MySQL components are in place to support CDR reporting: module show like mysql. Finally, let’s verify that Jabber is alive and well even though we haven’t set up any Google Voice accounts yet: jabber show connections.

    Finally, a few words of warning about security. Incredible Pi is designed to run behind a hardware-based firewall with no Internet exposure to the server itself. Don’t cheat! Prior to the 1.2 release, there are no security mechanisms in place: no IPtables firewall and no Fail2Ban. Beginning with Incredible Pi 1.2, the Linux firewall (iptables) is included, but our recommendation still stands unless you are using the preinstalled Travelin’ Man 3 to enable access of a remote phone connection to your PBX.

    All builds do include Suhosin which has been properly configured to facilitate use of phpMyAdmin with MySQL. Within FreePBX, you can secure extensions with strong passwords and IP address filtering, and you need to do that. Exposing Incredible Pi‘s web server to Internet access would be an open invitation to an expensive phone bill. Don’t do it! You’ve been warned.

    Securing Incredible Pi with Travelin’ Man 3

    Travelin’ Man 3 is a collection of programs that implement firewall whitelists (safe IP addresses) using the Linux firewall, iptables. Before you ever expose your server to any kind of Internet access, read the Nerd Vittles Travelin’ Man 3 article. As delivered with Incredible Pi 1.2 and later, iptables is configured to block all access to your server except from non-routable IP addresses (typically used on LANs sitting behind hardware-based firewalls). The one exception is SIP and IAX access from VoIP Trusted Providers. This allows you to add trunks to your server from these providers without touching your firewall settings.

    There are instances in which you may actually need to connect your server from a public Internet site. For example, if you travel for a living and want to use a softphone connected back to your server from a distant hotel room or customer site, you would need access through both your hardware-based firewall and iptables. If one of your children is away at school and needs a free telephone connection, this might also warrant a change in your firewalls. Because of the low cost of a Raspberry Pi, we still believe AND RECOMMEND that you use separate servers to meet remote requirements.

    If you still believe remote access is necessary after reading the Travelin’ Man 3 article, then the tools are available by logging into your Incredible Pi server as root and changing to the /root directory. Here are the four apps:

    For whiz kids only, Debian manages iptables quite differently than what you may be accustomed to on the CentOS platform. Debian stores iptables rules in /etc/network/iptables. You can reload the iptables rules like this: iptables-restore /etc/network/iptables. And you can display the rules currently in effect like this: iptables-save. Be careful!


    Configuring Incredible Pi with FreePBX

    Now we’re ready to configure Incredible Pi so that you can start making and receiving calls. We’ll be using the FreePBX web GUI. To begin, using a browser on your desktop, access Incredible Pi by pointing to the IP address of your server (that you wrote down above). Choose FreePBX Administration at the main menu. When prompted for your username and password, enter admin for both.

    If you’re new to Asterisk, here’s the one paragraph primer on what needs to happen before you can make free calls with Google Voice. You’ll obviously need a free Google Voice account. This gets you a phone number for people to call you and a vehicle to place calls to plain old telephones throughout the U.S. and Canada at no cost. You’ll also need a softphone or SIP phone to actually place and receive calls. YATE makes a free softphone for PCs, Macs, and Linux machines so download your favorite and install it on your desktop. Phones connect to extensions in FreePBX to work with Incredible Pi. Extensions talk to trunks (like Google Voice) to make and receive calls. FreePBX uses outbound routes to direct outgoing calls from extensions to trunks, and FreePBX uses inbound routes to route incoming calls from trunks to extensions to make your phones ring. In a nutshell, that’s how a PBX works. There are lots of bells and whistles that we will cover later.

    Before you do anything else, change your admin password to access FreePBX. From the main FreePBX GUI, choose Admin => Administrators. Next, set your default email address at the bottom of Settings -> General Settings.

    So here’s our 7-Step Checklist to set things up. After you complete these steps, you can start making free calls throughout the U.S. and Canada. And people can call you using your new Google Voice number.

    1. Create a free Google Voice account
    2. Set up Extension to connect to softphone
    3. Create a Google Voice Trunk using GV credentials
    4. Create an Inbound Route from Google Voice to Extension
    5. Create an Outbound Route from Extension to Google Voice
    6. Download and Configure YATE softphone
    7. Make Your First Call

    Creating a Free Google Voice Account

    You’ll need a dedicated Google Voice account to support Incredible Pi. The more obscure the username (with some embedded numbers), the better off you will be. This will keep folks from bombarding you with unsolicited Gtalk chat messages, and who knows what nefarious scheme will be discovered using Google messaging six months from now. So keep this account a secret!

    We’ve tested this extensively using an existing Gmail account, and inbound calling is just not reliable. The reason seems to be that Google always chooses Gmail chat as the inbound call destination if there are multiple registrations from the same IP address. So, be reasonable. Do it our way! Set up a dedicated Gmail and Google Voice account, and use it exclusively with Incredible Pi. Google Voice no longer is by invitation only so, if you’re in the U.S. or have a friend that is, head over to the Google Voice site and register. Don’t use funky characters in your Google password! If you’re living on another continent, see MisterQ’s posting for some setup tips.

    You must choose a telephone number (aka DID) for your new account, or Google Voice calling will not work… in either direction. Google used to permit outbound Gtalk calls using a fake CallerID, but that obviously led to abuse so it’s over! You also have to tie your Google Voice account to at least one working phone number as part of the initial setup process. Your cellphone number will work just fine. Don’t skip this step either. Just enter the provided 2-digit confirmation code when you tell Google to place the test call to the phone number you entered. Once the number is registered, you can disable it if you’d like in Settings, Voice Setting, Phones. But…

    IMPORTANT: Be sure to enable the Google Chat option as one of your phone destinations in Settings, Voice Setting, Phones. That’s the destination we need for Incredible Pi to work its magic! Otherwise, all inbound and outbound calls will fail. If you don’t see this option, you may need to call up Gmail and enable Google Chat there first. Then go back to the Google Voice Settings.

    While you’re still in Google Voice Settings, click on the Calls tab. Make sure your settings match these:

    • Call ScreeningOFF
    • Call PresentationOFF
    • Caller ID (In)Display Caller’s Number
    • Caller ID (Out)Don’t Change Anything
    • Do Not DisturbOFF
    • Call Options (Enable Recording)OFF
    • Global Spam FilteringON

    Click Save Changes once you adjust your settings. Under the Voicemail tab, plug in your email address so you get notified of new voicemails. Down the road, receipt of a Google Voice voicemail will be a big hint that something has come unglued with Incredible Pi.

    Configuring an Extension to Use with a SIP Phone

    As mentioned, an Extension is the component in FreePBX that actually interfaces with a telephone. Whether to use a hardware-based phone or a softphone is your choice. Without an adapter, POTS phones won’t work with Incredible Pi. You’ll need a SIP phone. We’ll set up a softphone today to get you started, but first we need to configure an extension in FreePBX. We’ve actually made one for you to use, extension 701. So, rather than create a new one, let’s just modify the one that’s already in place. You can add additional extensions later to support additional phones.

    From the main FreePBX GUI, choose Applications -> Extensions. Then click on 701 in the Extension List on the right side of your display. You’ll see a form that looks like this:

    For now, we only need to make a few changes. First, you need a very secure password for both the extension itself and your voicemail account for this extension. The extension secret needs to be a combination of letters and numbers. The Voicemail Password needs to be all numbers, preferably six or more. Replace the existing 1234secret and 1234 with your own (very secure) entries. You also need to lock down this extension so that it is only accessible from devices on your private LAN. You do that with the deny and permit entries which currently are filled with zeroes. Leave the deny entry the way it is which tells Incredible Pi to block everybody except those allowed in the permit entry below. For the permit, we need the first three octets of your private LAN address, e.g. if your LAN is 192.168.0.something then the permit entry will be 192.168.0.0/255.255.255.0.

    Finally, you need to plug in your actual email address in the Voicemail section so that voicemails can be delivered to you when someone leaves a message. You can also include a pager email address if you want a text message alert with incoming voicemails. If you want the voicemails to automatically be deleted from the server after they are emailed to you (a good idea considering the disk storage limitations of an SDHC card), change the Delete Voicemail option from No to Yes. That’s it. Now save your settings by clicking the Submit button. Then reload the dialplan by clicking on the red prompt when it appears.

    In case you’re curious, unless you’ve chosen to automatically delete voicemails after emailing them, you can retrieve your voicemails by dialing *98701 from any extension on your phone system. You’ll be prompted to enter the voicemail password you set up. In addition to managing your voicemails, you’ll also be given the opportunity to either return the call to the number of the person that called or to transfer the voicemail to another extension’s voicemail box. And you can always leave a voicemail for someone by dialing their extension number preceded by an asterisk, e.g. *701 would let someone leave you a voicemail without actually calling you.

    Activating a Google Voice Trunk in FreePBX

    To create a Trunk in FreePBX to handle calls to and from Google Voice, you’ll need three pieces of information for the Google Voice account you set up above: the 10-digit Google Voice phone number, your Google Voice account name, and your Google Voice password. Once you have these in hand, choose Other -> Google Voice from the FreePBX GUI. The following blank form will appear:

    Fill in the blanks with your information and check all 3 boxes. If your Google Voice account name ends in @gmail.com, you can leave that out. Otherwise, include the full email address. Then click Submit Changes and reload your dialplan when prompted.

    There’s one more step or your Google Voice account won’t work reliably with Incredible Pi! From the Linux command prompt while logged into your server as root, restart Asterisk: amportal restart

    Creating an Inbound Route for Your Google Voice Trunk

    Now that you’ve created your Google Voice Trunk, we need to tell FreePBX how to process the call when someone dials your Google Voice number. There are any number of choices. You could simply ring an extension. Or you could ring multiple extensions by first creating a Ring Group which is just a list of extension numbers. Or you could direct incoming calls to an Interactive Voice Response (IVR) system (we’ve actually set one up for you to play with). For the time being and since you only have one extension at the moment, let’s just route incoming Google Voice calls to extension 701.

    To do this, you create an Inbound Route based upon the DID (phone number) of the Google Voice trunk. In FreePBX, choose Connectivity -> Inbound Routes. Fill in the form so that it looks like the example below using your own 10-digit Google Voice description and number instead of Atlanta GV and 6781234567. Be sure to set the Destination.

    Then click Submit. But, before you reload the dialplan, make one change to the form. Click on the CID Lookup Source pull-down menu and choose CallerID Superfecta. This tells FreePBX to actually add names to phone numbers when someone calls. Now click Submit again and reload the dialplan when prompted.

    Creating an Outbound Route for Google Voice Calls

    FreePBX is actually smart enough to create an outbound route for your new Google Voice trunk so that you can place calls from any extension by dialing either a 10-digit number or 1 plus a 10-digit number to call anyone in the U.S. or Canada. If that’s all you care about, you can skip to the next section. But there’s more.

    You can have more than one Google Voice trunk with Incredible Pi, and each one could be in a different area code. For example, you may do business in many different places and would like a local number for folks to call. Or Grandma may live in a distant city, and you’d like her to be able to call you without paying long distance charges. Then there are the kids. If you have three, you might want to give each of them their own Google Voice number which would ring just their phone. And, for outbound calls, you’d like each of them to use their own Google Voice trunk. All of these options are possible with Incredible Pi.

    For outbound calls with multiple Google Voice trunks, you need a way to tell the system which trunk to use. We recommend dial prefixes that identify the city of the trunk, e.g. ATL, NYC, MIA. Or, for the kids, a dial prefix made up of initials, e.g. KHM, RWM, JSM. These dial prefixes get stripped off before the call is actually placed so the prefix is only used to determine the trunk used for placing the call.

    To implement dial prefixes, you’ll need to adjust the default entries for your Google Voice Outbound Routes by adding the prefix option as an additional Dial Pattern. Here’s an example using an Atlanta Google Voice trunk where we want to allow a prefix of ATL-XXX-XXX-XXXX to force a call to go out on the Atlanta Google Voice trunk:

    Another option may be appealing if you happen to make a lot of international calls and don’t want to pay for them. First, you can read all about iNum calling in this Nerd Vittles article. Another hidden feature in Google Voice is the ability to place iNum calls worldwide at no cost. To implement this, you’ll need to add another Dial Pattern to your Google Voice trunk. Prepend: 8835100 with Match Pattern: XXXXXXXX. Now you can dial iNum DIDs by dialing just the last 8 digits using any phone on your server. For example, try out the Nerd Vittles’ Dictionary Demo by calling 09901997. There also are a huge number of iNum Access Numbers that will let you call back to your server or any other iNum DID from almost anywhere in the world at no cost. These are covered in the Nerd Vittles article as well.

    Configuring a YATE Softphone

    As we mentioned, the easiest way to get started with Incredible Pi is to set up a YATE softphone on your Desktop computer. Versions are available at no cost for Macs, PCs, and Linux machines. Just download the appropriate one and install it from this link. Once installed, it’s a simple matter to plug in your extension 701 credentials and start making calls. Run the application and choose Settings -> Accounts and click the New button. Fill in the blanks using the IP address of Incredible Pi, 701 for your account name, and whatever password you created for the extension. Click OK.

    Once you are registered to extension 701, close the Account window. Then click on YATE’s Telephony Tab and place your first call. It’s that easy!

    Configuring Email Messaging

    Incredible Pi comes preconfigured with SendMail to provide reliable delivery of outbound email messages. You can test it by logging in and issuing the following command using your own email address instead of yourname@gmail.com:

    echo "test" | mail -s testmessage yourname@gmail.com

    If you don’t receive the message, chances are that your Internet Service Provider blocks downstream mail servers from sending email to reduce spam. To fix it, the simplest way is to configure SendMail to use your ISP as the smart relay host for outbound mail, e.g. with Comcast, it’s smtp.comcast.net. It takes about 10 seconds to configure. After logging in as root, edit /etc/mail/sendmail.cf. Change line 116 from DS to DSsmtp.comcast.net using the SMTP gateway domain of your ISP. Save your change and restart SendMail: service sendmail restart. Then send another test message to make sure it works. If that fails, you can use Gmail as the mail relay. Here’s how. Now voicemail messages delivered directly to any email account by inserting your email address in the Voicemail section of the extension accepting your voicemail messages.

    Configuring SMS Messaging

    Incredible Pi also allows you to dictate messages and deliver them to any phone which accepts SMS messages. Just dial S-M-S (767) from any extension on your server. In addition, you can use Incredible Pi’s Message Blaster to send SMS messages to a group of individuals, e.g. a Little League team. In order to use SMS messaging, you must have at least one Google Voice account configured on your server. Then it’s a simple matter of inserting your Google Voice account name and password in two files. First, edit extensions_custom.conf in /etc/asterisk. On the second line of the 767 extension, replace acctname with your Google Voice account name (without @gmail.com). On the third line, replace acctpass with your Google Voice password for this account. Reload your dialplan to activate the new settings:

    asterisk -rx "dialplan reload"

    For the message blasting service, change to the /root directory. Insert the numbers to be dialed in the smslist.txt file following the example in the file. Enter the SMS message to be sent in smsmsg.txt keeping in mind that many phone providers limit SMS messages to 140 characters or less. Finally, insert your Google Voice account name (with @gmail.com) and password in smsblast. To kick off an SMS message blast, just issue the command: ./smsblast.

    Configuring SAMBA for Windows Networking Support

    Beginning with Incredible Pi 1.4, SAMBA is included in the distribution for transparent access using the Windows Networking Protocol from PCs, Macs, and other Linux machines. As delivered, SAMBA is deactivated. For obvious reasons, we recommend you never activate root login access to SAMBA. If you wish to enable SAMBA on your server, here are the steps while logged in as root:

    • 1. Set SAMBA password for user pi: smbpasswd -a pi
    • 2. Change Windows workgroup from WORKGROUP, if needed: nano -w /etc/samba/smb.conf
    • 3. Manually start SAMBA from command prompt: service samba start
    • 4. Set SAMBA to start on boot: rcconf and activate SAMBA option with space bar
    • 5. reboot

    A Word of Warning: We’ve apparently reached the end of Memory Lane with SAMBA. Only activate it permanently (#4) after thoroughly testing it (#3) in your environment. We have found TTS IVRs in particular to be less than stable with SAMBA running.

    Troubleshooting Audio Problems with Phone Calls

    For most good routers/firewalls, there should be no problems connecting calls with Google Voice or SIP calls inbound or outbound. If you place a call and the audio is missing in one or both directions or your end of the call continues to ring even after the other person has answered, these are telltale signs of NAT and RTP connection issues. The quick fix is to plug in your public IP address and private LAN information under Settings -> Asterisk SIP Settings -> NAT Settings in FreePBX. If you continue to have connectivity issues, post the symptoms of your problem on the PIAF Forum and one of our helpful gurus will offer additional suggestions. Be sure to include the make and model of your router/firewall.

    Using AsteriDex

    Incredible Pi includes a robust phonebook application that uses MySQL for storage. You can access it with a browser by pointing to the following link using the IP address of your own server: http://192.168.0.185/asteridex4. Some entries for your favorite airlines are included to get you started. You can add, change, and delete entries under the Admin panel.

    By dialing 411 from any phone on your system, you can speak the name of any entry in your AsteriDex database, and Incredible Pi will look up the name and dial the number. Try American Airlines just for fun.

    Managing CallerID Superfecta

    What began with our first release of CallerID Trifecta many years ago now has grown into one of the best examples of collaborative computing in the open source community. Maintained by the PBX Open Source Software Alliance, CallerID Superfecta now performs a number of functions in addition to matching names against phone numbers. Today you can display incoming call alerts and pop-ups on all sorts of devices in your home or office including XBMC, SqueezeBox, Winunciator, and many more. You can tailor CallerID Superfecta to meet your own local needs by opening the Default Superfecta tab under Other -> CallerID Superfecta in FreePBX. As with all database lookups, they take time. So keep in mind that you are trying to find the best match for inbound calls that takes the least time to retrieve corresponding CNAM information for the caller. To facilitate your search for the perfect combination, CallerID Superfecta includes a testing facility which will report the time required for each lookup. Then you can sort your lookup sources accordingly. To follow the latest developments, visit this thread on the PIAF Forums.

    Adding Wireless Network Support

    Particularly with a device the size of the Raspberry Pi, you may find it more convenient to place the unit on a bookshelf where a wired network connection is not feasible. This setup already is included in Incredible Pi 1.1 and later. For those using the 1.0 release, here’s how to use your Raspberry Pi wirelessly. First, order a TP-Link TL-WN722N USB 802.11n WiFi Adapter from Amazon for under $20. You won’t need a USB extender cable. This device can easily be plugged into one of the two USB slots without jeopardizing your ability to also connect a USB keyboard. Be sure your 5V power adapter is rated at 1.2 amps or greater to avoid lockups!2

    We recommend the 1.3 Incredible Pi release or later if you plan to go the wireless route. All of the wireless networking components already are in place. Log into Incredible Pi as root (or su root for purists) and edit /etc/wpa.conf. Insert the SSID name and password for your wireless access point. Then reboot your server and wireless networking "just works."

    Beginning with the 1.3 release, support has been added for the ultra-tiny AirLink 101 Wireless N adapter (AWLL5088). The setup process is identical to the 1.1 setup above. Just edit /etc/wpa.conf and insert the SSID name and password for your wireless access point. We strongly recommend disabling network connections that you aren’t using, e.g. eth0 and wlan0 if you go the AirLink 101 route. Just edit /etc/network/interfaces and comment out the eth0 line as well as the block of commands pertaining to wlan0. Then reboot, a process that now will be much quicker. If you plug in earbuds when you reboot, Incredible Pi 1.3 or later will read you the DHCP-assigned IP address when the boot process finishes so you no longer need a monitor. SSH can be used to connect to your server from any desktop PC or Mac.

    Adding a PPTP VPN Client to Incredible Pi

    If you’ve followed the Nerd Vittles tutorial and previously set up a PPTP VPN Server for your devices, then it’s pretty simple to add Incredible Pi to the mix by activating a PPTP VPN client. It’s only a few steps. You’ll need the FQDN or public IP address of your VPN server as well as a username and password for VPN access to your VPN server. Once you have those in hand, log into Incredible Pi as root.

    Lest we forget to mention, you cannot log into your PPTP server from an IP address on the same private LAN so you’ll need to take your Incredible Pi device to a neighbor’s house to test this.

    If you’re using Incredible Pi 1.5 or later, all of the PPTP VPN client software already is in place. Edit the connection template: nano -w /etc/ppp/peers/my-pptp-server. Insert the following text and replace myfqdn.org with the FQDN of your PPTP server, replace myname with your PPTP username, and replace mypassword with your PPTP password. Then save the file: Ctrl-X, Y, then Enter.

    Now activate the PPTP VPN client. On your Incredible Pi server, run rcconf. If you’re using a release prior to 1.4, you’ll need to install rcconf first with the command: apt-get install rcconf. Scroll to the bottom of the list until you’ve highlighted pptp. Press the space bar to select it for automatic startup when you boot your server. Then tab to OK and press Enter.

    To test it, issue the following command: /etc/init.d/pptp start. When you run ifconfig, you should now see a ppp0 entry:

    ppp0 Link encap:Point-to-Point Protocol
    UP POINTOPOINT RUNNING NOARP MULTICAST MTU:1500 Metric:1
    RX packets:0 errors:0 dropped:0 overruns:0 frame:0
    TX packets:0 errors:0 dropped:0 overruns:0 carrier:0
    collisions:0 txqueuelen:3
    RX bytes:0 (0.0 B) TX bytes:0 (0.0 B)

    Remember, it won’t show an IP address if the Raspberry Pi and your PPTP VPN Server are on the same subnet (like ours). Once you install your Raspberry Pi in a remote location, you now can access it at the first IP address in your reserved PPTP IP address pool.

    Power Adapters: The Hidden Gotcha

    We’ve learned a lot about power adapters since acquiring the Raspberry Pi. First, not all adapters are created equal. Second, the type adapter you require depends upon what you’ve plugged into those USB ports. If one of the residents is a WiFi adapter, then the power draw of the WiFi adapter can add an additional wrinkle.

    Here’s what we’ve found. If you decide to use the TP-Link TL-WN722N adapter, you’ll need a power adapter rated for at least 5V, 1.2 amps. These are few and far between and many adapters rated at even higher amperages (and not U/L approved) still won’t keep your RasPi from crashing regularly. We have had good results with $9.99 RND Power Solutions 2.1A Dual USB AC Adapter so long as you use the USB port closest to the red light and leave the second USB unoccupied.

    If you use the AirLink 101 WiFi adapter or no WiFi adapter, then a less expensive 5V, 1A adapter may suffice. They’re typically about half the price, but some users have reported issues. For testing results and details, see this thread.

    We’ve tested these adapters, and they both work. We can also count on both hands the number of adapters we tested that fail to keep the Raspberry Pi functioning. If you have a 1.2+ amp adapter from a reputable tablet computer, that will probably work as well. These replacement adapters tend to cost $25 or more. So the choice is yours. If your Raspberry Pi experiences frequent lockups, then an underperforming power adapter is the likely culprit, not the Raspberry Pi itself.

    VoIP Redundancy: Use It to Your Advantage

    As much as we love Google Voice, things do go wrong from time to time. The real beauty of VoIP telephony is there’s absolutely no reason to put all of your eggs in one basket. Multiple providers don’t cost you much particularly if you don’t use them regularly. And, when things go wrong, you won’t have to scramble to continue making phone calls. Vitelity has been a generous, long-term supporter of Nerd Vittles and our projects. You’ll find a compelling offer below, and we encourage you to consider them. Here’s the Incredible PBX Top 20 Trunk List with some reasons why these providers made our short list:

    • AxVoice ($14.99/mo. Business Plan; $16.58/mo. Unlimited Calls to 45 Countries)
    • CallCentric (Good International Calling Rates; Free iNum DID)
    • DIDforSale (20 channels per DID; unlimited DID calls for $8.99/mo.)
    • ENUM
    • FlowRoute (Good International Calling Rates)
    • FreeNum
    • Future-Nine (Supports CallerID Spoofing)
    • Google Voice (Free DIDs and free U.S./Canada calling)
    • IPkall (Free SIP/IAX DIDs)
    • Les.net (Supports CallerID Spoofing; very low rates)
    • LocalPhone (Dirt-cheap DIDs and calling rates worldwide; Free iNum DID)
    • Simon Telephonics (Free SIP-to-GoogleVoice Gateway)
    • SIPgate (Free residential DIDs sometimes)
    • Skype (Free Skype-to-Skype calls worldwide)
    • Teliax (Unlimited inbound DID $5/mo.)
    • Vitelity (Our supporter and the Best in the Business!)
    • VoIPms (CallerID spoofing; Free iNum calling; Very low rates)
    • VoIPMyWay (Residential Unlimited: $15.50/mo. Business Unlimited: $40/mo.)
    • VoIPStreet (Free DID)

    Making Backups of Incredible Pi

    Last, but not least, you’ll need to make periodic backups of your Incredible Pi system unless you don’t mind starting over when disaster strikes. It’s easy using almost any Linux server, and it’s especially easy with a PBX in a Flash server.

    To begin, shutdown your Incredible Pi server gracefully: sudo shutdown -h now. Once the display shows that the system has halted, unplug it and remove the SDHC card. Then insert the SDHC card into the slot or reader on your PIAF system and reboot the server. Log into your server as root and issue the fdisk -l command to decipher the devname of your SDHC disk, e.g. /dev/sdb. To make a backup of your SDHC card, issue the following commands using today’s date and the proper devname for your SDHC drive:

    dd if=/dev/sdb of=/root/incrediblepi-08-20-2012.img
    sync
    gzip /root/incrediblepi-08-20-2012.img

    When the process is finished, you’ll have a compressed image roughly one-third the size of your SDHC card.

    Firmware and Kernel Updates

    Only after making a backup, you may find it helpful to upgrade your Raspberry Pi firmware and kernel from time to time. Releases of Incredible Pi below 1.4 do not have the firmware updating tool in place. So you’ll first have to install it. Log into your server as root and issue these commands:

    wget http://goo.gl/1BOfJ -O /usr/bin/rpi-update
    chmod +x /usr/bin/rpi-update

    You can decipher the kernel currently running on your Raspberry Pi by issuing the command: uname -a

    To determine GPU’s firmware version, issue the command: /opt/vc/bin/vcgencmd version

    Once the updater has been installed (and after you’ve made a backup!), you can update your Raspberry Pi’s kernel and firmware to the latest and greatest by issuing the following commands while logged in as root. The latest kernel addresses some issues with the USB ports and is worth installing: raspberrypi 3.2.27+ #66 PREEMPT Fri Aug 24 with GPU firmware version 332937.
    rpi-update
    reboot


    Don’t forget to List Yourself in Directory Assistance so everyone can find you by dialing 411. And add your new number to the Do Not Call Registry to block telemarketing calls. Or just call 888-382-1222 from your new number.

    Originally published: Monday, August 20, 2012

    Continue Reading… Incredible PBX for Raspberry Pi Turns 21


    Support Issues. With any application as sophisticated as this one, you’re bound to have questions. Blog comments are a terrible place to handle support issues although we welcome general comments about our articles and software. If you have particular support issues, we encourage you to get actively involved in the PBX in a Flash Forums. It’s the best Asterisk tech support site in the business, and it’s all free! In fact, there is a thread dedicated to support of Incredible Pi. Please have a look and post your support questions there. Unlike some forums, ours is extremely friendly and is supported by literally hundreds of Asterisk gurus and thousands of ordinary users just like you. You won’t have to wait long for an answer to your question.

    Bug Fixes. A few bugs are to be expected. If you’re using Incredible Pi, please review these on the PIAF Forum. A serious problem with IPtables has now been fixed in Incredible Pi 1.5. A patch for previous versions is on the forum.


    Astricon 2012. Astricon 2012 will be in Atlanta at the Sheraton beginning October 23 through October 25. We hope to see many of you there. We called Atlanta home for over 25 years so we’d love to show you around. Be sure to tug on my sleeve and mention you’d like a free PIAF Thumb Drive. We’ll have a bunch of them to pass out to our loyal supporters. Nerd Vittles readers also can save 20% on your registration by using coupon code: AC12VIT.


    Need help with Asterisk? Visit the PBX in a Flash Forum.


    whos.amung.us If you’re wondering what your fellow man is reading on Nerd Vittles these days, wonder no more. Visit our new whos.amung.us statistical web site and check out what’s happening. It’s a terrific resource both for us and for you.


    Special Thanks to Our Generous Sponsors


    FULL DISCLOSURE: ClearlyIP, Skyetel, Vitelity, DigitalOcean, Vultr, VoIP.ms, 3CX, Sangoma, TelecomsXchange and VitalPBX have provided financial support to Nerd Vittles and our open source projects through advertising, referral revenue, and/or merchandise. As an Amazon Associate and Best Buy Affiliate, we also earn from qualifying purchases. We’ve chosen these providers not the other way around. Our decisions are based upon their corporate reputation and the quality of their offerings and pricing. Our recommendations regarding technology are reached without regard to financial compensation except in situations in which comparable products at comparable pricing are available from multiple sources. In this limited case, we support our sponsors because our sponsors support us.

    BOGO Bonaza: Enjoy state-of-the-art VoIP service with a $10 credit and half-price SIP service on up to $500 of Skyetel trunking with free number porting when you fund your Skyetel account. No limits on number of simultaneous calls. Quadruple data center redundancy. $25 monthly minimum spend required. Tutorial and sign up details are here.

    The lynchpin of Incredible PBX 2020 and beyond is ClearlyIP components which bring management of FreePBX modules and SIP phone integration to a level never before available with any other Asterisk distribution. And now you can configure and reconfigure your new Incredible PBX phones from the convenience of the Incredible PBX GUI.

    VitalPBX is perhaps the fastest-growing PBX offering based upon Asterisk with an installed presence in more than 100 countries worldwide. VitalPBX has generously provided a customized White Label version of Incredible PBX tailored for use with all Incredible PBX and VitalPBX custom applications. Follow this link for a free test drive!
     

    Special Thanks to Vitelity. Vitelity is now Voyant Communications and has halted new registrations for the time being. Our special thanks to Vitelity for their unwavering financial support over many years and to the many Nerd Vittles readers who continue to enjoy the benefits of their service offerings. We will keep everyone posted on further developments.


    Some Recent Nerd Vittles Articles of Interest…

    1. DISCLOSURE: Most Amazon referral links include a Nerd Vittles referral code so that Amazon can send us a boatload of money each month. It costs you nothing while keeping the Nerd Vittles lights burning brightly. We never recommend Amazon unless their prices or products are the best we could find at the time of publication. []
    2. The TP-Link adapter is no longer recommended due to it substantial USB power requirements. We recommend the AirLink 101 which can coexist with a 5V, 1A power supply. You must use Incredible Pi 1.3 or later. []

    Speech-to-Text Directory Assistance Comes to Asterisk

    Since the invention of the telephone, the most critical component has been the ability to match people's names to their phone numbers. Ma Bell did this with live operators (including my aunt) for many years. Then came automated lookups where you called a number for directory assistance and actually spoke the name of the person you wished to call. A computer then converted your speech to text and looked up the number in a database. Typically, the number was spoken back to the caller who then could place the call. Or "for a few cents more" the lookup service would actually place the call for you. For the learning impaired, this became a godsend when many metropolitan areas switched to 10-digit dialing.

    Today, we'll show you how trivial it is to implement this yourself on any Asterisk® server using Google's new (free) speech-to-text web service which we introduced a few weeks ago. It's a 2-minute drill using PBX in a Flash™ with Incredible PBX™ and Google's Speech-to-Text web service. We'll be using a MySQL database to demonstrate the concept today, but it easily could be tweaked for use with any ODBC-compatible database. ODBC demos are included in Incredible PBX by dialing 222 or 223.

    Many years ago we demonstrated how to quickly place calls to your friends by dialing the first three letters in their names with any phone connected to your Asterisk server using our freely available AsteriDex™ database. This has been incorporated into Incredible PBX by dialing 412 from phones connected to your PBX in a Flash server. Thanks to Google's new (free) speech-to-text web service, today we'll show you how trivial it is to tweak that application to replace 3-letter calling with spoken names of people to call with Asterisk. When you're finished, you'll be able to pick up any phone on your Asterisk server, dial 4-1-2, speak the name of an individual or company in your AsteriDex database, and have Asterisk automatically place the call for you.

    Legal Disclaimer. What we're demonstrating today is how to use a publicly accessible web resource to respond to queries using a phone connected to your Asterisk server. We're assuming that Google has its legal bases covered and has a right to provide the public service they are offering. We are not vouching for Google or the services being offered in any way. By using our tutorial, YOU AGREE TO ASSUME ALL RISKS, LEGAL AND OTHERWISE, ASSOCIATED WITH USE OF THIS FREELY ACCESSIBLE WEB TOOL. NO WARRANTY EXPRESS OR IMPLIED IS BEING PROVIDED BY US INCLUDING ANY IMPLIED WARRANTY OF FITNESS FOR USE OR MERCHANTABILITY. You, of course, have an absolute right not to read our articles or implement our code if you have reservations of any kind or are unwilling to assume all risks associated with such use. Sorry for legalese, but it's the time in which we live I'm afraid. Plain English: "Don't Shoot the Messenger!"

    Prerequisites. The easiest setup for this is a new PIAF2™ server. Once you have it running, install Incredible PBX 3 by logging into your server as root and issuing the command: install-incredpbx3. For complete instructions on Incredible PBX 3, here's the link to the Nerd Vittles tutorial. If you'd prefer not to go the Incredible route, then simply install AsteriDex 4 and then add the CallWho extension. Finally, you'll need to run the Wolfram Alpha for Asterisk one-click installer. This gets Google's speech-to-text components installed on your server. Now you're ready to tweak the CallWho app to use speech-to-text lookups through Google instead of 3-letter dialing.

    Editing nv-callwho.php. Log in as root and edit nv-callwho.php in /var/lib/asterisk/agi-bin:

    cd /var/lib/asterisk/agi-bin
    nano -w nv-callwho.php

    Press Ctrl-W. Search for where dialcode =. Replace it with where name =.

    Now save the file with the change: Ctrl-X, Y, then press Enter.

    If you'd prefer to use the latest, greatest (preconfigured) version, ignore the above and issue the following commands instead:

    cd /var/lib/asterisk/agi-bin
    wget http://nerd.bz/xnyJR3
    tar zxvf callwho21.tgz
    rm callwho21.tgz

    Tweaking Your Custom Dialplan. While still logged in as root, you'll also need to edit extensions_custom.conf in /etc/asterisk:

    cd /etc/asterisk
    nano -w extensions_custom.conf

    Press Ctrl-W. Search for 412. Now scroll down to the following lines:

    exten => 412,9,Read(DIALCODE,beep,3)
    exten => 412,10,NoOp(Name lookup: ${DIALCODE})
    exten => 412,11,AGI(nv-callwho.php,${DIALCODE})

    You'll want to replace those lines with the following 3 lines with no word wrap:

    exten => 412,9(record),agi(speech-recog.agi,en-US)
    exten => 412,10,Noop(= Script returned: ${status} , ${id} , ${confidence} , ${utterance} =)
    exten => 412,11,AGI(nv-callwho.php,${utterance})

    Finally, you'll want to adjust the spoken prompts in lines 412,6 and 412,8 to say something like this: "At the beep say the name of the person or company you wish to call. Then press the pound key."

    Now save the file with your changes: Ctrl-X, Y, then press Enter

    Finally, reload your Asterisk dialplan: asterisk -rx "dialplan reload"

    Test Drive. To test things out, pick up a phone connected to your Asterisk server and dial 412. When prompted for the person or company to call, say "American Airlines" and then press the pound key.

    Tweaking AsteriDex. You may need to make some minor adjustments to entries in your AsteriDex database to accommodate speech-to-text queries. For example, the sample entries include American Airlines and Delta Air Lines. Google translates the spoken words "air lines" as "airlines" so you'll need to modify the Delta entry, or it won't find a match. Similarly, there's a sample entry for "Emery Worldwide" but Google translates the spoken words as "emory worldwide." While capitalization doesn't matter, emory will not match emery. But, with a little tweaking, you'll have a very impressive, homegrown directory assistance service to impress all of your Friends and Family™. Enjoy!

    Fuzzy Search Update. After we went to press, one of our favorite pundits on the PIAF Forum suggested that perhaps implementing fuzzy logic searches with MySQL would improve results, particularly with proper names. Great idea! It solved both the Delta Air Lines and Emery Worldwide lookup issues. And it turned out it was incredibly simple to implement. All that was required was replacing the existing $query command in nv-callwho.php (as explained above) with the following. This now has been incorporated into the preconfigured AGI script which is available for download above.

    $query = "SELECT * FROM user1 where strcmp(soundex(name), soundex('$dialcode')) = 0";

    For additional enhancements, see this thread on the PIAF Forum.

    Asterisk TTS Bug. Be advised that certain newer releases of Asterisk have a text-to-speech bug which abnormally terminates TTS messages that have an embedded comma. If you have stored names in AsteriDex using Lastname, Firstname format, this may pose a problem. The simple solution is to either remove the commas or change them to periods. In the alternative, you can add the following line of code immediately below all existing lines of code beginning with $msg in nv-callwho.php. This, too, has been incorporated into the preconfigured AGI script above.

    $msg = str_replace( ",", ".", $msg );

    Originally published: Monday, January 30, 2012


    Support Issues. With any application as sophisticated as Asterisk, you're bound to have questions. Blog comments are a terrible place to handle support issues although we welcome general comments about our articles and software. If you have particular support issues, we encourage you to get actively involved in the PBX in a Flash Forums. It's the best Asterisk tech support site in the business, and it's all free! We maintain a thread with Information, Patches and Bug Fixes for Incredible PBX. Please have a look. Unlike some forums, ours is extremely friendly and is supported by literally hundreds of Asterisk gurus and thousands of ordinary users just like you. You won't have to wait long for an answer to your question.


    Special Thanks to Our Generous Sponsors


    FULL DISCLOSURE: ClearlyIP, Skyetel, Vitelity, DigitalOcean, Vultr, VoIP.ms, 3CX, Sangoma, TelecomsXchange and VitalPBX have provided financial support to Nerd Vittles and our open source projects through advertising, referral revenue, and/or merchandise. As an Amazon Associate and Best Buy Affiliate, we also earn from qualifying purchases. We’ve chosen these providers not the other way around. Our decisions are based upon their corporate reputation and the quality of their offerings and pricing. Our recommendations regarding technology are reached without regard to financial compensation except in situations in which comparable products at comparable pricing are available from multiple sources. In this limited case, we support our sponsors because our sponsors support us.

    BOGO Bonaza: Enjoy state-of-the-art VoIP service with a $10 credit and half-price SIP service on up to $500 of Skyetel trunking with free number porting when you fund your Skyetel account. No limits on number of simultaneous calls. Quadruple data center redundancy. $25 monthly minimum spend required. Tutorial and sign up details are here.

    The lynchpin of Incredible PBX 2020 and beyond is ClearlyIP components which bring management of FreePBX modules and SIP phone integration to a level never before available with any other Asterisk distribution. And now you can configure and reconfigure your new Incredible PBX phones from the convenience of the Incredible PBX GUI.

    VitalPBX is perhaps the fastest-growing PBX offering based upon Asterisk with an installed presence in more than 100 countries worldwide. VitalPBX has generously provided a customized White Label version of Incredible PBX tailored for use with all Incredible PBX and VitalPBX custom applications. Follow this link for a free test drive!
     

    Special Thanks to Vitelity. Vitelity is now Voyant Communications and has halted new registrations for the time being. Our special thanks to Vitelity for their unwavering financial support over many years and to the many Nerd Vittles readers who continue to enjoy the benefits of their service offerings. We will keep everyone posted on further developments.


    Siriously: It’s Wolfram Alpha for Asterisk

    Ever wished your Asterisk® server could harness the power of a 10,000 CPU Supercomputer to answer virtually any question you can dream up about the world we live in? Well, so long as it's for non-commercial use, today's your lucky day. Apple demonstrated with Siri™ just how amazing this technology can be by coupling Wolfram Alpha® to a speech-to-text engine on the iPhone 4S. And, thanks to Google's new speech transcription engine and Wolfram Alpha's API, you can do much the same thing with any Asterisk server. Today, we'll show you how.1

    We had such a good name for this project, Iris, which is Siri spelled backwards. You know the backwards sister and all of that. Unfortunately, the new (similar) product for Android phones was named Iris two months ago. And we didn't want to be like Larry on Newhart with two brothers named Darryl. So... we give you 4747. You can figure it out from there.

    When people ask what exactly Wolfram Alpha is, our favorite answer was provided by Ed Borasky.

    It's an almanac driven by a supercomputer.

    That's an understatement. It's a bit like calling Google Search a topic index. Unlike Google which provides links to web sites that can provide answers to queries, Wolfram Alpha provides specific and detailed answers to almost any question. Here are a few examples (with descriptions of the functionality) to help you wrap your head around the breadth of information. For a complete list of what's available, visit Wolfram Alpha's Examples by Topic. Type a sample query here. Or call our demo line2 (1-904-339-8254 or iNum: 883510009043155) and say:

    Weather in Charleston South Carolina
    Weather forecast for Washington D.C.
    Next solar eclipse
    Otis Redding
    Define politician
    Who won the 1969 Superbowl? (Broadway Joe)
    What planes are flying overhead? (flying over your server's location)
    Ham and cheese sandwich (nutritional information)
    Holidays 2012 (summary of all holidays for 2012 with dates and DOW)
    Medical University of South Carolina (history of MUSC)
    Star Trek (show history, air dates, number of episodes, and more)
    Apollo 11 (everything you ever wanted to know)
    Cheapest Toaster (brand and price)
    Battle of Gettysburg (sad day 🙂 )
    Daylight Savings Time 2012 (date ranges and how to set your clocks)
    Tablets by Motorola (pricing, models, and specs from Best Buy)
    Doughnut (you don't wanna know)
    Snickers bar (ditto)
    Weather (local weather at your server's location)

    Best Question of the Day Award: "How much wood could a woodchuck chuck if a woodchuck could chuck wood?" And the answer: "A woodchuck would chuck all the wood he could chuck if a woodchuck could chuck wood. According to the tongue twister, although the paper 'The Ability of Woodchucks to Chuck Cellulose Fibers' by P.A. Paskevich and T.B. Shea in Annals of Improbable Research vol. 1, no. 4, pp. 4-9, July/August 1995, concluded that a woodchuck can chuck 361.9237001 cubic centimeters of wood per day."

    Implementation Overview. Today what we're going to demonstrate is how to configure your Asterisk server so that you can pick up any phone on your system, dial 4-7-4-7, speak a question, and we'll show you how to send it to Google to convert your spoken words into text. Then we'll pass that text translation to Wolfram Alpha which will provide a plain text answer to your question. Finally, we'll take that plain text and use Flite or Cepstral to deliver the results to you.

    For openers, you'll need a free Wolfram Alpha account. We'll be using PBX in a Flash 2.0.6.2.1™ to demonstrate the setup because its reliance on CentOS 6.2 provides the most complete collection of Linux utilities available. And, of course, you get unlimited, free calling within the U.S. and Canada with Google Voice as part of any PBX in a Flash install. It's certainly possible to do what we're demonstrating on other Asterisk server platforms once you get all of the dependencies resolved. But we'll leave that for the pioneers.

    Using PIAF2™, you'll need to download a new AGI script to take advantage of Google's speech transcription engine. No registration is (yet) required. Then we'll provide a simple piece of dialplan code to handle the phone conversation. Finally, we'll provide a couple of AGI scripts to tame the Wolfram Alpha interface for you. Plug in your Wolfram Alpha APP-ID, and you'll be off to the races. It's about a 15-minute project using an existing PIAF2 server. So let's get started.

    Legal Disclaimer. What we're demonstrating today is how to use two publicly accessible web resources to harness the power of a supercomputer to respond to your queries using a phone connected to an Asterisk server. We're assuming that both Google and Wolfram Alpha have their legal bases covered and have a right to provide the public services they are offering. We are not vouching for them or the services they are offering in any way. By using our scripts, YOU AGREE TO ASSUME ALL RISKS, LEGAL AND OTHERWISE, ASSOCIATED WITH USE OF THESE FREELY ACCESSIBLE WEB TOOLS. NO WARRANTY EXPRESS OR IMPLIED IS BEING PROVIDED BY US INCLUDING ANY IMPLIED WARRANTY OF FITNESS FOR USE OR MERCHANTABILITY. You, of course, have an absolute right not to use our code if you have reservations of any kind or are unwilling to assume all risks associated with such use. Sorry for legalese, but it's the time in which we live I'm afraid. Plain English: "Don't Shoot the Messenger!"

    Getting a Wolfram Alpha Account. As you can imagine, there have to be some rules when you're using someone else's supercomputer for free. So here's the deal. It's free for non-commercial, personal use once you sign up for an account. But you're limited to 2,000 queries a month which works out to almost 70 queries a day. Every query requires your personal application ID, and that's how Wolfram Alpha keeps track of your queries. Considering the price, we think you'll find the query limitation pretty generous compared to other web resources.

    To get started, sign up for a free Wolfram Alpha API account. Just provide your email address and set up a password. It takes less than a minute. Log into your account and click on Get An App ID. Make up a name for your application and write down (and keep secret) your APP-ID code. That's all there is to getting set up with Wolfram Alpha. If you want to explore costs for commercial use, there are links to let you get more information.

    One-Click Installer. If you don't care about how things work, you can skip all of the steps below and use the new one-click installer. Or you can keep reading to see what's going on. Here are the steps to use the one-click installer. Log into your server as root and issue the following commands:

    cd /root
    wget http://nerd.bz/xhUpJr
    chmod +x wolframalpha-oneclick.sh
    ./wolframalpha-oneclick.sh

    You now can skip the next four sections and dial 4-7-4-7 to try things out.

    Installing the Google Transcription AGI Script. Log into your PIAF2 server as root and issue the following commands to download and install Lefteris Zaferis' AGI script from GitHub. It's a terrific piece of code!

    cd /root
    wget --no-check-certificate http://nerd.bz/w8HCDF
    tar zxvf asterisk-speech*
    cd asterisk-speech-recog-0.4
    cp speech-recog.agi /var/lib/asterisk/agi-bin/.

    If you prefer living on the Bleeding Edge, you can download Lefteris' very latest (untested by us!) release3:

    cd /root
    wget --no-check-certificate http://nerd.bz/zA4fCB
    tar zxvf asterisk-speech*
    cd asterisk-speech-recog-0.5
    cp speech-recog.agi /var/lib/asterisk/agi-bin/.

    Installing the Wolfram Alpha Scripts. Now log into your PIAF2 server as root using SSH and issue the following commands to install the Wolfram Alpha transportation layer:

    cd /
    wget http://nerd.bz/A7umMK
    tar zxvf 4747.tgz
    cd /tmp
    cat 4747.txt

    Adding the Asterisk Dialplan Module. What is displayed on your screen at the end of the steps above will be the dialplan code that needs to be added to extensions_custom.conf in the /etc/asterisk directory. Just cut-and-paste the code and drop it into the [from-internal-custom] context. If you use nano, be sure to open the file with nano -w extensions_custom.conf to avoid problems with long lines being truncated. You'll notice that there are commented lines 3, 6, 16, and 17 to support Cepstral. If you use this commercial TTS app which now can be installed in PIAF2 with install-cepstral, then you can comment out the Flite entries and uncomment the Swift (Cepstral) entries in the dialplan code. Here's the SED alternative rather than manually updating the file with cut-and-paste:

    cd /etc/asterisk
    cp /tmp/4747.txt .
    sed -i '/\[from-internal-custom\]/r 4747.txt' extensions_custom.conf
    asterisk -rx "dialplan reload"

    If you manually edit, don't forget: asterisk -rx "dialplan reload".

    Adding Wolfram Alpha APP-ID. The final configuration step is adding your Wolfram Alpha APP-ID credentials. Issue the following commands to access the AGI script:

    cd /var/lib/asterisk/agi-bin
    nano -w 4747

    When the file opens, replace yourID between the quotes with the APP-ID that was provided to you on the Wolfram Alpha web site. Then save the file: Ctrl-X, Y, then Enter. You're done!

    Tweaking the Abbreviations List. Translating abbreviations into speech is a tricky business, and Flite and Cepstral do a pretty lousy job on some of them. We've started the beginnings of an abbreviation list which you will find in the function section of 4747.php which is stored in /var/lib/asterisk/agi-bin. It's easy to add additional entries. Just clone one of the entries that's already there. For example, here's the line that translates Jr. into Junior. HINT: Be careful to surround most unpunctuated abbreviations with spaces, or you may get unexpected results when a word actually begins or ends with the same letters.

    $response = str_replace("Jr.","junior",$response);

    Taking Wolfram Alpha for a Spin. Some sample commands have been documented above to get you started. Just pick up a phone on your PIAF2 server and dial 4747. When prompted, say one of the commands and press the pound key. Your command will be sent to Google for translation, and then the text result will be played back using Flite or Cepstral. If it says what you meant to say, press 1 to launch the Wolfram Alpha connection and get the answer to your question. If not, press * and try again.

    You also can watch the progress of your calls on the Asterisk CLI. We've found the Google speech-to-text transcription to be extremely accurate in quiet rooms. One of the variables returned in the [4747@from-internal:5] entry on the Asterisk CLI includes a transcription accuracy measurement which is shown as a decimal number less than 1. This gives you an idea of how well Google is understanding your accent. If the number consistently falls below .9, you may want to move out of the Deep South for a bit. 😉

    Originally published: Monday, January 16, 2012


    Need help with Asterisk? Visit the VoIP-info Forum.


    Special Thanks to Our Generous Sponsors


    FULL DISCLOSURE: ClearlyIP, Skyetel, Vitelity, DigitalOcean, Vultr, VoIP.ms, 3CX, Sangoma, TelecomsXchange and VitalPBX have provided financial support to Nerd Vittles and our open source projects through advertising, referral revenue, and/or merchandise. As an Amazon Associate and Best Buy Affiliate, we also earn from qualifying purchases. We’ve chosen these providers not the other way around. Our decisions are based upon their corporate reputation and the quality of their offerings and pricing. Our recommendations regarding technology are reached without regard to financial compensation except in situations in which comparable products at comparable pricing are available from multiple sources. In this limited case, we support our sponsors because our sponsors support us.

    BOGO Bonaza: Enjoy state-of-the-art VoIP service with a $10 credit and half-price SIP service on up to $500 of Skyetel trunking with free number porting when you fund your Skyetel account. No limits on number of simultaneous calls. Quadruple data center redundancy. $25 monthly minimum spend required. Tutorial and sign up details are here.

    The lynchpin of Incredible PBX 2020 and beyond is ClearlyIP components which bring management of FreePBX modules and SIP phone integration to a level never before available with any other Asterisk distribution. And now you can configure and reconfigure your new Incredible PBX phones from the convenience of the Incredible PBX GUI.

    VitalPBX is perhaps the fastest-growing PBX offering based upon Asterisk with an installed presence in more than 100 countries worldwide. VitalPBX has generously provided a customized White Label version of Incredible PBX tailored for use with all Incredible PBX and VitalPBX custom applications. Follow this link for a free test drive!
     

    Special Thanks to Vitelity. Vitelity is now Voyant Communications and has halted new registrations for the time being. Our special thanks to Vitelity for their unwavering financial support over many years and to the many Nerd Vittles readers who continue to enjoy the benefits of their service offerings. We will keep everyone posted on further developments.


    1. We want to extend a special welcome to our Hack A Day and Reddit visitors. We have new tips and tricks on VoIP technology every week. And almost half of our traffic is from returning visitors. We hope you'll join the club. Thanks for visiting. []
    2. Because of a few "special people" we've had to limit calls to one per person. You still can beat the system by calling back from a different phone. 😉 For those that are curious, this demo line is supported by Google Voice so you can check out the call quality for yourself. We alternate hosting the trunk on either an Aspire Revo or one of 10 PBX in a Flash servers running as virtual machines under Proxmox on a $500 Dell PowerEdge T310 server behind a secure, hardware-based firewall with no Internet port exposure and no ports forwarded from the firewall to the server. Dell servers go on sale about once every couple of weeks. []
    3. Version 0.5 also includes some sample Wolfram Alpha perl code that is certainly worth a look. []

    Incredible PBX 1.8: New OpenVZ and Cloud Editions

    Another exciting week in the Asterisk® community with the introduction of Asterisk 1.8.2 last Friday. It's now the official PIAF-Purple payload so you can simply download the current ISO to take it for a spin. Most of the pesky bugs in Asterisk 1.8.0 and 1.8.1 now have been addressed. Let us know if you find some new ones.

    While the Asterisk Dev Team has been hard at work on Asterisk 1.8.2, we've turned our attention to the cloud and VoIP virtualization. We have three new products to introduce today. The first lets you install PIAF-Purple with Asterisk 1.8.2 using a new OpenVZ template. The second lets you run Incredible PBX 1.8 as a virtual machine using the new PIAF-Purple 1.8.2 OpenVZ template. Finally, we'll show you how to run Incredible PBX 1.8 in the cloud with hosted VoIP service from RentPBX.com for $15 a month with a free local phone number and free Google Voice calling in the U.S. and Canada. So let's get started.

    Using the OpenVZ PIAF-Purple Template. If you haven't heard of OpenVZ templates before, you've missed one of the real technological breakthroughs of the last decade. Rather than wading through the usual 30-minute ISO installation drill, with an OpenVZ template, all of the work is done for you. And it's quick. You can build a dozen PIAF-Purple systems using an OpenVZ template in about 15 minutes with a per system cost of less than $50. See Comment #2 below for an extra special Dell half-price server deal this week. And it's incredibly easy to then tie all of these systems together using either SIP or IAX trunks. Just follow our previous tutorial. For resellers and developers that want to try various Asterisk configurations before implementation and for trainers and others that want to host dedicated Asterisk systems for customers, the OpenVZ platform is a perfect fit. Read our original two-part article to get up to speed on Proxmox, virtualization, and IPtables with OpenVZ. Then continue on here.

    Thanks to Darrell Dillman (aka dad311 on the PIAF Forums), there already is a 64-bit OpenVZ template of PIAF-Purple with Asterisk 1.8.2. Just download the template to your Desktop and then, using the Proxmox console, choose Appliance Templates, Upload File to upload the OpenVZ template into your Proxmox server platform. Once installed, you can build Asterisk 1.8.2 virtual machines to your heart's content... in less than a minute apiece. Just choose Virtual Machine, Create to create a new virtual machine using the OpenVZ template you just uploaded. In the Configuration section, choose OpenVZ for the Type and pick your new OpenVZ template from the pulldown list. Fill in a Host Name, Disk Space maximum (in GB), and (root) Password. The other defaults should be fine. In the Network section of the form, change to the Bridged Ethernet (veth) option which means the VM will obtain its IP address from your DHCP server. Make sure your DNS settings are correct for your LAN. Here's how a typical OpenVZ creation form will look:

    Once the image is created, start up the virtual machine, wait about 70 seconds for the system to load, and then click on Open VNC Console. Asterisk will be loaded and running. You can verify this on the status display. You can safely ignore the status messages pertaining to IPtables assuming iptables -nL shows that IPtables is functioning properly. With the exception of text-to-speech (TTS), you now have a PIAF-Purple base platform running Asterisk 1.8.2 and FreePBX 2.8. Be sure you always run it behind a hardware-based firewall with no port exposure to the Internet.

    Before you do anything else, run passwd-master to secure the passwords for FreePBX GUI access to your system. Don't forget!

    If you're planning to install Incredible PBX below or if you don't need text-to-speech on your system, you can skip this next step which gets 64-bit TTS installed. Otherwise, here are the commands to get it working:

    cd /root
    ./install-flite

    Note to Our Pioneers. To those that tested the new OpenVZ template this past week, THANK YOU! Be advised that we now have incorporated several of the recommended tweaks which were documented in the PIAF Forums. The install procedure outlined above explains the new behavior of the slightly improved OpenVZ template which now is available for download. We recommend you switch.

    Asterisk CLI Change. Finally, just a heads up that (once again) the Asterisk Dev Team appears to have changed the default behavior of the Asterisk CLI. With Asterisk 1.8.2, if you make outbound calls after loading the CLI, you will notice that call progress no longer appears in the CLI. To restore the standard behavior (since Moses), issue the following command: core set verbose 3. 🙄


    Installing Incredible PBX on OpenVZ Systems. We won't repeat the entire Incredible PBX article here. If you want the background on the product, read the latest article. To get everything working with an OpenVZ system, there are only three steps:

    1. Set Up Your Google Voice Account
    2. Run the Incredible PBX VM Installer
    3. Configure a Softphone

    Configuring Google Voice. You'll need a dedicated Google Voice account to support The Incredible PBX. The more obscure the username (with some embedded numbers), the better off you will be. This will keep folks from bombarding you with unsolicited Gtalk chat messages, and who knows what nefarious scheme will be discovered using Google messaging six months from now. So why take the chance. Keep this account a secret!

    We've tested this extensively using an existing Gmail account, and inbound calling is just not reliable. The reason seems to be that Google always chooses Gmail chat as the inbound call destination if there are multiple registrations from the same IP address. So, be reasonable. Do it our way! Set up a dedicated Gmail and Google Voice account, and use it exclusively with The Incredible PBX. Google Voice no longer is by invitation only so, if you're in the U.S. or have a friend that is, head over to the Google Voice site and register. If you're living on another continent, see MisterQ's posting for some tips on getting set up.

    You must choose a telephone number (aka DID) for your new account, or Google Voice calling will not work... in either direction. Google used to permit outbound Gtalk calls using a fake CallerID, but that obviously led to abuse so it's over! You also have to tie your Google Voice account to at least one working phone number as part of the initial setup process. Your cellphone number will work just fine. Don't skip this step either. Just enter the provided 2-digit confirmation code when you tell Google to place the test call to the phone number you entered. Once the number is registered, you can disable it if you'd like in Settings, Voice Setting, Phones. But...

    IMPORTANT: Be sure to enable the Google Chat option as one of your phone destinations in Settings, Voice Setting, Phones. That's the destination we need for The Incredible PBX to work its magic! Otherwise, all inbound and outbound calls will fail. If you don't see this option, you may need to call up Gmail and enable Google Chat there first. Then go back to the Google Voice Settings.

    While you're still in Google Voice Settings, click on the Calls tab. Make sure your settings match these:

    • Call Screening - OFF
    • Call Presentation - OFF
    • Caller ID (In) - Display Caller's Number
    • Caller ID (Out) - Don't Change Anything
    • Do Not Disturb - OFF

    Click Save Changes once you adjust your settings. Under the Voicemail tab, plug in your email address so you get notified of new voicemails. Down the road, receipt of a Google Voice voicemail will be a big hint that something has come unglued on your PBX.

    Running The Incredible PBX Installer. Log into your server as root and issue the following commands to set up The Incredible PBX:

    cd /root
    rm incrediblepbx18-vm.x
    wget http://incrediblepbx.com/incrediblepbx18-vm.x
    chmod +x incredible*
    ./incrediblepbx18-vm.x
    passwd-master

    When The Incredible PBX install begins, you'll be prompted for the following:

    Google Voice Account Name
    Google Voice Password
    Google Voice 10-digit Phone Number
    Gmail Notification Address
    FreePBX maint Password

    The Google Voice Account Name is the Gmail address for your new dedicated account, e.g. joeschmo@gmail.com. Don't forget @gmail.com! The Google Voice Password is the password for this dedicated account. The Google Voice Phone Number is the 10-digit DID for this dedicated account. We need this if we ever need to go back to the return call methodology for outbound calling. For now, it's not necessary. But who knows what the future holds. 🙄 The Gmail Notification Address is the email address where you wish to receive alerts when incoming and outgoing Google Voice calls are placed using The Incredible PBX. And your FreePBX maint Password is the password you'll use to access FreePBX. You'll actually set it by running passwd-master after The Incredible PBX completes. We need this password to properly configure the CallerID Superfecta for you. By the way, none of this confidential information ever leaves your machine... just in case you were wondering.

    Now have another 5-minute cup of coffee, and consider a modest donation to Nerd Vittles... for all of our hard work. 😉 You'll find a link at the top of the page. While you're waiting (and so you don't forget), go ahead and configure your hardware-based firewall to support Google Voice. See the next section for what's required. Without completing this firewall configuration step, no calls will work! When the installer finishes, READ THE SCREEN just for grins.

    Here's a short video demonstration of the original Incredible PBX installer process. It still works just about the same way except there's no longer a second step to get things working.

    One final word of caution is in order regardless of your choice of providers: Do NOT use special characters in any provider passwords, or nothing will work!

    Before you do anything else, run passwd-master again to resecure the passwords for FreePBX GUI access to your system. Don't forget!

    Firewall Configuration. We hope you've taken our advice and installed a hardware-based firewall in front of The Incredible PBX. It's your phone bill. You'll need to make one adjustment on the firewall. Map UDP 5222 traffic to the internal IP address of The Incredible PBX. This is the port that Google Voice uses for phone calls and Google chat. You can decipher the IP address of your server by logging into the server as root and typing status.

    Extension Password Discovery. If you're too lazy to look up your extension 701 password using the FreePBX GUI, you can log into your server as root and issue the following command to obtain the password for extension 701 which we'll need to configure your softphone or color videophone in the next step:

    mysql -uroot -ppassw0rd -e"select id,data from asterisk.sip where id='701' and keyword='secret'"

    The result will look something like the following where 701 is the extension and 18016 is the randomly-generated extension password exclusively for your Incredible PBX:

    +-----+-------+
    id         data
    +-----+-------+
    701      18016
    +-----+-------+

    Configuring a SIP Phone. There are hundreds of terrific SIP telephones and softphones for Asterisk-based systems. Once you get things humming along, you'll want a real SIP telephone such as the $50 Nortel color videophone we've recommended above. You'll also find lots of additional recommendations on Nerd Vittles and in the PBX in a Flash Forum. If you're like us, we want to make damn sure this stuff works before you shell out any money. So, for today, let's download a terrific (free) softphone to get you started. We recommend X-Lite because there are versions for Windows, Mac, and Linux. So download your favorite from this link. Install and run X-Lite on your Desktop. At the top of the phone, click on the Down Arrow and choose SIP Account Settings, Add. Enter the following information using your actual password for extension 701 and the actual IP address of your Incredible PBX server instead of 192.168.0.251. Click OK when finished. Your softphone should now show: Available.

    Incredible PBX Test Flight. The proof is in the pudding as they say. So let's try two simple tests. First, let's place an outbound call. Using the softphone, dial your 10-digit cellphone number. Google Voice should transparently connect you. Answer the call and make sure you can send and receive voice on both phones. Second, from another phone, call the Google Voice number that you've dedicated to The Incredible PBX. Your softphone should begin ringing shortly. If not, make certain you are not logged into Google Chat on a Gmail account with these same credentials. If everything is working, congratulations!

    Here's a brief video demonstration showing how to set up a softphone to use with your Incredible PBX, and it also walks you through several of the dozens of Asterisk applications included in your system.

    Solving One-Way Audio Problems. If you experience one-way audio on some of your phone calls, you may need to adjust the settings in /etc/asterisk/sip_custom.conf. Just uncomment the first two lines by removing the semicolons. Then replace 173.15.238.123 with your public IP address, and replace 192.168.0.0 with the subnet address of your private network. There are similar settings in gtalk.conf that can be activated although we've never had to use them. In fact, we've never had to use any of these settings. After making these changes, save the file(s) and restart Asterisk: amportal restart.


    Running Incredible PBX in the Cloud. We've saved the best for last today. For many folks, you may want to experiment with VoIP technology without making a hardware investment and without having to master the intricacies of managing your own server and network. That's what Cloud Computing is all about. And we've searched far and wide to find you the perfect platform. As with many of you, one of our top priorities is always cost. While many providers were willing to provide Nerd Vittles with a few sheckles for pitching their product, only one stepped forward with a price point that we think is irresistible. And, for the record, we waived any compensation other than a few test accounts to get things working properly, so that all of the savings could be passed on to you! So here's the deal. $15 a month gets you your own PIAF-Purple server in the cloud at RentPBX.com. Just use this coupon code: BACK10, pick an east coast or west coast server to host your new system, choose the PIAF-Purple 1.7.5.5.4 install option, set up a username and very secure password, and you're off to the races. Once your account is established, here's the 5-minute procedure to install the special RentPBX-edition of Incredible PBX to begin making free calls in the U.S. and Canada through Google Voice.

    Begin by Configuring Google Voice as outlined above. Then log into your RentPBX account using SSH and the port assigned to your account. For Windows users, download Putty from here. The SSH command will look something like this:

    ssh -p 21422 root@209.249.149.108

    Issue the following commands to download and run The Incredible PBX installer for RentPBX:

    cd /root
    wget http://incrediblepbx.com/incrediblepbx18-rentpbx.x
    chmod +x incrediblepbx18-rentpbx.x
    ./incrediblepbx18-rentpbx.x
    passwd-master

    Now just follow along in the Incredible PBX virtual machine tutorial which we've included above. Remember that your new Incredible PBX is sitting directly on the Internet! So don't forget to run passwd-master when you finish the install, or your system is vulnerable. Ours was attacked within minutes!

    Securing Your RentPBX Server. With the exception of our WhiteList application, everything is working on your RentPBX server. While we continue to work on the WhiteList component (reread this section of the article in a week or so to get the latest updates), you need to secure your system to avoid endless hack attempts on your SIP resources. Here's how. First, write down the IP addresses of your RentPBX server and your home network. Second, print out your existing IPtables configuration. The file to print is /etc/sysconfig/iptables. Third, make a backup copy of the file. While logged into your server with SSH, the easiest way is like this:

    cd /etc/sysconfig
    cp iptables iptables.bak

    Now we need to edit the iptables file itself: nano -w iptables. Then search for the line that contains 5060: Ctrl-W, 5060, Enter. At the beginning of this line, add # to comment out the line. With the cursor still on this line, press Ctrl-K then Ctrl-U twice. This will duplicate the line. Move to the second commented line and remove #. Use the right cursor to move across the line to --dport. Then insert the following using the IP address of your RentPBX server, e.g.

    -s 229.149.129.248

    Be sure there's at least one space before and after the new text. Now duplicate that line with Ctrl-K and Ctrl-U twice. Change the IP address on the second line to the public IP address of your home or office network. Repeat this process for every IP address where you intend to use a SIP phone connected to your RentPBX server. Make additional entries for your SIP providers as well. If you want to sleep better, you can make similar changes to the SSH port entry to restrict it to your home/office IP address. It's the line immediately above the 5060 entry. Ditto for port 80 which is web access. Be very careful here. A typo will lock you out of your own server! When you're finished, save the changes: Ctrl-X, Y, Enter. Then restart IPtables: service iptables restart.

    As always, we strongly recommend that you not put all of your VoIP eggs in one basket. Google Voice does go down from time to time. Vitelity is a perfect complement because the costs are low and you only pay for the service you use. A discount sign up link is below. And Vitelity has contributed generously to both the Nerd Vittles and PBX in a Flash projects. So please support them. Enjoy!

    Originally published: Monday, January 17, 2011


    Need help with Asterisk? Visit the PBX in a Flash Forum.
    Or Try the New, Free PBX in a Flash Conference Bridge.


    whos.amung.us If you're wondering what your fellow man is reading on Nerd Vittles these days, wonder no more. Visit our new whos.amung.us statistical web site and check out what's happening. It's a terrific resource both for us and for you.


    Special Thanks to Our Generous Sponsors


    FULL DISCLOSURE: ClearlyIP, Skyetel, Vitelity, DigitalOcean, Vultr, VoIP.ms, 3CX, Sangoma, TelecomsXchange and VitalPBX have provided financial support to Nerd Vittles and our open source projects through advertising, referral revenue, and/or merchandise. As an Amazon Associate and Best Buy Affiliate, we also earn from qualifying purchases. We’ve chosen these providers not the other way around. Our decisions are based upon their corporate reputation and the quality of their offerings and pricing. Our recommendations regarding technology are reached without regard to financial compensation except in situations in which comparable products at comparable pricing are available from multiple sources. In this limited case, we support our sponsors because our sponsors support us.

    BOGO Bonaza: Enjoy state-of-the-art VoIP service with a $10 credit and half-price SIP service on up to $500 of Skyetel trunking with free number porting when you fund your Skyetel account. No limits on number of simultaneous calls. Quadruple data center redundancy. $25 monthly minimum spend required. Tutorial and sign up details are here.

    The lynchpin of Incredible PBX 2020 and beyond is ClearlyIP components which bring management of FreePBX modules and SIP phone integration to a level never before available with any other Asterisk distribution. And now you can configure and reconfigure your new Incredible PBX phones from the convenience of the Incredible PBX GUI.

    VitalPBX is perhaps the fastest-growing PBX offering based upon Asterisk with an installed presence in more than 100 countries worldwide. VitalPBX has generously provided a customized White Label version of Incredible PBX tailored for use with all Incredible PBX and VitalPBX custom applications. Follow this link for a free test drive!
     

    Special Thanks to Vitelity. Vitelity is now Voyant Communications and has halted new registrations for the time being. Our special thanks to Vitelity for their unwavering financial support over many years and to the many Nerd Vittles readers who continue to enjoy the benefits of their service offerings. We will keep everyone posted on further developments.


    Some Recent Nerd Vittles Articles of Interest...

    5 Steps to Paradise: It’s Incredible PBX for Asterisk 1.8

    Hard to believe it's been almost six months since we introduced The Incredible PBX, but that makes today even more special. With the release of Asterisk® 1.8, the PBX in a Flash Development Team headed up by Tom King burned the midnight oil to introduce the latest PBX in a Flash Purple Edition with Asterisk 1.8 in less than 24 hours.

    News Flash: Incredible PBX 4.0 is now available with FreePBX 2.10 support!

    Coming January 19: Incredible PBX 11 & Incredible Fax for Asterisk 11 and FreePBX 2.11

    So we had all the tools necessary to reengineer, design and build the all-new Incredible PBX for Asterisk 1.8. What used to be a somewhat kludgey, dual-call, dual-provider Google Voice implementation to take advantage of Google's free PSTN calling in the U.S. and Canada with Asterisk 1.4 and 1.6 is now a zippy-quick, Gtalk-based calling platform that rivals the best SIP-to-SIP calls on the planet and provides virtually instantaneous PSTN connections to almost anybody, anywhere. Trust us! Except for the price which is now free, you'll never know you weren't connected via Ma Bell's overpriced long-distance lines and neither will the Little Mrs. And, yes, our recommended $50 Nortel SIP videophone is plug-and-play on extensions 701 and 702.

    Just download the latest PBX in a Flash ISO, burn to then boot from the PIAF CD, choose the Purple Edition to load Asterisk 1.8 and FreePBX 2.8, and then install the new Incredible PBX for Asterisk 1.8. In about an hour, you'll have a turnkey PBX with a local phone number and free calling in the U.S. and Canada via your own Google Voice account plus dozens and dozens of terrific Asterisk applications to keep your head spinning for months.

    Thanks to its Zero Internet Footprint™ design, The Incredible PBX remains the most secure Asterisk-based PBX around. What this means is The Incredible PBX™ has been engineered to sit safely behind a NAT-based, hardware firewall with minimal port exposure to your actual server. And you won't find a more full-featured Personal Branch Exchange™ at any price.

    Did we mention that all of this telephone goodness is still absolutely FREE!

    The Incredible PBX Inventory. For those that have never heard of The Incredible PBX, here's a feature list of components you get in addition to the base install of PBX in a Flash the latest CentOS 5.x, Asterisk 1.8, FreePBX 2.8, and Apache, SendMail, MySQL, PHP, phpMyAdmin, IPtables Linux firewall, Fail2Ban, and WebMin. Cepstral TTS, Hamachi VPN, and Mondo Backups are just one command away and may be installed using some of the PBX in a Flash-provided scripts.

    Prerequisites. Here's what we recommend to get started properly:

    Installing The Incredible PBX. The installation process is simple and straight-forward. Here are the 5 Easy Steps to Free Calling, and The Incredible PBX will be ready to receive and make free U.S./Canada calls immediately:

    1. Install PBX in a Flash Purple Edition
    2. Download & run The Incredible PBX 1.8 installer
    3. Run passwd-master on your PIAF server
    4. Map UDP 5222 on firewall to PIAF server
    5. Configure a softphone or SIP telephone

    Installing PBX in a Flash. Here's a quick tutorial to get PBX in a Flash installed. To use Incredible PBX for Asterisk 1.8, you must install the latest 32-bit version of PBX in a Flash.3 Unlike other Asterisk aggregations, PBX in a Flash utilizes a two-step install process. The ISO only installs the CentOS operating system. That hasn't changed. But, once CentOS is installed, the server reboots and downloads a payload file that includes Asterisk, FreePBX, and many other VoIP and Linux utilities including all of the new Google Voice components. Just choose the new Purple Payload to get the latest Asterisk 1.8 release and all of the Google Voice goodies!

    You can download the 32-bit PIAF from SourceForge or one of our download mirrors. Burn the ISO to a CD. Then boot from the installation CD and press the Enter key to begin.

    WARNING: This install will completely erase, repartition, and reformat EVERY DISK (including USB flash drives) connected to your system so disable any disk you wish to preserve! Press Ctrl-C to cancel the install.

    On some systems you may get a notice that CentOS can't find the kickstart file. Just tab to OK and press Enter. Don't change the name or location of the kickstart file! This will get you going. Think of it as a CentOS 'feature'. 🙂 If your system still won't boot, then you have an incompatible drive controller.

    At the keyboard prompt, tab to OK and press Enter. At the time zone prompt, tab once, highlight your time zone, tab to OK and press Enter. At the password prompt, make up a VERY secure root password. Type it twice. Tab to OK, press Enter. Get a cup of coffee. Come back in about 5 minutes. When the system has installed CentOS, it will reboot. Remove the CD promptly. After the reboot, choose PIAF-Purple option. Have a 15-minute cup of coffee. After installation is complete, the machine will reboot a second time. You now have a PBX in a Flash base install. On a stand-alone machine, it takes about 30 minutes. On a virtual machine, it takes about half that time. Write down the IP address of your new PIAF server. You'll need it to configure your hardware-based firewall in a minute.

    NOTE: For previous users of PBX in a Flash, be aware that this new version automatically runs update-programs and update-fixes for you. You still should set your FreePBX passwords by running passwd-master after The Incredible PBX installer finishes!

    Configuring Google Voice. You'll need a dedicated Google Voice account to support The Incredible PBX. The more obscure the username (with some embedded numbers), the better off you will be. This will keep folks from bombarding you with unsolicited Gtalk chat messages, and who knows what nefarious scheme will be discovered using Google messaging six months from now. So why take the chance. Keep this account a secret!

    We've tested this extensively using an existing Gmail account, and inbound calling is just not reliable. The reason seems to be that Google always chooses Gmail chat as the inbound call destination if there are multiple registrations from the same IP address. So, be reasonable. Do it our way! Set up a dedicated Gmail and Google Voice account, and use it exclusively with The Incredible PBX. Google Voice no longer is by invitation only so, if you're in the U.S. or have a friend that is, head over to the Google Voice site and register. If you're living on another continent, see MisterQ's posting for some tips on getting set up.

    You must choose a telephone number (aka DID) for your new account, or Google Voice calling will not work... in either direction. Google used to permit outbound Gtalk calls using a fake CallerID, but that obviously led to abuse so it's over! You also have to tie your Google Voice account to at least one working phone number as part of the initial setup process. Your cellphone number will work just fine. Don't skip this step either. Just enter the provided 2-digit confirmation code when you tell Google to place the test call to the phone number you entered. Once the number is registered, you can disable it if you'd like in Settings, Voice Setting, Phones. But...

    IMPORTANT: Be sure to enable the Google Chat option as one of your phone destinations in Settings, Voice Setting, Phones. That's the destination we need for The Incredible PBX to work its magic! Otherwise, all inbound and outbound calls will fail. If you don't see this option, you may need to call up Gmail and enable Google Chat there first. Then go back to the Google Voice Settings.

    While you're still in Google Voice Settings, click on the Calls tab. Make sure your settings match these:

    • Call Screening - OFF
    • Call Presentation - OFF
    • Caller ID (In) - Display Caller's Number
    • Caller ID (Out) - Don't Change Anything
    • Do Not Disturb - OFF

    Click Save Changes once you adjust your settings. Under the Voicemail tab, plug in your email address so you get notified of new voicemails. Down the road, receipt of a Google Voice voicemail will be a big hint that something has come unglued on your PBX.

    Running The Incredible PBX Installer. Log into your server as root and issue the following commands to download and run The Incredible PBX installer:

    cd /root
    wget http://incrediblepbx.com/incrediblepbx18.x
    chmod +x incrediblepbx18.x
    ./incrediblepbx18.x
    passwd-master

    If you've installed the previous version of The Incredible PBX, you'll recall that there was a two-step install process after configuring another trunk with either SIPgate or IPkall. That's now a thing of the past. All you need to do after The Incredible PBX script completes is run passwd-master to set up your master password for FreePBX.

    When The Incredible PBX install begins, you'll be prompted for the following:

    Google Voice Account Name
    Google Voice Password
    Gmail Notification Address
    FreePBX maint Password

    The Google Voice Account Name is the Gmail address for your new dedicated account, e.g. joeschmo@gmail.com. Don't forget @gmail.com! The Google Voice Password is the password for this dedicated account. The Gmail Notification Address is the email address where you wish to receive alerts when incoming and outgoing Google Voice calls are placed using The Incredible PBX. And your FreePBX maint Password is the password you'll use to access FreePBX. You'll actually set it by running passwd-master after The Incredible PBX completes. We need this password to properly configure the CallerID Superfecta for you. By the way, none of this confidential information ever leaves your machine... just in case you were wondering. 🙄

    Now have another 15-minute cup of coffee, and consider a modest donation to Nerd Vittles... for all of our hard work. 😉 You'll find a link at the top of the page. While you're waiting (and so you don't forget), go ahead and configure your hardware-based firewall to support Google Voice. See the next section for what's required. Without completing this firewall configuration step, no calls will work! When the installer finishes, READ THE SCREEN just for grins.

    Here's a short video demonstration of the original Incredible PBX installer process. It still works just about the same way except there's no longer a second step to get things working.

    One final word of caution is in order regardless of your choice of providers: Do NOT use special characters in any provider passwords, or nothing will work!

    Firewall Configuration. We hope you've taken our advice and installed a hardware-based firewall in front of The Incredible PBX. It's your phone bill. You'll need to make one adjustment on the firewall. Map UDP 5222 traffic to the internal IP address of The Incredible PBX. This is the port that Google Voice uses for phone calls and Google chat. You can decipher the IP address of your server by logging into the server as root and typing status.

    Logging in to FreePBX. Using a web browser, you access the FreePBX GUI by pointing your browser to the IP address of your Incredible PBX. Click on the Admin tab and choose FreePBX. When prompted for a username, it's maint. When prompted for the password, it's whatever you set up as your maint password when you installed Incredible PBX. If you forget it, you can always reset it by logging into your server as root and running passwd-master.

    Extension Password Discovery. If you're too lazy to look up your extension 701 password using the FreePBX GUI, you can log into your server as root and issue the following command to obtain the password for extension 701 which we'll need to configure your softphone or color videophone in the next step:

    mysql -uroot -ppassw0rd -e"select id,data from asterisk.sip where id='701' and keyword='secret'"

    The result will look something like the following where 701 is the extension and 18016 is the randomly-generated extension password exclusively for your Incredible PBX:

    +-----+-------+
    id         data
    +-----+-------+
    701      18016
    +-----+-------+

    Configuring a SIP Phone. There are hundreds of terrific SIP telephones and softphones for Asterisk-based systems. Once you get things humming along, you'll want a real SIP telephone such as the $50 Nortel color videophone we've recommended above. You'll also find lots of additional recommendations on Nerd Vittles and in the PBX in a Flash Forum. If you're like us, we want to make damn sure this stuff works before you shell out any money. So, for today, let's download a terrific (free) softphone to get you started. We recommend X-Lite because there are versions for Windows, Mac, and Linux. So download your favorite from this link. Install and run X-Lite on your Desktop. At the top of the phone, click on the Down Arrow and choose SIP Account Settings, Add. Enter the following information using your actual password for extension 701 and the actual IP address of your Incredible PBX server instead of 192.168.0.251. Click OK when finished. Your softphone should now show: Available.

    Incredible PBX Test Flight. The proof is in the pudding as they say. So let's try two simple tests. First, let's place an outbound call. Using the softphone, dial your 10-digit cellphone number. Google Voice should transparently connect you. Answer the call and make sure you can send and receive voice on both phones. Second, from another phone, call the Google Voice number that you've dedicated to The Incredible PBX. Your softphone should begin ringing shortly. Answer the call, press 1 to accept the call, and then make sure you can send and receive voice on both phones. Hang up. If everything is working, congratulations!

    Here's a brief video demonstration showing how to set up a softphone to use with your Incredible PBX, and it also walks you through several of the dozens of Asterisk applications included in your system.

    Solving One-Way Audio Problems. If you experience one-way audio on some of your phone calls, you may need to adjust the settings in /etc/asterisk/sip_custom.conf. Just uncomment the first two lines by removing the semicolons. Then replace 173.15.238.123 with your public IP address, and replace 192.168.0.0 with the subnet address of your private network. There are similar settings in gtalk.conf that can be activated although we've never had to use them. In fact, we've never had to use any of these settings. After making these changes, save the file(s) and restart Asterisk with the command: amportal restart.

    Learn First. Explore Second. Even though the installation process has been completed, we strongly recommend you do some reading before you begin your VoIP adventure. VoIP PBX systems have become a favorite target of the hackers and crackers around the world and, unless you have an unlimited bank account, you need to take some time learning where the minefields are in today's VoIP world. Start by reading our Primer on Asterisk Security. We've secured all of your passwords except your root password and your passwd-master password, and we're assuming you've put very secure passwords on those accounts as if your phone bill depended upon it. It does! Also read our PBX in a Flash and VPN in a Flash knols. If you're still not asleep, there's loads of additional documentation on the PBX in a Flash documentation web site.

    Adding Multiple Google Voice Trunks. Thanks to rentpbx on our forums, adding support for multiple Google Voice trunks is now a five-minute operation. Once you have your initial setup running smoothly, hop on over to the forums and check out this Incredible solution.

    Choosing a VoIP Provider for Redundancy. Nothing beats free when it comes to long distance calls. But nothing lasts forever. And, in the VoIP World, redundancy is dirt cheap. So we strongly recommend you set up another account with Vitelity using our special link below. This gives your PBX a secondary way to communicate with every telephone in the world, and it also gets you a second real phone number for your new system... so that people can call you. Here's how it works. You pay Vitelity a deposit for phone service. They then will bill you $3.99 a month for your new phone number. This $3.99 also covers the cost of unlimited inbound calls (two at a time) delivered to your PBX for the month. For outbound calls, you pay by the minute and the cost is determined by where you're calling. If you're in the U.S., outbound calls to anywhere in the U.S. are a little over a penny a minute. If you change your mind about Vitelity and want a refund of the balance in your account, all you have to do is ask. The trunks for Vitelity already are preconfigured with The Incredible PBX. Just insert your credentials using FreePBX. Then add the Vitelity trunk as the third destination for your default outbound route. That's it. Congratulations! You now have a totally redundant phone system.

    Using ENUMPlus. Another terrific money-saving tool is ENUM. Your system comes with ENUMPlus installed. The advantage of ENUM is that numbers registered with any of the ENUM services such as e164.org can be called via SIP for free. You can read all about it in this Nerd Vittles' article. To activate ENUMPlus, you'll need to register and obtain an API Key at enumplus.org. It's free! Sign up, log in, and click on the Account tab to get your API key. Once you have your key, copy it to your clipboard and open FreePBX with your browser. Then choose SetUp, ENUMPlus and paste in your API Key. Save your entry, and you're all set. After entering your key, all outbound calls will be checked for a free ENUM calling path first before using other outbound trunks.

    Stealth AutoAttendant. When incoming calls arrive, the caller is greeted with a welcoming message from Allison which says something like "Thanks for calling. Please hold a moment while I locate someone to take your call." To the caller, it's merely a greeting. To those "in the know," it's actually an autoattendant (aka IVR system) that gives you the opportunity to press a button during the message to trigger the running of some application on your Incredible PBX. As configured, the only option that works is 0 which fires up the Nerd Vittles Apps IVR. It's quite easy to add additional features such as voicemail retrieval or DISA for outbound calling. Just edit the MainIVR option in FreePBX under Setup, IVR. Keep in mind that anyone (anywhere in the world) can choose these options. So be extremely careful not to expose your system to security vulnerabilities by making certain that any options you add have very secure passwords! It's your phone bill. 😉

    Configuring Email. You're going to want to be notified when updates are available for FreePBX, and you may also want notifications when new voicemails arrive. Everything already is set up for you except actually entering your email notification address. Using a web browser, open the FreePBX GUI by pointing your browser to the IP address of your Incredible PBX. Then click Administration and choose FreePBX. To set your email address for FreePBX updates, go to Setup, General Settings and scroll to the bottom of the screen. To configure emails to notify you of incoming voicemails, go to Setup, Extensions, 701 and scroll to the bottom of the screen. Then follow your nose. Be sure to reload FreePBX when prompted after saving your changes.

    A Word About Security. Security matters to us, and it should matter to you. Not only is the safety of your system at stake but also your wallet and the safety of other folks' systems. Our only means of contacting you with security updates is through the RSS Feed that we maintain for the PBX in a Flash project. This feed is prominently displayed in the web GUI which you can access with any browser pointed to the IP address of your server. Check It Daily! Or add our RSS Feed to your favorite RSS Reader. We also recommend you follow @NerdUno on Twitter. We'll keep you entertained and provide immediate notification of security problems that we hear about. Be safe!

    Enabling Google Voicemail. Some have requested a way to retain Google's voicemail system for unanswered calls in lieu of using Asterisk voicemail. The advantage is that Google offers a free transcription service for voicemail messages. To activate this, you'll need to edit the [googlein] context in extensions_custom.conf in /etc/asterisk. Just modify the last four lines in the context so that they look like this and then restart Asterisk: amportal restart

    ;exten => s,n(regcall),Answer
    ;exten => s,n,SendDTMF(1)
    exten => s,n(regcall),Set(DIAL_OPTIONS=${DIAL_OPTIONS}aD(:1))
    exten => s,n,Goto(from-trunk,gv-incoming,1)

    Kicking the Tires. OK. That's enough tutorial for today. Let's play. Using your new softphone, begin your adventure by dialing these extensions:

    • D-E-M-O - Incredible PBX Demo (running on your PBX)
    • 1234*1061 - Nerd Vittles Demo via ISN FreeNum connection to NV
    • 17476009082*1089 - Nerd Vittles Demo via ISN to Google/Gizmo5
    • Z-I-P - Enter a five digit zip code for any U.S. weather report
    • 6-1-1 - Enter a 3-character airport code for any U.S. weather report
    • 5-1-1 - Get the latest news and sports headlines from Yahoo News
    • T-I-D-E - Get today's tides and lunar schedule for any U.S. port
    • F-A-X - Send a fax to an email address of your choice
    • 4-1-2 - 3-character phonebook lookup/dialer with AsteriDex
    • M-A-I-L - Record a message and deliver it to any email address
    • C-O-N-F - Set up a MeetMe Conference on the fly
    • 1-2-3 - Schedule regular/recurring reminder (PW: 12345678)
    • 2-2-2 - ODBC/Timeclock Lookup Demo (Empl No: 12345)
    • 2-2-3 - ODBC/AsteriDex Lookup Demo (Code: AME)
    • Dial *68 - Schedule a hotel-style wakeup call from any extension
    • 1061*1061 - PIAF Support Conference Bridge (Conf#: 1061)
    • 882*1061 - VoIP Users Conference every Friday at Noon (EST)

    PBX in a Flash SQLite Registry. Last, but not least, we want to introduce you to the new PBX in a Flash Registry which uses SQLite, a zero-configuration SQL-compatible database engine. After logging into your server as root, just type show-registry for a listing of all of the applications, versions, and install dates of everything on your new server. Choosing the A option will generate registry.txt in the /root folder while the other options will let you review the applications by category on the screen. For example, the G option displays all of The Incredible PBX add-ons that have been installed. Here's the complete list of options:

    • A - Write the contents of the registry to registry.txt
    • B - PBX in a Flash install details
    • C - Extra programs install details
    • D - Update-fixes status and details
    • E - RPM install details
    • F - FreePBX modules install details
    • G - Incredible PBX install details
    • Q - Quit this program

    And here's a sample from an install we just completed. We'll have more details and additional utilities for your use in coming weeks. Stay tuned!


    Click above. Enter your name and phone number. Press Connect to begin the call.


    Special Thanks. It's hard to know where to start in expressing our gratitude for all of the participants that made today's incredibly simple-to-use product possible. Please bear with us. To Mark Spencer, Malcolm Davenport, and the rest of the Asterisk development team, thanks for a much improved Asterisk. To Philippe Sultan and his co-developers, thank you for finally making Jabber jabber with Asterisk. To Leif Madsen, our special thanks for your early pioneering work with Gtalk and Jabber which got this ball rolling. To Philippe Lindheimer & Co., thanks for FreePBX 2.8 which really makes Asterisk shine. To Lefteris Zafiris, thank you for making Flite work with Asterisk 1.8 thereby preserving all of the Nerd Vittles text-to-speech applications. To Darren Sessions, thanks for whipping app_swift into shape and restoring Cepstral and commercial TTS applications to the land of the living with Asterisk 1.8. And to our pal, Tom King, we couldn't have done it without you. You rolled up your sleeves and really made Asterisk 1.8.0 sit up and bark. No one will quite understand what an endeavor that was until they try it themselves. You've made it look so easy. And, finally, to our dozens of beta testers, THANK YOU! We've implemented almost all of your suggestions.

    Additional Goodies. Be sure to log into your server as root and look through the scripts added in the /root/nv folder. You'll find all sorts of goodies to keep you busy. The 32-bit install-cepstral script does just what it says. With Allison's Cepstral voice, you'll have the best TTS implementation for Asterisk available. ipscan is a little shell script that will tell you every working IP device on your LAN. trunks.sh tells you all of the Asterisk trunks configured on your system. purgeCIDcache.sh will clean out the CallerID cache in the Asterisk database. convert2gsm.sh shows you how to convert a .wav file to .gsm. munin.pbx will install Munin on your system while awstats.pbx installs AWstats. s3cmd.faq tells you how to quickly activate the Amazon S3 Cloud Computing service. All the other scripts and apps in /root/nv already have been installed for you so don't install them again.

    If you've heeded our advice and purchased a PogoPlug, you can link to your home-grown cloud as well. Just add your credentials to /root/pogo-start.sh. Then run the script to enable the PogoPlug Cloud on your server. All of your cloud resources are instantly accessible in /mnt/pogoplug. It's perfect for off-site backups and is included as one of the backup options in the PBX in a Flash backup utilities.

    Don't forget to List Yourself in Directory Assistance so everyone can find you by dialing 411. And add your new number to the Do Not Call Registry to block telemarketing calls. Or just call 888-382-1222 from your new number. Enjoy!

    Originally published: Monday, November 1, 2010


    VoIP Virtualization with Incredible PBX: OpenVZ and Cloud Solutions

    Safely Interconnecting Asterisk Servers for Free Calling

    Adding Skype to The Incredible PBX

    Adding Incredible Backup... and Restore to The Incredible PBX

    Adding Remotes, Preserving Security with The Incredible PBX

    Remote Phone Meets Travelin' Man with The Incredible PBX

    Continue reading Part II.

    Continue reading Part III.

    Continue reading Part IV.


    Support Issues. With any application as sophisticated as this one, you're bound to have questions. Blog comments are a terrible place to handle support issues although we welcome general comments about our articles and software. If you have particular support issues, we encourage you to get actively involved in the PBX in a Flash Forums. It's the best Asterisk tech support site in the business, and it's all free! We maintain a thread with the latest Patches and Bug Fixes for Incredible PBX. Please have a look. Unlike some forums, ours is extremely friendly and is supported by literally hundreds of Asterisk gurus and thousands of ordinary users just like you. So you won't have to wait long for an answer to your questions.


    Need help with Asterisk? Visit the PBX in a Flash Forum.
    Or Try the New, Free PBX in a Flash Conference Bridge.


    whos.amung.us If you're wondering what your fellow man is reading on Nerd Vittles these days, wonder no more. Visit our new whos.amung.us statistical web site and check out what's happening. It's a terrific resource both for us and for you.


    Special Thanks to Our Generous Sponsors


    FULL DISCLOSURE: ClearlyIP, Skyetel, Vitelity, DigitalOcean, Vultr, VoIP.ms, 3CX, Sangoma, TelecomsXchange and VitalPBX have provided financial support to Nerd Vittles and our open source projects through advertising, referral revenue, and/or merchandise. As an Amazon Associate and Best Buy Affiliate, we also earn from qualifying purchases. We’ve chosen these providers not the other way around. Our decisions are based upon their corporate reputation and the quality of their offerings and pricing. Our recommendations regarding technology are reached without regard to financial compensation except in situations in which comparable products at comparable pricing are available from multiple sources. In this limited case, we support our sponsors because our sponsors support us.

    BOGO Bonaza: Enjoy state-of-the-art VoIP service with a $10 credit and half-price SIP service on up to $500 of Skyetel trunking with free number porting when you fund your Skyetel account. No limits on number of simultaneous calls. Quadruple data center redundancy. $25 monthly minimum spend required. Tutorial and sign up details are here.

    The lynchpin of Incredible PBX 2020 and beyond is ClearlyIP components which bring management of FreePBX modules and SIP phone integration to a level never before available with any other Asterisk distribution. And now you can configure and reconfigure your new Incredible PBX phones from the convenience of the Incredible PBX GUI.

    VitalPBX is perhaps the fastest-growing PBX offering based upon Asterisk with an installed presence in more than 100 countries worldwide. VitalPBX has generously provided a customized White Label version of Incredible PBX tailored for use with all Incredible PBX and VitalPBX custom applications. Follow this link for a free test drive!
     

    Special Thanks to Vitelity. Vitelity is now Voyant Communications and has halted new registrations for the time being. Our special thanks to Vitelity for their unwavering financial support over many years and to the many Nerd Vittles readers who continue to enjoy the benefits of their service offerings. We will keep everyone posted on further developments.


    Some Recent Nerd Vittles Articles of Interest...

    1. For 64-bit systems with Asterisk 1.8, use the Cepstral install procedures outlined in this Nerd Vittles article. []
    2. If you use the recommended Acer Aspire Revo, be advised that it does NOT include a CD/DVD drive. You will need an external USB drive to load the software. Some of these work with CentOS, and some don't. Most HP and Sony drives work; however, we strongly recommend you purchase an external DVD drive from a merchant that will accept returns, e.g. Best Buy, WalMart, Office Depot, Office Max, Staples. You also can run The Incredible PBX on a virtual machine such as the free Proxmox server. Another less costly (but untested) option might be this Shuttle from NewEgg: $185 with free shipping. Use Promo Code: EMCYTZT220 []
    3. HINT: Version 1.7.5.6 recommended, but 1.7.5.5.3+ ISOs also work just fine. []