
Getting Started
This is what we call the Lowest Common Denominator install. The Debian 9 install, Wazo install, and Wazo configuration steps are all performed manually. Use it when nothing else is successful. As you might expect, this installation procedure takes the longest. If you’re using a Cloud-based provider, start with the 64-bit Debian 9 platform and skip the Debian 9 installation step which comes next. If it’s a standalone server or virtual machine, begin by downloading the Debian 9 amd64 netinst ISO to your desktop. Burn the ISO to a CD/DVD or USB stick.
Debian 9 Installation
Boot your server from the Debian 9/64 CD image. WARNING: Your entire disk and all connected drives will be erased as part of the Debian installation process. Click Install to begin. Choose your Language, choose your Country, and pick your Keyboard keymap. Enter xivo for Hostname and incrediblepbx.com for Domain Name. You can change these after the install completes successfully. Choose a very secure root password. Set up a user account when prompted by entering your full name, username, and password. Pick your time zone. For Partitioning Method, choose Guided – use entire disk. Select the disk to partition and choose all files in one partition unless you know what you’re doing. Click Finish and Write Changes to Disk and confirm by choosing Yes. When the whirring stops after the base system is installed, choose a Debian mirror that’s close to your server and select a Debian Archive Mirror. Leave the Proxy Server blank and Continue. After additional whirring, the Package Selection menu will appear. Use the space bar to deselect Debian Desktop Environment and Print Server. Then select SSH server and leave Standard System Utilities selected. Review your choices. The only two selections with asterisks should be SSH server and standard system utilities. Click Continue. Standby while about 300 additional packages are installed. Finally, install the GRUB bootloader and select your Bootloader Device, e.g. /dev/sda. Click Continue and your server will reboot.
Enabling Root SSH Access
When you install Debian 9 manually using the Debian ISO, root logins via SSH are disabled by default. Let’s enable root logins via SSH so that you can use SSH or Putty to complete the rest of the install and take advantage of cut-and-paste. Log into your server console as root and edit the SSH config file: nano -w /etc/ssh/sshd_config. Go to line 28 (it’s in the Authentication section and begins with PermitRootLogin. Change it to: PermitRootLogin yes. Save your change (Ctrl-X, y, ENTER) and then restart SSH: /etc/init.d/ssh restart.
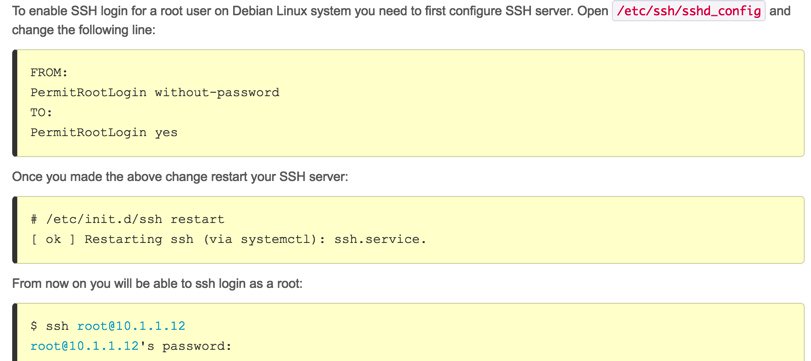
When the configuration setup is finished, use ifconfig to obtain the IP address of your server. Then log back in using SSH or Putty to continue.
Wazo Installation
Be advised that there is no actual standard for what constitutes a Debian 9 minimal install. You are well advised to run the following commands on Cloud servers to be sure that you have all of the components required to install Wazo and that you have no components which would cause the Wazo install to fail:
apt-get update
apt-get -y remove apache2*
# use the next line only for cloud-based platforms
#apt-get -y install cloud-init
Next, on all platforms, perform the Wazo base install:
wget http://mirror.wazo.community/fai/xivo-migration/wazo_install.sh
bash wazo_install.sh
Verify that the Wazo modules shown below started successfully before proceeding:
Waiting for services to start successfully…
starting rabbitmq-server … OK
starting consul … OK
starting postgresql@9.4-main … OK
starting nginx … OK
starting dahdi … OK
starting wazo-sysconfd … OK
starting wazo-confgend … OK
starting wazo-confd … OK
starting wazo-auth … OK
wazo-dxtora is disabled
wazo-provd is disabled
wazo-agid is disabled
asterisk is disabled
wazo-amid is disabled
wazo-call-logs is disabled
wazo-agentd is disabled
wazo-ctid is disabled
wazo-dird is disabled
wazo-dird-phoned is disabled
wazo-ctid-ng is disabled
wazo-websocketd is disabled
Opening port 5060.
Wazo fully booted
You must now finish the installation
open http://server-IP-address to configure Wazo
Wazo 16.x Configuration
The Incredible PBX installer usually performs this configuration step using a Python wizard provided by the Wazo Development Team. Unfortunately, it is temperamental especially with cloud platforms with unusual hostnames for servers. If you’ve gotten this far using the manual setup, you don’t want to blow it now by risking a failure in the config step. So let’s do it manually. Switch to a web browser pointed to the IP address of your Wazo server. Depending upon your browser, you may have to trust the security certificate before proceeding.
When the XiVO/Wazo Configurator appears, choose your Language and click Next. Accept the GPL3 license agreement and click Next. In the Configuration screen, choose a secure web password for Wazo access and fill in the remaining blanks to match your network. If you’re on a cloud platform, we recommend using Google’s DNS servers: 8.8.8.8 and 8.8.4.4. Leave the hostname and domain name entries alone! Click Next to continue.

In the Entities and Contexts screen, enter the following and click Next:
- Display Name: IncrediblePBX
- Internal Calls Context: Default – 701 – 750
- Incalls Context: Incalls – 2011000000 – 9999999999 – 10
- Outcalls Context: Outcalls
In the Validation screen, verify your entries and then click Validate.
Once the validation completes successfully, the XiVO/Wazo web login screen should appear. Before proceeding, make certain you can login as root using the web password you assigned above. The Other Services status display should show all systems up and running:
Click X – Logout to proceed.
Incredible PBX Installation
Log into your server again as root via SSH/Putty and issue the following commands to complete the Wazo and Incredible PBX setup.
cd /root
wget http://incrediblepbx.com/IncrediblePBX15-Wazo.sh
chmod +x IncrediblePBX15-Wazo.sh
./IncrediblePBX15-Wazo.sh
Managing Your Wazo Server
Almost everything else you do with Wazo can be handled using a web browser pointed to this IP address.
Open a web browser to the IP address of your server. Ignore the https credentials warning to access your server. The default username for access is root, and the password is the one set during the Configuration step above.
You now can proceed to Incredible PBX Initial Configuration tutorial to continue your setup.