
Getting Started
For VirtualBox installations of Wazo, begin by downloading the 64-bit Wazo Server ISO to your desktop.
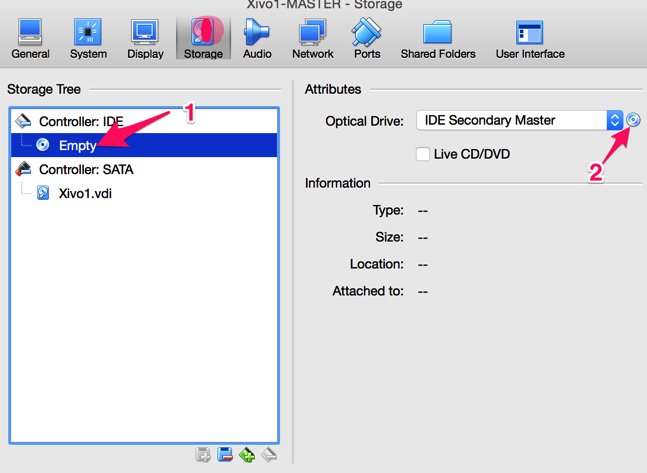
Open VirtualBox on your desktop computer, and create a VirtualBox 64-bit Debian VM platform with 1024 MB RAM and at least a 15GB virtual drive. In System Settings, enable I/O APIC and disable the other options. Select a Sound Card to match your machine and configure Network Adapter 1 as a Bridged Network Device. In the Storage Settings (shown below) for your (1) Empty IDE Controller, (2) select the downloaded Wazo ISO as your installation media. Start the VM and proceed through the initial install.
Debian/Wazo Installation
Click Install, choose your language, pick your time zone, choose your keyboard map, create a very secure root password, and choose a Debian mirror that’s close to your server. Choose /dev/sda as your bootloader assuming that’s the disk drive configured by VirtualBox. Then sit back and relax. In about 5 minutes, the install will complete and your virtual machine will reboot.
Enabling Root SSH Access
When you install Wazo from the XiVO ISO, root logins via SSH are disabled by default. Only enable it if you plan to also implement the firewall in the next step! To enable root logins via SSH, log into your VirtualBox console session as root and edit the SSH config file: nano -w /etc/ssh/sshd_config. Find the line in the Authentication section that begins with PermitRootLogin and change it to: PermitRootLogin yes. Save your change (Ctrl-X, y, ENTER) and then restart SSH: /etc/init.d/ssh restart.

When your setup is finished, use ifconfig to obtain the IP address of your server.
Now you can exit from the VirtualBox console window by pressing Ctrl-Alt and use a browser to complete the install by pointing to the IP address of your virtual machine.
Incredible PBX Installation
Log into your server again as root via SSH/Putty and issue the following commands to complete the Wazo and Incredible PBX setup.
cd /root
wget http://incrediblepbx.com/IncrediblePBX15-Wazo.sh
chmod +x IncrediblePBX15-Wazo.sh
./IncrediblePBX15-Wazo.sh
Managing Your Wazo Server
Almost everything else you do with XiVO can be handled using a web browser pointed to this IP address.
Open a web browser to the IP address of your server. Ignore the https credentials warning to access your server. The default username for access is root, and the password is the one set during the Configuration step above.
You now can proceed to Incredible PBX Initial Configuration tutorial to continue your setup.