Home » Incredible PBX » Raspberry Pi (Page 16)

Category Archives: Raspberry Pi

The Most Versatile VoIP Provider: FREE PORTING

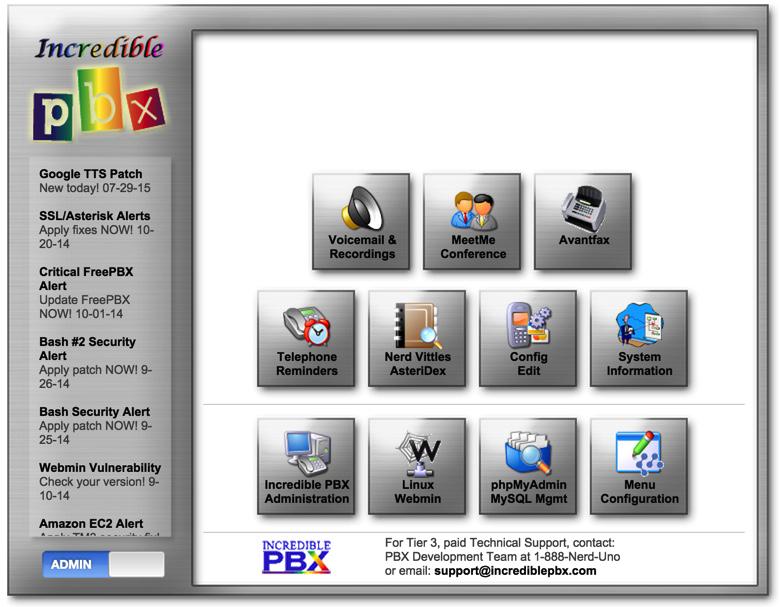
Why Reinvent the Wheel: Incredible PBX GUI Application User’s Guide

blank

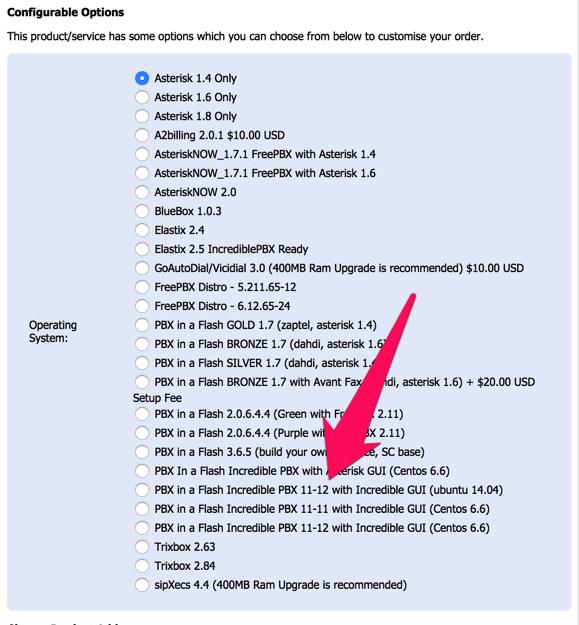
We’ve spent the last two months introducing a half dozen new flavors of Incredible PBX™ featuring the new GPL-compliant Incredible PBX GUI. We hope you’re enjoying the new builds. But it’s Back-to-School Time in the United States so today we’re shifting gears and providing a refresher course on the three dozen or so applications for Asterisk® that accompany every Incredible PBX install.

For those just beginning your Incredible PBX adventure, start here and choose your favorite platform. There are plenty of choices featuring Asterisk 11 or 13, FreePBX® GPL-compatible modules for versions 2.11 and 12, plus your favorite operating system: CentOS 6.7 and 7.0, Ubuntu 14, and Raspbian for the Raspberry Pi 2. There’s even an installer for the AsteriskNOW and FreePBX Distro proprietary platforms.

Once your system is up and running, you’ll be ready to kick the tires and discover all of the hidden goodies that await. Today we’ll cover all of the applications for Asterisk® that are included in the new Incredible PBX GUI platforms. After reading this tutorial, if you have specific questions, by all means post them on the PIAF Forum for some quick and friendly help.

Table of Contents to the Incredible PBX Applications

  1. Checking System Status
  2. Enabling Speech Recognition
  3. Wolfram Alpha for Siri-like queries by phone*
  4. Automatic Update Utility
  5. Asterisk Upgrade Utility
  6. Apache Authentication for Apps
  7. IPtables Firewall WhiteList
  8. PortKnocker Remote Access
  9. Travelin’ Man 4 Remote Access by Phone
  10. Conference Bridge
  11. CallerID Name (CNAM) Lookups
  12. Faxing with Incredible PBX
  13. Voicemail 101 with Incredible PBX
  14. Email Delivery of MP3 Voicemails
  15. Reconfiguring SendMail for SmartHosts
  16. SMS Blasting with Google Voice
  17. SMS Voice Messaging with Google Voice*
  18. SMS Messaging with VoIP.ms
  19. SIP URI Calling with Speed Dials
  20. IVR Demo of Incredible PBX Applications*
  21. Backup and Restore Options
  22. AsteriDex – The Poor Man’s Rolodex®
  23. Voice Dialing with AsteriDex*
  24. Speed Dialing with AsteriDex
  25. Scheduling Reminders by Phone or Web
  26. DISA Access with Incredible PBX
  27. Yahoo! News Headlines
  28. Weather Forecasts with Incredible PBX*
  29. ODBC Application Support
  30. Today in History
  31. Time of Day
  32. WebMin: The Linux Swiss Army Knife
  33. phpMyAdmin: The MySQL Swiss Army Knife
  34. SIP Gateways for Secure (and Free) Google Voice Calling
  35. User Control Panel for Extension Management

* Requires Voice Recognition implementation. See #2 above.

1. Checking Current Status of Incredible PBX

There are several ways to check the status of your server. First, log in as root and type: status or pbxstatus

blank

The second option is to use a browser to access your server. Choose the Admin menu. Then click Incredible PBX Administration. Log in as admin with the password you set in the Linux CLI: /root/admin-pw-change. Once you log in with your Incredible GUI admin password, the System Status menu will be displayed.

blank

Once you roam through the GUI options, you can redisplay the System Status screen by clicking Reports -> System Status.

2. Adding Speech Recognition to Incredible PBX

Google changed the licensing of their speech recognition engine last year and now restricts use to "personal and development use." Assuming you qualify, the very first order of business is to enable speech recognition for your new PBX. Once enabled, the Incredible PBX feature set grows exponentially. You’ll have access to the Voice Dialer for AsteriDex, Worldwide Weather Reports where you can say the name of a city and state or province to get a weather forecast for almost anywhere, Wolfram Alpha for a Siri-like encyclopedia for your PBX, and Lefteris Zafiris’ speech recognition software to build additional Asterisk apps limited only by your imagination.

Here’s how to activate speech recognition on Incredible PBX. Don’t skip any steps!

3. Using Wolfram Alpha with Incredible PBX

Ever wished your Asterisk server could harness the power of a 10,000 CPU Supercomputer to answer virtually any question you can dream up about the world we live in? Well, so long as it’s for non-commercial use, today’s your lucky day. Apple demonstrated with Siri™ just how amazing this technology can be by coupling Wolfram Alpha® to a speech-to-text engine on the iPhone. Now you can do much the same thing using voice recognition with Incredible PBX.

blank

Before using Wolfram Alpha from any phone connected to your PBX, you first must configure it by obtaining and adding a Wolfram Alpha application ID to Incredible PBX. Here are the simple steps:

1. Obtain your free Wolfram Alpha APP-ID here.

2. Log into your server as root and issue the following command:

nano -w /var/lib/asterisk/agi-bin/4747

3. When the nano editor opens, the top line of the file will look like this:

APPID="Your-Wolfram-Alpha-App-ID-Goes-Here"

4. Replace the text between the quotes with your APP_ID key from Step #1 above. Then save the file: Ctrl-X, Y, then Enter.

To use Wolfram Alpha, dial 4747 (that’s S-I-R-I backwards) from any extension.

Here are some sample queries to get you started:

Weather in Charleston South Carolina
Weather forecast for Washington D.C.
Next solar eclipse
Otis Redding
Define politician
Who won the 1969 Superbowl? (Broadway Joe)
What planes are overhead? (flying over your server’s location)
Ham and cheese sandwich (nutritional information)
Holidays 2015 (summary of all holidays for 2015 with dates and DOW)
Medical University of South Carolina (history of MUSC)
Star Trek (show history, air dates, number of episodes, and more)
Apollo 11 (everything you ever wanted to know)
Cheapest Toaster (brand and price)
Battle of Gettysburg (sad day 🙂 )
Daylight Savings Time 2015 (date ranges and how to set your clocks)
Tablets by Samsung (pricing, models, and specs)
Doughnut (you don’t wanna know)
Snickers bar (ditto)
Weather (local weather at your server’s location)

4. Automatic Update Utility for Incredible PBX

A key security component of Incredible PBX is its Automatic Update Utility. Each time you log into your server as root, the Automatic Update Utility is run. It installs the latest fixes and security patches for your server. Don’t disable it! In fact, don’t delete anything from the /root folder. You’ll need all of it sooner or later.

We recommend you log into your server as root at least once a week to keep your server current. Ditto for the web interface to Incredible PBX. Insofar as security is concerned, we make a best effort to keep the components of Incredible PBX up to date. The Linux operating system was installed by you before the Incredible PBX install began. That’s a nice way of saying Linux security is primarily your responsibility. When an egregious Linux vulnerability comes along that we know about, we will try to notify you of the issue on the PIAF Forum and on the RSS Feed that is part of the Incredible PBX Main Menu shown at the top of this article. Check the RSS Feed with a browser at least once a week. As a condition of use of the free Incredible PBX, you accepted ultimate responsibility for the security and reliability of your server. None of this discussion changes any of that.

5. Asterisk Upgrade Utility for Incredible PBX

We’ve developed a script to upgrade Asterisk to the latest version whenever you feel the urge. This brings you current in your existing release, e.g. Asterisk 11 or 13. It does NOT upgrade Asterisk 11 to 13! Before beginning the upgrade, log into your server as root using SSH and maximize the window. Otherwise, Asterisk may not compile properly. Then execute these commands:
cd /root
wget http://incrediblepbx.com/upgrade-asterisk-to-current.tar.gz
tar zxvf upgrade-asterisk-to-current.tar.gz
rm -f upgrade-asterisk-to-current.tar.gz
./upgrade-asterisk-to-current

6. Implementing Apache Authentication with Incredible PBX

With the exception of the Incredible GUI and WebMin, all web-based applications included in Incredible PBX require successful authentication with the Apache admin password to gain access. When you installed Incredible PBX, you should have created an Apache admin account. If not, issue the following command using a secure password after logging in as root:

htpasswd -b /etc/pbx/wwwpasswd admin newpassword

With the exception of AsteriDex and Reminders, you gain access to other Incredible PBX applications with the Apache admin account. For the remaining apps, you may wish to (but don’t have to) assign different account names and passwords to various departments in your organization. To set up these accounts, use the syntax above substituting the name of the department for "admin" and the department password for "newpassword."

7. Managing the IPtables Linux Firewall and WhiteList

As installed, Incredible PBX includes a preconfigured, locked-down Linux firewall that restricts incoming IPv6 traffic to localhost and, via a WhiteList, limits incoming IPv4 traffic to your server’s public and private IP addresses, your desktop computer’s IP address (that was used for the install), private LAN and NeoRouter VPN traffic, and a collection of our favorite SIP providers. You can WhiteList additional IP addresses for additional providers or for SIP and IAX phones located outside your firewall. The following firewall management scripts are mostly installed in the /root directory:

  • ./add-ip — WhiteList an additional IP address or IP address range (CIDR)
  • ./add-fqdn — WhiteList a site using a fully-qualified domain name (FQDN)
  • ./del-acct — Remove previously designated entry from the WhiteList
  • ./ipchecker — Check whether specified FQDNs have changed & update IPtables
  • iptables-restart — Used exclusively to restart IPtables and test for failed FQDNs
  • iptables -nL — Check the current status of your IPtables firewall

IPtables can be manually configured (if you know what you’re doing) by editing iptables and ip6tables in /etc/sysconfig (CentOS) or rules.v4 and rules.v6 in /etc/iptables (Ubuntu/Debian/Raspbian). NEVER use traditional iptables commands such as service iptables save to update your IPtables configuration, or you will permanently delete all of your FQDN entries! Instead, edit the files directly and then restart IPtables using iptables-restart. This protects the FQDN entries in your setup while also checking for invalid FQDN entries and removing them temporarily so that IPtables will successfully restart. If you use service iptables restart to restart IPtables and there happens to be an FQDN entry for a host that is either down or has disappeared, IPtables will fail to restart and your server will be left with NO firewall protection! The reason for this is the IPtables design which converts all FQDN entries to fixed IP addresses when it starts up. It’s also the reason we have to periodically check for changed FQDN entries using the ipchecker script with cron. For this to work properly, you will need to manually add your FQDN setups to the top of /root/ipchecker by inserting the filenames of any add-fqdn entries you have created. For additional details, read our Travelin’ Man 3 tutorial.

8. PortKnocker Remote Access to Incredible PBX

IPtables is a powerful firewall that keeps the bad guys out. It also will keep legitimate users (including you) from gaining remote access to your server unless you had the forethought to WhiteList your remote IP address before you left on that family vacation. Unfortunately, you don’t always know your IP address in advance. And dynamic IP addresses assigned with hotel WiFi frequently change. To address this problem, Incredible PBX includes a preconfigured PortKnocker utility. This lets you send three secret "knocks" on random TCP ports to your server to tell it to let you in temporarily (until IPtables is again restarted or the access window time expires).

For PortKnocker to work, you obviously need to know the secret knocks. You’ll find them in /root/knock.FAQ. Record them in your wallet or inside your suitcase for that rainy day! There are PortKnocker apps for almost all smartphones as well as for Windows, Mac, and Linux computers. Install your favorite AND test access before you leave town.

Finally, be aware that PortKnocker does not need any special access to your server to work; however, if your server is behind a hardware-based firewall, then you must map the three PortKnocker TCP ports to the private IP address of your server, or the knocks obviously will never get delivered to your server.

Review our PortKnocker tutorial for additional configuration tips.

9. Travelin’ Man 4 Remote Access to Incredible PBX (Dial TM4)

In addition to PortKnocker, Incredible PBX also includes a telephone-based solution to temporarily gain remote access to your server. This does require a bit of preplanning since you must create account credentials for the person to whom you wish to give remote access via a phone call. The complete tutorial for Travelin’ Man 4 is available on the PIAF Forum. All of the pieces already are in place on your server so skip down to the Configuration & Operation sections for details on implementation. The tutorial also covers the Administrator Utilities in /root/tm4 which let you set up remote user accounts.

10. Using the Conference Bridge in Incredible PBX (Dial C-O-N-F)


A new turnkey Asterisk Conference Bridge has been added to Incredible PBX. A conference bridge allows a group of people to participate in a joint phone call. Typically, participants dial into a virtual meeting room from their own phone. This virtual meeting room supports dozens or even hundreds of participants depending upon server capacity.

You do not need a timing source for conferencing with Incredible PBX! Old-style Asterisk MeetMe Conference Rooms which required a timing source are disabled.

To access the Conference Bridge, dial C-O-N-F (2663) from any phone connected to your server. Remote users can be added to a conference by providing a DID that points to an IVR which includes Conference Bridge access. Once connected to the conference bridge, a caller is prompted for the Conference Bridge PIN and his or her name.

To display Conference Bridge PINs, open Incredible GUI with a browser. Choose Applications -> Conferences -> 2663 and your Conference Bridge PINs will be shown. Reset them as desired.

11. CallerID Name (CNAM) Lookups with Incredible PBX

By default, Incredible PBX is configured to automatically provide CallerID Name lookups using CallerID Superfecta, an application initially developed on Nerd Vittles almost a decade ago. You also have the option of using free OpenCNAM CallerID name lookups for the first ten calls received each hour. These lookups are only from cached entries in the OpenCNAM database; however, you can enable the commercial lookup service if desired. The cost is four tenths of a cent per successful query.

12. Free Faxing with Incredible PBX

If you added Incredible Fax to your server by running incrediblefax script in the /root folder, then you’re in for a treat. As part of the install, you provided an email address for delivery of incoming faxes. That’s all the setup that is required to have incoming faxes delivered via email in PDF format. The best way to figure out whether a particular provider supports fax technology on their DIDs is to send a test fax to yourself. FaxZERO lets you send 5 free faxes of up to 3 pages every day. Give it a whirl.

blank

You also can send faxes using standard document types with the AvantFax web application. Log into AvantFax from the main Incredible PBX page by clicking on the AvantFax icon. Choose the Send a Fax option from the main menu, fill in the blanks, and attach your document. AvantFax uses the default dialplan so use the prefix desired to send the fax using your preferred provider. HINT: Google Voice does an excellent job with both incoming and outgoing faxes, and the calls are free in the U.S. and Canada.

Copies of all incoming faxes also are available for retrieval within AvantFax.

13. Voicemail 101 for Incredible PBX

Voicemail functionality is enabled on an extension-by-extension basis as part of the Extension setup under the Applications tab in the GUI. Once enabled, you can set up your mailbox and retrieve your messages by dialing *98. You can leave a message for any extension without actually calling the extension. Just prepend * to any extension number before dialing, e.g. *701. A number of the system settings for voicemail can be tweaked under the Voicemail Admin option under the Settings tab.

blank

14. Email Delivery of MP3 Voicemails with Incredible PBX

Speaking of email delivery, your voicemails also can be delivered to any email address of your choosing. For every Extension, simply add an Email Address in the Voicemail section of the form. With Incredible PBX, the voicemail message will be attached to the email in MP3 format so it’s suitable for playback with most email clients on desktop PCs, Macs, and smartphones. Be advised that some Internet service providers (such as Comcast) block downstream SMTP servers. You can check whether your outbound email is flowing by accessing WebMin (below) and choosing Servers -> SendMail Mail Server -> Mail Queue. If you find outbound mail is accumulating, then you’ll need to add your ISP’s SMTP server address as a SmartHost for SendMail as documented in the next section.

15. Reconfiguring SendMail for SmartHost SMTP Delivery Of Outgoing Emails

Many residential Internet service providers block downstream SMTP servers such as the SendMail server running with Incredible PBX. If you’re sending emails but they never arrive and you’ve checked your SPAM folder, then chances are your ISP is the culprit. The simple solution is to add your ISP’s SMTP server as a SmartHost for SendMail. This means outbound emails will be forwarded to your ISP for actual email transmission over the Internet. Here’s how. Edit /etc/mail/sendmail.cf and search for DS. Immediately after DS, add the FQDN of your ISP’s SMTP server, e.g. DSsmtp.comcrap.net (no spaces!). Save the file and then restart SendMail: service sendmail restart. Your email and voicemail messages with attachments should begin flowing without further delay.

Email from: Asterisk PBX asterisk@pbx.local...
"Nerd Vittles" at 8001234567 left a new voicemail message 1 for extension 6002 on Thursday, January 29, 2015 at 01:42:33 PM.

You can test email delivery by sending yourself a message from the Linux CLI:

echo "test" | mail -s testmessage yourname@somedomain.com

16. SMS Blasting with Google Voice and Incredible PBX

Out of the box, Incredible PBX supports SMS Message Blasting if you have a functioning Google Voice account set up. Before first use, you must add your credentials, address list, and text message to the SMS Blaster scripts in the /root folder.

In smsblast, insert your credentials:

GVACCT="yourname@gmail.com"
GVPASS="yourpassword"
MSGSUBJECT="Little League Alert"

In smslist.txt, insert one or more recipients for your message. These can be a combination of SMS addresses and email addresses and will be delivered accordingly.

NOTE: For most cellphone providers, you also can send an email message for SMS delivery by the provider. The complete list of providers is available here. Email messaging for SMS requires that you know the cellphone provider for your recipient while standard SMS messaging does not.

# In lieu of SMS number, email is also OK
8431234567 Doe John
mary@doe.com Doe Mary
8435551212@txt.att.net Mr T

In smsmsg.txt, enter the text message to be sent.

Once you have all three files configured, run the script: /root/smsblast.

17. Voice-Activated SMS Messaging with Incredible PBX (Dial S-M-S)

In addition to message blasting, you also can dial 767 from any extension and dictate an SMS message to send through your Google Voice account. When prompted for the destination, simply enter the 10-digit SMS number of the recipient.

18. SMS Messaging with VoIP.ms and Incredible PBX

Incredible PBX also supports SMS messaging through VoIP.ms if you have an account and an SMS-enabled DID. See the VoIP.ms wiki for setup info on the VoIP.ms side.

To install the VoIP.ms SMS scripts, follow these steps:

cd /root
mkdir sms-voip.ms
cd sms-voip.ms
wget http://incrediblepbx.com/voipms-SMS.tar.gz
tar zxvf voipms-SMS.tar.gz

Edit voipms-sms.php and insert your VoIP.ms number that supports SMS messaging (no spoofing allowed!):

$SMSsender="8005551212";

Edit class.voipms.php and insert your VoIP.ms API credentials:

    /*******************************************\
     *  VoIPms - API Credentials
    \*******************************************/
    var $api_username   = 'yourname@youremail.com';
    var $api_password   = 'yourpassword';

Send an SMS message through VoIP.ms with the following command where smsnumber is the 10-digit number of the SMS recipient and "sms message" is the text message surrounded by quotes:

/root/sms-voip.ms/voipms-sms.php smsnumber "sms message"

NOTE: VoIP.ms has indicated that sooner or later there will be a penny per message charge for SMS messages; however, they’re still free as of now.

19. SIP URI Calling with Incredible PBX (Demo: Dial L-E-N-N-Y)

With one line of dialplan code, you can add Speed Dials for free SIP URI calling worldwide. Just create an Other (Custom) Device Extension. Provide an extension number for the SIP URI and enter the SIP URI in the following format in the dial field: SIP/2233435945@sip2sip.info

20. IVR Demo of Incredible PBX Applications (Dial 7001)

The easiest way to try out a number of the Incredible PBX applications is to take the IVR Demo for a spin. Just pick up any phone and dial D-E-M-O (3366). The sample code for the IVR is available for review and modification in extensions_custom.conf. Just search for 3366. You can create your own IVRs and AutoAttendants using the IVR option under the Applications tab in the GUI.

21. Incredible Backup & Restore with Incredible PBX

Incredible Backup and Restore scripts are included in the /root folder. These scripts make and restore snapshots of the settings on your server and should be used in conjunction with a full system backup solution. The GUI includes its own backup snapshots by choosing Backup & Restore under the Admin tab.

22. AsteriDex – The Poor Man’s Rolodex

AsteriDex is a web-based phonebook application for Incredible PBX. You can access it from the main web menu. Scripts are also available to import your contacts from Outlook and Google Contacts.

23. Voice Dialing with AsteriDex (Dial 411)

If you have voice recognition enabled on your server, you can call anyone in your AsteriDex database by dialing 411.

24. Speed Dialing with AsteriDex (Dial 412 or 000+)

For those without voice recognition, Incredible PBX includes two speed dialing utilities. The first is accessed by dialing 412. Then enter any 3-digit dialcode from your AsteriDex database to complete the call.

For a complete listing of your AsteriDex dial codes, execute this query:

mysql -u root -ppassw0rd asteridex -e "select name,dialcode from user1 order by name"

25. Telephone Reminders (Dial 123)

Incredible PBX includes a sophisticated reminders system that lets you schedule individual or recurring reminders using your phone by dialing 123 or a web browser. A complete tutorial is available here. For phone reminders, a password is required to access the reminder system. You’ll find or can set your Reminders password by searching for 123 in extensions_custom.conf. Typically, these reminders set up a return call at a scheduled time that then plays back either a recorded message or a TTS message generated from the text you entered in the browser application. Incredible PBX also includes a new addition that lets you schedule web reminders that are delivered by email or SMS message. Links to the web-based reminders applications are in the main Incredible PBX web menu.

blank

26. DISA Access with Incredible PBX

Direct Inward System Access (aka DISA) is one of the great PBX inventions of the last 50 years. It’s also one of the most dangerous. It lets someone connect to your PBX and obtain dial tone to place an outbound call using your trunks… on your nickel. Typically, it is offered as an option with an IVR or AutoAttendant. DISA extensions can be added using the DISA option under the Applications tab. Make sure you assign a very secure password. It’s your phone bill.

blank

27. Yahoo! News (Dial 951)

Yahoo! news headlines are available by dialing 951. The news option also is included in the sample IVR application.

28. Weather Forecasts by Phone (Dial 949 or Z-I-P)

If you have voice recognition enabled on your server, you can retrieve a weather report for most cities in the world by dialing 949 and saying the name of the city plus the state, province, or country. For PBXs without voice recognition, you can obtain a weather forecast for most zip codes by dialing 947 (Z-I-P) and entering the 5-digit zip code.

29. ODBC Application Support for Asterisk

ODBC/MySQL application support for Asterisk is included in Incredible PBX. You can try out a few sample applications that are included to get you started. Dial 222 and enter 12345 for the employee number. This retrieves an employee name from the MySQL timeclock database using Asterisk. Dial 223 to retrieve an AsteriDex name and phone number by entering the 3-character dialcode. You then have the option of placing the call by pressing 1. Once you have created accounts for Travelin’ Man 4, you can dial 864 (T-M-4) to WhiteList an IP address for that account after entering the account number and matching PIN. Use the * key for periods in the IP address. The code for all of the samples is in the following files in /etc/asterisk: odbc.conf and func_odbc.conf. If you create new MySQL databases, remember to add corresponding entries in res_odbc.conf and /etc/odbc.ini. Then restart Asterisk: amportal restart.

30. Today in History (Dial T-O-D-A-Y)

It’s always interesting to find out what happened Today in History. And Incredible PBX now delivers it by phone. Just dial 86329 (T-O-D-A-Y) for a walk down memory lane.

31. Time of Day

Speaking of yesteryear, if you grew up dialing TI-4-1212 for the time of day, Ma Bell may have discontinued the service, but we haven’t. Now you can do it on your very own PBX. Just dial into the DEMO IVR and choose option 4.

But suppose you want your users to be able to dial in for the time. Just dial *61 for a time update.

32. WebMin: The Linux Swiss Army Knife

There is no finer Linux application than WebMin. There is no more dangerous Linux application than WebMin. You’ve been warned. We heartily recommend WebMin as a tool to LOOK at your server’s settings. We strongly discourage changing anything in WebMin unless you totally know what you are doing. This is especially true with management of Linux applications that make up the core of Incredible PBX: the Linux kernel, SendMail, IPtables, Apache, MySQL, PHP, and…

blank

To access WebMin, click on the WebMin link in the main Incredible PBX web menu. The username is root. The password is your root password. WebMin has root privileges to your server. Reread paragraph 1 and act accordingly.

For an exhaustive tutorial on WebMin, download The Book of WebMin by Joe Cooper. For a more recent commercial offering, take a look at Michal Karzyński’s WebMin Administrator’s Cookbook.

33. phpMyAdmin: The MySQL Swiss Army Knife

The same caveats we expressed regarding WebMin apply to phpMyAdmin. It is a powerful tool for managing MySQL databases in the right hands. It is a dangerous tool in the wrong hands. There should be little need to use phpMyAdmin unless you are developing a customized database solution for your business. We’ve included phpMyAdmin just in case.

blank

To access phpMyAdmin, click on the phpMyAdmin link in the main Incredible PBX web menu. For tutorials on phpMyAdmin, see the phpMyAdmin wiki. For an excellent commercial offering focused on the version of phpMyAdmin installed on your server, consider Mastering phpMyAdmin 3.4 for Effective MySQL Management by Marc Delisle.

34. SIP Gateways for Secure (and Free) Google Voice Calling

If you have difficulty finding the Google Chat option after setting up a new Google Voice account, follow this tutorial. If you’d prefer a secure, pain-free method of accessing Google Voice via SIP for a modest one-time fee, there are some other options:

35. User Control Panel for Extension Management

For those that have clamored for a safe way to permit end-users to manage their extensions and voicemails, your ship has arrived. Meet the User Control Panel (UCP) which now is part of the Incredible PBX GUI. First, set up accounts for your users with the User Management option under the Admin tab. Specify account names, passwords, and extensions to be managed. Other entries for email addresses are optional. Then choose the UCP option in the GUI, login with one of the accounts you’ve created, and follow your nose.

blank

Originally published: Wednesday, August 26, 2015


blankSupport Issues. With any application as sophisticated as this one, you’re bound to have questions. Blog comments are a terrible place to handle support issues although we welcome general comments about our articles and software. If you have particular support issues, we encourage you to get actively involved in the PBX in a Flash Forums. It’s the best Asterisk tech support site in the business, and it’s all free! Please have a look and post your support questions there. Unlike some forums, ours is extremely friendly and is supported by literally hundreds of Asterisk gurus and thousands of users just like you. You won’t have to wait long for an answer to your question.


blank
Need help with Asterisk? Visit the PBX in a Flash Forum.


Special Thanks to Our Generous Sponsors


FULL DISCLOSURE: ClearlyIP, Skyetel, Vitelity, DigitalOcean, Vultr, VoIP.ms, 3CX, Sangoma, TelecomsXchange and VitalPBX have provided financial support to Nerd Vittles and our open source projects through advertising, referral revenue, and/or merchandise. As an Amazon Associate and Best Buy Affiliate, we also earn from qualifying purchases. We’ve chosen these providers not the other way around. Our decisions are based upon their corporate reputation and the quality of their offerings and pricing. Our recommendations regarding technology are reached without regard to financial compensation except in situations in which comparable products at comparable pricing are available from multiple sources. In this limited case, we support our sponsors because our sponsors support us.

blankBOGO Bonaza: Enjoy state-of-the-art VoIP service with a $10 credit and half-price SIP service on up to $500 of Skyetel trunking with free number porting when you fund your Skyetel account. No limits on number of simultaneous calls. Quadruple data center redundancy. $25 monthly minimum spend required. Tutorial and sign up details are here.

blankThe lynchpin of Incredible PBX 2020 and beyond is ClearlyIP components which bring management of FreePBX modules and SIP phone integration to a level never before available with any other Asterisk distribution. And now you can configure and reconfigure your new Incredible PBX phones from the convenience of the Incredible PBX GUI.

blankVitalPBX is perhaps the fastest-growing PBX offering based upon Asterisk with an installed presence in more than 100 countries worldwide. VitalPBX has generously provided a customized White Label version of Incredible PBX tailored for use with all Incredible PBX and VitalPBX custom applications. Follow this link for a free test drive!
 

blankSpecial Thanks to Vitelity. Vitelity is now Voyant Communications and has halted new registrations for the time being. Our special thanks to Vitelity for their unwavering financial support over many years and to the many Nerd Vittles readers who continue to enjoy the benefits of their service offerings. We will keep everyone posted on further developments.


Some Recent Nerd Vittles Articles of Interest…

Decisions, Decisions: Choosing the SOHO Asterisk Platform That’s Best For You

Each year we like to revisit the topic of choosing the best Asterisk® platform for deployment in the home and small business environment. No solution is obviously right for everybody. But we think it’s important to sketch out the relevant factors that need careful evaluation before you begin the installation process.

Our focus today is open source, GPL platforms with Asterisk for home or SOHO deployments. That excludes a broad swath of equally capable commercial or proprietary alternatives including ThirdLane, Switchvox, and FreePBX® Distro as well as many unified communications solutions that do not rely upon the Asterisk telephony engine including FreeSWITCH, ShoreTel, Cisco, 3CX, and many others. If your requirements exceed telephony support for more than a few dozen employees, our recommendation is to hire a consultant that can assist you in that decision-making process.

When It Comes to Hardware, Size Matters!

Even in the telephony world, it’s true. Size Matters! Choosing an Asterisk platform for your home and choosing a telephony platform for a call center are very different beasts. Our traditional recommendation for home and SOHO deployments was to go with dedicated hardware with an appropriately sized Atom processor, RAM, and hard drive. In the words of Bob Dylan, "The Times They Are A Changin’." With the nosedive in Cloud processing costs and the emergence of powerful desktop virtual machine platforms, that may no longer be the smartest solution. First, it puts you in the hardware business which means you’ll have to deal with hardware failures and backups and redundancy. Second, depending upon where you live, it may not be cost-effective to maintain your own server. Electricity and Internet connectivity cost real money above and beyond hardware costs.

For home or SOHO deployments, it also depends upon what other computers already are in use around your house or office. For example, if you have a $2,000 iMac with a $100 backup drive running Carbon Copy Cloner each night, then you’ve already got a fully redundant server platform in place. You really don’t need a dedicated server for telephony to support a handful of telephones. VirtualBox® running any of the Incredible PBX™ solutions is free, and it’s fully capable of meeting your telephony requirements with no additional hardware investment.1 If your iMac’s main drive crashes, you can reboot from the attached USB backup drive with a single keystroke and never miss a beat. For those dead set on running dedicated hardware for your home or SOHO telephone system, there’s really no reason to spend more than $35 for a Raspberry Pi®. With its new quad-core processor and gig of RAM, it can meet or exceed any requirements you may have. Buy a second microSD card for redundancy and call it day as far as hardware is concerned.

If you’d prefer to separate your telephone system from your house or small office, a Cloud-based setup may be a better fit. Our Platinum sponsor, RentPBX,2 offers a worldwide collection of servers and will host your Asterisk-based PBX for $15 a month (Coupon Code: NOGOTCHAS) on a platform that rarely, if ever, goes down. If you like to tinker but also prefer a Cloud solution, consider Digital Ocean ($5 a month for a virtual machine) or Vultr ($2.50 a month) or HiFormance ($13/year). All four support Nerd Vittles with referral revenue which helps us keep the lights on.

blank

NEWS FLASH: RentPBX now offers all of the new Incredible PBX builds with the Incredible PBX GUI. Tutorials available here: CentOS platform or Ubuntu platform. Use the NOGOTCHAS coupon code for $15/mo. pricing.

That’s our latest take on SOHO hardware. If you have additional questions or concerns, come join the PIAF Forum and take advantage of our hundreds of gurus who will give you all of the free advice you could ever want.

I’ve Got My Hardware Platform. Now What?

The next step is choosing an Asterisk telephony platform. That used to be easy. There was Plain Ol’ Asterisk if you were a guru or there was Asterisk@Home if you wanted a GUI to guide you through the telephony maze. Now it’s more complicated. There are a number of different Linux platforms. There are a number of different Asterisk versions. And there are a number of different GUIs that support Asterisk. So let’s work our way down the list starting with the Linux platform.

Choosing the Best Linux Platform for Asterisk

The gold standard for Asterisk servers has always been CentOS, a GPL clone of RedHat Enterprise Linux. It, too, is now owned by Red Hat. The old adage was that nobody ever got fired for recommending IBM. In the Asterisk community, that remains true with CentOS. Unfortunately, CentOS now comes in several flavors. There’s CentOS 6 or CentOS 7 which is a very different beast. For Asterisk deployments, you can’t go wrong with CentOS 6. It works well on the latest dedicated hardware and is supported on all virtual machine platforms.

As with choosing a language, you now have a choice of Linux platforms. There’s RedHat/CentOS, or Debian, or Ubuntu, or even Raspbian for the Raspberry Pi hardware. Unfortunately, the RedHat-CentOS and Debian-Ubuntu-Raspbian platforms have completely different languages, much like French and Spanish. The Linux packages that are included in the platforms also have different names. If you’re a Linux aficionado and you already have a favorite, stick with what you love. If you’re planning to deploy a Raspberry Pi, stick with Raspbian. For everyone else, CentOS 6 still is your best bet for now.

Choosing the Best Asterisk Platform

Believe it or not, there are many organizations still running their telephone systems using Asterisk 1.4 or 1.8 even though Digium support for those platforms ended years ago. In the commercial world, it is not uncommon to see telephone systems that are more than a decade old. With Asterisk, things are quite different. There’s a new version every year. Fortunately, Digium has adopted a new support philosophy and every other release (more or less) now is anointed with the LTS (Long Term Support) moniker. An LTS release gets four years of bug fixes and five years of security updates as opposed to the other releases that come with one year of bug fixes and two years of security updates. It’s still not 10 years, but it’s certainly better than wrestling with Asterisk updates annually.

We think there remains a need to reconsider these timetables. New updates have become so complex that the releases typically are almost two years into their life cycle before there is anyone that treats the releases as anything more than experimental. This was especially true of Asterisk 12 which was a terrific new product that provided dramatic improvements particularly in the SIP area. Unfortunately, it reached end-of-life status before most folks even had an opportunity to use it. Our recommendation remains Asterisk 13 which is an LTS version that’s rock-solid.

Choosing a GPL-Compliant GUI

Most of the GUIs for Asterisk have one primary purpose. They are code generators for the Asterisk telephony engine, nothing more. With each of them, you can turn off your web server after using the graphical user interface, and your phone system will continue to work as designed. The exception to that is Wazo which is an awesome real-time implementation of Asterisk. The only drawback is its steep learning curve.

In the top right sidebar of Nerd Vittles, you’ll find a colorful list of all the Asterisk distributions we support. The good news for you is they’re all free. So take a little time and load up several of them. Kick the tires until you find one that is easy for you to deploy. Our personal favorite remains Incredible PBX® 13-13, but you can’t go wrong with Issabel® or Wazo. Rome wasn’t built in a day so don’t expect to master Asterisk in a couple of hours. We’ve been at it for ten years and still learn something new almost every day. And that’s the fun of it.

A 3-Click Decision Tree for Asterisk

Now that you have the background, we also wanted to provide a simple Decision Tree tool that will guide you through choosing the Asterisk GPL aggregation that best meets your needs. After you’ve made your selections, the utility will point you to the tutorials that will walk you through downloading, installing, and using the platform of your choice. Just click here to get started. Enjoy!

Originally published: Monday, June 22, 2015  Updated: Wednesday, February 21, 2018


blank
Need help with Asterisk? Visit the PBX in a Flash Forum.


Special Thanks to Our Generous Sponsors


FULL DISCLOSURE: ClearlyIP, Skyetel, Vitelity, DigitalOcean, Vultr, VoIP.ms, 3CX, Sangoma, TelecomsXchange and VitalPBX have provided financial support to Nerd Vittles and our open source projects through advertising, referral revenue, and/or merchandise. As an Amazon Associate and Best Buy Affiliate, we also earn from qualifying purchases. We’ve chosen these providers not the other way around. Our decisions are based upon their corporate reputation and the quality of their offerings and pricing. Our recommendations regarding technology are reached without regard to financial compensation except in situations in which comparable products at comparable pricing are available from multiple sources. In this limited case, we support our sponsors because our sponsors support us.

blankBOGO Bonaza: Enjoy state-of-the-art VoIP service with a $10 credit and half-price SIP service on up to $500 of Skyetel trunking with free number porting when you fund your Skyetel account. No limits on number of simultaneous calls. Quadruple data center redundancy. $25 monthly minimum spend required. Tutorial and sign up details are here.

blankThe lynchpin of Incredible PBX 2020 and beyond is ClearlyIP components which bring management of FreePBX modules and SIP phone integration to a level never before available with any other Asterisk distribution. And now you can configure and reconfigure your new Incredible PBX phones from the convenience of the Incredible PBX GUI.

blankVitalPBX is perhaps the fastest-growing PBX offering based upon Asterisk with an installed presence in more than 100 countries worldwide. VitalPBX has generously provided a customized White Label version of Incredible PBX tailored for use with all Incredible PBX and VitalPBX custom applications. Follow this link for a free test drive!
 

blankSpecial Thanks to Vitelity. Vitelity is now Voyant Communications and has halted new registrations for the time being. Our special thanks to Vitelity for their unwavering financial support over many years and to the many Nerd Vittles readers who continue to enjoy the benefits of their service offerings. We will keep everyone posted on further developments.


Some Recent Nerd Vittles Articles of Interest…

  1. We will introduce the all-new Incredible PBX GUI platform for VirtualBox next week on Nerd Vittles. If you’re in a hurry, the Pioneer’s Edition now is available with a tutorial to get you started on the PIAF Forum. []
  2. Some of our links refer users to service providers when we find their prices are competitive for the recommended products. Nerd Vittles receives a small referral fee from some of these providers to help cover the costs of our blog. We never recommend particular products solely to generate commissions. However, when pricing is comparable or availability is favorable, we support these providers because they support us. []

Introducing Incredible PBX and the New Incredible GUI for the Raspberry Pi 2

blank

[iframe-popup id="3″]
We’ve been huge fans of the Raspberry Pi since its introduction. And the Raspberry Pi 2 with its quad-core processor and gig of RAM transformed the platform from a tinkerer’s dream machine into a production workhorse. Four months ago, we introduced our Gotcha-Free PBX with Asterisk® 11 for the new platform. But Asterisk-GUI had a steep learning curve, and Digium now has officially discontinued support of what we believe was a terrific product with enormous potential. So today we’re pleased to introduce the all-new Incredible PBX with the Incredible PBX GUI running the very latest Asterisk 11.18 release together with all of the GPL-compatible PBX GUI modules you’ve known and loved for the past decade. No strings, no trademark gotchas, just pure GPL code that you can share and embellish as you see fit without legal retribution from us.

Target Audience: Home or SOHO/SBO seeking a GPL PBX with a web-based Graphical User Interface

Default Configuration: Asterisk 11 with Incredible PBX GUI, Kennonsoft GUI, and NANPA dialplan

Platform: Raspbian 7 running on a Raspberry Pi 2

Standard Memory: 1024MB

Recommended Disk: 16GB+

Default Trunks: Google Voice, CallCentric, DIDlogic, Future-Nine, IPcomms, Les.net, Vitelity, VoIP.ms1

Feature Set: SMS messaging, VPN, Reminders, ConfBridge Conferencing, AsteriDex, Voicemail, Email, IVR, News, Weather, Voice Dialer, Wolfram Alpha, Today in History, TM3 Firewall WhiteList, Speed Dialer, iNUM and SIP URI (free) worldwide calling, OpenCNAM CallerID lookups, DISA, Call Forwarding, CSV CDRs

Administrator Utilities: Incredible Backup/Restore, Automatic Updater, Asterisk Upgrader, phpMyAdmin, Timezone Config, Plug-and-Play Trunk Configurator, WebMin, External IP Setup, Firewall WhiteList Tools

As if that weren’t enough good news, we also are pleased to introduce our new 10-Layer Network Security Model for future Incredible PBX builds including today’s Raspberry Pi edition.

  1. Preconfigured IPtables Linux Firewall
  2. Preconfigured Travelin’ Man 3 WhiteLists
  3. Randomized Port Knocker for Remote Access
  4. TM4 WhiteListing by Telephone (optional)
  5. Fail2Ban Log Monitoring for SSH, Apache, Asterisk
  6. Randomized Ultra-Secure Passwords
  7. Automatic Security Updates & Bug Fixes
  8. Asterisk Manager Lockdown to localhost
  9. Apache htaccess Security for Vulnerable Web Apps
  10. Security Alerts via RSS Feeds in Kennonsoft and Incredible PBX GUIs

No single network security system can protect you against zero-day vulnerabilities that no one has ever seen. Just ask the FreePBX® folks. Deploying multiple layers of security is not only smart, it’s essential with today’s Internet topology. It works much like the Bundle of Sticks from Aesop’s Fables. The more sticks there are in your bundle, the more difficult it is to break them apart. If a vulnerability suddenly appears in the Linux kernel, or in Asterisk, or in Apache, or in your favorite web GUI, you can continue to sleep well knowing that other layers of security have your back. No one else in the telecommunications industry has anything even close. It’s all open source GPL code so we would encourage everyone to get on board and do their part to make the Internet a safer place!

Getting Started with Incredible PBX and Incredible PBX GUI (RasPi 2 Edition)

Here’s a quick overview of the installation and setup process for Incredible PBX featuring the Incredible PBX GUI:

  1. Install Linux for Raspberry Pi 2 – Install Raspbian 7 Platform
  2. Configure Raspbian 7 – Optimize Raspbian 7 for Incredible PBX
  3. Download and Install Incredible PBX + Incredible PBX GUI
  4. Install Incredible Fax with HylaFax/AvantFax (optional)
  5. Set Up Passwords for Incredible PBX
  6. Configure Trunks using Incredible PBX GUI
  7. Connect a Softphone using Incredible PBX GUI

1. Install Raspbian 7 Platform for Raspberry Pi 2

For those with Raspberry Pi experience, this is the same drill you’ve performed a dozen times before. For newbies, here’s the procedure. You’ll need a microSD card of at least 8GB, and we strongly recommend a 16GB or 32GB Type 10 card for Incredible PBX. We’ve tested both the SanDisk and Transcend cards, and they work great.

Begin by downloading the RASPBIAN Wheezy image from RaspberryPi.org to your desktop. After you’ve unzipped the image, you need to get it moved to your microSD card. RaspberryPi.org has excellent tutorials that will walk you through the process using a Linux, Mac, or Windows desktop platform. Don’t forget to unmount the card before removing it!

Once you have your microSD card ready to go, plug it into the slot on the back of the Raspberry Pi 2 and then plug in the power cord. On your attached monitor, you can follow the boot up process. When the login prompt appears, log in as user pi with the password raspberry. Choose text mode for bootups!

2. Optimizing Raspbian 7 for Incredible PBX

The first time you boot up your Raspberry Pi 2 with Raspbian 7, it will run the raspi-config script. This allows you to make a number of changes to your Raspberry Pi environment to maximize performance. Let’s take advantage of it.

Option 1. Expand the File System to fill your SD card. Otherwise, there’s insufficient disk space to complete the install.

Advanced Options. Enable Remote SSH access to your Raspberry Pi 2.

Tab to the Finish option and press ENTER. Then choose Reboot and YES.

After the reboot, log back in as pi:raspberry and set a very secure root password: sudo passwd root. Decipher your IP address so that you can log in as root via SSH: ifconfig.

We strongly recommend completing the install by logging in as root using a desktop computer via SSH or Putty (for Windows). This gives you the ability to scroll back up and find errors if something happens to come unglued during the install process. It also assures that your desktop computer will be whitelisted in the automated setup of the IPtables firewall.

3. Install Incredible PBX on Your Raspberry Pi 2

Adding Incredible PBX to the Raspberry Pi 2 is easy. To restate the obvious, your server needs a reliable Internet connection to proceed. Using SSH (or Putty on a Windows machine), log into your Raspberry Pi 2 as root at the IP address you deciphered in the ifconfig step at the end of the Raspbian install procedure above.

Now let’s begin the Incredible PBX install. After logging in as root, issue the following commands. The install takes less than an hour and runs unattended so there’s no need to watch unless you’re curious about how sausage is made. Remember, as part of the build process, we compile all of the major components for Incredible PBX from source. And you can review the open source GPL script to see how it’s done if you have an interest or wish to embellish. It’s Gotcha-Free code so go for it and share your discoveries. After all, that’s what open source is all about!

cd /root
wget http://incrediblepbx.com/incrediblepbx11-12.2.raspbian.tar.gz
tar zxvf incrediblepbx11-12.2.raspbian.tar.gz
rm -f incrediblepbx11-12.2.raspbian.tar.gz
./IncrediblePBX11-12.2-raspbian.sh

blank

4. Install Incredible Fax for Incredible PBX (optional)

Administrators have been trying to stomp out faxing for at least two decades. Here’s a hint. It ain’t gonna happen. So go with the flow and add Gotcha-Free Faxing to your server. It’ll be there when you need it. And sooner or later, you’ll need it. This install script is simple enough for any monkey to complete. Run the script and enter the email address for delivery of your faxes. Then, if you’re in the U.S. or Canada, press the Enter key to accept every default entry during the HylaFax and AvantFax installation steps. For other countries, read the prompts and answer accordingly.

cd /root
./incrediblefax11_raspi2.sh

When the installation finishes, reboot your server to bring faxing on line. After rebooting, change your AvantFax admin password: /root/avantfax-pw-change. You can access the AvantFax GUI with your browser by logging in as admin with your admin password from the previous step suing either the Kennonsoft admin menu (pictured below) or from within the Incredible PBX GUI itself by clicking on the AvantFax tab.

blank

Outgoing faxes using standard document attachments can be created using the AvantFax GUI. The faxes will be sent out using your default outbound dial rules. You can add a dial prefix in sending a fax with AvantFax to force the call out a particular trunk that has been preconfigured in the Incredible PBX GUI.

Incoming faxes will be delivered to the email address you specified when installing Incredible Fax; however, incoming faxes will be ignored until you configure a destination DID to accept the faxes. For the incoming route of the destination DID, specify: blank

5. Initial Configuration of Incredible PBX

Incredible PBX is installed with the preconfigured IPtables Linux firewall already in place. It implements WhiteList Security to limit server access to private LANs, your server’s IP address, your desktop computer’s IP address, and a few of our favorite SIP providers. You can add additional entries to this WhiteList whenever you like using the add-ip and add-fqdn tools in /root. There’s also an Apache security layer for our web applications. And the Incredible PBX GUI has its own security methodology. Finally, we randomize extension and DISA passwords as part of the initial install process. Out of the starting gate, you won’t find a more secure VoIP server implementation anywhere. After all, it’s your phone bill.

Even with all of these layers of security, here are 10 Quick Steps to better safeguard your server. You only do this once, but failing to do it may lead to security issues you don’t want to have to deal with down the road. So DO IT NOW!

First, log into your server as root with your root password and do the following:

Make your root password very secure: passwd
Set your correct time zone: ./timezone-setup
Restart Asterisk: amportal restart
Create admin password for main GUI: /root/admin-pw-change
Create admin password for web apps: htpasswd -b /etc/pbx/wwwpasswd admin newpassword
Make a copy of your other passwords: cat passwords.FAQ
Make a copy of your Knock codes: cat knock.FAQ
Decipher IP address and other info about your server: status

Second, log into your server as admin using a web browser pointed to your server’s IP address and change your extension 701 extension and voicemail passwords:

Click USERS tab in Incredible PBX GUI
Click Incredible PBX GUI Administration
Log in as user: admin with admin-pw-change password

Last but not least, Incredible PBX includes an automatic update utility which downloads important updates whenever you log into your server as root. We recommend you log in once a week to keep your server current. Now would be a good time to log out and back into your server at the Linux command line to bring your Raspberry Pi 2 up to current specs.

6. Configure Trunks with Incredible PBX

Now for the fun part. If this is your first VoIP adventure, be advised that this ain’t your grandma’s phone system. You need not and should not put all your eggs in one basket when it comes to telephone providers. In order to connect to Plain Old Telephones, you still need at least one provider. But there is nothing wrong with having several. And a provider that handles an outbound call (termination) need not be the same one that handles an incoming call (origination) and provides your phone number (DID). We cannot recommend Vitelity highly enough, and it’s not just because they have financially supported our projects for almost a decade. They’re as good as VoIP providers get, and we use lots of them. If you’re lucky enough to live in the U.S., you’d be crazy not to set up a Google Voice account. It’s free as are all phone calls to anywhere in the U.S. and Canada. The remaining preconfigured providers included in Incredible PBX are equally good, and we’ve used and continue to use almost all of them. So pick a few and sign up. You only pay for the calls you make with each provider so you have little to lose by choosing several. The PIAF Forum includes dozens of recommendations on VoIP providers if you want additional information.

With the preconfigured trunks in Incredible PBX, all you need are your credentials for each provider and the FQDN of their server. Log into Incredible PBX GUI Administration as admin using a browser. From the System Status menu, click Connectivity -> Trunks. Click on each provider you have chosen and fill in your credentials including the host entry. Be sure to uncheck the Disable Trunk checkbox! Fill in the appropriate information for the Register String. Save your settings by clicking Submit Changes. Then click the red Apply Config button.

7. Configure a Softphone for Incredible PBX

We’re in the home stretch now. You can connect virtually any kind of telephone to your new PBX. Plain Old Phones require an analog telephone adapter (ATA) which can be a separate board in your computer from a company such as Digium. Or it can be a standalone SIP device such as ObiHai’s OBi100 or OBi110 (if you have a phone line from Ma Bell to hook up as well). SIP phones can be connected directly so long as they have an IP address. These could be hardware devices or software devices such as the YateClient softphone. We’ll start with a free one today so you can begin making calls. You can find dozens of recommendations for hardware-based SIP phones both on Nerd Vittles and the PIAF Forum when you’re ready to get serious about VoIP telephony.

We recommend YateClient which is free. Download it from here. Run YateClient once you’ve installed it and enter the credentials for the 701 extension on Incredible PBX. You’ll need the IP address of your server plus your extension 701 password. Choose Applications _> Extensions -> 701 and write down your SIP/IAX Password. You can also find it in /root/passwords.FAQ. Fill in the blanks using the IP address of your server, 701 for your account name, and whatever password is assigned to the extension. Click OK to save your entries.

blank

Once you are registered to extension 701, close the Account window. Then click on YATE’s Telephony Tab and place some test calls to the numerous apps that are preconfigured on Incredible PBX. Dial a few of these to get started:

DEMO - Apps Demo
123 - Reminders
947 - Weather by ZIP Code
951 - Yahoo News
*61 - Time of Day
TODAY - Today in History

If you are a Mac user, another great no-frills softphone is Telephone. Just download and install it from the Mac App Store.

Configuring Google Voice

If you want to use Google Voice, you’ll need a dedicated Google Voice account to support Incredible PBX. The more obscure the username (with some embedded numbers), the better off you will be. This will keep folks from bombarding you with unsolicited Gtalk chat messages, and who knows what nefarious scheme will be discovered using Google messaging six months from now. So keep this account a secret!

IMPORTANT: Do NOT under any circumstances take Google’s bait to switch from Google Chat to Hangouts, or you will forever lose the ability to use Google Chat with Incredible PBX. Also be sure to enable the Google Chat option as one of your phone destinations in Settings, Voice Setting, Phones. That’s the destination we need for The Incredible PBX to work its magic! Otherwise, all inbound and outbound calls will fail. Good News! You’re in luck. Google has apparently had a change of heart on discontinuing Google Chat support so it’s enabled by default in all new Google Voice accounts. Once you’ve created a Gmail and Google Voice account, go to Google Voice Settings and click on the Calls tab. Make sure your settings match these:

  • Call ScreeningOFF
  • Call PresentationOFF
  • Caller ID (In)Display Caller’s Number
  • Caller ID (Out)Don’t Change Anything
  • Do Not DisturbOFF
  • Call Options (Enable Recording)OFF
  • Global Spam FilteringON

Click Save Changes once you’ve adjusted your settings. Under the Voicemail tab, plug in your email address so you get notified of new voicemails. Down the road, receipt of a Google Voice voicemail will be a big hint that something has come unglued on your PBX.

One final word of caution is in order regardless of your choice of providers: Do NOT use special characters in any provider passwords, or nothing will work!

Now you’re ready to configure your Google Voice account in Incredible PBX. You can do it from within the Incredible PBX GUI by choosing Connectivity -> Google Voice. Once you’ve entered your credentials, you MUST restart Asterisk from the command line, or Google Voice calls will fail.

If you have trouble getting Google Voice to work (especially if you have previously used your Google Voice account from a different IP address), try this Google Voice Reset Procedure. It usually fixes connectivity problems. If it still doesn’t work, enable Less Secure Apps using this Google tool.

If you have difficulty finding the Google Chat option after setting up a new Google Voice account, follow this tutorial.

NOTE: There are all sorts of rumors circulating again that the Google Voice free ride may be coming to a close. We’ve heard this song before, but who knows?? Whether true or not, you are well advised to not rely solely on Google Voice for your phone calls. That’s the real beauty of a PBX. So take advantage of it!

Another option is to use one of the inexpensive SIP Gateways to Google Voice. HINT: The Simonics trunk in the Incredible PBX GUI is preconfigured. All you’ll need is your credentials.

Adding Speech Recognition Support to Incredible PBX

To support many of our applications, Incredible PBX has included Google’s speech recognition service for years. These applications include Weather Reports by City (949), AsteriDex Voice Dialing by Name (411), and Wolfram Alpha for Asterisk (4747), all of which use Lefteris Zafiris’ terrific speech-recog AGI script. Unfortunately (for some), Google now has tightened up the terms of use for their free speech recognition service. Now you can only use it for "personal and development use." If you meet those criteria, keep reading. Here’s how to activate speech recognition on Incredible PBX. Don’t skip any steps!

To use Wolfram Alpha by phone, you first must obtain a free Wolfram Alpha APP-ID. Then issue the following command replacing APP-ID with your actual ID. Do NOT change the yourID portion of the command:

sed -i "s|yourID|APP-ID|" /var/lib/asterisk/agi-bin/4747

Now you’re ready to try out the speech recognition apps. Dial 949 and say the name of a city and state/province/country to get a current weather forecast from Yahoo. Dial 411 and say "American Airlines" to be connected to American.

To access Wolfram Alpha by phone, dial 4747 and enter your query, e.g. "What planes are overhead." Read the Nerd Vittles tutorial for additional examples and tips.

OK, Smarty Pants: Show Me the Beef!

We know what some of you are thinking. "What does a fast food worker really know about VoIP and Gotcha-Free PBXs?? Before wasting a bunch of time on this, show me the beef!" Fair enough. Sit by your phone and click the Call Me icon below. Type in a fake name and your real phone number. Click the Connect button, answer your phone when it rings, and press 1. You’ll be connected to the Incredible PBX IVR. Pick an option from the menu of choices and take the Incredible PBX apps for a spin on our dime… actually it’s Google’s dime. Everything you see and hear is part of what you get with Incredible PBX for the Raspberry Pi 2 including the ability to set up your own click-to-dial web interface exactly like this one. The demo just happens to be running on our hardware instead of yours. So… what are you waiting for? Click away and try Incredible PBX for yourself. And, by the way, nobody besides the NSA and Google will be monitoring your call. 😉


Nerd Vittles Demo IVR Options
1 – Call by Name (say “Delta Airlines” or “American Airlines” to try it out)
2 – MeetMe Conference (password is 1234)
3 – Wolfram Alpha (say “What planes are overhead?”)
4 – Lenny (The Telemarketer’s Worst Nightmare)
5 – Today’s News Headlines
6 – Weather Forecast (say the city and state, province, or country)
7 – Today in History
8 – Speak to a Real Person (or maybe just voicemail if we’re out)

Homework Assignment: Mastering the Incredible PBX Feature Set

Now would be a good time to explore the Incredible PBX applications. Continue reading there. If you have questions, join the PBX in a Flash Forums and take advantage of our awesome collection of gurus. There’s an expert available on virtually any topic, and the price is right. As with Incredible PBX, it’s absolutely free.

Originally published: Monday, June 8, 2015


blankSupport Issues. With any application as sophisticated as this one, you’re bound to have questions. Blog comments are a terrible place to handle support issues although we welcome general comments about our articles and software. If you have particular support issues, we encourage you to get actively involved in the PBX in a Flash Forums. It’s the best Asterisk tech support site in the business, and it’s all free! Please have a look and post your support questions there. Unlike some forums, ours is extremely friendly and is supported by literally hundreds of Asterisk gurus and thousands of users just like you. You won’t have to wait long for an answer to your question.


blank
Need help with Asterisk? Visit the PBX in a Flash Forum.


Special Thanks to Our Generous Sponsors


FULL DISCLOSURE: ClearlyIP, Skyetel, Vitelity, DigitalOcean, Vultr, VoIP.ms, 3CX, Sangoma, TelecomsXchange and VitalPBX have provided financial support to Nerd Vittles and our open source projects through advertising, referral revenue, and/or merchandise. As an Amazon Associate and Best Buy Affiliate, we also earn from qualifying purchases. We’ve chosen these providers not the other way around. Our decisions are based upon their corporate reputation and the quality of their offerings and pricing. Our recommendations regarding technology are reached without regard to financial compensation except in situations in which comparable products at comparable pricing are available from multiple sources. In this limited case, we support our sponsors because our sponsors support us.

blankBOGO Bonaza: Enjoy state-of-the-art VoIP service with a $10 credit and half-price SIP service on up to $500 of Skyetel trunking with free number porting when you fund your Skyetel account. No limits on number of simultaneous calls. Quadruple data center redundancy. $25 monthly minimum spend required. Tutorial and sign up details are here.

blankThe lynchpin of Incredible PBX 2020 and beyond is ClearlyIP components which bring management of FreePBX modules and SIP phone integration to a level never before available with any other Asterisk distribution. And now you can configure and reconfigure your new Incredible PBX phones from the convenience of the Incredible PBX GUI.

blankVitalPBX is perhaps the fastest-growing PBX offering based upon Asterisk with an installed presence in more than 100 countries worldwide. VitalPBX has generously provided a customized White Label version of Incredible PBX tailored for use with all Incredible PBX and VitalPBX custom applications. Follow this link for a free test drive!
 

blankSpecial Thanks to Vitelity. Vitelity is now Voyant Communications and has halted new registrations for the time being. Our special thanks to Vitelity for their unwavering financial support over many years and to the many Nerd Vittles readers who continue to enjoy the benefits of their service offerings. We will keep everyone posted on further developments.


Some Recent Nerd Vittles Articles of Interest…

  1. Vitelity and Google provide financial support to Nerd Vittles and the Incredible PBX project. []